Embed Size (px)
Citation preview

Page 1
SonicWALL SSL-PCIUser’s Guide

Page 2 SonicWALL SSL-PCI User’s Guide
Page 3
CONTENTS
LIMITED WARRANTY ............................................................. 5
HARDWARE WARRANTY ........................................................ 6
1 SONICWALL SSL-PCI .......................................................... 7About This Guide .................................................................. 7SSL-PCI Features .................................................................. 7Released Platforms ................................................................ 8Text Conventions .................................................................. 8
2 INSTALLATION ................................................................... 9Bracket Description ............................................................... 9Package Contents ................................................................. 9Installing the Hardware ........................................................10Installing the Device Driver ...................................................11Deployment Examples ..........................................................16Web Site Changes ................................................................18
3 QUICKSTART WIZARD .......................................................19SSL Prerequisites .................................................................19Starting the QuickStart Wizard ..............................................19
4 CONFIGURATION MANAGER ..............................................27Introduction to SSL ..............................................................27Cryptography Schemes .........................................................27Port Blocking .......................................................................28Before You Begin .................................................................30Using Existing Keys and Certificates .......................................30Using OpenSSL ....................................................................33Configuration Security ..........................................................35Using the Configuration Manager ..........................................35Starting the Configuration Manager .......................................36Step-Up Certificates and Server-Gated Cryptography .............. 39Configuring Chained Certificates ............................................39Supporting Other Secure Protocols ........................................41
APPENDIX A - TECHNICAL SPECIFICATIONS .......................... 43
APPENDIX B - TROUBLESHOOTING GUIDE ............................45Resetting the SSL-PCI ..........................................................45
Page 4 SonicWALL SSL-PCI User’s Guide
APPENDIX C - COMMAND SUMMARY .....................................47Input Data Format Specification ............................................47Text Conventions .................................................................47Editing and Completion Features ...........................................48Command Hierarchy .............................................................49Configuration Security ..........................................................50Top Level Command Set .......................................................51Configuration Command Set .................................................65Interface Configuration Command Set ...................................71SSL Configuration Command Set ...........................................72Failover Configuration Command Set .....................................82
APPENDIX D - GLOSSARY .....................................................87
APPENDIX E - ELECTROMAGNETIC COMPATIBILITY ...............89FCC Class A .........................................................................89CISPR 22 (EN 55022) Class A ................................................89VCCI ...................................................................................90Canadian Radio Frequency Emissions Statement ....................90EC Declaration of Conformity ................................................90
Page 5
LIMITED WARRANTY
SonicWALL, Inc. warrants that SonicWALL software will perform inaccordance to the accompanying written materials for a period ofninety (90) days from the date of receipt.
SonicWALL Inc.’s and its suppliers’ entire liability and your exclusiveremedy shall be, at SonicWALL’s option, either a) return of theprice paid, or b) repair or replacement of the PRODUCT that doesnot meet SonicWALL’s Limited Warranty and which is returned toSonicWALL with a copy of your receipt. This Limited Warranty isvoid if failure of the PRODUCT has resulted from accident, abuse,or misapplication. Any replacement PRODUCT shall be warrantedfor the remainder of the original warranty period or thirty (30)days, whichever is longer.
In no event shall SonicWALL or its suppliers be liable for anydamages whatsoever (including, without limitation, special,incidental, indirect, or consequential damages for loss of businessprofits, business interruption, loss of business information, or anyother pecuniary loss) arising out of the use of or inability to use thePRODUCT.
Some states do not allow the exclusion or limitation of impliedwarranties or liability for incidental or consequential damages, sothe above limitation or exclusion may not apply to you. Whereliability may not be limited under applicable law, SonicWALL’sliability shall be limited to the amount you paid for the Product.This warranty gives you specific legal rights, and you may haveother rights which vary from state to state.
By using this Product, you agree to these limitations of liability.
THIS WARRANTY AND THE REMEDIES SET FORTH ABOVE AREEXCLUSIVE AND IN LIEU OF ALL OTHER WARRANTIES, ORAL ORWRITTEN, EXPRESS OR IMPLIED.
No dealer, agent, or employee of SonicWALL is authorized to makeany extension or addition to this warranty.

Page 6 SonicWALL SSL-PCI User’s Guide
HARDWARE WARRANTY
SonicWALL, Inc. warrants the SonicWALL Transaction Securityproduct (the Product) for one (1) year from the date of purchaseagainst defects in materials in workmanship. If there is a defect inthe hardware, SonicWALL will replace the product at no charge,provided that it is returned to SonicWALL with transportationcharges prepaid. A Return Materials Authorization (RMA) numbermust be displayed on the outside of the package for the productbeing returned for replacement or the product will be refused. TheRMA number may be obtained by calling SonicWALL CustomerService between the hours of 8:30 AM and 5:30 PM PacificStandard Time, Monday through Friday.
Phone: (408) 752-7819
Fax: (408) 745-9300
Web: <http://support.sonicwall.com>
This warranty does not apply if the Product has been damaged byaccident, abuse, misuse, or misapplication or has been modifiedwithout the written permission of SonicWALL. In no event shallSonicWALL, Inc. or its suppliers be liable for any damageswhatsoever (including, without limitation, damages for loss ofprofits, business interruption, loss of information, or otherpecuniary loss) arising out of the use or of inability to use theProduct. Some states do not allow the exclusion or limitation ofimplied warranties or liability for incidental or consequentialdamages, so the above limitation or exclusion may not apply toyou. Where liability may not be limited under applicable law,SonicWALL's liability shall be limited to the amount you paid for theProduct. This warranty gives you specific legal rights, and you mayhave other rights which vary from state to state.
By using this Product, you agree to these limitations of liability.THIS WARRANTY AND THE REMEDIES SET FORTH ABOVE AREEXCLUSIVE AND IN LIEU OF ALL OTHER WARRANTIES, ORAL ORWRITTEN, EXPRESS OR IMPLIED. No dealer, agent, or employee ofSonicWALL is authorized to make any extension or addition to thiswarranty.
Page 7
1 SONICWALL SSL-PCI
The SSL-PCI is a Secure Sockets Layer (SSL) processing offloadingsolution in a PCI NIC form, providing an attractive SSL processingalternative that costs less than most SSL appliances. The SSL-PCIoffloads all SSL processing entirely, allowing the local host computer toprovide both secure and non-secure services at the same high speeds.
Setup with the QuickStart wizard is fast and easy. You can secure aserver immediately using a default key and certificate pre-loadedinto the SSL-PCI, rather than waiting up to a week before you canbegin configuration. Simply load your own certificate and key whenthey are available.
About This Guide
This guide can help you successfully configure the SSL appliance.The guide contains:• 1 SSL-PCI: An overview of the User’s Guide contents and
product features• 2 Installation: Instructions for placing the devices on a network• 3 QuickStart Wizard: Instructions for using the QuickStart
wizard for simple SSL configuration• 4 Configuration Manager: Instructions for using the
configuration manager to set up SSL offloading, chainedcertificates, and RIP support
• Appendix A - Specifications: Product specifications• Appendix B - Troubleshooting: Information to help you isolate
and solve problems• Appendix C - Command Line Reference: Detailed command
descriptions and examples• Appendix D - Glossary: Terminology used in this guide• Appendix F - Electromagnetic Compatibility: Compliance with
applicable regulations
SSL-PCI Features
The SSL-PCI has the following features:• Compliance with the IEEE 802.3u standard• More efficient SSL processing than with an accelerator• Non-SSL traffic blocking option• Arbitrary certificate size (up to 255 certificates) support

Page 8 SonicWALL SSL-PCI User’s Guide
• Netscape International Step-Up Certificate and MicrosoftServer Gated Cryptography support
• Chained certificate support• Private key security• HTTPS, SFTP, IMAPS, POP3S, NNTPS, and LDAPS as well as
TSL 1.0, and SSL 2.0 and 3.0 support
Released Platforms
The SonicWALL configuration manager supports Linux Red Hatversions 5.2, 6.0, 6.1, 6.2, and 7.0; Windows NT 4.0; Windows 2000;and Solaris 2.6, 7, and 8 operating systems.
The root directory of the CD-ROM includes a readme.txt filecontaining information that became available after this guide went topress. The subdirectory entitled Docs contains .pdf versions of theproduct documentation. Release notes for each operating system arelocated in each operating system’s directory in a file appropriate tothat operating system.
Text Conventions
This manual contains configuration and setup examples using thetext conventions below.• Items that appear like this are commands and should be
entered as they appear.• Items that appear like this are computer responses.• Items that appear in bold refer to button file, directory, icon, and
volume names as well as items in lists.• Computer keys are indicated like this: Tab.

Page 9
2 INSTALLATION
This chapter presents installation instructions for the SSL-PCIhardware. This guide assumes you have an Ethernet networkconnected to the Internet. Additionally, this chapter presents someexamples for using the SSL-PCI.
Please see the SonicWALL website (http://www.sonicwall.com) foradditional deployment applications.
Bracket Description
Package Contents
• One SonicWALL transaction security device• This User's Guide• One SonicWALL CDIf any items are missing from your package, contact SonicWALL,Inc. immediately.
Web: <http://www.sonicwall.com/support/>Phone: (408) 745-9600.
Page 10 SonicWALL SSL-PCI User’s Guide
Installing the Hardware
Prepare the SSL-PCI and the Server
1. Unpack and inspect the SSL-PCI for damage.
2. Exit all open applications and user processes.
3. Turn off the computer. Turn off the power to the server andattached devices. Unplug the power cable.
4. Discharge any static electricity from your body by touching thechassis of the server or using an ESD wrist strap. Remove thecomputer cover from the server. (You may need to refer to thedocumentation that accompanied the computer for detailedinstructions for removing the cover and adding PCI cards.)
5. Locate an empty PCI-bus expansion slot.
Install the SSL-PCI Hardware
1. Remove the metal expansion slot cover and screw from thechassis. (Save the slot cover in case you remove the card in thefuture and do not wish to replace it.)
2. Insert the SSL-PCI into the PCI-bus expansion slot. Press downfirmly on the card to seat it properly.
3. Use the screw removed earlier to secure the SSL-PCI bracketto the system chassis.
4. Replace the system cover.
5. Reconnect the server power cable, and turn on the server.
Connecting to Ethernet
1. Use a Category 5 UTP cable with an RJ-45 connector. Use astraight-through cable to connect the SSL-PCI to a hub or switch.
2. Push the RJ-45 connector into the jack until it clicks into place.
3. The green Link LED should be solidly lit. If the Link LED doesnot light, see the “Troubleshooting” section for suggestions.The amber TX LED will flash as packets are transmitted to thenetwork. The green RX LED will flash as packets are receivedby the SSL-PCI.
4. To disconnect a cable, press the small tab on the RJ-45connector and gently pull the connector from the jack. If theconnector does not disengage, press the tab down more firmlyand pull again.
Page 11
Note: Use only a straight-through cable. The Link LED will notlight if a crossover cable is used.
Installing the Device Driver
Linux
1. Insert the CD-ROM into the server’s CD-ROM drive.
2. You must be logged in as root to install and configure thedevice driver. Either use the su command (if the server isrunning) or log in as root when starting up the server.
3. Enter the following commands at a Linux prompt:mount -o map=off /mnt/cdromcd /mnt/cdrom/Linux/i386./install_inx
You can configure the interface manually or by using linuxconf.The instructions presented here are for manual configuration of theinterface and must be executed for each SSL-PCI card.
1. Create the file /etc/sysconfig/network-scripts/ifcfg-inbN, where N corresponds to the interface number. Use aneditor such as vi, vim, emacs, or pico.
2. Edit the file, adding the following information with theappropriate values. The SSL-PCI device is identified by inbN,where N is the SSL-PCI number in the local host. The firstSSL-PCI installed in the host is inb0.
For example:DEVICE=inb0IPADDR=192.0.2.1NETMASK=255.255.255.0NETWORK=192.0.2.0BROADCAST=192.0.2.255ONBOOT=yes
The NETWORK value is the logical "AND" of the IPADDR andNETMASK. The BROADCAST value is the logical "OR" of theNETWORK value and the inverse of the NETMASK.
3. Edit the file /etc/conf.modules, adding the line:alias inb0 inx
4. Use these commands to determine if the interface is working:# insmod inx# ifup inb0
Page 12 SonicWALL SSL-PCI User’s Guide
Solaris
1. Insert the CD-ROM into the server’s CD-ROM drive.
2. You must be logged in as root to install and configure thedevice driver.
3. Enter the volcheck command if your server does notautomount the CD.
4. Refer to the list below to find the correct command to use withyour server. (N is the CD-ROM identification number.)
Sparc 2.6:# pkgadd -d /cdrom/cdromN/Solaris/Sparc/2.6
Sparc 7 or 8:# pkgadd -d /cdrom/cdromN/Solaris/Sparc/7
UltraSparc 2.6:# pkgadd -d /cdrom/cdromN/Solaris/UltraSparc/2.6
UltraSparc 7 or 8:# pkgadd -d /cdrom/cdromN/Solaris/UltraSparc/7
5. The following display is shown:
1. SNWLinb SonicWALL SSL-PCI Encryption Offloader
(sparc) 2.0
Select package(s) you wish to process (or ‘all’ to process all
packages). (default: all) [?,??,q]
Type 1 or a and press Enter. (“ultrasparc” is shown instead of“sparc” when appropriate.)
6. This message is shown:
This package contains scripts which will be executing with
superuser permissions during the process of installing this
package. Do you want to continue with the installation of
<SNWLinb> [y,n,?]
Type y and press Enter to continue.
7. The following display is shown:
1. SNWLinb SonicWALL SSL-PCI Encryption Offloader
(sparc) 2.0
Select package(s) you wish to process (or ‘all’ to process all
packages). (default: all) [?,??,q]
Type q and press Enter.
Page 13
8. Create the file /etc/hostname.inbN, where N correspondsto the interface number (“0” being the first inb interface).Enter the name of the host interface (such as “myHost”), save,and close the file.
9. Edit the /etc/hosts file, adding the interface IP address forthe hostname. An example is below:
10.1.200.140 myHost
Note: All enabled interfaces must be on separate subnets.
10. Reboot the server or use the following command to activatethe interface (N is the interface number):
# ifconfig inbN plumb
11. Enter the following command to check the interface status:
# ifconfig inbN -a
12. Set the IP address and netmask using the following command,supplying the appropriate information in place of theexamples:
# ifconfig inbN 10.1.200.140 netmask 255.255.0.0
Notes: Refer to the Solaris administrator’s guide for moreinformation on configuring network interfaces.
Windows NT 4.0
Installation follows standard Windows NT procedures. If you haveany questions about installation, please refer to the Windows NTdocumentation. If the SSL-PCI is already installed in the server andyou reinstall Windows NT, the SSL-PCI is recognized incorrectlyduring the installation process. You will need to delete the driversinstalled by Windows and reinstall the SSL-PCI drivers.
Loading the SSL-PCI Driver
You must set the IP address for the SSL-PCI host manually. Obtainthe IP address before you begin to load the driver.
1. Insert the CD-ROM into the computer’s CD-ROM drive.
2. Click the Start button, then point to Settings>ControlPanel. The Control Panel opens.
3. Double-click the Network icon.
4. Select Adapters. A list of available adapters appears in the listwindow.

Page 14 SonicWALL SSL-PCI User’s Guide
5. Click Add.
6. Click Have Disk, and enter the name of the drive where youhave inserted the installation disk followed by the directoryname “MSWin\NT4” (i.e., D:\ MSWin\NT4). The OEM Optionwindow appears. This window lists the software you caninstall.
7. Select SonicWALL SSL-PCI. The device driver loads, and thenewly installed adapters appear in the adapter window.
8. An Install Shield application opens and automatically installsthe configuration manager.
9. Click Close when prompted to continue with driver installation.The TCP/IP window appears for assigning network addresses.
Assigning Network Addresses
The next step is to assign an IP address for the host computer. If yournetwork is configured with a DHCP server, do not use it to assign anaddress. For the SSL-PCI to function properly, the server must have astatic IP address.
1. Select the IP Address tab.
2. Enter an IP address and Subnet Mask. If you are using a gateway,enter an IP address for the default gateway setting. A message boxappears saying, “The adapter requires at least one IP address.Please enter one.” Click OK. Return to step 1, above, for each ofthe remaining SSL-PCI cards.
3. When you have configured the last SSL-PCI card, you have theoption to reboot the server for changes to take effect. If allother applications are closed, reboot the computer. Otherwise,select the option to not reboot, close all applications, andrestart the computer.
Windows 2000
Installation follows standard Windows 2000 procedures. If youhave any questions about installation, please refer to theWindows 2000 documentation. Use the CD-ROM that came withthe SSL-PCI. If the SSL-PCI is already installed in the computer andyou reinstall Windows 2000, the SSL-PCI is recognized incorrectlyduring the installation process. You will need to delete the driversinstalled by Windows and reinstall the SSL-PCI drivers.
Page 15
Loading the SSL-PCI Driver
You must set the IP address for the SSL-PCI host manually. Obtainthe IP address before you begin to load the driver.
1. After you log on when you’ve rebooted the server with theSSL-PCI card, the Found New Hardware Wizard opens.Click Next to continue.
2. The “Install Hardware Device Drivers” panel opens. Select“Search for a suitable driver for my device (recommended)”.Click Next.
3. The “Locate Driver Files” panel opens. Make sure the “CD-ROMdrive” box is selected. Insert the CD-ROM into the server’sCD-ROM drive. Click Next.
4. The “Driver File Search Results” panel opens. Click Next toaccept the location of the driver.
5. If the “Digital Signature Not Found” panel opens, click Yes tocontinue the installation.
6. Progress indicators is displayed.
7. Click Finish when prompted to complete the installation.
8. Install the configuration manager by clicking the Start button,clicking Run, and entering D:\MSWin\Win2K\setup, where D isthe name of the CD-ROM drive. Click OK. An Install Shield shellopens. Follow the prompts to install the configuration manager.
Assigning Network Addresses
The next step is to assign an IP address for the host computer.Even if your network is configured with a DHCP server, do not useit to assign an address. For the SSL-PCI to function properly, theserver must have a static IP address.
1. Click the Start button, then point to Settings>ControlPanel. The Control Panel opens.
2. Double-click Network and Dial-up Connections to open it.
3. Right-click the appropriate Local Area Connection icon andselect Properties from the contextual menu.
4. Double-click Internet Protocol (TCP/IP) in the componentlist.
5. Enter the appropriate IP address information. If the networkDHCP server provides DNS addresses, select “Obtain DNS
Page 16 SonicWALL SSL-PCI User’s Guide
server addresses automatically”. Otherwise, enter the DNSaddresses manually.
6. Click OK to close the Internet Protocol (TCP/IP)Properties window.
7. Click OK to close the Local Area Connections Propertieswindow.
Deployment Examples
Below are several SSL-PCI usage examples. Please see theSonicWALL website (http://www.sonicwall.com) for additionaldeployment applications.
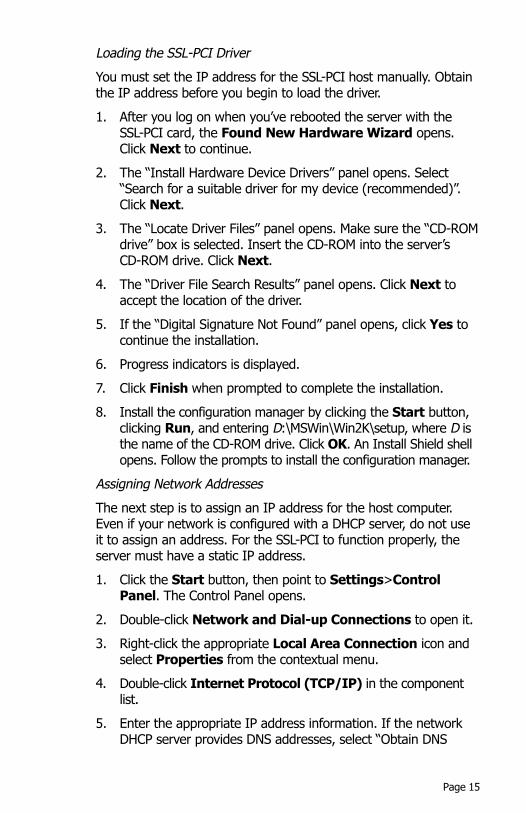
Single SSL-PCI Card Installation
A single SSL-PCI can be installed in a single server.
1. Install the SSL-PCI as instructed previously.
2. Connect the device to the router or intervening networkequipment via the Ethernet port.
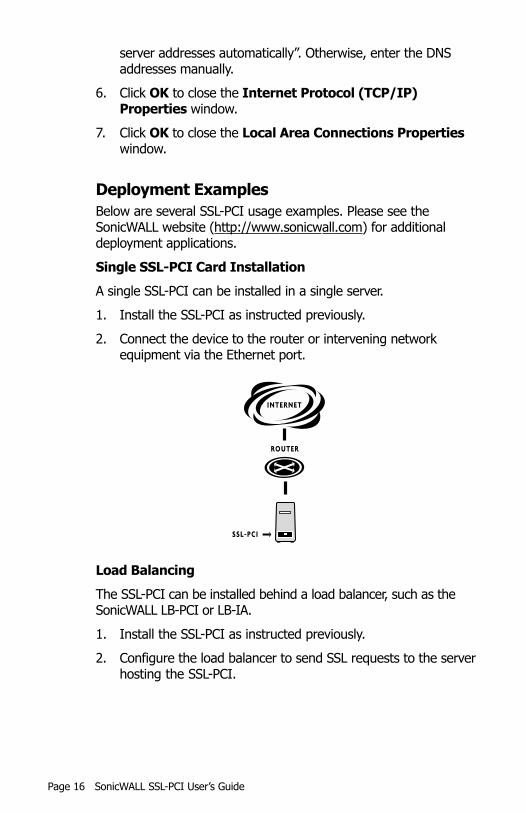
Load Balancing
The SSL-PCI can be installed behind a load balancer, such as theSonicWALL LB-PCI or LB-IA.
1. Install the SSL-PCI as instructed previously.
2. Configure the load balancer to send SSL requests to the serverhosting the SSL-PCI.
Page 17
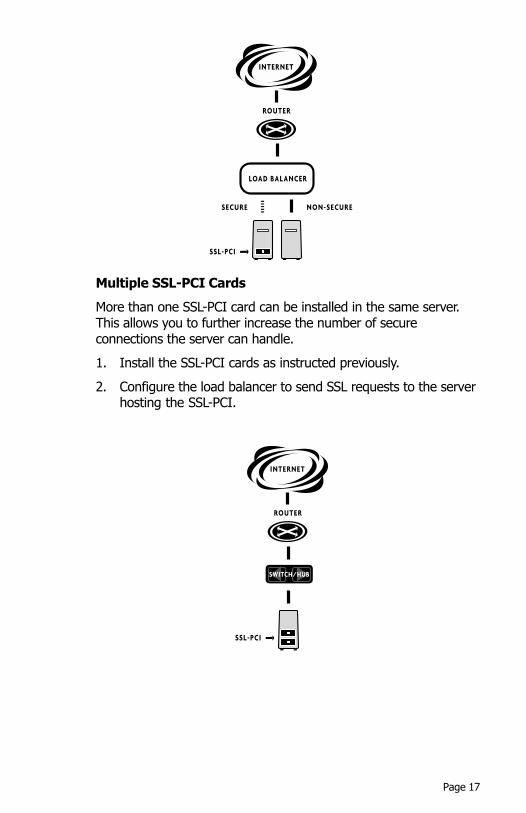
Multiple SSL-PCI Cards
More than one SSL-PCI card can be installed in the same server.This allows you to further increase the number of secureconnections the server can handle.
1. Install the SSL-PCI cards as instructed previously.
2. Configure the load balancer to send SSL requests to the serverhosting the SSL-PCI.
Page 18 SonicWALL SSL-PCI User’s Guide
Web Site Changes
You must make changes to your existing web pages before theycan be accessed by users.
1. Install and configure the SSL device.
2. Create a non-secure (“http://”-prefixed) web page as an entrypoint for the web site. Include some method of transferringthe user to the secure (“https://”-prefixed) URL. You may usea button, hypertext link, image map, automatic redirection, orany other method you choose.
3. If your site does not use relative links, change the “http://”portion of every link (including graphic links) to “https://”;otherwise, links should remain the same.
Note: If you are using IIS and have a redirection in your webpage, the URL must have a trailing slash (“/”) to work properly,e.g., <href=”/issamples/default/learn.asp/”>.
Page 19
3 QUICKSTART WIZARD
The QuickStart wizard helps you set up the SSL-PCI rapidly using themost basic information. To perform a more advanced configuration,use the configuration manager as described in 4 ConfigurationManager.
SSL Prerequisites
Before you use the QuickStart wizard, you must have either a privatekey and certificate available in a PEM-encoded file or be willing touse a default or previously loaded key and certificate. If you needassistance in finding the current key and certificate on an existingweb server or want to create a key and certificate for testingpurposes, refer to 4 Configuration Manager in this guide.
You also must make some changes to your web pages. The natureof these changes depends upon whether you are securing apreviously unsecured site or adding the device to an already securesite. These changes are described in 2 Installation.
During configuration you are asked to specify the SSL and clear text(plain text) TCP service ports. The SSL device monitors the secureTCP service port(s) you specify, performs SSL procedures, thensends the packets to the web server via an unsecure, user-definedTCP service port. All other network traffic is passed transparentlythrough the SSL device.
The TCP service port you specify for direction of packets from the SSLdevice to the web server cannot be used for any other data. This portblocking strategy protects the viability of your secure data fromattempted security breaches. You cannot use the same TCP serviceport between the SSL device and the server for both non-secure anddecrypted secure data transfer. Unencrypted data received on thatTCP service port is blocked. For more information about portblocking, see the discussion in 4 Configuration Manager.
Starting the QuickStart Wizard
Run the QuickStart Wizard by first starting the configurationmanager:
• Linux. At the shell prompt, enter inxcfg.
• Solaris. At any prompt, enter inxcfg.

Page 20 SonicWALL SSL-PCI User’s Guide
• Windows NT and Windows 2000. Use the Start menu andpoint to Programs>SonicWALL Corporation>SonicWALL Configuration Manager, or double-click theshortcut on the desktop.
Note: SSL-PCI devices can be configured only from the localserver.
If the SSL-PCI is not configured, the QuickStart wizard runsautomatically, and you are asked:
Would you like to use the QuickStart wizard for inb0? (y/n/q):
The object inb0 is the name of the first SSL-PCI card installed inthe server. Type y to continue with the QuickStart wizard. Typing nlaunches the configuration manager. Typing q quits theconfiguration manager.
If you are running the QuickStart wizard for a previously configuredSSL-PCI, start the configuration manager and enter the commandquick-start. If more than one SSL device is installed andconfigured, you are prompted to supply the name of the device toconfigure. If you do not remember the name of the device you wishto configure, enter show devices to see a complete listing ofnetworked LB-PCI, LB-IA, SSL-IA, and SSL-R and local LB-PCI andSSL-PCI devices. You are prompted to supply the configurationpassword if one has been set.
Read the opening screen information and respond to the prompt.
Would you like to use the QuickStart wizard to create a ssl-server?(y/n/q):
If you do not have a key and certificate available and do not wish touse a default key and certificate, enter n or q. If you have read andagree with the introductory information, enter y. The following textwill be displayed:
CONFIGURE SSL-SERVEREnter a name for your ssl-server:
Enter a name for the logical secure server (“ssl-server”) you areconfiguring. The name is used for identification purposes only. (Inthis example, we name the server myServer.) If it already exists,you are prompted to provide a different name. The server namecan be the DNS name of the server, though the device does notuse DNS services.
Page 21
Enter the IP address for ‘myServer’:
This is the IP address for the secure site on the physical server(the host server) to which the clear (or “plain”) text should besent.
Enter the netmask for MyServer:
Enter the netmask for the server. This information is used tofacilitate routing.
Enter the SSL port [443]:
Enter the TCP service port for the device to monitor for secureconnection requests. The default is 443, but you may specify a differentnumber. You may not specify a TCP service port already configured tothe same IP address.
Enter the clear text port:
Enter the number of the TCP service port for the SSL device to useto send clear text to the server. If you specify TCP service port 80,you are warned that the port will be unavailable for non-SSLrequests. (See the next chapter for a discussion of port blocking.)You can abort the current clear text port designation and enter adifferent TCP service port, or approve using TCP service port 80 forclear text.
You have completed TCP service port configuration of the logical secureserver and are ready to specify the key and certificate to use.
CONFIGURE SSL-SERVER ‘myServer’ KEY ASSOCIATIONSSL-server name : myServerIp address : 10.1.2.3Secure Port : 443Clear Port : 80
Each ssl-server is associated with a private key and certificate.1. Key and Certificate are stored in a file on a disk2. Want to use an existing or default Key and CertificateChoose the option corresponding to your situation (1/2):
Note: If you are using a key created with IIS or a non-PEM-encoded key or certificate, use the default keys and certificatesincluded with SSL device. After configuring the device with theQuickStart wizard, use the configuration manager to load your owncertificate and key. See "Example: Setting Up a Secure Server" in4 Configuration Manager for an example, and "SSL ConfigurationCommand Set" in Appendix C - Command Summary.
If you have the key and certificate on disk, type 1.
Page 22 SonicWALL SSL-PCI User’s Guide
Enter the name of the key association for ssl-server ‘myServer’:
Enter the name to assign the key association. This name is usedfor identification only.
Enter PEM encoded X509 private key filename: a:\server.keyEnter PEM encoded X509 certificate filename: a:\server.crt
Enter the file names for the key and certificate, including paths, asprompted. If the QuickStart wizard is unable to find or load the files, youreceive an error message and are allowed to restart key assignment.After the key and certificate are properly loaded, configure the securitypolicy as described, below.
To use any key and certificate already loaded into the device(including defaults) rather than a key and certificate on disk, type 2when prompted to choose an option. All available key associationsare displayed. Enter the name of the key association to use. Afterthe key and certificate have been properly loaded, you are shown asummary and asked to configure the security policy.
CONFIGURE SSL-SERVER ‘myServer’ SECURITY POLICYCurrent ssl-server is
SSL-server name : myServerIP address : 10.1.2.3Secure Port : 443Clear Port : 80Key Association Name : myKey
You need to enter a security policy for ssl-server ‘myServer’.To simplify the encryption algorithms, you have 3 options: strong - RSA key size of 1024, DES_SHA1, ARC4_MD5 and
ARC4_SHA1 weak - RSA key size of 512, exp DES_SHA1, ARC2_MD5,
ARC4_MD5 and ARC4_SHA1 default - RSA key size of 1024, ARC4_MD5, ARC4_SHA1 and
exp ARC4_MD5, ARC4_SHA1, MD5
ARC4 is compatible with RC4™ RSA Data Security; ARC2 iscompatible with RC2™ RSA Data Security.
Enter the security policy for ssl-server ‘myServer’ [default]:
At the prompt, enter the name of the security policy to use. The“strong” policy includes the most secure algorithms. The “weak” policyalgorithms are less secure and appropriate for export use. The “default”policy algorithms are those most commonly used. See section 4 Configuration Manager for more algorithm information. If youenter an invalid name, you receive an error message and are prompted
Page 23
to re-enter the name. After the name of the security policy is accepted,you are prompted to verify the logical secure server configuration.
SSL-SERVER ‘myServer’ SUMMARYThe following SSL-server will be created:
SSL-server name : myServerIP address : 10.1.2.3Secure Port : 443Clear Port : 80Key Association Name : myKeySecurity Policy : strong
Is the above information correct? (y/n) :
If the information is correct, type y. The logical secure server youhave configured is created. If you type n, the server configurationprocess restarts using the current secure server.
Would you like to use the QuickStart wizard to create another ssl-server? (y/n):
Type y to begin the server configuration process again with a newserver. Type n to set a configuration password for the device.
SETUP CONFIGURATION PASSWORD PROTECTIONWould you like to set a password to protect configuration of theSSL-PCI? (y/n):
Type y, and enter a password. Reenter it to confirm.
Note: You must set a configuration password for the device toensure its security. The password you enter is not displayed.
Would you like to set a name for this device? (y/n/q):Enter a name for this device: myDevice
Type y, and enter a name for the SSL device.
A default gateway is needed to connect outside of your local subnet.Would you like to set a default gateway for this device? (y/n/q): yEnter a default gateway for this device:
A default gateway is needed for the device to connect outside of thelocal subnet. Type y, and enter the IP address at the prompt.
A summary screen shows information about the device and thelogical secure servers configured on it.
Page 24 SonicWALL SSL-PCI User’s Guide
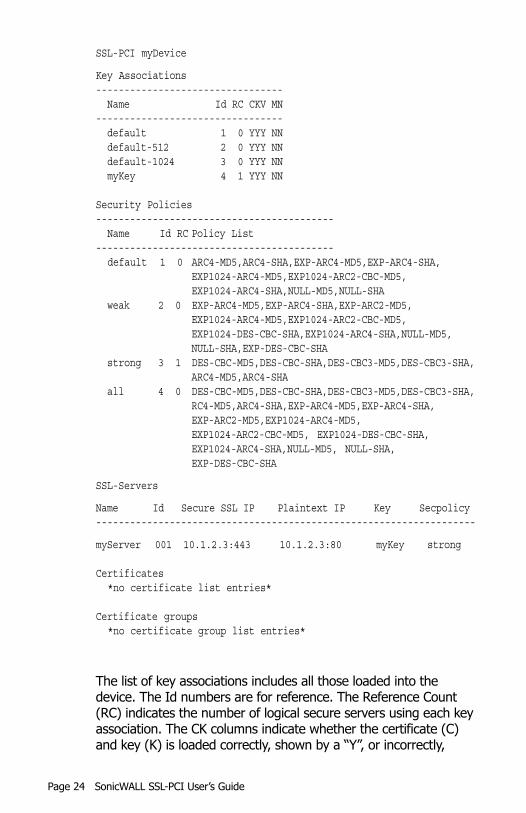
SSL-PCI myDevice
Key Associations--------------------------------- Name Id RC CKV MN--------------------------------- default 1 0 YYY NN default-512 2 0 YYY NN default-1024 3 0 YYY NN myKey 4 1 YYY NN
Security Policies------------------------------------------ Name Id RC Policy List------------------------------------------ default 1 0 ARC4-MD5,ARC4-SHA,EXP-ARC4-MD5,EXP-ARC4-SHA,
EXP1024-ARC4-MD5,EXP1024-ARC2-CBC-MD5,EXP1024-ARC4-SHA,NULL-MD5,NULL-SHA
weak 2 0 EXP-ARC4-MD5,EXP-ARC4-SHA,EXP-ARC2-MD5,EXP1024-ARC4-MD5,EXP1024-ARC2-CBC-MD5,EXP1024-DES-CBC-SHA,EXP1024-ARC4-SHA,NULL-MD5,NULL-SHA,EXP-DES-CBC-SHA
strong 3 1 DES-CBC-MD5,DES-CBC-SHA,DES-CBC3-MD5,DES-CBC3-SHA,ARC4-MD5,ARC4-SHA
all 4 0 DES-CBC-MD5,DES-CBC-SHA,DES-CBC3-MD5,DES-CBC3-SHA,RC4-MD5,ARC4-SHA,EXP-ARC4-MD5,EXP-ARC4-SHA,EXP-ARC2-MD5,EXP1024-ARC4-MD5,EXP1024-ARC2-CBC-MD5, EXP1024-DES-CBC-SHA,EXP1024-ARC4-SHA,NULL-MD5, NULL-SHA,EXP-DES-CBC-SHA
SSL-Servers
Name Id Secure SSL IP Plaintext IP Key Secpolicy-------------------------------------------------------------------
myServer 001 10.1.2.3:443 10.1.2.3:80 myKey strong
Certificates *no certificate list entries*
Certificate groups *no certificate group list entries*
The list of key associations includes all those loaded into thedevice. The Id numbers are for reference. The Reference Count(RC) indicates the number of logical secure servers using each keyassociation. The CK columns indicate whether the certificate (C)and key (K) is loaded correctly, shown by a “Y”, or incorrectly,
Page 25
shown by an “N”. The V column indicates whether the certificate/key pair match and are valid, indicated by a “Y”. The “M” and “N”columns indicate whether the key association supports MicrosoftServer-Gated Cryptography, Netscape International Step-UpCertification (respectively), or both.
The list of security policies includes all named security policies storedin the device. The Id numbers are strictly for reference. The RCnumbers indicate the number of logical secure servers using eachpolicy. The Policy List displays all cryptography schemes in eachsecurity policy.
You are asked whether to save the configuration to flash memory.
Would you like to save your configuration to flash? (y/n):
If you type y, you will be asked to wait while the configuration issaved to flash, and the QuickStart wizard finishes. If you type n,the QuickStart wizard finishes.
Note: If the configuration is not saved to flash memory, it is lostduring a power cycle or if the reload command is used.

Page 26 SonicWALL SSL-PCI User’s Guide
Page 27
4 CONFIGURATION MANAGER
This chapter augments the information in 3 QuickStart Wizard.This chapter includes:• An introduction to SSL• Instructions for exporting keys and certificates from secure servers• Instructions for generating keys• Instructions for generating a certificate signing request• Instructions for using the command line interface and
configuration examples
Introduction to SSL
Secure Socket Layer (SSL) is an application-level protocol thatenables secure transactions of data through privacy,authentication, and data integrity. It relies upon certificates, publickeys, and private keys.
Certificates are similar to digital ID cards. They prove the identityof the server to clients. Certificates are issued by CertificateAuthorities (CAs) such as VeriSign® or Thawte. Each certificateincludes the name of the authority that issued it, the name of theentity to which the certificate was issued, the entity’s public key,and time stamps that indicate the certificate’s expiration date.
Public and private keys are the ciphers used to encrypt and decryptinformation. While the public key is shared quite freely, the privatekey is never given out. Each public-private key pair works together:data encrypted with the public key can only be decrypted with theprivate key.
You can configure SSL devices using either the QuickStart wizardor the configuration manager.
Cryptography Schemes
SonicWALL Transaction Security Devices can handle a wide rangeof single and composite cryptography schemes. The following tableshows a comparison of the individual schemes. If you configurethe device to use the weak security policy, all schemes marked as“weak” are used. If you use the strong security policy, all schemesmarked as “strong” are used. The “default” security policy uses theencryption and message authentication methods commonlyavailable. The “all” security policy incorporates every algorithm.
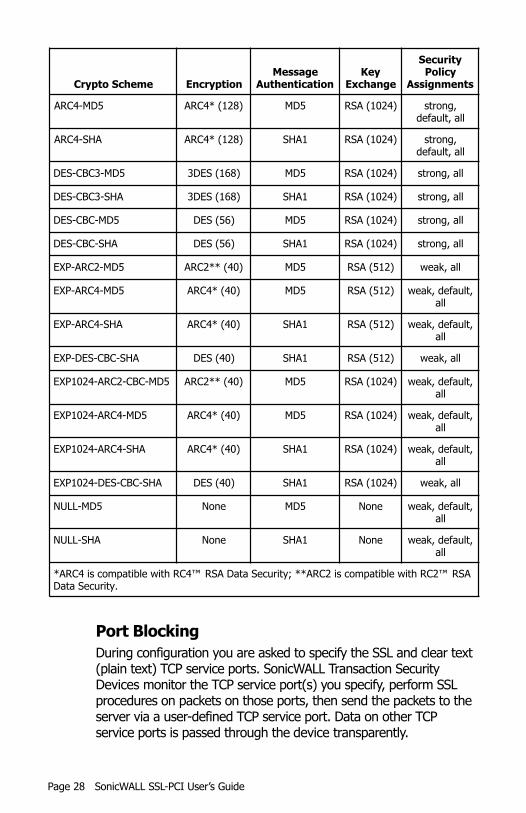
Page 28 SonicWALL SSL-PCI User’s Guide
Port Blocking
During configuration you are asked to specify the SSL and clear text(plain text) TCP service ports. SonicWALL Transaction SecurityDevices monitor the TCP service port(s) you specify, perform SSLprocedures on packets on those ports, then send the packets to theserver via a user-defined TCP service port. Data on other TCPservice ports is passed through the device transparently.
emehcSotpyrC noitpyrcnEegasseM
noitacitnehtuAyeK
egnahcxE
ytiruceSyciloP
stnemngissA
5DM-4CRA )821(*4CRA 5DM )4201(ASR ,gnortslla,tluafed
AHS-4CRA )821(*4CRA 1AHS )4201(ASR ,gnortslla,tluafed
5DM-3CBC-SED )861(SED3 5DM )4201(ASR lla,gnorts
AHS-3CBC-SED )861(SED3 1AHS )4201(ASR lla,gnorts
5DM-CBC-SED )65(SED 5DM )4201(ASR lla,gnorts
AHS-CBC-SED )65(SED 1AHS )4201(ASR lla,gnorts
5DM-2CRA-PXE )04(**2CRA 5DM )215(ASR lla,kaew
5DM-4CRA-PXE )04(*4CRA 5DM )215(ASR ,tluafed,kaewlla
AHS-4CRA-PXE )04(*4CRA 1AHS )215(ASR ,tluafed,kaewlla
AHS-CBC-SED-PXE )04(SED 1AHS )215(ASR lla,kaew
5DM-CBC-2CRA-4201PXE )04(**2CRA 5DM )4201(ASR ,tluafed,kaewlla
5DM-4CRA-4201PXE )04(*4CRA 5DM )4201(ASR ,tluafed,kaewlla
AHS-4CRA-4201PXE )04(*4CRA 1AHS )4201(ASR ,tluafed,kaewlla
AHS-CBC-SED-4201PXE )04(SED 1AHS )4201(ASR lla,kaew
5DM-LLUN enoN 5DM enoN ,tluafed,kaewlla
AHS-LLUN enoN 1AHS enoN ,tluafed,kaewlla
ASR™2CRhtiwelbitapmocsi2CRA**;ytiruceSataDASR™4CRhtiwelbitapmocsi4CRA*.ytiruceSataD
Page 29
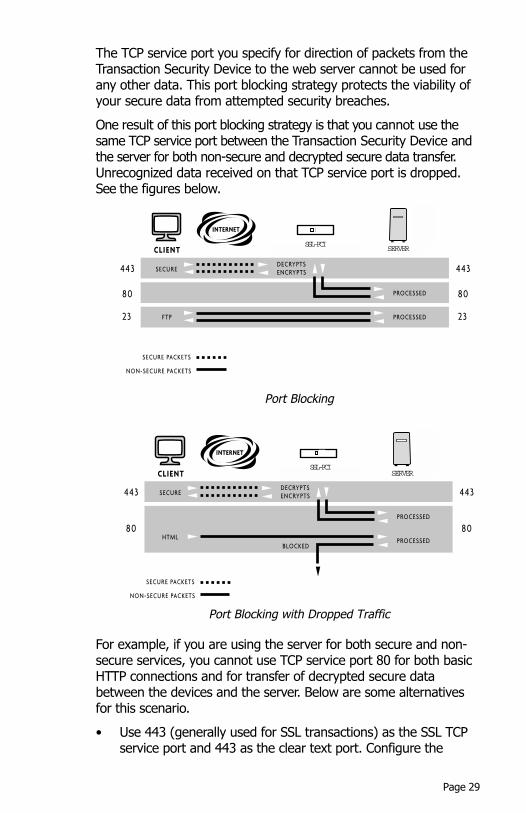
The TCP service port you specify for direction of packets from theTransaction Security Device to the web server cannot be used forany other data. This port blocking strategy protects the viability ofyour secure data from attempted security breaches.
One result of this port blocking strategy is that you cannot use thesame TCP service port between the Transaction Security Device andthe server for both non-secure and decrypted secure data transfer.Unrecognized data received on that TCP service port is dropped.See the figures below.
Port Blocking
Port Blocking with Dropped Traffic
For example, if you are using the server for both secure and non-secure services, you cannot use TCP service port 80 for both basicHTTP connections and for transfer of decrypted secure databetween the devices and the server. Below are some alternativesfor this scenario.
• Use 443 (generally used for SSL transactions) as the SSL TCPservice port and 443 as the clear text port. Configure the
SSL-PCISERVER
SSL-PCISERVER

Page 30 SonicWALL SSL-PCI User’s Guide
server to not use SSL and to monitor port 443. TCP serviceport 80 requests are serviced normally.
• Use 443 as the SSL TCP service port and 81 (or another unusedport) for the clear text port. Configure the server to monitor port81. TCP service port 80 requests are serviced normally.
All data sent on any other port is passed through and returned. Seethe remoteport and sslport commands in Appendix C -Command Summary in this guide.
Before You Begin
Before configuring the SSL-PCI you must have a certificate andkeys for the server. You can use the files you received from theCertificate Authority, copy the keys and certificate from an existingsecure server, or generate keys and certificates with OpenSSL.
Additionally, be aware that you must make several changes to yourweb pages. The nature of the changes depends upon whether youare securing a previously unsecured site, or adding the SSL deviceto an already secure server installation. These changes are describedin 2 Installation.
Using Existing Keys and Certificates
If you already have a secure server, you can transfer the keys andcertificate to the SSL-PCI. Follow the instructions below, or refer tothe web server software documentation for detailed information.
Note: Key and certificate file names cannot contain spaces andmust be compatible with the server operating system. Whenprompted either to name a key or certificate file or check the nameof a key or certificate file, please ensure the names follow theseconventions.
Apache mod_SSL
The key and certificate locations are listed in the$APACHEROOT/conf/httpd.conf file. The default key is$APACHEROOT/conf/ssl.key/*.key. The default certificate is$APACHEROOT/conf/ssl.crt/*.crt. Note the name andlocation of these elements.
ApacheSSL
The key and certificate locations are listed in the$APACHESSLROOT/conf/httpd.conf file. The default key is
Page 31
$APACHEROOT/certs/*.key. The default certificate is$APACHEROOT/certs/*.crt. Note the name and location ofthese elements.
Stronghold
The key and certificate locations are listed in the$STRONGHOLDROOT/conf/httpd.conf file. The default key is$STRONGHOLDROOT/ssl/private/*.key. The defaultcertificate is $STRONGHOLDROOT/ssl/*.cert. Note the nameand location of these elements.
IIS 4 on Windows NT
The certificate file is in the directory specified when the certificatewas downloaded from the CA.
1. Double-click the certificate file to open the viewer.
2. Click the Details tab.
3. Click Copy to file. The Certificate Manager Export Wizardopens. Click Next.
4. Select the DER-encoded binary X.509 radio button. ClickNext.
5. Specify a file name and location. Click Next.
6. Click Finish.
7. Click OK when you see the successful completion notice.
8. Exit the Certificate Manager Export Wizard.
9. Close the certificate viewer.
The keys are located within the Key Ring—the key managerprogram. Follow these instructions to export a key.
1. Click the Start button, point to Programs>Windows NT4.0 Option Pack>Microsoft Internet InformationServer, and click Internet Service Manager. The MicrosoftManagement Console opens.
2. Navigate to the web site using the object list.
3. Right-click the web site object and click Properties in theshortcut menu.
4. Click the Directory Security tab.
5. Click Edit in the Secure Communication panel.
6. Click Key Manager.
Page 32 SonicWALL SSL-PCI User’s Guide
7. Click the key to export.
8. On the Key menu, point to Export Key, and click BackupFile.
9. Read the security warning and click OK.
10. Select a file location and enter a file name.
11. Click Save.
12. Exit the Internet Service Manager.
IIS 5 on Windows 2000
Follow these steps to export a certificate and key.
1. Click the Start button, point to Programs>AdministrativeTools, and click Internet Service Manager. Or you canopen the Internet Service Manager in the AdministrativeTools folder in the Control Panel.
2. Right-click the web site object and click Properties in theshortcut menu.
3. Click the Directory Security tab.
4. Click View Certificate in the Secure Communicationspanel. The Certificate Viewer appears.
5. Click the Details tab.
6. Click Copy to File. The Certificate Export Wizard appears.
7. Click Next. The Export Private Key screen appears.
8. Select the Yes, export the private key option. Click Next.The Export File Format screen appears.
9. Select the Personal Information Exchange—PKCS#12(pfx) option and any optional choices you wish to use. ClickNext. The Password screen appears.
10. Type the password in the Password and Confirm Passwordtext boxes. Click Next. The File to Export screen appears.
11. Type the path and file name in the File name text box or clickBrowse to select a location manually. Click Next.
12. The Completing the Certificate Export Wizard screen appears.Click Finish.
Note: The key and certificate file exported from IIS 5 are inPKCS#12 format and must be transformed using OpenSSL.Instructions for this are shown in the section Transforming a
Page 33
PKCS#12-Format Key and Certificate file to PEM-EncodedFormat later in this chapter.
Using OpenSSL
OpenSSL is installed on the server and paths are updated duringthe configuration manager installation procedure. Severalcommand examples are shown here. For a complete listing ofOpenSSL commands, see the file opnsslcm.txt on the CD-ROM.
For Windows NT and Windows 2000, double-click the OpenSSLicon on the desktop to open a command window. (The icon iscopied to the desktop during installation.) For Linux or Solaris,enter openssl at a command prompt. When you are done workingwith OpenSSL, enter exit.
Note: Key and certificate file names cannot contain spaces andmust be compatible with the server operating system. Whenprompted to either name a key or certificate file or check the nameof a key or certificate file, please ensure the names follow theseconventions.
Generating Keys
To generate an encrypted 512-bit key, enter this command at theprompt:
genrsa -des3 -out key512.pem 512
To generate an encrypted 1024-bit key, enter this command at theprompt:
genrsa -des3 -out key1024.pem 1024
You must specify a passphrase needed later for security purposes.Make sure that you back up the key and remember thepassphrase.
Generating Certificates
You can generate certificate signing requests and self-signed rootcertificates to use for testing.
Note: The openssl_config.txt file must be in the currentworking directory. If it is not, you must specify the path to the file.For Windows NT and Windows 2000, the current default workingdirectory is Program Files\SonicWALL Corporation\SonicWALL Configuration Manager, and openssl_config.txtis located there by default. For Linux and Solaris, the currentworking directory is the directory from which you executed

Page 34 SonicWALL SSL-PCI User’s Guide
OpenSSL. However, the openssl_config.txt file is located in the/etc directory of the root. When you see the openssl_config.txtfile name in a listing, you must add “/etc/” before entering it.
To create an unencrypted private key and generate a certificaterequest from it, enter the following command lines at the prompt:
genrsa -out key.pem 1024req -new -key key.pem -out req.pem -config openssl_config.txt
To create a self-signed root certificate valid for 30 days, enter thefollowing commands:
genrsa -out key.pem 1024req -new -x509 -out cert.pem -key key.pem -config openssl_config.txt
You are prompted for additional information with each commands.
Transforming a PKCS#12-Format Key and Certificate
Key and certificate files exported from IIS 5 are in PKCS#12 formatand must be converted to PEM-encoded format prior to loadinginto the device. Enter the following command line at the prompt:
pkcs12 -in <sourceFile> -out <convertedFile>
sourceFile is the path and file name of the PKCS#12-format file.convertedFile is the path and file name of the PEM-encoded file.Open the output file with a text editor and copy the certificate andkey into individual files.
The certificate starts with “-----BEGIN CERTIFICATE-----” and endswith “-----END CERTIFICATE-----”.
They key starts with “-----BEGIN RSA PRIVATE KEY-----” and endswith “-----END RSA PRIVATE KEY-----”.
Transforming a PKCS#7-Format Chain Certificate
PKCS#7-format files are commonly used to transfer chainedcertificates from a CA to a user. These must be converted toindividual certificate files prior to loading into the device. Enter thefollowing command line at the prompt:
pkcs7 -in <sourceFile> -out <convertedFile> -print_certs
sourceFile is the path and file name of the PKCS#7-format file.convertedFile is the path and file name of the PEM-encoded file.Open the output file with a text editor and copy the certificatesinto individual files.
The certificate starts with “-----BEGIN CERTIFICATE-----” and endswith “-----END CERTIFICATE-----”.
Page 35
Configuration Security
SonicWALL SSL devices allow easy, flexible configuration withoutcompromising the security of your network or their own configuration.
Passwords
SonicWALL SSL-PCI devices use configuration-level passwords tosecure access. These devices are always attached at the local hostserver. Configuration-level passwords control who can see statisticsand sensitive data and configure the device. The SSL device“remembers” passwords during management sessions.
SSL devices are shipped without passwords. Setting passwords isimportant. For more information about passwords, see thecommands password configure, su, and su all in AppendixC - Command Summary.
Using the Configuration Manager
The command line interface of the configuration manager givesyou greater control over the SSL device than the QuickStart wizardprovides.
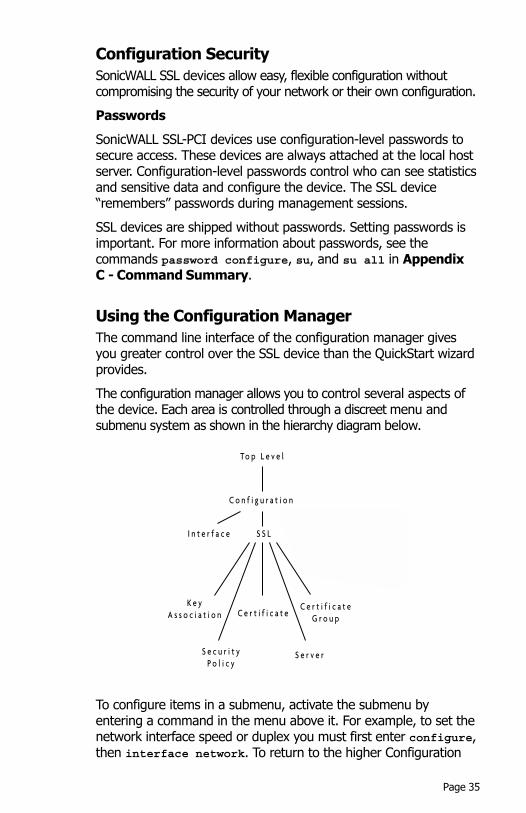
The configuration manager allows you to control several aspects ofthe device. Each area is controlled through a discreet menu andsubmenu system as shown in the hierarchy diagram below.
To configure items in a submenu, activate the submenu byentering a command in the menu above it. For example, to set thenetwork interface speed or duplex you must first enter configure,then interface network. To return to the higher Configuration

Page 36 SonicWALL SSL-PCI User’s Guide
menu, simply enter end. Appendix C - Command Summary inthis guide lists all appropriate commands for the SSL device.
To list all networked SonicWALL SSL appliances, load-balancing (LB)appliances, networked and local LB-PCI cards, and local SSL-PCIcards, enter the command show devices. Devices are listed in thefollowing format:
Type Key Name Version MacAddr IPaddr
The Type may be “SSL-PCI” (local only), “SSL-IA”, “SSL-R”, “LB-PCI”,or “LB-IA”. The Key area consists of three columns, each of whichcontains locality, attachment, or configuration information for thespecific device. A key displayed below the listing defines eachindicator. The Version is the product version. The factory defaultdevice name is in the form of IN-macaddress, where macaddress isthe device’s hyphen-delimited, hard-coded MAC address . If youhave given the device an IP address but not a specific name, thenew name of the device is in the form of IN-ipaddress, whereipaddress is the device’s hyphen-delimited IP address. SSL-PCIdevices are named inbN, where N is the number of the device inthe host. After naming the device, its administrator-configured nameis listed in the Name column. Device names should be unique toavoid confusion.
Note: Identify an unnamed device as a specific device, match thelast six digits of the serial number with the MAC address shown.
When you configure an device to perform SSL offloading you areactually setting up one or more logical secure servers whose SSL-related configurations reside in the device. Each logical secureserver has several attributes:• An IP address for the SSL-PCI• A unique IP address for the web server providing content• A key association specifying the key and certificate to use• A security policy specifying the cryptographic scheme(s) to use
Starting the Configuration Manager
Run the configuration manager using the appropriate command:
• Linux. At the shell prompt, enter inxcfg.
• Solaris. At any prompt, enter inxcfg.
• Windows NT and Windows 2000. Use the Start menu andpoint to Programs>SonicWALL Corporation>SonicWALL Configuration Manager, or double-click theshortcut on the desktop.

Page 37
Note: SSL-PCI devices can be configured only from the local server.
EXAMPLE: Setting up a Secure Server
This example describes how to use the configuration managerrather than the QuickStart wizard to set up a secure server. In thisexample, the default SSL port (443) and remote port (81) areused. The IP address of the SSL-PCI is 10.1.2.3. The name of theSSL-PCI is myDevice. The SSL server IP address is 10.1.2.5. (If youare unsure of the device’s identifying address, use the showdevices command to display a list.)
1. Start the configuration manager as described above. TheSSL-PCI cards installed in the server are automatically attached.If you are prompted to use the QuickStart wizard to set up asecure server, type n.
2. Enter Configuration mode. (If more than one SSL device isattached, you must specify the device to configure.)
inxcfg> configure(config[inb0])>
3. Assign the name myDevice to the SSL-PCI and set the defaultrouter.
(config[inb0])> hostname myDevice(config[inb0])> endinxcfg> configure myDevice(config[myDevice])> ip route default 10.1.1.1(config[myDevice])>
4. Enter SSL Configuration mode.
(config[myDevice])> ssl(config-ssl[myDevice])>
5. Enter Key Association Configuration mode and create a keyassociation named myKey. Then load the PEM-encodedcertificate and key files. Return to SSL Configuration Mode.
(config-ssl[myDevice])> keyassoc myKey create(config-ssl-keyassoc[myKey])> pem certFile keyFile(config-ssl-keyassoc[myKey])> end(config-ssl[myDevice])>
Note: Use the der command when using DER-encoded keysand certificates, the netiis command when using keys andcertificates from IIS 4, or the cert and key commands forcombinations of encoding formats.

Page 38 SonicWALL SSL-PCI User’s Guide
6. Enter Security Policy Configuration mode and create a securitypolicy named myPol. Assign the “strong” cryptography policy toit. Return to SSL Configuration mode.
(config-ssl[myDevice])> secpolicy myPol create(config-ssl-secpolicy[myPol])> crypto strong(config-ssl-secpolicy[myPol])> end(config-ssl[myDevice])>
7. Enter Server Configuration mode and create a server namedmyServer. Assign the IP address 10.1.2.4 and netmask255.255.0.0. Assign port 443 for monitoring for SSL connectionsand port 81 for sending clear text. Assign the key associationand security policies just created. Return to Top Level mode.
(config-ssl[myDevice])> server myServer create(config-ssl-server[myServer])> ip address 10.1.2.4 netmask255.255.0.0(config-ssl-server[myServer])> sslport 443(config-ssl-server[myServer])> remoteport 81(config-ssl-server[myServer])> keyassoc myKey(config-ssl-server[myServer])> secpolicy myPol(config-ssl-server[myServer])> end(config-ssl[myDevice])> end(config[myDevice])> endinxcfg>
8. Save the configuration to flash memory. If it is not saved, theconfiguration is lost during a power cycle or if the reloadcommand is used.
inxcfg> write flash myDeviceinxcfg>
EXAMPLE: Setting a Configuration Password
Setting a configuration-level password protects the sensitiveconfiguration information stored. The password you enter and confirmis not displayed. Make sure to save this configuration to flash.
inxcfg> configure myDevice(config[myDevice])> password configureEnter new password:Confirm password:(config[myDevice])>endinxcfg>
Page 39
EXAMPLE: Configuring the Ethernet Interface
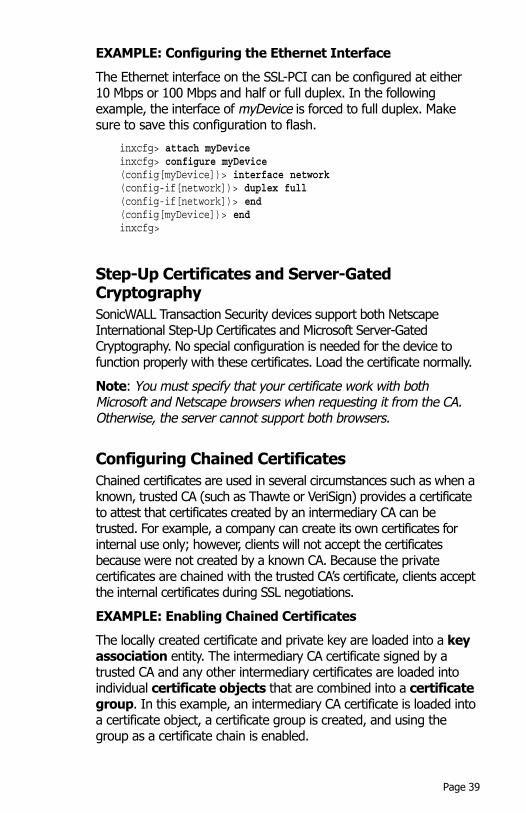
The Ethernet interface on the SSL-PCI can be configured at either10 Mbps or 100 Mbps and half or full duplex. In the followingexample, the interface of myDevice is forced to full duplex. Makesure to save this configuration to flash.
inxcfg> attach myDeviceinxcfg> configure myDevice(config[myDevice])> interface network(config-if[network])> duplex full(config-if[network])> end(config[myDevice])> endinxcfg>
Step-Up Certificates and Server-GatedCryptography
SonicWALL Transaction Security devices support both NetscapeInternational Step-Up Certificates and Microsoft Server-GatedCryptography. No special configuration is needed for the device tofunction properly with these certificates. Load the certificate normally.
Note: You must specify that your certificate work with bothMicrosoft and Netscape browsers when requesting it from the CA.Otherwise, the server cannot support both browsers.
Configuring Chained Certificates
Chained certificates are used in several circumstances such as when aknown, trusted CA (such as Thawte or VeriSign) provides a certificateto attest that certificates created by an intermediary CA can betrusted. For example, a company can create its own certificates forinternal use only; however, clients will not accept the certificatesbecause were not created by a known CA. Because the privatecertificates are chained with the trusted CA’s certificate, clients acceptthe internal certificates during SSL negotiations.
EXAMPLE: Enabling Chained Certificates
The locally created certificate and private key are loaded into a keyassociation entity. The intermediary CA certificate signed by atrusted CA and any other intermediary certificates are loaded intoindividual certificate objects that are combined into a certificategroup. In this example, an intermediary CA certificate is loaded intoa certificate object, a certificate group is created, and using thegroup as a certificate chain is enabled.
Page 40 SonicWALL SSL-PCI User’s Guide
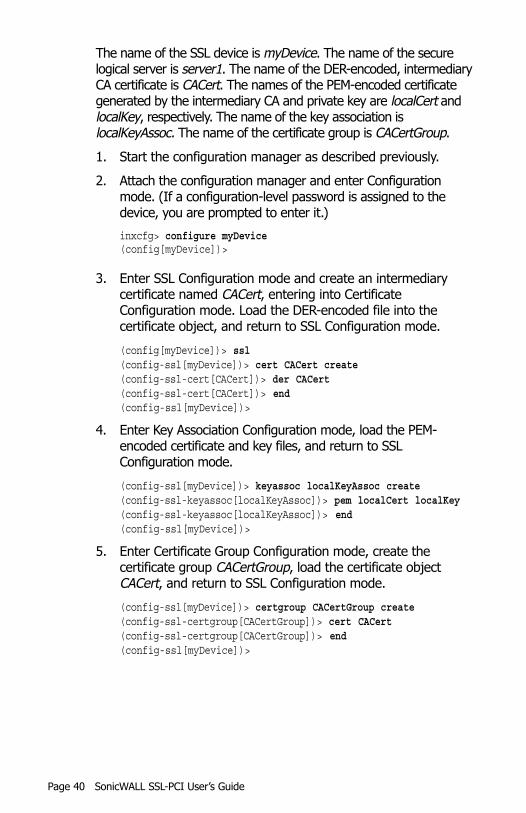
The name of the SSL device is myDevice. The name of the securelogical server is server1. The name of the DER-encoded, intermediaryCA certificate is CACert. The names of the PEM-encoded certificategenerated by the intermediary CA and private key are localCert andlocalKey, respectively. The name of the key association islocalKeyAssoc. The name of the certificate group is CACertGroup.
1. Start the configuration manager as described previously.
2. Attach the configuration manager and enter Configurationmode. (If a configuration-level password is assigned to thedevice, you are prompted to enter it.)
inxcfg> configure myDevice(config[myDevice])>
3. Enter SSL Configuration mode and create an intermediarycertificate named CACert, entering into CertificateConfiguration mode. Load the DER-encoded file into thecertificate object, and return to SSL Configuration mode.
(config[myDevice])> ssl(config-ssl[myDevice])> cert CACert create(config-ssl-cert[CACert])> der CACert(config-ssl-cert[CACert])> end(config-ssl[myDevice])>
4. Enter Key Association Configuration mode, load the PEM-encoded certificate and key files, and return to SSLConfiguration mode.
(config-ssl[myDevice])> keyassoc localKeyAssoc create(config-ssl-keyassoc[localKeyAssoc])> pem localCert localKey(config-ssl-keyassoc[localKeyAssoc])> end(config-ssl[myDevice])>
5. Enter Certificate Group Configuration mode, create thecertificate group CACertGroup, load the certificate objectCACert, and return to SSL Configuration mode.
(config-ssl[myDevice])> certgroup CACertGroup create(config-ssl-certgroup[CACertGroup])> cert CACert(config-ssl-certgroup[CACertGroup])> end(config-ssl[myDevice])>

Page 41
6. Enter Server Configuration mode, create the logical secureserver server1, assign an IP address, SSL and clear text ports,a security policy myPol, the certificate group CACertGroup, keyassociation localKeyAssoc, and exit to Top Level mode.
(config-ssl[myDevice])> server server1 create(config-ssl-server[server1])> ip address 10.1.2.4 netmask 255.255.0.0(config-ssl-server[server1])> sslport 443(config-ssl-server[server1])> remoteport 81(config-ssl-server[server1])> secpolicy myPol(config-ssl-server[server1])> certgroup chain CACertGroup(config-ssl-server[server1])> keyassoc localKeyAssoc(config-ssl-server[server1])> end(config-ssl[myDevice])> end(config[myDevice])> endinxcfg>
7. Save the configuration to flash memory. If it is not saved, theconfiguration is lost during a power cycle or if the reloadcommand is used.
inxcfg> write flash myDeviceinxcfg>
Supporting Other Secure Protocols
Along with SSL, SonicWALL SSL devices can support other secureprotocols using TLS v1.0, SSL v2.0, and SSL v3.0. SFTP, IMAPS,POP3S, NNTPS, and LDAPS are some examples. The steps belowshow how to configure the SSL device for setting up a secureserver to process only POP3S (S-POP) mail.
Note: The steps in this example are abbreviated to only showrelevant changes from the standard SSL server setup.
1. Start the configuration manager as described above. EnterConfiguration mode. Enter a default router. Enter SSLConfiguration mode. If a key association has not been defined,create one. If a security policy has not been defined, specify one.
Page 42 SonicWALL SSL-PCI User’s Guide
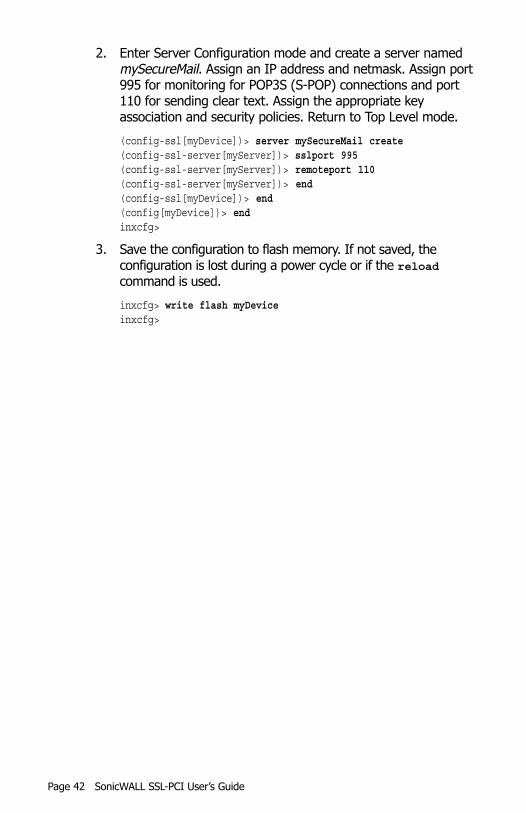
2. Enter Server Configuration mode and create a server namedmySecureMail. Assign an IP address and netmask. Assign port995 for monitoring for POP3S (S-POP) connections and port110 for sending clear text. Assign the appropriate keyassociation and security policies. Return to Top Level mode.
(config-ssl[myDevice])> server mySecureMail create(config-ssl-server[myServer])> sslport 995(config-ssl-server[myServer])> remoteport 110(config-ssl-server[myServer])> end(config-ssl[myDevice])> end(config[myDevice])> endinxcfg>
3. Save the configuration to flash memory. If not saved, theconfiguration is lost during a power cycle or if the reloadcommand is used.
inxcfg> write flash myDeviceinxcfg>
Page 43
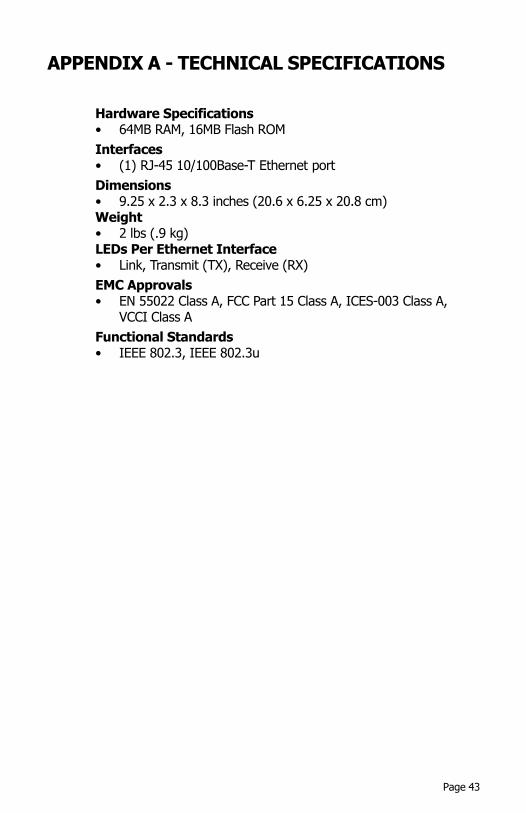
APPENDIX A - TECHNICAL SPECIFICATIONS
Hardware Specifications• 64MB RAM, 16MB Flash ROM
Interfaces• (1) RJ-45 10/100Base-T Ethernet port
Dimensions• 9.25 x 2.3 x 8.3 inches (20.6 x 6.25 x 20.8 cm)Weight• 2 lbs (.9 kg)LEDs Per Ethernet Interface• Link, Transmit (TX), Receive (RX)
EMC Approvals• EN 55022 Class A, FCC Part 15 Class A, ICES-003 Class A,
VCCI Class A
Functional Standards• IEEE 802.3, IEEE 802.3u

Page 44 SonicWALL SSL-PCI User’s Guide

Page 45
APPENDIX B - TROUBLESHOOTING GUIDE
This chapter provides solutions for problems that you might encounterwhen using the SonicWALL SSL-PCI. If you are unable to solve yourproblem, please visit SonicWALL’s Technical Support Web site at<http://support.sonicwall.com>. There, you will find resources to helpyou resolve most technical issues, and instructions for contactingSonicWALL’s Technical Support engineers.
The Link LED is off.
• Make sure the connected network equipment is powered on.
• Make sure the cable connections are secure. Gently movingthe cable back and forth should not make the Link LED turn onand off. If you still believe a bad cable may be at fault, try acable that you know is “good”.
• Make sure you are using the correct type of cable. Use astraight-through cable to attach SSL-PCI to a switch or hub.
• Make sure to use standard, properly wired cables.
Resetting the SSL-PCI
If the appliance is not working properly, reboot the device. Usingthe configuration manager, enter the reload command, or rebootthe server. This will erase the current configuration if you have notsaved it to the flash memory using the write flash command.The device reboots using information stored in the flash. (See“Configuration Commands” in Appendix C - CommandSummary in this user guide.)
If the previously described method does not solve the problem,reboot the server. The SSL-PCI reboots with the configurationstored in the flash memory.

Page 46 SonicWALL SSL-PCI User’s Guide

Page 47
APPENDIX C - COMMAND SUMMARY
This appendix contains a categorized complete listing of configurationmanager commands for SonicWALL SSL devices. Each command isdescribed and, where appropriate, an example of usage is included.
Input Data Format Specification
Various commands accept data in several formats, such as thefollowing:
MAC Address: HH:HH:HH:HH:HH:HH
MAC Address: HHHH.HHHH.HHHH
IP Address: D.D.D.D
IP Address: 0xHHHHHHHH
Integer Values: D
Integer Values: 0xH
Integer Range: D-D
where H is one or more hexadecimal digit [0-F] and D is one ormore decimal digit.
Text Conventions
• Items that appear like this should be entered as theyappear.
• Items within [brackets] are optional.
• Items within <angle brackets> are required.
• Items that appear in italics are user-specified.
• Items separated by a vertical bar (one | other) are options.You may choose any one of them.
• Items that appear like this are responses from thecomputer.
Note: Though a command string may be displayed on multiplelines in this guide, it must be entered on a single line with noreturns except at the end of the command.
Page 48 SonicWALL SSL-PCI User’s Guide
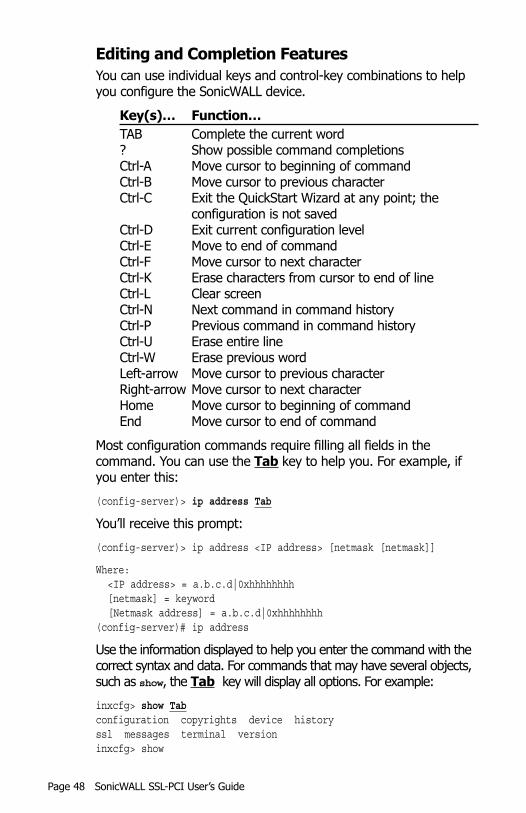
Editing and Completion Features
You can use individual keys and control-key combinations to helpyou configure the SonicWALL device.
Key(s)… Function…
TAB Complete the current word? Show possible command completionsCtrl-A Move cursor to beginning of commandCtrl-B Move cursor to previous characterCtrl-C Exit the QuickStart Wizard at any point; the
configuration is not savedCtrl-D Exit current configuration levelCtrl-E Move to end of commandCtrl-F Move cursor to next characterCtrl-K Erase characters from cursor to end of lineCtrl-L Clear screenCtrl-N Next command in command historyCtrl-P Previous command in command historyCtrl-U Erase entire lineCtrl-W Erase previous wordLeft-arrow Move cursor to previous characterRight-arrow Move cursor to next characterHome Move cursor to beginning of commandEnd Move cursor to end of command
Most configuration commands require filling all fields in thecommand. You can use the Tab key to help you. For example, ifyou enter this:
(config-server)> ip address Tab
You’ll receive this prompt:
(config-server)> ip address <IP address> [netmask [netmask]]
Where: <IP address> = a.b.c.d|0xhhhhhhhh [netmask] = keyword [Netmask address] = a.b.c.d|0xhhhhhhhh(config-server)# ip address
Use the information displayed to help you enter the command with thecorrect syntax and data. For commands that may have several objects,such as show, the Tab key will display all options. For example:
inxcfg> show Tabconfiguration copyrights device historyssl messages terminal versioninxcfg> show
Page 49
The Tab key can also be used to finish a command if thecommand is uniquely identified by user input.
inxcfg> show copTab
results in
inxcfg> show copyrights
Additionally, commands may be abbreviated as long as the partialcommands are unique. The following text:
inxcfg> sho ssl key
is an acceptable abbreviation for
inxcfx> show ssl keyassoc
Note: Device names are case-sensitive.
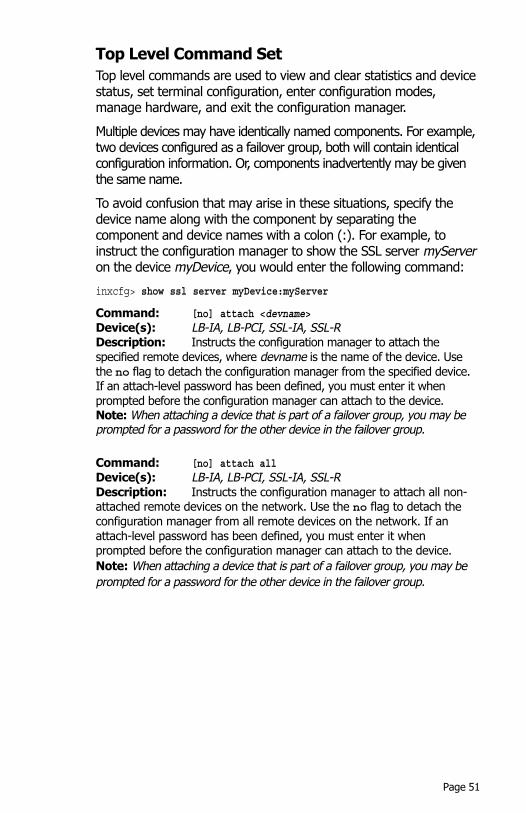
Command Hierarchy
The commands for SonicWALL SSL devices fit into the followinglogical hierarchy:
SSL Command Hierarchy

Page 50 SonicWALL SSL-PCI User’s Guide
Configuration Security
SonicWALL devices allow easy and flexible configuration withoutcompromising the security of your network or their ownconfiguration.
Passwords
SonicWALL SSL devices utilize two levels of password protection:attach- and configuration-level. Attach-level passwords control whocan attach the configuration manager to the specific device to viewstatistics and other nonsensitive data. Configuration-levelpasswords control who can view the same data available withattach-level passwords as well as see sensitive data and configurethe device. Passwords are “remembered” by the device for theduration of the management session.
Note: SSL-PCI devices are automatically attached at the local hostserver. An attach password is not valid with SSL-PCI devices.
SonicWALL devices are shipped without passwords. Settingpasswords is important as some devices are administered over thenetwork. For more information about passwords, see the commandspassword attach, password configure, su, and su all.
Note: Some commands used with SonicWALL SSL devices are alsoapplicable to SonicWALL LB devices. For that reason, the followinglist of commands indicates for which device(s) each command isappropriate.
Page 51
Top Level Command Set
Top level commands are used to view and clear statistics and devicestatus, set terminal configuration, enter configuration modes,manage hardware, and exit the configuration manager.
Multiple devices may have identically named components. For example,two devices configured as a failover group, both will contain identicalconfiguration information. Or, components inadvertently may be giventhe same name.
To avoid confusion that may arise in these situations, specify thedevice name along with the component by separating thecomponent and device names with a colon (:). For example, toinstruct the configuration manager to show the SSL server myServeron the device myDevice, you would enter the following command:
inxcfg> show ssl server myDevice:myServer
Command: [no] attach <devname>Device(s): LB-IA, LB-PCI, SSL-IA, SSL-RDescription: Instructs the configuration manager to attach thespecified remote devices, where devname is the name of the device. Usethe no flag to detach the configuration manager from the specified device.If an attach-level password has been defined, you must enter it whenprompted before the configuration manager can attach to the device.Note: When attaching a device that is part of a failover group, you may beprompted for a password for the other device in the failover group.
Command: [no] attach allDevice(s): LB-IA, LB-PCI, SSL-IA, SSL-RDescription: Instructs the configuration manager to attach all non-attached remote devices on the network. Use the no flag to detach theconfiguration manager from all remote devices on the network. If anattach-level password has been defined, you must enter it whenprompted before the configuration manager can attach to the device.
Note: When attaching a device that is part of a failover group, you may be
prompted for a password for the other device in the failover group.
Page 52 SonicWALL SSL-PCI User’s Guide
Command: [no] attach ip <ipaddr> [port <portid>]Device(s): LB-IA, SSL-IA, SSL-RDescription: Instructs the configuration manager to attach a non-attached remote device using an alternate remote management port,where ipaddr is the IP address of the device. Use the port option tospecify a TCP service port to use for attaching to the device, where portidis the server port number. Use the no flag to detach the configurationmanager from the specified device. If an attach-level password has beendefined, you must enter it when prompted before the configurationmanager can attach to the device.Note: When attaching a device that is part of a failover group, you may beprompted for a password for the other device in the failover group.
Command: clear failover statistics [devname]Device(s): LB-IA, LB-PCI, SSL-IA, SSL-RDescription: Resets all failover statistics, where devname is thename of the device. You must include the name of the device unless onlyone device configured for failover is attached. If you have not entered thedevice’s configuration password previously, you are prompted for it.
Command: clear messages [devname]Device(s): LB-IA, LB-PCI, SSL-IA, SSL-PCI, SSL-RDescription: Resets all diagnostic messages, where devname is thename of the device. You must include the device name unless only onedevice is attached. If you have not entered the device’s configurationpassword previously, you are prompted for it.
Command: clear screenDevice(s): LB-IA, LB-PCI, SSL-IA, SSL-PCI, SSL-RDescription: Clears the display, leaving only one prompt line.
Command: clsDevice(s): LB-IA, LB-PCI, SSL-IA, SSL-PCI, SSL-RDescription: Clears the display, leaving only one prompt line.
Command: configure [devname]Device(s): LB-IA, LB-PCI, SSL-IA, SSL-PCI, SSL-RDescription: Enters Configuration mode for an attached device,where devname is the name of the device. You must specify a deviceunless only one device is attached. If you have not entered the device’sconfiguration password previously, you are prompted for it.

Page 53
Command: copy file configuration [devname]Device(s): LB-IA, LB-PCI, SSL-IA, SSL-PCI, SSL-RDescription: Loads a saved configuration for use as the activeconfiguration for the device, where devname is the name of the device. Youare prompted to supply the name of the file to read. You must specify adevice unless only one device is attached. If you have not entered thedevice’s configuration password previously, you are prompted for it.
Command: copy file flash [devname]Device(s): LB-IA, LB-PCI, SSL-IA, SSL-PCI, SSL-RDescription: Updates a flash image on the specified device based uponthe specified flash image file, where devname is the name of the device. Youare prompted to supply the name of the file to use. You must specify a deviceunless only one device is attached. If you have not entered the device’sconfiguration password previously, you are prompted for it.
Command: copy file flash allDevice(s): LB-IA, LB-PCI, SSL-IA, SSL-PCI, SSL-RDescription: Updates all flash images on all attached devices. You areprompted to supply the name of the single file to use to update the flash ofall appropriate devices. For each attached device, you are prompted tocontinue with copying the flash image.
Command: discoverDevice(s): LB-IA, LB-PCI, SSL-IA, SSL-RDescription: Checks the network for new remote devices. Localdevices are discovered when the configuration manager starts up.
Command: discover port <portid>Device(s): LB-IA, LB-PCI, SSL-IA, SSL-RDescription: Checks the network for new remote devices on thespecified TCP service port when using an alternate remote managementport, where portid is the port number.
Command: erase flash [devname]Device(s): LB-IA, LB-PCI, SSL-IA, SSL-PCI, SSL-RDescription: Erases the configuration stored in the flash memory ofthe specified device. You must specify a device unless only one device isattached. If you have not entered the device’s configuration passwordpreviously, you are prompted for it.
Command: erase flash allDevice(s): LB-IA, LB-PCI, SSL-IA, SSL-PCI, SSL-RDescription: Erases the configuration stored in the flash memory allattached devices.Note: You are not prompted to verify erasing the flash on a device-by-device basis.
Page 54 SonicWALL SSL-PCI User’s Guide
Command: erase memory [<devname>]Device(s): LB-IA, LB-PCI, SSL-IA, SSL-PCI, SSL-RDescription: Erases the configuration running on the specified devicebut does not erase the configuration stored in the flash memory. You mustspecify a device unless only one device is attached. If you have not enteredthe device’s configuration password previously, you are prompted for it.
Command: exitDevice(s): LB-IA, LB-PCI, SSL-IA, SSL-PCI, SSL-RDescription: Quits the configuration manager.
Command: help [command]Device(s): LB-IA, LB-PCI, SSL-IA, SSL-PCI, SSL-RDescription: Displays information for a specific command, wherecommand is the name of the command. If no command is specified, helpinformation is displayed for all Top Level commands.
Command: ping <ipaddr>Device(s): LB-IA, LB-PCI, SSL-IA, SSL-PCI, SSL-RDescription: Sends ICMP packets to the specified IP address, whereipaddr is the specified destination IP address.
Command: quick-start [devname]Device(s): LB-IA, LB-PCI, SSL-IA, SSL-PCI, SSL-RDescription: Runs the QuickStart wizard for the specified device. Youmust specify a device unless only one device is attached. If a configurationpassword has been set for the device and you have not entered the device’sconfiguration password previously, you are prompted for it.
Command: quitDevice(s): LB-IA, LB-PCI, SSL-IA, SSL-PCI, SSL-RDescription: Quits the configuration utility.
Command: reload [devname]Device(s): LB-IA, LB-PCI, SSL-IA, SSL-PCI, SSL-RDescription: Reboots the specified device, where devname is thename of the device. The device resumes operation using the configurationstored in the flash memory. You are prompted to confirm restarting thedevice. You must specify a device unless only one device is attached. Ifyou have not entered the device’s configuration password previously, youare prompted for it. The device is not accessible for several seconds afterentering this command.
Page 55
Command: reload allDevice(s): LB-IA, LB-PCI, SSL-IA, SSL-PCI, SSL-RDescription: Reboots all attached configuration-level devices.Devices resume operation using the configuration stored in the flashmemory. You are prompted to confirm this action. Device are notaccessible for several seconds after entering this command.Note: You are not prompted to verify rebooting devices on a device-by-device basis.
Command: show access-list <listid> [devname]Device(s): LB-IA, LB-PCI, SSL-IA, SSL-RDescription: Displays the specified access list for a specified device,where listid is the valid access list id number and devname is the name ofthe device. You must specify a device unless only one remote device isattached. If you have not entered the device’s configuration passwordpreviously, you are prompted for it.
Command: show access-lists [devname]Device(s): LB-IA, LB-PCI, SSL-IA, SSL-RDescription: Displays all defined access lists for a specified device,where devname is the name of the attached device. You must specify adevice unless only one device is attached. If you have not entered thedevice’s configuration password previously, you are prompted for it.
Command: show arp [devname]Device(s): SSL-IA, SSL-RDescription: Displays the arp device cache on the specified device,where devname is the name of the attached device. You must specify adevice unless only one device is attached.
Command: show configuration [devname]Device(s): LB-IA, LB-PCI, SSL-IA, SSL-PCI, SSL-RDescription: Displays the active configuration for the specifieddevice, where devname is the name of the device. You must specify adevice unless only one device is installed. If you have not entered thedevice’s configuration password previously, you are prompted for it.
Command: show copyrightsDevice(s): LB-IA, LB-PCI, SSL-IA, SSL-PCI, SSL-RDescription: Displays copyright information for software andhardware products.
Page 56 SonicWALL SSL-PCI User’s Guide
Command: show device [devname]Device(s): LB-IA, LB-PCI, SSL-IA, SSL-PCI, SSL-RDescription: Displays information about the specified device, wheredevname is the name of the device. You must specify a device unless onlyone device is attached.
Command: show devicesDevice(s): LB-IA, LB-PCI, SSL-IA, SSL-PCI, SSL-RDescription: Displays a list of all LB and SSL appliances, networkedLB-PCI cards, and local LB-PCI and SSL-PCI cards. SSL-PCI cards areautomatically named upon installation. The device name format forSSL-PCI cards is inbN, where N is the number of the card in the server.Unconfigured SSL and LB appliances and LB-PCI cards are listed in theformat IN-macaddress, where macaddress is the factory-encoded MACaddress. Configured devices are listed in the format of IN-<ipaddr>,where ipaddr is the IP address of the device; or are listed as devname,where devname is the user-defined name. Change the device’s nameusing the hostname command.
Command: show failover [groupname]Device(s): LB-IA, LB-PCI, SSL-IA, SSL-RDescription: Displays failover data associated with the specified device,where groupname is the name of the failover group. You must specify thedevice name unless only one device configured for failover is attached.
Command: show failover statistics [devname]Device(s): LB-IA, LB-PCI, SSL-IA, SSL-RDescription: Displays failover statistics for the specified device,where devname is the name of the device. You must specify a deviceunless only one device configured for failover is attached.
Command: show historyDevice(s): LB-IA, LB-PCI, SSL-IA, SSL-PCI, SSL-RDescription: Displays the last commands executed. The number ofcommands stored in the history may be configured by using theterminal history command. You may view the history size by usingthe show terminal command.
Page 57
Command: show interface [network | server] [devname]Device(s): SSL-IA, SSL-PCI, SSL-RDescription: Displays information for the specified Ethernetinterface, where devname is the name of the SSL device. The informationincludes connection, duplex, speed, and autonegotiation settings. Youmust specify a device name unless only one SSL device is attached. If youdo not specify network or server, information for all interfaces on thespecified device is displayed.Example: show interface network myDevice
Displays information for the “Network” interface on thedevice named myDevice.
Note: The SSL-PCI has a single interface, named “Network”.
Command: show interface statistics <network | server>[devname] [continuous]
Device(s): SSL-IA, SSL-PCI, SSL-RDescription: (This command must be entered on one line.) Displayspacket statistics for the specified Ethernet interface, where devname is thename of the SSL device. If continuous is specified, statistics are updatedevery second. Press any key to stop displaying continuous statistics. Youmust specify a device name unless only one SSL device is attached.Example: show interface statistics server myDevice
Displays statistics for the “Server” interface on thedevice named myDevice.
Note: The SSL-PCI has a single interface, named “Network”.
Command: show ip routes [devname]Device(s): LB-IA, LB-PCI, SSL-IA, SSL-PCI, SSL-RDescription: Displays the routing table stored in the device, wheredevname is the name of the device. You must specify a device nameunless only one device is attached.
Command: show ip statistics [devname]Device(s): SSL-IA, SSL-PCI, SSL-RDescription: Displays diagnostic IP, ICMP, TCP, and UDP statistics forthe specified device, where devname is the name of the device. You mustspecify a device name unless only one device is attached.
Command: show memory [zone] <devname>Device(s): SSL-IA, SSL-PCI, SSL-RDescription: Displays memory usage on the specified device, wheredevname is the name of the attached device. The zone flag is used todisplay information for each memory zone.
Page 58 SonicWALL SSL-PCI User’s Guide
Command: show messages [devname]Device(s): LB-IA, LB-PCI, SSL-IA, SSL-PCI, SSL-RDescription: Displays the diagnostic message buffer for the specifieddevice, where devname is the name of the device. You must specify adevice name unless only one device is attached.
Command: show netstat [devname]Device(s): SSL-IA, SSL-PCI, SSL-RDescription: Displays the current state of the IP connection for thespecified device, where devname is the name of the attached device. Youmust specify a device name unless only one SSL device is attached.
Command: show processes <devname>Device(s): SSL-IA, SSL-PCI, SSL-RDescription: Displays information, by thread, about processesrunning on the specified device, where devname is the attached device.
Command: show remote-management [devname]Device(s): LB-IA, LB-PCI, SSL-IA, SSL-RDescription: Displays remote management information for thespecified remote device, where devname is the name of the device. Youmust specify a device unless only one remote device is attached.
Command: show rip [devname]Device(s): SSL-IA, SSL-PCI, SSL-RDescription: Displays the RIP status of the specified device, wheredevname is the name of the attached device. You must specify a deviceunless only one device is attached.
Command: show routes [devname]Device(s): SSL-IA, SSL-PCI, SSL-RDescription: Displays the routing table stored in the device, wheredevname is the name of the device. You must specify a device nameunless only one device is attached. (This command has the same outputas show ip routes.)
Command: show running-config [devname]Device(s): SSL-IA, SSL-PCI, SSL-RDescription: Displays the active configuration for the specifieddevice, where devname is the name of the device. You must specify adevice unless only one device is attached. If you have not entered thedevice’s configuration password previously, you are prompted for it.
Page 59
Command: show snmp [devname]Device(s): SSL-IA, SSL-PCI, SSL-RDescription: Displays SNMP configuration information for thespecified device, where devname is the name of the device. You mustspecify a device name unless only one device is attached.
Command: show ssl [devname]Device(s): SSL-IA, SSL-PCI, SSL-RDescription: Displays summary data for the specified SSL device,where devname is the name of the device. You must specify a deviceunless only one SSL device is attached.
Command: show ssl cert [certname]Device(s): SSL-IA, SSL-PCI, SSL-RDescription: Displays summary data for the specified certificateentity loaded on the device, where certname is the name of the certificateentity. If you do not specify a certificate entity name, all certificate entityinformation is displayed for all attached SSL devices.
Command: show ssl certgroup [certgroupname]Device(s): SSL-IA, SSL-PCI, SSL-RDescription: Displays summary data for the specified certificategroup loaded on the device, where certgroupname is the name of thecertificate group. If you do not specify a certificate group, all certificategroup information is displayed for all attached SSL devices.
Command: show ssl errors [devname] [continuous]Device(s): SSL-IA, SSL-PCI, SSL-RDescription: Displays SSL errors reported on the specified device,where devname is the name of the device. You must specify a devicename unless only one SSL device is attached. Use the continuousoption to update the statistics every second. Press any key to stopdisplaying statistics. See the command show ssl errors all for a list ofdisplayed errors.
Page 60 SonicWALL SSL-PCI User’s Guide
Command: show ssl errors all [continuous]Device(s): SSL-IA, SSL-PCI, SSL-RDescription: Displays SSL errors for all attached SSL devices. Usethe continuous option to update the statistics every second. Press anykey to stop displaying statistics. The errors displayed are:
ACPT SSL Accept ErrorsSSLW SSL System Write Errors to ClientSSLWBC SSL System Write Broken Connection Errors to ClientSSLR SSL System Read Errors from ClientSSLRBC SSL System Read Broken Connection Errors from ClientSVRW System Write Errors to Remote ServerSVRWBC Broken Connection Write Errors to Remote ServerSVRR System Read Errors from Remote ServerSVRRBC Broken Connection Read Errors from Remote Server
Command: show ssl keyassoc [keyname]Device(s): SSL-IA, SSL-PCI, SSL-RDescription: Displays summary data for the specified public/privatekey pair loaded on the device, where keyname is the name of the pair. Ifyou do not specify a key association name, all key association informationis displayed for all attached SSL devices.
Command: show ssl secpolicy [polname]Device(s): SSL-IA, SSL-PCI, SSL-RDescription: Displays summary data for the specified security policy,where polname is the name of the security policy. If you do not specify asecurity policy name, all security policy information is displayed for allattached SSL devices.
Command: show ssl server [servname]Device(s): SSL-IA, SSL-PCI, SSL-RDescription: Displays information for the specified configured logicalsecure server, where servname is the name of the server. If you do notspecify a logical secure server, all logical secure server information isdisplayed for all attached SSL devices.
Page 61
Command: show ssl statistics all [continuous]Device(s): SSL-IA, SSL-PCI, SSL-RDescription: Displays SSL statistics summed over all secure logicalservers on all attached SSL devices. Use the continuous option todisplay running totals for all categories except Active Client Connectionsand Active Sockets, which show the number of client connections orsockets active at that time. Displays are updated every second. Press anykey to stop displaying statistics. The statistics displayed are:
ACC Active Client ConnectionsAS Active SocketsSNE SSL Negotiation ErrorsTSE Total Socket ErrorsCES Connection Errors to Remote ServerTCBE Total Connection Block ErrorsTSCR Total SSL Connections RefusedTCA Total Connections AcceptedTROH Total RSA Operations in HardwareTSNS Total SSL Negotiations Succeeded
Active Server Connections is not shown when using the continuous option.
Command: show ssl statistics [devname] [continuous]Device(s): SSL-IA, SSL-PCI, SSL-RDescription: Displays SSL statistics summed over all secure logicalservers, where devname is the name of the device. You must specify adevice name unless only one SSL device is attached. Use thecontinuous option to update statistics every second. Press any key tostop displaying statistics. See the command show ssl statistics all fora list of displayed statistics.
Command: show syslog [devname]Device(s): LB-IA, LB-PCI, SSL-IA, SSL-PCI, SSL-RDescription: Displays the list of hosts to which diagnostic messagesfrom the device are sent, where devname is the name of the device. Youmust specify the device name unless only one device is attached.
Command: show system-resources [devname]Device(s): SSL-IA, SSL-PCI, SSL-RDescription: Displays system memory and CPU usage for thespecified device, where devname is the name of the device. You mustspecify the device name unless only one device is attached.
Command: show terminalDevice(s): LB-IA, LB-PCI, SSL-IA, SSL-PCI, SSL-RDescription: Displays terminal setting information.

Page 62 SonicWALL SSL-PCI User’s Guide
Command: show versionDevice(s): LB-IA, LB-PCI, SSL-IA, SSL-PCI, SSL-RDescription: Displays configuration manager version information.
Command: [no] su [devname]Device(s): LB-IA, LB-PCI, SSL-IA, SSL-PCI, SSL-RDescription: Raises the security level on the specified attach-leveldevice, where devname is the device name. Using the no flag lowers thesecurity level on the specified config-level device. You must specify a devicename unless only one LB or SSL device is attached. (SSL-PCI devices arealways attached to the local server and may not be configured remotely.) Ifyou have not entered the device’s configuration password previously, youare notified that the command is inappropriate for that device.Note: You must set a configuration password for an LB or SSL device toprotect its configuration. When a device without a configuration passwordis attached, the security level of the device is automatically raised.Therefore, if you use the no su command to lower the security level of adevice with no configuration password, the device immediately is taken toconfiguration level again.
Command: [no] su allDevice(s): LB-IA, LB-PCI, SSL-IA, SSL-PCI, SSL-RDescription: Raises the security level on all attach-level devices. Foreach attach-level device installed, you are prompted for a configuration-level password. Using the no flag lowers the security level on allconfig-level devices. You do not need to specify a password whenlowering configuration-level devices.Note: You must set a configuration password for an LB or SSL device toprotect its configuration. When a device without a configuration passwordis attached, the security level of the device is automatically raised.Therefore, if you use the no su command to lower the security level of adevice with no configuration password, the device immediately is taken toconfiguration level again.
Command: [no] terminal history <length>Device(s): LB-IA, LB-PCI, SSL-IA, SSL-PCI, SSL-RDescription: Sets the number of commands saved in the historybuffer, where length is the number of commands. The default is 25. Usethe no keyword to disable the history list. The show history commanddisplays the last commands executed. You may view the history size usingthe show terminal command.Example: terminal history 30
Sets the number of commands saved in the history bufferto 30.
Page 63
Command: [no] terminal pagerDevice(s): LB-IA, LB-PCI, SSL-IA, SSL-PCI, SSL-RDescription: Enables the terminal pager. Using the no keyworddisables the pager.
Command: terminal resetDevice(s): LB-IA, LB-PCI, SSL-IA, SSL-PCI, SSL-RDescription: Resets the internal state of the terminal.
Command: traceroute <ipaddr>Device(s): LB-IA, LB-PCI, SSL-IA, SSL-PCI, SSL-RDescription: Displays the router hops to the specified destination,where ipaddr is the IP address of the destination.
Command: write file [devname]Device(s): LB-IA, LB-PCI, SSL-IA, SSL-PCI, SSL-RDescription: Writes the configuration of the specified device to a file,where devname is the name of the device. You are prompted to supply afile name. You must specify a device name unless only one device isattached. If you have not entered the device’s configuration passwordpreviously, you are prompted for it.
Command: write flash [devname]Device(s): LB-IA, LB-PCI, SSL-IA, SSL-PCI, SSL-RDescription: Writes the active configuration to flash memory on thespecified device, where devname is the name of the device. You mustspecify a device name unless there is only one device is attached. If youhave not entered the device’s configuration password previously, you areprompted for it.Note: In circumstances when a large configuration is being saved to theflash memory, the configuration manager may return an error messagestating, “lost connection to device!”. Wait until the flashing LED display(on appliances) returns to normal, reattach the configuration manager tothe device (if necessary), and continue with any configuration. Theconfiguration will have been written successfully to the flash memory.
Page 64 SonicWALL SSL-PCI User’s Guide
Command: write flash allDevice(s): LB-IA, LB-PCI, SSL-IA, SSL-PCI, SSL-RDescription: Writes the active configuration to flash memory on allattached devices.Notes: You are not prompted to verify writing to the flash on a device-by-device basis. In circumstances when a large configuration is beingsaved to the flash memory, the configuration manager may return anerror message stating, “lost connection to device!”. Wait until the flashingLED display (on appliances) returns to normal, reattach the configurationmanager to the device (if necessary), and continue with anyconfiguration. The configuration will have been written successfully to theflash memory.
Command: write messages [devname]Device(s): LB-IA, LB-PCI, SSL-IA, SSL-PCI, SSL-RDescription: Writes the diagnostic messages for the specified deviceto a file, where devname is the name of the device. You must specify adevice name unless only one device is attached. You are prompted for afile name.
Command: write terminal [<devname>]Device(s): LB-IA, LB-PCI, SSL-IA, SSL-PCI, SSL-RDescription: Displays the active configuration of the specified device,where devname is the name of the device. You must specify a devicename unless only one device is attached. If you have not entered thedevice’s configuration password previously, you are prompted for it.
Page 65
Configuration Command Set
Use Configuration mode commands to configure the Ethernet interface,failover, and SSL functions of the SSL device. Enter Configuration modeusing the configure command in Top Level mode.
Command: [no] access-list <id> <permit | deny> <ipaddr> <mask>Device(s): LB-IA, LB-PCI, SSL-IA, SSL-RDescription: Adds an access list entry to the end of the specifiedaccess list, where id is the list identifier, ipaddr and mask are the IP addressand mask to be added, respectively. You can have up to four access lists foreach device. Use the no flag to delete the entire specified access list. Thepermit option allows access from the specified address(es). The denyoption locks access from the specified address(es). To activate the access list,you must also use the remote-management access-list or snmpaccess-list command.Example: access-list 2 permit 100.1.2.3 0.0.0.0
Specifies the host with the IP address 10.1.2.3 to bethe only remote host to configure the remote device.
Example: access-list 1 permit 100.128.0.0 0.0.255.255Specifies only remote hosts on the identified subnetcan configure the remote device.
Command: endDevice(s): LB-IA, LB-PCI, SSL-IA, SSL-PCI, SSL-RDescription: Exits Configuration mode and returns to Top Level mode.
Command: [no] failover [create]Device(s): LB-IA, LB-PCI, SSL-IA, SSL-RDescription: Enters Failover Configuration mode for the currentdevice. If the create flag is used, a new failover group is created with thecurrent device as the primary device, and Failover Configuration mode isentered. The no flag can be used in two ways:
• If the current device is the primary device of a failover group,the failover group is deleted and the SSL information on anyexisting secondary device is removed.
• If the current device is the secondary device of a failover group, youare warned that the current device is a secondary device, andasked whether to delete the failover group without removing theSSL information on the secondary device. This option is useful if theprimary device has been removed from the network and thesecondary device is promoted to become the primary device in anew failover group.
See the section "Failover Configuration Command Set" for more information.Note: You can only configure the primary device for failover. The secondarydevice is automatically configured for proper operation.
Page 66 SonicWALL SSL-PCI User’s Guide
Command: help [command]Device(s): LB-IA, LB-PCI, SSL-IA, SSL-PCI, SSL-RDescription: Displays help information for the specified command,where command is the name of the command. If not command is specified,help information is displayed for all Configuration mode commands.
Command: [no] hostname <newdevname>Device(s): LB-IA, LB-PCI, SSL-IA, SSL-PCI, SSL-RDescription: Sets the identification name for the current device,where newdevname is the desired name. Use the no flag to clear thehostname of the current device.Note: The command prompt updates to the new name the next timeConfiguration mode is entered.
Command: interface <network | server>Device(s): SSL-IA, SSL-PCI, SSL-RDescription: Enters Interface Configuration mode for the specifiedEthernet interface of the current device. The network interface connects theSSL appliance to the Internet; the server interface connects the SSLappliance to the servers. On SSL-PCI devices, the only interface is network.See "Interface Configuration Command Set" for more information.
Command: [no] ip address <ipaddr> [netmask <netmask>]Device(s): LB-IA, LB-PCI, SSL-IA, SSL-RDescription: Sets the IP address for the current device, where ipaddris the IP address and netmask is the valid netmask. Use the no flag toclear the IP address for the current device. If the netmask is not specified,a default value calculated from the user-provided IP address is used.Note: This command only sets the IP address of the device, not for thehost computer in the case of the SSL-PCI. Use the operating systemsoftware to reset the IP address of the host computer after executing thecommand.
Command: [no] ip route <destip> <mask> <gatewayip>[metric <n>]
Device(s): SSL-IA, SSL-RDescription: (This command must be entered on one line.) Adds astatic route entry for the specified destination IP address to the device’srouting table, where destip is the destination IP address, mask is thenetmask, and gatewayip is the next-hop router address for the destinationIP address. The metric flag is used to show the total number of hops tothe destination IP address. Use the no flag to delete the specified staticroute entry from the device’s routing table.
Page 67
Command: [no] ip route default <ipaddr>Device(s): LB-IA, LB-PCI, SSL-IA, SSL-PCI, SSL-RDescription: Sets the default route for the current device, whereipaddr is the IP address of the default router to use. Use the no flag toclear the IP address for the default router.
Command: [no] password attachDevice(s): LB-IA, SSL-IA, SSL-RDescription: Sets the attach-level password for the current device.You are prompted to enter the password. Use the no flag to clear theattach-level password for the current device.
Command: [no] password configureDevice(s): LB-IA, LB-PCI, SSL-IA, SSL-PCI, SSL-RDescription: Sets the configuration-level password for the currentdevice. You are prompted to enter the password. Use the no flag to clearthe configuration-level password for the current device.Note: You must set a configuration password for a device to protect itsconfiguration. When a device without a configuration password is attached,the device is automatically advanced to configuration level.
Command: [no] remote-management access-list <id>Device(s): LB-IA, LB-PCI, SSL-IA, SSL-RDescription: Assigns the specified IP access list to the remotemanagement subsystem, where id is the access list identifier. Use the noflag to clear the IP access list assignment in the remote managementsubsystem. Create access lists using the access-list command.
Command: [no] remote-management enableDevice(s): LB-IA, LB-PCI, SSL-IA, SSL-RDescription: Enables remote management for the current device.Remote management is enabled by default. Use the no flag to disableremote management of the current device.Note: This command is only valid for remote devices. You must enter areload command to activate or deactivate remote management.
Command: remote-management encryption <aes | des | arc4>Device(s): SSL-IA, SSL-RDescription: Sets the encryption method for remote managementsessions. Use this command after setting a passphrase with the serial utility(see Appendix D - Serial Access). Encryption begins at the next attach.
Page 68 SonicWALL SSL-PCI User’s Guide
Command: [no] remote-management port <portid>Device(s): SSL-IA, SSL-RDescription: Sets the TCP service port used for remote managementto the current device, where portid is the port number. This port is used atthe next attach. Use the no flag to clear the port specification and returnto the default communication port.
Command: [no] rip [v1|v2]Device(s): LB-IA, LB-PCI, SSL-IA, SSL-RDescription: Enables Routing Interface Protocol (RIP) for the currentdevice. You must specify either v1 or v2 versions of the protocol. Using theno flag disables RIP completely if you do not specify a version to disable.Example: rip
no rip v2The first command enables both RIP versions. Thesecond command disables on RIP v2. This has thesame result as using the command rip v1.
Command: no snmpDevice(s): LB-IA, LB-PCI, SSL-IA, SSL-RDescription: Disables SNMP and clears all SNMP data. The devicemust be rebooted (reloaded) before this command takes effect.
Command: [no] snmp access-list <id>Device(s): LB-IA, LB-PCI, SSL-IA, SSL-RDescription: Assigns an existing access list to be used with theSNMP subsystem, where id is the access list number. Use the no flag toremove the specified access list.
Command: [no] snmp contact <contactInfo>Device(s): LB-IA, LB-PCI, SSL-IA, SSL-RDescription: Assigns contact information for the SNMP subsystem,where contactInfo is a string containing the contact information. Contactinformation must be entered within quotes. Use the no flag to remove thecontact information.
Command: [no] snmp default community <comName>Device(s): LB-IA, LB-PCI, SSL-IA, SSL-RDescription: Assigns a default community for the SNMP subsystem,where comName is a string containing the community name. Use the noflag to clear the community name. The community name can have amaximum of 16 characters with no spaces and is not entered in quotes.
Page 69
Command: [no] snmp enableDevice(s): LB-IA, LB-PCI, SSL-IA, SSL-RDescription: Enables SNMP using the current SNMP configuration.Use the no flag to disable SNMP without clearing SNMP data. The devicemust be rebooted (reloaded) before this command takes effect.
Command: [no] snmp location <locInfo>Device(s): LB-IA, LB-PCI, SSL-IA, SSL-RDescription: Assigns location information for the SNMP subsystem,where locInfo is a string containing the location information. The locationinformation must be entered within quotes. Use the no flag to clear thelocation information.
Command: [no] snmp trap-host <v1 | v2c> <ipaddr> [community]Device(s): LB-IA, LB-PCI, SSL-IA, SSL-RDescription: Assigns a destination for SNMP trap messages, whereipaddr is the IP address of the computer receiving the messages. Selecteither v1 (for SNMP version 1) or v2c (for SNMP version 2c). If you donot specify an individual SNMP community, messages are sent to allcommunities.
Command: [no] snmp trap-type genericDevice(s): LB-IA, LB-PCI, SSL-IA, SSL-RDescription: Enables generic SNMP traps. Use the no flag to disablegeneric SNMP traps.

Page 70 SonicWALL SSL-PCI User’s Guide
Command: [no] snmp trap-type enterprise <cpu-utilization |ssl-tps | ssl-total-connections | config-changed>[threshold value1 [value2]]
Device(s): LB-IA, LB-PCI, SSL-IA, SSL-RDescription: (This command must be entered on one line.) Enablesdevice event trap messages to be sent for a specific trap-type event andevent filter. Use the no flag to disable the specified event trap-type. Usethe threshold option to specify one or more threshold levels, whereappropriate. (Threshold values are inappropriate for the config-changed option.) Threshold value1 is the low level and optional thresholdvalue2 is the high level. Values must be entered as integers and areinclusive. A device is considered to be at a low level until the high levelvalue (value2) is exceeded; a device is considered to be at a high leveluntil it reaches or exceeds the low level value (value1). If not thresholdvalues are specified, the default values are used. If only one thresholdvalue is specified, it is used as both the high and low level value;otherwise, two-level thresholding behavior occurs using the default oruser-specified levels for each value. The table below shows trap-typeminimum, maximum, and default levels for each value argument. Exceptin the case of cpu-utilization, the levels indicate actual values; cpu-utilization levels indicate percentage of use.
Value1 Value1 Value1 Value2 Value2 Value2
Trap-Type Min Max Default Min Max Default
cpu-utilization 1 99 75 1 99 90ssl-tps 1 2500 170 1 2500 190ssl-total-connections 1 10000 600 1 10000 800
Command: sslDevice(s): SSL-IA, SSL-PCI, SSL-RDescription: Enters the SSL Configuration mode for the current SSLdevice. See the section "SSL Configuration Command Set" for moreinformation.
Command: [no] syslog <ipaddr>Device(s): LB-IA, LB-PCI, SSL-IA, SSL-PCI, SSL-RDescription: Adds the specified IP address to the syslog list for thedevice, where ipaddr is the specified IP address. Using the no flagremoves the specified IP address from the syslog list of the currentdevice. Up to four IP addresses can be specified. Syslog messages aresent to all hosts at the IP addresses in this list.
Page 71
Interface Configuration Command Set
Use these commands to manage the speed and duplex settings ofthe specified Ethernet interface on the current SSL device. EnterInterface Configuration mode by using the configure command atthe Top Level. Specify an Ethernet interface to configure using theinterface command in Configuration mode.
Command: autoDevice(s): SSL-IA, SSL-PCI, SSL-RDescription: Sets the current Ethernet interface to autonegotiation,canceling any existing forced duplex or speed setting.
Command: duplex <full|half>Device(s): SSL-IA, SSL-PCI, SSL-RDescription: Forces the current Ethernet interface to full or half duplex.
Command: endDevice(s): SSL-IA, SSL-PCI, SSL-RDescription: Exits Interface Configuration mode and returns toConfiguration mode.
Command: help [<command>]Device(s): SSL-IA, SSL-PCI, SSL-RDescription: Displays help information for the specified command,where command is the name of the command. If you do not specify acommand, help information is displayed for all Interface Configurationcommands.
Command: speed <10|100>Device(s): SSL-IA, SSL-PCI, SSL-RDescription: Forces the speed of the current Ethernet interface to10 Mbps or 100 Mbps.
Page 72 SonicWALL SSL-PCI User’s Guide
SSL Configuration Command Set
Use these commands to set up and manage the SSL configurationfor the current SSL device. Enter the SSL Configuration mode byusing the configure command at the Top Level and the sslcommand in Configuration mode.
Command: [no] cert <certname> [create]Device(s): SSL-IA, SSL-PCI, SSL-RDescription: Creates and/or configures the specified certificate object,where certname is the name of the certificate object and enters CertificateConfiguration mode for the certificate object. The create flag is used tocreate a new certificate object. The no flag is used to remove the specifiedcertificate object. You may have up to 255 certificate objects. See thesection "Certificate Configuration Command Set" for more information.Example: cert myCert create
Creates a certificate object named myCert and entersCertificate Configuration mode for the certificate objectmyCert.
Command: [no] certgroup <certgroupname> [create]Device(s): SSL-IA, SSL-PCI, SSL-RDescription: Creates and/or configures the specified certificategroup, where certgroupname is the name of the certificate group andenters Certificate Group Configuration mode for the certificate group. Thecreate flag is used to create a new certificate group. The no flag is usedto remove the specified certificate group. You may have up to 63certificate groups. See the section "Certificate Group ConfigurationCommand Set" for more information.Example: cert myCertGroup create
Creates a certificate object named myCertGroup andenters Certificate Group Configuration mode forcertificate group myCertGroup.
Command: endDevice(s): SSL-IA, SSL-PCI, SSL-RDescription: Exits SSL Configuration mode and returns toConfiguration mode.
Command: help [<command>]Device(s): SSL-IA, SSL-PCI, SSL-RDescription: Displays help information for the specified command,where command is the name of the command. If you do not specify acommand, help information is displayed for all SSL Configuration commands.
Page 73
Command: [no] keyassoc <keyname> [create]Device(s): SSL-IA, SSL-PCI, SSL-RDescription: Creates and/or configures the specified key association,where keyname is the name of the key association and enters KeyAssociation Configuration mode for the specified key association. Thecreate flag is used to create a new key association. The no flag is usedto remove a key association. You may not delete a key associationreferenced by a server. See the section "Key Association ConfigurationCommand Set" for more information.Example: keyassoc mykey create
Creates a key association named mykey and enters KeyAssociation Configuration mode.
Command: [no] secpolicy <polname> [create]Device(s): SSL-IA, SSL-PCI, SSL-RDescription: Creates and/or configures the specified security policy,where polname is the name of the security policy and enters Security PolicyConfiguration mode for the security policy. The create flag is used to createa new security policy. The no flag is used to remove a security policy. You maynot delete a security policy still referenced by a server. See the section"Security Policy Configuration Command Set" for more information.Example: secpolicy mypolicy create
Creates a security policy named mypolicy and entersSecurity Policy Configuration mode.
Command: [no] server <servname> [create]Device(s): SSL-IA, SSL-PCI, SSL-RDescription: Creates and/or configures the specified server, whereservname is the name of the server and enters Server Configuration modefor the server. The create flag is used to create a new server. The no flagis used to remove a server. You may have up to 256 servers configured.See the section "Server Configuration Command Set" for more information.
Page 74 SonicWALL SSL-PCI User’s Guide
Certificate Configuration Command Set
Use Certificate Configuration commands to set up and managecertificate objects. Enter Certificate Configuration mode by usingthe configure command at the Top Level, the ssl command inConfiguration mode, and the cert command in SSL Configurationmode.
Command: der [<cert-filename>]Device(s): SSL-IA, SSL-PCI, SSL-RDescription: Loads a DER-encoded X509 certificate file into thecurrent object, where cert-filename is the name of the DER-encodedcertificate file. If you do not enter the file name, you are prompted for it.You must enter the path if the file is not located in the current directory.
Command: endDevice(s): SSL-IA, SSL-PCI, SSL-RDescription: Exits Certificate Configuration mode, activates all validchanges, and returns to SSL Configuration mode.
Command: help [<command>]Device(s): SSL-IA, SSL-PCI, SSL-RDescription: Displays help information for the specified command,where command is the name of the command. If you do not specify acommand, help information is displayed for all Certificate Configurationcommands.
Command: infoDevice(s): SSL-IA, SSL-PCI, SSL-RDescription: Displays current information about the certificate objectbeing created or edited.
Command: pem [<cert-filename>]Device(s): SSL-IA, SSL-PCI, SSL-RDescription: Loads a PEM-encoded X509 certificate into the currentcertificate object, where cert-filename is the name of the PEM-encodedcertificate file. If you do not enter the file name, you are prompted for it.You must enter the path if the file is not located in the current directory.
Command: pem-pasteDevice(s): SSL-IA, SSL-PCI, SSL-RDescription: Allows a PEM-encoded X509 certificate to be pastedinto the configuration manager. After the command is entered, you areprompted to paste a certificate from the cut buffer. You can use a texteditor to copy the certificate from a file. After the certificate is pasted, youmust press Enter twice to complete the command.
Page 75
Certificate Group Configuration Command Set
Use Certificate Group Configuration commands to set up andmanage certificate groups utilized for chaining. Enter CertificateGroup Configuration mode by using the configure command atthe Top Level, the ssl command in Configuration mode, and thecertgroup command in SSL Configuration mode.
Command: cert <certObject>Device(s): SSL-IA, SSL-PCI, SSL-RDescription: Adds the specified, existing certificate object into thecurrent certificate group, where certObject is the name of the certificategroup. You may have up to 64 certificate objects per certificate group.
Command: endDevice(s): SSL-IA, SSL-PCI, SSL-RDescription: Exits Certificate Group Configuration mode, activates allchanges, and returns to SSL Configuration mode.
Command: help [<command>]Device(s): SSL-IA, SSL-PCI, SSL-RDescription: Displays help information for the specified command,where command is the name of the command. If you do not specify acommand, help information is displayed for all Certificate GroupConfiguration commands.
Command: infoDevice(s): SSL-IA, SSL-PCI, SSL-RDescription: Displays current information about the certificate groupbeing created or edited.
Page 76 SonicWALL SSL-PCI User’s Guide
Key Association Configuration Command Set
Use the Key Association Configuration commands to set up andmanage key associations. Enter the Key Association Configuration modeby using the configure command at the Top Level, the ssl commandin Configuration mode, and the keyassoc command in SSLConfiguration mode.
Command: cert <der | pem> [<cert-filename>]Device(s): SSL-IA, SSL-PCI, SSL-RDescription: Loads a X509 certificate file in the specified file format,where cert-filename is the name of the certificate file. If you do not enterthe file name, you are prompted for it. You must enter the path if the fileis not located in the current directory.
Command: cert pem-pasteDevice(s): SSL-IA, SSL-PCI, SSL-RDescription: Allows a PEM-encoded X509 certificate to be pastedinto the configuration manager. After the command is entered, you areprompted to paste the certificate from the cut buffer. You can use a texteditor to copy the certificate from a file. After the certificate is pasted, youmust press Enter twice to complete the command.
Command: der [<cert-filename> [<key-filename>]]Device(s): SSL-IA, SSL-PCI, SSL-RDescription: Loads a DER-encoded X509 certificate and private keyinto the key association entity, where cert-filename is the name of the DER-encoded certificate file and key-filename is the name of the DER-encodedkey file. If you do not enter the file names, you are prompted for them. Youmust enter the path if the file is not located in the current directory.
Command: endDevice(s): SSL-IA, SSL-PCI, SSL-RDescription: Exits Key Association Configuration mode, activates allchanges, and returns to SSL Configuration mode.
Command: help [<command>]Device(s): SSL-IA, SSL-PCI, SSL-RDescription: Displays help information for the specified command,where command is the name of the command. If you do not specify acommand, help information is displayed for all Key Association commands.
Command: infoDevice(s): SSL-IA, SSL-PCI, SSL-RDescription: Displays current information about the key associationbeing created or edited.
Page 77
Command: key <der | netiis | pem> [<key-filename>]Device(s): SSL-IA, SSL-PCI, SSL-RDescription: Loads a key file in the specified file format, where key-filename is the name of the key file. If you do not enter the file name,you are prompted for it. Key names cannot contain spaces and must becompatible with the configuring computer’s operating system. You mustenter the path if the file is not located in the current directory.
Command: key pem-pasteDevice(s): SSL-IA, SSL-PCI, SSL-RDescription: Allows a PEM-encoded key to be pasted into theconfiguration manager. After the command is entered, you are promptedto paste the key from the cut buffer. You can use a text editor to copy thekey from a file. After the key is pasted, you must press Enter twice tocomplete the command.
Command: net-iis [<cert-filename> [<key-filename>]]Device(s): SSL-IA, SSL-PCI, SSL-RDescription: Loads a certificate and private key into the keyassociation entity, where cert-filename is the name of the certificate fileexported from IIS and key-filename is the name of the key file exportedfrom IIS 4 only. You must enter a private key password. If you do notenter file names, you are prompted for them. Certificate names cannotcontain spaces and must be compatible with the configuring computer’soperating system. You must enter the path if the file is not located in thecurrent directory.
Command: pem [<cert-filename> [<key-filename>]]Device(s): SSL-IA, SSL-PCI, SSL-RDescription: Loads a PEM-encoded X509 certificate and private keyinto the key association entry, where cert-filename is the name of thePEM-encoded certificate file and key-filename is the name of the PEM-encoded key file. If you do not enter the file names, you are prompted forthem. Key and certificate names cannot contain spaces and must becompatible with the configuring computer’s operating system. You mustenter the path if the file is not located in the current directory.
Page 78 SonicWALL SSL-PCI User’s Guide
Security Policy Configuration Command Set
Use Security Policy Configuration commands to set up and managesecurity policies. Enter Security Policy Configuration mode by usingthe configure command at the Top Level, the ssl command inthe Configuration mode, and secpolicy command in SSLConfiguration mode.
Command: [no] crypto < strong | weak | ARC4-MD5 | ARC4-SHA |DES-CBC3-MD5 | DES-CBC3-SHA | DES-CBC-MD5 |DES-CBC-SHA | EXP-ARC2-MD5 | EXP-ARC4-MD5 |EXP-ARC4-SHA | EXP-DES-CBC-SHA |EXP1024-ARC2-CBC-MD5 | EXP1024-ARC4-MD5 |EXP1024-ARC4-SHA | EXP1024-DES-CBC-SHA | NULL-MD5 |NULL-SHA >
Device(s): SSL-IA, SSL-PCI, SSL-RDescription: (This command must be entered on one line.) Createsa customized security policy for the current SSL device. You may identifyeither individual ciphers or use the keywords to specify cipher sets. Theno flag is used to remove a cipher or set of ciphers. You must specifywhich algorithm(s) to remove following the no crypto command.
You can load multiple cryptography schemes into a security policy. Forexample, using the commands crypto ARC4-MD5 and crypto ARC4-SHA loads both schemes into the current security policy. Additionally, youcan alter the preset cryptography schemes specified for the currentsecurity policy. If you enter crypto weak and no crypto NULL-MD5commands, the NULL-MD5 cryptography scheme is removed from thecurrent security policy.
Notes: “ARC4” is compatible with RC4™ RSA Data Security. “ARC2” is
compatible with RC2™ RSA Data Security. The “strong” policy includes
ARC4-MD5, ARC4-SHA, DES-CBC3-MD5, DES-CBC3-SHA, DES-CBC-MD5,
and DES-CBC-SHA. The “weak” policy includes all policies that are
prefixed with “EXP-” or “NULL-”. These policies are considered to be
export-level policies.
Command: endDevice(s): SSL-IA, SSL-PCI, SSL-RDescription: Exits Security Policy Configuration mode, activates allchanges, and returns to SSL Configuration mode.
Command: help [<command>]Device(s): SSL-IA, SSL-PCI, SSL-RDescription: Displays help information for the specified command,where command is the name of the command. If you do not specify acommand, help information is displayed for all Security Policy Configurationcommands.

Page 79
Command: infoDevice(s): SSL-IA, SSL-PCI, SSL-RDescription: Displays current information about the security policybeing edited or created.

Page 80 SonicWALL SSL-PCI User’s Guide
Server Configuration Command Set
Use the Server Configuration commands to set up and configurelogical secure servers. Enter the Server Configuration mode by usingthe configure command at the top level, the ssl command in theConfiguration mode, and the server command in the SSLConfiguration mode.
Note: These commands are available only for SSL devices.
Command: [no] cachesize [<size>]Device(s): SSL-IA, SSL-PCI, SSL-RDescription: Allows you to specify the size of cache used for SSLsessions in kilobytes, where size may be from 20 to 100. The default is20. Using the no flag returns the server cache size to the default.
Note: You do not need to specify a size when using the no flag.
Command: [no] certgroup chain <certgroupname>Device(s): SSL-IA, SSL-PCI, SSL-RDescription: Enables the specified certificate group to be used as acertificate chain, where certgroupname is the name of the certificategroup. The no flag is used to disable certificate chaining. Only onecertificate chain is allowed.Note: When using the no flag, you do not need to specify any certificategroup name.
Command: endDevice(s): SSL-IA, SSL-PCI, SSL-RDescription: Exits Server Configuration mode, activates all changes,and returns to SSL Configuration mode.
Command: help [<command>]Device(s): SSL-IA, SSL-PCI, SSL-RDescription: Displays help information for the specified command,where command is the name of the command. If you do not specify acommand, help information is displayed for all Server ConfigurationCommands.
Command: infoDevice(s): SSL-IA, SSL-PCI, SSL-RDescription: Displays current information about the logical secureserver being edited or created.
Page 81
Command: [no] ip address <ipaddr> [netmask <mask>]Device(s): SSL-IA, SSL-PCI, SSL-RDescription: Sets the specified IP address for the logical secureserver, where ipaddr is the IP address and mask is the valid netmask.Using the no flag clears the IP address for the logical secure server.
Command: keyassoc <keyassocName>Device(s): SSL-IA, SSL-PCI, SSL-RDescription: Creates an association between this logical secureserver and the specified key association, where keyName is the name ofthe key association.Notes: Several default keys have been preloaded into the SSL device. Tosee a list of all default and user-defined keys, use the show sslkeyassoc command to display a list of all key associations loaded. If youused OpenSSL to create the key you are loading, you will be prompted forthe passphrase you set during its creation.
Command: remoteport <port>Device(s): SSL-IA, SSL-PCI, SSL-RDescription: Specifies the TCP service port to which non-secureconnections is sent, where port is the port number.Note: Traffic sent on this TCP service port is not secured by SSL duringtransmission to the server. It must be secured by another means.
Command: secpolicy <polname>Device(s): SSL-IA, SSL-PCI, SSL-RDescription: Creates an association between this server and thespecified security policy, where polname is the name of the security policy.Note: Several default security policies have been preloaded into the SSLdevice. To see a list of all default and user-defined security policies, usethe show ssl secpolicy command to display a list of all securitypolicies loaded.
Command: sslport <port>Device(s): SSL-IA, SSL-PCI, SSL-RDescription: Specifies the port on which the logical secure serverreceives SSL traffic, where port is the TCP service port number. The defaultvalue is 443. The SSL traffic is decrypted and sent to the physical serverusing the TCP service port previously specified with the remoteportcommand.
Command: [no] transparentDevice(s): SSL-IA, SSL-PCI, SSL-RDescription: Enables to servers to function as a transparent proxy(default). The no flag is used to disable this behavior. When transparentproxy behavior is disabled, the device accepts connections on the device’sIP address rather than on the server’s address.

Page 82 SonicWALL SSL-PCI User’s Guide
Failover Configuration Command Set
Use the Failover Configuration commands to specify Ethernet andserial failover behaviors. The following commands are valid only inFailover Configuration mode. Enter the Failover Configuration modeby using the configure command at the Top Level, and thefailover command in the Configuration mode.
Notes: You may configure only the primary device for failover. Thesecondary device is automatically configured for proper operation.You may configure failover groups only among devices with thesame function. For example, an SSL-IA may be configured tofailover only to another SSL-IA or an SSL-R.
Command: activate < primary | secondary >Device(s): LB-IA, LB-PCI, SSL-IA, SSL-RDescription: Activates a specific device in an existing failover groupto be the active device in the group. (Note that “primary” denotes thedevice configured to be the primary , not necessarily the currently activedevice.) Activating one device means potentially deactivating the otherdevice. This command is useful when you must take the currently activeappliance off the network or out of service for any reason. Processes aretaken over by the secondary device immediately.Example: activate secondary
Immediately shifts all processes to the applianceconfigured as the secondary device.
Note: All current connections being serviced by the primary will beterminated. This command only can be used with an existing failover group.This command is not available unless a valid failover group has beencreated and enabled.
Command: [no] enableDevice(s): LB-IA, LB-PCI, SSL-IA, SSL-RDescription: Enables the failover group currently being configured.Using the no flag disables the current failover group.
Command: endDevice(s): LB-IA, LB-PCI, SSL-IA, SSL-RDescription: Completes failover configuration and returns toConfiguration mode. If sufficient information has been specified for thefailover group, both the primary and secondary device are updatedappropriately, otherwise a warning is issued. The incomplete currentconfiguration information is saved in the configuration manager but notsent to the device.
Page 83
Command: [no] heartbeat [interface | serial]Device(s): SSL-IA, SSL-RDescription: Specifies the heartbeat to use for failover monitoring,where interface is via Ethernet and serial is via serial, and entersHeartbeat Configuration mode for the specified heartbeat type. The noflag clears the heartbeat setting and removes all heartbeat configuration.Example: heartbeat interface
Configures monitoring of the primary device via theEthernet interface and enters Interface HeartbeatConfiguration mode.
Command: help [<command>]Device(s): SSL-IA, SSL-RDescription: Displays help information for the specified command,where command is the name of the command. If you do not specify acommand, help information is displayed for all Failover Configurationcommands.
Command: name <string>Device(s): LB-IA, LB-PCI, SSL-IA, SSL-RDescription: Sets a name for the failover group being configured,where string is the name of the failover group. By default, the name ofthe failover group is the name of the primary device until this command isused to change it. While you may change the name of the failover group,you may not delete it unless you delete the entire failover groupconfiguration.
Command: [no] secondary <devname>Device(s): LB-IA, LB-PCI, SSL-IA, SSL-RDescription: Sets the secondary device used for failover with thecurrent device, where devname is the name of an attached device. Usethe no flag to remove a secondary device prior to specifying a newsecondary device.Example: secondary myBackup
Specifies the device named myBackup is used as thesecondary device in the failover group.

Page 84 SonicWALL SSL-PCI User’s Guide
Interface Heartbeat Configuration Command Set
Use these commands to configure the Ethernet interface heartbeatfor failover. Enter the Interface Heartbeat Configuration mode byusing the configure command at the Top Level, failover inConfiguration mode, and heartbeat interface in FailoverConfiguration mode.
Command: [no] enableDevice(s): SSL-IA, SSL-RDescription: Enables the current heartbeat configuration. The noflag disables the current heartbeat configuration. The disabled heartbeatconfiguration is stored in the device.
Command: endDevice(s): SSL-IA, SSL-RDescription: Exits Interface Heartbeat Configuration mode andreturns to Failover Configuration mode.
Command: infoDevice(s): SSL-IA, SSL-RDescription: Displays information about the heartbeat being configured.
Command: interval [<num> | default]Device(s): SSL-IA, SSL-RDescription: Specifies the interval for the Ethernet heartbeat, wherenum is the interval (in seconds), or resets the heartbeat to the default.
Command: help [<command>]Device(s): SSL-IA, SSL-RDescription: Displays help information for the specified command,where command is the name of the command. If you do not specify acommand, help information is displayed for all Interface HeartbeatConfiguration commands.
Command: resetDevice(s): SSL-IA, SSL-RDescription: Resets the interface heartbeat to the defaultconfiguration and disables it.
Command: retries [<num> | default]Device(s): SSL-IA, SSL-RDescription: Specifies the number of Ethernet heartbeat retriesbefore the secondary device activates, where num is the number ofretries, or resets the number of retries to the default.
Page 85
Serial Heartbeat Configuration Command Set
Use these commands to configure the serial interface heartbeat forfailover. Enter the Serial Heartbeat Configuration mode by using theconfigure command at the Top Level, failover in Configurationmode, and heartbeat serial in Failover Configuration mode.
Command: [no] enableDevice(s): SSL-IA, SSL-RDescription: Enables the current heartbeat configuration. The noflag disables the current heartbeat configuration. The disabled heartbeatconfiguration is stored in the device.
Command: endDevice(s): SSL-IA, SSL-RDescription: Exits Serial Heartbeat Configuration mode and returnsto Failover Configuration mode.
Command: infoDevice(s): SSL-IA, SSL-RDescription: Displays information about the heartbeat beingconfigured.
Command: interval [<num> | default]Device(s): SSL-IA, SSL-RDescription: Specifies the interval for the serial heartbeat, wherenum is the interval (in seconds), or resets the heartbeat to the default.
Command: help [<command>]Device(s): SSL-IA, SSL-RDescription: Displays help information for the specified command,where command is the name of the command. If you do not specify acommand, help information is displayed for all Ethernet Heartbeatconfiguration commands.
Command: resetDevice(s): SSL-IA, SSL-RDescription: Resets the serial heartbeat to the default configurationand disables it.
Command: retries [<num> | default]Device(s): SSL-IA, SSL-RDescription: Specifies the number of serial heartbeat retries beforethe secondary device activates, where num is the number of retries, orresets the number of retries to the default.

Page 86 SonicWALL SSL-PCI User’s Guide
Page 87
APPENDIX D - GLOSSARY
10Base-TThe IEEE standard for 10 Mbps CSMA/CD networking on twisted-pair cable.
100Base-TThe IEEE standard for 100 Mbps CSMA/CD networking over twopairs of Category 5 or packet signaling, on a cable. Access to thecable is based on CSMA/CD.
CertificateDigital information that proves the identity of the server; similar toa digital ID card. Certificates are issues by Certificate Authorities.
Fast EthernetA 100 Mbps technology based on the 10Base-T Ethernet CSMA/CDnetwork access method.
KeyA cipher used to encrypt and decrypt information. Two types of keysare used: public and private. Public keys are shared; private keys arenot. Public and private keys work together: information encrypted bythe public key can only be decrypted by the private key.
Logical Secure ServerThe SSL configuration consisting of an IP address for the hardwareweb server providing content, an SSL TCP service port specification,a clear text port specification, a key association specifying the keyand certificate to use when processing transactions, and a securitypolicy specifying the cryptographic scheme(s) to use.
Twisted-PairWiring that consists of two insulated wires loosely twisted aroundeach other.
Secure Sockets Layer (SSL)An application-level protocol enabling secure transactions of datathrough privacy, authentication, and data integrity.

Page 88 SonicWALL SSL-PCI User’s Guide
Page 89
APPENDIX E - ELECTROMAGNETICCOMPATIBILITY
FCC Class A
Note: This equipment has been tested and found to comply withthe limits for a Class A digital device, pursuant to part 15 of theFCC Rules. These limits are designed to provide reasonableprotection against harmful interference when the equipment isoperated in a commercial environment. This equipment generates,uses, and can radiate radio frequency energy and, if not installedand used in accordance with the instruction manual, may causeharmful interference to radio communications. Operation of thisequipment in a residential area is likely to cause harmfulinterference in which case the user will be required to correct theinterference at his own expense.
To maintain compliance with the limits of a Class A digital device,SonicWALL requires that you use quality interface cables whenconnecting to this device. During testing for certification,SonicWALL used Category 5 cables.
CAUTION: Modifying this equipment or using this equipment forpurposes not shown in this manual without SonicWALL Corporation’swritten consent could void the user’s authority to operate thisequipment.
The user may find the following booklet prepared by the FederalCommunications Commission helpful: The Interference Handbook.This booklet is available from the U.S. Government Printing Office,Washington, D.C. 20402. Stock No. 004-000-00345-4.
For more information regarding the above statement, pleasecontact SonicWALL, Inc. at 1160 Bordeaux Drive; Sunnyvale, CA94089-1209; telephone 408-745-9600.
CISPR 22 (EN 55022) Class A
WARNING: This is a class A product. In a domestic environmentthis product may cause radio interference in which case the usermay be required to take adequate measures.
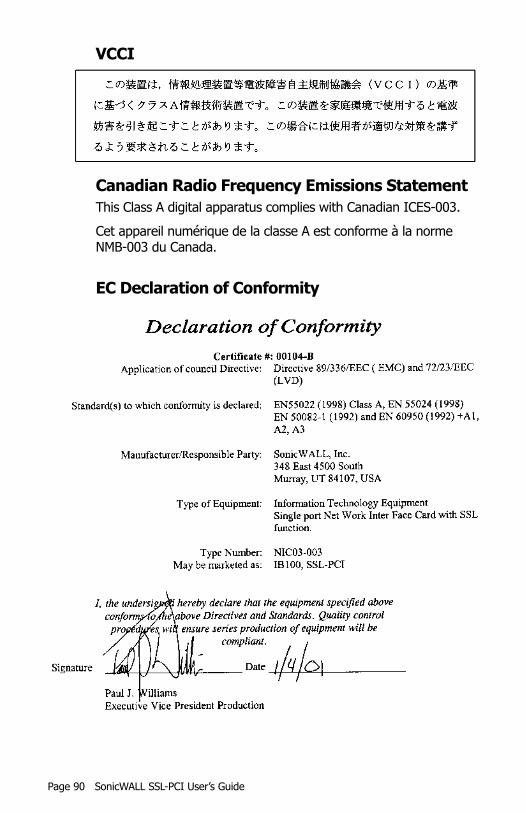
Page 90 SonicWALL SSL-PCI User’s Guide
VCCI
Canadian Radio Frequency Emissions Statement
This Class A digital apparatus complies with Canadian ICES-003.
Cet appareil numérique de la classe A est conforme à la normeNMB-003 du Canada.
EC Declaration of Conformity

Page 91
Page 92 SonicWALL SSL-PCI User’s Guide
Part # 232-000115-00 Rev. A 05/01
SonicWALL, Inc.1160 Bordeaux DriveSunnyvale, CA 94089-1209Tel: 408-745-9600Fax: 408-745-9300E-mail: [email protected]: http://www.sonicwall.com
©2001 SonicWALL, Inc. All rights reserved.
Under the copyright laws, this manual or the software describedwithin, may not be copied, in whole or in part, without the writtenconsent of the manufacturer, except in the normal use of thesoftware to make a backup copy. The same proprietary andcopyright notices must be affixed to any permitted copies as wereaffixed to the original. This exception does not allow copies to bemade for others, whether or not sold, but all of the materialpurchased (with all backup copies) may be sold, given, or loanedto another person. Under the law, copying includes translating intoanother language or format.
SonicWALL is a registered trademark. All trademarks and tradenames belong to their respective holders. This product includescryptographic software written by Eric A. Young. This productincludes software written by Tim J. Hudson.
Specifications in this manual are subject to change without notice.