Embed Size (px)
Citation preview

Version 1.0.1.0
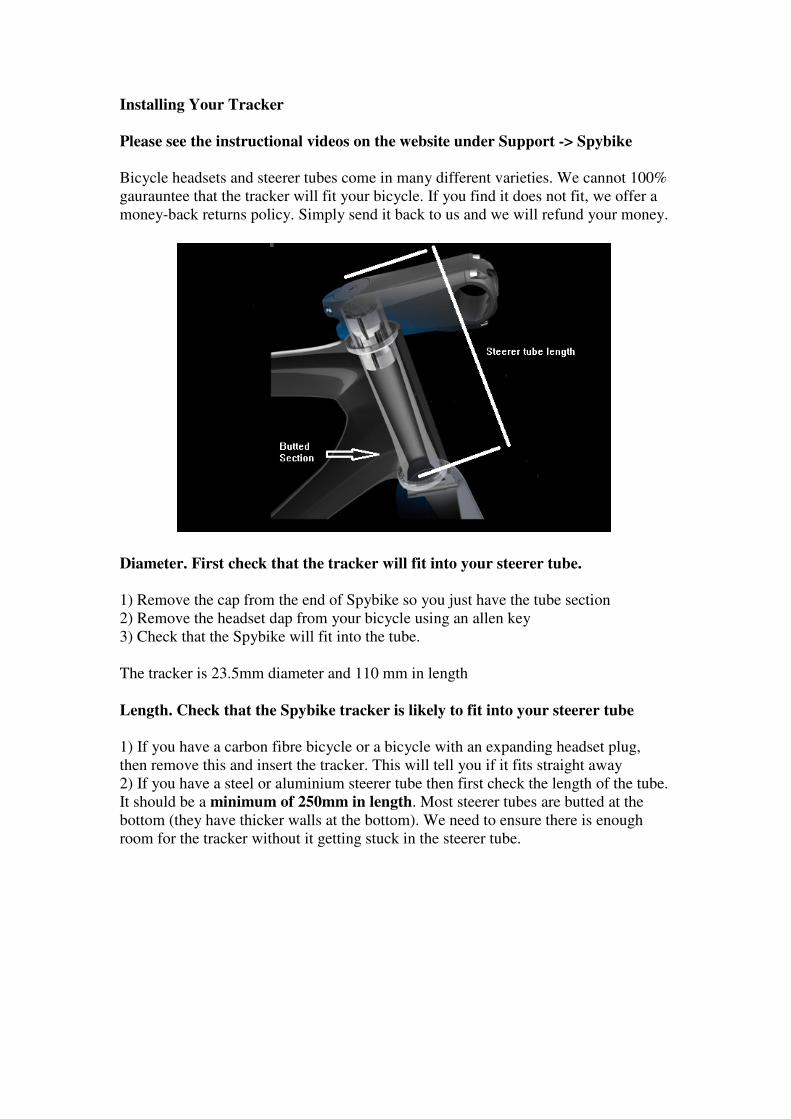
Installing Your Tracker
Please see the instructional videos on the website under Support -> Spybike
Bicycle headsets and steerer tubes come in many different varieties. We cannot 100%
gaurauntee that the tracker will fit your bicycle. If you find it does not fit, we offer a
money-back returns policy. Simply send it back to us and we will refund your money.
Diameter. First check that the tracker will fit into your steerer tube.
1) Remove the cap from the end of Spybike so you just have the tube section
2) Remove the headset dap from your bicycle using an allen key
3) Check that the Spybike will fit into the tube.
The tracker is 23.5mm diameter and 110 mm in length
Length. Check that the Spybike tracker is likely to fit into your steerer tube
1) If you have a carbon fibre bicycle or a bicycle with an expanding headset plug,
then remove this and insert the tracker. This will tell you if it fits straight away
2) If you have a steel or aluminium steerer tube then first check the length of the tube.
It should be a minimum of 250mm in length. Most steerer tubes are butted at the
bottom (they have thicker walls at the bottom). We need to ensure there is enough
room for the tracker without it getting stuck in the steerer tube.
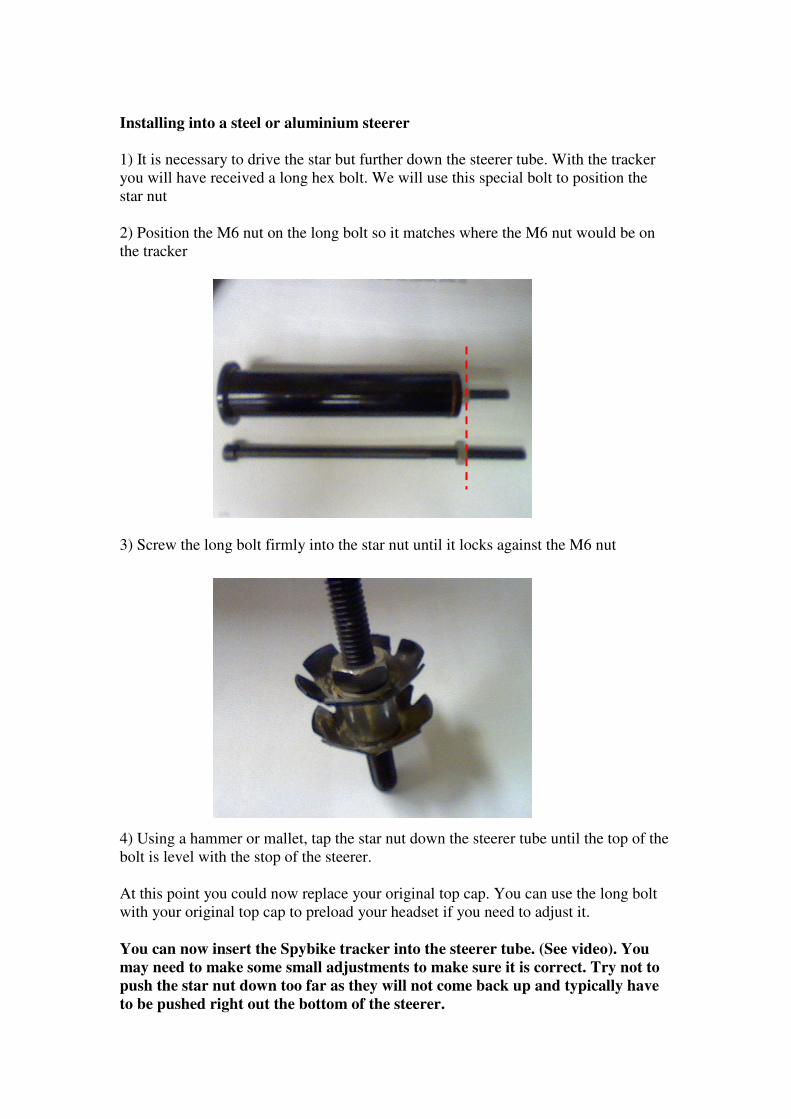
Installing into a steel or aluminium steerer
1) It is necessary to drive the star but further down the steerer tube. With the tracker
you will have received a long hex bolt. We will use this special bolt to position the
star nut
2) Position the M6 nut on the long bolt so it matches where the M6 nut would be on
the tracker
3) Screw the long bolt firmly into the star nut until it locks against the M6 nut
4) Using a hammer or mallet, tap the star nut down the steerer tube until the top of the
bolt is level with the stop of the steerer.
At this point you could now replace your original top cap. You can use the long bolt
with your original top cap to preload your headset if you need to adjust it.
You can now insert the Spybike tracker into the steerer tube. (See video). You
may need to make some small adjustments to make sure it is correct. Try not to
push the star nut down too far as they will not come back up and typically have
to be pushed right out the bottom of the steerer.

Setting Up Your Tracker
We need to do several things to make sure your tracker is set up and ready to use.
Please follow these instructions
Adding your SIM card
You will need a SIM card for your tracker. The tracker will use this SIM to send you
SMS text messages and to report its position online. If your tracker did not come with
a SIM plan, it is best to select a low cost pay-as-you-go SIM plan if these are
available. Make sure the SIM is on a network that support 2G. Almost all networks do
however there are a few 3G-only networks that only support 3G. (These are rare.
"Three" in the UK and Ireland is one such network.) Most networks support but 2G
and 3G.
Before using the SIM in the tracker. Please test it first in a mobile phone to ensure that it can
send and receive SMS text messages OK. If your SIM has a PIN code, please remove this
with your mobile phone. Please also ensure that you have good network connectivity.
Open the tracker by unscrewing the nut at the base of the plastic tube. The plastic cap
will then slide out approx 5mm. It can then be rotated and removed completely.
1) Remove the battery and ensure it is charged. Your
tracker will have come with a charger for 16340 batteries.
The battery should be charged against the 3.7V setting.
2) Gently slide the card out of the tracker. You will see
a SIM card holder on the side of the card
3) Insert your SIM Card into the holder and slide it
closed. Then replace the battery and re-secure the
plastic cap. Note the battery orientation symbol on the
cap. The battery should be this way around.
There are videos of this process on the Support pages

Sending SMS messages to your tracker
1) With your tracker, you will have received a small
plastic keyring. Wave the keyring across the top of the
tube. You should see a light come on briefly inside the
tracker.
Whenever you do this, the tracker will wake up and connect to the mobile phone (GSM)
network. It will stay connected for 5 mins. This is useful for sending the tracker
configuration texts.
*Important If you do not first wake the tracker up before sending it texts then it will not
reply to them immediately.
2) Wait 30 seconds for the tracker to connect to the network
3) Send the tracker the text settings
You will need to use your mobile phone to send the text to the mobile phone number of
the SIM card you installed in the tracker
The tracker will respond with a list of settings. These are not important right now, we are
just testing the tracker can respond. If you do not receive a text back, wait a little while
and try again. If you still cannot receive texts then the tracker may not be able to connect
to the network. Check that it has sufficient credit and you are able to send and receive
texts from in it on a regular mobile phone.
SMS text messages are not always delivered immediately by the GSM network. 4) We need to give the tracker your mobile phone number so it knows who to text if it
detects it is being stolen. Send the tracker a text like the one below
setphone1 +44789123456 (replace with your own personal mobile phone number)
The tracker will respond with a confirmation message
Using the + area code syntax is useful in case your tracker is taken overseas
SMS

Getting your trackers location
You can retrieve the trackers position by SMS message. We will do this to test the GPS
function.
1) Take the tracker outside where it can get a good view of the sky
2) Hold the tracker upright so the rubber cap is facing upwards
3) Wave the magnet / magenetic FOB over the tracker to wake it. You should see the
light glow inside the tracker. Wait 30 seconds for the tracker to connect to the network
4) Send the text whereareyou to the tracker
The tracker will respond with a message informing you that it is attempting to get a GPS
lock. It will try to get a lock for 5 mins. If it successfully gets a GPS lock then it will send
you an SMS message with its latitude and longitude which you can enter into Google
Maps and also a hyperlink which you can click on a smart phone to take you directly to
the trackers position. If it cannot get a GPS lock then it will return a less accurate GSM
location. (Based upon the nearby mobile phone towers)

Tracking on the internet
Before we can set up live tracking, we need to send the tracker a couple of configuration
messages. The settings are based upon the GSM network you are using.
1) Please go to the following page to find the APN settings for the SIM card that you
installed in the tracker
http://www.flexispy.com/Mobile%20APN%20Setting%20to%20use%20GPRS.htm
If you cannot find your mobile network there then you can usually find it online (ie
Google mynetwork APN) or by contacting the mobile network directly.
2) Activate the tracker with the magnet and wait 30 secs for it to connect
3) Send the configuration texts
SMS 1 :
setapn yourapn
SMS 2 :
setuser youruser yourpasswod
substituting your apn, user and password into the texts from the link above
4) Send the tracker the text
pingserver
The tracker will now test its connection with the tracking server. It will return you a
success or failure.
*Note GPRS connectivity can be affected by network congestion and signal strength.
You may need to try several times if this is the case.
5) Take the tracker outside and send the command
upload
The tracker will attempt to get a single GPS location and upload it.
6) Go to the online tracking site on your computer or mobile phone. You will need to
enter the IMEI number as your unique tracker ID. This number will have send to your
phone when you sent the settings and whereareyou texts.
7) You can now view the tracker location on the website.


Activating the Vibration Sensor
The tracker contains a vibration sensor. This is useful when you want to lock your bicycle up somewhere and want to be notified if anyone touches it. 1) To arm the tracker. Hold the keyring over the rubber plug for 5 seconds. The cap will glow during this time. When you remove the keyring, the tracker will flicker. It is now armed 2) To disarm the tracker. Hold the keyring over the rubber plug for 5 seconds. The cap will glow during this time. When you remove the keyring, the tracker will flash slowly. It is now disarmed
You can also arm and disarm the tracker by sending it the SMS text messages arm and
disarm. Note that these will not be received until the next time the tracker wakes up.
There are videos of this process on the Support pages
Typical Operation
It is best not to rely on SMS messages to obtain your bicycles position. These are not
always reliable and your tracker may be "asleep" when you attempt to contact it.
It is best to rely on the vibration sensor. Simply arm your tracker when you lock up
your bicycle and disarm it when you unlock it.
This way, you will be notified by SMS if your bicycle is moved while you are away
and then tracking will commence.
Battery Consumption
The battery should last at least 3 months in good conditions. The main factors
affecting battery consumption are
- How often the tracker wakes to check SMS messages (default 6 hours)
- How often you track yourself riding
- The strength of the mobile signal. If the signal is strong then the tracker will connect
quickly and will broadcast on low power. If the signal is weak then the tracker will
spend a long time connecting and will transmit on maximum power. This makes a big
difference
The tracker will send you an SMS when the battery runs low and also it will upload
its battery level to the tracking site so you can monitor the remaining voltage.

Some common commands :
Text these numbers to the SIM card in your GPS tracker to control it
whereareyou - Send me the current GPS location (mainly for testing, tracker usually asleep)
help - Send me some common commands
settings - What are the current settings
gprssettings - What are the current gprs (internet) settings
setphone1 - Set my current phone number setphone1 +441234567879
reset - Reset to factory settings. (You will need to text setphone1 again)
setwakeup - How often should the device wake. i.e. setwakeup 6 hours
setwaketime - How long tracker stays connected after waking setwaketime 5 mins
setstatus - How often the tracker should 'check in' ie setstatus 7 days
(Your tracker will periodically send you an SMS and upload its status)
setstatusmode - Send 'check in' status to you via SMS or upload to WEB or both
(setstatusmode SMS, setstatusmode WEB, setstatusmode SMSWEB)
flash - Flash the light.
networkinfo - Send me local cell information for my mobile tower
cellinfo - Send me local cell information for all surrounding mobile towers
checkbattery - How much charge does the battery have left
setvibration - Turn the vibration sensor on or off i.e. setvibration on
setdebug - Causes the tracker to flash when it receives a text. Only for testing
setsensitivity - How strong the bump must be to set it off (1-100) 1=most sensitive
GPRS tracking commands setapn - Set the GPRS APN ie. setapn myapn.com
setuser - Set the GPRS username and password ie setuser myuser mypassword
setgprsinterval - Set the time in between tracking positions. ie setgprsinterval 20 seconds
setgprsamount - (1-10) Set the number of positions uploaded each time setgprsamount 5
pingserver - Test the GPRS settings. Useful for checking your APN is set correctly
upload - Upload the GPS location once to the website (mainly for testing)
download - Download a new version of firmware to the tracker ie download latest
setip - Set the GPRS IP and port. ie setip 78.129.149.11 9201
The setwakeup, setwaketime and setstatus messages are denominated in seconds, minutes,
hours or days. e.g. setwakeup 6 hours, setwaketime 5 minutes, setstatus 7 days or you can
abbreviate setwakeup 6 h, setwaketime 5 m, setstatus 7 d.
The setvibration, setdebug, settracking and setnotify messages take the form setxxxxx on/off
These instructions are valid for the tracker at the time of writing. You can download
new versions of software to your tracker from time to time when they are released.
Because of this, specific functions may be added or changed.
Refer to the Integrated Trackers website for the latest instructions

Warranty
GPS TRACKER
PURCHASE DATE ____________________________________ If your tracker is faulty within 12 months of purchase then it will be replaced or refunded at your discretion. We do not accept responsibility for any damage that may occur to equipment during the use, misuse or installation of your tracker above the price of the unit.
This warranty is in addition to your statutory rights.

