Embed Size (px)
DESCRIPTION
Welcome to the "Beginner's" Spooky2 Rife for Life group :) https://www.facebook.com/groups/spooky2/ advanced group: spooky2.com ~~SPOOKY2 DOWNLOAD'S - updated beginning every month: bit.ly/spooky2download 2015 Spooky2 Manual: bit.ly/Spooky2ManualFeb2015 Testimony's: bit.ly/Spooky2---testimonials FAQ: bit.ly/spooky2-faq Pulse: bit.ly/spooky-pulse Bio-Feedback Scan (2 pages): bit.ly/Spooky2_Biofeedback_Scan Morgellons Protocol: bit.ly/morgellons-spooky2 ~~"ADVANCED" SPOOKY2 FORUMS: spooky2.com/forums groups.yahoo.com/neo/groups/Spooky2 seen.is/group/5831 bit.ly/Spooky2Linkedin ~~TUTORIAL VIDEO'S - John White Youtube: bit.ly/1vyR6GZ Vimeo: vimeo.com/spooky2
Citation preview

Spooky2User’s Guide
05 May 2015 by David Bourke
Table of contents
Before we begin...................................................................................................................................... 1Important advice..................................................................................................................................... 2System requirements.............................................................................................................................. 2What you get.......................................................................................................................................... 3What’s new............................................................................................................................................. 4The Spooky2 Rife System...................................................................................................................... 5Making connections............................................................................................................................... 7 Spooky Remote.............................................................................................................................. 10 Spooky Tube electrodes.................................................................................................................. 11 Standard electrodes........................................................................................................................ 13 Plasma units.................................................................................................................................... 13Installing the software.......................................................................................................................... 14 Installing a beta/EXE...................................................................................................................... 38 Installing a database....................................................................................................................... 41 Windows warnings......................................................................................................................... 43Testing & configuration........................................................................................................................ 44 Spooky Boost & Remote MN/BN.................................................................................................. 44 Original Remote & Direct Connect................................................................................................ 46Treatment choices................................................................................................................................. 47
(Click on chapter title to go there – click on “Back to Contents” at the bottom of each page to return here)

Remote Mode................................................................................................................................. 52 Contact Mode................................................................................................................................. 53 Plasma Mode.................................................................................................................................. 54OK, let’s Rife........................................................................................................................................ 55 JW – Killing.................................................................................................................................... 73 JW – Healing.................................................................................................................................. 74 DH – Killing/Healing..................................................................................................................... 75 Spooky Spectrum Sweep................................................................................................................ 76 Spooky Converge Sweep................................................................................................................ 77 Morgellons Slime Moulds Sweep................................................................................................... 78Remote & Contact modes.................................................................................................................... 79 Spooky Boost & Dual Remotes..................................................................................................... 84 Footplates & TENS pads................................................................................................................ 89 Inverse+Sync.................................................................................................................................. 93The Spooky2 interface........................................................................................................................ 105 Menu bar....................................................................................................................................... 106 File Menu............................................................................................................................... 107 Create Frequency Set........................................................................................................ 109 Create Spectrum Sweep.................................................................................................... 114
(Click on chapter title to go there – click on “Back to Contents” at the bottom of each page to return here)

Database Menu....................................................................................................................... 116 Edit in Notepad................................................................................................................. 117 Global Menu........................................................................................................................... 121 Online Menu........................................................................................................................... 122 Utils Menu.............................................................................................................................. 124 Advanced Menu...................................................................................................................... 126 Help Menu.............................................................................................................................. 129 Conditions & Database................................................................................................................. 130 Program Options pane.................................................................................................................. 132 Channels & User Data/Web.......................................................................................................... 140 Status bar...................................................................................................................................... 143 Channel Control Panel.................................................................................................................. 144 Biofeedback scanning......................................................................................................................... 150Wobbles & feathering......................................................................................................................... 157Waveform & frequency...................................................................................................................... 162 Waveform & Offset...................................................................................................................... 167 Duty Cycle................................................................................................................................... 169Understanding Spooky Remote.......................................................................................................... 171 Remote & frequency..................................................................................................................... 172
(Click on chapter title to go there – click on “Back to Contents” at the bottom of each page to return here)
Remote & amplitude.................................................................................................................... 174 Remote & waveform..................................................................................................................... 174Understanding Spectrum.................................................................................................................... 177 Two formulas................................................................................................................................ 182Multitalented Spooky2....................................................................................................................... 183 Clark zapper................................................................................................................................. 183 Pests & moulds............................................................................................................................. 185How the universe works..................................................................................................................... 187 Speed, space & time..................................................................................................................... 191How Rife works.................................................................................................................................. 192Appendix A: terrain............................................................................................................................ 195Appendix B: Spectrum’s story........................................................................................................... 197Appendix C: making waves............................................................................................................... 207Appendix D: serial numbers............................................................................................................... 214Thanks & acknowledgements............................................................................................................. 215Precautions for users.......................................................................................................................... 216Legal Notice & Disclaimer................................................................................................................. 217Spooky2 Software License................................................................................................................. 218
(Click on chapter title to go there – click on “Back to Contents” at the bottom of each page to return here)

Before we begin...Welcome to the new Spooky2 User’s Guide. This replaces both the 101 User’s Guide and the Manual, and takes the reader from setting up and testing a new Spooky2 rig correctly to loading, running, and saving Programs. We also examine Spooky2’s interface, explain the controls in plain language, and show how they can be used for maximum benefit.
The Guide has also been completely restructured. Practice now comes first, so that you can put Spooky2 to use straight away. Then we dive deeper into the controls and underpinnings of the system. Next, we show you how Rife and Spooky2 actually work – getting to grips with this is essential for effective Program design.
We also deal with other ways you can use Spooky2 for health and home. Finally, we look at the big picture – the mind-blowing quantum laws that underlie our physical universe, how they dictate our lives and health, and how they relate to Spooky2.
However, the most important change of all must come from you, the Spooky2 user. Despite the personal time and effort that went into creating the first edition of this Guide (and the Spooky2 manual), I found that many people didn’t read them, and asked a question on the Spooky2 Forum instead. In some cases, this is due to illness, but in too many – let’s be honest here – it’s laziness.
Answering such questions is a huge drain on Spooky team resources. So, since this Guide is now encyclopaedic in scope, we expect you to play your part – and read it. In future, Forum questions already fully answered by this Guide will not receive a team response unless we’re aware of extenuating circumstances. Knowledge is power, but gaining it takes time and effort – yours.
Unusually, my name appears on the front cover because I alone am responsible for all its contents, and the opinions and experiences recorded herein are mine alone, expressed on my own behalf and not that of any other member of the Spooky team (although it’s all been checked by John White for technical accuracy). So far, what I laughingly call “government” still allows me the basic human right of free speech.
Now take control. And I salute you all with “Go n-éirí an bóthar leat!” (Irish Gaelic meaning “May your road rise with you!”).
David Bourke – December 2014
Back to contents 1
Important adviceDon’t touch the generator controls unless you know what you’re doing or you’re being guided by tech support. The Spooky2 Rife System is designed to be totally controlled by the software.
Drink pure water – lots of it. Ideally, you should drink from six to eight pints daily, half of it before noon. This does two very important things: it flushes toxins and dead organisms out of your body quicker, and it improves your electrical conductivity.
Don’t keep your Spooky2 rig in your bedroom or general living area – the magnetic Spooky Remotes are so powerful that they “sing” when they’re running frequencies in the human audio range. And it will eventually drive you crazy. If you can’t put it into an unused room or space, line a cardboard box with foam or polystyrene and upend it over the Remote(s).
The Spooky Spectrum Sweep and Spooky Converge Sweep are intended for use only in the absence of a reliable diagnosis, not as a general panacea. Both these sweeps will kill all bacteria – pathogenic and beneficial. Prolonged continuous use may damage the immune system unless you supplement with natural probiotics using fermented foods such as sauerkraut, kefir (dairy and/or water), kimchi, pickles, and the like. In no case other than an emergency should either of these sweeps be used continuously for more than 4-5 days.
System requirementsPC: Spooky2 was originally designed for use with Windows XP, but it also runs perfectly on Windows 7 and Windows 8 and 8.1. USB 2.0 or greater is required for frequency generator connectivity.
Mac/Linux: Regretfully, there are no native Mac or Linux versions. We recommend you pick up a pre-owned Windows PC and dedicate it to Spooky2. These can usually be bought for a very modest price. Since many of you will wish to try experiments with long run times, this may be a good idea anyway. Alternatively, you can use BootCamp to create a Windows partition, or purchase virtualization software. You can download our helpful “ Spooky2 in Linux or Mac” PDF guide here under “Useful Documents.”
Back to contents 2

What you getSpooky2–5M generator built from high quality components and optimized for Spooky2.Unique Wave Cycle Multiplication enables frequencies up to 25MHz.Two damped waveforms (square and sinusoidal) with configurable decay oscillations.Brand new H-Bomb waveform (both square and sinusoidal), plus BXBY (cancer), Square Harmonic, and Lily.Spectral processing can transmit up to 1,024 frequencies simultaneously with uniform amplitude.High voltage multiple “spike” injection into all waveforms to increase effectiveness.Enhanced signal gate control.Software amplitude, offset, and phase angle control.Auto-calibration – no adjustment necessary.Dual configurable amplitude and frequency wobble systems.Selectable wobble functions.Configurable automatic frequency transposition up or down.Direct entry of light wavelength in the database.Randomized gate.Global controls for multi-generator rigs.Global pause scheduling.Windows 32 and 64 bit support with auto-detection for driver installation.Internet controls to update the database online.Database editor.Improved multiple subject handling.Auto-resizing supports all screen sizes.Biofeedback (Spooky Pulse accessory) to detect MORs and “Yes/No” body responses. Program/Preset save and restore, including frequency set(s), waveform(s), and all settings.
Download Spooky2 here.
Visit the Spooky2 website to see full-size versions of main screen graphics contained in this Guide.
Back to contents 3

What’s newHere’s what’s new in Spooky2 05052015 (5 May 2015):
New: confirmation alerts for “Save and Exit” and “Cancel” commands in Create Frequency Set and Create Spectrum Sweep windows.
New: social media toggle pane with eight clickable icons.
New: screenshot button with ability to email files.
New: Papimi waveform – load JW–Papimi (Killing) from the Program/Patient Name menu.
Improved: Spectrum can now be applied to square waves with 50% Duty Cycle.
Improved: clicking on the pulse graphs now forces the pulse to be displayed if biofeedback scan is not running.
Improved: connected USB device list is now cleared on every port scan/rescan.
Improved: the biofeedback scan results window now always displays in front of the main Spooky2 window.
Fixed: corrected min/max frequency limits for waveforms with Wave Cycle Multipliers.
Fixed: Out 2 Control gating and scalar/octal harmonic frequency limits now work correctly.
Removed: BPM/HRV toggle button in Advanced Menu.
05 May 2015
Back to contents 4
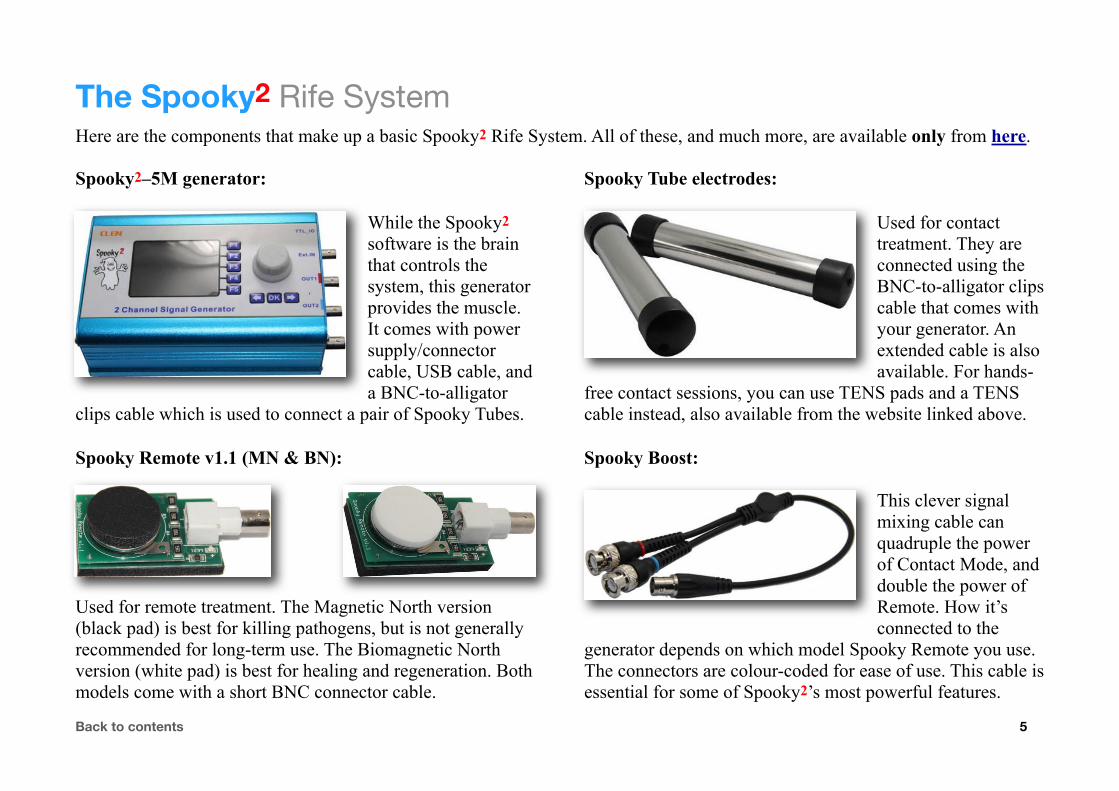
The Spooky2 Rife SystemHere are the components that make up a basic Spooky2 Rife System. All of these, and much more, are available only from here.
Spooky2–5M generator:
While the Spooky2 software is the brain that controls the system, this generator provides the muscle. It comes with power supply/connector cable, USB cable, and a BNC-to-alligator
clips cable which is used to connect a pair of Spooky Tubes.
Spooky Remote v1.1 (MN & BN):
Used for remote treatment. The Magnetic North version (black pad) is best for killing pathogens, but is not generally recommended for long-term use. The Biomagnetic North version (white pad) is best for healing and regeneration. Both models come with a short BNC connector cable.
Spooky Tube electrodes:
Used for contact treatment. They are connected using the BNC-to-alligator clips cable that comes with your generator. An extended cable is also available. For hands-
free contact sessions, you can use TENS pads and a TENS cable instead, also available from the website linked above.
Spooky Boost:
This clever signal mixing cable can quadruple the power of Contact Mode, and double the power of Remote. How it’s connected to the
generator depends on which model Spooky Remote you use. The connectors are colour-coded for ease of use. This cable is essential for some of Spooky2’s most powerful features.
Back to contents 5
Back to contents 6
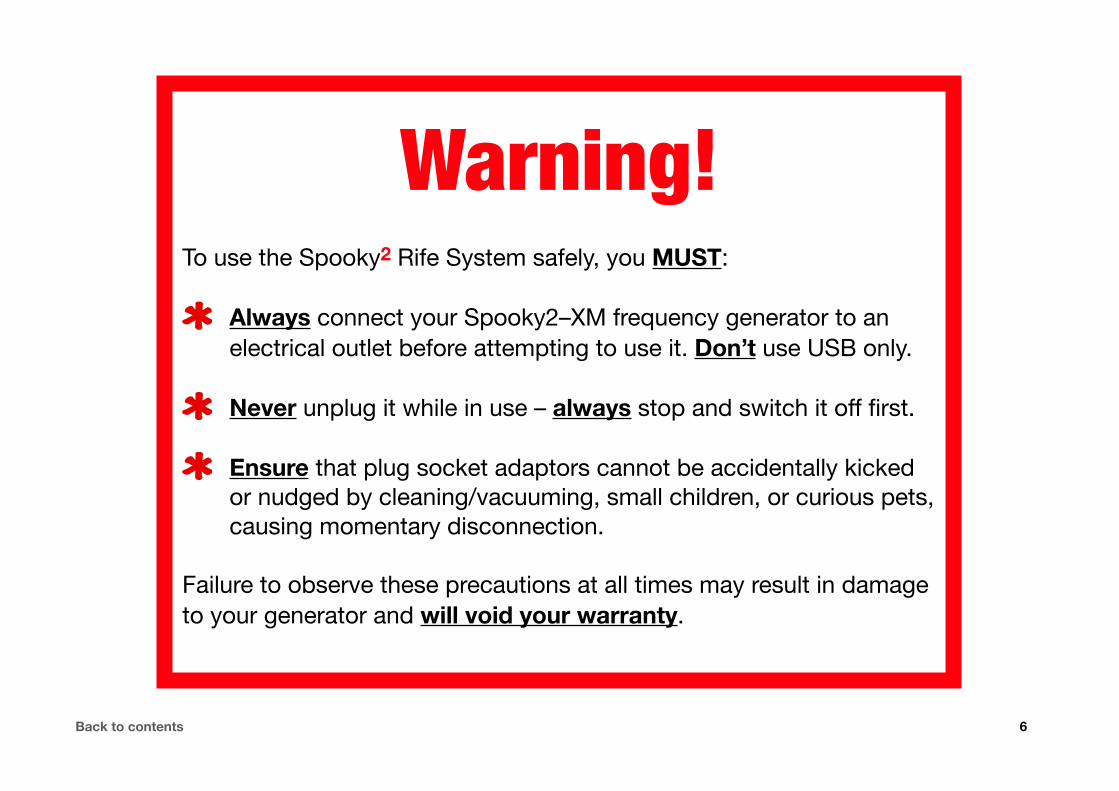
Warning!To use the Spooky2 Rife System safely, you MUST:
Always connect your Spooky2–XM frequency generator to an electrical outlet before attempting to use it. Don’t use USB only.
Never unplug it while in use – always stop and switch it off first.
Ensure that plug socket adaptors cannot be accidentally kicked or nudged by cleaning/vacuuming, small children, or curious pets, causing momentary disconnection.
Failure to observe these precautions at all times may result in damage to your generator and will void your warranty.

Making connectionsLet’s get your generator(s) hooked up first.
Connecting a Spooky2–5M:
The first essential is power. With the 5M generators, power means electricity from your home’s main electricity supply, not from the PC’s USB port. While a 5M generator’s display will light up when you connect it via USB alone, it’s designed to be driven by a normal 120/220 volt wall power supply, otherwise it won’t work correctly, and is highly likely to sustain damage.
So connect the small connector on one end of the power cord to the socket on the left side of the generator and make sure it’s pushed all the way home. Then connect the “wall-wart” transformer plug on the other end of the cord to a wall power socket, along with any adaptor you may need for your particular country’s socket design.
If you’re connecting multiple 5Ms, you’ll need to go to a hardware store and buy one or more surge-proof socket strip extensions that can plug into a single wall socket and provide power for between four and six devices. Connect each generator to this in turn.
As you can see, the unusual orientation of the transformer plug only allows four to be connected per six-socket UK-style strip.Back to contents 7

Now take the USB cable that came with the generator and connect the long “boxy” end to the socket on the left side of the unit.
You need to be careful with this connection because both plug and socket are shaped so that they can only be mated if the plug is presented correctly to the socket.
You can see this in the image on the left – the specially shaped plug is on the lower right, closest to the camera.
Theoretically, it shouldn’t be possible to force the plug into the socket the wrong way round, but we’ve come across cases where it’s happened. And the result is always a burned-out data chip in the generator. So care is advised.
Connect the other end of the USB cable to your PC, or to a USB hub if you need to
connect multiple generators. The one shown on the right is a four-port non-powered hub, and you can use it to connect up to four generators to a single PC USB socket – this looks decent.
These hubs can also be “daisy-chained,” which means you can use one of the sockets on the first hub to connect a second hub to it, giving you seven USB sockets connected to a single socket on the PC. You can also buy seven-port hubs – even more efficient.
I’ve successfully daisy-chained five four-port hubs from two PC USB sockets, allowing me to connect 10 5M and six UDB generators to my netbook, and still have one socket left over to connect a USB stick.
However, because these hubs are non-powered, the UDBs on the end of the daisy chain don’t receive enough power from the PC to display the frequencies clearly enough on their front panels to be legible, but they work perfectly.Back to contents 8
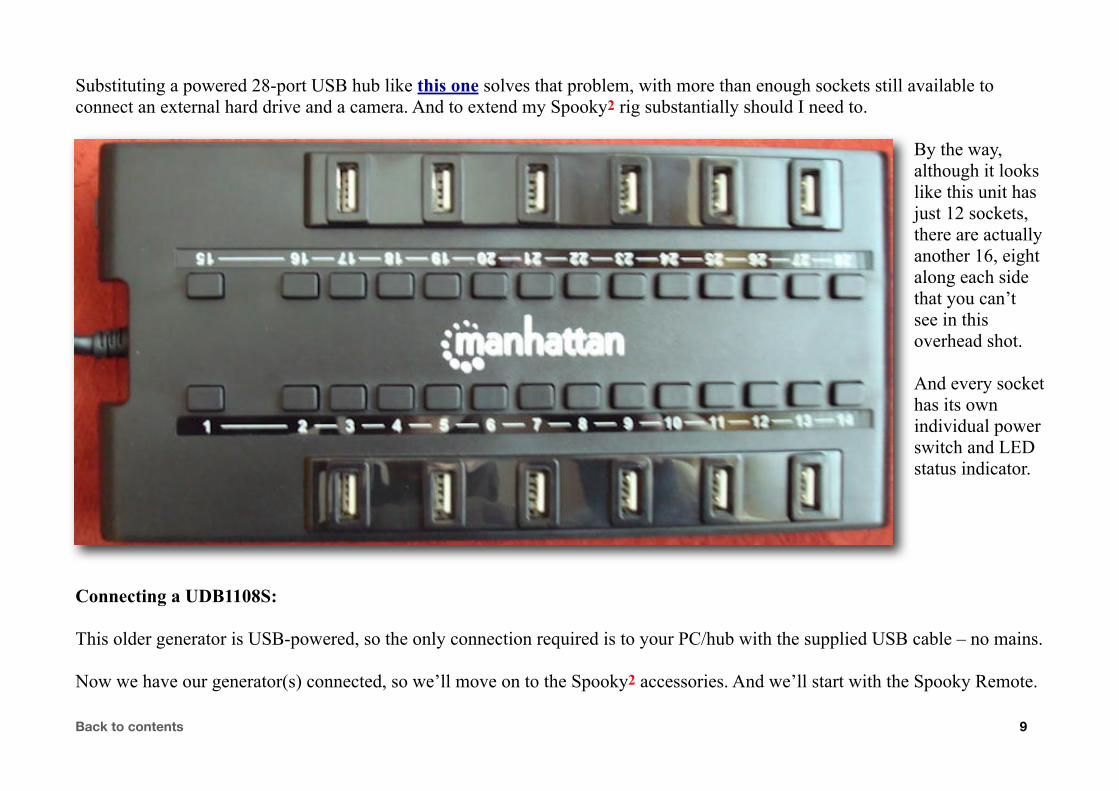
Substituting a powered 28-port USB hub like this one solves that problem, with more than enough sockets still available to connect an external hard drive and a camera. And to extend my Spooky2 rig substantially should I need to.
By the way, although it looks like this unit has just 12 sockets, there are actually another 16, eight along each side that you can’t see in this overhead shot.
And every socket has its own individual power switch and LED status indicator.
Connecting a UDB1108S:
This older generator is USB-powered, so the only connection required is to your PC/hub with the supplied USB cable – no mains.
Now we have our generator(s) connected, so we’ll move on to the Spooky2 accessories. And we’ll start with the Spooky Remote.
Back to contents 9
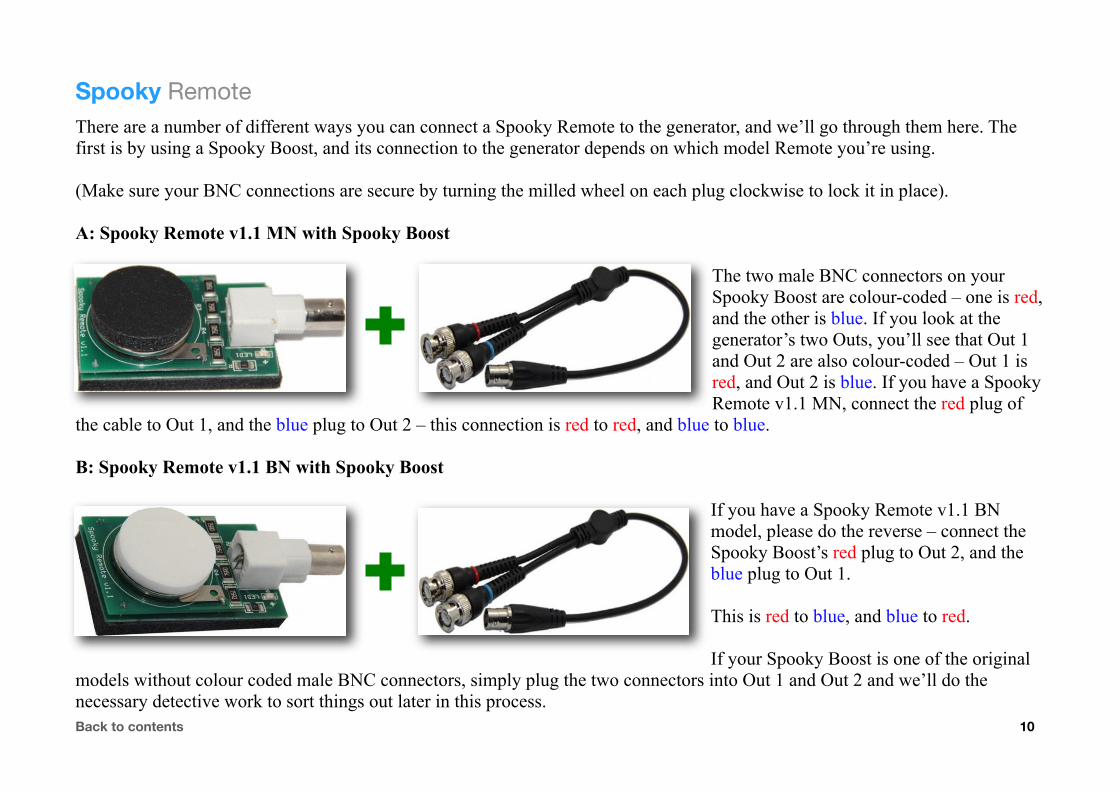
Spooky RemoteThere are a number of different ways you can connect a Spooky Remote to the generator, and we’ll go through them here. The first is by using a Spooky Boost, and its connection to the generator depends on which model Remote you’re using.
(Make sure your BNC connections are secure by turning the milled wheel on each plug clockwise to lock it in place).
A: Spooky Remote v1.1 MN with Spooky Boost
The two male BNC connectors on your Spooky Boost are colour-coded – one is red, and the other is blue. If you look at the generator’s two Outs, you’ll see that Out 1 and Out 2 are also colour-coded – Out 1 is red, and Out 2 is blue. If you have a Spooky Remote v1.1 MN, connect the red plug of
the cable to Out 1, and the blue plug to Out 2 – this connection is red to red, and blue to blue.
B: Spooky Remote v1.1 BN with Spooky Boost
If you have a Spooky Remote v1.1 BN model, please do the reverse – connect the Spooky Boost’s red plug to Out 2, and the blue plug to Out 1.
This is red to blue, and blue to red.
If your Spooky Boost is one of the original models without colour coded male BNC connectors, simply plug the two connectors into Out 1 and Out 2 and we’ll do the necessary detective work to sort things out later in this process.Back to contents 10

Now you can simply connect your Spooky Remote to the female output socket of the Spooky Boost by using the short cable that came with your Remote. Note that you can also connect a set of handheld electrodes to your Spooky Boost.
C: Spooky Remote v1.1 MN or BN Direct Connect
If you don’t have a Spooky Boost, you can connect your Spooky Remote directly to Out 1 of a 5M generator using the Remote cable. Since the UDB1108S generator has just a single Out, you can’t use a Spooky Boost to connect a Remote to it anyway.
The image at left shows a UDB1108S with a Spooky Remote attached. Above is a different way to do it devised by Spooky2 Forum Member John M. Kane. This dispenses with the Remote cable and uses a simple BNC Male-to-Male connector, also called a “coupler.” Essentially, it’s two BNC plugs end-to-end with a straight-through connection. These also work fine for the UDB1108S. Like all great ideas, it simplifies and makes things easier, it’s tidier, and it’s also inexpensive. You can buy them here.
Another really cool thing about these connectors is that if you ever need to use two Spooky Remotes with one 5M generator, you can attach two as shown above – useful if you need to treat large numbers of subjects for the same condition.
Back to contents 11
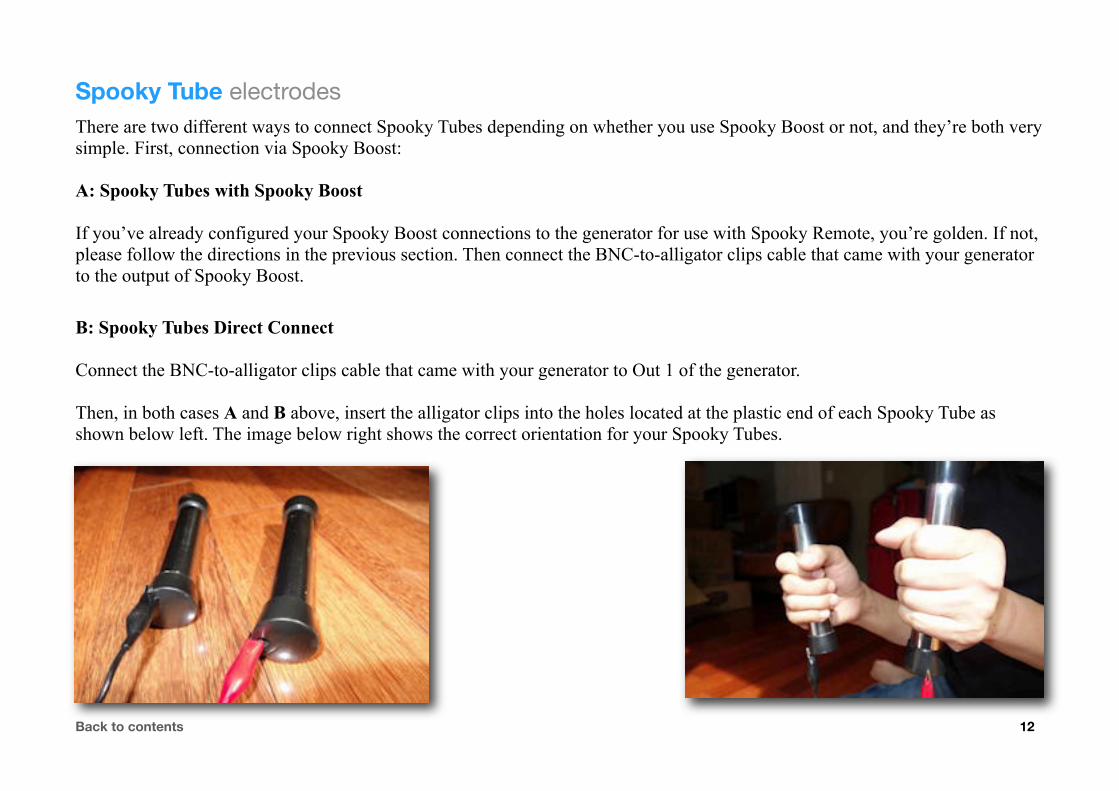
Spooky Tube electrodesThere are two different ways to connect Spooky Tubes depending on whether you use Spooky Boost or not, and they’re both very simple. First, connection via Spooky Boost:
A: Spooky Tubes with Spooky Boost
If you’ve already configured your Spooky Boost connections to the generator for use with Spooky Remote, you’re golden. If not, please follow the directions in the previous section. Then connect the BNC-to-alligator clips cable that came with your generator to the output of Spooky Boost.
B: Spooky Tubes Direct Connect
Connect the BNC-to-alligator clips cable that came with your generator to Out 1 of the generator.
Then, in both cases A and B above, insert the alligator clips into the holes located at the plastic end of each Spooky Tube as shown below left. The image below right shows the correct orientation for your Spooky Tubes.
Back to contents 12

Standard electrodesMany Spooky2 users already own electrodes that came with conventional Rife machines or zappers which they may wish to use. I’m one, and here’s how I do it.
Left: two copper electrodes are attached via cheap standard banana cables to a BNC-to-dual-banana adapter (right), available here.
The adapter can then be connected to a Spooky Boost, or to Out 1 of the generator.
In all cases when using Contact Mode, we recommend using Spooky Boost for deeper body and cell penetration.
Plasma unitsIf you purchased a plasma amplifier and tube from Ralph Hartwell, you will already have received instructions from him for using it with Spooky2, so I won’t repeat them here. If you’re connecting a different plasma setup, it’s extremely likely that you know exactly what you’re doing (because you should if you’re attempting this), so I’ll wish you luck and leave you to it.
Back to contents 13

Installing the softwareFirst, make sure that your rig is properly connected to the PC and turned on. Then double click the installer. This will have a file-name ending in “_Setup.exe.” The following series of screens are presented, each of which you must respond to after this one:
Note: if you’ve installed Spooky2 before this, you should leave it in place and choose to overwrite it. This will not affect your own files, and the installation will be easier, more efficient, and foolproof.
Here, the installer is unpacking its files.
Next, you’ll see this Welcome screen.
Click Next > to continue.Back to contents 14

Readme – the Readme screen contains important information. Please read it.Then click Next>
Back to contents 15
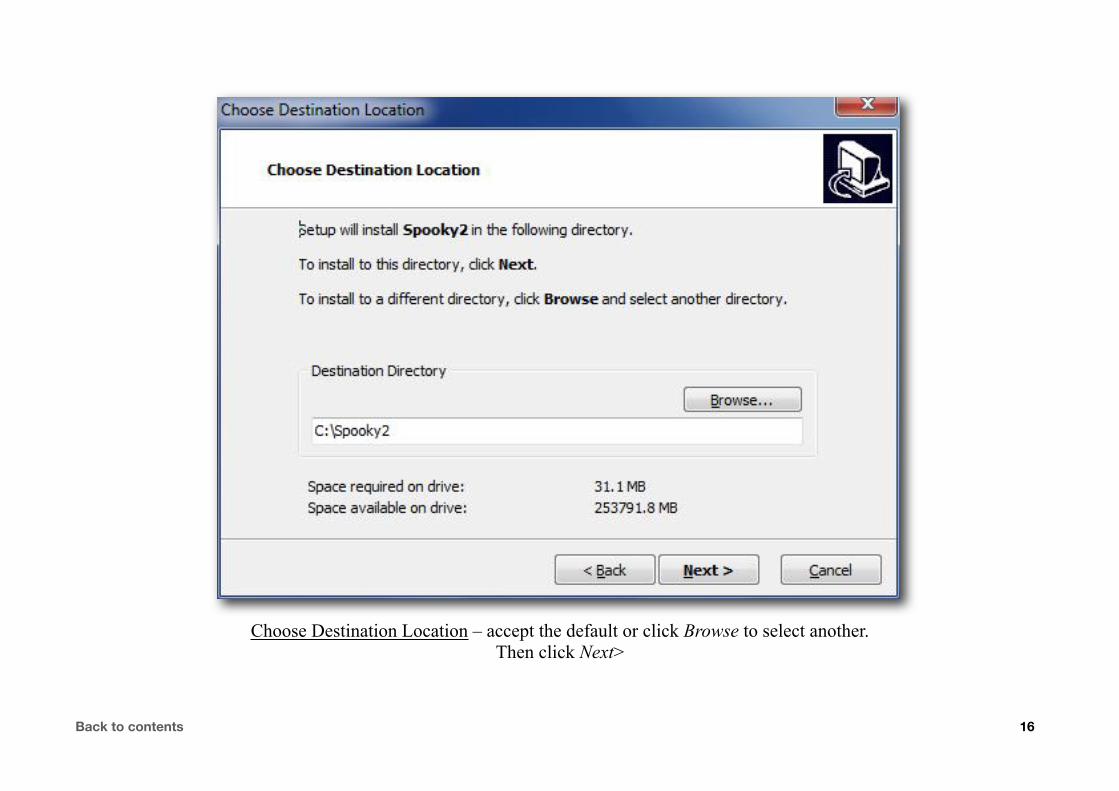
Choose Destination Location – accept the default or click Browse to select another.Then click Next>
Back to contents 16

Set Program Shortcuts – the installer adds a shortcut to your Windows Start Menu.Click Next>
Back to contents 17

Confirm Setup Settings – the Spooky2 directory is created and the installer asks you to confirm your settings.Click Next>
Back to contents 18
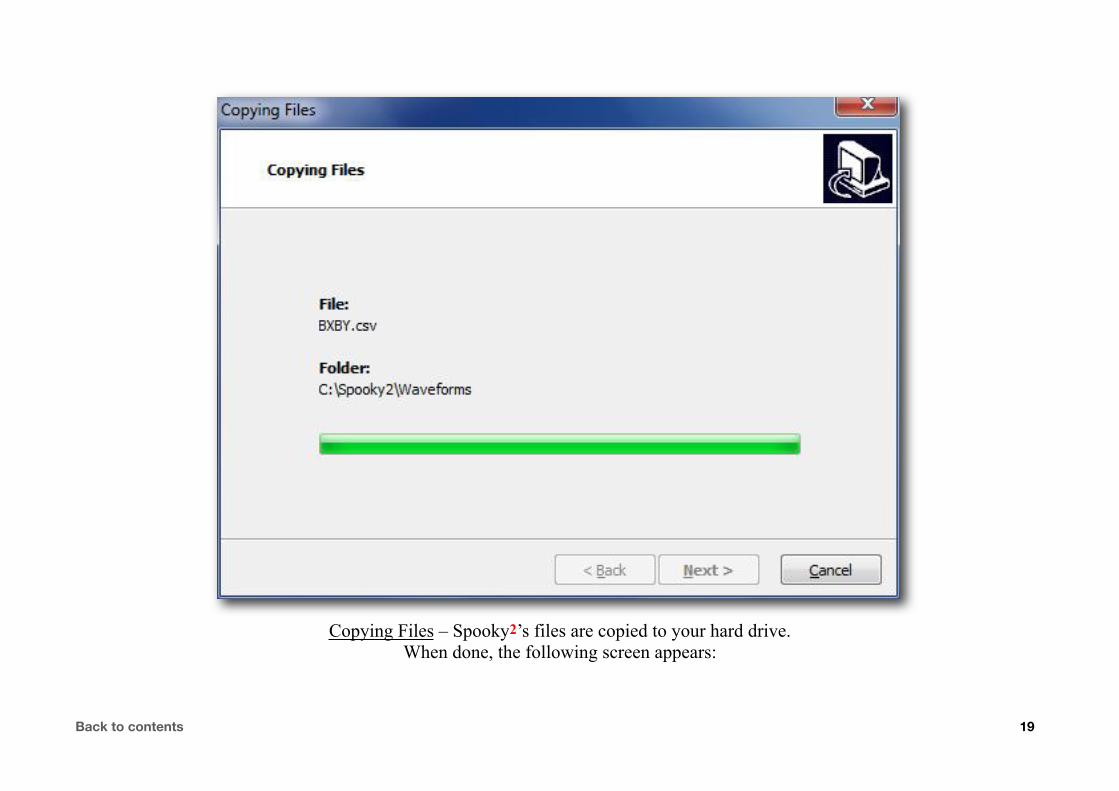
Copying Files – Spooky2’s files are copied to your hard drive.When done, the following screen appears:
Back to contents 19
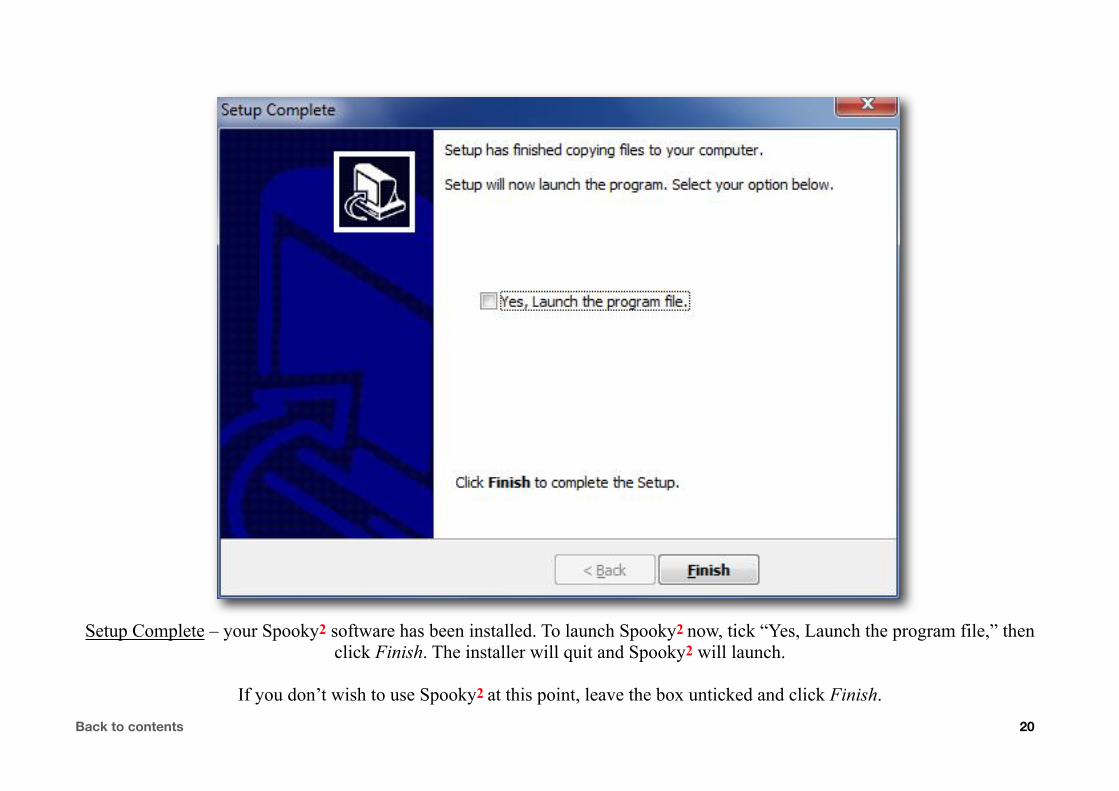
Setup Complete – your Spooky2 software has been installed. To launch Spooky2 now, tick “Yes, Launch the program file,” thenclick Finish. The installer will quit and Spooky2 will launch.
If you don’t wish to use Spooky2 at this point, leave the box unticked and click Finish.
Back to contents 20

When you click Yes, the driver installer for theSpooky2-5M generator launches. Click Next>
The alert on the left will appear. Choose Yes to install the driver. Choosing No will cause Spooky2 to enter Test Mode, and you will see 128 virtual generators in its interface. Doing this will not install the driver required for real, physical generators.
Back to contents 21

License Agreement – select “I accept this agreement.”Then Click Next>
Back to contents 22

The driver installation for the Spooky2-5M generator completes. Click Finish.Unless you also need to install a driver for the older UDB1108S generator, please restart your PC now.
Back to contents 23

Installing a UDB1108S Driver:
Installation of the driver for the older UDB1108S generators may be performed manually.
Click on the Windows Start Menu and choose Computer. A new window will open. The icon at the top left is your (C:) drive.
Double click it, and you’ll see a list of folders. Double click the folder named “Spooky2.”
With the exception of some user-created items, on the left is what you’ll see.
The fourth folder from the top – PL2302_Prolific_DriverInstaller_ v1_8_0 – (highlighted) contains the installer for the UDB1108S driver.
Double click this folder.
Back to contents 24

This is what you’ll see.
The installer program is fourth in this list, and it’s highlighted here.
Left click it, then choose Run as administrator from the Context Menu.
The installer will launch and present a series of screens very similar to those you’ve just seen for the CP210x USB to UART Bridge Driver installer.
Respond positively to all prompts.
When the final screen exits, please restart your PC.
Back to contents 25

Launch Spooky2, and this screen appears. Depending on how many physical generators you have connected, the number of red buttons you see (circled above) will be different. Each red button represents and controls one single physical generator.Back to contents 26
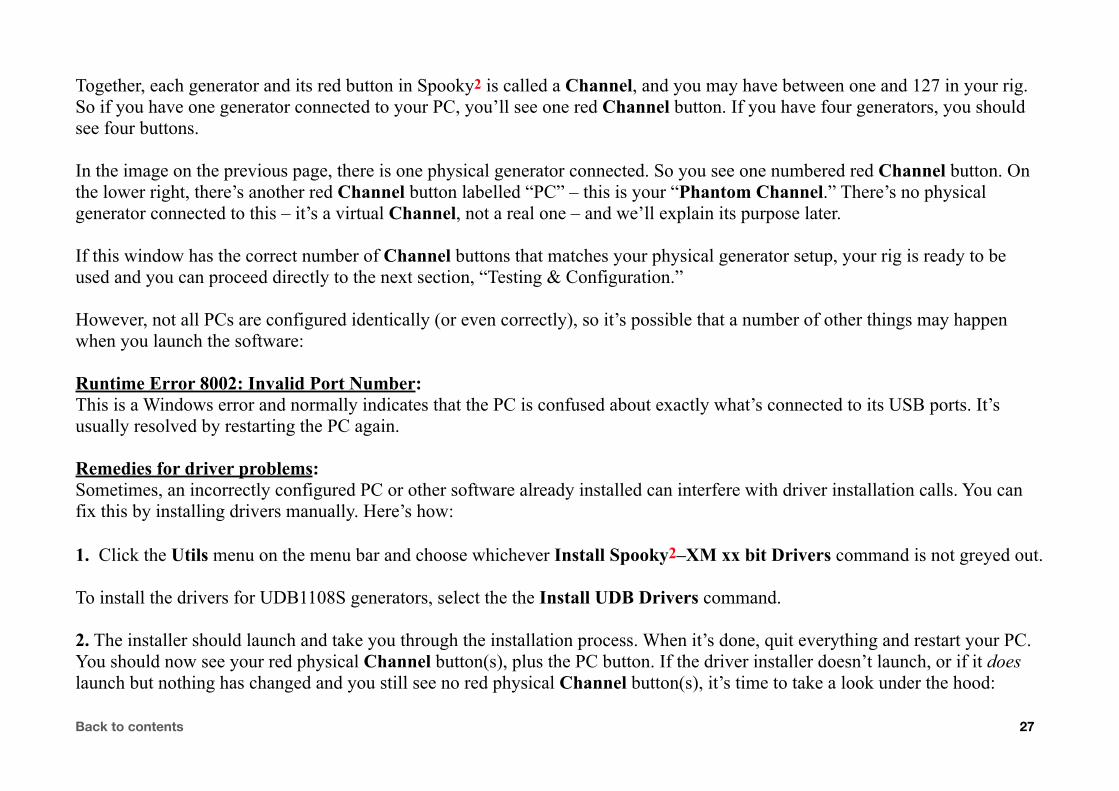
Together, each generator and its red button in Spooky2 is called a Channel, and you may have between one and 127 in your rig. So if you have one generator connected to your PC, you’ll see one red Channel button. If you have four generators, you should see four buttons.
In the image on the previous page, there is one physical generator connected. So you see one numbered red Channel button. On the lower right, there’s another red Channel button labelled “PC” – this is your “Phantom Channel.” There’s no physical generator connected to this – it’s a virtual Channel, not a real one – and we’ll explain its purpose later. If this window has the correct number of Channel buttons that matches your physical generator setup, your rig is ready to be used and you can proceed directly to the next section, “Testing & Configuration.”
However, not all PCs are configured identically (or even correctly), so it’s possible that a number of other things may happen when you launch the software:
Runtime Error 8002: Invalid Port Number:This is a Windows error and normally indicates that the PC is confused about exactly what’s connected to its USB ports. It’s usually resolved by restarting the PC again.
Remedies for driver problems:Sometimes, an incorrectly configured PC or other software already installed can interfere with driver installation calls. You can fix this by installing drivers manually. Here’s how:
1. Click the Utils menu on the menu bar and choose whichever Install Spooky2–XM xx bit Drivers command is not greyed out.
To install the drivers for UDB1108S generators, select the the Install UDB Drivers command.
2. The installer should launch and take you through the installation process. When it’s done, quit everything and restart your PC. You should now see your red physical Channel button(s), plus the PC button. If the driver installer doesn’t launch, or if it does launch but nothing has changed and you still see no red physical Channel button(s), it’s time to take a look under the hood:
Back to contents 27
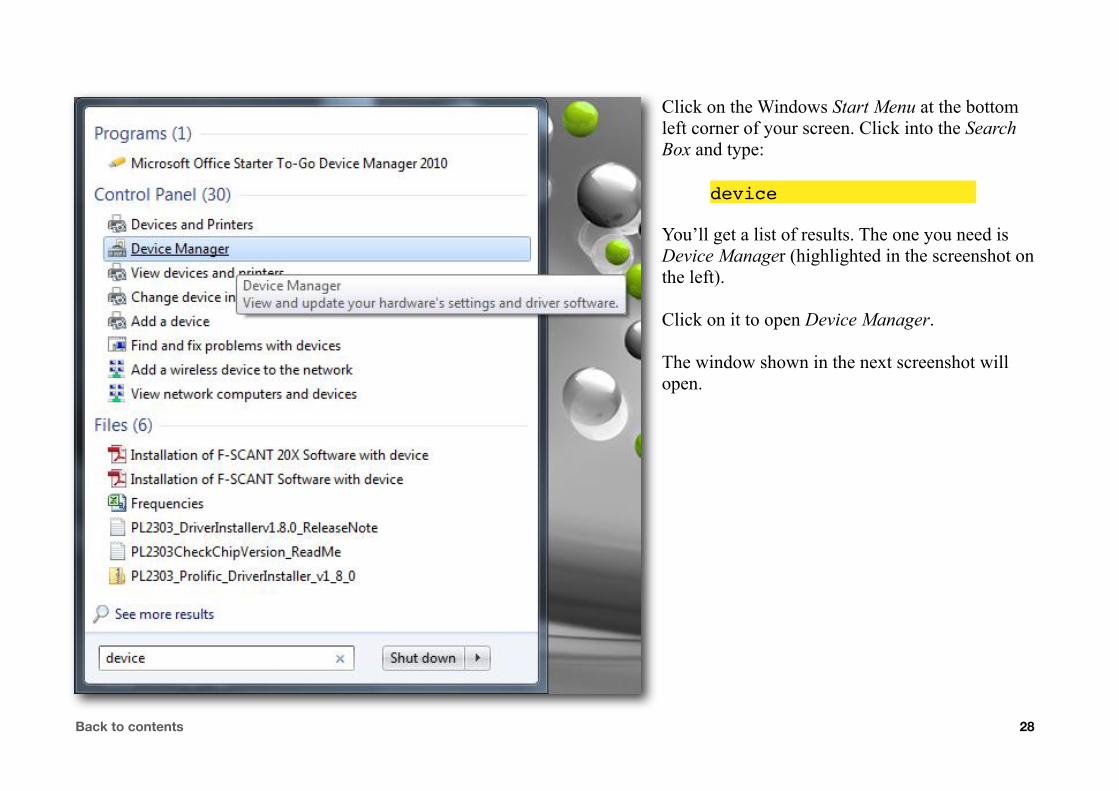
Click on the Windows Start Menu at the bottom left corner of your screen. Click into the Search Box and type:
You’ll get a list of results. The one you need is Device Manager (highlighted in the screenshot on the left).
Click on it to open Device Manager.
The window shown in the next screenshot will open.
Back to contents 28
device

Find and click on Ports (highlighted in the screenshot).
The navigation tree will expand to show all device drivers and the ports which they’re controlling.
The Silicon Labs CP210x USB to UART Bridge entries are all instances of the 5M drivers with the USB port numbers they control in parentheses.
The Prolific USB-to-Serial Comm Port entries are all instances of the UDB1108S drivers, also with the USB port numbers they control.
If you see yellow exclamation marks on any of these entries, it means that the drivers weren’t installed correctly, and you will have to reinstall them.
But you don’t have to go through the entire installation procedure all over again – you can simply reinstall the drivers you require.
There’s another way to do this manually, and it’s pretty simple.
Back to contents 29

But first, an explanation: there are two kinds of accounts on Windows – Administrator and User. If you log in using an account with admin rights and permissions, you can pretty much do anything you like on the PC. However, it’s not a good idea to go online using an Admin account because hackers can put this power to use if they get past your firewall. The answer is a User Account. This has less power to change anything, so it’s safer for online use. However, it can cause problems with certain kinds of software installations.
Thankfully, there’s a way round this without having to log out and back in as Administrator. First, quit Spooky2. Then click on the Windows Start Menu and choose Computer. The Start Menu will disappear and a new window will open.
The highlighted icon shown at the top left here is your (C:) drive.
“WINTRANS” is my USB stick.
Double click the (C:) drive icon.
Back to contents 30

The window now displays a list of all the folders on your hard drive. The Spooky2 folder is highlighted left. Double click it.
Note: the “Spooky2 Documents” folder is not part of the Spooky2 installation – it’s my own collection of personal documents related to using the system.
Back to contents 31

Now you can see everything that’s contained in the Spooky2 folder.
This folder is where you’ll have to visit if you wish to manually install a new database, or edit your own custom database in Notepad.
The top seven icons are folders, the rest are files (folders always contain files).
The first one in the list on the left– CP210x_VCP_Windows – contains 5M driver installers.
The fourth folder from the top – PL2302_Prolific_DriverInstaller_ v1_8_0 – contains the installer for the UDB1108S driver.
Since this procedure is identical for installing either driver, we’ll do it for the Silicon Labs 5M drivers.
So double click the first folder in the list to open it.
Back to contents 32
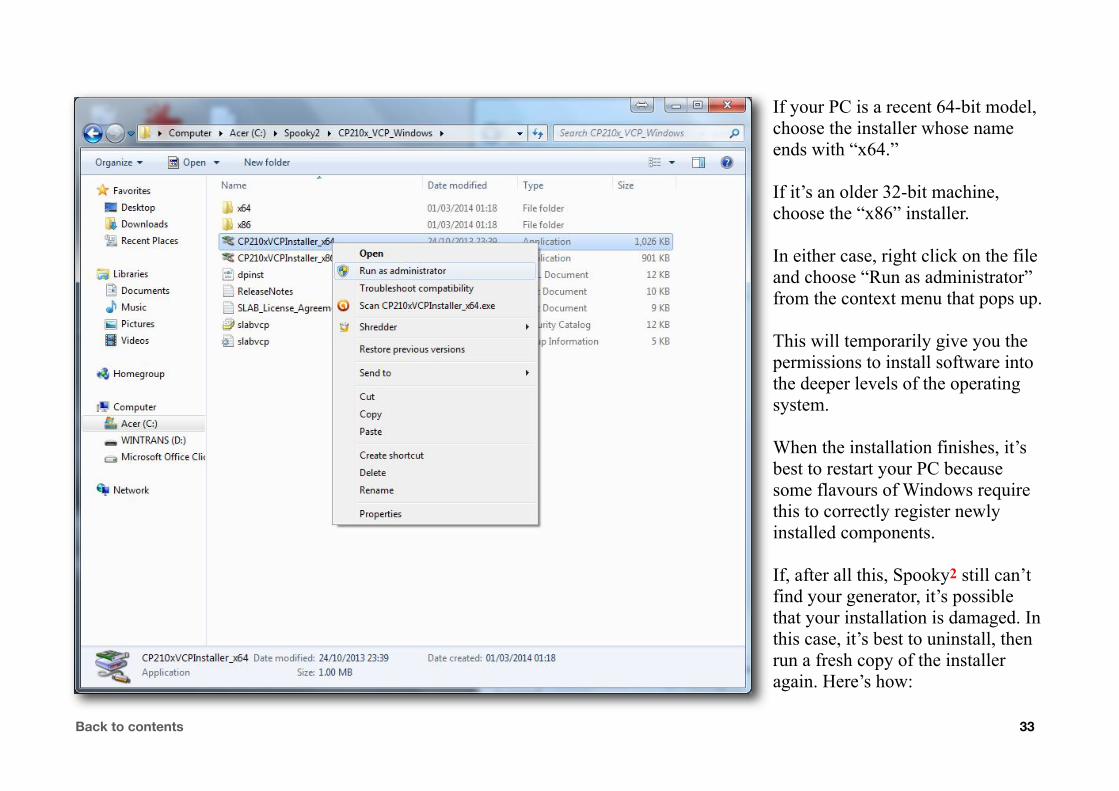
If your PC is a recent 64-bit model, choose the installer whose name ends with “x64.”
If it’s an older 32-bit machine, choose the “x86” installer.
In either case, right click on the file and choose “Run as administrator” from the context menu that pops up.
This will temporarily give you the permissions to install software into the deeper levels of the operating system.
When the installation finishes, it’s best to restart your PC because some flavours of Windows require this to correctly register newly installed components.
If, after all this, Spooky2 still can’t find your generator, it’s possible that your installation is damaged. In this case, it’s best to uninstall, then run a fresh copy of the installer again. Here’s how:
Back to contents 33

Click on the Windows Start Menu at the lower left of the screen and choose Control Panel as shown below.
The Start Menu will disappear and a new window will open.
Back to contents 34
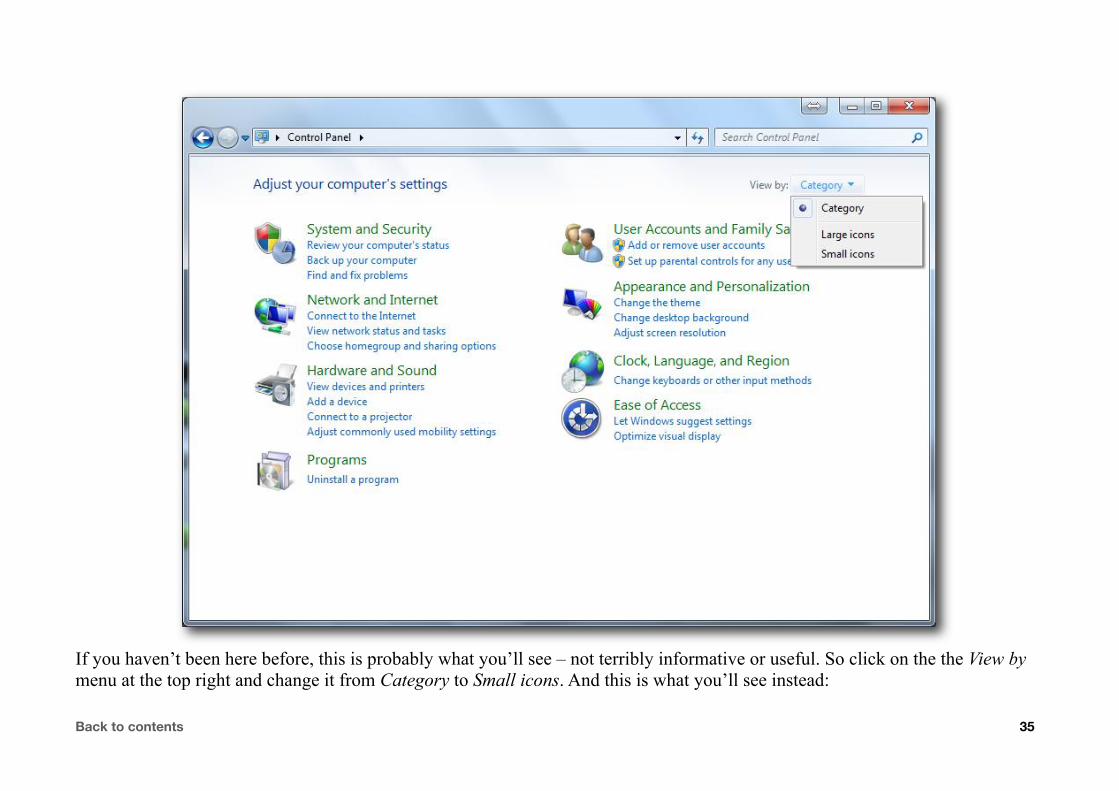
If you haven’t been here before, this is probably what you’ll see – not terribly informative or useful. So click on the the View by menu at the top right and change it from Category to Small icons. And this is what you’ll see instead:
Back to contents 35

Choose Programs and Features (highlighted in the image above). This will open a new window:
Back to contents 36

Here, I’ve highlighted the 5M’s Silicon Labs driver. You can also see Spooky2 and the UDB1108S’s PL-2303 driver package entries further up the list. To uninstall, either double click the name, or select, then click Uninstall at the top of the list.Back to contents 37
Uninstall both driver packages in succession, but don’t bother trying to uninstall Spooky2 – Windows isn’t very effective at removing anything that doesn’t have a registry entry. So it’s quicker and easier to manually delete it. To do this, simply navigate to the Spooky2 folder as you did before:
Windows Start Menu > Computer > Hard Drive (double click). Then drag the Spooky2 folder to the Recycle Bin and empty it.
Now you can download a fresh copy of the installer and try again. To do this new installation, I advise disconnecting from the internet, logging into an Administrator account on your PC, and installing Spooky2 for all users. Then restart the PC and log into your normal User Account so you can re-enable internet access if you wish.
Finally, click the Advanced Menu button to open the Advanced Menu, then enter the number of generators you’ve connected into the DDS Generators field near the top, and Spooky2 will find your entire rig a lot quicker on subsequent launches.
Generators Missing:if you have four generators connected, but only three red Channel buttons, it means that either the driver hasn’t installed properly for the particular port your missing generator is connected to, or its USB cable may be faulty.
To fix the first, quit Spooky2, disconnect each generator’s USB cable from the PC/hub, and restart the PC. One by one, reconnect the generators and watch the right side of the Taskbar for alerts that tell you whether the driver install for that port was successful. With luck, they should all be. If not, it’s time to try swapping the USB cable for that missing generator so that Windows can identify it and install the correct driver.
Installing a beta/EXEThe latest stable version of Spooky2 can always be found on the Spooky2 website’s Downloads page. This is the one that most people will wish to use. But John White often provides advance beta versions of the next proposed official release for download on his own site, usually as software-only EXE files. “Beta” means that they’re test versions, and so may contain bugs. And this is the main reason that they’re made available – so that experienced users can download and test them, then report any bugs found so they can be fixed for the next official release.Back to contents 38

The length of time between official stable releases is generally about a month, but three or four beta versions may be released for testing in the same period, and the final bugfixed beta then becomes official and is uploaded to the Spooky2 website.
At that time also, if an update contains no changes to Spooky2’s support files, an EXE file download will usually also be provided for users with existing installations.
Because of the nature of beta software, no technical support can be provided since it’s essentially a work-in-progress. So unless you know your way around Spooky2 and your PC, it may not always be a good idea for you to install a beta, especially if you’re dealing with something serious. But if you wish to go ahead anyway, here’s how I do it:
Download the beta (or EXE) to your Desktop. The file-name will always lack the word “_Setup” and end in “.exe.” This means that it’s an executable and doesn’t need to be decompressed like a .zip file or double clicked like a full Setup installer. Click once on the file to select it, then press Ctrl C on your keyboard to copy it.
Navigate to the Spooky2 folder – Windows Start Menu > Computer > Hard Drive (double click).
Click anywhere on the list of files, then press Ctrl V on your keyboard to paste the beta into the folder. You don’t have to worry about the beta replacing your existing installation because its file name is different. However, you will need to make an easy way for yourself to launch the new beta.
To do this, you can either create a Shortcut, or you can “pin” the beta to the Taskbar or the Windows Start Menu. For a Shortcut, right click on the beta file and select Create shortcut from the Context Menu that pops up. Then drag the newly-created Shortcut out of the Spooky2 folder and onto your Desktop.
You can then close the Spooky2 folder window because double clicking the Shortcut will now launch the new beta version.
To pin the new version to the Taskbar or the Start Menu, you also right click on the beta file, but this time choose either “Pin to Taskbar,” or “Pin to Start Menu.” Clicking on the beta’s icon in either of these two locations will then launch your new version. The following screenshot shows all the options:
Back to contents 39
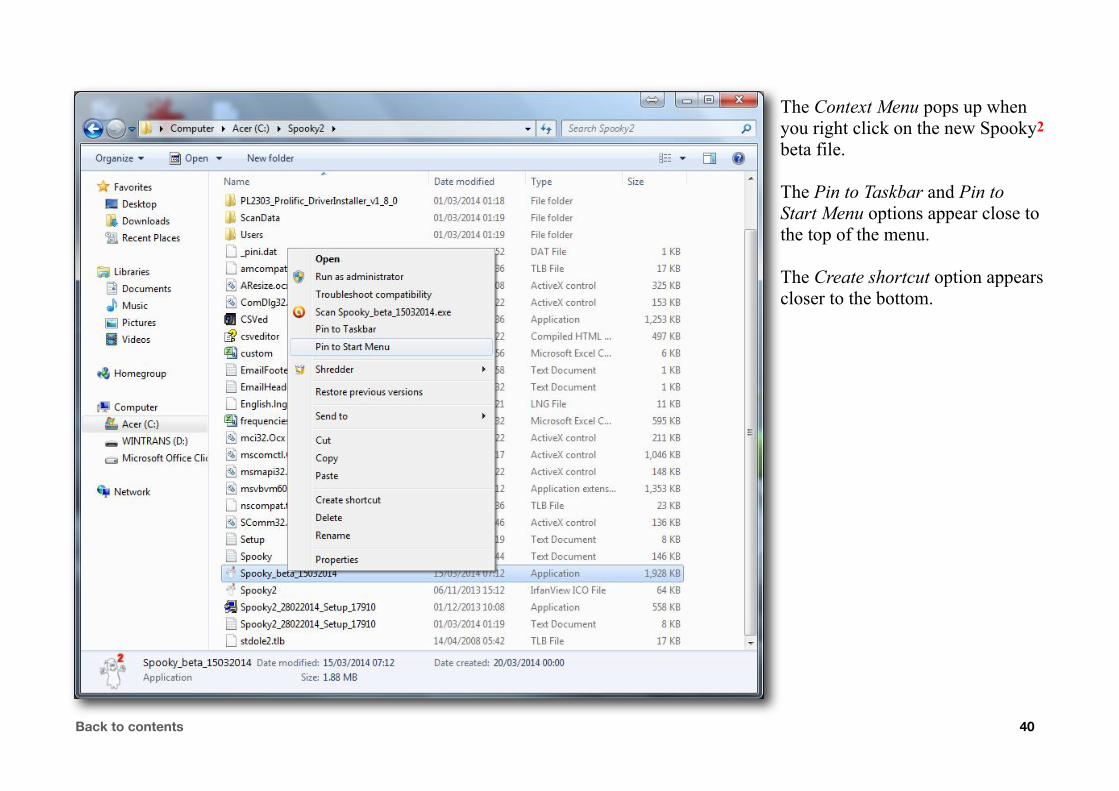
The Context Menu pops up when you right click on the new Spooky2 beta file.
The Pin to Taskbar and Pin to Start Menu options appear close to the top of the menu.
The Create shortcut option appears closer to the bottom.
Back to contents 40

Installing a databaseHere’s one very important thing you need to understand about installing a new database after you’ve downloaded it from the Spooky2 website:
When you launch Spooky2, it loads certain of its own support files – including the database – into memory. This means that if you trash the database file in the Spooky2 folder and replace it with a new one, you can’t access that new database inside Spooky2 until you either quit and relaunch, or tell Spooky2 to load the database into memory from the hard drive again.
So there are two ways to install a new database, and which one you use depends on whether Spooky2 is running or not.
If Spooky2 isn’t running:
‣ Download the database file and decompress it if it’s the “.zip” file.
‣ Click on the “.csv” file to select it, then press Ctrl C on your keyboard to copy it.
‣ Now navigate to the Spooky2 folder – you know how to do this by now.
‣ You’ll see the older “frequencies” file in the folder, and you have two choices – you can either:
✓ Drag it into the Recycle Bin, then click back into the Spooky2 window and press Ctrl V on the keyboard to paste the new file in.
✓ Leave the existing file where it is and just press Ctrl V. You’ll see a dialogue warning that a file named “frequencies” already exists in the folder and asking how you wish to proceed. Choose Copy and replace.
‣ Close the window and launch Spooky2. The new database will be loaded into memory and be available for immediate use.
Back to contents 41

If Spooky2 is running:
Click the Database menu on Spooky2’s menu bar and select Download Database. You internet browser will launch and automatically download the file “frequencies.csv” from the Spooky2.com Downloads web-page straight into your Downloads folder. You now have a number of choices:
‣ You can copy and paste it into the Spooky2 folder as detailed above, then trash the file.
‣ You can create a new dated folder for the file, then move that folder anywhere you like.
Here, I’ve downloaded my new database, created a new folder named “Freqs 14 Mar 2014,” put the file inside it, then placed the new folder in my Documents library.
To load it into Spooky2, I click the Database menu, then choose Select Database.
This opens a file navigation dialogue (left) where I can navigate to my new file, select it, then click the Open Button to make it immediately available in Spooky2.
The Refresh Database command reloads the file after manual edits.
Back to contents 42

Windows warningsThere are two very important settings in Windows that you need to be aware of when using Spooky2:
PC Sleep Settings:If your computer is set to sleep or hibernate after a certain amount of time with no user activity, here’s what happens:
The contents of your memory are temporarily written to a file on the hard drive. The drive then stops spinning – this means that nothing more can be read from it into memory.
So when your PC sleeps or hibernates, it is effectively no longer working, much like a TV on standby. Consequently, Spooky2 will simply suspend transmission until you wake your PC again.
To fix this, go to Control Panels > Power Options > Change when the computer sleeps, and set everything except the screen to Never. Alternatively, you can use a dark screen saver to extend display life (Control Panels > Personalization > Screen Saver).
Windows Update Reboots:If your PC is also used for the internet, be aware that default system settings mean that Windows can download and install updates automatically. It can then quit Spooky2, install the updates, and restart your PC – ending your entire Spooky2 session without any warning to you.
To fix this, go to Control Panels > Windows Update > Change settings and choose anything other than Install updates automatically. If you don’t want to lose this auto-install functionality, you can simply switch off your modem/wi-fi router before going to sleep or leaving your home. But do remember to keep an eye on things while you’re at home but away from the computer.
If you don’t use a wi-fi system, your computer is connected to the internet with an ethernet cable plugged into a modem or switcher. If you unplug this cable, Windows can’t go looking for updates, so your Spooky2 session can’t be interrupted.
Back to contents 43
Testing & configurationNow that you’ve got your rig connected, and your software installed and able to talk to your generator(s), it’s time to configure the Remote system to work optimally, and to make sure everything is actually doing what it’s supposed to do. Here’s how:
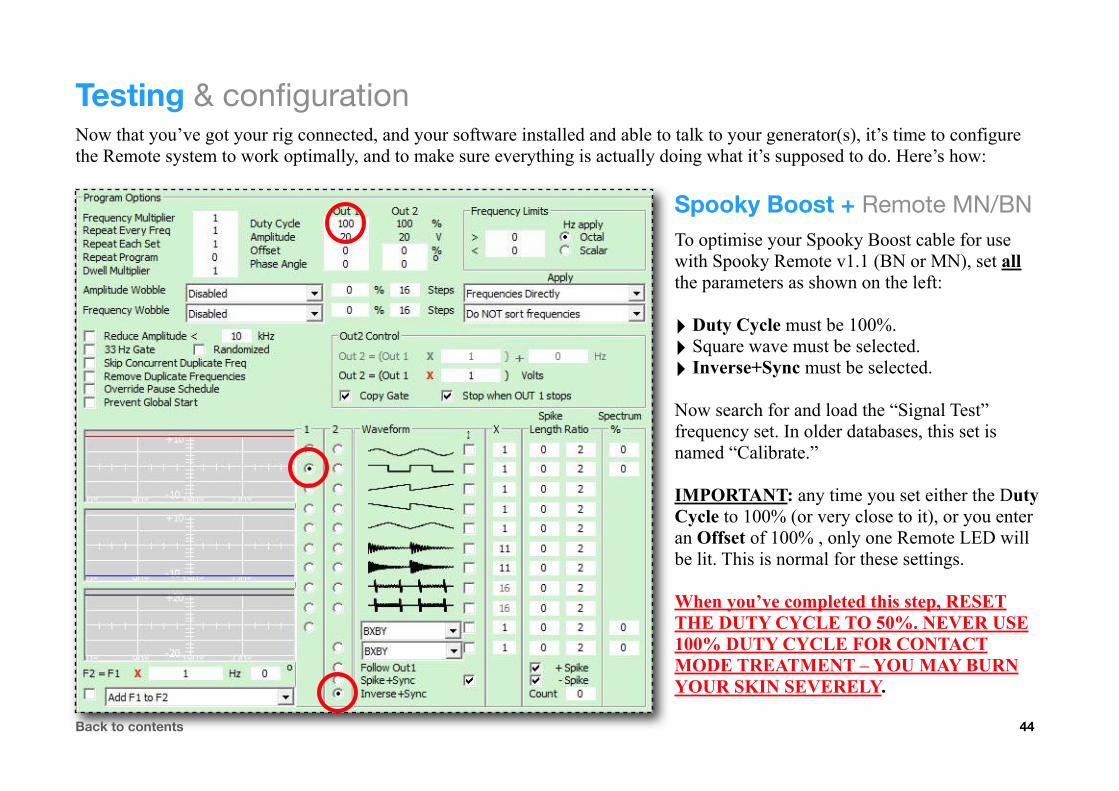
Spooky Boost + Remote MN/BNTo optimise your Spooky Boost cable for use with Spooky Remote v1.1 (BN or MN), set all the parameters as shown on the left:
‣ Duty Cycle must be 100%.‣ Square wave must be selected.‣ Inverse+Sync must be selected.
Now search for and load the “Signal Test” frequency set. In older databases, this set is named “Calibrate.”
IMPORTANT: any time you set either the Duty Cycle to 100% (or very close to it), or you enter an Offset of 100% , only one Remote LED will be lit. This is normal for these settings.
When you’ve completed this step, RESET THE DUTY CYCLE TO 50%. NEVER USE 100% DUTY CYCLE FOR CONTACT MODE TREATMENT – YOU MAY BURN YOUR SKIN SEVERELY.
Back to contents 44

When the Channel is started, only one LED will be lit.
MN Remote: the top (+ sign) LED should be lit (circled in red).
BN Remote: the bottom (– sign) LED should be lit (circled in yellow).
If you own an earlier non-colour coded Spooky Boost, simply swap the plugs connected to OUT 1 and OUT 2 if the wrong LED is lit for your specific Remote.
Your Spooky Boost is now set up for whichever version of Spooky Remote v1.1 you own. This procedure is only necessary to set up magnet-enhanced Spooky Remote v1.1 models correctly because of their different magnetic polarities. It’s not required for the original Spooky Remote or for Spooky Tube/electrodes. No light? Check the generator display for the blue ON icon. If you see a red OFF icon, quit Spooky2 and turn off your 5M. Reseat USB connections, then turn on the 5M and launch Spooky2 again. If you still see OFF, swap the USB cable for a known good one. If you do see the ON icon, reseat your BNC connectors securely.Back to contents 45

Original Remote & Direct Connect
If you use an original Remote with Spooky Boost, connect them. If you don’t use Boost, connect your Remote to Out 1.
Set all the parameters as shown:
‣ Duty Cycle should be 50%.‣ Amplitude should be 20.‣ Square wave must be selected.‣ Follow Out 1 must be selected.
Now search for and load the “Signal Test” frequency set. In older databases, this set may be named “Calibrate.” When the Channel is started, both LEDs should be lit. If so, your Spooky Remote is now ready for action.
No light? Check the generator display for the blue ON icon. If you see a red OFF icon, quit Spooky2 and turn off your XM. Reseat USB connections, then turn on the XM and launch Spooky2 again.
If the generators still shows OFF, try swapping the USB cable for a known good one.
If you do see the ON icon, reseat your BNC connectors securely.
Back to contents 46

Treatment choicesBefore you use Spooky2 to tackle any problem, you have a number of very important things to consider first:
1. Killing or healing? This will affect your choice of waveform, its settings, amplitude, and wobbles. Generally, killing pathogens requires a wobble or feathering to cover possible mutations. But a much better alternative is to use a well-designed Spectrum.
Contact Mode needs higher amplitudes to achieve adequate body penetration (14–20 volts) unless a carrier wave is used (use a higher harmonic multiplier on Out 2 rather than a static carrier – I’ll show you how later).
Remote Mode can use any Amplitude from about 4 volts up to 20. High voltages are not necessary because all we need to penetrate is the fingernail clipping in Spooky Remote, not the entire body. For killing, a Spooky Remote v1.1 Magnetic North is best, but we don’t recommend using it non-stop for longer than 3-5 days because it can produce unpleasant side effects. A Spooky Remote v1.1 Bio North model will kill pathogens, too, but not quite as quickly, and it’s best for healing, repair, and regeneration. This can be used continuously without problems.
For Plasma Mode, please see the documentation that came with your Spooky Plasma or other amplifier.
2. Which waveform? Sine: the non-linear curve of the sine wave’s amplitude makes it suitable for gentle healing. Its trajectory is the purest form of energy/motion, and you will see its shape commonly reflected throughout the natural world. Best for high frequencies.
Square: The abrupt rises and falls in amplitude coupled with long peaks and troughs make this wave very suitable for killing pathogens. However, it’s also effective for healing, especially if low frequencies are used.
Sawtooth: This does not have a history in Rife, so it’s still largely experimental. However, our experiments have now shown that it’s a very effective waveform to use for healing.
Back to contents 47

Inverse Sawtooth: The sharp rise to peak level combined with the linear fall in amplitude make this waveform excellent for killing organisms, and it does this more effectively than the square wave. At higher voltages, it’s not really suitable for healing – but some users have reported good results using it at lower Amplitudes.
Triangle: Does not have a history in Rife – so it’s still experimental. Its linear slopes make for a less efficient “whip-crack” effect but it may be useful as a possible substitute for a sine.
Damped Sinusoidal: Dr. Rife’s well-known cancer-killer waveform, as documented by the Smithsonian. When liberally sprinkled with spikes, this becomes a truly fearsome weapon. But because it’s based on gradually decaying sine waves, it’s also excellent for healing applications.
Damped Square: damping applied to square waves – a brand new Spooky2 exclusive. Its energy trajectory makes it lethal for pathogens, and it’s currently being tested successfully in healing situations.
H-Bomb Sinusoidal: designed by John to feature energy spikes on leading and trailing edges. It’s based on sine waves, and this should make it a good choice for powerful healing. But it should also be useful as a pathogen killer.
H-Bomb Square: I feel that this may be Spooky2’s most powerful killing machine. John has questioned if it may be too powerful for remote use, but I’ve used it successfully in this way without Herxing.
3. Database sets, Pulse results, or Spectrum sweeps? For killing, the Spectrum Sweeps are convenient and very powerful. It’s best to adjunct or alternate with targeted database sets. Most powerful of all, but not as convenient, are Spooky Pulse scan results. Spooky Pulse has now clearly shown itself capable of detecting early cancer.
The effectiveness or otherwise of database sets also depends on the accuracy of your diagnosis. It’s possible, too, that a different strain or a mutation of the pathogen is involved. Either way, if you get no results after 2–3 days, you should try another database set instead.
Back to contents 48
For healing, I would use either Pulse results or targeted database sets. The Spectrum Sweeps are designed for killing. Most healing works through frequency entrainment, and sweeps don’t work for this process.
Important: the Spooky2 database includes about 300 “split” frequency sets.
These are sets which originally contained too many frequencies for them to be fully effective when used in remote mode. So we made the decision to split them into parts, each of which takes no more than an hour to transmit. To use them, you must load them into a Program in the correct order, and this Program should NOT contain any other sets, otherwise the split set may not work properly.
All split sets have a numerical identifier at the end of their names that looks like a numerical fraction:
Lymphs and Detox 1/2 Lymphs and Detox 2/2 The “1/2” in the name above means that “Lymphs and Detox 1/2” is part one of a two-part set, and “Lymphs and Detox 2/2” is the second part – which MUST also be loaded and run for the Program to work.
Long set names may have these numbers hidden in the Conditions List. Select any set to show its full name in the Additional Notes area beneath the list.
WARNING: you must NEVER run the parts of any split set on separate generators. All split set parts MUST be loaded and run in the correct order on one single generator. Many frequency sets are designed to disrupt organism components in a specific order, and if you run their frequencies out of that order, the Program may not work.
4. What source of DNA for Remote? Nails: the DNA contained in fingernails is encased in hard keratin which protects it from degradation. In theory, it should be good to use for scalar transmission forever, and indeed some practitioners never change their specimens. However, my research
Back to contents 49

suggests that since photonic energy has been shown to be intimately bound up with DNA, nail specimens may be best renewed each month. Russian experiments show that the photonic energy “imprint” which “shadows” DNA fades after this time.
If you choose to change your samples regularly, you may wish to substitute lightweight cigarette rolling papers for paper masking tape.
Nail sample preparation:
1. First, cut your nail into four equal pieces, as shown. You only need to use one piece of nail for each Remote.2. The correct length of 2” paper tape, sticky side up. Bottom left is a single piece of nail. The red mark shows where to place it.3. Fold tape over lengthwise. Write initials on one end if required. Place as shown and mark the tape at the edge of the Remote.4. Insert tape in the Remote so the mark aligns with the Remote's edge as shown. This ensures DNA is correctly placed.
Back to contents 50
Saliva: cut a strip of blank paper (blotting paper is best) about two inches long and one inch wide. Place the top one-third of this in your mouth for about five minutes, or until it becomes saturated with saliva. Allow it to air-dry for about 10-20 minutes before placing it into your Remote. Good for about three days.
Buccal Skin Cells: this is how police do large-scale DNA testing after certain serious crimes. As above, use a strip of paper, but don’t allow it to soak in your mouth. Instead, rub the top one-third gently but firmly against the inside of your cheek for a moment. If it becomes wet, allow it to air-dry as above. Good for about 4-5 days.
Blood: for this you need a pack of lancets designed for diabetics to safely test blood sugar levels. These are inexpensive and available from all pharmacies. Wash your hands thoroughly first, then follow the directions on the pack. Smear the droplet of blood on the top one-third of a strip of paper. Allow to air-dry for a few moments. Good for about 5-6 days.
Hair: the shaft contains no DNA, only RNA. So it must have the root “bulb” attached. Good for about two days.
5. Remote, contact, or plasma? Plasma: well-designed and implemented plasma is quickest and most powerful. The best we have today comes from Ralph Hartwell in the form of the PA3 amplifier used with a plasma tube blown by Bill Cheb.
Contact: used with a carrier wave, this comes next for speed and power.
Remote: scalar DNA treatment has been vastly improved by the introduction of Spooky Remote v1.1, such that it has gained markedly on contact mode. The convenience of remote mode makes it a winner.
For serious conditions, I would do one contact session daily, then switch that generator to Remote Mode.
The following three screenshots are good settings for each of the three modes – Remote, Contact, and Plasma. In all cases except Plasma, which requires a square wave for everything you do, you should choose your own waveform based on whether you’re killing organisms, healing, or detoxing.
Back to contents 51

Remote Mode settings
Repeat Each Set: 4.Repeat Program: 0 (for an endless loop that must be stopped manually) OR:Repeat Program: 30 (for a timed session equivalent to seven consecutive contact treatments).Dwell Multiplier: .33 (cuts Program times to one-third) – original Remotes must use 1, which John White always uses on all Remote models.Duty Cycle: 50 (may be changed to alter the harmonic content – relevant to square wave only).Amplitude: 5–20 volts.Offset: 0 & 0 (can also be 100 and 100, or 100 and -100 if Spooky Boost is connected.Apply: +- .02% Feathering for kill, or Frequencies Directly for heal & detox.Waveform: user’s choice.
How Remote works...
Back to contents 52
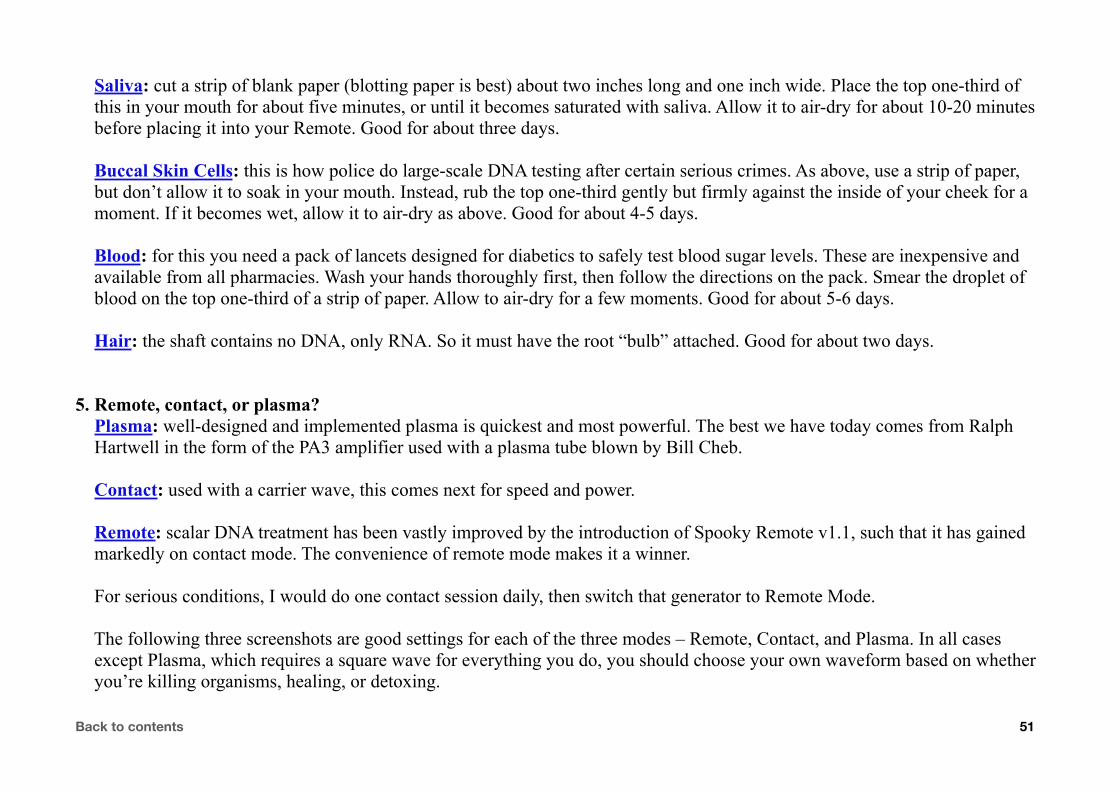
Contact Mode settings
Repeat Each Set: 1.Repeat Program: 1.Dwell Multiplier: 1 (Programs run for default dwells/times).Duty Cycle: 50 (may be higher to create more harmonics – relevant to square wave only).Amplitude: 14–20 volts.Offset: 0 & 0 (can also be 100 and 100, or 100 and -100 if Spooky Boost is connected.Apply: Frequencies Directly for kill, heal, and detox.Reduce Amplitude < 10KHz: checked (prevents low frequencies from causing discomfort).Waveform: user’s choice.
Note: high-amplitude low frequencies can cause unpleasant and even painful muscle contraction. The threshold at which this occurs is different for all of us (mine is about 1KHz). Try values lower than 10KHz to find your own.
How Contact works...
Back to contents 53
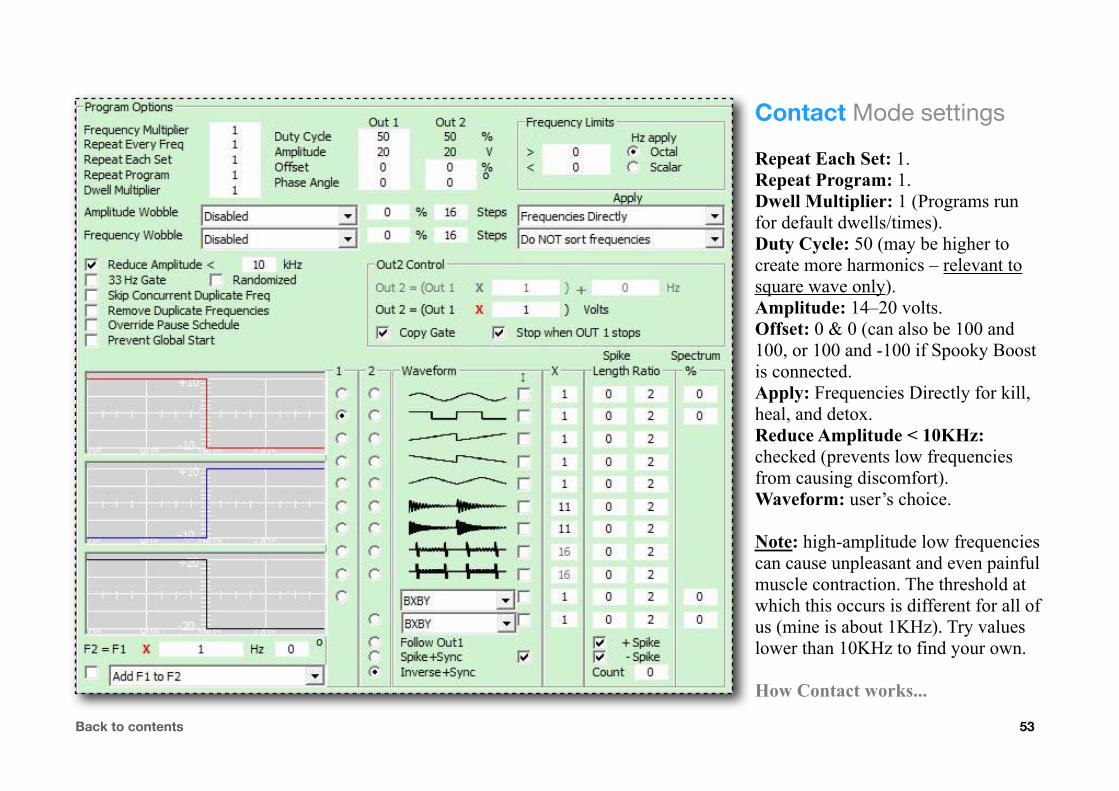
Plasma Mode settings
Frequency Limits: high 3,300,000Hz, low 100,000Hz (for Spooky Plasma)/high 400,000Hz (for Spectrotek amps).Repeat Each Set: 1.Repeat Program: 1.Dwell Multiplier: 1 (Programs run for default dwells/times).Duty Cycle: 50 (may be higher to create more harmonics – relevant to square wave only).Amplitude: 10 volts.Offset: 100 & 100.Apply: Frequencies Directly for kill, heal, and detox.Waveform: square wave only.
Note: Spooky Boost is not used for Plasma Mode.
How Plasma works...
Back to contents 54

OK, let’s RifeIf you've never used Rife technology before, I'm willing to bet that your reaction on first seeing this interface was sheer panic.
That's entirely understandable. At first sight, Spooky2 looks so overwhelmingly complex that you naturally think, "How the heck am I ever going to learn this?"
But I'm also willing to bet that your first reaction on getting into a car to take your first driving lesson was also panic, and that the exact same thought went through your head.
Well, just like a car, you don't need to use everything that's on display in order to actually drive it, do you? Spooky2 is no different.
Over the next few pages, I'm going to show you how to use it quickly and easily, and in less than 15 minutes, you're going to be loading and running Programs easily and quickly..The best way to learn something is by doing it. So please follow along over the next few pages and I'll show you how easy it can be.
Back to contents 55

With Spooky2, we use what we need, and ignore everything else. Eventually, over time, you'll get comfortable and confident, and you'll want to get the most out of this fabulous system. When that happens, use this Guide to learn what everything does, and how it can be used for maximum benefit. It's not going to be a walk in the park, but it’s certainly not climbing Mount Everest either.
I’ll bet you’re a pretty good driver now, aren’t you? Believe in yourself, keep at it, and soon you’ll be a pretty good rifer, too.
So let’s get going with something simple like a cold (please note that I’ve removed excess blank space from this screenshot and later similar ones in order to make all the elements big enough to be clearly seen):
First, I must select the Channel I want to load by clicking its red button, then simply closing its red Control Panel again.
Next, I type “cold” into the Search field. Spooky2 returns 42 results. In the red circle, 42 is the second number shown.
I select the one I want to run. This is result number 22 In the red circle, 22 is the first number shown. So here, I’ve selected result 22 out of a possible 42.
Back to contents 56

I double click it, and it loads into the Selection field on the lower right. However, since I’m going to be killing pathogens, I need to run a detox set as well. It’s always better to keep killing sets on one Channel and put detox on another, but in this case we’ll suppose I only have a single generator.
So I type “detox” into the Search field – there’s no need to click the Clear button first – and I get a bunch of results, from which I choose Detox 4 Toxins Throughout the Body CAFL, and I double click this also.
Both sets are now loaded into my Program and can be seen in the Selection field. If I change my mind about one of them, I just double click it here to remove it, or I can clear both selections I made by clicking the – Button (circled in red).
Now it’s time to make settings that will work to kill pathogens – and clear out toxins.
Any of the square waves are good for both of these tasks, but I want to use a 100% positive Offset as recommended by Dr. Hulda Back to contents 57

Clark, so I’ll stick with her classic settings of a plain square wave and an Amplitude of 9.5 volts. However, I could also choose a H-Bomb square or a damped square if I desired. Below are all the settings I enter in the green Program Options pane:
I lead an active life, and I don’t want to let treatment of a cold interfere with that. So I’ll use Remote Mode.
First, I enter 64000 in the < field of the Frequency Limits pane to bring all these low sub-harmonics up to more effective levels. I enter 4 for Repeat Each Set, 0 for Repeat Program, and .33 for Dwell Multiplier (but note that John White uses 1 for this). Remote also normally calls for an Apply Menu setting of +- .02% Feathering, but because I’m also running detox frequencies which need Apply to be set to Frequencies Directly, I’ve set it to use that instead.
I also have a Spooky Boost connected, so I select Inverse+Sync for added power. If I didn’t have this cable, I would connect the Remote to Out 1 of the generator and select Inverse+Sync or Follow Out 1 here instead.
Now I’m ready. But because I’m changing the state of my currently blank Channel, there’s one more box to check:
Back to contents 58
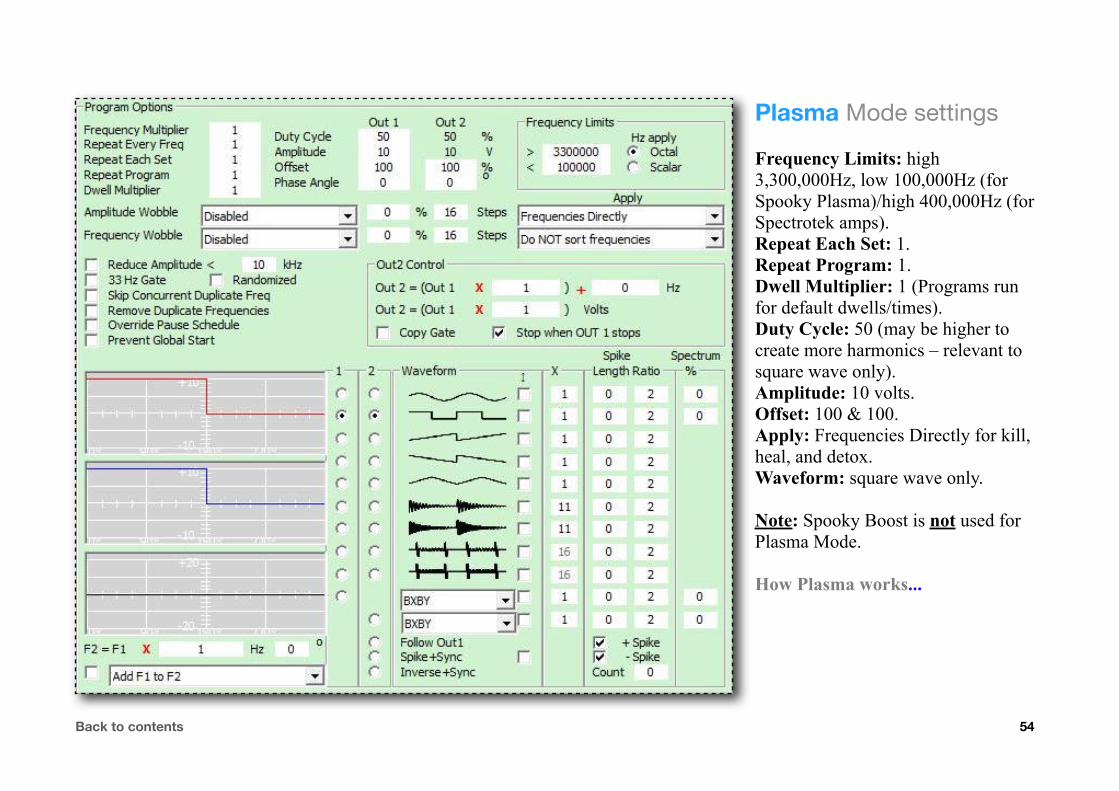
And it’s Allow Channel Overwrites, to the left of the Selection field. Any time you change a Channel’s settings, or its frequency sets, you must tick this box before clicking the red Channel button so you can start the Program.
If you don’t, the Channel Control Panel will replace all your work with its last saved settings – which will clear everything you’ve done. So don’t forget to tick this box when you’ve built your Program. When you do, the Every time checkbox will appear. Tick this if you wish to always overwrite. Now you can click the Channel button:
The red Channel Control appears (above). And you’re ready to rumble! So click the Start button and get on with your day.
Back to contents 59

But hold on. Suppose I realise I made a mistake and I want to change a setting or frequency set. How can I do that at this stage?
At the top right of the Channel Control Panel, you’ll see three buttons. The rightmost one with the “X” closes the panel, as you’d expect. However, if you use this to close, you won’t be able to change anything – it simply closes the panel and locks the Channel so it can’t be changed. Its purpose is to allow you to close a Channel
and move on to set up the next one. So, to fix my mistake, I must click the Settings Button instead – with the curvy wave image.
This also closes the panel, but it unlocks the Channel so I can change anything I wish. However, when I’ve done, I must once again tick the Allow Channel Overwrites box before I click the coloured button again to reopen the Control Panel, otherwise the Channel will discard my correction. The leftmost – Button goes even further: it unlocks the Channel and clears the Program I’ve built so I can start over again. However, it leaves my carefully thought-out settings intact. Nice.
Now here’s a different case – let’s say I want to treat for Epstein Barr virus. So, again, I first open and close the Channel I want to use, type “epstein” into the Search field, and I get 34 results. The set I want to use is Epstein Barr Virus 1 XTRA, and I can see that it has three numbered parts – it’s a split set.
When you select some sets, you’ll see Additional Notes related to your selection appear in the area ringed in red above. Usually, these instruct or inform. Some will also describe important settings you must make for that set when you load it.
Back to contents 60

So I double click Epstein Barr Virus 1 1/3 XTRA to load it into the Selection field. Then I double the next one – Epstein Barr Virus 1 2/3 XTRA. Finally, I double click the third and last part of the set – Epstein Barr Virus 1 3/3 XTRA. Please note that we don’t advise loading any other sets together with a split set, unless they contain just a few frequencies.
Now my Selection field looks like this, with all three parts in numerical order from the top down:
I’ve also ensured that the Allow Chanel Overwrites box is ticked so I don’t forget to do it after I’ve made my settings. Unless you also tick Every time, you will have to tick this box immediately after loading all your sets, and this is a good habit to get into because you can get caught up in making settings and forget to do it before you try running the Program. Well, I do anyway!
The Total Run Time of your Program, taking into account all repeats, is shown beneath the Selection field (circled in red above). However, because entering 0 into the Repeat Program field tells Spooky2 to loop the Program until I manually stop it, what you see here is the total time the Program would take to run through just once.Back to contents 61

Now for our settings. We’re killing pathogens here, and we have detox either running on another Channel, or we’ll load a detox Program with appropriate settings and waveform after this one has finished. So we can choose settings that kill exclusively:
Once again, I’m using Remote Mode for convenience, and I’ve loaded all its recommended settings – 4 for Repeat Each Set, 0 for Repeat Program, and .33 for Dwell Multiplier.
I want all the power I can get for this virus, so I’m using one of John White’s favoured kill settings here (a better one is shown later).
I also want to raise all the frequencies up into the KHz range to be closer to the original fundamentals, so I enter 64000 in the < field of the Frequency Limits pane.
Now is a good time to explain that each waveform in the list has its own row of controls. Those for the square wave we’re using for these settings are shown in the red box.
So all my settings are now entered, and I’ve remembered to tick the Allow Channel Overwrites box, so I click the chosen Channel’s button again:
Back to contents 62

And here’s my loaded Channel Control Panel, waiting for me to click the Start button.
Next, we’ll take a look at building a complex healing Program. Specifically, I want to normalise and stimulate a whole bunch of organs and systems in one go – normalise adrenal gland function, blood pressure and circulation, endocrine/glandular system, and lymphatic system.
I also want to stimulate and normalise my kidney and liver functions. Plus a couple of others thrown in for good measure. The important thing here is that I can use the same waveform to optimise all these tasks. If I added in some pathogen killing sets, I’d be more limited in my choices for settings and waveforms because what I do must work for both these different jobs.
Back to contents 63

To get started, I type “normal” into the Search box:
Spooky2 returns 56 results for my search, and Adrenal Function Normalize XTRA is second in the list (please note that US spelling is used throughout the database – so it’s “normalize” instead of “normalise,” and “hemorrhage” and “edema” instead of “haemorrhage” and “oedema.”
By double clicking each one, I then add Blood Pressure Normalize XTRA, Circulation Stimulate Normalized XTRA, Endocrine System Function Normalize XTRA, Glands General Normalize XTRA, Kidney Function Normalize Stimulate XTRA, Liver Function Stimulate & Normalize XTRA, Lymph Function Stimulate Normal XTRA, plus a few others I think I might need.
Here, I need to point out something that’s important when searching: if I had typed “normalize” into the Search box instead of “normal,” my results wouldn’t have included Lymph Function Stimulate Normal XTRA. So it pays to give some thought to what you type in order to search. In general, partial words often work better than complete ones – “stimulat” will find “stimulate,” “stimulatory,”and “stimulation.”
Back to contents 64
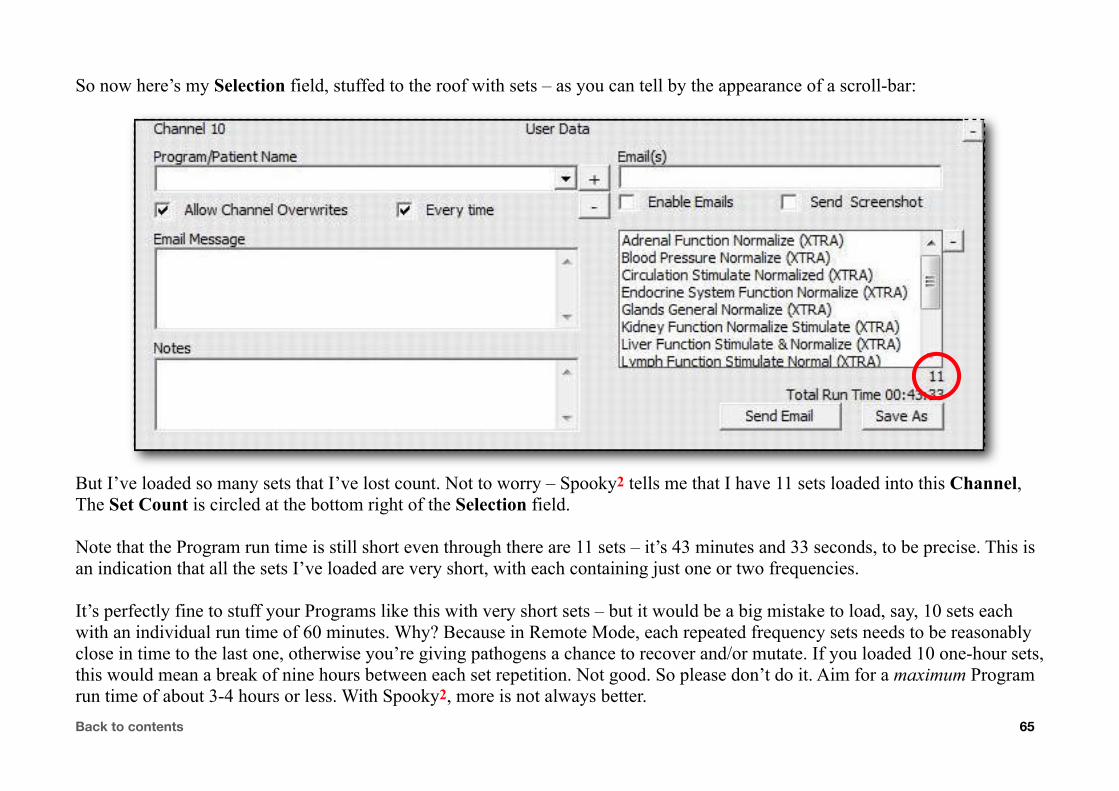
So now here’s my Selection field, stuffed to the roof with sets – as you can tell by the appearance of a scroll-bar:
But I’ve loaded so many sets that I’ve lost count. Not to worry – Spooky2 tells me that I have 11 sets loaded into this Channel, The Set Count is circled at the bottom right of the Selection field.
Note that the Program run time is still short even through there are 11 sets – it’s 43 minutes and 33 seconds, to be precise. This is an indication that all the sets I’ve loaded are very short, with each containing just one or two frequencies.
It’s perfectly fine to stuff your Programs like this with very short sets – but it would be a big mistake to load, say, 10 sets each with an individual run time of 60 minutes. Why? Because in Remote Mode, each repeated frequency sets needs to be reasonably close in time to the last one, otherwise you’re giving pathogens a chance to recover and/or mutate. If you loaded 10 one-hour sets, this would mean a break of nine hours between each set repetition. Not good. So please don’t do it. Aim for a maximum Program run time of about 3-4 hours or less. With Spooky2, more is not always better.Back to contents 65
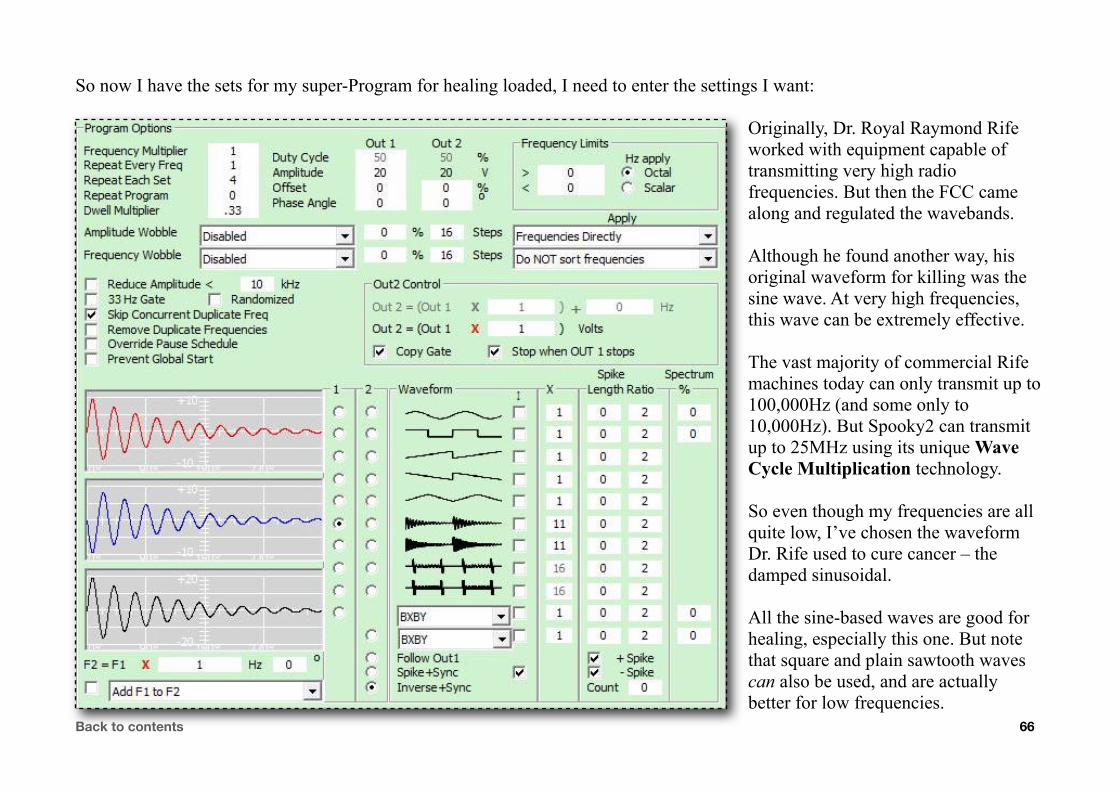
So now I have the sets for my super-Program for healing loaded, I need to enter the settings I want:
Originally, Dr. Royal Raymond Rife worked with equipment capable of transmitting very high radio frequencies. But then the FCC came along and regulated the wavebands.
Although he found another way, his original waveform for killing was the sine wave. At very high frequencies, this wave can be extremely effective.
The vast majority of commercial Rife machines today can only transmit up to 100,000Hz (and some only to 10,000Hz). But Spooky2 can transmit up to 25MHz using its unique Wave Cycle Multiplication technology.
So even though my frequencies are all quite low, I’ve chosen the waveform Dr. Rife used to cure cancer – the damped sinusoidal.
All the sine-based waves are good for healing, especially this one. But note that square and plain sawtooth waves can also be used, and are actually better for low frequencies.
Back to contents 66

Now that all my sets and settings are entered, and I’ve made sure that the all-important Allow Channel Overwrites box is ticked, I’m good to go. So I click my red Channel button, and my Start button awaits:
Personally, I actually like sitting down to work out the best settings for a Program I want to run – some of my decisions are based on science, some are intuitive, and others are in the time-honoured Rife tradition of “try it and see.”
However, there are times when you come up with effective but complex settings which are tedious to enter (and can be hard to remember if you suffer with certain neurological symptoms). For this reason, and for people in a hurry, Spooky2 offers a way to save a Program, with all its sets and settings, so you can store and recall it instantly. And there’s no limit to the number of Presets you can save and store – as long as you’re prepared to scroll through the resultant menu!
Back to contents 67

Although the interface labels them as “Programs,” we’ll refer to them here as “Presets” to distinguish them from the normal manually-assembled Programs we’ve been building up to now.
Let’s say I’ve noticed a lot of aerosol spraying by high altitude jet aircraft – or chemtrailing – going on in my area, and I’ve found, like many, that it seems to be affecting my breathing. It’s a good idea for me to assemble a Preset with frequency sets that will help take care of this so I can just look out the window at the sky, and load it up if they’re spraying again.
So first, we’ll assemble all our frequency sets, and I start by typing “chemtrail” into the Search box:
I get 11 results. I choose Chemtrail Detox 2 XTRA because it contains two high frequencies (which penetrate lung cells and alveoli more effectively than low frequencies). I double click it to load it. I also pick Lung General CAFL, Breathing Deep CAFL, and Breathing Difficulty (Dyspnea) XTRA, and double click each in turn.
This gives me a nice short Program just over 55 minutes long whose sets will repeat more often in a given time, and thus will be more effective.
Back to contents 68
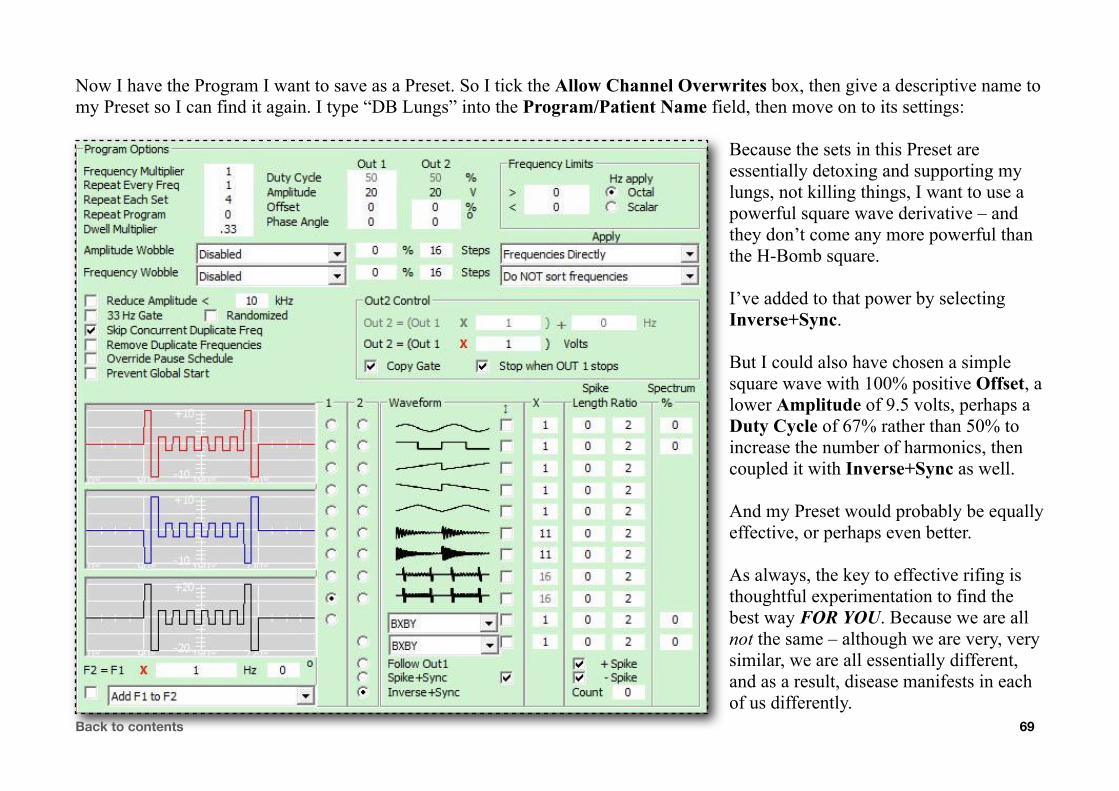
Now I have the Program I want to save as a Preset. So I tick the Allow Channel Overwrites box, then give a descriptive name to my Preset so I can find it again. I type “DB Lungs” into the Program/Patient Name field, then move on to its settings:
Because the sets in this Preset are essentially detoxing and supporting my lungs, not killing things, I want to use a powerful square wave derivative – and they don’t come any more powerful than the H-Bomb square.
I’ve added to that power by selecting Inverse+Sync.
But I could also have chosen a simple square wave with 100% positive Offset, a lower Amplitude of 9.5 volts, perhaps a Duty Cycle of 67% rather than 50% to increase the number of harmonics, then coupled it with Inverse+Sync as well.
And my Preset would probably be equally effective, or perhaps even better.
As always, the key to effective rifing is thoughtful experimentation to find the best way FOR YOU. Because we are all not the same – although we are very, very similar, we are all essentially different, and as a result, disease manifests in each of us differently.
Back to contents 69

So now here’s my Preset, ready to be saved together with all its settings:
To save it, I click the + Button circled in red above. “DB Lungs” will now appear in the drop-down menu whose arrow is immediately to the left of that + Button. To see it, I must click and hold on that arrow. You will see this on the next page.
If I wanted to remove any Preset from this menu, I would first select it in the drop-down menu in order to load it, then I would click on the – Button immediately beneath the + Button. The Preset will disappear from the menu and from the Program/Patient Name field, and its frequency sets will be deleted. But its settings will remain.
CLINICIANS: this feature can also be used to track Subject treatments. Simply enter the Subject’s name instead of a Preset name. You may also enter your private clinical notes, the Subject’s email address, and a message that Spooky2 can send whenever you start or change the Program. Please note that a POP email program like Outlook or Windows Mail is required – this doesn’t work for IMAP accounts (email accessed using an internet browser) unless your POP email client is set up for IMAP.Back to contents 70

Now, here’s what my drop-down menu looks like after I’ve saved “DB Lungs”:
To load a Preset from this menu, I must first choose the Channel I want to use by opening and closing its Control Panel. I then select the Preset from this menu.
This loads its frequency sets into the Selection field.
To run the Preset, I must ensure that the Allow Channel Overwrites box is ticked before I click the Channel button again.
And here’s my Preset loaded into the Channel Control Panel and ready to run:
Back to contents 71
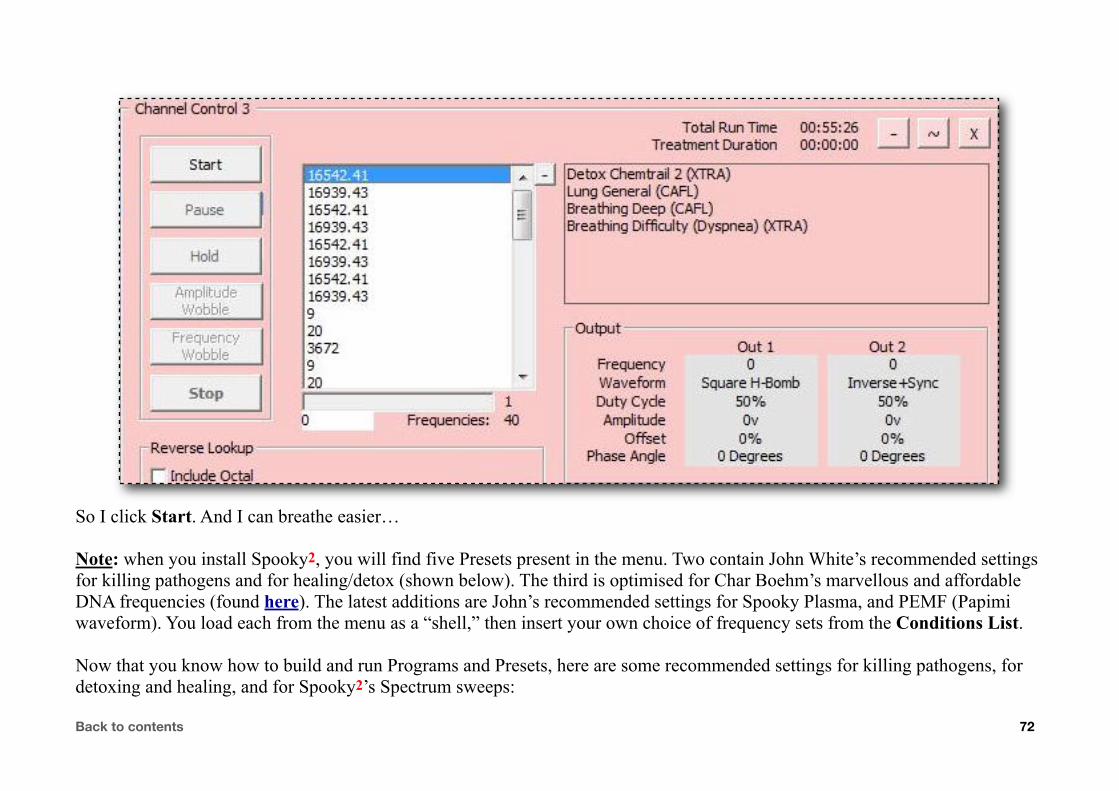
So I click Start. And I can breathe easier…
Note: when you install Spooky2, you will find five Presets present in the menu. Two contain John White’s recommended settings for killing pathogens and for healing/detox (shown below). The third is optimised for Char Boehm’s marvellous and affordable DNA frequencies (found here). The latest additions are John’s recommended settings for Spooky Plasma, and PEMF (Papimi waveform). You load each from the menu as a “shell,” then insert your own choice of frequency sets from the Conditions List.
Now that you know how to build and run Programs and Presets, here are some recommended settings for killing pathogens, for detoxing and healing, and for Spooky2’s Spectrum sweeps:
Back to contents 72
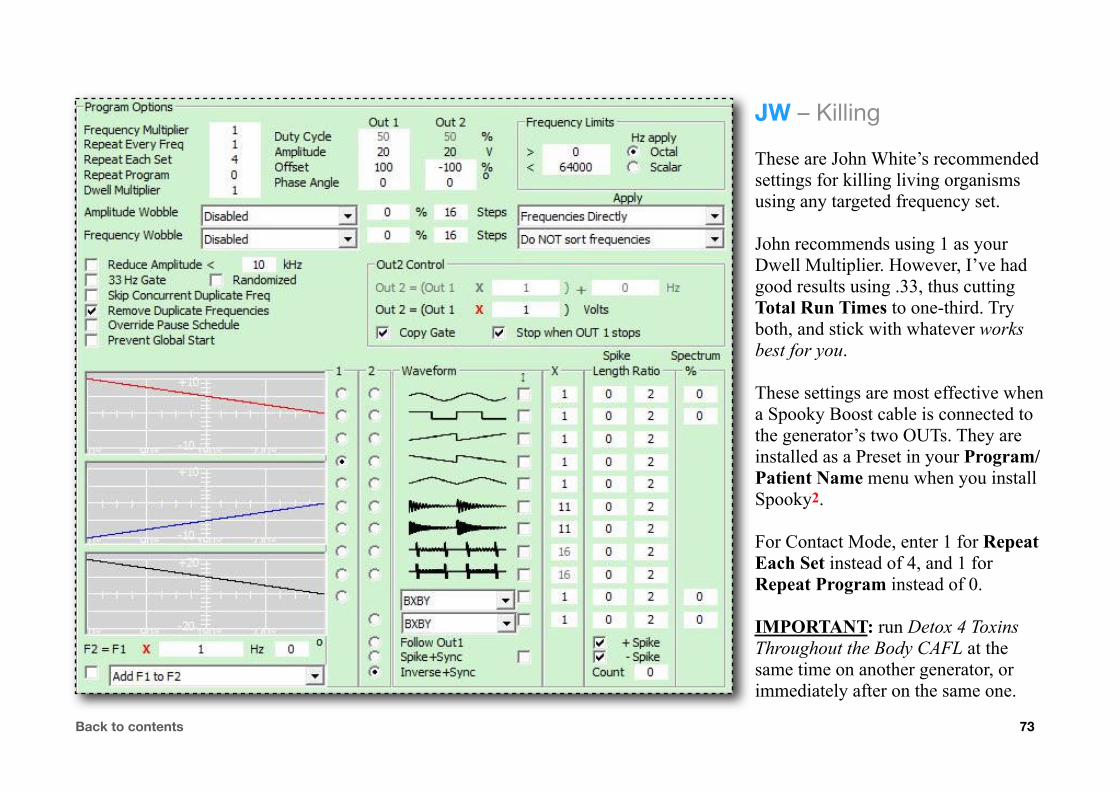
JW – Killing
These are John White’s recommended settings for killing living organisms using any targeted frequency set.
John recommends using 1 as your Dwell Multiplier. However, I’ve had good results using .33, thus cutting Total Run Times to one-third. Try both, and stick with whatever works best for you.
These settings are most effective when a Spooky Boost cable is connected to the generator’s two OUTs. They are installed as a Preset in your Program/Patient Name menu when you install Spooky2.
For Contact Mode, enter 1 for Repeat Each Set instead of 4, and 1 for Repeat Program instead of 0.
IMPORTANT: run Detox 4 Toxins Throughout the Body CAFL at the same time on another generator, or immediately after on the same one.
Back to contents 73
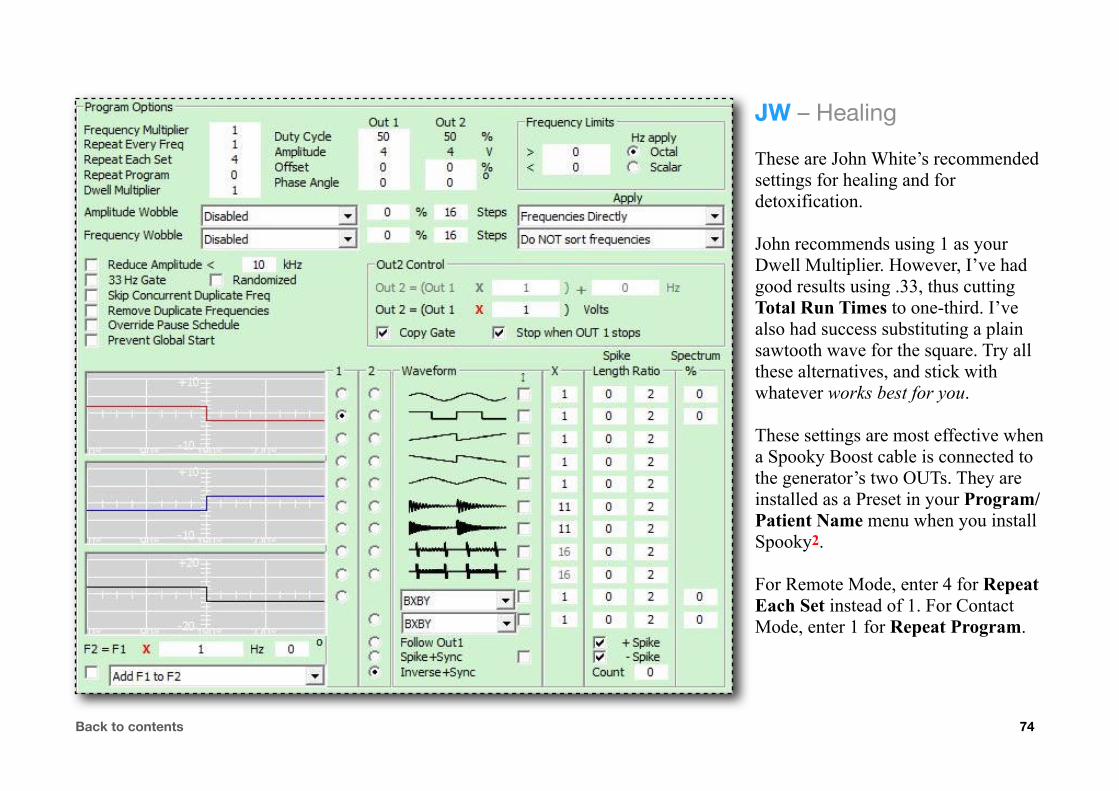
JW – Healing
These are John White’s recommended settings for healing and for detoxification.
John recommends using 1 as your Dwell Multiplier. However, I’ve had good results using .33, thus cutting Total Run Times to one-third. I’ve also had success substituting a plain sawtooth wave for the square. Try all these alternatives, and stick with whatever works best for you.
These settings are most effective when a Spooky Boost cable is connected to the generator’s two OUTs. They are installed as a Preset in your Program/Patient Name menu when you install Spooky2.
For Remote Mode, enter 4 for Repeat Each Set instead of 1. For Contact Mode, enter 1 for Repeat Program.
Back to contents 74
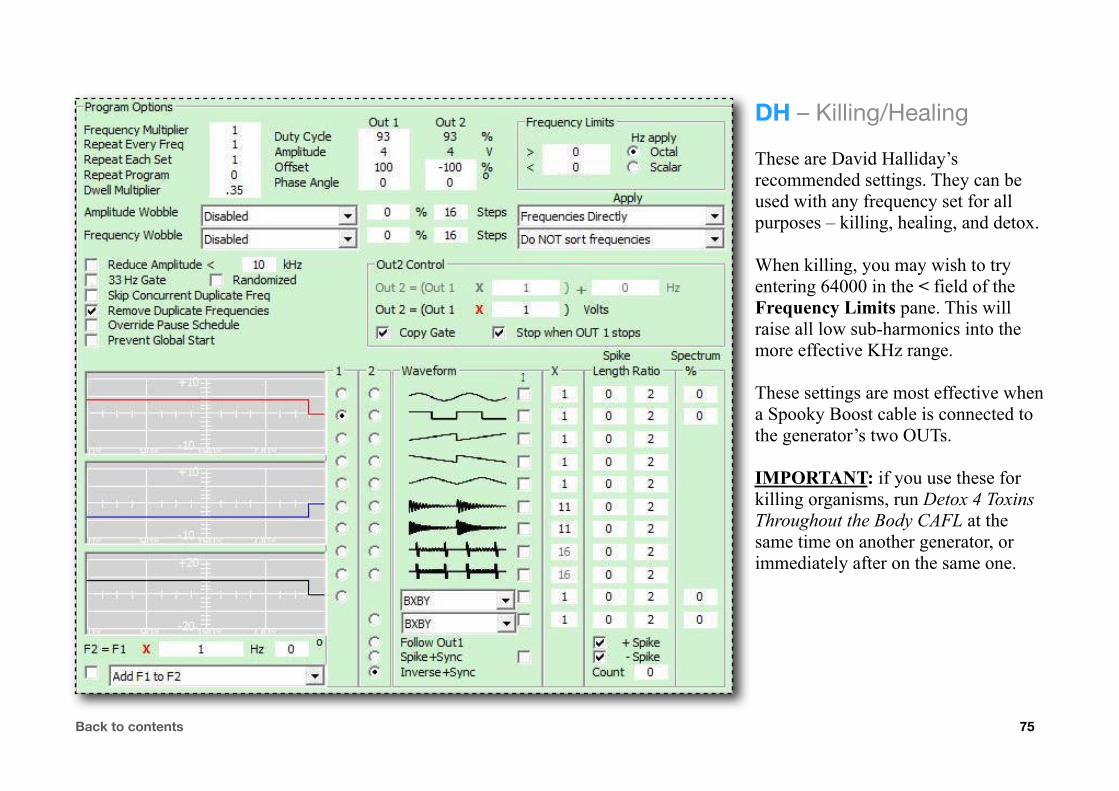
DH – Killing/Healing
These are David Halliday’s recommended settings. They can be used with any frequency set for all purposes – killing, healing, and detox.
When killing, you may wish to try entering 64000 in the < field of the Frequency Limits pane. This will raise all low sub-harmonics into the more effective KHz range.
These settings are most effective when a Spooky Boost cable is connected to the generator’s two OUTs.
IMPORTANT: if you use these for killing organisms, run Detox 4 Toxins Throughout the Body CAFL at the same time on another generator, or immediately after on the same one.
Back to contents 75

Spooky Spectrum Sweep
These are the settings for a dual-output Program using the Spooky Spectrum Sweep CUST set.
Best used when a Spooky Boost cable is attached to the generator’s two OUTs with one Spooky Remote. They will also work when two Spooky Remotes are connected.
With one Spooky Remote Direct Connected to OUT 1, you will lose the fine-grained second sweep from OUT 2, but the main sweep will still transmit.
The Dwell Multiplier must be set to 1 for the sweep to work correctly.
IMPORTANT: run Detox 4 Toxins Throughout the Body CAFL at the same time on another generator, or immediately after on the same one.
Back to contents 76
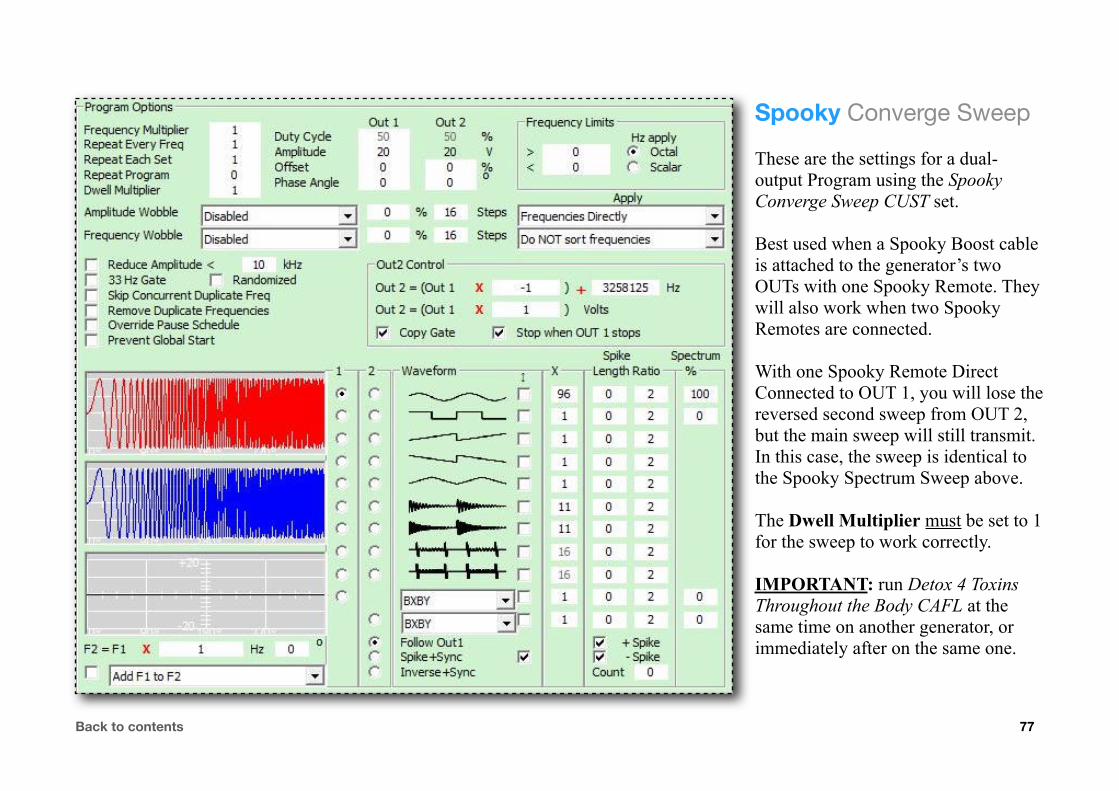
Spooky Converge Sweep
These are the settings for a dual-output Program using the Spooky Converge Sweep CUST set.
Best used when a Spooky Boost cable is attached to the generator’s two OUTs with one Spooky Remote. They will also work when two Spooky Remotes are connected.
With one Spooky Remote Direct Connected to OUT 1, you will lose the reversed second sweep from OUT 2, but the main sweep will still transmit. In this case, the sweep is identical to the Spooky Spectrum Sweep above.
The Dwell Multiplier must be set to 1 for the sweep to work correctly.
IMPORTANT: run Detox 4 Toxins Throughout the Body CAFL at the same time on another generator, or immediately after on the same one.
Back to contents 77
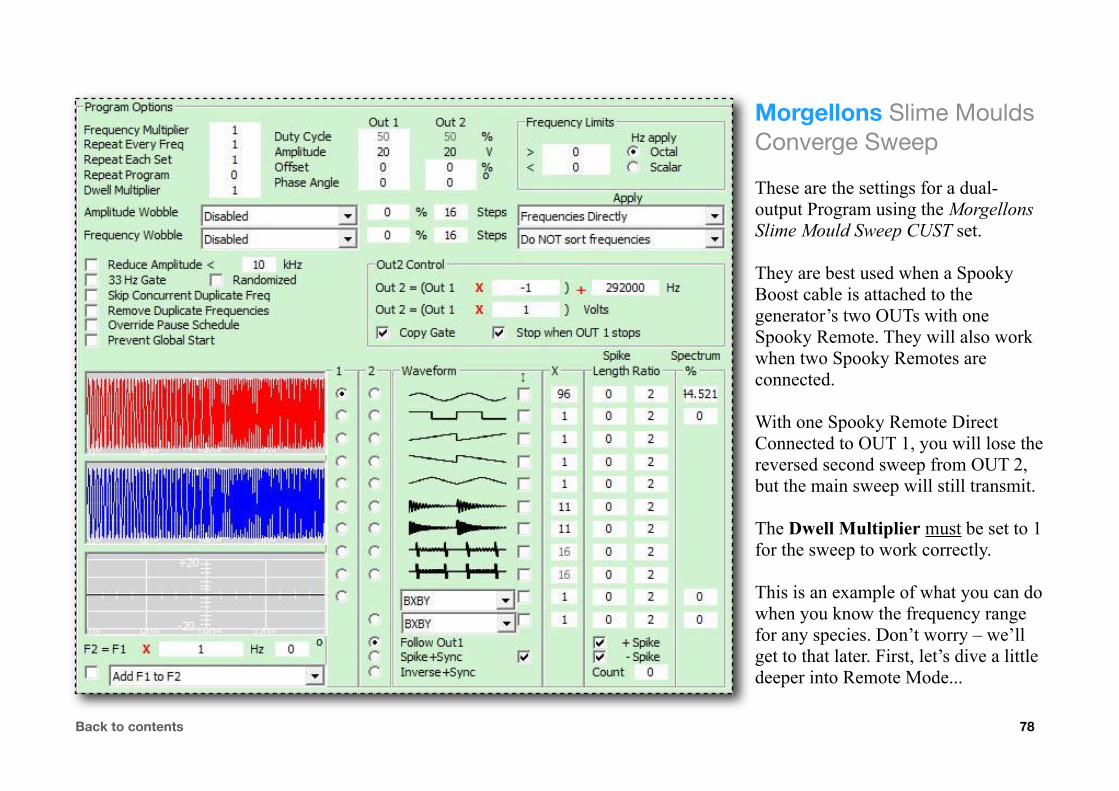
Morgellons Slime Moulds Converge Sweep
These are the settings for a dual-output Program using the Morgellons Slime Mould Sweep CUST set.
They are best used when a Spooky Boost cable is attached to the generator’s two OUTs with one Spooky Remote. They will also work when two Spooky Remotes are connected.
With one Spooky Remote Direct Connected to OUT 1, you will lose the reversed second sweep from OUT 2, but the main sweep will still transmit.
The Dwell Multiplier must be set to 1 for the sweep to work correctly.
This is an example of what you can do when you know the frequency range for any species. Don’t worry – we’ll get to that later. First, let’s dive a little deeper into Remote Mode...
Back to contents 78

Remote & Contact modesThe vast majority of Spooky2 users will spend their time using Remote and Contact Modes. Although these two ways of working may seem worlds apart, in reality there are only a few important operational differences between them.
Here’s a table that summarises those differences:
Differences Remote Mode Contact Mode
Transmission Wireless delivery: Spooky Remote via DNA/scalar energy.
Wired delivery: Spooky Tubes/electrodes via DC electricity.
Treatment Durations Takes more time: usually 1-3 minutes per frequency repeated up to 20 times a day, or even non-stop.
Takes less time: usually three minutes per frequency repeated once or twice a day.
Radio-band Carriers Carrier not required – frequencies are received by every cell that contains DNA. But use of a dynamic carrier will add therapeutic effect.
Carrier may be required for deep body penetration. Static or dynamic carriers are possible, with dynamic strongly recommended for added therapeutic effect.
Spectrum Sweeps Currently, Spectrum sweeps are specifically engineered to be used in Remote Mode only.
Currently, Spectrum sweeps are not effective in Contact Mode because of their voltage requirements.
Inverse+Sync Doubles the power of Remote Mode by inverting Out 2ʼs waveform and adding its harmonic content to Out 1.
Quadruples the power of Contact Mode by inverting Out 2ʼs waveform, doubling its voltage potential, and adding it to Out 1 (doubling the voltage of a signal squares its power).
As you can see, Remote Mode looks extremely attractive for those who lead busy lives. And there is also the problem that the very powerful and effective Spectrum sweeps are not yet practicable in Contact Mode.
However, there are considerable benefits to be had from using both modes, and our recommendation is to do one Contact session on the main problem every day, then switch the generator over to Remote Mode. This way, you get the best of both worlds.Back to contents 79
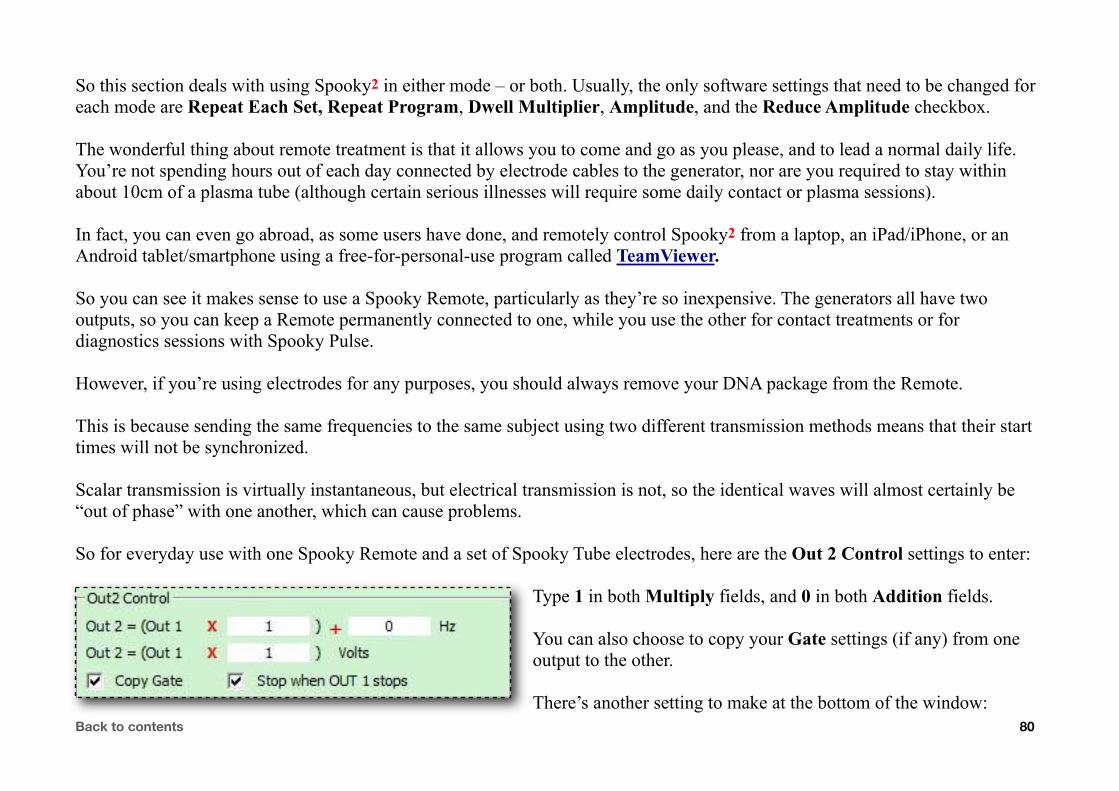
So this section deals with using Spooky2 in either mode – or both. Usually, the only software settings that need to be changed for each mode are Repeat Each Set, Repeat Program, Dwell Multiplier, Amplitude, and the Reduce Amplitude checkbox.
The wonderful thing about remote treatment is that it allows you to come and go as you please, and to lead a normal daily life. You’re not spending hours out of each day connected by electrode cables to the generator, nor are you required to stay within about 10cm of a plasma tube (although certain serious illnesses will require some daily contact or plasma sessions).
In fact, you can even go abroad, as some users have done, and remotely control Spooky2 from a laptop, an iPad/iPhone, or an Android tablet/smartphone using a free-for-personal-use program called TeamViewer.
So you can see it makes sense to use a Spooky Remote, particularly as they’re so inexpensive. The generators all have two outputs, so you can keep a Remote permanently connected to one, while you use the other for contact treatments or for diagnostics sessions with Spooky Pulse.
However, if you’re using electrodes for any purposes, you should always remove your DNA package from the Remote.
This is because sending the same frequencies to the same subject using two different transmission methods means that their start times will not be synchronized.
Scalar transmission is virtually instantaneous, but electrical transmission is not, so the identical waves will almost certainly be “out of phase” with one another, which can cause problems.
So for everyday use with one Spooky Remote and a set of Spooky Tube electrodes, here are the Out 2 Control settings to enter:
Type 1 in both Multiply fields, and 0 in both Addition fields.
You can also choose to copy your Gate settings (if any) from one output to the other.
There’s another setting to make at the bottom of the window:Back to contents 80
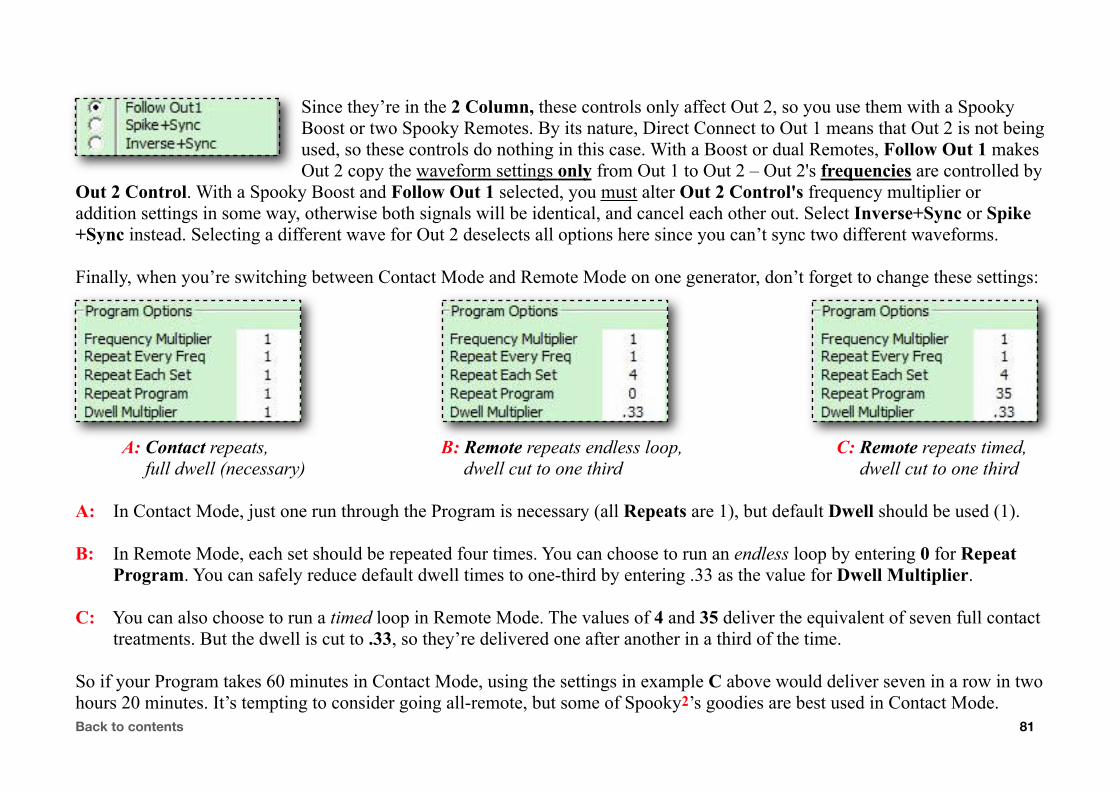
Since they’re in the 2 Column, these controls only affect Out 2, so you use them with a Spooky Boost or two Spooky Remotes. By its nature, Direct Connect to Out 1 means that Out 2 is not being used, so these controls do nothing in this case. With a Boost or dual Remotes, Follow Out 1 makes Out 2 copy the waveform settings only from Out 1 to Out 2 – Out 2's frequencies are controlled by
Out 2 Control. With a Spooky Boost and Follow Out 1 selected, you must alter Out 2 Control's frequency multiplier or addition settings in some way, otherwise both signals will be identical, and cancel each other out. Select Inverse+Sync or Spike+Sync instead. Selecting a different wave for Out 2 deselects all options here since you can’t sync two different waveforms.
Finally, when you’re switching between Contact Mode and Remote Mode on one generator, don’t forget to change these settings:
A: Contact repeats, B: Remote repeats endless loop, C: Remote repeats timed, full dwell (necessary) dwell cut to one third dwell cut to one third
A: In Contact Mode, just one run through the Program is necessary (all Repeats are 1), but default Dwell should be used (1).
B: In Remote Mode, each set should be repeated four times. You can choose to run an endless loop by entering 0 for Repeat Program. You can safely reduce default dwell times to one-third by entering .33 as the value for Dwell Multiplier.
C: You can also choose to run a timed loop in Remote Mode. The values of 4 and 35 deliver the equivalent of seven full contact treatments. But the dwell is cut to .33, so they’re delivered one after another in a third of the time.
So if your Program takes 60 minutes in Contact Mode, using the settings in example C above would deliver seven in a row in two hours 20 minutes. It’s tempting to consider going all-remote, but some of Spooky2’s goodies are best used in Contact Mode.Back to contents 81
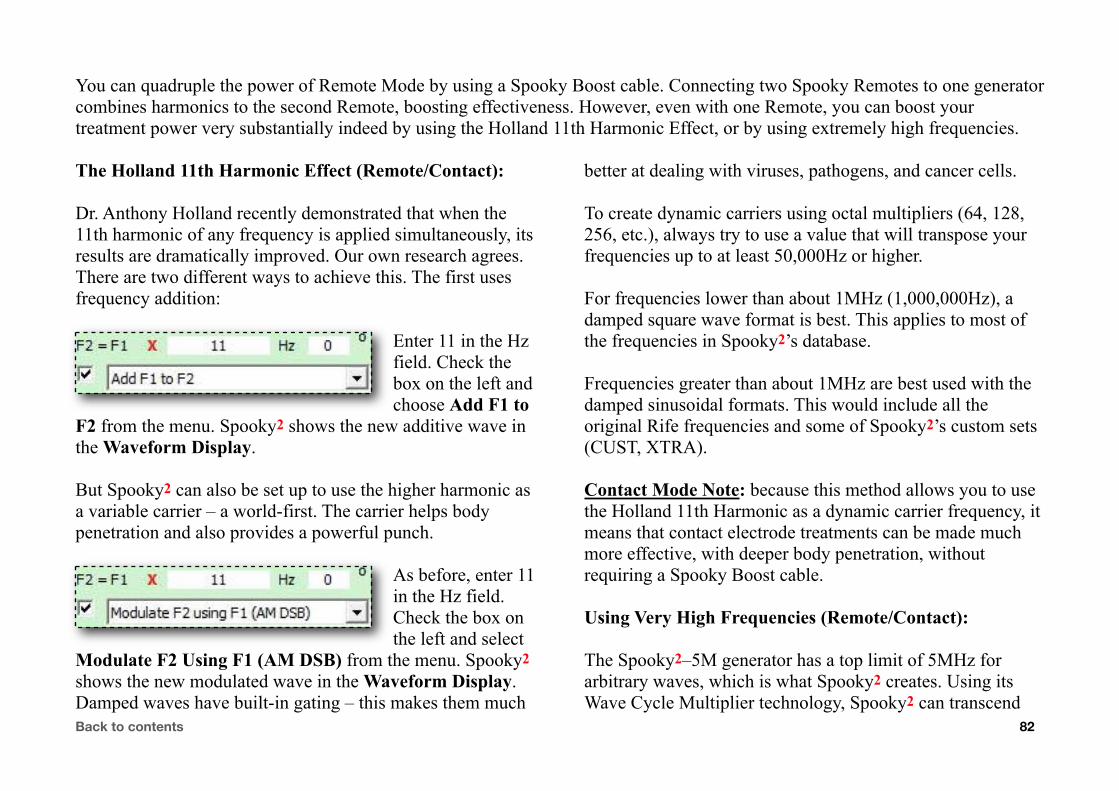
You can quadruple the power of Remote Mode by using a Spooky Boost cable. Connecting two Spooky Remotes to one generator combines harmonics to the second Remote, boosting effectiveness. However, even with one Remote, you can boost your treatment power very substantially indeed by using the Holland 11th Harmonic Effect, or by using extremely high frequencies.
The Holland 11th Harmonic Effect (Remote/Contact):
Dr. Anthony Holland recently demonstrated that when the 11th harmonic of any frequency is applied simultaneously, its results are dramatically improved. Our own research agrees. There are two different ways to achieve this. The first uses frequency addition:
Enter 11 in the Hz field. Check the box on the left and choose Add F1 to
F2 from the menu. Spooky2 shows the new additive wave in the Waveform Display.
But Spooky2 can also be set up to use the higher harmonic as a variable carrier – a world-first. The carrier helps body penetration and also provides a powerful punch.
As before, enter 11 in the Hz field.Check the box on the left and select
Modulate F2 Using F1 (AM DSB) from the menu. Spooky2 shows the new modulated wave in the Waveform Display. Damped waves have built-in gating – this makes them much
better at dealing with viruses, pathogens, and cancer cells.
To create dynamic carriers using octal multipliers (64, 128, 256, etc.), always try to use a value that will transpose your frequencies up to at least 50,000Hz or higher.
For frequencies lower than about 1MHz (1,000,000Hz), a damped square wave format is best. This applies to most of the frequencies in Spooky2’s database.
Frequencies greater than about 1MHz are best used with the damped sinusoidal formats. This would include all the original Rife frequencies and some of Spooky2’s custom sets (CUST, XTRA).
Contact Mode Note: because this method allows you to use the Holland 11th Harmonic as a dynamic carrier frequency, it means that contact electrode treatments can be made much more effective, with deeper body penetration, without requiring a Spooky Boost cable.
Using Very High Frequencies (Remote/Contact):
The Spooky2–5M generator has a top limit of 5MHz for arbitrary waves, which is what Spooky2 creates. Using its Wave Cycle Multiplier technology, Spooky2 can transcend
Back to contents 82
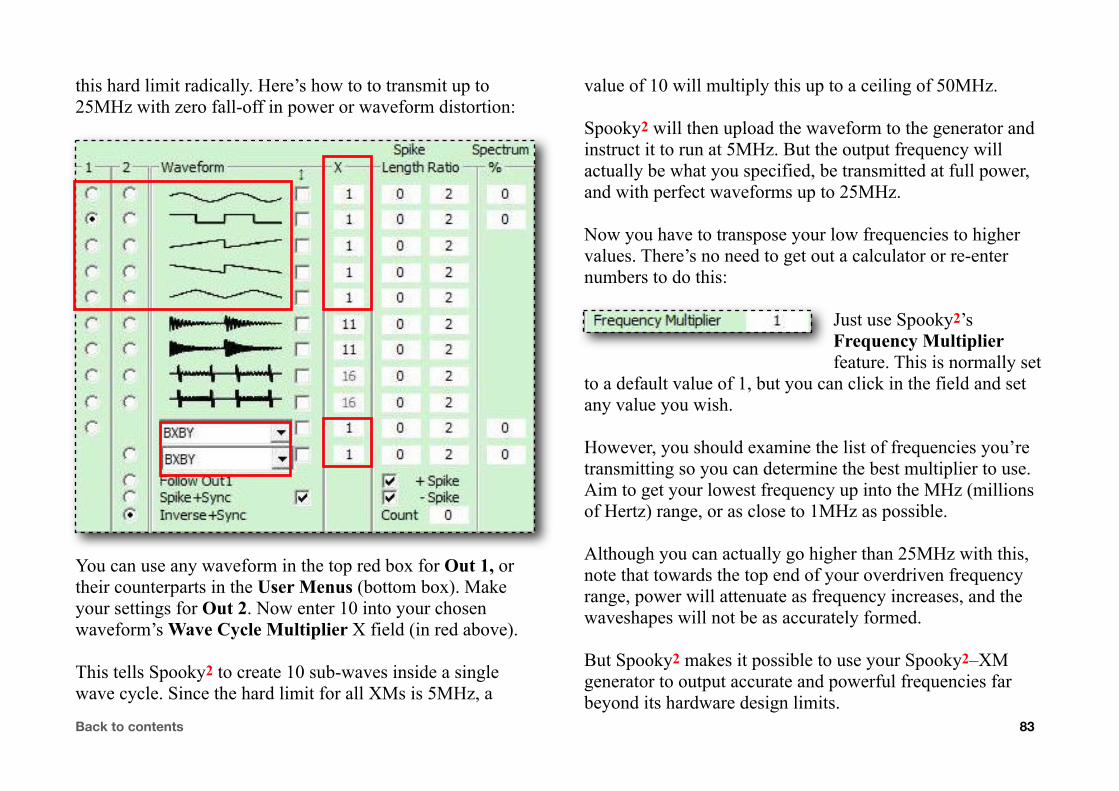
this hard limit radically. Here’s how to to transmit up to 25MHz with zero fall-off in power or waveform distortion:
You can use any waveform in the top red box for Out 1, or their counterparts in the User Menus (bottom box). Make your settings for Out 2. Now enter 10 into your chosen waveform’s Wave Cycle Multiplier X field (in red above).
This tells Spooky2 to create 10 sub-waves inside a single wave cycle. Since the hard limit for all XMs is 5MHz, a
value of 10 will multiply this up to a ceiling of 50MHz.
Spooky2 will then upload the waveform to the generator and instruct it to run at 5MHz. But the output frequency will actually be what you specified, be transmitted at full power, and with perfect waveforms up to 25MHz.
Now you have to transpose your low frequencies to higher values. There’s no need to get out a calculator or re-enter numbers to do this:
Just use Spooky2’s Frequency Multiplier feature. This is normally set
to a default value of 1, but you can click in the field and set any value you wish.
However, you should examine the list of frequencies you’re transmitting so you can determine the best multiplier to use. Aim to get your lowest frequency up into the MHz (millions of Hertz) range, or as close to 1MHz as possible.
Although you can actually go higher than 25MHz with this, note that towards the top end of your overdriven frequency range, power will attenuate as frequency increases, and the waveshapes will not be as accurately formed.
But Spooky2 makes it possible to use your Spooky2–XM generator to output accurate and powerful frequencies far beyond its hardware design limits.
Back to contents 83
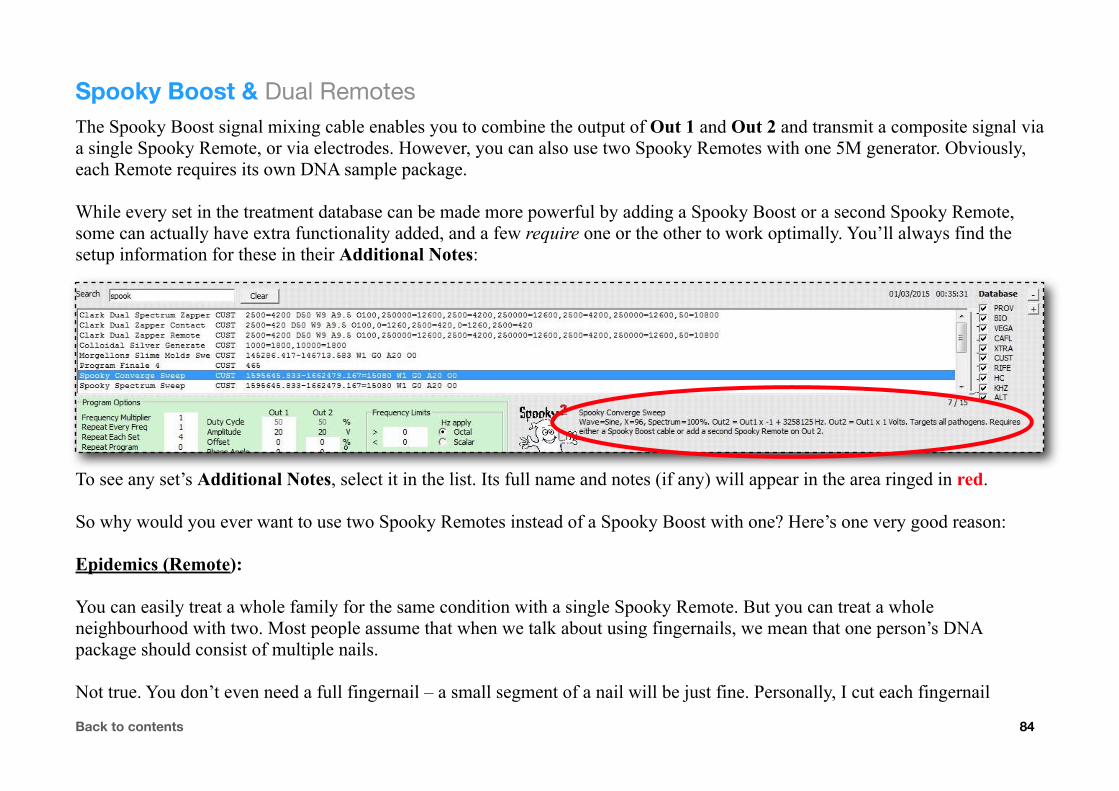
Spooky Boost & Dual RemotesThe Spooky Boost signal mixing cable enables you to combine the output of Out 1 and Out 2 and transmit a composite signal via a single Spooky Remote, or via electrodes. However, you can also use two Spooky Remotes with one 5M generator. Obviously, each Remote requires its own DNA sample package.
While every set in the treatment database can be made more powerful by adding a Spooky Boost or a second Spooky Remote, some can actually have extra functionality added, and a few require one or the other to work optimally. You’ll always find the setup information for these in their Additional Notes:
To see any set’s Additional Notes, select it in the list. Its full name and notes (if any) will appear in the area ringed in red.
So why would you ever want to use two Spooky Remotes instead of a Spooky Boost with one? Here’s one very good reason:
Epidemics (Remote):
You can easily treat a whole family for the same condition with a single Spooky Remote. But you can treat a whole neighbourhood with two. Most people assume that when we talk about using fingernails, we mean that one person’s DNA package should consist of multiple nails.
Not true. You don’t even need a full fingernail – a small segment of a nail will be just fine. Personally, I cut each fingernail
Back to contents 84
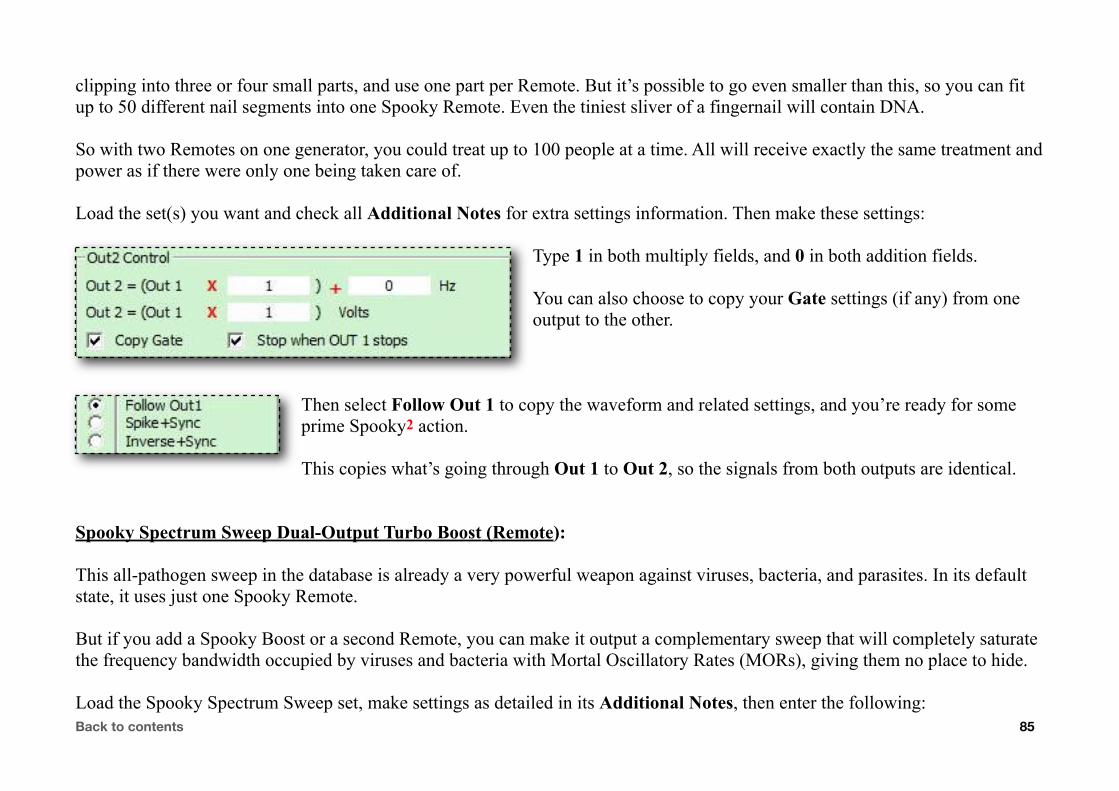
clipping into three or four small parts, and use one part per Remote. But it’s possible to go even smaller than this, so you can fit up to 50 different nail segments into one Spooky Remote. Even the tiniest sliver of a fingernail will contain DNA.
So with two Remotes on one generator, you could treat up to 100 people at a time. All will receive exactly the same treatment and power as if there were only one being taken care of.
Load the set(s) you want and check all Additional Notes for extra settings information. Then make these settings:
Type 1 in both multiply fields, and 0 in both addition fields.
You can also choose to copy your Gate settings (if any) from one output to the other.
Then select Follow Out 1 to copy the waveform and related settings, and you’re ready for some prime Spooky2 action.
This copies what’s going through Out 1 to Out 2, so the signals from both outputs are identical.
Spooky Spectrum Sweep Dual-Output Turbo Boost (Remote):
This all-pathogen sweep in the database is already a very powerful weapon against viruses, bacteria, and parasites. In its default state, it uses just one Spooky Remote.
But if you add a Spooky Boost or a second Remote, you can make it output a complementary sweep that will completely saturate the frequency bandwidth occupied by viruses and bacteria with Mortal Oscillatory Rates (MORs), giving them no place to hide.
Load the Spooky Spectrum Sweep set, make settings as detailed in its Additional Notes, then enter the following:Back to contents 85
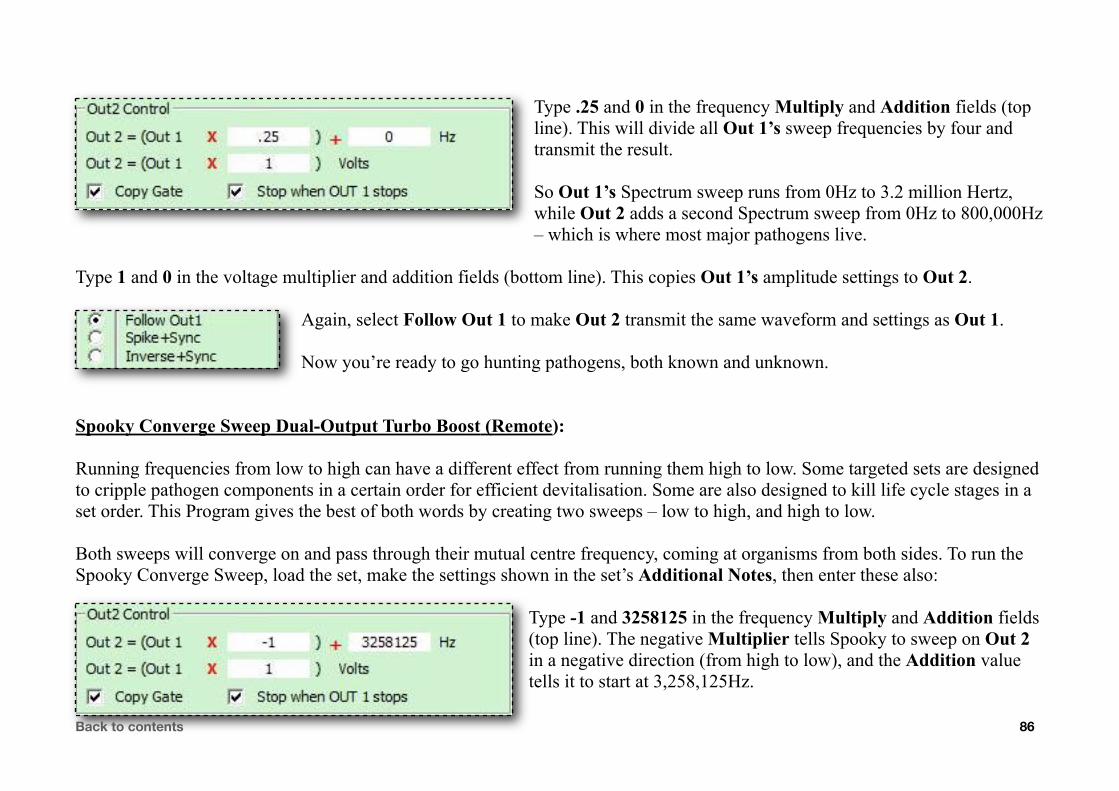
Type .25 and 0 in the frequency Multiply and Addition fields (top line). This will divide all Out 1’s sweep frequencies by four and transmit the result.
So Out 1’s Spectrum sweep runs from 0Hz to 3.2 million Hertz, while Out 2 adds a second Spectrum sweep from 0Hz to 800,000Hz – which is where most major pathogens live.
Type 1 and 0 in the voltage multiplier and addition fields (bottom line). This copies Out 1’s amplitude settings to Out 2.
Again, select Follow Out 1 to make Out 2 transmit the same waveform and settings as Out 1.
Now you’re ready to go hunting pathogens, both known and unknown.
Spooky Converge Sweep Dual-Output Turbo Boost (Remote):
Running frequencies from low to high can have a different effect from running them high to low. Some targeted sets are designed to cripple pathogen components in a certain order for efficient devitalisation. Some are also designed to kill life cycle stages in a set order. This Program gives the best of both words by creating two sweeps – low to high, and high to low.
Both sweeps will converge on and pass through their mutual centre frequency, coming at organisms from both sides. To run the Spooky Converge Sweep, load the set, make the settings shown in the set’s Additional Notes, then enter these also:
Type -1 and 3258125 in the frequency Multiply and Addition fields (top line). The negative Multiplier tells Spooky to sweep on Out 2 in a negative direction (from high to low), and the Addition value tells it to start at 3,258,125Hz.
Back to contents 86

Type 1 and 0 in the voltage Multiplier and Addition fields (bottom line). This copies Out 1’s amplitude settings to Out 2.
Select Follow Out 1 to make Out 2 transmit the same waveform and related settings as Out 1.
Now you’ve got two Spooky Spectrum Sweeps running in opposite directions – both produced by one 5M generator.
Harmonic Power (Remote/Contact):
Frequencies are always more effective when they’re augmented by a higher harmonic of themselves. Remember that every frequency can be transposed down into the human audio range and experienced as a musical pitch. So what you’re doing by adding a harmonic is “playing a chord.” In music, and in Rife, a chord is always more powerful than a single note/frequency.
Although harmonics can be calculated by repeatedly adding the fundamental – or original – frequency, it’s easier to just use a multiplier. Some harmonics we’ve come across in Rife include the Holland 11th Harmonic (11 is the multiplier), the third harmonic (three is the multiplier), and the 64th harmonic (used in the Parasites Ropeworm CUST set).
So to add a harmonic frequency on the second Spooky Remote, you simply enter your positive value in the top Multiply field of the Out 2 Control Pane, and a value of 0 in the Addition field. The frequencies transmitted via Out 1 will then be multiplied by your harmonic value and transmitted simultaneously via Out 2.
It’s also possible to add a harmonic by “building it into” the fundamental frequency using the F2 = F1 controls, then choosing an option from the menu below. But using a second Remote and the Out 2 Control gives you something you can’t get any other way – control over your harmonic’s amplitude. Here, Out 1 has an amplitude of 5 volts.
Let’s say you wish to add the Holland 11th Harmonic– but run it at 9 volts. Enter the settings on the left to get the results on the right (9/5=1.8).
Back to contents 87
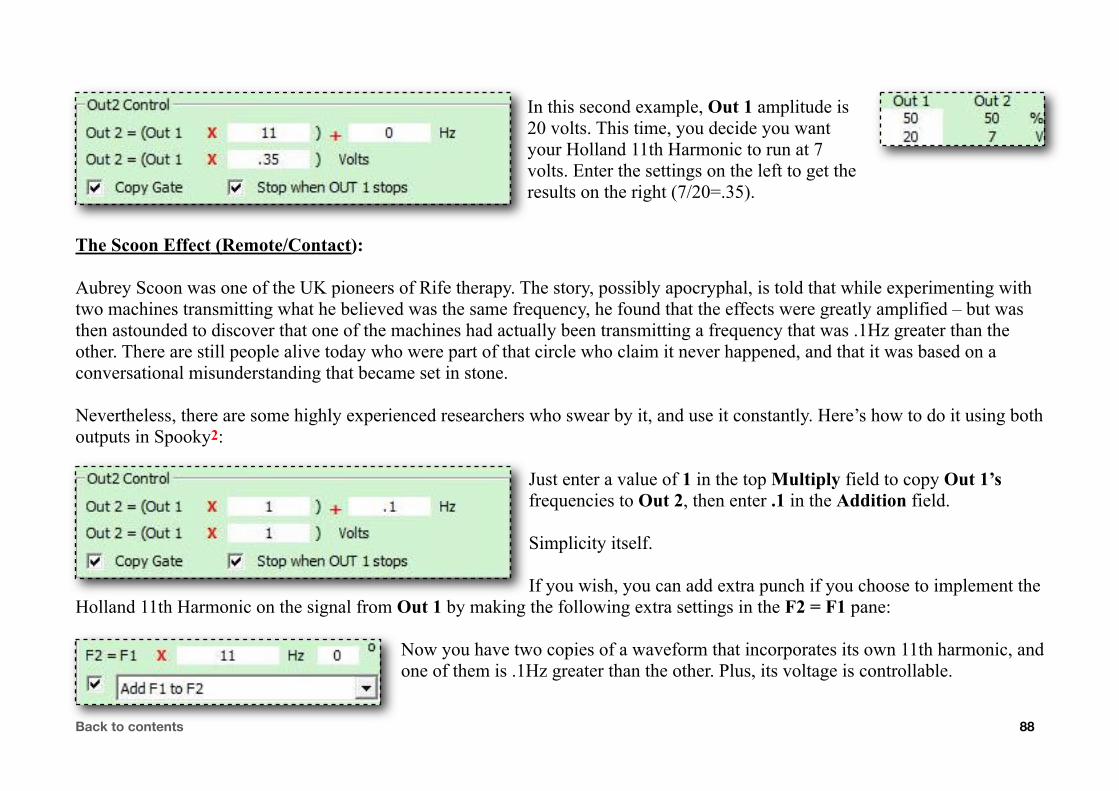
In this second example, Out 1 amplitude is 20 volts. This time, you decide you want your Holland 11th Harmonic to run at 7 volts. Enter the settings on the left to get the results on the right (7/20=.35).
The Scoon Effect (Remote/Contact):
Aubrey Scoon was one of the UK pioneers of Rife therapy. The story, possibly apocryphal, is told that while experimenting with two machines transmitting what he believed was the same frequency, he found that the effects were greatly amplified – but was then astounded to discover that one of the machines had actually been transmitting a frequency that was .1Hz greater than the other. There are still people alive today who were part of that circle who claim it never happened, and that it was based on a conversational misunderstanding that became set in stone.
Nevertheless, there are some highly experienced researchers who swear by it, and use it constantly. Here’s how to do it using both outputs in Spooky2:
Just enter a value of 1 in the top Multiply field to copy Out 1’s frequencies to Out 2, then enter .1 in the Addition field.
Simplicity itself.
If you wish, you can add extra punch if you choose to implement the Holland 11th Harmonic on the signal from Out 1 by making the following extra settings in the F2 = F1 pane:
Now you have two copies of a waveform that incorporates its own 11th harmonic, and one of them is .1Hz greater than the other. Plus, its voltage is controllable.
Back to contents 88
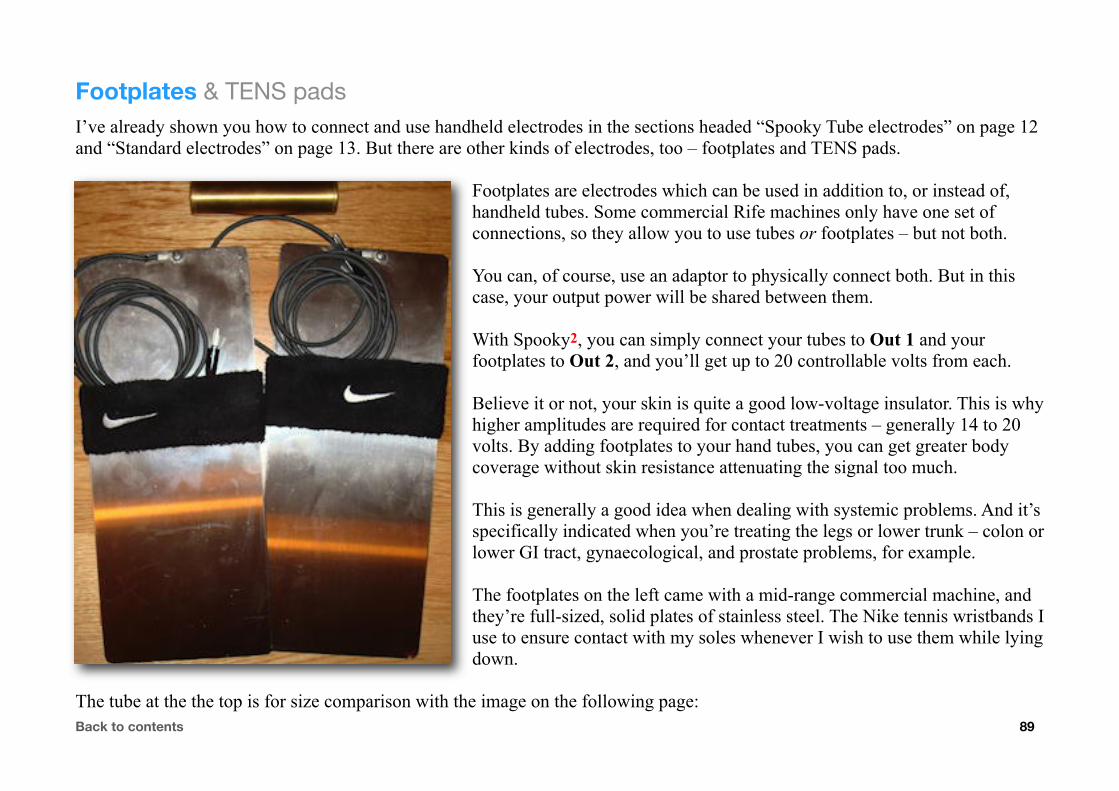
Footplates & TENS padsI’ve already shown you how to connect and use handheld electrodes in the sections headed “Spooky Tube electrodes” on page 12 and “Standard electrodes” on page 13. But there are other kinds of electrodes, too – footplates and TENS pads.
Footplates are electrodes which can be used in addition to, or instead of, handheld tubes. Some commercial Rife machines only have one set of connections, so they allow you to use tubes or footplates – but not both.
You can, of course, use an adaptor to physically connect both. But in this case, your output power will be shared between them.
With Spooky2, you can simply connect your tubes to Out 1 and your footplates to Out 2, and you’ll get up to 20 controllable volts from each.
Believe it or not, your skin is quite a good low-voltage insulator. This is why higher amplitudes are required for contact treatments – generally 14 to 20 volts. By adding footplates to your hand tubes, you can get greater body coverage without skin resistance attenuating the signal too much.
This is generally a good idea when dealing with systemic problems. And it’s specifically indicated when you’re treating the legs or lower trunk – colon or lower GI tract, gynaecological, and prostate problems, for example.
The footplates on the left came with a mid-range commercial machine, and they’re full-sized, solid plates of stainless steel. The Nike tennis wristbands I use to ensure contact with my soles whenever I wish to use them while lying down.
The tube at the the top is for size comparison with the image on the following page:Back to contents 89

This set of footplates came with a much more expensive setup, and I’ve included the same tube in the photo at the same scale so you can see how much smaller they are – half as long and wide as the previous set. I’ve no idea what kind of metal they’re made from, but when you pick one up by its connector, it will wobble and bend readily.
Proving that price is no guarantee of quality.
However, they do show how easy it would be to make these yourself – two decent-sized pieces of thin stainless steel, attach the alligator clips cable that came with your generator, and you have a serviceable set of footplates to connect to Out 2.
When you do use footplates, remember that the skin on the soles of your feet is much tougher –which means it’s a better insulator. So it’s a good idea
to place your footplates on a towel and wrap them in kitchen tissue dampened with tap or salted water to enhance conductivity. And although they’re called “foot” plates, you can use them anywhere on your body.
A more flexible alternative is a TENS pad (right). These are rubber sticky pad electrodes for Transcutaneous Electrical Nerve Stimulation units used in medicine for pain control.
They are available on the Spooky2 Mall site here, along with a TENS cable. Pad placement should be on either side of the area to be treated. For an organ, front and back is best, so you transect it with energy through the body. Some TENS pads use snap-on electrical connections, and some use pin sockets (like those pictured right).Back to contents 90

For snap-on connectors, simply attach an alligator clip to each one (TENS pads should be used in pairs, like any other electrodes). For pads that use sockets, you can buy two of the TENS pins 6-inch cables pictured below here.
Each pin is inserted into a pad socket, and the other end of each cable can be stripped of its insulation and connected to an alligator clip. The connections can then be wrapped with paper masking tape.
Or, if you can handle a screwdriver, you can quickly make up your own permanent cables using TENS pins and banana plugs, both from here.
Attach these to the ends of two suitable lengths of 12-gauge single-core wire from any electrical supplies store. Then connect it all up to your generator
with this BNC-to-dual banana plug adaptor for a more durable, tidy, and professional setup (pictured below right).
For footplates and for TENS pads, here are the settings – which can also be used to connect two sets of hand electrodes to treat two subjects with the same condition, as you’ll see in a moment:
Back to contents 91
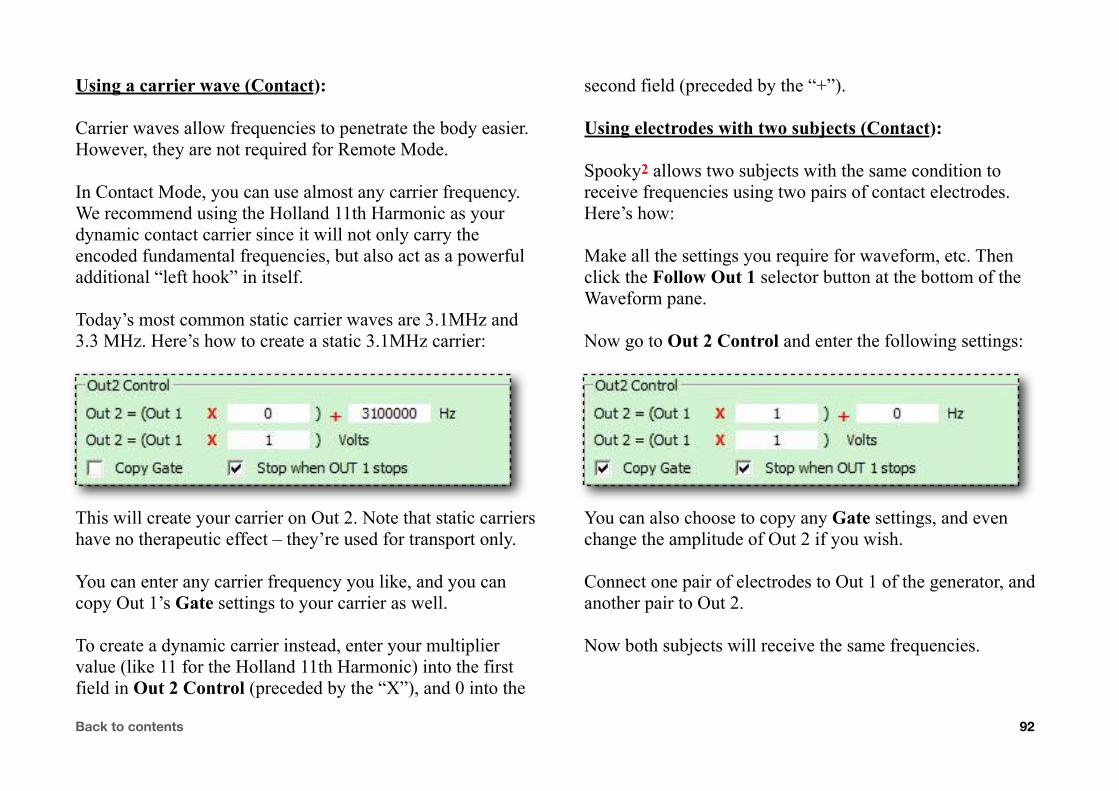
Using a carrier wave (Contact):
Carrier waves allow frequencies to penetrate the body easier. However, they are not required for Remote Mode.
In Contact Mode, you can use almost any carrier frequency. We recommend using the Holland 11th Harmonic as your dynamic contact carrier since it will not only carry the encoded fundamental frequencies, but also act as a powerful additional “left hook” in itself.
Today’s most common static carrier waves are 3.1MHz and 3.3 MHz. Here’s how to create a static 3.1MHz carrier:
This will create your carrier on Out 2. Note that static carriers have no therapeutic effect – they’re used for transport only.
You can enter any carrier frequency you like, and you can copy Out 1’s Gate settings to your carrier as well.
To create a dynamic carrier instead, enter your multiplier value (like 11 for the Holland 11th Harmonic) into the first field in Out 2 Control (preceded by the “X”), and 0 into the
second field (preceded by the “+”).
Using electrodes with two subjects (Contact):
Spooky2 allows two subjects with the same condition to receive frequencies using two pairs of contact electrodes. Here’s how:
Make all the settings you require for waveform, etc. Then click the Follow Out 1 selector button at the bottom of the Waveform pane.
Now go to Out 2 Control and enter the following settings:
You can also choose to copy any Gate settings, and even change the amplitude of Out 2 if you wish.
Connect one pair of electrodes to Out 1 of the generator, and another pair to Out 2.
Now both subjects will receive the same frequencies.
Back to contents 92

Inverse+SyncI’ve shown you how Spooky2 provides a way to greatly increase the effectiveness of contact treatment by connecting footplates or TENS pads in addition to the handheld electrodes – thus putting both outputs to work. And of course connecting a Spooky Boost cable also harnesses both outputs by mixing their signals and sending the result to one Remote or set of electrodes.
But can you do this without a Spooky Boost? Yes, you can – if you have two BNC-to-alligator clips cables. Every 5M generator comes from the factory with one . If you have more than one generator, you can use a second cable.
You can also buy these at electronics stores, or make one yourself. By doing this, you can apply a constant amplitude of up to 20 volts in Contact Mode treatments (doubling the voltage squares its power).
So you get FOUR times the power, thanks to Inverse+Sync. Here’s how:
Connect both cables to Out 1 and Out 2. Now separate the red clips from the black ones – we won’t be connecting the black clips, so you can wrap each one in paper masking tape.
Now connect one red clip to a Spooky Tube electrode, and do the same for the other red clip – each red clip should be attached to an electrode. By connecting in this way, you’re about to enable a true bipolar signal, which give an additional fourfold increase in power.
Back to contents 93
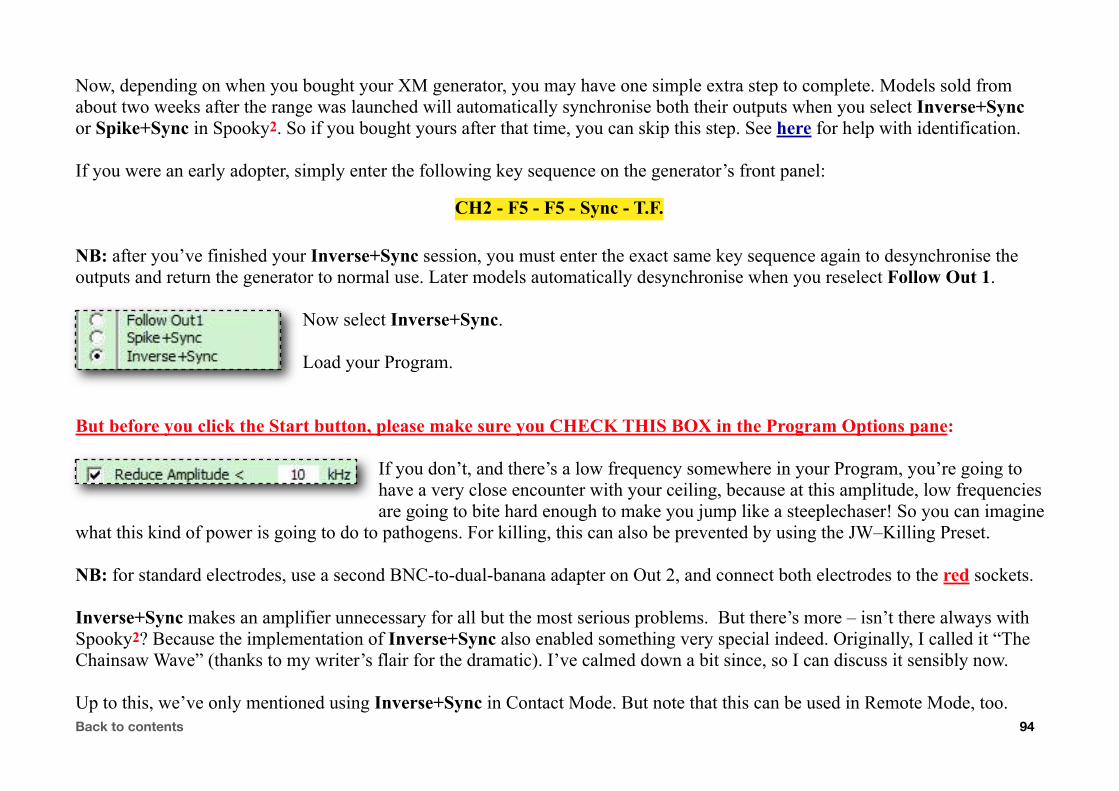
Now, depending on when you bought your XM generator, you may have one simple extra step to complete. Models sold from about two weeks after the range was launched will automatically synchronise both their outputs when you select Inverse+Sync or Spike+Sync in Spooky2. So if you bought yours after that time, you can skip this step. See here for help with identification.
If you were an early adopter, simply enter the following key sequence on the generator’s front panel:
NB: after you’ve finished your Inverse+Sync session, you must enter the exact same key sequence again to desynchronise the outputs and return the generator to normal use. Later models automatically desynchronise when you reselect Follow Out 1.
Now select Inverse+Sync.
Load your Program.
But before you click the Start button, please make sure you CHECK THIS BOX in the Program Options pane:
If you don’t, and there’s a low frequency somewhere in your Program, you’re going to have a very close encounter with your ceiling, because at this amplitude, low frequencies are going to bite hard enough to make you jump like a steeplechaser! So you can imagine
what this kind of power is going to do to pathogens. For killing, this can also be prevented by using the JW–Killing Preset.
NB: for standard electrodes, use a second BNC-to-dual-banana adapter on Out 2, and connect both electrodes to the red sockets.
Inverse+Sync makes an amplifier unnecessary for all but the most serious problems. But there’s more – isn’t there always with Spooky2? Because the implementation of Inverse+Sync also enabled something very special indeed. Originally, I called it “The Chainsaw Wave” (thanks to my writer’s flair for the dramatic). I’ve calmed down a bit since, so I can discuss it sensibly now.
Up to this, we’ve only mentioned using Inverse+Sync in Contact Mode. But note that this can be used in Remote Mode, too.
CH2 - F5 - F5 - Sync - T.F.
Back to contents 94
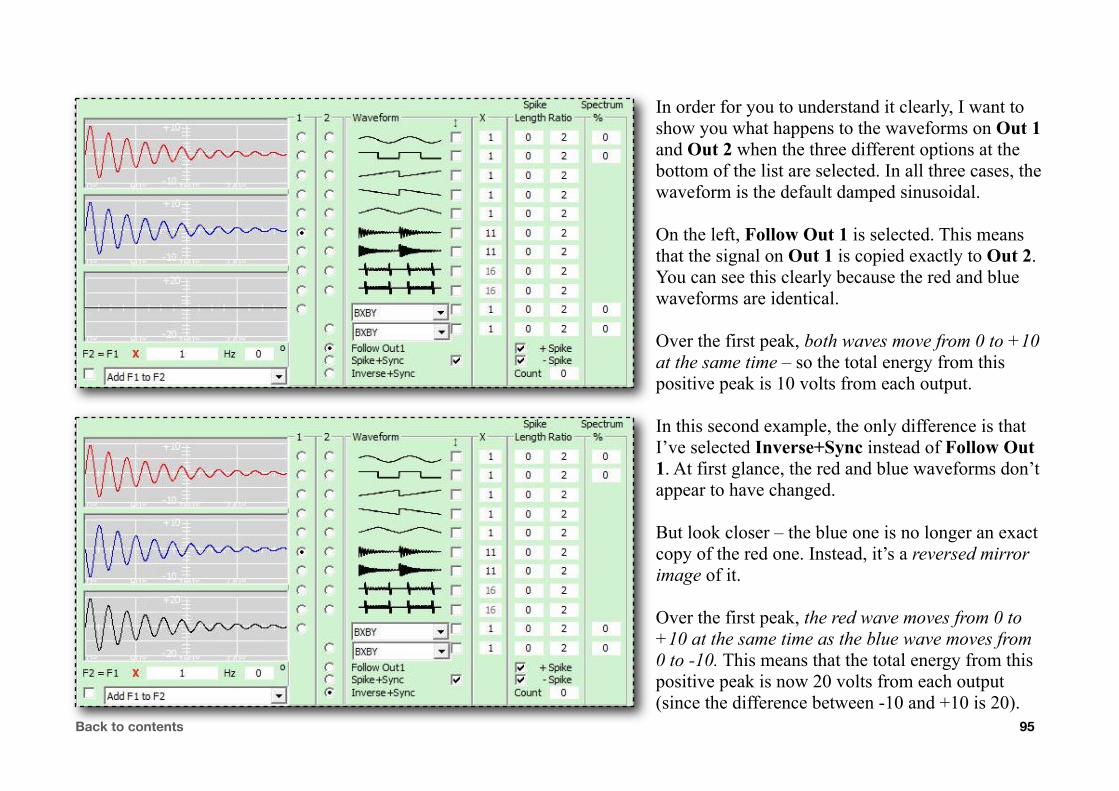
In order for you to understand it clearly, I want to show you what happens to the waveforms on Out 1 and Out 2 when the three different options at the bottom of the list are selected. In all three cases, the waveform is the default damped sinusoidal.
On the left, Follow Out 1 is selected. This means that the signal on Out 1 is copied exactly to Out 2. You can see this clearly because the red and blue waveforms are identical.
Over the first peak, both waves move from 0 to +10 at the same time – so the total energy from this positive peak is 10 volts from each output.
In this second example, the only difference is that I’ve selected Inverse+Sync instead of Follow Out 1. At first glance, the red and blue waveforms don’t appear to have changed.
But look closer – the blue one is no longer an exact copy of the red one. Instead, it’s a reversed mirror image of it.
Over the first peak, the red wave moves from 0 to +10 at the same time as the blue wave moves from 0 to -10. This means that the total energy from this positive peak is now 20 volts from each output (since the difference between -10 and +10 is 20).
Back to contents 95
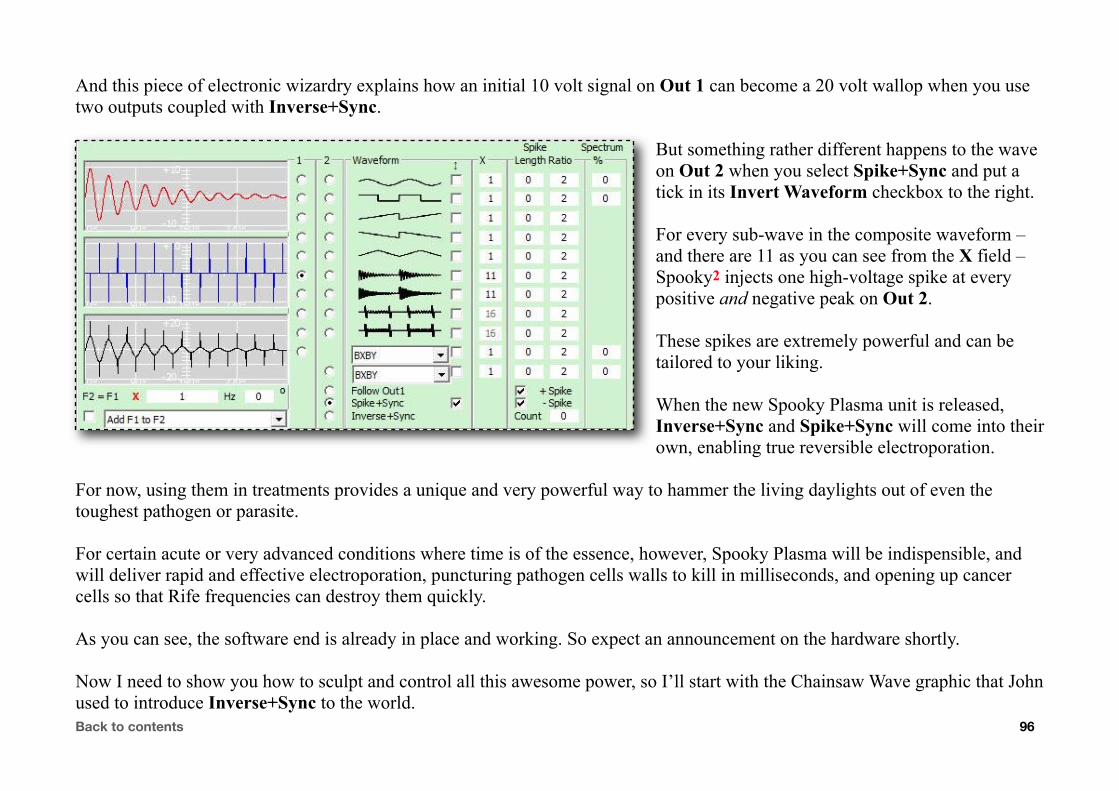
And this piece of electronic wizardry explains how an initial 10 volt signal on Out 1 can become a 20 volt wallop when you use two outputs coupled with Inverse+Sync.
But something rather different happens to the wave on Out 2 when you select Spike+Sync and put a tick in its Invert Waveform checkbox to the right.
For every sub-wave in the composite waveform – and there are 11 as you can see from the X field – Spooky2 injects one high-voltage spike at every positive and negative peak on Out 2.
These spikes are extremely powerful and can be tailored to your liking.
When the new Spooky Plasma unit is released, Inverse+Sync and Spike+Sync will come into their own, enabling true reversible electroporation.
For now, using them in treatments provides a unique and very powerful way to hammer the living daylights out of even the toughest pathogen or parasite.
For certain acute or very advanced conditions where time is of the essence, however, Spooky Plasma will be indispensible, and will deliver rapid and effective electroporation, puncturing pathogen cells walls to kill in milliseconds, and opening up cancer cells so that Rife frequencies can destroy them quickly.
As you can see, the software end is already in place and working. So expect an announcement on the hardware shortly.
Now I need to show you how to sculpt and control all this awesome power, so I’ll start with the Chainsaw Wave graphic that John used to introduce Inverse+Sync to the world.Back to contents 96
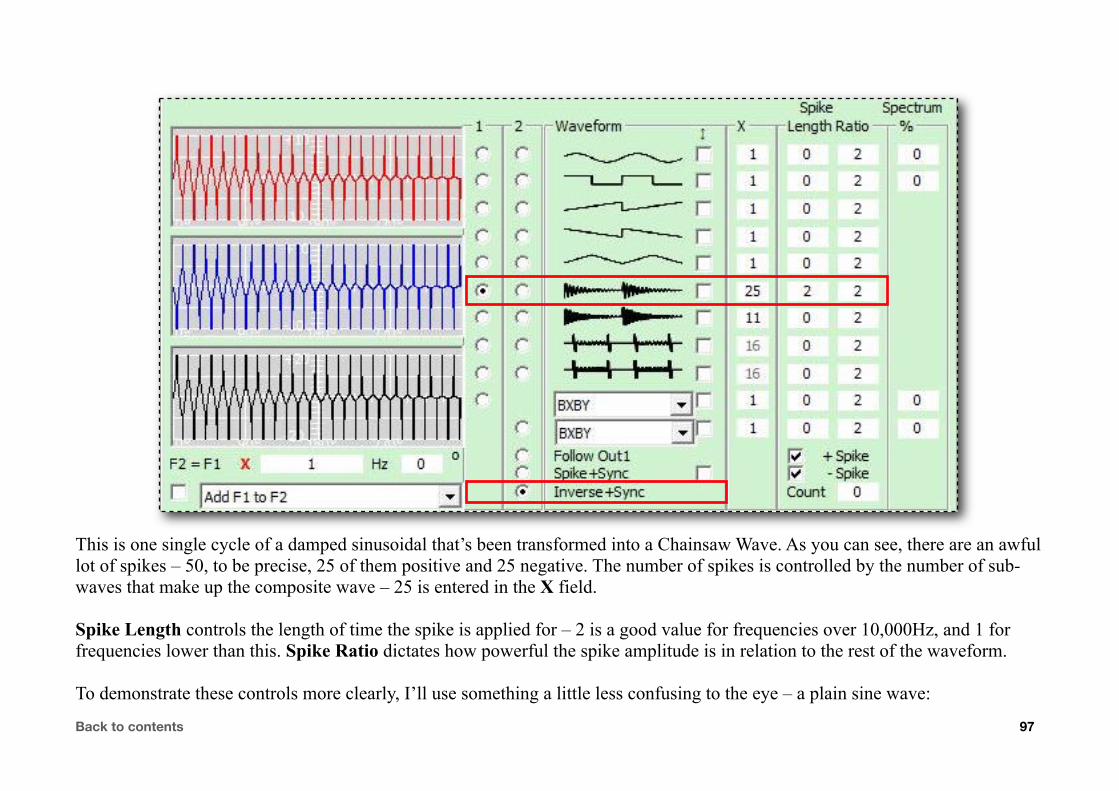
This is one single cycle of a damped sinusoidal that’s been transformed into a Chainsaw Wave. As you can see, there are an awful lot of spikes – 50, to be precise, 25 of them positive and 25 negative. The number of spikes is controlled by the number of sub-waves that make up the composite wave – 25 is entered in the X field.
Spike Length controls the length of time the spike is applied for – 2 is a good value for frequencies over 10,000Hz, and 1 for frequencies lower than this. Spike Ratio dictates how powerful the spike amplitude is in relation to the rest of the waveform.
To demonstrate these controls more clearly, I’ll use something a little less confusing to the eye – a plain sine wave:
Back to contents 97

Here’s our sine wave, composed of five sub-waves (X = 5). There’s a voltage spike at each positive and negative peak (+Spike and –Spike are both ticked), and each one is transmitted for two time units (Spike Length = 2).
Spike Ratio is set to 2, which means that the amplitude of each spike is twice that of the overall waveform. You can see that the curved wave only rises and falls halfway to the top and bottom of the window, but each spike goes all the way.
Now let’s try changing the Spike Length and Spike Ratio so you can see the difference these make:
Back to contents 98

Here I’ve changed the Spike Length to 16 and the Spike Ratio to 8 so you can clearly see what’s going on.
The physical width of each spike (which is the left-to-right time axis) has obviously increased, and the height of the underlying parent wave (which is the vertical amplitude axis) has decreased – but the spike’s height (amplitude) has remained the same. Note that a Spike Length of 16 as shown wouldn’t be a good value to enter because high voltage would be applied for longer – this would be painful. I’ve used this value simply to demonstrate how the waveform’s shape changes in response.
OK, so what do the other spike controls do?
Back to contents 99
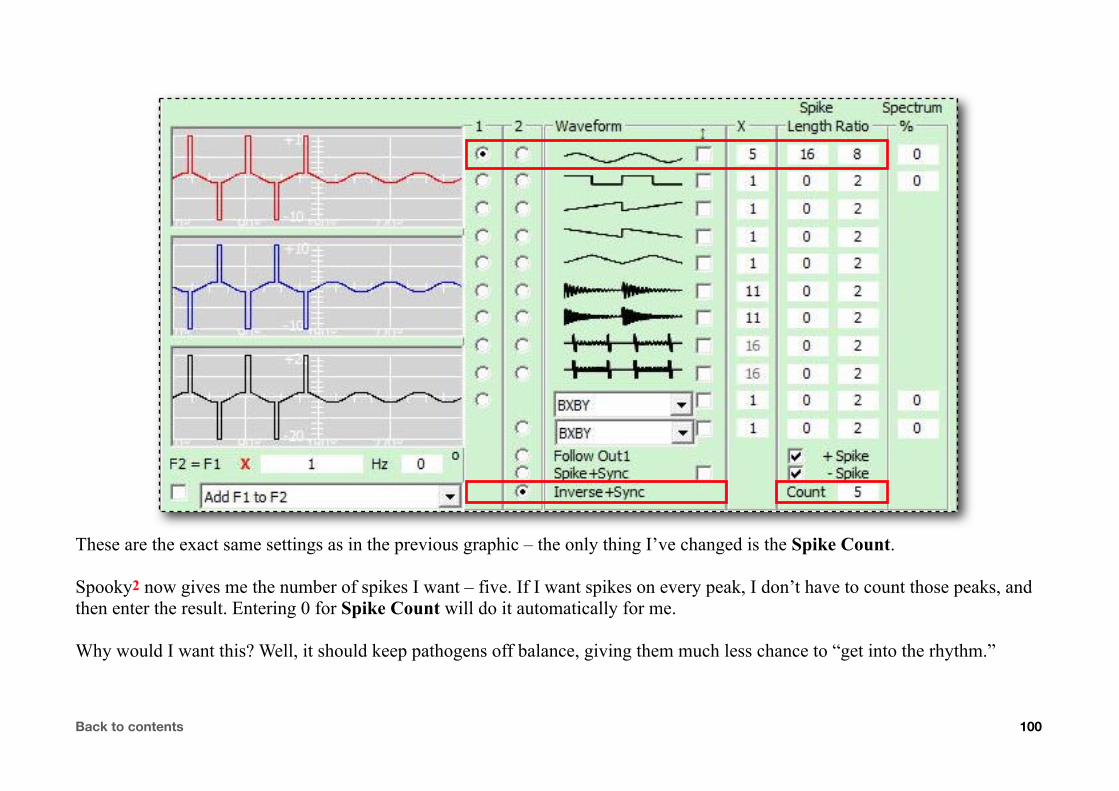
These are the exact same settings as in the previous graphic – the only thing I’ve changed is the Spike Count.
Spooky2 now gives me the number of spikes I want – five. If I want spikes on every peak, I don’t have to count those peaks, and then enter the result. Entering 0 for Spike Count will do it automatically for me.
Why would I want this? Well, it should keep pathogens off balance, giving them much less chance to “get into the rhythm.”
Back to contents 100
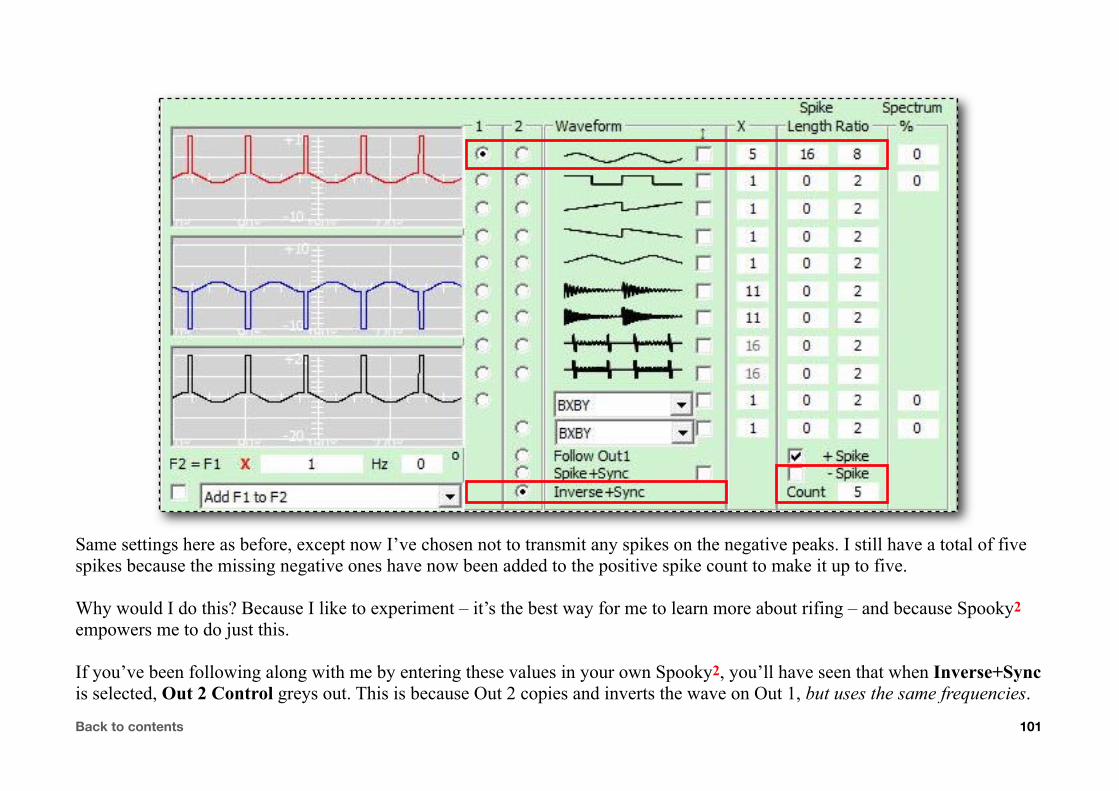
Same settings here as before, except now I’ve chosen not to transmit any spikes on the negative peaks. I still have a total of five spikes because the missing negative ones have now been added to the positive spike count to make it up to five.
Why would I do this? Because I like to experiment – it’s the best way for me to learn more about rifing – and because Spooky2 empowers me to do just this.
If you’ve been following along with me by entering these values in your own Spooky2, you’ll have seen that when Inverse+Sync is selected, Out 2 Control greys out. This is because Out 2 copies and inverts the wave on Out 1, but uses the same frequencies.
Back to contents 101
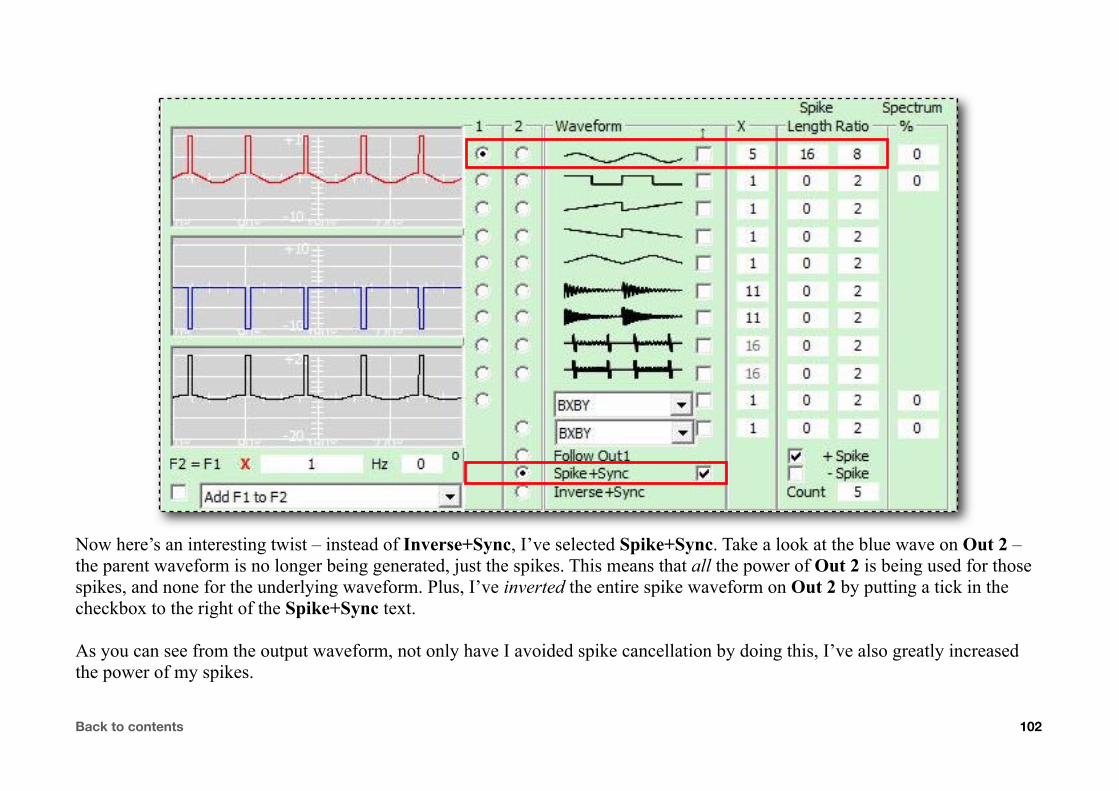
Now here’s an interesting twist – instead of Inverse+Sync, I’ve selected Spike+Sync. Take a look at the blue wave on Out 2 – the parent waveform is no longer being generated, just the spikes. This means that all the power of Out 2 is being used for those spikes, and none for the underlying waveform. Plus, I’ve inverted the entire spike waveform on Out 2 by putting a tick in the checkbox to the right of the Spike+Sync text.
As you can see from the output waveform, not only have I avoided spike cancellation by doing this, I’ve also greatly increased the power of my spikes.
Back to contents 102
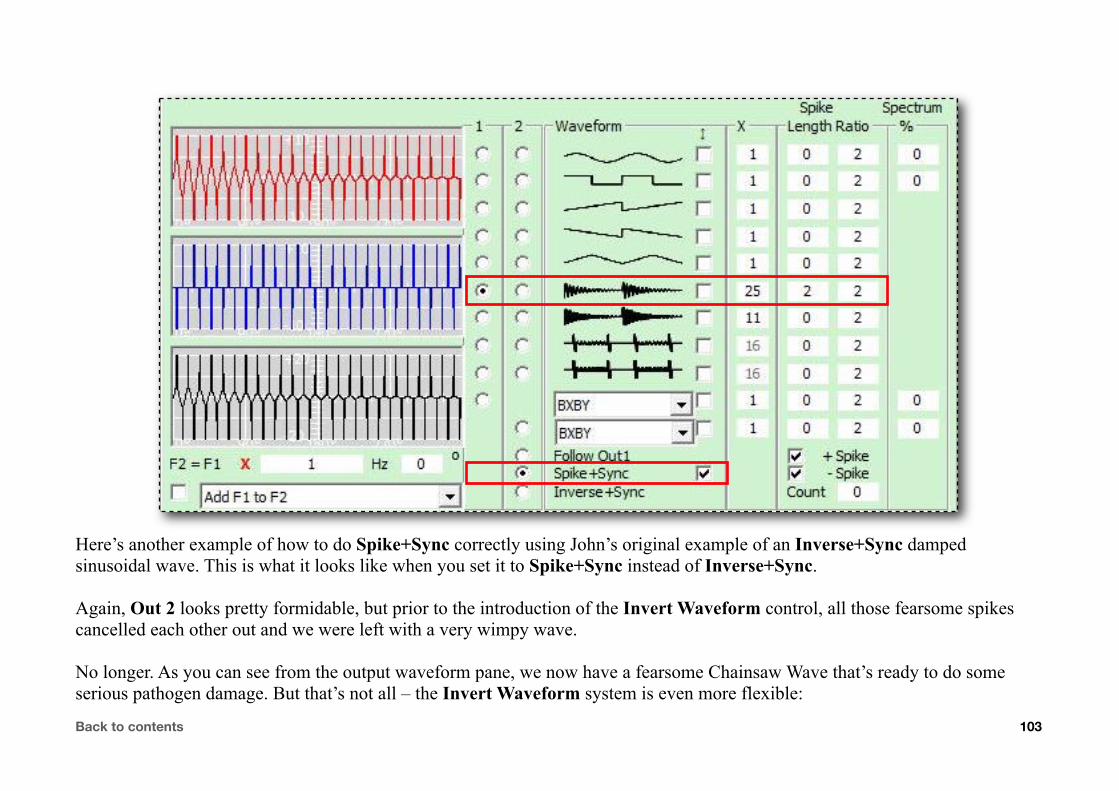
Here’s another example of how to do Spike+Sync correctly using John’s original example of an Inverse+Sync damped sinusoidal wave. This is what it looks like when you set it to Spike+Sync instead of Inverse+Sync.
Again, Out 2 looks pretty formidable, but prior to the introduction of the Invert Waveform control, all those fearsome spikes cancelled each other out and we were left with a very wimpy wave.
No longer. As you can see from the output waveform pane, we now have a fearsome Chainsaw Wave that’s ready to do some serious pathogen damage. But that’s not all – the Invert Waveform system is even more flexible:
Back to contents 103

I’ve returned to our earlier example of a sine wave so you can see this clearly.
This image shows our sine wave on Out 1 together with the spikes we’ve added via its Spike Length/Spike Ratio controls.
Spike+Sync is selected, and its Invert Waveform box is ticked.
In most cases, this is exactly what you want.
But you can invert every waveform in the list, not just the Spike+Sync one.
Here, we’ve chosen to invert the sine wave instead of the Spike+Sync wave by ticking its Invert Waveform box, and unticking the Spike+Sync box.
If you compare the output waveform panes in both images, you can clearly see the two different output signals – they are mirror images of each other.
Now that’s what I call taking control!
Back to contents 104

The Spooky2 interface
1: Menu Bar. 2: Conditions & Database. 3: Program Options. 4: Channel(s) & User Data/Web pane. 5: Status Bar.Back to contents 105
2
4
3
1
5

Menu bar
Spooky2 has seven menus which allow quick access to vital functions. Click on any blue link below to go to that section.
File: this menu offers commands for various file operations, like creating new frequency sets, reading or saving settings files, and loading new waves. It also allows you to exit Spooky2.
Database: this menu features commands that allow you to select a different database on disk from the one currently load, edit either the main or your custom database, and to load those edits into Spooky2.
Global: the Global Menu’s commands allow you to control all generators in your rig at the same time – you can start, pause, hold, and stop everything all at once.
Online: choosing a command from this menu will launch your web browser and take you to various Spooky2-connected websites.
Utils: you’ll find six very useful commands in this menu, allowing you to install drivers, re-establish communication with offline generators, relate generators to port numbers, and identify patients.
Advanced Menu: you won’t find a list of commands in this menu. Instead, clicking it opens the Advanced Menu where you can set all sort of important things, then forget about them.
Help: for very good reasons, there are no help-related commands in this menu. Instead, you can see the people who helped make Spooky2 what it is today, and find out which version you’re running.
So let’s start with the File Menu and take a look at all its commands:
Back to contents 106

1. Create and save your own frequency sets.
3. Restores Spooky2’s original factory default settings.
2. Create and save your own Spectrum Sweep Programs.
4. Save the current settings as Spooky2’s startup default.
Back to contents 107

5. Reloads all custom waveforms into Spooky2. 6. Quits Spooky2. The red X also does the same job.
The first two commands in the File Menu open new windows in which we can create different kinds of frequency sets.
The first – which opens when we choose Create Frequency Set – allows us to create our own frequency set and add it to our custom database. It can consist of a single frequency, or a list. It can be a linear ascending or descending sweep, or even a mix of single frequencies and sweeps.
We can assign a single default dwell to all frequencies, or we can specify a different dwell for each. We can even insert simple code at any point that will tell Spooky2 to switch to a different waveform, turn the Gate on or off, change the Amplitude or Offset (positive or negative), and we can alter the Phase angle of the output. We can even, instead of a frequency, enter a wavelength of light, and Spooky2 will convert it to the highest sub-harmonic possible. Then we can add our own notes, name, and save it.
The second command – Create Spectrum Sweep – lets us create three different kinds of Spectrum sweep, similar to the very powerful Spooky Spectrum Sweep and Spooky Converge Sweep. Just enter start and end frequencies, plus a few other important details, name your sweep, then save it. When you select it for use, you’ll see the settings you must enter in its Additional Notes.
Back to contents 108
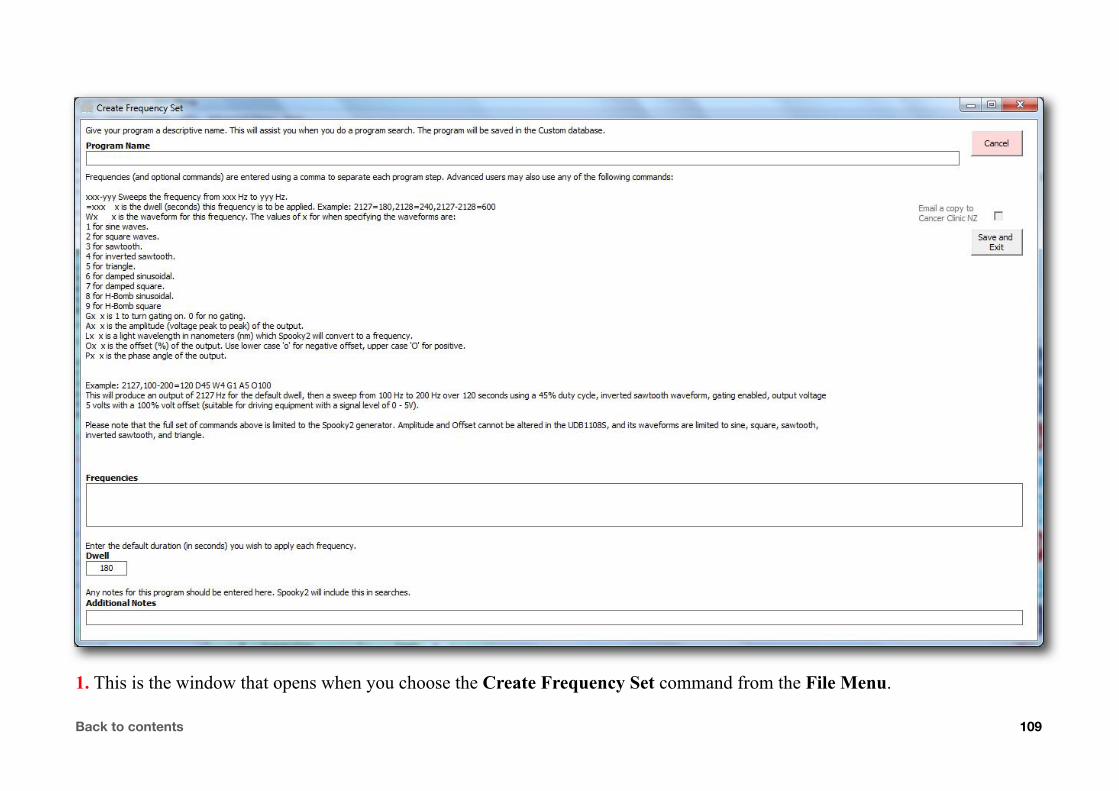
1. This is the window that opens when you choose the Create Frequency Set command from the File Menu.
Back to contents 109
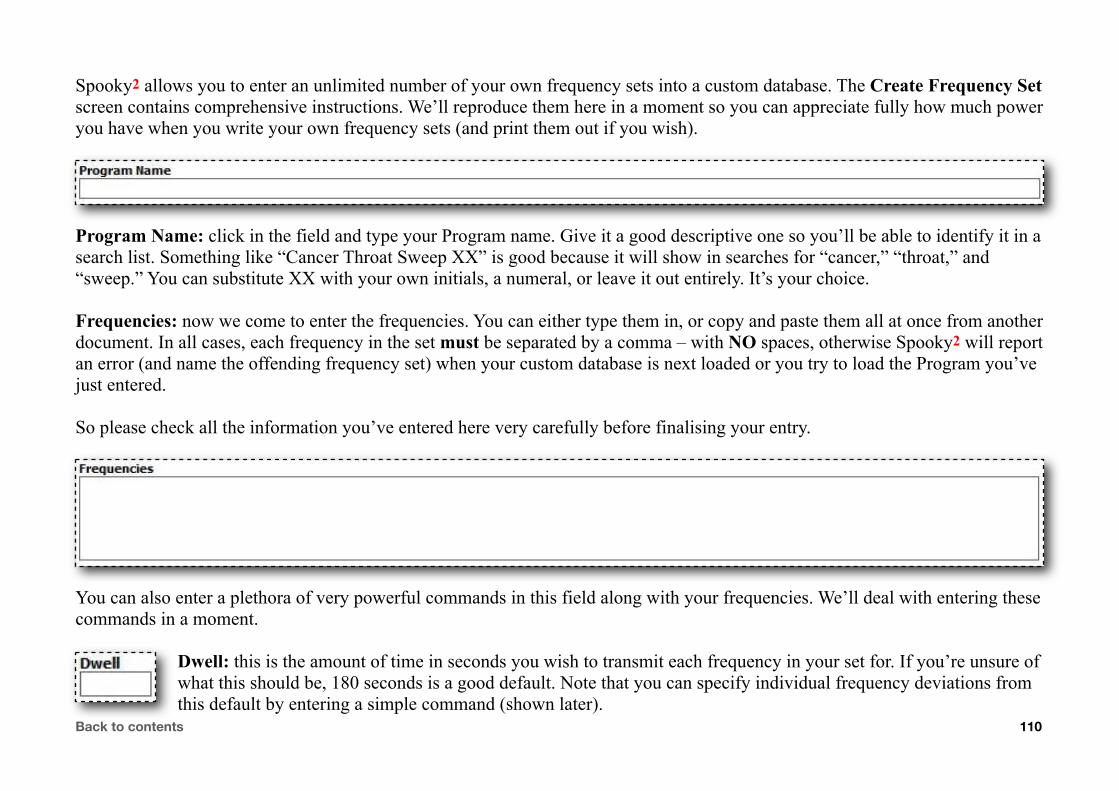
Spooky2 allows you to enter an unlimited number of your own frequency sets into a custom database. The Create Frequency Set screen contains comprehensive instructions. We’ll reproduce them here in a moment so you can appreciate fully how much power you have when you write your own frequency sets (and print them out if you wish).
Program Name: click in the field and type your Program name. Give it a good descriptive one so you’ll be able to identify it in a search list. Something like “Cancer Throat Sweep XX” is good because it will show in searches for “cancer,” “throat,” and “sweep.” You can substitute XX with your own initials, a numeral, or leave it out entirely. It’s your choice.
Frequencies: now we come to enter the frequencies. You can either type them in, or copy and paste them all at once from another document. In all cases, each frequency in the set must be separated by a comma – with NO spaces, otherwise Spooky2 will report an error (and name the offending frequency set) when your custom database is next loaded or you try to load the Program you’ve just entered.
So please check all the information you’ve entered here very carefully before finalising your entry.
You can also enter a plethora of very powerful commands in this field along with your frequencies. We’ll deal with entering these commands in a moment.
Dwell: this is the amount of time in seconds you wish to transmit each frequency in your set for. If you’re unsure of what this should be, 180 seconds is a good default. Note that you can specify individual frequency deviations from this default by entering a simple command (shown later).
Back to contents 110

Additional Notes: you can use field this to add notes to your Program for any purpose. The text you enter here will be included in all Spooky2 searches, and will appear in the text area beneath the Conditions List when you click on the set’s name.
If you make a textual mistake when entering a set, don’t worry – you can edit it later by clicking the Edit Custom Database button in the Advanced Menu. You can also choose to open your custom file in Notepad and edit it there.
The Commands List:
The following commands are entered into the Frequencies field at the point in your frequency sequence where you want them to take effect. Letters can be capitals or lowercase.
xxx-yyy:This is how you enter a sweep between two frequencies – xxx stands for one frequency, and yyy for the other. If you want an ascending sweep, enter the lower frequency first, then type a hyphen (the sweep command), followed by the higher frequency.
For a downward sweep, enter the higher frequency first, then a hyphen, and then the lower one.
=xxx:For any frequencies, you can specify different dwells from the default you want applied to the rest. Just type an equal sign (the dwell command) followed by the dwell in seconds.
Spooky2 allows you to select a different waveform for every frequency in your set if you wish.
Wx:After the frequency for which you want to use a different wave, just type W followed by the number of the wave as shown in the list below.
Sine wave: 1 Square wave: 2 Sawtooth wave: 3 Inverted sawtooth: 4 Triangle wave: 5 Damped Sinusoidal: 6 Damped Square: 7 H-Bomb Sinusoidal: 8 H-Bomb Square: 9
The last four waveforms shown above are only available on the Spooky2–5M generators, not on the UDB1108S.
Back to contents 111

If you wish to add a Gate for some frequencies, no problem.
Gx:After the target frequency or command, type G followed by 1 to turn gating on, and G followed by 0 to turn it off.
With the Spooky2–5M generator only, you can boost or cut the Amplitude, or output voltage.
Ax:After your target frequency or command, type A followed by the voltage you wish to use.
The new generator also allows you to change the Offset.
Ox:After your target, for positive offset type upper-case O followed by the value desired as a percentage of Amplitude rather than a voltage. For negative offset type lowercase o.
You can also change the Phase angle of the output.
Px:After your target, type P followed by the value you require.
Lx:Spooky2 allows you to enter light wavelengths directly. Type L followed by your wavelength in nanometers (nm). Spooky2 will automatically convert this to the highest subharmonic frequency your generator is set up to transmit.
Codes Example: you have six frequencies – 100, 200, 300, 400, 450, and 600. You want 100 and 200 to transmit for your default dwell of three minutes, and 300 to transmit for 10 minutes, all using a square wave with Amplitude of 9volts and an Offset of 0.
Enter: 100 W2 A09 O00,200,300=600,
You then want 400 to sweep up to 450 over a period of 30 minutes using a sine wave.
Add: 400-450=1800 W1,
Finally, you want 600 to use a square wave again for your default dwell. You also want an Amplitude of 5volts and a positive Offset of 2.5volts (which is 50% of the Amplitude).
Add: 600 W2 A05 O50,
So here’s your entire string of frequencies and commands:
100 W2 A09 O00,200,300=600,400-450=1800 W1,600 W2 A05 O50,
Some features and waveforms are only available on the Spooky2–5M generator, not on the UDB1108S.
Back to contents 112
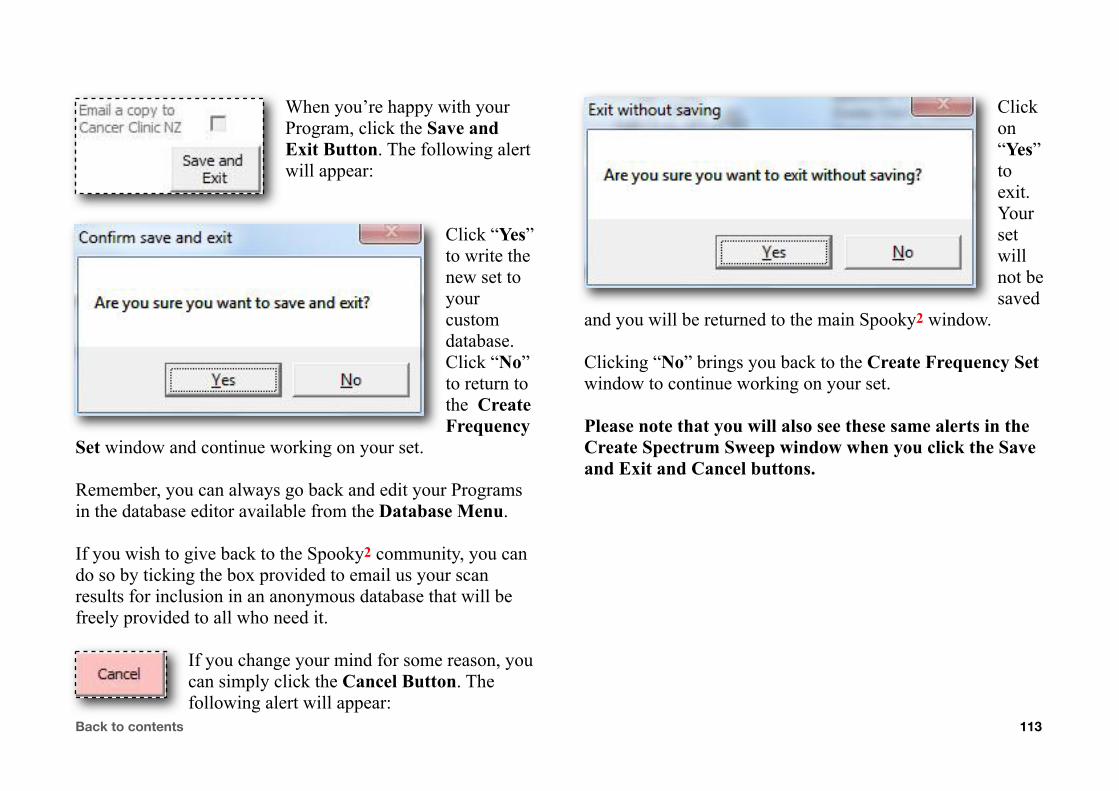
When you’re happy with your Program, click the Save and Exit Button. The following alert will appear:
Click “Yes” to write the new set to your custom database. Click “No” to return to the Create Frequency
Set window and continue working on your set.
Remember, you can always go back and edit your Programs in the database editor available from the Database Menu.
If you wish to give back to the Spooky2 community, you can do so by ticking the box provided to email us your scan results for inclusion in an anonymous database that will be freely provided to all who need it.
If you change your mind for some reason, you can simply click the Cancel Button. The following alert will appear:
Click on “Yes” to exit. Your set will not be saved
and you will be returned to the main Spooky2 window.
Clicking “No” brings you back to the Create Frequency Set window to continue working on your set.
Please note that you will also see these same alerts in the Create Spectrum Sweep window when you click the Save and Exit and Cancel buttons.
Back to contents 113

2. This is the window that opens when you choose the Create Spectrum Sweep command from the File Menu. This allows you to design and create your own Spectrum sweeps based on the information you input.
Program Name: make searches easier with a meaningful name. Including something like “Spectrum” or “Sweep” is a good idea.
Spectrum Low Frequency/Spectrum High Frequency: enter your lower and higher sweep limits here.
Example: Dr. Hulda Clark found that the bandwidth for moulds and mycotoxins was approximately 85,000–300,000Hz. To build a Spectrum sweep to target these, you’d enter 85000 for Spectrum Low Frequency and 300000 for Spectrum High Frequency.
Back to contents 114
Frequency Tolerance: this is the range above and below an organism’s Mortal Oscillatory Rate (MOR) in which a frequency will still be effective. Although Dr. Rife originally expressed this as a wavelength of light, it’s generally accepted that a good rule of thumb is plus or minus 0.025% of the organism’s MOR. However, larger values may generally be input for sweeps that are intended for purposes other than killing pathogens.
Frequency Application Time: the amount of time in seconds you wish each MOR to be applied for (180 is a reasonable value).
Wave Cycle Multiplier: the number of sub-waves that will create your sweep. We recommend using 96 or fewer. Note that setting a value here does not set it in the Wave Cycle Multiplier field in the Program Options Pane – this must still be set manually by you when you enter your settings for the Program you’re about to create. The value input here is solely for sweep calculation purposes.
Frequency Hits Per Sweep: the number of times during your sweep you wish each MOR to be applied.
Sweep Type Buttons: you have three choices.
‣ Single: creates a single sweep that will use Out 1 only and will proceed from low to high frequency.‣ Dual Converge: creates a dual convergence sweep that will use Out 1 and Out 2 – requires connection to both outputs.
These will proceed simultaneously from low to high, and from high to low.‣ Dual Weighted: creates a dual sweep, one weighted towards the lower frequency range – requires connection to both
outputs. Both sweeps will proceed simultaneously from low to high.
Spectrum Sweep Info: shows necessary settings and other information for the Spectrum sweep based on your input. To update it after changing a field, please select a Sweep Type.
Database Entry View: at the bottom of the screen, you see your custom Spectrum sweep exactly as it will appear in your database. To update it after changing a field, please select a Sweep Type.
Save and Exit/Cancel Buttons: when you’re happy with your sweep, click Save and Exit. To discard your work, click Cancel.
Back to contents 115
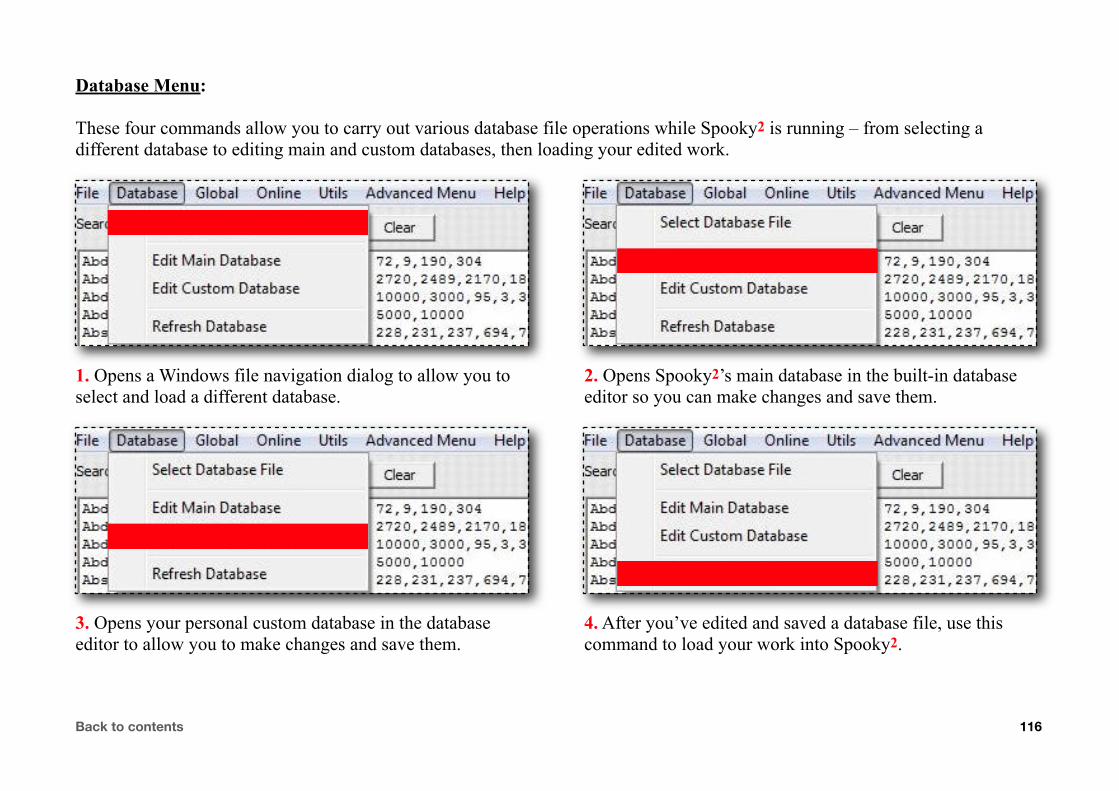
Database Menu:
These four commands allow you to carry out various database file operations while Spooky2 is running – from selecting a different database to editing main and custom databases, then loading your edited work.
1. Opens a Windows file navigation dialog to allow you to select and load a different database.
3. Opens your personal custom database in the database editor to allow you to make changes and save them.
2. Opens Spooky2’s main database in the built-in database editor so you can make changes and save them.
4. After you’ve edited and saved a database file, use this command to load your work into Spooky2.
Back to contents 116
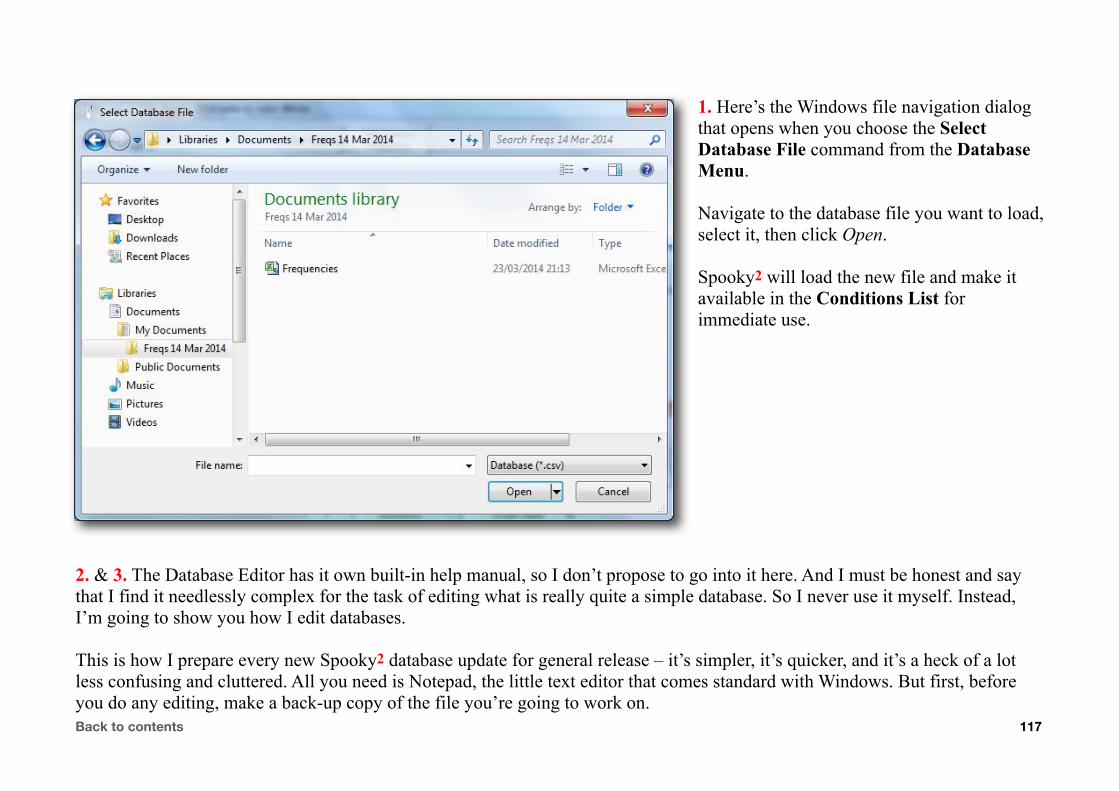
1. Here’s the Windows file navigation dialog that opens when you choose the Select Database File command from the Database Menu.
Navigate to the database file you want to load, select it, then click Open.
Spooky2 will load the new file and make it available in the Conditions List for immediate use.
2. & 3. The Database Editor has it own built-in help manual, so I don’t propose to go into it here. And I must be honest and say that I find it needlessly complex for the task of editing what is really quite a simple database. So I never use it myself. Instead, I’m going to show you how I edit databases.
This is how I prepare every new Spooky2 database update for general release – it’s simpler, it’s quicker, and it’s a heck of a lot less confusing and cluttered. All you need is Notepad, the little text editor that comes standard with Windows. But first, before you do any editing, make a back-up copy of the file you’re going to work on.Back to contents 117
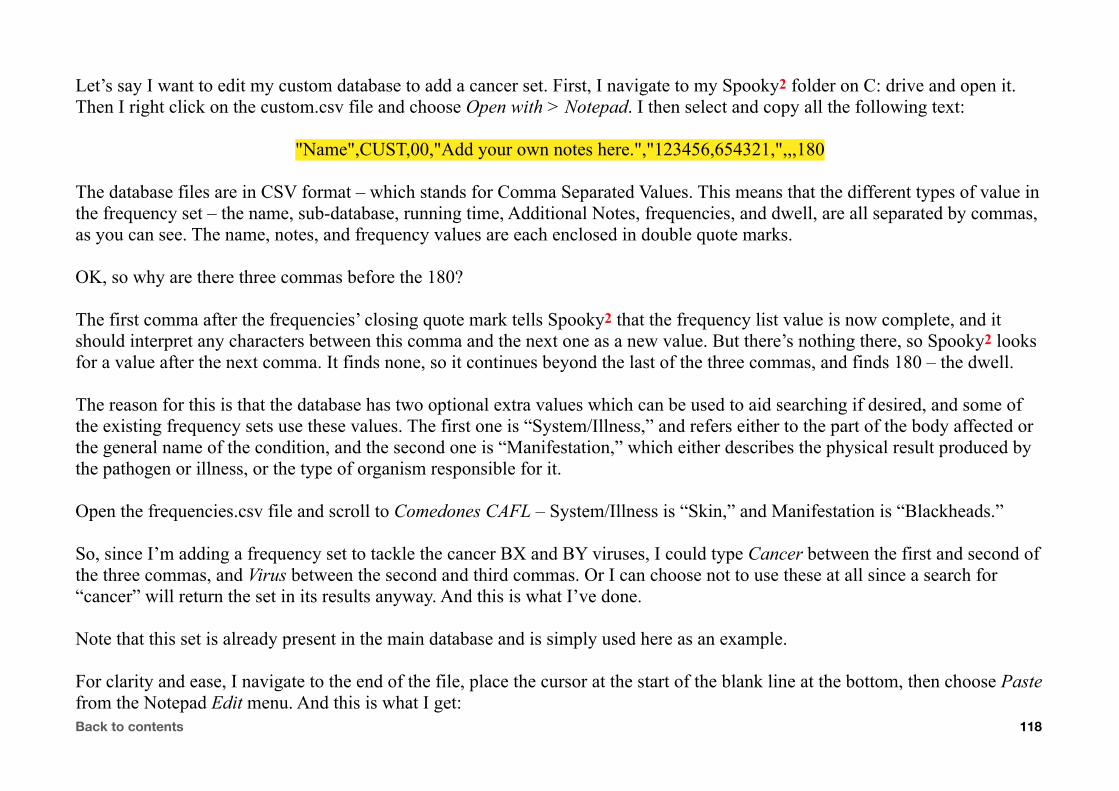
Let’s say I want to edit my custom database to add a cancer set. First, I navigate to my Spooky2 folder on C: drive and open it. Then I right click on the custom.csv file and choose Open with > Notepad. I then select and copy all the following text:
"Name",CUST,00,"Add your own notes here.","123456,654321,",,,180
The database files are in CSV format – which stands for Comma Separated Values. This means that the different types of value in the frequency set – the name, sub-database, running time, Additional Notes, frequencies, and dwell, are all separated by commas, as you can see. The name, notes, and frequency values are each enclosed in double quote marks.
OK, so why are there three commas before the 180?
The first comma after the frequencies’ closing quote mark tells Spooky2 that the frequency list value is now complete, and it should interpret any characters between this comma and the next one as a new value. But there’s nothing there, so Spooky2 looks for a value after the next comma. It finds none, so it continues beyond the last of the three commas, and finds 180 – the dwell.
The reason for this is that the database has two optional extra values which can be used to aid searching if desired, and some of the existing frequency sets use these values. The first one is “System/Illness,” and refers either to the part of the body affected or the general name of the condition, and the second one is “Manifestation,” which either describes the physical result produced by the pathogen or illness, or the type of organism responsible for it.
Open the frequencies.csv file and scroll to Comedones CAFL – System/Illness is “Skin,” and Manifestation is “Blackheads.”
So, since I’m adding a frequency set to tackle the cancer BX and BY viruses, I could type Cancer between the first and second of the three commas, and Virus between the second and third commas. Or I can choose not to use these at all since a search for “cancer” will return the set in its results anyway. And this is what I’ve done.
Note that this set is already present in the main database and is simply used here as an example.
For clarity and ease, I navigate to the end of the file, place the cursor at the start of the blank line at the bottom, then choose Paste from the Notepad Edit menu. And this is what I get:Back to contents 118
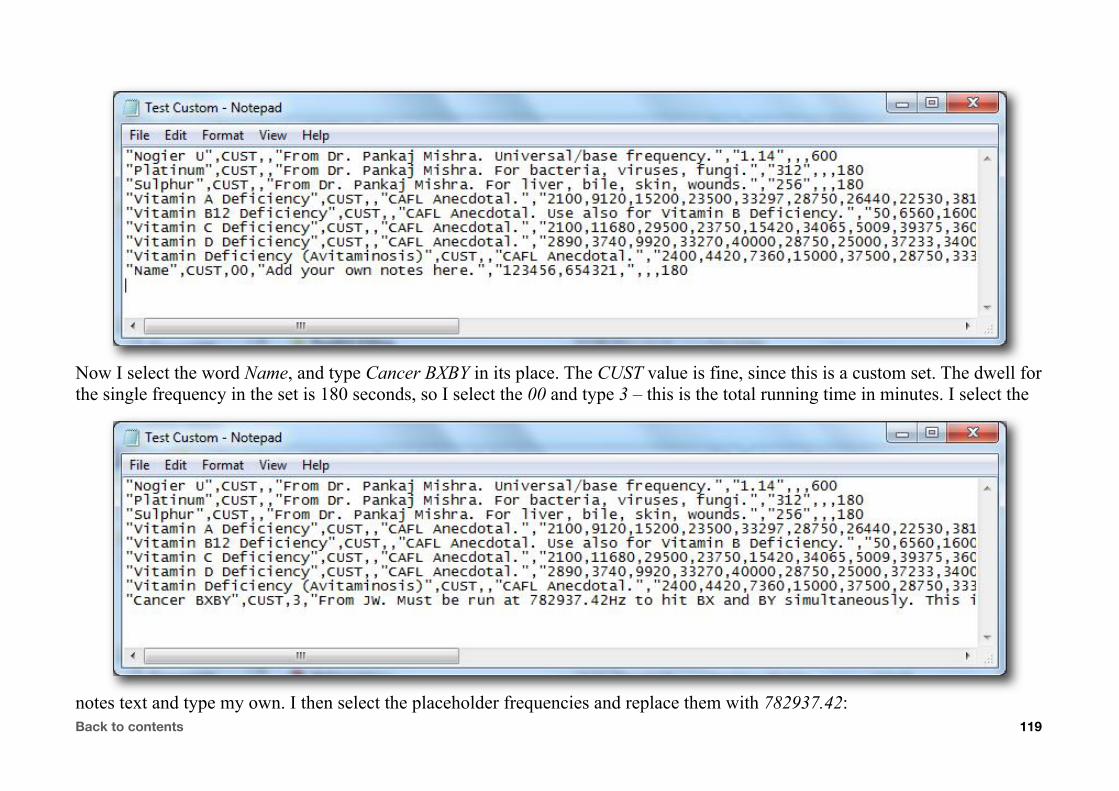
Now I select the word Name, and type Cancer BXBY in its place. The CUST value is fine, since this is a custom set. The dwell for the single frequency in the set is 180 seconds, so I select the 00 and type 3 – this is the total running time in minutes. I select the
notes text and type my own. I then select the placeholder frequencies and replace them with 782937.42:Back to contents 119
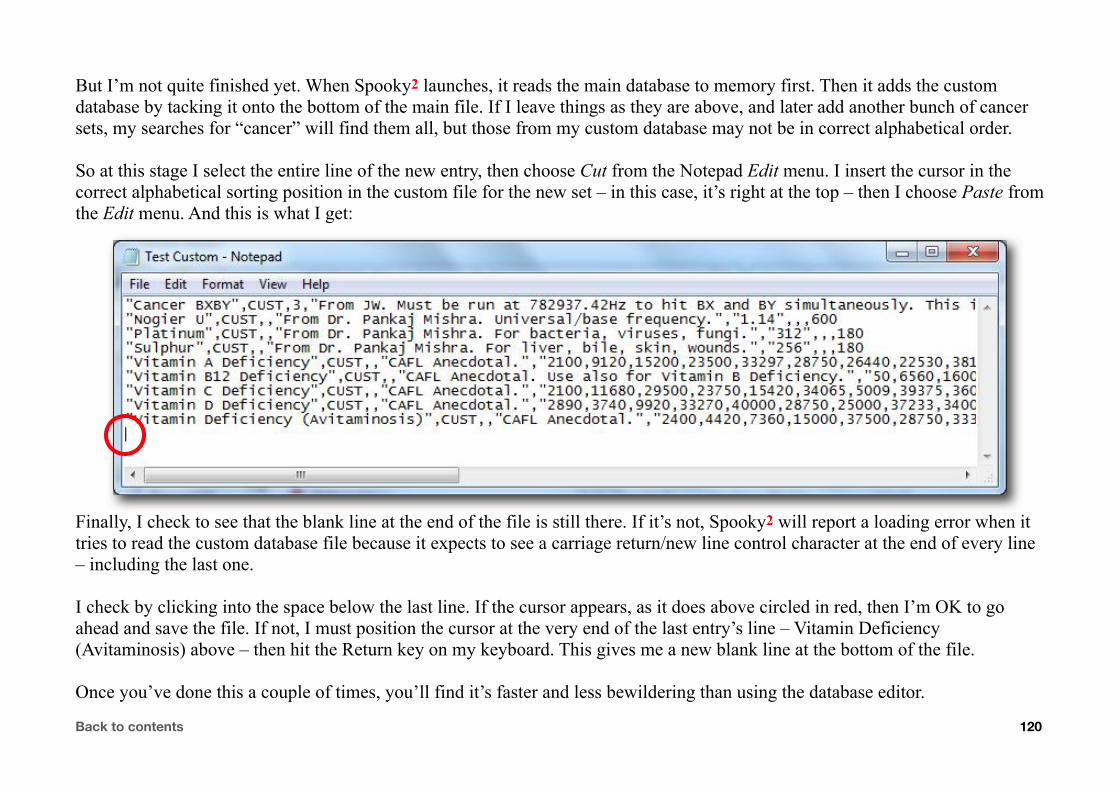
But I’m not quite finished yet. When Spooky2 launches, it reads the main database to memory first. Then it adds the custom database by tacking it onto the bottom of the main file. If I leave things as they are above, and later add another bunch of cancer sets, my searches for “cancer” will find them all, but those from my custom database may not be in correct alphabetical order.
So at this stage I select the entire line of the new entry, then choose Cut from the Notepad Edit menu. I insert the cursor in the correct alphabetical sorting position in the custom file for the new set – in this case, it’s right at the top – then I choose Paste from the Edit menu. And this is what I get:
Finally, I check to see that the blank line at the end of the file is still there. If it’s not, Spooky2 will report a loading error when it tries to read the custom database file because it expects to see a carriage return/new line control character at the end of every line – including the last one.
I check by clicking into the space below the last line. If the cursor appears, as it does above circled in red, then I’m OK to go ahead and save the file. If not, I must position the cursor at the very end of the last entry’s line – Vitamin Deficiency (Avitaminosis) above – then hit the Return key on my keyboard. This gives me a new blank line at the bottom of the file.
Once you’ve done this a couple of times, you’ll find it’s faster and less bewildering than using the database editor.
Back to contents 120

Global Menu:
These four commands allow you to control the “transport” of multiple generators with a single operation. With four generators, you can start or stop them all at the same time by choosing a command here rather than opening the Channels one after another.
1. Choose Start to fire up all the generators in your Spooky2 rig at the same time.
3. Choose Hold to remain on current frequencies on all generators – stays in force until you choose Hold again.
2. Choose Pause to temporarily stop all the generators without losing positions reached in their Programs.
4. Choose Stop to end Programs on all your generators at the same time.
Back to contents 121

Online Menu:
If your PC is connected to the internet, these six commands will be very useful for Spooky2-related tasks. For each command, Spooky2 will launch your brower (or open a new window/tab if it’s already launched).
1. This will take you to the CleanEnergy website where you can buy all the components of the Spooky2 Rife System.
3. This will take you to the Spooky2 Vimeo Channel.
2. This will take you to the Spooky2.com Downloads page and download the latest database to your Downloads folder.
4. This command takes you to the Spooky2.com website.Back to contents 122
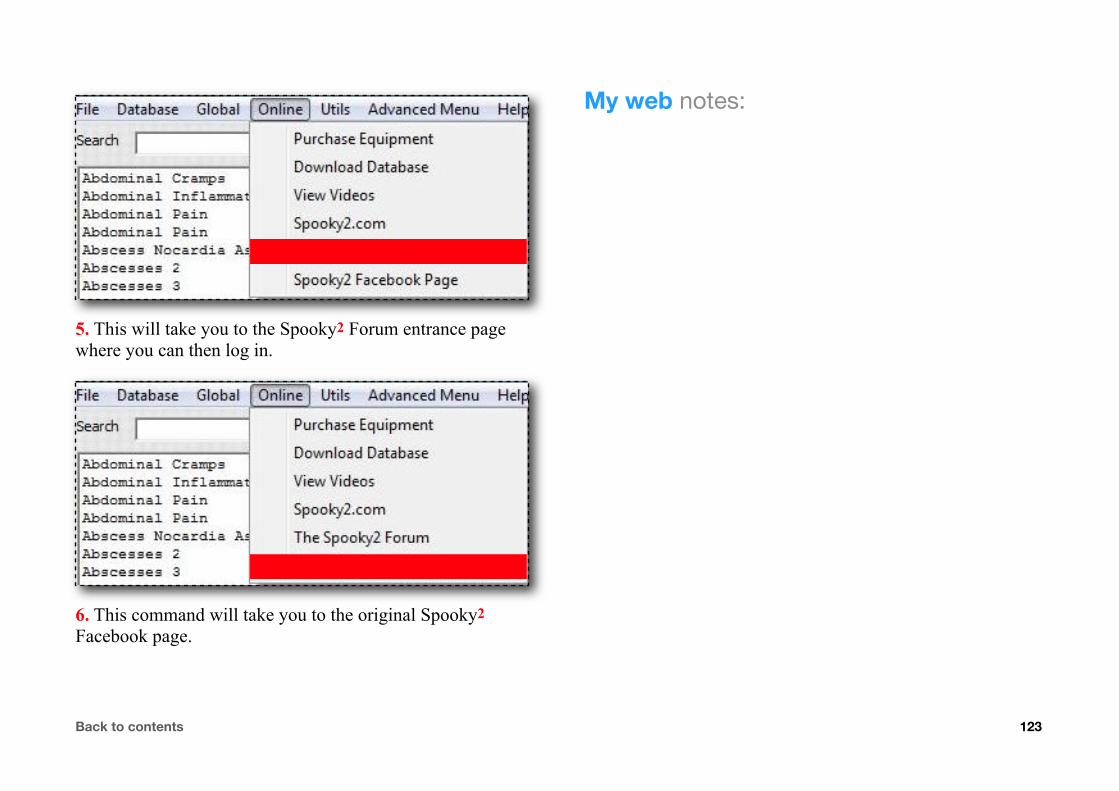
5. This will take you to the Spooky2 Forum entrance page where you can then log in.
6. This command will take you to the original Spooky2 Facebook page.
My web notes:
Back to contents 123
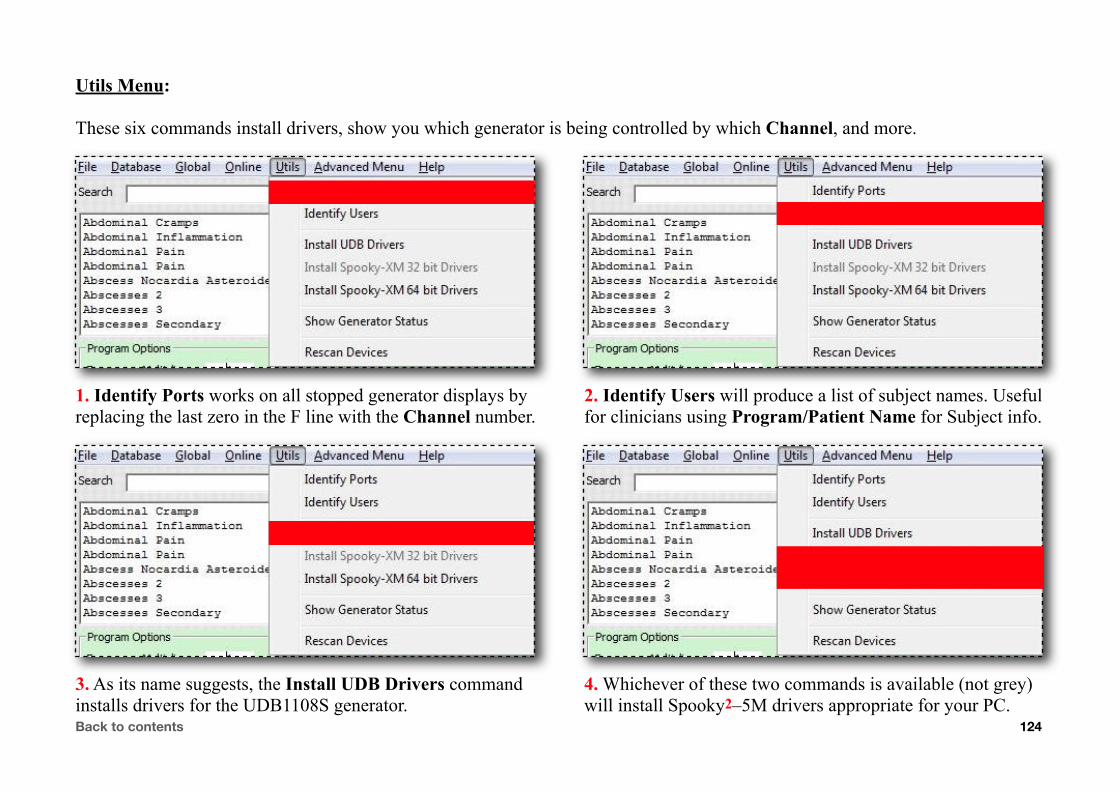
Utils Menu:
These six commands install drivers, show you which generator is being controlled by which Channel, and more.
1. Identify Ports works on all stopped generator displays by replacing the last zero in the F line with the Channel number.
3. As its name suggests, the Install UDB Drivers command installs drivers for the UDB1108S generator.
2. Identify Users will produce a list of subject names. Useful for clinicians using Program/Patient Name for Subject info.
4. Whichever of these two commands is available (not grey) will install Spooky2–5M drivers appropriate for your PC.
Back to contents 124

5. Opens a window showing the frequencies and voltage for both Outs on each generator which can be saved to file.
6. Sends a “handshake” signal to an offline generator, bringing it back online without having to stop your entire rig.
Two commands in the Utils Menu open new windows – Identify Users, and Show Generator Status. Since they’re both very similar, we’ll just take a look at Show Generator Status (left).
When you choose this command, Spooky2 takes a “snapshot” of the frequencies and voltages being transmitted from both Outs of each generator. This can be saved as a text file named “GeneratorStatus.txt.”
One excellent way to use this would be if you were part-way through a multi-generator treatment, but you wanted to install a new version of Spooky2. Choose the command, do your installation, then relaunch, and use the file to restore each generator to the point it had reached before.
Back to contents 125

Advanced Menu:
You’ll find many powerful and useful goodies tucked away out of sight in here, ranging from troubleshooting tools to a timer for setting a global pause period for your rig.
This menu is different from all the others. When you click it, there’s no drop-down list of commands shown. Instead, a new window opens. Although it isn’t strictly speaking a menu, it’s always been called the Advanced Menu. Inside it, among other features, you get:
‣ Enable Sound control – this enables or disables Spooky2’s launch sound as well as the biofeedback scan completion alert.
‣ Global controls for Amplitude Wobble – this wobble is applied with the toggle button in the Channel Control Panel.
‣ Global controls for Frequency Wobble – also applied as a toggle in the Channel Control Panel.
‣ Global Pause timing – sets a time period during which all Channels will pause, then unpause when the time’s up.
‣ Gate Off voltage and frequency – normally set at 0 and 0.
‣ All UDBs are 19200 BPS – used to ensure smooth operation of UDB generators with slower USB communication speeds.
‣ Utility Buttons for important functions like writing a USB communications or program log for troubleshooting.
‣ A Graph for some important Spooky Pulse functions.
‣ Frequency Blacklist Control – used to block Spooky2 from ever transmitting specified frequencies.
‣ Blacklist sub-options for harmonics.
‣ A driver load check pane – useful for Channel/driver troubleshooting.
‣ Main database file path – shows the exact location of the currently loaded database.
‣ A count of all frequency sets contained in both main and custom databases.
Back to contents 126

DDS Generators: enter the number of physical generators you have connected here – this speeds up Spooky2 launches.
Refresh Rate: controls the speed of the Gate and all the feathering and wobble options in Spooky2’s Apply menu. Their speed will be half the value you enter here. Maximum value is 66Hz.
Amplitude & Frequency Wobbles: these prevent organisms from becoming adapted to frequencies. These settings are separate from those in the Channel’s Program Options pane. These will only be applied when you click the Amplitude and Frequency Wobble toggle buttons in a Channel Control Panel.
Pause Between: sets a global pause for all Channels. This can be defeated in individual Channels by checking Override Pause Schedule in each Progam Options pane.
Gate Off: when the Gate closes, you normally want voltage to drop to zero and frequency to be 0Hz. If you wish to change this, do so here. Check Fast Gate to free up Channel resources for faster gating rates.
All UDBs are 19200 BPS: allows Spooky2 to drive UDBs with slower v4.2 firmware.
Back to contents 127
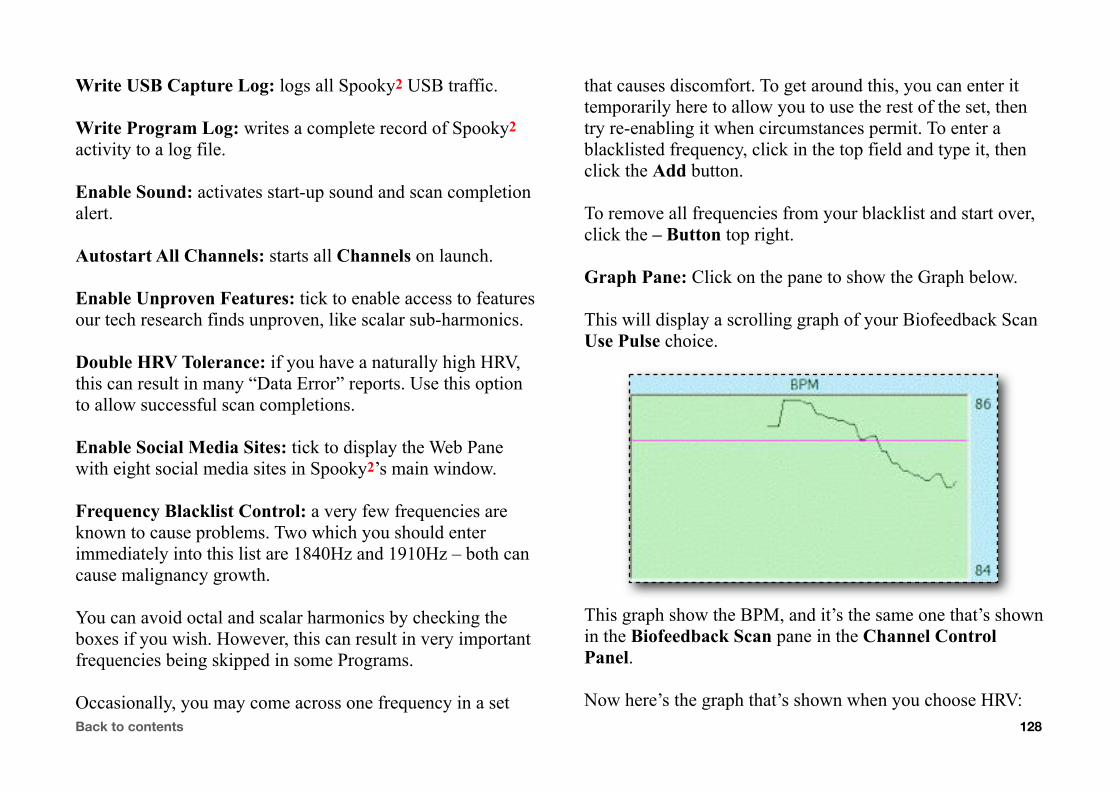
Write USB Capture Log: logs all Spooky2 USB traffic.
Write Program Log: writes a complete record of Spooky2 activity to a log file.
Enable Sound: activates start-up sound and scan completion alert.
Autostart All Channels: starts all Channels on launch.
Enable Unproven Features: tick to enable access to features our tech research finds unproven, like scalar sub-harmonics.
Double HRV Tolerance: if you have a naturally high HRV, this can result in many “Data Error” reports. Use this option to allow successful scan completions.
Enable Social Media Sites: tick to display the Web Pane with eight social media sites in Spooky2’s main window.
Frequency Blacklist Control: a very few frequencies are known to cause problems. Two which you should enter immediately into this list are 1840Hz and 1910Hz – both can cause malignancy growth.
You can avoid octal and scalar harmonics by checking the boxes if you wish. However, this can result in very important frequencies being skipped in some Programs.
Occasionally, you may come across one frequency in a set
that causes discomfort. To get around this, you can enter it temporarily here to allow you to use the rest of the set, then try re-enabling it when circumstances permit. To enter a blacklisted frequency, click in the top field and type it, then click the Add button.
To remove all frequencies from your blacklist and start over, click the – Button top right.
Graph Pane: Click on the pane to show the Graph below.
This will display a scrolling graph of your Biofeedback Scan Use Pulse choice.
This graph show the BPM, and it’s the same one that’s shown in the Biofeedback Scan pane in the Channel Control Panel.
Now here’s the graph that’s shown when you choose HRV:Back to contents 128
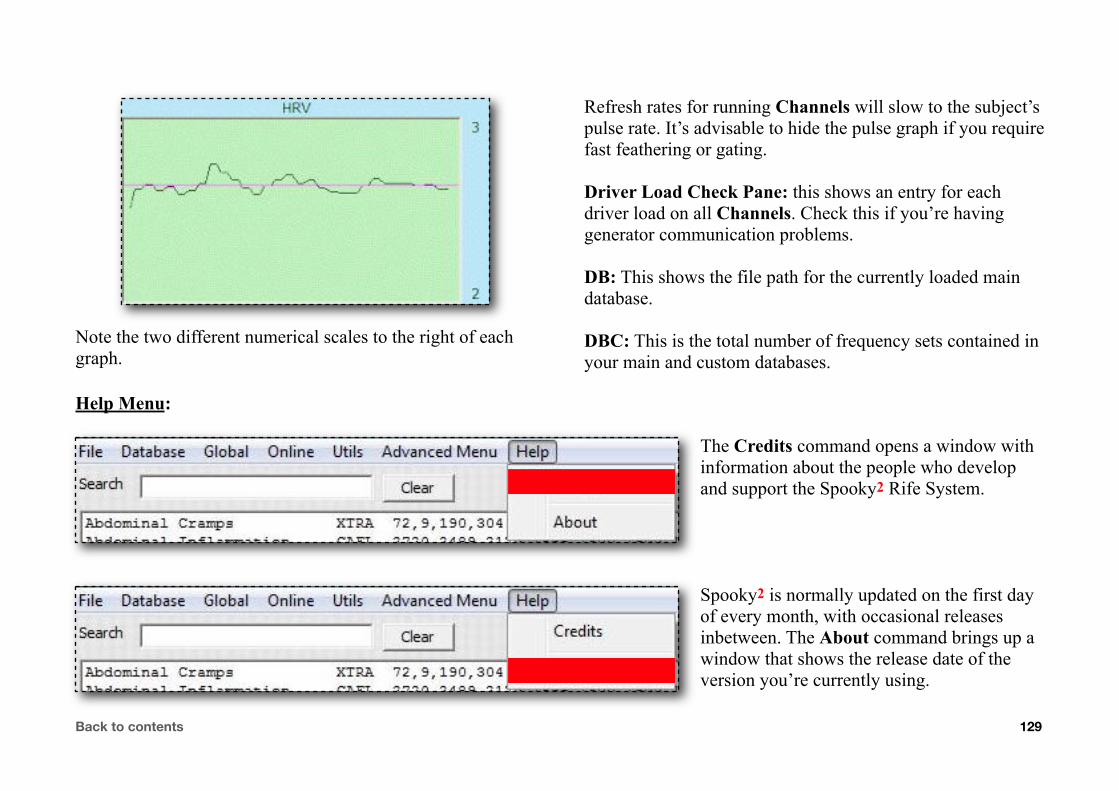
Note the two different numerical scales to the right of each graph.
Refresh rates for running Channels will slow to the subject’s pulse rate. It’s advisable to hide the pulse graph if you require fast feathering or gating.
Driver Load Check Pane: this shows an entry for each driver load on all Channels. Check this if you’re having generator communication problems.
DB: This shows the file path for the currently loaded main database.
DBC: This is the total number of frequency sets contained in your main and custom databases.
Help Menu:
The Credits command opens a window with information about the people who develop and support the Spooky2 Rife System.
Spooky2 is normally updated on the first day of every month, with occasional releases inbetween. The About command brings up a window that shows the release date of the version you’re currently using.
Back to contents 129

Conditions & Database
The top graphic shows the Conditions List when the Font Size Slider (left) is set to its lowest position (10pt). The one beneath it shows the change when it’s set to its highest position (16pt). Grab the slider handle to show the font size.
Search: When Spooky2 launches, the main and your custom databases are loaded into the Conditions List. If you enter a word or partial word associated with the condition you want to treat, both databases are automatically searched for relevant entries. Set names, text in Additional Notes, and System/Illness and Manifestation text fields (if used) are searched.
A search for a frequency will return all sets in which that frequency is used. The search results will replace the contents of the Back to contents 130

Conditions List. One or more results can be loaded into a Program by double clicking their lines.
Clear Button: click this to remove the Search term and the list of results, and return the contents of both databases to the Conditions List. Note that you can perform multiple successive searches without needing to clear the previous search.
Date & Time: the current date and time is shown at the top right.
Database: Spooky2’s main database is made up of 10 sub-databases. To include them all in your searches, click the + Button. You can also simply check only those you want included. To deselect all sub-databases at once so you can quickly select just a few to search, click the – Button.
‣ PROV has produced consistent results in virtually all subjects it was used with.‣ BIO and VEGA are both excellent, based on Russian frequency research.‣ CAFL is the Consolidated Annotated Frequency List, amassed from the experience of Rife experimenters over years.‣ XTRA is a collection of sets from various sources, all chosen for their reputation for effectiveness.‣ CUST is your own personal database.‣ RIFE is a collection of Dr. Royal Raymond Rife’s original frequencies.‣ HC is Dr. Hulda Clark’s database. Use with a square wave, 100% positive Offset, and Amplitude of 9.5.‣ KHZ is a collection of higher frequencies. Use with a square or inverse sawtooth wave, 100% positive Offset, and
Amplitude of 9.5.‣ ALT consists of sets based on Ayurvedic knowledge and practise, solfeggios, and planetary frequencies.
The Screenshot Button makes a screenshot of the Spooky2 window and saves it to Spooky2’s Data folder as a JPG file.
Conditions List: contains the contents of both the main and custom database files if the Search field is empty. Displays results from both when a search is performed.
Selection/Count: the first numeral is always the line count from the top of the Conditions List pane when a selection is made. When the Search field is blank, the second numeral is the number of frequency sets contained in both databases. When a search has been performed, this changes to the total number of results returned.Back to contents 131
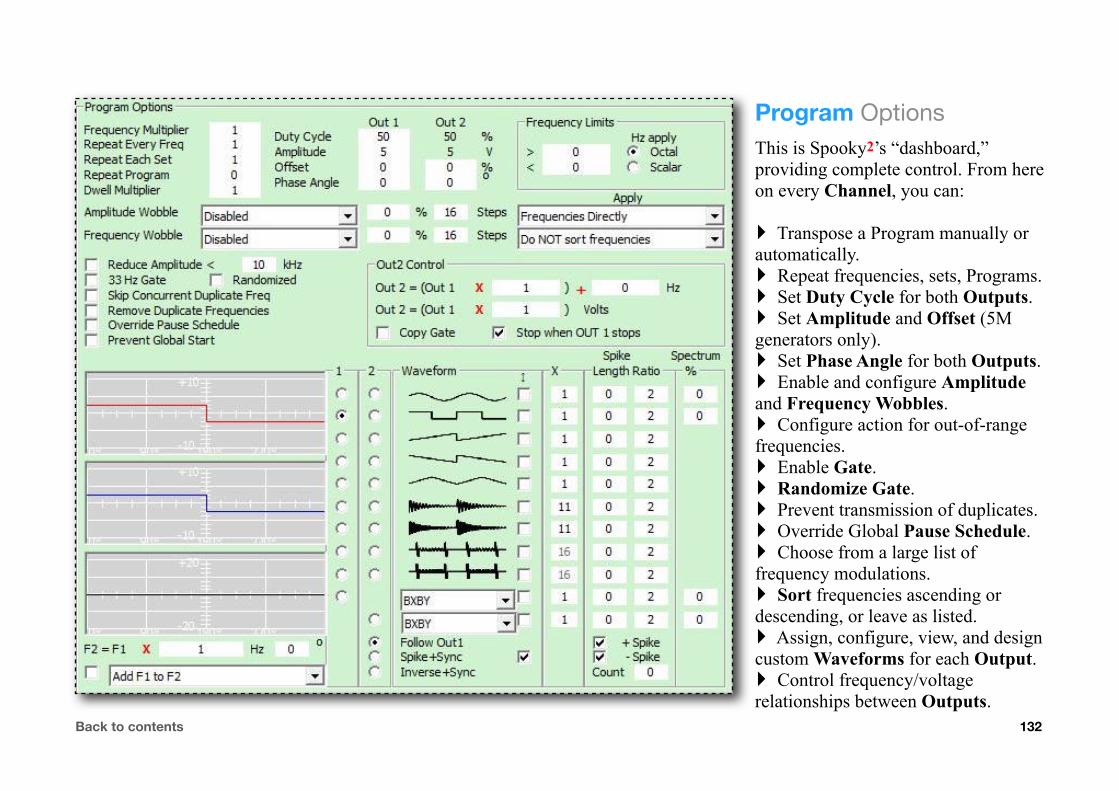
Program OptionsThis is Spooky2’s “dashboard,” providing complete control. From here on every Channel, you can:
‣ Transpose a Program manually or automatically.‣ Repeat frequencies, sets, Programs.‣ Set Duty Cycle for both Outputs.‣ Set Amplitude and Offset (5M generators only).‣ Set Phase Angle for both Outputs.‣ Enable and configure Amplitude and Frequency Wobbles.‣ Configure action for out-of-range frequencies.‣ Enable Gate.‣ Randomize Gate.‣ Prevent transmission of duplicates.‣ Override Global Pause Schedule.‣ Choose from a large list of frequency modulations.‣ Sort frequencies ascending or descending, or leave as listed.‣ Assign, configure, view, and design custom Waveforms for each Output.‣ Control frequency/voltage relationships between Outputs.
Back to contents 132
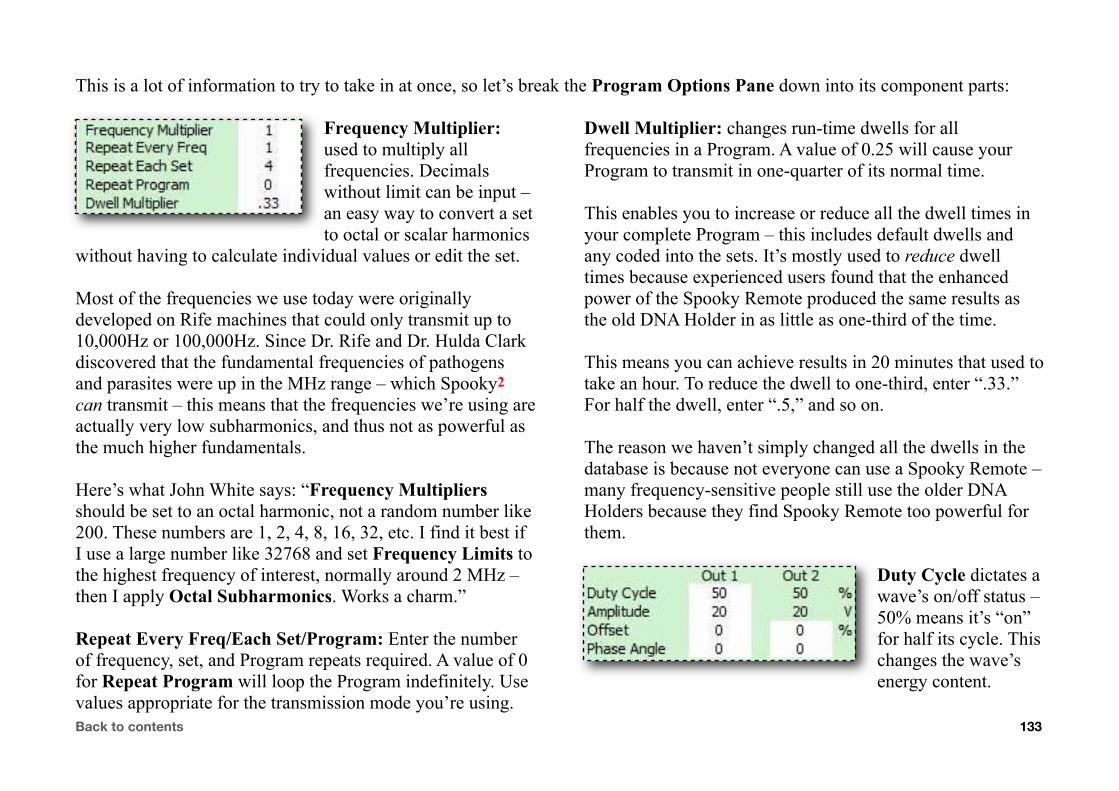
This is a lot of information to try to take in at once, so let’s break the Program Options Pane down into its component parts:
Frequency Multiplier: used to multiply all frequencies. Decimals without limit can be input – an easy way to convert a set to octal or scalar harmonics
without having to calculate individual values or edit the set.
Most of the frequencies we use today were originally developed on Rife machines that could only transmit up to 10,000Hz or 100,000Hz. Since Dr. Rife and Dr. Hulda Clark discovered that the fundamental frequencies of pathogens and parasites were up in the MHz range – which Spooky2 can transmit – this means that the frequencies we’re using are actually very low subharmonics, and thus not as powerful as the much higher fundamentals.
Here’s what John White says: “Frequency Multipliers should be set to an octal harmonic, not a random number like 200. These numbers are 1, 2, 4, 8, 16, 32, etc. I find it best if I use a large number like 32768 and set Frequency Limits to the highest frequency of interest, normally around 2 MHz – then I apply Octal Subharmonics. Works a charm.”
Repeat Every Freq/Each Set/Program: Enter the number of frequency, set, and Program repeats required. A value of 0 for Repeat Program will loop the Program indefinitely. Use values appropriate for the transmission mode you’re using.
Dwell Multiplier: changes run-time dwells for all frequencies in a Program. A value of 0.25 will cause your Program to transmit in one-quarter of its normal time.
This enables you to increase or reduce all the dwell times in your complete Program – this includes default dwells and any coded into the sets. It’s mostly used to reduce dwell times because experienced users found that the enhanced power of the Spooky Remote produced the same results as the old DNA Holder in as little as one-third of the time.
This means you can achieve results in 20 minutes that used to take an hour. To reduce the dwell to one-third, enter “.33.” For half the dwell, enter “.5,” and so on.
The reason we haven’t simply changed all the dwells in the database is because not everyone can use a Spooky Remote – many frequency-sensitive people still use the older DNA Holders because they find Spooky Remote too powerful for them.
Duty Cycle dictates a wave’s on/off status – 50% means it’s “on” for half its cycle. This changes the wave’s energy content.
Back to contents 133

Amplitude and Offset: enter Amplitude and Offset values for a Spooky2–5M. Offset is normally 0 for Remote and Contact, and 100 for Plasma (and Zapper sets). The UDB1108S generator must be manually set up.
Phase Angle: requires both OUTs. Useful when driving an external device that can mix both signals – the difference between two out-of-phase waves can create harmonics that hit Mortal Oscillatory Rates. For techies only.
Frequency Limits: for best effect, use high frequencies for killing. Dr. Rife and Dr. Clark found that the fundamental
frequencies of most organisms were in the KHz range. But past tech limitations meant that only low sub-harmonics could be used on most machines. If you enter
an appropriate frequency in the < field, Spooky2 solves this problem – e.g., a low threshold of 100,000Hz here will turn the CAFL Follicular Mange low frequencies 253, 693, 701, and 774 into 129536, 177408, 179456, and 198144.
The > control sets the high threshold – any frequency higher than the value here will be lowered to the highest harmonic below it that your generator is set up for.
Wobbles: some pathogens can adapt to frequency attack.
The answer is to apply Amplitude and/or Frequency Wobbles to rapidly change the signal strength and frequency. When set here, wobbles apply once the Channel is running.
Amplitude and Frequency Wobble controls are also found in the Advanced Menu. Settings made here will only apply to the toggle buttons for these functions you’ll find in each Channel’s Control Panel.
If you feel a definite reaction from a frequency, it can be good to apply one or both wobbles with these buttons – 1% is a good value for Frequency Wobble.
The menu choices are Disabled, Sawtooth, Inverted Sawtooth, and Triangle. These waveforms describe the shape of the wobble’s progress.
Example: triangle starts with no wobble, ramps up to full wobble at the percentage chosen in the number of steps specified, then ramps back down to zero wobble, and repeats.
Percentage is the amount of wobble you wish to apply, and Steps specifies the number of discrete “jumps” in a single cycle – 16 is a good value. More than this increases the resolution of the sweep, but also increases the time taken.
Back to contents 134

The Apply Menu allows you to apply a constant rapid change to each frequency in a set. The speed of this
change is set in the Advanced Menu. There are many different modulations to choose from, as well as the ability to disable the function. The choices will be explained later.
This option is different, and in addition, to the configurable Frequency Wobble. Both can be used at the same time.
Sort Menu: some developers maintain that using frequencies in ascending order will produce different results from descending order. This menu allows you to choose frequencies Ascending, Descending, or Do NOT Sort.
Reduce Amplitude: check this box to prevent low frequencies from causing discomfort in Contact Mode.
Gate: this is a control signal which turns the main signal on and off very rapidly – 4Hz equals four times a second. Its application to the main signal can be randomized. This helps to prevent any pathogen adaptation. Its speed (or, more accurately, rate) is set in the Advanced Menu as shown:
This rate is half the value you enter in the Refresh
Rate field above. In this example, the value is 8Hz, so the Gate is labelled “4Hz Gate.”
If you changed this from 8Hz to 16Hz, the Gate label would change to “8Hz Gate,” and all the wobble and feathering rates would also be twice as fast.
Faster rates are generally better, but if you’re running a lot of Channels, all of which have multiple gates and wobbles, it will greatly increase the computation load on Spooky2.
If this happens (usually on older, slower PCs), you can tick the Fast Gate checkbox in the Advanced Menu to free up unused resources. But you should be fine with up to about half a dozen generators.
Gate is normally only used in Plasma Mode, but it can be very useful in the other modes, too, because it provides an additional “hammering” effect to keep pathogens off-balance.
Skip Concurrent Duplicate Freq: if you’re running multiple generators, it’s possible that identical frequencies used in different sets may coincidentally be transmitted at the same time.
This uncontrolled frequency duplication can cause unwanted phase problems, and even wave cancellation (where two
Back to contents 135

waves cancel each other out completely). With this box checked, Spooky2 will never allow duplicates to be transmitted simultaneously.
Remove Duplicate Frequencies: some sets, particularly those developed on older machines, contain duplicates.
In some cases, this may be what you want (some Frequency Foundation sets). In others, it serves no useful purpose.
Checking this box stops single-set duplicates from being output. This will not alter the database – it is runtime only.
Override Pause Schedule: the Advanced Menu features a control which allows you to schedule a pause of any length at a set time daily.
This pause will apply to all generators in your rig – thus it’s called a “global” control. Checking the box here enables this Channel to “opt out” of your pause.
Prevent Global Start: the Advanced Menu contains a set of Start, Pause, and Stop buttons. These are global controls, and will control all generators in your rig at the same time.
The checkbox here allows you to keep this Channel’s transmission independent of global control.
Out 2 Control: When using both OUTs, this is where you configure the settings for Out 2, unsurprisingly.
Here, you can specify a constant frequency multiplier and a constant frequency addition to apply to Out 1 frequencies.
You can also set a constant voltage multiplier, and choose to copy your Out 1 Gate settings. Copy Gate is mainly useful for Plasma Mode.
Stop when OUT 1 stops halts transmission from Out 2 when a Pause frequency set (0Hz) runs on Out 1.
Out 2 can be used to provide contact mode to a second subject using the same frequencies as Out 1, or set to 180 degrees out of phase to increase the power for one subject.
When Inverse+Sync is selected, these fields become irrelevant, and are greyed out and unavailable.
Back to contents 136

For plasma systems, Out 2 would provide either a fixed carrier (resonant load), or harmonically-related carrier for a system using a non-resonant balun.
Waveform Displays: the top pane shows a single cycle of the waveform for Out 1. The middle pane shows Out 2, and
the lower pane shows the combined output.
This is a damped sinusoidal with 11 entered in the Wave Cycle Multiplier field to the right of the Waveform Selectors.
Wave Cycle Multiply can be used with any waveform to infold "sub-waves" into
single cycles – a Spooky2 world-first exclusive.
This allows you to exceed the frequency limit of your generator – a Spooky2–5M (5MHz) can output 25MHz.
Waveform Selectors: from the top down, these are: Sine, Square, Sawtooth, Inverted Sawtooth, Triangle, Damped sinusoidal, Damped square, H-Bomb sinusoidal, and H-Bomb square. Each one, plus the Spike+Sync waveform when selected, may be inverted by ticking its checkbox.
The Damped sinusoidal wave was used by Dr. Royal Raymond Rife in his documented cure of 14 terminal cancer and two terminal TB cases in 1932.
Back to contents 137

The Damped square and both H-Bomb waveforms are extrapolations of the principles involved in this wave. All four are orders of magnitude more powerful that the first five waveforms in the list.
We recommend the square versions for your experiments, and the sinusoidal ones for scanning with Spooky Pulse.
Custom Waveform Menus: these menus allow you to choose any of the nine Spooky2 waves, plus three new ones – Lily, BXBY, and Square Harmonic. By selecting them here, you can edit their values for Wave Cycle Multiplier, Spike Length and Ratio – and, best of all, for Spectrum.
Your edits, together with any modulation settings you make for F2=F1, are written to file and saved in the Waveforms folder inside the Spooky2 directory on C: drive.
You can rename these files in Windows, and create as many as you wish. Because they’re CSV files, you can open, view, and edit them in any spreadsheet program. To load new waves, simply drop the files into your own Waveforms folder and choose Refresh Waveforms from the File Menu.
Wave Cycle Multipliers: the X column of controls to the right of the waveforms turns Spooky2 into something very
special indeed. Spooky2 creates each frequency as what’s known as an arbitrary waveform.
This allows all of its frequencies to be constructed from multiple copies of the waves. This is extremely important for the Damped and H-Bomb waves because the number of decay frequencies in each must be set correctly.
However, this can also be applied to the other waveforms, too. Example: a plain Sine Wave with Wave Cycle Multiplier set to 10 will be able to reach frequencies of up to 25MHz, or even higher.
1, 2 Controls and the Follow Out 1 Button: if you’re using both outputs, these controls allow you to make independent waveform selections for each one, or to have Out 2 reflect Out 1’s settings. With Spooky Boost, Follow Out 1 should ONLY be used if frequency differs on Outs 1 and 2.
Spike+Sync: selecting this uses Out 2 to create a high voltage spike which is then “injected” into the waveform on Out 1. The duration of the spike is set in in the Length field.
There are 1,024 sample points that make up a full waveform. However, lower values work best by providing a short, sharp burst of energy that can punch holes in a cancer or pathogen cell wall. This is called electroporation.
The spike’s voltage is controlled by the Ratio parameter. If your amplitude is set to 20v, and you enter 4 in this field, the
Back to contents 138

spike’s voltage will be 20v, and the remainder of the wave will be 5v (20/4). If you enter 2, the spike will still be 20v, but the rest of the wave will be 10v (20/2).
+Spike/-Spike Checkboxes: checking these allows you to specify whether you wish to produce positive spikes only, negative spikes only, or both.
Spike Count: enter the number of spikes you wish to inject. Entering 0 will inject the maximum number possible.
Inverse+Sync: in Contact Mode, this allows you to effectively quadruple the output power of your 5M generator. Creates a mirror image of Out 1 on Out 2.
When using either Spike+Sync or Inverse+Sync, your electrodes or Remote must be connected with a Spooky Boost cable. Alternatively for Contact Mode, connect two BNC-to-alligator clips cables – one to Out 1 and the other to Out 2. Then attach each red alligator clip only to your electrodes.
To prevent the unconnected black clips from accidentally touching, you can wrap each one roughly with sellotape.
Be warned that applying high voltage low frequencies (below about 10,000Hz) can cause painful muscle lock-ups, so please put a checkmark in the Reduce Amplitude box before starting. This allows you to use high power in comfort.
NOTE: different people have different thresholds at which this effects kicks in – my own is about 1,000Hz. So it’s worth experimenting with the frequency value field in the Reduce Amplitude control to ensure you get maximum value from your frequencies.
F2 Multiplier: Spooky2 can transmit two frequencies through Out 1
alone – F2 is the second one. These must be mathematically related by multiplier. Degrees allow the addition of a Phase Angle to F2 for frequency adding or modulating.
Example: if you enter 3, F2 will be the third harmonic of F1 (F1 x 3). If you enter 11, it’s the 11th harmonic (F1 x 11). You’d normally enter a straight integer value in the multiplier field (2, 3, 5, 7, 11, 64, etc.).
Dr. Anthony Holland recently found that adding an 11th harmonic to any frequency greatly increased its power. This can be used with any wave.
F2 Modulation Menu & Checkbox: this is where you decide how F2 interacts with F1. To activate the entire F2=F1 system, check the box to the left of the menu.
Your menu choices are: Add F1 to F2, Modulate F2 Using F1 (AM DSB), and Modulate F2 Using F1 (AM SSB).
Back to contents 139

Channels & User Data/Web
We’ve been here before, so you’ll be fairly familiar with this section of Spooky2’s interface.
Nevertheless, we’ll go through the components one by one from left to right and top to bottom.
Channel Number: shows the number of the Channel whose Control Panel was last opened – this is the one you’re working with.
– Button: clears the entire contents of the User Data pane.
Program/Patient Name: dual-purpose control. Most owners will wish to use this to create Presets. Clinicians can use it to keep track of Subject treatments. In both cases, the drop-down menu (with arrow to right) displays a list of Presets or Subjects. You can save up to 32,000 entries – as long as you’re prepared to scroll through a long menu, or organise a folder swap-out system.
Back to contents 140

Overwrite Channel Settings: when you’ve chosen a Channel by opening and closing it, then entered all your sets and settings, tick this before clicking on the Channel button again to run the Program. This tells Spooky2 that you wish to delete the memorised Channel settings and replace them. If you forget to do this, you may lose your work. This is true for Subjects, too.
+ and – Buttons: The + Button saves a Preset or Subject name, (plus email address, email message, notes, and Selection field contents) and enters it into the drop-down menu. The – Button will delete it after it’s been loaded by choosing it from the menu.
Email(s): Useful for clinicians. Enter your Subject’s email address here and Spooky2 can send her a notification of any change you make in treatment when you click the Send Email button.
Enable Emails: tick to activate Spooky2’s email system. This system works with POP email clients like Outlook and Windows Mail. It will only work with IMAP email accounts like GMail, Hotmail, or Yahoo if you use a POP email client that has been correctly configured to also access webmail.
Send Screenshot: tick this box to include a screenshot of the Spooky2 window with your email – you must first use the Screenshot Button to create this.
Email Message: enter the text of the message you wish to send to your Subject. The names of all sets loaded into the Selection field will be appended to your message.
Selection: this field contains names of the set(s) you’ve loaded from your Conditions List search. If you change your mind about any, simply double click each to remove it. The entire list can be cleared by clicking the – Button at the top right of the field.
Notes: personal users can enter any notes they wish concerning the Preset they’re about to save. Clinicians can use this to enter Subject notes. These will not be sent in emails.
Send Email: clinicians can click this button to send their email to the Subject.
Save As: you can also save multiple sets loaded in the Selections Box by clicking this button. It saves all frequencies in all sets under a new set name to your custom database, potentially saving time when setting up multiple Channels.Back to contents 141

Channel Buttons: there’s one for each generator. Green means the Channel is running, red means it’s stopped. The top numeral is the COMM Port (USB) number, the bottom is the Channel Program’s percentage completed.
PC Button: this is your Phantom Channel. When you click it, it will open a Channel that “controls” a virtual generator. This allows you to experiment, and to create and save Presets without stopping any of your real generators.
Social Media Web Pane: This is enabled in the Advanced Menu. To use it, your PC must be connected to the internet.
Click to visit the Spooky2 Forum.
Click to visit the Spooky2 Facebook group.
Click to visit the Spooky2 YouTube channel.
Click to visit the Spooky2 Vimeo channel.
Click to visit the Spooky2 Seen.is group.
Click to visit Pinterest.
Click to tweet about Spooky2.
Click to visit Tumblr.
Back to contents 142
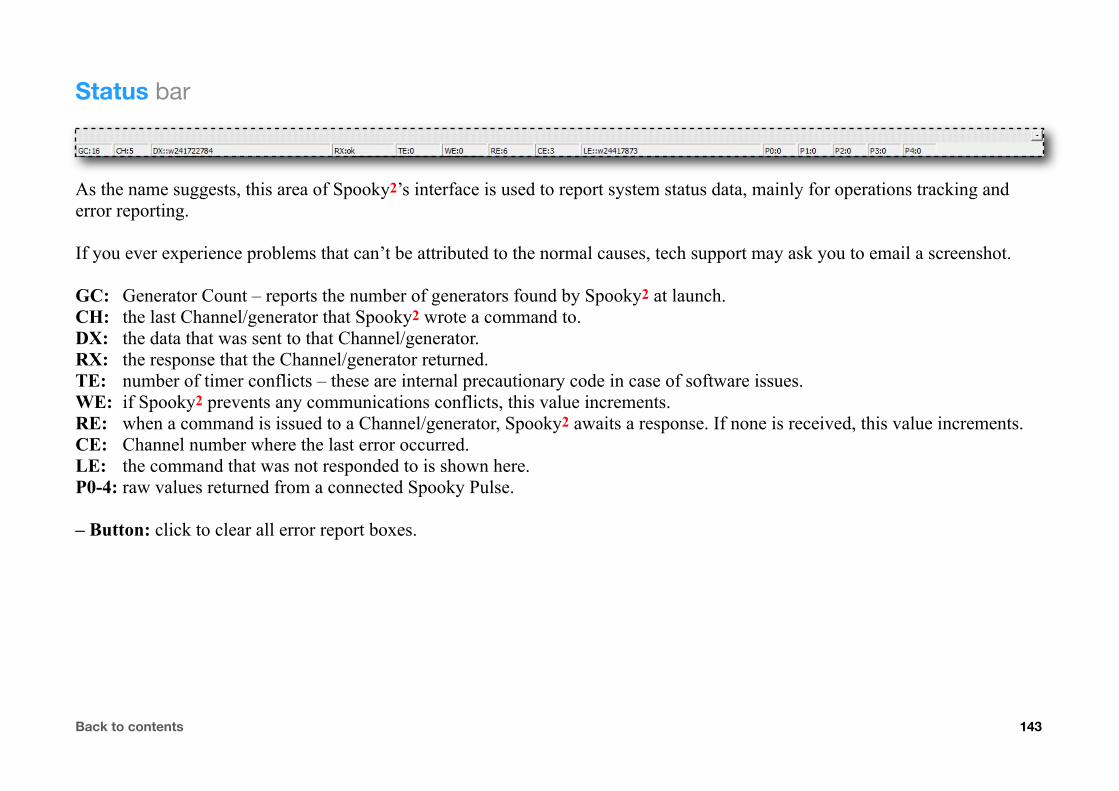
Status bar
As the name suggests, this area of Spooky2’s interface is used to report system status data, mainly for operations tracking and error reporting.
If you ever experience problems that can’t be attributed to the normal causes, tech support may ask you to email a screenshot.
GC: Generator Count – reports the number of generators found by Spooky2 at launch.CH: the last Channel/generator that Spooky2 wrote a command to.DX: the data that was sent to that Channel/generator.RX: the response that the Channel/generator returned.TE: number of timer conflicts – these are internal precautionary code in case of software issues.WE: if Spooky2 prevents any communications conflicts, this value increments.RE: when a command is issued to a Channel/generator, Spooky2 awaits a response. If none is received, this value increments.CE: Channel number where the last error occurred.LE: the command that was not responded to is shown here.P0-4: raw values returned from a connected Spooky Pulse.
– Button: click to clear all error report boxes.
Back to contents 143
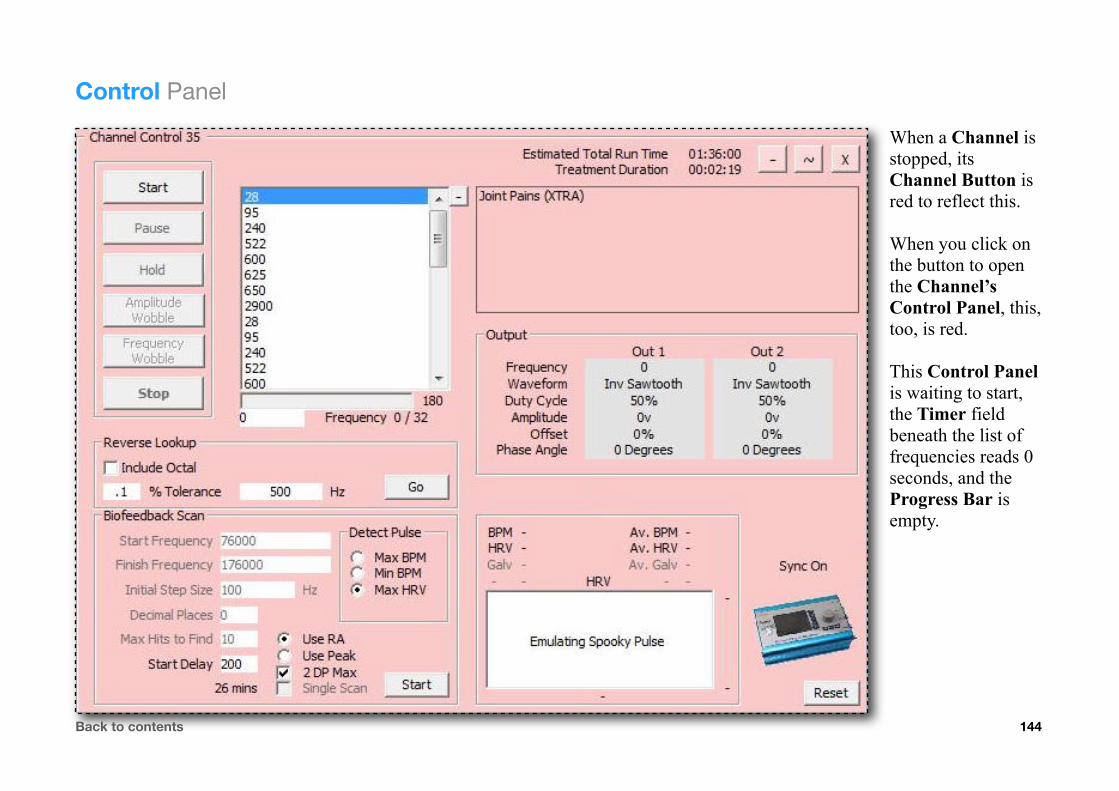
Control Panel
When a Channel is stopped, its Channel Button is red to reflect this.
When you click on the button to open the Channel’s Control Panel, this, too, is red.
This Control Panel is waiting to start, the Timer field beneath the list of frequencies reads 0 seconds, and the Progress Bar is empty.
Back to contents 144
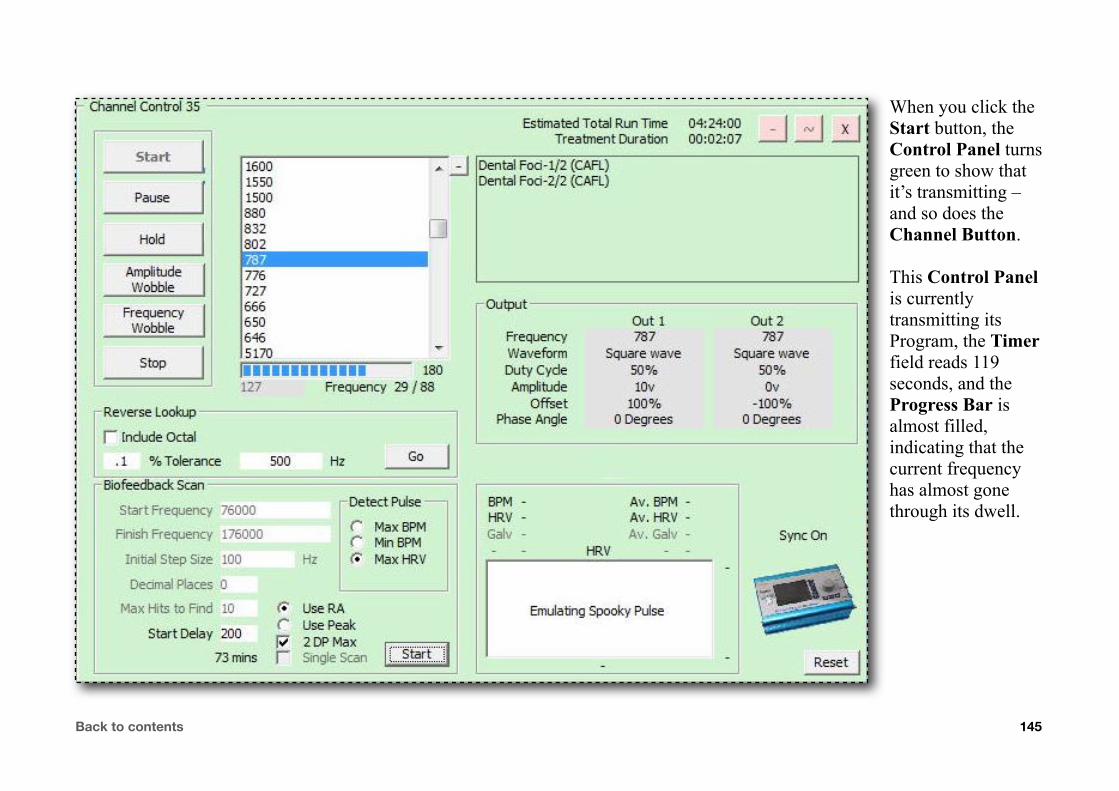
When you click the Start button, the Control Panel turns green to show that it’s transmitting – and so does the Channel Button.
This Control Panel is currently transmitting its Program, the Timer field reads 119 seconds, and the Progress Bar is almost filled, indicating that the current frequency has almost gone through its dwell.
Back to contents 145
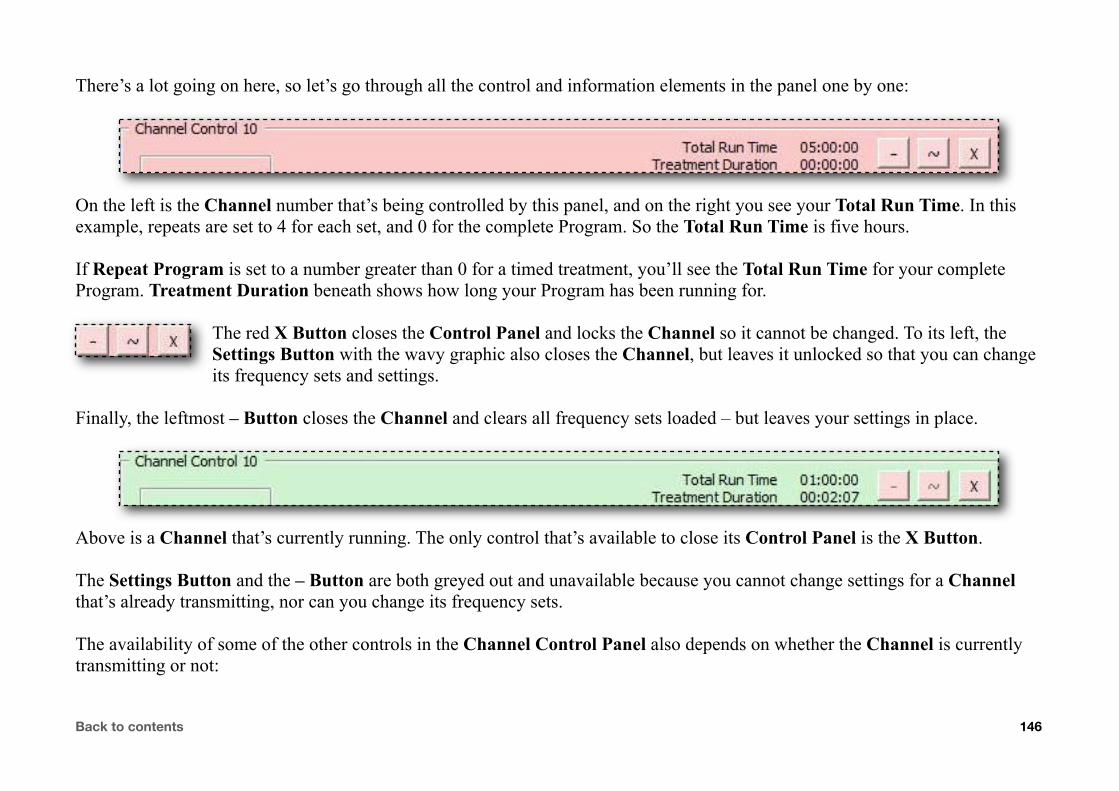
There’s a lot going on here, so let’s go through all the control and information elements in the panel one by one:
On the left is the Channel number that’s being controlled by this panel, and on the right you see your Total Run Time. In this example, repeats are set to 4 for each set, and 0 for the complete Program. So the Total Run Time is five hours.
If Repeat Program is set to a number greater than 0 for a timed treatment, you’ll see the Total Run Time for your complete Program. Treatment Duration beneath shows how long your Program has been running for.
The red X Button closes the Control Panel and locks the Channel so it cannot be changed. To its left, the Settings Button with the wavy graphic also closes the Channel, but leaves it unlocked so that you can change its frequency sets and settings.
Finally, the leftmost – Button closes the Channel and clears all frequency sets loaded – but leaves your settings in place.
Above is a Channel that’s currently running. The only control that’s available to close its Control Panel is the X Button.
The Settings Button and the – Button are both greyed out and unavailable because you cannot change settings for a Channel that’s already transmitting, nor can you change its frequency sets.
The availability of some of the other controls in the Channel Control Panel also depends on whether the Channel is currently transmitting or not:
Back to contents 146

Transmission Buttons: some are greyed out till the Channel runs. Bold text on a button shows it was clicked last.
Pause, Hold, and Wobble are toggles that remain active till you click them again. Start, Pause, and Stop are obvious. Hold remains on the
current frequency indefinitely till it’s clicked again.
The Wobble buttons apply Amplitude and/or Frequency Wobbles as configured in the Advanced Menu – click to start. The wobbled frequency continues indefinitely. Click again to stop and continue progression through the Program.
Progress Bar: tracks progress through each frequency. The number to the right (180) is the Dwell in seconds.
Four sets are shown at right, and at left their frequencies.
To start with a specific frequency, double click it, then click Start. To jump to a different one while the Channel is running, double click it.
– Button: removes all frequencies from the list.
Timer: shows the number of seconds elapsed for the current frequency (bottom left). Editable when the Channel is stopped.
Frequency Count: displays your total number of frequencies taking account of all Repeat settings – 40 is shown above.
Back to contents 147

Output Panes: the two grey fields display all aspects of the signals being output by your generator from both OUTs – Frequency, Waveform, Duty Cycle, Amplitude, Offset, and Phase Angle.
A greyed Out 2 means that a second output is not available, as with a UDB1108S generator connected, which has one Out. These fields are not editable. The frequency you see here may not be what you see on the generator display. When this happens, look at your waveform’s X field – you’ll always find that its value is greater than 1.
What’s happening is that Spooky2 is transmitting an arbitrary waveform made up of the number of sub-waves you see in the “X” field. Obviously, the generator can’t display all these sub-waves at the same time, so it just displays one. So if your waveform has 16 sub-waves, you’re seeing one-sixteenth of the frequency that’s actually being transmitted. This can be verified by connecting an oscilloscope to your generator’s output.
Generator Graphic: Spooky2 shows you an image of whichever generator you’re using for each Channel. If your Channel uses a Spooky2–5M, you’ll see it here, with its Sync status displayed above.
Sync On means that the outputs are synchronised because Inverse+Sync or Spike+Sync is selected.
To turn Sync off, you must select Follow Out 1 instead.
Sync Off: this this is what you’ll see instead.
This is a UDB1108S. These generators have only one output. Sync is thus not applicable, and will always be reported as Off.
When a Channel is stopped, click this button to reset its generator to factory defaults.
Biofeedback Scan: This has its own section here, and will soon have its own more detailed User’s Guide.
Back to contents 148
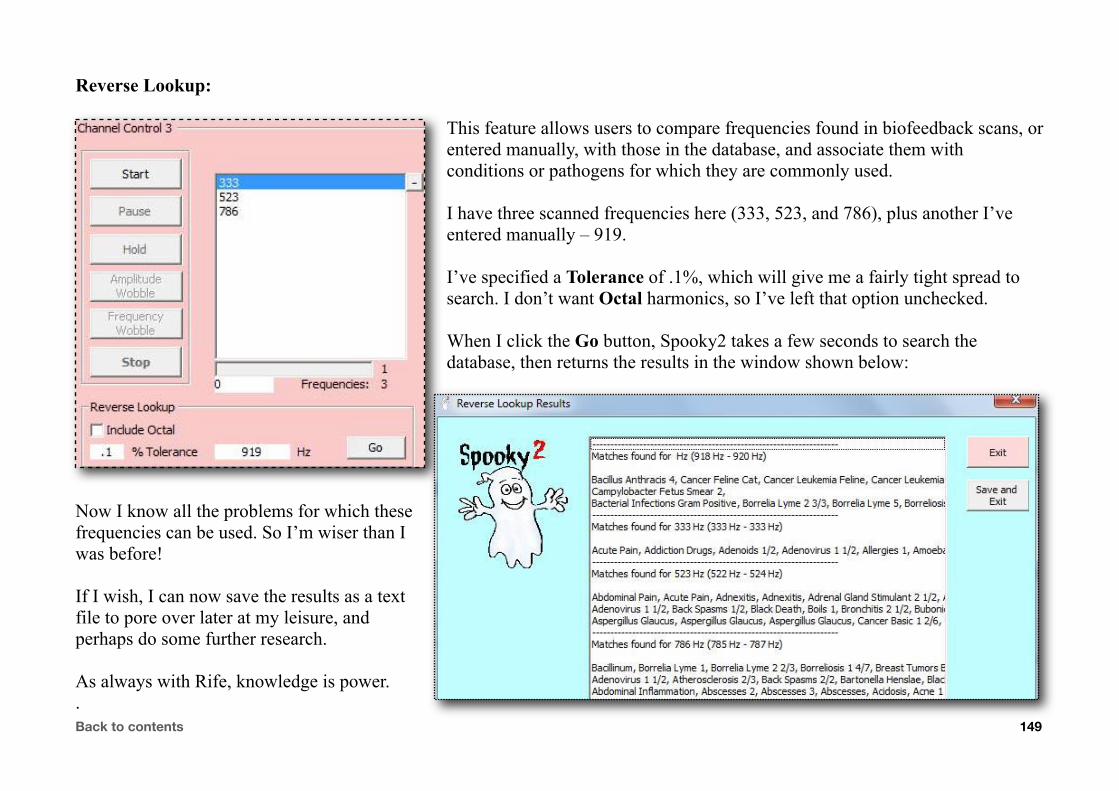
Reverse Lookup:
This feature allows users to compare frequencies found in biofeedback scans, or entered manually, with those in the database, and associate them with conditions or pathogens for which they are commonly used.
I have three scanned frequencies here (333, 523, and 786), plus another I’ve entered manually – 919.
I’ve specified a Tolerance of .1%, which will give me a fairly tight spread to search. I don’t want Octal harmonics, so I’ve left that option unchecked.
When I click the Go button, Spooky2 takes a few seconds to search the database, then returns the results in the window shown below:
Now I know all the problems for which thesefrequencies can be used. So I’m wiser than Iwas before!
If I wish, I can now save the results as a textfile to pore over later at my leisure, andperhaps do some further research.
As always with Rife, knowledge is power..Back to contents 149
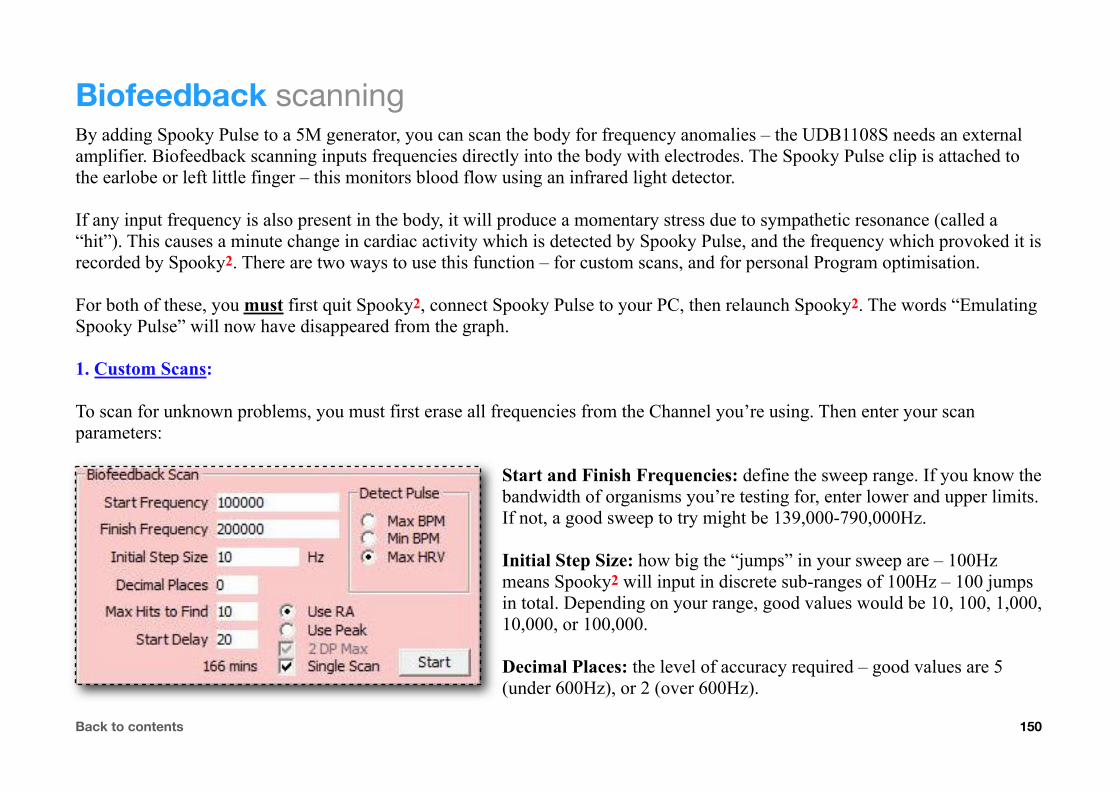
Biofeedback scanningBy adding Spooky Pulse to a 5M generator, you can scan the body for frequency anomalies – the UDB1108S needs an external amplifier. Biofeedback scanning inputs frequencies directly into the body with electrodes. The Spooky Pulse clip is attached to the earlobe or left little finger – this monitors blood flow using an infrared light detector.
If any input frequency is also present in the body, it will produce a momentary stress due to sympathetic resonance (called a “hit”). This causes a minute change in cardiac activity which is detected by Spooky Pulse, and the frequency which provoked it is recorded by Spooky2. There are two ways to use this function – for custom scans, and for personal Program optimisation.
For both of these, you must first quit Spooky2, connect Spooky Pulse to your PC, then relaunch Spooky2. The words “Emulating Spooky Pulse” will now have disappeared from the graph.
1. Custom Scans:
To scan for unknown problems, you must first erase all frequencies from the Channel you’re using. Then enter your scan parameters:
Start and Finish Frequencies: define the sweep range. If you know the bandwidth of organisms you’re testing for, enter lower and upper limits. If not, a good sweep to try might be 139,000-790,000Hz.
Initial Step Size: how big the “jumps” in your sweep are – 100Hz means Spooky2 will input in discrete sub-ranges of 100Hz – 100 jumps in total. Depending on your range, good values would be 10, 100, 1,000, 10,000, or 100,000.
Decimal Places: the level of accuracy required – good values are 5 (under 600Hz), or 2 (over 600Hz).
Back to contents 150
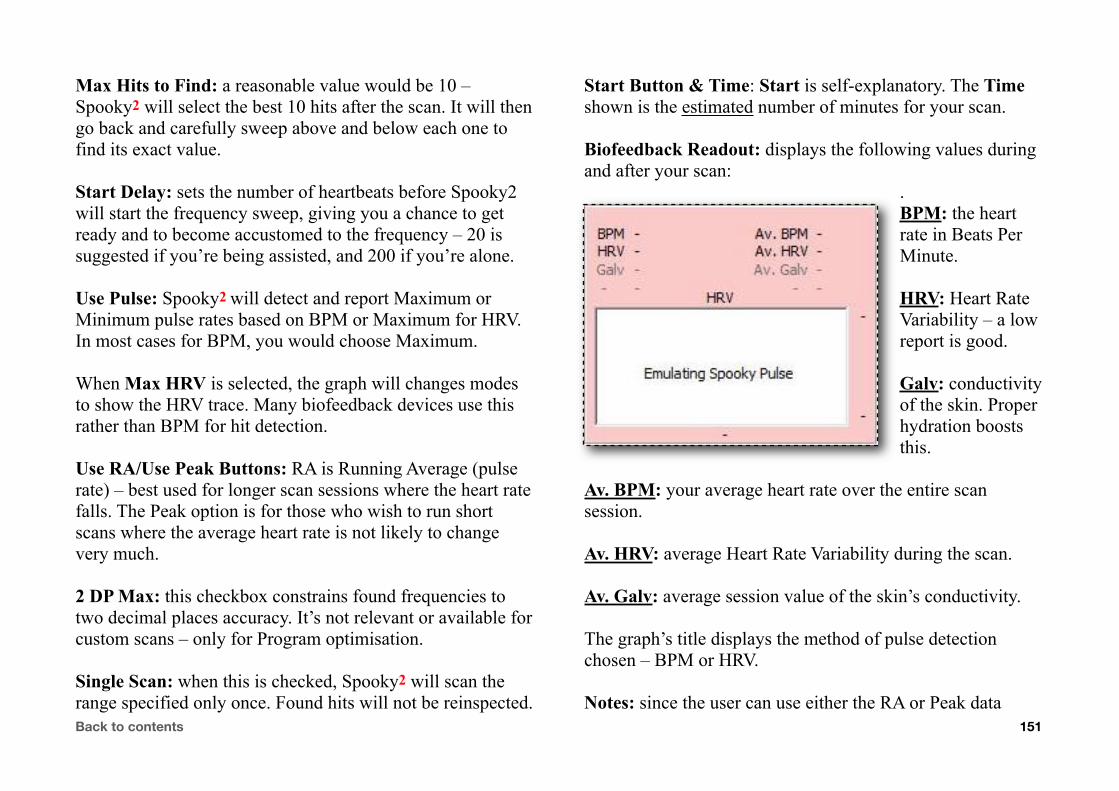
Max Hits to Find: a reasonable value would be 10 – Spooky2 will select the best 10 hits after the scan. It will then go back and carefully sweep above and below each one to find its exact value.
Start Delay: sets the number of heartbeats before Spooky2 will start the frequency sweep, giving you a chance to get ready and to become accustomed to the frequency – 20 is suggested if you’re being assisted, and 200 if you’re alone.
Use Pulse: Spooky2 will detect and report Maximum or Minimum pulse rates based on BPM or Maximum for HRV. In most cases for BPM, you would choose Maximum.
When Max HRV is selected, the graph will changes modes to show the HRV trace. Many biofeedback devices use this rather than BPM for hit detection.
Use RA/Use Peak Buttons: RA is Running Average (pulse rate) – best used for longer scan sessions where the heart rate falls. The Peak option is for those who wish to run short scans where the average heart rate is not likely to change very much.
2 DP Max: this checkbox constrains found frequencies to two decimal places accuracy. It’s not relevant or available for custom scans – only for Program optimisation.
Single Scan: when this is checked, Spooky2 will scan the range specified only once. Found hits will not be reinspected.
Start Button & Time: Start is self-explanatory. The Time shown is the estimated number of minutes for your scan.
Biofeedback Readout: displays the following values during and after your scan:
.BPM: the heart rate in Beats Per Minute.
HRV: Heart Rate Variability – a low report is good.
Galv: conductivity of the skin. Proper hydration boosts this.
Av. BPM: your average heart rate over the entire scan session.
Av. HRV: average Heart Rate Variability during the scan.
Av. Galv: average session value of the skin’s conductivity.
The graph’s title displays the method of pulse detection chosen – BPM or HRV.
Notes: since the user can use either the RA or Peak data Back to contents 151
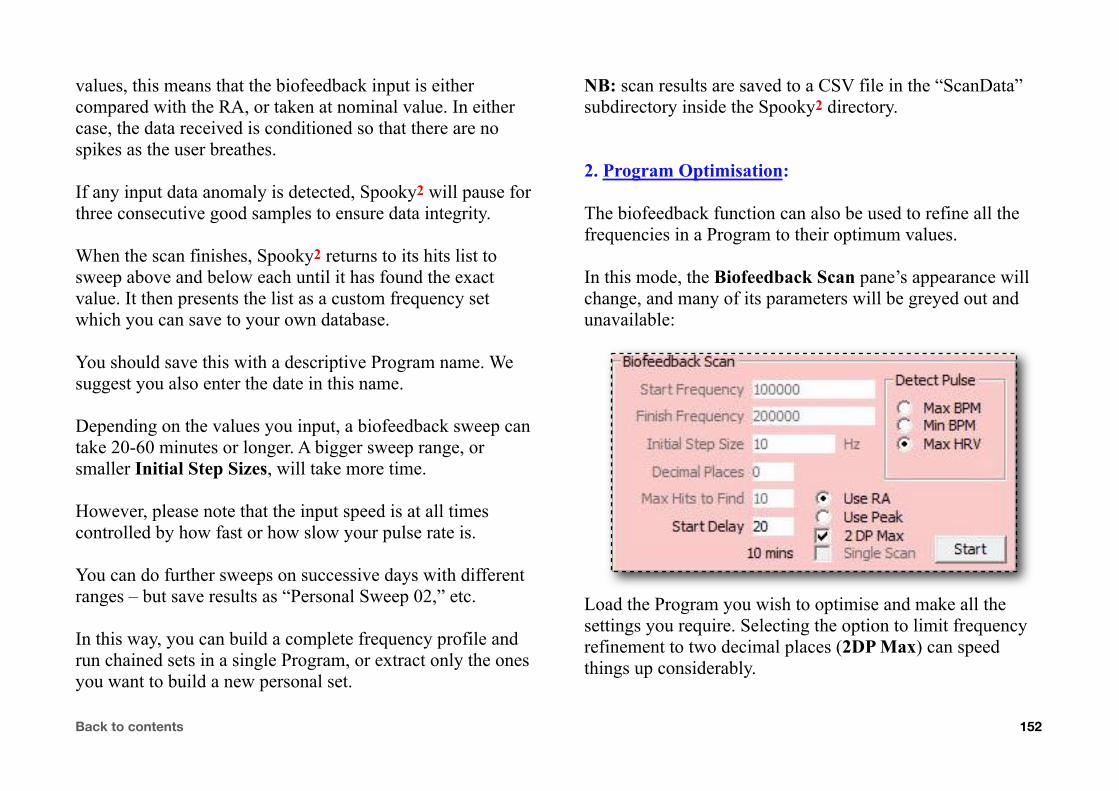
values, this means that the biofeedback input is either compared with the RA, or taken at nominal value. In either case, the data received is conditioned so that there are no spikes as the user breathes.
If any input data anomaly is detected, Spooky2 will pause for three consecutive good samples to ensure data integrity.
When the scan finishes, Spooky2 returns to its hits list to sweep above and below each until it has found the exact value. It then presents the list as a custom frequency set which you can save to your own database.
You should save this with a descriptive Program name. We suggest you also enter the date in this name.
Depending on the values you input, a biofeedback sweep can take 20-60 minutes or longer. A bigger sweep range, or smaller Initial Step Sizes, will take more time.
However, please note that the input speed is at all times controlled by how fast or how slow your pulse rate is.
You can do further sweeps on successive days with different ranges – but save results as “Personal Sweep 02,” etc.
In this way, you can build a complete frequency profile and run chained sets in a single Program, or extract only the ones you want to build a new personal set.
NB: scan results are saved to a CSV file in the “ScanData” subdirectory inside the Spooky2 directory.
2. Program Optimisation:
The biofeedback function can also be used to refine all the frequencies in a Program to their optimum values.
In this mode, the Biofeedback Scan pane’s appearance will change, and many of its parameters will be greyed out and unavailable:
Load the Program you wish to optimise and make all the settings you require. Selecting the option to limit frequency refinement to two decimal places (2DP Max) can speed things up considerably.
Back to contents 152

Practical Advice:
‣ Make sure you connect Spooky Pulse to your PC via USB before launching Spooky2.
‣ To scan reliably, make sure you’re properly hydrated.
‣ To detect heart rate changes due solely to frequency hits, you need to be relaxed. Meditation, breathing exercises, or even zoning out for five minutes works.
‣ Or you can use a web white noise generator and leave it running in the background. We recommend this website.
‣ If using TENS pads, place one on the back of the right hand, and the other just below the outside ankle of the left foot. We recommend Inverse+Sync with a sine wave.
What Will Happen:
After you start the scan, the Channel Control Panel turns purple and the white box is replaced with a graph showing the current and historical pulse rate.
The graph is auto-ranging for optimum display resolution.
Graphs always scroll to the left, with current biofeedback values updating on the right.
The horizontal cyan line is the Running Average rate (RA).
When the pulse graph is under this line, the background is green, indicating no stress. When the pulse is above the RA line, the background turns red, indicating a stress response.
Note that a low quiescent HRV indicates poor health. During biofeedback scans, Spooky2 disregards the baseline. Any increase in the absolute value of HRV is a sign of momentary stress.
When you click Start, you see the following alert – Spooky2 is now loading the waveform you’ve selected into the generator.
Now let’s take a look at a custom biofeedback scan in progress:
Back to contents 153

Here, a custom scan has just been started.
The numbers to the right of the BPM graph show the graph’s range.
The number at the bottom (12) is a countdown while Spooky2 fills the Running Average data array.
In this example, the Start Delay has been set to 20 heartbeats.
Back to contents 154

The custom scan is now well under way.
The numbers under the graph display the range of frequencies that are being scanned.
During the second phase of the Biofeedback Scan, when the resolution of hits is increased (unless Single Scan has been checked), the ranges will change appropriately.
Back to contents 155
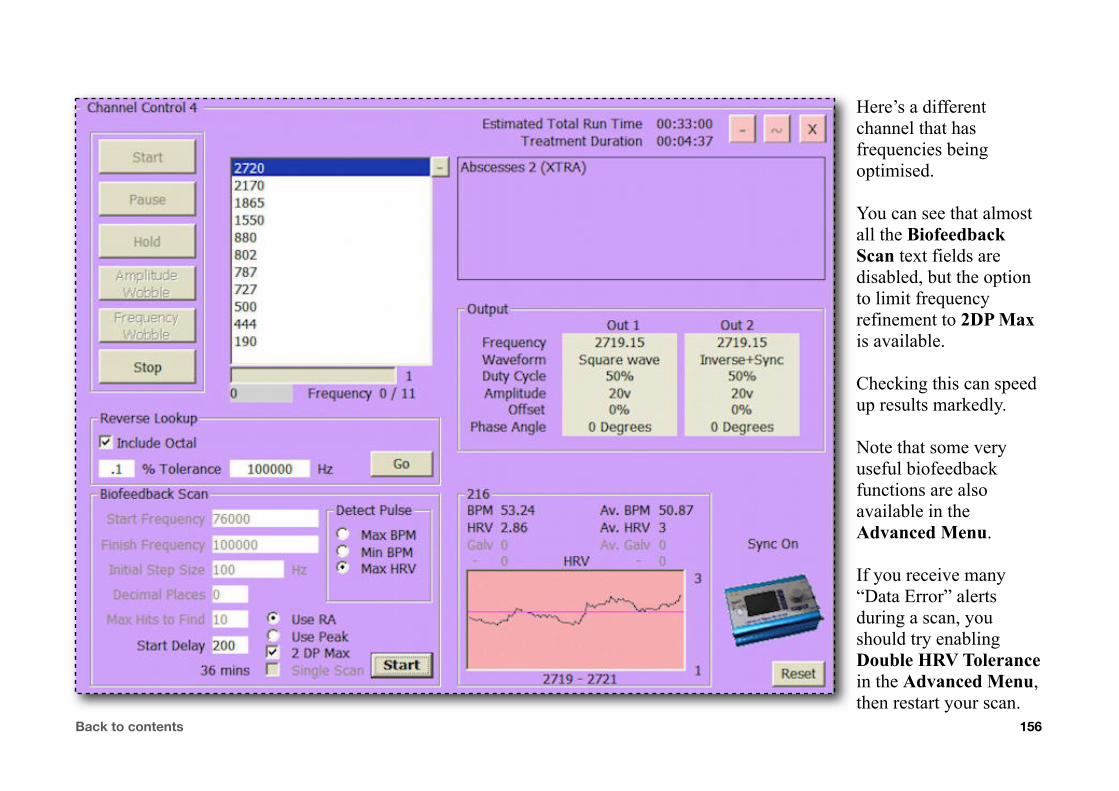
Here’s a different channel that has frequencies being optimised.
You can see that almost all the Biofeedback Scan text fields are disabled, but the option to limit frequency refinement to 2DP Max is available.
Checking this can speed up results markedly.
Note that some very useful biofeedback functions are also available in the Advanced Menu.
If you receive many “Data Error” alerts during a scan, you should try enabling Double HRV Tolerance in the Advanced Menu, then restart your scan.
Back to contents 156

Wobbles & featheringCertain pathogens can be hard to kill straight away. So they will require multiple treatment sessions.
One problem that can arise with this is that they may become adapted to the treatments, and so take longer to eradicate. The answer is to prevent this from happening by constantly and minutely varying either the exact values of the frequencies being applied, or their amplitudes – or both.
You have three methods to choose from – and you can use all if you wish. The first are Amplitude and Frequency Wobbles.
The menus above allow you to select from three waveforms that describe the trajectory along which the change will be applied – Sawtooth, Inverse Sawtooth, and Triangle. The “%” field dictates how intensely the change will be applied. And the Steps parameter lets you specify how many discrete steps or “jumps” the change will make from one value to the next.
For Amplitude, 10-15% is a reasonable value for intensity, and 1% is good for Frequency.
Steps are the red dots in the illustrations above. They are discrete values along the trajectories of the waveforms. So these wobbles aren’t applied smoothly and continuously – they jump from each step position to the next, without any change in value in between. A good general option for Steps is 16.
Back to contents 157

The Apply Menu:
The second method of preventing pathogen adaptation is a different kind of frequency wobble, found in the Apply Menu.
This menu also contains two Feathering options – feathering is true randomisation of values within a fixed percentage above and below the frequency being processed.
There are 28 choices, all of which are detailed below.
The difference between the Apply Menu options and the other Wobbles is that these ones are all preconfigured – no user input or tailoring is possible.
The general rules on frequency wobbles and feathering are: for something that’s non-living, the Apply setting should be “Frequencies Directly” (e.g. metals, pollutants, toxins). We
don’t wobble non-living things because they cannot mutate.
If it’s a living thing, and it belongs naturally in your body, the Apply setting should also be “Frequencies Directly” (e.g. normalise liver, relieve pain, stimulate immune system).This is because we’re usually applying precise entrainment frequencies.
If it’s a living thing, and it doesn’t belong naturally in your body, the Apply setting should be anything other than “Frequencies Directly.”
This is because living things can mutate over time, thus changing their frequencies slightly, and you need to feather to catch those mutations (e.g. bacteria, fungi, parasites, viruses).
Research and observation has shown that +- .02% Feathering is generally best for Remote Mode, although there are also other excellent choices. So please feel free to experiment.
But whichever setting you choose, it’s important to examine the frequencies you’re running so that you can be aware of what that setting will do to them. Here are some examples:Back to contents 158
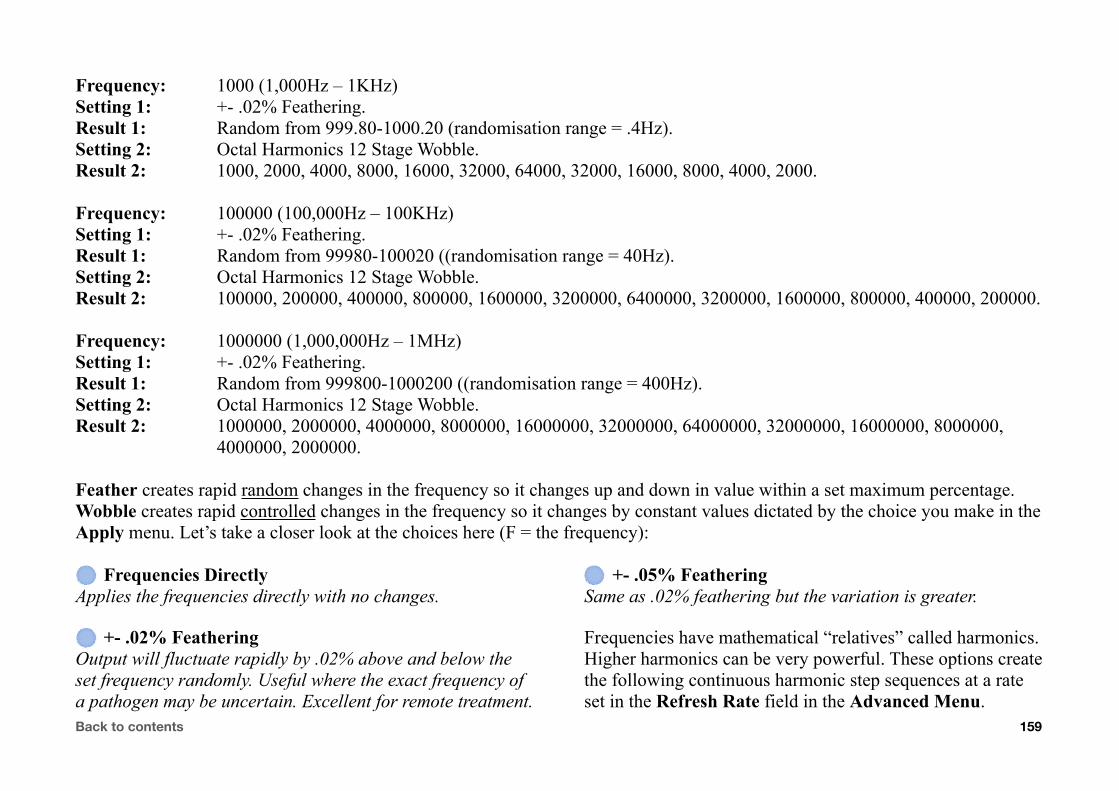
Frequency: 1000 (1,000Hz – 1KHz)Setting 1: +- .02% Feathering.Result 1: Random from 999.80-1000.20 (randomisation range = .4Hz).Setting 2: Octal Harmonics 12 Stage Wobble.Result 2: 1000, 2000, 4000, 8000, 16000, 32000, 64000, 32000, 16000, 8000, 4000, 2000.
Frequency: 100000 (100,000Hz – 100KHz)Setting 1: +- .02% Feathering.Result 1: Random from 99980-100020 ((randomisation range = 40Hz).Setting 2: Octal Harmonics 12 Stage Wobble.Result 2: 100000, 200000, 400000, 800000, 1600000, 3200000, 6400000, 3200000, 1600000, 800000, 400000, 200000.
Frequency: 1000000 (1,000,000Hz – 1MHz)Setting 1: +- .02% Feathering.Result 1: Random from 999800-1000200 ((randomisation range = 400Hz).Setting 2: Octal Harmonics 12 Stage Wobble.Result 2: 1000000, 2000000, 4000000, 8000000, 16000000, 32000000, 64000000, 32000000, 16000000, 8000000, 4000000, 2000000.
Feather creates rapid random changes in the frequency so it changes up and down in value within a set maximum percentage. Wobble creates rapid controlled changes in the frequency so it changes by constant values dictated by the choice you make in the Apply menu. Let’s take a closer look at the choices here (F = the frequency):
Frequencies DirectlyApplies the frequencies directly with no changes.
+- .02% FeatheringOutput will fluctuate rapidly by .02% above and below the set frequency randomly. Useful where the exact frequency of a pathogen may be uncertain. Excellent for remote treatment.
+- .05% FeatheringSame as .02% feathering but the variation is greater.
Frequencies have mathematical “relatives” called harmonics. Higher harmonics can be very powerful. These options create the following continuous harmonic step sequences at a rate set in the Refresh Rate field in the Advanced Menu.
Back to contents 159
.02% 4 Stage WobbleF, F+.02%, F, F-.02%
.02% 8 Stage WobbleF, F+.01%, F+.02%, F+.01%, F, F-.01%, F-.02%, F-.01%
.05% 4 Stage WobbleF, F+.05%, F, F-.05%
.05% 8 Stage WobbleF, F+.025%, F+.05%, F+.025%, F, F-.025%, F-.05%,F-.025%
Octal Harmonics 2 Stage WobbleF, F x 2
Octal Harmonics 4 Stage WobbleF, F x 2, F x 4, F x 2
Octal Harmonics 6 Stage WobbleF, F x 2, F x 4, F x 6, F x 4, F x 2
Octal Harmonics 8 Stage WobbleF, F x 2, F x 4, F x 6, F x 8, F x 6, F x 4, F x 2
Octal Harmonics 10 Stage WobbleF, F x 2, F x 4, F x 6, F x 8, F x 10, F x 8, F x 6, F x 4, F x 2
Octal Harmonics 12 Stage WobbleF, F x 2, F x 4, F x 6, F x 8, F x 10, F x 12, F x 10, F x 8,F x 6, F x 4, F x 2
A perfect square wave is made up of odd harmonics. Spooky2 can force these to work harder by fluctuating to higher ones:
Odd Harmonics 2 Stage WobbleF, F x 3
Odd Harmonics 4 Stage WobbleF, F x 3, F x 5, F x 3
Odd Harmonics 6 Stage WobbleF, F x 3, F x 5, F x 7, F x 5, F x 3
Odd Harmonics 8 Stage WobbleF, F x 3, F x 5, F x 7, F x 9, F x 7, F x 5, F x 3
Odd Harmonics 10 Stage WobbleF, F x 3, F x 5, F x 7, F x 9, F x 11, F x 9, F x 7, F x 5, F x 3
Odd Harmonics 12 Stage WobbleF, F x 3, F x 5, F x 7, F x 9, F x 11, F x 13, F x 11, F x 9,F x 7, F x 5, F x 3
The Fibonacci Series of numbers can be seen everywhere in nature. It’s an excellent choice for good results:
Back to contents 160
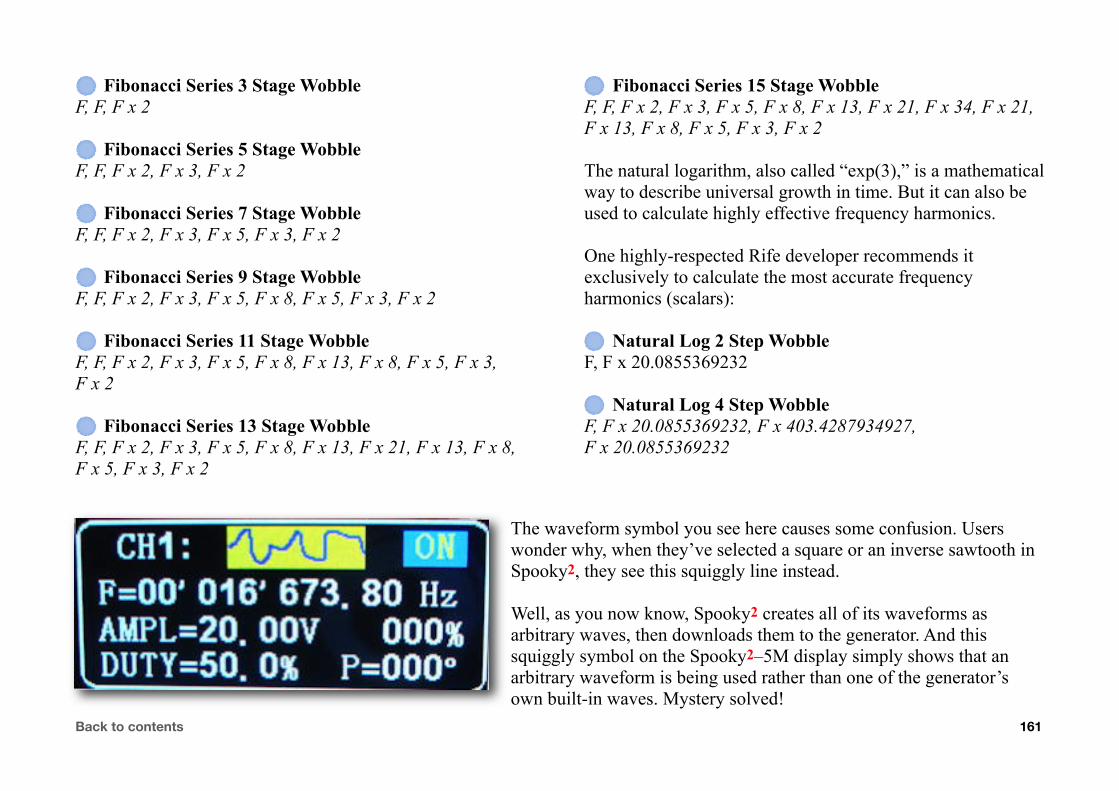
Fibonacci Series 3 Stage WobbleF, F, F x 2
Fibonacci Series 5 Stage WobbleF, F, F x 2, F x 3, F x 2
Fibonacci Series 7 Stage WobbleF, F, F x 2, F x 3, F x 5, F x 3, F x 2
Fibonacci Series 9 Stage WobbleF, F, F x 2, F x 3, F x 5, F x 8, F x 5, F x 3, F x 2
Fibonacci Series 11 Stage WobbleF, F, F x 2, F x 3, F x 5, F x 8, F x 13, F x 8, F x 5, F x 3,F x 2
Fibonacci Series 13 Stage WobbleF, F, F x 2, F x 3, F x 5, F x 8, F x 13, F x 21, F x 13, F x 8,F x 5, F x 3, F x 2
Fibonacci Series 15 Stage WobbleF, F, F x 2, F x 3, F x 5, F x 8, F x 13, F x 21, F x 34, F x 21,F x 13, F x 8, F x 5, F x 3, F x 2
The natural logarithm, also called “exp(3),” is a mathematical way to describe universal growth in time. But it can also be used to calculate highly effective frequency harmonics.
One highly-respected Rife developer recommends it exclusively to calculate the most accurate frequency harmonics (scalars):
Natural Log 2 Step WobbleF, F x 20.0855369232
Natural Log 4 Step WobbleF, F x 20.0855369232, F x 403.4287934927,F x 20.0855369232
The waveform symbol you see here causes some confusion. Users wonder why, when they’ve selected a square or an inverse sawtooth in Spooky2, they see this squiggly line instead.
Well, as you now know, Spooky2 creates all of its waveforms as arbitrary waves, then downloads them to the generator. And this squiggly symbol on the Spooky2–5M display simply shows that an arbitrary waveform is being used rather than one of the generator’s own built-in waves. Mystery solved!
Back to contents 161

Waveform & frequencyEven though they may look mysterious, waveforms are very easy to understand. They are simply graphical illustrations of how the amplitude, or power, of energy changes over time. Let’s look at the waves in Spooky2. The vertical red line at left measures positive and negative amplitudes, with 0 being the divider. The horizontal red line at bottom shows time – one second.
Sine Wave: like all the waves shown below, this one completes one full cycle every second, so its frequency is 1Hz.
A: amplitude rises from zero in a positive direction at a changing rate.B: amplitude has reached its highest positive point, or peak.C: it goes below 0 and continues in a negative direction at a changing rate.D: amplitude reaches its highest negative point, or peak.E: amplitude once again starts to move in a positive direction at a changing rate.
Good for: healing, detox, killing (at very high frequencies).
Square Wave: this also completes one full cycle every second, so its frequency is 1Hz.
A: amplitude is running at its highest positive level at a constant rate.B: amplitude immediately drops below 0 and continues in a negative direction.C: amplitude is running at its highest negative level at a constant rate.D: amplitude immediately moves through 0 to hit peak positive level.
Good for: killing, healing, detox.
Back to contents 162

Sawtooth: this completes its full cycle in one second, so its frequency is 1Hz.
A: amplitude moves from negative peak towards positive at a constant rate.B: amplitude passes through 0.C: it continues to move in a positive direction at a constant rate.D: amplitude immediately drops through 0 to peak negative level.
Good for: experimentation as a possible linear substitute for sine.
Inverse Sawtooth: this completes its full cycle in one second, so its frequency is 1Hz.
A: amplitude ramps down from positive peak level at a constant rate.B: amplitude passes through 0.C: amplitude continues to move in a negative direction at a constant rate.D: amplitude immediately moves through 0 to peak positive level.
Good for: killing.
The Sawtooth and the Inverse Sawtooth are the only two waveforms that are mirror images of each other. Sawtooth always rises slowly and drops quickly, where Inverse Sawtooth always falls slowly and rises quickly. Although this may seem insignificant, it’s actually very important, and we’ll look at the different results in a later section.
Back to contents 163
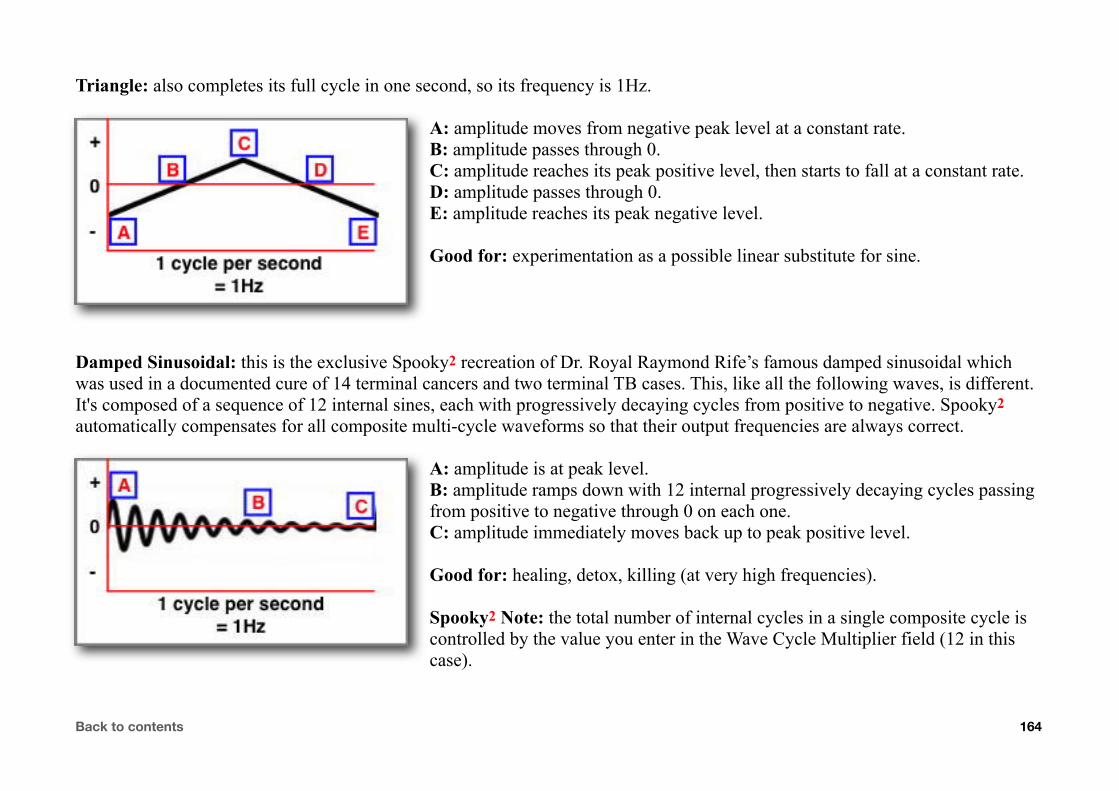
Triangle: also completes its full cycle in one second, so its frequency is 1Hz.
A: amplitude moves from negative peak level at a constant rate.B: amplitude passes through 0.C: amplitude reaches its peak positive level, then starts to fall at a constant rate.D: amplitude passes through 0.E: amplitude reaches its peak negative level.
Good for: experimentation as a possible linear substitute for sine.
Damped Sinusoidal: this is the exclusive Spooky2 recreation of Dr. Royal Raymond Rife’s famous damped sinusoidal which was used in a documented cure of 14 terminal cancers and two terminal TB cases. This, like all the following waves, is different. It's composed of a sequence of 12 internal sines, each with progressively decaying cycles from positive to negative. Spooky2 automatically compensates for all composite multi-cycle waveforms so that their output frequencies are always correct.
A: amplitude is at peak level.B: amplitude ramps down with 12 internal progressively decaying cycles passing from positive to negative through 0 on each one.C: amplitude immediately moves back up to peak positive level.
Good for: healing, detox, killing (at very high frequencies).
Spooky2 Note: the total number of internal cycles in a single composite cycle is controlled by the value you enter in the Wave Cycle Multiplier field (12 in this case).
Back to contents 164

Damped Square: a new waveform based on the principles of the damped sinusoidal. Its 12 internal square waves progressively decay, and Spooky2 automatically adjusts the composite waveform to make its transmitted frequency correct.
A: amplitude is at peak level.B: amplitude drops sharply with 12 internal progressively decaying cycles passing from positive to negative through 0 on each one.C: amplitude immediately rises back up to peak positive level.
Good for: killing, healing, detox.
Spooky2 Note: the total number of internal cycles in a single composite cycle is controlled by the value you enter in the Wave Cycle Multiplier field (12 in this case).
H-Bomb Sinusoidal: another new wave based on the damped sinusoidal. Technically, it’s more complex and involves duty cycle computations. It’s built from eight internal sine cycles, and the composite waveform is automatically adjusted to make its transmitted frequency correct.
A: amplitude is at 0.B: amplitude ramps to peak positive level, then ramps back through 0 to peak negative level.C: amplitude rises and proceeds through six smaller internal cycles.D: amplitude ramps to peak positive level, then ramps back through 0 to peak negative level.E: amplitude moves back up to 0.
Good for: healing, detox, killing (at very high frequencies).
Spooky2 Note: the total number of internal cycles in a single composite cycle is controlled by the value you enter in the Wave Cycle Multiplier field (eight here).Back to contents 165

H-Bomb Square: this is a third new waveform based on the principles behind the damped square. It’s built from eight internal square wave cycles, and Spooky2 automatically adjusts the composite waveform to make its transmitted frequency correct.
A: amplitude is at 0.B: amplitude rises sharply to peak positive level, then moves immediately through 0 to peak negative level.C: amplitude rises and proceeds through six smaller internal cycles.D: amplitude rises sharply to peak positive level, then moves immediately through 0 to peak negative level.E: amplitude moves back up to 0.
Good for: killing, healing, detox.
Spooky2 Note: the total number of internal cycles in a single compositve cycle is controlled by the value you enter in the Wave Cycle Multiplier field (eight here).
So let’s sum up:
Frequency is how often the energy in something changes from a positive state to a negative state in one second of time.
Waveform is a visual representation of how the energy’s power ramps up and down during one such change.
But we’re not finished yet. We need to take a look at two other important properties which have great importance for how waveforms behave.
The first is Offset, and this applies to all waveforms. The second is Duty Cycle, which applies only to plain square waves.
So let’s do that that now.
Back to contents 166

Waveform & OffsetYou’ve seen that normal waveforms have two phases – positive and negative. What this means in practice is that positive energy is applied by the waveform for half its cycle, and negative energy is applied for the other half. Some renowned energy medicine researchers, most notably Dr. Hulda Clark, maintain that it’s more effective for pathogen killing to apply unidirectional energy only. You can do this by using Offsest.
So that you can see the effect of Offset clearly, I’ve chosen a triangle wave here. This one has 0% Offset,
The wave is in its positive phase for 50% of its cycle (above the red 0 line), and in its negative phase for the other 50% (below the red 0 line).
Above are the settings to enter for a normal zero Offset waveform like this.
On the left, you can see that this is still the same triangle waveform, but its position on the graph is now different.
I’ve given it a 100% positive Offset, and the wave is now entirely in its positive phase for its whole cycle.
Above are the settings for 100% positive Offset when using Inverse+Sync with Spooky Boost. If you wish to use Follow Out 1 instead of Inverse+Sync, the
values to enter for both Outs are 100 and 100 (both positive). For Direct Connect to Out 1 only, you’d enter 0 instead of -100.
Back to contents 167

If you choose to use a positive Offset, one very important thing you mustn’t forget is its effect on available Amplitude.
The 5M generator has a voltage range that goes from -10 volts to +10 volts. This gives us a total range of 20 volts when measured from the highest negative peak to the highest positive peak, so the generators output 20 volts peak to peak.
However, since we’ve applied a 100% positive Offset here and pushed the waveform up into the positive phase only, this means that the voltage available for a potential negative phase is not used, since no part of the signal is now negative.
As a result, applying an Offset to any waveform may reduce the overall amplitude of your signal (see table below).
Vmax = Volts maximum. Vmin = Volts minimum. Vpp = Volts peak to peak.
NOTE: applying a 100% Offset means that only one LED on your Spooky Remote will light up. This is normal.
Back to contents 168
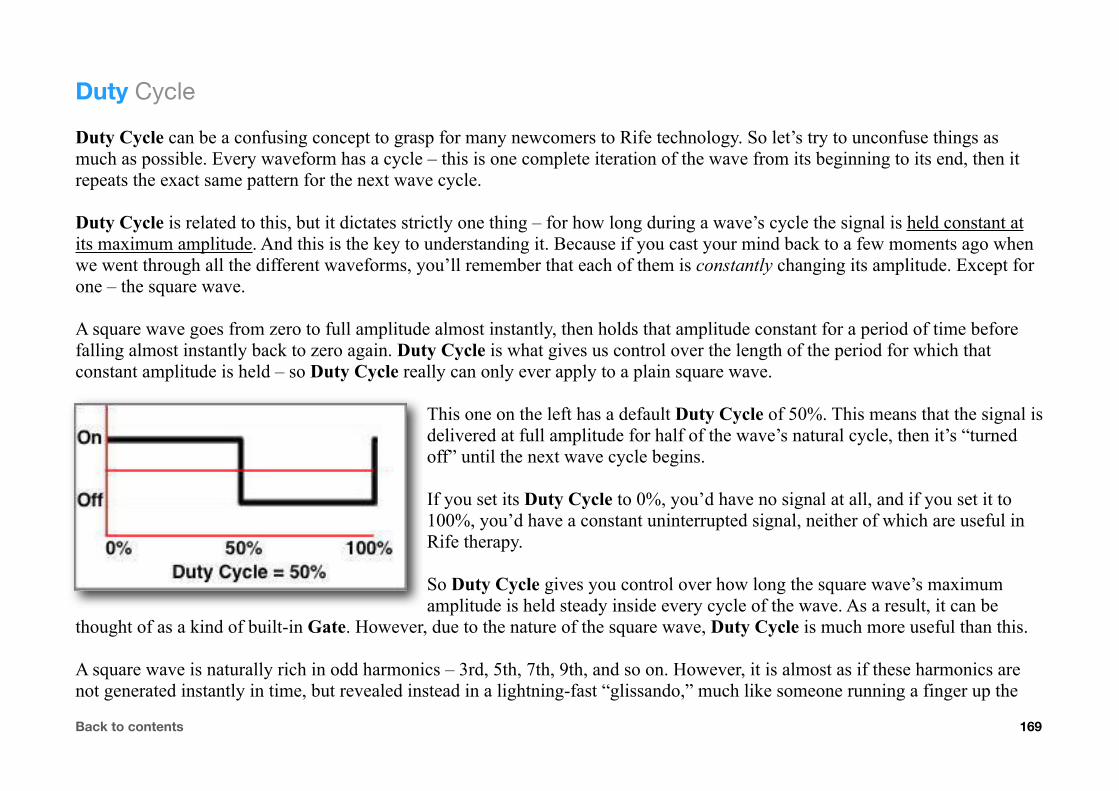
Duty Cycle
Duty Cycle can be a confusing concept to grasp for many newcomers to Rife technology. So let’s try to unconfuse things as much as possible. Every waveform has a cycle – this is one complete iteration of the wave from its beginning to its end, then it repeats the exact same pattern for the next wave cycle.
Duty Cycle is related to this, but it dictates strictly one thing – for how long during a wave’s cycle the signal is held constant at its maximum amplitude. And this is the key to understanding it. Because if you cast your mind back to a few moments ago when we went through all the different waveforms, you’ll remember that each of them is constantly changing its amplitude. Except for one – the square wave.
A square wave goes from zero to full amplitude almost instantly, then holds that amplitude constant for a period of time before falling almost instantly back to zero again. Duty Cycle is what gives us control over the length of the period for which that constant amplitude is held – so Duty Cycle really can only ever apply to a plain square wave.
This one on the left has a default Duty Cycle of 50%. This means that the signal is delivered at full amplitude for half of the wave’s natural cycle, then it’s “turned off” until the next wave cycle begins.
If you set its Duty Cycle to 0%, you’d have no signal at all, and if you set it to 100%, you’d have a constant uninterrupted signal, neither of which are useful in Rife therapy.
So Duty Cycle gives you control over how long the square wave’s maximum amplitude is held steady inside every cycle of the wave. As a result, it can be
thought of as a kind of built-in Gate. However, due to the nature of the square wave, Duty Cycle is much more useful than this.
A square wave is naturally rich in odd harmonics – 3rd, 5th, 7th, 9th, and so on. However, it is almost as if these harmonics are not generated instantly in time, but revealed instead in a lightning-fast “glissando,” much like someone running a finger up the
Back to contents 169

keys of a piano. So the larger the square wave’s Duty Cycle value is, the more harmonics are revealed because the “glissando” is being “played” for longer. And once you start to go much higher than 50%, even harmonics start to show themselves, too.
This square wave has a Duty Cycle of 10%. This means that it’s delivering power for 10% of its total wave cycle duration, and turned off for the remaining 90%.
Duty Cycles of less than 50% are not really very useful, and I can’t think of any reason why I’d want to do this, unless it was for pure experimentation.
The more useful values are over 50%, and I’ve seen 67%, 72%, 81%, and 93% being recommended by various experienced rifers.
At the other end of the scale, here’s a square wave with a Duty Cycle of 90%. This delivers power at a constant amplitude for 90% of the wave cycle’s duration, then turns off for the remaining 10%.
This is a lot more useful than the previous example.
However, it must be said that we’ve found that using an inverse sawtooth, a waveform naturally rich in both odd and even harmonics, is a better bet for killing pathogens, and a plain sawtooth is now yielding excellent experimental results for healing and detoxification applications.
For me personally, this makes a great deal of sense. Here’s why:
The heart of every symphony orchestra is the strings section – full-bodied, rich, and powerful. As a former professional composer and sound designer, I can convincingly emulate an entire orchestral strings section on a music synthesizer using only sawtooth waves. I can’t do that with square waves., which are good for emulating brass instruments only. Nice, but not the same thing.Back to contents 170

Understanding Spooky RemoteSpooky Remote was introduced before the 5M generator was available. So the only generator you could use with it was the UDB1108S. At that time, calibrating this generator had to be done manually with a multimeter.
Because this cheap and cheerful unit’s components tended to drift over time, you had to do your calibration routine at least once a month, but preferably every week – a painful chore if you were using a bunch of UDBs, as I was.
But Spooky Remote offered a brilliantly simple way to calibrate quickly and easily without needing a multimeter.
Every Remote has two red LEDs. One LED uses the positive part of the signal to illuminate, and the other uses the negative part. So when you loaded the “Signal Test” set and ran it, you turned the AMPLITUDE knob up full, then adjusted the OFFSET knob until both LEDs shone equally brightly.
When they did, your setup was calibrated – meaning that the positive and negative aspects of the signal were equal in strength. In other words, the signal’s Offset from the point of equal power was zero. This meant you could recalibrate as often as you wished, even in the middle of a Program, and I believe that the constant application of properly calibrated frequencies was responsible for at least some of the excellent results that started to come in after the Remote entered widespread use.
However, after the introduction of the 5M generator, which is calibrated by the user entering values for Amplitude and Offset in the Spooky2 software, the Remote LEDs didn’t seem to have any purpose other than letting the user know that a signal was being transmitted.
Many users were confused.
Seemingly baffling LED behaviour ranging from only one LED lighting to neither of them working was reported.
But to those with “The Knowledge,” this was all normal, and to be expected.
Back to contents 171

The truth is that the LEDs are far more useful than they appear, and once you understand how they work, you’ll be able to judge at a glance a lot more of what’s going on in your generator.
Three things control how the LEDs respond to the signal – frequency, waveform, and amplitude. I don’t own an oscilloscope, so I’ve constructed the graphics in Spooky2 by using Wave Cycle Multipliers to give you an indication of what’s going on. First, let’s look at frequency:
Remote & frequency
This is a 1Hz square wave. It completes one positive-to-negative cycle every second.
A: Signal is positive for half a second, so the left LED lights for half a second.B. Signal immediately drops through 0 to negative.C: Signal is negative for half a second, so the right LED lights for half a second.
The LEDs turn on and off very slowly, and are never both lit at the same time.
Now here’s a 32Hz square wave – it completes 32 positive-to-negative cycles every second. Count the peaks – there are 32.
With this frequency, the entire A-B-C cycle described above takes place 32 times every second.
This means that for every one of those 32 cycles, the signal is positive for 1/64th of a second, so the left LED is lit for 1/64th of a second.
The signal then goes negative for 1/64th of a second, so the right LED lights for 1/64th of a second.
Back to contents 172

Now the LEDs are both flashing quite quickly. Nevertheless, it’s always the case that only one of them is lit at a time.
Note that if you use a Wave Cycle Multiplier of 12, the frequency sent to the 5M is divided by 12. Now let’s move it up a notch.
Here’s a 256Hz square wave. Please note that a real one you’d see on an oscilloscope doesn’t look exactly like this – what we’re running up against here are the resolution limits of computer screens. Nevertheless, 256 cycles in a single second moves the peaks of each one so close to one another that the PC screen cannot show any degree of separation between them.
Now, the original A-B-C positive-to-negative cycle happens 256 times every second.
And for each of those 256 cycles, the signal is positive for 1/512th of a second, so the left LED lights for 1/512th of second.
The cycle then goes negative for 1/512th of a second, so the right LED is lit for 1/512th of a second.
Now each LED will appear to be constantly lit, at equal brightness. However, as you now know, it’s not possible for each LED to be lit at the same time, because the signal can never be both positive and negative at the same time, so what you’re seeing is an illusion that’s caused by the limits of the human eye.
That same illusion is what allows movies, which are a series of still photos transmitted in sequence at a frequency of about 24 per second, to appear to be a facsimile of real life.
We come up against a different type of limit when we start to transmit very high frequencies in the megaHertz range – which is millions of cycles every second: the limits of some of our present-day technologies.
What happens with high MHz frequencies is that the cycle switches from positive to negative so fast that neither LED has time to switch on fully before it receives the signal to switch off again. The result is the LEDs appear to go very dim, and may even appear to be turned off completely.Back to contents 173

This doesn’t mean that Spooky2, the generator, or the Remote have stopped working – just that current LED switching technology isn’t fast enough to keep up with what’s happening with an extremely fast signal. This is nothing to worry about.
Remote & amplitudeHowever, there’s another scenario where the LEDs can appear to be very dim, or even unlit – and this one doesn’t involve very high frequencies at all.
Every time an LED lights up, it uses a very tiny fraction of the frequency’s motive power – amplitude, otherwise known as voltage. At amplitudes above about 5volts, you won’t really see any difference in the luminance of the LEDs. However, if you set your amplitude lower than this, the voltage available to light up the LEDs drops off, and the result is that they appear to be dim. At very low amplitudes, they will look like they’re not working at all.
This is also nothing to worry about. In fact, it’s a good thing because it means that all of the frequency’s voltage is being used for the purpose intended – healing.
Remote & waveformWould it surprise you to learn that you can get a pretty good idea of which waveform is being used on a Channel from watching how the Remote LEDs behave at low frequencies?
For all of the examples I’ve already shown you, we used a square wave. With a square, the power is always constant at positive and negative polarities, and the change from positive to negative is almost instantaneous.
However, exactly the same positive-to-negative switching principles apply to all the waveforms in Spooky2, and at low frequencies, you’ll be able to see that the changes in brightness of both LEDs reflects the actual shape of the waveform.
Let’s go back to some of the original waveform graphics to explain what happens:Back to contents 174

Here’s what happens with a 1Hz sine wave:
A: positive amplitude ramps up, so the left LED gets progressively brighter.B: amplitude has reached its high point, so the left LED is at its brightest.C: amplitude falls, so the LED dims and goes out, while the right LED starts to brighten.D: negative amplitude reaches its high point, so the right LED is at its brighest.E: amplitude once again starts to go positive, so the right LED starts to dim.
Here’s an inverse sawtooth waveform, also at 1Hz:
A: positive amplitude falls at a constant rate, so the left LED slowly dims.B: amplitude passes through 0, the left LED goes out and the right one comes on.C: negative amplitude increases at a constant rate, so the right LED slowly brightens.D: amplitude rises through 0 to peak positive, so the right LED goes out, and the left one immediately brightens fully.
Let’s take a look at the 1 Hz damped sinusoidal:
A: amplitude is at peak, so the left LED is fully lit. As amplitude ramps down, the LED dims and goes out, and the right LED comes on dimly and starts to brighten.B: amplitude falls away with 12 internal rises and falls passing from positive to negative through 0. So each LED will brighten and dim 12 times in succession, and the brightness ramps up and down gradually. With a damped square, the LEDs wouldn’t ramp up and down – they’d simply switch on and off alternately.C: at this point, both LEDs are very dimly lit because of the low amplitudes. Finally, the amplitude returns to peak positive to start the cycle all over again.
Back to contents 175
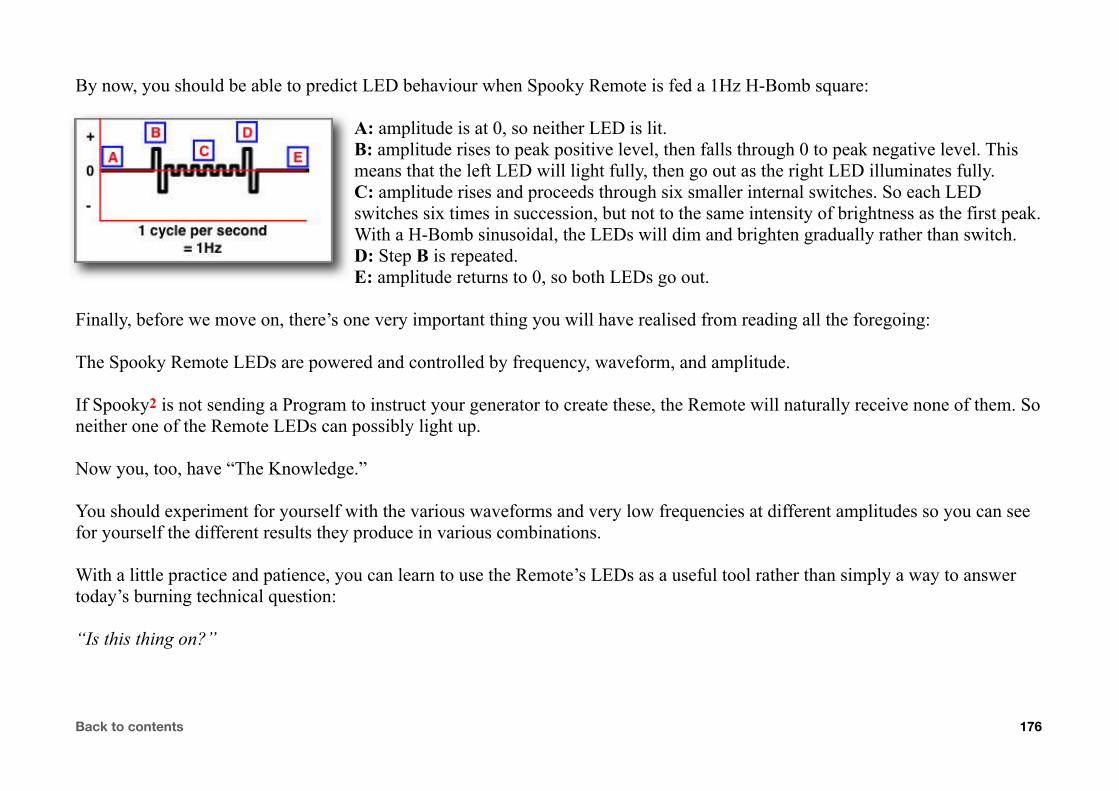
By now, you should be able to predict LED behaviour when Spooky Remote is fed a 1Hz H-Bomb square:
A: amplitude is at 0, so neither LED is lit.B: amplitude rises to peak positive level, then falls through 0 to peak negative level. This means that the left LED will light fully, then go out as the right LED illuminates fully.C: amplitude rises and proceeds through six smaller internal switches. So each LED switches six times in succession, but not to the same intensity of brightness as the first peak. With a H-Bomb sinusoidal, the LEDs will dim and brighten gradually rather than switch.D: Step B is repeated.E: amplitude returns to 0, so both LEDs go out.
Finally, before we move on, there’s one very important thing you will have realised from reading all the foregoing:
The Spooky Remote LEDs are powered and controlled by frequency, waveform, and amplitude.
If Spooky2 is not sending a Program to instruct your generator to create these, the Remote will naturally receive none of them. So neither one of the Remote LEDs can possibly light up.
Now you, too, have “The Knowledge.”
You should experiment for yourself with the various waveforms and very low frequencies at different amplitudes so you can see for yourself the different results they produce in various combinations.
With a little practice and patience, you can learn to use the Remote’s LEDs as a useful tool rather than simply a way to answer today’s burning technical question:
“Is this thing on?”
Back to contents 176
Understanding SpectrumWhen I told John I wanted to do a section designed to make Spectrum easy, he laughed and wished me luck. Now I know why: the mathematics underlying it baffles even the best engineers, and many professional mathematicians would be hard pressed to understand what’s going on under the hood.
So the best I can do is to explain how the Spectrum parameters affect the output signal, and give you some examples. This will give you a good handle on it all. But the first thing you must understand about Spectrum is what it’s meant to be used for.
Spectrum was designed to kill every organism foreign to the body. Its primary purpose is not to heal, not to support, not to detox. It’s really meant to be an executioner – for viruses, bacteria, fungi, mould, yeast, and parasites. So whenever you use it, you should also run detox and support Programs.
There are three sweeps that use Spectrum in the Spooky2 database. And the Create Spectrum Sweep facility makes it easy to design your own. However, you should remember that a sweep slowly moves from one frequency to another, so you will need to know the low and high frequencies that define the range in which your chosen target lives.
But sweeps are pretty straightforward. What’s less well understood is the idea of applying Spectrum to static single frequencies. The first technical area we must look at is power – or amplitude:
Spectrum is a mathematical way to make one “parent” static or moving frequency produce up to 1,024 “child” frequencies simultaneously, spread equally above and below that frequency. While this is an amazing feat, you must never forget that a generator’s available amplitude is divided between all the frequencies it’s currently transmitting.
The 5M, 10M, and 20M generators operate at a maximum of 20 volts.
So if you build a Spectrum that creates 1,024 frequencies at the same time, the amplitude of each would be 0.01953125volts – less than one fiftieth of a volt. While this might be useful in Remote Mode – we can’t say for sure yet because we haven’t had time to research it – it’s certain that it would be no good in Contact Mode, which needs higher far voltages to penetrate the skin.
Back to contents 177

There are two answers to this problem. The first is to reduce the number of frequencies being transmitted so there’s more power available to each of them. The second is to use a Spooky amplifier, development of which has now entered its final stages. Since it’s presently our only option, let’s start with the first case by defining our terms:
Centre Frequency: this is your frequency on which the Spectrum will be centred – child frequencies will range above and below.
Spectrum %: this is how you set the range within which frequencies will be created – Spectrum is always a percentage of your Centre Frequency.
Wave Cycle Multiplier (X): this is how you set the number of child frequencies to be produced. Because frequencies are created both above and below the centre frequency, the number of child frequencies you create will be twice the value you enter here.
To make things clearer and easier to follow, let’s say we want to apply Spectrum to a frequency of 500Hz – this is our Centre Frequency.
Example 1: we want to create 100 child frequencies that will range from 450Hz to 550Hz with the values 450, 451, 452, 453, 454, 455, etc. So 500Hz is our Centre Frequency and each frequency is spaced 1Hz apart. Here’s how to find the value to enter for Spectrum % to make this happen:
A: we want 100 child frequencies, so our Wave Cycle Multiplier must be half this – 50. Multiply this value by 100:
50x100=5000
B: multiply this result by our required frequency spacing – 1Hz:
5000x1=5000
C: divide this by our Centre Frequency – 500Hz:
5000/500=10Back to contents 178
So 10 is the value we must enter in the Spectrum % field and 50 in the Wave Cycle Multiplier field to produce our result.
Example 2: let’s make Spooky2 output 20 individual frequencies ranging from 990-1,010Hz in 1Hz steps. This is a far more effective way to produce a cluster of frequencies around a set Centre Frequency than by using any frequency wobble – wobbled frequencies are produced one after another (they’re linear), and thus their dwell is momentary. Spectrum frequencies are produced in parallel, and their dwells are thus all equal to the Centre Frequency’s dwell:
A: we want 20 child frequencies, so our Wave Cycle Multiplier must be half this – 10. Multiply this value by 100:
10x100=1000
B: multiply this result by our required frequency spacing – 1Hz:
1000x1=1000
C: divide this by our Centre Frequency – 1,000Hz:
1000/1000=1
So 1 is the value we must enter in the Spectrum % field and 10 in the Wave Cycle Multiplier field to produce our result.
Example 3: let’s say that we wish to produce 20 evenly-spaced frequencies centred around 1,000Hz ranging from 500Hz to 1,500Hz to produce the sequence 500, 550, 600, 650, 700, 750, 800, 850, 900, 950, 1000, 1050, 1100, 1150, 1200, 1250, 1300, 1350, 1400, 1450, and 1500. There are 21 frequencies in all – our Centre Frequency plus 10 below it and 10 above it.
A: we want 20 child frequencies, so our Wave Cycle Multiplier must be half this – 10. Multiply this value by 100:
10x100=1000Back to contents 179

B: multiply this result by our required frequency spacing – 50Hz:
1000x50=50000
C: divide this by our Centre Frequency – 1,000Hz:
50000/1000=50
So 50 is the value we must enter in the Spectrum % field and 10 in the Wave Cycle Multiplier field to produce our result.
Example 4: let’s introduce another factor – Mortal Oscillatory Rate tolerance. This is the actual frequency of the pathogen.
Dr. Rife found that if you used any frequency that was within +/-.025% of the pathogen’s MOR, it would still be killed.
To see how this can be very useful, we’ll take a look at two frequencies – 150Hz and 1,500,000Hz (1.5MHz).
The tolerance for 150Hz is .0375Hz (.025% of 150Hz), which means that any frequency from 149.9625Hz to 150.0375Hz will kill a pathogen whose MOR is 150Hz. Interesting, but not too useful.
However, it’s very important to remember that virtually all the frequencies we have today were developed on machines that had a top frequency limit of 10,000Hz or 100,000Hz. But Dr. Rife and Dr. Clark had found that the actual MORs of pathogens were up in the megahertz range – which these machines couldn’t transmit.
This means that we’re still dealing with low weaker subharmonics because of the technical limitations of the past.
But that day is over now – Spooky2 can transmit up to 25 million Hertz. So here’s where MOR tolerance becomes useful to us:
The tolerance for 1,500,000Hz (1.5MHz) is 375Hz, which means that any frequency from 1,499,625Hz to 1,500,375Hz will kill a pathogen whose MOR is 1.5MHz – but it will also kill everything else whose MORs lie within that range.Back to contents 180
And that’s not the only benefit. MOR tolerance up in the MHz range means we can take far bigger steps through frequencies and still be guaranteed we’re going to kill bad guys.
Here’s one example of this using 1.5MHz as our Centre Frequency:
A: let’s say we want 100 child frequencies, so our Wave Cycle Multiplier must be half this – 50. Multiply this value by 100:
50x100=5000
B: multiply this result by our required frequency spacing – we’re allowed up to 375Hz, but let’s play safe and choose 350Hz:
5000x350=1750000
C: divide this by our Centre Frequency – 1,500,000Hz:
1750000/1500000=1.17
So 1.17 is the value you must enter in the Spectrum % field and 50 in the Wave Cycle Multiplier field to produce your result:
By transmitting 1.5MHz with these Spectrum % and Wave Cycle Multiplier settings, you will hit every pathogen whose MOR lies between 1,482,150Hz and 1,517,850Hz.
That’s a lot of territory that can be covered by just one frequency.
So by carefully designing custom Spectrum frequency sets with the right Centre Frequencies, you can start to take giant strides through the entire MHz range, which is where all the bad guys really hang out.
Suddenly, those very big numbers are not quite as daunting as you may have thought.
Back to contents 181

Two formulas1. The formula to calculate the required Spectrum % value is:
Spectrum = (half the number of child frequencies required x 100) x frequency spacing desired / Centre Frequency
2. The formula to calculate the frequency spacing that will be produced by any given Spectrum % value is:
Frequency spacing = (Centre Frequency x Spectrum) / (Wave Cycle Multiplier x 100)
Note that calculations enclosed in parentheses should always be resolved first before carrying out any other maths operations.
So in the example above, you’d first multiply Centre Frequency by Spectrum %, note down the result, then multiply the Wave Cycle Multiplier by 100. Only then would you divide your first result by your second one.
One final word of advice about Spectrum:
Always sit down with pencil, paper, and calculator first and plan exactly what you want to achieve. Once you get the hang of it, there’s no limit to what can be done.
But for the moment, if you wish to try doing contact Spectrum sessions, don’t forget to divide the generator’s amplitude by the number of child frequencies plus the Centre Frequency to see how much power each frequency is going to be allocated.
Back to contents 182
Multitalented Spooky2
I’ve owned three very expensive topline commercial Rife machines that together cost me the price of a small car. I returned the most expensive one for a partial refund because it kept breaking down. A second one never worked from the moment I took it out of the box. The third works fine, and it’s built like a tank, so it fulfils the first necessity for any machine that’s going to be (literally) vitally important – reliability.
Yet I choose to use the cheap and cheerful Spooky2. I use it because I believe it’s the most powerful, effective, and versatile Rife machine that money can buy. Very little money. But Spooky2 isn’t just a Rife machine. Right now, it can also:
‣ Function as a powerful Clark zapper – with Spectrum zapping as an added bonus.‣ Be used very effectively as a foot tubs Rife system (new section coming soon).‣ Eradicate insect pests and moulds in the home.
And more is planned for the future. A lot more…
Clark zapperBefore Spooky2, only the well-upholstered could afford to play with Rife therapy. If you weren’t loaded, your only alternative was the zapper.
Invented by the wonderful and humane Dr. Hulda Clark, the schematics and instructions to build this at home using widely available inexpensive electronic components were given away freely.
So Spooky2 stands in exalted company.
Since those days, a whole new industry has sprung up around zappers. There are some very good ones, and there are some not-so-good ones. And virtually all of them cost more than a Spooky2 rig.
Back to contents 183

At its most basic, the original Clark zapper used one frequency – 30,000Hz. And it killed everything you pointed it at. So how can one single frequency possibly do this?
The answer lies in the settings Dr. Clark chose. Because her device had to be battery-powered, she was limited to an amplitude of 9 volts. She chose a square wave because she wanted as many odd harmonics (both higher and lower) as possible.
Her real genius lay in specifying a 100% positive Offset because pushing a square wave like this makes it produces a huge spread of harmonic frequencies, from 0Hz up into the MHz range, all of them spaced 60,000Hz apart.
Later, another zapper frequency was developed – 2,500Hz. When used with the same settings, this produces a spread of harmonics that are 5,000Hz apart. Many zapper users believe that this lower frequency is more effective for problems in hollow organs and body cavities.
Both versions are now in the Spooky2 database. We’ve also added a dual version that uses the two Outs to transmit both frequencies at the same time.
But why stop there? A second version of this for remote use incorporates Spectrum, too, making life Frequency Hell for pathogens and parasites.
Zapping is still most effectively done in Contact Mode, although Dr. Pankaj Mishra has kindly provided very useful Remote versions..
Since the last frequency transmitted in Contact Mode zapper sets is always 0Hz for 21 minutes, we’ve decided to remove it, so these sets now take 63 minutes. But you should use the 21 minutes saved to relax and give your body a chance to get organised to deal with clean-up. Then you can help out by running a detox Program.
If you haven’t tried zapping, you should because it’s very effective. And it’s still the best way to kill a tapeworm safely.
Back to contents 184
Pests & mouldsMy own informal environmental experiments with Spooky2 and the Spectrum sweeps have given me some pretty astonishing results so far.
It all started at the end of summer 2013 with a black mould on my natural wood and tiled floors. My home is the driest place I’ve ever lived in, so finding this was a shock.
The mould was sticky and couldn’t be either swept or vacuumed – both bad ideas anyway. So the only way to deal with it was to get down on hands and knees to physically dislodge it, then very carefully clear one tiny area at a time. Because I’m spinally disabled, this was out of the question for me, so I had to find another solution.
I took a sample of the mould and put it in tape, then inserted it into my home-made DNA Holder attached to an older UDB1108S generator I was using at that time. I then ran the two-part CAFL Fungus and Mould set in an endless loop.
It took a month to six weeks, but eventually that black mould turned grey, which I took to mean that it was dead.
A couple of weeks later, a correspondent whose home was infested with springtails wrote to me at my Delusional Insects website. She didn’t have Spooky, but she did have a commercial Rife machine. So I told her how to set it up for remote, use a dead insect as the remote transmission DNA sample, then transmit a frequency set that had been reported by another correspondent to drive collembola out of the body.
It worked – her home was cleared of collembola. Shortly after the release of the Spooky Spectrum Sweep, I noticed one morning that I had large black ants in an unused bedroom – about 50-60 of them, all coming up from under the floor.
So I decided that I’d try the same trick. I killed one, put it in a paper tape wrap, then ran the Spooky Spectrum Sweep non-stop. The numbers dropped dramatically almost immediately, and within a week they were all gone.
I also noticed that my fresh organic produce was developing moulds very quickly. So I did the same with two different types – one blue, one white. No more moulds grow on my fruit and veggies now!Back to contents 185

Another escapade was with hordes of red ants in my kitchen. A dual-Remote 5M ran the Converge Sweep on two corpses, and they were all gone in three days.
After that, I had yet another ant infestation by a different species. Again, I dealt with it using Spooky2, and they all disappeared from my kitchen – within five minutes this time. Since then, nothing.
How does it work? Well, just like us, insects have bacterial and fungal symbionts in their gut to help them digest food. The sweep kills these very quickly, and suddenly the pests are starving to death in the midst of plenty.
There have also been reports of Spooky2 being used successfully to eradicate fleas. The Spooky Spectrum Sweep wasn’t used in this case, but the CAFL set for Fleas.
I found this interesting because it means that insects for which a frequency set exists can be killed in the environment.
Since there are frequencies for Bird mites in the database, this is good news for those infested both personally and environmentally with these dreadful pests – it means that adults in the home will die at the same time as emergent young in the skin.
And because there are also frequencies for dust mites (Dermatophagoides), it’s also good news for asthma and allergy sufferers because it’s a non-toxic way to quickly eradicate dust mites in the home – simply by putting a few samples of sweepings in the Remote.
Unfortunately, Spooky2 is unlikely to be able to solve gardening problems. Outdoor infestations are far more likely to be composed of insects from many different gene pools, so only those genetically related to the transmission insect will be affected.
If you have insect or mould infestation problems, please give this a try and let me know how you get on.
Back to contents 186

How the universe worksIf you want to get the most out of Spooky2, it’s essential that you understand one very basic thing – energy. And in order to do that, you have to be prepared to completely discard your present beliefs about reality and the nature of the universe.
Because things are not what they seem to be.
Right now, you probably believe that the world you live in is solid. And it certainly seems that way – if you bump into a coffee table, you’ll hurt your shin and hop around the room in pain. The coffee table is matter, and so are you.
But what is matter?
Matter is made up of molecules. And molecules are made up of elemental atoms. The nature of those elemental atoms, and the way they’re joined together, determines the type of matter you’re dealing with.
Here’s an illustration of the difference between atoms and molecules.
The top row of spheres are single atoms of oxygen, carbon, and hydrogen. Single atoms are called elements.
Below them are simple molecules that are made up from those atoms: O2 is the type of oxygen we need to breathe, and it’s made from two single oxygen atoms.
Next is carbon dixoide, which we exhale. That’s made from two atoms of oxygen that have bonded with one atom of carbon.
The final molecule is water, made from two atoms of hydrogen and one atom of oxygen.
Back to contents 187

These are all very simple molecules. Two are gases, and the third is a liquid. Now lets’s look at a more complex molecule.
This is a molecule of heroin. It’s made from atoms of carbon, hydrogen, nitrogen, and oxygen.
The solid links between the atoms in the illustration don’t actually exist – they’re simply used in models of molecules to show how each atom is bound to its neighbours.
This method of modelling is called stick-and-ball.
As molecules go, heroin is fairly straightforward. But there are a great many others that are far more complex than this.
When you look at this molecule, you can see that it actually consists of one other thing besides its constituent atoms.
Empty space.
In fact, it’s more empty space than it is atoms.
Yet heroin isn’t a gas, and it isn’t a liquid – it’s a solid. A solid that’s mostly made up of empty space.
OK, but it’s still got a whole bunch of atoms in there, and they must be what give heroin its apparent solidity.
So let’s examine a single atom and see what it’s made from.
We’ll pick carbon, since diamonds are made from this, and they’re one of the hardest and most solid things on Earth.
Back to contents 188

The nucleus in the centre is composed of neutrons and protons that are tightly packed together. The rest of our carbon atom is six electrons, all orbiting the nucleus very rapidly.
Every type of elemental atom has a different number of protons, neutrons, and orbiting electrons.
You’ll notice that protons all have a positive electrical charge, and electrons all have a negative charge. Neutrons, as their name suggests, carry no electrical charge, and are neutral.
But, just like a molecule, an atom is once again mostly empty space.
And when you start to probe even deeper into the structure of neutrons, protons, and electrons, you find that they’re composed of even smaller sub-atomic particles. Interesting, but not terribly exciting so far.
Now let me show you something that will shock you – it certainly shocked me when I first found it out.
Let’s gather together every single molecule that exists in the observable universe. We’ll split all those molecules into their constituent atoms, removing all the empty space.
Now we’ll make a necklace of all those single atoms end to end.
How long do you think that necklace would be?
It would be the same length as the Earth’s orbit around the Sun – 600 million miles.
Back to contents 189

If you think that’s amazing, let’s go further now and remove the empty space in all those atoms, so we’re only left with real solid material. And then we’ll roll all these solid leftovers up into a ball.
How big do you think that ball would be?
Get ready for this: all the atoms in the observable universe, with all their empty space removed and compressed into a single ball, would be the size of one single PEA.
Solid matter is an illusion.
Matter is energy. And energy is movement from one state to another and back again. This movement of energy is called vibration, or oscillation. And it’s the mind-boggling speed at which this oscillation occurs that gives energy its appearance of solidity.
Think of a propellor on an airplane. When it’s stopped, it’s two or three distinct single blades. When it’s moving, it looks like a semi-solid disc. If you could build an engine that was capable of turning the propellor faster than the speed of light, the semi-solid disc of the propellor would become solid, and you could reach out and touch it without harm.
At this speed, linear time breaks down, and the individual blades are now in all their possible positions at the exact same instant.
In other words, what were originally positions in time have now become positions in space.
So now we’ve identified three interrelated aspects of energy that relate to its manifestation as matter, and they’re not just the building blocks of the universe we’re all part of, they’re also the foundation stones of Rife therapy.
They are speed, space, and time, and we’ll look at them in the next section.
And we’ll see how the combinations of these three variables explain the infinite multiplicity we experience all around us.
Back to contents 190

Speed, space & timeSpeed is a function of space and time. When you take a leisurely stroll, you’re moving through five miles of space in one hour of time - 5mph. When light takes a stroll, it moves through almost 671 million miles of space in one hour of time - 670,616,629mph.
When something vibrates, or oscillates, it’s energy moving through space and time. The difference is that the distance through space is almost infinitesimally small, and the time taken for the journey varies with whatever’s doing the vibrating. Another difference is that vibration is always a journey from A to Z and back again – it’s never in one single direction.
To simplify things, let’s call this journey from A to Z and back again a “state change.” Where energy is concerned, this state change is from positive to negative and back again, and as energy undergoes it, its amplitude, or power, changes. The speed at which this state change happens isn’t measured in miles per hour – instead, we measure it by finding out how often it happens in a given time. This is called “frequency.”
Everything in the universe, from an elemental atom to a star, has its own unique frequency. And the reason for this is the different number of protons, neutrons, and electrons that make up each elemental atom. But there’s more. When you take elemental atoms and make a molecule from them, that molecule now assumes its own unique frequency.
This happens every time you move one level up the scale of complexity. So the frequency of an elemental atom of oxygen is different from the frequency of the oxygen you can breathe (two atoms making up a molecule), and both are also different from the frequency of water (two elemental atoms of hydrogen bonded with one elemental atom of oxygen).
So frequency is a measurement of how fast energy moves through one single state change in a given time. This used to be called Cycles Per Second (CPS), but it’s now called Hertz (Hz).
But there’s another very important attribute of energy we haven’t looked at yet. Amplitude is a measure of how strong or powerful the energy is, and it changes throughout every state change. The change can be orderly or chaotic. Chaotic energy change is called “noise.” Here, we need only deal with orderly change, and we’ll do so in the next section.
Back to contents 191

How Rife worksDepending on what it’s being used for, Rife therapy works in a number of different ways.
Perhaps the most common use for frequencies is to kill pathogens, and the best description of how that process works that I’ve ever heard comes from John:
“Imagine a cowboy with a whip. He brings the whip back, then forward. When the sinusoidal energy wave travelling down the leather reaches the end, it must change direction very quickly. When it does, there is a loud ‘crack’ as the speed of the tip exceeds the speed of sound.
“It is only when the direction changes that the energy is expended. This is a close analogy to why only the peaks and troughs of a waveform create the output frequencies. These are the points in the wave where the voltage and fields change direction.
“Technically, it can be explained as conservation of momentum. Momentum is a vector that has direction. Momentum will not turn corners, so some of it is expelled as energy.”
This principle explains how “whiplash” injuries sustained in car crashes can be so physically devastating.
So now, here’s the unsuspecting pathogen, minding its own business, busy making your life miserable, and buzzing along at its own natural frequency.
Out of the blue, it now finds itself vibrating with much greater force because you’ve just transmitted its own natural frequency into your body by “cracking the Spooky2 whip” repeatedly. Adding two identical frequencies to each other greatly increases the energy in the target system, just as two ocean waves become bigger and more powerful when they conjoin as one.
But your overlaying waveform now controls how those conjoined energies behave. If you’ve chosen a wave with abrupt direction changes in energy, the rapid and repeated “whip-cracks” will cause electrical state changes that can damage, disable, or devitalise the pathogen.
Back to contents 192

Some frequency sets are specifically designed to disable specific life-systems, cell-wall components, or functions, so that a pathogen can no longer reproduce, take in sustenance, or even move. So it will quickly die.
For detox, the repeated application of energies serves to “bump” pollutants out of cells and tissues to where they can enter the blood or lymph and be removed by the liver and kidneys. So it works on pretty much the same principles as pathogen killing, except that its result is the mechanical movement of materials foreign to the body.
For healing, the process is completely different and works on the principle of frequency entrainment.
Take two grandfather clocks and stand them against the same wall.
Now set their pendulums swinging out of sync with each other. Within a few days, both pendulums will have come back into perfect sync with each other, and will remain that way until they’re disturbed again.
That’s entrainment.
Another example is a little more mysterious and is seen only in girls’ boarding schools and university dorms. At the start of the term, the girls’ natural cycles are all out of sync with each other. Within a few months, they will all have synchronized to within a couple of days of each other.
That’s also entrainment.
So if you take the frequencies of a healthy liver, or a robust immune system, and you transmit them into a body where these are not so wonderful, within a few days frequency entrainment will have taken place, and things will start looking much better.
Some experienced Rife researchers also maintain that since life itself is frequency, the simple act of transmitting beneficial frequencies into the body – any beneficial frequencies – will act to “wake up” the immune system, “remind” it of its function, and set it to work again properly.
Back to contents 193

The Golden Rule of Rifing:
Any living thing that lives in or on you, that consumes your energy or resources, and that confers no benefit upon you in exchange, is a parasite. This includes insects, fungi, bacteria, and viruses.
It may surprise you to learn that, with the possible exception of viruses, all parasites themselves have parasites. Viruses and spirochaetes can parasitize bacteria. Fungi can parasitize larger fungi. They can also host viruses, bacteria, and insects. And insects can harbour many different parasites internally and on the surface of their bodies.
Entirely understandably, insect infestation sufferers wish to be rid of their pests the moment they get their hands on a Rife system. I did this myself – and it brought me a world of nightmare and suffering.
When you kill hundreds of thousands of large parasites like mites (“large” by comparison with bacteria), you’re leaving all their internal and external parasites alive. When the insect bodies decompose, all those living fungi, bacteria, and viruses are released into your bloodstream.
And now you’re in big trouble. Since you’ve just killed their hosts of choice, you will have to take their place.
You’ve just given your already-overburdened immune system a few million extra headaches to deal with.
So the rule when rifing is this:
Work from smallest to largest.
This can also be stated as:
Work from the inside to the outside, from the things contained to the container itself.
If you proceed like this, you won’t end up in the awful trouble that I did, because when you finally get to kill your biggest parasites, you will already have killed everything they might have unleashed.Back to contents 194
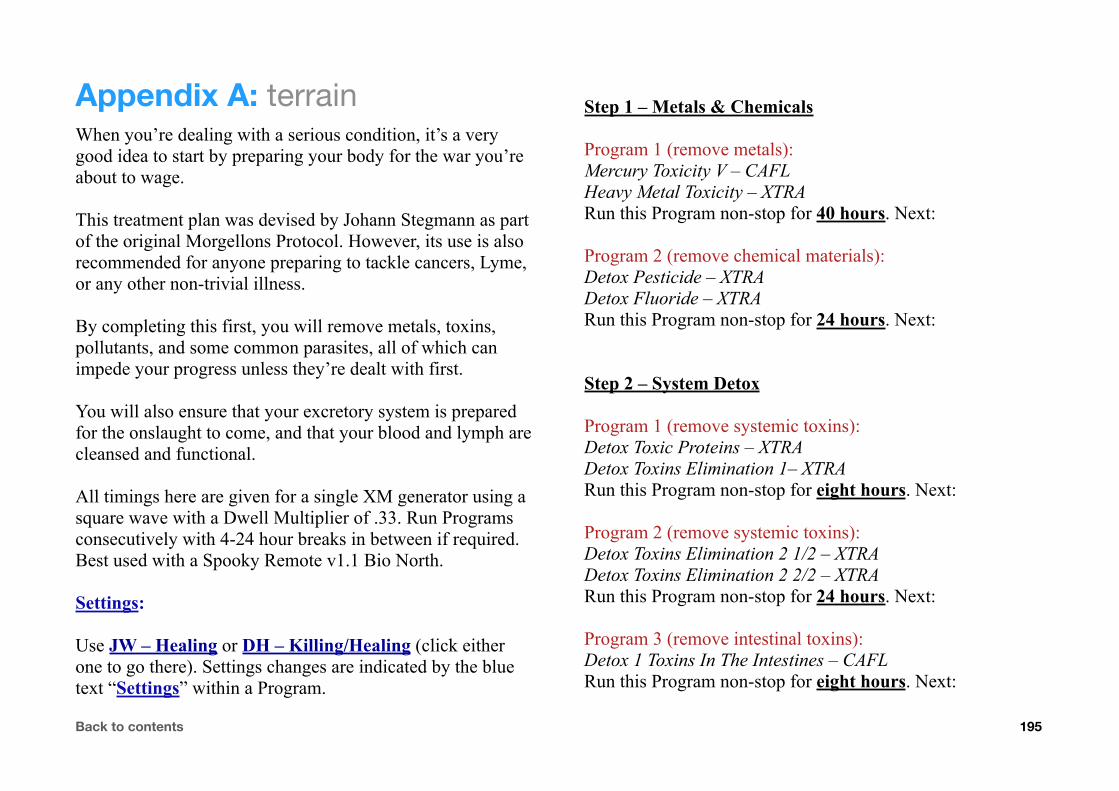
Appendix A: terrainWhen you’re dealing with a serious condition, it’s a very good idea to start by preparing your body for the war you’re about to wage.
This treatment plan was devised by Johann Stegmann as part of the original Morgellons Protocol. However, its use is also recommended for anyone preparing to tackle cancers, Lyme, or any other non-trivial illness.
By completing this first, you will remove metals, toxins, pollutants, and some common parasites, all of which can impede your progress unless they’re dealt with first.
You will also ensure that your excretory system is prepared for the onslaught to come, and that your blood and lymph are cleansed and functional.
All timings here are given for a single XM generator using a square wave with a Dwell Multiplier of .33. Run Programs consecutively with 4-24 hour breaks in between if required. Best used with a Spooky Remote v1.1 Bio North.
Settings:
Use JW – Healing or DH – Killing/Healing (click either one to go there). Settings changes are indicated by the blue text “Settings” within a Program.
Step 1 – Metals & Chemicals
Program 1 (remove metals):Mercury Toxicity V – CAFLHeavy Metal Toxicity – XTRARun this Program non-stop for 40 hours. Next:
Program 2 (remove chemical materials):Detox Pesticide – XTRADetox Fluoride – XTRARun this Program non-stop for 24 hours. Next:
Step 2 – System Detox
Program 1 (remove systemic toxins):Detox Toxic Proteins – XTRADetox Toxins Elimination 1– XTRARun this Program non-stop for eight hours. Next:
Program 2 (remove systemic toxins):Detox Toxins Elimination 2 1/2 – XTRADetox Toxins Elimination 2 2/2 – XTRARun this Program non-stop for 24 hours. Next:
Program 3 (remove intestinal toxins):Detox 1 Toxins In The Intestines – CAFLRun this Program non-stop for eight hours. Next:
Back to contents 195
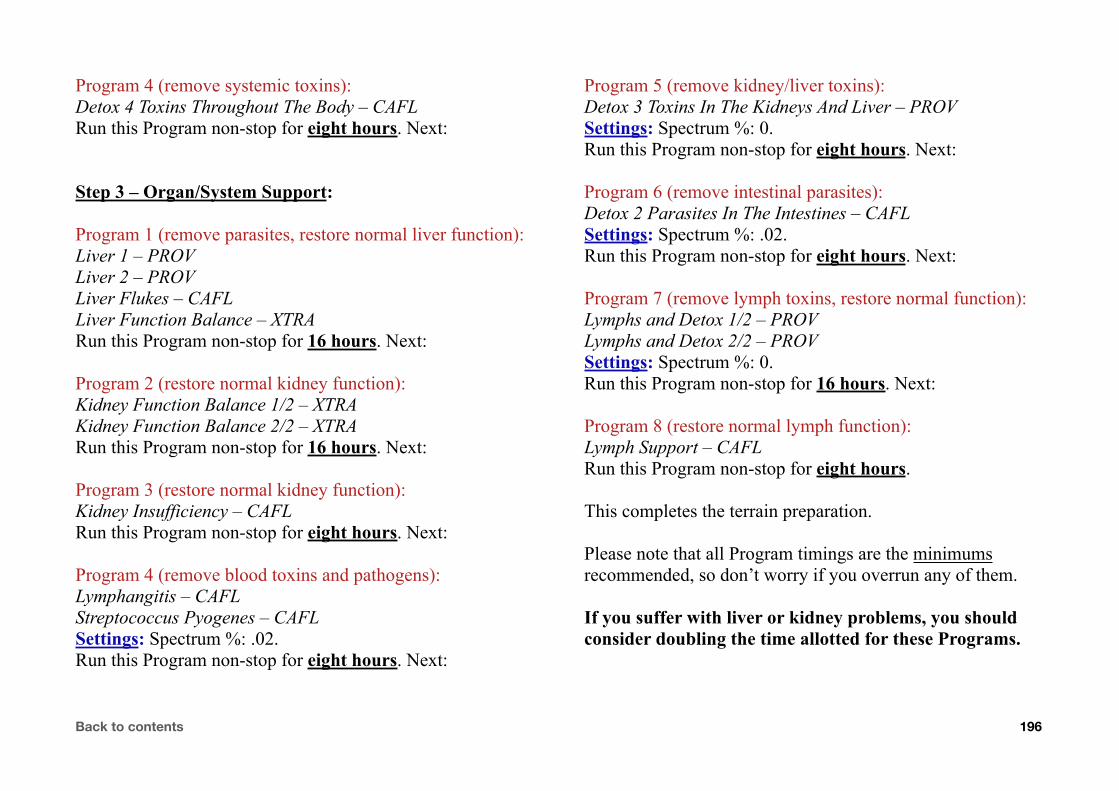
Program 4 (remove systemic toxins):Detox 4 Toxins Throughout The Body – CAFLRun this Program non-stop for eight hours. Next:
Step 3 – Organ/System Support:
Program 1 (remove parasites, restore normal liver function):Liver 1 – PROVLiver 2 – PROVLiver Flukes – CAFLLiver Function Balance – XTRARun this Program non-stop for 16 hours. Next:
Program 2 (restore normal kidney function):Kidney Function Balance 1/2 – XTRAKidney Function Balance 2/2 – XTRARun this Program non-stop for 16 hours. Next:
Program 3 (restore normal kidney function):Kidney Insufficiency – CAFLRun this Program non-stop for eight hours. Next:
Program 4 (remove blood toxins and pathogens):Lymphangitis – CAFLStreptococcus Pyogenes – CAFLSettings: Spectrum %: .02.Run this Program non-stop for eight hours. Next:
Program 5 (remove kidney/liver toxins):Detox 3 Toxins In The Kidneys And Liver – PROVSettings: Spectrum %: 0.Run this Program non-stop for eight hours. Next:
Program 6 (remove intestinal parasites):Detox 2 Parasites In The Intestines – CAFLSettings: Spectrum %: .02.Run this Program non-stop for eight hours. Next:
Program 7 (remove lymph toxins, restore normal function):Lymphs and Detox 1/2 – PROVLymphs and Detox 2/2 – PROVSettings: Spectrum %: 0.Run this Program non-stop for 16 hours. Next:
Program 8 (restore normal lymph function):Lymph Support – CAFLRun this Program non-stop for eight hours.
This completes the terrain preparation.
Please note that all Program timings are the minimums recommended, so don’t worry if you overrun any of them.
If you suffer with liver or kidney problems, you should consider doubling the time allotted for these Programs.
Back to contents 196
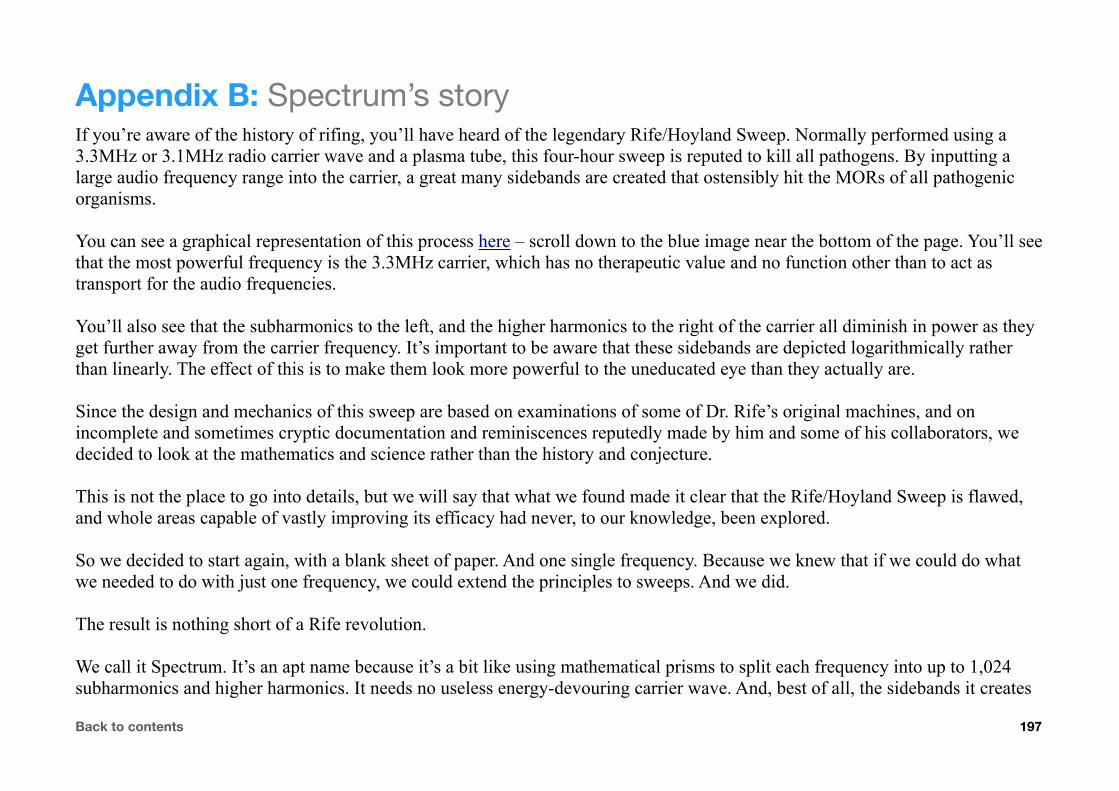
Appendix B: Spectrum’s storyIf you’re aware of the history of rifing, you’ll have heard of the legendary Rife/Hoyland Sweep. Normally performed using a 3.3MHz or 3.1MHz radio carrier wave and a plasma tube, this four-hour sweep is reputed to kill all pathogens. By inputting a large audio frequency range into the carrier, a great many sidebands are created that ostensibly hit the MORs of all pathogenic organisms.
You can see a graphical representation of this process here – scroll down to the blue image near the bottom of the page. You’ll see that the most powerful frequency is the 3.3MHz carrier, which has no therapeutic value and no function other than to act as transport for the audio frequencies.
You’ll also see that the subharmonics to the left, and the higher harmonics to the right of the carrier all diminish in power as they get further away from the carrier frequency. It’s important to be aware that these sidebands are depicted logarithmically rather than linearly. The effect of this is to make them look more powerful to the uneducated eye than they actually are.
Since the design and mechanics of this sweep are based on examinations of some of Dr. Rife’s original machines, and on incomplete and sometimes cryptic documentation and reminiscences reputedly made by him and some of his collaborators, we decided to look at the mathematics and science rather than the history and conjecture.
This is not the place to go into details, but we will say that what we found made it clear that the Rife/Hoyland Sweep is flawed, and whole areas capable of vastly improving its efficacy had never, to our knowledge, been explored.
So we decided to start again, with a blank sheet of paper. And one single frequency. Because we knew that if we could do what we needed to do with just one frequency, we could extend the principles to sweeps. And we did.
The result is nothing short of a Rife revolution.
We call it Spectrum. It’s an apt name because it’s a bit like using mathematical prisms to split each frequency into up to 1,024 subharmonics and higher harmonics. It needs no useless energy-devouring carrier wave. And, best of all, the sidebands it creates
Back to contents 197

are all equal-power, no matter how distant from the centre frequency – another world-first.
The implications of using Spectrum on a single static frequency are astonishing enough, but when you apply it to a frequency sweep, it really comes into its own, and the sky is truly the limit.
So we sat down and designed the sweep that we believe the Rife/Hoyland Sweep could, and should, have been. Because our sweep doesn’t need radio carrier wave technology, it can be used in Contact, Remote, or Plasma Mode.
Now let’s get down to the nitty-gritty. First, some explanations, then we’ll show you how to use Spectrum effectively.
This is the first composite image of the Spooky2 settings, and the oscilloscope readings that proved we were on the right track. At this point, we were experimenting with a square wave. The centre frequency used here was 10,000Hz – 10KHz. We specified four Back to contents 198

sub-waves, or “wavelets,” and a Spectrum value of 100%. Across the bottom of the image, you can see the oscilloscope readings of the different frequency clusters this produced in the 0-20KHz range.
Now, here’s what happens when you increase the number of sub-waves from four to 100:
We’re still using a centre frequency of 10,000Hz and a plain square wave, but now take a look at the number of frequencies produced.
At this point, we knew we were getting somewhere. But how far could we push it?
The answer surprised us.
Back to contents 199

We used 256 sub-waves for this torture test. Normally, this would be quite a bit lower to allow for extended sub-waves taking up twice the sample points of the centre frequency. And there must also be sufficient resolution to accommodate the reduced waveform (if a lower Spectrum value is used, then a higher sub-wave count is possible).
But this composite image clearly shows that Spooky2 and Spectrum can now easily do exactly what a plasma machine does. Except that Spectrum sidebands are more uniform across the entire range – and stronger.
But we still weren’t happy. Notice the difference in height of most of the frequencies? We went back and took another look at our mathematical “prisms,” and discovered a way to tweak them to work with sub-hertz accuracy on sine waves instead of square waves. We’d successfully produced the range of sidebands we needed, without any fall-off in amplitude with distance from the centre frequency. But now we needed to see what our altered “prisms” could do with sine waves, while comparing like with like.
Back to contents 200

So we input parameters for the fabled Rife/Hoyland Sweep. And this is what Spooky2 produced:
The centre frequency is the Rife/Hoyland carrier – 3.3MHz. We wanted frequency spacing of 25KHz, so we divided 3.3MHz by 25KHz to give us the the number of sub-waves needed – 132. And we applied a Spectrum value of 100%.
Now our frequency spectrum is much more uniform in power, from 0-6.6MHz, with no typical plasma fall-off in amplitude.
But remember, we control the width of the frequency spectrum and the number of bands. So we altered one setting.
Simply by changing the Spectrum value from 100% to 50%, we now output only frequencies in the range from 1.65MHz to 4.95MHz (3.3MHz plus or minus 50%). This means that all our power is much more focused in a narrower band. And you can see the hugely positive effect this has on the uniformity of frequency amplitudes.
Another world-first.
Back to contents 201

Everything you’ve seen so far is using single static frequencies. But what happens when you input a sweep?
The answer is: just about everything.
A sweep from 3.3MHz to 3.325MHz will hit ALL frequencies. If we produce frequencies ranging from 1MHz to 2MHz, we’ll hit the octal subharmonics of ALL viruses.
The generally accepted tolerance for frequencies to be effective is +/- .025%. To fall inside this limit, our smallest distance between each frequency here needs to be 825Hz. This is achieved by using a centre frequency of 1.5MHz, 128 sub-waves, and a Spectrum value of 33%.
See how almost all the generator’s energy is focused on the selected band, making the frequencies more powerful?
The awesome power of Spectrum cannot be understated. Spooky2 now has the ability of transmit up to 1,024 frequencies simultaneously, each as high as 5MHz. And you can tailor the frequency range as well as the number of harmonics you wish to output.
This is true multiple simultaneous output – not high-speed digital signal or packet switching.
Using the settings above, a very slow sweep from 1.5MHz to 1.5078125MHz will hit the MORs of all known pathogens.
Which brings us nicely to a sweep that will hit the MORs of all pathogens – known and unknown.
Back to contents 202

First, here’s our initial version of it using a square wave:
Once again, the frequencies are not uniform in power. We should explain at this point that this is because the odd harmonics in square waves interfere with signal strength smoothing.
Now let’s see the sine wave version:
All the amplitudes here are uniform, and there are far less power-wasting harmonics above our end-of-range target of 3.2MHz.
But despite this, we still weren’t happy with it. Because there are 64 frequencies being swept, and the output voltage of the new Spooky2–XM generators is 20 volts, this means that each frequency is allocated an average of just 0.3 volts. So we moved it up to the next level and built a new sweep algorithm that achieves exactly the same results using 16 frequencies instead of 64.
And here’s what we called the “Spooky Remote Sweep”:
Back to contents 203
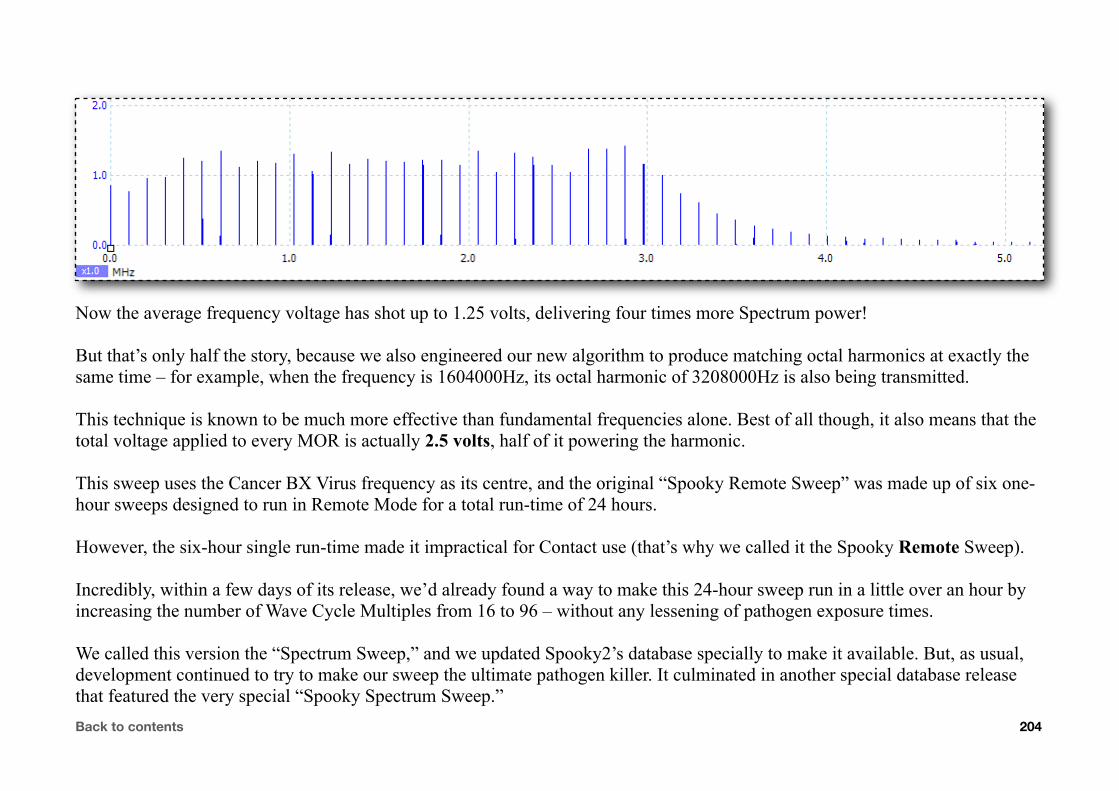
Now the average frequency voltage has shot up to 1.25 volts, delivering four times more Spectrum power!
But that’s only half the story, because we also engineered our new algorithm to produce matching octal harmonics at exactly the same time – for example, when the frequency is 1604000Hz, its octal harmonic of 3208000Hz is also being transmitted.
This technique is known to be much more effective than fundamental frequencies alone. Best of all though, it also means that the total voltage applied to every MOR is actually 2.5 volts, half of it powering the harmonic.
This sweep uses the Cancer BX Virus frequency as its centre, and the original “Spooky Remote Sweep” was made up of six one-hour sweeps designed to run in Remote Mode for a total run-time of 24 hours.
However, the six-hour single run-time made it impractical for Contact use (that’s why we called it the Spooky Remote Sweep).
Incredibly, within a few days of its release, we’d already found a way to make this 24-hour sweep run in a little over an hour by increasing the number of Wave Cycle Multiples from 16 to 96 – without any lessening of pathogen exposure times.
We called this version the “Spectrum Sweep,” and we updated Spooky2’s database specially to make it available. But, as usual, development continued to try to make our sweep the ultimate pathogen killer. It culminated in another special database release that featured the very special “Spooky Spectrum Sweep.”Back to contents 204
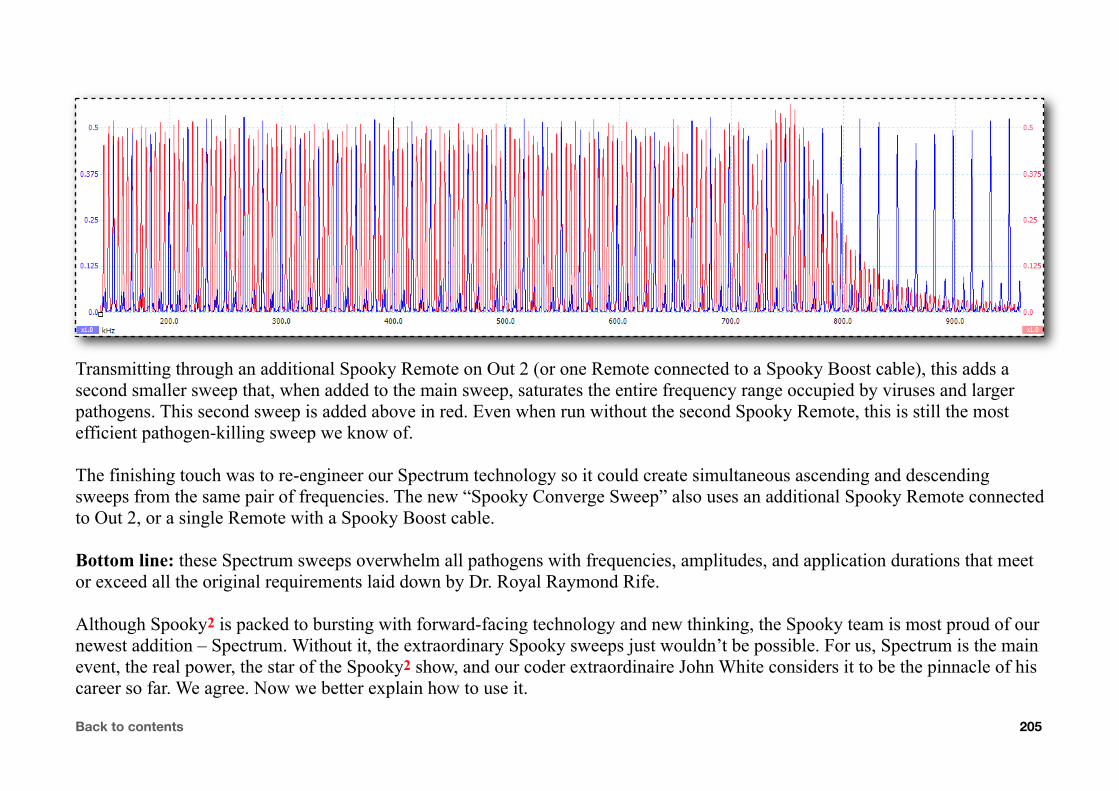
Transmitting through an additional Spooky Remote on Out 2 (or one Remote connected to a Spooky Boost cable), this adds a second smaller sweep that, when added to the main sweep, saturates the entire frequency range occupied by viruses and larger pathogens. This second sweep is added above in red. Even when run without the second Spooky Remote, this is still the most efficient pathogen-killing sweep we know of.
The finishing touch was to re-engineer our Spectrum technology so it could create simultaneous ascending and descending sweeps from the same pair of frequencies. The new “Spooky Converge Sweep” also uses an additional Spooky Remote connected to Out 2, or a single Remote with a Spooky Boost cable.
Bottom line: these Spectrum sweeps overwhelm all pathogens with frequencies, amplitudes, and application durations that meet or exceed all the original requirements laid down by Dr. Royal Raymond Rife.
Although Spooky2 is packed to bursting with forward-facing technology and new thinking, the Spooky team is most proud of our newest addition – Spectrum. Without it, the extraordinary Spooky sweeps just wouldn’t be possible. For us, Spectrum is the main event, the real power, the star of the Spooky2 show, and our coder extraordinaire John White considers it to be the pinnacle of his career so far. We agree. Now we better explain how to use it.
Back to contents 205
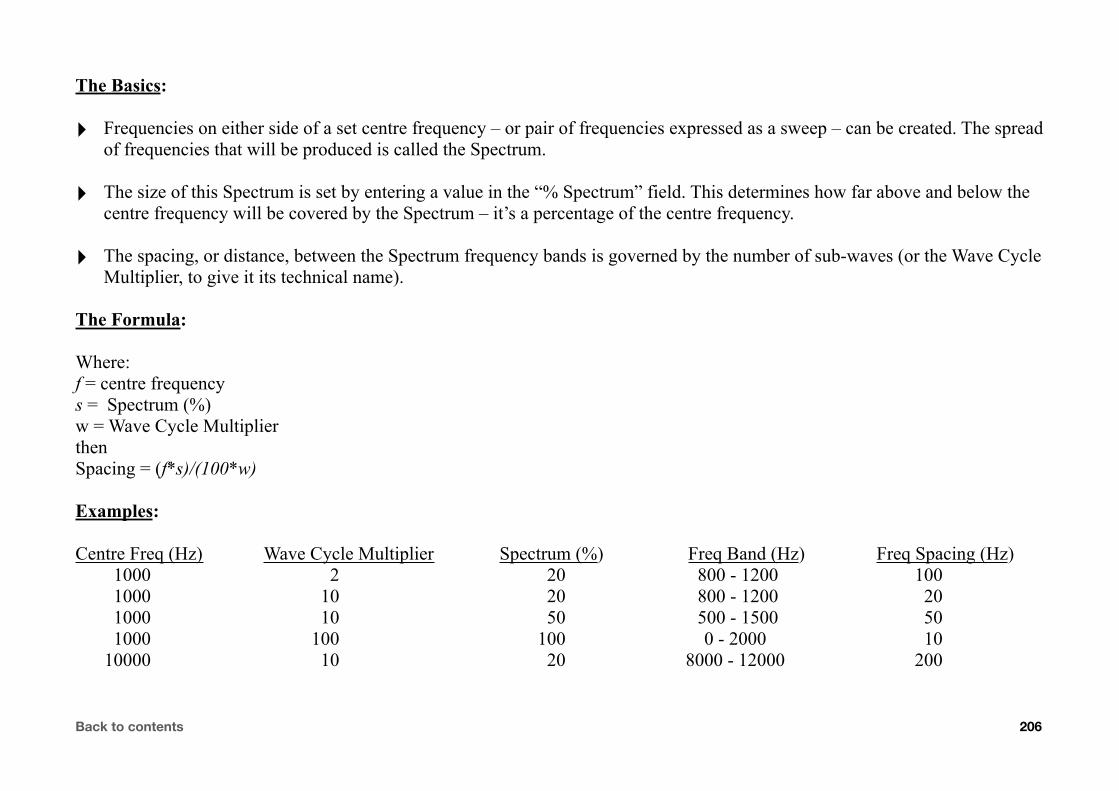
The Basics:
‣ Frequencies on either side of a set centre frequency – or pair of frequencies expressed as a sweep – can be created. The spread of frequencies that will be produced is called the Spectrum.
‣ The size of this Spectrum is set by entering a value in the “% Spectrum” field. This determines how far above and below the centre frequency will be covered by the Spectrum – it’s a percentage of the centre frequency.
‣ The spacing, or distance, between the Spectrum frequency bands is governed by the number of sub-waves (or the Wave Cycle Multiplier, to give it its technical name).
The Formula:
Where:f = centre frequencys = Spectrum (%)w = Wave Cycle MultiplierthenSpacing = (f*s)/(100*w)
Examples:
Centre Freq (Hz) Wave Cycle Multiplier Spectrum (%) Freq Band (Hz) Freq Spacing (Hz) 1000 2 20 800 - 1200 100 1000 10 20 800 - 1200 20 1000 10 50 500 - 1500 50 1000 100 100 0 - 2000 10 10000 10 20 8000 - 12000 200
Back to contents 206

Appendix C: making wavesSpooky2 generates 12 different waveforms. Here’s what they are, and what they can do. First, the plain unaltered waves:
Sine: useful for healing with a gentle rise and fall in energy.
Triangle: smooth constant power rise and drop-off. Mainly experimental.
H-Bomb square: world-first, square version.
Square: normally used to kill pathogens, with almost instant rises to full power.
Damped sinusoidal: used by Dr. Rife in the ‘30s. Very powerful.
Lily: compressed sine with built-in pulsing.
Sawtooth: a smooth rise in power, then an abrupt drop – useful for healing.
Damped square: world-first, extrapolation of Dr. Rife’s damped sinusoidal.
Inverted sawtooth: powerful killer, with an almost instant power rise.
H-Bomb sinusoidal: world-first, a very powerful new sine.
Back to contents 207
Spooky2 offers two additional waveforms from the Custom Waves Menu – BXBY and Square Harmonic. These are designed to be used without any changes, and no frequency addition or modulation should be performed on them – so none will be shown on the following pages.
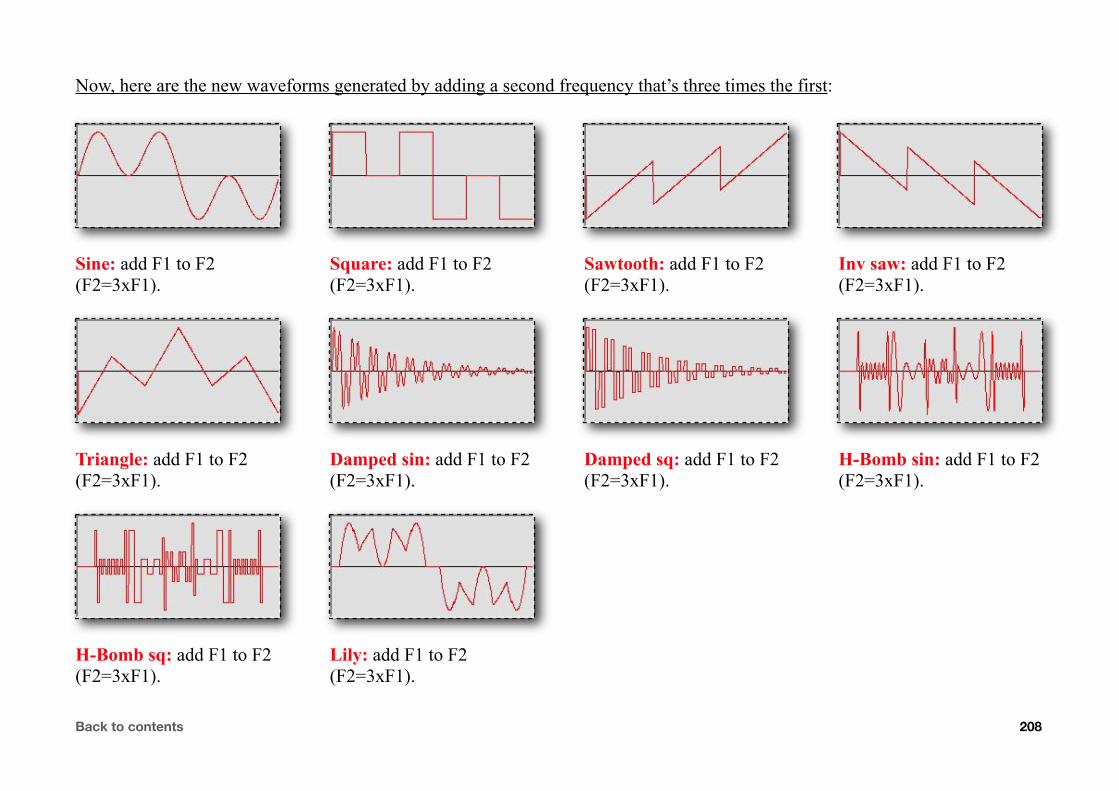
Now, here are the new waveforms generated by adding a second frequency that’s three times the first:
Sine: add F1 to F2 (F2=3xF1).
Triangle: add F1 to F2 (F2=3xF1).
H-Bomb sq: add F1 to F2 (F2=3xF1).
Square: add F1 to F2 (F2=3xF1).
Damped sin: add F1 to F2 (F2=3xF1).
Lily: add F1 to F2 (F2=3xF1).
Sawtooth: add F1 to F2 (F2=3xF1).
Damped sq: add F1 to F2 (F2=3xF1).
Inv saw: add F1 to F2 (F2=3xF1).
H-Bomb sin: add F1 to F2 (F2=3xF1).
Back to contents 208
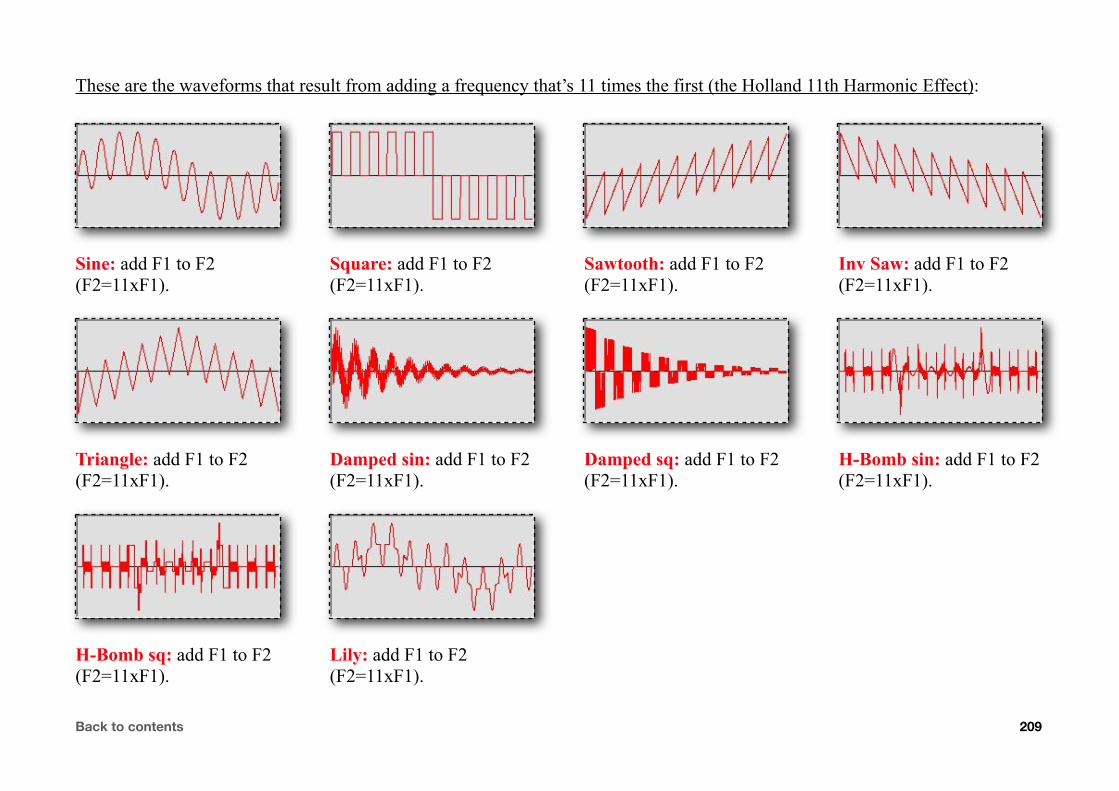
These are the waveforms that result from adding a frequency that’s 11 times the first (the Holland 11th Harmonic Effect):
Sine: add F1 to F2 (F2=11xF1).
Triangle: add F1 to F2 (F2=11xF1).
H-Bomb sq: add F1 to F2 (F2=11xF1).
Square: add F1 to F2 (F2=11xF1).
Damped sin: add F1 to F2 (F2=11xF1).
Lily: add F1 to F2 (F2=11xF1).
Sawtooth: add F1 to F2 (F2=11xF1).
Damped sq: add F1 to F2 (F2=11xF1).
Inv Saw: add F1 to F2 (F2=11xF1).
H-Bomb sin: add F1 to F2 (F2=11xF1).
Back to contents 209

Double side band (DSB) amplitude modulation – this adds upper and lower harmonics. Frequency 2 is three times the first:
Sine: mod F2 using F1 (AM DSB, F2=3xF1).
Triangle: mod F2 with F1 (AM DSB, F2=3xF1).
H-Bomb sq: mod F2 with F1 (AM DSB, F2=3xF1).
Square: mod F2 with F1 (AM DSB, F2=3xF1).
Damped sin: mod F2 w/F1 (AM DSB, F2=3xF1).
Lily: mod F1 to F2 (F2=11xF1).
Sawtooth: mod F2 with F1 (AM DSB, F2=3xF1).
Damped sq: mod F2 with F1 (AM DSB, F2=3xF1).
Inv saw: mod F2 with F1 (AM DSB, F2=3xF1).
H-Bomb sin: mod F2 w/F1 (AM DSB, F2=3xF1).
Back to contents 210

DSB amplitude modulation again – this time Frequency 2 is Frequency 1’s 11th harmonic (the Holland Effect via DSB AM):
Sine: mod F2 using F1 (AM DSB, F2=11xF1).
Triangle: mod F2 with F1 (AM DSB, F2=11xF1).
H-Bomb sq: mod F2 with F1 (AM DSB, F2=11xF1).
Square: mod F2 with F1 (AM DSB, F2=11xF1).
Damped sin: mod F2 w/F1 (AM DSB, F2=11xF1).
Lily: mod F1 to F2 (F2=11xF1).
Sawtooth: mod F2 with F1 (AM DSB, F2=11xF1).
Damped sq: Mod F2 with F1 (AM DSB, F2=11xF1).
Inv saw: mod F2 with F1 (AM DSB, F2=11xF1).
H-Bomb sin: mod F2 w/F1 (AM DSB, F2=11xF1).
Back to contents 211

Single side band (SSB) AM adds powerful upper harmonics – Frequency 1 is multiplied by Frequency 2’s third harmonic:
Sine: mod F2 using F1 (AM SSB, F2=3xF1).
Triangle: mod F2 with F1 (AM SSB, F2=3xF1).
H-Bomb sq: mod F2 with F1 (AM SSB, F2=3xF1).
Square: mod F2 with F1 (AM SSB, F2=3xF1).
Damped sin: mod F2 with F1 (AM SSB, F2=3xF1).
Lily: mod F2 with F1 (AM SSB, F2=3xF1).
Sawtooth: mod F2 with F1 (AM SSB, F2=3xF1).
Damped sq: mod F2 with F1 (AM SSB, F2=3xF1).
Inv saw: mod F2 with F1 (AM SSB, F2=3xF1).
H-Bomb sin: mod F2 w/F1 (AM SSB, F2=3xF1).
Back to contents 212

Finally, SSB AM again with Frequency 2 multiplied by Frequency 1’s 11th harmonic (the Holland Effect via SSB AM):
Sine: mod F2 using F1 (AM SSB, F2=11xF1).
Triangle: mod F2 with F1 (AM SSB, F2=11xF1).
H-Bomb sq: mod F2 with F1 (AM SSB, F2=11xF1).
Square: mod F2 with F1 (AM SSB, F2=11xF1).
Damped sin: mod F2 w/F1 (AM SSB, F2=11xF1).
Lily: mod F2 with F1 (AM SSB, F2=11xF1).
Sawtooth: mod F2 with F1 (AM SSB, F2=11xF1).
Damped sq: mod F2 with F1 (AM SSB, F2=11xF1).
Inv saw: mod F2 with F1 (AM SSB, F2=11xF1).
H-Bomb sin: mod F2 w/F1 (AM SSB, F2=11xF1).
Back to contents 213

Appendix D: serial numbersWhen the Spooky2–5M generator was first launched back in January 2014, the Auto-Sync function triggered by the selection of Inverse+Sync or Spike+Sync wasn’t incorporated in the firmware because these features hadn’t yet been developed by John White.
This was rectified about a fortnight later. However, this means that the first batch of generators built must have their outputs manually synchronised.
We have now identified the range of serial numbers involved:
P/N24140001 – P/N24140181: these XMs have no Auto-Sync function.
P/N24140182 – P/N24140365: if the Revision No. is 2.85, Auto-Sync is built in. If not, the generator must be manually synced.
Back to contents 214
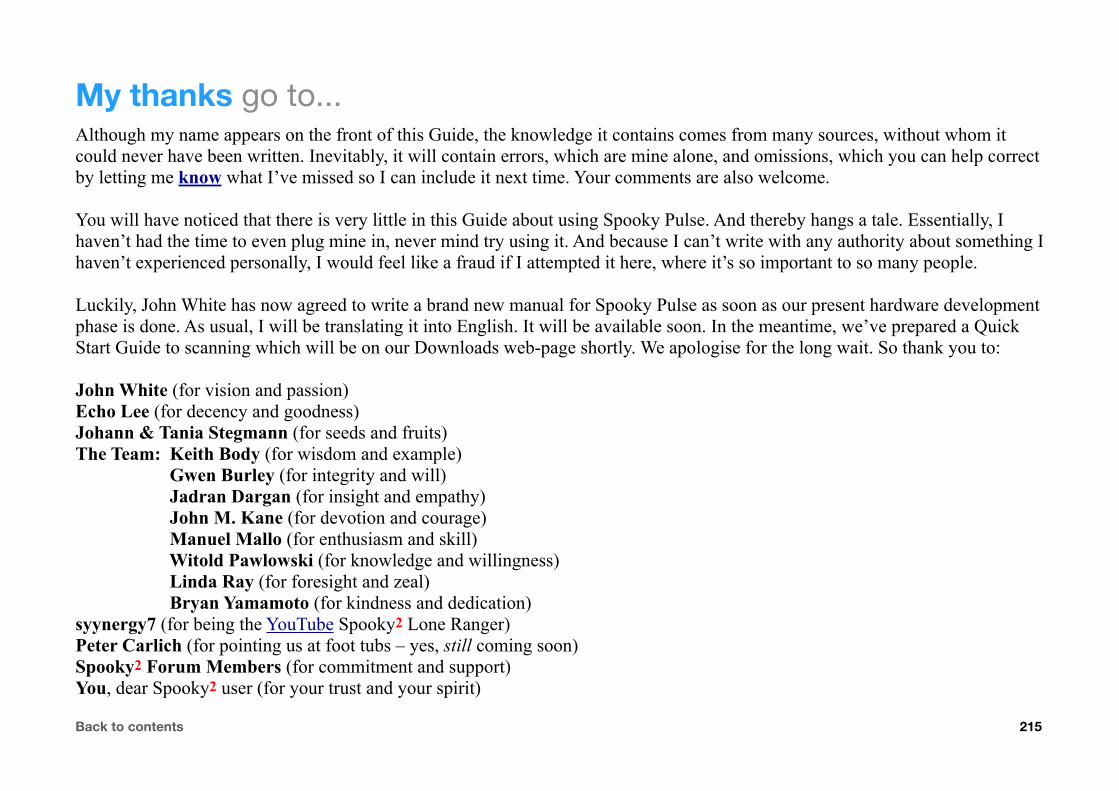
My thanks go to...Although my name appears on the front of this Guide, the knowledge it contains comes from many sources, without whom it could never have been written. Inevitably, it will contain errors, which are mine alone, and omissions, which you can help correct by letting me know what I’ve missed so I can include it next time. Your comments are also welcome.
You will have noticed that there is very little in this Guide about using Spooky Pulse. And thereby hangs a tale. Essentially, I haven’t had the time to even plug mine in, never mind try using it. And because I can’t write with any authority about something I haven’t experienced personally, I would feel like a fraud if I attempted it here, where it’s so important to so many people.
Luckily, John White has now agreed to write a brand new manual for Spooky Pulse as soon as our present hardware development phase is done. As usual, I will be translating it into English. It will be available soon. In the meantime, we’ve prepared a Quick Start Guide to scanning which will be on our Downloads web-page shortly. We apologise for the long wait. So thank you to:
John White (for vision and passion)Echo Lee (for decency and goodness)Johann & Tania Stegmann (for seeds and fruits)The Team: Keith Body (for wisdom and example) Gwen Burley (for integrity and will) Jadran Dargan (for insight and empathy) John M. Kane (for devotion and courage) Manuel Mallo (for enthusiasm and skill) Witold Pawlowski (for knowledge and willingness) Linda Ray (for foresight and zeal) Bryan Yamamoto (for kindness and dedication)syynergy7 (for being the YouTube Spooky2 Lone Ranger)Peter Carlich (for pointing us at foot tubs – yes, still coming soon)Spooky2 Forum Members (for commitment and support)You, dear Spooky2 user (for your trust and your spirit)
Back to contents 215
Precautions for usersIf you suffer from impaired liver or kidney functions, please exercise caution when using Spooky2.
Frequency generation systems should NEVER be used while pregnant.
Please do not operate the Spooky2 frequency generation system while driving or using dangerous machinery.
Please keep your Spooky2 frequency generation system out of the reach of children.
If you feel nauseous, faint, dizzy, or have ‘flu-like symptoms or headaches after exposures to Spooky2’s frequencies, please drink lots of pure water and shorten your future Spooky2 session times appropriately.
Because no electricity is passed into the body when using the Spooky2 frequency generation system to broadcast frequencies via nonlocal space (Remote Mode), this system should have no ill effect on the electrical or mechanical components of cardiac pacemakers or internal defibrillators. But, as always when using frequencies, please proceed with care and caution.
If you do suffer with heart problems, or wear a pacemaker or other electrical implant, you should NEVER attach electrodes to the Spooky2 system. Please use Spooky2’s Remote Mode ONLY.
In general, it’s best to experiment with Spooky2 before about 5pm because the excitation effects of frequencies on human cells can affect sleep. However, depending on the nature of your experimentation, Spooky2 can be run overnight if desired.
Finally, when experimenting with Spooky2 or any other frequency generation system, proper hydration will produce better results. As a general rule, it’s best to drink 4-8 pints of pure water daily, half of it before noon.
On behalf of all the people who assisted in the development of Spooky2, we wish you all a long and healthy life.
John White and David Bourke, April 2014
Back to contents 216
Legal Notice & DisclaimerThe Spooky2 software and frequency generation system is not approved by the FDA as a medical device. It is intended for use as an experimental electronic device only. It is not intended for the diagnosis, prevention, cure, treatment, or mitigation of any disease or illness in human beings. Neither is it designed or intended to affect the function or structure of any human body system.
I, John White, and I, David Bourke, make no medical claims whatsoever for the Spooky2 frequency generation system. If you have a problem with your health, please consult a licensed healthcare professional.
In the US, you can legally use frequency systems like Spooky2 for testing, energy balancing, life extension, and relaxation. You can experiment using frequencies on bacterial cultures, laboratory animals, and yourself. For what it’s worth, you still have a legal right to self-medicate under the Ninth Amendment of the United States Constitution.
In Germany and South Africa, as well as some other nations, frequency devices are legally licensed as medical instruments.
Please note that neither I, John White, nor any of my associates involved in the design and development of this system, are responsible whatsoever for the use, abuse, or misuse, intentionally or unintentionally, of the Spooky2 frequency generation system or any of its component parts due to any circumstances beyond our reasonable control. In any case, I, John White, or any of my associates, shall have no other liability.
By using the Spooky2 frequency generation system, you, the user, understand and accept that you have no expectation of curing any ailment. You also understand that possible negative physical and/or mental effects, unknown to John White or his associates, might result from the use of the Spooky2 frequency generation system. Moreover, you intend to undertake only responsible experimentation, and you voluntarily accept all responsibility for the use and application of all frequencies generated by the Spooky2 system.
Furthermore, you agree that you will not hold John White or associates responsible for any consequences, whether harmful or otherwise, that may occur as a result of using the Spooky2 frequency generation system.
Back to contents 217
Spooky2 Software LicenseAlthough the source code is © John White, this software is free, and has been written for the greater benefit and knowledge of all mankind. You are actively encouraged to pass it on freely to everyone you know, as long as it’s accompanied by this document.
Back to contents 218