Embed Size (px)
Citation preview
1
Sponsored Programs
Document Imaging
An Introduction
and
Guide for New Users
Prepared May, 2007 Last update: August 14, 2007 jwarnert

2
What You Will Find in this Document: I. General Overview ................................................................................................................................3 What is Document Imaging (DI)?.........................................................................................................3 What is Considered a “Document?”.....................................................................................................3 Who May CAPTURE and LINK Documents into DI?...........................................................................4 Who May VIEW Documents in DI? ......................................................................................................4 II. What Other DI Terms Do I Need to Understand?................................................................................5 III. Drawers: How Many Drawers Do We Have in Sponsored Programs DI?...........................................................7 Which Drawer Will the Documents I CAPTURE Go Into? ...................................................................7 Can I Place Documents into ALL of the Drawers? ..............................................................................7 Which Documents Can I See (View)?..................................................................................................7 IV. How Do I Do It?—Step-by-Step Instructions .......................................................................................8
OPTION 1: Process Documents Using a SCANNER.........................................................................8 BATCH SCANNING.........................................................................................................8
Pre-Sort Batch Scanning Documents .....................................................................8 CAPTURE the Documents......................................................................................9 QA—Verify Users Can Read the Document.........................................................11 Link Each Document .............................................................................................12
SINGLE DOCUMENT SCAN .........................................................................................13 CAPTURE (Scan) and LINK the Document..........................................................13 QA—Verify Users Can Read the Document and Accept It or Reject It ................13
OPTION 2: Process an Electronic Document Using the IMAGENOW PRINTER ............................14
CAPTURE the Document...............................................................................................14 LINK the Document: Select Drawer and DOCTYPE ....................................................16 QA—Verify Users Can Read the Document ..................................................................16
SEARCH—Find the Document You Want to See..............................................................................18
Run a Simple Search .....................................................................................................18 Run an Advanced Search ..............................................................................................20
ANNOTATE—Place Notes/Symbols/Messages on a Document ......................................................24 VI. Processing the PCF and GCAF Forms..............................................................................................26 VII. Processing a Pre-Award Project Create Form...................................................................................30 VIII. How to Request Document Imaging for Your Sponsored Programs Function ..................................33 Appendix 1. Assign the DOCTYPE that Best Describes Your Document........................................34 Appendix 2: Workflow—How Documents Move through Document Imaging ..................................38 Appendix 3: Quickguides ..................................................................................................................41
QG: Batch Scan Documents and Link Later.....................................................................................42 QG: Single Document Scan and Link Now.......................................................................................44 QG: Capture a Document with your IMAGENOW Printer.................................................................45 QG: Search for Documents Using the ImageNow Client and Binoculars.........................................47 QG: Search for Documents Using the WebNow Link and PS Project Attributes .............................48 QG: Process for Submitting a Pre-Award PCF and GCAF..............................................................49 QG: Process for Submitting Project Attribute and Allocation Changes ............................................53 QG: How to Delete a Document in ImageNow .................................................................................55 QG: How to Change the Default Page View.....................................................................................59 QG: Relinking: What is it? When and How does it Occur?.............................................................60 QG: Relinking by Appending.............................................................................................................61 QG: Indexing (Linking) Schemes ......................................................................................................62

3
I. General Overview This guide tells you about the Sponsored Programs Document Imaging system managed through ImageNow software. The two basic purposes of this document are: 1. To teach users:
• How to capture and link documents into the ImageNow system, and • How to search for (find) documents stored in the ImageNow system.
2. To document the practices users have agreed to follow to ensure ALL USERS of this shared
system can easily and consistently locate the documents they need. This document is written primarily for potential new Sponsored Programs users at UMA, UMF, UMFK, UMM, and UMPI. UM and USM started Sponsored Programs document imaging in July of 2007. Their set ups include customized features related to their Access databases. This document focuses on using the PeopleSoft database as the primary source for processing documents into ImageNow. It, therefore, does not provide detailed information about set up features and processes related to the UM and USM Access databases.
What is Document Imaging (DI)? Document Imaging is a document storage and retrieval system which allows multiple users at various locations to access documents quickly. It stores documents electronically—items users might otherwise put on paper and place in a file cabinet. Document imaging allows users at different locations to capture documents into the ImageNow system, to link documents with pre-defined identifiers (DOCKEYS), to perform QA (quality assurance) to verify documents are legible, to manually or automatically route documents to other users, and to quickly retrieve (search for) documents. ImageNow document imaging also allows users to annotate documents—add notes, stamps, and text.
What is Considered a “Document?” A “document” is a single or multi-page item a user places into DI for future viewing. There are two kinds of DI “documents:”
• PAPER documents you would normally put into a file folder. Examples include: o a letter, e.g., a letter from a sponsor you received in the mail o a note or memo, e.g. a reminder from a colleague, notes you wrote at a meeting o a form, a printed no-cost extension request, a printed invoice o a report, a printed Data Base Summary Sheet o a report, e.g., a paper copy of technical report from a PI. o a printed email o a printed word document, e.g., a proposal from a PI, an award from a sponsor, a
subrecipient agreement o a printed excel document, e.g., a project budget o a photo, e.g., a 4” x 6” glossy attached to a technical report o a drawing, e.g., an equipment design stapled to a proposal o a diagram, e.g., an organizational chart clipped to a proposal
• ELECTRONIC documents you can view on your computer screen--documents either from a
drive on your computer or from the web. Examples include: o a letter, e.g. a letter you are viewing on your monitor that was attached to an
email from a sponsor o a note or memo you wrote on your laptop, e.g., reminder to a colleague, notes
you wrote at a meeting

4
o a electronic form on the web, e.g., a no-cost extension request, a DOD invoice o a report, a Data Base Summary Sheet you are viewing on your database o a report, e.g. a technical report received from a PI in PDF format o an email you are viewing on your monitor o a word document you are viewing on your monitor, e.g., a proposal from a PI, an
award from a sponsor, a subrecipient agreement o an excel document you are viewing on your monitor, e.g., a project budget o a photo, e.g., a picture in JPG format received as part of a technical report o a drawing in electronic format, e.g. an equipment design in PDF format o a diagram in electronic format, e.g., an organizational chart prepared with
Microsoft Office Publisher
Who May CAPTURE and LINK Documents into DI? Employees in the Sponsored Programs Offices of the campuses and the Sponsored Programs function of the System Office may capture and link documents provided:
• they have learned the procedures for entering documents correctly; • they have agreed to follow the practices explained in this new-users guide. In order for
users to readily find documents in this shared system, procedures must be followed consistently by all users entering documents;
• they have the appropriate equipment and DI client software; • they have agreed to pay annual software maintenance fee of approximately $50 per
month.
Who May VIEW Documents in DI? Employees who capture and link documents may also view documents. Other employees involved in Sponsored Programs activities may view documents provided they have learned the procedures for viewing documents and their campus Sponsored Programs Office has granted users access to the campus drawer. (Training to view documents will be scheduled based on user interest and the availability of staff.)
The documents a user can view are determined by whether or not the user has access to the drawer that contains the document. See headings under Drawers for more information about drawers.

5
II. What Other DI Terms Do I Need to Understand? The terms below are described for new users. For detailed explanations, please refer to advanced Document Imaging manuals. Annotate: A process to mark up and comment on a document object without affecting the original image. Annotations may include, but are not limited to, stamps, notes, and highlights. Applet: A component that enables ImageNow to communicate with PeopleSoft or a campus database to gather key data to form the DOCKEYS. Capture Profile: A profile that determines what happens to a document once it is scanned. Document: A “document” is an item a user places into the Document Imaging System for future viewing. It includes those items you would normally put in a paper file folder plus “electronic” documents that may or may not have been printed on paper. A document can be one or many pages. See What is Considered a “Document” for examples of paper and electronic documents. DOCTYPE: An index field that describes the nature of a document, e.g., an AWARD, a BILL, a SUBCONTRACT. For Sponsored Programs a user assigns one of 26 doc types to each document. The DOCTYPE is one of the six DOCKEYS that help users find documents. See Assign the DOCTYPE that Best Describes Your Document. DOCKEY: The data used by ImageNow to index and retrieve captured documents. There are a total of six DOCKEYS in ImageNow – Drawer, Folder, Tab, Field 3, Field 4, and Field 5. See Indexing (Linking) Schemes.for the DOCKEY structure customized for Sponsored Programs Document Imaging. Drawer: A DOCKEY that is used to separate document images into logical categories. This can be likened to the drawer of a filing cabinet. See headings under Drawers for more information about drawers. ImageNow: The desktop client software application that support document imaging. An upgrade is anticipated in the spring of 2008. Indexing: See Linking. Linking: A process of associating a document with information from its corresponding record in a PeopleSoft or an Access database. When linking, a user “scrapes” information from the database into the linking fields in ImageNow. Linking provides a means to locate documents in ImageNow. Linking is sometimes referred to as “indexing.” Quality Assurance (QA): A process by which you verify that a document meets the standards of image quality that you require in order to store, view, and work with that document online. The task of QA is to decide which pages to keep, discard, or rescan. Scanning: A process of capturing a physical or an electronic document as an image to be viewed, linked, routed, annotated, etc., within ImageNow. Documents may be scanned in batches, or a group of scanned/imported documents, by use of Patch Code sheets. Patch Code sheets separate different groups of documents. For more information on Patch Code sheets, see Pre-Sort section. Security: Users are assigned to one or more security groups that enable them to view and process documents. Security groups define drawer access and privileges. WebNow: A browser based application that allows ImageNow users to VIEW documents for a single project. WebNow can be used in lieu of the ImageNow desktop client version. It is ideal for users who do not need to capture or link documents, e.g., principal investigators, department financial managers, and
6
other management personnel. Features such as searching, routing, and sorting are not available on WebNow. Workflow: A designed framework of queues connected by routes that simulate the path a document would follow as if it were in an office environment.

III. Drawers
How Many Drawers Do We Have in Sponsored Programs DI? There are currently four drawers in Sponsored Programs Document Imaging:
• U SP A “shared” drawer. Documents in this drawer can be viewed by all users. • S SP A drawer for the System Office • P SP A drawer for USM • O SP A drawer for UM
A separate drawer will be set up for each campus that participates in Sponsored Programs document imaging.
Which Drawer Will the Documents I CAPTURE Go Into? When you capture a document, it will automatically go into the drawer you select at the time you capture the document. You choose the appropriate drawer, either the drawer for your campus or a “shared” drawer for those documents users at all campuses need to view.
Can I Place Documents into ALL of the Drawers? The drawers a user can place a document into is determined by the security group to which the user is assigned. Some users can place documents only in the drawer designated for their campus. Other users can place documents into all Sponsored Programs drawers. This activity is determined by the security group to which a user is assigned. The security group also defines other privileges such as whether or not the user can delete documents from the ImageNow system.
Which Documents Can I See (View)? When a user captures and links a document into Document Imaging, DI puts it into the DRAWER the user requested, provided that user has security privileges to that drawer. The documents each user can see are determined by the security group to which the user is assigned. Here are the current drawer security assignments:
Users put their documents into one of these DRAWERS
SHARED Drawer
U SP
UMAINE Drawer
O SP
USM
Drawer
P SP
SYSTEM Drawer
S SP
Other
Campus Drawers
Users at these sites UM can see (view) the documents that are in USM the Drawer listed at the top of each column. SWS (For example, USM users can see docs in drawers U SP and P SP)
UM
USM
SWS
UM
SWS
USM
SWS
SWS
Drawers for UMA, UMF, UMFK, UMM, and UMPI are not created at this time
7

8
IV. How Do I Do It?—Step-by-Step Instructions
OPTION 1: Process Documents Using a SCANNER A scanner allows users to process paper documents such as those described in “What is Considered a Document.” There are two ways to use a document SCANNER—Batch Scanning and Single Scanning. They are described
• Batch Scanning: CAPTURE (Scan) multiple documents during one work session. Then, link the documents later during another work session. The general process for batch scanning is:
o In work session 1, Pre-Sort Batch Scanning Documents o In work session 1, CAPTURE (Scan) all of the documents, o In work session 1, assign Drawer o In work session 2, Provide QA (Quality Assurance) to ensure each document is legible o In work session 2,Open PeopleSoft to the attributes page DOCKEYS for each
document o In work session 2, LINK remaining DOCKEYS
• Single Document Scan: Capture (Scan) a single document and link now. The general
process is: o Open the PeopleSoft project to the attributes page. o CAPTURE (Scan) and LINK the single document with 4 DOCKEYS from PS o Assign Drawer and DOCTYPE o provide QA (Quality Assurance) to ensure the document is legible
The instructions in the first part of this section explain how to do Batch Scanning. Instructions on Single Document Scan follow.
BATCH SCANNING
Pre-Sort Batch Scanning Documents Step 1: Gather and Prepare Available Documents Be sure to do the following:
Remove any staples, paperclips, or other objects that might cause the scanner to jam Tape all documents smaller than 8½” x 11” to a blank 8½” x 11” sheet of paper
Step 2: Sort Documents into Stacks Documents must be sorted into batches according to pre- or post-award. Documents are then separated by proposal number (USM), submission number (UMaine), or project number and within this group by doc type. Step 3: Insert Patch Code Sheets between Different Doc Types Patch Code sheets are 8 1/2” x 11” sheets of paper printed with the following header:

ImageNow Patch I Header Patch Code sheets separate documents into batches and allow multiple documents to be scanned at once. Insert a Patch Code between documents of different project numbers and DOCTYPES. Note: A Patch Code sheet may not function properly if the sheet has any stray marks or folds. Also, Patch Code sheets are not necessary at the beginning of a batch, but may be placed at the end in the event of adding a second batch.
CAPTURE the Documents Now that the documents have been prepared and sorted, they are ready to be scanned. Step 1: Load Documents into the Scanner Insert the prepared/sorted documents into the scanner with the text facing down, and the top of the documents facing the feeder headfirst. Note: Turn the Scanner on BEFORE you turn on the computer. Step 2: Select Capture Profile There are three capture profiles for Sponsored Programs:
O SP – All documents that are to be scanned into the O SP (Orono) drawer P SP – All documents that are to be scanned into the P SP (USM) drawer S SP – All documents that are to be scanned into the S SP (System) drawer
From the ImageNow Control Menu, right-click the capture icon and select SP_LINKLATER. Step 3: Check for Correct Capture Profile
To ensure that the appropriate capture profile is selected, hover the cursor over the Capture Icon.
Step 4: Click the CAPTURE Icon
From the ImageNow Control Bar, click the Capture Icon to begin scanning. As the documents prepare to scan, two windows will appear: the Proposed Key window and the “Batch scan in progress” window behind it. 9

In the Proposed Key window, select S_SP from the Drawer pull-down menu. Note, the SP_DOCTYPES window shows “pslink” and is not active.
Click to begin scanning. Document(s) start moving through the scanner to the feeder tray and stop after the page following the Patch Code sheet goes through the scanner. The Proposed Key dialogue box opens again. Repeat the Drawer Selection and DOCTYPE selection until all of the documents in the Batch have been fed through the feeder tray. Once the document feeder is empty, the following prompt appears:
Click No to end the scanning process.
10
QA—Verify Users Can Read the Document After a document is scanned into the DI system it is sent to a workflow queue where a QA (quality assurance) step will be performed before you LINK the document to a project. Step 1: Open Workflow
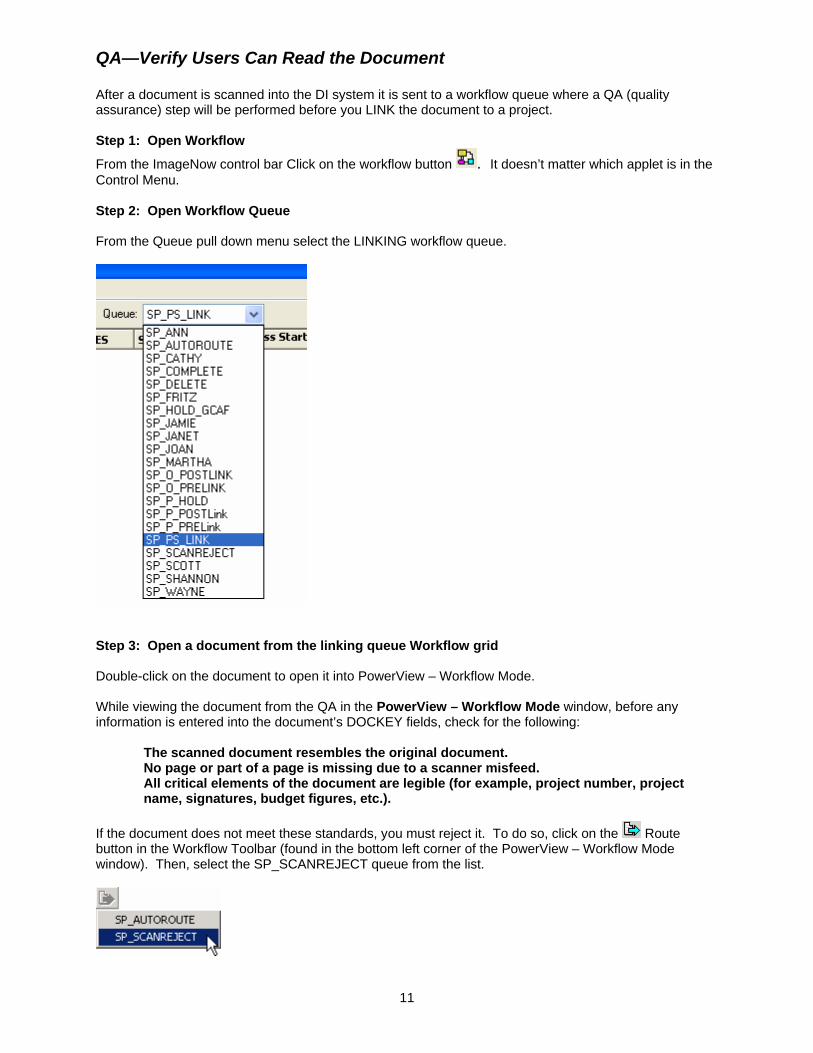
From the ImageNow control bar Click on the workflow button . It doesn’t matter which applet is in the Control Menu. Step 2: Open Workflow Queue From the Queue pull down menu select the LINKING workflow queue.
Step 3: Open a document from the linking queue Workflow grid Double-click on the document to open it into PowerView – Workflow Mode. While viewing the document from the QA in the PowerView – Workflow Mode window, before any information is entered into the document’s DOCKEY fields, check for the following:
The scanned document resembles the original document. No page or part of a page is missing due to a scanner misfeed. All critical elements of the document are legible (for example, project number, project name, signatures, budget figures, etc.).
If the document does not meet these standards, you must reject it. To do so, click on the Route button in the Workflow Toolbar (found in the bottom left corner of the PowerView – Workflow Mode window). Then, select the SP_SCANREJECT queue from the list.
11
The document will then be moved from the current workflow queue to the Scan Reject queue, where it will stay until someone with delete privileges can go in and manually delete it. Note: It is important that you do QA before any information is entered into the document’s doc key fields. This is to avoid the occurrence of rescanned documents becoming appended to documents in the Scan Reject queue.
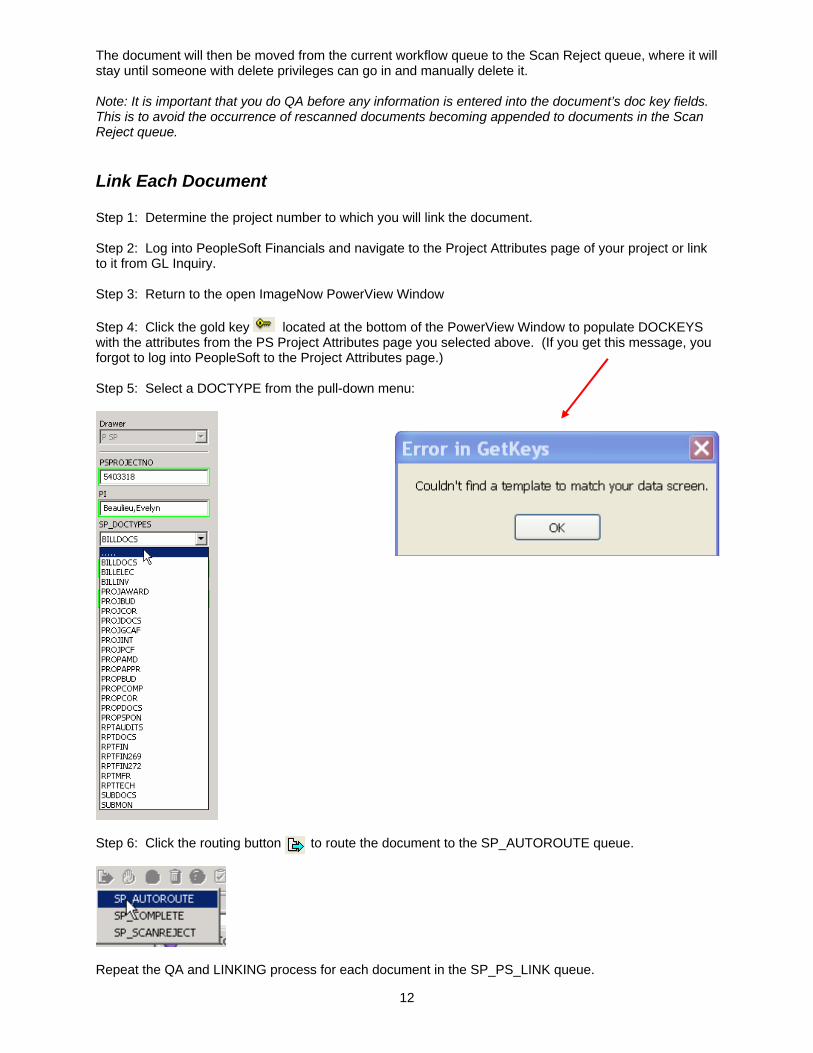
Link Each Document Step 1: Determine the project number to which you will link the document. Step 2: Log into PeopleSoft Financials and navigate to the Project Attributes page of your project or link to it from GL Inquiry. Step 3: Return to the open ImageNow PowerView Window Step 4: Click the gold key located at the bottom of the PowerView Window to populate DOCKEYS with the attributes from the PS Project Attributes page you selected above. (If you get this message, you forgot to log into PeopleSoft to the Project Attributes page.) Step 5: Select a DOCTYPE from the pull-down menu:
Step 6: Click the routing button to route the document to the SP_AUTOROUTE queue.
Repeat the QA and LINKING process for each document in the SP_PS_LINK queue.
12

SINGLE DOCUMENT SCAN The process for scanning a single document is similar to that of batch scanning except, the user links the document during the same work session in which the document is captured.
CAPTURE (Scan) and LINK the Document Step 1: Place Document in Feeder Tray upside down and top end in first. Step 2: Select Capture Profile From the ImageNow Control Menu, RIGHT-click the Capture Icon and select SP_LINKNOW. Step 3: Select Linking Source Open the PeopleSoft Attributes Page to the Project from which you will scrape information to fill the document’s DOCKEYS. Step 4: From the ImageNow Control Menu, click the capture icon The Proposed Key Dialogue Box opens. From the pull-down menu, select the Drawer where you will place the document From the DOCTYPE pull-down menu, select the appropriate DOCTYPE for this document. Verify the information in the remaining DOCKEYS matches information in your open PS page.
QA—Verify Users Can Read the Document and Accept It or Reject It Step 1: Click “Scan” on the opened Proposed Key dialogue box. The document opens in PowerView – Workflow Mode. View the document to determine that:
The scanned document resembles the original document. No page or part of a page is missing due to a scanner misfeed. All critical elements of the document are legible (for example, project number, project name, signatures, budget figures, etc.).
Click the TRASH icon if you decide the document is not legible and you do not want to retain this image in ImageNow.
Step 2: Click the SAVE icon if the quality of the document is acceptable. When you click SAVE, DOCKEY information from PeopleSoft is linked to the document, e.g., the PI, the Project Number, the Grant Number, and the Financial Contact.
Step 3: Click the routing button to route the document to the SP_AUTOROUTE queue.
13
OPTION 2: Process an Electronic Document Using the IMAGENOW PRINTER A second way to capture and link documents is by using the ImageNow Printer. This method works for capturing and linking ELECTRONIC documents. In this example you will link the document with information from PeopleSoft.
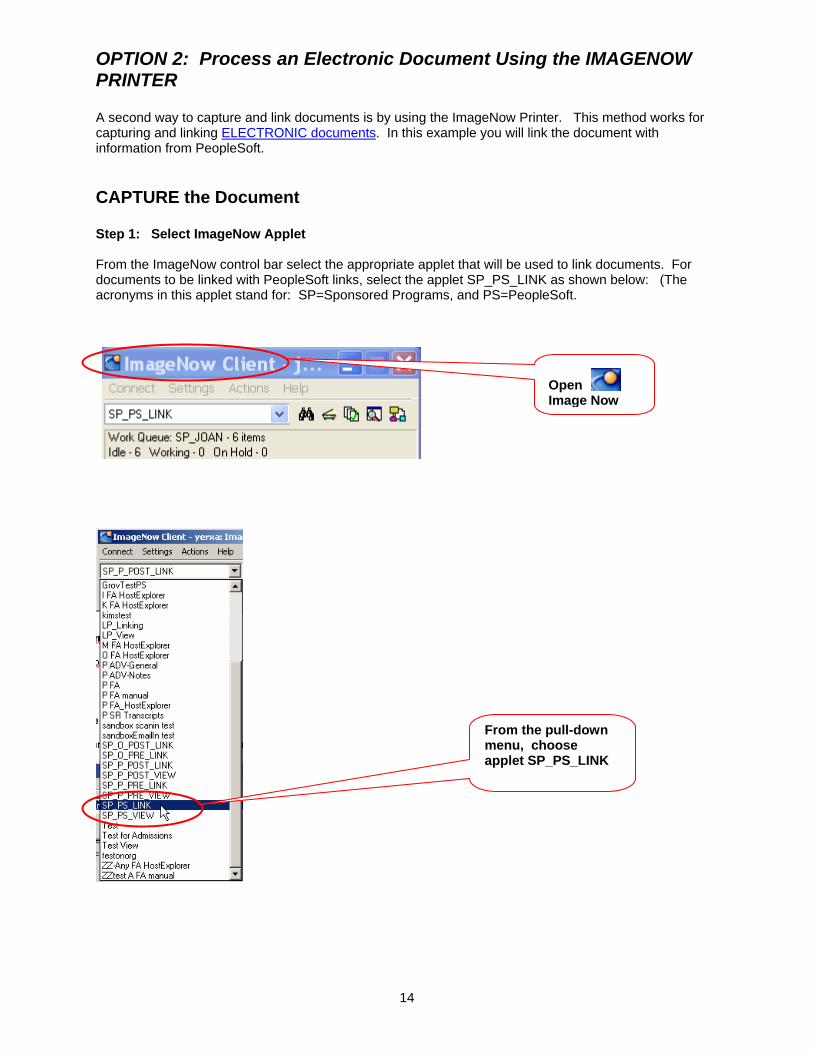
CAPTURE the Document Step 1: Select ImageNow Applet From the ImageNow control bar select the appropriate applet that will be used to link documents. For documents to be linked with PeopleSoft links, select the applet SP_PS_LINK as shown below: (The acronyms in this applet stand for: SP=Sponsored Programs, and PS=PeopleSoft.
Open Image Now
From the pull-down menu, choose applet SP_PS_LINK
14
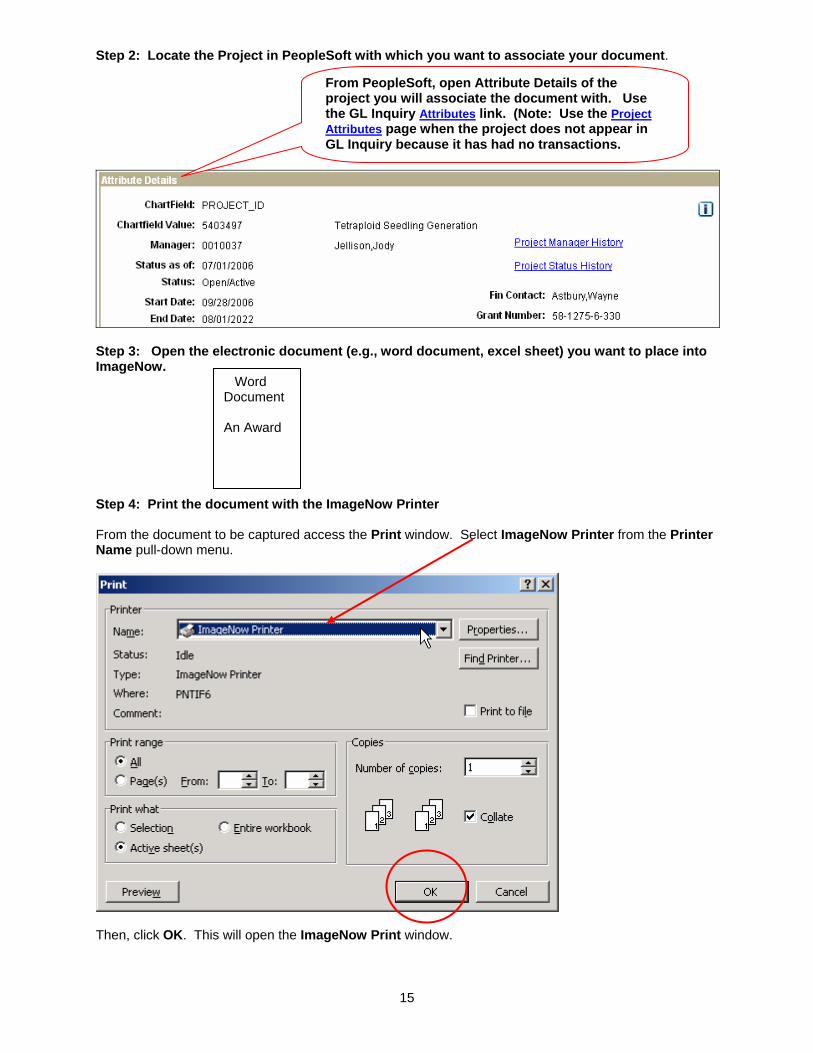
Step 2: Locate the Project in PeopleSoft with which you want to associate your document.
15
From PeopleSoft, open Attribute Details of the project you will associate the document with. Use the GL Inquiry Attributes link. (Note: Use the Project Attributes page when the project does not appear in GL Inquiry because it has had no transactions.
Step 3: Open the electronic document (e.g., word document, excel sheet) you want to place into ImageNow.
Word Document An Award
Step 4: Print the document with the ImageNow Printer From the document to be captured access the Print window. Select ImageNow Printer from the Printer Name pull-down menu.
Then, click OK. This will open the ImageNow Print window.

Step 5: ImageNow Print: LINK NOW or LINK LATER? [NOTE: If the ImageNow Print window does not appear, you will LINK NOW. Go to “LINK the Document” below. From the ImageNow Print window, select INPRINTER_LINKNOW from the Capture Profile pull-down menu. Click OK.
LINK the Document: Select Drawer and DOCTYPE The Proposed Key window opens. From here, select the appropriate drawer from the Drawer pull-down menu. The drawer you select will be the drawer designated for your campus (P SP is for UMS (Portland); or select U SP (University) if you want share access with ALL users who have access to any of the drawers listed.
16
QA—Verify Users Can Read the Document When you click Scan, the PowerView Scan Mode box opens and displays your document so you can verify that it is legible.
From the Drawer pull-down, select the Drawer where you will store the document:
U SP for ALL users to view O SP for UM and SWS viewers P SP for USM and SWS viewers S SP for SWS and Other Campuses viewers
From the SP_DOCTYPES pull-down, select the DOCTYPE you want to assign to the document. In this example, we assign DOCTYPE of PROJAWARD
Assign Keywords based on defined business processes. This step is optional
Click Scan. The document appears in Power View - Scan Mode.

Word Document An Award
17
Click the SAVE icon if the quality of the document is acceptable. When you click SAVE, DOCKEY information from PeopleSoft is linked to the document, e.g., the PI, the Project Number, the Grant Number, and the Financial Contact.
Click the TRASH icon if you decide the document is not legible and you do not want to retain this image in ImageNow.
SEARCH—Find the Document You Want to See
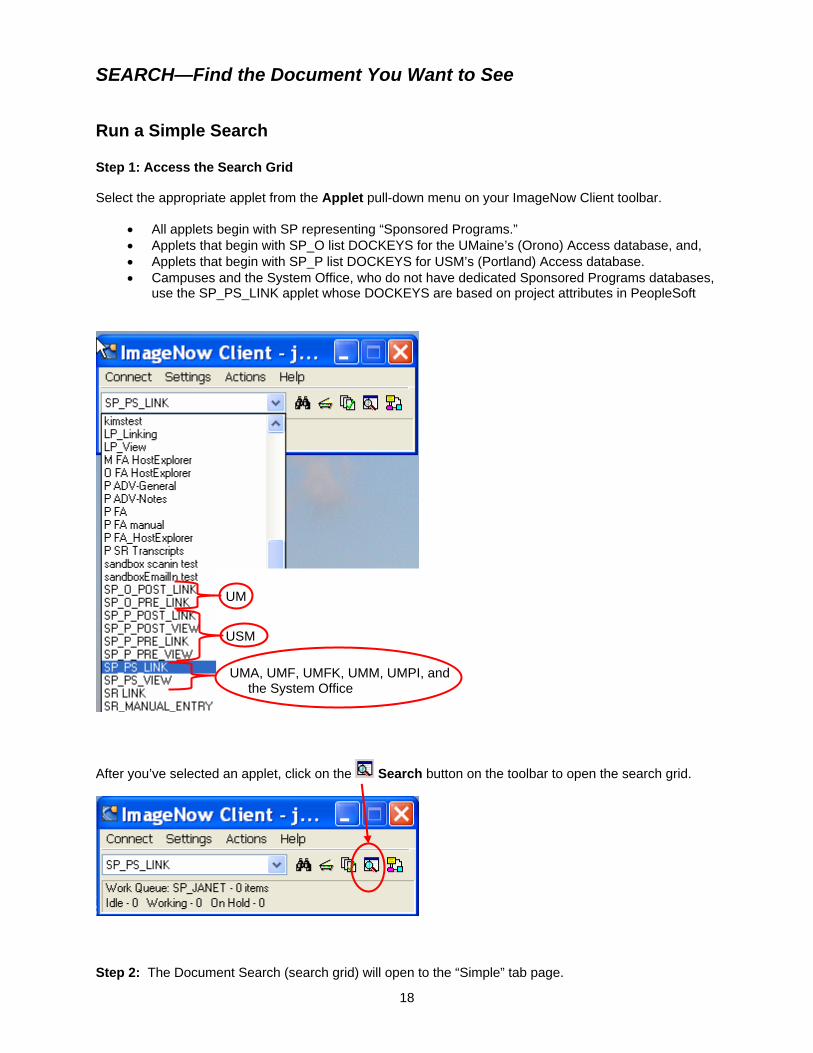
Run a Simple Search Step 1: Access the Search Grid Select the appropriate applet from the Applet pull-down menu on your ImageNow Client toolbar.
• All applets begin with SP representing “Sponsored Programs.” • Applets that begin with SP_O list DOCKEYS for the UMaine’s (Orono) Access database, and, • Applets that begin with SP_P list DOCKEYS for USM’s (Portland) Access database. • Campuses and the System Office, who do not have dedicated Sponsored Programs databases,
use the SP_PS_LINK applet whose DOCKEYS are based on project attributes in PeopleSoft After you’ve selected an applet, click on the Search button on the toolbar to open the search grid.
UM
USM UMA, UMF, UMFK, UMM, UMPI, and the System Office
Step 2: The Document Search (search grid) will open to the “Simple” tab page.
18

From the Find documents where pull-down menu, select the DOCKEY you want to search on. For this exercise, we will search DOCKEY “PSProjectNo” which stands for PeopleSoft project number.
19
Step 3: From the operator pull-down menu, select how you want to structure your search. For this exercise select the operator “equals.”
Step 4: Type your search query as shown below. For this exercise, your search query would be a specific PeopleSoft project number, for instance “2400278.”
Step 5: Click the button. The documents appear that meet the conditions of your search: those that “equal” project “2400278” and were captured into ImageNow within the last 60 days:

20
Step 6: Click on any of the documents listed to open it. The documents listed above include the project Award document PROJAWARD (a memorandum of understanding), the Grants and Contract Allocation Form PROJGCAF submitted for this project, and the Project Create Form PROJPCF. Each of these three documents is indexed (linked) with the 6 DOCKEYS created for the SP_PS_LINK applet. They are shown in the search grid column headings: Drawer, Project No. PI, DOCTYPE, Grant Number, and Financial Contact. You could have structured your simple search to search on any one of these DOCKEYS.
Run an Advanced Search Step 1: Access the Search Grid Select the appropriate applet from the Applet pull-down menu on your ImageNow Client toolbar.
• All applets begin with SP representing “Sponsored Programs.” • Applets that begin with SP_O list DOCKEYS for the UMaine’s (Orono) Access database, and, • Applets that begin with SP_P list DOCKEYS for USM’s (Portland) Access database. • Campuses and the System Office, who do not have dedicated Sponsored Programs databases,
use the SP_PS_LINK applet whose DOCKEYS are based on project attributes in PeopleSoft
UM
USM UMA, UMF, UMFK, UMM, UMPI, and the System Office

After you’ve selected an applet, click on the Search button on the toolbar.
21
The Document Search grid opens. Click on the Advanced tab.
Step 2: To add a search condition, click the Add… button.
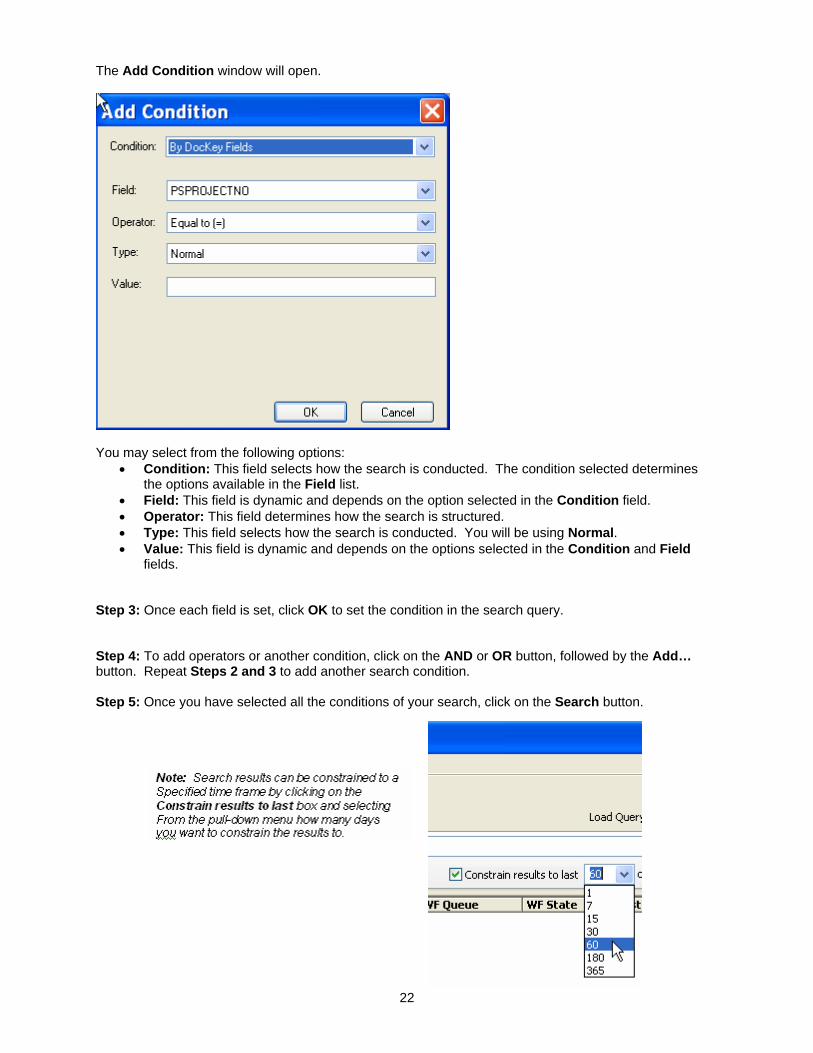
The Add Condition window will open.
You may select from the following options:
• Condition: This field selects how the search is conducted. The condition selected determines the options available in the Field list.
• Field: This field is dynamic and depends on the option selected in the Condition field. • Operator: This field determines how the search is structured. • Type: This field selects how the search is conducted. You will be using Normal. • Value: This field is dynamic and depends on the options selected in the Condition and Field
fields. Step 3: Once each field is set, click OK to set the condition in the search query. Step 4: To add operators or another condition, click on the AND or OR button, followed by the Add… button. Repeat Steps 2 and 3 to add another search condition. Step 5: Once you have selected all the conditions of your search, click on the Search button. 22
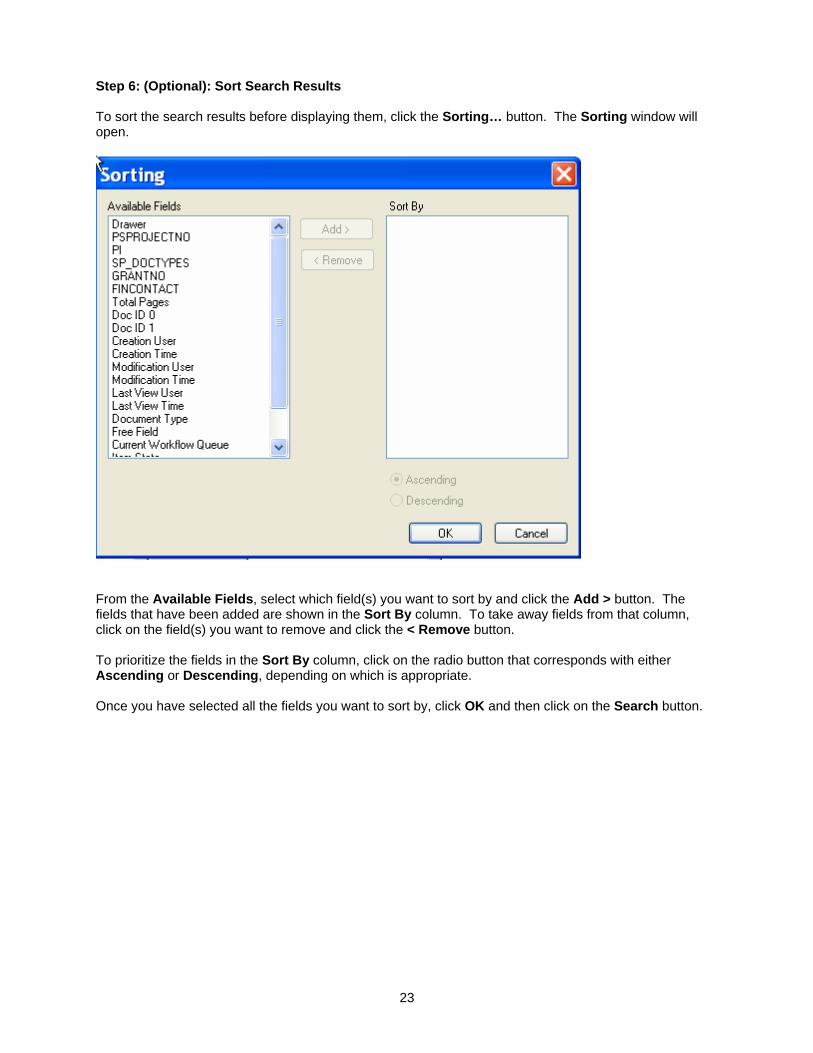
Step 6: (Optional): Sort Search Results To sort the search results before displaying them, click the Sorting… button. The Sorting window will open.
From the Available Fields, select which field(s) you want to sort by and click the Add > button. The fields that have been added are shown in the Sort By column. To take away fields from that column, click on the field(s) you want to remove and click the < Remove button. To prioritize the fields in the Sort By column, click on the radio button that corresponds with either Ascending or Descending, depending on which is appropriate. Once you have selected all the fields you want to sort by, click OK and then click on the Search button.
23
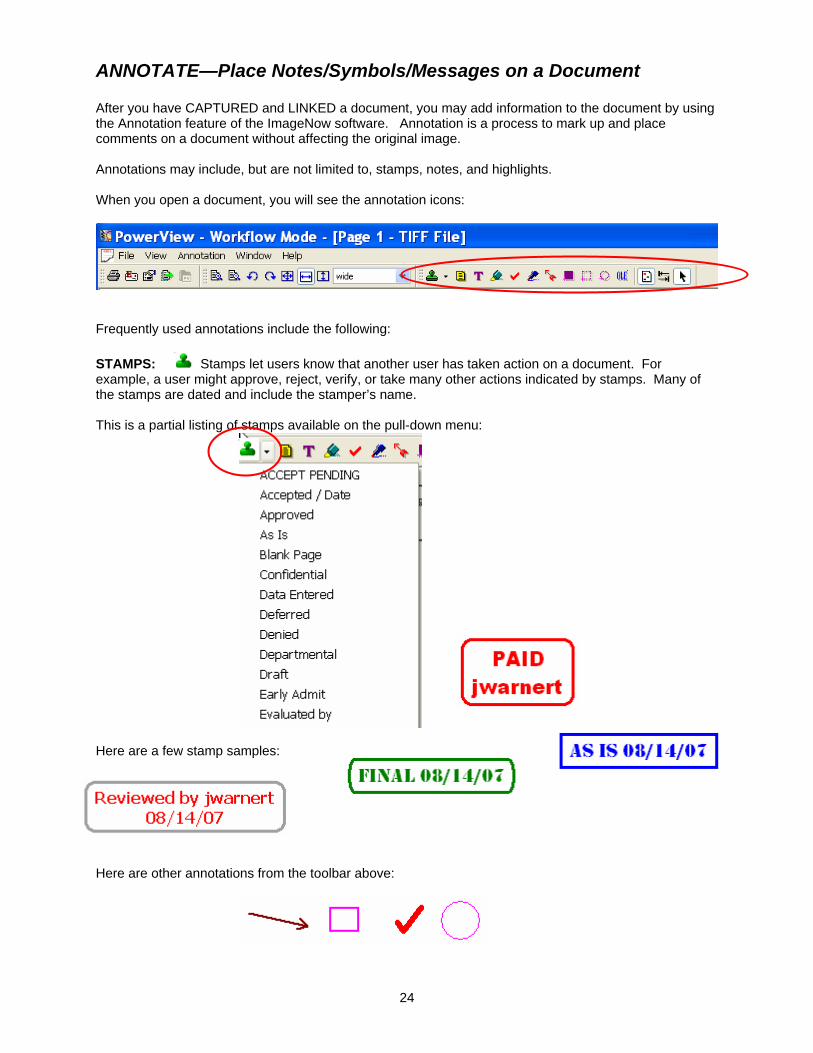
ANNOTATE—Place Notes/Symbols/Messages on a Document After you have CAPTURED and LINKED a document, you may add information to the document by using the Annotation feature of the ImageNow software. Annotation is a process to mark up and place comments on a document without affecting the original image. Annotations may include, but are not limited to, stamps, notes, and highlights. When you open a document, you will see the annotation icons:
24
Frequently used annotations include the following: STAMPS: Stamps let users know that another user has taken action on a document. For example, a user might approve, reject, verify, or take many other actions indicated by stamps. Many of the stamps are dated and include the stamper’s name. This is a partial listing of stamps available on the pull-down menu:
Here are a few stamp samples:
Here are other annotations from the toolbar above:

THE STICKY NOTE: The sticky note allows users to have a conversation by attaching a sticky note to a document and then routing the document to another user. Each user’s response is dated and the name of the person entering information into a sticky note is provided. Unlike Text annotations and Stamps, STICKY NOTES MAY NOT BE deleted from a document. They are especially useful in resolving minor problems, or securing missing information, on forms.
TEXT: The text annotation allows users to add short notes or messages to a document. Examples are:
25

VI. Processing the PCF and GCAF Forms Campuses prepare Project Create Forms (PCFs) and Grants and Contracts Allocation Forms (GCAFs) to initiate the creation of a new PeopleSoft project. With Document Imaging, these forms are routed electronically between the System Office and the Campus submitting the forms. The following chart explains the roles and responsibilities of campus and system individuals in processing the PCF and GCAF forms.
26

27

WHO? DOES WHAT…….
28

WHO? DOES WHAT…….
29
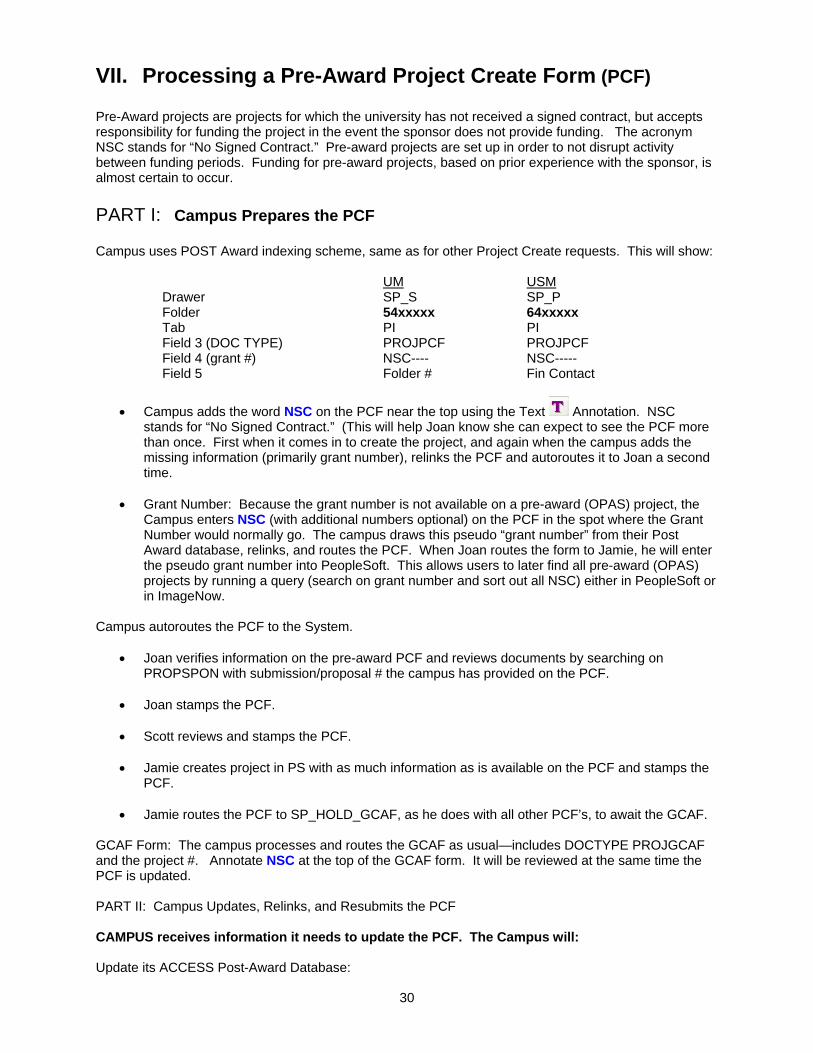
VII. Processing a Pre-Award Project Create Form (PCF) Pre-Award projects are projects for which the university has not received a signed contract, but accepts responsibility for funding the project in the event the sponsor does not provide funding. The acronym NSC stands for “No Signed Contract.” Pre-award projects are set up in order to not disrupt activity between funding periods. Funding for pre-award projects, based on prior experience with the sponsor, is almost certain to occur. PART I: Campus Prepares the PCF Campus uses POST Award indexing scheme, same as for other Project Create requests. This will show:
UM USM Drawer SP_S SP_P Folder 54xxxxx 64xxxxx Tab PI PI Field 3 (DOC TYPE) PROJPCF PROJPCF Field 4 (grant #) NSC---- NSC----- Field 5 Folder # Fin Contact
• Campus adds the word NSC on the PCF near the top using the Text Annotation. NSC stands for “No Signed Contract.” (This will help Joan know she can expect to see the PCF more than once. First when it comes in to create the project, and again when the campus adds the missing information (primarily grant number), relinks the PCF and autoroutes it to Joan a second time.
• Grant Number: Because the grant number is not available on a pre-award (OPAS) project, the
Campus enters NSC (with additional numbers optional) on the PCF in the spot where the Grant Number would normally go. The campus draws this pseudo “grant number” from their Post Award database, relinks, and routes the PCF. When Joan routes the form to Jamie, he will enter the pseudo grant number into PeopleSoft. This allows users to later find all pre-award (OPAS) projects by running a query (search on grant number and sort out all NSC) either in PeopleSoft or in ImageNow.
Campus autoroutes the PCF to the System.
• Joan verifies information on the pre-award PCF and reviews documents by searching on PROPSPON with submission/proposal # the campus has provided on the PCF.
• Joan stamps the PCF.
• Scott reviews and stamps the PCF.
• Jamie creates project in PS with as much information as is available on the PCF and stamps the
PCF.
• Jamie routes the PCF to SP_HOLD_GCAF, as he does with all other PCF’s, to await the GCAF. GCAF Form: The campus processes and routes the GCAF as usual—includes DOCTYPE PROJGCAF and the project #. Annotate NSC at the top of the GCAF form. It will be reviewed at the same time the PCF is updated. PART II: Campus Updates, Relinks, and Resubmits the PCF CAMPUS receives information it needs to update the PCF. The Campus will: Update its ACCESS Post-Award Database:
30

• Add missing or revised information (grant number, Start/End dates CFDA #) so information in
your database is correct and so the updated information can be brought into ImageNow when you relink the PCF.
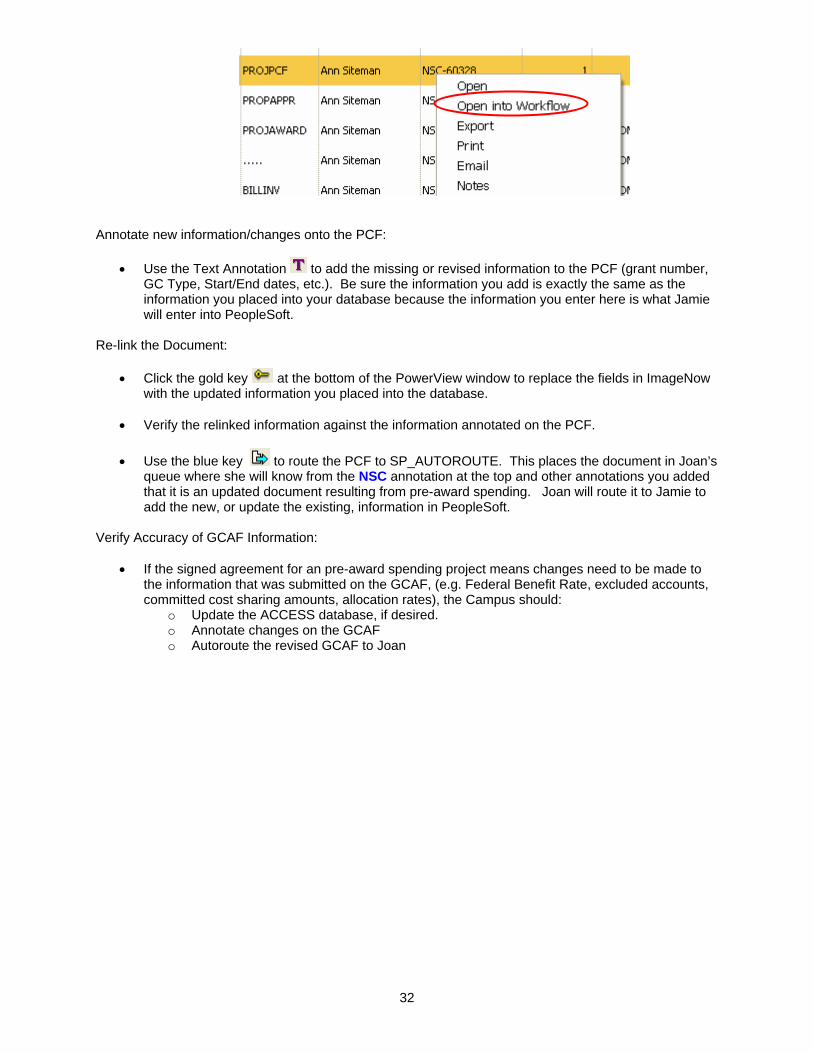
Locate the PCF in ImageNow using the document search:
• Search for the PCF using project number. • Locate it on the search grid and click on it once to highlight it. Do not open it.
Route PCF to the Linking Queue:
• With your curser on the highlighted document, RIGHT-click on the listing. A pull-down menu will open. Move your curser to “Send to”. Another pull-down menu will open where you will select the linking queue to which you will move the PCF.
Open PCF into Workflow:
• From the Document Search results list, RIGHT-click on the PCF document listing and select “Open Into Workflow.”
31
32
Annotate new information/changes onto the PCF:
• Use the Text Annotation to add the missing or revised information to the PCF (grant number, GC Type, Start/End dates, etc.). Be sure the information you add is exactly the same as the information you placed into your database because the information you enter here is what Jamie will enter into PeopleSoft.
Re-link the Document:
• Click the gold key at the bottom of the PowerView window to replace the fields in ImageNow with the updated information you placed into the database.
• Verify the relinked information against the information annotated on the PCF. • Use the blue key to route the PCF to SP_AUTOROUTE. This places the document in Joan’s
queue where she will know from the NSC annotation at the top and other annotations you added that it is an updated document resulting from pre-award spending. Joan will route it to Jamie to add the new, or update the existing, information in PeopleSoft.
Verify Accuracy of GCAF Information:
• If the signed agreement for an pre-award spending project means changes need to be made to the information that was submitted on the GCAF, (e.g. Federal Benefit Rate, excluded accounts, committed cost sharing amounts, allocation rates), the Campus should:
o Update the ACCESS database, if desired. o Annotate changes on the GCAF o Autoroute the revised GCAF to Joan
33
VIII. How to Request Document Imaging for Your Sponsored Programs Function
If you are interested in participating in Sponsored Programs Document Imaging, please contact Kim Yerxa in the Systems and Operations unit of Information Technology Services. She will guide you in submitting a request and can provide a rough estimate of costs. The time frame for setting up Document Imaging at your campus will vary depending on what other projects are already approved for implementation, the availability of time and staff to begin work on your set up and training, and the extent to which the standard Sponsored Programs set up will accommodate your needs.
34
Appendix 1. Assign the DOCTYPE that Best Describes Your Document
Appendix 1 is a full listing of the DOCTYPES referenced in earlier sections of this document. Sponsored Programs document imaging uses 26 DOCTYPES. A user assigns one of these 26 DOCTYPES to each document placed ImageNow. When assigning a DOCTYPE, follow these procedures: First, consider which of the five DOCTYPE GROUPS best describes the nature of your document. The GROUPS are:
Proposal PROP Project PROJ Subrecipient SUB Report RPT Billing BILL
Second, after you’ve selected the correct group, use the chart in APPENDIX 1 to choose the DOCTYPE within that group that most closely matches the nature of the document you are indexing. The DOCTYPE is prefaced with the GROUP title. Note: An * asterisk next to a document in the list below means not all campuses use ImageNow to store the document described. The campus either does not use that document, or it uses it, but does not store it in ImageNow.
PROPosal Doc Types
PROPAPPR Approval: Approval routing forms. * USM Bluesheet routing form * UM Bluesheet and UM Greensheet * PARS (Proposal Approval Routing System) Budget Justification Narrative (UM) * PARS Budget * PARS Project Summary Narrative (UM) Proposal Abstract, usually 1-2 pages of text. Proposal Planning & Submission Data Sheet Pre-Contact Contract Approval Form (campus permission document) Research startup funds requests Proposal cover sheet Request for direct cost sharing funds Request for waiver from standard F&A rates Proposal Description, usually 15-50 pages of text Requests from PI's for assistance in preparing a proposal.
PROPBUD Proposed detailed BUDGET. (NOTE: SWS will search on PROPBUD to find the budget a user records in the budget ledger for a pre-award spending project. Users are responsible for adjusting the budget and indexing the sponsor-approved budget in PROJBUD after it is approved by the sponsor.
Budgets for pre-award (OPAS) spending. Budget justification, usually 1-3 pages of text.

35
PROPDOCS Documents: PROPOSAL documents that do not fit in other PROPOSAL doc types. USM sponsor defined requirements for preparing a proposal UM RFP (Request for Proposal) guidelines
PROPSPON Initial proposal package a campus submits to a sponsor. (The package may include the final versions of several documents indexed in PROPAPPR). Amendments to sponsor package will go in PROPAMD. (NOTE: When processing a PCF for pre-award spending, SWS will search on PROPSPON to find a document that suggests funds will eventually be received. Always index the pre-award commitment document with doc type PROPSPON before you submit a pre-award PCF.)
UM initial proposal package and cover letter or form sent to a sponsor. USM initial proposal package and cover letter or form sent to a sponsor.
PROPAMD Amendments: Changes/additions to the initial proposal package submitted to a sponsor.
PROPCOR Correspondence: Examples of the documents a user will find in this doc type are: Letters, emails, faxes, ITP's (intent to propose), etc., about project PROPOSALS.
PROPCOMP Compliance: Examples of the documents a user will find in this doc type are: PI signoff form for Applications to PHS Application form for Approval of Research with Human Subjects Correspondence regarding compliance issues, concerns, information, alerts, warnings, etc. Protocol Institutional Animal Care and Use Form Other compliance forms: PHS, IRB, IACUC forms
PROJect Doc Types
PROJAWARD Award: Documents approving or amending an award. (NOTE: SWS will search on PROJAWARD when processing PCF and GCAF forms. Always index the award document before you submit the PCF.)
Project award document and/or letter. For example, NOGA -- Notice of Grant Award. Award letters confirming total budget(s) and providing tentative budgets for multi-year grants. Award letters confirming total budgets for a single budget year. Amendments to awards. Supplemental Funding award documents
Descriptions of budget requirements of the sponsor that are in addition to those in the project award document, e.g., special mile reimbursement rate, no equipment purchases, etc.
PROJBUD Budget: As a general rule, documents in PROJBUD are line-item, detailed budgets.
Sponsor-approved detailed budget received with the initial award. (NOTE: SWS will search on PROJBUD to find the project budget a user records in the budget ledger. Always index this budget before you submit the Project Create Form.
Detailed budget of Carryover funds when the sponsor has put restrictions on how the carryover is to be spent.
PROJCOR Correspondence: The PROJCOR doc type is assigned to letters, emails, faxes, etc, about projects
to/from campus personnel, sponsors, and other outside parties. Congratulations letters from VP/Provost to PI. Letter or email from PI or Dean about impact on a project due to pending lab renovation. Letter from donor regarding valuation of in-kind cost share commitment on a particular project. Requests to sponsors, along with their responses, regarding sponsor-required approval on: no-cost extensions pre-award spending carryover of funds budget changes

36
early termination of a project transfer of a project to another institution change in the PI on an award Note: see also PROJAWARD for responses that came back as an amendment to an award.
PROJDOCS Documents: in addition to holding the type of documents listed below, use PROJDOCS to index PROJECT documents that do not fit in the other 6 PROJECT doc types.
ACCESS database Project Summary Sheet(s) that include the PeopleSoft project #'s No-cost extensions requests to SP from PI's and responses (requests not sent to a sponsor). Pre-award spending requests to SP from PI's and responses (requests not sent to a sponsor). Project Agreement Short Form, with cover letter if any. State/University Cooperative Projects Amendment, with cover letter if any. State Sponsored DHHS Agreement, with cover letter if any. Industry Research Agreement, with cover letter if any.
PROJINT Internal: This doc type is a holding spot for informal messages, temporary notes, and follow-up items shared primarily among staff. It does not include formal documents.
*
In-house notes/emails/documents--reminders/ticklers/sensitive issues primarily for reference by staff within the office.
PROJPCF Project Create Form: Use Doc type PROJPCF ONLY for the Project Create Form (PCF).
PROJGCAF Grants and Contracts Allocation Form: Use doc type PROJGCAF ONLY for the Grants &
Contracts Allocation Form (GCAF).
Report (RPT) Doc Types
RPTAUDITS Audit: A user searching for one of the documents listed below will find it with doc type RPTAUDITS Correspondence (letters/emails/notes) related to audit issues and site-visit audits. Correspondence related to DS-2 Statement and A-133 Audit Reports
RPTFIN Financial Report: A user searching for one of the documents below will find it with doc type RPTFIN Financial reports, but not subrecipient financial reports included in SUBDOCS. Federal Cash Management Report submitted to the State of Maine quarterly.
RPTFIN269 Financial 269: A user searching for an SF-269 will find it in with doc type RPTFIN269 Financial Status Report SF-269, including correspondence. Financial Status Report SF-269A (short form), including correspondence.
RPTFIN272 Financial 272: Federal Cash Transactions Report SF-272, including correspondence.
RPTMFR * Monthly Financial Report: Monthly Financial Review documents, forms, checklists, reminders, etc.
RPTTECH Technical: A user searching for one of the documents listed below will find it with doc type RPTTECH
Technical Report submitted by a PI Letter sent to a PI reminding the PI a technical report is due.
RPTDOCS Documents: REPORT documents that do not fit in other REPORT doc types.
37
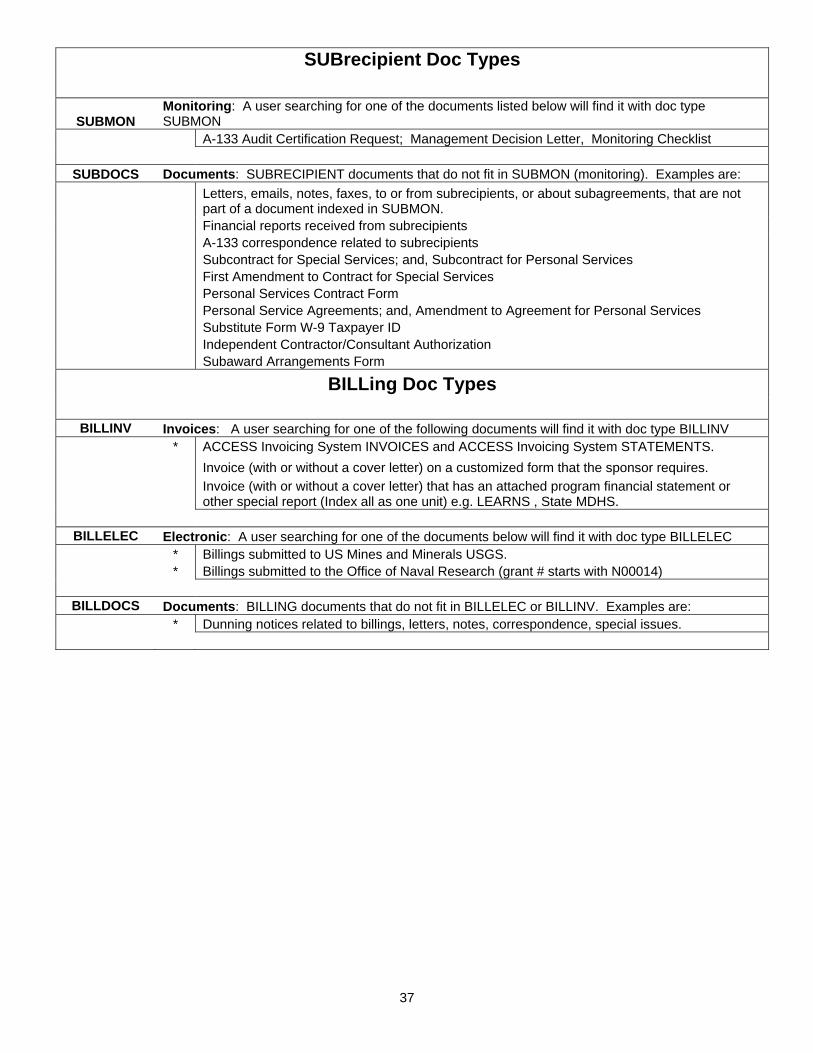
SUBrecipient Doc Types
SUBMON Monitoring: A user searching for one of the documents listed below will find it with doc type SUBMON
A-133 Audit Certification Request; Management Decision Letter, Monitoring Checklist
SUBDOCS Documents: SUBRECIPIENT documents that do not fit in SUBMON (monitoring). Examples are:
Letters, emails, notes, faxes, to or from subrecipients, or about subagreements, that are not part of a document indexed in SUBMON.
Financial reports received from subrecipients A-133 correspondence related to subrecipients Subcontract for Special Services; and, Subcontract for Personal Services First Amendment to Contract for Special Services Personal Services Contract Form Personal Service Agreements; and, Amendment to Agreement for Personal Services Substitute Form W-9 Taxpayer ID Independent Contractor/Consultant Authorization Subaward Arrangements Form
BILLing Doc Types
BILLINV Invoices: A user searching for one of the following documents will find it with doc type BILLINV * ACCESS Invoicing System INVOICES and ACCESS Invoicing System STATEMENTS. Invoice (with or without a cover letter) on a customized form that the sponsor requires.
Invoice (with or without a cover letter) that has an attached program financial statement or other special report (Index all as one unit) e.g. LEARNS , State MDHS.
BILLELEC Electronic: A user searching for one of the documents below will find it with doc type BILLELEC
* Billings submitted to US Mines and Minerals USGS. * Billings submitted to the Office of Naval Research (grant # starts with N00014)
BILLDOCS Documents: BILLING documents that do not fit in BILLELEC or BILLINV. Examples are: * Dunning notices related to billings, letters, notes, correspondence, special issues.

38
Appendix 2: Workflow—How Documents Move through Document Imaging
This section provides a detailed look at how documents move through the DI system. This is especially important for tracking the Project Create Forms (PCFs) and the Grants and Contracts Allocation Forms (GCAFs) you submit to the System Office to set up new projects and their allocations. The diagram below includes workflow of PCF and GCAF documents by UM and USM. Selected documents from all other campuses are currently processed by the System Office Scanning and Indexing Queue Description Possible Destination(s) Pre- and post-award documents are
scanned into ImageNow via a capture profile. The profile places the document into a specific drawer and routes it into workflow.
SP_LINK_ROUTE
SP_LINK_ROUTE Documents are automatically routed to “linking” queues based on temporary key value (‘Pre Award” or “Post Award”) assigned by the capture profile.
SP_P_PRELINK, SP_P_POSTLINK, SP_O_PRELINK, SP_O_POSTLINK, SP_PS_LINKING, or SP_ROUTE_EXCEPTIONS
SP_P_PRELINK Pre-award documents for USM are reviewed for quality and are either rejected or manually routed to SP_AUTO_ROUTE. Prior to routing document to SP_AUTO_ROUTE, document is linked to a record in Access via (applet name).
SP_SCAN_REJECT or SP_AUTO_ROUTE
SP_P_POSTLINK Post-award documents for USM are reviewed for quality and are either rejected or manually routed to SP_AUTO_ROUTE. Prior to routing document to SP_AUTO_ROUTE, document is linked to a record in Access via (applet name).
SP_SCAN_REJECT or SP_AUTO_ROUTE
SP_O_PRELINK Pre-award documents for Orono are reviewed for quality and are either rejected or manually routed to SP_AUTO_ROUTE. Prior to routing document to SP_AUTO_ROUTE, document is linked to a record in Access via (applet name).
SP_SCAN_REJECT or SP_AUTO_ROUTE
SP_O_POSTLINK Post-award documents for Orono are reviewed for quality and are either rejected or manually routed to SP_AUTO_ROUTE. Prior to routing document to SP_AUTO_ROUTE, document is linked to a record in Access via (applet name).
SP_SCAN_REJECT or SP_AUTO_ROUTE
SP_PS_LINKING Pre- and post-award documents for UMS System Office are reviewed for quality and are either rejected or manually routed to SP_AUTO_ROUTE. Prior to routing document to SP_AUTO_ROUTE, document is linked to a record in PeopleSoft via (applet name).
SP_SCAN_REJECT or SP_AUTO_ROUTE
39
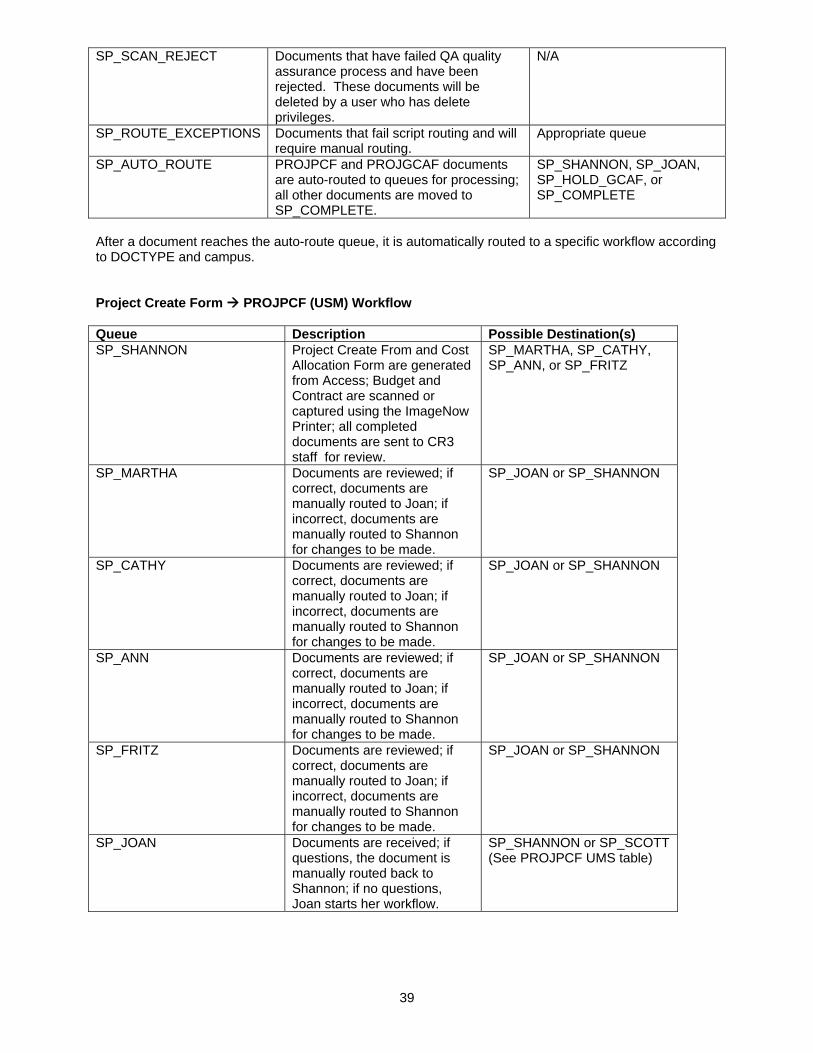
SP_SCAN_REJECT Documents that have failed QA quality assurance process and have been rejected. These documents will be deleted by a user who has delete privileges.
N/A
SP_ROUTE_EXCEPTIONS Documents that fail script routing and will require manual routing.
Appropriate queue
SP_AUTO_ROUTE PROJPCF and PROJGCAF documents are auto-routed to queues for processing; all other documents are moved to SP_COMPLETE.
SP_SHANNON, SP_JOAN, SP_HOLD_GCAF, or SP_COMPLETE
After a document reaches the auto-route queue, it is automatically routed to a specific workflow according to DOCTYPE and campus. Project Create Form PROJPCF (USM) Workflow Queue Description Possible Destination(s) SP_SHANNON Project Create From and Cost
Allocation Form are generated from Access; Budget and Contract are scanned or captured using the ImageNow Printer; all completed documents are sent to CR3 staff for review.
SP_MARTHA, SP_CATHY, SP_ANN, or SP_FRITZ
SP_MARTHA Documents are reviewed; if correct, documents are manually routed to Joan; if incorrect, documents are manually routed to Shannon for changes to be made.
SP_JOAN or SP_SHANNON
SP_CATHY Documents are reviewed; if correct, documents are manually routed to Joan; if incorrect, documents are manually routed to Shannon for changes to be made.
SP_JOAN or SP_SHANNON
SP_ANN Documents are reviewed; if correct, documents are manually routed to Joan; if incorrect, documents are manually routed to Shannon for changes to be made.
SP_JOAN or SP_SHANNON
SP_FRITZ Documents are reviewed; if correct, documents are manually routed to Joan; if incorrect, documents are manually routed to Shannon for changes to be made.
SP_JOAN or SP_SHANNON
SP_JOAN Documents are received; if questions, the document is manually routed back to Shannon; if no questions, Joan starts her workflow.
SP_SHANNON or SP_SCOTT (See PROJPCF UMS table)
40
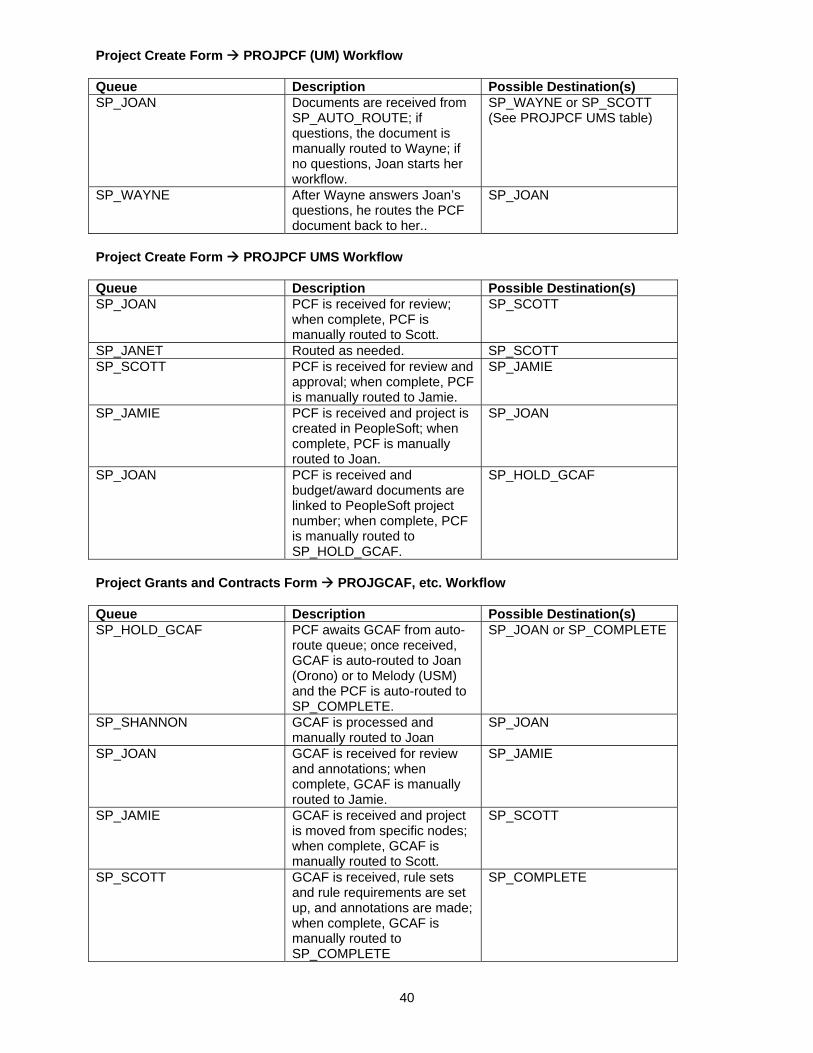
Project Create Form PROJPCF (UM) Workflow Queue Description Possible Destination(s) SP_JOAN Documents are received from
SP_AUTO_ROUTE; if questions, the document is manually routed to Wayne; if no questions, Joan starts her workflow.
SP_WAYNE or SP_SCOTT (See PROJPCF UMS table)
SP_WAYNE After Wayne answers Joan’s questions, he routes the PCF document back to her..
SP_JOAN
Project Create Form PROJPCF UMS Workflow Queue Description Possible Destination(s) SP_JOAN PCF is received for review;
when complete, PCF is manually routed to Scott.
SP_SCOTT
SP_JANET Routed as needed. SP_SCOTT SP_SCOTT PCF is received for review and
approval; when complete, PCF is manually routed to Jamie.
SP_JAMIE
SP_JAMIE PCF is received and project is created in PeopleSoft; when complete, PCF is manually routed to Joan.
SP_JOAN
SP_JOAN PCF is received and budget/award documents are linked to PeopleSoft project number; when complete, PCF is manually routed to SP_HOLD_GCAF.
SP_HOLD_GCAF
Project Grants and Contracts Form PROJGCAF, etc. Workflow Queue Description Possible Destination(s) SP_HOLD_GCAF PCF awaits GCAF from auto-
route queue; once received, GCAF is auto-routed to Joan (Orono) or to Melody (USM) and the PCF is auto-routed to SP_COMPLETE.
SP_JOAN or SP_COMPLETE
SP_SHANNON GCAF is processed and manually routed to Joan
SP_JOAN
SP_JOAN GCAF is received for review and annotations; when complete, GCAF is manually routed to Jamie.
SP_JAMIE
SP_JAMIE GCAF is received and project is moved from specific nodes; when complete, GCAF is manually routed to Scott.
SP_SCOTT
SP_SCOTT GCAF is received, rule sets and rule requirements are set up, and annotations are made; when complete, GCAF is manually routed to SP_COMPLETE
SP_COMPLETE

41
Appendix 3: Quickguides The Quickguides (QG) on the following pages are useful references for new users or for the occasional user.

QG: Batch Scan Documents and Link Later REMINDERS:
• The documents you scan could be one page or many pages. The stack of documents you place into the scanner is the “Batch.”
• Patch sheets are required. Make sure they have no extraneous markings. If you need extra Patch sheets, PRINT them rather than copy. You will find the Patch Sheet word document on the scanner monitor desktop.
• The number of pages in a single Batch should be no greater than about 100, including Patch sheets.
• We will link the documents after they are ALL scanned (Linklater) • Because you are not linking as part of the scanning process, it
doesn’t matter which Applet you have selected on your ImageNow Client Control Menu
• If the scanner and computer are off, turn the scanner on before you turn on the computer
Scan Documents: A. Prepare Documents:
1. Sort documents by the Project number you will assign to each and insert a Patch sheet each time the Project number changes. Now repeat this process by looking at all of the documents with the same project number. For documents with the same project number, sort the documents by DOCTYPE you will assign and insert a Patch sheet each time the DOCTYPE changes for that Project.
2. Remember, documents with the SAME Project number and SAME
DOCTYPE will append when you link them. In addition to having the same Project and DOCTYPE, documents that append have the same Drawer, Grant Number, PI, and Financial Contact.
3. Place the “Batch” (all of the documents and patch sheets for all projects)
in the Feeder Tray – face down and head first. B. Select Capture Profile: 1. From ImageNow Control Menu, RIGHT-click the capture icon and select SP_LINKLATER
42
C. Capture the Documents
1. From ImageNow Control Menu, click capture icon . The Proposed Key dialogue box opens with another dialogue box behind it.
a) select Drawer where you want the Document to be, e.g., S_SP. b) notice the DOCTYPE in the dialogue box is “pslink” and is not
active.
c) click scan on the dialogue box:

1) document(s) start moving through the scanner to the feeder tray
and stop after the page following the Patch page goes through the scanner.
2) the Proposed Key dialogue box opens again. Repeat steps a), b), and c) until all of the documents in the Batch have been fed through the feeder tray.
d) When the feeder tray is empty, a dialogue box will open and ask if you want to process another Batch. Click No. 2. You are done scanning the documents in the Batch and can link them now
or later. They will wait for you until you’re ready in the SP_PS_LINK queue.
Link the Batch Scan Documents:
1. On your ImageNow Client Menu, click Workflow and select queue: SP_PS_LINK where you will see a list of all of the documents that have been scanned, but not linked. The DOCTYPE on each of them will be PSLINK. Click Refresh to ensure all of the documents you scanned have been brought into SP_PS_LINK.
2. Double-click on the listing of a document. The document will open in PowerView Workflow Mode. Click F9 to see how many pages are in the document.
3. Do QA: Is the document legible? Are all pages there? Is important
information visible? 4. If DOCKEYs don’t appear, click F7 to open them. Note, the Drawer is the
drawer you chose when you scanned the document. The SP_DocTypes field shows PSLINK. Click the DOCTYPES pull-down menu and select the DOCTYPE you will assign to the document.
5. Determine the Project Number to which you will link this document. Open
the Attributes Page in PeopleSoft for that project number. 6. Return to the document in PowerView Workflow Mode. 7. Click the gold key to scrape the Project number, PI, Financial Contact, and
Grant Number from the PeopleSoft Attributes Page and copy it to the ImageNow DOCKEYs.
8. Look at the information that populated the DOCKEYs to verify you choose
the correct project number for the document displayed.
9. Route the document to the SP_COMPLETE queue. END
43

QG: Single Document Scan and Link Now REMINDERS:
• The document you scan could be one page or many pages • You do not use a Patch sheet when you scan a single document • We will link the document NOW, instead of from the Workflow Linking Queue • Applet matters for Single Scan (makes no difference for batch scanning)
A. Place document page(s) in Feeder Tray – face down and head first B. Select Capture Profile: 1. From ImageNow Control Menu, RIGHT-click the capture icon and select SP_LINKNOW 2. From ImageNow Control Menu, select applet SP_PS_LINK C. Select Linking Source:
1. Open PeopleSoft Attributes Page to the Project from which you will scrape information to fill the DOCKEYS.
D. Capture and Link Document
1. From ImageNow Control Menu, click capture icon . The Proposed Key dialogue box will open. a) select Drawer where you want Document to be, e.g., S_SP. b) select DOCTYPE , e.g., PROJAWARD for a project award letter. ` c) verify the information in the remaining DOCKEYS matches
the information in your open PS page.
d) click scan on the dialogue box.
1) the document moves through the scanner to the feeder tray
2) the document opens in Power View Scan Mode
(NOTE: F7 and F9 keys do not work in Power View Scan Mode)
e) do QA: Is the image legible? Are all pages there? Is important information visible?
f) click Save icon at the bottom of the page.
DONE You can search for the document using DOCKEY information.
END
44

QG: Capture a Document with your IMAGENOW Printer
LINK the document you Captured in one of two ways. From PeopleSoft, you will use either:
– GL Inquiry project Attributes link, or
– Project Attributes page. (Use the Project Attributes page when the project does not appear in GL Inquiry because it has had no transactions.)
Open Image Now and choose applet SP_PS_LINK
45
AWARD
DOCUMENT For Project
5403497
Do NOT Click the webnow link
Open the document you want to link, e.g., word document, excel, email, pdf, etc.
From PeopleSoft, open Attribute Details for a project (5403497) from the GL Inquiry Attributes link. (Note: Use the Project Attributes page when the project does not appear in GL Inquiry because it has had no transactions.
Print the document by choosing the Image NowPrinter from your list of printers..
X

From the Drawer dropdown, select the Drawer where you will store the document:
U SP for ALL users to view O SP for UM and SWS viewers P SP for USM and SWS viewers S SP for SWS viewers
From the SP_DOCTYPES dropdown, select the DOCTYPE you want to assign to the document. Assign PROJAWARD to our sample Award Document for 5403497.
Assign Keywords based on defined business processes. Click Scan. The
document appears in Power View - Scan Mode.
Verify the document is legible and you have all pages. Click SAVE. The document will close.
If you forget to save, you will be prompted.
Refer to SEARCH for Documents instructions to locate your document.
END
46

QG: Search for Documents Using the ImageNow Client and Binoculars
47
All documents with project 5403497 appear. Double click a document to open it.
Do NOT Click the webnow link
Instead, Click the Binoculars in the ImageNow Client.
This is the Project Create Form (doc type PROJPCF) for project 5403497.
From PeopleSoft, open Attribute Details for a single project (5403497) from the GL Inquiry Attributes link. (Note: Use the Project Attributes page instead if there have been no transactions in GL Inquiry.)
Set ImageNow applet to SP_PS_VIEW.
X
Why would I search with SP_PS_VIEW and Binoculars? Because, when you are reviewing a Project in GL Inquiry and want to see all of its documents, it is FASTER than doing a Search with .
END
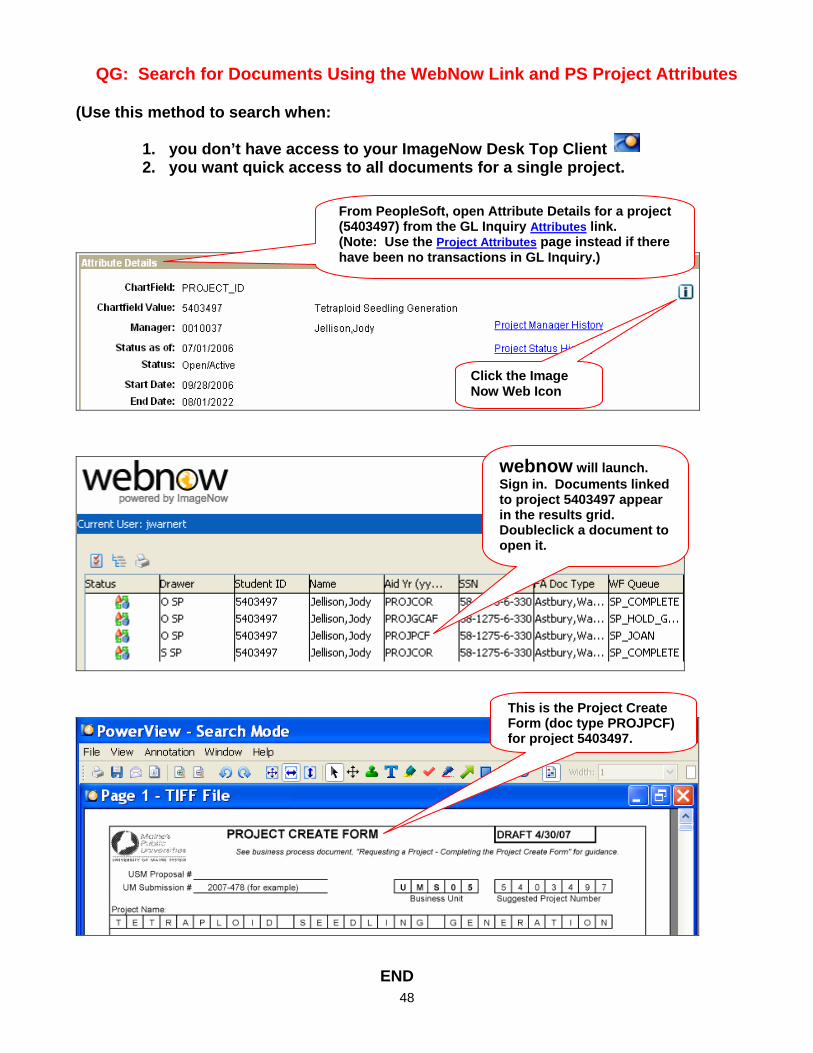
QG: Search for Documents Using the WebNow Link and PS Project Attributes
(Use this method to search when:
1. you don’t have access to your ImageNow Desk Top Client 2. you want quick access to all documents for a single project.
48
Click the Image Now Web Icon
webnow will launch. Sign in. Documents linked to project 5403497 appear in the results grid. Doubleclick a document to open it.
This is the Project Create Form (doc type PROJPCF) for project 5403497.
From PeopleSoft, open Attribute Details for a project (5403497) from the GL Inquiry Attributes link. (Note: Use the Project Attributes page instead if there have been no transactions in GL Inquiry.)
END

QG: Process for Submitting a Pre-Award PCF and GCAF PART I: The Campus Prepares the Pre-Award PCF When preparing a Pre-Award PCF, the Campus uses their POST Award indexing scheme--the same scheme the Campus uses to prepare other Project Create requests. The post-award indexing schemes have these DOCKEYS:
UM USM Drawer SP_S SP_P Folder 54xxxxx 64xxxxx Tab PI PI Field 3 (DOC TYPE) PROJPCF PROJPCF Field 4 (grant #) NSC---- NSC----- Field 5 Folder # Fin Contact Steps: 1. To help users identify the PCF as a pre-award PCF, the Campus adds the word NSC on the
PCF, near the top of the form. Two ways to do this are: a) print NSC on the document before the PCF is captured into ImageNow. b) use the Text Annotation Tool to add “NSC ” after the PCF is captured into ImageNow.
NOTE: NSC stands for “No Signed Contract.” Marking NSC on the PCF form will help Joan know the PCF will enter her workflow queue more than once: First, when the Campus submits it and the System processes it, stamps it, and routes it to the SP_COMPLETE. And then a second time, when the Campus resubmits the PCF after receiving the fully signed contract/award along with the Grant Number and any other missing information. The instructions for relinking and resubmitting the PCF a second time are in Part II of this document.
c) Because the grant number is not available for a pre-award (OPAS) project, the Campus
enters NSC (with additional numbers optional) on the PCF form in the spot where the Grant Number would normally go. Each Campus should determine the most efficient way for them to add the information: Optional ways to do this are:
1) Manually enter NSC into the Grant Number field on the PCF 2) Enter the NSC “grant number” into the Campus post-award database so it
populates the Grant Number on the PCF when other PCF information is populated.
NOTE: Entering NSC as the Grant Number will allow the Campus and SWS to find all pre-award (NCS) projects by searching in ImageNow on the GrantNo DOCKEY.
2. The Campus captures and links the pre-award PCF in the same way it processes other
PCF’s. Joan receives the autorouted PCF in her workflow queue and processes it as she would any other PCF. She searches on PROPSPON/PROPBUD or PROJAWARD/PROJBUD to find the information the Campus imaged assuring the award will be funded, even though a fully signed contract is not in hand. Joan routes the PCF to Scott and Jamie and they follow the usual procedures for processing a PCF.
49

3. The Campus enters the budget into the PeopleSoft budget ledger following normal procedures.
4 The Campus submits the GCAF Form:
a) The Campus adds NSC at the top of the GCAF form if it is for a NSC project. See Step 1 for suggestions on how to do this.
b) The Campus captures and links the GCAF following normal procedures. c) The System processes the GCAF following normal procedures.
PART II: The Campus Receives the Approved Award, Updates the ACCESS Database, and Relinks the PCF Steps: 1. Once the Grant Number is available and the contract/award is signed, the Campus adds the
missing or revised information, e.g., Grant Number, Start/End dates, CFDA #, so information in the ACCESS database is correct. Leave your database open so you can relink the new information to the PCF in Step 5 below.
2. The Campus locates the PCF in ImageNow using Document Search :
a) Search by project number to locate all documents for your project. b) Sort documents by DOCTYPE by clicking on the heading of the SP_DOCTYPE column. c) Go to the PROJPCF DOCTYPE to locate your PCF. b) Click once on the document listing. Do not open it.
3. The Campus routes the PCF to the Linking Queue and Opens the PCF into Workflow
following these procedures:
a) See next page for a snapshot of the following instructions. With your curser on the highlighted document, RIGHT-click on the listing. A dropdown box will open. Move your curser to “Send to”. Another dropdown box will open where you will select your linking queue. When you click the document moves to the linking queue you selected. See next page for diagram.
50

51
b) Open PCF into Workflow: From the Document Search results list, RIGHT-click on the PCF document listing and select “Open into Workflow.” The document opens.
4. The Campus annotates the new information/changes onto the PCF:
a) Use the Text Annotation to add the missing or revised information to the PCF (grant number, GC Type, Start/End dates, etc.). Be sure the information you add is exactly the same as the information you placed into your database in Part II, Step #1 because the information you enter here is what Jamie will enter into PeopleSoft.
5. The Campus relinks the PCF:

a) Make sure your ACCESS data base is open. On the menu bar at the bottom of your PCF document, click the Gold Key to replace the information currently in the DOCKEYS with the updated information you placed into the database in Part II, Step 1.
b) After you click the Gold Key, the information in the DOCKEYS shown to the right of the
document will reflect any changes you made to Grant Number or PI when you updated your database. Check to see that the information in the DOCKEYS is the same as any PI or Grant Number annotations you placed on the PCF form.
c) Use the blue key to route the PCF to SP_AUTOROUTE. This places the document
in Joan’s queue where she will know from the NSC annotation at the top and other annotations you added that it is an updated document resulting from pre-award spending. Joan will route it to Jamie to add the new or update the existing information in PeopleSoft. (Jamie will not relink the PCF in ImageNow because you will have already done that before you submitted the PCF to Joan.)
6. The Campus verifies accuracy of GCAF information previously submitted:
a) If any of the information on the initial GCAF you submitted when the project was created needs to changed, because of new or revised requirements in the fully signed contract/agreement, (e.g. Federal benefit rate, excluded accounts, committed cost sharing amounts, allocation rates), the Campus:
1) Updates the ACCESS database, for any of the items that are maintained there. b) The Campus follows Part II, Step 2 through Step 5, substituting DOCTYPE PROJPCF
for PROJGCAF, to: 2) Locate the GCAF form 3) Route the GCAF document to workflow 4) Annotates the changes on the GCAF. (Include a sticky note if you need to
explain the changes you make) 5) Relink the GCAF to replace updated DOCKEY information, if any, and to
autoroute the GCAF to Joan where the changes will be processed. END
52

53
QG: Process for Submitting Project Attribute and Allocation Changes Notes:
• Follow these procedures when you need to make a change to an attribute or an allocation on a project of an approved award. (This process replaces the current practice of submitting an email.)
• Do not use this process to update attributes or allocations for a Pre-award
(OPAS/NSC) project. Instead, refer to the procedures for processing Pre-Award Projects.
Examples: of some of the changes you might request through this process: Group 1: Changes related to the PCF form:
• changing a project end-date resulting from a no-cost extension • changing the PI • correcting the grant number • relocating project to a different level on the UMS_PROJECT tree (to group projects by
grant number) • adding or revising the Billing Code or GC Type • correcting or adding a CFDA# • changing the Financial Contact • changing status and effective status of a project:
o Active/Open to Inactive/Hold o Inactive/Hold to Active/Open o Active/Open to Inactive/Closed
Group 2: Changes related to the GCAF form:
• correcting the Federal benefit rate • correcting or adding the F&A rate • correcting or adding the F&A cost share rate • adding or removing Accounts excluded from F&A Cost calculations • revising percentages on non-salary accounts that have direct cost share • correcting direct cost share fund
Steps: 1. Campus updates the campus Access data base with the change you are requesting,
assuming the information you are changing is maintained in your data base. For example, if you are changing PI or Grant Number or F&A rate, or project end-date, you would update your data base. If you are requesting a change in Status, there is no need to update the data base since you do not track Status in your data base.
IF the change you will request affects either the PI or the Grant Number, or both, the
Campus follows Step 2 to relink the project’s PCF and GCAF, if the forms currently exist in Image Now. The purpose of Step 2 is to remove the old information from the DOCKEYS and relink the documents with the new information you put into your data base. Skip all of Step 2 if: a) Your request does not change the PI or Grant Number, or b) If there is no existing PCF or GCAF in ImageNow for the project on which you are
making a change.

2. Follow these steps to relink the existing PCF and GCAF forms so they capture any changes you made to PI or Grant Number when you updated your Access data base.
a) To find an existing PCF and GCAF, search on the project number and sort the DOCTYPE column to find any documents for that project with DOCKEYS PROJPCF and PROJGCAF.
b) When you locate a document with your project and either DOCKEY PROJPCF or PROJGCAF, double-click on the document listing to open the document so you can verify the project on the document is the same as the project on which you are changing the PI or Grant Number.
c) Close the document by clicking on the red in the upper right-hand corner. You will return to the search grid.
d) Right-click on the document listing in your Document Search grid. A drop-down menu will open.
e) Move your curser to “Send To” which will open another menu that shows the linking and workflow queues.
f) Move your curser to the linking queue that links information from the Access database where you changed the PI or the Grant Number. For example, click on linking queue SP_O_POSTLINK to move a UM document to that linking queue. A dialogue box will open where you should click “Yes” to confirm that you want to move the document. A second dialogue box will open asking you to confirm again. Click “Yes.” The designation in the WF Queue column of your search grid will change to the linking queue you selected.
g) To relink the document with the new information you added to your data base in Step #1, right-click on the document listing and click on “Open into Workflow.”
h) Make sure your data base is open and click the Gold Key on the menu bar at the bottom of the document to relink the PCF or GCAF document. The DOCKEYS will populate with the new Grant Number and/or PI information you entered into your ACCESS data base. Click the red . Respond “Yes” to the dialogue box that asks if you want to save the changes. The document will close.
3. Campus prepares the Request for an attribute or allocation change. Use a memo format or
a campus-designed form, if that works better for you. Be sure to include the project number in your request and indicate who from your campus we should contact if someone has a question about the Request. Prepare a separate Request for each project for which you are changing attributes or allocations. (The Request(s) you prepare replace the emails you would otherwise have sent to the System pre ImageNow.)
4. Campus captures the Request in ImageNow by:
a) Scanning it to bring it into ImageNow, or b) Using the ImageNow Printer to bring it into ImageNow.
5. Campus links the Request by drawing the updated information from the Access Data
Base, and selecting DOCTYPE PROJPCF if the Request is for changes in Group 1 OR selecting DOCTYPE PROJGCAF if the Request is for changes in Group 2. When the Request is linked, two things happen: a) The Request appends (attaches) to the PCF or the GCAF that is already in ImageNow,
This happens because the DOCKEYS of the Request and the DOCKEYS of the PCF or GCAF are exactly the same), and,
b) The Request, appended to the existing PCF or GCAF, is autorouted to Joan’s queue where she will process it, or, when appropriate, route it to Scott or Jamie for processing. When they complete the change(s), they will route your Request to the SP_COMPLETE queue.
END
54

QG: How to Delete a Document in ImageNow Description This process is used to delete documents that are in any drawer in the Sponsored Programs system. Delete privileges are given ONLY to users who are in the SP_Manager security group, however, users not in this group can route documents to the SP_DELETE queue where they can be reviewed and deleted by a SP_Manager later on. Procedures outlined in this document are listed below:
1. How to Route Documents to the SP_DELETE queue 2. How to Delete documents from Document Search (requires SP_Manager level access) 3. How to Delete Documents while in workflow (requires SP_Manager level access) 4. How to Delete a Page from a document (requires SP_Manager level access)
Process Steps 1. How to Route Documents to the SP_Delete queue Step 1: Perform Search
• From the Simple Search tab enter criteria for search. Use Advance search options to customize search option and better filter search results
Step 2: Select and Route Documents to the SP_Delete queue
• Select document to delete. Use click +Shift to select multiple documents.
• Right-click on the document and select “Send to”. From the pull down list select “SP_Delete”. This will route the document to the delete queue where it can be deleted by a SP_Manager.
2. How to Delete a Document from the Document Search Grid A. To delete a specific document….. Step 1: Perform Simple Search
• From the Document Search click “Simple” tab enter criteria for search.
55

• Enter search criteria for the document, i.e., ProjectNo. • Click Search
Step 2: Select and Delete Documents
• Select document to be deleted. Use click +Shift to select multiple documents. • With document(s) selected right-click and select “delete” from menu list
• In the ImageNow Confirmation Window click “Yes”
B. To delete multiple documents in the SP_Delete queue Step 1: Perform Advance Search
• From the Document Search click “Advance” tab • Click “Add…” button to enter search condition
• In the Add Condition dialog box, under “Condition” select “By Workflow Fields” in the pull down list and under “Value” select “SP_DELETE”
56

• The search condition will appear in the “Search for” window. • Click Search
• Results will appear in the Document Search Grid. Step 2: Delete Documents
• Follow Steps 2 under A. To delete a specific document…. 3. How to Delete Document while in Workflow Step 1: Locate and Open document
• Open Workflow • Select workflow queue • Locate document in workflow queue list • Double-click document to open it in Powerview: Workflow Mode
Step 2: Delete document
• On the tool bar located at the bottom of the PowerView window CTL+Click on the trash can. NOTE: You must use the CTL key to delete the document from the system. If you don’t then you will only REMOVE the document from the workflow queue. This does NOT remove it from the system.
57
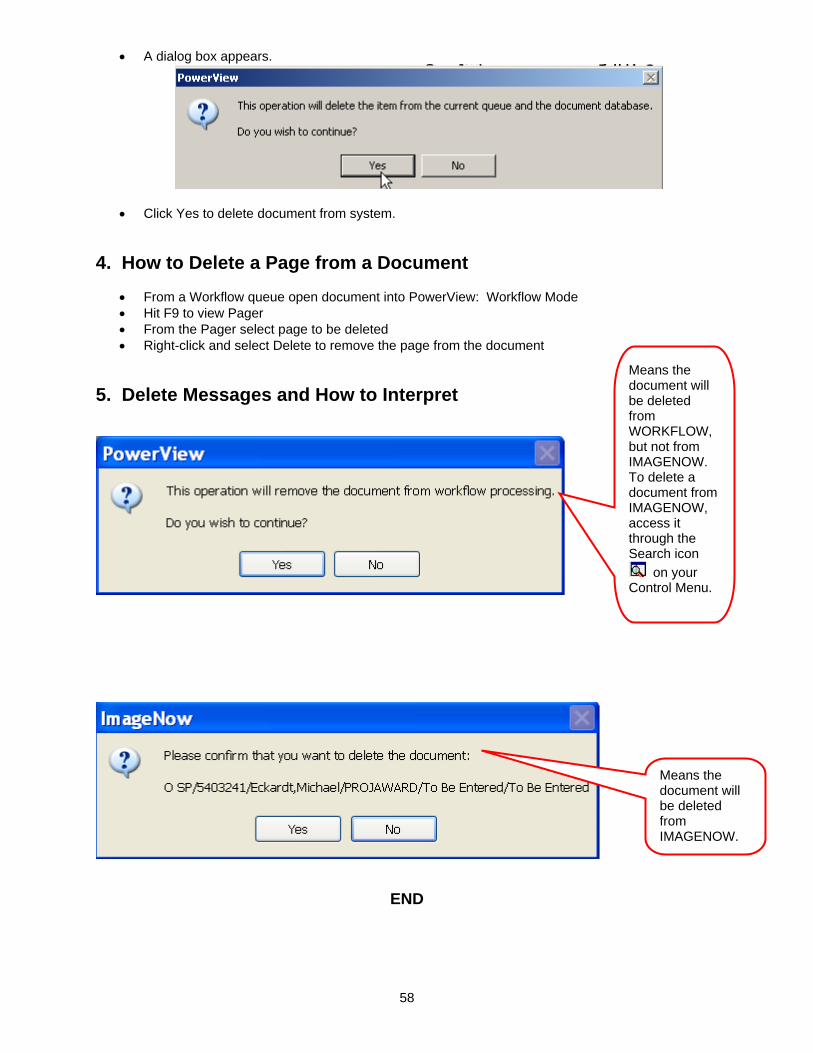
• A dialog box appears.
• Click Yes to delete document from system. 4. How to Delete a Page from a Document
• From a Workflow queue open document into PowerView: Workflow Mode • Hit F9 to view Pager • From the Pager select page to be deleted • Right-click and select Delete to remove the page from the document
58
5. Delete Messages and How to Interpret
Means the document will be deleted from WORKFLOW, but not from IMAGENOW. To delete a document from IMAGENOW, access it through the Search icon
on your Control Menu.
Means the document will be deleted from IMAGENOW.
END

QG: How to Change the Default Page View The Default view is the view of a document that automatically appears when you open a document You can view a page in three ways:
• Fit Window (you see the full document, but it may be small) • Fit Width (you see the full area of the page from left to right, but
you may only see the upper half of the page) • Fit Height (you see the document from top to bottom, but it may
be small) To change the DEFAULT view, in both Search Mode and Workflow Mode, do this:
Part I: Create a Name for your View
1. Open a document
2. Use the icons on your menu bar to set pick the view you want to set 3. Select “File from your tool bar 4. Select “Settings” 5 Select “Save View”
Part II: Select the View you Named 1. With the document open, Select “File” from your tool bar 2 Select Settings 3 Select Edit View 4. Select the View you Named 5. Click “Set Default” 6. Click “OK”
END
59

QG: Relinking: What is it? When and How does it Occur? Relinking means linking a document that has already been linked at least once before. When you relink, you can APPEND a document by attaching new pages to existing pages. DOCKEYS do not change (see quickguide on APPENDING). Or, when you relink, you can change the DOCKEYS. The number of pages in the document will not change. For this example, we will relink Document B because we have received a grant number to replace the “NSC” placeholder. Page 1 of 1 Page 1 of 1 Page 1 of 1
AWARD LETTER
AWARD LETTER When you look at Document B in
ImageNow, AFTER you relink it, it looks like this—EXACTLY the SAME, no additional pages.
When you look at Document B in ImageNow, BEFORE you relink it, it looks like this:
Document B before you relink is EXACTLY THE SAME as after you relink.
You changed the information in the DOCKEYS.
In this case you changed the Grant # on the GRANTNO DOCKEY from NSC to 123. In order to relink in ImageNow, the corresponding change had to have already been made in PeopleSoft. To keep all databases in sync, the change also needs to be made in the campus ACCESS databases.
BEFORE AFTER
DOCKEYS Relink Relink
Drawer: S_SP S_SP Proj #: 8400000 8400000 PI: John Smith John Smith DocType: PROJAWARD PROJAWARD Fin Cont: Bennett,Scott Bennett,Scott GrantNo NSC 123
END
60

QG: Relinking by Appending APPENDING: What is it? When and How does it occur? When you append you add a page(s) to an existing document. For example, you link Document A which has one page. At a later time, you link Document B that also has one page, USING THE SAME DOCKEYS. The two documents are joined. When you look at the appended document, you will see the page(s) of Document B directly follow the page(s) of Document A. Page 1 Page 2
Amendment To the Award
(Doc B)
AWARD LETTER
(Doc A)
The DOCKEYS BEFORE you append to a document ARE EXACTLY THE SAME as they are AFTER you append to the document. When you do a search and open the document, you will find that it has two pages. The Award Letter is page 1 and the Amendment to the Award is page 2.
The page on the left is the page that you linked first. It is the award letter for a project. It has one page. It is “page 1” before you appended Document B and it remains “page 1” after you appended Document B.
The page on the right is the page you appended to Document A. (It is an Amendment to the award that you received 6 months after you linked the Award Letter.) When you link Document B, it becomes Page 2. The Award Letter, the original document you linked, remains Page 1.
DOCKEYS DOCKEYS
BEFORE AFTER DOCKEYS Append Append
Drawer: S_SP S_SP Proj #: 8400000 8400000 PI: John Smith John Smith DocType: PROJAWARD PROJAWARD Fin Cntct: Bennett,Scott Bennett,Scott Grant # 123 123
END
61

QG: Indexing (Linking) Schemes INDEXING (Linking) SCHEMES AT UM, USM AND SWS
INDEXING SCHEMES
Scheme #1 Scheme #2 Scheme #3 Scheme #4
DOCKEYS
PEOPLESOFT POST Award Access DB
PRE Award UM
Access DB
PRE Award USM
Access DB
DRAWER:
U_SP, S_SP, O_SP or P_SP
U_SP, S_SP,
O_SP or P_SP
U_SP, S_SP,
O_SP or P_SP
U_SP, S_SP,
O_SP or P_SP
FOLDER:
PS Project #
Access Project #
Submission #
Proposal #
(w/relinking)
TAB:
PS PI
Access PI
Access PI
Access PI
Field 3:
DOCTYPE
DOCTYPE
DOCTYPE
DOCTYPE
Field 4: PS Grant # Access Grant #
Access Sponsor
Access
Sponsor
Field 5: PS Fin Contact Fin Cont (USM)
or Folder # (UM)
Access Folder #
Access Title Long
Notes: Sponsored Programs document imaging has four index schemes. Scheme 1, PEOPLESOFT, is the default scheme for linking documents into ImageNow. When a user links a document, these DOCKEYS are attached to it: IMAGENOW DOCKEY Example of DOCKEYS FIELDS DOCKEYS in SCHEME 1 Linked to a Document Drawer: Drawer – System, UM or USM S_SP Folder: PeopleSoft Project Number 2400282 Tab: Principal Investigator Henry Smith Field 3: DOCTYPE – Award, Bill, Report, etc PROJAWARD Field 4: Grant Number 3476889 Field 5: Financial Contact in the OSP/ORSP office Laurie Gardner Schemes 2, 3, and 4 are designed for use with the UM and USM Access databases.
62

63