Embed Size (px)
Citation preview

SPITZER RL150
Remote Controlled Electric Golf Caddy
User Manual
WARNING: PLEASE FOLLOW ALL ASSEMBLY INSTRUCTIONS AND READ
AND UNDERSTAND THE OPERATING INSTRUCTIONS BEFORE YOU
OPERATE THE CADDY, EITHER MANUALLY OR BY REMOTE CONTROL.
User Manual version 3.0

2
PLEASE READ BEFORE RETURNING THIS PRODUCT FOR ANY REASON:
If you have a question or experience a problem with your Spitzer Golf Caddy, call
1-800-814-6536 to speak with a support representative. Or for fast response,
email us at [email protected]
**DISCLAIMER SAFETY WARNING**
OPERATORS ARE SOLELY RESPONSIBLE FOR SAFE OPERATION and
MAINTENANCE OF THIS DEVICE. AS A REMOTELY CONTROLLED
DEVICE, EXTREME CAUTION AND CARE MUST BE TAKEN TO AVOID
INJURIES, DAMAGE OR LOSS. UNDER NO CIRCUMSTANCES DOES
SPITZER GOLF ASSUME ANY RESPONSIBILITY FOR OPERATOR SAFETY,
INJURIES OR PRODUCT LOSS.

3
Table of Contents
1.0 Introduction ..................................................................................................................... 4
1.1 Features ........................................................................................................................ 4
1.2 Packing List ................................................................................................................... 4
2.0 Assembly Instructions ....................................................................................................... 6
3.0 Manual Handle Control .................................................................................................... 8
3.1Variable Speed Control Knob ......................................................................................... 9
4.0 Remote Control .............................................................................................................. 10
4.1 Functions .................................................................................................................... 10
4.2 Important Notes – PLEASE READ CAREFULLY .............................................................. 11
5.0 Operating Instructions .................................................................................................... 12
5.1 Battery Charging & Maintenance ................................................................................ 12
6.0 Caddy Self-Test (IMPORTANT)! ........................................................................................ 13
6.1 Non-Moving Test (Initial Test) ..................................................................................... 13
6.2 Moving Test (Prior to each use) ................................................................................... 14
6.3 Recommendations for Efficient and Safe Operation .................................................... 15
7.0 Additional Functions ....................................................................................................... 16
7.1 Free-Wheel Mode ....................................................................................................... 16
7.2 Controller/Remote Frequency Adjustment ................................................................. 16
7.3 Tracking Adjustment ................................................................................................... 17
8.0 General Maintenance ..................................................................................................... 18
9.0 Electronic Systems .......................................................................................................... 19
10.0 Technical Specifications RL150 ...................................................................................... 20
11.0 Frequently Asked Questions (FAQ) ................................................................................ 22
4
1.0 Introduction
1.1 Features
The SPITZER Remote Control Golf Trolley/Caddy features manual and remote controls to
provide the user with:
- An electrically assisted manually controlled movement of the cart while you
walk-along with it. This operation is controlled through the manual control
handle on the cart.
- A remote controlled electrically assisted movement of the cart while you remote
control the cart by means of a wireless handheld remote control.
1.2 Packing List
The following is a list of parts that the package should normally contain. If your package
is missing any parts, please contact [email protected] immediately.
Standard Parts
• 1 x Caddy Frame
• 1 x Anti-Tip Wheel
• 2 x Rear Wheels
• 1 x Battery Pack (Battery, Bag, Leads)
• 1 x Charger
• 1 x Tool Kit
• 1 x Remote Control including Batteries
• 1 x User Manual, Warranty
Optional Accessories – Available at www.spitzerproducts.com
• Cup Holder
• Umbrella Holder
• Carrying Bag
• Rain Cover
• Scorecard Holder

5
1. Manual Rheostat Speed Control 9. Lower Bag Support
2. Upper Bag Support 10. Front Wheel
3. Bag Support Strap 11. Upper Arm Frame Lock Knob
4. Battery (with Bag) may not be exactly as shown 12. Manual Handle Controls
5. Rear Wheel 13. Battery plug
6. Wheel Cap 14. Front wheel Adjustment bolt
7. Rear Wheel Quick Release Lock 15. Score Card Holder (optional)
8. Dual Motors 16. Lower Frame Lock Knob
6
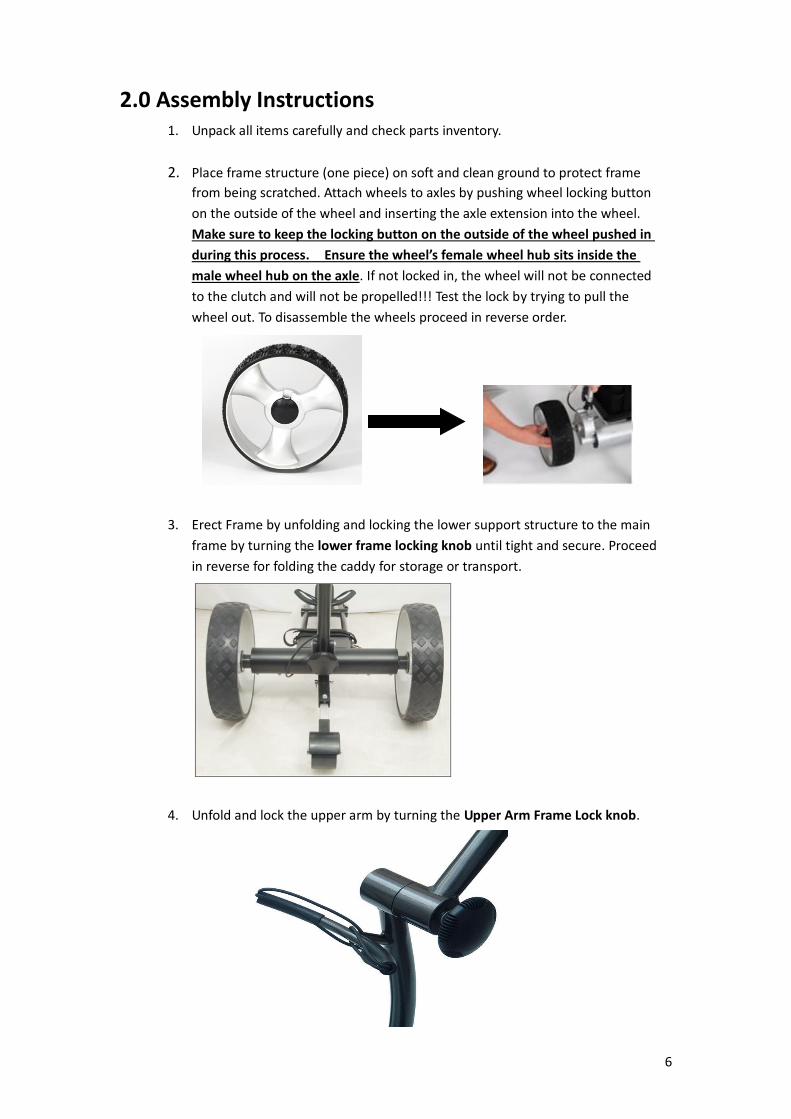
2.0 Assembly Instructions 1. Unpack all items carefully and check parts inventory.
2. Place frame structure (one piece) on soft and clean ground to protect frame
from being scratched. Attach wheels to axles by pushing wheel locking button
on the outside of the wheel and inserting the axle extension into the wheel.
Make sure to keep the locking button on the outside of the wheel pushed in
during this process. Ensure the wheel’s female wheel hub sits inside the
male wheel hub on the axle. If not locked in, the wheel will not be connected
to the clutch and will not be propelled!!! Test the lock by trying to pull the
wheel out. To disassemble the wheels proceed in reverse order.
3. Erect Frame by unfolding and locking the lower support structure to the main
frame by turning the lower frame locking knob until tight and secure. Proceed
in reverse for folding the caddy for storage or transport.
4. Unfold and lock the upper arm by turning the Upper Arm Frame Lock knob.

7
5. Place battery pack on battery tray and fasten Velcro strap around battery and
frame tightly. Not using the Velcro strap to secure the battery to the frame
could damage battery. Insert battery plug into caddy outlet. Note: BEFORE
CONNECTING make sure that Main On/Off switch on handle is in OFF (0)
position and the remote control is stored securely!!!
6. Insert anti tip wheel into frame and secure with pin.
7. Install Scorecard Holder and other accessories, such as beverage or umbrella
holder below handle in the foreseen places or receptors. (Optional
Accessories)

8
8. Unpack remote control and install batteries as indicated in the diagram in the
receiver compartment of the unit. Now you are ready to learn and understand
the functions of the manual and remote controls.
3.0 Manual Handle Control
Symbol Function Description
Battery Power Green LED: Battery is operational
Red LED: Battery is low and requires recharging.
Timer Press once for auto-run and stop in 10 yards
Power and
Start/Stop
Power: Press and hold for 3 seconds to power on/off the cart
Start/Stop: Once cart is powered on, press once to start and
press again to stop the cart
9
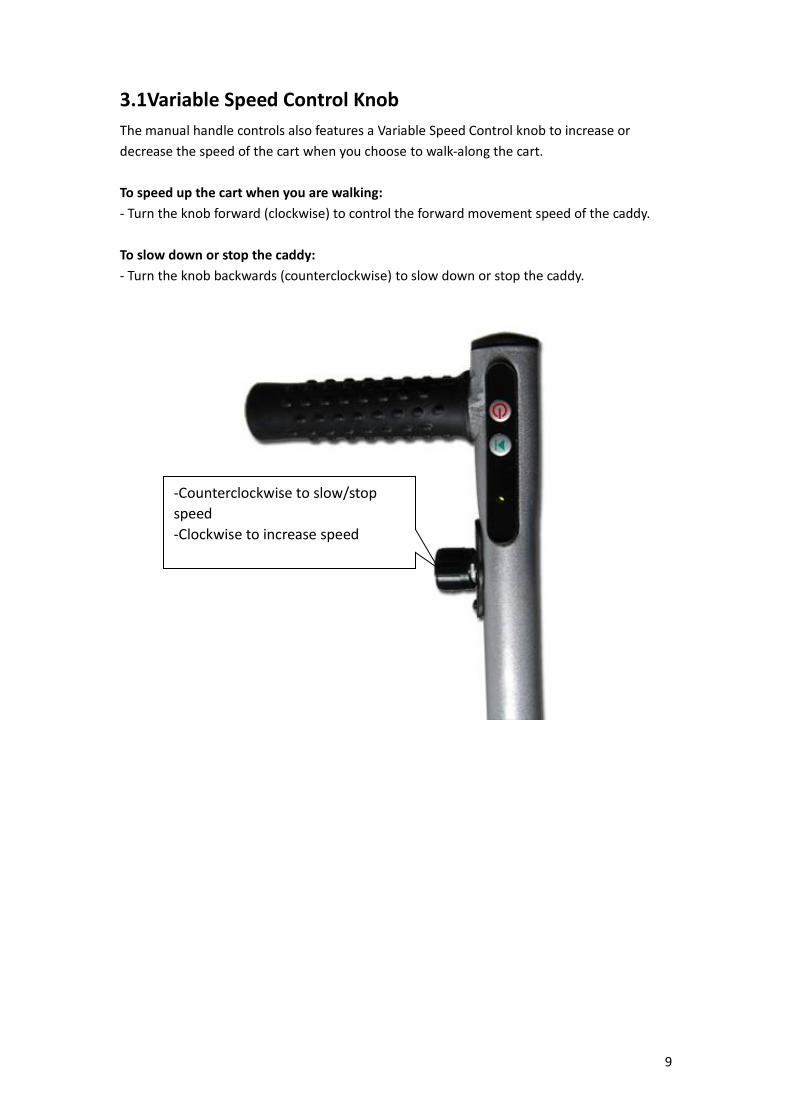
3.1Variable Speed Control Knob
The manual handle controls also features a Variable Speed Control knob to increase or
decrease the speed of the cart when you choose to walk-along the cart.
To speed up the cart when you are walking:
- Turn the knob forward (clockwise) to control the forward movement speed of the caddy.
To slow down or stop the caddy:
- Turn the knob backwards (counterclockwise) to slow down or stop the caddy.
-Counterclockwise to slow/stop
speed
-Clockwise to increase speed

10
4.0 Remote Control
If cart does not respond to the remote, synchronization of the remote may be required.
To synchronize the remote, follow the steps in Controller / Remote Frequency Adjustment
(Section 7.2)
4.1 Functions
A. STOP : The red button in the middle of the directional arrows
is the brake
B. Timer: 10, 20, 30 yards auto-run. Press once for 10 yards,
twice for 20 yards and three times for 30 yards
C. Forward Arrow: Pushing the forward arrow will set the
caddy in forward motion.
D. Left Arrow: Initiates left turns. When the arrows are released
the caddy stops turning and continues straight with the
original speed prior to turning.
E. Right Arrow: Same as left arrow function but right turn.
F. Back Arrow: Pressing the back arrow will set the caddy in
backward motion. Increase speed by pushing multiple times.
G. ON/OFF Switch: Located on side of device, turns remote control
on or off.

11
4.2 Important Notes – PLEASE READ CAREFULLY
Change the remote control batteries once the indicator LED gets weak
The remote control uses two 1.5V AAA batteries available in any supermarket,
drug store or electronics store
It is recommended to keep a set of extra batteries ready as replacement
To change the batteries open up the battery compartment cover and place the
batteries according to the diagram in the battery compartment
The remote control system is designed, so it does not interfere with other electric
caddies.
The maximum range of the remote control varies between 80-120 yards,
depending on the battery charge, obstacles, atmospheric conditions, power lines
and the topography of the course.
It is strongly recommended to operate the caddy at a maximum range not to
exceed 50 yards in order to prevent the loss of control of the unit!

12
5.0 Operating Instructions
PLEASE OBEY THESE PRECAUTIONS FOR BATTERY USE & CHARGING
a) Please do not charge the battery in a sealed container or in upside down position.
It is recommended to charge the battery in a well ventilated area.
b) Please do not charge the battery near a heater, or where heat accumulation may
occur or in direct sunshine.
c) In order to prolong the service life of the battery, please avoid complete discharge.
When the trolley is not in use for an extended period of time, it is recommended
to charge the battery before storage.
d) The battery’s poles red color stands for positive, and the black for negative. In case
of battery replacement please reconnect the poles of the battery correctly.
Otherwise your caddy could suffer severe damage.
e) EXPLOSION HAZARD! Please do not disassemble the battery or throw it into a fire.
f) SAFETY HAZARD! NEVER TOUCH THE ELECTRIC POLES OF THE BATTERY!!
5.1 Battery Charging & Maintenance
Connect the battery cable plug with the charger and then plug the charger into an
electrical outlet. During the charging cycle the LED on the charger will show a steady red
light (some models also have a blinking green light during charging). Once the charging
cycle is complete the red light or blinking green light will turn into a steady green light. It
is now suitable to unplug the charger and battery for reuse. The charging cycle can last up
to 10 hours depending on the level of discharge.
Normally the battery will hold its charge for several months, and it does not have a
“memory effect” and therefore can be recharged at any discharge level. It is not
recommended to fully discharge the batteries, as this will shorten battery life. The battery
has a normal lifespan of 400-600 charges, depending on charging frequency, storage
conditions and discharge history. Replacement batteries are available from your
authorized SPITZER dealer or directly from SPITZER.
RECOMMENDATIONS FOR BATTERY CHARGING & MAINTENANCE
a. Fully charge the battery for 12 hours before the first use
b. Do not leave the battery on the charger if it is not used for extended periods of time. It is
not recommended to leave the charger on the battery for more than 12 hours.
c. The battery will take approximately 2-3 rounds and charging cycles before it reaches its
full operating potential. During the first couple of rounds it might still be below its optimal
power.
d. Always keep your battery fully charged before another game
e. Never keep your battery connected to the grid during prolonged power outages. It might
be irreversibly damaged
f. Do not fully discharge the battery by “overplaying” it. It is recommended to recharge the
battery after every 18 holes.

13
6.0 Caddy Self-Test (IMPORTANT)! Please review or follow these steps and guidelines to test your caddy prior to use every
time.
6.1 Non-Moving Test (Initial Test)
Before actually using the SPITZER cart for the first time, it is recommended you operate the
golf cart elevated at the drive wheels to familiarize yourself with how the cart works for
both remote and handle control functions. Elevate your cart with a paint can or a similar
sized and strength item allowing your cart’s drive wheels to freely move without touching
the ground. The pictures below illustrate an example of how the cart can be elevated for
this test.

14
6.2 Moving Test (Prior to each use)
Make sure this test is performed with the caddy in a wide and safe area, free of
obstructions or valuables, such as people, parked automobiles, flowing traffic, furniture or
water bodies (rivers, swimming pools etc.), steep hills, cliffs or similar hazards.
a. Manual Control Operation
Test the manual function first:
(i) The manual functions of the caddy are controlled through the variable speed control
knob on the right side of the handle. Ensure the variable speed control knob is at its “0”
position. To verify, the knob should be turned counterclockwise until it stops.
(ii) Turn the main switch to “On” (I) position.
(iii) Turning the knob forward (clockwise) will increase the forward movement speed of the
caddy.
(iv) To slow down or stop the caddy, turn the knob backwards (counterclockwise).
(v) Once the desired speed is set, press the Power Button to start and stop the cart.
b. Remote Control Operation
Make sure you are close to the caddy at all times while testing it and familiarizing
yourself with the remote control!!! Now turn on the main power switch (“I”), and make
sure that the rheostat control knob is in “0” position. One touch of the Forward/Backward
arrows on the remote control starts the caddy in either direction. Further pushes increase
the speed. In order to stop the caddy press round red STOP button in the middle of the
remote!! To turn the caddy in either direction, push the left or right arrows briefly. Once
you release the button the caddy will continue in the current direction at the same speed
prior to the turning command. You will notice that the caddy reacts promptly to any
turning command, so it will take you some practice to get just the right touch for turning
maneuvers. Please be aware that the turning characteristics will change depending on the

15
surface (grass, asphalt), the slope or the weight (loaded, unloaded) of your caddy.
The remote is designed to have a reach of approximately 80-120 yards, but we strongly
recommend to operate the caddy in closer ranges of 10-30 yards (not exceeding 50 yards)
to be able to react to any unforeseen events, such as other golfers crossing your path or to
avoid hidden obstructions (creeks, bunkers, GUR, etc.) or an unexpected disconnection in
remote operation. An additional safety feature of this caddy is that it will stop moving if it
does not receive a signal from the remote control at least every 30 seconds. This way,
should you ever be distracted, your caddy does not get away.
6.3 Recommendations for Efficient and Safe Operation
• Be alert and act responsibly at all times while operating your caddy, just as you
would when operating a riding cart, motor vehicle or any other type of machinery.
We absolutely do not recommend the consumption of alcohol or any other
impairing substances while operating our caddies.
• Do not operate the caddy with the remote control in narrow or dangerous spaces,
places with valuables or any people gathering areas, such as parking lots, close to
flowing traffic, bag drop-off areas, stores, driving ranges, putting greens and
practice areas, pro shops, restaurants, starter areas and other areas where people
or items could be harmed through an error or lack of skill in operation. In such
situations the caddy should be best operated with its manual controls or without
power. Also, please make sure to always switch off the power (“0”), disconnect
the battery cable from the cart and secure the caddy when you park and leave
the unit for any reason, either on or off course.
• With its optimized balance and straight front wheel the caddy has extraordinarily
narrow and responsive turning and maneuvering abilities. However, it sometimes
tends to react to severe uneven weight distribution of its load or steep slope
variations and follows the slope of the golf course. Therefore, please make sure the
weight in your bag is distributed evenly (move heavy balls and items to both sides,
or shift the bag on the caddy). Also, when operating your caddy by remote control
anticipate the slope of the course in order to avoid frequent corrections in
directions. In some extreme environments, such as very uneven terrain, steep hills,
narrow and/or sloped cart paths, muddy areas, gravel paths, close to bunkers and
hazard, around bushes and trees it is recommended to operate the caddy via
manual control in order to prevent any collisions, damage or the need for
complicated correction adjustment maneuvers.

16
7.0 Additional Functions
7.1 Free-Wheel Mode
The caddy can be operated without power. In order to activate the free wheel mode turn
the main power switch into “Off” (0) position. The caddy now can be pushed manually
without resistance from the drive shaft.
7.2 Controller/Remote Frequency Adjustment
Press and hold the STOP button on the remote. Turn the main cart power switch to ON
position while still pressing the STOP button for 6-10 seconds. The LED on the handle will
flash once it synchronizes the remote and controller. Your new remote control should now
be tuned to your caddy.
Note: The cart can only accept one remote frequency at any one time.

17
7.3 Tracking Adjustment
You can adjust the tracking of your caddy by loosening the axle and the adjustment bar on
the right side of the front wheel and shifting the axle accordingly.
- Loosen the nuts (#3 in diagram) on the front wheel and align it. Keep the nuts (#1
and #2) on the alignment bar un-tightened.
- When the front wheel is loose, you can adjust it left or right.
- When the wheel is aligned, tighten the nut (#3) on the axle (but still keep the
alignment bar’s nuts loose.
- Test the cart to make sure it goes straight on an asphalt/cement flat road or
pathway. If it does not, re-adjust the front wheel.
- ONLY AFTER when the cart is going straight, do you start tightening the nuts (#1
and #2) on the alignment bar. It does not need to be tight as its only purpose is to
prevent the wheel from going back and forth.

18
8.0 General Maintenance
The steps below will ensure that you get a prolonged and reliable life out of your SPITZER
RL150.
1) The Caddy has been designed so that the user can concentrate on playing golf, while the
caddy does the work of carrying your bag. In order to keep your SPITZER RL150 looking
at its best, we advise that you wipe any mud or grass from the frame, wheels and chassis
after every round with a damp cloth or paper towel.
2) Do NOT use hoses or any high-pressure jet washers to prevent moisture entering the
electronic systems, motors or gear boxes of the caddy.
3) Remove the rear wheels every few weeks and remove any debris that might cause the
wheels to drag. You might also apply some lubricant, such WD-40 to keep moving parts
smooth and corrosion free.
4) A four - five hour round of golf played once a week for 12 months is equivalent to four
years use of a lawnmower, so please inspect your cart at least once a year thoroughly,
and if you notice any symptoms of wear, contact your SPITZER Service Center.
Alternatively, you can have your caddy inspected and tuned by our Service Center, so it’s
always in great shape for the new season.
5) Always disconnect the battery when you store the caddy, and always put your caddy
together before re-connecting the battery. If you are not planning to play for at least a
month, store the battery in a warm and dry place (not on concrete floor).
All of these recommendations will help keep your SPITZER RL150 in top condition and ensure
that it remains your reliable partner, both on and off the course.

19
9.0 Electronic Systems
• Remote Control Range: We recommend not to exceed 50 yards distance. The greater
the distance between you and caddy, the greater the chance of losing contact with it
• Microcomputer: The remote caddy has 3 microcomputer controls: The first is in
main controller box. The second is in the remote control transmitter handset, and
the third is in the receiver in the handle.
• Safety Protection: When the temperature of the controller box reaches its upper
limit in case of an overload it will automatically shut down to cool off.
• Microprocessor Controlled Electronics System: When you connect the battery, the
electronics system will automatically run through a start-up routine. Then you can
press the main OFF/ON switch on the handle. The battery charge indicator lights will
show you the charge level of the battery from green (fully charged) to red
(discharged).
• Important: The electronics controller box contains no user serviceable parts.
Therefore, it is sealed to reduce the risk of moisture entering and impacting the
electronic system. Breaking this seal increases the risk of damaging the electronics
and decreasing the reliability of your caddy. DO NOT attempt to open the controller
case. Doing so will void the warranty!
• Battery Operation and Care: Follow battery charge and maintenance instructions.

20
10.0 Technical Specifications RL150
Feature Specification
Speed Control
• Remote Control (range up to 100 Yards) and Manual
• Function: Forward & Backward, Left & Right
Motor • Power: 2 x 200 Watt (400 Watt)
• 24 V DC Electric
Drive Train • Rear Wheel Drive, Steel Gear (17:1 ratio)
• Dual independent transmission
Battery
• Power: 24V
• Average Charge Time: 4 Hours
• Lifetime: 600 charges
Charger • Input: 100/240V AC
• Output: 24V/2A DC Trickle Charger
Weight
• Net Weight Caddy: 24.0 Lbs (11 kg)
• Net Weight Battery: 6 Lbs (3 kg)
• Total Net Weight: 30 Lbs (13 kg)
Speed • 5.4 m/h (8.6 km/h)
Distance/Range • 18 Holes
Maximum Load • 55 Lbs (25 kg)
Climbing Ability • 35 degrees
Dimensions
Full Folded
· Length 42" 33"
· Width 21" 21"
· Height 35" 10"
Rear Wheels • Airless stabilizing wheel
Front Wheels • Airless, rubberized tread
Materials • Frame: Aluminum
• Bag Support: ABS, Nylon
Colors • Painted: Silver
• Oxidized: Stainless Steel
Additional Accessories
• Cup Holder
• Seat
• Umbrella Holder
• Carrying Bag

21
• Rain Cover
• Scorecard Holder
Warranty • 1 Year on Parts
Packaging
• Type: Cardboard Box, Styrofoam or Cardboard
Cushioning
• Dimensions: 34 x 24" x 13” (88 x 60 x 31 cm)
• Gross Weight: (20 kg)

22
11.0 Frequently Asked Questions (FAQ)
1. Question: I lost my remote control handset. What shall I do?
Reply:You can purchase a new remote handset from www.spitzergolf.com. After you
receive your new remote control, please connect the battery to the trolley. Turn the
main switch to ON position and press and hold the stop button for 6-10 seconds. The
LED will flash when it synchronizes the remote and controller. Your new remote
control should now be tuned to your caddy.
2. Question: When I connect the battery plug to the caddy and turn the main switch
on, the battery indicator lights do not come on.
Reply: a) Inspect if the fuse in the battery case is still good, and if the battery leads
are well connected to the battery.
b) Open the back of the handle with a screwdriver. Make sure the handle line plug is
in the right position on the handle electronic board. It will happen when the line of
the caddy is not connected in right the position.
3. Question: The caddy’s main switch is on, and all battery indicator lights are on, but
the caddy does not run or one motor does not run.
Reply: a)Please check the motor connectors on the controller box and if connector
pins are in the correct position.
b) Please check the wheel is properly engaged to the axle. If the axle is turning, but
the wheel is not, the wheel is not properly engaged to the axle.
4. Question: The manual control function works, but the remote control does not?
Reply: Please confirm that the rheostat speed knob is in Off “0” or Stop position. Also
check the batteries in your remote control handset. If it still does not work open up
the remote control and check the connection.
5. Question: The caddy does not respond well to the remote control handset?
Reply: Please check the condition of the handset batteries. Make sure you don’t
exceed the range distance limit. Resynchronize the remote by following the steps
in Section 7.2 (Controller/ Remote Frequency Adjustment)
6. Question: The trolley stops by itself.
Reply: Please check the battery charge. Also the controller box has a shut-down
function, if the battery is too low or the controller is overheating or the caddy does
not receive a signal for a while.
7. Question: The caddy tracks to one side.
Reply: Please make sure that the weight distribution of your golf bag is balanced on

23
the caddy. To adjust the tracking loosen the axle screw of the front wheel on the right
side, and adjust the wheel position accordingly. Tighten the axle screw after the
adjustment to make sure the front wheel stays in the desired position. See Section
7.3 (Tracking Adjustment) for more details.

24
SUPPORT INFORMATION
FOR ANY FURTHER INFORMATION OR SUPPORT ISSUES, PLEASE CALL
SPITZER GOLF AT 1-800-814-6536 OR EMAILS WILL BE PROMPTLY
RESPONDED TO AT [email protected]


![VOLKSWAGEN CADDY, CADDY MAXI [2004-2015] VOLKSWAGEN CADDY, CADDY … · 43062 • 1.1 • 08/07/2015 2 43062 volkswagen caddy, caddy maxi eco fuel, 4 motion volkswagen caddy, caddy](https://img.dokumen.tips/doc/110x75/60f989e18ccff15ba348ac77/volkswagen-caddy-caddy-maxi-2004-2015-volkswagen-caddy-caddy-43062-a-11-a.jpg)