Embed Size (px)
Citation preview

SPID Elektronik
Driver MD-01
MD-01

Table of contents
Table of contents ........................................................................................................................................ 2
Introduction ................................................................................................................................................ 4
Block diagram ............................................................................................................................................. 4
Parameters of the driver ............................................................................................................................ 4
Photos and description ............................................................................................................................... 5
Front ....................................................................................................................................................... 5
Back ........................................................................................................................................................ 5
Operation.................................................................................................................................................... 8
Normal mode (NORMAL) ........................................................................................................................ 8
Calibration mode (MOTOR ANGLES) ...................................................................................................... 9
Driver MD-01 configuration ....................................................................................................................... 9
Motor configuration ............................................................................................................................... 9
TEMPLATE ........................................................................................................................................... 9
Start .................................................................................................................................................. 10
Stop ................................................................................................................................................... 10
External control (CONTROL xx) ......................................................................................................... 10
Protocol (PROT. xx) ........................................................................................................................... 11
Set motors (SET MOTOR 1, SET MOTOR 2) .......................................................................................... 11
STATE ................................................................................................................................................ 11
TYPE .................................................................................................................................................. 11
KIND .................................................................................................................................................. 11
INPUT ................................................................................................................................................ 11
GEAR ................................................................................................................................................. 11
MIN ANGLE ....................................................................................................................................... 11
MAX ANGLE ...................................................................................................................................... 11
MAX POWER ..................................................................................................................................... 12

START POWER, START TIME ............................................................................................................. 12
STOP POWER, STOP TIME ................................................................................................................. 13
STOP AT ............................................................................................................................................ 13
PULS TIMEOUT.................................................................................................................................. 13
SET COM 0, SET COM 1 ......................................................................................................................... 13
STATE ................................................................................................................................................ 13
BAUD................................................................................................................................................. 13
DATA BITS ......................................................................................................................................... 14
STOP BITS .......................................................................................................................................... 14
PARITY ............................................................................................................................................... 14
SET USB COM ........................................................................................................................................ 14
STATE ................................................................................................................................................ 14
BAUD................................................................................................................................................. 14
DATA BITS ......................................................................................................................................... 14
STOP BITS .......................................................................................................................................... 14
PARITY ............................................................................................................................................... 14
SET ETHERNET ...................................................................................................................................... 14
STATE ................................................................................................................................................ 14

Introduction
MD-01 is an electronic driver used for turning rotors. It is a multifunctional device, allowing for various
combinations of work setting. The driver may be connected to two single rotors (e.g. two Azimuth rotors) or
double (one Azimuth / Elevation rotor). The basic circuit provides operation with direct current motors.
Block diagram
Parameters of the driver
supply voltage of driver MD-01 15 VDC (Imax – 2A),
supply voltage of rotors 12-14 VDC (Imax – 40 A),
the maximum current of a single motor up to 20 A.
2 x RS232 ports
1 x USB host port
1 x USB device – visible in the system as the virtual COM port.
1 x Ethernet RJ45 port.

Photos and description
Front
1. Keyboard.
2. 2x20 characters display.
3. Switch-key.
Back
1. Plug-in socket to turn on Ground (the remaining NC PINs).
2. Rotor motor supply input (FUZE 40A).
3. NC, in the future planned for connecting modules, e.g. CAN, RS485, RS422 or analogue inputs.
4. Inching input for systems with two sensors type HALL.
5. Electronics supply input (FUZE 2A).
6. Supply outputs for Rotor BIG-RAS Elevation. PINs for motor supply. Elevation PINs from the motor
(3,4), PINs in the driver (1, 2). Every output has its own FUZE (20A).
7. Supply outputs for Rotor BIG-RAS Elevation. PINs for motor supply. Elevation PINs from the motor
(1,2), PINs in the driver (1, 2). Every output has its own FUZE (20A).
8. Switch used to update the driver software (FIRMWARE). To update the software we use COMO (item
12), while we turn the switch OFF. Normal mode of the driver is when the switch is in the PR position.
9. Universal output – the possibility to connect inside the module driver with relays. Then the controller
will have the function of antenna change-over switch.
10. I2C output – used to control SW-01 switch.
11. USB HOST port (type A plug) and DEVICE port (type B plug).
12. RS232 ports – COM0 and COM1. COM0 is also used to update the driver software (see item 8).
13. Input used to control a specially designed mouse.
14. Network input RJ45 (ETHERNET).
Descriptions of PINs of sockets in the back panel

How to connect MD-01 controller to BIG-RAS/HR rotor:
#1 Connection of the engines AZ & EL: The rotor is connected by using the delivered connectors (4-pin type) and are used to drive the Azimuth and Elevation engines. AZ & EL (drawing below) are market at the back site of the MD-01 controller Both AZ &EL are using pin 1 and 2 from both connector. Connection insite the rotor is: AZ wire No1&2 / EL wire 3&4 Picture of connection insite the rotor is also in the PS-01 manual
(Note: is you did not ordered the PS-01 PSU, you have to make your own connections)
Connection of the Sensor cable MD-01 <> BIG-RAS/HR
#2 Connection of the sensor cable (AZ &EL)
Delivered is a DB9 Male connector which is used to connect to MD-01. Connection at the rotor is done with a delivered 8-pol connector. Wire diagram below how to connect this connectors, you do need at least a 6-core control cable.

MIC328 is at the rotor, DB9 Male is at the MD-01 controller back site
Operation
MD-01 Driver may be operated with the use of a keyboard or a computer.
MD-01 module has two modes (MODE).
NORMAL – normal mode.
MOTOR ANGLES – calibration mode.
To change the mode, use the [F] key.
Normal mode (NORMAL)
In this mode the driver may be operated with the [Right], [Left], [Up] and [Down] buttons or receives
the command from PC. The driver supports communications protocols such as SPID ROT1, SPID ROT2, SPID
MD01, BRITE, YAESU and HyGain, which you can attribute to each communications port (COM0, COM1, USB D
and ETH) in the settings.
The [Right] and [Left] buttons are used to rotate the antennae in the azimuth.
The right direction – the antennae turns in a clockwise direction, the value of the angle in the display
increases.
The left direction – the antennae turns in an anticlockwise direction, the value of the angle in the
display decreases.
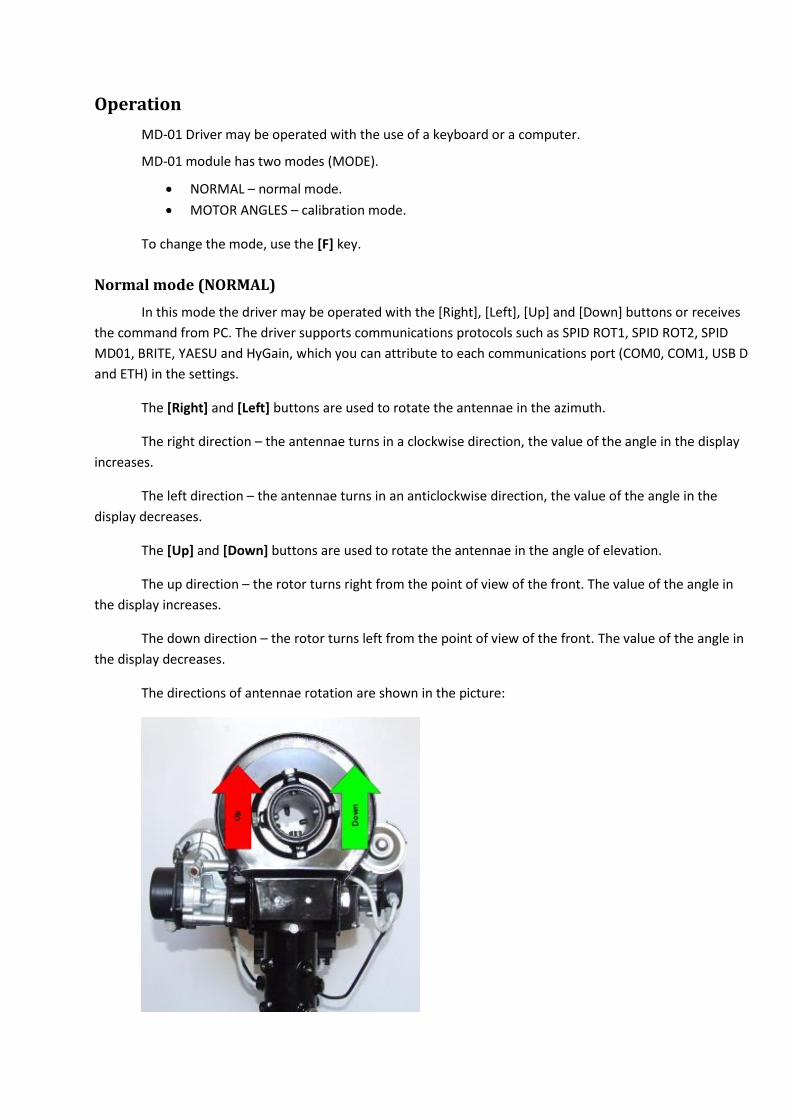
The [Up] and [Down] buttons are used to rotate the antennae in the angle of elevation.
The up direction – the rotor turns right from the point of view of the front. The value of the angle in
the display increases.
The down direction – the rotor turns left from the point of view of the front. The value of the angle in
the display decreases.
The directions of antennae rotation are shown in the picture:

Calibration mode (MOTOR ANGLES)
To switch-over the driver in the calibration mode use the button [F]. In this mode you can set any
value of the angle in the azimuth and in the elevation angle without turning the antennae. This mode is
needed to preliminary calibrate the antennae.
To set the azimuth angle to zero, push the [F1] and [Left] buttons simultaneously. In order to set the
elevation angle to zero, push the [F1] and [Up] buttons simultaneously.
To set any azimuth angle use the buttons [Left] and [Right], while to change the elevation angle use
the buttons [Up] and [Down].
After setting any azimuth angle use the buttons [Left] and [Right], while to change the elevation angle
push the buttons [Up] and [Down].
After completing the calibration you need to leave the calibration mode and come back to the normal
mode by pushing the [F] button.
Driver MD-01 configuration
When driver MD-01 is in NORMAL mode you can use button [S] to enter configuration.
The structure of driver configuration is modular. Select module using buttons [Left] or [Right]. When
you select module you can use button [S] to enter in its parameters. Moving between parameters is done with
buttons [Left] or [Right]. Value of parameter can change with buttons [Up] or [Down].
Button [F] is used for exiting configuration. After pushing button there is question about writing
current configuration. If we want to confirm changes we are pressing button [Left], if we want to go back to
previous configuration we are pressing [Right].
Motor configuration
The number before the ":" in the name of the template determines which connector on the rear panel
must be connected motor:
1. AZIMUTH
2. ELEVATION
TEMPLATE
Type of motors connected to the controller is pre-set by templates:
1:NC, 2:NC - no motors connected to the controller,
1:AZ, 2:NC - a motor is connected on the rear panel of controller on connector AZIMUTH.
Motor rotates only in azimuth,
1:NC, 2:EL - a motor is connected on the rear panel of controller on connector ELEVATION.
Motor rotates only in elevation,
1:AZ, 2:EL - there are two motors connected to the controller. Motor 1 (connector AZIMUTH)
rotates in azimuth, and Motor 2 (connector ELEVATION) - rotates in elevation,

1:AZ, 2:AZ - there are two motors connected to the controller, which is rotated in azimuth
only.
Start
Motors run mode:
MAX SPEED - motor starts with max speed, that is set for each motor separately in modules
SET MOTOR 1 and SET MOTOR 2, described later,
SOFTLY – so-called soft start. For each motor set in the module SET MOTOR 1
and SET MOTOR 2, described later.
Stop
Motors stop mode:
IMMEDIATELY – at once,
SOFTLY – so-called soft stop. For each motor set in the module SET MOTOR 1
and SET MOTOR 2, described later.
External control (CONTROL xx)
This parameter specifies the communication port driver that is used to control the connected motors.
Appears only if the chosen template is different from 1: NC, 2: NC. If the latter is chosen template 1: AZ, 2: AZ,
then for each motor, you can choose another port for control.
On display of controller can show few descriptions it depends of selected motors template:
CONTROL A1 – motor template 1:AZ, 2:NC or 1:AZ, 2:AZ,
CONTROL E2 – motor template 1:NC, 2:EL,
CONTROL AE – motor template 1:AZ, 1:EL,
CONTROL A2 – motor template 1:AZ, 2:AZ.
CONTROL parameter value:
NONE - no external control. Motor controlled manually with buttons on driver,
COM 0 - external control with selected protocol. Can be controlled manually,
COM 1 - external control with selected protocol. Can be controlled manually,
USB - controlled throughout USB D with selected protocol. Can be controlled manually,
ETH - controlled throughout ETHERNET with selected protocol. Can be controlled manually.

Protocol (PROT. xx)
Communication protocol between the controller and the control device (it may be, for example, a PC
program):
SPID ROT1
SPID ROT2
SPID MD01 - in the future. New communication protocol from SPID Elektronik
YAESU - in the future.
BRITE - in the future. New protocol created by SPID Elektronik firm and Space Analysis Center
in Warsaw.
HyGain - in the future.
Set motors (SET MOTOR 1, SET MOTOR 2)
STATE
Read only. Depends on a TEMPLATE configured motors (see Motor configuration -> TEMPLATE). It
defines if motor is switched on or switched off.
TYPE
Type of motor return signal:
DIGITAL – controller counts pulses,
ANALOG – in the future. Controller measures the voltage.
KIND
Read only. Depends on a TEMPLATE configured motors (see Motor configuration -> TEMPLATE):
AZIMUTH – motor rotates in azimuth,
ELEVATION – motor rotates in elevation.
INPUT
Sensor type of driver MD-01 (only when the input type is DIGITAL):
ELECTRONIC - using electronic motion sensors (without vibration),
MECHANIC - in the future. Mechanical switches (vibration).
GEAR
Gear motor.
MIN ANGLE
Minimum angle, it is possible to be turned for which motor.
MAX ANGLE
Maximum angle, it is possible to be turned for which motor.

MAX POWER
Maximum power in a percent’s of full power, which the driver can provide rotor.
START POWER, START TIME
We use if we want to obtain a so-called soft-start. We can set one, two or three-stage motor start
(START POWER 1, POWER START 2, START and START POWER 3 TIME 1, TIME 2 START, START TIME 3). Power
(START POWER) is introduced as a percentage of full power, which can provide a driver for the rotor. Time
(START TIME) enter in seconds.
Example: One-step - set the initial speed of rotation of the motor START POWER 1 = 30%, time to
reach maximum power (MAX POWER) START TIME 1 = 5s and START TIME 2 = 0s - in this way, we specify that
the engine start is a single step. MAX POWER = 100%. This means that the motor is started with 30% power,
and within five seconds linearly increases power to 100%.

Example 2: three-step - set the POWER START 1 = 20% START POWER 2 = 30%, START POWER 3 = 50%,
START TIME 1 = 3s, START TIME 2 = 3s, START TIME 3 = 3s, MAX POWER = 100%. This means that the rotor
starts with 20% power, within 3 s power reaches 30%, followed by 3s power reaches 50% and last 3 s power up
to 100%.
STOP POWER, STOP TIME
Use, if we want to obtain a so-called soft stop. It works the same way as soft start so that the other
way.
STOP AT
Specifies how many degrees before the specified angle (for example, sent by a computer program like
Orbitron) is to start the motor stopping. It matters if it is selected in the parameter mode STOP softly module
MOTOR CONFIGURATION.
PULS TIMEOUT
Specifies how long the motor has run off its power, if it does not come from the motion sensor pulses.
Applies only to motors of type DIGITAL.
SET COM 0, SET COM 1
STATE
Read only. Possible values: ON or OFF.
BAUD
Possible values: 600, 1200, 2400, 4800, 9600, 19200, 38400, 57600, 115200, 230400 and 460800.
DATA BITS
Possible values: 4,5,6,7 or 8 bit.
STOP BITS
Possible values: 1 or 2 bit.
PARITY
Possible values: none, odd or even.
SET USB COM
STATE
Read only. Possible values: ON or OFF.
BAUD
Possible values: 600, 1200, 2400, 4800, 9600, 19200, 38400, 57600, 115200, 230400 and 460800.
DATA BITS
8 bit.
STOP BITS
1 bit.
PARITY
NONE.
SET ETHERNET
The Ethernet port is set to dynamic IP address. Communication with this port is done with the help of
one of the protocols (MD01 SPID, SPID ROT1, SPID ROT2, Yaesu, or HiGain BRITE). For example, the MD-01
driver received the IP address from a DHCP server 192.168.0.10. It can connect to it, for example, Hyper
Terminal by selecting the type of connection TCP / IP (Winsock), set host address 192.168.0.10 and port
number to 23. Protocol can be BRITE or Yaesu, because they are text protocols.
STATE
Read only. Possible values: ON or OFF.

Controller Dimensions:
Controller MD-01 Dimensions FRONT
Controller MD-01 Dimensions BACK


![SPID - Home Page - Camera di Commercio Pavia SPID[1].pdf · Title: SPID Created Date: 1/25/2017 10:06:28 AM](https://img.dokumen.tips/doc/110x75/5c663d5409d3f2e4308be884/spid-home-page-camera-di-commercio-spid1pdf-title-spid-created-date.jpg)