Embed Size (px)
Citation preview

South Dakota Motorcycle Manual
Graphics and pictures contained within this manual are provided courtesy of Motorcycle Safety Foundation and Highway Safety
Services, LLC.
July 2015

Attention: South Dakota law requires all motorists to stop when coming from any direction and approaching any stopped authorized emergency vehicle making use of red visual signals. The law requires you to move over and slow down when passing any vehicles displaying amber or yellow flashing lights. When motorists are traveling on South Dakota interstates or other highways with two or more lanes, traveling in the same direction as an authorized emergency vehicle with amber lights on, they must merge into the lane farthest from the vehicle and proceed with caution, unless otherwise directed. On two lane highways, motorists must slow to a speed that is at least twenty miles per hour less than the posted speed limit or five miles per hour when the speed limit is posted at twenty miles per hour or less and proceed with caution, unless otherwise directed. Emergency vehicles include, but are not limited to, law enforcement vehicles, ambulances and fire department vehicles. A violation of this law is a class 2 misdemeanor which is punishable by a fine of $200 and/or 60 days in jail. South Dakota Codified Law 32-31-6.1

To the Motorcycle Operator: This manual contains important information for anyone wishing to operate a motorcycle. The first section of the manual is information specific to the State of South Dakota. The remainder of the manual was developed by the National Public Services Research Institute with the cooperation of the Motorcycle Safety Foundation under contract to the National Highway Safety Administration.
You are urged to study this manual thoroughly to make sure that you know the rules of the road,
therefore ensuring your own safety, as well as the safety of others.
South Dakota Driver Licensing
118 West Capitol Avenue
Pierre, SD 57501
Phone: (605) 773-6883 or 1-800-952-3696
E-mail Address: [email protected]
Internet Address: www.dps.sd.gov

General Information
Anyone who operates a motor vehicle or motor-driven cycle on public roadways in South Dakota is
required to have a driver license. You are required to have a South Dakota driver license if you live
here for more than 90 days. If you are a commercial driver license holder, you must apply for a South
Dakota license within 30 days. South Dakota law states that every licensee shall have their driver
license in their immediate possession at all times when operating a motor vehicle.
The following people can drive on a valid license from their home state, provided they are at least 16
years old:
Military - Members of the Armed Forces on active duty or members of foreign military on temporary
duty with the Armed Forces, as well as their spouse and children.
Student - Students who are here to further their education and who are considered a non-resident for
tuition purposes.
You may obtain a driver license if you:
• Are at least 14 years of age and have met the instruction permit requirement outlined in the South Dakota Graduated Licensing Laws.
• Are able to submit the proper proof of identity, citizenship or lawful status, Social Security number and address.
• Have parental/guardian consent if under age 18 for every application completed • Pass needed driver license tests • Surrender all driver licenses and identification cards • Do not have suspended, revoked, or denied driving privileges in South Dakota or any other
state • Are not in this country illegally • Have not been found by a court to be mentally incompetent, alcoholic, or a habitual user of
illegal drugs • Have no unpaid fines for moving traffic violations

DOCUMENT REQUIREMENTS (photo copies are not acceptable) Renewal of a driver license or ID card (must have a star in upper right corner):
1. South Dakota driver license or ID card (with star in upper right corner) 2. Two documents proving your residential address (must be less than one year old) 3. Non-US citizens and transfers from other states must provide proof of lawful status in the U.S.
(such as U.S. certified birth certificate, U.S. passport/passport card, certificate of citizenship/naturalization, permanent resident card, employment authorization card, or foreign passport with visa/I-94)
4. If your name has changed you will need to provide proof of the name change (marriage certificate, divorce decree, or court order)
For information about online renewal (available every other renewal period) go to www.dps.sd.gov
Replacement of a South Dakota driver license or ID card (had a star in upper right corner): 1. U.S. certified birth certificate, valid U.S. passport/passport card, certificate of
citizenship/naturalization, valid permanent resident card, valid employment authorization document, or foreign passport with U.S. visa/I-94
2. Second document proving identity (such as social security card, W-2 form, military ID, tribal ID, or other document approved by examiner)
3. Two documents proving your residential address (must be less than one year old) 4. If your name has changed you will need to provide proof of the name change (marriage certificate,
divorce decree, or court order) 5. If your name has changed you will need to provide proof of the name change (marriage certificate,
divorce decree, or court order) To request a duplicate online (once per renewal period) go to www.dps.sd.gov
New South Dakota driver license or ID card (includes transfer from another state*) 1. One document proving your date of birth, identity and lawful status or presence. If possible,
select a document that has your current full legal name to avoid documenting any name change.
Valid, unexpired U.S. passport or U.S. passport card Certified copy of a birth certificate issued by a state of the United States. It must be a certified
copy and have the stamp or raised seal of the issuing authority. A hospital-issued certificate is not acceptable. A certified birth certificate issued by Puerto Rico must be certified as being issued on or after July 1, 2010.
Consular Report of Birth Abroad issued by the U.S. Department of State (Form FS-240, DS-1350 or FS-545)
Certificate of Naturalization (Form N-550, N-570 or N-578) Certificate of Citizenship (Form N-560, N-561 or N-645) Unexpired Permanent Resident Card (Form I-551) Unexpired Employment Authorization Document (Form I-766). Record of Arrival and Departure (I-94) with attached photo and stamped “Temporary Proof of
Lawful Permanent Resident” Record of Arrival and Departure (I-94) stamped “Refugee,” “Parolee” or “Asylee” Unexpired foreign passport accompanied by the approved I-94 documenting applicant’s most
recent admittance into the United States Valid foreign passport stamped “Processed for I-551” Permit to Reenter the United States (I-327) Refugee Travel Document (I-571)

*Transfer of a federally compliant driver license or ID from another state requires the documents listed under “Renewal of a driver license or ID card (must have a star in upper right corner)” above.
2. Check your name. Is your current full legal name different from the name listed on the identity document you are providing in step 1? Were you previously issued a South Dakota driver license or ID card with a name different from that listed on the identity document in step 1? If you answered yes to one or both of the questions above, you must document your name change. If not, go to step 3.
To document your name change, bring documents that connect the name on the identity document you selected to your current full legal name. Select the documents you will use (this can be more than one if needed to connect the name listed on your identity document to your current name). Certified marriage certificate
Court order under petition for name change Court order for name change in a divorce decree or decree of annulment Court order for name change in a decree of adoption
Any marriage certificate must be issued by the state office of vital statistics or equivalent agency in your state or country of marriage. It must be a certified copy and have the stamp or raised seal of the issuing authority. A church, chapel or similarly issued certificate is not acceptable. Any court order must contain your prior full legal name, your court-ordered full legal name and your date of birth; and be stamped with the official court seal (date stamps and file stamps are not the official court seal). Photocopies and faxes are not acceptable.
3. Document your Social Security number (SSN). Select one document you will use that contains your current name and SSN.
Social Security card W-2 form Social Security Administration 1099 form Non-Social Security Administration 1099 form Pay stub or statement with your name and full Social Security number on it I am a temporary foreign national not authorized for employment. (You do not have to document a SSN, but
South Dakota will verify your USCIS number. Make sure you are not authorized for employment. If you are eligible for employment but do not have a SSN, you are required to obtain and present one.
4. Two documents proving your residential address (less than one year old). A parent’s proof
of address is acceptable for a minor child (the parent’s name who is accompanying the minor must be on the address documents)
Utility bill Pay stub or earnings statement Rent receipt Phone bill Transcript or report card from accredited
school Bank statement Mortgage document Tax document Homeowners/rent’s insurance policy
Other items with your address can be reviewed by the examiner
If you are unable to provide proof of residency please see a list of address exceptions on our website at www.dps.sd.gov or call 1-800-952-3696
Mail with post office box addresses are acceptable in areas not assigned a street or 911 address

Veterans
Veterans who have been honorably discharged from the military have the option of adding the word “Veteran’ to their front of their South Dakota Driver License or identification card. In addition to the documents listed above, they will need to present one of the following:
DD 214 form which shows their honorable discharge status from active duty
Present a certificate signed by a county or tribal veteran’s service officer verifying their status
DD form 2 (Retired)
DD form 2A (Reserve Retired)
Note to current or new CDL applicants. If you are required to carry a medical examiners certificate (aka DOT medical card) you must show a valid card at the driver exam station.
If you are unable to obtain any of the required documents, please contact our office to see if exceptions are available.
Email [email protected] (please include your first and last name)
Phone: 1-800-952-3696 Website Address: www.dps.sd.gov
Address: South Dakota Driver Licensing Program, 118 W. Capitol Ave, Pierre, SD 57501
Fees Effective July 1st
Regular Driver License or Instruction Permit (new, renewal, or transfer from out-of-state) $20.00 | $28.00
Identification Card (new, renewal, or transfer from out-of-state)………………………….… $20.00 | $28.00
Replacement Driver License or Identification card……………………………………………. $10.00 | $15.00
Motorcycle Instruction Permit (if you already have a valid driver license)…………………. $10.00 | $15.00
Motorcycle Instruction Permit (new license or are within renewal period)…………………. $20.00 | $28.00
Conversion of a valid car, motorcycle, or CDL instruction permit……………………………. No Charge
Commercial Driver license renewal, instruction permit or transfer from out-of state…….. $25.00 | $33.00
Adding CDL endorsements……………………………………………………………………….. $10.00 | $15.00
The fee for a commercial driver license does not include the skill (drive) test. The skill test must be conducted by a third party tester and the tester may charge up to $80 for testing.
For testing purposes, the fee allows you three attempts to pass a test within a 6 month period. After 3 attempts, or 6 months, the fee must be paid again.
A one-time proration of fees is given to applicants under 21 years of age who are being issued less than a 5-year license.

Who Can’t Get A South Dakota Driver License?
Persons under 14 years of age.
Persons who have a license or driving privilege withdrawn in South Dakota or any other State.
Persons who have accumulated child support arrearages of $1,000 or more. (These people will
be issued one 6-month temporary.)
Persons present illegally in the U.S.
Persons who have been determined medically or psychologically unfit to drive.
PREFACE
Operating a motorcycle safely in traffic requires special skills and knowledge. The Motorcycle Safety Foundation has made this manual available to help novice motorcyclists reduce their risk of having an accident. The manual conveys essential safe-driving information and has been designed for use in state licensing programs. While designed for the novice, all motorcyclists can benefit from the information this manual contains.
The original Motorcycle Operator Manual was developed by the National Public Services Research Institute (NPSRI)
under contract to the National Highway Traffic Safety Administration (NHTSA) and within the terms of a cooperative
agreement between NHTSA and the Motorcycle Safety Foundation. The manual and related tests were used in a
multi-year study of improved motorcycle operator license procedures, conducted by the California Department of
Motor Vehicles under contract to NHTSA.
The purpose of this manual is to educate the reader to help avoid accidents while safely operating a motorcycle. For
this edition, the Motorcycle Safety Foundation has updated and expanded the content of the original manual. These
revisions reflect:
• The latest findings of motorcycle-safety research. • Comments and guidance provided by the motorcycling, licensing, and traffic-safety communities. • Expanded alcohol and drug information.
In promoting improved licensing programs, the Motorcycle Safety Foundation works closely with state licensing
agencies. The Foundation has helped more than half the states in the nation adopt the Motorcycle Operator Manual
for use in their licensing systems.
Improved licensing, along with quality motorcycle rider education and increased public awareness, has the potential
to reduce the number and severity of motorcycle accidents. Staff at the Foundation are available to assist state,
private and governmental agencies in efforts to improve motorcycle safety.
Tim Buche, President Motorcycle Safety Foundation

Table of Contents SECTION 1 - Motorcycle Rider Licensing .................................................................1-9 How to Obtain Your Motorcycle License....................................................................... 1 Types of Motorcycle Licenses ...................................................................................... 2 Types of Vehicles ......................................................................................................... 3 Required Motorcycle License Tests ............................................................................. 4 Motorcycle Rider Training ............................................................................................ 6 Required Motorcycle Equipment................................................................................... 6 Alcohol and the Law ..................................................................................................... 7 Drugs and the Law ....................................................................................................... 7 Special Motorcycle Regulations.................................................................................... 8 Motorcycle Registration and Title ................................................................................. 9 SECTION 2 - Being in Shape to Ride ........................................................................ 10-12 Alcohol, Other Drugs and Riding .................................................................................. 10 Health ........................................................................................................................... 12 Emotions ....................................................................................................................... 12 SECTION 3 - Before You Ride ....................................................................................13-17 Selecting and Wearing Protective Gear ....................................................................... 13 Helmet Use ................................................................................................................... 13 Helmet Selection ...........................................................................................................13 Helmet Fit ..................................................................................................................... 14 Face and Eye Protection .............................................................................................. 15 Hearing Protection ........................................................................................................ 15 Protective Riding Gear ................................................................................................ 15 Know Your Motorcycle ...................................................................................................16 Motorcycle Controls ...................................................................................................... 16 SECTION 4 - Vehicle Control Skills............................................................................ 18-22 Getting Started ............................................................................................................. 18 Mounting the Motorcycle .............................................................................................. 18 Riding in a Straight Line ............................................................................................... 19 Riding Posture .............................................................................................................. 19 Friction Zone.................................................................................................................. 19 Shifting Gears .............................................................................................................. 20 Stopping ....................................................................................................................... 21 Normal Stopping in a Curve ........................................................................................ 21 Turning .......................................................................................................... .................21 SECTION 5 - Street Strategies ................................................................................... 23-33 Risk Awareness/Acceptance ....................................................................................... 23 Rider Responsibilities ................................................................................................... 23 Risk Awareness ................................................................................................. ........... 23 Risk Acceptance ........................................................................................................... 24

Risk Management ..........................................................................................................24 Search ......................................................................................................................... 24 Evaluate ........................................................................................................................ 25 Execute ......................................................................................................................... 25 Intersections ................................................................................................................. 26 Traffic-Activated Sensor Lights ..................................................................................... 26 Space Management ..................................................................................................... 26 Lane Positions .............................................................................................................. 27 Following Another Vehicle ............................................................................................ 27 Being Followed ............................................................................................................. 28 Lane Sharing ................................................................................................................ 28 Merging Vehicles .......................................................................................................... 29 Vehicles Alongside ....................................................................................................... 29 Escape Routes ............................................................................................................. 29 Increasing Conspicuity ................................................................................................. 30 Clothing .........................................................................................................................30 Headlight .......................................................................................................................30 Signals ............................................................................................................... ........... 30 Brake Light ....................................................................................................................31 Horn ................................................................................................................... ........... 31 Speed Management ..................................................................................................... 31 Handling Dangerous Surfaces ...................................................................................... 31 SECTION 6 - Roadway Management ......................................................................... 34-37 Crash Avoidance .......................................................................................................... 34 Stopping Quickly ................................................................................................ .......... 34 Stopping Quickly in a Curve ......................................................................................... 35 Anti-Lock Braking Systems (ABS) ................................................................................ 35 Handling Skids .............................................................................................................. 35 Swerving ............................................................................................................ ........... 36 Cornering ...................................................................................................................... 36 SECTION 7 - Special Riding Situations .................................................................... 38-40 Crowned Roads ............................................................................................................ 38 Work Zones ........................................................................................................... ....... 38 Tire Failure ............................................................................................................ ........39 Animals ................................................................................................................. ........ 39 Wind ...................................................................................................................... ........40 SECTION 8 - Passengers, Cargo and Group Riding ................................................41-43 Carrying Passengers and Cargo .................................................................................. 41 Instructing Passengers ................................................................................................. 42 Group Riding ......................................................................................................... ........42

SECTION 9 - Factors Affecting Rider Performance ................................................. 44-46 Cold Weather ................................................................................................................ 44 Hypothermia ................................................................................................................. 44 Extreme Hot Weather ................................................................................................... 45 Night Riding .......................................................................................................... ........ 45 Distracted Riding .......................................................................................................... 45 Fatigue .................................................................................................................. ........ 45 SECTION 10 - Three-Wheel Vehicles ........................................................................ 47-53 Common Operating Characteristics of Trikes and Motorcycles with a Sidecar ............ 47 Types of Three-Wheel Vehicles ................................................................................... 47 Differences between Two-Wheel Motorcycles and Three-Wheel Vehicles ................ 47 Be Familiar with Your Vehicle ....................................................................................... 48 Body Position................................................................................................... .............. 48 Turning ..........................................................................................................................48 Hills .................................................................................................................. ............. 48 Lane Position ................................................................................................... ............. 48 Parking at the Roadside ............................................................................................... 48 Swerving .......................................................................................................... ............. 49 Cornering and Curves .................................................................................................. 49 Unique Operating Characteristics of Trikes ................................................................. 49 Turning ............................................................................................................ ..............49 Stopping Quickly ........................................................................................................... 49 Carrying a Passenger and Cargo ................................................................................. 50 Unique Operating Characteristics of a Motorcycle with a Sidecar ................................ 50 Stopping .......................................................................................................... ............. 50 Accelerating .................................................................................................................. 50 Turning ............................................................................................................ ..............50 Stopping Quickly ........................................................................................................... 52 Carrying Passengers and Cargo ........................................................................... ….. 52 Additional Resources for More Information on Three-Wheel Vehicles ......................... 52 SECTION 11 ..................................................................................................................54-59 Motorcycle Controls ...................................................................................................... 54 Pre-Ride Check ............................................................................................................ 56 Parking at Curbs ........................................................................................................... 57 Passing and Being Passed ........................................................................................... 57 Hand Signals ................................................................................................................ 59 Carrying Loads ............................................................................................................. 59

1
This Section Covers
How to Obtain Your Motorcycle License
Types of Motorcycle Licenses
Types of Vehicles
Required Motorcycle License Tests
Motorcycle Rider Training
Required Motorcycle Equipment
Alcohol and the Law
Drugs and the Law
Special Motorcycle Regulations
Registration and Title
Operating a motorcycle can be safe and fun when you act as a responsible rider. It also requires special skills and a heightened sense of awareness about other road users, traffic, and environmental conditions and a personal strategy to manage potential problems. Studying this manual will not only help you pass your licensing tests, but it will also help prepare you to become a responsible and safe motorcyclist. Take your time learning how to operate your motorcycle and get plenty of riding experience. Find an experienced and responsible motorcyclist to mentor your learning. This mentoring and riding experience will prepare you for handling today’s traffic environment and reduce the potential for a crash. All riders are also encouraged to attend an entry-level rider education course which provides knowledge and hands-on-training before receiving a motorcycle operator’s license.
How to Obtain Your Motorcycle License You may obtain a Motorcycle License/Endorsement if you:
Are at least 14 years of age,
Are able to submit all required documents,
Have parental/guardian consent if under age 18,
Pass required Motorcycle License tests,

2
Currently, do not have your license suspended, revoked, denied or cancelled
Pass required vision requirements for the Motorcycle License.
This manual will provide information needed to operate a motorcycle or motor-driven cycle.
Types of Motorcycle Driver Licenses
No person may operate a motorcycle on South Dakota public streets or highways without a motorcycle
driver license or permit. Drivers operating a vehicle officially classified as a moped are not required to
have a special motorcycle driver license or endorsement, but must have a valid South Dakota
car/truck (Class 1) driver license.
Motorcycle Instruction Permit:
To obtain a Motorcycle Instruction Permit, you must be at least 14 years of age and pass the vision
and knowledge (car/truck and motorcycle) tests. Minors at least 14 years of age, but less than 18
years of age, must hold the valid permit continuously for 180 days (90 days if successful completion of
an approved Department of Education driver education course) prior to upgrade of the permit to a
Motorcycle Restricted Minor’s Permit or a Motorcycle Operator’s License. However, if in addition to the
approved driver education course, the person has successfully completed the South Dakota (or
another state’s) authorized motorcycle safety course, the Motorcycle Instruction Permit only needs to
be held for 30 continuous days. The permit is valid for one year or on the same date as the expiration
date on the valid documents authorizing the applicant’s presence in the United States, whichever
occurs first. If the applicant is under 18 years of age and the Motorcycle Instruction Permit expires, the
minor is required to obtain another Instruction Permit for the required time. Restrictions: The
Motorcycle Instruction Permit holder may operate a motorcycle during the hours of 6 a.m. to 8 p.m. if
accompanied by a licensed motorcycle operator who is at least eighteen years of age, who has at
least one year of driving experience and who is driving another motorcycle along with the permit
holder. No Motorcycle Instruction Permit holder may carry another person on the motorcycle.
Motorcycle Restricted Minor’s Permit:
To obtain a Motorcycle Restricted Minor’s Permit, you must be at least 14 years of age and pass the
vision, knowledge (car/truck and motorcycle) tests, and motorcycle drive test, complete the
requirements of the Instruction Permit, and have not been convicted of a traffic violation during the
past six months prior to obtaining the Motorcycle Restricted Minor’s Permit. An individual up to age 18
years of age may hold a Motorcycle Restricted Minor’s Permit. The permit is valid for 5 years or until
the same date as the expiration date of the valid documents authorizing the applicant’s presence in
the United States, whichever occurs first.
Restrictions: Entitles the holder, while having the permit in his immediate possession, to operate a
motorcycle during the hours of 6:00 am to 8:00 pm if the motorcycle is being operated with the
permission of the minor’s parent or legal guardian.
Motorcycle Operator’s License: To obtain a Motorcycle
Operator’s License, you must be at least 16 years of age and pass the vision, knowledge (car/truck
and motorcycle) tests, and motorcycle driving test. If a minor is at least 16 years of age, but less than

3
18 years of age, they must complete the requirements of the Instruction Permit and have not been
convicted of a traffic violation during the past six months prior to obtaining the Motorcycle Operator’s
License. The license is valid for 5 years or until the same date as the expiration date on the valid
documents authorizing the applicant’s presence in the United States, whichever occurs first.
CDL with Motorcycle: A person who already has a valid CDL (Commercial Driver License) may
apply for a motorcycle license class with his/her CDL. The applicant must pass the motorcycle
written and driving tests. The license will indicate a Class A, B or C (for CDL) and a code 3 for
motorcycle (example: Class A3).
Duplicate License: When a duplicate license is obtained, your license will retain the original license
expiration date.
Moped Operators: You must be in possession of a valid Operator’s License.
Identification Card: To obtain an Identification Card, you must provide identity documents (see
pages ii-iii). There is no age requirement. The card is valid for 5 years or until the same date as the
expiration date on the valid documents authorizing the applicant’s presence in the United States,
whichever occurs first. If you are not a United States citizen, you will be required to present a
Naturalization and Immigration record authorizing your legal presence in the United States. Driver
examiners have the right to scrutinize all documents and request additional information for verification
of identity prior to issuance of an identification card.
Any driver license or non-driver identification card issued to any individual under 21 years of age
with five years or less remaining until the applicant’s 21st birthday will expire 30 days after the
individual’s 21st birthday.
NOTE: Per South Dakota law, every licensee shall have their driver license in their immediate
possession at all times when operating a motor vehicle and shall display the same upon
demand of a judge or a court of record, a magistrate, a peace officer, or a field deputy or
inspector of the Department of Public Safety.
Types of Vehicles
A motorcycle is any motorized two or three-wheeled vehicle, except a tractor or farm implement. This
means that mopeds, mini-bikes, motor scooters, and motorized bicycles are all considered
motorcycles under South Dakota law (with certain exceptions).
Certain mopeds are treated differently than motorcycles under the law. There is a special definition to
separate mopeds and motorcycles in these cases.
Definition: A moped is a motor driven cycle equipped with two or three wheels. If a combustion
engine is used, the maximum piston or rotor displacement shall be fifty cubic centimeters regardless
of the number of chambers in such power source. The power source shall be equipped with a power

4
drive system that functions directly or automatically only, not requiring clutching or shifting by the
operator after the drive system is engaged.
Required Motorcycle License Tests Cooperation with Examiner
• The applicant must cooperate fully with the examiner and follow all instructions.
• License applicants must furnish their own motorcycle for the on-the-road test.
• Pets or passengers will not be allowed on the motorcycle during the on-the-road test.
• It is recommended that children or pets not be brought to the exam station. Children and pets
are not permitted in the testing area or on drive tests.
Examination Procedures
You may apply for a South Dakota motorcycle license at any exam station within the state. Licenses
may be renewed 180 days prior to their expiration date unless the applicant is turning 21 years of age
upon renewal. Licenses expiring 30 days after licensee’s 21st birthday may only be renewed within the
30 days immediately following the birth date. For other Driver Licensing information regarding
locations, procedures, testing times & locations, handicap assistance, and other issues call 1-800-952-
3696; or you may visit the South Dakota web site at
https://dps.sd.gov/licensing/driver_licensing.
When applying for your South Dakota Driver License, your social security number will be requested,
and your current South Dakota or out-of-state driver license or out-of-state identification card must be
surrendered . If you do not have a license or ID to surrender, you must provide the documents on
pages ii-iii. If you are currently holding a valid out-of-state driver license, no testing will be required for
the transfer of that license. Examiners may request additional documentation for proof of identity.
1. Photo:
After completing the driver license/ identification card application a photo will be taken.
2. Vision Test:
If you wear glasses or contact lenses while taking the vision test, you will be required to wear them
whenever driving. If you do not pass the vision test, you must present a statement from an
Optometrist or Ophthalmologist certifying that you possess the visual ability to drive safely before
continuing the examination process. If you already currently hold a license and you fail the vision test,
your license will be confiscated until you can pass the vision test or you provide our office with a
completed satisfactory vision statement.
3. Knowledge Test:
You will be required to pass a test covering the rules of the road and safe driving practices.
4. Driving Test:

5
This test will provide you the opportunity to demonstrate our ability to safely operate a motorcycle.
The driving test consists of normal driving tasks. You will not be asked to do anything against the
law.
Unsuccessful Examinations
If you fail any of the tests, you may not re-test before the next working day. You may wait longer if you
want more time to study the manual or to practice driving. You are allowed 3 opportunities to test for
each fee paid within a 6-month period. After 3 failures in the 6-month period a new fee must be paid.
Restrictions Placed On License
A motorcycle license may be issued subject to certain restrictions. For example, a person who
cannot see clearly
with their right or left eye will be restricted to driving a vehicle with a left outside rearview mirror.
Safe riding requires knowledge and skill. Licensing tests are the best measurement of the skills necessary to operate safely in traffic. Assessing your own skills is not enough. People often overestimate their own abilities. It’s even harder for friends and relatives to be totally honest about your skills. Licensing exams are designed to be scored more objectively. To earn your license, you must pass a knowledge test and an on-cycle skill test. An on-cycle skill test will either be conducted in an actual traffic environment or in a controlled, off-street area. Vision – you will need to take and successfully pass a vision test. Knowledge Test – you will need to take and successfully pass the Knowledge tests (car/truck and motorcycle). Knowledge test questions are based on information, practices and ideas from this manual. They require that you know and understand road rules and safe riding practices. See Section 10 for sample knowledge test questions. On-cycle Skill Test – you will need to take and successfully pass an on-cycle skill test. The test will be conducted in an actual traffic environment. Note: Jurisdictions may waive this requirement for applicants who successfully complete a rider education course in the last year. Basic vehicle control and crash-avoidance skills are included to determine your ability to handle normal and hazardous traffic situations. You may be tested for your ability to:
• Know your motorcycle and your riding limits.
• Accelerate, brake and turn safely.
• See, be seen and communicate with others.
• Adjust speed and position to the traffic situation.
• Stop, turn and swerve quickly.
• Make critical decisions and carry them out.

6
• Select safe speeds to perform maneuvers.
• Choose the correct path and stay within boundaries.
• Complete normal and quick stops.
• Complete normal and quick turns or swerves.
Motorcycle Rider Training
MOTORCYCLES MAKE SENSE SO DOES PROFESSIONAL TRAINING
They are inexpensive to operate, fun to ride and easy to park. Unfortunately, many riders never learn
the critical skills needed to ride safely.
Professional training for beginning and experienced riders prepares them for the real-world traffic
situations.
Motorcycle Rider Courses teach and improve skills such as:
• effective turning • obstacle avoidance • braking maneuvers • traffic strategies • protective apparel selection • maintenance
MOTORCYCLE RIDER COURSE
The Motorcycle Rider Course consists of 16 hours of instruction. Anyone 14 years of age or older is
eligible. Persons under 18 years of age must obtain written parental consent. Upon successful completion
of the course, you will receive a Course Completion Card which will serve as a waiver for the South Dakota
Motorcycle License Tests (for one year after completion date).
The Course Completion Card may also qualify you for insurance discounts. What you save in insurance
alone may pay for the cost of the course.
For more information:
Visit: http://southdakotarides.com/
and http://southdakotasafetycouncil.org/motorcycle/
Or call the South Dakota Safety Council at:
605-361-7785 (Sioux Falls & vicinity)
1-800-952-5539 (toll-free in South Dakota)
Required Motorcycle Equipment
State and federal laws require the following equipment:
A permanently attached seat for the driver. A motorcycle may not carry a passenger unless a permanently attached seat and foot pegs are provided for a passenger;

7
A properly maintained muffler or mufflers;
At least one reflector on the rear of the motorcycle;
At least one rear view mirror;
A horn which can be heard for at least 200 feet;
A brake or brakes capable of stopping the vehicle in 30 feet or less from a speed of 20 M.P.H.;
At least one, but no more than two, headlights;
A white license plate light, which is lighted when the headlamp is on;
A red taillight which is lighted when the headlarnp is on and which is visible for at least 500 feet to the rear;
A red stop light which is lighted when the brakes are activated and is visible for at least 300 feet to the rear.
No person may operate a motorcycle with the handlebars positioned so that the grips are at or
above shoulder height of the person sitting astride the seat.
It is unlawful for a person under 18 years of age to drive or ride on a motorcycle unless that person
wears an approved safety helmet. Although motorcycle drivers and passengers 18 years of age or
older are not required by law to wear a helmet, accident statistics have shown that persons who were
wearing helmets at the time of an accident experienced less injury than those who were not wearing
helmets. The South Dakota Department of Public Safety therefore urges all motorcycle operators and
riders to wear motorcycle helmets while riding.
Eye protective devices must be worn by all operators of all motorcycles, including mopeds, either in
the form of windshields, glasses, goggles or face shields of safety glass or plastic. All eye protective
devices must meet the minimum standards as required by the South Dakota Department of Public
Safety.
Alcohol and the Law
Blood alcohol concentration (BAC) is the percentage of alcohol in relation to the amount of blood in your body. If you are operating a motor vehicle with a BAC at or over .08 BAC you are in violation of the law. However, impairment begins with the first drink. Even under .08 you can be impaired and convicted for riding impaired. If you are arrested for drinking and riding, the penalties are severe. Your driver’s license and riding privileges may be revoked and you may be or subject to criminal penalties. In South Dakota, if you are under 21, you can also be arrested under South Dakota’s “Zero Tolerance” law at .02%. An Alcohol Concentration test measures how much alcohol is in your system and is usually determined by a breath, blood or urine test. You are required to take a BAC test if asked by a police officer due to the implied consent laws in your state. Implied consent laws are based on the principle that when you get your driver’s license you have implicitly consented to a lawfully requested test to determine the alcohol content of the blood, breath, urine or other bodily substance if suspected of impaired riding. You can lose your Driver’s License for one year if you refuse to take a BAC test.
Drugs and the Law
Driving under the influence of drugs is illegal and it’s not only illegal substances that impair riding; some over-the-counter and prescription medications can impair your riding. Several states have per

8
se drug laws covering specific drugs, whereby having the presence of that drug in your system while riding is a criminal offense
Texting and the Law It is illegal to text and drive SDCL 32-26-46, 32-26-47 and 32-26-48. Driver’s under 16 years of age
have specific laws, SDCL 32-12-11, 12, and 12.4. Texting is defined as a serious traffic violation for
those driving a commercial motor vehicle under 32-12A-31(n) and goes towards a disqualification of a commercial driver license.
Distracted Driving: One text or call could change it all….
Texting while driving creates a crash risk 23 times worse than driving while not distracted.
Send/receiving a text will take a driver’s eyes and mind from the road for an average of 4.6 seconds. This is equivalent to driving the length of a football field at 55 mph. Eleven percent of all drivers less than 20 years old involved in fatal crashes were distracted.
Special Motorcycle Regulations
All basic rules of the road in the South Dakota Vehicle Code apply to motorcycles as well as other vehicles.
No dealer or person can loan or rent a motorcycle (mopeds excepted) unless the person renting or
borrowing the motorcycle has a valid motorcycle license, permit or endorsement. Only the person who
borrows or rents the motorcycle is permitted to drive it. The operator of a motorcycle can ride only while sitting astride the seat facing forward. No operator may carry any package or other article that prevents him or her from keeping both hands on the handlebars or obstructs their vision. No passenger can ride in a position that might interfere with the safe operation of the motorcycle or obstruct the view of the operator. The operator of a motorcycle must change lanes when passing any vehicle in the same lane. No person shall operate a motorcycle between lanes of traffic or between adjacent lanes or rows of vehicles. Motorcycles cannot be operated more than two abreast in any single lane. No person shall operate a motorcycle in any municipal, county, state park or recreation area except upon the normally traveled roads or in specifically designated areas. No person riding upon a motorcycle shall attach themselves or the motorcycle to any other moving vehicle on a street or roadway. No person, other than a law enforcement officer or conservation officer, shall operate or ride on any motorcycle with any firearm in their possession unless the firearm is completely unloaded and within a carrying case which encloses the entire firearm. No motorcycle instruction permit holder may carry another person on the motorcycle.

9
Motorcycle Registration and Title
All motorcycles owned by South Dakota residents and operated on public streets and highways must
be registered with the Department of Revenue. You have 90 days to register a motorcycle brought in
from another state. You must register your motorcycle with the County Treasurer, in the county in
which you reside. All owners shall continue to renew the registration of their motorcycle during the
month assigned to the first initial of their last name. A certificate of title is required to sell or transfer
any motorcycle. The registration certificate and proof of liability insurance card must be carried on the
motorcycle at all times. Motorcycles officially classified as mopeds are exempt from registration and
title requirements. Additional information on motor vehicle registration and titling in South Dakota is
available on the Department of Revenue website at http://dor.sd.gov/.

10
This Section Covers
Alcohol, Other Drugs and Riding
Health
Emotions Riding a motorcycle demands your full attention. Responsible riders pay attention to the riding environment, identify potential hazards, look for escape routes and make good decisions.
Alcohol, Other Drugs and Riding Alcohol is a major contributor to motorcycle crashes, particularly fatal crashes. Studies show that nearly 40% of all riders killed in motorcycle crashes had been drinking. Riding “under the influence” of alcohol or other drugs poses physical and legal hazards for every rider.
By becoming knowledgeable about the effects of alcohol and other drugs you will see that riding and alcohol don’t mix. Effects of Alcohol and other Impairing Drugs Alcohol and other drugs impair your: Judgment – Alcohol and other impairing drugs affect those areas of your brain that control judgment. You may not be able to make good decisions about the traffic conditions or how you can protect yourself. Vision – Alcohol and certain types of drugs can blur your vision, slow your ability to focus and cause double vision. Reaction Time – Alcohol and other impairing drugs slows your ability to process information and impacts your ability to react quickly to a situation.
Riding under the influence of alcohol or other drugs poses physical and legal hazards for every rider.

11
How Alcohol Works Unlike other beverages, alcohol is absorbed directly through the walls of the stomach and the small intestine, goes into the bloodstream, and travels throughout the body and to the brain. Alcohol is absorbed quickly and can be measured within 30 to 70 minutes after a person has had a drink.
A typical alcoholic drink equals about half an ounce of alcohol. This is the approximate amount of alcohol found in:
one shot of distilled spirits, or
one 5-ounce glass of wine, or
one 12-ounce beer.
What Affects My Blood Alcohol Concentration (BAC)? BAC refers to the amount of alcohol contained in a person’s blood. In all states, an adult with a BAC of 0.08% or above is considered intoxicated. However, impairment begins with the first drink. Even under .08 you can be impaired and convicted for riding impaired. How fast a person’s BAC rises varies with a number of factors:
The number of drinks. The more you drink, the higher the BAC.
How fast you drink. When alcohol is consumed quickly, you will reach a higher BAC than when it is consumed over a longer period of time.
Your gender. Women generally have less water and more body fat per pound of body weight than men. Alcohol does not go into fat cells as easily as other cells, so more alcohol remains in the blood of women.
Your weight. The more you weigh, the more water is present in your body. This water dilutes the alcohol and lowers the BAC.
Food in your stomach. Absorption will be slowed if you’ve had something to eat. Don’t Drink or Don’t Ride The safest and most responsible choice is to not drink and ride. Because once you start, your judgment is affected and your ability to say “no” gets weaker. If you plan on drinking, leave your motorcycle at home and find other transportation so you won’t be tempted to ride impaired. Or, call ahead to where you plan on drinking and ask if there is a secure place for you to store your motorcycle overnight so you can find an alternative way home – such as a taxi or designated driver. There are no shortcuts to removing the alcohol from your body fast. None of the “remedies” you may have heard about – cold showers, hot coffee, or physical exercise – will make you remove the alcohol faster. The only proven remedy to removing the alcohol is time. Remember – your body can process about one drink an hour.

12
Other Impairing Drugs and Riding All drugs may affect your ability to ride safely. This is true of many prescription, over-the-counter, and illegal drugs. If you are not sure if it is safe to take a drug and ride, ask your doctor or pharmacist about any side effects. Never drink alcohol while you are taking other drugs. These drugs could multiply the effects of alcohol or have additional effects of their own. These effects not only reduce your ability to operate your motorcycle, but could cause serious health problems, even death.
Health There are many health conditions that can affect your riding, even little problems. Check with your doctor if a health condition could interfere with you operating a motorcycle.
Emotions Emotions can interfere with your ability to think, can create mental distractions, increase risk-taking, create a lack of attention, and can interrupt the ability to process information. You may not be able to give all your attention to operating a motorcycle if you are overly worried, excited, afraid, angry or depressed.
Test Your Knowledge 1. If you have only one drink before riding:
A. You cannot be arrested for drinking and riding.
B. Your riding skills will not be affected.
C. It can affect your ability to operate a motorcycle.
2. What percent BAC is considered intoxicated:
A. 0.02%
B. 0.04%
C. 0.08% 1. C – page 2-2, What Affects My Blood Alcohol Concentration?,
2. C – page 2-2, What Affects My Blood Alcohol Concentration?
Test Your Knowledge

13
This Section Covers
Selecting and Wearing Protective Gear
Getting to Know Your Motorcycle
Motorcycle Controls
A responsible rider makes a point to: 1. Wear protective riding gear.
2. Be familiar with the motorcycle.
3. Inspect the motorcycle.
4. Be free of impairments (alcohol and drug free).
Selecting and Wearing Protective Gear Anytime you ride a motorcycle you should wear:
A helmet compliant with the U.S. Department of Transportation (DOT).
Face and eye protection.
Motorcycle protective riding gear (gloves, long pants, jacket, sturdy footwear). Helmet Use Crash data shows that head injuries account for a majority of serious and fatal injuries to motorcyclists. Research also shows that riders wearing helmets have fewer and less severe head injuries in a crash. Here are some facts to consider:
Helmets make your riding experience more enjoyable.
Helmets protect you from the elements (wind, bugs, debris, etc.).
A DOT compliant helmet does not restrict vision or mask important sounds.
Crashes are unpredictable and may happen at any time, even on short rides or within minutes of starting the ride.
Regardless of speed, a helmet will reduce the severity of head injuries. Helmet Selection Protection should be the first consideration when buying your motorcycle helmet. There are three primary types of helmets: full face, three-quarter, and half. A full face helmet

14
gives the most head protection since it covers all of the head and face. This design has a flip-up face shield that protects the eyes. A three-quarter helmet affords riders good head protection and is constructed with the same basic components, but doesn’t offer the face and chin protection of full-face helmets. If you wear a three-quarter helmet, you should use an approved snap-on face shield or goggles. Half helmets provide the least amount of protection. Whichever style you choose, make sure that the helmet:
Is DOT compliant. You can tell if a
helmet is DOT compliant if it has a
label attached to the helmet that
states the manufacturer’s name
and/or brand, model, and says
DOT, FMVSS No. 218,
CERTIFIED.
Has no obvious defects such as
cracks, loose padding or frayed
straps.
Fastens securely. Helmet Fit A helmet should fit comfortably, but snugly. A helmet that is too loose can lift in the wind or come off your head in a fall. One that is too tight can create sores or cause headaches. When choosing a helmet, try on several brands and sizes to get an idea of fit and comfort. Here are a few tips for the best fit:
Cheek pads should touch your cheeks without pressing uncomfortably.
There should be no gaps between your temples and brow pads.
If the helmet has a neck roll, it should not push the helmet away from the back of your neck.
On full face helmets, press on the chin piece. The helmet or face shield should not touch your nose or chin.
Whatever helmet you decide on, keep it securely fastened on your head when you ride. Otherwise, if you are involved in a crash, it’s likely to come off your head before it gets a chance to protect you.

15
Face and Eye Protection Without face protection, an object could hit you in the eye, face, or mouth. A full face helmet provides the maximum face and eye protection while riding and in the event of a crash. A plastic shatter-resistant face shield can help protect your eyes and face from wind, dust, dirt, rain, insects, and pebbles thrown up from cars ahead. These distractions can be painful and can take your full attention from the road. Whatever happens, keep your eyes on the road and your hands on the handlebars. Face shields come in a variety of designs to fit most any helmet. Make sure that the face shield you choose is designed for your helmet and does not interfere with eyeglasses or sunglasses. To be effective, eye or face shield protection must:
Be free of scratches.
Be resistant to penetration.
Give a clear view to either side.
Fasten securely, so it does not blow off.
Permit air to pass through, to reduce fogging.
Permit enough room for eyeglasses or sunglasses, if needed. Windshields will not protect your eyes from the wind and debris; neither will eyeglasses or sunglasses. A windshield is not a substitute for a face shield. Glasses will not keep your eyes from watering, and they might blow off when you turn your head while riding. Goggles protect your eyes, though they won’t protect the rest of your face like a face shield does. Goggles can also reduce peripheral vision. Tinted eye protection or shields should not be worn at night or any other time when little light is available. Hearing Protection Long-term exposure to wind noise can cause irreversible hearing damage. Properly worn hearing protection can reduce wind noise and make your ride more enjoyable, while still allowing you to hear important sounds like car horns and sirens. You can choose from a variety of styles, from disposable foam plugs to reusable custom-molded devices. Protective Riding Gear Riding gear designed for motorcycle riders provides protection in the event of a crash, as well as from heat, cold, rain, debris, and hot or moving parts of the motorcycle. Sturdy synthetic or leather materials provide the best protection. Wearing brightly colored clothing with reflective material will make you more visible to other roadway users.
Sturdy synthetic or
leather materials
provide the best
protection.

16
Jackets and pants should cover arms and legs completely and be made of durable material. Jeans do not provide adequate protection. Wear a jacket even in warm weather to prevent dehydration. Many motorcycle riding jackets are designed to protect without getting you overheated, even on summer days.
Protective footwear provides protection for the feet, ankles, and lower parts of the legs. They should be high and sturdy enough to cover your ankles and give them support. Leather boots are best. Soles should be made of hard, durable slip resistant material. Sandals, sneakers, and similar footwear should not be used since they provide little protection and may interfere with controls. Keep heels short so they do not catch on rough surfaces. Tuck laces in so they won’t catch on your motorcycle.
Gloves allow a better grip and help protect your hands. Your gloves should be full-fingered and made of leather or similar durable material.
Rain suits designed for motorcycle riding resist tearing apart or ballooning up at high speeds. You will be much more comfortable and alert than a rider who is wet and cold. One or two piece styles are available. A rain suit with reflective strips or high visibility orange or yellow colors are good choices.
Whatever the weather conditions, always wear protective gear that will keep you comfortable, enabling you to concentrate on your riding.
Know Your Motorcycle You should get to know your motorcycle. Learning how things work and what parts need the most attention could reduce your chances of being in a crash and extend the life of your motorcycle. To make sure that your motorcycle will not let you down:
Read the owner’s manual first and get to know it.
Be familiar with the motorcycle controls.
Conduct a pre-ride check of the
Motorcycle before every ride.
Keep it serviced and maintained. Make sure your motorcycle fits you. Your feet should reach the ground while you are seated on the motorcycle.
Motorcycle Controls It is important to read your motorcycle owner’s manual to learn where your motorcycle controls are and how to operate them. You should be able to operate them while riding without having to look for them.

17
Test Your Knowledge
Test Your Knowledge 1. What should be the first consideration when buying your motorcycle helmet:
A. Appearance
B. Protection
C. Price 2. A plastic shatter-resistant face shield:
A. Is not necessary if you have a windshield.
B. Only protects your eyes.
C. Helps protect your whole face.
1. B – page 3-1, Helmet Selection
2. C – page 3-3, Face and Eye Protection

18
This Section Covers
Getting Started
Riding in a Straight Line
Shifting Gears
Stopping
Turning
The following section offers basic riding information on getting started, shifting gears, stopping, straight-line riding and turning. These basic skills are important to learn before moving onto more complex skills.
Getting Started Mounting the Motorcycle To mount the motorcycle, stand on the left side of the motorcycle. Grasp both handgrips, squeeze the front brake to keep the motorcycle from rolling, and swing your right leg over the seat. Sit and straighten the bike; raise the side stand with your foot. Starting the Engine 1. Turn the fuel valve and ignition switch ON.
2. Shift to neutral. Do not rely on the indicator light. Rock the motorcycle back and forth. If the motorcycle rolls freely it’s in neutral.
3. Turn the engine cut-off switch to ON.
4. Turn the choke ON for cold starts. Many motorcycles require squeezing the clutch before the starter will operate. This is also a good precaution against accidentally starting the bike in gear and reduces the load on the starter motor.
5. Press the starter button. Avoid using the throttle; the motorcycle should start without it. Many motorcycles have a safety mechanism that cuts power to the motor if the bike is placed in gear with the side stand down; so if you haven’t brought the side stand up, do it now. If the motor doesn’t start in the first 5 to 8 seconds, stop and repeat the steps above.
19
Stopping the Engine, Dismounting and Securing the Motorcycle 1. Turn the engine cut-off switch to OFF. Turn the ignition OFF. Turn the fuel valve OFF if your motorcycle has one. Make sure all lights are off.
2. To dismount, put the side stand down. Lean the motorcycle onto the side stand, while grasping both handgrips squeeze the front brake and swing your right leg over. Turn the handlebar fully toward the side stand for stability.
3. After dismounting remove the ignition key and engage fork lock or other security device.
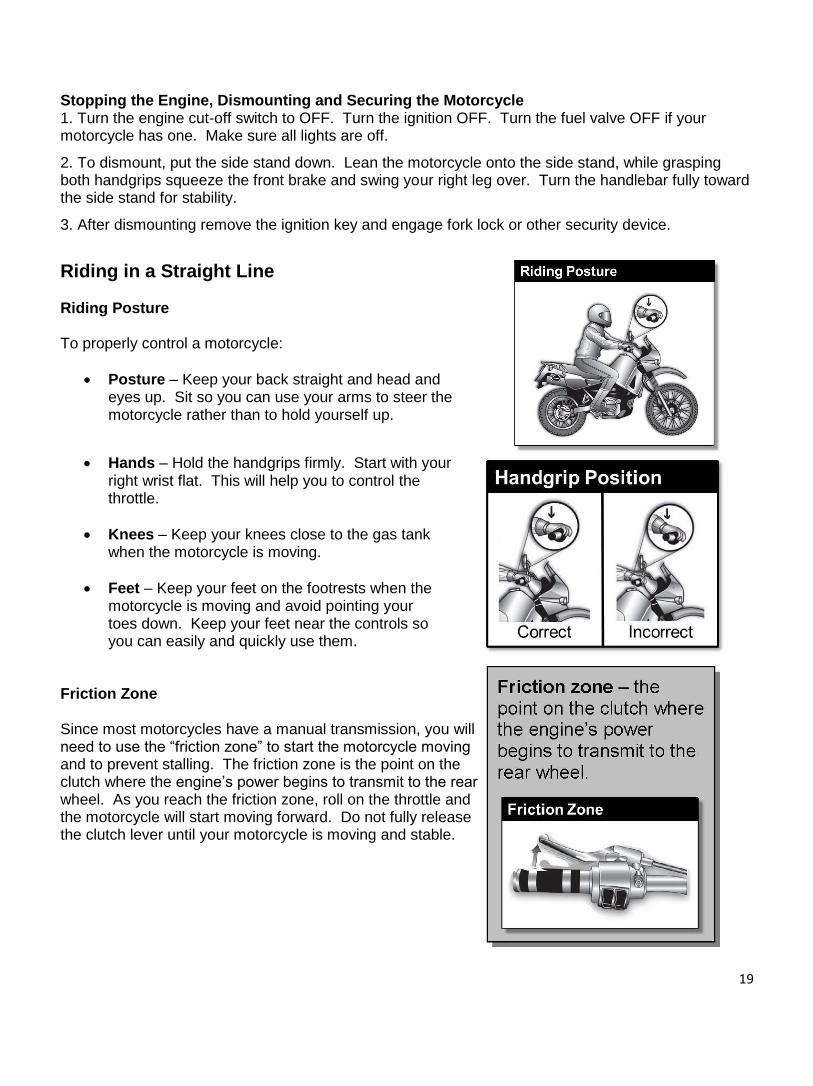
Riding in a Straight Line Riding Posture To properly control a motorcycle:
Posture – Keep your back straight and head and eyes up. Sit so you can use your arms to steer the motorcycle rather than to hold yourself up.
Hands – Hold the handgrips firmly. Start with your right wrist flat. This will help you to control the throttle.
Knees – Keep your knees close to the gas tank when the motorcycle is moving.
Feet – Keep your feet on the footrests when the motorcycle is moving and avoid pointing your toes down. Keep your feet near the controls so you can easily and quickly use them.
Friction Zone Since most motorcycles have a manual transmission, you will need to use the “friction zone” to start the motorcycle moving and to prevent stalling. The friction zone is the point on the clutch where the engine’s power begins to transmit to the rear wheel. As you reach the friction zone, roll on the throttle and the motorcycle will start moving forward. Do not fully release the clutch lever until your motorcycle is moving and stable.

20
Shifting Gears There is more to shifting gears than simply getting the motorcycle to pick up speed smoothly. Learning to use the gears when downshifting, turning, or starting on hills is important for safe motorcycle operation.
To upshift to a higher gear:
– Roll off, or close, the throttle as you squeeze in the clutch lever.
– Lift the shift lever. Use firm pressure.
– Release the shift lever after each shift is completed.
– Ease the clutch out as you roll on the throttle.
To downshift to a lower gear:
– Roll off or close the throttle as you squeeze in the clutch lever.
– Press down firmly (but don’t stomp) on the shift lever.
– Ease out the clutch to avoid skidding the rear tire. Starting on an Incline Here are some important tips to remember when starting on a hill:
Use the front brake to hold the motorcycle while you start the engine and shift into first gear.
Change to the foot brake to hold the motorcycle while you operate the throttle with your right hand.
Open the throttle a little bit for more power.
Release the clutch gradually.
Release the foot brake when the engine begins to slow down. This means the clutch is beginning to transmit power.
Continue to release the clutch gradually. If you release it too quickly, the front wheel may come off the ground, the engine may stop, or both.
Continue to open the throttle gradually, as needed. It is more difficult to start the motorcycle moving on an upgrade than on flat ground. There is always the danger of rolling backwards into a vehicle behind you.

21
Stopping Your motorcycle has brakes on the front and rear wheels. Always use both brakes, every time you slow or stop. When used correctly, the front brake can provide 70% or more of your total stopping power, therefore, use of the front brake is required for effective speed reduction. Using both front and rear brakes shortens stopping distance. To stop your motorcycle, squeeze the front brake lever and press down on the rear brake pedal gradually until stopped. Grabbing at the front brake or jamming down on the rear can cause the brakes to lock, resulting in control problems. Normal Stopping in a Curve If you need to stop while leaned over in a curve, apply smooth gradual pressure to both brakes as you start reducing your lean angle. The more you reduce the lean the more traction you will have to stop. You can apply more brake pressure as your motorcycle straightens up. It is recommended that riders use four steps for better control:
Turning New riders must be aware of the difficulty of negotiating turns and curves. Riders often try to take curves or turns too fast. Reduce speed before entering the turn and maintain this speed. These four steps will help you learn the skills for turning: SLOW – Reduce your speed before the turn. This can be done by rolling off the throttle as needed and, if necessary, applying both brakes. LOOK – Look through the turn to where you want to go. Turn just your head, not your shoulders, and keep your eyes level with the horizon. PRESS – Press on the handgrip in the direction of the turn. Press left handgrip – lean left – go left. Press right handgrip– lean right – go right. The higher the speed in a turn, the greater the lean angle. ROLL – Roll on the throttle to maintain steady speed or gradually accelerate through the turn. This will help keep the motorcycle stable.
It is recommended that riders use four steps for better control: 1. SLOW 2. LOOK 3. PRESS 4. ROLL

22
Turning Techniques In normal turns, the rider and the motorcycle should lean together at the same angle. In slow tight turns, counterbalance by leaning the motorcycle only and keeping your body straight.
Test Your Knowledge
Test Your Knowledge
1. When stopping, you should:
A. Use both brakes.
B. Use the front brake only.
C. Use the rear brake only.
2. When turning, you should:
A. Turn your head and shoulders to look through turns.
B. Turn just your head, not your shoulders to look through turns.
C. Keep your knees away from the gas tank.
1. A – page 4-4, Stopping
2. B – page 4-4, Turning

23
This Section Covers
Risk Awareness/Acceptance
Risk Management
Intersections
Space Management
Escape Routes
Increasing Conspicuity
Speed Management
Safe riding is more of a skill of the eyes and mind than of the hands and feet. You need to develop a set of street riding strategies that allows you to gather critical information to make good decisions and avoid problems.
Risk Awareness/Acceptance Almost all activities people engage in have some level of risk. Operating a motorcycle requires your full attention to reduce risk. Consider the following steps to manage risk and be a responsible rider: Rider Responsibilities Accept the responsibilities associated with operating a motorcycle:
You must have a motorcycle license.
You will be expected to follow the laws and rules of the road.
You must share the road with other users (i.e. pedestrians, bicyclists, large vehicles, etc.)
Ride alcohol and drug free.
Always wear protective gear. Risk Awareness Riding a motorcycle involves some risks not encountered when driving other types of vehicles. Some of these risks include:
Vulnerability – motorcycles provide less protection in a crash and do not have the stability of cars. This is why you should always wear protective gear.

24
Visibility – motorcycles are not as visible as other
types of vehicles because of their size. Other
motorists may not be looking for motorcycles in
traffic. This places you at risk. Risk Acceptance
Once you become aware of the risks associated with motorcycling it is time to accept those risks. Choosing to accept the challenges of being a responsible motorcyclist means to think about the consequences of your riding behavior in traffic. It also means accepting personal responsibility for the results of your decisions and actions, as well as developing good skills and judgment.
Risk Management To manage risk you must be aware of the potential risks and then have a plan to reduce the risks. SEESM – a simple, 3-step and powerful strategy – is to Search, Evaluate, Execute. It is the strategy to help you understand what is going on in traffic and to be constantly planning and implementing a course of action. Let’s examine each of these steps. Search Aggressively searching as far ahead as possible, to the sides and behind to identify potential hazards and escape routes, may help to avoid a crash. When searching ahead you should search for:
Road and surface characteristics – potholes, bridge
gratings, railroad tracks, debris, curves, slippery
surfaces, etc. may influence your riding strategy,
Traffic control markings and devices – look for traffic
signals and signs to help you know what to expect
ahead.
Other roadway users – vehicles in front of you traveling
in the same direction, those behind you, vehicles
traveling in the opposite direction, those entering and
leaving the roadway and turning. Pedestrians also can
cross your path of travel or reduce your escape route
options. SM – SEE is a Service Mark of MSF. Used with permission.
Motorcycles are not as
visible as other types
of vehicles because of
their size

25
While it’s most important to keep track of what’s happening ahead, you can’t afford to ignore situations behind. Knowing what’s going on behind will help you make a safe decision about how to handle trouble ahead. To search behind:
Check your mirrors – frequent mirror checks should be
part of your normal searching routine. Make a special point
of using your mirrors when you are stopped at an
intersection, before you change lanes, and before you slow
down.
Use head checks – checking your mirrors is not enough.
Motorcycles have “blind spots” like cars. Before you
change lanes, turn your head, and look to the side for other
vehicles. Only by knowing what is happening all around
you, are you fully prepared to deal with it. Evaluate Once you have identified the hazard(s), the next step is to quickly determine if they could affect you. Ask yourself, “what if?” Think about how hazards can interact to create risk for you. Anticipate potential problems and have a plan to reduce or eliminate the risk. Think about your time and space requirements in order to maintain a margin of safety. You must leave yourself time to react if a dangerous situation occurs. Execute Carry out your decision. What are you going to do and how are you going to do it? To create more space and minimize harm from any hazard:
Adjust your position and/or direction.
Adjust your speed by accelerating, stopping or slowing.
Communicate your presence and intentions with lights
and/or horn. Apply the SEE strategy to give yourself time and space. It works anywhere, and can help to ensure your safety and the safety of others.

26
Intersections The greatest potential for crashes is at intersections. Cars that turn left in front of you are the biggest dangers. Your use of SEE at intersections is critical. Increase your chances of being seen at intersections. Ride with your headlight on in a lane position that provides the best view of oncoming traffic. Provide a space cushion around the motorcycle that permits you to take evasive action. When approaching an intersection where a vehicle is preparing to cross your path:
Slow down.
Select a lane position to increase your
visibility to that driver.
Cover both brakes to reduce the time you
need to react.
Cover the clutch lever to prevent stalling. As you enter the intersection, move away from the vehicle.
Do not make radical movements, as drivers might think you are preparing to turn.
Be prepared to take action.
Traffic-Activated Sensor Lights Traffic-activated sensor lights can be troublesome for motorcyclists since the sensor may not detect your presence. To ensure the best chance of being detected, stop where the sensors are located. They are usually visible in the road surface.
Space Management It is extremely important to maintain an adequate “cushion of space" between vehicles. Increasing the following distance between vehicles will provide you with:
Time to react.
Space to maneuver. A responsible rider recognizes that space is the best protection against potential hazards.
Forty percent of
motorcycle/car crashes
are caused by drivers
turning left in front of
motorcyclists.

27
Lane Positions In some ways the size of the motorcycle can work to your advantage. Each traffic lane gives a motorcycle three paths of travel, as indicated in the illustration. Your lane position should:
Increase your ability to see and be seen.
Avoid others’ blind spots.
Avoid surface hazards.
Protect your lane from other drivers.
Communicate your intentions.
Avoid wind blast from other vehicles.
Provide an escape route. In general, there is no single best position for you to be seen and to maintain a space cushion around the motorcycle. No portion of the lane need be avoided – including the center, if weather and roadway conditions permit. Position yourself in the portion of the lane where you are most likely to be seen and you can maintain a space cushion around you. Move from one side of the lane to another to increase your distance from other vehicles. A responsible rider changes position as traffic situations change. Ride in path 2 or 3 if vehicles or other potential hazards are on your left. Remain in path 1 or 2 if hazards are on your right. If vehicles are present on both sides of you, the center of the lane, path 2, is usually your best option. The oily strip in the center portion that collects drippings from cars is usually no more than 2 feet wide. Unless the road is wet, the average center strip permits adequate traction to ride on safely. You can operate to the left or right of the oily strip and still be within the center portion of the traffic lane. Avoid riding on big buildups of oil and grease usually found at busy intersections or toll booths. Following Another Vehicle Motorcycles need as much distance to stop as cars. It is recommended that new motorcycle operators try to maintain a four second following distance behind the vehicle ahead. This allows you space to stop, swerve, and to keep a reasonable space cushion. A larger cushion of space is needed if your motorcycle will take longer than normal to stop. For example if you are riding 40 mph or more, if the pavement is slippery, if you cannot see
Use the whole width of the lane to help other roadway users see you better.

28
through the vehicle ahead, or if traffic is heavy and someone may squeeze in front of you, open up a five second or more following distance. Keep well behind the vehicle ahead even when you are stopped. This will make it easier to get out of the way if someone behind you is not slowing down. It will also give you a cushion of space if the vehicle ahead starts to back up for some reason. To estimate your following distance:
Pick out an object, such as a pavement marking, sign, pole or other stationary point, on or near the road ahead.
When the rear bumper of the vehicle ahead passes the object, count off the seconds: “one-thousand-one, one-thousand-two, one-thousand-three, one-thousand-four.”
If you reach the object before you reach “four,” you are following too closely.
Reduce speed and then count again at another stationary point to check the new following interval. Repeat until you are following no closer than “four-seconds.”
Being Followed Speeding up to lose someone following too closely only ends up with someone tailgating you at a higher speed. A better way to handle tailgaters is to get them in front of you. When someone is following too closely, change lanes and let them pass. If you can’t do this, slow down and open up extra space ahead of you to allow room for both you and the tailgater to stop. This will also encourage them to pass. If they don’t pass, you will have given yourself and the tailgater more time and space to react in case an emergency does develop ahead. Lane Sharing Vehicles and motorcycles need a full lane to operate safely. Do not share lanes with other vehicles. Lane sharing can leave you vulnerable to the unexpected and reduces your space cushion. You should ride in a staggered formation when following other motorcycles and position the motorcycle in the center of the travel lane, if weather and roadway conditions permit, to discourage motorists from attempting to squeeze by the motorcycle. Do not ride between rows of stopped or moving motor vehicles. This can be dangerous.

29
Merging Vehicles Do not assume that drivers merging on an entrance ramp will see you. Minimize the potential for danger by giving them plenty of room. Change lanes if one is open. If there is no room for a lane change, adjust speed to open up space for the merging driver.
Vehicles Alongside Avoid riding in the blind spot of a vehicle. Responsible riders recognize that vehicles traveling in the adjacent lane may unexpectedly change direction forcing the rider into a potentially dangerous situation. Vehicles in the next lane also block your escape if you come upon a hazard in your own lane. Adjust your speed until a proper and adequate space cushion has been established between vehicles.
Escape Routes An escape route is an alternate path of travel that you can take if a hazard develops in your path. No matter what the conditions, always use SEE and plan an escape route. In the illustration below, the first box shows a rider who has three escape routes open, should they need to take an alternate path. The second box shows a rider who has not planned an escape path. The rider has nowhere to go if they need to take an alternate path of travel, which leaves them vulnerable to potential hazards.

30
Increasing Conspicuity In crashes with motorcyclists, drivers often say that they never saw the motorcycle. From ahead or behind, a motorcycle’s outline is much smaller than a car’s. Also, it’s hard to see something you are not looking for, and most drivers are not looking for motorcycles. More likely, they are looking through the narrow, two-wheeled silhouette in search of cars that may pose a problem to them. Even if a driver does see you coming, you aren’t necessarily safe. Motorcycles may appear farther away, and seem to be traveling slower than they actually are. It is common for drivers to pull out in front of motorcyclists, thinking they have plenty of time. Too often, they are wrong. However, you can do many things to make it easier for others to recognize you
and your cycle. Clothing Most crashes occur in broad daylight. Wear bright colored clothing to increase your chances of being seen. Remember, your body is half of the visible surface area of the rider-motorcycle unit. Reflective, bright colored clothing is best. Bright orange, red, yellow or green jackets or vests are your best bets for being seen. Brightly colored helmets can also help others see you. Reflective material on a vest and on the sides of the helmet will help drivers coming from the side spot you. Reflective material can also be a big help for drivers coming toward you or from behind. Headlight The best way to help others see your motorcycle is to keep the headlight on – at all times (new motorcycles sold in the USA since 1978 automatically have the headlights on when running). Studies show that, during the day, a motorcycle with its light on is twice as likely to be noticed. Also use your low beams at night and in fog. Signals The signals on a motorcycle are the same as those on a car. They tell others what you plan to do. Use them anytime you plan to change lanes or turn. Use them even when you think no one else is around. Due to a rider’s added vulnerability, signals are even more important. They make you easier to spot.
Being seen is your responsibility!

31
When you enter a freeway, drivers approaching from behind are more likely to see your signal blinking and make room for you. Once you turn, make sure your signal is off or a driver may pull directly into your path, thinking you plan to turn again.
Brake Light Your motorcycle’s brake light is usually not as noticeable as the brake lights on a car – particularly when your taillight is on. (The taillight goes on with the headlight.) If the situation will permit, help others notice you by flashing your brake light before you slow down. It is especially important to flash your brake light before:
You slow more quickly than others might expect (for example, turning off a high-speed highway.)
You slow where others may not expect it (for example, in the middle of a block or at an alley.) If you are being followed closely, it’s a good idea to flash your brake light before you slow. The tailgater may be watching you and not see something ahead that will make you slow down. This will hopefully discourage them from tailgating and warn them of hazards ahead they may not see. Horn Be ready to use your horn to get someone’s attention quickly. Keep in mind that a motorcycle’s horn isn’t as loud as a car’s, therefore, use it, but don’t rely on it. Other strategies may be appropriate along with the horn.
Speed Management Handling Dangerous Surfaces
Slippery surfaces.
Railroad tracks.
Grooves and gratings. Slippery Surfaces On slippery surfaces, you should use added caution. Motorcycles handle better when ridden on surfaces with good traction. Maintaining balance and cycle control are difficult on slippery surfaces. To reduce your risk you can take certain preventative measures:
Reduce Speed – Slow down before you get to a slippery surface to lessen your chances of skidding and increase your following distance. Your motorcycle needs more distance to stop. And, it is particularly important to reduce speed before entering wet curves.

32
Avoid Sudden Moves – Any sudden changes in speed or direction can cause a skid. Be as smooth as possible when you speed up, shift gears, turn or brake.
Use Both Brakes – The front brake is still effective, even on a slippery surface. Squeeze the brake lever gradually to avoid locking the front wheel. Remember, gentle pressure on the rear brake.
Surfaces that provide less traction include:
Wet surfaces – particularly just after it starts to rain
and before surface oil washes to the side of the road.
When it starts to rain, ride in the tire tracks left by cars
and avoid pooled water and highway ruts. Often, the
left tire track will be the best position, depending on
traffic and other road conditions as well.
Ice or snow covered surfaces – snow melts faster on
some sections of a road than on others. Patches of ice
can occur in low or shaded areas and on bridges and
overpasses. It is recommended you avoid snow and
ice covered surfaces.
Shiny surfaces – metal covers, steel plates, bridge
gratings, train tracks, lane markings, leaves and wood
can be very treacherous when wet.
Dirt and gravel – on curves and ramps leading to and
from highways, dirt and gravel can collect along the sides
of the road. Choose a lane position that minimizes the risk of injury.
Oil spots – watch for these when you put your foot down to stop or park. You may slip and fall. Securing the proper footing will help you from losing your balance or falling.
Railroad Tracks, Trolley Tracks and Pavement Seams Usually it is safer to ride straight within your lane to cross tracks. Turning to cross tracks at a 90 degree angle or parallel path can be more dangerous – your path may carry you into another lane of traffic. For track and road seams that run parallel to your path of travel, move far enough away from tracks, ruts, or pavement seams to cross at an angle of at least 45. Then, make a quick, sharp turn. Edging across could catch your tires and throw you off balance.

33
Grooves and Gratings Riding over rain grooves or bridge gratings may cause your motorcycle to weave. Maintain a steady speed and ride straight across. Crossing at an angle forces riders to zigzag to stay in the lane.

34
This Section Covers
Crash Avoidance
Cornering
On the road, situations change constantly. As a responsible rider, you know how important it is to be in full control of the motorcycle. A responsible rider knows that good road management starts with knowledge and practice of SEE.
Crash Avoidance No matter how careful you are, there will be times when you find yourself in a difficult spot. Your chances of avoiding a crash and possible injury will depend on your ability to react quickly and properly. Two critical crash avoidance skills you will need to learn and practice are stopping quickly and swerving. Stopping Quickly Stopping a motorcycle quickly and safely is a skill that requires a lot of practice. This is accomplished by applying controlled pressure to both the front and rear brakes at the same time without locking either wheel. To do this:
Squeeze the front brake lever and apply pressure to the rear brake pedal at the same time. Do not apply maximum pressure to the front brake lever and rear brake pedal all at once. Gradually increase pressure to the front brake lever as weight is transferred forward to the front tire.
Keep your knees against the tank and your eyes up, looking well ahead. Good riding posture will help you stop the motorcycle in a straight line.
If the front wheel locks up, release pressure on the front brake lever to get the tire rolling, then immediately reapply with controlled gradual pressure.
If the rear wheel locks up, keep it locked until you have come to a complete stop. Maintain pressure on the rear brake pedal and keep your knees against the tank and your eyes up. You can still bring the motorcycle to a controlled stop in a straight line if the rear wheel locks up.

35
Stopping Quickly in a Curve If you must stop quickly while turning or riding in a curve, the best technique is to straighten the motorcycle, square the handlebars and then stop. There may be conditions that do not allow straightening first, such as running off the road in a left-hand curve or dealing with oncoming traffic in a right-hand curve. In such situations, apply the brakes smoothly and gradually. As you slow, you can reduce your lean angle and apply more brake pressure until the motorcycle is straight and maximum brake pressure is possible. You should “straighten” the handlebars in the last few feet of stopping; the motorcycle should then be straight up. Anti-Lock Braking Systems (ABS) Some motorcycles use this technology to prevent wheel lock-up. If your motorcycle is equipped with anti-lock brakes apply maximum pressure on both the front and rear brakes as quickly and firmly as you can. You may feel a pulsation in the brakes; continue to hold brake pressure until you have completely stopped. Handling Skids Sometimes a skid cannot be avoided. Here’s what to do:
Front-Wheel Skids – If the front wheel locks, release the front brake immediately and completely. Reapply the brake smoothly. Front-wheel skids result in immediate loss of steering control and balance. Failure to fully release the brake lever immediately will result in a crash.
Rear-Wheel Skids – A skidding rear wheel is
a dangerous condition, caused by too much
rear brake pressure, which can result in a
violent crash and serious injury or death. If
the rear wheel is skidding, keep the rear
brakes applied and the front tire pointed
straight ahead, until you have come to a
complete stop. Do not release the rear
brake.

36
Swerving Swerving to avoid a crash may be appropriate if stopping isn’t a solution. A swerve is any sudden change in direction. Be sure you have enough time and space to swerve. It can be two quick turns, or a rapid shift to the side. To swerve:
Apply firm pressure to the handgrip located on the side you want to turn. This will cause the motorcycle to lean quickly. The sharper the turn, the more the motorcycle must lean.
Press on the opposite handgrip once you clear the obstacle to return to your original direction of travel.
Keep your body upright and allow the motorcycle to lean in the direction of the turn while keeping your knees against the tank and your feet solidly on the footrests.
IF BRAKING IS REQUIRED SEPARATE IT FROM SWERVING. Brake before or after – never while swerving
Cornering in a Curve Many crash-involved riders enter curves too fast and are unable to complete the curve. Although every curve is different, the basic cornering procedure – slow, look, press, roll – applies to all curves. Your best path in a curve depends on traffic, road conditions and curve of the road. If traffic is present:
Move to the center of your lane before entering a
curve – and stay there until you exit.
This permits you to spot approaching traffic, adjust for
traffic “crowding” the center line, and debris blocking part of your lane.
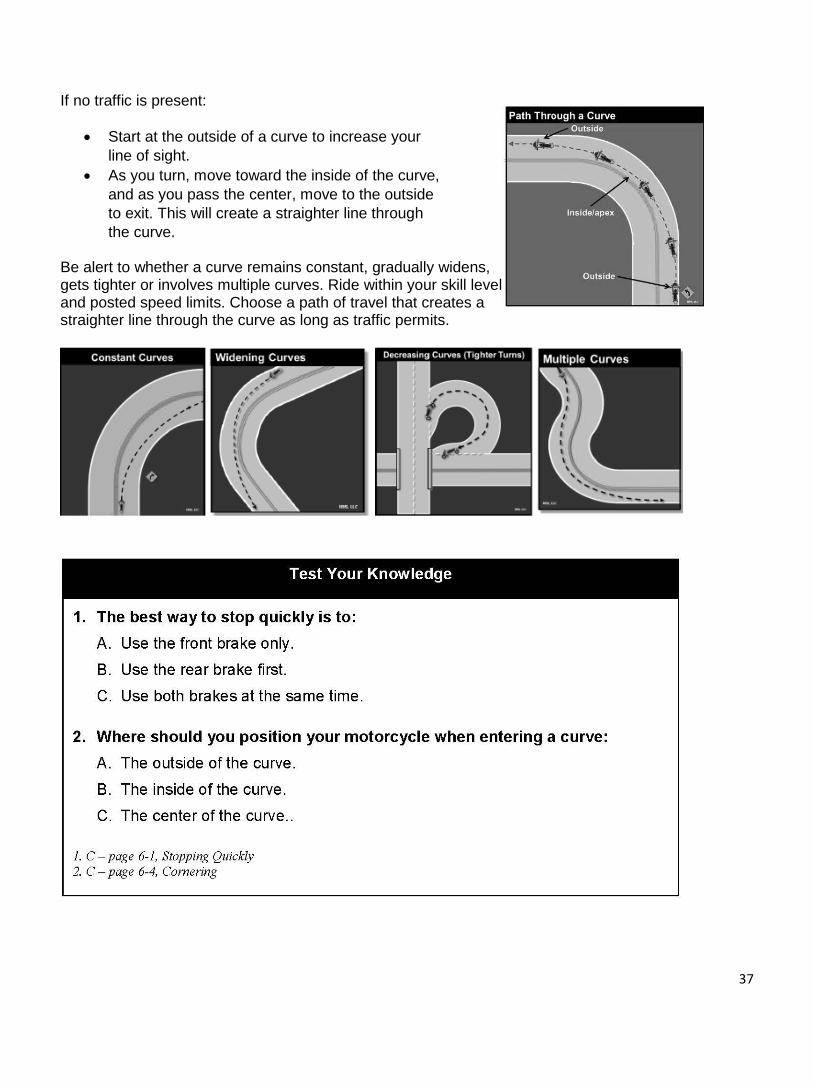
37
If no traffic is present:
Start at the outside of a curve to increase your
line of sight.
As you turn, move toward the inside of the curve,
and as you pass the center, move to the outside
to exit. This will create a straighter line through
the curve. Be alert to whether a curve remains constant, gradually widens, gets tighter or involves multiple curves. Ride within your skill level and posted speed limits. Choose a path of travel that creates a straighter line through the curve as long as traffic permits.

38
SECTION 7
Special Riding Situations
This Section Covers
Crowned Roads
Work Zones
Tire Failure
Animals
Wind
The following section offers some additional information on special riding situations you may encounter when riding a motorcycle.
Crowned Roads A road surface that is higher in the middle than at the sides is a crowned road. Use caution and slow down when traveling on crowned roads because ground clearance is reduced and the lean angle available will be less than on a flat road.
Work Zones Work zones present a hazard to all drivers but even more so for motorcycle riders. Lacking four-wheel stability, the motorcycle rider must reduce speed and be especially mindful of potential hazards. The following are types of work zone road hazards and what to do if you encounter them:
Sand or gravel on pavement – Slow down,
don’t make sudden turns, brake lightly in a
straight line. If you encounter long stretches of
sand or gravel, downshift and keep your speed
steady.
Scored or grooved pavement – Keep your
head and eyes up. Go slow, don’t fight the handlebars. Keep a steady throttle.
Oil or fresh tar – Avoid if possible. Go slow and avoid sudden moves.
Rippled and uneven temporary pavement – Scan the pavement and pick the smoothest line. Cross slowly and carefully. Be aware of the difference in height between lanes that have been repaved and those awaiting to be paved – crossing into the higher lane at high speeds and a narrow angle could cause you to lose control.
Objects in the road – Scan well ahead. Go around object, if possible. Increase your following distance to allow maneuvering room.
SECTION 7
Special Riding Situations

39
Tire Failure You will seldom hear a tire go flat. If the motorcycle starts handling differently, it may be a tire failure. This can be dangerous. You must be able to tell from the way the motorcycle reacts. If one of your tires suddenly loses air, react quickly to keep your balance. Pull off and check the tires. If the front tire goes flat, the steering will feel “heavy.” A front-wheel flat is particularly hazardous because it affects your steering. You have to steer well to keep your balance. If the rear tire goes flat, the back of the motorcycle may jerk or sway from side to side. If either tire goes flat while riding:
Hold handgrips firmly, ease off the throttle, and keep a straight course.
If braking is required, however, gradually apply the brake of the tire that isn’t flat, if you are sure which one it is.
When the motorcycle slows, edge to the side of the road, squeeze the clutch and stop.
Animals Dogs sometimes chase motorcycles. Once an approaching dog is spotted, slow down and downshift until the dog is near your motorcycle then accelerate away from the dog as it approaches. Keep control of your motorcycle, and look to where you want to go. Don’t kick at the dog because it will make controlling the motorcycle difficult. Larger animals such as deer or elk present a different problem. These animals are unpredictable, and hitting one can be as harmful as colliding with another vehicle. Use more aggressive SEE maneuvers for additional time and space in areas where larger animals may be present. If one of these animals is encountered on or near the roadway, the only reliable action is to stop before reaching it. Then wait until the animal leaves or move past the animal at walking speed.
When being chased by a dog: 1. Slow down 2. Downshift 3. Accelerate out of dog’s
reach

40
Wind Strong, steady winds can affect you and your motorcycle. The effects can occur anywhere and often happen in open areas or mountainous terrain. Wind turbulence can occur when you share the road with large vehicles like trucks, buses and recreational vehicles. To respond to wind gusts or windblasts:
Lean into the wind by applying forward pressure on the handgrip.
Move away from other vehicles as they approach or as you pass.
Maximize the space cushion around you.
Find a safe place to park until conditions improve if the wind becomes too dangerous.
Test Your Knowledge
1. When riding over scored or grooved pavement in a work zone:
A. Look down to see changes in the road surface.
B. Keep your head and eyes up.
C. Stay to the left side of the lane. 2. If you are chased by a dog:
A. Stop until the animal loses interest.
B. Approach the animal slowly, then speed up.
C. Swerve around the animal.
1. B – page 7-1, Work Zones
2. B – page 7-2, Animals
Test Your Knowledge

41
This Section Covers
Carrying Passengers and Cargo
Group Riding
Only skilled, experienced riders should carry passengers or heavy loads or ride in groups. If you choose to carry passengers or heavy loads or ride in a group you will need to know some important information.
Carrying Passengers and Cargo Only skilled, experienced riders should carry passengers or heavy loads or ride in groups. Before carrying a passenger or heavy loads, know how both could affect motorcycle operation. The extra weight of a passenger or cargo will affect the way your motorcycle handles, requiring extra practice, preparation and caution. For this reason, only experienced riders should attempt to carry passengers or large loads. Before taking a passenger or heavy load on the street, check the air pressure of both tires and adjust the suspension settings to compensate for the lower rear of the motorcycle. Refer to the owner’s manual for more information. When carrying a passenger, your motorcycle should have:
A seat large enough to hold both of you. The passenger should be seated behind you and should sit as far forward as possible. No passenger regardless of age should be seated in front of you.
Footrests for the passenger to prevent them from falling off and pulling you off, too.
Secure hand strap or solid handholds for the passenger to hold onto. The passenger can also hold on to your waist, hips, or belt.
When riding with passengers:
Ride a little slower, especially when taking curves, corners, or bumps.
Start slowing earlier; you may need to use more pressure on the brakes.
Wait for larger gaps to cross, enter, or merge in traffic.
Incorporate a larger cushion of space when stopping or slowing the cycle.

42
Instructing Passengers Your passenger should wear the same protective gear as you. As a routine practice, instruct your passenger on cycling basics prior to starting their trip. Even if your passenger is a motorcycle rider, provide complete instructions before you start. Tell your passenger to:
Get on the motorcycle only after you have started the engine.
Keep both feet firmly planted on the cycle’s footrests, even when stopped.
Keep legs away from the muffler(s), chains or moving parts.
Hold firmly onto your waist, hips, or passenger handgrips.
Stay directly behind you and look over your shoulder in the direction of the turn or curve to help you lean in the direction of the turn or curve.
Avoid unnecessary conversation and movement when the cycle is in operation. Also, tell your passenger to tighten his or her hold when you:
Approach surface problems.
Are about to start from a stop.
Are about to turn sharply or make a sudden move.
Group Riding Riding with others is one of the many great experiences of motorcycling. Responsible riders do so in a manner that neither endangers nor interferes with the free flow of traffic, riding with other cyclists can help to increase rider visibility and safety. Concentration and communication are essential to group riding. You should gain some riding experience before riding in a group. To enhance safety and reduce the risk of injury when riding in groups you should:
Plan ahead
Keep the group small
Keep your distance
Ride in staggered formation – don’t pair up
Move into single-file formation when riding curves, turns,
or entering or leaving a highway.

43
Passing in a Group
Riders in a staggered formation should pass one at a time. If being passed while riding in a group, maintain your lane position.
First, the lead rider should pull out and pass when it is safe. After passing, the leader should return to correct formation position to open up space for rider number two and ride at passing speed.
After the first rider passes safely, the second rider should move from the right position to the left (lead) position and complete their pass, pulling into staggered formation behind the lead.
The rest of the group follows this routine. Pass from the left position and return to the proper formation.
The lead rider returns to cruising speed when the last rider has completed the pass.
Test Your Knowledge
1. Passengers should:
A. Look over their shoulder in the direction of the turn or curve.
B. Never hold onto the rider.
C. Sit as far back as possible. 2. What formation should you form when riding in a group?
A. Single-file formation.
B. Side-by side formation.
C. Staggered formation. 1. A – page 8-2, Instructing Passengers, 2. C – page 8-2, Group Riding
r Knowledge

44
This Section Covers
Cold Weather
Extreme Hot Weather
Night Riding
Distracted Riding
Fatigue
Riding a motorcycle requires a great amount of mental alertness and physical skill. Sometimes changes in your environment occur, which can affect your visibility. Physical changes may occur as well, which may affect your riding performance. Responsible riders know how to adjust or compensate for factors which affect rider performance.
Cold Weather In cold weather riding, protect yourself by wearing proper protective gear like a windproof jacket and insulated layers of clothing. It is wise to dress in layers so the layers can be removed as desired. Topping the protective gear with a windproof outer layer can prevent cold air from reaching the skin. Cold weather significantly lengthens your reaction time. To compensate for the slower reaction time, reduce your speed and increase your following distance and space to the sides. Hypothermia Riding for long periods in cold weather may lower your body temperature and cause hypothermia. Symptoms of hypothermia may include:
Deterioration in physical coordination
Irrational, confused behavior
Sluggish movement
Shivering
Muscle tension
Shallow, slow breathing If chill is experienced, leave the roadway at your first opportunity and find shelter. Drink warm liquids, do some exercise to warm yourself and if your clothes are wet change out of them.

45
Extreme Hot Weather In extreme hot weather wear protective gear that breathes. It is still important to wear a jacket and pants to protect you in a collision and to prevent dehydration. Drink plenty of water, stop and remove unnecessary, heavy clothing and dry your hands, if they become slippery due to perspiration.
Night Riding Riding at night presents additional risks because a rider’s ability to see and be seen by others is limited. You should adjust your riding behavior to compensate for limited visibility by:
Reducing Your Speed – Ride even slower than you would during the day, particularly on roads you don’t know well. This will increase your chances of avoiding a hazard.
Increasing Distance – Distances are harder to judge at night than during the day. Open up a four second following distance or more. And allow more distance to pass and be passed.
Using the Car Ahead – The headlights of the car ahead can give you a better view of the road than even your high beam can. Taillights bouncing up and down can alert you to bumps or rough pavement.
Using Your High Beam – Get all the light you can. Use your high beam whenever you are not following or meeting a car.
Be Visible – Wear reflective materials when riding at night.
Being Flexible About Lane Position – Change to whatever portion of the lane is best able to help you see, be seen, and keep an adequate space cushion.
Distracted Riding A distraction is anything that takes your attention away from riding. Rider distractions may occur anytime and anywhere. Distracted riding can cause collisions, resulting in injury, death or property damage. Taking your eyes off the road or hands off the motorcycle presents obvious riding risks. Mental activities that take your mind away from riding are just as dangerous. You must maintain your attention to the riding task. You are completely and solely responsible for operating your motorcycle in a safe manner.
Fatigue Fatigue can affect your control of the motorcycle. To minimize the potential for fatigue:
Get a good night’s rest – A good night’s rest is important for preventing fatigue.
Protect yourself from the elements – wind, cold and rain make you tire quickly. Dress warmly. A windshield is worth its cost if you plan to ride long distances.
Vary speed and position on seat regularly –The stimulation resulting from slight changes in speed or in body position will help to overcome the effects of fatigue.
Take frequent rest breaks – Stop, and get off the motorcycle every two hours or as needed.
Don’t use artificial stimulants – Artificial stimulants often result in extreme fatigue or depression when they start to wear off. Riders are unable to concentrate on the task at hand.

46
Test Your Knowledge
1. When riding at night:
A. Use the left portion of the lane to see around other vehicles ahead.
B. Ride close to the vehicle in front of you to see better with their headlights.
C. Reduce your speed to increase your chance of avoiding a hazard.
2. To minimize the potential for fatigue:
A. Turn on the radio and open the window.
B. Take frequent rest breaks.
C. Drink caffeine.
1. C – page 9-2, Night Riding
2. B – page 9-3, Fatigue
Test Your Knowledge

47
This Section Covers
Common Operating Characteristics of Trikes and Motorcycles
Unique Operating Characteristics of Trikes
Unique Operating Characteristics of a Motorcycle with a Sidecar
Additional Resources
Many states require a separate license or endorsement to operate a three-wheel vehicle. You may be required to pass both a written and a skills test. This section contains information that will help you prepare for the written exam for a three-wheel vehicle license or endorsement.
Common Operating Characteristics of Trikes and Motorcycles with a Sidecar
Types of Three-Wheel Vehicles Traditional two-wheel motorcycles are considered single-track vehicles. Three-wheel vehicles could have either double or triple tracks. Double track vehicles are motorcycles with sidecars, while triple track vehicles (trikes) can have either two front wheels or two rear wheels.
Differences between Two-Wheel Motorcycles and Three-Wheel Vehicles A three-wheel vehicle is naturally more stable than a two-wheel motorcycle. However under certain conditions it could “tip over” or lift one of the wheels off the pavement. In order to ensure its stability, you will need to pay attention to your body position, your speed, and how you load a three-wheel vehicle. Three-wheel vehicles also steer differently. Since three-wheel vehicles cannot lean, the front wheel must be pointed in the direction you want the vehicle to go.
SECTION 10 Three-Wheel Vehicles

48
Be Familiar with Your Vehicle Make sure you are completely familiar with the three-wheel vehicle before you take it out on the street. Be sure to review the owner’s manual. Remember three-wheel vehicles take up more space than two-wheel motorcycles and therefore you will need more space to maneuver.
Body Position Your body position is important for control on a three-wheel vehicle. You should be able to reach both handgrips comfortably while leaning and shifting your weight in turns.
Turning Approach turns and curves with caution. If you enter a turn too fast you may end up crossing into another lane of traffic, lifting a wheel, or going off the road. Over steering could cause the vehicle to skid and you could lose control.
Hills When riding uphill on a three-wheel vehicle some weight will shift to the rear, causing the front of the vehicle to become lighter. This weight shift reduces the traction on the front wheel(s) for steering and braking. You should shift some of your body weight forward to maintain steering control. When riding downhill, gravity increases the amount of braking force required to slow or stop the vehicle. It is important, therefore, to begin slowing earlier for cornering and stopping.
Lane Position The width of a three-wheel vehicle is similar to the width of some automobiles, therefore, unlike a two-wheel motorcycle, you are limited in lane positioning. Keep toward the center of the lane and within the lane markings. Lane positioning when riding in groups is also an important consideration. Ride single file and always maintain a safe margin, four seconds minimum, between vehicles.
Parking at the Roadside Position your vehicle in a parking space so you are parked parallel to the curb. Set the parking brake or leave it in gear to keep it from rolling. Parking parallel to the curb will facilitate pulling away from the curb and entering the lanes of traffic.

49
Swerving A three-wheel vehicle is not as maneuverable as a two-wheel motorcycle, so it is important to look well ahead to avoid the need for any sudden turns or swerving. Swerving is seldom the best option to avoid a collision. If swerving is required, brake either before or after the swerve, never while swerving. You should not attempt swerving without proper training. If you need to avoid a collision the best option may be hard braking.
Cornering and Curves When riding through curves, remember to stay within your lane. Adjust your speed before entering a curve. You may need to lean or shift your weight in the direction of the turn to avoid causing any of the wheels to leave the ground and, possibly, losing control.
Unique Operating Characteristics of Trikes Turning Because the weight of a trike is distributed almost equally between the two front or two rear wheels, these vehicles handle the same in left and right turns. When turning a trike:
Approach a turn with your head up, and look
through the turn.
Adjust speed before the turn to allow you to safely
accelerate through the turn.
Lean or shift your weight in the direction of the turn.
Steer the front wheel(s) toward the turn.
Accelerate gradually as you exit the turn.
Stopping Quickly An important handling characteristic to be aware of on a standard trike (1 wheel in front, 2 in the rear) is that the two rear wheels have more braking power. How much varies by trike design. This is because weight does not shift to the front wheel on a trike during hard braking. Most of the weight stays on the rear wheels and makes the rear brakes more effective. The front brakes are more effective on trikes with 2 wheels in front, 1 in the rear, where weight is tranfered to the front wheels during braking making the front brakes more effective.

50
Carrying a Passenger and Cargo Only skilled, experienced riders should carry passengers or heavy loads. The additional weight of a passenger or cargo will change the handling characteristics of the vehicle. If a passenger is being carried, the passenger will sit directly behind you. When carrying cargo, center the load and keep it low in the storage areas so it is balanced side-to-side. Refer to your owner’s manual for more information.
Unique Operating Characteristics of a Motorcycle with a Sidecar
Stopping Check your sidecar for brakes. Some sidecars are equipped with brakes while others are not. Your stopping distance and handling will be affected if your sidecar is not equipped with brakes. You may need to steer slightly in the direction of the sidecar when applying the motorcycle brakes if your sidecar is not equipped with brakes.
Accelerating During acceleration, steer slightly in the opposite direction from the sidecar to maintain a straight line path.

51
Turning When operating a sidecar-equipped motorcycle, additional consideration needs to be given to the direction of the turn and amount of weight in the sidecar. When turning a motorcycle with a sidecar:
Evaluate the degree of turn required.
Adjust speed before the turn to allow you to safely accelerate through the turn.
Lean or shift your weight in the direction of the turn.
Maintain speed as you enter the turn.
Accelerate gradually as you exit the turn. Turning Left During a left turn, the sidecar acts as a stabilizer, so the sidecar wheel stays on the ground. However, if the turn is taken too sharply or at too great a speed, it may cause the rear wheel of the motorcycle to lift off the ground and the nose of the sidecar to contact the pavement. Turning Right A right turn taken too sharp or at too great a speed may cause the sidecar wheel to lift off the ground. The lift will be greater if the sidecar is empty or lightly loaded. You can avoid this wheel lift by slowing before entering the turn and shifting more of your weight to the inside of the turn, towards the sidecar.

52
Stopping Quickly Stopping quickly in a straight line is the primary technique for avoiding collisions in traffic. Always use the front and rear brakes simultaneously, adjusting pressure on the levers to apply maximum braking just short of skidding either wheel. If the front wheel skids, ease off some of the pressure to regain steering control. If the rear wheel skids, keep it locked until the vehicle has stopped completely. If the sidecar wheel has a brake, and that wheel starts to skid, you can safely ignore it. Making quick stops in a curve is more difficult, especially if the road curves to the right. Hard braking in a curve to the right tends to lift the sidecar which may require additional weight shift to the right to compensate. Stopping quickly in turns to the left is less dangerous because there is a reduced danger of tipping over. And, if the wheels skid, the vehicle will slide toward the road shoulder, not into the opposing lane of traffic.
Carrying Passengers and Cargo Only skilled, experienced riders should carry passengers or heavy loads. The additional weight of a passenger or cargo will change the handling characteristics of the vehicle. You must give some thought to where the passengers are seated and the loads are positioned. The best place for a passenger is in the sidecar. Avoid carrying a passenger behind you while leaving the sidecar empty. This could increase your chances for a tip over. If you have two passengers, place the heavier passenger in the sidecar to improve handling. The passenger sitting behind you should sit upright at all times. It is not necessary for the passenger to lean into curves with you. When loaded, your vehicle will need more time and distance to stop. You will need to increase your following distance. When carrying cargo in a sidecar, it should be centered low, over the sidecar axle and secured firmly in place. If the cargo shifts, handling will be affected.
Additional Resources for More Information on Three-Wheel Vehicles Here is a list of additional resources for more information on three-wheel vehicles.
The National Highway Traffic Safety Administration (NHTSA) website: http://www.nhtsa.gov/Safety/Motorcycles
Evergreen Safety Council’s website, includes a list of nationally available three-wheel courses: www.esc.org/step_national_schedule.php
The Sidecar/Trike Education Program student handbook can be purchased from the Evergreen Safety Council at 800-521-0778.
Sidecar Safety Program (SSP), Inc., Driving a Sidecar Outfit: A manual on learning to drive a motorcycle/sidecar combination, 2nd edition, Copyright 2008. This book is available by contacting the SSP directly at: [email protected].
The Motorcycle Safety Foundation’s (MSF) website has information on: - You and Your 3-wheel Motorcycle: Riding Tips:
http://msf-usa.org/downloads/3w_tips.pd f - MSF 3WBRC training course:
http://msfusa.org/downloads/3WBRC_Student_Handbook_2010.pdf

53
Test Your Knowledge
1. What are two major differences between two-wheel motorcycles and three-wheel vehicles? A three-wheel vehicle:
A. Is less stable, and is steered by pointing the front-wheel in the direction of the turn.
B. Is more stable, but could tip-over and is steered by pointing the front-wheel in the direction of the turn.
C. Is more stable, but could tip-over and is steered by pointing the front-wheel in the opposite direction of the turn. 2. When riding a three-wheel vehicle in groups, you should:
A. Ride single file and maintain a four-second following distance.
B. Ride in staggered formation and maintain a four-second following distance.
C. Ride single file and maintain a one-second following distance.
3. When turning a trike, how should you approach the turn?
A. With your head up and adjusting your speed.
B. With your head down and accelerating.
C. With your head down and adjusting your speed.
4. When stopping quickly and the front wheel skids, you should:
A. Keep it locked until the vehicle has completely stopped.
B. Ease off some of the pressure to regain steering control.
C. Hold the handgrips firmly and ease off the throttle. 1.B – page 10-4, Differences between Two-Wheel Motorcycles and Three-Wheel Vehicles, 2. A – page 10-5, Lane Position, 3.A –
page 10-6, 4. B – page 10-9, Stopping Quickly
Test Your Knowledge

54
This Section Covers
Motorcycle Controls
Pre-Ride Check
Passing Parked Vehicles
Parking at Curbs
Passing and Being Passed
Hand Signals
Carrying Loads This section contains supplementary information that may useful when learning how to ride a motorcycle. Refer to your motorcycle owner’s manual for additional information.
Motorcycle Controls It is important to read your motorcycle owner’s manual to learn where your motorcycle controls are and how to operate them. You should be able to operate them while riding without having to look for them. Primary Controls There are six primary controls needed to make the motorcycle move and stop. You will need both hands and both feet to operate these controls.
Handlebars – The handlebars are used to initiate and control motorcycle lean, which turns the motorcycle.
Throttle – Is the right handgrip and is operated by rolling the handgrip toward you to increase speed and away from you to decrease speed. When released, the throttle snaps back to an “idle” position. To use the throttle safely and comfortably, keep four fingers around the throttle/handgrip and the wrist in a flat position.
SECTION 11
Optional Content

55
Clutch Lever – Located in front of the left handgrip. To operate squeeze the clutch lever in toward the left handgrip, disconnecting power from the rear wheel. To reengage power, slowly release the clutch lever while gently applying throttle.
Gearshift Lever – Is usually located on the left side of the motorcycle in front of the footrest and is operated by the left foot. To shift to a higher gear (upshift), squeeze the clutch lever and then lift the gearshift lever. To shift to a lower gear (downshift), squeeze the clutch lever and then press the gearshift lever. Motorcycle transmissions shift only one gear per each lift or press. The shift lever must be released before you can shift again. A typical shift pattern is 1-N-2-3-4-5-(6).Neutral (N) is a half-shift up from first or a half-shift down from second; a full upshift or downshift will bypass neutral. An instrument light indicates when the transmission is in neutral.
Front Brake Lever – Located in front of the right handgrip and controls the brakes on the front wheel. To operate, squeeze the front brake lever smoothly and progressively.
Rear Brake Pedal – Located in front of the right footrest and controls braking on the rear wheel. To operate press down on the rear brake pedal with your right foot.
Other Controls and Equipment Along with the six primary controls there are a few other controls on most motorcycles that are important to know and locate. The location and operation of some of these controls vary from model to model. Refer to your motorcycle owner’s manual.
Engine Cut-Off Switch – Located on the right handgrip and operated by the right thumb. It allows you to shut off the engine without removing your hands from the controls.
Fuel Supply Valve – Controls fuel supply to the engine. To run, turn from OFF to ON. Also may include RESERVE and PRIME positions. It may not be present on some motorcycles.
Ignition Switch – Usually located near the instrument cluster, on the gas tank or under the tank and activated with a key. Positions include ON, OFF, LOCK and PARK. The LOCK position allows the key to be removed and engages a steering-lock mechanism. PARK activates the taillight for increased visibility if you park alongside a roadway at night.
Choke (if equipped) – Frequently located near the left handgrip, the instrument cluster or the carburetor. It is important that you consult your owner’s manual for more information. The choke provides an enriched fuel mixture to assist in cold engine starts. Turn to OFF position when engine is warmed.
Turn Signal Switch – Usually located on the handgrip(s) and operated by the thumb. Most models do not self-cancel. Check your owner’s manual.
High/Low Beam Headlight – Located on the left handgrip. On most motorcycles the headlight activates when the ignition is on.

56
Horn – Located on the left handgrip. Operate by pressing with your thumb.
Starter – Located on the right handgrip. Operate by pressing with your thumb.
Speedometer – Indicates motorcycle road speed. An odometer shows miles ridden, and a re-settable trip meter can be used to show trip miles or miles since the last gas stop.
Tachometer (if equipped) – It indicates motorcycle engine speed in revolutions per minute (RPM). Never exceed red line RPM.
Indicator Lights – Located in the instrument cluster. Includes neutral, turn signals, oil pressure, high beam, side-stand down and possibly others.
Mirrors – Located on the left and right sides of the motorcycle. Most mirrors are convex. Convex mirrors provide a wider view than flat mirrors but make vehicles seem further away than they really are. Adjust them so your shoulder and upper arm are partially visible. This gives you the maximum view to the rear and the side.
Side and Center Stands – Supports the motorcycle when parked. Not all models have center stands. Most stands have return springs that snap up and hold them in place. Always raise the stand before riding.
Pre-Ride Check If something’s wrong with the motorcycle, you’ll want to find out about it before you get in traffic. Make a complete check of your motorcycle before every ride. Before mounting the motorcycle make the following checks:
Tires/Wheels – Keep tires in good condition. – Tire pressure – Check the tire pressure using a gauge. A tire may be underinflated without a
noticeable change in appearance. Motorcycles do not handle properly if the inflation pressure is too low or too high. Check the owner’s manual for the right amount.
– Tire Tread – Check the tread of the tires. Worn or uneven tread can make the motorcycle hard to handle, particularly on wet pavement.
– Rims/Spokes – Check for bent, loose or damaged rims and spokes.
– Damage to Tires – Check for cuts or objects stuck in the tread. Also, check the sidewalls for cracks. A blowout on a motorcycle can be extremely dangerous.
Fluids – Oil and fluid levels. At a minimum, check hydraulic fluids and coolants weekly. Look under the motorcycle for signs of an oil or gas leak. Running out of gas is inconvenient. It can also be dangerous as it makes leaving the road difficult. Lack of oil can damage your engine.
Headlights and Taillight – Check them both. Test your switch to make sure both high and low beams are working.
Turn Signals – Turn on both right and left turn signals. Make sure all lights are working properly.

57
Brake Light – Try both brake controls, and make sure each one turns on the brake light.
Controls (levers, cables, throttle) – Check the condition, operation and routing. Check the cables for kinks or broken strands. If a cable breaks while riding, the motorcycle could become difficult to control and a crash could result.
Chain – Make sure the drive chain is properly adjusted and lubricated. Check the motorcycle owner’s manual for information regarding chain adjustment.
Once you have mounted the motorcycle, complete the following checks before starting out:
Clutch and Throttle – Make sure they operate smoothly. The throttle should snap back when released. The clutch should feel tight and smooth.
Mirrors – Clean and adjust both mirrors before riding. It is difficult and dangerous to adjust a mirror while riding. Position both mirrors far enough outward to show about half the lane behind and as much as possible of the lane to the side. When properly adjusted, a mirror may show the edge of your arm or shoulder – but it’s the road behind and to the side that’s most important.
Brakes – Try the front and rear brake controls, one at a time. Make sure each one feels firm, not spongy and holds the motorcycle when the brake is fully applied. Check the brake fluid levels. Roll the motorcycle a little and make sure the brakes stop the motorcycle. After starting to ride, slightly apply the brakes and make sure the motorcycle slows. It is important to check the brakes because you must be able to slow down and stop the motorcycle.
Horn – Try the horn. Make sure it works.
Fuel Supply Valve (if equipped) – Make sure the valve is on/open. Your motorcycle may start with fuel still in the lines, but it will stall once the lines are empty.
Parking at Curbs If parking in a parallel parking space next to a curb, position the motorcycle at an angle with the rear wheel to the curb. (Note: Some cities have ordinances that require motorcycles to park parallel to the curb.)
Passing and Being Passed Passing and being passed by another vehicle is not much different than with a car. However, visibility is more critical. Be sure other drivers see you, and that you see potential hazards. 1. Passing
– Ride in the left portion of the lane at a safe following distance to increase your line of sight and make you more visible. Signal and check for oncoming traffic. Use your mirrors and turn your head to look for traffic behind.
– When safe, move into the left lane and accelerate. Select a lane position that doesn’t crowd the car you are passing and provides space to avoid hazards in your lane.

58
– Ride through the blind spot as safely and quickly as possible.
– Signal again, and complete mirror and head checks before returning to your original lane and then cancel signal.
2. Being Passed When you are being passed ride in the center portion of your lane. Riding any closer to the passing vehicle could put you in a hazardous situation. Do not move into the portion of the lane farthest from the passing vehicle. It might invite the other driver to cut back into your lane too early.

59
Hand Signals You should also be familiar with hand signals, as shown in the figure, and be able to use them if the motorcycle’s turn signals are not working correctly.
Carrying Loads Most motorcycles are not designed to carry much cargo. Small loads can be carried safely if positioned and fastened properly.
Keep the load low – Secure loads low to the seat and not against rear seat frames. Fasten loads securely, or put them in saddlebags. Piling loads against a sissy bar or frame on the back of the seat changes the motorcycle’s center of gravity and disturbs its balance.
Keep the load forward – Place the load over, or in front of, the rear axle. Tank bags keep loads forward, but use caution when loading hard or sharp objects. Make sure the tank bag does not interfere with handlebars or controls. Mounting loads behind the rear axle can affect how the motorcycle turns and brakes. It can also cause a wobble.
Distribute the load evenly – Load saddlebags with about the same weight on each side. An uneven load can cause the motorcycle to pull to one side. Overloading may also cause the bags to catch in the wheel or chain, locking the rear wheel and prompting the cycle to skid.
Secure the load – Fasten the load securely with elastic cords (bungee cords or nets). Elastic cords with more than one attachment point per side are more secure. A tight load won’t catch in the wheel or chain, causing it to lock up and skid. Rope tends to stretch and knots come loose, permitting the load to shift or fall.
Check the load – Stop and check the load every so often to make sure it has not worked loose or moved.

60
Department of Public Safety Driver Licensing Program
118 W. Capitol Ave Pierre, SD 57501
1-800-952-3696
20,000 copies of this publication were printed at a cost of $.244 per copy by Leader Printing.
Revised July 2015