Embed Size (px)
Citation preview

SourceTap CRM Documentation
1.
2. Installation
2.1. SourceTap CRM Requirements
2.1.1. SourceTap CRM Requirements
SourceTap CRM is a J2EE application. The defaults installation comes self contained withthe Jetty Application Server and an hSQL database. All you need to get it running is a JavaDevelopment Kit (JDK) version 1.4 or above, which can be downloaded from Sun's website
SourceTap CRM will work with most J2EE application servers, including:
• Orion• Tomcat• BEA Weblogic• IBM Websphere
It will also work with most Relational Databases, including:
• Oracle• Microsoft SQL Server• Sybase• DB2• MySql• PostgreSQL• Cloudscape• SAP DB
2.2. SourceTap CRM Installation Guide
2.2.1. SourceTap CRM Installation Guide
• Install the Java Development Kit (JDK) 1.4 or greater• Download the software from Sourceforge Project Site
Page 1Copyright © 2004 SourceTap All rights reserved.

• unzip the file• run start.bat or start.sh from the directory where you unzipped the files
3. Configuration
3.1. SourceTap CRM Configuration
3.1.1. SourceTap Configuration
The distribution comes preconfigured with a Jetty application server and an hSql database.This section describes how to configure SourceTap CRM to work with different applicationservers and/or databases
Here are some pointers to get you started:
Want to use SourceTap CRM with a different database? The Database Configutation Guideis what you need to start with.
If you want to run SourceTap CRM with a different application server, the best place to startis with the Application Server Configuration Guide.
3.2. SourceTap CRM Database Configuration
3.2.1. SourceTap CRM Database Configuration
The Entity Engine from the OFBiz project is what SourceTap CRM uses to persist data to adatabase. You can find out more about why we chose the EE at the bottom of this page. Seethe configuration overview for a conceptual overview of what is being done here.
3.2.1.1. Configuring the Entity Engine for SourceTap CRM
The configuration of the Entity Engine is done through a simple XML file calledentityengine.xml. This file is used to define parameters for persistence servers such as JDBCdatasource parameters.
For SourceTap CRM, this file is located in the distribution atcomponents/entiy/config/entityengine.xml.
As outlined in the overview, the settings which generally need to be configured are:
• Transaction Factory - see below• field type - edit the field-type-name attribute of the <datasource> tag.• datasource location - edit the jndi-name attribute of the <jndi-jdbc> tag relevant to your
SourceTap CRM Documentation
Page 2Copyright © 2004 SourceTap All rights reserved.

database.
Transaction Factory
By default the Entity Engine tries to obtain a JTA transaction factory from the applicationserver using JNDI. This table shows the different values for different application servers:
Orion, Resin, Tomcat and Weblogic(see also the Orion, Resin, Tomcat and Weblogicguides)
<transaction-factory class="org.ofbiz.core.entity.transaction.JNDIFactory"><user-transaction-jndi jndi-server-name="default"jndi-name="java:comp/UserTransaction"/>
<transaction-manager-jndi jndi-server-name="default"jndi-name="java:comp/UserTransaction"/>
</transaction-factory>
JBoss (see also the JBoss 2.4.4 and JBoss 3.0.x guides)
<transaction-factory class="org.ofbiz.core.entity.transaction.JNDIFactory"><user-transaction-jndi jndi-server-name="default"jndi-name="UserTransaction"/>
<transaction-manager-jndi jndi-server-name="default"jndi-name="java:/TransactionManager"/>
</transaction-factory>
Jetty (see also Jetty guide)
<transaction-factory class="org.ofbiz.core.entity.transaction.JotmFactory" />
3.2.1.2. Altering the Entity Model
The Entity Model describes the table and column layout that SourceTap CRM uses in adatabase. It can be completely altered without changing any of the internal workings ofSourceTap CRM.
The model provided should work with almost any database (care has been taken to ensure thecolumn and table names are SQL compliant).
The entity model is configured through an XML file called entitymodel.xml (located in thedistribution at hot-deploy/sfa/entitydef/entitymodel.xml).
The format of the file should be fairly self explanatory - basically SourceTap CRM alwaysrefers to the entity-name and field-name attributes within the code. The type attribute of a
SourceTap CRM Documentation
Page 3Copyright © 2004 SourceTap All rights reserved.
<field> tag should always match the type attribute of a <field-type-def> tag in yourfieldtype-*.xml files.
To change where entities and fields are persisted in your database, simply add (or edit) theattribute table-name (for entities) or col-name (for fields).
3.2.1.3. Why we chose the Entity Engine
We chose the EE over CMP or BMP entity beans because:
• it is more portable between application servers• table schemas are automatically created and updated• using the field type definitions, we can add support for new databases very quickly• it is faster than most CMP implementations and has some nice caching features
This document deals with configuring the entity engine for SourceTap CRM (but should beapplicable to most applications). For more details on the entity engine itself and it's innerworkings, see:
OFBiz Entity Engine Guide
describes the theory behind the entity engine, its architecture and usage patterns
OFBiz Entity Engine configuration guide
describes all of the entity engine configuration options, whereas this document just describesconfiguring the entity engine for SourceTap CRM
API Docs
the API docs for the org.ofbiz.entity package
3.3. SourceTap CRM Application Server Configuration
3.3.1. SourceTap CRM Application Server Configuration
Coming Soon!
4. Usage
4.1. SourceTap CRM Getting Started
4.1.1. SourceTap CRM Getting Started
SourceTap CRM Documentation
Page 4Copyright © 2004 SourceTap All rights reserved.

This document is intended to give you an introduction to the Lead Tracking System, and togive you enough information to test drive the demo system. The Lead Tracking System is acomponent of SourceTap’s CRM application. The demo shows the standard functionality ofthe system in a typical implementation. The system is highly configurable so that it can betailored to meet additional requirements in a very short time frame.
Login Screen
4.2. How-To
4.2.1. Importing Data
4.2.1.1. Importing Data
Data can be imported into the SourceTap CRM from comma separated (CSV) flat files. Thesystem supports importing of leads, accounts, contacts, and opportunities. The first line of theCSV file should contain header information with the names of the fields being imported. Anexample import file is shown below
SourceTap CRM Documentation
Page 5Copyright © 2004 SourceTap All rights reserved.

Sample Import File
To import a file choose the Import/Export option from the main menu
Sample Import FileFrom the Import Data option, choose the type of data you want to import. It is recommended
SourceTap CRM Documentation
Page 6Copyright © 2004 SourceTap All rights reserved.

that accounts and contacts be imported as leads first and then converted to accounts and/orcontacts, rather than directly into accounts and contacts. The reason for this is that the importprocess will import all data as new records. It does not attempt to match imported data toexisting data in the system. On the other hand, the lead conversion process will attempt tomatch the lead to be converted with existing accounts and contacts, and it will give you theoption to update existing information or convert the lead into new records. The leadconversion can be done on a single lead or on a list of leads.
The first step of the import process is to upload the file to the server.
Import File SelectionOnce the file is uploaded, you will be asked to map the columns in the import file to thefields in the database. The system will attempt to automatically map fields by matching thecolumn names in the first row of the CSV file to field names in the database.
SourceTap CRM Documentation
Page 7Copyright © 2004 SourceTap All rights reserved.

Import Field MappingYou should verify that the field matching is correct before proceeding. The mapping willmatch fields based on the first field in the database that contains the text in the column
SourceTap CRM Documentation
Page 8Copyright © 2004 SourceTap All rights reserved.

header label, so it may not always map fields correctly. In the file listed above, the twocolumns in the import file: "Address" and "Address2" should be mapped to "Address1" and"Address2" in the database. However, there is also an "Address" field in the database, so the"Address" column in the file is initially mapped to "Address". In order to fix this, you shouldchange the "Address" field to "NOT MAPPED" and map the "Address1" database field to"Address" from the file.
If the column label in the file doesn't match any database fields, the screen will show theunmatched columns in the "Fields Not Automatically Mapped" area of the mapping screen.You should determine if any of the unmapped columns need to be imported, and if so, youshould set up the mapping before proceeding. The mapping screen lists all of the fields in thedatabase, and for each field, there is a drop down containing all of the columns from theimport file.
In addition to mapping input columns from the CSV file to the fields in the database, you canalso set fields in the database to constant values by filling in the "Fixed Value" field on thescreen. This is usefule in cases where you want to set a field in the database such as "LeadSource" to a constant value.
At the bottom of the screen, you are giving the ability to add the imported data to a list. Youcan either add the data to an existing list by choosing one of the existing lists from thedropdown, or you can create a new list by entering a list name in the text field next to thedropdown. You would typically add imported data to a list if you wanted to perform someactivities on the items in the import file as a group. Currently, this is primarily used with themail merge functionality, which requires a list to perform the merge against. You can alsocreate lists after importing the data by creating a query, but this assumes that you have theability to define a query that will match the records that have been imported.
You can also use identifiers to tag imported records. Leads, contacts, and accounts can byassociated with identifiers, which make them easier to find and group together. At the bottomof the import mapping screen, you are given the option to set assign an existing identifier tothe imported record or to create a new identifier and assign it to the imported records.
Once you hit the "import" button, the import process will begin. Once it is complete, you willbe given a message telling you the number of records imported and the elapsed time of theimport
SourceTap CRM Documentation
Page 9Copyright © 2004 SourceTap All rights reserved.

Import Results
4.2.2. Using Queries
4.2.2.1. Using Queries
Queries give you the ability to find the data you are looking for. You can create a query andsave the query definition so that the query can be run again with a single click. You can alsosave the results of a query to a list for further processing, such as for mail merge.
Some screens, such as the Lead and Contact Home screens, have a simplified query interfacewith a few of the more common fields available to be searched. For example, the mainContact screen shown below allows you to query based on first name, last name, and city.
Contact HomeFor more query options, you can click on the "Advanced" link next to the "Run/Save Query"button. This will give you the ability to search on all available fields. There are two different
SourceTap CRM Documentation
Page 10Copyright © 2004 SourceTap All rights reserved.

query modes, standard and advanced. The default query mode is controlled by a userpreference setting. The standard query screen looks like screen shown below:
Contact Standard QueryThis screen allows you to search using query by example. You fill in the values you want tomatch and then run the query. The query will find any results where the specified fields startwith the specified value. For the screen shown above, the query would find all contacts witha last name starting with "Smith", a city that starts with "Dallas", and a type that starts with"Alumni". The query will only return results where all the conditions are met.
The advanced query screen looks like the screen shown below:
Contact Advanced QueryThis screen allows you to perform more complex queries. You have the option of using thefollowing conditions:
• STARTS WITH - finds records where the field value begins with the specified value• = - finds records where the field value exactly matches the specified value• CONTAINS - finds records where the field value contains the specified value anywhere
in the string• ENDS WITH - finds records where the field value ends with the specified value• < - finds records where the field value is less than the specified value• > - finds records where the field value is greater than the specified value• <= - finds records where the field value is less than or equal to the specified value
SourceTap CRM Documentation
Page 11Copyright © 2004 SourceTap All rights reserved.

• >= - finds records where the field value is greater than or equal to the specified value• NOT EQUALS - finds records where the field value does not match the specified value• BETWEEN - finds records where the field value is between two specified values. When
using BETWEEN, you should enter two values separated by a comma.• IN - finds records where the field value is in a list of specified values. When using IN,
you should enter a list of comma separated values• NOT IN - works the opposite of the IN condition
In addition to being able to enter different condition operators, you also have the ability tosearch for values in related tables. For example, the query shown above lets you search forcontacts with a first name that starts with "SMITH", who live in "Dallas", who are"ALUMNI", and who have given gifts greater than $500 between January 1, 2000 andDecember 31,2003.
When you run a query, you can save the query definition so that it can be reused easily. Ifyou enter a name in the "Save Query Definition" field, the query definition will be availablein the Query drop down field on the associated list screen. Query definitions are dynamic,meaning that the next time you run the query, you may get different results if records havebeen added, deleted, or modified.
You can also specify that the results of the query should be saved to a list, which can be usedin further processing, such as mail merge. This is done by filling in the "Save Results ToList" field before running the query. Saved lists are static, meaning that the results are storedin the list when the query is run. Any inserts, updates, or deletes to the database will notaffect the results of a saved list.
4.2.3. Creating Reports
4.2.3.1. Creating Reports
The Report Builder allows you to create and run custom reports. Reports can be displayed tothe screen or exported to Excel, CSV, or XML. The main screen, shown below, contains alist of pre-defined reports and gives you the ability to create new reports.
SourceTap CRM Documentation
Page 12Copyright © 2004 SourceTap All rights reserved.

Report BuilderThe top portion of the screen shows existing reports. When you select an existing report, youwill be taken to the report definition, which will give you the ability to modify the reportprior to running it. The bottom portion of the screen gives you a list of report types that youcan create
The screen below shows the report definition screen.
SourceTap CRM Documentation
Page 13Copyright © 2004 SourceTap All rights reserved.

Report DefinitionThe report definition screen allows you to choose which fields are show in the report, whatcriteria will be used to retrieve data for the report, and what the sort order of the data shouldbe.
SourceTap CRM Documentation
Page 14Copyright © 2004 SourceTap All rights reserved.

To add fields to the report, you select fields in the "Available Fields" select box and movethem to the "Report Display Fields" select box using left arrow button between the boxes.You can select multiple fields at the same time by using the CTRL and SHIFT keys. If youhold down the CTRL key, each field you click will be hilited. If you hold down the SHIFTkey, all fields between the first field clicked and the last field clicked will be hilited. Whenyou use the left arrow button all hilited fields will be moved. Similarly, you can removefields from the report by hiliting them in the "Report Display Fields" select box and using theright arrow button to move them back to the "Available Fields" select box. You can alter theorder of the fields in the report by using the up and down arrow buttons to the right of the"Report Display Fields" select box
Report Criteria are defined in the same way that you handle advanced queries. You canremove a search condition by clicking on the red "X" button in the action column. If youneed to add additional conditions, you can click on the green "+" button in the action column.
The order that data is displayed in the report are defined in the "Sort" section of the screen.Adding, removing, and ordering sort columns is done in the same way that you choose thefields to display in the report.
If you want to save the report so that it can be rerun at a later date, you should enter a namein the "Save Report As" field.
The figure below shows the report output screen
SourceTap CRM Documentation
Page 15Copyright © 2004 SourceTap All rights reserved.
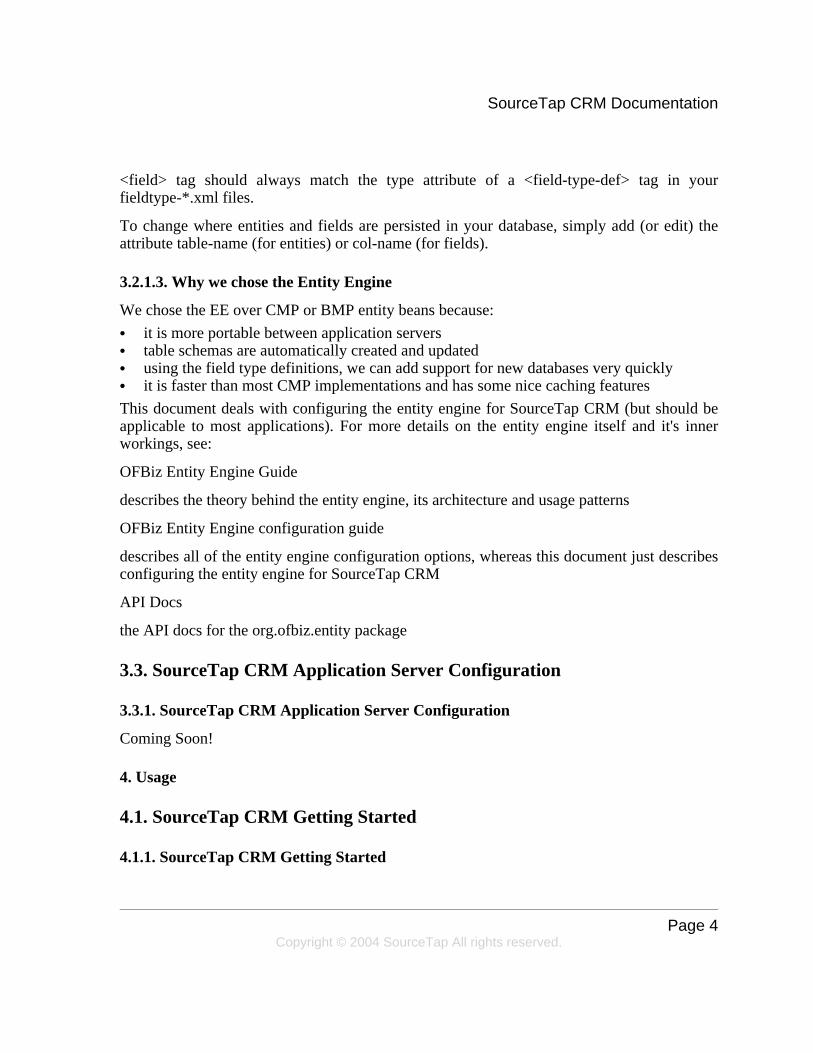
Report ResultsThe top of the screen shows the number of records returned by the report and allows you topage thru the results. The middle portion of the screen contains the actual report results. Youcan dynamically alter the sort order by clicking in the column headers. The bottom portion ofthe screen lets you export data in Excel, XML, or CSV formats.
4.2.4. Exporting Data
4.2.4.1. Exporting Data
Data can be exported to Excel, XML, or CSV format using the Report Builder. See thesection on Creating Reports for more information.
4.2.5. Lead Conversion
SourceTap CRM Documentation
Page 16Copyright © 2004 SourceTap All rights reserved.

4.2.5.1. Lead Conversion
Lead Conversion is the process of converting a lead into an account, contact, and/oropportunity. Leads are typically generated from marketing events, such as trade shows ormailing campaigns. Once enough information is gathered about a lead to qualify that lead asa potential opportunity, the lead can be automatically converted to an account and/or contact.SourceTap CRM allows you to convert leads on a case by case basis, or to convert a wholelist of leads to accounts at the same time.
Conversion of a Single Lead
Individual Leads can be converted from the Lead Detail page. This is done by clicking on the"Convert this Lead to Account/Contact/Opportunity" link as seen in the screen below:
Lead Conversion Step 1After you click on the "Convert" link, you are taken to a screen that allows you to set theconversion options, as shown below:
SourceTap CRM Documentation
Page 17Copyright © 2004 SourceTap All rights reserved.

Lead Conversion Step 2The options screen gives you the ability to create a new account for this lead or to map thelead to an existing account. The system will find Accounts with names that are similar to thecompany name associated with the lead, and give you a list of accounts that the lead might belinked to. You can also control whether the conversion process will also create a contact oropportunity for the lead. If you choose to create an opportunity, you can set the name of theopportunity and the initial stage to be set on the new opportunity.
Once you click on the "convert" button, you may be taken to a screen that lets you map thelead to an existing contact. This step is only done in the case where you choose to map thelead to an existing account and where there is an existing contact in that account with a namethat matches the lead being converted. After this, you will be shown a confirmation screen, asshown below, which will give you a final chance to change things prior to initiating theconversion.
SourceTap CRM Documentation
Page 18Copyright © 2004 SourceTap All rights reserved.

Lead Conversion Step 3Once the lead is converted, you will get a message confirming the conversion and given a setof links that allow you to navigate to the newly created account, contact, or opportunity, asshown below:
Lead Conversion Step 4The screen below shows a what a typical contact looks like after conversion
SourceTap CRM Documentation
Page 19Copyright © 2004 SourceTap All rights reserved.

Lead Conversion Step 5
Conversion of Multiple Leads
In order to import contacts into the system, it is recommended that you first import them asleads and then convert them. This helps eliminate the possibility of duplicate contacts beingcreated, as the conversion process allows you to choose whether to create newaccounts/contact information of map the lead to an existing account/contact.
To make this process as easy as possible, the system allows you to convert multiple leads atthe same time. This option is available in the "Mass Convert Leads" link from the LeadHome page, as shown below:
SourceTap CRM Documentation
Page 20Copyright © 2004 SourceTap All rights reserved.
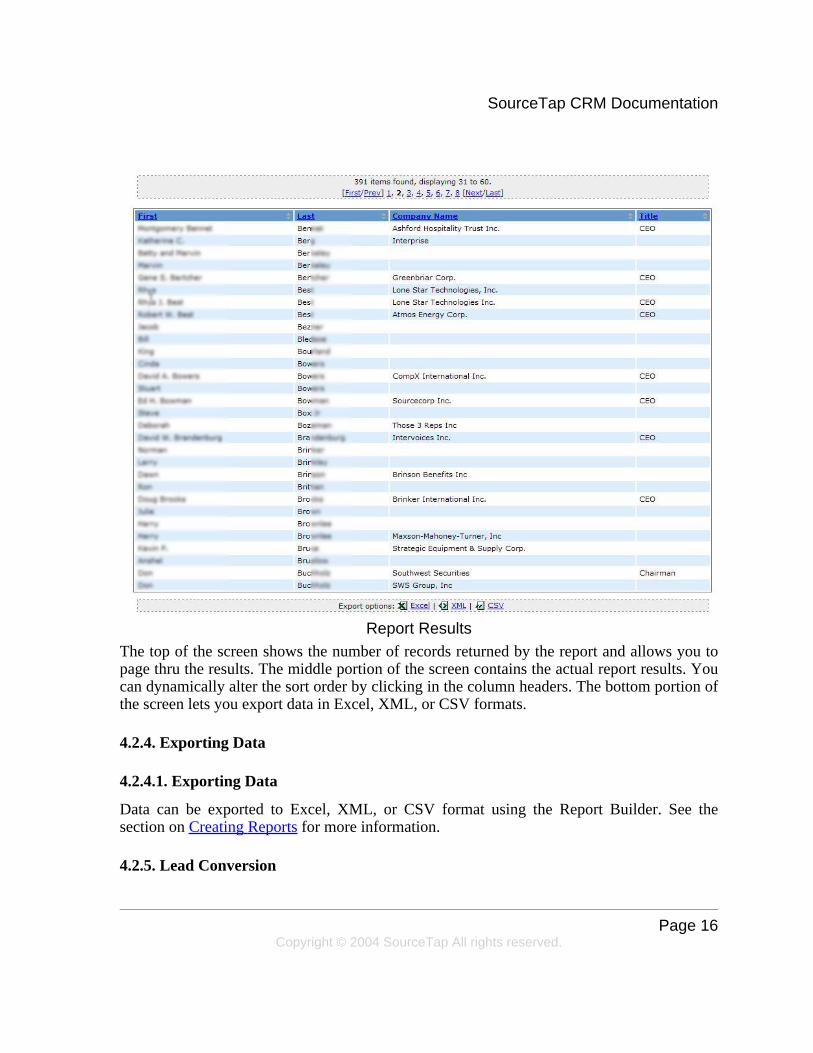
Lead HomeThe first step is to choose a list of leads to convert, as shown in the screen below:
Mass Convert Step 1If you need to create a list, you can do it by creating a query and choosing the save results aslist option. The list select screen allows you to view the leads in the list or to delete the list orto start the conversion process. If you delete the list, it will not delete the underlying leads, itwill merely remove the list. To begin the conversion process, click on the list name. This willtake you to the conversion options page, as shown below:
SourceTap CRM Documentation
Page 21Copyright © 2004 SourceTap All rights reserved.

Mass Convert Step 2This screen gives you the ability to control whether contacts and opportunities will be createdduring the conversion process. It also gives you the ability to attempt to match leadinformation to existing accounts/contacts. Unless you are sure that none of these leadsalready exist in the database as accounts or contacts, you should leave the "Find MatchingAccounts" option checked. When you click "next", you are taken to the account/contactmatching screen, as shown below:
Mass Convert Step 3
SourceTap CRM Documentation
Page 22Copyright © 2004 SourceTap All rights reserved.

The matching screen gives you a list of leads to be converted and gives you the option to mapthe lead to existing accounts/contacts in cases where there is a close name match to existinginformation in the database. You can choose to create new accounts/contacts for each lead, oryou can link to one of the suggested matching accounts or contacts. If the matching accountis not displayed and you think there might be a matching account in the database, you canclick on the "Find Account" link, which will give you the ability to search through accountsto see if there is a better match, as shown below:
Mass Convert Step 4Similarly, you can use the "Find Contact" screen, as shown below, to determine if there areany existing contacts that match the lead being converted.
SourceTap CRM Documentation
Page 23Copyright © 2004 SourceTap All rights reserved.

Mass Convert Step 5Once you are happy with the account/contact mapping options, you can click next to beginthe conversion process. If the list to be converted is large, the matching may be split overmultiple screens with a subset of leads listed on each page. The conversion will not beginuntil you have mapped thru all of the leads. If you back out of or stop the process prior toconfirming all of the conversion options, the conversion can be resumed later, and you willonly have to confirm the matching of leads that were not previously matched.
4.2.6. Lead Capture from Web
4.2.6.1. Lead Capture
You can use this feature to capture leads from your corporate website or any externalwebsite. The system will generate an HTML form to capture lead information that you canpaste into any web page.
This option is available in the "Generate form to capture leads from your website" link fromthe Lead Home page, as shown below:
SourceTap CRM Documentation
Page 24Copyright © 2004 SourceTap All rights reserved.

Lead HomeThe first step is to choose the fields that you would like to include in the form. This is donefrom the page shown below:
SourceTap CRM Documentation
Page 25Copyright © 2004 SourceTap All rights reserved.

Lead Capture Setup Step 1You can add and remove rows using the "X" and "+" buttons at the right of each row. Youcan also enter the pages in you website that you would like the system to redirect the user toafter submission of the generated form. You can specify different pages based on whether thelead is loaded successfully or not. When you hit the "Generate HTML" button, you will betaken to the generated form page, as shown below:
SourceTap CRM Documentation
Page 26Copyright © 2004 SourceTap All rights reserved.

Lead Capture Setup Step 2You should copy the generated HTML from this page and paste it into your external webpage. You can modify the look and feel of the form to meet your corporate standards, but youshould be careful not to remove any of the generated form elements.
4.2.7. Mail Merge
4.2.7.1. Mail Merge
Mail merge is the process of integrating data from SourceTap CRM with documenttemplates. This is typically done for form letters and email campaigns. You can use externaltools, such as Microsoft Office, to handle mail merge or use the built in email mergecapabilites.
4.2.7.2. Using External Tools for Mail Merge
The simplest way to use mail merge is to create a report and export it to CSV format. Thenyou can use Microsoft Word or any other tool with document merge capabilities to create amerge document. You can also use Microsoft Outlook to handle email merge. See thedocumentation for your word processing application for more information on mergingdocuments with data.
SourceTap CRM Documentation
Page 27Copyright © 2004 SourceTap All rights reserved.

4.2.7.3. Using the Built-In Email Merge Capabilities
SourceTap CRM has built-in email merge functionality. To access it, choose the "EmailLists" option from the main menu. This will give you the email list page, as shown below:
Email Merge MainThe top portion of the screen allows you to create an email template or choose an existingtemplate. For existing templates, you can choose to Edit, Duplicate, or Delete them.Duplicate allows you to create a new template based off of an existing template. The bottomportion of the screen allows you to choose a list of people to send the email to. This listshould be either a list of Leads or a list of Contacts. For more information on lists, seeWorking with Lists. You can also choose to override the "To" address in the template to astatic address, which is useful for testing purposes. Before sending any mass mailings out, itis recommended that you test the template on a small list and that you fill in your emailaddress in the "Override" field. Once the template has been sent to you successfully, you canthen resend it to the the correct recipients by clearing the "Override" field.
The template editor is shown below:
SourceTap CRM Documentation
Page 28Copyright © 2004 SourceTap All rights reserved.

Email TemplatesEmail templates can be in plain text or HTML. The "To", "CC", "BCC", "Subject", and"Body" fields can contain static text and field tags that are filled in from the database at runtime. The field tags can be filled in from any field in the Lead or Contact information. Youshould make sure that the fields tags that you enter on the template match the type of list youare sending the email too. For example, if you use information from Leads in the templatebut send the email to a list of Contacts, you will not get the desired result.
To simplify the creation of templates, the template editor has a list of available fields lists onthe right side of the screen. You can switch the template type to Contact or Lead to get thelist of fields available for that type. By clicking on an item in the "Available Fields" selectlist, you will see the correct template tag to be used in the "Field Value" field. You can thencopy and past the value from the "Field Value" field to the desired field on the template.
4.2.7.4. Configuring the System for Mail Merge
In order to use the email merge feature, you need to set the outgoing mail (SMTP) server tobe used for sending emails. This is set in the general.properties file which is located in thecomponents/common/config directory. You should verify the settings of the followingparameters in this file:
• mail.smtp.relay.host - the internet address (host name or IP address) of your outgoing(SMTP) mail server
• mail.smtp.auth.user - if your email server requires authentication, this should be the
SourceTap CRM Documentation
Page 29Copyright © 2004 SourceTap All rights reserved.

userid required to log into the mail server• mail.smtp.auth.password - if your email server requires authentication, this should be the
password required to log into the mail server
4.2.8. Working with Lists
4.2.8.1. Working with Lists
Lists are used to identify a subset of data for further processing. Lists can be created bysaving the results of a query or by choosing to add imported data to a list. Currently, you canpreform the following actions on lists:
• Mass Lead Conversion - see Lead Conversion for more information.• Mail Merge - see Mail Merge for more information
5. Miscellaneous
5.1. Frequently Asked Questions
5.1.1. Questions
1. General• What is the difference between Leads and Contacts?• Should I import contact information as Leads or Contacts?
5.1.2. Answers
5.1.2.1. 1. General
1.1. What is the difference between Leads and Contacts?
Leads are typically generated from Marketing activities, such as mailing campaigns or tradeshows. Initially, the information about a lead is very minimal. A lead could consist ofinformation about a Company or a Person. Once more information is gathered about a lead,or as potential opportunities are identified for that lead, the lead can be converted to andaccount, contact, and opportunity.
1.2. Should I import contact information as Leads or Contacts?
Information should be initially imported as leads. Once the lead is qualified, it can beconverted to a contact. The lead conversion process performs some checks to identifyexisting contacts which may match the lead being converted. This helps prevent you reduce
SourceTap CRM Documentation
Page 30Copyright © 2004 SourceTap All rights reserved.

the chance of having duplicated information in the system.
6. Printable Docs
SourceTap CRM Documentation
Page 31Copyright © 2004 SourceTap All rights reserved.


![SSR発表tahara/ssr2014/resources/SSR...Enumeration (1,11 Service-Level Infrastructure (8, 16%): Relationship Business Function (1, 2%): String [1,1] Attribute Name Attribute Type](https://img.dokumen.tips/doc/110x75/5ede28b3ad6a402d666974f1/ssrce-taharassr2014resourcesssr-enumeration-111-service-level-infrastructure.jpg)