Embed Size (px)
Citation preview

COMPREHENSIVE INTERNET SECURITY
SonicWALL SSL-VPN 2.5User’s Guide
SonicWALL Internet Security Appliances
COMPREHENSIVE INTERNET SECURITY
SonicWALL SSL-VPN 2.5User’s Guide
SonicWALL Internet Security Appliances


Table of Contents
Using This GuideAbout this Guide . . . . . . . . . . . . . . . . . . . . . . . . . . . . . . . . . . . . . . . . . . . . . . . . . . . . . . 5Organization of this Guide . . . . . . . . . . . . . . . . . . . . . . . . . . . . . . . . . . . . . . . . . . . . . . 5
Chapter 1 Virtual Office Overview. . . . . . . . . . . . . . . . . . . . . . . . . . . . . . . . . . . . . 5Chapter 2 Using Virtual Office . . . . . . . . . . . . . . . . . . . . . . . . . . . . . . . . . . . . . . . . 5
Guide Conventions . . . . . . . . . . . . . . . . . . . . . . . . . . . . . . . . . . . . . . . . . . . . . . . . . . . . 6Icons Used in this Manual . . . . . . . . . . . . . . . . . . . . . . . . . . . . . . . . . . . . . . . . . . . . 6
Virtual Office OverviewVirtual Office Overview. . . . . . . . . . . . . . . . . . . . . . . . . . . . . . . . . . . . . . . . . . . . . . . . . 9
Accessing Virtual Office Resources . . . . . . . . . . . . . . . . . . . . . . . . . . . . . . . . . . . . 9Browser Requirements . . . . . . . . . . . . . . . . . . . . . . . . . . . . . . . . . . . . . . . . . . . . . . . . . 10Web Management Interface Overview . . . . . . . . . . . . . . . . . . . . . . . . . . . . . . . . . . . . 11
Certificates . . . . . . . . . . . . . . . . . . . . . . . . . . . . . . . . . . . . . . . . . . . . . . . . . . . . . . . 14
Using Virtual Office FeaturesImporting Certificates . . . . . . . . . . . . . . . . . . . . . . . . . . . . . . . . . . . . . . . . . . . . . . . . . 15Using Two-Factor Authentication. . . . . . . . . . . . . . . . . . . . . . . . . . . . . . . . . . . . . . . . 16
User Prerequisites. . . . . . . . . . . . . . . . . . . . . . . . . . . . . . . . . . . . . . . . . . . . . . . . . . 16User Configuration Tasks . . . . . . . . . . . . . . . . . . . . . . . . . . . . . . . . . . . . . . . . . . . 16
Using One-Time Passwords . . . . . . . . . . . . . . . . . . . . . . . . . . . . . . . . . . . . . . . . . . . . 19User Prerequisites. . . . . . . . . . . . . . . . . . . . . . . . . . . . . . . . . . . . . . . . . . . . . . . . . . 19User Configuration Tasks . . . . . . . . . . . . . . . . . . . . . . . . . . . . . . . . . . . . . . . . . . . 19Verifying User One-Time Password Configuration. . . . . . . . . . . . . . . . . . . . . . . 21Troubleshooting Common Errors . . . . . . . . . . . . . . . . . . . . . . . . . . . . . . . . . . . . 21
iiiSonicWALL SSL VPN 2.5 User Guide
Using NetExtender . . . . . . . . . . . . . . . . . . . . . . . . . . . . . . . . . . . . . . . . . . . . . . . . . . . .21NetExtender User Prerequisites . . . . . . . . . . . . . . . . . . . . . . . . . . . . . . . . . . . . . . .21NetExtender User Configuration Tasks . . . . . . . . . . . . . . . . . . . . . . . . . . . . . . . .22Verifying NetExtender Operation from the System Tray. . . . . . . . . . . . . . . . . . .43Related Documents. . . . . . . . . . . . . . . . . . . . . . . . . . . . . . . . . . . . . . . . . . . . . . . . .43Changing Your Password . . . . . . . . . . . . . . . . . . . . . . . . . . . . . . . . . . . . . . . . . . . .44
Using Virtual Assist . . . . . . . . . . . . . . . . . . . . . . . . . . . . . . . . . . . . . . . . . . . . . . . . . . . .45Using File Shares . . . . . . . . . . . . . . . . . . . . . . . . . . . . . . . . . . . . . . . . . . . . . . . . . . . . . .50
Using the File Shares Applet . . . . . . . . . . . . . . . . . . . . . . . . . . . . . . . . . . . . . . . . .50Using HTML-Based File Shares . . . . . . . . . . . . . . . . . . . . . . . . . . . . . . . . . . . . . . .65
Managing Bookmarks . . . . . . . . . . . . . . . . . . . . . . . . . . . . . . . . . . . . . . . . . . . . . . . . . .67Adding Bookmarks . . . . . . . . . . . . . . . . . . . . . . . . . . . . . . . . . . . . . . . . . . . . . . . . .68Editing Bookmarks . . . . . . . . . . . . . . . . . . . . . . . . . . . . . . . . . . . . . . . . . . . . . . . . .71Removing Bookmarks. . . . . . . . . . . . . . . . . . . . . . . . . . . . . . . . . . . . . . . . . . . . . . .72Bookmark Single Sign-On Options . . . . . . . . . . . . . . . . . . . . . . . . . . . . . . . . . . . .72Using Bookmarks . . . . . . . . . . . . . . . . . . . . . . . . . . . . . . . . . . . . . . . . . . . . . . . . . .73Using Remote Desktop Bookmarks. . . . . . . . . . . . . . . . . . . . . . . . . . . . . . . . . . . .73Using VNC Bookmarks . . . . . . . . . . . . . . . . . . . . . . . . . . . . . . . . . . . . . . . . . . . . .75Using FTP Bookmarks . . . . . . . . . . . . . . . . . . . . . . . . . . . . . . . . . . . . . . . . . . . . . .77Using Telnet Bookmarks . . . . . . . . . . . . . . . . . . . . . . . . . . . . . . . . . . . . . . . . . . . .80Using SSHv1 Bookmarks . . . . . . . . . . . . . . . . . . . . . . . . . . . . . . . . . . . . . . . . . . . .80Using SSHv2 Bookmarks . . . . . . . . . . . . . . . . . . . . . . . . . . . . . . . . . . . . . . . . . . . .81Using HTTP and HTTPS Bookmarks . . . . . . . . . . . . . . . . . . . . . . . . . . . . . . . . . .83Using File Share Bookmarks. . . . . . . . . . . . . . . . . . . . . . . . . . . . . . . . . . . . . . . . . .83Using Citrix Bookmarks . . . . . . . . . . . . . . . . . . . . . . . . . . . . . . . . . . . . . . . . . . . . .83Platforms . . . . . . . . . . . . . . . . . . . . . . . . . . . . . . . . . . . . . . . . . . . . . . . . . . . . . . . . .84
Logging Out of the Virtual Office . . . . . . . . . . . . . . . . . . . . . . . . . . . . . . . . . . . . . . . .88
iv SonicWALL SSL VPN 2.5 User Guide

Using This Guide
About this GuideWelcome to the SonicWALL SSL-VPN User’s Guide. This manual is a user's guide. It provides information on using the SonicWALL SSL-VPN user portal called Virtual Office that allows you to create bookmarks and run services over the SonicWALL SSL-VPN security appliance.
Note Always check http://www.sonicwall.com/support/documentation.html for the latest version of this manual as well as other SonicWALL products and services documentation.
Organization of this GuideThe SonicWALL SSL-VPN User’s Guide organization is structured into the following parts that follow the SonicWALL Web Management Interface structure. Within these parts, individual chapters correspond to SonicWALL security appliance management interface layout.
Chapter 1 Virtual Office OverviewThis chapter provides an overview of new SonicWALL SSL-VPN security appliance user features, NetExtender, File Shares, services, sessions, bookmarks, and service tray menu options.
Chapter 2 Using Virtual OfficeThis chapter provides procedures on how to install NetExtender, working with the NetExtender system tray, displaying the NetExtender log, configuring bookmarks, and using file shares.
5SonicWALL SSL VPN 2.5 User Guide

Guide Conventions
Guide ConventionsThe following conventions used in this guide are as follows:
Icons Used in this ManualThese special messages refer to noteworthy information, and include a symbol for quick identification:
Tip Useful information about security features and configurations on your SonicWALL.
Note Important information on a feature that requires callout for special attention.
Convention UseBold Highlights dialog box, window, and screen names. Also highlights
buttons. Also used for file names and text or values you are being instructed to type into the interface.
Italic Indicates the name of a technical manual. Also indicates emphasis on certain words in a sentence. Also, sometimes indicates the first instance of a significant term or concept.
6 SonicWALL SSL VPN 2.5 User Guide

Guide Conventions
SonicWALL Technical SupportFor timely resolution of technical support questions, visit SonicWALL on the Internet at http://www.sonicwall.com/support/support.html. Web-based resources are available to help you resolve most technical issues or contact SonicWALL Technical Support.
To contact SonicWALL telephone support, see the telephone numbers listed below:
North America Telephone SupportU.S./Canada - 888.777.1476 or +1.408.752.7819
International Telephone SupportAustralia - + 1.800.35.1642
Austria - + 43(0)820.400.105
EMEA - +31(0)411.617.810
France - + 33(0)1.4933.7414
Germany - + 49(0)1805.0800.22
Hong Kong - + 1.800.93.0997
India - + 8026556828
Italy - +39(0)2.7541.9803
Japan - + 81(0)3.5460.5356
New Zealand - + 0800.446489
Singapore - + 800.110.1441
Spain - + 34(0)9137.53035
Switzerland - +41(0)1.308.3.977
UK - +44(0)1344.668.484
Note Please visit http://www.sonicwall.com/support/contact.html for the latest technical support telephone numbers.
More Information on SonicWALL Products Contact SonicWALL, Inc. for information about SonicWALL products and services at:
Web: http://www.sonicwall.comEmail: [email protected]: (408) 745-9600Fax: (408)745-9300
7SonicWALL SSL VPN 2.5 User Guide

Guide Conventions
Quick Access Work SheetThis section should be completed by your network administrator to allow remote users SSL-VPN access.
Important Information You NeedIP Address:___________________________________________________
User Name:___________________________________________________
Password:___________________________________________________
Domain:_____________________________________________________
8 SonicWALL SSL VPN 2.5 User Guide

Virtual Office Overview
This chapter provides an overview of the SonicWALL SSL-VPN user portal. It also includes an introduction to the SSL-VPN and its features and applications. This chapter contains the following sections:
• “Virtual Office Overview” section on page 9
• “Browser Requirements” section on page 10
• “Web Management Interface Overview” section on page 11
Virtual Office OverviewSonicWALL SSL-VPN Virtual Office provides secure remote access to network resources, such as applications, files, intranet web sites, and email through web access interface such as Microsoft Outlook Web Access (OWA). The underlying protocol used for these sessions is SSL.
With SSL-VPN, mobile workers, telecommuters, partners, and customers can access information and applications on your intranet or extranet. What information should be accessible to the user is determined by access policies configured by the SonicWALL SSL-VPN administrator.
Accessing Virtual Office ResourcesRemote network resources can be accessed in the following ways:
• Using a standard web browser - To access network resources, you must log into the SSL-VPN portal. Once authenticated, you may access intranet HTTP and HTTPS sites, web-based applications, and web-based email. In addition, you may upload and download files using FTP or Windows Network File Sharing. All access is performed through a standard web browser and does not require any client applications to be downloaded to remote users’ machines.
• Using Java thin-client access to corporate desktops and applications – The SonicWALL SSL-VPN security appliance includes several Java or ActiveX thin-client programs that can be launched from within the SonicWALL SSL-VPN security appliance. Terminal Services and VNC Java clients allow remote users to access corporate servers and desktops, open files, edit and store data as if they were at the office. Terminal Services provides the ability to open individual applications and support remote sound and print services. In addition, users may access Telnet and SSH servers for SSH version 1 (SSHv1) and SSH version 2 (SSHv2), from the SSL-VPN portal.
9SonicWALL SSL VPN 2.5 User Guide

Browser Requirements
• Using the NetExtender SSL-VPN client – The SonicWALL SSL-VPN security appliance includes an ActiveX-based SSL-VPN client for Window users. To connect using the SSL-VPN client, log into the portal, download the installer application and then launch the NetExtender connector to establish the SSL-VPN tunnel. Once you have set up the SSL-VPN tunnel, you can access network resources as if you were on the local network.
With SSL-VPN releases 1.5 and later, NetExtender is installed as a standalone client, which can be launched directly from users’ computers without requiring them to log in to the SSL-VPN portal first.
For SSL-VPN to work as described in this guide, the SonicWALL SSL-VPN security appliance must be installed and configured according to the directions provided in the SonicWALL SSL-VPN 2000 Getting Started Guide or the SonicWALL SSL-VPN 4000 Getting Started Guide.
Browser RequirementsThe following web browsers are supported for the web management interface and the SSL-VPN portal. Note that Java is only required for the SSL-VPN portal, not the web management interface.
Table 1 Microsoft Windows Settings
To configure SonicWALL SSL-VPN software, an administrator must use a web browser with JavaScript, cookies, and SSL enabled.
Before using Virtual Assist, you must meet the following requirements:
• Virtual Assist is only supported on Windows platforms. Virtual Assist is certified to work on Windows XP and Windows 2000.
• Technicians must either be on the same network as the SonicWALL SSL VPN security appliance or using a NetExtender connection.
Attribute SettingBrowser • Internet Explorer 6.0 or higher
• Opera 7.0 or higher
• FireFox 2.0 or higher
Java • Sun JRE 1.3.1 or higher
Apple MacOS X • Browser: Safari 1.2 or higher
• Java: Sun JRE 1.3.1 or higher
Unix, Linux, or BSD • Browser: Mozilla 1.x or Netscape 7.0 or higher
• Java: Sun JRE 1.31 or higher
Citrix applet • Java: Sun JRE 1.5
Telnet, SSHv1, VNC applets • Browser: Supports MS JVM for Internet Explorer
• Java: Requires Sun JRE 1.1 or higher for other browsers
RDP5 Java applet • Java: Sun JRE 1.2 or higher
SSHv2 applet • Java: Sun JRE 1.4.2 or higher
10 SonicWALL SSL VPN 2.5 User Guide

Web Management Interface Overview
Web Management Interface OverviewFrom your workstation at your remote location, launch an approved web-browser and browse to yourSSL-VPN appliance at the URL provided to you by your network administrator.
Step 1 Open a Web browser and enter https://192.168.200.1 (the default LAN management IP address) in the Location or Address field.
Step 2 A security warning may appear. Click the Yes button to continue.
Step 3 The SonicWALL SSL-VPN Management Interface displays and prompts you to enter your user name and password. As a default value, enter admin in the User Name field, password in the Password field, and select a domain from the Domain drop-down list and click the Login button. Note that your administrator may have set up another login and password for you that has only user privileges.
The default page displayed is the Virtual Office home page. The default version of this page shows a SonicWALL logo, although your company’s system administrator may have customized this page to contain a logo and look and feel of your company. Go to the Virtual Office Overview, page 9 to learn more about the Virtual Office home page.
Note From the Virtual Office portal home page, you cannot navigate to the administrator’s environment. If you have administrator’s privileges and want to enter the administrator environment, you need to go back to the login page and enter a username and password that have administrator privileges set up for them and log in again. Note that the domain is independent of the privileges set up for the user.
11SonicWALL SSL VPN 2.5 User Guide

Web Management Interface Overview
Logging in as a user takes you directly to Virtual Office. The Virtual Office Home page displays as shown here.
Note The Virtual Office content will vary based on the configuration of your network administrator. Some bookmarks and services described in the SonicWALL SSL-VPN User’s Guide may not be displayed when you log into the SonicWALL SSL-VPN security appliance.
The Virtual Office consists of the nodes described in the following table.
Node DescriptionFile Shares Provides access to the File Shares utility, which gives remote users with
a secure Web interface access to Microsoft File Shares using the CIFS (Common Internet File System) or SMB (Server Message Block) protocols. Using a Web interface similar in style to Microsoft’s familiar Network Neighborhood or My Network Places, File Shares allow users with appropriate permissions to browse network shares, rename, delete, retrieve, and upload files, and to create bookmarks for later recall.
NetExtender Provides access to the NetExtender utility, a transparent SSL-VPN client for Windows users that allows you to run any application securely on the remote network. It acts as an IP-level mechanism provided by the virtual interface that negotiates the ActiveX component, using a Point-to-Point Protocol (PPP) adapter instance.
12 SonicWALL SSL VPN 2.5 User Guide

Web Management Interface Overview
The Home page provides customized content and links to network resources. The Home Page may contain support contact information, VPN instructions, company news, or technical updates.
Only a web browser is required to access intranet web sites, File Shares, and FTP sites. VNC, Telnet and SSHv1 require Java. SSHv2 provides stronger encryption than SSHv1, requires SUN JRE 1.4 or 1.5 and can only connect to servers that support SSHv2. Terminal Services requires either Java or ActiveX on the client machine.
As examples of tasks you can perform and environments you can reach through Virtual Office, you can connect to:
• Intranet web or HTTPS sites – If your organization supports web-based email, such as Outlook Web Access, you can also access web-based email
• The entire network by launching the NetExtender client
• FTP servers for uploading and downloading files
• The corporate network neighborhood for file sharing
• Telnet and SSH servers
• Desktops and desktop applications using Terminal Services or VNC.
• Email servers via the NetExtender client.
The administrator determines what resources are available to users from the SonicWALL SSL-VPN Virtual Office. The administrator can create user, group, and global policies that disable access to certain machines or applications on the corporate network.
The administrator may also define bookmarks, or preconfigured links, to web sites or computers on the intranet. Additional bookmarks may be defined by the end user.
SonicWALL NetExtender is a software application that enables remote users to securely connect to the remote network. With NetExtender, remote users can virtually join the remote network. Users can mount network drives, upload and download files, and access resources in the same way as if they were on the local network.
Virtual Assist Provides access to Virtual Assist, an easy to use tool that allows SonicWALL SSL VPN users to remotely support customers by taking control of their computers while the customer observes. Virtual Assist is a lightweight, thin client that installs automatically using Java from the SonicWALL SSL VPN Virtual Office without requiring the installation of any external software. For computers that do not support Java, Virtual Assist can be manually installed by downloading an executable file from the Virtual Office.
Bookmarks Provides a list of available bookmarks which are objects that enable you to connect to a location or application conveniently and quickly.
Options Provides the option to change user password and use single sign-on, if enabled by the administrator.
Online Help Launches online help for Virtual Office.
Logout Logs you out of the Virtual Office environment.
Node Description
13SonicWALL SSL VPN 2.5 User Guide

Web Management Interface Overview
CertificatesIf the SSL-VPN gateway uses a self-signed SSL certificate for HTTPS authentication, then it is recommended to install the certificate before establishing a NetExtender connection. If you are unsure whether the certificate is self-signed or generated by a trusted root Certificate Authority, SonicWALL recommends that you import the certificate. The easiest way to import the certificate is to click the Import Certificate button at the bottom of the Virtual Office home page.
14 SonicWALL SSL VPN 2.5 User Guide
Using Virtual Office Features
This chapter provides details on how to use the features in the SonicWALL SSL-VPN user portal, including NetExtender, configuring bookmarks, accessing services, and using file shares. This chapter contains the following sections:
• “Importing Certificates” section on page 9
• “Using Two-Factor Authentication” section on page 10
• “Using One-Time Passwords” section on page 13
• “Using NetExtender” section on page 15
• “Using Virtual Assist as a Technician” section on page 40
• “Using Virtual Assist as a Customer” section on page 47
• “Using File Shares” section on page 52
• “Managing Bookmarks” section on page 70
• “Using Bookmarks” section on page 77
• “Logging Out of the Virtual Office” section on page 92
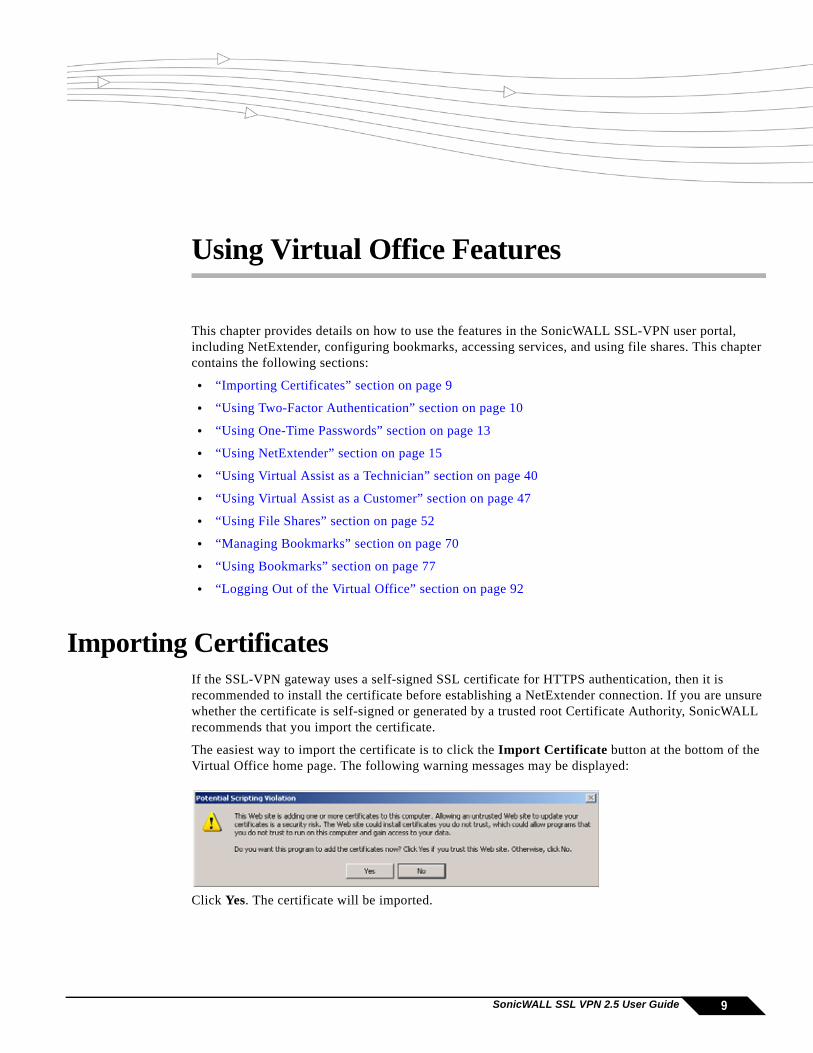
Importing CertificatesIf the SSL-VPN gateway uses a self-signed SSL certificate for HTTPS authentication, then it is recommended to install the certificate before establishing a NetExtender connection. If you are unsure whether the certificate is self-signed or generated by a trusted root Certificate Authority, SonicWALL recommends that you import the certificate.
The easiest way to import the certificate is to click the Import Certificate button at the bottom of the Virtual Office home page. The following warning messages may be displayed:
Click Yes. The certificate will be imported.
9SonicWALL SSL VPN 2.5 User Guide
Using Two-Factor Authentication
Using Two-Factor AuthenticationThe following sections describe how to log in to the SSL-VPN virtual access using two-factor authentication:
• “User Prerequisites” on page 10
• “User Configuration Tasks” on page 10
User PrerequisitesBefore you can log in using two-factor authentication, you must meet the following prerequisites:
• Your administrator has created your user account.
• You have either an RSA SecurID token or a VASCO Digipass token.
User Configuration TasksThe following sections describe how users log in to the SonicWALL SSL-VPN appliance using the two types of two-factor authentication:
• “RSA User Authentication Process” on page 10
• “VASCO User Authentication Process” on page 12
RSA User Authentication ProcessThe following sections describe user tasks when using RSA two-factor authentication to log in to the SonicWALL SSL-VPN Virtual Office:
• “Logging into the SSL-VPN Virtual Office Using RSA Two-Factor Authentication” on page 10
• “Creating a New PIN” on page 11
• “Waiting for the Next Token Mode” on page 12
Logging into the SSL-VPN Virtual Office Using RSA Two-Factor Authentication
To log in to the SonicWALL SSL-VPN Virtual Office using RSA two-factor authentication, perform the following steps.
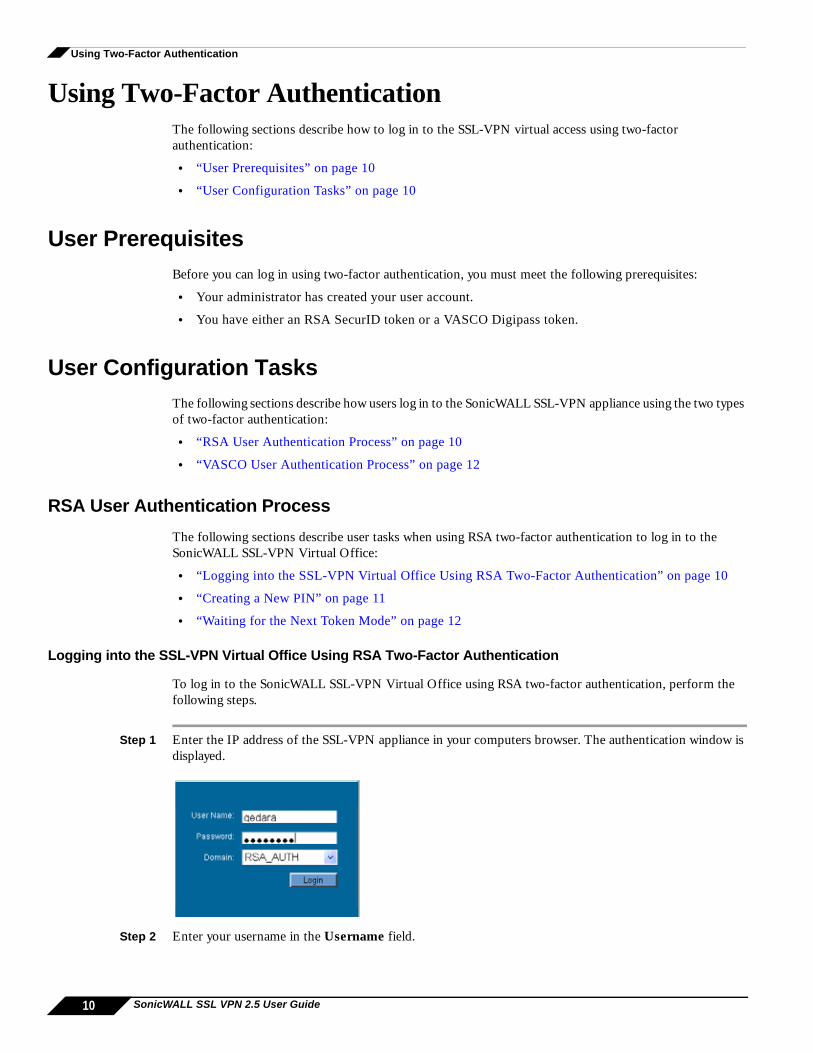
Step 1 Enter the IP address of the SSL-VPN appliance in your computers browser. The authentication window is displayed.
Step 2 Enter your username in the Username field.
10 SonicWALL SSL VPN 2.5 User Guide

Using Two-Factor Authentication
Step 3 The first time you log in to the Virtual office, your entry in the password field depends on whether you have been given a PIN or if you need to create the PIN.
• If you already have a PIN, enter the passcode in the Password field. The passcode is the user PIN and the SecurID token code. For example, if the user’s PIN is 8675 and the token code is 30966673, then the passcode is 867530966673.
• If you do not have a PIN, enter the SecurID token code in the Password field.
Step 4 Select the appropriate Domain.
Note If manually entering the Domain, it is case-sensitive.
Step 5 Click Login.
Creating a New PIN
The RSA Authentication Manager automatically determines when users are required to create a new PIN. will determines that user associated with a particular token requires a new PIN. SSL-VPN appliance prompts the user to enter new PIN.
Step 1 If the user is configured for the Allowed to Create a PIN option, users are first asked if they want the system to generate a PIN. To have the system generate a PIN, type y and click OK. To create your own PIN, type n and click OK.
Step 2 The new PIN is displayed. To accept the PIN type y and click OK. To have the system generate a different PIN, type n and click OK.
Step 3 If you declined to accept a system-generated PIN, or if your username is configured for Required to Create a PIN, you are prompted to enter your new PIN. Enter the PIN in the New PIN field and again in the Confirm PIN field and click OK.
11SonicWALL SSL VPN 2.5 User Guide

Using Two-Factor Authentication
Step 4 The RSA Authentication Manager verifies that the new PIN is an acceptable PIN. If the PIN is accepted, the user is prompted to log in with the new passcode.
Waiting for the Next Token Mode
If user authentication fails three consecutive times, the RSA server requires the user to generate and enter a new token. To complete authentication, the user is prompted to wait for the token to change and enter the next token.
VASCO User Authentication ProcessThe following sections describe user tasks when using RSA two-factor authentication:
• “Logging into the SSL-VPN Virtual Office Using VASCO Two-Factor Authentication” on page 12
• “Creating a New PIN” on page 11
Logging into the SSL-VPN Virtual Office Using VASCO Two-Factor Authentication
To log in to the SonicWALL SSL-VPN Virtual Office using VASCO two-factor authentication, perform the following steps:
Step 1 Enter the IP address of the SSL-VPN appliance in your computers browser. The authentication window is displayed.
Step 2 Enter your username in the Username field.
12 SonicWALL SSL VPN 2.5 User Guide

Using One-Time Passwords
Step 3 Enter the passcode in the Password field. The passcode is the user PIN and the VASCO Digipass token code. For example, if the users PIN is 8675 and the token code is 30966673, then the passcode is 867530966673.
Step 4 Select the appropriate Domain.
Note If manually entering the Domain, it is case-sensitive.
Step 5 Click Login.
Using One-Time PasswordsThe following sections describe how to use one-time passwords:
• User Prerequisites, page 13
• User Configuration Tasks, page 13
• Verifying User One-Time Password Configuration, page 15
• Troubleshooting Common Errors, page 15
User PrerequisitesUsers must have a user account enabled in the SSL-VPN management interface. Only users enabled by the administrator to use the One-Time Password feature will need to perform the following configuration tasks. The administrator must enable a correct email address that accessible by the user. Users cannot enable the One-Time Password feature and they must be able to access the SSL-VPN user portal, the SSL-VPN Virtual Office.
Note The One-time Password feature is supported on the SonicWALL SSL-VPN 2000 and 4000 security appliances.
User Configuration TasksTo use the One-Time Password feature, perform the following steps:
Step 1 If you are not logged into the SSL-VPN Virtual Office user interface, open a Web browser and type the Virtual Office interface URL in the Location or Address bar and press Enter. Type in your user name in the User Name field and your password in the Password field, then select the appropriate domain from the Domain pull-down. Click Login.
13SonicWALL SSL VPN 2.5 User Guide
Using One-Time Passwords
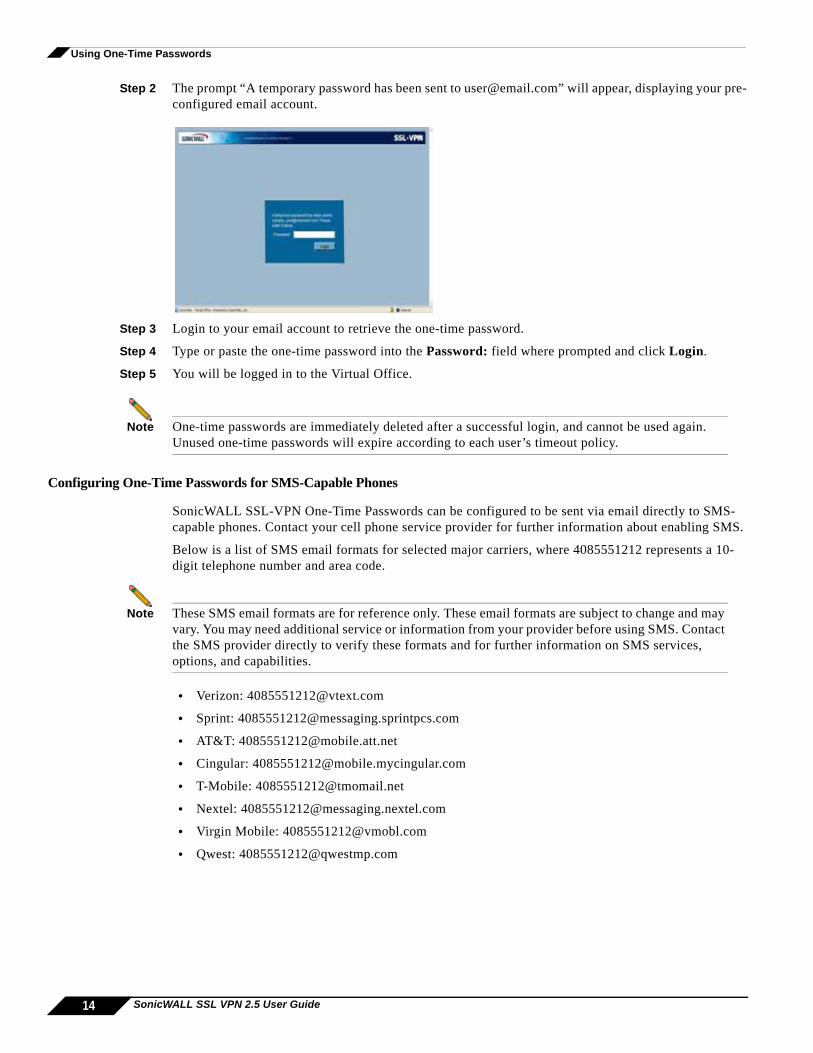
Step 2 The prompt “A temporary password has been sent to [email protected]” will appear, displaying your pre-configured email account.
Step 3 Login to your email account to retrieve the one-time password.
Step 4 Type or paste the one-time password into the Password: field where prompted and click Login.
Step 5 You will be logged in to the Virtual Office.
Note One-time passwords are immediately deleted after a successful login, and cannot be used again. Unused one-time passwords will expire according to each user’s timeout policy.
Configuring One-Time Passwords for SMS-Capable Phones
SonicWALL SSL-VPN One-Time Passwords can be configured to be sent via email directly to SMS-capable phones. Contact your cell phone service provider for further information about enabling SMS.
Below is a list of SMS email formats for selected major carriers, where 4085551212 represents a 10-digit telephone number and area code.
Note These SMS email formats are for reference only. These email formats are subject to change and may vary. You may need additional service or information from your provider before using SMS. Contact the SMS provider directly to verify these formats and for further information on SMS services, options, and capabilities.
• Verizon: [email protected]
• Sprint: [email protected]
• AT&T: [email protected]
• Cingular: [email protected]
• T-Mobile: [email protected]
• Nextel: [email protected]
• Virgin Mobile: [email protected]
• Qwest: [email protected]
14 SonicWALL SSL VPN 2.5 User Guide

Using NetExtender
Verifying User One-Time Password ConfigurationIf you are successfully logged in to Virtual Office, you have correctly used the One-Time Password feature.
If you cannot login using the One-Time Password feature, verify the following:
• Are you able to login to the Virtual Office without being prompted to check your email for a one-time password? You have not been enabled to use the One-Time Password feature.Contact your SSL-VPN administrator.
• Is your email address correct? If your email address has been entered incorrectly, contact your SSL-VPN administrator to correct it.
• Is there no email with a one-time password? Wait a few minutes and refresh your email inbox. Check your spam filter. If there is no email after several minutes, try to login again to generate a new one-time password.
• Have you accurately typed the one-time password in the correct field? Re-type or copy and paste the one-time password.
Troubleshooting Common Errors
Symptom I see an error message indicating that an email configuration is invalid, and I have verified that the One-Time Password feature is configured correctly.
Possible Cause The SonicWALL SSL-VPN One-Time Password feature does not support email servers that require passwords or other authentication. Your email server must allow anonymous access to allow the One-Time Password feature to successfully send a one-time password.
Using NetExtenderThe following sections describe how to use NetExtender:
• “User Prerequisites” section on page 15
• “User Configuration Tasks” section on page 16
• “Verifying NetExtender Operation from the System Tray” section on page 31
User PrerequisitesWindows clients must meet the following prerequisites in order to use NetExtender:
• One of the following platforms:
– Windows Vista, Windows XP Home or Professional, Windows 2000 Professional, Windows 2000 Server Windows 2003 Server.
• One of the following browsers:
– Internet Explorer 5.0.1 and higher
– Mozilla Firefox 1.5 and higher
• To initially install the NetExtender client, the user must be logged in to the PC with administrative privileges.
15SonicWALL SSL VPN 2.5 User Guide

Using NetExtender
• Downloading and running scripted ActiveX files must be enabled on Internet Explorer.
• If the SSL-VPN gateway uses a self-signed SSL certificate for HTTPS authentication, then it is necessary to install the certificate before establishing a NetExtender connection. If you are unsure whether the certificate is self-signed or generated by a trusted root Certificate Authority, SonicWALL recommends that you import the certificate. The easiest way to import the certificate is to click the Import Certificate button at the bottom of the Virtual Office home page.
Macintosh clients meet the following prerequisites in order to use NetExtender:
• MacOS 10.4 and higher
• Java 1.4 and higher
• Both PowerPC and Intel Macs are supported.
Linux clients must meet the following prerequisites in order to use NetExtender:
• Linux Fedora Core 3 or higher, or Ubuntu 7 or higher
• Sun Java 1.4 and higher is required for using the NetExtender GUI.
Note Open source Java Virtual Machines (VMs) are not currently supported. If you do not have Sun Java 1.4, you can use the command-line interface version of NetExtender.
User Configuration TasksSonicWALL NetExtender is a software application that enables remote users to securely connect to the remote network. With NetExtender, remote users can virtually join the remote network. Users can mount network drives, upload and download files, and access resources in the same way as if they were on the local network.
The following sections describe how to install NetExtender on a Windows platform:
• “Installing NetExtender Using the Mozilla Firefox Browser” section on page 17
• “Installing NetExtender Using the Internet Explorer Browser” section on page 19
The following sections describe how to use NetExtender on a Windows platform:
• “Launching NetExtender Directly from Your Computer” section on page 23
• “Configuring NetExtender Preferences” section on page 24
• “Configuring NetExtender Connection Scripts” section on page 26
• “Configuring Proxy Settings” section on page 28
• “Viewing the NetExtender Log” section on page 29
• “Disconnecting NetExtender” section on page 30
• “Upgrading NetExtender” section on page 31
• “Uninstalling NetExtender” section on page 31
• “Displaying Route Information” section on page 32
• “Displaying Connection Information” section on page 32
The following section describe how to install and use NetExtender on a Macintosh platform:
• “Installing and Using NetExtender on MacOS” section on page 32
The following section describe how to install and use NetExtender on a Linux platform:
• “Installing and Using NetExtender on Linux” section on page 36
16 SonicWALL SSL VPN 2.5 User Guide

Using NetExtender
Installing NetExtender Using the Mozilla Firefox BrowserTo use NetExtender for the first time using the Mozilla Firefox browser, perform the following:
Step 1 To launch NetExtender, first log in to the SSL-VPN portal.
Step 2 Click the NetExtender button.
Step 3 The first time you launch NetExtender, it will automatically install the NetExtender stand-alone application on your computer. If a warning message is displayed in a yellow banner at the top of your Firefox banner, click the Edit Options... button.
Step 4 The Allowed Sites - Software Installation window is displayed, with the address of the Virtual Office server in the address window. Click Allow to allow Virtual Office to install NetExtender, and click Close.
Step 5 Return to the Virtual Office window and click NetExtender again.
Step 6 The Software Installation window is displayed. After a five second countdown, the Install Now button will become active. Click it.
17SonicWALL SSL VPN 2.5 User Guide

Using NetExtender
Step 7 NetExtender is installed as a Firefox extension.
Step 8 When NetExtender completes installing, the NetExtender Status window displays, indicating that NetExtender successfully connected.
Closing the windows (clicking on the x icon in the upper right corner of the window) will not close the NetExtender session, but will minimize it to the system tray for continued operation.
Step 9 Review the following table to understand the fields in the NetExtender Status window.
Field DescriptionStatus Indicates what operating state the NetExtender client is in, either
Connected or Disconnected.
Server Indicates the name of the server to which the NetExtender client is connected.
Client IP Indicates the IP address assigned to the NetExtender client.
Sent Indicates the amount of traffic the NetExtender client has transmitted since initial connection.
Received Indicates the amount of traffic the NetExtender client has received since initial connection.
Duration The amount of time the NetExtender has been connected, expressed as days, hours, minutes, and seconds.
18 SonicWALL SSL VPN 2.5 User Guide

Using NetExtender
Step 10 Additionally, a balloon icon in the system tray appears, indicating NetExtender has successfully installed.
Step 11 The NetExtender icon is displayed in the task bar.
Installing NetExtender Using the Internet Explorer BrowserIn SonicWALL SSL-VPN release 2.1, NetExtender is fully compatible with Microsoft Windows Vista and supports the same functionality as with other Windows operating systems.
Note It may be necessary to restart your computer when installing NetExtender on Windows Vista.
Internet Explorer Prerequisites
It is recommended that you add the URL or domain name of your SSL-VPN server to Internet Explorer’s trusted sites list. This will simplify the process of installing NetExtender and logging in, by reducing the number of security warnings you will receive. To add a site to Internet Explorer’s trusted sites list, complete the following procedure:
Step 1 In Internet Explorer, go to Tools > Internet Options.
Step 2 Click on the Security tab.
Step 3 Click on the Trusted Sites icon and click on the Sites... button to open the Trusted sites window.
Step 4 Enter the URL or domain name of your SSL-VPN server in the Add this Web site to the zone field and click Add.
Step 5 Click Ok in the Trusted Sites and Internet Options windows.
19SonicWALL SSL VPN 2.5 User Guide

Using NetExtender
To use NetExtender for the first time using the Internet Explorer browser, perform the following:
Step 1 To launch NetExtender, first log in to the SSL-VPN portal.
Step 2 Click the NetExtender button.
Step 3 The first time you launch NetExtender, you must first add the SSL-VPN portal to your list of trusted sites. If you have not done so, the follow message will display.
20 SonicWALL SSL VPN 2.5 User Guide

Using NetExtender
Step 4 Click Instructions to add SSL-VPN server address into trusted sites for help.
Step 1 In Internet Explorer, go to Tools > Internet Options.
Step 2 Click on the Security tab.
Step 3 Click on the Trusted Sites icon and click on the Sites... button to open the Trusted sites window.
21SonicWALL SSL VPN 2.5 User Guide

Using NetExtender
Step 4 Enter the URL or domain name of your SSL-VPN server in the Add this Web site to the zone field and click Add.
Step 5 Click Ok in the Trusted Sites and Internet Options windows.
Step 6 Return to the SSL-VPN portal and click on the NetExtender button. The portal will automatically install the NetExtender stand-alone application on your computer. The NetExtender installer window opens.
Step 7 If an older version of NetExtender is installed on the computer, the NetExtender launcher will remove the old version and then install the new version.
Step 8 If the following warning message is displayed, click Continue Anyway. SonicWALL testing has verified that NetExtender is fully compatible with Windows XP and 2000.
22 SonicWALL SSL VPN 2.5 User Guide

Using NetExtender
Step 9 When NetExtender completes installing, the NetExtender Status window displays, indicating that NetExtender successfully connected.
Launching NetExtender Directly from Your ComputerYou can launch NetExtender directly from your computer without first navigating to the SSL-VPN portal. To launch NetExtender, complete the following procedure:
Step 1 Navigate to Start > All Programs.
Step 2 Select the SonicWALL SSL-VPN NetExtender folder, and then click on SonicWALL SSL-VPN NetExtender. The NetExtender login window is displayed.
Step 3 The IP address of the last SSL-VPN server you connected to is displayed in the SSL-VPN Server field. To display a list of recent SSL-VPN servers you have connected to, click on the arrow.
Step 4 Enter your username and password.
Step 5 The last domain you connected to is displayed in the Domain field.
Step 6 The pulldown menu at the bottom of the window provides three options for remembering your username and password:
• Save user name & password if server allows
23SonicWALL SSL VPN 2.5 User Guide

Using NetExtender
• Save user name only if server allows
• Always ask for user name & password
Tip Having NetExtender save your user name and password can be a security risk and should not be enabled if there is a chance that other people could use your computer to access sensitive information on the network.
Configuring NetExtender PreferencesComplete the following procedure to configure NetExtender preferences:
Step 1 Right click on the icon in the system tray and click on Preferences... The NetExtender Preferences window is displayed.
Step 2 The Connection Profiles tab displays the SSL-VPN connection profiles you have used, including the IP address of the SSL-VPN server, the domain, and the username.
Step 3 To delete a profile, highlight it by clicking on it and then click the Remove buttons. Click the Remove All buttons to delete all connection profiles.
24 SonicWALL SSL VPN 2.5 User Guide

Using NetExtender
Step 4 The Settings tab allows you to customize the behavior of NetExtender.
Step 5 To have NetExtender automatically connect when you start your computer, check the Automatically connect with Connection Profile checkbox and select the appropriate connection profile from the pulldown menu.
Note Only connection profiles that allow you to save your username and password can be set to automatically connect.
Step 6 To have NetExtender launch when you log in to your computer, check the Automatically start NetExtender UI. NetExtender will start, but will only be displayed in the system tray. To have the NetExtender log-in window display, check the Display NetExtender UI checkbox.
Step 7 Select Minimize to the tray icon when NetExtender window is closed to have the NetExtender icon display in the system tray. If this option is not checked, you will only be able to access the NetExtender UI through Window’s program menu.
Step 8 Select Display Connect/Disconnect Tips from the System Tray to have NetExtender display tips when you mouse over the NetExtender icon.
Step 9 Select Automatically reconnect when the connection is terminated to have NetExtender attempt to reconnect when it loses connection.
Step 10 Select Uninstall NetExtender automatically to have NetExtender uninstall every time you end a session.
Step 11 Select Disconnect an active connection to have NetExtender log out of all of your SSL-VPN sessions when you exit a NetExtender session
Step 12 Click Apply.
25SonicWALL SSL VPN 2.5 User Guide

Using NetExtender
Configuring NetExtender Connection ScriptsSonicWALL SSL-VPN release 2.0 provides users with the ability to run batch file scripts when NetExtender connects and disconnects. The scripts can be used to map or disconnect network drives and printers, launch applications, or open files or websites. To configure NetExtender Connection Scripts, perform the following tasks.
Step 1 Right click on the icon in the task bar and click on Preferences... The NetExtender Preferences window is displayed.
Step 2 Click on Connection Scripts.
Step 3 To enable the domain login script, select the Attempt to execute domain login script checkbox. When enabled, NetExtender will attempt to contact the domain controller and execute the login script.
Note Enabling this feature may cause connection delays while remote client’s printers and drives are mapped. Make sure the domain controller and any machines in the logon script are accessible via NetExtender routes
Step 4 To enable the script that runs when NetExtender connects, select the Automatically execute the batch file “NxConnect.bat” checkbox.
Step 5 To enable the script that runs when NetExtender disconnects, select the Automatically execute the batch file “NxDisconnect.bat” checkbox.
Step 6 To hide either of the console windows, select the appropriate Hide the console window checkbox. If this checkbox is not selected, the DOS console window will remain open while the script runs.
Step 7 Click Apply.
26 SonicWALL SSL VPN 2.5 User Guide
Using NetExtender
Configuring Batch File Commands
NetExtender Connection Scripts can support any valid batch file commands. For more information on batch files, see the following Wikipedia entry: http://en.wikipedia.org/wiki/.bat. The following tasks provide an introduction to some commonly used batch file commands.
Step 1 To configure the script that runs when NetExtender connects, click the Edit “NxConnect.bat” button. The NxConnect.bat file is displayed.
Step 2 To configure the script that runs when NetExtender disconnects, click the Edit “NxDisconnect.bat” button. The NxConnect.bat file is displayed.
Step 3 By default, the NxConnect.bat file contains examples of commands that can be configured, but no actual commands. Too add commands, scroll to the bottom of the file.
Step 4 To map a network drive, enter a command in the following format: net use drive-letter\\server\share password /user:Domain\name
For example to if the drive letter is z, the server name is engineering, the share is docs, the password is 1234, the user’s domain is eng and the username is admin, the command would be the following:net use z\\engineering\docs 1234 /user:eng\admin
Step 5 To disconnect a network drive, enter a command in the following format:net use drive-letter: /delete
For example, to disconnect network drive z, enter the following command:net use z: /delete
Step 6 To map a network printer, enter a command in the following format:net use LPT1 \\ServerName\PrinterName /user:Domain\name
For example, if the server name is engineering, the printer name is color-print1, the domain name is eng, and the username is admin, the command would be the following:net use LPT1 \\engineering\color-print1 /user:eng\admin
Step 7 To disconnect a network printer, enter a command in the following format:net use LPT1 /delete
Step 8 To launch an application enter a command in the following format:C:\Path-to-Application\Application.exe
Step 9 For example, to launch Microsoft Outlook, enter the following command:C:\Program Files\Microsoft Office\OFFICE11\outlook.exe
Step 10 To open a website in your default browser, enter a command in the following format:start http://www.website.com
Step 11 To open a file on your computer, enter a command in the following format:C:\Path-to-file\myFile.doc
Step 12 When you have finished editing the scripts, save the file and close it.
27SonicWALL SSL VPN 2.5 User Guide

Using NetExtender
Configuring Proxy SettingsSonicWALL SSL-VPN release 2.1 introduces support for NetExtender sessions using proxy configurations. Currently, only HTTPS proxy is supported. When launching NetExtender from the web portal, if your browser is already configured for proxy access, NetExtender automatically inherits the proxy settings.
To manually configure NetExtender proxy settings, perform the following tasks.
Step 1 Right click on the icon in the task bar and click on Preferences... The NetExtender Preferences window is displayed.
Step 2 Click on Proxy.
Step 3 Select the Enable proxy settings checkbox.
Step 4 NetExtender provides three options for configuring proxy settings:
• Automatically detect settings - To use this setting, the proxy server must support Web Proxy Auto Discovery Protocol (WPAD)), which can push the proxy settings script to the client automatically.
• Use automatic configuration script - If you know the location of the proxy settings script, select this option and enter the URL of the scrip in the Address field.
• Use proxy server - Select this option to enter the Address and Port of the proxy server. Optionally, you can enter a User name and Password for the proxy server. If the proxy server requires a username and password, but you do not specify them in the Preferences window, a NetExtender pop-up window will prompt you to enter them.
Step 5 Click the Internet Explorer proxy settings button to open Internet Explorer’s proxy settings.
28 SonicWALL SSL VPN 2.5 User Guide

Using NetExtender
Viewing the NetExtender LogThe NetExtender log displays information on NetExtender session events. The log is a file named NetExtender.dbg. It is stored in the directory: C:\Program Files\SonicWALL\SSL-VPN\NetExtender. To view the NetExtender log, right click on the NetExtender icon in the system tray, and click View Log.
To view details of a log message, double-click on a log entry, or go to View > Log Detail to open the Log Detail pane.
To save the log, either click the Export icon or go to Log > Export.
SonicWALL SSL VPN release 2.5 introduces the ability to filter the NetExtender log. To filter the log to display entries from a specific duration of time, go to the Filter menu and select the cutoff threshold.
To filter the log by type of entry, go to Filter > Level and select one of the level categories. The available options are Fatal, Error, Warning, and Info, in descending order of severity. The log displays all entries that match or exceed the severity level. For example, when selecting the Error level, the log displays all Error and Fatal entries, but not Warning or Info entries.
29SonicWALL SSL VPN 2.5 User Guide

Using NetExtender
To view the Debug Log, either click the Debug Log icon or go to Log > Debug Log.
Note It may take several minutes for the Debug Log to load. During this time, the Log window will not be accessible, although you can open a new Log window while the Debug Log is loading.
To clear the log, click on Log > Clear Log.
Disconnecting NetExtenderTo disconnect NetExtender, perform the following steps:
Step 1 Right click on the NetExtender icon in the system tray to display the NetExtender icon menu and click Disconnect.
Step 2 Wait several seconds. The NetExtender session disconnects.
You can also disconnect by double clicking on the NetExtender icon to open the NetExtender window and then clicking the Disconnect button.
When NetExtender becomes disconnected, the NetExtender window displays and gives you the option to either Reconnect or Close NetExtender.
30 SonicWALL SSL VPN 2.5 User Guide

Using NetExtender
Upgrading NetExtenderBeginning with SonicWALL SSL VPN release 2.5, NetExtender automatically notifies users when an updated version of NetExtender is available. Users are prompted to click OK and NetExtender downloads and installs the update from the SonicWALL SSL VPN security appliance.
When using releases prior 2.5, users should periodically launch NetExtender from the SonicWALL Virtual Office to ensure they have the latest version. Prior to release 2.5, NetExtender does not check for updates when it is launched directly from a user’s computer.
Uninstalling NetExtenderThe NetExtender utility is automatically installed on your computer. To remove NetExtender, click on Start > All Programs, click on SonicWALL SSL-VPN NetExtender, and then click on Uninstall.
You can also configure NetExtender to automatically uninstall when your session is disconnected. To do so, perform the following steps:
Step 1 Right click on the NetExtender icon in the system tray and click on Preferences... The NetExtender Preferences window is displayed.
Step 2 Click on the Settings tab.
Step 3 Select Uninstall NetExtender automatically to have NetExtender uninstall every time you end a session.
Verifying NetExtender Operation from the System TrayTo view options in the NetExtender system tray, right click on the NetExtender icon in the system tray. The following are some tasks you can perform with the system tray.
31SonicWALL SSL VPN 2.5 User Guide

Using NetExtender
Displaying Route InformationTo display the routes that NetExtender has installed on your system, click the Route Information option in the system tray menu. The system tray menu displays the default route and the associated subnet mask.
Displaying Connection InformationYou can display connection information by mousing over the NetExtender icon in the system tray.
Installing and Using NetExtender on MacOSSonicWALL SSL VPN 2.5 introduces support for NetExtender on MacOS. To use NetExtender on your Macintosh, your system must meet the following prerequisites:
• MacOS 10.4 and higher
• Java 1.4 and higher
• Both PowerPC and Intel Macs are supported.
To install NetExtender on your Macintosh, perform the following tasks:
Step 1 Log in to the SonicWALL Virtual Office.
Step 2 Click the NetExtender button.
32 SonicWALL SSL VPN 2.5 User Guide

Using NetExtender
Step 3 A pop-up window indicates that you have chosen to open the NetExtender.dmg file. Click OK to save it to your default download directory.
Step 4 Launch the NetExtender.dmg file. It will mount a drive that contains the NetExtender installer. Double click on the NetExtender-2.5.pkg file.
33SonicWALL SSL VPN 2.5 User Guide
Using NetExtender
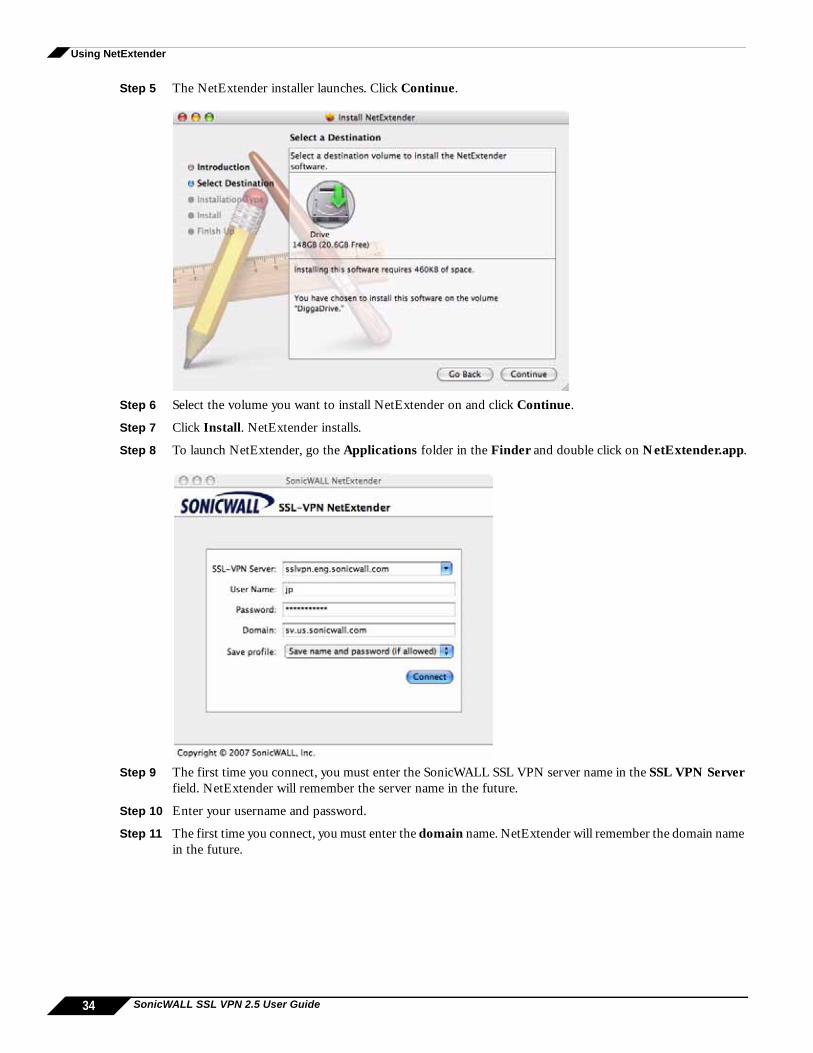
Step 5 The NetExtender installer launches. Click Continue.
Step 6 Select the volume you want to install NetExtender on and click Continue.
Step 7 Click Install. NetExtender installs.
Step 8 To launch NetExtender, go the Applications folder in the Finder and double click on NetExtender.app.
Step 9 The first time you connect, you must enter the SonicWALL SSL VPN server name in the SSL VPN Server field. NetExtender will remember the server name in the future.
Step 10 Enter your username and password.
Step 11 The first time you connect, you must enter the domain name. NetExtender will remember the domain name in the future.
34 SonicWALL SSL VPN 2.5 User Guide
Using NetExtender
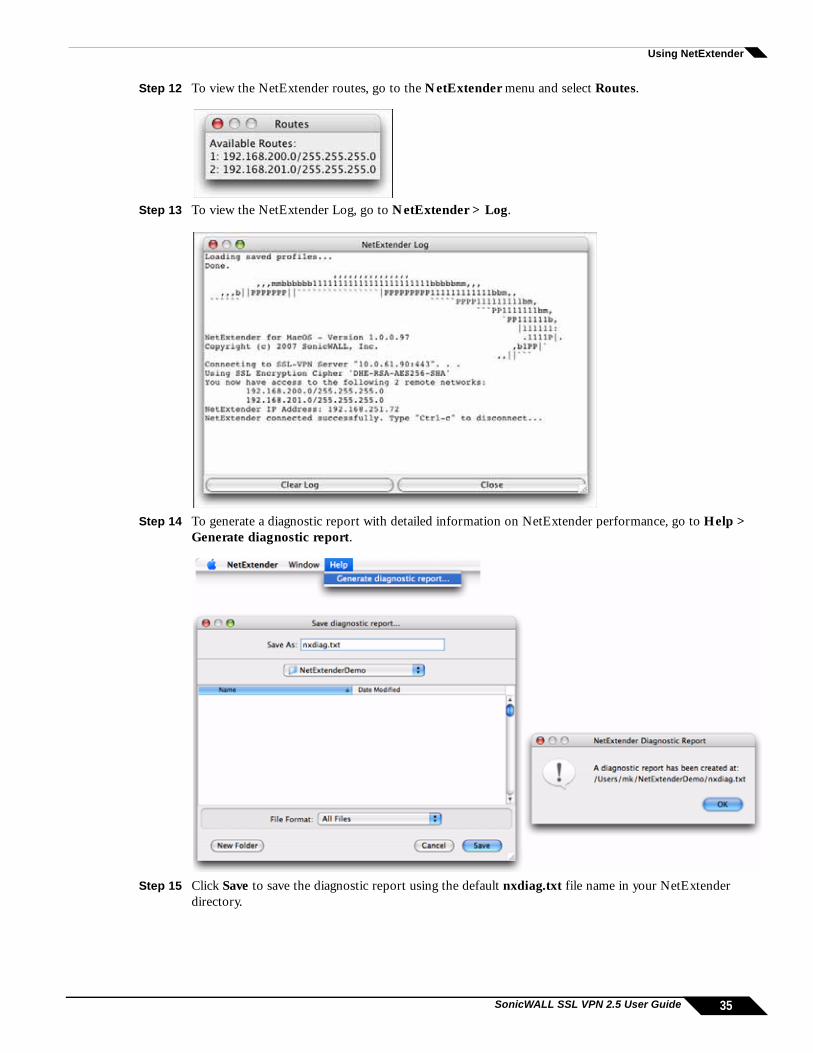
Step 12 To view the NetExtender routes, go to the NetExtender menu and select Routes.
Step 13 To view the NetExtender Log, go to NetExtender > Log.
Step 14 To generate a diagnostic report with detailed information on NetExtender performance, go to Help > Generate diagnostic report.
Step 15 Click Save to save the diagnostic report using the default nxdiag.txt file name in your NetExtender directory.
35SonicWALL SSL VPN 2.5 User Guide

Using NetExtender
Installing and Using NetExtender on LinuxSonicWALL SSL VPN 2.5 introduces support for NetExtender on MacOS. To use NetExtender on your Macintosh, your system must meet the following prerequisites:
• Linux Fedora Core 3+ and Ubuntu 7
• Sun Java 1.4 and higher is required for using the NetExtender GUI.
Note Open source Java Virtual Machines (VMs) are not currently supported. If you do not have Sun Java 1.4, you can use the command-line interface version of NetExtender.
To install NetExtender on your Macintosh, perform the following tasks:
Step 1 Log in to the SonicWALL Virtual Office.
Step 2 Click the NetExtender button. A pop-up window indicates that you have chosen to open the NetExtender.tgz file. Click OK to save it to your default download directory.
Step 3 Launch the NetExtender.tgz file and follow the instructions in the NetExtender installer. The new netExtender directory contains a NetExtender shortcut that can be dragged to your desktop or toolbar.
36 SonicWALL SSL VPN 2.5 User Guide

Using NetExtender
Step 4 The first time you connect, you must enter the SonicWALL SSL VPN server name in the SSL VPN Server field. NetExtender will remember the server name in the future.
Step 5 Enter your username and password.
Step 6 The first time you connect, you must enter the domain name. NetExtender will remember the domain name in the future.
Note You must be logged in as root to install NetExtender, although many Linux systems will allow the sudo ./install command to be used if you are not logged in as root.
Step 7 To install NetExtender from the CLI, navigate to the directory where you saved NetExtender.tgz and enter the tar -zxf NetExtender.tgz command.
Step 8 Enter the cd netExtenderClient command.
Step 9 Enter ./install to install NetExtender.
37SonicWALL SSL VPN 2.5 User Guide

Using NetExtender
Step 10 To view the NetExtender routes, go to the NetExtender menu and select Routes.
Step 11 To view the NetExtender Log, go to NetExtender > Log.
Step 12 To generate a diagnostic report with detailed information on NetExtender performance, go to Help > Generate diagnostic report.
Step 13 Click Save to save the diagnostic report using the default nxdiag.txt file name in your NetExtender directory.
38 SonicWALL SSL VPN 2.5 User Guide

Using NetExtender
Related DocumentsThe following Technical Notes provide more information on advanced NetExtender scenarios:
• Running NetExtender on a Different TCP Port
• Using the SonicWALL CDP Agent over a SonicWALL NetExtender Connection
• Using SonicWALL NetExtender to Access FTP Servers
• Resolving NetExtender Error With McAfee Enterprise 8.5
Changing Your PasswordYou can change your password using the Options button on the main Virtual Office page. To change your password, perform the following tasks:
Step 1 Click the Options button. The User Options page displays.
39SonicWALL SSL VPN 2.5 User Guide

Using Virtual Assist as a Technician
Step 2 Type a new password in the New Password field.
Step 3 Re-type the new password in the New Password (again) field.
Step 4 Click Save.
Using Virtual Assist as a TechnicianVirtual Assist is an easy to use tool that allows SonicWALL SSL VPN users to remotely support customers by taking control of their computers while the customer observes. Virtual Assist is a lightweight, thin client that installs automatically using Java from the SonicWALL SSL VPN Virtual Office without requiring the installation of any external software. For computers that do not support Java, Virtual Assist can be manually installed by downloading an executable file from the Virtual Office.
Before using Virtual Assist, you must meet the following requirements:
• Virtual Assist is only supported on Windows platforms. Virtual Assist is certified to work on Windows XP and Windows 2000.
• Technicians must either be on the same network as the SonicWALL SSL VPN security appliance or using a NetExtender connection.
The following sections describe how to use the technician view of Virtual Assist:
• “Launching a Virtual Assist Technician Session” section on page 41
40 SonicWALL SSL VPN 2.5 User Guide

Using Virtual Assist as a Technician
• “Performing Virtual Assist Technician Tasks” section on page 43
Launching a Virtual Assist Technician SessionTo launch a Virtual Assist session as a technician, perform the following steps.
Step 1 Log in to the SonicWALL SSL VPN security appliance Virtual Office. If you are already logged in to the SonicWALL SSL VPN customer interface, click on the Virtual Office button.
Step 2 Click on the Virtual Assist button.
Step 3 The Virtual Assist pop-up window displays, and Virtual Assist attempts to automatically install.
Step 4 If installation does not automatically begin, click the Download link to manually install the Virtual Assist applet.
Step 5 Click Run to launch the program directly. Or click Save to save the installer file to your computer, and then launch the supportExpert.exe file.
41SonicWALL SSL VPN 2.5 User Guide

Using Virtual Assist as a Technician
Step 6 During installation, the following warning messages may display:
a. Click Yes to accept the validity of the certificate.
b. Click Yes to accept the name of the certificate.
c. Click Run to launch Virtual Assist.
42 SonicWALL SSL VPN 2.5 User Guide
Using Virtual Assist as a Technician
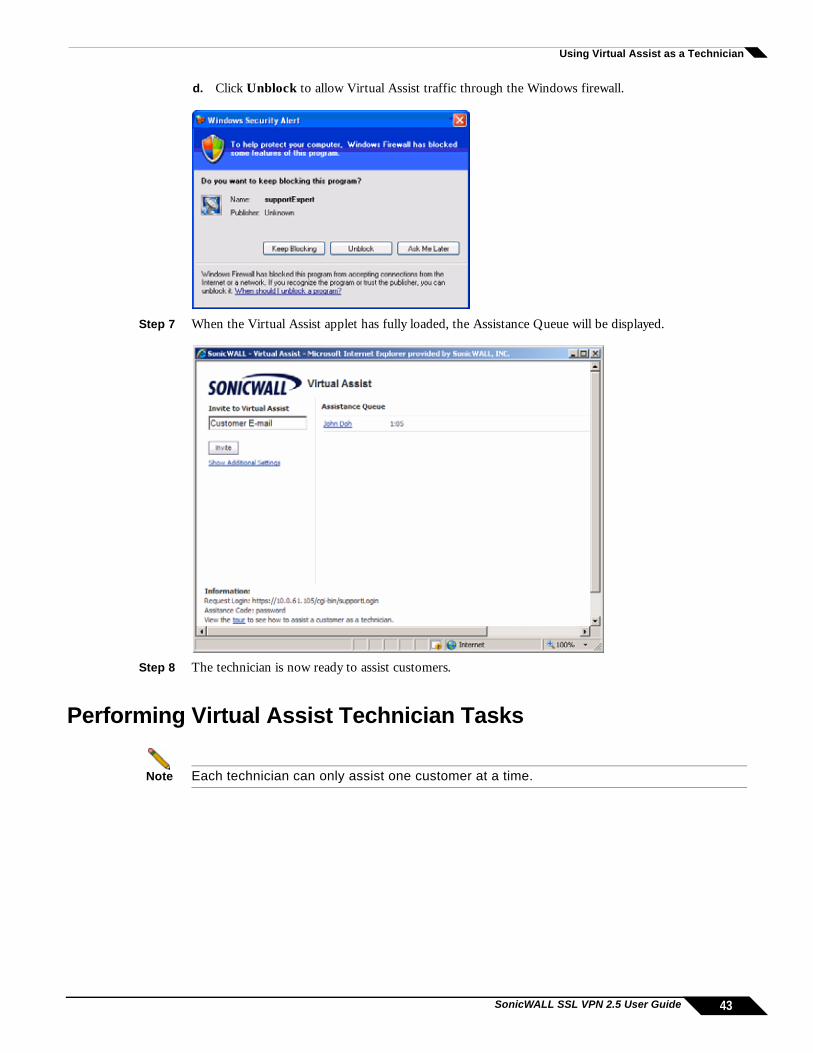
d. Click Unblock to allow Virtual Assist traffic through the Windows firewall.
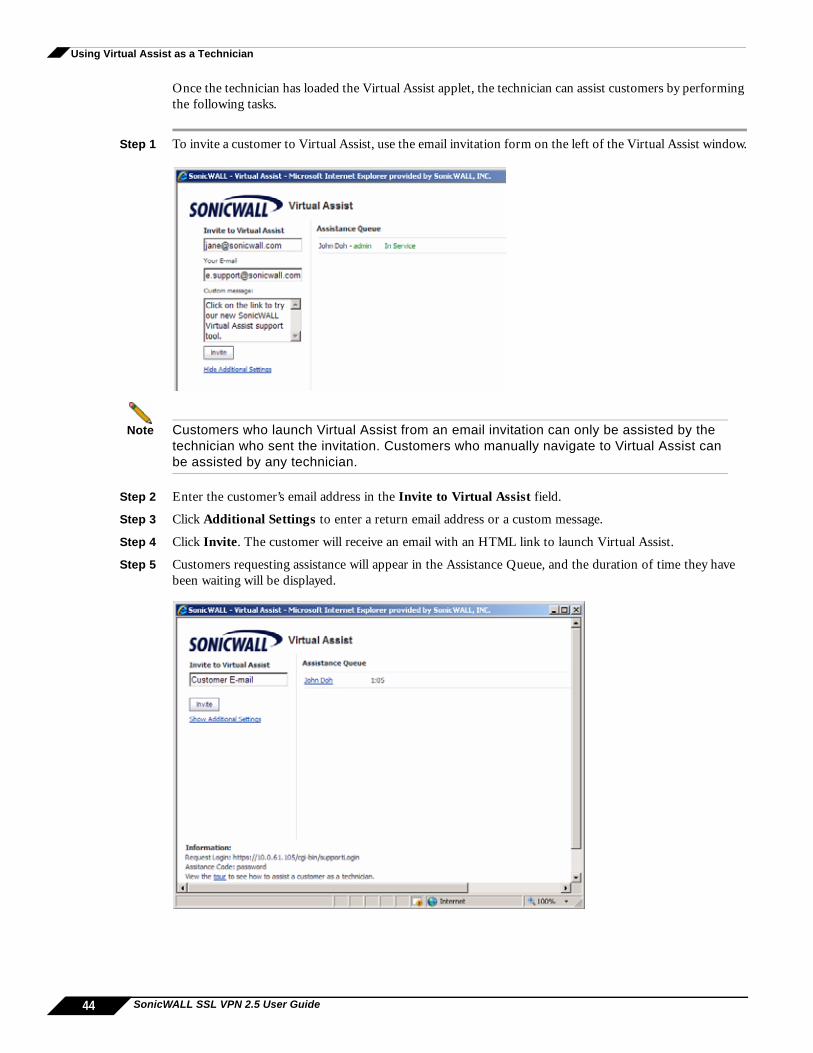
Step 7 When the Virtual Assist applet has fully loaded, the Assistance Queue will be displayed.
Step 8 The technician is now ready to assist customers.
Performing Virtual Assist Technician Tasks
Note Each technician can only assist one customer at a time.
43SonicWALL SSL VPN 2.5 User Guide
Using Virtual Assist as a Technician
Once the technician has loaded the Virtual Assist applet, the technician can assist customers by performing the following tasks.
Step 1 To invite a customer to Virtual Assist, use the email invitation form on the left of the Virtual Assist window.
Note Customers who launch Virtual Assist from an email invitation can only be assisted by the technician who sent the invitation. Customers who manually navigate to Virtual Assist can be assisted by any technician.
Step 2 Enter the customer’s email address in the Invite to Virtual Assist field.
Step 3 Click Additional Settings to enter a return email address or a custom message.
Step 4 Click Invite. The customer will receive an email with an HTML link to launch Virtual Assist.
Step 5 Customers requesting assistance will appear in the Assistance Queue, and the duration of time they have been waiting will be displayed.
44 SonicWALL SSL VPN 2.5 User Guide

Using Virtual Assist as a Technician
Step 6 Click on a customer’s user name to begin assisting the customer. A Session In-Progress notice will appear until the customer gives permission for the Virtual Assist session.
Step 7 Once the customer authorizes the session, the Virtual Assist window displays the customer’s entire desktop with the Virtual Assist taskbar in the top left corner.
The technician now has complete control of the customer’s keyboard and mouse. The customer can see all of the actions that the technician performs.
Note During a Virtual Assist session, the customer is not locked out of their computer. Both the technician and customer can control the computer, although this may cause confusion and consternation if they both attempt to drive at the same time. The customer can resume control when the technician is not actively typing or moving the mouse. And the customer can end the session at any time by clicking the End Virtual Assist button in the bottom right corner.
45SonicWALL SSL VPN 2.5 User Guide

Using Virtual Assist as a Technician
Step 8 The Technician’s view of Virtual Assist includes a taskbar with three buttons in the top left corner: Refresh, File Transfer, and Chat.
Step 9 Click the Refresh button to refresh the view of the customer’s computer.
Step 10 Click the File Transfer button to transfer files to and from the customer’s computer. The File Transfer window opens and shows the file directory of the technician’s computer on the left and the customer’s computer on the right.
Step 11 The File Transfer window functions in much the same manner as Windows Explorer or an FTP program. Navigate the File Transfer window by double-clicking on folders and selecting files. The File Transfer window includes the following controls:
• Desktop jumps to the desktop of the technician’s or customer’s computer.
• Up navigates up one directory on either the technician’s or customer’s computer.
• Download transfers the selected file or files from the technician’s computer to the customer’s computer.
• Upload transfers the selected file or files from the customer’s computer to the technician’s computer.
• Delete deletes the selected file or files.
• New folder creates a new folder in the selected directory.
• Rename renames the selected file or directory.
Step 12 When a file is transferring, the transfer progress is displayed at the bottom of the File Transfer window. Click the Exit button to cancel a transfer in progress.
46 SonicWALL SSL VPN 2.5 User Guide
Using Virtual Assist as a Customer
Note File Transfer supports the transfer of single or multiple files. It does not currently support the transfer of directories. To select multiple files, hold down the Ctrl button while clicking on the files.
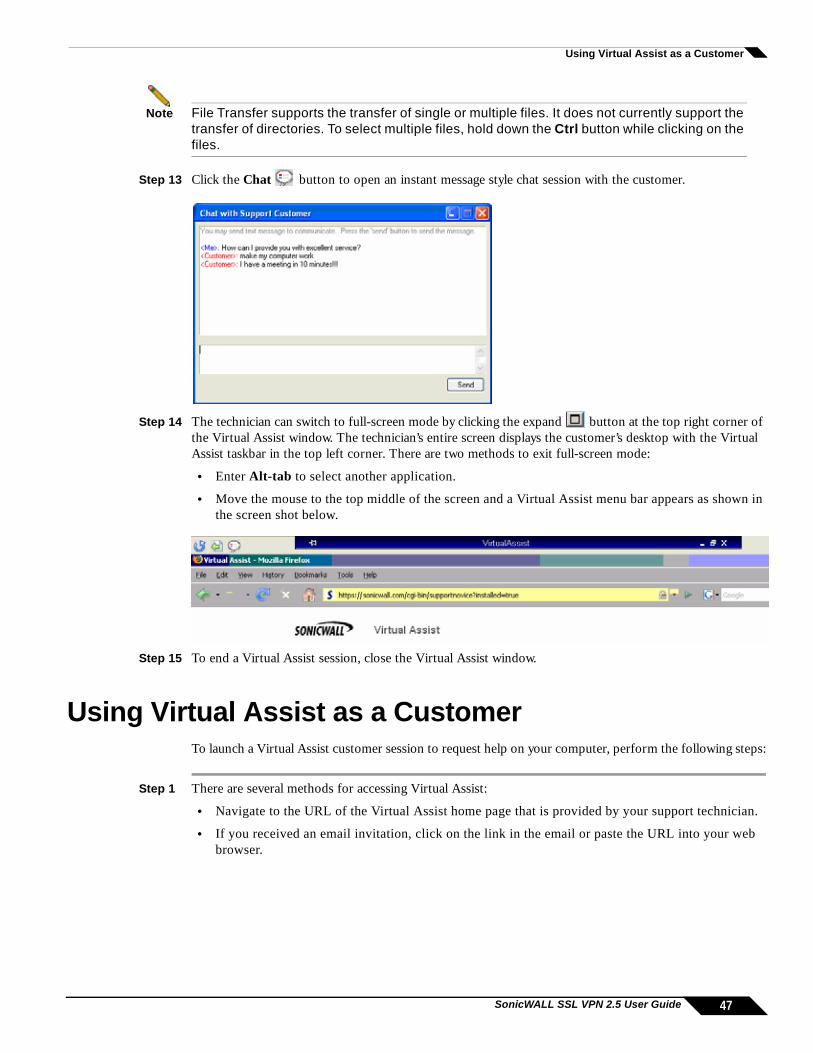
Step 13 Click the Chat button to open an instant message style chat session with the customer.
Step 14 The technician can switch to full-screen mode by clicking the expand button at the top right corner of the Virtual Assist window. The technician’s entire screen displays the customer’s desktop with the Virtual Assist taskbar in the top left corner. There are two methods to exit full-screen mode:
• Enter Alt-tab to select another application.
• Move the mouse to the top middle of the screen and a Virtual Assist menu bar appears as shown in the screen shot below.
Step 15 To end a Virtual Assist session, close the Virtual Assist window.
Using Virtual Assist as a CustomerTo launch a Virtual Assist customer session to request help on your computer, perform the following steps:
Step 1 There are several methods for accessing Virtual Assist:
• Navigate to the URL of the Virtual Assist home page that is provided by your support technician.
• If you received an email invitation, click on the link in the email or paste the URL into your web browser.
47SonicWALL SSL VPN 2.5 User Guide

Using Virtual Assist as a Customer
• The login page of your Virtual Office may include a direct link to Virtual Assist as shown below.
Step 2 Enter your email address or name in the Name field. If the Assistance Code field is displayed, you must enter the correct code. Contact your support staff if you do not know the code. Click Request Assistance.
48 SonicWALL SSL VPN 2.5 User Guide

Using Virtual Assist as a Customer
Step 3 If a Disclaimer is displayed, you must click Accept to proceed.
Step 4 Virtual Assist attempts to automatically install.
Step 5 If installation does not automatically begin, click the Download link to manually install the Virtual Assist application.
49SonicWALL SSL VPN 2.5 User Guide

Using Virtual Assist as a Customer
Step 6 Click Run to launch the program directly. Or click Save to save the installer file to your computer, and then launch the file.
Note Customers using the Internet Explorer browser may need to save the installer file to their computer and manually launch the file. Customers using the Firefox or Opera browsers should be able to launch the program directly by clicking on Run.
Step 7 During installation, the following warning messages will display on computer with Java Virtual Machine (JVM) installed:
a. Click Yes to accept the validity of the certificate.
b. Click Yes to accept the name of the certificate.
c. Click Run to launch Virtual Assist.
50 SonicWALL SSL VPN 2.5 User Guide

Using Virtual Assist as a Customer
Step 8 When the Virtual Assist application has fully loaded, the Wait for Tech tab will be highlighted and a counter will display the length of time you have been in the Assistance Queue. To cancel your Virtual Assist request, click the Cancel Request button.
Step 9 When a technician is ready to assist you, a final warning pop-up window displays. Click OK to give the technician complete control of your computer.
Step 10 Click Unblock to allow Virtual Assist traffic through the Windows firewall.
Step 11 The technician now has complete control of your computer, and you will see all of the actions they take displayed on your monitor.
Note During a Virtual Assist session, you are not completely locked out of your computer. Both the technician and customer can control the computer, although this may cause confusion and consternation if they both attempt to drive at the same time. You can resume control when the technician is not actively typing or moving the mouse. And you can end the session at any time by clicking the End Virtual Assist button in the bottom right corner.
51SonicWALL SSL VPN 2.5 User Guide

Using File Shares
Step 12 Click the Chat button to open an instant message style chat session with the technician. The Chat button is located in the bottom right corner of your desktop next to the End Virtual Assist button.
Step 13 The technician can also open a Chat window to communicate with you. To chat, type text in the Chat window and type Enter or click Send.
Step 14 You can end the Virtual Assist session at anytime by clicking on the End Virtual Assist button in the bottom right corner of the screen. This will end the technician’s control of your computer.
Using File SharesFile shares provide remote users with a secure Java applet or HTML-based interface to Microsoft File Shares using the CIFS (Common Internet File System) or SMB (Server Message Block) protocols. Using a Web interface similar in style to Microsoft’s familiar Network Neighborhood or My Network Places, File Shares allow users with appropriate permissions to browse network shares, rename, delete, retrieve, and upload files, and to create bookmarks for later recall.
The File Shares Applet mimics Windows Explorer navigation and provides functionality not available in HTML-based File Shares, including the ability to overwrite existing files and upload directories.
This section contains the following subsections:
• “Using the File Shares Applet” section on page 52
• “Using HTML-Based File Shares” section on page 68
Using the File Shares Applet The File Shares Applet has a similar look and feel to the Windows Explorer tool, featuring drag-and-drop and multiple file selection capabilities. It also provides the user the ability to set up bookmarks to quickly navigate through networks from the portal level. This feature saves time lost moving through network and server paths. The File Shares Applet leverages Sun’s Java platform browser plug-in to increase usability by mimicking the common Windows Explorer interface. With the help of the HTTPS protocol, the applet securely transfers encrypted files and information to and from the SSL-VPN appliance. The appliance communicates this data to the individual machines on the remote network.
52 SonicWALL SSL VPN 2.5 User Guide

Using File Shares
This section contains the following subsections:
• “User Prerequisites” section on page 53
• “Configuration Overview” section on page 53
• “Configuration Examples” section on page 58
User PrerequisitesThe SonicWALL SSL-VPN File Shares Applet is a Java application that supports Java 1.3.1 and newer, and the JRE Version 5.0 Update 10 or newer is recommended. To download the latest Java and JRE versions, visit http://www.java.com. Internet Explorer 6.0, Firefox 1.5 or newer, Opera 8 or newer, and Safari RSS are recommended Web browsers of optimal performance of the Java File Shares feature.
The administrator must unable the File Shares Applet for users to use it.
There must be a computer with open access for the SonicWALL SSL-VPN File Shares Applet to log into. The remote computer must have shared folders for files to be copied or moved. Sharing policy must be set from within the remote computer’s own operating system.
Configuration OverviewThe SSL-VPN File Shares Applet is easy and intuitive to use. User should be aware of its functions and limitations. Setting up bookmarks and the browser interface are covered in this section, along with an overview of the browser and sample use cases.
This section contains the following subsections:
• “Setting up Bookmarks” section on page 53
• “Using the Java File Shares Applet” section on page 54
• “File Shares Applet Browser Overview” section on page 57
Setting up Bookmarks
Bookmarks can be set up for folders and for files. A file bookmark will not launch the Applet, but instead will download and launch the file directly. Bookmarks must be enabled by the administrator.
To set up bookmarks from the Virtual Office Portal, perform the following steps.
Step 1 Open a Web browser and log into the SSL-VPN Virtual Office interface by typing the URL in the Location or Address bar and press Enter. Type in your user name in the User Name field and your password in the Password field, then select the appropriate domain from the Domain pull-down. Click Login.
53SonicWALL SSL VPN 2.5 User Guide

Using File Shares
Step 2 Click the Add Bookmark button in the portal page.
Step 3 In the Edit Bookmark window, type a friendly name for the bookmark in the Bookmark Name field, type the bookmark name or IP address in the Name or IP Address field.
Step 4 In the service pull down menu, select the File Shares option.
Step 5 Check the Use File Shares Java Applet box to enable the File Shares Applet for this bookmark. Leaving this box unchecked means the portal will launch the original HTML browser when the bookmark is selected.
Step 6 Click Add.
Bookmark serve as useful shortcuts to quickly access different network locations. Bookmarks can also be set up from the File Shares Browser, either by clicking the Bookmark button, or using the bookmark option from the right-click menu.
Using the Java File Shares Applet
While loading the browser interface, warning messages might display. These messages will look different for different browsers. For the purpose of these examples, Internet Explorer 6.0 was used.
Step 1 If you are not logged into the SSL-VPN Virtual Office user interface, open a Web browser and type the Virtual Office interface URL in the Location or Address bar and press Enter. Type in your user name in the User Name field and your password in the Password field, then select the appropriate domain from the Domain pull-down. Click Login.
54 SonicWALL SSL VPN 2.5 User Guide

Using File Shares
Step 2 Launch File Shares Applet by clicking the File Shares button, or clicking on a link with the File Shares Applet enabled. The File Shares Applet will launch in a new widow, separate from the Virtual Office portal.
Step 3 Depending on available browser and Java plug-in, a warning may display, click OK to continue.
Note To avoid this warning, upgrade browser to Internet Explorer 6 or newer, Firefox 1.5 or newer, Opera 8 or newer, or Safari RSS. Also updates to Java 5.0 Update 10 or newer are recommended.
Step 4 Depending on the networks configurations and browser, one or more security warning may display, click Yes or Run to continue.
55SonicWALL SSL VPN 2.5 User Guide

Using File Shares
The File Shares Applet will load.
Note The File Shares Applet window will not automatically refresh when its contents have changed or if it has been previously viewed. To refresh, click the Refresh icon from the toolbar, or use the Refresh option from the right-click menu.
Note The remote network can be browsed from the remote window’s address bar. The local directory can not be changed from the address bar. The remote path is capped at 1024 characters. The actual maximum string size will change depending on language.
Step 5 To select multiple items, click the items while holding the shift or the ctrl key. Clicking on an item again will de-select it and remove it from the group.
Step 6 To copy a file or group of files either to or from the network, select desired items and click-and-drag them across the center boundary. This will copy the file(s) into the open directory. Alternatively, the file(s) can be copied directly into a folder by dragging the icon and dropping over the desired folder; one could also use the copy button on the toolbar, or use the copy option from the right-click menu. A progress bar displays the waiting time required to copy the files.
Note The File Shares Applet supports overwriting existing files. If a file exists with the same name as the one you are trying to copy over, the Applet will prompt you to rename the file being copied. If the name is kept the same, the copied file will overwrite the existing one.
56 SonicWALL SSL VPN 2.5 User Guide

Using File Shares
Step 7 Double click on a file to launch it with the proper application. If activating a file on the remote machine, the File Shares Applet will first download the file to a temporary folder on your machine and then open it.
Note The File Shares Applet will not always be able to delete the temporary file after use. Use caution when opening files with sensitive material.
File Shares Applet Browser Overview
Each window, local and remote, contains a set of buttons for commonly used operations in the toolbar. Hovering the mouse cursor over these icons displays convenient tool tips to the user. Dragging the toolbar by the dotted line on the left side of it undocks the toolbar into its own window. To re-dock the toolbar, close the window. These are the same functions as those in the right-click menu.
Here is a list of the buttons on the task bar and their respective function.
• Back: Traverses back in the history. Sets the current view of the window to the previous location in history. This icon is dimmed if there is no previous history location.
• Forward: Traverses forward in history. This icon is dimmed if there are no forward locations in history.
• Up: Traverses up the directory tree to the parent directory of the current view. This icon is dimmed if the current view is of the root directory or if the parent directory cannot be resolved.
• Refresh: Refreshes the current view by either polling the local file system or remote network via the SSL-VPN. The refresh icon will be dimmed in the remote window if its contents are currently being refreshed.
• New Folder: Creates a new folder within the respective file system. Clicking this icon displays the “New Folder” dialog box, allowing the user to assign a name to the new folder. This icon is dimmed when the location of the window is such that a new folder cannot be created. (for example, Root of a Windows filesystem, domain list, machine list)
• Copy: Copies the selected file(s)/folder(s) to the location of the remote window. Clicking this icon displays the “Copy” dialog box that will show the status information of the copy procedure. If the file being copied already exists, a new dialog will display asking the user whether or not the existing file should be replaced. The copy icon is dimmed when there are no selected files/folders to copy
57SonicWALL SSL VPN 2.5 User Guide

Using File Shares
(for example, if no drive or domain is selected). It is also dimmed if the remote location cannot accept files copied to it (for example, Domain List/ Machine List). Copying a folder also copies everything within the folder.
• Delete: Deletes the selected file(s)/folder(s). Deleting a folder will delete everything within the folder.
Note Files deleted this way are fully removed from the original machine they were on. These files are not sent to the recycling bin and are in no way recoverable.
Configuration ExamplesThe following configuration examples provide a demonstration of the usefulness and flexibility of the File Shares Applet.
• Configuring Bookmarks from Within the File Shares Applet, page 58
• Using Bookmarks from Within the File Shares Applet, page 62
• Moving Files and Folders, page 63
• Launching a File Directly from the File Shares Applet, page 65
Configuring Bookmarks from Within the File Shares Applet
Navigating a remote computer’s directory hierarchy structure takes a long time. To reduce this process as much as possible, the SonicWALL SSL-VPN File Shares Applet allows the user to create bookmarks on the fly from within the File Shares Applet itself. This allows the user to skip the hierarchy structure of the remote computer the next time she needs to access a particular file or folder.
Step 1 Launch the File Shares Applet by clicking on the File Shares button in the Virtual Office portal. The File Shares Applet displays.
58 SonicWALL SSL VPN 2.5 User Guide

Using File Shares
Step 2 The File Shares Applet’s default location for the local window is the base directory, while the remote window shows the entire network. Double click on the appropriate folders to navigate the local window to the desktop or another appropriate folder.
Step 3 To navigate the remote window, double click on a visible computer, or input the name in the address bar preceded by \\ and followed by a \ and press Enter. The File Shares Applet will then navigate to the requested computer. It may take several seconds for the resources to load, depending on the network configuration.
Step 4 Once loaded, double click on a folder or enter the target directory path within the address bar. This can take some time as the File Shares Applet must browse through the network after every change.
Note Only the remote window can use the address bar to navigate through a computer’s file hierarchy.
Step 5 To set a bookmark to the current directory, right-click in an empty location in the remote directory and select Add Bookmark.
59SonicWALL SSL VPN 2.5 User Guide

Using File Shares
Note To set a bookmark for a specific file or folder, select it prior to selecting Add Bookmark from the right-click menu.
Step 6 Enter a name for the new bookmark in the New Bookmark window that displays.
60 SonicWALL SSL VPN 2.5 User Guide

Using File Shares
Step 7 Click OK. The bookmark is added to the Virtual Office portal. Clicking on the bookmark accesses the selected folder or file.
61SonicWALL SSL VPN 2.5 User Guide

Using File Shares
Using Bookmarks from Within the File Shares Applet
In Addition to accessing bookmarks from the Virtual Office portal, bookmarks can be easily accessed from within the File Shares Applet.
Step 1 Launch the File Shares Applet by clicking on the File Shares button in the Virtual Office portal.
Step 2 Click on the Bookmarks button on the task bar in the remote window. A pull down menu displays with the message Loading Bookmarks. Keep the mouse within the pull down menu as the File Shares Applet loads the bookmarks.
Step 3 Once loaded, click book mark to load the desired file or folder.
62 SonicWALL SSL VPN 2.5 User Guide

Using File Shares
Moving Files and Folders
The File Shares Applet is designed for ease of use. There is more than one way to perform file transfers.
This section provides an example of a folder that is copied from a remote machine onto the local machine’s desktop, deleted from the remote machine, and moved back from the local machine unto the remote machine, all from the File Shares Applet.
Step 1 Launch the File Shares Applet by clicking on a bookmark in the Virtual Office portal.
Step 2 Double-click the C:\ drive, double-click the Documents and Settings folder, then double-click a specific folder, for example, the one that holds the Desktop folder.
Step 3 The current directory shows the Desktop folder. Select a file or folder from the remote machine and drag its icon onto the Desktop folder in the local machine. This will copy the item from the remote machine directly onto the desktop.
63SonicWALL SSL VPN 2.5 User Guide

Using File Shares
Step 4 Once the transfer is complete, double-click on the Desktop folder. The folder copied from the remote machine will display in that folder.
Note The item still exists on the remote machine. To initiate a move, not a copy, you must use the Move command from the right-click menu.
Step 5 To delete the original file or folder, select it by clicking on it once, and press the Delete button on the tool bar. Alternatively, the item can be deleted by using the right-click menu. The File Shares Applet displays a delete confirmation window. Click the Delete button in the pop-up to delete the item.
Warning The File Shares Applet will completely delete the file or folder from the remote machine. In the case of a folder, nested item will also be deleted. These items will not be sent to the recycle bin on either machine and are not recoverable.
64 SonicWALL SSL VPN 2.5 User Guide
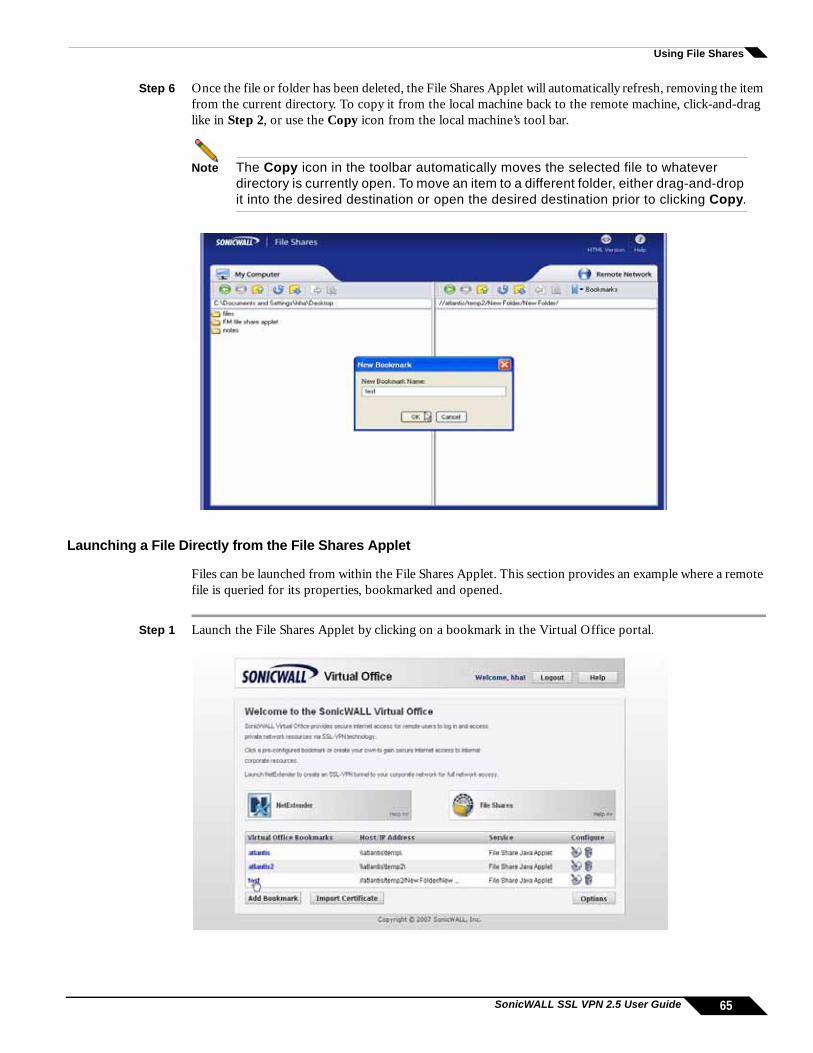
Using File Shares
Step 6 Once the file or folder has been deleted, the File Shares Applet will automatically refresh, removing the item from the current directory. To copy it from the local machine back to the remote machine, click-and-drag like in Step 2, or use the Copy icon from the local machine’s tool bar.
Note The Copy icon in the toolbar automatically moves the selected file to whatever directory is currently open. To move an item to a different folder, either drag-and-drop it into the desired destination or open the desired destination prior to clicking Copy.
Launching a File Directly from the File Shares Applet
Files can be launched from within the File Shares Applet. This section provides an example where a remote file is queried for its properties, bookmarked and opened.
Step 1 Launch the File Shares Applet by clicking on a bookmark in the Virtual Office portal.
65SonicWALL SSL VPN 2.5 User Guide

Using File Shares
Step 2 Right click the file and select Properties.
The file’s properties will be displayed in a separate window.
Step 3 To open the file, double-click on the file. Alternatively, create a bookmark to it, and launch the file from the bookmark menu. To create a bookmark, select the Add Bookmark option from the right-click menu. The name of the file is the default name of the new bookmark, but a new name can be entered if so desired.
66 SonicWALL SSL VPN 2.5 User Guide
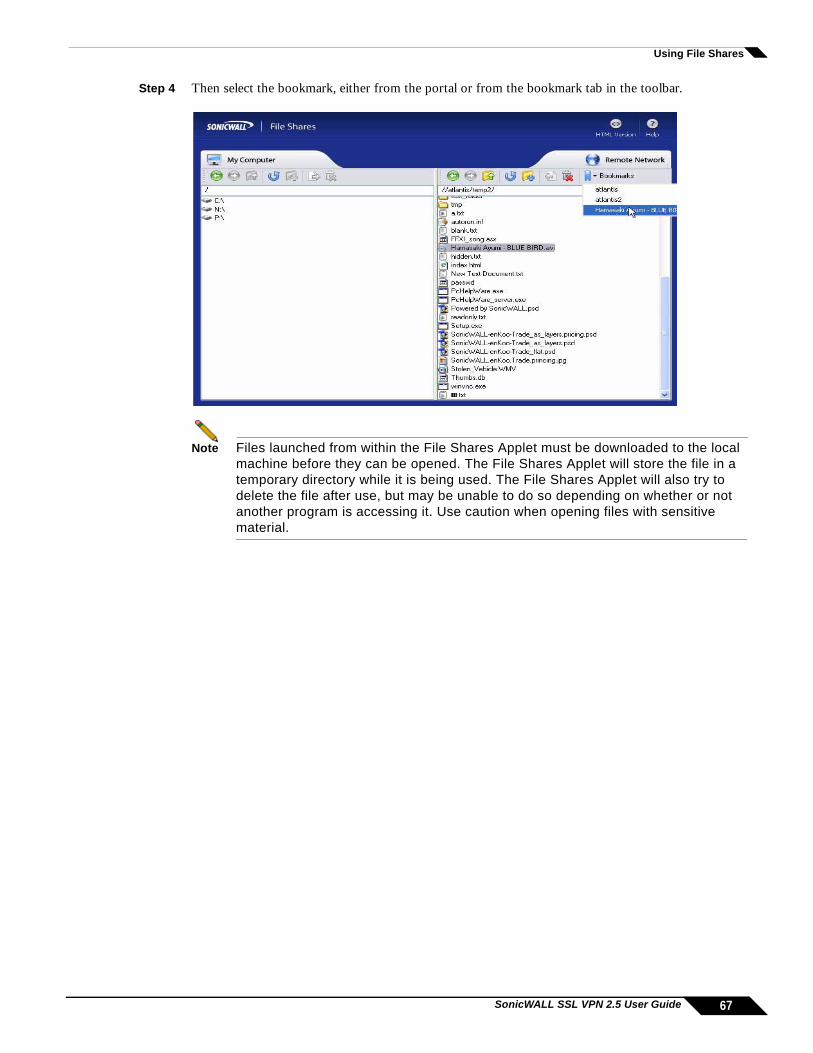
Using File Shares
Step 4 Then select the bookmark, either from the portal or from the bookmark tab in the toolbar.
Note Files launched from within the File Shares Applet must be downloaded to the local machine before they can be opened. The File Shares Applet will store the file in a temporary directory while it is being used. The File Shares Applet will also try to delete the file after use, but may be unable to do so depending on whether or not another program is accessing it. Use caution when opening files with sensitive material.
67SonicWALL SSL VPN 2.5 User Guide

Using File Shares
Using HTML-Based File SharesFile shares provide remote users with a secure Web interface to Microsoft File Shares using the CIFS (Common Internet File System) or SMB (Server Message Block) protocols. Using a Web interface similar in style to Microsoft’s familiar Network Neighborhood or My Network Places, File Shares allow users with appropriate permissions to browse network shares, rename, delete, retrieve, and upload files, and to create bookmarks for later recall.
Note The server can be specified either by name or by IP address, for example, \\moosedc or \\10.50.165.2. For names to work, it is necessary that DNS and or WINS be properly configured by the administrator on the SSL-VPN appliance to be able to resolve host names.
To create a file share, perform the following steps:
Step 1 Click on the File Shares button. Virtual Office displays a dialog box that provides a hot link to a login prompt.
Note Pop-up window blockers may prevent File Shares from functioning properly. Configure your browser to allow pop-up windows on the SSL-VPN portal site.
Step 2 To specify a new share path (as an example, \\moosedc) in the Address field. You need to precede the share name with two back slashes. For example: \\file-directory01.example.com.
Step 3 To connect to a pre-existing file share, click the Login to Server link next to the file share name.
Step 4 Click the go prompt to display the Enter Network Password dialog box.
Login Prompt
Address Field
68 SonicWALL SSL VPN 2.5 User Guide

Using File Shares
Step 5 Type a valid username in the User Name field and a valid password in the Password field and click Login.
Step 6 Virtual Office displays the home File Share screen that you have specified, displaying folders on the network to which you can navigate.
Table 1 describes the controls at the top of the File Share window.
Table 1 File Share Controls
Button Description Back Navigate to the previous File Share location.
Forward Navigates forward to the previous File Share location after you have pressed the Back button.
Reload Reloads the current folder to display any changes.
Up Navigates
Delete Deletes the selected folders and files. Select items by checking the checkbox next to their name under the Select column.
Rename Renames the selected folders and files. Select items by checking the checkbox next to their name under the Select column.
69SonicWALL SSL VPN 2.5 User Guide

Managing Bookmarks
Step 7 You can now navigate the folders and files in the File Share as you would through Windows Explorer or other file management systems.
Step 8 To add a new folder in the current File Share location, type the name of the folder in the Add New Folder: field and click Submit.
Step 9 To add a file in the current File Share location, click the Browse... button. Navigate to the location of the file on your computer in the Choose file window that opens, select the file and click ok, and then click Submit in the File Share window.
Managing BookmarksBookmarks are objects that enable you to connect to a location or application conveniently and quickly. The Virtual Office Bookmark system allows bookmarks to be created at the group and user levels. The administrator can create both group and user bookmarks which will apply to applicable users while individual users can create only personal (user-level) bookmarks.
Since bookmarks are stored within the security appliance’s local configuration files, it is necessary for group and user bookmarks to be correlated to defined group and user entities. When working with local groups and users (LocalDomain), this is automated since the administrator must manually define the groups and users on the device. Similarly, when working with external groups (not LocalDomain), the correlation is automated since creating an external domain creates a corresponding local group.
However, when working with external users, a local user entity must exist so that any user-created (personal) bookmarks can be stored within the SSL-VPN’s configuration files. The need to store bookmarks on the SSL-VPN itself is because LDAP, RADIUS, and NT authentication external domains do not provide a direct facility to store such information as bookmarks.
Rather than requiring administrators to manually create local users for external domain users wishing to use personal bookmarks, SonicWALL SSL-VPN automatically creates a corresponding local user entity when an external domain user logs in to the Virtual Office.
The following sections describe basic bookmark tasks:
• “Adding Bookmarks” section on page 71
• “Editing Bookmarks” section on page 73
• “Removing Bookmarks” section on page 74
• “Global Bookmark Single Sign-On Options” section on page 75
• “Per-Bookmark Single Sign-On Options” section on page 76
Bookmark Creates a new bookmark to the current File Share location.
Logout Logout of the File Share service.
Table 1 File Share Controls
Button Description
70 SonicWALL SSL VPN 2.5 User Guide
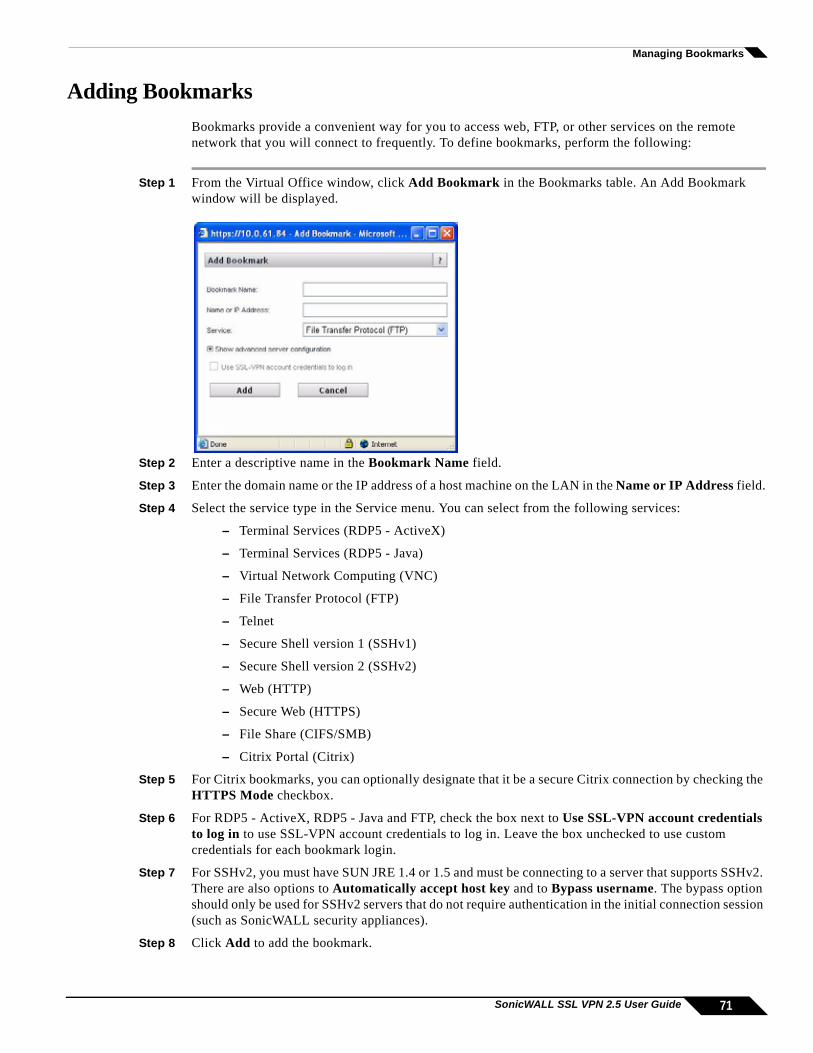
Managing Bookmarks
Adding BookmarksBookmarks provide a convenient way for you to access web, FTP, or other services on the remote network that you will connect to frequently. To define bookmarks, perform the following:
Step 1 From the Virtual Office window, click Add Bookmark in the Bookmarks table. An Add Bookmark window will be displayed.
Step 2 Enter a descriptive name in the Bookmark Name field.
Step 3 Enter the domain name or the IP address of a host machine on the LAN in the Name or IP Address field.
Step 4 Select the service type in the Service menu. You can select from the following services:
– Terminal Services (RDP5 - ActiveX)
– Terminal Services (RDP5 - Java)
– Virtual Network Computing (VNC)
– File Transfer Protocol (FTP)
– Telnet
– Secure Shell version 1 (SSHv1)
– Secure Shell version 2 (SSHv2)
– Web (HTTP)
– Secure Web (HTTPS)
– File Share (CIFS/SMB)
– Citrix Portal (Citrix)
Step 5 For Citrix bookmarks, you can optionally designate that it be a secure Citrix connection by checking the HTTPS Mode checkbox.
Step 6 For RDP5 - ActiveX, RDP5 - Java and FTP, check the box next to Use SSL-VPN account credentials to log in to use SSL-VPN account credentials to log in. Leave the box unchecked to use custom credentials for each bookmark login.
Step 7 For SSHv2, you must have SUN JRE 1.4 or 1.5 and must be connecting to a server that supports SSHv2. There are also options to Automatically accept host key and to Bypass username. The bypass option should only be used for SSHv2 servers that do not require authentication in the initial connection session (such as SonicWALL security appliances).
Step 8 Click Add to add the bookmark.
71SonicWALL SSL VPN 2.5 User Guide

Managing Bookmarks
Once the configuration has been updated, the new bookmark will be displayed in the Bookmarks table. Click on a bookmark description to go to the bookmark location that you have defined.
Configuring RDP Bookmarks
For RDP Terminal Services bookmarks, there are two additional options.
Step 1 Select the resolution for the RDP window. It is advised that you select a size equal to or smaller than your current desktop screen size. ActiveX RDP bookmarks also have a full-screen option that will display the RDP window in full screen mode. To toggle from the RDP window back to your desktop, press Alt-Tab.
Tip The ActiveX client is only supported on the Internet Explorer browser, while the Java client is supported on all platforms and browsers that are compatible with SonicWALL SSL-VPN.
72 SonicWALL SSL VPN 2.5 User Guide

Managing Bookmarks
Step 2 To have the RDP session launch an application when the bookmark is initiated, enter the path to the application in the Application and Path (optional): field. For example, C:\Program Files\Example\app.exe.
Determining the Remote Computer’s Full Name or IP Address
Complete the following steps to determine the full name of the computer the RDP bookmark is pointing to:
Step 1 Right click on the My Computer icon on the desktop of the remote computer, and select Properties.
Step 2 Click the Remote tab.
Step 3 The full computer name will be listed under Remote Desktop.
Complete the following steps to determine the IP address of your computer.
Step 1 In the Windows Start menu on the remote computer, navigate to Run...
Step 2 Type CMD to open the command interpreter and press OK.
Step 3 Type IPconfig. The IP address of your computer is displayed.
Configuring Remote Desktop Access on the Remote Computer
Complete the following steps to allow remote desktop access to the computer that is the target of the RDP bookmark:
Step 1 Right click on the My Computer icon on the desktop, and select Properties.
Step 2 Click the Remote tab.
Step 3 Check the box next to Allow users to connect remotely to this computer
Step 4 Click Apply.
Step 5 Click OK.
Editing BookmarksYou can change the IP address or domain name as well as the service associated with an existing bookmark.
Note Only user-created Bookmarks can be edited or deleted by the user. Global Bookmarks pre-defined by the administrator can not be edited or deleted.
To edit a bookmark to change its name or associated IP address, perform the following steps:
Step 1 Identify a bookmark in the Bookmarks list for which you want to change an IP address or domain name.
73SonicWALL SSL VPN 2.5 User Guide

Managing Bookmarks
Step 2 In the Bookmarks list, click on the Configure icon for an existing bookmark. The Edit Bookmark dialog box displays.
Step 3 To change the bookmark name, domain name or IP address of the bookmark, edit the names in the Bookmark Name or Name or IP Address fields.
Step 4 To change the service, select a new service from the pull-down menu.
Step 5 Click Apply. The Virtual Office home page displays with the new IP address or domain name.
Removing BookmarksTo remove a bookmark, perform the following steps:
Step 1 Identify a bookmark in the Bookmarks list that you want to remove.
Step 2 In the Bookmarks list, click on the trash icon for the bookmark you want to remove. The bookmark disappears from the Bookmarks list.
Caution No warning message is displayed after you click the trash icon. The bookmark will be deleted immediately.
74 SonicWALL SSL VPN 2.5 User Guide

Managing Bookmarks
Global Bookmark Single Sign-On OptionsYou can configure single sign-on using the Options button on the main Virtual Office page. SSO settings will be enabled only if the administrator has configured user- controlled single sign-on (SSO). To configure SSO bookmark options, perform the following tasks:
Step 1 Click the Options button. The User Options page displays.
Step 2 Under Single Sign-On Settings, check the Use SSL-VPN account credentials to log into bookmarks to enable SSO for bookmarks. Leave the box unchecked if you do not want to use SSO for bookmarks.
Step 3 Click Save to save your changes.
75SonicWALL SSL VPN 2.5 User Guide

Managing Bookmarks
Note Fileshares will use the configured domain name of which the user is a member to supply to the backend server. HTTP, HTTPS, FTP, RDP5 - ActiveX, RDP5- Java will supply the username and password that was used to login. If the server is expecting a domain-prefixed username, SSO will fail. In some cases, a default domain can be specified at the server to allow SSO to succeed.
Per-Bookmark Single Sign-On OptionsSonicWALL SSL VPN 2.5 introduces support for per-bookmark single sign-on for the following bookmark services:
• Terminal Services (RDP 5 - Active X)
• Terminal Services (RDP 5 - Java)
• FTP
Per-Bookmark SSO allows users to enable or disable SSO for inidividual bookmarks. This flexibility in specifying login credentials is useful in the following cases:
• Users who use multiple accounts to access a variety of resources.
• Users who use two-factor authentication to log in to the SSL VPN Virtual Office, but use a static password to access other resources.
• Users who need to access servers that require a domain prefix.
To configure per-bookmark SSO, perform the following tasks.
Step 1 Before enabling SSO on an individual bookmark, you must first enable SSO globally as described in the “Global Bookmark Single Sign-On Options” section on page 75.
Step 2 On the Virtual Office page, click on the Add Bookmark button.
Step 3 Select one of the service types that supports per-bookmark SSO: Terminal Services (RDP 5 - Active X), Terminal Services (RDP 5 - Java), or FTP.
Step 4 To use SSO for the bookmark, ensure that the Automatically log in checkbox is checked and select the Use SSL-VPN account credentials radio button.
76 SonicWALL SSL VPN 2.5 User Guide

Managing Bookmarks
Step 5 To disable SSO for the bookmark, ensure that the Automatically log in checkbox is checked and select the Use custom credentials radio button.
Step 6 Enter the User name and password for the service.
Using BookmarksThe following sections describe how to use the various types of bookmarks:
• “Using Remote Desktop Bookmarks” section on page 77
• “Using VNC Bookmarks” section on page 79
• “Using FTP Bookmarks” section on page 81
• “Using Telnet Bookmarks” section on page 84
• “Using SSHv1 Bookmarks” section on page 84
• “Using SSHv2 Bookmarks” section on page 85
• “Using HTTP and HTTPS Bookmarks” section on page 87
• “Using File Share Bookmarks” section on page 87
• “Using Citrix Bookmarks” section on page 87
Using Remote Desktop BookmarksRemote Desktop Protocol (RDP) bookmarks enable you to establish remote connections with a specified desktop. SSL-VPN releases 1.5, 2.0, and later support the RDP5 standard with both Java and an ActiveX clients. RDP5 ActiveX can only be used through Internet Explorer, while RDP5 Java can be run on any platform and browser that supports the SonicWALL SSL-VPN. The basic functionality of the two clients is the same; however, the ActiveX client supports the following features that the Java client does not:
• Full-screen mode
• Drive mapping
• Plugin DLLs
77SonicWALL SSL VPN 2.5 User Guide

Managing Bookmarks
Tip To terminate your remote desktop session, be sure to log off from the Terminal Server session. If you wish to suspend the Terminal Server session (so that it can be resumed later) you may simply close the remote desktop window.
Step 1 Click on the RDP bookmark. Continue through any warning screens that display by clicking Yes or Ok.
Step 2 Enter your username and password at the login screen and select the proper domain name from the pull-down menu.
Step 3 A window is displayed indicating that the Remote Desktop Client is loading. The remote desktop then loads in its own windows. You can now access all of the applications and files on the remote computer.
78 SonicWALL SSL VPN 2.5 User Guide

Managing Bookmarks
Using VNC Bookmarks
Step 1 Click the VNC bookmark. The following window is displayed while the VNC client is loading.
Note VNC can have a port designation if the service is funning on a different port.
Step 2 When the VNC client has loaded, you will be prompted to enter your password in the VNC Authentication window.
Step 3 To configure VNC options, click the Options button. The Options window is displayed.
Table 2 describes the options that can be configured for VNC.
79SonicWALL SSL VPN 2.5 User Guide

Managing Bookmarks
Table 2 VNC Options
Option Default Description of OptionsEncoding Tight Hextile is a good choice for fast networks, while Tight is better
suited for low-bandwidth connections. From the other side, the Tight decoder in TightVNC Java viewer is more efficient than Hextile decoder so this default setting can also be acceptable for fast networks.
Compression Level Default Use specified compression level for Tight and Zlib encodings. Level 1 uses minimum of CPU time on the server but achieves weak compression ratios. Level 9 offers best compression but may be slow in terms of CPU time consumption on the server side. Use high levels with very slow network connections, and low levels when working over higher-speed networks. The Default value means that the server's default compression level should be used.
JPEG image quality 6 This cannot be modified.
Cursor shape updates Enable Cursor shape updates is a protocol extension used to handle remote cursor movements locally on the client side, saving bandwidth and eliminating delays in mouse pointer movement. Note that current implementation of cursor shape updates does not allow a client to track mouse cursor position at the server side. This means that clients would not see mouse cursor movements if the mouse was moved either locally on the server, or by another remote VNC client.
Set this parameter to Disable if you always want to see real cursor position on the remote side. Setting this option to Ignore is similar to Enable but the remote cursor will not be visible at all. This can be a reasonable setting if you don't care about cursor shape and don't want to see two mouse cursors, one above another.
Use CopyRect Yes CopyRect saves bandwidth and drawing time when parts of the remote screen are moving around. Most likely, you don't want to change this setting.
Restricted colors No If set to No, then 24-bit color format is used to represent pixel data. If set to Yes, then only 8 bits are used to represent each pixel. 8-bit color format can save bandwidth, but colors may look very inaccurate.
Mouse buttons 2 and 3 Normal If set to Reversed, then right mouse button (button 2) will act as it was middle mouse button (button 3), and vice versa.
View only No If set to Yes, then all keyboard and mouse events in the desktop window will be silently ignored and will not be passed to the remote side.
Share desktop Yes If set to Yes, then the desktop can be shared between clients. If this option is set to No then an existing user session will end when a new user accesses the desktop.
80 SonicWALL SSL VPN 2.5 User Guide

Managing Bookmarks
Using FTP Bookmarks
Step 1 Click the FTP bookmark. The FTP Session dialog box displays.
Step 2 Enter your username and password. If you want to use your Virtual Office username and password, simply leave the fields blank.
81SonicWALL SSL VPN 2.5 User Guide
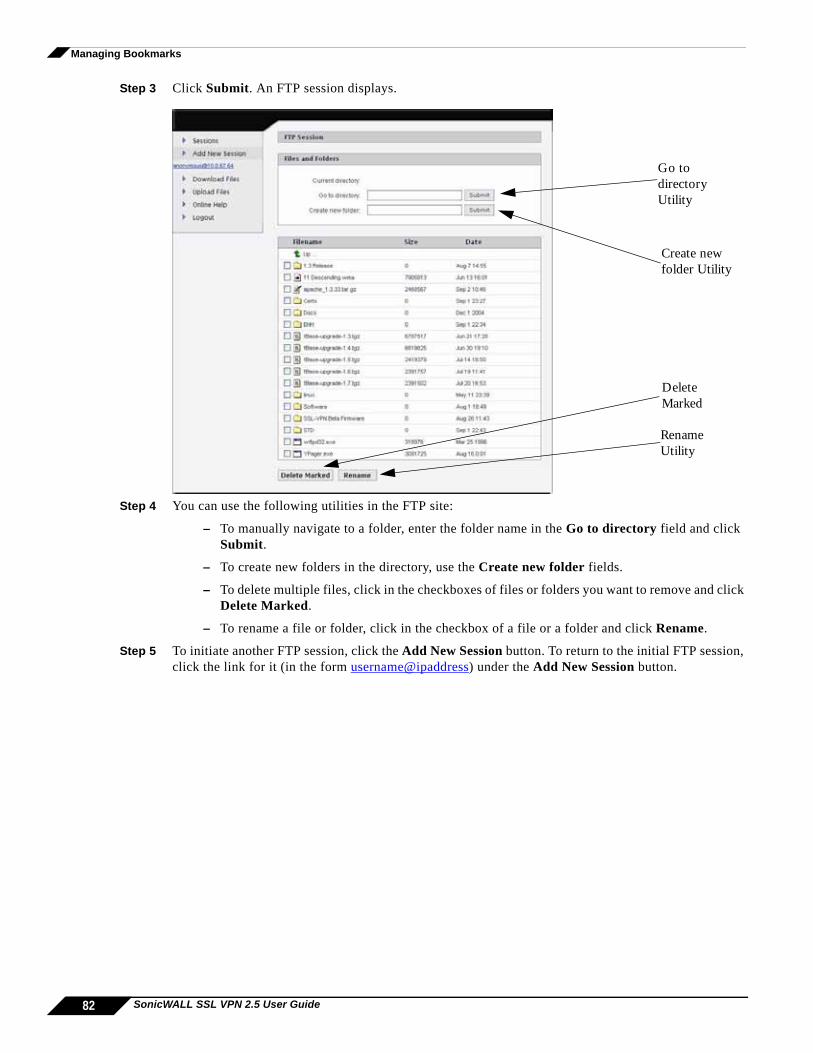
Managing Bookmarks
Step 3 Click Submit. An FTP session displays..
Step 4 You can use the following utilities in the FTP site:
– To manually navigate to a folder, enter the folder name in the Go to directory field and click Submit.
– To create new folders in the directory, use the Create new folder fields.
– To delete multiple files, click in the checkboxes of files or folders you want to remove and click Delete Marked.
– To rename a file or folder, click in the checkbox of a file or a folder and click Rename.
Step 5 To initiate another FTP session, click the Add New Session button. To return to the initial FTP session, click the link for it (in the form username@ipaddress) under the Add New Session button.
Go to directory Utility
Create new folder Utility
Delete Marked
Rename Utility
82 SonicWALL SSL VPN 2.5 User Guide

Managing Bookmarks
Downloading Files
To download a file, perform the following:
Step 1 Click Download Files in the navigation bar.
Step 2 Click on the name of the file in the Filename column. The File Download window displays.
Step 3 Click Run to launch the file. Click Save to save it to your computer.
Uploading Files
To upload a file, perform the following:
Step 1 Click Upload Files in the navigation bar. The FTP Session upload files window will be displayed.
83SonicWALL SSL VPN 2.5 User Guide

Managing Bookmarks
Step 2 The current directory is displayed in the Upload files to: field. To navigate to a different directory, enter the directory name in the Go to directory: field. To create a new folder in the current directory, enter the name of the folder in the Create new folder: field and click submit.
Step 3 Select the file you want to upload by clicking the Browse... button and navigating to the file. You can upload up to three files at once.
Note To navigate between uploads, click the Sessions link.
Step 4 Click Import to upload the files.
Using Telnet Bookmarks
Step 1 Click on the Telnet bookmark.
Note Telnet bookmarks can use a port designation for servers not running on the default port.
Step 2 Click ok to any warning messages that are displayed. A Java-based Telnet window launches.
Step 3 If the device you are Telnetting to is configured for authentication, enter you username and password.
Using SSHv1 Bookmarks
Step 1 Click on the SSHv1 bookmark. A Java-based SSH window is launched.
84 SonicWALL SSL VPN 2.5 User Guide
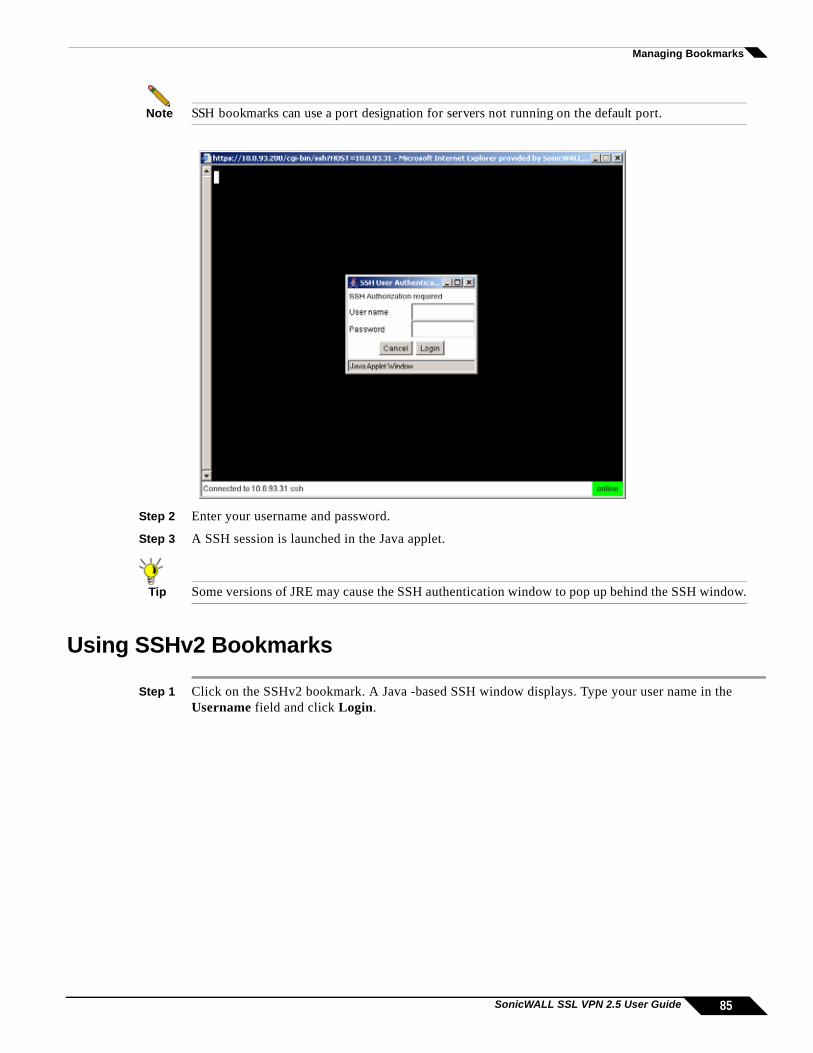
Managing Bookmarks
Note SSH bookmarks can use a port designation for servers not running on the default port.
Step 2 Enter your username and password.
Step 3 A SSH session is launched in the Java applet.
Tip Some versions of JRE may cause the SSH authentication window to pop up behind the SSH window.
Using SSHv2 Bookmarks
Step 1 Click on the SSHv2 bookmark. A Java -based SSH window displays. Type your user name in the Username field and click Login.
85SonicWALL SSL VPN 2.5 User Guide
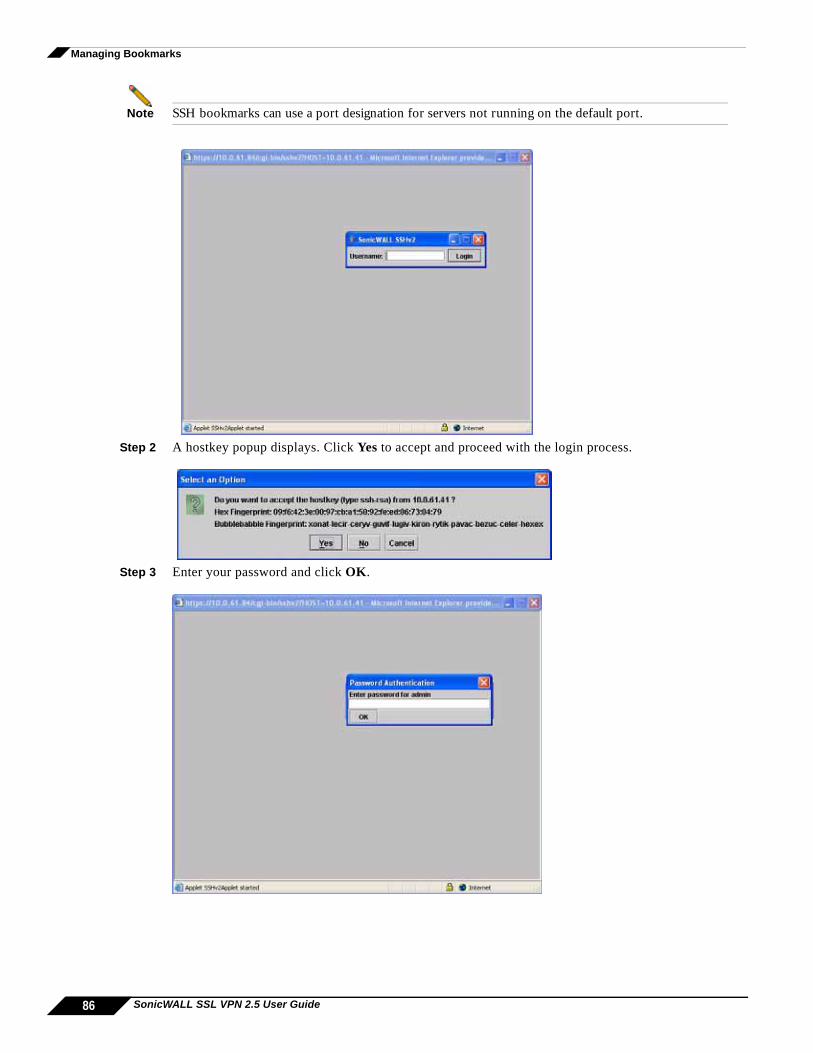
Managing Bookmarks
Note SSH bookmarks can use a port designation for servers not running on the default port.
Step 2 A hostkey popup displays. Click Yes to accept and proceed with the login process.
Step 3 Enter your password and click OK.
86 SonicWALL SSL VPN 2.5 User Guide

Managing Bookmarks
Step 4 The SSH terminal launches in a new screen.
Using HTTP and HTTPS Bookmarks
Step 1 Click on the HTTP or HTTPS bookmark.
Note HTTP bookmarks can have a port designation and a path.
Step 2 A new window is launched in your default browser that connects to the domain name or IP address specified in the bookmark.
Note OWA Premium and Lotus Domino Web Access are supported in SSL-VPN 2.0. Other applications may work but there may be problems accessing pages that are malformed, have advanced HTML features, use an unsupported authentication method (for example, Windows Integrated Authentication) and URLs that are embedded in Macromedia Flash, Java or ActiveX.
Using File Share BookmarksFor information on using File Share bookmarks, see the previous “Using HTML-Based File Shares” section on page 68.
Using Citrix BookmarksCitrix is a remote access, application sharing service, similar to RDP. It enables users to remotely access files and applications on a central computer over a secure connection.
87SonicWALL SSL VPN 2.5 User Guide

Managing Bookmarks
Platforms
Note The Citrix support feature is supported on the SonicWALL SSL-VPN 2000 security appliance.
Step 1 Click on the Citrix bookmark.
Step 2 The first time you use a Citrix bookmark, it will install the Citrix Web Client on your computer. Click Install to install the client.
Step 3 The Citrix Web Client begins to install. If prompted, click the banner to grant ActiveX control to the Citrix Web Client.
Step 4 Click Yes to the Security Warning message that is displayed.
88 SonicWALL SSL VPN 2.5 User Guide

Managing Bookmarks
Step 5 The Citrix Web Client installs.
Step 6 Click Yes to the Citrix license agreement.
Step 7 When the Citrix Web Client has installed, click Ok. If the Citrix MetaFrame XP login window does not display, restart your web browser and launch the Citrix bookmark again.
89SonicWALL SSL VPN 2.5 User Guide

Managing Bookmarks
Step 8 Enter your username, password, and domain in the Citrix MetaFrame XP login window.
Step 9 The Citrix MetaFrame XP home page is displayed. Click on the application you want to use.
Step 10 You may be prompted to install additional Citrix software.
90 SonicWALL SSL VPN 2.5 User Guide

Managing Bookmarks
Step 11 The shared application is now launched.
91SonicWALL SSL VPN 2.5 User Guide

Logging Out of the Virtual Office
Logging Out of the Virtual OfficeTo end your session, simply return to the Virtual Office home page from wherever you are within the portal and click on the Logout button.
If you have successfully logged out, the system collapses the window and displays the text:User successfully logged out. Close this window.
Note When using the Virtual Office with the admin username, the Logout button is not displayed. This is a security measure to ensure that administrators log out of the administrative interface, and not the Virtual Office.
TrademarksSonicWALL is a registered trademark of SonicWALL, Inc.
Microsoft Windows 98, Windows NT, Windows 2000, Windows XP, Windows Server 2003, Internet Explorer, and Active Directory are trademarks or registered trademarks of Microsoft Corporation.
Netscape is a registered trademark of Netscape Communications Corporation in the U.S. and other countries. Netscape Navigator and Netscape Communicator are also trademarks of Netscape Communications Corporation and may be registered outside the U.S.
Adobe, Acrobat, and Acrobat Reader are either registered trademarks or trademarks of Adobe Systems Incorporated in the U.S. and/or other countries.
Other product and company names mentioned herein may be trademarks and/or registered trademarks of their respective companies and are the sole property of their respective manufacturers.
Limited WarrantySonicWALL, Inc. warrants that commencing from the delivery date to Customer (but in any case commencing not more than ninety (90) days after the original shipment by SonicWALL), and continuing for a period of twelve (12) months, that the product will be free from defects in materials and workmanship under normal use. This Limited Warranty is not transferable and applies only to the original end user of the product. SonicWALL and its suppliers' entire liability and Customer's sole and exclusive remedy under this limited warranty will be shipment of a replacement product. At SonicWALL's discretion the replacement product may be of equal or greater functionality and may be of either new or like-new quality. SonicWALL's obligations under this warranty are contingent upon the
Logout Button
92 SonicWALL SSL VPN 2.5 User Guide

Logging Out of the Virtual Office
return of the defective product according to the terms of SonicWALL's then-current Support Services policies.
This warranty does not apply if the product has been subjected to abnormal electrical stress, damaged by accident, abuse, misuse or misapplication, or has been modified without the written permission of SonicWALL.
DISCLAIMER OF WARRANTY. EXCEPT AS SPECIFIED IN THIS WARRANTY, ALL EXPRESS OR IMPLIED CONDITIONS, REPRESENTATIONS, AND WARRANTIES INCLUDING, WITHOUT LIMITATION, ANY IMPLIED WARRANTY OR CONDITION OF MERCHANTABILITY, FITNESS FOR A PARTICULAR PURPOSE, NONINFRINGEMENT, SATISFACTORY QUALITY OR ARISING FROM A COURSE OF DEALING, LAW, USAGE, OR TRADE PRACTICE, ARE HEREBY EXCLUDED TO THE MAXIMUM EXTENT ALLOWED BY APPLICABLE LAW. TO THE EXTENT AN IMPLIED WARRANTY CANNOT BE EXCLUDED, SUCH WARRANTY IS LIMITED IN DURATION TO THE WARRANTY PERIOD. BECAUSE SOME STATES OR JURISDICTIONS DO NOT ALLOW LIMITATIONS ON HOW LONG AN IMPLIED WARRANTY LASTS, THE ABOVE LIMITATION MAY NOT APPLY TO YOU. THIS WARRANTY GIVES YOU SPECIFIC LEGAL RIGHTS, AND YOU MAY ALSO HAVE OTHER RIGHTS WHICH VARY FROM JURISDICTION TO JURISDICTION. This disclaimer and exclusion shall apply even if the express warranty set forth above fails of its essential purpose.
93SonicWALL SSL VPN 2.5 User Guide

©2007 SonicWALL, Inc. is a registered trademark of SonicWALL, Inc. Other product names mentioned herein may be trademarks and/or registered trademarks of their respective companies.Specifications and descriptions subject to change without notice.
T +1 408.745.9600
SonicWALL, Inc.
1143 Borregas Avenue
Sunnyvale CA 94089-1306 F +1 408.745.9300
PN: 232-001272-00Rev A 10/07
www.sonicwall.com


![KORUS업무포털사용자등록및로그인가이드 - Kangwon · II - 2 SSL VPN 계정신청(최초1회) - 서식참조 I. SSL VPN 접속 [ SSL VPN 사용자ID 신청리스트]](https://img.dokumen.tips/doc/110x75/5f06912d7e708231d418a10a/koruseeeeeoeeeeoe-kangwon-ii-2-ssl-vpn-eoe1oe.jpg)