Embed Size (px)
Citation preview

Jawaharlal Nehru Engineering College
Laboratory Manual
PROGRAMMING IN C#.NET
For
Third Year Students CSE
Dept: Computer Science & Engineering (NBA Accredited)
ad

FOREWORD
It is my great pleasure to present this laboratory manual for Third year engineering students
for the subject of Programming in C#.NET As a student, many of you may be wondering with some of the questions in your mind
regarding the subject and exactly what has been tried is to answer through this manual.
As you may be aware that MGM has already been awarded with ISO 9001:2000 certification and it is our endure to technically equip our students taking the advantage of
the procedural aspects of ISO 9001:2000 Certification.
Faculty members are also advised that covering these aspects in initial stage itself, will greatly relived them in future as much of the load will be taken care by the enthusiasm
energies of the students once they are conceptually clear.
Dr. S.D.Deshmukh
Principal
LABORATORY MANUAL CONTENTS
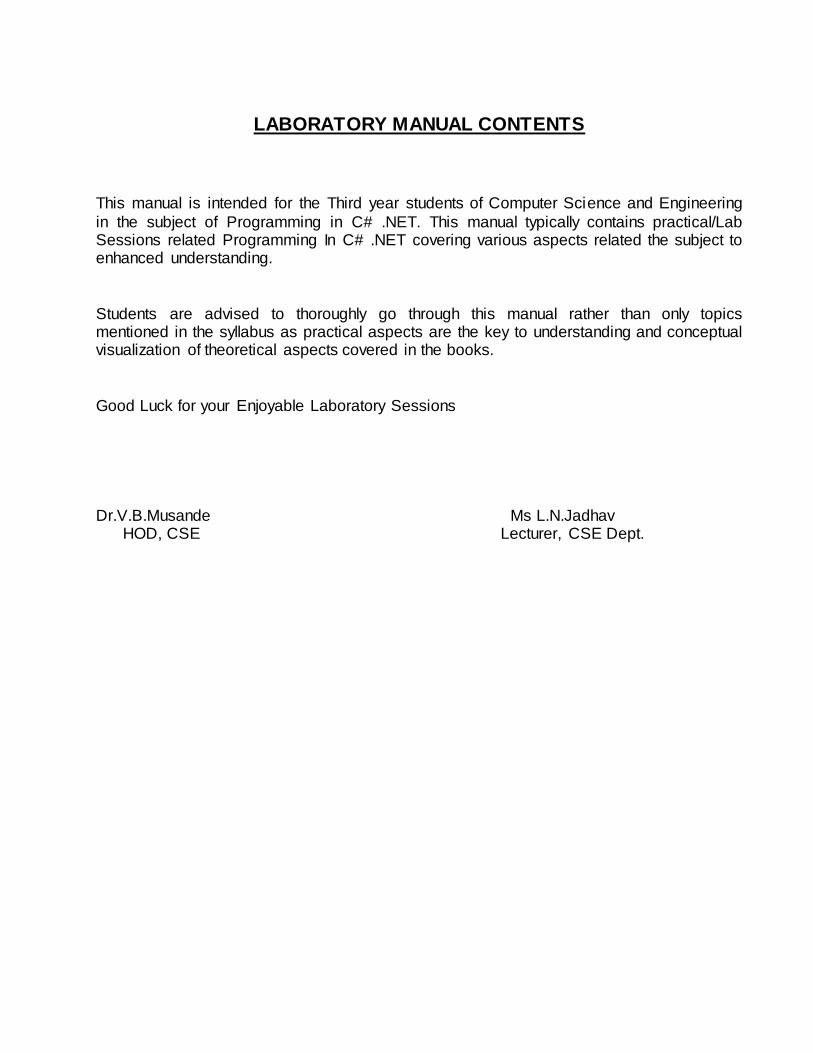
This manual is intended for the Third year students of Computer Science and Engineering
in the subject of Programming in C# .NET. This manual typically contains practical/Lab Sessions related Programming In C# .NET covering various aspects related the subject to enhanced understanding.
Students are advised to thoroughly go through this manual rather than only topics mentioned in the syllabus as practical aspects are the key to understanding and conceptual visualization of theoretical aspects covered in the books.
Good Luck for your Enjoyable Laboratory Sessions
Dr.V.B.Musande Ms L.N.Jadhav HOD, CSE Lecturer, CSE Dept.

MGM’s
Jawaharlal Nehru Engineering College, Aurangabad
Department of Computer Science and Engineering
Vision of CSE Department:
To develop computer engineers with necessary analytical ability and human values who can creatively design, implement a wide spectrum of computer systems for welfare of the society.
Mission of the CSE Department: I. Preparing graduates to work on multidisciplinary platforms associated with their professional
position both independently and in a team environment.
II. Preparing graduates for higher education and research in computer science and engineering
enabling them to develop systems for society development.
Programme Educational Objectives:
Graduates will be able to I. To analyze, design and provide optimal solution for Computer Science & Engineering and
multidisciplinary problems.
II. To pursue higher studies and research by applying knowledge of mathematics and
fundamentals of computer science.
III. To exhibit professionalism, communication skills and adapt to current trends by engaging in lifelong learning.
Programme Outcomes (POs):
Engineering Graduates will be able to: 1. Engineering knowledge: Apply the knowledge of mathematics, science, engineering
fundamentals, and an engineering specialization to the solution of complex engineering problems.

2. Problem analysis: Identify, formulate, review research literature, and analyze complex
engineering problems reaching substantiated conclusions using first principles of mathematics,
natural sciences, and engineering sciences.
3. Design/development of solutions: Design solutions for complex engineering problems and
design system components or processes that meet the specified needs with appropriate consideration for the public health and safety, and the cultural, societal, and environmental
considerations.
4. Conduct investigations of complex problems: Use research-based knowledge and research
methods including design of experiments, analysis and interpretation of data, and synthesis of the information to provide valid conclusions.
5. Modern tool usage: Create, select, and apply appropriate techniques, resources, and modern
engineering and IT tools including prediction and modeling to complex engineering activities with an understanding of the limitations.
6. The engineer and society: Apply reasoning informed by the contextual knowledge to assess
societal, health, safety, legal and cultural issues and the consequent responsibilities relevant to
the professional engineering practice. 7. Environment and sustainability: Understand the impact of the professional engineering
solutions in societal and environmental contexts, and demonstrate the knowledge of, and need for sustainable development.
8. Ethics: Apply ethical principles and commit to professional ethics and responsibilities and norms
of the engineering practice.
9. Individual and team work: Function effectively as an individual, and as a member or leader in
diverse teams, and in multidisciplinary settings. 10. Communication: Communicate effectively on complex engineering activities with the
engineering community and with society at large, such as, being able to comprehend and write effective reports and design documentation, make effective presentations, and give and receive
clear instructions. 11. Project management and finance: Demonstrate knowledge and understanding of the
engineering and management principles and apply these to one’s own work, as a member and
leader in a team, to manage projects and in multidisciplinary environments.
12. Life-long learning: Recognize the need for, and have the preparation and ability to engage in
independent and life-long learning in the broadest context of technological change.
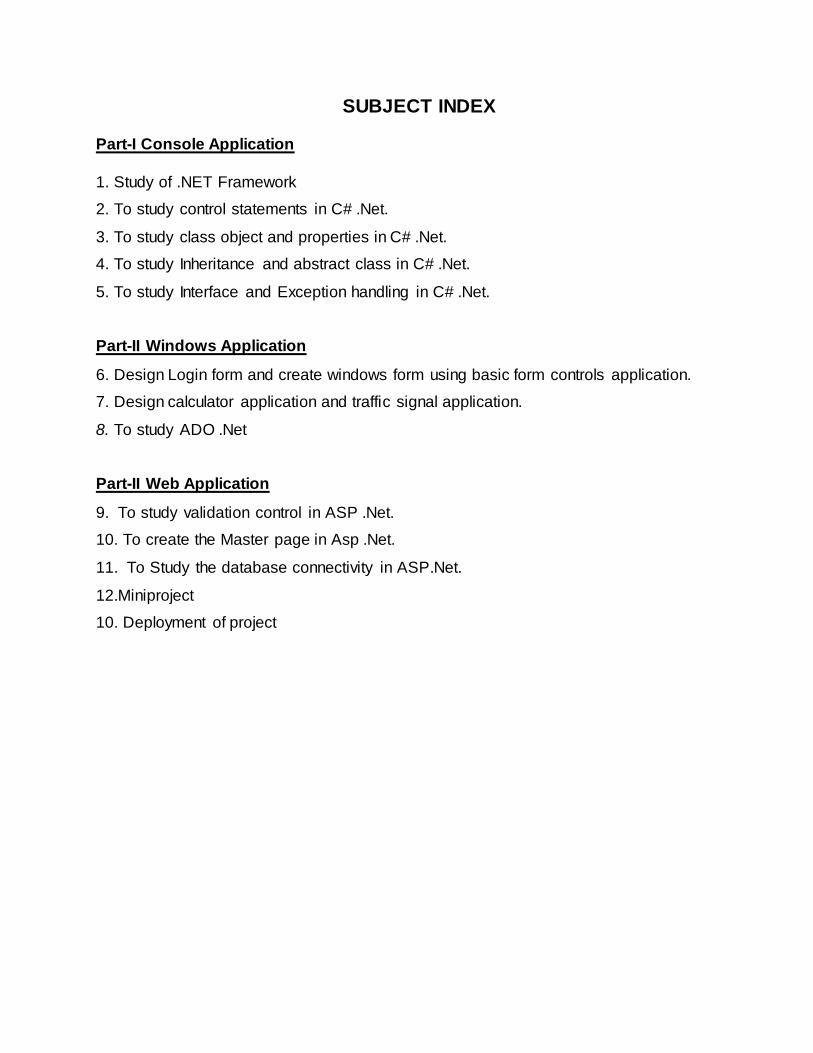
SUBJECT INDEX Part-I Console Application
1. Study of .NET Framework
2. To study control statements in C# .Net.
3. To study class object and properties in C# .Net.
4. To study Inheritance and abstract class in C# .Net.
5. To study Interface and Exception handling in C# .Net.
Part-II Windows Application
6. Design Login form and create windows form using basic form controls application.
7. Design calculator application and traffic signal application.
8. To study ADO .Net
Part-II Web Application
9. To study validation control in ASP .Net.
10. To create the Master page in Asp .Net.
11. To Study the database connectivity in ASP.Net.
12.Miniproject
10. Deployment of project

DOs and DON’Ts in Laboratory:
1. Make entry in the Log Book as soon as you enter the Laboratory.
2. All the students should sit according to their roll numbers starting from their left to
right.
3. All the students are supposed to enter the terminal number in the log book.
4. Do not change the terminal on which you are working.
5. All the students are expected to get at least the algorithm of the program/concept
to be implemented.
6. Strictly observe the instructions given by the teacher/Lab Instructor.
Instruction for Laboratory Teachers::
1. Submission related to whatever lab work has been completed should be done during the
next lab session. The immediate arrangements for printouts related to submission on the
day of practical assignments.
2. Students should be taught for taking the printouts under the observation of lab teacher.
3. The promptness of submission should be encouraged by way of marking and evaluation
patterns that will benefit the sincere students.
EXPERIMENT No. 1

AIM - Introduction to Dotnet Framework
Objectives:
To understand the concept and need on .Net framework.
To understand the components of .Net framework.
.Ability to install visual studio 2010.
Theory:
POINTS TO BE COVERED
- What is Dotnet?
- Describing Dotnet Framework
- Describing its core components
- Advantages of Dotnet
- Dotnet languages
.net (network) is a generic top-level domain (gTLD) used on the Internet's Domain Name
System. The Microsoft .NET Framework is a software framework that can be installed on
computers running Microsoft Windows operating systems. It includes a large library of
coded solutions to common programming problems and a virtual machine that manages
the execution of programs written specifically for the framework.
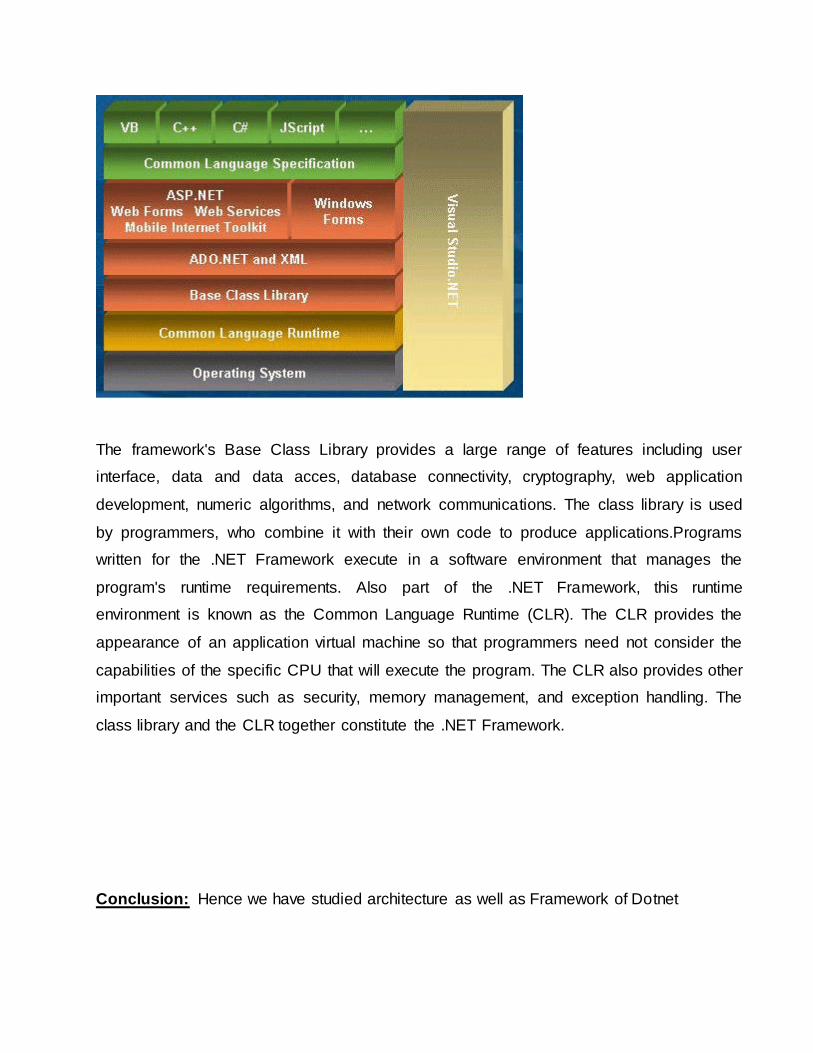
The framework's Base Class Library provides a large range of features including user
interface, data and data acces, database connectivity, cryptography, web application
development, numeric algorithms, and network communications. The class library is used
by programmers, who combine it with their own code to produce applications.Programs
written for the .NET Framework execute in a software environment that manages the
program's runtime requirements. Also part of the .NET Framework, this runtime
environment is known as the Common Language Runtime (CLR). The CLR provides the
appearance of an application virtual machine so that programmers need not consider the
capabilities of the specific CPU that will execute the program. The CLR also provides other
important services such as security, memory management, and exception handling. The
class library and the CLR together constitute the .NET Framework.
Conclusion: Hence we have studied architecture as well as Framework of Dotnet

EXPERIMENT No. 2
AIM: To study control statements in C# .Net.
Objectives:
1. To understand the concept of all control statements.
Theory:
Decision making structures require that the programmer specify one or more conditions to be evaluated or tested by the program, along with a statement or statements to be
executed if the condition is determined to be true, and optionally, other statements to be executed if the condition is determined to be false.
Following is the general from of a typical decision making structure found in most of the
programming languages:
If else statement
An if statement can be followed by an optional else statement, which executes when the
boolean expression is false.
Syntax:
The syntax of an if...else statement in C# is:
if(boolean_expression)
{ /* statement(s) will execute if the boolean expression is true */ }
else {
/* statement(s) will execute if the boolean expression is false */ }

If the boolean expression evaluates to true, then the if block of code will be executed, otherwise else block of code will be executed.
Flow Diagram:
Example:
using System;
namespace DecisionMaking {
class Program {
static void Main(string[] args) {
/* local variable definition */ int a = 100;
/* check the boolean condition */
if (a < 20) { /* if condition is true then print the following */
Console.WriteLine("a is less than 20"); }
else { /* if condition is false then print the following */
Console.WriteLine("a is not less than 20");
}
Console.WriteLine("value of a is : {0}", a); Console.ReadLine();
} } }
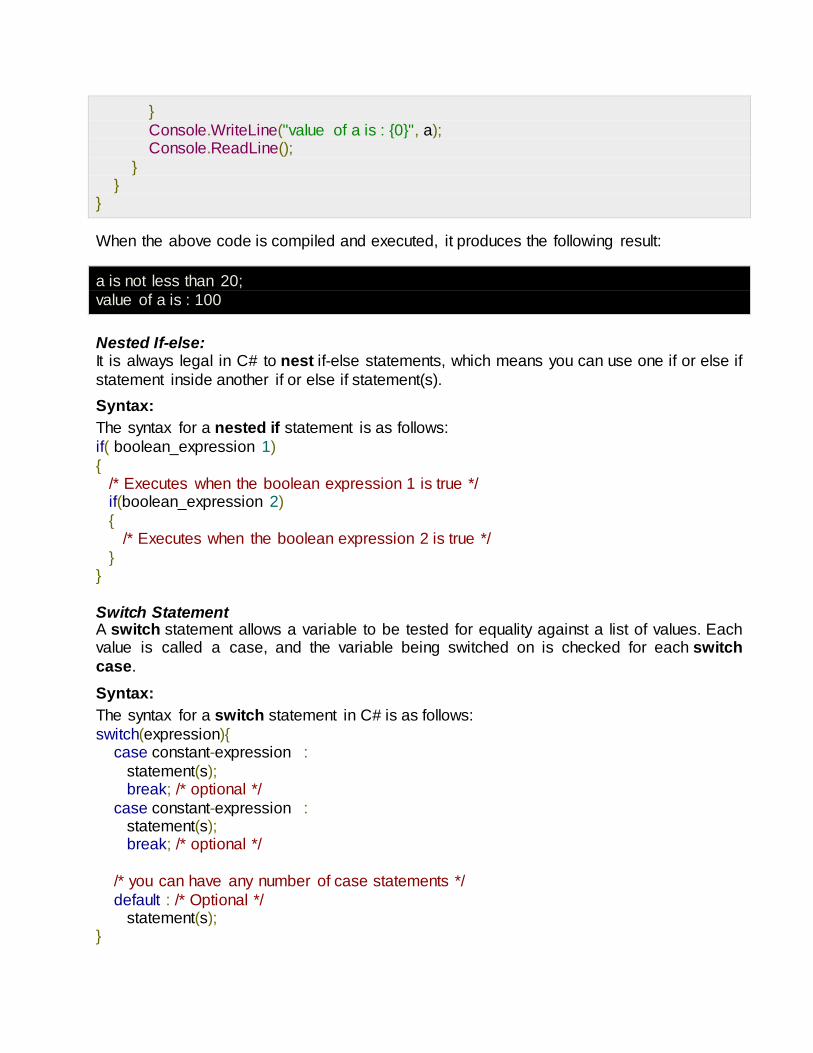
When the above code is compiled and executed, it produces the following result:
a is not less than 20;
value of a is : 100
Nested If-else: It is always legal in C# to nest if-else statements, which means you can use one if or else if
statement inside another if or else if statement(s).
Syntax:
The syntax for a nested if statement is as follows:
if( boolean_expression 1)
{ /* Executes when the boolean expression 1 is true */ if(boolean_expression 2)
{ /* Executes when the boolean expression 2 is true */
} }
Switch Statement A switch statement allows a variable to be tested for equality against a list of values. Each value is called a case, and the variable being switched on is checked for each switch
case.
Syntax:
The syntax for a switch statement in C# is as follows:
switch(expression){ case constant-expression :
statement(s); break; /* optional */
case constant-expression : statement(s); break; /* optional */
/* you can have any number of case statements */
default : /* Optional */ statement(s); }
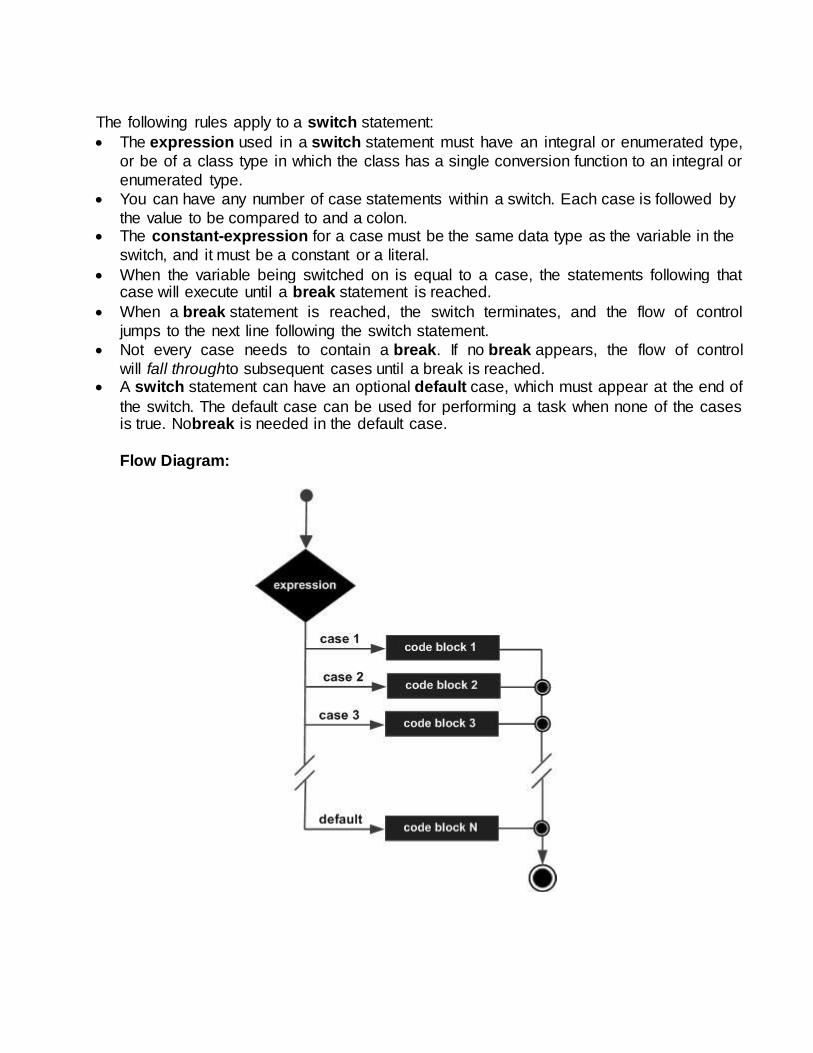
The following rules apply to a switch statement:
The expression used in a switch statement must have an integral or enumerated type,
or be of a class type in which the class has a single conversion function to an integral or
enumerated type.
You can have any number of case statements within a switch. Each case is followed by
the value to be compared to and a colon. The constant-expression for a case must be the same data type as the variable in the
switch, and it must be a constant or a literal.
When the variable being switched on is equal to a case, the statements following that case will execute until a break statement is reached.
When a break statement is reached, the switch terminates, and the flow of control
jumps to the next line following the switch statement.
Not every case needs to contain a break. If no break appears, the flow of control
will fall throughto subsequent cases until a break is reached. A switch statement can have an optional default case, which must appear at the end of
the switch. The default case can be used for performing a task when none of the cases is true. Nobreak is needed in the default case.
Flow Diagram:
Loops
There may be a situation, when you need to execute a block of code several number of
times. In general statements are executed sequentially: The first statement in a function is executed first, followed by the second, and so on.
Programming languages provide various control structures that allow for more complicated execution paths.
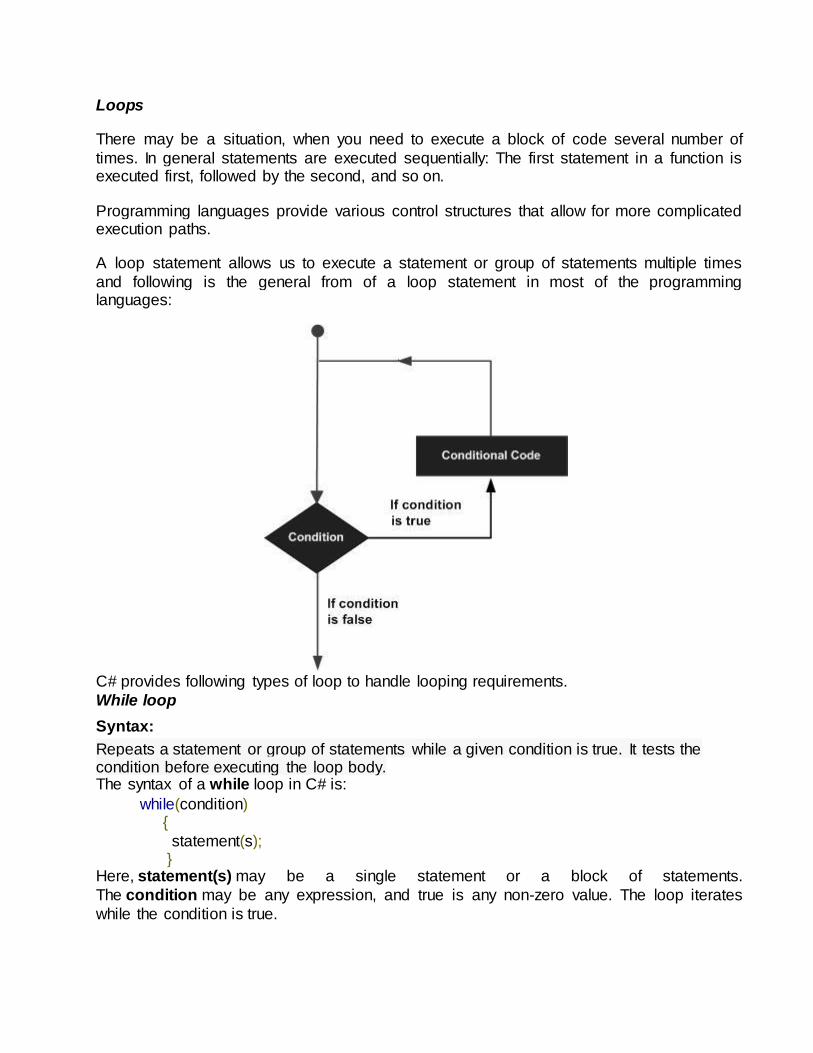
A loop statement allows us to execute a statement or group of statements multiple times
and following is the general from of a loop statement in most of the programming languages:
C# provides following types of loop to handle looping requirements.
While loop
Syntax:
Repeats a statement or group of statements while a given condition is true. It tests the condition before executing the loop body. The syntax of a while loop in C# is:
while(condition) {
statement(s); } Here, statement(s) may be a single statement or a block of statements.
The condition may be any expression, and true is any non-zero value. The loop iterates
while the condition is true.

When the condition becomes false, program control passes to the line immediately following the loop.
Here, key point of the while loop is that the loop might not ever run. When the condition is tested and the result is false, the loop body will be skipped and the first statement after the
while loop will be executed.
For loop
Executes a sequence of statements multiple times and abbreviates the code that manages
the loop variable.
A for loop is a repetition control structure that allows you to efficiently write a loop that
needs to execute a specific number of times.
Syntax:
The syntax of a for loop in C# is:
for ( init; condition; increment ) {
statement(s); }
Here is the flow of control in a for loop:
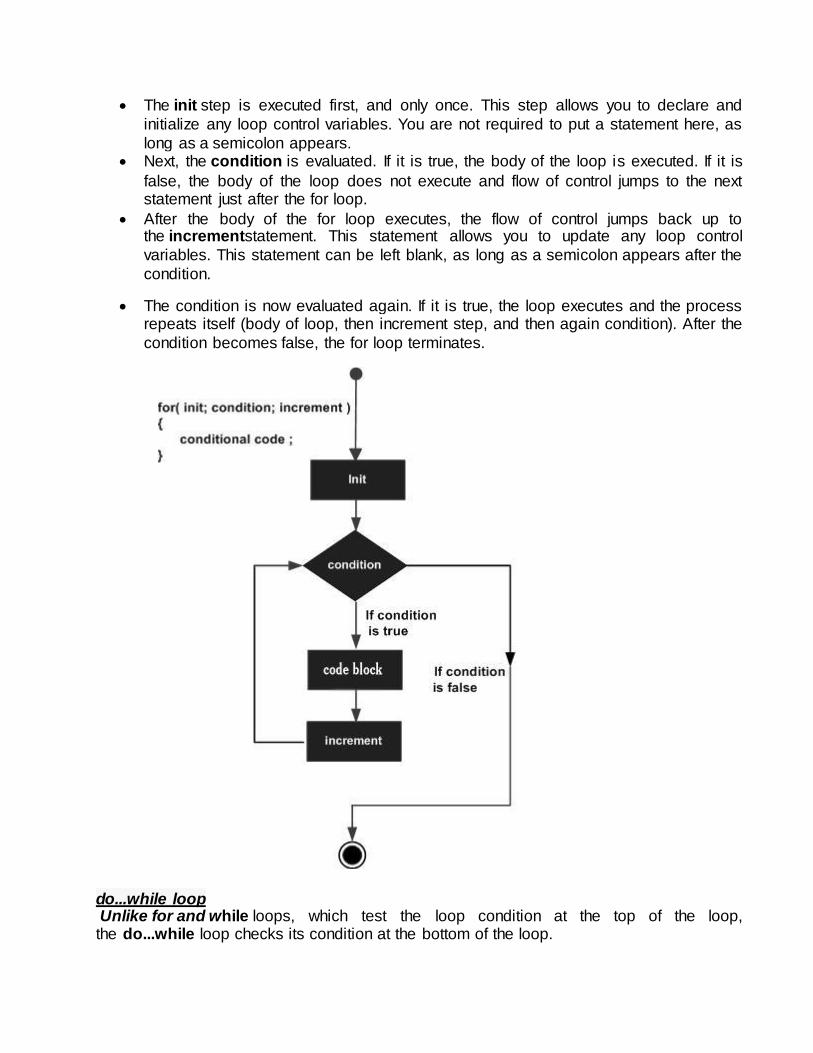
The init step is executed first, and only once. This step allows you to declare and
initialize any loop control variables. You are not required to put a statement here, as
long as a semicolon appears. Next, the condition is evaluated. If it is true, the body of the loop is executed. If it is
false, the body of the loop does not execute and flow of control jumps to the next statement just after the for loop.
After the body of the for loop executes, the flow of control jumps back up to the incrementstatement. This statement allows you to update any loop control
variables. This statement can be left blank, as long as a semicolon appears after the
condition.
The condition is now evaluated again. If it is true, the loop executes and the process repeats itself (body of loop, then increment step, and then again condition). After the
condition becomes false, the for loop terminates.
do...while loop Unlike for and while loops, which test the loop condition at the top of the loop, the do...while loop checks its condition at the bottom of the loop.
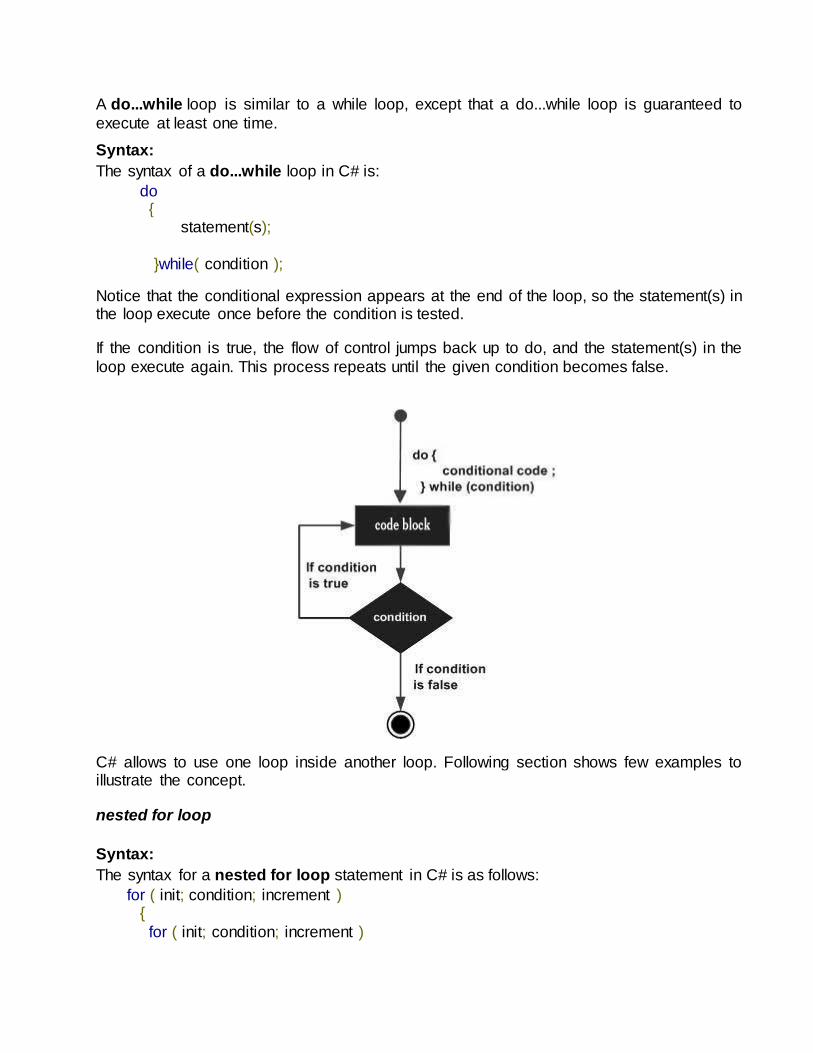
A do...while loop is similar to a while loop, except that a do...while loop is guaranteed to
execute at least one time.
Syntax:
The syntax of a do...while loop in C# is:
do { statement(s);
}while( condition );
Notice that the conditional expression appears at the end of the loop, so the statement(s) in the loop execute once before the condition is tested.
If the condition is true, the flow of control jumps back up to do, and the statement(s) in the
loop execute again. This process repeats until the given condition becomes false.
C# allows to use one loop inside another loop. Following section shows few examples to illustrate the concept.
nested for loop
Syntax:
The syntax for a nested for loop statement in C# is as follows:
for ( init; condition; increment ) {
for ( init; condition; increment )

{ statement(s);
} statement(s);
} The syntax for a nested while loop statement in C# is as follows:
while(condition)
{ while(condition)
{ statement(s); }
statement(s); } The syntax for a nested do...while loop statement in C# is as follows:
do {
statement(s); do
{ statement(s); }while( condition );
}while( condition );
Foreach loop
Foreach loop is a different kind of looping constructs in C# programming that
doesn’t includes initialization, termination and increment/decrement
characteristics. It uses collection to take value one by one and then processes
them.
syntax:
foreach (string name in arr)
{
}
Where, name is a string variable that takes value from collection as arr and
then processes them in the body area.
using System;
namespace foreach_loop {
class Program

{ static void Main(string[] args)
{ string[] arr = new string[5]; // declaring array
//Storing value in array element arr[0] = "Steven";
arr[1] = "Clark"; arr[2] = "Mark";
arr[3] = "Thompson"; arr[4] = "John";
//retrieving value using foreach loop foreach (string name in arr)
{ Console.WriteLine("Hello " + name); }
Console.ReadLine(); }
} } Output
Hello Steven Hello Clark
Hello Mark Hello Thompson Hello John
Questions:
1.write a program to perform arithematic operaton in console application using switch case. 2. write a program to perform reverse number.
3. write a program to perform laep year and fabonic series. 4. write a program to check whether the given No.is armstong number or not.
5.
Conclusion: Hence we have studied Control statements in C# .Net

EXPERIMENT No. 3
Aim: To Study Class,object and properties in C# .Net
Objectives:
To understand the concept and declaration of member of class.
To understand the concept of properties.
Class Definition
A class definition starts with the keyword class followed by the class name; and the class
body, enclosed by a pair of curly braces. Following is the general form of a class definition:
<access specifier> class class_name
{ // member variables <access specifier> <data type> variable1;
<access specifier> <data type> variable2; ...
<access specifier> <data type> variableN; // member methods <access specifier> <return type> method1(parameter_list)
{ // method body
} <access specifier> <return type> method2(parameter_list) {
// method body }
... <access specifier> <return type> methodN(parameter_list) {
// method body }
}
Please note that,
Access specifiers specify the access rules for the members as well as the class itself, if not mentioned then the default access specifier for a class type is internal. Default access for the members is private.
Data type specifies the type of variable, and return type specifies the data type of the
data, the method returns, if any.
To access the class members, you will use the dot (.) operator.

The dot operator links the name of an object with the name of a member.
Member Functions and Encapsulation
A member function of a class is a function that has its definition or its prototype within the
class definition like any other variable. It operates on any object of the class of which it is a member, and has access to all the members of a class for that object.
Member variables are attributes of an object (from design perspective) and they are kept
private to implement encapsulation. These variables can only be accessed using the public member functions.
Object:
Object is a run time entity.We used the object to access the member and the functionof class.An object is created in the memory using the keyword ‘new’.
Synax:
Myclass mycl=new myclass();
Properties: A property is a member that provides a flexible mechanism to read, write, or
compute the value of a private field. Properties can be used as if they are public data
members, but they are actually special methods called accessors. This enables data to be accessed easily and still helps promote the safety and flexibility of methods.
Properties enable a class to expose a public way of getting and setting values, while
hiding implementation or verification code.
A get property accessor is used to return the property value, and a set accessor is used to assign a new value. These accessors can have different access levels. For
more information, see Restricting Accessor Accessibility (C# Programming Guide). The value keyword is used to define the value being assigned by the set accessor. Properties that do not implement a set accessor are read only.
Syntax:
<access specifier>datatype<name of property>
{ Get {
//some optional statement return<some private field>
} Set {
//some optional statement <some private field>=value;
} }

Example
class TimePeriod
{ private double seconds;
public double Hours {
get { return seconds / 3600; } set { seconds = value * 3600; } }
}
class Program {
static void Main() {
TimePeriod t = new TimePeriod(); // Assigning the Hours property causes the 'set' accessor to be called.
t.Hours = 24;
// Evaluating the Hours property causes the 'get' accessor to be called. System.Console.WriteLine("Time in hours: " + t.Hours); }
}
Output
Time in hours: 24
Questions:
1. Write a console application for bank account in C# .Net. 2. Write a console application to display student information using class and object.
3. Write a console application to display employee information using properties. 4.Write a console application for a class person having data members name & age.Accept
the value for this using constructor.And display the output for one object. 5. Write a console application containing a method that will swap the value of two integer type variable.
Conclusion: Hence we have studied Class,object & properties in C# .Net.

EXPERIMENT No.4
Aim: To Study Inheritance and Abstract class in C# .Net Objectives:
To understand the concept of Inheritance.
To understand the difference between class and abstract class Theory:
What is Inheritance in C#
Creating a new class from existing class is called as inheritance.
//All the car properties can be used by the supercar
class SuperCar : car
{
}
When a new class needs same members as an existing class, then instead of creating
those members again in new class, the new class can be created from existing class, which
is called as inheritance.
Main advantage of inheritance is reusability of the code.
During inheritance, the class that is inherited is called as base class and the
class that does the inheritance is called as derived class and every non private
member in base class will become the member of derived class.
If you want the base class members to be accessed by derived class only , you
can apply access modifier Protected to the base class member.
There are 5 Different types of inheritance .
Syntax

[Access Modifier] class ClassName : baseclassname
{
}
Inheritance can be classified to 5 types.
1. Single Inheritance
2. Hierarchical Inheritance
3. Multi Level Inheritance
4. Hybrid Inheritance
5. Multiple Inheritance
1.Single Inheritance
when a single derived class is created from a single base class then the
inheritance is called as single inheritance.
Single Inheritance Example Program
2. Hierarchical Inheritance
when more than one derived class are created from a single base class, then that inheritance is called as hierarchical inheritance.

3. Multi Level Inheritance
when a derived class is created from another derived class, then that
inheritance is called as multi level inheritance.
4. Hybrid Inheritance
Any combination of single, hierarchical and multi level inheritances is called as hybrid inheritance.

5. Multiple Inheritance
when a derived class is created from more than one base class then that inheritance is called as multiple inheritance. But multiple inheritance is not
supported by .net using classes and can be done using interfaces.
Multiple Inheritance Example
Handling the complexity that causes due to multiple inheritance is very complex. Hence i t was not supported in dotnet with class and i t can be done with
interfaces.
Abstract class
Abstract classes are one of the essential behaviors provided by .NET. Commonly, you would like to make classes that only represent base classes, and don’t want anyone to
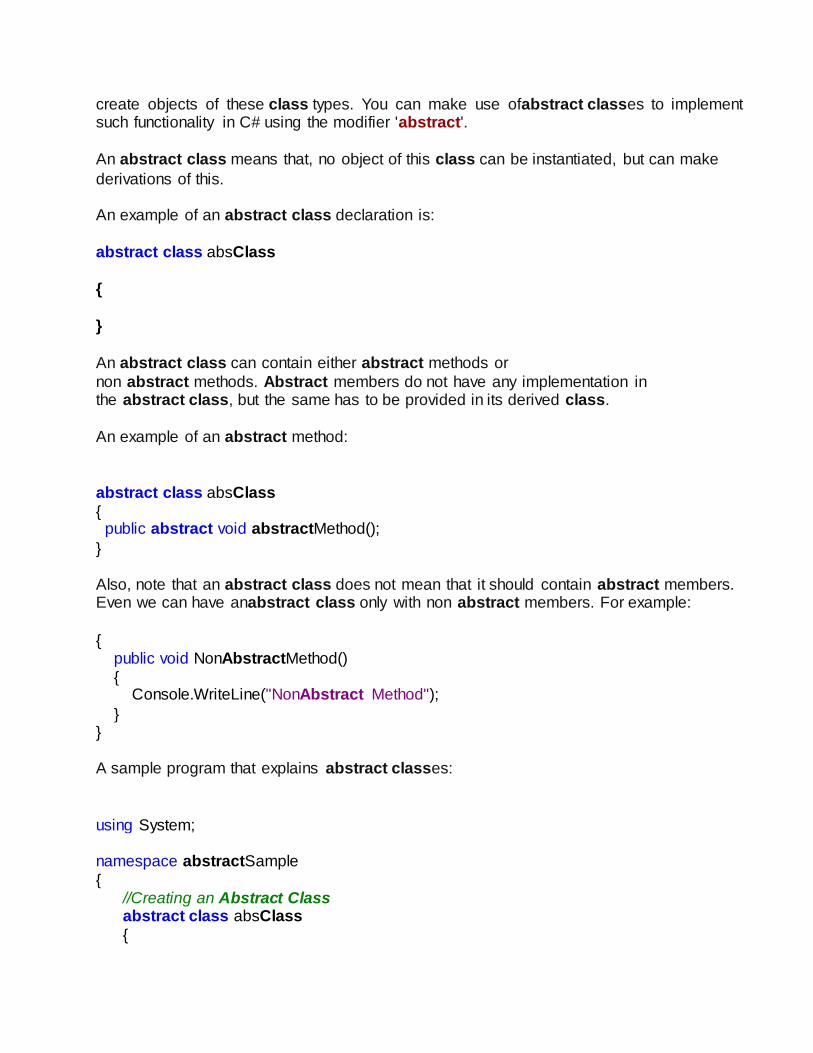
create objects of these class types. You can make use ofabstract classes to implement such functionality in C# using the modifier 'abstract'.
An abstract class means that, no object of this class can be instantiated, but can make
derivations of this.
An example of an abstract class declaration is:
abstract class absClass
{
}
An abstract class can contain either abstract methods or
non abstract methods. Abstract members do not have any implementation in the abstract class, but the same has to be provided in its derived class.
An example of an abstract method:
abstract class absClass
{ public abstract void abstractMethod();
}
Also, note that an abstract class does not mean that it should contain abstract members. Even we can have anabstract class only with non abstract members. For example:
{ public void NonAbstractMethod()
{ Console.WriteLine("NonAbstract Method");
} }
A sample program that explains abstract classes:
using System; namespace abstractSample
{ //Creating an Abstract Class abstract class absClass
{

//A Non abstract method public int AddTwoNumbers(int Num1, int Num2)
{ return Num1 + Num2;
} //An abstract method, to be
//overridden in derived class public abstract int MultiplyTwoNumbers(int Num1, int Num2);
} //A Child Class of absClass class absDerived:absClass
{
[STAThread] static void Main(string[] args) {
//You can create an //instance of the derived class
absDerived calculate = new absDerived(); int added = calculate.AddTwoNumbers(10,20);
int multiplied = calculate.MultiplyTwoNumbers(10,20); Console.WriteLine("Added : {0},
Multiplied : {1}", added, multiplied); }
//using override keyword, //implementing the abstract method
//MultiplyTwoNumbers public override int MultiplyTwoNumbers(int Num1, int Num2) {
return Num1 * Num2; }
} }
Output:
Added:30 multiplied:200
Questions:
1. Write a console application calculate the area and circumference of circle &rectangle using inheritance .
2. Write a program for calculates the area and circumference of circle &rectangle using

abstract class. 3. Implement the concept of overloading in console application.
4. Implement the concept of folloeing inheritance
Conclusion: Hence we have studied inheritance and abstract class in C# .Net.
Student
Engg Student

EXPERIMENT No.5. Aim: To Study (multiple Inheritance )and Exception handling in C# .Net
Objectives:
To understand the concept of interface.
To understand the concept of Exception handling
Theory:
Interface:
An interface is not a class.An interface has no implementation,it only hasthe signature or
the defination of the methods without body.When we create an interface,we are basically creating a set of methods without any implementation that must be overriden by implemented classes.Using the interface we can achieve multiple inheritance.
Ex:
class Demo : abc
{ public static void Main() { System.Console.WriteLine("Hello Interfaces");
Demo refDemo = new Demo();
refDemo.xyz(); Sample refSample = new Sample(); refSample.xyz();
}
public void xyz() { System.Console.WriteLine("In Demo :: xyz");
} }
interface abc
{
void xyz(); }
class Sample : abc {
public void xyz()
{ System.Console.WriteLine("In Sample :: xyz");
} }
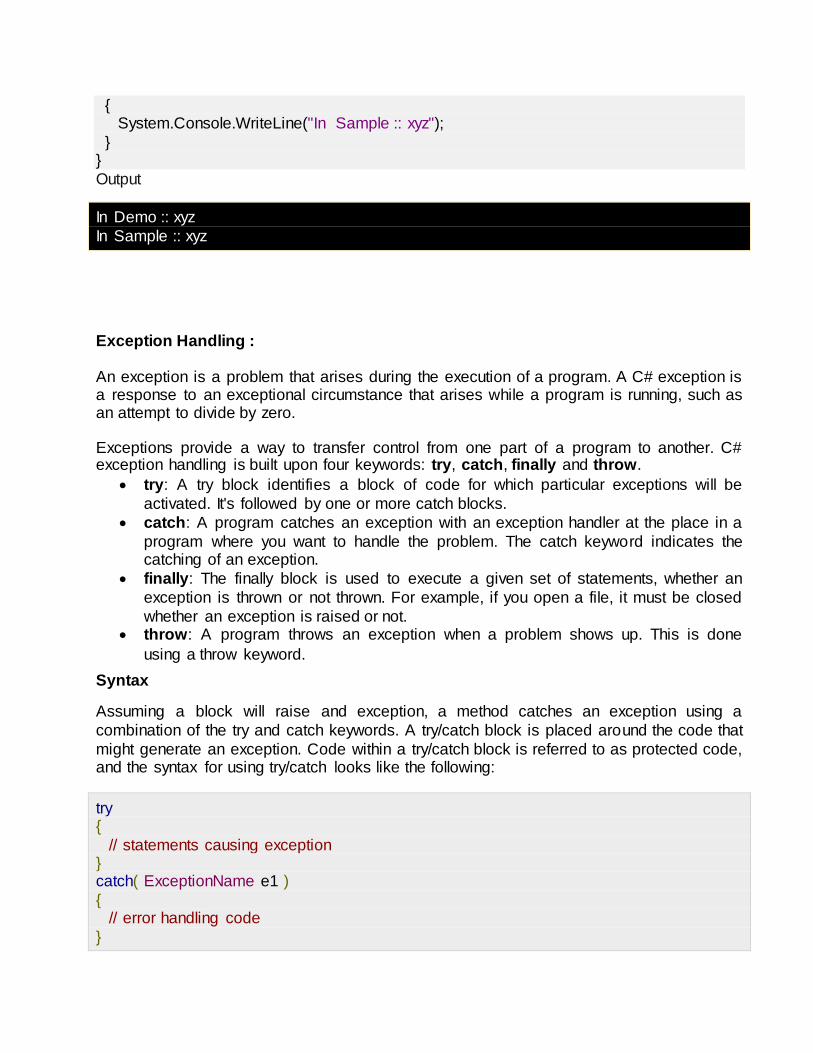
Output
In Demo :: xyz
In Sample :: xyz
Exception Handling :
An exception is a problem that arises during the execution of a program. A C# exception is a response to an exceptional circumstance that arises while a program is running, such as an attempt to divide by zero.
Exceptions provide a way to transfer control from one part of a program to another. C# exception handling is built upon four keywords: try, catch, finally and throw.
try: A try block identifies a block of code for which particular exceptions will be
activated. It's followed by one or more catch blocks.
catch: A program catches an exception with an exception handler at the place in a
program where you want to handle the problem. The catch keyword indicates the catching of an exception.
finally: The finally block is used to execute a given set of statements, whether an
exception is thrown or not thrown. For example, if you open a file, it must be closed
whether an exception is raised or not. throw: A program throws an exception when a problem shows up. This is done
using a throw keyword.
Syntax
Assuming a block will raise and exception, a method catches an exception using a
combination of the try and catch keywords. A try/catch block is placed around the code that
might generate an exception. Code within a try/catch block is referred to as protected code, and the syntax for using try/catch looks like the following:
try {
// statements causing exception } catch( ExceptionName e1 )
{ // error handling code
}

catch( ExceptionName e2 )
{ // error handling code
} catch( ExceptionName eN ) {
// error handling code }
finally { // statements to be executed
}
You can list down multiple catch statements to catch different type of exceptions in case
your try block raises more than one exception in different situations.
Exception Classes in C#
C# exceptions are represented by classes. The exception classes in C# are mainly directly or indirectly derived from the System.Exception class. Some of the exception classes
derived from the System.Exception class are the System.ApplicationException and System.SystemException classes
The System.ApplicationException class supports exceptions generated by application
programs. So the exceptions defined by the programmers should derive from this class. The System.SystemException class is the base class for all predefined system exception.
The following table provides some of the predefined exception classes derived from the
Sytem.SystemException class:
Exception Class Description
System.IO.IOException Handles I/O errors.
System.IndexOutOfRangeException Handles errors generated when a method refers to an array index out of range.
System.ArrayTypeMismatchException Handles errors generated when type is mismatched with the array type.
System.NullReferenceException Handles errors generated from deferencing a null object.
System.DivideByZeroException Handles errors generated from dividing a
dividend with zero.
System.InvalidCastException Handles errors generated during typecasting.
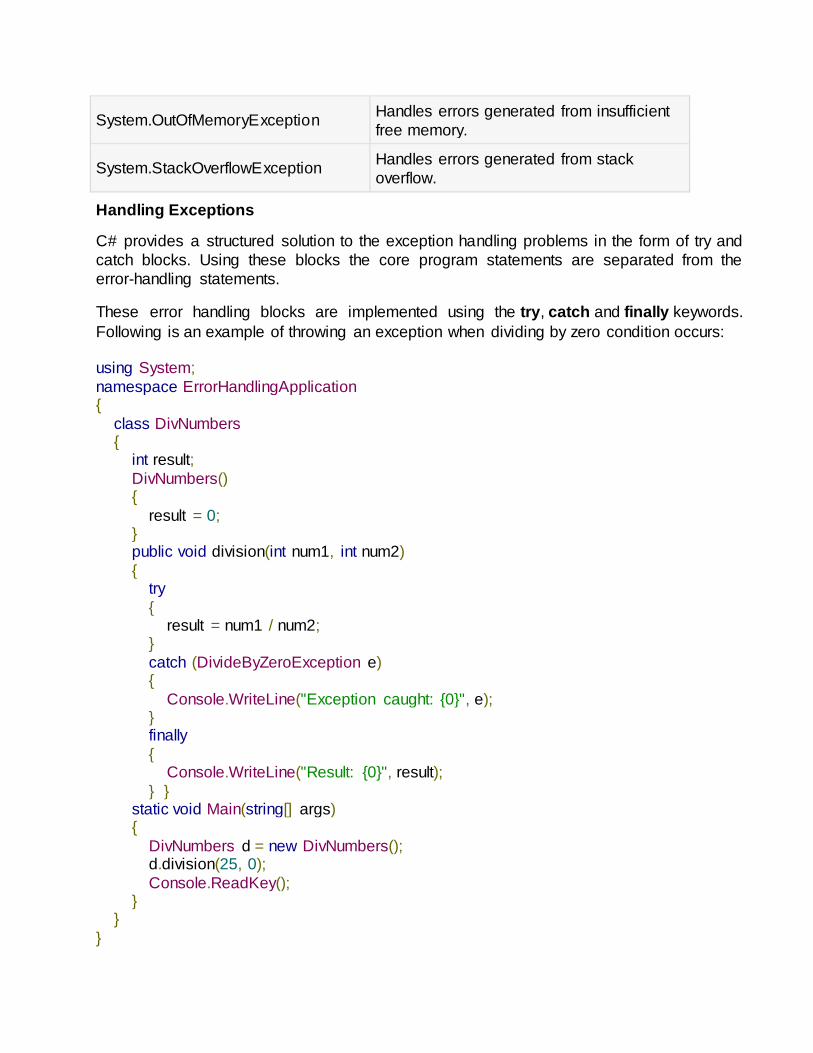
System.OutOfMemoryException Handles errors generated from insufficient
free memory.
System.StackOverflowException Handles errors generated from stack
overflow.
Handling Exceptions
C# provides a structured solution to the exception handling problems in the form of try and
catch blocks. Using these blocks the core program statements are separated from the
error-handling statements.
These error handling blocks are implemented using the try, catch and finally keywords.
Following is an example of throwing an exception when dividing by zero condition occurs: using System;
namespace ErrorHandlingApplication {
class DivNumbers { int result;
DivNumbers() {
result = 0; } public void division(int num1, int num2)
{ try
{ result = num1 / num2; }
catch (DivideByZeroException e) {
Console.WriteLine("Exception caught: {0}", e); } finally
{ Console.WriteLine("Result: {0}", result);
} } static void Main(string[] args) {
DivNumbers d = new DivNumbers(); d.division(25, 0);
Console.ReadKey(); } }
}
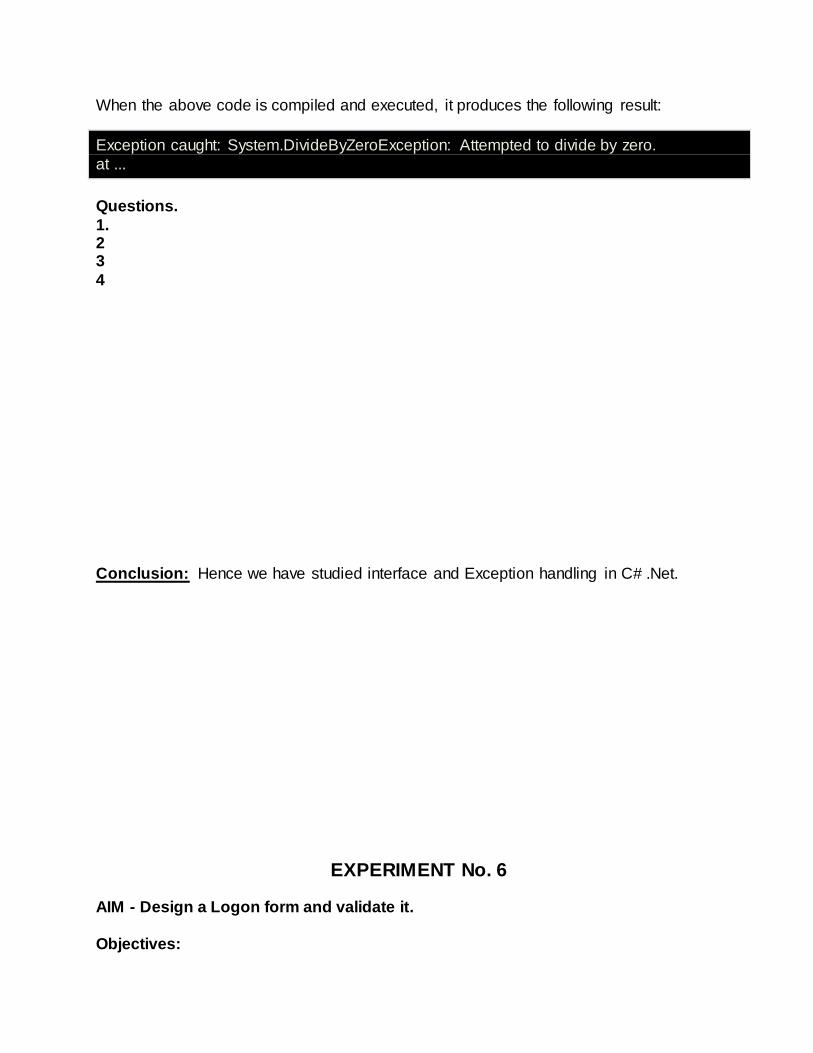
When the above code is compiled and executed, it produces the following result:
Exception caught: System.DivideByZeroException: Attempted to divide by zero.
at ...
Questions.
1. 2 3
4
Conclusion: Hence we have studied interface and Exception handling in C# .Net.
EXPERIMENT No. 6 AIM - Design a Logon form and validate it.
Objectives:

To understand the cocept all windows form controls.
Ability to write a program for windows application.
Theory:
- Create a logon form
- Enter the fields for username and password
- Validate whether the entered fields are correct or not.
Steps to create windows application
- In Visual Studio, select File|New|Project. Visual studio will display the new project dialog
box.
- In the new project dialog box, click the windows Application icon. In the name field, type
a project name that describes the program you are binding, such as Demo program.
Then, in the location field, type the name of the folder in which you want visual studio to
place the projects folder and files. Click ok. Visual studio will display a design window
where you can drag and drop controls onto your form.
- To display the toolbox that contains the control you can drag and drop on to your form,
select View|Toolbox.Visual studio will open the Toolbox window.
- In the toolbox window, locate the various button control, textbox control and label
control
- In the property window give the text to the button, label and button control.
- Set the password char property for password textbox as “ * ”
- To run the programme select the debug menu and then press start.
- Your output must look as shown.
OUTPUT:

Conclusion:
Hence we have studied and implemented the logon form and how to validate
the values.

EXPERIMENT No7.
AIM - Design a form to create calculator and traffic signal application.
- Calculator must possess the following function buttons
- +, _, *, /,log, sqr, cube, sqrt, cube root, mod, %, sin, cos, tan, cancel, 1/x, pie Steps to create windows application
- In Visual Studio, select File|New|Project. Visual studio will display the new project dialog
box.
- In the new project dialog box, click the windows Application icon. In the name field, type
a project name that describes the program you are binding, such as Demo program.
Then, in the location field, type the name of the folder in which you want visual studio to
place the projects folder and files. Click ok. Visual studio will display a design window
where you can drag and drop controls onto your form.
- To display the toolbox that contains the control you can drag and drop on to your form,
select View|Toolbox.Visual studio will open the Toolbox window.
- In the toolbox window, locate the various button control and textbox control
- In the property window give the text to the button control
- As mentioned above the calculator must possess the buttons
- Use operators and select case statements to execute the programme.
- To run the programme select the debug menu and then press start.
Output:

Steps to create traffic signal windows application
- In Visual Studio, select File|New|Project. Visual studio will display the new project dialog
box.
- In the new project dialog box, click the windows Application icon. In the name field, type
a project name that describes the program you are binding, such as Demo program.
Then, in the location field, type the name of the folder in which you want visual studio to
place the projects folder and files. Click ok. Visual studio will display a design window
where you can drag and drop controls onto your form.
- To display the toolbox that contains the control you can drag and drop on to your form,
select View|Toolbox.Visual studio will open the Toolbox window.
- Design the Diagram of Square with signals on each terminals
- In the property window set the textbox property backcolor using colors red,blue and
green as the colors of the signal
- Drag and drop the timer control. Set the properties enable to true and set interval.
- To run the programme select the debug menu and then press start.
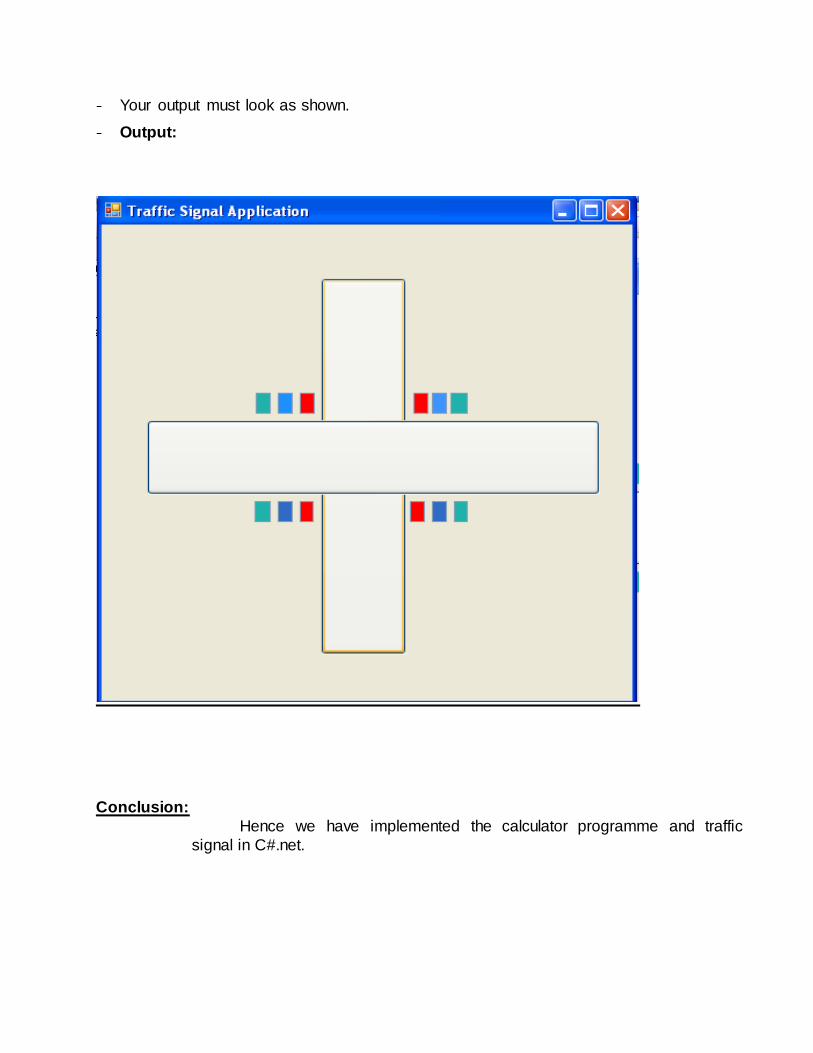
- Your output must look as shown.
- Output:
Conclusion:
Hence we have implemented the calculator programme and traffic
signal in C#.net.

EXPERIMENT No.8
AIM – To Study of ADO.NET
Objectives:
To understand the concept of ADO .Net.
To understand the difference between Data Provider and Dataset.
Ablity to write a program for DataBase connectivity.
Theory:
- Explain block diagram
- Describe various components
- Write all the steps to connect to a database.
ADO.NET provides consistent access to data sources such as Microsoft SQL Server, as
well as data sources exposed through OLE DB and XML. Data-sharing consumer
applications can use ADO.NET to connect to these data sources and retrieve, manipulate,
and update data.
ADO.NET cleanly factors data access from data manipulation into discrete components
that can be used separately or in tandem. ADO.NET includes .NET Framework data
providers for connecting to a database, executing commands, and retrieving results. Those
results are either processed directly, or placed in an ADO.NET Dataset object in order to
be exposed to the user in an ad-hoc manner, combined with data from multiple sources, or
remote between tiers. The ADO.NET Dataset object can also be used independently of a
.NET Framework data provider to manage data local to the application or sourced from
XML.
The ADO.NET classes are found in System.Data.dll, and are integrated with the XML
classes found in System.Xml.dll. When compiling code that uses the System. Data
namespace, reference both System.Data.dll and System.Xml.dll. For an example of
compiling an ADO.NET application using a command line compiler
most applications need data access at one point of time making it a crucial component

when working with applications. Data access is making the application interact with a
database, where all the data is stored. Different applications have different requirements for
database access. C# .NET uses ADO .NET (Active X Data Object) as it's data access and
manipulation protocol which also enables us to work with data on the Internet. Let's take a
look why ADO .NET came into picture replacing ADO.
Block Diagram
The ADO.NET Data Architecture
Data Access in ADO.NET relies on two components: Dataset and Data Provider.

Dataset: The dataset is a disconnected, in-memory representation of data. It can be
considered as a local copy of the relevant portions of the database. The Dataset is
persisted in memory and the data in it can be manipulated and updated independent of the
database. When the use of this Dataset is finished, changes can be made back to the
central database for updating. The data in Dataset can be loaded from any valid data
source like Microsoft SQL server database, an Oracle database or from a Microsoft Access
database.
Data Provider
The Data Provider is responsible for providing and maintaining the connection to the
database. A DataProvider is a set of related components that work together to provide data
in an efficient and performance driven manner. The .NET Framework currently comes with
two DataProviders: the SQL Data Provider which is designed only to work with Microsoft's
SQL Server 7.0 or later and the OleDb DataProvider which allows us to connect to other
types of databases like Access and Oracle. Each DataProvider consists of the following
component classes:
The Connection object which provides a connection to the database
The Command object which is used to execute a command
The DataReader object which provides a forward-only, read only, connected record set
The Data Adapter object which populates a disconnected Dataset with data and performs
update
Data access with ADO.NET can be summarized as follows:
A connection object establishes the connection for the application with the database. The command object provides direct execution of the command to the database. If the
command returns more than a single value, the command object returns a DataReader to provide the data. Alternatively, the DataAdapter can be used to fill the Dataset object. The
database can be updated using the command object or the DataAdapter.
Component classes that make up the Data Providers
The Connection Object

The Connection object creates the connection to the database. Microsoft Visual Studio
.NET provides two types of Connection classes: the SqlConnection object, which is
designed specifically to connect to Microsoft SQL Server 7.0 or later, and the
OleDbConnection object, which can provide connections to a wide range of database types
like Microsoft Access and Oracle. The Connection object contains all of the information
required to open a connection to the database.
The Command Object
The Command object is represented by two corresponding classes: SqlCommand and
OleDbCommand. Command objects are used to execute commands to a database across
a data connection. The Command objects can be used to execute stored procedures on
the database, SQL commands, or return complete tables directly. Command objects
provide three methods that are used to execute commands on the database:
ExecuteNonQuery:
Executes commands that have no return values such as INSERT, UPDATE or DELETE
ExecuteScalar: Returns a single value from a database query
ExecuteReader: Returns a result set by way of a DataReader object
The DataReader Object
The DataReader object provides a forward-only, read-only, connected stream recordset
from a database. Unlike other components of the Data Provider, DataReader objects
cannot be directly instantiated. Rather, the DataReader is returned as the result of the
Command object's ExecuteReader method. The SqlCommand.ExecuteReader method
returns a SqlDataReader object, and the OleDbCommand.ExecuteReader method returns
an OleDbDataReader object. The DataReader can provide rows of data directly to
application logic when you do not need to keep the data cached in memory. Because only
one row is in memory at a time, the DataReader provides the lowest overhead in terms of
system performance but requires the exclusive use of an open Connection object for the
lifetime of the DataReader.

The DataAdapter Object
The DataAdapter is the class at the core of ADO .NET's disconnected data access. It is
essentially the middleman facilitating all communication between the database and a
DataSet. The DataAdapter is used either to fill a DataTable or DataSet with data from the
database with it's Fill method. After the memory-resident data has been manipulated, the
DataAdapter can commit the changes to the database by calling the Update method. The
DataAdapter provides four properties that represent database commands:
SelectCommand
InsertCommand
DeleteCommand
UpdateCommand
When the Update method is called, changes in the DataSet are copied back to the
database and the appropriate InsertCommand, DeleteCommand, or UpdateCommand is
executed.
Using OleDb Provider
The Objects of the OleDb provider with which we work are:
TheOleDbConnectionclass The OleDbConnection class represents a connection to OleDb
data source. OleDb connections are used to connect to most databases.
TheOleDbCommandClass The OleDbCommand class represents a SQL statement or
stored procedure that is executed in a database by an OLEDB provider.
TheOleDbDataAdapterClass The OleDbDataAdapter class acts as a middleman between
the datasets and OleDb data source. We use the Select, Insert, Delete and Update
commands for loading and updating the data.
TheOleDbDataReaderClass The OleDbDataReader class creates a data reader for use
with an OleDb data provider. It is used to read a row of data from the database. The data is
read as forward-only stream which means that data is read sequentially, one row after

another not allowing you to choose a row you want or going backwards.
Sample Code
We will work with the sample worker table in Oracle.
Retrieving Records and inserting records
Using System.Data.OleDB
namespace WindowsFormsApplication1
{
public partial class Form1 : Form
{
public Form1()
{
InitializeComponent();
}
OleDbConnection con;
DataSet ds1;
OleDbDataAdapter da;
private void Form1_Load(object sender, EventArgs e) {
con = new.OleDbConnection(); ds1 = new DataSet();
con.ConnectionString="Provider=Microsoft.Jet.OLEDB.4.0;Data Source=D:/MyWorkers1.mdb";
string sql = "SELECT * from tblWorkers";
da = new OleDbDataAdapter(sql, con);
con.Open();
da.Fill(ds1, "MyWorkers1"); datagrid1.Datasource=ds1;
datagrid1.datamember=" MyWorkers1";
con.close(); }
private void btninsert_Click(object sender, EventArgs e)
{
con = new.OleDbConnection(="Provider=Microsoft.Jet.OLEDB.4.0;Data Source=D:/MyWorkers1.mdb");
con.Open();
string str="insert into MyWorkers1 values("+textbox1.Text+","+textbox2.Text+")";

cmd=new Oledbcommand(str,con);
icount=cmd.ExecuteNonQuery();
messagebox.show("row inserted");
con.close();
}
Updating Records
private void btnupdate_Click(object sender, EventArgs e)
{
con = new.OleDbConnection(="Provider=Microsoft.Jet.OLEDB.4.0;Data
Source=D:/MyWorkers1.mdb");
con.Open();
string str="update MyWorkers1 set name="+textbox2.Text+" where
lname=="+textbox2.Text+")";
cmd=new Oledbcommand(str,con);
icount=cmd.ExecuteNonQuery();
messagebox.show("row updated");
con.close();
}
Questions:
Design a windows application to display the teacher information to perform select
and insert operation using oracle 10g database connections.
Design a windows application to display the student information to perform select
and update operation using MS-access database connections.
Conclusion: Hence we have studied ADO.NET.

Part-III Web Application
EXPERIMENT No.8
AIM - To Study of Validation Control in ASP.Net
Objectives:
To understand the concept of validation.
To unnderstand the validation of input
Ablity to write the regular expression.
Theory:
Validation:
ASP.Net validation controls validate the user input data to ensure that useless,
unauthenticated or contradictory data don.t get stored.
ASP.Net provides the following validation controls:
1. RequiredFieldValidator 2. RangeValidator
3. CompareValidator 4. RegularExpressionValidator
5. CustomValidator 6. ValidationSummary
The BaseValidator Class:
The validation control classes inherit from the BaseValidator class and inherit its properties and methods. Therefore, it would help to take a look at the properties and the methods of
this base class, which are common for all the validation controls:
Members Description
ControlToValidate Indicates the input control to validate.
Display Indicates how the error message is shown.
EnableClientScript Indicates whether client side validation will take.
Enabled Enables or disables the validator.
ErrorMessage Error string.

Text Error text to be shown if validation fails.
IsValid Indicates whether the value of the control is valid.
SetFocusOnError It indicates whether in case of an invalid control, the focus should switch to the related input control.
ValidationGroup The logical group of multiple validators, where this control belongs.
Validate() This method revalidates the control and updates the IsValid
property.
The RequiredFieldValidator:
The RequiredFieldValidator control ensures that the required field is not empty. It is generally tied to a text box to force input into the text box.
The syntax for the control:
<asp:RequiredFieldValidator ID="rfvcandidate"
runat="server" ControlToValidate ="ddlcandidate" ErrorMessage="Please choose a candidate"
InitialValue="Please choose a candidate"> </asp:RequiredFieldValidator>
The RangeValidator:
The RangeValidator control verifies that the input value falls within a predetermined range.
It has three specific properties:
Properties Description
Type it defines the type of the data; the available values are: Currency, Date, Double, Integer and String
MinimumValue it specifies the minimum value of the range
MaximumValue it specifies the maximum value of the range
The syntax for the control:
<asp:RangeValidator ID="rvclass" runat="server"
ControlToValidate="txtclass" ErrorMessage="Enter your class (6 - 12)"

MaximumValue="12" MinimumValue="6" Type="Integer">
</asp:RangeValidator>
The CompareValidator:
The CompareValidator control compares a value in one control with a fixed value, or, a value in another control.
It has the following specific properties:
Properties Description
Type it specifies the data type
ControlToCompare it specifies the value of the input control to compare with
ValueToCompare it specifies the constant value to compare with
Operator it specifies the comparison operator, the available values are: Equal, NotEqual, GreaterThan, GreaterThanEqual, LessThan,
LessThanEqual and DataTypeCheck
The basic syntax for the control:
<asp:CompareValidator ID="CompareValidator1" runat="server"
ErrorMessage="CompareValidator"> </asp:CompareValidator>
The RegularExpressionValidator
The RegularExpressionValidator allows validating the input text by matching against a pattern against a regular expression. The regular expression is set in the ValidationExpression property.
The following table summarizes the commonly used syntax constructs for regular
expressions:
Character Escapes Description
\b Matches a backspace
\t Matches a tab
\r Matches a carriage return
\v Matches a vertical tab
\f Matches a form feed
\n Matches a new line
\ Escape character
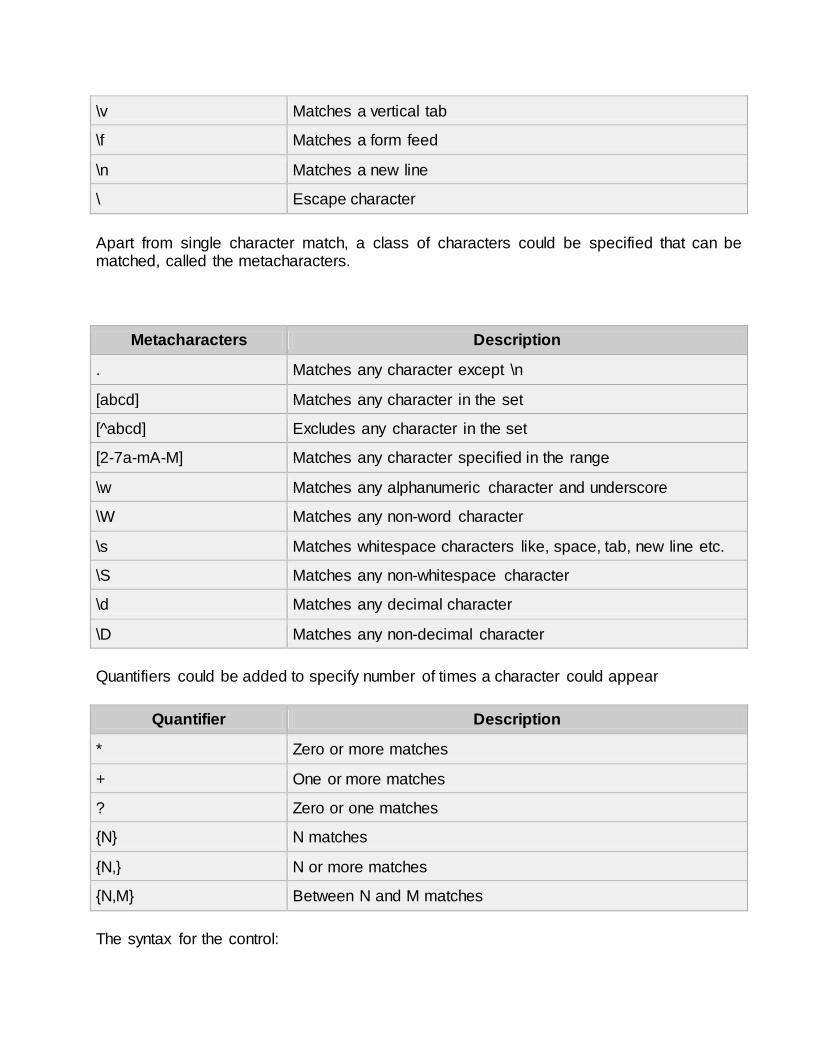
Apart from single character match, a class of characters could be specified that can be matched, called the metacharacters.
Metacharacters Description
. Matches any character except \n
[abcd] Matches any character in the set
[^abcd] Excludes any character in the set
[2-7a-mA-M] Matches any character specified in the range
\w Matches any alphanumeric character and underscore
\W Matches any non-word character
\s Matches whitespace characters like, space, tab, new line etc.
\S Matches any non-whitespace character
\d Matches any decimal character
\D Matches any non-decimal character
Quantifiers could be added to specify number of times a character could appear
Quantifier Description
* Zero or more matches
+ One or more matches
? Zero or one matches
{N} N matches
{N,} N or more matches
{N,M} Between N and M matches
The syntax for the control:

<asp:RegularExpressionValidator ID="string" runat="server"
ErrorMessage="string" ValidationExpression="string"
ValidationGroup="string"> </asp:RegularExpressionValidator>
The CustomValidator:
The CustomValidator control allows writing application specific custom validation routines
for both the client side and the server side validation.
The client side validation is accomplished through the ClientValidationFunction property. The client side validation routine should be written in a scripting language, like JavaScript or VBScript, which the browser can understand.
The server side validation routine must be called from the control.s ServerValidate event
handler. The server side validation routine should be written in any .Net language, like C# or C# .Net.
The basic syntax for the control
<asp:CustomValidator ID="CustomValidator1"
runat="server" ClientValidationFunction=.cvf_func.
ErrorMessage="CustomValidator"> </asp:CustomValidator>
The ValidationSummary Control
The ValidationSummary control does not perform any validation but shows a summary of all errors in the page. The summary displays the values of the ErrorMessage property of all
validation controls that failed validation.
The following two mutually inclusive properties list out the error message:
ShowSummary: shows the error messages in specified format. ShowMessageBox: shows the error messages in a separate window.
The syntax for the control:
<asp:ValidationSummary ID="ValidationSummary1" runat="server" DisplayMode = "BulletList"

ShowSummary = "true" HeaderText="Errors:" />
Validation Groups:
Complex pages have different groups of information provided in different panels. In such a situation a need for performing validation separately for separate group, might arise. This kind of situation is handled using validation groups.
To create a validation group, you should put the input controls and the validation controls
into the same logical group by setting their ValidationGroup property.
Example:
The following example describes a form to be filled up by all the students of a school, divided into four houses, for electing the school president. We will be using the validation
controls to validate the user input.
The form in Design view:
The content file code:
<form id="form1" runat="server"> <table style="width: 66%;"> <tr>
<td class="style1" colspan="3" align="center">

<asp:Label ID="lblmsg" Text="President Election Form : Choose your president"
runat="server" /> </td>
</tr> <tr> <td class="style3">
Candidate: </td>
<td class="style2"> <asp:DropDownList ID="ddlcandidate" runat="server" Width="239px"> <asp:ListItem>Please Choose a Candidate</asp:ListItem>
<asp:ListItem>M H Kabir</asp:ListItem> <asp:ListItem>Steve Taylor</asp:ListItem>
<asp:ListItem>John Abraham</asp:ListItem> <asp:ListItem>Venus Williams</asp:ListItem> </asp:DropDownList>
</td> <td>
<asp:RequiredFieldValidator ID="rfvcandidate" runat="server" ControlToValidate ="ddlcandidate" ErrorMessage="Please choose a candidate"
InitialValue="Please choose a candidate"> </asp:RequiredFieldValidator>
</td> </tr> <tr>
<td class="style3"> House:</td>
<td class="style2"> <asp:RadioButtonList ID="rblhouse" runat="server"
RepeatLayout="Flow"> <asp:ListItem>Red</asp:ListItem>
<asp:ListItem>Blue</asp:ListItem> <asp:ListItem>Yellow</asp:ListItem> <asp:ListItem>Green</asp:ListItem>
</asp:RadioButtonList> </td>
<td> <asp:RequiredFieldValidator ID="rfvhouse" runat="server"
ControlToValidate="rblhouse" ErrorMessage="Enter your house name">
</asp:RequiredFieldValidator> <br />

</td> </tr>
<tr> <td class="style3">
Class:</td> <td class="style2"> <asp:TextBox ID="txtclass" runat="server"></asp:TextBox>
</td> <td>
<asp:RangeValidator ID="rvclass" runat="server" ControlToValidate="txtclass" ErrorMessage="Enter your class (6 - 12)" MaximumValue="12"
MinimumValue="6" Type="Integer"> </asp:RangeValidator>
</td> </tr> <tr>
<td class="style3"> Email:</td>
<td class="style2"> <asp:TextBox ID="txtemail" runat="server" Width="250px"> </asp:TextBox>
</td> <td>
<asp:RegularExpressionValidator ID="remail" runat="server" ControlToValidate="txtemail" ErrorMessage="Enter your email"
ValidationExpression="\w+([-+.']\w+)*@\w+([-.]\w+)*\.\w+([-.]\w+)*"> </asp:RegularExpressionValidator>
</td> </tr> <tr>
<td class="style3" align="center" colspan="3"> <asp:Button ID="btnsubmit" runat="server" onclick="btnsubmit_Click"
style="text-align: center" Text="Submit" Width="140px" /> </td> </tr>
</table> <asp:ValidationSummary ID="ValidationSummary1"
runat="server" DisplayMode ="BulletList" ShowSummary ="true"
HeaderText="Errors:" /> </form>
The code behind the submit button:

protected void btnsubmit_Click(object sender, EventArgs e) {
if (Page.IsValid) {
lblmsg.Text = "Thank You"; } else
{ lblmsg.Text = "Fill up all the fields";
} }
Questions:
Design a sign Up form & validate user phone no with exactly 10 digit and email-id.
Design a sign up form & validate username (minimum 8 characters &maximum 15 and only character) password and retype password (both should be same)
Design a web application form having loan amount,interest rate and duration fields.calculate the simple interest and perform nacessary validation ie
o Ensures data has been entered for each field.
o Checking for non numeric value.
Conclusion: Hence we have studied validation Control in ASP.Net.
EXPERIMENT No.9
Aim: To Study Master Page in ASP.Net
Objectives:
To understand the concept of master page. Ability to create website using master page.
Theory:
How To Create master page?
ASP.NET programming language is composed of different suite packages of programming
tools. However, the most exciting thing to learn from this language is to create a website
because you don’t have to put in a lot of effort for building a complex website. In this
language, you don’t need to find some flat form in order to make a beautiful and flexible
website because there is already a package on how we are going to handle and locate
those important matters to build a website. The advantages of why ASP.NET is popular?
It’s because, you can write least amount of code. Unfortunately, it depends on the
programmer side which programming tools they are going to choose. The most interesting
part of ASP.NET Web programming is the use of Master Page. The master page is the
template for how your pages will look like. It enables you to store the same content among
multiple content pages in a website.
For instance, if you would like to display a standard header and footer in each page of your
website, then you can generate the standard header and footer in a Master Page. That’s
how powerful a master page is to handle multiple forms and is easier to maintain
throughout what the website looks like. Take note, the ID attribute uniquely identifies the
placeholder, allowing you to put more than one placeholder in a master page.
To start - open your Visual Studio 2010, File and choose New Web Site, choose C#.

Choose ASP.NET Empty Web Site. Make the default File System; you can change the file
directory of your file. Just simply browse and name your folder where your file is being
saved and click Ok.
When we notice there’s no display, what are we going to do. We are going to Add a Master Page. To do that, in your solution explorer, right click the name of your website and choose Add new item. Choose MasterPage.master, the default name is MasterPage.

Make sure that the check box is checked, only place code in a separate file, not a selectmaster page.
This is the master build in code:
<%@ Master Language="C#" AutoEventWireup="true" CodeFile="MasterPage.master.cs" Inherits="MasterPage" %>
<!DOCTYPE html PUBLIC "-//W3C//DTD XHTML 1.0 Transitional//EN" "http://www.w3.org/TR/xhtml1/DTD/xhtml1-transitional.dtd">
<html xmlns="http://www.w3.org/1999/xhtml"> <head runat="server">
<title></title> <asp:ContentPlaceHolder id="head" runat="server">
</asp:ContentPlaceHolder> </head> <body>
<form id="form1" runat="server"> <div>
<asp:ContentPlaceHolder id="ContentPlaceHolder1" runat="server"> </asp:ContentPlaceHolder>
</div> </form>
</body>
</html>
Under the code, either you can choose Source, Split, and design. In order to show only the code, use the design just like above, split shows both source and design and design shows only a design.
Now, we are going to use design in order to see the full design of our Master Page. Click
design; first delete the current placeholder because we are going to create a new one.
In the above menu, click table and insert table:

Click Ok, we are going to merge cells, the header and footer. Highlight the entire first row, right click and choose modify merge cells. Expand the height - it looks like a website and fill
some color to make it look like an interesting site, look at the properties settings. If you want to add color for header and footer, click the cells and locate the properties and
choose Bgcolor.
In toolbox, choose Hyperlink and drag in your Page. Make 3 copies and name them Home,
About, and Settings.
So, this is how your Master Page looks like. In order to make multiple Web Forms, in your

Solution Explorer, click your web site name, right click and Add new item. Choose C# and click Web Form. The default name is default, change it to Home to make it more meaningful. Remember; make sure to check the select master page and Add. When you notice another dialog box appears, it does mean that you are in the Master Page control.
Click MasterPage.master, then Ok.
This is the build in code.
<%@ Page Title="" Language="C#" MasterPageFile="~/MasterPage.master"
AutoEventWireup="true" CodeFile="Home.aspx.cs" Inherits="Home" %>
<asp:Content ID="Content1" ContentPlaceHolderID="head" Runat="Server">
</asp:Content>
Do the same procedure like what you created in the Home web form and name it About
and Setting. Now you’ve already created 3 Web Forms.
Back to the Master Page, drag Content PlaceHolder from your toolbox in your Master Page.
Gdf
Click Home menu hyperlinks, in your properties setting, locate Navigate URL, click … and choose Home Web Form that corresponds to your menu. Do the same procedure when
you link About and Settings Menu.

In Solution Explorer, double click Home Web Form. When you notice your cursor, only ContentPlaceHolder is active, it means you could not write anything except the place holder. Now, we are going to put something in the place holder. Type “This is my Home Page”, do the same as what you created in your home web form and type that relate in every pages.
Questions:
Design a college website(minimum 4 pages)
Design a company website(minimum 4 pages)
Conclusion: Hence we have studied master page ASP.Net.

EXPERIMENT No.11 Aim: To Study ADO .NET ASP .Net.
Objectives: To understan
ADO.Net provides a bridge between the front end controls and the back end database. The ADO.Net objects encapsulate all the data access operations and the controls interact with these objects to display data, thus hiding the details of movement of data.
The following figure shows the ADO.Net objects at a glance:
The DataSet Class:
The data set represents a subset of the database. It does not have a continuous connection to the database. To update the database a reconnection is required. The
DataSet contains DataTable objects and DataRelation objects. The DataRelation objects represent the relationship between two tables.
Following table shows some important properties of the DataSet class:
Properties Description
CaseSensitive Indicates whether string comparisons within the data tables are case-sensitive.
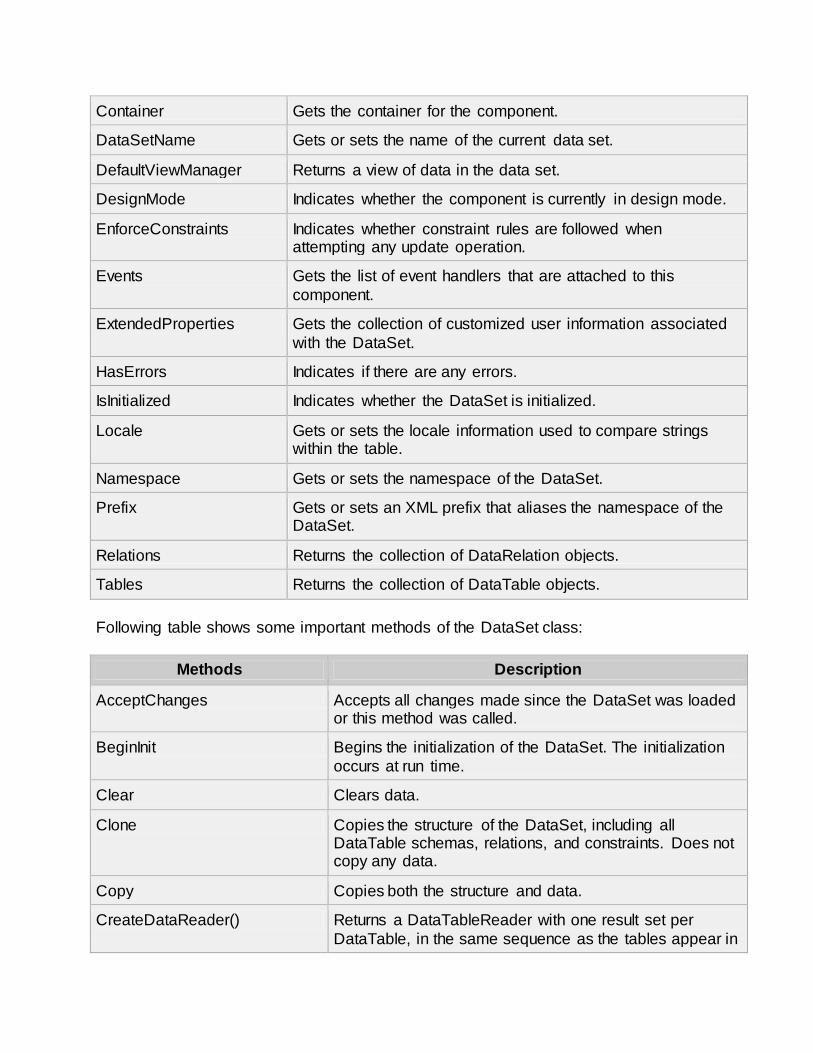
Container Gets the container for the component.
DataSetName Gets or sets the name of the current data set.
DefaultViewManager Returns a view of data in the data set.
DesignMode Indicates whether the component is currently in design mode.
EnforceConstraints Indicates whether constraint rules are followed when attempting any update operation.
Events Gets the list of event handlers that are attached to this
component.
ExtendedProperties Gets the collection of customized user information associated
with the DataSet.
HasErrors Indicates if there are any errors.
IsInitialized Indicates whether the DataSet is initialized.
Locale Gets or sets the locale information used to compare strings within the table.
Namespace Gets or sets the namespace of the DataSet.
Prefix Gets or sets an XML prefix that aliases the namespace of the DataSet.
Relations Returns the collection of DataRelation objects.
Tables Returns the collection of DataTable objects.
Following table shows some important methods of the DataSet class:
Methods Description
AcceptChanges Accepts all changes made since the DataSet was loaded or this method was called.
BeginInit Begins the initialization of the DataSet. The initialization
occurs at run time.
Clear Clears data.
Clone Copies the structure of the DataSet, including all DataTable schemas, relations, and constraints. Does not copy any data.
Copy Copies both the structure and data.
CreateDataReader() Returns a DataTableReader with one result set per
DataTable, in the same sequence as the tables appear in

the Tables collection.
CreateDataReader(DataTable[]) Returns a DataTableReader with one result set per
DataTable.
EndInit Ends the initialization of the data set.
Equals(Object) Determines whether the specified Object is equal to the current Object.
Finalize Free resources and perform other cleanups.
GetChanges Returns a copy of the DataSet with all changes made since it was loaded or the AcceptChanges method was
called.
GetChanges(DataRowState) Gets a copy of DataSet with all changes made since it was loaded or the AcceptChanges method was called,
filtered by DataRowState.
GetDataSetSchema Gets a copy of XmlSchemaSet for the DataSet.
GetObjectData Populates a serialization information object with the data needed to serialize the DataSet.
GetType Gets the Type of the current instance.
GetXML Returns the XML representation of the data.
GetXMLSchema Returns the XSD schema for the XML representation of
the data.
HasChanges() Gets a value indicating whether the DataSet has changes, including new, deleted, or modified rows.
HasChanges(DataRowState) Gets a value indicating whether the DataSet has changes, including new, deleted, or modified rows,
filtered by DataRowState.
IsBinarySerialized Inspects the format of the serialized representation of the DataSet.
Load(IDataReader, LoadOption, DataTable[])
Fills a DataSet with values from a data source using the supplied IDataReader, using an array of DataTable
instances to supply the schema and namespace information.
Load(IDataReader,
LoadOption, String[])
Fills a DataSet with values from a data source using the
supplied IDataReader, using an array of strings to supply the names for the tables within the DataSet.
Merge() Merges the data with data from another DataSet. This method has different overloaded forms.

ReadXML() Reads an XML schema and data into the DataSet. This method has different overloaded forms.
ReadXMLSchema(0 Reads an XML schema into the DataSet. This method has different overloaded forms.
RejectChanges Rolls back all changes made since the last call to AcceptChanges.
WriteXML() Writes an XML schema and data from the DataSet. This
method has different overloaded forms.
WriteXMLSchema() Writes the structure of the DataSet as an XML schema.
This method has different overloaded forms.
The DataTable Class:
The DataTable class represents the tables in the database. It has the following important properties; most of these properties are read only properties except the PrimaryKey
property:
Properties Description
ChildRelations Returns the collection of child relationship.
Columns Returns the Columns collection.
Constraints Returns the Constraints collection.
DataSet Returns the parent DataSet.
DefaultView Returns a view of the table .
ParentRelations Returns the ParentRelations collection.
PrimaryKey Gets or sets an array of columns as the primary key for the
table.
Rows Returns the Rows collection.
Following table shows some important methods of the DataTable class:
Methods Description
AcceptChanges Commits all changes since the last AcceptChanges.
Clear Clears all data from the table.
GetChanges Returns a copy of the DataTable with all changes made since
the AcceptChanges method was called.
GetErrors Returns an array of rows with errors.
ImportRows Copies a new row into the table.
LoadDataRow Finds and updates a specific row, or creates a new one, if not found any.
Merge Merges the table with another DataTable.
NewRow Creates a new DataRow.
RejectChanges Rolls back all changes made since the last call to
AcceptChanges.
Reset Resets the table to its original state.
Select Returns an array of DataRow objects.
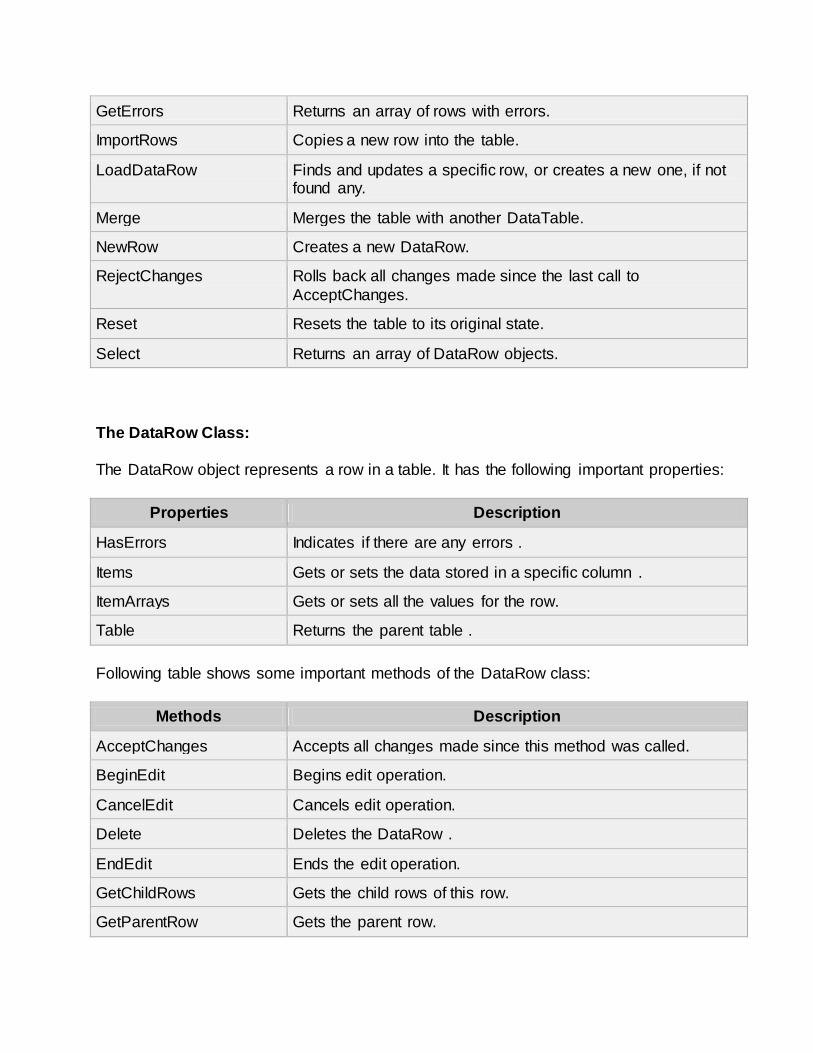
The DataRow Class:
The DataRow object represents a row in a table. It has the following important properties:
Properties Description
HasErrors Indicates if there are any errors .
Items Gets or sets the data stored in a specific column .
ItemArrays Gets or sets all the values for the row.
Table Returns the parent table .
Following table shows some important methods of the DataRow class:
Methods Description
AcceptChanges Accepts all changes made since this method was called.
BeginEdit Begins edit operation.
CancelEdit Cancels edit operation.
Delete Deletes the DataRow .
EndEdit Ends the edit operation.
GetChildRows Gets the child rows of this row.
GetParentRow Gets the parent row.

GetParentRows Gets parent rows of DataRow object.
RejectChanges Rolls back all changes made since the last call to
AcceptChanges.
The DataAdapter Object:
The DataAdapter object acts as a mediator between the DataSet object and the database. This helps the data set to contain data from more than one database or other data source.
The DataReader Object:
The DataReader object is an alternative to the DataSet and DataAdapter combination. This object provides a connection oriented access to the data records in the database. These objects are suitable for read-only accesses, such as populating a list and then breaking the
connection.
DbCommand and DbConnection Objects:
The DbConnection object represents a connection to the data source. The connection could be shared among different command objects.
The DbCommand object represents the command or a stored procedure sent to the
database from retrieving or manipulating data.
Example:
So far, we have used tables and databases already existing in our computer. In this example, we will create a table, add column, rows and data into it and display the table
using a GridView object.
The source file:
<%@ Page Language="C#" AutoEventWireup="true" CodeBehind="Default.aspx.cs"
Inherits="createdatabase._Default" %>
<!DOCTYPE html PUBLIC "-//W3C//DTD XHTML 1.0 Transitional//EN" "http://www.w3.org/TR/xhtml1/DTD/xhtml1-transitional.dtd">
<html xmlns="http://www.w3.org/1999/xhtml" > <head runat="server">
<title>Untitled Page</title> </head>

<body> <form id="form1" runat="server">
<div>
<asp:GridView ID="GridView1" runat="server"> </asp:GridView>
</div> </form>
</body> </html>
The code behind file:
namespace createdatabase
{ public partial class _Default : System.Web.UI.Page {
protected void Page_Load(object sender, EventArgs e) {
if (!IsPostBack) { DataSet ds = CreateDataSet();
GridView1.DataSource = ds.Tables["Student"]; GridView1.DataBind(); }
} private DataSet CreateDataSet()
{ //creating a DataSet object for tables DataSet dataset = new DataSet();
// creating the student table
DataTable Students = CreateStudentTable(); dataset.Tables.Add(Students); return dataset;
} private DataTable CreateStudentTable()
{ DataTable Students = new DataTable("Student");
// adding columns AddNewColumn(Students, "System.Int32", "StudentID");
AddNewColumn(Students, "System.String", "StudentName"); AddNewColumn(Students, "System.String", "StudentCity");

// adding rows
AddNewRow(Students, 1, "M H Kabir", "Kolkata"); AddNewRow(Students, 1, "Shreya Sharma", "Delhi");
AddNewRow(Students, 1, "Rini Mukherjee", "Hyderabad"); AddNewRow(Students, 1, "Sunil Dubey", "Bikaner"); AddNewRow(Students, 1, "Rajat Mishra", "Patna");
return Students;
} private void AddNewColumn(DataTable table,
string columnType, string columnName)
{ DataColumn column = table.Columns.Add(columnName, Type.GetType(columnType));
}
//adding data into the table private void AddNewRow(DataTable table, int id, string name, string city)
{ DataRow newrow = table.NewRow();
newrow["StudentID"] = id; newrow["StudentName"] = name; newrow["StudentCity"] = city;
table.Rows.Add(newrow); }
} }
When you run the program observe the following:
The application first creates a data set and binds it with the grid view control using the DataBind() method of the GridView control.
The Createdataset() method is a user defined function, which creates a new DataSet object and then calls anther user defined method CreateStudentTable() to create the
table and add it to the Tables collection of the data set. The CreateStudentTable() method calls the user defined methods AddNewColumn()
and AddNewRow() to create the columns and rows for the table as well as to add
data to the rows.
When the page is run, it returns the rows of the table so created:

Conclusion: Hence we have studied ADO .Net ASP.Net.