Embed Size (px)
Citation preview

Prepared by GRA interactive2
S O C I A L M E D I A K I T
Table of Contents
Social Media Guidelines .....................................................................3
Facebook:
Anatomy of a Fan Page .........................................................5
Admin Features ......................................................................6
Create a Fan Page .................................................................7
Posting to a Fan Page .........................................................10
Facebook Advertising:
Creating Ads ........................................................................13
Helpful Resources ................................................................15
Glossary of Terms ................................................................16
Pinterest:
The Basics ............................................................................17
Create a Pinterest Account ................................................18
Managing Pin Boards ..........................................................19

Prepared by GRA interactive3
S O C I A L M E D I A K I T
Social Media GuidelinesThis document is meant to serve as the foundation by which your library or organization authors its policies regarding social media—the specifics of which will be unique to your individual situation. Because social media sites are prone to changing their interfaces and often update features, the contents herein outline basic features and practices that are current as of its drafting. It is not intended to be an in-depth, end-all manual, but a starting point for self-discovery. While best practices, hints, and how-to’s are outlined, your final policies will be the result of your hands-on experimentation and the dynamics of your particular resources and market.
When drafting your policies, take the following into consideration.
Social Media ManagementAlthough there isn’t a one-size-fits-all structure for a social media management team, there are basic best practices to consider when establishing one for your library or organization.
Appoint one person to oversee your social media efforts for your library or organization.
Successful characteristics for this role:
• Manages the team of content generators and Page managers
• Establishes a process for content approval and communicates expectations to all stakeholders
• Ensures that the social media efforts are in concert with the branding and marketing objectives of the organization or library
• Brings all stakeholders together to ensure internal support of social media efforts
• Oversees relationships with third-party partners, such as graphic designers, advertising/PR agencies, web developers, social media consultants
Establish a social media/Pages team.
Successful characteristics for this role:
• Responsible for the Page planning/strategies and daily, weekly or monthly editorial calendar
• Creates engaging content and promotes the best content in ads and sponsored stories
• Acquires the necessary approval of content before it is published
• Utilizes tools, such as Facebook’s “Insights” and “Ads Manager” to evaluate fan engagement and ad effectiveness
If applicable, appoint a team member to collaborate with traditional media team to promote content with ads and sponsored stories.
Successful characteristics for this role:
• Works closely with internal media department or media partner to allocate social media ad budget in order to promote the strongest content
• Coordinates the post timelines for promoted content to coincide with timing of other marketing venues and paid content
• Notify the Pages team of upcoming campaigns that should be integrated into the Page content calendar
• Creates a media strategy that uses ads to connect with new audiences and keeps fans and friends of fans engaged with Page content
• Reinforces social media content with messaging used in other channels, both online and offline
Focus creative efforts on fan acquisition and engagement.
Successful characteristics for this role:
• Knows what is inherently engaging about your brand that people would want to talk about and share with their friends, and uses it as a catalyst for creative ideas
• Creates messaging and graphics that are interesting and relevant—with personality that drives people to share
• Develops ad campaigns that are designed to motivate people to engage or share
Make Page publishing a priority.
Because Facebook users spend the majority of their time on their news feed, it makes sense to publish posts regularly to your Page. Facebook’s own statistics show that posting at least five times per week (at a consistent time) is necessary to stay top of mind for fans. However, there is a fine balance between posting too often or not often enough. Although unsubscribe rates go up after three posts per day, there are situations where multiple posts in a day would be appropriate depending on the subject matter and time-sensitivity of the posts.

Prepared by GRA interactive4
S O C I A L M E D I A K I T
Social Media GuidelinesPost Review and Response Time
Based on the size and interactivity of your fan base, determine a consistent time of day/day of the week to review posts. This could be once at the end of each day, or 3 times a day – first thing in the morning, noon, and end of the day, etc.
Establish turnaround times for responding to posts that are specific to your library or organization and based on time-sensitivity. For complaints it is best to reply immediately even if you don’t have an immediate resolution. Likewise, questions about an event that require a quick reply should be made within a reasonable time – it could mean the difference between someone being able to attend an event or not.
Posting during off-peak hours from 2:00 p.m. – 5:00 a.m. and weekends is more likely to increase fan interaction. Thursdays typically show the highest number of postings and the lowest interaction rate, so keep that in mind when planning your posting schedule.
Replying to Posts
Create a process for fielding questions, engaging in conversations and resolving issues. Determine who replies to different kinds of communication (i.e. a junior staff member is assigned to answering general questions, a senior staff member posts and engages fans about events, the librarian deals with complaints, etc. Consider hiring a student if your resources are limited.)
Posts are categorized as:
• Complaints: If a complaint can be categorized as constructive criticism, it is best to respond on Facebook as others may have the same concern. But avoid a heated back and forth conversation. If the situation intensifies, take the conversation offline (i.e. email or phone call).
• Questions
• Kudos
• Conversations
Determine Ground Rules for Fan Posts
Many organizations have a paragraph on their “About” page defining the ground rules for Fan posts, linking to their website “Terms of Use” page. View examples of terms at www.facebook.com/SmithsonianLibraries/info and libraries.idaho.gov/page/terms-of-service.
Use common sense when posting content.
As a member of your library or organization’s social media team, you are its representative online. Whatever you say, and the photos you post, reflects either positively or negatively on its reputation. Content that is published online and shared by others is out of your control – you may be able to delete a post, but you can’t delete what others have re-posted or shared about it.
Do’s and Don’ts:
• Set the tone for engagement, posts should convey that you are friendly, authentic, and open. Be true to your brand personality.
• Make sure content is grammatically correct with no misspelled words, links point to the proper places, and facts are correct (phone numbers, hours, etc.)
• When adding photos and videos to your Page, make sure that you own the copyright or have permission to use them. Avoid using images that you find while searching online unless you know the source and have permission – often people will unknowingly put images on their websites that infringe on a photographer’s copyright.
• Use appropriate language – the same policies for verbal interaction with your patrons and the public should apply to online communications.
• Don’t overwhelm fans with unnecessary updates or those with mundane details.
• Don’t post content that is not relevant to your library or organization (i.e. what you had for lunch, or today’s horoscope, etc.)
• Unless it is pertinent to an event or story, avoid political discussions
• Don’t post about personal issues

Prepared by GRA interactive5
S O C I A L M E D I A K I T
Facebook: Anatomy of a Fan PageCover Photo
Profile Picture
You can “pin” an important story so that it is achored to the top of your page for up to seven days.
Brief sentence from your “About” Page that displays on your Timeline
Name of your library or organization and a short description
Your main page is referred to as your “Timeline,” because your posts and milestones are organized by current month, previous month and then by year for easy navigation.
Your Photos, Likes, Events and custom Apps are displayed here on the Favorites App bar, and in the order you prefer. Up to four can be shown on your main page. The remaining are accessed by clicking the arrow located on the far right.
You also have the option of highlighting important stories with the star icon. This makes the story expand across both columns to make is stand out.
If you want to hide a story that is no longer relevant use the pencil icon.
Prepared by GRA interactive6
S O C I A L M E D I A K I T
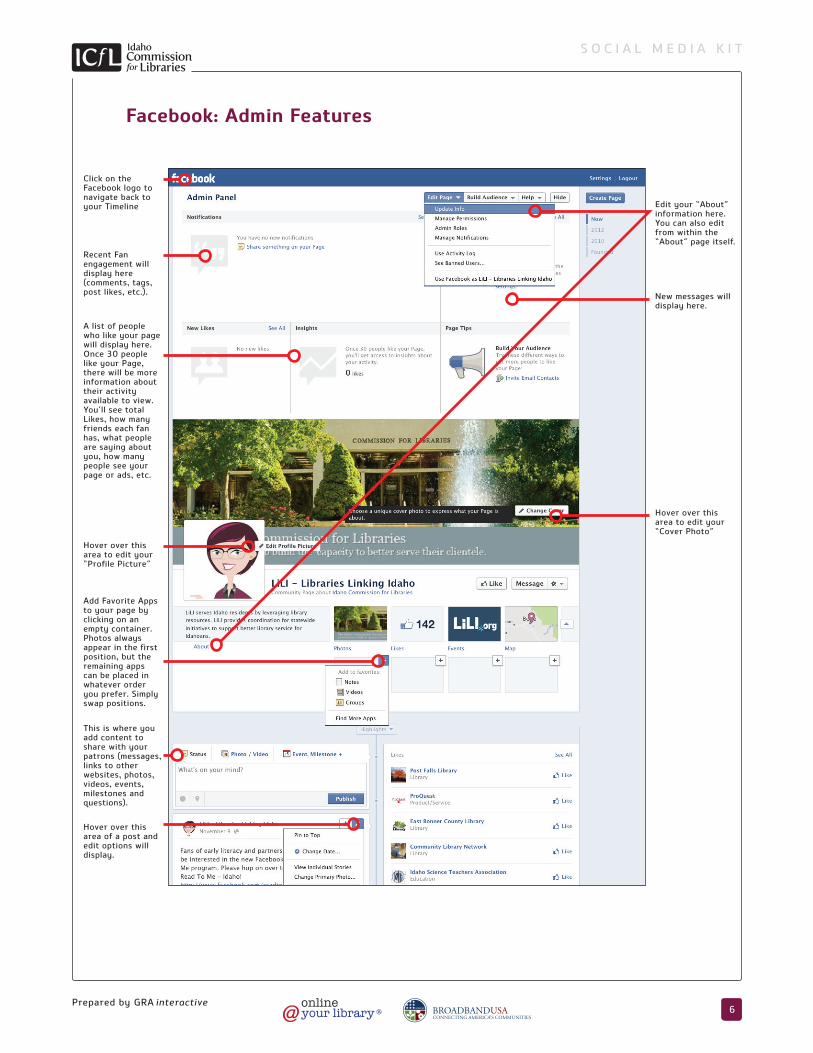
Facebook: Admin Features
Recent Fan engagement will display here (comments, tags, post likes, etc.).
Click on the Facebook logo to navigate back to your Timeline
Hover over this area of a post and edit options will display.
This is where you add content to share with your patrons (messages, links to other websites, photos, videos, events, milestones and questions).
Add Favorite Apps to your page by clicking on an empty container. Photos always appear in the first position, but the remaining apps can be placed in whatever order you prefer. Simply swap positions.
Hover over this area to edit your “Profile Picture”
A list of people who like your page will display here. Once 30 people like your Page, there will be more information about their activity available to view. You’ll see total Likes, how many friends each fan has, what people are saying about you, how many people see your page or ads, etc.
Edit your “About” information here. You can also edit from within the “About” page itself.
Hover over this area to edit your “Cover Photo”
New messages will display here.

Prepared by GRA interactive7
S O C I A L M E D I A K I T
Create a Facebook Account Go to https://www.facebook.com/pages/create.php then:
• Click on the category “Company, Organization or Institution,” then select “Education.” Enter a name that accurately identifies who you are and agree to the terms to get started. (IMPORTANT: Once you enter a name it cannot be changed. This name will appear in the URL of your Facebook page - i.e. www.facebook.com/yourlibraryname)
• Create a Facebook Account by entering an email address, choosing a password, entering your date of birth and agreeing to the Terms of Use and Privacy Policy.
Upon submission of the form, you will receive a confirmation message at the email address you used to set up the account. This message confirms that you are the rightful owner of the email. It will also be the address that all notifications from Facebook will be sent to. Click on the link in the message to complete the sign-up process.
Best Practice: Make sure that you enter an email address that will be accessible to those authorized to manage your Facebook page. Do not use a personal email address.
Option: You can also choose the category “Local Business or Place,” then select “Library”. This will display different information under your Profile Picture and on your “About” page. Once you set up your page you can change your category at any time. Choose the category that works best for you.
Once signed up, you will be prompted to begin setting up the various aspects of your page.
Set-up Your Profile Picture The Profile Picture is the photo that people see next to your name on Facebook. This image could be a photo of your logo, building, librarian or a symbolic icon.
When you first set up your page, you will be prompted to upload a Profile Picture. The image:
• should measure at least180 pixels wide. (Facebook automatically crops the image to a square.)
Once you upload the picture, you can move the image around to adjust the crop by hovering over the picture and clicking on “Edit Profile Picture,” then selecting “Edit Thumbnail.” This will open a new window where you can drag the image to the position you like. This will adjust both the main Profile Picture and the thumbnail.
Best Practice: Choose an image that, when cropped square, looks good scaled down to the thumbnail size.
Facebook: Create a Fan Page

Prepared by GRA interactive8
S O C I A L M E D I A K I T
Set-up a Facebook Cover Photo The Cover Photo is the large horizontal image that appears at the top of your Timeline page above your Profile Picture.
Choose a single photo or create a graphic that communicates the personality, or brand, of your library or organization. The image:
• should measure 851 pixels wide and 315 pixels high
• must be formatted as a .jpg, .gif, .png, or .bmp
Keep in mind that Facebook policies regarding cover photos are strict and cannot contain:
• price or purchase information (this kind of info would appear on an event page);
• contact information (this info is designated for the “About” section);
• references to Facebook features or actions, such as “Like” or “Share”, or an arrow pointing to any of these features;
• calls to action (such as “Tell your friends” or QR codes)
To upload your Cover Photo to Facebook, click the “Add a Cover” button, then choose to upload a new photo. Navigate to the image you created and select to upload. Once the photo is on Facebook, you can reposition it by clicking on the image and dragging it up or down. Click “Save.”
Suggestion: Changing the Cover Photo to coincide with changing seasons or milestones (such as a new building grand opening, anniversary, etc.) will add a freshness to your page.
Add Information to the “About” Section This section is comprised of different types of information, such as “About,” “Contact Info,” “Basic Info,” etc. To add or edit, click on the “About” link located under the Profile Picture or the “Edit Page” button at the top of the page. Be sure to fill in all information that you want your patrons to view. Some of this information will appear on your Timeline page.
Write a few concise sentences that describe your library or organization. Information could include your mission statement, as well as general information about amenities such as high-speed Internet access, free access to online resources, parking, etc. When you enter your address information a map of your location automatically displays on the “About” page, as well as in the App bar under your Cover Photo.
Adding Favorite Apps The Favorite Apps bar is located under your Cover Photo. It is the area where your Photos, Map, Likes
and custom Apps are displayed. Adding and re-ordering Apps is easy. To add, simply click on the arrow button on the far right to reveal all of the available App positions. Click the “+” of an empty container and select an existing App or go to “Find More Apps”.
Apps in the “App Center” are organized by categories and easy to navigate through. Follow the simple installation directions for each App you choose for your Page. Popular Apps that you may wish to install are “Pinterest” (find it in the “Lifestyle” category) and “Twitter” (go directly to: http://apps.facebook.com/involver_mohfpfdp) if your library or organization has accounts for these social sites. These Apps allow your “Pins” and “Tweets” to post to your Facebook Page.
Best Practice: Add only those Apps that are relevant to how your library or organization engages with patrons. Games may be fun on a personal Facebook Page, but may not be appropriate for your business Fan Page.
Facebook: Create a Fan Page
Prepared by GRA interactive9
S O C I A L M E D I A K I T
Facebook: Create a Fan Page
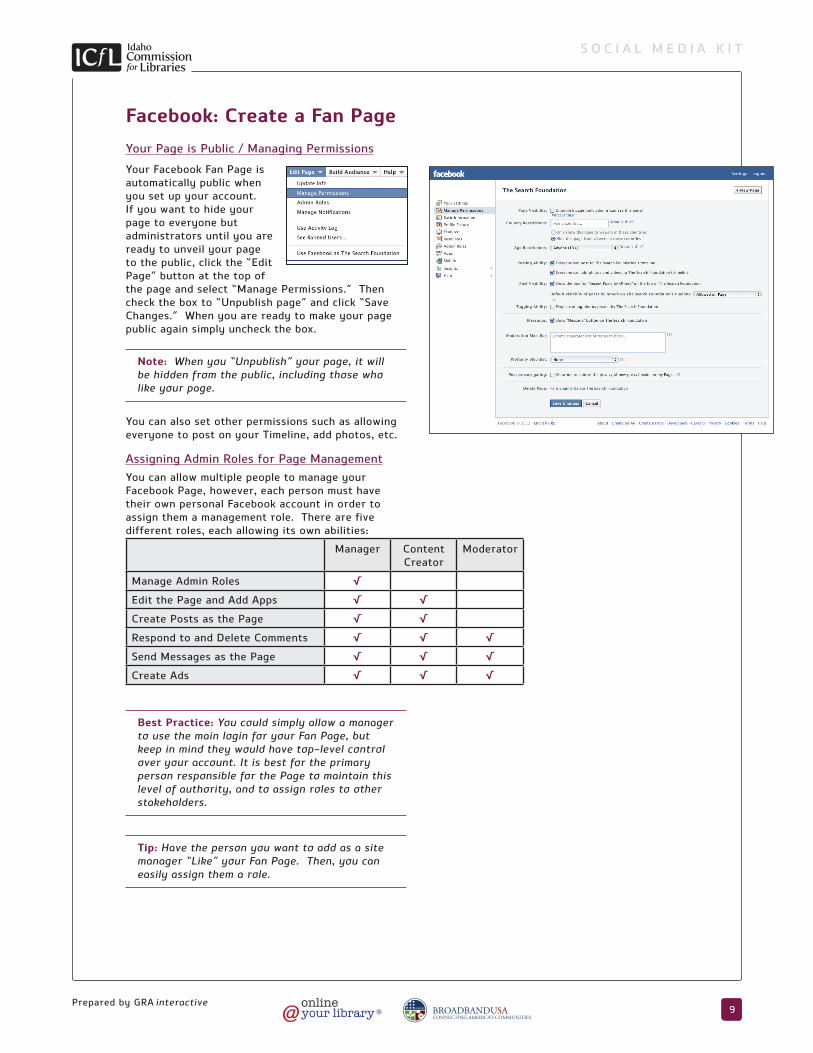
Your Page is Public / Managing Permissions
Your Facebook Fan Page is automatically public when you set up your account. If you want to hide your page to everyone but administrators until you are ready to unveil your page to the public, click the “Edit Page” button at the top of the page and select “Manage Permissions.” Then check the box to “Unpublish page” and click “Save Changes.” When you are ready to make your page public again simply uncheck the box.
Note: When you “Unpublish” your page, it will be hidden from the public, including those who like your page.
You can also set other permissions such as allowing everyone to post on your Timeline, add photos, etc.
Assigning Admin Roles for Page ManagementYou can allow multiple people to manage your Facebook Page, however, each person must have their own personal Facebook account in order to assign them a management role. There are five different roles, each allowing its own abilities:
Best Practice: You could simply allow a manager to use the main login for your Fan Page, but keep in mind they would have top-level control over your account. It is best for the primary person responsible for the Page to maintain this level of authority, and to assign roles to other stakeholders.
Tip: Have the person you want to add as a site manager “Like” your Fan Page. Then, you can easily assign them a role.
Manager Content Creator
Moderator
Manage Admin Roles √
Edit the Page and Add Apps √ √
Create Posts as the Page √ √
Respond to and Delete Comments √ √ √
Send Messages as the Page √ √ √
Create Ads √ √ √

Prepared by GRA interactive1 0
S O C I A L M E D I A K I T
Sharing ContentYou can create different kinds of content on your Fan Page. Posts include stories and updates, adding
links to other websites, events, questions, photos and videos. People who like your page can receive your posts in their news feed. In fact, people on Facebook spend 40% of their time looking at the posts of their Friends and Likes.
Best Practice: Successful posts are short (between 100 and 250 characters) and visual (posts with a photo album, picture or video garner higher Fan interaction).
Posting a Status UpdateClick into the “Status” field and type your message, then click “Publish” to post it live.
If you have a message that you want to display on your Timeline at a future date and time, create your message then click on the “Clock” icon located underneath to the left.
Next, click on the “Add year” link and you will be directed to select a year, month, day, and even hour of the day. Then click “Schedule.” Your message will not show up on your Timeline until the date and time you have selected. You can view scheduled posts by clicking the “Edit Page” button at the top of the page, then selecting “Use Activity Log.”
You also have the option of adding the location where you are posting from by clicking the “Pin” icon. For instance, let’s say you are at an out-of-town conference and you want to share something that happened at the conference with your patrons, along with a map link of your location.
Once you start typing the name of the city, a dropdown list of location maps displays. You can simply select the city’s name, or possibly a map for the facility where your conference is hosted.
Adding a Link
When you add a website’s URL to a post, Facebook automatically displays the site’s title, description and thumbnail image. If there is more than one image on the webpage, you can choose which one to display as the thumbnail.
You can then delete the original link that you added to the post or replace it with an intro sentence.
Facebook: Posting to a Fan Page

Prepared by GRA interactive1 1
S O C I A L M E D I A K I T
Facebook: Posting to a Fan Page
Adding a Photo or VideoIf you have a photo or video that you want to share, select “Attach Photo/Video,” write your message, then click on “Choose File” and navigate to the photo or video located on your computer and add to upload. Then click “Post.”
Creating a Photo AlbumYou can add a set of multiple photos by creating an album. Click on “Create Photo Album” and navigate to the photos on your computer.
Once you select and upload one or more photos, a window will open where you can name the album, write a brief description about the album, add more photos, photo captions, a location where the photos were taken and a date. After you’ve added all of the photos and information, click “Post Photos.” A link to your album will appear in the post you created, as well as in the “Photos” area of your Timeline in the Favorite Apps bar.
Create an EventWhen you select “Event,” a window will open where you can enter the name of your event, add detailed information, its location and the date.
Once you click the “Create” button, Facebook creates a page for the event. You can then add a photo by hovering over the graphic box located in the upper left corner of its page. Click “Add Event Photo” and navigate to the photo on your computer to upload.
A link to your event will appear in the “Events” and “Activity” areas on your Timeline. However, it will not appear as a post on your Timeline until you select to share it. To share, click on “Events” and then on the “Share” link located to the far right of the event’s name. Write a message about the event and click “Share Event.”
Note: The most recent event will display on your Timeline in the Favorite Apps bar.

Prepared by GRA interactive1 2
S O C I A L M E D I A K I T
Add a MilestoneYou can set milestones to commemorate key moments in your history. Examples include reaching a certain number of fans, a new building project, the aquisition of a book collection or winning an award or grant, etc.
To add an important event in your history, select “Milestone” and enter the event name, date, story, and any photo/s about the Milestone. Click “Save.”
Your milestones will appear on your “About” page under the heading “History by Year.” You can also choose to display or hide the event on your Timeline’s news feed.
Add a Question/PollThere may be occasions where you might want to ask a question and post a poll on your Timeline. To add, click on “Question,” then type in your question and “Add Poll Options” to enter multiple choice answers.
You can view your polls and see how many votes each poll option receives by clicking the “Edit Page” button at the top of the page, then selecting “Use Activity Log.”
Facebook: Posting to a Fan Page

Prepared by GRA interactive1 3
S O C I A L M E D I A K I T
Facebook Ads are paid advertising messages that are displayed to Facebook users. They appear stacked, one above the other, in the far-right column of their Page (and seen in their news feed on mobile devices). Up to 10 ads are displayed at any given time. Each ad consists of a short headline, a sentence of text and an image.
Ads are served to Facebook users based on a variety of criteria, including demographic information that is gleaned from their profile, their Likes, and the way they interact with content. You, the advertiser, will not know the identity of the individuals in your target audience (i.e. name, address, etc.). How often they will see a particular ad is determined by the advertiser’s budget and the number of other ads vying for their attention.
Use Facebook Ads to promote your Fan Page or post, external websites (your library or organization, etc.), an event or a program.
Getting StartedThe first step in the process, is to clearly define your goals and objectives for your Facebook Ad Campaign. This is something you should do before you even login to your Page.
Questions to answer:
• What are we promoting? (an event, Facebook Page or post, a resource or page on your website, etc.)
• Who are we trying to reach? (age, male or female, etc.)
• What action do we want them to take, if any? (click on the ad, like the ad, call a phone number, simply read a message, etc.)
• What is the end-goal for ad click-through? (acquire new Fans, change perceptions, educate, sell something, etc.)
• How much money do we spend to reach them?
• Do we have the staff and resources to manage our Facebooks ads in order to maximize our budget?
Once you have established your goals and objectives, craft your ad messages and create the graphics.
Be PreparedMake sure that you have all of your ad elements together before starting the ad creation process. Also have your library’s or organization’s credit card on hand, as you must designate a funding source for the ads before they can be placed.
Important: Your ads have to be approved by Facebook before they can go live. This process can take a few days, so allow time for this when planning your ad campaign. Once you have been approved, subsequent ads will take less approval time. Typically the busiest days are Thursday and the weekend. Ads sent for approval earlier in the week tend to be approved quicker.
Crafting an Effective AdIn order to hone in on the right message that will reach and impact your audience, be prepared to experiment with a variety of ads and to regularly monitor their performance reports. Often it will take just a minor word change or new photo to increase ad clicks. As a general rule:
• Write a headine that is short and succinct, as you only have a 25 character limit. Questions are often effective if they speak to a need, for example: “Need a Good Paying Job?”
Note: If you are advertising your Page or an Event (created on Facebook), the headline will automatically be its name. Take this into consideration when naming events, even if you might not promote it via Facebook ads.
• Write body text that is concise and communicates a clear action that you want your audience to take. Maximum number of characters is 90.
• Highlight the benefits. For example, if you are promoting an event, speak to the reason/s why someone would want to attend (i.e. to learn something, meet someone, help a cause, etc.)
• Use an image that is simple, eye-catching and relevant to the subject matter. Acceptable formats are .jpg, .gif, .png or .bmp.
Best Practice: Size your image to 100 pixels wide x 72 pixels high before uploading it to your ad. This will ensure that you are maximizing all of the available space, while maintaining the proper image scale and proportion.
Facebook Advertising: Creating Ads

Prepared by GRA interactive1 4
S O C I A L M E D I A K I T
As you create your ad, it is automatically displayed here for you to preview.
Facebook Advertising: Creating Ads
Step 1: Choose what you want to advertise. By default, it selects your Facebook Page. But you can also choose to promote an Event that you created on Facebook or a URL to a website, etc.
If you are promoting your Facebook Page, you will have the option to include “Sponsored Stories.” You can select whether they show up on the Timeline of people liking your Page post, commenting on your Page post and sharing your Page post.
If you select the default setting, your next option is to answer the question: “What would you like to do?” Choices include: Get More Page Likes, Promote Page Posts or Advanced Options. Depending on which you choose, your next options are different for each.
If you type in a URL in Step 1, then your next option jumps to “Design Your Ad” where you enter the headline and text, then upload your image.
This area configures ad creation
This area defines the demographics of who your ad will be displayed to.
This area specifies your pricing choice, whether paying for clicks (when someone clicks your ad) or for impressions (how many people have the opportunity to see your ad).
Depending on the selections you make in this section, you will be able to narrow the audience that your ad targets. Each choice will not only change the number of people in your demographic profile, but the suggested bid for clicks will change.
Once you have created your ad, defined your target audience and specified your budget, click this button to review the details before placing your order.

Prepared by GRA interactive1 5
S O C I A L M E D I A K I T
The Ad Set-up ProcessSetting up a Facebook Ad is easy. Click on the “Build Awareness” button at the top of the page and
select “Create an Ad.” This will take you to a page comprised of three major sections:
Section 1: Create your ad.
Section 2: Define your target audience.
Note: You define your audience by making certain selections when creating an ad. Select “Precise Interests” to further narrow your target.
Section 3: Choose your pricing option:
» Cost per Click (CPC) is a method whereby you pay a pre-defined bid amount each time someone clicks on your ad. You specify the budget:
◊ Daily Budget is a set amount of money spent each day. Once the budget is maxed, the ad stops and is no longer displayed for the day.
◊ Lifetime Budget is the total amount of money that you want to spend for the entire life of your ad campaign, over a period of days. Once the budget is maxed, the ad stops and is no longer displayed.
» Cost per Impression (CPM) charges you every time your ad or sponsored story is displayed or “seen.” The bid price is based on the cost for 1,000 impressions.
Considerations: Although the CPM option is considerably lower in cost than the CPC, there is no guarantee that your ad will actually be “seen” every time it is displayed to your audience. The ad may be poorly positioned and not as noticable. Therefore, the CPC method might be more effective, as it is measureable by the number of clicks.
Important: An effective Facebook Ad takes more than just selecting a pricing option and then letting the ad run its course. It takes someone monitoring the ad’s performance and budget activity on a regular basis—making any necessary adjustments to text or images—in order to make it more enticing to click.
Helpful ResourcesThe following Facebook resources provide more in-depth information to help you with the social media efforts of your library or organization. In addition to the “Help” button located at the top of your Facebook Fan Page, click on a link to learn more about:
Creating Facebook Ads: http://fbrep.com//SMB/Ads_Create_Flow.pdf
Targeting Your Audience: http://ads.ak.facebook.com/ads/FacebookAds/InterestsTargeting.pdf
Campaign Cost & Budgeting: http://www.facebook.com/help/318171828273417/
Measuring Success with Ads Manager: http://fbrep.com//collateral/Ads_Manager_Guide_with_Action_Measurement.pdf
Pages Insights: http://fbrep.com//SMB/Page_Insights_Guide.pdf
Facebook Security: http://www.facebook.com/help/security
How-To Videos
Create a Facebook Account: http://www.youtube.com/watch?v=ky7k7us4Yd8
Adding Favorite Apps: http://www.youtube.com/watch?v=bC_EM281AFE
Posting to a Fan Page: http://www.youtube.com/watch?v=Bj1OQlMHMKA
Ad Set-up: http://www.youtube.com/watch?v=KDt36iacB70
Precise Interests: http://www.youtube.com/watch?v=a1ChwmdAVHs
Facebook Advertising: Creating Ads

Prepared by GRA interactive1 6
S O C I A L M E D I A K I T
CopyThe headline, descriptive text and display URL used to form an advert to persuade people to visit your site that is displayed on the results page of a search engine.
Ad GroupAn ad group is a collection of keywords paired with specific adverts for that group. You are allowed multiple ad groups per campaign.
Bid PriceThe maximum amount of money you are willing to pay for your search keywords.
Broad MatchA broad match keyword would be triggered for a search that contains the initial keyword and also for associated searches.
For example: the broad match keyword of ‘red shirt’ would be triggered by searches for ‘red shirts’, ‘find red shirt’, ‘red and blue shirts’ and ‘shop that sells red shirts’ etc. A broad match is written literally with no added punctuation.
Click Through Rate (CTR) Also called Pay per Click (PPC). A performance-based advertising model where the advertiser pays a set fee for every click on an ad. The majority of text ads sold by search engines are billed under the CPC model.
Click Per Thousand Impressions (CPM) An ad model that charges advertisers every time an ad is displayed to a user, whether the user clicks the ad or not. The fee is based on every 1,000 ad impressions (M is for the Roman numeral for 1,000). Most display ads, such as banner ads, are sold as CPM.
Clicks The amount of times somebody clicks through to your site via your ad. It is determined by dividing the amount of conversations by the amount of clicks.
Conversion Rate The conversion rate is the number of conversions divided by the number of ad clicks. A conversion is when a visitor interacts with your site, whether it is by purchasing or inquiring, as a result of clicking on your ad.
Cost Per Click (CPC) The amount of money you end up paying for someone clicking through from an ad displayed for one of your search terms (this depends on competition, CTR and Quality Score).
Daily Budget You can set the maximum amount of money you are willing to spend on your ad campaign each day by defining a limit, known as the daily budget. When your budget limit is reached, your ad will stop showing.
FrequencyThe average number of times each person saw your ad.
Impressions The amount of times your advertisement comes up in response to a specific search term.
Keyword The word or phrase somebody searches for that you bid on. By creating relevant keywords, your ads will only appear to the more interested customers, who are most likely to purchase from you. Therefore increasing your conversion rate, lowing your CPC, and raising your ad position.
Landing Page The specific web page a visitor gets when they click on your ad.
PriceThe actual amount your paying per click (CPM) or 1,000 impressions (CPM)
Position Your rank amongst the paid listings on a search engine’s results page. Positioning is dependent on the quality score of your adverting. The higher your quality score, the higher the ranking of your adverts.
Quality Score This is the ranking method used on the Google AdWords system. It is based on your adverts CPC, CTR and relevancy. The higher a keyword’s Quality Score, the lower its minimum bid and the better its ad position.
Reach Your reach is the total number of unique users who will see your advert over a given period of time. It determines the presence and online exposure your ad will get. This is different than impressions, which includes people seeing them multiple times.
Relevancy The relevancy of your search term/advert/landing page to what someone is actually looking for. Relevancy is reflected by a keyword’s quality score.
Targeted AudienceThe approximate number of people your ad reached based on the targeting you’ve selected.
Facebook Advertising: Glossary of Terms

Prepared by GRA interactive1 7
S O C I A L M E D I A K I T
Pinterest is described as an online pinboard or scrapbook where you can organize and share images, called “Pins,” found on websites or uploaded from your computer.
These images are added or “pinned” to virtual “boards” based on their category. For example, if you are a library, you can create boards in a variety of categories that could include (but are not limited to) the following:
• Book of the Day
• Story Time and Programs
• New e-Books
• Staff Picks
• Just for Teens
• Photo Collections
• What are You Reading?
• Librarian’s List
• Children’s Books
• Libraries We Love
• Kid’s Crafts
As you (and other content contributors) visit websites and find interesting images/content that relate to your boards, you can pin them to their respective categories. Likewise, if you have existing images that you own or have permission to share, you can upload them to the appropriate boards.
When you pin an image that is located on a website, the image links back to its web page. When you upload an image, you can link it to any resource on the Web (page, PDF, video, etc). A good Pin includes a meaningful description and links to a useful resource.
Important: Select images that are high quality and interesting. If your goal for using Pinterest is to promote social interaction with your library or organization by having people “Repin” or visit your page, a good quality image will get more attention than a small pixelated, grainy or poorly photographed image or graphic.
Best Practice: For images you upload from your computer, size them large enough to be readable. As a general rule, size a horizontal image to a width of 600 pixels. For a vertical image, a minimum of 600 pixels high – unless it is an infographic that should be larger for better readability.
Plan Before You PinBefore creating your Pinterest account, it is important that you plan the architecture of your page and determine best practices for maintaining the content and keeping it current.
» Determine which board categories are applicable to your library or organization
» Collect photos, articles, and links to online resources (begin by leveraging resources from sites that you already have a relationship with)
» Create a pinning calendar (how often and when to pin, repin and follow – as a general rule, 3-5 times per week)
» Assign staff to curate your boards
Important: As with any social media effort, do not create a Pinterest account unless your library or organization is committed to maintaining it and keeping it current. If followers don’t see fresh content on a regular basis, your page becomes less relevant.
Best Practice: Regularly repin, comment on images and follow other Pinterest users. This will expose your Pins and Page to a wider audience (similar to Friends of Friends on Facebook).
Suggestion: Tie in a Pin to a Facebook Event. Create your event, then pin it to a Pinterest board. Remember to use a high quality image.
Think Before You PinThe same policies that you put into effect for your Facebook Page applies to Pinterest. Use common sense when you pin to a website or repin from another Pinterest user. You might pin a perfectly acceptable image, but when you visit the website that it links to, there might be content that you won’t want to be associated with. Make sure to research the source before pinning to your board.
Pin images with subject matter and descriptions appropriate to your patrons—their experience with you online should be the same as when they walk in your door.
Be sure to have all your team members review Pinterest’s policies on:
• Pin Etiquette
• Terms & Privacy
• Copyright & Trademark
Pinterest: The Basics

Prepared by GRA interactive1 8
S O C I A L M E D I A K I T
Create an AccountGo to http://pinterest.com and hover over the “About” button, then click “For Businesses.” If you have an existing personal Pinterest account you will be directed to convert it to a business account. Otherwise click the link to join as a business.
Upload an image (preferably your logo or an icon that represents your library or organization) and fill out all form fields.
Upon submission of the form, you will receive a confirmation message at the email address you used to set up the account. This message confirms that you are the rightful owner of the email. It will also be the address that all notifications from Pinterest will be sent to. Click on the link in the message to complete the sign-up process.
Best Practice: Make sure that you enter an email address that will be accessible to those authorized to manage your Pinterest page. Do not use a personal email address.
Once your account is created, you must select five boards of other Pinterest users to follow before you can start creating boards and pinning. The Pins from these boards will be displayed on your Pinterest home page. From the categories listed on the left side of the page, click on one or more that correlate with your pre-planned board categories. Then choose a board/s to follow.
Note: You can select five boards in the same category or from different categories.
Pinterest: Create a Pinterest Account

Prepared by GRA interactive1 9
S O C I A L M E D I A K I T
Getting StartedOnce your account is set up, you’ll be directed to a “Get Started” page where you can create boards and start pinning. You also have the option of adding code to your website to start driving traffic to your Pinterest page.
Create Your BoardsThere are multiple ways to create a board:
» From your “Get Started” page, click the “Create a Board” button, enter the title of the board, choose a category, then click “Create Board.”
» Click the “Add +” button on the top right of the toolbar. Then click “Create a Board.” Enter the title of the board, choose a category, then click “Create Board.”
» Click on the “Boards” link in the status bar located under your name and logo. From your Boards Page, hover over an empty container and click the “Create a Board” button. Enter the title of the board, choose a category, then click “Create Board.”
Once you have all of your boards created, start pinning images to them. Be sure to have at least one image for each board.
As your Pinterest page evolves, you may find images that spark ideas for new board categories. To create a new board while you are pinning, enter the name of the new board in the field provided and click the “Create” button.
Note: You have the option of creating up to three secret boards that will not show up on your page or anywhere else on Pinterest. You might use a secret board to collaborate with collegues.
Pinning to a BoardThere are three ways that you can pin images to your boards:
• Upload images from your computer.
• Type in the exact URL of a Web page where the image is located.
• Use the “Pin It” button installed on your browser’s Bookmarks Bar.
Upload Images To upload images from your computer, click on the “Add +” button on the top right of the toolbar. Then click “Upload a Pin.” Navigate to the image file, assign it a board, type in a description and click the “Pin It” button.
Note: In order to link to a Facebook Event, you must upload the image you used to create your event, then manually enter the URL link to the event. Pinterest’s automatic pin options cannot link directly to Facebook.
Pinterest: Managing Pin Boards
Prepared by GRA interactive2 0
S O C I A L M E D I A K I T
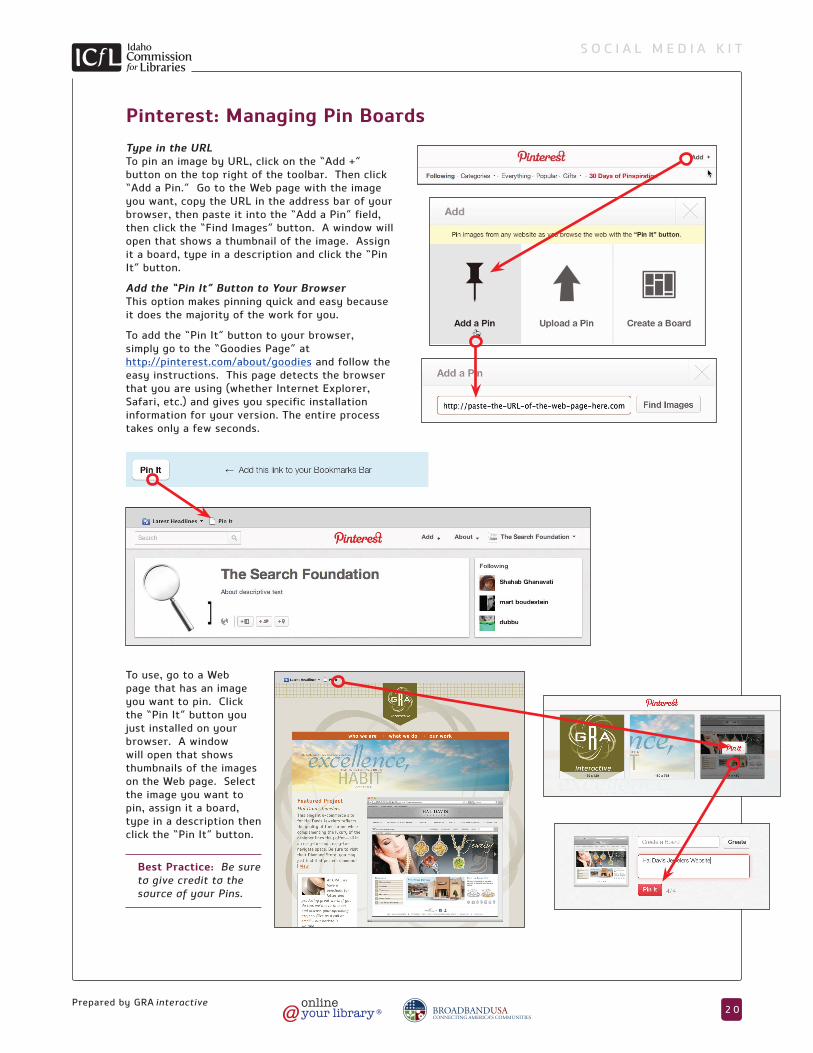
Type in the URL To pin an image by URL, click on the “Add +” button on the top right of the toolbar. Then click “Add a Pin.” Go to the Web page with the image you want, copy the URL in the address bar of your browser, then paste it into the “Add a Pin” field, then click the “Find Images” button. A window will open that shows a thumbnail of the image. Assign it a board, type in a description and click the “Pin It” button.
Add the “Pin It” Button to Your Browser This option makes pinning quick and easy because it does the majority of the work for you.
To add the “Pin It” button to your browser, simply go to the “Goodies Page” at http://pinterest.com/about/goodies and follow the easy instructions. This page detects the browser that you are using (whether Internet Explorer, Safari, etc.) and gives you specific installation information for your version. The entire process takes only a few seconds.
To use, go to a Web page that has an image you want to pin. Click the “Pin It” button you just installed on your browser. A window will open that shows thumbnails of the images on the Web page. Select the image you want to pin, assign it a board, type in a description then click the “Pin It” button.
Best Practice: Be sure to give credit to the source of your Pins.
Pinterest: Managing Pin Boards

Prepared by GRA interactive2 1
S O C I A L M E D I A K I T
Repin, Like, Comment and FollowTo repin, like or comment on an image that another Pinterest user has pinned, roll over the image and click on the appropriate button that appears at the top of the image.
To follow the board of the person who pinned the photo, click on the image. A window will open that shows a larger version of the image – click on the “Follow” button in the top right corner of the page. You will also see other board options to follow located at the bottom of the page.
There are a variety of places where you can find images to pin and boards to follow. From your status bar on your Pinterest home page, click on “Categories,” “Everything” or “Popular” links to find images of interest. Or simply type a category name in the “Search” field at the top left of the page.
Add Other Contributors to a BoardYou can allow others to contribute to a board by going to the board and clicking the “Edit” button, then typing in the name of the person you would like to add.
The people that you allow to contribute to a board must be Pinterest users and you must follow at least one of their boards. Once you type his/her name in the field, potential matches will begin to load. Find the person you want, click their name and then the “Add” button and save.
Pinterest NavigationTo navigate to the admin features of Pinterest, roll over your name located in the top right corner of the page and click on an option. To navigate to your home page where the Pins of those boards you follow are displayed, click on the Pinterest logo at top of the page.
Pinterest with Facebook and TwitterYou can enhance your social media efforts by publishing your activity to your Facebook Timeline and inviting friends to your Pinterest page. You can also use Pinterest to post Tweets. There are also Apps that you can add to your Facebook Page that integrates with Pinterest and Twitter.
Before taking this approach, make sure that your library or organization is actively (and successfully) maintaining all social media sites on a consistent basis first. This will help make a combined effort easier to manage, especially if you have staff on more than one social media team.
How-To VideosPinterest Set-up: http://youtu.be/Gi93JE81QNA
Pinterest”Pin It” Button Overview: http://youtu.be/kAmjT3MtoJQ
Pinterest: Managing Pin Boards