Embed Size (px)
Citation preview

SMS Remote SoftwareUser Manual
Pro Series & Contender Series DVRs

Table of Contents
Chapter 1 Overview 1 1.1 In This Manual 1 1.2 Overview 1 1.3 SMS Features 1 1.4 Product Information 1 1.5 System Requirements 1 1.6 Software Upgrade 1
Chapter 2 Installation & Operation 2 2.1 Installation Procedures 2 2.2 Operating Procedures 3
Chapter 3 SMS Admin 4 3.1 Description 4 3.2 Functions of the SMS Admin 4 3.2.1 Status 4 3.2.2 eMap 7 3.2.3 Config 9 3.2.4 Backup 11
Chapter 4 SMS Live Viewer 13 4.1 Description 13 4.2 Functions of the SMS Live Viewer 15
Chapter 5 Search Viewer 18 5.1 Description 18 5.2 Time Search 18
Chapter 6 DVR Player 19 6.1 Description 19 6.2 DVR Player Functions 19

1.1 In This Manual
This manual describes the procedures for remote operation of the Pro and Contender Series DVRs through the proprietary Server Management Software (SMS) which is included with each Pro and Contender Series DVRs. The same software works with all the Pro and Contender Series models. There are no licensing agreements necessary to use this software.
1.2 Overview
The remote software contains the SMS, Live Viewer and Search Viewer programs.
• SMS:Mainadministrationprogram • LiveViewer:RemoteSurveillance&CameraPlaybackprogram • SearchViewer: RemoteSearchprogram • DVRPlayer:RecordedVideoPlaybackprogram
1.3 SMS Features
• Remotemonitoringoflivecameraimages • Timeandeventsearchofrecordedimages • Remotesoftware • eMapping • VariousBackuptoolsataremotesite • Remoteconfigurationforrecordingandcamerasetup • RemoteCommandCDbackuptoaserver
1.4 Product Information
• SMSUser’sGuide • SMSInstallationCD(1ea.)
1.5 System Requirements
• OperatingSystem:MicrosoftWindows2000orhigher • CPU:IntelProcessor800Mhzorhigher • RAM:256MBorhigher • VGA:16MBorhigher
1.6 Software Upgrade
• Anysoftwareupgrades:contactClinton Electronics Technical Support at 800-549-6393.
Chapter 1 Overview
Sales: 1-800-447-3306 Support: 1-800-549-6393 www.clintonelectronics.com 1

2.1 Installation Procedures
1. Insert the SMS installation CD. 2. Run the “Setup.exe” file. 3. WhenFigure 1 dialog box is displayed, click “Next” button. 4. Figures 2 and 3 show the default folder and location to save the SMS program files, or you can click Browse and select a folder, click “Next” button. 5. Select additional tasks in Figure 4 to “Create a desktop icon”. Four icons (SMS, Live Viewer, Search Viewer and DVR Player) will be added to your desktop, click “Next” button.
Chapter 2 Installation & Operation
Sales: 1-800-447-3306 Support: 1-800-549-6393 www.clintonelectronics.com
Figure 1 Figure 2
Figure 3 Figure 4
2

6. In Figure 5 Setup is now ready to install on your computer, click “Install” button. 7. The install progress is indicated in Figure 6. 8. The final step in Figure 7 to complete the install, click “Finish” button.
2.2 Operating Procedures
AfterinstallingtheSMSSoftware,thefollowingiconswillbeaddedtoyourcomputerdesktop: “SMS” “Live Viewer” “Search Viewer” “DVR Player”
Run the programs by double-clicking the icons. The four programs can be active at the same time.
Sales: 1-800-447-3306 Support: 1-800-549-6393 www.clintonelectronics.com
Figure 5
Figure 7
Figure 6
3
l Installation Procedures continued
3.1 Description
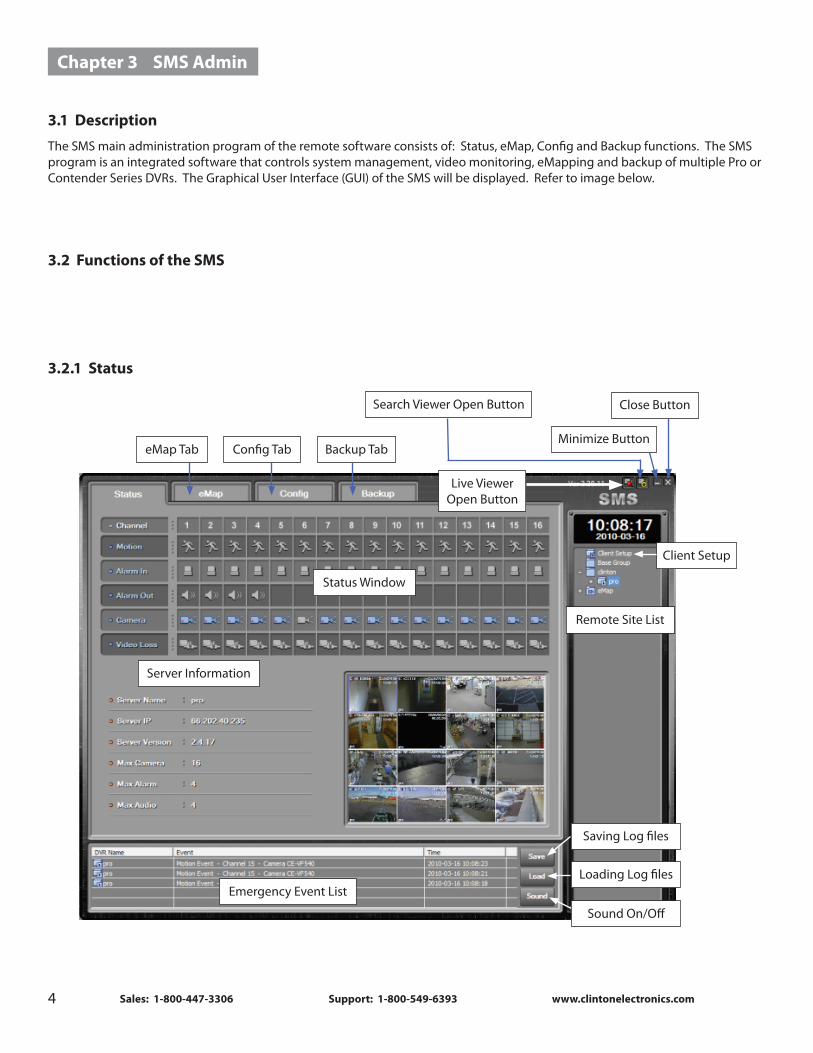
TheSMSmainadministrationprogramoftheremotesoftwareconsistsof:Status,eMap,ConfigandBackupfunctions.TheSMSprogram is an integrated software that controls system management, video monitoring, eMapping and backup of multiple Pro or ContenderSeriesDVRs.TheGraphicalUserInterface(GUI)oftheSMSwillbedisplayed.Refertoimagebelow.
3.2 Functions of the SMS
3.2.1 Status
Chapter 3 SMS Admin
Sales: 1-800-447-3306 Support: 1-800-549-6393 www.clintonelectronics.com
StatusWindow
Server Information
Remote Site List
Emergency Event List
eMap Tab Config Tab Backup Tab
Close Button
MinimizeButton
Search Viewer Open Button
Live Viewer Open Button
Saving Log files
Loading Log files
Sound On/Off
Client Setup
4

To make a Remote Server List, click the right button of the mouse when the mouse pointer ispositionedontheRemoteSiteListareaofthewindow,andclick“AddGroup”.Inthe “AddGroup”pop-upwindow,enteraGroupnameinthe“Group”textbox,click“OK”.
Default: Port - 7000, ID - remote, Password - 1111.
AfteraddingaGroup,the“AddDVR”pop-upwindowwillbedisplayed.Clickthedrop downbuttononthe“Group”selectionbox,andselectaGroupinthedropdownlist. Enter a DVR name, IP Address, Port, ID and password in the respective text boxes, click “OK”button.
To connect to the DVR, double-click the DVR on the Remote Server List.
The Connection Status window will pop-up and the SMS Status Screen will display the live images from the DVR when the connection is completed.
Selection Description
Remote Site List Displays the list of remote sites (Pro and Contender Series DVRs) registered in the SMS.
Client Setup Allows user to setup each connection. (Refer to Client Setup pg. 6)
Close Button Closes the SMS program.
Minimize Button MinimizestheSMSprogram.
Live Viewer Open Button Activatesthe‘LiveViewer’program.
Search Viewer Open Button Activatesthe’SearchViewer’program.
eMap Tab Opensthe‘eMap’window.
Config Tab Opensthe‘Configuration’window.
Backup Tab Opensthe‘Backup’window.
Status WindowDisplays the status of the Pro or Contender Series DVR currently connected. •MotionDetection •AlarmIn •VideoLoss •CameraOn/Off •AlarmOut
Server Information
Displays the connection information of the Pro or Contender Series DVR system currently connected. •Name •IPAddress •AlarmNumbers •ConnectedCamera •SoftwareVersion
Emergency Event List Displaysthe‘EventList’fromtheProorContenderSeriesDVRcurrentlyconnected.
Save Button Savesthe‘EmergencyEventList’atthe“C:\ProgramFiles\SMS\Backup\Log”folder.
Load Button Loadsthesaved‘EmergencyEventLog’filesfromthe“C:\ProgramFiles\SMS\Backup\Log”folder in your computer.
Sales: 1-800-447-3306 Support: 1-800-549-6393 www.clintonelectronics.com 5
l Status continued
Sales: 1-800-447-3306 Support: 1-800-549-6393 www.clintonelectronics.com
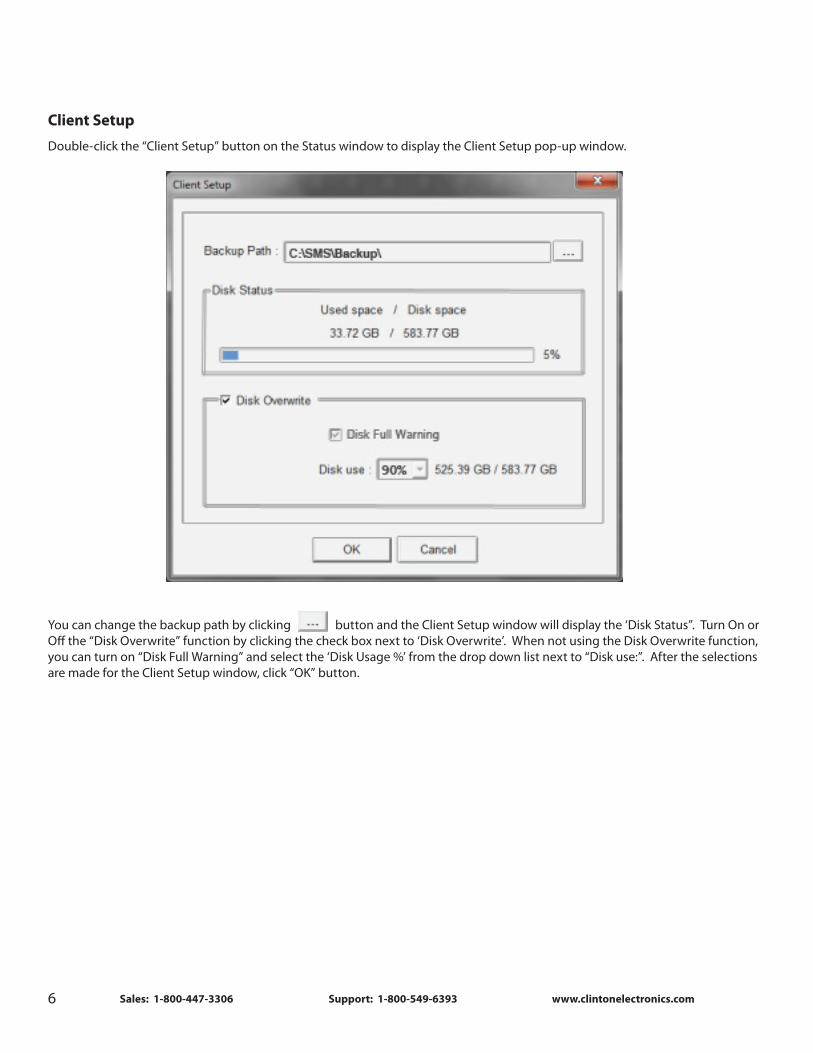
Client Setup
Double-click the “Client Setup” button on the Status window to display the Client Setup pop-up window.
You can change the backup path by clicking button and the Client Setup window will display the ‘Disk Status”. Turn On or Offthe“DiskOverwrite”functionbyclickingthecheckboxnextto‘DiskOverwrite’.WhennotusingtheDiskOverwritefunction,youcanturnon“DiskFullWarning”andselectthe‘DiskUsage%’fromthedropdownlistnextto“Diskuse:”.AftertheselectionsaremadefortheClientSetupwindow,click“OK”button.
6

3.2.2 eMap
The eMap function allows you to program maps in bitmap (BMP) format. You can locate any camera from any remote server to your map by dragging and dropping from the list. The live camera feed (Figure 8) on the emap below, has a convenient hot key function.TheGraphicalUserInterface(GUI)oftheeMapandthedescriptionofeachGUIareaisindicatedbelow.
Sales: 1-800-447-3306 Support: 1-800-549-6393 www.clintonelectronics.com
ServerHotKeys
Emergency Event List
Search Viewer Open Button
Saving Log files
Loading Log files
Sound On/Off
Server/Camera/eMap List
Local map in bitmap (.bmp) format
LiveHotKeys
Live Viewer Open Button
Drag&Drop
7
Figure 8

Whenclickingtherightbuttonofthemousewhilethemousepointerispositionedonthe‘Live’feedimage(asshowninFigure 8 on pg. 7), the hot key pop-up menu will be displayed.
Byclickingtherightbuttonofthemouseonthe“BaseGroup”serverfoldericon,thehotkeypop-upmenu(Figure 9) allows you to Add/Modify/DeleteGroups,AddDVRserversorConnect/DisconnecttoaGroup.
ByclickingtherightbuttonofthemouseonanamedGroupserverfolder,thehotkeypop-upmenuallows(Figure 10) you to Select/Modify/Add/Delete DVR server or check DVR Information.
By clicking the right button of the mouse on an eMap server folder, the hot key pop-up menu (Figure 11) allows you to Add eMaps.
By clicking the right button of the mouse on “+” next to the eMap folder icon to view the drop down list and select an eMap location site. The hot key pop-up menu (Figure 12 ) allowsyoutoConnect/DisconnectaDVRGroup,DeleteeMaporLoadMapImage File to the eMap selection list.
Live Hot Keys DescriptionViewer Size Adjustment Adjusttheviewersizebyselectingx1/4,x1orx4.
Digital Zoom Allowsusertozoominorouttox1.5orx2.
OSD SetupAllowsusertosetuptheOnScreenDisplay(OSD)forthe: •DVR •Date/Time •CameraName •Event
Print & Save Print the Live Image and save it in .jpg format.
Live Recording Recordthelivescreentoyourcomputer.Thefileswillbesavedin: “C:\SMS\Backup\Live\ServerName”folder
Delete eMap Delete the live camera on the map.
Sales: 1-800-447-3306 Support: 1-800-549-6393 www.clintonelectronics.com8
Figure 9 Figure 10
Figure 11 Figure 12
l eMap continued

3.2.3 Config
TheSMSallowstochangeDVRsystemsettingsremotely,butthisfunctionisuserpasswordprotected.TheGraphicalUser Interface(GUI)oftheConfig,andthedescriptionofeachGUIareafortheProSeriesandContenderSeriesDVRswillbedisplayed.
You can save the current configuration by clicking the “Save” button, and load the saved configuration by clicking the “Load” button.
Sales: 1-800-447-3306 Support: 1-800-549-6393 www.clintonelectronics.com
ProSeries:
ContenderSeries:
9

Configuring the DVR remotely is a two-step process.
1. Makethechangesyouwantthroughthesametypeofmenu’savailableontheDVRsfrontpanel. 2. Upload the changes to the desired DVRs.
Select the DVR by clicking on the server folder, then make your changes.
After making your changes, click the “Save” button to save the changes or click the “Cancel” button to exit from the menu without saving.
To apply these changes to the DVR, click the Setup Servers button, then the “Password” pop-up window will be displayed. Type passwordinthe“Password:”textbox,click“OK”.
Default: Password - 1234.*Tochangethepassword,typethenewpasswordinthe“Password:”textbox,click“Change”.
Oncethepasswordhasbeenentered,click“OK”button,andthefollowingwindowwillbedisplayed.
Whendouble-clickingtheDVRnamesontheserverfolderlist,theDVRwillbelistedtotheright.Fromthatlist,clickontheDVRyou want to change and click the “Upload” button. The changed configuration will be applied to the selected DVRs.
You can save any DVR configuration to your PC by clicking the “Save” button in the Config menu or you can reload the saved configuration from your PC.
Whenclickingthe“Save”button,thecurrentconfigurationwillbesavedat“C:\ProgramFiles\SMS\Backup\Config”folder.
Sales: 1-800-447-3306 Support: 1-800-549-6393 www.clintonelectronics.com
Double-Click Server Names
10
NOTE: Keep the password confidential to prevent changes by unauthorized users.
l Config continued

3.2.4 Backup
The SMS Backup Screen displays 4 different backup windows and you can backup the recorded images by four different backup methods:Direct/Event/Schedule/CDBackup
Direct Backup
1. Click “Direct” tab. 2. Click the “Server Selection” button drop down list, and select a DVR for backup. 3. WhenselectingaDVR,theDaysonthecalendarthathaverecordedvideowillturnBlue.ClickaDaythatyouwantto backup. 4. WhenselectingaDay,theTimeLinethathasrecordedvideowillturnBlueandyoucanselecttheTimebymovingthe selection bar, then click “Accept” button. 5. Double-click the channels that you want to backup on the Channel list. Each channel selected will be shown on the Download List. 6. Click the “Start Download” button. 7. Playback the downloaded files by using the Mini Player. Double-click one of the downloaded files on the download list. The Mini Player will be activated.
Thedownloadedfileswillbesavedat“C:\SMS\Backup\Direct\ServerName\Date”folder.
NOTE: Actual download time will depend on the quality of your internet connection, the size and number of files to be downloaded.
Sales: 1-800-447-3306 Support: 1-800-549-6393 www.clintonelectronics.com
Remote Site List
CD Backup
Download List
Calendar
Channel List
Schedule BackupServer Selection Button
Event Backup
Time List
11

Event Backup
This feature allows users to backup selected events from a DVR to your PC by Camera, Day and Time.
1. Click “Event” tab. 2. Select the Channels, Time and Days. 3. Whenclickingthe“AddEventBackup”button,theeventaddedwillbecreatedintheDownloadList. 4. Click the “Start” button, the SMS program will start downloading video which has events only.
NOTE: Actual download time will depend on the quality of your internet connection, the size and number of files to be downloaded.
Schedule Backup
1. Click “Schedule” tab. 2. Click the “Server Selection” button and select a DVR for Backup. 3. Select Channels and Days that you want to backup. 4. Set the Begin Time and End Time. 5. Set the Download Start Time. 6. Click the “Add Schedule Backup” button. 7. The SMS will start downloading at the assigned Download Start Time.
Thedownloadedfileswillbesavedat“C:\SMS\Backup\Schedule\ServerName\Date”folder.
NOTE: Actual download time will depend on the quality of your internet connection, the size and number of files to be downloaded.
CD Backup
The SMS allows you to remotely backup video to the CD Burner located on the DVRs front panel.
1. Click “CD Backup” tab. 2. Click the “Server Selection” button and select a DVR you want to download to. 2. Select All Channels. 3. Set the Start Date/Time and Finish Date/Time. 4. Clickthe“GetList”buttonandtheDownloadlistwillbedisplayed. 5. Select the Channels for downloading in Download List. 6. Click the “Start Burning” button.
NOTE: When the file size is bigger than one CD, you will be asked to put another CD in the CD tray once the first CD is full.
Sales: 1-800-447-3306 Support: 1-800-549-6393 www.clintonelectronics.com12
l Backup continued

4.1 Description
The SMS Live Viewer is a powerful and reliable remote surveillance software, which provides a 64 channel remote monitoring functionforlivevideofromsingleormultiplesites.Wheneventsaredetectedataremotesite,theSMSLiveViewerdisplaystheeventinformation,andallowsuserstoaccesstheremotesitedirectlytosearchtheimageassociatedwiththeevent.TheGUIoftheSMSLiveViewerisshownbelowwithadescriptionofeachGUIarea.Youcanusethe‘HotKeyMenu’byclickingtheright buttonofthemouseoneachGUIarea.
Chapter 4 SMS Live Viewer
Sales: 1-800-447-3306 Support: 1-800-549-6393 www.clintonelectronics.com
ScreenHotKeys
Search Viewer Open Button
Close Button
MinimizeButton
Remote Site List
Event List
Monitoring/Playback Screen
ServerHotKeys
Utility Buttons
Screen Mode Buttons
Image Adjustment Sliders
Audio On/Off
Start Recording
Stop Recording
Alarm ControlPTZ ControlImage
Adjustment
Drag&Drop
SMS Admin Open Button
13

GUI Selection Area Description
Monitoring/Playback Screen Displays live and/or recorded images from selected cameras.
NOTE: Displays “PB” on the screen while playing back video. No Video when the remote DVR system has no video input.
Screen Hot Keys AllowstheuseofScreenHotKeysbyclickingtherightbuttonofthemousewhilethepointeris positioned on the Monitoring/Playback area.
Event List Displays the event logs of a remote DVR system.
Close Button Closesthe‘LiveViewer’program.
Minimize Button Minimizingthe‘LiveViewer’program.
Search Viewer Open Button Opensthe‘SearchViewer’program.
SMS Admin Open Button Opens the SMS Admin program.
Remote Site List DisplaysDVRsthatareaddedtothe‘RemoteSiteList’.
Server Hot Keys AllowstheuseofServerHotKeymenubyclickingtherightbuttonofthemousewhilethepointerispositionedonthe‘RemoteSiteList’area.
Screen Mode Buttons AllowstheselectionofSingle/Quad/3x3/4x4/6/7/10/13/36/64/SelectAllChannels/FullScreen.
Utility ButtonsEnablesvariousSMSLiveViewerutilityprograms: •ImageAdjustment •AudioControl •PTZControl •AlarmControl
Image Adjustment SlidersAllowsadjustmentofviewedimages: •FrameRate •Contrast •Brightness •Filter
Live Audio Allows users to turn On or Off Live Audio.
Start Recording Allowsusersto‘StartRecording’livevideodirectlytothePC.
Stop Recording Allowsusersto‘StopRecording’livevideodirectlytothePC.
Sales: 1-800-447-3306 Support: 1-800-549-6393 www.clintonelectronics.com14
l Live Viewer Description continued

4.2 Functions of the SMS Live Viewer
Remote Sites
oAdding/Deleting remote sites
Click the right button of the mouse while the mouse pointer is positioned on the Remote Site List area. The hot key menu will be displayed.AddaGroupfirst,thenassignsingleormultipleDVRstoaGroup.Refertotheimagesbelow.
By clicking the right button of the mouse, the hot key menu pop-up menu (Figure 13 ) allowsyoutoAddaGroup.
ByclickingtherightbuttonofthemouseonaGroup,thehotkeymenupop-up(Figure 14 ) allows you to Add a DVR, Connect/ DisconnecttoaGrouporAdd/Modify/DeleteaGroup.
By clicking the right button of the mouse on a remote server, the hot key menu pop-up (Figure 15 ) Add/Delete/Modify the DVR, display the DVR information, Disconnect a remote site, view All Cameras, or do a Multi Search.
oAdding/Deleting favorites
Click the right button of the mouse, the hot key menu pop-up (Figure 16 ) allows you to Add/Modify/Delete Favorites, or Connect/Disconnect.
oConnecting the Site
Double-click a select DVR from the Remote Site List or select “Connect” on the hot key menu (Figure 16 ), then click the “All Camera menu” on the next pop-up menu. All the channels from the DVR server will be displayed; You can locate any camera from any server and swap the viewed camera channels by dragging and dropping.
Sales: 1-800-447-3306 Support: 1-800-549-6393 www.clintonelectronics.com 15
Figure 13 Figure 14 Figure 15
Figure 16

oScreen Mode Buttons
To select the Screen Mode, click one of the 12 buttons. You can also select all channels by clicking the Full Screen button.
Screen Mode Full Screen buttons button
oSingle-Screen mode
To view a specific image in the single-screen mode, move the cursor to that image and double-click the left mouse button.
oReturn to the previous screen mode
To return to the previous screen mode from the single-screen mode, double-click the left mouse button in the Monitoring/ Playback window.
oScreen Hot Key Menu
Click the right mouse button on the Monitoring/Playback window to display the hot key menu.
Select the screen mode between single or multi.
ZoomIn/Outto1.0x,1.5xor2x.
Change Quality of Video.
Selecting OSD Menu, DVR Name/Camera Name/Date/Time/Event. Turn On/Off the Direct X.
Freezetheviewedimage. Turn On/Off Recording. Turn On/Off Auto-Sequencing.
Search the recorded video for playback. Select for the Search Control Pad.
Print or Save the viewed image in .jpg format.
Sales: 1-800-447-3306 Support: 1-800-549-6393 www.clintonelectronics.com16
l Functions of Live Viewer continued

Utility Buttons
oImage Adjust Sliders
Adjust the Frame Rate, Brightness, Contrast and Image Filter by clicking on the slider button and moving the sliders left or right.
Slider button Frame Rate
Brightness
Contrast
Image Filter
oPTZ Control Keys
Control the connected PTZ cameras by clicking the Advance button, and the pop-up Control Pad will be displayed.
oAlarm Control Keys
Control the Alarms by using the control pad shown below. Select a DVR from the drop down list menu and you can control the Alarms.
Sales: 1-800-447-3306 Support: 1-800-549-6393 www.clintonelectronics.com 17
l Functions of Live Viewer continued

5.1 Description
The SMS Search Viewer is remote search software, which searches for recorded images on the remote DVR system or your computer and plays back the found images. In addition to time search and playback functions, the file (image) save and file (image)printfunctionsareprovided.FeaturesoftheSMSSearchprogramareasfollows:
• TimeandEventSearch • Zoom • VariousImageenhancement • Savethecurrentimage • Printthecurrentimage
5.2 Time Search
In the time mode, the system searches for recorded images by Date/Time and plays back the found images. Selecting a date fromtheCalendarinitializesTimeSearch.Thedatesforwhichrecordingisavailablearedisplayedinblue.Whenenteringthesearch mode, recorded information available from the selected date is shown on the recording status window. The recorded data is displayed by time (in hour segments). A green line indicates the selected time (in hour segment) that will be played back. Select a specific hour by clicking the mouse or dragging the pointer on the desired hour segment. Video image will be played back starting with the first image captured within the one-hour segment.
If you want to view images for a different date, select the Date in the Calendar by clicking the “Select Date” button.
Chapter 5 SMS Search Viewer
Sales: 1-800-447-3306 Support: 1-800-549-6393 www.clintonelectronics.com
ScreenHotKeys
Remote Site List
ServerHotKeys
Utility Buttons
Screen Mode Buttons
Playback Screen
Time Search Slider Control Pad
18
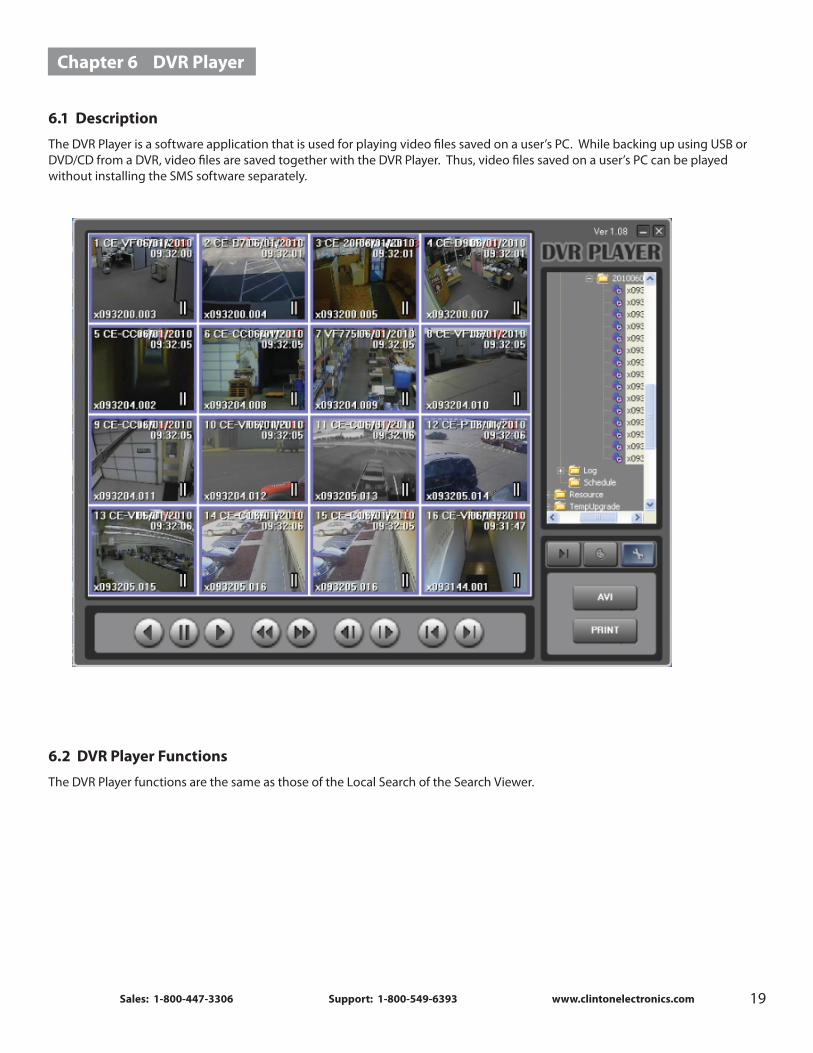
6.1 Description
TheDVRPlayerisasoftwareapplicationthatisusedforplayingvideofilessavedonauser’sPC.WhilebackingupusingUSBorDVD/CDfromaDVR,videofilesaresavedtogetherwiththeDVRPlayer.Thus,videofilessavedonauser’sPCcanbeplayed without installing the SMS software separately.
6.2 DVR Player Functions
The DVR Player functions are the same as those of the Local Search of the Search Viewer.
Chapter 6 DVR Player
Sales: 1-800-447-3306 Support: 1-800-549-6393 www.clintonelectronics.com 19

v.06.01.10