Embed Size (px)
Citation preview

SMART Inspector User Guide
1 Copyright 2019 © Computer and Design Services Limited
SMART Inspector User Guide The SMART Inspector App can be downloaded to your mobile device from the Google play store or App store. Please see links below. https://play.google.com/store/apps/details?id=smartscaffolder.smartinspector https://itunes.apple.com/gb/app/smart-inspector/id1199021676?mt=8
Copyright 2019 © Computer and Design Services Ltd Version: 1.0

SMART Inspector User Guide
Copyright 2019 © Computer and Design Services Limited
Contents
Home Screen………….………………………………………………………………………………………………..…..1 Side Bar Menu ………….………………………………………………………………………………………………..1 Sites………………………………………………………………………………………………………..……………………2 Adding a Site……………………………………………………………………………………………………………..3 Adding an Area……………………………………………………………………………………………………………4 Adding a Scaffold………….…………………………………………………………………………………………….4 Editing a Scaffold..………....…………………………………………………………………………………………..5 Adding to the Diary………..…………….………………………………………………………………………..…..5 Dismantling a Scaffold……………………………………………………………………………………………….6 Customers…………………………………………………………………….……………..……………..……………….6 Inspections Due………….………………..………………………………………………………………………………7 Completing an Inspection……..….………………………………………………………………………………..8 Adding a Defect……..…………………………………………………………………………………………………..9 Adverse Weather…………………..…………………………………………………………………………………….9 In Progress………………………………………………………………………………………………………………….10 Scanner………………………..…………………………………………………………………………………………….10 Sync……………………………..…………………………………………………………………………………………….10

SMART Inspector User Guide
1 Copyright 2019 © Computer and Design Services Limited
1. Home Screen The Home screen is the landing page for the Apps, it displays the sections of the app.
1.1 Side Bar menu
There is a menu icon in the top right hand side of the screen, and this allows you to open the side bar menu from any screen. The side bar menu allows you to navigate to the home screen, access settings or log out. The current app version number is displayed in the bottom right hand corner.

SMART Inspector User Guide
2 Copyright 2019 © Computer and Design Services Limited
Settings allows you to select your internet connection preferences and reset the Application data. Resetting the application data will delete all data from the app. Any work you haven’t synced to the Web Console will be lost.
2. Sites The Site section allows you to add a site or navigate to an existing site, view the areas and scaffolds within. You can then select a scaffold to inspect, edit or dismantle.

SMART Inspector User Guide
3 Copyright 2019 © Computer and Design Services Limited
2.1. Adding a site To add a site, click the blue “Add Site” button at the bottom of the sites section.
This will open the “add new site” screen, all the sections marked red or amber will need completing before the site can be created.
Next you add the Site address, Name, choose a Depot, Company (Customer), Contact Name and Email. Once all fields have been completed, the cancel button will change to cancel or done. Click done to add the site.
You will now be presented with the site overview for your new site, you can add an area using the blue “Add Area” button at the bottom of the screen, or click on the default area to add a scaffold. You can also add a site photo, this will appear as the thumbnail image for the site in the lists and on the Web Console.

SMART Inspector User Guide
4 Copyright 2019 © Computer and Design Services Limited
2.2. Adding an area Click the “add Area” button and you will open the add area screen. Give your new area a name and click done to add it to the site.
2.3. Adding a scaffold Open the area you wish to add a scaffold to and click the blue “Add Scaffold” button at the bottom of the screen. This will open the “add new scaffold screen”. Choose a customer, give the scaffold a name, and add a QR code if required. Click “done” to create the scaffold. Now the scaffold is created you will see the Scaffold details screen.

SMART Inspector User Guide
5 Copyright 2019 © Computer and Design Services Limited
2.4. Editing a Scaffold Open the scaffold details screen and select Edit.
This will open the scaffold specifications to be edited, you can change the scaffolds name, area, adverse weather conditions, inspection date and add a QR code. Click done to save your changes.
To assign a QR code, click the “add QR code” field at the bottom of the edit scaffold menu, this will open the QR scanner. Now scan the QR code you wish to assign to this scaffold.
2.5. Adding to the Diary Click on the diary Icon to make a new entry to the diary, add notes, photos and % standing. Once completed click done. This will add your entry to the scaffold history on the Web Console and it will also appear in various reports for this scaffold.
SMART Inspector User Guide
6 Copyright 2019 © Computer and Design Services Limited
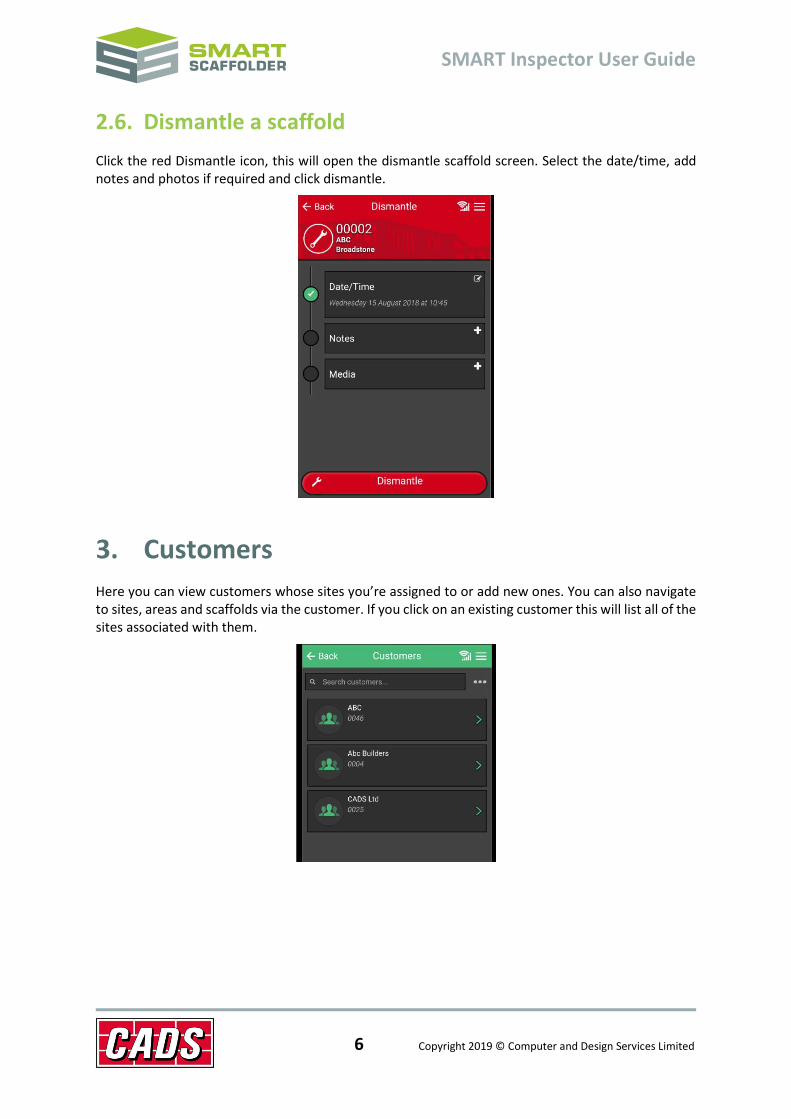
2.6. Dismantle a scaffold Click the red Dismantle icon, this will open the dismantle scaffold screen. Select the date/time, add notes and photos if required and click dismantle.
3. Customers Here you can view customers whose sites you’re assigned to or add new ones. You can also navigate to sites, areas and scaffolds via the customer. If you click on an existing customer this will list all of the sites associated with them.

SMART Inspector User Guide
7 Copyright 2019 © Computer and Design Services Limited
4. Inspections Due Inspections due shows you the number of inspections due per day for the next 7 days. By clicking on a day it will display a list of scaffolds separated by site. You can click on a scaffold and will be taken straight to the schedule 7 inspection form for that scaffold. When completing inspections the app will remember the order you walked the site in and display in this order the following week to make it easier to walk the site completing inspections.
SMART Inspector User Guide
8 Copyright 2019 © Computer and Design Services Limited
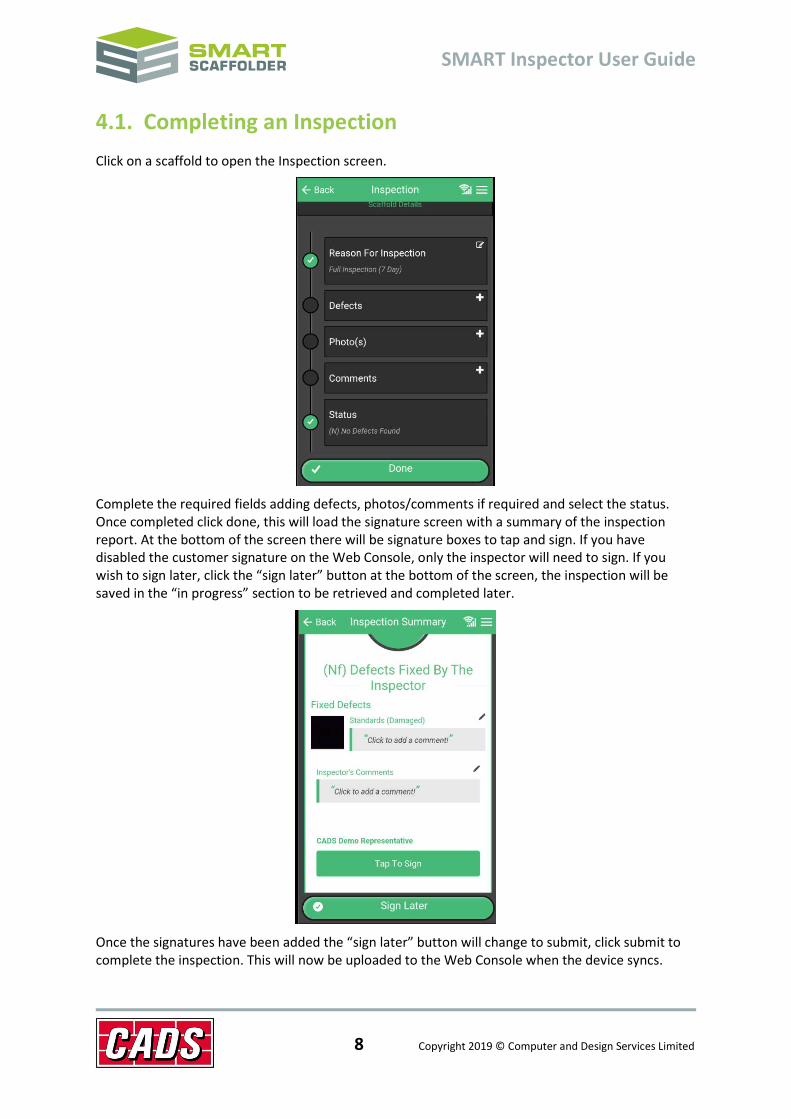
4.1. Completing an Inspection Click on a scaffold to open the Inspection screen.
Complete the required fields adding defects, photos/comments if required and select the status. Once completed click done, this will load the signature screen with a summary of the inspection report. At the bottom of the screen there will be signature boxes to tap and sign. If you have disabled the customer signature on the Web Console, only the inspector will need to sign. If you wish to sign later, click the “sign later” button at the bottom of the screen, the inspection will be saved in the “in progress” section to be retrieved and completed later.
Once the signatures have been added the “sign later” button will change to submit, click submit to complete the inspection. This will now be uploaded to the Web Console when the device syncs.

SMART Inspector User Guide
9 Copyright 2019 © Computer and Design Services Limited
4.1.1. Adding a defect
Click the Defect field in the inspection screen to open the “add defect screen” ensure you fully complete all the fields highlighted orange, selecting defect type, attaching a photo of the defect and selecting a status.
5. Adverse Weather Here you can complete an ad hoc inspection following adverse weather. Open the adverse weather section of the home screen and select the required weather type and click done.
The app will now display a list of all scaffolds affected by adverse weather. Click the scaffold you wish to inspect. This will open the inspection screen and complete the inspection as per instructions in section 4.1.

SMART Inspector User Guide
10 Copyright 2019 © Computer and Design Services Limited
6. In Progress In progress is where you can find any inspections that have been started but not finished. It also contains the completed inspections that are awaiting signature. Simple click on an inspection to reopen and complete it.
7. Scanner The app has been built to recognise QR codes. A QR code is similar to a barcode, but for mobile devices.
It allows you to incorporate unique QR codes on your scaffold tags. These can then be scanned into the software and assigned to the corresponding scaffold. Once the QR code has been linked to the scaffold in the scaffold details screen. You can use the home screen scanner to scan it and it will open the scaffold detail screen for the scaffold, speeding up the app navigation process.
8. Sync The sync button allows you to manually trigger the sync. It will highlight with a yellow icon if you have un-synced inspections. Open the sync and click sync to complete.
You must have a live internet connection to sync.
SMART Inspector User Guide
11 Copyright 2019 © Computer and Design Services Limited
Feedback Thank you for choosing CADS SMART Scaffolder.
We are always striving to improve the product so please contact us with your feedback. We are always keen to hear new ideas and if you experience any problems with the software we want to hear about them so that they can be resolved.
You can contact us via:
Our website support centre at www.smartscaffolder.com/support.html;
Email on [email protected];
Telephone on +44 (0)1202 603733 from Monday to Friday between 09:30 and 17:00.