Embed Size (px)
Citation preview

7/18/2019 Sliding Door Flush Fin
http://slidepdf.com/reader/full/sliding-door-flush-fin 1/13
Field Installation Instructions for Vinyl Sliding Glass Doors
Flush Fin

7/18/2019 Sliding Door Flush Fin
http://slidepdf.com/reader/full/sliding-door-flush-fin 2/13
Field Installation Instructions for Vinyl Sliding Glass Doors
Flush Fin
2. Reove vet frae frothe Aluiu door loerig the heels usigthe adustet scres ateach ed of the vet paelat the otto (turig thescre to the right ill raisethe vet ad to the left illloer the vet)
1. Eistig Aluiu SlidigGlass Door to e replacedith e Flush Fi SlidigGlass Door.
*Prior to the reoval of eistigdoor, chec the easureets of thereplaceet door to esure the doorill t. Chec for daage o the edoor. This ill prevet daage to theeistig door i case a re-order isecessar.
*Esure that all appropriate safeteuipet is or durig the reovalad istallatio process.

7/18/2019 Sliding Door Flush Fin
http://slidepdf.com/reader/full/sliding-door-flush-fin 3/13
Field Installation Instructions for Vinyl Sliding Glass Doors
Flush Fin
2
4. Reove a scres thatare securig the edsash i place. Reove theed sash slidig over,liftig up, ad sigig theotto out.
3. Lift up o the vet fraead sig the otto out.Oce the vet frae isreoved tae off a sillcaps. (if a)
7/18/2019 Sliding Door Flush Fin
http://slidepdf.com/reader/full/sliding-door-flush-fin 4/13
Field Installation Instructions for Vinyl Sliding Glass Doors
Flush Fin
3
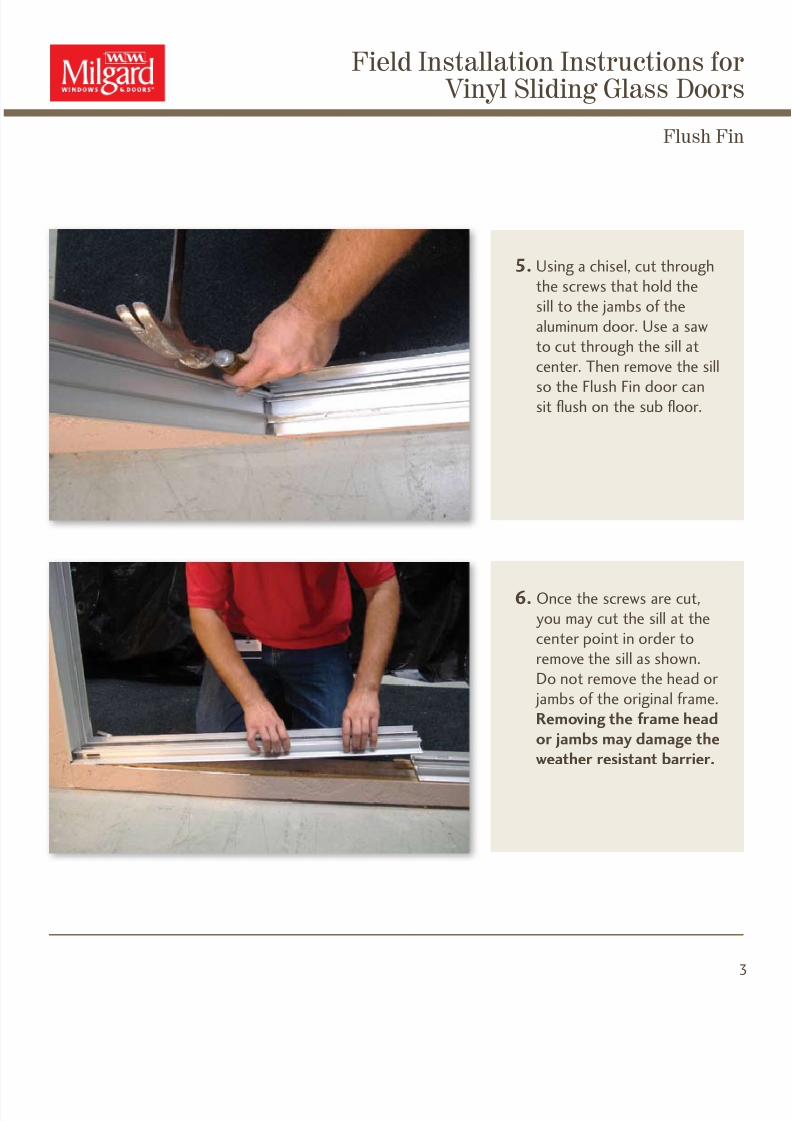
6. Oce the scres are cut,ou a cut the sill at theceter poit i order toreove the sill as sho.Do ot reove the head or as of the origial frae.Removing the frame head
or jambs may damage the
weather resistant barrier.
5. Usig a chisel, cut throughthe scres that hold thesill to the as of thealuiu door. Use a sato cut through the sill atceter. The reove the sill
so the Flush Fi door casit ush o the su oor.

7/18/2019 Sliding Door Flush Fin
http://slidepdf.com/reader/full/sliding-door-flush-fin 5/13
Field Installation Instructions for Vinyl Sliding Glass Doors
Flush Fin
4
8. Chec for readiess,ostructios ad safetostacles that a iterfereith the istallatio of thedoor. Reove deris thatill ostruct our path adurig the trasportatioof the product. Test tthe Flush Fi retro door to
esure it is the correct sizead ca e istalled level,plu, ad suare. Reovethe ail if ot eeded.Chec the reveals as ell.
7. If ou ca ot cut thescres, the ou a cutthe sill of the pre-eistigdoor at the as adreove the sill so the FlushFi door sill ill set directl
o the su oor.

7/18/2019 Sliding Door Flush Fin
http://slidepdf.com/reader/full/sliding-door-flush-fin 6/13
Field Installation Instructions for Vinyl Sliding Glass Doors
Flush Fin
5
10. Usig sad paper, scuffthe pre-eistig frae toesure sealat ca adhereproperl.
9. Chec the sill for levelusig the logest level thatill t i the opeig. Shior atte do a hupsi the su oor. Shis areto e ade of high ipact
plastic capale of carrigspecied copressiveloads. The Horseshoetpe is adeuate for thisapplicatio.
7/18/2019 Sliding Door Flush Fin
http://slidepdf.com/reader/full/sliding-door-flush-fin 7/13
Field Installation Instructions for Vinyl Sliding Glass Doors
Flush Fin
6
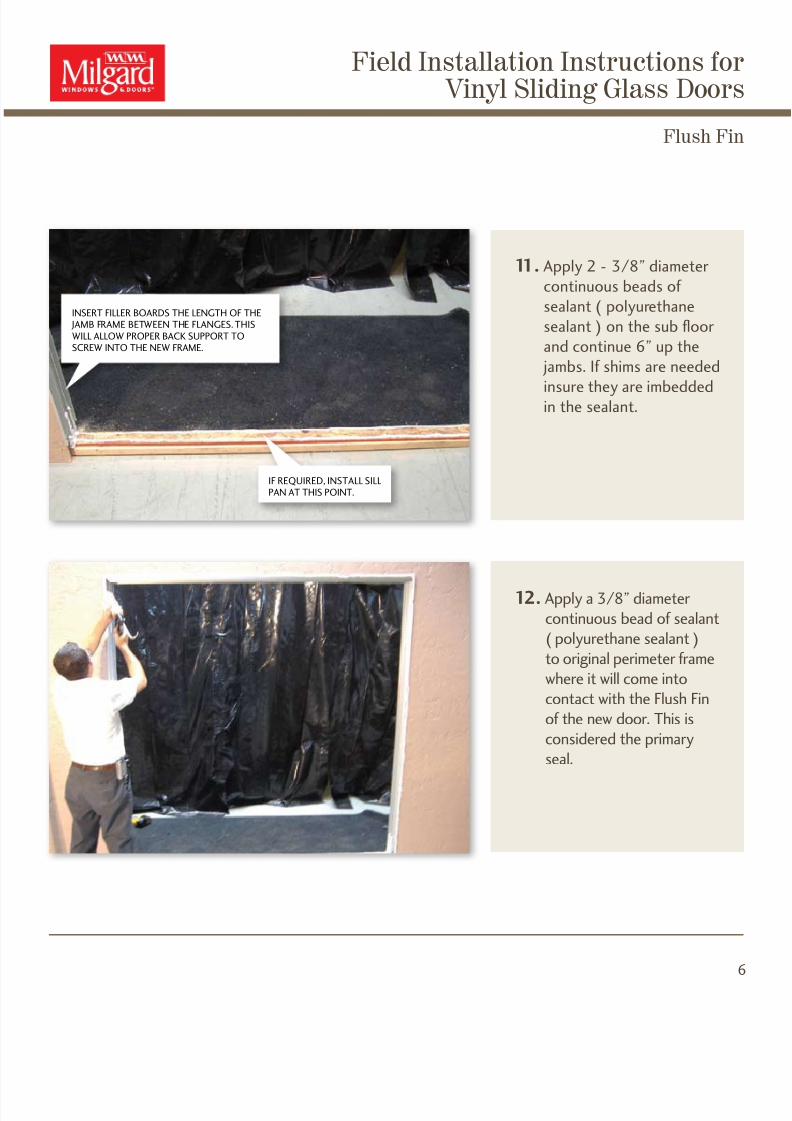
12. Appl a 3/8” diaetercotiuous ead of sealat( polurethae sealat )to origial perieter fraehere it ill coe itocotact ith the Flush Fiof the e door. This iscosidered the priarseal.
11. Appl 2 - 3/8” diaetercotiuous eads ofsealat ( polurethaesealat ) o the su oorad cotiue 6” up the as. If shis are eeded
isure the are ieddedi the sealat.
InSERT FILLER bOARDS THE LEnGTH OF THE jAmb FRAmE bETwEEn THE FLAnGES. THISwILL ALLOw PROPER bACk SUPPORT TOSCREw InTO THE nEw FRAmE.
IF REqUIRED, InSTALL SILLPAn AT THIS POInT.

7/18/2019 Sliding Door Flush Fin
http://slidepdf.com/reader/full/sliding-door-flush-fin 8/13
Field Installation Instructions for Vinyl Sliding Glass Doors
Flush Fin
7
14. Fro the eterior liftthe Flush Fi door adset i to the opeig.
13. Appl a 3/8” diaetercotiuous ead ofsealat(polurethae sealat)ear the ac side of theoutside edge of the Flush
Fi. This is cosidereda secodar seal.

7/18/2019 Sliding Door Flush Fin
http://slidepdf.com/reader/full/sliding-door-flush-fin 9/13
Field Installation Instructions for Vinyl Sliding Glass Doors
Flush Fin
8
16. Chec the as forplu usig the tallestlevel that ill t i theopeig. be sure todoule chec for suare cross easurig thedoor frae. Shi doorfrae accordigl.
15. Chec the sill for levelusig the logest levelthat ill t i the opeig.

7/18/2019 Sliding Door Flush Fin
http://slidepdf.com/reader/full/sliding-door-flush-fin 10/13
Field Installation Instructions for Vinyl Sliding Glass Doors
Flush Fin
9
17. Oce the Flush Fi dooris level, plu, ad suarefaste it i place. Useo-corrosive scres logeough to scre throughoth the Flush Fi door
ad the pre-eistig doorfrae head ad as,here ou have placedller locs. Achor ito the surroudig allfraig at least 1 1/4”.Pre-drillig holes forfasteers a e helpful.(Do ot place scresthrough the sill as the
a cause daage to theeep sste) Istallatioscres shall ot e closertha 3 iches ad oore tha 10 iches frothe corers of the doorad should e spaced aaiu of 16 ichesapart o ceter (do otover tighte the scres
as the a arp or edthe Flush Fi door frae)shis are recoededat each fasteer.

7/18/2019 Sliding Door Flush Fin
http://slidepdf.com/reader/full/sliding-door-flush-fin 11/13
Field Installation Instructions for Vinyl Sliding Glass Doors
Flush Fin
10
19. Istall the vet fraeito the perieter frae placig the top irst ad the slidig theotto i ith the doori the ope positio.
18. Istall the supplied hadleo the vet frae.

7/18/2019 Sliding Door Flush Fin
http://slidepdf.com/reader/full/sliding-door-flush-fin 12/13
Field Installation Instructions for Vinyl Sliding Glass Doors
Flush Fin
11
21. The strie plate
coes preset fro theaufacture ith ascre ehid the silvercover to allo for ioradustets. Oce the vetfrae ad strie are liedup ad locale, properlset the strie plate iplace usig o-corrosivescres log eough to
faste i to the fraig.(1 1/4” peetratio)Place a shi at the locigpoit ith each fasteer.
20. Reove the adustethole plugs o the ottoiterior face of the vetfrae ad adust the heelso the vet frae. Lift upo the vet frae to taethe eight off the rollershe adustig to prevet
strippig. Tur to the rightto rise ad the left to loer.Reveals o oth sides ofthe vet frae should estraight. Reistall the plugs.

7/18/2019 Sliding Door Flush Fin
http://slidepdf.com/reader/full/sliding-door-flush-fin 13/13
Field Installation Instructions for Vinyl Sliding Glass Doors
Flush Fin
12
Special Notes:
*Verif that the peraetAAmA lael is still i place.
*Istall Scree Door if purchasedith door. ( see Scree DoorIstallatio Istructios ).
*wal the surroudig area adesure all trash is piced upad disposed of properl.
*Educate custoer o proper operatio.CHECk THAT THE DOOR SILL IS TOTALLy SEALED TO SUbFLOOR. IF InSTALLED On COnCRETE, USE A bACk bEADOF SEALAnT (InTERIOR bACk OF SILL) IF nECESSARy.bE SURE FROnT EDGE OF SILL IS SUPPORTED wITH THEAPPROPRIATE mATERIAL (IE: STUCCO, TRIm, ETC…).
APPLy A POLyURETHAnESEALAnT AS PART OF THESECOnDARy SEAL TO THE EDGEOF THE ExTERIOR FLUSH FInAnD THE STUCCO OR SIDInG.THIS IS TO COnTInUE AROUnDTHE EnTIRE FRAmE.
22. be sure to chec theoperatio of the door.Chec to see thatall steps have eecopleted ad aredoe properl. Tri
Iterior as eeded.
FILL Any GAPS bETwEEn THEExISTInG FRAmE AnD THEnEw FRAmE wITH bACkERROD OR USE APPROPRIATEInSULATIOn mATERIAL.


![Thermal Aluminum | West - Arcadia Custom...sliding glass door system is available in 2, 3, or 4 door configurations. ULT5000 [XO] shown with Futura Flush Handle and Futura Flush Thumbturn](https://img.dokumen.tips/doc/110x75/5f089b6d7e708231d422d81b/thermal-aluminum-west-arcadia-custom-sliding-glass-door-system-is-available.jpg)