Embed Size (px)
Citation preview

USER GUIDES2573_01292020 V2.0

TOPIC
SkyTab Settings in Lighthouse
Connecting SkyTab to Wi-Fi
Log In
Log Out
View Check Details
Create New Check
Select Table
Set Party Size
Add items to the Order
Add Modifiers
Reorder Items
Pay Checks in Full
View SkyTab Settings
PAGE
1
2
2
3
4
5
5
7
8
10
12
14
17
Table of Contents
Technical Support: 866.374.8865 or [email protected]

SkyTab Settings in Lighthouse
To configure SkyTab settings:
Log in to your Lighthouse account and select Add-on Devices from the left navigation bar, then select the Pay at the Table tab at the top.
The settings that you can change in Lighthouse include:
Default Tip Settings: • Tip 1, 2, and 3: These are the default tips displayed to the guest while paying. These should be entered as whole
numbers (i.e., 10 for 10%). • Default tip: This drop down determines which tip is selected by default when the guest is on the “Add a tip” screen.
Guest Settings: Guest settings are used to configure the rating screen.• Enable free form field: When enabled, this will display an optional text field on the star rating screen for a guest to
type in their full name or phone number.• Free form label: The name of the free form field. It is set to “Full Name” by default.• Message wording: This is the message that will be displayed in the free form field that guests will see.
Guest Rating Settings: Rating settings control where and when rating notifications are sent.• Notify when rating is below rating value: Enable this option to get email and/or phone notifications if any guest
feedback is below the set star value.• Rating value: This setting determines the minimum star rating that a guest has to submit to have a notification sent.• Notification email: The email address that notifications will be sent to.• Notification phone: The phone number that notifications will be sent to.
Ordering:
• Enable Order-at-the-Table feature: This option activates the ability to place orders from SkyTab
Payment Settings: • Allow partial payment flow: This setting allows guests to pay a check with multiple equally split payments. If this is
disabled, guests will only be able to pay checks with one full payment.
• Enable tip screen: This option enables the customer to leave a tip.
Branding:
• Show location logo: When enabled, this will display the uploaded logo on the rating screen.
• Upload a new image: This is where you upload your logo.
1Technical Support: 866.374.8865 or [email protected]

Connecting SkyTab to Wi-Fi
Log In
The first time you power on the SkyTab device, open the Settings icon from the home screen and connect to the appropri-ate Wi-Fi network. The device will automatically connect to the network going forward.
1. Log in using the same PIN code used for your point of sale (POS) and then press the checkmark button in the bottom right to confirm.
2. After logging in, you will see a list of open checks assigned to you (“My checks”).
From this screen you also have the ability to:
• View a check’s details
• Create a new check
• Select a check to reorder items
• Select a check or multiple checks to pay
• Select your name in the top left corner to access “Settings”.
2Technical Support: 866.374.8865 or [email protected]

Log Out
1. Log out by selecting your name in the top left corner of the “My checks” screen.
2. This will open the “Settings” page. Select the “Logout” button in the bottom right.
3. A confirmation message will then appear. Select the “Cancel” button to stay logged in or the “Logout” button to finish logging out.
3Technical Support: 866.374.8865 or [email protected]

View Check Details
1. From the “My checks” or “All checks” screen, tap on a check to view the check details.
2. Select the back arrow in the top left corner to return to the list of checks.
4Technical Support: 866.374.8865 or [email protected]

Create New Check
Select Table
1. From the “My checks” or “All checks” screen, tap on the “+” icon in the top right corner to create a new check.
1. When starting a new check you will be brought to the “Select Table” screen.
First, choose the section where the customer will be seated (e.g., “Main Hall”, “Bar”, “Patio”).
5Technical Support: 866.374.8865 or [email protected]
6Technical Support: 866.374.8865 or [email protected]
Select Table (continued)
2. Select a table from the list of available tables in that section.
3. Alternatively, you can give a custom name to the check. Tap on the “Custom name” entry bar and type in the name, then tap the checkmark on the bottom right corner.
4. After you’ve selected your table and/or entered the custom name for the check, tap the “Continue” button to proceed with the order.

7Technical Support: 866.374.8865 or [email protected]
Set Party Size
1. After selecting a table, select the “Party Size”.
Select the number of guests from the predefined party size buttons. After you select the party size, the menu screen will open automatically.
If none of the predefined party sizes apply to your guests, click “Custom Size”.
3. After you tap “Custom Size”, the number pad will open.
Enter the number of guests using the number pad or use the “+” and “-” signs to adjust the guest number.
When finished, tap “Continue”.

8Technical Support: 866.374.8865 or [email protected]
Add Items to the Order
After selecting a table and setting the party size, you’ll be brought to Order Pad screen.
From this screen you can:
• Add new guests to the check
• Open the “Check Actions” menu
• Select a guest from “Guest Selector”
• Remove uncommitted items from the check
• Use actions from “Check toolbar”
• Show/hide menu
• Search item
• Send item or “Send & Stay”
9Technical Support: 866.374.8865 or [email protected]
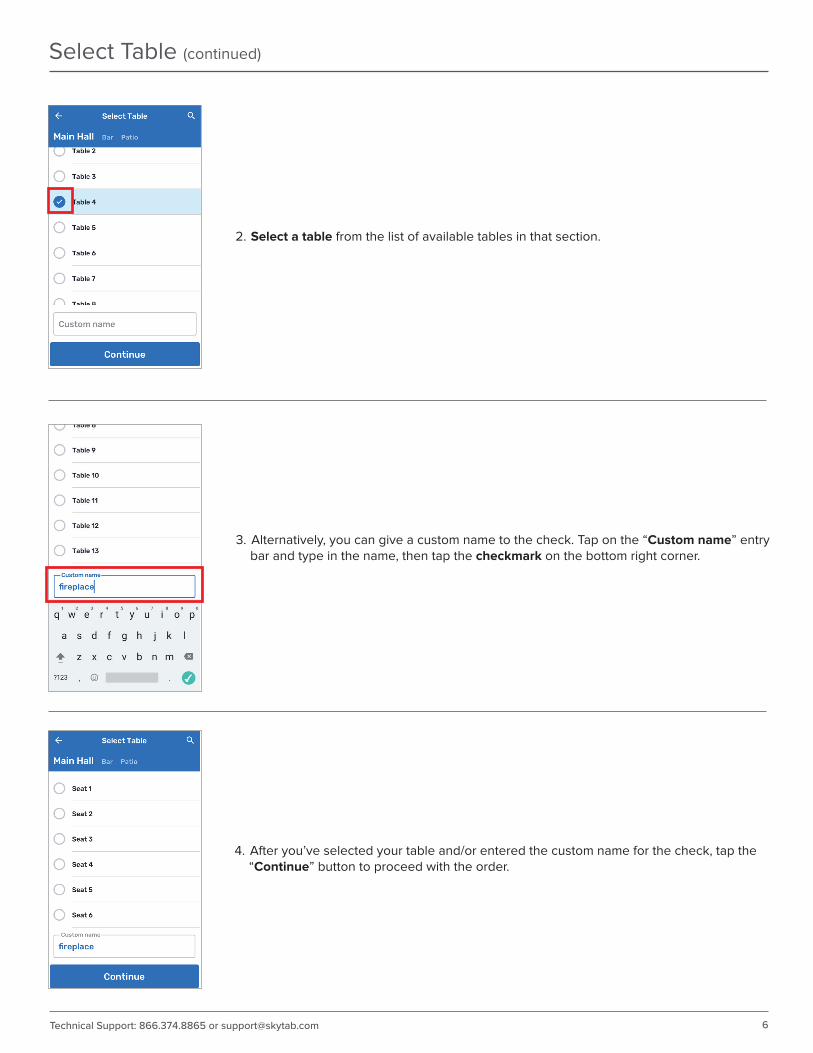
Add Items to the Order (continued)
1. The menu departments list will be open on the screen and Guest 1 (“G1”) selected by default. To start adding items, select the desired department.
Swipe the menu screen left and right to browse through the pages of departments and items.
2. After selecting the department, the menu will display the items within the selected department.
Tap on the desired item to add it to the check.
3. Alternatively, you can tap on the Search icon to look up the item and add it to the check from search results.

10Technical Support: 866.374.8865 or [email protected]
Add Modifiers
1. To select modifiers for the item, tap on the item you want to edit.
The item menu will slide from the right side.
Tap on the “Modifiers” button to start the selection.
If you add an item that requires to select modifiers, the “Modifiers” screen will open up automatically.
2. The required modifier types will have a note indicating how many modifiers you have to select. If you don’t select a required modifier, you will see red notes reminding you which ones are missing.
Select preferred modifiers, adjust their quantity, and tap the “Done” button. You will be taken back to the current check’s order screen.
3. To further edit the item, tap on the item to open the item menu.
You can:
• Adjust item quantity using the “+” and “-” buttons
• Record any special requests
• Duplicate an item

11Technical Support: 866.374.8865 or [email protected]
Add Modifiers (continued)
4. To remove uncommitted items from the check, swipe the item to the left and tap the red trash bin icon.
5. Tap on the “Send & Stay” button to send the items to the kitchen (e.g. drink/appetizer orders) before continuing to add more items (e.g. entrees).
Tap the “Send” button to send the remaining order to the POS and return to “My Checks” screen.

Reorder Items
1. From ‘My Checks’ or ‘All Checks’, tap on the circle to the left of the check you would like to reorder items on and select the Reorder button.
2. After selecting the check and selecting the “Order” button, you will be brought to the “Reorder” screen.
From this screen, you can either reorder existing items or add new items to the check. (Note: You can perform only one of these actions.)
To add new items to the check, tap the “Add” button. You will be redirected to “Order Pad” screen (Step 1 in “Add Items to the Order”)
3. To reorder an item once, tap on the item from the list you want to reorder.
The “Reorder” button will become active and the “Add” button become inactive.
To reorder for quantities higher than one, tap on the box to the left of the item to get the quantity selection screen.
12Technical Support: 866.374.8865 or [email protected]

Reorder Items (continued)
4. Use the ‘-’ and ‘+’ buttons to decrease/increase the quantity by ‘1’.
Use the number pad to enter a custom amount.
Select Done to close the number pad. Tap on the Reorder Selected button to go to the next step.
5. Review your order on this screen.
Select the “back arrow” in the top left corner to adjust the order.
Select the Send button to complete the order.
13Technical Support: 866.374.8865 or [email protected]
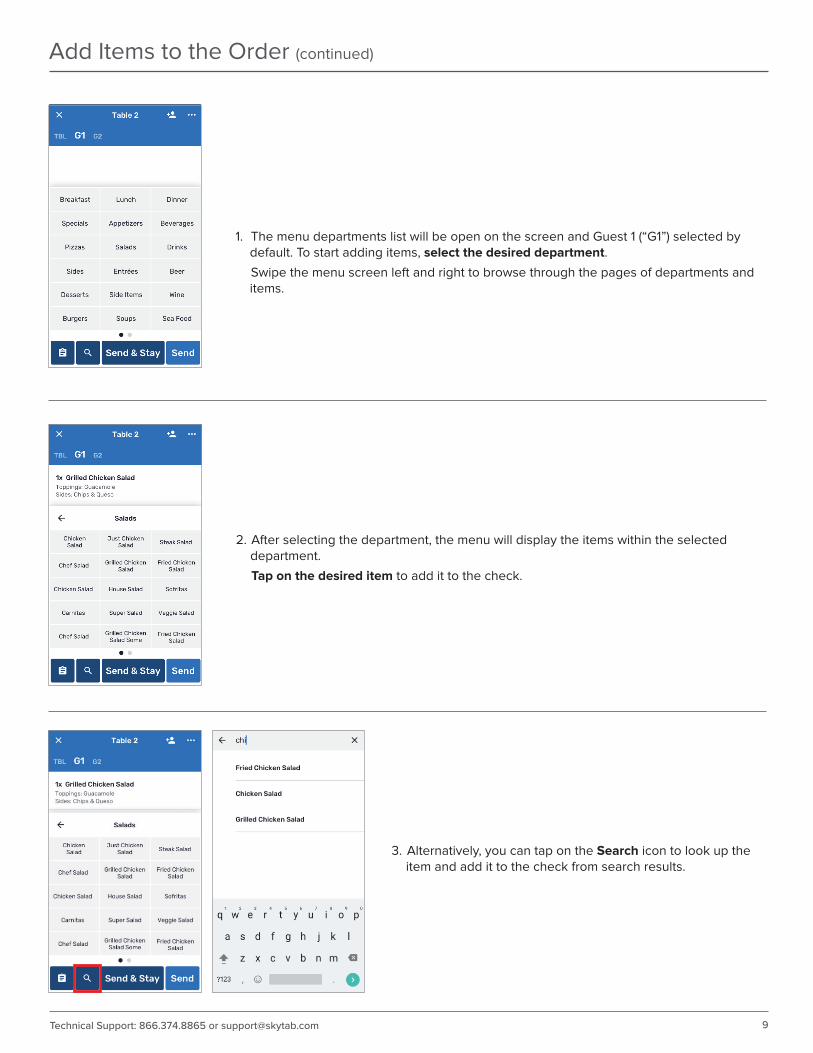
Pay Checks in Full
1. From ‘My Checks’ or ‘All Checks’, tap on the circle to the left of the check or checks you would like to pay and select the Pay button.
2. The guest-facing payment mode is enabled from this point on. The device can be left at the table for the guest to pay the check(s) out. You can also pay for the guest using the same process.
The guest will see the selected check’s details and have the option of paying the check with a single full payment or multiple split payments (if this is enabled in SkyTab settings). Select Pay in Full to pay the full amount due.
3. The guest will then be prompted to tap, insert, or swipe. Guests can pay by credit card or contactless (contactless credit cards, Apple Pay from phones or watches, Google Pay, etc.).
14Technical Support: 866.374.8865 or [email protected]

Pay Checks in Full (continued)
4. After the guest enters a form of payment, you will briefly see a processing screen and either a payment approved or declined screen. The customer now has the option to email the receipt (step 5), print the receipt (step 6), or skip the receipt.
5. If the guest chooses to email the receipt, they will see the email receipt screen where they can fill in their email address and full name. Selecting the Continue button will email the receipt and navigate to the service rating screen.
6. Printing a receipt from the payment approved screen will result in the receipt being printed on the device and the user is navigated to the service rating screen.
15Technical Support: 866.374.8865 or [email protected]

Pay Checks in Full (continued)
7. The guest will see the service rating after emailing, printing or skipping a receipt. They can choose to rate their service by tapping on the star rating they’d like to leave. Select-ing the Continue button will navigate to the ‘Thank You’ screen.
8. Guests will see the ‘Thank You’ screen if they skip emailing/printing receipts or after continuing from the rating screen.
If paying a single check, selecting the Done button will log out of SkyTab to prevent the guest from accessing the list of checks.
If paying for multiple checks, selecting the Done button will open the next check’s details. Repeat the steps starting from step 2 of this how-to to pay each check until all checks are paid.
16Technical Support: 866.374.8865 or [email protected]
View SkyTab Settings
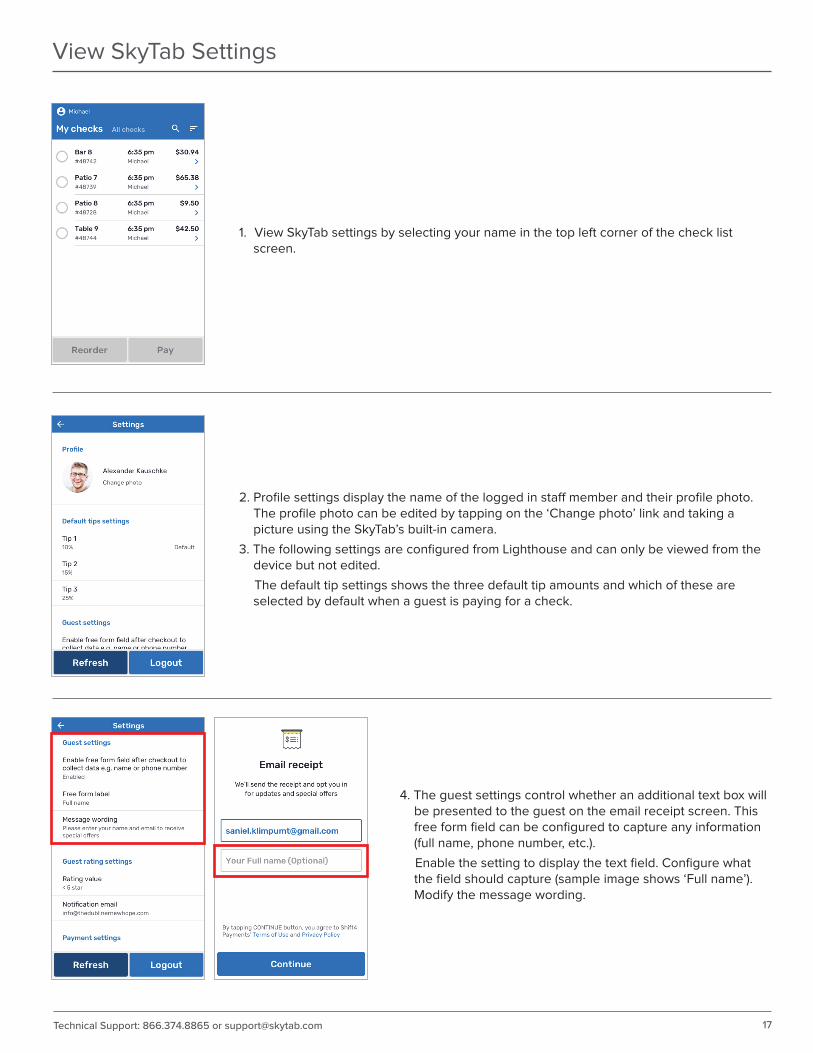
1. View SkyTab settings by selecting your name in the top left corner of the check list screen.
2. Profile settings display the name of the logged in sta� member and their profile photo.The profile photo can be edited by tapping on the ‘Change photo’ link and taking a picture using the SkyTab’s built-in camera.
3. The following settings are configured from Lighthouse and can only be viewed from the device but not edited.
The default tip settings shows the three default tip amounts and which of these are selected by default when a guest is paying for a check.
4. The guest settings control whether an additional text box will be presented to the guest on the email receipt screen. This free form field can be configured to capture any information (full name, phone number, etc.).
Enable the setting to display the text field. Configure what the field should capture (sample image shows ‘Full name’). Modify the message wording.
17Technical Support: 866.374.8865 or [email protected]
View SkyTab Settings (continued)
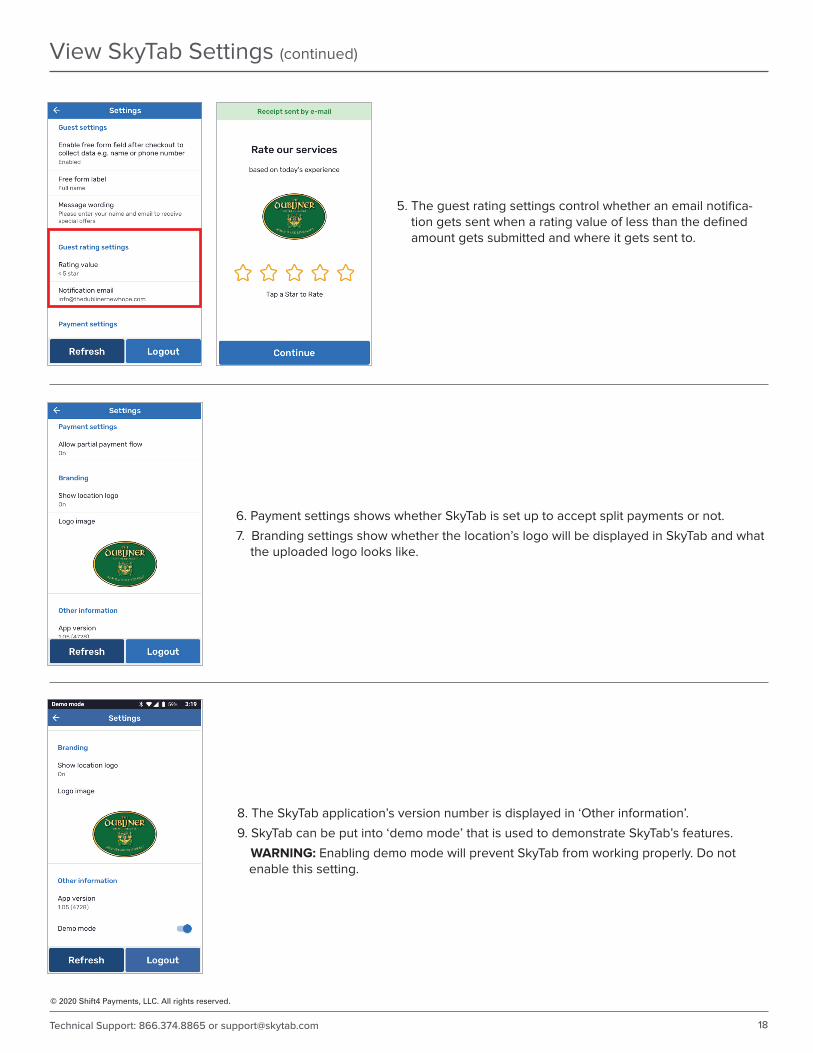
6. Payment settings shows whether SkyTab is set up to accept split payments or not.
7. Branding settings show whether the location’s logo will be displayed in SkyTab and what the uploaded logo looks like.
8. The SkyTab application’s version number is displayed in ‘Other information’.
9. SkyTab can be put into ‘demo mode’ that is used to demonstrate SkyTab’s features.
WARNING: Enabling demo mode will prevent SkyTab from working properly. Do not enable this setting.
5. The guest rating settings control whether an email notifica-tion gets sent when a rating value of less than the defined amount gets submitted and where it gets sent to.
© 2020 Shift4 Payments, LLC. All rights reserved.
18Technical Support: 866.374.8865 or [email protected]
![THE REAL PRICE OF PAYING RANSOMS: THE AUSTRALIAN …2016] The Real Price of Paying Ransoms: The Australian Legal Position Concerning Ransom Payments to Terrorist Organisations 121](https://img.dokumen.tips/doc/110x75/5e33d7a1812a1549ce3c1a74/the-real-price-of-paying-ransoms-the-australian-2016-the-real-price-of-paying.jpg)