Embed Size (px)
Citation preview
SitePublish Administrator Guide
SchoolMessenger 100 Enterprise Way, Suite A-300 Scotts Valley, CA 95066 800-920-3897 www.schoolmessenger.com
PRESENCE
SitePublish Administrator Guide
2
Contents Contents ................................................................................................................................................................ 2 Introduction ........................................................................................................................................................... 5 Who Should Use this Guide ................................................................................................................................ 5 About SitePublish ................................................................................................................................................. 5 Accessing your site .............................................................................................................................................. 5 The Administrative Toolbar ................................................................................................................................. 6 Import new XML Page .......................................................................................................................................... 6 Advanced Options Menu ..................................................................................................................................... 7
Move Page ......................................................................................................................................................... 7 Copy Page .......................................................................................................................................................... 9 Save as Page Type ............................................................................................................................................ 9 View Local Portlets ........................................................................................................................................... 10
Site Administration ............................................................................................................................................. 12 Site Properties .................................................................................................................................................. 12 Site Permissions ............................................................................................................................................... 13 Page Move Requests ....................................................................................................................................... 13 File Administration ............................................................................................................................................ 13 Generate XML Sitemap… ................................................................................................................................ 15
Other Site Admin Options .................................................................................................................................. 15 Browse Pagesets ............................................................................................................................................. 15 URL Administration .......................................................................................................................................... 16 Style Sheet Administration ............................................................................................................................... 16 Page Types Administration .............................................................................................................................. 17 Search Settings ................................................................................................................................................ 18 Activity .............................................................................................................................................................. 18
System Administration ...................................................................................................................................... 19 Server Settings ................................................................................................................................................. 19
General Settings .......................................................................................................................................... 19 Text Editor Settings ...................................................................................................................................... 22 Emails .......................................................................................................................................................... 27
Manage Applications ........................................................................................................................................ 31 Manage Themes .............................................................................................................................................. 31 Manage Users .................................................................................................................................................. 32
Adding Users ................................................................................................................................................ 32 Deleting Users .............................................................................................................................................. 33 Log in as a User ........................................................................................................................................... 33
SitePublish Administrator Guide
©2016 West Corporation. [03222016]. All rights reserved. May not be reproduced without express written permission. 3
Search User Names ..................................................................................................................................... 33 Editing a User ............................................................................................................................................... 34
Manage Groups and Roles .............................................................................................................................. 37 Managing Departments .................................................................................................................................... 38 Managing Authentication Sources ................................................................................................................... 38 Using Published Links ...................................................................................................................................... 39 Managing RSS Providers ................................................................................................................................. 41 Sending Mass Email ........................................................................................................................................ 41 Default Calendar Settings ................................................................................................................................ 42 Manage Event Categories ................................................................................................................................ 44 Working with Site Render Templates ............................................................................................................... 45 Filtering Profanity ............................................................................................................................................. 46 Control Settings ................................................................................................................................................ 47
CAPTCHA .................................................................................................................................................... 47 School Drop Down ....................................................................................................................................... 48 Telerik CMS Menu ....................................................................................................................................... 50
Monitoring and Reporting ................................................................................................................................. 51 Event Logs ................................................................................................................................................... 51 System Reports ............................................................................................................................................ 51
Importing and Exporting Data .......................................................................................................................... 53 Importing XML .............................................................................................................................................. 53 Exporting XML .............................................................................................................................................. 53 Importing and Exporting Users .................................................................................................................... 54
Managing Portal Themes ................................................................................................................................. 55 Working with Portlet Templates ....................................................................................................................... 56 Managing Portlets ............................................................................................................................................ 58 Configuring Document Container Settings ....................................................................................................... 60 Accessing Site Management ............................................................................................................................ 62 Using Page Review Notification Settings ......................................................................................................... 63 Moving Pages between Sites ........................................................................................................................... 63
Sending a Page to another Site ................................................................................................................... 64 Receiving a Page from another Site ............................................................................................................ 65 Page Move Mailing List ................................................................................................................................ 66
Managing the Knowledge Repository .............................................................................................................. 66 Using eLearning Server ................................................................................................................................... 66 Managing Search ............................................................................................................................................. 67
Changing Search Providers ......................................................................................................................... 67 Managing Search Settings ........................................................................................................................... 68

SitePublish Administrator Guide
©2016 West Corporation. [03222016]. All rights reserved. May not be reproduced without express written permission. 4
Managing Search Templates ....................................................................................................................... 68 Using Best Bets ............................................................................................................................................ 69
Managing Event Registration ........................................................................................................................... 69 Managing Wikis ................................................................................................................................................ 70 Managing Blogs ................................................................................................................................................ 70
SitePublish Administrator Guide
©2016 West Corporation. [03222016]. All rights reserved. May not be reproduced without express written permission. 5
Introduction This guide has been designed to help administrators make the best use of the SchoolMessenger Presence’s system. The following chapters are divided into individual modules and contain important information in the form of Reminders, Notes and Tips. Pay attention to these alerts as they will help you to avoid common mistakes.
If you are an administrator at your district or school, and do not see some of the tools mentioned in this manual, it is because of the permission settings applied at the district level. Nonetheless, you will still have the ability to perform many of the tasks mentioned in this manual.
Who Should Use this Guide The contents of this guide are written for administrators who have some technical background. Primarily, this guide will be used by IT personnel.
If you have been given a training site, it is a good idea to practice the steps covered in this guide on the training site before working with your real sites. This eliminates the risk of accidentally deleting or ruining anything on your real site.
About SitePublish SitePublish is Presence’s Content Management System (CMS). This system offers a typical, non-technical web user all the tools they need to create, edit and maintain content on websites. We will go into greater detail on these tools later in the guide.
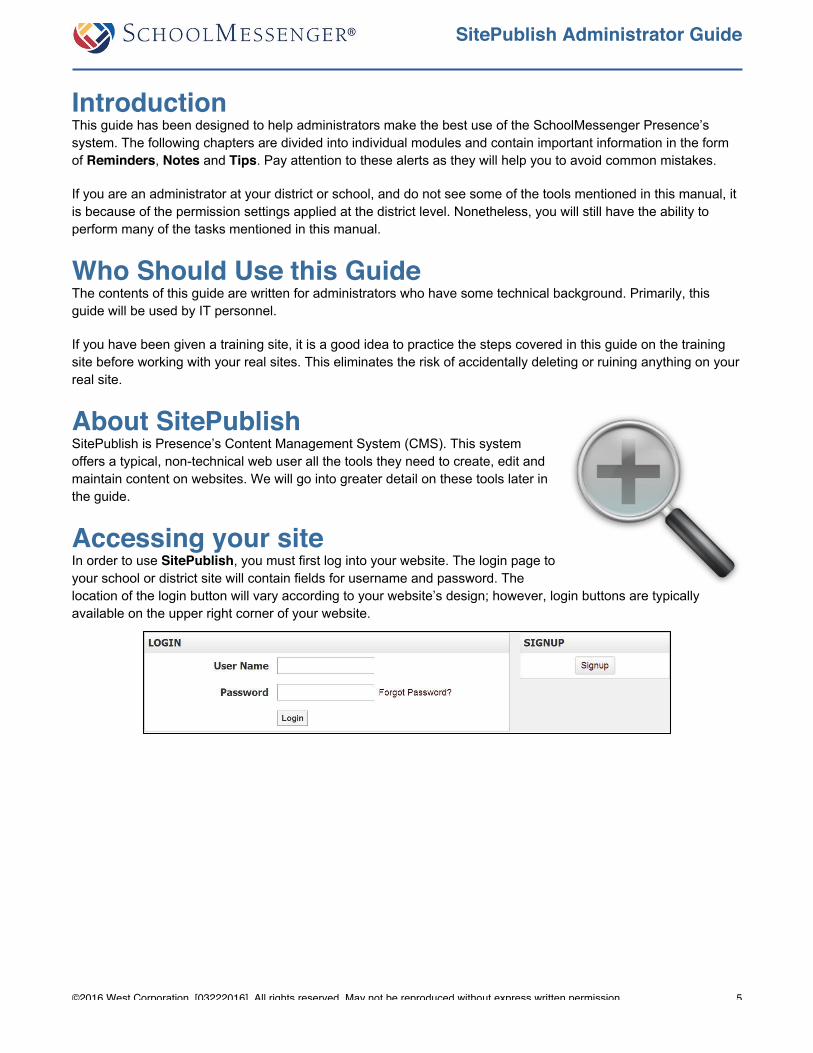
Accessing your site In order to use SitePublish, you must first log into your website. The login page to your school or district site will contain fields for username and password. The location of the login button will vary according to your website’s design; however, login buttons are typically available on the upper right corner of your website.
SitePublish Administrator Guide
©2016 West Corporation. [03222016]. All rights reserved. May not be reproduced without express written permission. 6
The Administrative Toolbar
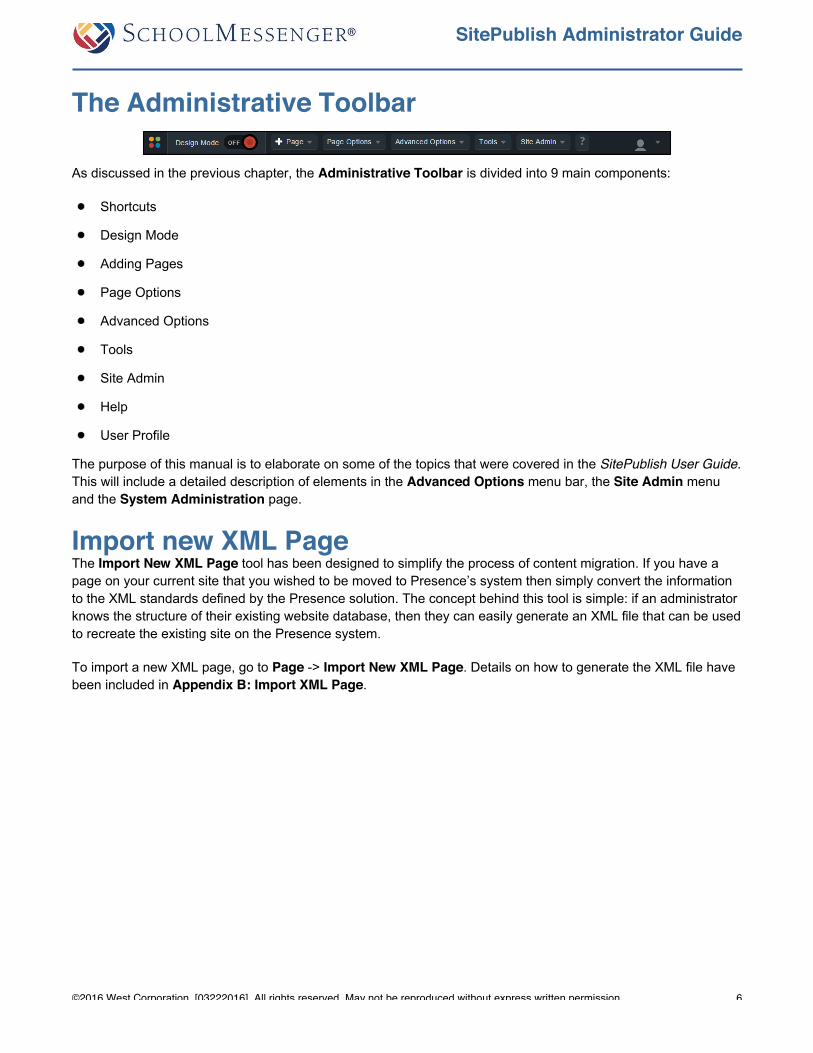
As discussed in the previous chapter, the Administrative Toolbar is divided into 9 main components:
Shortcuts
Design Mode
Adding Pages
Page Options
Advanced Options
Tools
Site Admin
Help
User Profile
The purpose of this manual is to elaborate on some of the topics that were covered in the SitePublish User Guide. This will include a detailed description of elements in the Advanced Options menu bar, the Site Admin menu and the System Administration page.
Import new XML Page The Import New XML Page tool has been designed to simplify the process of content migration. If you have a page on your current site that you wished to be moved to Presence’s system then simply convert the information to the XML standards defined by the Presence solution. The concept behind this tool is simple: if an administrator knows the structure of their existing website database, then they can easily generate an XML file that can be used to recreate the existing site on the Presence system.
To import a new XML page, go to Page -> Import New XML Page. Details on how to generate the XML file have been included in Appendix B: Import XML Page.
SitePublish Administrator Guide
©2016 West Corporation. [03222016]. All rights reserved. May not be reproduced without express written permission. 7
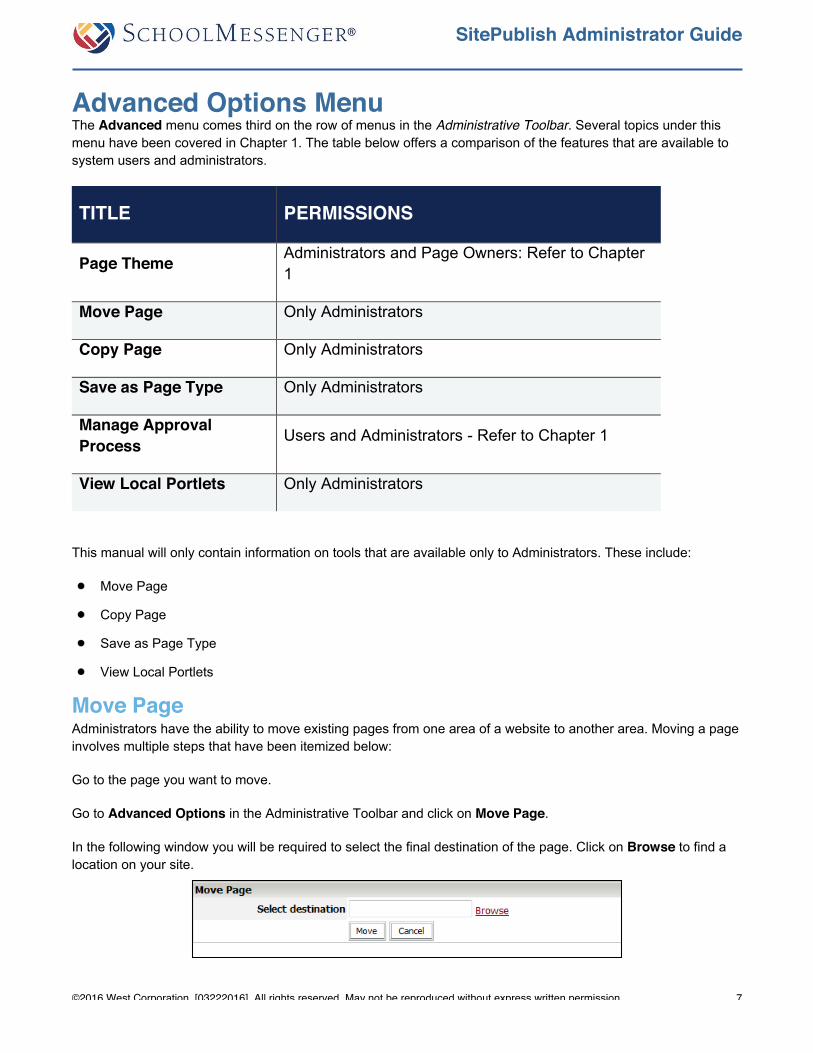
Advanced Options Menu The Advanced menu comes third on the row of menus in the Administrative Toolbar. Several topics under this menu have been covered in Chapter 1. The table below offers a comparison of the features that are available to system users and administrators.
TITLE PERMISSIONS
Page Theme Administrators and Page Owners: Refer to Chapter 1
Move Page Only Administrators
Copy Page Only Administrators
Save as Page Type Only Administrators
Manage Approval Process Users and Administrators - Refer to Chapter 1
View Local Portlets Only Administrators
This manual will only contain information on tools that are available only to Administrators. These include:
Move Page
Copy Page
Save as Page Type
View Local Portlets
Move Page Administrators have the ability to move existing pages from one area of a website to another area. Moving a page involves multiple steps that have been itemized below:
Go to the page you want to move.
Go to Advanced Options in the Administrative Toolbar and click on Move Page.
In the following window you will be required to select the final destination of the page. Click on Browse to find a location on your site.

SitePublish Administrator Guide
©2016 West Corporation. [03222016]. All rights reserved. May not be reproduced without express written permission. 8
Clicking on Browse will open a window that contains the current location of your page on the system.
In this window, it is essential to understand key pieces of information first:
Site Root: The site root contains the name of the server on which your site is located. This will often contain the name of your organization.
Site Name: Here you will have two options; the default pageset and the secondary pageset. All sites are set up under the default pageset, so click on this option.
Default Pageset: Contains all the top-level pages available from the homepage of your website.
At this point, it is important to know exactly where you want to move a page. To move a page under a particular parent page, simply click on Select next to page’s title (In this case, we have decided to move the page under Applications).

SitePublish Administrator Guide
©2016 West Corporation. [03222016]. All rights reserved. May not be reproduced without express written permission. 9
Let’s assume that you wanted to move the page into a sub-page under Applications. In this case click on the Applications page and then click Select beside the sub-page you wish to move the page under.
Copy Page Administrators also have the ability to copy pages within a site. The process of copying a page is similar to moving one in the system.
Go to the page you want to copy.
Go to Advanced Options in the Administrative Toolbar and click on Copy Page.
In the following window you will be asked to title the new page as well as select a destination for the copied page on the site. You must click on Browse to select a location on your site.
To select an area on your website to move a copied page, simply follow the steps covered in the Move Page section on the previous page.
Save as Page Type Administrators have the ability to create pages with custom portlet layouts that can be made available to all users in the system. After creating a page with a particular arrangement of portlets and sub-pages, simply click on Save as Page Type. This page type will now be available to add users when they go to add a new page under the Page menu.
Note: If you save a specific page as a Page Type, then all sub-pages of that page will be included. This allows you to easily create new sections of your site that are pre-populated. For example, the Teacher Page type includes several other pages such as the Calendar and Photo Gallery by default.
SitePublish Administrator Guide
©2016 West Corporation. [03222016]. All rights reserved. May not be reproduced without express written permission. 10
View Local Portlets View Local Portlets displays the portlets that were created specifically for the site. By clicking one of these portlets you can edit the settings you originally assigned when you first created the portlet.
In some cases, you may wish to create portlets to be used on specific pages or for specific tasks. To create a new portlet, go to the View Local Portlets page and click Add Local Portlet. The fields that an administrator is required to fill in are:
Portlet Name: This name will be displayed to users via the Add Portlet to Region option.
Portlet Template: Administrators can select the portlet template that they wish to duplicate. The name of the portlet template will generally match the default portlet name (for instance, the advanced data summary uses the portlet template called Advanced Data Summary). For content portlets though, the template name is a bit different. It is called Content Managed Data.
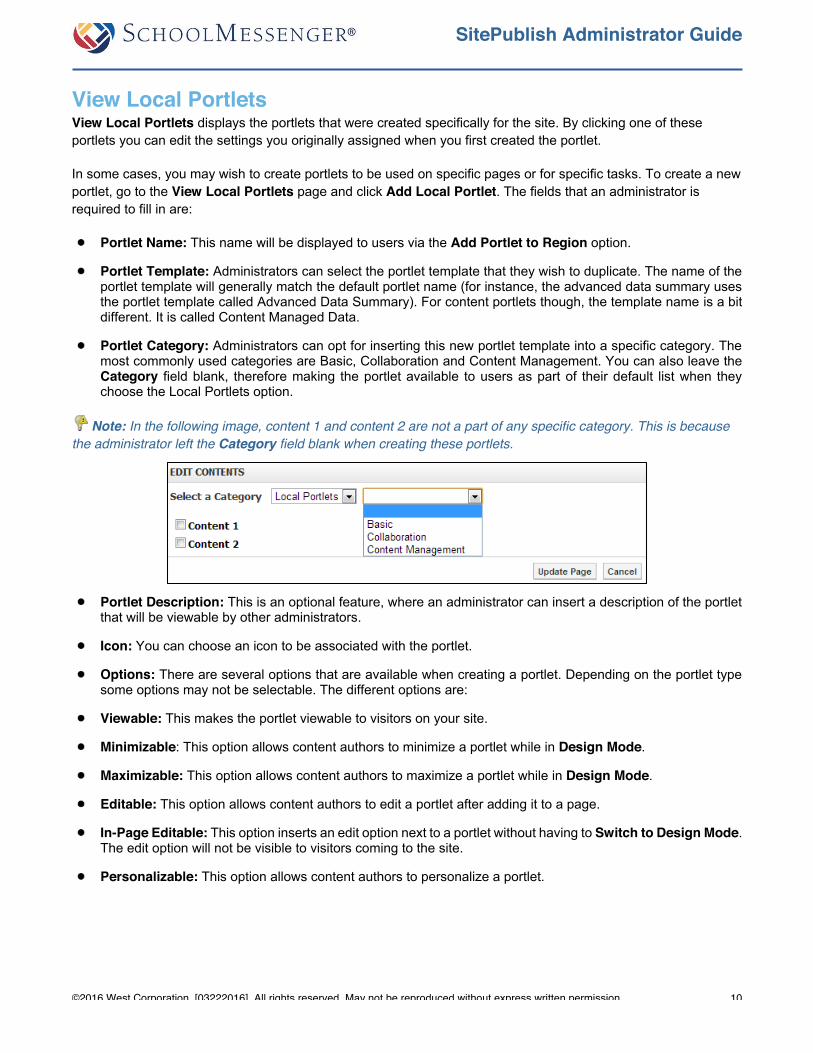
Portlet Category: Administrators can opt for inserting this new portlet template into a specific category. The most commonly used categories are Basic, Collaboration and Content Management. You can also leave the Category field blank, therefore making the portlet available to users as part of their default list when they choose the Local Portlets option.
Note: In the following image, content 1 and content 2 are not a part of any specific category. This is because the administrator left the Category field blank when creating these portlets.
Portlet Description: This is an optional feature, where an administrator can insert a description of the portlet that will be viewable by other administrators.
Icon: You can choose an icon to be associated with the portlet.
Options: There are several options that are available when creating a portlet. Depending on the portlet type some options may not be selectable. The different options are:
Viewable: This makes the portlet viewable to visitors on your site.
Minimizable: This option allows content authors to minimize a portlet while in Design Mode.
Maximizable: This option allows content authors to maximize a portlet while in Design Mode.
Editable: This option allows content authors to edit a portlet after adding it to a page.
In-Page Editable: This option inserts an edit option next to a portlet without having to Switch to Design Mode. The edit option will not be visible to visitors coming to the site.
Personalizable: This option allows content authors to personalize a portlet.
SitePublish Administrator Guide
©2016 West Corporation. [03222016]. All rights reserved. May not be reproduced without express written permission. 11
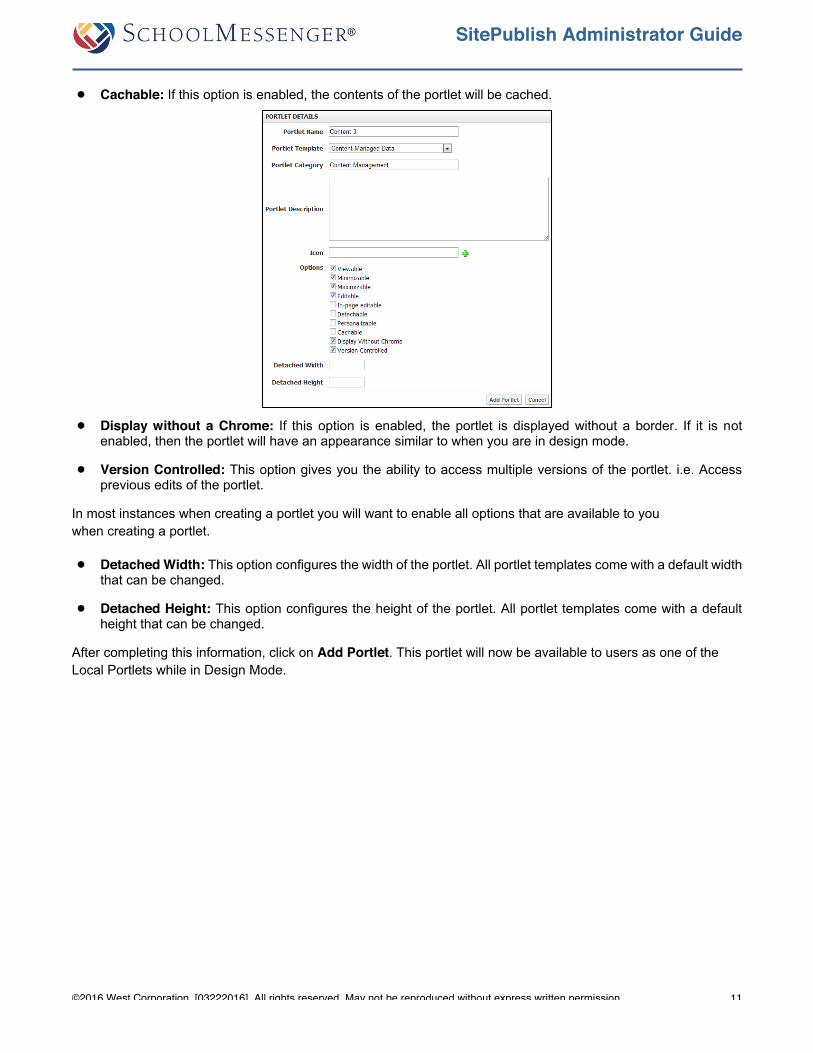
Cachable: If this option is enabled, the contents of the portlet will be cached.
Display without a Chrome: If this option is enabled, the portlet is displayed without a border. If it is not enabled, then the portlet will have an appearance similar to when you are in design mode.
Version Controlled: This option gives you the ability to access multiple versions of the portlet. i.e. Access previous edits of the portlet.
In most instances when creating a portlet you will want to enable all options that are available to you when creating a portlet.
Detached Width: This option configures the width of the portlet. All portlet templates come with a default width that can be changed.
Detached Height: This option configures the height of the portlet. All portlet templates come with a default height that can be changed.
After completing this information, click on Add Portlet. This portlet will now be available to users as one of the Local Portlets while in Design Mode.
SitePublish Administrator Guide
©2016 West Corporation. [03222016]. All rights reserved. May not be reproduced without express written permission. 12
Site Administration The Site Admin menu gives administrators the ability to manage and monitor various aspects of the overall site. It is also available to users who have been added to the Administrators role within Site Admin -> Site Permissions. This menu is broken into a number of headings:
Site Properties This section gives administrators the ability to define the name of the site as it appears on the breadcrumb trail for the site.
The first section is Edit Portal. This covers some general site settings. You will see the following options:
Name: The name of your site.
Type: The type of portal. This should be left as a Group Portal.
Theme: This drop down defines the default look and feel of the site and is configured by SchoolMessenger.
The next section is the Theme Properties. This section allows you to specify default metadata for the teacher page themes. Header Line 1 and Header Line 2 are the default text that will show up when using a teacher page theme. The other fields are only used for metadata purposes.
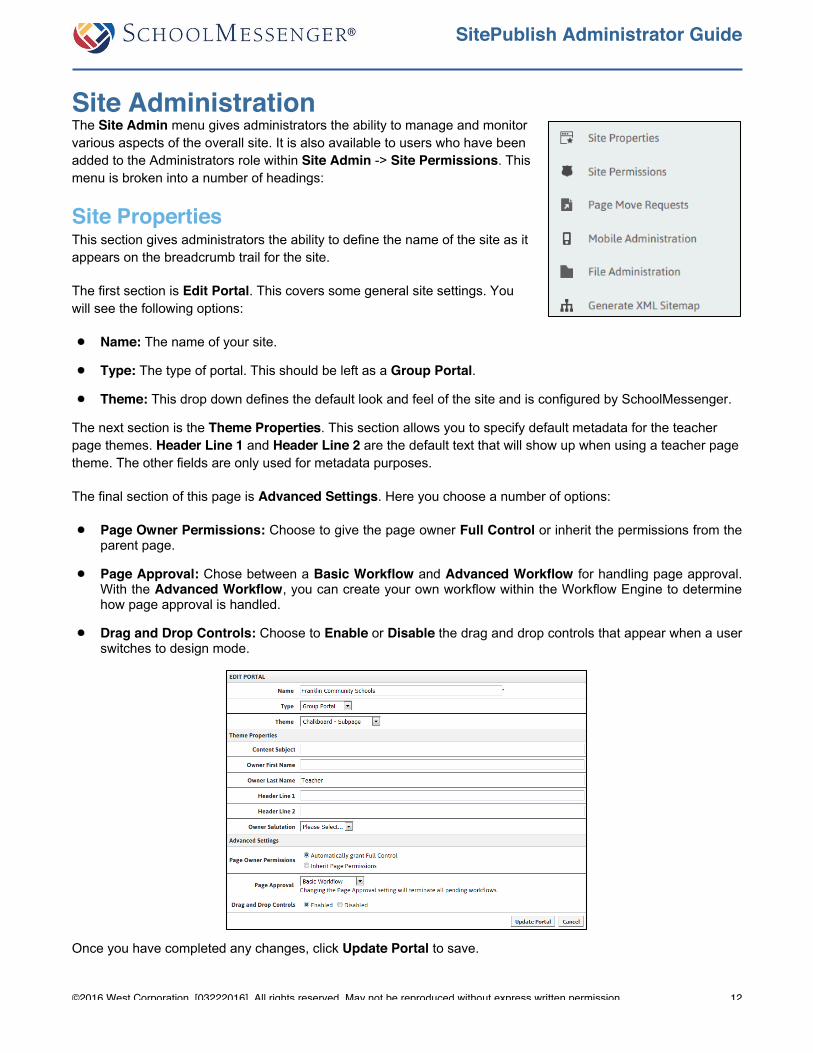
The final section of this page is Advanced Settings. Here you choose a number of options:
Page Owner Permissions: Choose to give the page owner Full Control or inherit the permissions from the parent page.
Page Approval: Chose between a Basic Workflow and Advanced Workflow for handling page approval. With the Advanced Workflow, you can create your own workflow within the Workflow Engine to determine how page approval is handled.
Drag and Drop Controls: Choose to Enable or Disable the drag and drop controls that appear when a user switches to design mode.
Once you have completed any changes, click Update Portal to save.
SitePublish Administrator Guide
©2016 West Corporation. [03222016]. All rights reserved. May not be reproduced without express written permission. 13
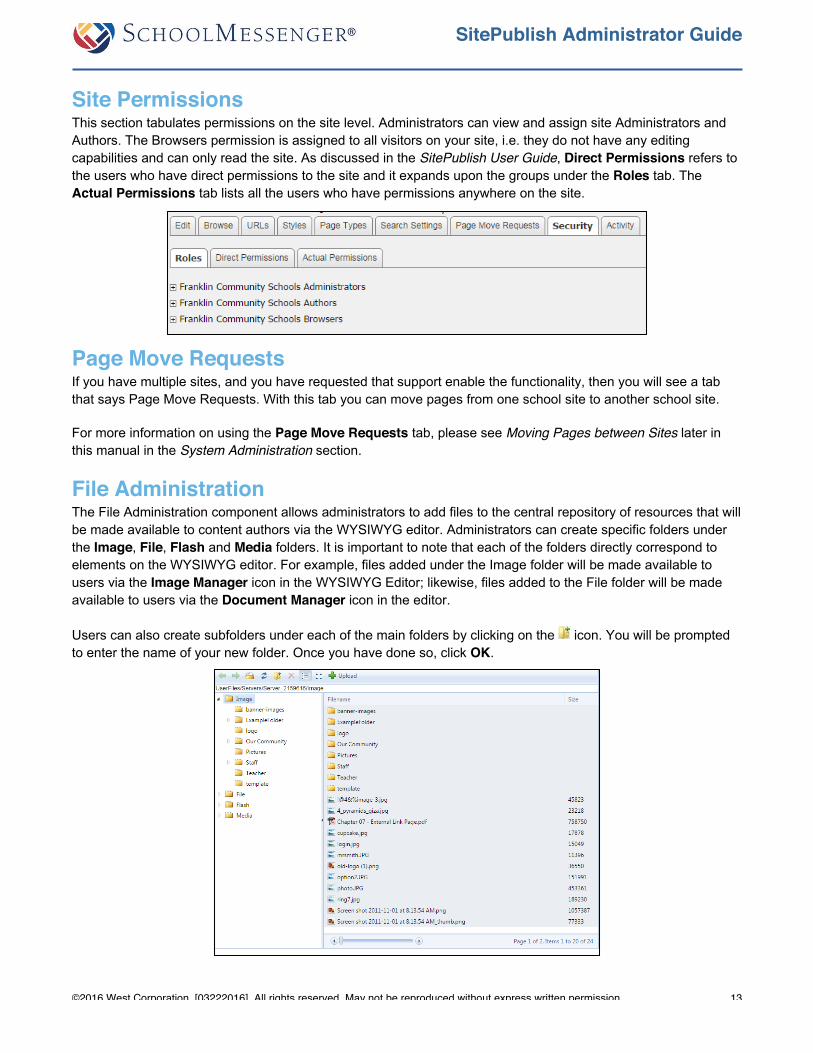
Site Permissions This section tabulates permissions on the site level. Administrators can view and assign site Administrators and Authors. The Browsers permission is assigned to all visitors on your site, i.e. they do not have any editing capabilities and can only read the site. As discussed in the SitePublish User Guide, Direct Permissions refers to the users who have direct permissions to the site and it expands upon the groups under the Roles tab. The Actual Permissions tab lists all the users who have permissions anywhere on the site.
Page Move Requests If you have multiple sites, and you have requested that support enable the functionality, then you will see a tab that says Page Move Requests. With this tab you can move pages from one school site to another school site.
For more information on using the Page Move Requests tab, please see Moving Pages between Sites later in this manual in the System Administration section.
File Administration The File Administration component allows administrators to add files to the central repository of resources that will be made available to content authors via the WYSIWYG editor. Administrators can create specific folders under the Image, File, Flash and Media folders. It is important to note that each of the folders directly correspond to elements on the WYSIWYG editor. For example, files added under the Image folder will be made available to users via the Image Manager icon in the WYSIWYG Editor; likewise, files added to the File folder will be made available to users via the Document Manager icon in the editor.
Users can also create subfolders under each of the main folders by clicking on the icon. You will be prompted to enter the name of your new folder. Once you have done so, click OK.
SitePublish Administrator Guide
©2016 West Corporation. [03222016]. All rights reserved. May not be reproduced without express written permission. 14
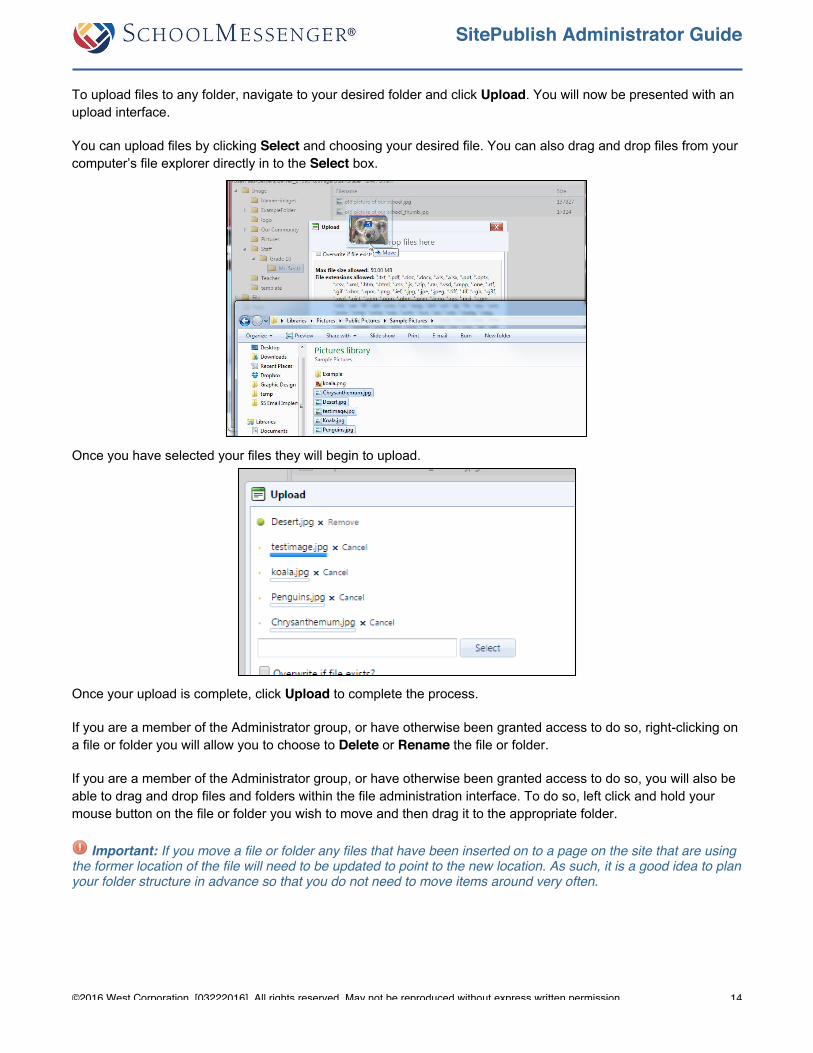
To upload files to any folder, navigate to your desired folder and click Upload. You will now be presented with an upload interface.
You can upload files by clicking Select and choosing your desired file. You can also drag and drop files from your computer’s file explorer directly in to the Select box.
Once you have selected your files they will begin to upload.
Once your upload is complete, click Upload to complete the process.
If you are a member of the Administrator group, or have otherwise been granted access to do so, right-clicking on a file or folder you will allow you to choose to Delete or Rename the file or folder.
If you are a member of the Administrator group, or have otherwise been granted access to do so, you will also be able to drag and drop files and folders within the file administration interface. To do so, left click and hold your mouse button on the file or folder you wish to move and then drag it to the appropriate folder.
Important: If you move a file or folder any files that have been inserted on to a page on the site that are using the former location of the file will need to be updated to point to the new location. As such, it is a good idea to plan your folder structure in advance so that you do not need to move items around very often.
SitePublish Administrator Guide
©2016 West Corporation. [03222016]. All rights reserved. May not be reproduced without express written permission. 15
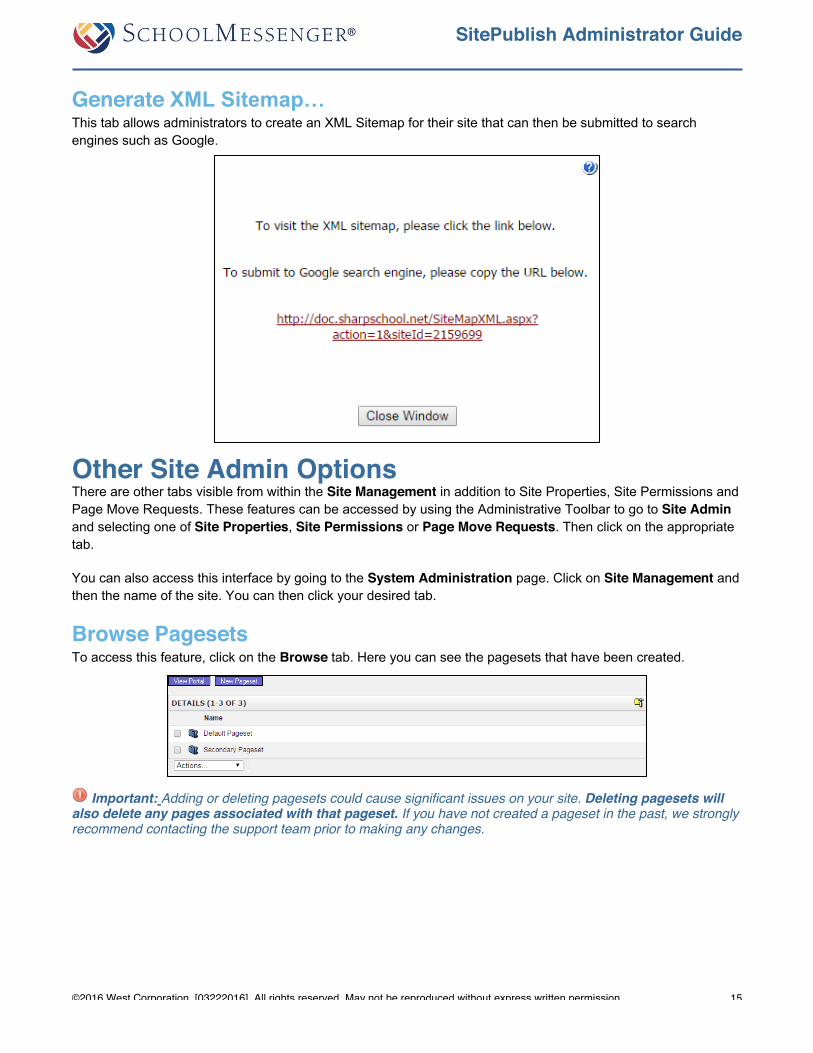
Generate XML Sitemap… This tab allows administrators to create an XML Sitemap for their site that can then be submitted to search engines such as Google.
Other Site Admin Options There are other tabs visible from within the Site Management in addition to Site Properties, Site Permissions and Page Move Requests. These features can be accessed by using the Administrative Toolbar to go to Site Admin and selecting one of Site Properties, Site Permissions or Page Move Requests. Then click on the appropriate tab.
You can also access this interface by going to the System Administration page. Click on Site Management and then the name of the site. You can then click your desired tab.
Browse Pagesets To access this feature, click on the Browse tab. Here you can see the pagesets that have been created.
Important: Adding or deleting pagesets could cause significant issues on your site. Deleting pagesets will also delete any pages associated with that pageset. If you have not created a pageset in the past, we strongly recommend contacting the support team prior to making any changes.
SitePublish Administrator Guide
©2016 West Corporation. [03222016]. All rights reserved. May not be reproduced without express written permission. 16
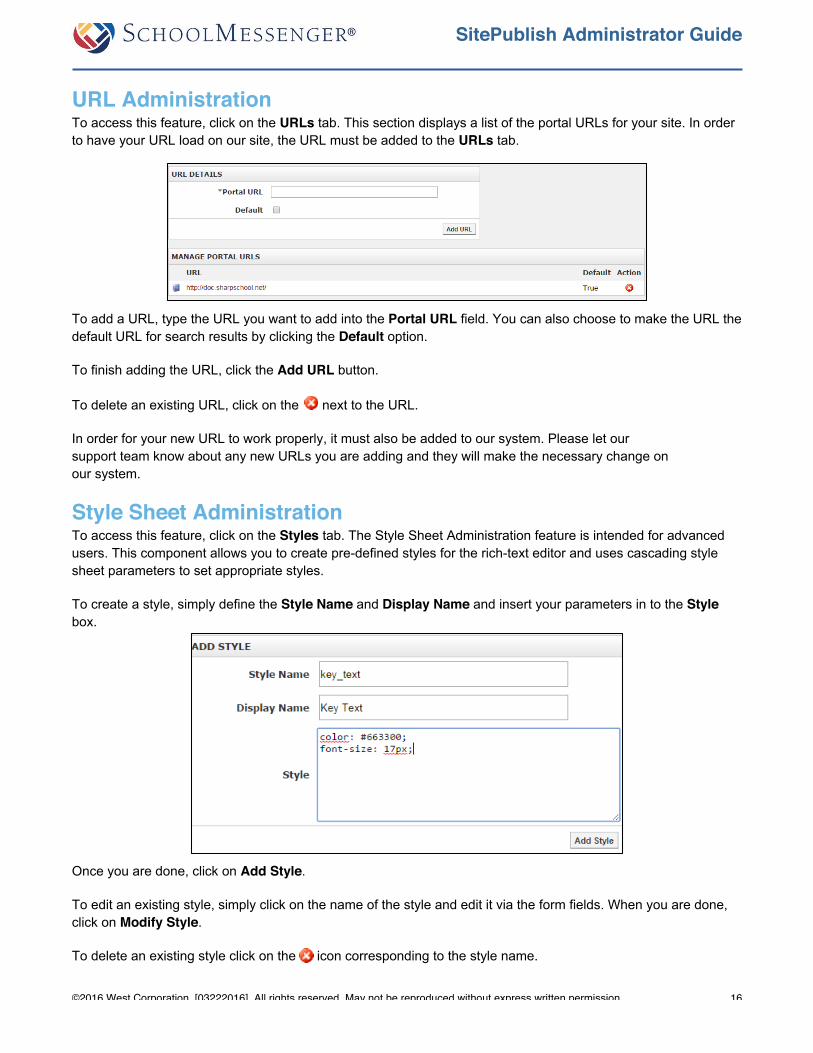
URL Administration To access this feature, click on the URLs tab. This section displays a list of the portal URLs for your site. In order to have your URL load on our site, the URL must be added to the URLs tab.
To add a URL, type the URL you want to add into the Portal URL field. You can also choose to make the URL the default URL for search results by clicking the Default option.
To finish adding the URL, click the Add URL button.
To delete an existing URL, click on the next to the URL.
In order for your new URL to work properly, it must also be added to our system. Please let our support team know about any new URLs you are adding and they will make the necessary change on our system.
Style Sheet Administration To access this feature, click on the Styles tab. The Style Sheet Administration feature is intended for advanced users. This component allows you to create pre-defined styles for the rich-text editor and uses cascading style sheet parameters to set appropriate styles.
To create a style, simply define the Style Name and Display Name and insert your parameters in to the Style box.
Once you are done, click on Add Style.
To edit an existing style, simply click on the name of the style and edit it via the form fields. When you are done, click on Modify Style.
To delete an existing style click on the icon corresponding to the style name.
SitePublish Administrator Guide
©2016 West Corporation. [03222016]. All rights reserved. May not be reproduced without express written permission. 17
If you delete a style type, anywhere that the style was applied will no longer display that CSS and it will revert to the default CSS for the page.
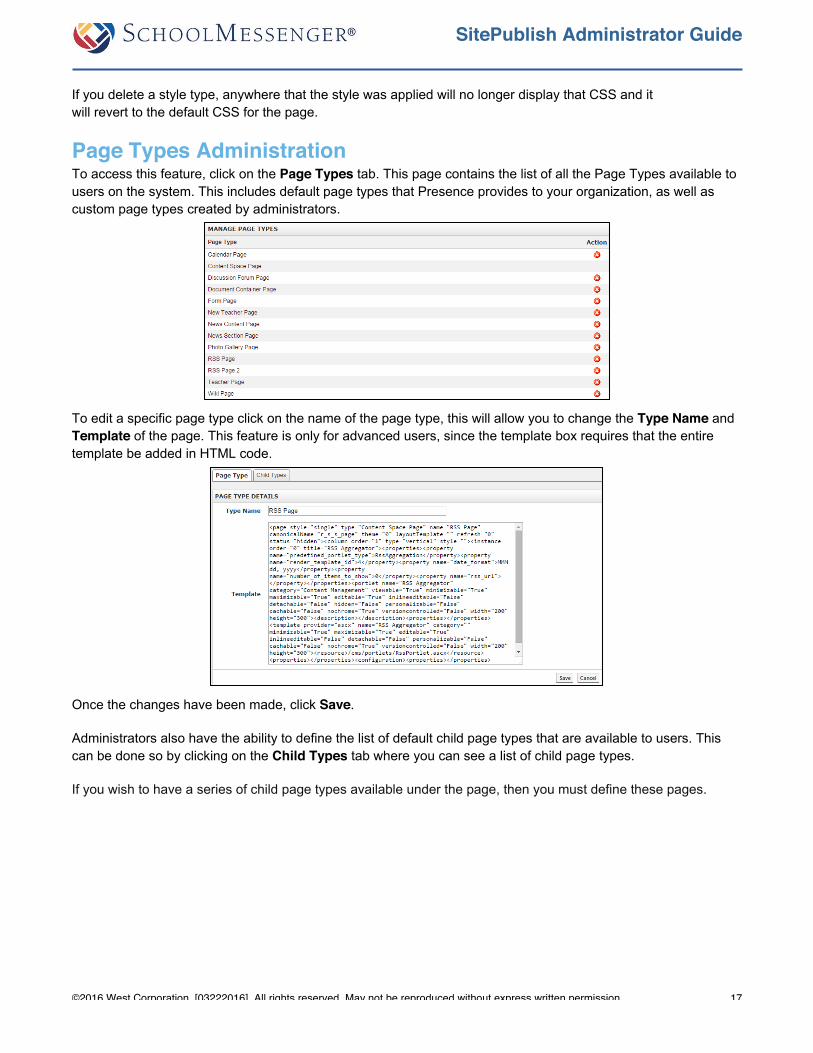
Page Types Administration To access this feature, click on the Page Types tab. This page contains the list of all the Page Types available to users on the system. This includes default page types that Presence provides to your organization, as well as custom page types created by administrators.
To edit a specific page type click on the name of the page type, this will allow you to change the Type Name and Template of the page. This feature is only for advanced users, since the template box requires that the entire template be added in HTML code.
Once the changes have been made, click Save.
Administrators also have the ability to define the list of default child page types that are available to users. This can be done so by clicking on the Child Types tab where you can see a list of child page types.
If you wish to have a series of child page types available under the page, then you must define these pages.

SitePublish Administrator Guide
©2016 West Corporation. [03222016]. All rights reserved. May not be reproduced without express written permission. 18
To add a child page type, select a type from the drop down menu and click Add. To delete a child page types, click on the button next to the child page.
If you wish to remove a page type, click on the button next to the page type you wish to delete.
Search Settings To access this feature, click on the Search Settings tab. If you want to make the content of your site searchable via Presence’s search bar, you must enable the search portal in the Search Settings tab. To name and enable the portal click the Edit button, choose your preferred settings and press Update.
Activity To access this feature, click on the Activity tab. This tab displays any activity that has occurred on the site level, that is, if any changes were made to the site from the Edit Site option under Site Administration.
SitePublish Administrator Guide
©2016 West Corporation. [03222016]. All rights reserved. May not be reproduced without express written permission. 19
System Administration The System Administration area can be accessed by going to the Shortcuts and clicking on System Administration.
Server Settings This is where general system settings may be configured, such as configuring site notifications, setting user password restrictions and default time zone locations.
The settings are broken in to multiple tabs.
General Settings The General Settings tab contains a number of sections on the page. Each section will deal with a different aspect of your site settings.
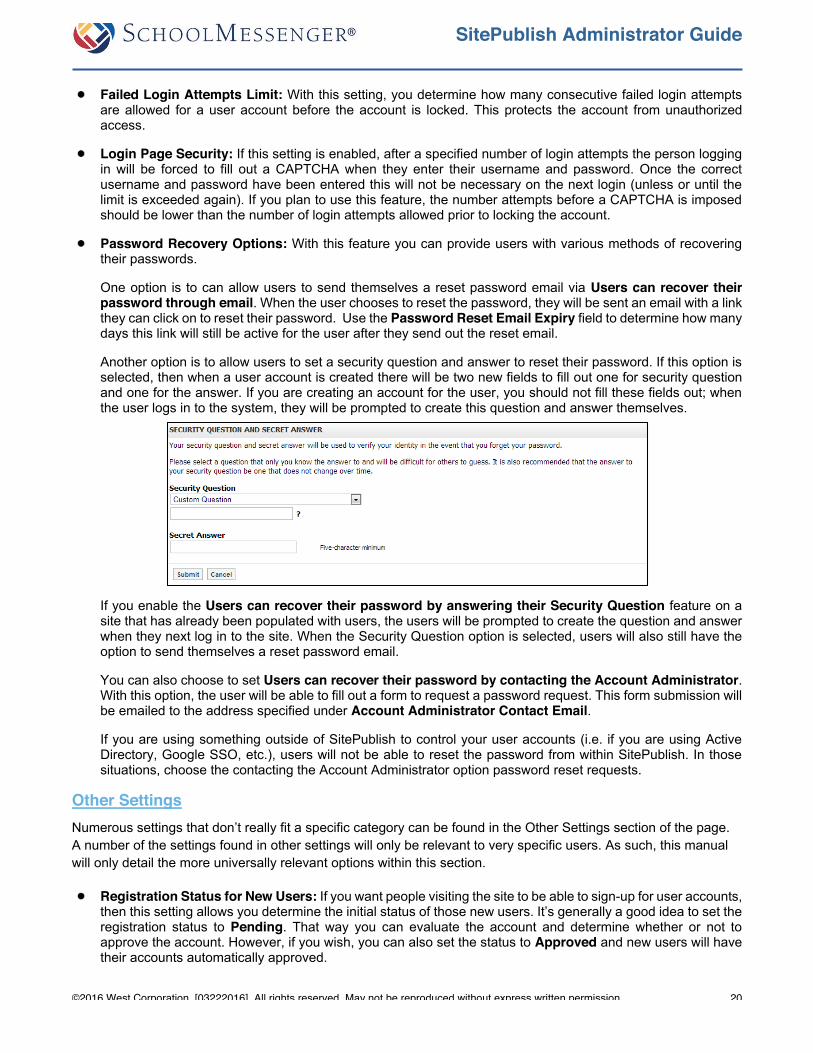
Server Settings In this section, administrators can specify a Server Name (this will appear on the breadcrumb for the site).
This is also where you can choose a Document Type for your site. The document type tells your browser what formatting rules to follow.
If you are not familiar with document types, you should not change this setting.
Report Settings If you check the box for Restrict Reports you can limit the ability of user’s to see reports outside of their locale. As most sites do not contain multiple locales this option is moot for many customers.
Password Related Settings In the Password Related Settings section you have the ability to determine what sort of passwords users need, how often they can login, and the user’s options for password recovery.
Password Strength: These three checkboxes allow you to require that a password contain numbers, that it contain both upper and lower case letters and that the password will expire after a set period of time. If you enable password expiration you will then be able to set the number of days before the password expires. Once a password has expired, the user will be required to set a new one when they next log in to the site.
Minimum Password Length: This setting allows you to require the password be at least a set number of characters in length. The longer the password and the more password strength options you enable, the stronger and more secure your password will be.
SitePublish Administrator Guide
©2016 West Corporation. [03222016]. All rights reserved. May not be reproduced without express written permission. 20
Failed Login Attempts Limit: With this setting, you determine how many consecutive failed login attempts are allowed for a user account before the account is locked. This protects the account from unauthorized access.
Login Page Security: If this setting is enabled, after a specified number of login attempts the person logging in will be forced to fill out a CAPTCHA when they enter their username and password. Once the correct username and password have been entered this will not be necessary on the next login (unless or until the limit is exceeded again). If you plan to use this feature, the number attempts before a CAPTCHA is imposed should be lower than the number of login attempts allowed prior to locking the account.
Password Recovery Options: With this feature you can provide users with various methods of recovering their passwords.
One option is to can allow users to send themselves a reset password email via Users can recover their password through email. When the user chooses to reset the password, they will be sent an email with a link they can click on to reset their password. Use the Password Reset Email Expiry field to determine how many days this link will still be active for the user after they send out the reset email.
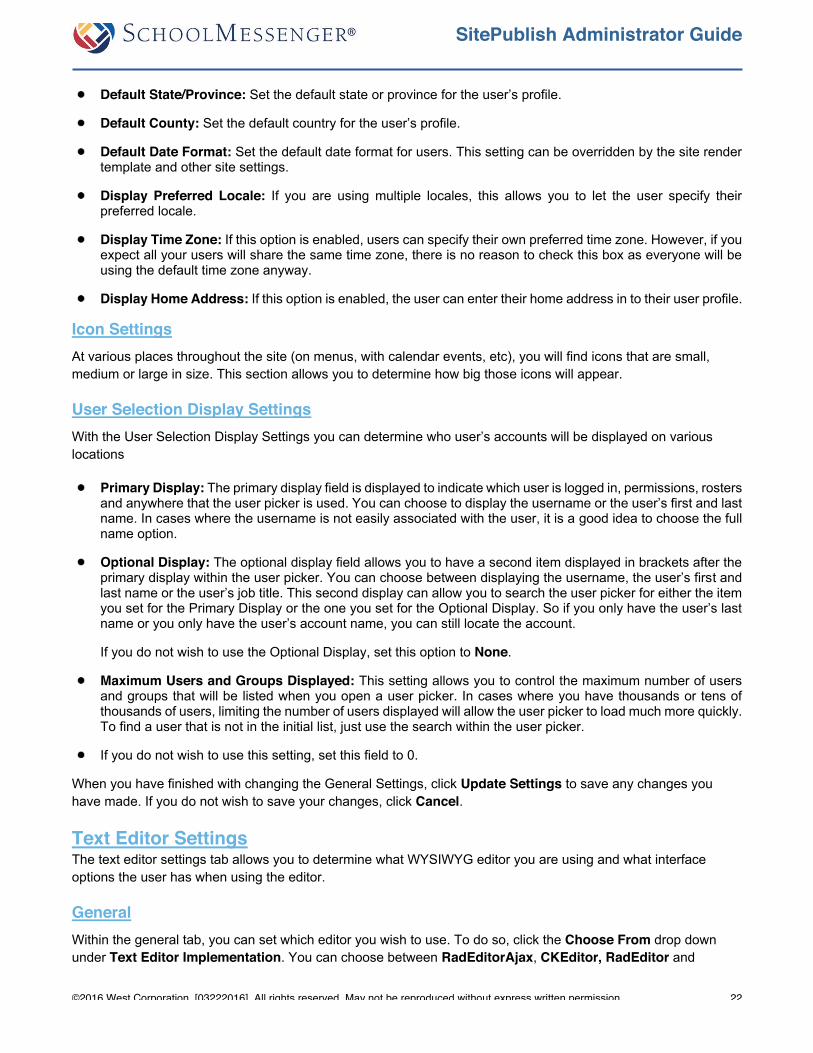
Another option is to allow users to set a security question and answer to reset their password. If this option is selected, then when a user account is created there will be two new fields to fill out one for security question and one for the answer. If you are creating an account for the user, you should not fill these fields out; when the user logs in to the system, they will be prompted to create this question and answer themselves.
If you enable the Users can recover their password by answering their Security Question feature on a site that has already been populated with users, the users will be prompted to create the question and answer when they next log in to the site. When the Security Question option is selected, users will also still have the option to send themselves a reset password email.
You can also choose to set Users can recover their password by contacting the Account Administrator. With this option, the user will be able to fill out a form to request a password request. This form submission will be emailed to the address specified under Account Administrator Contact Email.
If you are using something outside of SitePublish to control your user accounts (i.e. if you are using Active Directory, Google SSO, etc.), users will not be able to reset the password from within SitePublish. In those situations, choose the contacting the Account Administrator option password reset requests.
Other Settings Numerous settings that don’t really fit a specific category can be found in the Other Settings section of the page. A number of the settings found in other settings will only be relevant to very specific users. As such, this manual will only detail the more universally relevant options within this section.
Registration Status for New Users: If you want people visiting the site to be able to sign-up for user accounts, then this setting allows you determine the initial status of those new users. It’s generally a good idea to set the registration status to Pending. That way you can evaluate the account and determine whether or not to approve the account. However, if you wish, you can also set the status to Approved and new users will have their accounts automatically approved.

SitePublish Administrator Guide
©2016 West Corporation. [03222016]. All rights reserved. May not be reproduced without express written permission. 21
Global Theme: Whenever you are somewhere on the site where you cannot specify a theme (such as the login page, the administration page, etc) the site will use whatever theme is set for the Global Theme. This is usually set to Custom Theme.
Display Authentication Source Selection Box on Login Screen: If you are using multiple external authentication sources, checking this box will give the user the ability to choose which authentication source they wish to use when logging in.
Enable Signup on Login Page: If you want to let users sign up for their own user accounts, enable this option. If you are allowing users to enable their own accounts, you may also want to set Registration Status for New Users to Pending so that you can review their accounts prior to approval.
Only allow Administrators to edit user account information: If you wish to prevent users from making any changes to their own user accounts, then enable this option.
Calendar First Day: This option allows you to choose the first day of the week for any calendars on your site.
Login page welcome message: Often it can be useful to share information on the login page. For instance, if your site contains links to other services users may try to login in to the site, thinking they are logging in to the service. With the login page welcome message you can help educate the users.
Display Settings For the most part the options configured in display settings are generally controlled by the templates and thus are not relevant. However, the Credits tag is used any many templates. Changing what appears in the Credits field will change what is displayed by that tag. In most templates, the Credits tag is used on the footer of the page.
User Profile Settings This section controls information about the user’s profile. With the exception of the default time zone, these settings will not impact the user’s experience when visiting the site.
Default Timezone: This setting determines what the default time zone is for users on your site. This is useful because when viewing calendar events, version history, and other similar locations the time will be displayed in the user’s preferred time zone. In the case of guests, they will be forced to use the default setting. For users who will be signing in to the site, you can allow them to change from the default time zone via the Display Time Zone checkbox.
SitePublish Administrator Guide
©2016 West Corporation. [03222016]. All rights reserved. May not be reproduced without express written permission. 22
Default State/Province: Set the default state or province for the user’s profile.
Default County: Set the default country for the user’s profile.
Default Date Format: Set the default date format for users. This setting can be overridden by the site render template and other site settings.
Display Preferred Locale: If you are using multiple locales, this allows you to let the user specify their preferred locale.
Display Time Zone: If this option is enabled, users can specify their own preferred time zone. However, if you expect all your users will share the same time zone, there is no reason to check this box as everyone will be using the default time zone anyway.
Display Home Address: If this option is enabled, the user can enter their home address in to their user profile.
Icon Settings At various places throughout the site (on menus, with calendar events, etc), you will find icons that are small, medium or large in size. This section allows you to determine how big those icons will appear.
User Selection Display Settings With the User Selection Display Settings you can determine who user’s accounts will be displayed on various locations
Primary Display: The primary display field is displayed to indicate which user is logged in, permissions, rosters and anywhere that the user picker is used. You can choose to display the username or the user’s first and last name. In cases where the username is not easily associated with the user, it is a good idea to choose the full name option.
Optional Display: The optional display field allows you to have a second item displayed in brackets after the primary display within the user picker. You can choose between displaying the username, the user’s first and last name or the user’s job title. This second display can allow you to search the user picker for either the item you set for the Primary Display or the one you set for the Optional Display. So if you only have the user’s last name or you only have the user’s account name, you can still locate the account.
If you do not wish to use the Optional Display, set this option to None.
Maximum Users and Groups Displayed: This setting allows you to control the maximum number of users and groups that will be listed when you open a user picker. In cases where you have thousands or tens of thousands of users, limiting the number of users displayed will allow the user picker to load much more quickly. To find a user that is not in the initial list, just use the search within the user picker.
If you do not wish to use this setting, set this field to 0.
When you have finished with changing the General Settings, click Update Settings to save any changes you have made. If you do not wish to save your changes, click Cancel.
Text Editor Settings The text editor settings tab allows you to determine what WYSIWYG editor you are using and what interface options the user has when using the editor.
General Within the general tab, you can set which editor you wish to use. To do so, click the Choose From drop down under Text Editor Implementation. You can choose between RadEditorAjax, CKEditor, RadEditor and

SitePublish Administrator Guide
©2016 West Corporation. [03222016]. All rights reserved. May not be reproduced without express written permission. 23
FCKEditor. By default, our recommended editor, RadEditorAjax, will be selected. If you wish, you may also want to try the CKEditor however certain features, such as spell check and clipart, are not currently available with the CKEditor. The RadEditor and FCKEditor are legacy editors and will not work properly in newer browsers. We do not recommend using those unless you are running an older browser (such as IE6 or IE7).
Within the General tab you will find a number of sub-tabs, each with their own options for you to configure. Which of these options and tabs appear will depend on which editor you select. Only the RadEditorAjax will contain all of the options discussed.
Basic Settings Within the Basic Settings tab you can determine what features are available within the RadEditorAjax’s managers (such as the document manager and the image manager), control which users have access to those managers and make a few other configuration choices.
File Storage Locations: You can choose whether users are able to access the Physical File System, their Personal Folder (elocker) or both. The Physical File System is the shared collaborative folders that are available to all editors by default. For the personal folder option to appear, your site must have eLockers enabled.
Physical File System Restrictions: If you decide that you do not want some editors to access the shared collaborative folders, you can choose to Limit access to selected users. This can be quite useful if your users have accessing to their own personal folders.
You also have the option to Only allow Administrators to delete, rename and move files in the file manager. If this option is checked that administrators will be the only users that can delete, rename or move any files or folders found within the shared collaborative area.
Style Sheets: If Include System Default CSS (merged.css) is enabled, the editor will automatically incorporate the merged.css style sheet entries into the Apply CSS drop down that appears within the editor.
Other: If the option Disable mandatory Alt Text fields is enabled then users will no longer be required to fill in a tooltip or alt text when inserting images, hyperlinks, etc. Accessibility rules may require that your users use alt text when inserting images and hyperlinks so take that into consideration that before deciding to disable the mandatory alt text fields.
Text Editor Modes Within the Text Editor Modes tab you can determine which buttons will be enabled for each mode of the editor.
CMS: This is the mode for any content portlets found on your site. Generally this includes all portlets with names like Web Content, Content 1, etc. Tabs portlets also use the CMS mode.
Simple: This mode is used for areas where you often only need to type text and may not require any additional options. For example, the login page welcome message uses this mode.
Basic: Basic is much like simple in that it is mainly used for places where you often only need text and may not wish to have additional options available. The homework area within the LMS, for example, uses the Basic mode.
Default: This is the mode used for most portlets on the site that make use of the editor but that are not content portlets. This would include things like advanced data display portlets (used for news), calendar events, forums and the newsletter module. Many sites will want to configure this to add the Image Manager, Document Manager and Hyperlink Manager.
SitePublish Administrator Guide
©2016 West Corporation. [03222016]. All rights reserved. May not be reproduced without express written permission. 24
Forms: Though this option shows buttons for the forms, the Form Module uses the CKEditor or the FCKEditor so if you wish to change that buttons that appear in the Form Module, you should click on the Form Editor tab. We will discuss that tab later in this manual.
Wiki: This mode controls which buttons are available if you are editing a wiki portlet in rich text mode.
CRM: This mode determines which buttons will be displayed if you are working within the CRM Module. As most sites do not have the CRM module, this may not be relevant to you.
Regardless of which text editor mode you are editing, the interface is the same. The only difference is which options are enabled by default.
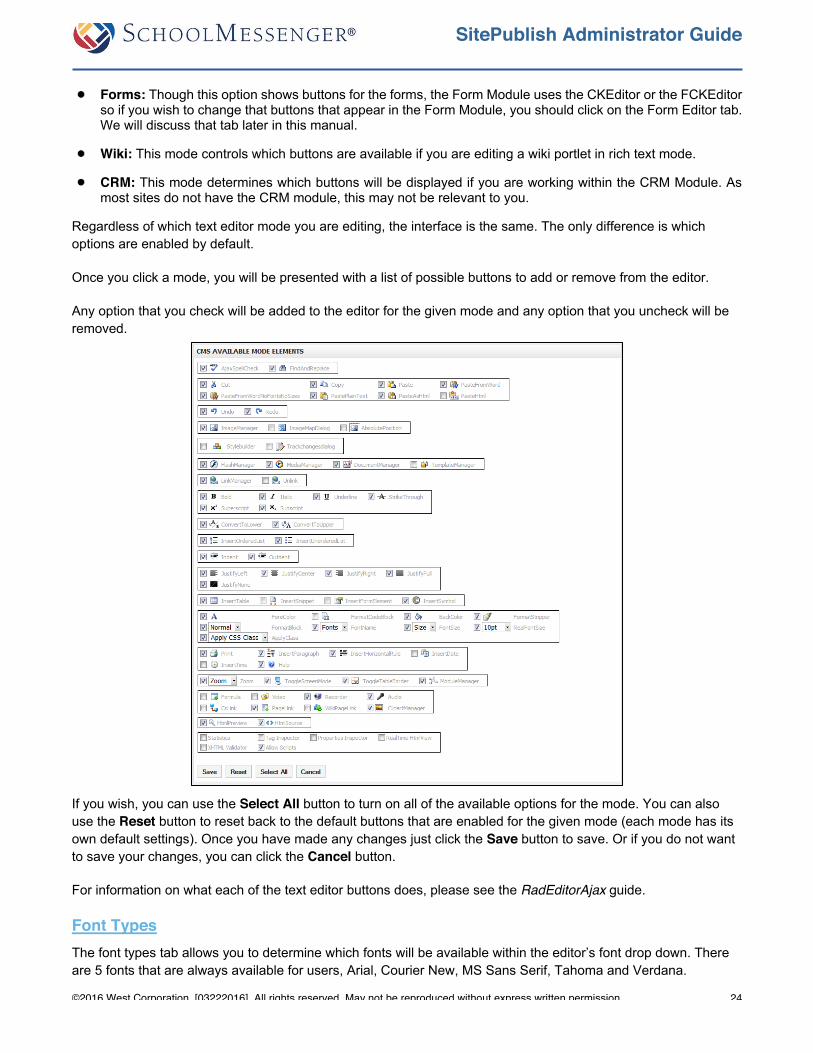
Once you click a mode, you will be presented with a list of possible buttons to add or remove from the editor.
Any option that you check will be added to the editor for the given mode and any option that you uncheck will be removed.
If you wish, you can use the Select All button to turn on all of the available options for the mode. You can also use the Reset button to reset back to the default buttons that are enabled for the given mode (each mode has its own default settings). Once you have made any changes just click the Save button to save. Or if you do not want to save your changes, you can click the Cancel button.
For information on what each of the text editor buttons does, please see the RadEditorAjax guide.
Font Types The font types tab allows you to determine which fonts will be available within the editor’s font drop down. There are 5 fonts that are always available for users, Arial, Courier New, MS Sans Serif, Tahoma and Verdana.
SitePublish Administrator Guide
©2016 West Corporation. [03222016]. All rights reserved. May not be reproduced without express written permission. 25
You can use the Font Name drop down to add additional fonts. You can choose seven additional fonts to add to the site. These are Andalus, Comic Sans MS, Georgia, Helvetica, sans-serif, Times and Times New Roman.
You can also add other fonts as long as they are considered to be web safe fonts. You can research which fonts work best online. To add a font that is not listed in the drop down, click the Font Name drop down and simply type your desired font in to the text field. In the screenshot below you can see that the Impact font is being added and that Century Gothic, Forte, Garamond and Poor Richard fonts have already been added to the site.
You can tell if your new font is compatible by clicking Add Font. If the font is one that is supported it will be rendered in the font you added. If the font is not supported, it will be rendered as your site’s default font.
If you wish to remove a font from the drop down, click the to the right of the font. You can only remove the optional fonts. The five default fonts are always available.
Table Layout CSS This option allows you to specify a custom CSS file for table layout. In most cases you will want to leave this set to Default. However, if you have your own table layout you wish to use, click Custom from the Table Style and then click Choose File to specify the CSS file you wish to use. Click Save to save your changes.
Form Editor The interface for the Form Editor is like a combination of the Text Editor Implementation fields and one of the Text Editor Modes. However instead of being able to choose between four options for the editor, you are limited to choosing between the CKEditor and the FCKEditor. The reason for this is that some functionality that is required for forms is not available within RadEditorAjax. While both the CKEditor and the FCKEditor are available from the Choose From drop down, the FCKEditor is a legacy editor that may not work properly with newer browsers. As such, we recommend using the CKEditor.
Regardless of which option you choose, you will be presented with a list of buttons you can check or uncheck. Any option that is checked will appear in the editor when you are working with forms. Any option that is unchecked will not appear.
You will want to make sure that you keep the options Checkbox, Radio, TextField, TextArea, Select and HiddenField checked as those can all be used to create different types of form fields for your forms.

SitePublish Administrator Guide
©2016 West Corporation. [03222016]. All rights reserved. May not be reproduced without express written permission. 26
If you want to go back to having the default buttons checked, click Reset. And if you would like to check all buttons, click Select All. Once you have made any changes you wish, click Save to save those changes.
Limited Access Mode The Limited Access Mode tab allows you to control what low-level users can see when they are given access to one of the editing modes. This may be useful if you want to allow, for instance, guests to be able to participate in a forum but you do not want to give them the same options as registered users have within that forum (a common example would be that registered users may be able to utilize the image manager while you likely will not want to grant guests that level of access).
From here you can choose that the Limited Access Mode be Applied to Guest and Read Only Users, be Applied to Guest Users Only or be Disabled.
By default the Limited Access Mode only allows users to use Bold, Italic, Underline and Strikethrough however, just like with the other Text Editor Modes you can add or remove buttons as you wish.
If you wish, you can use the Select All button to turn on all of the available options for the mode (though this is strongly not recommended as it would give guests users a high degree of access to the page and the various managers within the editor). You can also use the Reset button to reset back to the default buttons that are enabled for the Limited Access Mode. Once you have made any changes just click the Save button to save. Or if you do not want to save your changes, you can click the Cancel button.
SitePublish Administrator Guide
©2016 West Corporation. [03222016]. All rights reserved. May not be reproduced without express written permission. 27
Emails There are many emails that can be generated automatically by your site. These can be generated for everything from new user registrations to new blog posts to pages pending approval to new workflow tasks and much, much more. The exact emails you have available as well as the email categories will vary somewhat depending on your build and the features that have been installed/enabled within your site.
To view all the emails available for a particular category of emails, click the drop down to the right of In and choose the category you wish. Then click the Find button and you will be presented with all the email messages for that category.
As there is significant variance between sites as far as what options are available, we will not go over the list of options here. Each should be self-explanatory given its category and title however.
We will look at an example email message to get a feel for how updating the messages works.
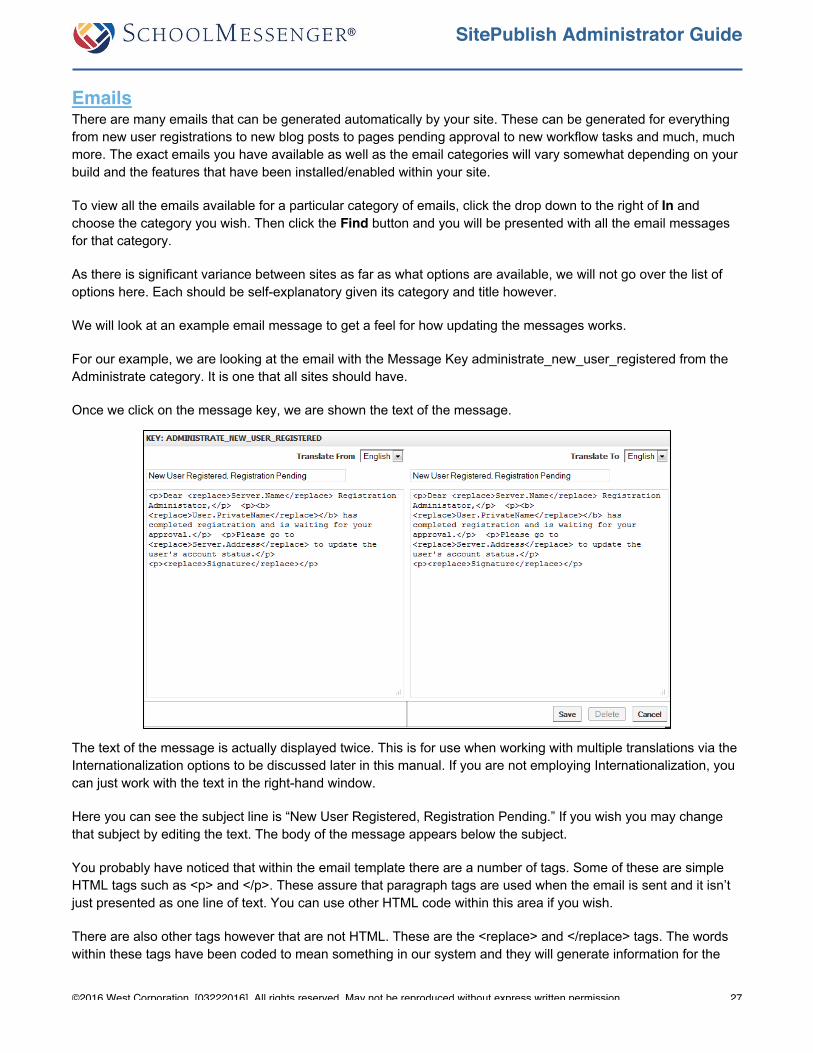
For our example, we are looking at the email with the Message Key administrate_new_user_registered from the Administrate category. It is one that all sites should have.
Once we click on the message key, we are shown the text of the message.
The text of the message is actually displayed twice. This is for use when working with multiple translations via the Internationalization options to be discussed later in this manual. If you are not employing Internationalization, you can just work with the text in the right-hand window.
Here you can see the subject line is “New User Registered, Registration Pending.” If you wish you may change that subject by editing the text. The body of the message appears below the subject.
You probably have noticed that within the email template there are a number of tags. Some of these are simple HTML tags such as <p> and </p>. These assure that paragraph tags are used when the email is sent and it isn’t just presented as one line of text. You can use other HTML code within this area if you wish.
There are also other tags however that are not HTML. These are the <replace> and </replace> tags. The words within these tags have been coded to mean something in our system and they will generate information for the
SitePublish Administrator Guide
©2016 West Corporation. [03222016]. All rights reserved. May not be reproduced without express written permission. 28
message. For example, <replace>User.PrivateName</replace> will display the name of the user that has registered for a new account and <replace>Server.Address</replace> will provide a link to the Manage User page for this site.
You can make any changes you wish to the body of the email template. You can also choose to not use one or more of the <replace>keytext</replace> tags that are part of the default message. However you cannot add new <replace> tags that are not part of the default message, even if you see those tags being used in another email key. Each key has its own words that can be used for <replace> tags that have been coded for use in our system. In some cases, like <replace>Signature</replace> the code is the same across virtually all email keys. However other replace keys are unique to a specific email message key or keys.
Once you have made the necessary changes to an email message key, click Save to save those changes. If you ever wish to revert one of your message keys back to the default, simply go to the list of keys for that category and click the to the right of the key.
SMTP Settings The SMTP settings tab allows you to configure the SMTP server that you will use to generate any emails from the system. This will be used for the messages that are generated from the Emails tab but it will also be used for any emails from the Send Mass Email module, from the Newsletter module, from the Send Emails tasks in the workflow and anywhere else where the system needs to send an email to a user.
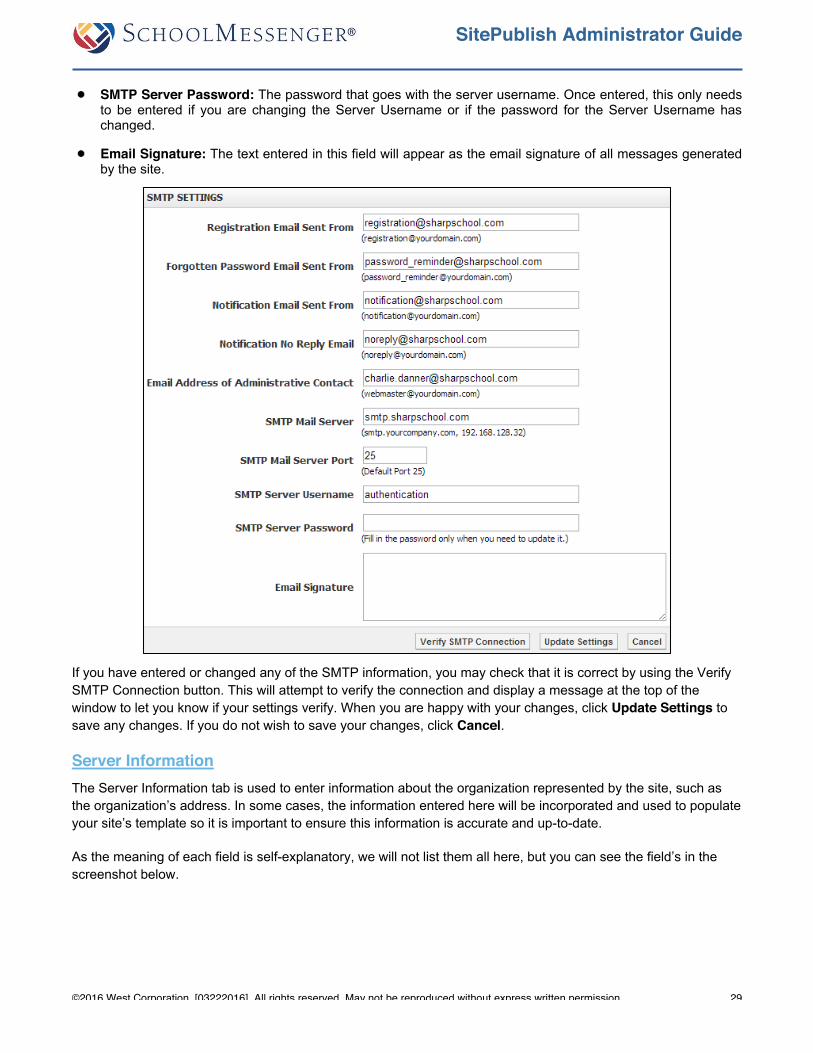
The SMTP Settings tab contains the following fields.
Registration Email Sent From: The email address that registration emails will appear to originate from. This would be emails informing administrators of new registrations as well as emails to newly registered users.
Forgotten Password Email Sent From: This is the email address that password reset request emails will appear to come from.
Notification Email Sent From: Most emails from the system (newsletters, approval requests, form submissions, etc) will appear to come from this field’s email address.
Notification No Reply Email: For emails that do not offer a reply option, this is the address the emails will appear to come from.
Email Address of Administrative Contact: This is the email address for any emails that need to be sent to a server administrator (such a new user registrations that require approval). Be sure to set this to the primary person in charge of maintaining the site. If multiple people will be primary then you may wish to create a shared alias and send the emails to that alias.
Unless you are planning to use your own mail server to send email from the site, you should not make any changes to the SMTP fields below.
SMTP Mail Server: The SMTP address for the mail server that is sending messages for the site. If you have your own mail server that you wish to use, you can enter the address here. Be sure that your mail server is set to accept requests from your website’s IP address.
SMTP Mail Server Port: The port that your mail server uses for sending email messages. For most mail servers this will be port 25.
SMTP Server Username: The username for the account you will be using to send mail messages through the server.
SitePublish Administrator Guide
©2016 West Corporation. [03222016]. All rights reserved. May not be reproduced without express written permission. 29
SMTP Server Password: The password that goes with the server username. Once entered, this only needs to be entered if you are changing the Server Username or if the password for the Server Username has changed.
Email Signature: The text entered in this field will appear as the email signature of all messages generated by the site.
If you have entered or changed any of the SMTP information, you may check that it is correct by using the Verify SMTP Connection button. This will attempt to verify the connection and display a message at the top of the window to let you know if your settings verify. When you are happy with your changes, click Update Settings to save any changes. If you do not wish to save your changes, click Cancel.
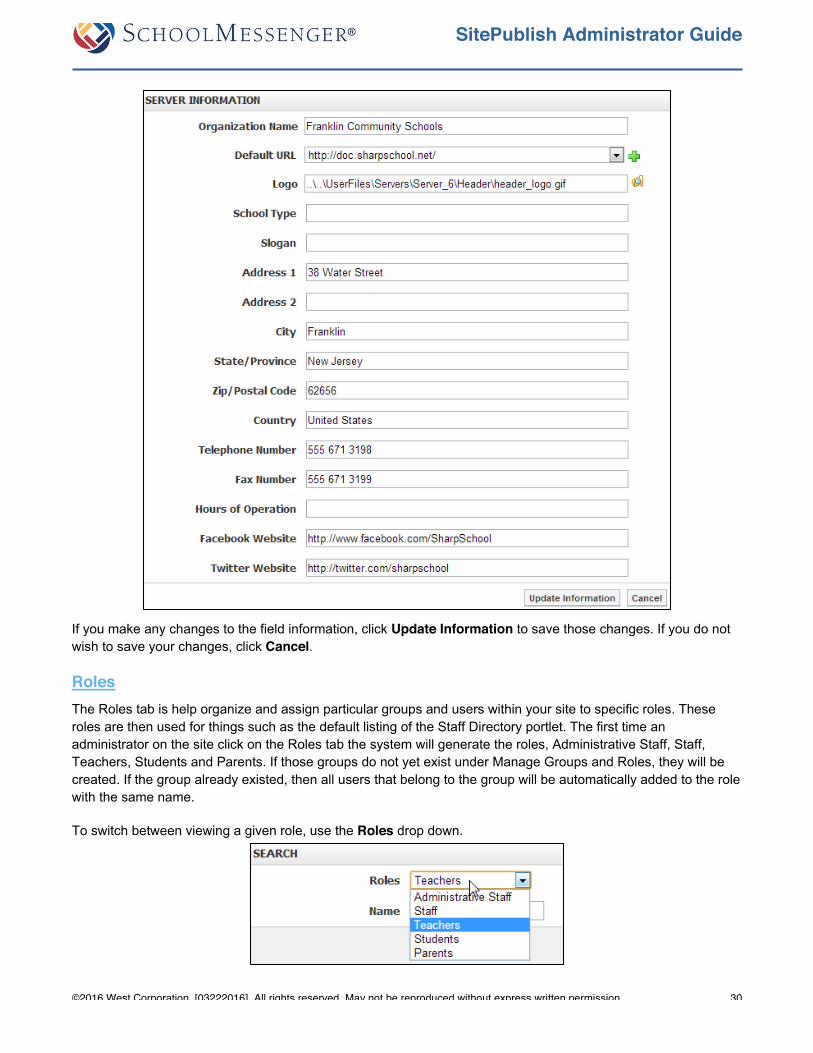
Server Information The Server Information tab is used to enter information about the organization represented by the site, such as the organization’s address. In some cases, the information entered here will be incorporated and used to populate your site’s template so it is important to ensure this information is accurate and up-to-date.
As the meaning of each field is self-explanatory, we will not list them all here, but you can see the field’s in the screenshot below.
SitePublish Administrator Guide
©2016 West Corporation. [03222016]. All rights reserved. May not be reproduced without express written permission. 30
If you make any changes to the field information, click Update Information to save those changes. If you do not wish to save your changes, click Cancel.
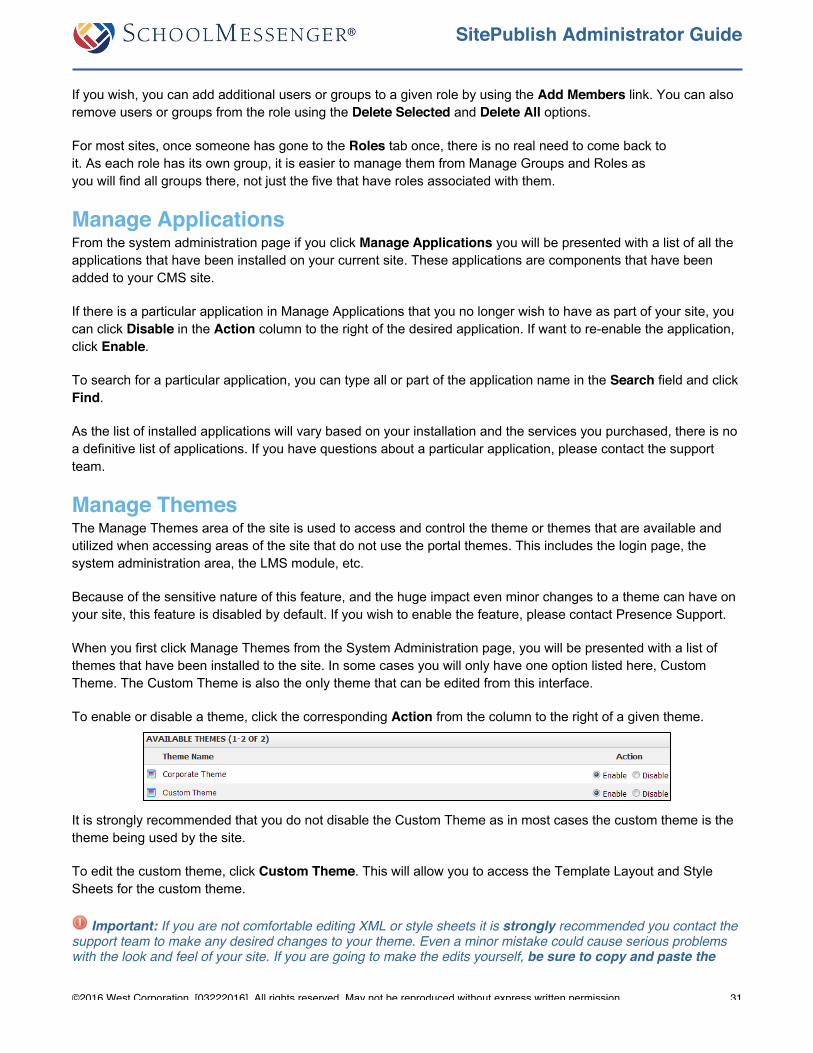
Roles The Roles tab is help organize and assign particular groups and users within your site to specific roles. These roles are then used for things such as the default listing of the Staff Directory portlet. The first time an administrator on the site click on the Roles tab the system will generate the roles, Administrative Staff, Staff, Teachers, Students and Parents. If those groups do not yet exist under Manage Groups and Roles, they will be created. If the group already existed, then all users that belong to the group will be automatically added to the role with the same name.
To switch between viewing a given role, use the Roles drop down.
SitePublish Administrator Guide
©2016 West Corporation. [03222016]. All rights reserved. May not be reproduced without express written permission. 31
If you wish, you can add additional users or groups to a given role by using the Add Members link. You can also remove users or groups from the role using the Delete Selected and Delete All options.
For most sites, once someone has gone to the Roles tab once, there is no real need to come back to it. As each role has its own group, it is easier to manage them from Manage Groups and Roles as you will find all groups there, not just the five that have roles associated with them.
Manage Applications From the system administration page if you click Manage Applications you will be presented with a list of all the applications that have been installed on your current site. These applications are components that have been added to your CMS site.
If there is a particular application in Manage Applications that you no longer wish to have as part of your site, you can click Disable in the Action column to the right of the desired application. If want to re-enable the application, click Enable.
To search for a particular application, you can type all or part of the application name in the Search field and click Find.
As the list of installed applications will vary based on your installation and the services you purchased, there is no a definitive list of applications. If you have questions about a particular application, please contact the support team.
Manage Themes The Manage Themes area of the site is used to access and control the theme or themes that are available and utilized when accessing areas of the site that do not use the portal themes. This includes the login page, the system administration area, the LMS module, etc.
Because of the sensitive nature of this feature, and the huge impact even minor changes to a theme can have on your site, this feature is disabled by default. If you wish to enable the feature, please contact Presence Support.
When you first click Manage Themes from the System Administration page, you will be presented with a list of themes that have been installed to the site. In some cases you will only have one option listed here, Custom Theme. The Custom Theme is also the only theme that can be edited from this interface.
To enable or disable a theme, click the corresponding Action from the column to the right of a given theme.
It is strongly recommended that you do not disable the Custom Theme as in most cases the custom theme is the theme being used by the site.
To edit the custom theme, click Custom Theme. This will allow you to access the Template Layout and Style Sheets for the custom theme.
Important: If you are not comfortable editing XML or style sheets it is strongly recommended you contact the support team to make any desired changes to your theme. Even a minor mistake could cause serious problems with the look and feel of your site. If you are going to make the edits yourself, be sure to copy and paste the

SitePublish Administrator Guide
©2016 West Corporation. [03222016]. All rights reserved. May not be reproduced without express written permission. 32
original layout and style sheets in to Notepad or another word processing program. That way you can use that copied code to revert to the previous version if anything goes wrong. Once you have made your changes, click Update Template to save the changes. An XML validation will be run on the template to ensure the code still validate. If the changes you have made do not validate, you will not be able to save your updated layout.
Manage Users The Manage Users section lets administrators add and search for users, edit user profiles and assign users to specific groups.
There are five primary tasks that administrators can perform through the Manage Users interface, these are:
Adding Users
Delete Users
Logging in as a User
Searching User Names
Editing a User
Adding Users As a general practice, when you first receive your site(s) from Presence all your users are already imported into the system. However, this may not always be the case and as new members are added to an organization it becomes important for the Administrator to take on the responsibility of adding these users.
If you are using LDAP, Google Apps or a similar process to create user accounts, you will usually create accounts via this method. However you may wish to create a handful of manually generated accounts as well. For instance, if inclement weather has caused a power outage that has made your LDAP server inaccessible, you may still
SitePublish Administrator Guide
©2016 West Corporation. [03222016]. All rights reserved. May not be reproduced without express written permission. 33
need to be able to log in to update the site. A manually created account will be able to log-in, even if the LDAP server is not available.
Adding individual users into the system is straightforward; simply click on the Add User icon. Here, you can enter distinct values for the user in specific fields, such as: Screen Name, First Name, Last Name, Email Address, and Password. Once these fields are completed, simply click on Add User.
It is important to use a current and valid email address for users, especially if this user will be responsible for editing content on pages, since reminders and notifications will be routed to the email address provided in the user’s profile information.
The Default Organization option will not be visible to regular users on the system, i.e. non-administrators.
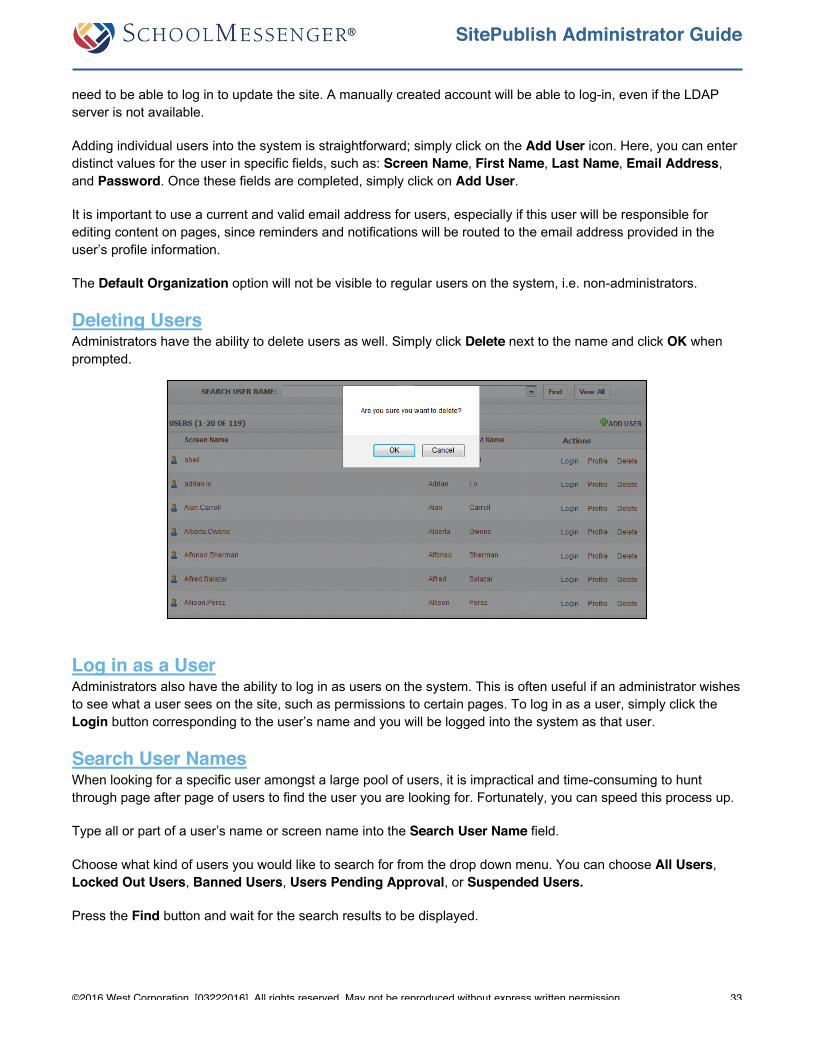
Deleting Users Administrators have the ability to delete users as well. Simply click Delete next to the name and click OK when prompted.
Log in as a User Administrators also have the ability to log in as users on the system. This is often useful if an administrator wishes to see what a user sees on the site, such as permissions to certain pages. To log in as a user, simply click the Login button corresponding to the user’s name and you will be logged into the system as that user.
Search User Names When looking for a specific user amongst a large pool of users, it is impractical and time-consuming to hunt through page after page of users to find the user you are looking for. Fortunately, you can speed this process up.
Type all or part of a user’s name or screen name into the Search User Name field.
Choose what kind of users you would like to search for from the drop down menu. You can choose All Users, Locked Out Users, Banned Users, Users Pending Approval, or Suspended Users.
Press the Find button and wait for the search results to be displayed.
SitePublish Administrator Guide
©2016 West Corporation. [03222016]. All rights reserved. May not be reproduced without express written permission. 34
Editing a User Once a user has been added into the system, an administrator has the ability to edit various aspects of that user’s profile.
By clicking on a user’s Screen Name in the Manage Users list, the administrator can access the user’s profile page. In addition, there are five tabs available that will allow the administrator to grant even further rights and permissions to an account. These five tabs are:
Member Of
Permissions
Activity
Access and Suspension
Delegation
Each tab is described in details later in this user manual.
Member Of The Member Of tab allows administrators to do three primary functions:
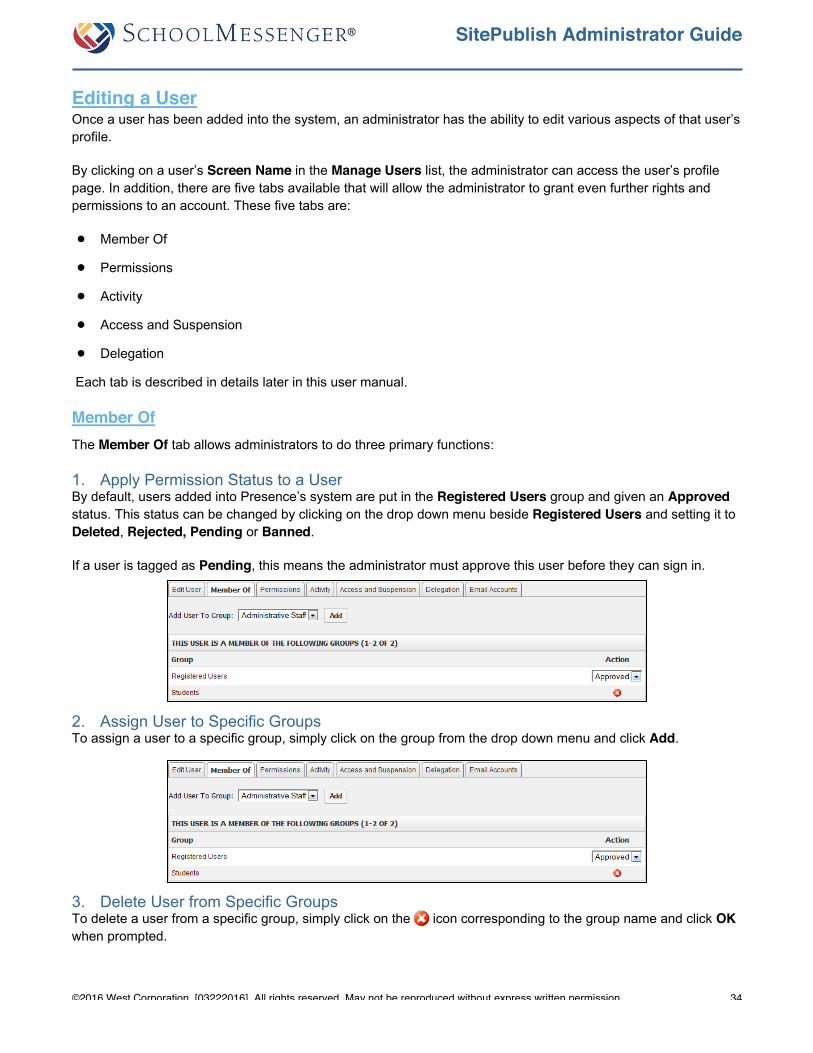
1. Apply Permission Status to a User By default, users added into Presence’s system are put in the Registered Users group and given an Approved status. This status can be changed by clicking on the drop down menu beside Registered Users and setting it to Deleted, Rejected, Pending or Banned.
If a user is tagged as Pending, this means the administrator must approve this user before they can sign in.
2. Assign User to Specific Groups To assign a user to a specific group, simply click on the group from the drop down menu and click Add.
3. Delete User from Specific Groups To delete a user from a specific group, simply click on the icon corresponding to the group name and click OK when prompted.
SitePublish Administrator Guide
©2016 West Corporation. [03222016]. All rights reserved. May not be reproduced without express written permission. 35
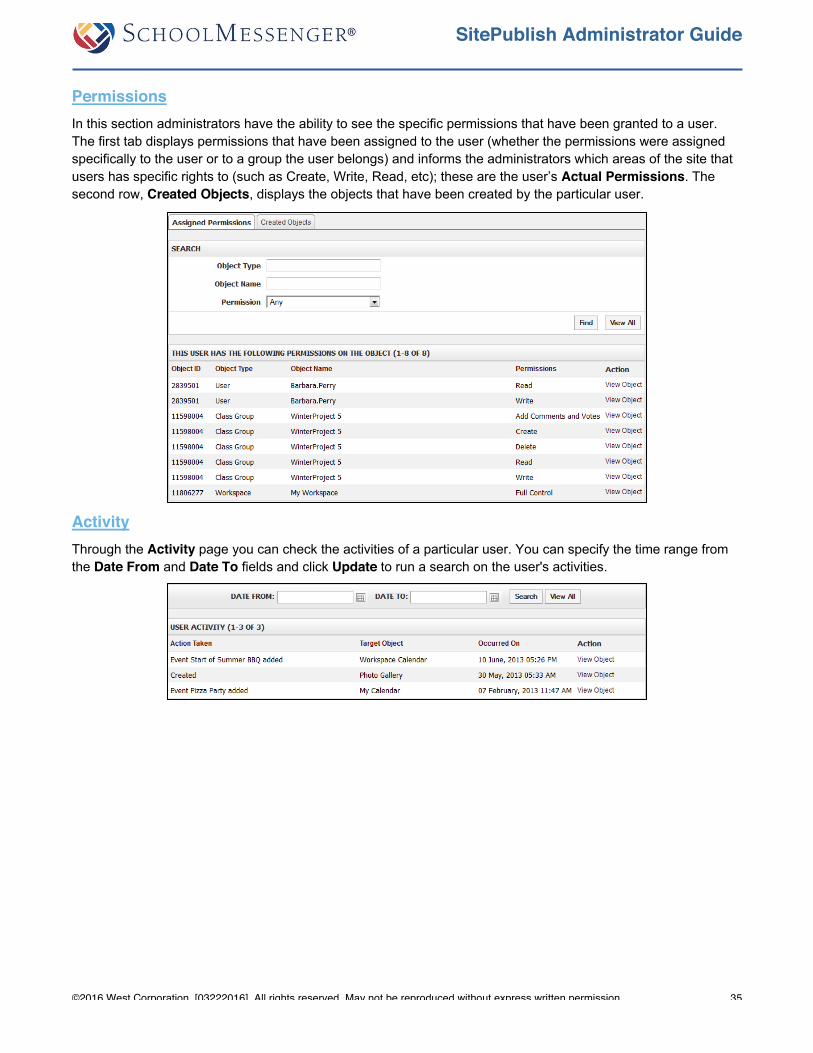
Permissions In this section administrators have the ability to see the specific permissions that have been granted to a user. The first tab displays permissions that have been assigned to the user (whether the permissions were assigned specifically to the user or to a group the user belongs) and informs the administrators which areas of the site that users has specific rights to (such as Create, Write, Read, etc); these are the user’s Actual Permissions. The second row, Created Objects, displays the objects that have been created by the particular user.
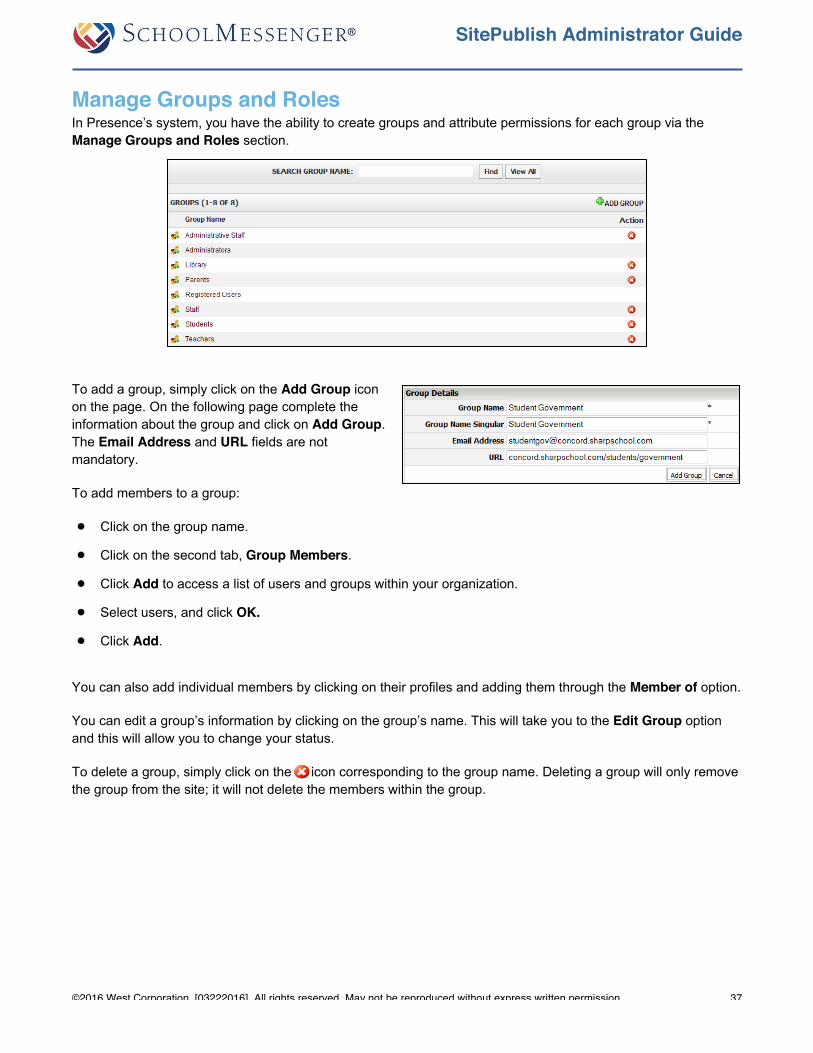
Activity Through the Activity page you can check the activities of a particular user. You can specify the time range from the Date From and Date To fields and click Update to run a search on the user's activities.

SitePublish Administrator Guide
©2016 West Corporation. [03222016]. All rights reserved. May not be reproduced without express written permission. 36
Access and Suspension Administrators have the ability to suspend user accounts for specific durations of time. There are three options available through this interface:
ACCESS STATUS DEFINITION
Access Granted
This is a default setting on the system. All users added into the Presence system are given an Access Granted status. If Administrators wish to grant access only for a specific duration of time, then simply select the dates and times from the drop down menus.
Access Banned Users can be banned from using any aspect of the system.
Access Temporarily Suspended
User accounts can also be suspended on a temporary basis.
Delegation Delegation of accounts is often used for student or parent accounts. Administrators can delegate a student account to a parent, or assign a parent account to a student. This allows parents to view their child’s progress on online tests, assignments, keep track of attendance and view their emails and messages. An administrator that is taking a leave of absence may also wish to delegate permission to another user via this method.
When setting one account as the parent of another account, the parent account will have all the same rights and access that the child account has (in addition to its own rights and access).
SitePublish Administrator Guide
©2016 West Corporation. [03222016]. All rights reserved. May not be reproduced without express written permission. 37
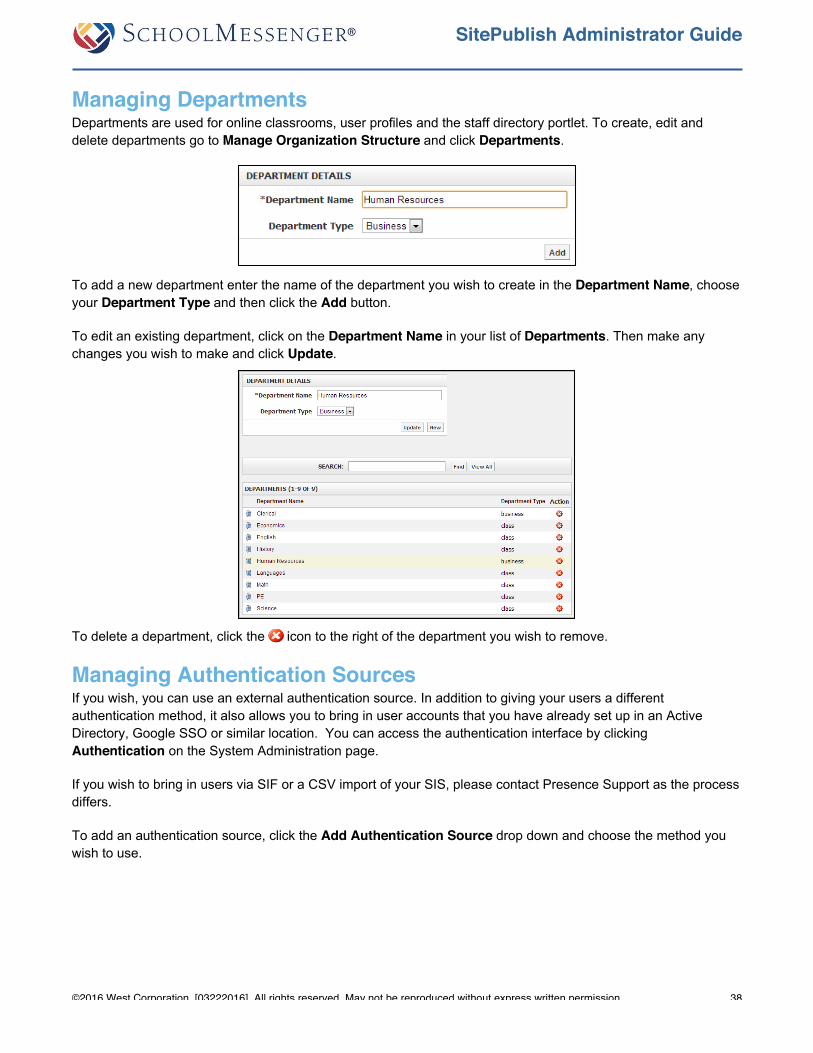
Manage Groups and Roles In Presence’s system, you have the ability to create groups and attribute permissions for each group via the Manage Groups and Roles section.
To add a group, simply click on the Add Group icon on the page. On the following page complete the information about the group and click on Add Group. The Email Address and URL fields are not mandatory.
To add members to a group:
Click on the group name.
Click on the second tab, Group Members.
Click Add to access a list of users and groups within your organization.
Select users, and click OK.
Click Add.
You can also add individual members by clicking on their profiles and adding them through the Member of option.
You can edit a group’s information by clicking on the group’s name. This will take you to the Edit Group option and this will allow you to change your status.
To delete a group, simply click on the icon corresponding to the group name. Deleting a group will only remove the group from the site; it will not delete the members within the group.
SitePublish Administrator Guide
©2016 West Corporation. [03222016]. All rights reserved. May not be reproduced without express written permission. 38
Managing Departments Departments are used for online classrooms, user profiles and the staff directory portlet. To create, edit and delete departments go to Manage Organization Structure and click Departments.
To add a new department enter the name of the department you wish to create in the Department Name, choose your Department Type and then click the Add button.
To edit an existing department, click on the Department Name in your list of Departments. Then make any changes you wish to make and click Update.
To delete a department, click the icon to the right of the department you wish to remove.
Managing Authentication Sources If you wish, you can use an external authentication source. In addition to giving your users a different authentication method, it also allows you to bring in user accounts that you have already set up in an Active Directory, Google SSO or similar location. You can access the authentication interface by clicking Authentication on the System Administration page.
If you wish to bring in users via SIF or a CSV import of your SIS, please contact Presence Support as the process differs.
To add an authentication source, click the Add Authentication Source drop down and choose the method you wish to use.
SitePublish Administrator Guide
©2016 West Corporation. [03222016]. All rights reserved. May not be reproduced without express written permission. 39
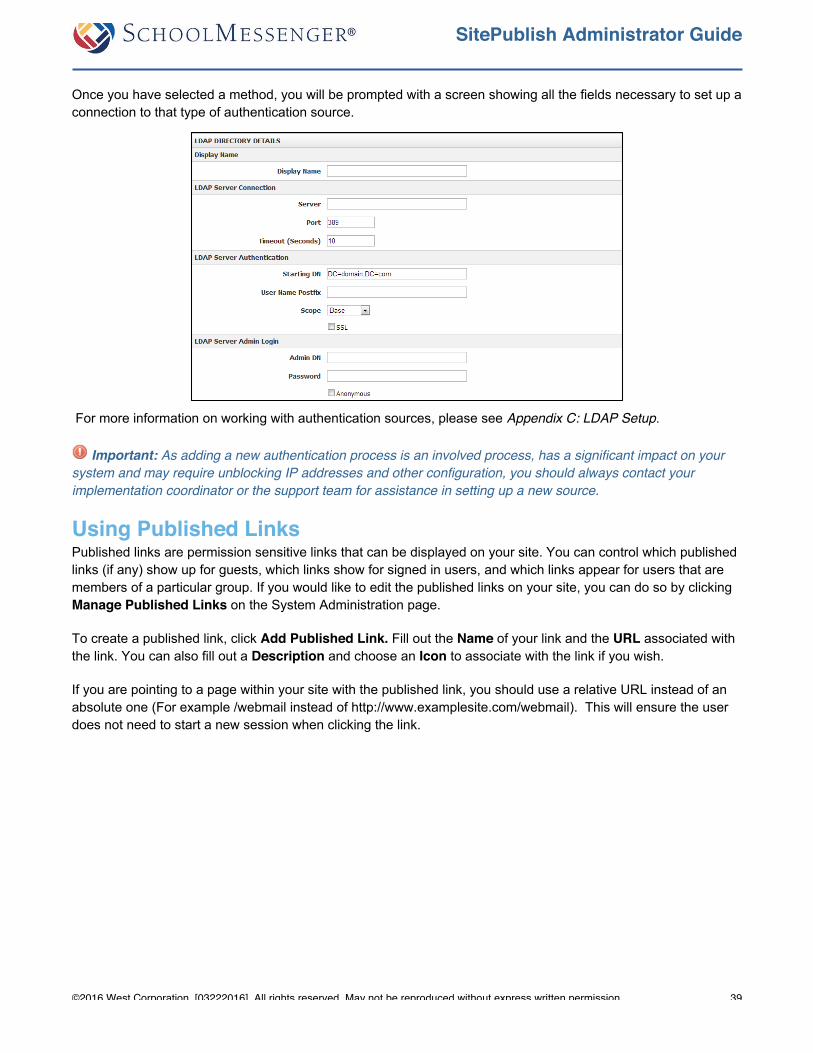
Once you have selected a method, you will be prompted with a screen showing all the fields necessary to set up a connection to that type of authentication source.
For more information on working with authentication sources, please see Appendix C: LDAP Setup.
Important: As adding a new authentication process is an involved process, has a significant impact on your system and may require unblocking IP addresses and other configuration, you should always contact your implementation coordinator or the support team for assistance in setting up a new source.
Using Published Links Published links are permission sensitive links that can be displayed on your site. You can control which published links (if any) show up for guests, which links show for signed in users, and which links appear for users that are members of a particular group. If you would like to edit the published links on your site, you can do so by clicking Manage Published Links on the System Administration page.
To create a published link, click Add Published Link. Fill out the Name of your link and the URL associated with the link. You can also fill out a Description and choose an Icon to associate with the link if you wish.
If you are pointing to a page within your site with the published link, you should use a relative URL instead of an absolute one (For example /webmail instead of http://www.examplesite.com/webmail). This will ensure the user does not need to start a new session when clicking the link.
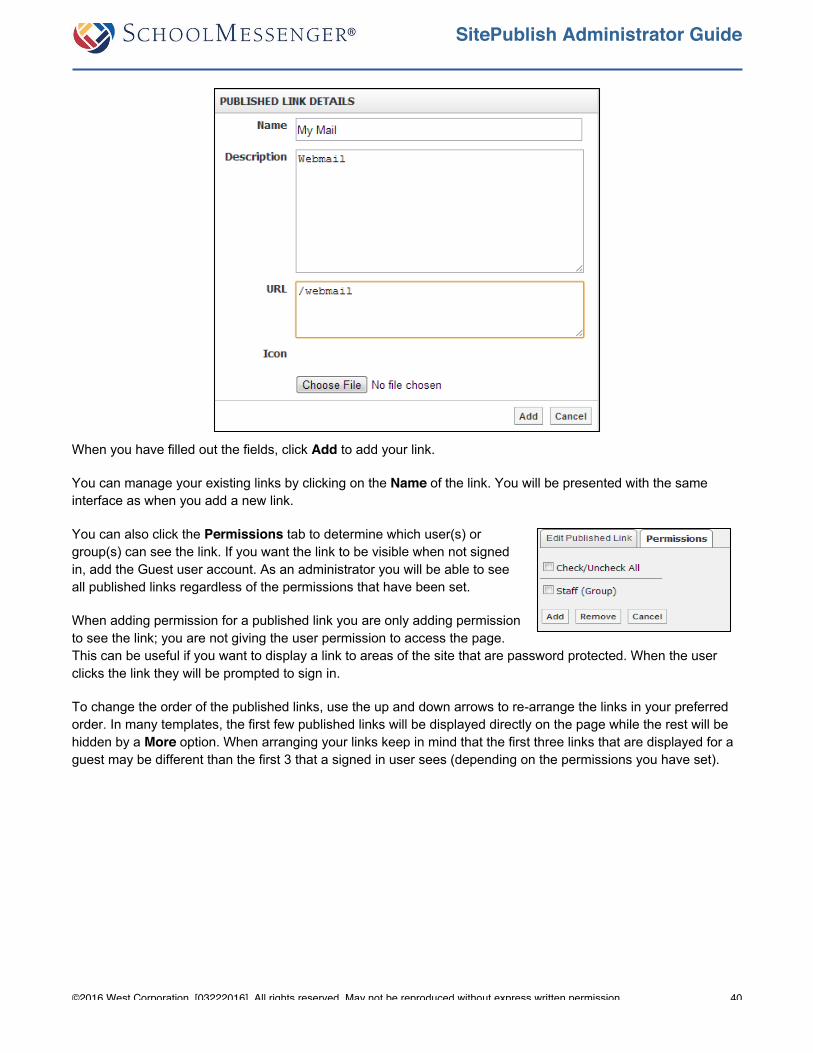
SitePublish Administrator Guide
©2016 West Corporation. [03222016]. All rights reserved. May not be reproduced without express written permission. 40
When you have filled out the fields, click Add to add your link.
You can manage your existing links by clicking on the Name of the link. You will be presented with the same interface as when you add a new link.
You can also click the Permissions tab to determine which user(s) or group(s) can see the link. If you want the link to be visible when not signed in, add the Guest user account. As an administrator you will be able to see all published links regardless of the permissions that have been set.
When adding permission for a published link you are only adding permission to see the link; you are not giving the user permission to access the page. This can be useful if you want to display a link to areas of the site that are password protected. When the user clicks the link they will be prompted to sign in.
To change the order of the published links, use the up and down arrows to re-arrange the links in your preferred order. In many templates, the first few published links will be displayed directly on the page while the rest will be hidden by a More option. When arranging your links keep in mind that the first three links that are displayed for a guest may be different than the first 3 that a signed in user sees (depending on the permissions you have set).

SitePublish Administrator Guide
©2016 West Corporation. [03222016]. All rights reserved. May not be reproduced without express written permission. 41
To remove any of your published links, click the icon to the right of the respective link.
Managing RSS Providers Several applications on Presence’s system have RSS capabilities. These can be found in Manage RSS Providers. Administrators can determine which application should offer RSS feeds by simply clicking on the Enable or Disable radio buttons.
The corresponding RSS feeds will only be available if the provider has been set to enable.
Sending Mass Email To aid in communications with your users, Presence provides a tool for sending mass emails. This feature can be found under Send Mass Email.
To send a message, first choose whether to have the message show as being sent From the default notification email address or from the email address associated with your user account.
If the email address associated with your email account isn’t from the server domain you have set in the SMTP settings, there is an increased risk of your message being incorrectly identified as spam by users receiving your email.

SitePublish Administrator Guide
©2016 West Corporation. [03222016]. All rights reserved. May not be reproduced without express written permission. 42
You can then choose who you want to send your message to using the To, CC, and BCC fields. If you are sending to people who have email accounts on the system, click the User Picker icon to choose the users or groups you want. If you are sending to people who aren’t users on your system, you can type or paste in their email addresses in the Other Email Addresses fields.
If sending to a large group of users it is generally considered inappropriate to use the To or CC fields as that allows everyone who receives the message to see all the other email addresses that received the message. In those cases you should use the BCC field instead.
Now enter a Subject, type your message, and click Send.
Default Calendar Settings Whenever you create a new calendar on your site, it will have certain default settings pertaining to its look and feel. There are also some elements of the look and feel that are universal to all calendars of a particular type on your site. You can change what those default settings are by going to the Default Calendar Settings.
There are four different areas where you can create calendars within your site and each of those has their own default calendar settings that you can configure. The four areas are:
Content Manager: Any calendar created by adding a calendar page or adding a calendar portlet to an existing page. This will likely compromise the vast majority of your calendars.
E-Learning Server: Any calendar inside the online classrooms.
Collaboration Server: Any calendar created in the Workspaces module.
RegisterNow Enterprise Edition: Any event registration calendar.
In all the calendar modes you will have the same default configuration options.
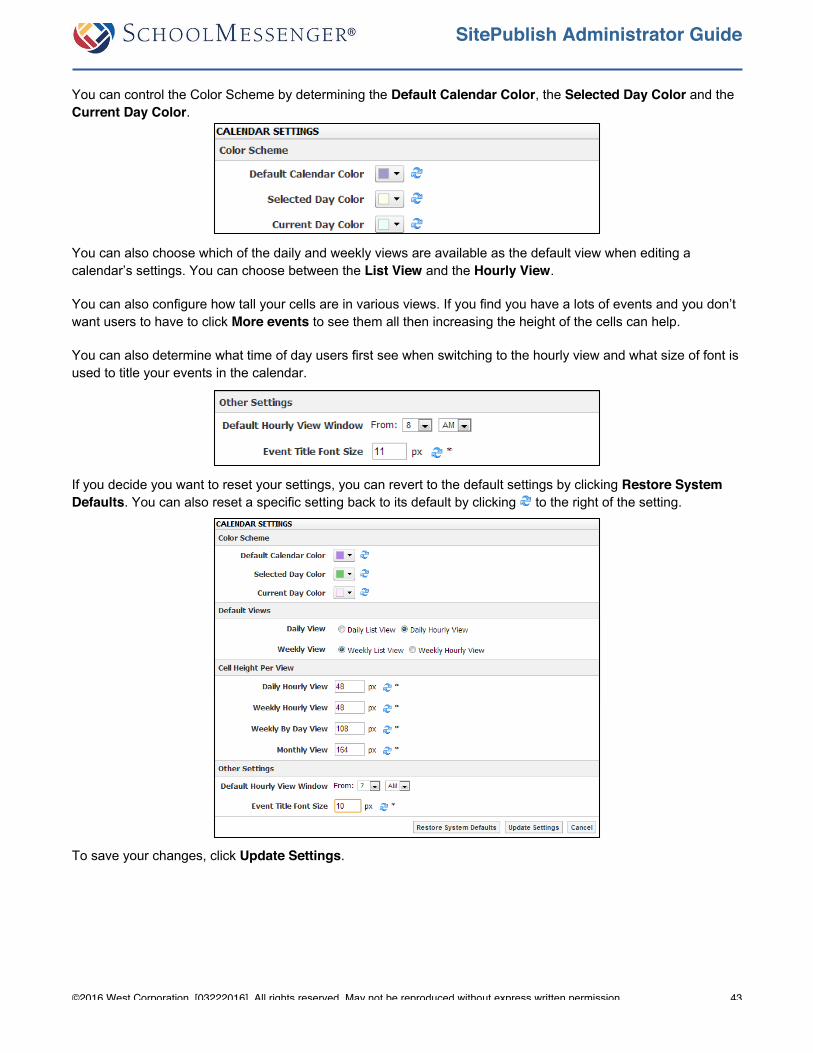
SitePublish Administrator Guide
©2016 West Corporation. [03222016]. All rights reserved. May not be reproduced without express written permission. 43
You can control the Color Scheme by determining the Default Calendar Color, the Selected Day Color and the Current Day Color.
You can also choose which of the daily and weekly views are available as the default view when editing a calendar’s settings. You can choose between the List View and the Hourly View.
You can also configure how tall your cells are in various views. If you find you have a lots of events and you don’t want users to have to click More events to see them all then increasing the height of the cells can help.
You can also determine what time of day users first see when switching to the hourly view and what size of font is used to title your events in the calendar.
If you decide you want to reset your settings, you can revert to the default settings by clicking Restore System Defaults. You can also reset a specific setting back to its default by clicking to the right of the setting.
To save your changes, click Update Settings.

SitePublish Administrator Guide
©2016 West Corporation. [03222016]. All rights reserved. May not be reproduced without express written permission. 44
Manage Event Categories Administrators have the ability to create event categories that will be made available to calendar users on the system, such as teachers, secretaries or athletics coaches. These Event Categories can be customized to have a unique icon and font color associated with it.
There are four locations of Event Categories that can be created within the system, and these are listed as individual tabs on this page. These are:
Content Manager: Any calendar created by adding a calendar page or adding a calendar portlet to an existing page. This will likely compromise the vast majority of your calendars.
E-Learning Server: Any calendar inside the online classrooms.
Collaboration Server: Any calendar created in the Workspaces module.
RegisterNow Enterprise Edition: Any event registration calendar.
To add an Event Category, simply click Add Event Category.
Fill in information about your specific event and assign it a font color and icon and click on Create Event Category.
If you wish to copy a specific event category, simply click on the icon corresponding to the title of the event category.
You can select which location you wish to copy that event to from the Copy to drop down. Furthermore, you can rename the title of the event in the New Category Name field. When finished, click on Copy.
To delete an event category, simply click on the icon next to the corresponding to the title.
For more information on working with calendars, please refer to the chapter on Calendars.
SitePublish Administrator Guide
©2016 West Corporation. [03222016]. All rights reserved. May not be reproduced without express written permission. 45
Working with Site Render Templates Site Render templates can be used to control the look and feel of various elements on your site. They are most commonly used for are the Navigation, Data Display, Data Summary and RSS Aggregator and Upcoming Events portlets. You can access the Site Render Templates by clicking Site Render Templates on the System Administration page.
If you are not comfortable editing XML or style sheets it is strongly recommended you contact the support team to make any desired changes to your theme. Even a minor mistake could make your render template no longer display properly. And if you are making changes on the district site, this is particularly risky as one or more of your school sites may be using your render templates. If you are going to make the edits yourself, be sure to copy and paste the original layout and style sheets in to Notepad or another word processing program. That way you can use that copied code to revert to the previous version if anything goes wrong.
To add a new site render template, click Add Site Render Template. You can then enter the following information:
Template Name: The name of your site render template.
Category: The category of your render template. For portlets that use render templates, they will only be able to use a specific type of render template so it is important to set the right category. For more information, see the documentation for the portlet or module you are planning to use.
Description: A description of the render template for reference purposes.
XSL Transform: The XML of your render template goes here. The field should start with <xsl:stylesheet version="1.0" xmlns:xsl="http://www.w3.org/1999/XSL/Transform"> and end with </xsl:stylesheet>. The XML code entered must be valid code or the render template will be unable to be added or updated.
Style Sheets: Any CSS you wish to apply to the render template can be entered here. You can also have CSS in the style sheet for the broader template being used on the page applied to the site render template.
Upload Images: If you wish, you can upload image files to be used in your XSL Transform and Style Sheets fields. You can also use images from the image manager/document manager/etc but this interface gives you a place you can upload those images from within the site render template interface.
Once you have finished setting up your site render template, click Add Render Template. The XML will be tested to ensure it is valid and then the render template will be added to your site.
To edit an existing site render template, just click on the template you wish to edit. You will then have the same interface you get when adding a new template except that the button at the bottom of the page will now say Update Render Template. The XSL Transform input will still need to pass a validation check in order to be successfully updated.
When viewing the list of site render templates you will notice that many of them do not have a under the action column. The ones without the are either from a parent site (such as the district site if you are on a school site) or they are system default templates; these templates cannot be edited (though if they are from a parent site, you can go to the parent site and perform your edits there). If you want to modify one of these static templates, you can click on the render template and then copy and paste the code in to a new site render template; you can edit the new template as you wish.
To delete a render template, click on the and then confirm your decision.
SitePublish Administrator Guide
©2016 West Corporation. [03222016]. All rights reserved. May not be reproduced without express written permission. 46
Be careful when deleting a render template as this will disrupt the rendering of any portlet that is using your template. Be particularly mindful of this when deleting a render template from a district site as any render template created at the district level is also available (in a static form) at the school level.
Filtering Profanity SitePublish includes an optional profanity filter module. Once it has been enabled this filter can be used to block inappropriate language from being posted to your site. The filter is designed to work with the parts of your site where guests or students are likely to have the ability to post or submit content. You can find the profanity filter under Profanity Filter Settings on the system administration page. If you do not have this option, please contact the support team and they will be happy to enable it for you.
In the profanity filter interface you can list any and all word or phrases that you wish to block by entering them into the Filtered Words List field. Each word or phrase you wish to block should be entered in on its own line.
In order to keep this manual appropriate for all readers we will not post it here but we do have a default list of words to filter. If you contact support they can add the list for you. You can still add your own custom entries in addition to the default list if you so choose.
Once you have set up your list of words, you will now need to decide what you want to apply the filter on. You can choose from any or all of the following:
Form
Forum
Blog
Gallery Comments
File Comments
Group Comments: Only available if Groups module is enabled
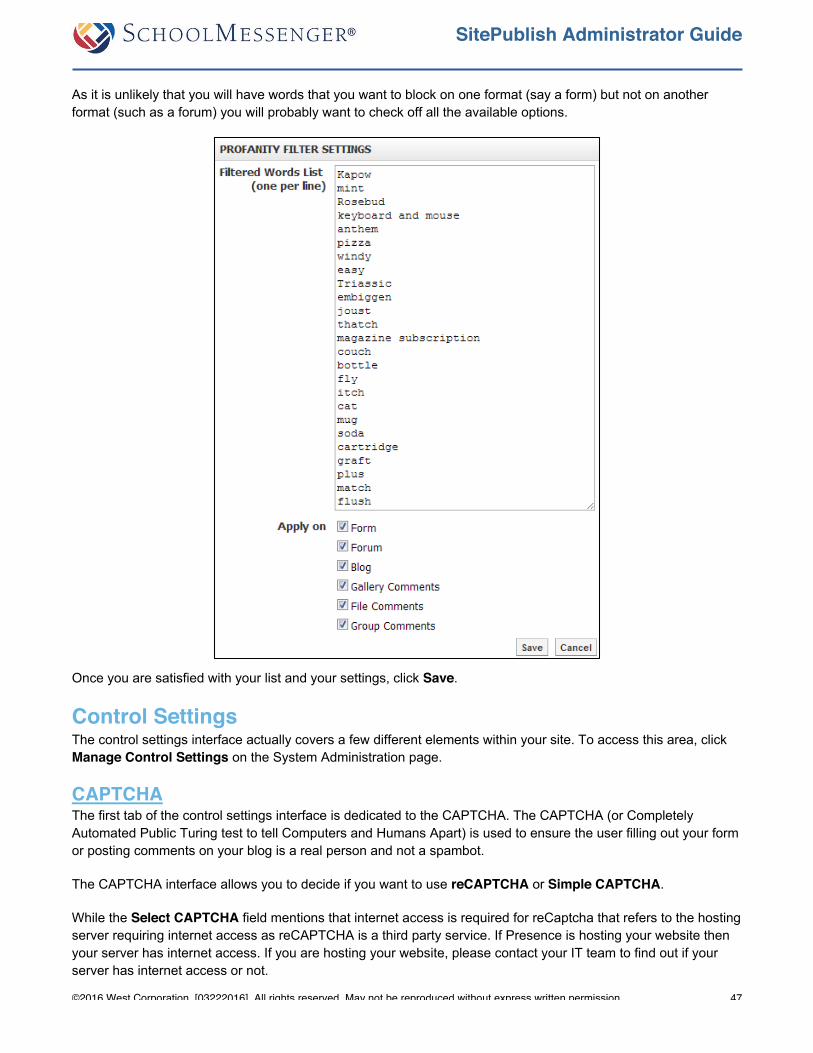
SitePublish Administrator Guide
©2016 West Corporation. [03222016]. All rights reserved. May not be reproduced without express written permission. 47
As it is unlikely that you will have words that you want to block on one format (say a form) but not on another format (such as a forum) you will probably want to check off all the available options.
Once you are satisfied with your list and your settings, click Save.
Control Settings The control settings interface actually covers a few different elements within your site. To access this area, click Manage Control Settings on the System Administration page.
CAPTCHA The first tab of the control settings interface is dedicated to the CAPTCHA. The CAPTCHA (or Completely Automated Public Turing test to tell Computers and Humans Apart) is used to ensure the user filling out your form or posting comments on your blog is a real person and not a spambot.
The CAPTCHA interface allows you to decide if you want to use reCAPTCHA or Simple CAPTCHA.
While the Select CAPTCHA field mentions that internet access is required for reCaptcha that refers to the hosting server requiring internet access as reCAPTCHA is a third party service. If Presence is hosting your website then your server has internet access. If you are hosting your website, please contact your IT team to find out if your server has internet access or not.

SitePublish Administrator Guide
©2016 West Corporation. [03222016]. All rights reserved. May not be reproduced without express written permission. 48
If you are using reCAPTCHA you can set an Error Message, choose whether to Show Error Message as well as choose between a number of possible Themes and Languages.
If you are using the Simple CAPTCHA you can specify the Error Message that is displayed when a user fills out the CAPTCHA incorrectly.
With either CAPTCHA option you will see a preview of your CATPCHA under the settings.
When you are ready to save your configuration, click Update.
School Drop Down Another component of the control settings interface is the School Drop Down. Here you can configure the look and feel of your school drop down as well as control which schools are included in the drop down and how they are organized. To access this interface, click the School Drop Down tab within Manage Control Settings. As you might expect, this interface will not be available if you have a single standalone site.
The first tab within the School Drop Down is the Display Settings tab.
Here you can choose a Render Template for your school drop down. You can also choose how to Group Schools By (Name, School Type or None).
You can also decide what to do with the Current Website Link, whether to include the district site in the drop down and whether to allow schools to configure these settings or force them to follow the settings from the district site.

SitePublish Administrator Guide
©2016 West Corporation. [03222016]. All rights reserved. May not be reproduced without express written permission. 49
Finally you can choose from one of several Layout Mode options.
When you are happy with your settings, click Update Settings.
The second tab in the School Drop Down is School List. Here you will see a list of all the schools that are part of your district along with the Type, Default URL (this is the URL that will be used if someone clicks on the school in your drop down menu) and Status (this allows you to toggle sites from being included or excluded from the school drop down).
If you wish to change the name, type, default URL or status for any of the schools, just click on the icon. To save your change, click
The final tab within School Drop Down is the School Types tab. Here you can specify the order for the School Types you created in the School List tab.
The school type order is only relevant if you have chosen to group schools by school type. For more information on that option, see the previous page.
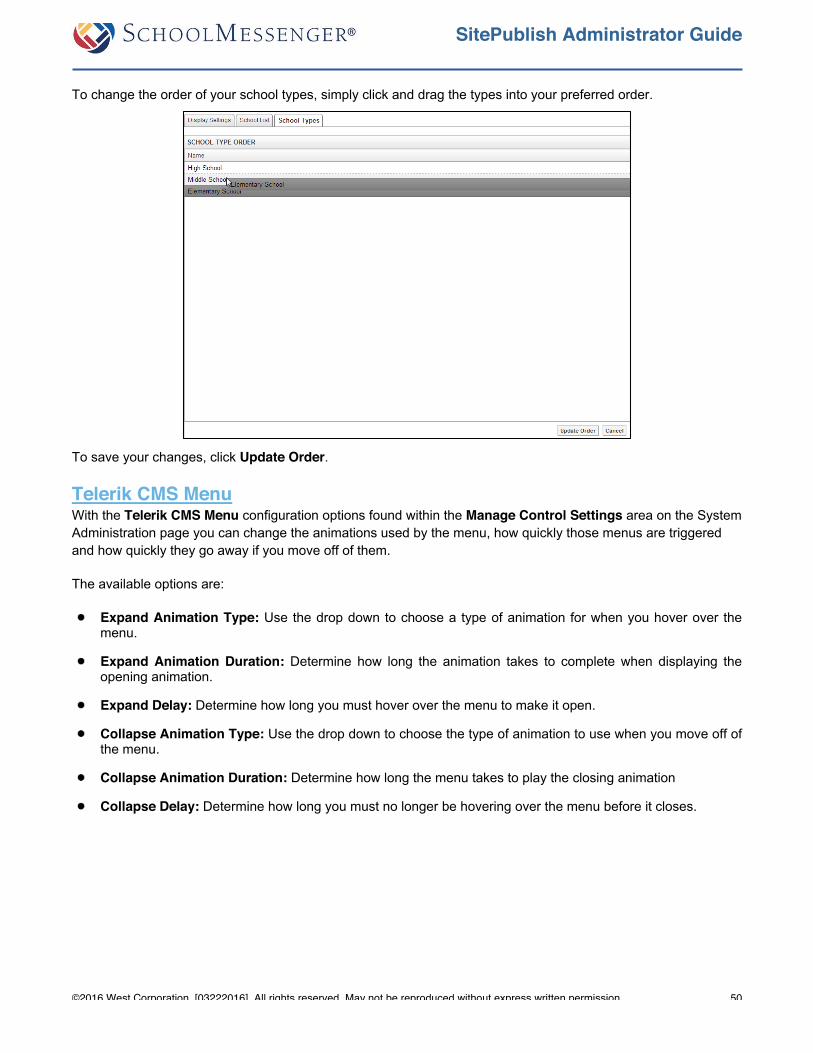
SitePublish Administrator Guide
©2016 West Corporation. [03222016]. All rights reserved. May not be reproduced without express written permission. 50
To change the order of your school types, simply click and drag the types into your preferred order.
To save your changes, click Update Order.
Telerik CMS Menu With the Telerik CMS Menu configuration options found within the Manage Control Settings area on the System Administration page you can change the animations used by the menu, how quickly those menus are triggered and how quickly they go away if you move off of them.
The available options are:
Expand Animation Type: Use the drop down to choose a type of animation for when you hover over the menu.
Expand Animation Duration: Determine how long the animation takes to complete when displaying the opening animation.
Expand Delay: Determine how long you must hover over the menu to make it open.
Collapse Animation Type: Use the drop down to choose the type of animation to use when you move off of the menu.
Collapse Animation Duration: Determine how long the menu takes to play the closing animation
Collapse Delay: Determine how long you must no longer be hovering over the menu before it closes.

SitePublish Administrator Guide
©2016 West Corporation. [03222016]. All rights reserved. May not be reproduced without express written permission. 51
All duration and delay settings in the Telerik CMS menu are in microseconds. 1000 microseconds is one second.
Once you have completed your change, click Update Settings to save. If you ever wish to go back to the default settings, click Reset to Default.
Monitoring and Reporting There are numerous logs available within your site. Some of these are event logs which will help determine the source of errors. Others are system report logs which allow you to learn more about the users on your site and things they may be doing on the site.
Event Logs Event logs track any events on the system. Most important of these events are the errors. In particular, any items that show up as Errors in the System Log can be of great help if users are reporting difficultly accessing a particular page or performing a particular action. Whenever you see a message saying that “There has been an error on this page” a system log entry of the error is created. This entry contains information like the user that got the error, the URL of the page they were accessing and specific details of what the error actually was.
While you do have access to these logs, it is generally advised that you contact the support team and ask them for assistance with tracking down the source of any errors you are experiencing.
System Reports The system reports allow you to learn all kinds of information about the users and usage of the site. You will find these in the Monitoring and Reporting section of the System Administration page by clicking System Reports.
The available reports are:
Basic User List: A list of all users on the site, including basic profile information.
User List By Group: Specify a group or groups of users to view.
Registration By Geography: View your users broken down by country and state.
Activity Summary: View site activity over a specified date range including number of logins per user.
Most Active Users: See which users have performed the most activities over a given date range.
SitePublish Administrator Guide
©2016 West Corporation. [03222016]. All rights reserved. May not be reproduced without express written permission. 52
Login and Logout Audit: View a list of logins and logouts over a given date range.
Activity By User: View the activity for a specific user over a given date range.
Activity For All Users: View the activity of all users over a given date range.
Failed Login Attempts by Associated User: View the number of unsuccessful logins attempts for a given user.
Registration by Date: View new user registrations over a given date range and organized by year, month and day.
Group List: View a list of all groups on your site.
Group Membership: View a list of all group members of all groups, sorted by group.
Event Logs: See previous section for more information on Event Logs
Object Type Distribution: See how many of each object type are found on your site.
Sub Server List: View a list of all child sites of your current site.
Alert Subscription Report: View a list of people that have subscribed to a particular component(s) on your site.
Security Classes List: View a list of security classes on your site. Security classes are a legacy item and are not used on most sites.
Portlet Deletion Activity List: Find information about deleted portlets over a given date range.
Popular Search Phrases: View a list of the most popular search phrases over a given date range. This will only contain data if you are using SitePublish’s search function (and not a third party search tool).
Search Phrase By User: View searches performed by a particular user over a given date range. This will only contain data if you are using SitePublish’s search function (and not a third party search tool).
Search Activity by Month: View the number of times someone searched your site over a given date range. This will be displayed by year and by month. This will only contain data if you are using SitePublish’s search function (and not a third party search tool).
All of the reports will have a similar interface however the exact options available for search criteria will vary depending on the report. When you run a report you will have the ability to determine which criteria you want to use (in our example on the next page, the options are Start Date and End Date). To run the report, click View Report.
While the report is running, you will see a Loading image. The amount of time the report takes to complete vary based on the type of report, the date range set and how much data needs to be searched to compile the report.
When the report is complete you will see the first page of the report. From here you can use the blue arrows to go forward to the next page or jump to the last page. You can also use the Find box to search the report for something specific.

SitePublish Administrator Guide
©2016 West Corporation. [03222016]. All rights reserved. May not be reproduced without express written permission. 53
With larger reports that contain a lot of data, you will probably want to export the report. To do so click the icon and choose the format you would like the report. You can choose between Excel, PDF, and Word. Once you make your choice, you will be prompted to download the file.
When you are finished working with your report, click Close to close the window.
Importing and Exporting Data In some cases you may find the need to import and export data on the system. For example, you may want to export the themes that have been set up on one site and then import those themes to a new site.
Importing XML To import XML go to the System Administration page and click Import XML in the Data Management section of the page.
From here you can click Choose File to select the XML file that you wish to import. Once you have selected the file, click Import to import the file.
You should only attempt to import XML files that you have exported from other SitePublish sites. Other XML files will not be formatted correctly and thus will not be able to import.
Exporting XML To export XML go to the System Administration page and click Export XML in the Data Management section of the page.
From here you can use the Export XML drop down to choose the type of data you wish to export. You can choose from:
Application Settings
Certifications
CMS Templates

SitePublish Administrator Guide
©2016 West Corporation. [03222016]. All rights reserved. May not be reproduced without express written permission. 54
Course Levels
Departments
Groups
Notice Board
Portal Themes
Portlet Templates
Published Link
Server Locales
Server Packages
Server Themes
Users
Once you make your choice you may be presented with additional options to specify exactly what you want to export. For example if you choose to export the portal themes you will then be able to check or un-check the specific themes you wish to export.
By default all the options will be checked but you can quickly uncheck them using the Invert Selection button.
Once you have made your selection, click Export to save your data to a file.
Importing and Exporting Users If you wish to import or export users via CSV file, you can do so by going to Other Integration Options under Data Management on the System Administration page.
To import users via a CSV file, you will first need to create the spreadsheet of users you wish to import. You can view an example file to help you get started with that by selecting Import CSV User File from the Conversion Type drop down and then clicking View Example File. If you open this file you will see the format you need to enter your user data in. All fields must be completed for a user to be successfully imported in to the system.
Once you have created your CSV file, click Choose File and select the file you have created.
You can then choose whether you want to update existing users. Your choices are:
Do not update existing users: Any username that is already in the system will be skipped during the file import.
Update existing user information: If the username is already in the system, the account will be updated to incorporate any changes to the first name, last name or email address fields.
Update existing user information and reset user password: If the username is already in the system, the account will be updated to incorporate any changes to the first name, last name or email address fields. The user’s password will also be reset to whatever password was specified in the spreadsheet file.
You can also choose how to handle the group membership of existing users. Your choices are:
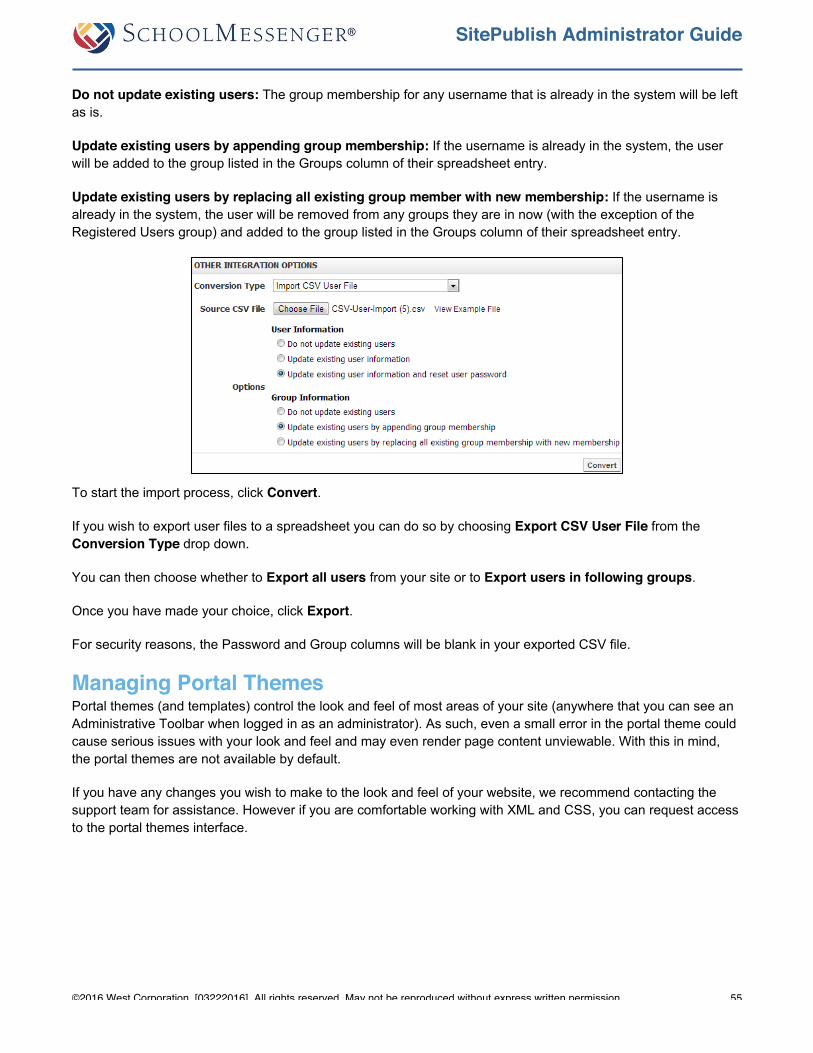
SitePublish Administrator Guide
©2016 West Corporation. [03222016]. All rights reserved. May not be reproduced without express written permission. 55
Do not update existing users: The group membership for any username that is already in the system will be left as is.
Update existing users by appending group membership: If the username is already in the system, the user will be added to the group listed in the Groups column of their spreadsheet entry.
Update existing users by replacing all existing group member with new membership: If the username is already in the system, the user will be removed from any groups they are in now (with the exception of the Registered Users group) and added to the group listed in the Groups column of their spreadsheet entry.
To start the import process, click Convert.
If you wish to export user files to a spreadsheet you can do so by choosing Export CSV User File from the Conversion Type drop down.
You can then choose whether to Export all users from your site or to Export users in following groups.
Once you have made your choice, click Export.
For security reasons, the Password and Group columns will be blank in your exported CSV file.
Managing Portal Themes Portal themes (and templates) control the look and feel of most areas of your site (anywhere that you can see an Administrative Toolbar when logged in as an administrator). As such, even a small error in the portal theme could cause serious issues with your look and feel and may even render page content unviewable. With this in mind, the portal themes are not available by default.
If you have any changes you wish to make to the look and feel of your website, we recommend contacting the support team for assistance. However if you are comfortable working with XML and CSS, you can request access to the portal themes interface.
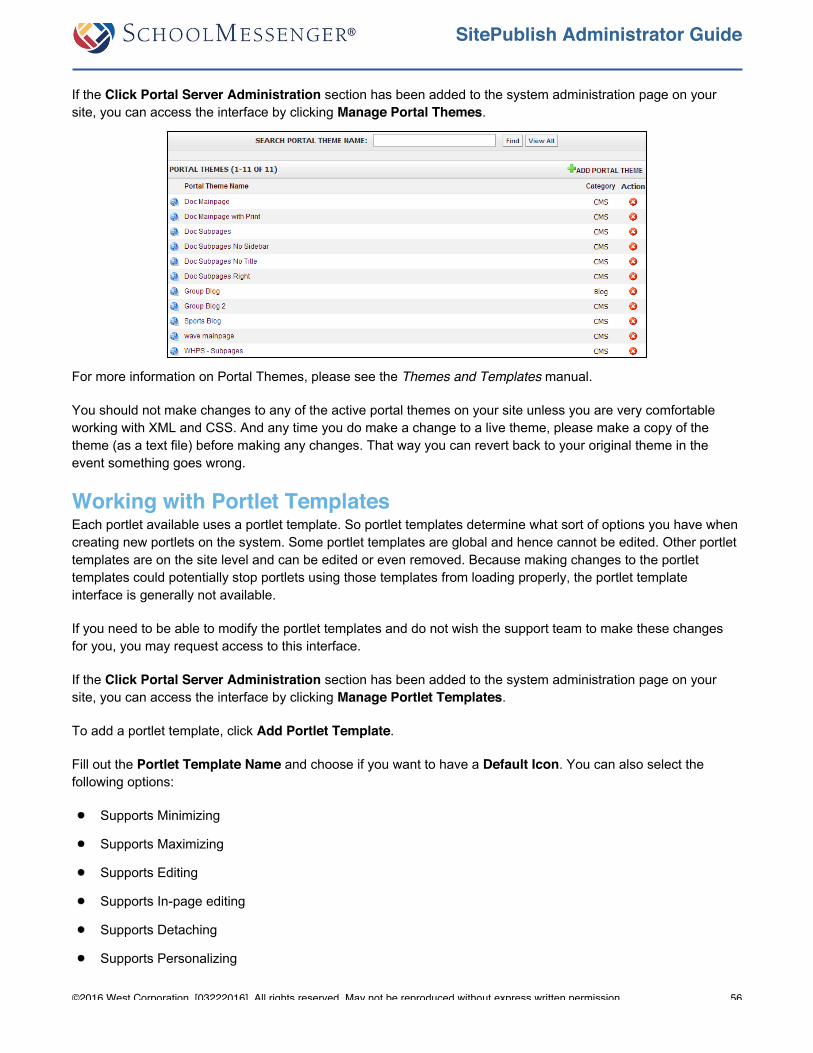
SitePublish Administrator Guide
©2016 West Corporation. [03222016]. All rights reserved. May not be reproduced without express written permission. 56
If the Click Portal Server Administration section has been added to the system administration page on your site, you can access the interface by clicking Manage Portal Themes.
For more information on Portal Themes, please see the Themes and Templates manual.
You should not make changes to any of the active portal themes on your site unless you are very comfortable working with XML and CSS. And any time you do make a change to a live theme, please make a copy of the theme (as a text file) before making any changes. That way you can revert back to your original theme in the event something goes wrong.
Working with Portlet Templates Each portlet available uses a portlet template. So portlet templates determine what sort of options you have when creating new portlets on the system. Some portlet templates are global and hence cannot be edited. Other portlet templates are on the site level and can be edited or even removed. Because making changes to the portlet templates could potentially stop portlets using those templates from loading properly, the portlet template interface is generally not available.
If you need to be able to modify the portlet templates and do not wish the support team to make these changes for you, you may request access to this interface.
If the Click Portal Server Administration section has been added to the system administration page on your site, you can access the interface by clicking Manage Portlet Templates.
To add a portlet template, click Add Portlet Template.
Fill out the Portlet Template Name and choose if you want to have a Default Icon. You can also select the following options:
Supports Minimizing
Supports Maximizing
Supports Editing
Supports In-page editing
Supports Detaching
Supports Personalizing
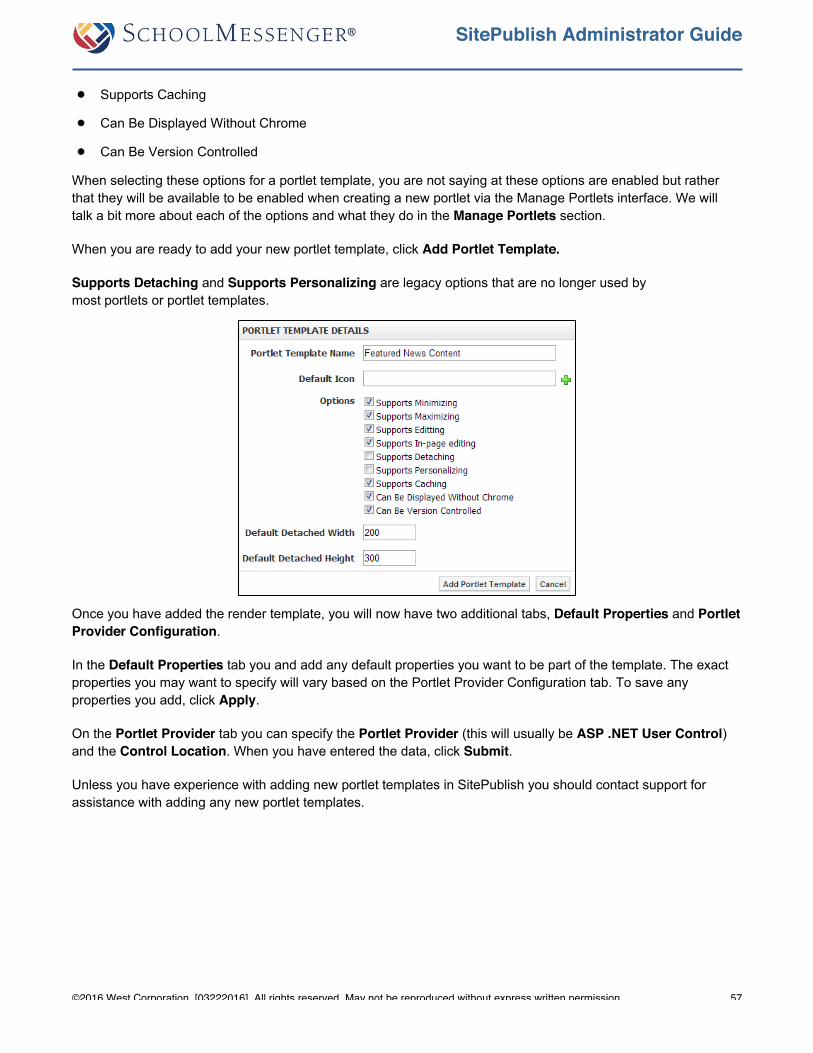
SitePublish Administrator Guide
©2016 West Corporation. [03222016]. All rights reserved. May not be reproduced without express written permission. 57
Supports Caching
Can Be Displayed Without Chrome
Can Be Version Controlled
When selecting these options for a portlet template, you are not saying at these options are enabled but rather that they will be available to be enabled when creating a new portlet via the Manage Portlets interface. We will talk a bit more about each of the options and what they do in the Manage Portlets section.
When you are ready to add your new portlet template, click Add Portlet Template.
Supports Detaching and Supports Personalizing are legacy options that are no longer used by most portlets or portlet templates.
Once you have added the render template, you will now have two additional tabs, Default Properties and Portlet Provider Configuration.
In the Default Properties tab you and add any default properties you want to be part of the template. The exact properties you may want to specify will vary based on the Portlet Provider Configuration tab. To save any properties you add, click Apply.
On the Portlet Provider tab you can specify the Portlet Provider (this will usually be ASP .NET User Control) and the Control Location. When you have entered the data, click Submit.
Unless you have experience with adding new portlet templates in SitePublish you should contact support for assistance with adding any new portlet templates.

SitePublish Administrator Guide
©2016 West Corporation. [03222016]. All rights reserved. May not be reproduced without express written permission. 58
You can also view existing portlet templates form the Manage Portlet Templates interface. If you want to view just the server level (editable and deletable) templates click the drop down for Search Portlet Template Name, choose Server Level and click Find. Alternatively, you can choose Global Level to view the list of global portlet templates.
You can edit an existing Server Level portlet template by clicking on the appropriate Portlet Template Name. You will see the same interface options as when adding a new portlet template.
You also have the option to delete an existing server level portlet template. To do so, click the to the right of the template you wish to remove.
If any portlets are using a portlet template that you have deleted, the contents of those portlets will no longer be displayed correctly if you delete the portlet template.
Managing Portlets Whenever ever you add an element to a page (whether it is a calendar, a news summary, a banner or a text area) you are using a portlet. Each site has two types of portlets, global portlets and server portlets. Global portlets are part of the Portlet Library when you go to add a new portlet to a page. These portlets are system portlets; their configuration options cannot be changed and they cannot be added or deleted. Server portlets are the ones that you find when you go to Local Portlets. These are site-specific portlets; their configuration options can be changed, new portlets can be added and existing portlets can be deleted. Because editing or deleting an existing portlet that is being used on the site could cause the portlet contents to no longer be displayed properly, the Manage Portlets interface is not available by default.
If you need to be able to create or modify new portlets and do not wish the support team to make these changes for you, you may request access to this interface.
If the Click Portal Server Administration section has been added to the system administration page on your site, you can access the interface by clicking Manage Portlets.
To add a new portlet to your site, click Add Portlet. You will be prompted to enter the following data:
Portlet Name: The name of your new portlet
Portlet Template: The template that your portlet is using. This determines what sort of portlet you will have and what sort of functionality it provides. For the most part the default portlets all have names that match their

SitePublish Administrator Guide
©2016 West Corporation. [03222016]. All rights reserved. May not be reproduced without express written permission. 59
portlet template (for instance, the Advanced Data Display portlet uses the Advanced Data Display template, the Global Content portlet uses the Global Content template and the Web Content portlet uses the Content Managed Data portlet). Your new portlet names do not have to match the name of the portlet template of course. Once you select the portlet template a number of additional options will be displayed.
Portlet Category: The category you select determines where inside the Local Portlets area this portlet will appear. Most portlets go best with Collaboration or Content Management however you can choose whatever category you prefer or choose Other… to be able to add a new category to the site.
Portlet Description: In this field you can enter a description of your portlet.
Icon: You have the option to choose an icon to go with your portlet.
Application: Choose which areas the portlet can be added to. Blog means you can add the portlet to a blog page, Collaboration Group means the portlet is available for use in the Groups module, Content Manager means you can add the portlet to normal pages in the CMS and MentorMatch is only applicable if you have the MentorMatch application. For ease of use, you can also select Check All.
Options: The options that are available will depend on what options are enabled in the portlet template. If an option has been enabled in the portlet template then it will appear as a selectable checkbox here. If the option has not been enabled then the checkbox will be greyed out. As a rule of thumb you will generally want to choose all available options that have been enabled for the template but at times you may wish to exclude particular options.
Viewable: This option allows the portlet to be visible on the page to users in view mode.
Minimizable - This allows you to minimize the portlet to hide the content will still leaving it on the page
Maximizable: This allows you to make the portlet content visible again after it has been minimized.
Editable: This allows you to change the content and configuration settings for the portlet.
In-page editable: If the portlet supports it this allows you to edit the content or settings directly on the page the portlet is on (without being taking to a new page).
Detachable: This is a legacy feature that is no longer supported by most portlets.
Personalizable: This is a legacy feature that is no longer supported by most portlets.
Cachable: If the portlet supports it, the contents of the portlet will be cached for faster page loading.
Display Without Chrome: If this feature is not enabled the editing options for a portlet will be displayed on the page even when in View mode (though it is permission dependent. If you do not have permission to edit the portlet you will not seeing the editing options.
Version Controlled: This feature allows you to access older versions of the content you have added to the portlet. This will only work with Data Display, Content and Tabs portlets.

SitePublish Administrator Guide
©2016 West Corporation. [03222016]. All rights reserved. May not be reproduced without express written permission. 60
Detached size: As Detachable is a legacy feature, you can safely ignore these settings.
Once you have made your choices, click Add Portlet to create your new portlet. This will be a new Server portlet and it will be available when adding new portlets to a page under the Local Portlets area.
You can also edit Server portlets by clicking on the portlet you wish to edit. This will bring up an editing portlet interface. The first tab, Edit Portlet, will look the same as the Add Portlet interface but with Add Portlet changed to Update Portlet. You also have access to Portlet Properties and Portlet Permissions tabs where you can set default properties for the portlet and assign permission to particular users or groups.
Note: You cannot edit any Global portlets as these are system portlets. However if you wish to make a new version of a Global portlet you may do so by clicking the icon under the Action column.
Configuring Document Container Settings Document containers play an important role on many sites as they allow teachers and administrators to easily share files and links with other users. There are a number of configuration options that can be used to maximize the effectiveness of document containers within your site.
To access the document containers settings, click Collaboration Server Settings under Collaboration Server Administration on the System Administration page.
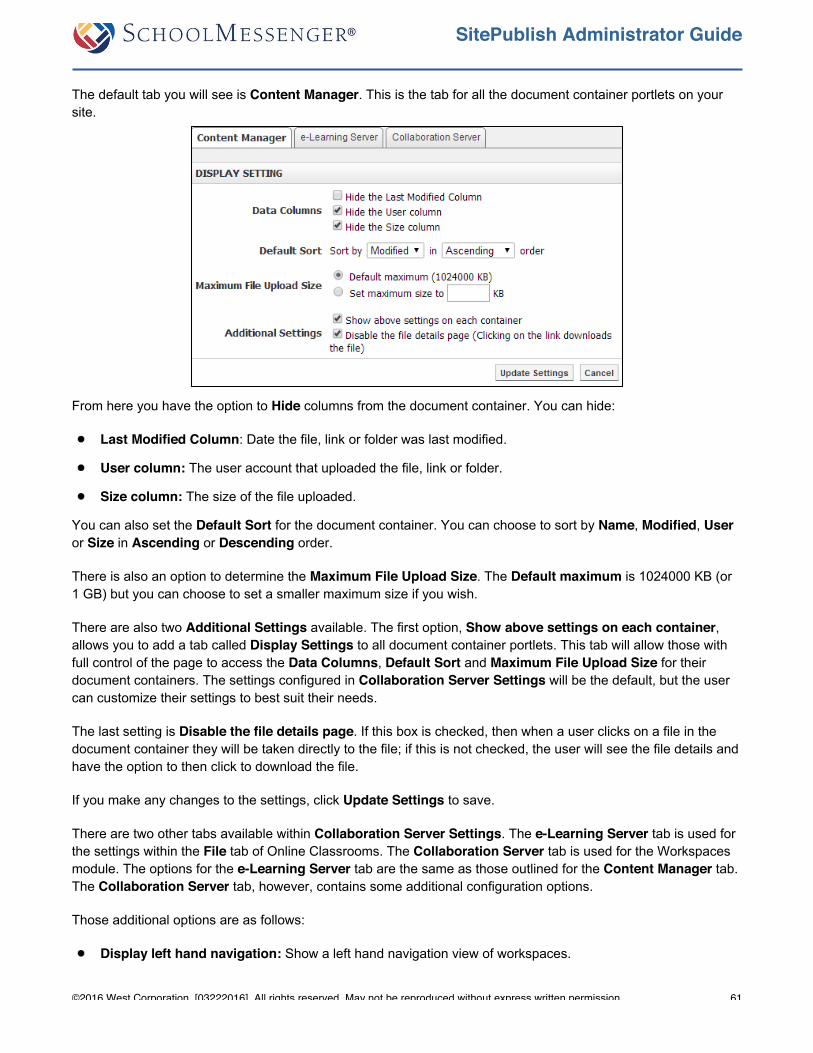
SitePublish Administrator Guide
©2016 West Corporation. [03222016]. All rights reserved. May not be reproduced without express written permission. 61
The default tab you will see is Content Manager. This is the tab for all the document container portlets on your site.
From here you have the option to Hide columns from the document container. You can hide:
Last Modified Column: Date the file, link or folder was last modified.
User column: The user account that uploaded the file, link or folder.
Size column: The size of the file uploaded.
You can also set the Default Sort for the document container. You can choose to sort by Name, Modified, User or Size in Ascending or Descending order.
There is also an option to determine the Maximum File Upload Size. The Default maximum is 1024000 KB (or 1 GB) but you can choose to set a smaller maximum size if you wish.
There are also two Additional Settings available. The first option, Show above settings on each container, allows you to add a tab called Display Settings to all document container portlets. This tab will allow those with full control of the page to access the Data Columns, Default Sort and Maximum File Upload Size for their document containers. The settings configured in Collaboration Server Settings will be the default, but the user can customize their settings to best suit their needs.
The last setting is Disable the file details page. If this box is checked, then when a user clicks on a file in the document container they will be taken directly to the file; if this is not checked, the user will see the file details and have the option to then click to download the file.
If you make any changes to the settings, click Update Settings to save.
There are two other tabs available within Collaboration Server Settings. The e-Learning Server tab is used for the settings within the File tab of Online Classrooms. The Collaboration Server tab is used for the Workspaces module. The options for the e-Learning Server tab are the same as those outlined for the Content Manager tab. The Collaboration Server tab, however, contains some additional configuration options.
Those additional options are as follows:
Display left hand navigation: Show a left hand navigation view of workspaces.

SitePublish Administrator Guide
©2016 West Corporation. [03222016]. All rights reserved. May not be reproduced without express written permission. 62
Display online users: While in workspaces, display users that are currently online.
Hide tabs if only one tab is visible
Allow multiple choices when only one Calendar filter specified: If viewing a calendar filter drop down, you can choose to display more than one of the options listed.
Accessing Site Management On the system administration page under SitePublish you will find Site Management. Clicking on this link will bring up the Site Management interface.
If your site has more than one active site, you can determine which of these sites will be the default site when users access your URL by using the Default Website drop down.
If you change the setting, click Update to save.
You can also choose the style of your Site Control Toolbar. You can choose to have a Scrolling Menu with Icons or a Docked Menu without Icons. The scrolling menu will always appear at the top of the window when you scroll down the page. With the docked menu, the menu is only visible if you scroll to the top of the page.
You can also add an additional site by using Add Site. This will require some configuration from the support team and it may be better to create a standalone site rather than a sub-site of your current site. If you are looking to add a new site, please contact the support team for a recommendation on how to proceed.
You can use the icon to view the homepage of the site.
The icon can be used to deactivate a site. A deactivated site will not be accessible by any but system administrators. If you wish to deactivate or decommission a site, please contact the support team for assistance.
You can also click on the Site Name to access the site administration options.

SitePublish Administrator Guide
©2016 West Corporation. [03222016]. All rights reserved. May not be reproduced without express written permission. 63
Using Page Review Notification Settings One of the follow-up tasks that can be set on any page is when the page should be reviewed. In order to determine what happens when a page is reviewed, you can use the Page Review Notification Settings. You will find the Page Review Notification Settings on the left side of the System Administration page in the SitePublish section.
Within the Review Notification Settings you can configure a number of options.
Trigger Date: Choose to start sending email reminders about required review on the Review Date or a specific number of Days Before the Review Date.
Frequency: Choose to send email reminders once the review has been triggered and until the review has been completed on a Daily, Weekly or Monthly basis.
Recipient: Choose which user or users are emailed about the review. You can choose to email one or more of the Page Owner, Site Administrators, and Selected Users.
Page Review Duration: This determines how long the page is considered to be under view once the review has been triggered. The Recipient(s) will be emailed a reminder about the review based on the Frequency specified until the Page Review Duration has elapsed or the page has been reviewed.
Flag Message: This is the message that will appear to the page owner if they visit a page they own that is currently awaiting review.
Excluded Pages: Sometimes pages that had a review date set may no longer be relevant so you may want to exempt them from review. The most obvious example of this would be for Archived Pages, but depending on how you use them, you may also want to bypass the review process for Hidden Sections and Hidden Selections.
Once you have completed making any changes, click Save.
Moving Pages between Sites While the feature is not enabled by default, it is possible to move sites from one school site to another school site within the same district. If this is a feature you would like to use, please contact the support team and they will be happy to enable the feature for you.

SitePublish Administrator Guide
©2016 West Corporation. [03222016]. All rights reserved. May not be reproduced without express written permission. 64
Once the feature has been enabled on your sites, pages can be moved from one school in your district to another school in your district. However, if you need to move a page from the district to a school or vice versa, please contact the support team as they will need to make this move on your behalf.
If you are an administrator at only one of the two sites involved in a page move, you will only be able to handle either the sending or receiving portion of the page move. An administrator for the other site will need to handle the other portion of the move.
Sending a Page to another Site To move a page from your current site to another site, you will need to go to Site Management (found on the System Administration page under SitePublish) and click on the name of your site. Then click on the Page Move Requests tab. Alternatively, from the Administrative Toolbar, you can go to Site Admin -> Page Move Requests. If you do not see this option, please contact Presence Support and they will enable the feature for you.
Within the Page Move Requests page you will see a list of all the page move requests that are pending within your site. To add a new request, click Add Page Move Request.
Now fill out the page move requests fields. You will need to specify:
Requested By: Specify the user that requested the page move. This information will be particularly useful if another administrator will be receiving the page move request at the destination site.
Page to be Moved: Click Browse to bring up another window. Then click Default Pageset and navigate to the page you wish to move. When you have found the page that you want to move click Select to the right of the page name.
Destination: Use the drop down to specify the site the page should be moved to.
Comments: You can also add some comments about the move. This can give the administrator at the destination site an idea of why the page is being moved.
When you are ready to move the page, click Send Request.
You will now see that your page move request is pending approval of the destination site. If you have administrative access to the destination site, you can process the move. Otherwise, an administrator from the destination site will need to do so.

SitePublish Administrator Guide
©2016 West Corporation. [03222016]. All rights reserved. May not be reproduced without express written permission. 65
Receiving a Page from another Site To receive a page that has been sent from another site, you will need to go to Incoming Page Move Requests in the SitePublish section of the System Administration page.
On the page you will see a list of all your page move requests, both past and present. To approve or reject a particular request, click the Approve/Reject link.
You will be able to view who requested the page move, what page is to be moved and when the request was sent.
If you plan to approve the request, you will need to set the Page Owner field. If the owner of the moved page already has an account on your site, choose Existing User and use the user picker icon to choose the intended owner. If the owner does not have an account on your site yet, fill out the Username, Password, and Re-enter Password fields and set the Group Membership of the new user.
To set the Destination for the moved page, click Browse…
In the new window that comes up, navigate to your desired location. You will first want to click on Site Root, then the name of your school. If you want this page to appear on the top menu of the site, click Select to the right of Default Pageset. Otherwise, click Default Pageset to see a list of your top level pages and keep clicking down until you get to the page that you want to be the parent page of the page you are moving. For example, if you wanted to place the page under your Grade 11 Science section, you might click on Staff Directory -> Science and then click Select to the right of Grade 11. Once you click Select on your desired destination, the browse window will close.
Finally, fill out the Comments field. You can use this space to indicate that the request is being approved and any other details you may wish to add.
To complete the page move process, click Move Page.
Once your move has completed you will be able to view its updated status from both the origin and destination sites:
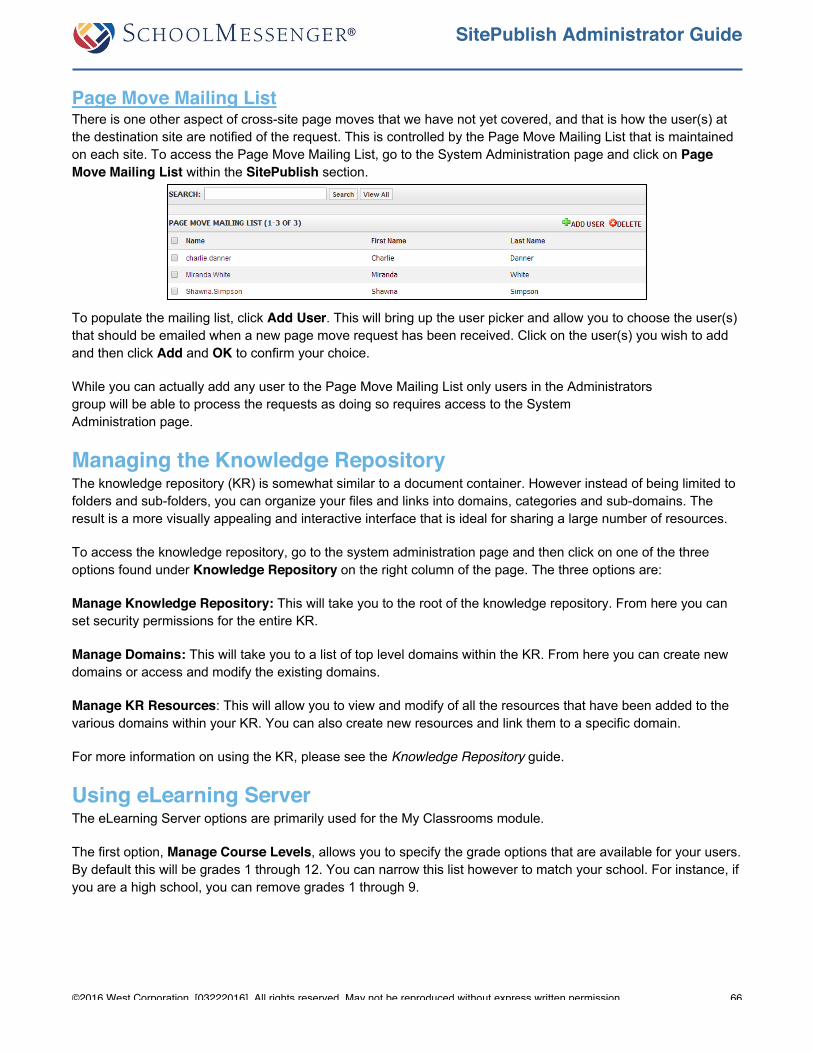
SitePublish Administrator Guide
©2016 West Corporation. [03222016]. All rights reserved. May not be reproduced without express written permission. 66
Page Move Mailing List There is one other aspect of cross-site page moves that we have not yet covered, and that is how the user(s) at the destination site are notified of the request. This is controlled by the Page Move Mailing List that is maintained on each site. To access the Page Move Mailing List, go to the System Administration page and click on Page Move Mailing List within the SitePublish section.
To populate the mailing list, click Add User. This will bring up the user picker and allow you to choose the user(s) that should be emailed when a new page move request has been received. Click on the user(s) you wish to add and then click Add and OK to confirm your choice.
While you can actually add any user to the Page Move Mailing List only users in the Administrators group will be able to process the requests as doing so requires access to the System Administration page.
Managing the Knowledge Repository The knowledge repository (KR) is somewhat similar to a document container. However instead of being limited to folders and sub-folders, you can organize your files and links into domains, categories and sub-domains. The result is a more visually appealing and interactive interface that is ideal for sharing a large number of resources.
To access the knowledge repository, go to the system administration page and then click on one of the three options found under Knowledge Repository on the right column of the page. The three options are:
Manage Knowledge Repository: This will take you to the root of the knowledge repository. From here you can set security permissions for the entire KR.
Manage Domains: This will take you to a list of top level domains within the KR. From here you can create new domains or access and modify the existing domains.
Manage KR Resources: This will allow you to view and modify of all the resources that have been added to the various domains within your KR. You can also create new resources and link them to a specific domain.
For more information on using the KR, please see the Knowledge Repository guide.
Using eLearning Server The eLearning Server options are primarily used for the My Classrooms module.
The first option, Manage Course Levels, allows you to specify the grade options that are available for your users. By default this will be grades 1 through 12. You can narrow this list however to match your school. For instance, if you are a high school, you can remove grades 1 through 9.
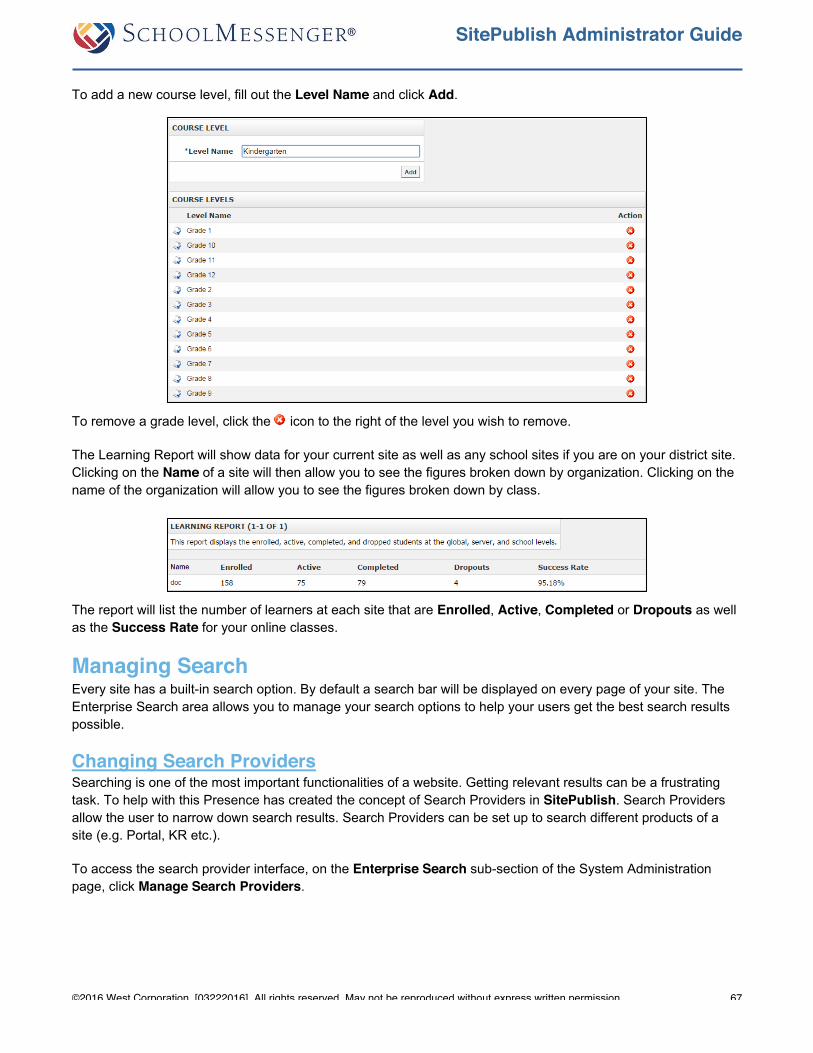
SitePublish Administrator Guide
©2016 West Corporation. [03222016]. All rights reserved. May not be reproduced without express written permission. 67
To add a new course level, fill out the Level Name and click Add.
To remove a grade level, click the icon to the right of the level you wish to remove.
The Learning Report will show data for your current site as well as any school sites if you are on your district site. Clicking on the Name of a site will then allow you to see the figures broken down by organization. Clicking on the name of the organization will allow you to see the figures broken down by class.
The report will list the number of learners at each site that are Enrolled, Active, Completed or Dropouts as well as the Success Rate for your online classes.
Managing Search Every site has a built-in search option. By default a search bar will be displayed on every page of your site. The Enterprise Search area allows you to manage your search options to help your users get the best search results possible.
Changing Search Providers Searching is one of the most important functionalities of a website. Getting relevant results can be a frustrating task. To help with this Presence has created the concept of Search Providers in SitePublish. Search Providers allow the user to narrow down search results. Search Providers can be set up to search different products of a site (e.g. Portal, KR etc.).
To access the search provider interface, on the Enterprise Search sub-section of the System Administration page, click Manage Search Providers.

SitePublish Administrator Guide
©2016 West Corporation. [03222016]. All rights reserved. May not be reproduced without express written permission. 68
The following page has two sections on it. You can select to Enable or Disable Search Providers or Context Search Providers on this page.
The search page will display these enabled options on the right hand side.
It is possible to apply permissions to each individual search provider. Permissions can be added for both a user and a group of users.
To configure these permissions, go to the Manage Search Providers page under the Enterprise Search heading on the System Administration page. Click the icon in the Action column to access the permissions.
You can now click Choose User/Group to determine who can view the search results for this provider.
Managing Search Settings Manage Search Settings is accessible from the System Administration page under the Enterprise Search sub-section.
Only display results which the user has permissions to read: It is within this section that the Administrator can control if the site will use permissions-based search vs. public-based search.
Display the context bar on the search page: If this box is unchecked the breadcrumb will be hidden on the search screen.
Managing Search Templates To manage search templates, click on Manage Search Templates under Enterprise Search sub-section on the System Administration page.
From the Manage Search Templates page you can Enable and Disable templates and configure which users and groups have access to a given search template.

SitePublish Administrator Guide
©2016 West Corporation. [03222016]. All rights reserved. May not be reproduced without express written permission. 69
Using Best Bets Best Bets allows you to specify results that should show up if a user searches for specific terms. That way you can ensure the user sees the result you wish them to see for a given search.
To access the Best Bets interface, go to Manage Best Bets on the System Administration page within the Enterprise Search sub-section.
To add a new Best Bet, go to the Manage Best Bets page and click Add Best Bet.
When adding a Best Bet SitePublish requires you to fill out the following fields:
Search Provider: This drop down item allows you to choose which Search Provider the Best Bet is linked to.
Title: The title of the Best Bet.
Keywords: This field allows you to set which search terms will bring up the Best Bet in a search result.
Description: This field allows you to enter a description of your Best Bet.
URL: This field is where you point the Best Bet to a specific page. A user who clicks on the Best Bet in a search result will be taken to this URL.
Once your settings have been configured, click Add Best Bet.
To edit a Best Bet, go to the Manage Best Bets page and click the Title of the Best Bet you wish to edit.
When you have finished making changes, click Update Best Bet to save your changes.
Managing Event Registration Event Registration allows you to create events that staff, teachers and students can register for. This can be as simple as a dinner for members of a club to as complex as a multi-day conference with a variety of sessions for each user to choose from.
To learn more about the Event Registration module, listed as RegisterNow Enterprise Edition on the System Administration page, please see the Event Registration guide.
SitePublish Administrator Guide
©2016 West Corporation. [03222016]. All rights reserved. May not be reproduced without express written permission. 70
Managing Wikis The Wiki module allows multiple users to collaborate on a topic. This can include the creation of many pages within the wiki that can be linked to and updated by the users that have been assigned permission to update the wiki.
To learn more about the Wiki module, please see the Wikis manual.
Managing Blogs The Blog module allows users to create their own blogs. A blog can be maintained by a single user or multiple users may post to it. For example, a teacher may create a blog, assign her class as authors and set up an approval process so that all new posts must be approved before going live on the site.
For more information on how the Blog module works, please see the Blogs guide.


![The VPO Administrator. [vpo_administrator] 2 The VPO Administrator The VPO Administrator - Overview The role of the VPO Administrator Understand High](https://img.dokumen.tips/doc/110x75/56649e5e5503460f94b58169/the-vpo-administrator-vpoadministrator-2-the-vpo-administrator-the-vpo.jpg)