Embed Size (px)
Citation preview

1 Copyright 2015. Site Store Pro, Inc. All Rights Reserved.
Site Store Pro™
INSTALLATION GUIDE – WPCartPro Wordpress Plugin Version
WPCARTPRO INTRODUCTION 2
SYSTEM REQUIREMENTS 4
DOWNLOAD YOUR WPCARTPRO VERSION 5
EXTRACT THE FOLDERS FROM THE ZIP FILE TO A DIRECTORY ON YOUR LOCAL COMPUTER 5
SETUP THE SITE STORE PRO MYSQL DATABASE 6
EDIT THE MYSQL (DATABASE) CONNECTION FILE 8
FTP (TRANSFER) THE STORE AND ADMIN FILES TO YOUR WEBSERVER 9
ACTIVATE THE PLUGIN INSIDE OF WORDPRESS 11
ACTIVATING THE SITE STORE PRO ADMIN AREA 12
CREATE YOUR MASTER ADMINISTRATOR ACCOUNT 13
VERIFY YOUR STORE URL AND CHECKOUT URL SETTINGS 13
ADDING MENU LINKS TO STORE CATEGORIES 15
ADDING THE QUICK CART DISPLAY TO WORDPRESS PAGES 15
SETTING UP SEO FRIENDLY LINKS FOR STORE AND PRODUCT PAGES 17
This installation guide assumes that you already have a working copy of
Wordpress on your hosting account. If you have not downloaded and
installed Wordpress on your hosting account, please do that first before
proceeding with the WP Cart Pro Installation.
FREE INSTALLATION! If you are not experienced setting up MYSQL databases or using FTP to copy files to and from
your hosting account, SiteStorePro.com will install the WPCartPro (Site Store Pro) ecommerce application on your
webserver free‐of‐charge with any registered version of the cart.
This includes setting up the MYSQL database, website upload folder permissions (if required) and webserver email
component settings. To schedule an install, please email [email protected] or submit a support ticket
online at : http://www.sitestorepro.com/support.php

2 Copyright 2015. Site Store Pro, Inc. All Rights Reserved.
WPCartPro Introduction
The WPCartPro plugin allows you to run a completely integrated Site Store Pro installation inside
virtually any wordpress theme.
All store features that are available with a Site Store Pro stand‐alone installation are also available when
using WPCartPro on your Wordpress site (with the exception of the website CMS features, since the site
content is managed through Wordpress)
The WPCartPro plugin was designed to allow merchants to switch seamlessly from stand‐alone Site
Store Pro installations using their own custom design to Wordpress installations using a theme for the
design skinning and vice versa. Since the WPCartPro uses the same unified core framework and
enterprise‐level database structure as a regular Site Store Pro install, merchants came switch from
either platform without having to learn different ecommerce admin functions and features.
The primary difference between a stand‐alone Site Store Pro installation and a WPCartPro install, is that
the store CSS files are located inside the plugin’s CSS folder instead of the site /css/ folder.
Since the plugins (store) CSS files are inside the plugin folder, they can be edited from inside Wordpress.
(if required) instead of by using a third‐party CSS/HTML tool like Dreamweaver. The WPCartPro plugin
also has several Wordpress specific features for search and quick cart displays.
The installation of the WPCartPro plugin to run Site Store Pro on a wordpress install is very similar to the
standard Site Store Pro installation process.
1) Download your WPCartPro installation zip file from your account manager at
https://www.sitestoepro.com/myaccount/
2) Extract the contents of the install folder to a directory on your local system.
3) Edit The Connection File To Reflect Your MySQL database connection credentials
4) Upload the entire contents of the install folder up to your Wordpress installation root directory. {You will
notice that there is a /wp‐content/ folder in the installation; this is the folder that contains the WPCartPro
plugin files. However, all folders in the installation zip file must be uploaded to your webserver (hosting
account)}
5) Activate the WPCartPro plugin inside of Wordpress
6) Click on the WPCartPro Menu Item In Wordpress To Open Your Store Admin System.
7) Activate the Install (Optional)
8) Set the Master Admin Account For the Store Admin Area.
Each step above is outlined in detail in the following pages.

3 Copyright 2015. Site Store Pro, Inc. All Rights Reserved.
The WpCartPro™ ecommerce application contains:
The Store‐Front Files
The WPCartPro (Site Store Pro) storefront files , which include the main store
page, product results, item details, shopping cart display , customer registration,
order checkout and the “My Account” area are designed to integrate seamlessly
into virtually any Wordpress theme. Unlike a stand‐alone Site Store Pro
installation, the store‐front files are not edited directly for design purposes. All
design related functions in the WPCartPro plugin are done via the CSS files that
are included with the plugin.
The Web‐Based Administration System
The WPCartPro ecommerce features such as products configuration, customers
and orders management , payment providers, shipping preferences, emails and
discounts are controlled through the Site Store Pro web‐based admin system that
can be accessed directly from inside the Wordpress admin area.
The MySQL Database
WPCartPro is “powered” by a the MySQL back‐end database that runs stand‐
alone Site Store Pro stores. In order to run WPCartPro on your Wordpress site,
the Site Store Pro database must be setup on your webhost’s MySQL Server. The
Site Store Pro database stores all of the categories, product information,
customer data, order history, store configuration settings and usage stats.

4 Copyright 2015. Site Store Pro, Inc. All Rights Reserved.
System Requirements
The following are the minimum requirements to run WPCartPro.
PHP 5.2 Or Higher.
MySQL 5.1 Or Higher.
Wordpress 3.91 or Higher
cURL enabled in PHP.
PHP mail or access to SMTP mail server for outgoing store emails.
GD2 or ImageMagic enabled in PHP For Automatic Product Thumbnail Creation.
Website Hosting Questions?
If you are unsure that your current website hosting account supports Site Store Pro or would
like advice on a hosting plan prior to setting up an account, please email
[email protected] or call (800) 974‐6493 for assistance.
SiteStorePro.com does not recommend any specific webhosting company for the Site Store Pro
and the WPCartPro plugin.
However, we can inform you if your current or desired webhost is compatible and what specific
plan would be best suited for running Site Store Pro.

5 Copyright 2015. Site Store Pro, Inc. All Rights Reserved.
Download Your WPCartPro Version
Login to your account at https://www.sitestorepro.com/myaccount with the email address and
password entered when you registered for your account at SiteStorePro.com.
After logging into your account, click on the Download button in the ‘My Downloads’ to download your
copy of WPCartPro.
Note: Your account will automatically include the LATEST version of Site Store Pro (WPCartPro).
Extract The Folders From The Zip File To A Directory On Your Local Computer
Folders In the Site Store Pro WPCartPro Installation Include:
Documents: Installation & Integration Assistance PDFs
MySQL_Database: The database installation scripts. (See The Section Titled ‘ Setup The Site Store Pro MySQL Database)
New_Installation: This folder contains the complete install and all the Site Store Pro shopping cart engine files, WPCartPro Plugin files and web‐based admin system files.
Upgrade: This folder contains folders and files that will allow you to upgrade an existing install to the latest release. If the folder is empty, there is not upgrade available for the downloaded release.
Here is a snapshot of what the extracted folder(s) will look like on your local system.
6 Copyright 2015. Site Store Pro, Inc. All Rights Reserved.
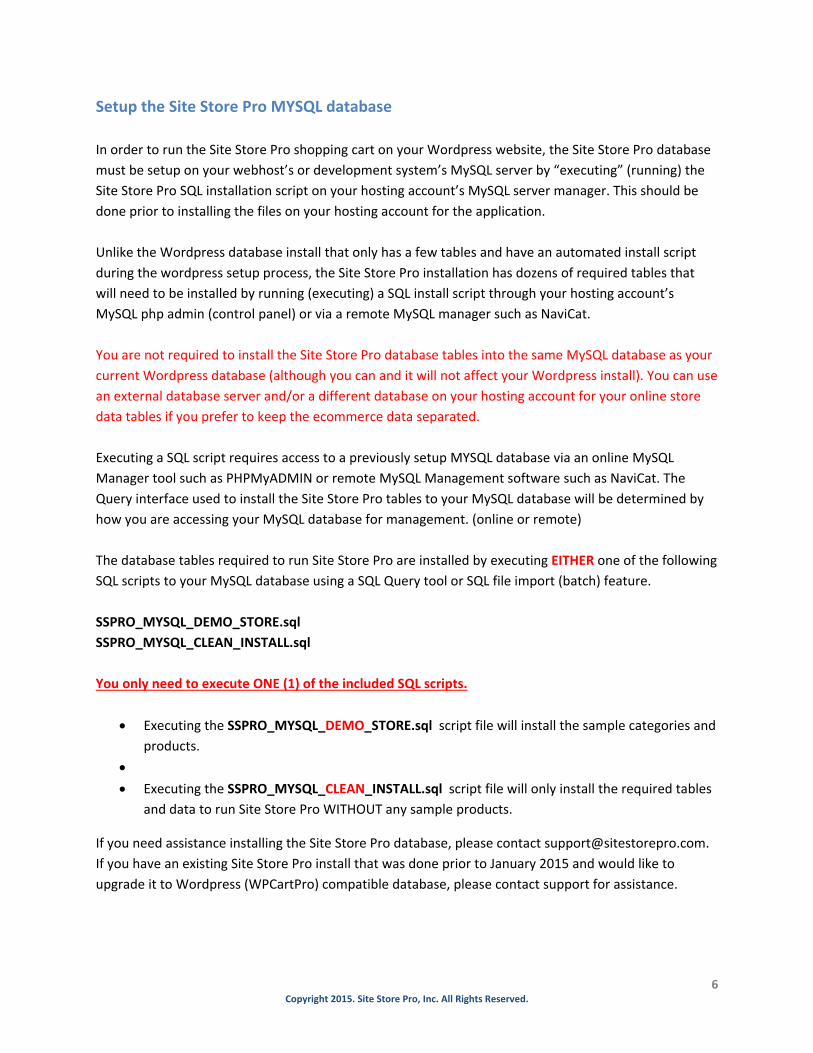
Setup the Site Store Pro MYSQL database
In order to run the Site Store Pro shopping cart on your Wordpress website, the Site Store Pro database
must be setup on your webhost’s or development system’s MySQL server by “executing” (running) the
Site Store Pro SQL installation script on your hosting account’s MySQL server manager. This should be
done prior to installing the files on your hosting account for the application.
Unlike the Wordpress database install that only has a few tables and have an automated install script
during the wordpress setup process, the Site Store Pro installation has dozens of required tables that
will need to be installed by running (executing) a SQL install script through your hosting account’s
MySQL php admin (control panel) or via a remote MySQL manager such as NaviCat.
You are not required to install the Site Store Pro database tables into the same MySQL database as your
current Wordpress database (although you can and it will not affect your Wordpress install). You can use
an external database server and/or a different database on your hosting account for your online store
data tables if you prefer to keep the ecommerce data separated.
Executing a SQL script requires access to a previously setup MYSQL database via an online MySQL
Manager tool such as PHPMyADMIN or remote MySQL Management software such as NaviCat. The
Query interface used to install the Site Store Pro tables to your MySQL database will be determined by
how you are accessing your MySQL database for management. (online or remote)
The database tables required to run Site Store Pro are installed by executing EITHER one of the following
SQL scripts to your MySQL database using a SQL Query tool or SQL file import (batch) feature.
SSPRO_MYSQL_DEMO_STORE.sql
SSPRO_MYSQL_CLEAN_INSTALL.sql
You only need to execute ONE (1) of the included SQL scripts.
Executing the SSPRO_MYSQL_DEMO_STORE.sql script file will install the sample categories and
products.
Executing the SSPRO_MYSQL_CLEAN_INSTALL.sql script file will only install the required tables
and data to run Site Store Pro WITHOUT any sample products.
If you need assistance installing the Site Store Pro database, please contact [email protected].
If you have an existing Site Store Pro install that was done prior to January 2015 and would like to
upgrade it to Wordpress (WPCartPro) compatible database, please contact support for assistance.

7 Copyright 2015. Site Store Pro, Inc. All Rights Reserved.
Below is a snapshot of what a MySQL database looks like after the required Site Store Pro tables have
been installed. (Screen shot of installed tables from Navicat. Your specific MYSQL admin screen listing
the tables in your database may look different but the installed table names and structure will be the
same).
The default Wordpress tables are highlighted in blue for reference.
8 Copyright 2015. Site Store Pro, Inc. All Rights Reserved.
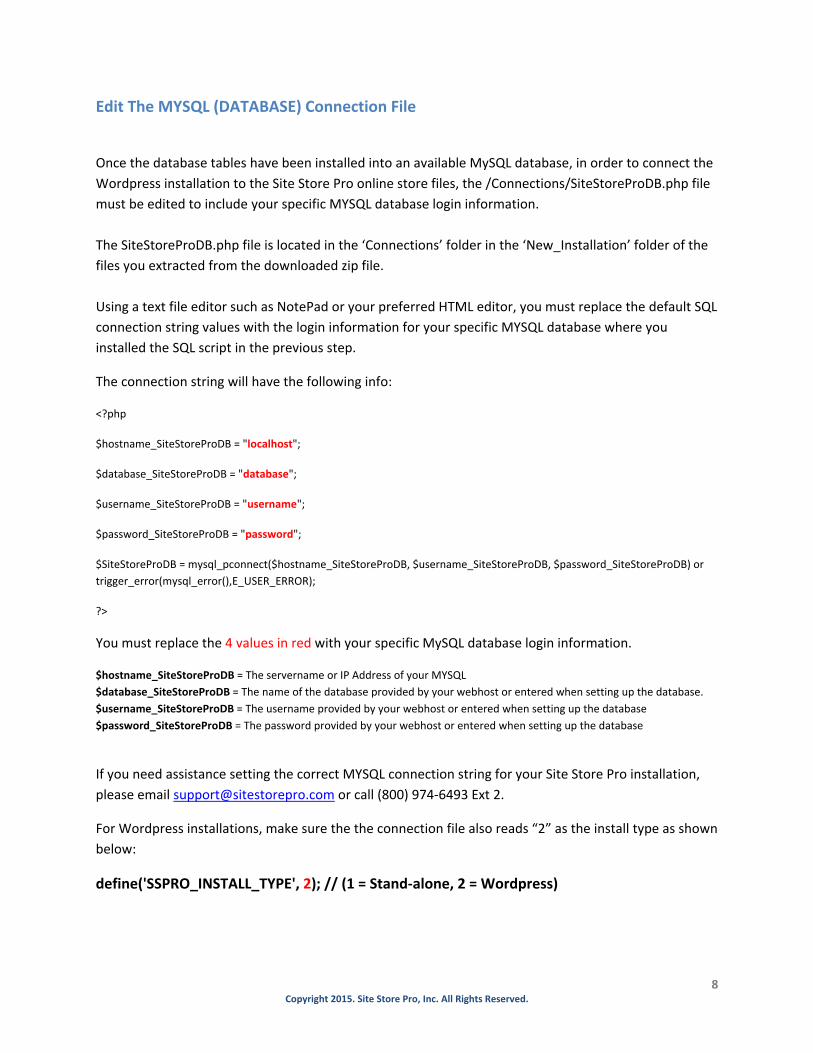
Edit The MYSQL (DATABASE) Connection File
Once the database tables have been installed into an available MySQL database, in order to connect the
Wordpress installation to the Site Store Pro online store files, the /Connections/SiteStoreProDB.php file
must be edited to include your specific MYSQL database login information.
The SiteStoreProDB.php file is located in the ‘Connections’ folder in the ‘New_Installation’ folder of the
files you extracted from the downloaded zip file.
Using a text file editor such as NotePad or your preferred HTML editor, you must replace the default SQL
connection string values with the login information for your specific MYSQL database where you
installed the SQL script in the previous step.
The connection string will have the following info:
<?php
$hostname_SiteStoreProDB = "localhost";
$database_SiteStoreProDB = "database";
$username_SiteStoreProDB = "username";
$password_SiteStoreProDB = "password";
$SiteStoreProDB = mysql_pconnect($hostname_SiteStoreProDB, $username_SiteStoreProDB, $password_SiteStoreProDB) or
trigger_error(mysql_error(),E_USER_ERROR);
?>
You must replace the 4 values in red with your specific MySQL database login information.
$hostname_SiteStoreProDB = The servername or IP Address of your MYSQL
$database_SiteStoreProDB = The name of the database provided by your webhost or entered when setting up the database.
$username_SiteStoreProDB = The username provided by your webhost or entered when setting up the database
$password_SiteStoreProDB = The password provided by your webhost or entered when setting up the database
If you need assistance setting the correct MYSQL connection string for your Site Store Pro installation,
please email [email protected] or call (800) 974‐6493 Ext 2.
For Wordpress installations, make sure the the connection file also reads “2” as the install type as shown
below:
define('SSPRO_INSTALL_TYPE', 2); // (1 = Stand‐alone, 2 = Wordpress)
9 Copyright 2015. Site Store Pro, Inc. All Rights Reserved.
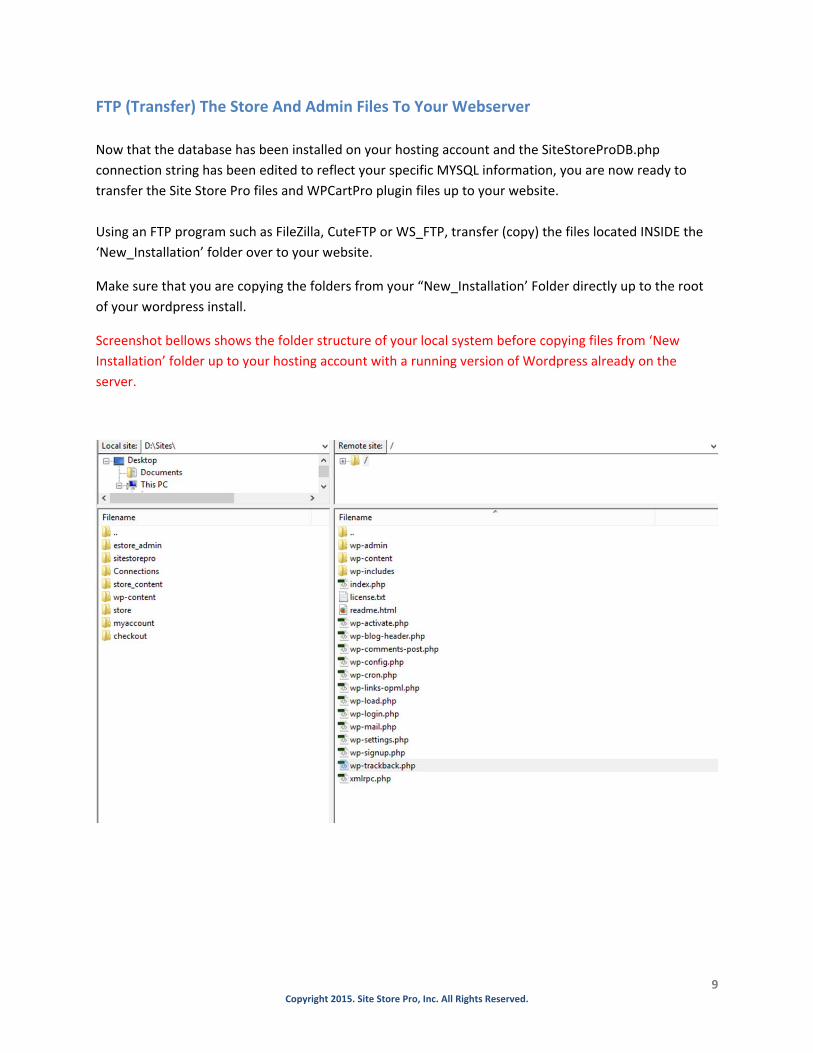
FTP (Transfer) The Store And Admin Files To Your Webserver
Now that the database has been installed on your hosting account and the SiteStoreProDB.php
connection string has been edited to reflect your specific MYSQL information, you are now ready to
transfer the Site Store Pro files and WPCartPro plugin files up to your website.
Using an FTP program such as FileZilla, CuteFTP or WS_FTP, transfer (copy) the files located INSIDE the
‘New_Installation’ folder over to your website.
Make sure that you are copying the folders from your “New_Installation’ Folder directly up to the root
of your wordpress install.
Screenshot bellows shows the folder structure of your local system before copying files from ‘New
Installation’ folder up to your hosting account with a running version of Wordpress already on the
server.

10 Copyright 2015. Site Store Pro, Inc. All Rights Reserved.
Screenshot below shows the server folder structure after the WPCartPro (Site Store Pro) folders have
been posted with FTP to the server with a running version of Wordpress.
11 Copyright 2015. Site Store Pro, Inc. All Rights Reserved.
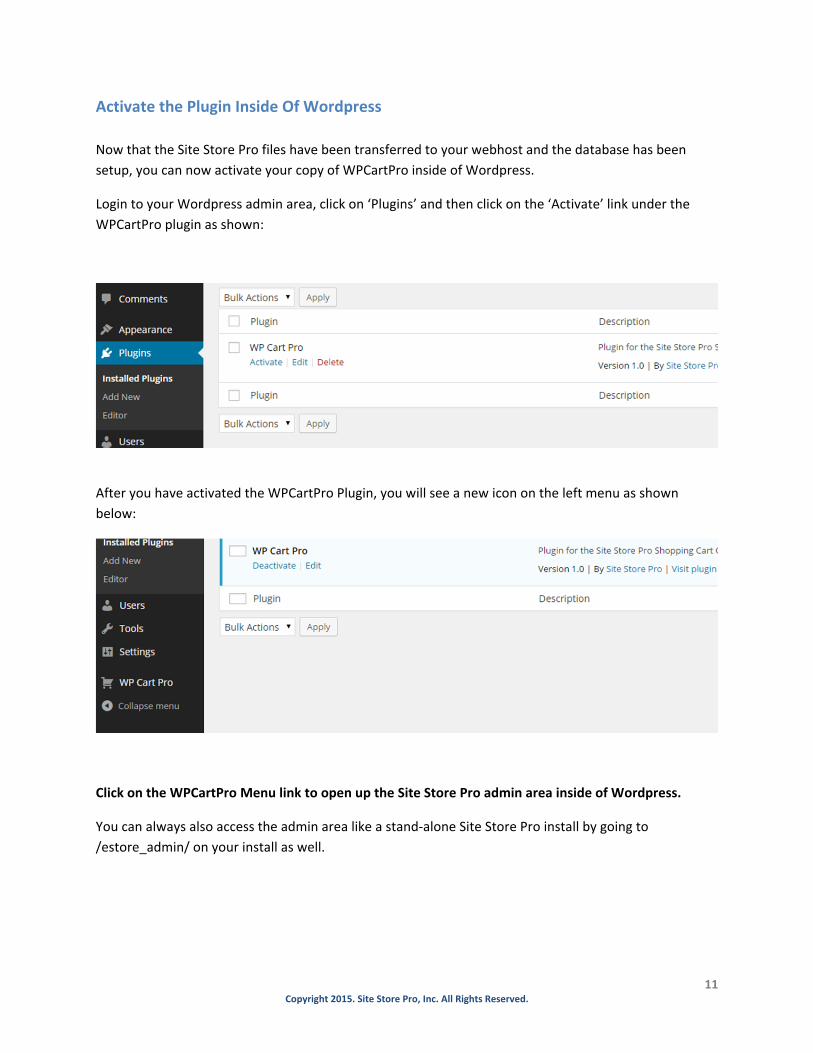
Activate the Plugin Inside Of Wordpress
Now that the Site Store Pro files have been transferred to your webhost and the database has been
setup, you can now activate your copy of WPCartPro inside of Wordpress.
Login to your Wordpress admin area, click on ‘Plugins’ and then click on the ‘Activate’ link under the
WPCartPro plugin as shown:
After you have activated the WPCartPro Plugin, you will see a new icon on the left menu as shown
below:
Click on the WPCartPro Menu link to open up the Site Store Pro admin area inside of Wordpress.
You can always also access the admin area like a stand‐alone Site Store Pro install by going to
/estore_admin/ on your install as well.

12 Copyright 2015. Site Store Pro, Inc. All Rights Reserved.
Activating the Site Store Pro Admin Area
When you first click on the WPCartPro menu link, you will be shown an activation screen like below.
Activation is not required. You can bypass the activation screen by clicking on the button that reads “I
don’t want to activate…proceed to admin area”.
However, activation of the Site Store Pro admin area with a purchased support license serial number
gives you premium support and other benefits. For more information on available license options,
please visit https://www.sitestorepro.com/
After you activate your install with a valid serial number or skip the activation process, you will be asked
to create a Master Administrator account.

13 Copyright 2015. Site Store Pro, Inc. All Rights Reserved.
Create Your Master Administrator Account
New installations will be prompted to create a MASTER Administrator account for the store admin area.
The Master Administrator can perform all store administration functions as well as create new
administrator accounts and other MASTER administrators.
Below is the screen that will prompt you to create a new Master Administrator account.
After you have setup your Master Admin account, you will be redirected into the admin area and shown
the following screen:
Verify Your Store URL and Checkout URL Settings
After you setup your Master Administrator account, you will be redirected into the admin area and
shown the screen below. Your Store URL and Checkout URL values should be automatically set for you

14 Copyright 2015. Site Store Pro, Inc. All Rights Reserved.
with the correct values.
If you will be using SSL (https) on your site and the SSL certificate has already been installed and is
working on your Wordpress installation, you can edit the Checkout URL from http:// to https:// at this
time. Otherwise, you can always change the Checkout value later to https mode.
Do not enable https in the checkout URL field if you don’t have a valid SSL certificate installed on your
hosting account/server.
The installation is now finished and you can now start to add your products, store settings and
ecommerce related content directly from inside your WPCartPro (Site Store Pro) admin area.

15 Copyright 2015. Site Store Pro, Inc. All Rights Reserved.
AddingMenuLinksToStoreCategories
When you add new categories, subcategories, brands, etc to your online store, you may wish to link
directly to those items from your wordpress menus.
You can either copy the link URLs directly from the admin area locations inside of your Site Store Pro
admin area and add them as custom menu URLs inside of wordpress (Under Appearance > Menus) to
your top‐navigation bar or you can use the WPCartPro Menu Widgets to dynamically list brands,
categories, subcategories, collections, shop‐by‐styles, shop‐by‐occasions, colors, sizes and materials as
lists on your sidebar or footer menus.
AddingtheQuickCartDisplayToWordpressPages
You can include a realtime “quick summary” bar on your wordpress site of the current status of the
shopping cart items and total by using the built‐in quick cart shortcode or quickcart widget.
To place the Quick Cart Display anywhere on your Wordpress install (pages, posts, menus, etc), use the
shortcode: [wpcartpro_quick_cart]
You can also add the Quick cart to the site using the WPCartPro widget. (Available under Appearance >
Widgets) To format the contents of the Quick Cart display , open up the css file in the plugin’s /css/
directory called wpcartpro.css. You can edit it directly from Wordpress by opening the plugin settings as
shown below:

16 Copyright 2015. Site Store Pro, Inc. All Rights Reserved.
Although the quick cart appearance is formatted by changing the CSS in /wp‐
content/plugins/wpcartpro/css/wpcartpro.css
.. the quick cart contents / labels are managed with the rest of the site ecommerce content in the store
admin area.
You can change the labels of the Quick Cart display by clicking on the WPCartPro menu link, then clicking
on Store Setup > Shopping Cart Display > Quick Cart Display Setup.
Below is a screen shot of the Quick Cart Manager in the Site Store Pro admin area:

17 Copyright 2015. Site Store Pro, Inc. All Rights Reserved.
SettingUpSEOFriendlyLinksForStoreAndProductPages Site Store Pro includes the option to have dynamically generated content use friendly page names (similar to the Wordpress permalinks setting(s). In order to use SEO friendly links on your store, you must turn on that option in the admin area and then add some rules to your .htaccess file. To setup SEO friendly store links (page names), click on the WPCartPro menu button, then Store Setup and ‘Store URL’ Check the box that says “Turn On SEO” Friendly URLS (links) and save your settings. Then you need to download / edit your htaccess file and add the following rules to the file.
# BEGIN Site Store Pro <IfModule mod_rewrite.c> RewriteRule ^items/([^/\.]+) store/item_view.php?itemlink=$1 [L] RewriteRule ^brands/([^/\.]+)/?$ store/store_results.php?brandname=$1 [L] RewriteRule ^section/([^/\.]+)/?$ store/store_results.php?mastercatname=$1 [L] RewriteRule ^subcats/([^/\.]+)/?$ store/store_results.php?subcatname=$1 [L] RewriteRule ^collections/([^/\.]+)/?$ store/store_results.php?collectionname=$1 [L] RewriteRule ^occasions/([^/\.]+)/?$ store/store_results.php?shopoccasions=$1 [L] RewriteRule ^styles/([^/\.]+)/?$ store/store_results.php?shopstyles=$1 [L] RewriteCond %{REQUEST_URI} !^/(store|store/.*)$ </IfModule> # END Site Store Pro If you need assistance setting up your SEO settings on your Wordpress installs, please submit a support request to [email protected]