Embed Size (px)
Citation preview
SirenOwner’s Manual

Contents
Getting StartedInsteon Siren 4
Device Overview 4Buttons 4Installation 4Protective Film 4
Alert Types 5
Insteon app for iPhone, iPad and iPod touchAdd to the Insteon Hub 7Configure Audible Alerts 8Configure Arm and Disarm 10
Insteon app for AndroidAdd to the Insteon Hub 13Configure Audible Alerts 14Configure Arm and Disarm 16
Local ProgrammingAbout Local Programming 19Local Programming Flow Chart 20
Basic LinkingTriggering Siren from an Insteon Device 22Arming and Disarming Siren from an Insteon Device 23
Factory ResetFactory Reset 26
AppendixSpecifications 28Troubleshooting 30Certifications and Warnings 31Product Warranty 32
3
Everything you need to quickly get up and running.
Getting Started
4
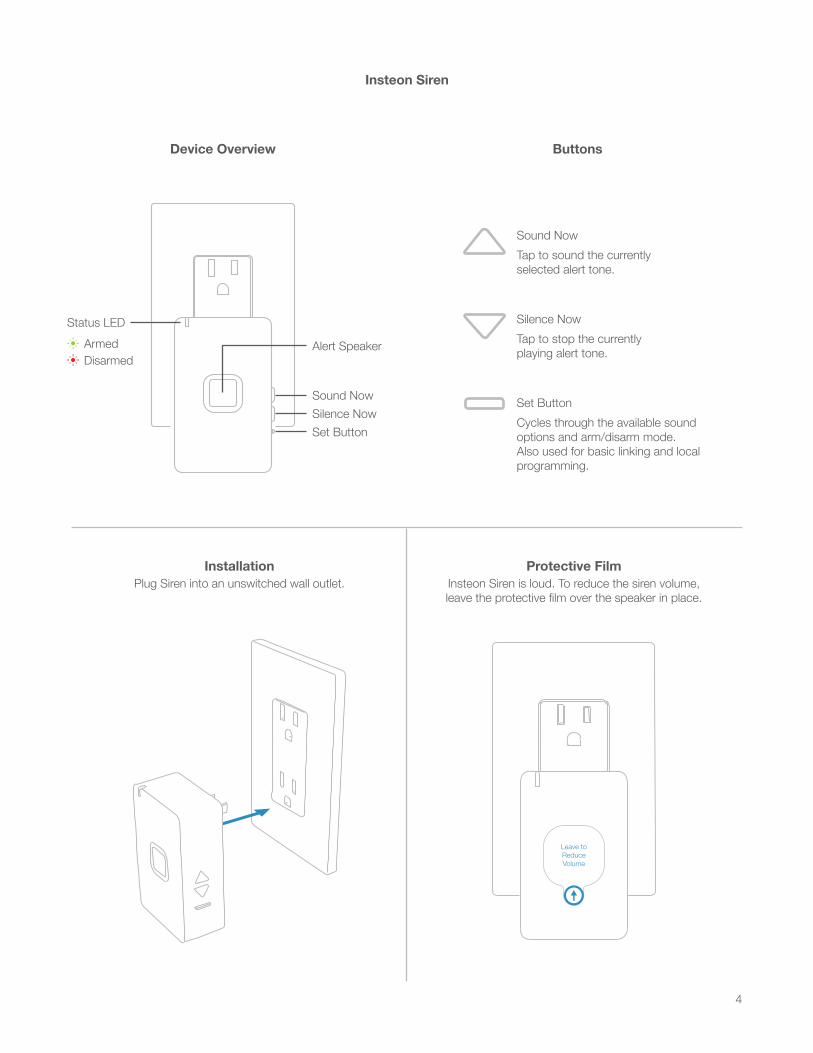
Installation Protective Film
ButtonsDevice Overview
Insteon Siren
Set Button
Sound NowSilence Now
Alert Speaker
Status LEDArmedDisarmed
Plug Siren into an unswitched wall outlet. Insteon Siren is loud. To reduce the siren volume, leave the protective film over the speaker in place.
Set ButtonCycles through the available sound options and arm/disarm mode. Also used for basic linking and local programming.
Silence NowTap to stop the currently playing alert tone.
Sound NowTap to sound the currently selected alert tone.

5
Alert Types
ChimeTwo short beeps will sound if Siren is armed and triggered
by a linked device.
SirenLoud ringing will sound if Siren is armed and triggered by a linked
device. The loud ringing will persist for 2 minutes unless stopped by
disarming Siren.
Siren features two types of audible alerts. Choose the suitable alert when creating a Scene via Insteon for Hub app
or tap-tap linking.
Siren is loud. Use hearing protection when testing in
close proximity.
Caution

6
Use the Insteon app to configure and control Siren.
Insteon app for iPhone, iPad and iPod touch

7
When prompted, press and hold the set button on Siren until the device
double-beeps
Launch the Insteon App
Tap Plug-in Module
Tap Add a DeviceTap the drawer icon or swipe from the right edge of the display to
open the drawer
You can now manage Siren with the Insteon app.X
Add to the Insteon HubiPhone, iPad and iPod touch
8
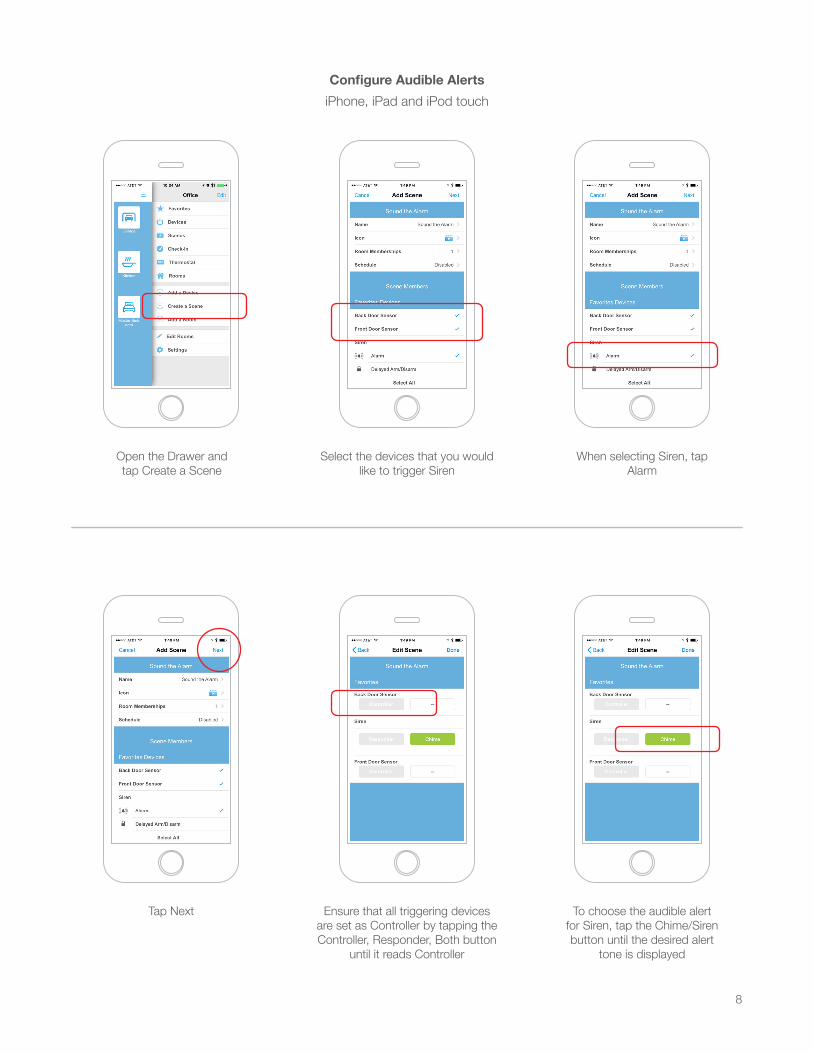
Configure Audible AlertsiPhone, iPad and iPod touch
Open the Drawer and tap Create a Scene
Tap Next
When selecting Siren, tap Alarm
To choose the audible alert for Siren, tap the Chime/Siren button until the desired alert
tone is displayed
Select the devices that you would like to trigger Siren
Ensure that all triggering devices are set as Controller by tapping the Controller, Responder, Both button
until it reads Controller

9
When prompted, press and hold the set button on any battery-powered sensors
included in the Scene
Tap Done to begin creating the scene
Configure Audible AlertsiPhone, iPad and iPod touch
Tap Yes
Your Siren is now configured for aduible alerts.X
10
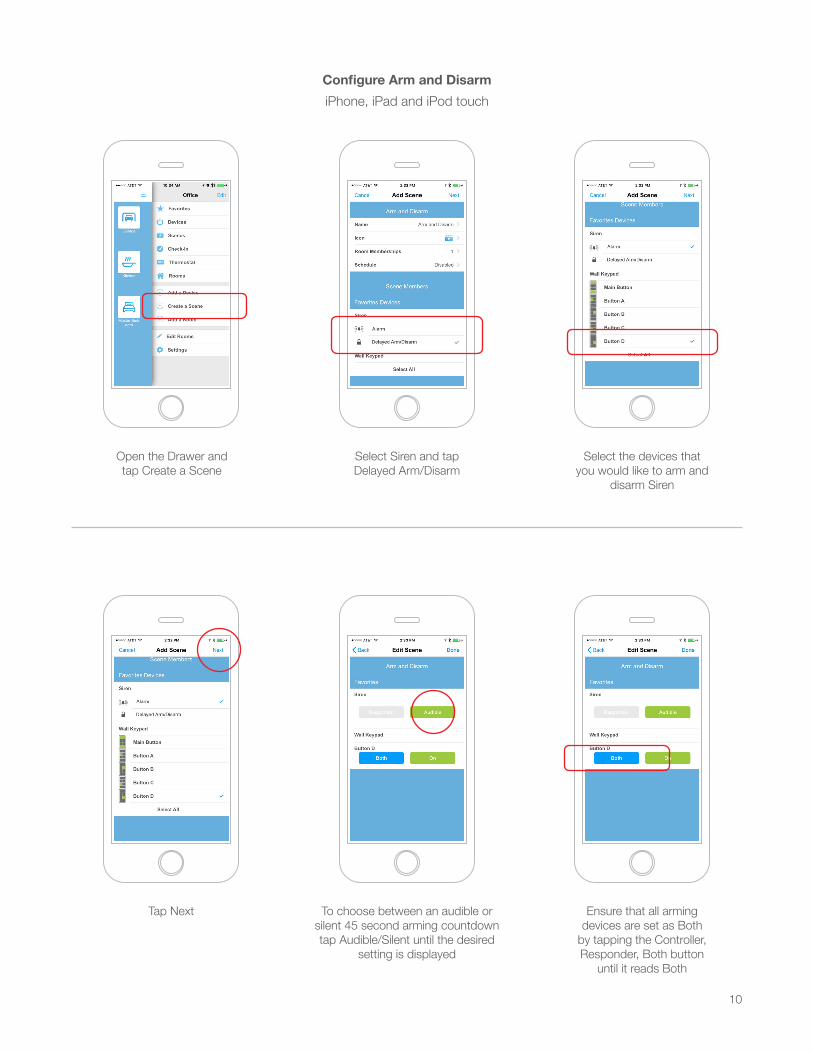
Configure Arm and DisarmiPhone, iPad and iPod touch
Open the Drawer and tap Create a Scene
Tap Next
Select the devices that you would like to arm and
disarm Siren
Ensure that all arming devices are set as Both
by tapping the Controller, Responder, Both button
until it reads Both
Select Siren and tap Delayed Arm/Disarm
To choose between an audible or silent 45 second arming countdown tap Audible/Silent until the desired
setting is displayed
11
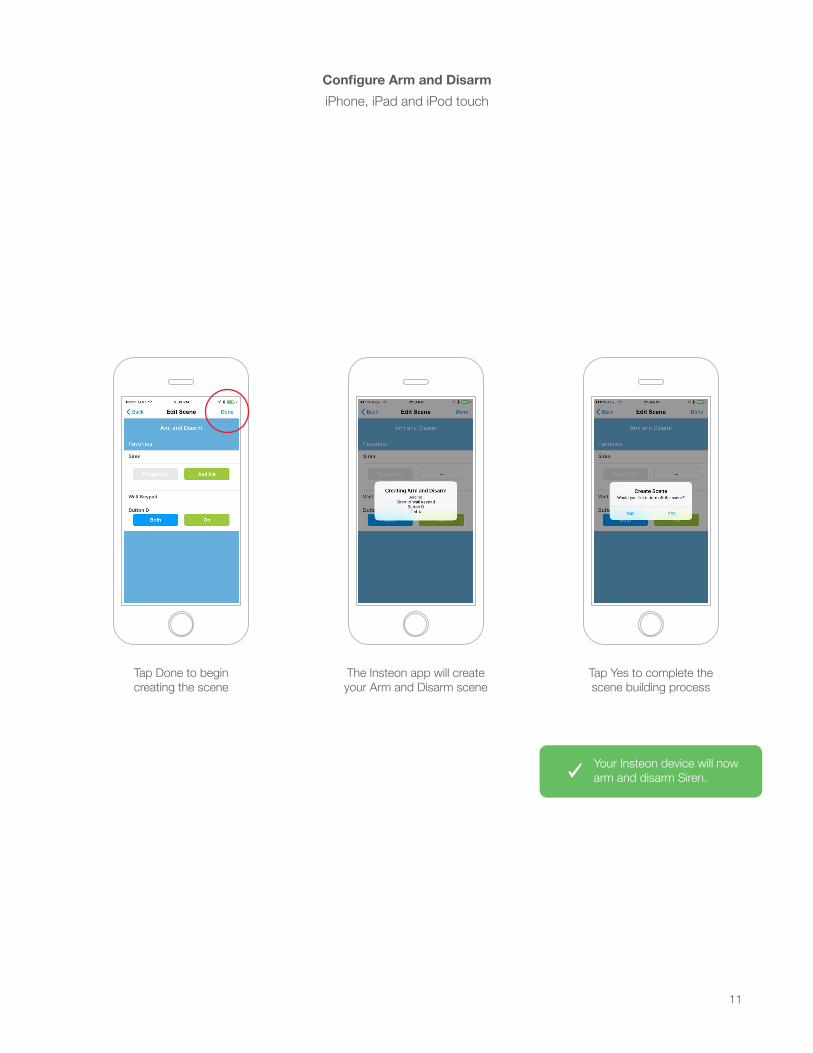
The Insteon app will create your Arm and Disarm scene
Configure Arm and DisarmiPhone, iPad and iPod touch
Tap Yes to complete the scene building process
Your Insteon device will now arm and disarm Siren.X
Tap Done to begin creating the scene
12
Use the Insteon app to configure and control Siren.
Insteon app for Android
13
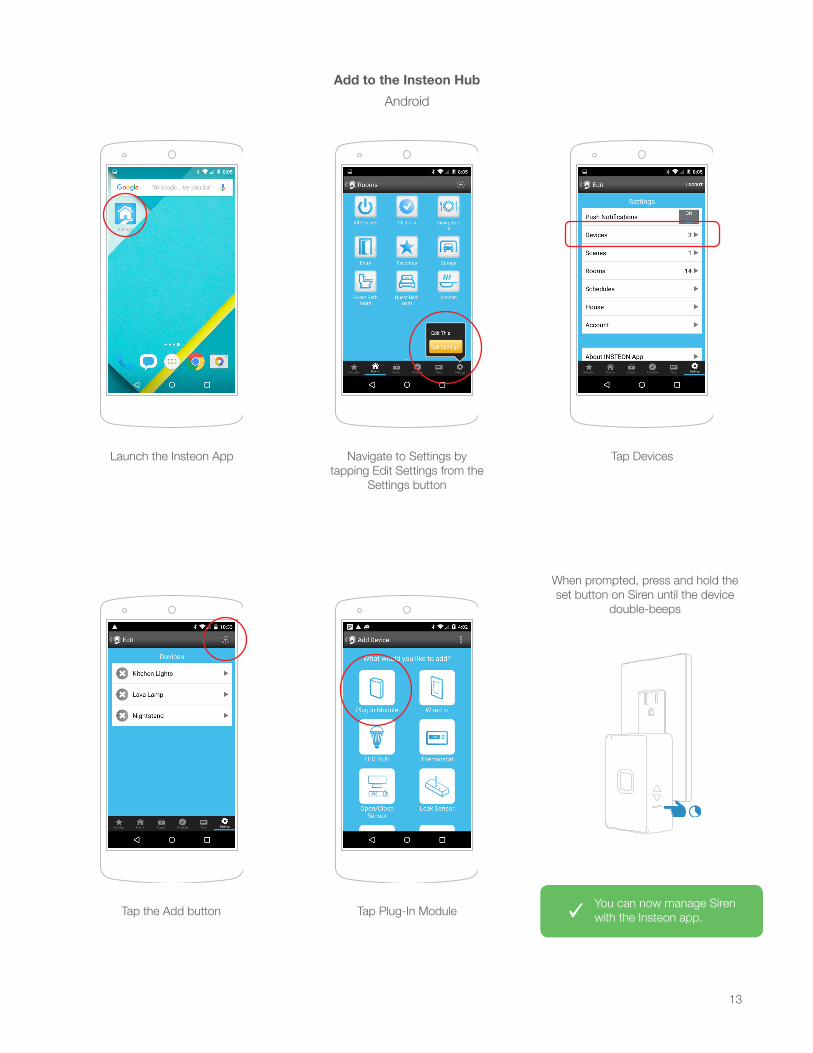
Add to the Insteon HubAndroid
Launch the Insteon App
Tap the Add button
Tap DevicesNavigate to Settings by tapping Edit Settings from the
Settings button
Tap Plug-In Module
When prompted, press and hold the set button on Siren until the device
double-beeps
You can now manage Siren with the Insteon app.X
14
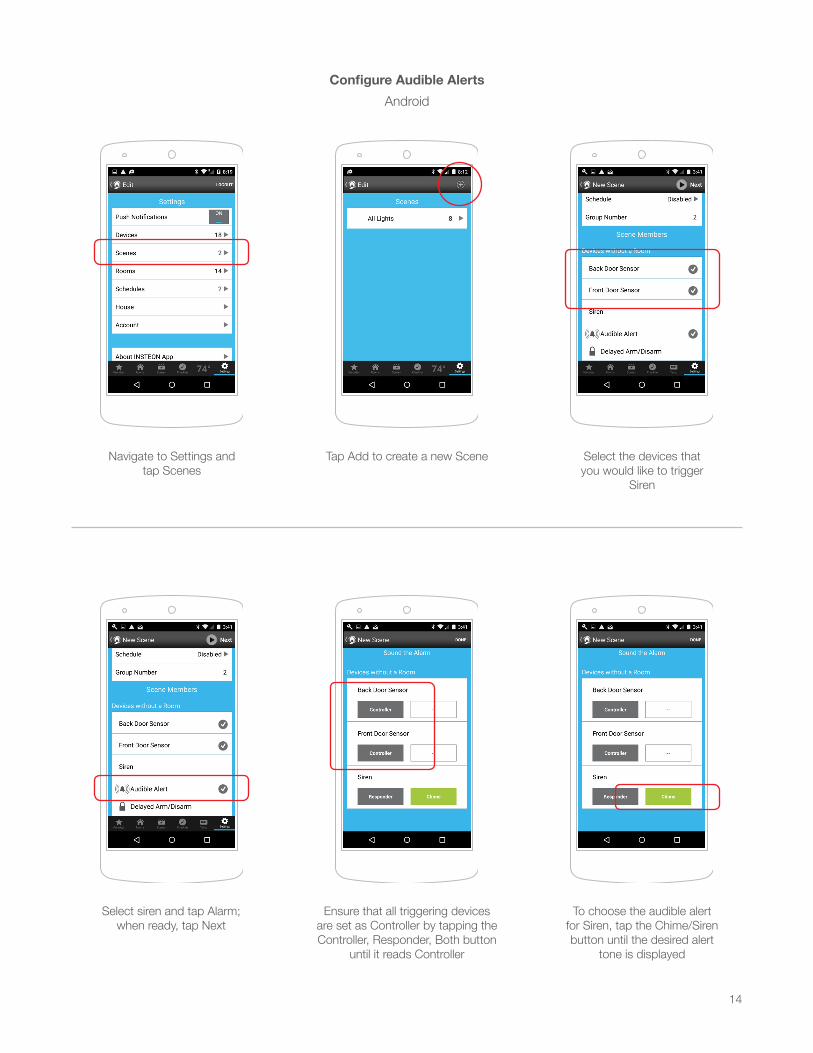
Configure Audible AlertsAndroid
Navigate to Settings and tap Scenes
Select siren and tap Alarm; when ready, tap Next
Select the devices that you would like to trigger
Siren
To choose the audible alert for Siren, tap the Chime/Siren button until the desired alert
tone is displayed
Tap Add to create a new Scene
Ensure that all triggering devices are set as Controller by tapping the Controller, Responder, Both button
until it reads Controller
15
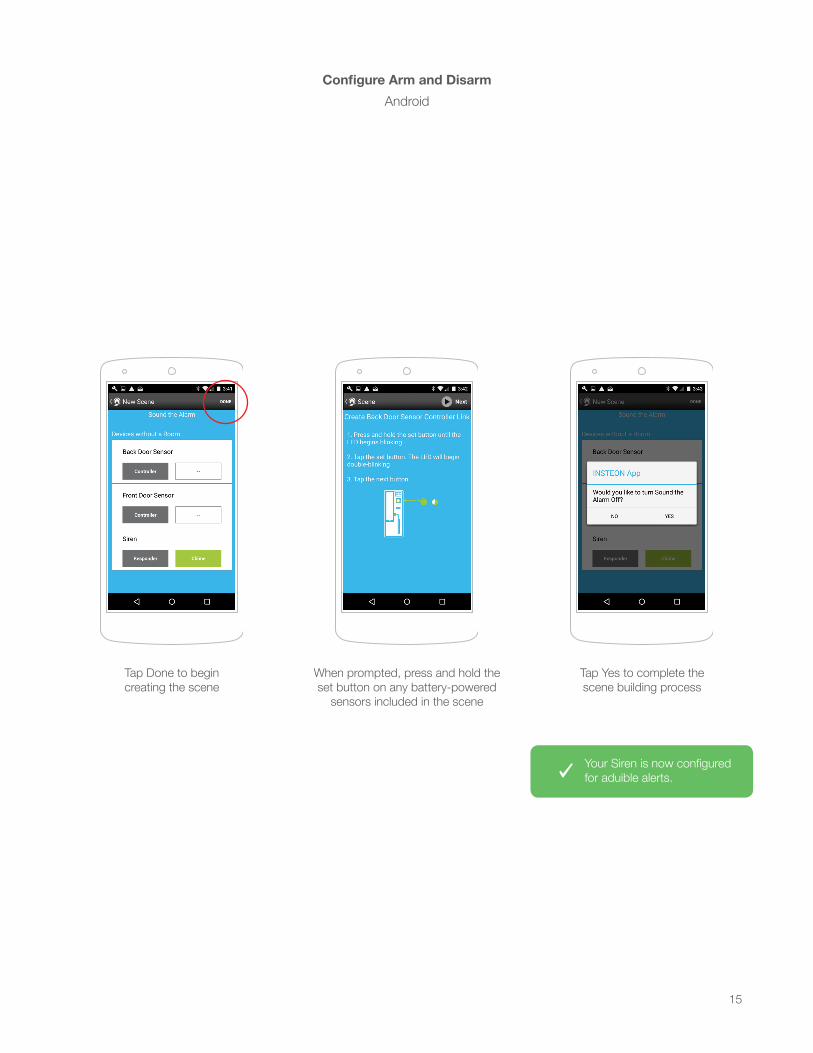
Configure Arm and DisarmAndroid
Tap Done to begin creating the scene
Tap Yes to complete the scene building process
When prompted, press and hold the set button on any battery-powered
sensors included in the scene
Your Siren is now configured for aduible alerts.X
16
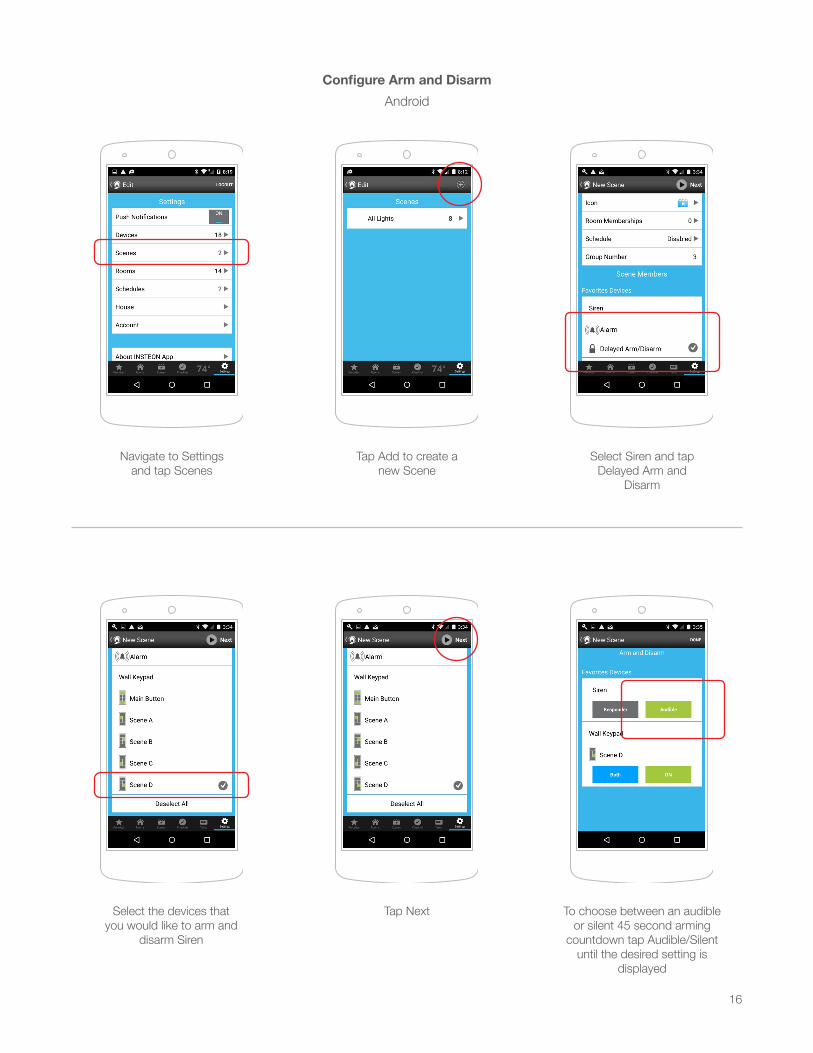
Configure Arm and DisarmAndroid
Navigate to Settings and tap Scenes
Select the devices that you would like to arm and
disarm Siren
Select Siren and tap Delayed Arm and
Disarm
To choose between an audible or silent 45 second arming
countdown tap Audible/Silent until the desired setting is
displayed
Tap Add to create a new Scene
Tap Next
17
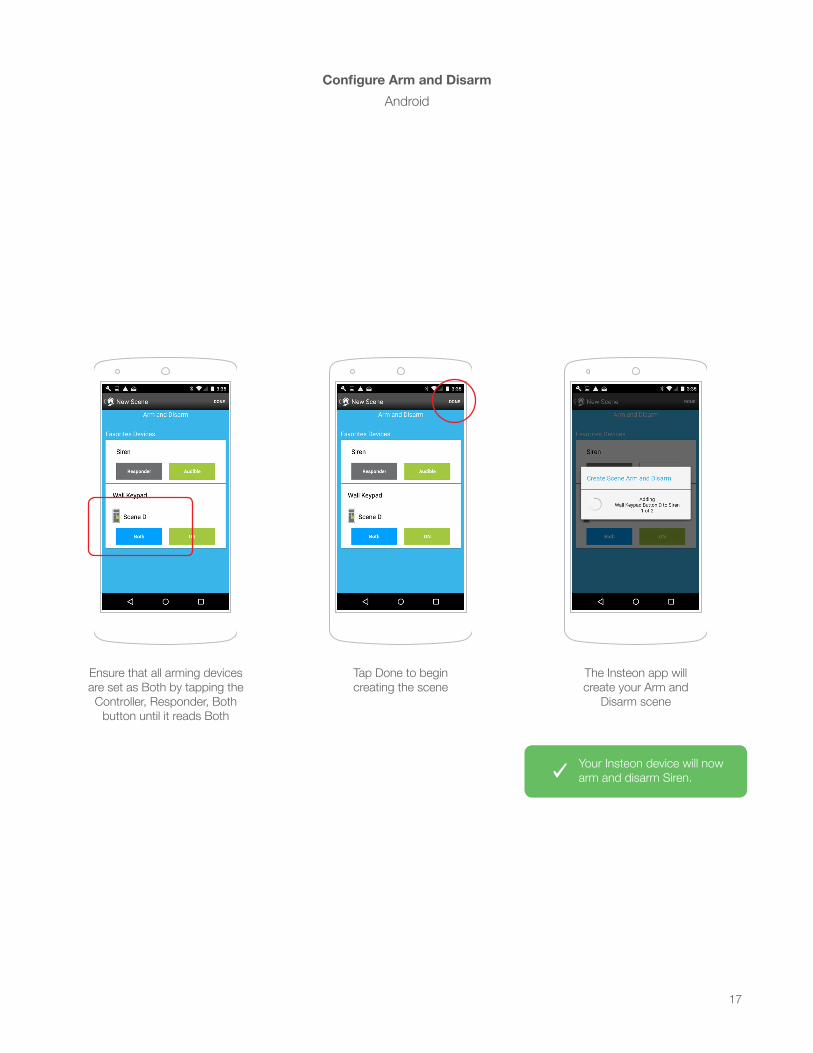
Configure Arm and DisarmAndroid
Tap Done to begin creating the scene
The Insteon app will create your Arm and
Disarm scene
Your Insteon device will now arm and disarm Siren.X
Ensure that all arming devices are set as Both by tapping the Controller, Responder, Both
button until it reads Both

18
Use the local programming to link Insteon devices together with the set button.
Local Programming
19
About Local Programming
Local Programming Features
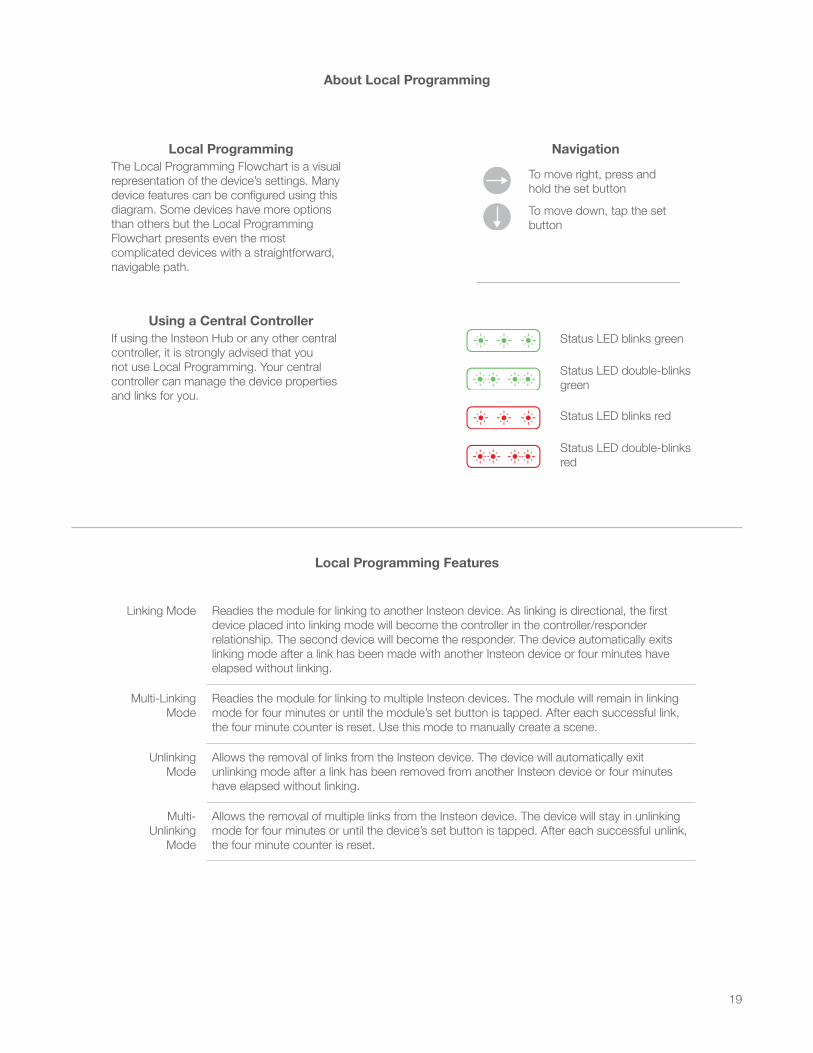
Linking Mode Readies the module for linking to another Insteon device. As linking is directional, the first device placed into linking mode will become the controller in the controller/responder relationship. The second device will become the responder. The device automatically exits linking mode after a link has been made with another Insteon device or four minutes have elapsed without linking.
Multi-Linking Mode
Readies the module for linking to multiple Insteon devices. The module will remain in linking mode for four minutes or until the module’s set button is tapped. After each successful link, the four minute counter is reset. Use this mode to manually create a scene.
Unlinking Mode
Allows the removal of links from the Insteon device. The device will automatically exit unlinking mode after a link has been removed from another Insteon device or four minutes have elapsed without linking.
Multi-Unlinking
Mode
Allows the removal of multiple links from the Insteon device. The device will stay in unlinking mode for four minutes or until the device’s set button is tapped. After each successful unlink, the four minute counter is reset.
To move right, press and hold the set button
To move down, tap the set button
Status LED blinks green
Status LED double-blinks green
Status LED blinks red
Status LED double-blinks red
The Local Programming Flowchart is a visual representation of the device’s settings. Many device features can be configured using this diagram. Some devices have more options than others but the Local Programming Flowchart presents even the most complicated devices with a straightforward, navigable path.
If using the Insteon Hub or any other central controller, it is strongly advised that you not use Local Programming. Your central controller can manage the device properties and links for you.
Navigation Local Programming
Using a Central Controller
NEW
X

20
Arm & Disarm
Chime
Siren
TapTap
Tap
Press
Press
Press
Unlinking Mode
Multi-Unlinking Mode
Linking Mode
Multi-Linking Mode
Press
Tap
Tap
PressPress
Tap
Tap
ExitExit
Exit
Exit
Local Programming Flow Chart
PressExit
21
Configure Insteon Siren without Insteon Hub; do not use these instructions if you intend to use Siren with Insteon Hub or other Insteon management software.
Basic Linking
22
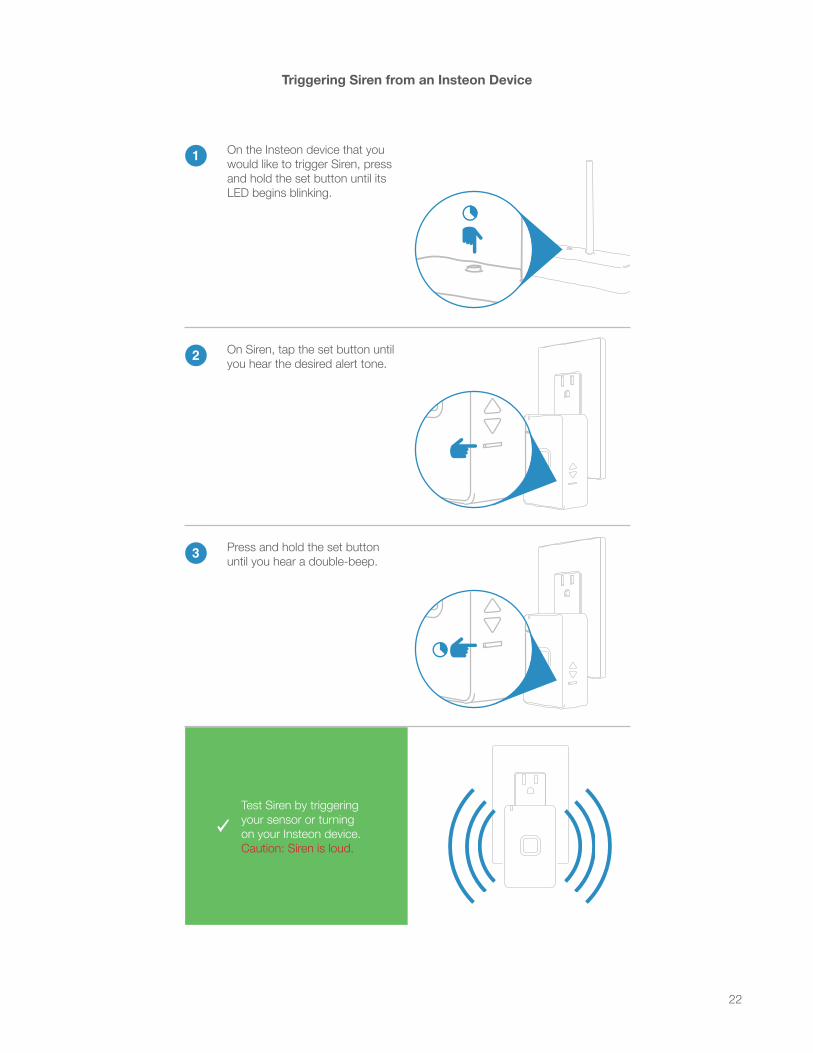
XTest Siren by triggering your sensor or turning on your Insteon device. Caution: Siren is loud.
Triggering Siren from an Insteon Device
1 On the Insteon device that you would like to trigger Siren, press and hold the set button until its LED begins blinking.
2 On Siren, tap the set button until you hear the desired alert tone.
3 Press and hold the set button until you hear a double-beep.

23
Arming and Disarming Siren from an Insteon Device
1 On the Insteon device that you would like to use to arm and disarm Siren, tap the desired button.
You can use an Insteon device like a Wall Keypad or Mini Remote to arm and disarm Siren. When using a Wall Keypad, you can also see if Siren is
armed or disarmed by looking at the arm and disarm button.
2 Press and hold the set button until the device’s LED begins blinking.
3 On Siren, tap the set button until the status LED glows red.
4 Press and hold the set button until you hear a double-beep.

24
X Your Insteon device will now arm and disarm Siren
Arming and Disarming Siren from an Insteon Device
5 Test Siren by arming from your Insteon device. While arming, Siren will beep for 45 seconds and any linked devices will not trigger the siren or chime.
To cancel arming, tap the button again (or turn controller off).

25
A factory reset will erase all links stored in the device’s database as well as any customized properties.
Factory Reset
26
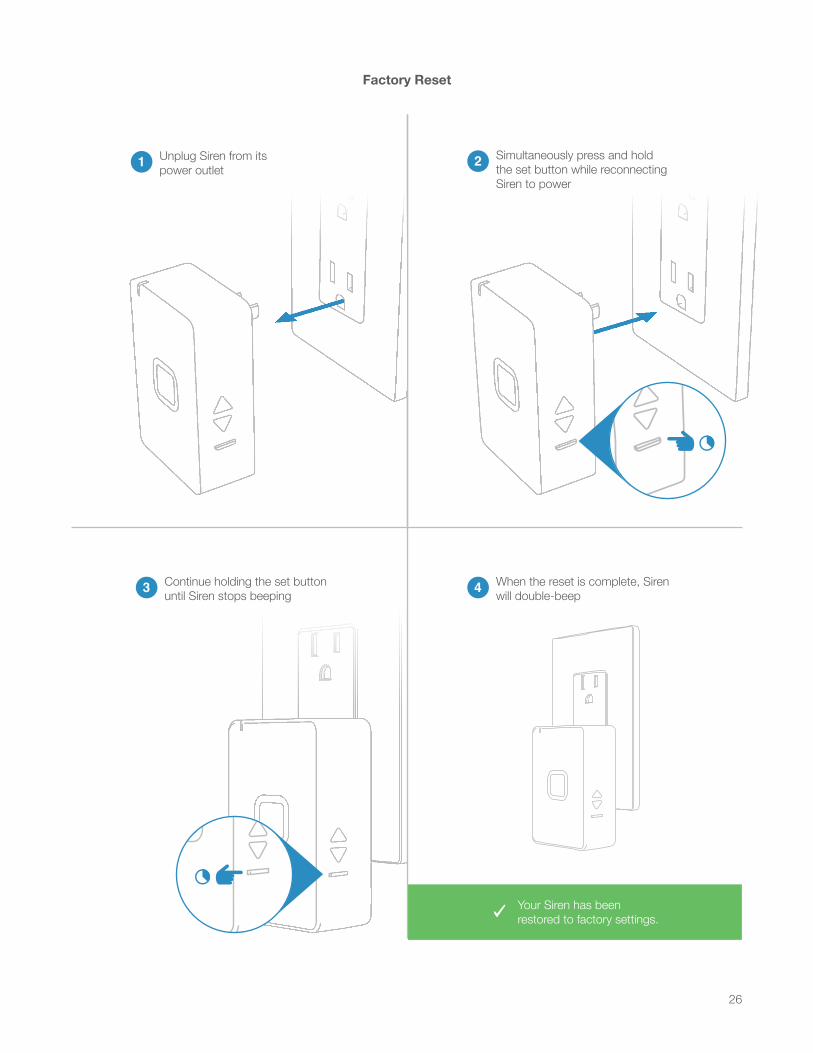
X Your Siren has been restored to factory settings.
Factory Reset
1 Unplug Siren from its power outlet
2 Simultaneously press and hold the set button while reconnecting Siren to power
3 Continue holding the set button until Siren stops beeping 4 When the reset is complete, Siren
will double-beep

27
Everything else you might need to know about your Insteon product.
Appendix

28
Specifications
General
Available Colors White
Brand: Insteon
FCC ID SBP2457D2A
Industry Canada 5202A-2457D2A
Manufacturer Product No.: 2868-222
Patent No.: Protected under US and Foreign Patents (see www.insteon.com/patents)
UPC: 813922015713
Warranty: 2 years, limited
Operation
Audio Alert Beeper, Chime, Siren
Chime Volume 100 dB at 1 meter
Siren Volume 115 dB at 1 meter
Setup Memory Non-volatile EEPROM
Status LED Red/Green LED
Insteon Features
Insteon Device Category 0x07
Insteon Device Subcategory 0x1E
Insteon Links 24
Insteon Messages Repeated Yes
Insteon Minimum Receive Level 10 mV
Insteon Minimum Transmit Level 3.2 Vpp into 5 Ohms
Insteon Powerline Device Yes
Insteon Powerline Frequency 131.65 KHz
Insteon RF Device Yes
Multi-Link Support Yes
Multi-Unlink Support Yes
RF Beacon Yes

29
Radio Frequency 915.0 MHz
Radio Frequency Range 150 feet
Scene Commands Supported as Controller
Fast-On Fast-Off
Scene Commands Supported as Responder
On, Fast-On Off
Software Configurable Yes
Mechanical
Dimensions 3.2” H x 2.05” W x 1.05” D 81.2mm H x 53mm W x 26.6mm D
Enclosure Material UV stabilized plastic
Mounting Ungrounded, polarized electrical outlet, NEMA 1-15
Operating Environment Indoors
Operating Humidity Range 0-85% relative humidity, non-condensing
Operating Temperature Range 32º to 104º F 0º to 40º C
Set Button Yes
Storage Temperature Range -4º to 158º F -20º to 70º C
Weight 3.3 oz
Electrical
Power Consumption <0.75 Watts
Supply Voltage 120 Volts AC ± 10%, 60 Hertz, single phase
Surge Resistance Surges over 1,000 volts

30
TroubleshootingFor detailed troubleshooting information, visit insteon.com/get-started-2868-222
31
Certifications and Warnings
Read and understand these instructions before installing and retain them for future reference.
This product is not designed or approved for use on powerlines other than 120VAC, 60Hz, single phase. Attempting to use this product on unapproved powerlines may have hazardous consequences.
• Use only indoors or in outdoor rated box
• This product may feel warm during operation. The amount of heat generated is within approved limits and poses no hazards. To minimize heat buildup, ensure the area surrounding this product is as clear of clutter as possible.
• Each Insteon product is assigned a unique Insteon ID, which is printed on the product’s label.
This device complies with FCC Rules and Industry Canada license-exempt RSS standard(s). Operation is subject to the following two conditions: (1) this device may not cause harmful interference, and (2) this device must accept any interference, including interference that may cause undesired operation of the device.
Le present appareil est conforme aux CNR d’Industrie Canada applicables aux appareils radio exempts de licence. L’exploitation est autorise aux deux conditions suivantes: (1) l’appareil ne doit pas produire de brouillage, et (2) l’utilisateur de l’appareil doit accepter tout brouillage radiolectrique subi, mme si le brouillage est susceptible d’en compromettre le fonctionnement.
32
Product Warranty
Limited Warranty
Seller warrants to the original consumer purchaser of this product that, for a period of two years from the date of purchase, this product will be free from defects in material and workmanship and will perform in substantial conformity to the description of the product in this Owner’s Manual. This warranty shall not apply to defects or errors caused by misuse or neglect. If the product is found to be defective in material or workmanship, or if the product does not perform as warranted above during the warranty period, Seller will either repair it, replace it, or refund the purchase price, at its option, upon receipt of the product at the address below, postage prepaid, with proof of the date of purchase and an explanation of the defect or error. The repair, replacement, or refund that is provided for above shall be the full extent of Seller’s liability with respect to this product. For repair or replacement during the warranty period, call 866-243-8022 with the Model # and Revision # of the device to receive an RMA# and send the product, along with all other required materials to:
Insteon ATTN: Receiving 16542 Millikan Ave. Irvine, CA 92606-5027
Limitations
The above warranty is in lieu of and Seller disclaims all other warranties, whether oral or written, express or implied, including any warranty or merchantability or fitness for a particular purpose. Any implied warranty, including any warranty of merchantability or fitness for a particular purpose, which may not be disclaimed or supplanted as provided above shall be limited to the two-year of the express warranty above. No other representation or claim of any nature by any person shall be binding upon Seller or modify the terms of the above warranty and disclaimer.
Home automation devices have the risk of failure to operate, incorrect operation, or electrical or mechanical tampering. For optimal use, manually verify the device state. Any home automation device should be viewed as a convenience, but not as a sole method for controlling your home.
In no event shall Seller be liable for special, incidental, consequential, or other damages resulting from possession or use of this device, including without limitation damage to property and, to the extent permitted by law, personal injury, even if Seller knew or should have known of the possibility of such damages. Some states do not allow limitations on how long an implied warranty lasts and/or the exclusion or limitation of damages, in which case the above limitations and/or exclusions may not apply to you. You may also have other legal rights that may vary from state to state.
Protected under U.S. and foreign patents (see www.insteon.com/patents) Copyright © 2016 Insteon
Rev 11.16.16