Embed Size (px)
Citation preview

SimPooch
Canine Medical Acupuncture Training & Simulation System
May 08, 2009

Team Members Sean Thomas – ECE
Bryan Landwehr – ECE [email protected]
Advisors Professor Peter Young – ECE
Sue James – ME [email protected]
Sponsors Narda Robinson – CVMBS
Regina Schoenfeld-Tacher – CVMBS [email protected]
Colorado State University
Department of Electrical & Computer Engineering &
College of Veterinary Medicine and Biomedical Sciences
Available Online: http://www.engr.colostate.edu/ece-sr-
design/AY08/SIMPooch/Documentation/SimPooch_Spring_2009_Engineering_Report.pdf

Abstract
Teaching acupuncture point location requires a combination of anatomical knowledge and
palpation techniques in order ensure accuracy. Because live dogs may not be immediately available, and in order to limit stress on dogs with repeated point locating and needling practice, we are working on developing a canine acupuncture simulator that will provide visual and force feedback, as well as provide a mechanism for testing and grading.
We are implementing this simulator using physical and virtual model s. A physical mannequin exists to provide the palpatory sensation of locating known acupuncture points; while a virtual model supplies the sensation of inserting the acupuncture needle, and grades the student on a variety of parameters relevant to performing effective canine acupuncture. With the use of a haptic device, open source haptic software, and an object oriented programming language; a virtual model can be created that simulates the properties of canine skin and flesh, and measures the interaction between itself and a user.
The ultimate goal of the SimPooch project is to develop a process to manufacture a canine acupuncture simulator which has the ability to grade an acupuncture student’s performance.

Table of Contents I. Introduction .............................................................................................................................................. 7
Background of Acupuncture ..................................................................................................................... 7
Need for Acupuncture Simulator .............................................................................................................. 7
Project Description.................................................................................................................................... 7
II. Summary of Previous Work ..................................................................................................................... 7
Physical ..................................................................................................................................................... 8
Virtual ........................................................................................................................................................ 8
III. Virtual Simulation Design ........................................................................................................................ 9
Overview ................................................................................................................................................... 9
Haptic Representation of Canine Flesh ..................................................................................................... 9
Overview ............................................................................................................................................... 9
Model Criteria ..................................................................................................................................... 10
Solid Surface Canine Model ................................................................................................................ 10
Magnetic Spheres ............................................................................................................................... 11
Spring Effect Surface ........................................................................................................................... 13
Volume Based Model .......................................................................................................................... 14
Limitations of Haptic Device ................................................................................................................... 15
Simulation Program ................................................................................................................................ 15
Overview ............................................................................................................................................. 15
Program Structure............................................................................................................................... 16
Grading .................................................................................................................................................... 18
Closest Point 1.0 .................................................................................................................................. 18
Voronoi Algorithm .............................................................................................................................. 19
Closest Point 2.0 .................................................................................................................................. 19
GUI .......................................................................................................................................................... 21
H3DLoad .............................................................................................................................................. 21
AutoHotKey ......................................................................................................................................... 21
wxWidgets ........................................................................................................................................... 22
IV. Conclusion ............................................................................................................................................. 22
Year Conclusions ..................................................................................................................................... 22
Accomplishments ................................................................................................................................ 23

Failures ................................................................................................................................................ 23
Project Continuation ............................................................................................................................... 23
Introduction ........................................................................................................................................ 23
Haptics ................................................................................................................................................ 23
Simulation Program ............................................................................................................................ 24
Physical System ................................................................................................................................... 24
Long Term Continuation ......................................................................................................................... 24
V. References ............................................................................................................................................. 25
VI. Bibliography .......................................................................................................................................... 26
VII. Appendices ........................................................................................................................................... 26
Appendix A: Abbreviations ..................................................................................................................... 26
Appendix B: Budget................................................................................................................................. 26
Appendix C: Phantom Omni Data Sheet ................................................................................................. 27
Appendix D: Software ............................................................................................................................. 27
Appendix E: Acknowledgements ............................................................................................................ 28
Appendix F: Project Code ........................................................................................................................ 29

Table of Figures Figure 1: Physical System – Mannequin on top of the stand (black box). Inside the stand is a rotational
sensor. ........................................................................................................................................................... 8
Figure 2: Conceptual Tissue Model ............................................................................................................. 10
Figure 3: Solid Surface Model ..................................................................................................................... 11
Figure 4: Magnetic sphere model: supplied haptic force vs. depth ........................................................... 12
Figure 5: Magnetic spheres model – conceptual model ............................................................................. 12
Figure 6: Spring effect node – conceptual force vs. depth ......................................................................... 13
Figure 7: Spring effect node - cylindrical boundary surface ....................................................................... 14
Figure 8: Spring Effect flowchart ................................................................................................................. 14
Figure 9: Program flow ................................................................................................................................ 16
Figure 10: Program output with sample grading points ............................................................................. 18
Figure 11: Voronoi diagram ........................................................................................................................ 19
Figure 12: Flowchart for grading algorithm ................................................................................................ 20
Figure 13: Data structure of grading algorithm .......................................................................................... 20
Figure 14: Improved stylus model, H3DAPI\settings\common\stylus.x3d ................................................ 21
Figure 15: AutoHotKey - docking toolbar and status window with fish demo ........................................... 22

I. Introduction
Background of Acupuncture Veterinary medical acupuncture is a medical discipline that approaches the ancient system of
acupuncture, or needling therapy, from a scientific perspective. Veterinarians who practice medical acupuncture find it to be an effective method of relieving
pain and speeding recovery from a variety of medical conditions. For example, dogs who are experiencing pain from arthritis or neurologic compromise from disk disease often respond especially well to acupuncture. Veterinary medical acupuncture differs from Traditional Chinese Medical TCM style acupuncture, by placing emphasizing the neuro-anatomic and neurophysiologic bases of acupuncture.
Acupuncture points contain nerve endings that, when stimulated, cause the body to release endorphins and other neurotransmitters that will counter the pain and promote recovery. Other physiologic changes include improved circulation and better immune function. Instead of selecting acupuncture points based on invisible energy blockages as a TCM-style acupuncturist would, medical acupuncturists determine a needling protocol based on their knowledge of the nervous system, and which neural pathways require stimulation in order to bring the body back to health.
This demands in-depth study of anatomy and specifically the nervous system, but delivers more reliable and more effective results. Knowing which nerves relate to which acupuncture points and acquiring skill at localizing the points through palpation comprise important first steps to becoming a successful veterinary medical acupuncturist (Dr. Narda Robinson).
Need for Acupuncture Simulator The main problem with training veterinarians in acupuncture is the difficulty associated with
hands-on training. Recruiting canine participants for acupuncture point palpation and needling practice becomes time-consuming, expensive, and poses a certain amount of stress for dogs. A simulator specifically designed for acupuncture would equip teachers with necessary tools in veterinary education.
When a student is deemed competent enough to practice on live animals, any mistakes could cause harm to the dog used for training. To reduce the chance of harming or causing stress to live animals, students training on our simulator would become as proficient without the emotional, physical, or financial cost of recruiting live dogs. [1]
Project Description An acupuncture simulator would provide an efficient, effective, and cost-saving solution for the
aforementioned challenges, as well as providing an accurate representation of the canine anatomy and exhibiting the many behaviors tissues express. Our sponsor in the College of Veterinary Medicine and Biomedical Sciences, Dr. Narda Robinson, created SimPooch to accomplish this need. The SimPooch simulator is separated into two separate systems: A physical system and a virtual system. In this report, the virtual system will be the topic of focus, as we were tasked with its improvement.
II. Summary of Previous Work Our work on SimPooch could not have been accomplished without standing on the shoulders of
past teams. Development of the physical system was accomplished by fall 2006-fall 2007 teams, and the virtual system by a fall 2007/spring 2008 team. Brief descriptions of prior work are given below, for detailed descriptions; please refer to their respective engineering reports.

Physical Sue James coordinated the design and construction of the physical system, which was
completed in fall 2006/spring 2007 by a Colorado State University mechanical engineering senior design team. The physical system is comprised of several subsystems: a silicone rubber mannequin, a stand supporting the mannequin, and a rotation sensor, shown in Figure 1.
Figure 1: Physical System – Mannequin on top of the stand (black box). Inside the stand is a rotational sensor.
The mannequin model allows the student to perform palpation, a technique of pressing the tissue with the tips of fingers, to identify and locate acupuncture locations on the head. The mannequin was developed from CT data of a Chocolate Labrador Retriever, obtaining a CAD model, and fabricating the head out of silicone rubber. The stand supports the mannequin head and is attached to a rotation senor housed in a black box, the base unit. The rotation sensor reads the angle of rotation of the mannequin, converts this data to a digital representation using an A/D converter, and sends it to the computer via a USB port. Details of the design and construction of the physical system can be found in the SimPooch Spring 2007 Engineering Report. [3]
Virtual The fall 2007/spring 2008 team was made up of ECE students, under the direction of our current
advisor, Dr. Peter Young. Much of the groundwork of our current software was conceptualized and implemented by this team. The virtual system had three major subsystems: acquisition of A/D data, conversion of CT data to enclosure.x3d file, H3D API. The rotational data obtained from the USB port

was initially read and stored by a database using MYSQL. It was later determined that this approach was not fast enough to keep up with the haptic processing requirements. MYSQL was replaced with a homebrew rotation acquisition program, written in C# in spring 2008, which improved rotation rendered in graphics. All of the CT data and volumetric data needed to be converted to a model that could be use with the software packages. The painstaking process of obtaining those points was a semester long process that the fall 2007/spring 2008 team accomplished. Details of the design and procedure of the virtual system can be found in the SimPooch Fall 2007 Engineering Report. [3]
III. Virtual Simulation Design
Overview Currently, the SimPooch system is powered by the H3D API 2.0. Registration on the H3D.org
website is required for downloading the software, as well as other toolkits available. H3D API is an open source haptics software development platform that uses the open standards OpenGL and X3D with haptics in one unified scene graph to handle both graphics and haptics [4]. Designed for use with the Python programming language, H3D API greatly simplifies development by rendering scene data provided by Python scripts in a haptic environment with minimal programming and fast computation. H3D uses X3D worlds for obtaining geometric input data. X3D is a XML-like file format for providing point sets for describing 3D models, like our virtual mannequin head.
Python is a high level scripting language that is used to implement the routes that H3D provides. It is also useful for its extensive libraries as an object-oriented programming language, easily interpreting H3D objects such as: nodes, surfaces, and forces. These objects can all be accessed through a Python interface, and thus can be modified, created, or removed. The fact that Python is becoming a widely supported and powerful language, and that H3DAPI was designed around this framework, makes it the natural choice for central development [5].
All of these components of the virtual system are integrated together in a cohesive collection of programs known as SimPooch. The next task was to use this powerful API to realistically simulate accurate canine acupuncture techniques.
Haptic Representation of Canine Flesh
Overview
The central aspect of haptics is the sensation of touch. As demonstrated by Dr. Robinson, touch is the primary tool to locate the exact position of a known acupuncture point. This process is called palpation. By feeling the plastic canine skull beneath the silicone canine flesh of the physical model a student will be able to accurately find the locations of acupuncture points. However finding the points is only half the process. Once the point is found the user needs to insert the needle; this is where the physical model reaches its limit. Although it may have been possible to simulate the sensation of needle insertion with a physical model similar to our existing canine head mannequin; previous teams chose to pursue a virtual simulation [2],[3]. A virtual model was chosen for a wide variety of reasons. It will not wear down and become damaged with prolonged use, it is simpler change parameters to tune the virtual model for the desired feel, and it is faster to reproduce a working virtual model on a large scale. Still, the strongest argument for the use of a virtual system is that it is expandable; a simple model can be created, and from those more complicated effects can be programmed without the expensive and time consuming molding and casting process [2]. To develop a virtual model for acupuncture we need to be familiar with the sensation of inserting a needle into flesh. With the assistance of Dr. Robinson, we were able to perform some basic acupuncture procedures on a canine head analog. From this

demonstration we were able to determine the necessary parameters for a suitable virtual model. Two model options were considered: a surface based haptic model, and a volume based haptic model. Both models use the open source software from H3D and the Python programming language.
Model Criteria
With the assistance and supervision of Dr. Robinson we were able to perform acupuncture techniques on a whole store bought chicken. The chicken was chosen because no canine cadaver was available for the demonstration. However, the chicken is a suitable replacement because it does exhibit similar effects we intend to model. The current model already exhibits the primary effect of a haptic model, the shape. The surface model is unfortunately only skin deep and a more advanced model is required. The primary effect our new haptic model will be required to implement is the sensation of different layers. While it is important to model other aspects of tissue, this is the primary sensation of inserting a needle and therefore the most critical. From the chicken demonstration we were able to determine that the general flesh model will need four layers. These four layers can be thought of as variable amounts of force required to push a needle through them Figure 2. This is a conceptual description of general flesh and it will be where we begin to construct the model. The layer thickness and the force required to pass a needle through them are important parameters to consider. However, the initial model will focus more on replicating the effect of layers and less on the physical parameters. Even so, there are some parameters that remain constant throughout the model. In all places there will be four distinct layers. The last of these layers will represent a bone layer and will be completely solid. Also for the general case the force required to pass through the skin is larger than the force required to pass through the muscle, and that is larger than the force required in fat. Two haptic models exist in the SimPooch program; the solid surface canine model, and the layered sphere model. Each of these represents a part of what will become a complete model.
Figure 2: Conceptual Tissue Model
Solid Surface Canine Model
The SimPooch project requires the ability to map physical acupuncture points into a virtual environment and onto a virtual dog model. The solution to this is the solid surface model found in enclosure.x3d, and shown here in Figure 3. The main requirement of the solid surface model is its shape. Ultimately, the physical and virtual systems will be synchronized and calibrated and this will require a virtual model that accurately represents the physical one. This model will also serve as a basis for future models. The model development process begins with implementing an effect on a simple geometry and then translating it to more complex shapes. All models will eventually be required to take

the shape of the solid surface dog model. The shortcoming of this model is that it is simply one solid surface. It lacks the sensation of actually inserting a needle into anything. To give the effect of layers a layered surface model was created, the magnetic sphere model.
Figure 3: Solid Surface Model
Magnetic Spheres
The most advanced haptic flesh model that exists in the SimPooch program is the layered magnetic sphere model. The primary goal of this model is to create the sensation of pushing a needle through layers. To achieve this effect, it was first required to develop the effect of pushing a needle through one surface. The H3D API contains pre-defined force effect nodes create simple force feedback applications [6].We have used one of these pre-existing force effect nodes in an attempt to simulate this sensation. The magnetic surface force effect node behaves as the name suggests; when a haptic device gets within a snap distance of the magnetic surface, it feels a force pulling it in the direction of surface, and when it travels past the snap distance, it no longer feels the force. By making the snap distance small, the model gives the illusion of a needle pushing through a thin dense layer. The development of another layer simply involves defining another magnetic surface inside the previous one. The layer that will represent muscle and bone is developed by defining a frictional surface inside the two magnetic surfaces. The inner surface provides a lower force feedback over a distance before being damped to the device limit. Conceptual descriptions of the haptic model and feedback it supplies are shown below in Figure 4 and Figure 5.
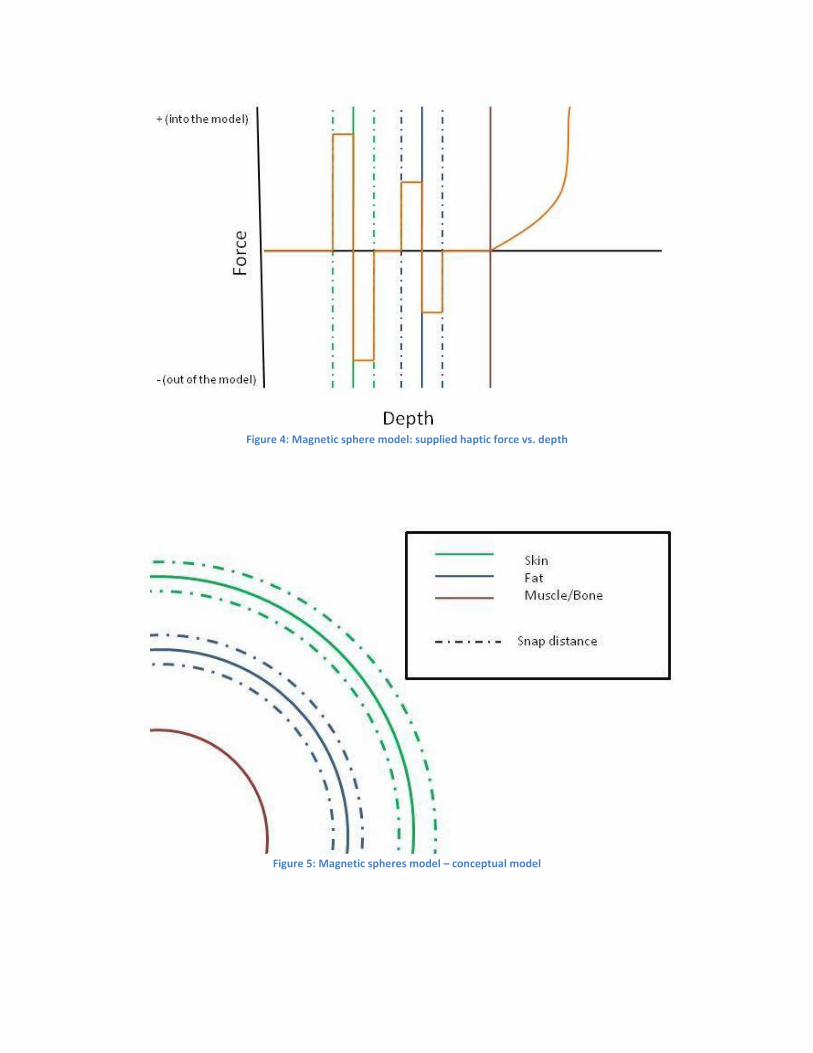
Figure 4: Magnetic sphere model: supplied haptic force vs. depth
Figure 5: Magnetic spheres model – conceptual model

While the model in Figure 4 does approximate the design criteria model in Figure 2, there are some undesirable effects present. The most prominent of these is a force hovering above the outer surface that pulls the haptic device towards the object. Also note that while the inner surface does approach the maximum device damping, it is not constant throughout the region that would represent the muscle. Another model was researched for haptic implementation, the spring effect surface model.
Spring Effect Surface
Another conceptual model was designed but not programmed because a more efficient method was found. This model generates the feedback force by creating surface objects and force effect nodes at a touched point and then removing them when there is no longer contact between the device and the surface. The sensation of layers is modeled as a set of spring nodes. Springs are force effects that apply to a specific point in the haptic environment [6]. Spring effect nodes work similar to magnetic surfaces, the force is only felt within a specified distance of the spring. The forces generated by a spring effect are the same for the force on a spring. This would model what is called a Hookean material [7] because it depends on Hooke's Law,
The force of three springs with different constants and escape distances can be made to provide an effect similar to the design criterion, shown in the force vs. depth diagram of Figure 6. This model is a two surface model. The springs are created on the outer surface and a solid inner surface exists to act as the bone. Notice that the only major difference between this model and the design criteria is the force felt by the user is not constant throughout the different layers. This model will however give the sensation of passing from one layer to another with a different density.
Figure 6: Spring effect node – conceptual force vs. depth
Additional design criteria specified that the needle should not slide around laterally while inserted in the skin. To address this restriction of movement to one direction, it was determined that the simplest solution was to create a boundary surface beneath the skin surface that would not allow movement along any other direction. In the same method, we generated a thin cylinder at the same point, oriented in the direction of the haptics device upon contact. As long as the haptic device remains in contact with the surface, the cylinder will prevent it from moving in any other direction Figure 7. A flowchart of this entire modeling process is presented in Figure 8.

Figure 7: Spring effect node - cylindrical boundary
surface
Figure 8: Spring Effect flowchart
Volume Based Model
Although it would be possible to model the force profile of a canine flesh with a surface based model, the resulting product would have little physical meaning. Flesh is not made up of springs and cylinders, it is made up of different layers of volumetric material with varying properties, and a better model should reflect this. H3D supplies a toolkit that is designed to represent volumetric data, (VHTK) [8]. VHTK is a relatively new software tool and as of May 1st 2008, less than 200 people have downloaded VHTK [4]. Several attempts were made to compile the source code for the VHTK library; however despite technical support from the webmasters at H3D.org Forums, none were effective. Problems in graphic rendering and compatibility with the Phantom device are the primary reasons for the inability to compile a working version of VHTK. It is unfortunate we were not able to develop a volumetric model for canine flesh with VHTK; however the concept of volume haptics will be valuable to future teams in one form or another, because VHTK is designed specifically to simulate the sensation of tissue [8].
Another toolkit provided from H3D would have been useful as well, MedX3D. MedX3D is an implementation of the volumetric rendering component of H3D [9]. Had we been able to compile and operate VHTK, MedX3D would have allowed us to translate the files taken from the CT scan into a

volumetric representation of the dog's head. Without VHTK, we were unable to do this. Ultimately, volume haptics will be used to create an accurate model for canine flesh. But it should be noted that a virtual model must still work within the confines of the physical system's limitations.
Limitations of Haptic Device While the Phantom Omni is a powerful tool for haptic interaction, it two serious limitations:
force feedback and mechanical failures. The Phantom Omni can deliver a maximum force of 3.3 N (Appendix C), which is suitable for our application, but could be cause problems for users unfamiliar to the device. While the Phantom Omni can measure orientation and deliver force with respect to the stylus' orientation of pitch, yaw, and roll; it cannot measure orientation or supply force to the torque orientation about the stylus axis.
The Phantom Omni is also susceptible to mechanical failure. The fall 2007 team had to order a new Phantom Omni four days before E-Days due to catastrophic failure of the actuators in the device. The cause of this failure was due to the unexpected reaction of the stylus to being trapped in narrow corridor in a test program, with very high stiffness, causing the Omni to vibrate between the walls at a very high frequency. The stylus snapped before the program could be terminated. A less extreme case of mechanical problems is currently occurring to our Omni: random button failures. We have programmed our demo to terminate when a button on the stylus is clicked. However, due to poor connections or some other unexplained malfunction, the buttons have been known to be unresponsive to a user input.
Simulation Program
Overview
At the center of the SimPooch project is the SimPooch test program. A combination of Python, X3D, C# and the H3D API, the test program controls interaction between the physical system and the virtual model. Initially developed by the fall 2007/Spring 2008 team, the test program has evolved since its inception. Currently the test program has the ability to render the surface based haptic model of the canine head, detect a collision between the haptic device and the haptic surface, grade a user on their ability to touch near an acupuncture point, and display markers for the teacher and student points. Sample output from the current SimPooch simulation program is shown at the end of the section in Figure 10. The current form of the program exists in two windows; a command window used for entering user information and displaying grade statistics, and an H3D environment window where graphics are rendered and haptic interaction occurs.

Figure 9: Program flow
Program Structure
dog_main.x3d
A flow diagram of the program structure is included above in Figure 9. The program is run using H3D to open the dog_main.x3d file. Dog_main.x3d defines the primary structure for the SimPooch program. It contains references to the initialization program DogStart.py and the simulation program Dog.py. H3D works by continuously looping through the nodes defined in dog_main.x3d and taking appropriate action, such as rendering graphics and forces, or executing program scripts, this process is called traversal [10].
DogStart.py
The execution of the Python scripts begins with DogStart.py. DogStart.py provides a primitive user interface and initializes the simulator according to the user's selection. Four modes of simulation are available to the user: student, teacher, demo and contest. The student mode prompts the user for a set or pre-defined acupuncture points that the user will attempt to touch. The student then begins to attempt to touch the points correctly without being able to see them displayed on the virtual model. When finished the students score is displayed and he/she is prompted to continue with another set of points or exit the simulation. The teacher mode is designed for the creation of acupuncture point sets. A teacher would define a name for the set and touch the points to be graded. These points are then saved and can be accessed through the student mode. The demo mode was developed for demonstration of the SimPooch project at events like Colorado State University's Engineering Days. The difference between the demo mode and student mode is the appearance of four points displayed on the

virtual dog; the goal being to hit the point with the stylus. The demo mode was expanded further, to a contest mode. In contest mode, users now have the option of entering their names, which are matched to scores. These scores can be compared to scores of other users. The results of the E-Days 2009 scores were posted on the 2009 SimPooch website.
enclosure.x3d
After the user has made their selection the simulation begins with the rendering of the enclosure.x3d file. This file is primarily a container for the data points that define the shape of the dog head. Along with the data this file contains transforms to hold each of the three rendered objects; the dog, the markers, and the needle. The data for these objects are contained in nodes called transforms; this is done to allow manipulation of properties like scale and rotation without changing the viewpoint. Routes exist between the dog and marker transforms to ensure that when parameters are changed for one they are updated for both. An example of this is that the change in the rotation of the dog also changes the rotation of the markers so that they do not move relative to the dog. Every time the scene changes it is rendered again. As H3D continuously loops through dog_main.x3d it encounters the python scripts that make these changes and record the user interaction.
Dog.py
The function traverseSG is called in DogStart.py, the main function for the simulator. After initialization the scene is constantly being rendered. When the python script nodes are encountered H3D calls traverseSG, a method that has been overridden to perform the simulation. The primary function of traverseSG is to call the update function in Dog.py. The update function has two tasks; handling the changes to the rendered scene, and the identification of touched points. When a touch occurs its value is saved and a timer is initialized. If another touch occurs within a short time it means that the stylus is still in contact with the surface and no additional touched point is saved. The event of a touched point or change in rotation causes the scene to change. Using a series of helper functions the markers are added and the orientation of the scene is updated, the changes appear the next time the scene is traversed. When the user has selected the points and chooses to proceed to grading (or saving teacher points), traverseSG is suspended. At this point the scene is no longer being rendered and the finish function is called. Depending on the user type, finish will grade or save the points and display the results. Displaying the results requires one more traversal of the scene graph so traverseSG is called again and then immediately paused. The user now has the option of starting over again in the same mode or exiting the program. Restarting clears all markers and the arrays storing the grade and touched points and restarts rendering of the scene
SimPooch.exe
An additional program SimPooch.exe allows the rotation of the physical mannequin to be read from a magnetic encoder trough a D/A converter. This process involves reading the value on from the encoder and converting the voltage to a rotational value. This value is then saved in a file that is opened and read in the update function of Dog.py. Ultimately this function will be invaluable for the synchronization of the two systems; however it is not required for the virtual simulation. When a user chooses to run the program without the rotation function activated, movement of the physical mannequin will do nothing. The scene can instead be rotated using the mouse in the H3D environment window.
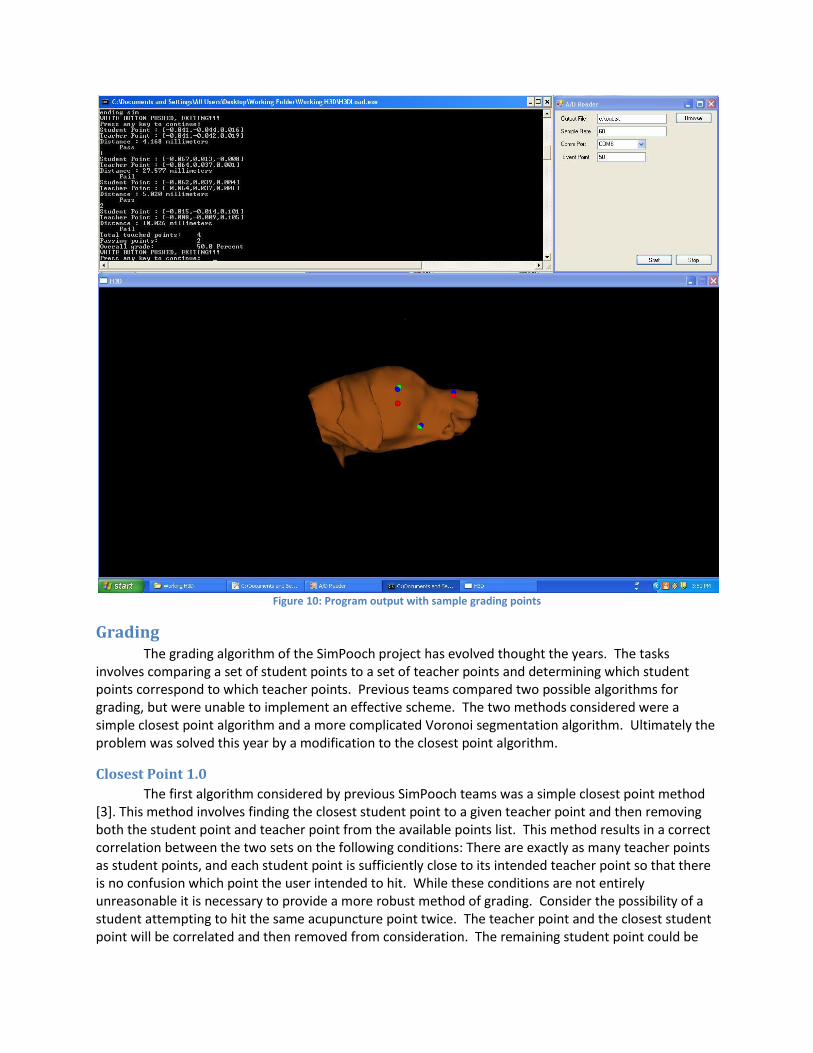
Figure 10: Program output with sample grading points
Grading The grading algorithm of the SimPooch project has evolved thought the years. The tasks
involves comparing a set of student points to a set of teacher points and determining which student points correspond to which teacher points. Previous teams compared two possible algorithms for grading, but were unable to implement an effective scheme. The two methods considered were a simple closest point algorithm and a more complicated Voronoi segmentation algorithm. Ultimately the problem was solved this year by a modification to the closest point algorithm.
Closest Point 1.0
The first algorithm considered by previous SimPooch teams was a simple closest point method [3]. This method involves finding the closest student point to a given teacher point and then removing both the student point and teacher point from the available points list. This method results in a correct correlation between the two sets on the following conditions: There are exactly as many teacher points as student points, and each student point is sufficiently close to its intended teacher point so that there is no confusion which point the user intended to hit. While these conditions are not entirely unreasonable it is necessary to provide a more robust method of grading. Consider the possibility of a student attempting to hit the same acupuncture point twice. The teacher point and the closest student point will be correlated and then removed from consideration. The remaining student point could be

associated to another teacher point and those two removed. The process of removing possibly incorrect student and teacher point pairs will propagate through the point sets and the result is only guaranteed to be one correct match.
Voronoi Algorithm
To remedy this major flaw the Voronoi method was considered. The Voronoi method involves partitioning a region into sections based on a set of points, which is shown in Figure 11. Everything within a particular section is closest to the point that generated that section [11]. This method involves setting results in the entire student points in the same cell associated to the teacher point used to generate that cell. For any number of student and teacher points the Voronoi method will return the appropriate result; however, the significant computational complexity of the Voronoi method makes it difficult to implement, especially in three dimensions. Ultimately the Voronoi method was abandoned.
Figure 11: Voronoi diagram
Closest Point 2.0
The solution to the SimPooch grading issues is similar to the form of the closest point algorithm. It provides an association between any student point and its closest teacher point. It accounts for the case of more or less student points than teacher points, and the case of more than one student point for any given teacher point. The current successful SimPooch grading algorithm, shown below in Figure 12, is as follows. For student point find the closest teacher point. Save the student point, the teacher point, and the distance between them into one row of an array. Continue for each student point without removing the previous teacher point. When the process is complete the results are returned in the data structure shown below in Figure 13. The solution to the grading issue comes in the form of no longer removing points when they have been associated. With the correlation algorithm set the actual grading is simply comparing the distance between each point to the maximum allowable passing distance specified by Dr. Robinson (2.5mm). By making measurements on the physical mannequin and comparing the distances in virtual units a conversion method was developed. The function convert in DogStart.py maps the distance in virtual units to millimeters using the formula, where m is the output in millimeters, and v is the input in virtual units.
All grades are displayed in the form of pass/fail with the distance specified in millimeters.

Figure 12: Flowchart for grading algorithm
Figure 13: Data structure of grading algorithm

GUI The GUI is a core component in the virtual simulation design. When H3D API was installed, it
was included with a simple scene graph loader, H3DLoad. To improve the functionality of the program for users unfamiliar with SimPooch, a more intuitive GUI needed to be developed. Various scripting languages were tested, AutoHotKey and wxWidgets. The GUI was not improved, and remains as the basic H3DLoad interface.
H3DLoad
H3dLoad would load up an X3D world or python script in a simple window for viewing models. The settings for H3DLoad were limited to selecting haptic devices, stylus models and display types. To improve the appearance, the stylus model was improved to more closely resemble an acupuncture needle. This accomplished by editing the model in an X3D editor, shown in Figure 14.
Figure 14: Improved stylus model, H3DAPI\settings\common\stylus.x3d
However, H3DLoad has substantial limitations: a lack of controls/textual feedback in H3DLoad.exe, and SimPooch's program output fed to a separate window.
AutoHotKey
AutoHotKey was researched [12], and a beta program was developed, complete with an installer and graphics. It improved H3DLoad.exe by adding a toolbar with File, Edit, View, and Help menus, with respective submenus. The top of the H3DLoad window was lined with a status bar, giving the user basic instructions and progress indicators. These additions can be seen in a screenshot of the program, shown in Figure 15. However, a fatal flaw in the AutoHotKey scripting language was soon discovered - only one instance of H3DLoad.exe could be running at once. This was problematic when opening simulations from the program without closing and restarting the program. This approach had to be abandoned.
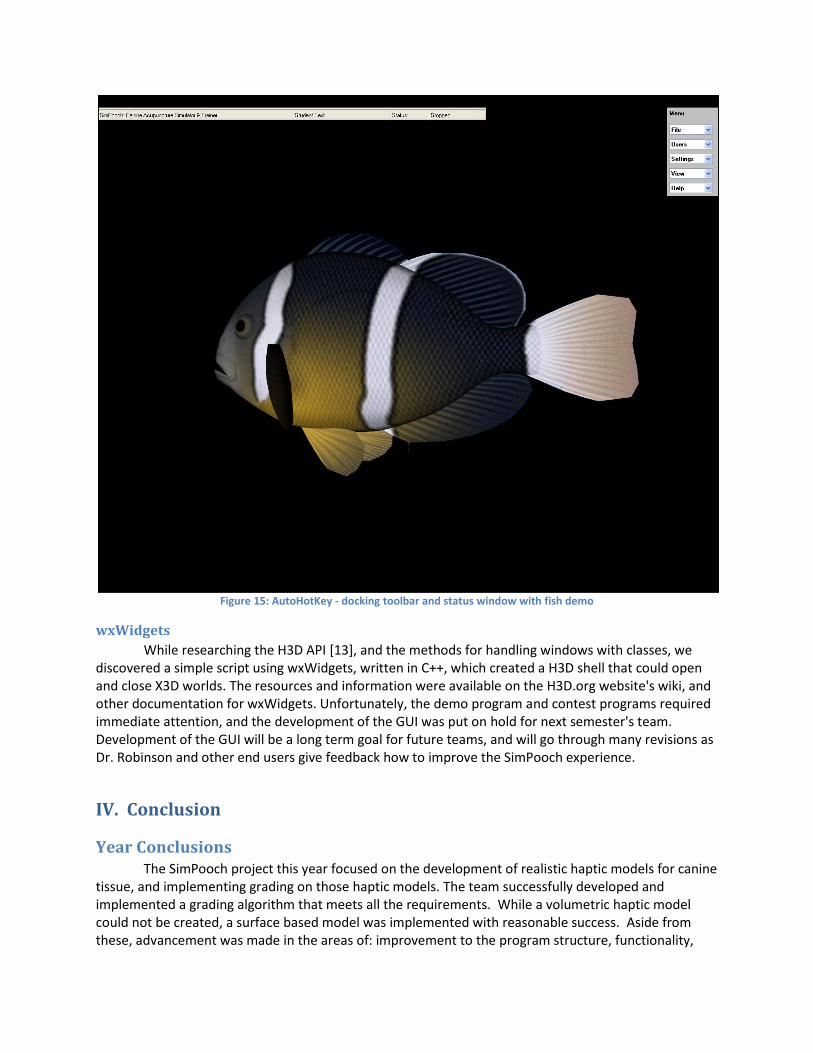
Figure 15: AutoHotKey - docking toolbar and status window with fish demo
wxWidgets
While researching the H3D API [13], and the methods for handling windows with classes, we discovered a simple script using wxWidgets, written in C++, which created a H3D shell that could open and close X3D worlds. The resources and information were available on the H3D.org website's wiki, and other documentation for wxWidgets. Unfortunately, the demo program and contest programs required immediate attention, and the development of the GUI was put on hold for next semester's team. Development of the GUI will be a long term goal for future teams, and will go through many revisions as Dr. Robinson and other end users give feedback how to improve the SimPooch experience.
IV. Conclusion
Year Conclusions The SimPooch project this year focused on the development of realistic haptic models for canine
tissue, and implementing grading on those haptic models. The team successfully developed and implemented a grading algorithm that meets all the requirements. While a volumetric haptic model could not be created, a surface based model was implemented with reasonable success. Aside from these, advancement was made in the areas of: improvement to the program structure, functionality,

and a wealth of resources and direction provided to next year's team. Overall the SimPooch team had a productive and effective year and sizeable contributions were made to the project as a whole.
Accomplishments
One of the primary accomplishments this year is the development of a surface based haptic model. The initial requirements specified that a model exhibit the sensation of layers, which was created. The magnetic spheres model gives a clear sensation of layered tissue, and although it has some undesirable effects, it is a major step in the right direction of haptic programming for SimPooch. The second primary accomplishment of this year's SimPooch team was the development and implementation of the grading algorithm. Previous teams were unable to implement an effective, robust algorithm to associate the student and teacher points. It was determined that the Voronoi method was unnecessary and needlessly complicated, and a simple, effective solution to the problem was determined.
A third accomplishment of the SimPooch team is the improvement of our simulation program. Not only were all of the known bugs repaired, but the program now has extensively improved functionality. The additions to the simulation program functionality are as follows: A conversion method from virtual units to millimeters displays the grade in a more intuitive manner, so grades can now be displayed on the virtual model alongside the teacher points. In the competition mode, users have may save their grades for comparison with other users.
Finally, the simulation can be repeated without closing and reloading the program, and grading and display algorithms have been separated for ease of expansion.
Failures
The primary failure of this year’s SimPooch team was the inability to compile VHTK. VHTK would have dramatically improved the volumetric haptic model for the dog, and much time was spent debugging source code and graphics drivers. Two factors contributed to this failure: inexperience with compiling binaries with many dependencies, and with debugging C++ source code that was not written by us. Future teams would be inclined to learn more about this process, as we were inexperienced.
Another issue VHTK had was a general lack of documentation and support. It was developed and released "as is" to the public, with only a handful of developers offering support. The failure to develop the GUI was another issue dominated by the lack of time at the end of the spring semester. It was not put as a high priority by the team and thus, was constantly put on hold by more pressing issues in SimPooch development. Research was done, and much still needs to be done in the development of a user friendly interface.
Project Continuation
Introduction
The direction of the project for next year depends on the composition of the team members involved. Mechanical engineering students would concentrate on the physical design stage. Electrical/Computer engineering students would focus on improving the haptic representations and the simulation program.
Haptics
Our attempts to use the tools provided by H3D: VHTK and MedX3D, was unsuccessful. Future team members skilled in compiling and debugging C++ code would be better equipped to handle this. With VHTK or another working volumetric haptic library, a greatly improved haptic model can be implemented. Using MedX3d or another medical image reader a volumetric model could be

implemented directly from the CT scan data. Failing that a simple volumetric model could be designed based on force tissue force tests.
Simulation Program
The SimPooch simulation program provides an effective base for haptic development, but improvements to its functionality are still required. The main considerations are improvements to the rotational sensor algorithm and implementation of a GUI.
There are several areas of improvement for the simulation program: writing USB Drivers for the A/D controller, adding controls and functionality to the GUI with wxWidgets, improving the X3D model (filling holes, reducing extraneous polygons, etc) in MeshLab, and implementing volumetric haptic properties in Python to create realistic forces of layers with VHTK.
These suggestions for improvement are explained in much more detail in the spring 2009 continuation report. Obviously, all of these issues require knowledge and experience with the respective software packages in Appendix D.
Physical System
Mechanical engineering students would have two important subsystems of the physical system: An improved stylus, and a calibration arm. The stylus has several proposed upgrades; Dr. Young suggested a retractable needle on the tip of the stylus, which would give the user the impression of inserting an acupuncture needle into the dog head. Dr. Robinson suggested a finger sleeve in between the buttons and tip of the stylus for the pointer finger. Doing so would make the stylus lighter and could make the stylus' usage more versatile - for both palpation and needle insertion.
The second improvement would be a calibration arm attached to the base unit, which would in effect 'lock' the rotational position of the head at zero at the start of each simulation. This calibration effort would be complemented in software by reading the rotation value and assigning it to 'zero'. This important upgrade would allow more realistic correlation of physical and virtual systems and improve the user experience vastly.
Long Term Continuation In the long run, several years down the road, SimPooch can take several directions. The initial
constraints specified by Dr. Robinson, was to start with the head. Once that worked, the remainder of the body would be developed in the same fashion. This would be a viable and quick approach, once the head is completed to Dr. Robinson's satisfaction, using the same methodology the rest of the body can be designed and implemented in a rapid prototype, taking very little time.
Ultimately, the direction of this project will heavily depend on the motivation and willingness of future teams to develop a marketable prototype which can be put into production and distributed in a cost effective fashion. The cost of haptic devices, like the Phantom Omni will surely decrease in the future as haptics becomes more widespread and better supported as communities grow.

V. References 1. Surgery rehearsal in virtual reality: freedom to learn [online]. Available:
http://www.comp.leeds.ac.uk/matthewb/research/FirstYearPresentation.ppt [accessed: December 12, 2008].
2. SimPooch spring 2007 engineering report, “Canine Acupuncture Simulator & Trainer”, [online].
Available: http://www.engr.colostate.edu/ece-sr-design/AY08/SIMPooch/Documentation/SimPooch_Spring_2007_Engineering_Report.pdfengr report 06/07. [Accessed: May 2, 2009]
3. SimPooch spring 2008 engineering report, “SimPooch, Canine Medical Acupuncture Training &
Simulating System”, [online]. Available: http://www.engr.colostate.edu/ece-sr-design/AY08/SIMPooch/Documentation/SimPooch_Spring_2008_Engineering_Report.pdf. [Accessed: May 2, 2009]
4. H3D.org “Open Source Haptics”, [online]. Available: http://www.h3dapi.org/ [Accessed May 01,
2009]. 5. Python Programming Language-Official Website, “Python Software Foundation”, [online].
Available: http://www.python.org/. [Accessed: May 02, 2008] 6. H3D documentation 2.0,” DOXGEN 1.5.7” November 7, 2008 [online]. Available:
http://www.h3dapi.org/uploads/api/H3DAPI_20/docs/H3DAPI/html/index.html . [Accessed: May 2, 2009]
7. A. Maciel, “A biomechanics-based articulation model for medical applications”. [online],
Available: http://vrlab.epfl.ch/~amaciel/projects/These_3360_Maciel.pdf. [Accessed: May 2, 2009]
8. Volume Haptics Toolkit, MediaWiki. August 17, 2008 .[online], Available: http://www.h3dapi.org/modules/mediawiki/index.php/Volume_Haptics_Toolkit.[Accessed:
May 2, 2009] 9. MedX3D, MediaWiki. October 7, 2008. [online] Available:
http://www.h3dapi.org/modules/mediawiki/index.php/MedX3D . [Accessed: May 2, 2009] 10. H3D API 2.0 User Manual, SenseGraphics AB, October 31, 2008 [online]. Available:
http://www.h3dapi.org/uploads/api/H3DAPI_20/docs/H3D%20API%20Manual.pdf. [Accessed: May 2, 2009]
11. J. Wijk and A. Telea, “Visualization of Generalized Voronoi Diagrams”. [online] Available:
www.win.tue.nl/~alext/ALEX/PAPERS/VisSym01/paper.pdf. [Accessed: May 2, 2009] 12. Autohotkey quickstart tutorial “Tutorial and Overview”. [online], Available:
http://www.autohotkey.com/docs/Tutorial.htm. [Accessed: May 2, 2009]
13. A basic H3D player with wxWidgets, MediaWiki. January 11, 2009 .[online], Available: http://www.h3dapi.org/modules/mediawiki/index.php/A_basic_H3D_player_with_wxWidgets. [Accessed: May 2, 2009]
VI. Bibliography 1. “H3D API 2.0 User Manual”©SenseGraphics AB October 31, 2008 [online]. Available:
http://www.h3dapi.org/uploads/api/H3DAPI_20/docs/H3D%20API%20Manual.pdf [Accessed: December 12, 2008]
2. “Volume Haptics Toolkit User Manual”, Norrköping Visualization and Interaction Studio. August
29, 2006 [online]. Available: http://www.h3dapi.org/modules/vhtkdoc/VHTK_Manual.pdf [Accessed: December 12, 2008]
VII. Appendices
Appendix A: Abbreviations A/D Analog to Digital (converter) API Application Programming Interface CT Computed Tomography GUI Graphical User Interface TCM Traditional Chinese Medicine VHTK Volume Haptics Toolkit
Appendix B: Budget
Item Contributions Expenses Description Year Initial Donation $25,000 - Narda Robinson Fund 2006
AY06 Expenses - -$9,177.74 Phantom Omni, Base Unit 2006
AY07 Expenses - - $47.67 of various misc. components paid by Sr. Design
fund
2007
Display board - -$299.16 Display Board funded by Narda 2008
Adjustment of Narda’s project funding
- -$14523.10 Loss of Narda’s project budget 2008
MS Office 2007 - - $60 from sr. design fund financed office 2007 software
2008
Available Funds Narda Robinson $1,000
ECE Sr. Design $50
Total $1,050

Appendix C: Phantom Omni Data Sheet
Appendix D: Software AutoHotKey Scripting package for rapid development
C++ Mid level language for general software development
C# Web scripting language
DisReal X3D graphical world editor
H3D API Open source haptic development platform
MedX3D Open source medical image reader designed by H3D
MeshLab 3D graphics viewer and editor
MYSQL Open source database management software
OpenGL Open Graphics Language for cross-platform graphics development
Python Object oriented language for general development
VHTK Volume Haptics Toolkit for representing haptics volumetrically
wxWidgets GUI development toolkit
X3D Standard file format for representing 2D and 3D graphics

Appendix E: Acknowledgements Thanks to those who helped contribute to SimPooch:
Dr. Narda Robinson – Project Sponsor Dr. Peter Young – Project Advisor Dr. Regina Schoenfeld-Tacher – Project Sponsor Olivera Notaros – ECE Senior Design Coordinator The 2007-2008 SimPooch Team: Brendan Dahl Ben Cordova Eric Hall Jeff Barlett The 2006-2007 SimPooch Team: Matt Cain Renata Voorhees Brandon Nino Kelly Galloway Michelle Dummer Tim Bradney Dr. Sue James Terry Precht DATAQ Instruments The Developers at H3DAPI.org and Markus at the H3D API Forums Guido van Rossum and the Developers of Python The Developers of MySQL Mercury Systems, Inc. (provided AMIRA Trial Program) Dr. Sue Kraft and Mrs. Betsy Sestina of the CSU Veterinary Hospital Mr. Wes Womack Jay Oaks
..And so many more!

Appendix F: Project Code The current code is omitted. As we are using open source software, please email the SimPooch team to
obtain a working version of our program.
Thank You


