Embed Size (px)
Citation preview
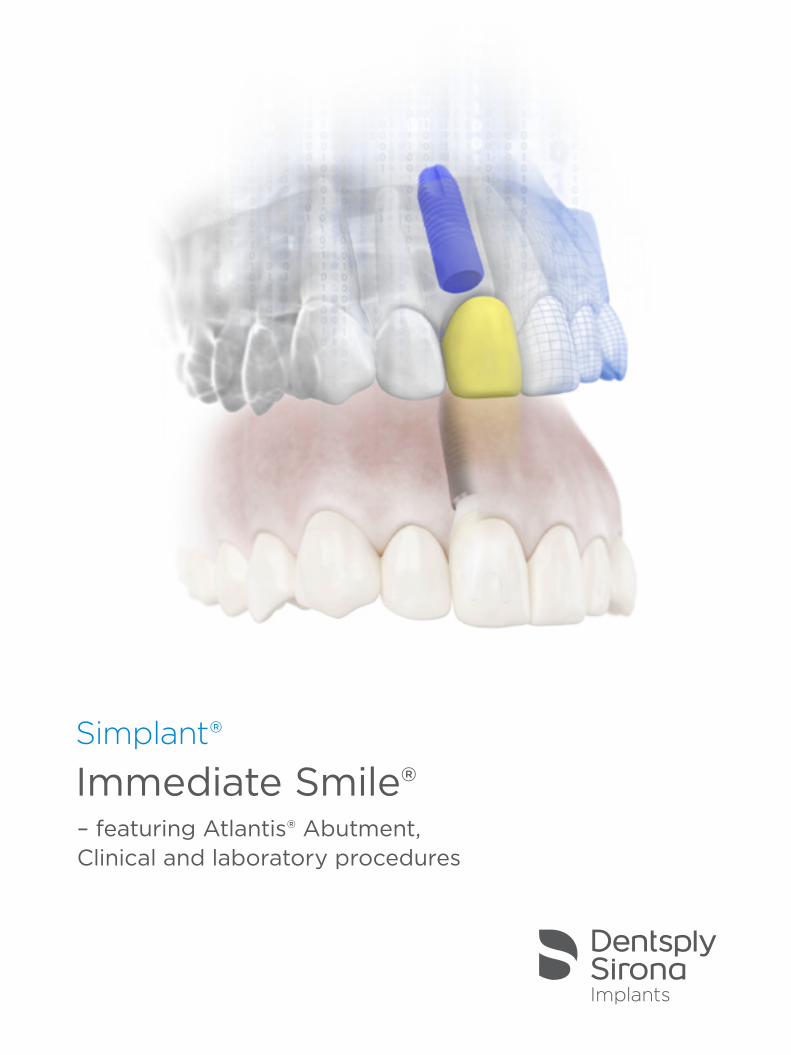
Immediate Smile®– featuring Atlantis® Abutment, Clinical and laboratory procedures
Simplant®

Immediate Smile®—featuring Atlantis® Abutment
Product description 4 Advantages 5 Process at a glance 6
When?
Clinical indications 8 Available for all major implant systems 9 Infrastructural requirements 9 Limitations 9
How?
Examination and preparation 10 Treatment planning in Simplant 12 Order process in Simplant 13 Abutment design & manufacturing: Atlantis production facility, dental laboratory and clinician 13 Guide design & manufacturing: Simplant production facility 15 Crown design & manufacturing: dental laboratory 16 Surgical procedure 17 Restorative procedure 17 Final restoration 17
What if?
Preparations 18 Treatment planning and order process in Simplant 18 Review of the abutment design 18 Crown design & manufacturing: dental laboratory 19 Surgical procedure 19 Restorative procedure 19
3
This manual has been created with contributions from Dr. David Guichet,
Dr. Dwayne Karateew and Dr. Marcus Dagnelid.
To improve readability for our customers, Dentsply Sirona Implants does not
use ® or ™ in body copy. However, Dentsply Sirona Implants does not waive any
right to the trademark and nothing herein shall be interpreted to the contrary.
Contents

54
Product descriptionThe Immediate Smile solution featuring an Atlantis Abutment offers guided surgery and guided soft tissue healing for immediate temporizations, even at time of tooth extraction.
The solution that consists of a Simplant Guide, an Atlantis Abutment and a temporary crown based on the Atlantis Abutment Core File is currently indicated for single implant restorations.
Immediate Smile®— featuring Atlantis® Abutment
AdvantagesPatients want beautiful and functioning teeth – both quickly and with optimal long-term results. That is why Simplant and Atlantis combine the proven benefits of guided surgery and patient-specific CAD/CAM abutments into an innovative and open solution for implant restorations, with strong customer values:
• Immediate individualized restoration – if so indicated – in a single visit.
• Patient-specific Atlantis Abutment and temporary crown at implant installation provide perfect conditions for individualized esthetics and healthy soft tissue.
• Minimal switch of components interfacing with the implant (based on clinical judgment, the initial immediate Atlantis Abutment can be kept and act as the final abutment).
• Simplified processes and communication within the dental team through a full digital process.
• Accurate guided implant placement according to 3D planning
• Choice among titanium, gold-shaded titanium and zirconia
• Immediate individualized restoration – in a single visit
“Prosthetic driven implant placement has been a challenge for the last decade. Immediate temporization is also a demanding procedure to reach a restoration with a correct pattern and occlusion within 48 hours after surgery.
Simplant software offers the opportunity to plan virtually the surgical position of the implant and also the prosthetic components. This gives the clinician all data to be able to place easily and predictably all components at the time of surgery. The patient-specific Atlantis
Abutment, well-known for many years in the market as a prosthetic option with high technological quality and optimal prosthetic performance, can now be placed immediately after surgery, giving a perfect start to soft tissue conditioning.”
Dr. Guido Schiroli, Genova, Italy
“An Atlantis Abutment is by far a more anatomical, precise and stable provisional solution than the standard provisional materials used today.
Several studies indicate the favored healing situation created by one abutment at one time, as well as the correct tissue support during healing, avoiding soft tissue collapse.”
Dr. Marcus Dagnelid, Gothenburg, Sweden

6 7
The process starts with a (CB)CT scan of the patient’s jaw in order to visualize the 3D bone anatomy. The intraoral situation, i.e. soft tissue and dentition, as well as the desired crown, are digitized and added to the (CB)CT scan in a Simplant project file.
The desired implant is planned in Simplant, accounting for the shape, dimensions, and density of the bone, as well as the esthetics. A tooth-supported Simplant SAFE Guide order with an Atlantis Abutment can then be placed through the Simplant Online Shop. The Simplant SAFE Guide provides drill guidance, guided implant placement and full depth control and can be used with the guided surgery kits of all major implant brands. For the Atlantis Abutment order, the clinician
specifies the dental laboratory that will be responsible for order confirmation of the Atlantis Abutment and for the production of the temporary crown.
The dental laboratory completes the Atlantis Abutment order in Atlantis WebOrder, specifying the desired abutment material and design preferences. The order includes the Atlantis Abutment Core File. The core file is a digital file representing the manufactured Atlantis Abutment shape and the patient´s remaining dentition. It enables the dental laboratory to design and manufacture the temporary crown, before receipt of the abutment and before implant placement.
Process at a glance
All components for this treatment solution can then be delivered to the clinician prior to surgery to provide the patient with an immediate and anatomically precise temporary restoration:
• The Simplant SAFE Guide
• The Atlantis Abutment
• The temporary crown
The precision of the treatment solution is improved through:
• The quality of the initially gathered information (CB)CT scan together with an intraoral scan or an optical scan of plaster model and wax-up)
• Straight-forward digital collaboration between clinician, dental laboratory and the Dentsply Sirona Implants production facilities for Simplant guides and Atlantis abutments.
Simplant project fileDentition and soft tissue – Intraoral scan or model scan
Bone – (CB) CT
Desired crown – Model scan with wax-up or CAD
Implant planning Order guide and abutment (incl. Atlantis Abutment Core File)
Design and create temporary crown (CAD/CAM)
Simplant guided surgery + immediate temporization with Atlantis Abutment and temporary crown

98
Clinical indications
The Immediate Smile solution with an Atlantis Abutment is currently indicated for single implant restorations with the following treatment options (see below):
Multiple single tooth restorations in the same jaw are allowed as long as adjacent teeth are present on both sides of each implant.
When?
This solution can be used when the clinician has access to
• Simplant software, version 16 or higher (OneShot, Pro or Master version)
• The respective brand-specific surgical instrumentation for guided drilling and implant placement
• A dental laboratory, trained on Atlantis solutions
Available for all major implant systems
Requirements
Treatment options for single tooth restoration by means of the Immediate Smile solution – featuring an Atlantis Abutment
Immediate implant placement and immediate temporization
Delayed implant placement and immediate temporization
Tooth extraction+ Immediate implant placement with a Simplant SAFE Guide+ Atlantis Abutment and temporary restoration
Tooth extraction+ Healing of
extraction socket
Implant placement with a Simplant SAFE Guide+ Atlantis Abutment and
temporary restoration
All general and implant brand-specific limitations for implant treatment should be considered.
The solution is limited to
• Tooth-supported Simplant SAFE guides
• Sufficiently wide implant sites allowing the use of a Simplant Guide
• An implant planning that
– Is sufficiently occlusal in order to allow depth control for drilling and implant placement with the Simplant SAFE Guide
– Is sufficiently subgingival for a nicely shaped emergence profile of the Atlantis Abutment
– Has the implant axis extending through the crown-to-be, with a sufficiently small angle between the implant axis and the axis of the crown-to-be
Limitations
The Immediate Smile solution with an Atlantis Abutment is available for implants that have instrumentation for guided implant surgery and are placed with a Simplant SAFE Guide and where the implant rotational position can be controlled.
The complete list of compatible implants and Atlantis abutments is available at www.simplantdentsply.com.
*Not yet available for all geographic markets.
Final restoration 1 or 2
Healing period AND evaluation of soft tissue and crestal bone response
Place final crownAbutment level impression and create final crown
Keep the initial Atlantis Abutment
Order a 2nd final abutment Place final abutment and final crownImplant level impression
Final RestorationAfter soft-tissue healing, the temporary crown is removed and the initial abutment is evaluated. The clinician then chooses to either:
Replace the initial Atlantis Abutment
An abutment level impression or intraoral scan is made to proceed with the final crown restoration.
A new Atlantis Abutment is ordered. The final crown can be fabricated using conventional methods on a master model or from the Atlantis Abutment Core File
1
2

10 11
1. Anatomical situation
A (CB)CT scan is taken of the patient’s jaw in order to evaluate the bone and to virtually create the surgical planning in the Simplant software.
Prepare a bite index for the (CB)CT scan:
• Inject the radiolucent bite registration material onto the patient´s occlusal surface
• Guide the patient to close the mouth into the desired position
• Remove the bite index and trim excess material with a sharp instrument
• The bite index should separate the jaws during scanning with at least 3 mm
Scan the patient wearing the bite index.
2. Intraoral situation
An actual representation of the patient´s dentition and soft tissue is needed to design and manufacture the tooth-supported Simplant SAFE Guide and the Atlantis Abutment.
Preferred options for obtaining the 3D representation of the intraoral situation are:
A. An optical scan of a plaster model by means of a validated optical scanner
OR
B. An intraoral scan by means of a validated1 intraoral scanner
The list of validated optical and intraoral scanners is available within Simplant when importing the scan data.
Alternatively, the plaster model can be shipped to the Simplant facilities2 for optical scanning.
3. Desired crown and soft tissue
An ideal representation of the desired crown is essential for the design of the Atlantis Abutment and also guides the prosthetic implant planning.
Preferably this 3D representation is obtained by:
• Designing a wax-up in a dental CAD package3
OR
• Optically scanning a lab-made physical wax-up.
Alternatively, the physical wax-up made at the laboratory can be shipped to the Simplant facilities2 for optical scanning, together with the plaster model, or a Virtual Tooth can be planned in Simplant.
Preparing a plaster model and wax-up:
• Use accurate impression material (poly-ether, silicone)
• Use an up-to-date and intact plaster model
• A maxillary model should contain the complete palate and tuberositas
• If the tooth will be extracted during implant surgery, grind away the tooth-to-be-extracted from the plaster model
• Adapt the soft tissue shape if needed4
• Prepare a wax-up of the ideal tooth set-up
• Take two optical scans of the entire plaster model, i.e. with and without the wax-up
If the tooth will be extracted during implant surgery, and the actual tooth should be copied into a temporary restoration:
• Take two optical scans of the entire plaster model, i.e. before and after grinding away the tooth-to-be-extracted (no wax-up is needed)
Alternatively, the two plaster models can be shipped to the Simplant facilities2 for optical scanning.
Once all data are available, they must be combined into one Simplant project file. This can be done by:
• The clinician using Simplant Pro with the import and optical scan module
• Requesting a Simplant conversion on DentalPlanit
– Open Simplant, click the DentalPlanit button or go directly to www.dentalplanit.com
– Request Simplant conversion and upload all (CB)CT data
– Upload optical scan data of plaster model and wax-up or schedule pick-up of plaster model and wax-up
– Download Simplant file with soft tissue and tooth set-up when ready
1 A validated scanner is one that is validated so that the scans can be used for Simplant Guide design.
2 Address information of local Simplant facilities is available at www.simplantdentsply.com.
3 The designed wax-up needs to be exported in STL format in order to be able to import it in the Simplant project.
How?
Examination and preparation
The implant treatment starts with 3D examination of the available bone and significant anatomical landmarks, such as neighboring teeth and roots, as well as examination of the prosthetic conditions, such as the intraoral situation and the desired crown and soft tissue shapes, all available in the same Simplant software. This is the basis for an optimal treatment planning and a successful treatment outcome.
4 The margin of the patient-specific abutment will be designed towards the soft tissue as provided in the 3D representation. Therefore, it could be needed to adapt the soft tissue shape in order to provide the necessary information to design the margin of the patient-specific Atlantis Abutment as desired.

1312
Once the implant planning is finished the Simplant Guide request wizard needs to be followed in order to select and preview the tooth-supported Simplant Guide. Afterwards you proceed to the Simplant Online Shop to order the Simplant Guide and the Atlantis Abutment.
The clinician can now start the implant planning with Simplant.
In Simplant the Atlantis icon indicates the implants that are compatible with the Immediate Smile solution.
It is recommended to start the implant planning by choosing in the Simplant implant library your preferred Simplant Guide solution to ensure compatibility of the planned implants.
Note: Only Simplant Guide solutions included in the compatibility chart for Immediate Smile – featuring Atlantis Abutment (available at www.simplantdentsply.com) should be selected.
Treatment planning in Simplant® Order process in Simplant®
Guidelines for implant planning
Do not rotate the implant around its long axis unless desired. The index of the implant is automatically aligned in Simplant according to the standard clinical position advised by the implant manufacturer. This index position will be used as such for the design of the Atlantis Abutment.
The implant shoulder should be planned so that a minimum distance of 0.5 mm is guaranteed between the implant shoulder and the abutment margin to allow design of the abutment. A minimum distance is needed for milling and strength reasons.
All general, implant brand specific, and restoration type specific guidelines for implant planning should be considered.
Within the Simplant Online Shop the patient-specific Atlantis Abutment is shown in the list of additional components. The following details need to be filled out:
• The implant(s) for which a patient-specific Atlantis Abutment is needed
• The tooth number of the tooth to be restored (which is needed for the correct design of the Atlantis Abutment); and
• The dental laboratory you want to collaborate with.
The procedure is facilitated by collaborating with a dental laboratory that already has an Atlantis WebOrder account.
If your dental laboratory is not yet an Atlantis customer, contact your local Dentsply Sirona Implants office for support.
Placing the order in the Simplant Online Shop results in
• A Simplant Guide order which is processed at the Simplant production facility; and
• An Atlantis Abutment partial order which is sent through the Atlantis WebOrder system to the selected dental laboratory.
Abutment design & manufacturing: Atlantis® production facility, dental laboratory and clinician
The dental laboratory chosen by the clinician receives the Atlantis Abutment partial order and completes the abutment order details (material, design, preferences...) in Atlantis WebOrder. This dental laboratory will be responsible for the Atlantis order and will receive the abutment and the invoice.
No plaster models should be shipped to the Atlantis production facility, since the intraoral scan or optical scan(s) are already available in the Simplant order file.
Design recommendations for the laboratory to complete the Atlantis Abutment order
Select “Full anatomical dimensions” to have the Atlantis Abutment designed taking into account the ideal final tooth shape.
When specifying the subgingival margin depth, the 3D representation of the soft tissue will be taken as reference. This is either a 3D representation of the current patient situation or a 3D representation of the desired soft tissue shape.

14 15
Guide design & manufacturing: Simplant® production facility
The implant brand-specific Simplant SAFE Guide is designed by the Simplant production team and a confirmation email will be provided to the clinician.
The design of the Simplant SAFE Guide for these cases is adapted and contains a small groove to which the marker of the implant holder must be aligned in order to have the correct position of the implant index for the Atlantis Abutment.
The Simplant Guide is shipped to the delivery address as provided in the Online Shop preferably after approval of the Atlantis Abutment. In case of delays in finalizing the Atlantis Abutment partial order and in approving the Atlantis Abutment design, the Simplant production team will contact the clinician to ask whether the Simplant Guide can be shipped or if they prefer to wait until the Atlantis Abutment design is finished. Therefore, the expected shipment date as shown in the Simplant Online Shop is purely indicative.
Review of the designed Atlantis Abutment
The dental laboratory has access to the Atlantis WebOrder where images are posted for review with the Atlantis 3D Editor. The online 3D editor allows adjusting of the Atlantis Abutment design if needed or detailed instructions can be added for the Atlantis design technician.
The clinician has view access to the Atlantis WebOrder for online review of the abutment design. The clinician can also click the “download abutment design for import into Simplant” on the Atlantis WebOrder and import the designed Atlantis Abutment in the Simplant project file for review.
In cases where the implant platform is placed sub-crestally, and the clinician desires to avoid having to remove crestal bone to accommodate the abutment emergence profile, the clinician provides the dental laboratory with a measurement of the greatest distance between the implant platform and the crestal bone. The laboratory should then add a design remark containing this information to the Atlantis Abutment order.
Do not change the default option “Hold case – send images” in order to review and approve the Atlantis Abutment design prior to fabrication. For these Simplant cases the email notification for abutment design review will be sent to the dental laboratory and to the clinician that initiated the Atlantis Abutment partial order in the Simplant Online Shop.
All changes to the Atlantis Abutment design desired by the clinician must be communicated directly to the dental laboratory, and the dental laboratory has to implement these by means of the Atlantis 3D Editor or add detailed instructions for the Atlantis design technician.
Note: In case of deep implant placement, it is important that the clinician reviews the Atlantis Abutment design in Simplant in order to verify whether there is a conflict between the Atlantis Abutment design and the bone. If there is a conflict, you can decide either to change the design by informing your dental laboratory or you perform minor osteoplasty in conjunction to the surgery.
Details on the use of the Atlantis WebOrder system are described in the Atlantis WebOrder User Guide and shown in an online movie (www.simplantdentsply.com).
Abutment
Implant
Nerve
Abutment interferes with bone at border of implant hole that is prepared during surgery
Index marking
Distance over which the abutment must be designed straight

1716
Crown design & manufacturing: dental laboratory
The dental laboratory receives the Atlantis Abutment and the Atlantis Abutment Core File.
To produce an excellent temporary restoration, it is recommended to use the Atlantis Abutment Core File for the production of a CAD/CAM crown. The core file is a digital file that includes the Atlantis Abutment design and the soft tissue, the neighboring teeth and – if provided – the opposing dentition all in correct relative position. This digital abutment model is a reproduction of the manufactured Atlantis Abutment shape (i.e. the outer surface of the abutment without the screw hole) enabling the laboratory to design the temporary crown.
Surgical procedure
Final restoration
After a period of time appropriate for osseointegration and soft tissue healing, the initial abutment is evaluated. The clinician must choose to either:
Keep the initial Atlantis Abutment
If it is desired to use the initial Atlantis Abutment for the final restoration, an abutment level impression or intraoral scan is made to proceed with the final crown restoration. The temporary crown is placed back.
Note: The core file provided with the initial Atlantis abutment should not be used for the final restoration, as the actual implant position can vary slightly from the planned implant position contained in the core file.
Before placing the final crown, torque the abutment according to the specific implant manufacturer´s recommendation for final use.
Order a new Atlantis Abutment, designed based on the healed soft tissue contours and actual implant position
If after soft tissue healing, a new Atlantis Abutment is desired (e.g. because of soft tissue healing patterns, implant position discrepancy, desire to change to an Atlantis Crown Abutment, or change of abutment material), then the abutment is removed. An implant level impression is made and the initial abutment and temporary crown are placed back. A new Atlantis Abutment is ordered. The final crown can be fabricated using conventional methods on a master model.
Note: Atlantis Later Order is not available for this concept since a new impression has been taken.
The Atlantis Abutment Core File can be used with the following dental CAD packages: 3Shape, Dental Wings and 3M Lava.
Benefits of using the Atlantis Abutment Core File:
• Reduces turnaround time of the temporary crown
• Provides a convenient workflow at a dental laboratory
• Eliminates time spent on scanning and scanning related activities, as well as the corresponding costs
The clinician provides the dental laboratory with the proper shade for the temporary crown according to the patient’s remaining dentition.
The laboratory provides the Atlantis Abutment and the optimally fitting temporary crown to the clinician before surgery.
In case the dental CAD package cannot work with the Atlantis Abutment Core File or does not connect with a milling system that has the possibility to mill in a material suitable for a temporary crown, then use one of the alternative approaches described in the ‘What if’ section.
Once all patient-specific components (i.e. the Simplant Guide, the Atlantis Abutment and the temporary restoration), as well as the brand-specific surgical instrumentation are available, the clinician can perform the surgery.
All general guidelines as provided for Simplant (instructions for use and surgical protocol delivered with the Simplant Guide) and all implant-specific guidelines as provided by the implant manufacturer should be followed.
Restorative procedure
Once the implant has reached the designated position and is aligned according to the index by means of the Simplant Guide, then you can install the Atlantis Abutment and the temporary crown.
Be aware that an abutment insertion guide is not applicable, as there are minor differences between planning and placement of the implant.
Torque the abutment screw according to the specific implant manufacturer´s recommendation for temporary use.
The Atlantis Abutment Core File allows for the production of a very precise temporary crown. In certain instances, minor modifications might be necessary.
Check for the desired occlusal clearance and lateral contacts of the temporary crown.
It is also recommended for these cases to take into account the following guidelines.
Identify the index marking(s) on the implant driver /holder before implant installation.
The correct position is reached when the index marking on the implant driver / holder aligns with the index marking on the Simplant Guide, just before the indicated vertical stop (visual or physical).

1918
What if?
What if the desired implant is not compatible with the patient-specific Atlantis Abutment or with the Simplant SAFE Guide?
The Immediate Smile solution with an Atlantis Abutment is available for all major implant systems. You can find the corresponding compatibility chart at www.simplantdentsply.com.
What if the surgical instrumentation has no index marking on the implant holder?
You will need to manually indicate the index position on the implant holder for correct alignment during surgery. Therefore, check the orientation of the implant index in Simplant and the groove in the Simplant SAFE Guide.
What if the mesio-distal width at the implant side is very small?
If the mesio-distal distance in-between the neighboring teeth is very small (i.e. less than 7 mm), there is a high risk that the Simplant SAFE Guide cannot be designed since there is not enough space for the guiding sleeve.
Preparations
What if you have an intraoral scanner?
You can use the intraoral scanner for digitizing the patient situation, i.e. neighboring teeth and mucosal information. This information can be used for the design of the tooth-supported Simplant Guide and the Atlantis Abutment.
Do not forget to provide a digital representation of the crown-to-be either by optically scanning a physical wax-up or by digitally designing the wax-up.
Note: in case of tooth extractions, it is advised to work with a conventional impression and optical scan of the plaster cast, since you will have to create the desired gingival sulcus on the model.
What if you want to optimize the soft tissue relation to the Atlantis Abutment design?
Changing the soft tissue contour to the desired shape can either be done digitally (i.e. by means of a dental CAD package) or physically on the plaster cast before scanning or shipping it to the Simplant facilities for scanning.
Treatment planning and order process in Simplant®
What if the abutment design is not as desired and you want to adapt the implant planning to improve the abutment design?
The Simplant Guide order and the Atlantis Abutment order must both be cancelled by contacting Simplant, as well as Atlantis customer services. (www.simplantdentsply.com and www.atlantisdentsply.com)
A new implant planning must be made within Simplant and used for placing the new Simplant Guide order and Atlantis Abutment order through the Simplant Online Shop.
What if the clinician wants to approve the patient-specific Atlantis Abutment design?
As a dentist, you need to inform your dental laboratory upfront about your desire to review and approve the design of the patient-specific Atlantis Abutment. Your dental laboratory will have to wait upon your approval (offline communication) before they approve the Atlantis Abutment design by means of the Atlantis WebOrder system.
What if the dental laboratory cannot work with the Atlantis Abutment Core File?
In that case there are mainly three options to make a temporary crown.
1. Simulate surgery The dental laboratory can use the Simplant SAFE Guide to make a master model. As such, the implant will be positioned and oriented according the planning in Simplant. By means of this master model and the Atlantis Abutment, a temporary crown (cement- or a screw-retained) can be made using the conventional (non-digital) approach.
2. Screw-retained temporary crown The dental laboratory applies an acrylic layer on the Atlantis Abutment in order to create a reduced anatomic tooth shape. During surgery, the clinician applies a direct veneering technique to finish the temporary restoration so that it ideally fits in between the neighboring teeth and that the (non-) occlusion is as desired. Keep the screw access hole open during this process.
3. Combined laboratory and chair-side approach – The dental laboratory can make a soft acrylic shell
based on the plaster model and the diagnostic wax-up. During surgery this shell is filled with self- or light-curing resin and placed onto the Atlantis Abutment for making the temporary crown.
OR – The dental laboratory can make a hollowed out
temporary crown based on the plaster model and the diagnostic wax-up. During surgery this prefabricated crown is relined intraorally onto the Atlantis Abutment.
In both cases, the temporary crown is completed extra-orally to fit the abutment margin nicely. This combined approach facilitates the restorative procedure for the clinician when compared to a complete chair-side approach.
Review of the abutment design
Crown design & manufacturing: dental laboratory
What if the implant does not have primary stability?
In case of insufficient primary stability of the implant, a two stage function approach is advised. This means that at the time of implant placement a cover screw or standard healing abutment is placed to allow implant healing and in a later phase (i.e. after appropriate healing period or after osseointegration of the implant) the initial Atlantis Abutment and temporary crown are placed to guide the soft tissue healing.
What if the physical stop of the implant holder is in contact with the Simplant Guide (thus implant holder at planned depth), and the index of the implant is not yet correctly oriented?
Remove the implant holder and use a regular long implant driver to manually rotate it to the nearest alignment possibility.
What if the bone prevents the placing of the initial Atlantis Abutment?
Place a standard cover screw on the implant to prevent bone debris from entering the screw thread of the implant. Perform minor osteoplasty in conjunction with the surgery.
How to create a temporary restoration without the use of the Atlantis Abutment Core File?
You can make a temporization using the conventional methods.
– Prefabricated temporary crown that is relined and adapted in the patient’s mouth.
– Prefabricated custom shell mimicking the final contours and anatomy of the temporary restoration to be relined with an acrylic resin on the Atlantis Abutment.
– For extraction cases, a chair-side temporization can be made by means of an impression made of the pre-extraction situation and then using this as a shell for relining with an acrylic resin on the Atlantis Abutment.
Surgical procedure
Restorative procedure (for chair side processing)

Den
tsp
ly S
iro
na d
oes
no
t w
aive
any
rig
ht t
o it
s tr
adem
arks
by
not
usin
g t
he s
ymb
ols
® o
r ™
. 32
670
144
-USX
-16
10 ©
20
16 D
ents
ply
Sir
ona
. All
rig
hts
rese
rved
About Dentsply Sirona Implants
Dentsply Sirona Implants offers comprehensive solutions for all phases of implant therapy, including Ankylos®, Astra Tech Implant System® and Xive® implant lines, digital technologies, such as Atlantis® patient-specific solutions and Simplant® guided surgery, Symbios® regenerative solutions, and professional and business development programs, such as STEPPS™. Dentsply Sirona Implants creates value for dental professionals and allows for predictable and lasting implant treatment outcomes, resulting in enhanced quality of life for patients.
About Dentsply Sirona
Dentsply Sirona is the world’s largest manufacturer of professional dental products and technologies, with a 130-year history of innovation and service to the dental industry and patients worldwide. Dentsply Sirona develops, manufactures, and markets a comprehensive solutions offering including dental and oral health products as well as other consumable medical devices under a strong portfolio of world class brands. As The Dental Solutions Company™, Dentsply Sirona’s products provide innovative, high-quality and effective solutions to advance patient care and deliver better, safer and faster dentistry. Dentsply Sirona’s global headquarters is located in York, Pennsylvania, and the international headquarters is based in Salzburg, Austria. The company’s shares are listed in the United States on NASDAQ under the symbol XRAY.
Visit www.dentsplysirona.com for more information about Dentsply Sirona and its products.
THE DENTAL SOLUTIONS COMPANY™