Embed Size (px)
DESCRIPTION
How to properly install Mass Loaded Vinyl (MLV). Step by Step fully illustrated how to guide to MLV.
Citation preview

When building sound isolated walls, floors and ceilings, we want to introduce significant non-resonant mass. MLV is an excellent source for this non-resonant mass. Other building materials such as drywall, plywood, and concrete are all very resonant, creating problems during construction. This makes MLV unique and a very useful source of the desired non-resonant mass.
You’ll find MLV very useful for adding thin mass to walls, floors and ceilings. This mass directly lowers sound transmission.
Our MLV material comes in both 48” and 54” widths. 48” is generally used when hanging MLV on framing, while 54” is slightly more economical and commonly used on larger expanses such as floors.
All MlV is Not CreAted equAlMany low-cost MLV products use cheaper materials to manufacture. It’s important to note that we only use vinyl that contains polymeric placticisers for strength and stability rather than the cheaper monomeric. We also only use extruded MLV rather than cast, as cast MLV is quite weak. Make sure you’re getting the quality you’re paying for.
Warranty: Because of the many installation variables beyond our control, we shall not be liable for incidental and consequential damages, directly or indirectly sustained, nor for any loss caused by application of these goods not in accordance with current printed instructions or for other than the intended use. Soundproofing Company, Inc liability is expressly limited to replacement of defective goods. Any claims shall be deemed waived unless made in writing to us within thirty (30) days from the date it was or reasonably should have been discovered.
Building Code: The Soundproofing Company presents these construction concepts with the understanding that local Building Codes vary. It is the responsibility of the installer to ensure that these concepts meet local Building Code. The Soundproofing Company is not liable for mis-installation or non-compliance with local code.
Mass Loaded VinyLsoundproofing insTaLLaTion ManuaL
SIM
Sale & Support: (800) 397-87912520 Schuette Drive Midland, MI 48642
www.soundproofingcompany.com

Mass Loaded Vinyl (MLV) Installation Guide
Installation must comply with local, state and national building codes.
© Soundproofing Company 2011 2
FAsteNers - support the WeightOur MLV is an extruded, not cast product, consequently it is much more resistant to tears. Having said that, MLV can still easily tear under its own weight. Care needs to be taken during installation.
It’s important to use the proper fastener. A wide head fastener is needed to spread out the weight; such as Cap Staples, Roofing Nails or Screws with Plastic Washers.
Do not expect one or two fasteners to support the significant weight of MLV. Secure the beginning of the roll with several fasteners, before allowing to hang.
All fasteners must be anchored flush into the structures framing. Do not rely on drywall alone to support the weight of the MLV.
Material: Extruded Mass Loaded Vinyl with Calcium Silicate
Width: 48” x 25’ (1 lb.) 54” x 30’ (1 lb.) 48” x 18’ (2 lb.) 54” x 15’ (2 lb.)
Color: Black
Surface: Smooth finish
Density and 1.0 lb. per sq.ft. Weight: 2.0 lb. per sq.ft.
Thickness: 1/8"(1 lb.) & 1/4"(2 lb.)
Tensile Strength: 500 psi
Die "C" Tear: 100 lb.
Shore: 85 +/-5
Elongation: 90%
Burn Test: Meets MVSS302 ULP4 - HF-1
Service Temp: -20F - 180F
required MAteriAl Tape Measure Utility Knife T-Square or Straight Edge Pneumatic Cap Stapler, Hammer
or Screw Driver Roofing Nails, Cap Staples,
or Screws with Caps Vinyl or Foil Seam Tape Acoustical Sealant
optioNAl MAteriAl Outlet Putty Pads
speCiFiCAtioNs
1 ¼" Roofing Nail
3/4" Wafer Head Screw with Plastic Washer
Pneumatic Cap Stapler (Recommended) 1" Long 5/16" Wide Staple with 1" Cap
WHERE TO APPLY?
5/16”
1”
1” Button Cap
Mass Loaded Vinyl can be installed over existing surfaces or directly to wood and metal framing. MLV is equally effective whether placed loosely or taught on framing. Additionally, MLV is equally effective attached to framing or constrained between layers of drywall, plywood, plaster, etc. The material functions so well because of its mass and independent lab tests clearly show there is no advantage installing limply or rigidly. Install in whatever manner is most convenient.
If installing on bare wall studs or ceiling joists, it is generally easier to install parallel to the framing. So for example MLV would be installed vertically on wall studs. This allows you to press on the seams when sealing, because there’s a stud or joist behind the seam.
If installing on existing drywall or plaster & lathe, find the studs or joists and mark them with a chalk line. MLV can just as easily be installed horizontally or vertically in this case, as the existing wall will support the seams and you will have a very flat application.

Mass Loaded Vinyl (MLV) Installation Guide
Installation must comply with local, state and national building codes.
© Soundproofing Company 2011 3
Place the roll of Mass Loaded Vinyl on the floor, then cut to length.
Use a T-Square or Straight Edge to cut a square edge. Use a Utility Knife and cut the MLV to length.
Measure the distance between the floor and the ceiling. Subtract 1⁄8" - ¼" from the measured length.
PREPARATiOn: MEAsuRing And CuTTing MAss LOAdEd VinYL
1 2 3
Mass Loaded Vinyl (MLV) Installation Guide
Installation must comply with local, state and national building codes.
© Soundproofing Company 2011 4
steel stud installation
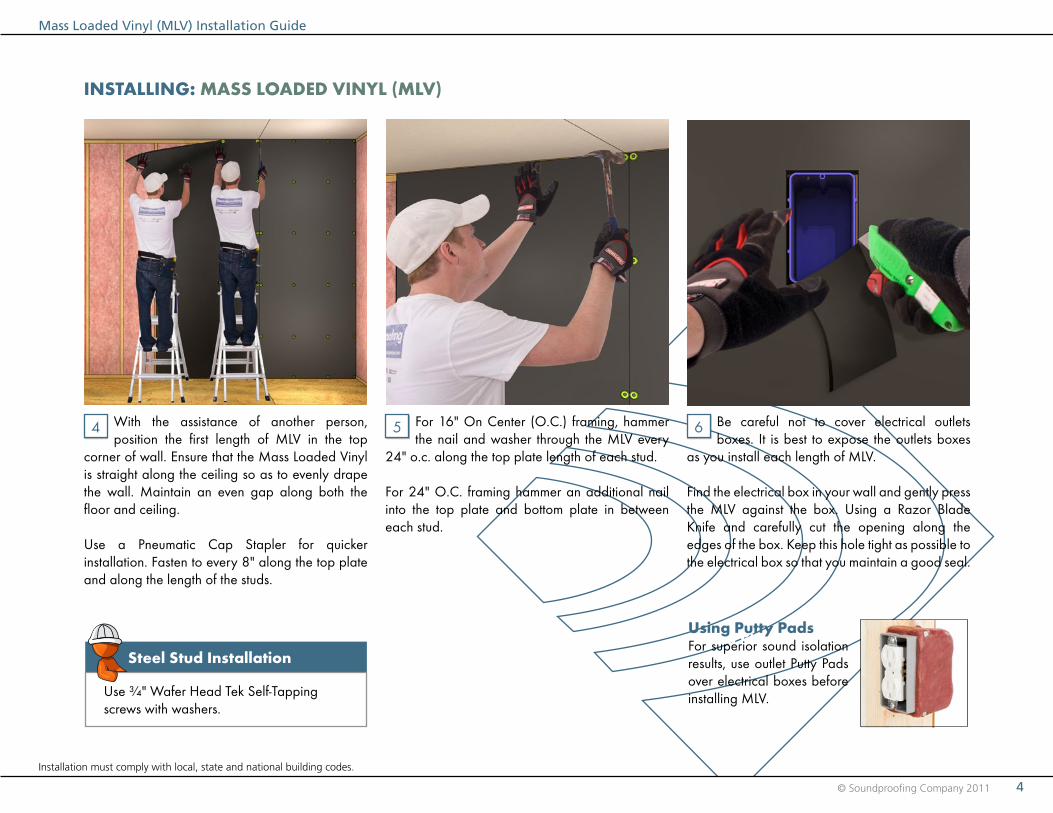
insTALLing: MAss LOAdEd VinYL (MLV)
For 16" On Center (O.C.) framing, hammer the nail and washer through the MLV every
24" o.c. along the top plate length of each stud.
For 24" O.C. framing hammer an additional nail into the top plate and bottom plate in between each stud.
Be careful not to cover electrical outlets boxes. It is best to expose the outlets boxes
as you install each length of MLV.
Find the electrical box in your wall and gently press the MLV against the box. Using a Razor Blade Knife and carefully cut the opening along the edges of the box. Keep this hole tight as possible to the electrical box so that you maintain a good seal.
With the assistance of another person, position the first length of MLV in the top
corner of wall. Ensure that the Mass Loaded Vinyl is straight along the ceiling so as to evenly drape the wall. Maintain an even gap along both the floor and ceiling.
Use a Pneumatic Cap Stapler for quicker installation. Fasten to every 8" along the top plate and along the length of the studs.
Use ¾" Wafer Head Tek Self-Tapping screws with washers.
4 5 6
using Putty Padsusing Putty Pads s For superior sound isolation results, use outlet Putty Pads over electrical boxes before installing MLV.

Mass Loaded Vinyl (MLV) Installation Guide
Installation must comply with local, state and national building codes.
© Soundproofing Company 2011 5
insTALLing: MAss LOAdEd VinYL
Hang your drywall over the MLV, vertically or horizontally. Caulk the perimeter seams with Acoustical Sealant. Proper sealing is necessary to achieve quality sound isolation results.
Mud your drywall seams and finish you wall or ceiling to your desired results.
Repeat steps 1- 6 until your entire wall or ceiling is covered in MLV.
Where MLV seams fall on a stud, butt pieces against one another and tape with Vinyl or Foil Tape.
Where MLV seams falls between studs, overlap pieces by 2". See Dealing with Seams page for detailed instruction.
7 8 9

Mass Loaded Vinyl (MLV) Installation Guide
Installation must comply with local, state and national building codes.
© Soundproofing Company 2011 6
dETAiLs: dEALing WiTH sEAMs
seam Between the studsIt is common for a Mass Loaded Vinyl seam to occur between studs, as the width of the MLV might not necessarily fit your framing.
To create a seam between studs, overlap one length of MLV approximately 2" over the next length of MLV. Cut away the layer of MLV where it overlays at the top and bottom plates of the frame. Seal the seam with a strip of 2" wide vinyl tape.
It is important to not have two layers of MLV overlapping on the framing. This will cause problems when installing drywall flush to the wall.
seam on the studsSeams on a stud makes it easier to apply Vinyl or Foil Tape. This type of installation will requires more precision when installing MLV.
To create a seam on a stud, butt two pieces of MLV against one another. Do not allow the strips to overlay one another. Fasten each length of MLV separately into the framing. Cover each seam with a strip of 2" Vinyl of Foil Tape.
Cut away top layer of MLV. Tape seamwith Vinyl Tape.
2” Vinyl Tape
Add Extra Vinylor Foil Tape over seams.

Mass Loaded Vinyl (MLV) Installation Guide
Installation must comply with local, state and national building codes.
© Soundproofing Company 2011 7
SilenSealAcoustical Sealent
Drywall
Drywall Screws
2” Vinyl Tape
Mass Loaded VinylWall Framing
Insulation
Staples withButton Caps
Use Silensealto �ll gap around
outlet box.
Use Putty Padsto wrap outlet box
Fill gap along MLV perimeter with Silenseal Sealent
Fill gap along the perimeter of drywall with SilenSeal Sealent
COMPLETEd WALL AssEMBLY WiTH MLV


![(MLV) MULTILAYER CHIP VARISTOR - fenghua.comfenghua.com/pdf/varistor/chip_varistor.pdf · (MLV) MULTILAYER CHIP VARISTOR Multilayer Chip ... [2220] 8063[3225] 1080[4032] 55 125 V](https://img.dokumen.tips/doc/110x75/5b42af3a7f8b9ad23b8b5240/mlv-multilayer-chip-varistor-mlv-multilayer-chip-varistor-multilayer-chip.jpg)


