Embed Size (px)
Citation preview

SILESTONE®
TRAININGMANUAL
INSTALLATION GUIDE


installation guide
The purpose of this manual is to provide the installer with specific instructions related to the installation of a Silestone® countertop. The following sections include the suitable handling of joints, edges, backsplashes and gluing. Additionally, this manual is aimed at improving customer care, cleaning and safety measures. Our goal is to provide you with the necessary tools and knowledge in order to carry out the tasks correctly and achieve customer satisfaction.
1. Check all the documentation before leaving the workshop to get a clear understanding of what is likely to be involved in the installation.
2. Take all required material and special tools from the fabrication shop.
3. Check that all the necessary and Silestone pieces are available and that all the colors match (no change in tone) and that all the Silestone edges have been correctly manufactured at the fab shop. Inform the fab shop manager of any irregularities.
4. Measure the Silestone pieces with care; they are heavy. To avoid scratching them, do not let them touch any abrasive surface. Place the pieces face to face and back to back.
6. Take note of the special instructions (special drill bits, location of kitchen sinks/faucets, etc) Note the contact phone number of the templater incase you have any questions.
7. Be careful not to damage walls, cabinets, machinery and floors when transporting Silestone in and out of the customer´s home.
8.Contact your supervisor immediately to resolve any issues.
GENERAL INFORMATION
5. Secure the Silestone pieceswith ratchets. During the transport secure the load with straps to avoid any movement that may damage or break the pieces.

inst
alla
tion
guid
e
INSPECTBEFOREINSTALLATION
1. Evaluate the area before beginning the job.
2. Before starting, check the conditions of the cabinets, floor, carpets, walls, machines, drawers, etc.
3. Measure the cabinets and compare with the measurements on the worksheet.
4. Check the levelling of the cabinets. And check that the new countertop does not obstruct the opening of windows and drawers before installing it.
5. Check that the kitchen sink and the cooktop have been disconnected and that the previous countertop has been removed. If this has not been carried out and if you have any concerns, contact your supervisor and await instructions.
6. Do not try to disconnect the gas, electric and pipes. Do not install Silestone® onto existing countertops.
CHECKING 1. Before installing Silestone, assess the situation in order to check how the piece fits and identify any potential problems.
2. Place the Silestone pieces in the correct positions.
3. Line up and check the edge and squareness of the Silestone pieces. Modify the edges to adjust the level and check the joints to determine if these are levelled and square.
furniture
line up
shape of edge wall
wall
shape of edge

installation guide
EDGES 1. Measure the countertop from the front of the cabinet to the Silestone® edge.
2. Check the position is centered when installing it.
3. Determine the adjustment of the joints. The edge line up will be determined by the size of the joints.
4. Verify that the countertop installation does not interfere with the opening of the doors, drawers and dishwashers.
5. If there is no backsplash, the back edge of the pieces should be adhered to the wall. If there is a Silestone backsplash, the gap between the Silestone and the wall should be 1/4”.
LEVELING 1. Place the leveller against the edge front, in the intersection of the joints. This will indicate if the Silestone pieces are straight and lined up.
2. Check the level of edges and joints again. Check that all the doors and drawers can be opened before installing the countertop.
cabinet
alineación
edge wall
wall
edge------------------------
JointCabinets
Silestone
Silestone
A small gap can be hidden by the thickness of the Silestone backsplash.
Cabinets
Cabinets
Cabinets
3. Determine whether it would be necessary to install wedges to adjust the level between the pieces.

inst
alla
tion
guid
e
JOINTS When the line-up of the edges are perfect it is easy to determine if the joints are correctly installed by looking at the cutouts.
1. Using a protractor, place the inside edge againts the front corner of each Silestone piece and check.
2. Stick some adhesive tape on the piece to be cut. Measure the widest part of the joint and draw the cutting line in the adhesive line with a pencil or marker. Check that the joint is squared and closed.
3. After cutting, check that the full edge (including the inside face) is evenly lined up and that the edge is smooth.
4. Check that the joints are leveled by placing a spirit level on the surface of the countertop, perpendicular to the joint.
5. Place and adjust the wedges with the suitable thickness under the Silestone countertop to level the surface. Check that the joints are not cracked.
wall
joint
cabinet supports
Check that all the joints are leveled airtight, and that the color of all the pieces match.The joints will be supported on both sides, front and back.If one of the Silestone pieces does not fit, it will have to be adjusted.
installation guide
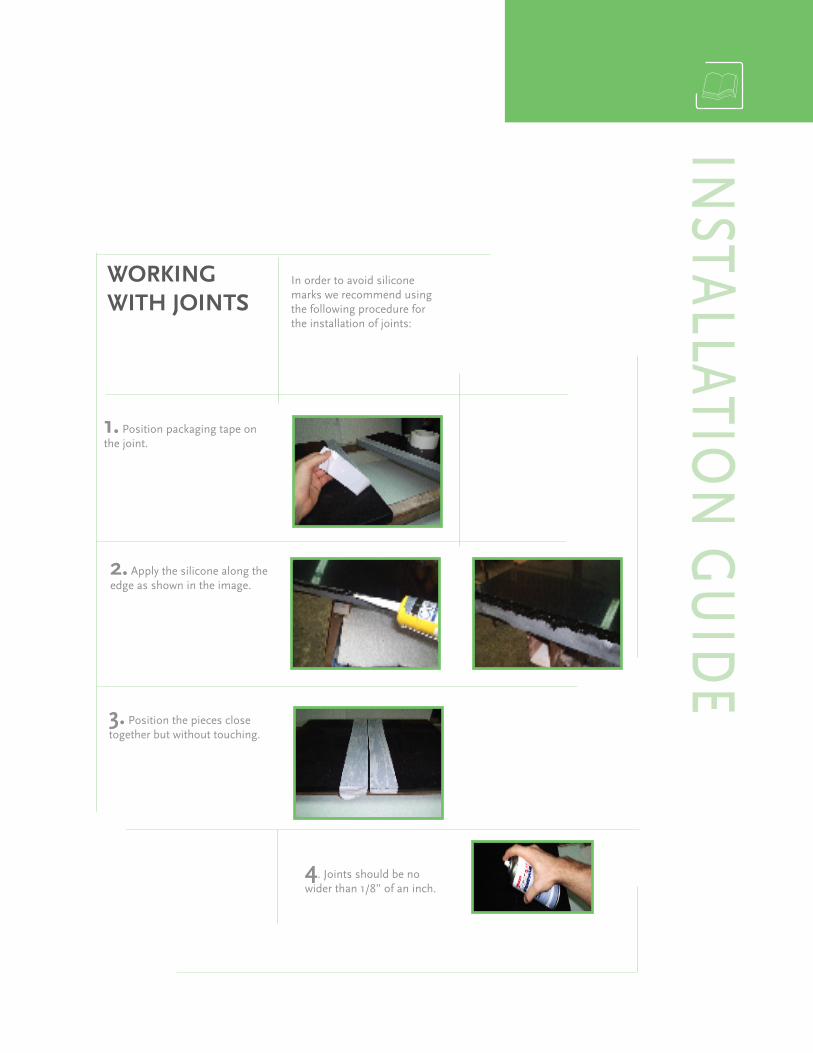
WORKING WITH JOINTS
In order to avoid silicone marks we recommend using the following procedure for the installation of joints:
1. Position packaging tape on the joint.
2. Apply the silicone along the edge as shown in the image.
3. Position the pieces close together but without touching.
4. Joints should be no wider than 1/8” of an inch.

inst
alla
tion
guid
e
ADHESIVE PROCESS
1. Dirt, dust and any other foreign substance body may interfere with the adhesive quality between the countertops and cabinets. Check that the area is completely clean before applying silicone.
2. Leave a gap between the Silestone pieces for the joints.
3. Lift the Silestone from the outside edge and place it against the back wall.
4. Do not affix the pieces to the walls. Leave a gap of 3mm between the Silestone and the walls to allow for expansion.
5. Apply small amounts of silicone on the cabinets surface every 20 inches. Use more silicone for the areas surrounding kitchen sink or the differently-shaped edges.
6. When positioning Silestone pieces, check that the wedges have not moved.Check that the edges and joints are lined up.
7. Press the pieces tightly together.
8. Remove the excess silicone with a putty knife.

installation guide
EDGES The length of the edge should be smooth and unsplintered, especially in the joints. To polish the rough and sharp edges, sand paper is needed (120).
1. Using the suitable diamond sponge, pass it along the Silestone® where the joints are joined.
2. Flatten out all the joints and the exposed edges that need to be polished.
Nota: Do not use sponges or polish directly on the Silestone surface, as it will alter the finish.
3. Clean the countertop with lacquer thinner or mild soap and water.
BACKSPLASHES
3. Each light socket/switch requires 4 measurements. Measure vertically from the countertop to the lower part of the socket, and from the countertop to the top part of the socket, horizontally.
2. Decide how many light sockets and switch cutouts are required to complete the installation of the backsplash. Removing of the sockets and switchs cutouts are required for the completion of the backsplash installation. Remove the light socket switch covers before measuring.
1. Check the measurements and position the backsplashes in their correct locations, against the wall check all the joints.
inst
alla
tion
guid
e
10. When choosing the silicone for the backsplash, the color should be the same as that of the Silestone® countertop.
9. Hold the pieces in place for a few minutes in order for the glue to dry.
8. Check that the backsplashes are leveled.
7. To fix the backsplash, apply small amounts of silicone every 20”.
6. Using an electric saw, cut the cutouts from the underside of the countertop.
5. Leave space for the screws affixing the cover to the socket/plug.
4. Mark these measurements on the backsplash, leaving a space for the socket cover.
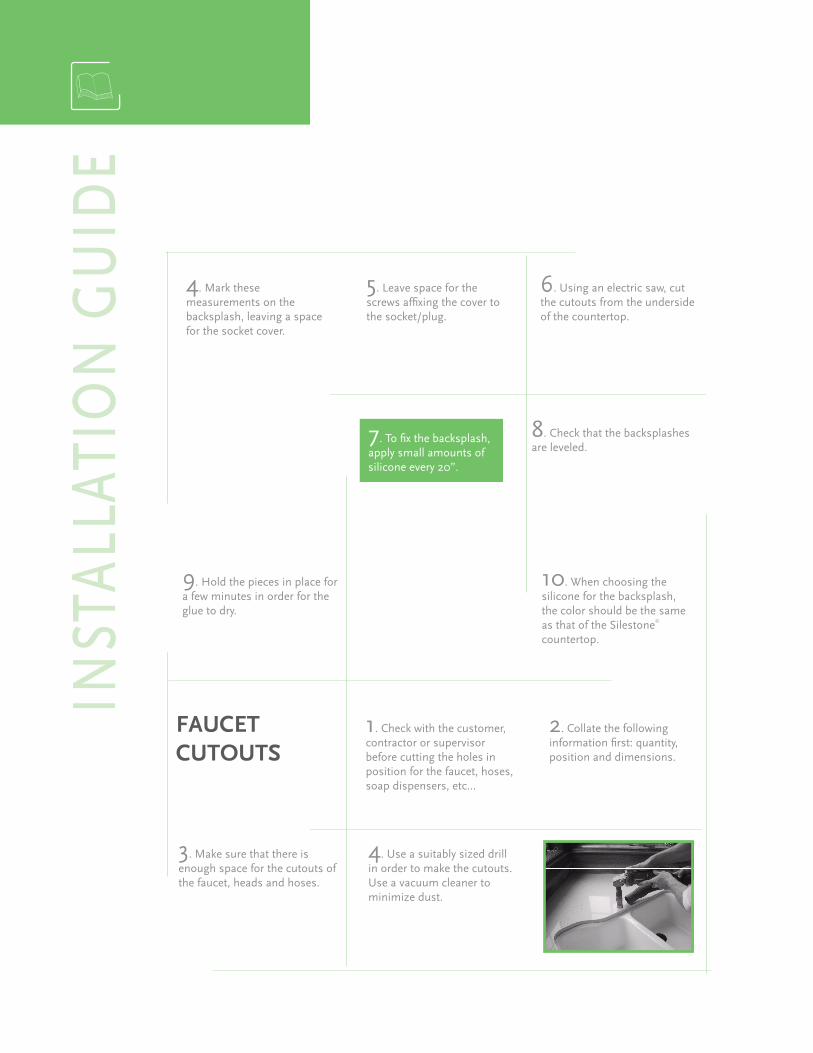
FAUCETCUTOUTS
1. Check with the customer, contractor or supervisor before cutting the holes in position for the faucet, hoses, soap dispensers, etc...
2. Collate the following information first: quantity, position and dimensions.
3. Make sure that there is enough space for the cutouts of the faucet, heads and hoses.
4. Use a suitably sized drill in order to make the cutouts. Use a vacuum cleaner to minimize dust.

installation guide
Before installing the kitchen sink a mark should be made with a pencil, 3/4” from the kitchen sink cutout to the outside edge.
_ Neutral Pencil Notch to 2 cm from the sink hole.
_ Murofix application area
Install the kitchen sink faucet to the underside of the countertop. Make sure that the area is free from dust.
Note: There is another option of installing the reinforcement first and then sticking the kitchen sink faucet with caulking .
In the event, you do not have plugs, staples and/or bolts, the following is suggested:
A. Make the required cutout.B. Polish the inside edges of the cutout.C. Stick the kitchen sink tab with caulking.D. Make a Silestone reinforcement. Attach the Silestone reinforcements with Solumastic on the faucet and countertop.
Adhesive or staples will be used as reinforcement to attach the kitchen sink.
1. For topmount sinks determine the center of the sink based on the configuration of the cabinets base. By applying the adhesive tape to Silestone® you can mark the center of the kitchen sink for cutting using a pencil or marker.
2. Center the oven or cooktop under the countertop.
3. Leave a space of at least 1/8” along all the sides of the kitchen sink to allow for expansion.
4. Always double check the measurements before manufacturer.
5. Apply temporary adhesive between the undermount sink and the Silestone countertop.
SINK INSTALLATION
_ Neutral Pencil Notch to 2 cm from the sink hole.
If its an undermount sink the following steps should be followed:
A. Join the kitchen sink tab to the under side of the countertop with Murofix adhesive.
B. Secure the sink with reinforcements.

inst
alla
tion
guid
e
QUALITY GUARANTEE
8. Check that all the Silestone surfaces are clean. It is very important to carry out a point- by-point inspection of all the installation details in order to achieve customer satisfaction.
7. If other work is going to be carried out during the installation of the Silestone countertops, make sure to protect these areas.
6. Check that the doors and drawers can be opened easily and are not obstructed by the Silestone®.
5. Check that the edges are smooth, polished and that the colors match.
3. Check that all the holes have been filled with the suitable color.
2. Check that all the visible corners are smooth.
1. Check that all the corners visible have the correct radius.
4. Check the joints, especially those with on front edges. Check that they are leveled, tight and smooth.

installation guide
FINAL CLEANING
1. Clean the Silestone® countertop.
2. Ask the customer to fill- in any relevant paperwork.
3. Clean the floor if necessary.
4. Thank the customer and give the countertops a final check that all is perfect.
5. Remove all the cuttings and rubbish.
6. Leave the working area as clean as you found it.
A clean working area causes a good impression and provides a safe environment.
FINAL INFORMATION
4. Thank the customer. The impression left on each of your customers will be reflected on the company. Politeness, professionalism and cleanliness is important to achieve total customer satisfaction.
3. If an undermount kitchen sink has been installed, inform the customer to wait 24 hours to connect the piping.
2. Ask the customer to complete and sign the Installation Approval Form.
1. Inspect the work with the customer.

inst
alla
tion
guid
eNOTES


www.cosentinonorthamerica.com
countertops, floors, walls, mosaics | www.silestoneusa.com | 866.countertops
© 2008 Cosentino N.A. MWM 10.13.08 Silestone trademark and logo are the property of Cosentino N.A. under exclusive license from Cosentino, S.A.


