Embed Size (px)
Citation preview

052950-001r1 1 June, 2005
CAREFREE
SIDE-OUT CANOPY REPLACEMENT
RV Kits
These instructions are for canopy replacement only for• SOKII W/ DEFLECTOR OR FULL CASE; • SUMMIT; AND, • A & E SLIDE TOPPER
WARNING THESE PROCEDURES DEAL DIRECTLY WITH THE PRE-WOUND SPRING TENSION IN THE ROLL BAR. FAILURE TO EXCERCISE CARE AND/OR
FAILURE TO FOLLOW THE INSTRUCTIONS CAN RESULT IN PERSONAL INJURY AND/OR PROPERTY DAMAGE.
SOKII CANOPY REPLACEMENT REMOVING THE OLD FABRIC 1. Open the slide out room 10"-12".
2. Remove the screws and end caps from the pivot brackets and set aside.
3. Remove the screws and deflector or full case and set aside.
4. Remove the fabric retaining screws from the awning rail. Do not discard.
5. On the left side of the rollbar align the holes in the rollbar with the holes in the pivot bracket inside the rollbar. It may be necessary to rotate the rollbar to align the holes.
6. Insert the furnished 2 inch cotter pin through the holes. Insert the pin as far as possible.
7. (See Figure 1) Grasp the roll bar and loosen the spring attach bolt on the outside of the LH pivot bracket. Loosen only 2-3 turns, DO NOT REMOVE. The rollbar can now spin freely. NOTE: When rotating the roll bar the bolt may have a
tendency to tighten. Loosen as needed. 8. Unroll the fabric off of the roll bar by rotating the roll bar toward the
coach.
9. (See Figure 2) Holding or supporting the RIGHT end of the roll bar; remove the attaching screws and remove the RIGHT pivot bracket from the mounting bracket and roll bar and set aside.
10. Simultaneously slide the fabric to the right from the awning rail and rollbar.
INSTALLING THE NEW FABRIC 11. Check that the awning rail and roll bar grooves are clean. If necessary spread open the end of the awning rail slightly;
deburr the awning rail. Lightly spray the inside of the awning rail and roll bar grooves with a silicone lubricant.
12. Carefully insert the new fabric into the awning rail approximately 6 to 8 inches. The edge with the larger polyrod goes into the awning rail.
13. Carefully insert the new fabric into the roll bar groove. The edge with the smaller polyrod goes into the roll bar.
14. Simultaneously slide the new fabric into the awning rail and roll bar until the fabric is centered in the roll bar.
15. Insert the right pivot bracket into the roll bar and mounting bracket. Secure with the screws removed previously.
16. Slowly roll up the fabric onto the roll bar. Ensure that the fabric is rolling straight. Adjust the fabric position as required.
17. After the fabric has been rolled up, tighten the spring attach bolt on the outside of the LH pivot bracket.
18. While firmly holding the rollbar remove the cotter pin. Slowly allow the spring to take up any slack in the material and apply tension.
19. Replace the fabric retaining screws in the awning rail.
20. Install the defector or full case.
21. Install the end caps.
Fabric RetainerScrews (2)
SOK2022
Cotter Pinto Lock Spring
Roller SpringAttach Bolt
Figure 1.
SOK2022a
RH Pivot Bracket
Pivot BracketRetaining Screws(2 per bracket)
Figure 2.
Carefree of Colorado Side-Out Canopy Replacement
052950-001r1 2 June, 2005
SUMMIT CANOPY REPLACEMENT REMOVING THE OLD FABRIC 1. Open the slide out room 10"-12". 2. Remove the fabric retaining screws from the awning rail. Do not
discard. 3. Remove the front cover.
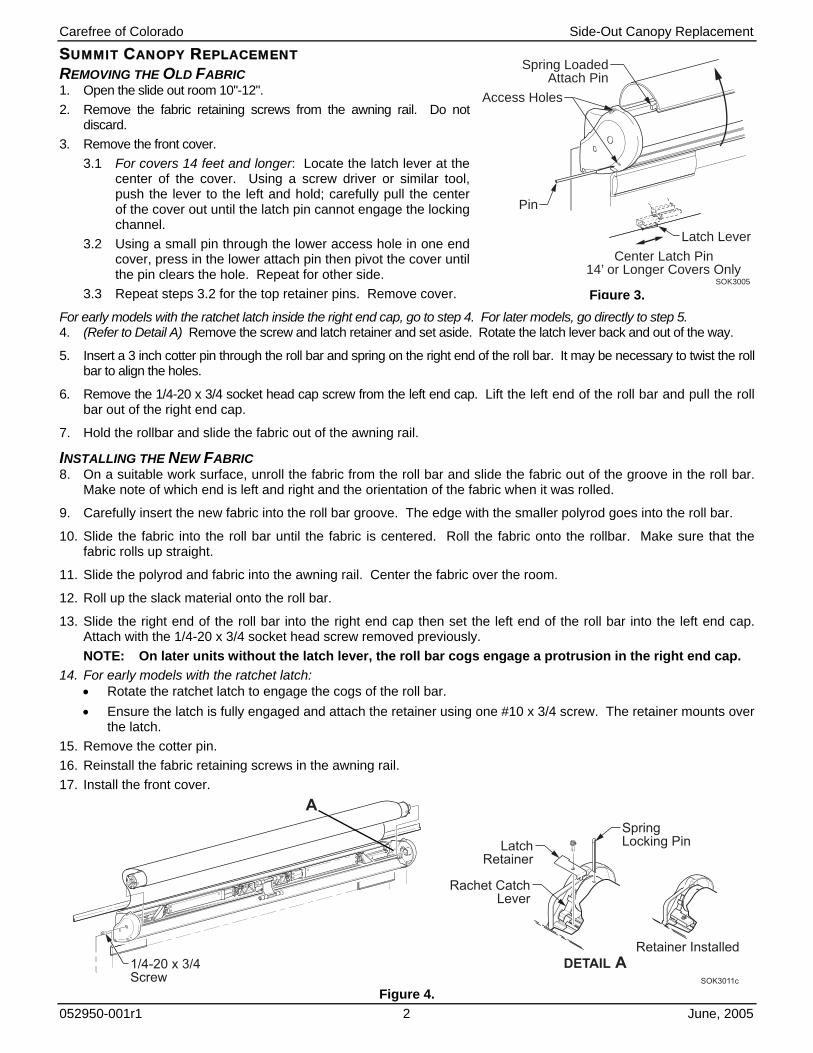
3.1 For covers 14 feet and longer: Locate the latch lever at the center of the cover. Using a screw driver or similar tool, push the lever to the left and hold; carefully pull the center of the cover out until the latch pin cannot engage the locking channel.
3.2 Using a small pin through the lower access hole in one end cover, press in the lower attach pin then pivot the cover until the pin clears the hole. Repeat for other side.
3.3 Repeat steps 3.2 for the top retainer pins. Remove cover.
For early models with the ratchet latch inside the right end cap, go to step 4. For later models, go directly to step 5. 4. (Refer to Detail A) Remove the screw and latch retainer and set aside. Rotate the latch lever back and out of the way.
5. Insert a 3 inch cotter pin through the roll bar and spring on the right end of the roll bar. It may be necessary to twist the roll bar to align the holes.
6. Remove the 1/4-20 x 3/4 socket head cap screw from the left end cap. Lift the left end of the roll bar and pull the roll bar out of the right end cap.
7. Hold the rollbar and slide the fabric out of the awning rail.
INSTALLING THE NEW FABRIC 8. On a suitable work surface, unroll the fabric from the roll bar and slide the fabric out of the groove in the roll bar.
Make note of which end is left and right and the orientation of the fabric when it was rolled.
9. Carefully insert the new fabric into the roll bar groove. The edge with the smaller polyrod goes into the roll bar.
10. Slide the fabric into the roll bar until the fabric is centered. Roll the fabric onto the rollbar. Make sure that the fabric rolls up straight.
11. Slide the polyrod and fabric into the awning rail. Center the fabric over the room.
12. Roll up the slack material onto the roll bar.
13. Slide the right end of the roll bar into the right end cap then set the left end of the roll bar into the left end cap. Attach with the 1/4-20 x 3/4 socket head screw removed previously. NOTE: On later units without the latch lever, the roll bar cogs engage a protrusion in the right end cap.
14. For early models with the ratchet latch: • Rotate the ratchet latch to engage the cogs of the roll bar. • Ensure the latch is fully engaged and attach the retainer using one #10 x 3/4 screw. The retainer mounts over
the latch. 15. Remove the cotter pin. 16. Reinstall the fabric retaining screws in the awning rail. 17. Install the front cover.
1/4-20 x 3/4Screw SOK3011c
A
DETAIL A
LatchRetainer
SpringLocking Pin
Retainer Installed
Rachet CatchLever
Figure 4.
Access Holes
Spring LoadedAttach Pin
SOK3005
Pin
Center Latch Pin14’ or Longer Covers Only
Latch Lever
Figure 3.
Carefree of Colorado Side-Out Canopy Replacement
052950-001r1 3 June, 2005
A & E TOPPER CANOPY REPLACEMENT REMOVING THE OLD FABRIC 1. Fully extend the room out.
2. Firmly grasp the roll bar and twist toward the coach until all the fabric is off the roll bar.
3. Align the holes in the roll bar end cap and the pivot bar inside the roll bar. Insert a 3" cotter pin. Repeat for other side.
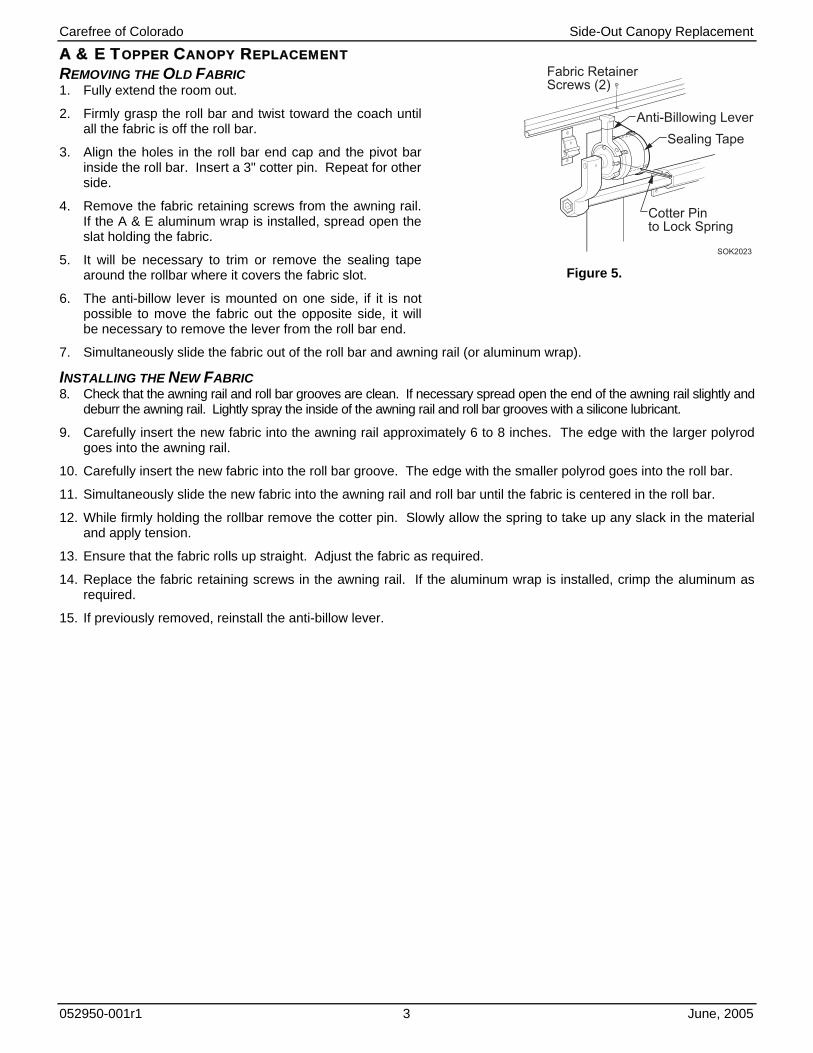
4. Remove the fabric retaining screws from the awning rail. If the A & E aluminum wrap is installed, spread open the slat holding the fabric.
5. It will be necessary to trim or remove the sealing tape around the rollbar where it covers the fabric slot.
6. The anti-billow lever is mounted on one side, if it is not possible to move the fabric out the opposite side, it will be necessary to remove the lever from the roll bar end.
7. Simultaneously slide the fabric out of the roll bar and awning rail (or aluminum wrap).
INSTALLING THE NEW FABRIC 8. Check that the awning rail and roll bar grooves are clean. If necessary spread open the end of the awning rail slightly and
deburr the awning rail. Lightly spray the inside of the awning rail and roll bar grooves with a silicone lubricant.
9. Carefully insert the new fabric into the awning rail approximately 6 to 8 inches. The edge with the larger polyrod goes into the awning rail.
10. Carefully insert the new fabric into the roll bar groove. The edge with the smaller polyrod goes into the roll bar.
11. Simultaneously slide the new fabric into the awning rail and roll bar until the fabric is centered in the roll bar.
12. While firmly holding the rollbar remove the cotter pin. Slowly allow the spring to take up any slack in the material and apply tension.
13. Ensure that the fabric rolls up straight. Adjust the fabric as required.
14. Replace the fabric retaining screws in the awning rail. If the aluminum wrap is installed, crimp the aluminum as required.
15. If previously removed, reinstall the anti-billow lever.
Cotter Pinto Lock Spring
SOK2023
Fabric RetainerScrews (2)
Sealing TapeAnti-Billowing Lever
Figure 5.


