Embed Size (px)
Citation preview
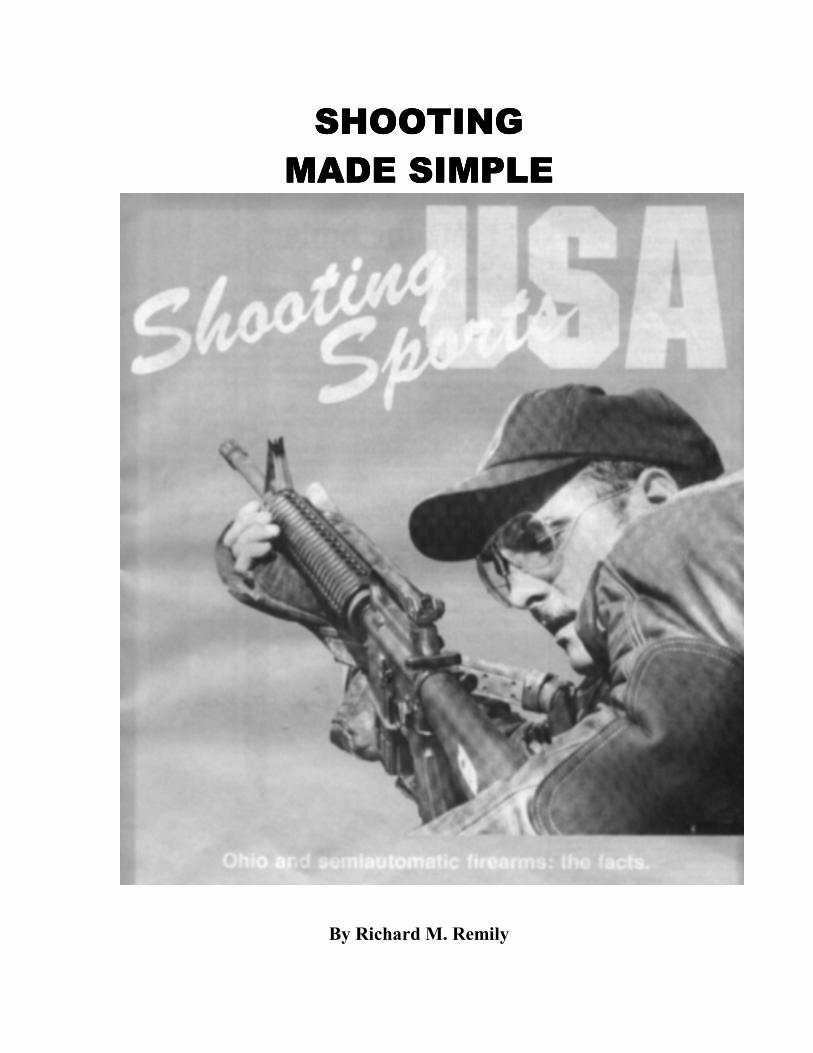
SHOOTING SHOOTING SHOOTING SHOOTING MADE SIMPLEMADE SIMPLEMADE SIMPLEMADE SIMPLE
By Richard M. Remily
ii
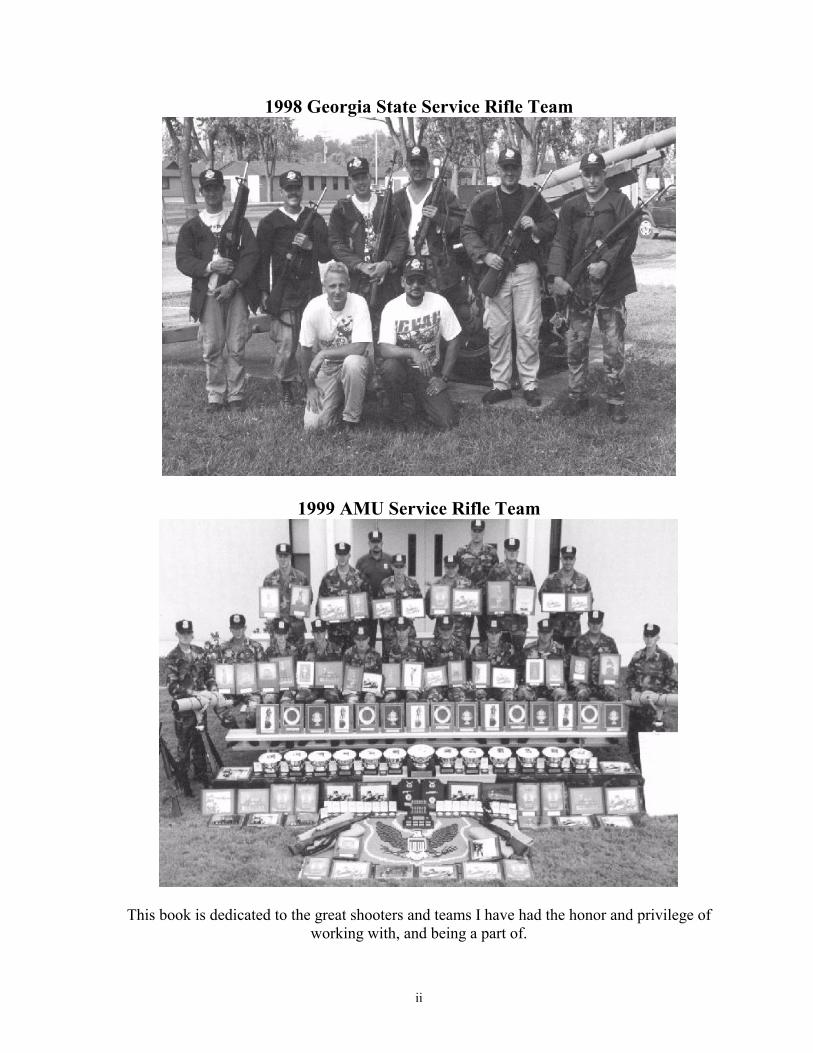
1998 Georgia State Service Rifle Team
1999 AMU Service Rifle Team
This book is dedicated to the great shooters and teams I have had the honor and privilege of working with, and being a part of.
iii
TABLE OF CONTENTS PAGE FOREWORD……………………………………………………………………………. VII INTRODUCTION………………………………………………………………………. VIII CHAPTER 1: SAFETY.……………………………………………………………… 1 CHAPTER 2: MENTAL ASPECT OF SHOOTING……………………………… 2 CHAPTER 3: FUNDAMENTALS OF MARKSMANSHIP………………………. 4 AIMING…………………………………………………………………………... 4 Dominant Eye 4 Barrel/Eye Alignment 5 Sight Alignment 5 Eye Relief 7 Sight Picture 9 TRIGGER CONTROL……………………………………………………………. 10 CHAPTER 4: THINGS TO DO BEFORE YOU FIRE ZEROING………………………………………………………………………… 13 SIGHT ADJUSTMENTS……………………………………………………….... 13 MARKING THE SIGHTS……………………………………………………….. 14 SLING ADJUSTMENTS………………………………………………………… 16 Putting the Sling Together 16

iv
Putting the Sling on the Rifle 18 Putting the Sling on the Arm 19 CHAPTER 5: POSITIONS
ELEMENTS……………………………………………………………………… 21 Natural Point of Aim 21 BUILDING A POSITION……………………………………………………….. 22
Offhand 22 Offhand NPA 25 Sitting Rapid Fire 26 Sitting NPA 29 Prone Rapid/Slow Fire 29 Prone NPA 32 Modifications For Trophy 32 Trophy Trigger 32 CHAPTER 6. EFFECTS OF WIND AND WEATHER WIND……………………………………………………………………………. 34 Wind Value 35 Wind Velocity 36 Interpret the Correction 36 WIND CHARTS………………………………………………………………… 36 MIRAGE………………………………………………………………………… 37 TEMPERATURE………………………………………………………………... 38 LIGHT…………………………………………………………………………… 38
v
HUMIDITY……………………………………………………………………… 38 NEGOTIATING THE WIND…………………………………………………… 39 CHAPTER 7: COACHING ATTRIBUTES OF A COACH…………………………………………………... 41 EVALUATION AND SELECTION OF SHOOTERS………………………….. 41 TRAINING AND PRACTICE…………………………………………………… 42 READING THE MIRAGE AND VAPOR TRAILS…………………………….. 42 Using the Scope 42 COACHING NATIONAL MATCH EVENTS…….……………………………. 43 Offhand 43 Sitting Rapid Fire 43 Prone Rapid Fire 43 Prone Slow Fire 43 USING BINOCULARS…………………………………………………………. 44 FAVORS………………………………………………………………………… 44 COACH’S TRAINING PLAN…………………………………………………... 45 CHAPTER 8: TRAINING OFFHAND TRAINING…………………………………………………………. 48 RAPID FIRE TRAINING……………………………………………………….. 48 INFANTRY TROPHY TRAINING……………………………………………... 49 DETECTION AND CORRECTION OF ERRORS……………………………... 50 CHAPTER 9: THE DATA BOOK AND PLOT SHEETS…………………………. 56 RECORD WIND AND WEATHER……………………………………………... 56
vi
RECORD SIGHT ALIGNMENT/PICTURE……...……………………………... 57
PLOTTING YOUR SHOTS……………………………………………………… 57 COACH’S PLOT SHEETS………………………………………………………. 58 CALLING YOUR SHOT………………………………………………………... 60 CHAPTER 10: PUTTING IT ALL TOGETHER………………………………….. 61 SHOOTING THE SHOT………………………………………………………… 61 Offhand 61 Rapid Fire 62 Prone Slow Fire 64 FAQ AND ANSWERS…………………………………………………………………... 66
vii
FOREWORD The material I present in this book was put together based on the results achieved in recent years by the U.S. Army teams and individuals with whom I have been affiliated as their coach. Some of the material will be similar or even identical to the text in the Army Service Rifle Manual. I authored a large portion of the Service Rifle Manual, and because of the time restraints required for it’s completion, I used portions of this book that had already been finished, to conclude it. You will notice many changes between the old manual and the new one. Those changes reflect the current beliefs and philosophy of some of today’s Champions. A misconception exists in the minds of many competitive shooters regarding the amount of training the Army teams obtain prior to a summer season. My shooters in the past have received an average of 45 days of training or less between summer trips. The reason they are successful is because of the quality of training, not the quantity. This rule holds true for many tasks requiring precision. My former team mates and I have used the techniques and methods described to dominate the field of service rifle marksmanship at all levels of competition. The Army Team currently holds records in the four man NMC team event (1980 x 97), the NTIT (1466), and the NTT (2954 x 121). During my four and a half year tour as the senior military Service Rifle Coach, the section won three Infantry Trophy IS matches, and four team Championship Matches at the Interservice Championships, three NTIT matches, two NTT matches, and two Enlisted Team matches at the National Championships, and nearly all state and regional matches competed in. During these four years, the Service Rifle National Championship was won every year by one of my shooters. My thanks go out to all of the shooters with which I have had the honor of coaching both in the military and civilian arenas. Without them I could never have learned or achieved the success I attained throughout my career. The only coaches recognized as being successful, are those who have had great shooters. Particular thanks to Mr. Jack Hieder, the late Mr. Art Sievers and Mr. Frank Briggs for the knowledge they shared with me. A very special thanks to my wife, Jane, who has always encouraged me, stood by my side, and supported me.
viii
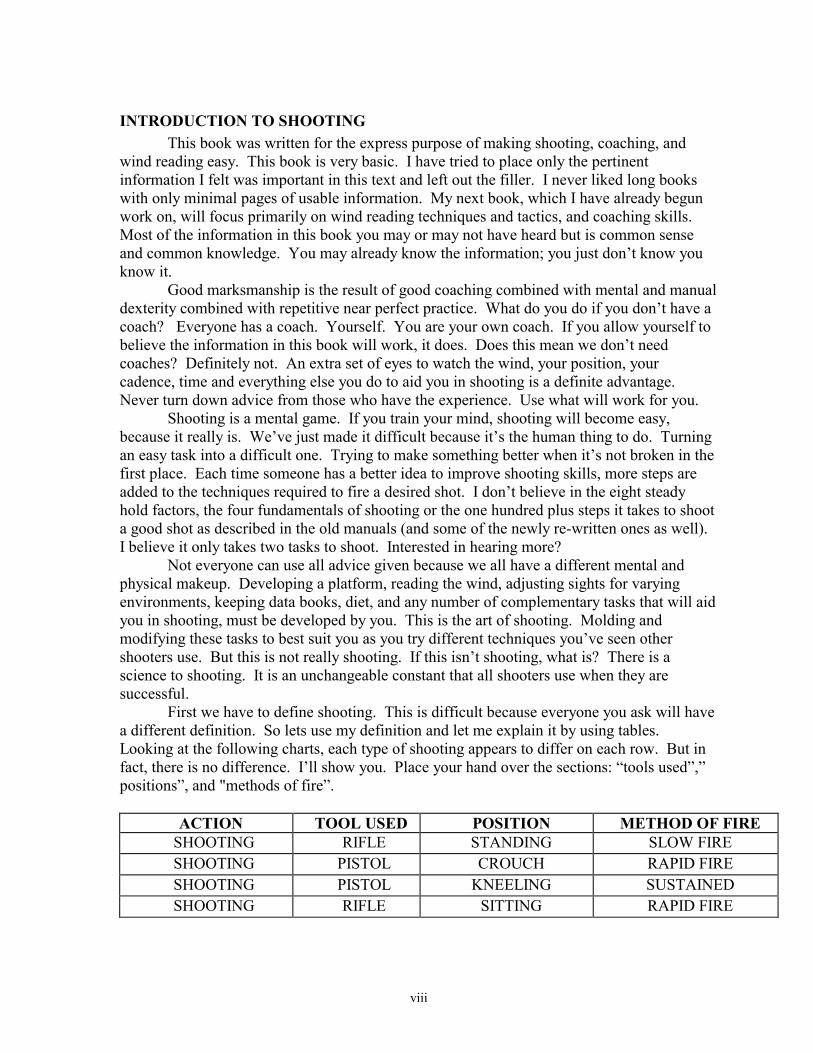
INTRODUCTION TO SHOOTING This book was written for the express purpose of making shooting, coaching, and wind reading easy. This book is very basic. I have tried to place only the pertinent information I felt was important in this text and left out the filler. I never liked long books with only minimal pages of usable information. My next book, which I have already begun work on, will focus primarily on wind reading techniques and tactics, and coaching skills. Most of the information in this book you may or may not have heard but is common sense and common knowledge. You may already know the information; you just don’t know you know it. Good marksmanship is the result of good coaching combined with mental and manual dexterity combined with repetitive near perfect practice. What do you do if you don’t have a coach? Everyone has a coach. Yourself. You are your own coach. If you allow yourself to believe the information in this book will work, it does. Does this mean we don’t need coaches? Definitely not. An extra set of eyes to watch the wind, your position, your cadence, time and everything else you do to aid you in shooting is a definite advantage. Never turn down advice from those who have the experience. Use what will work for you. Shooting is a mental game. If you train your mind, shooting will become easy, because it really is. We’ve just made it difficult because it’s the human thing to do. Turning an easy task into a difficult one. Trying to make something better when it’s not broken in the first place. Each time someone has a better idea to improve shooting skills, more steps are added to the techniques required to fire a desired shot. I don’t believe in the eight steady hold factors, the four fundamentals of shooting or the one hundred plus steps it takes to shoot a good shot as described in the old manuals (and some of the newly re-written ones as well). I believe it only takes two tasks to shoot. Interested in hearing more? Not everyone can use all advice given because we all have a different mental and physical makeup. Developing a platform, reading the wind, adjusting sights for varying environments, keeping data books, diet, and any number of complementary tasks that will aid you in shooting, must be developed by you. This is the art of shooting. Molding and modifying these tasks to best suit you as you try different techniques you’ve seen other shooters use. But this is not really shooting. If this isn’t shooting, what is? There is a science to shooting. It is an unchangeable constant that all shooters use when they are successful. First we have to define shooting. This is difficult because everyone you ask will have a different definition. So lets use my definition and let me explain it by using tables. Looking at the following charts, each type of shooting appears to differ on each row. But in fact, there is no difference. I’ll show you. Place your hand over the sections: “tools used”,” positions”, and "methods of fire”.
ACTION TOOL USED POSITION METHOD OF FIRE SHOOTING RIFLE STANDING SLOW FIRE SHOOTING PISTOL CROUCH RAPID FIRE SHOOTING PISTOL KNEELING SUSTAINED SHOOTING RIFLE SITTING RAPID FIRE
ix
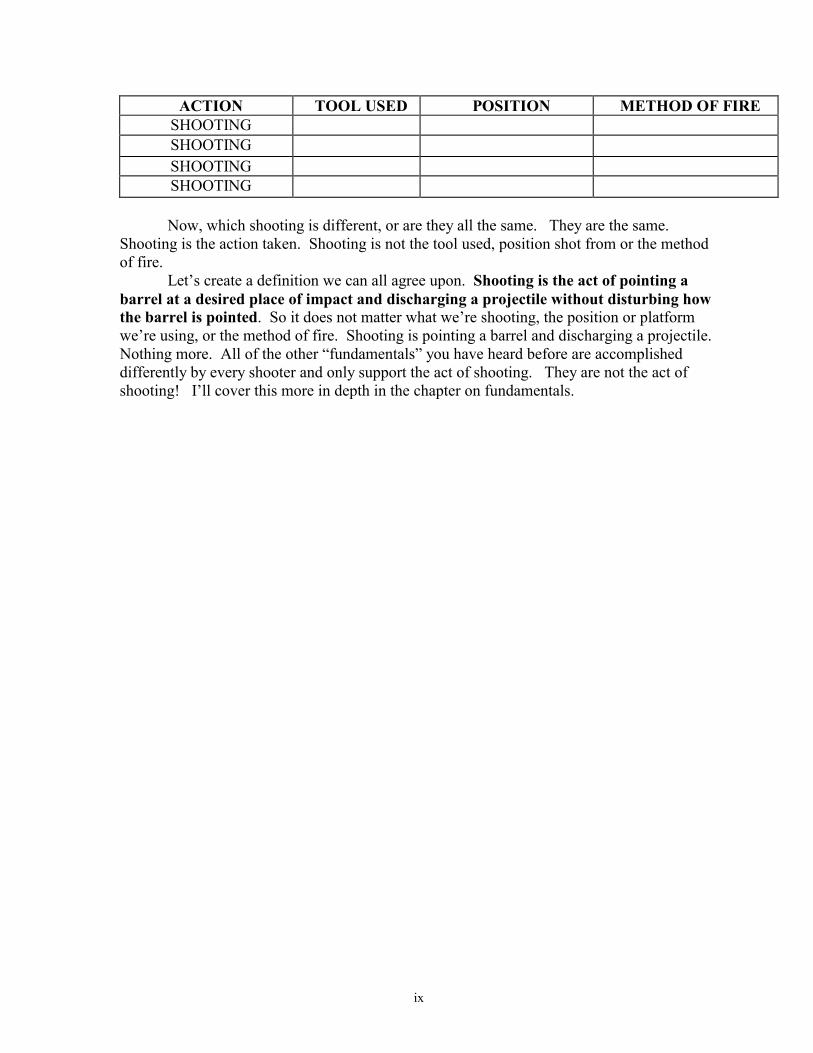
ACTION TOOL USED POSITION METHOD OF FIRE SHOOTING SHOOTING SHOOTING SHOOTING
Now, which shooting is different, or are they all the same. They are the same. Shooting is the action taken. Shooting is not the tool used, position shot from or the method of fire. Let’s create a definition we can all agree upon. Shooting is the act of pointing a barrel at a desired place of impact and discharging a projectile without disturbing how the barrel is pointed. So it does not matter what we’re shooting, the position or platform we’re using, or the method of fire. Shooting is pointing a barrel and discharging a projectile. Nothing more. All of the other “fundamentals” you have heard before are accomplished differently by every shooter and only support the act of shooting. They are not the act of shooting! I’ll cover this more in depth in the chapter on fundamentals.
1
CHAPTER 1
SAFETY Firearm safety is the first and most serious aspect of marksmanship that each shooter must learn. Shooting is one of the safest sports if the rules and guidelines are followed and practiced by everyone on the firing range. Let us for just a moment think about how a rifle or pistol works and what they really are. Let’s think about this in the simplest terms. These weapons are nothing more than tubes. These tubes are designed to discharge a projectile, in this case a bullet. If this barrel has a bullet in it, what happens when we pull the trigger? The bullet is expelled out of one end of the tube. Where does that bullet go? Where the barrel was pointed. This is an important fact that must be remembered for desired results to occur in the act of shooting, but because it’s a major factor in the next subject to be discussed. Accidents. What is an accident? An Accident is something that happens unintentionally. Can we prevent accidents? No! We can only reduce the possibility by taking precautions, but we cannot prevent accidents. An accident by definition is unpreventable. So how do we ensure safe conduct around firearms? By eliminating the variables that could cause an accident. The variables in this case are the shooter, the ammunition and the weapon. None of these variables can positively be eliminated. I know you’re thinking, “I can eliminate one variable, Ammunition”. Wrong! How many people have been shot with an “unloaded” weapon? So how can we be safe? Easy. One situation can be controlled. Where does the bullet go when we fire the weapon? Where the barrel was pointed. All the rules we’ve heard since we began shooting have meant the same thing. Treat every rifle as if it were loaded. Point the muzzle down range. Always keep the muzzle of the firearm pointed in a safe direction. Keep the muzzle up and downrange towards the pits. The rule we need to follow is never allowing the barrel to point at anything you don’t want shot! One last safety factor I want to discuss is following directions. Obey all commands given by the range and safety officers. They are there to provide guidance, direction, and ensure the safest conduct possible. HEALTH PRECAUTIONS Hearing protection is absolutely necessary to prevent permanent hearing damage. Earmuffs and/or earplugs must be worn. Ask those of us with a few years of shooting behind us. When your hearing is lost, it’s forever. Something else can be lost forever if not protected. Your eyesight. Eye protection is highly recommended.
2
CHAPTER 2
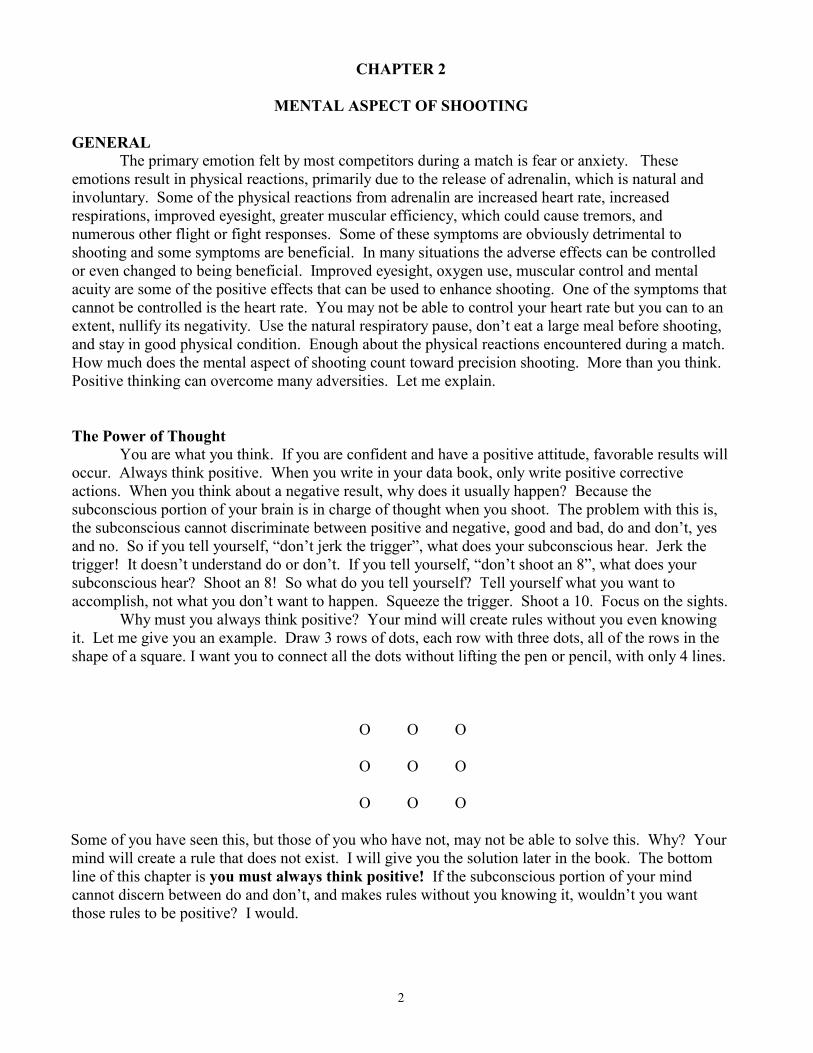
MENTAL ASPECT OF SHOOTING GENERAL The primary emotion felt by most competitors during a match is fear or anxiety. These emotions result in physical reactions, primarily due to the release of adrenalin, which is natural and involuntary. Some of the physical reactions from adrenalin are increased heart rate, increased respirations, improved eyesight, greater muscular efficiency, which could cause tremors, and numerous other flight or fight responses. Some of these symptoms are obviously detrimental to shooting and some symptoms are beneficial. In many situations the adverse effects can be controlled or even changed to being beneficial. Improved eyesight, oxygen use, muscular control and mental acuity are some of the positive effects that can be used to enhance shooting. One of the symptoms that cannot be controlled is the heart rate. You may not be able to control your heart rate but you can to an extent, nullify its negativity. Use the natural respiratory pause, don’t eat a large meal before shooting, and stay in good physical condition. Enough about the physical reactions encountered during a match. How much does the mental aspect of shooting count toward precision shooting. More than you think. Positive thinking can overcome many adversities. Let me explain. The Power of Thought You are what you think. If you are confident and have a positive attitude, favorable results will occur. Always think positive. When you write in your data book, only write positive corrective actions. When you think about a negative result, why does it usually happen? Because the subconscious portion of your brain is in charge of thought when you shoot. The problem with this is, the subconscious cannot discriminate between positive and negative, good and bad, do and don’t, yes and no. So if you tell yourself, “don’t jerk the trigger”, what does your subconscious hear. Jerk the trigger! It doesn’t understand do or don’t. If you tell yourself, “don’t shoot an 8”, what does your subconscious hear? Shoot an 8! So what do you tell yourself? Tell yourself what you want to accomplish, not what you don’t want to happen. Squeeze the trigger. Shoot a 10. Focus on the sights. Why must you always think positive? Your mind will create rules without you even knowing it. Let me give you an example. Draw 3 rows of dots, each row with three dots, all of the rows in the shape of a square. I want you to connect all the dots without lifting the pen or pencil, with only 4 lines.
O O O O O O
O O O Some of you have seen this, but those of you who have not, may not be able to solve this. Why? Your mind will create a rule that does not exist. I will give you the solution later in the book. The bottom line of this chapter is you must always think positive! If the subconscious portion of your mind cannot discern between do and don’t, and makes rules without you knowing it, wouldn’t you want those rules to be positive? I would.
3
The Physical and Mental Bridge Any adversity can be overcome with a positive mind-set. What do I mean? What should you think about before shooting a shot? Let me give you a few ideas. An adverse weather day is a good day to shoot because you’ve already beaten 75% of the competition. They don’t want to be there. Wind is your ally because you know how to deal with it, while others don’t. Offhand is the best part of the match because it’s where you can excel above most of the competition. Any number of adversities can be converted to your advantage by what you think. There are several cautions I will provide you. Do not become over confident. This can make you forget the little things. Only think about shooting when you’re shooting. Nothing else should be in your mind except what it takes to shoot a good shot. If while on the firing line your mind wonders, you will not be successful or obtain the desired results, that being 10s and Xs.
4
CHAPTER 3
FUNDAMENTALS OF MARKSMANSHIP To become an effective individual and team shooter, you must be thoroughly trained in the fundamentals of marksmanship. The shooting fundamentals are defined as the act of pointing a barrel at a desired place of impact and discharging a projectile without disturbing how the barrel is pointed. There are only two fundamentals! The purpose of teaching these fundamentals is to develop correct firing habits. This is accomplished every time you train or practice so that the fundamentals will be instinctively applied during the competitive matches. I call this training repetitive perfection. Practice shooting Xs. Practice using techniques that give you the results you want. Don’t be willing to accept anything less than you want. It should be a requirement that every shooter periodically refamiliarize themselves with these two fundamentals regardless of their years of firing experience. Even the experienced shooter will develop a deficiency from time to time in the application of fundamentals, often due to concentration on other complementary tasks related to position refinement or stability. Now it’s time to breakdown our shooting definition. Shooting is the act of pointing a barrel at a desired place of impact and discharging a projectile without disturbing how the barrel is pointed. There are two fundamentals derived from this definition. 1. Pointing a barrel or “Aiming”: The technique of aligning the barrel with the eye (sight/eye alignment) and pointing this system in such a way as to create a desired impact. 2. Discharging a projectile or “Trigger Control”: The act of moving the trigger and firing the rifle without disturbing the aiming process. AIMING The first and most important fundamental taught to the shooter is aiming. Aiming is the process of aligning the barrel with the eye and pointing this system down range at a desired point. Dominant Eye The first thing I think we need to discuss is the dominant eye. If you can’t see, you can’t aim. What is the dominant eye? It is the stronger of your two eyes. How do you determine your dominant eye? By performing an exercise, one of which I will explain. There are several methods of determining the dominant eye but in all cases, the eye being used the most, to look at an object with both eyes open, is the dominant eye. Start out by creating as triangle in front of you with your hands by touching your thumbs and index fingers together. With both eyes open, look at an object that will appear small. This object can be anywhere from 10 feet to just visible at any distance. Make sure both your eyes are open. Concentrate on the object you’re looking at and gradually slide one hand over the other, decreasing the size of the triangle. Once you’ve gotten to the point where you can barely see the object, close one eye. If you can still see the object, the eye you have open is dominant. Verifying your dominant eye is a very simple exercise resulting in a very important factor required in shooting. You should use your dominant eye to aim. The dominant eye is the primary factor used to determine what hand the new shooter should fire from.
5
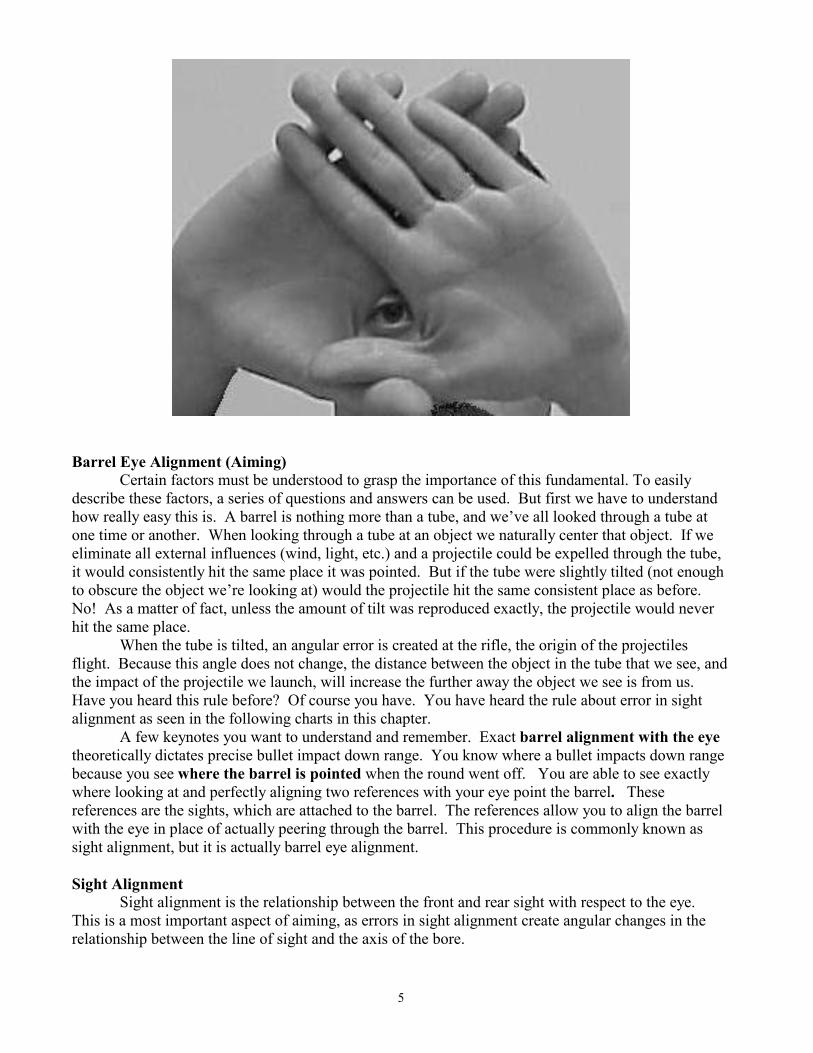
Barrel Eye Alignment (Aiming) Certain factors must be understood to grasp the importance of this fundamental. To easily describe these factors, a series of questions and answers can be used. But first we have to understand how really easy this is. A barrel is nothing more than a tube, and we’ve all looked through a tube at one time or another. When looking through a tube at an object we naturally center that object. If we eliminate all external influences (wind, light, etc.) and a projectile could be expelled through the tube, it would consistently hit the same place it was pointed. But if the tube were slightly tilted (not enough to obscure the object we’re looking at) would the projectile hit the same consistent place as before. No! As a matter of fact, unless the amount of tilt was reproduced exactly, the projectile would never hit the same place. When the tube is tilted, an angular error is created at the rifle, the origin of the projectiles flight. Because this angle does not change, the distance between the object in the tube that we see, and the impact of the projectile we launch, will increase the further away the object we see is from us. Have you heard this rule before? Of course you have. You have heard the rule about error in sight alignment as seen in the following charts in this chapter. A few keynotes you want to understand and remember. Exact barrel alignment with the eye theoretically dictates precise bullet impact down range. You know where a bullet impacts down range because you see where the barrel is pointed when the round went off. You are able to see exactly where looking at and perfectly aligning two references with your eye point the barrel. These references are the sights, which are attached to the barrel. The references allow you to align the barrel with the eye in place of actually peering through the barrel. This procedure is commonly known as sight alignment, but it is actually barrel eye alignment. Sight Alignment Sight alignment is the relationship between the front and rear sight with respect to the eye. This is a most important aspect of aiming, as errors in sight alignment create angular changes in the relationship between the line of sight and the axis of the bore.
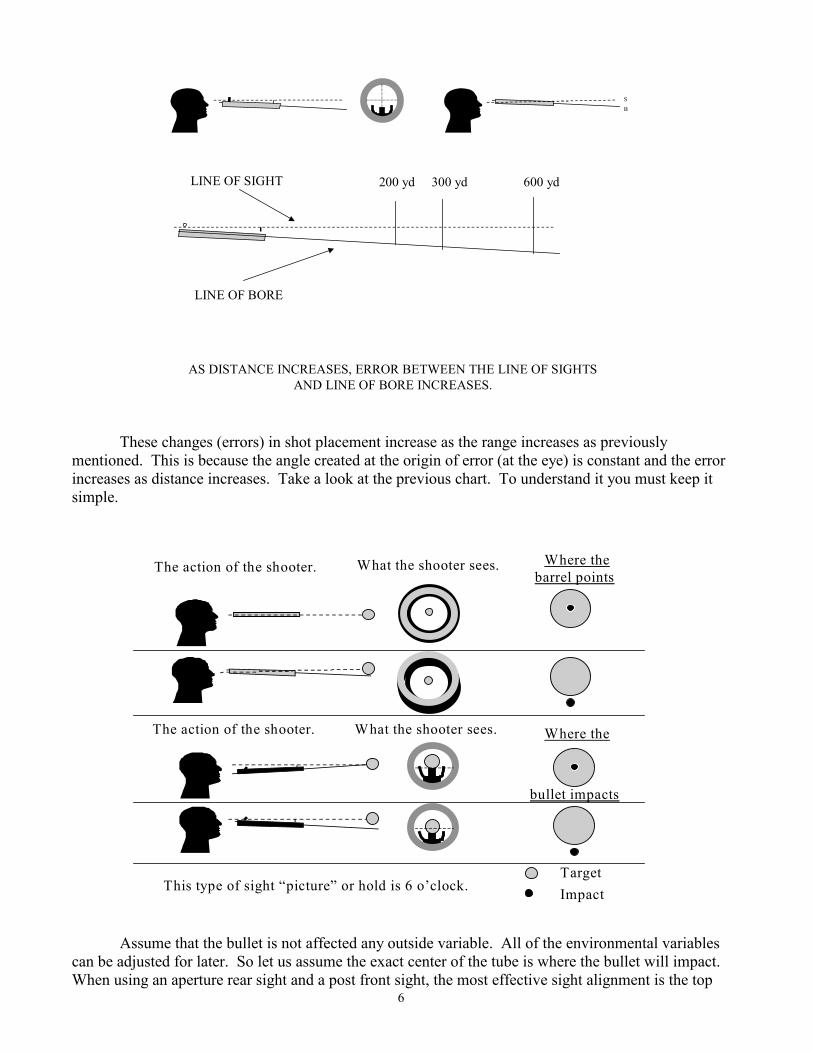
6
S
B
200 yd 300 yd 600 ydLINE OF SIGHT
AS DISTANCE INCREASES, ERROR BETWEEN THE LINE OF SIGHTS AND LINE OF BORE INCREASES.
LINE OF BORE
These changes (errors) in shot placement increase as the range increases as previously mentioned. This is because the angle created at the origin of error (at the eye) is constant and the error increases as distance increases. Take a look at the previous chart. To understand it you must keep it simple.
The action of the shooter. What the shooter sees. Where thebarrel points
The action of the shooter. What the shooter sees. Where the
bullet impacts
Target Impact This type of sight “picture” or hold is 6 o’clock.
Assume that the bullet is not affected any outside variable. All of the environmental variables can be adjusted for later. So let us assume the exact center of the tube is where the bullet will impact. When using an aperture rear sight and a post front sight, the most effective sight alignment is the top
7
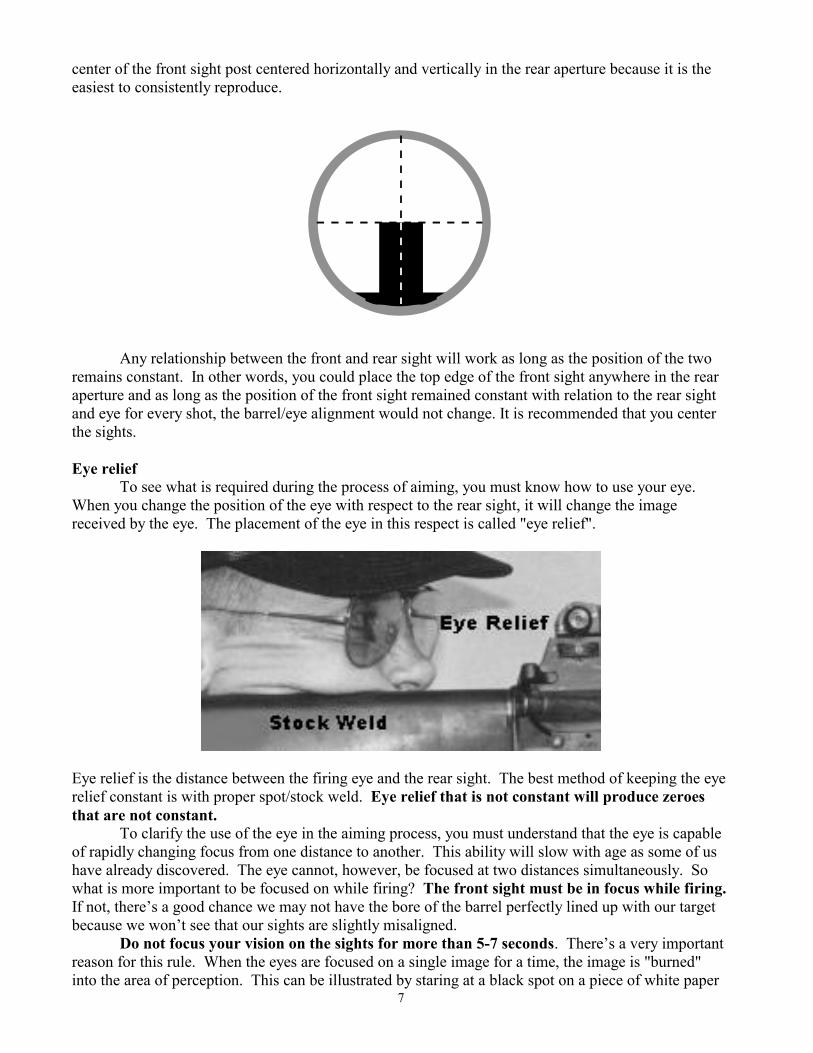
center of the front sight post centered horizontally and vertically in the rear aperture because it is the easiest to consistently reproduce.
Any relationship between the front and rear sight will work as long as the position of the two remains constant. In other words, you could place the top edge of the front sight anywhere in the rear aperture and as long as the position of the front sight remained constant with relation to the rear sight and eye for every shot, the barrel/eye alignment would not change. It is recommended that you center the sights. Eye relief To see what is required during the process of aiming, you must know how to use your eye. When you change the position of the eye with respect to the rear sight, it will change the image received by the eye. The placement of the eye in this respect is called "eye relief".
Eye relief is the distance between the firing eye and the rear sight. The best method of keeping the eye relief constant is with proper spot/stock weld. Eye relief that is not constant will produce zeroes that are not constant. To clarify the use of the eye in the aiming process, you must understand that the eye is capable of rapidly changing focus from one distance to another. This ability will slow with age as some of us have already discovered. The eye cannot, however, be focused at two distances simultaneously. So what is more important to be focused on while firing? The front sight must be in focus while firing. If not, there’s a good chance we may not have the bore of the barrel perfectly lined up with our target because we won’t see that our sights are slightly misaligned. Do not focus your vision on the sights for more than 5-7 seconds. There’s a very important reason for this rule. When the eyes are focused on a single image for a time, the image is "burned" into the area of perception. This can be illustrated by staring at a black spot on a piece of white paper
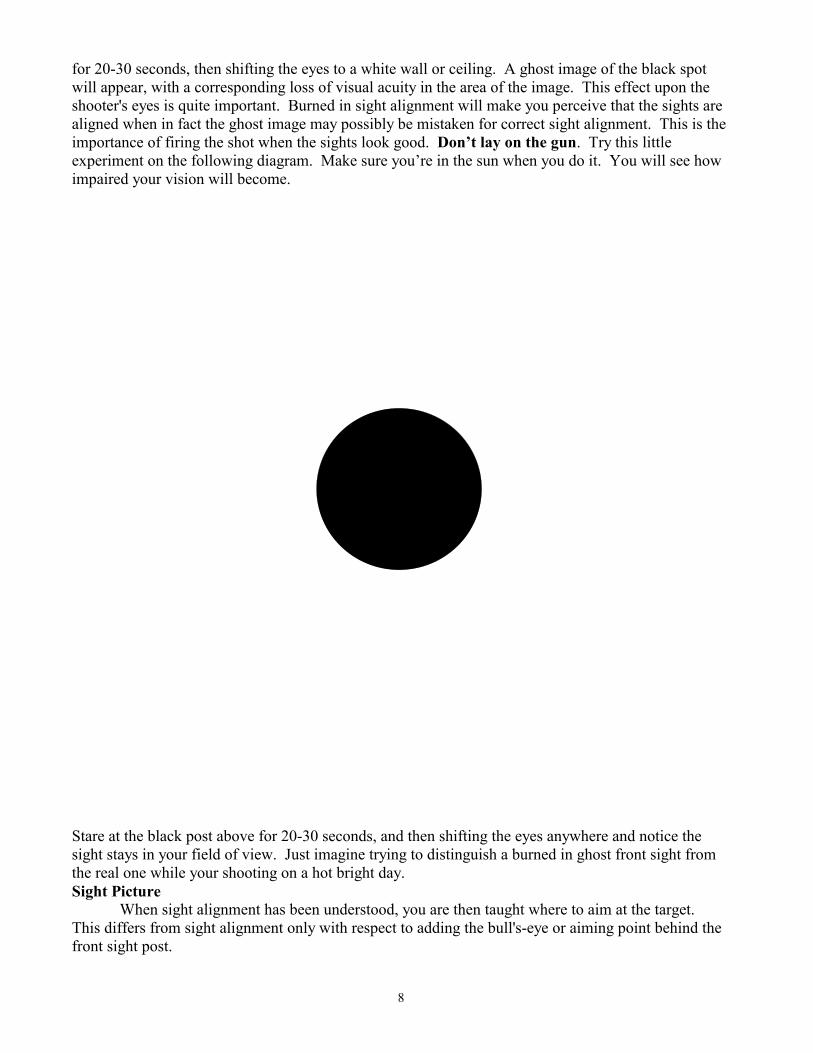
8
for 20-30 seconds, then shifting the eyes to a white wall or ceiling. A ghost image of the black spot will appear, with a corresponding loss of visual acuity in the area of the image. This effect upon the shooter's eyes is quite important. Burned in sight alignment will make you perceive that the sights are aligned when in fact the ghost image may possibly be mistaken for correct sight alignment. This is the importance of firing the shot when the sights look good. Don’t lay on the gun. Try this little experiment on the following diagram. Make sure you’re in the sun when you do it. You will see how impaired your vision will become.
Stare at the black post above for 20-30 seconds, and then shifting the eyes anywhere and notice the sight stays in your field of view. Just imagine trying to distinguish a burned in ghost front sight from the real one while your shooting on a hot bright day. Sight Picture When sight alignment has been understood, you are then taught where to aim at the target. This differs from sight alignment only with respect to adding the bull's-eye or aiming point behind the front sight post.
9
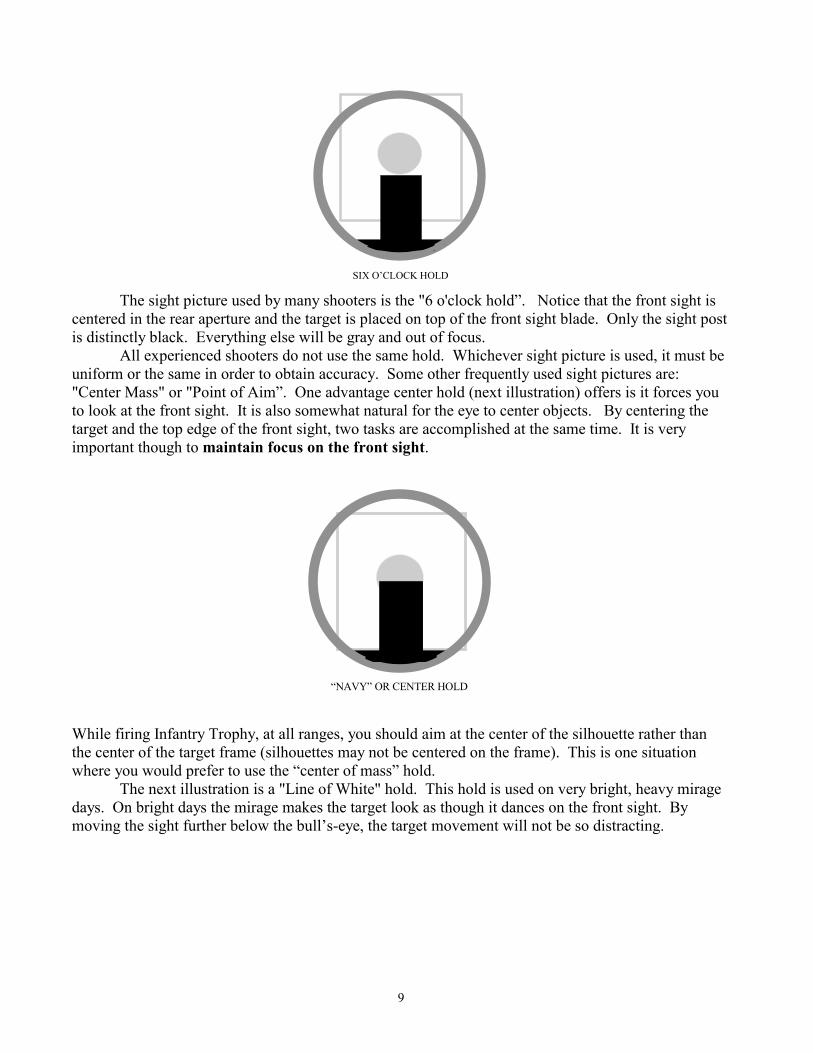
SIX O’CLOCK HOLD
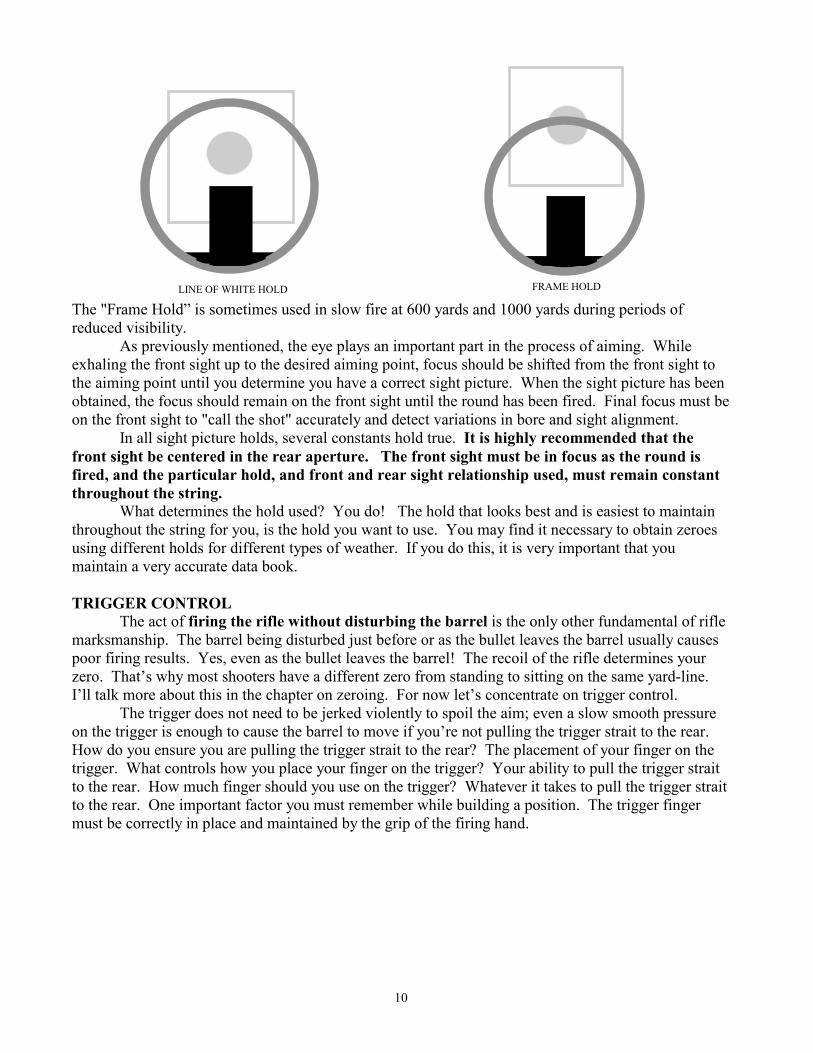
The sight picture used by many shooters is the "6 o'clock hold”. Notice that the front sight is centered in the rear aperture and the target is placed on top of the front sight blade. Only the sight post is distinctly black. Everything else will be gray and out of focus. All experienced shooters do not use the same hold. Whichever sight picture is used, it must be uniform or the same in order to obtain accuracy. Some other frequently used sight pictures are: "Center Mass" or "Point of Aim”. One advantage center hold (next illustration) offers is it forces you to look at the front sight. It is also somewhat natural for the eye to center objects. By centering the target and the top edge of the front sight, two tasks are accomplished at the same time. It is very important though to maintain focus on the front sight.
“NAVY” OR CENTER HOLD
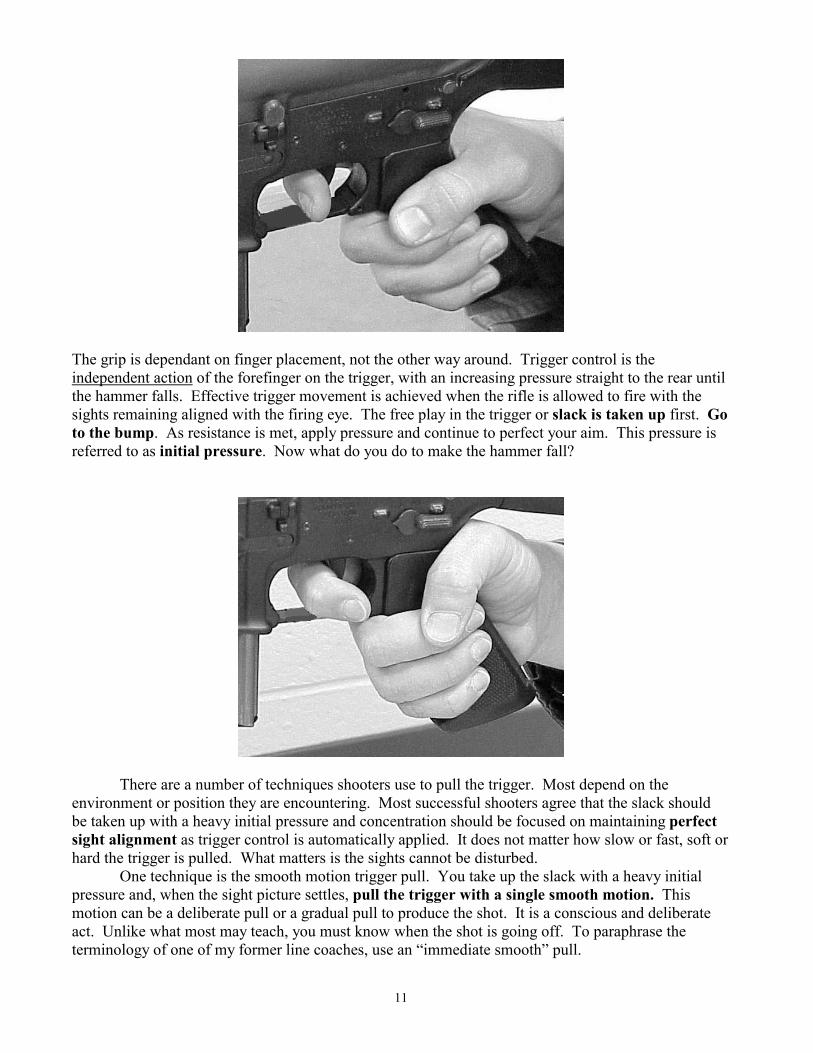
While firing Infantry Trophy, at all ranges, you should aim at the center of the silhouette rather than the center of the target frame (silhouettes may not be centered on the frame). This is one situation where you would prefer to use the “center of mass” hold. The next illustration is a "Line of White" hold. This hold is used on very bright, heavy mirage days. On bright days the mirage makes the target look as though it dances on the front sight. By moving the sight further below the bull’s-eye, the target movement will not be so distracting.
10
LINE OF WHITE HOLD FRAME HOLD The "Frame Hold” is sometimes used in slow fire at 600 yards and 1000 yards during periods of reduced visibility. As previously mentioned, the eye plays an important part in the process of aiming. While exhaling the front sight up to the desired aiming point, focus should be shifted from the front sight to the aiming point until you determine you have a correct sight picture. When the sight picture has been obtained, the focus should remain on the front sight until the round has been fired. Final focus must be on the front sight to "call the shot" accurately and detect variations in bore and sight alignment. In all sight picture holds, several constants hold true. It is highly recommended that the front sight be centered in the rear aperture. The front sight must be in focus as the round is fired, and the particular hold, and front and rear sight relationship used, must remain constant throughout the string. What determines the hold used? You do! The hold that looks best and is easiest to maintain throughout the string for you, is the hold you want to use. You may find it necessary to obtain zeroes using different holds for different types of weather. If you do this, it is very important that you maintain a very accurate data book. TRIGGER CONTROL The act of firing the rifle without disturbing the barrel is the only other fundamental of rifle marksmanship. The barrel being disturbed just before or as the bullet leaves the barrel usually causes poor firing results. Yes, even as the bullet leaves the barrel! The recoil of the rifle determines your zero. That’s why most shooters have a different zero from standing to sitting on the same yard-line. I’ll talk more about this in the chapter on zeroing. For now let’s concentrate on trigger control. The trigger does not need to be jerked violently to spoil the aim; even a slow smooth pressure on the trigger is enough to cause the barrel to move if you’re not pulling the trigger strait to the rear. How do you ensure you are pulling the trigger strait to the rear? The placement of your finger on the trigger. What controls how you place your finger on the trigger? Your ability to pull the trigger strait to the rear. How much finger should you use on the trigger? Whatever it takes to pull the trigger strait to the rear. One important factor you must remember while building a position. The trigger finger must be correctly in place and maintained by the grip of the firing hand.
11
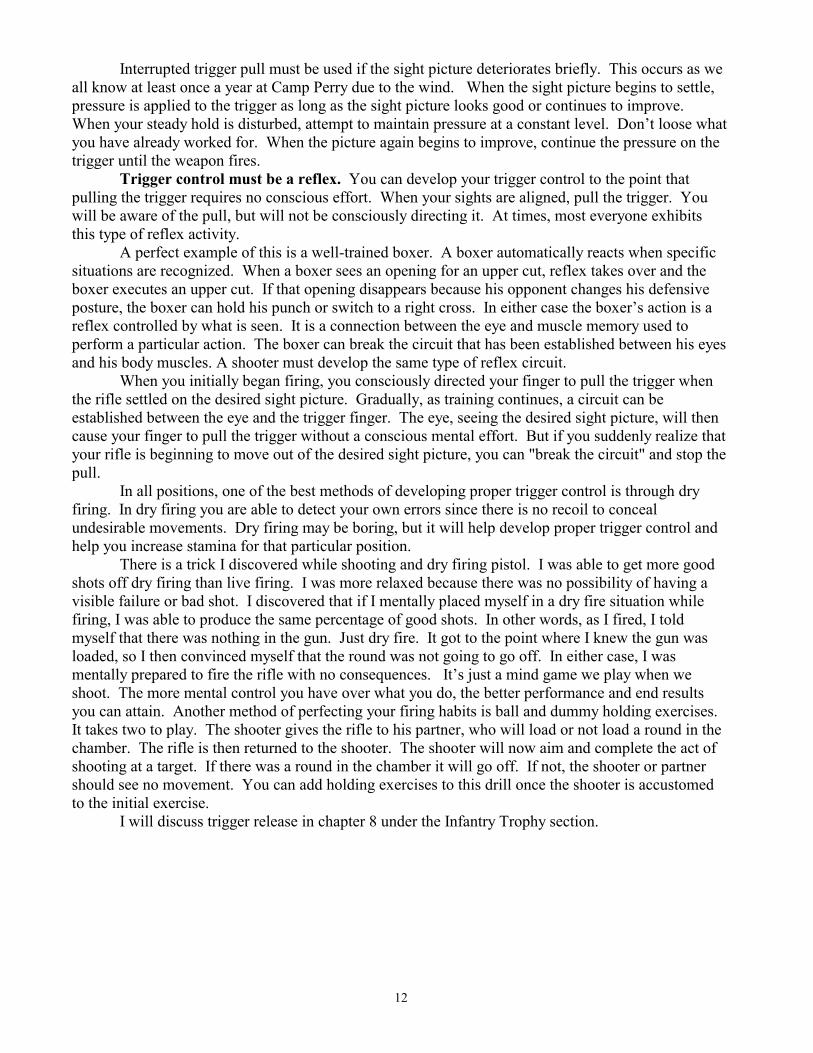
The grip is dependant on finger placement, not the other way around. Trigger control is the independent action of the forefinger on the trigger, with an increasing pressure straight to the rear until the hammer falls. Effective trigger movement is achieved when the rifle is allowed to fire with the sights remaining aligned with the firing eye. The free play in the trigger or slack is taken up first. Go to the bump. As resistance is met, apply pressure and continue to perfect your aim. This pressure is referred to as initial pressure. Now what do you do to make the hammer fall?
There are a number of techniques shooters use to pull the trigger. Most depend on the environment or position they are encountering. Most successful shooters agree that the slack should be taken up with a heavy initial pressure and concentration should be focused on maintaining perfect sight alignment as trigger control is automatically applied. It does not matter how slow or fast, soft or hard the trigger is pulled. What matters is the sights cannot be disturbed. One technique is the smooth motion trigger pull. You take up the slack with a heavy initial pressure and, when the sight picture settles, pull the trigger with a single smooth motion. This motion can be a deliberate pull or a gradual pull to produce the shot. It is a conscious and deliberate act. Unlike what most may teach, you must know when the shot is going off. To paraphrase the terminology of one of my former line coaches, use an “immediate smooth” pull.
12
Interrupted trigger pull must be used if the sight picture deteriorates briefly. This occurs as we all know at least once a year at Camp Perry due to the wind. When the sight picture begins to settle, pressure is applied to the trigger as long as the sight picture looks good or continues to improve. When your steady hold is disturbed, attempt to maintain pressure at a constant level. Don’t loose what you have already worked for. When the picture again begins to improve, continue the pressure on the trigger until the weapon fires. Trigger control must be a reflex. You can develop your trigger control to the point that pulling the trigger requires no conscious effort. When your sights are aligned, pull the trigger. You will be aware of the pull, but will not be consciously directing it. At times, most everyone exhibits this type of reflex activity. A perfect example of this is a well-trained boxer. A boxer automatically reacts when specific situations are recognized. When a boxer sees an opening for an upper cut, reflex takes over and the boxer executes an upper cut. If that opening disappears because his opponent changes his defensive posture, the boxer can hold his punch or switch to a right cross. In either case the boxer’s action is a reflex controlled by what is seen. It is a connection between the eye and muscle memory used to perform a particular action. The boxer can break the circuit that has been established between his eyes and his body muscles. A shooter must develop the same type of reflex circuit. When you initially began firing, you consciously directed your finger to pull the trigger when the rifle settled on the desired sight picture. Gradually, as training continues, a circuit can be established between the eye and the trigger finger. The eye, seeing the desired sight picture, will then cause your finger to pull the trigger without a conscious mental effort. But if you suddenly realize that your rifle is beginning to move out of the desired sight picture, you can "break the circuit" and stop the pull. In all positions, one of the best methods of developing proper trigger control is through dry firing. In dry firing you are able to detect your own errors since there is no recoil to conceal undesirable movements. Dry firing may be boring, but it will help develop proper trigger control and help you increase stamina for that particular position. There is a trick I discovered while shooting and dry firing pistol. I was able to get more good shots off dry firing than live firing. I was more relaxed because there was no possibility of having a visible failure or bad shot. I discovered that if I mentally placed myself in a dry fire situation while firing, I was able to produce the same percentage of good shots. In other words, as I fired, I told myself that there was nothing in the gun. Just dry fire. It got to the point where I knew the gun was loaded, so I then convinced myself that the round was not going to go off. In either case, I was mentally prepared to fire the rifle with no consequences. It’s just a mind game we play when we shoot. The more mental control you have over what you do, the better performance and end results you can attain. Another method of perfecting your firing habits is ball and dummy holding exercises. It takes two to play. The shooter gives the rifle to his partner, who will load or not load a round in the chamber. The rifle is then returned to the shooter. The shooter will now aim and complete the act of shooting at a target. If there was a round in the chamber it will go off. If not, the shooter or partner should see no movement. You can add holding exercises to this drill once the shooter is accustomed to the initial exercise. I will discuss trigger release in chapter 8 under the Infantry Trophy section.
13
CHAPTER 4
THINGS TO DO BEFORE YOU FIRE ZEROING The zero of a rifle is the sight setting in elevation and windage required to place a shot or group in the center of your desired aiming point at a given range on a day when no wind is blowing. The best way to zero a rifle is to fire it from the position and the range with the cadence you intend firing. This is difficult with sighters as you only fire one at a time. When sighters are shot, you need to attempt to fire them just as you would a string. You must follow through and recover for the next shot just as though you would in your string. Some go as far as to stand up and reassume a position for each sighter. If it works for you, use it as long as it is within the guidelines of the rules. It is best to start the zeroing phase at the 200-yard line. Doing this will allow you to compare your sighter shots with normal predicted changes between yard lines during a match. If you’re starting out in practice without zeroes or known changes, it is suggested that the rounds be fired slow fire in the sitting position. When the slow fire shots are striking near the center of the target, fire two three-round shot groups at a rapid-fire cadence, followed by a rapid-fire string of ten. During this firing, make sight changes to bring the group into the center of the bull's-eye. If the windage zero is two minutes or more offset from mechanical zero, the front sight should be moved to allow mechanical zero and windage zero to be approximately the same. If this is necessary, the front sight is moved in the direction of the shot or shot group. After the front sight is moved it will be necessary to fire another zeroing exercise Often the rapid fire zero at 200 yards will be different from the slow fire zero. This is due to a difference in particular positions. Each position (offhand, sitting, prone) affects the recoil pattern of the rifle and the follow through of the shooter. The zero of a weapon depends upon the recoil pattern, follow through and type of support the position is providing. This is very easily seen in pistol shooting. If you “limp wrist” a shot, the end result will be a high impact. This is with a short barrel. Imagine what adverse effects will take place with rifle barrel when follow through or support is inconsistent or changes. Therefore, it is necessary to establish a zero in the position you will be firing the string from. To do this for offhand, fire several shots from the standing position and call each shot accurately. When the shots appear "on call," the standing zero has been obtained. All other zeroes are accomplished basically the same way, using the appropriate positions for the particular yard lines. If the six o'clock hold is used at all ranges, the normal sight change for an AR15 is up three minutes from 200 to 300 yards and up ten to eleven minutes from 300 to 600 yards with a load pushing 2700+ FPS. The last thing I want to cover in this sub-section will be determining your “no wind zero”. When zeroing in the wind, an accurate estimate of the wind velocity must be considered in determining the windage zero. For example, if the wind you’re firing in is worth three clicks right windage, you must take the wind off or in this case, come three clicks left to obtain a no wind zero. A no wind zero is just what it says. A windage setting that would be on the rifle in a “no wind” or zero wind day. SIGHT ADJUSTMENTS The front sight is similar to the old AR15 stock sights except that the front sight post is squared off and the number of clicks in a full revolution has been reduced from 5 to 4.
14
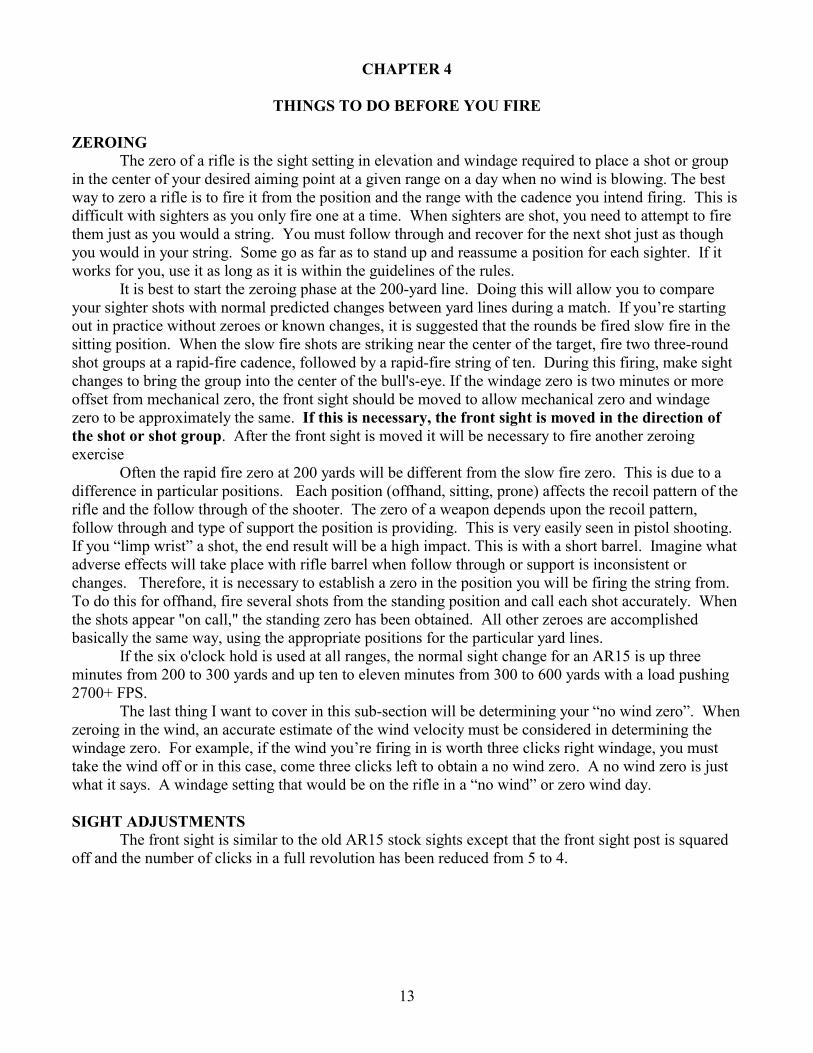
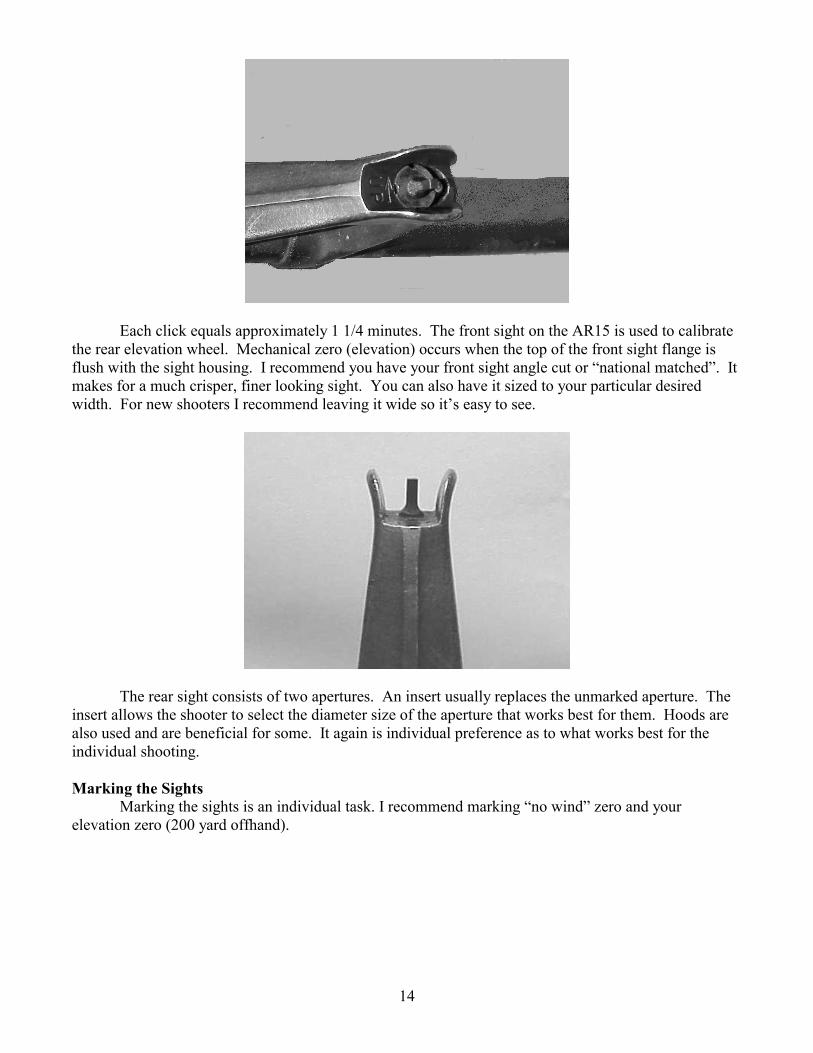
Each click equals approximately 1 1/4 minutes. The front sight on the AR15 is used to calibrate the rear elevation wheel. Mechanical zero (elevation) occurs when the top of the front sight flange is flush with the sight housing. I recommend you have your front sight angle cut or “national matched”. It makes for a much crisper, finer looking sight. You can also have it sized to your particular desired width. For new shooters I recommend leaving it wide so it’s easy to see.
The rear sight consists of two apertures. An insert usually replaces the unmarked aperture. The insert allows the shooter to select the diameter size of the aperture that works best for them. Hoods are also used and are beneficial for some. It again is individual preference as to what works best for the individual shooting. Marking the Sights Marking the sights is an individual task. I recommend marking “no wind” zero and your elevation zero (200 yard offhand).

15
The rear sight also consists of a windage drum for making windage changes. Mechanical zero (windage) occurs when the line on the 0-2 aperture is aligned with the center index line on the sight base.
Adjustments while zeroing or to compensate for the wind are made right or left of this center position. Each click equals half minute with stock sights and quarter minute with national match sights.

16
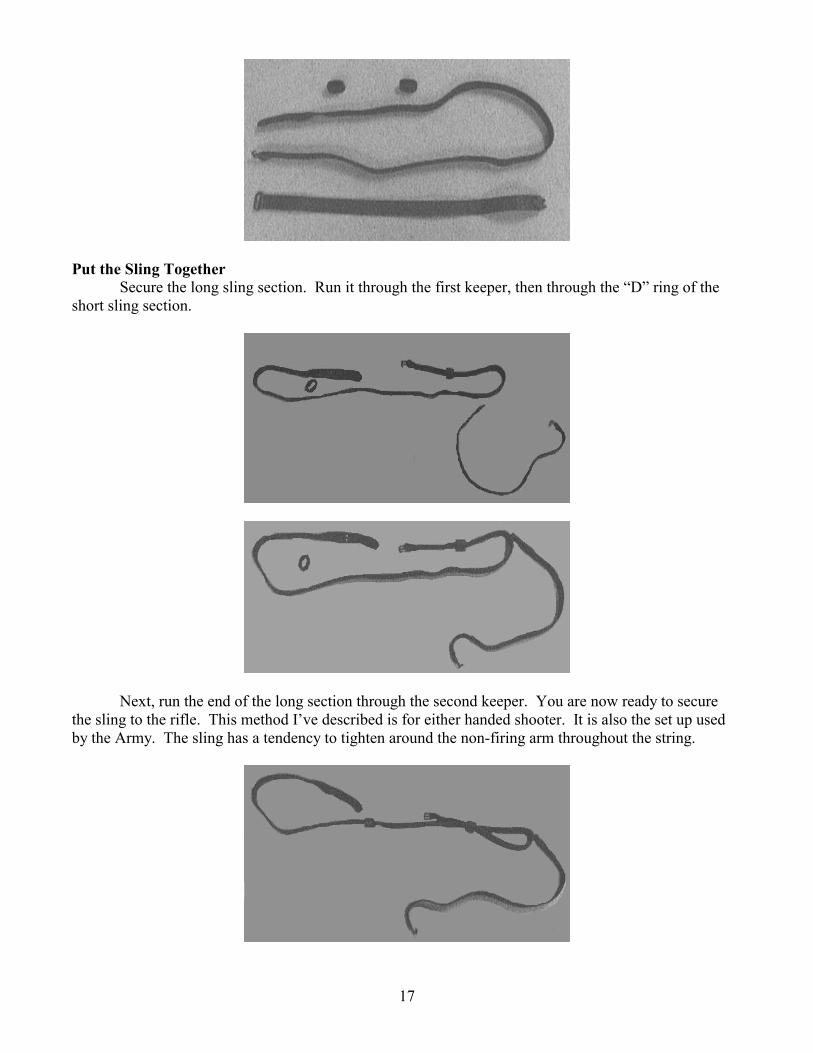
The rear sight also features an elevation wheel. The elevation wheel should be rotated to obtain the correct zero at the different distances. The initial sight setting should be set on 10 clicks from the bottom and elevation corrections are to be made by using the front sight post until the weapon is zeroed at the 200-yard line. A good starting position for the front sight is 10-12 down from mechanical zero or flush. When finished, I recommend your zero on the elevation hand wheel end up some where between 8 and 16 clicks with a national match sight (1/4 min) because it will allow for ease in obtaining a good head position all the way to the 600-yard line. The elevation wheel should then be moved to get the desired changes out to the 600-yard line. Again the average change from 200 to 300 yards is three minutes and from 300 to 600 yards is ten to twelve minutes. To properly utilize the sights in making adjustments during firing you must be familiar with the dimensions of the various targets and the capabilities of your sights. Once the dimensions are determined, you can accurately apply the windage and elevation to the sights you have on your rifle. Once you have zeroed your rifle you need to mark your sights. There is a multitude of ways to mark them. At A minimum, I would recommend marking your no-wind zero on the windage drum and marking your 200-yard elevation zero on the elevation wheel. After you’ve marked your sights, use those marks for your windage and elevation zeroes. SLING ADJUSTMENTS Putting the Sling Together I’m going to open Pandora’s box. The sling can be a problem even for experienced shooters. In the next few paragraphs I will hopefully clear up any questions you may have about setting the sling up and attaching it to the rifle. I will then cover how to place the loop sling on your arm. First let’s discuss the parts of the sling.
If you take the sling completely apart, you will have four pieces. You will have two sections of sling, one long and one short. On the ends of each section of sling are metal hooks called frogs. On one end of the short section of sling is a “D” ring. The other two pieces are the sling keepers.
17
Put the Sling Together
Secure the long sling section. Run it through the first keeper, then through the “D” ring of the short sling section.
Next, run the end of the long section through the second keeper. You are now ready to secure the sling to the rifle. This method I’ve described is for either handed shooter. It is also the set up used by the Army. The sling has a tendency to tighten around the non-firing arm throughout the string.
18
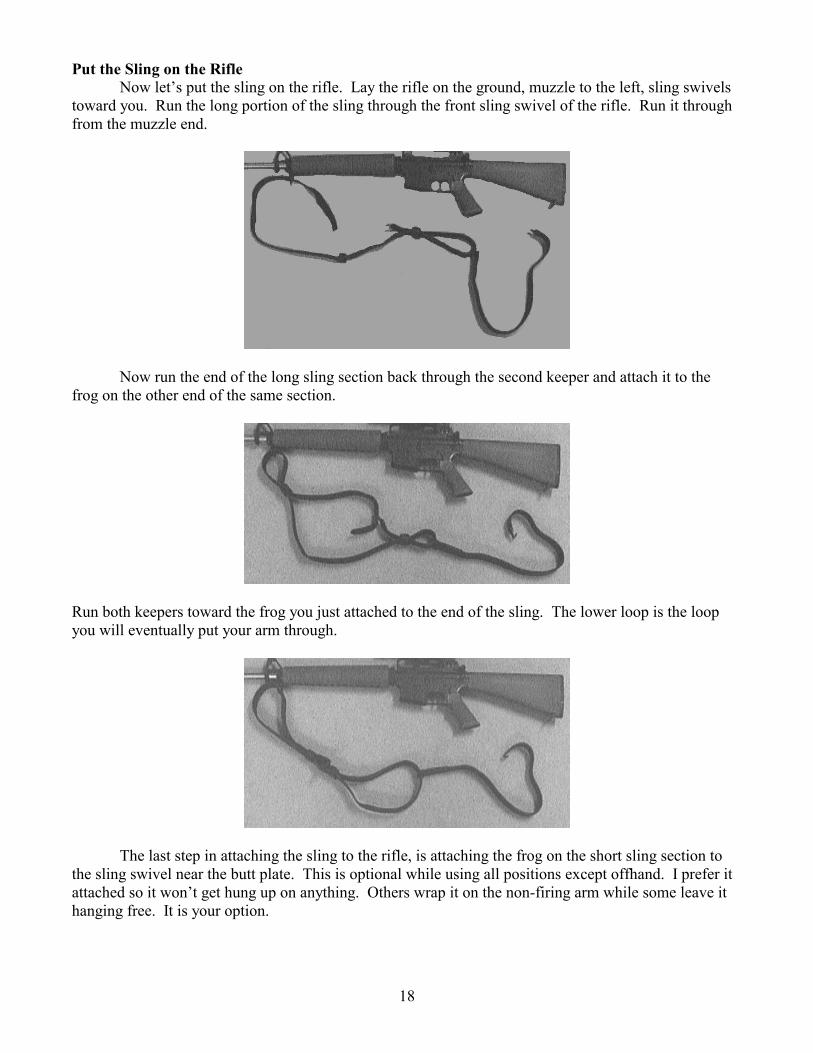
Put the Sling on the Rifle Now let’s put the sling on the rifle. Lay the rifle on the ground, muzzle to the left, sling swivels
toward you. Run the long portion of the sling through the front sling swivel of the rifle. Run it through from the muzzle end.
Now run the end of the long sling section back through the second keeper and attach it to the frog on the other end of the same section.
Run both keepers toward the frog you just attached to the end of the sling. The lower loop is the loop you will eventually put your arm through.
The last step in attaching the sling to the rifle, is attaching the frog on the short sling section to the sling swivel near the butt plate. This is optional while using all positions except offhand. I prefer it attached so it won’t get hung up on anything. Others wrap it on the non-firing arm while some leave it hanging free. It is your option.
19
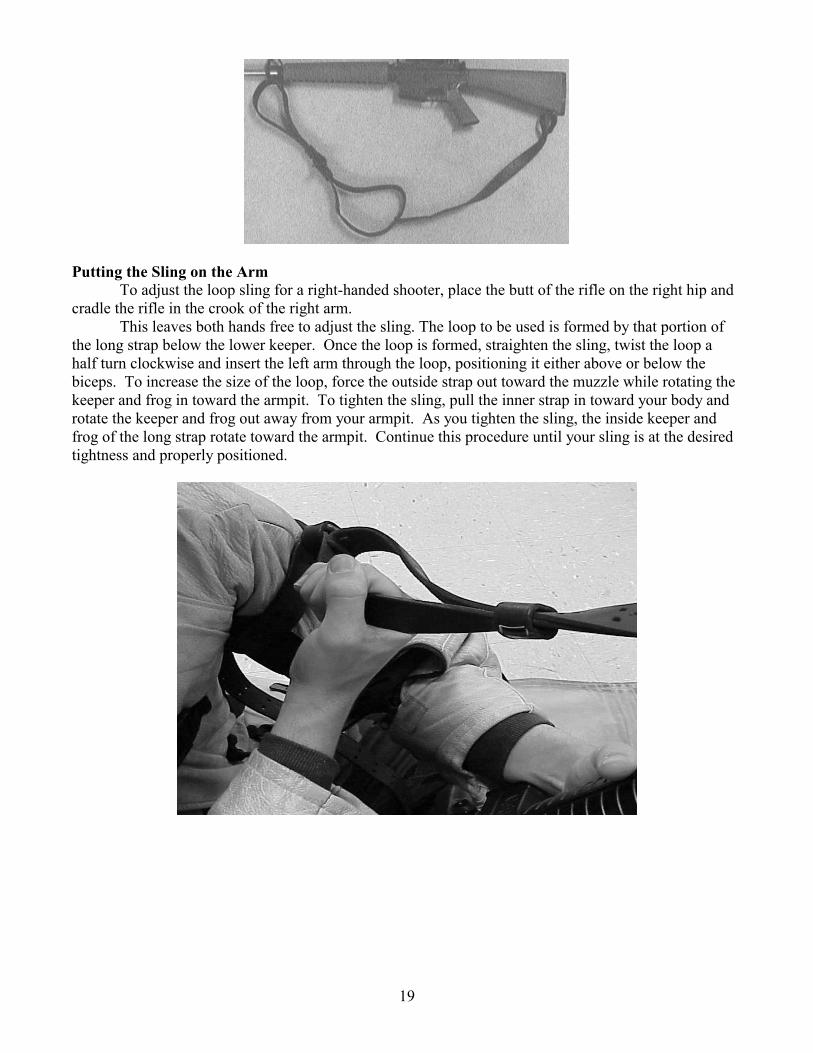
Putting the Sling on the Arm
To adjust the loop sling for a right-handed shooter, place the butt of the rifle on the right hip and cradle the rifle in the crook of the right arm.
This leaves both hands free to adjust the sling. The loop to be used is formed by that portion of the long strap below the lower keeper. Once the loop is formed, straighten the sling, twist the loop a half turn clockwise and insert the left arm through the loop, positioning it either above or below the biceps. To increase the size of the loop, force the outside strap out toward the muzzle while rotating the keeper and frog in toward the armpit. To tighten the sling, pull the inner strap in toward your body and rotate the keeper and frog out away from your armpit. As you tighten the sling, the inside keeper and frog of the long strap rotate toward the armpit. Continue this procedure until your sling is at the desired tightness and properly positioned.
20
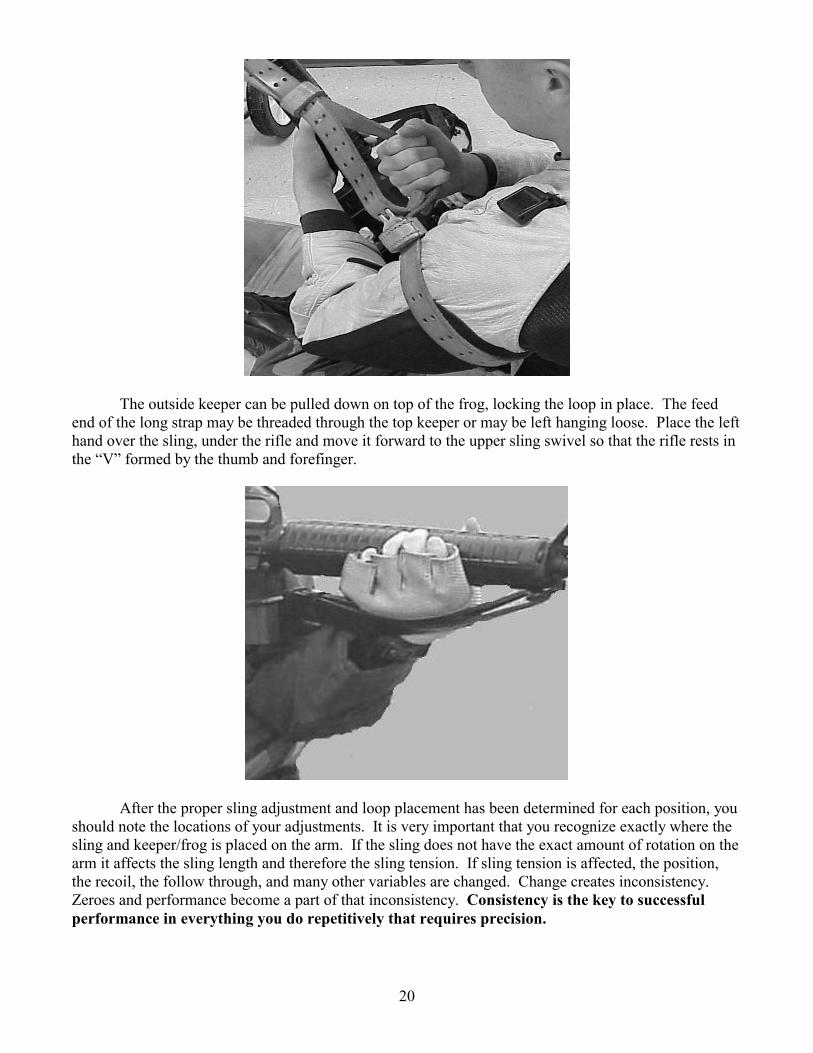
The outside keeper can be pulled down on top of the frog, locking the loop in place. The feed
end of the long strap may be threaded through the top keeper or may be left hanging loose. Place the left hand over the sling, under the rifle and move it forward to the upper sling swivel so that the rifle rests in the “V” formed by the thumb and forefinger.
After the proper sling adjustment and loop placement has been determined for each position, you
should note the locations of your adjustments. It is very important that you recognize exactly where the sling and keeper/frog is placed on the arm. If the sling does not have the exact amount of rotation on the arm it affects the sling length and therefore the sling tension. If sling tension is affected, the position, the recoil, the follow through, and many other variables are changed. Change creates inconsistency. Zeroes and performance become a part of that inconsistency. Consistency is the key to successful performance in everything you do repetitively that requires precision.
21
CHAPTER 5
POSITIONS ELEMENTS In firing the National Match Course, three basic positions (standing, sitting, and prone) are used. These positions are governed NRA Highpower Rulebook. In this chapter, I will cover the elements pertaining to creating correct and efficient positions. There are three elements to developing a position. They are bone support, consistent muscular stability and natural point of aim. Bone Support Positions are designed as foundations or platforms for the rifle to be fired from. It should be stressed that a good foundation (support) for the rifle is just as important as a good foundation is to a house. If a house is built on a weak foundation, it will not stand erect or last very long. The same is true when a shooter establishes a weak foundation (position) for the rifle. It will not withstand the repeated recoil of the rifle in a string of rapid fire. The bones of the body, in conjunction with the sling, provide the best support. Consistent Muscular Tension In all positions you must teach your muscles to support your foundation only, and not point the rifle. Only use enough muscle to maintain the position. Undue muscle strain or tension causes trembling, which is transmitted to the rifle. In all positions, a certain amount of controlled muscular tension is needed. I know you’ve heard before, “Relax your muscles”, or “You must be in a relaxed position”. This is furthest from the truth. You must use muscles to create and sustain your foundation (position). As a general rule, the further your position is from the ground, the more muscle must be used to stabilize the platform. For instance, in offhand the hamstrings and quads combined with the abdominal and lower back muscles must have enough rigidity to support the position. In all positions a slight downward pressure of the head on the stock will stabilize the rifle and provide a consistent head position on the stock. This in turn will provide a consistent eye relief. Only through practice and achieving a natural point of aim will you learn muscular stability, muscle memory, and position consistency. Never use muscle to aim the rifle. Use your muscles to maintain your position only. Natural Point of Aim Once you have established a position, a natural point of aim (NPA) must be obtained. A natural point of aim is acquired by moving the shooter and rifle as a unit from one particular pivot point in order to achieve a position that supports the rifle. When done correctly, the muscles are used to support the platform or position only. The NPA keeps the weapon pointed at the target. I will describe acquiring a natural point of aim as I go through each position. The natural point of aim is part of building a position and must be checked and adjusted prior to firing. Any error in natural point of aim occurring during the string will cause the weapon to settle in the direction of the NPA. A well-built position will allow you to concentrate on and spend time “shooting” rather than pointing each shot. To obtain a natural point of aim in all positions, you should close your eyes while in position, take a breath, and then open your eyes. A proper “sight picture” on your target will indicate the natural point of aim is correct. You can adjust the horizontal portion of the natural point of aim by moving clockwise or counter clockwise around a specified pivot point, the pivot point being different in each position. Elevation can be refined in each position by moving toward or away from a specified pivot point and fine-tuned by breath control. Obtaining a natural point of aim will be discussed in each position later in this chapter.
22
BUILDING A POSITION All positions require certain tasks or steps to take place in order for the platform to be consistent. As shooters we must create an unchanging sequence of events or task list, which must be followed precisely in developing our positions. I can give you a general outline of what needs to be accomplished but you as a shooter must create a system of your own. I recommend you write down your system initially, so as to completely and proficiently acquire each position. You must become consistent in your actions to obtain consistent results. In all positions, head position on the stock to accommodate sight/eye alignment and grip of the firing hand to accommodate correct rearward trigger pull, are the two portions of the position that must be accomplished first. All other support is created around these tasks.
For example, in the prone, my trigger finger must make contact with the trigger on my first joint. I place my first joint on the trigger as if to pull it and naturally grasp the pistol grip. My head must be erect to see through the sights. But because the butt of the weapon is so short, I must place my eye very close to the sight. In order to keep the sight from being too close to my eye, and keep my head erect, I must place the butt of the rifle inside the pocket of my shoulder and high near my neck. Due to the high placement of the butt of my rifle, I need to choke back on the hand guards to level the rifle with the target. It’s not difficult finding a position if you know what takes precedence. Sight alignment and trigger control are accomplished with proper head placement and grip of the firing hand. Do you see the relationship? The position of the head controls sight/eye alignment and the grip of the firing hand permits proper trigger finger placement. Offhand The offhand or standing position is fired from 200 yards, with the sling attached to both ends of the rifle. Offhand is perceived to be the most difficult to master. But in fact, because this stage of the match is fired at the closest distance with the most time allowed, it should be the easiest to perform well in. Perception is in the mind. If proper techniques are used to obtain a natural point of aim (NPA), the two fundamentals of sight alignment and trigger control are perfected and we have confidence in our performance, the end result will be a successful string. Obtaining a standing position First select a level portion of the firing point, stand facing 90 degrees from the target, facing in the direction of your firing hand. Spread your feet a comfortable distance apart. In the case of uneven ground, you want your heels slightly lower than your toes. In any case, if you develop a sway, point your toes inward. Too much toe-in makes you fall forward and conversely too much toe-out makes you fall back. There is a happy medium. Position the firing hand on the grip firm enough to control the movement of the rifle. The position of the firing hand is determined primarily by the ability to pull the trigger strait to the rear. Any amount of finger may be used in order to facilitate a strait rearward movement of the trigger. The firing arm can be placed in any comfortable position in order to accommodate good head position and pressure on the stock. Attempt to bring the rifle to your face rather than your face to the rifle. This can be accomplished by placing the rifle butt high in your shoulder or arm.
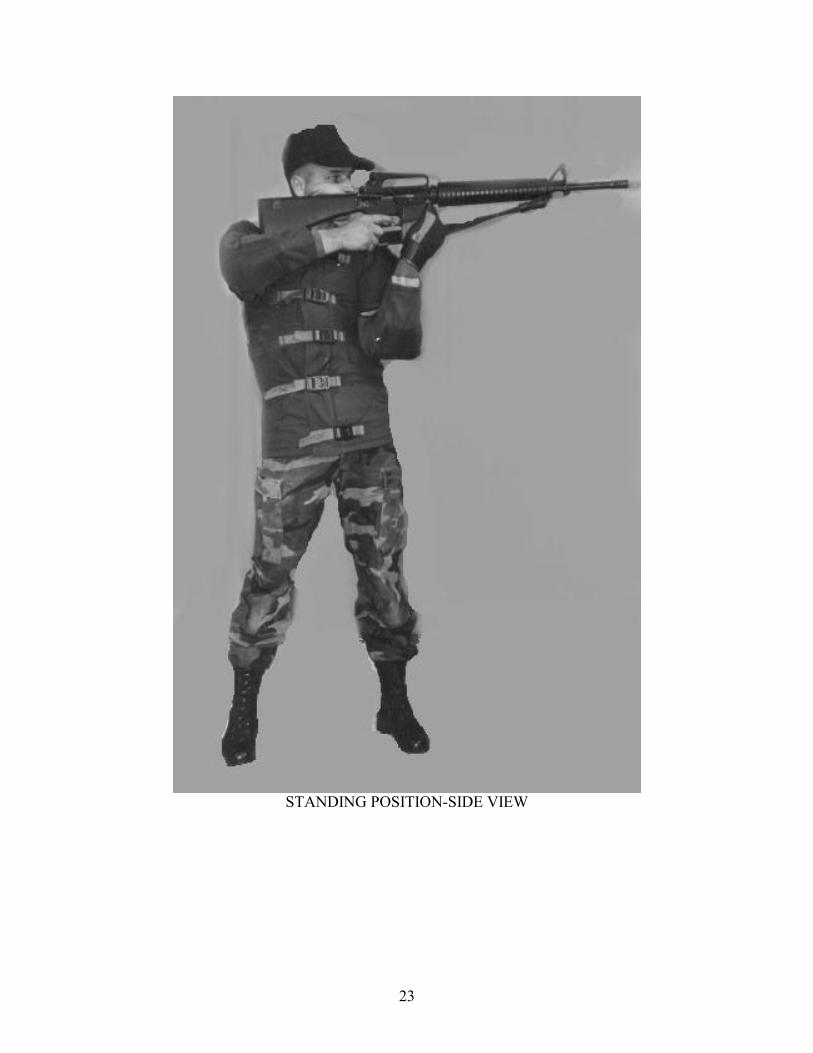
23
STANDING POSITION-SIDE VIEW
24
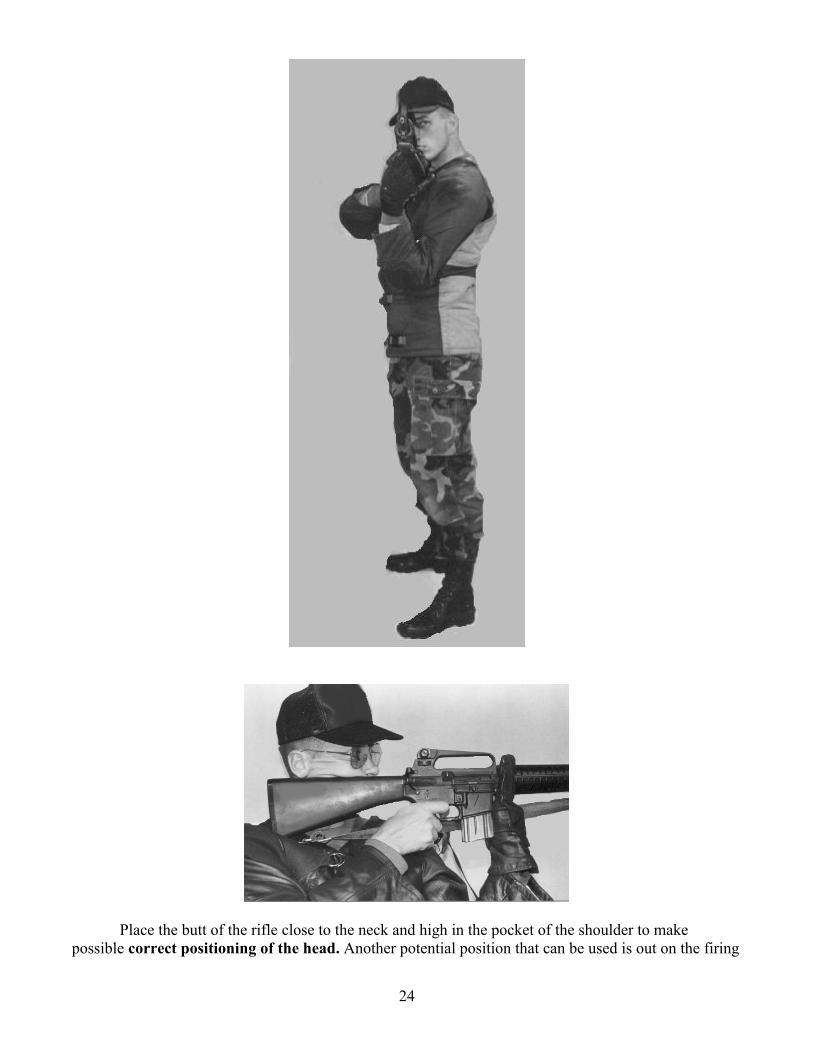
Place the butt of the rifle close to the neck and high in the pocket of the shoulder to make possible correct positioning of the head. Another potential position that can be used is out on the firing
25
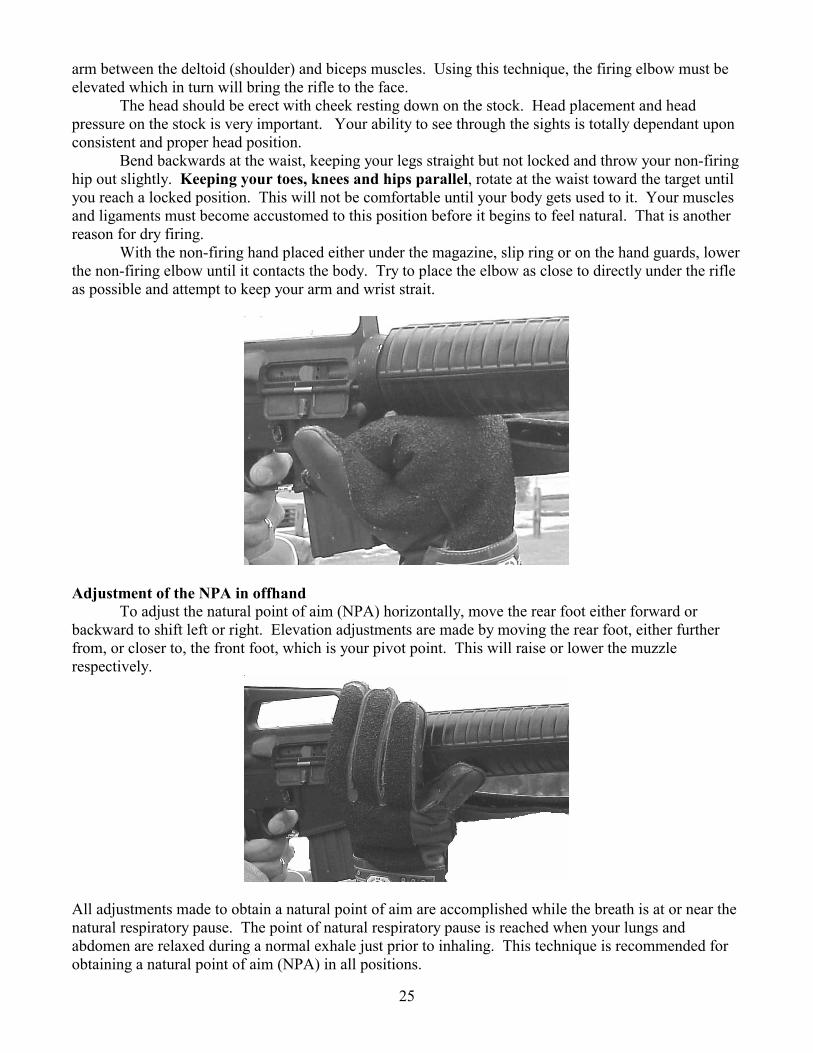
arm between the deltoid (shoulder) and biceps muscles. Using this technique, the firing elbow must be elevated which in turn will bring the rifle to the face. The head should be erect with cheek resting down on the stock. Head placement and head pressure on the stock is very important. Your ability to see through the sights is totally dependant upon consistent and proper head position. Bend backwards at the waist, keeping your legs straight but not locked and throw your non-firing hip out slightly. Keeping your toes, knees and hips parallel, rotate at the waist toward the target until you reach a locked position. This will not be comfortable until your body gets used to it. Your muscles and ligaments must become accustomed to this position before it begins to feel natural. That is another reason for dry firing. With the non-firing hand placed either under the magazine, slip ring or on the hand guards, lower the non-firing elbow until it contacts the body. Try to place the elbow as close to directly under the rifle as possible and attempt to keep your arm and wrist strait.
Adjustment of the NPA in offhand To adjust the natural point of aim (NPA) horizontally, move the rear foot either forward or backward to shift left or right. Elevation adjustments are made by moving the rear foot, either further from, or closer to, the front foot, which is your pivot point. This will raise or lower the muzzle respectively.
All adjustments made to obtain a natural point of aim are accomplished while the breath is at or near the natural respiratory pause. The point of natural respiratory pause is reached when your lungs and abdomen are relaxed during a normal exhale just prior to inhaling. This technique is recommended for obtaining a natural point of aim (NPA) in all positions.
26
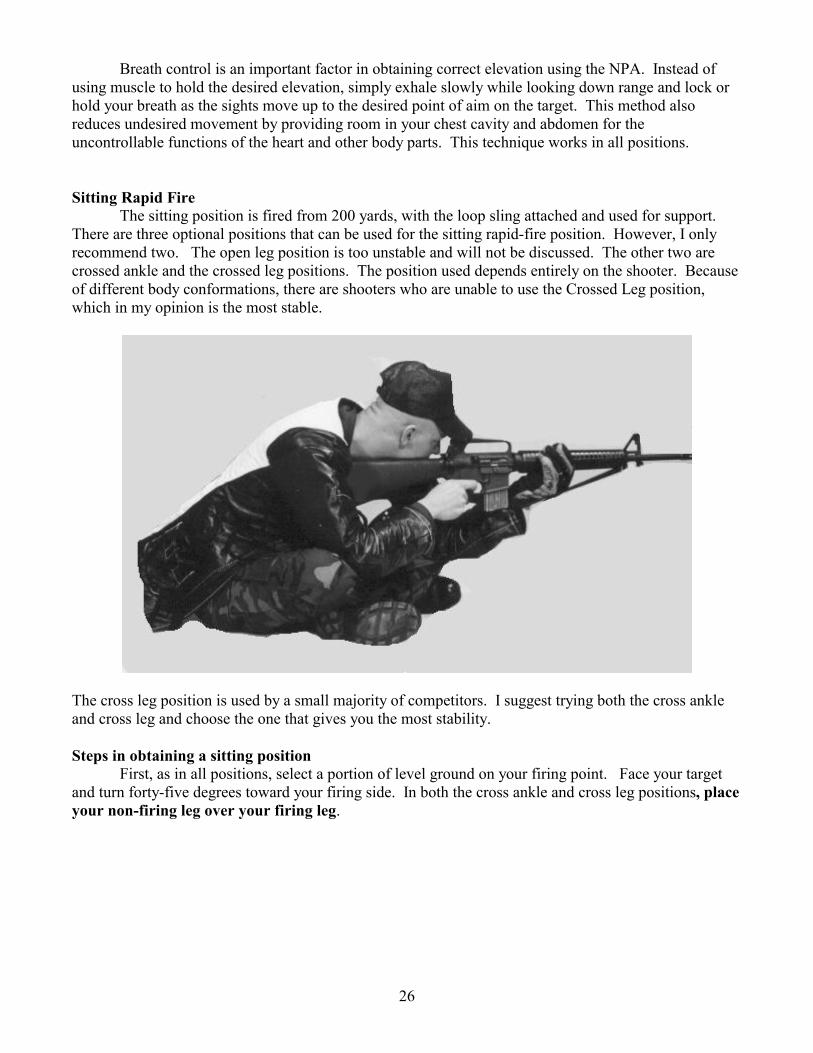
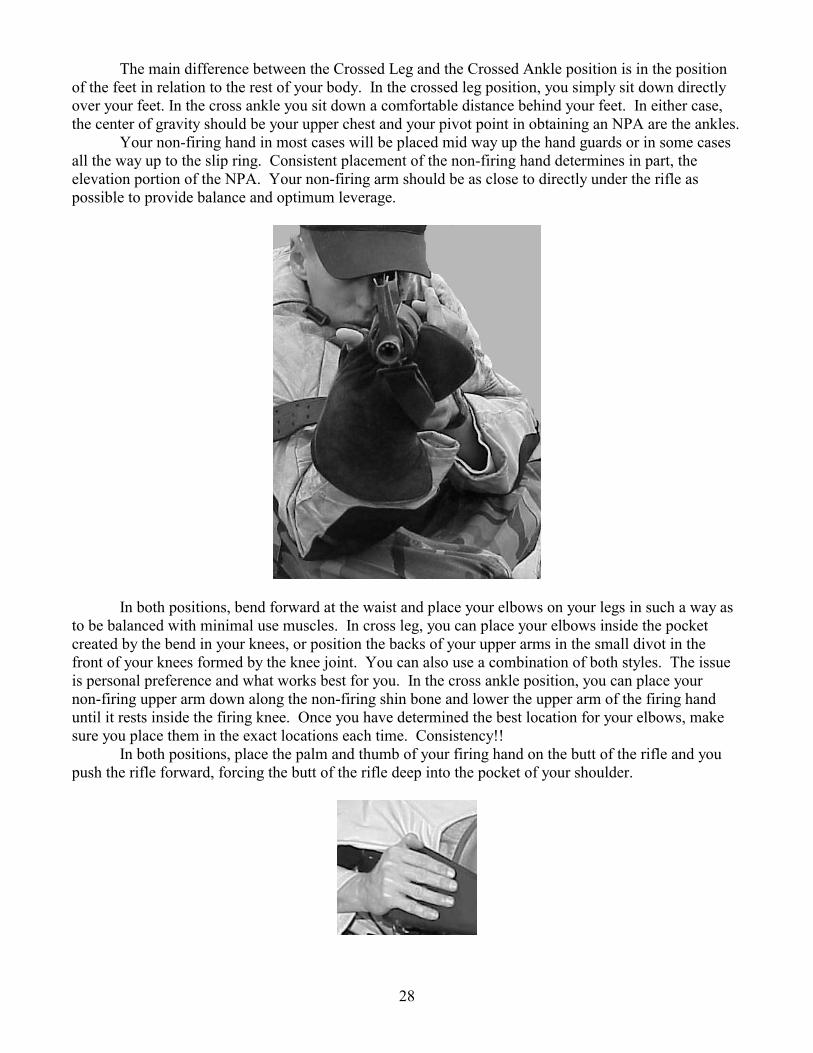
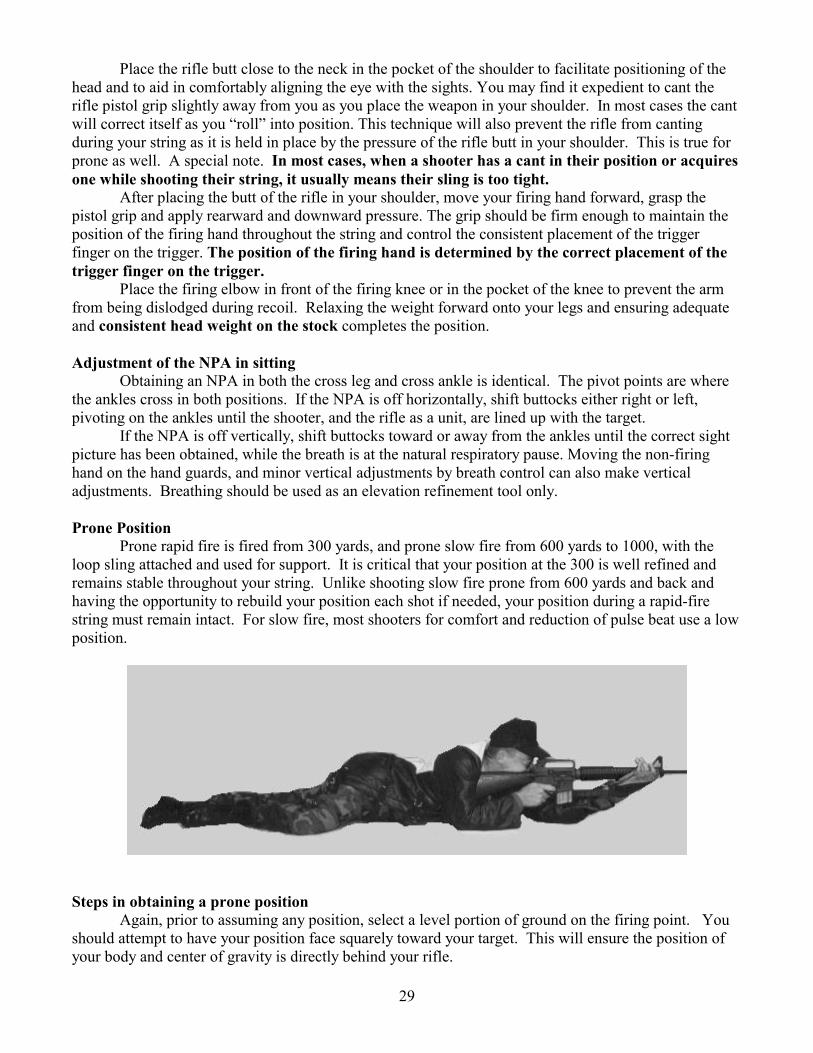
Breath control is an important factor in obtaining correct elevation using the NPA. Instead of using muscle to hold the desired elevation, simply exhale slowly while looking down range and lock or hold your breath as the sights move up to the desired point of aim on the target. This method also reduces undesired movement by providing room in your chest cavity and abdomen for the uncontrollable functions of the heart and other body parts. This technique works in all positions. Sitting Rapid Fire The sitting position is fired from 200 yards, with the loop sling attached and used for support. There are three optional positions that can be used for the sitting rapid-fire position. However, I only recommend two. The open leg position is too unstable and will not be discussed. The other two are crossed ankle and the crossed leg positions. The position used depends entirely on the shooter. Because of different body conformations, there are shooters who are unable to use the Crossed Leg position, which in my opinion is the most stable.
The cross leg position is used by a small majority of competitors. I suggest trying both the cross ankle and cross leg and choose the one that gives you the most stability. Steps in obtaining a sitting position
First, as in all positions, select a portion of level ground on your firing point. Face your target and turn forty-five degrees toward your firing side. In both the cross ankle and cross leg positions, place your non-firing leg over your firing leg.
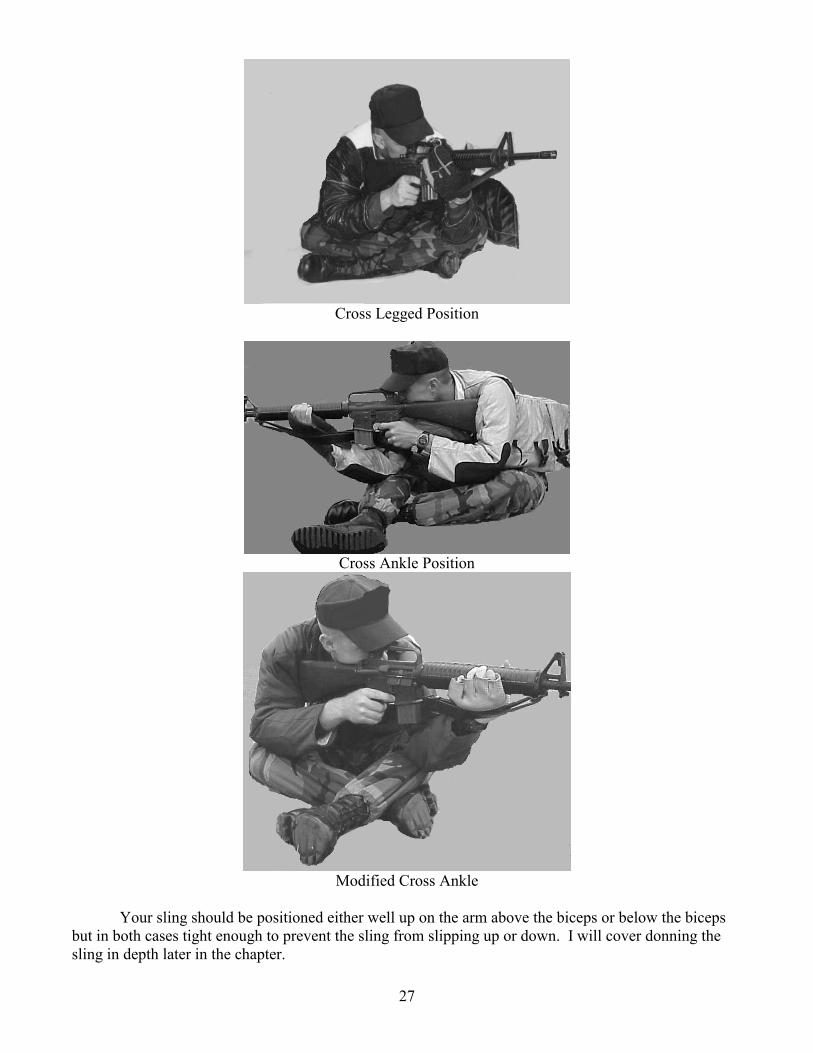
27
Cross Legged Position
Cross Ankle Position
Modified Cross Ankle
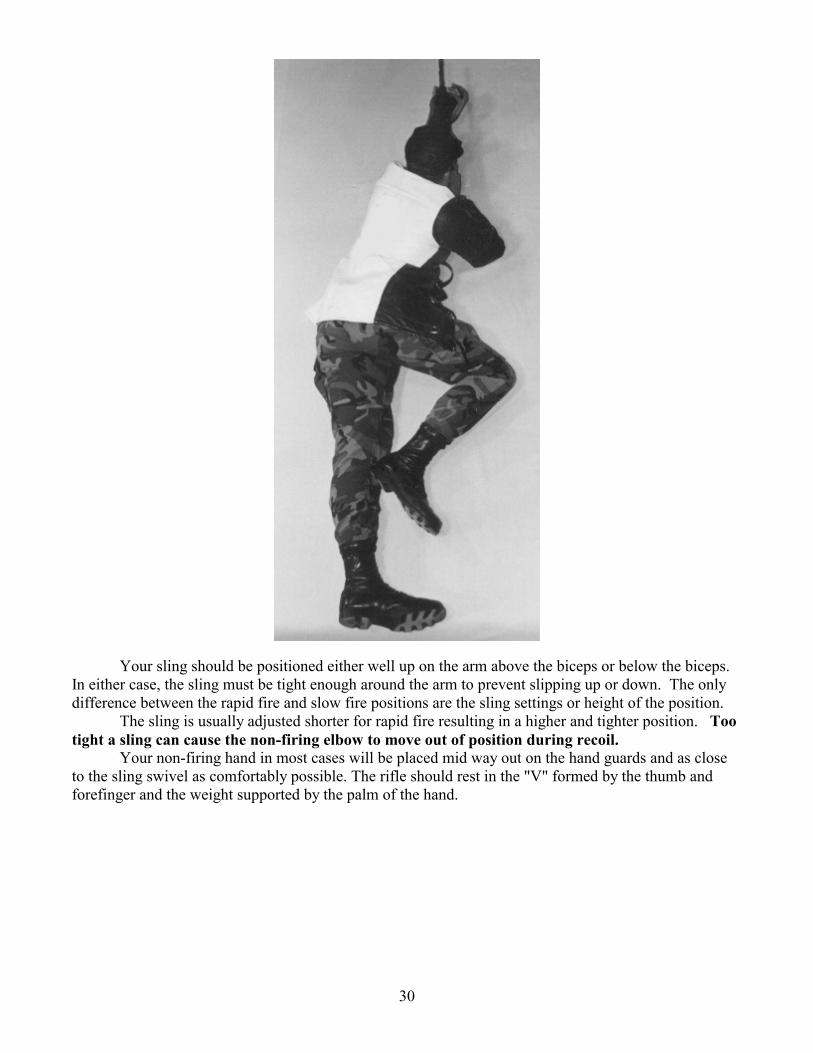
Your sling should be positioned either well up on the arm above the biceps or below the biceps
but in both cases tight enough to prevent the sling from slipping up or down. I will cover donning the sling in depth later in the chapter.
28
The main difference between the Crossed Leg and the Crossed Ankle position is in the position of the feet in relation to the rest of your body. In the crossed leg position, you simply sit down directly over your feet. In the cross ankle you sit down a comfortable distance behind your feet. In either case, the center of gravity should be your upper chest and your pivot point in obtaining an NPA are the ankles. Your non-firing hand in most cases will be placed mid way up the hand guards or in some cases all the way up to the slip ring. Consistent placement of the non-firing hand determines in part, the elevation portion of the NPA. Your non-firing arm should be as close to directly under the rifle as possible to provide balance and optimum leverage.
In both positions, bend forward at the waist and place your elbows on your legs in such a way as to be balanced with minimal use muscles. In cross leg, you can place your elbows inside the pocket created by the bend in your knees, or position the backs of your upper arms in the small divot in the front of your knees formed by the knee joint. You can also use a combination of both styles. The issue is personal preference and what works best for you. In the cross ankle position, you can place your non-firing upper arm down along the non-firing shin bone and lower the upper arm of the firing hand until it rests inside the firing knee. Once you have determined the best location for your elbows, make sure you place them in the exact locations each time. Consistency!! In both positions, place the palm and thumb of your firing hand on the butt of the rifle and you push the rifle forward, forcing the butt of the rifle deep into the pocket of your shoulder.
29
Place the rifle butt close to the neck in the pocket of the shoulder to facilitate positioning of the head and to aid in comfortably aligning the eye with the sights. You may find it expedient to cant the rifle pistol grip slightly away from you as you place the weapon in your shoulder. In most cases the cant will correct itself as you “roll” into position. This technique will also prevent the rifle from canting during your string as it is held in place by the pressure of the rifle butt in your shoulder. This is true for prone as well. A special note. In most cases, when a shooter has a cant in their position or acquires one while shooting their string, it usually means their sling is too tight. After placing the butt of the rifle in your shoulder, move your firing hand forward, grasp the pistol grip and apply rearward and downward pressure. The grip should be firm enough to maintain the position of the firing hand throughout the string and control the consistent placement of the trigger finger on the trigger. The position of the firing hand is determined by the correct placement of the trigger finger on the trigger. Place the firing elbow in front of the firing knee or in the pocket of the knee to prevent the arm from being dislodged during recoil. Relaxing the weight forward onto your legs and ensuring adequate and consistent head weight on the stock completes the position. Adjustment of the NPA in sitting Obtaining an NPA in both the cross leg and cross ankle is identical. The pivot points are where the ankles cross in both positions. If the NPA is off horizontally, shift buttocks either right or left, pivoting on the ankles until the shooter, and the rifle as a unit, are lined up with the target. If the NPA is off vertically, shift buttocks toward or away from the ankles until the correct sight picture has been obtained, while the breath is at the natural respiratory pause. Moving the non-firing hand on the hand guards, and minor vertical adjustments by breath control can also make vertical adjustments. Breathing should be used as an elevation refinement tool only. Prone Position Prone rapid fire is fired from 300 yards, and prone slow fire from 600 yards to 1000, with the loop sling attached and used for support. It is critical that your position at the 300 is well refined and remains stable throughout your string. Unlike shooting slow fire prone from 600 yards and back and having the opportunity to rebuild your position each shot if needed, your position during a rapid-fire string must remain intact. For slow fire, most shooters for comfort and reduction of pulse beat use a low position.
Steps in obtaining a prone position
Again, prior to assuming any position, select a level portion of ground on the firing point. You should attempt to have your position face squarely toward your target. This will ensure the position of your body and center of gravity is directly behind your rifle.
30
Your sling should be positioned either well up on the arm above the biceps or below the biceps. In either case, the sling must be tight enough around the arm to prevent slipping up or down. The only difference between the rapid fire and slow fire positions are the sling settings or height of the position. The sling is usually adjusted shorter for rapid fire resulting in a higher and tighter position. Too tight a sling can cause the non-firing elbow to move out of position during recoil. Your non-firing hand in most cases will be placed mid way out on the hand guards and as close to the sling swivel as comfortably possible. The rifle should rest in the "V" formed by the thumb and forefinger and the weight supported by the palm of the hand.

31
The non-firing hand, wrist and fingers should be relaxed. As in the sitting position, consistent placement of the non-firing hand determines in part, the elevation portion of the NPA. Your non-firing arm should be as close to directly under the rifle as possible to provide balance and optimum leverage. The magazine can rest against the arm but not in such a way as to be supportive.
Place your non-firing elbow in the top center portion of your mat. This will allow you to comfortably place your firing elbow on the rubber portion of the mat and use it to help prevent your firing elbow from slipping while firing. Once you have determined the best location for your elbows, make sure you place them in the exact locations each time. Consistency!! As in sitting, place the palm and thumb of your firing hand on the butt of the rifle and you push the rifle forward, forcing the butt of the rifle deep into the pocket of your shoulder.
Place the rifle butt close to the neck in the pocket of the shoulder to facilitate positioning of the head and to aid in comfortably aligning the eye with the sights. You may find it expedient to cant the rifle pistol grip slightly away from you as you place the weapon in your shoulder. In most cases the cant

32
will correct itself as you “roll” into position. This technique will also prevent the rifle from canting during your string as it is held in place by the pressure of the rifle butt in your shoulder. After placing the butt of the rifle in your shoulder, move your firing hand forward, grasp the pistol grip and apply rearward and downward pressure. The grip should be firm enough to maintain the position of the firing hand throughout the string and control the consistent placement of the trigger finger on the trigger. The position of the firing hand is determined by the correct placement of the trigger finger on the trigger. The remainder of your body should be flat to the ground or rolled slightly toward the non-firing side. Your back is straight and relaxed. Shoulders should be as level as possible. Your legs can be positioned in several ways. They can be spread equally on both sides of your body with toes out or the non-firing leg strait back with the toe in and the firing leg may be straight or slightly cocked. If you cock your firing leg up, it raises your abdomen off the ground and permits you to breath easier. It also reduces the weight on your firing elbow, which with too little weight can move during rapid fire. Again there is a happy medium but you have to find it. Once you find the desired positions of your elbows, you want to consistently use them every time you shoot prone. Relaxing the weight down onto your non-firing arm and ensuring adequate and consistent head weight on the stock completes the position. Adjustment of the NPA in prone
The center of gravity in the prone should be your head and your pivot point in obtaining an NPA is the non-firing elbow. To make major adjustments horizontally, shift the body right or left using the non-firing elbow as a pivot point until the body and rifle as a unit are pointed at the desired target. To make lesser horizontal adjustments, a small shift of the firing leg to the right will move the point of aim to the left and vise versa. To adjust vertically, shift the weight of the body slightly toward or away from the non-firing elbow, using it as the pivot point until the body and rifle as a unit are pointed at the desired target. The breathing cycle must be stopped at the natural respiratory pause during this adjustment. A shift of the weight forward will lower the point of aim and shifting the weight back will raise the point of aim. Remember to keep your non-firing elbow in place. To make fine adjustments it is usually necessary to breathe your sights up to the target and lock or hold your breath when the desired aiming point is obtained. This may or may not be your exact natural respiratory pause, but will be close. Most often you will hold your breath at some point other than the exact natural respiratory pause. Position Modifications For Infantry Trophy Rapid follow through and position stability is key to being a successful trophy shooter. Several things can be done to increase the stability of your position, especially in prone. Some of the suggestions I am giving you will or could increase the size of your groups somewhat. This is not a problem though as you are shooting at a larger target area. The dimensions of the full size targets are 19 1/2 X 40 inches for "E" silhouettes fired at 500 and 600 yards, and 26 X 19 inches for "F" silhouettes. The sling should beat least as tight as for National Match rapid fire. Increase grip of non-firing hand. Apply firm downward head pressure on the stock. Grasp the pistol grip firmly with the firing hand. Place as much weight as possible, evenly distributed, on both elbows. You may need to straighten your legs out to accomplish this. Build up to a cadence. Re-loading time must be minimal. Trophy Trigger In Chapter 3, I discussed trigger pull failed to mention trigger release? Usually in National Match firing the trigger is released immediately after the weapon fires. It is part of the follow through. Again it is reflex. The trigger control used in National Match firing can also be used in Infantry Trophy firing. However, some Infantry Trophy shooters have successfully used another technique, which
33
permits an extremely high rate of fire without disturbing the sight picture. In this method, the slack is not released after each shot. You merely release the trigger until the hammer hooks are engaged, at which time a distinct click will be heard and felt. You are then ready to increase pressure on the trigger to fire the next round. This method is sometimes difficult to master, but it can be very effective. It has been called “trophy trigger”. If mastered it can be used in all forms of firing. The performance at the rifle determines the outcome down range.
34
CHAPTER 6
EFFECTS OF WIND AND WEATHER GENERAL
The effects of the weather are a primary cause of error in the strike of the bullet down range in the case where the shooting principles, the positions used and zero settings are fundamentally correct. The wind, mirage, light, temperature, and humidity all have some effect on the bullet, the shooter, or both. Some of these effects, such as temperature and humidity, can be insignificant depending on the average conditions under which most matches are fired. However, if a match were to be fired under extremes of these effects, they would have to be considered. WIND
Wind is the condition, which presents you the greatest problem. Wind has a considerable effect on the bullet and this effect increases with the range. This is due primarily to increased resistance of the air as the bullet velocity is reduced, causing it to deviate from its natural trajectory. Wind can also have a considerable effect on you and your position. The stronger the wind, the more difficulty you will have in holding the rifle steady.
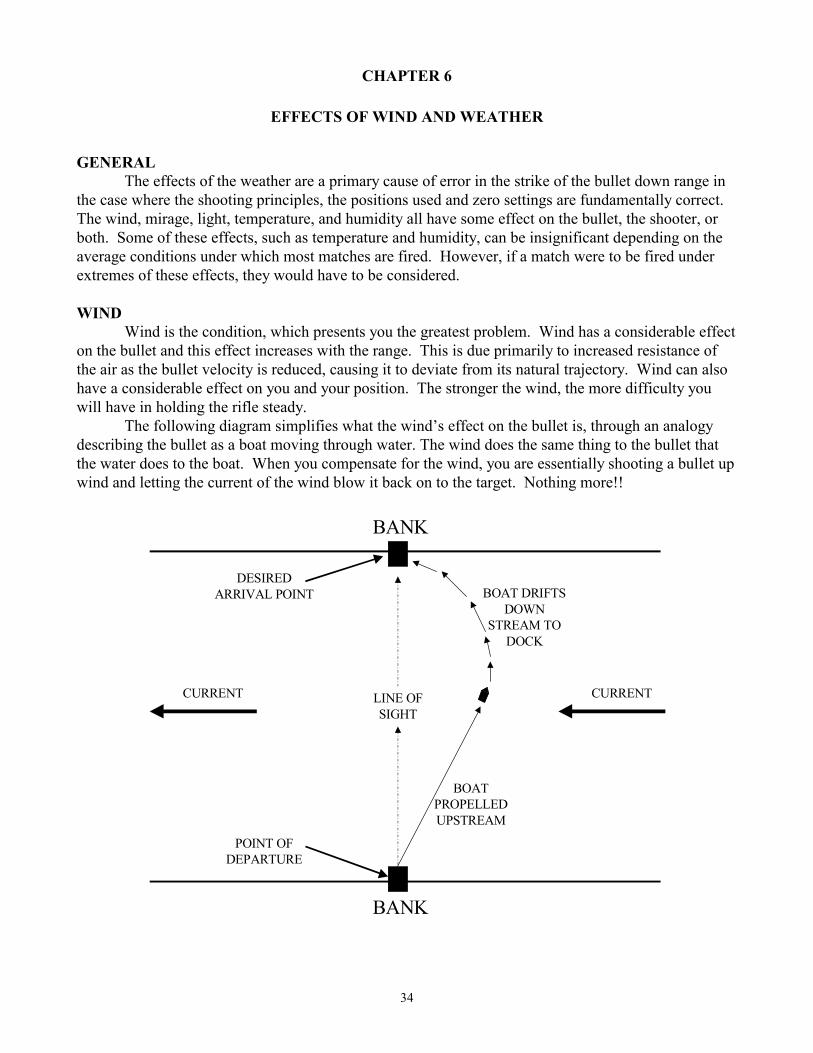
The following diagram simplifies what the wind’s effect on the bullet is, through an analogy describing the bullet as a boat moving through water. The wind does the same thing to the bullet that the water does to the boat. When you compensate for the wind, you are essentially shooting a bullet up wind and letting the current of the wind blow it back on to the target. Nothing more!!
BANK
BANK
CURRENTCURRENT
POINT OFDEPARTURE
DESIREDARRIVAL POINT
LINE OFSIGHT
BOATPROPELLEDUPSTREAM
BOAT DRIFTSDOWN
STREAM TODOCK
35
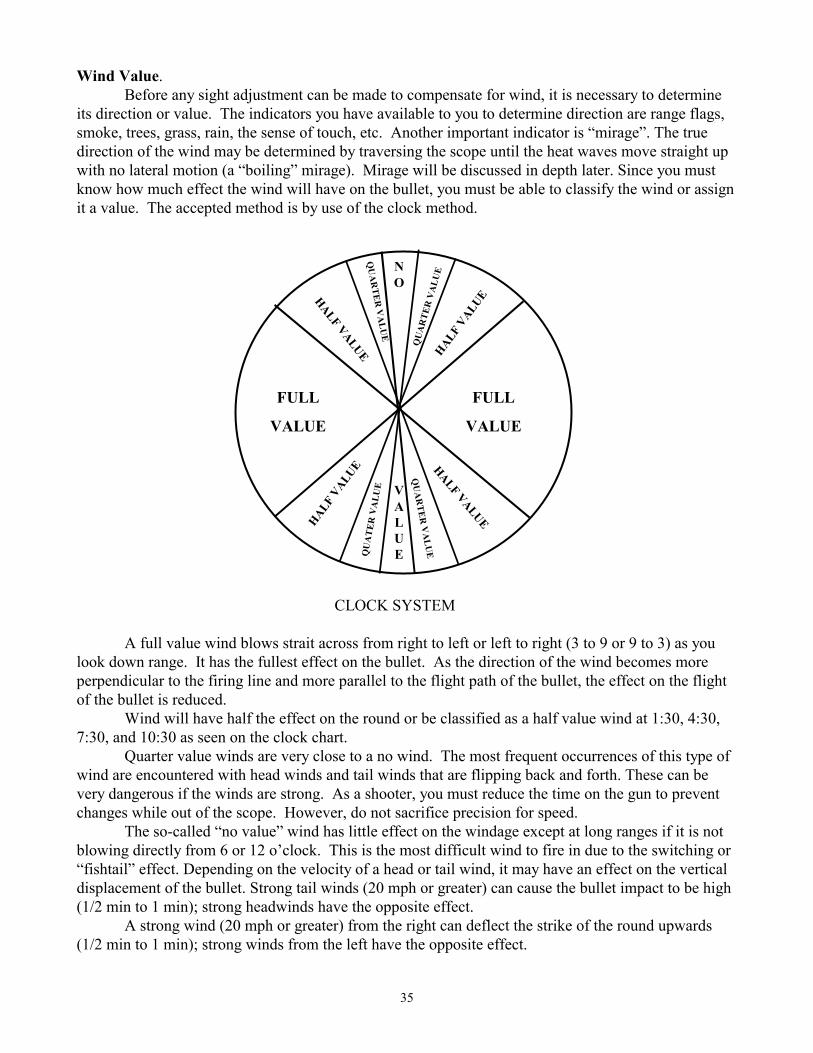
Wind Value. Before any sight adjustment can be made to compensate for wind, it is necessary to determine
its direction or value. The indicators you have available to you to determine direction are range flags, smoke, trees, grass, rain, the sense of touch, etc. Another important indicator is “mirage”. The true direction of the wind may be determined by traversing the scope until the heat waves move straight up with no lateral motion (a “boiling” mirage). Mirage will be discussed in depth later. Since you must know how much effect the wind will have on the bullet, you must be able to classify the wind or assign it a value. The accepted method is by use of the clock method.
FULL
VALUE
FULL
VALUE
HALF VALUE
HALF VALUE HALF VALUE
HALF VALUE
NO
VALUE
QU
AR
TER
VA
LU
E
QU
AT
ER V
ALU
E
QU
AR
TER
VA
LUE
QU
AR
TER
VA
LU
E
CLOCK SYSTEM
A full value wind blows strait across from right to left or left to right (3 to 9 or 9 to 3) as you
look down range. It has the fullest effect on the bullet. As the direction of the wind becomes more perpendicular to the firing line and more parallel to the flight path of the bullet, the effect on the flight of the bullet is reduced.
Wind will have half the effect on the round or be classified as a half value wind at 1:30, 4:30, 7:30, and 10:30 as seen on the clock chart.
Quarter value winds are very close to a no wind. The most frequent occurrences of this type of wind are encountered with head winds and tail winds that are flipping back and forth. These can be very dangerous if the winds are strong. As a shooter, you must reduce the time on the gun to prevent changes while out of the scope. However, do not sacrifice precision for speed.
The so-called “no value” wind has little effect on the windage except at long ranges if it is not blowing directly from 6 or 12 o’clock. This is the most difficult wind to fire in due to the switching or “fishtail” effect. Depending on the velocity of a head or tail wind, it may have an effect on the vertical displacement of the bullet. Strong tail winds (20 mph or greater) can cause the bullet impact to be high (1/2 min to 1 min); strong headwinds have the opposite effect.
A strong wind (20 mph or greater) from the right can deflect the strike of the round upwards (1/2 min to 1 min); strong winds from the left have the opposite effect.
36
Wind Velocity After determining the value of the wind, the velocity must be estimated. The following
methods can be used to determine velocity:
Environmental Effects Under 3 mph, winds can hardly be felt, but may be determined by smoke drift. A 3-5 mph wind can just be felt on the face. At 5-8 mph, leaves in trees are in constant motion. At 8-12 mph, wind will raise dust and loose papers. At 12-15 mph, small trees begin to sway.
Mirage The use of mirage will be discussed fully later in the chapter.
Wind meters Wind meters are fairly inexpensive. They can determine the wind speed at your particular location. You must determine if the wind is similar down range. This is best accomplished viewing the mirage. Interpret the Correction
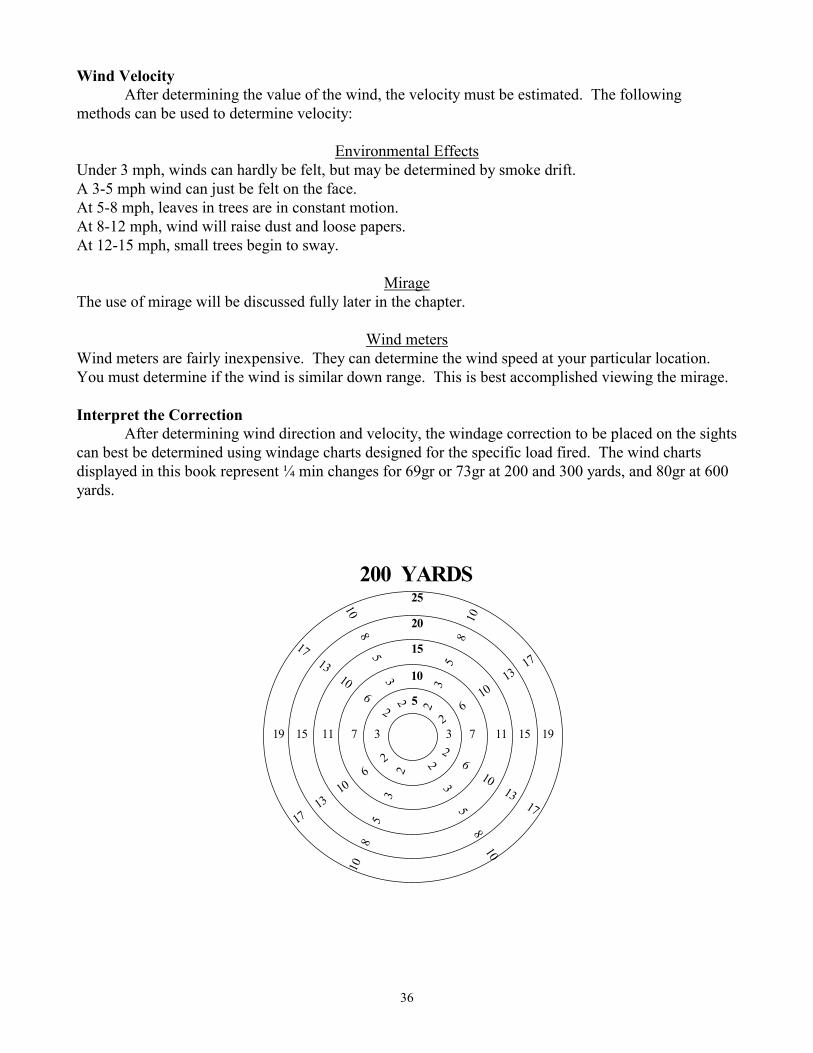
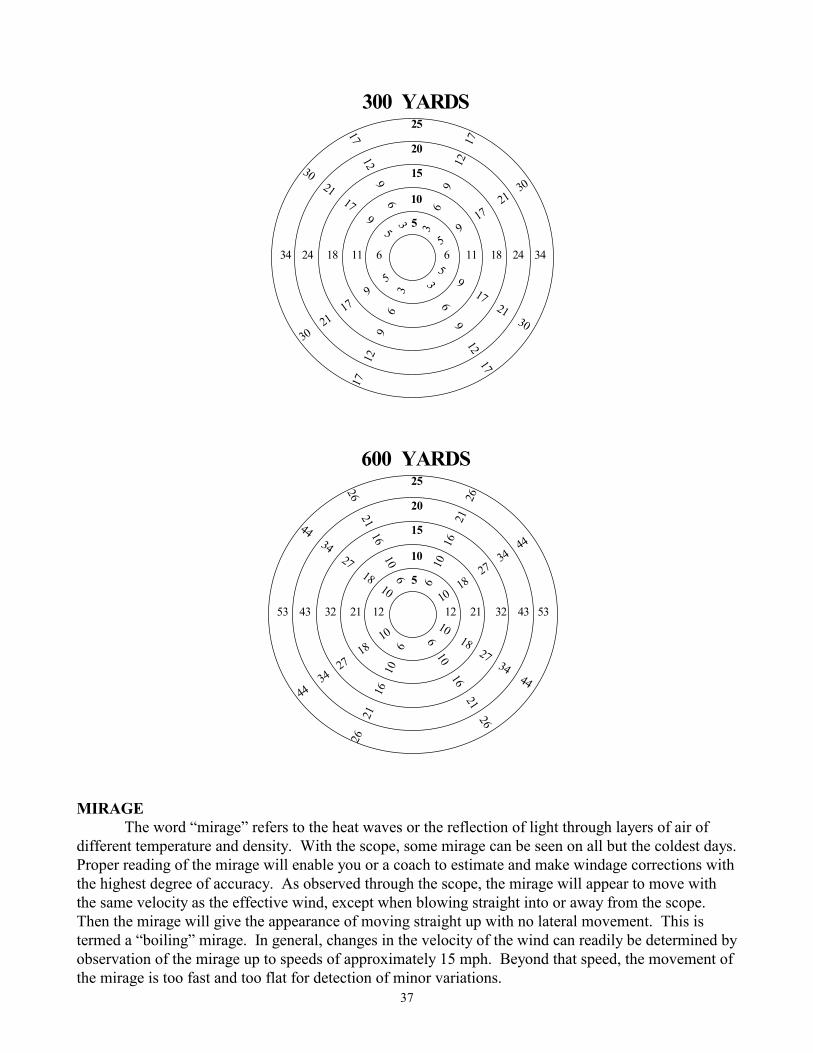
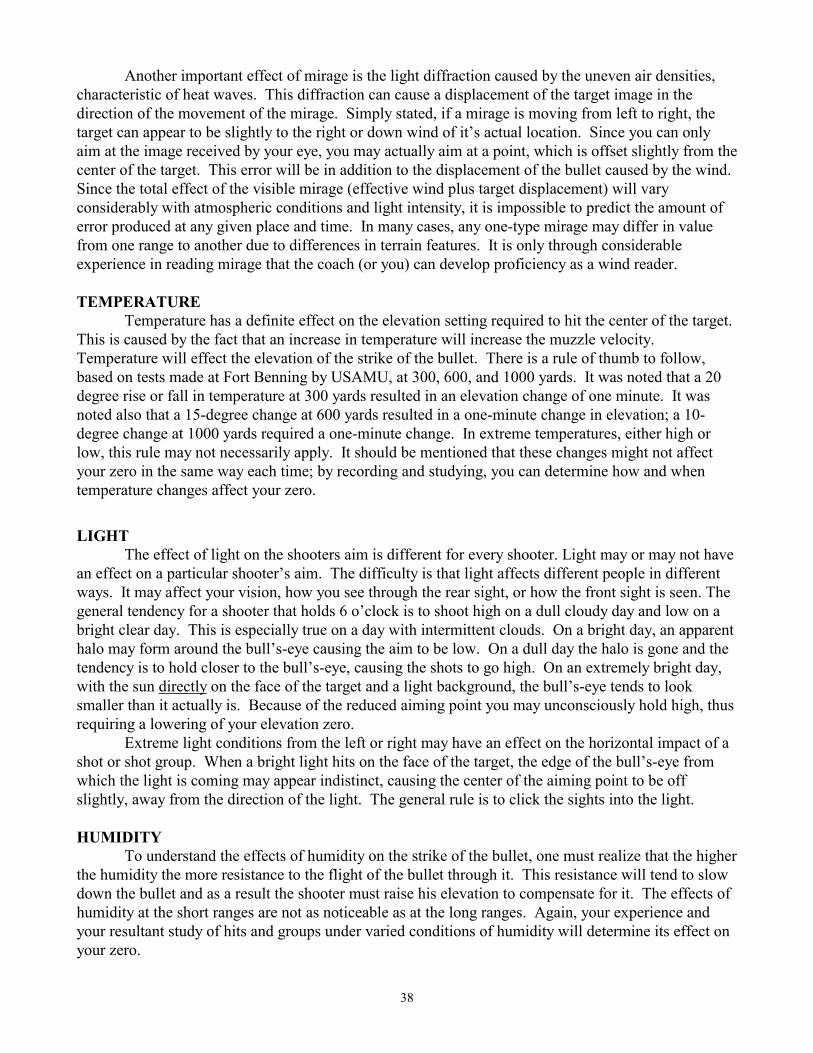
After determining wind direction and velocity, the windage correction to be placed on the sights can best be determined using windage charts designed for the specific load fired. The wind charts displayed in this book represent ¼ min changes for 69gr or 73gr at 200 and 300 yards, and 80gr at 600 yards.
5
10
15
20
25200 YARDS
2 6 10 13 17
3 7 11 15 19 2
6 10
13 17
2
3
5
8
1
0
2 3 5 8 10
10 8 5 3 2
10
8
5
3
2
17 13 10 6 2
17 13
10 6
2
19 15 11 7 3
37
5
10
15
20
25300 YARDS
5 9 17 21 30
6 11 18 24 34 5
9 17
21 30
3
6
9
12
17
3 6 9 12 17
17 12 9 6 3
17
12
9
6
3
30 21 17 9 5
30 21
17 9
5
34 24 18 11 6
5
10
15
20
25600 YARDS
10 18 27 34 44
12 21 32 43 53 10 1
8 27 3
4 44
6
10
16
2
1
26
6 10 16 21 26
26 21 16 10 6
26
21
16
1
0
6
44 34 27 18 10
44 34 2
7 18
10
53 43 32 21 12
MIRAGE
The word “mirage” refers to the heat waves or the reflection of light through layers of air of different temperature and density. With the scope, some mirage can be seen on all but the coldest days. Proper reading of the mirage will enable you or a coach to estimate and make windage corrections with the highest degree of accuracy. As observed through the scope, the mirage will appear to move with the same velocity as the effective wind, except when blowing straight into or away from the scope. Then the mirage will give the appearance of moving straight up with no lateral movement. This is termed a “boiling” mirage. In general, changes in the velocity of the wind can readily be determined by observation of the mirage up to speeds of approximately 15 mph. Beyond that speed, the movement of the mirage is too fast and too flat for detection of minor variations.
38
Another important effect of mirage is the light diffraction caused by the uneven air densities, characteristic of heat waves. This diffraction can cause a displacement of the target image in the direction of the movement of the mirage. Simply stated, if a mirage is moving from left to right, the target can appear to be slightly to the right or down wind of it’s actual location. Since you can only aim at the image received by your eye, you may actually aim at a point, which is offset slightly from the center of the target. This error will be in addition to the displacement of the bullet caused by the wind. Since the total effect of the visible mirage (effective wind plus target displacement) will vary considerably with atmospheric conditions and light intensity, it is impossible to predict the amount of error produced at any given place and time. In many cases, any one-type mirage may differ in value from one range to another due to differences in terrain features. It is only through considerable experience in reading mirage that the coach (or you) can develop proficiency as a wind reader. TEMPERATURE
Temperature has a definite effect on the elevation setting required to hit the center of the target. This is caused by the fact that an increase in temperature will increase the muzzle velocity. Temperature will effect the elevation of the strike of the bullet. There is a rule of thumb to follow, based on tests made at Fort Benning by USAMU, at 300, 600, and 1000 yards. It was noted that a 20 degree rise or fall in temperature at 300 yards resulted in an elevation change of one minute. It was noted also that a 15-degree change at 600 yards resulted in a one-minute change in elevation; a 10-degree change at 1000 yards required a one-minute change. In extreme temperatures, either high or low, this rule may not necessarily apply. It should be mentioned that these changes might not affect your zero in the same way each time; by recording and studying, you can determine how and when temperature changes affect your zero.
LIGHT The effect of light on the shooters aim is different for every shooter. Light may or may not have
an effect on a particular shooter’s aim. The difficulty is that light affects different people in different ways. It may affect your vision, how you see through the rear sight, or how the front sight is seen. The general tendency for a shooter that holds 6 o’clock is to shoot high on a dull cloudy day and low on a bright clear day. This is especially true on a day with intermittent clouds. On a bright day, an apparent halo may form around the bull’s-eye causing the aim to be low. On a dull day the halo is gone and the tendency is to hold closer to the bull’s-eye, causing the shots to go high. On an extremely bright day, with the sun directly on the face of the target and a light background, the bull’s-eye tends to look smaller than it actually is. Because of the reduced aiming point you may unconsciously hold high, thus requiring a lowering of your elevation zero. Extreme light conditions from the left or right may have an effect on the horizontal impact of a shot or shot group. When a bright light hits on the face of the target, the edge of the bull’s-eye from which the light is coming may appear indistinct, causing the center of the aiming point to be off slightly, away from the direction of the light. The general rule is to click the sights into the light. HUMIDITY
To understand the effects of humidity on the strike of the bullet, one must realize that the higher the humidity the more resistance to the flight of the bullet through it. This resistance will tend to slow down the bullet and as a result the shooter must raise his elevation to compensate for it. The effects of humidity at the short ranges are not as noticeable as at the long ranges. Again, your experience and your resultant study of hits and groups under varied conditions of humidity will determine its effect on your zero.
39
TECHNIQUES USED TO NEGOTIATE THE WIND
Chasing the Spotter The most common and frequently used method of negotiating the wind is “chasing the spotter”. It is the easiest and first learned method for wind corrections. Simply stated, it is a correction made for a mistake that has already been made. It is however, the correct modus operandi in successfully dealing with specific wind conditions. An ideal situation for chasing the spotter occurs when there are no known down range indicators, the wind changes are small and constant, and the target service enables the shooter to fire fast.
Shooting a Condition Another method of wind negotiation is “shooting a condition”. An ideal situation for shooting a condition exists when the wind makes many changes but always returns to a dominant condition, and this condition is nearly the same. The shooter must identify an indicator, preferably the mirage, which will be used to dictate the condition to be fired in. The shooter will then only fire when that condition exists. In other words, the shooter is zeroing for one particular wind.
Firing the Extremes A third method is firing the extremes. In this situation the shooter only fires when the wind has settled at its extreme left or right velocity and value. This method is recommended when firing in a very consistently changing head wind or tail wind with considerable changes. As an example, the wind is changing every five or six minutes from 2 minutes left to three minutes right. The shooter will only fire when the wind has reached approximately two minutes left or three minutes right and anticipates the changes.
Evaluate Each Shot A fourth method is actually reading the value of the wind for each shot to be fired. This is the most difficult method to master, as it requires much practice to proficiently develop the skill. It also requires the mirage to be readable and the wind to settle long enough to fire the shot. This method should be used when the wind is changing inconsistently left or right in increments greater than four or five clicks. The most important factor of this method is knowing what and where the no wind zero is with relation to what sight setting is on the gun. It is very easy to get lost when many sight changes are made. The method of recording and tracking sight changes becomes very important.
Combination The final method for wind negotiation is a combination of the first four. The environment being shot in determines what method should be used in best overcoming the wind. In the case of the highly trained competitive shooter, effects of the weather are a primary cause of error in the strike of the bullet. The wind, mirage, light, temperature, and humidity all have some effect on the bullet, the shooter, or both. An important factor to include in your training is the identification of downrange indicators, which will allow you or the coach to properly “read” the wind. Some of these indicators are obvious while others may be very obscure. Some of the indicators you should look for are:
Mirage changes.
Flag direction changes, looking at one or more for comparisons.
Grass or dust blowing downrange.
40
Where the majority of hits are on most of the targets exposed downrange.
What calls those around you are making.
Tie downs on the targets.
Directions and movement of your shooter’s vapor trails.
A combination of indicators, this is most efficient.
41
CHAPTER 7
COACHING
A coach must give direction to the development of a shooter. The rate at which a shooter progresses is to a great extent dependent on the shooters personal desire to excel. However, the coach must guide the development. In successful training, progress depends in a large measure on the coach. From the very first days of training, a coach must start a shooter off correctly to avoid forming harmful habits. It is much harder to re-teach an incorrectly taught person than to start initially teaching him correctly. ATTRIBUTES OF A COACH
A coach’s moral character and personal dignity must always serve as a model for those he is training. He must have a profound knowledge of the theory and practice of marksmanship and a serious attitude toward his training responsibilities. A love for the sport, a respect for and the sincere desire to help his shooters will in turn instill in his team members a respect for him. A coach must be strict in his demands upon his shooters and consistent in what he requires. He must insist always on observing discipline and adhering to the day’s program. He must place his team first at all cost. The coach is expendable, his team is not.
It is not necessary for a coach to be a champion shooter. In many instances a champion may possess too strong a drive toward personal achievement to be able to coax achievement out of others. A good coach need not be the equal of a champion in the ability to shoot high scores. A good coach must strive to be the equal of a champion in the depth of shooting knowledge possessed.
There are no perfect coaches. However, there are those who are outstanding because there is something in their makeup that induces excellence of performance from those who shoot under their guidance. Minor shortcomings do not impair the working loyalty of a progressing shooter who has found a coach with merit. To recognize merit in another person is in itself an essential of character. All successful coaches, in any form of shooting, have one thing in common. They have some attributes in their personality that induce excellence of performance from those under their guidance. Minor shortcomings of personality do not negate this art. There are no perfect coaches because there are no perfect people. We are accustomed to overlooking minor flaws in one who possesses true leadership qualities. A coach must be temperate in all aspects of coaching. Will power, intestinal fortitude and character are the attributes of the outstanding coach and leader. The members of the team will respect the coach only if they respect the person. The coach must be dedicated to his work and his team. He must constantly keep in mind that his job is to get the maximum performance out of his shooters and must be willing to make personal sacrifices to ensure his team succeeds.
EVALUATION AND SELECTION OF SHOOTERS
A coach must constantly evaluate shooter performance, match conduct and techniques used by experienced shooters and teams. The coach must refine doctrine and raise performance standards by constant review and upgrade of training manuals, materials and methods used by those that are experienced. This will aid the coach in the preparation of marksmanship training. The coach must maintain a current evaluation and the potential progress of each shooter. This estimate should include an analysis of the rate of progress, individual morale and attitudes, on and off the range, and the degree of team effort exercised. A good coach must distinguish between who is shooting for the team to win and which shooters are merely hanging on for a free ride. A coach must be capable of selecting potential shooters and members to form teams. During the match, the coach should keep notes on any mistakes made by team members and develop solutions to implement into his training program to prevent the errors from re-occurring. While on the firing line, the coach should study the shooter’s
42
behavior. Study the shooter’s reactions to good and bad shots. Ultimately there should be no difference. A positive attitude usually results in a positive performance. A coach’s recognition of a shooter’s performance is also very important. Excellence should be publicized not only for the individual shooter but for the team as well. It is important for a coach to keep in touch with his shooters. A shooting coach is a person who appreciates the problems faced by the competitive shooter. TRAINING AND PRACTICE
A coach must also know the difference between training and practice. Training is the time to try new techniques, to build endurance and stamina with position exercises, and to refine specific skills in the formation of positions. Practice is the conduct of the actual event you are preparing for.
To establish training requirements, a coach should determine the shooting ability of each of his shooters. This is a difficult but very important job. What the coach selects as the needed training subjects may well determine the later success of the team. The coach must take into account the individual needs and preferences of his team members in planning a training program. This does not mean separate training programs for all shooters, but it does mean that initially your training program must be flexible enough to allow the shooters to develop at their own pace. A difficult coaching task is to create an atmosphere in which each individual shooter can experiment and refine personal techniques. The training program should be tailored to the needs of the individual and gradually be tailored to team oriented training. Training methods should be flexible. Training should be flexible enough to permit change in form and method in the off-season, so that a shooter in some cases will be allowed to decide for himself what type of training is best for him. At least a full day before a match begins, the coach should limit training to a practice session at most. A great coach once said,” If you don’t have it when you get there, you won’t find it in one day of practice”.
It is a good idea to have the training period prior to a given match duplicate the procedure expected in the record match. This is called practice. If the team matches will be fired in one relay, practice shooting team matches in one relay. Careful observation of individual members and correcting faults during training is one of the primary duties of the coach. The coach should observe the manner in which the scores are fired in practice. These scores will help in initial selection of the training subjects for the immediate future. Match performance will become the basis for training subjects selected later in the training program.
READING THE MIRAGE AND VAPOR TRAILS Layers of air that have slightly different temperatures create mirage. Because they have different temperatures, they will not mix. As you look through these different layers of air, the assorted temperatures react on light, bending it differently. This creates a distortion in each layer as you look through it. As the wind blows these layers of air, and you become accustomed to viewing the mirage, the wind will actually appear to become visible to you. A vacuum that forms behind a projectile creates a vapor trail. As air attempts to fill the vacuum and the bullet pushes air out of it’s path, a cone of distortion is created. If viewed correctly, the path of the bullet can be seen from slightly forward of the muzzle through the apex of the trajectory to just forward of the target. It will appear as a distorted cone of air. It is imperative that you set up directly in line with the lay of the weapon to properly see accurate bullet flight. More in depth information on negotiating the wind can be found in chapter 6 on page 37. Using the Scope In utilizing the scope to read the mirage and vapor trail, the following adjustment technique is used. Since you are concerned with the wind between you and the target, the focus of the scope should be mid-range between you and the target. Be aware that the further you are from the target, more mirages may be detectable. One is usually the dominant wind and one is an indicator for impending
43
change. How do you know which mirage is dominant? How are you able to anticipate what the wind is going to do? You learn the wind on your way back through the match. Pay attention to what the wind is doing on the 300-yard line while shooting on it. Why? Because that’s nearest to where you will be focused while shooting the 600. A more in depth discussion of mirage can be found in chapter 6. Trial, error, and experience are your only allies. Always focus on the most dominant mirage and trust your zeros. If you are properly focused on the mirage, you will have the correct focus for vapor trails. With practice and experience you will learn where bullet impact occurs based on vapor trail appearance. COACHING NATIONAL MATCH EVENTS
The scope is very important to the coach in determining sight adjustments by reading the mirage (wind condition) or for observing the locations of hits to accurately plot them on the coach’s plot sheet and later transfer the information to the shooters scorebook. Depending on the range, the use of the telescope varies.
Offhand At 200 yards in the standing position, the scope is used to check the location of hits. The scope
should be positioned between the shooters if pair firing, or on the shooter’s firing side to better observe the shooter if firing single shooters. The scope should be focused clearly on the mirage. If there is a wind for sitting, there is a wind for offhand. Adjustments should be made equally in each position.
Sitting Rapid Fire At 200 yards in the sitting position, the scope is used to watch vapor trails and check mirage.
The scope should be directly behind the shooter and in line with his rifle bore, far enough from the shooter as to not interfere with the shooter as he assumes a standing position, but close enough to clearly communicate. The scope should be positioned directly in line with the bore of the weapon to better view the vapor trail. The more in line with the bore you are, the less distortion you will have to contend with. Your focus should be on the mirage, not the target. Your attention while the shooter is firing should be on the mirage and vapor trail. Favor the shooter in rapid fire similarly to the method used in slow fire. Most coaches favor their shooters based on visible impacts during rapid fire. Why wait to loose points? Provide favors to your shooters based primarily on mirage and secondly on impacts. Use this technique for two reasons. First, don’t wait to loose points before you direct your shooters fire. Second, the wind creates a constant change that can be reliably worked with while the shooter can be a variable. This holds true especially at the 600-yard line. I will cover favors more in depth later in the chapter.
Prone Rapid Fire At 300 yards, the scope is used primarily for reading the mirage and secondly for the plotting of
hits. The scope should be directly behind the shooter, far enough from the shooter as to not interfere with the shooter as he assumes a standing position, but close enough to clearly communicate. The scope should be positioned directly in line with the bore of the weapon just as in the sitting stage. All other aspects related to favors are basically the same for all forms of rapid fire.
Prone Slow Fire
At the 600-yard and 1000 yard lines, use the scope in the same manner as mentioned for 300 yards. If you are pair firing, which I prefer, your scope needs to be set up directly in the middle of the two shooters. The vapor trails you see will be offset equally for each shooter.
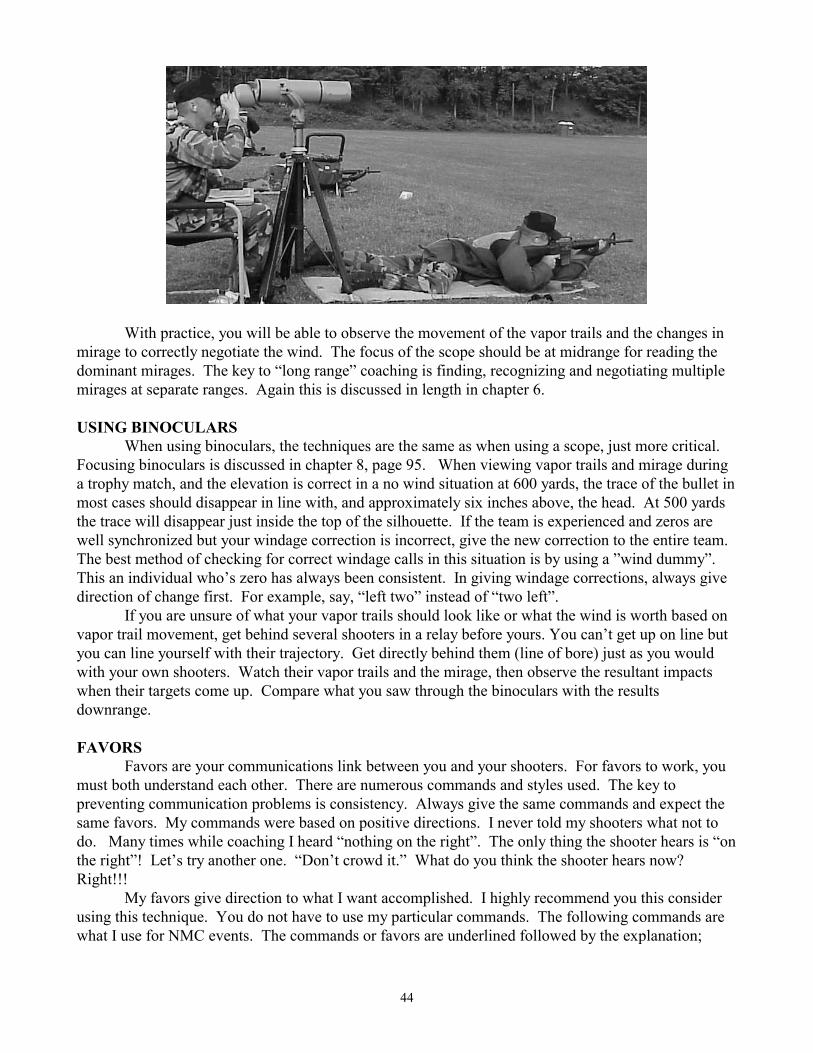
44
With practice, you will be able to observe the movement of the vapor trails and the changes in mirage to correctly negotiate the wind. The focus of the scope should be at midrange for reading the dominant mirages. The key to “long range” coaching is finding, recognizing and negotiating multiple mirages at separate ranges. Again this is discussed in length in chapter 6. USING BINOCULARS When using binoculars, the techniques are the same as when using a scope, just more critical. Focusing binoculars is discussed in chapter 8, page 95. When viewing vapor trails and mirage during a trophy match, and the elevation is correct in a no wind situation at 600 yards, the trace of the bullet in most cases should disappear in line with, and approximately six inches above, the head. At 500 yards the trace will disappear just inside the top of the silhouette. If the team is experienced and zeros are well synchronized but your windage correction is incorrect, give the new correction to the entire team. The best method of checking for correct windage calls in this situation is by using a ”wind dummy”. This an individual who’s zero has always been consistent. In giving windage corrections, always give direction of change first. For example, say, “left two” instead of “two left”. If you are unsure of what your vapor trails should look like or what the wind is worth based on vapor trail movement, get behind several shooters in a relay before yours. You can’t get up on line but you can line yourself with their trajectory. Get directly behind them (line of bore) just as you would with your own shooters. Watch their vapor trails and the mirage, then observe the resultant impacts when their targets come up. Compare what you saw through the binoculars with the results downrange. FAVORS Favors are your communications link between you and your shooters. For favors to work, you must both understand each other. There are numerous commands and styles used. The key to preventing communication problems is consistency. Always give the same commands and expect the same favors. My commands were based on positive directions. I never told my shooters what not to do. Many times while coaching I heard “nothing on the right”. The only thing the shooter hears is “on the right”! Let’s try another one. “Don’t crowd it.” What do you think the shooter hears now? Right!!! My favors give direction to what I want accomplished. I highly recommend you this consider using this technique. You do not have to use my particular commands. The following commands are what I use for NMC events. The commands or favors are underlined followed by the explanation;
45
Good right there: you shot a solid X Good: you shot one 10 close to an X. Good, favor a little left or right: you shot a couple 10s close together, aim a little left or right to shoot an X. Favor right or left: you shot a 9, favor a 9 in the direction I Give you. Anything outside of a 9 I state the value and direction followed by a correction. Ex: 8 on the left, favor hard right! In the case of Infantry Trophy, I usually give sight changes. I will cover more of this subject regarding Infantry Trophy and commands in the next chapter. I learned in 1998 while coaching 4 superb shooters, that if your shooters are shooting aperture front and rear match sights, you must also make sight changes. Do not expect favors with aperture sights. It cannot be done efficiently. I learned this too late to save the match that year. Don’t make the same mistake.
COACHES TRAINING PLAN
There are two primary abilities that separate the skill levels of a coach. The ability to read the wind and the ability to keep up with it. Reading the wind is a skill developed through experience. Wind reading is further discussed in negotiating the wind section of chapter 6. Keeping up with the wind is a matter of technique. The most efficient method is through the complete and systematic management of plots sheets. The following plan is one proposed method of training a coach. Keep in mind that as an individual shooter, you are your own coach and therefore the management of personal plot sheets is just as important. It could be considered more significant as your coach must use your plots to evaluate your performance and verify his data collected during the match. The comparison between the shooter’ scorebook and the coaches plots produce much more efficient and accurate data regarding zeros and the correlation between mirage and other wind indicators. The following series of tasks is recommended for training a new coach.
Plot sheet familiarization (level 1)
Recommended time for this task is one hour with an hour break. This task should be conducted for 1-2 days before moving on to the next task.
Familiarize yourself with the plot sheet and learn to annotate with efficiency and speed. No shooters will be involved at this level. Using a single side of the windage/shot plot section, be able to make your wind calls, plot it on the sheet with reference to the correct shot fired. Pace your calls as if you were coaching one shooter. Plot sheet familiarization (level 2)
Recommended time for this task is one hour with an hour break. This task should be conducted for 1-2 days before moving on to the next task. This exercise can be done intermittently throughout the training and be used as remedial training to strengthen the fundamental coaching skills.
Familiarize yourself with the plot sheet and learn to annotate with efficiency and speed. No shooters will be involved at this level. Using both sides of the windage/shot plot section, be able to
46
make your wind calls, plot it on the sheet with reference to the correct shot fired. Pace your calls as if you were coaching two shooters. Plot sheet Coach Apprentice Phase
Recommended time for this task is one hour with an hour break. This task should be conducted for 2-4 days before moving on to the next task. This exercise can be done intermittently throughout the training and be used as remedial training to strengthen the fundamental coaching skills.
Familiarize yourself with the plot sheet and learn to annotate with efficiency and speed. One shooter will be involved at this level initially and gradually a two-shooter system will be applied. Using a single side of the windage/shot plot section, be able to make your wind calls, plot it on the sheet with reference to the correct shot fired. Attempt to maintain the pace of your work with the coach. Eventually your desire is to keep up with the shooters and create a pace that strategically complements the wind. You will be evaluated by chart comparison at the end of the exercise. Plot sheet familiarization (level 3)
Recommended time for this task is one hour with an hour break. This task should be conducted for 2-4 days before moving on to the next task. This exercise can be done intermittently throughout the training and be used as remedial training to strengthen the fundamental coaching skills.
Familiarize yourself with the plot sheet and learn to annotate with efficiency and speed. One shooter will be involved at this level. Using a single side of the windage/shot plot section, be able to make your wind calls, plot it on the sheet with reference to the correct shot fired. Pace your calls to your speed. Eventually your desire is to keep up with the shooters and create a pace that strategically complements the wind. Shooter synchronization (level 1)
Recommended time for this task is one hour with 10-15 min break. This task should be conducted for 1-2 days before moving on to the next task.
One shooter will be involved at this level. Estimate the value of the wind, add the correction on the shooter’s zero, fire and correct for wind/zero synchronization. Using a single side of the windage/shot plot section, be able to estimate the value of the wind, place a correction on the shooter’s sights, fire a shot, apply a correction and fire an additional shot to confirm your correction for synchronization. Shooter synchronization (level 2)
Recommended time for this task is one hour with 10-15 min break. This task should be conducted for 2-4 days before moving on to the next task.
Two shooters will be involved at this level. Estimate the value of the wind, add the correction to both shooters’ zero, fire and correct for wind/zero synchronization. Using both sides of the windage/shot plot section, be able to estimate the value of the wind, place corrections on the shooters’ sights, fire a shot each, apply corrections and fire an additional shots each to confirm your corrections for synchronization. Plot sheet system sustainment (Sustainment level)
Familiarize yourself with the plot sheet and learn to annotate with efficiency and speed. Two shooters will be involved at this level. Both shooters must be synchronized prior to this exercise. Using both sides of the windage/shot plot section, be able to make your wind calls, plot it on the sheet with reference to the correct shot fired. Pace your calls to your speed. Eventually your desire is to keep up with the shooters and create a pace that strategically complements the wind.
47
Understand and implement the correct tactics to contend with environmental conditions. Recommended time for this task is one hour with an hour break. This task should be conducted
for 2-4 days before moving on to the next task. This exercise can be done intermittently throughout the training and be used as remedial training to strengthen the fundamental coaching skills. Keep in mind that no one condition normally exists during a string and therefore no one particular technique or tactic may be applicable.
No shooters will be involved at this level. Learn the tactic to be best used to compensate for a particular wind condition and practice your chosen tactic on paper using the wind as your teacher. First learn the tactics described in chapter 6, page 69. Then, using both sides of the windage/shot plot section, be able to estimate the value of the wind, and use the appropriate tactic to best accommodate and negotiate the wind. Become proficient at this before you practice with a shooter. Understand and implement the correct tactics to contend with environmental conditions. (Sustainment level)
Two shooters will be involved at this level. Learn the tactic to be best used to compensate for a particular wind condition and practice your chosen tactic with shooters. Using both sides of the windage/shot plot sections, be able to estimate the value of the wind, and use the appropriate tactic to best accommodate and negotiate the wind. You must be proficient with shooter synchronization and plot sheet procedures before conducting this exercise.
48
CHAPTER 8
TRAINING OFFHAND TRAINING There are many forms offhand training out there. But one technique has been tried and true throughout the ages. Yes, it’s dry firing. It’s boring, seems unproductive, feels like a waste of time, and produces no immediate feedback. But without fail, it will provide the desired positive results you expect. Recently I have come up with a combination of exercises combined with dry firing that reduce the monotony and provide additional training within the same period of time. I call it “holding up the dummy”. It’s a combination of holding exercises, and ball and dummy. Here’s how it works. Pair up into groups of two, one to perform the exercise, and one to control the exercise. The controller either loads or does not load the rifle and returns it to the shooter. The shooter is then told to assume a position and standby to fire. Once the shooter is in position, the controller starts time. The controller determines how much hold time the shooter undergoes. I do not recommend exceeding 30 seconds at first, and working your way to 1 minute maximum. Once the determined time has passed the shooter is told to fire. The shooter begins with 10 seconds to get the round off. Gradually work your way down to 5 seconds. This exercise accomplishes several things. First, it builds stamina and allows the shooter to comfortably hold the rifle without excessive movement. Next, it teaches the shooter to break the shot when he wants it to break. You must know when the round will go off. You must send the round downrange. It is not an accident or surprise. You as the shooter must be in control. When, where, how and what situation could these abilities be advantageous? How about a windy day at Camp Perry first thing in the morning? If you could hold the rifle comfortably for up to a minute and command detonate the round at the exact moment needed to shoot an X without moving anything but the trigger finger, and do it consistently, you would be unmatched. Offhand may only be one fifth to one quarter of the aggregate, but it can win the match. There are other means or devices that can be used to enhance offhand training such as Noptel or Beam Hit. If you have the assets to purchase or devices available, I would recommend using them. They both give you forms of immediate downrange feedback. But there is nothing better than the real thing. Keep that in mind when creating any form of training. RAPID FIRE TRAINING Cadence is important to you because it allows you to fire a series of well-aimed shots within the specified time. If you can establish a cadence you will obtain better groups and maintain a more constant zero. Learn to shot a cadence, concentrate on sight alignment, and trust your position. One Shot Exercise. In the one shot exercise you should be able to assume a position rapidly and fire the first shot in a period of 20 seconds. You first assume your regular position and adjust your natural point of aim on to the target. When satisfied with your position, you mark your mat in such a way as to facilitate retaking the same position. For example, in the prone you could mark the non-firing elbow location. In sitting, possibly the mat where the seam of your trousers lines up. You then rise, keeping your feet in place. In the prone you can move each foot forward three or four inches. Upon command you retake your position using your marks as a guide, check and if necessary readjust your natural point, and apply the correct fundamentals to fire the shot within the specified time limit.
49
Three Shot Exercise. In this exercise, you must rise, retake the position, fire two rounds, reload, and fire one round. The time limit recommended is 37 seconds. Reloading can be time consuming. With practice it can be accomplished smoothly and with a minimum of wasted time and motion. Remember, what you perform in practice or training, you will reproduce in a match. Perform all the tasks you perfected in the one shot drills. Don’t leave anything out. Include everything, down to the mark on your mat. This is also where you perfect, complete and practice your task list. 10 Shot Exercise. In the 10 shot exercise, you are required to quickly assume a good position, perfect your aim, and apply proper trigger control in firing the initial two rounds. You are then required to reload quickly, reassume your position, aim, and apply proper trigger control in firing the remaining rounds, all within 65 seconds. The authorized time limit is 70 seconds; this gives the firer 5 seconds as a buffer in case there are any problems. INFANTRY TROPHY TRAINING The success or failure of an Infantry Trophy team is determined largely by the coaching. A minor error in wind doping can cost the team the match. Fire Control The most common method of controlling fire is to divide the six shooters into two 3-man teams, each fire team being controlled by one coach. The right fire team will fire on the right four targets and the left team will fire on the left four targets. Obviously, when three shooting members fire on four targets, one shooter must fire on two targets. Usually the most consistent shooter is designated as the swingman. The swingman will usually use the outside target of his block as the first target engaged. However this at times is not possible. The rule to follow depends on which hand you fire from. If you’re right handed you swing right, left-handed you swing left. The reason for this is, for most shooters it is natural to adjust the NPA in the direction of the firing side. This being the case, the swingman on the right side should be left-handed and the shooter on the left, right handed. This way the outside targets can be the first targets engaged. Ideally, both fire teams, although working individually with their coach, are close enough together for all shooters to hear commands from either coach. All commands should be repeated. Fire Plans Fire plans vary according to the capabilities of the team and the desires of the coaches. This will insure the maximum number of hits within the capabilities of the shooters. The maximum rounds fired per shooter at this time cannot exceed 40. This requires a magazine change and the use of 20 round magazines. 30 round magazines are not used because they don’t allow a low enough position required for trophy shooting. A general rule to follow is to load the maximum number of rounds the shooter can accurately put downrange. Have the shooters build a cadence during the string. Stop your team from firing prior to the targets being pulled into the pits. This saves round missed over the targets and permits all your shooters getting maximum effective shots downrange. Maximum shots downrange is not the solution, maximum shots on target is. When loading magazines it is recommended your load be split, half in each magazine for each stage. Trophy Coach’s Responsibilities Prior to firing the coach needs to focus the binoculars. This is done by looking through the eyepiece at the target with both eyes open; place a hand over the front of one eyepiece and turn the focusing nut of the other until the object is sharply defined, then back it off so your focus is
50
approximately midrange. Repeat for the other eye and note the diopter scale reading on each eyepiece. I used on set of binoculars during my days of coaching and had them marked for correct focus. If you focus is correct, you will be able to see the vapor trails. If the focus is not correct, you will be blind. Prior to assuming your position on the firing line, ensure your shooters know their loads and have loaded their magazines. Once on line and not before, set your zeroes. Make a final estimation of the wind. You should have been watching the wind for as many strings as possible prior to yours. Give your shooters the wind. In order to best see the vapor trails and the mirage, it is recommended that the coach use the kneeling position because of its stability. The coach should position himself so that he is looking directly over the bore of the rifle. Any misalignment from the bore will create distortions, making it impossible to accurately view the vapor trails. When shooting begins the priority is ensuring your wind estimation is correct. There are several ways to do this. Because it is so rare to find a coach that can actually and accurately see the vapor trails through binoculars, I recommend using the wind dummy method. Select the shooter you are most confident with who has the most accurate and consistent zero, and use his vapor trails as the guide for the whole team. Using this method requires precise team synchronization of zeroes. If you are fortunate enough of having two coaches that can see the vapor trails, have each coach control a three-man section. In this situation, the coaches will start at the swingmen and move to the center, making windage corrections as required, as they go. They should return back out to the swingman just as they begin firing their second magazine. If windage is correct, continue moving to the center. After firing is complete, immediately have the shooters return their sights to no wind zero. Go down the line and give the shooters their windage and elevation zero for next stage. Collect and redistribute ammunition if needed. Have the shooters readjust slings for next stage if necessary. Verify scores and fill out the plot sheets. Prepare to move to the next stage and remember. The match isn’t over until it’s over! DETECTION AND CORRECTION OF ERRORS During the process of perfecting the two fundamentals, it will be quite evident that errors are the plague of any shooter. When an error is detected it must be corrected. Sometimes, however, errors are not quite so evident. This is when a good coach will be of value. The process of detection and correction of errors is extremely important. Most errors can be detected through shot group analysis. The most difficult type of errors to detect are caused by improper trigger control. If errors are suspected in trigger control, they may be detected by utilizing the ball and dummy method of firing as discussed in chapter 8. Shot group analysis is an important step in the process of detection and correction of errors. Rarely is a bad shot group caused by only one error. The following diagrams are depictions of typical shot groups, which may be the result of particular errors for right-handed shooters. Errors for a left-handed shooter would take on a mirror effect.
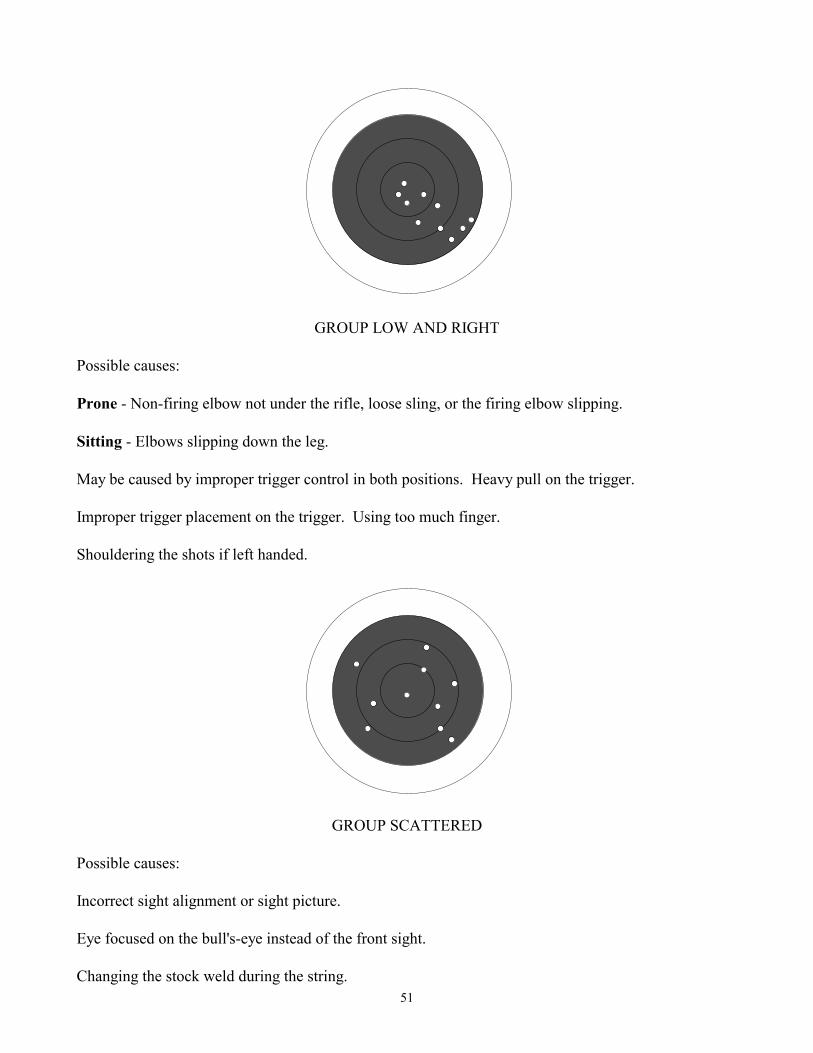
51
x
GROUP LOW AND RIGHT
Possible causes: Prone - Non-firing elbow not under the rifle, loose sling, or the firing elbow slipping. Sitting - Elbows slipping down the leg. May be caused by improper trigger control in both positions. Heavy pull on the trigger. Improper trigger placement on the trigger. Using too much finger. Shouldering the shots if left handed.
x
GROUP SCATTERED
Possible causes: Incorrect sight alignment or sight picture. Eye focused on the bull's-eye instead of the front sight. Changing the stock weld during the string.
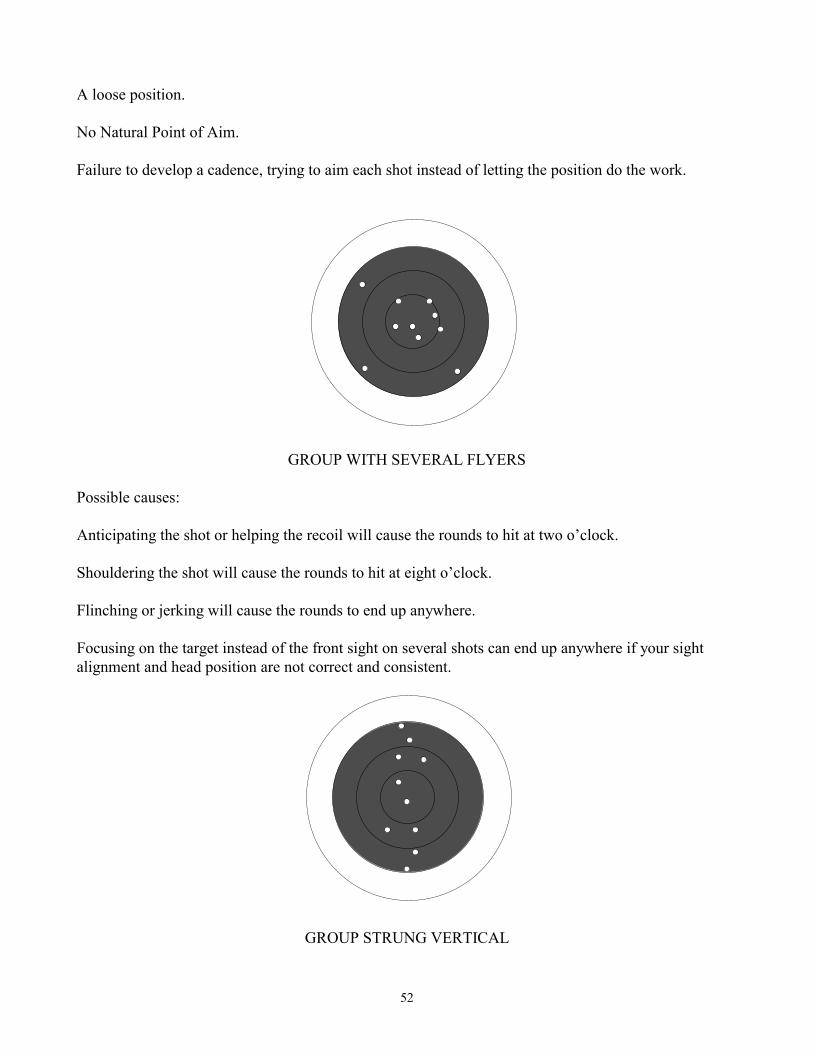
52
A loose position. No Natural Point of Aim. Failure to develop a cadence, trying to aim each shot instead of letting the position do the work.
x
GROUP WITH SEVERAL FLYERS
Possible causes: Anticipating the shot or helping the recoil will cause the rounds to hit at two o’clock. Shouldering the shot will cause the rounds to hit at eight o’clock. Flinching or jerking will cause the rounds to end up anywhere. Focusing on the target instead of the front sight on several shots can end up anywhere if your sight alignment and head position are not correct and consistent.
x
GROUP STRUNG VERTICAL
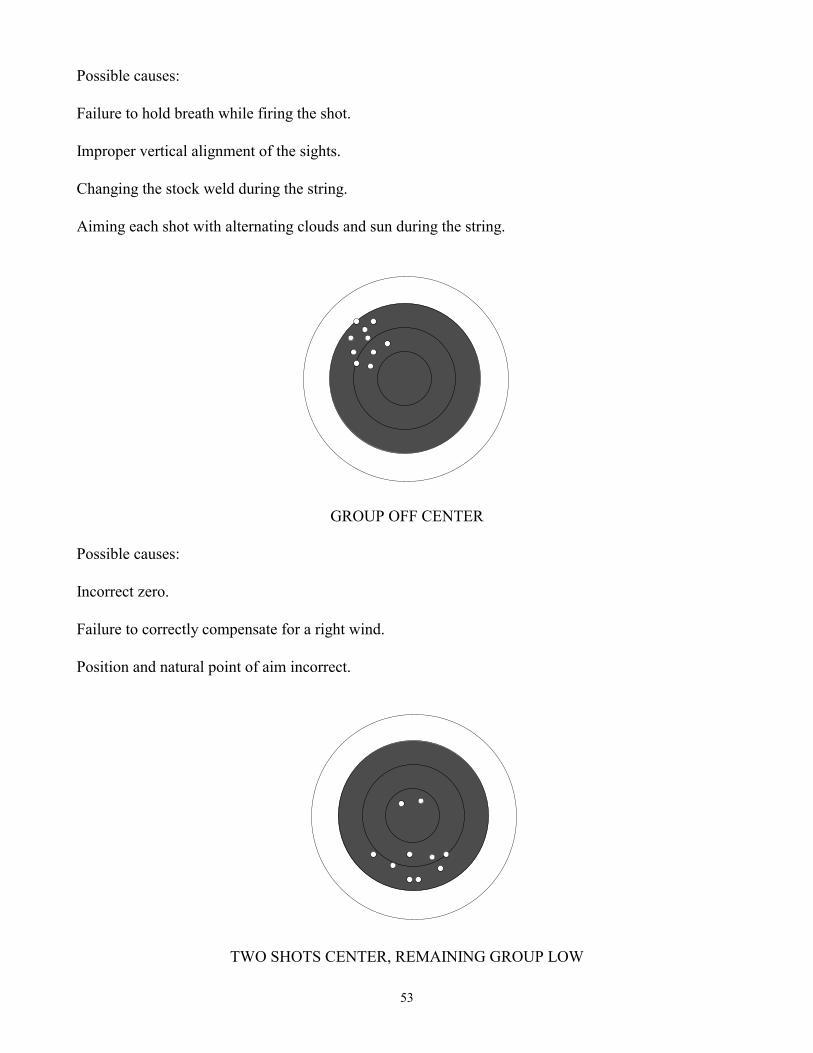
53
Possible causes: Failure to hold breath while firing the shot. Improper vertical alignment of the sights. Changing the stock weld during the string. Aiming each shot with alternating clouds and sun during the string.
x
GROUP OFF CENTER
Possible causes: Incorrect zero. Failure to correctly compensate for a right wind. Position and natural point of aim incorrect.
x
TWO SHOTS CENTER, REMAINING GROUP LOW
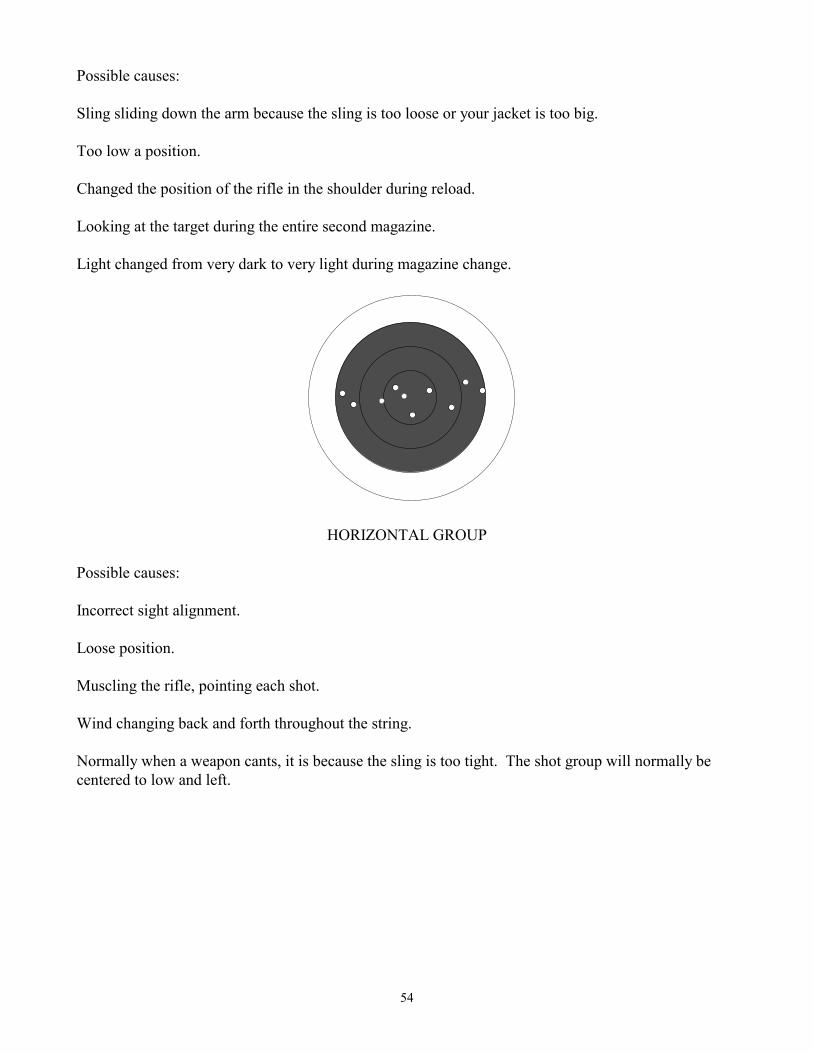
54
Possible causes: Sling sliding down the arm because the sling is too loose or your jacket is too big. Too low a position. Changed the position of the rifle in the shoulder during reload. Looking at the target during the entire second magazine. Light changed from very dark to very light during magazine change.
x
HORIZONTAL GROUP
Possible causes: Incorrect sight alignment. Loose position. Muscling the rifle, pointing each shot. Wind changing back and forth throughout the string. Normally when a weapon cants, it is because the sling is too tight. The shot group will normally be centered to low and left.
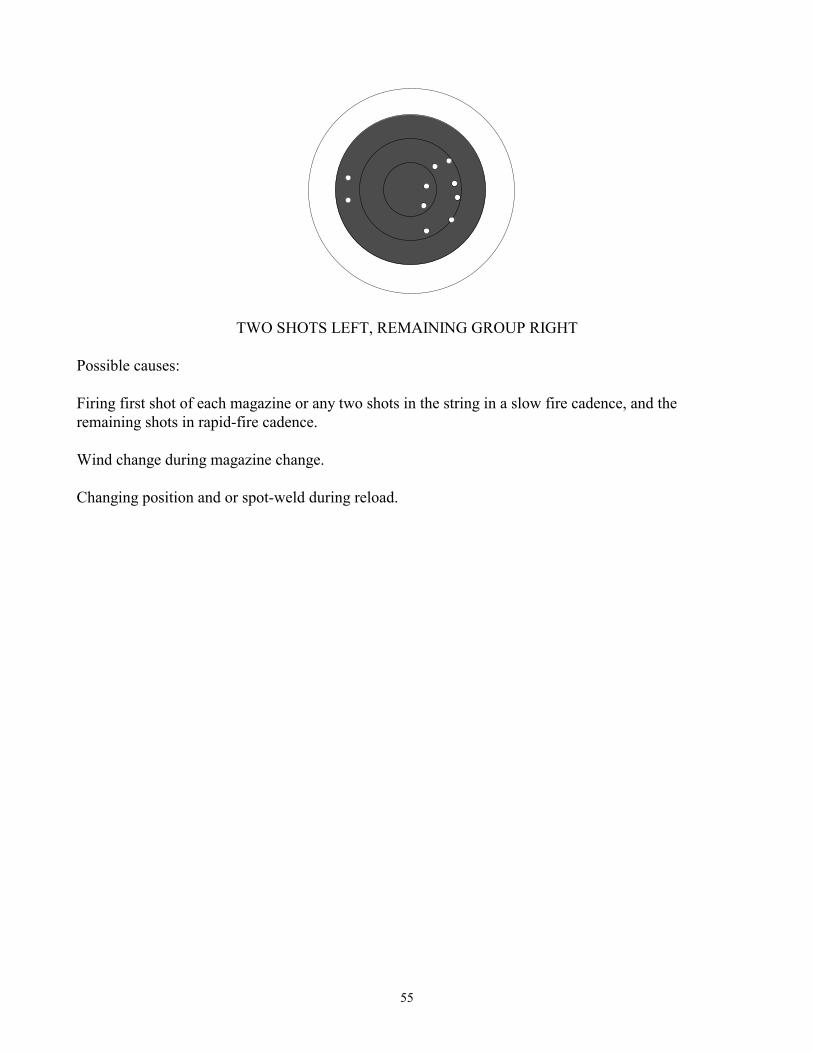
55
x
TWO SHOTS LEFT, REMAINING GROUP RIGHT
Possible causes: Firing first shot of each magazine or any two shots in the string in a slow fire cadence, and the remaining shots in rapid-fire cadence. Wind change during magazine change. Changing position and or spot-weld during reload.

56
CHAPTER 9
USE OF THE DATA BOOK AND PLOT SHEETS
The information you collect in your data book is history that you can decipher and use for future firing events. The proper collection of this information can help determine your light sensitivity, standard zero changes from range to range, zeroes for each distance, effect of temperature on your zeroes, the performance of specific lots of ammunition, or your strengths and weaknesses, all of which can help you develop a training plan. The information can also furnish you with any number of desired variables needed, providing you with the ability to predetermine changes to improve your performance during a match. Learning your history can potentially establish your ability to control your future. The more information you collect, the more knowledge you will have to modify your zero corrections, determine the most efficient sight picture to use, or how to prepare your self and what to expect for particular environmental conditions. You must be complete in your information gathering. You must be specific and exact. One thing you must remember. You are your own coach! At a minimum, what information should you collect? General Information
At a minimum, you should record where, when, what time, what rifle, and what point and relay you are shooting. You want to record the type weapon and serial number so you don’t confuse the information with another rifle. Writing down the relay and firing point where you will be shooting in your data book and on your scorecard can help you remember to shoot on your target.
LIGHT WIND
RELAY
DATE
ST PICTMPH
GUN # SN
PLACE
TARGET NO
TEMP
PERRY, RODRIGUES 3 AUG 02
87 1 NMC1 12612116
WEATHER INFORMATION All weather variables have the most impact on your zeroes. Regardless of the type or brand of scorebook/data book you use, you should fill out every portion related to the weather. Direction and intensity of the light, and the temperature and humidity of the air at a minimum should be recorded. You don’t need to carry around a weather station with you. Some of this information can be gathered the night before on the news. Specific Wind Information Wind is the weather variable that most affects your zeroes and performance. You must be very specific in gathering this information. Everything related to the wind has the potential of drastically changing the outcome of your performance level. The speed, the direction or value, whether it is a tail
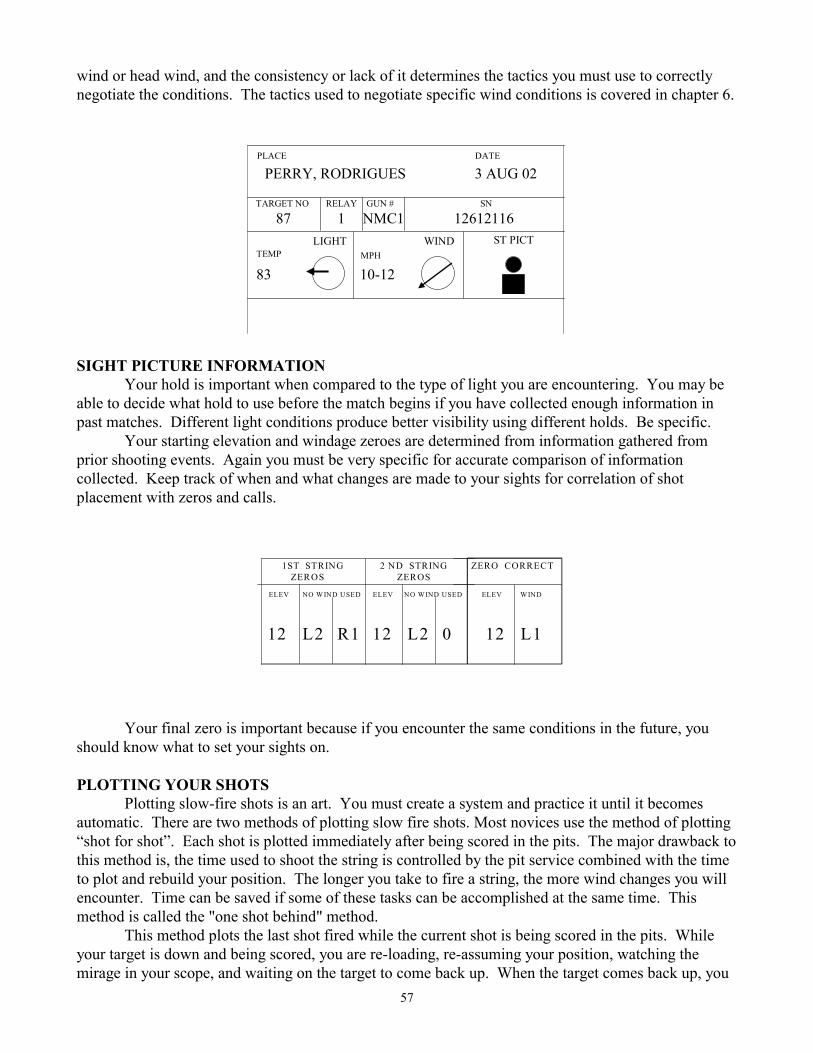
57
wind or head wind, and the consistency or lack of it determines the tactics you must use to correctly negotiate the conditions. The tactics used to negotiate specific wind conditions is covered in chapter 6.
LIGHT WIND
RELAY
DATE
ST PICTMPH
GUN # SN
PLACE
TARGET NO
TEMP
PERRY, RODRIGUES 3 AUG 02
87 1 NMC1 12612116
83 10-12
SIGHT PICTURE INFORMATION Your hold is important when compared to the type of light you are encountering. You may be able to decide what hold to use before the match begins if you have collected enough information in past matches. Different light conditions produce better visibility using different holds. Be specific. Your starting elevation and windage zeroes are determined from information gathered from prior shooting events. Again you must be very specific for accurate comparison of information collected. Keep track of when and what changes are made to your sights for correlation of shot placement with zeros and calls.
1ST STRING ZEROS
ZERO CORRECT2 ND STRING ZEROS
ELEV W INDELEV NO W IND USED ELEV NO W IND USED
12 L2 R1 12 L2 0 12 L1
Your final zero is important because if you encounter the same conditions in the future, you should know what to set your sights on. PLOTTING YOUR SHOTS
Plotting slow-fire shots is an art. You must create a system and practice it until it becomes automatic. There are two methods of plotting slow fire shots. Most novices use the method of plotting “shot for shot”. Each shot is plotted immediately after being scored in the pits. The major drawback to this method is, the time used to shoot the string is controlled by the pit service combined with the time to plot and rebuild your position. The longer you take to fire a string, the more wind changes you will encounter. Time can be saved if some of these tasks can be accomplished at the same time. This method is called the "one shot behind" method. This method plots the last shot fired while the current shot is being scored in the pits. While your target is down and being scored, you are re-loading, re-assuming your position, watching the mirage in your scope, and waiting on the target to come back up. When the target comes back up, you
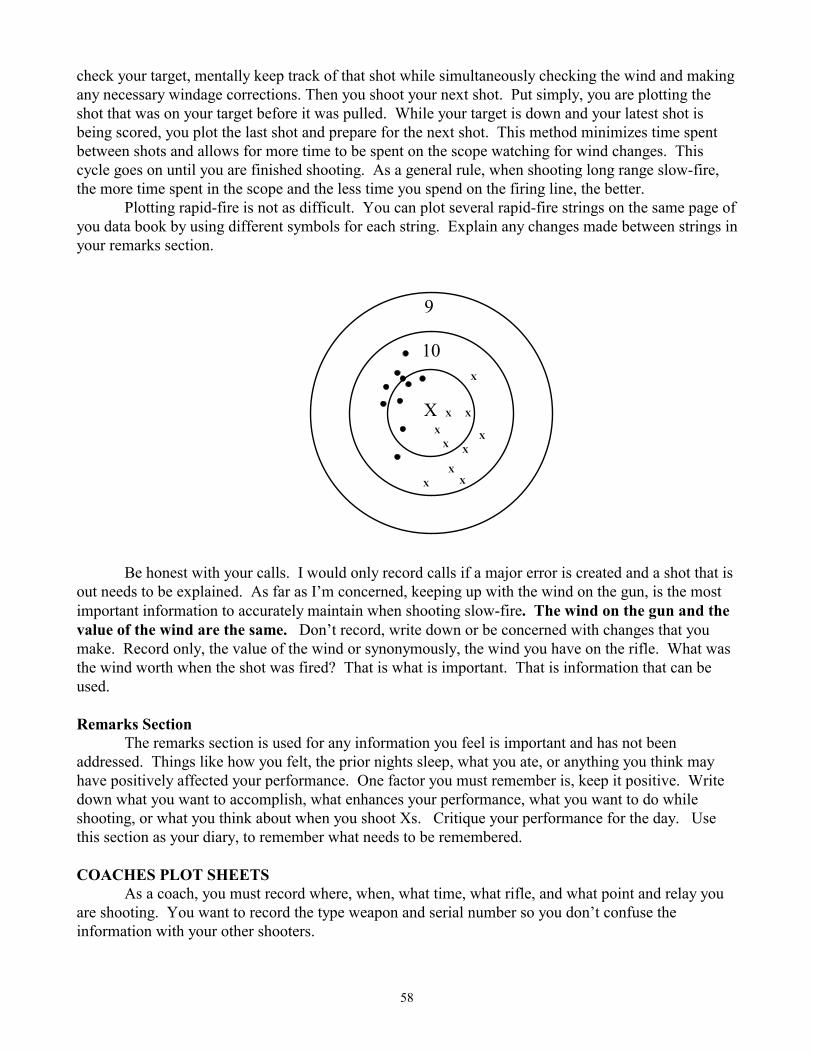
58
check your target, mentally keep track of that shot while simultaneously checking the wind and making any necessary windage corrections. Then you shoot your next shot. Put simply, you are plotting the shot that was on your target before it was pulled. While your target is down and your latest shot is being scored, you plot the last shot and prepare for the next shot. This method minimizes time spent between shots and allows for more time to be spent on the scope watching for wind changes. This cycle goes on until you are finished shooting. As a general rule, when shooting long range slow-fire, the more time spent in the scope and the less time you spend on the firing line, the better.
Plotting rapid-fire is not as difficult. You can plot several rapid-fire strings on the same page of you data book by using different symbols for each string. Explain any changes made between strings in your remarks section.
9
X
10
X
X
X
X
X
X
XX
X
X
Be honest with your calls. I would only record calls if a major error is created and a shot that is
out needs to be explained. As far as I’m concerned, keeping up with the wind on the gun, is the most important information to accurately maintain when shooting slow-fire. The wind on the gun and the value of the wind are the same. Don’t record, write down or be concerned with changes that you make. Record only, the value of the wind or synonymously, the wind you have on the rifle. What was the wind worth when the shot was fired? That is what is important. That is information that can be used. Remarks Section
The remarks section is used for any information you feel is important and has not been addressed. Things like how you felt, the prior nights sleep, what you ate, or anything you think may have positively affected your performance. One factor you must remember is, keep it positive. Write down what you want to accomplish, what enhances your performance, what you want to do while shooting, or what you think about when you shoot Xs. Critique your performance for the day. Use this section as your diary, to remember what needs to be remembered. COACHES PLOT SHEETS As a coach, you must record where, when, what time, what rifle, and what point and relay you are shooting. You want to record the type weapon and serial number so you don’t confuse the information with your other shooters.
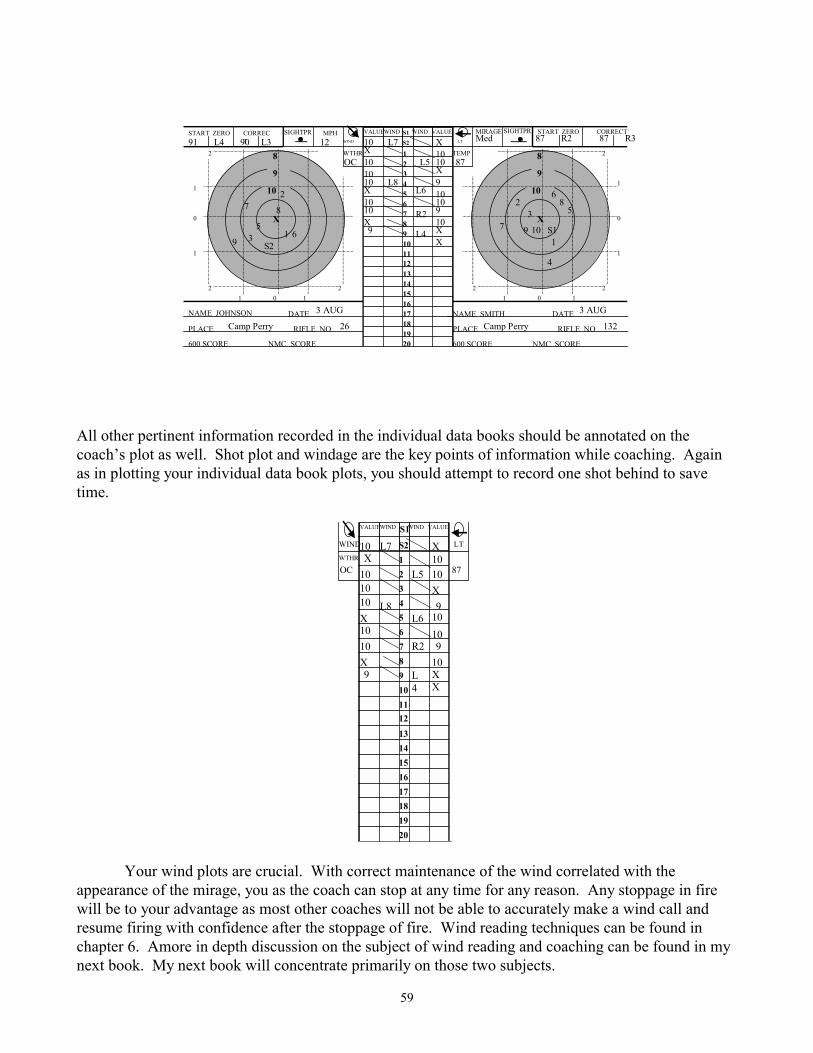
59
X
10
9
8
X
10
9
8WTHR TEMP
LTWIND
MPH SIGHTPR
NAME JOHNSON DATE
PLACE RIFLE NO
NMC SCORE600 SCORE
NAME SMITH DATE
PLACE RIFLE NO
NMC SCORE600 SCORE
MIRAGESIGHTPRSTART ZERO CORRECT
START ZERO CORRECT
0
1
1
1 1 11
1
1
0
0
0
2
2 2
2
2 2
1234567891011121314151617181920
S1
S2
WIND WINDVALUE VALUE
1010
1010
1010
10
1010
10
10 X
X
X
X
XX
9
9
9X
91 L4 87 R290 L3 87 R312 Med
87OC
3 AUG 3 AUG
Camp Perry Camp Perry26 132
L7
L5
L8L6
R2
L49
7
4
3
7
61
2
S2
5
8
68
5
1
2
S1
3
9 10
All other pertinent information recorded in the individual data books should be annotated on the coach’s plot as well. Shot plot and windage are the key points of information while coaching. Again as in plotting your individual data book plots, you should attempt to record one shot behind to save time.
WTHR
LTWIND
1234567891011121314151617181920
S1
S2
WIND WINDVALUE VALUE
1010
1010
1010
10
1010
10
10 X
X
X
X
XX
9
9
9X
87OC
L7
L5
L8L6
R2
L4
Your wind plots are crucial. With correct maintenance of the wind correlated with the appearance of the mirage, you as the coach can stop at any time for any reason. Any stoppage in fire will be to your advantage as most other coaches will not be able to accurately make a wind call and resume firing with confidence after the stoppage of fire. Wind reading techniques can be found in chapter 6. Amore in depth discussion on the subject of wind reading and coaching can be found in my next book. My next book will concentrate primarily on those two subjects.
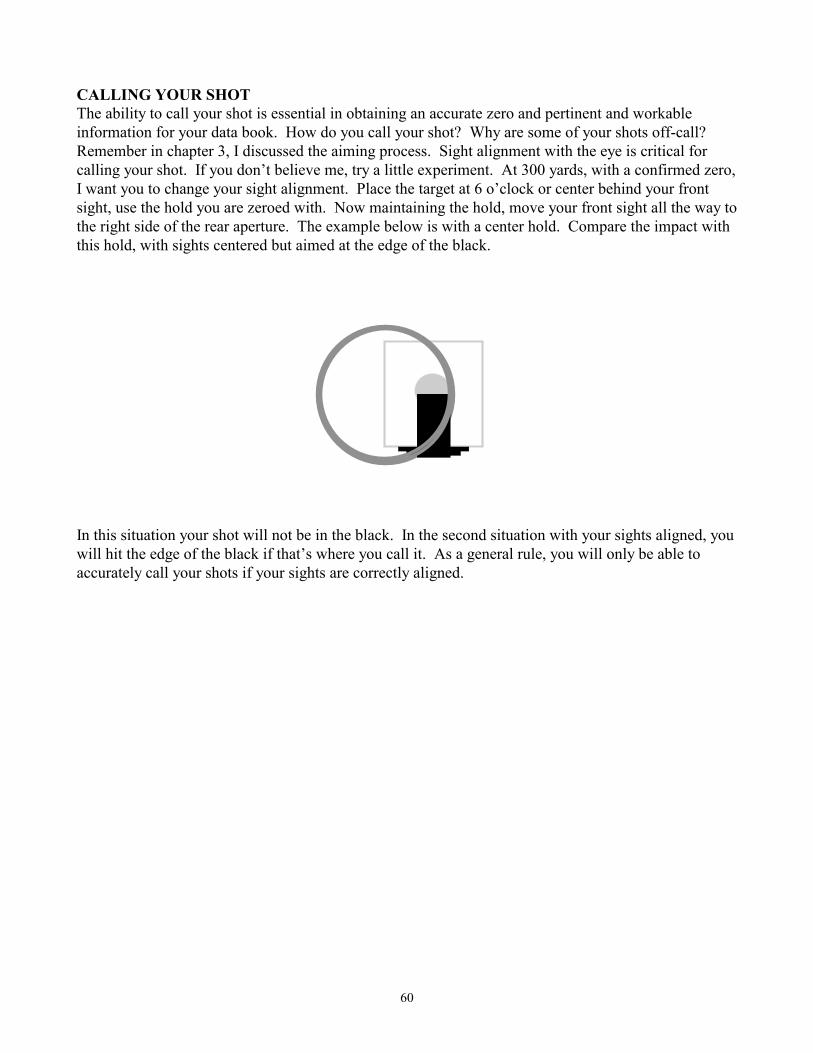
60
CALLING YOUR SHOT The ability to call your shot is essential in obtaining an accurate zero and pertinent and workable information for your data book. How do you call your shot? Why are some of your shots off-call? Remember in chapter 3, I discussed the aiming process. Sight alignment with the eye is critical for calling your shot. If you don’t believe me, try a little experiment. At 300 yards, with a confirmed zero, I want you to change your sight alignment. Place the target at 6 o’clock or center behind your front sight, use the hold you are zeroed with. Now maintaining the hold, move your front sight all the way to the right side of the rear aperture. The example below is with a center hold. Compare the impact with this hold, with sights centered but aimed at the edge of the black.
In this situation your shot will not be in the black. In the second situation with your sights aligned, you will hit the edge of the black if that’s where you call it. As a general rule, you will only be able to accurately call your shots if your sights are correctly aligned.
61
CHAPTER 10
PUTTING IT ALL TOGETHER
ARRIVE ON YOUR RANGE Once you arrive on your range, you need to organize your equipment and thoughts. Find your point and stage your equipment in the assembly area behind it. You should have filled out the known portions of your data book the night before. Fill out all other known information at this time. Prep your rifle, blacken the sights and account for your ammunition. I would not load it in magazines until just before going up on line. Do not set your zeroes until you’re on line. Make this a habit. When you’re called to the line, move your equipment to your point and begin setting it up. Load your magazines for rapid fire at this time. Fill in your data book information with the current weather. Set your sights and leave the windage at no-wind at this time. Set up your timer be it a watch or some other device. You need to control your time while shooting your string. When your prep time begins you may handle your rifles and begin setting up your position. For all stages except offhand, sling up. Now it’s time to start building your natural point of aim. Use your prep period to perfect your positions and prepare your mind for the task at hand. In slow fire events, dry fire for as long as it takes to settle the position, even if it exceeds the prep period. In rapid fire, attempt to mimic the string you’re going to shoot. SHOOTING THE SHOT When your prep period ends, your reflexes and automatic systems must take over. You can only think of one thing at a time. While you’re shooting you must think of shooting. Sight alignment and trigger control, and the latter should be automatic. What should a sequence of firing a string or shot involve? I divide the act of shooting into three stages for any and all methods of fire. They are the three Fs; Foundation, firing, and follow through. Build the foundation correctly and forget about it through that shot or string. Fire the shot by seeing, maintaining and thinking sight alignment in combination with trigger reflex. Automatically follow through and prepare for the next shot.
OFFHAND SLOWFIRE Foundation: Prior to shooting your string, dry fire until your position settles and your NPA stops shifting. Secure the pistol grip with the firing hand. I recommend placing your trigger finger forward on the edge of the magazine well until you have lowered the rifle onto the target. Place your non-firing hand in the correct place on the rifle based on your position. Place the rifle in your shoulder or on your arm, again depending on your position. With your head upright and facing downrange, lower the rifle onto your target and to your face. Attempt to bring the rifle to your face, not your face to the rifle. Once your rifle is in place you must ensure positive head pressure downward on the stock. One method is to raise your head, place your chin on the stock and slide your head down the stock until proper head position is achieved. A shooter that uses this method will have a stock weld with a distinct fold of skin above the stock as displayed on page 13 of the fundamentals chapter. Develop your NPA and check it each shot. Firing: Look through your sights, align them and find the target. Correctly place your finger on the trigger. Take up the slack (go to the bump). Now apply initial pressure. Focus back on the front sight and ensure it is centered in the rear aperture. Glance at the target making your position only, hold the front sight at your desired point of impact. Apply more pressure to the trigger. Glance back and forth
62
between the front sight and target, ensuring everything is aligned to your standard. Once you are satisfied, focus on the front sight and come through with the trigger. Follow Through: You are nothing more than a shock absorber at this time. You become an extension of the rifle. Accept and absorb the recoil. Immediately following recoil, take a breath and begin your exhale. Record your call, the last shot, re-load and rebuild your position and NPA. Do not react to the last shot, prepare for the next one. Check your NPA every shot in offhand. The following is a by the numbers example of what a shooter does to fire an offhand string.
BY THE NUMBERS: OFFHAND
1. Grasp the pistol grip or stock with the firing hand and check trigger finger placement. 2. Place your trigger finger along the side of the receiver. 3. Position your non-firing hand under the rifle to allow adequate support and balance. 4. Place the butt of the weapon in your shoulder. 5. Keeping your head erect, lower the weapon until your firing arm is no longer supporting the
weapon’s weight. 6. Raise your head and chin high and place your chin on the stock. Close your eyes. 7. Slide the side of your face down keeping skin to stock contact, until the correct stock weld and
head pressure has been achieved. 8. Open your eyes and check correct head position by focusing on the front site and ensuring it is
centered in the rear aperture. You should not have to move anything for this to be correct. If the sights do not automatically center with your eye, you do not have correct head position.
9. Check your NPA. Adjust as necessary. 10. Once on target, place your trigger finger on the trigger and apply initial pressure. 11. Re-check your NPA by closing your eyes, settling in your position, and looking back
downrange while maintaining initial pressure on the trigger. 12. Focus back on the front sight and when the blur of the target has settled correctly behind the
front sight, come through with the trigger. Remain focused on the front sight. 13. Follow through. During this time you can either hold the trigger back or release it. Just be
consistent and do the same thing every time. 14. Breathe and call your shot. 15. Perform data book duties and prepare for the next shot.
SITTING AND PRONE RAPID FIRE
Foundation: Generically, building your foundation is essentially the same in any position. Consistency in placement of every part of your body in any given position creates consistency in performance, which normally translates to consistency in score. In all but offhand, build a solid position directly behind the rifle. Your position must sustain you through your string in rapid fire. Once your rifle is in place you must ensure positive head pressure downward on the stock. Use the same method described in the offhand section. Build your NPA by breathing the sights to the desired point on the target. Make note of where key points of contact with the ground are before rising to begin your string. Re-assume the same position on the ground you developed in the prep period by using the key contact points. Close the bolt, place the rifle in your shoulder, Breath the sights into the target, check the NPA, and prepare to fire. This will be repeated on magazine changes. Firing: Take up the slack (go to the bump). Now apply initial pressure. Focus on the front sight and ensure it is centered in the rear aperture. Glance at the target making your position only, hold the front
63
sight at your desired point of impact. Apply more pressure to the trigger. Glance back and forth between the front sight and target, ensuring everything is aligned to your standard. Once you are satisfied, come through with the trigger. Each successive shot fired in rapid fire, is fired using nearly the same system with one exception. Your eye/sight alignment can’t change if your head position and eye relief remains constant. You can therefore concentrate on sight placement on the target. Develop a cadence and trust your position. Do not point each shot, let your breathing and follow through do that. Follow Through: Follow through is done after each shot. That means you breathe each shot. Again, you are nothing more than a shock absorber. Accept and absorb the recoil. Immediately following the recoil of each shot, take a breath and exhale your sights up to the desired position on the target. Make sure you follow through prior to a magazine change and after your last shot. During magazine changes, move as little as possible. Any change in position will result in a change in your NPA. While changing your magazine check the mirage and make any needed sight changes. Re-check your NPA prior to resuming firing. The following is a by the numbers example of a rapid-fire string.
BY THE NUMBERS: RAPID FIRE
1. Sling up and place the non-firing hand in the correct support position under the rifle. 2. Grasp the pistol grip or stock with the firing hand and check trigger finger placement. 3. Place your trigger finger along the side of the receiver. 4. Place the butt of the weapon in your shoulder. 5. Raise your head and chin high and place your chin on the stock. Close your eyes. 6. Slide the side of your face down keeping skin to stock contact, until the correct stock weld has
been achieved. Head pressure down on the stock is very important in controlling the rifle. 7. Open your eyes and check correct head position by focusing on the front site and ensuring it is
centered in the rear aperture. You should not have to move anything for this to be correct. If the sights do not automatically center with your eye, you do not have correct head position.
8. Check your NPA. Adjust as necessary. 9. Once on target, place your trigger finger on the trigger and apply initial pressure. 10. Re-check your NPA by closing your eyes, settling in your position, and looking back
downrange while maintaining initial pressure on the trigger. 11. Focus back on the front sight and when the blur of the target has settled behind the front sight,
come through with the trigger. Remain focused on the front sight. 12. Follow through. During this time you can either hold the trigger back or release it. Just be
consistent and do the same thing every time. 13. Breath. 14. Dry fire throughout your preparation period. 15. At the completion of your prep period, stand. 16. Load and stand by. There is no need to crouch unless you are comfortable in that position. It
will not save you time. The pace of your breathing and your shooting cadence controls time. 17. When you see target movement retake your position. The less you have moved from the
position you developed during the prep period the easier it is to re-obtain nearly the same position.
18. Go through steps 2-12 in rapid succession. If you spend the time obtaining a correct position you won’t have to waste time re-obtaining your position between shots. Position is everything in rapid fire.
19. After your follow through, inhale quickly and exhale, breathing your sights up to the target. Let the amount of air in your lungs control the elevation fine-tuning on the target.

64
20. During the follow through, occasionally check the wind conditions. Look for the wind speed and direction indicator down range as you shoot your string. Do not come out of position, just move your eyes. On the magazine change you should check the mirage through your scope to ensure no changes have taken place.
21. Re-apply initial pressure and fire once your position is settled, you’re focused on the front sight, and the target blur has settled correctly in your sight picture.
22. If your position is properly built, you will develop a cadence and won’t have to worry about re-adjusting anything during your string. Breathing should be the only thing moving your rifle.
PRONE SLOWFIRE
Foundation: Build a solid position directly behind the rifle. Again, use the method described in the offhand section until proper head position and downward pressure on the stock is achieved. Prior to shooting your string, dry fire until your position settles and your NPA stops shifting. Develop your NPA and check it each shot. As in every position, placement of the scope is part of obtaining a correct position. Your scope should be positioned in such a way as to allow you to view down range without moving anything but your head. The less you move in position, the more likely you will not loose that position. Never the less, check your NPA every shot. Firing: Firing prone slow fire is nearly identical to the procedures used in offhand. Once in position look through your sights, align them and exhale them up to the target. Take up the slack (go to the bump) and apply initial pressure. Focus back on the front sight and ensure it is centered in the rear aperture. Glance at the target making your position only, hold the front sight at your desired point of impact. Apply more pressure to the trigger. Glance back and forth between the front sight and target, ensuring everything is aligned to your standard. Once you are satisfied, focus on the front sight and come through with the trigger. Remember the more time you spend on the rifle the more time you will be blind to the wind. The first good sight picture you see will be the best one for that shot. Follow Through: Accept and absorb the recoil. Immediately following recoil, take a breath and begin your exhale. Record your call, the last shot, re-load and rebuild your position and NPA. Stay in the scope if you are not on the gun. Check your NPA every shot. The less you move between shots the less chance you have of loosing your NPA. Do not react to the last shot, prepare for the next one. The following is a by the numbers example of a prone slow fire string.
BY THE NUMBERS: PRONE SLOW FIRE
1. Sling up and place the non-firing hand in the correct support position under the rifle. 2. Grasp the pistol grip or stock with the firing hand and check trigger finger placement. 3. Place your trigger finger along the side of the receiver or stock. 4. Place the butt of the weapon in your shoulder. 5. Check the mirage through your scope and note any changes. Make sight corrections as needed. 6. Raise your head and chin high and place your chin on the stock. Close your eyes. 7. Slide the side of your face down keeping skin to stock contact, until the correct stock weld has
been achieved. 8. Open your eyes and check your NPA. Adjust as necessary. 9. Check correct head position by focusing on the front site and ensuring it is centered in the rear
aperture. You should not have to move anything for this to be correct. If the sights do not automatically center with your eye, you do not have correct head position.
10. Once on target, place your trigger finger on the trigger and apply initial pressure.
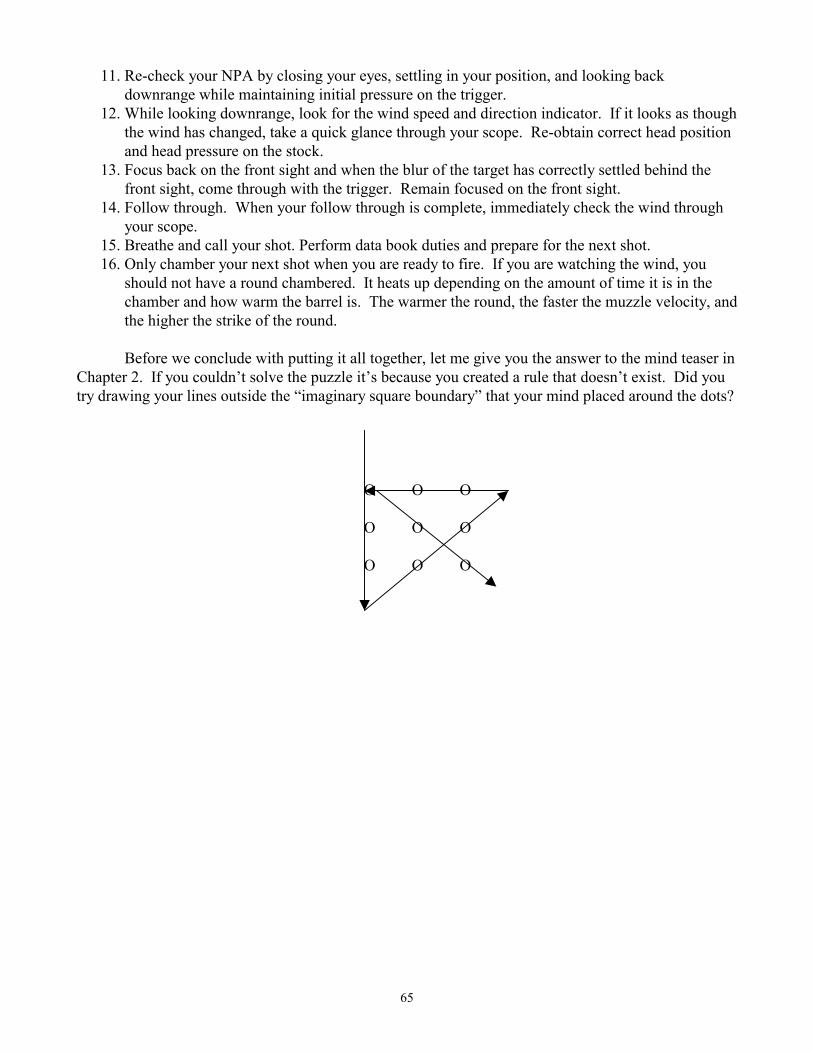
65
11. Re-check your NPA by closing your eyes, settling in your position, and looking back downrange while maintaining initial pressure on the trigger.
12. While looking downrange, look for the wind speed and direction indicator. If it looks as though the wind has changed, take a quick glance through your scope. Re-obtain correct head position and head pressure on the stock.
13. Focus back on the front sight and when the blur of the target has correctly settled behind the front sight, come through with the trigger. Remain focused on the front sight.
14. Follow through. When your follow through is complete, immediately check the wind through your scope.
15. Breathe and call your shot. Perform data book duties and prepare for the next shot. 16. Only chamber your next shot when you are ready to fire. If you are watching the wind, you
should not have a round chambered. It heats up depending on the amount of time it is in the chamber and how warm the barrel is. The warmer the round, the faster the muzzle velocity, and the higher the strike of the round.
Before we conclude with putting it all together, let me give you the answer to the mind teaser in Chapter 2. If you couldn’t solve the puzzle it’s because you created a rule that doesn’t exist. Did you try drawing your lines outside the “imaginary square boundary” that your mind placed around the dots?
O O O O O O O O O
66
ANSWERS TO FREQUENTLY ASKED QUESTIONS
Why is it so important to completely fill out my data book? A: You are your own coach. All information you can collect will make you able to predict the future. You can determine your light sensitivity, the effect wind has on your load, the best sight picture to use on days with a particular environment, your normal zero changes from different distances, particular zeroes for particular ranges or any other desired data needed to produce wanted results. Why does it appear I have to alter my positions from firing range to firing range. A: Not all ranges’ firing lines and targets are at the same level. Some targets are higher and some are lower than the firing lines. Your positions will therefore slightly change which in turn will slightly change your zeroes.
How do you accurately call your shots? A: Primarily by seeing where the front sight is in relationship to the rear aperture. If your sights are correctly aligned then the position of the front sight on the target will be the indicator. But be aware that sight alignment is much more critical. When dry firing, why can I produce better shots? A: Because there is no fear of failure. When dry firing only you know if mistakes are made. There is no visible mistake for others to see. What is the primary cause for my calls to be misplaced in offhand? A: Failure to see misaligned sights because you were looking at the target. Why do I have to move my rear foot back throughout my offhand string in order to maintain my NPA? A: You are not keeping your feet, knees and hips parallel. Ultimately you are bending at the knees and not correctly using the back bend technique. What causes my offhand position to sway forward and or backwards? A: The position of my toes. If your toes are lower than your heels you will sway forward. If your toes are too close together (pigeon toed) you will also sway forward. If your toes are too far apart (feet externally rotated or everted) you will tend to fall backwards. There is a happy medium. Only you can find this position on a given range. Why does movement increase in offhand when I begin pulling the trigger? A: In the process of squeezing the trigger you are tightening other muscles than just what’s needed to pull the trigger. Normally when this situation occurs the firing hand tightening around the pistol grip causes the movement. Is it more important to see shot holes or mirage when shooting rapid fire? A: It is more important to see the mirage but you must depend on accurate zeros. In some cases, shooters that focus on the target to see impacts have clicked themselves out because they saw what they thought were shot holes when in fact they were blemishes on the target. Why are my second groups in rapid fire not in the same place as the first group?
67
A: The sling is slipping down your arm between strings, either because the sling was too loose or your jacket is too big and it is actually slipping on your arm. You must check he position of your sling between strings and make sure it is correct. What causes my weapon to cant during a string? A: Usually the cause is a sling that is too tight. Also keep in mind; if you don’t counter cant your weapon as you put it in your shoulder, when you role into position the weapon will be canted. What causes my non-firing arm to slip out during rapid-fire strings? A: Either your sling is too short and tight or your firing leg is cocked up too far. What normally causes a pulse beat in sitting? A: Pants too tight around the waist or feet too close together in cross-legged, which puts pressure on the arteries in the front of the lower legs. Resolve these problems by unbuttoning your pants, which will release pressure around your waist. To eliminate the pulse beat from the arteries in the front of your lower legs make sure you have at least a hand thickness between your ankles if you use the cross legged position. What causes my shots to be off call at the 600 Yd line? A: Staring at the sights too long resulting in a burned retinal image. Sights misalign without you seeing it. What causes my windage calls to be opposite at long range? A: Wind changed while you were on the gun and changed back after your shot but before you checked the mirage in your scope. While shooting the 600 slow fire, why does my zero appear to rise or fall as I shoot my string? A: Barrel Heat or barrel mirage will make you aim lower making it appear your zero is rising and conversely if your ammo is allowed to heat up it will make your zero appear to fall. The round can heat up by either sitting it in the sun or in the barrel too long, and the strike of the round will rise. The strike of the round rises because the bullet velocity increases due to the heat of the powder in the bullet that increases the burn rate. Why do I have intermittent shots out the bottom while shooting long range? A: The most common cause is looking at the target. To see the target better you subconsciously lower your sights to get them out of the way.
Another possibility is you center the target in the rear aperture and maintain a 6’oclock hold with the front sight, which misaligns the sights. This actually lowers the front sight in the rear aperture resulting in a low shot.