Embed Size (px)
Citation preview

Page 1
Shed Building 2.0Custom 8’ by 8’ by 8’ Shed Plans
Designed for
Sheds of Hope
Shed provided by Local Churches for Sheds of HopeDesigned by ChurchGPS.org
Version 2.0 Build 5.5
Cen
ter a
54”
wid
e do
or o
peni
ng
Doo
r - R
ight
Doo
r - L
eft -
Wid
est t
o th
e Le
ft

Page 2Building Sheds for Disaster Victims
Sheds of Hope Teams have built over 1000 sheds for families. You can help during the next di-saster. Here’s a way that your group can help, whether it’s in Oklahoma or your own community.
Any Size Group or Church Can HelpChurchGPS is providing a free plan to help groups in North Texas and Oklahoma pre-build pan-els for sheds that can be assembled by teams at the disaster site. The plan will enable you to cut, prepare, and assemble 2, 4, or 6 sheds at a time, depending on how many helpers you can gather. A church parking lot is an ideal location for doing the work. Just build and flat-stack the panels for each shed.
A material list is provided and the church or group can order these materials from their lo-cal lumber yards. The idea is to build the sections, floor, walls and roof trusses. These can be shipped flat to OK and assembled on site. You can arrange for Sheds of Hope to pick up and transport the pre-built panels to the site, where volunteers will assemble them on the homeown-er’s property.
At the moment, we are focusing on Oklahoma, but these plans can be used anywhere.
Step 1. Download a Free PDF Shed Kit instructions from ChurchGPS. This will provide you with…
The material order list for 1, 2, 4 or 6 shedsInstructions on how to build your shed at your churchInstructions on how to set up the shed at the site
Step 2. Have a fund raiser for the sheds (allow)Material for 1 Shed allow $850 + $150 for pick-up and delivery – total $1,000Material for 2 Sheds allow $1,700 + $250 for pick-up and delivery – total $1,950Material for 4 Sheds allow $3,400 + $350 for pick-up and delivery – total $3,750Material for 6 Sheds allow $5,100 + $450 for pick-up and delivery – total $5,550 – This is a full trailer load.
Step 3. Arrange a work day at the church. 10 to 20 people who know what they are doing could build 4 to 6 sheds in a day. Don’t try and do too much in one day.
Get a Group to Build Sheds
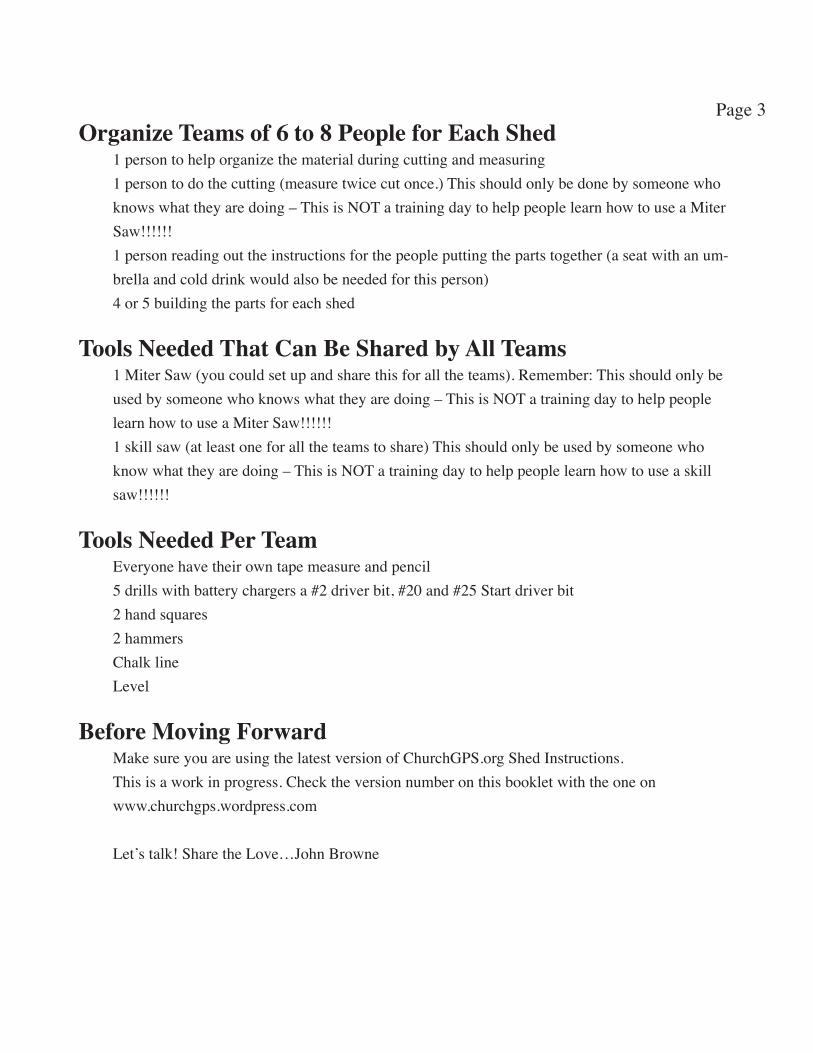
Page 3Organize Teams of 6 to 8 People for Each Shed
1 person to help organize the material during cutting and measuring1 person to do the cutting (measure twice cut once.) This should only be done by someone who knows what they are doing – This is NOT a training day to help people learn how to use a Miter Saw!!!!!!1 person reading out the instructions for the people putting the parts together (a seat with an um-brella and cold drink would also be needed for this person)4 or 5 building the parts for each shed
Tools Needed That Can Be Shared by All Teams1 Miter Saw (you could set up and share this for all the teams). Remember: This should only be used by someone who knows what they are doing – This is NOT a training day to help people learn how to use a Miter Saw!!!!!!1 skill saw (at least one for all the teams to share) This should only be used by someone who know what they are doing – This is NOT a training day to help people learn how to use a skill saw!!!!!!
Tools Needed Per TeamEveryone have their own tape measure and pencil5 drills with battery chargers a #2 driver bit, #20 and #25 Start driver bit 2 hand squares2 hammersChalk lineLevel
Before Moving ForwardMake sure you are using the latest version of ChurchGPS.org Shed Instructions. This is a work in progress. Check the version number on this booklet with the one on www.churchgps.wordpress.com
Let’s talk! Share the Love…John Browne

Page 4
Order List For...
Treated Lumber Flooring 2 - 4”x6”x8’ 10 - 2”x4”x8’ 2 - 3/4”x4’x8’ Treated Ply IF Optional Step* is Used 3 - 2”x4”x8’ 3 - 2”x2”x8’ 1 - 2”x4”x10’ 1 - 2”x6”x10’ 7 - 8” Joist Hangers IF Optonal Ramp* is Used 4 - 2”x6”x10’ 3 - 2”x4”x8’ 5 - 6” Hurricane Ties
Non-Treated Lumber Walls 44 - 2”x4”x8’ 5 - 2”x4”x10’ 3 - 2”x2”x8’ LP Smart Side and Trim 8 - 10mm x4’x8’ LP Siding 11 - 1”x4”x16’ LP Trim 1 - 1”x4”x16’ LP Trim or Subsuite LP Smart Trim with Treated Lumber 22 -1”x4”x8’ 2 -1”x6”x8’
Shed-in-a-Bucket Screws 1-1/4” 200 1lb Screws 1-5/8” 300 1lb12ozs Screws 2” 350 2lb10ozs Screws 2-1/2” 300 4lb10ozs Screws 3-1/2” 250 4lb12ozs 6 - 9” ‘T’ Hinges 1 - 6” Door Lock Latch 2 - 6” Bolt Latches 20 - 6” Hurricane Ties 1 - 7/64 Drill Bits 2PK 1 - Screws for Hinges 12x2 1 - 2” Metal Power Bit 5PK
Roof 3 - 7/16”x4’x8’OSB 1 Roll of 15lb Roofing Felt 2 lbs of Roofing Nails 4 - 10’ Galv’d Drip Edge 3 Bundles of Architectural 1 Bundle of 3-Tab Shingles
Treated Lumber Flooring 4 - 4”x6”x8’ 20 - 2”x4”x8’ 4 - 3/4”x4’x8’ Treated Ply IF Optional Step* is Used 5 - 2”x4”x8’ 5 - 2”x2”x8’ 2 - 2”x4”x10’ 2 - 2”x6”x10’ 14 - 8” Joist Hangers IF Optonal Ramp* is Used 8 - 2”x6”x10’ 6 - 2”x4”x8’ 10 - 6” Hurricane Ties Non-Treated Lumber Walls 88 - 2”x4”x8’ 10 - 2”x4”x10’ 6 - 2”x2”x8’
LP Smart Side and Trim 16 - 10mm x4’x8’ LP Siding 22 - 1”x4”x16’ LP Trim 2 - 1”x4”x16’ LP Trim or Subsuite LP Smart Trim with Treated Lumber 44 -1”x4”x8’ 4 -1”x6”x8’
Shed-in-a-Bucket Screws 1-1/4 - 400 Screws 1-5/8 - 600 Screws 2 - 700 Screws 2-1/2 - 600 Screws 3-1/2 - 500 12 - 9” ‘T’ Hinges 2 - 6” Door Lock Latch 4 - 6” Bolt Latches 40 - 6” Hurricane Ties 2 - 7/64 Drill Bits 2PK 2 - Screws for Hinges 12x2 2 - 2” Metal Power Bit 5PK
Roof 5 - 7/16”x4’x8’OSB 1 Roll of 15lb Roofing Felt 3 lbs of Roofing Nails 8 - 10’ Galv’d Drip Edge 5 Bundles of Architectural 1 Bundle of 3-Tab Shingles
Treated Lumber Flooring 8 - 4”x6”x8’ 40 - 2”x4”x8’ 8 - 3/4”x4’x8’ Treated Ply IF Optional Step* is Used 9 - 2”x4”x8’ 9 - 2”x2”x8’ 4 - 2”x4”x10’ 4 - 2”x6”x10’ 28 - 8” Joist Hangers IF Optonal Ramp* is Used 16 - 2”x6”x10’ 12 - 2”x4”x8’ 15 - 6” Hurricane Ties Non-Treated Lumber Walls 176 - 2”x4”x8’ 20 - 2”x4”x10’ 9 - 2”x2”x8’
LP Smart Side and Trim 32 - 10mm x4’x8’ LP Siding 44 - 1”x4”x16’ LP Trim 3 - 1”x4”x16’ LP Trim or Subsuite LP Smart Trim with Treated Lumber 88 -1”x4”x8’ 6 -1”x6”x8’
Shed-in-a-Bucket Screws 1-1/4 - 800 Screws 1-5/8 - 1200 Screws 2 - 1400 Screws 2-1/2 - 1200 Screws 3-1/2 - 1000 24 - 9” ‘T’ Hinges 4 - 6” Door Lock Latch 8 - 6” Bolt Latches 80 - 6” Hurricane Ties 4 - 7/64 Drill Bits 2PK 4 - Screws for Hinges 12x2 4 - 2” Metal Power Bit 5PK
Roof 9 - 7/16”x4’x8’OSB 1 Roll of 15lb Roofing Felt 6 lbs of Roofing Nails16 - 10’ Galv’d Drip Edge 8 Bundles of Architectural 2 Bundle of 3-Tab Shingles
1 Shed 2 Sheds 4 Sheds
Shed-in-a-Bucket@The Home Depot SKU# 0000-177-931 Qty 1 0000-735-034 Qty 1 0000-735-064 Qty 1 0000-735-068 Qty 1 0000-177-313 Qty 1 0000-697-524 Qty 6 0000-240-184 Qty 1 0000-854-339 Qty 2 0000-102-924 Qty 20 0000-382-093 Qty 1 0000-252-514 Qty 1 0000-406-605 Qty 1 Allow$230+Tax
0000-566-721 Qty 4

Page 5
When you see this Blue Bar across the top of the page this indicates
a BREAK in the process.
1. Take a water break...
2. Make notes that may help improve the building sequence for
yourselves and others
3. When finished with the shed, please send your
notes and recommendations to [email protected]
Helping to Improve the Building Process

Page 6
Tools Needed To Pre-Cut Material List
2 People who know how to use a Miter Saw
2 People who know how to use a Circular Saw
Use All Tools According to the Guidelines in the Owner’s Manual

Page 7
Start and End with PrayerGive God thanks for
His grace and your ability to work on this project today
Give God thanks for
Safety of all in traveling to get to the site today
Give God thanks for
The weather
Ask God’s Blessing on
the people who will receive this shed
Ask God’s Blessing on
All who work on this shed and that we will serve each other

Page 8
Cutting List for ONE (1) Shed - Page 1
Treated LumberCut 2 - 4 x 6 96” long Skids
2”
45°Cut each end to these sizes
Keep the crown / hump to the top when marking the 45º cuts on each end
Get a felt tip black marker and write the name that is underlined on all cut pieces. Example: “Saw Horse”
Note: Write the Size and Name on the Top Edge of the Board. This will be very helpful when the team starts to build the parts. 1. To find the top edge of the board, first find the crown (keep the hump of the joist or stud up). If the board is straight, pick an edge. 2. Why? When the team is building the parts, they will see the name and the size on the top edge of each board -- They will know they are using the right part, and they will know they are keeping the boards with the crown up3. Most importantly - It also means that the writing will be hidden when the shed is built
Treated LumberCut 7 - 2 x 4 92-7/8” long JoistsCut 2 - 2 x 4 92” long Side Joist StringersCut 1 - 2 x 4 96” long Door End Joist
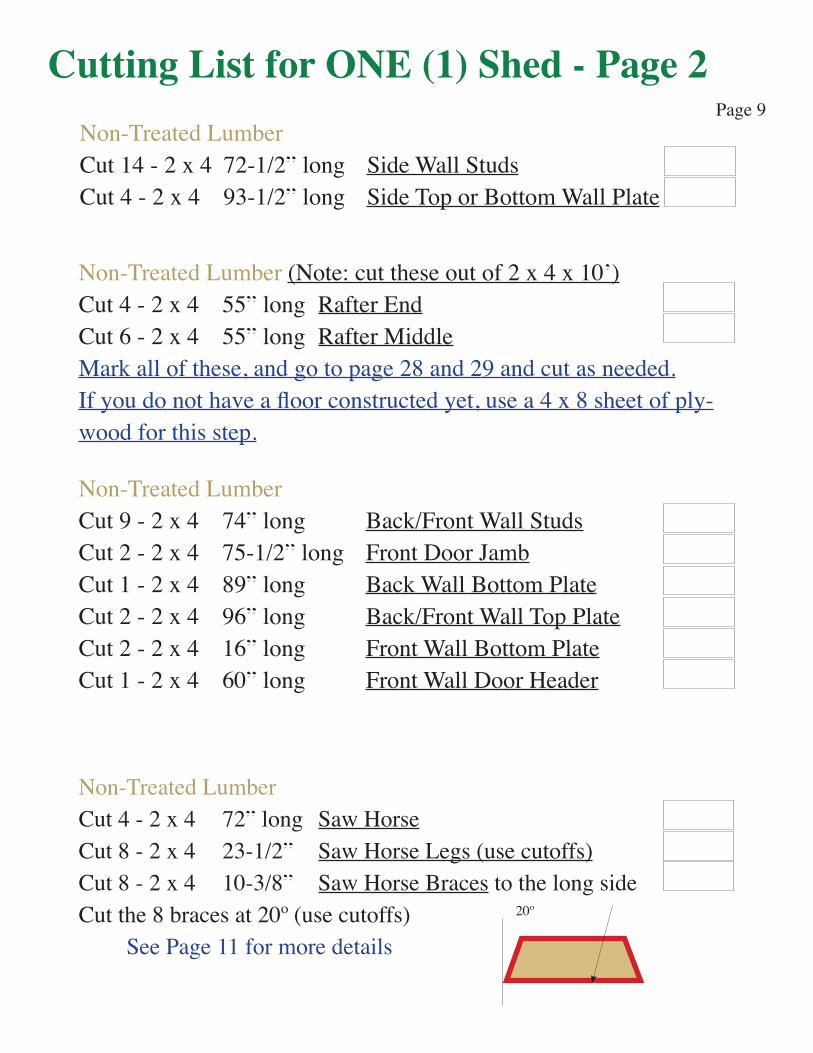
Page 9Non-Treated LumberCut 14 - 2 x 4 72-1/2” long Side Wall StudsCut 4 - 2 x 4 93-1/2” long Side Top or Bottom Wall Plate
Cutting List for ONE (1) Shed - Page 2
Non-Treated Lumber (Note: cut these out of 2 x 4 x 10’)Cut 4 - 2 x 4 55” long Rafter EndCut 6 - 2 x 4 55” long Rafter MiddleMark all of these, and go to page 28 and 29 and cut as needed. If you do not have a floor constructed yet, use a 4 x 8 sheet of ply-wood for this step.
Non-Treated LumberCut 9 - 2 x 4 74” long Back/Front Wall StudsCut 2 - 2 x 4 75-1/2” long Front Door JambCut 1 - 2 x 4 89” long Back Wall Bottom PlateCut 2 - 2 x 4 96” long Back/Front Wall Top PlateCut 2 - 2 x 4 16” long Front Wall Bottom PlateCut 1 - 2 x 4 60” long Front Wall Door Header
Non-Treated LumberCut 4 - 2 x 4 72” long Saw HorseCut 8 - 2 x 4 23-1/2” Saw Horse Legs (use cutoffs)Cut 8 - 2 x 4 10-3/8” Saw Horse Braces to the long sideCut the 8 braces at 20º (use cutoffs) See Page 11 for more details
20º

Page 10
Cutting List for ONE (1) Shed - Page 3Non-Treated LumberCut 4 - 2 x 4 at 45º 74-1/2” long point DoorCut 2 - 2 x 4 at 45º 25” long point Door RtCut 2 - 2 x 4 at 45º 27-1/2” long point Door LtCut 1 - 2 x 4 18” long Door Rt MdlCut 1 - 2 x 4 20-1/2” long Door Lt Mdl
Predrill and screw miter corners with 3-1/2” and 2-1/2” screws
25”
74 1/2”
Door - Right
Bottom
of Door
31” 33”
Top Of D
oor
27-1/2”
74 1/2”
Door - LeftB
ottom of D
oor
31” 33”
Top Of D
oor
3 1/2 2 1/2

Page 11
RoofCut 2 - 4-5/8” x 96” strips of the side
of a 7/16” x 4’ x 8’ OSB sheet for each roof
TrimCut the trim to be shipped with the shed
Cut 4 @ 75” x 3-1/2” Side Corner Trim
Cut 2 @ 94-3/8” x 3-1/2” Side Top Trim
Cut 2 @ 77” x 3-1/2” Door Side Trim
Cut 4 @ 76-1/2” x 3-1/2” Door Trim
Cut 1 @ 63” x 3-1/2” Door Top Trim 1
Cut 1 @ 62” x 3” Door Top Trim 2
Cut 3 @ 19-1/2” x 5-1/2” Door Cut To Fit
Cut 3 @ 19” x 5-1/2” Door Cut To Fit
Cut 2 @ 54” x 3-1/2” then cut 20º on the ends
Cut 2 @ 53-3/4” x 3-1/2” then cut 20º on the ends
Cut 2 @ 76-3/4” x 3-1/2” one end at 20º to the right
Cut 2 @ 76-3/4” x 3-1/2” one end at 20º to the left
76-3/4”These are all cut with 90º ends
53-3/4”
53-3/4”

Page 12
Make 2 saw horses 23-1/2” high by 6 ft. wide
Materials Needed 4 - 2” x 4” x 8’Cut 4 - 72” and 8 - 23-1/2” (from cutoffs)
Cut 8 braces as needed (from cutoffs)
Cut 8 - 10-3/8” braces to the long
pointCut at 20º
Apply one to each side
Then slide in the cross member
Measure down 4-9/16” from the end on the inside and put a 20º line
No need to put screws in Makes it easy to store
But if it makes you feel better, go ahead!
Preparation - Note: 2 Saw Horses are Needed for Each Team Building A Shed at the Same Time
2 1/2

Page 13
Roof and Wall Section Overview
Truss 28-7/8”
4-3/4” Truss 1
1/2”
2”
3/8” PlywoodOverhangor 1 1/8” if Trim is not Installed
3/4
Plywood 4-5/8”Strip
Plywood 48”Sheet
Top Edge of Plywood Strip 3”from End of Truss
Trim Along Top of
Side Wall94-3/8” Long
Top Edge of Truss 51-1/16”

Page 14
Treated LumberRunners 2 - 4” x 6” x 8’
Set runners on saw horses. Cut the ends and mark joists layout from template
Door End
Level Saw Horses in both directions before you begin
2”
45°
96”
Flooring

Page 15
Door End
Mark the joists on the 92” Side Joist Stringers
15-1/4”15-1/4”15-1/4”15-1/4”15-1/4”14-1/4”
Floor JoistsTreated Lumber 10 - 2” x 4” x 8’
Side Stringers Cut Two @ 92”
Joists Cut Seven @ 92-7/8”
If you have a template - Set floor joists across runners and lay out the side joists
from template, keeping the template to the door end
Note SizeStart Here
1-1/4” 2-3/4”
Line up the joists with side rail marks and fasten them with three 3-1/2” screws at
each joint. Note: keep the crown of the joist up
Door End
2-3/4”
46-1/2”45-1/2”1-1/4”
3 1/2
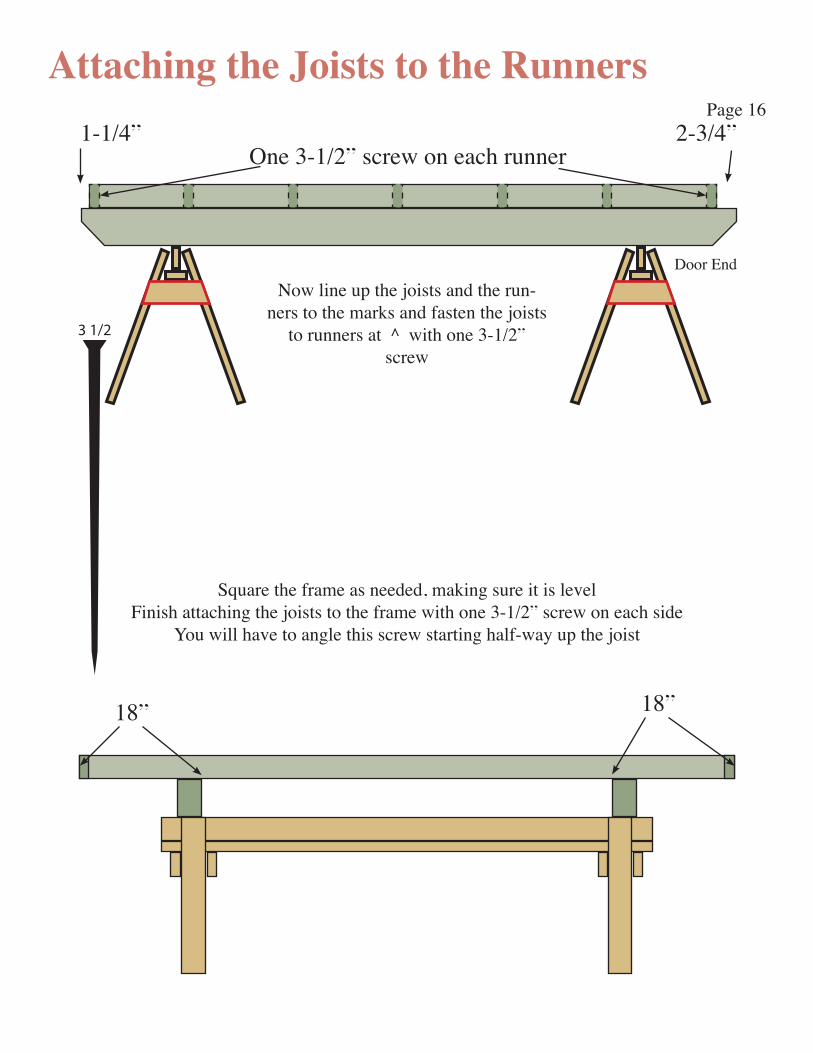
Page 16
Now line up the joists and the run-ners to the marks and fasten the joists
to runners at ^ with one 3-1/2” screw
Square the frame as needed, making sure it is level Finish attaching the joists to the frame with one 3-1/2” screw on each side
You will have to angle this screw starting half-way up the joist
Door End
18” 18”
1-1/4” 2-3/4”One 3-1/2” screw on each runner
Attaching the Joists to the Runners
3 1/2

Page 17With the frame attached to the runners and everything square and level attach a 2” x 4” x 8’ to door end secure to runners and joists with 2-1/2” screws pulling each joist together
Attach a Hurricane Tie with 1-1/4” screws to each joist and runner Keep the ties to the inside along the door end and back wall
Attach One
2” x 4” x 96” Joist at the Door End
Door End
Before Flooring
2 1/2
1 1/4

Page 18
When you see a Red Bar across the top of the page this indicates an
OPTIONAL STEP in the process
If you DID order the material for the Optional Step or Ramp
Turn to the Step or Ramp page and proceed with the one to be built
If you did NOT order the material for the Optional Step or Ramp
Skip to the next page that does not have a Red Bar along the top
Red Bar at the Top means...

Page 19
Model with Optional Front Door Step
Cut 2 - 54”
Cut 5 - 48”
Material neededTreated 3 / 2” x 4” x 8’1 / 2” x 4” x 10’ 3 / 2” x 2” x 8’1 / 2” x 6” x 10’ 7 / 8” Joist Hangers100 / 1 1/4” screws
Frame with 3” screws and square before installing step
Cut as needed and secure a 2” x 2” treated filler on top of each step joist allow a 1” space behind the step tread
1” space
Center the step on the door side - slide the step frame under the floor joists until step is 1 in away from the joist.
Use 6 - 8 in joist hangers to secure the step
Fasten 2 - 2” x 6” x 56” allowing a 1” over hang along front and sides

Page 20
Flush filler edge with joist
Pull step frame tight and make sure it is square to the frame and centered on the door end
Cut and Fasten 2 - 2” x 6” x 56” allowing a 1” over hang along front and sides
Joist hanger locations
Attach to inside of front double joist and the joist furthest back from the front door
Model with Optional Front Door Step

Page 21
Fasten 8 - 2” x 6” x 56” allowing a 1” over hang along sides to 5 - 48”
joists spaced evenly
Note: Start the first ramp tread flush with the ends of the ramp joists
You don’t need to flush this
end as it will be in the ground
Just evenly space the treads
Model with Optional Front Door Ramp
5 / 48” long12º Cut
Material NeededTreated Lumber 3 / 2” x 4” x 8’4 / 2” x 6” x 10’5 / 6” Hurricane Ties25 / 1 1/4” screws
Allow about a 1/4” for spacing

Page 22
When attaching the Hurricane Ties to the floor joist along the front of the door...
First, see the next page to see how to mark the Location of the Hurricane Ties
Then, if the floor is not installed yet - flush the top of the joist
to the top of the Hurricane Tie and secure to the joist with 5 - 1 1/4” screws
Flush the Hurricane Tie to the top of the floor
joist or 1/2” below the floor if installed
Provide a ziplock bag and put 60 / 1 1/4” screws and 12 / 3” screws in it
Secure the bag to the underside of the ramp for the
site crew to have the right screws for installing the ramp to the shed
Note this ramp tread will have to be re-moved to secure the ramp to the Hurricane Ties on site - Please don’t put these screws
too deep - leave them at the surface
Model with Optional Front Door Ramp

Page 23This ramp will be attached on the field to the 5 - 6” Hurricane Ties
Hold down 1” from top of floor to top of ramp
This allows the door to open
Ground level
Attach a Hurricane Tie with 1 1/4” screws to floor joist at each ramp joist
Have 4 people hold up the ramp and one person get un-der it and when it is in place mark the joists from below. Remember to Center the Ramp and hold it down the 1”
to allow the door to open.
Apply the Hurricane Ties to the side of the building
Take some scrap wood and put it in between the ties to keep people from catching on them while transporting the shed
Model with Optional Front Door Ramp

Page 24
Start 3/4” Treated Plywood flooring at door end; flush three sides and screw down with 2-1/2” screws, making sure all screws are set and in the
center of the joists
After the Optional Door Step is secured under the joists, proceed to the flooring
Make sure to have half the joist exposed and that screws do not miss the joist. Give them a little angle.
Let the Treated Plywood overhang, and screw the flooring to the joists. As you fasten last joist, measure to ensure joist and flooring are parallel.
Cut off the overhang flush with the joist. Use a chalk line and circular saw.
2 1/2

Page 25Start Treated Plywood flooring at door end, with the LONG side
of the plywood going across the door end; screw down with 2-1/2” screws, making sure all screws
are set and in the center of the joists
Floor Joist Direction to Plywood
*Let the Treated Plywood overhang, and screw the flooring to the joists. As you fasten last joist, measure to ensure joist and flooring are parallel.
Cut off the overhang flush with the joist. Use a chalk line and circular saw.
Sheet 1 - Set Door End
First (The End with Double Joist)
Flush All Three
Sides
Sheet 2 - Let this hang over and then trim to fit as needed (*see detail below)
Floor Joist Direction to Plywood
NOTE Door End has the Double Joist
2 1/2

Page 26
Leave the floor on the Saw HorsesThis will be your workbench for the walls and door
Now that the floor is in place, check the floor for level again -- I know it was OK the last time, but indulge me.
The Floor is now Complete

Page 27
When you see a Blue Bar across the top of the page remember this
indicates a BREAK in the process.
WATER...Everyone!
Number of people on your team? ____
Your recommended number for the tasks so far would be ____
Look back at the instructions and make any notes that would help
others in understanding the process
Other Notes:
Helping to Improve the Building Process
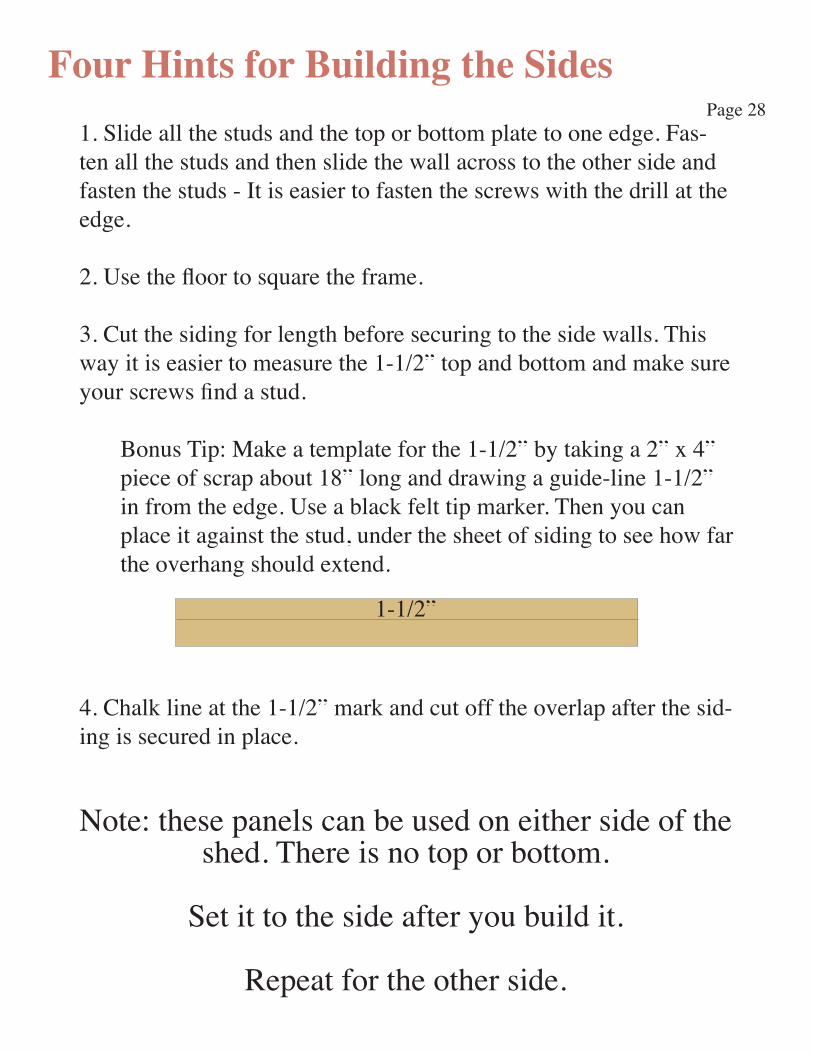
Page 281. Slide all the studs and the top or bottom plate to one edge. Fas-ten all the studs and then slide the wall across to the other side and fasten the studs - It is easier to fasten the screws with the drill at the edge.
2. Use the floor to square the frame.
3. Cut the siding for length before securing to the side walls. This way it is easier to measure the 1-1/2” top and bottom and make sure your screws find a stud.
Bonus Tip: Make a template for the 1-1/2” by taking a 2” x 4” piece of scrap about 18” long and drawing a guide-line 1-1/2” in from the edge. Use a black felt tip marker. Then you can place it against the stud, under the sheet of siding to see how far the overhang should extend.
4. Chalk line at the 1-1/2” mark and cut off the overlap after the sid-ing is secured in place.
Note: these panels can be used on either side of the shed. There is no top or bottom.
Set it to the side after you build it.
Repeat for the other side.
Four Hints for Building the Sides
1-1/2”

Page 29
B A
Edge of siding because of overlap is
Screw and Cut Diagram - Reference Page
Left Door Frame
27-1/2” wide
Right Door Frame25” wide
B A
Side Walls
An Aside: Try to keep the Crown of the joist and studs up. This does two
things...
First, for the Floor, the weight will tend to pull the joist down and
straighten the joist.
Secondly, for the Walls, this keeps the bend of the wall in the same di-rection, which in turn will make the wall look straighter and lie flatter
on the table while working - If you have one stud bent in one direction and one stud bent in an other direc-tion when looking down the wall it may look like the waves of Troy :)
Hold from edge 1/4”
When building walls install and secure “A” first

Page 30
Build the side walls
7 Studs for each side wall 72-1/2”Top and Bottom wall plate 93-1/2”Flush end studs; center the others
Overhang plywood siding top and bottom by 1-1/2”
Follow the layout pattern and allow plywood to over hang top and bottom by 1-1/2.” Cut sides flush with outside of stud.
Attach 3 Hurricane
Ties to one of these
studs for site installers
to use for tying down
rafters.
Cut Siding 78 1/2” long
22-1/4”
46-3/4”
24-1/2”24-1/2” 22-1/4”
46-3/4”
Note: Mesurments taken from the wall edge to centar of studs

Page 31
Cut The Gussets For The Roof TrussesUse the piece that is the cut-off after building the side walls
(It is approximatly 17 3/8” long by 48”)
Siding
This part is used for the Side Wall This part is the cut-off
Take the cut-off section approximatly 17 3/8” wide and use this for making the
Roof Truss Gussets
You will need 8 Gussets
5”
4.5”24”
8”
Note: When fixing the gussets to the trusses hold down top edge
about 1/4”

Page 32
Build The End Roof Trusses Next
18”
End Trusses: Put a mark on the floor at the center and 18” from the back end.
NOTE: Flush the rafter ends, and apply one 8” gusset to one side only.
Center line
Build 2 End Trusses
Apply ONE 8” gusset to ONE side ONLY of end trusses
Secure gusset with glue and 1-1/4” screws as needed (suggestion 6 on each side)
Hold it up 1/2” Helpful for Site Team Mark and Square a line up from the
bottom of the truss on each side at 3”

Page 33
Build The Center Roof Trusses Next
19-1/2”
Center Trusses: Put a mark on the floor at 19-1/8” from the back end. NOTE: Flush the rafter ends and apply one 8” gusset to one side; flip over
and apply another 8” gusset to the other side only.
Center line (from previous step)
Build 3 Center Trusses
Apply one 8” wide gusset to one side Flip over and apply another 8” gusset to the other side
Hold it up 2”Helpful for Site Team
Mark and Square a line up from the bottom of the truss on each side at 3”
Secure gusset with glue and 1-1/4” screws as needed (suggestion 6 on each side)
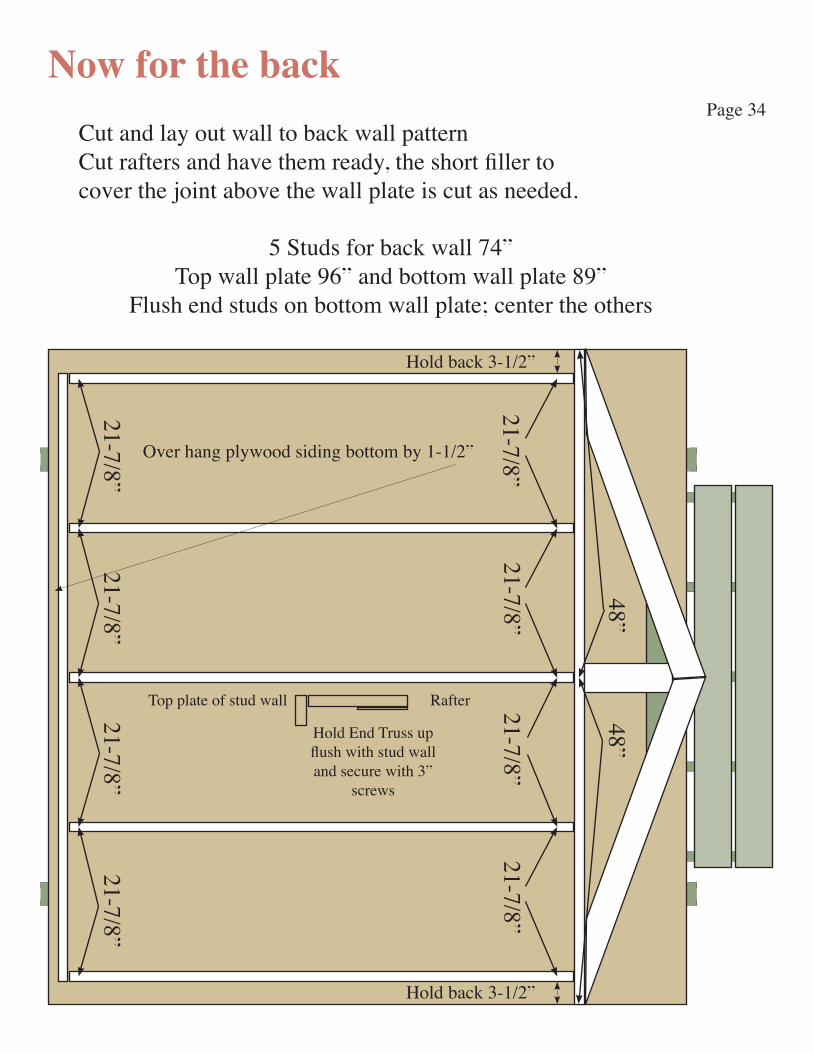
Page 34
Now for the backCut and lay out wall to back wall pattern Cut rafters and have them ready, the short filler to cover the joint above the wall plate is cut as needed.
Hold End Truss up flush with stud wall and secure with 3”
screws
RafterTop plate of stud wall
5 Studs for back wall 74”Top wall plate 96” and bottom wall plate 89”
Flush end studs on bottom wall plate; center the others
Hold back 3-1/2”
Hold back 3-1/2”
Over hang plywood siding bottom by 1-1/2”
21-7/8”
48”
21-7/8”
21-7/8”21-7/8”
48”
21-7/8”21-7/8”
21-7/8”21-7/8”

Page 35
Hold over 1-1/2” Measure down from top 17-1/2” chalk line to top middle and cut
Repeat for other side
17-1/2”
Remove Back Section and get ready for the Front
Apply the Siding
B A
Edge of siding because of overlap is...
A

Page 36
When you see a Blue Bar across the top of the page remember this
indicates a BREAK in the process.
WATER...Everyone!
Number of people on your team? ____
Your recommended number for the tasks so far would be ____
Look back at the instructions and make any notes that would help
others in understanding the process
Other Notes:
Helping to Improve the Building Process

Page 37
Hold End Truss up flush with stud wall and secure with 3”
screws
RafterTop plate of stud wall
Now To The Door End Frame
Center a 54” wide door opening
4 Studs for door wall 74”2 Studs for door wall 75-1/2”
Top wall plate 96” and Bottom wall plate 2 @ 16”Flush end studs on Bottom wall plate
Hold back 3-1/2”
Hold back 3-1/2”
54”21”
16”16”
21”
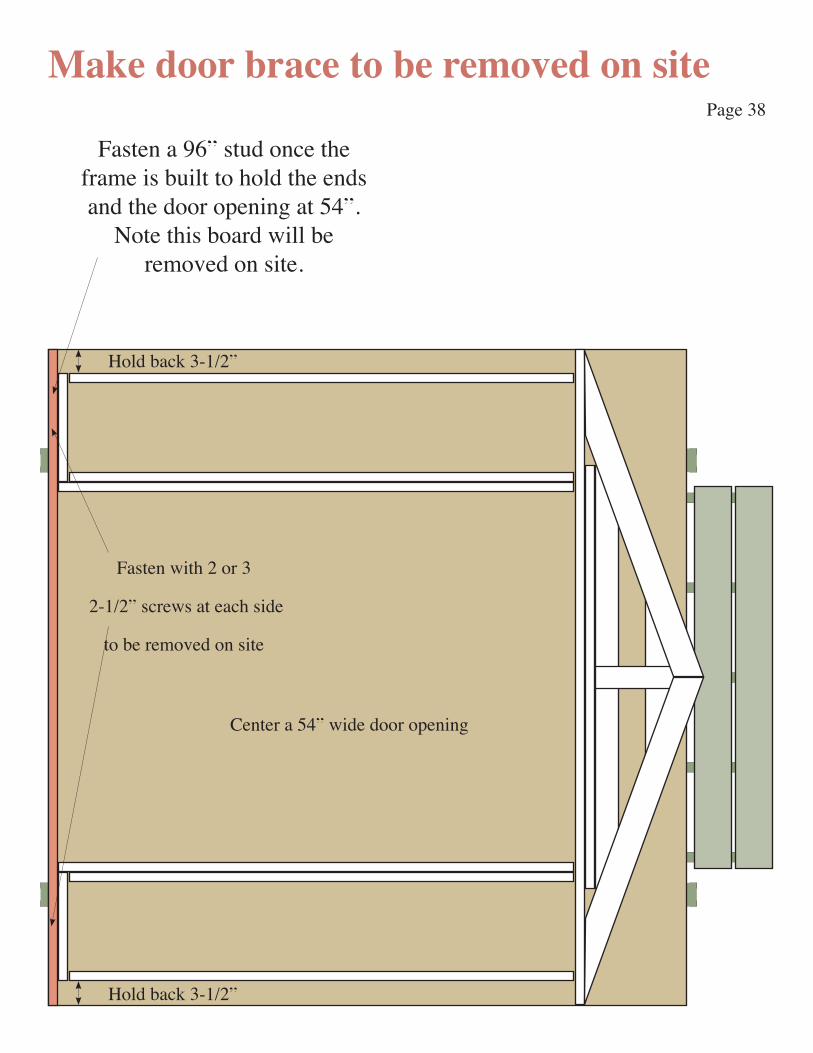
Page 38
Fasten a 96” stud once the frame is built to hold the ends and the door opening at 54”.
Note this board will be removed on site.
Make door brace to be removed on site
Center a 54” wide door opening
Fasten with 2 or 3
2-1/2” screws at each side
to be removed on site
Hold back 3-1/2”
Hold back 3-1/2”

Page 39
Set door stops
Hold these 3 - 2 x 2 down 1-5/8” from top edge
of 2 x 4 studs
Hold 2 x 2 down 1-5/8” from top of stud wall
Secure with 2-1/2” screws
Door FrameTop of stud stud wall

Page 40
Now To The DoorsUse 2” x 4” studs
Predrill and screw miter corners with 3-1/2” and 2-1/2” screws
25”
74 1/2”
Door - Right
Bottom
of Door
31” 33”
Top Of D
oor
27-1/2”
74 1/2”
Door - Left
Bottom
of Door
31” 33”
Top Of D
oor

Page 41Cut from scrap trim
5/8” spacersPut a number of 5/8” spacers around the door to center the door in the opening
Make sure the doors are pushed up to the top with the 5/8” spacers in place
Door - Right
Center in the 54” wide door opening
Door - Left - Widest Door to the Left
Set in the Doors

Page 42
Door - Right
B
A
17-1/2”
With the Doors in Place, Put on A and B
27
27
77
B A
Edge of siding because of overlap is
Left Door Frame Right Door Frame
Before Cutting out the Doors
REMEMBER to SET the SAW DEPTH to the THICKNESS
of the Siding. If you don’t, you will undo your hard work!!

Page 43Screw siding onto door frame, making sure you get screws into all the
cross rails and down both sides of the joint in the middle. Cut a 1/2” space down the sides and along the top and middle.
Center a 54” wide door opening
Door - Right
Door - Left - Widest to the Left
B
A
Ad
Bd
If you are adding the Optional Ramp, cut 1-1/2” off the bottom of the door before you hinge and trim the door
Cut Siding Ad and Bd for Doors
Cut 1/2” off Bd
Cut 1/2” off Ad
26-1/2
26
27
27

Page 44Header is doubled to help water drip off and not go in the top of door. Caulk along the top and fill any groves so water can’t go behind trim.
Install three 8” T hinges on each side and lock Looking from the bottom, put the hinges in the right and left side ,making sure hinge screws are going into the 2” x 4” door frame.
Center a 54” wide door opening
Door - Right
Door - Left - Widest to the Left
Trim Around Door and Door Frame
Double the trim along the top of door to help water drip away from the top edge of the door. Use a 4” and a 3” flush on the side next to
the door top. CAULK well along the top edge - Fill notches in siding.

Page 45
Last Blue Bar for this Section
WATER...Everyone!
How long did it take your team to get to this point? ____
Number of people on your team? ____
Your recommended number for this task would be ____
Look back at the instructions and make any notes that would help
others in understanding the process
Please send your notes and suggestions to [email protected]
Helping to Improve the Building Process

Page 46
Sheds of HopeSite Set Up
Cen
ter a
54”
wid
e do
or o
peni
ng
Doo
r - R
ight
Doo
r - L
eft -
Wid
est t
o th
e Le
ft

Page 47
If a Step is Part of the Floor
Set floor on blocks and adjust Level front to back and side to side
NOTE: DO NOT USE THE STEP DURING SET-UP AS IT NEEDS THE SUPPORT OF THE BUILDING
TO WORK
DO
NO
T U
SE T
HE
STEP
DU
RIN
G S
ET-U
P

Page 48
DO
NO
T U
SE T
HE
STEP
DU
RIN
G S
ET-U
P
Install side wall, securing the wall along the floor Brace the wall at back to keep from falling
1
Install Side Wall 1

Page 49
DO
NO
T U
SE T
HE
STEP
DU
RIN
G S
ET-U
P
2
Install side wall securing the wall along the floor Brace the wall at back to keep from falling
Install Side Wall 2

Page 50
DO
NO
T U
SE T
HE
STEP
DU
RIN
G S
ET-U
P
3
Use the back opening to get inside once the frame is secured at the corners and along the floor.
Remove the two screws on the outside above and below the lock. These screws will be near the edge of the trim.
Remove the transportation braces that held the door at the right width. Use one or both of these to prop the door open so that it does not get blown by the wind. After the trim is installed, you will attach a latch to the side trim to hold the door in an
open position.
Install Front Wall 3

Page 51
DO
NO
T U
SE T
HE
STEP
DU
RIN
G S
ET-U
P
4Remove side wall braces.
Lift back wall into place and secure at corners and along the floor.Use the front door to get inside.
DO NOT USE STEP YET
Install Back Wall 4

Page 52
2
DO
NO
T U
SE T
HE
STEP
DU
RIN
G S
ET-U
P
1 32
Keep Trusses in line with Wall Studs.Secure with screws.
Install Trusses
Attach Hurricane Ties at each truss
With 1-1/4” screws tying the truss to the stud

Page 53
DO
NO
T U
SE T
HE
STEP
DU
RIN
G S
ET-U
P
2
Keep trusses aligned.Install decking 1 and 2
4-5/8” x 96” strip and 48” x 96” sheet
7/8” overhang at each end or 1/8” if Trim is installed
Install Decking 1 and 2
If Side Trim is installed, hold the plywood decking past trim 3/8” at each side if not 1-1/8”This first strip should be 4-5/8” wide
And the top edge applyed 3” up from end of truss
1

Page 54
DO
NO
T U
SE T
HE
STEP
DU
RIN
G S
ET-U
P2
1
Install decking 3 and 44-5/8” x 96” strip and 48” x 96” sheet
Repeate 1 and 2
Install Decking 3 and 4 Next
4
3
7/8” overhang at each end or 1/8” if Trim is installed

Page 55
WATER...Everyone!
How long did it take your team to get to this point? ____
Number of people on your team? ____
Your recommended number for this task would be ____
Look back at the instructions and make any notes that would help
others in understanding the process
Other Notes:
Helping to Improve the Building Process

Page 56
DO
NO
T U
SE T
HE
STEP
DU
RIN
G S
ET-U
P
Install Roofing Felt Next
21
3
#1. Roll Felt out; flush and nail on all four sides #2. Roll Felt out; flush and nail on all four sides
#3. Roll Felt out over the ridge; center and over lap #1 and #2; move into position by flushing the ends and nail all four sides.
Use extra nails as needed to hold paper in place until shingles are installed
Ridge line
Page 57
DO
NO
T U
SE T
HE
STEP
DU
RIN
G S
ET-U
P
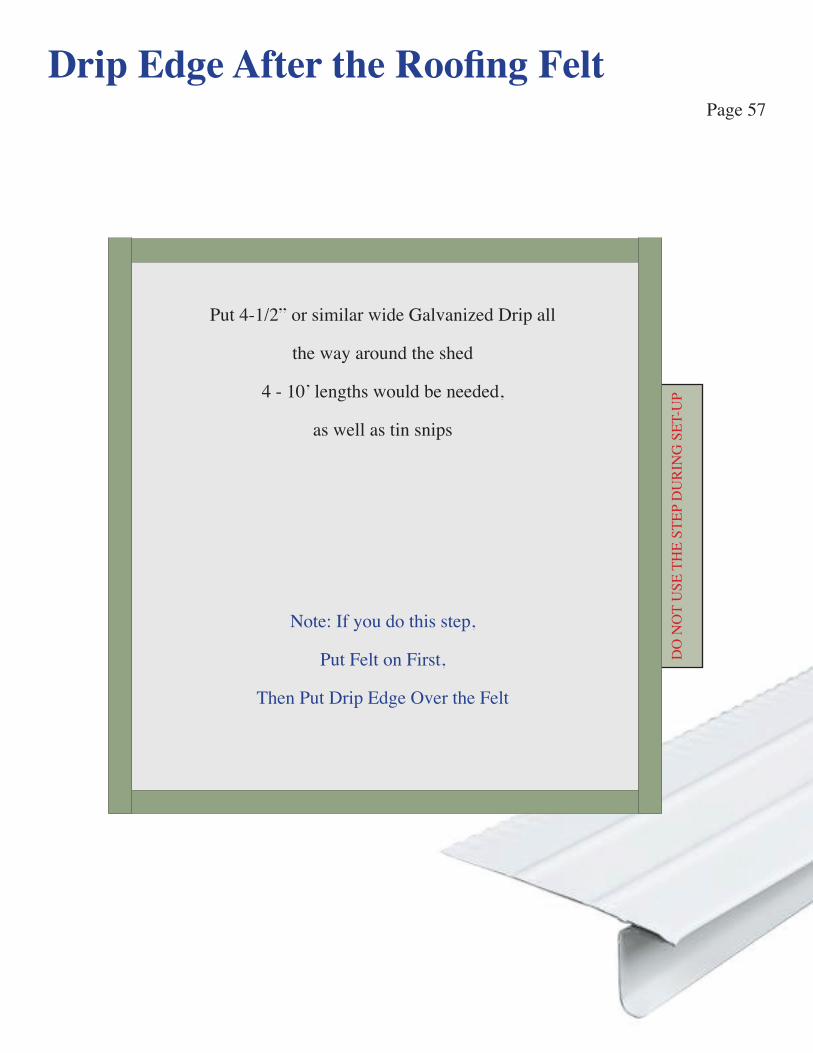
Put 4-1/2” or similar wide Galvanized Drip all
the way around the shed
4 - 10’ lengths would be needed,
as well as tin snips
Note: If you do this step,
Put Felt on First,
Then Put Drip Edge Over the Felt
Drip Edge After the Roofing Felt

Page 58
Cut
Shingle
To Continue Roofing USE A 3-TAB STARTER SHINGLE
TURN THE SHINGLE WITH THE TABS UP - ALIGN THE TAB-LESS EDGE NO MORE THAN 1” OVER EDGES OF PLYWOOD DECKING, OR 1/4’ OVER DRIP EDGE IF USED -
SECURE WITH NAILS ALONG THE BLACK TAR LINE
THE REASON FOR THE STARTER SHINGLE IS TO PREVENT RAIN FROM GETTING TO THE DECKING WHERE THE TWO ARCHITECTURAL SHINGLES MEET
Full
Architectural Shingle
Note: Cut the 3-tab shingle as
needed BUT KEEP THE CUT
END TO THE INSIDE
Full
3-Tab Shingle
Full
3-Tab Shingle
After the starter shingle is in place - Start shingling with a Full Architectural Shingle by holding the bottom and edge of the shingle to the bottom and
edge of the starter shingle

Page 59
FullFull18 1/2” Full Full 18 1/2”FullFull18 1/2”
Continue Roofing
Hold shingles over edges no more than 1” or 1/4” if using Drip Edge
Full 18-1/2”
Full Full 18 1/2”FullFull18 1/2”
Full
Architectural Shingle
Full 18-1/2”
Shingle Lap Bottom of shingle you are nailing
comes to the top edge of lap giving a 3D effect
Nail about 1/2” ABOVE the white line
Note: When nailing the shingle at each end of each row, keep the last nail back about 3” to 4” from the end

Page 60
Continue Roofing Cutting Ridge
It takes about seven 3-tab shingles, each trimmed as illustrated below.
Full
3 Tab Shingle
Cut lines
Note nail position
It is easier to cut shingles if you turn the shingle over and make
the cuts from the back side

Page 61
Cen
ter a
54”
wid
e do
or o
peni
ng
Doo
r - R
ight
Doo
r - L
eft -
Wid
est t
o th
e Le
ft
Install Trim Around the Front

Page 62
Install Trim Around the Back

Page 63
Fasten latch to each side after trim is installed to
hold doors open
You can find the latches inside on hinge side,
fastened to a stud
Praise the Lord!Shed provided by Local Churches and Sheds of Hope.
We encourage you to seek out a local church in your area.Shed Designed by ChurchGPS.org
Now you can use the step to step up into the shed
Install Trim on Both Sides
Full FullFull Full 18 1/2”FullFull18 1/2”
Full Full 18 1/2”FullFull18 1/2”
Full Full 18-1/2”

Page 64
WATER...Everyone!
How long did it take your team to get to this point? ____
Number of people on your team? ____
Your recommended number for this task would be ____
Look back at the instructions for this section and make any
notes that would help others in understanding the process
Other Notes:
Please send your notes and suggestions to [email protected]
Helping to Improve the Building Process


![Untitled-1 [] ENGINES AND ELECTRICS Electrics 2 2 2 6 ... Whistling Freight Shed Whistling Freight Shed Diesel Horn Shed ... Untitled-1](https://img.dokumen.tips/doc/110x75/5ab7e9c67f8b9ac60e8c2c53/untitled-1-engines-and-electrics-electrics-2-2-2-6-whistling-freight-shed.jpg)


![[Developer Shed Network] Server Side - PHP - Building a PHP-Based Mail Client (Part 2)](https://img.dokumen.tips/doc/110x75/55cf99e6550346d0339faf86/developer-shed-network-server-side-php-building-a-php-based-mail-client.jpg)

