Embed Size (px)
Citation preview

SharpShooter Reports.Web Using Web Viewer with WCF Service
Last modified on: September 5, 2011

2
www.perpetuumsoft.com PERPETUUM software
Table of Content
System Requirements .......................................................................................................... 3
Introduction ........................................................................................................................ 3
Step 1. Creation of a project .............................................................................................. 3
Step 2. Setting up a Web application .................................................................................. 4
Step 3. Implementation of Service Logic ............................................................................. 5
Step 4. Adding WCF service ............................................................................................... 5
Step 5. Setting up the service for the work with data in the Json format ................................. 6
Step 6. Checking if the set service is available ..................................................................... 8
Step 7. Adding Java Script files to the project ...................................................................... 9
Step 8. Adding styles ...................................................................................................... 11
Step 9. Adding default skin files ....................................................................................... 12
Step 10. Adding ASPX page to the project ......................................................................... 14
Step 11. Adding the Report Viewer component to the page ................................................. 16
Step 12. Running the application ...................................................................................... 19

3
www.perpetuumsoft.com PERPETUUM software
System Requirements
In order to use SharpShooter Reports.Web successfully in Web applications you will need:
.NET Framework 3.5 or higher
Visual Studio 2008/2010
Introduction
The purpose of this getting started is to cover the basic use and provide minimum required skills necessary for work with SharpShooter Reports.Web. This is step-by-step tutorial for creation of web application with SharpShooter Reports.Web. Let’s examine the creation and configuration of a service, creation of a report and integration of report web viewer.
Following this step-by-step tutorial, you will be able to configure a service and add report viewer with predefined skin into your web-application or your website in 15 minutes.
Here, we describe the process for web application creation with use of SharpShooter Reports.Web. We will examine the creation and configuration of a service, report creation and integration of report viewer to a web application page.
Step 1. Creation of a project
Create a new “ASP.NET Web Application” project and set a name to “SharpShooterWebViewerSkin”.
Select the “New\Project…” item in the Visual Studio main menu.
Select “ASP.NET Application”. Enter a name of the “SharpShooterWebViewerSkin” project in the “Name” field and click “OK”.

4
www.perpetuumsoft.com PERPETUUM software
Step 2. Setting up a Web application
Invoke the context menu and select the “Properties” item. Here you can change the properties of the “SharpShooterWebViewerSkin” project.
Set “Use Visual Studio Development Server”, “Specific port” equal to 5555 in the “Web” tab.

5
www.perpetuumsoft.com PERPETUUM software
Step 3. Implementation of Service Logic
Add the class which implements a service for Report Engine to the project. More detailed description on how to add this class is available in Configuring Reporting Engine.
Step 4. Adding WCF service
Add WCF service to the project. Select the “Add\New Item…” item in the context menu of the “SharpShooterWebViewerSkin” project.
Select the “WCF Service” element. Set “WcfReportService” in the “Name” field.

6
www.perpetuumsoft.com PERPETUUM software
Remove the following files from the project:
IWcfReportService.cs – the interface which defines the contract of the service;
WcfReportService.svc.cs – the class which implements the logic of the service.
You don’t need them since the created “ServiceClass” implements the logic of service work.
Step 5. Setting up the service for the work with data in the Json format
Open the markup file of the service. Select the “WcfReportService.svc” file in the “Solution Explorer” window. Select “View Markup” in the context menu.

7
www.perpetuumsoft.com PERPETUUM software
Since the logic of the service implementation is in the separate file, you can remove information about CodeBehind.
Set the full name of the class, which implements the logic of the service work, in the “Service” attribute.
Add the “Factory” attribute with the “System.ServiceModel.Activation.WebScriptServiceHostFactory” value to add the Json serialization. This serialization is needed for the work of your service with jQuery Ajax.
Open the web.config file (double click on the web.config file in “Solution Explorer”). Find the “system.serviceModel” section in the web.config file. This section is added by default when you add Wcf service to the project. The section looks as follows:
<system.serviceModel>
<behaviors>
<serviceBehaviors>
<behavior name="">
<serviceMetadata httpGetEnabled="true" />
<serviceDebug includeExceptionDetailInFaults="false" />
</behavior>
</serviceBehaviors>
</behaviors>
<serviceHostingEnvironment multipleSiteBindingsEnabled="true" />
</system.serviceModel>
Add the “aspNetCompatibilityEnabled” attribute with the value equal to true to the “serviceHostingEnvironment” section. Thus, Wcf service will work in the ASP.NET context. Add section, which describes the behavior of the added service, to the “serviceBehaviors” section. You can do it as follows:
<behavior name="WcfReportServiceBehavior">
<serviceMetadata httpGetEnabled="true" />
<serviceDebug includeExceptionDetailInFaults="true" />
</behavior>
Add the “service” section to the “system.serviceModel” section. Add the “service” section, which contains settings for your service, to the “services” section. It can be done as follows:
<services>
<service name="SharpShooterWebViewer.WcfReportService" behaviorConfiguration="WcfRepo
rtServiceBehavior">
<endpoint address="" binding="wsHttpBinding" contract="PerpetuumSoft.Reporting.WebV
iewer.Server.IReportService" />
<endpoint address="mex" binding="mexHttpBinding" contract="IMetadataExchange" />
</service>
</services>
The “system.serviceModel” section should look as follows:

8
www.perpetuumsoft.com PERPETUUM software
<system.serviceModel>
<behaviors>
<serviceBehaviors>
<behavior name="">
<serviceMetadata httpGetEnabled="true" />
<serviceDebug includeExceptionDetailInFaults="false" />
</behavior>
<behavior name="WcfReportServiceBehavior">
<serviceMetadata httpGetEnabled="true" />
<serviceDebug includeExceptionDetailInFaults="true" />
</behavior>
</serviceBehaviors>
</behaviors>
<serviceHostingEnvironment multipleSiteBindingsEnabled="true" aspNetCompatibilityEnabled="true" /
>
<services>
<service name="SharpShooterWebViewer.WcfReportService" behaviorConfiguration="WcfReportServiceB
ehavior">
<endpoint address="" binding="wsHttpBinding" contract="PerpetuumSoft.Reporting.WebViewer.Serv
er.IReportService" />
<endpoint address="mex" binding="mexHttpBinding" contract="IMetadataExchange" />
</service>
</services>
</system.serviceModel>
Step 6. Checking if the set service is available
Select the “WcfReportService.svc” file in the “Solution Explorer”, select the “View in Browser” in the context menu.
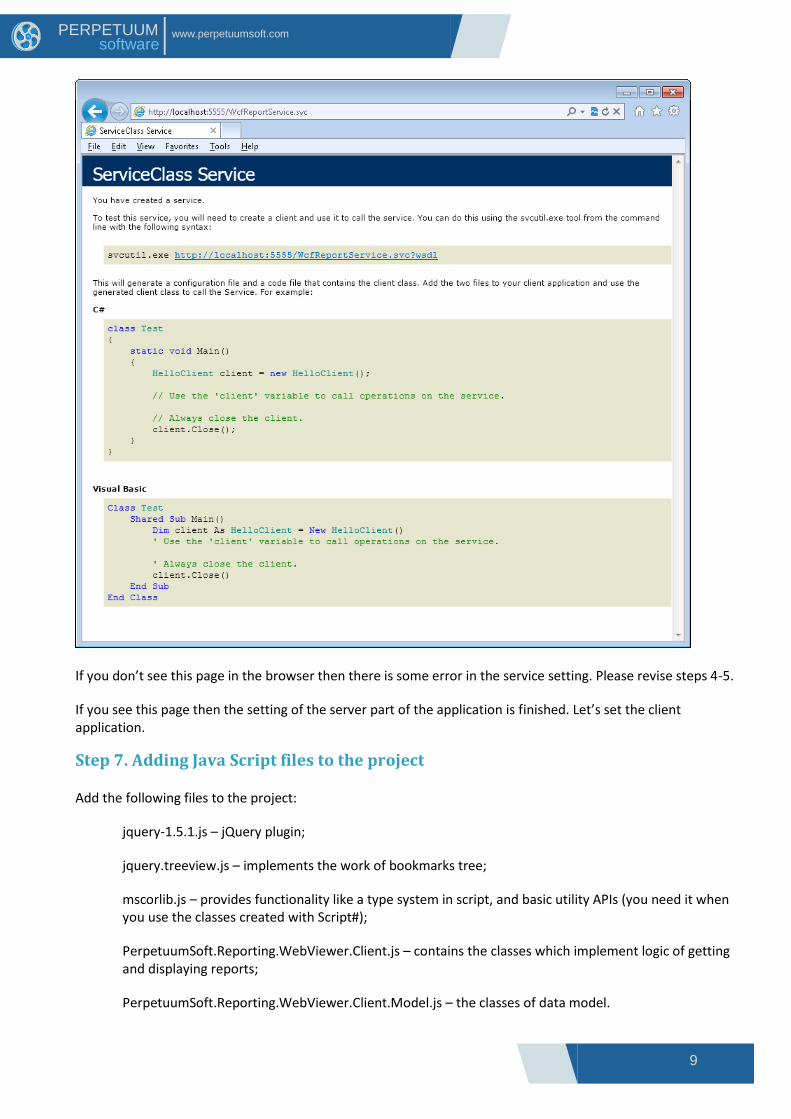
You should see the following page in the browser:
9
www.perpetuumsoft.com PERPETUUM software
If you don’t see this page in the browser then there is some error in the service setting. Please revise steps 4-5.
If you see this page then the setting of the server part of the application is finished. Let’s set the client application.
Step 7. Adding Java Script files to the project
Add the following files to the project:
jquery-1.5.1.js – jQuery plugin;
jquery.treeview.js – implements the work of bookmarks tree;
mscorlib.js – provides functionality like a type system in script, and basic utility APIs (you need it when you use the classes created with Script#);
PerpetuumSoft.Reporting.WebViewer.Client.js – contains the classes which implement logic of getting and displaying reports;
PerpetuumSoft.Reporting.WebViewer.Client.Model.js – the classes of data model.

10
www.perpetuumsoft.com PERPETUUM software
Add the folder, which will contain scripts, to the project. Select the “Add\New Folder” item in the context menu of the project.
Add the following files from the “Web\Scripts” folder: jquery-1.5.1.js
jquery.treeview.js
mscorlib.js
PerpetuumSoft.Reporting.WebViewer.Client.Model.js
PerpetuumSoft.Reporting.WebViewer.Client.js

11
www.perpetuumsoft.com PERPETUUM software
Add the following files from the “Web\Skins\Default\Scripts” folder:
WebViewer.Style.js;
jquery-ui-1.8.11.js.
Step 8. Adding styles
Add the styles for default skin of the component to the project. Add the following CSS files:
ReportViewer.css – styles for report visualization;
WebViewerSkin.css – styles for viewer component.
Select the “Styles” folder in the “Solution Explorer” and press “Add -> Existing Item…” in the context menu.

12
www.perpetuumsoft.com PERPETUUM software
Find ReportViewer.css in “Web\Content” folder and add it to the project.
Find the “WebViewerSkin.css” file in the “Web\Skins\Default\Content” folder and add it to the project.
Step 9. Adding default skin files
Add some files with styles and images to setup the user interface of the component. Copy the
content of the “Web\Skins\Default\Content\” folder in the installation directory to the “Styles”
folder of your project.
13
www.perpetuumsoft.com PERPETUUM software
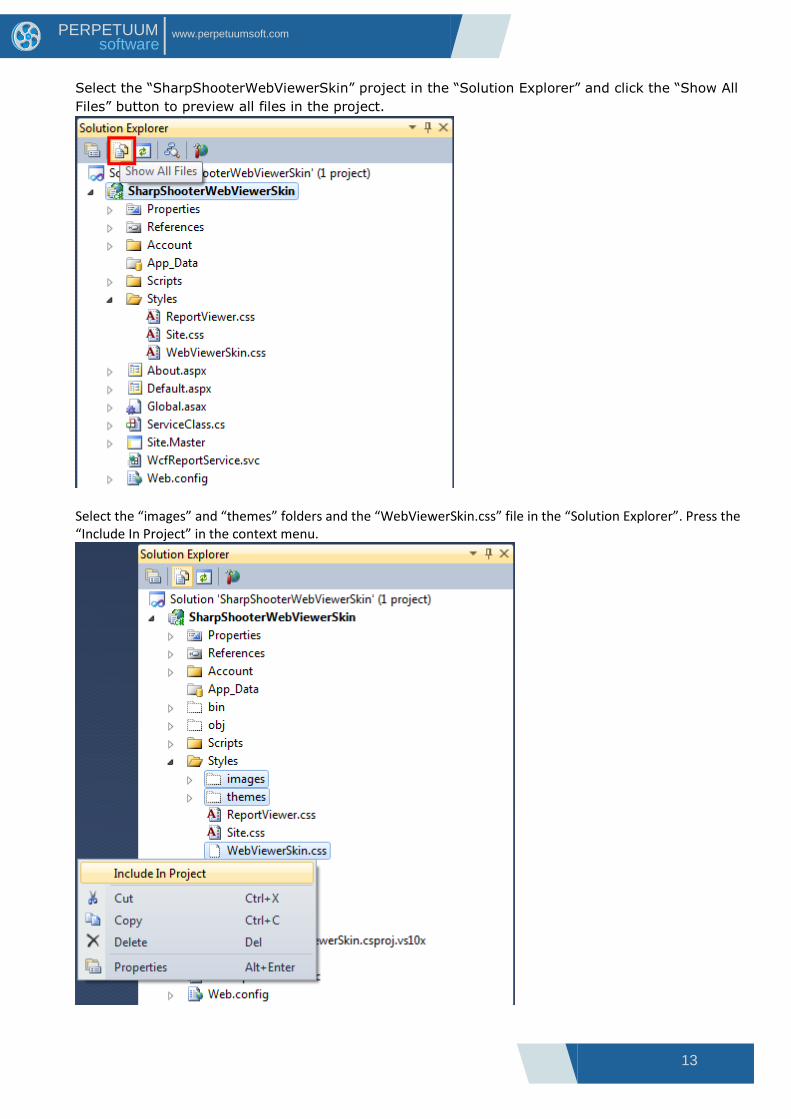
Select the “SharpShooterWebViewerSkin” project in the “Solution Explorer” and click the “Show All
Files” button to preview all files in the project.
Select the “images” and “themes” folders and the “WebViewerSkin.css” file in the “Solution Explorer”. Press the “Include In Project” in the context menu.

14
www.perpetuumsoft.com PERPETUUM software
The folders and nested files will be added to the project.
Step 10. Adding ASPX page to the project
Add the aspx page to the project and place the report viewer component on this page.
Select the “SharpShooterWebViewerSkin” project in the “Solution Explorer” and press “Add->New Item…” in the context menu.
15
www.perpetuumsoft.com PERPETUUM software
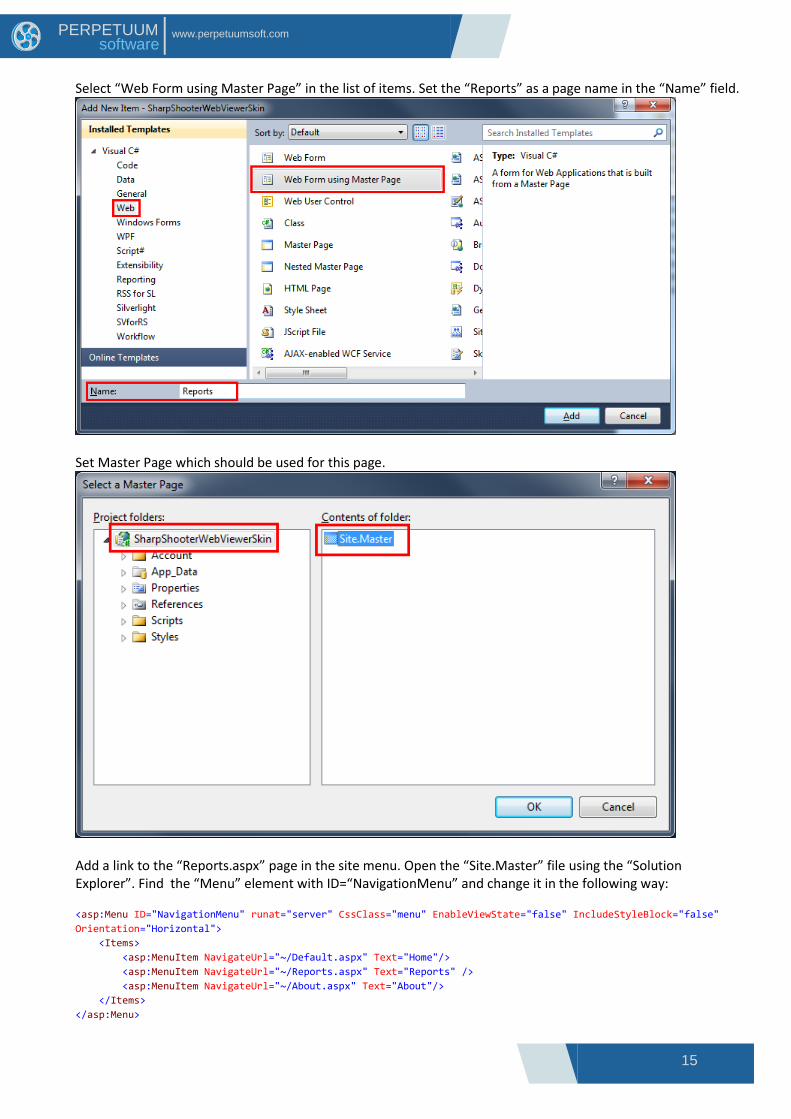
Select “Web Form using Master Page” in the list of items. Set the “Reports” as a page name in the “Name” field.
Set Master Page which should be used for this page.
Add a link to the “Reports.aspx” page in the site menu. Open the “Site.Master” file using the “Solution Explorer”. Find the “Menu” element with ID=“NavigationMenu” and change it in the following way:
<asp:Menu ID="NavigationMenu" runat="server" CssClass="menu" EnableViewState="false" IncludeStyleBlock="false"
Orientation="Horizontal">
<Items>
<asp:MenuItem NavigateUrl="~/Default.aspx" Text="Home"/>
<asp:MenuItem NavigateUrl="~/Reports.aspx" Text="Reports" />
<asp:MenuItem NavigateUrl="~/About.aspx" Text="About"/>
</Items>
</asp:Menu>
16
www.perpetuumsoft.com PERPETUUM software
Step 11. Adding the Report Viewer component to the page
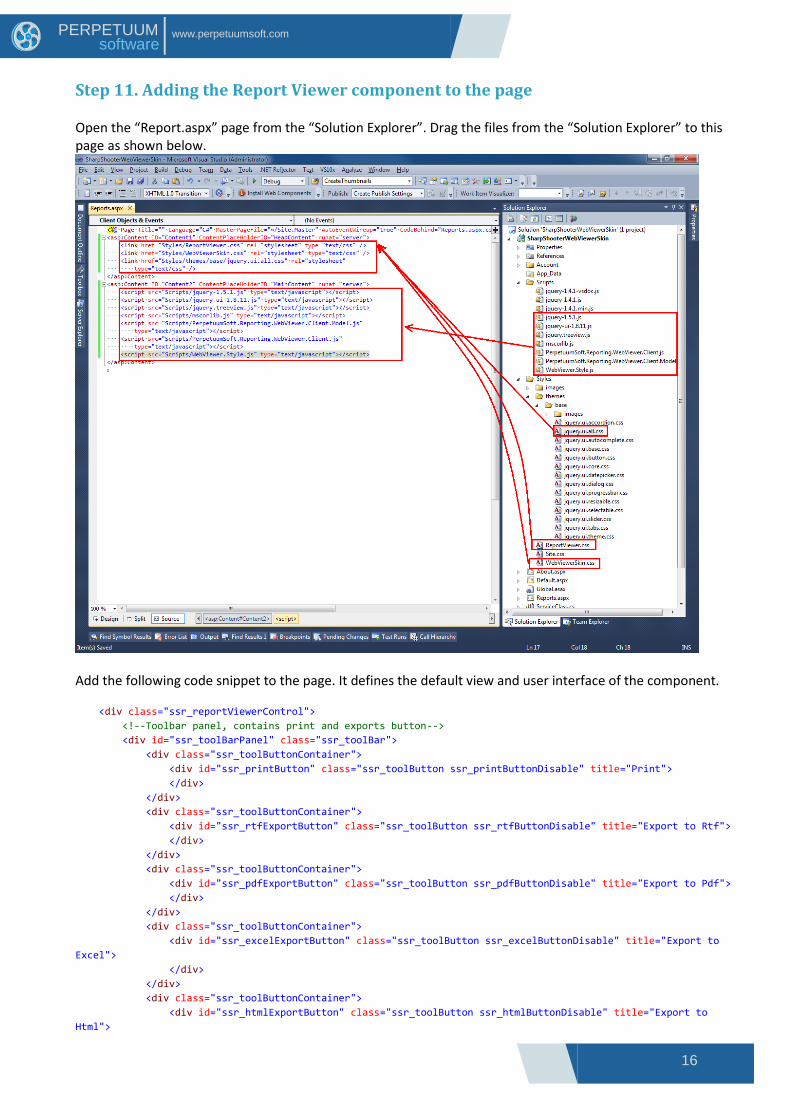
Open the “Report.aspx” page from the “Solution Explorer”. Drag the files from the “Solution Explorer” to this page as shown below.
Add the following code snippet to the page. It defines the default view and user interface of the component.
<div class="ssr_reportViewerControl">
<!--Toolbar panel, contains print and exports button-->
<div id="ssr_toolBarPanel" class="ssr_toolBar">
<div class="ssr_toolButtonContainer">
<div id="ssr_printButton" class="ssr_toolButton ssr_printButtonDisable" title="Print">
</div>
</div>
<div class="ssr_toolButtonContainer">
<div id="ssr_rtfExportButton" class="ssr_toolButton ssr_rtfButtonDisable" title="Export to Rtf">
</div>
</div>
<div class="ssr_toolButtonContainer">
<div id="ssr_pdfExportButton" class="ssr_toolButton ssr_pdfButtonDisable" title="Export to Pdf">
</div>
</div>
<div class="ssr_toolButtonContainer">
<div id="ssr_excelExportButton" class="ssr_toolButton ssr_excelButtonDisable" title="Export to
Excel">
</div>
</div>
<div class="ssr_toolButtonContainer">
<div id="ssr_htmlExportButton" class="ssr_toolButton ssr_htmlButtonDisable" title="Export to
Html">

17
www.perpetuumsoft.com PERPETUUM software
</div>
</div>
<div class="ssr_toolButtonContainer">
<div id="ssr_xpsExportButton" class="ssr_toolButton ssr_xpsButtonDisable" title="Export to Xps">
</div>
</div>
</div>
<div class="ssr_centralDiv">
<!--Contains thumbnails and documentMap elements-->
<div class="ssr_navigationArea" id="ssr_navigationAreaElement">
<div class="ssr_navigationIconPanel" id="ssr_navigationIconPanel">
<div class="ssr_thumbnailButtonContainer" id="ssr_thumbnailButtonContainer">
<!--shows or hides thumbnail element-->
<div title="Thumbnails" id="ssr_thumbnailButton" class="ssr_thumbnailButton
ssr_thumbnailButtonDisable">
</div>
</div>
<div class="ssr_documentMapButtonContainer" id="ssr_documentMapButtonContainer">
<!--shows or hides document map element-->
<div title="Document Map" id="ssr_documentMapButton" class="ssr_documentMapButton
ssr_documentMapButtonDisable">
</div>
</div>
</div>
<div id="ssr_thumbnailsPanel" class="ssr_thumbnailsPanel">
<div id="ssr_thumbnailHeadPanel" class="ssr_thumbnailHeadPanel">
<span class="ssr_thumbnailHeadPanelTitle">Thumbnails</span>
<div title="Close" id="ssr_closeThumbnailPanelButton"
class="ssr_closeThumbnailPanelButton">
</div>
</div>
<div id="ssr_wrapThumbnailContentPanel" class="ssr_wrapThumbnailContentPanel">
<!--element which contains a list of thumbnail-->
<div id="ssr_thumbnailContentPanel" class="ssr_thumbnailContentPanel">
</div>
</div>
</div>
<div id="ssr_documentMapPanel" class="ssr_documentMapPanel">
<div id="ssr_documentMapHeadPanel" class="ssr_documentMapHeadPanel">
<span class="ssr_documentMapHeadPanelTitle">Document Map</span>
<div title="Close" id="ssr_closeDocumentMapPanelButton"
class="ssr_closeThumbnailPanelButton">
</div>
</div>
<div id="ssr_wrapDocumentMapContentPanel" class="ssr_wrapDocumentMapContentPanel">
<!--element which contains a document map-->
<div id="ssr_documentMapContentPanel" class="ssr_documentMapContentPanel">
</div>
</div>
</div>
</div>
<!--reports will be shows in this element-->
<div id="ssr_reportContent" class="ssr_reportArea">
</div>
</div>
<!--Statusbar panel-->
<div id="ssr_statusBarPanel" class="ssr_statusPanel">
<div id="ssr_paginationPanel" class="ssr_paginationPanel">
<div class="ssr_statusButtonContainer ssr_statusButtonContainerBack">
<div id="ssr_firstPageButton" class="ssr_statusButton ssr_statusButtonBack
ssr_firstPageDisable">
</div>
</div>
<div class="ssr_statusButtonContainer ssr_statusButtonContainerBack">
<div id="ssr_previousPageButton" class="ssr_statusButton ssr_statusButtonBack
ssr_previousPageDisable">

18
www.perpetuumsoft.com PERPETUUM software
</div>
</div>
<div class="ssr_statusCurrentPageContainer">
<!--displays the current page number-->
<input id="ssr_currentPageNumberBox" class="ssr_currentPageNumber" title="Current page" />
<span class="ssr_pageCountOf">of</span><span> </span><span id="ssr_pageCountBox"
class="ssr_pageCount">0</span>
</div>
<div class="ssr_statusButtonContainer ssr_statusButtonContainerForward">
<div id="ssr_nextPageButton" class="ssr_statusButton ssr_statusButtonForward
ssr_nextPageDisable">
</div>
</div>
<div class="ssr_statusButtonContainer ssr_statusButtonContainerForward">
<div id="ssr_lastPageButton" class="ssr_statusButton ssr_statusButtonForward
ssr_lastPageDisable">
</div>
</div>
</div>
<!--Shows or hides error dialog-->
<div id="ssr_notificationPanel" class="ssr_notificationPanel">
<div id="ssr_errorButton" class="ssr_errorButton ssr_errorButtonDisable">
</div>
</div>
</div>
</div>
<div id="ssr_errorDialog" title="Error information" style="display: none;">
<div id="ssr_errorMessage" class="ssr_errorMessageContent">
</div>
</div>
Add the following javascript code to the page. It controls the loading of the document.
<script type="text/javascript">
var reportViewer = null;
$(document).ready(function () {
Initialize();
InitializeReportViewer();
});
function InitializeReportViewer() {
reportViewer = new PerpetuumSoft.Reporting.WebViewer.Client.ReportViewer('#ssr_reportContent');
reportViewer.setServiceUrl("http://localhost:5555/WcfReportService.svc");
reportViewer.reportName = "CustomersReport";
reportViewer.setDocumentMapControl("#ssr_documentMapContentPanel");
reportViewer.setThumbnailsControl("#ssr_thumbnailContentPanel");
reportViewer.documentInfoLoadedEvent = function (pages) {
EnableToolbarState();
if (pages.length > 1) {
pageCount = pages.length;
EnableNextLastPage();
DisablePreviousFirstPage();
}
else {
DisableNextLastPage();
DisablePreviousFirstPage();
}
$("#ssr_pageCountBox").text(pages.length.toString());
reportViewer.loadThumbnails();
};
reportViewer.errorEvent = function (errorModel) {
switch (errorModel.errorType) {
case PerpetuumSoft.Reporting.WebViewer.Client.ErrorType.communicationError:
$("#ssr_errorMessage").text(errorModel.error._error$1);

19
www.perpetuumsoft.com PERPETUUM software
break;
case PerpetuumSoft.Reporting.WebViewer.Client.ErrorType.clientError:
$("#ssr_errorMessage").text("clientError" + (errorModel.error).message);
break;
case PerpetuumSoft.Reporting.WebViewer.Client.ErrorType.serverError:
$("#ssr_errorMessage").text("serverError" + (errorModel.error).message +
(errorModel.error).getInformation());
break;
default:
$("#ssr_errorMessage").text(errorModel.error.message);
break;
}
EnableErrorButton();
ShowErrorDialog();
};
reportViewer.currentPageChangedEvent = function (pageNumber) {
if (reportViewer.isFirstPage()) {
DisablePreviousFirstPage();
}
else {
EnablePreviousFirstPage();
}
if (reportViewer.isLastPage()) {
DisableNextLastPage();
}
else {
EnableNextLastPage();
}
$("#ssr_currentPageNumberBox").val(pageNumber.toString());
};
reportViewer.renderDocument();
}
</script>
Now your component is added to the page and we need to test it.
Step 12. Running the application
Run the application by pressing F5 in Visual Studio. Click the “Reports” link and preview the page with the sample report.

20
www.perpetuumsoft.com PERPETUUM software
If you have any questions regarding the integration with SharpShooter Reports.Web don’t hesitate
to contact us at [email protected].