Embed Size (px)
Citation preview

PUBLIC
SAP Data ServicesDocument Version: 4.2 Support Package 8 (14.2.8.0) – 2017-03-30
Supplement for AdaptersDP Bridge, Hive, HTTP, JDBC, JMS, MongoDB, OData, Salesforce.com, Shapefile, and SuccessFactors

Content
1 Data Services adapters. . . . . . . . . . . . . . . . . . . . . . . . . . . . . . . . . . . . . . . . . . . . . . . . . . . . . . . . . . 51.1 Adapter user knowledge and expertise. . . . . . . . . . . . . . . . . . . . . . . . . . . . . . . . . . . . . . . . . . . . . . . . 6
2 Adapter installation and configuration. . . . . . . . . . . . . . . . . . . . . . . . . . . . . . . . . . . . . . . . . . . . . . 72.1 Adding and configuring an adapter instance. . . . . . . . . . . . . . . . . . . . . . . . . . . . . . . . . . . . . . . . . . . . .7
HTTP adapter specific configuration settings. . . . . . . . . . . . . . . . . . . . . . . . . . . . . . . . . . . . . . . . .12JDBC adapter specific configuration settings. . . . . . . . . . . . . . . . . . . . . . . . . . . . . . . . . . . . . . . . .12JMS adapter specific configuration settings. . . . . . . . . . . . . . . . . . . . . . . . . . . . . . . . . . . . . . . . . 14DP Bridge Outlook adapter runtime configuration settings. . . . . . . . . . . . . . . . . . . . . . . . . . . . . . . 15
2.2 Starting and stopping the adapter instance. . . . . . . . . . . . . . . . . . . . . . . . . . . . . . . . . . . . . . . . . . . . 162.3 Monitoring the adapter instances and operations. . . . . . . . . . . . . . . . . . . . . . . . . . . . . . . . . . . . . . . . 162.4 Monitoring adapter instance statistics. . . . . . . . . . . . . . . . . . . . . . . . . . . . . . . . . . . . . . . . . . . . . . . . 172.5 Creating an adapter datastore. . . . . . . . . . . . . . . . . . . . . . . . . . . . . . . . . . . . . . . . . . . . . . . . . . . . . .17
Adapter datastore configuration options. . . . . . . . . . . . . . . . . . . . . . . . . . . . . . . . . . . . . . . . . . . . 19Changing an adapter datastore's configuration. . . . . . . . . . . . . . . . . . . . . . . . . . . . . . . . . . . . . . . 32Deleting an adapter datastore and associated metadata objects. . . . . . . . . . . . . . . . . . . . . . . . . . . 33
3 Browse and import metadata. . . . . . . . . . . . . . . . . . . . . . . . . . . . . . . . . . . . . . . . . . . . . . . . . . . . 343.1 Viewing data. . . . . . . . . . . . . . . . . . . . . . . . . . . . . . . . . . . . . . . . . . . . . . . . . . . . . . . . . . . . . . . . . . 343.2 Importing metadata. . . . . . . . . . . . . . . . . . . . . . . . . . . . . . . . . . . . . . . . . . . . . . . . . . . . . . . . . . . . .34
4 Map adapter metadata. . . . . . . . . . . . . . . . . . . . . . . . . . . . . . . . . . . . . . . . . . . . . . . . . . . . . . . . . 364.1 Data type mapping for Outlook PST data . . . . . . . . . . . . . . . . . . . . . . . . . . . . . . . . . . . . . . . . . . . . . 364.2 Metadata mapping for Hive. . . . . . . . . . . . . . . . . . . . . . . . . . . . . . . . . . . . . . . . . . . . . . . . . . . . . . . .374.3 Metadata mapping for JDBC. . . . . . . . . . . . . . . . . . . . . . . . . . . . . . . . . . . . . . . . . . . . . . . . . . . . . . .374.4 Metadata mapping for MongoDB. . . . . . . . . . . . . . . . . . . . . . . . . . . . . . . . . . . . . . . . . . . . . . . . . . . 384.5 Metadata mapping for OData. . . . . . . . . . . . . . . . . . . . . . . . . . . . . . . . . . . . . . . . . . . . . . . . . . . . . . 394.6 Metadata mapping for Salesforce.com. . . . . . . . . . . . . . . . . . . . . . . . . . . . . . . . . . . . . . . . . . . . . . . 404.7 Metadata mapping for SuccessFactors. . . . . . . . . . . . . . . . . . . . . . . . . . . . . . . . . . . . . . . . . . . . . . . 41
5 Using DP Bridge adapter. . . . . . . . . . . . . . . . . . . . . . . . . . . . . . . . . . . . . . . . . . . . . . . . . . . . . . . . 425.1 SDI Outlook mail attachment table. . . . . . . . . . . . . . . . . . . . . . . . . . . . . . . . . . . . . . . . . . . . . . . . . . 425.2 SDI Outlook mail message table. . . . . . . . . . . . . . . . . . . . . . . . . . . . . . . . . . . . . . . . . . . . . . . . . . . . 43
6 Using Hive metadata. . . . . . . . . . . . . . . . . . . . . . . . . . . . . . . . . . . . . . . . . . . . . . . . . . . . . . . . . . .446.1 Hadoop Hive adapter source options. . . . . . . . . . . . . . . . . . . . . . . . . . . . . . . . . . . . . . . . . . . . . . . . .446.2 Hadoop Hive adapter target options. . . . . . . . . . . . . . . . . . . . . . . . . . . . . . . . . . . . . . . . . . . . . . . . . 456.3 Hive adapter datastore support for SQL function and transform. . . . . . . . . . . . . . . . . . . . . . . . . . . . . 45
2 P U B L I CSupplement for Adapters
Content

6.4 Pushing the JOIN operation to Hive. . . . . . . . . . . . . . . . . . . . . . . . . . . . . . . . . . . . . . . . . . . . . . . . . . 466.5 About partitions. . . . . . . . . . . . . . . . . . . . . . . . . . . . . . . . . . . . . . . . . . . . . . . . . . . . . . . . . . . . . . . 466.6 Previewing Hive table data. . . . . . . . . . . . . . . . . . . . . . . . . . . . . . . . . . . . . . . . . . . . . . . . . . . . . . . . 476.7 Using Hive template tables. . . . . . . . . . . . . . . . . . . . . . . . . . . . . . . . . . . . . . . . . . . . . . . . . . . . . . . . 47
7 Using the HTTP adapter. . . . . . . . . . . . . . . . . . . . . . . . . . . . . . . . . . . . . . . . . . . . . . . . . . . . . . . . 487.1 HTTP adapter scope. . . . . . . . . . . . . . . . . . . . . . . . . . . . . . . . . . . . . . . . . . . . . . . . . . . . . . . . . . . . 487.2 Architecture. . . . . . . . . . . . . . . . . . . . . . . . . . . . . . . . . . . . . . . . . . . . . . . . . . . . . . . . . . . . . . . . . . 497.3 Configure an HTTP operation instance. . . . . . . . . . . . . . . . . . . . . . . . . . . . . . . . . . . . . . . . . . . . . . . 50
Request/Reply operation configuration. . . . . . . . . . . . . . . . . . . . . . . . . . . . . . . . . . . . . . . . . . . . 50Request/Acknowledge operation configuration. . . . . . . . . . . . . . . . . . . . . . . . . . . . . . . . . . . . . . .52
7.4 HTTP adapter instance. . . . . . . . . . . . . . . . . . . . . . . . . . . . . . . . . . . . . . . . . . . . . . . . . . . . . . . . . . 53Testing the Request/Reply operation. . . . . . . . . . . . . . . . . . . . . . . . . . . . . . . . . . . . . . . . . . . . . . 54Testing the Request/Acknowledge operation. . . . . . . . . . . . . . . . . . . . . . . . . . . . . . . . . . . . . . . . 55
7.5 URL for HTTP requests. . . . . . . . . . . . . . . . . . . . . . . . . . . . . . . . . . . . . . . . . . . . . . . . . . . . . . . . . . 567.6 HTTP adapter datastore. . . . . . . . . . . . . . . . . . . . . . . . . . . . . . . . . . . . . . . . . . . . . . . . . . . . . . . . . .56
Import message functions and outbound messages. . . . . . . . . . . . . . . . . . . . . . . . . . . . . . . . . . . .57Importing message functions and outbound messages. . . . . . . . . . . . . . . . . . . . . . . . . . . . . . . . . 57
7.7 Configure SSL with the HTTP adapter. . . . . . . . . . . . . . . . . . . . . . . . . . . . . . . . . . . . . . . . . . . . . . . . 587.8 Error handling and tracing. . . . . . . . . . . . . . . . . . . . . . . . . . . . . . . . . . . . . . . . . . . . . . . . . . . . . . . . 59
8 Using the JMS adapter . . . . . . . . . . . . . . . . . . . . . . . . . . . . . . . . . . . . . . . . . . . . . . . . . . . . . . . . . 608.1 JMS adapter product components. . . . . . . . . . . . . . . . . . . . . . . . . . . . . . . . . . . . . . . . . . . . . . . . . . 608.2 Scope of the JMS adapter. . . . . . . . . . . . . . . . . . . . . . . . . . . . . . . . . . . . . . . . . . . . . . . . . . . . . . . . 628.3 Design considerations. . . . . . . . . . . . . . . . . . . . . . . . . . . . . . . . . . . . . . . . . . . . . . . . . . . . . . . . . . . 628.4 JMS adapter configuration information. . . . . . . . . . . . . . . . . . . . . . . . . . . . . . . . . . . . . . . . . . . . . . . 628.5 JMS adapter datastore. . . . . . . . . . . . . . . . . . . . . . . . . . . . . . . . . . . . . . . . . . . . . . . . . . . . . . . . . . .638.6 JMS adapter operations. . . . . . . . . . . . . . . . . . . . . . . . . . . . . . . . . . . . . . . . . . . . . . . . . . . . . . . . . . 63
Adding an operation instance to an adapter instance. . . . . . . . . . . . . . . . . . . . . . . . . . . . . . . . . . . 64Importing message functions and outbound messages to the datastore. . . . . . . . . . . . . . . . . . . . . 69Operations from Information Resource (IR) to Data Services. . . . . . . . . . . . . . . . . . . . . . . . . . . . . 70Operations from SAP Data Services to the JMS adapter. . . . . . . . . . . . . . . . . . . . . . . . . . . . . . . . . 74
8.7 Run the JMS sample. . . . . . . . . . . . . . . . . . . . . . . . . . . . . . . . . . . . . . . . . . . . . . . . . . . . . . . . . . . . 79Configuring the JMS provider. . . . . . . . . . . . . . . . . . . . . . . . . . . . . . . . . . . . . . . . . . . . . . . . . . . 80Using MQ instead of JNDI configuration. . . . . . . . . . . . . . . . . . . . . . . . . . . . . . . . . . . . . . . . . . . . 81
8.8 Weblogic as JMS provider. . . . . . . . . . . . . . . . . . . . . . . . . . . . . . . . . . . . . . . . . . . . . . . . . . . . . . . . .81Creating a JMS Connection Factory. . . . . . . . . . . . . . . . . . . . . . . . . . . . . . . . . . . . . . . . . . . . . . . 81Configuring the JMS Connection Factory. . . . . . . . . . . . . . . . . . . . . . . . . . . . . . . . . . . . . . . . . . . 82Creating a JMS queue. . . . . . . . . . . . . . . . . . . . . . . . . . . . . . . . . . . . . . . . . . . . . . . . . . . . . . . . . 82
8.9 Error handling and tracing. . . . . . . . . . . . . . . . . . . . . . . . . . . . . . . . . . . . . . . . . . . . . . . . . . . . . . . . 82
9 Using MongoDB metadata. . . . . . . . . . . . . . . . . . . . . . . . . . . . . . . . . . . . . . . . . . . . . . . . . . . . . . .83
Supplement for AdaptersContent P U B L I C 3

9.1 MongoDB as a source. . . . . . . . . . . . . . . . . . . . . . . . . . . . . . . . . . . . . . . . . . . . . . . . . . . . . . . . . . . 83MongoDB query conditions. . . . . . . . . . . . . . . . . . . . . . . . . . . . . . . . . . . . . . . . . . . . . . . . . . . . . 84Push down information. . . . . . . . . . . . . . . . . . . . . . . . . . . . . . . . . . . . . . . . . . . . . . . . . . . . . . . . 85
9.2 MongoDB as a target. . . . . . . . . . . . . . . . . . . . . . . . . . . . . . . . . . . . . . . . . . . . . . . . . . . . . . . . . . . . 859.3 Template documents. . . . . . . . . . . . . . . . . . . . . . . . . . . . . . . . . . . . . . . . . . . . . . . . . . . . . . . . . . . . 87
Creating template documents. . . . . . . . . . . . . . . . . . . . . . . . . . . . . . . . . . . . . . . . . . . . . . . . . . . 87Converting a template document into a regular document. . . . . . . . . . . . . . . . . . . . . . . . . . . . . . . 88
9.4 Parallel Scan. . . . . . . . . . . . . . . . . . . . . . . . . . . . . . . . . . . . . . . . . . . . . . . . . . . . . . . . . . . . . . . . . . 899.5 Re-importing schemas. . . . . . . . . . . . . . . . . . . . . . . . . . . . . . . . . . . . . . . . . . . . . . . . . . . . . . . . . . .899.6 Searching for MongoDB documents in the repository. . . . . . . . . . . . . . . . . . . . . . . . . . . . . . . . . . . . . 909.7 Previewing MongoDB document data. . . . . . . . . . . . . . . . . . . . . . . . . . . . . . . . . . . . . . . . . . . . . . . . 90
10 Using OData tables as a source or target in your data flow. . . . . . . . . . . . . . . . . . . . . . . . . . . . . . 91
11 Using Salesforce.com adapter metadata. . . . . . . . . . . . . . . . . . . . . . . . . . . . . . . . . . . . . . . . . . . .9411.1 Using the Salesforce.com DI_PICKLIST_VALUES table. . . . . . . . . . . . . . . . . . . . . . . . . . . . . . . . . . . . 9411.2 Using the CDC datastore table. . . . . . . . . . . . . . . . . . . . . . . . . . . . . . . . . . . . . . . . . . . . . . . . . . . . . 9411.3 Understanding changed data and Salesforce.com. . . . . . . . . . . . . . . . . . . . . . . . . . . . . . . . . . . . . . . 95
Reading changed data from Salesforce.com. . . . . . . . . . . . . . . . . . . . . . . . . . . . . . . . . . . . . . . . . 95Using check-points. . . . . . . . . . . . . . . . . . . . . . . . . . . . . . . . . . . . . . . . . . . . . . . . . . . . . . . . . . . 97Using the CDC table source default start date. . . . . . . . . . . . . . . . . . . . . . . . . . . . . . . . . . . . . . . . 97Limitations. . . . . . . . . . . . . . . . . . . . . . . . . . . . . . . . . . . . . . . . . . . . . . . . . . . . . . . . . . . . . . . . 98
11.4 Understanding Salesforce.com error messages. . . . . . . . . . . . . . . . . . . . . . . . . . . . . . . . . . . . . . . . . 9811.5 Running the application. . . . . . . . . . . . . . . . . . . . . . . . . . . . . . . . . . . . . . . . . . . . . . . . . . . . . . . . . . 99
12 Using SuccessFactors tables as a source or a target in your data flow. . . . . . . . . . . . . . . . . . . . . 10112.1 Using SuccessFactor's CompoundEmployee entity. . . . . . . . . . . . . . . . . . . . . . . . . . . . . . . . . . . . . . 102
Importing data from an .xsd file. . . . . . . . . . . . . . . . . . . . . . . . . . . . . . . . . . . . . . . . . . . . . . . . . 103Using CompoundEmployee as a source. . . . . . . . . . . . . . . . . . . . . . . . . . . . . . . . . . . . . . . . . . . 103Retrieving the information you want from CompoundEmployee. . . . . . . . . . . . . . . . . . . . . . . . . . 106
13 SSL connection support. . . . . . . . . . . . . . . . . . . . . . . . . . . . . . . . . . . . . . . . . . . . . . . . . . . . . . . .10713.1 Adding certificates. . . . . . . . . . . . . . . . . . . . . . . . . . . . . . . . . . . . . . . . . . . . . . . . . . . . . . . . . . . . . 107
4 P U B L I CSupplement for Adapters
Content

1 Data Services adapters
Adapters allow you to access, view, and import data from within Data Services.
Typical enterprise infrastructure is a complex mix of off-the-shelf and custom applications, databases, ERP applications etc. SAP Data Services combines and extends critical Extraction Transformation Loading (ETL) and Enterprise Application Integration (EAI) technology components required for true enterprise data integration.
Integrating disparate applications with the software's platform requires adapters. These adapters help facilitate otherwise incompatible applications and systems work together, thereby sharing data.
Table 1:
Adapter name Description
DP Bridge Use DP (data provisioning) Bridge as a connection to SDI (smart data integration) functions. Set up DP Bridge as an adapter instance in Administrator ( Data Services Management Console), and use configuration values that support the specific SDI functionality that you want to use. Currently you can set up the DP Bridge adapter to import Microsoft Outlook PST data, which includes mail message and attachment data.
Hive Hive is a data-warehousing infrastructure built on Hadoop. The SAP Hive adapter enables Data Services to connect to a Hive server so that you can work with tables from Hadoop.
HTTP The adapter rapidly integrates diverse systems and applications using HTTP protocol, supports SSL for security, compresses data encoding, and initiates Request/Reply and Request/Acknowledge services.
JDBC The JDBC adapter allows any JDBC source to connect to Data Services.
Once you create an adapter instance and a datastore, you can use JDBC tables as a source in your Data Services data flow to fetch, insert, update, and delete data.
JMS The JMS (Java Messaging Service) adapter initiates Request/Reply and Request/Acknowledgment messages. Additionally, JMS adapter supports IR (Information Resource, a JMS compatible application) requests, or you can set JMS adapter to subscribe to IR published messages.
Use the JMS adapter with a batch job or real-time data flow (RTDF) when the batch job or RTDF passes a message to an operation instance, using either:
● An Outbound message (for Request/Acknowledge operations)● A Message Function (for Request/Reply operations)
MongoDB The MongoDB adapter allows you to read data from MongoDB to other Data Services targets.
MongoDB is an open-source document database which uses JSON-like documents (MongoDB calls the format BSON) with dynamic schemas instead of a traditional table-based relational database structures.
MongoDB is schema-free, but Data Services needs metadata for task design and execution. Data Services generates schema data based on a certain number of records and allows you to provide a JSON file that the software can use to generate a schema for each collection.
Once you create an adapter instance and a datastore, you can browse and import MongoDB entities, which are similar to database tables.
Supplement for AdaptersData Services adapters P U B L I C 5
Adapter name Description
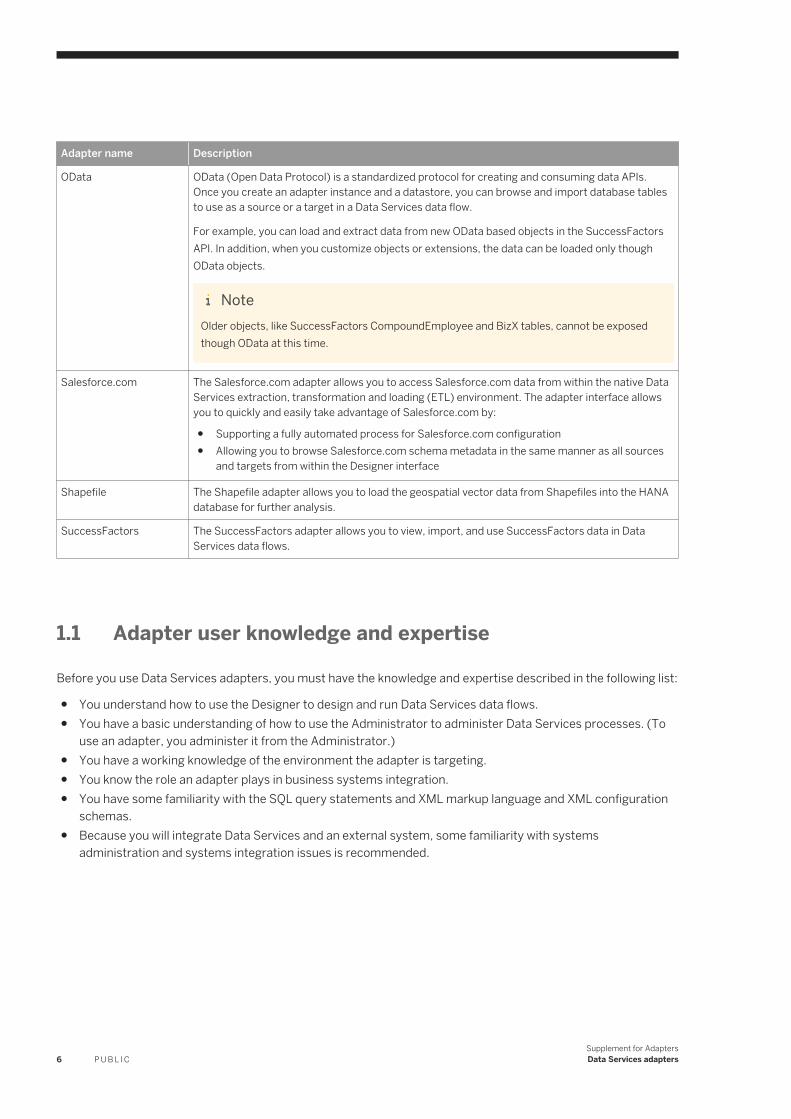
OData OData (Open Data Protocol) is a standardized protocol for creating and consuming data APIs. Once you create an adapter instance and a datastore, you can browse and import database tables to use as a source or a target in a Data Services data flow.
For example, you can load and extract data from new OData based objects in the SuccessFactors API. In addition, when you customize objects or extensions, the data can be loaded only though OData objects.
NoteOlder objects, like SuccessFactors CompoundEmployee and BizX tables, cannot be exposed though OData at this time.
Salesforce.com The Salesforce.com adapter allows you to access Salesforce.com data from within the native Data Services extraction, transformation and loading (ETL) environment. The adapter interface allows you to quickly and easily take advantage of Salesforce.com by:
● Supporting a fully automated process for Salesforce.com configuration● Allowing you to browse Salesforce.com schema metadata in the same manner as all sources
and targets from within the Designer interface
Shapefile The Shapefile adapter allows you to load the geospatial vector data from Shapefiles into the HANA database for further analysis.
SuccessFactors The SuccessFactors adapter allows you to view, import, and use SuccessFactors data in Data Services data flows.
1.1 Adapter user knowledge and expertise
Before you use Data Services adapters, you must have the knowledge and expertise described in the following list:
● You understand how to use the Designer to design and run Data Services data flows.● You have a basic understanding of how to use the Administrator to administer Data Services processes. (To
use an adapter, you administer it from the Administrator.)● You have a working knowledge of the environment the adapter is targeting.● You know the role an adapter plays in business systems integration.● You have some familiarity with the SQL query statements and XML markup language and XML configuration
schemas.● Because you will integrate Data Services and an external system, some familiarity with systems
administration and systems integration issues is recommended.
6 P U B L I CSupplement for AdaptersData Services adapters

2 Adapter installation and configuration
In order to use an adapter, you need to create and configure an adapter instance and necessary adapter operations in the Administrator and then create an adapter datastore in the Designer.
The following table contains a list of adapters that are automatically installed with Data Services.
Table 2:
Adapter Data Services version you need and other requirements
DP Bridge Adapter (for SDI Outlook) 4.2.7 or later
Hive 4.1.1 or later
HTTP
HTTP adapter servlet
4.0.0 or later
JDBC 4.2.2 or later
JMS 11.7.0 or later
You'll also need the following:
● JMS Provider (for example, Weblogic Application Server)● SAP Data Services Adapter SDK version 2.0.0.0 or later
MongoDB 4.2.4 or later
OData 4.2.2 or later
SuccessFactors 4.2.1 or later
Salesforce.com 12.0.0 or later
Shapefile 4.2.3 or later
Adapters are associated with several files:
● Adapter jar files● Adapter configuration templates● Software System extensions (Salesforce.com)
2.1 Adding and configuring an adapter instance
Use the SAP Data Services Management Console Administrator to add an adapter instance and necessary adapter operations to the Data Services system and to edit adapter configurations. Adapter operations identify the integration options available for the configured adapter instance.
You must establish Administrator connection to your adapter-enabled repository before adding an adapter instance. For more information about connecting repositories to the Administrator, see the “Administrator Management” section of the Management Console Guide.
Supplement for AdaptersAdapter installation and configuration P U B L I C 7

If the Adapter Instances node is not available in Administrator, open the SAP Data Services Server Manager and make sure the Support adapter and message broker communication option in the Job Server Properties window is enabled. The Server Manager is usually located in <LINK_DIR>/SAP Data Services <version>.
You must add and configure the adapter instance before you can run jobs using information from the adapter.
Follow these steps to add and configure an adapter instance in the Administrator:
1. Expand the Adapter Instances node and select a job server.2. Open the Adapter Configuration tab.3. Click Add to see a list of adapters managed by the job server, and select the applicable adapter.4. Complete the information on the Adapter instance startup configuration page.
Table 3: Options in the Adapter instance startup group
Parameter Description
Adapter Instance Name (Required) Enter a unique name to identify this instance of the adapter. Spaces are not allowed.
Access Server Host Enter the host ID of the computer running the Access Server that connects to this adapter instance.
To run a real-time job, you must configure a service that the Access Server will use to run the job. When a job uses adapter-based data, the Access Server must be able to connect to the adapter instance.
If you do not know this information, you can leave this blank.
Access Server Port Enter port information if the adapter accesses realtime services. If you do not know this information, you can leave this blank.
Use SSL Protocol When set to True, communication between the adapter and the job server/engine uses SSL (Secure Sockets Layer) protocol.
NoteSSL protocol is not applicable for the DP Bridge Outlook adapter.
Character Set Converts text characters to and from bytes for data.
Metadata Character Set Converts text characters to and from bytes for metadata.
Adapter Retry Count Applies if the adapter instance fails or crashes. Enter 0 for no retries and a negative number for indefinite retries.
Adapter Retry Interval The wait, in milliseconds, between adapter retry attempts.
8 P U B L I CSupplement for Adapters
Adapter installation and configuration

Parameter Description
Classpath Indicates the -classpath Java parameter value when the adapter starts.
Adapters are preconfigured with most of the necessary jar files. In some cases you might need to configure the jar files required by the adapter CLASSPATH. Listed below are jar files required for specific adapters.
DP Bridge Outlook adapter:
○ <LINK_DIR>\ext\lib\com.sap.hana.dp.adapterframework.jar;
○ <LINK_DIR>ext\lib\com.sap.hana.dp.agent.jar;
○ <LINK_DIR>\ext\lib\com.sap.hana.dp.cdcadaptercommons.jar;
○ <LINK_DIR>\ext\lib\org.eclipse.osgi_3.9.1.v20140110-1610.jar;
○ <LINK_DIR>ext\lib\org.antlr.runtime_3.2.0.v201101311130.jar;
○ <LINK_DIR>ext\lib\commons-codec-commons-codec-1.9.jar;
○ <LINK_DIR>ext\lib\com.sap.hana.dp.outlookadapter.jar;
○ <LINK_DIR>\ext\lib\java-libpst.jar;
HTTP adapter jar files:
○ <LINK_DIR>/lib/acta_adapter_sdk.jar○ <LINK_DIR>/lib/acta_broker_client.jar○ <LINK_DIR>/lib/acta_tool.jar○ <LINK_DIR>/ext/lib/xerces.jar○ <LINK_DIR>/lib/acta_http_adapter.jar○ <LINK_DIR>/lib/jcert.jar○ <LINK_DIR>/lib/jnet.jar○ <LINK_DIR>/lib/jsse.jar
For JDBC adapters, you must add the path to the ojdbc6.jar file to the JDBC adapter CLASSPATH.
For the JMS adapter, the vendor-specific JMS provider .jar files and the j2ee.jar file are not provided. You need to add these jar files to the CLASSPATH.
Supplement for AdaptersAdapter installation and configuration P U B L I C 9

Parameter Description
JMS adapter jar files:
○ <LINK_DIR>/lib/acta_adapter_sdk.jar○ <LINK_DIR>/lib/acta_broker_client.jar○ <LINK_DIR>/lib/acta_tool.jar○ <LINK_DIR>/ext/lib/xerces.jar○ <LINK_DIR>/lib/acta_jms_adapter.jar○ <LINK_DIR>/ext/lib/jms/<JMS Provider
Jar File>○ <LINK_DIR>/ext/lib/jms/j2ee.jar
NoteSpecify the jar file provided with the JMS provider that you are using. For Weblogic, the name of jar file is weblogic.jar.
The j2ee.jar file is required. Get the j2ee.jar file from Java EE 1.6 and copy it to the adapter job server machine. You then need to add the j2ee.jar to the JMS adapter CLASSPATH.
Autostart When set to True, the adapter interface automatically starts when the Administrator starts.
Trace mode Set this flag to control the number of trace messages the adapter writes.○ When set to True, the adapter interface writes informa
tion and error messages to help debug problems. The adapter writes information and error messages to the <adapter_instance_name>_trace.txt file in the <DS_COMMON_DIR>\adapters\logs directory.
○ When set to False the adapter interface writes only error information messages. The adapter writes error messages to the <adapter_instance_name>_error.txt file in the <DS_COMMON_DIR>\adapters\logs directory.
10 P U B L I CSupplement for Adapters
Adapter installation and configuration

Parameter Description
Additional Java Launcher Options Enabled when launching the Java process that hosts the adapter.
NoteIf you are connecting to the adapter from behind a proxy server, add the following to the end of the Additional Java Launcher options:
-Dhttps.proxyHost=<proxy_server_name> -Dhttps.proxyPort=<proxy_server_port>
NoteFor Unicode character support in MongoDB, add the following: -Dfile.encoding=UTF-8
Adapter type name (Read-only) The name of the adapter used to create this instance.
Adapter version (Read-only) The version of the adapter used to create this instance.
Adapter Class (Read-only) A name that identifies the adapter class. The name depends on the type of adapter.
5. Make specific adapter-type run-time configuration settings. Each adapter has unique settings:
○ HTTP adapter: HTTP adapter specific configuration settings [page 12]○ JDBC adapter: JDBC adapter specific configuration settings [page 12]○ JMS adapter: JMS adapter specific configuration settings [page 14]○ DP Bridge Outlook adapter: DP Bridge Outlook adapter runtime configuration settings [page 15]
6. Click Apply.
The Administrator adds your adapter instance to the Data Services system.
Related Information
JMS adapter operations [page 63]Configure an HTTP operation instance [page 50]JDBC adapter datastore configuration options [page 23]
Supplement for AdaptersAdapter installation and configuration P U B L I C 11

2.1.1 HTTP adapter specific configuration settings
Additional configuration settings to make in the Adapter instance startup configuration page for HTTP adapter.
Table 4:
Parameter Description
Keystore Password Required if requests are made using the HTTPS protocol. If a password is given, it is used to check the integrity of the keystore data. Otherwise, the integrity of the keystore is not checked.
Related Information
Adding and configuring an adapter instance [page 7]
2.1.2 JDBC adapter specific configuration settings
Additional configuration settings to make in the Adapter instance startup configuration page to configure JDBC connection information and push down capabilities at the adapter instance level, instead of the datastore level.
Table 5:
Parameter Description
JDBC driver class name The JDBC driver class name. For example, you might enter com.microsoft.sqlserver.jdbc.SQLServerDriver.
JDBC driver url The URL for the JDBC driver.
User The name of the user connecting to the JDBC driver.
Password The password needed to connect to the JDBC driver.
JDBC Pushdown Capability Select Yes to allow Data Services to push down a simple or nested expression or function to the JDBC driver.
If you know that the driver does not support a certain expression or function, select No.
12 P U B L I CSupplement for Adapters
Adapter installation and configuration

Parameter Description
JDBC Math Function Support Options are set to Yes by default. Select No if you don't want a function pushed down to the JDBC driver. The following math functions are available:
● cei: Returns the absolute value of the input number.● ceil: Returns the smallest integer value that is greater than or equal to the input number.● floor: Returns the largest integer value that is greater than or equal to the input number.● round: Returns the input number, rounded to the specified number of decimal places, to
the right of the decimal point.● trunc: Returns the input number, truncated to the specified number of decimal places, to
the right of the decimal point.● sqrt: Returns the square root of the input number.● log: Returns the base-10 logarithm of the given numeric expression.● ln: Returns the natural logarithm of the given numeric expression.● power: Returns the value of the given expression to the specified power.● mod: Returns the remainder when one number is divided by another.
JDBC String Function Support Options are set to Yes by default. Select No if you don't want a function pushed down to the JDBC driver. The following string functions are available:
● lower: Converts the input string to lowercase.● upper: Converts the input string to uppercase.● rtrim_blanks: Returns the input string with blanks on the right removed.● ltrim_blanks: Returns the input string with blanks on the left removed.● length: Returns the length of the input string.● substr: Returns the portion of the string specified by the offset and length.● soundex: Returns the Soundex encoding of the input string.
JDBC Aggregate Function Support
Options are set to Yes by default. Select No if you don't want a function pushed down to the JDBC driver. The following aggregate functions are available:
● avg: Calculates the average of a given set of values.● count: Counts the number of values in a table column.● count_distinct: Counts the number of distinct non-null values in a table column.● max: Returns the maximum value from a list.● min: Returns the minimum value from a list.● sum: Calculates the sum of a given set of values.
JDBC Date Function Support Options are set to Yes by default. Select No if you don't want a function pushed down to the JDBC driver. The following date functions are available:
● week_in_year: Returns the week number relative to the year for the input date.● month: Returns the month number for the input date.● quarter: Returns the number of the quarter for the input date.● year: Returns the year number for the input date.● day_in_month: Returns the day number relative to the month for the input date.● day_in_year: Returns the day number relative to the year for the input date.
JDBC Miscellaneous The following miscellaneous options are available:
● Ifthenelse: Computes the expression A. If A evaluates to TRUE, return B. Otherwise, return C.
● nvl: Replaces input with replacement if input is NULL.
Supplement for AdaptersAdapter installation and configuration P U B L I C 13

Related Information
Adding and configuring an adapter instance [page 7]
2.1.3 JMS adapter specific configuration settings
Additional configuration settings to make in the Adapter instance startup configuration page for the JMS adapter.
Make additional configuration settings in the Configuration Type parameter based on the selected configuration type.
Table 6: JNDI configuration type parameters
Parameter Description
Server URL Represents the URL of the JMS Provider. For example: t3://<JMS Provider IP Address>:<port number>.
JNDI Context Factory JNDI context factory name is JMS Provider specific. You can choose the context factory from a list that includes common context factories.
If you require a context factory that is not listed, you can add it to the list by editing file <DS_COMMON_DIR>/adapters/config/templates/JMSAdapter.xml and updating the <jndiFactory> element.
For Weblogic as a JMS Provider, the JNDI Factory name is: weblogic.jndi.WLInitialContextFactory.
Queue Connection Factory Queue connection factory name. For example: JMSConnections.AdapterConnectionFactory.
Topic Connection Factory Topic connection factory name. For example: JMSConnections.AdapterTopicConnectionFactory.
Table 7: MQ configuration type parameters
Parameter Description
MQ Queue Manager Name (Optional) Specify if not using the default MQ Queue Manager on the system running MQ.
MQ Channel Name (Optional) Specify if not using the default MQ Channel on the system running the adapter.
MQ Computer Name (Optional) Specify if not using the MQ Queue Manager on the same system running the adapter.
14 P U B L I CSupplement for Adapters
Adapter installation and configuration

Parameter Description
MQ Port (Optional) Specify if not using the default MQ port (1414).
MQ User ID (Optional) Specify if required to log in to the MQ Queue Manager.
MQ Password (Optional) Specify if required to log in to the MQ Queue Manager.
Related Information
Adding and configuring an adapter instance [page 7]
2.1.4 DP Bridge Outlook adapter runtime configuration settings
Complete additional runtime parameters for the DP Bridge Outlook adapter in the Adapter instance startup configuration page.
Table 8: DP Bridge Outlook adapter runtime parameters
Parameter Description
Adapter Factory Class Enter the following text: com.sap.hana.dp.outlookadapter.DSBridgeOutlookAdapterFactory
Adapter Jar File Leave this parameter blank. The value is included with the list of jar files that you enter for the DP Bridge Outlook adapter classpath.
Adapter Name Enter the following text:
DSBridgeOutlookAdapter
Related Information
Adding and configuring an adapter instance [page 7]
Supplement for AdaptersAdapter installation and configuration P U B L I C 15

2.2 Starting and stopping the adapter instance
Click the Status tab to view the status of all adapter instances you configured. From this tab, you can start adapter instances and shut down or abort instances that are running.
NoteIf you make any configuration changes to an adapter, you'll need to restart the adapter instance before the changes will take effect.
From the Status tab, you can also navigate to view Adapter Instance configuration details, Log Files, and Dependent Objects for each configured adapter instance.
2.3 Monitoring the adapter instances and operations
1. Select Adapter Instances <Job Server> .
The Adapter Instance Status page lists each adapter instance and its operations.2. Find the overall status of a particular adapter instance or operation by examining the indicators.
Table 9:
Indicator Description
A green icon indicates that the adapter instance or operation has started and is currently running.
A yellow icon indicates that the adapter instance or operation is not currently running.
A red icon indicates that the adapter instance or operation has experienced an error.
For each operation, this page lists four statistics.
Table 10:
Statistic Description
Requests Processed The number of requests for this operation instance that were processed. Processing of these requests is complete.
Requests Pending The number of requests for this operation instance that are still pending. Processing of these requests is not complete.
Requests Failed The number of requests for this operation instance that have failed. The operation has stopped processing these requests.
16 P U B L I CSupplement for Adapters
Adapter installation and configuration

Statistic Description
Status For operations, displays error text.
You can also find more detailed adapter instance information in the Status column. Possible values include:
○ Initialized○ Starting○ Started○ Shutting Down○ Shutdown○ Error text—Displays the last error message that occurred as the adapter instance
shut down or indicates that the configuration has changed. To allow the adapter instance to use the changes, restart the adapter instance.
For more detailed information about the adapter instance, view the error and trace log files.
2.4 Monitoring adapter instance statistics
1. Select Adapter Instances <Job Server> .
2. Click the name of an adapter instance.The statistics for the instance appear. The options and descriptions that appear on this page depend on the adapter's specific design. Consult your adapter-specific documentation for details.
2.5 Creating an adapter datastore
You need to create at least one adapter datastore in the Designer for each adapter through which you are extracting or loading data.
To create a datastore, you must have the appropriate access privileges to the application that the adapter serves.
1. In the Datastores tab of the Designer object library, right-click and select New.2. In the Datastore Editor window, type a unique name in the Datastore name box. It can be the same as the
adapter instance name.3. Select Adapter from the Datastore type list.4. Select a job server.
Adapters residing on the job server computer and registered with the selected job server appear in the list.5. Choose the name of the adapter instance from the Adapter instance name list.6. Click Advanced. Configuration options vary depending on the adapter you are creating. For information about
configuration options for specific adapters, see Adapter datastore configuration options [page 19].The following configuration options are used by multiple adapters:
Supplement for AdaptersAdapter installation and configuration P U B L I C 17

Table 11:
Parameter Description
Username and Password The user name and password associated with the adapter database to which you are connecting.
Web service end point or URL The URL where your service can be accessed by a client application.
Default Base64 binary field length in kilobyte (KB) Binary data is encoded in ASCII using Base64 format and Data Services stores this ASCII data in a varchar field.
You must specify the size for the Data Services varchar field. The default is 16 KB.
7. Click OK to save values and finish creating the datastore.The datastore configuration is saved in your metadata repository and the new datastore appears in the object library.
An error message appears stating that the adapter connection failed if you do not provide the correct user name and password (when required), or if you entered an invalid parameter.
NoteClick Show ATL to open a text window that displays how the software will code the selections you make for this datastore in its scripting language.
Related Information
Hive adapter datastore configuration options [page 20]Metadata mapping for JDBC [page 37]MongoDB adapter datastore configuration options [page 23]OData adapter datastore configuration options [page 27]Salesforce.com adapter datastore configuration options [page 28]Shapefile adapter datastore configuration options [page 31]SuccessFactors adapter datastore configuration options [page 32]
18 P U B L I CSupplement for Adapters
Adapter installation and configuration

2.5.1 Adapter datastore configuration options
The datastore editor contains configuration options that are common to all adapter datastores. Additional options that appear in the datastore editor are based on the type of adapter datastore you are creating.
Related Information
Creating an adapter datastore [page 17]
2.5.1.1 DP Bridge Outlook adapter datastore options
The Data Provisioning (DP) Bridge for the SDI Outlook adapter imports Outlook mail messages and attachments from a local PST file to Data Services.
The Outlook adapter imports Outlook mail messages and attachments from local PST files and places them into tables. Before you can create a DP Bridge adapter for Outlook adapter, create an instance of the DP Bridge adapter in the Management Console. The instance configuration must contain the specific settings related to the SDI Outlook adapater.
After you create an instance of DP Bridge adapter for the SDI Outlook adapter, you can create an adapter datastore in Data Services.
Make sure that you complete the following Datastore Editor options when you create this datastore:
Table 12: SDI Outlook adapter datastore options
Option Value
Datastore Name Enter a name.
Datastore Type Choose Adapter from the drop-down list.
Adapter Instance Name Choose the name of the DP Bridge adapter instance that you created in Management Console for the SDI Outlook adapter.
Table 13: Advanced options
SDI Outlook adapter option Value
PST file location Enter the full path and file name of the PST file that you want to access. You must have permission to access this file, and it must be local.
Supplement for AdaptersAdapter installation and configuration P U B L I C 19
SDI Outlook adapter option Value
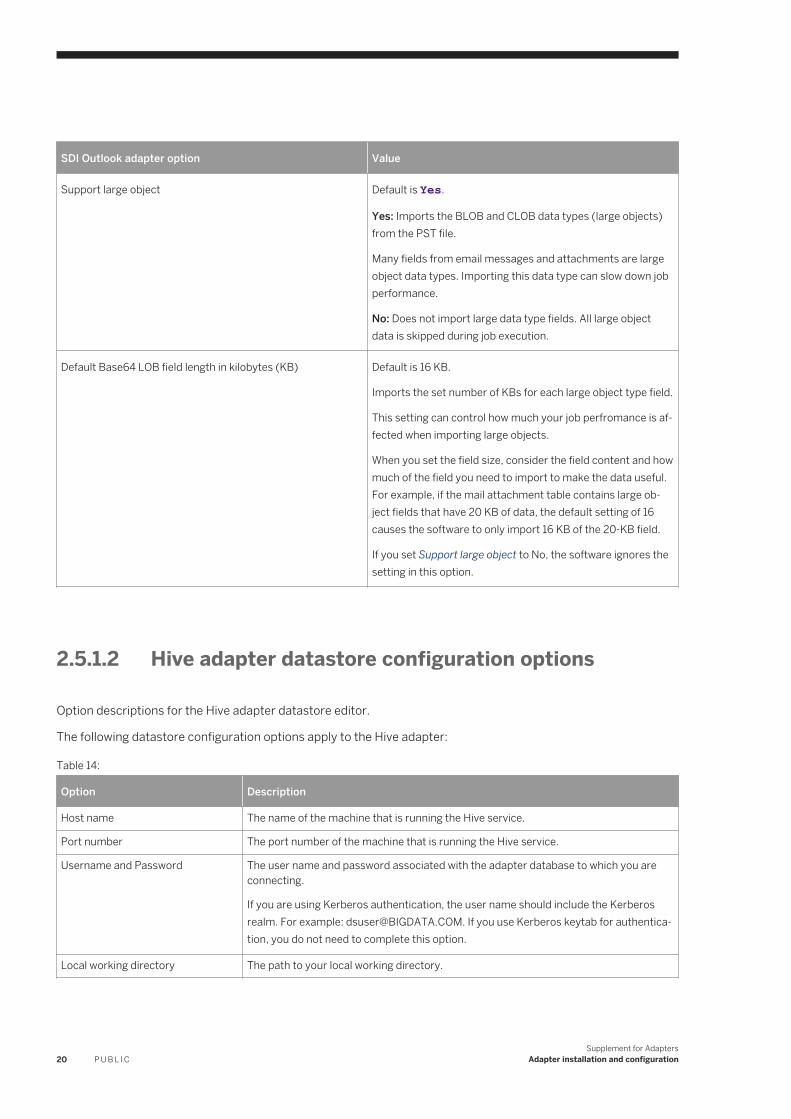
Support large object Default is Yes.
Yes: Imports the BLOB and CLOB data types (large objects) from the PST file.
Many fields from email messages and attachments are large object data types. Importing this data type can slow down job performance.
No: Does not import large data type fields. All large object data is skipped during job execution.
Default Base64 LOB field length in kilobytes (KB) Default is 16 KB.
Imports the set number of KBs for each large object type field.
This setting can control how much your job perfromance is affected when importing large objects.
When you set the field size, consider the field content and how much of the field you need to import to make the data useful. For example, if the mail attachment table contains large object fields that have 20 KB of data, the default setting of 16 causes the software to only import 16 KB of the 20-KB field.
If you set Support large object to No, the software ignores the setting in this option.
2.5.1.2 Hive adapter datastore configuration options
Option descriptions for the Hive adapter datastore editor.
The following datastore configuration options apply to the Hive adapter:
Table 14:
Option Description
Host name The name of the machine that is running the Hive service.
Port number The port number of the machine that is running the Hive service.
Username and Password The user name and password associated with the adapter database to which you are connecting.
If you are using Kerberos authentication, the user name should include the Kerberos realm. For example: [email protected]. If you use Kerberos keytab for authentication, you do not need to complete this option.
Local working directory The path to your local working directory.
20 P U B L I CSupplement for Adapters
Adapter installation and configuration

Option Description
HDFS working directory The path to your Hadoop Distributed File System (HDFS) directory. If you leave this blank, Data Services used /user/sapds_hivetmp as the default.
String size The size of the Hive STRING datatype. The default is 100.
SSL enabled Select Yes to use a Secure Socket Layer (SSL) connection to connect to the Hive server.
NoteIf you use Kerberos or Kerberos keytab for authentication, set this option to No.
SSL Trust Store The name of the Trust Store that verifies credentials and store certificates.
Trust Store Password The password associated with the Trust Store.
Authentication Indicates the type of authentication you are using for the Hive connection:
Kerberos: Select to use Kerberos for authentication. You must enter your Kerberos password in the Username and Password option.
Kerberos keytab: Select to use Kerberos for authentication. You must have a generated keytab file and enter the keytab file location in Kerberos Keytab Location option.
A Kerberos keytab file contains a list of authorized users for a specific password. The software uses the keytab information instead of the entered password in the Username and Password option. For more information about keytabs, see the MIT Kerberos documentation at http://web.mit.edu/kerberos/krb5-latest/doc/basic/keytab_def.html
.
Data Services supports Kerberos authentication for Hadoop and Hive data sources when you use Hadoop and Hive services that are Kerberos enabled.
Note● Data Services supports Hadoop/Hive on Linux 64 platform only.● You cannot use SSL and Kerberos or Kerberos keytab authentication together.
Set the SSL enabled option to No when using Kerberos authentication.● To enable SASL-QOP support for Kerberos, you need to enter a sasl.qop value
into the Additional Properties field. For more information, see the Additional Properties field description.
To use Kerberos authentication, you need to do the following:
● Install Kerberos 5 client 64 bit packages (krb5, krb5-client).● Configure Kerberos KDC according to the Hadoop/Hive distribution requirements.● Make sure the Kerberos configuration file (krb5.conf) is available and contains the
correct REALM/KDC configurations. Note that the location is installation specific (usually under /etc/krb5.conf on Linux).
● Point /usr/lib64: linkrb5.so to the preferred version of libkrb5.so.<version> library.
For more information about Kerberos, visit http://web.mit.edu/kerberos/ .
Supplement for AdaptersAdapter installation and configuration P U B L I C 21

Option Description
Kerberos Realm Specifies the name of your Kerberos realm. A realm contains the services, host machines, and so on that users can access. For example, BIGDATA.COM.
Kerberos KDC Specifies the server name of the Key Distribution Center (KDC). Secret keys for user machines and services are stored in the KDC database.
You should configure the Kerberos KDC with renewable tickets (ticket validity as required by Hadoop/Hive installation).
NoteData Services supports MIT KDC and Microsoft AD for Kerberos authentication.
Kerberos Hive Principal The Hive principal name for the KDC. This can be the same user that you use when installing Data Services. Hive service principal information can be found in the hive-site.xml file. For example, hive/<hostname>/@realm.
Kerberos Keytab Location Location for the applicable Kerberos keytab that you generated for this connection.
See the description for Authentication for more information about Kerberose keytab authentication.
Additional Properties Specifies any additional connection properties. Property value pairs must be followed by a semicolon (;). Multiple property value pairs must be separated by a semicolon. For example:
name1=value1;
name1=value1; name2=value2;
To enable SASL-QOP support, set the Authentication option to Kerberos and enter one of the following values (the value you use should match the value on the Hive server):
● Use ;sasl.qop=auth; for authentication only.● Use ;sasl.qop=auth-int; for authentication with integrity protection.● Use ;sasl.qop=auth-conf; for authentication with integrity and confidential
ity protection.
Related Information
Using Hive metadata [page 44]
22 P U B L I CSupplement for Adapters
Adapter installation and configuration

2.5.1.3 JDBC adapter datastore configuration options
The following configuration option applies to the JDBC adapter:
Table 15:
Option Description
Convert unknown data type to VARCHAR
Set this option to Yes if you want Data Services to import unsupported data types as VARCHAR.
If you set this option to No, Data Services ignores the metadata column for unsupported data types during import.
Related Information
Adding and configuring an adapter instance [page 7]Metadata mapping for JDBC [page 37]
2.5.1.4 MongoDB adapter datastore configuration options
The following configuration options apply to the MongoDB adapter:
Table 16:
MongoDB options Description
Server host The host name or IP address of the database server to which you are connecting.
Server port The port number of the database server to which you are connecting.
NoteWhen using sharded clusters, you need to specify the port for the mongos instance.
Database name The name of the database to which you are connecting.
Supplement for AdaptersAdapter installation and configuration P U B L I C 23

MongoDB options Description
Authentication Type Specifies the authentication type for the MongoDB connection. The following options are available:
● MongoDB-CR: Uses username/password authentication.● LDAP: Uses the Lightweight Directory Access Protocol (LDAP) service to authenticate user re
quests.
NoteUse only secure encrypted or trusted connections between the client and the server and between saslauthd and the LDAP server. The LDAP server uses the SASL PLAIN mechanism to send and receive data in plain text. Use a trusted channel, such as VPN, an encrypted connection with SSL, or a wired network.
● Kerberos: Authenticates the connection with the MongoDB server using Username and KeyTab. Kerberos uses tickets to authenticate, which means that passwords are not stored locally or sent over the internet.When using this authentication type, you must first export the KeyTab file and then copy it to the machine that is running the MongoDB adapter instance.
NoteKerberos is supported in MongoDB Enterprise version 2.4 and later.
For more information about Kerberos, visit http://web.mit.edu/kerberos/ .● SCRAM-SHA-1: Authenticates using user credentials against the user’s name, password, and the
database on which the user was created.
NoteSCRAM-SHA-1 is the preferred mechanism for MongoDB versions 3.0 and later. It is not supported in earlier versions.
● No Authentication (default)
Username The username associated with the selected authentication type.
This field is required for LDAP, MongoDB-CR, Kerberos, and SCRAM-SHA-1 authentication.
Password The password associated with the selected authentication type.
This field is required for LDAP, MongoDB-CR, Kerberos, and SCRAM-SHA-1 authentication.
Kerberos Realm Specifies the name of your Kerberos realm. A realm contains the services, host machines, and so on that users can access.
NoteThe Realm name is case-sensitive.
This field is required for Kerberos authentication.
Kerberos KDC Specifies the hostname of the Key Distribution Center (KDC). Secret keys for user machines and services are stored in the KDC database.
This field is required for Kerberos authentication.
24 P U B L I CSupplement for Adapters
Adapter installation and configuration

MongoDB options Description
Kerberos KeyTab Specifies the path to the .keytab file. The .keytab file stores long-term keys for one or more principals.
NoteThe .keytab file must be accessible on the machine that is running the MongoDB adapter instance.
This field is required for Kerberos authentication.
Varchar size Specifies the length of the varchar type for string columns. This determines the varchar size during table importing.
If the actual value is longer than the specified length, the string will be truncated when Data Services reads it. The default is 1024.
Rows to scan This option does the following:
● Specifies how many scanned records you want to use to generate the metadata schema during import (for example, enter -1 to scan all rows).
● Specifies how many rows you want to display when previewing document data (for example, enter -1 to display all rows).
The default is 100.
Sample directory The location of the folder in which you want to store files that are named to match the collection names on MongoDB.
For example, let's say you have a folder named c:\mongo_sample\ and that folder has three files in it that are named a.json, b.json, and c.json.
You set the Sample directory option to c:\mongo_sample\ and import collections named a, b, and c. The datastore is now able to find the corresponding files and use those files to generate schemas for the collections.
NoteThe Job Server must be able to access the folders and files you are using. Be aware that the Job Server may not be on the same machine as the Designer.
If Data Services does not find a file name that matches the collection name in the location you specify, it will generate a schema from data in the MongoDB server.
Supplement for AdaptersAdapter installation and configuration P U B L I C 25

MongoDB options Description
Use cache Indicates if you want to use cached metadata.
If this option is set to Yes, Data Services stores the generated schema in %DS_COMMON_DIR%/ext/mongo/mcache/ on the machine that hosts the Job Server which contains the adapter instance. To use cache, Data Services must be able to access the necessary files.
The Use Cache option has impacts in these two scenarios:
Table 17:
Scenario Description
You use one repository
(Using repository 1 and Job Server 1)
The Use cache option is set to Yes and you import a collection for the first time. Data Services generates a cache file.
If you decide to re-import the collection with the Use cache option set to Yes, Data Services will read the metadata from the cache file. Reading from a cache file is faster, but be aware that any potential schema changes in the database will not be reflected.
If you have Use cache set to No when re-importing, Data Services scans the collection and generates a schema instead of reading from the cache file.
You switch repositories
(Using repository 2 and Job Server 2)
You open repository 2 in the Designer and use Job Server 2. The Use cache option is set to Yes and you import the same collection that you used when you were using only one repository. Data Services tries to access the cache from Job Server 2's machine, but it can't find the cached file on the machine. Data Services instead scans from the collection.
To reuse the cache file generated by Job Server 1, you need to make sure Job Server 1 and Job Server 2 are under the same Data Services installation. You can also manually copy the cache files to the folder from which Job Server 2 is trying to access them.
Use SSL Indicates if you want to connect to MongoDB using SSL with or without a PEM file.
NoteSSL improves security for data exchange, but it can reduce application performance. The SSL configuration parameters and the hardware you use affect the reduction range.
SSL PEM File The path to the SSL privacy-enhanced mail (PEM) file you want to use when connecting to a MongoDB instance that requires client certificates. If you don't provide a path to a PEM file, Data Services connects using SSL without certificate.
NotePassphrase-protected certificates are not supported. If the .pem file is passcode encrypted, you must decrypt the file with the passphrase before using it.
26 P U B L I CSupplement for Adapters
Adapter installation and configuration

MongoDB options Description
Replica Set Indicates if you want to connect to a replica set. If you set this option to Yes, you also need to set the Secondary servers option.
NoteData Services ignores this option if Sharded Cluster is set to Yes.
Secondary servers The name of the secondary database server used for the replica set. Use a comma to separate multiple secondary database server names and ports. For example, <host1>:<port1>,<host2>:<port2>,<host3>:<port3>.
Sharded Cluster Indicates if you want to connect to a routing service (mongos) as a front end to a sharded cluster.
To use sharded clusters, you must enter the port for the mongos instance into the Server port field.
NoteIf you set this option to Yes, Data Services ignores the Replica Set option.
Related Information
Creating an adapter datastore [page 17]Using MongoDB metadata [page 83]
2.5.1.5 OData adapter datastore configuration options
The following configuration options apply to the OData adapter:
NoteOptions that are used by multiple adapters are explained in Creating an adapter datastore [page 17].
Table 18:
OData option Description
Default varchar length Indicates the default size for the Data Services varchar field.
Depth level Indicates if you're using navigation properties. Select 1 to disable and 2 to enable. Default navigation depth is 2.
Supplement for AdaptersAdapter installation and configuration P U B L I C 27

OData option Description
OData version The OData version. The following options are available:
● V1● V2 (default)● V4● AUTO (automatically detects the version from the URL)
NoteJob migration between OData V2 and V4 is not supported because each version uses different metadata. OData V3 is not supported.
The OData adapter uses the odata4j (supports V1 and V2) and Apache Olingo (supports V2 and V4) libraries. For more information about oData libraries, see http://www.odata.org/libraries/ .
Require CSRF Header Set this option to True to use a Cross-Site Request Forgery (CSRF) token to provide additional security when writing data to an OData API.
NoteThis option is supported for OData V2 only.
Related Information
Metadata mapping for OData [page 39]Using OData tables as a source or target in your data flow [page 91]
2.5.1.6 Salesforce.com adapter datastore configuration options
The following configuration options apply to the Salesforce.com adapter:
Table 19:
Salesforce.com options
Description
Batch size Specifies the batch size to use in queries. When loading data, Saleforce.com can send only a maximum of 200 rows.
Enable CDC Enables changed data capture for this datastore (default is No)
28 P U B L I CSupplement for Adapters
Adapter installation and configuration

Salesforce.com options
Description
Disable CDC deleted record
Disables the retrieval of deleted records for CDC loads.
Disable CDC upserted records
Disables the retrieval of updated or inserted records for CDC loads.
Disable HTTP chunking
Disables HTTP chunking (default is No).
NoteIf you get the following error when trying to browse metadata, set this parameter to Yes:
There was a communication error when talking to Salesforce.com: Transport error: 411 Error: Length Required
Convert Date value to UTC
Converts Date to UTC format when reading and loading data.
Supplement for AdaptersAdapter installation and configuration P U B L I C 29

Salesforce.com options
Description
Metadata resilience?
Indicates when you want the adapter to issue an error message when reading from CDC sources. The default value for this option is No. If you select Yes, the adapter will not throw an error in the following situations:
Table 20:
When reading from normal or CDC sources
When reading from normal or CDC sources
When loading data to Salesforce.com
If a table no longer exists, the adapter sends no record of that table to SAP Data Services
If a table no longer exists, the adapter sends no record of that table to SAP Data Services.
If a table no longer exists, the adapter sends no data for that table to Salesforce.com.
If a field use in a data flow no longer exists, the adapter returns a NULL value for that field to Data Services
If a field used in a data flow no longer exists, the adapter retains a NULL value for that field to Data Services.
If a column no longer exists, the adapter sends no value for that column to Salesforce.com.
If a field used in a WHERE clause no longer exists, all conditions that use that field automatically evaluate to FALSE, possibly reducing the conditions.
For example, if the WHERE clause is 'WHERE ColumnA = A and (ColumnB = B or ColumnC = C)' and ColumnC no longer exists, the clause will be processed as follows:
'WHERE ColumnA = A and (ColumnB = B or ColumnC = C)'
'WHERE ColumnA = A and (ColumnB = B or FALSE)'
'WHERE ColumnA = A and ColumnB'
Related Information
Creating an adapter datastore [page 17]Using Salesforce.com adapter metadata [page 94]
30 P U B L I CSupplement for Adapters
Adapter installation and configuration

2.5.1.7 Shapefile adapter datastore configuration options
The following configuration options apply to the Shapefile adapter:
● Each Shapefile consists of one set of .dbf, .shp, and .shx files. If there are duplicates, they must be separated into multiple sub-directories so that each file folder contains only one .dbf, .shp, and .shx file.
● To useData Services as a reader for the Shapefile metadata, you must go under the Adapter Source page and type the appropriate Java code page number (can be found online) associated with the language of the shapefile, into the DBF File Charset entry field.
NoteIn order to load the Shapefile data into HANA, create the appropriate spatial reference system in HANA. For information on spatial reference, see http://help.sap.com/hana/SAP_HANA_Spatial_Reference_en.pdf
Table 21:
Shapefile option Description
Directory path The directory that contains sub-directories of shapefile formats.
Import unsupported data types as varchar Allows you to choose whether or not you want unsupported data types to be imported as varchar. The default value is Yes.
VARCHAR size for unknown data type Specifies the length of the varchar type. The default value is 255.
Include shapefile name as column Iindicates whether or not to include the shapefile name as a column for each row. The default value is No.
Column name for shapefile name Gives the name for the column that includes the shapefile name. The default value is DI_SHAPEFILE_NAME.
VARCHAR size of column name for shapefile
Allows you to specify the length of the varchar of a column name if the column name is specified in the option above.
Include rowid column Specifies whether or not to include a rowid column for each row. The default value is No.
Column name for rowid Gives the name for the rowid column. The default value is DI_ROWID.
Table 22:
Shapefile reader options Description
Batch size Represents the number of rows the shapefile adapter sends in a a batch. The default value is '10'. The higher the number, the higher the amount of memory that will be used.
DBF File Charset Type the appropriate Java code page number (can be found online) associated with the language of the shapefile that is being read.
Supplement for AdaptersAdapter installation and configuration P U B L I C 31

Shapefile reader options Description
Include full path in shapefile name Input the full directory path for the shapefile that is being read.
Related Information
Creating an adapter datastore [page 17]
2.5.1.8 SuccessFactors adapter datastore configuration options
The following configuration option applies to the SuccessFactors adapter:
Table 23:
SuccessFactors option Description
Company ID A unique company ID that identifies the SuccessFactors client instance.
Other options that SuccessFactors uses are discussed in the "Creating an adapter datastore" topic.
Related Information
Creating an adapter datastore [page 17]Using SuccessFactors tables as a source or a target in your data flow [page 101]
2.5.2 Changing an adapter datastore's configuration
1. Right-click the datastore you want to browse and select Edit to open the Datastore Editor window.2. Edit configuration information.
When editing an adapter datastore, enter or select a value. The software looks for the Job Server and adapter instance name you specify. If the Job Server and adapter instance both exist, and the Designer can communicate to get the adapter's properties, then it displays them accordingly. If the Designer cannot get the adapter's properties, then it retains the previous properties.
3. Click OK.
The edited datastore configuration is saved in your metadata repository.
32 P U B L I CSupplement for Adapters
Adapter installation and configuration
2.5.3 Deleting an adapter datastore and associated metadata objects
1. Right-click the datastore you want to delete and select Delete.2. Click OK in the confirmation window.
The software removes the datastore and all metadata objects contained within that datastore from the metadata repository.
If these objects exist in established flows, they appear with a deleted icon .
Supplement for AdaptersAdapter installation and configuration P U B L I C 33

3 Browse and import metadata
You can view and import metadata to use as a source or a target in your data flows.
For general information about how to browse and import metadata using a Data Services datastore, see the “Datastores” section of the Designer Guide.
3.1 Viewing data
Steps for viewing data using an adapter datastore.
To use an adapter datastore to view data, open the Datastore tab in the object library of SAP Data Services Designer, and follow these steps:
1. Double-click the adapter datastore icon.The Adapter Metadata Browser window opens with a list of table objects (and their descriptions) that are available for viewing.
2. Click to open nodes and browse available metadata.When viewing Salesforce.com data, two or three folders appear under each table node. These folders include: Referenced by, References, and Columns.○ The Referenced by and References folders show relationships between the expanded table and itself as
well as other tables. (For example, if a Contact belongs to an Account, it will have an AccountId column pointing to its parent account. So, Account is "referenced by" Contact and Contact "references" Account.)
○ The Columns folder lists the table columns and their descriptions.
3.2 Importing metadata
Using a datastore to import metadata.
To use an adapter datastore to import data, open the Datastore tab in the object library of SAP Data Services Designer, and follow these steps:
1. Double-click the adapter datastore icon in the list of datastores in the object library.The Adapter Metadata Browser window opens with a list of table objects (and their descriptions) that are available for viewing.
2. Right-click on a table name and select Import By Name.In the Import By Name window, enter the full, exact table name in the Value column. Once imported, the table appears under the datastore.
If available, you can also select Import. For Salesforce.com, the following options are available:
34 P U B L I CSupplement for Adapters
Browse and import metadata

Table 24: Salesforce.com import options
Option What is imported
Table node That specific table.
Reference by node All tables directly under the node.
References node All tables directly under the node.
3. To open an imported table, double-click the table icon. You can then view input and output schemas, and so on.
Supplement for AdaptersBrowse and import metadata P U B L I C 35

4 Map adapter metadata
Metadata for each adapter comes with its own data types that you map to Data Services data types.
4.1 Data type mapping for Outlook PST data
You import Outlook data from PST files using the DP Bridge Outlook adapter. The software matches Outlook data types to specific SAP Data Services data types as shown in the following table.
NoteData Services has specific limitations for BLOB data types. In general, you cannot use blob data-type columns in comparisons, calculations, or data type conversions. See “Limitations for long and blob” in the Reference Guide for additional restrictions and information.
Table 25:
Outlook PST data type Data Services data type
Tinyint Int
Integer Int
Smallint Int
Alphanum Varchar
NVarchar Varchar
Varchar Varchar
Bigint Double
Time Time
Seconddate Datetime
Timestamp Datetime
Date Datetime
Double Double
Real Real
36 P U B L I CSupplement for AdaptersMap adapter metadata

Outlook PST data type Data Services data type
Decimal Decimal
NClob Varchar
Blob Varchar
Clob Varchar
Varbinary Varchar
4.2 Metadata mapping for Hive
The following table shows the conversion between Hadoop Hive data types and Data Services data types when Data Services imports metadata from a Hadoop Hive source or target.
Table 26:
Hadoop Hive data type Converts to Data Services data type
tinyint int
smallint int
int int
bigint decimal(20,0)
float real
double double
string varchar
boolean varchar(5)
complex not supported
4.3 Metadata mapping for JDBC
The following table shows the conversion between JDBC data types and Data Services data types when Data Services imports metadata from a JDBC source or target.
Binary, blob, clob and some other data types are not supported by Data Services. When trying to import these data types, the metadata column will be ignored. If you want to import unsupported data types as VARCHAR, enable the Convert unknown data type to VARCHAR option when configuring the JDBC adapter datastore.
Supplement for AdaptersMap adapter metadata P U B L I C 37

Table 27:
SQL JDBC/Java data type AWDataType
VARCHAR java.lang.String AWT_VARCHAR
CHAR java.lang.String AWT_VARCHAR
NVARCHAR java.lang.String AWT_VARCHAR
LONGVARCHAR java.lang.String AWT_VARCHAR
BIT boolean AWT_BARCHAR
NUMERIC java.math.BigDecimal AWT_DECIMAL
TINYINT byte AWT_INT
SMALLINT short AWT_INT
INTEGER int AWT_INT
BIGINT long AWT_DECIMAL
REAL float AWT_REAL
FLOAT float AWT_DOUBLE
DOUBLE double AWT_DOUBLE
VARBINARY byte[] Not supported
BINARY byte[] Not supported
DATE java.sql.Date AWT_DATETIME
TIME java.sql.Time AWT_TIME
TIMESTAMP java.sql.Timestamp AWT_TIME
CLOB java.sql.Clob Not supported
BLOB java.sql.Blob Not supported
ARRAY java.sql.Array Not supported
REF java.sql.Ref Not supported
STRUCT java.sql.Struct Not supported
4.4 Metadata mapping for MongoDB
NoteData type mapping will not always follow what is described in this table. For the same key with different object types, Data Services will use xs:string as a general data type.
38 P U B L I CSupplement for AdaptersMap adapter metadata

Table 28:
MongoDB Schema Data Services Notes
String xs:string varchar
Double xs:double double
Integer xs:integer int
Boolean xs:boolean varchar
Date xs:datetime datetime
Timestamp xs:datetime datetime
ObjectId xs:string varchar If the “_id” type is ObjectId, then the value displayed in Data Services would look something like ObjectId("5330fb1052935853002e54fa")
BINARY xs:string varchar
Other xs:string varchar
4.5 Metadata mapping for OData
OData data types map to Data Services data types as follows:
Table 29:
oData Data Services data types Notes
Int16, Int32, Int64 int
Double double
String varchar
Boolean varchar(5) Boolean true/false value.
Datetime datetime OData V2
DateTimeOffset datetime
Binary varchar In Base64 format. Size is defined in a datastore parameter named Default varchar length.
Byte int
Decimal decimal(20,0)
Single double
Float double OData V2
Guid varchar
SByte int
TimeOfDay time OData V4
Duration time OData V4
Supplement for AdaptersMap adapter metadata P U B L I C 39

oData Data Services data types Notes
Date datetime OData V4
Related Information
Creating an adapter datastore [page 17]OData adapter datastore configuration options [page 27]Using OData tables as a source or target in your data flow [page 91]
4.6 Metadata mapping for Salesforce.com
Salesforce.com data types map to SAP Data Services data types as follows:
Table 30:
Salesforce data type Data Services data types Description
xsd:base64Binary varchar Base 64-encoded binary data
xsd:boolean varchar ('true' or 'false') Boolean (True/False) values
xsd:date date Date values
xsd:datetime datetime Date/time values (timestamps)
xsd:double decimal Double values
xsd:int int Integer values
xsd:string varchar Character strings
The date/time values that the Salesforce.com adapter retrieves from Salesforce.com are all in ISO 8601 format, reflect GMT time, and include a time zone field. To adjust for any time zone differences, the Salesforce.com adapter automatically performs a translation based on the associated local and server clocks. When the Salesforce.com adapter communicates datetime information to SAP Data Services, the software receives those values in local time and the time zone field is not considered.
NoteIf your local and server clocks are not synchronized, translation speed is unaffected. However, if your local clock is not set to the correct time, the software may send incorrect times to Salesforce.com and changes that you expected to be returned may not be returned until a later synchronization.
Examples:
● If we are in Pacific Standard Time (PST) and the adapter receives '2005-08-10T23:00:00Z' (where 'Z' means GMT time) from Salesforce.com, the value sent to the software will be '2005.08.10 15:00:00'.
● You want to retrieve information that has changed since yesterday at 6:00 PM local time. You write a condition stating: SFDC_TIMESTAMP >='2005.08.10 18:00:00' and the software sends this condition "as is"
40 P U B L I CSupplement for AdaptersMap adapter metadata

to the adapter. Because Salesforce.com will not understand this timestamp (it lacks a time zone indicator), the Salesforce.com adapter automatically converts the time specified in the software to a format that Salesforce.com understands, formatting the value to '2005-08-11T01:00:00Z'.
4.7 Metadata mapping for SuccessFactors
SuccessFactors data types map to Data Services data types as follows:
Table 31:
SuccessFactors data types Data Services data types Description
Integer int Integer value.
Long decimal(20,0)
Float double Double values.
Double double Double values.
String varchar Character strings. SuccessFactors provides the size. Data is in UTF-8.
Boolean varchar(5) Boolean true/false value.
Date date Date values in <YYYY-MM-DD> format
Datetime datetime The date/time values that the adapter retrieves from SuccessFactors are in ISO 8601 format (<YYYY-MM-DDThh:mm:ssZ>). Reflect GMT time and include a time zone field. The adapter adjusts for any time zone differences by automatically performing a translation based on the associated local and server clocks. When the adapter communicates datetime information to Data Services, it receives those values in local time and the time zone field is not considered.
Binary varchar In Base64 format. Size is defined in a datastore parameter named Default Base64 binary field length.
Supplement for AdaptersMap adapter metadata P U B L I C 41
5 Using DP Bridge adapter
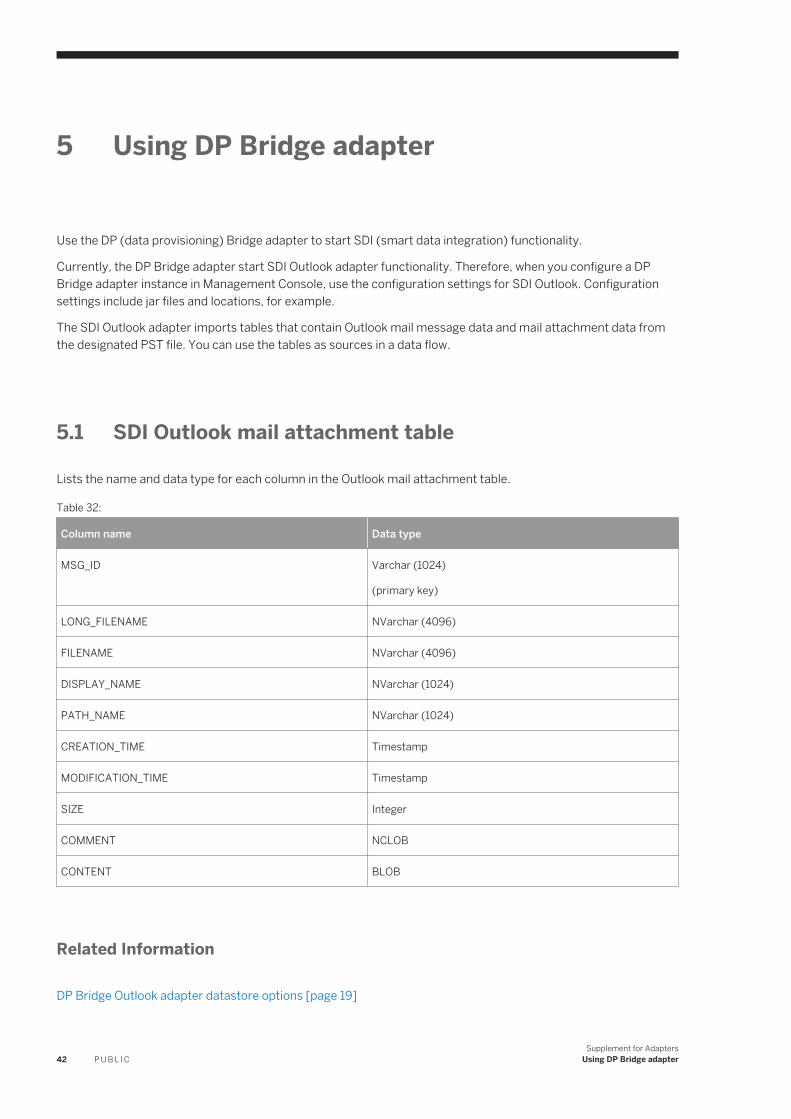
Use the DP (data provisioning) Bridge adapter to start SDI (smart data integration) functionality.
Currently, the DP Bridge adapter start SDI Outlook adapter functionality. Therefore, when you configure a DP Bridge adapter instance in Management Console, use the configuration settings for SDI Outlook. Configuration settings include jar files and locations, for example.
The SDI Outlook adapter imports tables that contain Outlook mail message data and mail attachment data from the designated PST file. You can use the tables as sources in a data flow.
5.1 SDI Outlook mail attachment table
Lists the name and data type for each column in the Outlook mail attachment table.
Table 32:
Column name Data type
MSG_ID Varchar (1024)
(primary key)
LONG_FILENAME NVarchar (4096)
FILENAME NVarchar (4096)
DISPLAY_NAME NVarchar (1024)
PATH_NAME NVarchar (1024)
CREATION_TIME Timestamp
MODIFICATION_TIME Timestamp
SIZE Integer
COMMENT NCLOB
CONTENT BLOB
Related Information
DP Bridge Outlook adapter datastore options [page 19]
42 P U B L I CSupplement for Adapters
Using DP Bridge adapter

5.2 SDI Outlook mail message table
Lists column name and data type in the Outlook mail message table.
Table 33:
Column name Data type
MSG_ID Varchar (256)
(primary key)
SUBJECT NVarchar (4096)
SENDER_NAME NVarchar (4096)
CREATION_TIME Timestamp
LAST_MDF_TIME Timestamp
COMMENT NCLOB
DESC_NODE_ID Varchar (1024)
SENDER_MAIL_ADDR Varchar (256)
RECIPIENTS CLOB
DISPLAYTO CLOB
DISPLAYCC CLOB
DISPLAYBCC CLOB
IMPORTANCE Varchar (100)
PRIORITY Varchar (100)
ISFLAGGED Tinyint
MESSAGEBODY NCLOB
Related Information
DP Bridge Outlook adapter datastore options [page 19]
Supplement for AdaptersUsing DP Bridge adapter P U B L I C 43

6 Using Hive metadata
Use the Hive adapter to connect to a Hive server so that you can work with tables from Hadoop.
You can use a Hive table as a source or a target in a data flow.
NoteData Services supports Apache Hive and HiveServer2 version 0.11 and higher. For the most recent compatibility information, see the Product Availability Matrix (PAM) at https://apps.support.sap.com/sap/support/pam .
For more information about Hadoop and Hive, see "Hadoop" in the Reference Guide.
Related Information
Hive adapter datastore configuration options [page 20]Metadata mapping for Hive [page 37]
6.1 Hadoop Hive adapter source options
You can set the following options on the Adapter Source tab of the source table editor.
Table 34:
Option Possible values Description
Clean up working directory True, False Select True to delete the working directory after the job completes successfully.
Execution engine type Default, Map Reduce, Spark Choosing Default tells Data Services to use the default Hive engine. Choosing either Spark or Map Reduce tells Data Services to use that engine, which enables reading data from Hive on Spark.
Parallel process threads Positive integers Specify the number of threads for parallel processing, which can improve performance by maximizing CPU usage on the Job Server computer. For example, if you have four CPUs, enter 4 for this option.
44 P U B L I CSupplement for Adapters
Using Hive metadata

6.2 Hadoop Hive adapter target options
You can set the following options on the Adapter Target tab of the target table editor.
Table 35:
Option Possible values Description
Append True, False Select True to append new data to the table or partition.
Select False to delete all existing data, then add new data.
Clean up working directory True, False Select True to delete the working directory after the job completes successfully.
Dynamic partition True, False Select True for dynamic partitions. Hive evaluates the partitions when scanning the input data.
Select False for static partitions.
Only all-dynamic or all-static partitions are supported.
Drop and re-create table before loading
True, False Select True to drop the existing table and create a new one with the same name before loading.
This option displays only for template tables. Template tables are used in design or test environments.
Number of loaders Positive integers Enter a positive integer for the number of loaders (threads).
Loading with one loader is known as single loader loading. Loading when the number of loaders is greater than one is known as parallel loading. You can specify any number of loaders. The default is 1.
6.3 Hive adapter datastore support for SQL function and transform
The Hive adapter datastore can process data using the SQL function and the SQL transform.
After connecting to a Hive datastore, you can do the following in Data Services:
● Use the SQL Transform to read data through a Hive adapter datastore. Keep in mind that the SQL transform supports a single SELECT statement only.
NoteSelect table column plus constant expression is not supported.
● Use the sql() function to:○ create, drop, or INSERT Hive tables○ return a single string value from a Hive table
Supplement for AdaptersUsing Hive metadata P U B L I C 45

○ select a Hive table that contains aggression functions (max, min, count, avg, and sum)○ perform inner and outer joins
6.4 Pushing the JOIN operation to Hive
You can stage non-Hive data in a dataflow (using the Data_Transfer transform) before joining it with a Hive source. You would then pushdown the Join operation to Hive.
Staging data is more efficient because Data Services doesn't have to read all the data from the Hive data source into memory before performing the join.
Before staging can occur, you must first enable the Enable automatic data transfer option for the Hive datastore. This option can be found in the Create New Datastore or Edit Datastore window.
After adding the Data_Transfer transform to your dataflow, you should open the editor and verify that Transfer Type is set to Table and Database type is set to Hive.
NoteIf you select Automatic for the Data Transfer Type in the Data_Transfer transform you need to turn off the Enable automatic data transfer option in all relational database datastores (with exeception of the Hive datastore).
6.5 About partitions
Data Services imports Hive partition columns the same way as regular columns. Partition columns display at the end of the table column list. The column attribute Partition Column identifies whether the column is partitioned.
When loading to a Hive target, you can select whether or not to use the Dynamic partition option on the Adapter Target tab of the target table editor. The partitioned data is evaluated dynamically by Hive when scanning the input data. If Dynamic partition is not selected, Data Services uses Hive static loading. All rows are loaded to the same partition. The partitioned data comes from the first row that the loader receives.
Related Information
Hadoop Hive adapter target options [page 45]
46 P U B L I CSupplement for Adapters
Using Hive metadata
6.6 Previewing Hive table data
To preview Hive table data, right-click on a Hive table name in the Local Object Library and click View Data. Alternatively, you can click the magnifying glass icon on Hive source and target objects in a data flow or View Data tab of the Hive table view.
NoteHive table data preview is only available with Apache Hive version 0.11 and later.
6.7 Using Hive template tables
After you create a Hive application datastore in Data Services, use a Hive template table in a data flow.
Start to create a data flow in Data Services Designer and follow these steps to add a Hive template table as a target.
1. When you are ready to complete the target portion of the data flow, either drag a template table from the toolbar to your workspace or drag a template table from the Datastore tab under the Hive node to your workspace.
The Create Template window opens.2. Enter a template table name in Template name.3. Select the applicable Hive datastore name from the In datastore dropdown list.4. Enter the Hive dataset name in Owner name.5. Select the format of the table from the Format dropdown list, either Text file, Parquet, ORC, or Avro.6. Click OK to close the Create Template window.7. Connect the dataflow to the Hive target template table.8. Open the target table and set the options in the Target tab.
The software automatically completes the input and output schema areas based on the schema in the stated Hive dataset.
9. Execute the data flow.
The software opens the applicable project and dataset, and creates the table. The table name is the name you entered for Template name in the Create Template window. The software populates the table with the results of the data flow.
Supplement for AdaptersUsing Hive metadata P U B L I C 47

7 Using the HTTP adapter
This section describes the HTTP adapter architecture and features, and provides information about how to install and configure the adapter.
HTTP protocol is an application-level protocol for distributed, collaborative, hypermedia information systems. HTTP has been in use by the World-Wide Web global information initiative since 1990 and its use has increased steadily over the years, mainly because it has proven useful as a generic middleware protocol.
The HTTP protocol is a request/response protocol. A client sends a request to the server in the form of a request method, URI, and protocol version, followed by a MIME-like message containing request modifiers, client information, and possible body content over a connection with a server.
The server responds with a status line, including the message's protocol version and a success or error code, followed by a MIME-like message containing server information, entity meta information, and possible entity-body content.
HTTP communication usually takes place over TCP/IP connections. The default port is TCP 80 [19], but you can use other ports. You can also implement HTTP on top of any other protocol on the Internet, or on other networks. HTTP only presumes a reliable transport; you can use any protocol that provides such guarantees.
TipFollow the steps and refer to the general adapter installation and configuration information that appears earlier in this guide. Additionally, keep the Designer Guide and the Administrator Guide handy for reference.
Related Information
Adapter installation and configuration [page 7]
7.1 HTTP adapter scope
The HTTP adapter's scope includes the following areas:
Table 36:
Scope Description
Rapid integration of diverse systems and applications Makes use of HTTP protocol with the SAP Data Services platform to meet unique business process requirements saving valuable time and effort.
48 P U B L I CSupplement for AdaptersUsing the HTTP adapter

Scope Description
SSL (Secure Socket Layer) Implements security over the HTTP protocol. Using HTTPS protocol, the data will be protected from any unscrupulous elements.
Compresses data encoding Saves network traffic by supporting compress type data encoding while sending and receiving the information.
Request/Reply and Request/Acknowledge services Initiates these services in SAP Data Services through the adapter.
Related Information
Using the HTTP adapter [page 48]
7.2 Architecture
The following diagram depicts two remote SAP Data Services installations using the HTTP Adapter to exchange information.
This diagram also applies to the interaction between SAP Data Services and any other third-party software supporting the HTTP protocol.
The following steps describe the flow of control. Refer to the above diagram.
1. External application invokes a service on SAP Data Services.
Supplement for AdaptersUsing the HTTP adapter P U B L I C 49
2. A data flow makes a call to the adapter operation instance.3. The operation instance receives the XML data from RTDF and makes a request on the remote Data Services
server. The operation instance forms the request URL by reading its configuration file. The URL contains servlet name and the service name, which are configured as part of the operation instance configuration. In the case of requesting to the information resource, a resource-specific URL will be configured as part of the operation instance configuration.
4. The information resource (for example, Siebel) can make a request on the remote Data Services server by using HTTP or HTTPS protocol. The information resource forms the URL, which contains the servlet name and service name.
5. The servlet runs on the HTTP server (Tomcat) that is a part of Data Services. This HTTP server can be SSL enabled, depending on user requirements. The servlet processes the request to get the service name and XML data. It will then invoke that service running locally in Data Services and send the reply back to the client.
7.3 Configure an HTTP operation instance
After adding an adapter instance, you need to configure an HTTP operation instance in the Administrator.
1. Select Adapter Instance Job Server2. Click the Configuration tab.3. Click Operations under Dependent Objects.4. Click Add to configure a new operation or click the link of an existing operation to edit its configuration.5. Select an operation type from the list and click Apply. The options that appear on this page depend on the
operation-specific design.6. Complete the operation instance configuration form.7. Click Apply.
Related Information
Adding and configuring an adapter instance [page 7]
7.3.1 Request/Reply operation configuration
Complete the following fields in the Administrator to set up a Request/Reply operation instance:
Table 37:
Field Configuration information
Operation instance Enter the unique operation instance name. In the Designer, Request/Reply operation metadata object will be imported with this name.
50 P U B L I CSupplement for AdaptersUsing the HTTP adapter
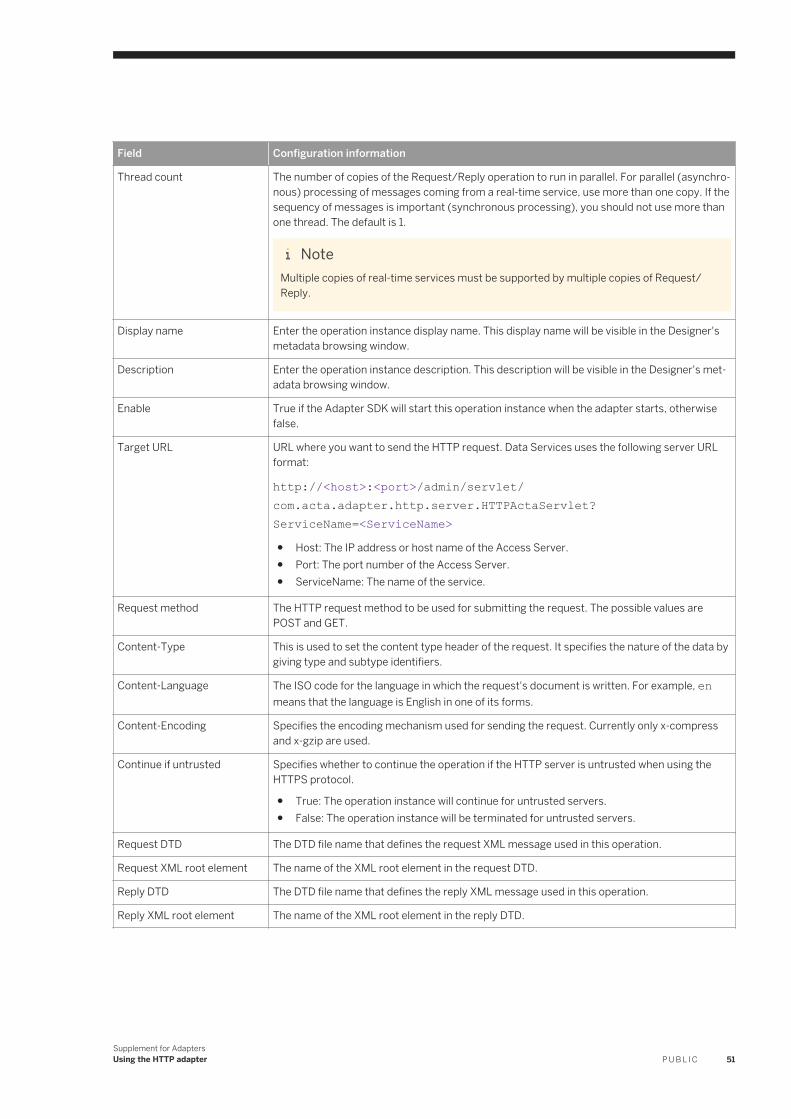
Field Configuration information
Thread count The number of copies of the Request/Reply operation to run in parallel. For parallel (asynchronous) processing of messages coming from a real-time service, use more than one copy. If the sequency of messages is important (synchronous processing), you should not use more than one thread. The default is 1.
NoteMultiple copies of real-time services must be supported by multiple copies of Request/Reply.
Display name Enter the operation instance display name. This display name will be visible in the Designer's metadata browsing window.
Description Enter the operation instance description. This description will be visible in the Designer's metadata browsing window.
Enable True if the Adapter SDK will start this operation instance when the adapter starts, otherwise false.
Target URL URL where you want to send the HTTP request. Data Services uses the following server URL format:
http://<host>:<port>/admin/servlet/com.acta.adapter.http.server.HTTPActaServlet?ServiceName=<ServiceName>● Host: The IP address or host name of the Access Server.● Port: The port number of the Access Server.● ServiceName: The name of the service.
Request method The HTTP request method to be used for submitting the request. The possible values are POST and GET.
Content-Type This is used to set the content type header of the request. It specifies the nature of the data by giving type and subtype identifiers.
Content-Language The ISO code for the language in which the request's document is written. For example, en means that the language is English in one of its forms.
Content-Encoding Specifies the encoding mechanism used for sending the request. Currently only x-compress and x-gzip are used.
Continue if untrusted Specifies whether to continue the operation if the HTTP server is untrusted when using the HTTPS protocol.
● True: The operation instance will continue for untrusted servers.● False: The operation instance will be terminated for untrusted servers.
Request DTD The DTD file name that defines the request XML message used in this operation.
Request XML root element The name of the XML root element in the request DTD.
Reply DTD The DTD file name that defines the reply XML message used in this operation.
Reply XML root element The name of the XML root element in the reply DTD.
Supplement for AdaptersUsing the HTTP adapter P U B L I C 51

NoteRestart the HTTP Adapter instance so that all configuration changes take effect.
7.3.2 Request/Acknowledge operation configuration
Complete the following fields in the Administrator to configure a Request/Acknowledge operation instance:
Table 38:
Field Configuration information
Operation instance Enter the unique operation instance name. In the Designer, Request/Acknowledge operation metadata object will be imported with this name.
Thread count The number of copies of the Request/Acknowledge operation to run in parallel. For parallel (asynchronous) processing of messages coming from a real-time service, use more than one copy. If the sequency of messages is important (synchronous processing), you should not use more than one thread. The default is 1.
NoteMultiple copies of real-time services must be supported by multiple copies of Request/Acknowledge.
Display name Enter the operation instance display name. This display name will be visible in the Designer's metadata browsing window.
Description Enter the operation instance description. This description will be visible in the Designer's metadata browsing window.
Enable True if the Adapter SDK will start this operation instance when the adapter starts, otherwise false.
Target URL URL where you want to send the HTTP request. Data Services uses the following server URL format:
http://<host>:<port>/admin/servlet/com.acta.adapter.http.server.HTTPActaServlet?ServiceName=<ServiceName>● Host: The IP address or host name of the Access Server.● Port: The port number of the Access Server.● ServiceName: The name of the service.
Request method The HTTP request method to be used for submitting the request. The possible values are POST and GET.
Content-Type This is used to set the content type header of the request. It specifies the nature of the data by giving type and subtype identifiers.
Content-Language The ISO code for the language in which the request document is written. For example, en means that the language is English in one of its forms.
Content-Encoding Specifies the encoding mechanism used for sending the request. Currently only x-compress and x-gzip are used.
52 P U B L I CSupplement for AdaptersUsing the HTTP adapter

Field Configuration information
Continue if untrusted Specifies whether to continue the operation if the HTTP server is untrusted when using the HTTPS protocol.
● True: The operation instance will continue for untrusted servers.● False: The operation instance will be terminated for untrusted servers.
Request DTD The DTD file name that defines the request XML message used in this operation.
Request XML root element The name of the XML root element in the request DTD.
NoteRestart the HTTP Adapter instance so that all configuration changes take effect.
7.4 HTTP adapter instance
When you start your adapter instance and its operations in the Administrator, the message “Started” appears in the Status column. To confirm that all operations are started, click Operations in the Dependent Objects column.
If you have a real-time service set up on your system, you can invoke it through the HTTP interface:
http://localhost:8080/admin/jsp/InvokeService.jsp
Using this interface, you can invoke the selected service by sending the input XML to the HTTP Adapter servlet running on the remote machine where the service is configured.
NoteFor information about how to set up a test service, see the Installation Guide.
Table 39: Operation instances
Operation instance Information
Request/Reply from Data Services The Request/Reply operation instance sends the request to the remote SAP Data Services machine and waits for the reply.
To check the sample Request/Reply operation, see the “Testing the Request/Reply operation” section.
Request/Acknowledge from Data Services The Request/Acknowledge operation instance sends the message to the remote SAP Data Services machine and gives an acknowledgement.
To check the sample Request/Acknowledge operation, see the “Testing the Request/Acknowledge operation” section.
Supplement for AdaptersUsing the HTTP adapter P U B L I C 53

Related Information
Starting and stopping the adapter instance [page 16]
7.4.1 Testing the Request/Reply operation
To configure the Request/Reply operation for testing, use the following information to configure the operation instance in the Administrator:
Table 40:
Field Configuration information
Operation instance HTTP_ReqReply_Function
Thread count 1
Display name HTTP_ReqReply_Function
Description Performs the Request/Reply operation
Enable true
Target URL For HTTP operation, use:
http://<ds_host_name>:<access_server_port>/admin/servlet/com.acta.adapter.http.server.HTTPActaServlet?ServiceName=Test
For HTTPS operation, use:
https://<ds_host_name>:<tomcat_https_port>/admin/servlet/com.acta.adapter.http.server.HTTPActaServlet?ServiceName=Test
NoteBy default, the HTTPS port of the Tomcat server is 8443. This can be changed in the Tomcat configuration file (acta-server.xml on Windows, and acta-server1.xml on UNIX)
Request method Post
Content-Type text/xml
Content-Language en
Content-Encoding application/nocompress
Continue if untrusted true
Request DTD <DS_COMMON_DIR>/adapters/Http/samples/dtd/HTTPTestIn.dtd
Request XML root element
test
Reply DTD <DS_COMMON_DIR>/adapters/Http/samples/dtd/HTTPTestOut.dtd
Reply XML root element
test
54 P U B L I CSupplement for AdaptersUsing the HTTP adapter

After configuring the operation instance, click Apply and then restart the HTTP Adapter instance. After the HTTP Adapter is running, the operation instance will also be in a running state.
Execute the HTTP_ReqRep_BatchJob job in the Designer.
After the batch job executes successfully, an output file OutputRep.xml will be created in the <DS_COMMON_DIR>/adapters/Http/samples/xml directory.
7.4.2 Testing the Request/Acknowledge operationTo configure the Request/Acknowledge operation for testing, use the following information to configure the operation instance in the Administrator:
Table 41:
Field Configuration information
Operation instance HTTP_ReqAck_Outbound
Thread count 1
Display name HTTP_ReqAck_Outbound
Description Performs the Request/Acknowledge operation
Enable true
Target URL For HTTP operation, use:
http://<ds_host_name>:<access_server_port>/admin/servlet/com.acta.adapter.http.server.HTTPActaServlet?ServiceName=Test
For HTTPS operation, use:
https://<ds_host_name>:<tomcat_https_port>/admin/servlet/com.acta.adapter.http.server.HTTPActaServlet?ServiceName=Test
NoteBy default, the HTTPS port of the Tomcat server is 8443. This can be changed in the Tomcat configuration file (acta-server.xml on Windows, and acta-server1.xml on UNIX)
Request method Post
Content-Type text/xml
Content-Language en
Content-Encoding application/nocompress
Continue if untrusted true
Request DTD <DS_COMMON_DIR>/adapters/Http/samples/dtd/HTTPTestIn.dtd
Request XML root element test
After configuring the operation instance, click Apply and then restart the HTTP Adapter instance. After the HTTP Adapter is running, the operation instance will also be in a running state.
Supplement for AdaptersUsing the HTTP adapter P U B L I C 55

Execute the HTTP_ReqAck_BatchJob job in the Designer.
After the batch job executes successfully, an output file OutputAck.xml will be created in the <DS_COMMON_DIR>/adapters/Http/samples/xml directory.
7.5 URL for HTTP requests
The SAP Data Services server URL format is:
http://<host>:<port>/DataServices/servlet/HTTP?ServiceName={GetService}
Where:
● <host> is the IP address/host name of the Access Server● <port> is the port number of the Access server
These values are the same as in the URL of the Administrator.
7.6 HTTP adapter datastore
Use the HTTP adapter with a real-time data flow (RTDF) or a data flow, when the REDF/data flow passes a message to an operation instance.
Use either an outbound message (Request/Acknowledge operation) or a message function (Request/Reply operation).
For each adapter instance, define a corresponding datastore object in the Designer in the Designer Datastore Editor window. An RTDF/data flow can then pass a message to one of the adapter's operation instances defined in the datastore.
To define an adapter datastore, you must:
● Define a datastore object for each adapter instance.● Define one function or one outbound message for each operation instance to which you want to pass a
message.
Related Information
Creating an adapter datastore [page 17]
56 P U B L I CSupplement for AdaptersUsing the HTTP adapter

7.6.1 Import message functions and outbound messages
Use an imported function or an outbound messages to pass messages from a real-time data flow (RTDF) to an operation instance.
Import either a function or an outbound message (depending on the type of operation involved) in the Datastore tab in the object library of the Designer for each operation instance.
Table 42: Methods for real-time data flows
Method Description
Message functions Pass messages to an operation instance if the RTDF waits for a return XML message from the information resource.
Outbound messages Outbound messages pass messages to an operation instance if the RTDF waits for a confirmation only (not a return XML message) from the information resource.
Table 43: Invocation types for operation types
Operation type Invocation type
Request/Reply Message function
Request/Acknowledge Outbound message
7.6.2 Importing message functions and outbound messages
1. In Designer, double-click the applicable datastore that has an associated HTTP adapter instance.2. In the adapter metadata browser window, right-click the operation instance to import, and select Import.
The selected operation instance is added to the datastore. Use these message functions and outbound messages for creating the RTDF/data flow in Data Services.
Related Information
Creating an adapter datastore [page 17]
Supplement for AdaptersUsing the HTTP adapter P U B L I C 57

7.7 Configure SSL with the HTTP adapter
With Secure Sockets Layer (SSL), the HTTP Adapter can use secure transport over the TCP/IP network.
Table 44:
Type More information
Server side To use SSL with the HTTP adapter, you must properly configure your web application server for SSL support.
If you are using the default web application server bundled with SAP BusinessObjects BI platform, see the SAP BusinessObjects BI Platform Administrator Guide for information on how to configure SSL.
If you are using a different third-party web application server, see the web application server's documentation.
Client side The HTTP Adapter client internally handles the details of certificate authentication by implementin the X509TrustManager interface and using SSLSocketFactory classes from the HttpsURLConnection class.
Whenever an HTTPS request is made to the SSL-enabled web server, the client requests the server's certificate, which may be issued by a standard authority, such as VeriSign.
If the HTTP client finds the certificate to be one that is trusted by comparing it to the certificate store in <LINK_DIR>/ext/jre/lib/security, it retrieves all data from the web server. In the case of an un-trusted certificate, the HTTP client throws an SSLException to the caller.
The HTTP client requires the password for querying the local keystore for verification. This password can be supplied through the keystorePassword parameter specified as a part of the adapter configuration.
The operation instance will read the configurable Continue if untrusted flag and, based on its value, trust the unknown server and its certificate.
● If the parameter is set to False, then the SSLException is shown to the user with a friendly message and logged in Data Services' trace files and the client does not retrieve any data from the server.
● If the parameter is set to True, then the SSLException is logged in Data Services' error and trace files and the client proceeds to retrieve data from the server.
The certificate file untrust.cer is downloaded to the user's current working directory or to the <LINK_DIR>/bin directory. This certificate file can later be imported into the JDK certificate keystore by using the keytool command-line utility:
keytool -import -alias <description> -file untrust.cer -keystore <full_path_of_cacerts_file> cacerts -storepass changeit
Related Information
SSL connection support [page 107]
58 P U B L I CSupplement for AdaptersUsing the HTTP adapter

7.8 Error handling and tracing
All error and trace messages are logged to the log files in the <DS_COMMON_DIR>/adapters/log directory. The names of the error and trace log files match the names of the adapter instance as configured in the Administrator, and appended with _error.txt for error logs and _trace.txt for trace logs.
For example, if the name of the HTTP Adapter instance is “HTTPAdapter”, the name of the error file will be HTTPAdapter_error.txt and the name of the trace file will be HTTPAdapter_trace.txt.
Supplement for AdaptersUsing the HTTP adapter P U B L I C 59

8 Using the JMS adapter
Enterprise-messaging or Message Oriented Middleware (MOM) products are fast becoming an essential component for integrating intra-company operations. They allow separate business components to be combined into a reliable, yet flexible, system. In addition to the traditional MOM vendors, several database vendors and Internet-related companies also provide enterprise-messaging products.
Java language clients and Java language middle-tier services must be capable of using these messaging systems. Java Messaging Service (JMS) provides a common way for Java language programs to access these systems.
JMS is a set of interfaces and associated semantics that define how a JMS client accesses the facilities of an enterprise-messaging product. Since messaging is peer-to-peer, all users of JMS are generically referred to as clients. A JMS application is composed of a set of application-defined messages and a set of clients that exchange them. Products that implement JMS do this by supplying a provider that implements the JMS interfaces.
8.1 JMS adapter product components
The following diagram shows a functional overview of the SAP Data Services Adapter for JMS with other components and their potential interrelationships:
60 P U B L I CSupplement for AdaptersUsing the JMS adapter

The diagram shows the architecture and functionality of the SAP Data Services Adapter for JMS as well as how the adapter interacts with the external JMS application through the JMS Provider. The adapter sends or receives data on queues using the Point to Point (P2P) mode of communication, or publishes or subscribes to a JMS topic using the Publish/Subscribe mode of communication.
The flow of control in the previous diagram is as follows:
1. External application invokes a service on the software.2. Based on the service invoked on the software, its respective real-time data flow (RTDF) invokes the Operation
instance with XML data sent by the external application as input.3. This operation instance sends the message to the configured queue or topic in the JMS provider. Based on
the type of operation (such as Request/Reply or Request/Acknowledge), the JMS provider sends the Reply/Acknowledgment message back to the software.
4. External JMS application sends messages to the JMS Provider on a request queue or publishes the message to a topic. The JMS Adapter receives these messages after polling them from the JMS Provider and for P2P, sends the reply back to external JMS application on a configured reply queue. No reply is sent if the message was from a topic.
Supplement for AdaptersUsing the JMS adapter P U B L I C 61

8.2 Scope of the JMS adapter
● SAP Data Services initiates Request/ReplyThe software initiates the request by sending the message on a pre-configured request queue and gets the reply on a pre-configured reply queue.
● The software initiates Request/AcknowledgmentThe software initiates the request by sending the message on a pre-configured target queue or by publishing a message to a JMS topic. In this case, only the acknowledgment is sent back to the software.
● IR initiates Request/Acknowledgment & Request/ReplyIn this case, an external Information Resource (IR is a JMS compatible application) sends the requests to the software and gets the reply or acknowledgment.Alternatively, the IR publishes a message to a JMS topic to which the JMS adapter has subscribed.
8.3 Design considerations
In the current design:
● JMS queues and topics used in the Operation instances must be pre-configured in the Messaging System.● Only XML messages are handled.● GetTopic operations should be configured to specify a Thread Count of 1. Since each thread would be a
subscriber to the topic, each thread would receive the same message and send it to the service, resulting in multiple copies of the same message going to the service.
8.4 JMS adapter configuration information
All SAP Data Services adapters communicate with the software through a designated Adapter Manager Job Server. Install adapters on the computer containing your designated Adapter Manager Job Server. This special Job Server integrates adapters with the software using the Administrator and Designer.
After you install your adapter:
1. Use the Server Manager utility to configure adapter connections with the Adapter Manager Job Server.2. From the Administrator, perform the following tasks:
○ Add at least one instance of the adapter to system.○ Add at least one operation for each adapter instance.○ Start the adapter instance (operations are started automatically).
3. Open the Designer and create an adapter datastore. Use metadata accessed through the adapter to create batch and/or real-time jobs.
For more information, see “To configure Job Servers” in the Installation Guide.
62 P U B L I CSupplement for AdaptersUsing the JMS adapter

Related Information
Adding and configuring an adapter instance [page 7]Creating an adapter datastore [page 17]Adding an operation instance to an adapter instance [page 64]
8.5 JMS adapter datastore
Use the SAP Data Services JMS adapter with a batch job or real-time data flow (RTDF) when the batch job or RTDF passes a message to an operation instance, using either:
● An Outbound message (for Request/Acknowledge operations)● A Message Function (for Request/Reply operations)
You must first define an adapter datastore in the Designer. Then, the batch job or RTDF can pass a message to one of the adapter operation instances defined in that datastore. To define an adapter, you must:
● Define a datastore object for each adapter instance● Define one function or one outbound message for each operation instance to which you want to pass a
message.
For each adapter instance, define a corresponding datastore object in the Datastore Editor window of the Designer object library.
Related Information
Creating an adapter datastore [page 17]
8.6 JMS adapter operations
Before the Adapter for JMS can begin integrating the JMS Provider with the SAP Data Services system you must create and configure at least one adapter instance and at least one operation for each instance.
Adapter instances identify the JMS Application used in the integration. Adapter operations identify the integration operations to be used with the configured adapter instance.
Operations provided with the JMS adapter include the following:
Supplement for AdaptersUsing the JMS adapter P U B L I C 63

Table 45:
Operation Description
PutGet Operation (Request/Reply) The software initiates a request, sending a message on a pre-configured request queue. Simultaneously, the software listens on a pre-configured reply queue. An external JMS-compatible application listens on the request queue, processes the request, and returns an XML response message to the reply queue. The adapter sends the message to the Job service.
Put Operation (Request/Acknowledgment) The software initiates a request, sending a message on a pre-configured target queue. If the message was sent successfully, the adapter sends an acknowledgement to the Job service. The adapter raises an exception if it was unable to send the message.
Get Operation (Request/Acknowledgment and Request/Reply from Information Resource)
An external information resource (IR) sends a request XML message to a JMS queue. The adapter polls the JMS queue at a time interval you specify in the configuration. When the adapter receives a message from the JMS queue, it sends the message to the pre-configured Job service.
After processing the XML message, the Job service may send a response message to the adapter. When this happens, the adapter puts the message in a pre-configured response queue. If the response queue is not configured, it becomes a request/acknowledgment operation and no reply is sent. If there is any error in invoking another service from the Job service, the original message is sent to the undelivered queue for reference by the IR.
PutTopic Operation (Request/Acknowledgment)
A software service initiates a request, publishing an XML message to a pre-configured target topic. If the message was sent successfully, the adapter sends an acknowledgement to the Job service. The adapter raises an exception if it was unable to send the message.
GetTopic Operation (Request/Acknowledgment)
An external information resource (IR) publishes an XML message to a JMS topic. The adapter polls the topic at the time intervals specified in the configuration. When the adapter receives the message from the topic, it sends the message to the service that handles the message.
Related Information
Adding and configuring an adapter instance [page 7]
8.6.1 Adding an operation instance to an adapter instance
1. Select Configuration Adapter instances .2. Click Operations under Dependent Objects.
64 P U B L I CSupplement for AdaptersUsing the JMS adapter

3. Click Add to configure a new operation. Or, you can click the link of an existing operation instance to edit its configuration.
4. Select an operation type from the list and click Apply. The options that appear on this page vary based on operation-specific design.
Complete the operation instance configuration form and click Apply.
8.6.1.1 Operation instance configuration options
Each operation type contains different configuration options. Operations include:
● Put Operation (request/acknowledgment) options● PutTopic Operation (request/acknowledgment) options● PutGet Operation (request/reply) options● Get Operation (request/reply and request/acknowledgment) options● GetTopic Operation (request/acknowledgment only) options
NoteWhen specifying a queue or topic, you must provide the JNDI queue name or the MQ queue name as indicated by the Adapter Configuration Type property.
8.6.1.1.1 Put Operation (request/acknowledgement) options
To set up an operation instance of type Put Operation in SAP Data Services, complete the following fields in the Administrator.
Table 46:
Field Description
Operation instance The unique operation instance name. In the Designer, your operation metadata object is imported with this name.
Thread count The number of copies of Request/Reply operation to run in parallel. For parallel (asynchronous) processing of messages coming from real-time service, more than one copy should be used. But if the sequence of messages is important (synchronous processing), more than one thread should not be used. (Multiple copies of real-time services must be supported by multiple instances of Request/Reply.) The default is 1.
Operation retry count The number of times to retry this operation if it fails. Enter 0 to indicate no retries are to be attempted. Enter a negative number to indicate the operation should be retried indefinitely.
Operation retry interval The time (in milliseconds) to wait between operation retry attempts.
Display name The display name of the operation instance. This display name is visible in the Designer's metadata browsing window.
Description The description of the operation instance. This description is visible in the Designer's metadata browsing window.
Supplement for AdaptersUsing the JMS adapter P U B L I C 65

Field Description
Enable Whether to enable the operation to start at the same time as the adapter instance. Valid values are true and false.
● When true, the operation starts when the adapter instance starts.● When false, the operation needs to be started manually from Adapter Operations Status
window of the adapter administrator.
Destination Queue The name of the destination queue where the message will be sent.
Request Format The DTD or XSD file name that defines the XML message used in the operation.
Request XML Root Element The name of the XML root element.
8.6.1.1.2 PutTopic Operation (request/acknowledgement) options
To set up an operation instance of type PutTopic in the SAP Data Services, complete the following fields in the Administrator.
Table 47:
Field Description
Operation instance The unique operation instance name. In the Designer, your operation metadata object is imported with this name.
Thread count The number of copies of Request/Reply operation to run in parallel. For parallel (asynchronous) processing of messages coming from real-time service, more than one copy should be used. But if the sequence of messages is important (synchronous processing), more than one thread should not be used. (Multiple copies of real-time services must be supported by multiple instances of Request/Reply.) The default is 1.
Operation retry count The number of times to retry this operation if it fails. Enter 0 to indicate no retries are to be attempted. Enter a negative number to indicate the operation should be retried indefinitely.
Operation retry interval The time (in milliseconds) to wait between operation retry attempts.
Display name The display name of the operation instance. This display name is visible in the Designer's metadata browsing window.
Description The description of the operation instance. This description is visible in the Designer's metadata browsing window.
Enable Whether to enable the operation to start at the same time as the adapter instance. Valid values are true and false.
● When true, the operation starts when the adapter instance starts.● When false, the operation needs to be started manually from Adapter Operations Status
window of the adapter administrator.
Destination Topic The topic to which the operation is published. Use JNDI or MQ name as specified by Adapter Configuration Type.
Message Format The DTD or XSD file name defining the XML message used in this operation.
Request XML Root Element The name of the XML root element.
66 P U B L I CSupplement for AdaptersUsing the JMS adapter

Field Description
Persistent Message Whether to make published messages available to durable subscribers. Valid values are true and false. When true, published messages are available to durable subscribers.
8.6.1.1.3 PutGet Operation (request/reply) options
To set up an operation instance of type PutGet Operation in SAP Data Services, complete the following fields in the Administrator.
Table 48:
Field Description
Operation instance The unique operation instance name. In the Designer, your operation metadata object is imported with this name.
Thread count The number of copies of Request/Reply operation to run in parallel. For parallel (asynchronous) processing of messages coming from real-time service, more than one copy is used. If the sequence of messages is important (synchronous processing), more than one thread should not be used. (Multiple copies of real-time services must be supported by multiple instances of Request/Reply.) The default is 1.
Operation retry count The number of times to retry this operation if it fails. Enter 0 to indicate no retries are to be attempted. Enter a negative number to indicate the operation should be retried indefinitely.
Operation retry interval The amount of time (in milliseconds) to wait between operation retry attempts.
Display name The display name of the operation instance. This display name is visible in the Designer's metadata browsing window.
Description The description of the operation instance. This description is visible in the Designer's metadata browsing window.
Enable Whether to enable the operation to start at the same time as the adapter instance. Valid values are true and false.
● When true, the operation starts when the adapter instance starts.● When false, the operation needs to be started manually from Adapter Operations Status
window of the adapter administrator.
Request Queue The name of the destination queue where the message will be sent.
Reply Queue The name of the destination queue where the message will be sent.
Timeout The maximum time (in milliseconds) the operation should wait for the reply message.
Continue After Error Whether to continue after encountering an error. Valid values are true and false.
● When true, the operation instance remains in start stage even after the error.● When false, the operation instance stops after the error occurs during the process.
Request Format The DTD or XSD file name that defines the Request XML message used in this operation.
Request XML Root Element The name of the XML root element in the Request DTD or XSD.
Reply Format The DTD or XSD file name that defines the Reply XML message used in the operation.
Reply XML Root Element The name of the XML root element in the Reply DTD or XSD.
Supplement for AdaptersUsing the JMS adapter P U B L I C 67

8.6.1.1.4 Get Operation (request/reply and request/acknowledgement) options
To set up an operation instance of type Get Operation in SAP Data Services, complete the following fields in the Administrator.
Table 49:
Field Description
Operation instance The unique operation instance name. In the Designer, your operation metadata object is imported with this name.
Polling interval The time interval (in milliseconds) for polling the source queue by this operation instance. For example, If the polling interval is 1000, then it polls the source queue after every one second.
Operation retry count The number of times to retry this operation if it fails. Enter 0 to indicate no retries are to be attempted. Enter a negative number to indicate the operation should be retried indefinitely.
Operation retry interval The time (in milliseconds) to wait between operation retry attempts.
Enable Whether to enable the operation to start at the same time as the adapter instance. Valid values are true and false.
● When true, the operation starts when the adapter instance starts.● When false, the operation needs to be started manually from Adapter Operations Status
window of the adapter administrator.
Source Queue The name of the queue where the message is sent by the IR and received by the adapter. Use JNDI or MQ name as specified by the Adapter Configuration Type.
Service The name of the real-time service invoked by the operation when it receives a new message from the Source Queue.
Timeout The maximum time (in milliseconds) that the Service takes to process a message. If the operation instance is unable to invoke the service within the Timeout limit, it sends the error message to the undelivered queue.
Continue After Error Whether to continue after encountering an error. Valid values are true and false.
● When true, the operation instance remains in start stage even after the error.● When false, the operation instance stops after the error occurs during the process.
Default Response Queue [optional]: Used only for Request/Reply operation. In case of Request/Acknowledgment operation, it remains blank. The application sends the reply back to external JMS application (IR) on this queue. Use JNDI or MQ name as specified by the Adapter Configuration Type.
Undelivered Queue [optional]: The undelivered queue for receiving the error messages, if any. Use JNDI or MQ name as specified by the Adapter Configuration Type.
Request DTD Root Element The name of the root element for the input DTD for this operation.
8.6.1.1.5 GetTopic Operation (request/acknowledgement only) options
To set up an operation instance of type GetTopic in SAP Data Services, complete the following fields in the Administrator.
68 P U B L I CSupplement for AdaptersUsing the JMS adapter

Table 50:
Field Description
Operation instance The unique operation instance name. In the Designer, your operation metadata object is imported with this name.
Polling interval The time interval (in milliseconds) for polling the source topic by this operation instance. For example, if the polling interval is 1000, then it polls the source topic after every one second.
Operation retry count The number of times to retry this operation if it fails. Enter 0 to indicate no retries are to be attempted. Enter a negative number to indicate the operation should be retried indefinitely.
Operation retry interval The time (in milliseconds) to wait between operation retry attempts.
Enable Whether to enable the operation to start at the same time as the adapter instance. Valid values are true and false.
● When true, the operation starts when the adapter instance starts.● When false, the operation needs to be started manually from Adapter Operations Status
window of the adapter administrator.
Source Topic The topic to which the operation subscribes. Use JNDI or MQ name as specified by Adapter Configuration Type.
Durable subscriber The subscription name of Durable subscriber. If not applicable, leave this field blank.
Service The name of the real-time service invoked by the operation when it receives a new message from the source topic.
Timeout The maximum time (in milliseconds) that the service takes to process a message.
Continue After Error Whether to continue after encountering an error. Valid values are true and false.
● When true, the operation instance remains in start stage even after the error.● When false, the operation instance stops after the error occurs during the process.
8.6.2 Importing message functions and outbound messages to the datastore
You can pass messages from a batch job or RTDF to an operation instance. Import either a function or an outbound message (depends on the type of operation involved) in the Designer Datastore library for each operation instance.
Real-time data flows use following methods.
Table 51:
Method Description
Message functions Pass messages to an operation instance if the RTDF waits for a return XML message from the IR.
Outbound messages Outbound messages Pass messages to an operation instance if the RTDF waits for a confirmation only (not a return XML message) from the IR.
Operation types in the SAP Data Services Adapter for JMS have the following invocation types.
Supplement for AdaptersUsing the JMS adapter P U B L I C 69

Table 52:
Operation type Invocation type
Request/Reply Operation Message Function
Request/Acknowledge Operation Outbound Message
8.6.2.1 Importing message functions and outbound messages
1. In Designer, double-click the datastore associated with your JMS Adapter Instance to display the Adapter metadata browser window.
2. Right-click the operation instance to be imported and select Import.The selected operation instance is added to the datastore.
These message functions and outbound message functions can be used for creating Batch Jobs or RTDFs in SAP Data Services.
8.6.3 Operations from Information Resource (IR) to Data Services
8.6.3.1 Request/Reply - Get operation
IR initiates the request by putting a message in the source queue of the Get operation. The Get operation receives the message from the source queue during a polling cycle and sends the message to the configured Job service. The service sends a reply message to the Get operation, which then puts the message in the response queue. The IR then gets the message from the response queue.
Related Information
Testing Get: Request/Reply [page 70]
8.6.3.1.1 Testing Get: Request/Reply
To configure the operation type Get (Request/Reply), enter the following information in the operation instance configuration page in the Web Administrator.
70 P U B L I CSupplement for AdaptersUsing the JMS adapter

Table 53:
Option Value
Operation instance JMSGetOperation
Polling interval 1000
Thread count 1
Enable true
Source queue Queue.ActaQueueGet
Service Queue.TestService
Timeout 2000
Continue after error true
Default response queue Queue.ActaReplyQueueGet
Undelivered queue (optional) Queue.ActaUndeliveredQueue
After entering this information, click Apply and restart the JMS Adapter instance. When the JMS Adapter starts running, the operation instance also starts running.
Testing on Windows
Run the sample application (external IR) by running sampleTest_Send.bat file from the command prompt. This sample application sends the message at the source queue of the Get operation instance configured in the software.
Also, run another sample application (external IR) by running the batch file sampleTest_Get.bat file, which receives the reply from SAP Data Services on a default response queue.
The sample application sampleTest_Send.bat (external IR) sends the message as a request on a source queue configured for JMSGetOperation instance. JMSGetOperation instance invokes the real-time batch job and also sends the reply back at the default response queue. The sample application sampleTest_Get.bat (external IR) receives the reply on this default response queue. If any error occurs while invoking another service from this Job service, then the original message is sent to the undelivered queue, for reference by the IR.
Testing on UNIX
Run the sample application (external IR) by running sampleTest_Send.sh file from the command prompt. This sample application sends the message at the request queue of the operation instance configured in the software.
Also, run another sample application (external IR) by running the batch file sampleTest_Get.sh file. This receives the reply from the software on a default response queue.
The sample application sampleTest_Send.sh (external IR) sends the message as a request on a source queue configured for JMSGetOperation instance. JMSGetOperation instance will invoke the real-time batch job and also sends the reply back at the default response queue. The sample application sampleTest_Get.sh (external IR) receives the reply on this default response queue. If any error occurs while invoking another service from this Job service, then the error message is sent to the undelivered queue, for reference by the IR.
Supplement for AdaptersUsing the JMS adapter P U B L I C 71

8.6.3.2 Request/Acknowledge - Get operation
IR initiates the request by putting a message in the source queue of the Get operation. The Get operation receives the message from the source queue during a polling cycle and sends the message to the configured Job service.
Related Information
Testing Get: Request/Acknowledge [page 72]
8.6.3.2.1 Testing Get: Request/Acknowledge
To configure the operation type Get (Request/Acknowledgment), enter the following information in the operation instance configuration page in the Web Administrator.
Table 54:
Option Value
Operation instance JMSGetOperation
Polling interval 1000
Thread count 1
Enable true
Source queue Queue.ActaQueueGet
Service Queue.TestService
Timeout 2000
Continue after error true
Default response queueNote
When you specify a value, this operation changes from Request/Acknowledgement to Request/Reply.
Undelivered queueNote
When you specify a value, this operation changes from Request/Acknowledgement to Request/Reply.
After entering this information, click Apply and restart the JMS Adapter instance. When the JMS Adapter starts running, the operation instance also starts running.
72 P U B L I CSupplement for AdaptersUsing the JMS adapter

Testing on Windows
Run the sample application by running sampleTest_Send.bat file from the command prompt.
This sample application (external IR) sends the message as a request on a source queue configured for JMSGetOperation instance. JMSGetOperation instance invokes the real-time batch job. This creates an output file JMSSourceOutput_Get.xml as an acknowledgement at the location <DS_COMMON_DIR>/adapters/JMS/samples/xml. No response is sent to the default response queue since it is not configured for this type of operation.
Testing on UNIX
Run the sample application by running sampleTest_Send.sh file from the command prompt.
This sample application (external IR) sends the message as a request on a source queue configured for JMSGetOperation instance. JMSGetOperation instance invokes the real-time batch job. This creates an output file JMSSourceOutput_Get.xml as an acknowledgement at the location <DS_COMMON_DIR>/adapters/JMS/samples/xml. No response is sent to the default response queue since it is not configured for this type of operation.
8.6.3.3 Request/Acknowledge - GetTopic operation
IR initiates the request by publishing a message to the source topic of the GetTopic operation. The GetTopic operation receives the message from the source queue during a polling cycle and sends the message to the configured Job service.
Related Information
Testing GetTopic: Request/Acknowledge [page 73]
8.6.3.3.1 Testing GetTopic: Request/Acknowledge
To configure the operation type Get topic (Request/Acknowledge), enter the following information in the operation instance configuration page in the Web Administrator.
Table 55:
Option Value
Operation instance JMSGetTopicOperation
Supplement for AdaptersUsing the JMS adapter P U B L I C 73

Option Value
Polling interval 1000
Thread count 1
Enable true
Source topic Topic.MyTopic
Service Topic.TestService
Timeout 2000
Continue after error true
After entering this information, click Apply and restart the JMS Adapter instance. When the JMS Adapter starts running, the operation instance also starts running.
Testing on Windows
Run the sample application (external IR) by running the sampleTest_GetTopic.bat file from the command prompt. This sample application publishes a message to the source topic of the GetTopic operation instance.
JMSGetTopicOperation, which has subscribed to the topic, receives the message and sends it to the real-time service. The service then puts the message into file JMSFileTarget_GetTopic.xml in directory <DS_COMMON_DIR>/adapters/jms/samples/xml.
Testing on UNIX
Run the sample application (external IR) by running the sampleTest_GetTopic.sh file from the command prompt. This sample application publishes a message to the source topic of the GetTopic operation instance.
JMSGetTopicOperation, which has subscribed to the topic, receives the message and sends it to the real-time service. The service then puts the message into file JMSFileTarget_GetTopic.xml in directory <DS_COMMON_DIR>/adapters/jms/samples/xml.
8.6.4 Operations from SAP Data Services to the JMS adapter
8.6.4.1 Request/Reply - PutGet operation
SAP Data Services initiates the request by sending a message on a pre-configured request queue. Simultaneously, the software also listens on a pre-configured reply queue. An external JMS-compatible application listening on this request queue, after processing, sends back the response on response queue. This response, in the form of the reply XML message, is returned back to the software.
74 P U B L I CSupplement for AdaptersUsing the JMS adapter

Related Information
Testing PutGet: Request/Reply [page 75]
8.6.4.1.1 Testing PutGet: Request/Reply
To configure the operation type PutGet (Request/Reply), enter the following information in the operation instance configuration page in Administrator.
Table 56:
Option Value
Operation instance JMSPutGetOperation
Thread count 1
Display name JMSPutGetOperation
Description This operation instance represents the PutGet Request/Reply operation. It sends the request message to the request queue and receives the reply message from the reply queue.
Enable true
Request queue Queue.ActaQueuePutGet
Reply queue Queue.ActaQueuePutGet1
Timeout 200000
Continue after error true
Request format <DS_COMMON_DIR>/adapters/JMS/samples/dtd/JMSPUTGET_SOURCE.dtd
Request XML root element source
Reply format <DS_COMMON_DIR>/adapters/JMS/samples/dtd/JMSPUTGET_RESPONSE1.dtd
Reply XML root element source
After entering this information, click Apply and restart the JMS Adapter instance. When the JMS Adapter starts running, the operation instance also starts running.
Testing on Windows
Open a command prompt window and change directory to <DS_COMMON_DIR>\adapters\jms\samples. Run the sample application (external IR) by running sampleTest_PutGet.bat. The application displays the message:
Ready to receive message from queue Queue.ActaQueuePutGet
Supplement for AdaptersUsing the JMS adapter P U B L I C 75

Execute the batch Job JMSPutGetOperation_BatchJob from the Designer. This sends the message to the request queue.
The sample application (external IR) listens for a message to arrive at the request queue of the JMSPutGetOperation instance. When it receives the message, it prints a message to the command prompt window such as:
Message received: <?xml version="1.0" encoding="UTF-8"?> <!-- Data Services generated XML --> <!-- 2005-05-05.16:41:57(539,223)[1] --> <source> <age>18</age> <salary>200000000</salary> <acno>2356376438743</acno> </source>
The sample test program then sends a reply message to the reply queue configured for the JMSPutGetOperation instance. It echoes a message to the command prompt window such as:
Message sent: <?xml version="1.0" encoding="UTF-8"?> <source> <age>ReplyFromJMSIR1</age> <salary>ReplyFromJMSIR2</salary> <acno>ReplyFromJMSIR3</acno> </source>
After the adapter operation receives the reply from the reply queue, it sends the message to the job which then generates the output file JMSSourceOutput_PutGet.xml under the directory <DS_COMMON_DIR>/adapters/JMS/samples/xml. The contents of the file should be similar to the message sent from the sample test with the addition of a timestamp and error information.
Testing on UNIX
Run the sample application (external IR) by running sampleTest_PutGet.sh file from the command prompt.
Execute the batch Job JMSPutGetOperation_BatchJob from Designer. This sends the message at the request queue.
Sample application (external IR) listens for the message at the request queue of JMSPutGetOperation instance and sends the message to the reply queue configured for the JMSPutGetOperation instance. After receiving the reply from the reply queue an output file JMSSourceOutput_PutGet.xml is generated under the directory <DS_COMMON_DIR>/adapters/JMS/samples/xml.
8.6.4.2 Request/Acknowledge - Put operation
SAP Data Services initiates the request by sending the message on a pre-configured target queue.
Related Information
Testing Put: Request/Acknowledge [page 77]
76 P U B L I CSupplement for AdaptersUsing the JMS adapter

8.6.4.2.1 Testing Put: Request/Acknowledge
To configure the operation type Put (Request/Acknowledge), enter the following information in the operation instance configuration page in the Web Administrator.
Table 57:
Option Value
Operation instance JMSPutOperation
Thread count 1
Display name JMSPutOperation
Description This operation instance represents the Put Request/Acknowledge operation. It queues the message to the configured destination queue.
Enable true
Destination queue Queue.MyQueue
Request format <DS_COMMON_DIR>/adapters/JMS/samples/dtd/JMSPUT_SOURCE.dtd
Request XML root element source
Click Apply after entering this information, then restart the adapter instance.
When the JMS Adapter is running, the operation instance is also running.
Testing on Windows
Open a command prompt window and change directory to <DS_COMMON_DIR>\adapters\jms\samples. Run the sample application (external IR) by running sampleTest_Put.bat. The application should display the message:
Ready to receive message from queue Queue.MyQueue.
Execute the batch Job JMSPutOperation_BatchJob from the Designer.
The sample application (external IR) listens for a message to arrive at the request queue of the JMSPutOperation instance. When it receives the message, it will print a message to the command prompt window such as:
Received message: <?xml version="1.0" encoding="UTF-8"?> <source> <age>18</age> <salary>200000000</salary> <acno>2356376438743</acno> </source>
After the adapter operation acknowledges sending the message to the IR, the job then generates the output file JMSSourceOutput_Put.xml under the directory <DS_COMMON_DIR>/adapters/JMS/samples/xml. The contents of the file should be similar to the message received by the sample test with the addition of a timestamp. Note that this file is created as a result of the design of the job, not as a result of the adapter operation sending a reply message to the job.
Supplement for AdaptersUsing the JMS adapter P U B L I C 77

Testing on UNIX
Run the sample application by running sampleTest_Put.sh file from the command prompt. This sample application listens at the destination queue configured for the Put operation instance.
Execute the batch Job JMSPutOperation_BatchJob from the Designer.
The sample application receives the message from the destination queue and an output file JMSSourceOutput_Put.xml as an acknowledgment gets created under the directory <DS_COMMON_DIR>/adapters/JMS/samples/xml.
8.6.4.3 Request/Acknowledge - PutTopic operation
SAP Data Services initiates the request by publishing the message to a pre-configured target topic.
Related Information
Testing PutTopic: Request/Acknowledge [page 78]
8.6.4.3.1 Testing PutTopic: Request/Acknowledge
To configure the operation type Put topic (Request/Acknowledge), enter the following information in the operation instance configuration page in the Web Administrator.
Table 58:
Option Value
Operation instance JMSPutTopicOperation
Thread count 1
Operation retry count 5
Operation retry interval 15000
Display name JMSPutTopicOperation Display Name
Description JMSPutTopicOperation Display Name
Enable true
Destination queue Topic
Message format C:\ProgramFiles\SAP BusinessObjects\Data Services
Request XML root element source
Persistent message true
78 P U B L I CSupplement for AdaptersUsing the JMS adapter

After entering this information, click Apply and restart JMS Adapter instance. When the JMS Adapter starts running, the operation instance also starts running.
Add the testing sections:
Testing on Windows
Open a command prompt window and change directory to <DS_COMMON_DIR>\adapters\jms\samples. Run the sample application (external IR) by running sampleTest_PutTopic.bat. The application should display the message:
Ready to receive message from topic Topic.MyTopic
If you do not see this message, then start the JMS publish/subscribe broker. The message should appear after you start the broker.
Execute the batch Job JMSPutTopicOperation_BatchJob from the Designer.
The sample application (external IR) listens for a message to be published by the JMSPutTopicOperation instance. When it receives the message, it will print a message to the command prompt window such as:
Received message: <?xml version="1.0" encoding="UTF-8"?> <source> <age>18</age> <salary>200000000</salary> <acno>2356376438743</acno> </source>
After the adapter operation acknowledges sending the message to the IR, the job then generates the output file JMSSourceOutput_PutTopic.xml under the directory <DS_COMMON_DIR>/adapters/JMS/samples/xml. The contents of the file should be similar to the message received by the sample test with the addition of a timestamp. Note that this file is created as a result of the design of the job, not as a result of the adapter operation sending a reply message to the job.
Testing on UNIX
Run the sample application by running sampleTest_Put.sh file from the command prompt. This sample application listens at the destination queue configured for the Put operation instance.
Execute the batch Job JMSPutOperation_BatchJob from the Designer.
8.7 Run the JMS sample
To run the JMS sample, do the following:
1. Import the JMSAdapter.atl file into the Designer. Find the .atl file in <DS_COMMON_DIR>/adapters/jms/samples. The imported project name is Acta_JMSAdapter_Sample.
2. Change the input and output XML files path for all the batch jobs depending on your location of your <DS_COMMON_DIR> environment variable.
Supplement for AdaptersUsing the JMS adapter P U B L I C 79

3. Use the Administrator Real-Time Services Configuration tab to create the service Queue.TestService referencing job TestService_Job and Topic.TestService referencing job TestServiceTopic_Job.
4. Open Web Administrator and configure a JMS adapter. Define the operations detailed in the following tests.5. Use the Designer to edit the JMSAdapter datastore and rename it to the name of the adapter you just created.
Before running the sample, create the following queues and topic using your JMS provider utilities:
● Queue.MyQueue● Queue.ActaQueuePutGet● Queue.ActaQueuePutGet1● Queue.ActaQueueGet● Queue.ActaReplyQueueGet● Queue.ActaUndeliveredQueue● Topic.MyTopic
NoteThe JMSAdapterTest.properties file and the scripts to execute the samples are located in the <DS_COMMON_DIR>/adapters/jms/samples directory.
The JMSAdapterTest.properties file TopicConnectionFactoryName property value is Tcf and the QueueConnectionFactoryName property value is Qcf. You must edit this file and change the property values if the adapter was configured using different factory names.
The JMSAdapterTest.properties file MessageSource property refers to the file <DS_COMMON_DIR>/adapters/jms/samples/xml/JMSSource.xml. You must edit this file and change the property value if this is not where your JMSSource.xml file is located.
You must edit setTestEnv.bat on Windows or setTestEnv.sh on UNIX to set the JMS Provider jar files in the class path used by the sample test programs.
8.7.1 Configuring the JMS provider
Create a JMS Server, Connection Factory and configure JMS queues to run SAP Data Services Adapter for JMS. For testing the adapter, using sample applications, configure the following queues and topic:
● Queue.MyQueue● Queue.ActaQueuePutGet● Queue.ActaQueuePutGet1● Queue.ActaQueueGet● Queue.ActaReplyQueueGet● Queue.ActaUndeliveredQueue● Topic.MyTopic
Refer to the “Appendix” section for instructions on using Weblogic as the JMS Provider. Steps for JMS Provider may differ from the example provided in this section.
80 P U B L I CSupplement for AdaptersUsing the JMS adapter

8.7.2 Using MQ instead of JNDI configuration
The properties file used by the samples, JMSAdapterTest.properties, is set up to use the JNDI configuration. You can edit this file to use MQ configuration parameters.
1. Open the JMSAdapterTest.properties file.
2. Set ConfigType = MQ.3. Set any of the following properties as required by your system:
○ MqQueueManager○ MqChannel○ MqComputerName○ MqPort○ MqUserID○ MqPassword
4. For the queue and topic names, use MQ names instead of the JNDI names for the following properties:○ TopicGetName○ TopicPutName○ QueueSourceGetName○ QueueResponseGetName○ QueuePutName○ QueueRequestPutGetName○ QueueReplyPutGetName
8.8 Weblogic as JMS provider
Before you run the SAP Data Services Adapter for JMS, you need to create a JMSServer, Connection Factory and configure JMS queues.
● Create a JMS Server● Start the BEA Weblogic server.● Open the Weblogic console.● Under services\JMS, click Servers.● Click Create a new JMS Server button.
Create the instance of JMS server. Then, click Create.
Click the Target link on the screen and select the server from available block to a chosen block. Click Apply to create the server instance.
8.8.1 Creating a JMS Connection Factory
1. Start the BEA Weblogic server.
Supplement for AdaptersUsing the JMS adapter P U B L I C 81

2. Open the Weblogic console.3. Under services\JMS, click Connection Factories.
Configure the Connection Factory. For testing purposes, “JMSConnections.AdapterConnectionFactory” must be configured.
Click the Target link on the screen. Select the server from available block to chosen block.
8.8.2 Configuring the JMS Connection Factory
For testing purposes, “JMSConnections.AdapterConnectionFactory” must be configured.
1. Click the Target link on the screen.2. Select the server from available block to chosen block.3. Click Apply to create the connection factory.
8.8.3 Creating a JMS queue
1. Start the BEA Weblogic server.2. Open the Weblogic console.3. Under services\JMS\Servers\ConfigJMSServer\Destinations, click Create a New JMS Queue.
For testing purposes, configure the following queues in the server:
● Queue.MyQueue● Queue.ActaQueuePutGet● Queue.ActaQueuePutGet1● Queue.ActaQueueGet● Queue.ActaReplyQueueGet● Queue.ActaUndeliveredQueue
8.9 Error handling and tracing
Error messages are logged in error log file under the <DS_COMMON_DIR>/adapters/log directory before throwing any exception. The name of the error log file is same as the name of the adapter configured in the Administrator.
For tracing, the trace messages are logged in the trace file under the <DS_COMMON_DIR>/adapters/log directory. The name of the trace file is same as the name of the adapter configured in the Administrator. You can enable the trace option in the Administrator for this adapter. Trace message shows the execution flow of the adapter and contain useful information on finding the cause of an error. The output in this trace file is of great help for SAP Business User Support.
82 P U B L I CSupplement for AdaptersUsing the JMS adapter

9 Using MongoDB metadata
You can use data from MongoDB as a source or target in a data flow.
Embedded documents and arrays in MongoDB are represented as nested data. Data Services converts JSON to XML for every record and then it converts metadata into an XSD file for the document source. The XSD file is then saved to the local disk (%DS_COMMON_DIR%\ext\mongo\mcache).
In the collection, the tag name should not contain special characters, which are invalid for the XSD file (for example, >, <, &, /, \, #, and so on). If special characters do exist, Data Services will remove them.
Also note that data is always changing, so the XSD may not reflect the entire data structure of all the documents in the MongoDB.
Restrictions and limitations
The following restrictions and limitations apply:
● The View Data feature is not supported.● Projection queries on adapters are not supported.● New fields that you add after the software creates a metadata schema, and were not present in the common
documents, are ignored.● Push down operators are not supported when using MongoDB as a target.
9.1 MongoDB as a source
In Data Services you can use MongoDB as a source and then you can flatten the schema by using the XML_Map transform.
Example 1: This data flow changes the schema via the Query transform and then loads the data to an XML target.
Example 2: This data flow simply reads the schema and then loads it directly into an XML template file.
Supplement for AdaptersUsing MongoDB metadata P U B L I C 83
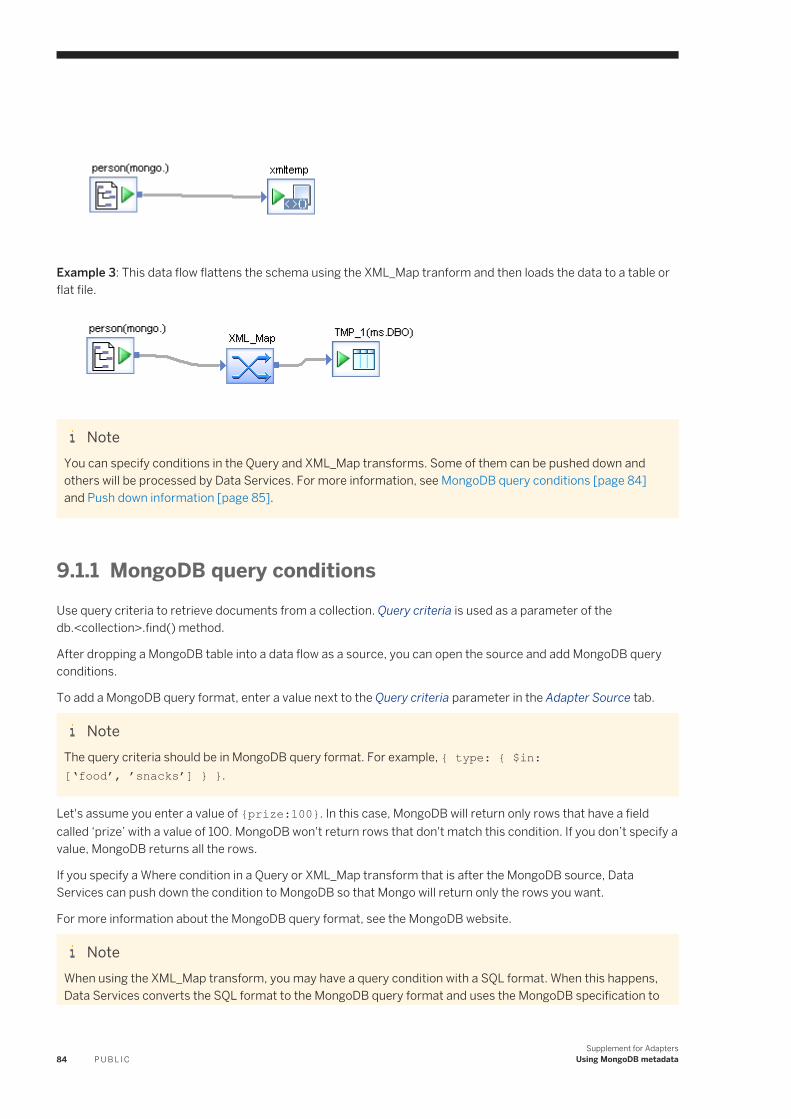
Example 3: This data flow flattens the schema using the XML_Map tranform and then loads the data to a table or flat file.
NoteYou can specify conditions in the Query and XML_Map transforms. Some of them can be pushed down and others will be processed by Data Services. For more information, see MongoDB query conditions [page 84] and Push down information [page 85].
9.1.1 MongoDB query conditionsUse query criteria to retrieve documents from a collection. Query criteria is used as a parameter of the db.<collection>.find() method.
After dropping a MongoDB table into a data flow as a source, you can open the source and add MongoDB query conditions.
To add a MongoDB query format, enter a value next to the Query criteria parameter in the Adapter Source tab.
NoteThe query criteria should be in MongoDB query format. For example, { type: { $in: [‘food’, ’snacks’] } }.
Let's assume you enter a value of {prize:100}. In this case, MongoDB will return only rows that have a field called ‘prize’ with a value of 100. MongoDB won't return rows that don't match this condition. If you don’t specify a value, MongoDB returns all the rows.
If you specify a Where condition in a Query or XML_Map transform that is after the MongoDB source, Data Services can push down the condition to MongoDB so that Mongo will return only the rows you want.
For more information about the MongoDB query format, see the MongoDB website.
NoteWhen using the XML_Map transform, you may have a query condition with a SQL format. When this happens, Data Services converts the SQL format to the MongoDB query format and uses the MongoDB specification to
84 P U B L I CSupplement for Adapters
Using MongoDB metadata

push down operations to the source database. In addition, be aware that Data Services does not support push down of query for nested array.
9.1.2 Push down information
Data Services does not push down Sort by conditions, but it does push down Where conditions. If you use a nested array in a Where condition, the nested array will not be pushed down.
NotePush down operators are not supported when using MongoDB as a target.
The following operators are supported when using MongoDB as a source:
● Comparison operators =, !=, >, >=, <, <=, like, and in.● Logical operators and and or in SQL query.
9.2 MongoDB as a target
You can use MongoDB as a target in your data flow.
NoteThe _id field is considered the primary key. If you create a new document with a field named _id, that field will be recognized as the unique BSON ObjectID. If a document contains more than one _id field (at a different level), only the _id field in the first level will be considered the ObjectID.
You can set the following options in the Adapter Target tab of the target document editor:
Table 59:
Option Description
Use auto correct Specifies basic operations when using MongoDB as your target datastore. The following values are available:
● True: The writing behavior is in Upsert mode. The software will update the document with the same _id or it will insert a new _id.
NoteUsing True may slow the performance of writing operations.
● False (default): The writing behavior is in Insert mode. If documents have the same _id in the MongoDB collection, then an error message appears.
Supplement for AdaptersUsing MongoDB metadata P U B L I C 85

Option Description
Write concern level Write concern is a guarantee that MongoDB provides when reporting on the success of a write operation. This option allows you to enable or disable different levels of acknowledgment for writing operations.
The following values are available:
● Acknowledged (default): Provides acknowledgment of write operations on a standalone mongod or the primary in a replica set.
● Unacknowledged: Disables the basic acknowledgment and only returns errors of socket exceptions and networking errors.
● Replica Set Acknowledged: Guarantees that write operations have propagated successfully to the specified number of replica set members, including the primary.
● Journaled: Acknowledges the write operation only after MongoDB has committed the data to a journal.
● Majority: Confirms that the write operations have propagated to the majority of voting nodes.
Use bulk Indicates whether or not you want to execute writing operations in bulk, which provides better performance.
When set to True, the software runs a bulk of write operation for a single collection in order to optimize the CRUD efficiency.
If the write operation in a bulk is more than 1000, MongoDB automatically splits into multiple bulk groups.
For more information about bulk, ordered bulk, and bulk maximum rejects, see http://help.sap.com/disclaimer?site=http://docs.mongodb.org/manual/core/bulk-write-operations/.
Use ordered bulk Specifies if you want to execute the write operations in serial (True) or parallel (False) order. The default value is False.
If you execute in parallel order (False), then MongoDB processes the remaining write operations even when there are errors.
Documents per commit Specifies the maximum number of documents that are loaded to a target before the software saves the data. If this option is left blank, the software uses 1000 (default).
Bulk maximum rejects Specifies the maximum number of acceptable errors before Data Services fails the job. Note that data will still load to the target MongoDB even if the job fails.
For unordered bulk loading, if the number of errors is less than, or equal to, the number you specify here, Data Services will allow the job to succeed and will log a summary of errors in the adapter instance trace log.
Enter -1 to ignore any bulk loading errors. Errors will not be logged in this situation.
NoteThis option does not apply when Use ordered bulk is set to True.
Delete data before loading
Deletes existing documents in the current collection before loading occurs.
Drop and re-create Drops the existing MongoDB collection and creates a new one with the same name before loading occurs. This option is available for template documents only. The default value is True.
86 P U B L I CSupplement for Adapters
Using MongoDB metadata

Option Description
Use audit Logs data for auditing. Data Services creates audit files containing write operation information and stores them in the <DS_COMMON_DIR>/adapters/audits/ directory. The name of the file is <MongoAdapter_instance_name>.txt.
Here's what you can expect to see when using this option:
● If a regular load fails and Use audit is set to False, loading errors will appear in the job trace log.● If a regular load fails and Use audit is set to True, loading errors will appear in the job trace log
and in the audit log.● If a bulk load fails and Use audit is set to False, the job trace log will provide a summary, but it
will not contain details about each row of bad data. There is no way to obtain details about bad data.
● If a bulk load fails and Use audit is set to True, the job trace log will provide a summary, but it will not contain details about each row of bad data. The job trace log will, however, tell you where to look in the audit file for this information.
9.3 Template documents
Use template documents as a target in one data flow or as a source in multiple data flows. Template documents are particularly useful in early application development when you are designing and testing a project.
Template documents can be found in the Template Documents node under the MongoDB datastore.
Importing a template document converts it to a regular document. You can use the regular document as a target or source in your data flow.
NoteTemplate documents are available in Data Services 4.2.7 and later. If you are upgrading from a previous version, you need to edit the MongoDB datastore and then click OK to see the Template Documents node and any other template document related options.
Template documents are similar to template tables. For information about template tables, see the Data Services User Guide and the Reference Guide.
9.3.1 Creating template documents
To create a template document, do the following:
1. Use one of the following methods to open the Create Template window:
○ From the tool palette:1. Click the template icon.2. Click inside a data flow to place the template document in the workspace.
Supplement for AdaptersUsing MongoDB metadata P U B L I C 87

3. Choose the MongoDB datastore.○ From the object library:
1. Expand a MongoDB datastore.2. Click the Template Documents node and drag it to the workspace.
○ From the workspace:1. Right-click on the workspace.2. Choose Add New and Template.3. Choose the MongoDB datastore.
2. In the Create Template window, enter a template name.
NoteThe maximum length of the collection namespace (<database>.<collection>) should not exceed 120 bytes.
3. Click OK.
The template document appears in the workspace.4. To use the template document as a target in the data flow, connect the template document to an input object.5. Click Save.
Linking a data source to the template document and then saving the project generates a schema for the template document. The icon changes in the Workspace and the template document appears in the Template Documents node under the datastore in the object library.
You can drag template documents from the Template Documents node into the workspace to use them as a source.
Related Information
Previewing MongoDB document data [page 90]MongoDB as a source [page 83]MongoDB as a target [page 85]
9.3.2 Converting a template document into a regular document
Importing a template document converts it into a regular document.
Use one of the following methods to import a MongoDB template document:
● Open a data flow and select one or more template target documents in the workspace. Right-click, and choose Import Document.
● Select one or more template documents in the object library, right-click and choose Import Document.
88 P U B L I CSupplement for Adapters
Using MongoDB metadata

The icon changes and the document is listed under Documents instead of Template Documents. Also note that the Drop and re-create configuration option is no longer available. This option is available for template target documents only.
Related Information
Re-importing schemas [page 89]
9.4 Parallel Scan
Generating metadata can be time consuming because Data Services needs to first scan all documents in the MongoDB collection. To improve performance while generating the metadata for big data, Data Services uses a process called Parallel Scan.
Parallel Scan allows Data Services to use multiple parallel cursors when reading all the documents in a collection, thus increasing performance.
NoteParallel Scan works with MongoDB server version 2.6.0 and above.
For more information about the parallelCollectionScan command, consult the MongoDB documentation.
9.5 Re-importing schemas
You can re-import MongoDB schemas into the Local Object Library. The software honors the MongoDB adapter datastore settings when re-importing.
● To re-import a single document, right-click on the document and click Reimport.● To re-import all documents, right-click on a MongoDB datastore or on the Documents node and click
Reimport All.
NoteWhen Use Cache is enabled, the software uses the cached schema.
When Use Cache is disabled, the software looks in the sample directory for a sample JSON file with the same name. If there is a matching file, the software uses the schema from that file. If there isn't a matching JSON file in the sample directory, the software re-imports the schema from the database.
Supplement for AdaptersUsing MongoDB metadata P U B L I C 89

9.6 Searching for MongoDB documents in the repository
From within the object library, you can search for MongoDB documents in a repository.
1. In the Designer, right-click in the object library and choose Search.The Search window appears.
2. Select the MongoDB datastore name to which the document belongs from the Look in drop-down menu. Choose Repository to search the entire repository.
3. Select Documents from the Object Type drop-down menu.4. Enter the criteria for the search.5. Click Search.
The documents matching your entries are listed in the window. A status line at the bottom of the Search window shows where the search was conducted (Local or Central), the total number of items found, and the amount of time it took to complete the search.
9.7 Previewing MongoDB document data
Data preview allows you to view a sampling of MongoDB data from documents.
To preview MongoDB document data, right-click on a MongoDB document name in the Local Object Library or on a document in the data flow and then select View Data.
You can also click the magnifying glass icon on a MongoDB source and target object in the data flow.
NoteBy default, the maximum number of rows displayed for data preview is 100. To change this number, use the Rows To Scan adapter datastore configuration option. Enter -1 to display all rows.
For more information, see “Using View Data”, “Viewing and adding filters”, and “Sorting” in the Designer Guide.
Related Information
MongoDB adapter datastore configuration options [page 23]
90 P U B L I CSupplement for Adapters
Using MongoDB metadata

10 Using OData tables as a source or target in your data flow
You can use an OData table as a source or a target in a data flow.
For more information, see the “Source and target objects” section in the Designer Guide.
Source information
The following adapter source options are available:
Table 60:
Option Description
Batch size Specifies the number of rows to be processed as a batch.
Column delimiter Separates data between columns.
Row delimiter Separates data between rows. Relevant options include:
● Top: Specifies the maximum number of rows that should be returned, starting from the beginning.
● Skip: Specifies the number of entries that should be ignored at the beginning of a collection. For example, if Skip=n then OData service returns the rows starting at position n+1.
Number of concurrent threads Controls the number of concurrent threads. Options include 1, 2, 4, 8, and 10.
The Depth value that you set when creating an adapter datastore affects the way Data Services uses entities:
Table 61:
Value Description
1 Data Services imports OData entities as flat DB tables and will not expand navigation entities. Data Services will also keep the entities' primary key attributes.
2 Data Services expands the OData navigation associate entity (main entity through the navigation properties). All properties, including main entity and navigation entity, will be imported as flat DB tables with format by add “navigation entity name”/”property name”.
Data Services will not keep the entities primary key. In addition, Data Services uses the “expand” operator to retrieve the properties data of the main and associated navigation entities, which is similar to the DB “join” concept.
Data Services uses the OData specification to push down operations to the source or target database. The following rules apply:
● Only "selectable" columns can be in the projection.● Only "filterable"columns can be in projection.● The Where clause is of the form <column> operation <constant>.
Supplement for AdaptersUsing OData tables as a source or target in your data flow P U B L I C 91
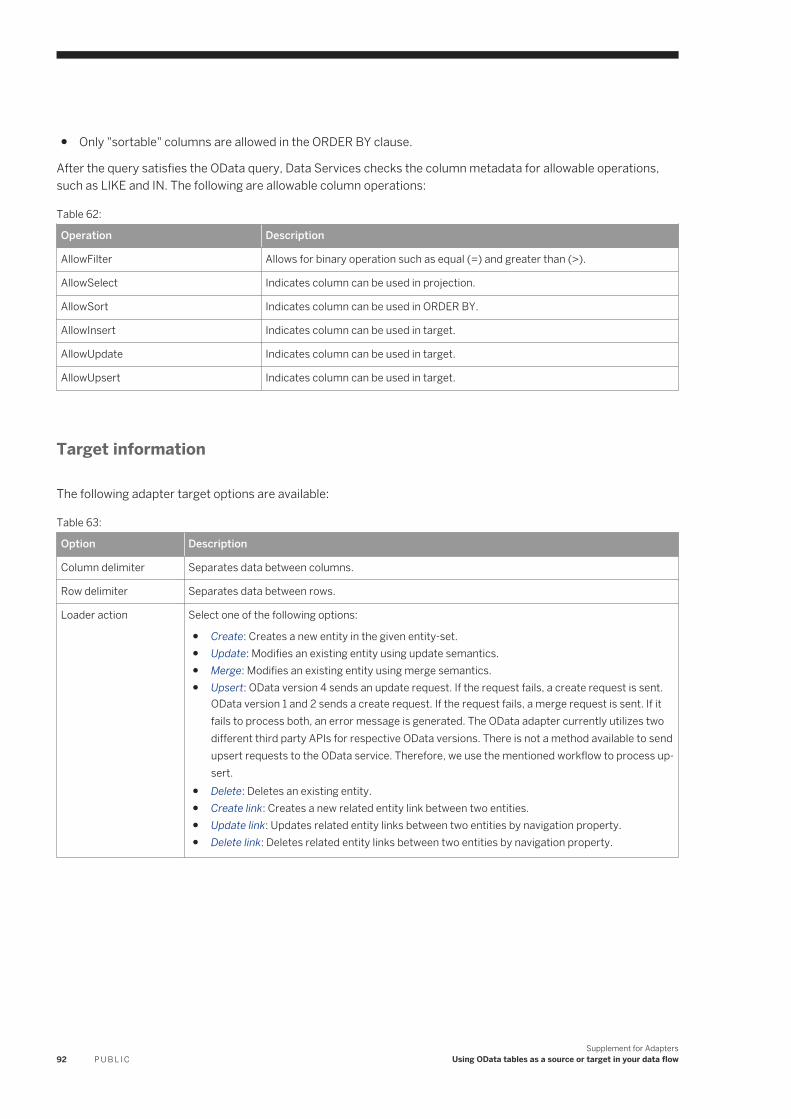
● Only "sortable" columns are allowed in the ORDER BY clause.
After the query satisfies the OData query, Data Services checks the column metadata for allowable operations, such as LIKE and IN. The following are allowable column operations:
Table 62:
Operation Description
AllowFilter Allows for binary operation such as equal (=) and greater than (>).
AllowSelect Indicates column can be used in projection.
AllowSort Indicates column can be used in ORDER BY.
AllowInsert Indicates column can be used in target.
AllowUpdate Indicates column can be used in target.
AllowUpsert Indicates column can be used in target.
Target information
The following adapter target options are available:
Table 63:
Option Description
Column delimiter Separates data between columns.
Row delimiter Separates data between rows.
Loader action Select one of the following options:
● Create: Creates a new entity in the given entity-set.● Update: Modifies an existing entity using update semantics.● Merge: Modifies an existing entity using merge semantics.● Upsert: OData version 4 sends an update request. If the request fails, a create request is sent.
OData version 1 and 2 sends a create request. If the request fails, a merge request is sent. If it fails to process both, an error message is generated. The OData adapter currently utilizes two different third party APIs for respective OData versions. There is not a method available to send upsert requests to the OData service. Therefore, we use the mentioned workflow to process upsert.
● Delete: Deletes an existing entity.● Create link: Creates a new related entity link between two entities.● Update link: Updates related entity links between two entities by navigation property.● Delete link: Deletes related entity links between two entities by navigation property.
92 P U B L I CSupplement for Adapters
Using OData tables as a source or target in your data flow

Option Description
Audit Logs data for auditing. Data Services creates audit files and stores them in the %DS_COMMON_DIR%\log\oData directory. The format of the file is <Datastore name>_<Table name>_<Process id><Thread id>.dat.
If you set the Use audit option to true, Data Services logs data for the following scenarios:
● For Insert, Data Services logs the user input keys. If there are no input keys specified, Data Services returns an error. Users specify the input keys in the Query transform connecting to the loader.
● Updates the row. If there is no primary key field, Data Services logs the user input keys, otherwise it logs primary key column.
Supplement for AdaptersUsing OData tables as a source or target in your data flow P U B L I C 93

11 Using Salesforce.com adapter metadata
After importing metadata as datastore objects in the Designer, you can use that metadata when designing data flows.
For general application design and administration information, see the Designer Guide and the Administrator Guide.
11.1 Using the Salesforce.com DI_PICKLIST_VALUES table
The Salesforce.com adapter includes a SAP Data Services proprietary table you can import like any other Salesforce.com table. This table contains all Salesforce.com picklists (a set of enumerated values from which to select).
To use the DI_PICKLIST_VALUES table as a source in data flows, import the DI_PICKLIST_VALUES just like you would any other table, then drag-and-drop it as a source in your data flow. Connect to a Query transform and drill down to add a WHERE clause and filter the values you require.
Columns defined for this table include:
● OBJECT_NAME● FIELD_NAME● VALUE● IS_DEFAULT_VALUE● IS_ACTIVE● LABEL
NoteIf you have translated pickup values in Salesforce.com, the LABEL column returns values for the language specified in your personal information settings. If pickup values are not translated, the VALUE and LABEL columns return the same values.
11.2 Using the CDC datastore table
The CDC table nodes differ from normal tables. If you expand a CDC table node, you will only see a Columns folder that contains the same columns as the original table with three generated columns. The generated columns are used for CDC data retrieval. Generated columns include:
● DI_SEQUENCE_NUMBER: The sequence number (int).● DI_OPERATION_TYPE: The operation type (varchar).
94 P U B L I CSupplement for Adapters
Using Salesforce.com adapter metadata
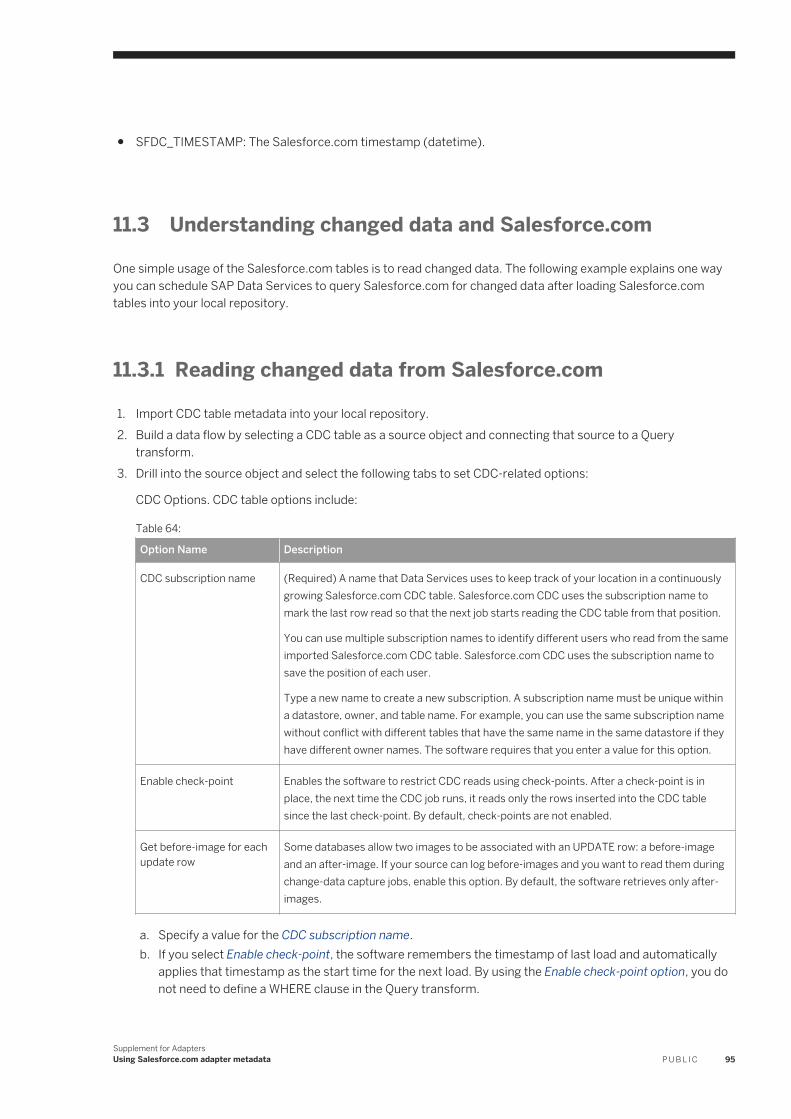
● SFDC_TIMESTAMP: The Salesforce.com timestamp (datetime).
11.3 Understanding changed data and Salesforce.com
One simple usage of the Salesforce.com tables is to read changed data. The following example explains one way you can schedule SAP Data Services to query Salesforce.com for changed data after loading Salesforce.com tables into your local repository.
11.3.1 Reading changed data from Salesforce.com
1. Import CDC table metadata into your local repository.2. Build a data flow by selecting a CDC table as a source object and connecting that source to a Query
transform.3. Drill into the source object and select the following tabs to set CDC-related options:
CDC Options. CDC table options include:
Table 64:
Option Name Description
CDC subscription name (Required) A name that Data Services uses to keep track of your location in a continuously growing Salesforce.com CDC table. Salesforce.com CDC uses the subscription name to mark the last row read so that the next job starts reading the CDC table from that position.
You can use multiple subscription names to identify different users who read from the same imported Salesforce.com CDC table. Salesforce.com CDC uses the subscription name to save the position of each user.
Type a new name to create a new subscription. A subscription name must be unique within a datastore, owner, and table name. For example, you can use the same subscription name without conflict with different tables that have the same name in the same datastore if they have different owner names. The software requires that you enter a value for this option.
Enable check-point Enables the software to restrict CDC reads using check-points. After a check-point is in place, the next time the CDC job runs, it reads only the rows inserted into the CDC table since the last check-point. By default, check-points are not enabled.
Get before-image for each update row
Some databases allow two images to be associated with an UPDATE row: a before-image and an after-image. If your source can log before-images and you want to read them during change-data capture jobs, enable this option. By default, the software retrieves only after-images.
a. Specify a value for the CDC subscription name.b. If you select Enable check-point, the software remembers the timestamp of last load and automatically
applies that timestamp as the start time for the next load. By using the Enable check-point option, you do not need to define a WHERE clause in the Query transform.
Supplement for AdaptersUsing Salesforce.com adapter metadata P U B L I C 95

c. Do not select Get before-image for each update row (for use only if your source can log before-images and you want to read them during change-data capture jobs) as Salesforce.com provides no before-images.
Adapter source options include:
Table 65:
Option Name Description
Column delimiter Specify a one-character delimiter for data columns by entering the forward-slash (/) followed by a three-digit ASCII code to indicate an invisible character.
Row delimiter Specify a one-character delimiter for data rows by entering the forward-slash (/) followed by a three-digit ASCII code to indicate an invisible character.
Escape character Must be one character.
CDC table source default start date
This option works with the CDC Enable check-point option. Salesforce.com requires the software to supply a start date and end date as part of a changed data request.
Fetch deleted records Set this value to Yes to also fetch the deleted records from the table. The default value is No.
4. Add a Map_CDC_Operation transform after the Query transform.5. Drill into the Map_CDC_Operation transform and configure the CDC columns in the transform editor.
○ Note that the software automatically pre-populates the Sequencing column and the Row operation columns fields with DI_SEQUENCE_NUMBER and DI_OPERATION_TYPE, respectively.The software fills DI_SEQUENCE_NUMBER using sequential numbers starting at 0 every time the CDC operation starts. Returned rows are always sorted by this column.The DI_OPERATION_TYPE indicates the type of operation performed on the object: INSERT, UPDATE or DELETE (I, U or D). The adapter does not return before-image records (B).
○ The SFDC_TIMESTAMP value will always indicate the time at which the operation was performed, (when the object was inserted, deleted, or last updated).
○ The other column values may or may not be set by the software, depending on the operation type. For a DELETE operation, only the ID will be set. For UPDATE and INSERT, the columns are set to represent the state of the object after the operation.
6. Connect the Map_CDC_Operation transform to your target table (where the INSERT, UPDATE and DELETE commands will be executed).
The following table shows the CDC operation mapping of data from Salesforce.com to the software:
Table 66:
Salesforce.com data since last CDC operation Records returned to Data Services
INSERT INSERT
UPDATE UPDATE
DELETE DELETE
INSERT & UPDATE INSERT & UPDATE
INSERT & DELETE DELETE
UPDATE & DELETE DELETE
INSERT & UPDATE & DELETE DELETE
96 P U B L I CSupplement for Adapters
Using Salesforce.com adapter metadata
If an object was inserted and updated after the reference time, two CDC records are returned to the software, one for each operation. However, both records will contain the same information, reflecting the state of the object after the UPDATE. So, in this type of situation, there is no way of knowing the object state after the INSERT operation.
11.3.2 Using check-points
If you can replicate an object, Salesforce.com allows applications to retrieve the changed data for that object. Salesforce.com saves changed data for a limited amount of time (for details, see your Salesforce.com technical documentation). Salesforce.com monitors neither the retrieving application nor the data retrieved.
When you enable check-points, a CDC job in Data Services uses the subscription name to read the most recent set of appended rows and to mark the end of the read (using the SF_Timestamp of the last record). If you disable check-points, the CDC job always reads all the rows in the CDC data source which increases processing time.
To use check-points, on the Source Table Editor enter the CDC Subscription name and select the Enable check-point option. If you enable check-points and run a CDC job in recovery mode, the recovered job begins to review the CDC data source at the last check-point.
NoteTo avoid data corruption problems, do not reuse data flows that use CDC datastores because each time a source table extracts data it uses the same subscription name. This means that identical jobs, depending upon when they run, can get different results and leave check-points in different locations in the file.
11.3.3 Using the CDC table source default start date
The CDC table source default start date is dependent on several factors. This date can be a value you specify, a check-point value, or a date related to the Salesforce.com retention period.
When you do not specify a value for the start date:
● SAP Data Services uses the beginning of the Salesforce.com retention period as the start date if a check-point is not available (during initial execution).
● The software uses the check-point as the start date if a check-point is available and occurs within the Salesforce.com retention period. If the check-point occurs before the retention period, the software uses the beginning of retention period as the start date.
● However, if a table is created within the Salesforce.com retention period and a check-point is not available, the execution returns an error message. Drill into the source object and enter a value for the CDC table source default start date. The value must be a date that occurs after the date the table was created to work around this problem.
When you specify a start date value, if your date occurs:
● Within the Salesforce.com retention period and no check-point is available, then the software uses your specified value.
● Within the Salesforce.com retention period and after the check-point, the software uses your specified value.
Supplement for AdaptersUsing Salesforce.com adapter metadata P U B L I C 97

● Within the Salesforce.com retention period and before the check-point, the software uses the check-point value as the start date.
● Outside of the Salesforce.com retention period, the Salesforce.com Adapter ignores the value.
11.3.4 Limitations
The Table Comparison and SQL transforms and the lookup and lookup_ext functions cannot be used with a source table imported with a CDC datastore because of the existence of the SAP Data Services generated columns. You cannot compare or search these columns.
11.4 Understanding Salesforce.com error messages
Table 67:During the course of designing and deploying your jobs, you may encounter error messages. Find error messages and their descriptions (including suggested actions) listed in the following table:
Error Message Description
Login operation has failed. SForce.com message is {0}
Invalid user name/password or user account is blocked for another reason, which is explained by the Salesforce.com message.
ACTION: Confirm password or contact Salesforce.com for more information.
Unknown object type. SForce.com message is {0}
The table used in the query is no longer available or visible to the user.
ACTION: Browse Salesforce.com metadata and look for the table.
Invalid field. SForce.com message is {0}
One or more fields used in the query are no longer available.
ACTION: Browse Salesforce.com metadata to determine if there is a difference between the imported table and the actual metadata. If necessary, rebuild your data flow.
Unsupported SQL statement: {0} Your data flow is not supported by Salesforce.com.
ACTION: Rebuild according to the restrictions described in this document.
Malformed query: {0}. SForce.com message is {1}
The submitted query is unsupported by Salesforce.com. Most likely you have encountered a bug translating between data flows and Salesforce.com queries.
ACTION: Contact product support.
98 P U B L I CSupplement for Adapters
Using Salesforce.com adapter metadata

Error Message Description
Invalid session parameter: name = {0}, value = {1}
The URL or batchSize session parameter is invalid. Either the URL is malformed or batchSize is not a positive integer.
ACTION: Check the integrity of the URL and confirm that the batchSize is a positive integer.
Invalid CDC query: {0} The data flow built over a CDC table is invalid.
ACTION: Check for (and fix) any missing WHERE clause condition for SFDC_TIMESTAMP.
There was a service connection error when talking to SForce.com: {0}
The adapter could not connect to Salesforce.com.
ACTION: Confirm that the web service end point is correct and accessible through your network.
There was a communication error when talking to SForce.com: {0}
A protocol error occurred.
ACTION: Contact product support.
There was an unexpected error. SForce.com message is {0}
An unknown, unexpected error occurred.
ACTION: Contact product support.
11.5 Running the application
After you design your application(s), you must run them to finalize SAP Data Services- Adapter integration. These are the basic startup tasks:
● In the Administrator, start each application to be used in the integration.Real-time: Start services and applications that use this service.Batch: Start/schedule the job.
● In the Administrator, monitor progress for each job. You can monitor pending requests, processed requests, failed requests, and status.
NoteThe Administrator does not automatically refresh views. To refresh views, go to the View menu and select Refresh.
● In the Administrator, monitor progress for each (real-time) service.● On the adapter server (for example, Salesforce.com Server), monitor messaging progress for the configured
queues.
If problems occur:
● For error message descriptions and suggested troubleshooting actions, see the "Understanding Salesforce.com error messages" topic.
● To understand the source of a problem, use error and log tracing.
Supplement for AdaptersUsing Salesforce.com adapter metadata P U B L I C 99

● To enable debug tracing for the adapter instance, use the Administrator.
Related Information
Understanding Salesforce.com error messages [page 98]
100 P U B L I CSupplement for Adapters
Using Salesforce.com adapter metadata

12 Using SuccessFactors tables as a source or a target in your data flow
You can use a SuccessFactors table as a source or a target in a data flow. For more information about how to do this, see the “Source and target objects” section in the Designer Guide.
Source information
The following adapter source options are available:
Table 68:
Option Description
Batch size Specifies the number of rows to be processed as a batch.
Column delimiter Separates data between columns.
Row delimiter Separates data between rows.
Data Services uses the SuccessFactors Query Language specification to push down operations to the source or target database. The following rules apply:
● Only columns can be in the projection.● The Where clause is of the form <column> operation <constant>.● Only columns are allowed in the ORDER BY clause.
Target information
Each SuccessFactors table has an id field. The id field is an internal key. When a row is inserted, SuccessFactors creates an id for that row. When inserting and upserting rows, make sure the input data does not include the id field. If the data does include the id field, SuccessFactors returns an error.
When a row is updated or deleted, SuccessFactors requires the id field to be present in the input data. The id field is used to identify a row. If the id field is not present, SuccessFactors returns an error.
The following adapter target options are available:
Table 69:
Option Description
Batch size Specifies the number of rows to be processed as a batch.
Column delimiter
Separates data between columns.
Supplement for AdaptersUsing SuccessFactors tables as a source or a target in your data flow P U B L I C 101

Option Description
Row delimiter Separates data between rows.
Use auto correct
Checks the target table for existing rows before adding new rows to the table. Note that using this option can slow jobs.
When you set this parameter to true, Data Services does the following:
Table 70:
Row status Action
Insert Inserts a row if it doesn't already exist. If the row does exist, the software updates the row.
Update When there is no id field in the input data, the existing row is updated. If the row doesn't exist, the row is inserted. When the table has an id field, the row is updated.
Delete Deletes the row.
Use audit Logs data for auditing. Data Services creates audit files and stores them in the %DS_COMMON_DIR%\log\SFSF directory. The format of the file is <Datastore name>_<Table name>_<Process id><Thread id>.dat.
If you set the Use audit option to true, Data Services logs data for the following scenarios:
● If there is no user input keys and a rows cannot be deleted or update, the id field is automatically logged.
● User input keys are always logged. For insert row, if you do not specify an input keys, an error is returned. You can specify input keys in the Query transform that is connected to the SuccessFactors loader.
12.1 Using SuccessFactor's CompoundEmployee entity
Data Services can extract information from a SuccessFactors data entity called CompoundEmployee.
The CompoundEmployee entity can be found under an already configured SuccessFactors datastore in the Data Services Designer.
In order to view and extract CompoundEmployee information, you first need to import the data. To import the data, right click on the CompoundEmployee entity and select Import or you can import by name by entering CompoundEmployee as the entity name.
The CompoundEmployee data will be visible under the Documents category because it has a nested structure.
For more information, see "Importing metadata through an adapter datastore" in the Designer Guide.
102 P U B L I CSupplement for Adapters
Using SuccessFactors tables as a source or a target in your data flow

12.1.1 Importing data from an .xsd file
After importing CompoundEmployee into a datastore, Data Services automatically creates and writes the CompoundEmployee metadata into <DS_COMMON_DIR>/ext/SFSF/EC_API_CompoundEmployee.xsd.bak.
If there is only a .bak file in the SFSF directory at the time of import, Data Services imports the schema from SuccessFactors.
To read CompoundEmployee metadata from an .xsd file instead of importing it from the SuccessFactors API, you must do the following:
1. Put the EC_API_CompoundEmployee.xsd file into the SFSF directory. For example, <DS_COMMON_DIR>/ext/SFSF/EC_API_CompoundEmployee.xsd.
See SAP Note 1900616 for information about how to download the .xsd file.
2. In the Designer, re-import the CompoundEmployee object into the datastore.
12.1.2 Using CompoundEmployee as a source
You can use the CompoundEmployee entity as a source in a data flow and then select what information you want to receive.
Once you open the source, you can specify filters. You can input text, global variables, or substitution parameters as filter values.
Table 71:
Field Valid Operations Examples
LAST_MODIFIED_ON =, >, >=, <, <= Example 1:
> to_date('2013-02-28','YYYY-MM-DD')
Range example:
> $v1 and < $v2 Expand toLAST_MODIFIED_ON > to_date(‘2013-02-25’,'YYYY-MM-DD') AND LAST_MODIFIED_ON < to_date(‘2013-02-28’,'YYYY-MM-DD')
COMPANY_TERRITORY_CODE
=, IN = ‘IND’ IN (‘IND’,’USA’)
PERSON_ID =, IN = '99'
Supplement for AdaptersUsing SuccessFactors tables as a source or a target in your data flow P U B L I C 103

Field Valid Operations Examples
PERSON_ID_EXTERNAL =, IN IN operator example:
IN ('nkoo1', 'cgrant1')
Global variable example:
= '$v1'
NoteYou need to use single quotes for character data.
Substitution parameter example:
= [$$param1]
NoteYou need to use single quote as part of the parameter.
COMPANY =, IN = 'SFIDC01' = $$sp Where $$sp = 'SFIDC01'
EMPLOYEE_CLASS =, IN= '2'
DEPARTMENT =, IN Examples:
= 'US010001'
= 'DE010001'
DIVISION =, IN= 'DE01' = 'divi1'
BUSINESS_UNIT =, IN= '1107bufd'
LOCATION =, IN= 'SE010010'
JOB_CODE =, IN= 'US_U2'
PAY_GROUP =, IN = 'A1'
104 P U B L I CSupplement for Adapters
Using SuccessFactors tables as a source or a target in your data flow

Field Valid Operations Examples
EFFECTIVE_END_DATE =, >=>= to_date('2013-02-10','YYYY-MM-DD')
ExampleData Services pushes down filters to SuccessFactors. The following is an example of a filter and the resulting query that Data Services sends to SuccessFactors.
Filter
EFFECTIVE_END_DATE >= to_date('2013-02-10','YYYY-MM-DD') PAY_GROUP IN (‘01’, ‘02’) JOB_CODE = ‘$JC’ LOCATION IN (‘DE010001’, ‘$loc’) BUSINESS_UNIT IN ('DE01','FR01') DIVISION IN (‘FR01’, ‘DE01’) DEPARTMENT IN (‘FR010000’, ‘DE010001’) EMPLOYEE_CLASS = ‘1’COMPANY IN (‘FR01’, DE01’) PERSON_ID_EXTERNAL IN (‘99999’, ‘9999_SACHIN’,’ RAHUL’, ‘11223347’) PERSON_ID IN (‘16116’, ‘15636’, ‘14276’) COMPANY_TERRITORY_CODE IN (‘FRA’, ‘DEU’) LAST_MODIFIED_ON >= $low_lmo AND <= $high_lmo
Where
$jc = ‘DE_00’ $loc = ‘FR010000’$ec = ‘1’$low_lmo = to_date('2013-03-01','yyyy-mm-dd')$high_lmo = to_date('2013-05-30','yyyy-mm-dd')
Resulting query
SELECT person, personal_information, address_information, phone_information, email_information, employment_information, job_information, compensation_information, paycompensation_recurring, paycompensation_non_recurring, payment_information, accompanying_dependent, alternative_cost_distribution, job_relation, direct_deposit, national_id_card, person_relation FROM CompoundEmployee WHERE LAST_MODIFIED_ON >= to_date('2013-03-01','YYYY-MM-DD') AND LAST_MODIFIED_ON <= to_date('2013-05-30','YYYY-MM-DD') AND COMPANY_TERRITORY_CODE IN ('FRA', 'DEU') AND PERSON_ID IN ('16116', '15636','14276') AND PERSON_ID_EXTERNAL IN ('99999', '9999_SACHIN','RAHUL', '11223347') AND COMPANY IN ('FR01', 'DE01') AND EMPLOYEE_CLASS = '1' AND DEPARTMENT IN ('FR010000', 'DE010001') AND DIVISION IN ('FR01', 'DE01') AND BUSINESS_UNIT IN ('DE01','FR01') AND LOCATION IN ('DE010001','FR010000') AND JOB_CODE = 'DE_00' AND PAY_GROUP IN ('01', '02') AND EFFECTIVE_END_DATE >= to_date('2013-02-10','YYYY-MM-DD')
Supplement for AdaptersUsing SuccessFactors tables as a source or a target in your data flow P U B L I C 105
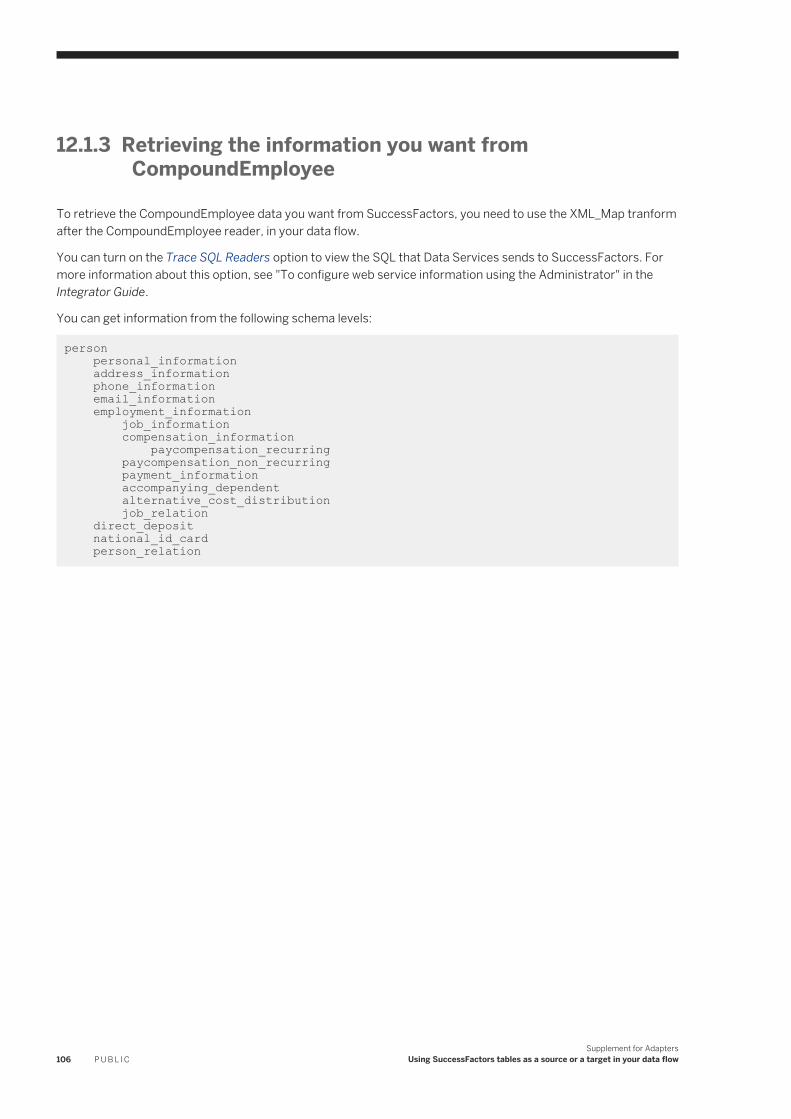
12.1.3 Retrieving the information you want from CompoundEmployee
To retrieve the CompoundEmployee data you want from SuccessFactors, you need to use the XML_Map tranform after the CompoundEmployee reader, in your data flow.
You can turn on the Trace SQL Readers option to view the SQL that Data Services sends to SuccessFactors. For more information about this option, see "To configure web service information using the Administrator" in the Integrator Guide.
You can get information from the following schema levels:
person personal_information address_information phone_information email_information employment_information job_information compensation_information paycompensation_recurring paycompensation_non_recurring payment_information accompanying_dependent alternative_cost_distribution job_relation direct_deposit national_id_card person_relation
106 P U B L I CSupplement for Adapters
Using SuccessFactors tables as a source or a target in your data flow

13 SSL connection support
Data Services supports SSL connections in all its adapters. The setup and support can differ for each adapter.
Table 72:
Support Adapter Description
File-based Shapefile, VCF, and Excel The SSL connection is used internally between the adapter and the Job Server.
No extra configuration is needed to use SSL connection with these adapters.
URL-based HTTP, JMS, OData, Salesforce, SuccessFactors, Testadapter, and WebService
Uses an external SSL connection. You need to import certificates into the Java Keystore to get the SSL connection to work.
For more information, see:
● Adding certificates [page 107]● Configuring SSL with the HTTP adapter [page 58]
Database connection-based Hive and MongoDB Requires you to configure SSL options on the Data Services server side. You also need to provide Data Services with the necessary certificates.
For more information about the SSL configuration options, see:
● Hive adapter datastore configuration options [page 20]● MongoDB adapter datastore configuration options [page
23]
NoteThe JDBC adapter requires a local JDBC driver. The JDBC driver should handle SSL security when connecting to a database server.
13.1 Adding certificates
Data Services automatically includes certificates in its Java keystore so that Data Services recognizes an adapter datastore instance as a trusted website.
However, if there is an error regarding a certificate, you can manually add a certificate back into the Java keystore.
For URL-based services, you can import the certification chain into Data Services runtime as follows:
1. Download the certificate file. In Internet Explorer, click on the lock icon in the address bar. Using the wizard, save the available certificate in base 64 encoded format to %LINK_DIR%\ssl\trusted_certs.
2. Stop Data Services Job Services.
Supplement for AdaptersSSL connection support P U B L I C 107

3. Open the command prompt and enter cd %LINK_DIR%\bin and run the program SetupJavaKeystore.bat.
The command generates the jssecacerts and sslks.key files.
4. Restart Data Services Job Services and the adapter.
108 P U B L I CSupplement for AdaptersSSL connection support

Important Disclaimers and Legal Information
Coding SamplesAny software coding and/or code lines / strings ("Code") included in this documentation are only examples and are not intended to be used in a productive system environment. The Code is only intended to better explain and visualize the syntax and phrasing rules of certain coding. SAP does not warrant the correctness and completeness of the Code given herein, and SAP shall not be liable for errors or damages caused by the usage of the Code, unless damages were caused by SAP intentionally or by SAP's gross negligence.
AccessibilityThe information contained in the SAP documentation represents SAP's current view of accessibility criteria as of the date of publication; it is in no way intended to be a binding guideline on how to ensure accessibility of software products. SAP in particular disclaims any liability in relation to this document. This disclaimer, however, does not apply in cases of willful misconduct or gross negligence of SAP. Furthermore, this document does not result in any direct or indirect contractual obligations of SAP.
Gender-Neutral LanguageAs far as possible, SAP documentation is gender neutral. Depending on the context, the reader is addressed directly with "you", or a gender-neutral noun (such as "sales person" or "working days") is used. If when referring to members of both sexes, however, the third-person singular cannot be avoided or a gender-neutral noun does not exist, SAP reserves the right to use the masculine form of the noun and pronoun. This is to ensure that the documentation remains comprehensible.
Internet HyperlinksThe SAP documentation may contain hyperlinks to the Internet. These hyperlinks are intended to serve as a hint about where to find related information. SAP does not warrant the availability and correctness of this related information or the ability of this information to serve a particular purpose. SAP shall not be liable for any damages caused by the use of related information unless damages have been caused by SAP's gross negligence or willful misconduct. All links are categorized for transparency (see: http://help.sap.com/disclaimer).
Supplement for AdaptersImportant Disclaimers and Legal Information P U B L I C 109

go.sap.com/registration/contact.html
© 2017 SAP SE or an SAP affiliate company. All rights reserved.No part of this publication may be reproduced or transmitted in any form or for any purpose without the express permission of SAP SE or an SAP affiliate company. The information contained herein may be changed without prior notice.Some software products marketed by SAP SE and its distributors contain proprietary software components of other software vendors. National product specifications may vary.These materials are provided by SAP SE or an SAP affiliate company for informational purposes only, without representation or warranty of any kind, and SAP or its affiliated companies shall not be liable for errors or omissions with respect to the materials. The only warranties for SAP or SAP affiliate company products and services are those that are set forth in the express warranty statements accompanying such products and services, if any. Nothing herein should be construed as constituting an additional warranty.SAP and other SAP products and services mentioned herein as well as their respective logos are trademarks or registered trademarks of SAP SE (or an SAP affiliate company) in Germany and other countries. All other product and service names mentioned are the trademarks of their respective companies.Please see http://www.sap.com/corporate-en/legal/copyright/index.epx for additional trademark information and notices.