Embed Size (px)
Citation preview
i
SGOS 6.6.x
Visual Policy Manager Reference
and Advanced Policy Tasks

Visual Policy Manager Reference
ii
Contact InformationAmericas:Blue Coat Systems Inc.384 Santa Trinita AvenueSunnyvale, CA 94085
Rest of the World:Blue Coat Systems International SARL3a Route des Arsenaux1700 Fribourg, Switzerland
http://www.bluecoat.com/contact/customer-support
http://www.bluecoat.com
For concerns or feedback about the documentation: [email protected]
iii
© 2016 Blue Coat Systems, Inc. All rights reserved. BLUE COAT, PROXYSG, PACKETSHAPER, CACHEFLOW, INTELLIGENCECENTER, CACHEOS, CACHEPULSE, CROSSBEAM, K9, DRTR, MACH5, PACKETWISE, POLICYCENTER, PROXYAV, PROXYCLIENT, SGOS, WEBPULSE, SOLERA NETWORKS, DEEPSEE, DS APPLIANCE, SEE EVERYTHING. KNOW EVERYTHING., SECURITY EMPOWERS BUSINESS, BLUETOUCH, the Blue Coat shield, K9, and Solera Networks logos and other Blue Coat logos are registered trademarks or trademarks of Blue Coat Systems, Inc. or its affiliates in the U.S. and certain other countries. This list may not be complete, and the absence of a trademark from this list does not mean it is not a trademark of Blue Coat or that Blue Coat has stopped using the trademark. All other trademarks mentioned in this document owned by third parties are the property of their respective owners. This document is for informational purposes only.
BLUE COAT MAKES NO WARRANTIES, EXPRESS, IMPLIED, OR STATUTORY, AS TO THE INFORMATION IN THIS DOCUMENT. BLUE COAT PRODUCTS, TECHNICAL SERVICES, AND ANY OTHER TECHNICAL DATA REFERENCED IN THIS DOCUMENT ARE SUBJECT TO U.S. EXPORT CONTROL AND SANCTIONS LAWS, REGULATIONS AND REQUIREMENTS, AND MAY BE SUBJECT TO EXPORT OR IMPORT REGULATIONS IN OTHER COUNTRIES. YOU AGREE TO COMPLY STRICTLY WITH THESE LAWS, REGULATIONS AND REQUIREMENTS, AND ACKNOWLEDGE THAT YOU HAVE THE RESPONSIBILITY TO OBTAIN ANY LICENSES, PERMITS OR OTHER APPROVALS THAT MAY BE REQUIRED IN ORDER TO EXPORT, RE-EXPORT, TRANSFER IN COUNTRY OR IMPORT AFTER DELIVERY TO YOU.
Americas: Rest of the World:
Blue Coat Systems, Inc. Blue Coat Systems International SARL384 Santa Trinita Avenue 3a Route des ArsenauxSunnyvale, CA 94085 1700 Fribourg, Switzerland
Document Number: 231-03015Document Revision: SGOS 6.6.x—07/2016-G

Visual Policy Manager Reference
iv
v
Introduction 15Document Conventions 16Notes and Warnings 17
Managing Policy Files 19About Policy Files 20Creating and Editing Policy Files 21
Creating and Editing Policy Files Using the Management Console 21Using the CLI Inline Command 23
Unloading Policy Files 25Configuring Policy Options 26
Policy File Evaluation 26Transaction Settings: Deny and Allow 27Policy Tracing 28
Managing the Central Policy File 29Configuring Automatic Installation 29Configuring a Custom Central Policy File for Automatic Installation 29Configuring E-mail Notification 29Configuring the Update Interval 30Checking for an Updated Central Policy File 30Resetting the Policy Files 30Moving Policy Files from One Appliance to Another 30
Viewing Policy Files 31Viewing the Installed Policy 31Viewing Policy Source Files 31Viewing Policy Statistics 32
The Visual Policy Manager 33
VPM Overview 34Launching the Visual Policy Manager (VPM) 35About the Visual Policy Manager User Interface 36
Menu Bar 36Tool Bar 38Policy Layer Tabs 38Rules and Objects 38About Code Sharing With the Management Console 39
About VPM Components 41Policy Layers 41Rule Objects 41Policy Layer/Object Matrix 43
The Set Object Dialog 45The Add/Edit Object Dialog 47
Policy Layer and Rule Object Reference 48Administration Authentication Policy Layer Reference 49Administration Access Policy Layer Reference 50

Visual Policy Manager Reference
vi
Administration Login Banner Policy Layer Reference 51DNS Access Policy Layer Reference 52SOCKS Authentication Policy Layer Reference 53SSL Intercept Layer Reference 54SSL Access Layer Reference 55Web Authentication Policy Layer Reference 57Web Access Policy Layer Reference 58Web Content Policy Layer Reference 62Forwarding Policy Layer Reference 63Web Request Policy Layer Reference 65CPL Layer 68
Detailed Object Column Reference 69Source Column Object Reference 70
Any 70Streaming Client 70Client Hostname Unavailable 70Authenticated User 70Guest User 70IM User Agent Unsupported 70Client IP Address/Subnet 70Client Geolocation 71Client Hostname 73HTTP CONNECT User Agent 74Proxy IP Address/Port 74User 74Group 77Attribute 79LDAP Attribute 80SAML Attribute 81User Login Address 81User Login Time 82User Login Count 82Client Address Login Count 82User Authentication Error 82User Authorization Error 84DNS Request Name 84RDNS Request IP Address/Subnet 84DNS Request Opcode 85DNS Request Class 85DNS Request Type 85DNS Client Transport 85SOCKS Version 86User Agent 86Request Header 86Client Certificate 87

vii
P2P Client 87Client Negotiated Cipher 87Client Negotiated Cipher Strength 88Client Negotiated SSL Version 88Client Connection DSCP Trigger 88HTTP Request Body 90Apparent Data Type 91ICAP Reqmod Response Header 92HTTP Request Argument 92Combined Source Object 94Source Column/Policy Layer Matrix 94
Destination Column Object Reference 96Any 96DNS Response Contains No Data 96Destination IP Address/Subnet 96Destination Host/Port 96Application Attributes 96Request URL 99Request URL Application 101Request URL Operation 101Request URL Category 102Threat Risk 104Category 105Server URL 105Server URL Category 106Server Certificate 106Server Certificate Category 106Server Negotiated Cipher 106Server Negotiated Cipher Strength 106Server Negotiated SSL Version 107File Extensions 107HTTP MIME Types 109Response Code 109Response Header 109Response Data 110ICAP Respmod Response Header 110DNS Response IP Address/Subnet 111RDNS Response Host 111DNS Response CNAME 111DNS Response Code 111Server Connection DSCP 111Resolved Country 112WebEx Site 112Specifies the WebEx site to allow or deny connections to. 112Combined Destination Objects 112Destination Column/Policy Layer Matrix 112
Visual Policy Manager Reference
viii
Service Column Object Reference 115Any 115Using HTTP Transparent Authentication 115Virus Detected 115Request Forwarded 115Client Certificate Requested 115Client Protocol 115Service Name 116Service Group 116Protocol Methods 116SSL Proxy Mode 117Streaming Content Type 117ICAP Error Code 117Health Check 119Health Status 119Combined Service Objects 119Service Column/Policy Layer Matrix 120
Time Column Object Reference 121Any 121Time 121Combined Time Object 122Time Column/Policy Layer Matrix 122
Action Column Object Reference 123Allow 123Set Effective Client IP 123Deny 124Deny (Content Filter) 124Force Deny 124Force Deny (Content Filter) 124Allow Content From Origin Server 124Allow Access to Server 125Connect Using ADN When Possible/Do Not Connect Using ADN 125Allow Read-Only Access 125Allow Read-Write Access 125Do Not Authenticate 125Do Not Authenticate (Forward Credentials) 125Authenticate 125Authenticate Guest 128Add Default Group 129Force Authenticate 129Bypass Cache 129Do Not Bypass Cache 129Bypass DNS Cache 129Do Not Bypass DNS Cache 129Allow DNS From Upstream Server 129Serve DNS Only From Cache 129
ix
Enable/Disable DNS Imputing 130Disable/Do Not Disable Fast-Caching in Windows Media Client 130Check/Do Not Check Authorization 130Always Verify 130Use Default Verification 130Block/Do Not Block PopUp Ads 130Force/Do Not Force IWA for Server Auth 131Log Out/Do Not Log Out Other Users With Same IP 131Log Out/Do Not Log Out User 131Log Out/Do Not Log Out User’s Other Sessions 131Tunnel/Do Not Tunnel IM Traffic 131Enable/Disable ICAP Mirroring 131Support/Do Not Support Persistent Client Requests 132Support/Do Not Support Persistent Server Requests 132Require/Do Not Require Client Certificate 132Trust/Do Not Trust Destination IP 132Deny 132Return Exception 132Return Redirect 133Time Quota 134Volume Quota 135Set Client Certificate Validation 136Set Server Certificate Validation 137Set Client Keyring 138Set Encrypted Tap 140SSL Interception 141Disable SSL Interception 143Modify Access Logging 144Override Access Log Field 145Rewrite Host 146Reflect IP 147Set Server URL DNS Lookup 148Suppress Header 149Control Request Header/Control Response Header 149Notify User 151Strip Active Content 155HTTP Compression Level 156Set Client HTTP Compression 157Set Server HTTP Compression 157Set HTTP Request Max Body Size 157Set Attack Detection Failure Weight 158Set Apparent Data Type Action 158Manage Bandwidth 160ADN Server Optimization 160Return ICAP Feedback 161Set Dynamic Categorization 162

Visual Policy Manager Reference
x
Add Request Analysis Service 163Add Response Analysis Service 165Set Malware Scanning 165Set FTP Connection 166Set SOCKS Acceleration 166Disable SSL Detection 166Set Streaming Max Bitrate 167Set Client Connection DSCP Value 167Set Server Connection DSCP Value 168Set ADN Connection DSCP 168Set Authorization Refresh Time 169Set Credential Refresh Time 169Set Surrogate Refresh Time 169Send DNS/RDNS Response Code 169Send DNS Response 170Send Reverse DNS Response 170Do Not Cache 171Set Force Cache Reasons 171Use Default Caching 171Mark/Do Not Mark As Advertisement 171Enable/Disable Pipelining 171Set TTL 171Send Direct 171Integrate/Do Not Integrate New Hosts 171Allow Content From Origin Server 172Serve Content Only From Cache 172Select SOCKS Gateway 172Select Forwarding 172Server Byte Caching 172Set Streaming Transport 173Authentication Charset 173Set IP Address For Authentication 174Permit Authentication Error 175Permit Authorization Error 176Kerberos Constrained Delegation 177Do Not Use Kerberos Constrained Delegation 178Send Credentials Upstream 178Do Not Send Credentials Upstream 179Set Effective Threat Risk Level 179Set Geolocation Restriction 179Combined Action Objects 179Do not Preserve Untrusted Issuer 180Preserve Untrusted Issuer 180Use Default Setting for Preserve Untrusted Issuer 180Action Column/Policy Layer Matrix 180
Login Banner Object Column Reference 189
xi
Track Object Column Reference 190Event Log, E-mail, and SNMP 191Policy ID 192Trace Object 192Combined Track Object 194Track Objects/Policy Layer Matrix 194
Comment Object Reference 195Using Combined Objects 196Centralized Object Viewing and Managing 199
Viewing Objects 199Managing Objects 200
Creating Categories 202Refreshing Policy 203
Creating Subject Directory Attribute Objects 204Restricting DNS Lookups 205
About DNS Lookup Restriction 205Creating the DNS Lookup Restriction List 205
Restricting Reverse DNS Lookups 206About Reverse DNS Lookup Restriction 206Creating the Reverse DNS Lookup Restriction List 206
Setting the Group Log Order 207About the Group Log Order 207Creating the Group Log Order List 207
Managing Policy Layers, Rules, and Files 208How Policy Layers, Rules, and Files Interact 209
How VPM Layers Relate to CPL Layers 209Ordering Rules in a Policy Layer 210Using Policy Layers of the Same Type 211Ordering Policy Layers 211About the Layer Guard Rule 212
Installing Policies 215Managing Policy 216
Refreshing Policy 216Reverting to a Previous Policy 216Changing Policies 216Managing Policy Layers 216Managing Policy Rules 217
Installing VPM-Created Policy Files 218Copying VPM Files To a Web Server 218Loading VPM Files to an Appliance 219
Viewing the Policy/Created CPL 221
Tutorials 222Tutorial—Creating a Web Authentication Policy 223
Example 1: Create an Authentication Rule 224

Visual Policy Manager Reference
xii
Example 2: Exempt Specific Users from Authentication 226Tutorial—Creating a Web Access Policy 229
Example 1: Restrict Access to Specific Websites 229Example 2: Allow Specific Users to Access Specific Websites 232
Composing CPL Directly in the VPM 237Advanced Policy Tasks 239
Blocking Pop Up Windows 240About Pop Up Blocking 241Interactivity Notes 242Recommendations 243
Exempting Non-Contiguous IP Addresses 244
Stripping or Replacing Active Content 245About Active Content 246About Active Content Types 247
Script Tags 247JavaScript Entities 247JavaScript Strings 247JavaScript Events 247Embed Tags 248Object Tags 248
Modifying Headers 249
Defining Exceptions 250Built-in Exceptions 251User-Defined Exceptions 258About Exception Definitions 259About the Exceptions Hierarchy 261About the Exceptions Installable List 263Creating or Editing Exceptions 265Creating and Installing an Exceptions List 267Viewing Exceptions 270
Managing Peer-to-Peer Services 272About Peer-to-Peer Communications 273About The ProxySG Solution 274
Supported Services 274Deployment 274
Policy Control 275 Support 275CPL Support 275Policy Example 276

xiii
P2P History Statistics 277P2P Clients 279P2P Bytes 280
Proxy Authentication 281Access Logging 282
Managing QoS and Differentiated Services 283About The Blue Coat Solution 284About DSCP Values 285About QoS Policy Tasks 287
Testing Incoming QoS 287Setting the Outgoing QoS 287
Policy Components 291 Objects 291 Example 292CPL Components 292
Access Logging 294
Providing Read-Only Access in the Management Console 295
Setting Policy for Content and Content-Type Filtering 298Filtering Based on URL Extension 299Filtering Based on HTTP Content-Type Response Header 300Filtering Based on Apparent Data Type 301Filtering Based on the http.response.data Condition (in CPL) 302Sample Configuration 303

Visual Policy Manager Reference
xiv

15
Chapter 1: Introduction
This document discusses creating and implementing policy. Creating policy is the core task of implementing Blue Coat ProxySG appliances into the enterprise. After the basic ProxySG configurations are complete, defined policy is what controls user activities and implements company authentication and network resource allocation goals.
The Visual Policy Manager is a user interface that creates underlying Blue Coat Content Policy Language (CPL). In the VPM, you create policy layers by selecting and customizing policy objects. This document discusses the facets of the VPM, including layer interactions and summary object descriptions. When appropriate, cross references are provided to other Blue Coat documents that describe the conceptual information of the feature. It also contains a chapter that discusses some common tasks that are only achieved through policy, not the Management Console.
This document contains the following chapters:
❐ "Managing Policy Files" on page 19
❐ "The Visual Policy Manager" on page 33
❐ "Advanced Policy Tasks" on page 239
Visual Policy Manager Referencee
16
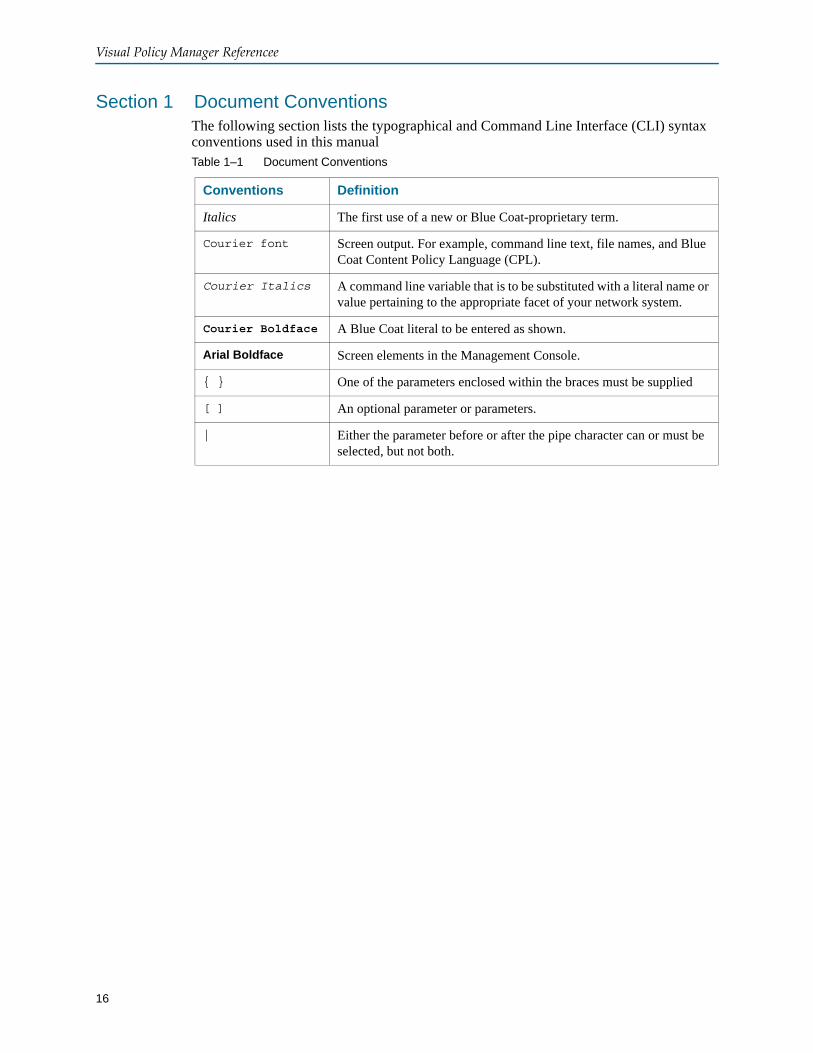
Section 1 Document ConventionsThe following section lists the typographical and Command Line Interface (CLI) syntax conventions used in this manualTable 1–1 Document Conventions
Conventions Definition
Italics The first use of a new or Blue Coat-proprietary term.
Courier font Screen output. For example, command line text, file names, and Blue Coat Content Policy Language (CPL).
Courier Italics A command line variable that is to be substituted with a literal name or value pertaining to the appropriate facet of your network system.
Courier Boldface A Blue Coat literal to be entered as shown.
Arial Boldface Screen elements in the Management Console.
{ } One of the parameters enclosed within the braces must be supplied
[ ] An optional parameter or parameters.
| Either the parameter before or after the pipe character can or must be selected, but not both.

17
Section 2 Notes and WarningsThe following is provided for your information and to caution you against actions that can result in data loss or personal injury:
Note: Information to which you should pay attention.
Important: Critical information that is not related to equipment damage or personal injury (for example, data loss).
WARNING! Used only to inform you of danger of personal injury or physical damage to equipment. An example is a warning against electrostatic discharge (ESD) when installing equipment.

Visual Policy Manager Referencee
18

19
Chapter 2: Managing Policy Files
This chapter describes the policy files and how they interact.
Topics in this Chapter
This chapter includes information about the following topics:
❐ "About Policy Files" on page 20
❐ "Creating and Editing Policy Files" on page 21
❐ "Unloading Policy Files" on page 25
❐ "Configuring Policy Options" on page 26
❐ "Managing the Central Policy File" on page 29
❐ "Viewing Policy Files" on page 31
To learn about writing policies, refer to the Content Policy Language Reference.

Visual Policy Manager Referencee
20
Section 1 About Policy FilesPolicy files contain the policies (triggers and actions) that manage every aspect of the ProxySG appliance, from controlling user authentication and privileges to disabling access logging or determining the version of SOCKS.
The policy for a given system can contain several files with many layers and rules in each. Policies can be defined through the Visual Policy Manager (VPM) or composed in Content Policy Language (CPL). (Some advanced policy features are not available in and can only be configured through CPL.)
Policies are managed through four files:
❐ Central policy file—Contains global settings to improve performance and behavior and filters for important and emerging viruses (such as Code Red and Nimda). This file is usually managed by Blue Coat, although you can point the ProxySG appliance to a custom Central policy file instead.
❐ Forward policy file—Usually used to supplement any policy created in the other three policy files. The Forward policy file contains Forwarding rules when the system is upgraded from a previous version of SGOS (2.x) or CacheOS (4.x).
❐ Local policy file—A file you create yourself. When the is not the primary tool used to define policy, the Local file contains the majority of the policy rules for a system. If the is the primary tool, this file is either empty or includes rules for advanced policy features that are not available in.
Visual Policy Manager—The policy created by the can either supplement or override the policies created in the other policy files.
21
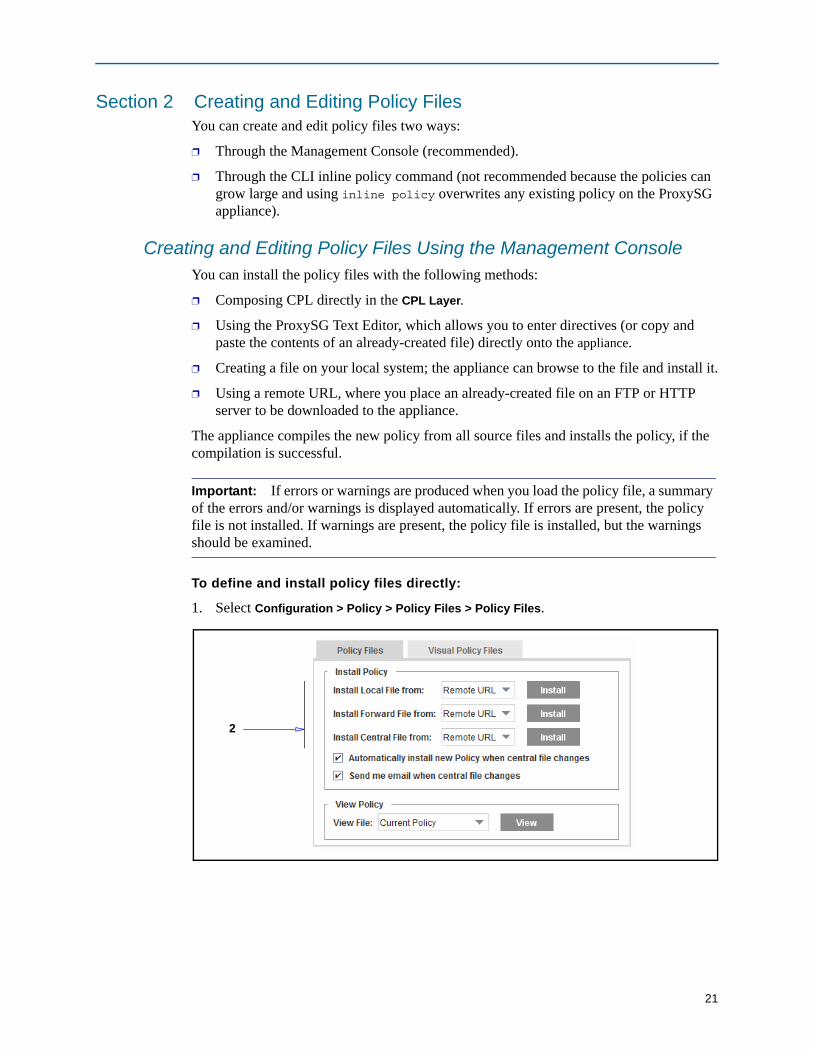
Section 2 Creating and Editing Policy FilesYou can create and edit policy files two ways:
❐ Through the Management Console (recommended).
❐ Through the CLI inline policy command (not recommended because the policies can grow large and using inline policy overwrites any existing policy on the ProxySG appliance).
Creating and Editing Policy Files Using the Management ConsoleYou can install the policy files with the following methods:
❐ Composing CPL directly in the CPL Layer.
❐ Using the ProxySG Text Editor, which allows you to enter directives (or copy and paste the contents of an already-created file) directly onto the appliance.
❐ Creating a file on your local system; the appliance can browse to the file and install it.
❐ Using a remote URL, where you place an already-created file on an FTP or HTTP server to be downloaded to the appliance.
The appliance compiles the new policy from all source files and installs the policy, if the compilation is successful.
To define and install policy files directly:
1. Select Configuration > Policy > Policy Files > Policy Files.
Important: If errors or warnings are produced when you load the policy file, a summary of the errors and/or warnings is displayed automatically. If errors are present, the policy file is not installed. If warnings are present, the policy file is installed, but the warnings should be examined.
2

Visual Policy Manager Referencee
22
2. From the Install Local/Forward/Central File from drop-down list, select the method used to install the local, forward, or central policy configuration; click Install and complete one of the three procedures below:
• Installing a policy file using a Remote URL:
In the Install Local/Forward/Central File dialog that displays, enter the fully-qualified URL, including the filename, where the policy configuration is located. To view the file before installing it, click View. Click Install. The Installation Status field summarizes the results; click Results to open the policy installation results window. Close the window when you are finished viewing the results; click OK in the Install Local/Forward/Central File dialog.
• Installing a policy file using a Local File.
In the dialog that opens, browse to the file on the local system and open it. Click Install. When the installation is complete, the installation results display. You can view the results and close the window.
• Installing a policy file using the ProxySG Text Editor:
Note: A message is written to the event log when you install a list through the appliance.
Note: If you install a Central policy file, the default is already entered; change this field only if you want to create a custom Central policy file.
To load a Forward, Local, or a custom Central policy file, move it to an HTTP or FTP server, and then use that URL to download the file to the appliance.

23
The current configuration is displayed in installable list format. Define the policy rules using CPL in the Edit and Install File window that opens (refer to the Content Policy Language Reference); click Install. When the installation is complete, a results window opens. View the results, close the results window and click OK in the Edit and Install File window.
3. Click Apply.
Using the CLI Inline Command To create policies using the CLI, you can use the inline policy command. This command either creates a new policy file or, if the specified file already exists, overwrites an existing policy file. You cannot edit an existing policy file using this command.
To create policy files:
1. At the (config) command prompt, enter the following command: SGOS#(config) inline policy file end-of-input-marker
where file specifies the type of policy you want to define: Central (Central policy file), Forward (Forward policy file), or local (local policy file).
Note: There are other management-related tasks regarding the ProxySG Central Policy File. See "Managing the Central Policy File" on page 29.
Note: If you are not sure whether a policy file is already defined, check before using the inline policy command. For more information, see "Viewing Policy Source Files" on page 31.
Visual Policy Manager Referencee
24
end-of-file-marker—Specifies the string that marks the end of the current inline command input; eof usually works as a string. The CLI buffers all input until you enter the marker string.
2. Define the policy rules using CPL (refer to the Content Policy Language Reference).
Enter each line and press Enter. To correct mistakes on the current line, use Backspace. If a mistake has been made in a line that has already been terminated by Enter, exit the inline policy command by typing Control+C to prevent the file from being saved.
3. Enter the eof marker to save the policies and exit the inline mode.
For more information on the inline command, refer to the Command Line Interface Reference).
To load policy files:
At the (config) command prompt, enter the following commands:
SGOS#(config) policy {forward-path | local-path | central-path} url SGOS#(config) load policy {forward | local | central}
The ProxySG compiles and installs the new policy. A warning might occur if the new policy causes conflicts. If a syntax error is found, the appliance displays an error message. For information about these messages, refer to the Content Policy Language Reference. Correct the error, and then reload the file.
Note: Do not use the inline policy command with files created using the module.

25
Section 3 Unloading Policy FilesTo disable policies, perform the following procedure to unload the compiled policy file from memory. These steps describe how to replace a current policy file with an empty policy file.
To keep a current policy file, either make a backup copy or rename the file before unloading it. By renaming the file, you can later reload the original policy file. If you use multiple policy files, back up or rename files as necessary. Alternatively, rather than use an empty policy file, you can delete the entire contents of the file, then reload it.
To unload policies:
1. Select Configuration > Policy > Policy Files > Policy Files.
2. Select Text Editor in the Install Local/Forward/Central File from drop-down list and click the appropriate Install button. The Edit and Install the Local/Forward/Central Policy File appears.
3. Delete the text and click Install.
4. View the results in the results page that opens; close the page.
5. Click Close.

Visual Policy Manager Referencee
26
Section 4 Configuring Policy OptionsThis section describes policy options, which allow you re-order policy evaluation, change the default transaction setting, and enable policy tracing.
Policy File EvaluationThe order in which the ProxySG appliance evaluates policy rules is important. Changes to the evaluation order can result in different effective policy, as the order of policy evaluation defines general rules and exceptions. While this order is configurable, the default and recommended order is:
File—Local Policy File—Central Policy File-Forward File
This prevents policies in the Central file that block virus signatures from being inadvertently overridden by allow (access-granting) policy rules in the and Local files.
When changing the policy file evaluation order, remember that final decisions can differ because decisions from files later in the order can override decisions from earlier files.
For a new appliance, the default evaluation order is:, Local, Central, and Forward.
For an upgraded appliance, the policy evaluation order is the order already existing on the appliance before the upgrade.

27
To change policy order:
1. Select Configuration > Policy > Policy Options.
2. To change the order, select the file to move and click Move Up or Move Down. Remember that the last file in the list overwrites decisions in files evaluated earlier.
See Also
❐ "Transaction Settings: Deny and Allow" on page 27
❐ "Policy Tracing" on page 28
Transaction Settings: Deny and AllowThe default proxy transaction policy is to either deny proxy transactions or to allow proxy transactions. A default proxy transaction policy of Deny prohibits proxy-type access to the ProxySG appliance; you must then create policies to explicitly grant access on a case-by-case basis.
A default proxy transaction policy of Allow permits most proxy transactions. However, if protocol detection is enabled, the appliance allows HTTP CONNECT for both port 443 and other ports—provided the appliance detects a known protocol. If protocol detection is disabled, HTTP CONNECT is only allowed on port 443. If your policy is set to Allow, you must create policies to explicitly deny access on a case-by-case basis.
Defaults:
❐ Proxy Edition: The default depends on how you installed SGOS and if it was a new installation or an upgrade:
2
Note: The default proxy policy does not apply to admin transactions. By default, admin transactions are denied unless you log in using console account credentials or if explicit policy is written to grant read-only or read-write privileges.

Visual Policy Manager Referencee
28
• If you installed the SGOS through a browser using the Initial Configuration Web site, you chose whether to allow or deny proxied transactions during initial configuration.
• If you installed the SGOS using the front panel or a serial console port, the default setting is Deny.
• If you upgraded the SGOS from a previous version, the default remains whatever it was for the previous policy.
❐ MACH5 Edition: The default setting is Allow.
You can always change the setting—see the procedures below for instructions.
Also keep in mind that:
❐ Changing the default proxy transaction policy affects the basic environment in which the overall policy is evaluated. It is likely that you must revise policies to retain expected behavior after such a change.
❐ Changes to the evaluation order might result in different effective policy, because the order of policy evaluation defines general rules and exceptions.
❐ Changing the default proxy transaction policy does not affect the evaluation of cache and admin transactions.
To configure Deny or Allow default proxy policy:
1. Select Configuration > Policy > Policy Options.
2. Under Default Proxy Policy, select either Deny or Allow.
3. Click Apply.
Policy TracingTracing enabled with the Management Console or CLI is global; that is, it records every policy-related event in every layer. It should be used only while troubleshooting. For information on troubleshooting policy, refer to the Content Policy Language Reference. Turning on policy tracing of any kind is expensive in terms of system resource usage and slows down the ProxySG appliance's ability to handle traffic.
To enable policy tracing:
1. Select Configuration > Policy > Policy Options.
2. Select Trace all policy execution.
3. Click Apply.
29
Section 5 Managing the Central Policy FileThe Central policy file is updated when needed by Blue Coat. The file can be updated automatically or you can request e-mail notification. You can also configure the path to point to your own custom Central policy file.
Configuring Automatic InstallationYou can specify whether the ProxySG appliance checks for a new version of the Central policy file. If a new version exists, the appliance can install it automatically.
Perform the following procedure to configure the appliance to check for and install a new version of the Central policy file.
To configure automatic installation:
1. Select Configuration > Policy > Policy Files > Policy Files.
2. Select Automatically install new Policy when central file changes.
3. Click Apply.
Configuring a Custom Central Policy File for Automatic InstallationIf you define your own Central policy file, you can configure the ProxySG appliance to automatically install any subsequent updated version of the file. To use this capability, you must change the Central policy file’s first line with each version update. With automatic installation, the appliance checks for a change to the first line of the file. In defining a custom Central policy file, add an item, such as a comment, to the first line of the Central policy file that changes with each update. The following is a sample first line, containing date information that is routinely updated with each version:
; Central policy file MonthDate, Year version
When you update and save the file in the original location, the appliance automatically loads the updated version.
Configuring E-mail NotificationYou can specify whether the ProxySG appliance sends e-mail when the Central policy file changes. The e-mail address used is the same as that used in diagnostic reporting: the event recipient for the custom heartbeat e-mail.
To configure e-mail notification:
1. Select Configuration > Policy > Policy Files > Policy Files.
2. Select Send me email when central file changes.
3. Click Apply.

Visual Policy Manager Referencee
30
Configuring the Update IntervalYou can specify how frequently the ProxySG appliance checks for a new version of the Central policy file. By default, the appliance checks for an updated Central policy file once every 24 hours (1440 minutes). You must use the CLI to configure the update interval. You cannot configure the update interval through the Management Console.
To configure the update interval:
At the (config) command prompt, enter the following command:
SGOS#(config) policy poll-interval minutes
Checking for an Updated Central Policy FileYou can manually check whether the Central policy file has changed. You must use the CLI. You cannot check for updates through the Management Console.
To check for an updated central file:
At the (config) command prompt, enter the following command:
SGOS#(config) policy poll-now
Resetting the Policy FilesYou can clear all the policy files automatically through the CLI.
To clear all policy files:
1. At the (config) command prompt, enter the following command:SGOS#(config) policy reset WARNING: This will clear local, central, forward and VPM policy. Are you sure you want to reset ALL policy files? (y or n)
The ProxySG appliance displays a warning that you are resetting all of your policy files.
2. Enter y to continue or n to cancel.
Moving Policy Files from One Appliance to AnotherPolicy files are specific to the ProxySG appliance where they were created. But just as you can use the same Central, Local, and Forward policy files on multiple appliances, you can use policies created on one appliance on other appliances.
For detailed information on moving policy files, see "Installing Policies" on page 215.
Note: This command does not change the default proxy policy settings.
31
Section 6 Viewing Policy FilesYou can view either the compiled policy or the source policy files. Use these procedures to view policies defined in a single policy file (for example, using the Visual Policy Manager) or in multiple policy files (for example, using the Blue Coat Central policy file and the VPM).
Viewing the Installed PolicyUse the Management Console or a browser to display installed Central, Local, or Forward policy files.
To view Installed policy:
1. Select Configuration > Policy > Policy Files > Policy Files.
2. In the View File drop-down list, select Current Policy to view the installed and running policy, as assembled from all policy source files. You can also select Results of Policy
Load to view any warnings or errors resulting from the last attempt (successful or not) to install policy.
3. Click View. The ProxySG appliance opens a separate browser window and displays the installed policy file.
To view the currently installed policy through a browser:
1. Enter a URL in one of the following formats:
• If an HTTPS-Console is configured, use https://SG_ip_address:HTTPS-Console_port/Policy/current (the default port is 8082).
• If an HTTP-Console is configured, use http://SG_ip_address:HTTP-Console_port/Policy/current (the default port is 8081).
The appliance opens a separate browser window and displays the policy.
2. Review the policy, then close the browser.
Viewing Policy Source FilesYou can display source (uncompiled) policy files on the ProxySG appliance.
To view policy source files:
1. Select Configuration > Policy > Policy Files > Policy Files.
2. To view a policy source file, select the file you want to view (Local, Forward, or Central) from the View File drop-down list and click View.
The appliance opens a separate browser window and displays the appropriate source policy file.
Note: You can view policy files through the Visual Policy Files tab.
Visual Policy Manager Referencee
32
Viewing Policy StatisticsYou can view policy statistics on all requests processed by the ProxySG appliance. Use the Management Console or a browser. You cannot view policy statistics through the CLI.
To review policy statistics:
1. Select Statistics > Advanced.
2. Click the Policy link.
3. Click the Show policy statistics link.
A separate browser window opens and displays the statistics.
4. Examine the statistics, then close the browser.
To review policy statistics through a browser:
1. Enter a URL in one of the following formats:
• If an HTTPS-Console is configured, use https://SG_ip_address:HTTPS-Console_port/Policy/statistics (the default port is 8082).
• If an HTTP-Console is configured, use http://SG_ip_address:HTTP-Console_port/Policy/statistics (the default port is 8081).
The appliance opens a separate browser window and displays the statistics.
2. Examine the statistics, then close the browser.
Related CLI Syntax to Manage Policy FilesSGOS#(config) policy order v l c SGOS#(config) policy proxy-default {allow | deny} SGOS# policy trace {all | none} SGOS#(config) inline policy file end-of-input-marker SGOS#(config) policy subscribe SGOS#(config) policy notify SGOS#(config) show policy SGOS#(config) show configuration -or- SGOS#(config) show sources policy {central | local | forward | -cpl | -xml}

33
Chapter 3: The Visual Policy Manager
The Visual Policy Manager (VPM) is a graphical policy editor included with the ProxySG appliance. The VPM allows you to define Web access and resource control policies without having an in-depth knowledge of Blue Coat Content Policy Language (CPL) and without the need to manually edit policy files.
This chapter serves as a VPM object reference, and assumes that you are familiar with basic concepts of appliance policy functionality as described in "Managing Policy Files" on page 19.
While VPM creates only a subset of everything you can achieve by writing policies directly in CPL, it is sufficient for most purposes. If your needs require more advanced policies, consult the Content Policy Language Reference.
Topics in this Chapter
The following topics are covered in this chapter:
❐ Section A: "VPM Overview" on page 34
❐ Section B: "Policy Layer and Rule Object Reference" on page 48
❐ Section C: "Detailed Object Column Reference" on page 69
❐ Section D: "Managing Policy Layers, Rules, and Files" on page 208
❐ Section E: "Tutorials" on page 222
❐ Section F: "Composing CPL Directly in the VPM" on page 237
Related topics:
❐ "Managing Policy Files" on page 19
❐ Content Policy Language Reference

Visual Policy Manager Reference
34
Section A: VPM Overview
❐ This section contains the following topics:"Launching the Visual Policy Manager (VPM)" —Describes how to start VPM from the Management Console.
❐ "About the Visual Policy Manager User Interface" —Describes VPM menu items, tool bars, and work areas.
❐ "About VPM Components" —Provides definitions of the policy layers and describes how rule objects comprise the layers.
❐ "The Set Object Dialog" —Describes the dialog used to select objects to be added or edited.
❐ "The Add/Edit Object Dialog" —Describes the dialog used to add and edit rule objects.
35
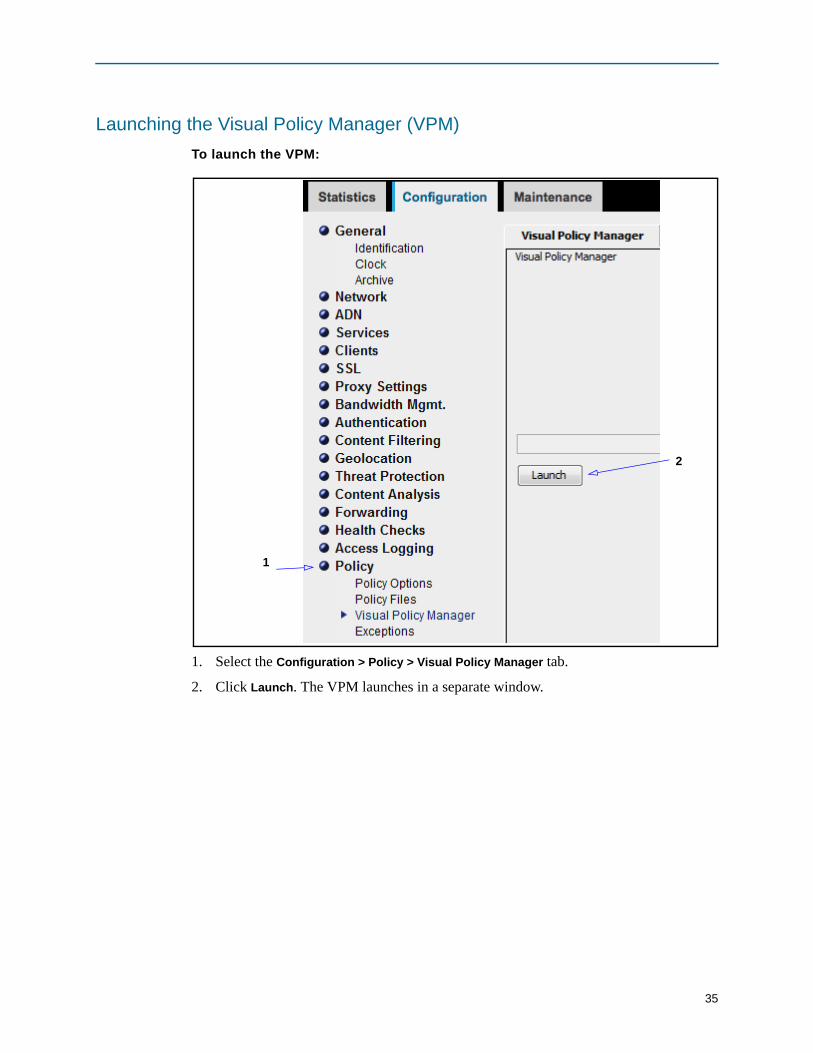
Launching the Visual Policy Manager (VPM)
To launch the VPM:
1. Select the Configuration > Policy > Visual Policy Manager tab.
2. Click Launch. The VPM launches in a separate window.
1
2

Visual Policy Manager Reference
36
About the Visual Policy Manager User InterfaceThe following figure labels VPM components.
Figure 3–1 The VPM Components
Menu BarThe following table describes VPM Menu Bar items.
Menu bar
Toolbar Layer tabs
Object types
Table 3–1 VPM Menu Bar Items
File
Install Policy On.... Saves all new policy rules.
Revert to existing Policy on... Ignores changes and reloads installed policy rules.
Exit Exits the application.
Edit
Add Rule
Delete Rule
Adds a new blank rule to the visible policy layer or removes a rule from the visible policy layer.
Cut Rule
Copy Rule Paste Rule
Standard cut, copy, and paste operations.
Move Rule(s) Up
Move Rule(s) Down
Moves rules up or down one position in a policy layer.
Disable/Enable Layer Disables or enables the selected layer. You can disable a layer without removing it from the VPM (thus losing composed policy rules) and re-enable it if required.
Rename Layer Blue Coat recommends renaming layers to make for easy identification when many layers are created.
Delete Layer Deletes a specific policy layer.
Add Layer Guard Used to set matching conditions. See "About the Layer Guard Rule" on page 212.
Reorder Layers Reorders the policy layers. See "Ordering Policy Layers" on page 211.
37
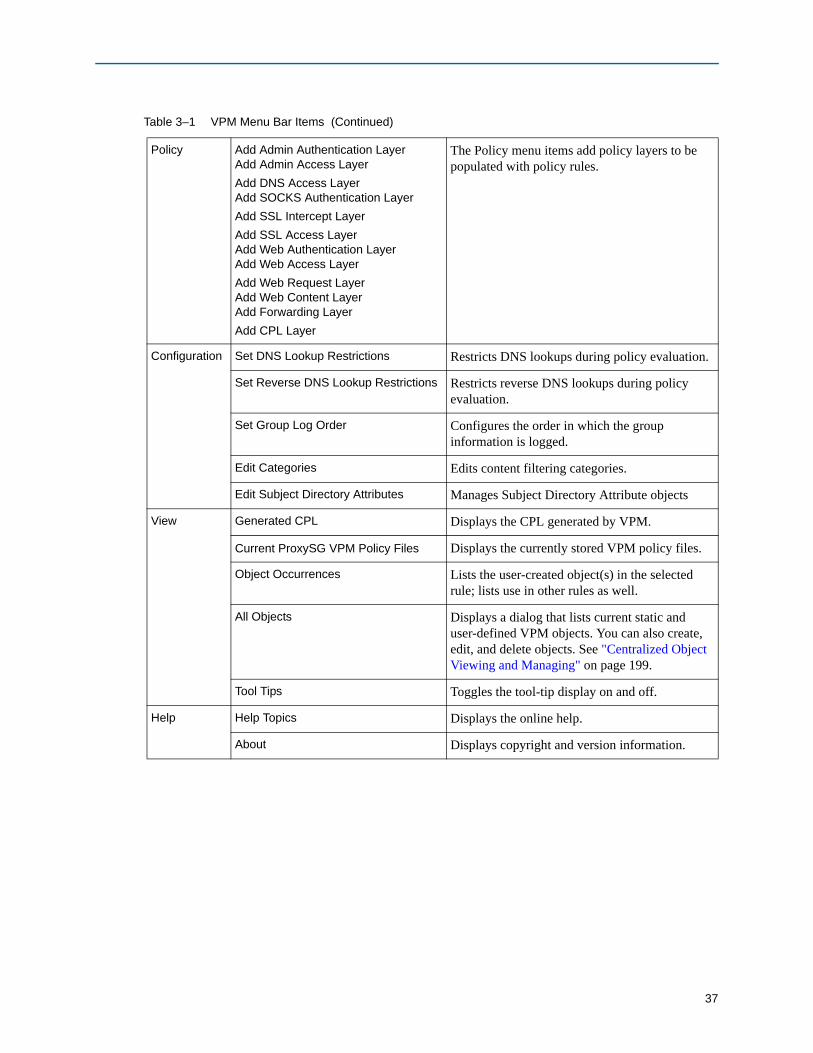
Policy Add Admin Authentication Layer Add Admin Access Layer
Add DNS Access Layer Add SOCKS Authentication Layer
Add SSL Intercept Layer
Add SSL Access Layer Add Web Authentication Layer Add Web Access Layer
Add Web Request Layer Add Web Content Layer Add Forwarding Layer
Add CPL Layer
The Policy menu items add policy layers to be populated with policy rules.
Configuration
Set DNS Lookup Restrictions Restricts DNS lookups during policy evaluation.
Set Reverse DNS Lookup Restrictions Restricts reverse DNS lookups during policy evaluation.
Set Group Log Order Configures the order in which the group information is logged.
Edit Categories Edits content filtering categories.
Edit Subject Directory Attributes Manages Subject Directory Attribute objects
View
Generated CPL Displays the CPL generated by VPM.
Current ProxySG VPM Policy Files Displays the currently stored VPM policy files.
Object Occurrences Lists the user-created object(s) in the selected rule; lists use in other rules as well.
All Objects Displays a dialog that lists current static and user-defined VPM objects. You can also create, edit, and delete objects. See "Centralized Object Viewing and Managing" on page 199.
Tool Tips Toggles the tool-tip display on and off.
Help
Help Topics Displays the online help.
About Displays copyright and version information.
Table 3–1 VPM Menu Bar Items (Continued)
Visual Policy Manager Reference
38
Tool BarThe VPM Tool Bar contains the following functions:
❐ Add Rule—Adds a blank rule to visible policy layer; all values for the rule are the defaults.
❐ Delete Rule—Deletes the selected rule from the visible policy layer.
❐ Move Up—Moves a rule up one position in the visible policy layer.
❐ Move Down—Moves a rule down one position in the visible policy layer.
❐ Install Policy—Converts the policies created in VPM into Blue Coat Content Policy Language (CPL) and installs them on the appliance.
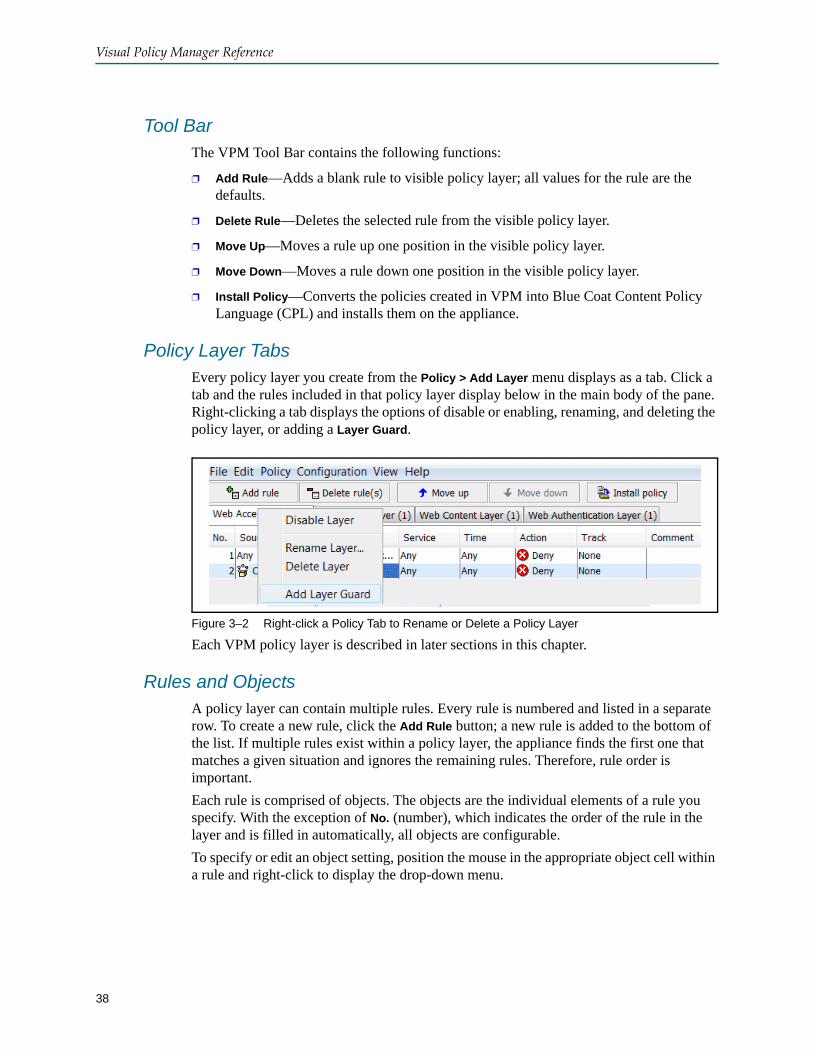
Policy Layer TabsEvery policy layer you create from the Policy > Add Layer menu displays as a tab. Click a tab and the rules included in that policy layer display below in the main body of the pane. Right-clicking a tab displays the options of disable or enabling, renaming, and deleting the policy layer, or adding a Layer Guard.
Figure 3–2 Right-click a Policy Tab to Rename or Delete a Policy Layer
Each VPM policy layer is described in later sections in this chapter.
Rules and ObjectsA policy layer can contain multiple rules. Every rule is numbered and listed in a separate row. To create a new rule, click the Add Rule button; a new rule is added to the bottom of the list. If multiple rules exist within a policy layer, the appliance finds the first one that matches a given situation and ignores the remaining rules. Therefore, rule order is important.
Each rule is comprised of objects. The objects are the individual elements of a rule you specify. With the exception of No. (number), which indicates the order of the rule in the layer and is filled in automatically, all objects are configurable.
To specify or edit an object setting, position the mouse in the appropriate object cell within a rule and right-click to display the drop-down menu.
39
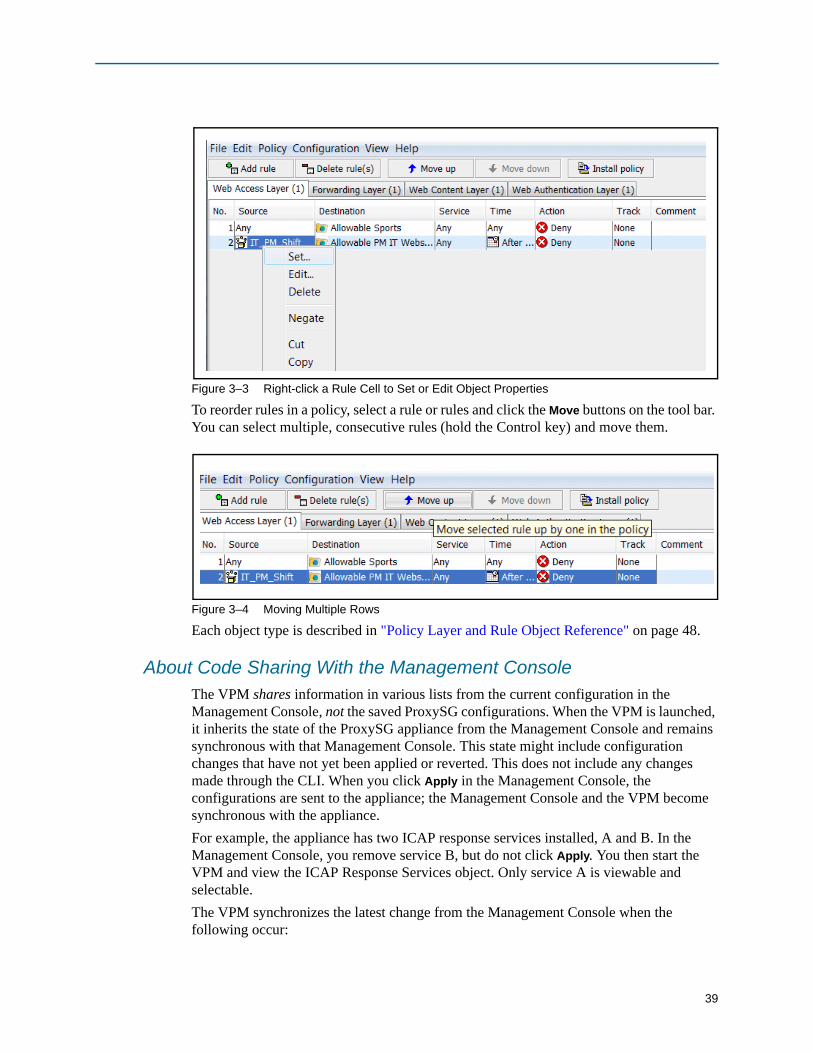
Figure 3–3 Right-click a Rule Cell to Set or Edit Object Properties
To reorder rules in a policy, select a rule or rules and click the Move buttons on the tool bar. You can select multiple, consecutive rules (hold the Control key) and move them.
Figure 3–4 Moving Multiple Rows
Each object type is described in "Policy Layer and Rule Object Reference" on page 48.
About Code Sharing With the Management ConsoleThe VPM shares information in various lists from the current configuration in the Management Console, not the saved ProxySG configurations. When the VPM is launched, it inherits the state of the ProxySG appliance from the Management Console and remains synchronous with that Management Console. This state might include configuration changes that have not yet been applied or reverted. This does not include any changes made through the CLI. When you click Apply in the Management Console, the configurations are sent to the appliance; the Management Console and the VPM become synchronous with the appliance.
For example, the appliance has two ICAP response services installed, A and B. In the Management Console, you remove service B, but do not click Apply. You then start the VPM and view the ICAP Response Services object. Only service A is viewable and selectable.
The VPM synchronizes the latest change from the Management Console when the following occur:

Visual Policy Manager Reference
40
❐ Clicking Revert.
❐ Clicking Apply.
❐ Clicking Policy Install.
❐ Restart the Management Console.
❐ Log out and re-log into the Management Console.
Any information the Management Console acquires from installable lists is immediately available in the VPM. The following are the lists the VPM obtains from the Management Console:
❐ Access Log fields.
❐ Authentication character sets.
❐ Authentication realms.
❐ Bandwidth gain classes.
❐ Categories.
❐ Exceptions.
❐ Forwarding hosts.
❐ ICAP request and response services.
❐ Keyrings.
❐ SOCKS gateways.

41
About VPM ComponentsThis section describes the specific policy layer types and rule objects.
Policy LayersThe layers are:
❐ Administration Authentication—Determines how administrators accessing ProxySG appliance must authenticate.
❐ Administration Access—Determines who can access the appliance to perform administration tasks.
❐ Admin Login Banner—(Added in version 6.6.4.3) Configure a notice and consent banner which appears before a user can access the Management Console.
❐ DNS Access—Determines how the appliance processes DNS requests.
❐ SOCKS Authentication—Determines the method of authentication for accessing the proxy through SOCKS.
❐ SSL Intercept—Determines whether to tunnel or intercept HTTPS traffic.
❐ SSL Access—Determines the allow/deny actions for HTTPS traffic.
❐ Web Authentication—Determines whether user clients that access the proxy or the Web must authenticate.
❐ Web Access—Determines what clients can and cannot access on the Web and specifies any restrictions that apply.
❐ Web Content—Determines caching behavior, such as verification and Content Analysis redirection.
❐ Forwarding—Determines forwarding hosts and methods.
❐ Web Request—Determines if a transaction is denied at the request stage without accessing the origin server.
❐ CPL—Allows you to compose Content Policy Language directly into the VPM.
As you create policy layers, you will create many different layers of the same type. Often, an overall policy requires layers of different types designed to work together to perform a task. For example, Authentication and Access layers usually accompany each other; an Authentication layer determines if a user or client must authenticate, and an Access layer subsequently determines where that user or client can go (what ProxySG or Web sites they can access) once they are authenticated.
Each object type is described in "Policy Layer and Rule Object Reference" on page 48.
Rule ObjectsPolicy layers contain rule objects. Only the objects available for that policy layer type are displayed. There are two types of objects:

Visual Policy Manager Reference
42
❐ Static Objects—A self-contained object that cannot be edited or removed. For example, if you write a rule that prohibits users from accessing a specific Web site, the Action object you select is Deny.
Static objects are part of the system and are always displayed.
❐ Configurable Objects—A configurable object requires parameters. For example, consider the rule mentioned in the previous item that prohibits users from accessing a specific Web site. In this case, the user is a Source object. That object can be a specific IP Address, user, group, user agent (such as a specific browser), and so on. Select one and then enter the required information (such as a verifiable user name or group name).
Configurable objects do not exist until you create them. A created object is listed along with all static objects in the list dialog, and you can reuse it in other applicable policy layers. For example, an IP address can be a Source or Destination object in many different policy-layer types.
While individual object-type menus occasionally contain entries specific to the object type, the basic menu options are:
❐ Allow—(Web Access Layer Action column only) Quick menu access; sets the policy to allow.
❐ Deny—(Web Access and Web Request Layer Action column only) Quick menu access; sets the policy to deny.
❐ Set—Displays the Set Object dialog where you select an object or create a new one.
❐ Edit—Opens the Edit Object dialog where you edit an object or change to another.
❐ Delete—Removes the selected object from the current rule and restores the default.
❐ Negate—Defined as not. Negate provides flexibility in writing rules and designing the structure of policies. The following is a simple Web Access rule that states: “When any client tries to access a URL contained in an object of JobSearch, allow access.”
Figure 3–5 A Simple Web Access Layer Policy Rule
Dragging the pointer to the Destination list, right-clicking to display the drop-down list, and clicking Negate invokes a red circle with a horizontal white line in the icon in the cell.
Important: The orders of policy layers, and the order of rules within a layer are important. For more information, see "How Policy Layers, Rules, and Files Interact" on page 209.
43
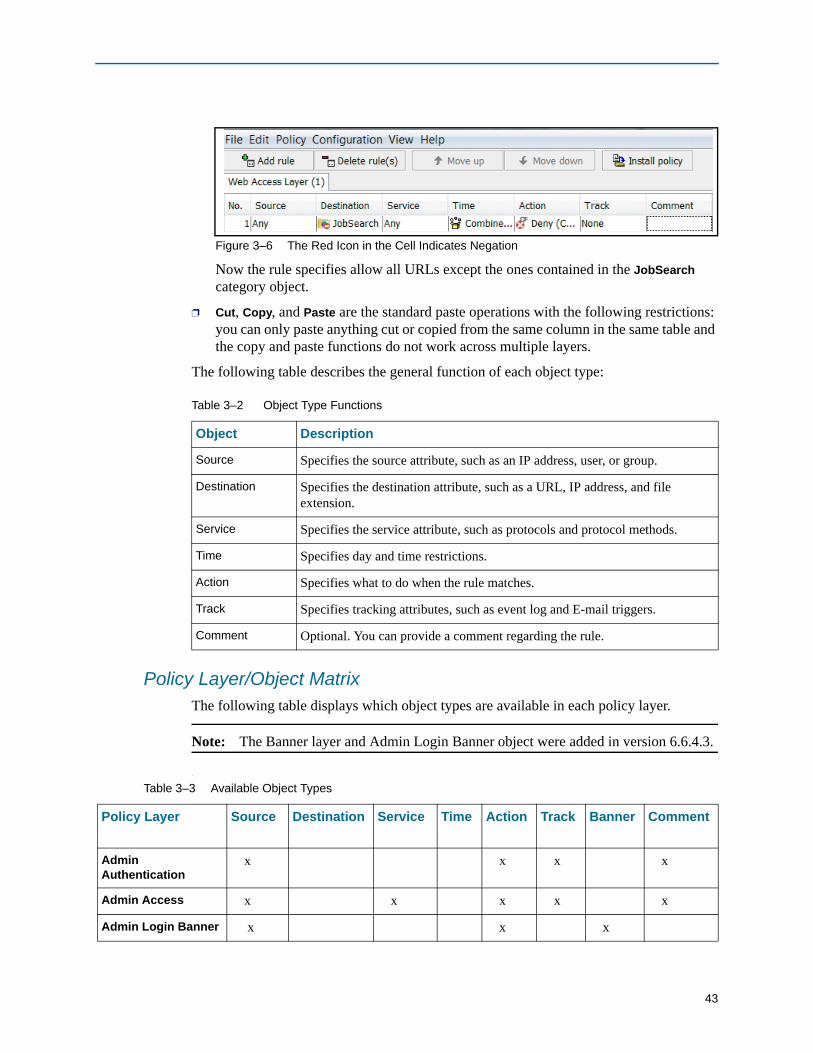
Figure 3–6 The Red Icon in the Cell Indicates Negation
Now the rule specifies allow all URLs except the ones contained in the JobSearch category object.
❐ Cut, Copy, and Paste are the standard paste operations with the following restrictions: you can only paste anything cut or copied from the same column in the same table and the copy and paste functions do not work across multiple layers.
The following table describes the general function of each object type:
Policy Layer/Object MatrixThe following table displays which object types are available in each policy layer.
Note: The Banner layer and Admin Login Banner object were added in version 6.6.4.3.
.
Table 3–2 Object Type Functions
Object Description
Source Specifies the source attribute, such as an IP address, user, or group.
Destination Specifies the destination attribute, such as a URL, IP address, and file extension.
Service Specifies the service attribute, such as protocols and protocol methods.
Time Specifies day and time restrictions.
Action Specifies what to do when the rule matches.
Track Specifies tracking attributes, such as event log and E-mail triggers.
Comment Optional. You can provide a comment regarding the rule.
Table 3–3 Available Object Types
Policy Layer Source
Destination
Service
Time
Action
Track
Banner Comment
Admin Authentication
x x x x
Admin Access x x x x x
Admin Login Banner x x x

Visual Policy Manager Reference
44
DNS Access x x x x x x
SOCKS Authentication
x x x x
SSL Intercept x x x x x
SSL Access x x x x x x
Web Authentication x x x x x
Web Access x x x x x x
Web Content x x x x x
Forwarding x x x x x x
Web Request x x x x x x x
CPL N/A N/A N/A N/A N/A N/A N/A
Table 3–3 Available Object Types (Continued)
Policy Layer Source
Destination
Service
Time
Action
Track
Banner Comment

45
The Set Object DialogThis section discusses the Set Object dialog used to select objects for configuration.
The object rules in all policy layer types determine the conditions for a particular policy rule. Depending on the type of policy layer, an object can be anything from a user or group to an IP address or a URL and so forth.
To create a rule, right-click a cell in an object cell. The relevant Set Object dialog displays. In this dialog, select the objects for the rule or create new objects as necessary.
Objects have type-specific icons to provide a visual aid in distinguishing among different types in the list.
Figure 3–7 Set Source Object Dialog with Selectable Objects
The Set Object dialog only displays or allows you to create the objects allowable in the specific option of the rule type you are creating. But if more than one policy-layer type uses the same object type (for example, IP address can be a source in rules for four of the five types of policies), then those existing objects display in all Set Object dialogs, regardless of policy-layer type.
Controlling the List of Objects in the Set Object Window
As you create more policies, it is likely that the lists of existing objects in the various Set Object dialogs expand. You can restrict the display of objects in the list to a specific type by selecting an object type from the Show drop-down list above the objects field. The following figure demonstrates the window displayed above with the list restricted to Client IP addresses.

Visual Policy Manager Reference
46
Figure 3–8 Limiting the Set Object Dialog view.
47
The Add/Edit Object DialogFrom the Set Object dialog, the Add Object dialog is used to define configurable objects. Existing configurable options can be altered using the Edit Object dialog. In terms of functionality, the two dialogs are identical.
For the initial configuration of an object, click New on the Set Object dialog to display the Add Object dialog. Perform the tasks required to configure the object and click OK. The newly named and configured object appears in the list of selectable objects in the Set Object dialog and is ready to be selected for the rule.
To edit an existing object, select an object from the list and click Edit. The Edit Object dialog appears with the existing parameters on display. Edit as necessary and click OK.
To remove an existing object, select an object from the list and click Remove. A secondary prompt verifies your attempt to remove the object; click OK. The object is deleted.

Visual Policy Manager Reference
48
Section B: Policy Layer and Rule Object Reference
The following topics describe the static and configurable objects available for each policy layer.
❐ "Administration Authentication Policy Layer Reference" on page 49
❐ "Administration Access Policy Layer Reference" on page 50
❐ "Administration Login Banner Policy Layer Reference" on page 51
❐ "DNS Access Policy Layer Reference" on page 52
❐ "SOCKS Authentication Policy Layer Reference" on page 53
❐ "SSL Intercept Layer Reference" on page 54
❐ "SSL Access Layer Reference" on page 55
❐ "Web Authentication Policy Layer Reference" on page 57
❐ "Web Access Policy Layer Reference" on page 58
❐ "Web Content Policy Layer Reference" on page 62
❐ "Forwarding Policy Layer Reference" on page 63
❐ "Web Request Policy Layer Reference" on page 65
49
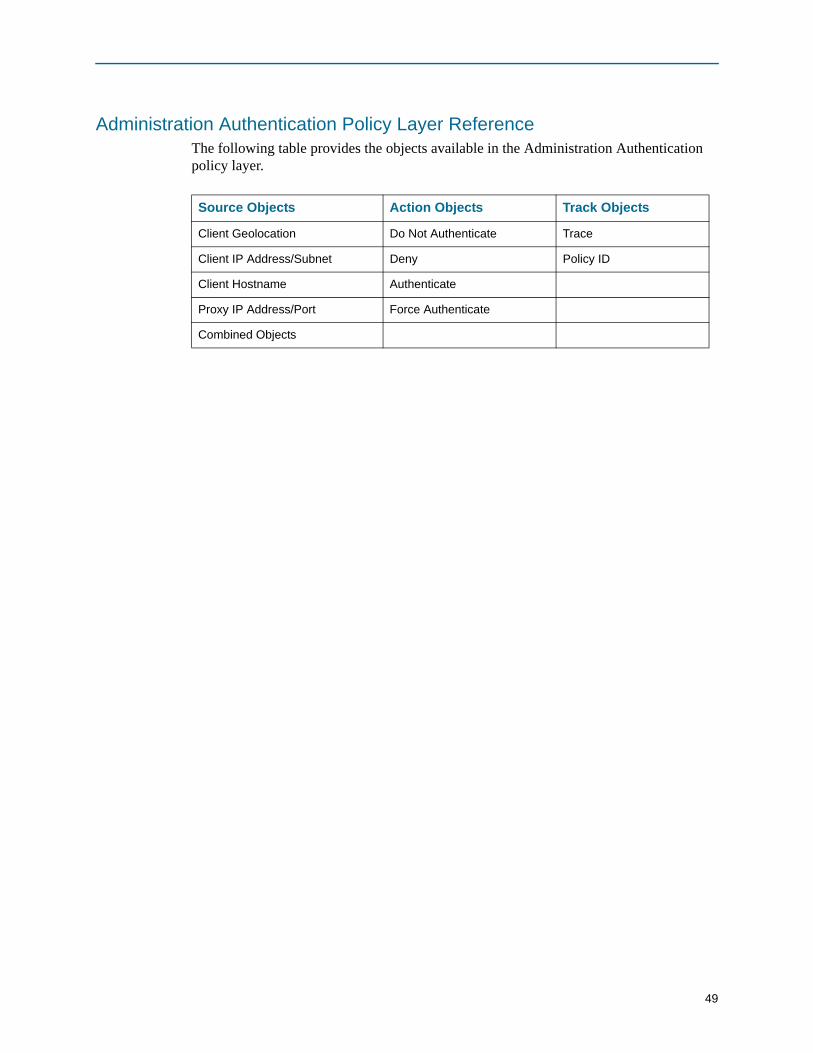
Administration Authentication Policy Layer ReferenceThe following table provides the objects available in the Administration Authentication policy layer.
Source Objects Action Objects Track Objects
Client Geolocation Do Not Authenticate Trace
Client IP Address/Subnet Deny Policy ID
Client Hostname Authenticate
Proxy IP Address/Port Force Authenticate
Combined Objects
Visual Policy Manager Reference
50
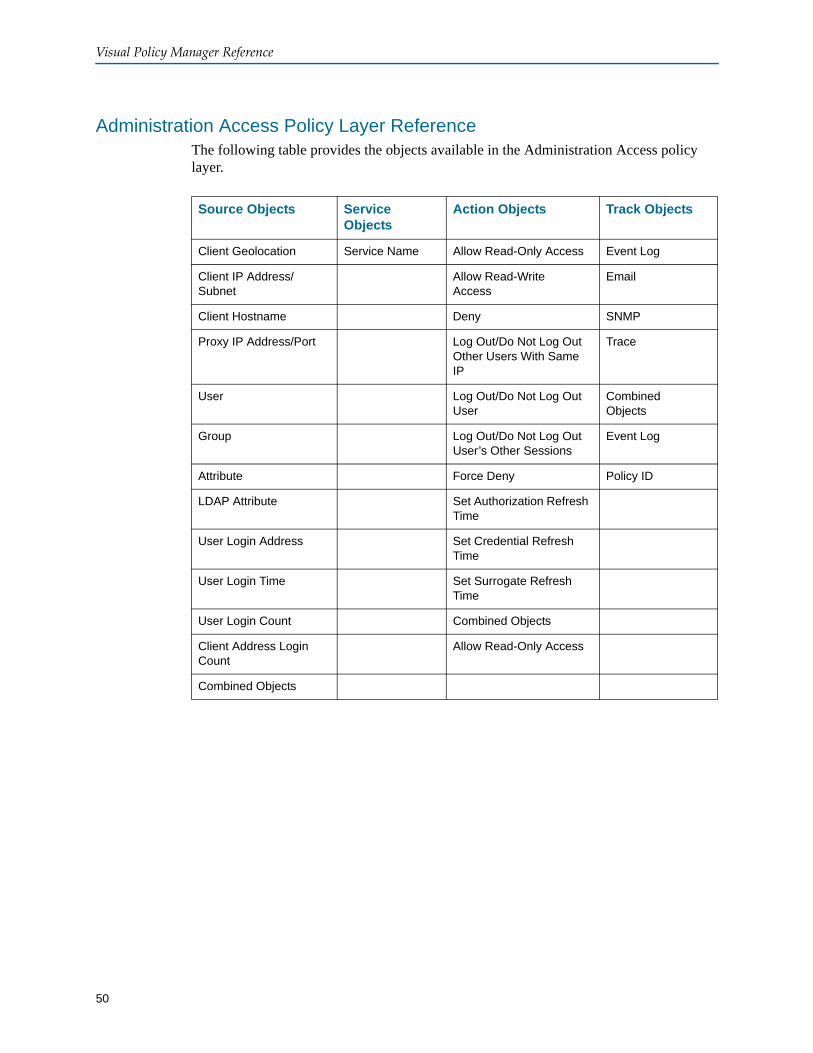
Administration Access Policy Layer ReferenceThe following table provides the objects available in the Administration Access policy layer.
Source Objects Service Objects
Action Objects Track Objects
Client Geolocation Service Name Allow Read-Only Access Event Log
Client IP Address/Subnet
Allow Read-Write Access
Client Hostname Deny SNMP
Proxy IP Address/Port Log Out/Do Not Log Out Other Users With Same IP
Trace
User Log Out/Do Not Log Out User
Combined Objects
Group Log Out/Do Not Log Out User’s Other Sessions
Event Log
Attribute Force Deny Policy ID
LDAP Attribute Set Authorization Refresh Time
User Login Address Set Credential Refresh Time
User Login Time Set Surrogate Refresh Time
User Login Count Combined Objects
Client Address Login Count
Allow Read-Only Access
Combined Objects
51
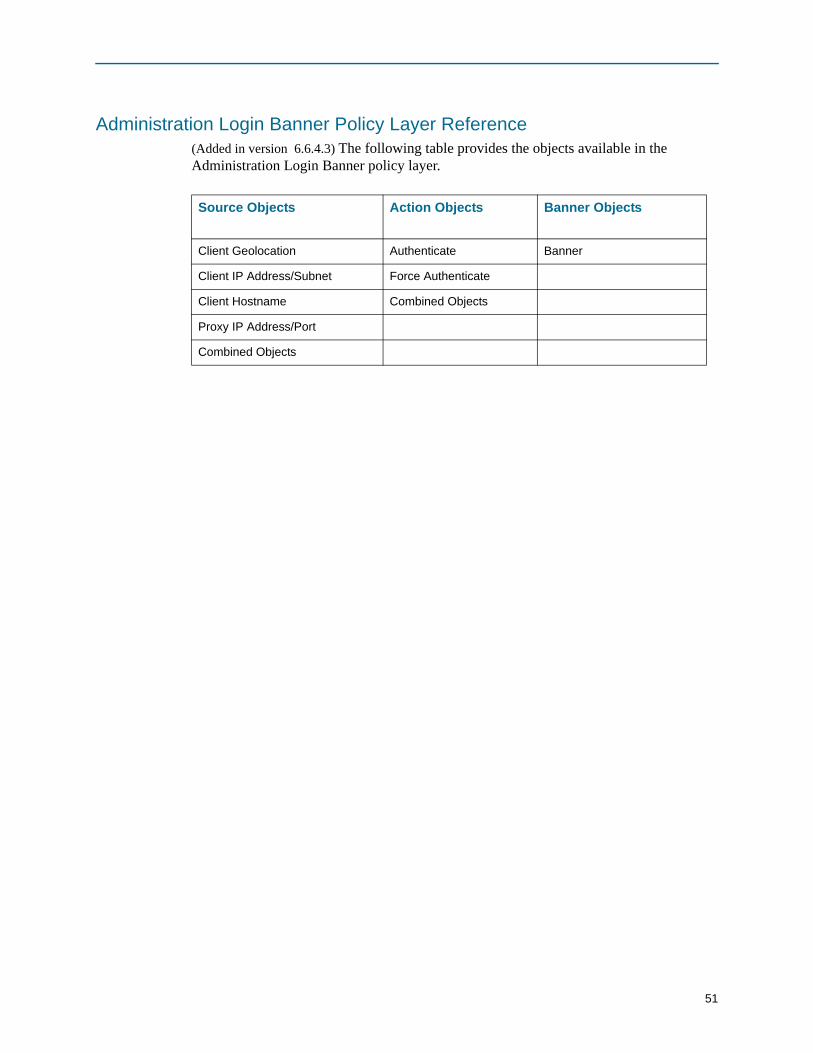
Administration Login Banner Policy Layer Reference(Added in version 6.6.4.3) The following table provides the objects available in the Administration Login Banner policy layer.
Source Objects Action Objects Banner Objects
Client Geolocation Authenticate Banner
Client IP Address/Subnet Force Authenticate
Client Hostname Combined Objects
Proxy IP Address/Port
Combined Objects

Visual Policy Manager Reference
52
DNS Access Policy Layer ReferenceThe following table provides the objects available in the DNS Access policy layer.
Source Objects
Destination Objects
Time Objects
Action Objects
Track Objects
Client Geolocation DNS Response Contains No Data
Time Bypass DNS Cache
Event Log
Client IP Address/Subnet
DNS Response IP Address/Subnet
Combined Objects
Do Not Bypass DNS Cache
SNMP
Proxy IP Address/Port
RDNS Response Host
Allow DNS From Upstream Server
Trace
DNS Request Name
DNS Response CNAME
Serve DNS Only From Cache
Combined Objects
RDNS Request IP Address/Subnet
DNS Response Code Enable/Disable DNS Imputing
DNS Request Opcode
Category Send DNS/RDNS Response Code
DNS Request Class
Server Connection DSCP
Send DNS Response
DNS Request Type
Combined Objects Send Reverse DNS Response
DNS Client Transport
Reflect IP
Client Connection DSCP Trigger
Manage Bandwidth
Combined Objects
Set Client Connection DSCP Value
Set Server Connection DSCP Value
Combined Objects

53
SOCKS Authentication Policy Layer ReferenceThe following table provides the objects available in the SOCKS Authentication policy layer.
Source Objects Action Objects Track Objects
Client Geolocation Do Not Authenticate Trace
Client IP Address/Subnet Authenticate SNMP
Client Hostname Force Authenticate Policy ID
Proxy IP Address/Port
SOCKS Version
Combined Objects

Visual Policy Manager Reference
54
SSL Intercept Layer ReferenceThe following table provides the objects available in the SSL Intercept policy layer.
Source Objects Destination Objects Service Objects Action Objects Track Objects
Client Geolocation Destination IP Address/Subnet
Client Certificate Requested
Do not Preserve Untrusted Issuer
Event Log
Attribute Destination Host/Port
Health Status Preserve Untrusted Issuer
Authenticated User Request URL Use Default Setting for Preserve Untrusted Issuer
SNMP
Client Address Login Count
Request URL Application
SSL Interception Trace
Client Hostname Request URL Category Enable HTTPS Interception on Exception
Combined Objects
SAML Attribute Server URL Combined Objects Policy ID
Client Hostname Unavailable
Server Certificate
Client IP Address/Subnet
Server Certificate Category
Group Combined Objects
Guest User
LDAP Attribute
Proxy IP Address/Port
User
User Authentication Error
User Authorization Error
User Login Address
User Login Count
User Login Time
Combined Objects

55
SSL Access Layer ReferenceThe following table provides the objects available in the SSL Access Layer policy layer.
Source Objects
Destination Objects
Service Objects
Action Objects
Track Objects
Authenticated User
Destination IP Address/Subnet
Request Forwarded
Allow Event Log
Client Hostname Unavailable
Destination Host/Port
Client Protocol Deny (static) Email
Guest User Request URL SSL Proxy Mode Require/Do Not Require Client Certificate
SNMP
Client Geolocation Request URL Application
Health Check Force Deny Trace
Client IP Address/Subnet
Request URL Category
Combined Objects
Force Deny (Content Filter)
Combined Objects
Client Hostname Server URL Deny Policy ID
Proxy IP Address/Port
Server Certificate Return Exception
User Server Certificate Category
Set Client Certificate Validation
Group Server Certificate Set Server Certificate Validation
Attribute Server Certificate Category
Set Client Keyring
LDAP Attribute Server Negotiated Cipher
Combined Objects
User Login Address
Server Negotiated Cipher Strength
User Authentication Error
Server Negotiated SSL Version
User Authorization Error
Combined Objects
Client Certificate
Client Negotiated Cipher
Client Negotiated Cipher Strength
SAML Attribute
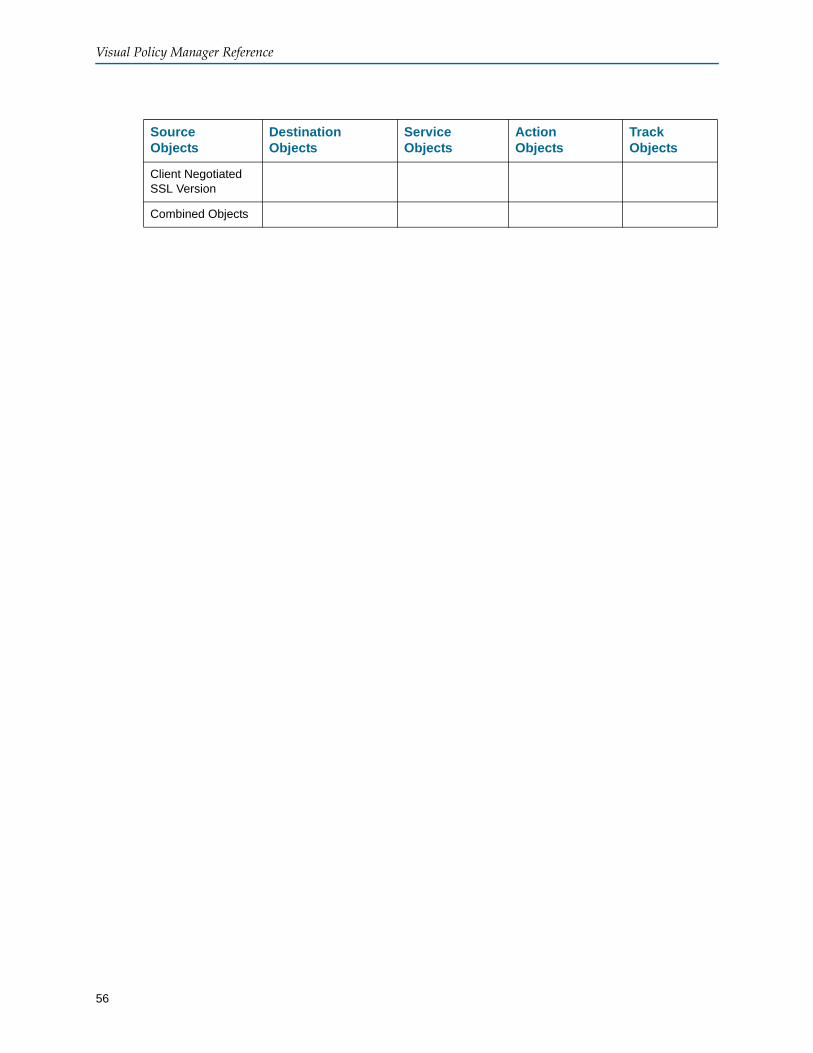
Visual Policy Manager Reference
56
Client Negotiated SSL Version
Combined Objects
Source Objects
Destination Objects
Service Objects
Action Objects
Track Objects

57
Web Authentication Policy Layer ReferenceThe following table provides the objects available in the Web Authentication policy layer.
Source Objects Destination Objects Action Objects Track Objects
Client Hostname Unavailable
Destination IP Address/Subnet
Deny Trace
Client Geolocation Destination Host/Port
Do Not Authenticate Policy ID
Client IP Address/Subnet
Request URL Do Not Authenticate (Forward Credentials)
Client Hostname Request URL Category Do Not Send Credentials Upstream
Proxy IP Address/Port Combined Objects Do Not Use Kerberos Constrained Delegation
User Agent Authenticate
Request Header Authenticate Guest
Combined Objects Add Default Group
Force Authenticate
Authentication Charset
Set IP Address For Authentication
Permit Authentication Error
Permit Authorization Error
Kerberos Constrained Delegation
Send Credentials Upstream
Combined Objects
Visual Policy Manager Reference
58
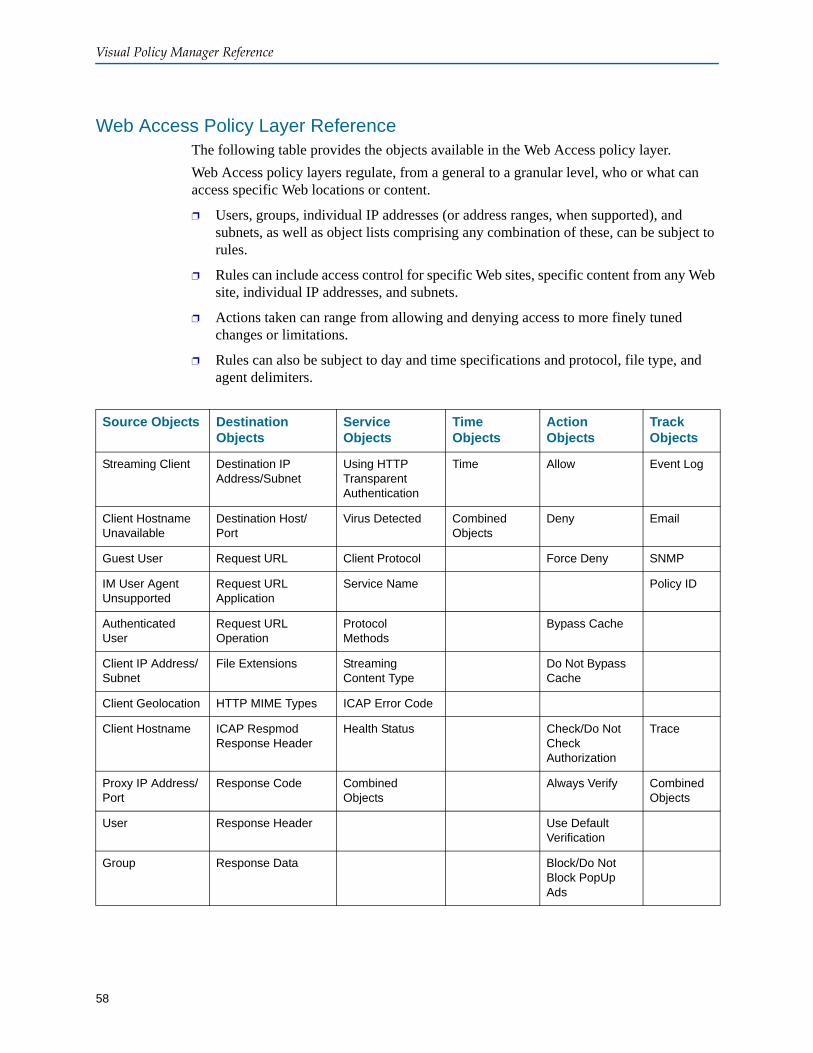
Web Access Policy Layer ReferenceThe following table provides the objects available in the Web Access policy layer.
Web Access policy layers regulate, from a general to a granular level, who or what can access specific Web locations or content.
❐ Users, groups, individual IP addresses (or address ranges, when supported), and subnets, as well as object lists comprising any combination of these, can be subject to rules.
❐ Rules can include access control for specific Web sites, specific content from any Web site, individual IP addresses, and subnets.
❐ Actions taken can range from allowing and denying access to more finely tuned changes or limitations.
❐ Rules can also be subject to day and time specifications and protocol, file type, and agent delimiters.
Source Objects Destination Objects
Service Objects
Time Objects
Action Objects
Track Objects
Streaming Client Destination IP Address/Subnet
Using HTTP Transparent Authentication
Time Allow Event Log
Client Hostname Unavailable
Destination Host/Port
Virus Detected Combined Objects
Deny Email
Guest User Request URL Client Protocol Force Deny SNMP
IM User Agent Unsupported
Request URL Application
Service Name Policy ID
Authenticated User
Request URL Operation
Protocol Methods
Bypass Cache
Client IP Address/Subnet
File Extensions Streaming Content Type
Do Not Bypass Cache
Client Geolocation HTTP MIME Types ICAP Error Code
Client Hostname ICAP Respmod Response Header
Health Status Check/Do Not Check Authorization
Trace
Proxy IP Address/Port
Response Code Combined Objects
Always Verify Combined Objects
User Response Header Use Default Verification
Group Response Data Block/Do Not Block PopUp Ads
59
Attribute Server Connection DSCP
Force/Do Not Force IWA for Server Auth
LDAP Attribute Combined Objects Log Out/Do Not Log Out Other Users With Same IP
User Login Address
Apparent Data Type Log Out/Do Not Log Out User
User Login Time Log Out/Do Not Log Out User’s Other Sessions
User Login Count
Client Address Login Count
Tunnel/Do Not Tunnel IM Traffic
User Authentication Error
Support/Do Not Support Persistent Client Requests
User Authorization Error
Support/Do Not Support Persistent Server Requests
User Agent Trust/Do Not Trust Destination IP
Request Header Deny
SOCKS Version Return Exception
Request Header Return Redirect
SOCKS Version Modify Access Logging
P2P Client Override Access Log Field
Client Negotiated Cipher
Rewrite Host
Client Negotiated Cipher Strength
Reflect IP
Client Connection DSCP Trigger
Suppress Header
Source Objects Destination Objects
Service Objects
Time Objects
Action Objects
Track Objects

Visual Policy Manager Reference
60
Combined Objects
Control Request Header/Control Response Header
P2P Client Notify User
Client Negotiated Cipher
Strip Active Content
Client Negotiated Cipher Strength
Set Client HTTP Compression
Client Connection DSCP Trigger
Set Server HTTP Compression
Combined Objects
Manage Bandwidth
HTTP Request Body
Return ICAP Feedback
Apparent Data Type
Add Request Analysis Service
ICAP Reqmod Response Header
Add Request Analysis Service
Client Certificate Set FTP Connection
SAML Attribute Set SOCKS Acceleration
Disable SSL Detection
Set Streaming Max Bitrate
Set Client Connection DSCP Value
Set Server Connection DSCP Value
Set ADN Connection DSCP
Set Authorization Refresh Time
Source Objects Destination Objects
Service Objects
Time Objects
Action Objects
Track Objects

61
Set Credential Refresh Time
Set Surrogate Refresh Time
Set Server URL DNS Lookup
Enable/Disable ICAP Mirroring
Set Apparent Data Type Action
Combined Objects
Source Objects Destination Objects
Service Objects
Time Objects
Action Objects
Track Objects
Visual Policy Manager Reference
62
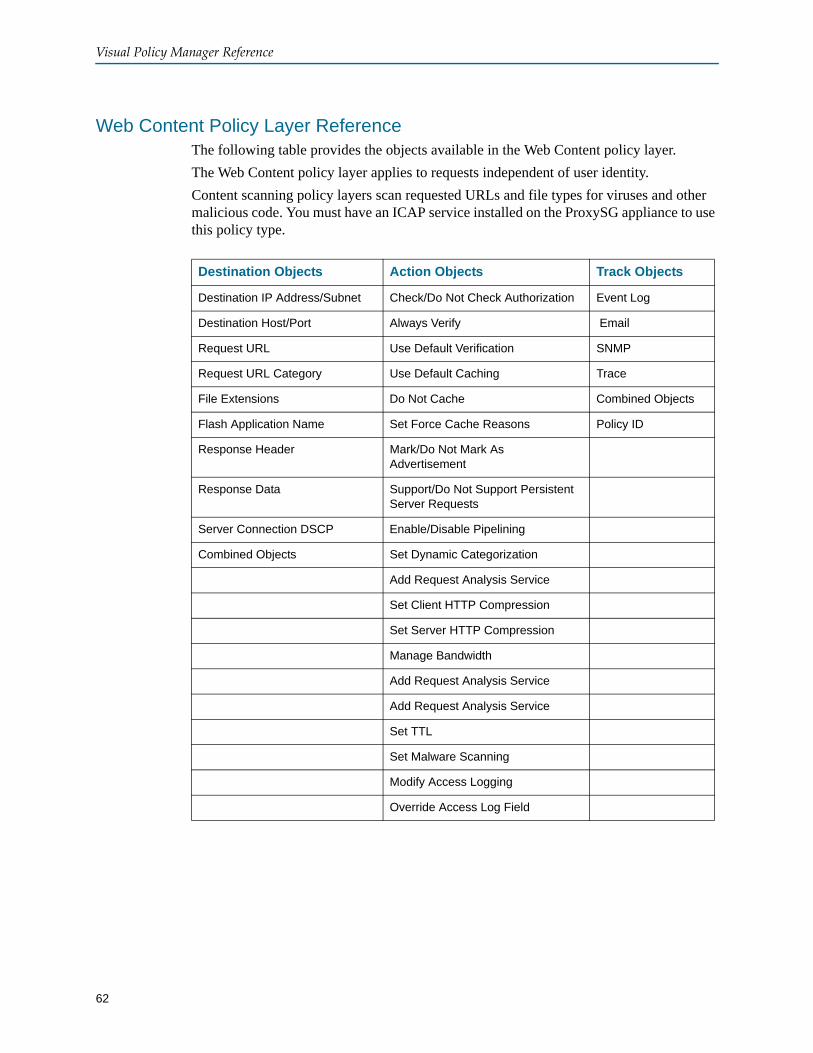
Web Content Policy Layer ReferenceThe following table provides the objects available in the Web Content policy layer.
The Web Content policy layer applies to requests independent of user identity.
Content scanning policy layers scan requested URLs and file types for viruses and other malicious code. You must have an ICAP service installed on the ProxySG appliance to use this policy type.
Destination Objects Action Objects Track Objects
Destination IP Address/Subnet Check/Do Not Check Authorization Event Log
Destination Host/Port Always Verify Email
Request URL Use Default Verification SNMP
Request URL Category Use Default Caching Trace
File Extensions Do Not Cache Combined Objects
Flash Application Name Set Force Cache Reasons Policy ID
Response Header Mark/Do Not Mark As Advertisement
Response Data Support/Do Not Support Persistent Server Requests
Server Connection DSCP Enable/Disable Pipelining
Combined Objects Set Dynamic Categorization
Add Request Analysis Service
Set Client HTTP Compression
Set Server HTTP Compression
Manage Bandwidth
Add Request Analysis Service
Add Request Analysis Service
Set TTL
Set Malware Scanning
Modify Access Logging
Override Access Log Field

63
Forwarding Policy Layer ReferenceThe following table provides the objects available in the Forwarding policy layer.
Source Objects Destination Objects
Service Objects Action Objects Track Objects
Client Geolocation Destination IP Address/Subnet
Client Protocol Send Direct Trace
Streaming Client Destination Host/Port
Health Check Integrate/Do Not Integrate New Hosts
Policy ID
Authenticated User
Server URL Health Status Connect Using ADN When Possible/Do Not Connect Using ADN
Guest User Server Connection DSCP
Combined Objects Allow Content From Origin Server
Client IP Address/Subnet
Combined Objects Serve Content Only From Cache
Client Hostname Select SOCKS Gateway
Proxy IP Address/Port
Select Forwarding
User Reflect IP
Group Manage Bandwidth
Attribute ADN Server Optimization
LDAP Attribute Set Streaming Transport
User Login Address
Set ADN Connection DSCP
User Login Time Combined Objects
User Login Count
Client Address Login Count
User Authentication Error
User Authorization Error
SOCKS Version
P2P Client

Visual Policy Manager Reference
64
Client Connection DSCP Trigger
SAML Attribute
Combined Objects
Source Objects Destination Objects
Service Objects Action Objects Track Objects

65
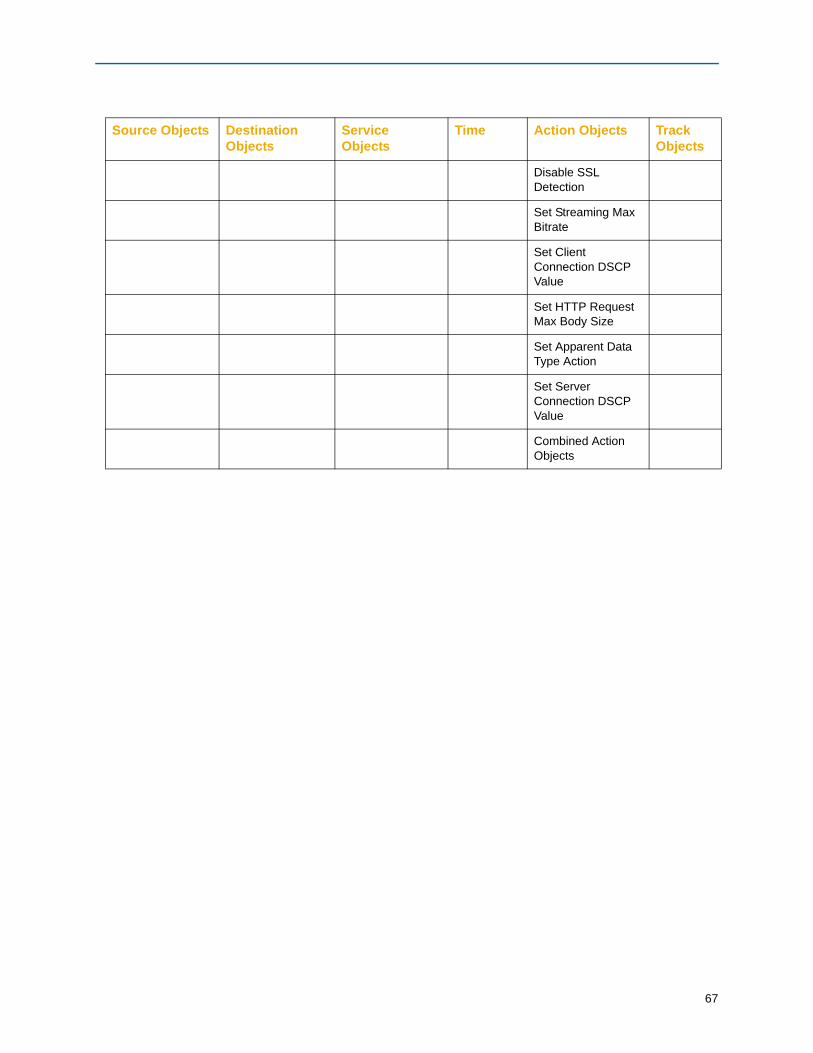
Web Request Policy Layer ReferenceThe following table provides the objects available in the Web Request policy layer. Web Request policy layers regulate outgoing requests and or outbound application operations.
❐ Use Allow Access to Server to override a Deny rule.
❐ In this context, a Deny rule denies access to the server.
❐ Deny (Content Filter) is also available.
Source Objects Destination Objects
Service Objects
Time Action Objects Track Objects
Authenticated User
Destination IP Address/Subnet
Using HTTP Transparent Authentication
Time Allow Access to Server
Event Log
Client Hostname Unavailable
Destination Host/Port
Client Protocol Combined Time Object
Deny Email
Guest User Request URL Service Name Deny (Content Filter)
Policy ID
Streaming Client Threat Risk Service Group Force Authenticate (Web Auth).
SNMP
Client IP Address/Subnet
Request URL Application
Protocol Methods Combined Object Trace
Client Geolocation Request URL Operation
Health Status Always Verify Combined Objects
Client Hostname Request URL Category
Combined Service Objects
Bypass Cache
Proxy IP Address/Port
File Extensions Check/Do Not Check Authorization
User Server Connection DSCP
Disable/Do Not Disable Fast-Caching in Windows Media Client
Group Server Certificate Do Not Bypass Cache
Attribute Specifies the WebEx site to allow or deny connections to.
Check/Do Not Check Authorization
LDAP Attribute Disable/Do Not Disable Fast-Caching in Windows Media Client

Visual Policy Manager Reference
66
User Login Address
Force/Do Not Force IWA for Server Auth
User Login Time Support/Do Not Support Persistent Client Requests
User Login Count Trust/Do Not Trust Destination IP
Client Address Login Count
Force/Do Not Force IWA for Server Auth
User Authentication Error
Support/Do Not Support Persistent Client Requests
User Authorization Error
Trust/Do Not Trust Destination IP
User Agent Use Default Verification
Request Header Modify Access Logging
SOCKS Version Override Access Log Field
IM User Agent Return Redirect
P2P Client Rewrite Host
Client Certificate Reflect IP
Client Negotiated Cipher Strength
Set Server URL DNS Lookup
Client Connection DSCP Trigger
Suppress Header
HTTP Request Body
Control Request Header/Control Response Header
Apparent Data Type
Perform Request Analysis
Combined Source Object
Set SOCKS Acceleration
Set Server HTTP Compression
Manage Bandwidth
Set FTP Connection
Source Objects Destination Objects
Service Objects
Time Action Objects Track Objects
67
Disable SSL Detection
Set Streaming Max Bitrate
Set Client Connection DSCP Value
Set HTTP Request Max Body Size
Set Apparent Data Type Action
Set Server Connection DSCP Value
Combined Action Objects
Source Objects Destination Objects
Service Objects
Time Action Objects Track Objects

Visual Policy Manager Reference
68
CPL LayerThis layer does not make use of objects, but allows you to compose CPL directly into the VPM. For more information, see Section F: "Composing CPL Directly in the VPM" on page 237.

69
Section C: Detailed Object Column Reference
This section contains the following topics:
❐ "Source Column Object Reference" on page 70 describes the available objects for policy layers that support the source column.
❐ "Destination Column Object Reference" on page 96 describes the available objects supported in the destination column.
❐ "Service Column Object Reference" on page 115 describes the policy objects available in the service column.
❐ "Time Column Object Reference" on page 121 describes the policy objects available in the Time column.
❐ "Action Column Object Reference" on page 123 describes the policy objects available in the action column.
❐ "Action Column Object Reference" on page 123 describes the available objects in the Track column.
❐
❐ "Comment Object Reference" on page 195 describes the use of the comments field to add relevance to individual rules.
❐ "Using Combined Objects" on page 196 describes how to use combined policy objects.
❐ "Creating Categories" on page 202 describes how to create policy-based categories.
Visual Policy Manager Reference
70
Source Column Object ReferenceA source object specifies the communication or Web transaction origin that is evaluated by the policy. Not all policy layers contain the same source objects.
AnyApplies to any source.
Streaming ClientThis is a static object. This rule applies to any request from a streaming client.
Client Hostname UnavailableThis is a static object. This rule applies if the client IP address could not be looked up with a reverse DNS query.
Authenticated UserThis is a static object. This rule applies to any authenticated user.
Guest UserThis is a static object. This rule applies to all guest users.
IM User Agent UnsupportedThis is a static object. This rule applies to all Windows Live Messenger (WLM) and Yahoo IM clients that are not currently supported in this SGOS release. To change the object to supported clients, add the object, right-click it, and select Negate.
Client IP Address/SubnetSpecifies the client IPv4 or IPv6 address, an IPv4 address with one or more wildcards, or a range of IP addresses in a network; an optional subnet mask (for IPv4) or prefix length (for IPv6); and an option to match the IP address to the effective client IP address if the effective client IP object is configured. If you select Look up effective client IP (if
configured) and the object is not configured, policy will ignore your selection.
Policy defined in this rule applies only to this address or addresses on this subnet. This object is automatically named using the prefix Client; for example, Client: 1.2.0.0/
255.255.0.0.
Important: Because of character limitations required by the generated CPL, only alphanumeric, underscore, dash, ampersand, period, or forward slash characters can be used to define a source object name.
71
Note: When traffic is explicitly proxied, it arrives at the Administration layer (Administration Authentication Policy Layer and Administration Access Policy Layer) with the client IP address set to the ProxySG appliance’s IP address; therefore, the Client IP
Address/Subnet object is not useful for explicitly proxied traffic.
Using an IP Address Range
For usage information, refer to the Knowledge Base article:
http://bluecoat.force.com/knowledgebase/articles/Solution/000010037
Using Wildcards
For usage information, refer to the Knowledge Base article:
http://bluecoat.force.com/knowledgebase/articles/Solution/000010950
Using Effective Client IP
To configure the effective client IP address, set the Effective Client IP action object (in the Action column, right click and select Set > New). For information on the effective client IP address, refer to "Set Effective Client IP" on page 123 and the Content Policy Language Reference.
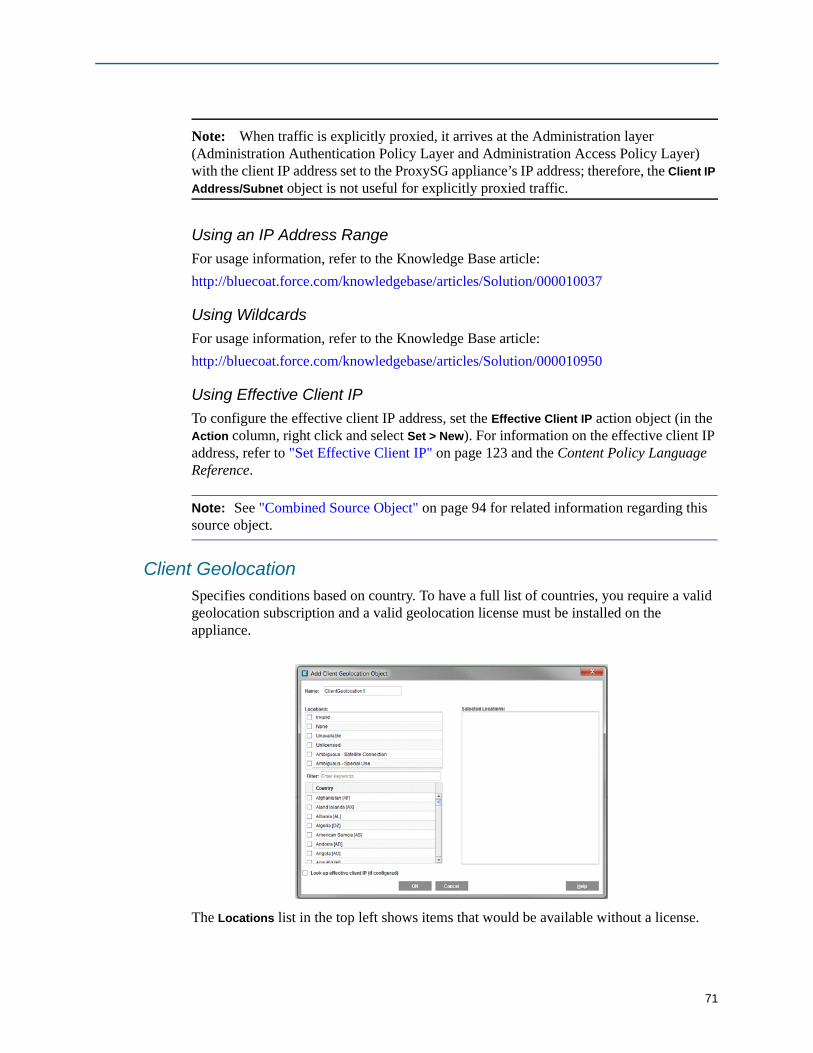
Client GeolocationSpecifies conditions based on country. To have a full list of countries, you require a valid geolocation subscription and a valid geolocation license must be installed on the appliance.
The Locations list in the top left shows items that would be available without a license.
Note: See "Combined Source Object" on page 94 for related information regarding this source object.

Visual Policy Manager Reference
72
To find specific countries in the list, enter a search string in the Filter field or scroll through the list.
To add a country to your selected locations, do one of the following:
❐ In the Locations list, select the country’s name.
❐ In the Locations list, select the check box beside its name.
The country appears in the Selected Locations list.
To remove a country from your selected locations:
❐ Select the country in the ‘Selected locations’ list, right click, and select Remove.
To remove multiple countries, select them while holding the CTRL or SHIFT key. Then, right click and select Remove.
❐ In the list of countries on the left, clear the check box beside the country’s name.
❐ In the ‘Selected locations’ list, select a country and press the DELETE key
73
What does the effective client IP selection do?
Policy can match an IP address to the effective client IP address.
❐ If you select Look up effective client IP (if configured), the appliance will match the IP address to the effective client IP address when the Effective Client IP object is configured and valid. Subsequent requests to the same IP address will use the effective IP address that was matched.
❐ If you select Look up effective client IP (if configured) and the effective client IP object is not configured or it extracts an invalid address, policy will use the client IP address.
Client HostnameSpecifies a reverse DNS hostname resolved in the reverse lookup of a client IP address. Enter the host name and select matching criteria. This object is automatically named using the prefix Client; for example, Client: host.com. If you select a matching qualifier, that attribute is appended to the object in parentheses. For example, Client: host.com (RegEx).
Visual Policy Manager Reference
74
HTTP CONNECT User AgentTests which user agent is used to initiate an explicit proxy HTTP CONNECT request. This object applies to explicitly proxied transactions.
Enter a text string and select one of the following:
❐ Exact Match - The User-Agent header matches the string exactly.
❐ Contains - The User-Agent header contains the string.
❐ At Beginning - The User-Agent header starts with the string
❐ At End - The User-Agent header ends with the string.
Alternatively, enter a regular expression and select RegEx.
Proxy IP Address/PortSpecifies the IPv4 or IPv6 address and, optionally, a port on the appliance. The policy defined in this rule applies only to this address or addresses with this subnet.
UserSpecifies an individual user in the form of a verifiable username or login name. When you enter a user name and select an authentication realm from the list, the dialog displays information depending on the type of authentication realm specified. You can only choose authentication realms that the ProxySG administrator configured.
IWA
Entries in this list are not prepopulated. You must enter a name in the Domain Name field. An entered name is retained and can subsequently be selected and edited. The Full Name field displays domain name and user name entered above.

75
Windows SSO
Entries in this list are not prepopulated. You must enter a name in the User field. Entries in the Domain Name list come from those specified by the administrator on the appliance. You can also edit an entry selected in the list, type a new one, or click Browse to manually select a name.
LDAP
You can optionally select a User Base DN from a drop-down list. Entries in the User Base
DN list come from those specified by the administrator on the appliance. You can also edit an entry selected in the list, type a new one, or click Browse to manually select a name. Edited names and new names are retained in the list. The Full Name field takes the User Attribute type specified by the administrator on the appliance (cn= in the following illustration), and associates it with the user name and Base DN specified.
Important: When you configure a realm, the appliance assumes a default primary user attribute (SAMAccountName for Active Directory; uid for Netscape/iPlanet Directory Server/SunOne; cn for Novell NDS). You can accept the default or change it. Whatever is entered there is what the VPM uses here, entering it in the Full Name display field after a Base DN is selected.
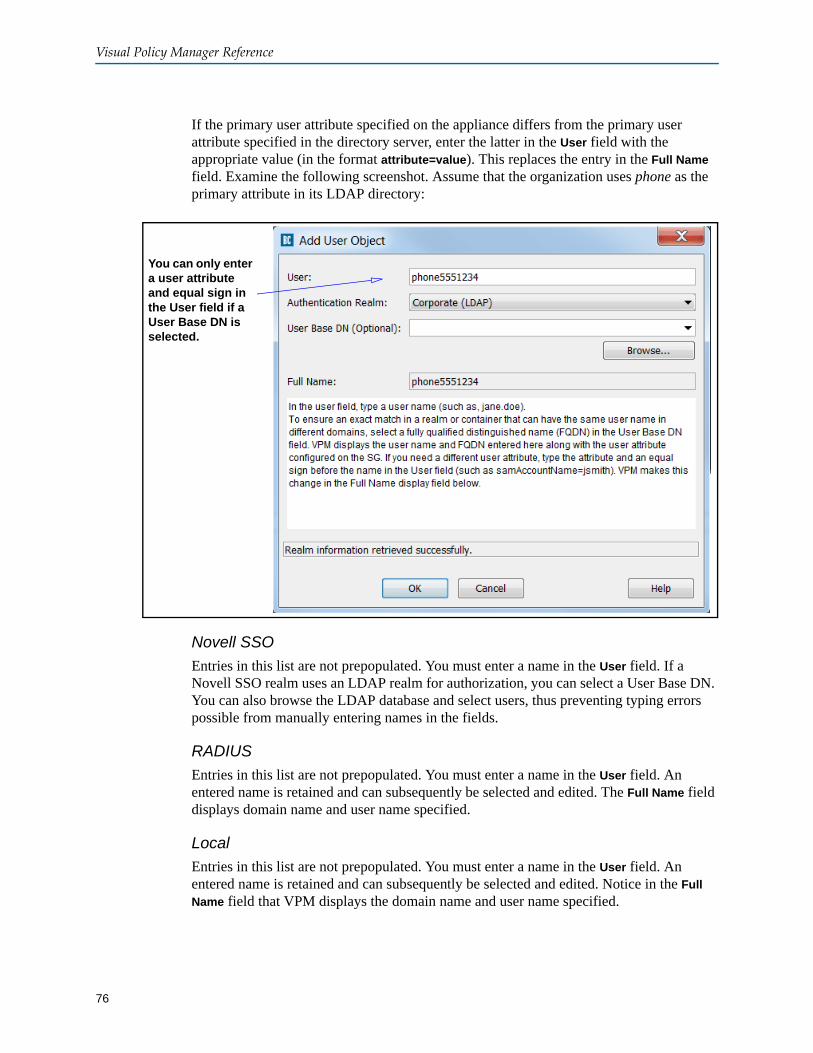
Visual Policy Manager Reference
76
If the primary user attribute specified on the appliance differs from the primary user attribute specified in the directory server, enter the latter in the User field with the appropriate value (in the format attribute=value). This replaces the entry in the Full Name field. Examine the following screenshot. Assume that the organization uses phone as the primary attribute in its LDAP directory:
Novell SSO
Entries in this list are not prepopulated. You must enter a name in the User field. If a Novell SSO realm uses an LDAP realm for authorization, you can select a User Base DN. You can also browse the LDAP database and select users, thus preventing typing errors possible from manually entering names in the fields.
RADIUS
Entries in this list are not prepopulated. You must enter a name in the User field. An entered name is retained and can subsequently be selected and edited. The Full Name field displays domain name and user name specified.
Local
Entries in this list are not prepopulated. You must enter a name in the User field. An entered name is retained and can subsequently be selected and edited. Notice in the Full
Name field that VPM displays the domain name and user name specified.
You can only enter a user attribute and equal sign in the User field if a User Base DN is selected.
77
Certificate
If a Certificate realm uses an LDAP realm for authorization, you can select a User Base DN. You can also browse the LDAP database and select users, thus preventing typing errors possible from manually entering names in the fields. If the Certificate realm does not use an LDAP authentication realm, Browse is not displayed.
CA eTrust SiteMinder
Entries in this list are not prepopulated. You must enter a name in the User field. An entered name is retained and can subsequently be selected and edited. The Full Name field displays the domain name and user name specified.
Oracle COREid
Entries in this list are not prepopulated. You must enter a name in the User field. An entered name is retained and can subsequently be selected and edited. The Full Name field displays the domain name and user name specified.
SAML
If a SAML realm uses an LDAP realm for authorization, you can select a User Base DN. You can also browse the LDAP database and select users, thus preventing typing errors possible from manually entering names in the fields. The Full Name field displays domain name and user name specified.
XML
If an XML realm uses an LDAP realm for authorization, you can select a User Base DN. You can also browse the LDAP database and select users, thus preventing typing errors possible from manually entering names in the fields.
Policy Substitution
Entries in this list are not prepopulated. You must enter a name in the User field. An entered name is retained and can subsequently be selected and edited. The Full Name field displays domain name and user name specified.
Sequences
Entries in this list are not prepopulated. You must enter a name in the User field. An entered name is retained and can subsequently be selected and edited. The Full Name field displays domain name and user name specified. From the Member Realm drop-down list, select an authentication realm (already configured on the appliance). Depending on the realm type, new fields appear.
GroupSpecifies a verifiable group name. Enter a user group and an authentication realm. The dialog then displays different information depending on the type of authentication realm specified.
❐ Group field—Replace the default with a verifiable group name.

Visual Policy Manager Reference
78
❐ Authentication Realm field—Select the appropriate realm from the drop-down list. Items in the list are taken from the realms configured by the administrator on the appliance.
• LDAP—Entries in the Group Base DN list come from those specified by the administrator on the appliance. You can also edit an entry selected in the list, or type a new one. Edited names and new names are retained in the list. Notice in the Full Name field that the VPM takes the User Attribute type specified by the administrator on the appliance (cn= in the following illustration), and conjoins it with the group name and Base DN entered here.
Figure 3–9 Adding a group object
If the primary user attribute specified on the appliance differs from the primary user attribute specified in the directory server, you need to enter the latter here. Do that by typing it in the Group field with the appropriate value (in the format attribute=value). Doing so replaces the entry in the Full Name field. Unlike the comparable situation when creating a user (described immediately above), when creating a group, the Group Base DN does not need to be selected to enter the attribute=value pair in the Group field.
• IWA—Entries in this list are not prepopulated. You must enter a name in the Domain Name field. A name typed in is retained and can subsequently be selected and edited. Notice in the Full Name field that the VPM displays the domain name and group name entered above.
Important: When you create a group, the default attribute is cn= in the Full Name display field.

79
• Windows SSO—Entries in this list are not prepopulated. You must enter a name in the Group field.
• Novell SSO—Entries in this list are not prepopulated. You must enter a name in the Group field.
• RADIUS—Entries in this list are not prepopulated. You must enter a name in the Group field.
• Local—Entries in this list are not prepopulated. You must enter a name in the Group field. A name typed in is retained and can subsequently be selected and edited. Notice in the Full Name field that VPM displays the group name entered above.
• Certificate—If a Certificate realm is selected and that realm uses an LDAP realm as authentication realm, the Browse button is clickable. This option allows you to browse the LDAP database and select users, thus preventing typing errors possible from manually entering names in the fields. If the Certificate realm does not use an LDAP authentication realm, Browse is not displayed.
• CA eTrust SiteMinder—Entries in this list are not prepopulated. You must enter a name in the Group field. A name typed in is retained and can subsequently be selected and edited. Notice in the Full Name field that VPM displays the group name entered above.
• Oracle COREid—Entries in this list are not prepopulated. You must enter a name in the Group field. A name typed in is retained and can subsequently be selected and edited. Notice in the Full Name field that VPM displays the group name entered above.
• SAML—Entries in this list are not prepopulated. You must enter a name in the Group field.
• XML—Entries in this list are not prepopulated. You must enter a name in the Group field.
• Policy Substitution—Entries in this list are not prepopulated. You must enter a name in the Group field. A name typed in is retained and can subsequently be selected and edited. Notice in the Full Name field that VPM displays the group name entered above.
• Sequences—Entries in this list are not prepopulated. You must enter a name in the Group field. An entered name is retained and can subsequently be selected and edited. Notice in the Full Name field that VPM displays domain name and user name entered above. From the Member Realm drop-down list, select an authentication realm (already configured on the appliance). Depending on the realm type, new fields appear.
AttributeSpecifies a RADIUS attribute.

Visual Policy Manager Reference
80
Specify a RADIUS attribute:
1. Select Attribute from the list of objects.
2. Configure object attributes:
a. In the Name field, enter a name for the object or leave as is to accept the default.
b. Select All RADIUS or a specific realm.
c. Select an Attribute Name.
d. Enter an Attribute Value for the Attribute Name.
3. Click OK.
LDAP AttributeSpecifies a specific LDAP attribute (and optional value).
Specify an LDAP attribute:
1. Select LDAP Attribute from the list of objects.
1a 1b
1c
1d
1
2 3
4

81
2. In the Name field, enter a name for the object or leave as is to accept the default.
3. From the Authentication Realm drop-down list, select All LDAP or a specific realm.
4. In the Attribute Name field, enter a valid LDAP attribute.
5. Perform one of the following:
• Select the Attribute Exists option to set the policy match when the attribute name exists.
• In the Attribute Value Match > Value field, enter value for the specified LDAP attribute, or leave blank to accept any value.
The example above sets a Common Name (CN) attribute with the value of peter.gibbons to the LDAP1 realm.
SAML AttributeThe ProxySG appliance processes SAML authentication responses from the SAML identity provider (IDP); these responses may contain assertion attributes that describe a SAML-authenticated user. For example, <saml:Attribute Name="mail"> is an assertion attribute that contains the user’s email address inside the <saml:AttributeValue> element.
You can configure the appliance to use assertion attributes in authorization decisions. The SAML Attribute object allows you to forward SAML assertion attributes via custom headers to back-end or front-end servers.
For information on SAML realm configuration, refer to the “SAML Authentication” chapter in the SGOS Administration Guide.
Specify a SAML attribute:
1. Select SAML Attribute from the list of objects.
2. In the Name field, enter a name for the object or leave as is to accept the default.
3. From the Authentication Realm drop-down list, select <All> or a specific realm.
4. In the Attribute Name field, enter a valid SAML attribute.
5. Do one of the following:
• Select the Attribute Exists option to set the policy match when the attribute name exists.
• In the Attribute Value Match > Value field, enter a value for the specified SAML attribute or leave it empty to accept any value.
User Login AddressThe condition matches the IPv4 or IPv6 address used to log in and serves as a request parameter for Windows Single Sign-On (SSO). You can also specify an IPv4 address range or IPv4 address with wildcards.

Visual Policy Manager Reference
82
Using an IP Address Range
For usage information, refer to the Knowledge Base article:
http://bluecoat.force.com/knowledgebase/articles/Solution/000010037
Using Wildcards
For usage information, refer to the Knowledge Base article:
http://bluecoat.force.com/knowledgebase/articles/Solution/000010950
User Login TimeThis condition matches the number of seconds since the current login started, and can limit the length of a login session.
User Login CountThis condition matches the number of times that a specific user is logged in with the current realm. This condition ensures that a user is only logged in at one workstation. If the condition is combined with the user.login.log_out_other property, old logins on other workstations are automatically logged out.
Client Address Login CountThis condition matches and can limit the number of different users who are logged into the current IP address.
User Authentication ErrorChecks for a matches of specified user authentication errors.

83
To specify a User Authentication Error object:
1. (Optional) In the Name field, enter a meaningful name (or accept the default).
2. Select one of the following:
• No errors: Authentication was attempted and no user errors occurred.
• Any errors: Authentication was attempted a user error occurred.
• Selected errors: Authentication was attempted and one of the selected errors occurred; selecting this enables the Show drop-down list and selectable errors area.
3. If you selected Selected errors:
a. Refine the error view from the Show drop-down list.
b. Select one or more error types; click the groups to expand the lists. If you select a group-level error, all of the errors in that group are also selected by default.
4. Click OK.
1
2
3a

Visual Policy Manager Reference
84
User Authorization ErrorChecks for a match of specified user authorization errors.
To specify a User Authorization Error object:
1. Select one of the following:
• None: Authorization was attempted and no user errors occurred.
• Any: Authorization was attempted a user error occurred.
• Selected errors: Authorization was attempted and one of the selected errors occurred.
2. If you selected Selected errors:
a. Select one or more error types (use Control + Left-click to highlight multiple errors).
b. Click Add to move the errors to the Selected field.
c. Name the object or accept the default name.
3. Click OK.
DNS Request NameSpecifies a DNS request. Enter the host name and select matching criteria. This object is automatically named using the prefix DNS; for example, DNS: host.com. If you select a matching qualifier, that attribute is appended to the object in parentheses. For example, DNS: host.com (RegEx).
RDNS Request IP Address/SubnetSpecifies the reverse DNS IPv4 address or range of addresses, IPv4 address with wildcards, or IPv6 address and, optionally, a subnet mask (for IPv4) or prefix length (for IPv6).
Using an IP Address Range
For usage information, refer to the Knowledge Base article:
http://bluecoat.force.com/knowledgebase/articles/Solution/000010037
Note: If authentication fails and no default groups are added through policy (see Guest Authentication and Default Groups), the group conditions always evaluate to false. Verify group conditions if you permit authentication errors, especially in scenarios where users are denied based on group membership.
Note: If authorization fails and no default groups are added through policy, the group conditions always evaluate to false. Verify group conditions if you permit authorization errors, especially in scenarios where users are denied based on group membership.
85
Using Wildcards
For usage information, refer to the Knowledge Base article:
http://bluecoat.force.com/knowledgebase/articles/Solution/000010950
The policy defined in this rule applies only to this address or addresses on this subnet. This object is automatically named using the prefix RDNS; for example, RDNS: 5.6.0.0/
255.255.0.0.
DNS Request OpcodeSpecifies OPCODEs to represent in the DNS header.
To specify a DNS Request OPCODE object:
1. In the Name field, enter a custom name or leave as is to accept the default.
2. Select one or more of the OPCODEs.
3. Click OK.
DNS Request ClassSpecifies the DNS request class (QCLASS) properties.
To specify a DNS request class object:
1. In the Name field, enter a custom name or leave as is to accept the default.
2. Select one or more of the request classes.
3. Click OK.
DNS Request TypeSpecifies the DNS request types (QTYPE) attributes.
To specify a DNS Request Type object:
1. In the Name field, enter a custom name or leave as is to accept the default.
2. Select one or more of the request types.
3. Click OK.
DNS Client TransportSpecifies the DNS client transport method, UDP or TCP.
To specify a DNS Client Transport object:
1. Select UDP Transport or TCP Transport. This object is automatically named using the prefix DNS; for example, DNS: Client Transport UDP.
2. Click OK.

Visual Policy Manager Reference
86
SOCKS VersionSpecifies the SOCKS version, 4 or 5. This object is automatically named as SOCKSVersion4 or SOCKSVersion5.
User AgentSpecifies one or more agents a client might use to request content. The choices include specific versions of: Microsoft Internet Explorer, Mozilla Firefox, Google Chrome, Netscape Communicator, Microsoft Windows Media Player and NetShow, Real Media RealPlayer and RealDownload, Apple QuickTime, Opera, and Wget as well as mobile devices including iPhone, iPad, iPod, Blackberry, Android, and Windows Mobile.
The policy defined in this rule applies to these selected agents. You can name this list and create other custom lists to use with other policy layer rules.
Request HeaderSpecifies the rule applies to requests containing a specific header. The ProxySG appliance supplies a list of standard headers, but you can also select a custom header.
Note: If you require a user agent not contained in this list, use the Request Header object, which can contain user agent specified as a header.
Example:
Selecting streaming media user agents.
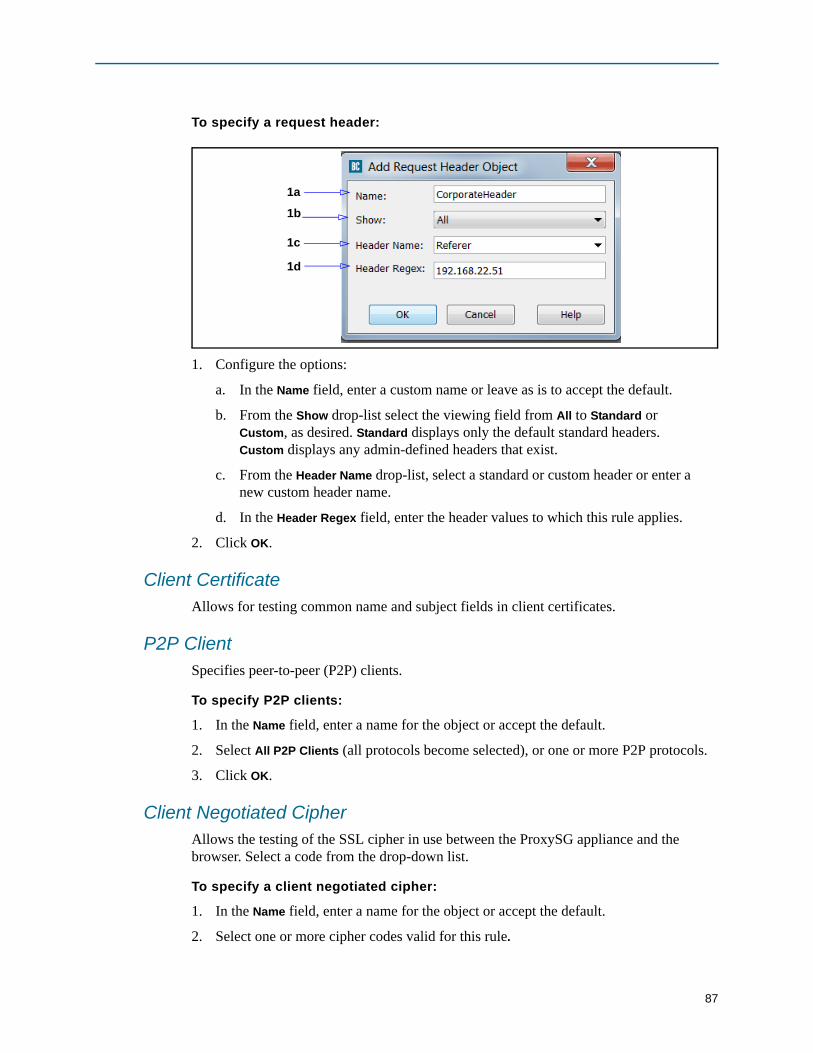
87
To specify a request header:
1. Configure the options:
a. In the Name field, enter a custom name or leave as is to accept the default.
b. From the Show drop-list select the viewing field from All to Standard or Custom, as desired. Standard displays only the default standard headers. Custom displays any admin-defined headers that exist.
c. From the Header Name drop-list, select a standard or custom header or enter a new custom header name.
d. In the Header Regex field, enter the header values to which this rule applies.
2. Click OK.
Client CertificateAllows for testing common name and subject fields in client certificates.
P2P ClientSpecifies peer-to-peer (P2P) clients.
To specify P2P clients:
1. In the Name field, enter a name for the object or accept the default.
2. Select All P2P Clients (all protocols become selected), or one or more P2P protocols.
3. Click OK.
Client Negotiated CipherAllows the testing of the SSL cipher in use between the ProxySG appliance and the browser. Select a code from the drop-down list.
To specify a client negotiated cipher:
1. In the Name field, enter a name for the object or accept the default.
2. Select one or more cipher codes valid for this rule.
1a 1b
1c 1d
Visual Policy Manager Reference
88
3. Click OK.
Note: Refer to the SGOS Administration Guide for a list of supported cipher suites.
Client Negotiated Cipher StrengthTests the cipher strength between a ProxySG-to-browser (client) HTTPS connection.
To specify a client negotiated cipher strength:
1. In the Name field, enter a name for the object or accept the default.
2. Select one or more of the strength options valid for this rule Export, High, Medium, or Low.
3. Click OK.
Low, Medium, and High strength ciphers are not exportable.
Client Negotiated SSL VersionTests the SSL version between a proxy-to-browser (client) HTTPS connection.
To specify a client negotiated SSL version:
1. In the Name field, enter a name for the object or accept the default.
2. Select one or more of the version options valid for this rule SSLv2, SSv3, TLSv1,
TLSv1.1, or TLSv1.2.
3. Click OK.
Client Connection DSCP TriggerTests the inbound differentiated service code point (DSCP) value of primary client-to-proxy connections. After testing DSCP bits (in the IP header), additional policy dictates how to handle traffic associated with the type of service.

89
To specify DSCP values to test against inbound client connections:
1. In the Name field, enter a name for the object or accept the default. This example creates an object that tests for an IP Precedence of 2 or any Assured Forwarding Class (AFC) of type 2 (for low, medium, and high drop rates).
2. Select IP Precedence values (denoted by CS) and Assured Forwarding Classes (Denoted by AF) as required).
3. (Optional) Rather than select Precedence and AFC values, enter a DSCP value range. The valid range is 0 to 63. Blue Coat does not recommend this option. Most applications fit into one of the defined values.
4. Click OK.
For conceptual information about configuring the ProxySG appliance to manipulate traffic based on type of service, refer to "Managing QoS and Differentiated Services" on page 283.
1
3 2
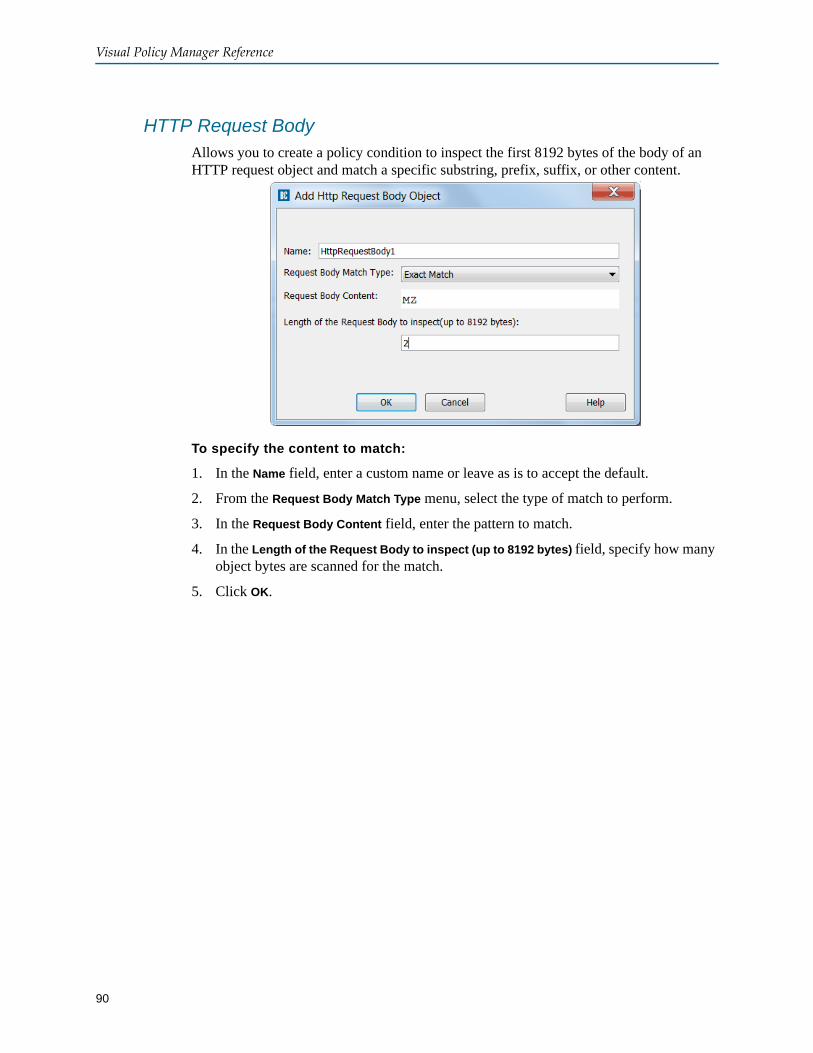
Visual Policy Manager Reference
90
HTTP Request BodyAllows you to create a policy condition to inspect the first 8192 bytes of the body of an HTTP request object and match a specific substring, prefix, suffix, or other content.
To specify the content to match:
1. In the Name field, enter a custom name or leave as is to accept the default.
2. From the Request Body Match Type menu, select the type of match to perform.
3. In the Request Body Content field, enter the pattern to match.
4. In the Length of the Request Body to inspect (up to 8192 bytes) field, specify how many object bytes are scanned for the match.
5. Click OK.
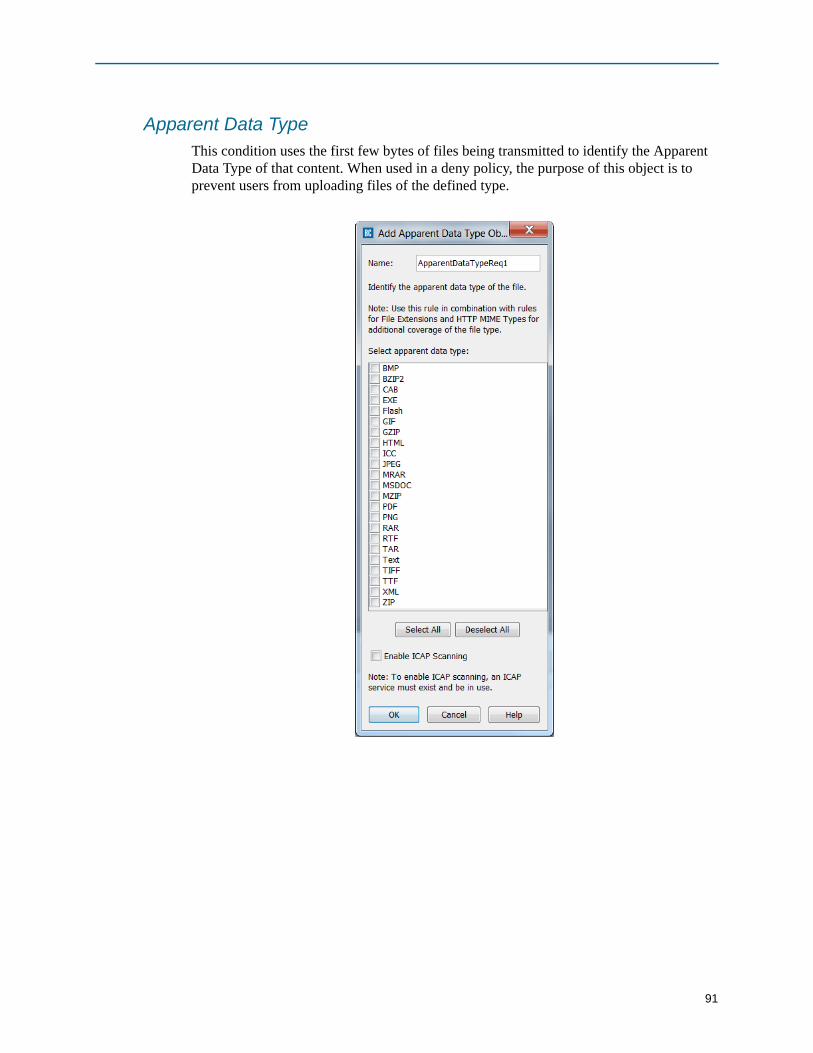
91
Apparent Data TypeThis condition uses the first few bytes of files being transmitted to identify the Apparent Data Type of that content. When used in a deny policy, the purpose of this object is to prevent users from uploading files of the defined type.
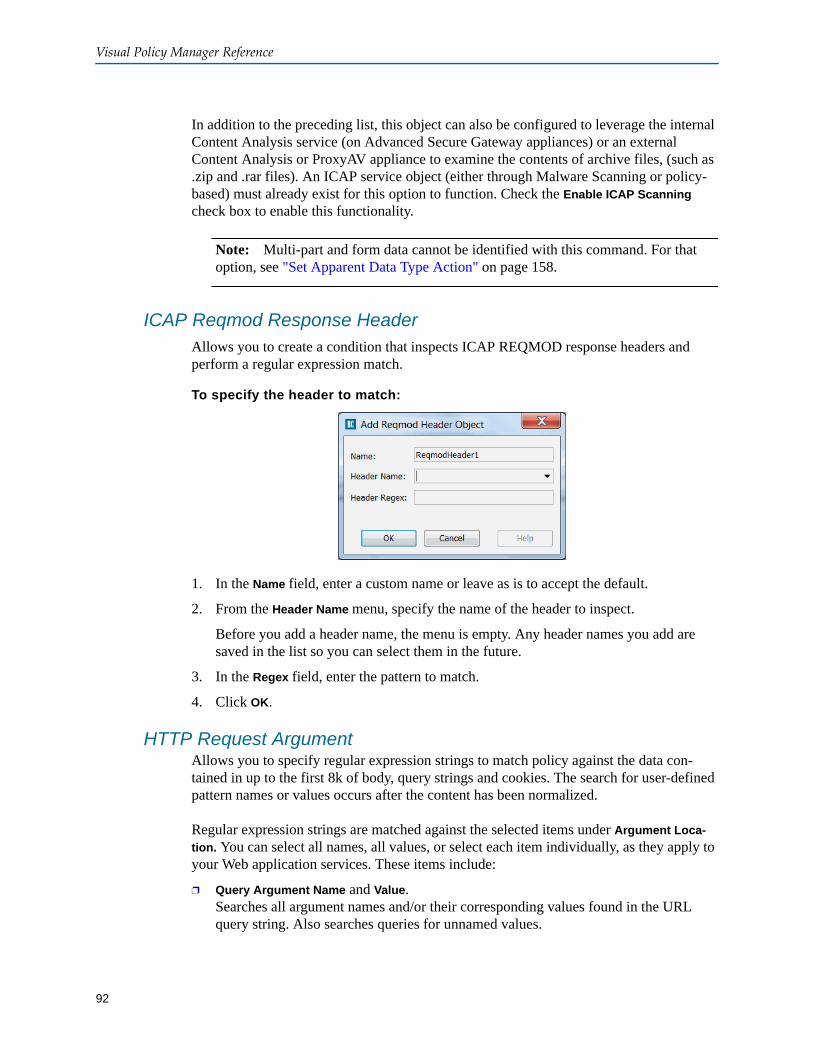
Visual Policy Manager Reference
92
In addition to the preceding list, this object can also be configured to leverage the internal Content Analysis service (on Advanced Secure Gateway appliances) or an external Content Analysis or ProxyAV appliance to examine the contents of archive files, (such as .zip and .rar files). An ICAP service object (either through Malware Scanning or policy-based) must already exist for this option to function. Check the Enable ICAP Scanning
check box to enable this functionality.
Note: Multi-part and form data cannot be identified with this command. For that option, see "Set Apparent Data Type Action" on page 158.
ICAP Reqmod Response HeaderAllows you to create a condition that inspects ICAP REQMOD response headers and perform a regular expression match.
To specify the header to match:
1. In the Name field, enter a custom name or leave as is to accept the default.
2. From the Header Name menu, specify the name of the header to inspect.
Before you add a header name, the menu is empty. Any header names you add are saved in the list so you can select them in the future.
3. In the Regex field, enter the pattern to match.
4. Click OK.
HTTP Request ArgumentAllows you to specify regular expression strings to match policy against the data con-tained in up to the first 8k of body, query strings and cookies. The search for user-defined pattern names or values occurs after the content has been normalized.
Regular expression strings are matched against the selected items under Argument Loca-
tion. You can select all names, all values, or select each item individually, as they apply to your Web application services. These items include:
❐ Query Argument Name and Value. Searches all argument names and/or their corresponding values found in the URL query string. Also searches queries for unnamed values.
93
❐ POST Argument Name and Value Searches all argument names and unnamed arguments found the POST body of HTTP requests in URL-encoded and multipart forms. Other formats such as XML, JSON etc. are not included.
❐ Cookie Argument Name and Value Searches all argument names and values in cookie and cookie 2 headers. Also searches cookies for unnamed values.
Pair the request argument object with an action, (such as Deny or Redirect) to ensure that if a request matches the regex value for an argument name or value, that action will be taken.
For more information on Request Argument usage in policy, see "HTTP Request Argument" on page 92.
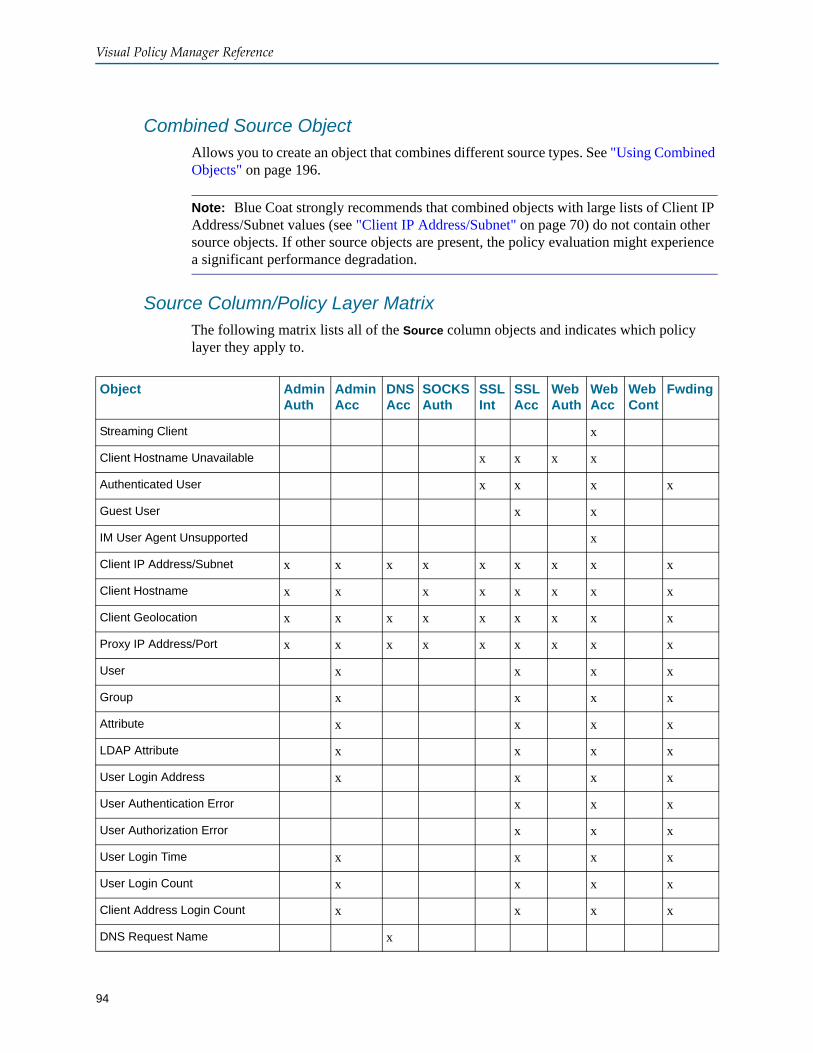
Visual Policy Manager Reference
94
Combined Source ObjectAllows you to create an object that combines different source types. See "Using Combined Objects" on page 196.
Source Column/Policy Layer MatrixThe following matrix lists all of the Source column objects and indicates which policy layer they apply to.
Note: Blue Coat strongly recommends that combined objects with large lists of Client IP Address/Subnet values (see "Client IP Address/Subnet" on page 70) do not contain other source objects. If other source objects are present, the policy evaluation might experience a significant performance degradation.
Object Admin Auth
Admin Acc
DNS Acc
SOCKS Auth
SSL Int
SSL Acc
Web Auth
Web Acc
Web Cont
Fwding
Streaming Client x
Client Hostname Unavailable x x x x
Authenticated User x x x x
Guest User x x
IM User Agent Unsupported x
Client IP Address/Subnet x x x x x x x x x
Client Hostname x x x x x x x x
Client Geolocation x x x x x x x x x
Proxy IP Address/Port x x x x x x x x x
User x x x x
Group x x x x
Attribute x x x x
LDAP Attribute x x x x
User Login Address x x x x
User Authentication Error x x x
User Authorization Error x x x
User Login Time x x x x
User Login Count x x x x
Client Address Login Count x x x x
DNS Request Name x

95
RDNS Request IP Address/Subnet
x
DNS Request Opcode x
DNS Request Class x
DNS Request Type x
DNS Client Transport x
SOCKS Version x x x
User Agent x x
Request Header x x
Client Certificate x x
P2P Client x x
Client Negotiated Cipher x x
Client Negotiated Cipher Strength
x x
Client Negotiated SSL Version x
Client Connection DSCP Trigger x x x
HTTP Request Body x
HTTP Request Argument x
ICAP Reqmod Response Header x x
Apparent Data Type x
Combined Objects x x x x x x x x x x
Object Admin Auth
Admin Acc
DNS Acc
SOCKS Auth
SSL Int
SSL Acc
Web Auth
Web Acc
Web Cont
Fwding

Visual Policy Manager Reference
96
Destination Column Object ReferenceA destination object specifies the communication or Web traffic destination that is evaluated by the policy. Not all policy layers contain the same destination objects.
AnyApplies to any destination.
Because of character limitations required by the generated CPL, only alphanumeric, underscore, dash, ampersand, period, or forward slash characters can be used to define a destination object name.
DNS Response Contains No DataThis is a static object.
Destination IP Address/SubnetSpecifies the client IPv4 or IPv6 address, an IPv4 address with one or more wildcards, or a range of IP addresses in a network; an optional subnet mask (for IPv4) or prefix length (for IPv6).
Using an IP Address Range
For usage information, refer to the Knowledge Base article:
http://bluecoat.force.com/knowledgebase/articles/Solution/000010037
Using Wildcards
For usage information, refer to the Knowledge Base article:
http://bluecoat.force.com/knowledgebase/articles/Solution/000010950
The policy defined in this rule only applies to this address only or addresses within this subnet. This object is automatically named using the prefix Destination; for example, Destination: 1.2.0.0/255.255.0.0.
Destination Host/PortSpecifies the hostname or port of a destination server. The policy defined in this rule applies to this host on this port only. Enter the host name and port number, and select matching criteria. This object is automatically named using the prefix Destination; for example, Destination: company.com:80.
Application Attributes(Added in SGOS 6.6.4) Specifies application attributes, which provide insight into a web application and its governance, risk management, and compliance.

97
Note: To use this policy object, you must: - Have a valid Application Classification subscription (included in an Intelligence Services bundle) that includes attributes - Enable the Application Classification and Application Attributes services
The Add/Edit Application Attributes object displays all attributes configured in the current rule. When multiple attributes are configured for a rule, they are logically ANDed in the condition. In the following example, four attributes are already configured for the current rule.
Important: Matches are case-insensitive. To perform case-sensitive matching, use the following CPL condition with a modifier: request.application.attribute_name.case_sensitive= For details, refer to the Content Policy Language Reference.
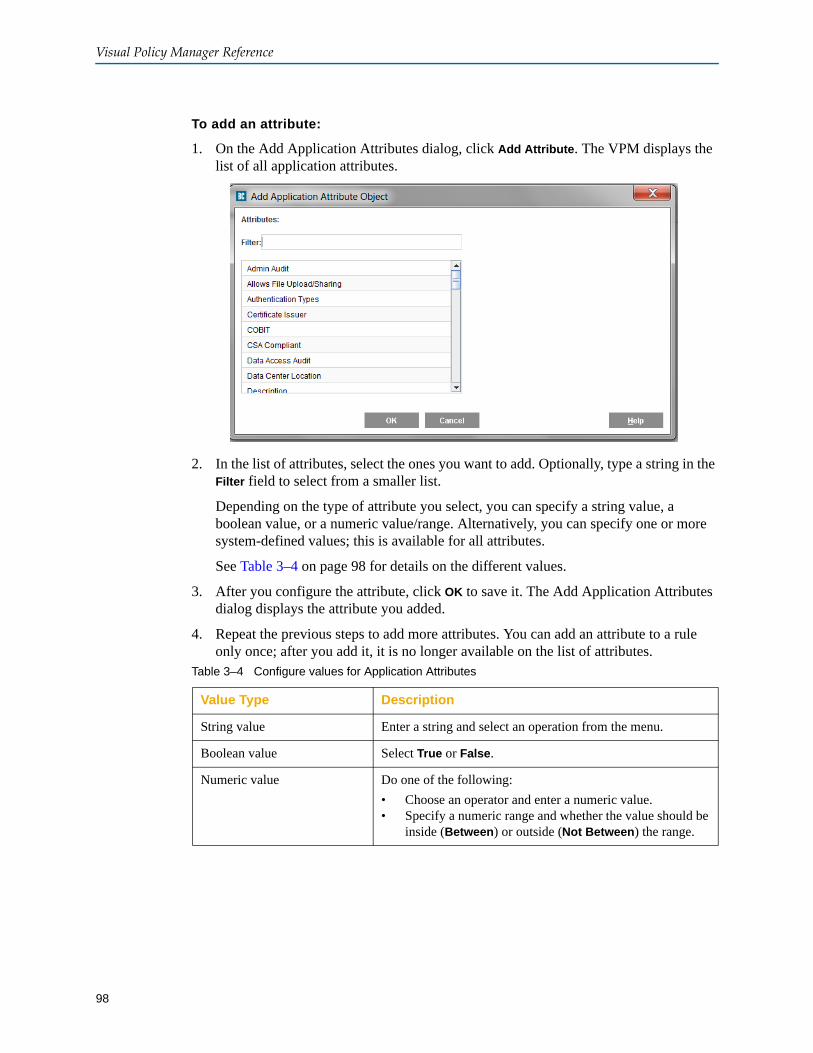
Visual Policy Manager Reference
98
To add an attribute:
1. On the Add Application Attributes dialog, click Add Attribute. The VPM displays the list of all application attributes.
2. In the list of attributes, select the ones you want to add. Optionally, type a string in the Filter field to select from a smaller list.
Depending on the type of attribute you select, you can specify a string value, a boolean value, or a numeric value/range. Alternatively, you can specify one or more system-defined values; this is available for all attributes.
See Table 3–4 on page 98 for details on the different values.
3. After you configure the attribute, click OK to save it. The Add Application Attributes dialog displays the attribute you added.
4. Repeat the previous steps to add more attributes. You can add an attribute to a rule only once; after you add it, it is no longer available on the list of attributes.
Table 3–4 Configure values for Application Attributes
Value Type Description
String value Enter a string and select an operation from the menu.
Boolean value Select True or False.
Numeric value Do one of the following:
• Choose an operator and enter a numeric value.• Specify a numeric range and whether the value should be
inside (Between) or outside (Not Between) the range.
99
To edit an existing attribute:
1. On the Add Application Attributes dialog, select the attribute to edit.
2. Click Edit. The VPM opens the Edit Application Attribute dialog.
3. Edit the attribute as required. See Table 3–4, "Configure values for Application Attributes" for details.
To delete an existing attribute:
1. On the Add Application Attributes dialog, select the attribute to delete
2. Click Delete. The attribute is deleted.
Request URLApplies to a URL in a user request (that is, a request sent by the client to the ProxySG appliance). Use this object when you want to create policy for a website that has a URL construct you are reasonably certain of. Most websites today have multiple sources that populate the content of the website and it is a challenge to block content using a specific URL.
If you would like to create a rule for all URLs that belong to a specific application, use the "Request URL Application" on page 101 object. Also, if you would like to define rules to permit or allow specific actions for Web applications, see "Request URL Operation" on page 101.
To check for a match against a requested URL
Select an option and enter the required information in the fields:
❐ Simple Match—Matches a partial URL. If a host name is specified, all hosts in that domain or subdomain match; if a path is specified, all paths with that path prefix match; if a scheme or port number is specified, only URLs with that scheme or port match. This object is automatically named using the prefix URL; therefore, the object is displayed in the rule as URL: host.com.
System values Specify one or more system-defined values:
• Attribute database is unlicensed: You do not have a valid Application Attributes license.
• Attribute database is unavailable: A non-licensing problem exists with the Application Attri-butes database or with accessing the service, or the Appli-cation Attributes service is disabled.
• Attribute is not defined for application: The specified attribute is undefined or does not exist for the given application.
Table 3–4 Configure values for Application Attributes
Value Type Description
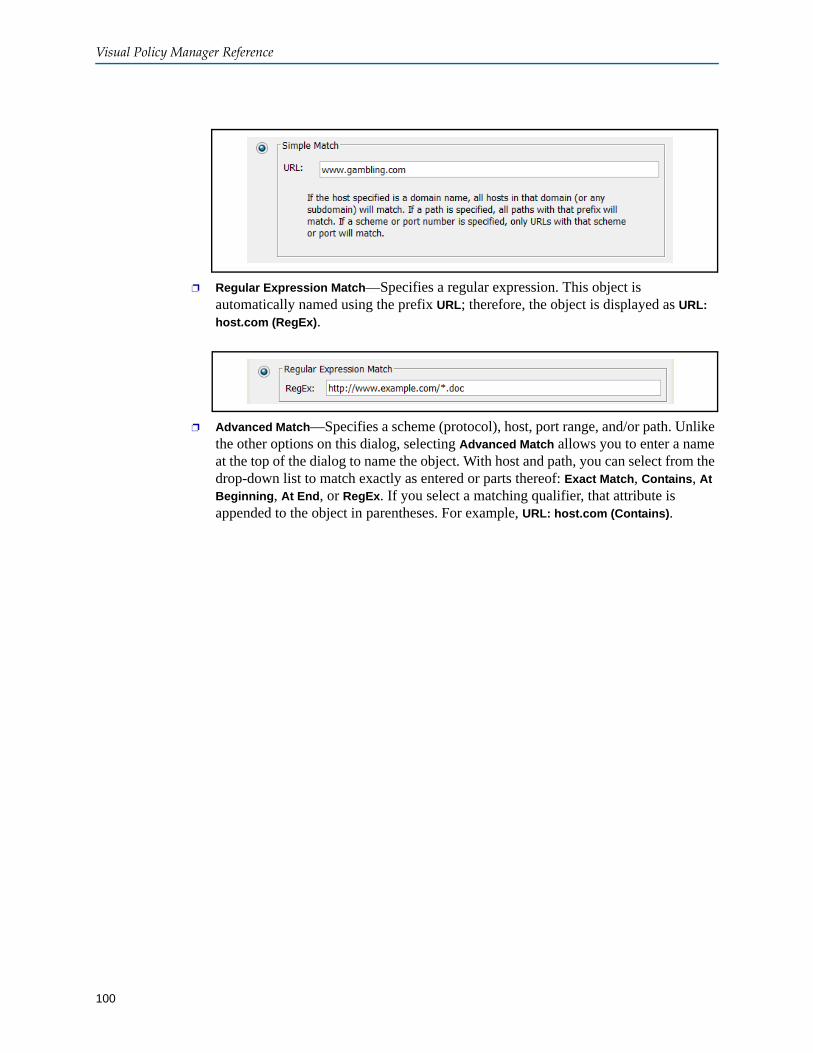
Visual Policy Manager Reference
100
❐ Regular Expression Match—Specifies a regular expression. This object is automatically named using the prefix URL; therefore, the object is displayed as URL:
host.com (RegEx).
❐ Advanced Match—Specifies a scheme (protocol), host, port range, and/or path. Unlike the other options on this dialog, selecting Advanced Match allows you to enter a name at the top of the dialog to name the object. With host and path, you can select from the drop-down list to match exactly as entered or parts thereof: Exact Match, Contains, At
Beginning, At End, or RegEx. If you select a matching qualifier, that attribute is appended to the object in parentheses. For example, URL: host.com (Contains).

101
Request URL ApplicationAllows you to create a rule that specifies an action for one or more Web applications.
Because a Web application pulls in content from multiple sources on the Web and is a collection of URLs that might belong to several different categories, this object gives you the flexibility to regulate access to all content associated with the application. For example, the application Facebook that belongs to the Social Networking category, includes URLs that belong to Email and Games categories.
This object allows you to define the behavior/rule when the URL in a user request matches the specified Web application. If you would like to create policy for a specific URL, use the "Request URL" object.
Request URL OperationAllows you to create a rule that allows or denies the user the ability to perform the defined operation; this object is only available in the Web Access layer. For example, block users from uploading attachments.
When you block an operation, URLs that support or perform that operation are blocked, the application itself is not blocked. For example, when you block users from uploading attachments, users in your network will be unable to upload attachments to Facebook, but they will be able to access Facebook and post comments or upload videos.
Visual Policy Manager Reference
102
If you would like to block all users from accessing Facebook or any other application, see "Request URL Application" . To block access to all social networking sites, see "Request URL Category" .
Request URL CategoryAllows you to allow or restrict access to an entire category of URLs. Based on the content filtering vendor that you have enabled, the relevant categories display in this object.
When you use this object, you can enforce access to all URLs that belong to the specified category. Each user request is checked against the content filter database for a category match, and evaluated for further action based upon the policy.
❐ Policy—Displays all current pre-defined and user created URL categories. This includes all category-related configurations created in the VPM, as well as in the Local and Central policy files (after being installed). Select and deselect categories as required.
You can also create new categories from this dialog, which is similar to the dialog accessed through the VPM Menu Bar as described in "Creating Categories" on page 202.
❐ YouTube—If you have enabled Blue Coat categories for YouTube™, the category list displays here. The categories are static. For more information, see “Filtering Web Content” in the SGOS Administration Guide.
Note: This feature is provided on an "as-is" basis. Blue Coat has no control of, and is not responsible for, information and content provided (or not) by YouTube. You are obligated to comply with all terms of use regarding the foregoing, including quotas that may be imposed by YouTube. Blue Coat shall not be liable for any discontinuance, availability or functionality of the features described herein.
❐ Blue Coat—If you have enabled Blue Coat Web Filter, the category list displays here.
❐ System—Displays hard-coded ProxySG configurations. These are not editable, but you can select or deselect them.
Create a policy category:
1. Select Policy; click Add. The Object Name dialog appears.
2. Name the category and click OK.
3. Drop the Policy list and select the created category; click Edit URLs. The Edit Locally Defined Category Object dialog appears.
4. Enter URLs appropriate for the content filter category you are creating; click OK.

103
5. Click OK.
Category Hierarchy Behavior
Once categories have been created, they can be selected and deselected as required. If you create sub-categories (a parent and child category hierarchy), the category selection behavior is the following:
❐ Selecting a parent category automatically selects all child categories if no child categories are already selected.
❐ Deselecting a parent category automatically deselects all child categories if all child categories are already selected.
❐ If one or more of the child categories are already selected or deselected, selecting or deselecting the parent category does not affect child categories—the status of selected or deselected remains the same.
This behavior applies to as many levels as you create.
Note: If one or more other administrators have access to the ProxySG appliance through other workstations and are creating categories either through VPM or with inline commands, consider that newly-created or edited categories are not synchronized until the policy is installed. When the policy is installed with VPM, the categories are refreshed. If confusion occurs, select the File > Revert to Existing Policy
on ProxySG Appliance option to restore the policy to the previous state and reconfigure categories.
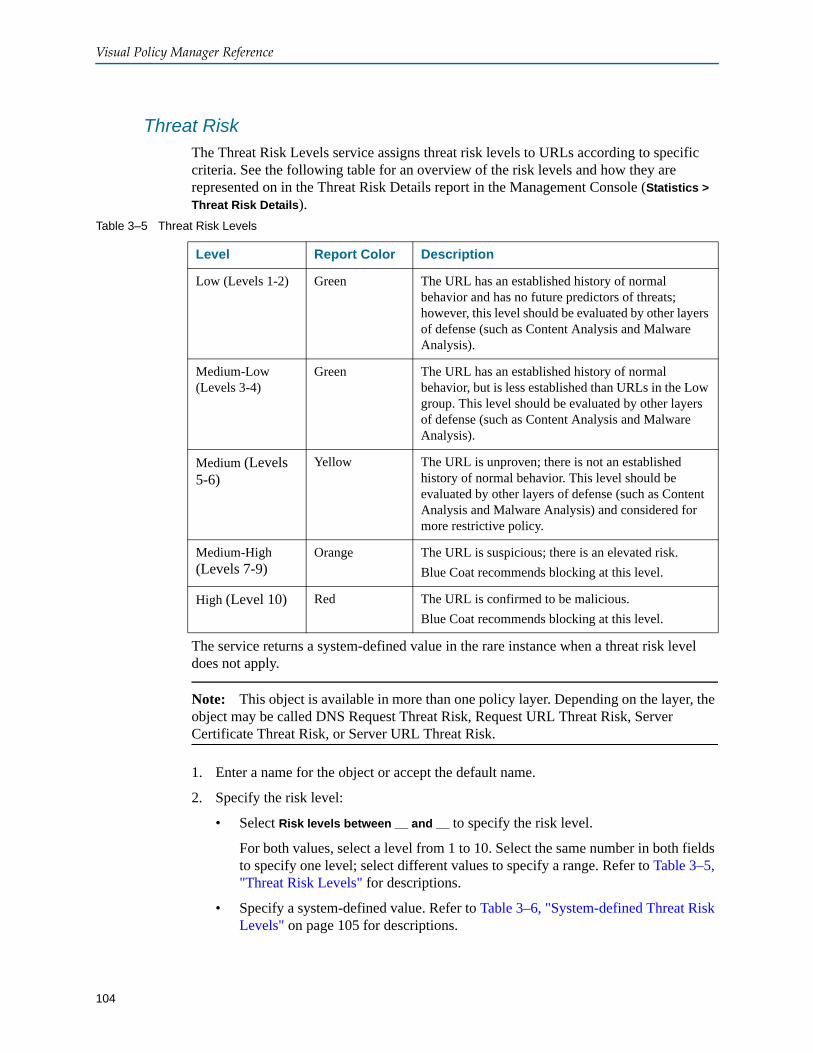
Visual Policy Manager Reference
104
Threat Risk The Threat Risk Levels service assigns threat risk levels to URLs according to specific criteria. See the following table for an overview of the risk levels and how they are represented on in the Threat Risk Details report in the Management Console (Statistics >
Threat Risk Details).
The service returns a system-defined value in the rare instance when a threat risk level does not apply.
Note: This object is available in more than one policy layer. Depending on the layer, the object may be called DNS Request Threat Risk, Request URL Threat Risk, Server Certificate Threat Risk, or Server URL Threat Risk.
1. Enter a name for the object or accept the default name.
2. Specify the risk level:
• Select Risk levels between __ and __ to specify the risk level.
For both values, select a level from 1 to 10. Select the same number in both fields to specify one level; select different values to specify a range. Refer to Table 3–5, "Threat Risk Levels" for descriptions.
• Specify a system-defined value. Refer to Table 3–6, "System-defined Threat Risk Levels" on page 105 for descriptions.
Table 3–5 Threat Risk Levels
Level Report Color Description
Low (Levels 1-2) Green The URL has an established history of normal behavior and has no future predictors of threats; however, this level should be evaluated by other layers of defense (such as Content Analysis and Malware Analysis).
Medium-Low (Levels 3-4)
Green The URL has an established history of normal behavior, but is less established than URLs in the Low group. This level should be evaluated by other layers of defense (such as Content Analysis and Malware Analysis).
Medium (Levels 5-6)
Yellow The URL is unproven; there is not an established history of normal behavior. This level should be evaluated by other layers of defense (such as Content Analysis and Malware Analysis) and considered for more restrictive policy.
Medium-High (Levels 7-9)
Orange The URL is suspicious; there is an elevated risk.
Blue Coat recommends blocking at this level.
High (Level 10) Red The URL is confirmed to be malicious.
Blue Coat recommends blocking at this level.

105
3. (Optional) Select Use Effective Threat Risk Level (if configured) if you want to override the assigned threat risk level. For information on the effective threat risk level, see "Set Effective Threat Risk Level" on page 179.
If no effective threat risk level is set, the assigned one is used.
4. Click OK to save the object.
CategoryThis object functions the same as "Request URL Category" on page 102, but is unique to the DNS Access Layer.
Server URLThis object is functions the same as the "Request URL" on page 99 object, but applies to a URL sent from the ProxySG appliance o a server. If the appliance is performing URL rewrites, the URL sent from the client might change, which requires another URL matching check.
Table 3–6 System-defined Threat Risk Levels
CPL Use for url.threat_risk.level=
VPM Use in Threat Risk Level Objects
Description
none Threat Risk Level not available
The URL does not have a threat risk level assigned to it and the request is not forwarded to WebPulse (or it has been forwarded and there is still no data), or the Threat Risk Levels service is disabled.
pending Threat Risk Level data pending background WebPulse analysis
No risk level is assigned to the URL on the appliance, but the appliance performed a WebPulse request in the background. Subsequent requests for the URL could match a result from the WebPulse cache.
unavailable Threat Risk Level database or service not accessible
A non-licensing problem exists with the BCWF database or with accessing the WebPulse service.
unlicensed Threat Risk Level feature not licensed
The Threat Risk Levels license is not valid.

Visual Policy Manager Reference
106
Server URL CategoryMatches the content categories of the URL that the ProxySG appliance sends for a user request. If a URL has been rewritten, the condition matches the categories of the rewritten URL instead of the requested URL.
Server CertificateAllows testing of server certificate attributes to be used by the proxy-to-server HTTPS connections. Select one of the options:
❐ Hostname: This is the hostname you want to match in the server certificate. After you enter the hostname, select from the dropdown list one of the following: Exact Match, Contains, At Beginning, At End, Domain, or Regex.
❐ Subject: This is the fully qualified subject name in the server certificate. After you enter the subject, select from the dropdown list one of the following: Exact Match, Contains, At Beginning, At End, Domain, or Regex.
Server Certificate CategoryFunctions the same as the "Request URL Category" on page 102 object, but the piece of information used for matching and categorizing is the hostname in the server certificate.
Server Negotiated CipherTests the cipher suites used in a proxy-to-server connection.
To specify a server-negotiated cipher:
1. In the Name field, enter a name for the object or accept the default.
2. Select one or more cipher codes valid for this rule.
3. Click OK.
Refer to the “Managing X.509 Certificates” chapter in the SGOS Administration Guide for information on the supported cipher suites.
Server Negotiated Cipher StrengthSpecifies the cipher strength between a proxy-to-server HTTPS connection.
To specify a server-negotiated cipher strength:
1. In the Name field, enter a name for the object or accept the default.
2. Select one or more of the strength options valid for this rule Export, High, Medium, or Low.
3. Click OK.
Low, Medium, and High strength ciphers are not exportable.

107
Server Negotiated SSL VersionSpecifies the SSL version between a proxy-to-server HTTPS connection.
To specify a server-negotiated SSL version:
1. In the Name field, enter a name for the object or accept the default.
2. Select one or more of the strength options valid for this rule SSLv2, SSLv3, TLSv1, TLSv1.1, or TLSv1.2.
3. Click OK.
File ExtensionsCreates a list of file extensions. The rule is triggered for content with an extension matching any on the list. You can create multiple lists that contain various extensions to use in different rules.
The File Extension object allows you to search the list of pre-defined extensions and add selected extensions to create a custom object. In the Find field, enter text strings and the object displays related file extensions based on text in the Extension column plus any text in the Description column. For example, you want to create an object that contains the streaming protocols.
You can edit or delete any object from the list. The VPM validates changes to any extension. For example, if you attempt to add an extension name that already exists (does not apply to descriptions), the VPM displays a failure message until you correct it. Also, if you attempt to remove an extension that is already referenced in a policy, a warning dialog displays.
To search and add existing extensions to the object:
1. In the Name field, enter a meaningful name for the object.
2. In the Find field, enter a search string. This example searches on the keyword apple, which displays three related streaming protocols.
1
2
3
Ctrl + click
or
Shift + click
4

Visual Policy Manager Reference
108
3. Use Control + left-click to select individual rows or Shift + left-click to select blocks of rows.
4. Click Add to move the selections to the File Extensions area. Once a file extension has been added, select it and click Remove to move it out of the object.
5. Click OK to create the object.
Creating a New Extension
If the File Extension object does not contain a type that you require, you can create a new extension.
To create a new extension:
1. Click New; a line displays at the end of the list, with the cursor inserted in the Extension name cell.
2. Enter a name for the new extension. If you enter lower-case text, the text switches to upper-case after you leave the cell.
3. (Optional) Press the Tab key to move to the Description field (or double-click the field if you have already moved out of the row). Notice that the object automatically moves the object to its rightful position in the alphabetical order. Enter a description.
4. Add the new extension to the object and click OK.
Editing Hotkeys
❐ Tab:
• Edit mode (cursor in field): Alternates between two columns of the same editing window.
• Read mode: Moves focus to next cell (horizontal first, then vertical).
❐ Escape:
• Edit mode: Cancels changes and exits edit mode.
• Read mode: No affect.

109
❐ Enter:
• Edit mode: Saves changes to the cell and exits edit mode.
• Read mode: Moves to next row.
❐ Delete:
• Edit mode: Deletes a character or highlighted text.
• Read mode: Deletes selected text.
HTTP MIME TypesCreates a list of HTTP MIME content types. The rule is triggered for content matching any on the list. You can create multiple lists that contain various MIME types to use in different rules. For example, create a list called MicrosoftApps, and select MIME types application/vnd.ms-excel, application/vnd.ms-powerpoint, application/vnd.ms-project, and application/vnd.works.
Response CodeSpecifies the rule applies to content responses containing a specific HTTP code. Select a code from the drop-down list. You can name the rule object or accept the default name.
Response HeaderSpecifies the rule applies to content responses containing a specific header. Blue Coat supplies a list of standard headers, but you can also enter a custom header.
To specify a response header:
1. In the Name field, enter a custom name or leave as is to accept the default.
2. From the Show drop-down list select the viewing field from All to Standard or Custom, as desired. Standard displays only the default standard headers. Custom displays any admin-defined headers that exist.
3. From the Header Name drop-down list, select a standard or custom header.
Note: If you require a MIME type not contained in this list, use a Request URL object that uses the At End matching criteria.
1 2 3
4

Visual Policy Manager Reference
110
4. In the Header Regex field, enter the header string this rule applies to.
Response DataSpecifies the rule applies to content responses containing specific regular expressions.
To specify a regular expression header:
1. In the Name field, enter a custom name or leave as is to accept the default.
2. In the RegEx to match field, enter the regular expression string to match.
3. In the Number of bytes to examine field, enter how many object bytes are scanned for the match.
4. Click OK.
ICAP Respmod Response HeaderAllows you to create a condition that inspects ICAP RESPMOD response headers and perform a regular expression match.
To specify the header to match:
1. In the Name field, enter a custom name or leave as is to accept the default.
2. From the Header Name menu, specify the name of the header to inspect.
1
2
3

111
Before you add a header name, the menu is empty. Any header names you add are saved in the list so you can select them in the future.
3. In the Regex field, enter the pattern to match.
4. Click OK.
DNS Response IP Address/SubnetSpecifies the client IPv4 or IPv6 address, an IPv4 address with one or more wildcards, or a range of IP addresses in a network; an optional subnet mask (for IPv4) or prefix length (for IPv6).
Using an IP Address Range
For usage information, refer to the Knowledge Base article:
http://bluecoat.force.com/knowledgebase/articles/Solution/000010037
Using Wildcards
For usage information, refer to the Knowledge Base article:
http://bluecoat.force.com/knowledgebase/articles/Solution/000010950
The policy defined in this rule only applies to DNS responses containing this address or addresses within this subnet. This object is automatically named using the prefix DNS; for example, DNS: 1.2.3.4/255.255.0.0.
RDNS Response HostSpecifies a reverse DNS response hostname resolved in the reverse lookup of a client IP address. Enter the host name and select matching criteria. This object is automatically named using the prefix RDNS; for example, RDNS: host.com. If you select a matching qualifier, that attribute is appended to the object in parentheses. For example, RDNS:
host.com (RegEx).
DNS Response CNAMESpecifies the rule applies to DNS CNAME responses matching a given hostname. Enter the host name and select matching criteria. This object is automatically named using the prefix DNS CNAME; therefore, the object is displayed as DNS CNAME: host.com.
DNS Response CodeSpecifies the rule applies to DNS responses containing a specific DNS Response code. Select one or more codes from the list. You can name the rule object or accept the default name.
Server Connection DSCPTests the inbound differentiated service code point (DCSP) value of primary server-to-proxy connections. By testing DCSP bits (in the IP header), additional policy dictates how to handle traffic associated with the type of service.

Visual Policy Manager Reference
112
To specify DSCP values to test against inbound server connections:
1. In the Name field, enter a name for the object or accept the default. This example creates an object that tests for an IP Precedence of 2 or any Assured Forwarding Class (AFC) of type 2 (for low, medium, and high drop rates).
2. Select IP Precedence values (denoted by CS) and Assured Forwarding Classes (Denoted by AF) as required).
3. (Optional) Rather than select Precedence and AFC values, enter a DSCP value range. The valid range is 0 to 63. Blue Coat does not recommend this option. Most applications fit into one of the defined values.
For conceptual information about configuring the ProxySG to manipulate traffic based on type of service, refer to "Managing QoS and Differentiated Services" on page 283.
Resolved CountryThe geographical location of the IP address of the specific host from which the appliance retrieves content for the response.
For detailed information on this policy gesture and usage examples, refer to the supplier.country= property in the Content Policy Language Reference.
1. In the Name field, enter a name for the object or accept the default.
2. Specify the following as needed:
• Under Locations, select one or more license statuses.
• In the list of countries, select the countries you want to add. Optionally, type a string in the Filter field to select from a smaller list.
The Selected Locations list displays the license statuses and countries you selected.
3. Click OK to save your changes.
WebEx Site
Specifies the WebEx site to allow or deny connections to.
Combined Destination ObjectsAllows you to create an object that combines different destination types. Refer to "Using Combined Objects" on page 196.
Destination Column/Policy Layer MatrixThe following matrix lists all of the Destination column objects and indicates which policy layer they apply to.

113
Object Admin Auth
Admin Acc
DNS Acc
SOCKS Auth
SSL Int
SSL Acc
Web Auth
Web Acc
Web Cont
Fwding
Destination IP Address/Subnet x x x x x x
Destination Port x x x x x x
Request URL x x x x x x
Request URL Application x x x
Request URL Operation x
Request URL Category x x x x x
Category x
Server URL x x
Server URL Category x
Server Certificate x x
Server Certificate Category x x
Server Negotiated Cipher x
Server Negotiated Cipher Strength x
Server Negotiated SSL Version x
File Extensions x x
HTTP MIME Types x x
Apparent Data Type x
Response Header x
Response Code x
Response Data x
DNS Response IP Address/Subnet
x
RDNS Response Host x
DNS Response CNAME x
DNS Response Code x
ICAP Respmod Response Header x
Server Connection DSCP x x x
DNS Request Threat Risk x
Request URL Threat Risk x x x x x
Server Certificate Threat Risk x x

Visual Policy Manager Reference
114
Server URL Threat Risk x
WebEx Site x
Combined Objects x x x x x
Object Admin Auth
Admin Acc
DNS Acc
SOCKS Auth
SSL Int
SSL Acc
Web Auth
Web Acc
Web Cont
Fwding
115
Service Column Object ReferenceA service object specifies a service type, such as a protocol, that is evaluated by the policy. Not all policy layers contain the same service objects.
AnyApplies to any service.
Using HTTP Transparent AuthenticationThis is a static object. The rule applies if the service is using HTTP transparent authentication.
Virus DetectedThis is a static object. The rule applies if ICAP scanning detects a virus.
Request ForwardedThis is a static object.
Client Certificate RequestedThis is a static object. Checks whether or not the OCS requests for client certificate authentication. The ProxySG appliance returns an exception page is sent to the browser when SSL proxy intercept is enabled and a client certificate is requested by the OCS; or you can configure the appliance to tunnel SSL over TCP when a protocol error occurs.
Client ProtocolSpecify the client protocol types and subsets.
From the first drop-down list, select a type: CIFS, Endpoint Mapper, FTP, HTTP, HTTPS, Instant Messaging, P2P, Shell, SOCKS, SSL, Streaming, TCP Tunneling, or WebSocket.
The second drop-down list allows you to select a protocol subset (the options available depend on the selected protocol):
❐ All—Applies to all communication using the specified client protocol.
❐ Pure—Applies if no other protocol is tunneled over the specified client protocol.
❐ Over—Applies if the client protocol communicates through the specified transport method.
Important: Because of character limitations required by the generated CPL, only alphanumeric, underscore, dash, ampersand, period, or forward slash characters can be used to define a service object name.
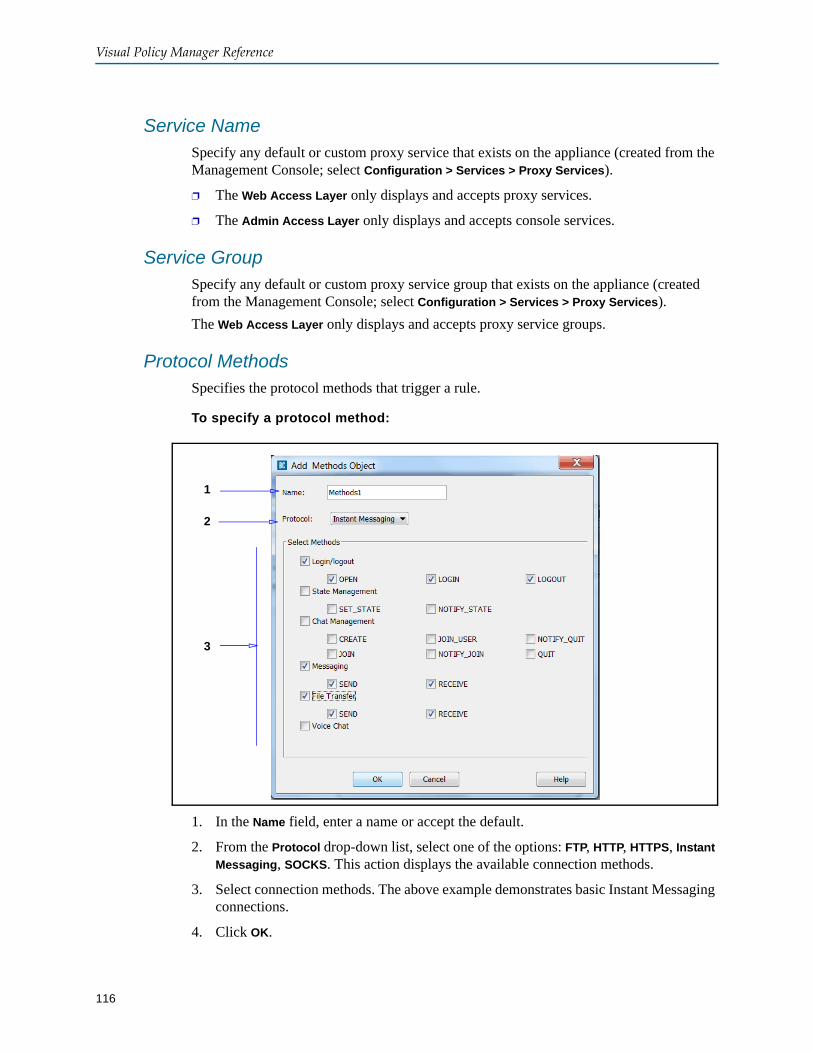
Visual Policy Manager Reference
116
Service NameSpecify any default or custom proxy service that exists on the appliance (created from the Management Console; select Configuration > Services > Proxy Services).
❐ The Web Access Layer only displays and accepts proxy services.
❐ The Admin Access Layer only displays and accepts console services.
Service GroupSpecify any default or custom proxy service group that exists on the appliance (created from the Management Console; select Configuration > Services > Proxy Services).
The Web Access Layer only displays and accepts proxy service groups.
Protocol MethodsSpecifies the protocol methods that trigger a rule.
To specify a protocol method:
1. In the Name field, enter a name or accept the default.
2. From the Protocol drop-down list, select one of the options: FTP, HTTP, HTTPS, Instant
Messaging, SOCKS. This action displays the available connection methods.
3. Select connection methods. The above example demonstrates basic Instant Messaging connections.
4. Click OK.
1
2
3

117
SSL Proxy ModeSpecifies the deployment mode of the SSL proxy: HTTPS Forward Proxy requests, HTTPS
Reverse Proxy requests, Unintercepted SSL requests. This objects allows you to apply policy to a subset of SSL traffic going through the ProxySG appliance. For example, this object can be used to enforce strong cipher suites for HTTPS reverse proxy requests while, allowing all ciphers suites for HTTPS forward proxy requests.
Streaming Content TypeSpecifies streaming protocols.
To specify streaming protocols:
1. In the Name field, enter a name for the object or accept the default.
2. Select All Streaming Content (all protocols become selected), or one or more streaming protocols.
3. Click OK.
ICAP Error CodeDefines an object that recognizes one or more ICAP error codes returned during a malware scan. The rule applies if the scan returns the specified errors.
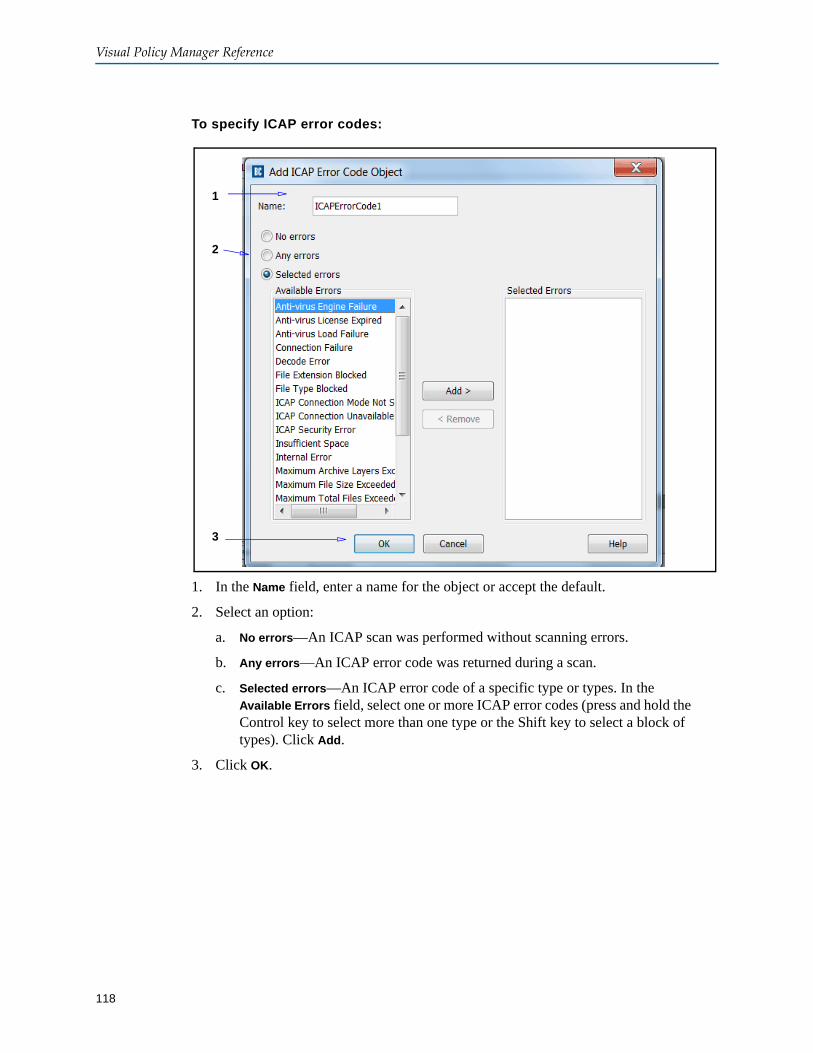
Visual Policy Manager Reference
118
To specify ICAP error codes:
1. In the Name field, enter a name for the object or accept the default.
2. Select an option:
a. No errors—An ICAP scan was performed without scanning errors.
b. Any errors—An ICAP error code was returned during a scan.
c. Selected errors—An ICAP error code of a specific type or types. In the Available Errors field, select one or more ICAP error codes (press and hold the Control key to select more than one type or the Shift key to select a block of types). Click Add.
3. Click OK.
1
2
3

119
Health CheckThis condition tests whether the current transaction is a health check transaction. Optionally, the condition tests whether the transaction is that of a specific health check.
To create a Health Check object:
1. Select one of the following:
• Not a health check: Transaction is not identified as a health check.
• Any Health Check: A health check service of any type was matched.
• Any of the selected health checks below: A health check of the selected types was matched.
2. If you selected Any of the selected health checks below:
a. Select one or more error types (use Control + Left-click to highlight multiple errors).
b. Click Add to move the errors to the Selected field.
3. Name the object or accept the default name.
4. Click OK.
Health StatusThis condition tests whether the target of the specified health check is health or sick.
Combined Service ObjectsAllows you to create an object that combines different service types. Refer to "Using Combined Objects" on page 196.
1
2a
2b

Visual Policy Manager Reference
120
Service Column/Policy Layer MatrixThe following matrix lists all of the Service column objects and indicates which policy layer they apply to.
Object Admin Auth
Admin Acc
DNS Acc
SOCKS Auth
SSL Int
SSL Acc
Web Auth
Web Acc
Web App
Web Cont
Fwding
Using HTTP Transparent Authentication
x
Request Forwarded x
Virus Detected x
Client Protocol x x x x
Service Name x x
Service Group x
Protocol Methods x x x
SSL Proxy Mode x
Streaming Content Type x
ICAP Error Code x
Health Status x x x
Health Check x x
Client Certificate Requested x
Combined Objects x x x x

121
Time Column Object ReferenceA time object specifies a block of time or time trigger that determines client access regarding other parameters in the rule (such Web sites and content types). Currently, the Time object is only applicable to the Web Access Layer.
AnyApplies anytime.
TimeSpecifies the time restrictions.
To configure time restrictions:
1. In the Name field, enter a name for the object or leave to accept the default.
2. Select Use Local Time Zone or Use UTC Time Zone.
Local time sets the rule to follow the appliance’s internal clock. UTC sets the rule to use the Universal Coordinated Time (also known as Greenwich Mean Time or GMT).
1
2
3
4
5
6
7

Visual Policy Manager Reference
122
In the Between section, enter a time range in 24-hour notation. The range can be contained within one 24-hour calendar day, or overlap days. For example, configuring the time to range from 22:00 to 06:00 sets a limit from 10 at night to 6 the following morning.
3. To specify a day of the week restriction, select Enable beside the Only on the following
days of the week section and select one or more days in.
4. To specify a date restriction, select Enable beside the Only between the following days
of the month (inclusive) section and select the dates, which are numbered from 01 to 31. To select a single date, select the same number in both fields. For example, selecting 22 and 22 specifies the rule to apply only the 22nd day of every month.
5. To specify a restriction that spans one or more months, select Enable beside the Only
between the following days of the year (inclusive) section and elect the month and day ranges. This calendar restriction applies every year unless the restriction is modified.
Overlapping months is allowed, similar to the behavior of day ranges in Step 3.
6. To specify a one-time only restriction, select Enable beside the Only between the
following dates (inclusive) section and select the year, month, and day ranges. This calendar restriction applies only during the time specified and does not repeat.
7. Click OK.
Combined Time ObjectAllows you to combine a time object that adheres to multiple time restrictions. See "Using Combined Objects" on page 196.
Time Column/Policy Layer MatrixThe following matrix lists all of the Time column objects and indicates which policy layer they apply to.
Object Admin Auth
Admin Acc
DNS Acc
SOCKS Auth
SSL Int
SSL Acc
Web Auth
Web Acc
Web App
Web Cont
Fwding
Time x x
Combined Objects x x
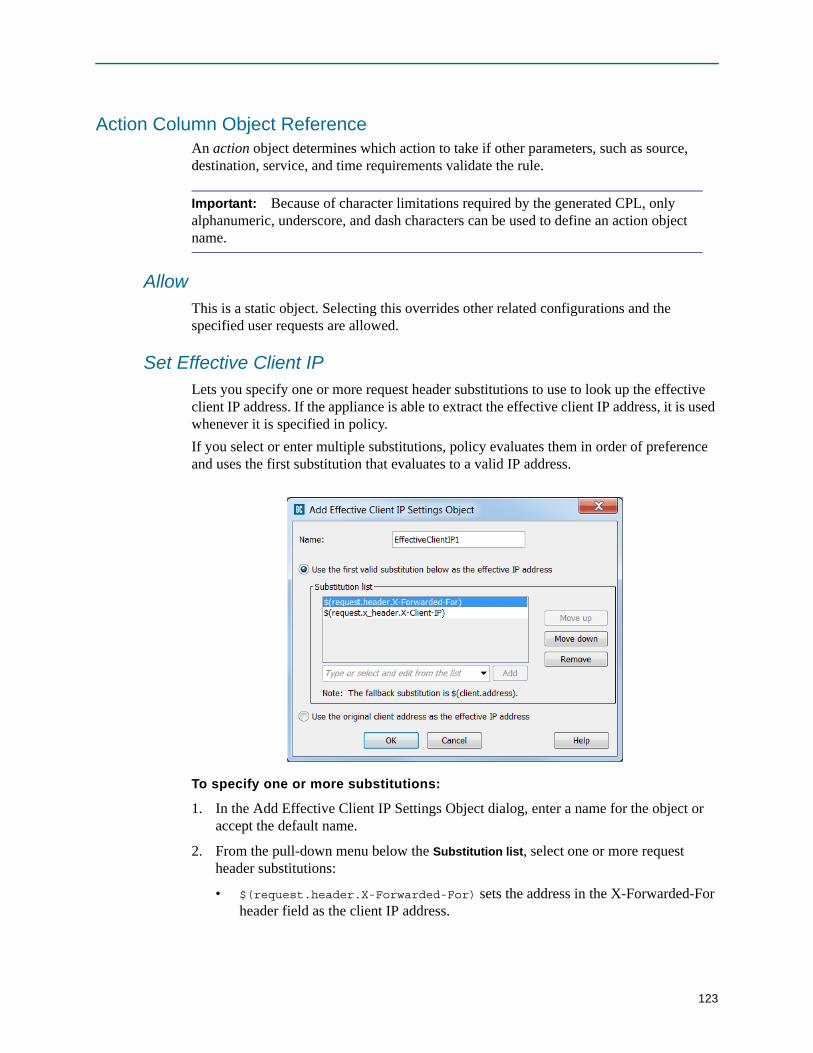
123
Action Column Object ReferenceAn action object determines which action to take if other parameters, such as source, destination, service, and time requirements validate the rule.
AllowThis is a static object. Selecting this overrides other related configurations and the specified user requests are allowed.
Set Effective Client IPLets you specify one or more request header substitutions to use to look up the effective client IP address. If the appliance is able to extract the effective client IP address, it is used whenever it is specified in policy.
If you select or enter multiple substitutions, policy evaluates them in order of preference and uses the first substitution that evaluates to a valid IP address.
To specify one or more substitutions:
1. In the Add Effective Client IP Settings Object dialog, enter a name for the object or accept the default name.
2. From the pull-down menu below the Substitution list, select one or more request header substitutions:
• $(request.header.X-Forwarded-For) sets the address in the X-Forwarded-For header field as the client IP address.
Important: Because of character limitations required by the generated CPL, only alphanumeric, underscore, and dash characters can be used to define an action object name.
Visual Policy Manager Reference
124
• $(request.x_header.X-Client-IP) sets the address in the X-Client-IP header field as the client IP address.
• $(request.header.Client-IP) sets the address in the Client-IP header field as the client IP address.
Alternatively, you can select a substitution and modify it, or enter a new one.
3. Click Add. The substitution is added to the list.
4. (Optional) Repeat step 2 to add more substitutions.
5. (If there are multiple substitutions) Use the Move up and Move down buttons to arrange the substitutions in order of preference. Policy evaluates the substitutions in this order and stops after it evaluates to a valid IP address.
6. Click OK.
To use the original client address:
1. In the Add Effective Client IP Settings Object dialog, enter a name for the object or accept the default name.
2. Select Use the original client address as the effective client IP address.
3. Click OK.
DenyThis is a static object. Selecting this overrides other related configurations and denies the specified user requests.
Deny (Content Filter)This is a static object. Selecting this overrides other related configurations and denies the specified user requests; use this object when you want the logged exception to indicate a Content Filter verdict was the reason for denial.
Force DenyThis is a static object. Forces a request to be denied, regardless if rules in subsequent layers would have allowed the request.
Force Deny (Content Filter)This is a static object. Forces a request to be denied, regardless if rules in subsequent layers would have allowed the request. In the access logs, the Content Filter moniker allows you to identify policy denies based on content filtering versus other reasons.
Allow Content From Origin ServerThis is a static object.

125
Allow Access to ServerThis is a static object. The outgoing request to the origin server is allowed. Selecting this overrides other related deny policy configurations.
Connect Using ADN When Possible/Do Not Connect Using ADNThese are static objects. Connect Using ADN When Possible instructs the ProxySG appliance to use the byte caching tunnels (used in Application Delivery Network (ADN) deployments). Do Not Connect Using ADN prevents the use of tunnel connections.
Allow Read-Only AccessThis is a static object. Grants full access to view data on the appliance.
Allow Read-Write AccessThis is a static object. Grants full access to view and manipulate data on the appliance.
Do Not AuthenticateThis is a static object. Selecting this overrides other configurations and the specified users are not authenticated when requesting content.
Do Not Authenticate (Forward Credentials)This is a static object. Selecting this action forwards credentials upstream instead of authenticating on the appliance.
AuthenticateCreates an authentication object to verify users. An authentication realm must exist on the ProxySGappliance to be selected through VPM.
Note: In the SOCKS Authentication policy layer, the object is SOCKS Authenticate.

Visual Policy Manager Reference
126
To create an Authenticate object:
1. In the Name field, enter a name for the object or leave as is to accept the default.
2. From the Realm drop-down list, select an authentication realm, which must already exist on the appliance.
3. Optional (in the Web Authentication policy layer only): from the Mode drop-down list, select a mode. The mode determines the way the appliance interacts with the client for authentication specifying the challenge type and the accepted surrogate credential:
• Auto—The default; the mode is automatically selected, based on the request. Selects among proxy, origin-IP, and origin-IP-redirect, depending on the type of connection (explicit or transparent) and the transparent authentication cookie settings.
• Form Cookie—For forms-based authentication: cookies are used as surrogate credentials. The cookies are set on the OCS domain only, and the user is presented with the form for each new domain. This mode is most useful in reverse proxy scenarios where there are a limited number of domains.
• Form Cookie Redirect—The user is redirected to the authentication virtual URL before the form is presented. The authentication cookie is set on both the virtual URL and the OCS domain. The user is only challenged when the credential cache entry expires.
• Form IP—The user’s IP address is used as a surrogate credential. The form is presented whenever the user’s credential cache entry expires.
• Form IP Redirect—This is similar to Form IP except that the user is redirected to the authentication virtual URL before the form is presented.
• Proxy—For explicit forward proxies: the appliance uses an explicit proxy challenge. No surrogate credentials are used. This is the typical mode for an authenticating explicit proxy.
1
2
3
4
5
127
• Proxy IP—The appliance uses an explicit proxy challenge and the client's IP address as a surrogate credential.
• Origin—The appliance acts like an OCS and issues OCS challenges. The authenticated connection serves as the surrogate credential.
• Origin IP—The appliance acts like an OCS and issues OCS challenges. The client IP address is used as a surrogate credential.
• Origin Cookie—For transparent proxies: for clients that understand cookies but do not understand redirects; the appliance acts like an origin server and issues origin server challenges. The surrogate credential is used.
• Origin Cookie Redirect—For transparent forward proxies: the client is redirected to a virtual URL to be authenticated, and cookies are used as the surrogate credential. The appliance does not support origin-redirects with the CONNECT method.
• Origin IP Redirect—Significantly reduces security; only useful for when clients have unique IP addresses and do not understand cookies (or you cannot set a cookie). Provides partial control of transparently intercepted HTTPS requests. The client is redirected to a virtual URL to be authenticated, and the client IP address is used as a surrogate credential. The appliance does not support origin-redirects with the CONNECT method.
• SG2—The mode is selected automatically, based on the request using the SGOS 2.x-defined rules.
4. (Optional) If you selected a Form mode in Step 3, the Authentication Form, New Pin
Form, and Query Form drop-down lists becomes active.
• Authentication Form—When forms-based authentication is in use, this property selects the form used to challenge the user.
• New Pin Form—When forms-based authentication is in use, this selects the form to prompt user to enter a new PIN.
• Query Form—When forms-based authentication is in use, this selects the form to display to the user when a yes/no questions needs to be answered.
In most deployments, the default form settings should be adequate. However, if in your enterprise you have customized authentication forms configured (in the ProxySG Management Console, select Configuration > Authentication > Forms), you can select them from the drop-down lists. For example, HR_PIN.
5. Click OK.
Users are prompted to provide a valid user name and password.
Note: The New Pin Form and the Query Form are only used with RSA SecurID authentication.
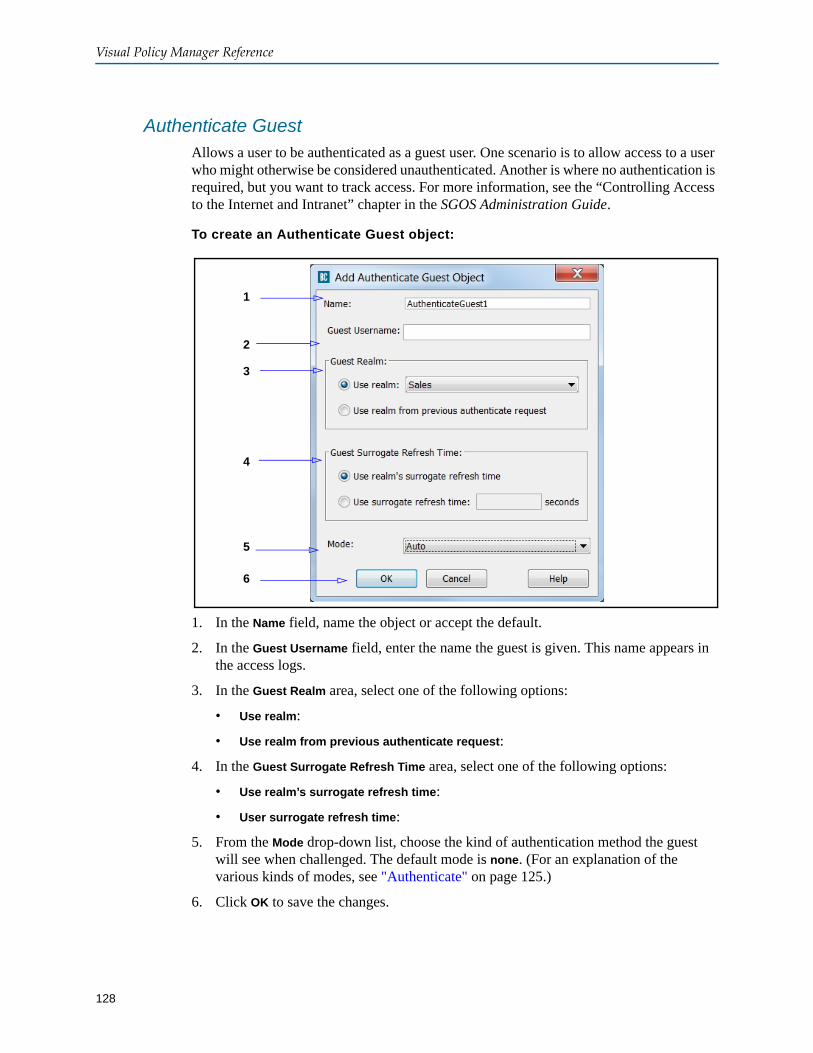
Visual Policy Manager Reference
128
Authenticate GuestAllows a user to be authenticated as a guest user. One scenario is to allow access to a user who might otherwise be considered unauthenticated. Another is where no authentication is required, but you want to track access. For more information, see the “Controlling Access to the Internet and Intranet” chapter in the SGOS Administration Guide.
To create an Authenticate Guest object:
1. In the Name field, name the object or accept the default.
2. In the Guest Username field, enter the name the guest is given. This name appears in the access logs.
3. In the Guest Realm area, select one of the following options:
• Use realm:
• Use realm from previous authenticate request:
4. In the Guest Surrogate Refresh Time area, select one of the following options:
• Use realm’s surrogate refresh time:
• User surrogate refresh time:
5. From the Mode drop-down list, choose the kind of authentication method the guest will see when challenged. The default mode is none. (For an explanation of the various kinds of modes, see "Authenticate" on page 125.)
6. Click OK to save the changes.
1
2 3
4
5
6

129
Add Default GroupA default group can be assigned to any realm. You can assign users to these groups, which are valid when authorization succeeds, fails, or not attempted. Default groups support guest users, which are users who are not authenticated against a realm, but are given a guest name and allowed access to specific information. For example, you create a default group that all guest users are assigned to, which makes it easier to track and log.
Default Groups are configured the same as described in "Group" on page 77.
Force AuthenticateForces the user to authenticate even though the request is going to be denied for reasons that do not depend on authentication. This action is useful to identify a user before the denial so that the username is logged along with the denial. Refer to the SGOS Administra-tion Guide for a description of the fields in this object.
Bypass CacheThis is a static object. Prevents the cache from being queried when serving a proxy request, and prevents the response from the origin server from being cached.
Do Not Bypass CacheThis is a static object. The ProxySG appliance always checks if the destination is cached before going to the origin server; also, the content is cached if cacheable.
Bypass DNS CacheThis is a static object. Prevents the request from querying the DNS cache list of resolved lookup names or addresses.
Do Not Bypass DNS CacheThis is a static object. The ProxySG appliance always queries the DNS cache list of resolved lookup names or addresses.
Allow DNS From Upstream ServerThis is a static object. Allows the ProxySG appliance to send requests for data not currently cached to DNS servers.
Serve DNS Only From CacheThis is a static object. Instructs the ProxySG appliance to only serve a DNS request from content that is already cached.
Note: In the SOCKS Authentication policy layer, the object is Force SOCKS Authenticate.

Visual Policy Manager Reference
130
Enable/Disable DNS ImputingThese are static objects. If DNS imputing is enabled, the ProxySG appliance appends the suffixes in the DNS imputing list to host names looked up when the original name is not found.
Disable/Do Not Disable Fast-Caching in Windows Media ClientThese are static objects. When disabled, the ProxySG appliance does not utilize fast-caching with a Windows Media Client.
Check/Do Not Check AuthorizationThese are static objects. These actions control whether or not the ProxySG appliance forces a request to be sent to an upstream server every time to check authorization, even if the content is already cached. The check action is not usually required for upstream origin content servers performing authentication, as the appliance automatically tracks whether content required authentication in each case. However, it can be required when an upstream proxy is performing proxy authentication because of the way some proxies cache credential information, causing them not to reliably challenge every request. When requests are directed to an upstream proxy which operates in this manner, enabling Check Authorization ensures that all such requests are properly authorized by the upstream proxy before the content is served from the local cache.
Always VerifyThis is a static object. Cached content is always verified for freshness for the sources, destinations, or service specified in the rule. For example, the CEO and Executive Staff always require content to be the most recent, but everyone else can be served from the cache.
Use Default VerificationThis is a static object. Overrides the Always Verify action and instructs the ProxySG appliance to use its default freshness verification.
Block/Do Not Block PopUp AdsThese are a static objects. Blocks or allows pop up windows. ProxySG appliance recommends creating separate Web Access Layers that only contain pop up blocking actions. Furthermore, many Web applications require pop up windows. As it is unlikely that your Intranet contains pages that pop up unwanted advertising windows, Blue Coat recommends disabling pop up blocking for your Intranet. For example:
❐ Web Access Layer rule 1: Specify the Intranet IP address and subnet mask in the Destination column and select Do Not Block Popup Ads in the Action column.
❐ Web Access Layer rule 2: Select Block Popup Ads in the Action column.

131
As you continue to modify policy, you can add more policy layers to block or allow specific IP addresses, but the policy layer as defined in the Web Access Layer rule 2 above must always be positioned last. Blocking pop up ads is the default if a previous policy rule does not trigger.
For more concept information about pop up windows, see "Blocking Pop Up Windows" on page 240.
Force/Do Not Force IWA for Server AuthThese are static objects. When configured for explicit proxy, Internet Explorer (IE) does not support an IWA challenge from an origin server. If Force IWA for Server Auth is applied, the ProxySG appliance converts the 401-type server authentication challenge to a 407-type proxy authentication challenge, which IE supports. The appliance also converts the resulting Proxy-Authentication headers in client requests to standard server authorization headers, which allows an origin server IWA authentication challenge to pass through when IE is explicitly proxied through the appliance.
Log Out/Do Not Log Out Other Users With Same IPThese are static objects. If more than one user is logged in at the IP address of the current transaction, this property logs out all users from the current IP address except the user of the current transaction.
Log Out/Do Not Log Out UserThese are static objects. This property logs out the login referenced by the current transaction.
Log Out/Do Not Log Out User’s Other SessionsThese are static objects. If a user is logged in at more than one IP address, this property logs out the user from all IP address except the IP address of the current transaction.
Tunnel/Do Not Tunnel IM TrafficThese are static objects. Specifies whether not IM traffic is tunneled, which means it is not subjected to policy checks. You might elect to tunnel unsupported IM clients (use with the IM User Agent Unsupported object in the Source column for this rule).
Enable/Disable ICAP MirroringICAP Mirroring allows you to serve content for known, difficult-to-handle data types (such as stock tickers or media streams without end) directly to users, without needing to wait for a portion of (or the complete) stream to be downloaded.
ICAP Mirroring can be used with any source or destination in policy to match an HTTP request. A Web Content layer rule to specify the ICAP service is also required to send response data to the ICAP server.
Visual Policy Manager Reference
132
If the ICAP server scans the data and identifies an issue (virus, malware detected, or a DLP rule is triggered) while the user is still receiving the data, their connection will be reset by the ProxySG appliance and an entry detailing this action is added to the HTTP access log. If the user has downloaded the content in its entirety before the ICAP server responds with a "virus found" or "DLP violation" message, the detection will be logged without affecting the user.
Support/Do Not Support Persistent Client RequestsThese are static objects. Allowing persistent connections to the ProxySG appliance from clients reduces load improves the all-around performance of the network. This object specifies whether or not to allow persistent server connections.
Support/Do Not Support Persistent Server RequestsThese are static objects. If the back-end authentication authority (such as LDAP, RADIUS, or the BCAAA service) receives large numbers of requests, you can configure the ProxySG appliance to use persistent connections to the server. This dramatically reduces load on the back-end authentication authority and improves the all-around performance of the network. This object specifies whether or not to allow persistent server connections.
Require/Do Not Require Client CertificateThese are static objects. For the SSL Proxy, specifies whether a client (typically a browser) certificate is required or not.
❐ In forward proxy deployments, this is used to either request consent certificates or to support certificate realm authentication.
❐ In reverse proxy deployments, client certificates are requested for certificate realm authentication.
Also, see "Set Client Certificate Validation" on page 136.
Trust/Do Not Trust Destination IPThese are static objects. The Trust Destination IP object instructs the ProxySG appliance to trust the IP address sent by the client, forgoing a DNS lookup. This is designed for transparent and ADN deployments. Conversely, the Do Not Trust Destination IP instructs the appliance to always perform a DNS lookup.
DenyThis object provides the same functionality as the "Force Deny" on page 124 object, but provides the option to re-allow authentication and insert substitution strings.
Return ExceptionAllows you to select exception types and associate a custom message, if desired. Blue Coat provides a list of standard exceptions, but VPM also accepts user-defined values.

133
To create a Return Exception object:
1. In the Name field, enter a name for the object or leave as is to accept the default.
2. Perform one of the following:
a. Standard exception type: select one from the Built-in exception drop-down list.
b. Custom exception (which already must be defined on the ProxySG appliance) type: select one from the User-defined exception drop-down list.
3. Optional: Select Force exception even if later policy would allow request to supersede other policy that applies to this request.
4. Optional: Select Allow re-authentication to allow the user to re-enter credentials should the first attempt fail.
5. Optional: in the Details field, enter a message that is displayed along with the summary and exception ID on the exception page displayed to the user when the exception is returned. Click Edit to display the Select the Rewrite String dialog, which allows you add ELFF and CPL strings to the exception.
The above example creates an object named DNSException2 that upon a DNS server failure returns a message to the user instructing them to contact their support person.
To create custom exceptions, see "Defining Exceptions" on page 250.
Return RedirectAborts the current transaction and forces a client request to redirect to a specified URL. For example, used to redirect clients to a changed URL; or redirecting a request to a generic page stating the Internet access policy. Applies only to HTTP transactions..
1
2a
2b
3
4
5
Note: Internet Explorer ignores redirect responses from FTP over HTTP requests. To prevent issues, do not use redirect when url.scheme=ftp.
Visual Policy Manager Reference
134
If the URL that you are redirecting the browser to also triggers a redirect response from your policy, then you can put the browser into an infinite loop.
This object supports the following redirect codes:
❐ 301 (Moved Permanently)—The ProxySG appliance redirects this and all future requests to the specified URL. Clients with link editing capabilities should automatically re-link references to one or more of the new references returned by the server. Unless indicated, this response is cacheable. For example, an internal resource Web page moved to a new server and all requests must go to that location.
❐ 302 (Found)—This is the default. The requested resource temporarily resides in a different location. For example, you are replacing a server and clients must go to an alternate location during the downtime. Clients continue to use the original URI for future requests. This response is only cacheable if indicated by a Cache-Control or Expires header field.
❐ 307 (Temporary Redirect)—Similar to 302; the request connects with using the specified URL, but future requests can still be made from the original URL. This code was introduced in HTTP/1.1.
In the Name field, enter a name for the object (or accept the default); select the return redirect HTTP code; in the URL field, enter the redirect destination URL.
Example
An object that redirects clients to a PDF policy statement file (in conjunction with a destination policy object).
Time QuotaRestrict the amount of time (quota amount) that users can spend on the Internet or Internet resource during a specific period of time (quota period). You can optionally display an exception page to users if they reach a specific percentage of the quota.
Note: Upgrade Note: Any Return Redirect objects that existed before upgrading to SGOS 6.x are configured to use 302.
Downgrade Note: Any objects created in SGOS 6.x with the 302 option are recognized by the VPM in previous versions; objects with 301 and 307 selections are ignored in versions previous to SGOS 5.5.x.

135
If more than one time quota matches a given transaction, only the last matched applies.
Note: Before you can create quota policy, you must enable the quota library in the CLI. Issue the following command: #(config)policy quota If quotas are disabled, the VPM displays a “variable not defined” error when you try to install quota policy.
1. In the Name field, enter a name for the object or leave it as-is to accept the default.
2. In the Quota section:
a. Quota period: Define the length of time against which to track the quota.At the end of the quota period, time tracking restarts. The quota period you select determines the units of measurement available for the quota amount.
For example, to create a daily quota, select Daily. Selections for hours and minutes are available for the quota amount.
b. Quota amount: Specify the maximum for the quota.
For example, to specify a 90-minute quota, select 1 for Hr and 30 for Min.
3. (Optional) To display an exception page to users when they reach a certain percentage of the quota, select the option under Warning threshold. Select a value from the menu to indicate the percentage.
For example, specifying a 75% threshold for the 90-minute daily quota means that users receive an exception page when they reach 67 minutes within the 24-hour quota period.
Note: The threshold is checked only at the beginning of a transaction; thus, if a user reaches the threshold during a transaction, access is still permitted and the user does not receive an exception page.
4. Click OK to save your settings.
Volume QuotaRestrict users’ Internet or Internet resource usage (volume quota) during a specific period of time (quota period). You can optionally display an exception page to users if they reach a specific percentage of the quota.
If more than one volume quota matches a given transaction, only the last matched applies.
Note: Before you can create quota policy, you must enable the quota library in the CLI. Issue the following command: #(config)policy quota If quotas are disabled, the VPM displays a “variable not defined” error when you try to install quota policy.
1. In the Name field, enter a name for the object or leave it as-is to accept the default.
2. In the Quota section:

Visual Policy Manager Reference
136
a. Quota period: Define the length of time against which to track the quota. At the end of the quota period, usage tracking restarts.
For example, to create a weekly quota, select Weekly.
b. Quota amount: Specify the maximum for the quota.
3. (Optional) To display an exception page to users when they reach a certain percentage of the quota, select the option under Warning threshold. Select a value from the menu to indicate the percentage.
For example, specifying a 75% threshold for the 2500 MB weekly quota means that users receive an exception page when they reach 1750 MB within the week.
Note: The threshold is checked only at the beginning of a transaction; thus, if a user reaches the threshold during a transaction, access is still permitted and the user does not receive an exception page.
4. Click OK to save your settings.
Set Client Certificate ValidationIf a client certificate is requested (see "Require/Do Not Require Client Certificate" on page 132), this object specifies whether the requested client certificate is validated using Online Certificate Status Protocol (OCSP) revocation or the local Certificate Revocation List (CRL).
To add a Server Certificate Validation object:
1. In the Name field, enter a name for the object or leave as is to accept the default.
1
2
3

137
2. (Optional) Select the client certificate validation method:
• Use OCSP revocation check if available otherwise use local: If OCSP is configured, this validation method uses OCSP to check the revocation status of the client certificate. If OCSP is not configured, this method uses on-box Certificate Revocation List (CRL) to perform the revocation check. This is the default.
• Use only OCSP revocation check: Uses only OCSP to check the revocation check of the client certificate.
• Use only local certificate revocation check: Uses the CRL configured on the ProxySG appliance to perform the revocation check for a client certificate.
• Do not check certificate revocation: Does not check the revocation status of the client certificate; however it still carries out the other certificate validation checks.
• (Optional) Disable client certificate validation: Select this option to disable certificate validation and cause the other options to be greyed out.
Set Server Certificate ValidationThis feature is enabled by default. The ProxySG appliance performs checks on server certificates. To mimic the overrides supported by browsers, the appliance can be configured to ignore failures for the first three checks in the list.
To add a Server Certificate Validation object:
1. In the Name field, enter a name for the object or leave as is to accept the default.
2. (Optional) Select one or more to ignore certain failures:
1
2
3
4
Visual Policy Manager Reference
138
• Ignore a hostname mismatch: Ignores the comparison of hostname in URL and certificate (intercepted connections only).
• Ignore certificate expiration: Ignores the verification of certificate dates. (Not Before and Not After date fields.)
• Ignore untrusted issuer: Ignores the verification of issuer signature.
3. (Optional) Select the server certificate validation method:
• Use OCSP revocation check if available otherwise use local: If OCSP is configured, this validation method uses OCSP to check the revocation status of the server certificate. If OCSP is not configured, this method uses on-box Certificate Revocation List (CRL) to check the certificate revocation status. This is the default.
• Use only OCSP revocation check: Uses only OCSP to check the revocation status of the server certificate.
• Use only local certificate revocation check: Uses the CRL configured on the appliance to perform the revocation check for a server certificate.
• Do not check certificate revocation: Does not check the revocation status of the server certificate; however it still carries out the other certificate validation checks.
4. (Optional) Disable server certificate validation: Select this option to disable certificate validation and cause the other options to be greyed out.
5. Click OK.
Client and Server Certificate Exceptions
Built-in exceptions can be used to notify the user that the verification of the server or client’s certificate failed. For a list and description of exceptions, see"Defining Exceptions" on page 250.
Set Client Keyring
Allows you to select a keyring or keylist with all the available conditions.
To respond to client certificate requests, in the SSL Access policy layer add an action object with the keyrings or keylists that can provide client certificates when requested.

139
To use a keyring:
1. In the Name field, enter a name for the object or leave as is to accept the default.
2. Select Keyring.
3. From the drop-down, select the keyring to use in policy.
4. Click OK.
To use a keylist:
5. In the Name field, enter a name for the object or leave as is to accept the default.
6. Select Keylist.
7. From the drop-down, select the keylist to use in policy.
8. In the Selector field, type a substitution variable.

Visual Policy Manager Reference
140
All substitution variables are supported; however recommended substitution variables for the selector include $(user), $(group), and $(server.address). For information on substitution variables, refer to “CPL Substitutions” in the Content Policy Language Reference.
Note: The Selector value must match the set of extractor values that are displayed when you run the view command for a keylist. For example, if the Subject.CN in the certificate is set to represent a user name, use the Selector $(user), and select the Extractor value $(Subject.CN). If the Extractor value was set to $(Subject.O), no match would be found and a certificate would not be sent.
If you are using the $(group) selector, you must also create a list of the groups to be included in the $(group) substitution variable. See "Creating the Group Log Order List" on page 207.
9. Click OK.
Set Encrypted TapAllows you to tap intercepted SSL traffic to an otherwise unused port. The data is presented in a format that can be understood by common network traffic analysis tools like Wireshark, common network intrusion detection systems such as Snort, and so on. SSL interception must be enabled. Add an SSL Access Layer, Set an Action, and follow from there.
To enable Encrypted Tap:
1. In the Name field, enter a name for the object or leave as is to accept the default.
2. Select Enable encrypted tap.
3. From the Interface drop-down, select the unused non-client/server/management interface to use for the tap.

141
4. Click OK.
To disable tap, simple select Disable encrypted tap.
SSL InterceptionAllows the ProxySG appliance to act as a forward proxy for HTTPS traffic and thus provides performance gains and security (authentication, content filtering, anti-virus scanning) for HTTPS traffic before it is delivered to clients. This object allows HTTPS content to be intercepted and examined.
1
2
3
4

Visual Policy Manager Reference
142
Enable HTTPS Interception
1. In the SSL Interception Object dialog, enter a name for the object or leave as is to accept the default.
2. To allow SSL content to be examined, select Enable HTTPS interception.
3. Specify the following:
a. Issuer Keyring: Accept the default keyring or select this option and from the drop-down list select a previously generated keyring. This is the keyring used for signing emulated certificates.
b. Hostname: The hostname you enter here is the hostname in the emulated certificate.
c. Splash Text: The limit is 200 characters. The splash text is added to the emulated certificate as a certificate extension. The splash text is added to the emulated certificate as a certificate extension. For example:
Visit http://example.com/https_policy.html
To add substitution variables to the splash text, click Edit and select from the list.
d. Splash URL: The splash text is added to the emulated certificate as a certificate extension.
The SSL splash can be caused by such occurrences as when a browser receives a server certificate signed by an unknown CA, or a host mismatch.
e. Click OK.
Enable HTTPS Interception on Exception
4. In the SSL Interception Object dialog, enter a name for the object or leave as is to accept the default.
5. To intercept SSL traffic if there is an exception, such as a certificate error or policy denial, select Enable HTTPS interception on exception.
6. See Step 3a in "Enable HTTPS Interception" on page 142 for configuring the keyring, hostname, and splash text.
7. Click OK.
Configure STunnel Policy
On the Add SSL Interception Object dialog, choose one of the following:
❐ Enable STunnel Interception: Establish a policy where configured STunnel services (such as POP3S and SMTPS) are terminated and accelerated.
❐ Enable SSL interception with automatic protocol detection: In addition to STunnel interception as described above, discovered HTTPS is handed off to the HTTPS proxy. Otherwise, SSL traffic continues in STunnel mode.
Note: Not all browsers display the splash text and splash URL correctly.
143
Example<ssl-intercept>
ssl.forward_proxy(stunnel)
Disable SSL InterceptionThis is a static object. Selecting this object disables HTTPS interception.
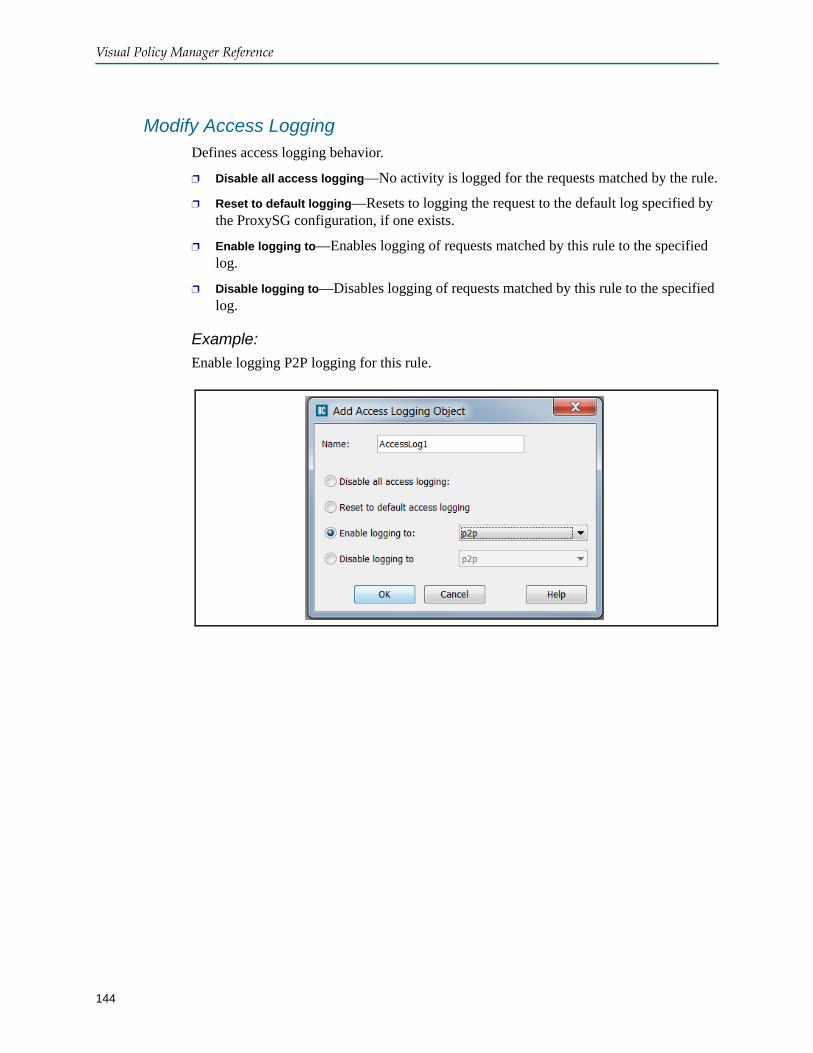
Visual Policy Manager Reference
144
Modify Access LoggingDefines access logging behavior.
❐ Disable all access logging—No activity is logged for the requests matched by the rule.
❐ Reset to default logging—Resets to logging the request to the default log specified by the ProxySG configuration, if one exists.
❐ Enable logging to—Enables logging of requests matched by this rule to the specified log.
❐ Disable logging to—Disables logging of requests matched by this rule to the specified log.
Example:
Enable logging P2P logging for this rule.
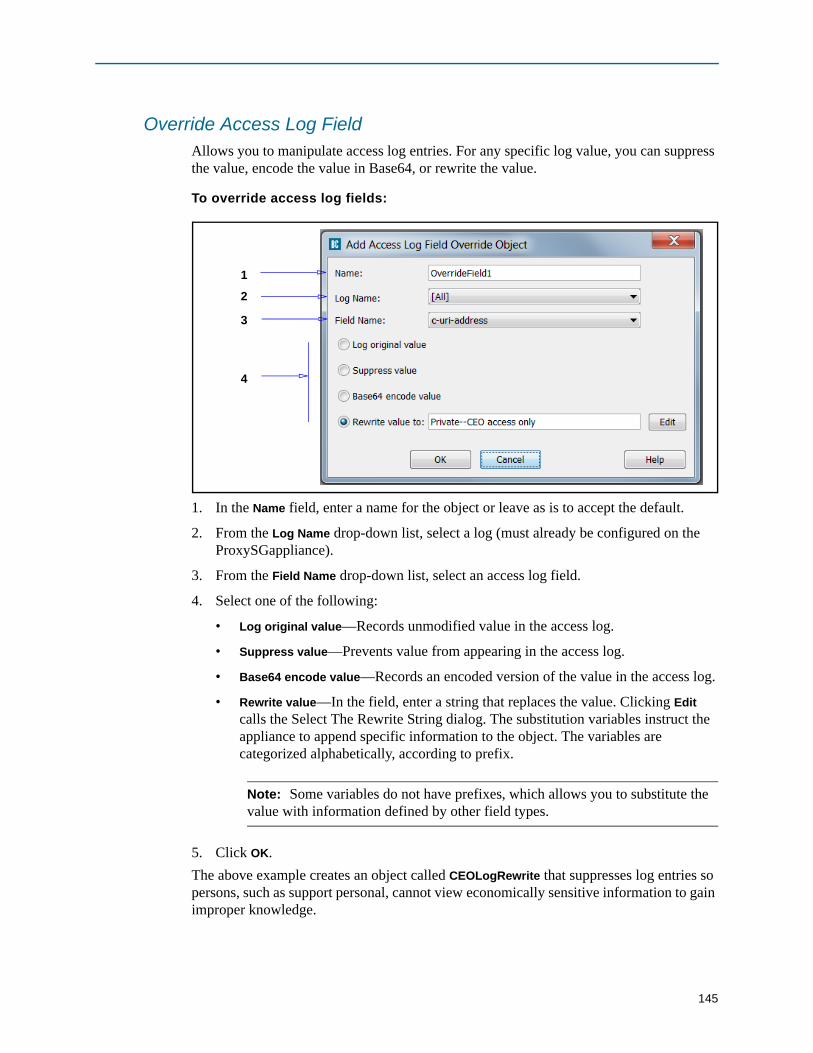
145
Override Access Log FieldAllows you to manipulate access log entries. For any specific log value, you can suppress the value, encode the value in Base64, or rewrite the value.
To override access log fields:
1. In the Name field, enter a name for the object or leave as is to accept the default.
2. From the Log Name drop-down list, select a log (must already be configured on the ProxySGappliance).
3. From the Field Name drop-down list, select an access log field.
4. Select one of the following:
• Log original value—Records unmodified value in the access log.
• Suppress value—Prevents value from appearing in the access log.
• Base64 encode value—Records an encoded version of the value in the access log.
• Rewrite value—In the field, enter a string that replaces the value. Clicking Edit calls the Select The Rewrite String dialog. The substitution variables instruct the appliance to append specific information to the object. The variables are categorized alphabetically, according to prefix.
5. Click OK.
The above example creates an object called CEOLogRewrite that suppresses log entries so persons, such as support personal, cannot view economically sensitive information to gain improper knowledge.
Note: Some variables do not have prefixes, which allows you to substitute the value with information defined by other field types.
1
2
3
4

Visual Policy Manager Reference
146
Rewrite HostRewrites host component of a URL in HTML, XHTML, javascript, and Windows Media Player and Real Media content. Use this to identify host details in request or response data and rewrite it with different a host address.
Set the Scheme drop-down to either All, Windows Media or Real Media protocols, depending on the content to be rewritten.
If left at All, content is parsed based on the format of that content. For HTML and XHTML content, the HTML parser will examine the content for hosts matching the defined pattern.
If the content is javscript, the javascript parser analyzes the content. The javascript parser includes the following content types:
text/javascript text/x-javascript text/x-json application/javascript application/x-javascript application/json
Note: Due to the variable nature of XML and the tags and attributes contained therein, if the content identifies itself as XML, the ProxySG appliance cannot perform the Rewrite
Host action.
1. To specify a rewrite:
2. In the Name field, enter a name or leave as is to accept to the default.
3. From the Scheme drop-down list, Windows Media, Real Media, or All to rewrite all URLs found in HTML, XML or Javascript content..
4. In the Pattern field, enter a host name.
5. In the Replacement field, enter the name the pattern is rewritten to.
6. Click OK.
1
2
3 4

147
Reflect IPSpecifies which IP address is used when making connections to upstream hosts.
To create a Reflect IP object:
1. In the Name field, enter name for the object or leave as is to accept the default.
2. In the In outgoing client IP, reflect area, select one of the following:
• Do not reflect IP—Disables the ability to reflect IP addresses; the ProxySG appliance uses the IP address of the interface that the request is sent from.
• Incoming client IP [IP reflection]—Reflects the client IP address.
• Incoming proxy IP—Reflects the IP address of where the request arrived to.
• Proxy IP—Reflects a specific IP address of the appliance; enter the IPv4/IPv6 address in the field.
• Use global configuration—Specifies whether to use reflect IP for all services system wide. The default is enabled.
Note: If you want to turn on reflect IP addresses for all but a few services, enable this option first, then write policy to disable reflect IP for the exceptions.
3. Click OK.
Example
The above example reflects another IP address configured on the ProxySG appliance.
1
2
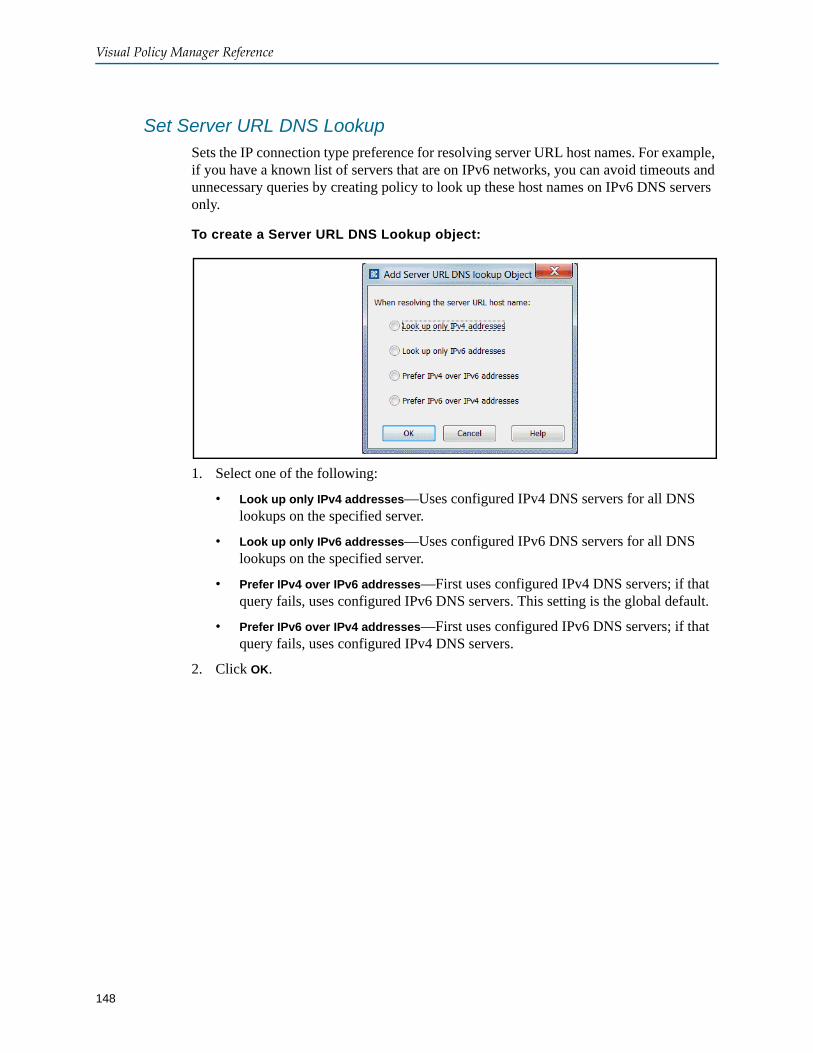
Visual Policy Manager Reference
148
Set Server URL DNS LookupSets the IP connection type preference for resolving server URL host names. For example, if you have a known list of servers that are on IPv6 networks, you can avoid timeouts and unnecessary queries by creating policy to look up these host names on IPv6 DNS servers only.
To create a Server URL DNS Lookup object:
1. Select one of the following:
• Look up only IPv4 addresses—Uses configured IPv4 DNS servers for all DNS lookups on the specified server.
• Look up only IPv6 addresses—Uses configured IPv6 DNS servers for all DNS lookups on the specified server.
• Prefer IPv4 over IPv6 addresses—First uses configured IPv4 DNS servers; if that query fails, uses configured IPv6 DNS servers. This setting is the global default.
• Prefer IPv6 over IPv4 addresses—First uses configured IPv6 DNS servers; if that query fails, uses configured IPv4 DNS servers.
2. Click OK.
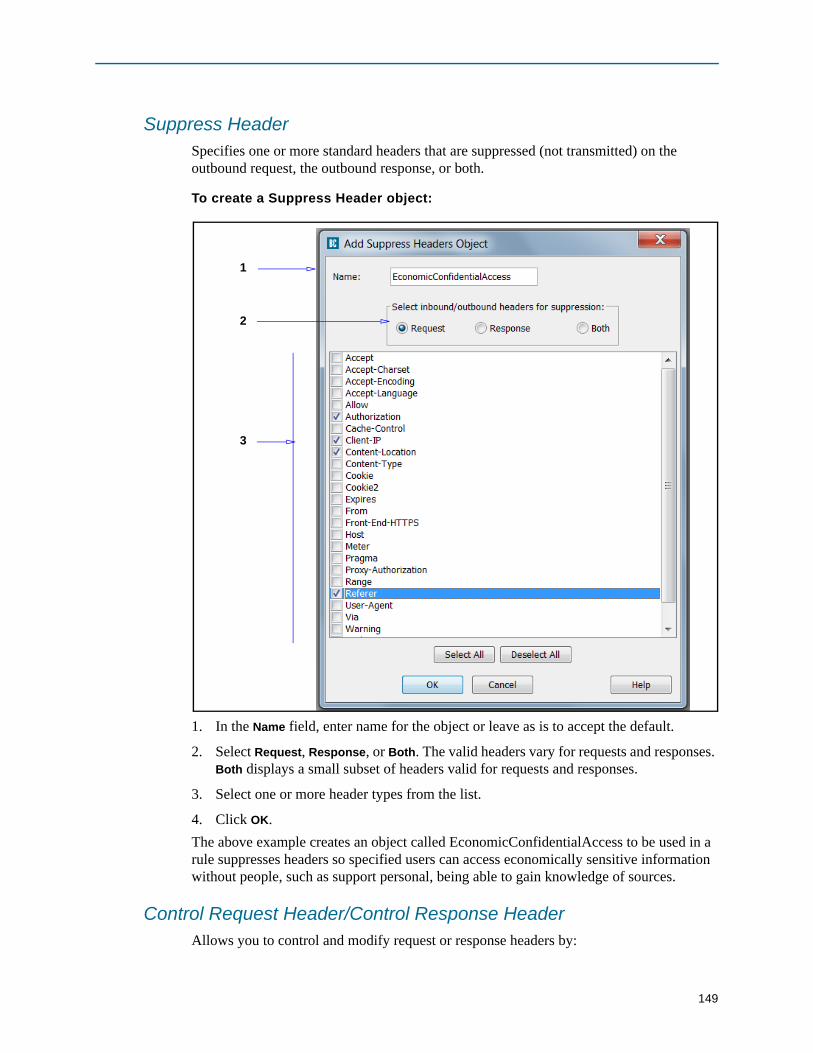
149
Suppress HeaderSpecifies one or more standard headers that are suppressed (not transmitted) on the outbound request, the outbound response, or both.
To create a Suppress Header object:
1. In the Name field, enter name for the object or leave as is to accept the default.
2. Select Request, Response, or Both. The valid headers vary for requests and responses. Both displays a small subset of headers valid for requests and responses.
3. Select one or more header types from the list.
4. Click OK.
The above example creates an object called EconomicConfidentialAccess to be used in a rule suppresses headers so specified users can access economically sensitive information without people, such as support personal, being able to gain knowledge of sources.
Control Request Header/Control Response HeaderAllows you to control and modify request or response headers by:
1
2
3
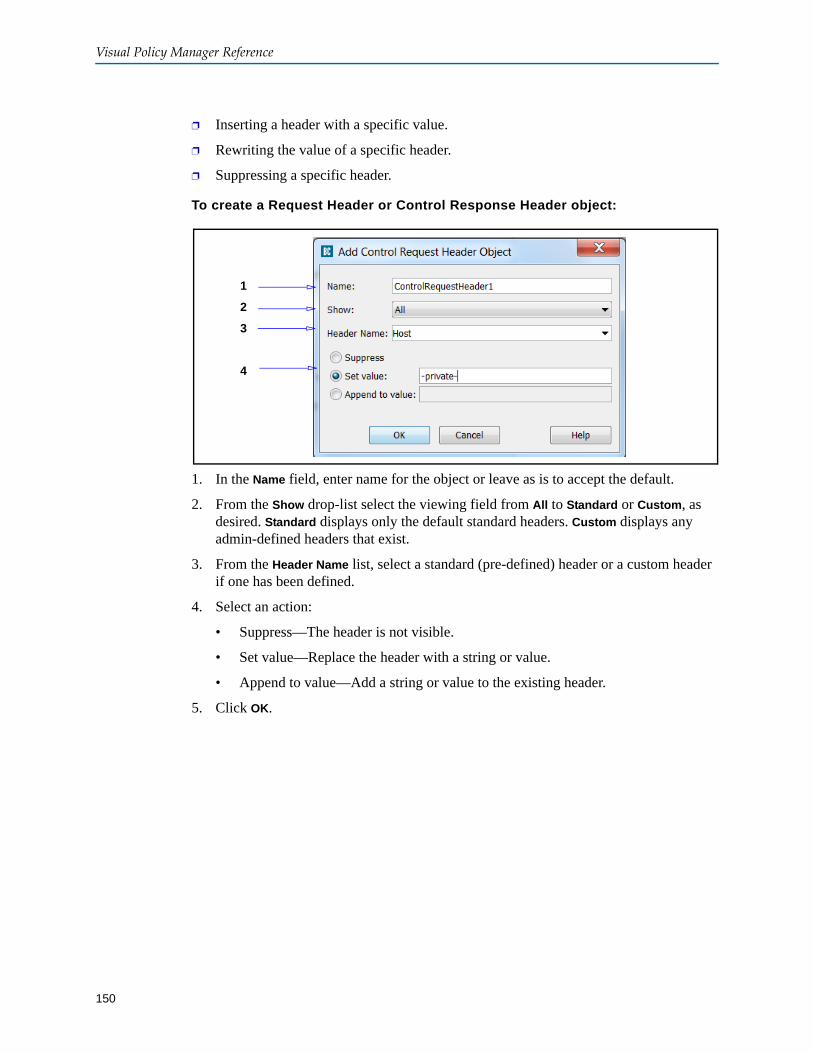
Visual Policy Manager Reference
150
❐ Inserting a header with a specific value.
❐ Rewriting the value of a specific header.
❐ Suppressing a specific header.
To create a Request Header or Control Response Header object:
1. In the Name field, enter name for the object or leave as is to accept the default.
2. From the Show drop-list select the viewing field from All to Standard or Custom, as desired. Standard displays only the default standard headers. Custom displays any admin-defined headers that exist.
3. From the Header Name list, select a standard (pre-defined) header or a custom header if one has been defined.
4. Select an action:
• Suppress—The header is not visible.
• Set value—Replace the header with a string or value.
• Append to value—Add a string or value to the existing header.
5. Click OK.
1
2
3
4
151
Notify UserThis action displays a notification page in the user’s Web browser. A user must read the notification and click an Accept button before being allowed to access the Web content. You can customize the following:
❐ The page title, notification message, and the Accept button.
❐ The conditions that cause a notification to be displayed again. By default, the notification is displayed each time a user begins a new Web browsing session (reboots, logs out, or closes all Web browser windows). You can configure re-notification to occur for each new visited host or Web site, or after a time interval.
This feature is designed to provide the following functionality:
❐ Web-use compliance: A compliance page is a customized notification page displayed on a user’s Web browser when attempting to access the Internet. This page ensures employees read and understand the company’s Acceptable Use Policy before Internet use is granted. Typically, a compliance notification is displayed each time a browser is opened, but you can configure a time condition to display the page at specific intervals or times of the day, week, or month.
❐ Coach users: A coaching page displays when a user visits a Web site that is blocked by content filtering policy. This page explains why the site is blocked, the consequences of un-authorized access, and a link to the site if business purposes warrants access. A coaching page is configured to display each time a user visits a new Web page that is barred by content filtering policy; however, you can also configure this page to appear at different time intervals.
Note: The Accept button click action is logged if HTTP access logging is enabled. A URL is logged that contains the string: accepted-NotifyName, where NotifyName is the name of the Notify User object.
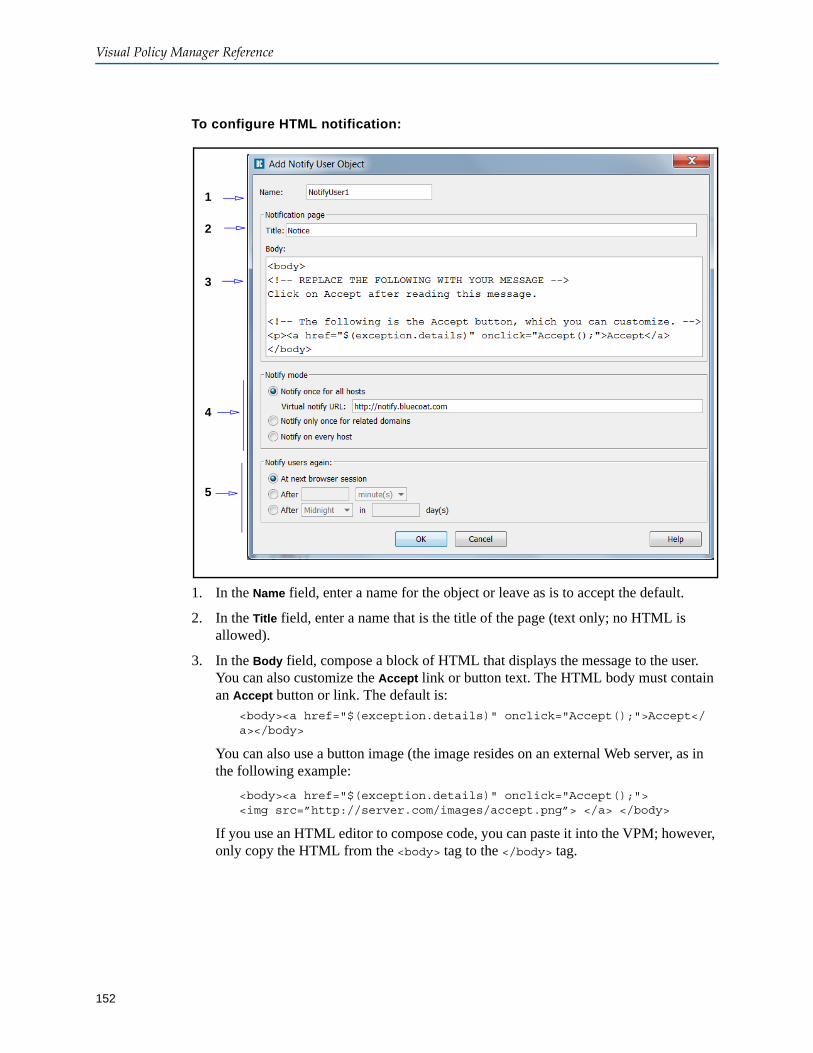
Visual Policy Manager Reference
152
To configure HTML notification:
1. In the Name field, enter a name for the object or leave as is to accept the default.
2. In the Title field, enter a name that is the title of the page (text only; no HTML is allowed).
3. In the Body field, compose a block of HTML that displays the message to the user. You can also customize the Accept link or button text. The HTML body must contain an Accept button or link. The default is:
<body><a href="$(exception.details)" onclick="Accept();">Accept</a></body>
You can also use a button image (the image resides on an external Web server, as in the following example:
<body><a href="$(exception.details)" onclick="Accept();"> <img src=”http://server.com/images/accept.png”> </a> </body>
If you use an HTML editor to compose code, you can paste it into the VPM; however, only copy the HTML from the <body> tag to the </body> tag.
1
2
3
4
5

153
4. Under Notify mode, select an option that determines notification when visiting a new Web site:
• Notify once for all hosts—The notification page is displayed only once; this is used for configuring compliance pages. This option uses a Virtual Notify URL. If you must change the URL from the default value, please read the limitation section following this procedure.
• Notify only once for related domains—The notify page reappears each time the user visits a new Web site; this is used for configuring coaching pages.
• Notify on every host—The notify page reappears each time the user visits a new Web host. Blue Coat recommends that only highly experienced administrators employ this option. In addition to breaking banner ads, as described above in the previous option, this option, on some Internet Web sites, might cause Javascript errors that impair the functionality of the site.
5. Under Notify users again, select an option that specifies when the notification expires and re-notification is required:
• At next browser session— The notification page does not reappear until the next browser session. When a user reboots, logs out, or closes all Web browser windows, this ends the browser session.
• After (time interval)—Notification reoccurs after the defined elapsed time (minutes or hours); this is useful for coaching.
• After (specific time)—Notification reoccurs at a specific time of day. You can specify an interval of days; this is useful for compliance.
The above example creates a Notify Object with a custom message, set to display once a day after 7 AM.
Interactivities and Workarounds
If you must change the default Virtual Notify URL, consider the following:
Note: This option might cause users to experience some noticeable Web browsing slowness.
Note: This option interferes with some Web advertising banners. In some cases, the notification page appears inside the banner. In other cases, banner ads are disabled by javascript errors. To fix these problems, do not serve notification pages for URLs that belong to the Web Advertising, Advertising, or Web Ads category. The actual name of this category varies with the content filtering vendor, and some vendors do not have an equivalent.
Note: The time is referenced from the local workstation. If a compliance page is configured, verify the workstations and ProxySG clocks are synchronized.
Visual Policy Manager Reference
154
❐ The Virtual Notify URL consists of an HTTP domain name or IP address (http://); a port number is optional.
❐ Do not use a host name that is explicitly defined as a trusted site on Internet Explorer 6 for Windows XP, Service Pack 2. Furthermore, only use domain names that contain dots. If you use domain names that do not contain dots, the HTTP redirects generated by the notification action causes Internet Explorer to display false warning messages each time the user is redirected from an untrusted site to a trusted site, or the other way around.
❐ For transparent proxy deployments, the domain name must be DNS-resolvable to an IP address that is in the range of destination IP addresses that are routed to the ProxySGappliance.
Policy Interactions
This action generates CPL that might interfere with other policy or cause undesired behavior. Enhancements will occur in future SGOS releases. For this release, consider the following guidelines:
❐ Do not create VPM policy that modifies the Cookie request header.
❐ Do not create VPM policy that modifies the Set-Cookie and P3P response headers.
❐ Notification pages exist in the browser history. Therefore, if you click Accept and are taken to the requested page, then click the back button, you get the notification page again.
❐ If you have a chain of appliances, with different notification pages configured on each appliance in the chain, then each notification page must have a different object name.

155
Strip Active ContentStrips HTTP tags from specified active content HTML pages. For each item you select for removal, you can also create a customized message that is displayed to the user.
See "Stripping or Replacing Active Content" on page 245 for detailed information about the different types of active content.
To create a Strip Active Content object:
1. In the Name field, enter name for the object or leave as is to accept the default.
2. Select the active content to be stripped.
3. The default message in the Replacement Text column is Active Content Removed. To replace the default message, double click the field, enter a message, and press Enter.
Exempting the Appliance
Stripping active content might interfere with Web applications deployed on your intranet. For example, if you create a policy rule that removes Java applets, and the destination defined in the rule contains an IP address of a ProxySG appliance functioning as a proxy, the policy rule actually disables the Management Console because the Console itself is comprised of Java applets.
To prevent this, for each appliance functioning as a forward proxy, create a rule that exempts the IP address of the appliance from the stripping action.
1. Click Add Rule.
Note: Pages served over an HTTPS tunneled connection are encrypted, so the content cannot be modified.
1
23

Visual Policy Manager Reference
156
2. Click Move Up; the rule to exempt the appliance must precede the rule that strips active content.
3. In the Destination field, enter the appliance IP address.
4. With the IP address entered, right-click it in the Destination field and select Negate from the drop-down list.
5. In the Action field, add a Strip Active Contents object that denies Java applets.
Figure 3–10 Exempting an appliance IP Address
HTTP Compression LevelAllows you to set the level of compression to low, medium, or high. When configuring, consider that a higher compression level consumes more CPU resource.
You can control the compression level based on any transaction condition (such as the client IP address, the hostname, request/response headers, and the like).
To specify an HTTP compression level:
1. Select a compression level option:
• Low—Equivalent to compression level 1.
• Medium—Equivalent to compression level 6.
• High—Equivalent to compression level 9.
2. Click OK.
The object is automatically named as Compression Level Low, Medium, or High.
Note: If you enable HTTP Compression using the VPM but do not specify the HTTP Compression Level using VPM policy, then by default the level is Low.

157
Set Client HTTP CompressionSpecifies the behavior to use when the client wants the content in a different compression form than is in the cache.
To specify compression actions:
1. In the Name field, enter name for the object or leave as is to accept the default.
2. Set the behavior to apply when a client requests compressed content, but only uncompressed content is available:
• Compress content before serving it—The default. Objects are compressed.
• Serve uncompressed content—No compression is applied.
3. Set the behavior to apply when a client requests uncompressed content, but only compressed content is available.
• Decompress content before serving it—The default. Objects are decompressed.
• Retrieve uncompressed content from server—Uncompressed content is requested and retrieved.
The default is to compress or decompress content, respectively, before serving it.
4. Click OK.
For recommended compression configurations, refer to the SGOS Administration Guide.
Set Server HTTP CompressionEnables or disables HTTP compression.
To specify compression options:
1. In the Name field, enter name for the object or leave as is to accept the default.
2. Select a compression option:
• Disable HTTP compression—The default. Objects are not compressed.
• Use client HTTP compression options—Default to the type of content requested by the client.
• Always request HTTP compression—Force clients to always request compressed content.
3. Click OK.
For recommended compression configurations, refer to the refer to the SGOS Administration Guide.
Set HTTP Request Max Body SizeSpecifies a limit (in bytes) for the size of body content for HTTP requests. When the limit is exceeded, the request is denied.
Visual Policy Manager Reference
158
Set Attack Detection Failure WeightAllows you to change the default value of a single failed request event for a given response code on the ProxySG appliance. Each failed request can have a value of 0 - 500, depending on the nature of the failed request.
To create an attack detection failure weight object:
1. In the Name field, enter name for the object or leave as is to accept the default.
2. Select Action under the new rule. Right click Any > Set. The Set Action Object window displays.
3. Select New > Attack Detection Failure to add a new object.
4. The Add Attack Detection Failure Object window allows you to configure the attack detection weight value.
a. In the Name field, enter a name for the object or leave as is to accept the default.
b. From the Failure Weight field, enter an integer value between 0-500. This value is the amount by which the client’s failure counter increases per failure event.
5. Click OK.
6. Click OK to return to the VPM.
Click the Install Policy button when finished adding policies.
Set Apparent Data Type ActionThis action controls how the Apparent Data Type of content found in an HTTP POST request are handled. Intended for use in reverse proxy deployments, this action matches policy against both single and multi-part files. The allow/deny transaction selection defines how policy reacts to the data types that are selected in the list.

159

Visual Policy Manager Reference
160
Manage BandwidthAllows you to manage bandwidth for all protocols or specific protocols, on both inbound and outbound traffic.
To create a manage bandwidth object:
1. In the Name field, enter name for the object or leave as is to accept the default.
2. Select to limit bandwidth on the: Client side or Server side.
• Client side—Traffic flowing between a client and the ProxySG appliance.
• Server side—Traffic flowing between a server and the appliance.
3. Select to limit bandwidth for: Inbound or Outbound traffic.
• Inbound—Network packets flowing into the appliance. Inbound traffic mainly consists of packets originating at the origin content server (OCS) and sent to the appliance to load a Web object and packets originating at the client and sent to the appliance for Web requests.
• Outbound—Network packets flowing out of the appliance. Outbound traffic mainly consists of packets sent to the client in response to a Web request and packets sent to an OCS or other service (such as a virus scanner) to request a service.
4. Select a Bandwidth Class from the drop-down list.
5. Click OK; click Save Changes.
For complete information about Bandwidth Management, refer to the SGOS Administration Guide.
ADN Server OptimizationSpecifies whether byte caching is employed on either (branch or core) or both sides of an Application Delivery Network connection (specified IP addresses in the rule). Byte caching reduces WAN latency.
❐ Optimize traffic in both directions: Apply Byte Caching to traffic coming and leaving the server.
❐ Optimize only inbound traffic: Apply Byte Caching only to traffic coming into the server.
❐ Optimize only outbound traffic: Apply Byte Caching only to traffic leaving the server.
❐ Do not optimize traffic: Do not allow Byte Caching on specified connections.
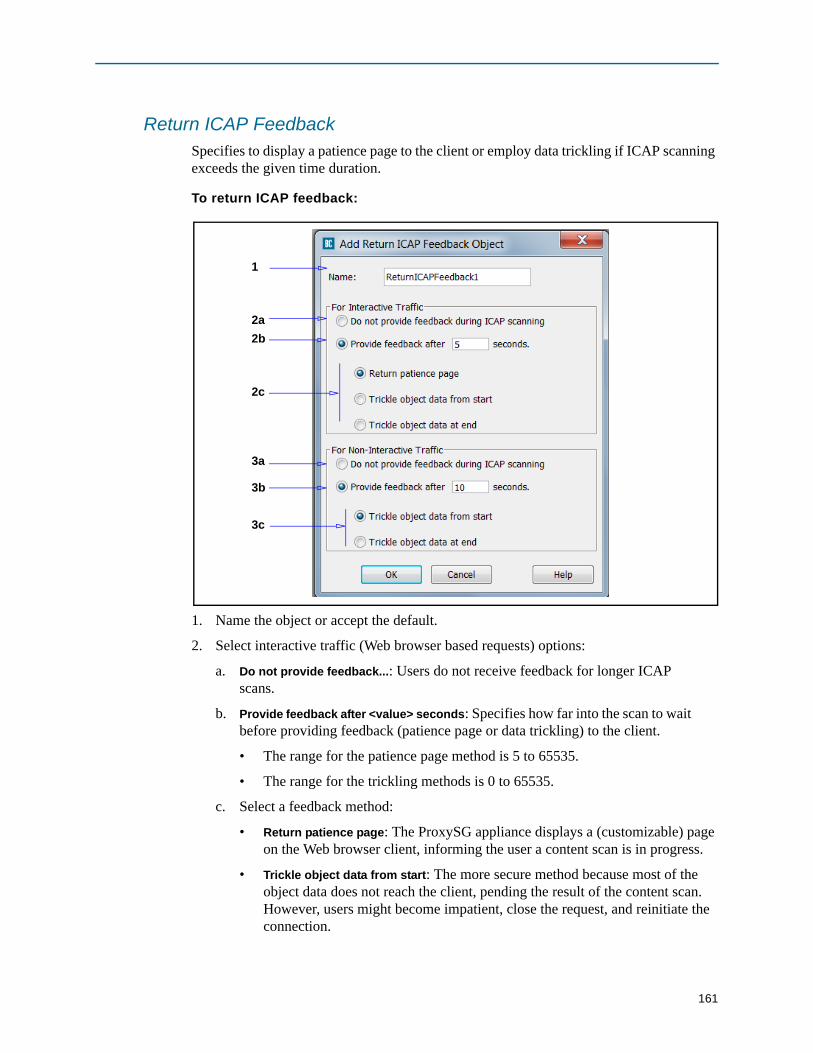
161
Return ICAP FeedbackSpecifies to display a patience page to the client or employ data trickling if ICAP scanning exceeds the given time duration.
To return ICAP feedback:
1. Name the object or accept the default.
2. Select interactive traffic (Web browser based requests) options:
a. Do not provide feedback...: Users do not receive feedback for longer ICAP scans.
b. Provide feedback after <value> seconds: Specifies how far into the scan to wait before providing feedback (patience page or data trickling) to the client.
• The range for the patience page method is 5 to 65535.
• The range for the trickling methods is 0 to 65535.
c. Select a feedback method:
• Return patience page: The ProxySG appliance displays a (customizable) page on the Web browser client, informing the user a content scan is in progress.
• Trickle object data from start: The more secure method because most of the object data does not reach the client, pending the result of the content scan. However, users might become impatient, close the request, and reinitiate the connection.
1
2a 2b
2c
3a
3b
3c
Visual Policy Manager Reference
162
• Trickle object data at end: The lesser secure method because the client receives most of the object data, pending the result of the content scan. This method provides the better user experience because they perceive the connection as almost complete.
3. Select non-interactive traffic (non-Web browser based clients, such as flash players or automatic updaters) options. See descriptions in Step 2.
4. Click OK.
Enter a time value (in seconds) that the appliance waits for content to be serviced from the origin content server before displaying the page that instructs users an ICAP scan is in progress.
Patience page management and limitations are described in “Configuring ICAP Feed-back” in the SGOS Administration Guide.
.
Set Dynamic CategorizationDynamic categorization extends the process of categorizing a URL. Traditional content filtering involves searching of massive URL pattern databases, which are published by vendors and downloaded to the ProxySG appliance at specified intervals. As new content constantly reaches the Web, the limitation is that it cannot be filtered until its existence is discovered, added, and uploaded. Dynamic categorization enhances content filtering by scanning a new Web page, attempting to determine its contents, and categorizing accordingly in real time.
When an un-categorized page is first encountered, the appliance calls an external service with a categorization request. Once the content is scanned, a category is assigned (a majority of the time).
For related information, refer to the Content Filtering chapter in the SGOS Administration Guide.
To configure dynamic categorization:
1. Select a mode:
• Do not categorize dynamically—The loaded database is consulted for category information. URLs not in the database show up as category none.
• Categorize dynamically in the background—Objects not categorized by the database are dynamically categorized as time permits. Proxy requests are not blocked while DRTR is consulted. Objects not found in the database appear as category pending, indicating that DRTR was requested, but the object was served before the DRTR response was available.
• Categorize dynamically in realtime—The default. Objects not categorized by the database are dynamically categorized on first access. If this entails consulting the DRTR service, the proxy request is blocked until DRTR responds.
Note: Patience pages display regardless of any pop up blocking policy that is in effect.
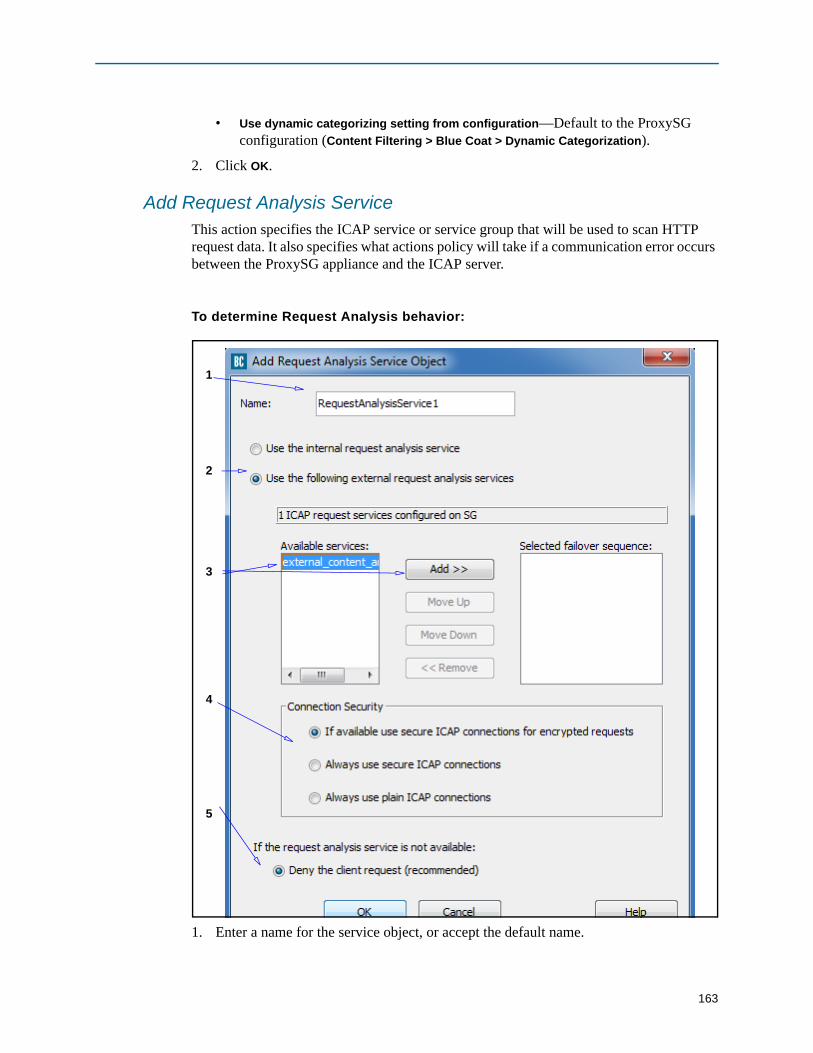
163
• Use dynamic categorizing setting from configuration—Default to the ProxySG configuration (Content Filtering > Blue Coat > Dynamic Categorization).
2. Click OK.
Add Request Analysis ServiceThis action specifies the ICAP service or service group that will be used to scan HTTP request data. It also specifies what actions policy will take if a communication error occurs between the ProxySG appliance and the ICAP server.
To determine Request Analysis behavior:
1. Enter a name for the service object, or accept the default name.
1
2
3
4
5

Visual Policy Manager Reference
164
2. Select how this service object will handle requests:
• Do not perform response analysis will bypass ICAP processing for requests that match rules that use this action object.
•
• Use the following external response analysis services allows you to select the services configured in the Proxy Management Console, under Configuration > Content Analysis > ICAP.
165
3. Select the ICAP service(s) for this action object:
• Select your preferred ICAP service on the left, under Available Services, click Add to move the service to the right, to Selected failover sequences.
• Repeat this process if you have multiple ICAP request services that you wish to load balance via policy.
4. If external ICAP services are used, you can select the security that will be used when the proxy sends traffic to the ICAP server.
5. To configure error handling, select one of the following options:
• To deny all requests or responses if a communication error occurs, select Deny
the client request. This is the default and recommended by Blue Coat.
• To allow requests or responses to go through without ICAP scanning, select Continue without further ICAP request processing. Be advised that this presents a content integrity risk.
6. Click OK; click OK again to add the object to the rule.
Add Response Analysis ServiceIdentical to "Add Request Analysis Service" on page 163, but it applies content analysis scanning to the response, rather than the request. Requires an ICAP response modification service created on the ProxySG appliance (Configuration > Content Analysis > ICAP) or in the case of Advanced Secure Gateway deployments, you can use the internal Content Analysis ICAP service
Set Malware ScanningThis action specifies the malware scanning level for a Web response, and is applicable only when you have configured the Blue Coat ProxyAV or Content Analysis service for ICAP scanning. This option allows you to create rules in VPM to complement the malware scanning options that are set in configuration (Configuration > Threat protection >
Malware Scanning). For example, you can use this action to fine tune the malware scanning level for a specific destination or subnet to be different from the default you have defined in configuration.
The following options are available — Use the protection level set in configuration, perform maximum protection malware scan (maximum security), and perform high performance malware scan (high performance).
While Content Analysis scans all Web responses when set to maximum security, it selectively scans Web responses when set to high performance bypassing content that has a low risk of malware infection.
Note: When the ICAP service is restored, these objects are scanned and served from the cache if they are requested again.
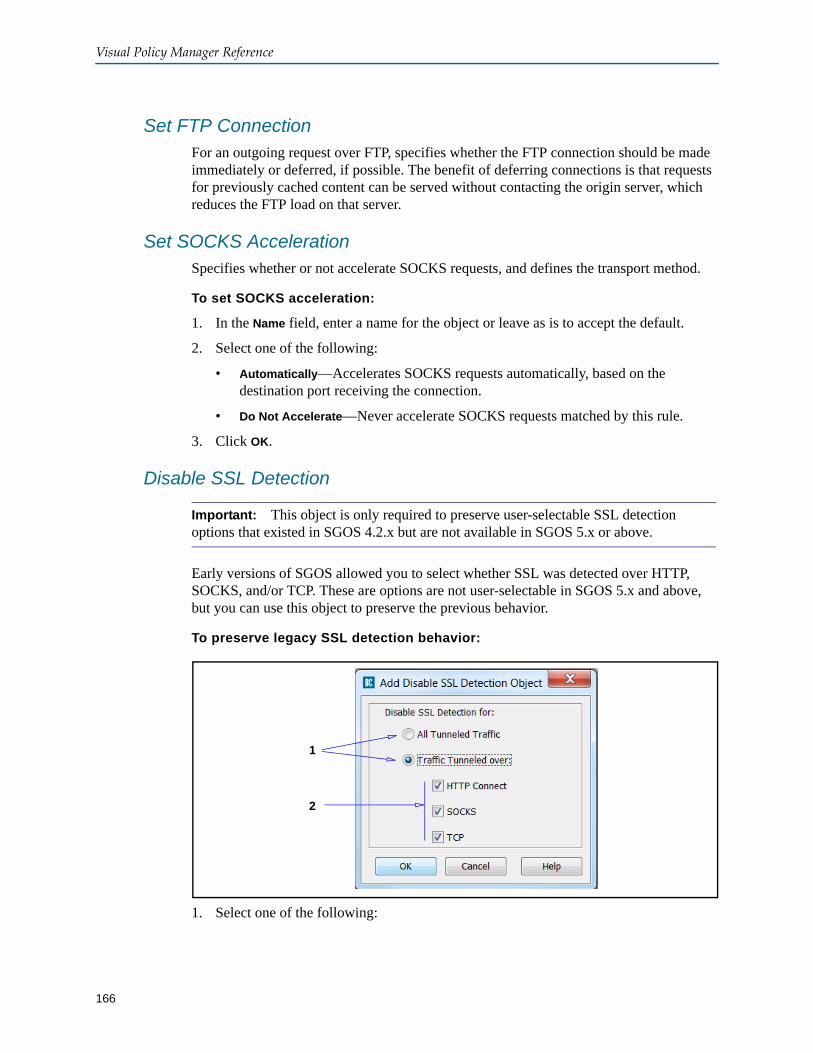
Visual Policy Manager Reference
166
Set FTP ConnectionFor an outgoing request over FTP, specifies whether the FTP connection should be made immediately or deferred, if possible. The benefit of deferring connections is that requests for previously cached content can be served without contacting the origin server, which reduces the FTP load on that server.
Set SOCKS AccelerationSpecifies whether or not accelerate SOCKS requests, and defines the transport method.
To set SOCKS acceleration:
1. In the Name field, enter a name for the object or leave as is to accept the default.
2. Select one of the following:
• Automatically—Accelerates SOCKS requests automatically, based on the destination port receiving the connection.
• Do Not Accelerate—Never accelerate SOCKS requests matched by this rule.
3. Click OK.
Disable SSL Detection
Early versions of SGOS allowed you to select whether SSL was detected over HTTP, SOCKS, and/or TCP. These are options are not user-selectable in SGOS 5.x and above, but you can use this object to preserve the previous behavior.
To preserve legacy SSL detection behavior:
1. Select one of the following:
Important: This object is only required to preserve user-selectable SSL detection options that existed in SGOS 4.2.x but are not available in SGOS 5.x or above.
1
2

167
• If in SGOS 4.2.x you configured all proxies to not detect SSL, select All Tunneled
Traffic and proceed to step 3.
• If in SGOS 4.2.x you configured SSL detection for one or two proxies, select Traffic Tunneled Over and proceed to step 2.
2. Select one or more proxies.
3. Click OK.
For more information about this feature, refer to the Blue Coat SGOS Upgrade/Downgrade Guide.
Set Streaming Max BitrateSpecifies the maximum bitrate, in kilobits per second, of requested streaming media. If a request exceeds this rule, the request is denied.
Set Client Connection DSCP ValueSets the outgoing differentiated service code point (DCSP) value or action for primary client connections (from the server) matching the DSCP value(s) in the Source column.
To set the server to client DSCP value or action:
1. In the Name field, enter a name for the object or leave as is to accept the default. This example sets the DSCP value to CS1 (IP Precedence 1).
2. Selection an action:
a. Echo the inbound packet’s DSCP value: Use the same outbound (point of reference, the ProxySG appliance) packet DSCP value as the inbound value.
b. Preserve the incoming DSCP value: Track the inbound (from the client) DSCP bits on the primary server connection and use that same value when sending packets to outbound to the server. This is valuable for protocols that have multiple client/server connections. For example, FTP control and data connections. The values remain independent for each connection.
1
2a
2b
2c
2d
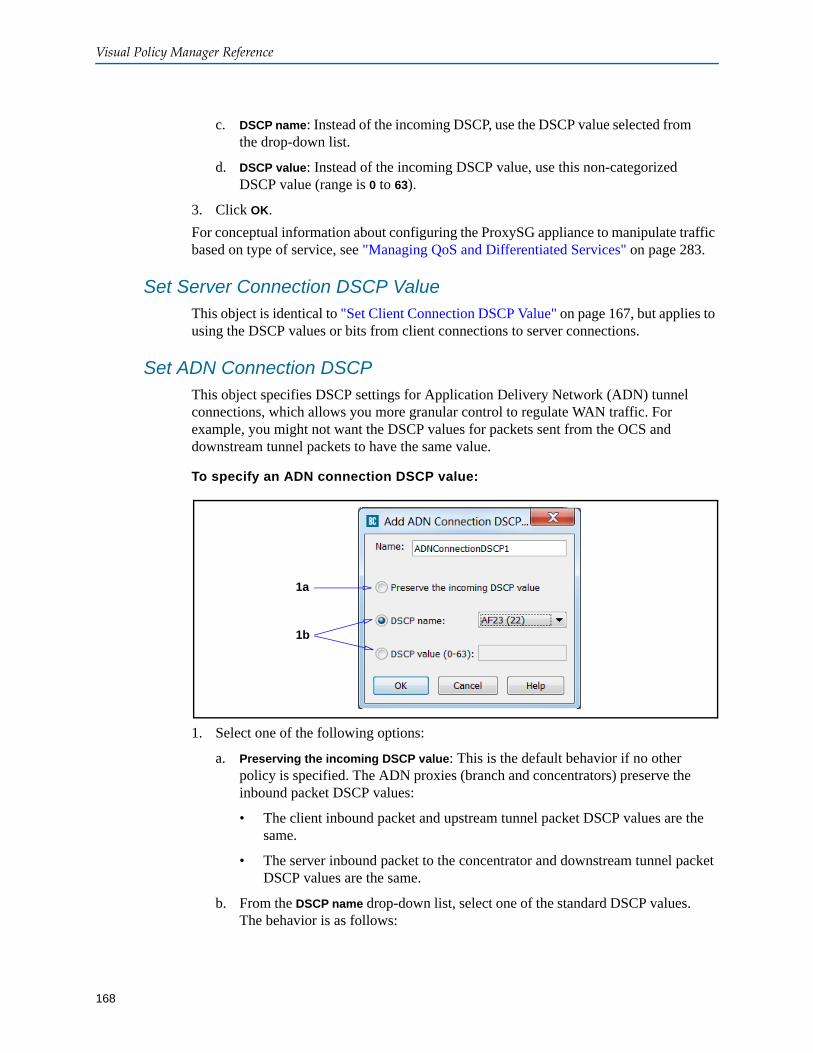
Visual Policy Manager Reference
168
c. DSCP name: Instead of the incoming DSCP, use the DSCP value selected from the drop-down list.
d. DSCP value: Instead of the incoming DSCP value, use this non-categorized DSCP value (range is 0 to 63).
3. Click OK.
For conceptual information about configuring the ProxySG appliance to manipulate traffic based on type of service, see "Managing QoS and Differentiated Services" on page 283.
Set Server Connection DSCP ValueThis object is identical to "Set Client Connection DSCP Value" on page 167, but applies to using the DSCP values or bits from client connections to server connections.
Set ADN Connection DSCPThis object specifies DSCP settings for Application Delivery Network (ADN) tunnel connections, which allows you more granular control to regulate WAN traffic. For example, you might not want the DSCP values for packets sent from the OCS and downstream tunnel packets to have the same value.
To specify an ADN connection DSCP value:
1. Select one of the following options:
a. Preserving the incoming DSCP value: This is the default behavior if no other policy is specified. The ADN proxies (branch and concentrators) preserve the inbound packet DSCP values:
• The client inbound packet and upstream tunnel packet DSCP values are the same.
• The server inbound packet to the concentrator and downstream tunnel packet DSCP values are the same.
b. From the DSCP name drop-down list, select one of the standard DSCP values. The behavior is as follows:
1a
1b
169
• The DSCP value of the upstream tunnel packets is the selected value until it is reset by an intermediary device.
• The DSCP value of a downstream packet is the selected value until it is reset by an intermediary device, even if the intermediary device modifies DSCP values of upstream tunnel packets.
Alternately, if your network uses a numerical DSCP value system, select DSCP
value (0-63) and enter a value.
2. Click OK.
Set Authorization Refresh TimeRealms that support authorization and authentication separately use the authorization refresh time value to manage the load on the authorization server. These realms include: Local, LDAP, Windows SSO, Novell SSO, Certificate, XML and Policy Substitution. They determine authorization data (group membership, attribute values) separately from authentication, allowing the time the authorization data is trusted to be increased or decreased.
For realms that must authenticate the user to determine authorization data, the authorization data is updated only when the user credentials are verified with the authentication server.
Set Credential Refresh TimeThe credential refresh time value determines how long a cache username and password is trusted. After that time has expired, new transactions that require credential authentication result in a request to the authentication server. A password different than the cached password also results in a request to the authentication server.
This value can is only valid for realms that cache the username and password on the proxy and realms that use Basic username and password credentials: LDAP, RADIUS, XML, IWA (with Basic credentials), SiteMinder, and COREid.
Set Surrogate Refresh TimeSpecifies how long surrogate credentials are trusted in a particular realm.
Send DNS/RDNS Response CodeSpecifies to send out the default response code or a selectable error response code. Perform one of the following:
❐ Select Send Default DNS Response; optionally, enter a TTL (time to live) value.
❐ Select Send Error Response Code and select a code from the drop-down list.
Note: For more information about DSCP values, see "Managing QoS and Differentiated Services" .

Visual Policy Manager Reference
170
Send DNS ResponseSpecifies which IP address to return for a specified host.
To set a DNS response:
1. In the Name field, enter a name for the object or leave as is to accept the default.
2. In the Host field, enter a host name that is returned.
3. To respond with the IP address of the proxy that is forwarding the request, select Respond with proxy IP.
4. To respond with one or more IP addresses:
a. Select Respond with listed IPs.
b. Click Add. The Add DNS Response IP dialog appears.
c. Enter an IP address and click Add.
d. Repeat as required; click Close.
5. (Optional) In the TTL field, enter a time-to-live value (how long the response is cached).
6. Click OK.
Send Reverse DNS ResponseSpecifies which host to return for a reverse DNS response. Optionally, define a time-to-live value.
1
2
3
4a
5
4b
171
Do Not CacheThis is a static object. Specifies that objects are never cached.
Set Force Cache ReasonsThis is a dynamic object. Specifies one or more reasons to force the caching of objects that may not otherwise be cached. For example, you can force objects to be cached when the response header contains set-cookie, no-store, and/or private.
Use Default CachingThis is a static object. Overrides the Do Not Cache and Set Force Cache Reasons actions and instructs the ProxySG appliance to use its default determination of whether or not to cache the content.
Mark/Do Not Mark As AdvertisementThese are static objects. Specifies content to be identified as an advertisement. The ProxySG appliance still fetches content from the cache (if present); however, just after serving to the client, the content is re-fetched from the ad server so that hit counters are updated.
Enable/Disable PipeliningThese are static objects. Enables or disables the ProxySG pipelining feature, which, when enabled, examines Web pages for embedded objects and requests them from the origin server in anticipation of a client request.
Set TTLSpecifies the time-to-live (TTL) an object is stored in the ProxySG appliance. In the Name field, enter a name for the object (or leave as is to accept the default); in the TTL field, enter the amount of time in seconds.
Send DirectThis is a static object. Overrides forwarding host, SOCKS gateway, or ICP configurations and instructs the ProxySG appliance to request the content directly from the origin server.
Integrate/Do Not Integrate New HostsThis is a static object. Used in server accelerator deployments. When enabled, the corresponding host that is accessed is added to the list of hosts for which the ProxySG appliance performs health checks. If that host name resolves to multiple IP addresses that correspond to different servers, the appliance fetches content from the available servers and ignores the servers that fail the health check.
Visual Policy Manager Reference
172
Allow Content From Origin ServerThis is a static object. Allows request to access content from an origin server if the content is not cached.
Serve Content Only From CacheThis is a static object. Requests to access content that is not cached are denied. If the content is cached, the content is served.
Select SOCKS GatewaySpecifies which SOCKS gateway, if any, to use; defines behavior if communication between the SOCKS gateway and the ProxySG appliance is down.
❐ To instruct the rule to connect directly without routing through a SOCKS service, select Do not use SOCKS gateway.
❐ To instruct the rule to connect through a SOCKS gateway, select Use SOCKS Gateway and select an installed SOCKS service from the drop-down list.
In the If no SOCKS gateway is available field, select Deny the request or Connect
directly, which allows requests to bypass the SOCKS service.
Select ForwardingSpecifies which forwarding host or group, if any, to use; defines behavior if communication between the forwarding and the ProxySG appliance is down.
❐ To instruct the rule to connect directly without redirecting to a forwarding host or group, select Do not forward.
❐ To instruct the rule to redirect to a forwarding host, select Use Forwarding and select an installed forwarding host from the drop-down list.
In the If no forwarding is available field, select Deny the request (fail closed) or Connect
directly (fail open), which allows requests to bypass the forwarding host.
❐ To instruct the rule to forward using the ICP configuration, select Forward using ICP.
Server Byte CachingSpecifies whether byte caching is employed on either (branch or core) or both sides of an Application Delivery Network connection (specified IP addresses in the rule). Byte caching reduces WAN latency.
❐ Optimize traffic in both directions: Apply Byte Caching to traffic coming and leaving the server.
❐ Optimize only inbound traffic: Apply Byte Caching only to traffic coming into the server.
❐ Optimize only outbound traffic: Apply Byte Caching only to traffic leaving the server.
❐ Do not optimize traffic: Do not allow Byte Caching on specified connections.

173
Set Streaming TransportSpecifies which streaming transport method the rule uses.
❐ Auto—Connects using the transport method used by the client.
❐ HTTP—Streaming over HTTP.
❐ TCP—Streaming over TCP.
Authentication CharsetThe VPM allows you enter non-ASCII in many objects, such user and group names and text for the "Notify User" on page 151 object. This object allows you set the character set to use in conjunction with localized policy. From the drop-down list, select a character set and click OK.
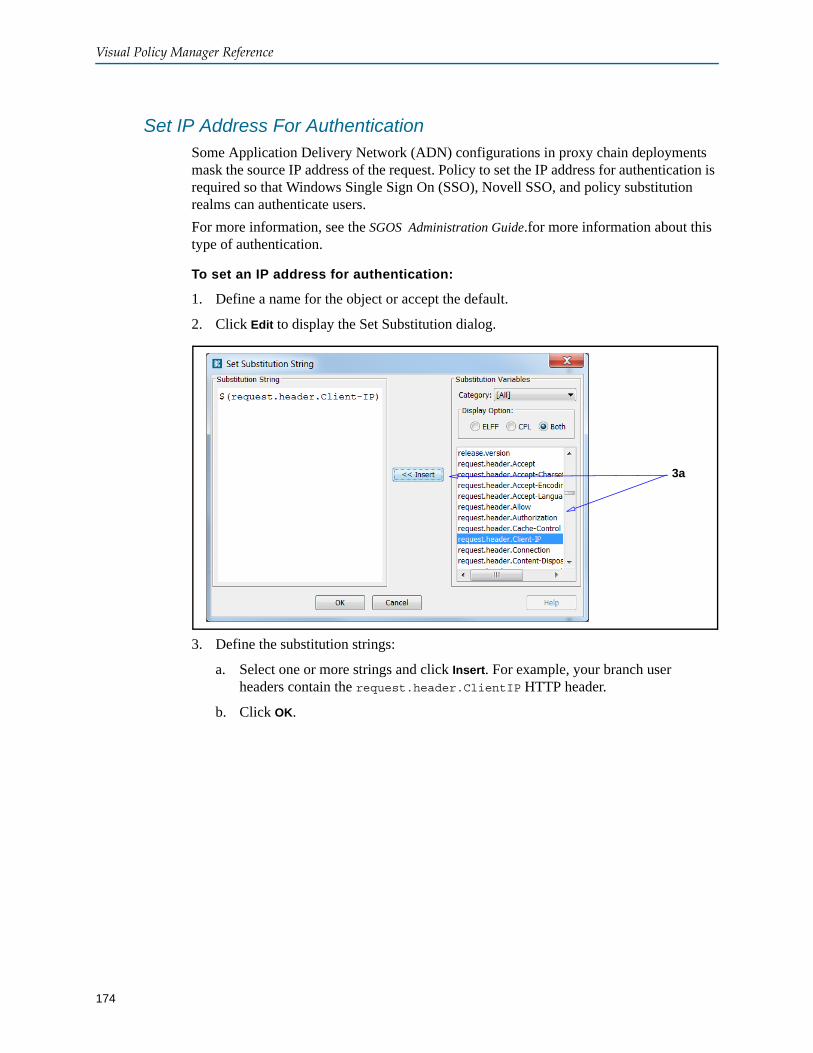
Visual Policy Manager Reference
174
Set IP Address For AuthenticationSome Application Delivery Network (ADN) configurations in proxy chain deployments mask the source IP address of the request. Policy to set the IP address for authentication is required so that Windows Single Sign On (SSO), Novell SSO, and policy substitution realms can authenticate users.
For more information, see the SGOS Administration Guide.for more information about this type of authentication.
To set an IP address for authentication:
1. Define a name for the object or accept the default.
2. Click Edit to display the Set Substitution dialog.
3. Define the substitution strings:
a. Select one or more strings and click Insert. For example, your branch user headers contain the request.header.ClientIP HTTP header.
b. Click OK.
3a

175
4. From the IP Address drop-down list, select a substitution string. For example: the $(request.header.Client-IP): sets the address for authentication to the address received from the HTTP Client-IP header.
5. Click OK.
Permit Authentication ErrorAfter an authentication failure occurs, the authentication error is checked against the list of errors that policy specifies as permitted:
❐ If the error is not on the list, the transaction terminates.
❐ If the error is on the list, the transaction proceeds; however, the user is unauthenticated. Because the transaction is not considered authenticated, the authenticated=yes policy condition evaluates to false and the user has no username, group information, or surrogate credentials. Policy that uses the user, group, domain, or attribute conditions does not match.

Visual Policy Manager Reference
176
To permit an authentication error:
1. Select one of the following:
• Any errors: Allows any type of authentication error.
• Selected errors: Only allowed if the error matches the selected errors.
2. If you selected Selected errors:
a. Select Show: All errors. This option displays the complete list of authentication errors.
b. Select one or more error types.
c. Name the object or accept the default name.
3. Click OK.
Permit Authorization ErrorAfter an authorization failure occurs, the authorization error is checked against the list of errors that policy specifies as permitted.
❐ If the error is not on the list, the transaction is terminated.
❐ If the error is on the list, the transaction is allowed to proceed and the user is marked as not having authorization data.
1 2

177
❐ If a user is successfully authenticated but does not have authorization data, the authenticated=yes condition evaluates to true and the user has valid authentication credentials.
❐ The user.authorization_error=any evaluates to true if user authorization failed and the user object contains username and domain information, but not group or attribute information. As a result, policy using user or domain actions still match, but policy using group or attribute conditions do not.
Kerberos Constrained DelegationThe Kerberos Constrained Delegation (KCD) action object allows you to select the IWA realm used to handle KCD for a particular transmission. An IWA realm is necessary to enable KCD on the ProxySG appliance.
To create and add a Kerberos Constrained Delegation object:
1. The Add Kerberos Constrained Delegation Object dialog allows you to configure KCD implementation.
a. In the Name field, enter a name for the object or leave as is to accept the default.
b. From the Authentication Type drop-down list, select origin or proxy. If you are authenticating to an upstream origin server, select origin. If you are authenticating to a proxy server, select proxy.
c. In the IWA Realm field, enter a valid IWA realm to use for Kerberos authentication.
d. (Optional) Enter the Service Principal Name to use for the OCS. The default SPN for the service is set to http/hostname. If a non-standard port is used for a service, use http/hostname:port
2. Click OK.
3. Click OK to return to the VPM.
4. Click the Install Policy button when finished adding policies.
1a
1b 1c 1d

Visual Policy Manager Reference
178
Do Not Use Kerberos Constrained DelegationThis is a static object. Adding this object disables Kerberos Constrained Delegation for a particular transmission.
Send Credentials UpstreamThe Send Credentials Upstream object enables BASIC credentials to be sent to an upstream server or proxy. User credentials (from ProxySG authentication) or custom credentials derived from a substitution must be specified.
To forward BASIC credentials:
1. The Add Send Credentials Upstream Object dialog allows configuration of forwarding BASIC credentials.
a. Enter an easily recognizable name in the field.
b. Select the authentication method from the Authentication Type drop-down list. Select origin or proxy. If you are authenticating to an upstream origin server, select origin. If you are authenticating to a proxy server, select proxy.
c. Select the credentials required for a particular OCS.
• Select the Send user credentials radio button to send user credentials to the OCS.
• Select the Send custom credentials radio button to forward a fixed username and password to an OCS. Selection of this option requires the UserName and Password fields to be filled with the appropriate values.
2. Click OK.
3. Click OK to return to the VPM.
4. Click the Install Policy button when finished adding policies.
Note: For all transactions which match the Send Credentials Upstream Object, credentials are sent even if the receiving server does not require them.
1a
1b 1c

179
Do Not Send Credentials UpstreamThis is a static object. Adding this object disables credential forwarding for a particular transaction.
Set Effective Threat Risk LevelYou can specify a threat risk level based on a policy condition to override the threat risk level that WebPulse returns for a request. This object is available in the DNS Access, SSL Intercept, Web Access, Web Authentication, Web Content, and Forwarding layers.
1. In the Name field, enter a name for the object or accept the default name.
2. In the Effective Threat Risk Level field, enter a value to assign a specific level. See Table 3–5, "Threat Risk Levels" on page 104 for a description of the level. You can override the risk level with a 0 in addition to the values described in Table 3–5.
3. Click OK to save your changes.
Set Geolocation RestrictionTests for IP addresses in specified geographical locations. During a connection attempt to a domain, the DNS server returns one or more IP addresses associated with the domain. The appliance tests each IP address against policy and skips any that are not allowed.
For detailed information on this policy gesture and usage examples, refer to the supplier.allowed_countries() property in the Content Policy Language Reference.
1. In the Name field, enter a name for the object or accept the default name.
2. Select one of the following:
• Create a new policy for all locations - Set the restriction to:
• Allow all locations - Allow connections to IP addresses in all countries that are not specified in geolocation policy. This is the default setting.
• Deny all locations - Deny connections to IP addresses in all countries that are not specified in geolocation policy.
• Create a new policy for a list of allowed location(s) - Create policy for one or more selected locations.
• Modify the current policy for a list of selected location(s) - Modify the existing policy for one or more selected locations.
3. Click OK to save your changes.
Combined Action ObjectsAllows you to combine an action object that invokes multiple actions. See "Using Combined Objects" on page 196.

Visual Policy Manager Reference
180
Do not Preserve Untrusted IssuerThis is a static object. If an OCS presents a certificate to the ProxySG appliance that is not signed by a trusted Certificate Authority (CA), the appliance either sends an error message to the browser, or ignores the error and processes the request, based on the configuration of the Server Certificate Validation object.
Preserve Untrusted IssuerThis is a static object. If an OCS presents a certificate to the ProxySG appliance that is not signed by a trusted Certificate Authority (CA), the appliance acts as a CA and presents the browser with an untrusted certificate. A warning message is displayed to the user, and they can decide to ignore the warning and visit the website or cancel the request.
Use Default Setting for Preserve Untrusted IssuerThis is a static object. The Preserve untrusted certificate issuer configuration setting in the ProxySG Management Console is used to determine whether or not untrusted certificate issuer should be preserved for a connection. This is the default behavior.
Action Column/Policy Layer MatrixThe following matrix lists all of the Action column objects and indicates which policy layer they apply to.Se
Object Admin Auth
Admin Acc
DNS Acc
SOCKS Auth
SSL Int
SSL Acc
Web Auth
Web Acc
Web Cont
Fwding
Allow x x
Deny (static) x x x x
Allow Read-Only Access x
Allow Read-Write Access x
Do Not Authenticate x x x
Do Not Authenticate (Forward Credentials)
x
Authenticate x x x
Force Authenticate x x x
Bypass Cache x
Do Not Bypass Cache x
Check Authorization x x
Do Not Check Authorization
x x
Always Verify x x
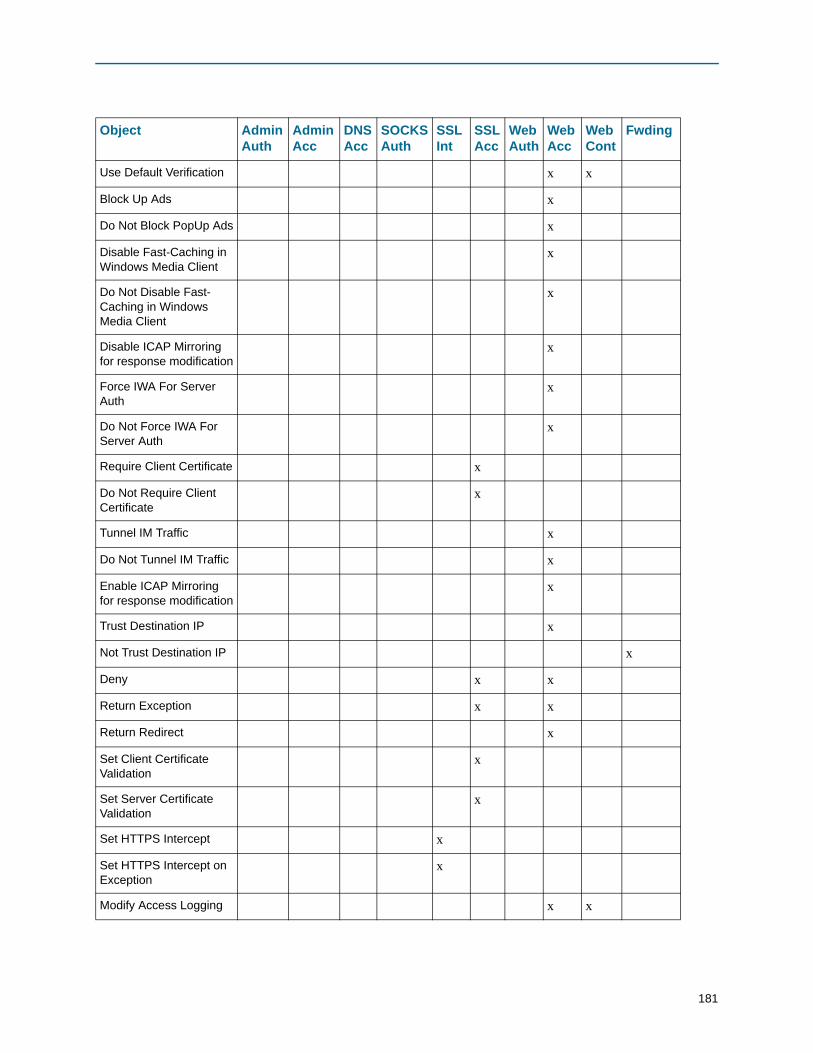
181
Use Default Verification x x
Block Up Ads x
Do Not Block PopUp Ads x
Disable Fast-Caching in Windows Media Client
x
Do Not Disable Fast-Caching in Windows Media Client
x
Disable ICAP Mirroring for response modification
x
Force IWA For Server Auth
x
Do Not Force IWA For Server Auth
x
Require Client Certificate x
Do Not Require Client Certificate
x
Tunnel IM Traffic x
Do Not Tunnel IM Traffic x
Enable ICAP Mirroring for response modification
x
Trust Destination IP x
Not Trust Destination IP x
Deny x x
Return Exception x x
Return Redirect x
Set Client Certificate Validation
x
Set Server Certificate Validation
x
Set HTTPS Intercept x
Set HTTPS Intercept on Exception
x
Modify Access Logging x x
Object Admin Auth
Admin Acc
DNS Acc
SOCKS Auth
SSL Int
SSL Acc
Web Auth
Web Acc
Web Cont
Fwding

Visual Policy Manager Reference
182
Override Access Log Field
x x
Rewrite Host x
Reflect IP x x
Set Server URL DNS Lookup
x
Manage Bandwidth
Object Admin Auth
Admin Acc
DNS Acc
SOCKS Auth
SSL Int
SSL Acc
Web Auth
Web Acc
Web Cont
Fwding

183
Suppress Header x
Control Request Header x
Control Response Header
x
Notify User x
Strip Active Content x
Set HTTP Request Max Body Size
x
Set Client HTTP Compression
x
ADN Server Optimization x
Set Server HTTP Compression
x
Return ICAP Feedback x
Set Dynamic Categorization
x
Set External Filter Service
x
Perform Request Analysis
x x
Perform Response Analysis
x
Use Default Caching x
Set FTP Connection x
Set SOCKS Acceleration x
Set Streaming Max Bitrate
x
Client Connection DSCP Value
x x
Server Connection DSCP Value
x x x x
Set Attack Detection Failure Weight
x
Set Apparent Data Type Action
x
Object Admin Auth
Admin Acc
DNS Acc
SOCKS Auth
SSL Int
SSL Acc
Web Auth
Web Acc
Web Cont
Fwding
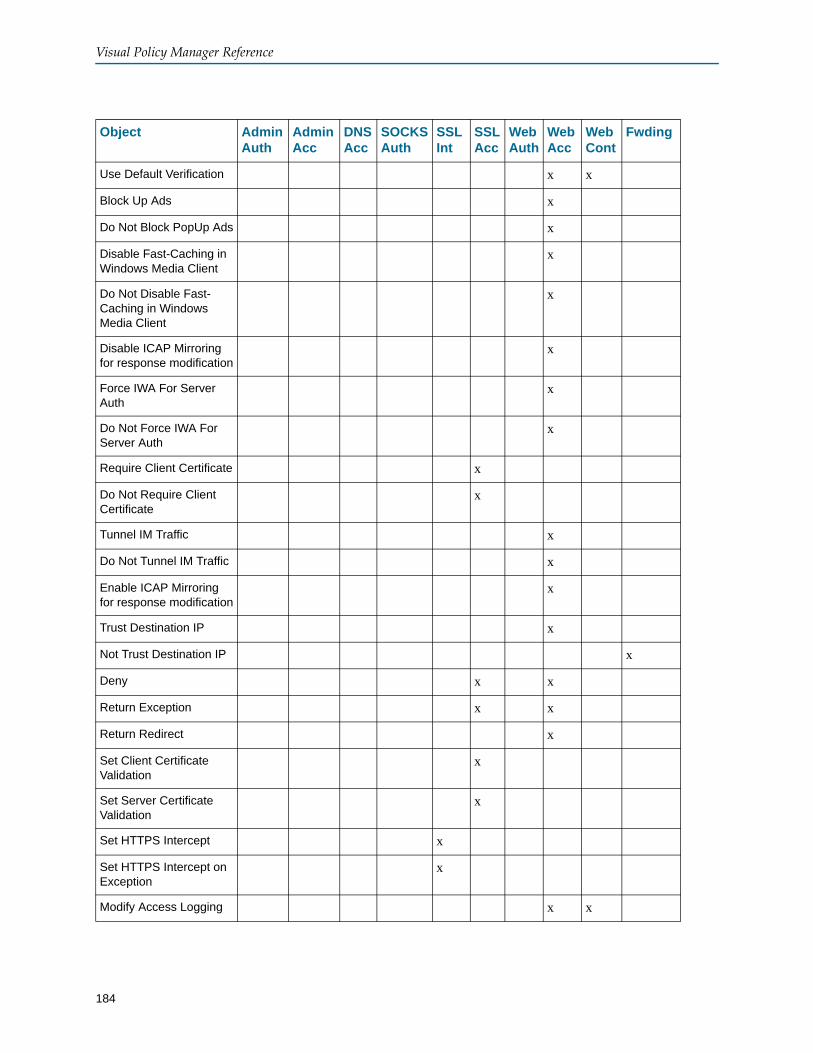
Visual Policy Manager Reference
184
Use Default Verification x x
Block Up Ads x
Do Not Block PopUp Ads x
Disable Fast-Caching in Windows Media Client
x
Do Not Disable Fast-Caching in Windows Media Client
x
Disable ICAP Mirroring for response modification
x
Force IWA For Server Auth
x
Do Not Force IWA For Server Auth
x
Require Client Certificate x
Do Not Require Client Certificate
x
Tunnel IM Traffic x
Do Not Tunnel IM Traffic x
Enable ICAP Mirroring for response modification
x
Trust Destination IP x
Not Trust Destination IP x
Deny x x
Return Exception x x
Return Redirect x
Set Client Certificate Validation
x
Set Server Certificate Validation
x
Set HTTPS Intercept x
Set HTTPS Intercept on Exception
x
Modify Access Logging x x
Object Admin Auth
Admin Acc
DNS Acc
SOCKS Auth
SSL Int
SSL Acc
Web Auth
Web Acc
Web Cont
Fwding

185
Override Access Log Field
x x
Rewrite Host x
Reflect IP x x
Set Server URL DNS Lookup
x
Manage Bandwidth
Object Admin Auth
Admin Acc
DNS Acc
SOCKS Auth
SSL Int
SSL Acc
Web Auth
Web Acc
Web Cont
Fwding

Visual Policy Manager Reference
186
Suppress Header x
Control Request Header x
Control Response Header
x
Notify User x
Strip Active Content x
Set HTTP Request Max Body Size
x
Set Client HTTP Compression
x
ADN Server Optimization x
Set Server HTTP Compression
x
Return ICAP Feedback x
Set Dynamic Categorization
x
Set External Filter Service
x
Perform Request Analysis
x x
Perform Response Analysis
x
Use Default Caching x
Set FTP Connection x
Set SOCKS Acceleration x
Set Streaming Max Bitrate
x
Client Connection DSCP Value
x x
Server Connection DSCP Value
x x x x
Set Attack Detection Failure Weight
x
Set Apparent Data Type Action
x
Object Admin Auth
Admin Acc
DNS Acc
SOCKS Auth
SSL Int
SSL Acc
Web Auth
Web Acc
Web Cont
Fwding

187
Send DNS/RDNS Response Code
x
Send DNS Response x
Send Reverse DNS Response
x
Do Not Cache x
Set Force Cache Reasons
x
Mark As Advertisement x
Do Not Mark as Advertisement
x
Enable Pipelining x
Disable Pipelining x
Set TTL x
Set Malware Scanning x
Send Direct x
Integrate New Hosts x
Do Not Integrate New Hosts
x
Allow Content From Origin Server
x
Serve Content Only From Cache
x
Select SOCKS Gateway x
Select Forwarding x
Reflect IP x
Set Streaming Transport x
Authentication Charset x
Combined Objects x x x x x x
Kerberos Constrained Delegation
x
Do Not Use Kerberos Constrained Delegation
x
Object Admin Auth
Admin Acc
DNS Acc
SOCKS Auth
SSL Int
SSL Acc
Web Auth
Web Acc
Web Cont
Fwding

Visual Policy Manager Reference
188
Set Geolocation Restriction
x
Send Credentials Upstream
x
Do Not Send Credentials Upstream
x
Object Admin Auth
Admin Acc
DNS Acc
SOCKS Auth
SSL Int
SSL Acc
Web Auth
Web Acc
Web Cont
Fwding

189
Login Banner Object Column Reference(Added in version 6.6.4.3) A login banner object defines the content of the notice and consent banner which will be displayed before the user may access the Management Console.
To create a login banner:
1. Right click BannerAttributeX, and select Set.
2. Click Edit.
3. Enter the banner text. On the Edit Banner Attribute Object pane:
a. Name the object as required.
b. Click inside the field to edit the Banner Text. The banner has a 2000 character limit.
c. To add a graphic, click Browse to locate a .jpg, .gif, or .png.
Note: The Banner Image field shows the physical size the banner will occupy. Banner images larger than 468 pixels wide and/or 60 pixels high will be resized.
d. Click OK.

Visual Policy Manager Referencee
190
Track Object Column ReferenceA track object defines the parameters for tracking and tracing traffic. All policy layers contain the same trace objects, but tracking parameters are layer-specific.
Note: Because of character limitations required by the generated CPL, only alphanumeric, underscore, and dash characters can be used to define an action object name.

191
Event Log, E-mail, and SNMPYou can customize the event log, E-mail notification, and SNMP with triggers. These triggers are the same for all three object types.
To customize an Event Log, E-mail, or SNMP object:
1. Right-click the Tracking cell in a policy layer and select Set; the Set Track Object dialog appears.
2. Click New and select Event Log, Email, or SNMP; the appropriate add object dialog appears.
3. In the Name field, enter a name for this object or leave as is to accept the default.
4. (Add/Edit Email Object only) Select the recipients for the email:
• Default recipients - Send email to the global recipient list. This is the default selection.
• Custom recipients - Send email to one or more existing recipient lists.
If there are no existing recipient lists, click Configure Custom Recipient Lists. Then, create a recipient list:
a. On the Configure Custom Recipient Lists dialog, click New.
3
4 5a
5b
5c
Note: The e-mail object also contains options for Recipients and Subject.

Visual Policy Manager Referencee
192
b. Enter a list name and at least one valid email address. Click OK. The dialog displays the list you created.
c. Select the list and click OK.
d. Repeat the previous steps to add more recipient lists. Then, proceed with configuring email for the selected recipient list(s).
5. In the Message Text field, enter a customized message that appears with each entry.
6. (Optional) Add substitution variables. The substitution variables instruct the ProxySG appliance to append specific information to the tracking object. The variables are categorized alphabetically, according to prefix.
In the Substitution Variables field:
a. From the Category drop-down list, select a category to narrow the view to a subset of variables.
b. The Display Option options allow you to further aggregate the variables by ELFF (Extended Log File Format) or CPL (Content Policy Language).
c. Select a variable and click Insert. Rolling the mouse over a variable displays a brief description of the variable. Repeat as required.
Policy IDSet a policy ID for a rule. The ID will be visible in all policy traces and access logs associated with requests matching the rule. This is very useful for identifying how frequently certain rules are used, and can aid in improving policy.
To view the ID in access logs, include the x-bluecoat-reference-id field in the access log format.
Trace ObjectThis object specifies rule and Web traffic tracing.
Select Trace Level and select one of the following trace options:
❐ Trace Disabled—(Default) Tracing is fully disabled.
❐ Trace Enabled—Tracing is fully enabled.
Traces are logged to a default location on the appliance (default.html), but you can enter a custom location for any trace produced by the current transaction. To specify a location, select Trace File and enter a path in the field.
If a trace destination is configured in multiple layers, the actual trace destination value displayed is the one specified in the last layer that had a rule evaluated (which has a destination property configured).
Consider the following example of generated CPL:
<Proxy> url.domain=aol.com trace.request(yes) \
trace.destination("aol_tracing.html")
Note: Some variables do not have prefixes.

193
url.domain=msn.com trace.request(yes) \
trace.destination("msn_tracing.html")
<Proxy>
client.address=10.10.10.1 trace.request(yes)

Visual Policy Manager Referencee
194
The resulting actions are:
❐ Requests to the aol.com domain are logged to aol_tracing.html.
❐ Requests to the msn.com domain are logged to msn_tracing.html.
❐ Requests from the client with the IP of 10.10.10.1 are logged to the default location of default.html.
.
The Trace File option can be used in conjunction or separately from the Trace Level option.
Access the default path of the trace file through one of the following URLs:
❐ If the Management Console secure mode is enabled (the default on a new or upgraded system):
https://IP_address:8082/Policy/Trace/default_trace.html
❐ If the Management Console is deployed in non-secure mode:
http://IP_address:8081/Policy/Trace/default_trace.html
Combined Track ObjectAllows you to combine track objects into one. See "Using Combined Objects" on page 196.
Track Objects/Policy Layer MatrixThe following matrix lists all of the Track column objects and indicates which policy layer they apply to.
Note: After using a trace to troubleshoot, remove the trace to reduce log space.
Object Admin Auth
Admin Acc
DNS Acc
SOCKS Auth
SSL Int
SSL Acc
Web Auth
Web Acc
Web Cont
Web App
Fwding
Event Log x x x x x x x
Email x x x x x x x
SNMP Objects x x x x x x x
Trace x x x x x x x x x x x
Combined Track Object
x x x x x x x

195
Comment Object ReferenceThe Comment object allows you to write any text to aid in labeling the policy layer. The text in this field does not impact the policy.
Visual Policy Manager Referencee
196
Using Combined ObjectsAs previously discussed, you select one object for as many object types as required for a given rule. Most object types also have the option of using a combined object. This feature allows you to select multiple objects for a given type, thus creating more complex tools. There are two uses for combined conditions: lists and multiple object types. Also consider the Negate option, which exempts the objects in the list.
Example One
Consider the following example. You want a Web Content policy layer that as an action forces authorization and sends the request to an ICAP service for content scanning.
1. In the Set Action Object dialog, select New > Combined Action Object.

197
2. In the Name field, enter a name for this object or leave as is to accept the default.
3. In the Description field, enter brief text that explains the intent of this object (for reference).
4. The Show drop-down list allows you narrow the scope of the displayed objects.
5. Hold the Shift key and select Check Authorization and Branch_AV_Req.
6. Click Add. The selected objects appear in the Selected Action Objects field.
7. Click OK. The CombinedAction1 object appears as a separate, selectable object.
8. Select CombinedAction1; click OK. The object is now part of the rule.
Based on the other parameters specified in the rule, all requests are forced to an upstream server for authorization and the Web responses are subject to content scanning through the ICAP service.
2 3
4
5Hold Shift to select multiple objects.
Click New to create new objects from this dialog. 6

Visual Policy Manager Referencee
198
Example Two
In the following example, the rule searches for one of the Proxy IP Address/Port objects and one of the streaming client user agents. .
Note: The VPM displays various warning messages if you attempt to add objects that creates an invalid combined object. However, it is possible to add a combined object to another combined object, even if doing so presents duplication of simple object definitions without receiving validation warnings. For example, the contents of a child combined object might have already been included either within the parent combined object directly, or indirectly within other child combined objects. This is allowable because of the complexity some combined objects and policies can achieve.
199
Centralized Object Viewing and ManagingThis section describes how to use the All Objects dialog to view and manage every VPM object.
Viewing ObjectsThe All Objects feature allows you view a list of all objects—both static and user-defined—that currently exist across all layers and columns. To view all configured VPM objects, in the Menu Bar select View > All Objects.
The objects are displayed according to the policy layer order (click Policy in the menu bar) and the column order (as presented in "Policy Layer and Rule Object Reference" on page 48). To narrow the scope of the displayed objects, select from the Show drop-down list at the top:
❐ All (sort by object name): Displays all objects in alphabetical order.
❐ All (sort by object type): Groups object types together.
❐ You can select to display only the static (predefined) objects for the Source, Destination, Service, and Action columns.
❐ You can select to display or any one object type. For example, you want to only view the user-defined P2P Client objects. Scroll down and select P2P Client Objects.

Visual Policy Manager Referencee
200
View Unused Objects
Selecting Show only unused objects displays all static and user-defined objects that are not currently used in any policy layer.
Managing ObjectsThis section describes how to manage objects within the All Objects dialog.
Creating Objects
The All Objects dialog also allows you to create objects. Once an object is created, it appears in the list. When creating or editing policy layers, the objects are available to add to rules.
To create an object:
1. Select New. The available columns and relevant objects are displayed in a cascade style.
2. Select Column > Object. The Add dialog for that object appears.
3. Define the object as required
4. Click OK.
Editing Objects
Any user-defined object can be modified. Highlight the object and click Edit. After editing the object, re-install the policy to apply the modified object in every policy layer it exists in.
Note: When creating Combined Objects, not all objects that appear in the left column are valid for more than one policy layer type. For example, the User object is only valid in the Web Access Layer > Source column. If you attempt to add an object that is not valid, a dialog appears with that information.

201
Deleting Objects
You cannot delete an object that is currently part of an installed policy or combined object. Before removing an object, you can use the View>Object Occurrences feature to identify which policy layers contain the object.
Visual Policy Manager Referencee
202
Creating CategoriesThis feature allows you create the content filter URL categories that can be used in the Category object. The Destination column in the DNS Access, Web Access, Web
Authentication, and Web Content policy layers contain the Category object. Similarly, categories created in the Category object (see "Request URL Category" on page 102) appear in this dialog and can be edited.
Create a category
1. In VPM, select Configuration > Edit Categories. The Edit Categories dialog appears.
2. Select Policy; click Add. The Object Name dialog appears.
3. Name the category and click OK.
4. Expand the Policy item and select the category you created; click Edit URLs. The Edit Locally Defined Category Object dialog appears.
2
4
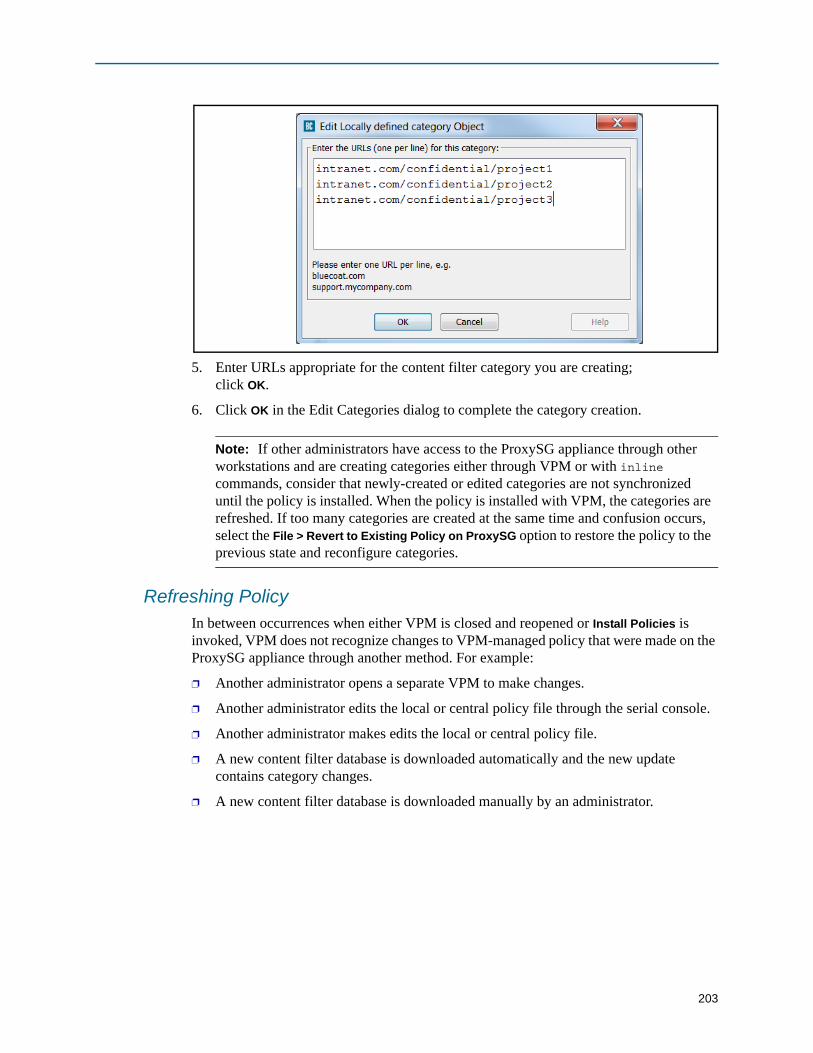
203
5. Enter URLs appropriate for the content filter category you are creating; click OK.
6. Click OK in the Edit Categories dialog to complete the category creation.
Refreshing PolicyIn between occurrences when either VPM is closed and reopened or Install Policies is invoked, VPM does not recognize changes to VPM-managed policy that were made on the ProxySG appliance through another method. For example:
❐ Another administrator opens a separate VPM to make changes.
❐ Another administrator edits the local or central policy file through the serial console.
❐ Another administrator makes edits the local or central policy file.
❐ A new content filter database is downloaded automatically and the new update contains category changes.
❐ A new content filter database is downloaded manually by an administrator.
Note: If other administrators have access to the ProxySG appliance through other workstations and are creating categories either through VPM or with inline commands, consider that newly-created or edited categories are not synchronized until the policy is installed. When the policy is installed with VPM, the categories are refreshed. If too many categories are created at the same time and confusion occurs, select the File > Revert to Existing Policy on ProxySG option to restore the policy to the previous state and reconfigure categories.
Visual Policy Manager Referencee
204
Creating Subject Directory Attribute ObjectsThe subject field of an SSL certificate can contain attributes and the ProxySG appliance can match policy against these attributes.
To manage subject directory attributes:
1. In the VPM, select Configuration > Edit Subject Directory Attributes.
The Edit Subject Directory Attributes dialog appears.
2. To add an attribute, click Add.
3. In the dialog that appears:
a. In the Name field, enter a name for the attribute. For example. country
b. In the OID field, enter a string value to match. For example, 2.16.840.1.101.2.1.5.61
c. Click OK.
To edit an attribute, select it and click Edit. Then, edit the attribute as necessary and click OK.
To delete an attribute, select and click Delete. A message appears, asking you to confirm the deletion. Click Yes.
4. On the Edit Subject Directory Attributes dialog, click OK.
205
Restricting DNS LookupsThis section discusses DNS lookup restrictions and describes how to create a list.
About DNS Lookup RestrictionThe DNS lookup restriction list is a list of domain names that apply globally, regardless of policy layer definitions. Once a domain name is added to the list, DNS lookup requests do not occur for that domain name while policy is evaluated. For more detailed information about using DNS lookups, refer to Content Policy Language Reference.
Creating the DNS Lookup Restriction ListThe list is created from the VPM Menu bar.
To create the DNS lookup restriction list:
1. Select Configuration > Set DNS Lookup Restrictions; the Set DNS lookup restrictions dialog appears.
The default is None; no domain names are restricted.
2. To restrict every domain name, select All.
3. To add specific domain names, perform the following steps.
a. Select Listed Host Patterns. This enables the Host Patterns field.
b. Click Add; the Add Host Pattern dialog appears.
c. Enter a domain name; click OK.
d. Repeat to add other domain names.
e. Click OK.

Visual Policy Manager Referencee
206
Restricting Reverse DNS Lookups This section discusses reverse DNS lookup restrictions and describes how to create a list.
About Reverse DNS Lookup RestrictionThe Reverse DNS lookup restriction list is a list of subnets that apply globally, regardless of policy layer definitions. Once a subnet is added to the list, the ProxySG appliance does not perform a reverse lookup of addresses on that subnet during policy evaluation. For more detailed information about using reverse DNS lookups, refer to Content Policy Language Reference.
Creating the Reverse DNS Lookup Restriction ListThe list is created from the VPM Menu bar. This prevents the ProxySG appliance from performing reverse DNS lookups of addresses in the list while evaluating policy.
To create the reverse DNS lookup restriction list:
1. Select Configuration > Set Reverse DNS Lookup Restrictions; the Set Reverse DNS lookup restrictions dialog appears.
The default is None; no subnets are restricted.
2. To restrict every subnet, select All.
3. To add specific subnets, perform the following steps.
a. Select Listed Subnets.
This enables the Subnets field.
b. Click Add; the Add Subnet dialog appears.
c. Enter a subnet; click OK.
d. Repeat to add other subnets.
e. Click OK.

207
Setting the Group Log OrderThis section discusses the group log order and describes how to create a list.
About the Group Log OrderThe Group Log Order object allows you to establish the order group data appears in the access logs. For more detailed information about using group log ordering, refer to Content Policy Language Reference.
Creating the Group Log Order ListThe list is created from the VPM Menu bar.
To create the group log order list:
1. Select Configuration > Set Group Log Order; the Set Group Log Order dialog appears.
2. Click Add; the Add Group Object dialog appears.
3. In the Group Name field, enter the name of a group.
The group must be already configured on the ProxySG appliance.
4. From the Authentication Realm drop-down list, select a realm.
5. Click OK.
6. Repeat as required to add more groups.
7. To order the list, select a group and click Move Up or Move Down until you achieve the desired order.
8. Click OK.

Visual Policy Manager Referencee
208
Section D: Managing Policy Layers, Rules, and Files
This ontains the following topics:
❐ "How Policy Layers, Rules, and Files Interact" —Describes the importance of rule order policy layer order.
❐ "Managing Policy" —Describes how to save and install policies on the ProxySG appliance.
❐ "Installing VPM-Created Policy Files" —Describes how to propagate a policy file created on one appliance to another.
❐ "Viewing the Policy/Created CPL" —Describes how to view the underlying CPL that is created with VPM.
209
How Policy Layers, Rules, and Files InteractThe following critical points discuss the behaviors and priorities of policy rules, layers, and files:
❐ Rules in different policy layers of the same type work together, and the order of policy layers is important.
❐ The order of policy layers of different types is important.
❐ The order of rules in a policy layer is important.
❐ Policy created in VPM is saved in a file on the ProxySG appliance; the state of the VPM user interface is also stored as an XML file on the appliance.
❐ How the appliance evaluates those rules in relation to policy layers that exist in the central and local policy files is important. For more information, see "Managing Policy Files" on page 19.
How VPM Layers Relate to CPL LayersVPM generates CPL in various layers, but the concept of layers presented in VPM is slightly different. VPM provides policy layers for special purposes. For example, Web Authentication and Web Authorization, which both generate CPL <Proxy> layers. This minimizes timing conflicts by restricting the choices of conditions and properties to those compatible timing requirements. The following table summarizes how to use VPM layers and which CPL layers result.
Note: These files are stored only if the policy is installed without any errors.
Table 3–7 VPM-Generated CPL Layers
Policy Purpose VPM Layer CPL Layer
Establish Administrator identities. Admin Authentication <Admin>
Control Administrator access. Admin Authorization <Admin>
Control DNS access. DNS Access <DNS>
Establish SOCKS user identities. SOCKS Authentication <Proxy>
Allow HTTPS interception. SSL Intercept <SSL-Intercept>
Control HTTPS traffic. SSL Access <SSL>
Establish user identities. Web Authentication <Proxy>
Control user access. Web Access <Proxy>
Control content independent of users.
Web Content <Cache>
Control forwarding. Forwarding <Forward>
Visual Policy Manager Referencee
210
Also, see Section F: "Composing CPL Directly in the VPM" on page 237.
Ordering Rules in a Policy LayerThe ProxySG appliance valuates the rules in the order in which they are listed in a policy layer. When it finds a rule that applies to the situation, it skips the remaining rules in the policy layer and goes on to the next policy layer.
Consider the following simple example. Assume that a company has a policy that prohibits everyone from accessing the Web. This is a policy that is easy to create with a Web Access Layer rule.
There are, however, likely to be exceptions to such a broad policy. For example, you require the manager of the purchasing department to be able to access the Web sites of suppliers. Members of the sales department need to access their customer websites. Creating Web Access Layer rules for both these situations is also simple. But if you put all these rules in a single policy layer, then the rule prohibiting access to everyone must be ordered last, or the other two rules are not applied.
Principle Design Rule:
Always go from the specific to the general.
Note: VPM currently does not support the <Exception> layer.

211
Using Policy Layers of the Same TypeBecause the ProxySG appliance skips the remaining rules in a policy layer as soon as it finds one that meets the condition, multiple policy layers and a combination of rules might be required to accomplish a task.
Consider the following example. A company does not want to prohibit its employees from accessing the Web, but it does not want them to abuse the privilege. To this end, the company wants employees who access the Web to authenticate when they do so; that is, enter a username and password. So the company creates a Web Authentication Layer with a rule that states:
If anyone from anywhere in the company sends a request to a URL on the Web, authenticate the client before granting access.
The company also allows members of the group Sales to access various sports Web sites only during non-work hours. Given the Web Authentication Layer rule above, these people must authenticate when they do this. But the company feels that it is not important for people going to these sites after hours to authenticate. So the company creates the following Web Access Layer rule:
❐ Grant Sales personnel access to sports websites from 5:00 PM to midnight.
But there are additional issues. Some members of the sales department spend a lot of time watching game highlights on video clips, and this takes up a lot of bandwidth. At the same time, a lot of customers access the company website in the evening (during non-work hours), so internal bandwidth should remain manageable. The company, therefore, limits the bandwidth available to the people in the Sales department with a Web Access Layer rule that is identical to the one above in all respects except for the action:
❐ Grant Sales personnel access to sports websites from 5:00 PM to midnight, but limit the maximum streaming bitrate to 300 kilobits per second.
For both these rules to work, they need to be in separate policy layers. If they were in the same policy layer, the rule listed second would never be applied.
Ordering Policy LayersThe order of policy layers is also important. The ProxySG appliance evaluates policy layers in the order in which they are listed in VPM. When the appliance is going through policy layers, it does not execute a given rule as soon as it finds that it meets the specific situation. Rather, it compiles a list of all the rules that meet the condition; when it has gone through all the policy layers, it evaluates the list, resolves any apparent conflicts, and then executes the required actions. If there is a conflict between rules in different policy layers, the matching rule in the policy layer evaluated last takes precedence.
In the above example, there are two Web Access Layers: one contains a rule stating that Sales personnel can access certain Web sites without authenticating, and the other states that when they do access these websites, limit the available bandwidth. The order of these policy layers is irrelevant. The order is irrelevant because there is no conflict between the rules in the layers.
Visual Policy Manager Referencee
212
The following is an example in which the order of policy layers does matter. Assume all URL requests from members of the purchasing department are directed to a single proxy server. To discourage employees from surfing the Web excessively during business hours, a company creates a Web Authentication Layer rule that states:
Whenever a client request comes in to the proxy server, prompt the client to authenticate.
Members of the purchasing department, however, need to access specific websites for business reasons, and the company does not want to require authentication every time they do this. So they create a Web Access Layer rule that states:
If any member of the purchasing department sends a request to a specific URL contained in a combined-object list, allow access.
The policy layer with the first rule needs to come first in evaluation order; it is then overridden by the second rule in a subsequent policy layer.
Principal Policy Layer Design Rule
Always go from the general to the specific; that is, establish a general rule in an early policy layer, then write exception rules in later policy layers.
About the Layer Guard RuleThe VPM layer guard feature allows you to set a condition by which the whole layer is evaluated or not. This saves system resources, especially if you have layers with large numbers of rules. When added, the layer guard is a single rule table that appears above the selected layer. The layer guard rule contains all of the columns available in the layer except for the Action and Track columns. These columns are not required because the rule itself does not invoke an action other than allowing or not allowing policy evaluation for the entire layer. All of the objects valid in the available columns are selectable and configurable in the layer guard rule, just as they are in the layer.
You cannot add a layer guard rule until you have created other policy layer rules.
To add a layer guard:
1. From the menu bar, click Edit.
1
2

213
2. Select Add Layer Guard. The layer guard rule displays above the evaluation rules.
3. Right-click any column in the layer guard rule; select Set.
4. Define an object or objects just as you would in a policy layer. These objects determine if the rest of the rules in the layer are evaluated. For example, if you specify a Destination IP address in the layer guard rule, the other rules in the layer are evaluated only when the appliance detects the a transaction destined for that IP address.
Note: If you create and install a "Notify User" object, the following layer guard CPL is automatically added to the Web Access, Web Content, and SSL Access policy layers: "condition=!__is_notify_internal". This is required for compatibility does not require any user interaction or tasks.
Visual Policy Manager Referencee
214
Disabling or Deleting a Layer Guard Rule
By default, a layer guard rule is enabled. You can disable (which retains the rule) or delete the rule from the VPM. Right-click Guard and make a selection.
Figure 3–11 Disabling a layer guard rule.
Note: Alternately, right-click the layer tab to add, disable, or remove a layer guard rule.

215
Installing PoliciesAs you add policy layers and rules, your work is saved in a file on the ProxySG appliance; however, policies only take effect after you install the policies and the generated XML has been validated. The appliance then compiles the policies into CPL format and saves the resulting policies in the vpm.cpl file. This overwrites any policies previously created using VPM. The appliance saves VPM-generated policies in a single file and loads it all at once. You do not need to load policies separately, as is the case with the local or central policy files.
To install policies:
❐ Select File > Install Policies, or
❐ Click Install Policies on the Rule bar.
The VPM validates the generated XML for any issues, such as missing layers. If the validation passes, the CPL is generated and the policies are loaded.
If the XML fails the validation, a dialog appears allowing you to:
• Revert to the policy currently installed on the appliance, or
• Continue to edit the policy and attempt another installation.
Furthermore, the failed XML file is written to your hard disk; view this file to troubleshoot the failed XML. The default location for this file is:
C:\Documents and Settings\user.name\bluecoat\vpm_err.xml
Notes
The Category and Notify User objects and the DNS Lookup Restrictions, Reverse DNS
Lookup Restrictions, and Group Log Order configuration objects generate CPL, regardless if they are or are not included in rules. These specific objects and features allow users to edit categories and lists that might or might not be used in current policies.

Visual Policy Manager Referencee
216
Managing PolicyThis section describes how to manage VPM policy.
Refreshing PolicyIn between occurrences when either VPM is closed and reopened or Install Policies is invoked, VPM does not recognize changes to VPM-managed policy that were made on the ProxySG appliance through another method. For example:
❐ Another administrator opens a separate VPM to make changes.
❐ Another administrator edits the local or central policy file through the serial console.
❐ Another administrator makes edits the local or central policy file.
❐ A new content filter database is downloaded automatically and the new update contains category changes.
❐ A new content filter database is downloaded manually by an administrator.
Reverting to a Previous PolicyIf after creating new policies or editing an existing policy you decide to abandon the process and continue with the existing policy installed on the ProxySG appliance, you can revert to that version. All current changes are deleted (VPM provides a verification prompt).
To revert to an existing installed policy:
Select File > Revert to Existing Policy on ProxySG.
Changing PoliciesYou can change, edit, delete, add to, and otherwise manage policies created in VPM at any time by returning to VPM and working with policy layers and rules just as you did when creating them.
Managing Policy LayersThis section describes how to perform edits of policy layers.
Renaming a Policy Layer
The VPM allows you to rename policy layers and disable and re-enable layers.
To rename a policy layer:
1. Right-click the tab of the policy layer and select Rename. The Rename New Layer dialog appears.
2. Rename the layer and click OK.
Disabling a Policy Layer
Disabling policy layers allows you to remove a subset of the employed policy without losing the rules and the effort put forth to create them. After it is disabled, the policy in that layers is ignored. You can re-enable a disabled layer at any time.
217
To disable or enable a policy layer:
Right-click the tab of the policy layer and select Disable Layer. The layer name text turns red and the layer rules are greyed-out.
To re-enable a layer, repeat this step and select Enable Layer.
Deleting a Policy Layer
You can completely remove a policy layer.
To delete a policy layer:
1. Right-click the tab of the policy layer to be deleted.
2. Select Delete Policy from the drop-down list.
Managing Policy RulesOccasionally, you might need to temporarily disable rules in a policy layer; for example, when troubleshooting compiles errors and warnings. This might help confirm that the ProxySG appliance can successfully compile the remaining policy. After disabling a rule, you can edit the objects and re-enable the rule.
To disable or enable a rule:
1. Click the appropriate policy layer tab.
2. Right-click in the No. column.
3. Click Disable Rule on the shortcut menu. The policy editor changes the rule text color to red.
4. To enable the rule, repeat step 3. After you enable a disabled rule, the policy editor changes the rule text color to black.
Important: After it is deleted, a layer cannot be recovered.
Note: All of the above procedures can be accomplished from the Menu Bar>Edit drop-down list.
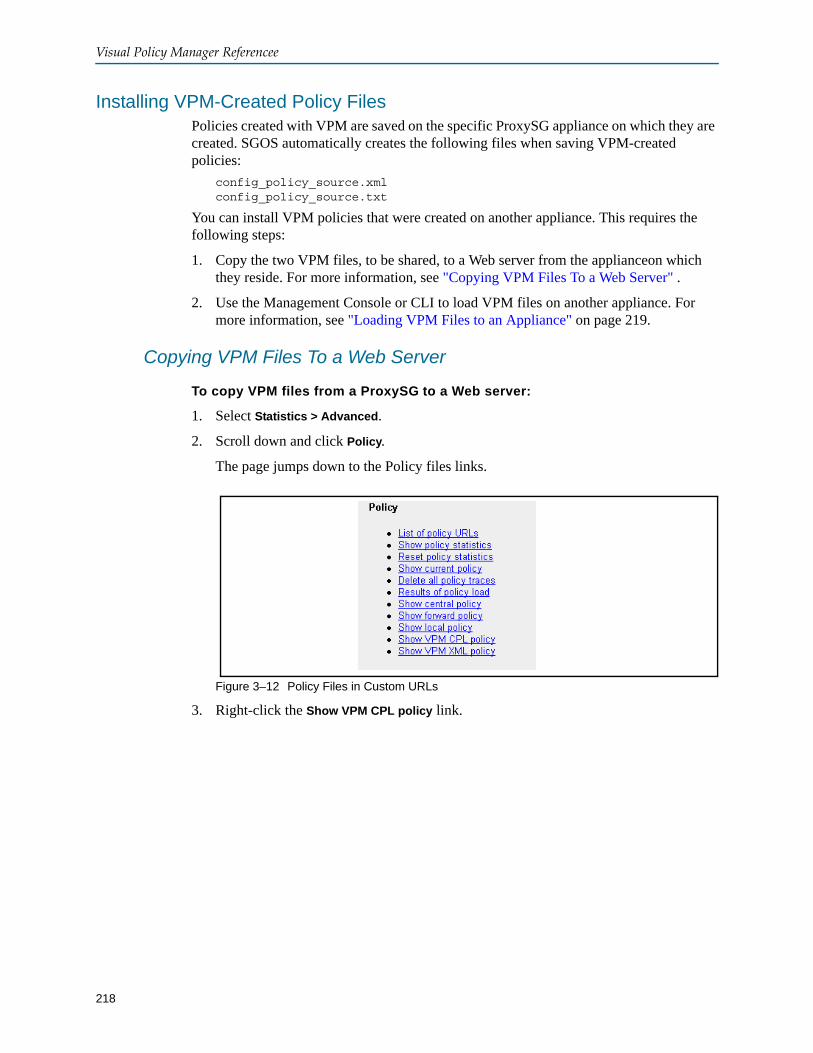
Visual Policy Manager Referencee
218
Installing VPM-Created Policy FilesPolicies created with VPM are saved on the specific ProxySG appliance on which they are created. SGOS automatically creates the following files when saving VPM-created policies:
config_policy_source.xml config_policy_source.txt
You can install VPM policies that were created on another appliance. This requires the following steps:
1. Copy the two VPM files, to be shared, to a Web server from the applianceon which they reside. For more information, see "Copying VPM Files To a Web Server" .
2. Use the Management Console or CLI to load VPM files on another appliance. For more information, see "Loading VPM Files to an Appliance" on page 219.
Copying VPM Files To a Web Server
To copy VPM files from a ProxySG to a Web server:
1. Select Statistics > Advanced.
2. Scroll down and click Policy.
The page jumps down to the Policy files links.
Figure 3–12 Policy Files in Custom URLs
3. Right-click the Show VPM CPL policy link.

219
4. In the Save As dialog, enter the full path to a directory on the Web server before the file name and click OK.
5. Repeat the previous step for the second VPM file.
Loading VPM Files to an Appliance
To load VPM files to an appliance:
1. Select Configuration > Policy > Policy Files > Visual Policy Files.
2. In the Install Visual Policy field:
a. Select Remote URL from the Install VPM-CPL from drop-down list.
b. Click Install. The Install VPM-CPL dialog appears.
c. In the Installation URL field, enter the URL to the VPM CPL file copied to the Web server (this is the file with the default .txt extension) and click Install.
d. Repeat Steps a through c to enter the URL to the second VPM XML file copied to the Web server (this is the file with the default .xml extension) and click Install.
3. Click Apply.
Important: The Save As dialog offers the appropriate default file name (config_policy_source.xml or config_policy_source.txt). You can change the names, including the extension. This can be helpful if an enterprise is using various sets of shared VPM files. You could rename files to indicate the ProxySG appliance on which they were created, for example, or for a department that has a set of VPM-specific policies, used perhaps in multiple locations (sales_vpm.cpl and sales_vpm.xml)
2a2b

Visual Policy Manager Referencee
220
Notes
❐ If VPM files already exist on the ProxySG appliance, the URLs to those files display in the two file fields. To replace them, delete the URLs and type new ones. Installing new files overwrites any that are already present.
❐ To review VPM-generated policies before installing them, enter the URL to the CPL file on the Web server and click View.
❐ Regardless of whether you are installing new VPM files, you can review the CPL or XML files of the policies currently on the appliance. Click VPM-CPL and VPM-XML in the View Visual Policy Files box at the bottom of the dialog.
❐ Never edit either of the VPM files directly. Change the files only by working with the policies in VPM and saving changes there.
To load VPM files to an appliance:
The two commands in the first step load one of the VPM policy files; the commands in the second step load the other policy file. In each case, url is the complete path, including file name, to the appropriate file on the Web server.
1. At the config command prompt, enter the following commands:SGOS#(config) policy vpm-cpl-path url SGOS#(config) load policy vpm-cpl
2. At the config command prompt, enter the following commands:SGOS#(config) policy vpm-xml-path url SGOS#(config) load policy vpm-xml
221
Viewing the Policy/Created CPLView the CPL generated by installing VPM-created policy from VPM or the Management Console.
To view the generated CPL through the VPM:
Select View > Generated CPL.
To view the VPM policy file:
Select View > Current ProxySG VPM Policy Files.
Important: Do not edit or alter VPM-generated files by opening the VPM policy file and working in the generated CPL. To edit, change, or add to VPM policies, edit the policy layers and re-install the policy.

Visual Policy Manager Referencee
222
Section E: Tutorials
This contains the following topics:
❐ "Tutorial—Creating a Web Authentication Policy" on page 223
❐ "Tutorial—Creating a Web Access Policy" on page 229

223
Tutorial—Creating a Web Authentication PolicyThis section is a tutorial that demonstrates how to create policies and rules for Web authentication.
Use Web Authentication policies to specify whether the individual making a request is prompted to authenticate by entering a username and password. In this example, a company uses a PAC file to configure most employee browsers to connect to a specific IP address on the ProxySG appliance.The company wants these users to authenticate when their browsers send a request to the proxy.
To create a policy layer:
1. Start the VPM from the Management Console: Configuration > Policy > Visual Policy
Manager.
2. Select Policy > Add Web Authentication Layer.
3. A dialog displays offering a default name for the layer, consisting of the layer type and a number. Rename the layer or accept the default and click OK.
The VPM creates the new layer tab and adds a blank rule.
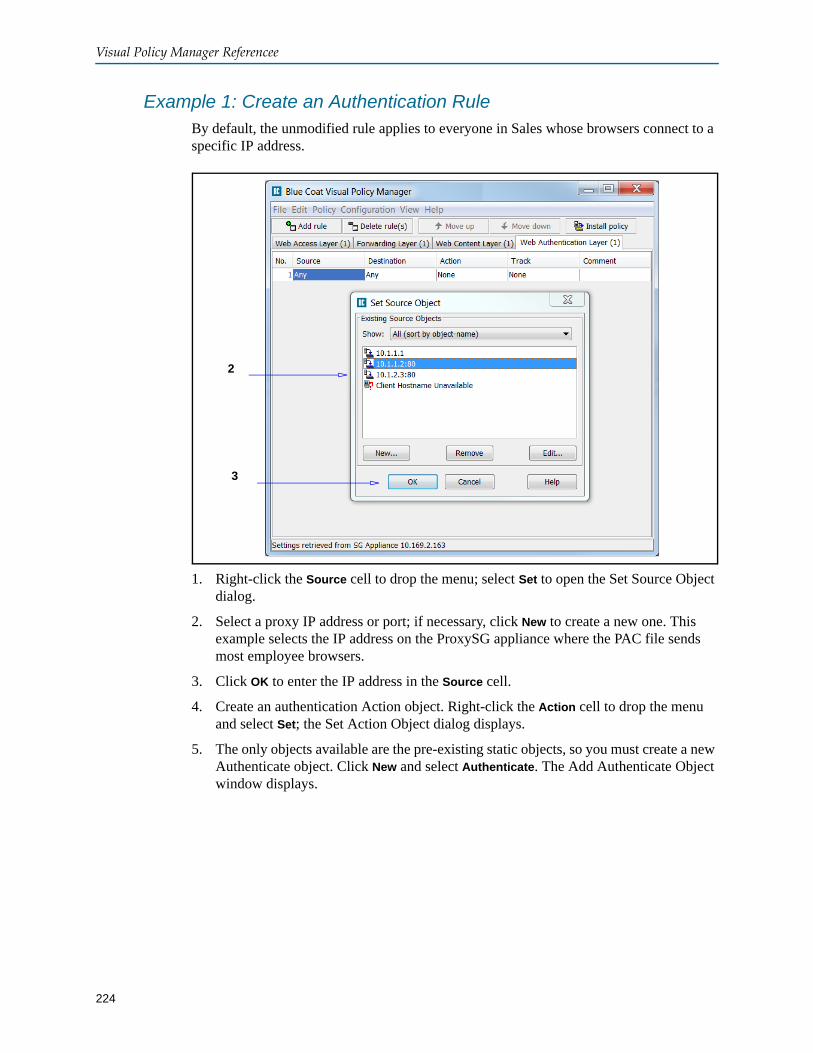
Visual Policy Manager Referencee
224
Example 1: Create an Authentication RuleBy default, the unmodified rule applies to everyone in Sales whose browsers connect to a specific IP address.
1. Right-click the Source cell to drop the menu; select Set to open the Set Source Object dialog.
2. Select a proxy IP address or port; if necessary, click New to create a new one. This example selects the IP address on the ProxySG appliance where the PAC file sends most employee browsers.
3. Click OK to enter the IP address in the Source cell.
4. Create an authentication Action object. Right-click the Action cell to drop the menu and select Set; the Set Action Object dialog displays.
5. The only objects available are the pre-existing static objects, so you must create a new Authenticate object. Click New and select Authenticate. The Add Authenticate Object window displays.
2
3

225
6. For this example, the following fields are:
• Name—Every configurable object has a name. The default name is Authenticate1; change to Authenticate_Sales.
• Realm—Specifies an LDAP realm.
• Mode—Specifies the authentication realm mode is Proxy IP.
7. Click OK to close the Add Action Object window, with the new Authenticate object in the list.
8. Click OK.
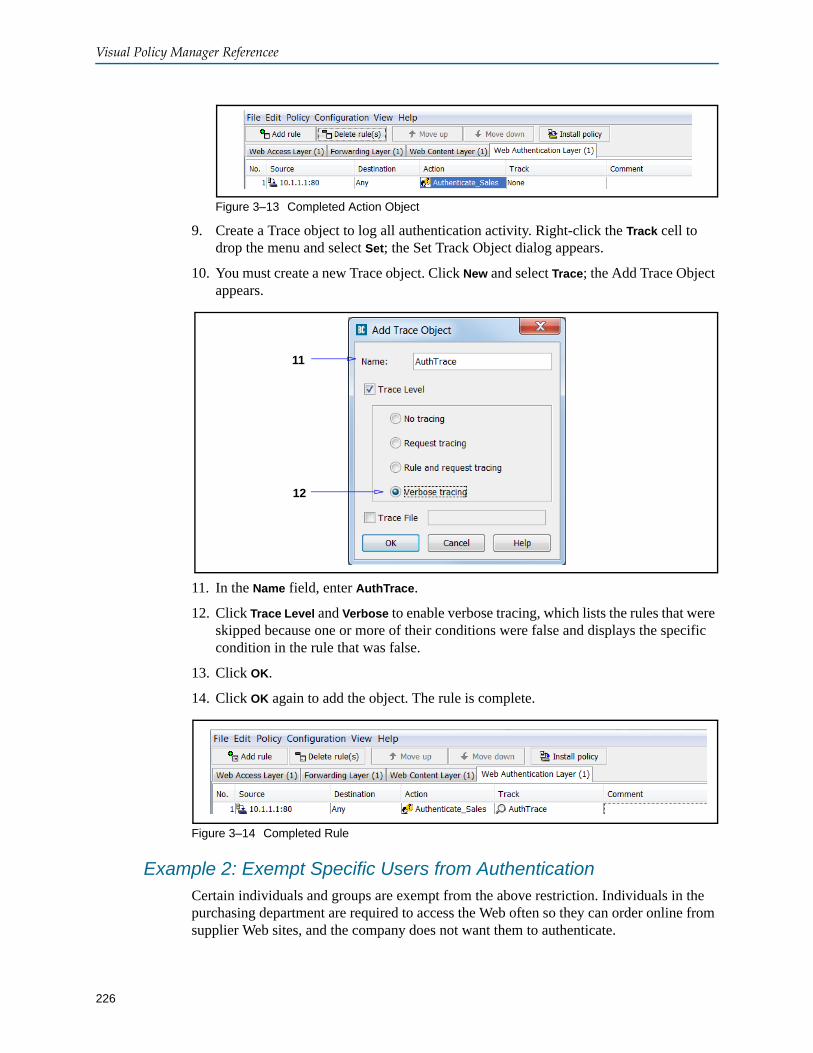
Visual Policy Manager Referencee
226
Figure 3–13 Completed Action Object
9. Create a Trace object to log all authentication activity. Right-click the Track cell to drop the menu and select Set; the Set Track Object dialog appears.
10. You must create a new Trace object. Click New and select Trace; the Add Trace Object appears.
11. In the Name field, enter AuthTrace.
12. Click Trace Level and Verbose to enable verbose tracing, which lists the rules that were skipped because one or more of their conditions were false and displays the specific condition in the rule that was false.
13. Click OK.
14. Click OK again to add the object. The rule is complete.
Figure 3–14 Completed Rule
Example 2: Exempt Specific Users from AuthenticationCertain individuals and groups are exempt from the above restriction. Individuals in the purchasing department are required to access the Web often so they can order online from supplier Web sites, and the company does not want them to authenticate.
11
12

227
1. Click Add Rule to add a new rule to this policy layer.
2. People in the purchasing group use the same PAC file and thus their browsers are directed to the same IP address: 10.1.1.1.
3. Change the Action object to Do Not Authenticate and click OK.
The new rule in the policy layer accepts the default Action Object to not authenticate and does not require a Trace Object.

Visual Policy Manager Referencee
228
Figure 3–15 Updated second rule.
However, a problem exists. The second rule cannot be evaluated because the first rule affects everyone who goes through the proxy. The rules need to be reversed.
4. Select the second rule and click Move Up to reorder the rules.
5. Click Install Policy.
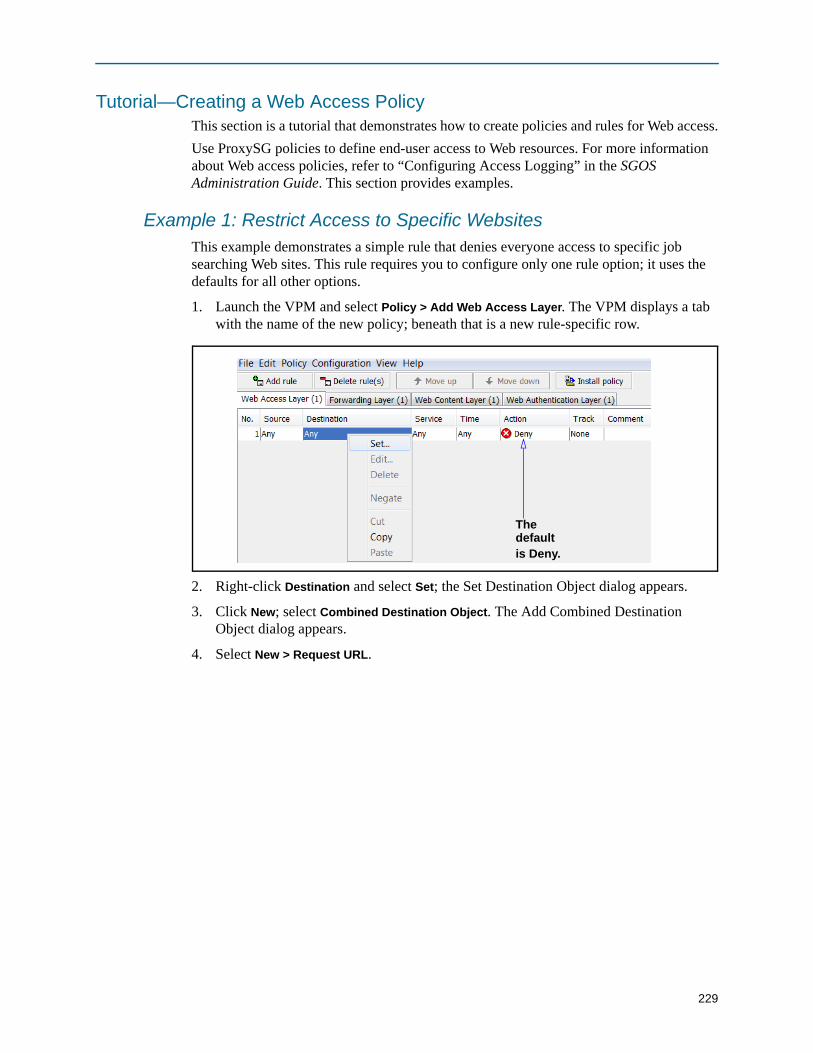
229
Tutorial—Creating a Web Access PolicyThis section is a tutorial that demonstrates how to create policies and rules for Web access.
Use ProxySG policies to define end-user access to Web resources. For more information about Web access policies, refer to “Configuring Access Logging” in the SGOS Administration Guide. This section provides examples.
Example 1: Restrict Access to Specific WebsitesThis example demonstrates a simple rule that denies everyone access to specific job searching Web sites. This rule requires you to configure only one rule option; it uses the defaults for all other options.
1. Launch the VPM and select Policy > Add Web Access Layer. The VPM displays a tab with the name of the new policy; beneath that is a new rule-specific row.
2. Right-click Destination and select Set; the Set Destination Object dialog appears.
3. Click New; select Combined Destination Object. The Add Combined Destination Object dialog appears.
4. Select New > Request URL.
The default is Deny.

Visual Policy Manager Referencee
230
5. Click Simple Match; in the URL field, enter hotjobs.com.
6. Click Add.
7. Repeat step 5, adding monster.com and bajobs.com.
8. Click Close.
5
6
8
9
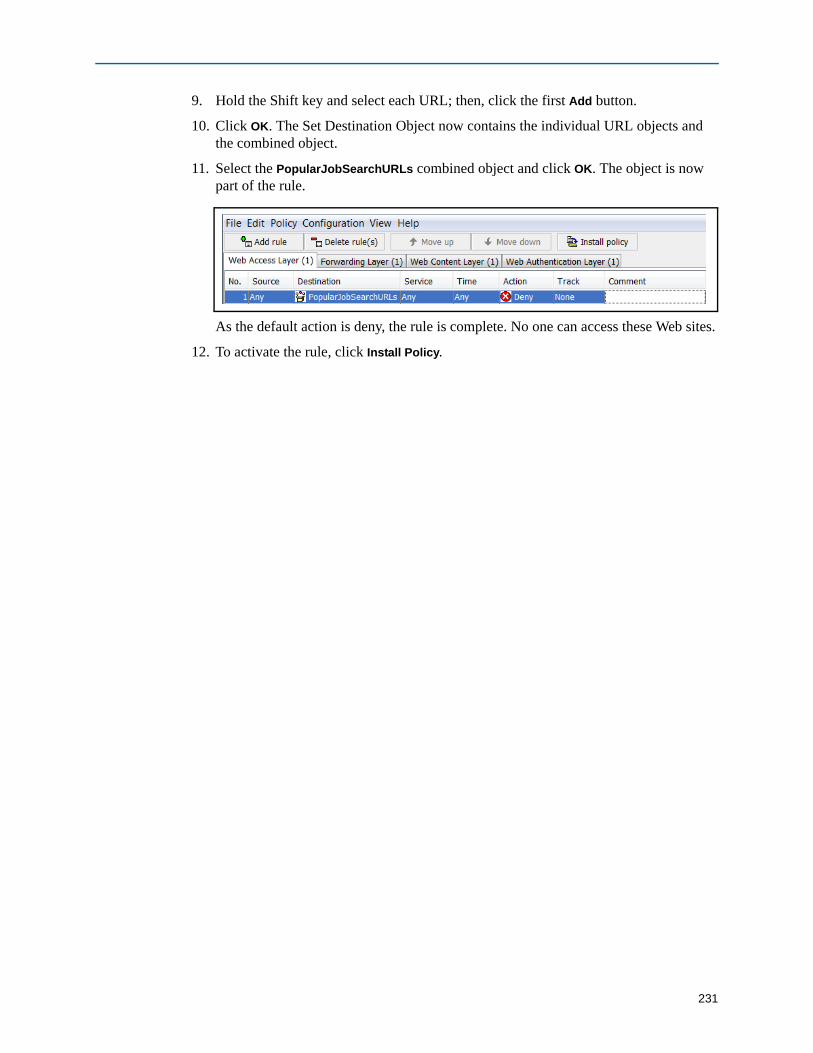
231
9. Hold the Shift key and select each URL; then, click the first Add button.
10. Click OK. The Set Destination Object now contains the individual URL objects and the combined object.
11. Select the PopularJobSearchURLs combined object and click OK. The object is now part of the rule.
As the default action is deny, the rule is complete. No one can access these Web sites.
12. To activate the rule, click Install Policy.

Visual Policy Manager Referencee
232
Example 2: Allow Specific Users to Access Specific WebsitesThe after-hours IT shift consists of part-time college interns who are on call to handle small problems, but are not involved in major projects. Therefore, you allow them to browse certain sports and entertainment Web sites when all is quiet; access is allowed from two workstations and you still want to track their browsing activity.
To configure the Source object:
1. Click Add Rule to add a new rule to the policy.
2. In the new rule, right-click the Source cell and select Set to display the Add Source Object dialog.
3. Click New and select Combined Source Object; the Add Combined Source Object appears.
4. Name the object IT_PM_Shift.
5. Under the selectable list of objects, click New and select Client IP Address/Subnet; the Add Client IP Address/Subnet Object dialog appears.
6. Enter the IPv4 or IPv6 address of the first workstation and click Add; repeat for the second; click Close. See"Client IP Address/Subnet" on page 70 for more information on using this object.
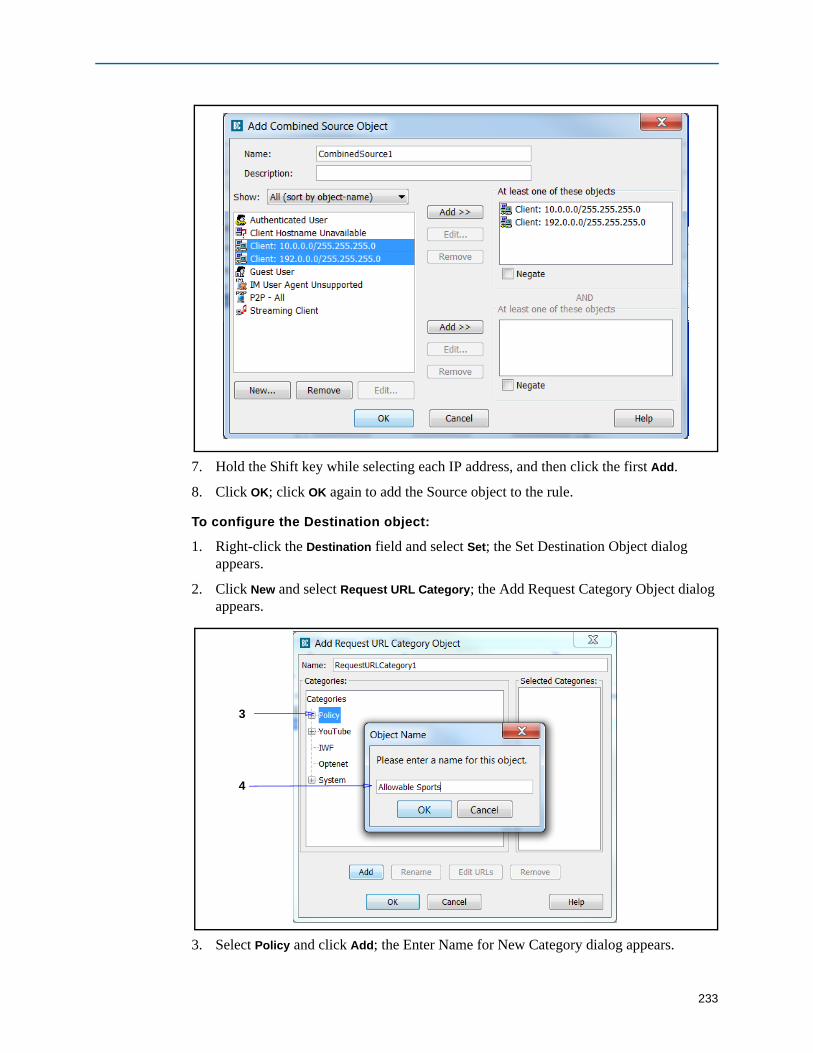
233
7. Hold the Shift key while selecting each IP address, and then click the first Add.
8. Click OK; click OK again to add the Source object to the rule.
To configure the Destination object:
1. Right-click the Destination field and select Set; the Set Destination Object dialog appears.
2. Click New and select Request URL Category; the Add Request Category Object dialog appears.
3. Select Policy and click Add; the Enter Name for New Category dialog appears.
3
4

Visual Policy Manager Referencee
234
4. Name the object Allowable_Sports and click OK.
5. Select Sports URLs. Click Edit URLs. The Edit Locally Defined Category Object dialog appears.
6. Enter the URLs for the allowable sports Web sites and click OK.
7. Under Policy, select Allowable Sports; click OK.
8. Repeat Steps 3 through 7, creating a category called Allowable Entertainment with the URLs ew.com, rollingstone.com, and variety.com.
9. Name the object Allowable PM IT Websites. Click OK twice to add the object to the rule.

235
Figure 3–16 Completed Second Rule in Layer
To configure the Time object:
This example allows the specified users to access the sports and entertainment Web sites after business hours.
1. In the second rule, right-click the Time field and select Set; the Set Time Object dialog appears.
2. Click New and select Time Object; the Add Time Object dialog appears.
3. Name the object After Hours.
4. In the Between section, set the time from 18:00 to 05:59.
This defines after hours as 6:00 PM to 6:00 AM.
5. Select Enable beside the Only on the following days of the week section and select Monday, Tuesday, Wednesday, Thursday, and Friday.
3
4
5
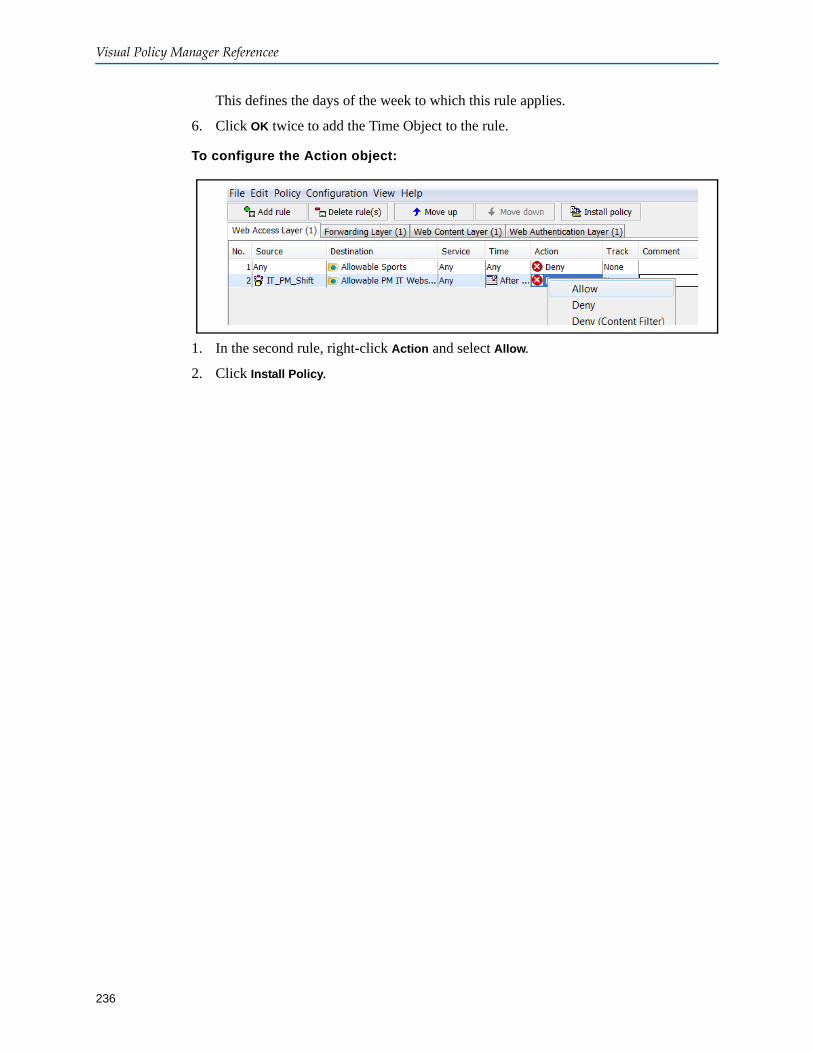
Visual Policy Manager Referencee
236
This defines the days of the week to which this rule applies.
6. Click OK twice to add the Time Object to the rule.
To configure the Action object:
1. In the second rule, right-click Action and select Allow.
2. Click Install Policy.

237
Section F: Composing CPL Directly in the VPM
The CPL Layer enables advanced CPL users to compose CPL language directly into the VPM without having to compose in a text file to be installed. You add and manage the CPL
Layer just as you do with other layers, but it does not make use of objects. The layer itself is essentially a text editor. The benefit of adding the CPL Layer is that you can change their place in the policy evaluation order. If you have multiple policy layers and you reorder the CPL Layer to the second position and install the policy, the generated CPL from CPL Layer policy displays in the second position.
The VPM does not perform any validation. If any CPL errors exist, the policy installation fails and you must manually fix the errors by editing the text in the CPL Layer.
To add a CPL Layer:
Use Case: A situation arises where you want to temporarily prevent the ProxySG appliance from caching a certain site.
1. In the VPM, select Policy > Add CPL Layer.
2. Click in the white work area and enter CPL.
3. Click Install Policy. In this example, the entered CPL displays as (View > Generated
CPL):;; Tab: [SanJoseWeb] <Proxy>
Deny; Rule 1
;; Tab: [SJAdminAccess] <Admin>
Deny; Rule 1
;; Tab: [CPL Layer (1)] <Cache>
url.domain="www.abc123.com" cache(no); Rule 1
4. Depending on the goal of the layer, change the order to ensure the priority of this action. Select Edit > Reorder Layers; set the evaluation order.
Note: The CPL Layer does not support the Layer Guard functionality.

Visual Policy Manager Referencee
238

239
Chapter 4: Advanced Policy Tasks
This chapter provides conceptual and procedural information about the ProxySG appliance’s advanced policy features. While many ProxySG features have a policy component, some features have no configuration component outside policy. Configuring advanced policy is accomplished by defining rules in the Visual Policy Manager (VPM) or by composing Content Policy Language (CPL). While some examples are provided in this chapter, references to the relevant chapter component are included in each section.
Topics in this Chapter
This chapter includes information about the following topics:
❐ Section A: "Blocking Pop Up Windows" on page 240
❐ Section B: "Exempting Non-Contiguous IP Addresses" on page 244
❐ Section C: "Stripping or Replacing Active Content" on page 245
❐ Section D: "Modifying Headers" on page 249
❐ Section E: "Defining Exceptions" on page 250
❐ Section F: "Managing Peer-to-Peer Services" on page 272
❐ Section G: "Managing QoS and Differentiated Services" on page 283
❐ Section H: "Providing Read-Only Access in the Management Console" on page 295
❐ Section I: "Setting Policy for Content and Content-Type Filtering" on page 298
Excluding exceptions, you must use policy to implement these capabilities. (For exceptions, you can create a list outside of policy to install on the system.)

Visual Policy Manager Reference
240
Section A: Blocking Pop Up Windows
This section describes the Blue Coat solution for blocking unwanted pop up windows.
241
Section 1 About Pop Up BlockingThe ProxySG appliance allows you to block pop up windows, which are usually in the form of unsolicited advertisements. Pop up windows are blocked by inserting Javascript code into each HTML Web page. Every time the Web page tries to open a new window, the code attempts to determine if the window is a result of user click. The window is allowed to open if the appliance determines a user clicked a button or link; otherwise, the window does not open.
Visual Policy Manager Reference
242
Section 2 Interactivity NotesBecause of the dynamic nature of the Web, blocking pop up windows is not a perfect solution. Consider the following caveats before configuring this feature:
❐ Windows that contain desired or useful information cannot be distinguished from undesired content, such as advertisements.
❐ If the Web browser caches a page that spawns pop up windows before the blocking policy was installed, pop up ads continue to be served from that page regardless of current policy.
❐ Animated ads contained within Web pages are not blocked. Commonly seen in scrolling or drop-down form, these are not true pop up windows but are contained within the page. Users who see these ads might believe that pop up window blocking is not implemented.
❐ Pop up windows that are delivered through HTTPS are not blocked.
❐ Although the ProxySG request headers instruct a Web server not to use compression, it is possible (though not likely) for a Web server to be configured to send compressed responses anyway. The pop up blocking feature does not work on compressed HTML pages.

243
Section 3 Recommendations❐ To compensate for limiting factors, administrators and users can override pop up
blocking:
• Administrators—Use the to create policy rules that exempt pop up blocking for specific Web sites and IP address ranges. For example, Blue Coat recommends disabling pop up blocking for your Intranet, which commonly resides on a IP address range.
Figure 4–1 Disabling pop up blocking on the corporate site.
• Users—When a pop-up window is blocked, a message is displayed in the status bar:
blocked popup window -- use CTRL Refresh to see all popups.
While pressing the Control key, click the Web browser Refresh button; the page is reloaded with pop up blocking disabled for that action.
❐ Create a separate Web Access policy layer for pop up blocking actions. This alleviates interference with Web applications deployed on your Intranet that require pop up windows.
❐ To prevent a cached Web page from spawning pop up windows, clear the browser cache, then reload the page without holding down the CTRL key.
Blocking pop up windows is accomplished through the Visual Policy Manager. See "Block/Do Not Block PopUp Ads" on page 130 for information about how to create blocking actions in a policy layers.
Visual Policy Manager Reference
244
Section B: Exempting Non-Contiguous IP Addresses
The ProxySG policy language includes several triggers that test a value of the current transaction against an IP address. All such triggers allow either an individual IP or a subnet, however non-contiguous IP ranges can present a problem. Replicating a rule multiple times to match each IP/subnet is not as efficient as grouping this information into a single object that is valid for all appropriate trigger conditions.
CPL Example:define subnet internal_ranges
10.0.0.0/16 192.168.1.0/24
end
<proxy>
client.address=internal_ranges ALLOW
Example:
1. In your Web Access Layer, add a Rule.
2. Create a Combined Object in the Source column; name the object Internal_IP_Ranges.
3. Add your internal IP address ranges and subnets to the combined object and add the object to the Source column.
4. Set the Action to allow.
245
Section C: Stripping or Replacing Active Content
This section describes the Blue Coat solution for stripping or replacing unwanted active content.

Visual Policy Manager Reference
246
Section 4 About Active ContentScripts activated within Web pages can pose a security concern. The ProxySG policy can be configured to supplement standard virus scanning of Web content by detecting and removing the HTML tags that launch active content such as Java applets or scripts. In addition, the removed content can be replaced with predefined material, a process referred to as active content transformation.
When the ProxySG appliance is configured to perform active content transformation, Web pages requested by a client are scanned before they are served and any specified tags and the content they define are either removed or replaced. Because the transformed content is not cached, the transformation process is based on a variety of conditions, including time of day, client identity, or URL.
The following tags and related content can be removed or replaced:
❐ <APPLET>—Java applets, as defined by HTML <applet> elements.
❐ <EMBED>—Embedded multimedia objects displayed using Netscape Navigator plug-ins as defined by HTML <embed> elements.
❐ <OBJECT>—Embedded multimedia objects displayed using Internet Explorer Active-X controls and other multimedia elements, as defined by HTML <object> elements
❐ <SCRIPT>—Embedded Javascript and VBScript programs, whether these are represented as HTML <script> elements, Javascript entities, Javascript URLs, or event handler attributes. The <noscript> tag is not affected by this features.
Stripping active content is accomplished through the Visual Policy Manager or by composing CPL.
❐ See "Strip Active Content" on page 155 for information about how to create a Strip
Active Content action object in a Web Access Layer.
❐ Refer to the Content Policy Language Reference.
Note: Pages served over an HTTPS tunneled connection are encrypted, so the content cannot be modified.
247
Section 5 About Active Content TypesThe following sections provide more detail about the types of active content that can be removed or replaced.
Script TagsScripts are generally placed between the start and end tags <SCRIPT> and </SCRIPT>. The type of script used is defined by the LANGUAGE attribute; for example, <SCRIPT LANGUAGE=”JavaScript 1.0”>). When the LANGUAGE attribute is undefined, the browser assumes JavaScript.
When transform active_content is configured to remove scripts, the basic operation is to remove all content between and including <SCRIPT> and </SCRIPT>, regardless of the language type, and substitute any defined replacement text. A notable exception occurs when a script is defined in the header portion of the HTML document (defined by the <HEAD> tag). In this case, the script is simply removed. This is because images, objects, and text are not allowed in the header of an HTML document. If the end script tag </SCRIPT> is missing from the document (the end of the document is defined as either up to the </BODY> or </HTML> tag, or the last character of the document), then all content from the start <SCRIPT> tag to the end of the document is removed.
JavaScript EntitiesJavaScript entities have the following format: &{javascript code} and are found anywhere in the value part of an attribute (that is, <IMG SRC=”&{images.logo};”). You can define more than one entity in the value portion of the attribute. When transform active_content is configured to remove scripts, all JavaScript entities attribute/value pairs are removed. No replacement text is put in its place.
JavaScript StringsJavaScript strings have the following format: javascript: javascript code and are found anywhere in the value part of an attribute, though usually only one of them can be defined in an attribute. Most modern browsers support JavaScript strings. When transform active_content is configured to remove scripts, all JavaScript string attribute/value pairs are removed. No replacement text is put in its place.
JavaScript EventsJavaScript events are attributes that start with the keyword on. For example, <A HREF=”index.html onMouseOver=”javascript code”>. The HTML 4.01 specification defines 21 different JavaScript events:
onBlur, onChange, onClick, onDblClick, onDragDrop, onFocus, onKeyDown, onKeyPress, onKeyUp, onLoad, onMouseDown, onMouseMove, onMouseOut, onMouseOver, onMouseUp, onMove, onReset, OnResize, onSelect, onSubmit, onUnload
Both Microsoft Internet Explorer and Netscape have defined variations on these events as well as many new events. To catch all JavaScript events, the active content transformer identifies any attribute beginning with the keyword on, not including on itself. For

Visual Policy Manager Reference
248
example, the attribute onDonner in the tag <A HREF=”index.html” onDONNER=”DONNER”> is removed even though onDonner does not exist as a valid JavaScript event in the browser. In this case, the transformed file would show <A HREF=”index.html”>.
Embed TagsHTML <EMBED> tags are not required to have an </EMBED> end tag. Many Web browsers do, however, support the <EMBED> </EMBED> tag pair. The text between the tags is supposed to be rendered by the browsers when there is no support for the embed tag, or if the MIME-type of the embed object is not supported. Thus, when transform active_content is configured to transform embed tags, only the <EMBED> tag is removed and replaced with any replacement text. Any occurrence of the end tag </EMBED> is simply removed, leaving the text between the beginning and end tags intact.
Object TagsObjects tags have a start <OBJECT> and end </OBJECT> tag pair, and the attributes CODETYPE and TYPE determine the type of object. The text between the tags is supposed to be rendered by the browsers when the object tag is not supported, so when transform active_content is configured to transform object tags, only the <OBJECT> and </OBJECT> tags are removed and replaced with any replacement text. The text between the tags remains. The CODETYPE or TYPE attributes do not affect the transformation. Also, if the end </OBJECT> tag is missing, the transformation will not be affected.

249
Section D: Modifying Headers
The request headers are sent when users access Web objects that contain a lot of information. This can raise a concern that such details compromise the privacy or security of the enterprise or user.
When a user clicks on a link, the Web browser sets the request’s Referer header to the URL of the Web page that contained the link. (This header is not set if the URL was entered or selected from a favorites or bookmarks list.) If an internal Web page provides links to external Web sites, users clicking those links sends the URL of the internal pages, and are logged in the Web logs of those external sites. This is not usually an issue; however, if the external Web site is a competitor Web site or another site with interest in the internal details of your enterprise, this might be a concern.
For example, how you structure your intranet might suggest something about your company’s current or future direction. Certain project names or codewords might show up in directory or file names. Exposing the structure of the intranet makes it easier for hackers to attack the network.
The broad solution of deleting Referer headers from all requests presents a problem because some Web sites do not serve images or other linked objects unless the Referer header is set to a referring page on that same Web site. The solution implemented by Blue Coat is to strip the Referer header only when the target Web page resides on the Internet and the referring page is on an internal host.
Suppressing headers is accomplished through the Visual Policy Manager or by composing CPL.
❐ See "Suppress Header" on page 149 for information about how to create a Suppress
Header action object in a Web Access Layer.
❐ Refer to the Content Policy Language Reference.
Visual Policy Manager Reference
250
Section E: Defining Exceptions
Exceptions are sent in response to certain ProxySG client requests, such as denial by policy, failure to handle the request, and authentication failure. Exceptions are returned to users based on policy rules defined by the ProxySG administrator. For example, if a client sends a request for content that is not allowed, an exception HTML page (for HTTP connections) or an exceptions string (for non-HTTP connections) is returned, informing the client that access is denied.
Two types of exceptions are used: built-in and user-defined.

251
Section 6 Built-in ExceptionsBuilt-in exceptions are a set of pre-defined exceptions contained on the ProxySG appliance. Built-in exceptions send information back to the user under operational contexts that are known to occur, such as policy_denied or invalid_request.Built-in exceptions are always available and can also have their contents customized; however, built-in exceptions cannot be deleted, and you cannot create new built-in exceptions.
The table below lists the built-in exceptions and the context under which they are issued.
Table 4–1 Exceptions
Exception Type and HTTP Response Code
Issued When
authentication_failed
(HTTP Response Code: 401)
The transaction cannot be authenticated, usually because the credentials were incorrect. authentication_failed is a synonym for deny.unauthorized.
authentication_failed_ password_expired (HTTP Response Code: 403)
The authentication server reports that the credentials provided have expired, and a new password must be obtained.
authentication_log_out
(HTTP Response Code: 200)
You have logged out.
authentication_mode_not_ supported (HTTP Response Code: 403)
The configured authentication mode is not supported for the current request.
authentication_redirect_ from_virtual_host (HTTP Response Code: 302)
Transparent redirect authentication is being used. This exception redirects the transaction from the virtual authentication host to the original request.
authentication_redirect_off_ box (HTTP Response Code: 302)
The request is being redirected to an authentication service on another device.
authentication_redirect_to_ virtual_host (HTTP Response Code: 302)
Transparent redirect authentication is being used. This exception redirects the transaction to the virtual authentication host.
authentication_success (HTTP Response Code: 302)
Transparent redirect authentication with cookies is being used. This exception redirects the transaction to the original request, but removes the authentication cookie form the request URL.
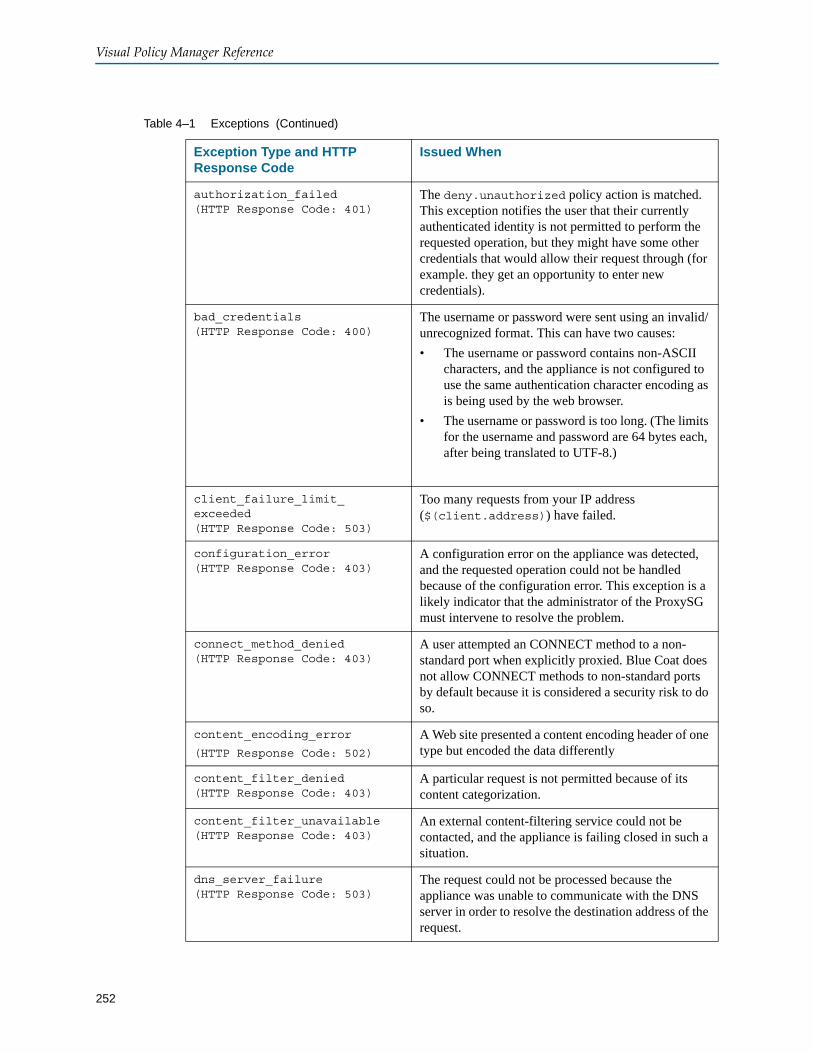
Visual Policy Manager Reference
252
authorization_failed (HTTP Response Code: 401)
The deny.unauthorized policy action is matched. This exception notifies the user that their currently authenticated identity is not permitted to perform the requested operation, but they might have some other credentials that would allow their request through (for example. they get an opportunity to enter new credentials).
bad_credentials (HTTP Response Code: 400)
The username or password were sent using an invalid/unrecognized format. This can have two causes:
• The username or password contains non-ASCII characters, and the appliance is not configured to use the same authentication character encoding as is being used by the web browser.
• The username or password is too long. (The limits for the username and password are 64 bytes each, after being translated to UTF-8.)
client_failure_limit_ exceeded (HTTP Response Code: 503)
Too many requests from your IP address ($(client.address)) have failed.
configuration_error (HTTP Response Code: 403)
A configuration error on the appliance was detected, and the requested operation could not be handled because of the configuration error. This exception is a likely indicator that the administrator of the ProxySG must intervene to resolve the problem.
connect_method_denied (HTTP Response Code: 403)
A user attempted an CONNECT method to a non-standard port when explicitly proxied. Blue Coat does not allow CONNECT methods to non-standard ports by default because it is considered a security risk to do so.
content_encoding_error
(HTTP Response Code: 502)
A Web site presented a content encoding header of one type but encoded the data differently
content_filter_denied (HTTP Response Code: 403)
A particular request is not permitted because of its content categorization.
content_filter_unavailable (HTTP Response Code: 403)
An external content-filtering service could not be contacted, and the appliance is failing closed in such a situation.
dns_server_failure (HTTP Response Code: 503)
The request could not be processed because the appliance was unable to communicate with the DNS server in order to resolve the destination address of the request.
Table 4–1 Exceptions (Continued)
Exception Type and HTTP Response Code
Issued When

253
dns_unresolved_hostname (HTTP Response Code: 404)
The request could not be processed because the appliance was unable to resolve the hostname in the request with DNS.
dynamic_bypass_reload (HTTP Response Code: 200)
The dynamic_bypass policy action is matched.
gateway_error
(HTTP Response Code: 504)
There was a network error while attempting to communicate with the upstream gateway.
icap_communication_error (HTTP Response Code: 504)
A network error occurred while the appliance was attempting to communicate with an external ICAP server.
icap_error
(HTTP Response Code: 504)
A network problem occurred, the ICAP service might be misconfigured, or the ICAP server might have reported an error.
internal_error (HTTP Response Code: 500)
The appliance encountered an unexpected error that resulted in the inability to handle the current transaction.
invalid_auth_form (HTTP Response Code: 403)
The submitted authentication form is invalid. The form data must contain the username, password, and valid original request information.
invalid_request (HTTP Response Code: 400)
The request received by the appliance was unable to handle the request because it detected that there was something fundamentally wrong with the syntax of the request.
invalid_response
(HTTP Response Code: 502)
The server's response could not be processed because of a malformed response or a misconfiguration.
license_exceeded
(HTTP Response Code: 403)
Access is denied because a license has been exceeded on the proxy, and the request is not permitted.
license_expired (HTTP Response Code: 403)
The requested operation cannot proceed because it would require the usage of an unlicensed feature.
method_denied (HTTP Response Code: 403)
The requested operation utilizes a method that has been explicitly denied because of the service properties associated with the request.
not_implemented (HTTP Response Code: 501)
The protocol cannot handle the requested operation because it utilizes a feature that is not currently implemented.
notify (HTTP Response Code: 200)
Used internally by the VPM. You do not need to customize the text of this exception, since in this case the entire HTML response is generated by VPM and is not taken from the exception definition.
Table 4–1 Exceptions (Continued)
Exception Type and HTTP Response Code
Issued When
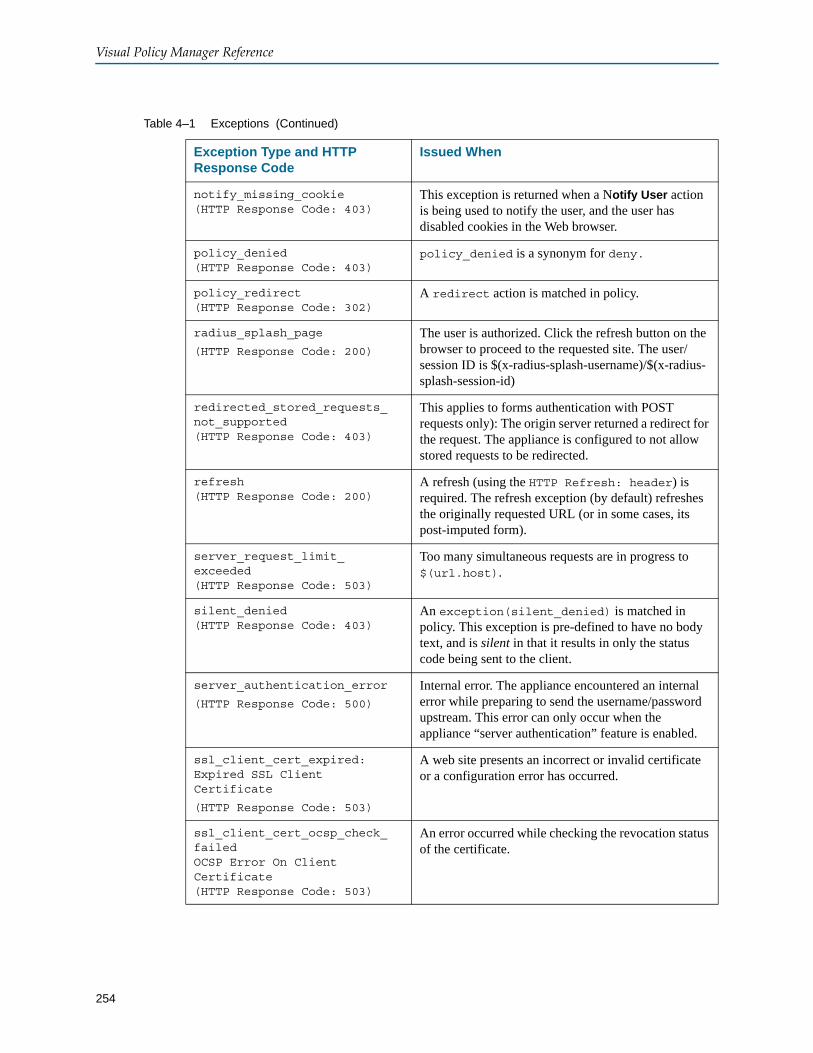
Visual Policy Manager Reference
254
notify_missing_cookie (HTTP Response Code: 403)
This exception is returned when a Notify User action is being used to notify the user, and the user has disabled cookies in the Web browser.
policy_denied (HTTP Response Code: 403)
policy_denied is a synonym for deny.
policy_redirect (HTTP Response Code: 302)
A redirect action is matched in policy.
radius_splash_page
(HTTP Response Code: 200)
The user is authorized. Click the refresh button on the browser to proceed to the requested site. The user/session ID is $(x-radius-splash-username)/$(x-radius-splash-session-id)
redirected_stored_requests_ not_supported (HTTP Response Code: 403)
This applies to forms authentication with POST requests only): The origin server returned a redirect for the request. The appliance is configured to not allow stored requests to be redirected.
refresh (HTTP Response Code: 200)
A refresh (using the HTTP Refresh: header) is required. The refresh exception (by default) refreshes the originally requested URL (or in some cases, its post-imputed form).
server_request_limit_ exceeded (HTTP Response Code: 503)
Too many simultaneous requests are in progress to $(url.host).
silent_denied (HTTP Response Code: 403)
An exception(silent_denied) is matched in policy. This exception is pre-defined to have no body text, and is silent in that it results in only the status code being sent to the client.
server_authentication_error
(HTTP Response Code: 500)
Internal error. The appliance encountered an internal error while preparing to send the username/password upstream. This error can only occur when the appliance “server authentication” feature is enabled.
ssl_client_cert_expired: Expired SSL Client Certificate
(HTTP Response Code: 503)
A web site presents an incorrect or invalid certificate or a configuration error has occurred.
ssl_client_cert_ocsp_check_ failed OCSP Error On Client Certificate (HTTP Response Code: 503)
An error occurred while checking the revocation status of the certificate.
Table 4–1 Exceptions (Continued)
Exception Type and HTTP Response Code
Issued When

255
ssl_client_cert_ocsp_status_ unknown: Unknown OCSP Status of Client Certificate (HTTP Response Code: 503)
An OCSP check returned unknown status for a client certificate.
ssl_client_cert_revoked: Revoked SSL Client Certificate
(HTTP Response Code: 503)
The client presents a revoked certificate or a configuration error has occurred.
ssl_client_cert_untrusted_ issuer Untrusted SSL Client Certificate
(HTTP Response Code: 503)
A Web site presents an incorrect or invalid certificate or a configuration error has occurred.
ssl_domain_invalid: SSL Certificate Host Mismatch (HTTP Response Code: 409)
There was a failure contacting a web site through HTTPS because the certificate has a common name that does not match the web site's domain name.
ssl_failed: SSL Certificate Verification Error (HTTP Response Code: 503)
A secure connection could not be established to an web site. This typically occurs when a web site that is not configured to accept SSL connections.
ssl_server_cert_expired: Expired SSL Server Certificate
(HTTP Response Code: 503)
A Web site presents an incorrect or invalid certificate or a configuration error has occurred.
ssl_server_cert_ocsp_check_ failed OCSP Error On Server Certificate (HTTP Response Code: 503)
An error occurred while checking the revocation status of the certificate.
ssl_server_cert_ocsp_status_ unknown Unknown OCSP Status of Server Certificate (HTTP Response Code: 503)
The server certificate revocation status is unknown. This is caused by a certificate revocation check for which the server does not have a status.
ssl_server_cert_revoked: Revoked SSL Server Certificate
(HTTP Response Code: 503)
A Web site presents a revoked certificate or a configuration error has occurred.
ssl_server_cert_untrusted_ issuer: Untrusted SSL Server Certificate
(HTTP Response Code: 503)
A Web site presents an incorrect or invalid certificate or a configuration error has occurred.
Table 4–1 Exceptions (Continued)
Exception Type and HTTP Response Code
Issued When

Visual Policy Manager Reference
256
Most of the above exceptions can be initiated directly through the policy exception property. However, some require additional state that makes initiating them either problematic or out of context.
tcp_error (HTTP Response Code: 503)
A network error occurred attempting to communicate with an upstream host.
transformation_error (HTTP Response Code: 403)
The server sends an unknown encoding and the appliance is configured to do content transformation.
unsupported_encoding (HTTP Response Code: 406)
The client makes a request with an Accept-Encoding: Identity;q=0, … header. Only uncompressed content is available in cache, the appliance is not configured to compress the content, or the compression license is expired, or the client request results in to Accept-Encoding: Identity;q=0 because of the combination of request and configured policy.
unsupported_protocol (HTTP Response Code: 406)
The protocol used in the request is not understood.
virus_detected
(HTTP Response Code: 200)
Virus was detected in the content.
data_leak_detected
(HTTP Response Code: 200)
A violation of DLP policy was detected in the content.
Note: The ICAP response must contain the following:
• HTTP header: X-Violations-Found • Server header contains the string dlp
Table 4–1 Exceptions (Continued)
Exception Type and HTTP Response Code
Issued When
257
The following are exceptions that cannot be initiated through the exception property:
❐ authentication_failed
❐ authentication_failed_password_expired
❐ authentication_redirect_from_virtual_host
❐ authentication_redirect_to_virtual_host
❐ authentication_success
❐ dynamic_bypass_reload
❐ license_expired
❐ ssl_domain_invalid
❐ ssl_failed
To view the content of a built-in exception, enter the following commands at the (config) prompt:
SGOS#(config) exceptions SGOS#(config exceptions) show exceptions configuration_error configuration_error exception: all protocols: summary text:
SG configuration error details text:
Your request could not be processed because of a configuration error: $(exception.last_error) help text:
The problem is most likely because of a configuration error, $(exception.contact) and provide them with any pertinent information from this message. http protocol:
code: 403

Visual Policy Manager Reference
258
Section 7 User-Defined ExceptionsUser-defined exceptions are created and deleted by the administrator. If a user-defined exception is referenced by policy, it cannot be deleted. The default HTTP response code for user-defined exceptions is 403.
An exception body less than 512 characters might cause a page does not exist 404 error. If this occurs, use the exception.autopad(yes|no) property to pad the body to more than 513 characters. For more information on the exception.autopad property, refer to the Content Policy Language Reference.
Note: For users who are explicitly proxied and use Internet Explorer to request an HTTPS URL, an exception body longer than 900 characters might be truncated. The workaround is to shorten the exception body.

259
Section 8 About Exception DefinitionsEach exception definition (whether built-in or user-defined) contains the following elements:
❐ Identifier—Identifies the type of exception. Table 4–1, "Exceptions" on page 251 lists the built-in exception types. For user-defined exceptions, the identifier is the name specified upon creation.
❐ Format—Defines the appearance of the exception. For an HTTP exception response, the format is an HTML file. For other protocols, where the user agents are not able to render HTML, the format is commonly a single line.
❐ Summary—A short description of the exception that labels the exception cause. For example, the default policy_denied exception summary is “Access Denied”.
❐ Details—The default text that describes reason for displaying the exception. For example, the default policy_denied exception (for the HTTP protocol) detail is: Your request has been denied by system policy.
❐ Help—An informative description of common possible causes and potential solutions for users to take. For example, if you want the categorization of a URL reviewed, you can append the $(exception.category_review_url) and $(exception.category_review_message) substitutions to the $(exception.help) definition. You must first enable this capability through content filtering configuration. For information on enabling review categorization, refer to Content Filtering chapters in the Blue Coat SGOS 6.x Administration Guide.
❐ Contact—Used to configure site-specific contact information that can be substituted in all exceptions. Although it is possible to customize contact information on a per-exception basis, customizing the top-level contact information, which is used for all exceptions, is sufficient in most environments.
❐ HTTP-Code—The HTTP response code to use when the exception is issued. For example, the policy_denied exception by default returns the 403 Forbidden HTTP response code.
When defining the above fields, you can use substitution variables that are particular to the given request. Some of the above fields are also available as substitutions:
❐ $(exception.id)
❐ $(exception.summary)
❐ $(exception.details)
❐ $(exception.help)
❐ $(exception.contact)
Additionally, the Format, Summary, Details, Help and Contact fields can be configured specifically for HTTP, or configured commonly for all protocols.
Important: Fields other than Format must be less than 8000 characters. If they are greater than this, they are not displayed.

Visual Policy Manager Reference
260
The Format field, the body of the exception, is not available as a substitution. However, the Format field usually includes other substitutions. For example, the following is a simple HTML format:
<html> <title>$(exception.id): $(exception.summary)</title> <body><pre> Request: $(method) $(url) Details: $(exception.details) Help: $(exception.help) Contact: $(exception.contact) </pre></body></html>
Some additionally useful substitutions related to exceptions are:
❐ $(exception.last_error)—For certain requests, the ProxySG appliance determines additional details on why the exception was issued. This substitution includes that extra information.
❐ $(exception.reason)—This substitution is determined internally by the appliance when it terminates a transaction and indicates the reason that the transaction was terminated. For example, a transaction that matches a DENY rule in policy has its $(exception.reason) set to "Either 'deny' or 'exception' was matched in policy".
261
Section 9 About the Exceptions HierarchyUnlike the error pages in previous SGOS releases, exceptions are not required to have its entire contents defined. Exceptions are stored in a hierarchical model, and parent exceptions can provide default values for child exceptions. There are two parent exceptions from which other exceptions are derived: exception.all and exception.user-defined.all.
Each built-in and user-defined exception derives its default values from the all exception. For example, by default the built-in exceptions do not define the format field. Instead, they depend on the all exception's format field definition. To change the format text for all built-in and user-defined exceptions, customize the format field for the all exception.
The user-defined.all exception is the parent of all user-defined exceptions, but it is also a child of the all exception. Configuring exception.user-defined.all is only necessary if you want certain fields to be common for all user-defined exceptions, but not common for built-in exceptions.
The following example demonstrates using the exception inline command to configure the $(exception.contact) substitution for every HTTP exception:
#(config exceptions) inline http contact EOF For assistance, contact <a href="mailto:[email protected]">sysadmin</a>EOF
Visual Policy Manager Reference
262
The following example configures a different $(exception.contact) substitution for every HTTP exception:
#(config exceptions) user-defined inline http contact EOF For assistance, contact <a href="mailto:[email protected]">policyadmin</a>EOF
263
Section 10 About the Exceptions Installable ListThe Exceptions Installable List uses the Structured Data Language (SDL) format. This format provides an effective method to express a hierarchy of key/value pairs. For example, the following is SDL file before customization:
(exception.all (format "This is an exception: $(exception.details)") (details "") (exception.policy_denied (format "") (details "your request has been denied by system policy") )
This SDL file defines an exception called policy_denied that defines the $(exception.details) substitution as "Your request has been denied by system policy". Because the exception does not define the format field, it inherits the format field from its parent exception (exception.all). When the policy_denied exception is issued, the resulting text is: This is an exception: your request has been denied by system policy.
Suppose you want to customize the $(exception.contact) substitution for every HTTP exception. Edit the exception.all component.
(exception.all (contact "For assistance, contact your network support team.") (details "") (format "$(exception.id): $(exception.details)") (help "") (summary "") (http (code "200") (contact "") (details "") (format <<EOF
<format removed>
EOF ) (help "") (summary "") ) <built-in exceptions removed> )
To add the $(exception.contact) information, modify the contact substitution under the http node:
(exception.all (contact "For assistance, contact your network support team.") (details "") (format "$(exception.id): $(exception.details)") (help "") (summary "")
Note: The default HTTP format and built-in exception definitions have been removed for example purposes.

Visual Policy Manager Reference
264
(http (code "200") (contact "For assistance, contact <a href="mailto:[email protected]">sysadmin</a>")EOF (details "") (format <<EOF
<format removed>
EOF ) (help "") (summary "")
<built-in exceptions removed> ) )
Consider the following conditions when modifying exception installable lists:
❐ Every exception installable list must begin with a definition for exception.all.
❐ In the exceptions’ installable list, all definitions must be enclosed by exception.all and its accompanying closing parenthesis; that is, (exception.all (exception.policy_denied) )
❐ Keep the definition strings under the enclosed parentheses short, no longer than one line if possible.
❐ Blue Coat strongly recommends downloading the existing exceptions installable list, then modifying it.

265
Section 11 Creating or Editing ExceptionsYou can create or edit an exception with the CLI or with installable lists on the Management Console.
To create or edit an exception:
1. At the (config) prompt, enter the following commands:SGOS#(config) exceptions SGOS#(config exceptions) create definition_name SGOS#(config exceptions) edit definition_name SGOS#(config exceptions user-defined.definition_name) http-code numeric HTTP response code SGOS#(config exceptions user-defined.definition_name) inline ? contact Set the $(exceptions.contact) substitution details Set the $(exceptions.details) substitution format Set the format for this exception help Set the $(exceptions.help) substitution http Configure substitution fields for just HTTP exceptions summary Set the $(exception.summary) substitution SGOS#(config exceptions user-defined.definition_name) inline contact eof string eof SGOS#(config exceptions user-defined.definition_name) inline details eof string eof SGOS#(config exceptions user-defined.definition_name) inline format eof string eof SGOS#(config exceptions user-defined.definition_name) inline help eof string eof SGOS#(config exceptions user-defined definition_name) inline summary eof string eof
2. (Optional) View the results.SGOS#(config exceptions user-defined.test) show exceptions user-defined.test $(exception.id): test $(exception.summary): Connection failed $(exception.details): Connection failed with stack error $(exception.contact): Tech Support
Note: You cannot create user-defined exceptions for Patience Pages.
Visual Policy Manager Reference
266
To delete a user-defined exception:
From the (config) prompt, enter the following commands:
SGOS#(config) exceptions SGOS#(config exceptions) delete exception_name ok
Note: You cannot delete a user-defined exception that is referenced by policy. You must remove the reference to the exception from the policy before deleting the exception.

267
Section 12 Creating and Installing an Exceptions ListThe Management Console allows you to create and install exceptions with the following methods:
❐ Using the ProxySG Text Editor, which allows you to customize the existing exceptions file.
❐ Creating a local file on your local system; the ProxySG appliance can browse to the already-created file and install it.
❐ Using a remote URL, where you place an already-created exceptions list on an FTP or HTTP server to be downloaded to the appliance.
When the Exceptions file is customized, it updates the existing exceptions already on the appliance. The configuration remains in effect until it is overwritten by another update; it can be modified or overwritten using CLI commands.
To install an exceptions definition:
1. Select Configuration > Policy > Exceptions.
2. From the Install Exceptions Definitions From drop-down list, select the method used to install the exceptions configuration.
3. Click Install.
• Installing from a Remote URL:
Note: A message is written to the event log when you install a list through the appliance.
2
3
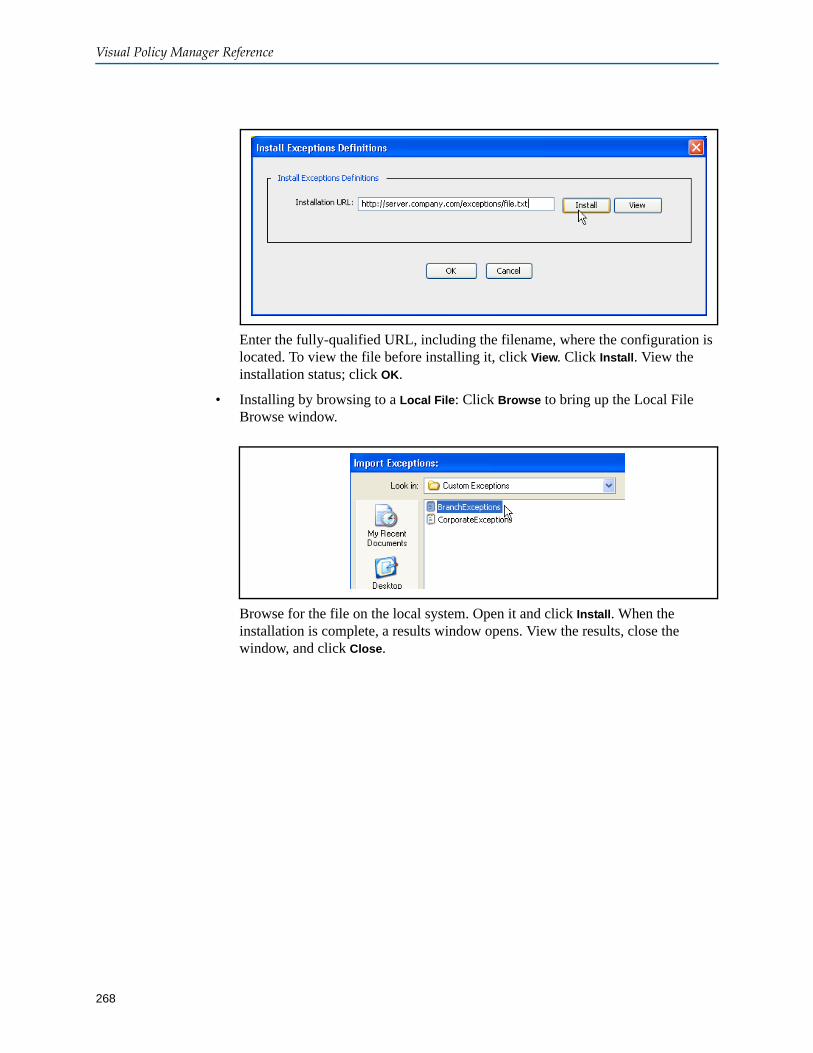
Visual Policy Manager Reference
268
Enter the fully-qualified URL, including the filename, where the configuration is located. To view the file before installing it, click View. Click Install. View the installation status; click OK.
• Installing by browsing to a Local File: Click Browse to bring up the Local File Browse window.
Browse for the file on the local system. Open it and click Install. When the installation is complete, a results window opens. View the results, close the window, and click Close.
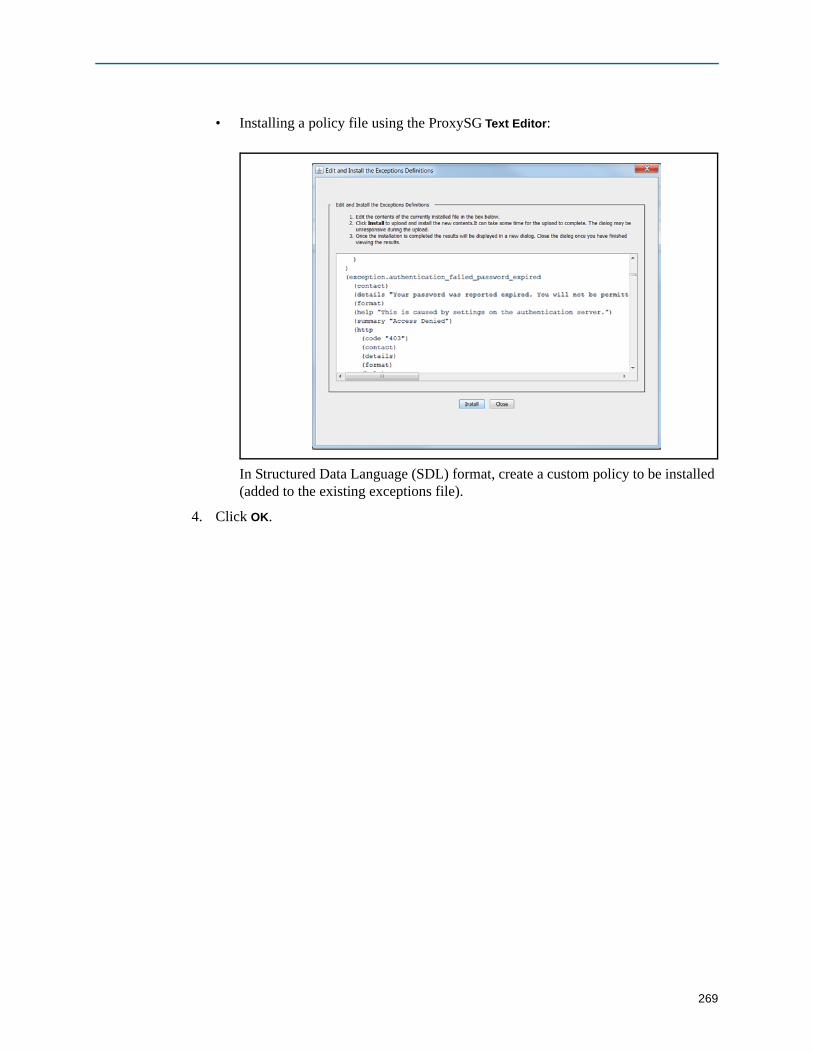
269
• Installing a policy file using the ProxySG Text Editor:
In Structured Data Language (SDL) format, create a custom policy to be installed (added to the existing exceptions file).
4. Click OK.
Visual Policy Manager Reference
270
Section 13 Viewing ExceptionsYou can view the exceptions defined on the ProxySGappliance, including how the defined HTML appears to users. The following are the viewable defined exception components:
❐ Current Exceptions—Displays all of the exceptions as they are currently defined.
❐ Default Exceptions Source—Displays the default exceptions.
❐ Exceptions Configuration—Displays a page from which you can click links to view how exceptions appear in HTML to users.
❐ Results of Exception Load—Displays the results of the last installable list load, including any errors and warning to be fixed.
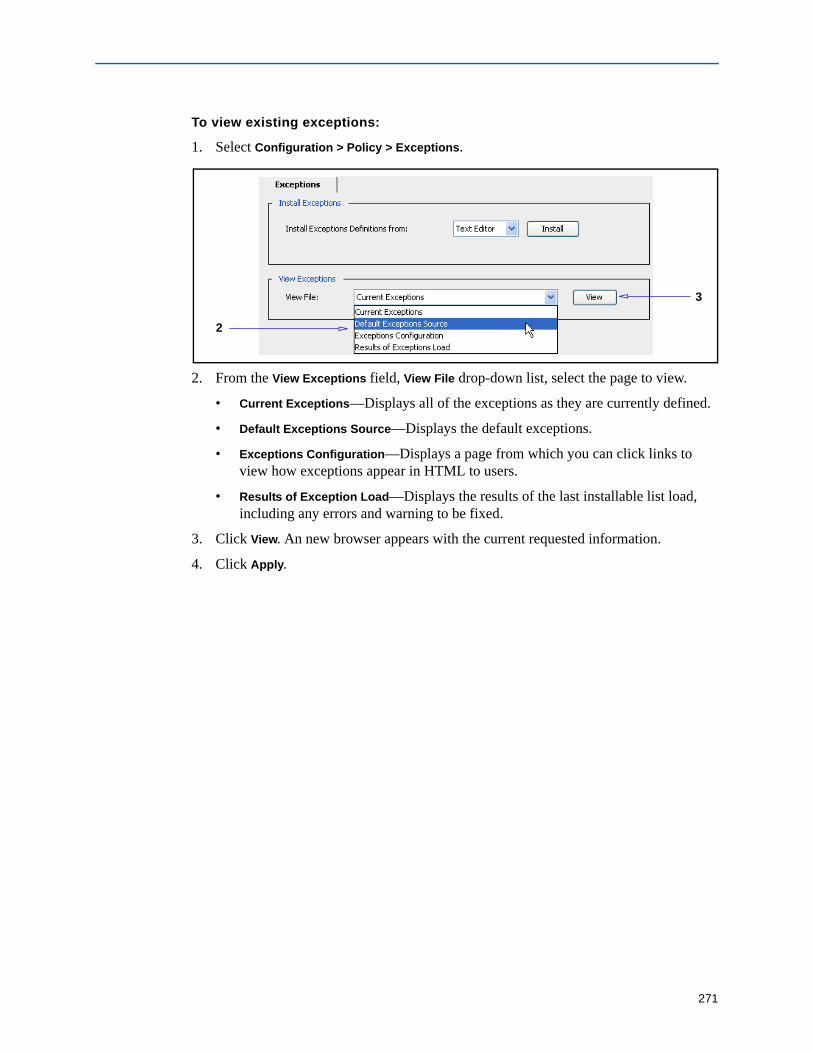
271
To view existing exceptions:
1. Select Configuration > Policy > Exceptions.
2. From the View Exceptions field, View File drop-down list, select the page to view.
• Current Exceptions—Displays all of the exceptions as they are currently defined.
• Default Exceptions Source—Displays the default exceptions.
• Exceptions Configuration—Displays a page from which you can click links to view how exceptions appear in HTML to users.
• Results of Exception Load—Displays the results of the last installable list load, including any errors and warning to be fixed.
3. Click View. An new browser appears with the current requested information.
4. Click Apply.
2
3

Visual Policy Manager Reference
272
Section F: Managing Peer-to-Peer Services
This section describes the ProxySG solution for managing and blocking peer-to-peer traffic.

273
Section 14 About Peer-to-Peer CommunicationsThe use of peer-to-peer (P2P) technologies and services consumes an estimated 60% of broadband ISP bandwidth. By design, most P2P services are port-agnostic, which makes attempting to block them at the firewall extremely difficult. One peer finds another IP address and port that is willing to share the file, but different peers can use different ports. Furthermore, P2P is not based on any standards, which makes it nearly impossible for network administrations to control or even detect.
Although P2P provides some practical business uses in enterprises, unmanaged P2P activity creates risks:
❐ Excessive bandwidth consumptions affects mission-critical applications.
❐ Exponential security risk of exposure to viruses, spyware, and other malicious content.
❐ The threat of legal action concerning the unlawful downloading of copyrighted music and movies.
Managing P2P is a dynamic challenge, as the administrator must be able to evaluate both P2P use and enterprise requirements.
Visual Policy Manager Reference
274
Section 15 About The ProxySG SolutionThe ProxySG recognizes P2P activity relating to P2P file sharing applications. By constructing policy, you can control, block, and log P2P activity and limit the bandwidth consumed by P2P traffic.
Supported ServicesThis version of SGOS supports the following P2P services:
❐ FastTrack (Kazaa)
❐ EDonkey
❐ BitTorrent
❐ Gnutella
DeploymentTo effectively manage P2P activity, the ProxySG appliance must be deployed to intercept outbound network traffic and the firewall configured to block outbound connections that are not initiated by the appliance.
Notes:
❐ The appliance intercepts outbound TCP network connections, as routed through an L4 switch or an appliance in bridging mode.
❐ Configure ProxySG HTTP, SOCKS, and TCP tunnel services for destination ports to be monitored.
❐ Create firewall rules that allow only outbound connections that are initiated by the appliance.
❐ You can block all known P2P ports and define policy to stop P2P traffic attempting to come through over HTTP
.
Note: Neither caching nor acceleration are provided with this feature.
Note: Refer to the Release Notes for the most current list of P2P services and versions the ProxySG appliance supports.
Note: This features does not include additional configurations for intercepting or controlling UDP traffic.
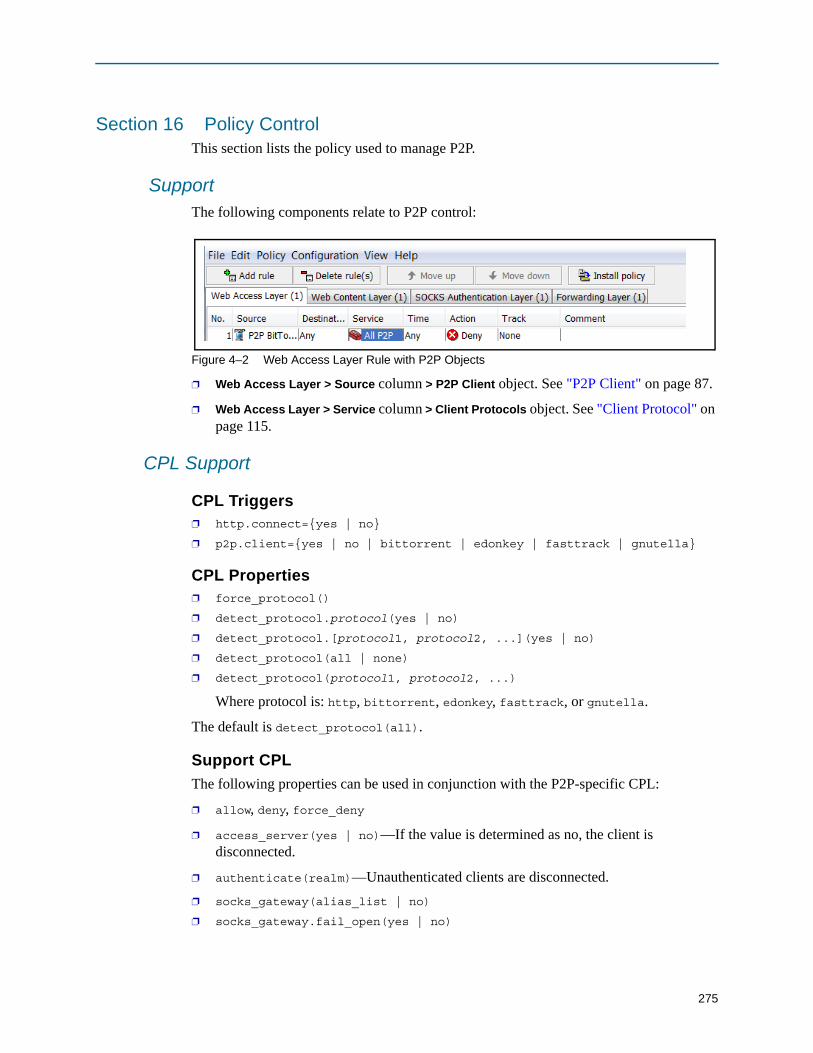
275
Section 16 Policy ControlThis section lists the policy used to manage P2P.
SupportThe following components relate to P2P control:
Figure 4–2 Web Access Layer Rule with P2P Objects
❐ Web Access Layer > Source column > P2P Client object. See "P2P Client" on page 87.
❐ Web Access Layer > Service column > Client Protocols object. See "Client Protocol" on page 115.
CPL Support
CPL Triggers❐ http.connect={yes | no}
❐ p2p.client={yes | no | bittorrent | edonkey | fasttrack | gnutella}
CPL Properties❐ force_protocol()
❐ detect_protocol.protocol(yes | no)
❐ detect_protocol.[protocol1, protocol2, ...](yes | no)
❐ detect_protocol(all | none)
❐ detect_protocol(protocol1, protocol2, ...)
Where protocol is: http, bittorrent, edonkey, fasttrack, or gnutella.
The default is detect_protocol(all).
Support CPL
The following properties can be used in conjunction with the P2P-specific CPL:
❐ allow, deny, force_deny
❐ access_server(yes | no)—If the value is determined as no, the client is disconnected.
❐ authenticate(realm)—Unauthenticated clients are disconnected.
❐ socks_gateway(alias_list | no)
❐ socks_gateway.fail_open(yes | no)
Visual Policy Manager Reference
276
❐ forward(alias_list) | no)—Only forwarding hosts currently supported by TCP tunnels are supported.
❐ forward.fail_open(yes | no)
❐ reflect_ip(auto | no | client | vip | ip_address)
For complete CPL references, refer to Blue Coat Systems Content Policy Language Reference.
Policy ExampleThe following policy example demonstrates how to deny network traffic that the ProxySG
appliance recognizes as P2P:
<proxy> p2p.client=yes deny

277
Section 17 P2P History StatisticsYou can construct policy that controls, blocks, and logs peer-to-peer (P2P) activity and limits the bandwidth consumed by P2P traffic (refer to Visual Policy Manager Reference for information about constructing P2P policy). The following section explains how to view P2P statistics, using either the Management Console or the CLI.
P2P Data
The P2P Data tab on the Management Console displays P2P statistics, either all P2P services at once or one service at a time.
The following table details the statistics provided through the Management Console P2P Data tab or through the CLI
Note: Some P2P statistics (P2P client connections and total bytes sent and received over a period of time) can only be viewed through the Management Console (see "P2P Clients" on page 279 and "P2P Bytes" on page 280, below).
Table 4–2 P2P Data Statistics
Status Description
Current Tunneled Sessions The current number of P2P client connections using native transport.
Current HTTP Requests The current number of HTTP requests from P2P clients.
Total Tunneled Sessions The cumulative number of P2P client connections using native transport since the ProxySG appliance was last rebooted.
Total HTTP Requests The cumulative number of HTTP requests from P2P clients since the appliance was last rebooted.
Total Bytes Received The total number of bytes received from all P2P clients.
Total Bytes Sent The total number of bytes sent to all P2P clients.
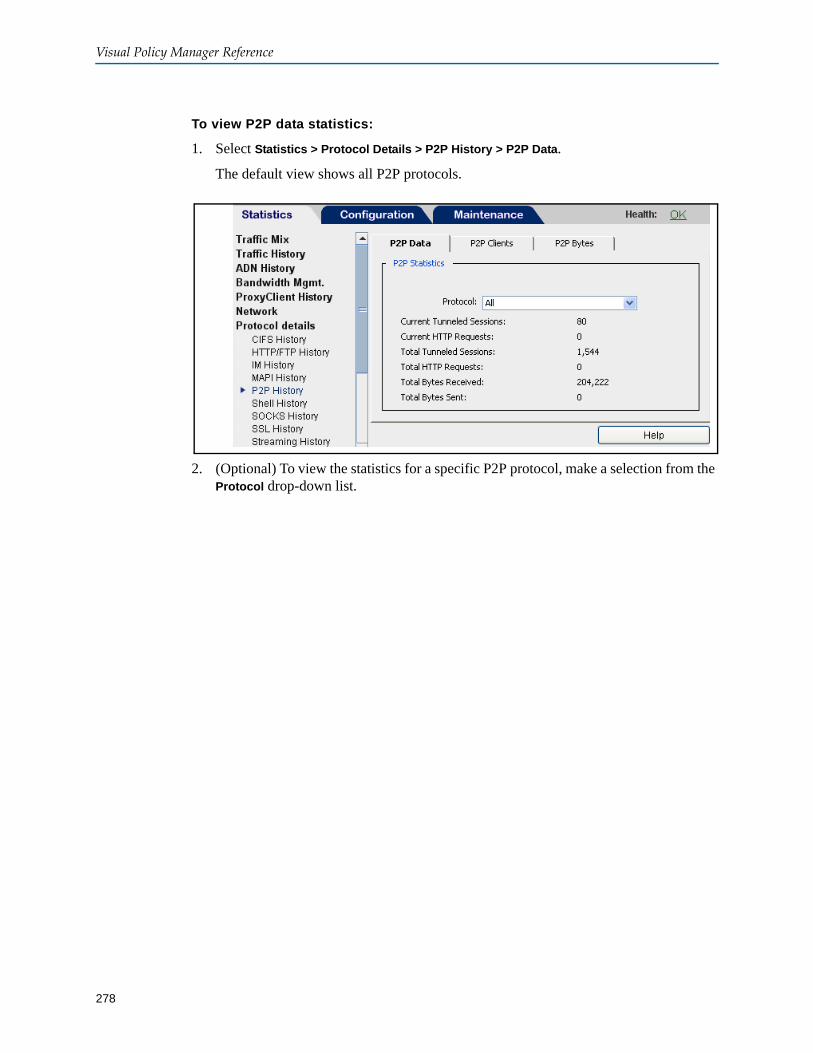
Visual Policy Manager Reference
278
To view P2P data statistics:
1. Select Statistics > Protocol Details > P2P History > P2P Data.
The default view shows all P2P protocols.
2. (Optional) To view the statistics for a specific P2P protocol, make a selection from the Protocol drop-down list.

279
P2P ClientsThe P2P Clients tab displays dynamic graphical statistics for client connections received in the last 60-minute, 24-hour, or 30-day period.
To view P2P client statistics:
1. Select Statistics > Protocol Details > P2P History > P2P Clients.
2. (Optional) To set the graph scale to a different value, select a value from the Graph
scale should drop-down list.
Note: The P2P client statistics are available only through the Management Console.

Visual Policy Manager Reference
280
P2P BytesThe P2P Bytes tab displays dynamic graphical statistics for the total number of bytes sent to and received from P2P clients in the last 60-minute, 24-hour, or 30-day period.
To view P2P byte statistics:
1. Select Statistics > Protocol Details > P2P History > P2P Bytes.
2. (Optional) To set the graph scale to a different value, select a value from the Graph
scale should drop-down list.
Note: The P2P bytes statistics are available only through the Management Console.
281
Section 18 Proxy AuthenticationWhile P2P protocols do not support native proxy authentication, most P2P clients support SOCKS v5 and HTTP 1.1 proxies. P2P proxy authentication is supported only for clients using these protocols (that are configured for proxy authentication).
For information about proxy authentication, refer to the SGOS Administration Guide. For a list of P2P clients suspected of not supporting SOCKS v5 with authentication, see the Release Notes for this release.
Visual Policy Manager Referencee
282
Section 19 Access LoggingP2P activity is logged and reviewable. Refer to the SGOS Administration Guide.

283
Section G: Managing QoS and Differentiated Services
This section describes how to create policy to manipulate Quality of Service (QoS) information.
Visual Policy Manager Referencee
284
Section 20 About The Blue Coat SolutionThe ProxySG appliance supports QoS detection, which is becoming a more prevalent control point for network layer traffic. Previously, the QoS information was lost—or not detected—when the appliance terminated the client connection and issued a new connection to server. QoS support allows you to create policy to examine the Type of Service (ToS) fields in the IP header to determine the QoS of the bits. The policy then either tests and matches ToS information and performs an action, or performs an action to manipulate ToS information based on something else in the rule (such as a user group).
You can apply QoS policy to any protocol supported on the appliance.

285
Section 21 About DSCP ValuesPolicy matches are based on Differentiated Services Code Point (DSCP) values, which network devices use to identify traffic to be handled with higher or lower priority. Identifying and matching values might trigger defined policy actions that either set a different DSCP value or preserve or echo existing DSCP values to use for outbound connections, thus regulating the QoS for different user classes (see descriptions in subsequent sections).
ToS is an eight-bit field in the IP header; the first six bits are used and the final two are reserved for other TCP specification and control. The first six bits constitute the DSCP value. For most networks, the DSCP values adhere to a standard set. The following table lists these values.
Note: The ProxySG policy requests a QoS level. Whether or not a level of QoS can be achieved depends upon your network/router configurations, which must also allow the level of requested QoS.
Table 4–3 DSCP Values and Descriptions
Name DCSP Value Description
Default 000000 (0) Best effort (Precedence 0)
CS1 001000 (8) Precedence 1
AF11 001010 (10) Assured Forwarding Class 1, Low Drop Rate
AF12 001100 (12) Assured Forwarding Class 1, Medium Drop Rate
AF13 001110 (14) Assured Forwarding Class 1, High Drop Rate
CS2 010000 (16) Precedence 2
AF21 010010 (18) Assured Forwarding Class 2, Low Drop Rate
AF22 010100 (20) Assured Forwarding Class 2, Low Drop Rate
AF23 010110 (22) Assured Forwarding Class 2, Low Drop Rate
CS3 011000 (24) Precedence 3
AF31 011010 (26) Assured Forwarding Class 3, Low Drop Rate
AF32 011100 (28) Assured Forwarding Class 3, Medium Drop Rate
AF33 011110 (30) Assured Forwarding Class 3, High Drop Rate
CS4 100000 (32) Precedence 4
AF41 100010 (34) Assured Forwarding Class 4, Low Drop Rate
AF42 100100 (36) Assured Forwarding Class 4, Medium Drop Rate
AF43 100110 (38) Assured Forwarding Class 4, High Drop Rate
CS5 101000 (40) Precedence 5

Visual Policy Manager Referencee
286
The conceptual definitions of the different classes are:
❐ Best Effort—This is the default DSCP value if an application does not specify any quality of service. The network delivers these packets if it can, but with no special assigned priority. You can use other DSCP values to specify priorities that are either above or below the Best Effort class; however, in most cases DSCP is used to specify priorities that are better than Best Effort.
❐ Class Selector—These values are defined in RFC 2474 and are designed to be backward compatible with the older Precedence field defined in RFC 791. Larger precedence values indicate packets that are more important than packets with smaller values of precedence; therefore, low-valued packets are dropped when a link becomes congested. Most common, Precedence 7 is reserved for link-layer and routing protocol keep-alive messages, and precedence 6 is reserved for other IP routing packets, both of which must get through for the network to function correctly.
❐ Assured Forwarding—This is defined in RFC 2597. Assured Forwarding (AF) allows you to specify both the relative priority and the drop sensitivity of traffic with a Precedence class. For example, AF31 specifies low drop-rate with in the CS3 Precedence class.
❐ Expedited Forwarding—This is defined in RFC 2598. Expedited Forwarding (EF) is usually reserved for premium traffic, or traffic that requires a virtual leased line. This traffic is higher priority than AF, but lower priority than precedence 6 and 7 routing messages.
EF 101110 (46) Expedited Forwarding—low drop rate, low latency
CS6 110000 (48) Precedence 6
CS7 111000 (56) Precedence 7
Note: Before creating policy, verify that your network adheres to these values. Other DSCP values are possible. You can specify a numerical range from 0 to 63. However, Blue Coat recommends using the above classifications, as most applications are associated to these classes already, which makes defining policy an easier task.
Table 4–3 DSCP Values and Descriptions (Continued)

287
Section 22 About QoS Policy TasksThis section describes what is achievable through QoS policy and provides basic examples.
Testing Incoming QoSPolicy triggers test the incoming packets of a client request or a server response. After the ProxySG appliance identifies the DSCP value, other policy in the rule dictates what, or if, any action is required. A common scenario is to create several bandwidth classes (Configure > Bandwidth Mgmt > BWM Classes) and allow the DSCP value to dictate which bandwidth applies to the transaction.
Example Policy
Three client connection DSCP Source objects associated with three bandwidth management level Action objects.
Figure 4–3 A example that tests QoS and assigns a BWM action
The above example generates the following CPL:
<Proxy>
client.connection.dscp=(ef) limit_bandwidth.client.outbound(High)
client.connection.dscp=(cs3,af31,af32,af33) limit_bandwidth.client.outbound(Medium)
client.connection.dscp=(cs1) limit_bandwidth.client.outbound(Low)
Caching Behavior
Detecting the QoS cannot occur for cached content. In the case of a cache hit, when no server connection is established, no server connection DSCP value is available for policy checks.
Multiple Connections
Some services use multiple client to server connections. When a service uses multiple connections, the triggers to test the inbound DSCP value apply to the primary control connection, which is (usually) the first connection opened by the client and the corresponding connection (if any) opened to the server. For example:
❐ FTP connections are comprised of a control connection and a data connection.
❐ IM connections involve connections to other hosts, such as chat buddies or file sharing hosts.
Setting the Outgoing QoSYou can create policy to preserve, echo, or set the DSCP value.

Visual Policy Manager Referencee
288
Preserving the DSCP Value
This is the default ProxySG policy. Using the ProxySG as the frame of reference, the Preserve property instructs the ProxySG appliance to preserve the incoming client DSCP values, on a per-packet basis, when making an outbound server connection and preserve the inbound server values when sending traffic back to the client.
Preserving is valuable for protocols that have multiple connections. For example, FTP connections consist of a control and a data connection; the independent connections might have a differing DSCP values. Preserving the FTP connections prevents the appliance from altering one or both of the connections and disrupting the FTP protocol transmission.
While the default policy of preserving the QoS level passes traffic through without any adjustments to QoS, this behavior is different than pre-SGOS 5.1.3 behavior in which QoS data was lost at the point where the appliance intercepted the traffic. The preserve property allows for the monitoring of QoS-related network information.
Figure 4–4 The ProxySG appliance preserves client-to-server and server-to-client DSCP values (default)
Example Policy<proxy> client.connection.dscp(preserve) server.connection.dscp(preserve)
Echoing the DSCP Value
Echoing is similar to preserving in that the outbound DSCP value remains the same as the inbound connection. The difference is that the point of reference is the ProxySG appliance, not specifically the client-to-appliance connection. When policy is set to echo, the appliance returns the client’s inbound DSCP back to the client or returns the server's inbound DSCP back to the server.
A deployment for which echoing is useful is reverse proxy, in which you want to let the client select the DSCP value in its request and then echo the reply back to that client with the same DSCP, even if the server does not set any DSCP on the packets it sends to the proxy.
The following diagram illustrates two different connections. The blue arrows represent a connection initiated by a client, with the policy set to echo. The red arrows represent a connection initiated by server, again with policy set to echo. Regardless of the DCSP value of the response, the QoS of the appliance back to the initiator remains the same as the sent value.

289
Figure 4–5 Echoing DSCP values
Example Policy<proxy> user=A client.connection.dscp(echo)
Setting the DSCP Value
QoS policy properties allow you to set outgoing (with the ProxySG appliance as the point of reference) DSCP values. At present, the appliance supports setting one DSCP value for all connections in a transaction (the only exception is the preserve property). If a cache hit occurs for one of the connection types, thus negating the requirement for a server connection, the default value (Best Effort) is assigned.
In the following diagram, the appliance intercepts a request that has a default QoS level of Best Effort. The appliance then initiates the server request at QoS level CS4.
Figure 4–6 Setting an ProxySG-to-server connection DSCP value
Real Solutions: Combining QoS Policies
Applying QoS policies to different connections in your network helps control traffic network traffic flow. Consider the following example:
❐ A branch sales office is comprised of a VP of Sales and various sales personnel. The VP requires a moderately higher QoS server connection.
❐ The office has a ProxySG appliance deployed as its WAN proxy.
❐ At the core offices, a ProxySG appliance 810 fronts a database server farm, which contains inter-company collateral.
Therefore, the policy instructs the appliance to echo the connections between the clients and the proxy; that is, they receive the same QoS level as they requested over the WAN. Then, the policy instructs the appliance to make the server connection with a QoS level of CS2, except when user VP_Sales is identified. The VP is granted a QoS level of CS4, which in this case is defined as a higher QoS than CS2. The following diagram illustrates this example.

Visual Policy Manager Referencee
290
Figure 4–7 Setting DSCP values, based on user level, from the ProxySG appliance to users
Example Policy<proxy> client.connection.dscp(echo) user=vp_sales server.connection.dscp(CS4) server.connection.dscp(cs2)
DSCP for ADN Tunnels
Through policy, you can manage DSCP values for upstream and downstream server connections over ADN tunnels.

291
Section 1 Policy ComponentsThis section lists the existing and CPL policy components.
ObjectsObjects (the cross-references are to the object descriptions in Chapter 3: "The Visual Policy Manager" on page 33):
❐ "Client Connection DSCP Trigger" on page 88—Web Access, DNS Access layers: Source column.
❐ "Server Connection DSCP" on page 111—Web Access, DNS Access, Web Content, Forwarding layers: Destination column.
❐ "Set Server Connection DSCP Value" on page 168—Web Access, DNS Access, Web
Content, Forwarding layers: Destination column.
❐ "Set Client Connection DSCP Value" on page 167—Web Access, DNS Access layers: Action column.
❐ "Set Server Connection DSCP Value" on page 168—Web Access, Forwarding layers: Action column.
❐ "Set ADN Connection DSCP" on page 168—Forwarding layer: Action column.

Visual Policy Manager Referencee
292
ExampleThe following screen illustrates configuring a Web Access rule to set the DSCP value for P2P connections to Best Effort (no priority).
Figure 4–8 Setting the action to Best Effort
CPL ComponentsThe following are the CPL triggers and properties:
Triggers❐ client.connection.dscp = 0..63 | af11 | af12 | af13 | af21 | af22 |
af23 | af31 | af32 | af33 | af41 | af42 | af43 | best-effort | cs1 | cs2 | cs3 | cs4 | cs5 | cs6 | cs7 | ef
Valid layers: <proxy>, <dns-proxy>, <forward>
❐ server.connection.dscp = 0..63 | af11 | af12 | af13 | af21 | af22 | af23 | af31 | af32 | af33 | af41 | af42 | af43 | best-effort | cs1 | cs2 | cs3 | cs4 | cs5 | cs6 | cs7 | ef
Valid layers: <proxy>, <dns-proxy>, <cache>
Properties❐ adn.connection.dscp(0..63 | af11 | af12 | af13 | af21 | af22 | af23 |
af31 | af32 | af33 | af41 | af42 | af43 | best-effort | cs1 | cs2 | cs3 | cs4 | cs5 | cs6 | cs7 | ef | preserve)
Valid layers: <forward>

293
❐ client.connection.dscp(0..63 | af11 | af12 | af13 | af21 | af22 | af23 | af31 | af32 | af33 | af41 | af42 | af43 | best-effort | cs1 | cs2 | cs3 | cs4 | cs5 | cs6 | cs7 | ef | echo | preserve)
Valid layers: <proxy>, <dns-proxy>
❐ server.connection.dscp(0..63 | af11 | af12 | af13 | af21 | af22 | af23 | af31 | af32 | af33 | af41 | af42 | af43 | best-effort | cs1 | cs2 | cs3 | cs4 | cs5 | cs6 | cs7 | ef | echo | preserve)
Valid layers: <proxy>, <dns-proxy>, <cache>, <forward>

Visual Policy Manager Referencee
294
Section 2 Access LoggingThe following access log formats are associated with QoS activity:
❐ x-cs-connection-dscp: The incoming client DSCP value.
❐ x-rs-connection-dscp: The incoming server DSCP value.
❐ x-sc-connection-dscp-decision: The client.connection.dscp () property value, or preserve or echo.
❐ x-sr-connection-dscp-decision: The server.connection.dscp () property value, or preserve or echo.

295
Section H: Providing Read-Only Access in the Management Console
This section describes how you can provide a user with read-only access in the Management Console. You can use any realm that supports BASIC credentials such as Local, Windows SSO, Novell SSO, LDAP, IWA, RADIUS, to log in administrative users.
This example uses the local realm so that on-box authentication is always available. When an external authentication server is used, the user is denied access to the Management Console, if the authentication server cannot be accessed successfully.
To provide read-only access using a local realm, you need to perform the following tasks:
❐ Create a local realm.
❐ Create a list that includes usernames and passwords for members whom you wish to provide read-only access in the Management Console.
❐ Connect the list to the local realm.
❐ Create policy to enforce read-only access to members included in the list.
Use the steps below to complete the tasks detailed above.
1. Create a local realm:
a. Select the Configuration > Authentication > Local > Local Realms tab.
b. Click New to add a new realm. In this example the realm is named MC_Access.
2. Using the Command Line Interface (CLI), create a list of users who need read-only access. The list must include a username and password for each user.
a. Enter configuration mode in the CLI; this example creates a list called Read_Access.SGOS#(config)security local-user-list create Read_Access
b. Edit the list to add user(s) and to create usernames and passwords. This example adds a user named Bob Kent. SGOS#(config)security local-user-list edit Read_Access SGOS#(config)user create Bob_Kent SGOS#(config)user edit Bob_Kent SGOS#(config)password 12345
3. Connect the user list (created in Step 2) to the local realm (created in Step 1).
a. In the Configuration > Authentication > Local > Local Main tab, select MC_Access from the Realm name drop-down menu.
b. Select Read_Access from the Local user list drop-down menu.
4. Use the for creating policy to enforce read-only access to the users in your list:
a. Launch the VPM.
b. Create an Admin Authentication Layer (or add a new rule in an existing layer). This layer determines the authentication realm that will be used to authenticate users who access the Management Console of the ProxySG appliance.

Visual Policy Manager Referencee
296
c. In the Action column, right click and select Set. In the Set Action dialog that displays, click New and select Authenticate. The Add Authentication Object displays.
d. In the Add Authenticate Object dialog that displays, select the local realm you created in Step 1.
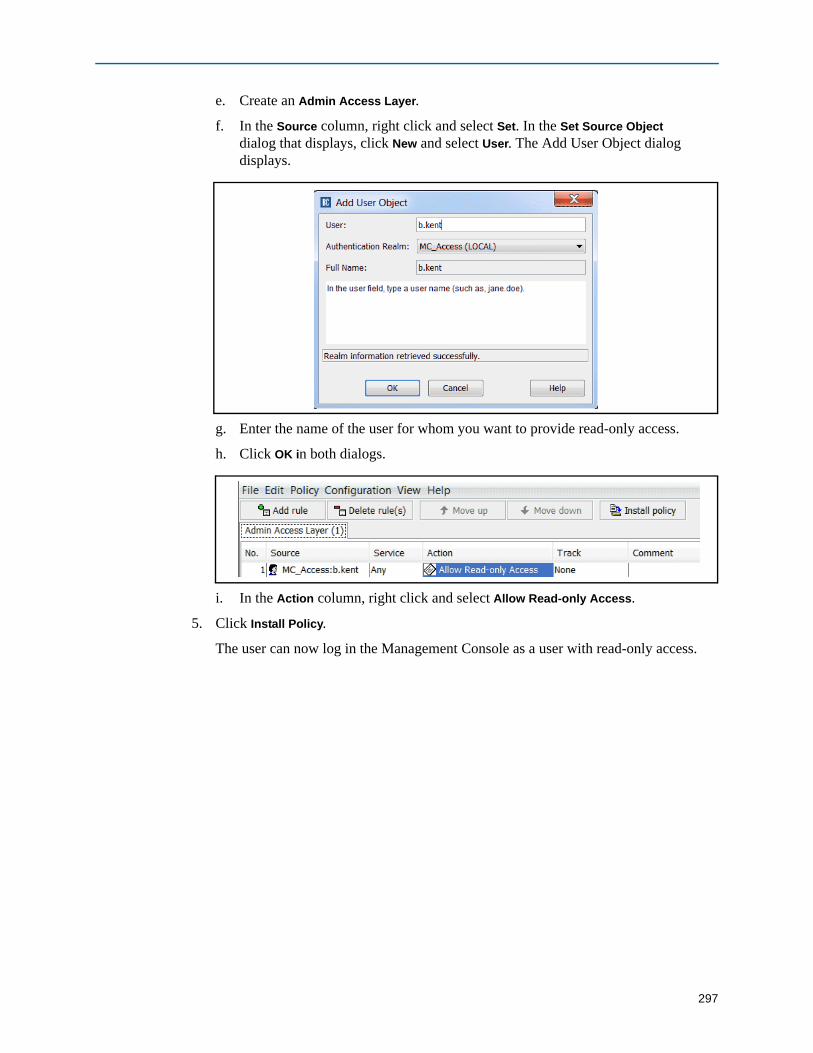
297
e. Create an Admin Access Layer.
f. In the Source column, right click and select Set. In the Set Source Object dialog that displays, click New and select User. The Add User Object dialog displays.
g. Enter the name of the user for whom you want to provide read-only access.
h. Click OK in both dialogs.
i. In the Action column, right click and select Allow Read-only Access.
5. Click Install Policy.
The user can now log in the Management Console as a user with read-only access.

Visual Policy Manager Referencee
298
Section I: Setting Policy for Content and Content-Type Filtering
Filtering on content and content type is a security feature that focuses on permitting or denying file downloads based on a variety of factors, such as file extensions, content-type, response headers, and apparent data type, to name but a few.
This section describes four techniques to consider when setting file filtering on the ProxySG appliance. Each technique offers its own advantages and disadvantages; however, no single approach is better than another.
The four techniques to be discussed are:
❐ "Filtering Based on URL Extension"
❐ "Filtering Based on HTTP Content-Type Response Header" on page 300
❐ "Filtering Based on Apparent Data Type" on page 301
❐ "Filtering Based on the http.response.data Condition (in CPL)" on page 302
A sample configuration using some of the techniques listed above is provided. To view the sample configuration, see "Sample Configuration" on page 303.
The best practice for content and content-type filtering depends on the particular content type that you want to filter, and whether you are writing white-list or black-list style policy. As a result, you should consider using a combination of techniques for setting reliable policies that will effectively accommodate your organization’s needs.
Although the suggestions for implementing content and content-type filtering should offer added protection to your network, you might want to also consider using an ICAP server, which offers more reliable protection.
In addition to filename extensions and content analysis, the intrinsic behaviors of browsers and platforms—and the different ways they deal with files—should also be considered when setting policies for your organization. For the purpose of this discussion, however, browsers and platforms are not being discussed.
You can define policy from both the Web Access Layer and the Web Content Layer.
• Rules defined in the Web Access Layer apply only when a client (such as a browser) accesses content.
• Rules defined in the Web Content Layer apply to the accesses noted above, but also when the appliance makes its own accesses to content to refresh its cache.
Note: A browser that requests data through the appliance will always hit the <proxy> and <cache> layers if the layer guards are set to permit this condition. For more information on layer guards, refer to Content Policy Language Reference, “Chapter 2: Managing Content Policy Language.”
To set policy for the techniques listed, you can launch the VPM from the appliance Management Console by selecting Configuration > Policy > Visual Policy Manager.
299
Section 3 Filtering Based on URL ExtensionContent filtering based on URL extension enables you to block files based on their filename extensions, such as .exe or .jpg. Although a common approach for filtering content, filtering based on URL extension is fairly unreliable, and the level of unreliability depends on the type of content you are filtering.
Filtering based on filename extensions is subject to false negatives, whereby the intended results differ from the actual results because the ProxySG appliance fails to block the intended content. This is due to an unreliable relationship that exists between the syntax of the URL and the type of content being returned. Content that has an extension that does not match the actual content type will not be blocked when performing content filtering based only on URL extension. For example, blocking URLs with a .php extension will not block PHP content that has been given a different extension that has not been blocked.
Filtering based on filename extensions is also subject to false positives, whereby the intended results differ from the actual results that can occur when filename extensions are blocked. For example, perhaps you want to block Windows executable (.exe) files. If you simply block the .exe file extension, you might also block certain URLs that include executables as part of their URL path, for example http://example.com/scripts/example.exe?a=1&b2. These executables are used by the Web server to service a request. By blocking the Windows executable files, you inadvertently also block the legitimate URL executable files.
The main advantage of filtering based on the URL extension is that it can be done without contacting the origin server. All information required to process or deny the request URL condition is present in the client’s request. Responses that are retrieved from the origin server are cached and can be returned by the appliance if another request for the URL’s content is made.

Visual Policy Manager Referencee
300
Section 4 Filtering Based on HTTP Content-Type Response HeaderFiltering based on HTTP Content-Type response header is generally more reliable than filtering based on URL extension, but this technique is also unreliable.
For example, consider a Web site developer who might not set the Content-Type header correctly for dynamically generated content. The actual results might be HTML text, even though returned content type claims to be text/plain.
For some content types, you might find multiple MIME types with the same meaning, which could result from a difference in spelling or using different names for the same content type.
In cases where URL extension filtering is accurate, the data returned is of a type that is generally denoted by that extension. In cases where the HTML header is accurate, the data returned is generally considered to qualify under that content-type classification.

301
Section 5 Filtering Based on Apparent Data TypeThe Apparent Data Type feature identifies data content associated with Microsoft DOS and Windows executable files. Filtering based on apparent data type examines up to the first 256 bytes of data, then attempts to determine whether the content is a Windows executable or cabinet file. When used in a deny policy, the purpose of this object is to deny executable downloads and block drive-by installation of spyware.

Visual Policy Manager Referencee
302
Section 6 Filtering Based on the http.response.data Condition (in CPL)Filtering based on the http.response.data condition in CPL is for advanced users who have expertise with file formats and regular expressions. Using CPL, you must define a substring or regular expression to match up to the first 256 bytes of the content type that you want to block.
The http.response.data condition is defined in the Content Policy Language Reference.

303
Section 7 Sample ConfigurationCompany ABC wants to define rules that will identify and block video files. To do this, they will need to define rules to block file extensions, HTTP MIME Types or response headers related to the video type. They use a ProxySG appliance to implement this policy. To define their policy needs, Company ABC will need to define the following:
❐ In the Web Access Layer, define a rule identifying the file extensions to block.
❐ In the Web Access Layer, define a rule identifying the HTTP MIME types to block.
❐ If there are other video MIME types that are not listed in the rule above, you can define additional rules that match on the Content-Type response header in the Web Access Layer to block this content.
Note: Although the product has the ability to filter based on apparent data types, the currently supported apparent data types do not match video content. As a result, that feature will be omitted from this example.
The following procedure focuses on the settings that are required to successfully implement Content-Type filtering. It does not fully describe the more intuitive wizard steps associated with the policy definition process.

Visual Policy Manager Referencee
304
To configure this policy, do the following:
1. Launch Visual Policy Manager.
a. From the Management Console, select Configuration > Policy > Visual Policy
Manager. The Visual Policy Manager window displays.
b. Click Launch to open the Visual Policy Manager dialog.
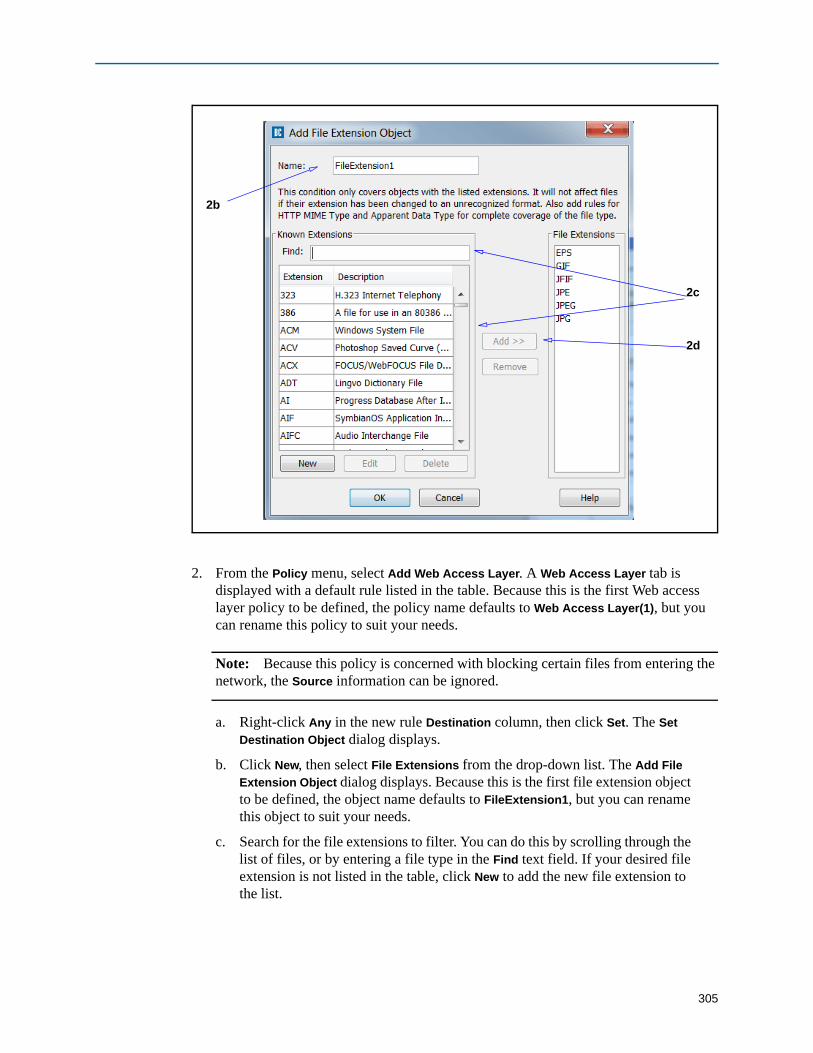
305
2. From the Policy menu, select Add Web Access Layer. A Web Access Layer tab is displayed with a default rule listed in the table. Because this is the first Web access layer policy to be defined, the policy name defaults to Web Access Layer(1), but you can rename this policy to suit your needs.
Note: Because this policy is concerned with blocking certain files from entering the network, the Source information can be ignored.
a. Right-click Any in the new rule Destination column, then click Set. The Set
Destination Object dialog displays.
b. Click New, then select File Extensions from the drop-down list. The Add File
Extension Object dialog displays. Because this is the first file extension object to be defined, the object name defaults to FileExtension1, but you can rename this object to suit your needs.
c. Search for the file extensions to filter. You can do this by scrolling through the list of files, or by entering a file type in the Find text field. If your desired file extension is not listed in the table, click New to add the new file extension to the list.
2b
2c
2d
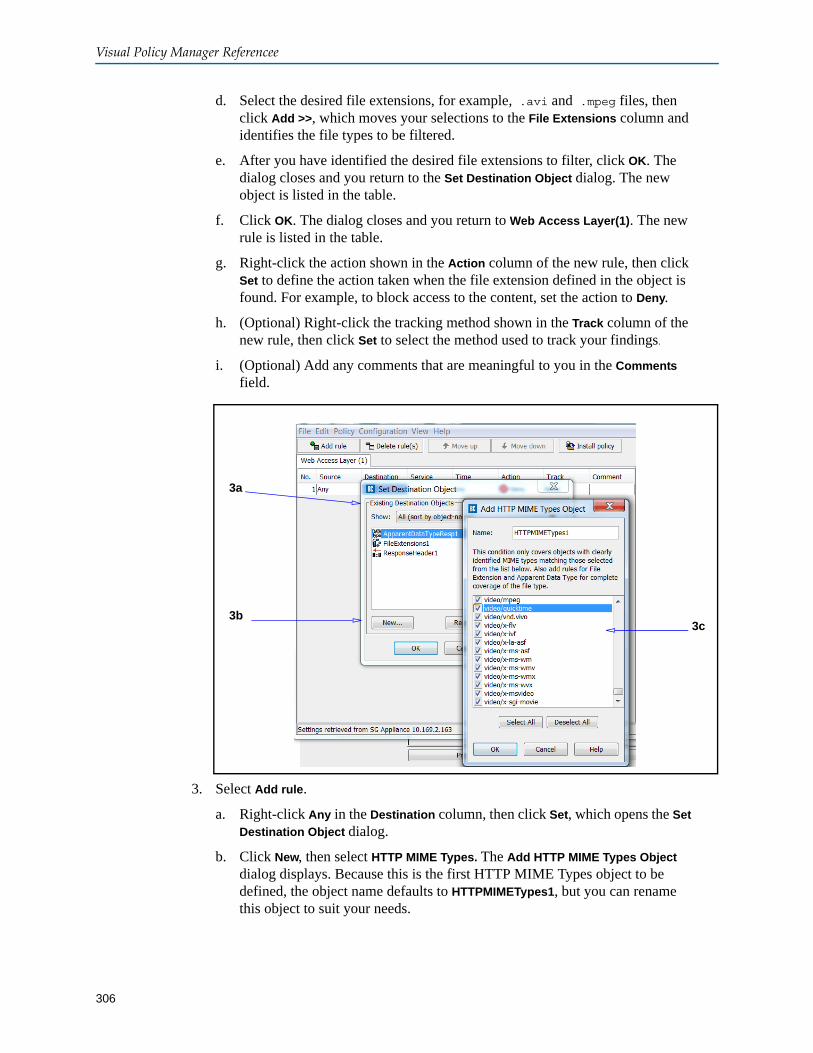
Visual Policy Manager Referencee
306
d. Select the desired file extensions, for example, .avi and .mpeg files, then click Add >>, which moves your selections to the File Extensions column and identifies the file types to be filtered.
e. After you have identified the desired file extensions to filter, click OK. The dialog closes and you return to the Set Destination Object dialog. The new object is listed in the table.
f. Click OK. The dialog closes and you return to Web Access Layer(1). The new rule is listed in the table.
g. Right-click the action shown in the Action column of the new rule, then click Set to define the action taken when the file extension defined in the object is found. For example, to block access to the content, set the action to Deny.
h. (Optional) Right-click the tracking method shown in the Track column of the new rule, then click Set to select the method used to track your findings.
i. (Optional) Add any comments that are meaningful to you in the Comments field.
3. Select Add rule.
a. Right-click Any in the Destination column, then click Set, which opens the Set
Destination Object dialog.
b. Click New, then select HTTP MIME Types. The Add HTTP MIME Types Object
dialog displays. Because this is the first HTTP MIME Types object to be defined, the object name defaults to HTTPMIMETypes1, but you can rename this object to suit your needs.
3a
3b3c

307
c. Select the HTTP MIME types from the list, for example, video/x-ms-wmv, then click OK. The dialog closes and you return to the Set Destination Object
dialog. The new object is listed in the table.
d. Click OK. The dialog closes and you return to Web Access Layer(1). The new rule is listed in the table.
e. Right-click the action shown in the Action column of the new rule, then click Set to define the action taken when the HTTP MIME types defined in the object are found. For example, to block access to the content, set the action to Deny.
f. (Optional) Right-click the method shown in the Track column of the new rule to select another method used to track your findings.
g. (Optional) Add any comments that are meaningful to you in the Comments column.
Note: Perform the following step if the Content-Type you want to filter is not listed in the HTTP MIME Type options.
4. Select Add rule.
a. Right-click Any in the Destination column, then click Set, which opens the Set
Destination Object dialog.
b. Click New, then select Response Header. The Add Response Header Object
dialog displays. Because this is the first response header object to be defined, the object name defaults to ResponseHeader1, but you can rename this policy to suit your needs.
You can select whether to show All, Standard, or Custom header names. The Show selection filters the list of options that appear in the Header Name drop-down list.
4a
4b4c
4d
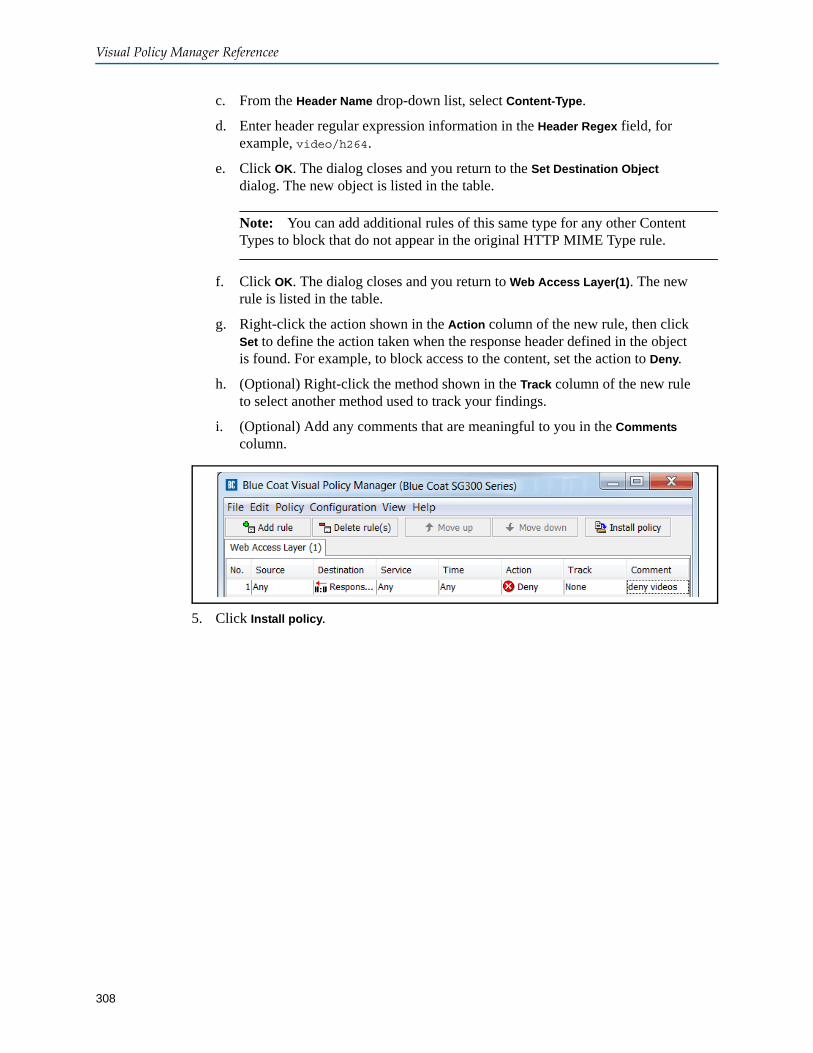
Visual Policy Manager Referencee
308
c. From the Header Name drop-down list, select Content-Type.
d. Enter header regular expression information in the Header Regex field, for example, video/h264.
e. Click OK. The dialog closes and you return to the Set Destination Object
dialog. The new object is listed in the table.
Note: You can add additional rules of this same type for any other Content Types to block that do not appear in the original HTTP MIME Type rule.
f. Click OK. The dialog closes and you return to Web Access Layer(1). The new rule is listed in the table.
g. Right-click the action shown in the Action column of the new rule, then click Set to define the action taken when the response header defined in the object is found. For example, to block access to the content, set the action to Deny.
h. (Optional) Right-click the method shown in the Track column of the new rule to select another method used to track your findings.
i. (Optional) Add any comments that are meaningful to you in the Comments column.
5. Click Install policy.