Embed Size (px)
Citation preview

DEPARTMENT OF THE AIR FORCE Headquarters US Air Force
QTP24-3-D586 14 January 2019
Washington, D.C. 20330-1030
Sewer Pipe Cleaning Vehicles: Truck Pipe Hi Pressure Sewer Cleaner, Sewer Jetter, Sewer Cleaner Jet
Rodder, Sewer Truck Centrifugal, Sludge Truck Vehicle Management Codes: D586, D588, D589, D593
QUALIFICATION TRAINING PACKAGE
CONTENTS SECTION 1—OVERVIEW ......................................................................................................... 3 1.1. Overview.......................................................................................................................................................... 3
SECTION 2—RESPONSIBILITIES .......................................................................................... 3 2.1. Responsibilities. .............................................................................................................................................. 3
SECTION 3—INTRODUCTION................................................................................................ 4 3.1. Objectives. ....................................................................................................................................................... 4 3.2. Desired Learning Outcomes. ......................................................................................................................... 5
3.3. Lesson Duration. ............................................................................................................................................. 5
3.4. Instructional References. ............................................................................................................................... 5
3.5. Instructional Training Aids and Equipment. ............................................................................................... 6
SECTION 4—TRAINEE PREPARATION ............................................................................... 6 4.1. Licensing Requirements. ................................................................................................................................ 6
4.2. Required Reading. .......................................................................................................................................... 6
SECTION 5—KNOWLEDGE LECTURE AND EVALUATION .......................................... 7 5.1. Overview of Training and Requirements. .................................................................................................... 7
5.2. Vehicle Inspection. .......................................................................................................................................... 8
5.3. Vehicle Safety and Equipment. ................................................................................................................... 11
5.4. Driving Safety and Precautions. .................................................................................................................. 12
5.5. Vehicle Operation. ........................................................................................................................................ 14
SECTION 6—EXPLANATION AND DEMONSTRATION. ................................................ 15 6.1. Instructor’s Preparation. ............................................................................................................................. 15
6.2. Safety Procedures and Equipment. ............................................................................................................. 16
6.3. Operator Maintenance Demonstration. ...................................................................................................... 17
6.4. Operation Demonstration. ........................................................................................................................... 17
Attachment 1—GLOSSARY OF REFERENCES AND SUPPORTING INFORMATION 26
Attachment 2—VEHICLE INSPECTION GUIDE 27
Attachment 3—SEVEN-STEP INSPECTION PROCESS 31

Section 1—OVERVIEW 1.1. Overview.
1.1.1. Send comments and suggested improvements on Air Force (AF) Form 847, Recommendation for Change of Publication through Air Force Installation and Mission Support Center (AFIMSC) functional managers via e-mail at [email protected]. 1.1.2. How to use this plan:
1.1.2.1. Instructor:
1.1.2.1.1. Provide overview of training, Section 2 and Section 3. 1.1.2.1.2. Instructor’s lesson plan for trainee preparation, give classroom lecture, Section 4. 1.1.2.1.3. Instructor’s lesson plan for knowledge lecture, Section 5. 1.1.2.1.4. Instructor’s lesson plan for demonstration, Section 6.
1.1.2.2. Trainee:
1.1.2.2.1. Reads this entire lesson plan prior to starting lecture. 1.1.2.2.2. Follows along with lecture using this lesson plan and its attachments. 1.1.2.2.3. Uses Attachment 2 and Attachment 3 as guides for vehicle inspection. 1.1.2.2.4. Takes performance test.
Section 2—RESPONSIBILITIES 2.1. Responsibilities.
2.1.1. The trainee shall:
2.1.1.1. Ensure the trainer explains the Air Force Qualification Training Plan (AFQTP) process and the trainee’s responsibilities. 2.1.1.2. Review the AFQTP with the trainer. 2.1.1.3. The trainee should ask questions if he or she does not understand the objectives for each unit.

2.1.1.4. Review missed questions with the trainer.
2.1.2. Instructor shall:
2.1.2.1. Review the AFQTP with the trainee. 2.1.2.2. Conduct knowledge training with the trainee using the AFQTP. 2.1.2.3. Review missed questions with the trainee to ensure the required task knowledge has been gained to complete the task. 2.1.2.4. Sign-off the task(s).
2.1.3. The Certifier shall:
2.1.3.1. Evaluate the Airman’s task performance without assistance. 2.1.3.2. Sign-off the task(s).
Section 3—INTRODUCTION 3.1. Objectives.
3.1.1. Given lectures, demonstrations, hands-on driving session, and a performance and written test, trainees will be able to perform operator’s inspection and complete the performance test with zero instructor assists. 3.1.2. Train and qualify each trainee in safe operation and preventive maintenance of the various sewer pipe cleaning vehicles listed below.
3.1.2.1. Truck Pipe Hi Pressure Sewer Cleaner. 3.1.2.2. Sewer Jetter.
3.1.2.3. Sewer Cleaner Jet Rodder (Snake).
3.1.2.4. Sewer Truck Centrifugal.
3.1.2.5. Sludge Truck.
3.1.3. This training will ensure the trainee becomes a qualified sewer pipe cleaning vehicle operator; an operator who has the knowledge and skills to operate a sewer pipe cleaner vehicle in a safe and professional manner.

3.2. Desired Learning Outcomes.
3.2.1. Understand the safety precautions to be followed pre-, during-, and post- operation of the sewer pipe cleaning vehicles. 3.2.2. Understand the purpose of the sewer pipe cleaning vehicles and its role in the mission. 3.2.3. Know the proper operator maintenance procedures of the sewer pipe cleaning vehicles, IAW applicable technical orders (TOs) and use of AF Form 1800, Operator’s Inspection Guide and Trouble Report. 3.2.4. Be completely familiar with the safety features of the sewer pipe cleaning vehicles. 3.2.5. Safely and proficiently operate the sewer pipe cleaning vehicles.
3.3. Lesson Duration.
3.3.1. Recommended instructional and hands on training time is 15 hours:
Figure 3.1. Recommended Training Time for Training Activities.
Training Activity Training Time Trainee’s Preparation 2 Hours Instructor’s Lecture 3 Hours Trainee’s Written Evaluation 1 Hour Instructor’s Demonstration 2 Hours Trainee’s Personal Experience (to build confidence and proficiency) Perform Operator Maintenance Operate the Vehicle
6 Hours
Trainee’s Performance Evaluation 1 Hour Note: This is a recommended time; training time may be more or less depending how quickly a trainee learns new tasks.
3.4. Instructional References.
3.4.1. Risk Management (RM) and Safety Principles IAQ Air Force Pamphlet (AFPAM) 90-803, Risk Management (RM) Guidelines and Tools. 3.4.2. Applicable TOs or Manufacturer’s Operator’s Manual.
3.4.3. Air Force Manual (AFMAN) 24-306, Operation of Air Force Government Motor Vehicles. 3.4.4. AF Form 1800.

3.4.5. Air Force Instruction (AFI) 91-203, Air Force Consolidated Occupational Safety Instruction.
3.4.6. AFI 24-302, Vehicle Management.
3.4.7. T.O.36A12-IS-6-1 and T.O.36AI2-IS-7-1.
3.5. Instructional Training Aids and Equipment.
3.5.1. Sewer Pipe Cleaning Vehicles Lesson Plan. 3.5.2. Sewer pipe cleaning vehicle. 3.5.3. Applicable TO or manufacturer’s operator’s manual. 3.5.4. AF Form 1800. 3.5.5. Videos (if locally produced). 3.5.6. Suitable training area. 3.5.7. Traffic cones.
Section 4—TRAINEE PREPARATION 4.1. Licensing Requirements.
4.1.1. Trainee must have in his/her possession a valid state driver’s license. 4.1.2. AF Form 171, Request for Driver’s Training and Addition to U.S. Government Drivers in accordance with (IAW) AFI 24-301, Ground Transportation.
4.1.3. Applicable local licensing jurisdiction requirements.
4.2. Required Reading.
4.2.1. Read this entire lesson plan. 4.2.2. Read AFMAN 24-306. 4.2.3. Read manufacturer’s operator’s manual for the vehicle being trained on.

Section 5—KNOWLEDGE LECTURE AND EVALUATION 5.1. Overview of Training and Requirements.
5.1.1. Training objectives:
5.1.1.1. Given lectures, demonstrations, hands-on driving session, and a performance and written test, trainees will be able to perform operator’s inspection and complete the performance test with zero instructor assists. 5.1.1.2. Train and qualify each trainee in safe operation and preventive maintenance of the various sewer pipe cleaning vehicles. 5.1.1.3. This training will ensure the trainee becomes a familiar with various sewer pipe cleaning vehicles — an operator who has the knowledge and skills to operate a various sewer pipe cleaning vehicles in a safe and professional manner.
5.1.2. Desired learning outcomes:
5.1.2.1. Understand the safety precautions to be followed pre-, during, and post-operation of the sewer pipe cleaning vehicles. 5.1.2.2. Be completely familiar with the safety features of the various sewer pipe cleaning vehicles. 5.1.2.3. Safely and proficiently operate sewer pipe cleaning vehicles 5.1.2.4. Understand the purpose of sewer pipe cleaning vehicles.
5.1.2.4.1. The purpose of the sewer pipe cleaning vehicles is to clean and service sewer utility lines. 5.1.2.4.2. Role in the mission (Unit/Base/Community (during natural disasters)/Air Force).
5.1.3. Sewer pipe cleaning vehicle design. The design these vehicles varies depending on the vehicle manufacturer. Refer to the manufacturer’s operator’s manual for additional information on the specific vehicle you are operating.

5.1.4. Sewer pipe cleaning vehicles are truck-mounted and hydraulically-operated, designed to do various job. The trainee should be able to identify the following components of the specific vehicle they are required to operate. Components of your specific vehicle may vary depending on the manufacturer.
5.1.4.1. Air brakes. 5.1.4.2. Front water hose reel control lever. 5.1.4.3. Water hose lever and reel. 5.1.4.4. Control lever for rotation, lowering, raising the boom. 5.1.4.5. Jetter hose switch. 5.1.4.6. High-Pressure handgun. 5.1.4.7. Vacuum controls. 5.1.4.8. Centrifugal Pump controls 5.1.4.9. Dump door operations.
5.2. Vehicle Inspection.
5.2.1. Pre-operation vehicle inspection test. Use Attachment 2 as a walk-around guide along with AF Form 1800. 5.2.2. A Seven-Step Inspection Method will help ensure the inspection is the same each time it is conducted, and that nothing is left out. See Attachment 3 for the Seven-Step Inspection Method. 5.2.3. Types of Vehicle Inspection. If discrepancies are found the operator must report them to Vehicle Control Officer/Vehicle Control Non Commissioned Officer (VCO/VCNCO), the supervisor, and/or vehicle maintenance:
5.2.3.1. Pre-operation inspection – find items/problems that could cause accident or breakdown.
5.2.3.1.1. Vehicle maintenance to authorize continued use for all other maintenance discrepancies.
5.2.3.1.2. Cleanliness/damage/missing items.
5.2.3.1.3. Leaks (fuel/oil/coolant/hydraulic/air).

5.2.3.1.4. Fluid Levels; ensure level is within limits:
5.2.3.1.4.1. Engine oil.
5.2.3.1.4.2. Coolant.
5.2.3.1.4.3. Power steering fluid.
5.2.3.1.4.4. Transmission fluid.
5.2.3.1.4.5. Antifreeze. 5.2.3.1.4.6. Chassis. 5.2.3.1.4.7. Hydraulic.
5.2.3.1.5. Battery; security, fluid, damage and corrosion.
5.2.3.1.6. All wheel rims (cracks, splits, etc.); check for loose or missing lug nuts.
5.2.3.1.7. All tires.
5.2.3.1.7.1. Proper inflation. Note: Notify VCO/VCNCO, the supervisor, and/or vehicle maintenance if split rim is completely flat.
5.2.3.1.7.2. Sidewalls, tread to include depth, bulges.
5.2.3.1.7.3. Cuts and abrasions.
5.2.3.1.7.4. Lug nuts.
5.2.3.1.8. Transmission.
5.2.3.1.9. Drive belts; tension and fraying.
5.2.3.1.10. All hoses and wiring.
5.2.3.1.11. Differential, shocks and brakes for leaks.
5.2.3.1.12. Suspension, springs and shocks.
5.2.3.1.13. Boom hinge pin and cylinder pins. 5.2.3.1.14. Turntable. 5.2.3.1.15. Frame bolts and other fasteners.

5.2.3.1.16. Welds. 5.2.3.1.17. Visual and audible warning devices. 5.2.3.1.18. Hydraulic cylinders, hoses, and tubes to ensure that they are in place and show no evidence of damage, cracks or corrosion. 5.2.3.1.19. Synthetic load line and material handling attachments for wear or damage. All material handling attachments have safety devices and are in good condition. 5.2.3.1.20. Fiberglasss vacuum boom structures, platforms, and guards for contamination, damage, and scratches. 5.2.3.1.21. Dump door properly latched. 5.2.3.1.22. Pintle hook connection/compatibility (if applicable). 5.2.3.1.23. Fuel door and fuel cap; intact, not broken or damaged.
5.2.3.1.24. Heater/defroster.
5.2.3.1.25. Wiring/lights/reflectors (interior and exterior).
5.2.3.1.26. Mirrors.
5.2.3.1.27. Windshield and windshield wipers/washers.
5.2.3.1.28. Doors.
5.2.3.1.29. Windows.
5.2.3.1.30. Seatbelts.
5.2.3.1.31. Fire Extinguisher. 5.2.3.1.32. Ensure the area is free from overhead obstructions such as trees, poles and power lines. 5.2.3.1.33. Operate the unit through the range of all functions to ensure proper operation. Be sure that the everyone is clear of moving components. 5.2.3.1.34. Return the vacuum boom to the carrying position and secure. 5.2.3.1.35. Perform a pre-operational check from the all control positions. Make sure the emergency stop button works properly (if applicable).

5.2.3.2. During-operation.
5.2.3.2.1. All gauges and warning lights for proper operations.
5.2.3.2.1.1. Warning lights.
5.2.3.2.1.2. Gauges (oil pressure, fuel gauge, water temperature, voltage).
5.2.3.2.1.3. Indicators.
5.2.3.2.2. Listen for exhaust and air leaks. Listen for any unusual sounds.
5.2.3.2.3. Stay alert for any unusual smells or odors.
5.2.3.2.4. Stay alert for any abnormal vibrations or handling problems.
5.2.3.3. Post-operation inspection and report.
5.2.3.3.1. Ensure vehicle and components are cleaned.
5.2.3.3.2. Properly stow equipment.
5.2.3.3.3. Ensure that the vehicle is refueled.
5.2.3.3.4. Park the vehicle.
5.2.3.3.5. Apply the brakes.
5.2.3.3.6. Place the transmission in neutral (park for an automatic). 5.3. Vehicle Safety and Equipment.
5.3.1. Hazards and human Factors:
5.3.1.1. Confined space. 5.3.1.2. Ladder use. 5.3.1.3. Sewer gases. 5.3.1.4. Loads beyond the vehicle’s capability.
5.3.1.4.1. Gross Vehicle Weight Rating (GVWR) = Truck Weight + Contaminants Weight + Tools + Personnel.

5.3.1.5. Overhead clearance. Check the clearance height of the vehicle (and any attachments or extended booms) relative to the overhead obstructions such as power lines and bridges. Consult OSHA CFR 1926.1408 for vehicle clearance required from high powered lines.
5.3.2. Safety clothing and equipment: 5.3.2.1. Safety toed boots must be worn. 5.3.2.2. Safety glasses. 5.3.2.3. First aid kit. Verify kit contents and serviceability. 5.3.2.4. Hand protection, if required. 5.3.2.5. Cones. 5.3.2.6. Inclement weather gear, if required. 5.3.2.7. Reflective belt during hours of reduced visibility and on the flightline. 5.3.2.8. Tire gauge. 5.3.2.9. Fire extinguisher. 5.3.2.10. AF Form 1800.
5.4. Driving Safety and Precautions.
5.4.1. Sewer pipe cleaning vehicle safety and precautions.
5.4.1.1. Over the road operation.
5.4.1.1.1. Greater vehicle weight. The operator needs to consider the combined weight of the sewer pipe cleaning vehicle and the load. This will affect the following:
5.4.1.1.1.1. Operator’s ability to stop. Do not tailgate the vehicle in front. Allow more distance between vehicles in order to increase reaction time. 5.4.1.1.1.2. Vehicle’s ability to accelerate/follow the flow of traffic. Accelerate smoothly and gradually so the truck does not jerk. Rough acceleration causes unnecessary, premature mechanical damage to the vehicle’s drive train. Maintain a safe speed (typically 5 miles per hour (mph) below the posted speed limit).

5.4.1.1.2. Downgrades/upgrades. The operator will use lower gears more frequently to climb hills or mountains with increasing grade steepness, length and/or heavy load weight. Plan ahead to identify downgrades/upgrades on the route of travel. If possible, talk to other drivers who are familiar with the grades to find out what speeds are safe. When encountering downgrades/upgrades as described, the operator will need to address:
5.4.1.1.2.1. Speed. On downgrades, gravity causes the speed of the vehicle to increase. The operator must select an appropriate safe speed, use a low gear, and proper braking techniques. The operator must go slow enough so as to not overheat the truck brakes. 5.4.1.1.2.2. Stopping. If the brakes become too hot, they may start to “fade”. This means the operator will need to apply the brakes harder and harder to acquire equivalent stopping power.
5.4.1.1.3. Sharp turns. Slow down before entering the turn. During the turn, avoid sharp sudden movements with the steering wheel. This reduces the chance of shifting the load in the tank, and also prevents the possibility of tipping over due to the higher center of gravity.
5.4.1.1.4. Surroundings. Operating a sewer pipe cleaning vehicle requires the operator’s constant attention. Many situations can be avoided by simply paying close attention to the surrounding conditions. Road signs such as “steep grade”, “low overhead clearance”, “sharp turn ahead”, and special speed limits are posted for the driver’s safety.
5.4.1.1.5. Size. The operator must take into account, the sewer pipe cleaning vehicle and load when operating the vehicle.
5.4.2. Backing.
5.4.2.1. Always use a trained spotter and hand signals. 5.4.2.2. Back slowly and keep the spotter in view at all times. If the operator loses sight of the spotter, the operator must immediately stop the vehicle. 5.4.2.3. See AFMAN 24-306 for standard AF spotter hand signals and additional guidance on spotter safety.
5.4.3. Parking.
5.4.3.1. Apply the parking brake. Chock the wheels. 5.4.3.2. Set cones when parked.

5.4.4. Tire changing safety.
5.4.4.1. Consider where the vehicle is located. If on a bridge, curve, road with no shoulder, etc.; it is safer to move a vehicle on a flat tire to a safe location.
5.4.4.2. Find a location with a firm and level surface for the jack.
5.4.4.3. Turn on the four-way flashers.
5.4.4.4. Place warning triangles or flares.
5.4.4.5. Chock the wheels. If changing a front tire, chock the rear wheels. If changing a rear tire, chock the front wheels.
5.4.4.6. Place the vehicle in “Park” if it has an automatic transmission and low gear if it has a standard shift.
5.4.4.7. Ensure the jack is rated for the weight of the vehicle. Ensure proper placement of jack.
5.4.4.8. If available, use jack stands after lifting the vehicle. Once the vehicle is lifted; never at any time get under the vehicle.
5.4.4.9. Before removing lug nuts, ensure lug wedges are loose (double check).
5.4.4.10. After changing the tire, return the jack and lug wrench to the location recommended by the manufacturer (keep them from becoming flying projectiles and makes them available for future tire changes).
5.4.4.11. Secure the damaged tire and once it is repaired, return the spare tire back to its proper location.
5.4.5. Off-road driving. For more information on off-road driving and safe vehicle operation guidance, refer to AFMAN 24-306.
5.5. Vehicle Operation.
5.5.1. Driving Characteristics.
5.5.2. General Vehicle Operation. 5.5.2.1. Sewer pipe cleaning vehicles are equipped with either one or two power take-off (PTO) controls. Check the vehicle operator’s manual to identify the configuration of the specific vehicle.

5.5.2.2. Position the vehicles at the work site and set the park brake. Place traffic cones at the front and rear of the vehicle. Be sure to position the vehicle next to the mahhole in the direction in which the cleaner jet rodder snake head will travel. 5.5.2.3. Engage the PTO allowing operation of the water pump. Once PTO is engaged, drop the gearshift lever to drive, allowing engine to be throttled from the truck’s rear. Higher engine revolutions per minute (RPMs) produce greater pressure to come out of the end of the hose. 5.5.2.4. Slowly feed the cleaner jet rodder snake into the utitliy hole. Adjust the reel speed, as necessary, to allow the snake to maneuver through the sewer pipe. 5.5.2.5. Turn on the water valve to allow water to flow through the snake 5.5.2.6. Feed the hose from the reel using the the controls. 5.5.2.7. Continue sewer cleaning operations until the snake head reaches the next manhole or until the hose runs out. 5.5.2.8. Once the sewer pipe is cleared, use the controls to recover the hose back onto the hose reel. 5.5.2.9. Be sure to wash the hose and reel before parking the vehicle at the end of the duty day.
5.5.3. Vacuum system.
5.5.3.1. Refer to the operator’s manual for instruction on operating the vacuum system.
Note: You may wish to develop specific guidance to include with this lesson plan on system component operations for assigned vehicles.
Section 6—EXPLANATION AND DEMONSTRATION. 6.1. Instructor’s Preparation.
6.1.1. Establish a training location. 6.1.2. Obtain appropriate manufacturer’s operator’s manual. 6.1.3. Schedule/reserve a vehicle. 6.1.4. Ensure trainee completes AF Form 171.

6.2. Safety Procedures and Equipment.
6.2.1. The following safety items should be followed by both the instructor and trainee.
6.2.1.1. Chock wheel (if required) when sewer pipe cleaning vehicle is parked. 6.2.1.2. Remove all jewelry and identification tags. 6.2.1.3. Personal protective equipment and equipment items.
6.2.1.3.1. Safety toed boots must be worn. 6.2.1.3.2. Gloves will be worn during cargo loading and unloading.
6.2.1.3.3. Hand protection, if required.
6.2.1.3.4. Safety glasses. 6.2.1.3.5. First aid kit. 6.2.1.3.6. Warning triangles. 6.2.1.3.7. Inclement weather gear, if required. 6.2.1.3.8. Reflective belt during hours of reduced visibility or on the flightline.
6.2.1.4. The trainer and the trainee should walk-around the vehicle to become familiar all warning labels and signs. 6.2.1.5. Ensure trainee wears seat belts. 6.2.1.6. Properly adjust driver’s seat and all mirrors, if available. 6.2.1.7. Throughout demonstration, practice sewer pipe cleaning vehicle safety.
6.2.2. Practice basic RM process during demonstration:
6.2.2.1. Identify hazards. 6.2.2.2. Assess hazards. 6.2.2.3. Develop controls and make decisions. 6.2.2.4. Implement controls. 6.2.2.5. Supervise and evaluate.

6.3. Operator Maintenance Demonstration.
6.3.1. With trainee, accomplish vehicle inspection using AF Form 1800. The vehicle inspection will follow the seven-step method as described in Attachment 3. An inspection guide (Attachment 2) can be used to ensure all areas of the sewer pipe cleaning vehicle are covered in addition to the “Operation Demonstration” guidelines provided below.
6.4. Operation Demonstration.
6.4.1. Throughout demonstration:
6.4.1.1. Allow for questions. 6.4.1.2. Repeat demonstrations as needed.
6.4.2. For all sewer pipe cleaning vehicles, within the training area, demonstrate and explain the following. Note: Use information contained on the data plate and/or the operator’s manual:
6.4.2.1. Specific sewer pipe cleaning capacities: Explain parking brake as they apply to sewer pipe cleaning vehicle being used. 6.4.2.2. Sewer pipe cleaning vehicle controls. 6.4.2.3. Point out the items to be inspected during operations.
6.4.3. Demonstrate the following sewer pipe cleaning vehicle operations.
6.4.3.1. Forward. 6.4.3.2. Stop. 6.4.3.3. Backing.
6.4.3.3.1. Always use a spotter when backing. 6.4.3.3.2. Stop the vehicle immediately if visual contact is lost with the spotter.
6.4.3.3.3. See AFMAN 24-306 for additional guidance.
6.4.3.4. Parking.
6.4.4. Show trainee the post-operation inspection and report.
6.4.4.1. Ensure vehicle is cleaned.

6.4.4.2. Refuel vehicle. 6.4.4.3. Following manufacturer’s shut-down procedures. 6.4.4.4. Park.
6.4.4.4.1. Apply brakes.
6.4.4.4.2. Place transmission in neutral (park or an automatic).
6.4.4.5. Perform a post-operation walk-around inspection. 6.4.4.6. Annotate any discrepancies found on AF Form 1800.
6.4.5. Conclude by allowing time for questions and any requested re-demonstrations.

Attachment 1
GLOSSARY OF REFERENCES AND SUPPORTING INFORMATION
References AFI 24-301, Ground Transportation, 1 November 2018 AFI 24-302, Vehicle Management, 26 June 2012 AFI 91-203, Air Force Consolidated Occupational Safety Instruction, 15 June 2012 AFMAN 24-306, Operation of Air Force Government Motor Vehicles, 9 December 2016 AFPAM 90-803, Risk Management (RM) Guidelines and Tools, 13 February 2011 Adopted Forms AF Form 171, Request for Driver’s Training and Addition to U.S. Government Drivers, 1 November 2018 AF Form 847, Recommendation for Change of Publication AF Form 1800, Operator’s Inspection Guide and Trouble Report Abbreviations and Acronyms AF—Air Force AFI—Air Force Instruction AFIMSC—Air Force Installation Mission Support Center AFMAN—Air Force Manual AFQTP—Air Force Qualification Training Plan GVWR—Gross Vehicle Weigh Rating IAW—In Accordance With PTO—Power Take-Off RM—Risk Management TO—Technical Order VCNCO—Vehicle Control Non Commissioned Officer VCO—Vehicle Control Officer

Attachment 2
SEWER PIPE CLEANING VEHICLE INSPECTION GUIDE
GENERAL STEP 1. VEHICLE OVERVIEW Paperwork
• AF Form 1800 • Discrepancy Correction Complete (VM Annotation)
Vehicle Approach • Damage • Vehicle Leaning • Fresh Leakage of Fluids • Hazards Surrounding Vehicle
INTERNAL STEP 2. ENGINE COMPARTMENT Leaks/hoses/Electrical Wiring Insulation Oil Level Coolant Level Power Steering Fluid Windshield Washer Fluid Battery Fluid Level, Connections & Tiedowns Automatic Transmission Fluid Level Engine Compartment Belts STEP 3. ENGINE START/CAB CHECK (LEFT/FRONT/RIGHT) Safe Start Gauges
• Oil Pressure Gauge • Air Pressure Gauge • Temperature Gauge (Coolant/Engine Oil) • Ammeter/Voltmeter
Warning Lights & Buzzers Mirrors & Windshield Wipers/Washers Emergency & Safety Equipment
• Red Reflective Triangles • Properly Charged & Rated Fire Extinguisher • Optional (Chains/Tire Changing Equip, Emergency Phone List)

3B – Lights/Reflectors/Reflector Tape Condition (Front/Sides/Rear) (Dash Indicators for:)
• Left Turn Signal • Right Turn Signal • Four-Way Emergency Flashers • High Beam Headlight • Headlights • Taillights • Backing Lights • Brake Lights • Red Reflectors & Amber Reflectors • Reflective Tape Condition
Horn Heater/Defroster Brakes
• Parking Brake Check • Hydraulic Brake Check • Air Brake Check (if equipped) • Service Brake Check • Safety Belt
(TURN-OFF ENGINE/TURN-ON HEADLIGHTS *LOW BEAM* AND FOUR-WAY FLASHERS) STEP 4. WALK-AROUND INSPECTION 4A – Steering
• Steering Box/Hoses • Steering Linkages
4B – Suspension • Springs/Air/Torque • Mounts • Shock Absorbers
4C – Brakes • Slack Adjustors & Pushrods • Brake Chambers • Brake Hoses/Lines • Drum Brake • Brake Linings
4D – Wheels • Rims • Tires • Hub Oil Seals/Axle Seals • Lug Nuts • Spacers & Budd Spacing

SIDE OF VEHICLE 4E – Doors 4E – Mirrors 4E – Fuel Tank 4E – Frame SPECIAL EQUIPMENT 4F – Boom 4G – Jetter Hose/Reel 4H –Dump Door 4I – High Pressure Handgun

Figure A2.1. Sewer Pipe Cleaning Vehicle Inspection Guide.

Figure A2.2. Sludge Truck Vehicle Inspection Guide.

Attachment 3
SEVEN-STEP INSPECTION PROCESS Figure A3.1. Seven-Step Inspection Process.
Seven-Step Inspection Process Step Procedure 1. Vehicle Overview • Review the AF Form 1800.
o Ensure any discrepancy has been corrected.
o Vehicle Management annotated the discrepancy was completed.
o Approaching the vehicle. o Damage or vehicle leaning to one side. o Fresh leakage of fluids. o Hazards around vehicle.
2. Check Engine Compartment Note: Check that the parking brakes are on and/or wheels chocked. The operator may have to raise the hood, tilt the cab (secure loose things so they don't fall and break something), or open the engine compartment door. • Check the following: o Engine oil level. o Coolant level in radiator; condition of
hoses. o Power steering fluid level; hose
condition (if so equipped). o Windshield washer fluid level. o Battery fluid level, connections and
tie-downs (battery may be located elsewhere).
o Automatic transmission fluid level (may require engine to be running).
o Check belts for tightness and excessive wear (alternator, water pump, air compressor)--learn how much "give" the belts should have when adjusted right.

o Leaks in the engine compartment (fuel, coolant, oil, power steering fluid, hydraulic fluid, battery fluid).
o Cracked, worn electrical wiring insulation.
3. Start Engine and Inspect Inside the Cab Get in and Start Engine
• Make sure parking brake is on. • Put gearshift in neutral (or park if
automatic). Start engine; listen for unusual noises. o If equipped, check the Anti-lock
Braking System (ABS) indicator lights. Light on dash should come on and then turn-off. If it stays on the ABS is not working properly.
Note: For trailers only, if the yellow light on the left rear of the trailer stays on, the ABS is not working properly. • Look at the gauges. o Oil pressure. Should come up to
normal within seconds after engine is started.
o Air pressure. Pressure should build from 50 to 90 psi within 3 minutes. Build air pressure to governor cut-out (usually around 120 – 140 psi. Know the vehicle’s requirements.
o Ammeter and/or voltmeter. Should be in normal range(s).
o Coolant temperature. Should begin gradual rise to normal operating range.
o Engine oil temperature. Should begin gradual rise to normal operating range.
o Warning lights and buzzers. Oil, coolant, charging circuit warning, and antilock brake system lights should go out right away.
• Check Condition of Controls. Check all of the following for looseness, sticking, damage, or improper setting: o Steering wheel. o Clutch.

o Accelerator (gas pedal). o Brake controls. o Foot brake. o Parking brake. o Retarder controls (if vehicle has them). o Transmission controls. o Interaxle differential lock (if vehicle
has one). o Horn(s). o Windshield wiper/washer. o Lights. o Headlights. o Dimmer switch. o Turn signal. o Four-way flashers. o Parking – clearance – identification –
marker switch (switches). • Check mirrors and windshield. o Inspect mirrors and windshield for
cracks, dirt, illegal stickers, or other obstructions to seeing clearly. Clean and adjust as necessary.
• Check emergency equipment. o Check for safety equipment: o Spare electrical fuses (unless vehicle
has circuit breakers). o Three red reflective triangles, 6 fuses
or 3 liquid burning flares. o Properly charged and rated fire
extinguisher. Check for optional items such as:
o Chains (where winter conditions require).
o Tire changing equipment. o List of emergency phone numbers
Accident reporting kit (packet). o Check safety belt. Check that the
safety belt is securely mounted, adjusts; latches properly and is not ripped or frayed.

4. Turn-off Engine • Make sure the parking brake is set, turn-off the engine, and take the key with.
• Turn-on headlights (low beams) and four-way emergency flashers, and get out of the vehicle.
5. Do Walk-Around Inspection • General. o Go to front of vehicle and check that
low beams are on and both of the four-way flashers are working.
o Push dimmer switch and check that high beams work.
o Turn-off headlights and four-way emergency flashers.
o Turn-on parking, clearance, side-marker, and identification lights.
o Turn-on right turn signal, and start walk-around inspection.
o Walk around and inspect. o Clean all lights, reflectors, and glass as
while doing the walk-around inspection.
• Left front side. o Driver's door glass should be clean. o Door latches or locks should work
properly. • Left front wheel. o Condition of wheel and rim--missing,
bent, broken studs, clamps, lugs, or any signs of misalignment.
o Condition of tires--properly inflated, valve stem and cap OK, no serious cuts, bulges, or tread wear.
o Use wrench to test rust-streaked lug nuts, indicating looseness.
o Hub oil level OK, no leaks. Left front suspension.
o Condition of spring, spring hangers, shackles,
o U-bolts. o Shock absorber condition.
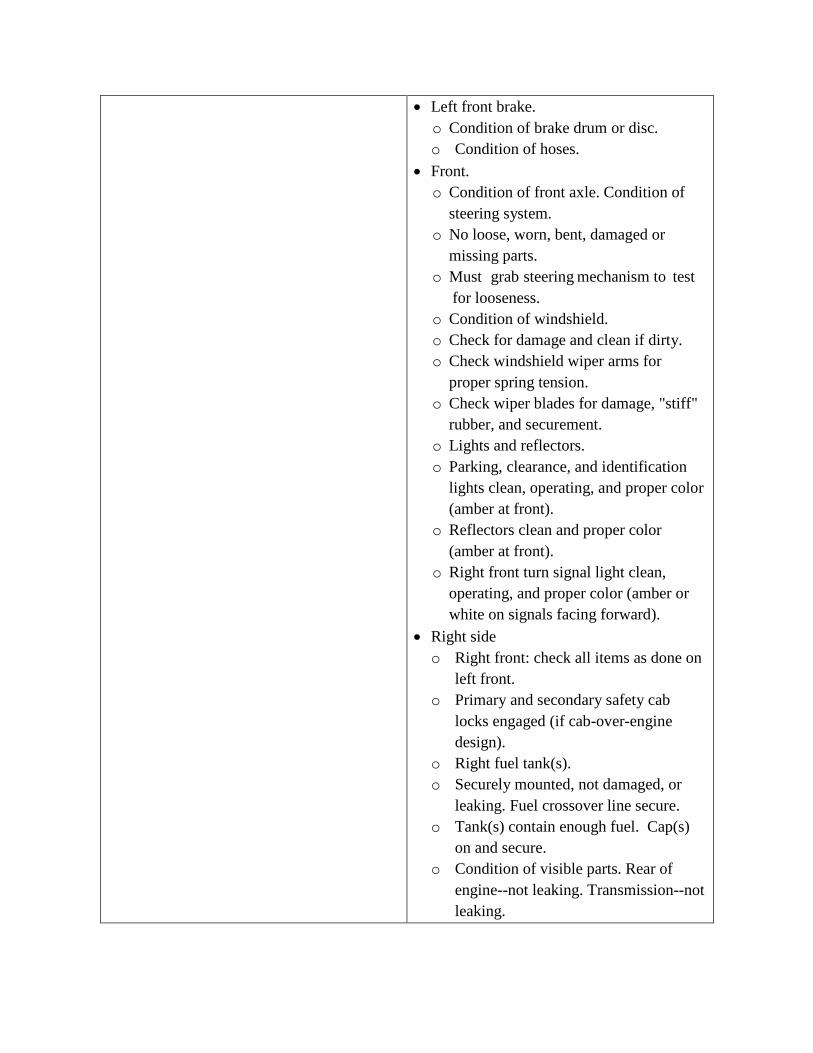
• Left front brake. o Condition of brake drum or disc. o Condition of hoses.
• Front. o Condition of front axle. Condition of
steering system. o No loose, worn, bent, damaged or
missing parts. o Must grab steering mechanism to test
for looseness. o Condition of windshield. o Check for damage and clean if dirty. o Check windshield wiper arms for
proper spring tension. o Check wiper blades for damage, "stiff"
rubber, and securement. o Lights and reflectors. o Parking, clearance, and identification
lights clean, operating, and proper color (amber at front).
o Reflectors clean and proper color (amber at front).
o Right front turn signal light clean, operating, and proper color (amber or white on signals facing forward).
• Right side o Right front: check all items as done on
left front. o Primary and secondary safety cab
locks engaged (if cab-over-engine design).
o Right fuel tank(s). o Securely mounted, not damaged, or
leaking. Fuel crossover line secure. o Tank(s) contain enough fuel. Cap(s)
on and secure. o Condition of visible parts. Rear of
engine--not leaking. Transmission--not leaking.

o Exhaust system--secure, not leaking, not touching wires, fuel, or air-lines.
o Frame and cross members--no bends or cracks.
o Air-lines and electrical wiring--secured against snagging, rubbing, wearing.
o Spare tire carrier or rack not damaged (if so equipped).
o Spare tire and/or wheel securely mounted in rack.
o Spare tire and wheel adequate (proper size, properly inflated).
o If oversize, all required signs (flags, lamps, and reflectors) safely and properly mounted and all required permits in driver's possession.
o Curbside cargo compartment doors in good condition, securely closed, latched/locked and required security seals in place.
• Right rear. o Condition of wheels and rims--no
missing, bent, or broken spacers, studs, clamps, or lugs.
o Condition of tires--properly inflated, valve stems and caps OK, no serious cuts, bulges, tread wear, tires not rubbing each other, and nothing stuck between them.
o Tires same type, e.g., not mixed radial and bias types.
o Tires evenly matched (same sizes). Wheel bearing/seals not leaking.
o Suspension. o Condition of spring(s), spring hangers,
shackles, and U-bolts. o Axle secure. o Powered axle(s) not leaking lube (gear
oil). Condition of torque rod arms, bushings.

o Condition of shock absorber(s). o If retractable axle equipped, check
condition of lift mechanism. If air powered, check for leaks.
o Condition of air ride components. o Brakes. o Brake adjustment. o Condition of brake drum(s) or discs. o Condition of hoses--look for any wear
due to rubbing. o Lights and reflectors. o Side-marker lights clean, operating,
and proper color (red at rear, others amber).
o Side-marker reflectors clean and proper color (red at rear, others amber).
• Rear. o Lights and reflectors. o Rear clearance and identification lights
clean, operating, and proper color (red at rear).
o Reflectors clean and proper color (red at rear).
o Taillights clean, operating, and proper color (red at rear).
o Right rear turn signal operating, and proper color (red, yellow, or amber at rear).
o License plate(s) present, clean, and secured.
o Splash guards present, not damaged, properly fastened, not dragging on ground, or rubbing tires.
o End gates free of damage, properly secured in stake sockets.

o If over-length, or over-width, make sure all signs and/or additional lights/flags are safely and properly mounted and all required permits are in driver's possession.
o Rear doors securely closed, latched/locked.
• Left side. o Check all items as done on right side,
plus: o Battery (batteries) (if not mounted in
engine compartment). o Battery box (boxes) securely mounted
to vehicle. Box has secure cover. o Battery (batteries) secured against
movement. Battery (batteries) not broken or leaking.
o Fluid in battery (batteries) at proper level (except maintenance-free type).
o Cell caps present and securely tightened (except maintenance-free type).
o Vents in cell caps free of foreign material (except maintenance-free type).
6. Check Signal Lights • Get in and turn-off all lights. • Turn-on stop lights (apply trailer hand
brake or have a helper put on the brake pedal).
• Turn-on left turn signal lights. • Get out and check lights. • Left front turn signal light clean, operating
and proper color (amber or white on signals facing the front).
• Left rear turn signal light and both stop lights clean operating, and proper color (red, yellow, or amber).
• Get in vehicle. o Turn-off lights not needed for driving.

o Check for all required papers, trip manifests, permits, etc.
o Secure all loose articles in cab (they might interfere with operation of the controls or hit the operator in a crash).
o Start the engine. 7. Start the Engine and Check Test for Hydraulic Leaks
• Test for hydraulic leaks. o If the vehicle has hydraulic brakes,
pump the brake pedal three times. o Then apply firm pressure to the pedal
and hold for five seconds. o The pedal should not move. If it does,
there may be a leak or other problem. • Brake system. • Test parking brake. o Fasten safety belt. o Gently pull forward against parking
brake to make sure the parking brake holds.
o If it doesn't hold vehicle, it is faulty; get it fixed.
• Test service brake stopping action. o Go about 5 miles per hour. o Push brake pedal firmly. o "Pulling" to one side or the other can
mean brake trouble. o Any unusual brake pedal "feel" or
delayed stopping action can mean trouble.
o If the trainee finds anything unsafe during the Vehicle inspection, get it fixed. Federal and state laws forbid operating an unsafe vehicle.
• Check vehicle operation regularly: o Instruments. o Air pressure gauge (if the vehicle has
air brakes). Temperature gauges. o Pressure gauges. Ammeter/voltmeter. o Mirrors. o Tires.

o Cargo, cargo covers. Lights, etc. o If the trainee sees, hears, smells, or
feels anything that might mean trouble, he/she should check it out.
• Safety inspection. • Document any discrepancy on AF Form
1800. Sign-off AF Form 1800 to signify accomplishment of inspection.