Embed Size (px)
Citation preview

Radius Authentication Page 1 of 12
Setting up SiteMinder Radius Authentication
Revision History
Revision Date Status Author(s) Changes
1.00 23/Nov/2010 Tested on v6.0.5.35
Sung Hoon Kim

Radius Authentication Page 2 of 12
Components and Versions
Policy Server : v6.0 SP5 CR35 JDK : v1.5.0_20 User Store : AD (You can chose different userstores) 3rd Party : NTRadPing Test Tool 1.5
Pre-requisites You should already have configured a working Policy Server and Active Directory as a User Store. You need to have some knowledge on RADIUS.
Before you begin
This is not using other RADIUS Server but configuring Policy Server to act as a RADIUS Server.
This has been tested to work on SiteMinder v6.0.5.35 but may fail or require additional/less configuration on other versions.
This document does not cover setting up AD.

Radius Authentication Page 3 of 12
Setting up Policy Server to act as RADIUS Server.
1. At the settings tab, check “Enable” button under RADIUS and leave the ports to default
value.
2. At the Logs tab, check “Log to File” under RADIUS Log and specify a full file path.
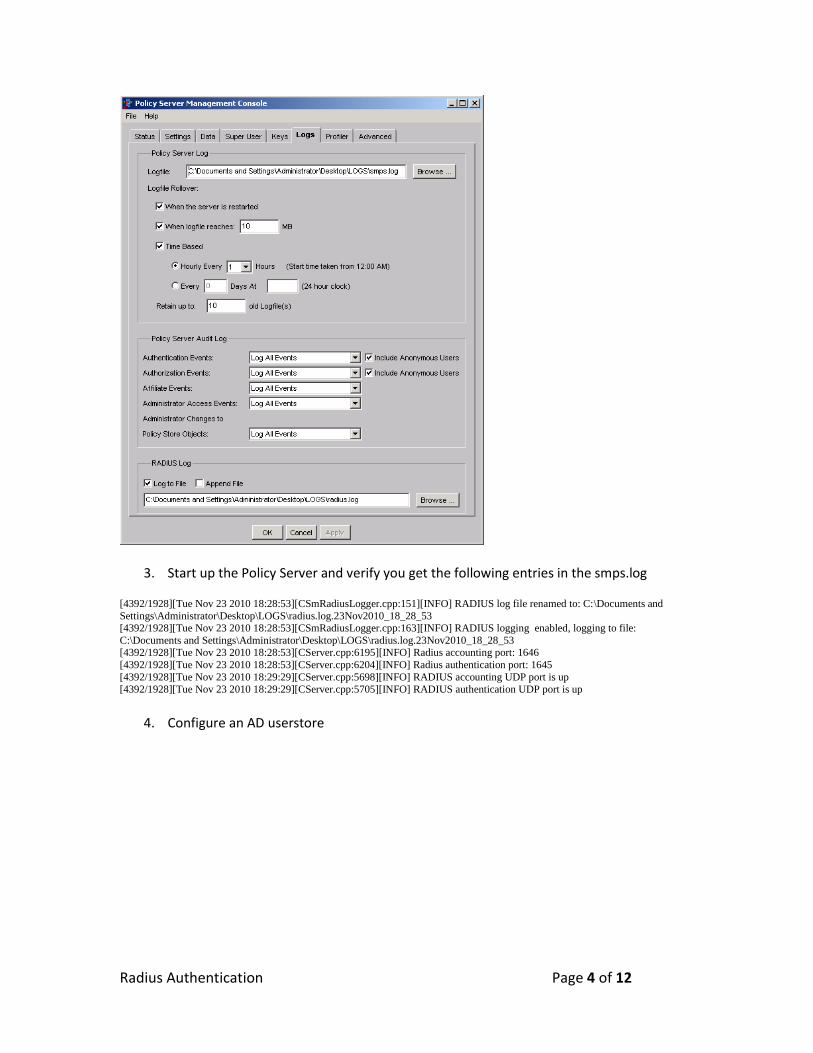
Radius Authentication Page 4 of 12
3. Start up the Policy Server and verify you get the following entries in the smps.log
[4392/1928][Tue Nov 23 2010 18:28:53][CSmRadiusLogger.cpp:151][INFO] RADIUS log file renamed to: C:\Documents and
Settings\Administrator\Desktop\LOGS\radius.log.23Nov2010_18_28_53 [4392/1928][Tue Nov 23 2010 18:28:53][CSmRadiusLogger.cpp:163][INFO] RADIUS logging enabled, logging to file:
C:\Documents and Settings\Administrator\Desktop\LOGS\radius.log.23Nov2010_18_28_53 [4392/1928][Tue Nov 23 2010 18:28:53][CServer.cpp:6195][INFO] Radius accounting port: 1646
[4392/1928][Tue Nov 23 2010 18:28:53][CServer.cpp:6204][INFO] Radius authentication port: 1645
[4392/1928][Tue Nov 23 2010 18:29:29][CServer.cpp:5698][INFO] RADIUS accounting UDP port is up
[4392/1928][Tue Nov 23 2010 18:29:29][CServer.cpp:5705][INFO] RADIUS authentication UDP port is up
4. Configure an AD userstore

Radius Authentication Page 5 of 12

Radius Authentication Page 6 of 12
5. Create a user for testing. In this sample, it is “winuser1”
Make sure the “Reversible Encryption” is enabled as this is a requirement for CHAP
authentication.
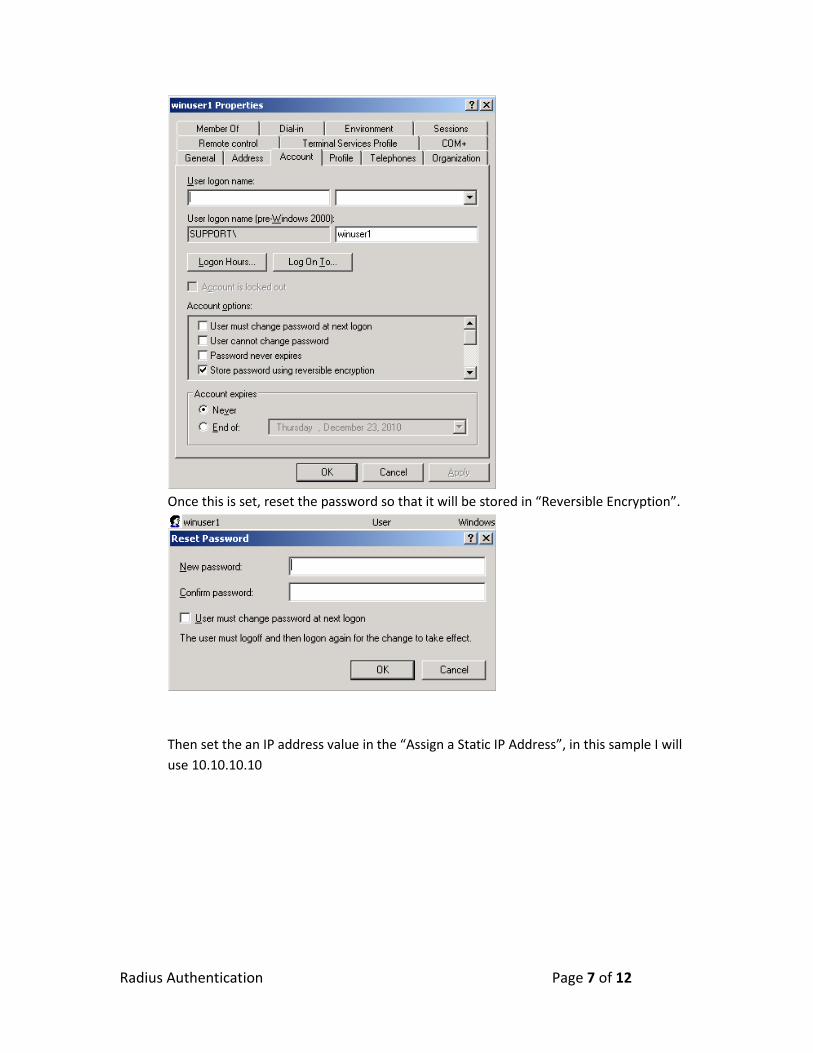
Radius Authentication Page 7 of 12
Once this is set, reset the password so that it will be stored in “Reversible Encryption”.
Then set the an IP address value in the “Assign a Static IP Address”, in this sample I will
use 10.10.10.10

Radius Authentication Page 8 of 12
6. Goto http://www.novell.com/coolsolutions/tools/14377.html and download ntradping
tool.

Radius Authentication Page 9 of 12
7. Create a Radius Agent as below
IP Address is the NAS Device IP Address(In this case it is all in one machine IP
192.168.38.128)
Secret is “password”
8. Create an Authentication Scheme as below
Specify the user attribute that stores the clear text password, since “Reversible
Encryption” is enabled we can specify the unicodePWD attribute.

Radius Authentication Page 10 of 12
9. Create a Domain named “Radius” and assign the AD userstore created above.
10. Create a Realm named “radius realm” and assign the radius agent and the
authentication scheme above.
11. Create a rule under “radius realm” as below.
There is only 1 type of rule you can create and that is “Authenticate”
12. Create a response to fetch the IP Address where you previously set in “Assign a Static IP
Address”

Radius Authentication Page 11 of 12
13. Create a Policy and add “winuser1” user. Then link above “rule” and “response”.

Radius Authentication Page 12 of 12
Ensure the user is able to authenticate successfully
1. Load the NTRadPing Test Utility and populate the values as below.
Radius Server/port: Policy Server and 1645
Reply timeout : set to 10
RADIUS Secret key: password (this was set in the radius agent properties at #7)
User-Name : winuser1
Password : P@ssw0rd
CHAP: You can have it enabled or disabled
Request type: “Authentication Request”
Then click on “Send” button
2. You will get the following response from the Policy Server.