Embed Size (px)
Citation preview
Setting up a Raspberry Pi’s SD Card for BTS 2
Kerry Veenstra
October 5, 2015
Contents
1 Introduction 2
2 Materials 2
3 Creating the SD Card 2
4 Other Notes 15
4.1 Creating init.d Scripts for Daemons . . . . . . . . . . . . . . . . . . . . . . 164.2 SSH Keys . . . . . . . . . . . . . . . . . . . . . . . . . . . . . . . . . . . . . 184.3 Creating a Base-Station Image File from an SD Card . . . . . . . . . . . . . 184.4 Copying a Base-Station Image File to an SD Card . . . . . . . . . . . . . . 19
1

1 Introduction
This document describes how to configure a Raspberry Pi1 B+ to create a BTS-2 base-station controller.
2 Materials
You will need several items to configure the Raspberry Pi’s SD Card. These items also willbe used in the base-station controller.
• Raspberry Pi Model B+
• 1-amp or greater USB power supply with Micro-B connector
• 4-GB or greater microSD memory card. Try to get a memory card with Class 6 speedor greater.
These items help with configuring the Raspberry Pi B+, but they are not deployed withthe base station.
• USB-to-SD adapter for 4-GB or larger memory cards, or a computer that can writeSD Cards
• USB keyboard
• Video monitor for HDMI signals
• Video monitor cable
• Computer with Internet access
3 Creating the SD Card
The setup procedure described here is organized into several sections.
Load GNU/Linux on the SD Memory Card
Some Raspberry Pi vendors will sell you an SD memory card that is preloaded withGNU/Linux. There is nothing wrong with this, and it will save you the steps in this firstsection, but it also will cost you about $4 additional (at the time of this writing).
1Raspberry Pi is a trademark of the Raspberry Pi Foundation
2

Assuming that you need to load GNU/Linux on a blank SD memory card, follow theinstructions on the web page
http://www.raspberrypi.org/documentation/installation/installing-images/README.md
For your convenience (actually, for our convenience), we’ve included steps from that webpage below for using an Apple computer. (We used the “Alternative Method” presentedon the page.) Check the web page just mentioned for using other computers.
Note: These commands and actions need to be performed as a computer user that hasadministrator privileges. Even if you don’t know what that means, it’s quite possible thatyou already have such privileges, but a web search may help you understand.
1. Download the Raspberry Pi’s Raspbian SD-Card image. See the URL
http://www.raspberrypi.org/downloads
Get the most recent version of the file.
Some commands below are typed into a Mac’s terminal program, but most of the commandsare typed into the Raspberry Pi’s keyboard. To remind you, the Mac commands areprefixed with mac$, while the Raspberry Pi’s commands are prefixed with just $.
2. Start the Mac OS X Terminal application.
3. Optional. Verify the file that you just downloaded. In the terminal, use the shasum
command to print the file’s Secure Hash Algorithm checksum and compare it to theSHA checksum on the download website. Substitute ________.zip with the nameof the file that you downloaded.
mac$ shasum ~/Downloads/________.zip
4. Extract the GNU/Linux image from ________.zip. (Substitute the name of the filethat you downloaded.)
mac$ unzip ~/Downloads/________.zip
5. The extracted file should have a .img extension. Write it here:
________.img
We need to know the name that the operating system uses for the SD Card. We’ll determinethat by comparing the mounted volumes before and after inserting the card.
6. Ensure that the SD Card reader is disconnected.
7. From the terminal run the Disk Free command.
3
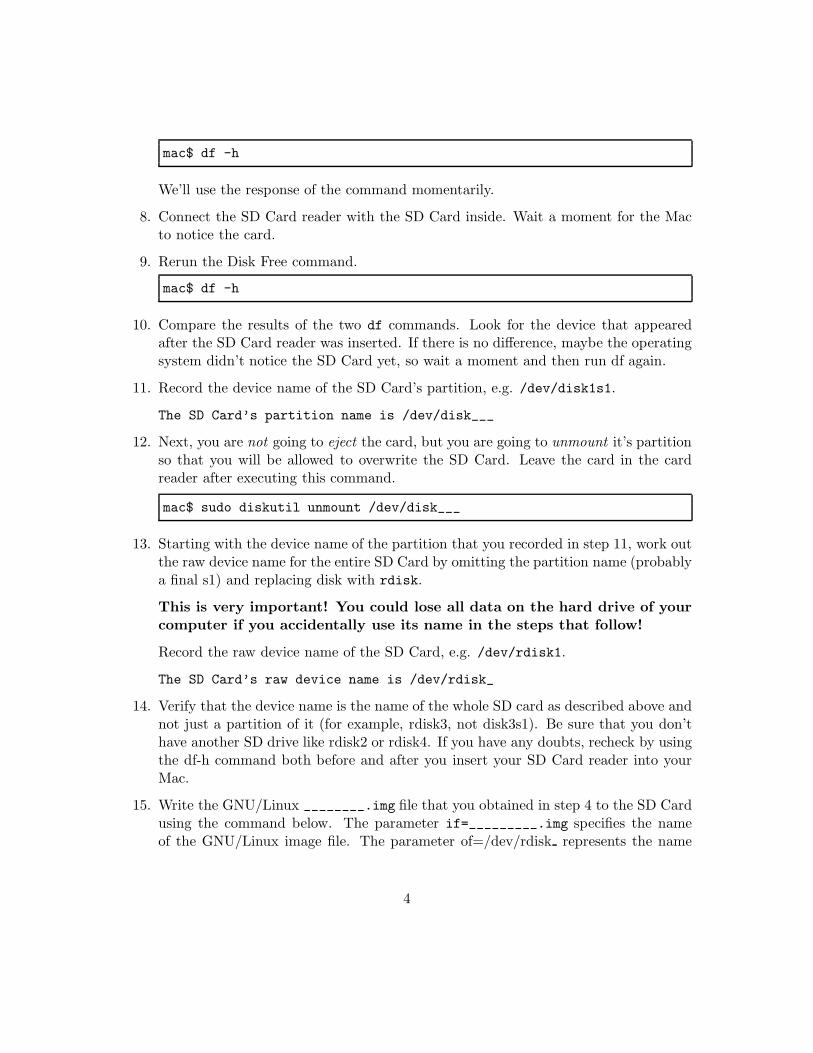
mac$ df -h
We’ll use the response of the command momentarily.
8. Connect the SD Card reader with the SD Card inside. Wait a moment for the Macto notice the card.
9. Rerun the Disk Free command.
mac$ df -h
10. Compare the results of the two df commands. Look for the device that appearedafter the SD Card reader was inserted. If there is no difference, maybe the operatingsystem didn’t notice the SD Card yet, so wait a moment and then run df again.
11. Record the device name of the SD Card’s partition, e.g. /dev/disk1s1.
The SD Card’s partition name is /dev/disk___
12. Next, you are not going to eject the card, but you are going to unmount it’s partitionso that you will be allowed to overwrite the SD Card. Leave the card in the cardreader after executing this command.
mac$ sudo diskutil unmount /dev/disk___
13. Starting with the device name of the partition that you recorded in step 11, work outthe raw device name for the entire SD Card by omitting the partition name (probablya final s1) and replacing disk with rdisk.
This is very important! You could lose all data on the hard drive of your
computer if you accidentally use its name in the steps that follow!
Record the raw device name of the SD Card, e.g. /dev/rdisk1.
The SD Card’s raw device name is /dev/rdisk_
14. Verify that the device name is the name of the whole SD card as described above andnot just a partition of it (for example, rdisk3, not disk3s1). Be sure that you don’thave another SD drive like rdisk2 or rdisk4. If you have any doubts, recheck by usingthe df-h command both before and after you insert your SD Card reader into yourMac.
15. Write the GNU/Linux ________.img file that you obtained in step 4 to the SD Cardusing the command below. The parameter if=_________.img specifies the nameof the GNU/Linux image file. The parameter of=/dev/rdisk represents the name
4

of the SD Card’s raw device name, which you just recorded and verified in step 13.Substitute the appropriate names in the command. It is very important to use thecorrect of= parameter because it specifies the disk that gets overwritten.
mac$ sudo dd bs=1m if=_________.img of=/dev/rdisk_
Note that dd will print an error if it is unsuccessful, but it will print nothing if it issuccessful. If you are curious, while dd is running, you can instruct the command toreport its progress by typing Ctrl-T. (This is called sending a SIGINFO signal to theprocess.)
In my laptop, the dd command took between four and five minutes to complete.
16. Type this command
mac$ sudo diskutil eject /dev/disk___
This command doesn’t physically eject the card. It just tells Mac OS X that you areabout to eject the card.
Note: it is super tempting to take a look at the card’s contents before ejecting it.Resist temptation! The Mac OS X operating system will write some hidden fileson the drive if you access it using the Finder, and these files can interfere with itsintended use under GNU/Linux. Just eject the SD Card immediately using thecommand above.
17. Remove the card physically from the SD Card reader.
We’ll talk about how to transfer other files onto the SD Card later. Next, let’s boot theRaspberry Pi and configure it for basic operation.
Basic Configuration
The first time you boot a Raspberry Pi that uses your newly formatted SD Card, it will runa utility called raspi-config. Below we tell you how to use this configuration utility.
Note that we do not want to boot the Raspberry Pi with connection to a network yetbecause its security is fairly low by default. Let’s fix that first.
18. Ensure that the Raspberry Pi is unpowered.
19. Insert the SD Card into its SD Card socket, and connect a USB keyboard and acomputer monitor.
20. Ensure that the network cable is unplugged.
5

21. Power up the Raspberry Pi by connecting it to the USB power supply using the USBcable (the board has no power switch). The raspi-config utility runs.
22. As it is now, the SD Card image is 2 GB. Run the option 1 Expand Filesystem toexpand the GNU/Linux root file system to use the entire card: use the downarrowkey to move select the option, and press the Enter key to run it. Press Enter againto close the <Ok> screen that follows.
We are going to remove the pi user later, but changing its default password is a good ideaanyway.
23. Select the 2 Change User Password option and enter a new password for the piuser.
By default the Raspberry Pi starts a graphical user interface. I don’t use it.
24. Select 3 Enable Boot to Desktop/Scratch. Select Console Text console so thatthe desktop does not start on boot.
The “locale” of the computer determines its character set. By default, it uses UK English,but we want to use US English. In the steps below, you will add US English, but you willleave UK English selected because it is used by the running raspi-config utility.
25. Select 4 Internationalisation Options and press Enter.
26. Select the I1 Change Locale option. (This option takes a moment to respond.)
27. Leave the option en GB.UTF-8 UTF-8 selected, and then using the Down Arrow andSpace bar select the option en US.UTF-8 UTF-8 as well.
28. Tab to <Ok> and press Enter.
29. Select en US.UTF-8 for the default locale, tab to <OK>, and press Enter. This optiontakes a while to run.
The Raspberry Pi sets its clock from the network every time it boots (it lacks a battery-powered clock), and it needs to know your timezone.
30. Select 4 Internationalisation Options and press Enter.
31. Select I2 Change Timezone and do the steps to set the time zone. There are twoPacific timezones. Select “Pacific-New”.
The GNU/Linux image assumes that you are using a UK-based keyboard. Tell it that youhave a US-based keyboard.
32. Select 4 Internationalisation Options and press Enter.
33. Select the I3 Change Keyboard Layout option.
6

34. Select Generic 104-key PC (I’m assuming that that’s what you have).
35. For the keyboard layout select Other.
36. Select English (US).
37. Select English (US) at the top of the next list.
38. Select The default for the keyboard layout.
39. Select No compose key.
40. Regarding Ctrl-Alt-Backspace, select <No>. (This will take a few moments.)
Set the network hostname.
41. Select 8 Advanced Options and press Enter.
42. Select the A2 Hostname option and set the hostname from among these options:bts2baskin, bts2college8, bts2development, bts2earth, bts2opers, bts2taps.
I think that SSH already is enabled, but it doesn’t hurt to be sure.
43. Select 8 Advanced Options and press Enter.
44. Select the A4 SSH option and do the steps to enable SSH.
We are done. Reboot.
45. Exit raspi-config and reboot: to do this you will select <Finish>, press Enter, andselect <Yes>.
If necessary, you can fix the video display’s borders.
46. Edit the boot configuration file.
$ sudo vi /boot/config.txt
You may not have seen the sudo command before. It acts like the root user and runsthe rest of the command line, which in this case is the vi text editor. The first timeyou use sudo, it will prompt you for your password. It’s just verifying that you reallywant to do this command.
I hope that you already know the basics of the vi text editor! If not, then you’ll needto learn it. It’s used often when administrating a GNU/Linux system.
47. Set the borders for an Adafruit 7” 1280 × 800 HDMI display (Product ID 1033).Uncomment this line by deleting the # on its left.
hdmi_force_hotplug=1
7
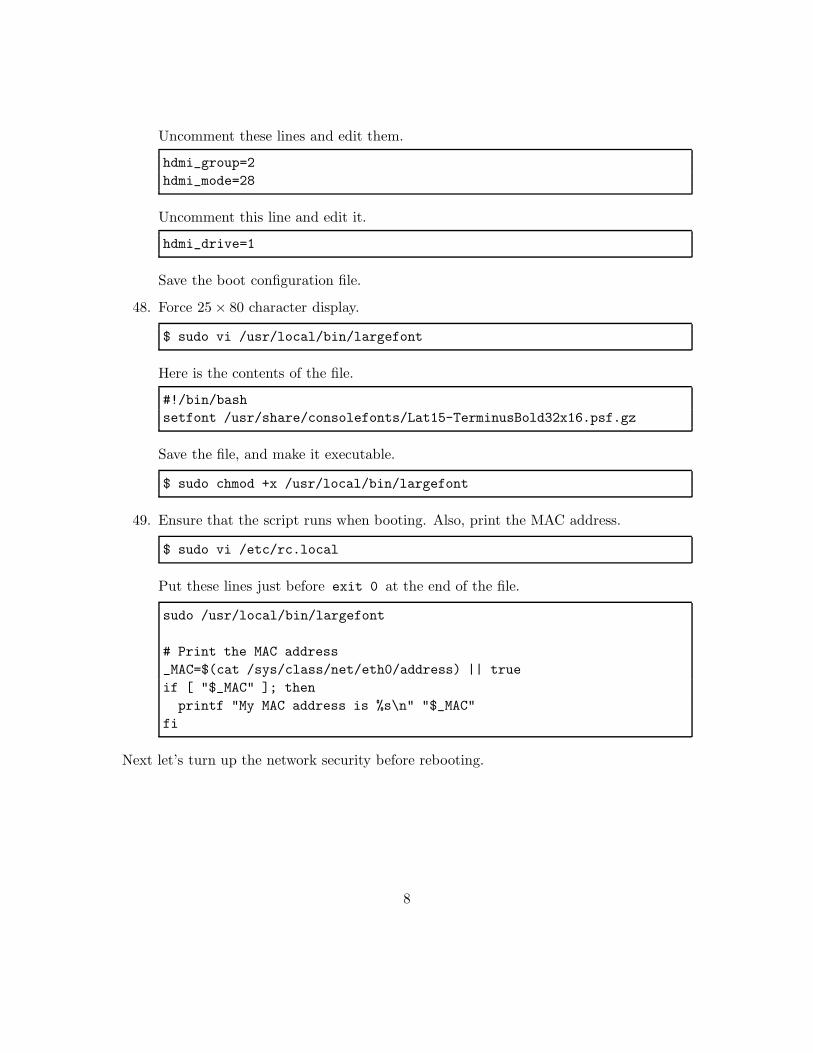
Uncomment these lines and edit them.
hdmi_group=2
hdmi_mode=28
Uncomment this line and edit it.
hdmi_drive=1
Save the boot configuration file.
48. Force 25 × 80 character display.
$ sudo vi /usr/local/bin/largefont
Here is the contents of the file.
#!/bin/bash
setfont /usr/share/consolefonts/Lat15-TerminusBold32x16.psf.gz
Save the file, and make it executable.
$ sudo chmod +x /usr/local/bin/largefont
49. Ensure that the script runs when booting. Also, print the MAC address.
$ sudo vi /etc/rc.local
Put these lines just before exit 0 at the end of the file.
sudo /usr/local/bin/largefont
# Print the MAC address
_MAC=$(cat /sys/class/net/eth0/address) || true
if [ "$_MAC" ]; then
printf "My MAC address is %s\n" "$_MAC"
fi
Next let’s turn up the network security before rebooting.
8

Basic Network Security
The pi user login probably is known by everyone who learns about Raspberry Pi. So forsecurity, let’s create a new user, confirm that we can log in as the new user, and then deletethe pi user.
50. Create a new user bts2admin with the following command. You can just press theEnter key for most questions, but you must choose a password. Use the standardbase-station password.
$ sudo adduser bts2admin
Accept defaults for all other questions.
51. Give the new user administrative privileges.
$ sudo visudo
52. Using arrow keys, go to the end of the file and add a line like this for your user.
bts2admin ALL=(ALL) ALL
Save the file with Ctrl-O followed by Enter, and exit with Ctrl-X.
53. Test the new user by logging out and then logging again as the new user.
$ logout
raspberrypi login: bts2admin
54. Remove the pi user.
$ sudo deluser -remove-home pi
$ sudo visudo
55. Using arrow keys and the Delete key, go to the end of the file remove the line
pi ALL=(ALL) NOPASSWD: ALL
Save the file with Ctrl-O followed by Enter, and exit with Ctrl-X.
Update GNU/Linux
The GNU/Linux image that you downloaded probably does not have all of the securityupdates. Usually it’s best to get the updates.
9

56. Plug in the network cable.
57. Reboot the Raspberry Pi. This step will take a few minutes as the operating systemfinalizes the configuration changes. (The -r option tells the command to reboot theboard instead of just shutting it down.)
$ sudo shutdown -r now
58. Log in as bts2admin .
59. The first step is to “update”:
$ sudo apt-get update
The udpate step takes between 1 and 2 minutes.
60. The next step is to “upgrade”. A few seconds after executing the command below,you’ll be asked a question. Answer “Y”.
$ sudo apt-get upgrade
Y
I’ve seen the upgrade step take between 2 and 3 minutes or as long as 10 minutes.
61. Install four modules. In some cases, you’ll be asked to confirm the installation.Answer “Y”.
$ sudo apt-get install libmysqlclient18
$ sudo apt-get install mysql-client
$ sudo apt-get install libmysqlclient-dev
$ sudo apt-get install libcurl4-openssl-dev
62. At this point it is prudent to confirm that the Raspberry Pi still can boot. Checkthat now.
$ sudo shutdown -r now
Assuming that the board reboots correctly, log in again as bts2admin and skip thenext step.
63. If there are problems, we know that they were caused by the update, the upgrade,or a module that you installed in the step 61. First, take a look at the log file:
$ dmesg | tail
10
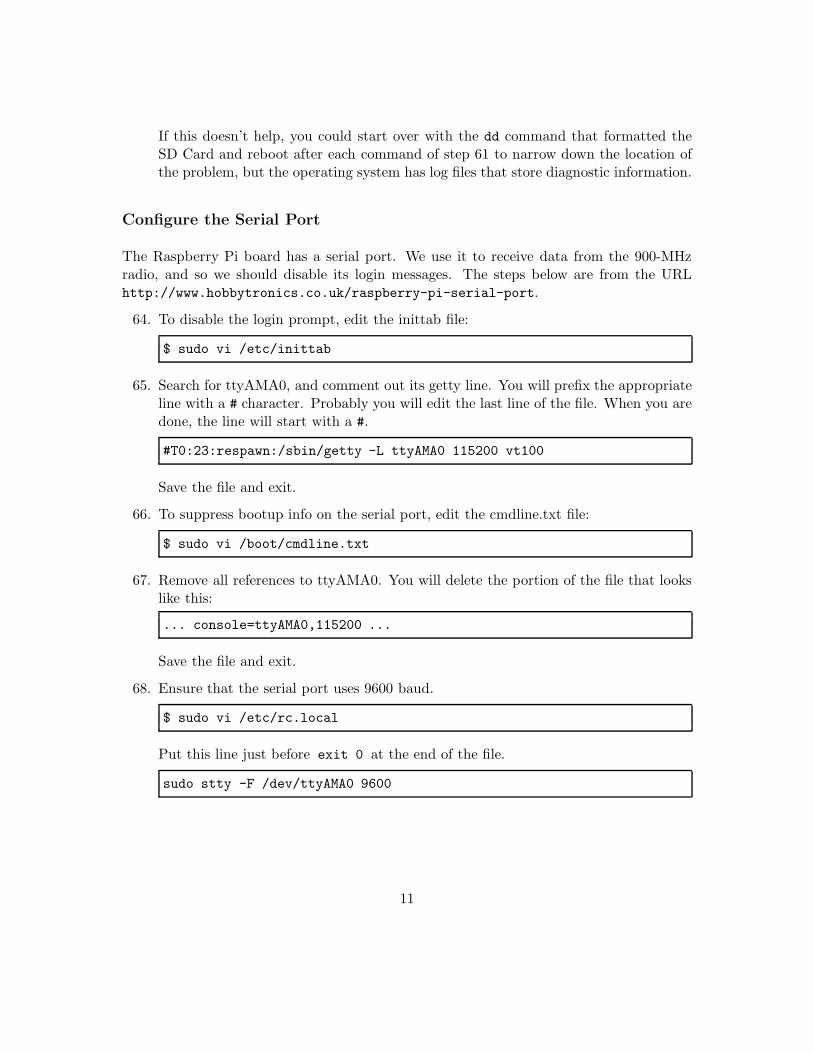
If this doesn’t help, you could start over with the dd command that formatted theSD Card and reboot after each command of step 61 to narrow down the location ofthe problem, but the operating system has log files that store diagnostic information.
Configure the Serial Port
The Raspberry Pi board has a serial port. We use it to receive data from the 900-MHzradio, and so we should disable its login messages. The steps below are from the URLhttp://www.hobbytronics.co.uk/raspberry-pi-serial-port.
64. To disable the login prompt, edit the inittab file:
$ sudo vi /etc/inittab
65. Search for ttyAMA0, and comment out its getty line. You will prefix the appropriateline with a # character. Probably you will edit the last line of the file. When you aredone, the line will start with a #.
#T0:23:respawn:/sbin/getty -L ttyAMA0 115200 vt100
Save the file and exit.
66. To suppress bootup info on the serial port, edit the cmdline.txt file:
$ sudo vi /boot/cmdline.txt
67. Remove all references to ttyAMA0. You will delete the portion of the file that lookslike this:
... console=ttyAMA0,115200 ...
Save the file and exit.
68. Ensure that the serial port uses 9600 baud.
$ sudo vi /etc/rc.local
Put this line just before exit 0 at the end of the file.
sudo stty -F /dev/ttyAMA0 9600
11

Create a /var/tmp Directory in RAM
Writing temporary files and log files to the SD card will wear it out. So instead, writethem to a RAM-based tmp directory.
69. Edit /etc/fstab.
$ sudo vi /etc/fstab
70. Add this line, and save the file.
tmpfs /var/tmp tmpfs defaults,noatime,nodev,nosuid,noexec,mode=1777,size=100m 0 0
71. Check the mount.
$ sudo mount -a
$ df
You should see the /var/tmp directory listed as tmpfs.
Copying Files Onto Your Raspberry Pi
We need to copy some files onto the Raspberry Pi’s SD Card. One way to copy the filesis to write the SD Card using another computer. But on a Mac (which I’m using) this isnot a good idea. The Mac OS X operating system writes hidden files onto the SD Cardfor Mac purposes. These files may trouble the GNU/Linux operating system. So instead,it’s best to leave the SD Card plugged into the Raspberry Pi and transfer files over thenetwork connection.
72. Display the network IP address of your Raspberry Pi. (Realize that this address isassigned when you reboot the board, and so it may change after rebooting.)
$ ifconfig eth0
Look through the command’s output for a string like this, with digits instead of #
characters. The phrase inet addr means internet address.
inet addr:###.###.##.##
The string of digits and periods following the colon (for example 128.114.59.59) is theIP address of the board’s network connector. Record this address for the followingsteps.
12

73. On a Mac, you will use the scp program to copy files from your computer to theboard. Here are the files that you need to copy along with their descriptions.
• Makefile — Makefile for aerod and btsManagerd daemons
• aero — init.d script for aerod daemon
• aerod.cpp — Source code for aerod daemon
• aws.c — Source code for AWS function
• aws.h — Header file for AWS function
• btsManager — init.d script for btsManagerd daemon
• btsManagerd.c — Source code for btsManagerd daemon
• strlog.c — Source code for log-file function
• strlog.h — Header file for log-file function
• unitdir.c — Source code for UNIT-file functions
• unitdir.h — Header file for UNIT-file functions
• unitdir.h — Header file for UNIT-file functions
• wiringPi-df45388.zip — Library for Wiring Pi library
On your Mac, in the terminal, go to the directory that contains the files. Then tocopy the files to the login directory of user bts2admin, type these commands intoyour Mac’s terminal, changing 128.114.59.59 into the IP address of your board.
mac$ scp Makefile [email protected]:.
mac$ scp aero [email protected]:.
mac$ scp aerod.cpp [email protected]:.
mac$ scp aws.c [email protected]:.
mac$ scp aws.h [email protected]:.
mac$ scp basestation.c [email protected]:.
mac$ scp btsManager [email protected]:.
mac$ scp btsManagerd.c [email protected]:.
mac$ scp const.h [email protected]:.
mac$ scp strlog.c [email protected]:.
mac$ scp strlog.h [email protected]:.
mac$ scp unitdir.c [email protected]:.
mac$ scp unitdir.h [email protected]:.
mac$ scp wiringPi-df45388.zip [email protected]:.
13

74. Next log into the Raspberry Pi as bts2admin .
75. The files that you just copied are in the login directory. Move them to their appro-priate destinations.
$ mkdir basestation
$ mv Makefile aerod.cpp basestation.c btsManagerd.c basestation
$ mv const.h strlog.c strlog.h unitdir.c unitdir.h basestation
$ mv aws.c aws.h basestation
$ sudo mv aero btsManager /etc/init.d
76. Install the Wiring Pi library.
$ unzip wiringPi-df45388.zip
$ cd wiringPi-df45388
$ ./build
$ cd ..
$ rm wiringPi-df45388.zip
77. Each base station has a different name. To change the name of the base station editthis file:
$ cd basestation
$ vi const.h
78. Change the value of the BASESTATION variable to one of these names: BASKIN,COLLEGE 8, EARTH & MARINE, OPERS, or TAPS.
79. Write the file.
80. Make the daemons aerod and btsManagerd.
$ make
81. Add the daemon to the init list with
$ cd /etc/init.d
$ sudo insserv aero
$ sudo insserv btsManager
82. Print base-station information.
$ sudo vi /etc/rc.local
Put these lines just before exit 0 at the end of the file.
14

# Print the name of the base station
_BASESTATION=$(/home/bts2admin/basestation/basestation) || true
if [ "$_BASESTATION" ]; then
printf "My name is %s\n" "$_BASESTATION"
fi
83. At this point reboot.
$ sudo shutdown -r now
84. After the the Raspberry Pi reboots and you log in, check that the daemons arerunning.
$ ps aux | grep basestation
You should see processes for aerod and btsManagerd .
85. One final item is to configure the base station to reboot every morning at 3 A.M.
$ sudo crontab -e
Add this line at the bottom of the file.
3 0 * * * /sbin/shutdown -r now
Save the file and exit. Configuration is complete.
Turning Off Your Raspberry Pi
You must shut down the Raspberry Pi before removing its power.
86. Here’s how to shut down the board, making everything safe for you to remove itspower.
$ sudo shutdown -h -P now
The -h and -P options tell the board to halt and power down. (I believe that actuallyit enters an infinite do-nothing loop.) Now you can remove the board’s power.
The Raspberry Pi is ready for use as the controller of a BTS 2 base station.
15
4 Other Notes
Here are a few notes on using the Raspberry Pi. These steps do not need to be performedto make the Raspberry Pi function as a BTS 2 base-station controller, but they may beuseful if you need to make changes to the Raspberry Pis programming.
4.1 Creating init.d Scripts for Daemons
The version of Debian GNU/Linux that we are using supports LSB (Linux Standards Base)init.d scripts. Here is how to create and install a daemon and its init.d script.
1. If necessary, create a directory for the daemon. It really can be anywhere, but onelocation is in a subdirectory of your new users login directory. For example, we usedthe directory name basestation .
$ mkdir ~/basestation
The next few steps explain how to create init.d scripts.
2. Go to the /etc/init.d directory, and make a copy of the skeleton script.
$ cd /etc/init.d
$ sudo cp skeleton mydaemon
$ sudo vi mydaemon
3. For information on editing the script can be found at this URL, see
http://wiki.debian.org/LSBInitScripts
The comments at the top of the daemon script actually are configuration lines. Weneed to edit several of them.
4. This is the file name of the script. Be sure to change mydaemon into the name of yourscript.
# Provides: mydaemon
5. List the daemons that need to be running before this one starts. Putting $all at theend is easiest; your daemons will be started last and stopped first.
# Required-Start: $remote_fs $syslog $all
# Required-Stop: $remote_fs $syslog $all
16

6. These lines give the run levels for your daemon. You probably can leave them un-changed. (Run level 2 is normal operation.)
# Default-Start: 2 3 4 5
# Default-Stop: 0 1 6
7. The descriptions are printed in some log files, and so making them descriptivewill help with diagnosing any future problems. Change short description andLonger description as necessary.
# Short-Description: short description
# Description: Longer description
# possibly with multiple lines.
8. Might as well claim authorship. The skeleton uses a name and an email address.
# Author: First Last <[email protected]>
9. Change the values of several variables.
DESC="useful description of daemon"
NAME=mydaemon
NAMED=mydaemond
DAEMON=/home/testbed/basestation/$NAMED
DAEMON_ARGS=""
PIDFILE=/var/run/NAMED.pid
10. If your daemon is written to run forever, and it does not create its own backgroundprocess, then add a --background option to the lines in the script that begin likethis.
start-stop-daemon --start --background --quiet ...
11. Find all lines that begin with start-stop-daemon and end with --name $NAME.Change $NAME into $NAMED.
start-stop-daemon ... --name $NAMED
12. Find all lines that contain log daemon msg. Change ”$NAME” into ”$NAMED” .
... log_daemon_msg ... "$NAMED"
17

13. Find all lines that start with status of proc. Change ”$NAME” into ”$NAMED”.
status_of_proc ... --name $NAMED
If you need to change the daemon’s name, you can edit the values of the $NAME and$NAMED variables in step 9.
4.2 SSH Keys
Remove the old SSH keys. On the Mac, type
vi ~/.ssh/known_hosts
Remove bts2development lines.
4.3 Creating a Base-Station Image File from an SD Card
To create an Image file of SD Card #1, perform these steps.
1. Ensure that the SD Card reader is disconnected.
2. From the terminal run the Disk Free command.
mac$ df -h
We’ll use the response of the command momentarily.
3. Connect the SD Card reader with SD Card #1 inside. Wait a moment for the Macto notice the card.
4. Rerun the Disk Free command.
mac$ df -h
5. Compare the results of the two df commands. Look for the device that appearedafter SD Card #1 was inserted. If there is no difference, maybe the operating systemdidn’t notice the SD Card yet, so wait a moment and then run df again.
6. Record the device name of SD Card #1’s partition, e.g. /dev/disk1s1 .
SD Card #1’s partition name is /dev/disk___
18
7. Starting with this device name, work out the raw device name for the entire SD Cardby omitting the partition name (probably a final s1) and replacing disk with rdisk .
Record the raw device name of SD Card #1, e.g. /dev/rdisk1 .
SD Card #1’s raw device name is /dev/rdisk_
8. Verify that the device name is the name of the whole SD card as described above andnot just a partition of it (for example, rdisk3, not disk3s1). Be sure that you don’thave another SD drive like rdisk2 or rdisk4. If you have any doubts, recheck by usingthe df -h command both before and after you inserted SD Card #1 into your Mac.
9. Create a GNU/Linux *.img file from SD Card #1 using the command below. Theparameter if=/dev/rdisk represents the name of the SD Card’s raw device name,which you just recorded and verified in step 7. The parameter of=filename.imgrepresents the name of the GNU/Linux image file that will be created. Substitutethe appropriate names in the command.
mac$ sudo dd bs=1m if=/dev/rdisk_ of=filename.img
Note that dd will print an error if it is unsuccessful, but it will print nothing if it issuccessful. If you are curious, while dd is running, you can instruct the command toreport its progress by typing Ctrl-T. (This is called sending a SIGINFO signal to theprocess.)
In my laptop, the dd command took between four and five minutes to complete.
10. Type this command
mac$ sudo diskutil eject /dev/disk___
This command doesn’t physically eject the card. It just tells Mac OS X that you areabout to eject the card.
11. Physically remove SD Card #1.
4.4 Copying a Base-Station Image File to an SD Card
Here’s how to copy a Base-Station Image file to SD Card #2.
1. From the terminal run the Disk Free command.
mac$ df -h
19
2. Insert the SD Card reader with SD Card #2 inside. Wait a moment for the Mac tonotice the card.
3. Rerun the Disk Free command.
mac$ df -h
4. Compare the results of the two df commands. Look for the device that appearedafter SD Card #2 was inserted. If there is no difference, maybe the operating systemdidn’t notice the SD Card yet, so wait a moment and then run df again.
5. Record the device name of SD Card #2’s partition, e.g. /dev/disk1s1 .
SD Card #2’s partition name is /dev/disk___
6. Starting with the device name of the partition that you recorded in step 5, work outthe raw device name for the entire SD Card by omitting the partition name (probablya final s1) and replacing disk with rdisk .
This is very important! You could lose all data on the hard drive of your
computer if you accidentally use its name in the steps that follow!
Record the raw device name of the SD Card, e.g. /dev/rdisk1 .
SD Card #2’s raw device name is /dev/rdisk_
7. Verify that the device name is the name of the whole SD card as described above andnot just a partition of it (for example, rdisk3, not disk3s1). Be sure that you don’thave another SD drive like rdisk2 or rdisk4. If you have any doubts, recheck by usingthe df-h command both before and after you insert your SD Card reader into yourMac.
8. Write the GNU/Linux filename.img file to the SD Card using the commands below.The parameter if=filename.img represents the name of the GNU/Linux image filethat you created earlier in step 9. The parameter of=/dev/rdisk represents thename of the SD Card’s raw device name, which you just recorded and verified in step6. Substitute the appropriate names in the command. It is very important to usethe correct of= parameter because it specifies the disk that gets overwritten.
mac$ sudo diskutil unmount /dev/disk___
mac$ sudo dd bs=1m if=filename.img of=/dev/rdisk_
mac$ sudo diskutil eject /dev/disk___
\end{\begin{Verbatim}[frame=single]
erbatim}
20

\item Remove the SD Card physically from the SD Card reader.
\item Insert the SD Card Boot into a Raspberry Pi and apply power.
\item Log in as \verb#bts2admin#.
\item Edit \verb#~/basestation/const.h#.
\begin{Verbatim}[frame=single]
$ cd basestation
9. Change the value of the BASESTATION variable to one of these names: BASKIN,COLLEGE 8, DEVELOPMENT, EARTH & MARINE, OPERS, or TAPS.
$ vi const.h
10. Remake the daemons, and run raspi-config.
$ make
$ sudo raspi-config
11. Select 8 Advanced Options and press Enter.
12. Select the A2 Hostname option and set the hostname from among these options:bts2baskin, bts2college8, bts2development, bts2earth, bts2opers, bts2taps.
13. Tab to <Finish>, press Enter, and reboot.
14. Log in as bts2admin. Confirm that the console shows desired information.
15. All look good?
My name is ________
Raspbian GNU/Linux 7 ________ tty1
________ login:
Then power down.
$ sudo shutdown -h -P now
21