Embed Size (px)
Citation preview
SAMSUNG | 95
1TROUBLESHOOTING 8Set up the model Option
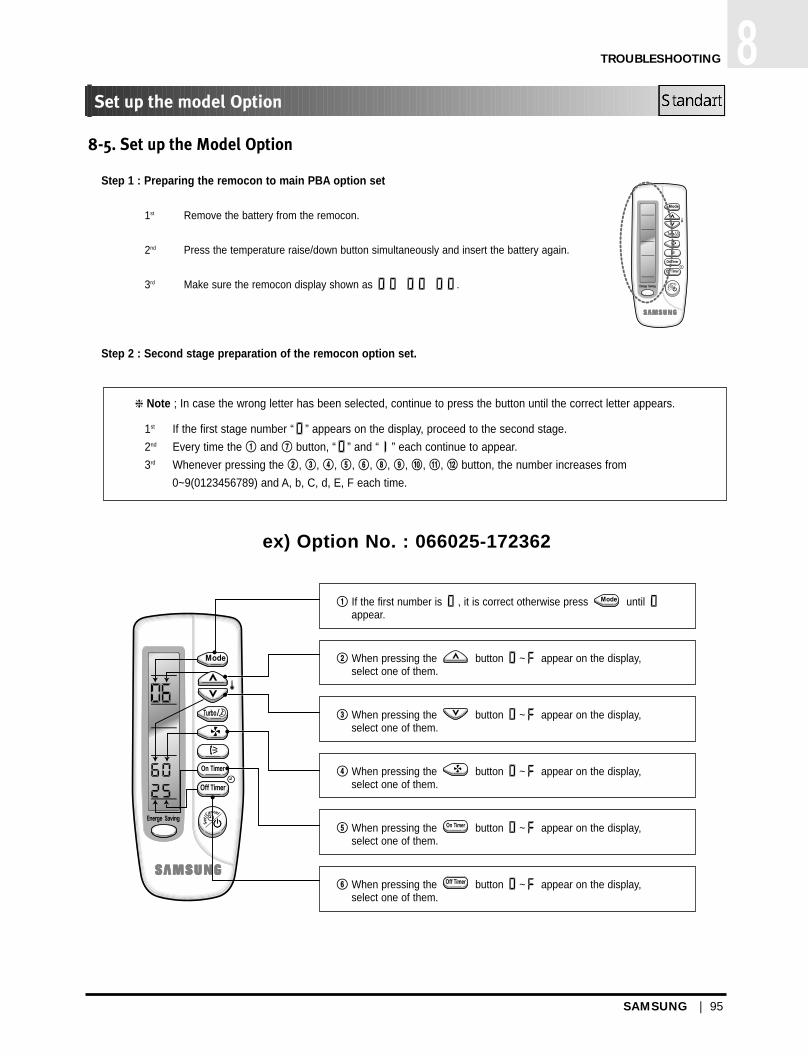
8-5. Set up the Model Option
Step 1 : Preparing the remocon to main PBA option set
1st Remove the battery from the remocon.
2nd Press the temperature raise/down button simultaneously and insert the battery again.
3rd Make sure the remocon display shown as .
Step 2 : Second stage preparation of the remocon option set.
ex) Option No. : 066025-172362
❈ Note ; In case the wrong letter has been selected, continue to press the button until the correct letter appears.
1st If the first stage number “ ” appears on the display, proceed to the second stage.
2nd Every time the ! and & button, “ ” and “ ” each continue to appear.
3rd Whenever pressing the @, #, $, %, ^, *, (, ), 1, 2 button, the number increases from
0~9(0123456789) and A, b, C, d, E, F each time.
! If the first number is , it is correct otherwise press until appear.
@ When pressing the button ~ appear on the display, select one of them.
# When pressing the button ~ appear on the display, select one of them.
$ When pressing the button ~ appear on the display, select one of them.
% When pressing the button ~ appear on the display, select one of them.
^ When pressing the button ~ appear on the display, select one of them.
DB98_08187A(1)_57~100 3/27/03 2:24 PM Page 95

96 | SAMSUNG
8 TROUBLESHOOTING
Set up the Model Option (Cont.)
Step 3 : Reconfirming option set after completion
(in case of ex. 066025-172362)
After pressing selector for the mode, the display shown as .
After pressing selector for the mode, the display shown as .
Step 4 : Pressing the ON/OFF button ( )When pressing the operation ON/OFF key with the direction of remote controller for unit, the sound “Ding” or “Diriring” is
heard and the OPERATION LED lamp is flickering at the same time, then the input of option is completed.
(If the diriring sound isn’t heard, try again pressing the ON/OFF button.)
Step 5 : Unit operation test-runFirst, Remove the battery from the remote controller.
Second, Re-insert the battery into the remote controller.
Third, Press ON/OFF key with the direction of remote controller for set.
! If the first number is , it is correct otherwise press until appear.
@ When pressing the button ~ appear on the display, selectone of them.
# When pressing the button ~ appear on the display, selectone of them.
$ When pressing the button ~ appear on the display, selectone of them.
% When pressing the button ~ appear on the display, selectone of them.
^ When pressing the button ~ appear on the display, selectone of them.
Error Mode :
1st If all lamps of indoor unit are flickering, Plug out and plug in again and pressing ON/OFF key to retry.
2nd If the unit is not working properly or all lamps are continuously flickering after setting the option code, seeif the correct option code is set up for it’s model.
DB98_08187A(1)_57~100 3/27/03 2:24 PM Page 96
97 | SAMSUNG
8Set up the model Option
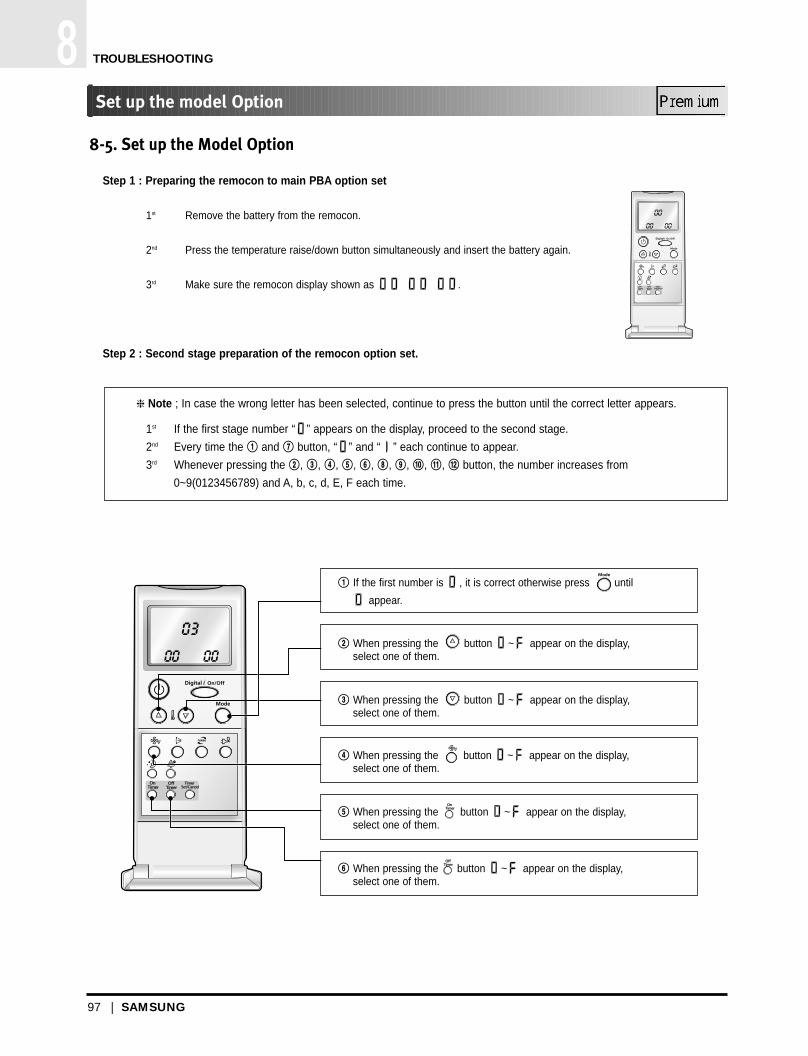
8-5. Set up the Model Option
Step 1 : Preparing the remocon to main PBA option set
1st Remove the battery from the remocon.
2nd Press the temperature raise/down button simultaneously and insert the battery again.
3rd Make sure the remocon display shown as .
Step 2 : Second stage preparation of the remocon option set.
❈ Note ; In case the wrong letter has been selected, continue to press the button until the correct letter appears.
1st If the first stage number “ ” appears on the display, proceed to the second stage.
2nd Every time the ! and & button, “ ” and “ ” each continue to appear.
3rd Whenever pressing the @, #, $, %, ^, *, (, ), 1, 2 button, the number increases from
0~9(0123456789) and A, b, c, d, E, F each time.
TROUBLESHOOTING
! If the first number is , it is correct otherwise press until
appear.
@ When pressing the button ~ appear on the display, select one of them.
# When pressing the button ~ appear on the display, select one of them.
$ When pressing the button ~ appear on the display, select one of them.
% When pressing the button ~ appear on the display, select one of them.
^ When pressing the button ~ appear on the display, select one of them.
DB00_00000A(1)_57~ 3/27/03 2:30 PM Page 96

SAMSUNG | 98
1TROUBLESHOOTING 8Set up the Model Option (Cont.)
Step 3 : Reconfirming option set after completion
(in case of ex. 017d25-17021d)
After pressing selector for the mode, the display shown as .
After pressing selector for the mode, the display shown as .
Step 4 : Pressing the ON/OFF button ( )When pressing the operation ON/OFF key with the direction of remote controller for unit, the sound “Ding” or “Diriring” is
heard and the OPERATION LED lamp is flickering at the same time, then the input of option is completed.
(If the diriring sound isn’t heard, try again pressing the ON/OFF button.)
Step 5 : Unit operation test-runFirst, Remove the battery from the remote controller.
Second, Re-insert the battery into the remote controller.
Third, Press ON/OFF key with the direction of remote controller for set.
! If the first number is , it is correct otherwise press until
appear.
@ When pressing the button ~ appear on the display, selectone of them.
# When pressing the button ~ appear on the display, selectone of them.
$ When pressing the button ~ appear on the display, select oneof them.
% When pressing the button ~ appear on the display, select oneof them.
^ When pressing the button ~ appear on the display, select oneof them.
Error Mode :
1st If all lamps of indoor unit are flickering, Plug out and plug in again and pressing ON/OFF key to retry.
2nd If the unit is not working properly or all lamps are continuously flickering after setting the option code, seeif the correct option code is set up for it’s model.
DB00_00000A(1)_57~ 3/27/03 2:30 PM Page 97

Samsung Electronics10
Feature Display
3. Set Up the Model Option
3-1 Setting Option Setup Method
Option No. : (SH12AWH)
Step 1 : Enter the Option Setup mode.
1st Take out the batteries of remote control.
2nd Press the temperature button simultaneously and insert the battery again.
3rd Make sure the remocon display shown as .
Step 2 : Enter the Option Setup mode and select your option according to the following procedure.
3
1,4 2,5
Setting Option SEG1.
Push the button to set the display panel to .
Every time you push the button, the display panel reads . . . repeatedly.
2Setting Option SEG2.
Push the button to set the display panel to .
Every time you push the button, the display panel reads . . . repeatedly.
4Setting Option SEG3.
Push the button to set the display panel to .
Every time you push the button, the display panel reads . . . repeatedly.
3Change it into the set display of Option SEG3 and SEG4
with the button.
5Setting Option SEG4.
Push the button to set the display panel to .
Every time you push the button, the display panel reads . . . repeatedly.
1
DB98_15924A(2)_1 04/3/8 11:29 AM Page 10

Set Up the Model Option
11Samsung Electronics
Feature Display
7Setting Option SEG5.
Push the button to set the display panel to .
Every time you push the button, the display panel reads . . . repeatedly.
6Change it into the set display of Option SEG5 and SEG6
with the button.
8Setting Option SEG6.
Push the button to set the display panel to .
Every time you push the button, the display panel reads . . . repeatedly.
10Setting Option SEG7.
Push the button to set the display panel to .
Every time you push the button, the display panel reads . . . repeatedly.
9Change it into the set display of Option SEG7 and SEG8
with the button.
11Setting Option SEG8.
Push the button to set the display panel to .
Every time you push the button, the display panel reads . . . repeatedly.
13Setting Option SEG9.
Push the button to set the display panel to .
Every time you push the button, the display panel reads . . . repeatedly.
12Change it into the set display of Option SEG9 and SEG10
with the button.
14Setting Option SEG10.
Push the button to set the display panel to .
Every time you push the button, the display panel reads . . . repeatedly.
6,9
7,10 8,11
12
13 14
DB98_15924A(2)_1 04/3/8 11:30 AM Page 11
Set Up the Model Option
Samsung Electronics12
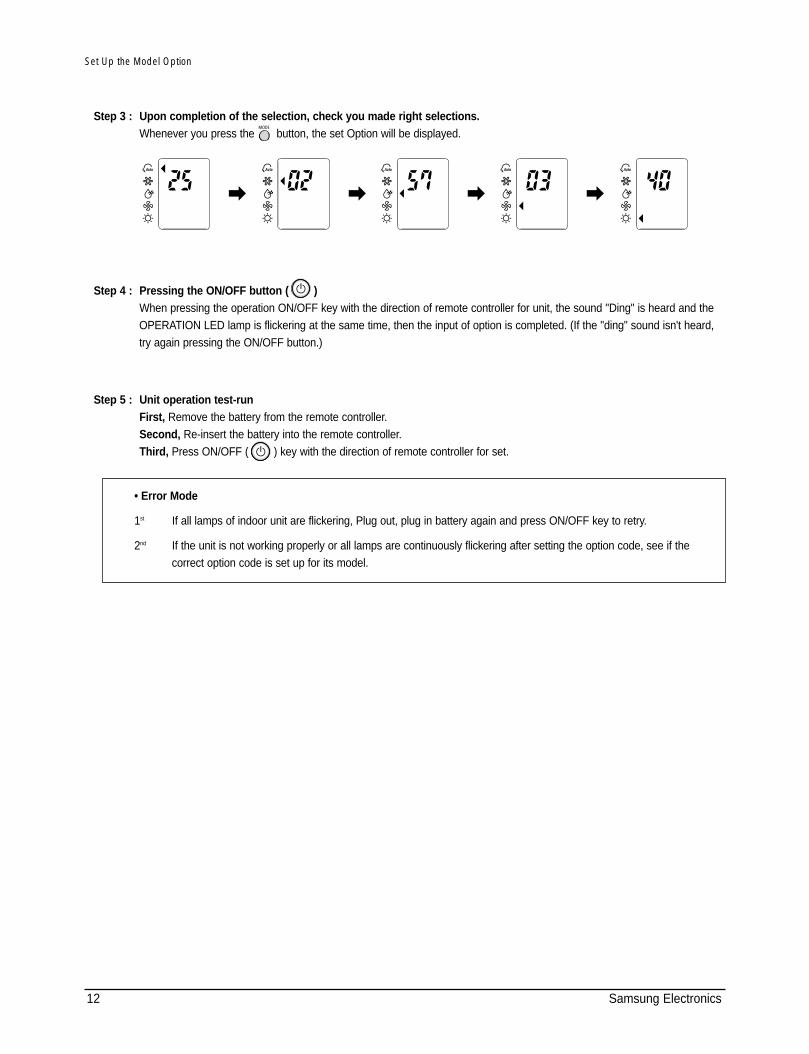
Step 3 : Upon completion of the selection, check you made right selections.Whenever you press the button, the set Option will be displayed.
Step 4 : Pressing the ON/OFF button ( )When pressing the operation ON/OFF key with the direction of remote controller for unit, the sound "Ding" is heard and theOPERATION LED lamp is flickering at the same time, then the input of option is completed. (If the "ding" sound isn't heard,try again pressing the ON/OFF button.)
Step 5 : Unit operation test-runFirst, Remove the battery from the remote controller.Second, Re-insert the battery into the remote controller.Third, Press ON/OFF ( ) key with the direction of remote controller for set.
• Error Mode
1st If all lamps of indoor unit are flickering, Plug out, plug in battery again and press ON/OFF key to retry.
2nd If the unit is not working properly or all lamps are continuously flickering after setting the option code, see if thecorrect option code is set up for its model.
DB98_15924A(2)_1 04/3/8 11:30 AM Page 12

SAMSUNG | 99
1TROUBLESHOOTING 8Set up the Model Option (Cont.)
<Table of the option code>
MODEL
SH12ZSG
SH09ZS8
SH07ZS8
OPTION CODE
066025-172362
027064-17221d
026064-1720Fb
◆ Non Inverter (7K/ 9K/ 12K)
DB98_08187A(1)_57~100 3/27/03 2:24 PM Page 97
100 | SAMSUNG
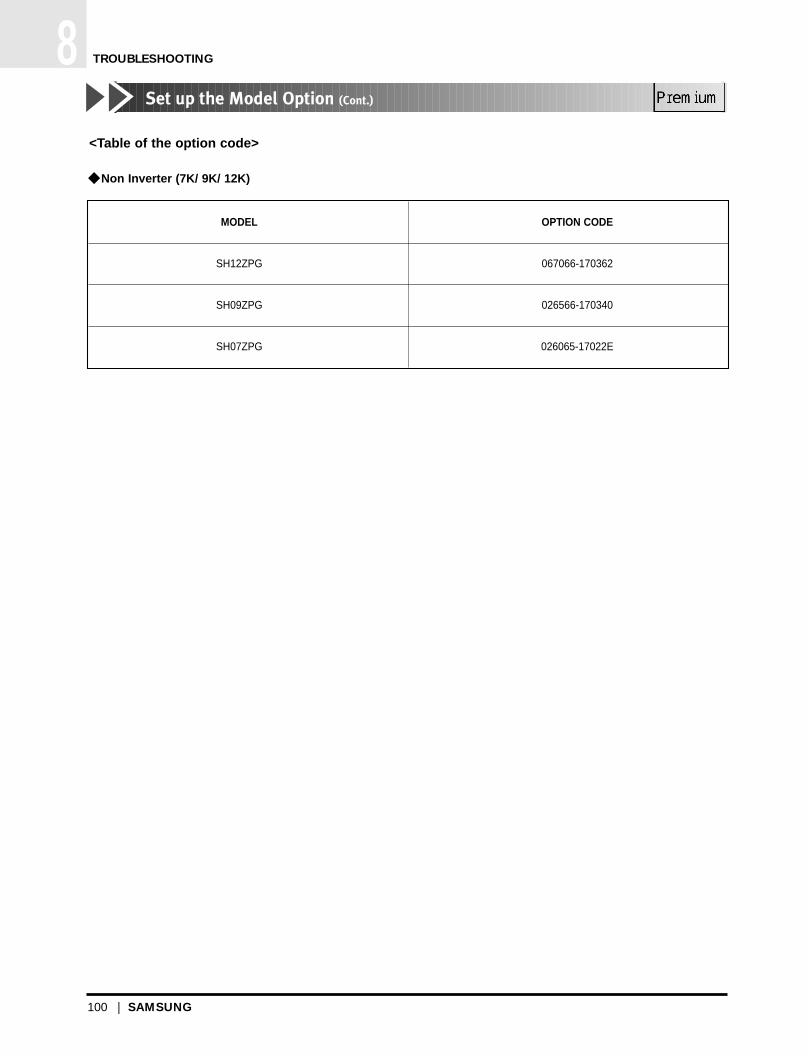
8Set up the Model Option (Cont.)
<Table of the option code>
MODEL
SH12ZPG
SH09ZPG
SH07ZPG
OPTION CODE
067066-170362
026566-170340
026065-17022E
◆ Non Inverter (7K/ 9K/ 12K)
TROUBLESHOOTING
DB00_00000A(1)_57~ 3/27/03 2:30 PM Page 98

<Table of the option code>
MODEL
AS09A3ME
SC09ZA3/A
AS07A3ME
SC07ZA3/A
AS09A4ME
SCO9ZA4/A
AS07A4ME
SCO7ZA4/A
AS12A1ME
SC12ZA1/A
AS09A1ME
SC09ZA1/A
AS07A1ME
SC07ZA1/A
AS12A2ME
SC12ZA2/A
AS09A2ME
SCO9ZA2/A
AS07A2ME
SCO7ZA2/A
OPTION CODE
010000-1700d9
010000-1700b7
000000-1700d9
000000-1700b7
010000-17021d
010000-1700d9
010000-1700b7
000000-17021d
000000-1700d9
000000-1700b7
◆ Non Inverter Cooling Only (7K/ 9K/ 12K)
Troubleshooting 136
100-139* 2/19/01 2:29 PM Page 136

MODEL
AQV12Y6ME
AQV09Y6ME
OPTION CODE
007510-10723F
007500-1070Fb
<Table of the option code>
◆ Inverter (9K/ 12K)
Troubleshooting 138
100-139* 2/19/01 2:29 PM Page 138

<Table of the option code>
◆ Non Inverter Cooling Only & Heat pump (18K/ 24K)
REMOCON
MODELSEG1 SEG2 SEG3 SEG4 SEG5 SEG6 SEG7 SEG8 SEG9 SEG10 SEG11 SEG12
AQT24A1(2)RE
SH24TA1
AQT24A2RE
AQT24A2RB
AST24A1RE
SC24TA1
AST24A2RE
AST24A2RB
AQT18A1RE
SH18TA1
AQT18A2RE
AQT18A2RB
AQ18A1RE
SH18ZA1
AQ18A2RE
AST18A1RE
SC18TA1
AST18A2RE
AST18A2RB
AS18A1RE
SC18ZA1
AS18A2RE
0
0
0
0
0
0
0
0
0
0
0
0
0
0
0
0
0
0
0
0
0
0
9
9
8
8
9
9
8
8
9
9
8
8
9
9
8
9
9
8
8
9
9
8
4
4
4
4
0
0
0
0
7
7
7
7
4
4
4
0
0
0
0
0
0
0
6
6
6
6
0
0
0
0
4
4
4
4
4
4
4
0
0
0
0
0
0
0
1
1
1
1
0
0
0
0
1
1
1
1
1
1
1
0
0
0
0
0
0
0
7
7
7
7
0
0
0
0
7
7
7
7
7
7
7
0
0
0
0
0
0
0
1
1
1
1
1
1
1
1
1
1
1
1
1
1
1
1
1
1
1
1
1
1
A
A
A
A
A
A
A
A
A
A
A
A
A
A
A
A
A
A
A
A
A
A
0
0
0
0
0
0
0
0
0
0
0
0
0
0
0
0
0
0
0
0
0
0
2
2
2
2
2
2
2
2
0
0
0
0
2
2
2
0
0
0
0
2
2
2
3
3
3
3
3
3
3
3
F
F
F
F
1
1
1
F
F
F
F
1
1
1
F
F
F
F
F
F
F
F
B
B
B
B
D
D
D
B
B
B
B
D
D
D
Troubleshooting139
100-139* 2/19/01 2:29 PM Page 139

<Table of the option code>
MODEL
AQ12✳5MCAQ12✳6MC
AQ09✳5MAAQ09✳6MA
AQ18✳5RCAQ18✳6RC
AQ24✳1RCAQ24✳2RC
AS12✳5MCAS12✳6MC
AS09✳5MAAS09✳6MA
AS07✳5MAAS07✳6MA
AS18✳5RCAS18✳6RC
AS24✳1RCAS24✳2RC
OPTION CODE
017725-17021d007725-17021d
016A25-1700d9006A25-1700d9
094415-15021d084415-15021d
097617-1A023F087617-1A023F
010000-17021F000000-17021F
010000-1700d9000000-1700d9
010000-1700b7000000-1700b7
090000-15021d080000-15021d
090000-1A0340080000-1A0340
Set up the Model option68
00210A(1)-1~83 7/18/01 10:45 AM Page 68

Set up the Model option 71
<Table of the option code>
MODEL
AQV12A2ME
SH12VA2
AQV09A2ME
SH09VA2
AQV12A1ME
SH12VA1
AQV09A1ME
SHO9VA1
OPTION CODE
005212-10123F
006500-1010FB
015212-10123F
016500-1010FB
1~91 2/5/01 11:24 AM Page 71

Set up the Model option72
<Table of the option code>
MODEL
AD18B1(B2)E09
MH18ZA1(A2)-09
AD19B1(B2)E07
MH19ZA1(A2)-09
AD19B1(B2)E12
MH19ZA1(A2)-12
AD24B1(B2)E12
MH24ZA1(A2)-12
AD26B1(B2)E12
MH26ZA1(A2)-12
AD26B1(B2)E07
MH26ZA1(A2)-07
OPTION CODE
016223-1000EA
015553-1000B7
015553-10023F
017553-10021d
-
-
1~91 2/5/01 11:24 AM Page 72

17Samsung Electronics
Set Up the Model Option
■ OPTION ITEMS
REMOCON
MODELSEG1 SEG2 SEG3 SEG4 SEG5 SEG6 SEG7 SEG8 SEG9 SEG10 SEG11 SEG12
SH18ZP0B
AQ18P0GBA
AQ18P0GEA
AQT18P0GBA
AQT18P0GEA
SH24ZP6B
AQ24P6GBA
AQ24P6GEA
AQT24P6GBA
AQT24P6GEA
0
0
0
0
0
0
0
0
0
0
8
8
8
8
8
8
8
8
8
8
5
5
5
5
5
7
7
7
5
5
1
4
1
4
4
2
4
2
4
4
1
1
1
d
d
d
1
d
1
1
5
7
5
7
7
6
7
6
7
7
1
1
1
1
1
1
1
1
1
1
d
d
d
d
d
d
d
d
d
d
0
0
0
0
0
0
0
0
0
0
3
3
3
3
3
3
3
3
3
3
5
4
5
4
4
6
6
6
6
6
1
0
1
0
0
2
2
2
2
2
DB98_16345A(1)_SH18ZP0B 04/2/9 2:19 PM Page 17

Troubleshooting
Samsung Electronics5-12
<Table of the option code>
MODEL
SH12VCD
SH09VCD
OPTION CODE
007315-10123F
007d08-1010Fb
DB98_08728A(1)_SM_1 12/20/02 3:25 PM Page 4-4

Operating Instructions
2-7Samsung Electronics
■ OPTION ITEMS
REMOCON
MODELSEG1 SEG2 SEG3 SEG4 SEG5 SEG6 SEG7 SEG8 SEG9 SEG10 SEG11 SEG12
SH24TS6
AQT24S6GB
AQT24S6GE
AQ24S6GB
SH18ZS0
AQT18S0GB
AQT18S0GE
AQ18S0GB
AQ18S0GE
0 8 5 4 1 6 1 d 2 3 6 2
0 8 5 4 1 6 1 d 2 3 6 2
0 8 5 2 d 5 1 d 2 3 7 3
0 8 5 1 1 5 1 d 2 3 4 0
0 8 5 4 1 7 1 d 2 2 3 F
0 8 5 4 1 7 1 d 2 3 4 0
0 8 5 1 1 5 1 d 2 2 3 F
0 8 5 1 1 5 1 d 2 3 4 0
0 8 5 4 1 7 1 d 2 3 6 2
DB98_11970A(2)<SM_1 03/5/16 1:55 PM Page 2-7

Samsung Electronics10
Set Up the Model Option
■ OPTION ITEMS
REMOCON
MODELSEG1 SEG2 SEG3 SEG4 SEG5 SEG6 SEG7 SEG8 SEG9 SEG10 SEG11 SEG12
SH05ZZ8
SH07ZZ8
0 0 5 0 2 5 1 7 0 2 1 d
0 0 5 0 2 4 1 7 0 3 6 0
SC05ZZ8 0 0 0 0 0 0 1 7 0 2 1 d
AS05Z1AZD 0 0 0 0 0 0 1 7 0 2 1 d
AS07Z1AZD 0 0 0 0 0 0 1 7 0 2 1 d
Tsar_DB98_15869A(1)_1 1/12/04 10:05 AM Page 10

Operating Instructions
Samsung Electronics2-8
■ OPTION ITEMS
REMOCON
MODELSEG1 SEG2 SEG3 SEG4 SEG5 SEG6 SEG7 SEG8 SEG9 SEG10 SEG11 SEG12
SH24TP6(A)
AQT24P6GB
AQT24P6GE
AQ24P6GB
SH18ZP0(A)
AQT18P0GB
AQT18P0GE
AQ18P0GB
AQ18P0GE
0 8 5 4 1 6 1 d 0 3 8 4
0 8 5 4 1 6 1 d 0 3 8 4
0 8 5 2 d 5 1 d 0 3 9 5
0 8 6 1 1 5 1 d 0 3 5 1
0 8 5 4 1 7 1 d 0 3 5 1
0 8 5 4 1 7 1 d 0 3 6 2
0 8 5 1 1 5 1 d 0 3 5 1
0 8 6 1 1 5 1 d 0 3 5 1
0 8 5 4 1 7 1 d 0 3 8 4
DB98_13339(A)_1~40 03/5/16 1:59 PM Page 2-8

Operating Instructions
2-7Samsung Electronics
■ OPTION ITEMS
REMOCON
MODELSEG1 SEG2 SEG3 SEG4 SEG5 SEG6 SEG7 SEG8 SEG9 SEG10 SEG11 SEG12
SH24TS6
AQT24S6GB
AQT24S6GE
AQ24S6GB
SH18ZS0
AQT18S0GB
AQT18S0GE
AQ18S0GB
AQ18S0GE
0 8 5 4 1 6 1 d 2 3 6 2
0 8 5 4 1 6 1 d 2 3 6 2
0 8 5 2 d 5 1 d 2 3 7 3
0 8 5 1 1 5 1 d 2 3 4 0
0 8 5 4 1 7 1 d 2 2 3 F
0 8 5 4 1 7 1 d 2 3 4 0
0 8 5 1 1 5 1 d 2 2 3 F
0 8 5 1 1 5 1 d 2 3 4 0
0 8 5 4 1 7 1 d 2 3 6 2
DB98_11970A(2)<SM_1 03/5/16 1:55 PM Page 2-7

Troubleshooting
Samsung Electronics5-12
<Table of the option code>
MODEL
AQ12✳ 5MB
AQ12✳ 6MB
AQ12✳ 5ME
AQ12✳ 6ME
AQ09✳ 5MESH09Z✳ 5
AQ09✳ 6MESH09Z✳ 6
AQ09✳ 5MEDSH09Z✳ 5D
AQ09✳ 6MEDSH09Z✳ 6D
AQ07✳ 5ME / AQ07✳ 5MEDSH07Z✳ 5 / SH07Z✳ 5D
AQ07✳ 6ME / AQ07✳ 6MEDSH07Z✳ 6 / SH07Z✳ 6D
AQ09✳ 7MESH09Z✳ 7
AQ09✳ 8MESH09Z✳ 8
AQ07✳ 7MESH07Z✳ 7
AQ07✳ 8MESH07Z✳ 8
AQ12✳ 9MESH12Z✳ 9
AQ12✳ 0MESH12Z✳ 0
AQ12✳ A(B)MESH12Z✳ A(B)X
OPTION CODE
017725-17021d
007725-17021d
017626-17021d
007626-17021d
016A25-1700d9
006A25-1700d9
016024-1700EA
006024-1700EA
014A25-1700b7
004A25-1700b7
016825-1700d9
006825-1700d9
014825-170067
004825-170067
017d25-17021d
007d25-17021d
007227-17023F
DB81-00181A(4)-1 3/6/11 3:25 PM Page 5-12
Troubleshooting
Samsung Electronics5-10
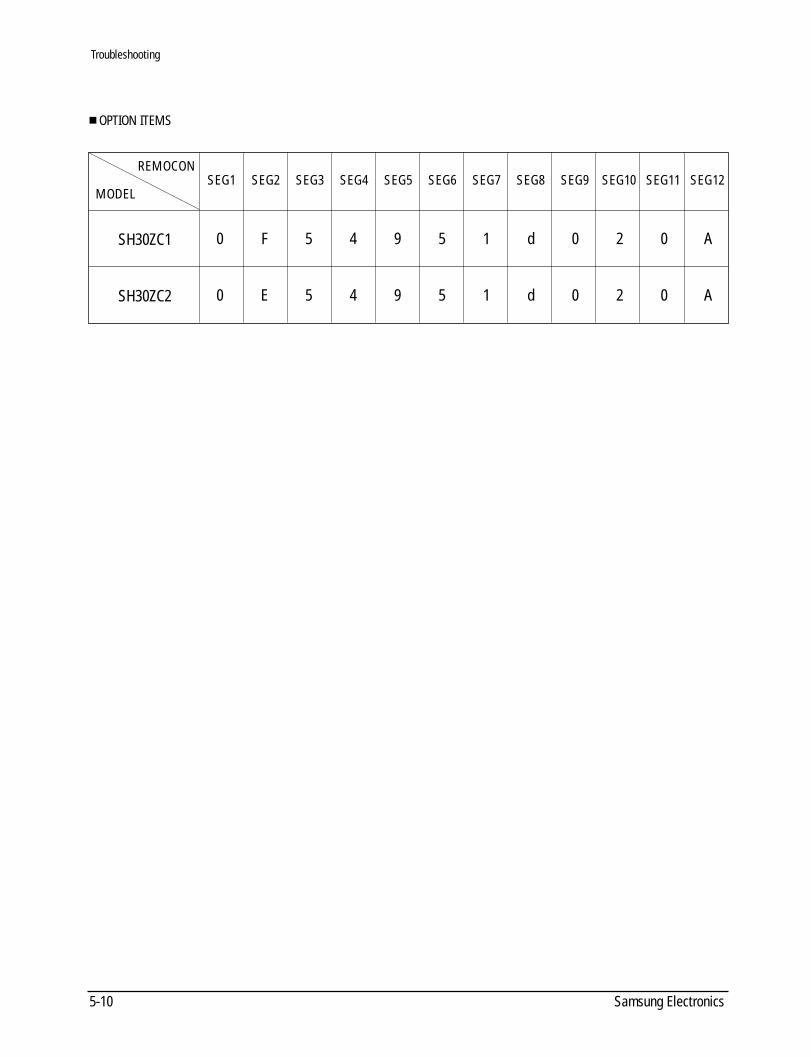
■ OPTION ITEMS
REMOCON
MODELSEG1 SEG2 SEG3 SEG4 SEG5 SEG6 SEG7 SEG8 SEG9 SEG10 SEG11 SEG12
SH30ZC1
SH30ZC2
0
0
F
E
5
5
4
4
9
9
5
5
1
1
d
d
0
0
2
2
0
0
A
A
DB98-03414A(2)-1 1/12/02 10:49 AM Page 5-10

13Samsung Electronics
3-2 Table of the option Code
ModelOption Code
SEG1 SEG2 SEG3 SEG4 SEG5 SEG6 SEG7 SEG8 SEG9 SEG10
SH12AWH
SH12ZWH
AQ12WHWE
KFR-35G / SWA
2 5 0 2 5 7 0 3 4 0
SH09AWH 2 5 0 2 5 7 0 0 c 8
SH09ZWH
AQ09WHWE
KFR-25G / SWA
2 5 0 2 5 7 0 0 F b
DB98_15924A(2)_1 04/3/8 11:30 AM Page 13

19Samsung Electronics
Set up the Model Option
■ OPTION ITEMS
REMOCON
MODELSEG1 SEG2 SEG3 SEG4 SEG5 SEG6 SEG7 SEG8 SEG9 SEG10 SEG11 SEG12
SH07ZP2
SH07ZP2A
AQ07P2GE
SH09ZP2
SH09ZP2A
SH12ZP4
SH12ZP4A
AQ12P4GE
AQ09P2GE
AQT12P4GB
AQT12P4GE
0 2 4 5 6 7 1 7 0 2 1 d
0 2 5 2 6 6 1 7 0 3 4 0
0 6 6 0 6 5 1 7 0 3 6 2
0 6 6 0 6 6 1 7 0 3 6 2
0 2 5 3 6 5 1 7 0 3 4 0
0 6 7 0 E 6 1 7 0 3 6 2
0 6 8 0 E 6 1 7 0 3 5 1
DB98_16202A(4)_1 04/3/29 12:20 PM Page 19

Samsung Electronics18
Set Up the Model Option
■ OPTION ITEMS
REMOCON
MODELSEG1 SEG2 SEG3 SEG4 SEG5 SEG6 SEG7 SEG8 SEG9 SEG10 SEG11 SEG12
SH07ZS2SH07ZS2AAQ07S2GE
SH09ZS2
SH09ZS2AAQ09S2GE
SH12ZS4
SH12ZS4AAQ12S4GE
AQT12S4GB
AQT12S4GE
0 2 4 5 6 7 1 7 A 2 0 c
0 2 5 2 6 6 1 7 A 2 3 F
0 2 5 3 6 5 1 7 A 2 3 F
0 6 6 0 6 5 1 7 A 3 5 1
0 6 7 0 6 6 1 7 A 3 5 1
0 6 7 0 E 6 1 7 A 3 5 1
DB98_16693A(2)_1 3/19/04 2:11 PM Page 18

Samsung Electronics10
Set Up the Model Option
■ OPTION ITEMS
REMOCON
MODELSEG1 SEG2 SEG3 SEG4 SEG5 SEG6 SEG7 SEG8 SEG9 SEG10 SEG11 SEG12
SH05ZZ8
SH07ZZ8
0 0 5 0 2 5 1 7 0 2 1 d
0 0 5 0 2 4 1 7 0 3 6 0
SC05ZZ8 0 0 0 0 0 0 1 7 0 2 1 d
AS05Z1AZD 0 0 0 0 0 0 1 7 0 2 1 d
AS07Z1AZD 0 0 0 0 0 0 1 7 0 2 1 d
Tsar_DB98_15869A(1)_1 1/12/04 10:05 AM Page 10

Operating Instructions
2-7Samsung Electronics
■ OPTION ITEMS
REMOCON
MODELSEG1 SEG2 SEG3 SEG4 SEG5 SEG6 SEG7 SEG8 SEG9 SEG10 SEG11 SEG12
SH24TS6
AQT24S6GB
AQT24S6GE
AQ24S6GB
SH18ZS0
AQT18S0GB
AQT18S0GE
AQ18S0GB
AQ18S0GE
0 8 5 4 1 6 1 d 2 3 6 2
0 8 5 4 1 6 1 d 2 3 6 2
0 8 5 2 d 5 1 d 2 3 7 3
0 8 5 1 1 5 1 d 2 3 4 0
0 8 5 4 1 7 1 d 2 2 3 F
0 8 5 4 1 7 1 d 2 3 4 0
0 8 5 1 1 5 1 d 2 2 3 F
0 8 5 1 1 5 1 d 2 3 4 0
0 8 5 4 1 7 1 d 2 3 6 2
DB98_11970A(2)<SM_1 03/5/16 1:55 PM Page 2-7

Samsung Electronics28
Set Up the Model Option
� OPTION ITEMS
REMOCON
MODELSEG1 SEG2 SEG3 SEG4 SEG5 SEG6 SEG7 SEG8 SEG9 SEG10 SEG11 SEG12
AS09HPBN
AS12HPBN
0 2 8 0 2 5 1 7 0 2 0 8
0 2 7 3 2 7 1 7 0 2 6 c
DB98_20429A(1)_1 12/24/04 10:55 AM Page 28

19Samsung Electronics
Set up the Model Option
� OPTION ITEMS
REMOCON
MODELSEG1 SEG2 SEG3 SEG4 SEG5 SEG6 SEG7 SEG8 SEG9 SEG10 SEG11 SEG12
SH07ZP2D
SH09ZP2D
SH12ZP4D
0 2 4 5 6 7 1 7 0 2 0 c
0 2 5 2 6 6 1 7 0 2 3 F
0 6 6 0 6 5 1 7 0 3 6 2

13Samsung Electronics
3-2 Table of the option Code
ModelOption Code
SEG1 SEG2 SEG3 SEG4 SEG5 SEG6 SEG7 SEG8 SEG9 SEG10
SH12AWH
SH12ZWH
AQ12WHWE
KFR-35G / SWA
2 5 0 2 5 7 0 3 4 0
SH09AWH 2 5 0 2 5 7 0 0 c 8
SH09ZWH
AQ09WHWE
KFR-25G / SWA
2 5 0 2 5 7 0 0 F b
DB98_15924A(2)_1 04/3/8 11:30 AM Page 13

Troubleshooting
Samsung Electronics5-10
■ OPTION ITEMS
REMOCON
MODELSEG1 SEG2 SEG3 SEG4 SEG5 SEG6 SEG7 SEG8 SEG9 SEG10 SEG11 SEG12
AQT24A(B)5RE
SH24TA(B)5
AQT24A(B)6RE
AQT24A(B)6RB
AQT18A(B)9RE
AQT18A(B)0RE
AQT18A(B)0RB
AQ18A(B)9RE
SH18ZA(B)9
AQ18A(B)0RE
AQT24A(B)5RED
AQT24A(B)6RED
AQ18A(B)9RED
AQ18A(B)0RED
SH24TA6D
SH18ZA0D
AQT24C6RB
AQT24C6RE
AQT18C0RB
AQT18C0RE
AQT18C0REF
AQ18A9RBD
AQ18A0RBD
AQ24A5RBD
AQ24A6RBD
0
0
0
0
0
0
0
0
0
0
0
0
0
0
0
0
0
0
0
0
0
0
0
0
0
9
9
8
8
9
8
8
9
9
8
9
8
9
8
8
8
8
8
8
8
8
9
8
9
8
4
4
4
4
7
7
7
4
4
4
6
6
6
6
6
6
4
4
7
7
5
4
4
5
5
6
6
6
6
4
4
4
4
4
4
3
3
4
4
3
4
6
6
4
4
4
4
4
6
6
1
1
1
1
1
1
1
1
1
1
1
1
1
1
1
1
1
1
1
1
1
1
1
9
9
7
7
7
7
7
7
7
7
7
7
4
4
7
7
4
7
7
7
7
7
7
5
5
5
5
1
1
1
1
1
1
1
1
1
1
1
1
1
1
1
1
1
1
1
1
1
1
1
1
1
A
A
A
A
A
A
A
A
A
A
A
A
A
A
A
A
A
A
A
A
A
A
A
d
d
0
0
0
0
0
0
0
0
0
0
0
0
0
0
0
0
0
0
0
0
0
0
0
0
0
2
2
2
2
0
0
0
2
2
2
2
2
2
2
2
2
3
3
2
2
2
2
2
3
3
3
3
3
3
F
F
F
1
1
1
3
3
1
1
3
1
4
4
0
0
3
1
1
5
5
F
F
F
F
b
b
b
d
d
d
F
F
d
d
F
d
0
0
C
C
F
d
d
1
1
DB81_00114A(5)_1 11/5/02 4:17 PM Page 5-10
29Samsung Electronics
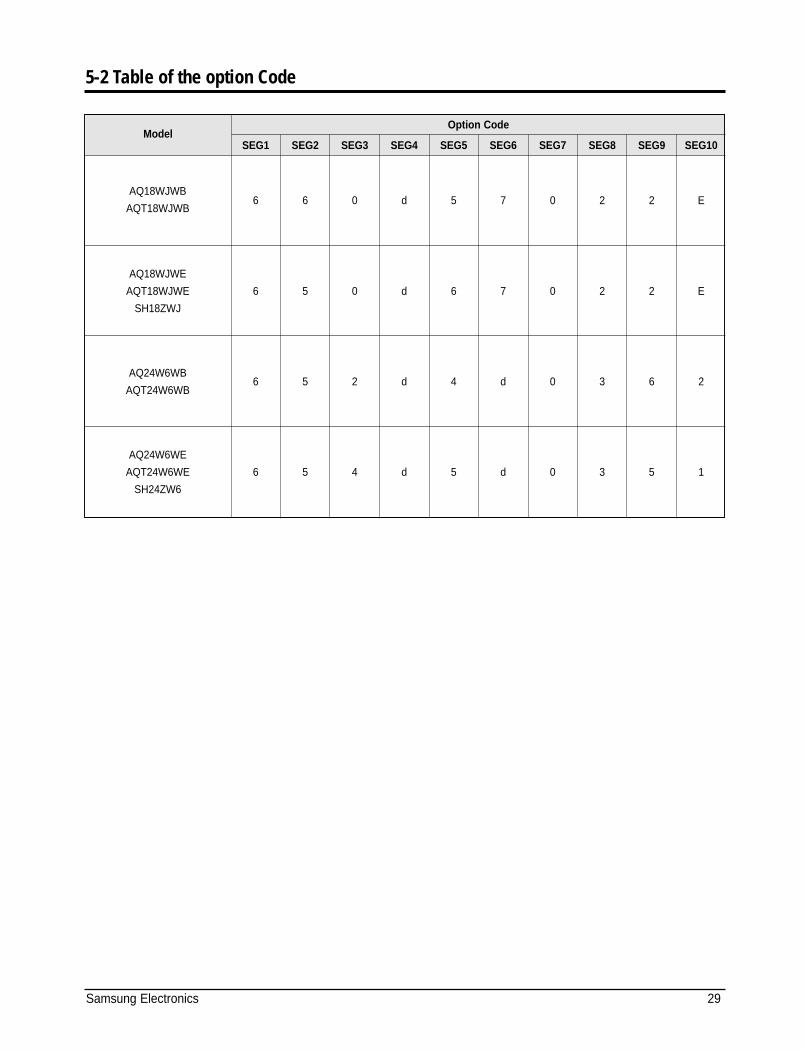
5-2 Table of the option Code
AQ18WJWB
AQT18WJWB
ModelOption Code
SEG1 SEG2 SEG3 SEG4 SEG5 SEG6 SEG7 SEG8 SEG9 SEG10
6 6 0 d 5 7 0 2 2 E
AQ18WJWE
AQT18WJWE
SH18ZWJ
6 5 0 d 6 7 0 2 2 E
AQ24W6WB
AQT24W6WB6 5 2 d 4 d 0 3 6 2
AQ24W6WE
AQT24W6WE
SH24ZW6
6 5 4 d 5 d 0 3 5 1
DB98_20874A(1)_1 05/1/28 4:02 AM Page 29