Embed Size (px)
Citation preview

Server/Publisher

Version 10, SR5, for Microsoft Windows®Lund, Sweden, June 2012Authored by QlikTech International AB
Copyright © 1994-2012 Qlik®Tech International AB, Sweden.
Under international copyright laws, neither the documentation nor the software may be copied,photocopied, reproduced, translated or reduced to any electronic medium or machine-readable form, inwhole or in part, without the prior written permission of QlikTech International AB, except in the mannerdescribed in the software agreement.
Qlik®, QlikTech® and QlikView® are trademarks and registered trademarks of QlikTech InternationalAB.
Other trademarks are the property of their respective owners and are hereby acknowledged.
2 QlikView Server/Publisher
Contents
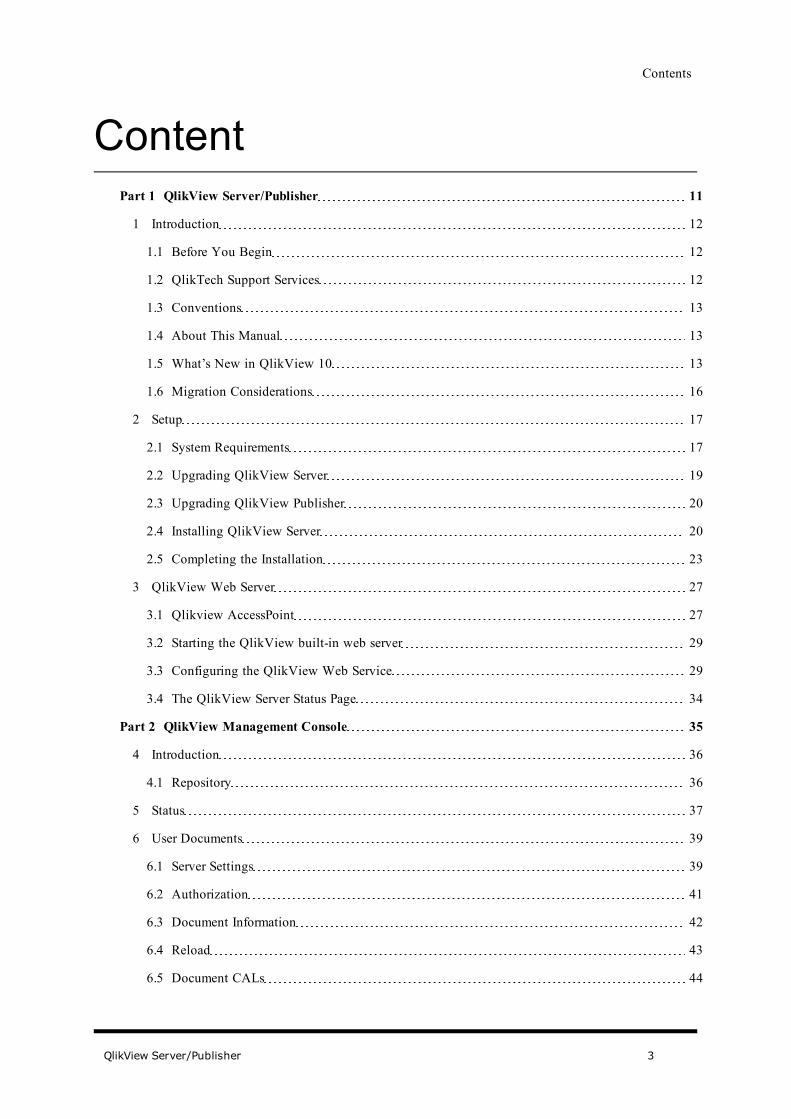
ContentPart 1 QlikView Server/Publisher 11
1 Introduction 12
1.1 Before You Begin 12
1.2 QlikTech Support Services 12
1.3 Conventions 13
1.4 About This Manual 13
1.5 What’s New in QlikView 10 13
1.6 Migration Considerations 16
2 Setup 17
2.1 System Requirements 17
2.2 Upgrading QlikView Server 19
2.3 Upgrading QlikView Publisher 20
2.4 Installing QlikView Server 20
2.5 Completing the Installation 23
3 QlikView Web Server 27
3.1 Qlikview AccessPoint 27
3.2 Starting the QlikView built-in web server 29
3.3 Configuring the QlikView Web Service 29
3.4 The QlikView Server Status Page 34
Part 2 QlikView Management Console 35
4 Introduction 36
4.1 Repository 36
5 Status 37
6 User Documents 39
6.1 Server Settings 39
6.2 Authorization 41
6.3 Document Information 42
6.4 Reload 43
6.5 Document CALs 44
QlikView Server/Publisher 3
Contents
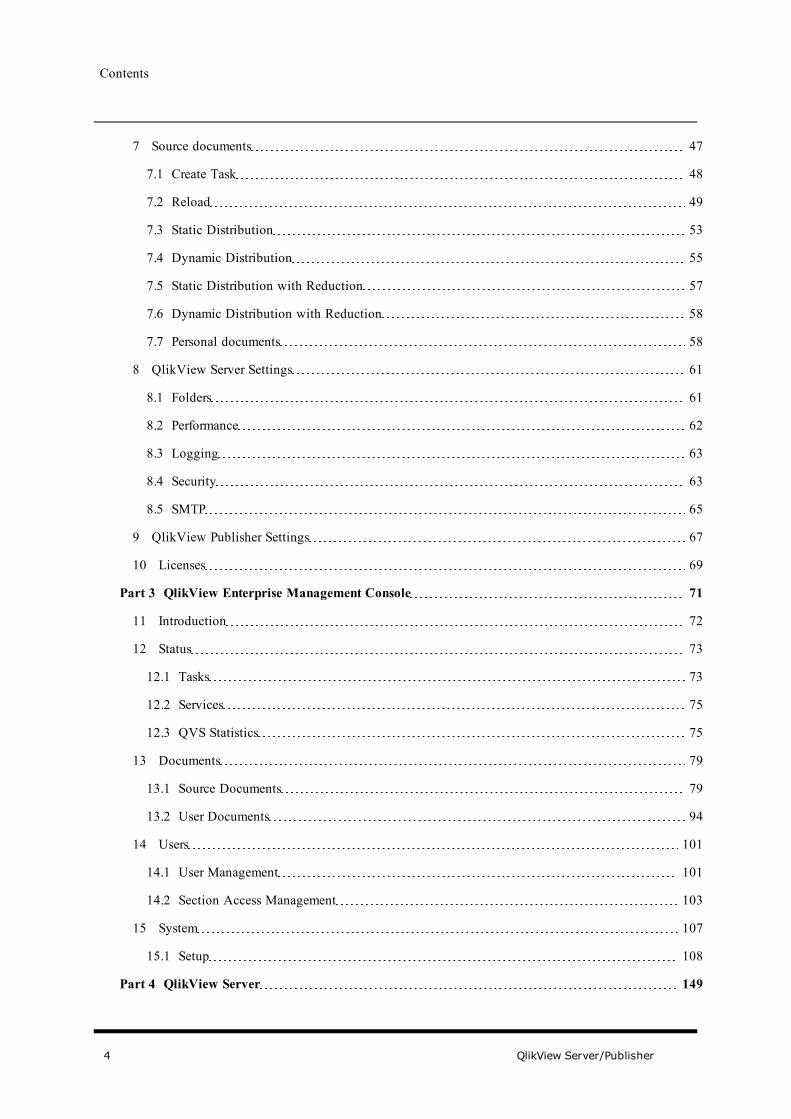
7 Source documents 47
7.1 Create Task 48
7.2 Reload 49
7.3 Static Distribution 53
7.4 Dynamic Distribution 55
7.5 Static Distribution with Reduction 57
7.6 Dynamic Distribution with Reduction 58
7.7 Personal documents 58
8 QlikView Server Settings 61
8.1 Folders 61
8.2 Performance 62
8.3 Logging 63
8.4 Security 63
8.5 SMTP 65
9 QlikView Publisher Settings 67
10 Licenses 69
Part 3 QlikView Enterprise Management Console 71
11 Introduction 72
12 Status 73
12.1 Tasks 73
12.2 Services 75
12.3 QVS Statistics 75
13 Documents 79
13.1 Source Documents 79
13.2 User Documents 94
14 Users 101
14.1 User Management 101
14.2 Section Access Management 103
15 System 107
15.1 Setup 108
Part 4 QlikView Server 149
4 QlikView Server/Publisher

Contents
16 Security Set-up 150
16.1 Communication Encryption 150
16.2 File System Security on Server 150
16.3 File System Security vs. QlikView Section Access Security 153
16.4 Security Configurations 153
16.5 Supervision Accounts 157
16.6 Adding Extensions to the QlikView Server 157
17 Functional Architecture 159
17.1 QlikView Server – Client Communication 159
17.2 QlikView Server Tunnel 162
18 Logging 165
18.1 Logging from QlikView Server 165
18.2 The Session log 165
18.3 The Performance log 167
18.4 The Event log 170
18.5 The Audit Log 171
19 Licensing 173
19.1 Client Access Licenses (CALs) 173
19.2 Types of CALs 173
19.3 Combining different types of CALs 174
19.4 License Lease 174
19.5 Cluster Licensing 174
19.6 Cold Standby Servers 175
19.7 Test License 175
19.8 Editions of QlikView Server 175
20 Repository for Shared Objects 179
20.1 Types of Objects Available for Sharing 179
20.2 Settings required for Server Objects 179
21 Document Metadata Service (DMS) 181
22 Load Sharing (Clustering) 183
22.1 Setting up a Cluster 184
QlikView Server/Publisher 5

Contents
Part 5 QlikView Publisher 187
24 Post Installation Settings 189
24.1 Installation on a Single Machine 189
24.2 Installation on Multiple Machines 189
24.3 Installation Overview 189
25 Publisher Upgrade Tool 191
25.1 Upgrading 191
25.2 Reloading a file from the command line 195
26 Load Sharing (Clustering) 197
26.1 QlikView Distribution Service 197
26.2 Directory Service Connector 198
27 Detailed Technical View 199
27.1 Audit Logging 199
27.2 Security Groups 200
27.3 Document Administrators 200
27.4 Configuration Files 201
27.5 Triggering EDX Enabled Tasks 203
28 Section Access 207
28.1 Authorization Management 207
28.2 Important notices and Troubleshooting 208
28.3 SSL on QlikView Publisher 209
Part 6 Clients 211
29 Summary of QlikView clients 212
30 Developing Documents for Use with QlikView Server 215
30.1 General 215
30.2 General limitations when working from clients 215
30.3 Performance Considerations 215
30.4 Document Configuration 215
30.5 Security and Access restriction 216
QlikView File Security 216
Dynamic Data reduction 217
6 QlikView Server/Publisher

Contents
31 QlikView IE Plug-in 219
31.1 Plug-in Client 219
31.2 Collaboration - Shared Objects 219
31.3 Deployment of QVA for IE 221
31.4 Customizing settings for QVA for IE 221
32 QlikX - Publishing separate sheet objects from the QVA for IE plug-in client 223
32.1 Technical description of the QlikX concept 223
32.2 Limitations 223
32.3 Getting it to work 223
32.4 Capabilities, differences and limitations 224
32.5 Complete sample page 224
33 QlikView installed Windows clients 227
33.1 Locally installed Windows Client 227
33.2 Open in Server 227
34 The QlikView AJAX Zero-Footprint Client (ZFC) 229
34.1 General 229
34.2 Collaboration - Shared Objects 230
34.3 Document Repository 232
34.4 Capabilities, differences and limitations 233
34.5 ASP timeouts for very large QlikView documents 235
35 The QlikView iPhone Client 237
35.1 General 237
Supported Devices 237
35.2 Setup 237
35.3 Document Access 238
Anonymous Access Using NTFS Authorization 238
Anonymous Access Using DMS Authorization 238
Authenticated Access Using NTFS Authorization 238
Authenticated Access Using DMS Authorization 239
35.4 Application Flow 239
Sheets and objects 239
QlikView Server/Publisher 7
Contents
Supported objects 241
Design Guidelines 242
36 The QlikView BlackBerry and Java Mobile Clients 243
36.1 General 243
36.2 Communication 243
36.3 Setup 243
Configuration with JAD Files 243
Server configuration parameters: 244
General parameters: 244
Centralized Configuration in BlackBerry 245
Authorization 245
36.4 Application Flow 245
General Features 245
Supported objects 246
Supported operations 246
Keyboard mapping phone keyboard 247
Keyboard mapping qwerty 247
Touch screen support 247
Design Guidelines 248
36.5 Web Server for Mobile Downloads for QlikView 248
Prerequisites 248
Configuring the Web Server 248
Modifying the Midlet Configuration Files 248
Upload to the WebServer 249
Configuring the redirect site (optional) 249
Sample source code 249
Test 249
37 The QlikView Android Client 251
37.1 General 251
37.2 Requirements 251
37.3 Application Flow 251
8 QlikView Server/Publisher
Contents
37.4 Supported Objects 251
Part 7 Appendix 253
38 The Directory Service Provider 254
38.1 The Directory Service Provider Interface 254
38.2 Configurable ODBC 255
39 SNMP 257
40 Active Directory Attributes 261
41 How to Activate SSL for Services in Windows 263
42 Deploying MSI packages with Group policies 267
43 Glossary 275
Index 277
QlikView Server/Publisher 9

Contents
10 QlikView Server/Publisher

Part 1 QlikView Server/Publisher
QlikView Server/Publisher 11

1 Introduction1.1 Before You BeginThis documentation provides the necessary steps to complete the installation of the QlikView Server, testyour installation, and share your QlikView documents. The documentation also describes how toconfigure and monitor QlikView Server through the Management Console, how to connect to QlikViewServer and its documents through different clients, and how to set up and maintain document managementand distribution through Publisher.
QlikView ServerQlikView Server provides a platform for hosting, and sharing QlikView information over theInternet/Intranet. QlikView Server is tightly integrated with QlikView to deliver a seamless suite of dataanalysis technology to end users. The server component of QlikView Server is the centerpiece of thistechnology, supplying a robust, centrally managed, QlikView document community, connecting multipleusers, client types, documents, and objects within a secure and safe environment.
QlikView PublisherQlikView Publisher is a member of the QlikView product family that manages content and access. Bypresenting your end-users with up-to-date information and letting you manage your QlikView documentsin a powerful way, QlikView Publisher is a valuable addition to the QlikView suite.
QlikView Publisher distributes data stored in QlikView documents to users within and outside theorganization. By reducing data, each user can be presented with the information that concerns him/her.The QlikView Publisher service and user interface are now fully integrated into QlikView Server and theQlikView Management Console (QMC).
QlikView ClientsThere are multiple client types available to connect to QlikView Server. There is the installed Windowsclient - QlikView. There is an ActiveX Internet Explorer plug-in client which can also be implemented aseither a full or object based client (Internet Explorer Client – QVA for IE - and QlikX Objects Client) foranalysis in an Internet Explorer browser. There is an AJAX Zero-Footprint Client (ZFC) that providesQlikView Objects support in a standard browser without requiring client side installation. Nothing apartfrom a standard web browser needs to be installed on the client machine.
In addition to the standard clients, QlikView Server 9 will support mobile clients, including iPhone andiTouch, along with support for many popular smart phones utilizing Java Mobile Edition (Java ME).
With the installed QlikView (exe) clients and the QVA for IE ActiveX plug-in client, whole QlikViewdocuments can be shown with complete sheet layout and more or less 100% fidelity to how the documentwould look if opened as a local qvw file in QlikView. All clients, except the mobile clients, can be usedto create and maintain new sheet objects that can be shared with other users of the document throughtQlikView Server.
1.2 QlikTech Support ServicesContact us if you need product support, additional training or consultation concerning applicationdevelopment. Please consult our homepage for current information on how to get in touch with our
12 QlikView Server/Publisher
1 Introduction
support services. You will find us at:
http://www.qlikview.com
QlikTech International HeadquartersQlikTech International Phone: +1 (888)-828-9768
150 N. Radnor Chester Road Fax: 610-975-5987
Suite E220
Radnor, PA 19087
USA
For other locations please visit our home page (see above).
1.3 ConventionsStyle codingIn this documentation all menu commands and dialog options are shown in Arial bold. All file names andpaths are shown in Courier Bold. Sample code is shown in Courier and Courier Bold.
1.4 About This ManualThis manual describes QlikView Server and QlikView Publisher version 10.0. The content of both thesoftware as well as the manual may change without prior notice.
1.5 What’s New in QlikView 10Ajax client improvementsApart from the new layout features listed above, a number of Ajax specific features have been added:
Ajax performancethe Ajax client. Most notably the Ajax client’s communication with QlikView Server is nowasynchronous, just like it is when using QlikView Desktop or the QlikView Plug-in client. This meansthat you do not have to wait for the entire layout to be updated after a selection, but can continue clickinge.g. in list boxes while heavy charts are still calculating. The result is a perception of considerableperformance increase.
UI upgradesA number of graphical upgrades have been added to the Ajax client, e.g. the sheet tab row.
Extension objectsVia a new simple API it is now possible to write plug-in extension sheet objects for integrated display inQlikView layouts (works in the Ajax client and WebView only). The extensions build on a QlikViewchart object and may be written in any modern web language, e.g. Flash, Silverlight, JavaScript etc.
To have Extension objects run in QlikView Server, the Extensions folder, including the Extension objects,need to be manually added. For a standard Windows Vista or Windows 7 installation, this folder must be
QlikView Server/Publisher 13

put in “C:\ProgramData\QlikTech\QlikViewServer\”. For a standard Windows XP installation, this foldermust be put in “C:\Documents and Settings\All Users\Application Data\QlikTech\QlikViewServer\”.
Session disconnect buttonA Close button has been added in the Ajax client. With this a user can actively disconnect from a session,thereby releasing server resources.
Session recoveryThere is now a setting on QlikView Server enabling intelligent session recovery for Ajax and mobileclients. When this setting is used, the current selection state for each user will be saved when a session isended and re-applied the next time the same user reconnects to the same document. This feature iscurrently “all or nothing”, meaning that it affects all users and all documents on a server.
Server ComponentsManagement APIsIn order to enable new integration options for enterprise customers and OEM partners, new managementAPIs for QlikView Server and Publisher have been developed. The long-term ambition is to expose thefull management capability. The APIs are exposed via a web service to the new unified managementconsole.
User ManagementA new high-level tab in the enterprise management console provides a unified view of all settings, listedby users across your entire QlikView deployment. From this view it is also possible to change the settingsfor e.g. user CALs, distributions and documents.
Document AdministratorA QlikView administrator can now delegate the responsibility for managing tasks to one or more selectedusers. The QlikView administrator can also set limitations to where the document administrator is allowedto distribute a document. Read more on See "Document Administrators".
Section Access ManagementThe QlikView Enterprise Management Console now provides the functionality to create, manage and storetables that can be used to define authorization in Section Access in QlikView documents. This featureconsists of three parts:
The creation, management and storing of the actual tables which are all handled by QEMC.
The created tables are accessed from the QlikView load script using a load statement that loads from anhttp address. A command in the script editor facilitates the creation of a script snippet containing this loadstatement.
This feature will require a Publisher license. Learn more in the section "Authorization Management".
Improved Document ListsThe QlikView Server will only show documents to which the user has NTFS permissions. In QlikView 10the document lists will be filtered further: If a document has Section Access, the server will now onlyshow the document to users that also are listed in the Section Access.
Directory Service Provider for Configurable LDAPA new Directory Service Provider has been added to make it possible to connect to any LDAP directoryservice. The user is given the possibility to configure the DSP so that it suits the particular LDAPDirectory Service. It is important to know, though, that QlikView only provides the functionality to
14 QlikView Server/Publisher

1 Introduction
extract user information from the Directory Service; any authorization needed against it has to be handledseparately. Learn more on See "Configurable LDAP".
Directory Service Provider for ODBCA new Directory Service Provider has been added to make it possible to connect to any database usingODBC instead. Learn more on See "Configurable ODBC".
Multiple Events TriggerIn addition to the existing triggers which operate with OR logic when combined, we have added a newtrigger with the possibility to combine the other triggers with AND logic. Read more on See "On MultipleEvents Completed" in the QMC and See "On Multiple Events Completed" in the QEMC.
Copy/Paste Tasks and Import TaskIn order to improve the usability when having an enterprise environment we have now implemented thepossibility to copy and paste tasks and the possibility to import tasks from another Publisher installation.Read more on See "Source Documents" and See "Source Documents".
QlikView Server CPU ThrottlingIn order to control how much CPU the QlikView Server is using it is possible to set a CPU throttlingthreshold. If the CPU usage gets above this value the CPU priority is set to lower than normal and whenthe CPU usage goes back below this value the priority is set to higher than normal. The setting is foundon See "CPU Throttle".
Granular Server Objects PermissionsOn a document level it is possible to specify if no, all, or a list of selected users should be allowed tocreate Server objects. Learn more on See "Server Objects".
Browsable Mount Check BoxThe browsable mount check box is now respected in Access Point.
For cases where the Access Point should list the documents, but the “Open in Server” in QlikViewDesktop or QlikView Plug-in should not, another check box, “Respect browsable mounts”, has beenadded to the Access Point settings.
Notification E-mailIt is possible to send a notification e-mail after distribution. Please note that there is not yet any way ofoptimizing the sending: there will be one mail for each task that has the notifi-cation e-mail option set.
Audit loggingSelection of values, sheet activation, usage of bookmarks and reports, clearing of a specific object, clear alland downloads for a specific user can now be logged for the QlikView Server. In QlikView Publisher, allchanges to tasks and some changes to the settings can be logged. Read more about Server logging on See"The Audit Log" and Publisher logging on See "Audit Logging".
Minor changesFile modification date is shown in Access Point.
Possibility to sort files in Access Point on file modification date.
“Mobile clients” is now treated as one of several possible clients, which gives the possibility to specifythat a document should be e.g. visible only to mobile clients, or invisible to mobile clients.
Possibility to make shared objects visible to anonymous users.
QlikView Server/Publisher 15
Possibility to connect to the QlikView Distribution Service and to the Directory Services Connector usinga user name.
PDF distribution to folder.
Possibility to use bookmarks as reduction rules.
APIsVersion 10 will provide two new documented APIs in addition to the Core COM API. The documentationof these APIs is still a work in progress and not yet available. Documentation updates including samplesare scheduled for the Release Candidate version.
COM APIThis API will continue to be documented within a QlikView Document.
QlikView Server Management APIThe QlikView Server exposes a web service using WSDL. Documentation will be provided in htmlformat.
QlikView JavaScript APIThe new JavaScript API is a client-side API for use with the Workbench or the standard QlikView Ajaxclient. This API is also for use with the development of QlikView Extension objects. Documentation willbe provided in html format.
1.6 Migration ConsiderationsThe following considerations apply when migrating QlikView Server from version 9.x to version 10.x, andwithin 10.x where applicable.
Installation of QlikView Server now requires a reboot of the Operating System for proper operation.
The QlikView AccessPoint is now the default start page for QlikView Server. The legacy sample pages arestill available, but AccessPoint is the recommended portal for all access to QlikView documents.
The old Management Consoles for QlikView Server and Publisher have been completely replaced by thenew QlikView Management Console. You must start the QMC in order to register a license for the QVS,unless you already have a valid license on the computer running the QVS.
The AJAX client has undergone major restructuring and extension. AJAX pages no longer need to be pre-generated as in previous versions. This also means that the URLs to invoke a document with the AJAXclient have changed.
Anti aliasing on fonts is no longer available
QlikView has a common file format for versions 7, 8, 9 and 10.
Windows 2000 is no longer an officially supported host operating system. However, in some cases theQlikView Desktop may still work just fine.
16 QlikView Server/Publisher

2 Setup
2 Setup2.1 System RequirementsIn order to successfully install and run the QlikView Server/Publisher, the following basic requirementsmust be met by the system:
Hardware and Softwarel 1 GHz (x86 processor) or 1.4 GHz (x64 processor). 2 GHz or faster, with several cores/processorsrecommended.
l QlikView Server will use the color settings of the Windows server where it runs when sendingcharts and other graphics to the client. For best results, the color palette on the Windows servershould be set to at least 65,536 colors (16 bit).
l a mouse or an equivalent pointing device supported by Microsoft Windows.l (optional) a DVD drive for DVD-based install media only.l a hard disk with at least 450 MB of free disk space.l 1 GB RAM minimum on x86 systems and 4GB minimum on X64 systems. The server’s capacity topublish QlikView documents and the number of users who concurrently can connect to it arestrongly related to the amount of RAM available.
l An http server for providing AJAX ZFC solutions to end users (e.g. MS Internet Information Services(IIS) or the built-in QVWebServer). Microsoft IIS or the built-in web server is required when usingtunneling, external authentication or NT security with the AJAX Zero-Footprint client.
l TCP/IP Network.l Microsoft .NET 3.5.l Actual requirements will vary, based on system configurations. It is recommended that you workwith your local QlikView representative to configure an appropriate hardware platform for yourQlikView Server/Publisher requirements.
l Microsoft Internet Explorer 7 and later or Firefox 3 to use QlikView Management Console.
Supported Operating Systemsl Microsoft® Windows Server 2003 ™ including x64 Editionl Microsoft® Windows Server 2008 ™ including x64 Editionl Microsoft® Windows XP™ including x64 Edition*l Microsoft® Windows Vista™ including x64 Edition*l Microsoft® Windows 7 including x64 Edition*
*Recommended for development and testing purposes only.
Database requirements and recommendations for QlikView PublisherThe database in QlikView Publisher can be either a Microsoft SQL Server or an XML repository thatrequires no pre-installed software.
The supported versions of Microsoft SQL Server are SQL Server 2000, SQL 2005 or SQL 2008. If youhave a Microsoft SQL Server already set up we recommend using that. The XML repository is sufficientfor most installations when it comes to performance.
QlikView Server/Publisher 17

If you do not have a Microsoft SQL Server available we recommend that you start with an XMLrepository installation and upgrade to Microsoft SQL Server if the performance is insufficient. It is possibleto migrate all data in the database between XML repository and SQL Server.
Client requirements for installed exe clientsl See reference manual for QlikView.
Client requirements for plug-in (QVA for IE)In addition to the server requirements above, the client must be running a compatible web browser. Clientrequirements are as follows:
l Microsoft Internet Explorer 6™ or higher.
and
l Microsoft® Windows Server 2003™; orl Microsoft® Windows Server 2008™; orl Microsoft® Windows XP™ ; orl Microsoft® Windows Vista™l Microsoft® Windows 7™
Client requirements for AJAX Zero-Footprint ClientsIn addition to the server requirements above, the client must be running a compatible web browser.
Client requirements are as follows:
l Under MS Windows:- Microsoft Internet Explorer 7 or later- Firefox 2 or 3, Safari 3, Google Chrome 1
l Under Linux (tested on Ubuntu Linux only):- Netscape Navigator 7.2 or later- Firefox 1.0.6 or later
l Under MacOS X (tested on v. 10.4 "Tiger" only):- Netscape Navigator 7.2 or later- Firefox 2 or 3, Safari 3
Other Mozilla-based browsers should work and the QlikView AJAX ZFC will most probably run on manyother environments, including various UNIX versions but this has not been verified by QlikTech R&D. Asthe number of possible combinations of operating system versions and browser versions is very large,QlikTech cannot guarantee correct operation with all possible set-ups. If some specific combination wouldbe found to suffer from problems, we encourage customers to report back, so that better coverage can beachieved in future releases of QlikView.
Note! Running Ajax Zero-Footprint Client on a mobile device is associated with several limitations. Werecommend that you use one of the mobile clients for QlikView instead; BlackBerry, iPhone or Java ME.
Client Requirements for Mobile ClientsA web server is needed to serve the mobile downloads for QlikView. In addition to the serverrequirements stated in the QlikView Server manual, the mobile clients must be running compatiblesoftware.
In order to use Microsoft IIS and the QlikView BlackBerry mobile client, you must enable asp pages on theIIS.
18 QlikView Server/Publisher
2 Setup
Client requirements are as follows:
Apple iPhone / iPod Touch 2G and 3G, iPad:
- ios 3.1.1 or above
- Wi-Fi or 3G recommended
BlackBerry
- OS 4.5 or later
- Wi-Fi or 3G recommended
Java Mobile Devices
- CLDC 1.1, MDIP 2.0 and JSR-172
- Wi-Fi or 3G recommended
Requirements for QlikView Management ConsoleWhen accessing the QlikView Management Console through a web browser, the following minimumrequirements apply:
- Microsoft Internet Explorer 7 or later
- Firefox 3
2.2 Upgrading QlikView ServerIf you are installing QlikView Server for the first time on a server, you may skip this section, and proceedto "Installing QlikView Server" on page 20 for installation instruction. If you already have QlikViewServer installed on a server, and would like to upgrade to a more current release, then follow theinstructions in this section.
Whether you are upgrading QlikView Server to a new release or a new version, it is helpful to be aware ofa few basic practices that will help to insure a successful transition to a new level.
l Always be sure to read the ReadMe documentation, if available, prior to installing an upgrade. Thiswill have the most current information available to help you perform a successful migration.
l Be sure you have backup media of the current software.l QlikView Server must be stopped to perform an upgrade, so it is best to schedule this procedure foran off time.
l Registration (licensing) information and Settings will be saved by default when the QlikView Serverprogram is removed. They will then be applied to any subsequent install of QlikView Server on thatsystem.
Upgrading to a new release of QlikView Server will generally require an uninstall of the old release andinstall of the new release.
Note! The installation does not support an upgrade from beta or release candidate versions of QlikView 10.
For the uninstall of QlikView Server, be sure to perform the following steps prior to running a WindowsRemove Program procedure:
1. Verify that backup media exists for the current release of QlikView Server and backup all currentfiles associated with QlikView Server (HTML pages, QlikView documents, licensing file, QlikView
QlikView Server/Publisher 19

Server .share files, etc.)2. If you are running version 8 of QlikView Server, use the QlikView Management Console Users tab
to determine if there are any active users linked to QlikView Server. You may wish to send out abroadcast message to notify users that the service will be stopping.
3. Stop the QVS service.4. Uninstall the QlikView Server from the Windows Control Panel.
For client program updates, if applicable, be sure the client computer has no open QlikView Serversessions before applying the update. If QlikView Publisher is running on the same machine, it must beuninstalled manually before installing QlikView Server.
Now you are ready to install the new release of QlikView Server.
Note! If you are upgrading from a previous version and are using Microsoft IIS, you must uppdate thevirtual folders in the IIS.
QVAJAXZfc, should be uppdated to C:\ProgramFiles\QlikView\Server\QlikViewClients\QlikViewAjax.
QvPlugin should be updated to C:\ProgramFiles\QlikView\Server\QlikViewClients\QlikViewPlugin.
QvClients should be updated to C:\Program Files\QlikView\Server\QlikViewClients
QvAnalyzer should be updated to C:\ProgramFiles\QlikView\Server\QlikViewClients\QlikViewDesktop
QvJava has been removed.
QvPrint has been removed.
2.3 Upgrading QlikView PublisherA fundamental change regarding tasks and jobs was made in version 9. The concept of jobs was removedand replaced by triggers that are added to each task. The jobs you had in version 8.5 that contained morethan one task, will be converted to a task chain. The first task in the old job will have a trigger thatcorresponds to the schedule of the job. The following tasks will have a “on finish of another task” triggerthat points to the previous task in the old job. Note that if you in version 8.5 have a disabled task withina job, the task chain will be broken after upgrade if you do not take the appropriate actions during theupgrade process.
One other significant difference in version 9 and 10 is that Active Directory distribution groups no longerare supported as user containers. To add users and groups in QlikView Publisher, you must use ActiveDirectory users or security groups. This change was made to comply with Microsoft’s recommendations.
When upgrading you must run the QlikView Publisher Upgrade Tool. This should be done after theinstallation of QlikView version 10. The upgrade tool does not support upgrades from Publisher StandardEdition. "Publisher Upgrade Tool" on page 191.
2.4 Installing QlikView ServerThe QlikView Server installation can be performed off DVD media or from a disk file. To installQlikView Server, insert the DVD in a drive accessible from the target server hardware.
20 QlikView Server/Publisher
2 Setup
It is recommended to install QlikView Server after the web server software (if you are not using theQlikView Web Server).
Note! If the required Microsoft .NET 3.5 Framework is not installed, it will be included as part of theQlikView Server installation process and downloaded from the Internet.
TIP: It is recommended to not move folder locations after QVS installation is complete, since manysettings are dependent on their initial file location. If you wish to change the location of QVS after it isinstalled, this should be done through an uninstall/install process.
Note! In order to install the Microsoft IIS support, the IIS Admin Service must be started!
1. If the DVD does not auto-run, or if you are installing from a different media, then executeQlikViewServer_x86.exe or QlikViewServer_x64 from the installation media. The first dialogwelcomes you to the installation.Click Next.
2. Select the region for the local location of the server. Click Next to continue.3. Read the license agreement, and continue by selecting I accept the terms in the license agreement,
and then click Next.4. Enter the user information for QlikView Server. Click Next to continue.5. All files will be installed under the specified folder location. If you would like to change the root
folder location of the installed files, click Change to specify the preferred location. Continue byclicking Next.
6. The Profile dialog lets you customize your installation. Select the features you wish to run. To selectindividual features, click the Configure button, then click Next to continue.
7. In the Logon Information dialog you set the account that the QlikView Server/Publisher serviceswill run under. Click Next.
Note! If you use a local administrator account on Windows XP x64 Sp2 that is not part of a domain, theinstallation program will not be able to resolve the account! You will have to set the account for theservices in Computer Manager manually.
8. Click Install to start the installation.9. Once the Installation is complete, click Finish.
Note! You must restart the operating system in order to enable the functionality of the QlikView Server.
Installation ProfilesWith the different installation profiles that you can choose from in the installation, you can choose exactlywhat you want to run. You can choose from the following profiles:
Single Machine Installation
Choose this alternative if you want to run all components on one single computer. This installs theQlikView Server and examples, the QlikView Distribution Service, the Directory Service Connector, theQlikView Web Server and the QlikView Management Server.
QlikView ServerThis alternative is for use in distributed environments and should be used to install the first QlikViewServer. This installs the QlikView Server and examples, as well as the Directory Service Connector.
Additional QlikView ServerThis alternative is used in clustered environments and only installs a QlikView Server.
QlikView Server/Publisher 21

Publisher EngineIn a distributed environment, this alternative is used to install reload functionality for the QlikView Serveror install a Publisher engine To run a Publisher Engine you need a Publisher license. This installs theQlikView Distribution Service.
Management ConsoleIn a distributed environment this is used to install only the Management Console. This installs theQlikView Management Service.
WebserverIn a distributed environment this is used to add web server funtionality. This installs the QlikView WebServer or support for Microsoft IIS.
Example ConfigurationsSimple QlikView Server ClusterComputer 1: main QlikView Server and management server. Install Single Machine Install.Computer 2: QlikView Server. Install Additional QlikView Server.
Distributed QlikView Server ClusterComputer 1: management server. Install Management Console.Computer 2: main QlikView Server. Install QlikView Server and Publisher Engine.Computer 3: extra QlikView Server. Install Additional QlikView Server.
Distributed Publisher EnvironmentComputer 1:management server and QlikView Server. Install QlikView Server and Management Console.
Computer 2: Publisher engine. Install Publisher Engine.
Logging the InstalltionWhen Setup.exe is run, a log file is written to the temp folder. The log file is calledQlikViewServerx86.wil for the x86 version and QlikViewServerx64.wil for the 64-bit version. Eachtime the installation is run a new file is generated, over writing the old log file.
Obtaining the MSI packageIf you need the msi package for installation you have to extract it from the exe file.
1. Start the installation from the exe file and let the first dialog open.2. In the temp folder in C:\Documents and Settings\username\Local Settings, or
C:\Users\username\AppData\Local depending on you operating system, you will find the msifile under a random name, e.g. ed34g.msi.
3. Copy the msi file to a location of your choice.4. Exit the exe installation.5. Install using the msi (see below for silent installation). See also "Deploying MSI packages with
Group policies" on page 267 in Appendix.
Silent InstallationTo make a silent installation start the msi file, 32-bit or 64-bit, from the command line with the followingparameters for the msi package:
msiexec /i QvsSetupRedist.msi MYUSERNAME=domain\username MYPASSWORD=password /l*vlog.txt /qn
22 QlikView Server/Publisher

2 Setup
and for the exe file:
msiexec /i QvsSetupRedist.exe MYUSERNAME=domain\username MYPASSWORD=password /l*v log.txt/qn
where domain\username is the domain and username of the user you wish the QlikView Server/Publisherservices to run as, password is the password of that user, /l*v creates a log for the installation and /qnmakes the installation silent.
2.5 Completing the InstallationAfter successfully installing QlikView Server/Publisher, you must complete the following steps to activateit:
1. Start Services2. Register
These steps must be completed after the installation using the QlikView Management Console (found inthe Start menu, under Programs, QlikView). The topics in the following explain how to use theManagement Console.
Start ServiceOnce QlikView Server/Publisher has been installed as Windows services, it can be started. If the QlikViewServer is set for automatic startup, rebooting the operating system will start the QlikView Server service.To manually start the service, go to the Windows Computer Management, Services.
Note! Running real-time anti-virus protection on a Server will degrade performance of QlikViewServer/Publisher. It is recommended that the following directories are excluded in the anti-virus, Userdocuments, Source documents and log directories. Note that only read and write operations should beexcepted!
Running Microsoft Internet Information ServicesIf you are using MS IIS as your web server in a Windows Server 2003 or greater environment, be sure tocheck the following settings to insure proper operation of the QlikView Server sample pages, as well asextended functions (e.g. QVS Tunnel).
On the IIS you must:
l Enable ASP Pages (only necessary if using BlackBerry or Java ME clients)l Enable ASP.NETl If your computer is on a domain and you are running IIS 6, you must add the account that is set asIdentity on the QlikView IIS application pool to the IIS_WPG group (Internet Information ServiceWorker Process Group).
l If you are using Microsoft IIS 6, read the Microsoft knowledge base article 871179 and implementthe appropriate resolution.
l Change the path to the file AccessPointSettings.aspx to point to the IIS’s virtual folder, for examplehttp://MyServer/QvAjaxZfc/AccessPointSettings.aspx, in QEMC under System - Setup -QlikView Web Servers - Url.
QlikView Server/Publisher 23

Change the URL for the AccessPoint settings file
See "For Tunneling on a Windows Server using IIS" on page 162 for setting up tunneling with IIS.
Note! To optimize performance when running Microsoft IIS and Ajax Zero-Footprint you should turncompression on in the web server. Read more on Microsoft TechNet. Seehttp://technet.microsoft.com/en-us/library/cc730629%28WS.10%29.aspx for how to configure IIS 6 andhttp://technet.microsoft.com/en-us/library/cc782942%28WS.10%29.aspx for IIS 7.
RegisterRegistration authenticates your copy of QlikView Server and allows it to run on your computer. In orderto register, you must have a valid Serial Number and Control Number issued by your vendor. If you donot have both a Serial Number and a Control Number, contact your vendor.
In the QlikView Management Console (Licenses), enter the Serial Number and Control Numberassigned to your copy of QlikView Server/Publisher. You should also enter your name and organizationin the fields provided..
The Licenses page for QlikView Management Console
The License Enabler File (lef.txt) for QlikView Server will be automatically written toC:\ProgramData\QlikTech on Windows Vista and later, and to C:\Documents and Settings\AllUsers\Application Data\QlikTech in older operating systems. The QlikView Publisher LEF file issaved in C:\ProgramData\QlikTech\Publisher\CommandCenter\Publisher LEF on Windows Vistaand later, and on earlier operating systems it is found under C:\Documents and Settings\AllUsers\Application Data\QlikTech.
Use the Update License from Server to download a new lef file from QlikTech’s Lef server. This isprimarily used when updating the number of CALs.
24 QlikView Server/Publisher

2 Setup
If for any reason, the LEF information cannot be accessed through the Internet from your server, you canobtain this information from your vendor, and copy the entire LEF.txt file to this location, or paste theLEF data using the corresponding field on the QlikViewManagement Console, License tab. Contact yourvendor for specific instructions.
QlikView Server/Publisher 25

26 QlikView Server/Publisher

3 QlikView Web Server
3 QlikView Web ServerA new feature as of version 9.0 is that the http service, the AccessPoint Service and the AccessPoint Website have been merged into one single service called QlikView Web Server, QVWS. The QlikView WebServer is used by default, in an Out-of-the-Box installation, thus removing the dependency on IIS thatpreviously existed. The QVWS service is responsible for not just serving web pages and preparing the filelist for the AccessPoint, but also in the load balancing of QlikView Servers.
The QVWS is used by the AccessPoint as a Web Server. The pages for the AccessPoint are by defaultlocated in the folder C:\Program Files\QlikView\Web. The QVWS will also act as the web server forany AJAX pages that the end users access.
The third functionality the QVWS provides is the load balancing of the QVS. Load balancing QlikViewServers is different from load balancing a web server, since the additional work and resource consumptionis almost similar for each user, so it does not matter on which server the user ends up.
The default load balancing scheme for a QlikView Web Server is “Random”, where a user is sent to arandom QVS, whether the document they seek is loaded there or not. You can also set the QVWS to loadbalance according to “Loaded Document”. The logic in the QVWS to load balance is based oncommunication with the QVS. The first question to all QlikView Servers is: “Do you have this documentloaded in RAM?” if only one QVS has that particular document loaded then the user will be directed tothat QVS. If more than one QVS, or none of the QlikView Servers has the document loaded the secondquestion is “How much free RAM is available?” based on that answer the user will be sent to a certainQVS. The case of a document being loaded on multiple QlikView Servers at the same time is mainly fromPreloading which would load a document in RAM on all servers in a cluster.
The settings for load balancing are configured in config.xml, see "Configuring the QlikView Web Service"on page 29.
Note! You cannot run the QlikView Web Server in both HTTP and HTTPS mode. Only one port will beused.
3.1 Qlikview AccessPointThe AccessPoint is a web portal that lists the documents that each user has access to. It is important tounderstand that the AccessPoint only links to each document, it does not host the documents themselves,that is done by the QlikView Server.
On the AccessPoint you can either view the documents you are authorized to see in a detailed list or asthumbnails.
QlikView Server/Publisher 27
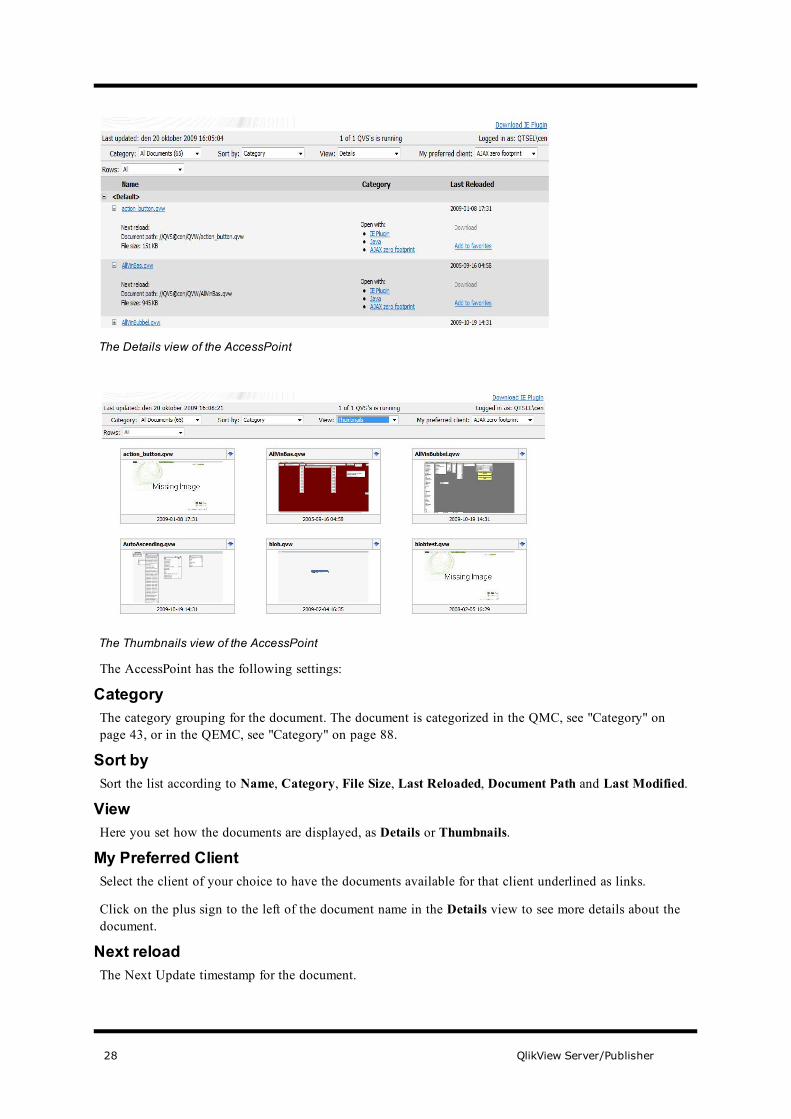
The Details view of the AccessPoint
The Thumbnails view of the AccessPoint
The AccessPoint has the following settings:
CategoryThe category grouping for the document. The document is categorized in the QMC, see "Category" onpage 43, or in the QEMC, see "Category" on page 88.
Sort bySort the list according to Name, Category, File Size, Last Reloaded, Document Path and Last Modified.
ViewHere you set how the documents are displayed, as Details or Thumbnails.
My Preferred ClientSelect the client of your choice to have the documents available for that client underlined as links.
Click on the plus sign to the left of the document name in the Details view to see more details about thedocument.
Next reloadThe Next Update timestamp for the document.
28 QlikView Server/Publisher

3 QlikView Web Server
Document pathThe path to the document.
File sizeThe size of the document.
Has ImageIf there is an image that can be displayed in the Thumbnails view.
Open withChoose which client to open the document with, IE Plugin, AJAX zero footprint or Download. ChooseDownload for offline analysis of the document.
Add to favoritesClick this link to add the document to your favorites. You can view your favorite documents by choosingCategory: Favorites in the AccessPoint.
3.2 Starting the QlikView built-in web serverThe built-in web server is installed as a Windows service during a default Complete installation ofQlikView Server. To start the server, use the Windows Services dialog. In the Services dialog, scroll downto find the QlikViewWebServer entry and start it.
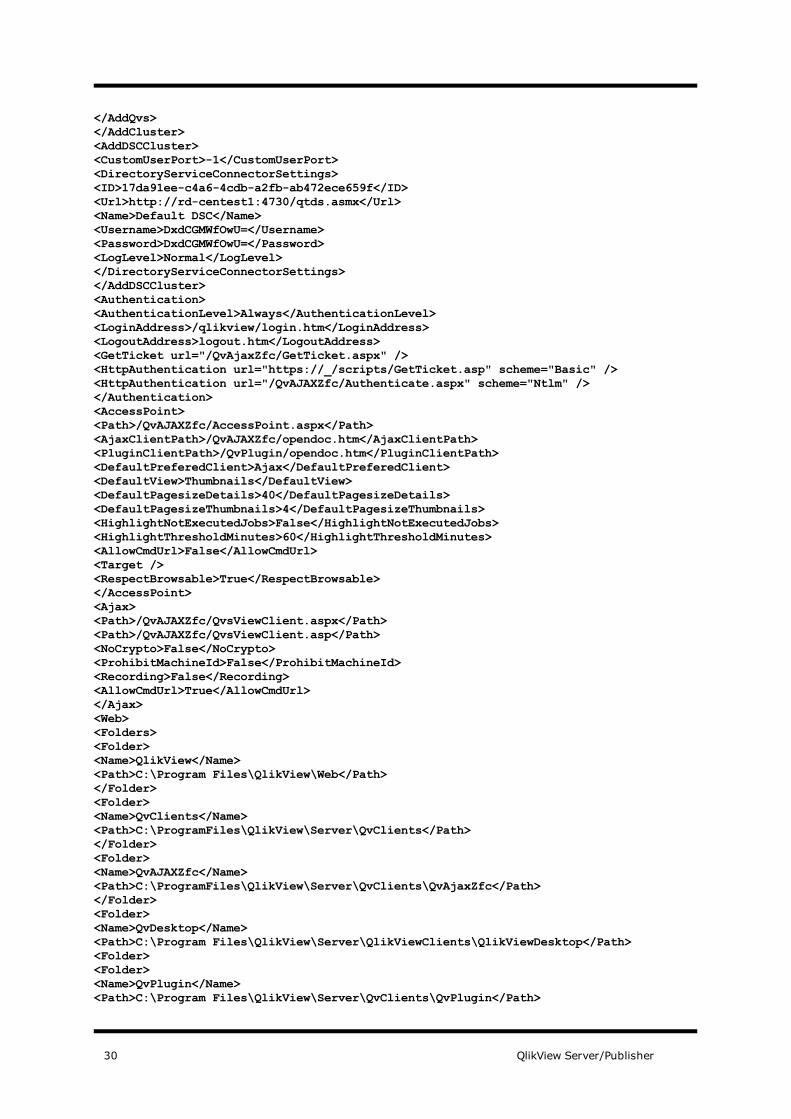
3.3 Configuring the QlikView Web ServiceYou may configure the web server either through the user interface, "System" on page 107, or by editingthe configuration file, config.xml, located in the following location:
C:\ProgramData\QlikTech\QvWebServer
The config.xml file contains a commented out section to simplify the usage of common but non-defaultoptions.<Config><DefaultUrl>http://_/</DefaultUrl><DefaultQvs>local</DefaultQvs><ConfigUrl>http://_:4750/qvws.asmx</ConfigUrl><TunnelUrl>/scripts/QVSTunnel.dll</TunnelUrl><QvsStatusUrl>/QvAjaxZfc/QvsStatus.aspx</QvsStatusUrl><LogLevel>Information</LogLevel><UseCompression>True</UseCompression><InstallationPath>C:\Program Files\QlikView\Server\Web Server</InstallationPath><QvsTimeout>60</QvsTimeout><QvsAuthenticationProt>Negotiate</QvsAuthenticationProt><QvpPort>-1</QvpPort><AddCluster><Name>local</Name><LoadBalancing>Random</LoadBalancing><AlwaysTunnel>False</AlwaysTunnel><AddQvs><Machine>localhost</Machine><Port>4747</Port><LinkMachineName>RD-CENTEST1</LinkMachineName><Weight>1</Weight><Username /><Password>Encrypted=DxdCGMWfOwU=</Password>
QlikView Server/Publisher 29
</AddQvs></AddCluster><AddDSCCluster><CustomUserPort>-1</CustomUserPort><DirectoryServiceConnectorSettings><ID>17da91ee-c4a6-4cdb-a2fb-ab472ece659f</ID><Url>http://rd-centest1:4730/qtds.asmx</Url><Name>Default DSC</Name><Username>DxdCGMWfOwU=</Username><Password>DxdCGMWfOwU=</Password><LogLevel>Normal</LogLevel></DirectoryServiceConnectorSettings></AddDSCCluster><Authentication><AuthenticationLevel>Always</AuthenticationLevel><LoginAddress>/qlikview/login.htm</LoginAddress><LogoutAddress>logout.htm</LogoutAddress><GetTicket url="/QvAjaxZfc/GetTicket.aspx" /><HttpAuthentication url="https://_/scripts/GetTicket.asp" scheme="Basic" /><HttpAuthentication url="/QvAJAXZfc/Authenticate.aspx" scheme="Ntlm" /></Authentication><AccessPoint><Path>/QvAJAXZfc/AccessPoint.aspx</Path><AjaxClientPath>/QvAJAXZfc/opendoc.htm</AjaxClientPath><PluginClientPath>/QvPlugin/opendoc.htm</PluginClientPath><DefaultPreferedClient>Ajax</DefaultPreferedClient><DefaultView>Thumbnails</DefaultView><DefaultPagesizeDetails>40</DefaultPagesizeDetails><DefaultPagesizeThumbnails>4</DefaultPagesizeThumbnails><HighlightNotExecutedJobs>False</HighlightNotExecutedJobs><HighlightThresholdMinutes>60</HighlightThresholdMinutes><AllowCmdUrl>False</AllowCmdUrl><Target /><RespectBrowsable>True</RespectBrowsable></AccessPoint><Ajax><Path>/QvAJAXZfc/QvsViewClient.aspx</Path><Path>/QvAJAXZfc/QvsViewClient.asp</Path><NoCrypto>False</NoCrypto><ProhibitMachineId>False</ProhibitMachineId><Recording>False</Recording><AllowCmdUrl>True</AllowCmdUrl></Ajax><Web><Folders><Folder><Name>QlikView</Name><Path>C:\Program Files\QlikView\Web</Path></Folder><Folder><Name>QvClients</Name><Path>C:\ProgramFiles\QlikView\Server\QvClients</Path></Folder><Folder><Name>QvAJAXZfc</Name><Path>C:\ProgramFiles\QlikView\Server\QvClients\QvAjaxZfc</Path></Folder><Folder><Name>QvDesktop</Name><Path>C:\Program Files\QlikView\Server\QlikViewClients\QlikViewDesktop</Path><Folder><Folder><Name>QvPlugin</Name><Path>C:\Program Files\QlikView\Server\QvClients\QvPlugin</Path>
30 QlikView Server/Publisher

3 QlikView Web Server
</Folder></Folders><Types><Type><Extension>.css</Extension><Content>text/css</Content></Type><Type><Extension>.htm</Extension><Content>text/html</Content></Type><Type><Extension>.html</Extension><Content>text/html</Content></Type><Type><Extension>.jpg</Extension><Content>image/jpg</Content></Type><Type><Extension>.gif</Extension><Content>image/gif</Content></Type><Type><Extension>.jar</Extension><Content>application/octet-stream</Content></Type><Type><Extension>.png</Extension><Content>image/png</Content></Type><Type><Extension>.exe</Extension><Content>application/octet-stream</Content></Type><Type><Extension>.msi</Extension></Type><Type><Extension>.htc</Extension><Content>text/xml</Content></Type><Type><Extension>.js</Extension><Content>text/javascript</Content></Type><Type><Extension>.xslt</Extension><Content>text/xml</Content></Type><Type><Extension>.xml</Extension><Content>text/xml</Content></Type><Type><Extension>.xls</Extension><Content>application/vnd.ms-excel</Content></Type><Type><Extension>.csv</Extension><Content>application/octet-stream</Content></Type><Type><Extension>.pdf</Extension>
QlikView Server/Publisher 31

<Content>application/pdf</Content></Type></Types></Web></Config>
The tags have the following meaning:DefaultURL
The url of the QlikView Server.ConfigUrl
This is the url the QMC and QEMC use to communicate with the QlikView Web Server.
TunnelUrl
The url used for tunneling.QvsStatusUrl
The url to the status page for the QlikView Server.
LogLevel
Sets the level of logging. Possible settings are Information (High), Warning (Medium) and Error (Low).
UseCompression
Set whether the information sent should be compressed.
InstallationPath
The installation path of the QlikView Web Server.
QvsTimeout
The timeout in secons of the QlikView Server.QvsAuthenticationProt
How the QlikView Server Authenticates. Set to Negotiate, Kerberos or NTLM.AddCluster - Name
The name of the cluster.AddCluster - LoadBalancing
How the load balance should be calculated. Possible values are Random, where the client is directed to aQVS at random, or LoadedDocument, where the client is directed to the QVS where the document theclient requests already is loaded.AddCluster - AddQvs - AlwaysTunnel
Set to true to anlways tunnel the communication to the QlikView Server.AddCluster - AddQvs - Machine
The name of the computer where the QlikView Server is running.AddCluster - AddQvs - Port
The port the QlikView Server listens to.AddCluster - AddQvs - LinkMachineName
The external name of the QlikView Server, used by the QlikView Plugin clients.AddCluster - AddQvs - Weight
32 QlikView Server/Publisher

3 QlikView Web Server
Set a higher value if you wish the QlikView Server to be elected more frequently when using random loadbalancing.AddCluster - AddQvs - Username
Enter a user name if needed to connect to the QlikView Server.
AddCluster - AddQvs - Password
Enter a password if needed to connect to the QlikView Server.AddDSCCluster - CustomUserPort
The port for the custom user DSC.AddDSCCluster - DirectoryServiceConnectorSettings - Url
The location of the Directory Service Connector.AddDSCCluster - DirectoryServiceConnectorSettings - Name
The name of the cluster.AddDSCCluster - DirectoryServiceConnectorSettings - Username
Enter a user name if needed to connect to the Directory Service Connector.AddDSCCluster - DirectoryServiceConnectorSettings - Password
Enter a password if needed to connect to the Directory Service Connector.Authentication - AuthenticationLevel
Sets how the client should access the AccessPoint. Possible values are Always, Login and Never.Authentication - LoginAddress
The path to an alternative login page used for custom users.Authentication - LogoutAddress
The path to an alternative logout page used for custom users.Authentication - GetTicket
The url and authentication used to get a ticket from the Server for a client.Authentication - HttpAuthentication
The url and authentication used go get a ticket from the Server for a client if using SSL.AccessPoint - Path
The path where the Access Point is installed.AccessPoint - AjaxClientPath
The relative path to the Ajax client.AccessPoint - PluginClientPath
The relative path to the IE plugin client.AccessPoint - DefaultPreferredClient
Sets which client should be set as preferred client for a user’s first visit to the AccessPoint for clients.AccessPoint - DefaultView
The default view of documents on the AccessPoint, details or thumbnails.AccessPoint - DefaultPagesizeDetails
The number of rows on the AccessPoint when using the view Details.AccessPoint - DefaultPagesizeThumbnails
The number of rows on the AccessPoint when using the view Thumbnails.AccessPoint - RespectBrowsable
QlikView Server/Publisher 33

When set to True only those mounts in the QVS that are set as Browsable will be displayed on theAccessPoint.Ajax - Path
The path to QvsViewClient.aspx. The path may be changed, but the file name must remain unchanged forthe installation to work.Ajax - NoCrypto
Prohibit the use of encryption between the QlikView Web Server and the QlikView Server.
Ajax - ProhibitMachineID
Prohibit sending machine ID. This will effectively exclude the usage of anonymous bookmarks.Ajax - Recording
When set to True, the qvpx calls for the AJAX zero footprint client are logged.Web - Folders
The path to the different virtual folders in the QlikView Web Server. Change the name and path if thefiles are installed to folders other than the default.Web - Types
Specify what file extensions the clients are allowed to download from the Access Point/QlikView WebServer.
3.4 The QlikView Server Status PageIncluded in the QlikView Web Server is an aspx page that displays the status of the QlikView Server,http://servername/QvAjaxZfc/QvsStatus.aspx. The page displays the status of the Server defined inthe config.xml for the QlikView Web Server, but you can also query for a specific Server or the Servers ina cluster by adding the name of the Server or cluster to the URL:http://servername/QvAjaxZfc/QvsStatus.aspx?server=myserver(or mycluster). If the Serveror the cluster do not exist, the status NotRegistered will be returned.
AServer that is down will return the statuscode HTTP/1.1 503. If all Servers are up and running the statuscode http/1.1 200 OK is returned.
The status page will also display codes such as RestartNeeded and OffDuty:
34 QlikView Server/Publisher
Part 2 QlikView ManagementConsole
QlikView Server/Publisher 35

4 IntroductionQlikView Management Console (QMC)The QlikView Management Console is completely built around modern AJAX technology, it will run in abrowser and without reliance on e.g. Microsoft IIS. The number of available settings is reduced, therebyproducing a cleaner, more intuitive interface more suited for those content with most default settings.
Even without the Publisher Module, the QMC will feature a page for basic reload scheduling. If thePublisher Module is installed this will be expanded to a wizard style interface for setting up Publishertasks.
The QMC handles only one instance of QlikView Server and one execution instance of the Publisher.
To open the Management Console go to Windows Start menu, QlikView and choose QlikViewManagement Console or open a web browser and enter the urlhttp://servername:4780/qmc/default.htm.
QlikView Enterprise Management Console (QEMC)The QEMC gives you full access to all possible settings for QlikView Server and the Publisher Module. Italso lets you control multiple instances of QlikView Server and multiple Publisher execution instancesfrom a single management console, by means of an integrated tree-control.
Just as the QMC the QEMC is built around AJAX technology and will run in a browser. Also hereextensive usability studies have been done prior to implementation.
To open the Enterprise Management Console go to Windows Start menu, QlikView and choose QlikViewEnterprise Management Console or open a web browser and enter the urlhttp://servername:4780/qemc/default.htm. See "Introduction" on page 72 for details.
4.1 RepositoryThe QlikView Management Console will create an XML repository for Qlikview Publisher located inC:\ProgramData\QlikTech\Publisher\CommandCenter\QVPR on Windows Vista and later, and onolder operating systems on C:\Documents and Settings\All Users\ApplicationData\QlikTech\Publisher\CommandCenter\QVPR. For use of SQL or change the location of therepository, the QlikView Enterprise Management Console is required.
36 QlikView Server/Publisher

5 Status
5 Status
The Status tab in the QMC
The Status tab displays the status of the Server/Publisher, the User Documents and the Source Documentsthat have been scheduled with a task are displayed, together with their current status.
The documents are preceded by a symbol showing the status of the task. A task can be Running ,Aborting or Failed . A task is aborted if you click stop, when it is running. Look in the log file (seebelow) for the task for more information as to why a task has been aborted or has failed.
The different Windows services are displayed with their status and the name of the server on which theyrun.
At the bottom of the page a part of the lastest log message for the highlighted task is displayed. Thecomplete log is found in C:\ProgramData\QlikTech\Publisher\Qlikview DistributionService\1\Log.
QlikView Server/Publisher 37

38 QlikView Server/Publisher
6 User Documents
6 User Documents
The User Documents tab in the QMC
Here all documents that are availabe in the server are displayed. The Root Folder, set on the QlikViewServer Settings tab will be shown as /, any additional folders will be displayed with the Name they weregiven. The menu on the right contains all the possible settings for the selected document.
Note! All time specifications must be in 24-hour format.
6.1 Server SettingsHere you specify how the user documents should behave on the Server.
The Server Settings page in the QMC
Availability limitationsHere you set if the highlighted document should be loaded on the QlikView Server.
This setting is only available if your QlikView Server license limits the number of documents you mayload concurrently.
QlikView Server/Publisher 39

Preload OptionsHere you may set the preload options for the document. A preloaded document is loaded into the server’sprimary memory to ensure quick access at all times. It will however, use up memory even when no user isaccessing the document.
Choose one of the options for Preloaded as follows:
NeverThe document will never be loaded automatically. Standard loading techniques, based on user requestsand Document Timeout settings will apply.
AlwaysThe document will always be loaded into server memory.
RestrictedThe document will be loaded automatically, based on specific day of the week and time restrictions.
If Preloaded is set to Restricted is selected, you may choose specific days of the week to automaticallyload the document and the times of the day to load and unload. All times are server local times (in 24hour format). The server time zone is set during installation of the operating system. See the WindowsControl Panel - Date and Time for more details.
ConcurrencyMax concurrent sessionsSets the number of concurrent sessions for the document.
Accesspoint Access MethodsMark the checkboxes for which flavors of QlikView clients that should be allowed on the AccessPoint.
UrlEnter a URL if you want to use your own html pages, instead of the default, for displaying the AJAXpages.
40 QlikView Server/Publisher
6 User Documents
6.2 Authorization
The Authorization page in the QMC
This tab is used to configure document authorization settings for the selected QlikView document. Thistab is only available if DMS Authorization is selected as the authorization method for this server. Onlyusers specified in this configuration will be allowed access to the document once DMS Authorization isselected. DMS Authorization is set in QlikView Server Settings, Security, see "DMS Authorization" onpage 64.
To add an authorized user/group, click on the Add button. To remove an existing authorized user/group,click on the X icon. The User/Group can be either Anonymous or named. Group names may be used, butaccess to the QlikView Directory Services Connector (DSC) will be required to resolve the group. Click
the properties icon to set the access restrictions for the user/group.
QlikView Server/Publisher 41

The Access dialog in the QMC
Access can be granted to all users, Anonymous, or to named users/groups. You can set the Access toAlways for no time restrictions, or Restricted to limit access to this document to specific days of the weekas well as times. All times are server local times (in 24 hour format).
6.3 Document Information
Document Information page in the QMC
42 QlikView Server/Publisher

6 User Documents
CategoryThis setting lets the administrator create, edit and delete categories. A category bundles documents incontainers to make categorization easier for the end-user. They are only visible to the end-user on anAccessPoint. Each document can only be part of one category. Clicking in the field will display a popupwith previously used categories.
Source DocumentThe name of the source document. This setting is only relevant if it is run through a QlikView Publishertask. The name is not changed by a QlikView Server reload.
AttributesIn this group you may set your own meta data attributes, with names and values, for the document. Theseattributes can be read from the database. The attributes will not be saved together with the document butin the metadata of the Server.
6.4 Reload
The Reload page in the QMC
This tab is available when running only QlikView Server. On this tab the schedule for reloading adocument is configured. The schedule can be set to None, Hourly, Daily,Weekly,Monthly,Continuously, Completion of, or External event.
On event of another taskSet this if the reload should be set off by another reload of a certain document.
External eventSet if an external event should set off the reload. Fill in the Password for the external event.
QlikView Server/Publisher 43

Timeout secondsSet a time limit for the reload. If the document is not reloaded within the timeout the process will beterminated and the old data is kept in the document.
DependencyWhen a reload that has a dependency is about to be executed, it will check the status of the dependencyand if that status is failed, the current reload will not be executed.
Data ProtectionThis setting allows you to select the username and password the Distribution Service should use whenopening this document. The default configuration is for the QlikView Distribution service to use theWindows credentials that are set for the service itself in the Windows Computer Management Console.Read more about section access on "Section Access" on page 207.
6.5 Document CALsIn order to connect to a QlikView Server each client needs a Client Access License (CAL). Read moreabout the different types of CALs and how they work in "Licensing" on page 173. This tab is onlyavailable if the Server license contain Document CALs.
The Document CALs page in the QMC
SummaryThese lines show the number of Document CALs that the license contains, the number of Document CALsthat not yet are allocated to any document, the number of Document CALs allocated to this specificdocument, the number of Document CALs within this document that are assigned to users, and the numberof CALS embedded in this document respectively.
44 QlikView Server/Publisher

6 User Documents
Document CALsNumber of CALs allocated to this DocumentEnter the number of Document CALs that should be allocated to this document. Initally the number willbe zero.
Allow Dynamic CAL AssignmentMark this check box if you want the QlikView Server to assigne CALs to any user that opens thedocument.
Assigned Named CALsThe current assignment of CALs is displayed. Document CALs can be either automatically or manuallyassigned to users by clicking on the Assign CAL button if there is a Document CAL. Note that theallocation of a CALs does not imply security.
If the Allow Dynamic CAL assignment is checked, a new Document CAL will automatically be grantedto a user connecting to this QlikView Server for the first time, as long as there are available DocumentCALs to assign.
The page has a list showing the names of all users currently holding a Document CAL on the document.You can also see the time of the respective user's last activity on the server. A name can be anauthenticated user name or a machine name (including MAC address).
To delete an assigned user, thus freeing a Document CAL, click on the Delete button ( ). If the CALhas not been in use for the last 24 hours, it will be deleted immediately. If the CAL is currently being usedor has recently been used, it will be marked for deletion, and not allow new sessions for user accessthrough this CAL, but will still occupy an allocated CAL until the Quarantine time ends. During thisperiod, you may undelete by clicking the Restore button ( ). After the quarantine period, you maydelete the entry manually (by clicking on the Delete button), or restart the QVS service.
QlikView Server/Publisher 45

46 QlikView Server/Publisher

7 Source documents
7 Source documentsOn this tab all the registered source documents are displayed. A source document is a QlikView documentthat contains data that is to be made accessible to end-users in the form of User Documents. This tabrequires a QlikView Publisher license.
The Source document tab in the QMC
Select a document and click on the green plus sign in the upper right corner to start the Create Taskwizard.
When a task is set up you can see the status of the task, and start and stop a task with the play icon.
You can create task chains, where one task triggers another. For example, Document 1 is reloaded everyhour and upon successful execution a distribution task is run for Document 2 and if that is successful adistribution is run for Document 3 and so on.
Note! If you disable a trigger for one of the tasks in the chain, the chain will be broken. If you disable oneof the tasks in the chain, the chain will continue, but the disabled task will simply not execute.
Note! The name of a task must be unique in the repository!
QlikView Server/Publisher 47

7.1 Create Task
The Create Task wizard in the QMC
EnabledMark this check box to enable the task.
Task nameEnter a name for the task. If the field is left blank or %auto% is entered, QlikView Publisher willautomatically generate a name for the task.
Task TypeThe following tasks exist:
ReloadReloads and refreshes the data in a Source Document.
DistributionA distribution produces one or many User Document, a distributed version of a Source Document. Thereare two types of distributions, Static Distribution (Distribute to recipients entered manually) and DynamicDistribution (Distribute based on field in the source document containing the recipients).
Data ReductionSelected values and all associated fields and values form the content of the User Document. There are twotypes of Data Reduction, Static Distribution with Reduction (Data Reduction based on selections in thesource document and distribution to recipients entered manually) and Dynamic Distribution withReduction (Data Reduction based on selections in the source document and distribution based on a fieldin the source document containing information regarding recipients).
Personal DocumentsThis setting makes it possible to reduce and distribute using the same field.
48 QlikView Server/Publisher

7 Source documents
7.2 ReloadSetting up a reload takes you through the following steps, Reload and Trigger Task.
Reload
Create Task - Reload
Section AccessThis setting allows you to select the username and password the Distribution Service should use whenopening QlikView documents. The default configuration is for the QlikView Distribution service to usethe Windows credentials that are set for the service itself in the Windows Computer Management Console.Read more about section access in "Section Access" on page 207.
Partial reloadThis allows you to use the partial reload functionality of QlikView.
Trigger TaskA trigger is what sets off a task. A task can have multiple triggers, creating a workflow of tasks.
QlikView Server/Publisher 49

Create task - Trigger
All tasks can be triggered by the following:
Configure trigger - On a schedule
On a ScheduleSet the schedule for the task. You may set it to run Once, Hourly, Daily,Weekly orMonthly.
Note! All time specifications must be in 24-hour format.
EnabledMark this check box to enable the schedule.
50 QlikView Server/Publisher

7 Source documents
Start atSet the date and time for the first execution of the task.
Run Only BetweenSet what times the task is allowed to run between.
Run Only onRestrict what days the task is allowed to run on.
Max Number of ExecutionsSet how many times the task is allowed to run.
ExpireMark this check box and enter a date and time in the field to the right to set how long the task schedule isvalid.
Configure trigger - On event from another task
On Event from another taskEnabledMark this check box to enable the trigger.
Start onSet if the task should start on the successful or failed completion of another task.
QlikView Server/Publisher 51

Configure trigger - On an external event
On an External EventThis allows an outside component to make a http call (post) and trigger the task. You may enter apassword if needed for the external event.
EnabledMark this check box to enable the trigger.
Configure trigger - On multiple events completed
52 QlikView Server/Publisher

7 Source documents
On Multiple Events CompletedThis type of trigger will only be executed if all other events have been completed within a certain time.
EnabledMark this check box to enable the trigger.
Time ConstraintSet the time limit for all events to complete. Default value is ten hours. The time is set in minutes.
Run task when all of these events completedHere you add all the tasks and events that must be completed before the current task is run. You caninclude both external events and several other tasks.
Task Execution OptionsNumber of TriesSet how many times QlikView Publisher should try to execute the task before failing, the default is 1.
Timeout in minutesSet how many minutes QlikView Publisher should wait before giving up trying to execute the task.
7.3 Static DistributionTo set up a static distribution you go through the following steps, Reload, Distribute, DocumentInformation and Trigger Task.
ReloadFill in the Reload page as describe on "Reload" on page 49 above.
Distribute
Create task - Static Distribution
QlikView Server/Publisher 53

DestinationSet how the document should be distributed to the recipients, via QlikView Server, e-mail or to a Folder.Pressing Add opens the Setup Recipients dialog.
The Setup Recipients page in the QMC
Type the search criteria in the topmost field, then select where to search for the user and press Add to addthe highlighted recipients. The names will be resolved by the Directory Service Connector.
Output Document TypeSet if the distribution should result in a QlikView document or in a PDF report. In order to choose a reportas basis for the PDF report you must click Open Document.
Server SettingsAccessMark the check boxes for the type of clients that should be able to connect to the QlikView Server andopen the document. Enter a URL if you want to use your own html pages for displaying the AJAX pages.
Maximum number of concurrent sessionsSet the number of user that may access the distributed document simultaneously. This setting is not relatedto CALs.
Preload document in server memorySet how the document should be preloaded in QlikView Server.
54 QlikView Server/Publisher
7 Source documents
Document Information
Create task - Document Information
CategoryThis setting lets the administrator create, edit and delete categories. A category bundles documents incontainers to make categorization easier for the end-user. They are only visible to the end-user on anAccessPoint. Each document can only be part of one category.
AttributesEnter a name and value for meta data attributes that can later be read from the database. These attributesare not saved in the document, but in the meta file. See "Document Metadata Service (DMS)" on page 181for more information.
Trigger TaskSet up triggers for the task as described on "Create task - Trigger " on page 50 above.
7.4 Dynamic DistributionTo set up a dynamic distribution, a distribution that is based on a field in the source document containingthe recipients, you must go through the following steps, Reload, Distribute, Document Information andTrigger Task.
ReloadFill in the Reload page as describe on "Reload" on page 49 above.
QlikView Server/Publisher 55

Distribute
Create task - Dynamic Distribution
Loop and DistributeOpen DocumentClick this button to have QlikView Publisher open the document you wish to distribute. Opening thedocument will allow you to select a field that contains information about the recipients in Fieldcontaining recipient information and the type of Check user identity on. Possible values are thefollowing directory service attributes, SecurityIdentifier, DisplayName, SAMAccountName, E-mailAddress and UserPrincipalName. The names of the attributes correspond to attributes in MicrosoftActive Directory. If you use another directory service provider, the attributes in this setting correspond asclosely as possible to attributes with a similar meaning in that provider. Learn the definitions of theseattributes in Active Directory on "Glossary" on page 275.
DestinationTarget TypeSet how the document should be distributed, via QlikView Server, e-mail or to a Folder.
Output Document TypeSet if the distribution should result in a QlikView document or in a PDF report. In order to choose a reportas basis for the PDF report you must click Open Document.
Server SettingsAccess MethodMark the check boxes for the type of clients that should be able to connect to the QlikView Server andopen the document.
Maximum Number of Concurrent SessionsSet the number of user that may access the document simultaneously.
Preload Document in Server MemorySet the restrictions for preloading the document.
56 QlikView Server/Publisher
7 Source documents
Document InformationCategorize the document as described on "Create task - Document Information " on page 55 above.
Trigger TaskSet up triggers for the task as described on "Create task - Trigger " on page 50 above.
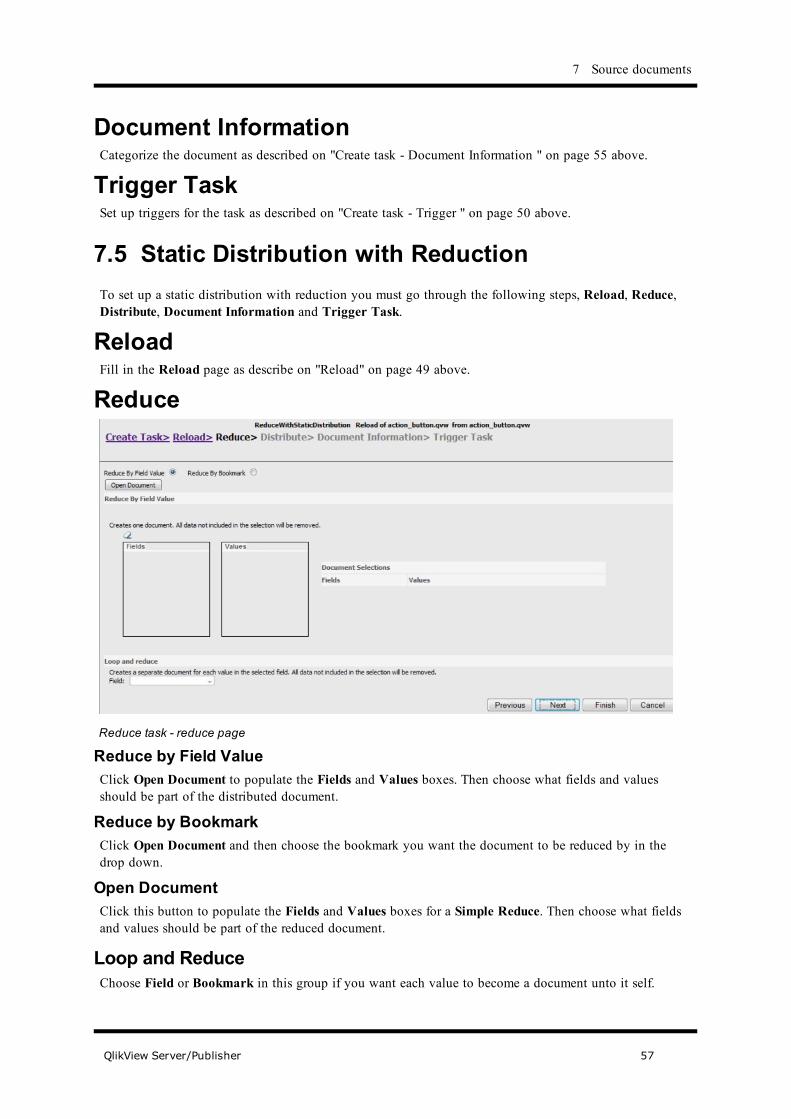
7.5 Static Distribution with ReductionTo set up a static distribution with reduction you must go through the following steps, Reload, Reduce,Distribute, Document Information and Trigger Task.
ReloadFill in the Reload page as describe on "Reload" on page 49 above.
Reduce
Reduce task - reduce page
Reduce by Field ValueClick Open Document to populate the Fields and Values boxes. Then choose what fields and valuesshould be part of the distributed document.
Reduce by BookmarkClick Open Document and then choose the bookmark you want the document to be reduced by in thedrop down.
Open DocumentClick this button to populate the Fields and Values boxes for a Simple Reduce. Then choose what fieldsand values should be part of the reduced document.
Loop and ReduceChoose Field or Bookmark in this group if you want each value to become a document unto it self.
QlikView Server/Publisher 57
DistributeFill in the page as described on "Create task - Static Distribution " on page 53 above.
Document InformationCategorize the document as described on "Create task - Document Information " on page 55 above.
Trigger TaskCreate triggers for the task as described on "Create task - Trigger " on page 50 above.
7.6 Dynamic Distribution with ReductionTo set up a dynamic distribution with reduction you must go through the following steps, Reload,Reduce, Distribute, Document Information and Trigger Task.
ReloadFill in the Reload page as describe on "Reload" on page 49 above.
ReduceFill in the Reduce page as described under "Reduce task - reduce page " on page 57 above.
DistributeFill in the Distribute page as described under "Create task - Dynamic Distribution " on page 56 above.
Document InformationCategorize the document as described on "Create task - Document Information " on page 55 above.
Trigger TaskCreate triggers for the task as described on "Create task - Trigger " on page 50 above.
7.7 Personal documentsTo set up personal documents, you must go through the following steps, Reload, Reduce and Distribute,Document Information and Trigger Task.
ReloadFill in the Reload page as describe on "Create Task - Reload " on page 49 above.
58 QlikView Server/Publisher

7 Source documents
Reduce and Distribute
Create task - Personal documents
Loop and DistributeOpen DocumentCreate a separate document for each value by selecting a field that contains information about therecipients in Field containing recipient information and the type of Check user identity on. Possiblevalues are the Active Directory attributes SecurityIdentifier, DisplayName, SAMAccountName, E-mailAddress and UserPrincipalName.
DestinationTarget TypeChoose distribution mode, QlikView Server, E-mail or Folder.
Output Document typeSet if the distribution should result in a QlikView document or in a PDF report. In order to choose a reportas basis for the PDF report you must click Open Document.
Server SettingsAccess MethodMark the check boxes for the type of clients that should be able to connect to the QlikView Server andopen the document.
Maximum Number of Concurrent SessionsSet the number of user that may access the distributed document simultaneously.
Preload Document in Server MemorySet the restrictions for preloading the document.
Document InformationCategorize the document as described on "Create task - Document Information " on page 55 above.
QlikView Server/Publisher 59

Trigger TaskCreate triggers for the task as described on "Create task - Trigger " on page 50 above.
60 QlikView Server/Publisher

8 QlikView Server Settings
8 QlikView Server Settings8.1 Folders
The Folders tab
Root FolderEnter the path to the QlikView documents that are to be accessed via the Server. This path will typicallyreflect the default document location. Documents may also reside in subfolders to this folder. Windowsfile security applies for all access by a client to document folders and files, unless DMS Authorizationmode is used. Read more about DMS in "Document Metadata Service (DMS)" on page 181. The defaultlocation of the Document folder may differ depending on operating system. Windows Vista and later willinstall the document folder to C:\ProgramData\QlikTech\Documents, while older Windows operatingsystems, such as Windows XP, install to C:\Documents and Settings\All Users\ApplicationData\QlikTech\Documents as default.
It is also possible to specify other mounted folders. A folder set here may contain subfolders to any level.Click the green plus sign to add other folders.
Mounted FoldersNameLogical name of the mounted folder as seen from QlikView Server. The name set here will be part of thepath shown in the User Documents tab.
PathThe path to the folder.
BrowsableMark this check box if the mounted folder and its contents should be browsable from the Open in Serverdialog in QlikView.
QlikView Server/Publisher 61

8.2 Performance
The Performance tab
QVS limitsCPU AffinityYou may deselect the use of specific processors on the computer running QlikView Server. QlikViewServer will automatically select the processors to use and this setting needs to be changed only when youwish to override that choice.
Working Set LimitsThis control sets the maximum of the physical amount of RAM that can be used by an application. Thisway it is possible to control if an application can be swapped out of physical memory or not. However,there are no guarantees that the operating system can serve the process with the amount of memory sethere.
Using too high settings will degrade the performance of other processes on the computer, this mayhowever be desirable if the computer is dedicated for QlikView Server.
Reload limitsCPU AffinityYou may deselect the use of specific processors on the computer running QlikView Server. The reloadprocess will normally automatically select the processors to use and this setting needs to be changed onlywhen you wish to override that choice.
CPU PrioritySets the priority of the reload process for the kernel. Processes with a higher priority execute more quicklythan processes with lower priority. The priority can be set to High, Normal or Low. Low priority is thedefault. Use caution when changing this setting. Read more about setting CPU priority onhttp://msdn.microsoft.com.
62 QlikView Server/Publisher
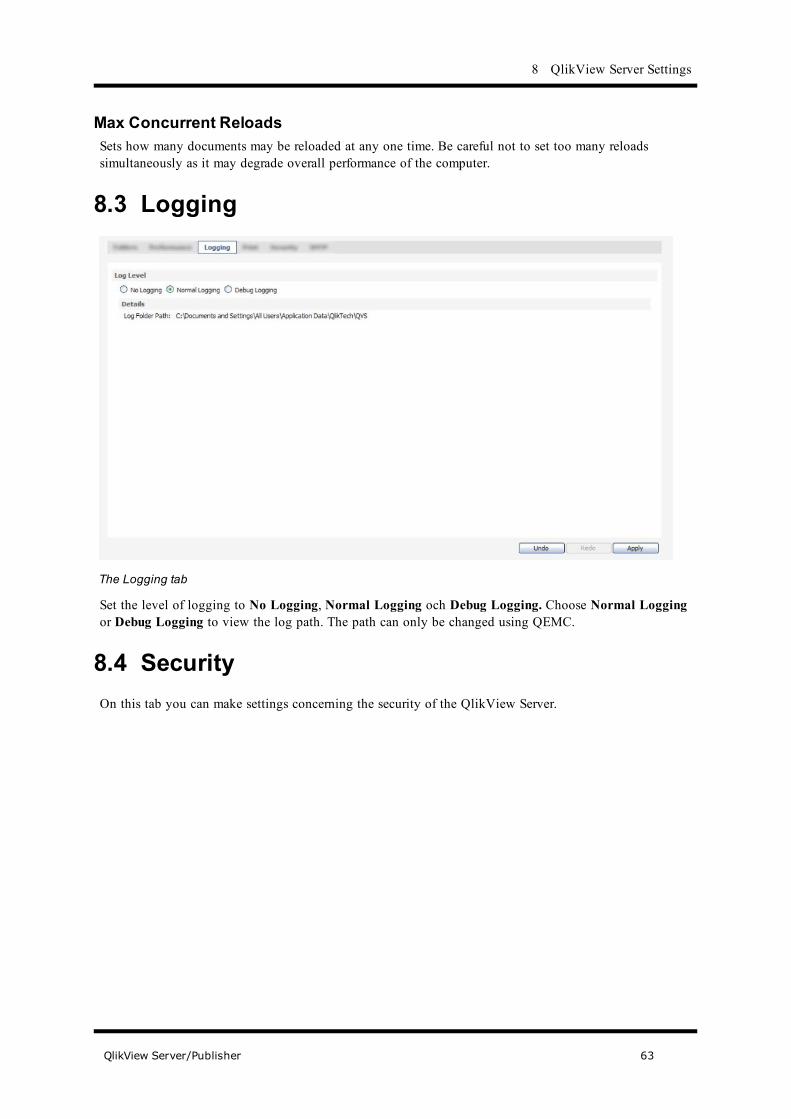
8 QlikView Server Settings
Max Concurrent ReloadsSets how many documents may be reloaded at any one time. Be careful not to set too many reloadssimultaneously as it may degrade overall performance of the computer.
8.3 Logging
The Logging tab
Set the level of logging to No Logging, Normal Logging och Debug Logging. Choose Normal Loggingor Debug Logging to view the log path. The path can only be changed using QEMC.
8.4 SecurityOn this tab you can make settings concerning the security of the QlikView Server.
QlikView Server/Publisher 63
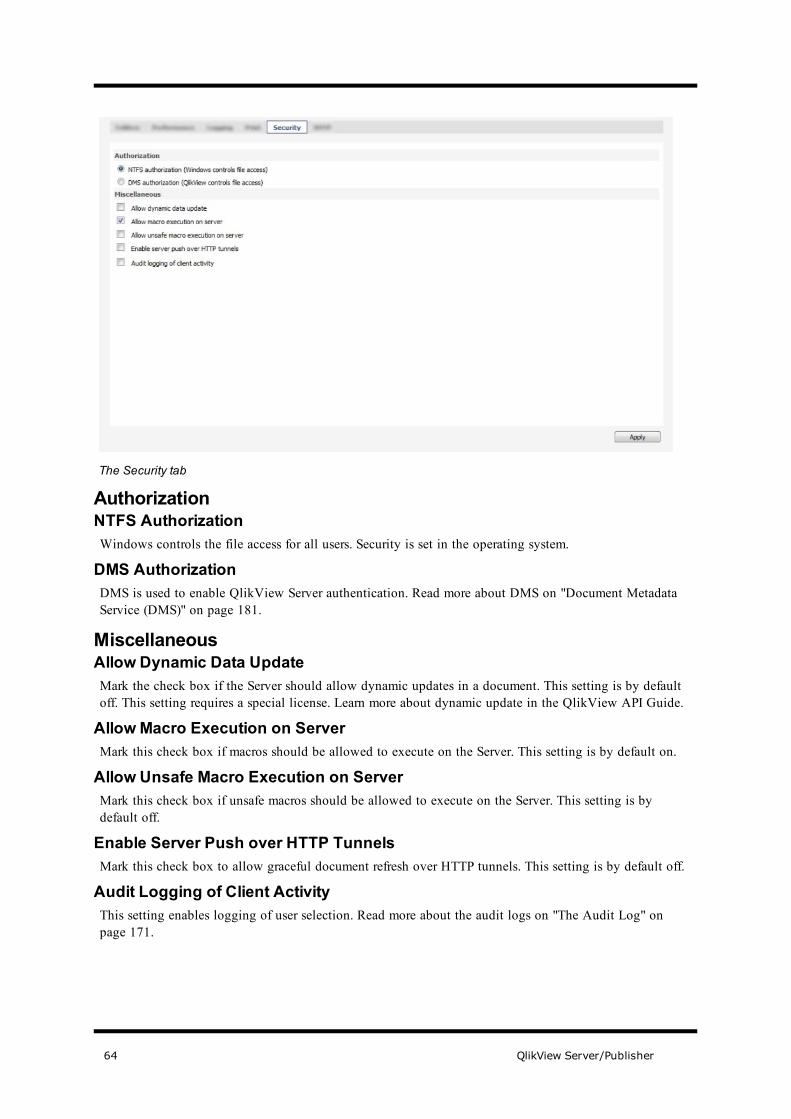
The Security tab
AuthorizationNTFS AuthorizationWindows controls the file access for all users. Security is set in the operating system.
DMS AuthorizationDMS is used to enable QlikView Server authentication. Read more about DMS on "Document MetadataService (DMS)" on page 181.
MiscellaneousAllow Dynamic Data UpdateMark the check box if the Server should allow dynamic updates in a document. This setting is by defaultoff. This setting requires a special license. Learn more about dynamic update in the QlikView API Guide.
Allow Macro Execution on ServerMark this check box if macros should be allowed to execute on the Server. This setting is by default on.
Allow Unsafe Macro Execution on ServerMark this check box if unsafe macros should be allowed to execute on the Server. This setting is bydefault off.
Enable Server Push over HTTP TunnelsMark this check box to allow graceful document refresh over HTTP tunnels. This setting is by default off.
Audit Logging of Client ActivityThis setting enables logging of user selection. Read more about the audit logs on "The Audit Log" onpage 171.
64 QlikView Server/Publisher

8 QlikView Server Settings
8.5 SMTPOn this tab the settings for e-mail alerts are set. An e-mail is sent to the entered addresses if a reload fails.
The SMTP tab
Server SettingsE-mail ServerThe IP address or the fully qualified domain name of the e-mail server. If you use another port than thedefault, which is port 25, you must specify this, e. g. smtp.mydomain.com:1124.
AuthenticationSet how the user should authenticate itself when sending an e-mail, Anonymous or Use DistributionService Account.
From AddressThe e-mail address the error messages should come from.
Send TimeoutHow long QlikView Server should try to send the message before giving up if the SMTP server does notrespond.
Send Test E-mail toEnter an e-mail address and click the button to test your settings.
Alert E-mail Recipients (separated by semicolon)Enter the e-mail addresses for those who should receive alert e-mails from the QDS, use semicolon asseparator.
QlikView Server/Publisher 65

66 QlikView Server/Publisher

9 QlikView Publisher Settings
9 QlikView Publisher SettingsThis tab is only available with a QlikView Publisher license.
The QlikView Publisher Settings tab
ResourcesThe QlikView Management Console sets up a number of resources, that are then used by the QlikViewPublisher to prepare and distribute the QlikView documents. Change the addresses of the differentresources if they are installed on different computers.
Distribution ServiceDefault address is http://localhost:4720/qtxs.asmx.
Directory Service ConnectorDefault address: http://localhost:4730/qtds.asmx.
QlikView ServerThe address to the QlikView Server that is managed by this console.
Active Directory ServerThe active directory, usually a domain controller, contains the users and computers of the domain. Theaddress to the domain controller, e.g. LDAP://company.com.
Computer for Local UsersIf the documents should be distributed to a specific computer and use the local accounts of that computeryou must enter the computer name here.
QlikView Server/Publisher 67

E-mail ServerThis is used for both distributing QlikView files to users and sending alert e-mails.
AuthenticationSet how the user should authenticate itself when sending an e-mail, Anonymous, or Use DistributionService Account.
From AddressSet the e-mail address that should be used as sender.
Send TimeoutSet the timeout in seconds for how long the service should try to sent the message.
Send Test E-mail toEnter an address and click the button to test your settings.
Alert e-mail recipients (Separated by semicolon)Enter the e-mail addresses for those who should receive alert e-mails from the QDS, use semicolon asseparator.
Source Document FoldersSource Documents are QlikView documents that contain data that is to be made accessible to end-users inthe form of User Documents. The default path to the source documents are in Windows Vista and laterC:\ProgramData\QlikTech\Publisher\Sourcedocuments, on older operating systmes the path isC:\Documents and Settings\All Users\Application
Data\QlikTech\Publisher\Sourcedocument. Click the green plus sign to add Source DocumentFolders. The documents in that folder are made available to the Publisher.
68 QlikView Server/Publisher
10 Licenses
10 Licenses"Register" on page 24 for details about the QlikView Server & Publisher page.
Client Access Licenses (CALs)IdentificationIn the Identify user by group you decide whether named users should be identified via identified UserName or via Machine Name (actually machine name + MAC address). It is possible to change this settingat any time but it is strongly recommended to use one mode consistently with a given QlikView Server. Ifchanged during operation, the same user can take up two CALs, one based on user name and one onmachine name.
The usage by type of CAL and number of CALs defined in the LEF is displayed. Read more about CALson "Licensing" on page 173.
Usage CALs are allocated in full upon license initiation. Then, 1/28th of your total number of usage CALsare replenished daily up to the amount of the total licensed usage CALs available. For example, if youlicense 56 usage CALs, you should see 2 additional usage CALs allocated daily, minus any used, notexceeding 56.
Allow License Lease (Named User CALs)Mark this check box if you want users to be able to “borrow” a license for use off-line for a period of 30days.
Allow Dynamic CAL Assignment (Named User CALs)Mark this check box if you wish to add CALs dynamically.
In the Identify by group you decide whether named users should be identified via identified User Nameor via Machine Name (actually machine name + MAC address). It is possible to change this setting at anytime but it is strongly recommended to use one mode consistently with a given QlikView Server. Ifchanged during operation, the same user can take up two CALs, one based on user name and one onmachine name.
License Lease HistoryThis section lists current information about leased license activity. A leased license is used by clients whoconnect to QlikView Server and are allowed to borrow a license to open the downloaded server documentfor 30 days.
Assigned UsersThe current assignment of CALs is displayed. Document CALs can be either automatically or manuallyassigned to users by clicking on the Assign CAL button, if there is a Document CAL. Note that theallocation of a CALs does not imply security
If the Allow Dynamic CAL assignment is checked, a new Document CAL will automatically be grantedto a user connecting to this QlikView Server for the first time, as long as there are available DocumentCALs to assign.
The page has a list showing the names of all users currently holding a Document CAL on the document.You can also see the time of the respective user's last activity on the server. A name can be anauthenticated user name or a machine name (including MAC address).
QlikView Server/Publisher 69

To delete an assigned user, thus freeing a Document CAL, click on the Delete button ( ). If the CALhas not been in use for the last 24 hours, it will be deleted immediately. If the CAL is currently being usedor has recently been used, it will be marked for deletion, and not allow new sessions for user accessthrough this CAL, but will still occupy an allocated CAL until the Quarantined until time. During thisperiod, you may undelete by clicking the Restore button ( ). After the quarantine period, you maydelete the entry manually (by clicking on the Delete button), or restart the QVS service.
Note! Maintenance of Named CALs does not require a restart of the QlikView Server service.
70 QlikView Server/Publisher

Part 3 QlikView EnterpriseManagement Console
QlikView Server/Publisher 71

11 IntroductionQlikView Enterprise Management Console (QEMC)The QlikView Management Console is completely built around modern AJAX technology, it will run in abrowser and without reliance on e.g. Microsoft IIS. Extensive usability studies have been done prior toimplementation.
The QEMC gives you full access to all possible settings for QlikView Server and the Publisher Module. Italso lets you control multiple instances of QlikView Server and multiple Publisher execution instancesfrom a single management console, by means of an integrated tree-control.
To open the Enterprise Management Console go to Windows Start menu, QlikView and choose QlikViewEnterprise Management Console or open a web browser and enter the urlhttp://servername:4780/qemc/default.htm.
QlikView Management Console (QMC)Just as the QEMC the QMC is built around AJAX technology and will run in a browser. The number ofavailable settings is reduced, thereby producing a cleaner, more intuitive interface more suited for thosecontent with most default settings.
Even without the Publisher Module, the QMC will feature a page for basic reload scheduling. If thePublisher Module is installed this will be expanded to a wizard style interface for setting up Publishertasks.
The QMC handles only one instance of QlikView Server and one execution instance of the Publisher.
To open the Management Console go to Windows Start menu, QlikView and choose QlikViewManagement Console or open a web browser and enter the urlhttp://servername:4780/qmc/default.htm. See "QlikView Management Console" on page 35 fordetails.
72 QlikView Server/Publisher
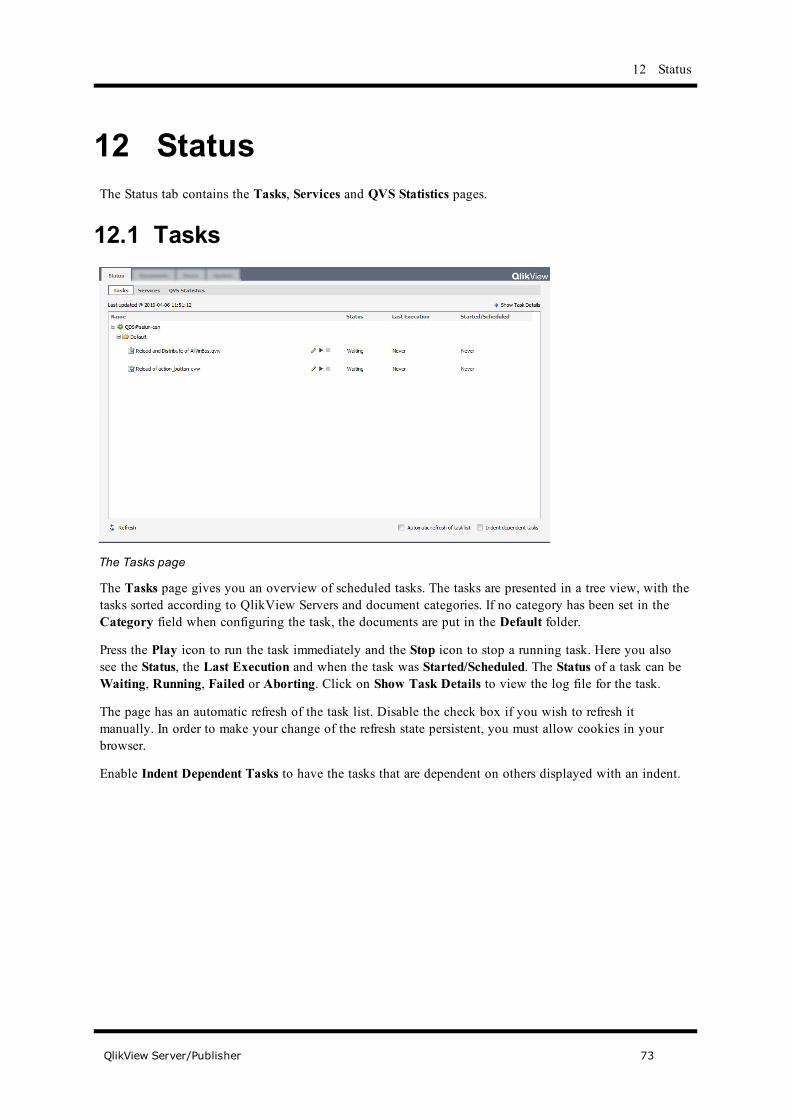
12 Status
12 StatusThe Status tab contains the Tasks, Services and QVS Statistics pages.
12.1 Tasks
The Tasks page
The Tasks page gives you an overview of scheduled tasks. The tasks are presented in a tree view, with thetasks sorted according to QlikView Servers and document categories. If no category has been set in theCategory field when configuring the task, the documents are put in the Default folder.
Press the Play icon to run the task immediately and the Stop icon to stop a running task. Here you alsosee the Status, the Last Execution and when the task was Started/Scheduled. The Status of a task can beWaiting, Running, Failed or Aborting. Click on Show Task Details to view the log file for the task.
The page has an automatic refresh of the task list. Disable the check box if you wish to refresh itmanually. In order to make your change of the refresh state persistent, you must allow cookies in yourbrowser.
Enable Indent Dependent Tasks to have the tasks that are dependent on others displayed with an indent.
QlikView Server/Publisher 73

Show Task DetailsTask Details
The Task Details tab
On this tab you see a Configuration Summary of the task and the details of its execution. A task with amultiple event trigger lists all events that must be completed.
Log
The Log tab
On this tab you can view the log files for the task. The drop-down menu at the top contains the 50 latestlogs.
74 QlikView Server/Publisher

12 Status
12.2 Services
The Services tab
The different Windows services are displayed with their status and the name of the server on which theyrun. Highlight a service to display status messages.
When running a QlikView Server only the following services will be displayed, QMC (QlikViewManagement Service), DSC, (Directory Service Connector), QDS (Distribution Server), QVS(QlikViewServer) and QVWS (QlikView Web Server).
12.3 QVS StatisticsOn these pages you can see statistics on all the QlikView Servers that are managed by this QEMC. Thereare several pages:
Open Documents
The Open Documents tab of QVS Statistics
The Open Documents page displays the documents and the number of session that are open.
QlikView Server/Publisher 75

Users
The Users tab of QVS Statistics
This page displays the active users and the number of documents they have open.
Performance
The Performance tab of the QVS Statistics tab
The Performance page displays information about the Server’s performance.
76 QlikView Server/Publisher

12 Status
Documents & Users
The Documents and Users page of the QVS Statistics tab
The page displays the documents and the users that are using them.
QlikView Server/Publisher 77

78 QlikView Server/Publisher
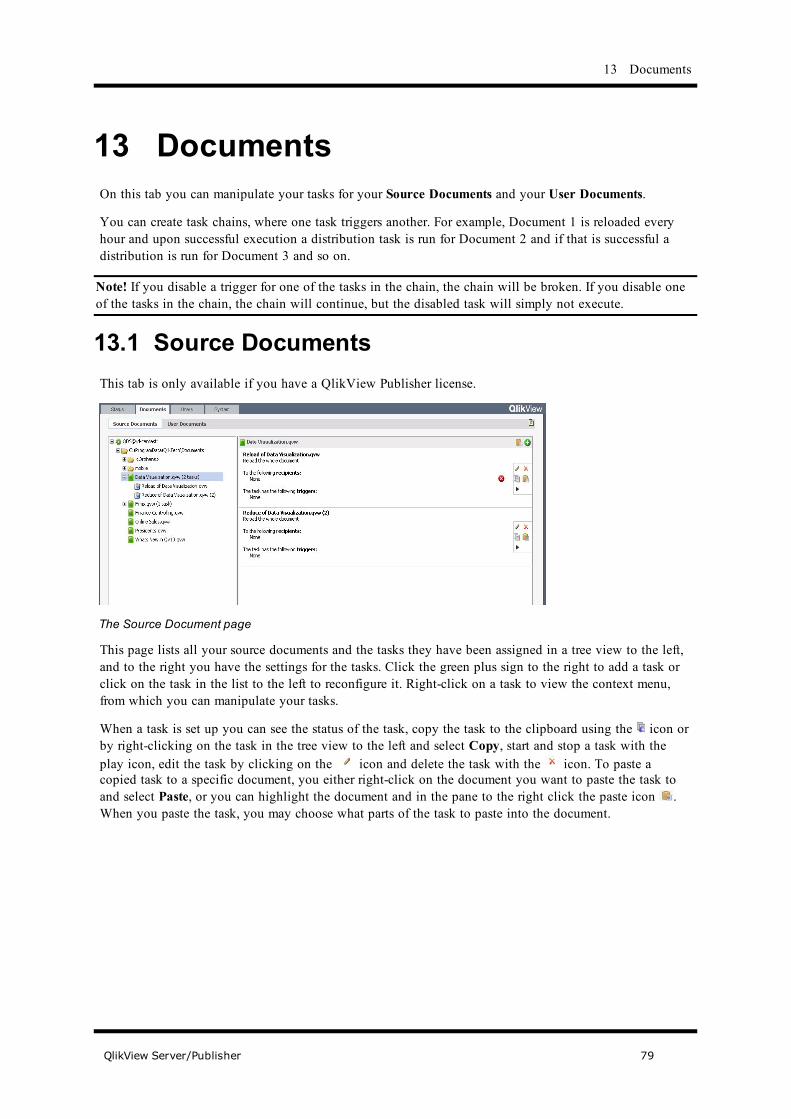
13 Documents
13 DocumentsOn this tab you can manipulate your tasks for your Source Documents and your User Documents.
You can create task chains, where one task triggers another. For example, Document 1 is reloaded everyhour and upon successful execution a distribution task is run for Document 2 and if that is successful adistribution is run for Document 3 and so on.
Note! If you disable a trigger for one of the tasks in the chain, the chain will be broken. If you disable oneof the tasks in the chain, the chain will continue, but the disabled task will simply not execute.
13.1 Source DocumentsThis tab is only available if you have a QlikView Publisher license.
The Source Document page
This page lists all your source documents and the tasks they have been assigned in a tree view to the left,and to the right you have the settings for the tasks. Click the green plus sign to the right to add a task orclick on the task in the list to the left to reconfigure it. Right-click on a task to view the context menu,from which you can manipulate your tasks.
When a task is set up you can see the status of the task, copy the task to the clipboard using the icon orby right-clicking on the task in the tree view to the left and select Copy, start and stop a task with theplay icon, edit the task by clicking on the icon and delete the task with the icon. To paste acopied task to a specific document, you either right-click on the document you want to paste the task toand select Paste, or you can highlight the document and in the pane to the right click the paste icon .When you paste the task, you may choose what parts of the task to paste into the document.
QlikView Server/Publisher 79

The Paste Task dialog
Select which components of the task you want to duplicate to the document and click OK. Pasting a taskwill create a new task.
The command Paste Special will merge the task from the copied task with the task it is pasted into. Youcan merge a copied task with several tasks simultaneously by multi-selecting all the tasks you with tomerge it with in the tree view.
Right-click a document and select Import Task, if you want to import a task from another installation (see"System" on page 107 for how to set up the remote system). This will bring up the remote system and youcan choose which task you want to import. If you already have a task in that document with the samename, a new name will be generated.
Importing tasks
To import all tasks from a remote system, you right-click the Distribution Service and choose ImportTasks. The Import dialog opens and you can choose a Distribution Service from a remote system.
80 QlikView Server/Publisher

13 Documents
General
The General tab
BasicsEnabledMark this check box to activate the task.
Task NameSet the name of the task.
DescriptionThe description written here will be visible in the summary of the task.
Note! The Task Name must be unique within the repository!
Task SummaryA short summary of the task(s) set for the document, including recipients and schedule.
QlikView Server/Publisher 81

Reload
The Reload tab
Perform ReloadMark the check box Enabled if the document should be reloaded.
Data ProtectionSection AccessMark the check box if other credentials than the default should be used. This setting allows you to selectthe username and password the Distribution Service should use when opening QlikView documents. Thedefault configuration is for the service to use the Windows credentials that are set for the service itself inthe Windows Computer Management Console.
Script SetupMark the check box Partial Reload to use the partial reload functionality of QlikView.
Script ParametersThis replaces the function of the repeat task in previous versions.
Parameter NameThe variable created in the QlikView script that will be used in the script execution of the document.
Parameter ValueThe values that will be assigned to the variable. This value or values will be used to create the document.Enter a list of values separated by semicolons (;) or use dash (-) to enter a sequence of data. A separatedocument will be created for each value.
82 QlikView Server/Publisher

13 Documents
OrIn this field you can select a field in the document and a separate document will be created for each valuein that field. Those values present at the start of the execution will be used. If field values change duringthe execution the change is not reflected.
Reduce
The Reduce tabOpen DocumentClick this button to populate the Fields and Values boxes for a Simple Reduce. Then choose what fieldsand values should be part of the reduced document.
Reduce by Field ValueClick Open document to populate the Fields and Values boxes. Then choose what fields and valuesshould be part of the distributed document.
Reduce by BookmarkClick Open document and then choose which bookmark the document should be reduced by in the dropdown.
Reduced Document NameSave the Reduced Document with the Following NameEnter a name for the user document. Click the icon on the right to open a dialog for creating a nametemplate for reduced documents.
QlikView Server/Publisher 83

Create a document name template
Click on the buttons to insert the different Publisher elements and date and time in the template for thedocument. You can enter any text in the Template field.
Simple ReduceDisplays the Fields and Values or the different bookmarks available in the document.
Loop and ReduceChoose By Field or By Bookmark in this group if you want each value to be a document unto it self. Alldata not included in the selection will be removed.
DistributeManually
The Distribute tab (manually)
84 QlikView Server/Publisher

13 Documents
Set how the document should be distributed to the recipients, via QlikView Server, e-mail or to a Folder.Press the add users icon to add recipients on that resource. The names will be resolved by the DirectoryService Connector.
Add Recipients
The QlikView Server Add Recipents dialog
Add the users from the QlikView Server, either Anonymous, All authenticated users or Named users.Choose Named users to search for users and groups in the domain or on a computer to add as recipents.
QlikView Server/Publisher 85

Loop Field in Document
The Distribute tab (loop and distribute)
Loop and DistributeOpen DocumentClick this button to have QlikView Publisher open the document you wish to distribute. Opening thedocument will allow you to select a field that contains information about the recipients in Fieldcontaining recipient information and the type of Check user identity on. Possible values are thefollowing directory service attributes, SecurityIdentifier, DisplayName, SAMAccountName, E-mailAddress and UserPrincipalName. The names of the attributes correspond to attributes in MicrosoftActive Directory. If you use another directory service provider, the attributes in this setting correspond asclosely as possible to attributes with a similar meaning in that provider. Learn the definitions of theseattributes in Active Directory on "Active Directory Attributes" on page 261.
DestinationChoose how to distribute the document(s): on a QlikView Server, via E-mail or via a Folder.
86 QlikView Server/Publisher
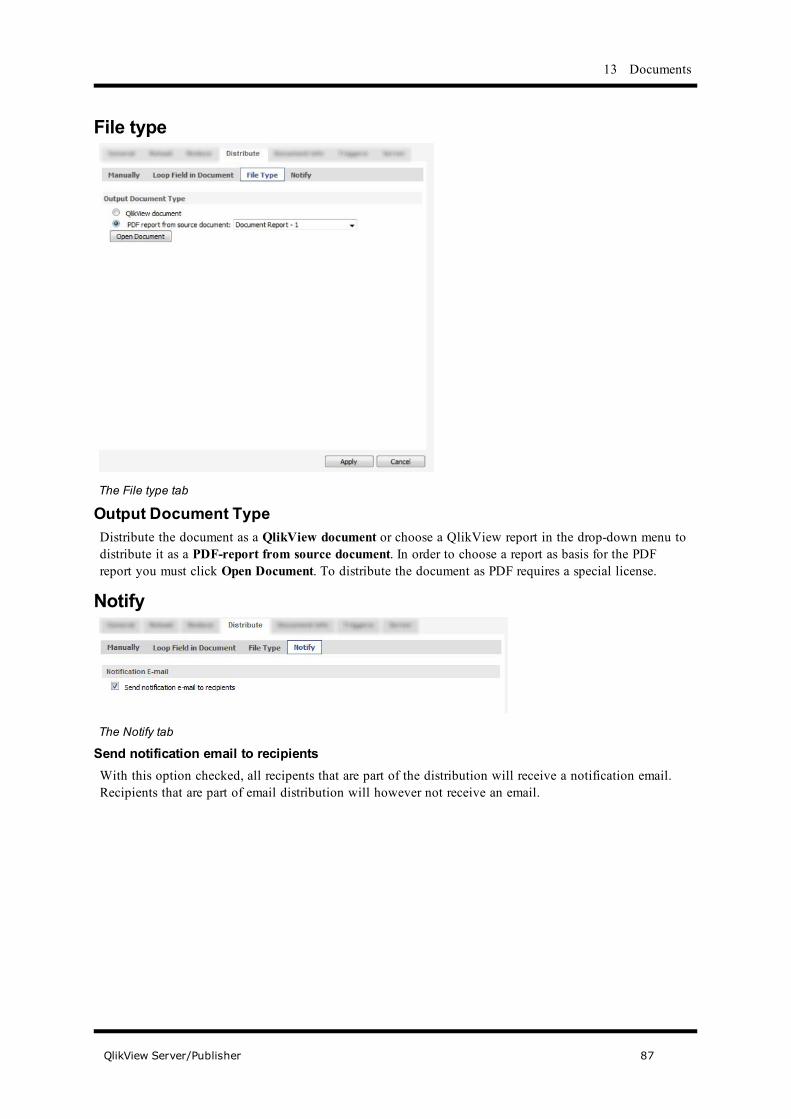
13 Documents
File type
The File type tab
Output Document TypeDistribute the document as a QlikView document or choose a QlikView report in the drop-down menu todistribute it as a PDF-report from source document. In order to choose a report as basis for the PDFreport you must click Open Document. To distribute the document as PDF requires a special license.
Notify
The Notify tab
Send notification email to recipientsWith this option checked, all recipents that are part of the distribution will receive a notification email.Recipients that are part of email distribution will however not receive an email.
QlikView Server/Publisher 87
Document Info
The Document Info tab
GeneralCategoryThis setting lets the administrator create, edit and delete categories. A category bundles documents incontainers to make categorization easier for the end-user. They are only visible to the end-user on anAccessPoint. Each document can only be part of one category. Clicking in the field will display a popupwith previously used categories.
AttributesEnter Name and Value for meta data attributes that can later be read from the database. These attributesare not saved in the document, but in the meta file. A third party application can then extract the attributesusing the qvpx protocol.
TriggersA trigger is what sets of a task. A task can have multiple triggers, creating a workflow of tasks.
88 QlikView Server/Publisher

13 Documents
The Triggers tab
Current TriggersClick the green plus sign to add a trigger. All tasks can be triggered by a schedule, by the event ofanother task, by an external event or by multiple events.
On a ScheduleOn a Schedule
Configure trigger - On a schedule
QlikView Server/Publisher 89
Set the schedule for the task. You may set it to run Once, Hourly, Daily,Weekly orMonthly.
Note! All time specifications must be in 24-hour format.
EnabledMark this check box to enable the schedule.
Start atSet the date and time for the first execution of the task.
Run EverySet how often the task should be run and on what days, or what months.
Run Only BetweenSet what times the task is allowed to run between.
Max Number of ExecutionsSet how many times the task is allowed to run.
ExpireMark this check box and enter a date and time in the field to the right to set how long the task is valid.
On Event from another task
Configure Trigger - On event from another task
EnabledMark this check box to enable the trigger.
Start onSet if the task should start on the successful or failed completion of another task.
90 QlikView Server/Publisher

13 Documents
On an External Event
Configure trigger - On an external event
This allows an outside component to make a http call (post) and trigger the task.
EnabledMark this check box to enable the trigger.
On Multiple Events Completed
Configure trigger - On multiple events completed
QlikView Server/Publisher 91

This type of trigger will only be executed if all other events have been completed within a certain time.
EnabledMark this check box to enable the trigger.
Time ConstraintSet the time limit for all events to complete. Default value is ten hours. The time is set in minutes.
Run task when all of these events completedHere you add all the tasks and events that must be completed before the current task is run. You caninclude both external events and several other tasks.
Task DependenciesClick on the green plus sign to add dependencies for the current task. Task dependency is a way ofmaking sure that your task only runs if other tasks have finished their last execution successfully.
Task Execution OptionsSet the Number of Tries for the task and how the Timeout in Minutes should be.
ServerServer Objects
The Server tab - Server ObjectsPermission to Create Server ObjectsHere you can specify who should be able to create Server objects in this document.
AllEveryone may create a Server object in this document.
RestrictedAdd users in the list below that may create Server objects in this document.
NoneNo one is allowed to create Server objects in this document.
Preload and Access MethodHere you specify how the user documents should behave on the Server.
92 QlikView Server/Publisher

13 Documents
The Server tab - Preload and Access
Preload Document in Server MemoryHere you may set the preload options for the document. A preloaded document is loaded into the server’sprimary memory to ensure quick access at all times. It will however, use up memory even when no user isaccessing the document.
Choose one of the options for Preloaded as follows:
NeverThe document will never be loaded automatically. Standard loading techniques, based on user requestsand Document Timeout settings will apply.
AlwaysThe document will always be loaded into server memory.
RestrictedThe document will be loaded automatically, based on specific day of the week and time restrictions. If thisoption is selected, additional settings will become visible.
If Preloaded is set to Restricted, you may choose specific days of the week to automatically load thedocument and the times of the day to load and unload. All times are Server local times (in 24 hour format).The server time is set during installation of the operating system. See the Windows Control Panel - Dateand Time for more details.
AccessAccessMark the checkboxes for which flavors of QlikView clients that should be allowed on the AccessPoint.
UrlEnter a URL if you want to use your own html pages, instead of the default, for displaying the AJAXpages.
Max Concurrent SessionsSets the number of concurrent sessions for the document.
QlikView Server/Publisher 93
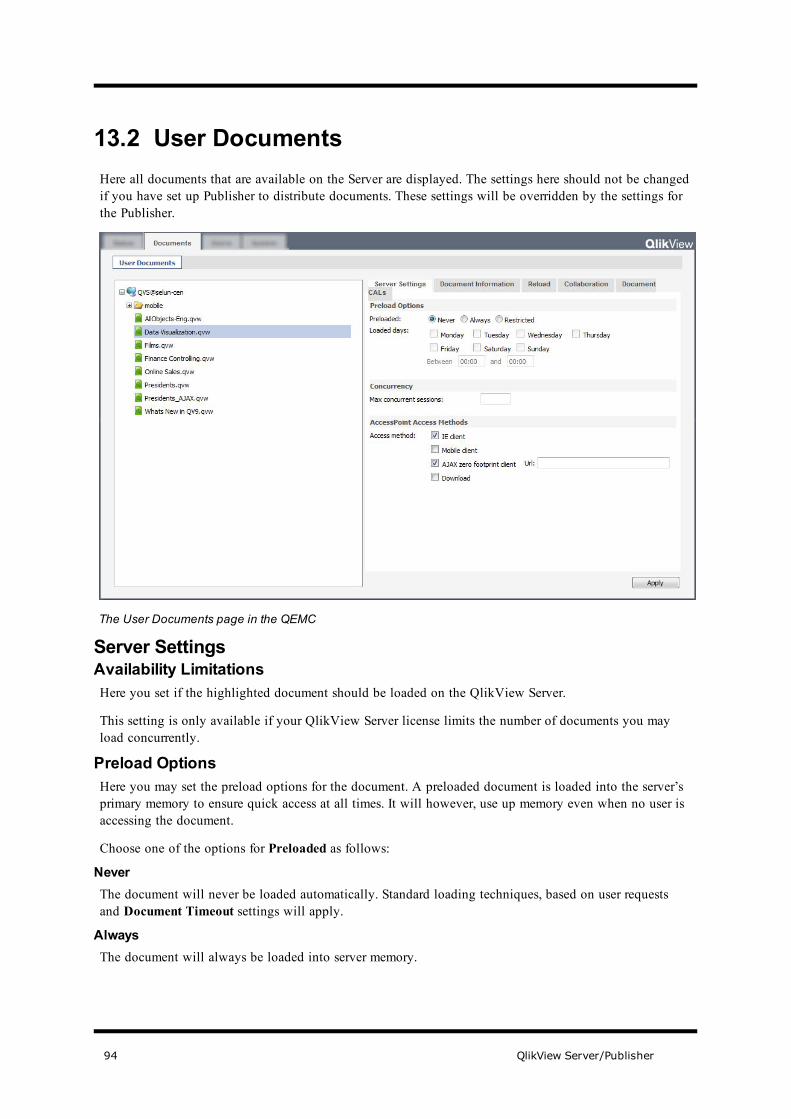
13.2 User Documents Here all documents that are available on the Server are displayed. The settings here should not be changedif you have set up Publisher to distribute documents. These settings will be overridden by the settings forthe Publisher.
The User Documents page in the QEMC
Server SettingsAvailability LimitationsHere you set if the highlighted document should be loaded on the QlikView Server.
This setting is only available if your QlikView Server license limits the number of documents you mayload concurrently.
Preload OptionsHere you may set the preload options for the document. A preloaded document is loaded into the server’sprimary memory to ensure quick access at all times. It will however, use up memory even when no user isaccessing the document.
Choose one of the options for Preloaded as follows:
NeverThe document will never be loaded automatically. Standard loading techniques, based on user requestsand Document Timeout settings will apply.
AlwaysThe document will always be loaded into server memory.
94 QlikView Server/Publisher

13 Documents
RestrictedThe document will be loaded automatically, based on specific day of the week and time restrictions.
If Preloaded is set to Restricted, you may choose specific days of the week to automatically load thedocument and the times of the day to load and unload. All times are Server local times (in 24 hour format).The server time is set during installation of the operating system. See the Windows Control Panel - Dateand Time for more details.
ConcurrencyMax Concurrent SessionsSets the number of concurrent sessions for the document.
Accesspoint Access MethodsAccess MethodMark the check boxes for which flavors of QlikView clients that should be allowed on the AccessPoint.
Authorization
The Authorization tab of the QEMC
This tab is used to configure document authorization settings for the selected QlikView document. Thistab is only available if DMS Authorization is selected as the authorization method for this server. Onlyusers specified in this configuration will be allowed access to the document once DMS Authorization isselected. DMS Authorization is set in QlikView Server Settings, Security. Read more in "DocumentMetadata Service (DMS)" on page 181.
To add an authorized user/group, click on the Add button. To remove an existing authorized user/group,click on the X icon. The User/Group can be either Anonymous or named. Group names may be used, butaccess to the QlikView Directory Services Connector (DSC) will be required to resolve the Group. Clickthe properties icon to set the access restrictions for the user/group.
QlikView Server/Publisher 95

The Access dialog
Access can be granted to all users, Anonymous, or to named users/groups. You can set the Access toAlways for no time restrictions, or Restricted to limit access to this document to specific days of the weekas well as times. All times are Server local times (in 24 hour format).
96 QlikView Server/Publisher

13 Documents
Document Information
The Document Information tab
GeneralCategoryThis setting lets the administrator create, edit and delete categories. A category bundles documents incontainers to make categorization easier for the end-user. They are only visible to the end-user on anAccessPoint. Each document can only be part of one category. Clicking in the field will display a popupwith previously used categories.
Source DocumentThe name of the source document. This setting is only relevant if it is run through a QlikView Publishertask. The name is not changed by a QlikView Server reload.
AttributesIn this group you may set your own meta data attributes, with names and values, for the document. Theseattributes can be read from the database. The attributes will not be saved together with the document butin the metadata of the Server. See "Document Metadata Service (DMS)" on page 181 for more information.
ReloadThis tab is available when running only QlikView Server.
Reload ScheduleOn this tab the schedule for reloading a document is configured.
EnabledCheck the box to enable the schedule below.
The schedule can be set to None, Hourly, Daily,Weekly,Monthly, Continuously, Completion of, orExternal event.
QlikView Server/Publisher 97
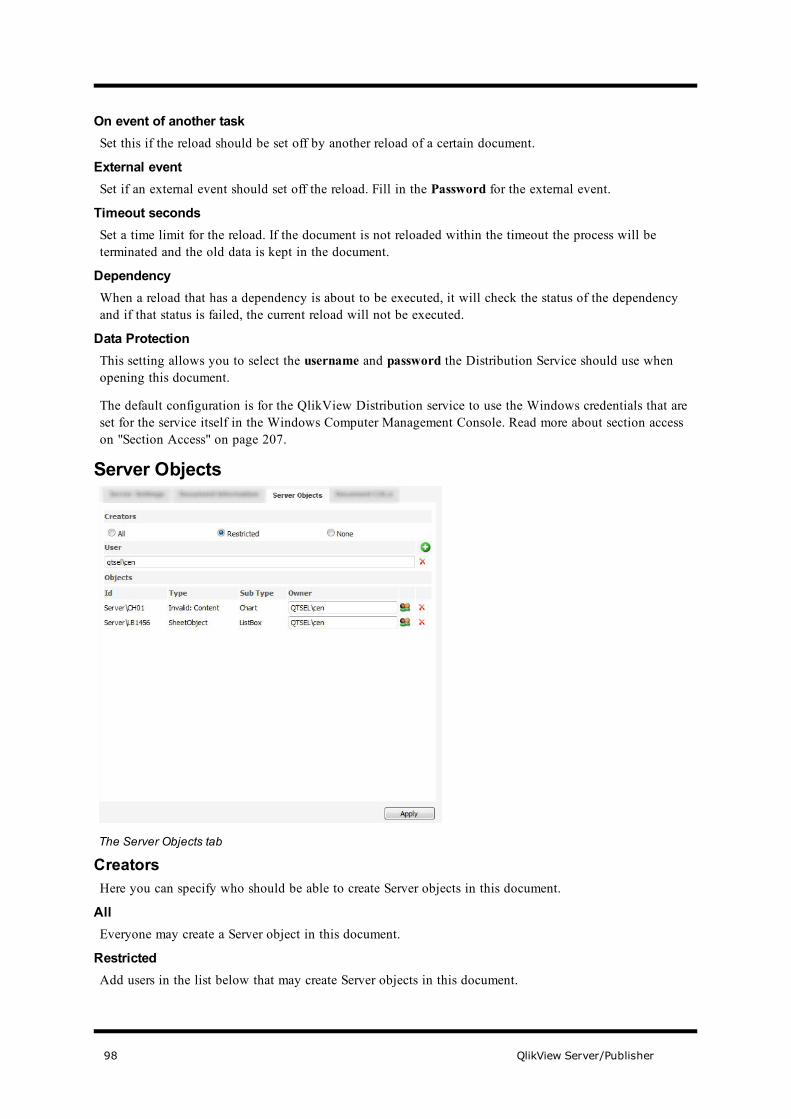
On event of another taskSet this if the reload should be set off by another reload of a certain document.
External eventSet if an external event should set off the reload. Fill in the Password for the external event.
Timeout secondsSet a time limit for the reload. If the document is not reloaded within the timeout the process will beterminated and the old data is kept in the document.
DependencyWhen a reload that has a dependency is about to be executed, it will check the status of the dependencyand if that status is failed, the current reload will not be executed.
Data ProtectionThis setting allows you to select the username and password the Distribution Service should use whenopening this document.
The default configuration is for the QlikView Distribution service to use the Windows credentials that areset for the service itself in the Windows Computer Management Console. Read more about section accesson "Section Access" on page 207.
Server Objects
The Server Objects tab
CreatorsHere you can specify who should be able to create Server objects in this document.
AllEveryone may create a Server object in this document.
RestrictedAdd users in the list below that may create Server objects in this document.
98 QlikView Server/Publisher
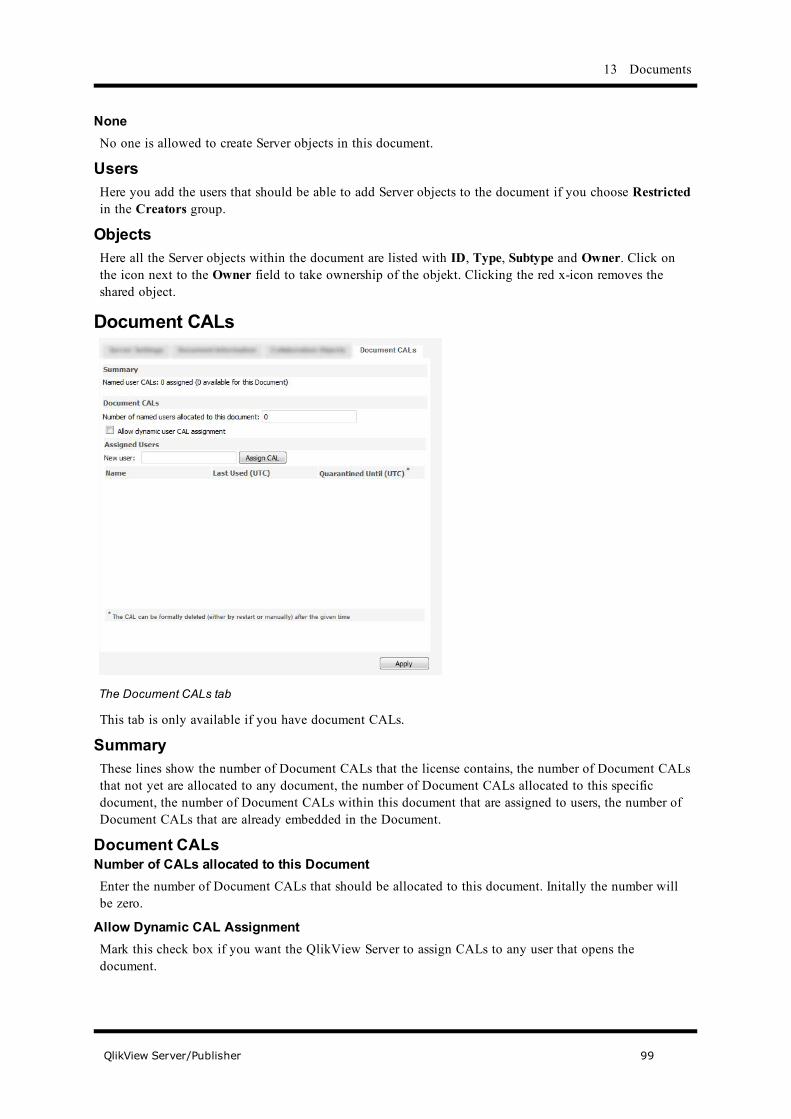
13 Documents
NoneNo one is allowed to create Server objects in this document.
UsersHere you add the users that should be able to add Server objects to the document if you choose Restrictedin the Creators group.
ObjectsHere all the Server objects within the document are listed with ID, Type, Subtype and Owner. Click onthe icon next to the Owner field to take ownership of the objekt. Clicking the red x-icon removes theshared object.
Document CALs
The Document CALs tab
This tab is only available if you have document CALs.
SummaryThese lines show the number of Document CALs that the license contains, the number of Document CALsthat not yet are allocated to any document, the number of Document CALs allocated to this specificdocument, the number of Document CALs within this document that are assigned to users, the number ofDocument CALs that are already embedded in the Document.
Document CALsNumber of CALs allocated to this DocumentEnter the number of Document CALs that should be allocated to this document. Initally the number willbe zero.
Allow Dynamic CAL AssignmentMark this check box if you want the QlikView Server to assign CALs to any user that opens thedocument.
QlikView Server/Publisher 99

Assigned Named CALsThe current assignment of CALs is displayed. Document CALs can be either automatically assigned ormanually assigned to users by clicking on the Assign CAL button, if there is a Document CAL. Note thatthe allocation of a CAL does not imply security
If the Allow Dynamic CAL assignment is checked, a new Document CAL will automatically be grantedto a user connecting to this QlikView Server for the first time, as long as there are available DocumentCALs to assign.
The page has a list showing the names of all users currently holding a Document CAL on the document.You can also see the time of the respective user's last activity on the server. A name can be anauthenticated user name or a machine name (including MAC address).
To delete an assigned user, thus freeing a Document CAL, click on the Delete button ( ). If the CALhas not been in use for the last 24 hours, it will be deleted immediately. If the CAL is currently being usedor has recently been used, it will be marked for deletion, and not allow new sessions for user accessthrough this CAL, but will still occupy an allocated CAL until the Quarantined until time. During thisperiod, you may undelete by clicking the Restore button ( ). After the quarantine period, you maydelete the entry manually (by clicking on the Delete button), or restart the QVS service.
100 QlikView Server/Publisher

14 Users
14 UsersOn these tabs the administrator can manage all objects of a certain user and set up section access.
14.1 User ManagementIn this dialog you can keep track of the users in the QlikView Server/Publisher system, all in one place.The following objects can be controlled: CALs, recipients, Server objects, groups and documents.
UserEnter the name of the user you wish to view or change settings for. Click on the magnifying glass toinitiate the search.
Search inSelect the directory in which you want to search for the user.
The search results are displayed with both the name and the location of the user.
CALsThe list displays all the CALs the user is assigned. As administrator you can click on the delete icon todelete the CAL for the user. Note that the CAL will not be available for 24 hours!
The User CALs tab of User Management
DistributionsThis page displays all the distributions where the highlighted user is a recipient. Click on the task name toedit the task. Click on the red X to remove the task.
The Distributions tab of User Management
QlikView Server/Publisher 101
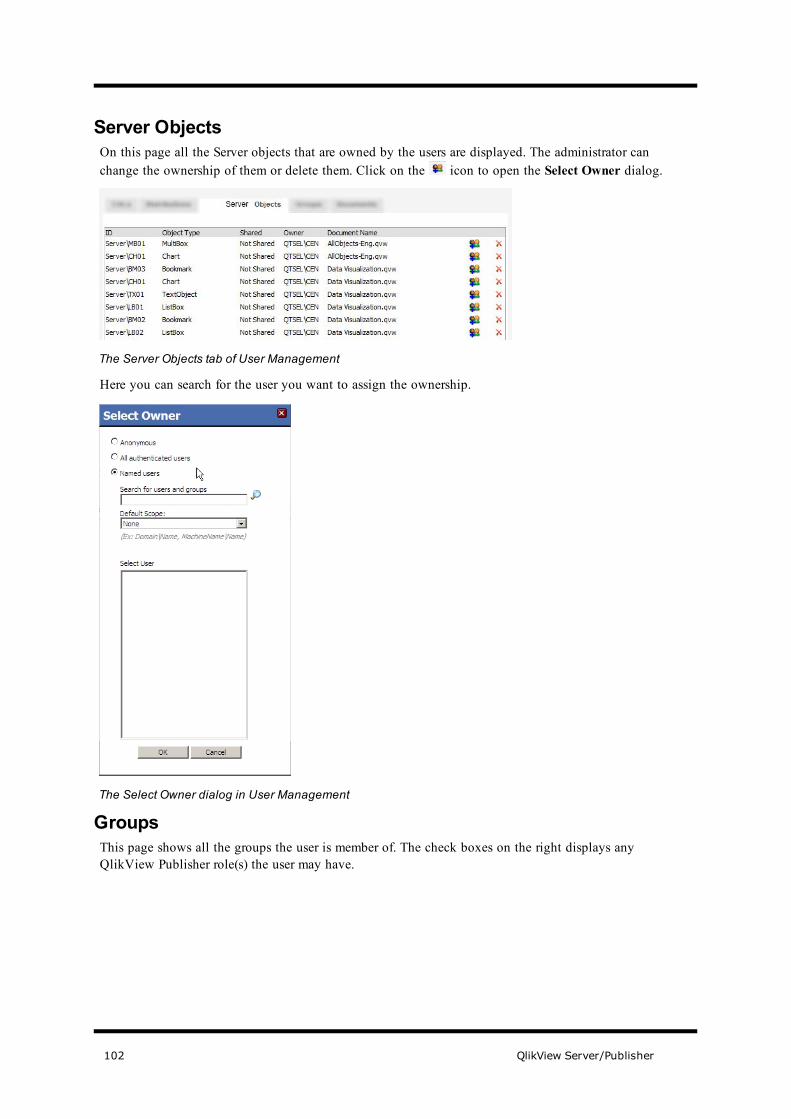
Server ObjectsOn this page all the Server objects that are owned by the users are displayed. The administrator canchange the ownership of them or delete them. Click on the icon to open the Select Owner dialog.
The Server Objects tab of User Management
Here you can search for the user you want to assign the ownership.
The Select Owner dialog in User Management
GroupsThis page shows all the groups the user is member of. The check boxes on the right displays anyQlikView Publisher role(s) the user may have.
102 QlikView Server/Publisher
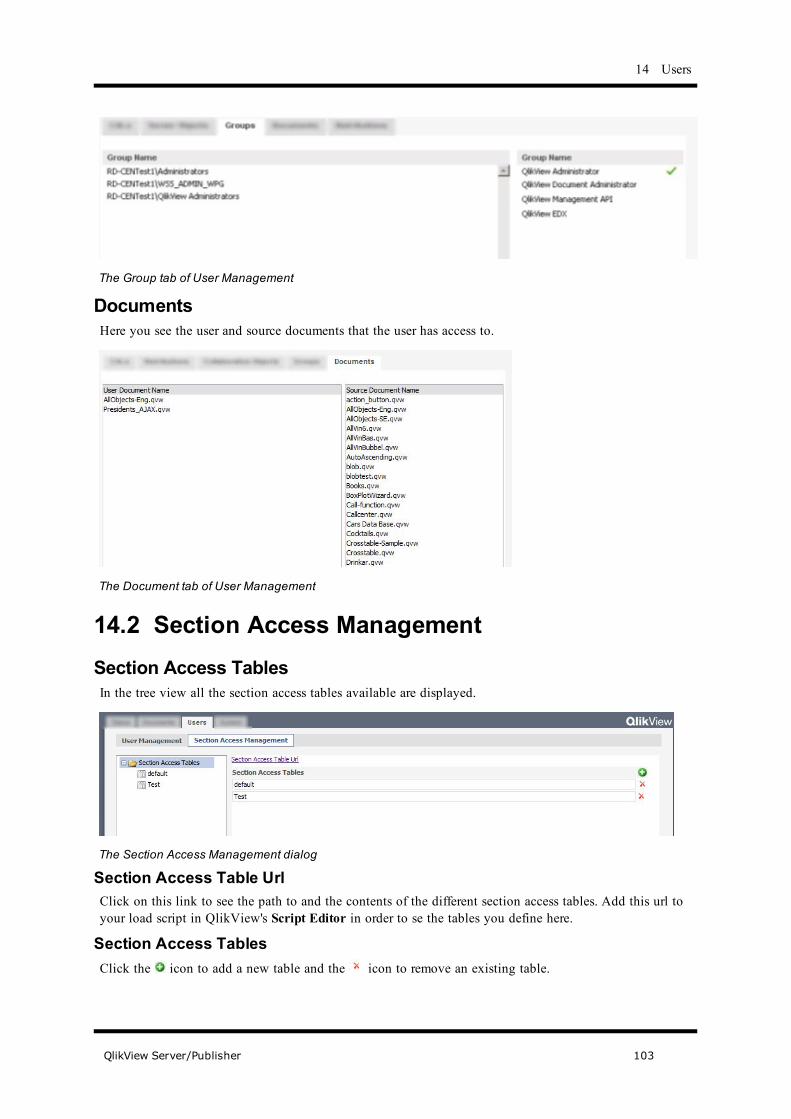
14 Users
The Group tab of User Management
DocumentsHere you see the user and source documents that the user has access to.
The Document tab of User Management
14.2 Section Access ManagementSection Access TablesIn the tree view all the section access tables available are displayed.
The Section Access Management dialog
Section Access Table UrlClick on this link to see the path to and the contents of the different section access tables. Add this url toyour load script in QlikView's Script Editor in order to se the tables you define here.
Section Access TablesClick the icon to add a new table and the icon to remove an existing table.
QlikView Server/Publisher 103
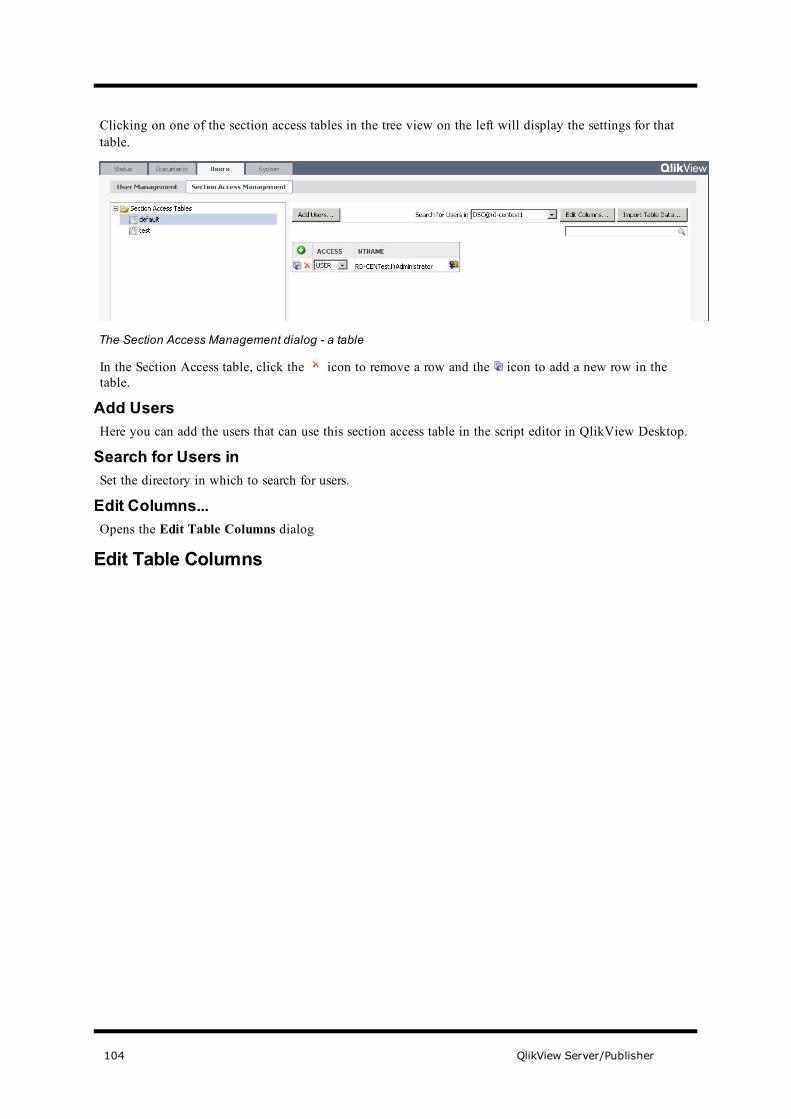
Clicking on one of the section access tables in the tree view on the left will display the settings for thattable.
The Section Access Management dialog - a table
In the Section Access table, click the icon to remove a row and the icon to add a new row in thetable.
Add UsersHere you can add the users that can use this section access table in the script editor in QlikView Desktop.
Search for Users inSet the directory in which to search for users.
Edit Columns...Opens the Edit Table Columns dialog
Edit Table Columns
104 QlikView Server/Publisher

14 Users
The Edit Table Columns dialog
In this dialog you can add or remove columns from the section access table.
QlikView ColumnThe list contains all the possible reserved columns in a QlikView Section Access. Highlight the columnyou wish to add and click Add Column. When a column is highlighted an explanation will be displayedbetween the available columns and the chosen columns. Click Remove Column to remove a column fromthe table.
Type ColumnHere you can type a name for your own custom column. Click Add Column to add it to the list of chosencolumns.
Import Table Data...Opens the Import dialog, where you can paste the contents of a tab separated file.
Import
The Import dialog in Section Access Management
Treat first row as column namesThe first row in the file are made up of column names.
QlikView Server/Publisher 105

Clear table dataThe previously existing data in the table is deleted when the file’s content is imported.
Read more about section access on "Authorization Management" on page 207 and in QlikView ReferenceManual.
106 QlikView Server/Publisher

15 System
15 SystemThe System tab contains all the settings for the different services in QlikView Server and Publisher.
Overview of infrastructure
QMS - QlikView Management ServiceCommunicates with all services and hosts the management console graphical user interface.
QDS - QlikView Distribution ServicePrepares and Distributes files.
DSC - Directory Service ConnectorKeeps track of the users.
QVS - QlikView ServerHosts the files for the end user.
QVWS - QlikView Web ServerActs as web server for AJAX pages, hosts the AccessPoint and load balances the QVS.
QlikView Server/Publisher 107

15.1 SetupManagement ServiceThe Management Service is the central coordinating component in QlikView Publisher. It is responsiblefor maintaining the QlikView Publisher Repository (QVPR) and keeping track of the differentcomponents. A QlikView Publisher installation has only one Management Service. The Summary pagedisplays the address of the Management Service.
The Summary page for the Management Service
Here you also have a link for the API documentation. The help is in CHM format, which means you mustdownload it and open the file from your hard drive in order to bypass Microsoft CHM file security.
General
The General tab for the Management Service
LocationSet the Hostname and the Port for the Management Service.
Logging LevelSet the level of logging, No Logging, Normal Logging or Debug Logging.
RepositoryThe repository, QVPR, is the database containing the information about every QlikView Publisher task.The repository can be either xml based or stored on a Microsoft SQL Server.
108 QlikView Server/Publisher

15 System
Note! The Repository tab is only available if you have a QlikView Publisher license.
XML Repository
Settings for XML Repository
Database NameEnter the name of your repository.
Optional Base PathThe path to the folder where the XML repository should be created. Default path isC:\ProgramData\QlikTech\Publisher\CommandCenter in Windows Vista and later andC:\Documents and Settings\All Users\Application
Data\QlikTech\Publisher\CommandCenter\QVPR for older operating systems.
Note!If the path contains a database with the same name, the data will be overwritten.
Migrate DataMark this check box if you want to migrate data from the current QVPR repository to a new path. Whencreating a new database, this allows you to move the data from your company database to the new one.
Backup SettingsHere you can configure backup of the repository. The backup is saved as a zip file and uses the timestampof its creation as name. Change the path to the zip file by entering a path in Optional Backup Path. Perdefault the zip file is saved to the same path as the repository. Click Backup Now to create a backupimmediately.
QlikView Server/Publisher 109

Microsoft SQL Server
Settings for Microsoft SQL repository
ServerClick the Get Servers button to choose a server from a list of Microsoft SQL Servers that are available onthe network.
PortSet the port for the communication.
Connection ModelSelect the protocol that should be used for the communication with the Microsoft SQL Server.
Connect UsingSelect the authentication method, Commandcenter User (Windows Authentication), that is the currentlylogged on user in Windows, or SQL Server Authentication.
DatabaseThe name of the database on the SQL Server. If a QlikView Publisher database with the same namealready exists it will be updated.
Migrate DataMark this check box if you want to migrate the data to a new location. When creating a new database,this allows you to move the data from your company database to the new one.
AuditingRead more about auditing in "Audit Logging" on page 199. Auditing must be turned on inQVManagementService.exe.config. The configuration file is found in C:\ProgramFiles\QlikView\Management Service.
110 QlikView Server/Publisher

15 System
The Auditlog tab of the QEMC
EnableShows if audit logging is on.
FolderDisplays the path for the logs.
Days to keep audit logsThe number of days the logs are saved. Logs older than the number set here are overwritten by new logs.
QlikView Servers
Overview of QlikView Servers
Highlight QlikView Servers to look at the Servers that are managed by this console. You can also addmore Servers by clicking the green plus sign on the right. Highlight one of the Servers to configure it.
General
The General tab of a QlikView Server
NameThe name of the QlikView Server.
QlikView Server/Publisher 111

Folders
The Folders tab of a QlikView Server
Document FoldersRoot FolderEnter the path to the QlikView documents that are to be accessed via the Server. This path will typicallyreflect the default document location. Documents may also reside in subfolders to this folder. Windowsfile security applies for all access by a client to document folders and files, unless DMS Authorizationmode is used. Read more about DMS in "Document Metadata Service (DMS)" on page 181. The defaultlocation of the Document folder may differ depending on operating system. Windows Vista and later willinstall the document folder to C:\ProgramData\QlikTech\Documents, while older Windows operatingsystems, such as Windows XP, install to C:\Documents and Settings\All Users\ApplicationData\QlikTech\Documents as default.
It is also possible to specify Mounted Folders. A folder set here may contain sub folders to any level.Click the green plus sign to add other folders.
Enable Browsable if you want the folder and its contents to be browsable from the Open in Server dialogin QlikView.
System FoldersAlternate Extensions PathEnter the path of, or browse to, the directory where your QlikView Extensions are located.
112 QlikView Server/Publisher

15 System
Alternate Temporary Files Folder PathIf you use clustering/load balancin for your QlikView Server, you must enter an alternate path fortemporary files here. The path must be reachable by all Servers in the cluster.
Documents
The Documents tab of a QlikView Server
ServerDocument TimeoutThe Document Timeout value allows you to control for how long a document will be allowed to beunused before the QlikView Server closes the document and reclaims the resources.
A document is a QVW file opened by the QlikView Server. Open documents take up valuable systemresources (i.e. RAM) and should not be allowed to remain open when not in use. However, if documentsare closed too quickly, the user may see longer delay times when accessing the document while the serverreopens it.
Allow Only One Copy of Document in MemoryMark this check box to allow only one version of the document in memory. If there are changes to thedocument, a reload or a layout change, a session update might be forced. Allowing only one version of adocument will conserve memory resources on the Server.
Allow Server ObjectsQlikView Server objects for Bookmarks, Objects and Reports allows sharing of objects between users.Make sure this setting is checked if you want to allow sharing of objects. This setting requires that theQlikView Server object settings Allow Server Bookmarks, Allow Server Objects and Allow ServerReports located on the Server tab in the QlikView Document Properties dialog is marked.
Allow Anonymous Server BookmarksIf this setting is checked, anonymous users will be allowed to create bookmarks. The machine ID of theclient will be used for ownership. The client must allow persistent cookies to be created.
Allow Document UploadIf checked, this setting will allow new or updated documents to be uploaded to QlikView Server throughthe Publisher QDS. QlikView Server must be defined as a resource in Publisher. This setting must beturned on if you use Publisher.
QlikView Server/Publisher 113

Allow Document DownloadIf checked, this setting will allow documents to be downloaded through the Publisher Access Point.
Prohibit Session RecoveryWith this setting active, the users will not be able to recover their sessions when lost.
ObjectsAllow moving and sizing objectsEnable this setting to let your users move and resize QlikView objects in the different clients.
Default Label for “Total”Here you can specify a default label for Totals in bar charts, pivot tables and straight tables.
Default Label for “Others”Here you can specify a default label for Others in bar charts and pie charts.
Performance
The Performance tab of a QlikView Server
CPUCPU AffinityYou may deselect the use of specific processors on the computer running QlikView Server. QlikViewServer will automatically select the processors to use and this setting needs to be changed only when youwish to override that choice.
CPU ThrottleSetting a threshold value here will increase or decrease the priority of the QVS process depending on howmuch CPU capacity the process is utilizing. This will free the CPU for other applications, improvingoverall performance of the server. 0 % means no throttling. This setting should not be changed if the serveris a dedicated QlikView Server server.
Note! If you notice that the CPU utilization for the QVS process exceeds the limit you have set here, it ismost likely because Windows has considers more resources available.
Reload LimitsMax Concurrent ReloadsSets how many documents may be reloaded at any one time. Be careful not to set too many reloadssimultaneously as it may degrade overall performance of the computer.
114 QlikView Server/Publisher

15 System
SessionsMaximum Number of Concurrent SessionsSets the maximum number of user sessions allowed on the QlikView Server at one time. A new usersession is generated for each document that a user opens on the Server. This setting is unrelated to CALspecifications.
Possible Session Timeout (seconds)When the session has had no activity for the specified number of seconds, it is eligible to be closed if anew user requests to start a session
Maximum Inactive Session Time (seconds)If this setting is non-zero, and the session has had no activity for the specified number of seconds, it willautomatically be terminated by QlikView Server.
Maximum Total Session Time (seconds)If this setting is non-zero, all sessions will be limited to the maximum number of seconds as specified.Once the time limit is reached, the session will automatically be terminated by QlikView Server.
Working SetThis control sets the minimum and maximum of the physical amount of RAM that can be used by anapplication. This way it is possible to control if an application can be swapped out of physical memory ornot. However, there are no guarantees that the operating system can serve the process with the amount ofmemory set here.
Using too high settings will degrade the performance of other processes on the computer, this mayhowever be desirable if the computer is dedicated for QlikView Server. Do not change these settingsunless you are well acquainted with Windows Virtual Memory Manager! Read more about working sets inthe Microsoft Windows documentation. The settings are:
LowSets the minimum amount of memory, in percentage, to be allocated to the application/process. If the useof RAM goes above this limit, Windows is allowed to swap the memory QlikView Server is using to disk.
HighSets the maximum amount of memory, in percentage, to be allocated to the application/process. If the useof RAM goes above this limit Windows should swap the memory QlikView Server is using to disk.
Note! QlikView Server assumes that it has reserved physical memory up to the Low limit.
DocumentObject Calculation Time LimitThe Object Calculation Time Limit setting specifies the maximum amount of time the QlikView Serverwill attempt to calculate a chart object. The time is set in seconds of total CPU time. Note that total CPUtime is not same as elapsed real time on a computer with parallel processing technology.
Max Symbol in ChartsHere you can specify a maximum number of symbols to plot in one chart.
Allow Document Auto LoadCheck this box to enable automated document loading and unloading.
QlikView Server/Publisher 115

Logging
The Logging tab of a QlikView Server
Log LevelEnable Session LoggingMark this check box to enable detailed session logging from QlikView Server. The file will be calledSession-Stats.log.
Enable Performance Logging Every n MinutesMark this check box to enable performance logging from QlikView Server. The file will be calledPerformance.log. The logging interval can be set between one minute and 24 hours (1440 minutes).
Enable Event LoggingMark this check box to enable mirroring to a log file of entries from QlikView Server to the Windowsevent log. The file will be called Events.log.
Enable audit logging of client activityEnable this setting to log user activity to disk. Read more about audit logging in "The Audit Log" onpage 171.
Log FolderHere you may specify the folder in which QlikView server will create log files. The default isC:\ProgramData\QlikTech\QVSon Windows Vista and later,C:\Documents and Settings\AllUsers\Application Data\QlikTech\QVS on older operating systems.
Event Log VerbosityUse this setting to control how much information will be written to the log files.
Split FilesSet how often you wish to split the log files in order to avoid having enormous files.
116 QlikView Server/Publisher
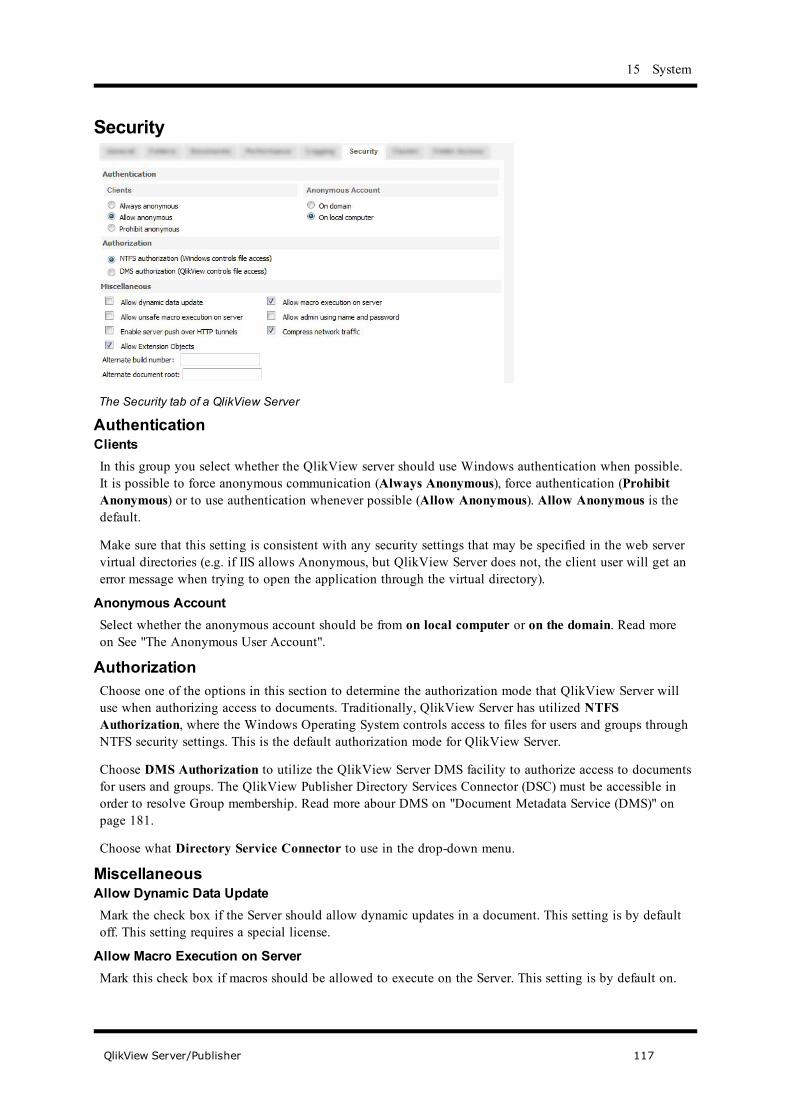
15 System
Security
The Security tab of a QlikView Server
AuthenticationClientsIn this group you select whether the QlikView server should use Windows authentication when possible.It is possible to force anonymous communication (Always Anonymous), force authentication (ProhibitAnonymous) or to use authentication whenever possible (Allow Anonymous). Allow Anonymous is thedefault.
Make sure that this setting is consistent with any security settings that may be specified in the web servervirtual directories (e.g. if IIS allows Anonymous, but QlikView Server does not, the client user will get anerror message when trying to open the application through the virtual directory).
Anonymous AccountSelect whether the anonymous account should be from on local computer or on the domain. Read moreon See "The Anonymous User Account".
AuthorizationChoose one of the options in this section to determine the authorization mode that QlikView Server willuse when authorizing access to documents. Traditionally, QlikView Server has utilized NTFSAuthorization, where the Windows Operating System controls access to files for users and groups throughNTFS security settings. This is the default authorization mode for QlikView Server.
Choose DMS Authorization to utilize the QlikView Server DMS facility to authorize access to documentsfor users and groups. The QlikView Publisher Directory Services Connector (DSC) must be accessible inorder to resolve Group membership. Read more abour DMS on "Document Metadata Service (DMS)" onpage 181.
Choose what Directory Service Connector to use in the drop-down menu.
MiscellaneousAllow Dynamic Data UpdateMark the check box if the Server should allow dynamic updates in a document. This setting is by defaultoff. This setting requires a special license.
Allow Macro Execution on ServerMark this check box if macros should be allowed to execute on the Server. This setting is by default on.
QlikView Server/Publisher 117
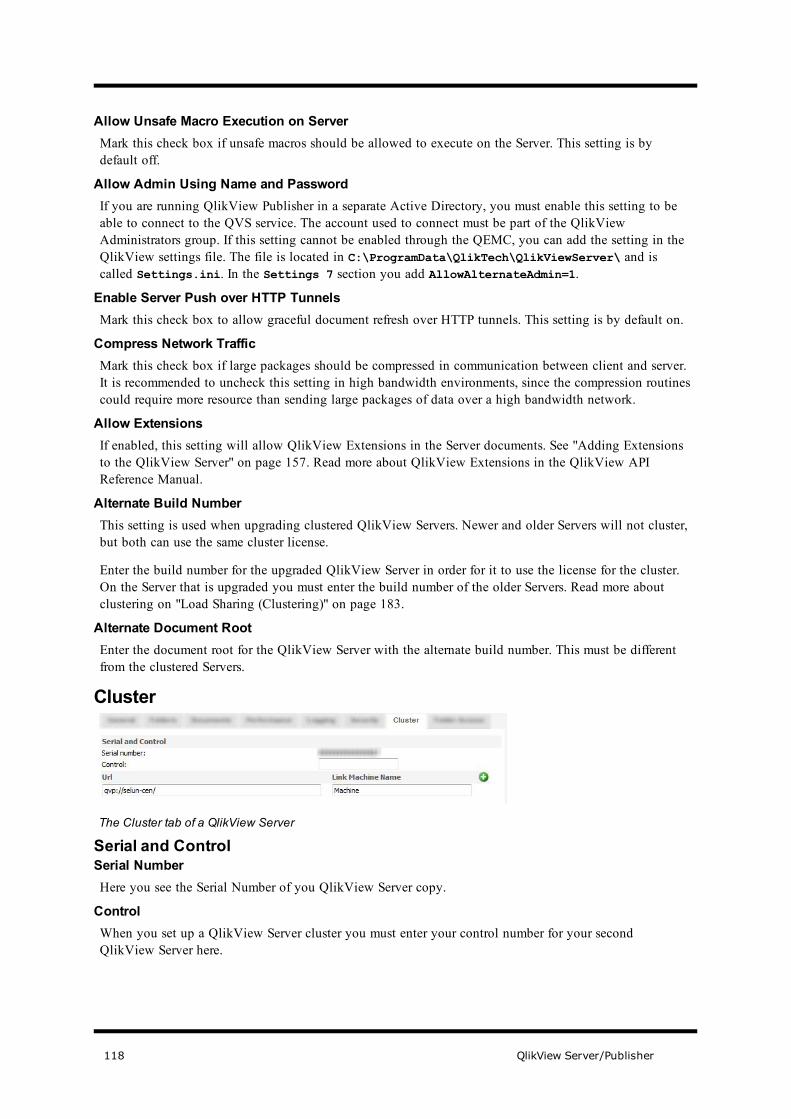
Allow Unsafe Macro Execution on ServerMark this check box if unsafe macros should be allowed to execute on the Server. This setting is bydefault off.
Allow Admin Using Name and PasswordIf you are running QlikView Publisher in a separate Active Directory, you must enable this setting to beable to connect to the QVS service. The account used to connect must be part of the QlikViewAdministrators group. If this setting cannot be enabled through the QEMC, you can add the setting in theQlikView settings file. The file is located in C:\ProgramData\QlikTech\QlikViewServer\ and iscalled Settings.ini. In the Settings 7 section you add AllowAlternateAdmin=1.
Enable Server Push over HTTP TunnelsMark this check box to allow graceful document refresh over HTTP tunnels. This setting is by default on.
Compress Network TrafficMark this check box if large packages should be compressed in communication between client and server.It is recommended to uncheck this setting in high bandwidth environments, since the compression routinescould require more resource than sending large packages of data over a high bandwidth network.
Allow ExtensionsIf enabled, this setting will allow QlikView Extensions in the Server documents. See "Adding Extensionsto the QlikView Server" on page 157. Read more about QlikView Extensions in the QlikView APIReference Manual.
Alternate Build NumberThis setting is used when upgrading clustered QlikView Servers. Newer and older Servers will not cluster,but both can use the same cluster license.
Enter the build number for the upgraded QlikView Server in order for it to use the license for the cluster.On the Server that is upgraded you must enter the build number of the older Servers. Read more aboutclustering on "Load Sharing (Clustering)" on page 183.
Alternate Document RootEnter the document root for the QlikView Server with the alternate build number. This must be differentfrom the clustered Servers.
Cluster
The Cluster tab of a QlikView Server
Serial and ControlSerial NumberHere you see the Serial Number of you QlikView Server copy.
ControlWhen you set up a QlikView Server cluster you must enter your control number for your secondQlikView Server here.
118 QlikView Server/Publisher

15 System
URLWhen setting up a cluster you must enter the path to your second QlikView Server here.
Link Machine NameIf your QlikView Server cluster is not exposed outward with the same name as is used internally, you mustenter your external name here in order for the QlikView Plug-in and the QlikView Java clients to work.
If left empty, the name exposed for the clients will be the computer name of the QlikView Server.
To mimic the behavior of version 8.5, you can enter (FromRequest) here. The name exposed outwardwill then be the same as the url the client uses to connect to the AccessPoint, that is the setting is takenfrom the request coming from the client.
Folder AccessOn this tab you can add supervision accounts and document administrators.
The Folder Access tab of a QlikView Server
Click on the respective Add users symbol to add users and groups as either Supervision Accounts ( see"Supervision Accounts") or as Document Administrators (see "Document Administrators" on page 200).Give the user access to either the root folder, meaning all folders on the Server, or to a specific folder.
Note! The System tab (see "System" on page 107) is unavailable for Document Administrators andSupervisors. This means that they cannot access supporting tasks.
Login
Server LoginIf you wish to manage a service installed on a different computer, enter the Username and Password of auser that is member of the QlikView Administrators group on that machine here.
Distribution ServicesThe Distribution Service is the component that is responsible for performing the preparation and deliveryof the QlikView files. A QlikView Publisher installation can contain many Distribution services locatedon different machines.
QlikView Server/Publisher 119
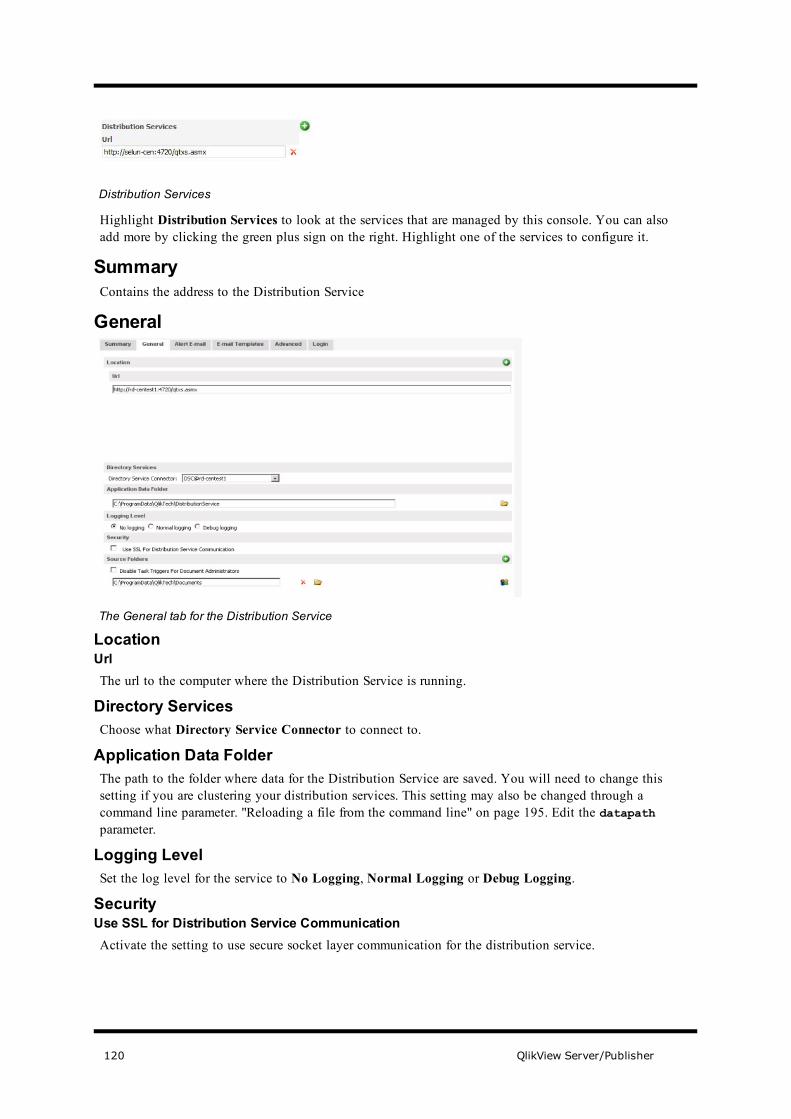
Distribution Services
Highlight Distribution Services to look at the services that are managed by this console. You can alsoadd more by clicking the green plus sign on the right. Highlight one of the services to configure it.
SummaryContains the address to the Distribution Service
General
The General tab for the Distribution Service
LocationUrlThe url to the computer where the Distribution Service is running.
Directory ServicesChoose what Directory Service Connector to connect to.
Application Data FolderThe path to the folder where data for the Distribution Service are saved. You will need to change thissetting if you are clustering your distribution services. This setting may also be changed through acommand line parameter. "Reloading a file from the command line" on page 195. Edit the datapathparameter.
Logging LevelSet the log level for the service to No Logging, Normal Logging or Debug Logging.
SecurityUse SSL for Distribution Service CommunicationActivate the setting to use secure socket layer communication for the distribution service.
120 QlikView Server/Publisher
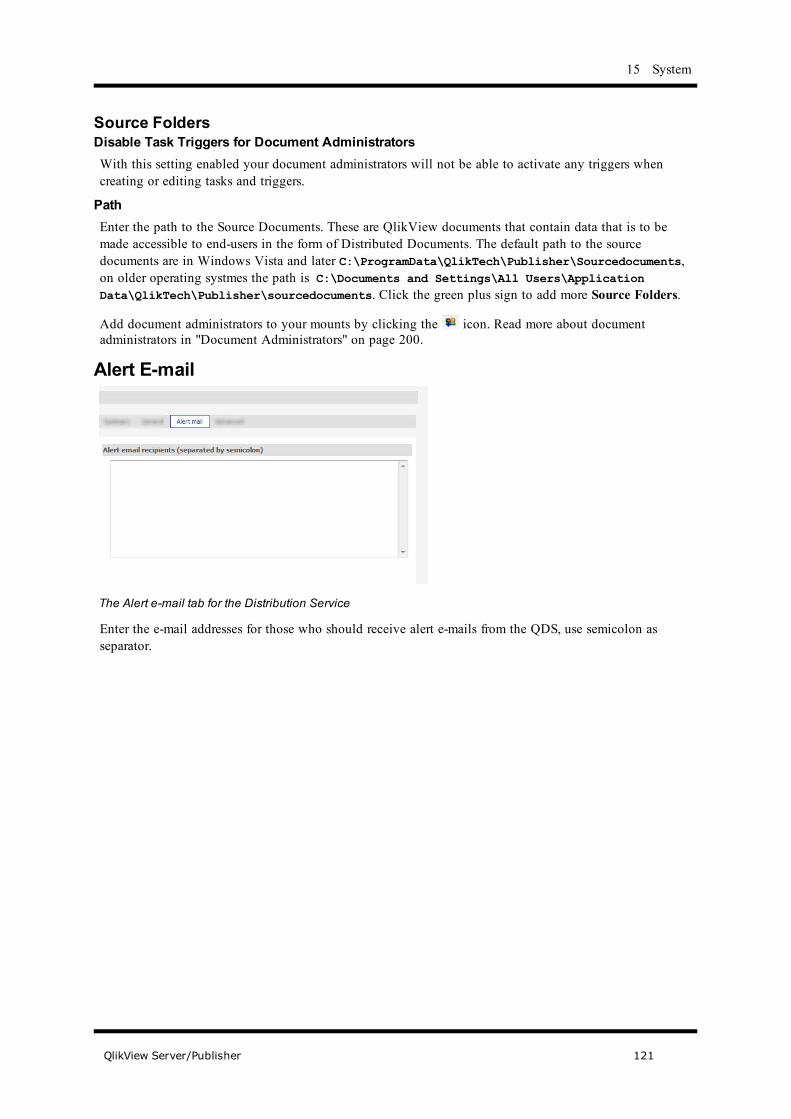
15 System
Source FoldersDisable Task Triggers for Document AdministratorsWith this setting enabled your document administrators will not be able to activate any triggers whencreating or editing tasks and triggers.
PathEnter the path to the Source Documents. These are QlikView documents that contain data that is to bemade accessible to end-users in the form of Distributed Documents. The default path to the sourcedocuments are in Windows Vista and later C:\ProgramData\QlikTech\Publisher\Sourcedocuments,on older operating systmes the path is C:\Documents and Settings\All Users\ApplicationData\QlikTech\Publisher\sourcedocuments. Click the green plus sign to add more Source Folders.
Add document administrators to your mounts by clicking the icon. Read more about documentadministrators in "Document Administrators" on page 200.
Alert E-mail
The Alert e-mail tab for the Distribution Service
Enter the e-mail addresses for those who should receive alert e-mails from the QDS, use semicolon asseparator.
QlikView Server/Publisher 121

E-mail Templates
The E-mail Template tab for the Distribution Service.
On this page you can create e-mail templates for the different messages that can be sent from QlikViewPublisher. The different messages include: Attachment (html and plain text), Notify (html and plain text)and Alert (html and plain text). You can edit the contents of the templates using html.
The following variables can be used (the variable must be inside square brackets):
[DocTitle] - The title of the QlikView document
[DateTime] - The current date and time
[Location] - The QlikView Server/folder to which the document has been distributed
[ResourceName] - The Publisher resource to which the document has been distributed
[TaskName] also [JobName] - The name of the task
[Log] - The log of the task.
Advanced
The Advanced tab for the Distribution Service
122 QlikView Server/Publisher

15 System
Set how the QDS should handle the QlikView engine (QVB.exe).
QlikView EngineMax Number of Simultaneous QlikView Engines for DistributionSet the number of QVBs that the QDS can send tasks to simultaneously.
Max Number of Simultaneous QlikView Engines for AdministrationSet how many simultaneous QVBs the QDS can use for the management of tasks in QMC/QEMC.
Section AccessThis setting allows you to select what username and password the Distribution Service will use whenopening QlikView documents. The default value is that the service will use the Windows credentials thatare set for the service itself in Windows computer management console. Read more about section accesson "Section Access" on page 207.
Work OrderClick Send Work Order to send a work order to the designated Distribution Service.
Login
Server LoginIf you wish to manage a service installed on a different computer, enter the Username and Password of auser that is member of the QlikView Administrators group on that machine here.
Directory Service ConnectorThe Directory Service Connector is responsible for communicating with the Directory Service that keepstrack of all the users and groups in your environment.
Directory Service Connectors managed by this QEMC
Highlight Directory Service Connectors to look at the connectors that are managed by this console. Youcan also add more by clicking the green plus sign on the right. Highlight one of the connectors toconfigure it.
The Summary page gives the address of the Directory Service Connector.
QlikView Server/Publisher 123

General
The General tab for the Directory Service Connector
LocationSet the location of the Directory Service Connector using the Host Name and Port fields.
Logging LevelSet the log level to No Logging, Normal Logging or Debug Logging.
ClusteringCluster urlWhen setting up a cluster you must enter the path to your other Directory Service Connectors here.
Login
Server LoginIf you wish to manage a service installed on a different computer, enter the Username and Password of auser that is member of the QlikView Administrators group on that machine here.
Active DirectoryGeneral
The General tab for the Active Directory
Set the Path to the active directory service and enter the Username and Password used for accessing it.
Click the settings icon ( ) to open the settings dialog:
124 QlikView Server/Publisher

15 System
The Directory Service Provider settings dialog for Active Directory
Cache Expiry in MinutesSet how long the queries to Active Directory should be cached.
Service Timeout in SecondsSet the time-out for the service’s connection to the Active Directory.
Custom DirectoryNo Custom Directory is installed as default. In order to use Custom users you must first add a DirectoryService Provider for custom users.
General
The General tab for the Custom Directory
Path
The path to the directory service. Press the icon to use the default path or click on the green add iconto add a new directory service.
Enter the Username and Password used for accessing the directory service if needed.
Click the settings icon ( ) to open the settings dialog:
The Directory Service Provider settings dialog for custom users
Domain NameEnter the name of the domain for your custom users.
Custom Directory PortThe port for the custom directory.
QlikView Server/Publisher 125

Users
The Users tab of the Custom Directory
Click the green plus sign to add Custom Users and Groups.
Add Custom Users
The Add Custer Users dialog
Account InformationUser NameEnter the user name.
PasswordSet a password for the user.
EnabledMark this check box to enable the user.
126 QlikView Server/Publisher

15 System
User InformationFull NameEnter the full name of the user.
E-mailEnter the e-mail address of the user.
GroupsMark the check boxes for the groups that the user should belong to.
Create Custom User Groups
The Create custom user groups dialog
Group InformationGroup NameEnter the name of the new group.
UsersMember TypeChoose to add Users or Groups to the new group.
Use the fields below to search for users or groups to add to the new group.
The information about custom users and groups is saved inC:\ProgramData\QlikTech\DirectoryServiceConnector\CustomDataDirectory.xml.
Configurable ODBCRead more about configuring the ODBC database in "Configurable ODBC" on page 255 in the Appendix.
QlikView Server/Publisher 127

General
The General tab of the Configurable ODBC settings
PathThe path to the directory service. Press the icon to use the default path or click on the green add iconto add a new directory service.
Enter the Username and Password used for accessing the directory service.
Click the settings icon ( ) to open the settings dialog:
The Directory Service Provider settings dialog for configurable ODBC
Cache Expiry in MinutesSet how long the queries to ODBC database should be cached.
Connection Database NameThe name of the ODBC database you wish to connect to.
Data Source NameThe name of the ODBC driver.
Directory LabelThe label of the directory service you are connecting to.
Entity NameThe name of the entity.
Entity Table Database NameThe name of the entities table.
Groups Table Database NameThe name of the groups table.
Override Connection StringThe string entered here will be used and the settings in Connection Database Name, Data Source Name,Username and Password will be ignored.
128 QlikView Server/Publisher

15 System
Service Timeout in SecondsSet the time-out for the service’s connection to the ODBC.
Configurable LDAPThis directory service provider can connect to any generic LDAP.
General
The General tab of the Configurable LDAP settings
PathThe path to the directory service. Press the icon to use the default path or click on the green add iconto add a new directory service.
Enter the Username and Password used for accessing the directory service.
Click the settings icon ( ) to open the settings dialog:
The Directory Service Provider settings dialog for configurable LDAP
Account name property nameThe property containing the account name of the node.
QlikView Server/Publisher 129

Cache expiry in minutesHow long the queries to the LDAP are cached.
Display name property nameThe property containing the display name of the node.
Directory LabelThe unique name of the Directory Service Provider instance.
E-mail property nameThe property containing the e-mail of the node.
Group member property nameThe property that identifies the users in a group.
Group object class valueThe class value for the LDAP group object.
ID property nameThe property containing ID of a node.
Ldap filterThe LDAP filter to use when searching user objects.
Service timeout in secondsThe time-out for the service’s connection to the LDAP server.
User member of property nameThe property value that specifies what group(s) the user is member of.
User object class valueThe class value for the LDAP user object.
Local DirectoryGeneral
The General tab of the Local Directory settings
PathThe path to the directory service. Press the icon to use the default path or click on the green add iconto add a new directory service.
Enter the Username and Password used for accessing the directory service.
Click the settings icon ( ) to open the settings dialog:
130 QlikView Server/Publisher

15 System
The Directory Service Provider settings dialog for local directory
Cache Expiry in MinutesSet how long the queries to local directory should be cached.
Windows NTGeneral
The General tab of the Windows NT settings
PathThe path to the directory service. Press the icon to use the default path or click on the green add iconto add a new directory service.
Enter the Username and Password used for accessing the directory service.
Click the settings icon ( ) to open the settings dialog:
The Directory Service Provider settings dialog for Windows NT
Cache Expiry in MinutesHow long the queries to Windows NT directory are cached.
QlikView Web ServicesThe QlikView Web services are responsible for the AccessPoint, load balancing, AJAX pages and theQlikView Web Server.
The QlikView Web Server managed by this QEMC
The Summary page contains the address of the service.
QlikView Server/Publisher 131

General
The General tab for QlikView Web Server
LocationSet the location of the QlikView Web Server using the Url field.
Logging LevelSet the log level to No Logging, Normal Logging or Debug Logging.
CommunicationPortThe port number that the web server will use.
Use httpsEnable this check box if all communication should go through secure http.
Directory Service ConnectorsEnter the URL address for the QlikView Publisher Directory Service Connector (DSC). This must containa valid address for the active DSC in order to resolve Group membership when using DMS Authorization.
Authentication
The Authentication tab
132 QlikView Server/Publisher

15 System
AuthenticationSets how the client should access the AccessPoint.
AlwaysThe client must log in to the AccessPoint.
LoginThe client can login, but can access the AccessPoint even without login in.
NeverThe AccessPoint only accepts anonymous users.
TypeChoose the what type of authentication to use:
NtlmUses the Microsoft authentication protocol.
HeaderUses a http header specified under Parameters.
Custom UserUses the custom user Directory Service Provider.
ParametersHeader NameAvailable only if Header is selected in the Authentication group. If you use a customized login system,you must specify the http header here in order for the AccessPoint to understand the login process.
PrefixAvailable only if Header is selected in the Authentication group. Enter the prefix used for the header.
PrefixAvailable only if Custom User is selected in the Authentication group. Enter the prefix used for customusers.
Login AddressIf using custom users, you must specify an address to your login page.
Default Login Page (browser authentication)Uses the web browsers login prompt.
Alternate Login Page (web form)A web page is used for login.
Custom Login PageYour own custom login page is used for logging in. Enter the path to the page in the field.
QlikView Server/Publisher 133

AccessPoint
The AccessPoint tab
PathAdd the path to the AccessPoint.
Open Document OptionsReuse New WindowOpens the QlikView document in a new browser window. The next QlikView document that is openedwill use the same window.
Same WindowOpens the QlikView document in the same browser window as the AccessPoint.
New WindowOpens each QlikView document in a new browser window.
Default Preferred ClientSet which client should be set as preferred client for a user’s first visit to the AccessPoint for clients.
Client PathsEnter the paths to where the different client files are located for the IE Plugin and Ajax zero footprintclients.
Plugin DownloadCheck the Show Link check box if you want the link for downloading the plugin to be visible on theAccessPoint.
Server ConnectionsRespect blowsable flag on mountWith this setting enabled, only those mounts in the QVS that are set as Browsable will be displayed onthe AccessPoint.
NameChoose which QlikView Server to view in the drop-down menu.
134 QlikView Server/Publisher

15 System
Load BalancingSet how the load balance should be calculated. Possible values are Random, where the client is directedto a QVS at random, or LoadedDocument, where the client is directed to the QVS where the documentthe client requests already is loaded.
Always TunnelEnable the setting to anlways tunnel the communication to the QlikView Server.
Ajax
The Ajax tab
PathThe path to QvsViewClient.aspx. The path may be changed, but the file names must remain unchangedfor the installation to work.
AdvancedHostThe default QlikView Server that the client will connect to.
No CryptoWhen enabled, this setting prohibits the use of encryption between the QlikView Web Server and theQlikView Server.
Prohibit Machine IDProhibit sending machine id. This will effectively exclude the usage of anonymous bookmarks.
RecordingLogging of qvpx calls for the AJAX zero footprint client.
QlikView Server/Publisher 135

Web
The Web tab
MimeTypesSpecify what file extensions QlikView Web Server should allow.
RootFoldersThe path to the different virtual folders in the QlikView Web Server.
Login
Server LoginIf you wish to manage a service installed on a different computer, enter the Username and Password of auser that is member of the QlikView Administrators group on that machine here.
Remote Management ServicesAdd the remote Servers from which you want to import tasks by entering the Url to the Servers’management services. The connection is made as the user you are currently logged in as. The user must bemember of the QlikView Management API security group.
136 QlikView Server/Publisher

15 System
General
The General tab of Remote Management Services
NameThe name of the remote connection.
LocationUrlThe path to the QlikView Management Services on the remote host.
Import OptionsDisable Tasks on ImportMark this check box to have all the tasks that are imported disabled. This is the default setting.
Source Folders
The Source Folders tab of Remote Management Services
Source Document Folder MappingsIn the From and To fields you set up the mappings for the souce and target document folders of thedifferent management services.
QlikView Servers
The QlikView Servers tab of Remote Management Services
QlikView Server/Publisher 137

QlikView Server MappingsIn the From and To fields you set up the mappings for the source and target QlikView Servers.
E-mail ServerGeneral
The General tab of E-mail Server
LocationHost NameSet the address to the SMTP server.
PortSet the port for the SMTP server.
MiscE-mail FormatSend the e-mail as either Plain text och HTML message.
SMTP Server TimeoutSet how long the service should wait for a response from the server.
From AddressSet the address of the sender.
Authentication MethodSet how the user should authenticate itself when sending an e-mail, Anonymous, Use Distribution ServiceAccount or enter Username and Password.
Override E-mailSend All E-mails toEnter an address that should receive all e-mails sent by QlikView Publisher. Only for test purposes.
Send Test E-mailEnter an address and click the button to test your settings.
138 QlikView Server/Publisher

15 System
Folder AccessOn this tab you add the names of the document administrators that are allowed to distribute via e-mail.
Licenses
The Licenses page
Highlight the product for which you wish to enter a license.
QlikView Server
The QlikView Server License tab
QlikView Server LicenseEnter the Serial Number and Control Number assigned to your copy of QlikView Server. You shouldalso enter your name and organization in the fields provided.
Use the Update License from Server to download a new lef file from QlikTech’s Lef server. This isprimarily used when updating the number of CALs.
The License Enabler File (lef.txt) for QlikView Server will be automatically written toC:\ProgramData\QlikTech on Windows Vista and later, and to C:\Documents and Settings\AllUsers\Application Data\QlikTech in older operating systems. If for any reason, the LEF informationcannot be accessed through the Internet from your server, you can obtain this information from your
QlikView Server/Publisher 139

vendor, and copy the entire LEF.txt file to this location, or paste the LEF data using the correspondingfield on this page. Contact your vendor for specific instructions.
Client Access LicensesThese pages display information about the client access licenses that are available on the server.
General
The Client Access License: General tab
IdentificationIn the Identify by group you decide whether named users should be identified via identified User Nameor via Machine Name (actually machine name + MAC address). It is possible to change this setting at anytime but it is strongly recommended to use one mode consistently with a given QlikView Server. Ifchanged during operation, the same user can take up two CALs, one based on user name and one onmachine name.
The usage by type of CAL and number of CALs defined in the LEF is displayed.
Usage CALs are allocated in full upon license initiation. Then, 1/28th of your total number of usage CALsare replenished daily up to the amount of the total licensed usage CALs available. For example, if youlicense 56 usage CALs, you should see 2 additional usage CALs allocated daily, minus any used, notexceeding 56.
Allow License Lease (Named User CALs)Mark this check box if you want users to be able to “borrow” a license for use off-line for a period of 30days.
Allow Dynamic CAL Assignment (Named User CALs)Enable this setting if you wish to add CALs dynamically.
140 QlikView Server/Publisher
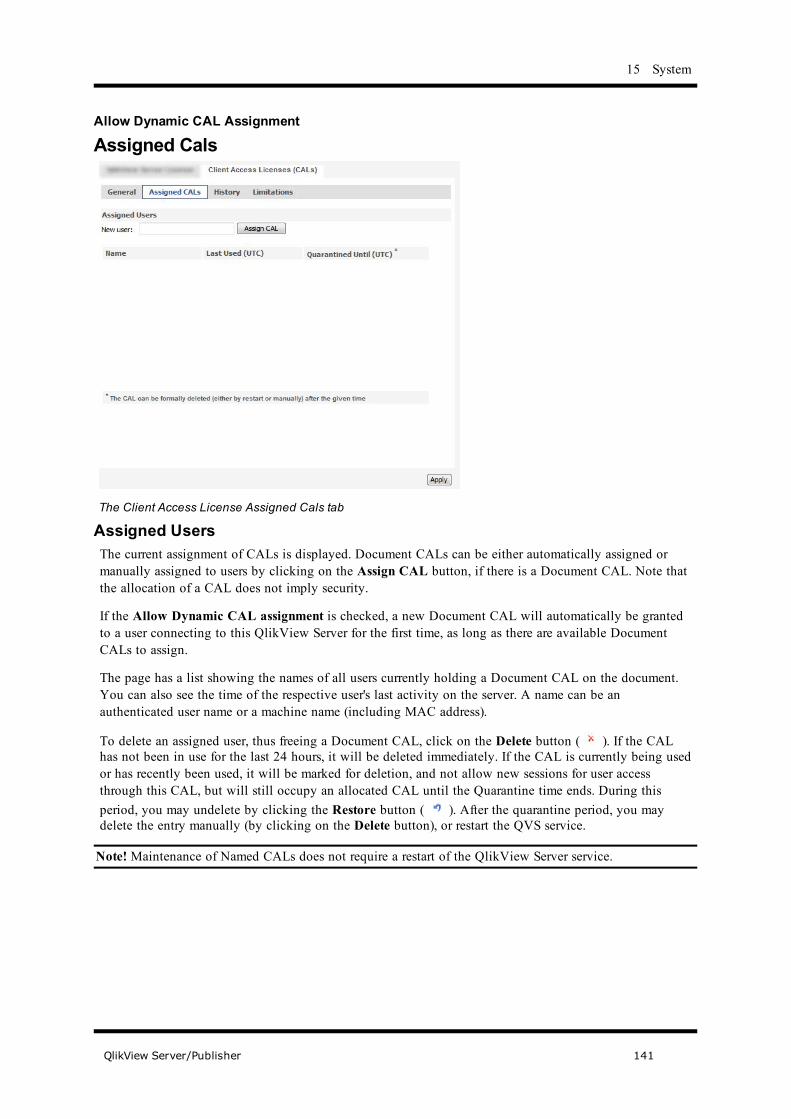
15 System
Allow Dynamic CAL Assignment
Assigned Cals
The Client Access License Assigned Cals tab
Assigned UsersThe current assignment of CALs is displayed. Document CALs can be either automatically assigned ormanually assigned to users by clicking on the Assign CAL button, if there is a Document CAL. Note thatthe allocation of a CAL does not imply security.
If the Allow Dynamic CAL assignment is checked, a new Document CAL will automatically be grantedto a user connecting to this QlikView Server for the first time, as long as there are available DocumentCALs to assign.
The page has a list showing the names of all users currently holding a Document CAL on the document.You can also see the time of the respective user's last activity on the server. A name can be anauthenticated user name or a machine name (including MAC address).
To delete an assigned user, thus freeing a Document CAL, click on the Delete button ( ). If the CALhas not been in use for the last 24 hours, it will be deleted immediately. If the CAL is currently being usedor has recently been used, it will be marked for deletion, and not allow new sessions for user accessthrough this CAL, but will still occupy an allocated CAL until the Quarantine time ends. During thisperiod, you may undelete by clicking the Restore button ( ). After the quarantine period, you maydelete the entry manually (by clicking on the Delete button), or restart the QVS service.
Note! Maintenance of Named CALs does not require a restart of the QlikView Server service.
QlikView Server/Publisher 141

History
The Client Access License History tab
License Lease HistoryThis section lists current information about leased license activity. A leased license is used by clients whoconnect to QlikView Server and are allowed to borrow a license to open the downloaded server documentfor 30 days.
Limitations
The Client Access License Limitations tab
On this page you can limit the number of CALs that may be in use at one time.
142 QlikView Server/Publisher
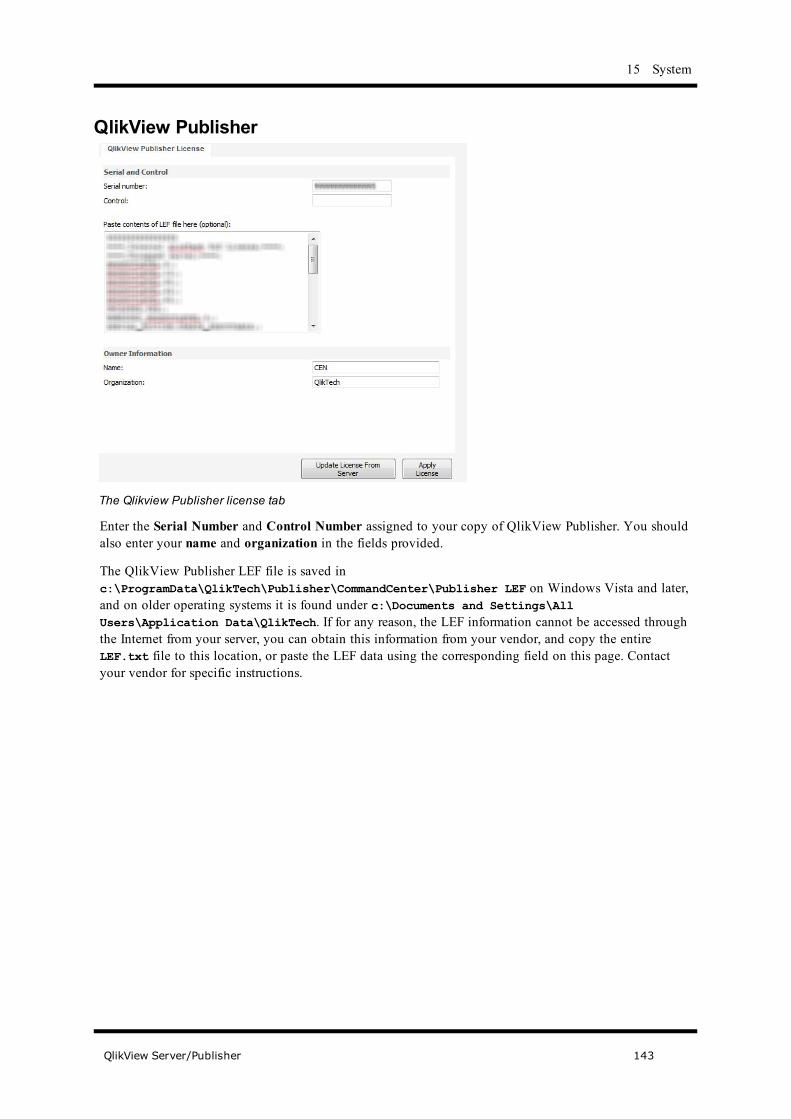
15 System
QlikView Publisher
The Qlikview Publisher license tab
Enter the Serial Number and Control Number assigned to your copy of QlikView Publisher. You shouldalso enter your name and organization in the fields provided.
The QlikView Publisher LEF file is saved inc:\ProgramData\QlikTech\Publisher\CommandCenter\Publisher LEF on Windows Vista and later,and on older operating systems it is found under c:\Documents and Settings\AllUsers\Application Data\QlikTech. If for any reason, the LEF information cannot be accessed throughthe Internet from your server, you can obtain this information from your vendor, and copy the entireLEF.txt file to this location, or paste the LEF data using the corresponding field on this page. Contactyour vendor for specific instructions.
QlikView Server/Publisher 143
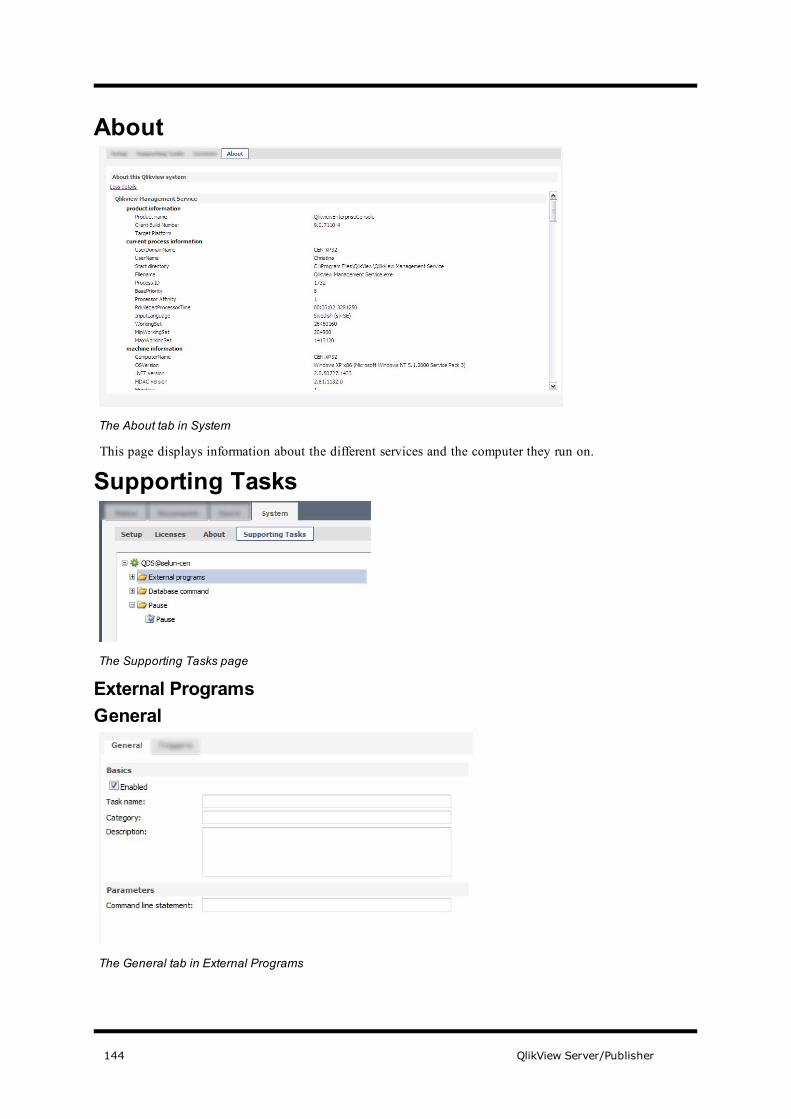
About
The About tab in System
This page displays information about the different services and the computer they run on.
Supporting Tasks
The Supporting Tasks page
External ProgramsGeneral
The General tab in External Programs
144 QlikView Server/Publisher
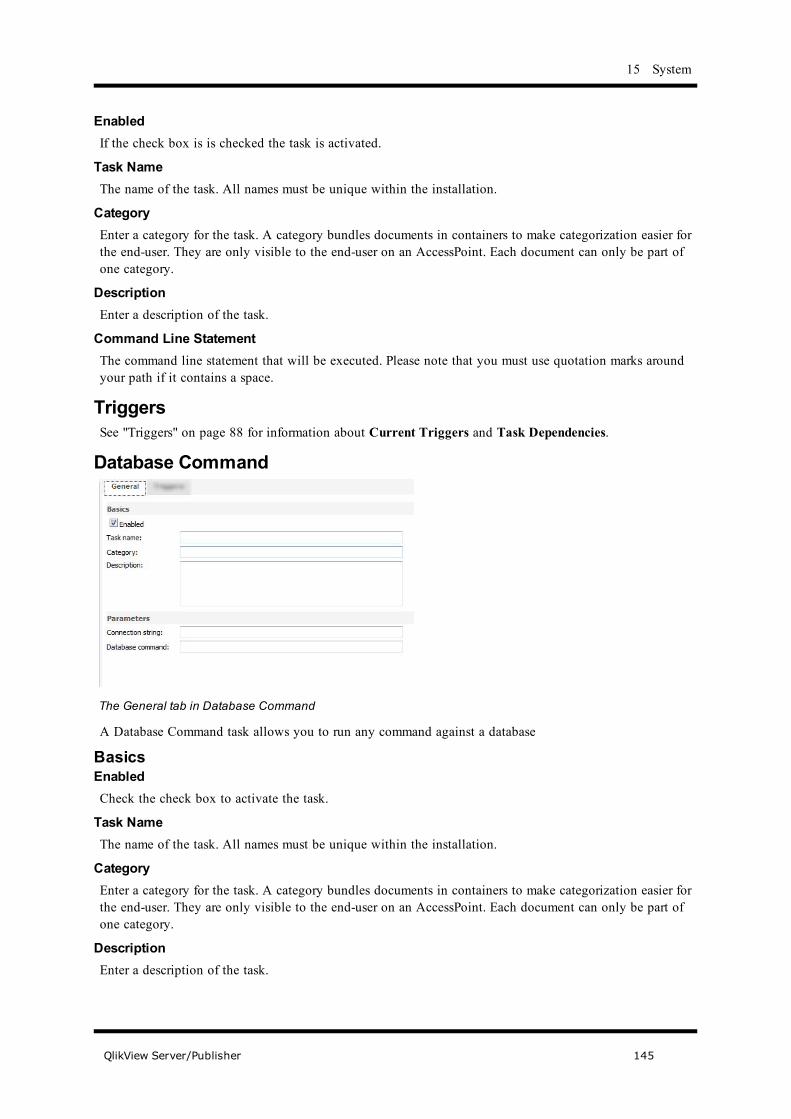
15 System
EnabledIf the check box is is checked the task is activated.
Task NameThe name of the task. All names must be unique within the installation.
CategoryEnter a category for the task. A category bundles documents in containers to make categorization easier forthe end-user. They are only visible to the end-user on an AccessPoint. Each document can only be part ofone category.
DescriptionEnter a description of the task.
Command Line StatementThe command line statement that will be executed. Please note that you must use quotation marks aroundyour path if it contains a space.
TriggersSee "Triggers" on page 88 for information about Current Triggers and Task Dependencies.
Database Command
The General tab in Database Command
A Database Command task allows you to run any command against a database
BasicsEnabledCheck the check box to activate the task.
Task NameThe name of the task. All names must be unique within the installation.
CategoryEnter a category for the task. A category bundles documents in containers to make categorization easier forthe end-user. They are only visible to the end-user on an AccessPoint. Each document can only be part ofone category.
DescriptionEnter a description of the task.
QlikView Server/Publisher 145

ParametersConnection StringThe connection string that will be used for connecting to the database.
Database CommandThe statement that will be executed. This can be any command that the database will recognize (storedprocedures or SQL statements).
TriggersSee "Triggers" on page 88 for information about Current Triggers and Task Dependencies.
Pause
The General tab
BasicsEnabledCheck the check box to activate the task.
Task NameThe name of the task. All names must be unique within the installation.
CategoryEnter a category for the task. A category bundles documents in containers to make categorization easier forthe end-user. They are only visible to the end-user on an AccessPoint. Each document can only be part ofone category.
DescriptionEnter a description of the task.
ParametersDelay SecondsThis will pause for n seconds.
Delay UntilThis will pause until the specified time.
146 QlikView Server/Publisher

15 System
Triggers"Triggers" on page 88 for information about Current Triggers and Task Dependencies.
QlikView Server/Publisher 147

148 QlikView Server/Publisher

Part 4 QlikView Server
QlikView Server/Publisher 149

16 Security Set-up16.1 Communication EncryptionAll communication between QlikView Server and Windows based clients is encrypted. QlikView Serverwill attempt to establish 128-bit encryption based on the RSA algorithm when a client connects. The levelof encryption may however be lowered if the operating system of the client computer does not support thisstrength of encryption.
Communication with the AJAX client can be secured using Secure Socket Layer (SSL) and HTTPSprotocol between the web browser and the web server (IIS or the QVS built in http server - QVWS). Thisrequires an additional certificate. Communication between the QVWS and QVS is, by default encryptedstarting with 8.5. If IIS is used, encryption is not possible between QVWS and QVS.
Secure communication between QlikView Server and the AJAX client depends on http or https. Betweenthe web browser and QVS, it depends on IIS or the QvWeb Server.
If you require a secure channel (using SSL) for communication with the server, these settings must be madeon the web server, either by using the built-in web server or in IIS. For IIS, set this on Web SiteProperties, Directory Security, Secure Communications.
For the QlikView Web Server read more in "How to Activate SSL for Services in Windows".
16.2 File System Security on ServerIf DMS Authorization is not set on the Security page in the QMC or QEMC, QlikView Server will onlymake qvw documents available to a connecting client if the client has an identity with operating systemfile access rights to that document. The account that the QlikView Server service is running as must haveread and execute permissions on both file and directory. See below for details regarding anonymousclients.
Document and folder permissions are set on the Security page of the Properties dialog for documents andfolders respectively. These settings are made entirely in the operating system and not from QlikView orQlikView Server.
TIP: Make sure to review the effective permissions after changing permission settings on a file or folderlevel. In complex environments it is not uncommon that conflicting permission settings cause access to bemore or less restricted than intended.
For DMS Authorization mode information and settings, refer to the sections titled Document MetadataService (DMS) and the Security page description for the QMC and QEMC.
Setting up IIS for Windows Authentication withQlikView for IE and QV AJAX ZFCIn order for the QlikView for IE plug-in to be able to work with Windows authentication when the clientcomputer is not on the same domain as the QVS, the following steps have to be performed:
Under Administrative Tools in the Windows Control Panel open Internet Information Server. Thenexpand your web site in the tree control.
150 QlikView Server/Publisher

16 Security Set-up
Right-click on QVPlugin and select Properties. Navigate to the Directory Security tab and click on Edit.
Make sure that Anonymous Access is deselected and that at least one of the check boxes underAuthenticated Access is selected.
Setting up IIS for Windows Authentication withQlikView AJAX ZFCIn order for the QlikView AJAX ZFC to be able to work with Windows authentication you must performthe same procedure as the one described for QVA for IE above, but set properties for QvAjaxZfc instead.This step is required if only named CALs are licensed.
While it is not a requirement, you may also want to set the virtual directory subfolderQlikView\QvAjaxZfc to Windows authentication as well to set the access rights to the html pages.
The Anonymous User AccountWhen the QlikView Server is started for the first time on a machine an account will be created foranonymous users. The account will be named IQVS_name where name is the name of the machine in thelocal network.
If the machine in question is a domain server, the anonymous account will be created as a domain accountor it will be a local machine account.
QlikView Server/Publisher 151
Each folder and file that should be available from anonymous clients must be given read privileges to theanonymous account.
It is important to start QlikView Server and thereby let it create the anonymous account before any attemptis made to grant privileges. You must not try to create the anonymous account yourself!
Connection Pseudo-URLsWhen connecting to QlikView Server from Windows clients, either via the Open in Server dialog or vialink files, the identity to be used is specified via the pseudo-URL document address.
The syntax is:
qvp://[[username]@]servername [:(port | protocol)] /[documentname.qvw][?paramname=paramvalue{¶mname=paramvalue}]
where
username is a Windows user ID
servername is the name of a server running QlikView Server
documentname is the name of the QlikView document (excluding qvw extension)
port (e.g. 4749) can be used to specify a specific port used by the server
protocol (e.g. http) can be used to specify tunneling protocol
paramname := (USERID | XUSERID | PASSWORD | XPASSWORD | MACRO |
IIS_AUTHENTICATE )
USERID denotes a section access userID in clear text
XUSERID denotes a scrambled section access userID
PASSWORD denotes a section access password in clear text
XPASSWORD denotes a scrambled section access password
MACRO denotes the name of a macro to be run when the document is opened
(only one macro allowed)
IIS_AUTHENTICATE denotes a single-use key (40 hex characters) for IIS integrated authentication.
paramvalue is a valid value for each parameter.
@ without username denotes anonymous identity.
If user identity is omitted altogether, the logged in Windows identity is assumed.
Examples:
qvp://www.qliktech.com/AcmeStores.qvw
qvp://@www.qliktech.com/AcmeStores.qvw
qvp://[email protected]/AcmeStores.qvw
qvp://www.qliktech.com:http/AcmeStores.qvw
152 QlikView Server/Publisher

16 Security Set-up
qvp://www.qliktech.com/AcmeStores.qvw?USERID=JOHN&PASSWORD=ABC123
qvp://www.qliktech.com/AcmeStores.qvw?MACRO=Mymacro
TIP: Internet Explorer 7 and 8 do not support @ or : in the URL in order to prevent spoofing of URLs. Tospecify these characters in the URL, you need to URL-encode them.
Use %3A for: and %40 for @.
16.3 File System Security vs. QlikView SectionAccess SecurityNTFS Authorization or DMS Authorization mode file system security only controls which documents aclient is allowed to see in the file tree and attempt to open. The documents may of course contain a scriptsection access which further prevents or limits the client's access to the content of the document onceopened.
The QlikView Windows clients will prompt the user for section access USERID and PASSWORD whenrequired. When using section access with QlikView USERID and PASSWORD in connection withQlikView AJAX ZFC it is necessary to make your own provisions for entering them and then pass them tothe QlikView AJAX ZFC by means of URL parameters (see special sub-section titled “Using sectionaccess with QlikView AJAX ZFC” for details).
16.4 Security ConfigurationsThere are, of course, many configuration choices available for a QlikView Server implementation. Thissection will attempt to describe some options as examples of possible configurations.
Authentication vs. AuthorizationAuthentication: ”Who is this user?”The main way of authenticating a user should be
l an Operating System logon (Windows, Novell, etc), orl any Web logon using a Directory Service.
Either way, it is made by non-QlikTech software.
An additional authentication can be made by QlikView through the fields USER, PASSWORD orSERIAL in a Section Access of the load script.
Authorization: ”What data is this user allowed to see?”1. If the QlikView Server runs in DMS Authorization mode, the authorization is handled through the
DMS thread on the QlikView Server.2. If the QlikView Server runs in NTFS Authorization mode (legacy mode), the authorization is
handled by the Windows NTFS file system. This requires that the authentication is made throughWindows.
3. In both modes, an additional access limitation can be defined in the Section Access of the scriptusing e.g. NTNAME. This is handled by QlikView.
Client Side AuthenticationThe QlikView Server is within the same Domain as the client, and a Windows Directory Service isavailable.
QlikView Server/Publisher 153

The user is already authenticated when the QlikView client is started. As the client clicks on a QlikViewlink, a request is sent to the QVS with the user credentials. The QlikView Server uses NTFS and SectionAccess to see if the user is allowed to see the document.
Server Side Authentication – Using AccessPointThe QlikView Server will issue a ticket for authenticating a user through QvsComRemote.dll. If the userpresents a valid ticket when requesting a session, the access is granted based on the user’s authorization toopen a document.
1. The client browses to the AccessPoint2. The AccessPoint requests the file list from the QlikView Server3. The QVS sends the file list4. The AP shows the available documents5. The client selects which file to open6. The AP requests ticket from the QVS
154 QlikView Server/Publisher

16 Security Set-up
7. The QVS sends the ticket8. The AP sends a placeholder document with the ticket9. The client requests the right file with the ticket from the AP10. The AP requests the file with the ticket from the QVS11. The QVS opens a connection to the file12. The AP shows the client the file
Server Side Authentication – Non Windows Web ServerThe QlikView Server will issue a ticket for authenticating a user through the QlikView web server. If theuser presents a valid ticket when requesting a session, the access is granted based on the user’sauthorization to open a document.
1. The client makes a call to a web server. The web server must already have an authentication systemin place. Either background authentication or a log-on screen.
2. As the client clicks on a QlikView link, the web server makes a web service call to the QlikViewHttp server with a request to the QVS with the user name and gets a ticket in return.
3. The client launches a QlikView client that sends a request including the ticket to the QVS.4. The QVS trusts the web server and thus ”knows” who the user is. QVS checks with the DMS if the
user is allowed to see the document.
Server Side Authentication – Get Ticket ProcessQlikView Server does not authenticate the user; it authenticates the process asking for a connection. Thereare two methods that can be used for authentication, Negotiated Authentication and TicketAuthentication. Once the connection is established QVS make no distinction between how theauthentication was done.
Authenticated Names are required for any task where a user name is required, other than CAL assignments,which use a simple, best guess procedure.
Negotiated Authentication: This authentication will be used as the authenticated user if:
QlikView Server/Publisher 155

l The connection is marked as admin.l Or if all the below apply:l The server is not set to ‘Always anonymous’l The connection is not done by ticketl The authenticated user isn’t considered as equal to anonymous (e.g. USR_...)l Negotiated Authentication will attempt to use Kerberos, but if that is unsuccessful, NTLM will beused.
l Ticket Authentication: The alternate method to get an authenticated user is through ticket. Seeexamples below for additional information.
l QVS is passed a username from a trusted source (in QVS Admin Group) and QVS trusts thatauthentication has happened elsewhere.
l Or, Tickets can also be obtained ‘For Me’ i.e. for the actual user of the asking process
Client Usage:
l The Windows client can use tickets (via QVP url) or negotiate authenticationl The AJAX client must use the ticket parameter, e.g.http://localhost/salesdemo/AJAXzfc/?ticket=510EA55C2DB723DC04C16C6FB3CDAB24F3390792
Get Ticket examples:There are two ways of requesting a ticket from QlikView Server, to be used in different Single Sign On(SSO) scenarios:
GetTicketForMe This will require that you are an authenticated Windows user and will generate a ticketonly valid for yourself. The function takes no parameters.
To try it out type the following in a web-browser:http://webhost/qvajaxzfc/qvsviewclient.aspx?cmd=<Global%20method='GetTicketForMe'%20/>
In programming (ASP/VBScript), use the following:set ntsecurity = Server.CreateObject("QVSRemote.Client")ntsecurity.AdminConnect "localhost"ticket = ntsecurity.execute("<Global method='GetTicketForMe'/>The response will be an XML-document in the following format:<Global><_retval_>40 char hex</_retval_></Global>
GetTicket This function will generate a ticket for any UserId submitted to the function.
Only members of the local QlikView Administrators group can retrieve a ticket. If not part of the group thefunction will return <Error />. See below for other options
In programming (ASP/VBScript), try the following:
set ntsecurity = CreateObject ("QVSRemote.Client")
ntsecurity.AdminConnect "localhost"
ticket = ntsecurity.Execute("<Globalmethod='GetTicket'><UserId>User</UserId></Global>")
msgbox ticket
The UserID is retrieved from any other trusted authentication source.
156 QlikView Server/Publisher

16 Security Set-up
If QVS and IIS is installed on different machines, replace "localhost" with the IP/DNS name for theQlikView Server.
16.5 Supervision AccountsThese accounts always have the right to open documents on the Server through one of the QlikViewclients, for example, through Open in Server in QlikView Desktop.
Note! The System tab (see "System" on page 107) is unavailable for Document Administrators andSupervisors. This means that they cannot access supporting tasks.
Add the users to the mounts in QEMC, see See "Folder Access".
16.6 Adding Extensions to the QlikView ServerTo make it possible to run QlikView Extensions on a QlikView Server you must copy the extensionfolder contents from %USERPROFILE%\AppData\Local\QlikTech\QlikView\Extensions\Objects tothe following folder on the Server, %PROGRAMDATA%\QlikTech\QlikViewServer\Extensions\Objects.
QlikView Server/Publisher 157

158 QlikView Server/Publisher

17 Functional Architecture
17 Functional Architecture17.1 QlikView Server – Client CommunicationThe QlikView Server – Client communication architecture requires three primary processes, which must beable to communicate with each other in a consistent and secure manner. This interaction can potentiallyinvolve multiple computers and multiple network connections, as well as other subordinate processes.
The three primary processes are:
1. The QlikView Server (QVS), which provides QlikView functionality to the client. The machine thatis hosting this service must be running in a Microsoft Windows Operating System (refer to SystemRequirements section at the beginning of this document).
2. The Client, running in a web browser or an application shell that provides a container for the clientcode. The client communicates with QlikView Server either directly or through the Web Server toprovide the QlikView interface and functionality to the end user.
3. The Web Server, running an HTTP server, which can be used to serve up the HTML web page tothe client, assist with authentication of the user, and enable communication between the client andQlikView Server.
In the simplest scenario, all three processes can be running on a single machine, with a single user. Thecomplexity of this relationship can increase quickly, however, as separate machines, Internet connections,multiple firewalls, and multiple Web Servers are introduced. Finally, multiple users who require securityauthentication and authorization from a myriad of Directory Services are added, and a QlikView Server –Client communication architecture can become quite involved.
There are, of course, a large number of possible network configurations that QlikView Server canparticipate in, but there are a few considerations to keep in mind regardless of the final configuration:
QlikView Server/Publisher 159

l QlikView Server runs as a Windows Service onlyl At least one network communication path must exist between the QlikView Server and the Clientl The authentication of the Client user must be performed either through Windows Authentication,QlikView Authentication (section access), or any third party system that can authenticate the user.
QlikView Server will cache group membership lookups for 15 minutes. This applies for Servers running inboth NTFS and DMS mode.
QlikView Server Functional DescriptionThere will be one QlikView Server process per logical computer, which must be running a WindowsOperating System. QlikView Server can run as a 32-bit or 64-bit process (OS and hardware dependent).The QlikView Server process can be identified as qvs.exe.
Client Access License (CAL)All client access to QlikView Server must be licensed. This is accomplished through the use of ClientAccess Licenses (CALs) linked to the specific instance of the QlikView Server through the LEF file. Inthis context, it is important to understand the definitions of anonymous user and authenticated user.
Anonymous user – an unidentified or unknown user (any user). There is no authentication for anonymoususers, they can be anyone.
Authenticated user – an identified user whose identity can be verified.
Authenticated Windows OS user (e.g. NTNAME, NT User, NTDOMAINSID)
Authenticated non-Windows user
Authenticated QlikView user (e.g. section access: USERID, PASSWORD)
Authenticated third party (build partner) user
The type of CAL will affect how users are allowed to connect to QlikView Server, based on the Clienttype and Authentication settings in the Web Server and/or QlikView Server. Read more about the differentCALs in "Types of CALs" on page 173.
Client Functional DescriptionQlikView Server can support the following categories of Clients:
1. Windows Clients – this is the QlikView Desktop. This category also includes the Internet Explorerplug-in ActiveX client running as a full window or object only (QlikX). All Windows Clientsrequire installation with Administrator level rights. QlikView Desktop requires licensing on theclient machine in addition to the QlikView Server CAL.
2. AJAX (ZFC) Clients – this includes the AJAX Client, which supports HTML objects only. NoClient side installation or licensing is required.
3. Mobile Client – this includes the iPhone client and the Java based mobile clients (for BlackBerryand others). An App Download to the mobile device and installation is required. Settings areavailable to configure the server from the download site as well as on the client device. No Clientside licensing is required.
Client Communication to QlikView ServerThere are multiple protocols defined for client communication with QlikView Server (QVS).
l QVP: Encrypted, binary, communicates directly with the QVS on port 4747l QVPX: Not encrypted, xml, communicates with the QVS using http/https through a web server.
160 QlikView Server/Publisher

17 Functional Architecture
Windows clients (exe/ocx) communicate directly with QlikView Server, using QVP (QlikView Protocol)on port 4747. These clients do not require a Web Server to establish and maintain a connection withQlikView Server.
AJAX (ZFC) Clients can never communicate directly with QlikView Server. They must establish andmaintain a connection using the QVPX protocol through a Web Server (e.g. QVWS or IIS). This istypically accomplished through port 80 (http).
The iPhone client and the BlackBerry client must establish and maintain a connection using the QVPXprotocol through a Web Server (e.g. QVWS or IIS). This is typically accomplished through port 80 (http).
The default installation settings for QlikView Server will use the QlikView Web Server and not the IIS.The QlikView Web Server will share port 80 with IIS on Vista, 2003 Server and 2008 Server. OnWindows XP, only one of the two web servers (IIS and QVWS) can be used on port 80. If both areconfigured to run, they must be assigned different ports.
All clients will communicate through a web server using http or https when tunnel is required. AJAX andMobile clients require connection to a web server when authentication is necessary. An http or httpsconnection to the QlikView Server is used to get a ticket.
Web Server Functional DescriptionTraditionally, the standard web server in a QlikView Server configuration has been Microsoft InternetInformation Services (IIS). QlikView offers an alternative solution that is included with the QlikViewServer installation. This is the QlikView Web Server. This web server can act as a stand alone service, butis cannot handle asp pages.
Other web servers can be utilized in a QlikView Server environment, but there are some restrictions. If theother web server is able to direct traffic to the QlikView web server (running on the same machine asQlikView Server), the possibilities are many, including the configuration with the other web serverrunning under a non-Windows operating system. If the other web server must utilize a local QlikViewServer dll (QvComRemote.dll) to communicate with QlikView Server (e.g. for tunneling), then the otherweb server must be running under a Windows operating system.
QlikView Server/Publisher 161

Web Server on Separate Machine from QlikView ServerIf the Microsoft IIS or QlikView Web Server is running on a separate machine from the QlikView Server,you will need to configure the location of the QlikView Server, and optionally, the port, to allow the webserver to locate the QlikView Server. The configuration requirement will vary, based on which web serveryou are using.
IIS web serverEdit the file QvClients\settings.js to point to the QlikView Server, and optionally, the port. Changethe variables QvsHost and QvsPort to match your environment, and remove the comments. TheQvsViewClient.aspx is configured to include the settings.js code, but you will need to remove thecomment tags.
QlikViewWeb ServerEdit the file C:\Program Files\QlikView\Server\QvWebServer\config.xml to point to theQlikView Server. Change the tags QvsHost and QvsTunnel to match your environment.
17.2 QlikView Server TunnelIf the standard communication port to QlikView Server (4747) is blocked in any way (typically by afirewall limitation), the Windows Clients will attempt to re-route their connection through port 80 (http).This connection path must then include the QVWS so that the QlikView Tunnel communication can beestablished. All communication through the QVS Tunnel must include the secure communication packet,so this will significantly increase the network traffic (along with response times) required between theQlikView Server and the client. The infrastructure might also interfere, for example, if the traffic is routedthrough proxy servers. This is especially true if tunneling using HTTPS. It is recommended to set up rulesto bypass proxy servers when tunneling using HTTPS.
The QlikView Tunnel is installed into the Web Server process and allows the QlikView Client to betunneled over the HTTP protocol to the HTTP process and then forwarded onwards to the QVS process.
When there is a requirement for the HTTP process to run on a third machine (perhaps since it is not aMicrosoft Windows server) but communication between the Client and the HTTP machine is restricted,then the setup is similar. The HTTP machine having a Tunnel installed to redirect the QlikView Clientprotocol on the QVS machine. Communications between the QVS and HTTP cannot be restricted in anyway.
Finally, if the HTTP process must run on a third machine and communication between the Client andHTTP machine is not restricted in any way, then another process can come into play. This is a TCP/IPRedirector (or Redirect) that runs on the HTTP machine. It is required because (in the case of Java) theClient applet can only connect to the machine that served the web page containing the applet. Theredirect process accepts the connection from the applet for the QlikView Client protocol and forwards itonto the actual QVS machine. The Redirect process may be a separate program, part of the operatingsystem of the HTTP machine or even a function of the firewall/proxy system in use between the HTTPmachine and the Client machine. All that matters is that both the machine name and the IP address of theRedirect is the same as the HTTP machine.
For Tunneling on a Windows Server using IISIf you want to use tunneling, you must add the tunnel dll-file as an ISAPI filter.
For Microsoft IIS 7: open the Internet Information Services Manager, select the IIS top node. Open theISAPI and CGI Restrictions dialog. Choose Add in the Actions pane and browse to the location of
162 QlikView Server/Publisher
17 Functional Architecture
QVSTunnel.dll. Give the instance a description and make sure to check Allow extension path toexecute.
Open the site that should host the QlikView Server/Publisher pages and click on Scripts, then open theHandler Mappings dialog. Locate the ISAPI-dll and choose Edit Features Permission in the Actionspane. Check Execute in the dialog that opens.
Two entries are required in the registry:[HKEY_LOCAL_MACHINE\SOFTWARE\QlikTech\QlikTunnel]
"QVSPort"=dword:000012a6
"QVSServer"="QvsHost"
The QVSPort entry should already exist, but the QVSServer must be added manually.
Note! These registry entries are only relevant when the Microsoft IIS and the QVS are on differentmachines.
Note! The tunnel.dll file is only needed when using Microsoft IIS and tunneling traffic.
For Tunneling using QlikViewWeb Server:Edit the Config.xml file to specify the location of the <QvsHost> and <TunnelHost>. <QvsHost> is usedin all non-tunnel-cases and <TunnelHost> when tunnelling is requested. It is thus possible to have oneQvs handling all non-tunneling and another handling tunnelling. Note that if you omit <TunnelHost> theQlikView Web Server will NOT support QVS tunnel.<Config><QvsHost>HIC-HP</QvsHost><TunnelHost>HIC-HP</TunnelHost>
Tunneling fromWindows clientsTunneling from Windows clients is achieved by adding http as protocol in the pseudo-URL describing theserver or document address. For Internet Explorer 7 and 8, the QVP syntax requires “;” in place of “:” inorder to prevent spoofing of URLs. For example, qvp://host;http/test.qvw.
QlikView Tunnel Test ProcedureYou can test the QlikView Tunnel by entering the following URL from a Client browser window if youare running Microsoft IIS:http://Server/scripts/qvstunnel.dll?test
Where
Server is the Web Server name or address
If the QlikView Tunnel is set up correctly, the webpage should return with a message saying thattunneling is available and the version number of QlikView Server.
QlikView Server/Publisher 163

164 QlikView Server/Publisher
18 Logging
18 Logging18.1 Logging from QlikView ServerAlerts from QlikView Server will appear in the Windows event log.
More detailed logs for sessions can be found in the logging directory specified on the QlikView ServerSettings, Logging tab of QMC and on the System, QlikView Server, Logging in QEMC. The defaultlocation is C:\Documents and Settings\All Users\Application Data\QlikTech\QVS, WindowsVista and later uses C:\ProgramData\QlikTech\QVS.
Log files can be set to split (create new) daily, weekly, monthly, yearly or never. Performance log intervalscan be set from 1 minute and higher.
A QlikView document designed to load data from the log files and support analysis is provided on thedefault installation of QlikView Server. This file is named QvServerPerformance.qvw and is located inthe QvsDocuments folder.
18.2 The Session logThe session log is updated each time a session ends. A session is defined as a single user connected to asingle document. The file name of the session log is Sessions*.log, where * reflects the server name andthe split interval. Each entry of the session log will contain the following fields.
Session Log filed Explanation
Exe TypeType of QlikView Server build
Example: 'RLS32' = 32-bit release build
Exe Version Full version number of QlikView Server.Example: ‘8.0.4366.0409.10’
Timestamp Date and Time when log entry was created
Document QlikView document accessed
Document Timestamp File timestamp of document accessed
QlikView User QlikView section access UserID (if used)
Exit Reason
Reason for session termination:
‘Socket closed’= client induced termination.
‘LRU’=terminated as Least Recently Used in
QlikView Server/Publisher 165

Session Log filed Explanation
favor of new user
‘Shutdown’=server induced termination forother causes
Additional values exist, but should normallynot occurr.
Session Start Time when session was started
Session Duration Duration of session inhours:minutes:seconds
CPU Spent (s) CPU-seconds spent by session
Bytes Received Bytes received by server during session
Bytes Sent Bytes sent by server during session
Calls Number of QlikView calls during session(bidirectional)
Selections Number of QlikView selections made duringsession
Authenticated user Authenticated Windows NT UserID (if itexists)
Identifying user User identification for client
Client machineidentification Machine identification for client
Serial number Serial number of QlikView client (QVA+,QVP or QVE installed client only)
Client Type
Type of client used
‘Windows exe’=Windows client
‘Java’=Java client
‘iPhone’=iPhone client
166 QlikView Server/Publisher

18 Logging
Session Log filed Explanation
Secure Protocol
‘On’ when encrypted communication is used(typically Windows clients=.
‘Off’ when non-encrypted communication isused
Tunnel Protocol ‘Tunnel’ when QVS tunnel communicationis used.
Server Port Port used by server.
Client Address Client IP number
Client Port Client port
Cal Type
Type of Client Access License used
‘User’=Named CAL
‘Session’=Session CAL
‘Usage’=Usage CAL
Cal Usage Count Count of Usage CALs
18.3 The Performance logThe performance log is updated at an interval set on the Logging page of the QlikView EnterpriseManagement Console. The default interval is 5 minutes. Additional entries are made whenever the serveris started or stopped. The file name of the session log is Performance*.log, where * reflects the servername and the split interval. Each entry of the log will contain the following fields.
Performance Log field Explanation
Exe Type Type of QlikView Server buildExample: 'RLS32' = 32-bit release build
Exe Version Full version number of QlikView ServerExample: '8.0.4366.0409.10'
QlikView Server/Publisher 167

Performance Log field Explanation
Timestamp Date and Time when log entry was created
EntryTypeType of entry. 'Server starting' denotes startup.'Normal' denotes normal interval log entry.'Server shutting down' denotes shutdown
ActiveDocSessionsNumber of document sessions* that haveshown activity during the interval and stillexist at the end of the interval
DocSessions Total number of document sessions* that existat the end of the interval
ActiveAnonymousDocSessio-ns
Number of document sessions* withanonymous user that have shown activityduring the interval and still exist at the end ofthe interval
AnonymousDocSessionsTotal number of document sessions* withanonymous user that exist at the end of theinterval
ActiveTunneledDocSessionsNumber of document sessions* with tunneledconnection that have shown activity during theinterval and still exist at the end of the interval
TunneledDocSessionsTotal number of document sessions* withtunneled connection that exist at the end of theinterval
DocSessionStarts Number of document sessions* that have beeninitiated during the interval
ActiveDocsNumber of documents loaded at the end of theinterval in which there has been user activityduring the interval
RefDocsNumber of documents loaded at the end of theinterval for which there is a session at the endof the interval
LoadedDocs Total number of documents loaded at the end
168 QlikView Server/Publisher

18 Logging
Performance Log field Explanation
of the interval
DocLoads Number of new documents loaded during theinterval
DocLoadFails Number of documents that have failed to loadduring the interval
Calls Total number of calls to QlikView Serverduring interval
Selections Number of selection calls during interval
ActiveIpAddrs
Number of distinct IP-addresses that have beenactive during the interval and still exist at theend of the interval. Note that tunneled sessionsand multiple users originating from the same IPcannot be distinguished
IpAddrs
Total number of distinct IP-addresses connectedat the end of the interval. Note that tunneledsessions and multiple users originating from thesame IP cannot be distinguished
ActiveUsers
Number of distinct NT users that have beenactive during the interval and still exist at theend of the interval. Note that anonymous userscannot be distinguished here
UsersTotal number of distinct NT users connected atthe end of the interval. Note that anonymoususers cannot be distinguished here
CPULoad Average CPU load from QlikView Serverduring interval
VMAllocated(MB) Size in MB of virtual memory allocated byQlikView Server at the end of the interval **
VMCommitted(MB)Size in MB of virtual memory actually used byQlikView Server at the end of the interval.
QlikView Server/Publisher 169
Performance Log field Explanation
This number is part of VMAllocated(MB) andshould not exceed the size of the physicalmemory in order to avoid unacceptableresponse times
VMFree(MB) Size in MB of unallocated virtual memoryavailable to QlikView Server **
VMLargestFreeBlock(MB)
Size in MB of the largest contiguous block ofunallocated virtual memory available toQlikView Server. This number is part ofVMFree(MB)
UsageCalBalance ‘-1.00’ denotes no Usage CALs exist
* one user + one document = one document session
**VMAllocated(MB)+ VMFree(MB) = total maximum virtual memory space available to the QlikViewServer process.
18.4 The Event logThe event log is updated each time a log entry is made to the Windows event log from QlikView Server.The information stored is a mirror of the information written to the Windows event log. The file name ofthe event log is Events*.log, where * reflects the server name and the split interval. Each entry of the logwill contain the following fields.
Event Logfield Explanation
Timestamp Date and Time when log entry was created
SeverityID
Unique ID of severity level
1 = Error
2 = Warning
4 = Information
EventID Unique ID for the type of event
SeveritySeverity level of event
Error | Information | Warning
170 QlikView Server/Publisher
18 Logging
Event Logfield Explanation
Message Description of the event
18.5 The Audit LogThis setting logs user selections, including clear selections, sheet activation, the application of bookmarks,report access. A log file called AUDIT_<machinename> is saved to C:\Documents and Settings\AllUsers\Application Data\QlikTech\QVS, Windows Vista and later usesC:\ProgramData\QlikTech\QVS.
Note! The logging of user selections in QlikView Server is based how the current selections object worksand therefore larger selections are not logged in detail.
Audit logfield Explanation
Serverstarted The date and time the QlikView Server was started.
Timestamp Date and time the log entry was created.
Document The path and the name of the document that wasaccessed.
Type The type of selection that was made, for exampleSelection and Bookmark.
User The name of the user.
MessageInformation about the type of selection or the applicationof bookmark that was made in the document. Example:Apply Server\BM15.
QlikView Server/Publisher 171

172 QlikView Server/Publisher

19 Licensing
19 Licensing19.1 Client Access Licenses (CALs)In order to connect to a QlikView Server each client needs a Client Access License (CAL). The CALs arepurchased with QlikView Server and tied to the QlikView Server serial number. A CAL is nevertransferred to a client, but a client uses a CAL when connecting to a specific QlikView Server, CAL.CALs are thus not transferable between different instances of QlikView Server. If a user is required towork with documents residing on several instances of QlikView Server, a separate CAL is needed at eachof the QlikView Servers.
19.2 Types of CALsThere are four different types of CALs available:
l Named CAL (an identified user on a server) – Access is based on user identity and valid for alldocuments on the server, that is any number of concurrent sessions from one user on one machine ata time is allowed.
l Document CAL (an identified user within a given document) – Just as above, the access is based onuser identity, but the CAL is valid only for one document. If the same user connects to twodocuments using this licensing method, he will hence consume two Document CALs.
l Session CAL – Each Session CAL allows one user on one computer to access QlikView documents,that is any number of concurrent sessions from one user on one machine at a time is allowed.Anonymous users are allowed, no identification of the client user is necessary.
l Usage CAL – Each Usage CAL gives the right to initiate one session (single document) per running28-day period. The session may last a maximum of one hour. Any activity after the first hour hasexpired will count as a new session (albeit without visible interruption). No identification of theclient user is necessary.
Note! CALs are used for purposes of licensing only and they have nothing to do with user authenticationfor data access purposes.
IdentificationIn order to utilize a Named CAL or a Document CAL, the client user must be identified either via anauthenticated user name (Windows Active Directory or through a ticket exchange between the web serverand the QlikView Server) or with a unique machine ID. An IP address is not a valid form of identificationfor a Named CAL. The two methods of identification cannot be mixed on the same instance of QlikViewServer. Note that the user name identification requires Windows authentication on Ajax clients, sincemachine name identification is not possible from these clients.
Document restrictionsThe purpose of the Document CAL is to provide a mechanism by which licensees can license the use of asingle document. To prevent the combination of many data models into a single document, there arerestrictions in the documents which can be used with the Document CAL. The Named CAL, the SessionCAL and the Usage CAL can however be used to open any functional QlikView document. TheDocument CAL, however, can only be used with documents which have a single contiguous data modeland do not contain any chasm traps between tables.
QlikView Server/Publisher 173

Most common data models used in QlikView documents can be used for Document CALs. For instance,proper star schemas and snowflake schemas typically have the field with the highest cardinality in the facttable and the keys in dimensional tables have a lower cardinality. For snowflake schemas, the cardinalitydecreases further as you move away from the fact table. Documents containing such models typicallyfulfill the above demands and are well suited for Document CALs.
But documents with multiple logical islands are normally not allowed. Multiple logical islands are onlyallowed if the additional tables are unconnected and contain only few records or one single column.
Further, the document may not contain any loosely coupled tables.
Finally, the cardinality (number of distinct values) of the key fields must decrease as you move away fromthe fact table.
19.3 Combining different types of CALsA given instance of QlikView Server can carry any combination of the CAL types listed above. Whendifferent CAL types are combined on the same server, the order of priority in the CAL assignment will bemade as follows:
1. If there is a dedicated Named CAL for the connecting client, it will be used.2. If there is a dedicated Document CAL for the connecting client, it will be used.3. If it is possible to assign a new Named CAL for the connecting client, it will be used.4. If it is possible to assign a new Document CAL for the connecting client, it will be used.5. If there is an available session CAL, it will be used.6. If there is an available usage CAL, it will be used.7. If none of the above, access will be denied.
19.4 License LeaseA QlikView client, that does not have a registered license, is allowed to connect to a QlikView Serverand "borrow" a license so that the user can work off-line for a period 30 days. The QlikView client mustthen make an authenticated log on (not anonymous) and obtain a Named CAL. Each time QlikView isstarted, QlikView tries to contact the QlikView Server and renew the license lease. If the client cannotreach the Server after 30 days, the license lease expires.
A license lease is only possible using the QlikView Desktop or the QlikView Plug-In for InternetExplorer. It is hence not possible to obtain a license lease using the Ajax clients.
19.5 Cluster LicensingA special type of license is available to allow multiple QlikView Server installations to share the samelicense serial number, and support shared CALs. These servers are automatically considered as clustered.Note that this configuration will affect networks where unauthorized license sharing between test andproduction environments has been configured.
174 QlikView Server/Publisher

19 Licensing
19.6 Cold Standby ServersQlikView Server license keys can be installed on as many servers as required provided that only thelicensed number of QlikView Servers are running at any given time. Thus, a cold standby environment canbe installed and ready-to-run, but cannot be live (that is, the Windows services cannot be started) and inuse prior to the live environment being shut down.
19.7 Test LicenseA special license type has been created for use with QlikView Server for test purposes. A QVS runningwith such a license will have the full feature set and performance, but the word "Test" will besuperimposed on all charts and added to all object captions.
A bar chart from a test Server
19.8 Editions of QlikView ServerQlikView Server currently comes in the following different editions with different capabilities designedfor different organizations and different purposes. Upgrading is done through the license key.
Enterprise Edition (EE)QlikView Server Enterprise Edition (EE) is available for customer looking to support large number of usersand integrate into enterprise environments. Offering features such as unlimited documents, server basedcollaboration, integration with third party security systems and server clustering.
Small Business EditionQlikView Server Small Business Edition (SBE) is available for customers looking for a QlikView Serverspecifically designed to support a smaller organization.
Information Access ServerInformation Access Server (IAS) is available for customers looking for a QlikView Server with a limitednumber of documents and large number of anonymous users.
Below is a table of the features and limitations of the different editions.
EE SBE IAS
Licensing
Named CAL PMax25 O
QlikView Server/Publisher 175

EE SBE IAS
Session CAL P O P
Document CAL PMax100 O
Usage CAL P O O
Clients
AJAX P P P
Workbench Option-al O P
IE Plugin P P P
Mobile P P P
Desktop Client P P P
Scaleability
Can be clustered P O P
Unlimited Documents P P O
Integration
3rd party securityintegration P O O
Dynamic Update(additional license feerequired)
P O P
Features
176 QlikView Server/Publisher

19 Licensing
EE SBE IAS
License leasing P P O
Server Objects P O P
Can use Publisher P P P
Can use SAPConnector P P P
Test Server available P O P
Security
Section Access P P O
DMS P O O
AD/NTFS P P O
Anonymous Possibl-e No Require-
d
QlikView Server/Publisher 177

178 QlikView Server/Publisher

20 Repository for Shared Objects
20 Repository for Shared Objects20.1 Types of Objects Available for SharingThere are multiple objects available for user collaboration and sharing through QlikView Server.
l Bookmarksl Sheet objects, including Chartsl Reports
Each of these objects may be defined as a user object, available to the authenticated user, regardless ofaccess method or location, or a shared object, available to all users of the document through QlikViewServer.
20.2 Settings required for Server ObjectsClient based bookmark, object and report creation is limited as follows:
l Server and client are QlikView version 8 or laterl All clients except Mobilel User authentication is required for Reports and Objects
In order for QlikView document objects to be enabled for sharing, the document must be set to allowServer objects on each of the object types. This is the default setting for documents in QlikView 10.
The Server page of the QlikView Document Properties dialog.
Allow Server BookmarksThis check box must be enabled, if remote clients are to be allowed to create and share bookmarks withthis document on the QlikView Server.
QlikView Server/Publisher 179
Allow Server ObjectsThis check box must be enabled, if remote clients are to be allowed to create and share sheet objects withthis document on the QlikView Server.
Allow Server ReportsThis check box must be enabled, if remote clients are to be allowed to create and share reports with thisdocument on the QlikView Server.
TIP: For more information on Server objects settings in QlikView, please consult the QlikView ReferenceManual.
In addition, QlikView Server must be set to Allow Server Objects. Set this on the System tab, Setup page,QlikView Servers, Documents tab of the QlikView Enterprise Management Console, the setting is notavailable in the QlikView Management Console. If the Server is set to disallow, this setting will overridethe Document settings for all documents on that server.
Once QlikView Server is enabled for Server objects, and any of the QlikView Server object settings arechecked, and the document is opened in QlikView Server, a special database file will be created andmaintained in the same location as the QlikView document. The file will have the same name as theQlikView document, but will have a file extension of .Shared.
For example:
QlikView document: Presidents.qvw
QlikView Server share file: PRESIDENTS.QVW.Shared
If the name of the QlikView document is changed for any reason, you will have to manually rename the.Shared file to match before opening the newly named QlikView document in QlikView Server. This willpreserve the shared objects attached to the document.
Note! After upgrading from a previous version, you will find files named with a .OLD extension, forexample, presidents.qvw.Shared.OLD. These files will be in the same folder as your documents. The files arecreated when users open a document in the new version for the first time. The .OLD files contain the datafrom the previous version. The original file called, presidents.qvw.Shared, has been upgraded to version 10.These files are temporary and may be deleted.
When updating a Server object, report, bookmark or input field data the file is exclusively locked, butmaking a selection or simply activating the object does not lock the file and any number of Servers canread the file at the same time. A partial lock is implemented so different sections of the file may beupdated simultaneously by different Servers in the cluster.
The file is read once when the Server opens the document, but it is not read again unless there arechanges. All sessions share the same internal copy of the shared file, that is, opening a session willgenerally not require the file to be read from disk.
You can manage the Server objects in QEMC on the tab Documents, User Documents and ServerObjects. The Take icon enables you to take ownership of an object. You can then open a QlikView clientand make changes to the object.
Note! Once you have taken ownership of an object you cannot give it back to the original owner.
180 QlikView Server/Publisher
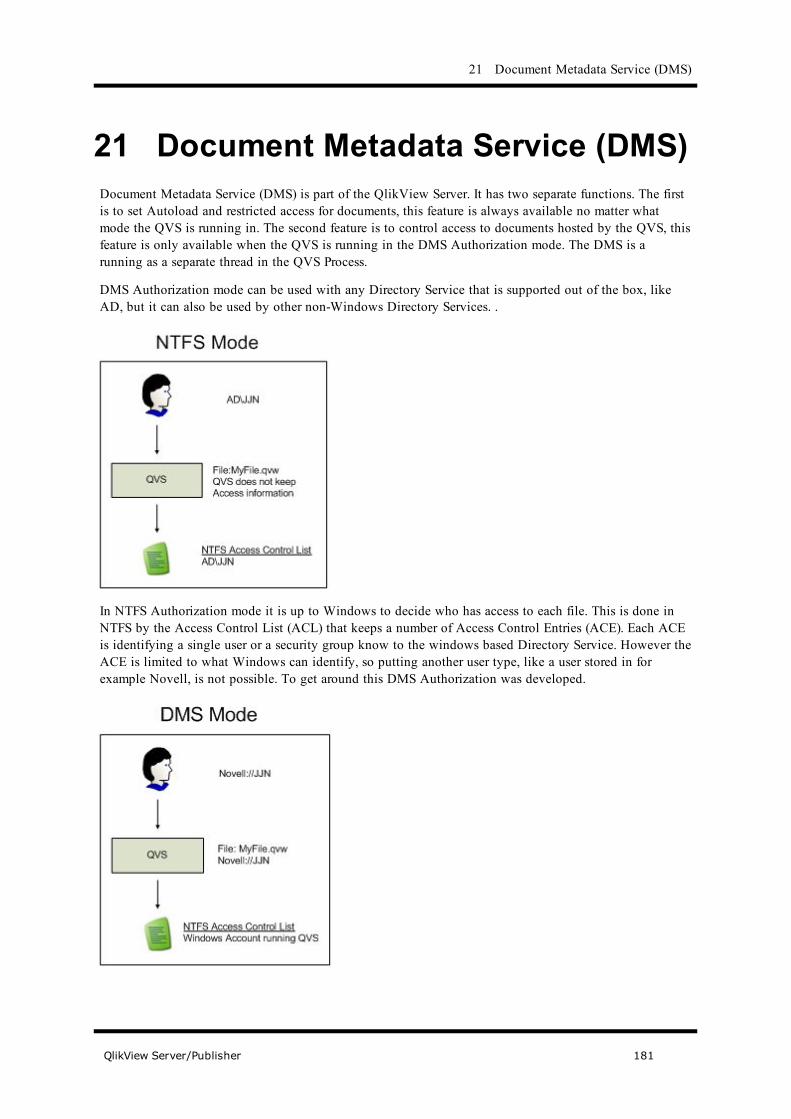
21 Document Metadata Service (DMS)
21 Document Metadata Service (DMS)Document Metadata Service (DMS) is part of the QlikView Server. It has two separate functions. The firstis to set Autoload and restricted access for documents, this feature is always available no matter whatmode the QVS is running in. The second feature is to control access to documents hosted by the QVS, thisfeature is only available when the QVS is running in the DMS Authorization mode. The DMS is arunning as a separate thread in the QVS Process.
DMS Authorization mode can be used with any Directory Service that is supported out of the box, likeAD, but it can also be used by other non-Windows Directory Services. .
In NTFS Authorization mode it is up to Windows to decide who has access to each file. This is done inNTFS by the Access Control List (ACL) that keeps a number of Access Control Entries (ACE). Each ACEis identifying a single user or a security group know to the windows based Directory Service. However theACE is limited to what Windows can identify, so putting another user type, like a user stored in forexample Novell, is not possible. To get around this DMS Authorization was developed.
QlikView Server/Publisher 181

DMS Authorization means that it the QVS that will decide who gets access to a file, not Windows. TheDMS keeps a list of users who has access to each particular document. This list can be populated in threedifferent ways. The first way is through QlikView Publisher sending a file to a QVS running in DMSAuthorization mode. The second way is through the QMC or QEMC, Please note that if you do changesto a User Document that is delivered by Publisher your changes will be overwritten by Publisher eachtime a new document is published, it is recommended that you instead do the change in the Publisherdistribution task. The third way you can populate the DMS access list is through an API where you canprogrammatically add and remove access.
The DMS will grant access to a user who’s credentials match a name in the list of users having access. Thematch is a string match so in the picture the user Novell://JJN would be granted access to the fileMyFile.qvw. However if a group has been given access to the file rather than one single user the DMSmust use the DSC to do a lookup to verify group membership. A call will then be made to the DSC andthe specific DSP including the username and group. If the DSP and Directory Service verify themembership then the user will get access to the file.
When DMS is used the QVW file on disk is only available to the account running the QVS and not toany of the users located in the DMS access list.
The metadata is stored in a file next to the QVW file with the extension .meta so the file presidents.qvwwould have a metadata file called presidents.qvw.meta.
Note! After upgrading from a previous version, you will find files named with a .OLD extension, forexample, presidents.qvw.meta.OLD. These files will be in the same folder as your documents. The files arecreated when users open a document in the new version for the first time. The .OLD files contain the datafrom the previous version. The original file called, presidents.qvw.meta, has been upgraded to version 10.These files are temporary and may be deleted.
182 QlikView Server/Publisher

22 Load Sharing (Clustering)
22 Load Sharing (Clustering)All clustering requires the QlikView Enterprise Management Console. QlikView Server will support loadsharing of documents across multiple physical or logical computers. This sharing includes the ability toshare in real time, information about Server objects, automated document loading and unloading (throughDMS), and user license CALs. Special licensing is available to enable multiple server instances to sharethe same license number.
In order to utilize load sharing between multiple QlikView Servers, all document and support files must beshared between the servers. In other words, all servers should point to the same physical location for thefiles. In addition to the file types described in the diagram above, QlikView Server will create andmaintain additional files to store load sharing data. These files will have a file type extension of .pgo(Persistent Group Object), and they will be located in the same folder as the QlikView documents. Thesefiles are locked while the QlikView Server is running. The different pgo files contain information aboutborrowed CALs, CALs in use, Server settings and ticket data.
Operating System Load Balance or Failover configurations are external to the QlikView Server loadsharing configuration, and QlikView Server has no control over those systems.
Server configuration settings are shared between all clustered QVS, and can be maintained through theQlikView Enterprise Management Console connected to any of the clustered QVS. Performance of aparticular QVS system can be monitored through the Management Console by connecting to that system.How the load balancing is made, that is which QlikView Server the client should be directed to, is set inthe QlikView Web Server’s configuration file, see "Configuring the QlikView Web Service" on page 29.
QlikView Server/Publisher 183

Since DMS data is shared among the QV Servers, any automated document load/unload procedures areperformed on all Servers. DMS Authorization is, of course, also shared among all clustered QVS.
22.1 Setting up a Cluster1. Install the first, “master”; QlikView Server, QlikView Distribution Service and QlikView
Management Services of the cluster and license the installation. The account running theManagement Service must be a member of the QlikView Administrators group and a member of thelocal Administrators group on each “slave” QlikView Server computers in order to restart allQlikView Servers from the QEMC.
2. Set the path for the User Document Root Folder and Mounted Folders under System, Setup,QlikView Servers, your QVS, Folders, to a disk area that can be read by all Servers in the cluster,preferably a NAS.
Note! QlikView Server currently only conforms with Windows File Share or a Windows-based NAS. Thismeans that storage must be owned, governed, and shared by a Windows operating system instance(typically accessed using a path like \\<servername>\<share>).
Setting the path to the shared disk area
3. To make it easier to recognize your cluster you can change the name of the QVS in the field Nameon System, Setup, QlikView Servers, your server, General.
Change the name of the cluster
4. Install the second QlikView Server, installing QVS and Management Services.5. Open the QEMC on the “master “ QVS and on the Cluster tab under System, Setup, QlikView
Servers, your first QVS, enter the Control Number and URL for the second QVS in the cluster.
184 QlikView Server/Publisher

22 Load Sharing (Clustering)
The Cluster tab
6. Repeat steps 3 and 4 for any other Servers that should be part of the cluster.7. Make sure that your cluster is selected on the AccessPoint tab in System, Setup, QlikView Web
Servers, your QVWS.
The Server Connections field for the AccessPoint
QlikView Server/Publisher 185

186 QlikView Server/Publisher

Part 5 QlikView Publisher
QlikView Server/Publisher 187

188 QlikView Server/Publisher
24 Post Installation Settings
24 Post Installation Settings24.1 Installation on a Single MachineIf all components of QlikView Publisher are installed on the same machine you do not need to modify anysettings and the only action you need to take before running QlikView Publisher is to start the services.The following services are part of the QlikView Publisher installation and are all found in the WindowsManagement Console Services; QlikView DirectoryServiceConnector, QlikView Web Service andQlikView Publisher DistributionService.
24.2 Installation on Multiple MachinesThere are many possible installation combinations for QlikView Publisher. Here
we will go through the settings you need to modify in order to install different components on differentmachines. These combinations are only possible when running QlikView Enterprise Management Console.
Distribution ServiceThe QlikView Distribution Service (QDS) needs to know which Directory Service Connector (DSC) itwill communicate with. This is set in the file C:\Program Files\QlikView\Publisher\DistributionService\QlikViewDistributionService.exe.config.
If you use any other value than the default, which is http://localhost:4730/qtds.asmx, you modifythe key:
<add key="DSCAddress" value=""/>
Directory Service ConnectorThe DSC has no settings that need to be modified if you install on different machines.
24.3 Installation OverviewThe components that will be installed are:
l The QlikView Management Service is a set of html based web pages that are used to configure whatthe QlikView Publisher will do. It is also the central coordinating component in QlikViewPublisher. It is responsible for maintaining the QlikView Publisher Repository (QVPR) and keepingtrack of the different components.
l The Distribution Service is the component responsible for performing the preparation and delivery ofthe QlikView files. A QlikView Publisher installation can contain many Distribution serviceslocated on different machines.
l The Directory Service Connector is responsible for communicating with the Directory Service thatkeeps track of all the users and groups in your environment. You need to have one Directory Serviceper Directory Service Provider (DSP). A DSP is a connection to a specific Directory Service. Theincluded DSPs allows you to connect to Active Directory, NT4 domains, Local Users and CustomUsers. Custom Users are users that only exist inside QlikView Publisher and have no matchingWindows user attached to them.
QlikView Server/Publisher 189

190 QlikView Server/Publisher

25 Publisher Upgrade Tool
25 Publisher Upgrade ToolThe QlikView Publisher Upgrade Tool must be run in order to update an older Publisher database toversion 10.
As of version 9 the repeat task is obsolete, but the functionality has been retained in the new distributiontask. The upgrade tool will convert the more simple repeat tasks to corresponding tasks in Publisher 10.More complex repeat tasks will, however, need to be restructured after the upgrade. See "SourceDocuments" on page 79 for more information on what tasks are supported in version 10.
If a job is disabled in version 8.5, the trigger will be disabled in later versions and if a task is disabled inversion 8.5, the task will be disabled in version 10 as well.
Note! The upgrade tool does not support upgrades from Publisher Standard Edition!
Note! Before running the upgrade tool, stop the Command Center Service and make sure the DirectoryService Connector Service is running.
Note! Back-up your database before running the upgrade tool!
25.1 UpgradingThe upgrade tool is installed together with QlikView Server/Publisher and is found in the folderC:\Program Files\QlikView\Publisher\Support Tools\. Run PubUpgrade.exe to start the upgrade.The program creates a txt logfile in C:\ProgramData\QlikTech\Publisher\Support Tools\Upgrade.
1. The first dialog will inform you of the current database version. If the upgrade cannot be carried out,the first dialog may display one of the following messages instead:
a. The Current database is up to dateb. Permission to current database is deniedc. The current database is too old and cannot be upgraded using this toold. The upgrade cannot be run because the Command Center Service is running. Please stop the service
and restart the upgrade tool.
QlikView Server/Publisher 191
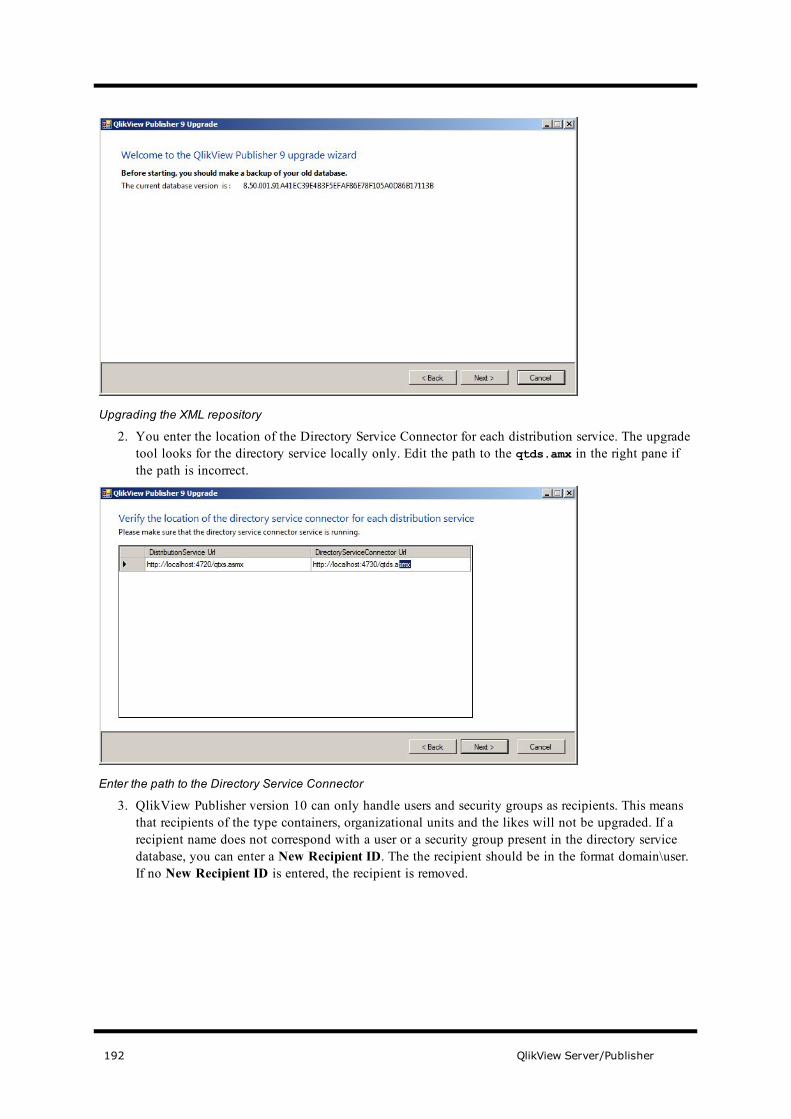
Upgrading the XML repository
2. You enter the location of the Directory Service Connector for each distribution service. The upgradetool looks for the directory service locally only. Edit the path to the qtds.amx in the right pane ifthe path is incorrect.
Enter the path to the Directory Service Connector
3. QlikView Publisher version 10 can only handle users and security groups as recipients. This meansthat recipients of the type containers, organizational units and the likes will not be upgraded. If arecipient name does not correspond with a user or a security group present in the directory servicedatabase, you can enter a New Recipient ID. The the recipient should be in the format domain\user.If no New Recipient ID is entered, the recipient is removed.
192 QlikView Server/Publisher

25 Publisher Upgrade Tool
Upgrading recipients
4. The AccessPoint resource of previous versions has been removed and the distribution is now handledby QlikView Server. Enter the name of the QlikView Server that will handle the distribution.
Select QlikView Server
5. In version 9 only one destination per task is allowed for dynamic distribution. You must choose adestination for each task that contains a dynamic distribution.
QlikView Server/Publisher 193

Choose destination for the old dynamic distributions
6. The Command Center no longer handles the Custom Users. You must choose a Directory ServiceConnector to handle your Custom Users.
Select Directory Service Connector to handle Custom Users
7. Until you mark the Confirm check box and click Upgrade you can still cancel the upgrade of therepository.
194 QlikView Server/Publisher

25 Publisher Upgrade Tool
Confirm the upgrade
After the upgrade has been completed, you must start the QlikView Management Service. You can nowopen the QMC or the QEMC and change your settings.
25.2 Reloading a file from the command lineThe following value in QlikViewDistributionService.exe.config needs to be set to true:
<add key="EnableBatchMode" value="false"/>
The following parameters are used for reloading:
-r=path to qvw file Reload and quit
-rp=path to qvw file Partial reload and quit
-out=logfile
Redirect output to file.Default output is console. -out=. creates a lofile in thecurrent directory
-variablename=name Variable name
-variablevalue=value Variable value
-debug Service will run asstandalone EXE
-sleep Service will wait 60 secondsbefore starting main
QlikView Server/Publisher 195

-datapath=pathPath to datafiles. Use -datapath=. for currentdirectory.
-port=number Override listening portspecified in workorder
Example:QlikViewDistributionService.exe -r=d:\myapps\document.qwv -out=d:\logfiles
echo Error Code: %errorlevel%
This will reload the document document.qwv and set the home directory to d:\logfiles where theDistribution Service files will be written.
The error code parameter goes through the log file and returns the number of errors found in it.
Note! Alerts will not be triggered via a command line reload.
196 QlikView Server/Publisher

26 Load Sharing (Clustering)
26 Load Sharing (Clustering)All clustering requires the QlikView Enterprise Management Console.
26.1 QlikView Distribution ServiceIn order to cluster QlikView Distribution Service, the services will need a common disk area on a NAS tosave the configuration file.
Note! QlikView Server currently only conforms with Windows File Share or a Windows-based NAS. Thismeans that storage must be owned, governed, and shared by a Windows operating system instance(typically accessed using a path like \\<servername>\<share>).
Add the same value to the setting <ApplicationDataFolder> in theQlikViewDistributionService.exe.config for all Distribution Services that should be clustered.
Note! All computers in the cluster must have the same regional settings and the clocks must besynchronized.
The load sharing is determined by a internal ranking system based on the amount of memory available andon previously cached documents. You can change how the ranking is done in the configuration fileQlikViewDistributionService.exe.config. The key (below) is written in JavaScript.
<add key="LoadBalancingFormule" value="(AverageCPULoad*400) + ((MemoryUsage /TotalMemory) * 300) + ((NumberOfQlikViewEngines / MaxQlikViewEngines)*200) +
(NumberOfRunningTasks*100)"/>.
AverageCPULoad
The average CPU load of all running QVBs.
MemoryUsage
The total memory usage for the entire application.
TotalMemory
The total amount of memory in the machine.
NumberOfQlikViewEngines
The number of the QlikView engines currently in use.
MaxQlikViewEngines
The configured value of max QlikView engines.
NumberOfRunningTasks
The number of currently running tasks.
If the log message “The network BIOS command limit has been reached” occurs in the Debug-Cluster log,you need to increase the limit for long-term sessions in the registry. Failure to do so may result in tasks notbeing run!
QlikView Server/Publisher 197

Increase the following parameters in the registry:
HKEY_LOCAL_MACHINE\SYSTEM\CurrentControlSet\Services\lanmanworkstation\parameters\MaxCmds
and
HKEY_LOCAL_MACHINE\SYSTEM\CurrentControlSet\Services\lanmanserver\parameters\MaxMpxCt
This issue only occurs on Windows Server 2000, Windows XP and Windows Server 2003! Moreinformation is available on http://support.microsoft.com/kb/810886.
26.2 Directory Service ConnectorTo cluster the Directory Service Connector, you need to add one or more Directory Service Connectors inthe QEMC, "Clustering" on page 124. You do not have to change the settings for those services pointingto the Directory Service Connector that you add the other connectors to. They will automatically point tothe cluster when the other connectors are added.
When using Custom Users you will need a common disk area on a NAS for the different services. The diskarea is set in the key <add key="ApplicationData- Folder" value="" /> in the fileQVDirectoryServiceConnector.exe.config.
Note! QlikView Server currently only conforms with Windows File Share or a Windows-based NAS. Thismeans that storage must be owned, governed, and shared by a Windows operating system instance(typically accessed using a path like \\<servername>\<share>).
Notable behavior in a DSC ClusterEvery node in a DSC cluster has its own cache. This means you might see variations between searches if achange has recently been made in your directory service. The variations are due to the fact that theQlikView Management Service randomly picks a DSC node for a search and the result of that search iscached with that node for 30 minutes. A workaround for this is to restart all DSC clusters after a change ismade in the underlying directory service, or searches should wait until the cache expires.
An example:
1. A cluster with two DSC nodes is running.2. The administrator searches for User1 and DSC node 1 executes the search and answers GroupA.3. In the underlying directory service, User1 is moved from GroupA to GroupB.4. A new search is made by the administrator and this time DSC node 2 executes the search. The result
is GroupB.5. Another search is made, DSC node 1, that still has the result of the first search in its cache, executes
the search and the result is GroupA.
198 QlikView Server/Publisher

27 Detailed Technical View
27 Detailed Technical View27.1 Audit LoggingAudit logging gives you the possibility to track changes on tasks and settings made in the system, to seewho made the changes and when they were made.
You set the location of the log files in the Management Service configuration file,QVManagementService.exe.config, see "Management Service – QVManagementService.exe.config" onpage 201. Changing the values requires that you restart the QMS service.
One folder per table is created. Each folder contains one file per day with the changes made to the tasks.The logs are tab separated files.
The following entries can be found in the logs:
TransactionID- The id of the transaction. Useful for keeping track of changes made simultaneously.
ChangeType - The type of operation made. The sub types are:
Update - New or changed entries.
Delete - Entries have been deleted.
ModifiedTime - The time and date the changes were made in UTC.
ModifiedByUser - The user that has made the changes in the user interface. The entry System means thatthe change has been initiated by the system and not by any user.
The following example comes from the table alert e-mail. The log has been put in a table for betteroverview.
TransactionID 455a241d-8428-4dc7-ba67-4ae7cb21cf3d
ChangeType Update
ModifiedTime 2010-02-02 15:12:54
ModifiedByUser MyDomain\mjn
ID b3745325-cee7-4fe7-b681-9c9efe22fc5c
DistributionServiceI-D 8846d7dd-bb3f-4289-9c9b-b0ca71b7c3b2
EmailAddress mjn
QlikView Server/Publisher 199
The following example comes from the table QDSCluster. Notice that the TransactionID is the same forboth examples. This means that the changes were made simultaneously.
TransactionID 455a241d-8428-4dc7-ba67-4ae7cb21cf3d
ChangeType Update
ModifiedTime 2010-02-02 15:12:54
ModifiedByUser MyDomain\mjn
ID a37f242c-6d80-42da-a10c-1742d2ec927f
DistributionServiceI-D 8846d7dd-bb3f-4289-9c9b-b0ca71b7c3b2
QDSWebAdress http://computer-mjn:4720/qtxs.asmx
CurrentWorkorderID 96bff2dc-f1ea-84d2-b6c4-ea58bf5c98e5
27.2 Security GroupsWhen installing QlikView Server\Publisher, a couple of security groups are created.
The QlikView Server/Publisher services must run under an account that is member of the security groupQlikView Administrators. Users connecting to QMC and QEMC must be part of this group. Anyoneconnecting to a remote service must also be part of QlikView Administrators.
The users connecting through the API must be members of the security group QlikView Management API.This group is created by the installation program and those users already part of the QlikViewAdministrators group are automatically made members to this group as well. You must also be a memberof this group to be able to import tasks from another Server/Publisher.
The security group QlikView EDX is not created during installation, but must be added in order to createEDX tasks.
27.3 Document AdministratorsTo delegate the responsibility of creating tasks to people not part of the QlikView Administrators group,you can now make users document administrators. The users that are appointed document administratorswill only be able to access those tabs in QEMC that are related to either user documents or sourcedocuments.
Note! The System tab (see "System" on page 107) is unavailable for Document Administrators andSupervisors. This means that they cannot access supporting tasks.
200 QlikView Server/Publisher
27 Detailed Technical View
Add the users to the mounts in QEMC, see "System" on page 107 for adding users to a user documentfolder and "System" on page 107 for adding users to source document folders.
If the users are to distribute via e-mail, you must add them to the e-mail server in the same way as theQVS, see "System" on page 107.
27.4 Configuration FilesNote! Use QEMC to set the parameters described in this section, since modifying the configuration filesdirectly may cause problems.
Management Service – QVManagementService.exe.configIn a default installation this file is found under C:\Program Files\QlikView\Management Service.This file has a number of automatically generated tags that should not be modified, but the followingsettings that can be modified. Read more about the snmp in"SNMP" on page 257.ApplicationDataFolder
This is the folder where the log folder and all other files/folders will be created. The default value isC:\Documents and Settings\All Users\Application
Data\QlikTech\Publisher\CommandCenter. This folder is where the XML version of QVPR and theLEF information are stored.UseHTTPS
If the value is set to True the communication will run over SSL instead of http. To enable this setting youneed a certificate for your web site.Trace
Used for debug logging.QMSBackendWebServicePort
This is the port the backend management service listens to. The default value is 799.QMSFrontendWebServicePort
This is the port the frontend management service listens to. The default value is 4780.MaxLogRecords
With this setting you can specify the maximum number of log records that should be retrieved for a task.EnableAuditLogging
Set this value to True if you want to track changes on tasks and settings made in the system, to see whomade the changes and when they were made.AuditLogFolder
Set the path to the folder where the audit logs should be saved.AuditLogKeepMaxDays
Set the maximum number of days each log should be saved.
Distribution Service – QvDistributionService.exe.configIn a default installation this file is located in C:\Program Files\QlikView\Distribution Service.The app settings tag is the part that can be modified. Read more about the snmp in "SNMP" on page 257.Below are some of the settings in the configuration file explained:ApplicationDataFolder
This is the folder where the log folder and all other files/folders will be created. The default value isC:\Documents and Settings\All Users\Application
QlikView Server/Publisher 201

Data\QlikTech\Publisher\CommandCenter. This folder is where the XML version of QVPR and theLEF information are stored.WebservicePort
This is the port that the Distribution service will use to communicate with. The default value is 4720.UseHTTPS
If the value is set to True the communication will run over SSL instead of http. To enable this setting youneed a certificate for your web site.DSCAddress
This is the port that the Directory Service Connector service will use to communicate with. The defaultvalue is 4730. If you modify that, you will need to modify the tag “DSCAddress” in theQVDirectoryServiceConnector.exe.config file too.DSCTimeoutSeconds
The timeout for calls to the Directory Service Connector.DSCCacheSeconds
Set how long the service should cache the responses from the Directory Service Connector.QlikViewEngineQuarantineTimeInms
Set how often a QlikView engine is allowed to start.OpenDocumentAttempts
This setting allows you to define how many tries that should be made to open a document before it islogged as an error during distribution.DebugLog
Set to True if you want to enable logging of memory usage and stack trace on “Error” logging.Trace
Set this to True if you wan to enable debug logging.EnableBatchMode
Enable this setting if you want to make batch calls to the Distribution service.
Directory Service Connector –QVDirectoryServiceConnector.exe.configBy default this file is located in C:\Program Files\QlikView\Directory ServiceConnector\DirectoryServiceConnector.exe.config. Read more about the snmp section in "SNMP"on page 257. Some of the more commonly modified settings are explained below:ApplicationDataFolder
This is the folder where the log folder and all other files/folders will be created. The default value isC:\Documents and Settings\All Users\Application
Data\QlikTech\DirectoryServiceConnector.WebservicePort
This is the port that the Directory Service Connector service will use to communicate with. The defaultvalue is 4730. If you modify that, you will need to modify the tag “DSCAddress” in theQVDistributionService.exe.config file too.UseHTTPS
If the value is set to True the communication will run over SSL instead of http. To enable this setting youneed a certificate for your web site.PluginPath
202 QlikView Server/Publisher

27 Detailed Technical View
This is the path where the DSC will look for available DSP plugins. The default value is C:\ProgramFiles\QlikView\Publisher\DirectoryServiceConnector\DSPlugins.
Trace
Set this to True if you wan to enable debug logging.DisableCompress
Enable this setting if you do not want to use compression on your http communication.
27.5 Triggering EDX Enabled TasksIn order to start the tasks that have an external event as trigger, you must make two POST type requestcalls to the QlikView Distribution Service that has been assigned the task. The user making the requestcalls must be member of the local group QlikView Administrators or QlikView EDX. The QlikViewAdministrators group is set up during installation of QlikView Server, but the QlikView EDX group youmust create yourself in Computer Management. A member of the QlikView EDX group has only theright to trigger an EDX enabled task.
The body of the first request call must contain the following:<Global method="GetTimeLimitedRequestKey" />
The reply will contain the following important entry:<GetTimeLimitedRequestKey>
<GetTimeLimitedRequestKeyResult>zLavfNlancWoyhACGlpaE5sWOy8kicLa</GetTimeLimitedRequestKeyResult></GetTimeLimitedRequestKey>
The value of the entry GetTimeLimitedRequestKey is then used for the next request:<Global method="RequestEDX" key="zLavfNlancWoyhACGlpaE5sWOy8kicLa"><i_TaskIDOrTaskName>MyTask</i_TaskIDOrTaskName><i_Password>MyPassword</i_Password><i_VariableName /><i_VariableValueList /></Global>
The attributes in the second request are:
TasIDOrTaskName - The name or ID of the task you want to start
i_Password - The password you set when you created the trigger. If no password was set the attributemust still be included but can be left empty.
i_VariableName - The name of the variable you wish to change. The attribute may be left empty.
i_VariableValueList - The values you want to assign the variable. The variables are entered accordingto the same pattern as in QEMC. The attribute may be left empty.
The status of the task is returned in xml format. The response for a successful call will look like thefollowing:<RequestEDX><RequestEDXResult><Log /><TaskStartResult>Success</TaskStartResult><TaskStartResultCode>0</TaskStartResultCode></RequestEDXResult></RequestEDX>
Where
QlikView Server/Publisher 203

Log - A small part of what is written in the log. It will be empty if the task has been started successfully.
TaskStartResult - A textual representation of TaskStartResultCode.
TaskStartResultCode - The result of the attempt to start a task. 0 means that the task was startedsuccessfully. 1 means TaskNotFound, 2 means TaskIsAlreadyRunning, 3 means NoEDXTriggerFoundand 9 is OtherError.
The response to an unsuccessful call may look like this:<RequestEDX><RequestEDXResult><Log><string>2009-10-29 12:32:18 Error Could not trigger task. Bad password. Task=Notepad,EDX triggered</string></Log><TaskStartResult>OtherError</TaskStartResult><TaskStartResultCode>9</TaskStartResultCode></RequestEDXResult></RequestEDX>.
You can connect to the Publisher to check the status of a given task. You must be member of theQlikView Administrators group to be able to do this.You must also get a temporary key, using theGetTimeLimitedRequestKey request. Then you send the request:<Global method="GetTaskStatus" key="rPnBL6zlbvNr5k2nowI919EJkkOeHsi8" ><TaskNameOrId>Notepad, EDX triggered</TaskNameOrId></Global>
Where
TaskNameOrId is the name or ID of the task you wish to check.
The respons is as follows:<GetTaskStatus><GetTaskStatusResult><TaskStatus><DocumentPath /><ID>55a4d924-f7bc-4027-9204-4c00711e001a</ID><LastLogMsg>Executing c:\windows\notepad.exeExecuting commandline: "c:\windows\notepad.exe" in folder "c:\windows".Process exited with exit code: 0 at 2009-10-29 12:31:31Process exited with exit code: 0 at 2009-10-29 12:31:31The task "Notepad, EDX triggered" finished successfully</LastLogMsg><Name>Notepad, EDX triggered</Name><Server /><Start>On EDX</Start><LastExec>2009-10-29 12:31:34</LastExec><Status>Waiting</Status><DoAlert>False</DoAlert><TaskType>ExternalProgramTask</TaskType><Summary /><Category>Default</Category></TaskStatus></GetTaskStatusResult></GetTaskStatus>
Where
DocumentPath - The path to the qvw document.
204 QlikView Server/Publisher

27 Detailed Technical View
ID - the ID of the task.
LastLogMsg - The last log message for this particular task.
Name - The name of the task.
Server - Not used.
Start - If the task is running according to a schedule, the next scheduled time is displayed. If the task hasan EDX trigger Start will say On EDX. If the task is already running, the start time is displayed.
LastExec - The time when the task was last finished.
Status - The status of the task, Running, Waiting, Finished with errors or Finished with warnings.
Do Alert - Is returned True if the task has errors, but has not been aborted manually.
Summary - Not used.
Category - The category of the task. If no category is set in the management console “Default” will bedisplayed.
QlikView Server/Publisher 205

206 QlikView Server/Publisher

28 Section Access
28 Section AccessA very important change in QlikView Publisher 8.00 and onwards compared to older versions is thatQlikView Publisher respects the Section Access of any document it works with. This means that if youhave a Section Access in your document script, the Publisher user or user account must have ADMINrights according to the Section Access statement. If the Distribution Service is running under the localcomputer accounts Local System or Network Service, the computer account must be added to your SectionAccess. The account name of the computer is usually the name of the computer plus a $ sign, e. g.PublisherServer$. If a dynamic reduction is made, the reduction field must be left empty.
Example:
Section Access;
LOAD * INLINE [
ACCESS, NTNAME, REDUCTIONFIELD
ADMIN, PUBLISHERACCOUNT,
USER, HIC, A
USER, TNI, B
Section Application;
Load …
It is important that the Section Access line containing the Publisher account does not reduce data in anunwanted way. Example: If you would use a wildcard “*” in the reduction field, this would limitQlikView Publisher’s access to the data in the QlikView file to other values defined in the Section Access(A and B in this example; however, the values C to Z would not be included). Such a reduction can beavoided in two ways: either you need to make sure that all values of the reduction field are represented inthe Section Access, or you leave the reduction field blank. In the latter case, no reduction will be madesince the Publisher account is an ADMIN account. However, in this case, the Publisher account cannot beused to open the file on a Server since all accounts are USER accounts on a Server and the user will thenbe denied access since no values are allowed.
Read more about Section Access in the Security chapter in the QlikView Reference Manual.
28.1 Authorization ManagementFrom version 10 QlikView Enterprise Management Console can provide a centralized way of maintainingauthorization tables that are used in the section access part of a QlikView document. This is done byletting the QlikView Administrators create and maintain the tables in the QEMC user interface. The tablesare stored in the repository and can be used by a QlikView developer as any other table by connecting tothe QlikView Management Service, for example http://MyServer:4780/QMS/authtables. This pagewill supply the developer with all the authorization tables that exist. It is however possible to get only aspecific table by specifying a table in the query string, for examplehttp://MyServer:4780/QMS/authtables?Salesauthtable.
The QlikView Administrator can specify which document developer should be able to use the wholeauthorization table or parts of it.
QlikView Server/Publisher 207

Example of an authorization table:
Access NT Name Country Product Group
Admin QvAdmin * *
User Bob US Socks, Shoes
User Stig Swe Ties, Hats
Table users: Sara
Column Users:
Access and NTName: John, Jenny
Country: John
Product Group: Jenny
This means that when requesting the authorization table Sara will get the entire table, John will get‘Access’, ‘NT Name’ and ‘Country’, finally, Jenny will get ‘Access’, ‘NT Name’ and ‘Product Group’.
More information on where you create these tables are found in "Section Access Management" on page103.
28.2 Important notices and Troubleshootingl All paths that are used by QlikView Publisher must be reachable from the application.
It is highly recommended that a designated account is created to run QlikView Distribution Service. Thisaccount must be permitted to log on as a Windows service. It must also be permitted to read from thedirectory service as well as to write to folders, change and set permissions on the content therein.
l Reduction based on Section Access may cause unwanted results in the Distributed Documents andshould be used with caution.
l If QlikView Publisher has difficulties when reading from Active Directory, a probable cause is thatthe account running the application lacks permissions to read from the directory service. Check thepermissions of this account.
l Make sure that Local Service, Network Service and the account running QlikView DistributionService have been given read and execute permissions to the .NET Framework componentSystem.Management.dll.
l Should a field name within a Source Document change, QlikView Publisher will not be able todistribute Distributed Documents based on this field. Please ensure that field names used forreductions are correctly represented in the Distributed Documents.
l The number of roles given access to a file on a Windows computer cannot exceed 1820.l QlikView Distribution Service does not execute any macros that may exist in the Source Document.l If a Source Document contains an “Only One Selected Value” setting on a field, this setting will berespected by QlikView Publisher. Any selections made on the document will be affected by thisfield.
208 QlikView Server/Publisher

28 Section Access
28.3 SSL on QlikView PublisherConfiguring SSL for the QlikView Publisher services can only be done in QlikView EnterpriseManagement Console and requires an SSL certificate.
The certificate must be installed for all QlikView Publisher Services, specifying their ip addresses andports, e.g. 0.0.0.0:4710. For more information on how to add certificates for services see Microsofts’homepage.
The configuration file for each service must be changed, see "Configuration Files" on page 201 for moreinformation about the configuration files. The setting <add key="UseHTTPS" value="false"/> must beset to TRUE.
In C:\ProgramData\QlikTech\WebServer\config.xml (C:\Documents and Settings\AllUsers\Application Data\QlikTech\WebServer\config.xml on older systems) change the setting<ConfigUrl>http://_:4750/qvws.asmx</ConfigUrl> to include https instead of http.
It is important that the URL for the services match the URL in the certificate. The settings must bechanged in the user interface: System, Setup, Service, General, Location. The picture below shows theQlikView Web Services Service.
Setting the domain for SSL
QlikView Server/Publisher 209

210 QlikView Server/Publisher

Part 6 Clients
QlikView Server/Publisher 211

29 Summary of QlikView clientsA QlikView client is required for display and usage of an existing QlikView document (.qvw file). Whilethe QlikView Server is responsible for opening, hosting, and calculating the document, the clients arerequired for user interaction and presenting the document and its objects. In addition, clients (exceptMobile Clients) can be used to add personal and shared objects to a document.
The choice of which client or set of clients to use is entirely dependent on the customer’s environment andpreferences. Client choices range from a fully installed QlikView Developer to a (no installation required)AJAX Zero-Footprint Client (ZFC), to a Mobile Client on your iPhone. Any combination of client types isallowed, as long as the proper licensing CALs are available (see Section QVS Licensing) on the serverlicense. In general, any QlikView document may be displayed with any client, although additional HTMLcode must be created for the Object clients, including AJAX, to display and interact with the objectswithin a particular document. In the case of AJAX, this code is generated automatically by QlikViewServer. Finally, certain considerations must be taken into account when deploying a QlikView documentwith QlikView Server and its clients. See Section Considerations when developing documents for use withQlikView Server for information on limitations when using a QlikView client to interface with aQlikView document.
The following table provides a brief summary description of client choices.
QlikView Client Description
Windows InstalledClient
Full image desktop installed QlikView Desktop.Installation and client licensing required.
QlikView IE Plug-in
Full image ActiveX plug in for Internet Explorerweb browser. Installation required. No client sidelicensing required.
QlikX Analyzer forInternet Explorer
Object only ActiveX plug in for Internet Explorerweb browser. Requires web page design orQlikView Client Generator. Installation required.No client side licensing required.
AJAX Zero-Footprint Client(ZFC)
Object only Dynamic HTML client utilizingAJAX architecture in web browser. Web page isautomatically generated by QlikView Server. Noinstallation or client side licensing required.
QlikView iPhoneclient
One object-at-a-time view of full QlikViewdocument. Download and install App throughApp Store. No client side licensing required.
QlikViewBlackBerry andJava Mobile clients
Full image client is based on Java Mobile Edition(Java ME) and will run on most mobile phonesthat support MIDP 2.0. Download and install
212 QlikView Server/Publisher
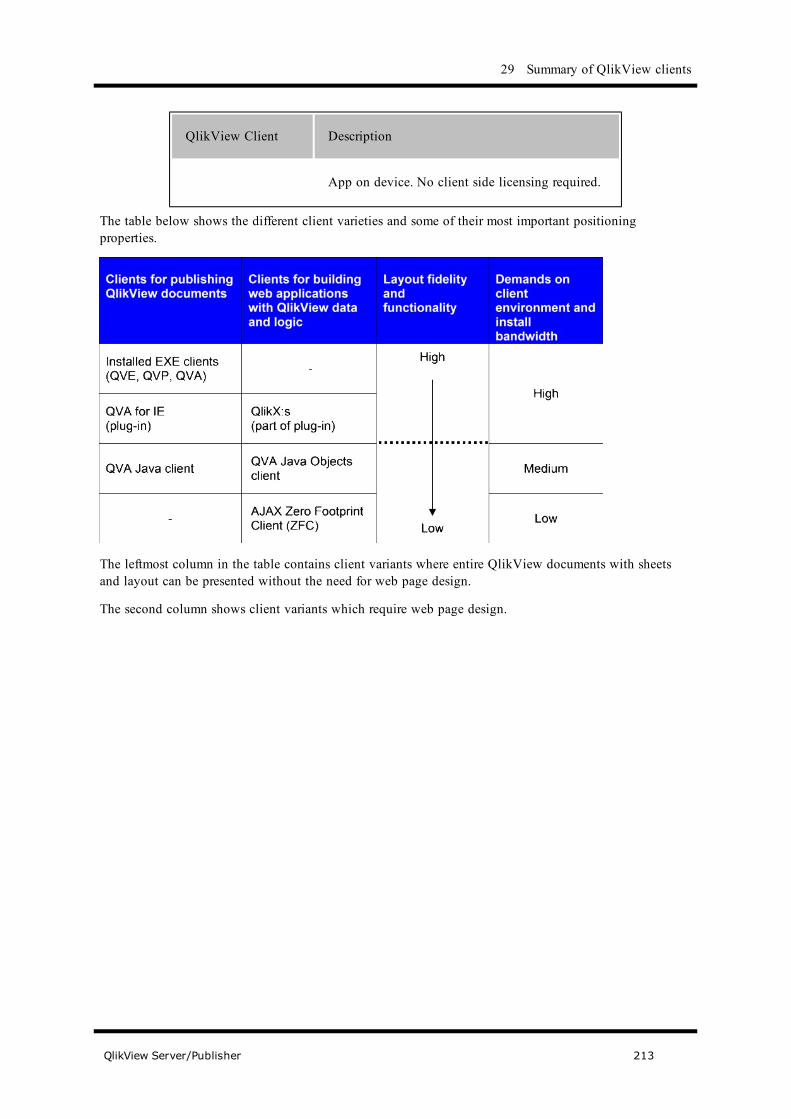
29 Summary of QlikView clients
QlikView Client Description
App on device. No client side licensing required.
The table below shows the different client varieties and some of their most important positioningproperties.
The leftmost column in the table contains client variants where entire QlikView documents with sheetsand layout can be presented without the need for web page design.
The second column shows client variants which require web page design.
QlikView Server/Publisher 213

214 QlikView Server/Publisher

30 Developing Documents for Use with QlikView Server
30 Developing Documents for Usewith QlikView Server30.1 GeneralThe QlikView Server will read all qvw files created by QlikView 6.0 and later. Files with older fileformats must be converted to a newer file format before used with the QlikView Server.
30.2 General limitations when working from clientsRegardless which client you use there are some things you cannot do when working with a documentopened through QlikView server:
l You cannot create new documentsl You cannot access or execute the scriptl You cannot access or change the macro modulel You cannot save changes to the document, beyond shared objects
30.3 Performance ConsiderationsResponse time and memory usage both on the server and on the client can depend heavily on how yourapplication is designed. Below are a few tips to bear in mind when building your application:
1. Each open chart and table will require extra memory in the server for each user connected.Minimized charts/tables as well as charts/tables not on the active sheet do not require extra memory.Each open chart/table must also be recalculated on the server after each change in the logical state,which could prolong response times. Therefore avoid opening charts and tables when it is notnecessary, or try to spread them over several sheets.
2. Large bitmap pictures in sheet backgrounds or text objects may cause delays, as they have to betransferred from the server to the client. The bitmaps are compressed during transfer and are onlytransferred once per session, but nevertheless can cause substantial amount of data to be moved.Consider using colored sheet background and text objects with opaque background for betterperformance. If you have to use bitmap sheet backgrounds, it is more efficient to apply onebackground on application level than assigning the same background to each sheet.
3. Very small (e.g. 1x1 pixel) tiled background bitmaps can greatly reduce performance on the client, asthey have to be rendered repeatedly by the Java Virtual Machine. Rather use medium size (e.g.20x20 pixel) tiles or colored sheet background.
30.4 Document ConfigurationCertain settings in the QlikView document are utilized for additional purposes when that document isopened under QlikView Server. The following considerations are suggestions for making the QlikViewServer experience better for your clients.
1. The Object caption Title Text is used in any document list of objects in the collaboration dialogs. Ifthe caption Title Text is not set, the object ID will be used. Be sure to set the object caption TitleText on all objects, including buttons, line arrow, and text objects, which do not use a default title.
QlikView Server/Publisher 215
You can set the object caption Title Text on the object Properties, Caption dialog.2. Expression Labels are used in the collaboration dialogs. The default Expression Label is the
expression itself, which may not be descriptive. Be sure to set all Expression Labels in chart objectsto a descriptive name.
3. Avoid using large images for the mobile clients, since the transfer of these images can cause responsetime delays for these clients. Images that exceed the memory capacity of the device will not bedisplayed. They will, however be transferred from the server and cause delays in the opening of thedocument. Smaller images should perform fine.
30.5 Security and Access restrictionIt is important that information is distributed only to those with access rights to it. Since QlikView makesthe previously cumbersome process of retrieving information a very simple task, it is obvious that anaccess restriction mechanism is necessary. This can be done when creating the application. For moreinformation on this, see the QlikView reference manual.
When a QlikView document is published on a QlikView Server, it is just as important to protectconfidential data and prevent unauthorized access as it is when running the standard QlikView. QlikViewServer therefore supports all security features built into QlikView. In addition, it is possible to use theWindows NT file security or DMS authorization to control access to specific documents. This can be donealso without using any of the QlikView built-in security features.
QlikView File Security
QlikView and QlikView server can be instructed to test for a number of user properties before letting theuser open a document. (For more information on this, see the QlikView reference manual.) Possible fieldsare:
USERID: A field that should contain a valid user ID. The client will open a dialog asking for user ID.
PASSWORD: A field that should contain a valid password. The client will open a dialog asking forPassword.
SERIAL: A field that should contain a number corresponding to the QlikView serial number. The serverwill check the Server Serial Number and compare that to the valid ones listed in the QlikView document.In other words, the Serial Number check is a very blunt security instrument for documents that are to bepublished: Any client will be allowed to open a document on the valid server.
NTNAME: A field that should contain a string corresponding to a Windows NT Domain user name orgroup name. The server will ask the operating system if the user named in the QlikView documentcorresponds to the user logged on, or to a group to which the logged on user belongs.
NTDOMAINSID: A field that should contain a string corresponding to a Windows NT Domain SID. Theserver will ask the operating system if the Windows NT Domain named in the QlikView documentcorresponds to the Domain to which the logged on user belongs.
NTSID: A field that should contain a Windows NT SID. The server will ask the operating system if theNT SID named in the QlikView document corresponds to the NT SID of the user logged on, or to a groupto which the logged on user belongs.
Only if all the required tests are passed, will the user be able to open the document.
The Windows File security described above and the three last tests are of course very similar. Thedifference is that for the former, the security information is fetched from the file system, whereas for the
216 QlikView Server/Publisher

30 Developing Documents for Use with QlikView Server
latter, it is fetched from within the QlikView file. Both are, however, compared to the logon informationfrom the operating system.
Dynamic Data reduction
QlikView Web Server supports a feature that can hide some part of the data (field values) in a documentfrom the user based on the login information. Only the information that the user has the right to see willbe shown.
The selection of values to be shown is controlled by means of having one or more fields with commonnames in the data and in the access restriction data. Only the field values logically connected to the userlogged on will be shown.
This is a very efficient way to hide information to which the user does not have access.
For more information on how to build such an application, see the QlikView reference manual.
QlikView Server/Publisher 217

218 QlikView Server/Publisher
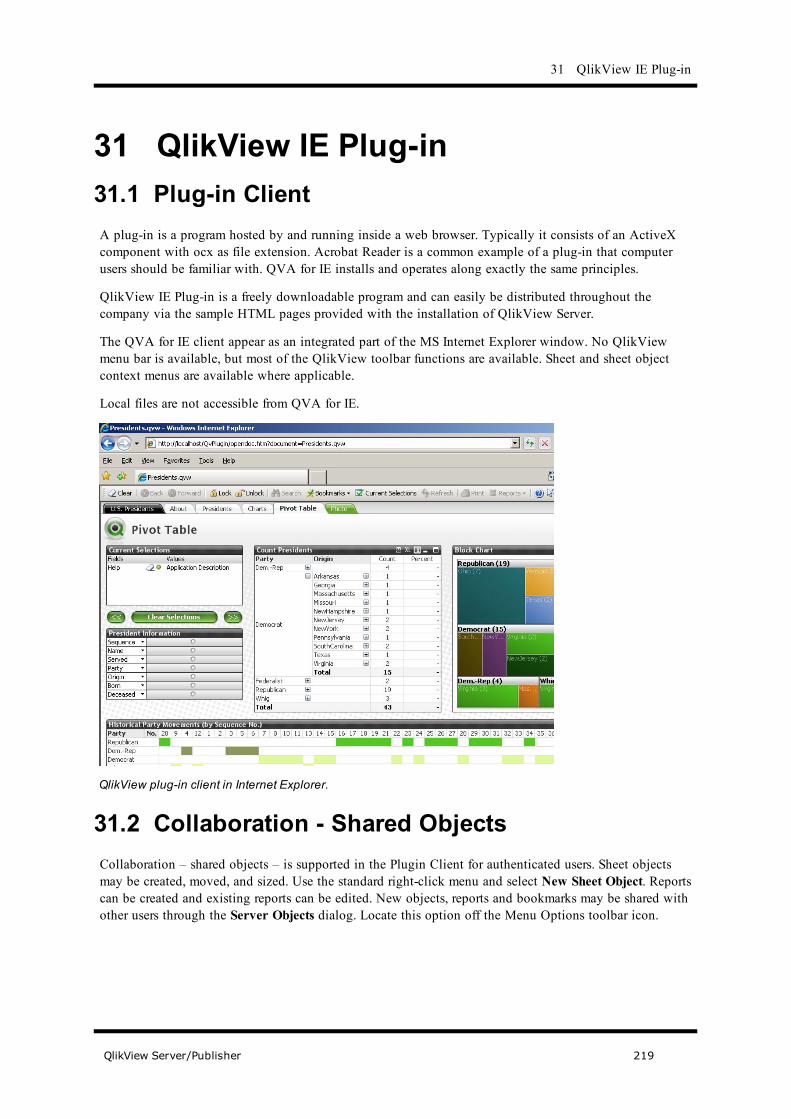
31 QlikView IE Plug-in
31 QlikView IE Plug-in31.1 Plug-in ClientA plug-in is a program hosted by and running inside a web browser. Typically it consists of an ActiveXcomponent with ocx as file extension. Acrobat Reader is a common example of a plug-in that computerusers should be familiar with. QVA for IE installs and operates along exactly the same principles.
QlikView IE Plug-in is a freely downloadable program and can easily be distributed throughout thecompany via the sample HTML pages provided with the installation of QlikView Server.
The QVA for IE client appear as an integrated part of the MS Internet Explorer window. No QlikViewmenu bar is available, but most of the QlikView toolbar functions are available. Sheet and sheet objectcontext menus are available where applicable.
Local files are not accessible from QVA for IE.
QlikView plug-in client in Internet Explorer.
31.2 Collaboration - Shared ObjectsCollaboration – shared objects – is supported in the Plugin Client for authenticated users. Sheet objectsmay be created, moved, and sized. Use the standard right-click menu and select New Sheet Object. Reportscan be created and existing reports can be edited. New objects, reports and bookmarks may be shared withother users through the Server Objects dialog. Locate this option off the Menu Options toolbar icon.
QlikView Server/Publisher 219

Use the Share option to share the selected objects with other server users. Access to the object throughthis dialog will move to the Shared Objects tab.
Shared Objects may also be controlled through the Server objects menu. You can display the Serverobjects menu from the Add or Remove buttons dialog off the main toolbar. Choose the Server ObjectsPane from the Toolbars tab of the dialog.
220 QlikView Server/Publisher

31 QlikView IE Plug-in
The Server Objects Pane will list all objects that you have created, as well as any shared objects that areavailable.
31.3 Deployment of QVA for IEThere are two basic ways to get the QVA for IE plug-in installed on a client computer:
Simple install link on web pageClicking on a download and install link on a web page starts the installation. This is a very commonapproach used for many commercial plug-ins.
It is necessary that the user installing the plug-in has install privileges on their own machine in order forthis approach to work.
Pushing out client via group policyIn organizations where individual users are not allowed to install new software on their computers, thesystem administrator may create a so called "group policy" and "shoot out" the QVA for IE clients to anyset of computers in the directory.
31.4 Customizing settings for QVA for IEThe appearance and behavior of the QVA for IE client can be changed via a couple of special commands,as follows.
QlikView Server/Publisher 221

Selecting toolbarsThe client comes with a predefined toolbar for Navigation, Server objects, Sheets and Bookmarks. Thetoolbar may be customized by clicking on the Toolbar Options icon located to the right of the toolbar.
Setting User PreferencesUse the Show Menu toolbar icon to display the User Preferences selection. This will allow setting userpreferences, such as language and printing preferences. For a detailed explanation of each of the availablecommands, please refer to the QlikView Reference Manual.
222 QlikView Server/Publisher
32 QlikX - Publishing separate sheet objects from the QVA for IE plug-in client
32 QlikX - Publishing separate sheetobjects from the QVA for IE plug-inclient32.1 Technical description of the QlikX conceptThe QVA for IE plug-in has the ability to support the display of individual sheet objects on a web page,without the surrounding sheet environment. Sheet objects from different QVS documents can be displayedon the same page. Web pages that are to utilize this functionality may be created manually. This sectiondescribes the requirements and process for creation and/or maintenance of a QlikX web page.
Incompatibility notice! The whole architecture for this concept was changed in version 9 of QlikView.The QlikOcx control is used for each object that is displayed and the QlikOcx.ocx directly connects to theQlikView document holding the data. The class id for the QlikOcx is also changed from the QlikOcxclass id used in version 8.
32.2 LimitationsThe following conditions must be met for the QlikXs to work:
l MS Internet Explorer version 6 or later must be installed on the client computerl The QlikView IE Plug- must be installed on the client computer
32.3 Getting it to workThis section provides an outline of the steps necessary to build a web page with QlikX objects. It isassumed that the reader possesses a general knowledge of HTML.
InfrastructureServer environmentQlikView Server must be of version 7 or later.
Web page componentsHTML web pageThe basic HTML web page(s) defining the client typically reside in a directory somewhere under the webserver’s wwwroot, either directly, or indirectly through the QlikView virtual directory. The pages couldcontain any standard HTML code. The details of how to present QlikX sheet objects is described in thenext chapter.
Plug-inThe QlikView IE Plug-in must be installed on the client computer.
QlikView Server/Publisher 223

32.4 Capabilities, differences and limitationsThis section describes some of the technical differences and limitations with QlikX in relation to otherQlikView clients.
Sheet Objects supportedAll sheet objects apart from Custom Objects are supported
QlikView entities with partial supportThe following QlikView entities currently have partial support:
l Sheets (there is no direct connection available to the sheets in the QVW document, but it is veryeasy to create the same functionality using HTML frames and tabs).
l The following QlikView entities currently have no counterpart in the QlikX environment but mayappear in some form in future versions:
l Alertsl Reports
Navigational differencesThere are a few differences in the GUI facing users of QlikX compared to users of other types of QlikViewclients.
l There is no menu barl There is no toolbar
Print/ExportPrint and export work exactly as in normal QlikView. Right-click on the object and select Print...
32.5 Complete sample pageBelow is a complete HTML page for displaying one list box and one chart with QlikX. Minimum HTMLformatting applied.<html><head><title>QlixTest</title><meta name="vs_targetSchema" content="http://schemas.microsoft.com/intellisense/ie5"><script type="text/javascript">function ClearAll(){Qlix1.ActiveDocument.ClearAll();}</script></head><body><OBJECTid="Qlix1"height="122"width="102"classid="CLSID:6E1BAAF6-ECB9-4505-86C1-5D04467B02CC" ><PARAM NAME="ObjectID" VALUE="Document\LB01"><PARAM NAME="DocName"VALUE="qvp://extra.qliktech.ideon.se/MyQvApp.qvw"></OBJECT>
224 QlikView Server/Publisher

32 QlikX - Publishing separate sheet objects from the QVA for IE plug-in client
<OBJECTid="Qlix2"height="288"width="448"classid="CLSID:6E1BAAF6-ECB9-4505-86C1-5D04467B02CC" ><PARAM NAME="ObjectID" VALUE="Document\CH01"><PARAM NAME="DocName" VALUE="qvp://extra.qliktech.ideon.se/MyQvApp.qvw"></OBJECT> <inputtype="button"value="ClearAll"onclick="ClearAll()"id=button2name=button2></body></html>
The result of the HTML code above can be seen below:
The QlikX example in Microsoft Internet Explorer.
QlikView Server/Publisher 225

226 QlikView Server/Publisher

33 QlikView installed Windows clients
33 QlikView installed Windows clients33.1 Locally installed Windows ClientWith QlikView Desktop installed on your machine, you may open any application on QlikView Serverwhich you have access rights to.
33.2 Open in ServerOnce QlikView has been installed, the end user can choose to open QlikView documents through theOpen in Server command in the File menu.
The Open in Server menu item.
This command will provide the end user with all the possible QlikView documents provided and whichQlikView Servers are available. By clicking in the Connect to Server dialog the application will openand the analysis session can begin.
The Connect to Server dialog in QlikView.
Connection pseudo-URLsWhen connecting to QlikView Server from Windows clients, either via the Open in Server dialog or vialink files, the identity to be used is specified via the pseudo-URL document address. The syntax is:
qvp://[[username]@]servername [:(port | protocol)] /[documentname.qvw][?paramname=paramvalue{¶mname=paramvalue}]
QlikView Server/Publisher 227

where
username is a Windows user ID
servername is the name of a server running QlikView Server
documentname is the name of the QlikView document (excluding qvw extension)
port (e.g. 4749) can be used to specify a specific port used by the server
protocol (e.g. http) can be used to specify tunneling protocol
paramname := (USERID | XUSERID | PASSWORD | XPASSWORD | MACRO | IIS_AUTHENTICATE )
USERID denotes a section access userID in clear text. This parameter is also utilized to pass a Ticketvalue during the Get Ticket process.
XUSERID denotes a scrambled section access userID
PASSWORD denotes a section access password in clear text
XPASSWORD denotes a scrambled section access password
MACRO denotes the name of a macro to be run when the document is opened
(only one macro allowed)
IIS_AUTHENTICATE denotes a single-use key (40 hex characters) for IIS integrated authentication.
paramvalue is a valid value for each parameter.
@ without username denotes anonymous identity.
If user identity is omitted altogether, the logged in Windows identity is assumed.
Examplesqvp://www.qliktech.com/AcmeStores.qvw
qvp://@www.qliktech.com/AcmeStores.qvw
qvp://[email protected]/AcmeStores.qvw
qvp://www.qliktech.com:http/AcmeStores.qvw
qvp://www.qliktech.com/AcmeStores.qvw?USERID=JOHN&PASSWORD=ABC123
qvp://www.qliktech.com/AcmeStores.qvw?MACRO=Mymacro
TIP: Internet Explorer 7 does not support @ or : in the URL in order to prevent spooling of URLs. Tospecify these characters in the URL, you need to URL-encode them.
Use %3A for: and %40 for @.
228 QlikView Server/Publisher

34 The QlikView AJAX Zero-Footprint Client (ZFC)
34 The QlikView AJAX Zero-FootprintClient (ZFC)34.1 GeneralThe QlikView AJAX Zero-Footprint Client (ZFC) provides an object based client environment built on astate-of-the-art AJAX (Asynchronous JavaScript And XML) architecture. The QlikView AJAX ZFCrequires no installation or version maintenance on the client computer. Implementations may chose tocustom develop their own HTML/ASP code for display and user interaction, but most installations cansimply use QlikView Server to automatically generate HTML code as needed. Almost all customizationcan be accomplished through the source QlikView document.
TIP: The detailed documentation for defining web pages using the AJAX client is now accessed throughthe QlikView Software Development Kit (SDK). SDK materials are available in the installation packagefor QlikView Server.
QlikView AJAX client
Basic description of the QlikView AJAX ZFCOne of the main advantages of the AJAX architecture is the inherent asynchronous update capability toprovide quick, incremental updates to the user interface, without requiring a browser page refresh. TheQlikView AJAX ZFC provides the environment for the QlikView Server to produce and send DynamicHTML (DHTML) pages and XML data to the browser running on the client computer and also receivefeedback from the user clicking in those pages. DHTML is basically HTML with scripting. Nothing isinstalled on the client computer.
QlikView AJAX ZFC is based on the component AVQ.HTC, which is part of Winsider AB’s “VisualValue”™ framework. The “Visual Value”™ framework is a data modeling and presentation framework
QlikView Server/Publisher 229

that allows location independent presentation and manipulation of data with advanced business logic rulesand constraints. QlikTech has licensed this component for use with QlikView Server.
Requirements and Limitationsl The client requires one of the following browser types:- MS Internet Explorer version 7 or later- Browsers based on the Mozilla engine version 1.0.6 or later (e.g. Firefox)Different browsers may render the same page slightly differently.
l This is a way to build web pages featuring one or more QlikView sheet objects. The standardQlikView Sheet Tab is not supported, but separate QlikView sheets may be emulated through theuse of multiple HTML pages. Selection state in the source QlikView document will hold throughoutthe same browser session.
l Almost all types of QlikView sheet objects and their functionality are supported. See the end of thischapter for details.
34.2 Collaboration - Shared ObjectsAll authenticated users are allowed to create and share objects through the AJAX client. Use the SharedObjects dialog to create new objects, access object properties, hide or show shared objects, and copyexisting objects.
Use the Share option when you have created a new object to share the selected objects with other serverusers.
QlikView AJAX client Collaboration
Click on New Sheet Object in the context menu to create a personal object.
230 QlikView Server/Publisher

34 The QlikView AJAX Zero-Footprint Client (ZFC)
Create new object
Select the object type and drag the icon to the desired location on the currently displayed sheet. This willdisplay the Properties dialog for the new object. Set the desired properties and close the dialog byclicking on the red X in the upper right corner.
Multiple Property dialogs can be open at the same time, and existing properties can be copied bydragging.
The properties page
Objects can be shared with other users through the Sharing dialog. Click on Sharing in the Propertiesdialog to control how the object should be shared or to turn off sharing.
QlikView Server/Publisher 231
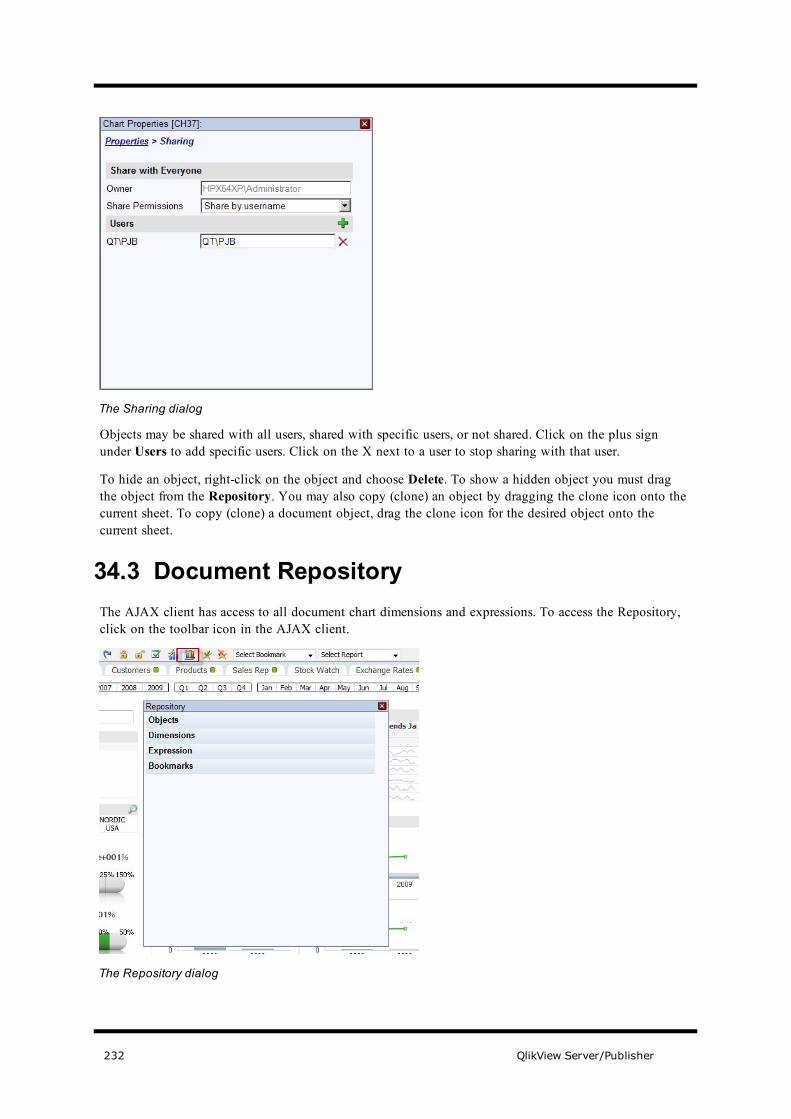
The Sharing dialog
Objects may be shared with all users, shared with specific users, or not shared. Click on the plus signunder Users to add specific users. Click on the X next to a user to stop sharing with that user.
To hide an object, right-click on the object and choose Delete. To show a hidden object you must dragthe object from the Repository. You may also copy (clone) an object by dragging the clone icon onto thecurrent sheet. To copy (clone) a document object, drag the clone icon for the desired object onto thecurrent sheet.
34.3 Document RepositoryThe AJAX client has access to all document chart dimensions and expressions. To access the Repository,click on the toolbar icon in the AJAX client.
The Repository dialog
232 QlikView Server/Publisher

34 The QlikView AJAX Zero-Footprint Client (ZFC)
In the Repository you see all objects of the document, those that originally were part of the document, theshared objects of other users and your own objects.
Use this dialog to view dimensions (fields) used in the document and to drag a dimension to another openproperty dialog.
The Document Dimensions page of the Repository dialog
Use this dialog to view expressions used in the document and drag an expression to another open propertydialog.
The Document Expressions page of the Repository dialog
34.4 Capabilities, differences and limitationsThis section describes some of the technical differences and limitations with QlikView AJAX ZFC inrelation to other QlikView Server clients.
Document Properties SupportOpening images and sounds are not supported.
QlikView Server/Publisher 233

Sheet Objects supportedVirtually all sheet objects and functionality is now supported through the AJAX client. The few minorexceptions to this are noted below.
The following types of sheet objects are not supported in the QlikView AJAX ZFC and are very unlikelyto ever be supported:
l Custom Object
QlikView entities with partial supportThe following QlikView entities currently have partial support in the QlikView AJAX ZFC environment:
l Sheets (there is no direct connection available to the sheets in the QVW document, but it is veryeasy to create the same functionality using HTML frames and tabs). User selection state ismaintained throughout a single browser session.
Print/ExportThe following general comments can be made with regard to print and export of objects and data whenusing the QlikView AJAX ZFC
Functionality supported includes:
l The HTML page can be printed by using the Print command in MS Internet Explorer. The usualrules and limitations regarding MS IE printing apply.
l Chart images can be copied to clipboard or saved as any other pieces of graphics on a web page.
Note! In order to copy an object you must first put your web browser in native mode by clicking shift+ctrl.You can then right-click and choose Copy Image.
l Button-driven server-side export providing results in a new MS Internet Explorer window.
Caption icons can be utilized in object captions for additional functionality.
APIs and integrationQlikView AJAX ZFC builds on HTML. This implies certain limitations with regard to programmaticaccess and integration
l Automation APIs cannot be usedl No real client side APIs are available. It may be possible in the future to access data stored client-side in QlikView AJAX ZFC elements via scripting.
Note however that
l Actions can be executed via buttons and objectsl The HTML elements of QlikView AJAX ZFC can co-exist with all other types of web pagecomponents on a common HTML page. That includes other QlikView clients (e.g. QVA for IE plug-in, including QlikX components) and all types of ActiveX controls. Interaction between QlikViewAJAX ZFC and the other components will however be limited.
Selection Parameters in the URLSelection Parameters in the URL It is possible to include selection parameters in the url for the Ajax ZFC.Note that the selection parameters always clears any other selections in the list box.
The following syntax rules apply:
l Separate selections are divided by “&”l Separate selection values are divided by “,”
234 QlikView Server/Publisher

34 The QlikView AJAX Zero-Footprint Client (ZFC)
l White spaces mattersl Syntax is case sensitive The following table includes a list of possible actions and url parameters.
Action ParameterSingle selection in list box select=LB02,Germany
Multiple selection in one list box select=LB02,Germany,Argentina
Multiple selection in multiple list boxes select=LB02,Germany,Argentina,Albania& select=LB01,-Boero
Specify whether the object is a Server ordocument object (document is default)
select=Server\LB02,DE4620select=Document\LB02,Germany,Argentina
Specify data source or document (onlynecessary if there is more than one on thepage)
select=DataSource1.Document\LB02,Germany,Argentina
select=Safpro9.Document\LB02,Germany, Argentina
select=DataSource1.LB02,Germany, Argentina
select=Safpro.LB02,Germany,Argentina
Select a bookmark. NB! Must enterbookmark id, not name. Do the followingto obtain the correct id:
1. Open the document in QlikView2. In the Bookmarks menu choose
"More..." 3.The id is in column "ID"
3. Only document bookmark can beused. The prefix is therefore always"Document". (Prefix must beentered)
bookmark=Document\BM02
Combine bookmark with selection select=LB02,Germany&bookmark=Document\ BM06
Change a data source document if there isonly one data source on the page application=Films
Example of a url:
http://AccessPoint1/QvAJAXZfc/opendoc.htm?document=Data%20Visualization.qvw&host=localhost&select=Document\LB02,Germany,Argentina,Albania&select=Document\LB01-Boero
34.5 ASP timeouts for very large QlikViewdocumentsWhen using the QlikView AJAX ZFC with large QlikView documents, the asp code might sometimesrequire that you increase the asp timeout. This can be made in two ways, either programmatically or bycustomizing the IIS.
QlikView Server/Publisher 235

l By setting the Server.ScriptTimeout property in your code, such as: <%Server.ScriptTimeout = 180%>, where the numeric value is the number of seconds that the current script will be executed.
l To set the timeout in the IIS, open the IIS Management Console, open Properties for the foldercontaining the asp code, go to the Directory or Virtual Directory page (depends on what type offolder you use), press the Configuration button to open the Application Configuration dialog, go tothe Options page where you find the edit box for the ASP Script Timeout.
236 QlikView Server/Publisher

35 The QlikView iPhone Client
35 The QlikView iPhone Client35.1 GeneralThe QlikView iPhone Client is available for free and can be downloaded from the Apple iTunesAppStore. Download and install the QlikView for iPhone app. The QlikView iPhone Client requiresversion 8.5 SR2 or later of QlikView Server.
Supported Devices
All generations of iPhone and iPod Touch are supported, using firmware version 3.0 or later.
35.2 SetupOnce the QlikView for iPhone app is downloaded and installed on your device, start the app, select the
Settings menu ( )and select Edit on the first screen.
Editing the settings for a QlikView Server
URL The url to the QlikView Server.
Display Name The name that should be presented in the Server list.
Uses Mobile Directory Set whether to use the Mobile Directory of the QlikView Server (generallyrecommended for documents specific to mobile devices).
Username Username for logging on to the Server.
Password Password for logging on to the Server. If the Password is left out here, you willbe required to enter it each time you open a document.
The URL can be specified in several different ways (the qvp protocol is not supported):
l demo.qlikview.coml http://demo.qlikview.com
QlikView Server/Publisher 237
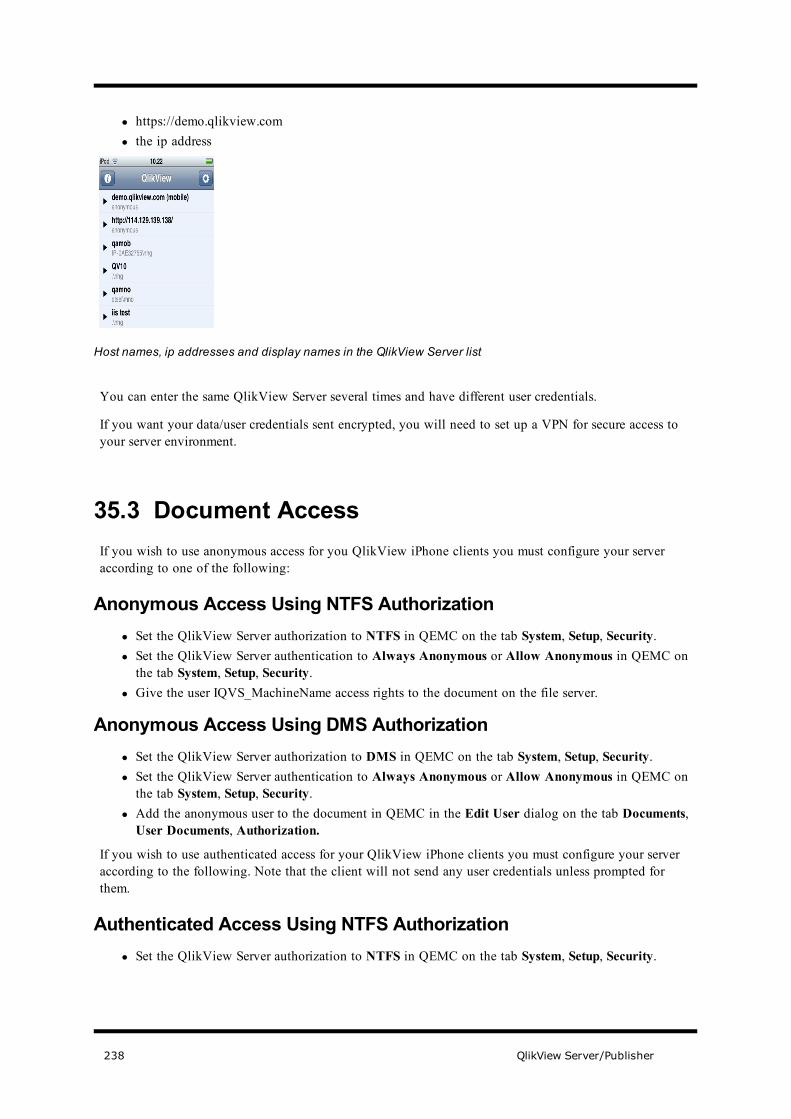
l https://demo.qlikview.coml the ip address
Host names, ip addresses and display names in the QlikView Server list
You can enter the same QlikView Server several times and have different user credentials.
If you want your data/user credentials sent encrypted, you will need to set up a VPN for secure access toyour server environment.
35.3 Document AccessIf you wish to use anonymous access for you QlikView iPhone clients you must configure your serveraccording to one of the following:
Anonymous Access Using NTFS Authorizationl Set the QlikView Server authorization to NTFS in QEMC on the tab System, Setup, Security.l Set the QlikView Server authentication to Always Anonymous or Allow Anonymous in QEMC onthe tab System, Setup, Security.
l Give the user IQVS_MachineName access rights to the document on the file server.
Anonymous Access Using DMS Authorizationl Set the QlikView Server authorization to DMS in QEMC on the tab System, Setup, Security.l Set the QlikView Server authentication to Always Anonymous or Allow Anonymous in QEMC onthe tab System, Setup, Security.
l Add the anonymous user to the document in QEMC in the Edit User dialog on the tab Documents,User Documents, Authorization.
If you wish to use authenticated access for your QlikView iPhone clients you must configure your serveraccording to the following. Note that the client will not send any user credentials unless prompted forthem.
Authenticated Access Using NTFS Authorizationl Set the QlikView Server authorization to NTFS in QEMC on the tab System, Setup, Security.
238 QlikView Server/Publisher
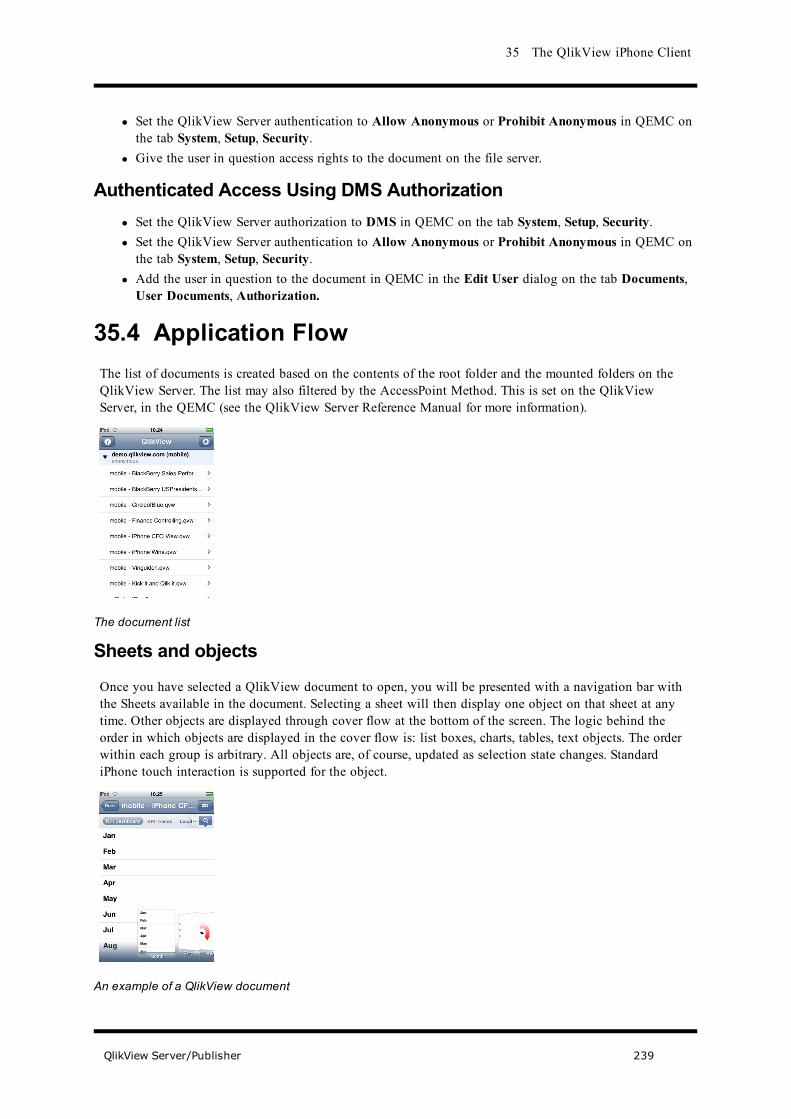
35 The QlikView iPhone Client
l Set the QlikView Server authentication to Allow Anonymous or Prohibit Anonymous in QEMC onthe tab System, Setup, Security.
l Give the user in question access rights to the document on the file server.
Authenticated Access Using DMS Authorizationl Set the QlikView Server authorization to DMS in QEMC on the tab System, Setup, Security.l Set the QlikView Server authentication to Allow Anonymous or Prohibit Anonymous in QEMC onthe tab System, Setup, Security.
l Add the user in question to the document in QEMC in the Edit User dialog on the tab Documents,User Documents, Authorization.
35.4 Application FlowThe list of documents is created based on the contents of the root folder and the mounted folders on theQlikView Server. The list may also filtered by the AccessPoint Method. This is set on the QlikViewServer, in the QEMC (see the QlikView Server Reference Manual for more information).
The document list
Sheets and objects
Once you have selected a QlikView document to open, you will be presented with a navigation bar withthe Sheets available in the document. Selecting a sheet will then display one object on that sheet at anytime. Other objects are displayed through cover flow at the bottom of the screen. The logic behind theorder in which objects are displayed in the cover flow is: list boxes, charts, tables, text objects. The orderwithin each group is arbitrary. All objects are, of course, updated as selection state changes. StandardiPhone touch interaction is supported for the object.
An example of a QlikView document
QlikView Server/Publisher 239

Touch a value to select, touch it again to deselect. To select multiple values in a list box, swipe sidewayson the list box. Two buttons are displayed at the top of the list box, Cancel and Select. Tap the values inthe list box you wish to alter selection state for. The values will be marked with a tick. Tap again toremove the tick-mark. Tap Select to send the request to the Server or Cancel to go back to previous selectstate. Tapping an excluded (gray) value will include it in the current selection, if it is not in conflict withselections made in other list boxes. In case of a conflict, all conflicting values will be deselected beforeselecting the tapped value.
For a list box, the All/Possible/Excluded buttons can be used to make multiple selections.
To make selections in charts, touch and hold for one second in the area you wish to select. A square withmovable corners and two buttons is displayed. Tap and drag the corners to mark the area you wish toselect. Tap Select to select the marked area or Cancel to keep the current selection.
Use the E-mail ( ) button in a chart to e-mail the image of the chart, the chart title and a list of currentselections. Make sure you have configured your device for e-mail.
Current Selections and Bookmarks buttons are located on a common page. View the page by pressing the
button in the upper right corner.
The Current Selections screen
Here you can manipulate your selections, for example lock and clear.
The Bookmarks screen
With the Snapshot Bookmarks button in the Bookmarks screen, you can download the bookmarks fromthe document. Note that this will store all data from the document locally!
When viewing a list box, shake the device to clear the selections shown in the list box.
Move to horizontal or vertical to change perspective.
240 QlikView Server/Publisher

35 The QlikView iPhone Client
Pan and zoom are supported.
Text in text objects is displayed. Text objects are presented last in the cover flow.
Press the button to access the information screen. Here you can access Demo files and System detailsfor support. There is an option to send an e-mail to [email protected]. The message, which can beedited, contains information about the client software and the device.
Press the Help button to enter an introductory walkthrough of QlikView.
Close and reopen a document to refresh it.
Supported objects
The following objects are supported:
l List boxl Text objectl Chartsl Current selectionsl Limited support* for:l Pivot table**l Straight Table***l Table box
*Supported features are:
l Selection in table cells (single tap on a cell)l Re-order table colums (tap on the header and drag the column)l Sort a column (double tap on a column header)l Links in tablesl Expression formattingl Calculation conditionsl Table grid linesl Table styles
Headers are locked while scrolling, there is limited column resizing.
**Supported features:
l Partial sumsl Expand and collapse by tapping the + symbol and the - symbol
***Supported features:
l All types of gauges as data representation for expressionsl Linked images as data representation for expressionsl Mini charts as data representation for expressionsl Subtotalsl Links
The totals row is always locked on top.
QlikView Server/Publisher 241
Design Guidelines
There are a few things to consider when developing applications that should be viewed on the iPhoneclient.
l Group Sheet Objects into Sheets so that they make sense without requiring a screen position.However, do not add too many Objects per Sheet. A maximum of 10 objects and 4 charts. (Chartstake up the most resource.)
l All objects should be maximized.l Charts should have white backgrounds.l Charts should be brightly colored, and colors should match on a sheet.l Charts should have axis titles.l Charts should not have cycle groups or scroll bars.l No need for Current Selections or Bookmarks objects on the sheets. However, you should assignsome interesting bookmarks to be saved in the document.
l Make use of location services by adding two listboxes, preferably to a separate sheet, one name"longitude", and one name "latitude".
l Consider reducing data before distribution to reduce data traffic.l Keep in mind that not all fonts are supported by the iPhone.
242 QlikView Server/Publisher

36 The QlikView BlackBerry and Java Mobile Clients
36 The QlikView BlackBerry and JavaMobile Clients36.1 GeneralThe BlackBerry and Java Mobile clients are both based on Java. The main difference between them is thatwhile the Java Mobile client is restricted to only use the Java ME standard MIDP 2.0, the BlackBerryclient uses BlackBerry native api for the User Interface.
The client connects to a QlikView Server, using either a socket connection (QVPJ) or HTTP/HTTPS, iftunneling is available on the server.
3G communication or WiFi is recommended. Connection speed is the most important factor for theperformance of the mobile clients.
The client will, of course, be most effective on larger screens. If a touch screen is available it will be used,but almost all functionality is available even from a phone with just a numeric keypad.
36.2 CommunicationThe Java Mobile client communicates with the QlikView Server using the QVPX protocol. The protocolis xml based and used by both the Ajax Zero-Footprint client and the iPhone client. With the support forQVPX, a protocol designed for communication over HTTP, the performance is improved when runningover HTTP or HTTPS compared to the older QVPJ protocol.
To use QVPX you must enable the setting Use XML interface in the Server setup screen.
The support for QVPJ will be removed in the future. QVPJ communicates either directly over a socket orvia the tunneler using http or https. For authorization it uses an https connection to the QlikView Server toget a ticket.
36.3 SetupTo install the client use a browser for installation (by simply browsing to the JAD file). No special setupis needed on the QlikView Server, but if you want to use authorization you will need to configure httpson your server with a certificate that is supported by your device. A QlikView Server Enterprise license isrequired to support the mobile client.
Configuration with JAD Files
JAD (Java Application Descriptor) files are part of the Java Mobile Edition framework. They contain someparameters that are mandatory for all Java ME applications and some QlikView specific parameters, e.g.,what host to connect to, etc. They can be customized in a customer installation to point directly to thecustomer’s host.
In the JAD file you can set the following parameters:
QlikView Server/Publisher 243
Server configuration parameters:
The first parameter should always be the DNS name or IP address, the second parameter, which is optional,should be the Server name. The user name and password cannot be pre-configured. The user will beprompted with a log-in dialog when connecting to the Server.
XML Use QVPX xml interface
ANONYMOUS Do not log in
SOCKET Use socket for communication
HTTP Use http communication
HTTPS Use SSL communication
LOGINHTTP Login over http
DIR=zzz Set directory zz
READONLY Do not allow the user to modify or remove Server configuration.
Up to ten QlikView Servers can be configured with the parameters QV-HOST and QV-HOST1 to 9, forexample:QV-Host: demo.qlikview.com;QlikView demo;XML;ANONYMOUS;READONLY;DIR=mobileQV-Host1: mobilebetaeu.qlikview.com;Beta EU;SOCKET;HTTP
General parameters:
DEBUG Enable debug mode
DPI=xx Set dpi to xx
SINGLE Single object mode is default
STDMENU Use standard menu (only for Java ME phones with touch functionality)
NOSTDMENU Do not use standard menu (only for Java ME phones with touch functionality
RECENT=y Number of recent documents to save (0=no recent documents)
FORCE_MDS Force MDS communication (only BlackBerry)
FORCE_TCP Force direct Tcp communication (only BlackBerry)
FORCE_WAP2 Force WAP2 communication (only BlackBerry)
USE_WLAN Use WLAN (only BlackBerry)
NOCOMPRESSION Do not use compression
The communication path from the device to the server is a little more complicated than the standard clientcommunication path, but basically it will go through the telephone operators network and over Internet to
244 QlikView Server/Publisher

36 The QlikView BlackBerry and Java Mobile Clients
the QVS host. If you use WiFi, which many modern devices support, and your QVS host is on the samelocal network as your wireless router you will, however not go over the internet.
Blackberry devices have a more complicated communication infrastructure, where communication isencrypted between the device and Blackberry BES server, if you use one of those. Blackberry also do notuse JAR files but have their own JAD file format.
To set up Internet connection with your phone you might need to download settings from your operator.For BlackBerry phones you may need to enter settings by hand, depending on your service provider.
If you are installing from the download link and have an existing version already installed, you mightneed to clear your content cache. If you haven’t done this you might get an error message ‘JAR sizemismatch’.
Centralized Configuration in BlackBerry
The BlackBerry client can be configured centrally. The configuration is done through the BlackBerry ITPolicy. The administrator must log in to the BlackBerry Administration service and define IT Policy Rules.Add the setup parameters, QV-Setup, QV-Host or QV-Host1 to 9. The parameters the administrator canconfigure will be displayed under User Defined. The possible parameters are the same as those availablefor a JAD file (see above). All parameters configured in BlackBerry IT policy are automatically read only.
Changes in the IT Policy will automatically propagate to the clients.
Note! Settings made in the BlackBerry IT Policy will overwrite any parameters set in a JAD file!
Authorization
If authorization is enabled in the setup screen the mobile client will ask for username and password. It willthen try to get a ticket from the QlikView Server. For this to work the server must be configured with SSLsupport.
36.4 Application FlowThe client shows QlikView documents in much the same way as the desktop clients, but on a screen thatis considerably smaller. It is also limited by the font handling of Java ME, where only three, pre-definedfont sizes (small, medium and large) are available. This means that text sizes might be different from thedesktop clients and some objects might not work. Another limitation is on image sizes, where images thatexceed the memory capacity of the device will not be displayed. They will, however be transferred fromthe server and can make opening the documents slow. When designing documents for the mobile clientyou should avoid using large images. Smaller images will work fine.
When you start the application you get a list of all your configured Servers. If you have openeddocuments before you also get an entry called Recent documents. When you click on a Server, the list ofdocuments is displayed below the Server. In the settings form you can also see some information aboutyour device and version of the QlikView Mobile client.
General Featuresl The documentsRecent Documentslist can be removedl Server name can be added in the Server settingsl A logo can be displayed on the documents
QlikView Server/Publisher 245

Supported objects
The following objects are supported:
l List boxl Table boxl Chartsl Text objects. Transparent text objects are supported in the BlackBerry client.l Line/Arrowl Buttonl Current selectionsl Statistics boxl Straight tablel Multi Box (read-only)l Pivot table
Drawings of the objects are simplified compared to the desktop clients. Columns cannot be moved orresized.
Supported operations
The following operations are supported:
l Selectionl Clearl Lockl Unlockl Backl Forwardl Searchl Fast Changel Apply bookmarkl Minimizel Maximize/Restorel Cycle and drill downl Table sortl Creating bookmarksl Zoom (only newer BlackBerry and Symbian devices)l Open URL. Depending on device the following URL types are supported:
l http/httpsl tell smsl mailto
l Pivot tables (pivoting is not supported. Expand/collapse is supported)l Drill-up in list boxes and tablesl Cycle in list boxes and tablesl Tree view in list boxes
246 QlikView Server/Publisher
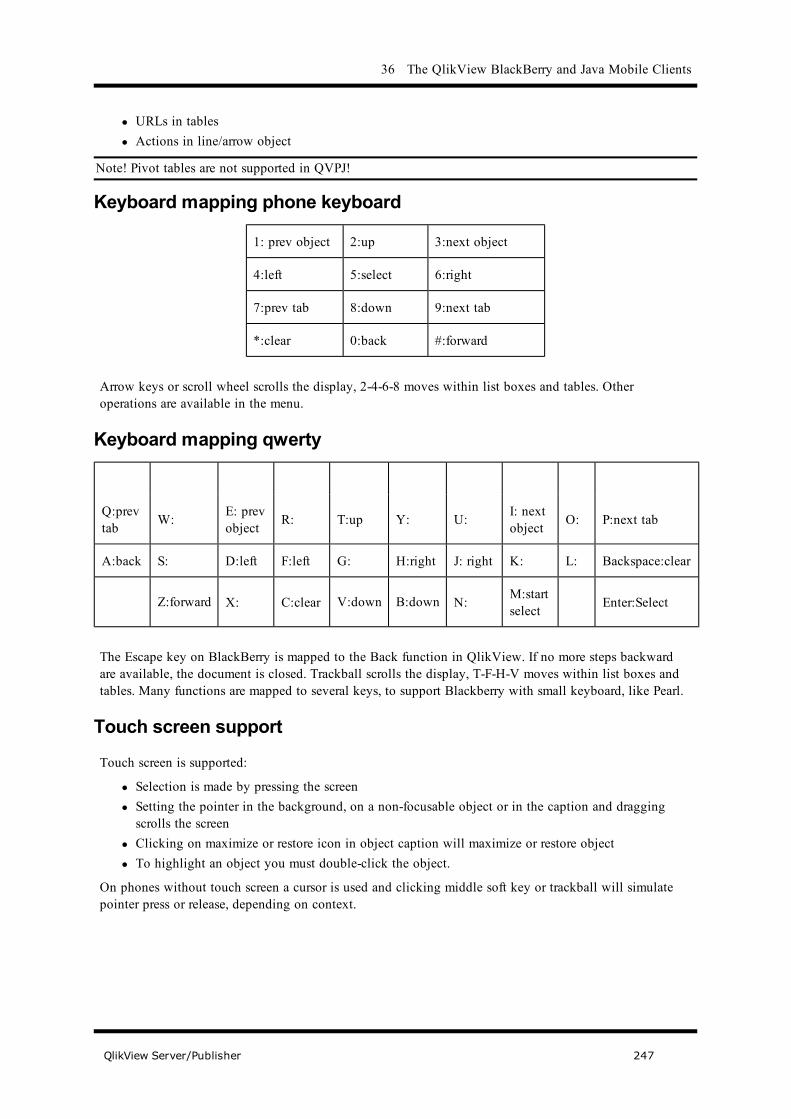
36 The QlikView BlackBerry and Java Mobile Clients
l URLs in tablesl Actions in line/arrow object
Note! Pivot tables are not supported in QVPJ!
Keyboard mapping phone keyboard
1: prev object 2:up 3:next object
4:left 5:select 6:right
7:prev tab 8:down 9:next tab
*:clear 0:back #:forward
Arrow keys or scroll wheel scrolls the display, 2-4-6-8 moves within list boxes and tables. Otheroperations are available in the menu.
Keyboard mapping qwerty
Q:prevtab W: E: prev
object R: T:up Y: U: I: nextobject O: P:next tab
A:back S: D:left F:left G: H:right J: right K: L: Backspace:clear
Z:forward X: C:clear V:down B:down N: M:startselect Enter:Select
The Escape key on BlackBerry is mapped to the Back function in QlikView. If no more steps backwardare available, the document is closed. Trackball scrolls the display, T-F-H-V moves within list boxes andtables. Many functions are mapped to several keys, to support Blackberry with small keyboard, like Pearl.
Touch screen support
Touch screen is supported:
l Selection is made by pressing the screenl Setting the pointer in the background, on a non-focusable object or in the caption and draggingscrolls the screen
l Clicking on maximize or restore icon in object caption will maximize or restore objectl To highlight an object you must double-click the object.
On phones without touch screen a cursor is used and clicking middle soft key or trackball will simulatepointer press or release, depending on context.
QlikView Server/Publisher 247
Design Guidelinesl
l Keep objects small. The screen is scrollable, but objects that are larger than the screen are generallynot a good idea.
l Verify that the font sizes you use work on your device. Small fonts might be displayed larger on thedevice, which might mean that texts will be cut off. The exception to this rule is graphs, which arerendered on the server, so scalable fonts can be used. Keep texts short if possible.
l Avoid buttons, if your users don’t have a pointing device.l Only use small images. A large image will take time to transfer to the device and make yourdocument slow and you do not want to use your limited memory for large images. If the image is toobig to fit into the devices memory it will not be displayed (but still take time to transfer).
36.5 Web Server for Mobile Downloads for QlikViewNote! The set up below is only one way of setting up a site for downloading the mobile client!
Prerequisites
In order to make the mobile client downloadable from a phone, the following prerequisites should befullfilled:
l The Midlet files (Java files)l An URL used as the download locationl Optionally a redirect site (Sample source code is included)
If Microsoft IIS is used as web server, the file getticket.asp must be placed in the Script folder. It isinstalled together with the feature Microsoft IIS Support.
Configuring the Web Server
Configure the following mime-types:
*.jad text/vnd.sun.j2me.app-descriptor
*.jar application/java-archive
*.cod application/vnd.rim.cod
This step must not be skipped!
Modifying the Midlet Configuration Files
Extract the Midlet on the local harddrive. The structure will look as follows:
QvJME.jar
QvJME.jad
bb\QvQlikView.jad
bb\QlikView-1.cod
248 QlikView Server/Publisher
36 The QlikView BlackBerry and Java Mobile Clients
bb\QlikView.cod
Upload to the WebServer
Upload the Midlet files to webserver.
Configuring the redirect site (optional)
Depending on the types of phones accessing the download site, they might be redirected to different sitesdepending on the type. The two most common redirects are:
Non-mobile-phone => "Please use a phone to access this page"
Blackberry => bb\QvJME.jad
All other => QvJME.jad
Sample source code
if (Request.ServerVariables["HTTP_USER_AGENT"].Contains("Windows NT"))Response.Redirect("windowsuser.aspx"); else if (Request.ServerVariables["HTTP_USER_AGENT"].Contains("BlackBerry")) Response.Redirect("bb/qvjme.jad"); elseResponse.Redirect("qvjme.jad");
Test
Open the URL pointing at the redirect site (or directly on the QvJME.jad) in the mobile phone.
QlikView Server/Publisher 249

250 QlikView Server/Publisher

37 The QlikView Android Client
37 The QlikView Android Client37.1 GeneralThe QlikView Android client is available on Android Market free of charge. It is a client that can viewQlikView Server data.
3G communication or WiFi is recommended. Connection speed is the most important factor for theperformance of the mobile clients.The current version is 1.0.
37.2 RequirementsThe client requires Android 1.5 or later and a screen resolution from 320x480 and above. The client will,of course, be most effective on larger screens.
QlikView Server version 9 is required on the Server side.
37.3 Application FlowThe list of documents is created based on the contents of the root folder and the mounted folders on theQlikView Server. The list may also filtered by the AccessPoint Method. This is set on the QlikViewServer, in the QEMC (see the QlikView Server Reference Manual for more information).
Sheets and objectsOnce you have selected a QlikView document to open, you will be presented with the first sheet of thedocument. At the bottom you see the tabs for all sheets. Selecting a sheet will display one object on thatsheet at the time. Other objects on the same sheet are displayed in a list to the right. All objects areupdated as selection state changes.
Touch a value in a list box to select, touch it again to deselect. To make a selection in a chart, you touchthe screen and a "slider" selection will appear. Paint over the selections you wish to make and tap theSelect button at the bottom, or tap the Cancel button to undo the selection.
Use the E-mail button in a chart to e-mail the image of the chart, the chart title and a list of currentselections. Make sure you have configured your device for e-mail.
37.4 Supported ObjectsThe following objects are supported:
l List boxesl All chart types*
*It is possible to select in all chart types except tables.
The current selections object is not supported, but there is a list of current selections built into the client.The bookmark object is not supported, but a list of current bookmarks is built into the client.
QlikView Server/Publisher 251

252 QlikView Server/Publisher

Part 7 Appendix
QlikView Server/Publisher 253
38 The Directory Service Provider38.1 The Directory Service Provider InterfaceThis chapter will examine the two relevant interfaces, their methods and properties and make notes onimplementation details where due. The chapter is aimed at users with programming experience.
The reason for developing a DSP of your own is to be able to use QlikView to distribute QlikViewdocuments to users in a directory service not supported per default today.
IDirectoryServiceProviderThis is the interface of the class that should plug into the framework. The members are as follows:
LogMessage LogMessageEvent { set; get; }
Directly after construction this field will be instantiated with a delegate providing crude logging facilities.
string ProviderName { get; }
A free-form, preferably somewhat descriptive, name for the component suitable for the end-user.
string ProviderType { get; }
An installation-unique identifier used internally by the framework and related components. The identifiersused by the supplied providers are: AD, NT, Local and Custom.
void SetupPath (string _path, string _username, string _password);
Should create a node representing the corresponding directory service node at the specified path. Uponfailure, an exception should be thrown.
IList<string>GetKnownRootPaths ();
The list returned should contain one or more viable paths for the methods above and below.
void ClearCache ();
If the implementation keeps a cache a call to this method should clear it.
string DomainName { get; }
A “domain name” associated with the path that is set up. It is used as qualifier to separate nodes ofdifferent providers (for example, the shipped Active Directory provider uses NetBIOSName as domainname).
IDictionary<string, string> GetSettings ();
The dictionary of supported settings has name of setting as key and name of type as value.
void SetSetting (string _name, string _value);
The parsing responsibility is obviously set on the provider.
IList<IDSObject> Search (string [] _pattern, eSearchType _type, string _otherattribute);
254 QlikView Server/Publisher

38 The Directory Service Provider
Search for nodes with attributes matching any of the patterns supplied. The attributes are specified withthe type parameter which can be one or more values from the enumeration. If type is “other”, then the lastparameter specifies the name of the attribute. The search type “legacyid” is used for backwardcompatibility. Search should support patterns containing the wildcard sign ‘*’ that matches zero or morecharacters of any kind.
void Dispose ();
This method will be called whenever a provider object is released.
IDSObjectA simple interface for any type of node within the directory service.
string ID { get; }
The id of the node, unique within the instantiated path and consistent over all executions.
string DisplayName { get; }
The common name of the node in the directory service.
string AccountName { get; }
If present, this is the account name associated with the node.
eDSObjectType ObjectType { get; }
The basic type of the object.
IList<IContainer> MemberOf ();
A list of all the groups the node is member of.
string GetCustomProperty (string _name);
Any other property not natively supported by the interface. If not present null should be returned.
string Email { get; }
The primary, if any, email-address associated with the node.
38.2 Configurable ODBCThe ODBC database has to have two table, or two views, one for entities and one for groups.
The entity table must have the four following fields: entityid, name, descr and email. The fields name,descr and email must be strings. Entityid must be a unique identifier (suitable for primary key).
The groups table must contain two fields: groupid and memberid. Together these two fields create aunique identifier.
QlikView Server/Publisher 255

256 QlikView Server/Publisher

39 SNMP
39 SNMPQlikView Publisher now incorporates SNMP agents for all Publisher services, the setting is, however, perdefault off. This implementation is in its initial stages and is subject to change. At the time of writing wehave enabled read from the agents. We support the following messages: GetRequest, GetRespons andGetNextRequest.
All services answer the standard SNMP queries, answer examples in parentheses:
1.3.6.1.2.1.1.1 sysDescrDescription of service/product (sysDescr.0:QlikviewPublisherCommandcenterservice version 8.50.600)
1.3.6.1.2.1.1.2 sysObjectIDType of unit(sysObjectID.0:iso.org.dod.internet.private.enterprises.qliktech.products.publisher.Distributionservice)
1.3.6.1.2.1.1.3 sysUpTime The system uptime (sysUpTime.0:0 hours, 12 minutes, 15seconds)
1.3.6.1.2.1.1.4 sysContact Possible to set in configuration file(sysContact.0:Unspecified System contact)
1.3.6.1.2.1.1.5 sysName Possible to set in configuration file(sysName.0:Unspecified name)
1.3.6.1.2.1.1.6 sysLocation Possible to set in configuration file(sysLocation.0:Unspecified location)
1.3.6.1.2.1.1.7 sysService Constant, 72 means application server (sysServices.0:72)
The Distribution Service can answer additional queries. These are specified in the MIB file; see sectionabout MIB file later in this chapter.
Each service has a configuration file, found in their subfolder in the Publisher installation folder, i.e. theconfiguration file for the Distribution Service is QlikViewdistributionService.exe.config.
The SNMP settings can be adjusted in the SNMP SETTINGS part of the configuration file. The SNMP hasto be enabled for all services, the default is off.
EnableSNMP - Set to true to enable SNMP listener. Default value is false.
SNMPPort - Set the port you want to use for the particular Publisher service. See default settings for eachservice below.
SNMPsysContact - The textual identification of the contact person for this managed node, together withinformation on how to contact this person. Default value is Unspecified System contact.
SNMPsysName - An administratively-assigned name for this managed node. By convention, this is thenode's fully-qualified domain name. If the name is unknown, the value is the zero-length string. If leftempty, it defaults to current machine name. Default value is Unspecified name.
QlikView Server/Publisher 257
SNMPsysLocation - The physical location of this node (e.g. 'telephone closet, 3rd floor'). Default value isUnspecified location.
DebugSNMP - Set to true to enable extended debuglog for SNMP listener. Default value is false.
The default port settings for the services are:
Management Service 4781
Directory ServiceConnector 4731
Distribution Service 4721 (default SNMPport).
QlikView Server 4748
The ports are all configurable. If the services are installed on different computers they can all run on thesame port. The ports will change as the implementation moves away from the experimental SNMP rangeand in to the range allotted QlikTech.
QlikTech has included a MIB file, so all SNMP managers will be able to interpret the additional responsesfor the Distribution Service. The file is installed to .\QlikView\Support Tools. The Support Toolsrequre a customized install. The MIB file is subject to change. The Distribution Service can answer thefollowing queries, in addition to the ones previously mentioned:
1.3.6.1.4.1.30764.1.2.2.1 QDSTaskExecuteStatusTable
1.3.6.1.4.1.30764.1.2.2.1.1 QDSTaskExecuteStatusEntry
1.3.6.1.4.1.30764.1.2.2.1.1.1 QDSTaskID (ID-number of the task)
1.3.6.1.4.1.30764.1.2.2.1.1.2 QDSTaskName (Name of the task)
1.3.6.1.4.1.30764.1.2.2.1.1.3
QDSTaskExecuteStatus.(Status of the task.Possible values are:
l Waitingl Runningl Abortingl Failedl Warning
1.3.6.1.4.1.30764.1.2.2.1.1.4 QDSTaskNextExecutionAt (When thetaskwill be executed next).
1.3.6.1.4.1.30764.1.2.2.1.1.5 QDSTaskLastExecutedAt (When the taskwas
258 QlikView Server/Publisher

39 SNMP
last executed).
1.3.6.1.4.1.30764.1.2.2.1.1.6 QDSTaskCurrentWork (What the task isdoing now).
1.3.6.1.4.1.30764.1.2.2.1.1.7
Read more about SNMP:
RFC for SNMP - http://www.ietf.org/rfc/rfc1157.txt
Wikipedia - http://en.wikipedia.org/wiki/Simple_Network_Management_Protocol
QlikView Server/Publisher 259

260 QlikView Server/Publisher

40 Active Directory Attributes
40 Active Directory AttributesBelow are Microsoft's definitions of the Active Directory attributes used in Check User Identity on in adistribution
SecurityIdentifier - A unique value of variable length used to identify a user account, group account, orlogon session to which an ACE applies.
DisplayName - The display name for an object. This is usually the combination of the users first name,middle initial, and last name.
SAMAccountName - The logon name used to support clients and servers running older versions of theoperating system, such as Windows NT 4.0, Windows 95, Windows 98, and LAN Manager. This attributemust be less than 20 characters to support older clients.
E-mailAddress - The list of email addresses for a contact.
UserPrincipalName - This attribute contains the UPN that is an Internet-style login name for a user basedon the Internet standard RFC 822. The UPN is shorter than the distinguished name and easier to remember.By convention, this should map to the user e-mail name. The value set for this attribute is equal to thelength of the user's ID and the domain name. For more information about this attribute, see the NamingProperties topic in the Active Directory guide.
QlikView Server/Publisher 261

262 QlikView Server/Publisher

41 How to Activate SSL for Services in Windows
41 How to Activate SSL for Servicesin WindowsMake sure you have a valid certificate for the web site. You can use Microsoft IIS to generate a CertificateRequest (CSR) or certreq.exe (part of Administration Toolkit in Windows Server 2003 (not covered here).
Import the certificate to the correct certificate store on the server using Management Console and theCertificate snap-in.
Bind the certificate to SSL using httpcfg in Windows Server 2003 or netsh.exe in Windows Server 2008.
Import CertificateOpen the Management Console (MMC)by pressing Start, Run and typing mmc.exe. In the MMC go toFile, Add/Remove Snap-ins. Select Certificates and click Add. Make sure you select Computer Accountand Local Computer when prompted.
Browse to Certificates and then Personal. If the certificate is not present, right-click and select All Tasks,Import...
Locate the certificate you wish to import. Make sure the Certificate store is set to Personal.
The Source Document page
Get the Thumbprint for the CertificateOpen the Certificate snap-in in MMC and double-click on the certificate. Copy the Thumbprint hash tonotepad or similar. Remove the spaces in the hash.
QlikView Server/Publisher 263

Generate a GUIDDownload Guidgen.exe from Microsoft to generate a unique GUID. Copy the GUID to Notepad.exe.
264 QlikView Server/Publisher

41 How to Activate SSL for Services in Windows
Bind to SSL in Windows Server 2003Use httpcfg to add the certificate in the SSL store (httpcfg can be found in the Support Tools forWindows 2003). Make sure you do not already have the certificate in the SSL store. If you do, you canskip this part.
The syntax for adding a certificate using httpcfg is:
Httpcfg set ssl /i ipnumber:port /h hash /g GUID
where
ipnumber:port the ipnumber of QlikViewWebServer and port used for SSL (443)
hash the Thumbprint hash of the certificate.
GUID the generated GUID in the form {xxxxxxxx-xxxx-….}”. The GUID must be enclosed by curlybrackets.
To verify the registration of the certificate, use httpcfg query ssl. The result will look something like:
---------------------------------------------------------------
IP : 10.1.2.5:443
Hash : 7091684c6baf12306788bca24f5ca3df4d63937a
Guid : {c52f8795-6047-43f4-94da-4fe84df7517c}
CertStoreName : (null)
CertCheckMode : 0
RevocationFreshnessTime : 0
UrlRetrievalTimeout : 0
SslCtlIdentifier : (null)
SslCtlStoreName : (null)
Flags : 0
Read more on http://technet2.microsoft.com/windowsserver/en/library/e17527d2-105a-451f-8e3f-d515479527011033.mspx?mfr=true
Bind to SSL in Windows Server 2008On Windows 2008 you use the netsh command shell:
netsh http add sslcert ipport=0.0.0.0:443 certhash=hash appid=GUID
where
ipport is the ipnumber of QlikView Web Server and port used for SSL (443).
QlikView Server/Publisher 265

certhash is the thumbprint hash of the certificate.
appid is the generated GUID in the form {xxxxxxxx-xxxx-….}”. The GUID must be enclosed by curlybrackets.
To verify the registration of the certificate, use netsh http show sslcert.
Addintional changes for the QlikView Web ServerMake changes to config.xml for QlikView Web Server to add the full URL used for SSL. The defaultlocation for the config.xml file is C:\Program Files\QlikView\Server\QvWebServer. Note that theURL must match the URL for which the certificate is valid.
<Url>https://QVS.companyx.local:443/</Url>
Make sure no other services are using the port specified for SSL (for example a running IIS) and restart theservice. If it fails to start, it’s either because a service is already running on the specified port, or errorsexist in the config.xml.
266 QlikView Server/Publisher

42 Deploying MSI packages with Group policies
42 Deploying MSI packages withGroup policiesGeneralA common issue today is how to deploy applications in a network environment where the users havelimited rights and how to deploy applications to a specific group of users. This document will shortlydescribe how to deploy Microsoft’s Windows Installer (.msi) packages with group policies in an ActiveDirectory environment.
Note! Deploying software with group policies is only supported by workstations running Windows XPProfessional, Windows Vista or 2003 or 2008 Server.
The QlikView .msi packages also require version 2.0 or higher of the Windows Installer service to beinstalled on the destination workstations.
Deploying the MSI PackageWhen you have obtained your .msi file it must be placed in a folder shared on the network. Make sure thatall users and/or computers that will install the application have read access to that folder. When thepackage is made accessible to these users and/or computers you are ready to create the Group policyobject that will advertise the installation package. See section 1.3 for further information aboutadvertising.
The package can be advertised for each user or each computer. Use the “User Configuration/SoftwareSettings” container to advertise per user. Use the “Computer Configuration/Software Settings” container toadvertise it per computer. Both containers are located in the Group Policy Object editor.
If the package is advertised per user, you can either assign or publish it. A package that is advertised percomputer can only be published.
To publish a package per user means that it is listed (advertised) in the “Add programs from yournetwork”-list in the “Add/Remove programs” dialog, see figure below.
Each user must then click the Add button to complete the installation.
To publish a package per computer means that the package is installed and accessible for all users on thatcomputer the next time the computer is rebooted.
QlikView Server/Publisher 267

An advertised package that is assigned is also listed in the “Add programs from your network” list and canbe added from there. This option also offers a few more ways to activate the installation package:
Shortcuts, if the installation package adds any shortcuts, to desktop and/or start menu, these are added andthe installation package can be executed by clicking on any of these.
File association, the installation program is executed when the user tries to open a file that is associatedwith the advertised application.
There are a few more ways to execute the installation when it is advertised as assigned but they are notapplicable to any QlikView installations and therefore fall out of the scope for this documentation.
Executing the installation from shortcuts or via a file association is not applicable to the “QlikViewAnalyzer for Internet Explorer”-installation package, since is doesn’t add any shortcuts or file associations.Therefore it is not recommended to advertise QlikView installation packages with the assign option.
AdvertisingTo advertise means that the administrator gives the installation package permission to execute on anaccount with locked down permissions.
When the package is advertised, there are so called “entry points” loaded onto the destination system.Entry points are typically shortcuts, file associations, listing in the Add/Remove programs dialog etc.
Step-by-step guideThis section provides a brief step-by-step guide for creating a group policy for the advertising of QlikViewInternet Explorer plug-in.msi package on a number of machines in the Active Directory.
For more details on creating group policies we refer to the wealth of published literature in this field.
268 QlikView Server/Publisher

42 Deploying MSI packages with Group policies
Browse to the folder containing the .msi package. Share the folder to the network users with permission toinstall the package.
Open Active Directory Users and Computers and highlight the Organizational Unit (OU) where youwant to deploy the package.
Right-click and choose Properties.
QlikView Server/Publisher 269

Go to the Group Policy tab, click New and give it an appropriate name.
Highlight the new group policy object and press Edit.
270 QlikView Server/Publisher

42 Deploying MSI packages with Group policies
Expand to Computer Configuration/Software Settings or User Configuration/Software Settingsdepending on how you want to deploy the package. We select Computer Configuration and thenhighlight Software installation.
Right-click Software installation and choose New -> Package. A pop-up window is shown asking whereto locate the installation package.
QlikView Server/Publisher 271

Find the installation package, select it and press Open (in this case QvPluginSetup.msi).
Select the deployment method Assigned and press the OK button. Since we selected to apply theinstallation to the Computer configuration in item #6, it is only possible to use the Assigned deploymentmethod, see section 1.2 for further information.
The deployment rule is now ready for use. All the machines in this Operational Unit (OU) get thisdeployment automatically. What actually happens is that when a computer is rebooted the installation
272 QlikView Server/Publisher

42 Deploying MSI packages with Group policies
program is executed so that any user who logs on to a computer in that OU, will be able to run theinstalled program. The rule can be applied to many different OUs.
QlikView Server/Publisher 273

274 QlikView Server/Publisher

43 Glossary
43 GlossaryAccessPoint A web portal that lists the User Documents hosted by
the QlikView Server.
Attribute Meta data attributes set on User Documents, but savedin the meta data of the Server, not in the document.
CategoryBundles User Documents in containers to makecategorization easier for the end-user. They are onlyvisible to the end-user on an AccessPoint.
Data reduction Only selected data and associated fields make up a UserDocument that has been reduced.
Distribution task Produces a User Document based on a Source Document
Preload Load the document into the server’s RAM for fasteraccess.
Reload task Reloads and refreshes the data in a Source Documen.
RepositoryThe database that contains all QlikView Publisher data.It can either be an XML repository or a Microsoft SQLdatabase.
Source documentQlikView documents that contain data that is to bemade accessible to end-users in the form of Distributeddocuments
Trigger
This is what sets of a QlikView Publisher task. A triggercan be set on a schedule, it can be an external event etc.A taska can have multiple triggers, making it possible toset up a workflow of tasks.
User document QlikView documents that are distributed to users, eitherthrough QlikView Server or QlikView Publisher.
QlikView Server/Publisher 275

276 QlikView Server/Publisher

Index
Index
A
Audit logging in QlikView Publisher 199
Audit logging in QlikView Server 116
Authentication vs. Authorization 153
C
Client Access Licenses (CALs) 173
Client Side Authentication 153
Cluster Licensing in QlikView Server 174
Clustering in QlikView Server 183
D
Directory Service Connector configuration file 202
Directory Service Provider interface 254
Distribution Service configuration file 201
Document Administrators 200
Document Metadata Service (DMS) 181
Dynamic Data reduction 217
E
Editions of QlikView Server 175
Extension objects 13
Extension objects path 13
Extensions, Adding to the QlikView Server 157
F
File Security 216
File system security on server 150
G
Glossary 275
I
Installation profiles 21
Installing QlikView Server 20
L
Load Sharing in Publisher 197
Logging the installation 22
M
Management Service configuration file 201
MIB file 258
Migration considerations 16
P
Publisher Upgrade Tool 191
Q
QEMC
Licenses 139
Repository 108
Source Documents 79
User Documents 94
Qlikview AccessPoint 27
QlikView AJAX Zero-Footprint Client (ZFC) 229
QlikView Android client 251
QlikView Enterprise Management Console (QEMC)72
QlikView IE Plug-in Client 219
QlikView iPhone Client 237
QlikView Java client 219
QlikView Java Mobile client 243
QlikView Java Objects Client 219
QlikView Server/Publisher 277
Index:
QlikView Management Console (QMC) 35
QlikView Publisher Configuration Files 201
QlikView Server Event log 170
QlikView Server Functional Architecture 159
QlikView Server Licensing 173
QlikView Server Load Sharing 183
QlikView Server Performance log 167
QlikView Server Session Log 165
QlikView Web Server 27
QlikView Windows Clients 227
QlikX 223
QMC
Creating a task 48
Licenses 24
QlikView Publisher Settings 67
QlikView Server Settings 61
Repository 36
Source Documents 47
Status 37
User Documents 39
R
Registering the software 24
Repository for Shared Objects 179
Running Microsoft IIS 23
S
Section Access in Publisher 207
Security groups in Publisher 200
Server
Communication encryption 150
Server logging 165
Server Security Configurations 153
Server Security Set-up 150
Server Tunnel 162
SNMP 257
SSL on QlikView Publisher 209
Summary of Clients 212
System Requirements 17
T
Test license 175
Trigger EDX 203
U
Upgrading QlikView Publisher 20
Upgrading the QlikView Server 19
User Management 144
W
Web Server for Mobile Downloads 213, 248
- 278 -