Embed Size (px)
Citation preview
F1034 Rev 202012
Serial Timer User Guide
Manufacturer: Colorado Time Systems 1551 East 11th Street Loveland, CO 80537 USA
Sales: 1-800-279-0111 or +1 970-667-1000 Service: 1-800-287-0653 or +1 970-667-1000 Service Fax: 970-667-1032
Web: www.coloradotime.com Email: [email protected]
Information in this manual is subject to change without notice. Pictures and illustrations may not accurately depict your version. Please check our website for the most current information; our user manuals are available online in the customer service section of our website.
Part Number F1034, Rev. 202012 ©2020 Colorado Time Systems. All rights reserved.
Table of Contents Introduction ................................................................................................................................ 5 Hardware ................................................................................................................................... 7
Power Supply Connections ........................................................................................................................... 8
Connecting the Start System Connect Interface Computer to Timer Other Connections
Software....................................................................................................................................11 Power On Sequence
Set Up ...................................................................................................................................11 Pool Selection Create a New Meet Open an Existing Meet Create a New Session Open an Existing Session
Main Screen ..........................................................................................................................12 Running Time and Toolbar Event Info Lane Data Status Bar Quick Actions
Settings .................................................................................................................................21 Settings Tabs and Toolbar General Timing Scoreboard Printing Session (Event Sequence) Session (Session Settings)
Basic Operation ........................................................................................................................45 Tutorial ..................................................................................................................................45
Starting the Race Times Registered Missed touch (Using +Touch) Extra touch (Using − Touch and Split Arm) Using Finish Arm Finishing the race
Handling Exceptions ..............................................................................................................49 No Show Disqualifying a swimmer: Promoting Backups:
Keyboard Shortcuts ...............................................................................................................51 Troubleshooting ........................................................................................................................53
Diagnostic Testing .................................................................................................................55 Diagnostic Table
Input Detection Routine Maintenance ................................................................................................................59
Connectors Case Cables Touchpads and Buttons Start Systems Scoreboard
Appendix A: Specifications ........................................................................................................61 Environmental Electrical Input and Output Connections (from top left to bottom right) Installation/Maintenance
www.coloradotime.com 5
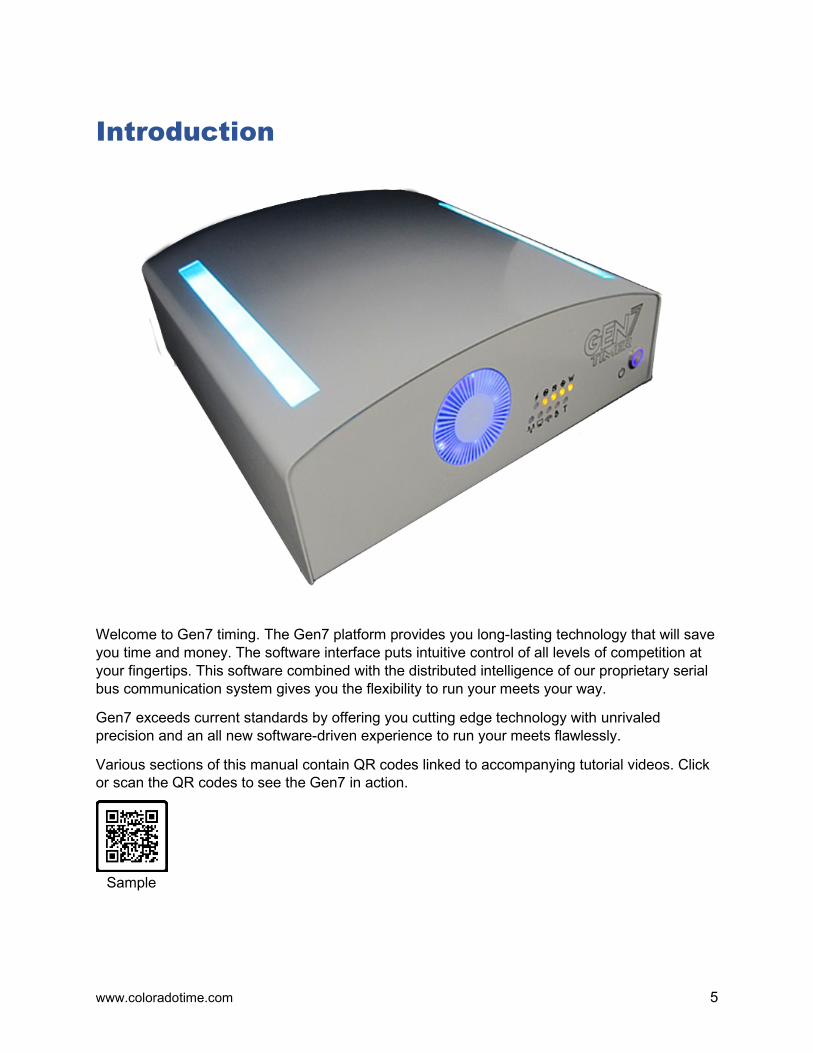
Introduction
Welcome to Gen7 timing. The Gen7 platform provides you long-lasting technology that will save you time and money. The software interface puts intuitive control of all levels of competition at your fingertips. This software combined with the distributed intelligence of our proprietary serial bus communication system gives you the flexibility to run your meets your way.
Gen7 exceeds current standards by offering you cutting edge technology with unrivaled precision and an all new software-driven experience to run your meets flawlessly.
Various sections of this manual contain QR codes linked to accompanying tutorial videos. Click or scan the QR codes to see the Gen7 in action.
Sample


www.coloradotime.com 7
Hardware
The LEDs on the front of the timer indicate data traffic and the state of the timer, as described above.
Power Supply Important Safety Instructions When using electrical products, basic precautions should always be practiced including the following: READ AND FOLLOW ALL SAFETY INSTRUCTIONS. Read and follow all instructions that are on the product or provided with the product. Do not use an extension cord with the Gen7 power supply. WARNING: Risk of Electric Shock. When used outdoors, install only to a covered Class A GFCI protected receptacle that is weatherproof with the power unit connected to the receptacle. If one is not provided, contact a qualified electrician for proper installation. Ensure that the power unit and cord do not interfere with completely closing the receptacle cover. SAVE THESE INSTRUCTIONS– This manual contains important safety and operating instructions for power units.
LED PATTERN MEANING Blank Not ready
Slow sweep Booting Pulsing Ready for race
Fast Sweep Running a race
Charging
Wired Scoreboard Data Traffic
Wireless Scoreboard Data Traffic
Network Link
USB Traffic
WiFi
Reserved for future
use
Timing Event Data
Power
8 [email protected] +1 970-667-1000
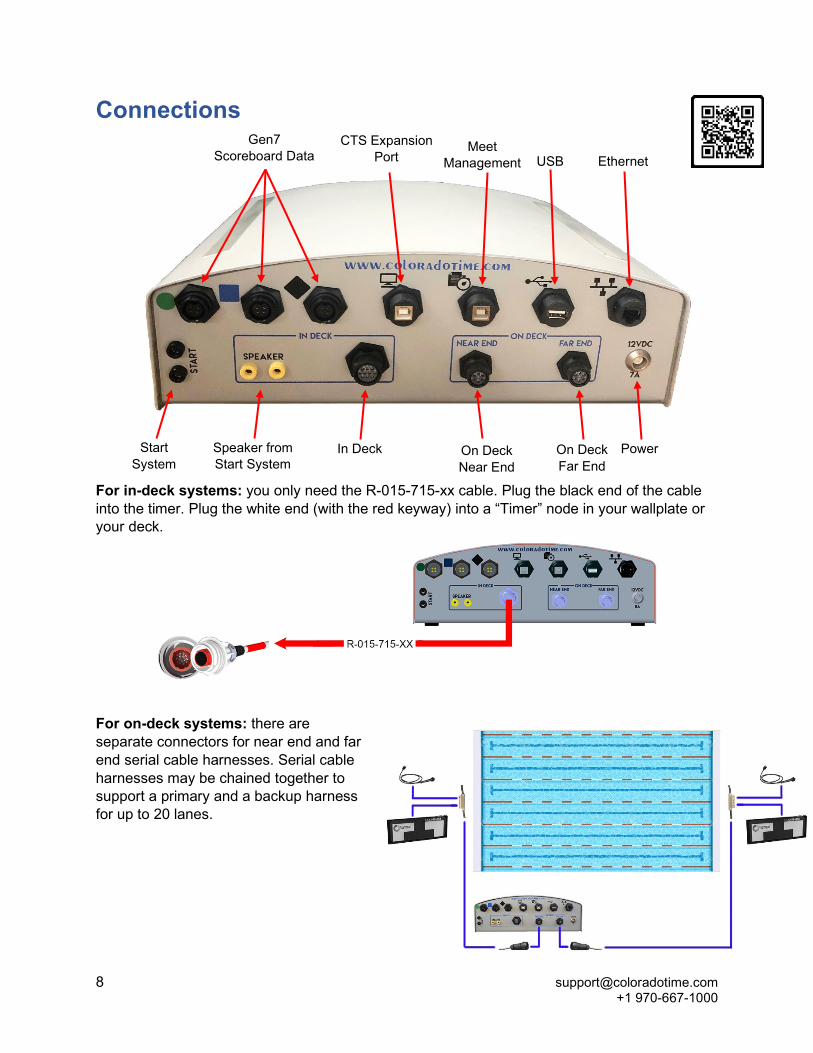
Connections
For in-deck systems: you only need the R-015-715-xx cable. Plug the black end of the cable into the timer. Plug the white end (with the red keyway) into a “Timer” node in your wallplate or your deck.
For on-deck systems: there are separate connectors for near end and far end serial cable harnesses. Serial cable harnesses may be chained together to support a primary and a backup harness for up to 20 lanes.
Power On Deck Far End
On Deck Near End
In Deck Speaker from Start System
Start System
Gen7 Scoreboard Data
CTS Expansion Port
Meet Management USB Ethernet
www.coloradotime.com 9
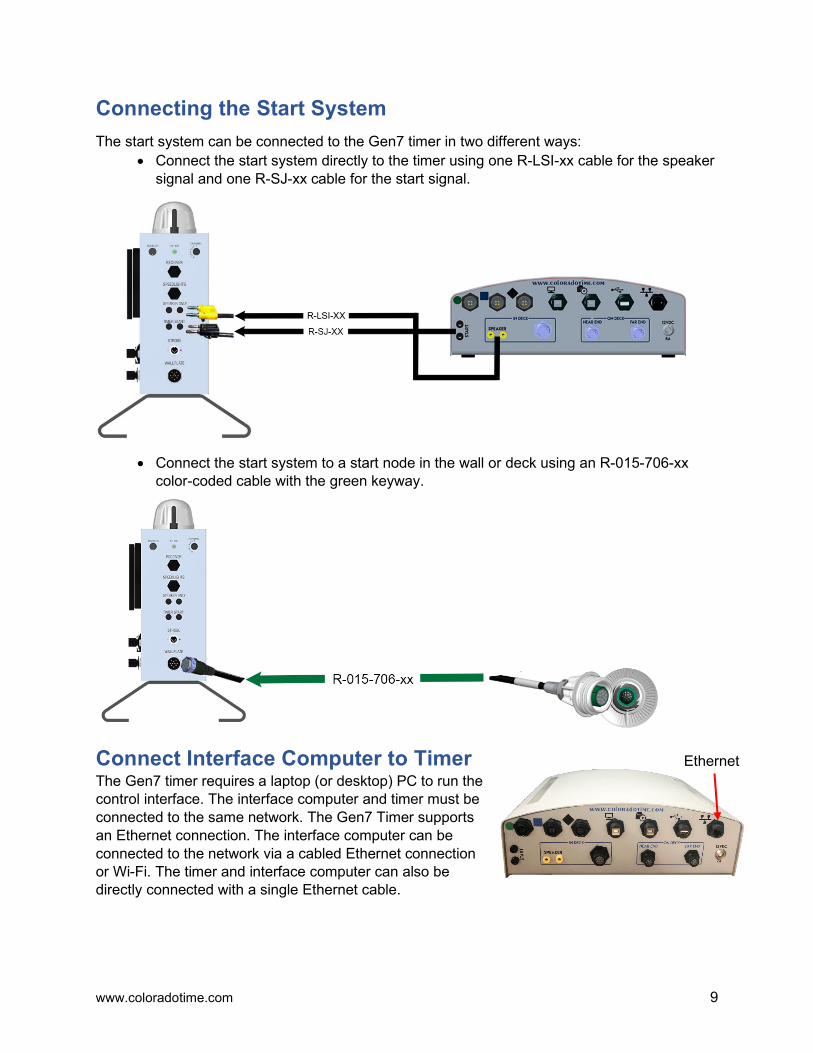
Connecting the Start System The start system can be connected to the Gen7 timer in two different ways:
• Connect the start system directly to the timer using one R-LSI-xx cable for the speaker signal and one R-SJ-xx cable for the start signal.
• Connect the start system to a start node in the wall or deck using an R-015-706-xx color-coded cable with the green keyway.
Connect Interface Computer to Timer The Gen7 timer requires a laptop (or desktop) PC to run the control interface. The interface computer and timer must be connected to the same network. The Gen7 Timer supports an Ethernet connection. The interface computer can be connected to the network via a cabled Ethernet connection or Wi-Fi. The timer and interface computer can also be directly connected with a single Ethernet cable.
Ethernet

10 [email protected] +1 970-667-1000
Other Connections Connect other equipment such as touchpads, pushbuttons and relay judging platforms to the deckplates at each lane. Use the Diagnostics function (see page 14) to quickly confirm that all equipment is in the correct location and plugged in.
www.coloradotime.com 11
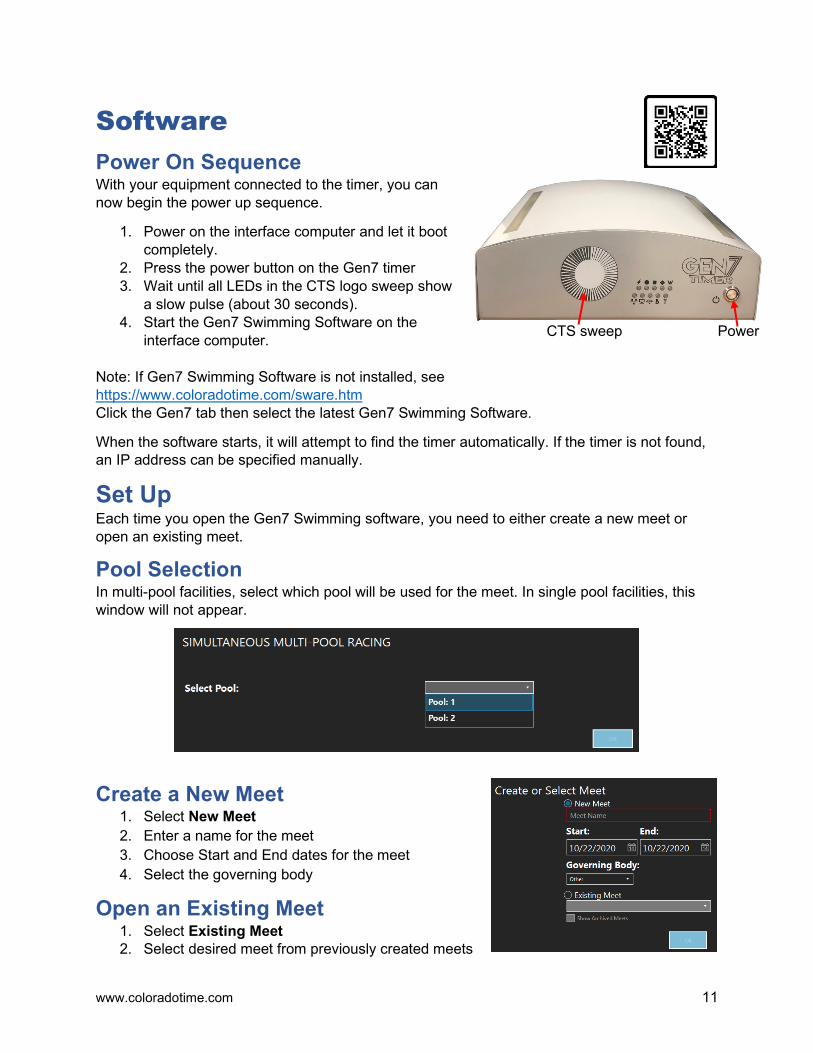
Software Power On Sequence With your equipment connected to the timer, you can now begin the power up sequence.
1. Power on the interface computer and let it boot completely.
2. Press the power button on the Gen7 timer 3. Wait until all LEDs in the CTS logo sweep show
a slow pulse (about 30 seconds). 4. Start the Gen7 Swimming Software on the
interface computer. Note: If Gen7 Swimming Software is not installed, see https://www.coloradotime.com/sware.htm Click the Gen7 tab then select the latest Gen7 Swimming Software.
When the software starts, it will attempt to find the timer automatically. If the timer is not found, an IP address can be specified manually.
Set Up Each time you open the Gen7 Swimming software, you need to either create a new meet or open an existing meet.
Pool Selection In multi-pool facilities, select which pool will be used for the meet. In single pool facilities, this window will not appear.
Create a New Meet
1. Select New Meet 2. Enter a name for the meet 3. Choose Start and End dates for the meet 4. Select the governing body
Open an Existing Meet 1. Select Existing Meet 2. Select desired meet from previously created meets
Power CTS sweep
12 [email protected] +1 970-667-1000
Create a New Session 1. Select New Session 2. Choose the session number 3. Choose the sessions start time. 4. A tag can be added to the session if desired. A tag
is extra text that is added to the session name (e.g., Friday Prelims)
5. Use Pool Setup to select the course configuration. Course setup options are configured at the time of installation. If additional course setups are required, please contact CTS support.
Open an Existing Session 1. Select Existing Session 2. Choose a session from previously created sessions 3. Use Pool Setup to select the course configuration
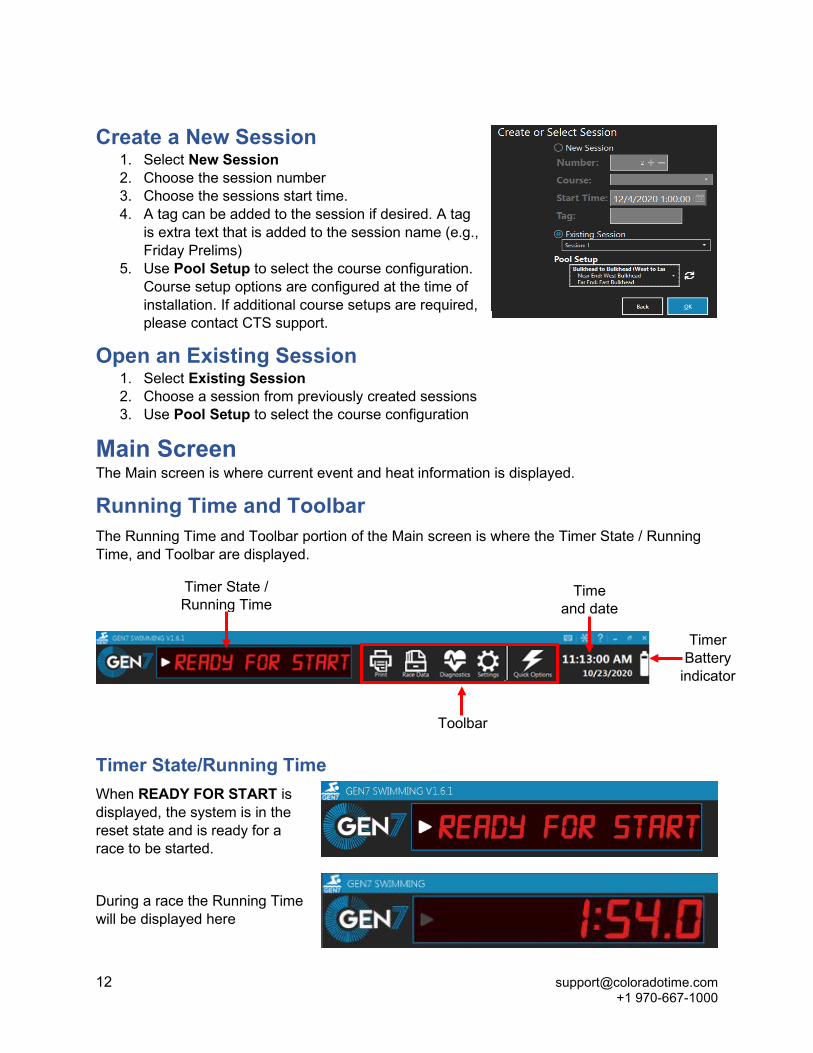
Main Screen The Main screen is where current event and heat information is displayed.
Running Time and Toolbar The Running Time and Toolbar portion of the Main screen is where the Timer State / Running Time, and Toolbar are displayed.
Timer State/Running Time When READY FOR START is displayed, the system is in the reset state and is ready for a race to be started.
During a race the Running Time will be displayed here
Timer State / Running Time
Time and date
Timer Battery
indicator
Toolbar
www.coloradotime.com 13
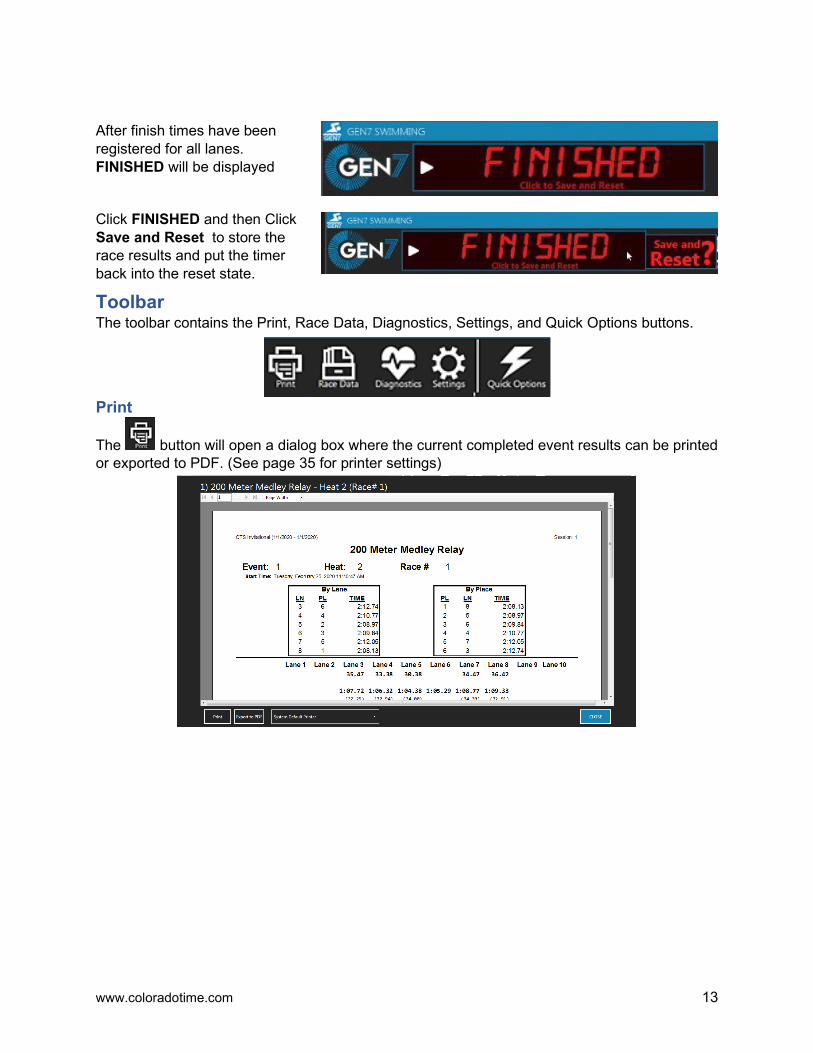
After finish times have been registered for all lanes. FINISHED will be displayed
Click FINISHED and then Click Save and Reset to store the race results and put the timer back into the reset state.
Toolbar The toolbar contains the Print, Race Data, Diagnostics, Settings, and Quick Options buttons.
The button will open a dialog box where the current completed event results can be printed or exported to PDF. (See page 35 for printer settings)
14 [email protected] +1 970-667-1000
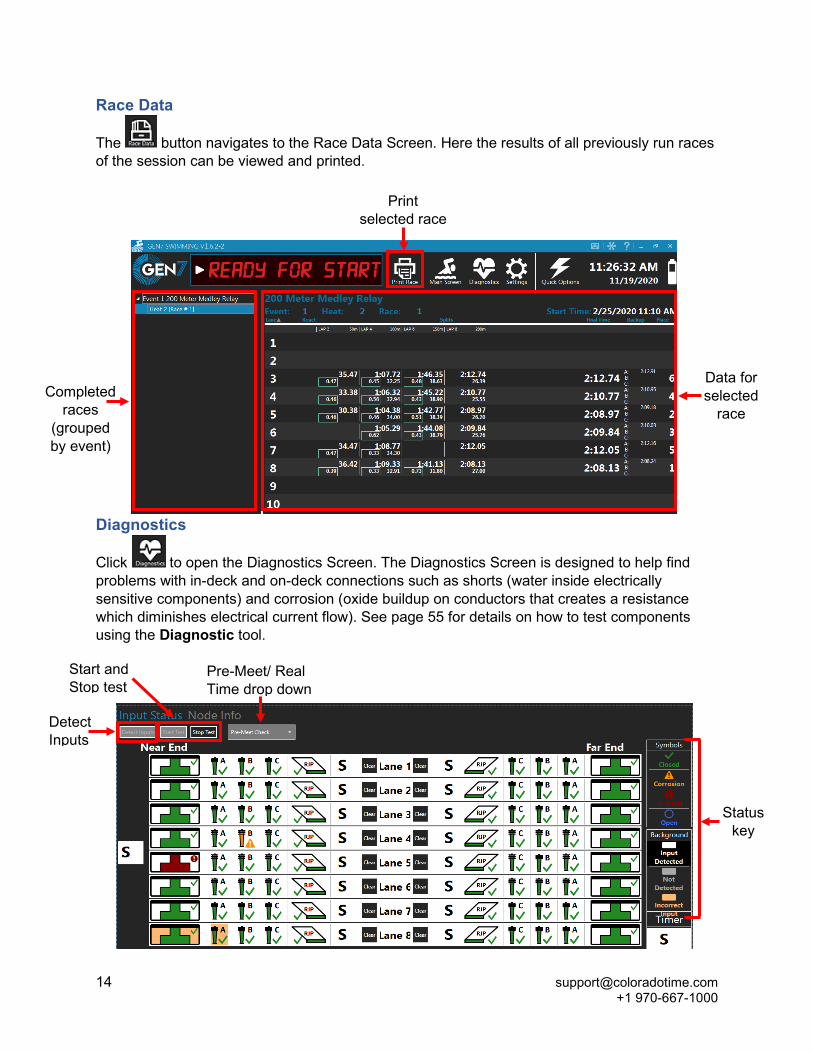
Race Data
The button navigates to the Race Data Screen. Here the results of all previously run races of the session can be viewed and printed.
Diagnostics
Click to open the Diagnostics Screen. The Diagnostics Screen is designed to help find problems with in-deck and on-deck connections such as shorts (water inside electrically sensitive components) and corrosion (oxide buildup on conductors that creates a resistance which diminishes electrical current flow). See page 55 for details on how to test components using the Diagnostic tool.
Completed races
(grouped by event)
Data for selected
race
Print selected race
Status key
Start and Stop test
Pre-Meet/ Real Time drop down
Detect Inputs
www.coloradotime.com 15
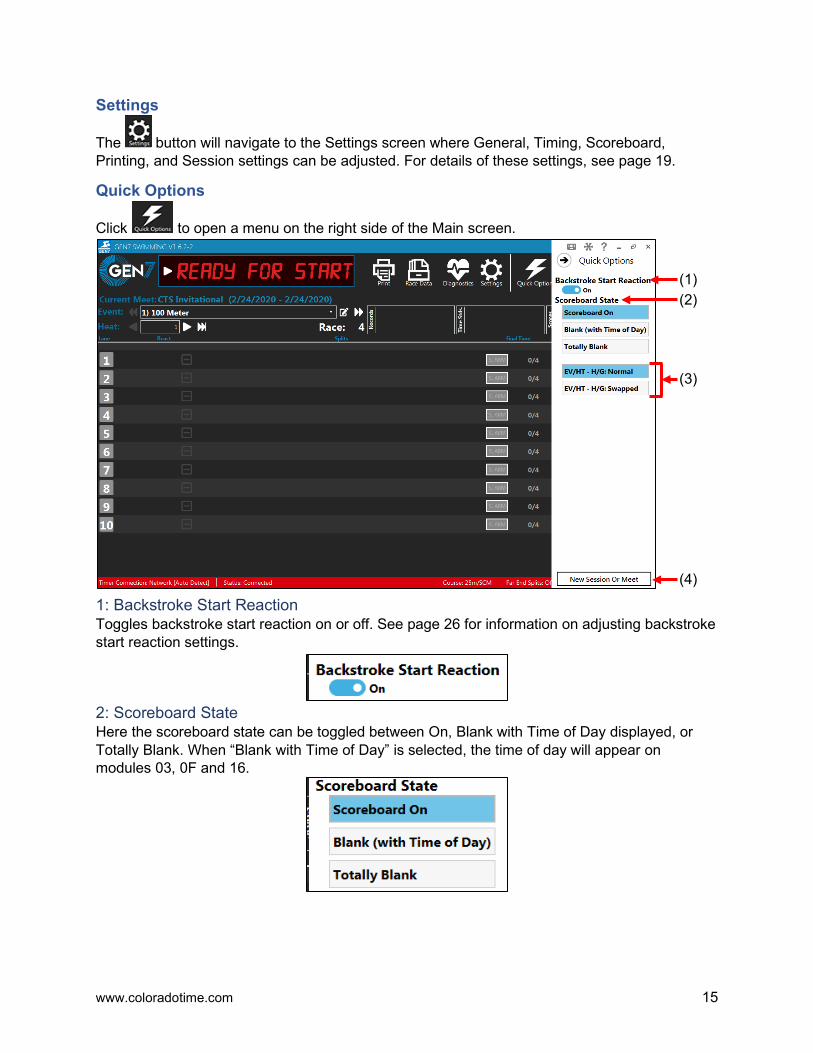
Settings
The button will navigate to the Settings screen where General, Timing, Scoreboard, Printing, and Session settings can be adjusted. For details of these settings, see page 19.
Quick Options
Click to open a menu on the right side of the Main screen.
1: Backstroke Start Reaction Toggles backstroke start reaction on or off. See page 26 for information on adjusting backstroke start reaction settings.
2: Scoreboard State Here the scoreboard state can be toggled between On, Blank with Time of Day displayed, or Totally Blank. When “Blank with Time of Day” is selected, the time of day will appear on modules 03, 0F and 16.
(1) (2)
(3)
(4)
16 [email protected] +1 970-667-1000
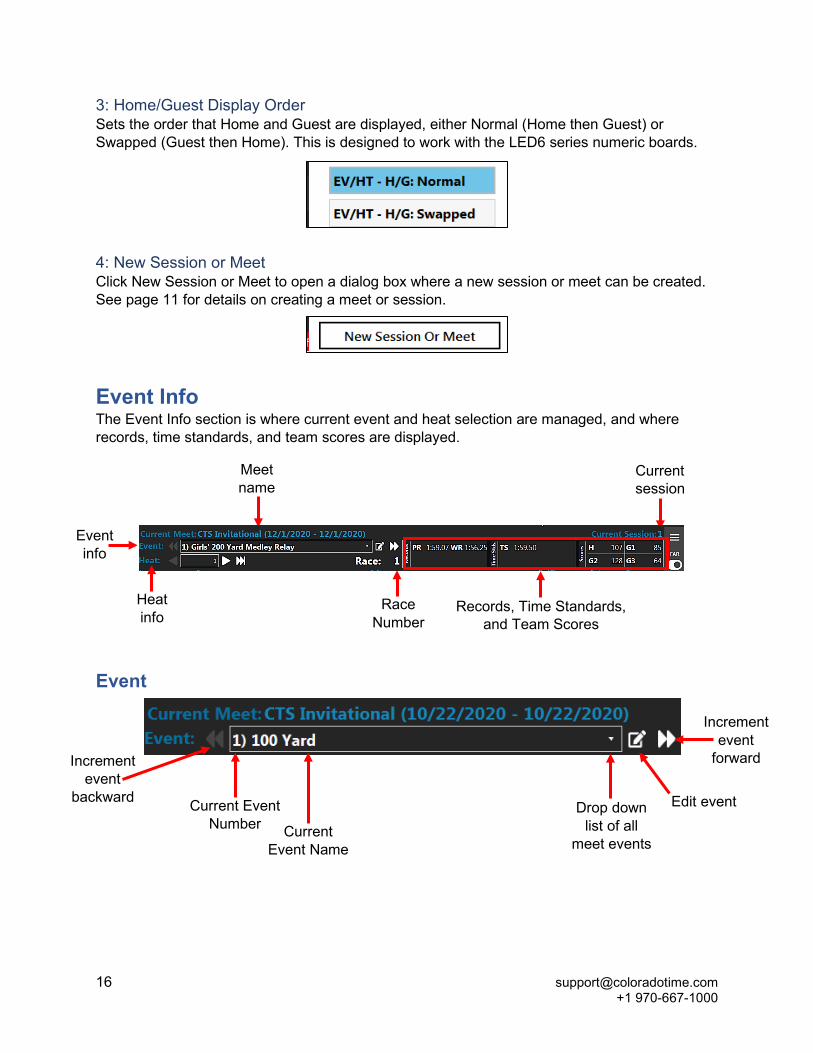
3: Home/Guest Display Order Sets the order that Home and Guest are displayed, either Normal (Home then Guest) or Swapped (Guest then Home). This is designed to work with the LED6 series numeric boards.
4: New Session or Meet Click New Session or Meet to open a dialog box where a new session or meet can be created. See page 11 for details on creating a meet or session.
Event Info The Event Info section is where current event and heat selection are managed, and where records, time standards, and team scores are displayed.
Event
Current Event Number
Drop down list of all
meet events
Edit event
Increment event
forward Increment event
backward
Current Event Name
Race Number
Current session
Meet name
Event info
Heat info
Records, Time Standards, and Team Scores
www.coloradotime.com 17
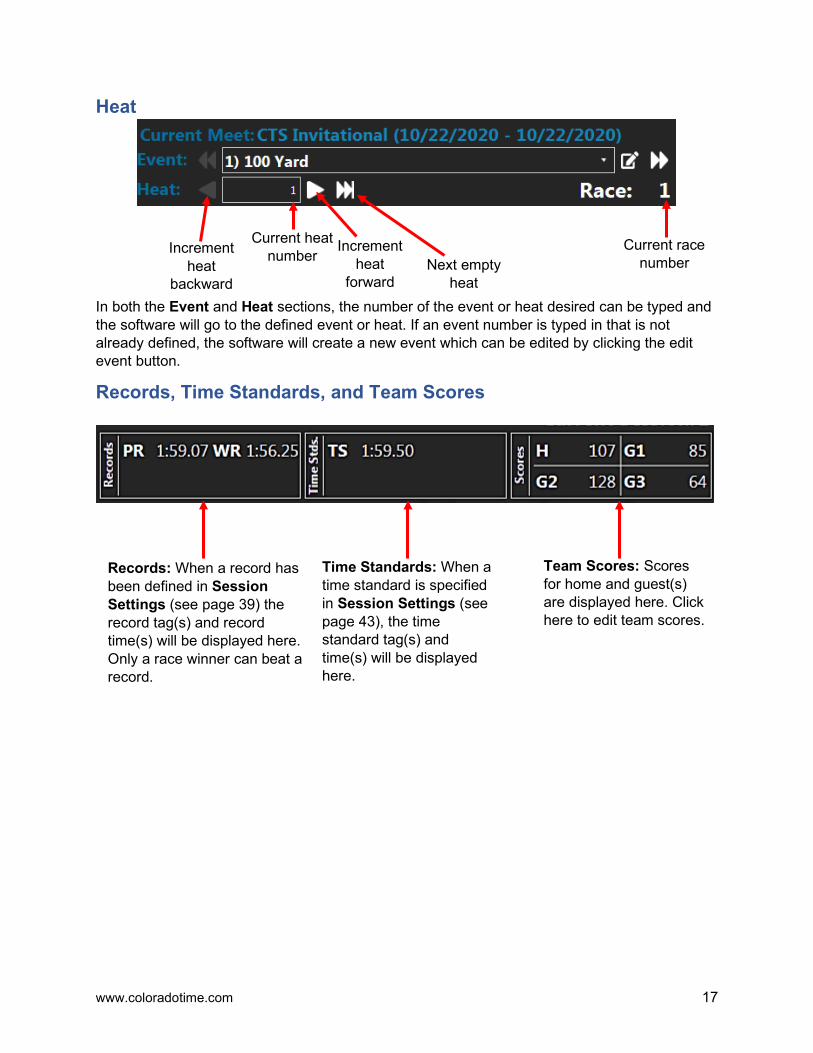
Heat
In both the Event and Heat sections, the number of the event or heat desired can be typed and the software will go to the defined event or heat. If an event number is typed in that is not already defined, the software will create a new event which can be edited by clicking the edit event button.
Records, Time Standards, and Team Scores
Current heat number
Increment heat
forward
Increment heat
backward Next empty
heat
Current race number
Records: When a record has been defined in Session Settings (see page 39) the record tag(s) and record time(s) will be displayed here. Only a race winner can beat a record.
Time Standards: When a time standard is specified in Session Settings (see page 43), the time standard tag(s) and time(s) will be displayed here.
Team Scores: Scores for home and guest(s) are displayed here. Click here to edit team scores.
18 [email protected] +1 970-667-1000
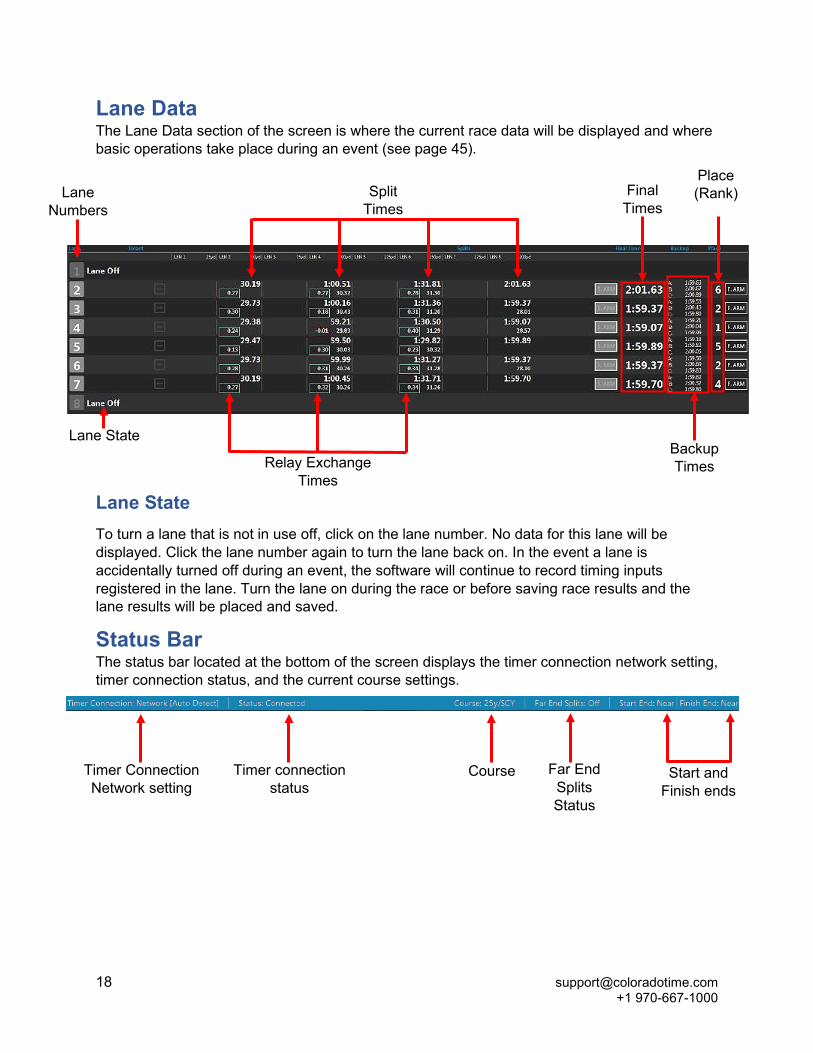
Lane Data The Lane Data section of the screen is where the current race data will be displayed and where basic operations take place during an event (see page 45).
Lane State To turn a lane that is not in use off, click on the lane number. No data for this lane will be displayed. Click the lane number again to turn the lane back on. In the event a lane is accidentally turned off during an event, the software will continue to record timing inputs registered in the lane. Turn the lane on during the race or before saving race results and the lane results will be placed and saved.
Status Bar The status bar located at the bottom of the screen displays the timer connection network setting, timer connection status, and the current course settings.
Lane Numbers
Lane State Backup Times
Final Times
Place (Rank)
Split Times
Relay Exchange Times
Timer Connection Network setting
Timer connection status
Course Far End Splits Status
Start and Finish ends
www.coloradotime.com 19
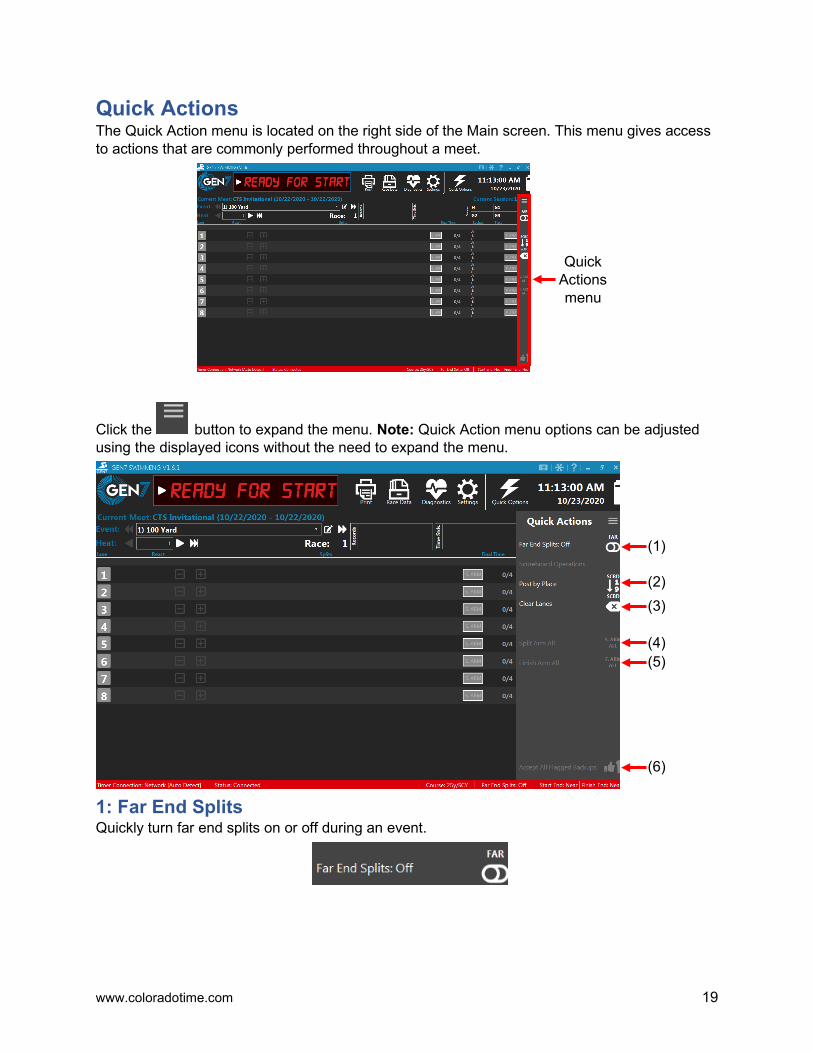
Quick Actions The Quick Action menu is located on the right side of the Main screen. This menu gives access to actions that are commonly performed throughout a meet.
Click the button to expand the menu. Note: Quick Action menu options can be adjusted using the displayed icons without the need to expand the menu.
1: Far End Splits Quickly turn far end splits on or off during an event.
(1)
(2) (3)
(4) (5)
(6)
Quick Actions menu
20 [email protected] +1 970-667-1000
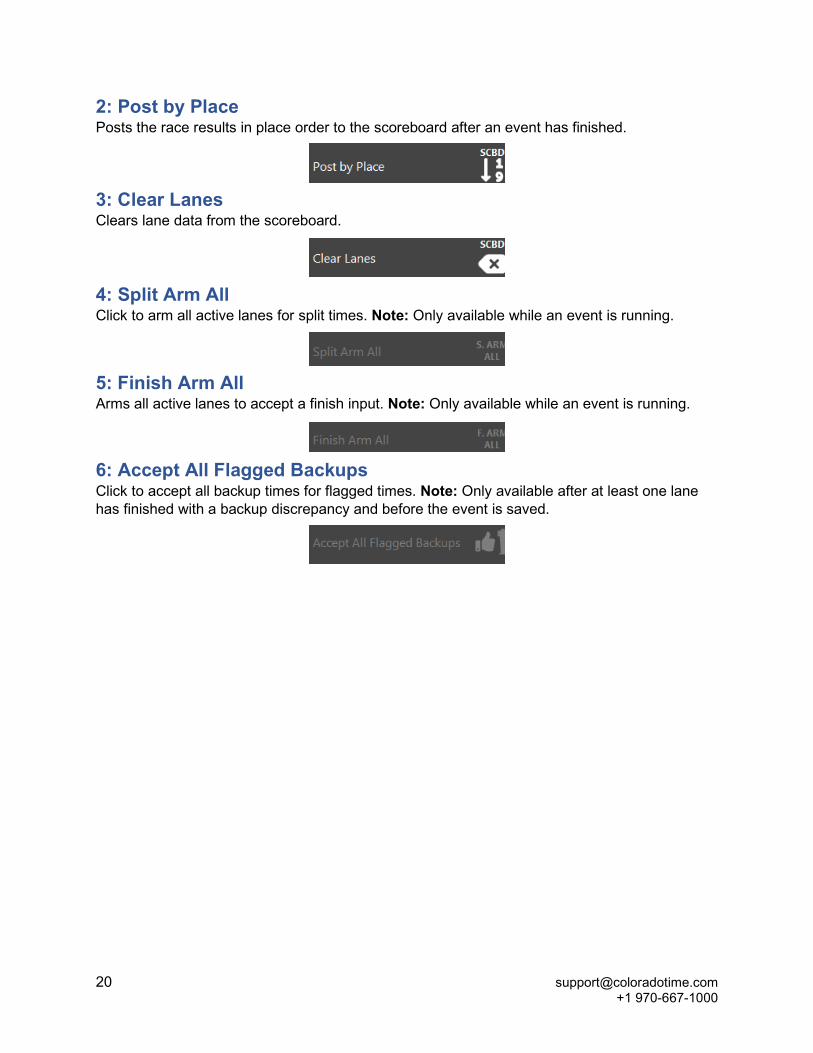
2: Post by Place Posts the race results in place order to the scoreboard after an event has finished.
3: Clear Lanes Clears lane data from the scoreboard.
4: Split Arm All Click to arm all active lanes for split times. Note: Only available while an event is running.
5: Finish Arm All Arms all active lanes to accept a finish input. Note: Only available while an event is running.
6: Accept All Flagged Backups Click to accept all backup times for flagged times. Note: Only available after at least one lane has finished with a backup discrepancy and before the event is saved.
www.coloradotime.com 21
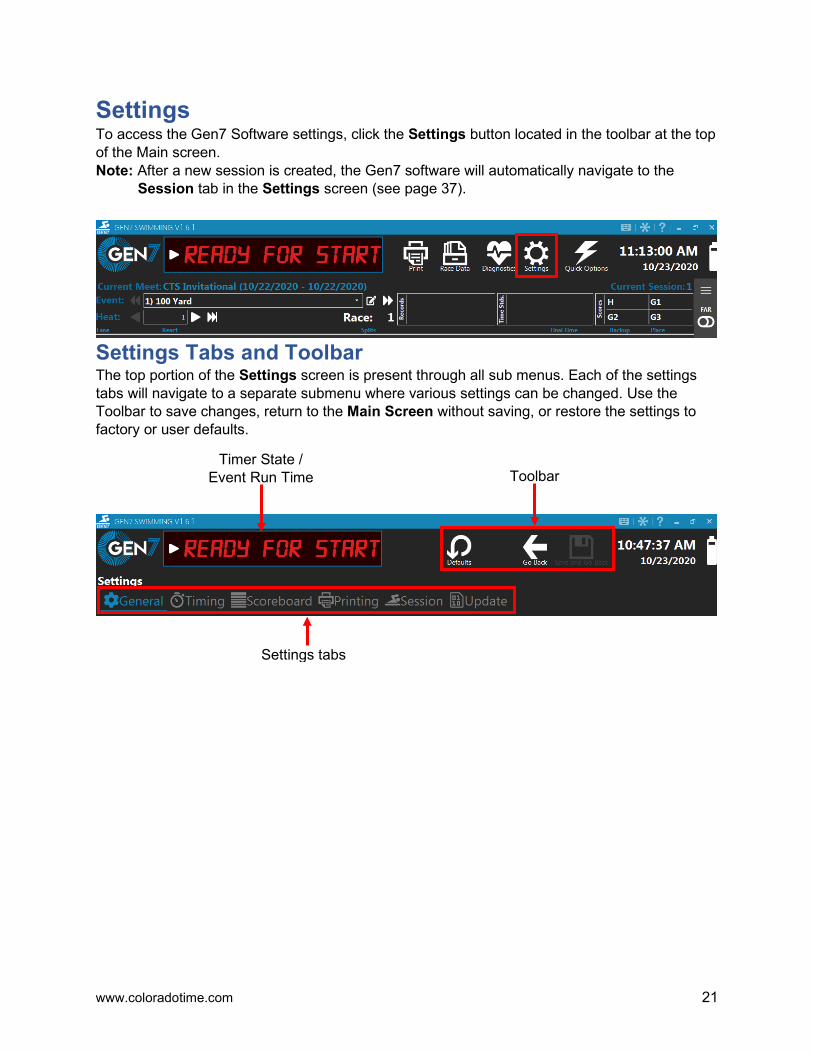
Settings To access the Gen7 Software settings, click the Settings button located in the toolbar at the top of the Main screen. Note: After a new session is created, the Gen7 software will automatically navigate to the
Session tab in the Settings screen (see page 37).
Settings Tabs and Toolbar The top portion of the Settings screen is present through all sub menus. Each of the settings tabs will navigate to a separate submenu where various settings can be changed. Use the Toolbar to save changes, return to the Main Screen without saving, or restore the settings to factory or user defaults.
Timer State / Event Run Time Toolbar
Settings tabs
22 [email protected] +1 970-667-1000
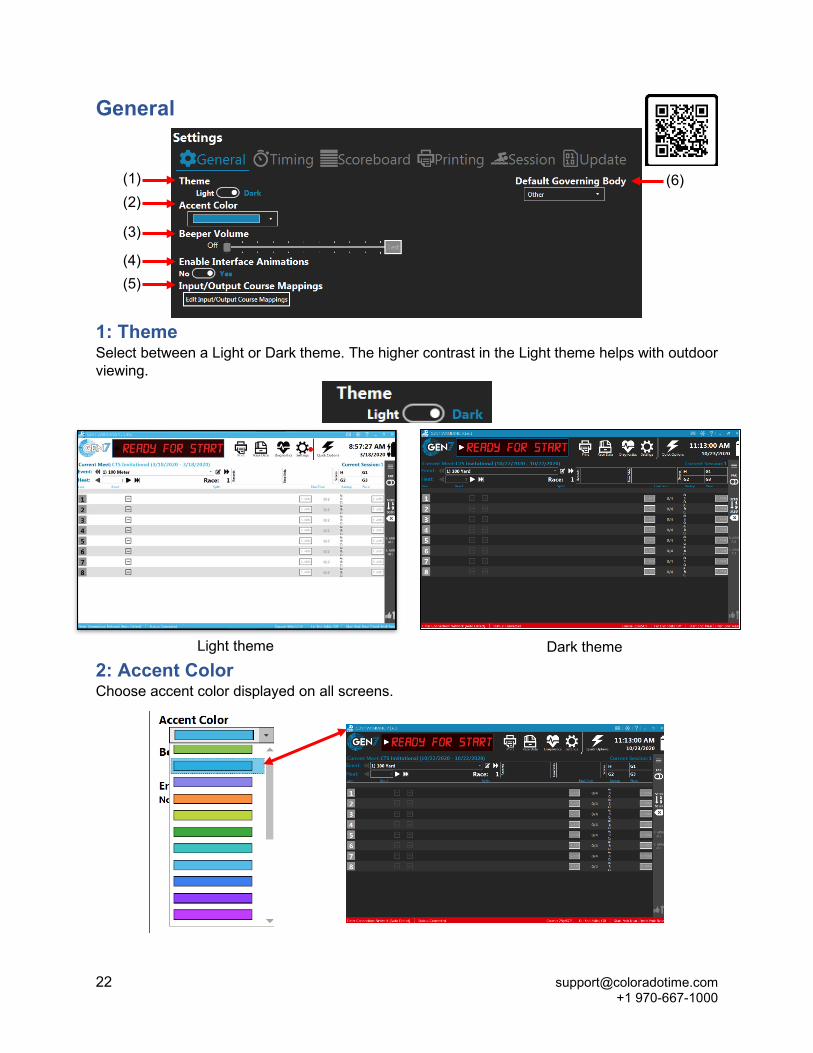
General
1: Theme Select between a Light or Dark theme. The higher contrast in the Light theme helps with outdoor viewing.
2: Accent Color Choose accent color displayed on all screens.
Light theme Dark theme
(1) (2)
(3)
(4) (5)
(6)
www.coloradotime.com 23
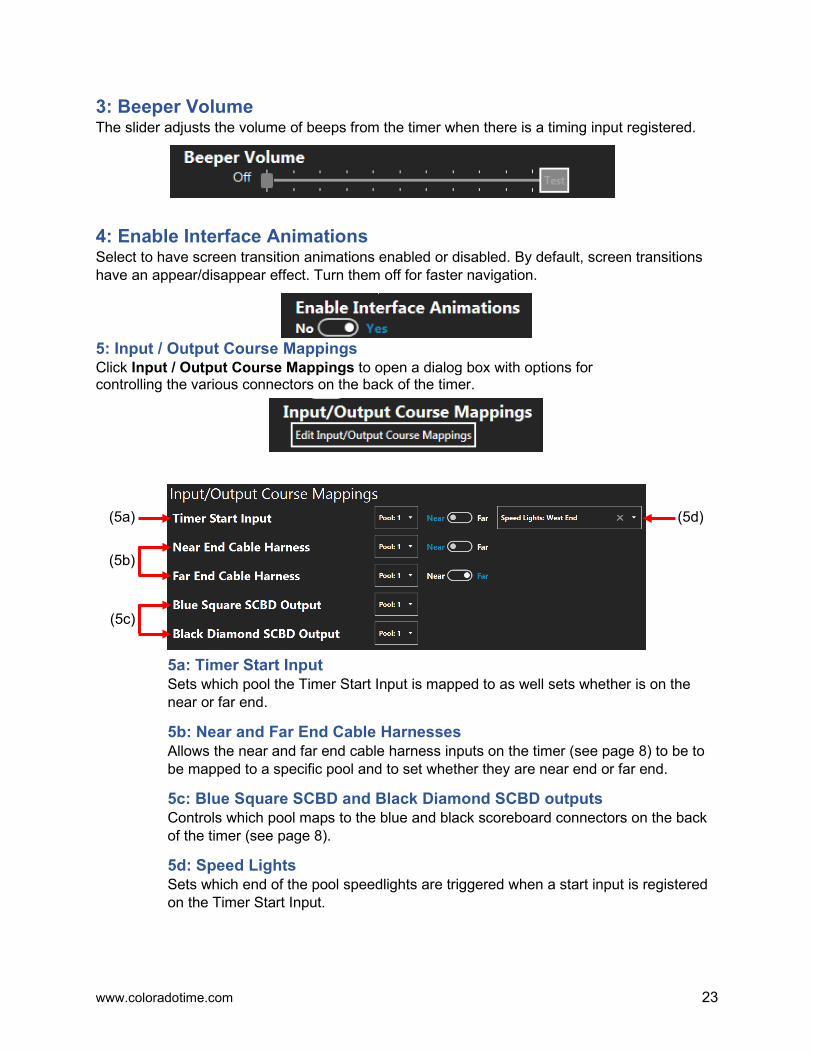
3: Beeper Volume The slider adjusts the volume of beeps from the timer when there is a timing input registered.
4: Enable Interface Animations Select to have screen transition animations enabled or disabled. By default, screen transitions have an appear/disappear effect. Turn them off for faster navigation.
5: Input / Output Course Mappings Click Input / Output Course Mappings to open a dialog box with options for controlling the various connectors on the back of the timer.
5a: Timer Start Input Sets which pool the Timer Start Input is mapped to as well sets whether is on the near or far end.
5b: Near and Far End Cable Harnesses Allows the near and far end cable harness inputs on the timer (see page 8) to be to be mapped to a specific pool and to set whether they are near end or far end.
5c: Blue Square SCBD and Black Diamond SCBD outputs Controls which pool maps to the blue and black scoreboard connectors on the back of the timer (see page 8).
5d: Speed Lights Sets which end of the pool speedlights are triggered when a start input is registered on the Timer Start Input.
(5b)
(5a)
(5c)
(5d)
24 [email protected] +1 970-667-1000
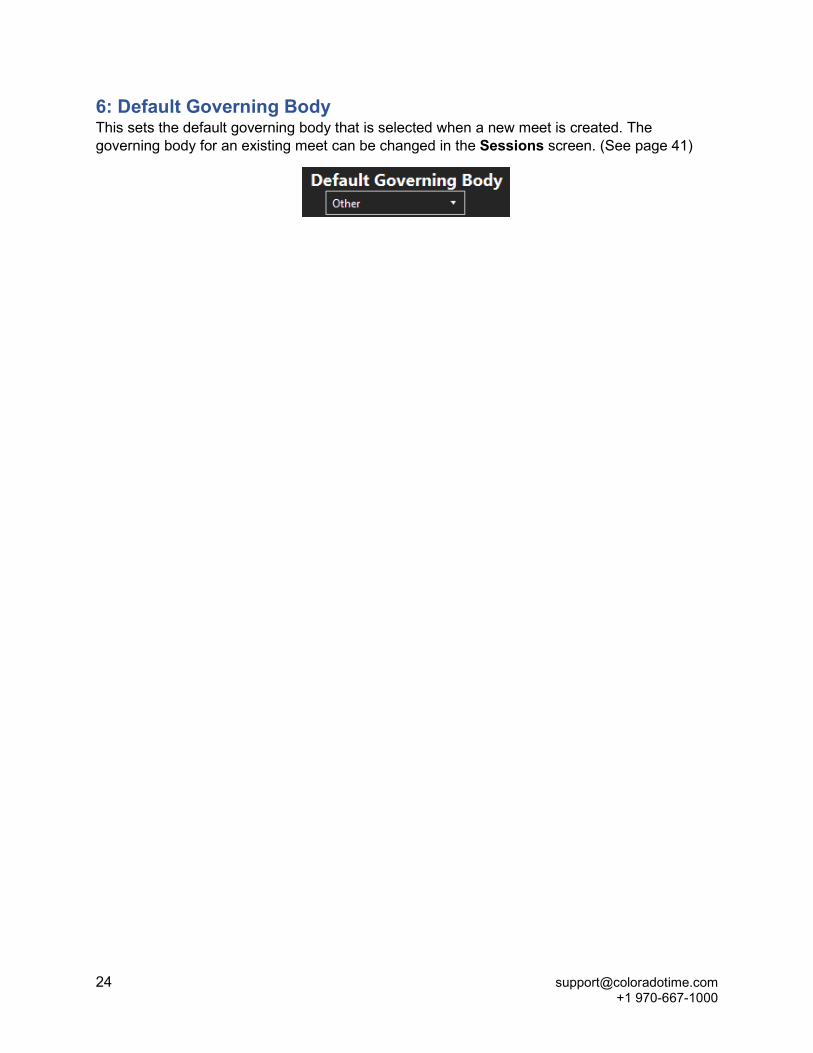
6: Default Governing Body This sets the default governing body that is selected when a new meet is created. The governing body for an existing meet can be changed in the Sessions screen. (See page 41)

www.coloradotime.com 25
Timing
1: Primary Finish Primary Finish sets whether the system will use touchpads or pushbuttons as the primary mode to finish a race. The near and far ends can be set independently. If pushbuttons are selected as the primary mode of finish, you can promote the inputs so that Pad becomes Button A, Button A becomes Button B and Button B becomes Button C. This will allow a 2 Button finish with a single cable harness.
2: Default Start End In the Default Start End section even and odd length races can be set to accept a start input on either the near or far end of the pool. Single events can be altered in the Session screen if needed (see page 39).
(1)
(2)
(3) (4)
(5)
(6)
(7)
(8)
(9)

26 [email protected] +1 970-667-1000
3: Backstroke Start Reaction Here is where the backstroke start reaction is enabled or disabled. The backstroke start reaction can be set to be enabled for all events or only for backstroke events.
If Backstroke Start Devices are being used or if performing flyover starts, disable backstroke start reaction to reduce extra touchpad hits being registered at the start which may skew the data.
4: Missed Pad Warnings Enabling the Missed Pad Warning will notify the operator of potential missed touches or that an athlete may be taking a long time or be off course.
In the event of a missed pad touch and with Missed Pad Warnings enabled, a “Missed Touch?” message will display for about one second in the Lane Data portion of the Main screen for the affected lane.
After the message fades the lane number of the affected lane will be displayed as yellow alerting the operator that action is required. (see Basic Operations on page 45).
5: Timing Resolution Timing resolution is where the number of places after the decimal that times are recorded is set. Select between seconds, tenths, hundredths, or thousandths. If the timing resolution is changed, only races that have not been run will be affected. Times for completed races are truncated according to the setting at the time of the race.
Note: Most governing bodies require the timing resolution to be set to Hundredths.
www.coloradotime.com 27
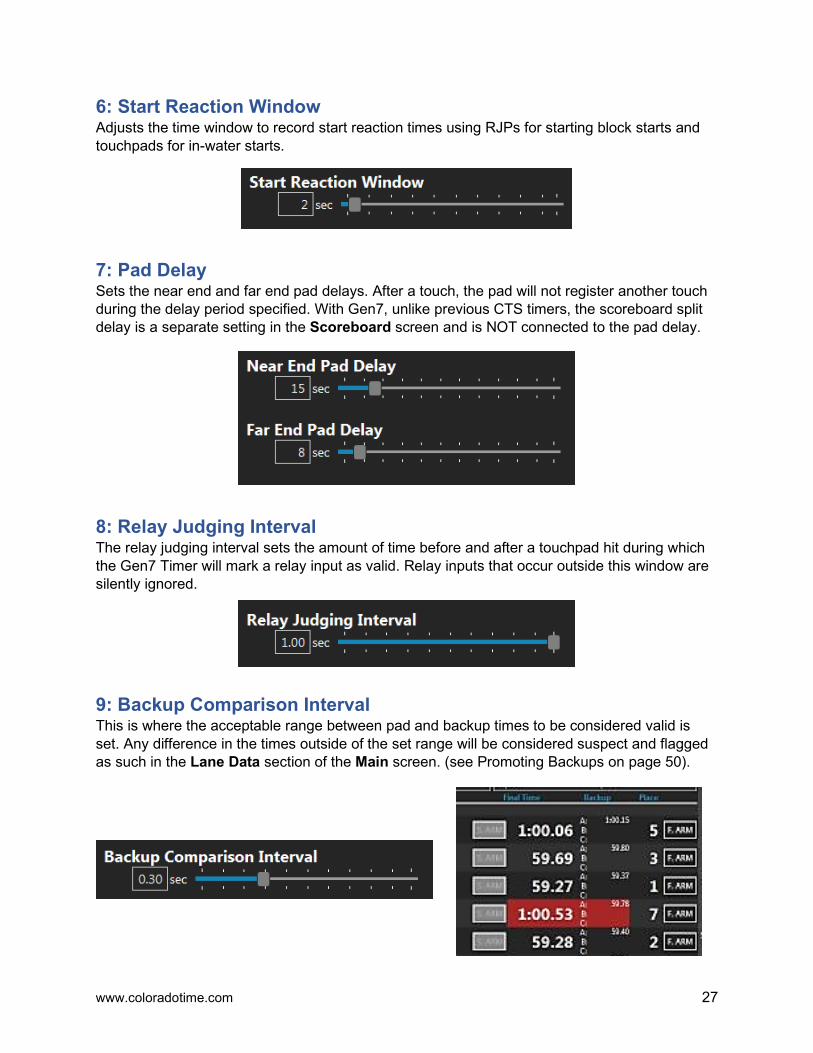
6: Start Reaction Window Adjusts the time window to record start reaction times using RJPs for starting block starts and touchpads for in-water starts.
7: Pad Delay Sets the near end and far end pad delays. After a touch, the pad will not register another touch during the delay period specified. With Gen7, unlike previous CTS timers, the scoreboard split delay is a separate setting in the Scoreboard screen and is NOT connected to the pad delay.
8: Relay Judging Interval The relay judging interval sets the amount of time before and after a touchpad hit during which the Gen7 Timer will mark a relay input as valid. Relay inputs that occur outside this window are silently ignored.
9: Backup Comparison Interval This is where the acceptable range between pad and backup times to be considered valid is set. Any difference in the times outside of the set range will be considered suspect and flagged as such in the Lane Data section of the Main screen. (see Promoting Backups on page 50).

www.coloradotime.com 29
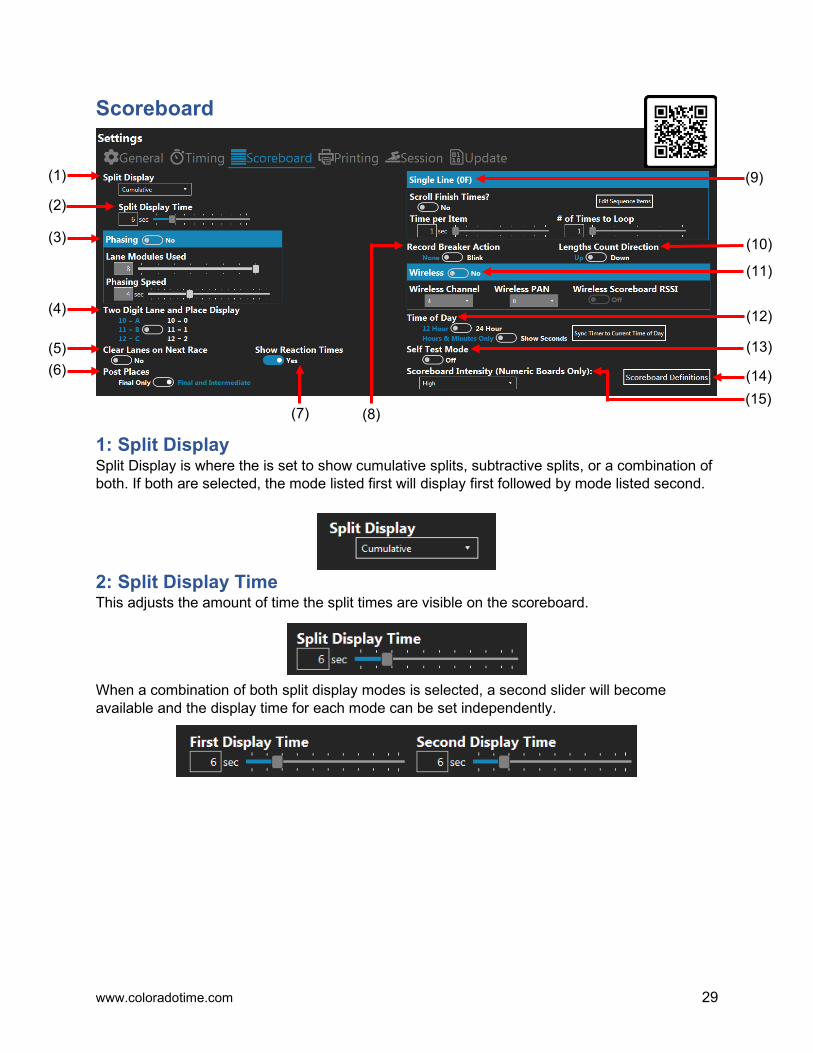
Scoreboard
1: Split Display Split Display is where the is set to show cumulative splits, subtractive splits, or a combination of both. If both are selected, the mode listed first will display first followed by mode listed second.
2: Split Display Time This adjusts the amount of time the split times are visible on the scoreboard.
When a combination of both split display modes is selected, a second slider will become available and the display time for each mode can be set independently.
(14)
(1)
(2)
(3)
(4)
(5) (6)
(7)
(9)
(8)
(10)
(11)
(12)
(13)
(15)
30 [email protected] +1 970-667-1000
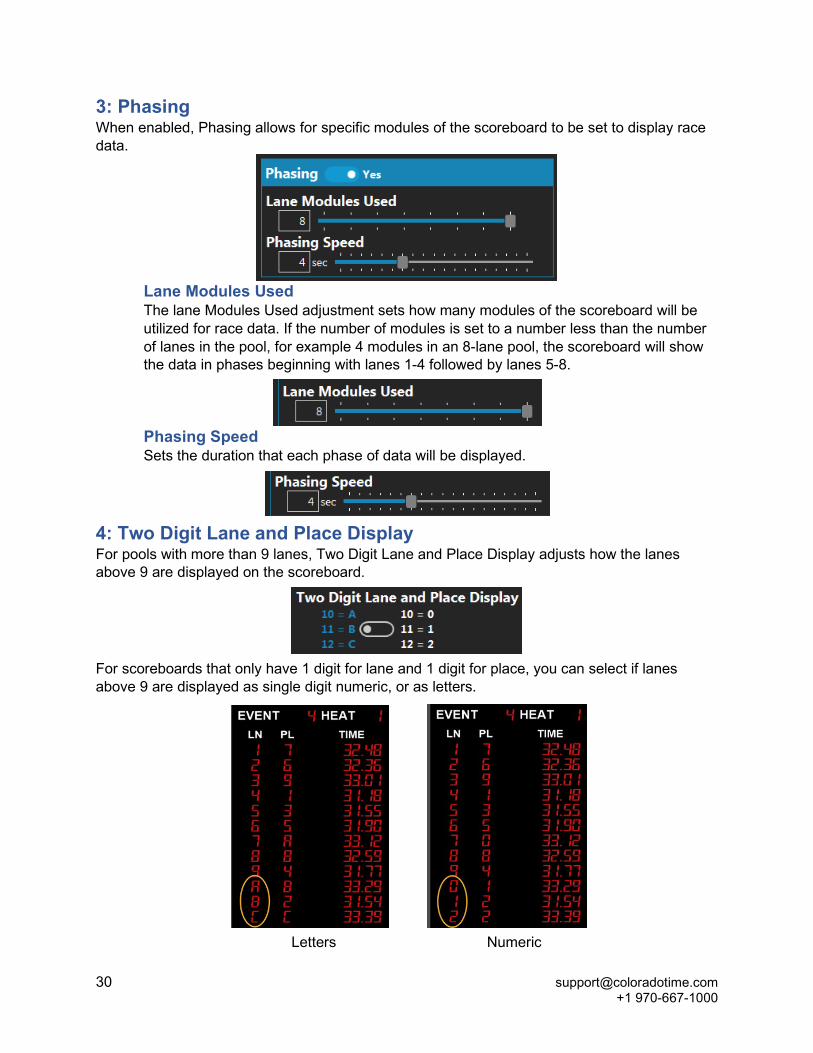
3: Phasing When enabled, Phasing allows for specific modules of the scoreboard to be set to display race data.
Lane Modules Used The lane Modules Used adjustment sets how many modules of the scoreboard will be utilized for race data. If the number of modules is set to a number less than the number of lanes in the pool, for example 4 modules in an 8-lane pool, the scoreboard will show the data in phases beginning with lanes 1-4 followed by lanes 5-8.
Phasing Speed Sets the duration that each phase of data will be displayed.
4: Two Digit Lane and Place Display For pools with more than 9 lanes, Two Digit Lane and Place Display adjusts how the lanes above 9 are displayed on the scoreboard.
For scoreboards that only have 1 digit for lane and 1 digit for place, you can select if lanes above 9 are displayed as single digit numeric, or as letters.
Letters Numeric

www.coloradotime.com 31
On scoreboards capable of displaying both digits such as 10 Digit Per Line Boards or video boards, set the Two Digit Lane and Place Display setting to A,B,C to display both digits of lanes above 9.
5: Clear Lanes on Next Race When Clear Lanes on Next Race is selected, places and times will automatically clear from the scoreboard when the event or heat are changed while the timer is in the reset state (see Timer State/ on page 12).
6: Post Places The Post Places option selects whether places are posted at each split or only at the final time.
7: Show Start Reaction Enable Show Start Reaction to display start reaction times for both RJP and backstroke take-offs with touchpads for each lane at the start of the race. Even if this option is turned off, start reaction times can still be recorded by the Gen7.
8: Record Breaker Action Set the Record Breaker Action to blink to set the scoreboard to blink the time when a record is broken.
32 [email protected] +1 970-667-1000
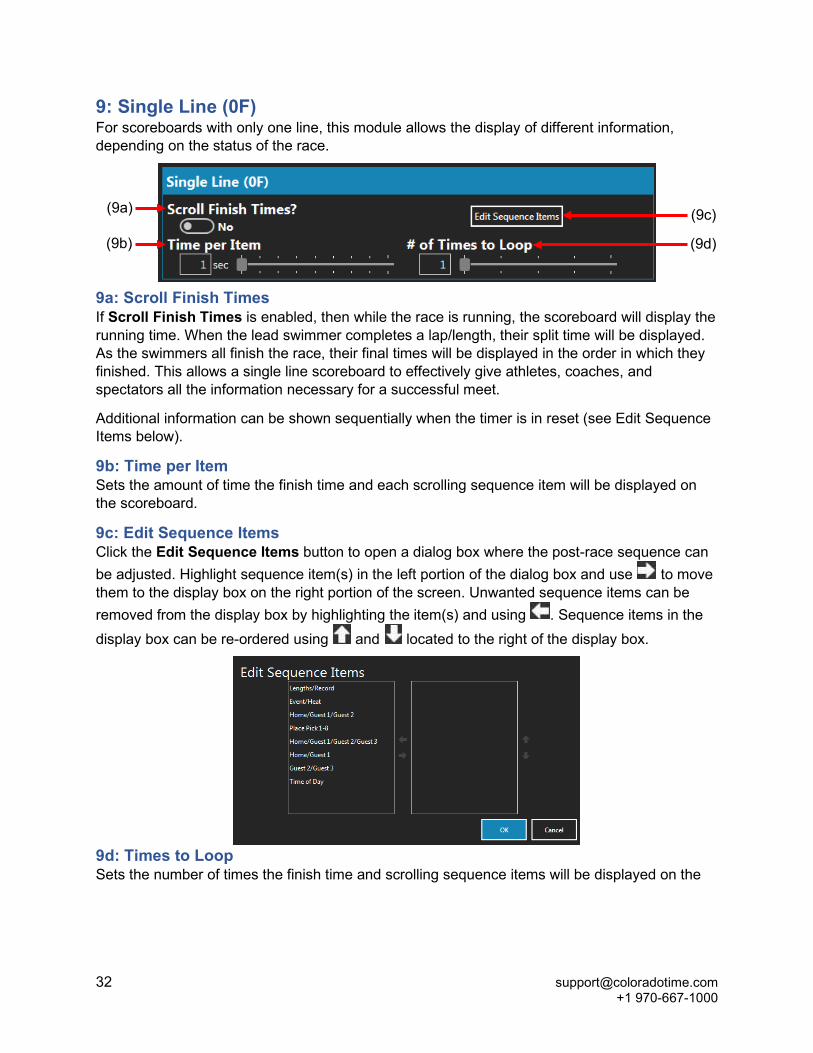
9: Single Line (0F) For scoreboards with only one line, this module allows the display of different information, depending on the status of the race.
9a: Scroll Finish Times If Scroll Finish Times is enabled, then while the race is running, the scoreboard will display the running time. When the lead swimmer completes a lap/length, their split time will be displayed. As the swimmers all finish the race, their final times will be displayed in the order in which they finished. This allows a single line scoreboard to effectively give athletes, coaches, and spectators all the information necessary for a successful meet.
Additional information can be shown sequentially when the timer is in reset (see Edit Sequence Items below).
9b: Time per Item Sets the amount of time the finish time and each scrolling sequence item will be displayed on the scoreboard.
9c: Edit Sequence Items Click the Edit Sequence Items button to open a dialog box where the post-race sequence can be adjusted. Highlight sequence item(s) in the left portion of the dialog box and use to move them to the display box on the right portion of the screen. Unwanted sequence items can be removed from the display box by highlighting the item(s) and using . Sequence items in the display box can be re-ordered using and located to the right of the display box.
9d: Times to Loop Sets the number of times the finish time and scrolling sequence items will be displayed on the
(9c)
(9d)
(9a)
(9b)
www.coloradotime.com 33
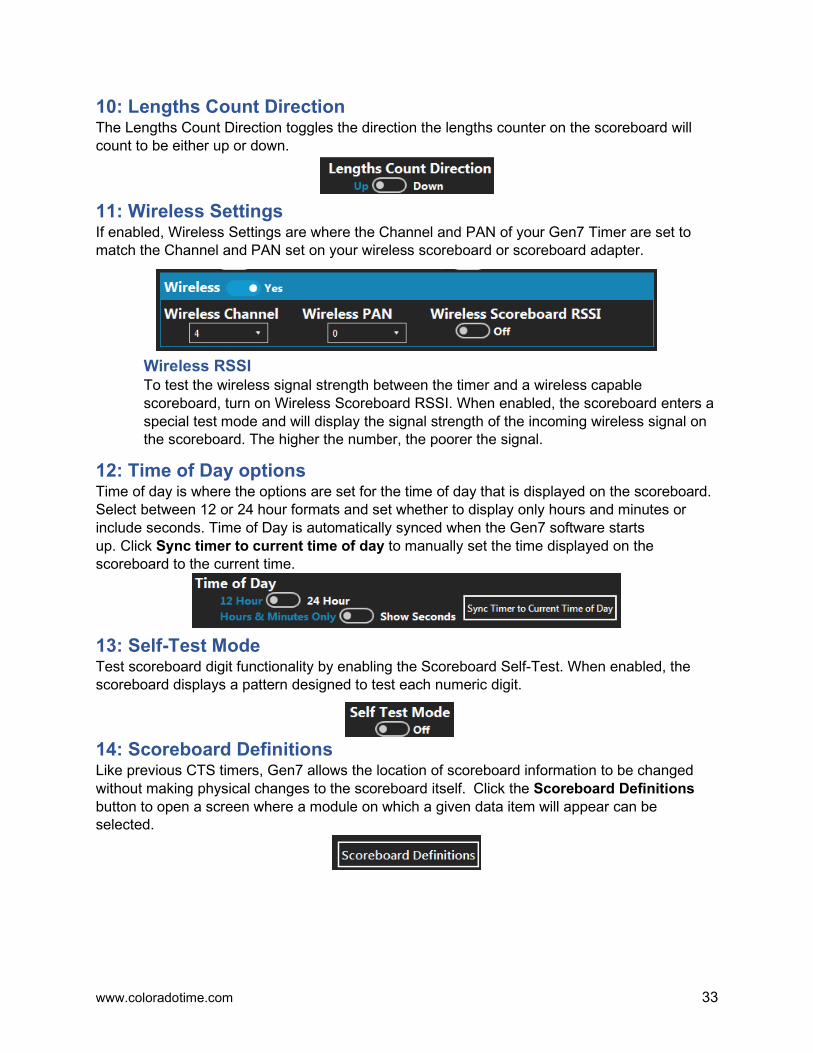
10: Lengths Count Direction The Lengths Count Direction toggles the direction the lengths counter on the scoreboard will count to be either up or down.
11: Wireless Settings If enabled, Wireless Settings are where the Channel and PAN of your Gen7 Timer are set to match the Channel and PAN set on your wireless scoreboard or scoreboard adapter.
Wireless RSSI To test the wireless signal strength between the timer and a wireless capable scoreboard, turn on Wireless Scoreboard RSSI. When enabled, the scoreboard enters a special test mode and will display the signal strength of the incoming wireless signal on the scoreboard. The higher the number, the poorer the signal.
12: Time of Day options Time of day is where the options are set for the time of day that is displayed on the scoreboard. Select between 12 or 24 hour formats and set whether to display only hours and minutes or include seconds. Time of Day is automatically synced when the Gen7 software starts up. Click Sync timer to current time of day to manually set the time displayed on the scoreboard to the current time.
13: Self-Test Mode Test scoreboard digit functionality by enabling the Scoreboard Self-Test. When enabled, the scoreboard displays a pattern designed to test each numeric digit.
14: Scoreboard Definitions Like previous CTS timers, Gen7 allows the location of scoreboard information to be changed without making physical changes to the scoreboard itself. Click the Scoreboard Definitions button to open a screen where a module on which a given data item will appear can be selected.
34 [email protected] +1 970-667-1000
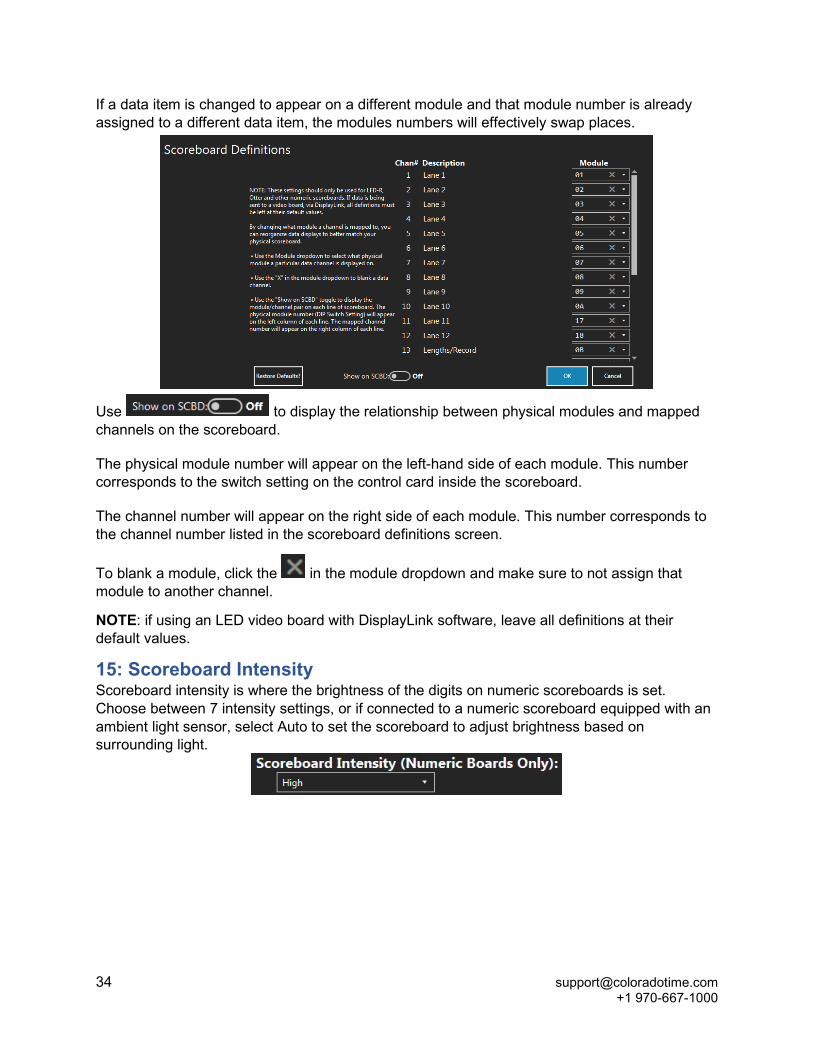
If a data item is changed to appear on a different module and that module number is already assigned to a different data item, the modules numbers will effectively swap places.
Use to display the relationship between physical modules and mapped channels on the scoreboard.
The physical module number will appear on the left-hand side of each module. This number corresponds to the switch setting on the control card inside the scoreboard.
The channel number will appear on the right side of each module. This number corresponds to the channel number listed in the scoreboard definitions screen.
To blank a module, click the in the module dropdown and make sure to not assign that module to another channel.
NOTE: if using an LED video board with DisplayLink software, leave all definitions at their default values.
15: Scoreboard Intensity Scoreboard intensity is where the brightness of the digits on numeric scoreboards is set. Choose between 7 intensity settings, or if connected to a numeric scoreboard equipped with an ambient light sensor, select Auto to set the scoreboard to adjust brightness based on surrounding light.

www.coloradotime.com 35
Printing
1: Paper Size Select the paper size that race results will be printed on.
2: Print Button Action The Print Button Action sets to show a preview before race results are printed or sets to print directly without showing a preview first.
3: Default Printer Sets the default printer that results will print to. You can override the default printer from the print preview screen.
4: Auto Print on Reset Use Auto Print on Reset to enable the system to automatically print race results every time an event is finished, and the timer is put back into the reset state.
(1)
(2)
(3) (4)

www.coloradotime.com 37
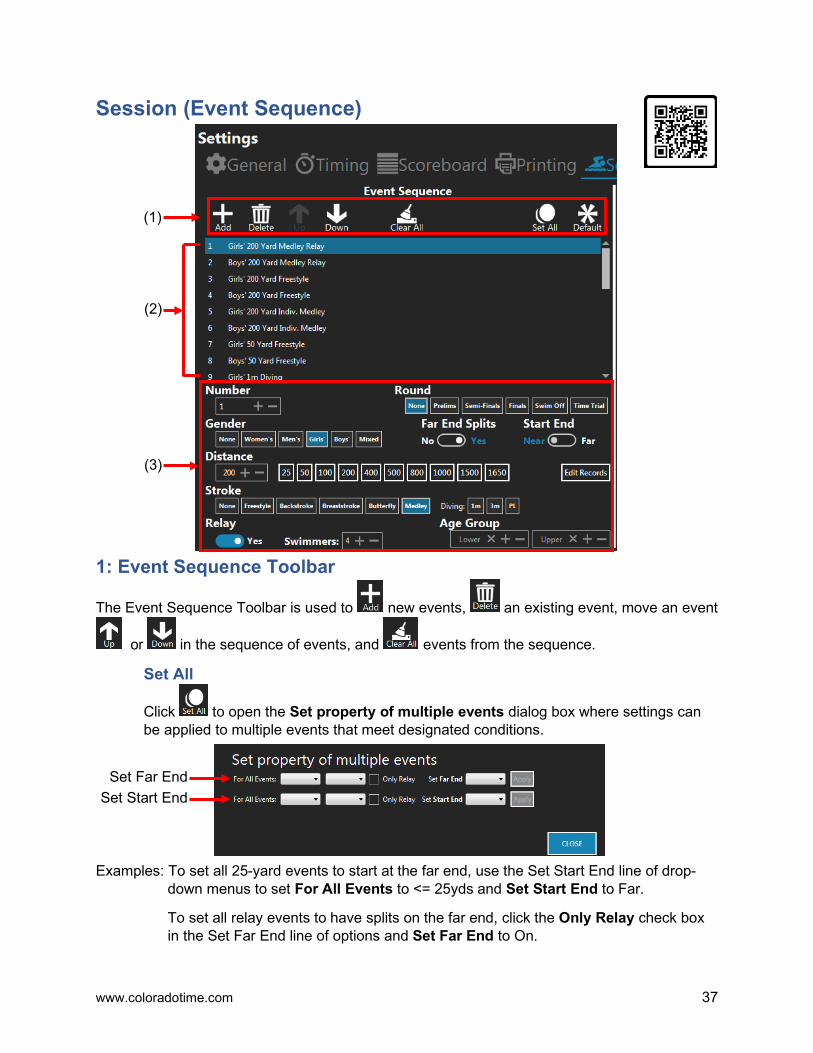
Session (Event Sequence)
1: Event Sequence Toolbar
The Event Sequence Toolbar is used to new events, an existing event, move an event
or in the sequence of events, and events from the sequence.
Set All
Click to open the Set property of multiple events dialog box where settings can be applied to multiple events that meet designated conditions.
Examples: To set all 25-yard events to start at the far end, use the Set Start End line of drop-down menus to set For All Events to <= 25yds and Set Start End to Far.
To set all relay events to have splits on the far end, click the Only Relay check box in the Set Far End line of options and Set Far End to On.
(1)
(2)
(3)
Set Far End Set Start End

38 [email protected] +1 970-667-1000
Default
To load a default event sequence for standard NFHS meets, click . A dialog box will open that contains a dropdown menu where either a default Coed, Girls, or Boys meet can be selected.
Click OK and the Gen7 software will generate a standard NFHS event sequence. If needed, the events can be edited just like any other event.
When the event sequence has been populated. Click save and go back to be taken to the main screen.
2: Sequence of Events The Event Sequence section display all loaded/created events for the current session.
www.coloradotime.com 39
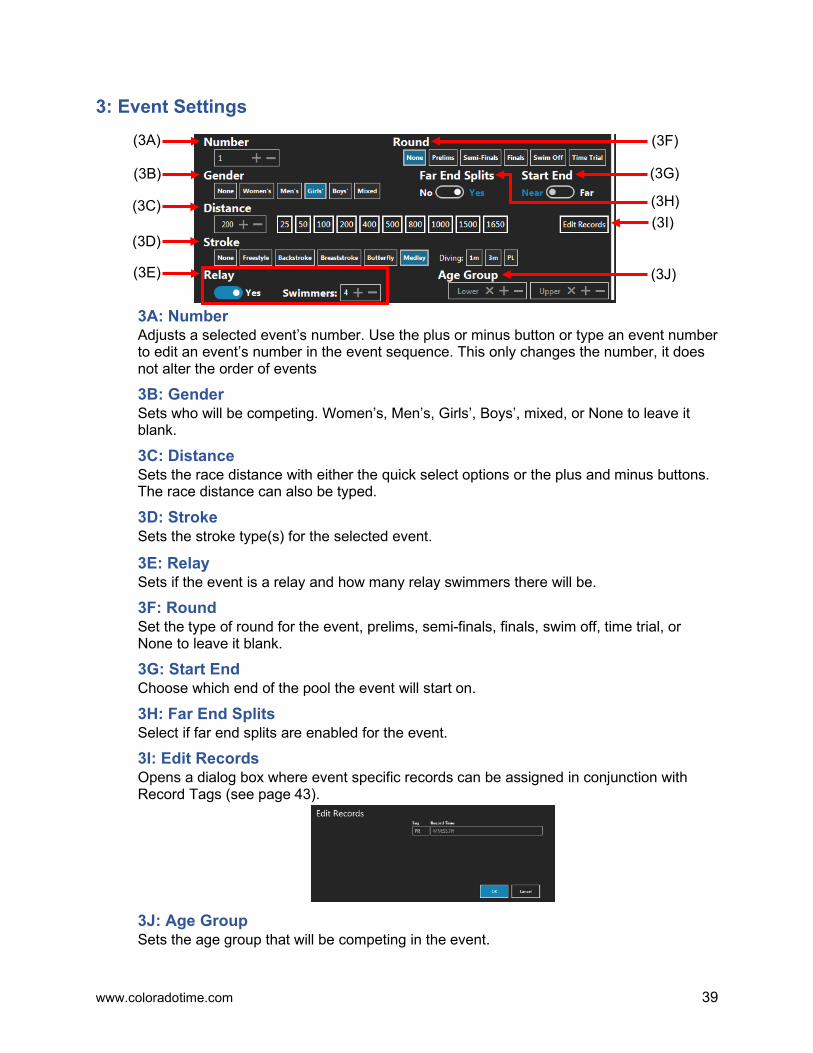
3: Event Settings
3A: Number Adjusts a selected event’s number. Use the plus or minus button or type an event number to edit an event’s number in the event sequence. This only changes the number, it does not alter the order of events
3B: Gender Sets who will be competing. Women’s, Men’s, Girls’, Boys’, mixed, or None to leave it blank.
3C: Distance Sets the race distance with either the quick select options or the plus and minus buttons. The race distance can also be typed.
3D: Stroke Sets the stroke type(s) for the selected event.
3E: Relay Sets if the event is a relay and how many relay swimmers there will be.
3F: Round Set the type of round for the event, prelims, semi-finals, finals, swim off, time trial, or None to leave it blank.
3G: Start End Choose which end of the pool the event will start on.
3H: Far End Splits Select if far end splits are enabled for the event.
3I: Edit Records Opens a dialog box where event specific records can be assigned in conjunction with Record Tags (see page 43).
3J: Age Group Sets the age group that will be competing in the event.
(3A)
(3B)
(3C)
(3D)
(3E)
(3F)
(3G)
(3H) (3I)
(3J)

www.coloradotime.com 41
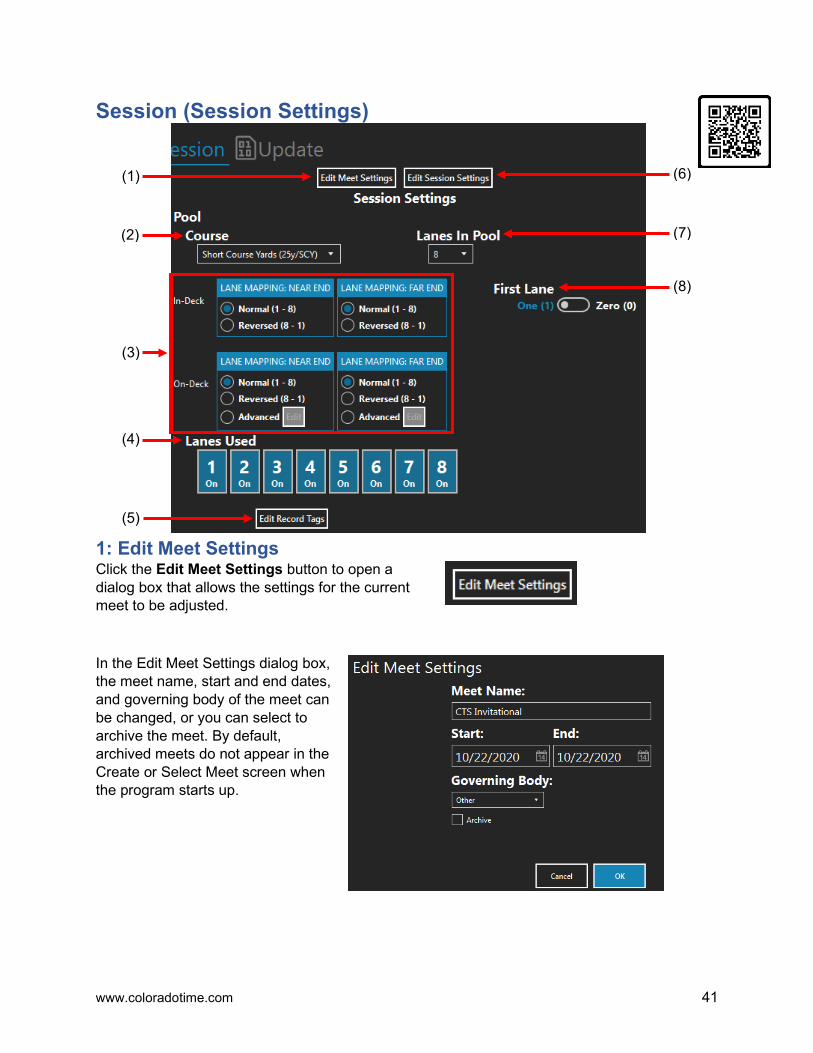
Session (Session Settings)
1: Edit Meet Settings Click the Edit Meet Settings button to open a dialog box that allows the settings for the current meet to be adjusted.
In the Edit Meet Settings dialog box, the meet name, start and end dates, and governing body of the meet can be changed, or you can select to archive the meet. By default, archived meets do not appear in the Create or Select Meet screen when the program starts up.
(1)
(2)
(3)
(4)
(5)
(6)
(7)
(8)
42 [email protected] +1 970-667-1000
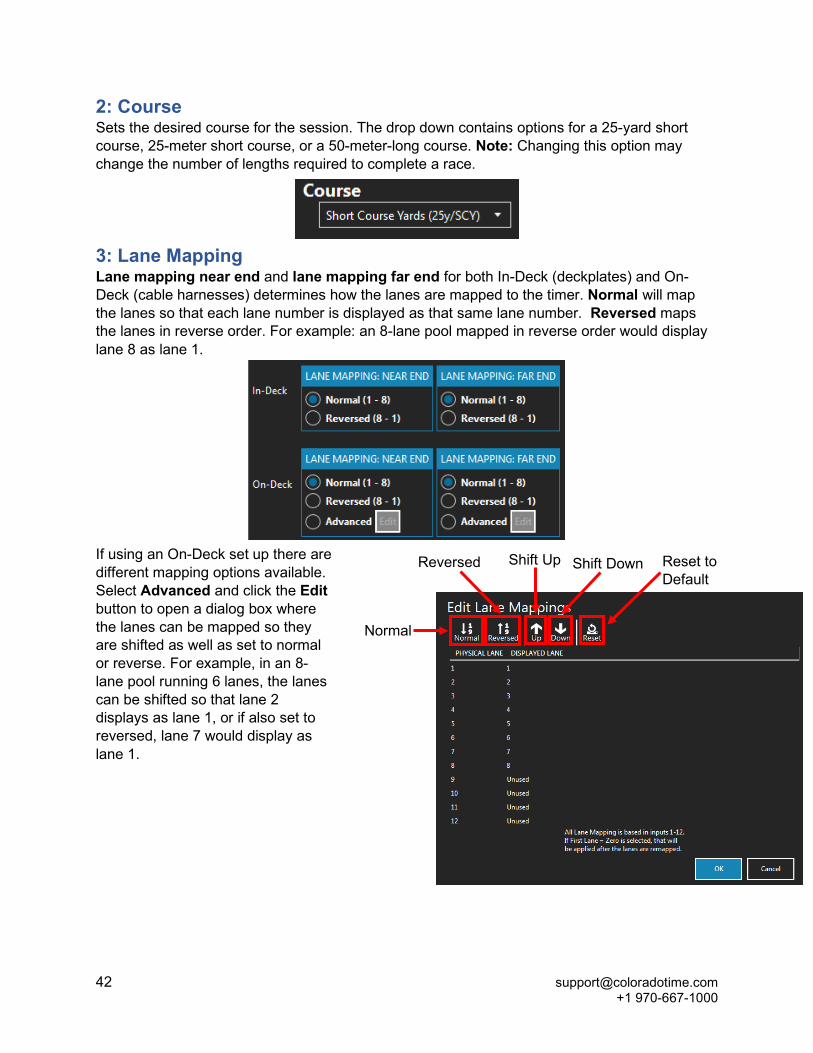
2: Course Sets the desired course for the session. The drop down contains options for a 25-yard short course, 25-meter short course, or a 50-meter-long course. Note: Changing this option may change the number of lengths required to complete a race.
3: Lane Mapping Lane mapping near end and lane mapping far end for both In-Deck (deckplates) and On-Deck (cable harnesses) determines how the lanes are mapped to the timer. Normal will map the lanes so that each lane number is displayed as that same lane number. Reversed maps the lanes in reverse order. For example: an 8-lane pool mapped in reverse order would display lane 8 as lane 1.
If using an On-Deck set up there are different mapping options available. Select Advanced and click the Edit button to open a dialog box where the lanes can be mapped so they are shifted as well as set to normal or reverse. For example, in an 8-lane pool running 6 lanes, the lanes can be shifted so that lane 2 displays as lane 1, or if also set to reversed, lane 7 would display as lane 1.
Normal
Reversed Shift Up Shift Down Reset to Default

www.coloradotime.com 43
4: Lanes Used Lanes for a session can be turned off or on. Click a lane number to toggle between on and off.
If a lane needs to be switched on or off for an event, it can be done by clicking the lane number on the main screen before the start of the event (see page 14).
5: Edit Record Tags Click Edit Record Tags to open a dialog box where information is added for records that will be displayed in the Records, Time Standards, and Team Scores section of the Main Screen (see page 17).
Click the to add a new record tag.
Enter a two letter tag in the Tag field for the record that will be displayed in Records section of the Main screen (see page 17) and on the scoreboard. For example: PR for pool record, or WR for world record. The record displayed on the scoreboard is used in conjunction with the Record Breaker Action option in the scoreboard settings screen (see page 31).
The Time Standard check box makes the tag a time standard instead of a record.
Input each events time data for records in the Edit Records section of the event settings on the left side of the session screen (see page 39).

44 [email protected] +1 970-667-1000
6: Edit Session Edit Session Settings opens a dialog box where the current session can be adjusted.
In the Edit Session Settings dialog box the current session number, and session start time can be changed, and a custom tag assigned to the session can be added or changed.
7: Lanes in Pool Use the Lanes in Pool drop down to select how many lanes there are in the pool for the course that will be used.
8: First Lane The First Lane setting toggles between the first lane being numbered as 1 or 0 with all subsequent lanes being in sequence corresponding to the selection.
www.coloradotime.com 45
Basic Operation This section will walk through a tutorial using a sample race to illustrate the basic operation of the Gen7 software and how to address common occurrences that arise during meets.
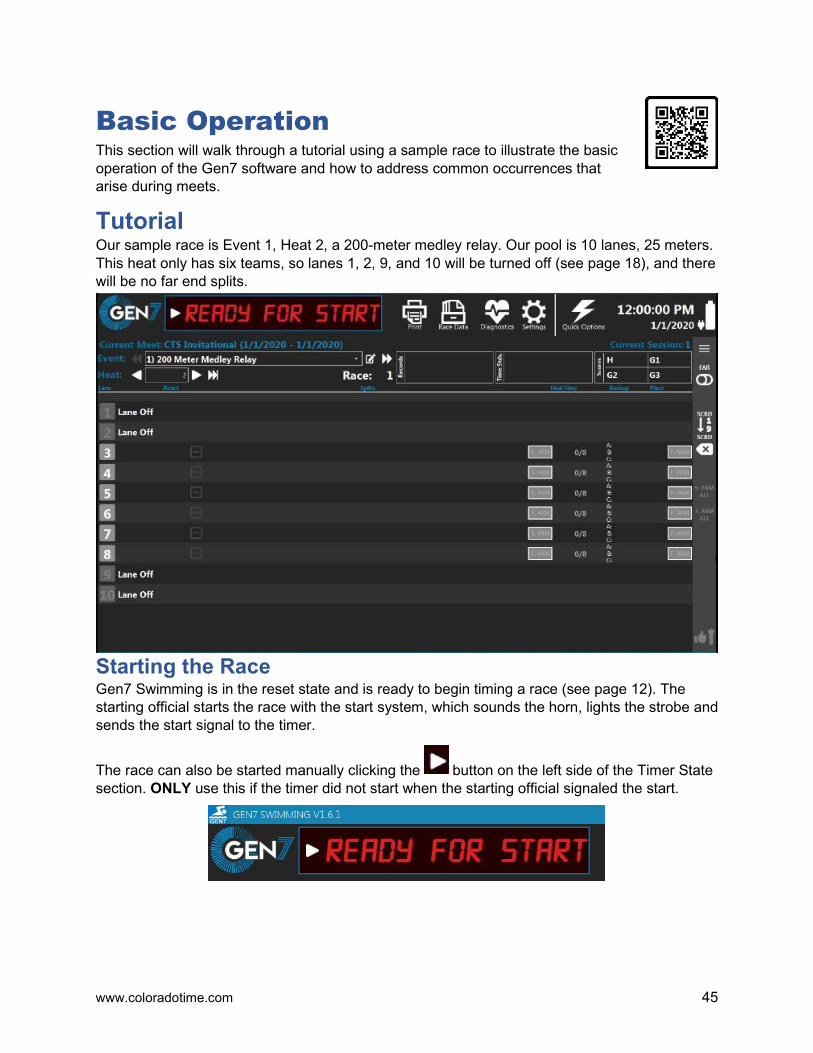
Tutorial Our sample race is Event 1, Heat 2, a 200-meter medley relay. Our pool is 10 lanes, 25 meters. This heat only has six teams, so lanes 1, 2, 9, and 10 will be turned off (see page 18), and there will be no far end splits.
Starting the Race Gen7 Swimming is in the reset state and is ready to begin timing a race (see page 12). The starting official starts the race with the start system, which sounds the horn, lights the strobe and sends the start signal to the timer.
The race can also be started manually clicking the button on the left side of the Timer State section. ONLY use this if the timer did not start when the starting official signaled the start.
46 [email protected] +1 970-667-1000
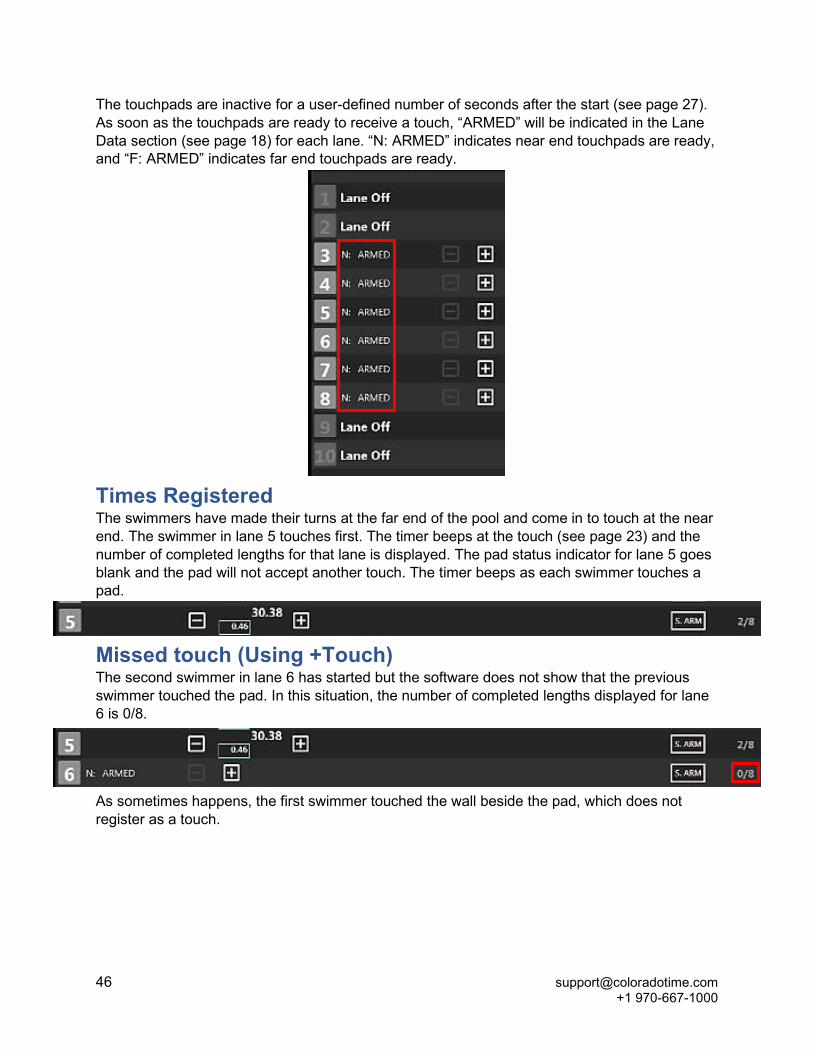
The touchpads are inactive for a user-defined number of seconds after the start (see page 27). As soon as the touchpads are ready to receive a touch, “ARMED” will be indicated in the Lane Data section (see page 18) for each lane. “N: ARMED” indicates near end touchpads are ready, and “F: ARMED” indicates far end touchpads are ready.
Times Registered The swimmers have made their turns at the far end of the pool and come in to touch at the near end. The swimmer in lane 5 touches first. The timer beeps at the touch (see page 23) and the number of completed lengths for that lane is displayed. The pad status indicator for lane 5 goes blank and the pad will not accept another touch. The timer beeps as each swimmer touches a pad.
Missed touch (Using +Touch) The second swimmer in lane 6 has started but the software does not show that the previous swimmer touched the pad. In this situation, the number of completed lengths displayed for lane 6 is 0/8.
As sometimes happens, the first swimmer touched the wall beside the pad, which does not register as a touch.
www.coloradotime.com 47
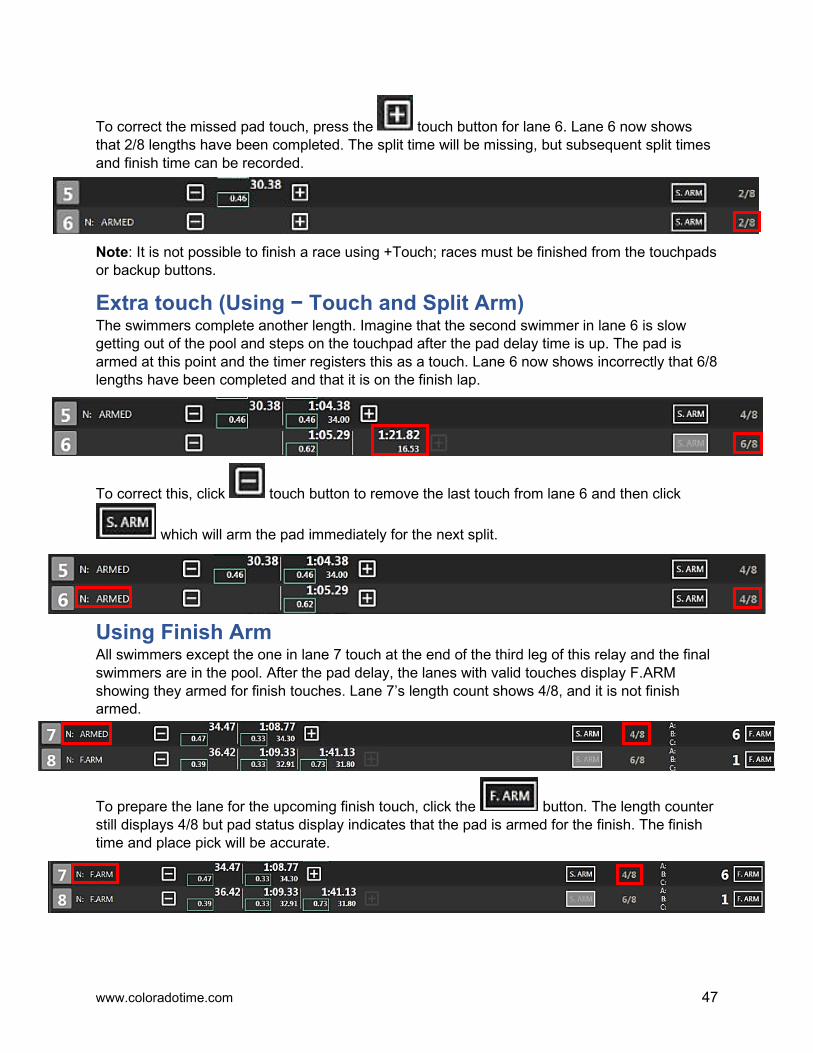
To correct the missed pad touch, press the touch button for lane 6. Lane 6 now shows that 2/8 lengths have been completed. The split time will be missing, but subsequent split times and finish time can be recorded.
Note: It is not possible to finish a race using +Touch; races must be finished from the touchpads or backup buttons.
Extra touch (Using − Touch and Split Arm) The swimmers complete another length. Imagine that the second swimmer in lane 6 is slow getting out of the pool and steps on the touchpad after the pad delay time is up. The pad is armed at this point and the timer registers this as a touch. Lane 6 now shows incorrectly that 6/8 lengths have been completed and that it is on the finish lap.
To correct this, click touch button to remove the last touch from lane 6 and then click
which will arm the pad immediately for the next split.
Using Finish Arm All swimmers except the one in lane 7 touch at the end of the third leg of this relay and the final swimmers are in the pool. After the pad delay, the lanes with valid touches display F.ARM showing they armed for finish touches. Lane 7’s length count shows 4/8, and it is not finish armed.
To prepare the lane for the upcoming finish touch, click the button. The length counter still displays 4/8 but pad status display indicates that the pad is armed for the finish. The finish time and place pick will be accurate.
v
48 [email protected] +1 970-667-1000
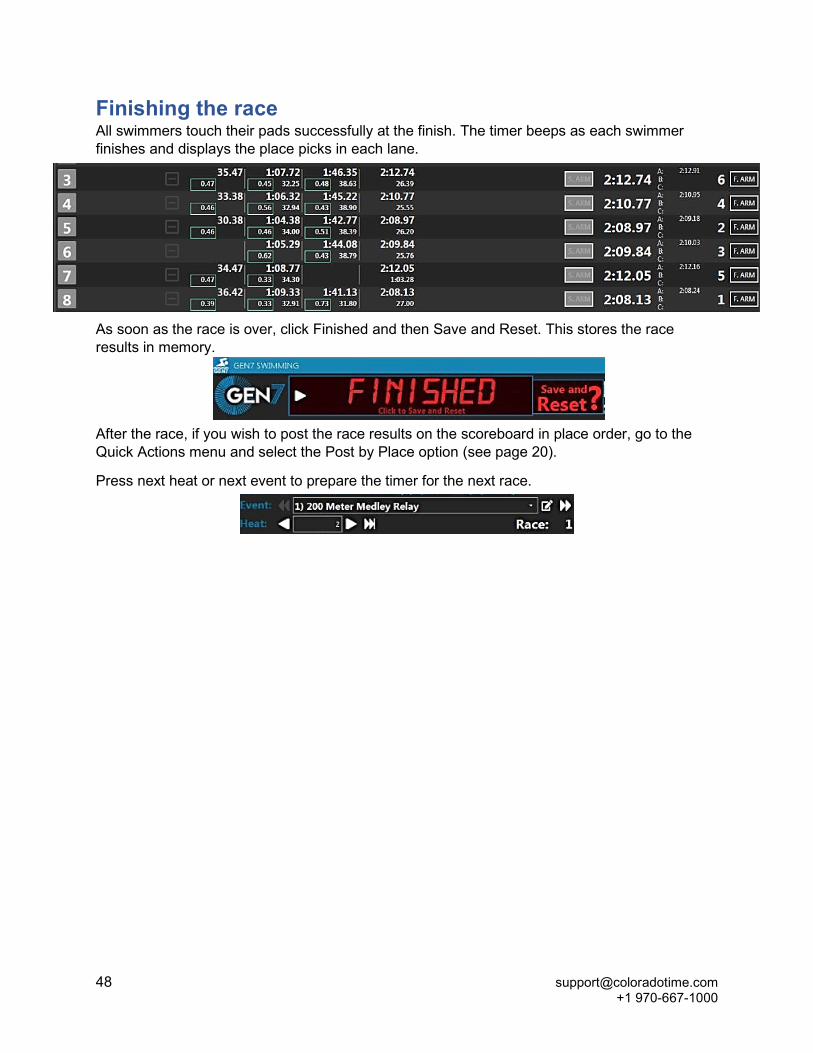
Finishing the race All swimmers touch their pads successfully at the finish. The timer beeps as each swimmer finishes and displays the place picks in each lane.
As soon as the race is over, click Finished and then Save and Reset. This stores the race results in memory.
After the race, if you wish to post the race results on the scoreboard in place order, go to the Quick Actions menu and select the Post by Place option (see page 20).
Press next heat or next event to prepare the timer for the next race.

www.coloradotime.com 49
Handling Exceptions Whether a swimmer has failed to touch at the end of a race, or there is a no show to an event, Gen7 makes it easy to handle exceptions that arise during a swim meet. In this section we will look at common exceptions and go over how to handle them.
No Show If a swimmer is a no show for an event, set the lane to display as a “no show”. After the race has started, right click on the lane number you want to update and then click No Show.
No show will be displayed next to the lane number.
After the race data has been saved, NS will appear in the “place” column for that lane.
If No Show is accidentally clicked for a lane with a swimmer in it. The Gen7 Timer will still record splits and finishes. Turn the lane back on before saving the event and all the data will be there.
Lanes marked as no show will not display on the scoreboard. When results are transmitted to meet management, the place for that lane will be marked as “NS”
Disqualifying a swimmer: To disqualify a swimmer, either right click on the lane number of the swimmer who is being disqualified and click DQ or use the keyboard short cut “D” followed by the lane number. See page 51 for a list of keyboard shortcuts.
“Disqualification” will appear for about a second and “pending DQ” will appear in the “place” column for that lane.
All of the swimmer’s touches will be registered, however at the end of the race DQ will be displayed in the “place” column of the DQ’d lane.
Pending DQ
50 [email protected] +1 970-667-1000
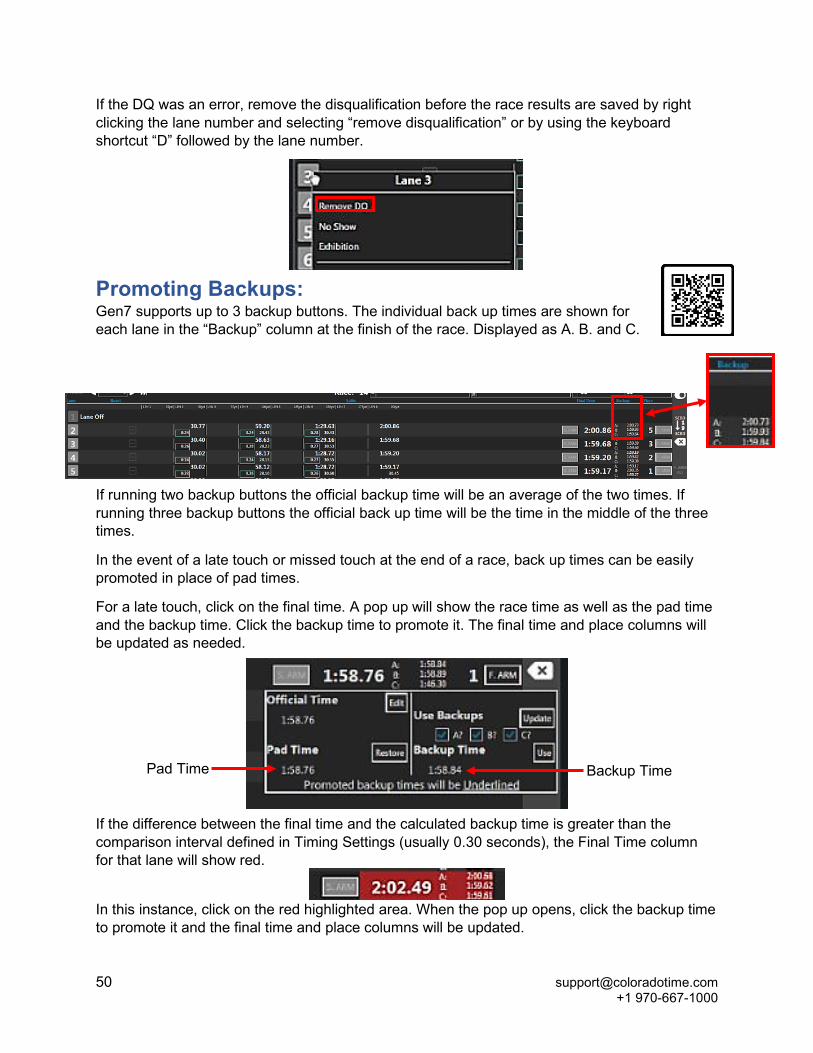
If the DQ was an error, remove the disqualification before the race results are saved by right clicking the lane number and selecting “remove disqualification” or by using the keyboard shortcut “D” followed by the lane number.
Promoting Backups: Gen7 supports up to 3 backup buttons. The individual back up times are shown for each lane in the “Backup” column at the finish of the race. Displayed as A. B. and C.
If running two backup buttons the official backup time will be an average of the two times. If running three backup buttons the official back up time will be the time in the middle of the three times.
In the event of a late touch or missed touch at the end of a race, back up times can be easily promoted in place of pad times.
For a late touch, click on the final time. A pop up will show the race time as well as the pad time and the backup time. Click the backup time to promote it. The final time and place columns will be updated as needed.
If the difference between the final time and the calculated backup time is greater than the comparison interval defined in Timing Settings (usually 0.30 seconds), the Final Time column for that lane will show red.
In this instance, click on the red highlighted area. When the pop up opens, click the backup time to promote it and the final time and place columns will be updated.
Pad Time Backup Time
www.coloradotime.com 51
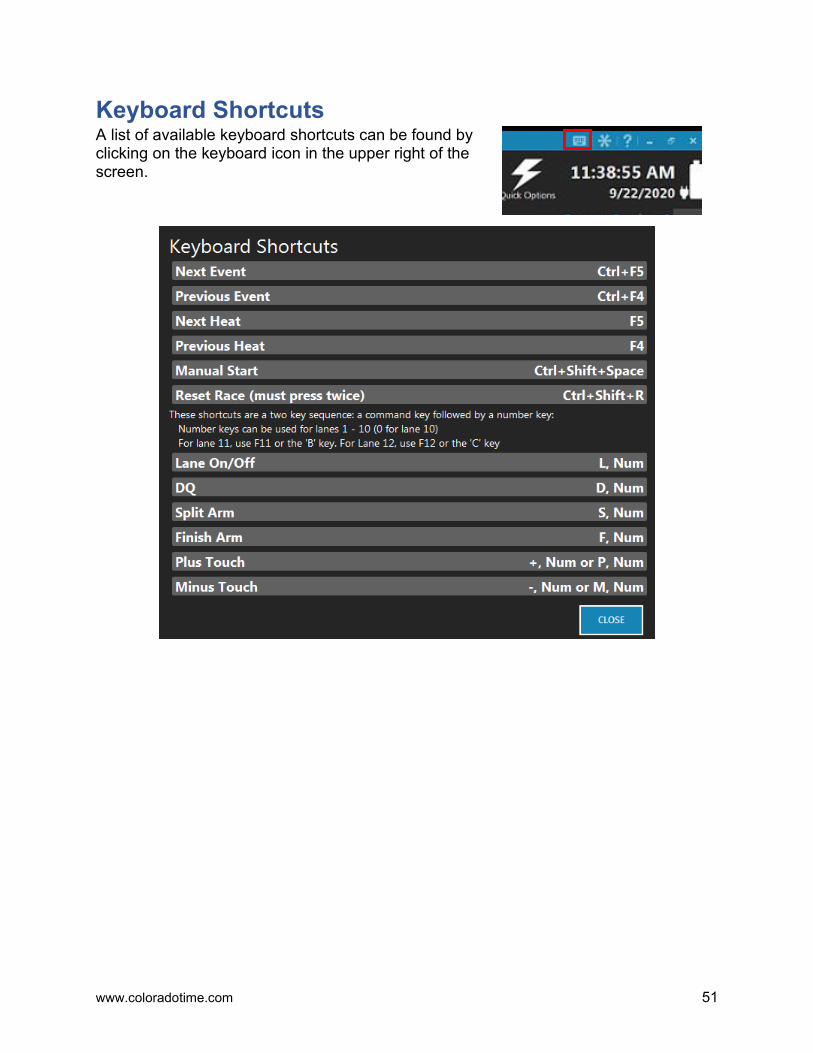
Keyboard Shortcuts A list of available keyboard shortcuts can be found by clicking on the keyboard icon in the upper right of the screen.

www.coloradotime.com 53
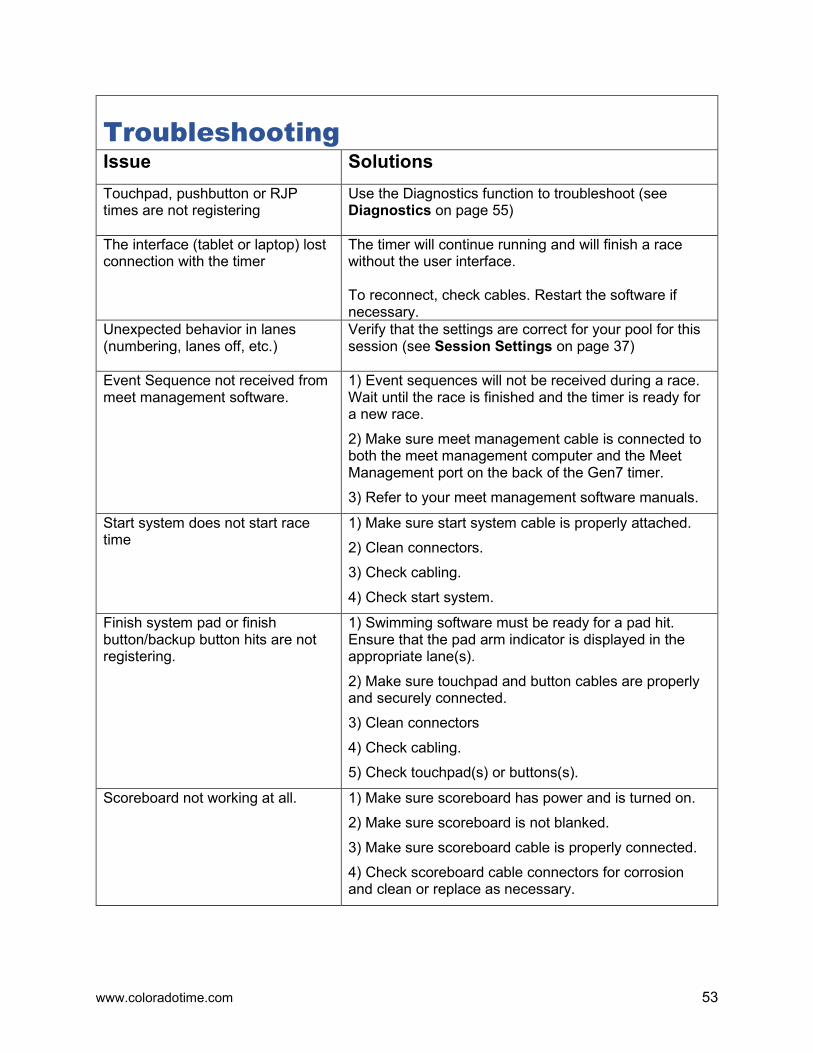
Troubleshooting Issue Solutions
Touchpad, pushbutton or RJP times are not registering
Use the Diagnostics function to troubleshoot (see Diagnostics on page 55)
The interface (tablet or laptop) lost connection with the timer
The timer will continue running and will finish a race without the user interface. To reconnect, check cables. Restart the software if necessary.
Unexpected behavior in lanes (numbering, lanes off, etc.)
Verify that the settings are correct for your pool for this session (see Session Settings on page 37)
Event Sequence not received from meet management software.
1) Event sequences will not be received during a race. Wait until the race is finished and the timer is ready for a new race. 2) Make sure meet management cable is connected to both the meet management computer and the Meet Management port on the back of the Gen7 timer. 3) Refer to your meet management software manuals.
Start system does not start race time
1) Make sure start system cable is properly attached. 2) Clean connectors. 3) Check cabling. 4) Check start system.
Finish system pad or finish button/backup button hits are not registering.
1) Swimming software must be ready for a pad hit. Ensure that the pad arm indicator is displayed in the appropriate lane(s). 2) Make sure touchpad and button cables are properly and securely connected. 3) Clean connectors 4) Check cabling. 5) Check touchpad(s) or buttons(s).
Scoreboard not working at all. 1) Make sure scoreboard has power and is turned on. 2) Make sure scoreboard is not blanked. 3) Make sure scoreboard cable is properly connected. 4) Check scoreboard cable connectors for corrosion and clean or replace as necessary.

54 [email protected] +1 970-667-1000
Issue Solutions
Scoreboard not showing expected results.
1) Make sure scoreboard cable is properly connected. 2) Check scoreboard cable connectors for corrosion and clean or replace as necessary. 3) Ensure that scoreboard DIP switches for each module are set to the proper physical address. 4) Check logical addresses in the Swimming software.
Event Sequence Download does not work.
3) Make sure meet management cable is connected to Meet management port on the back of the timer (see page 8). 4) Refer to your meet management program manuals.
Gen7 Software is unable to connect to Gen7 Timer
1) Check that the ethernet cable is securely plugged in to both devices. 2) If connecting via a switch or router, ensure that this device is powered on. 3) Ensure that your Windows networking settings match your timer settings. For most users, this will be the “Automatic Private IP Address” setting under “Alternate Configuration” under the “TCP/IP v4” properties of your ethernet controller. 4) Ask your local IT department if there is anything they need to do to get your Gen7 on to your facility network.
www.coloradotime.com 55
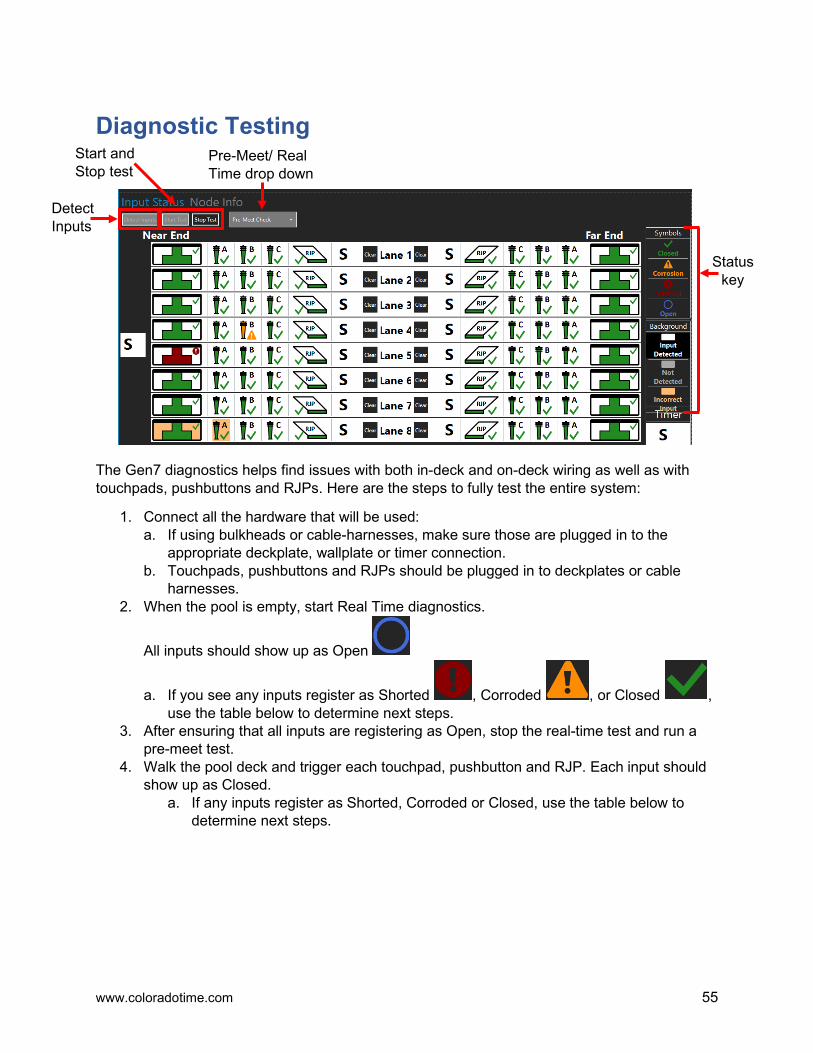
Diagnostic Testing
The Gen7 diagnostics helps find issues with both in-deck and on-deck wiring as well as with touchpads, pushbuttons and RJPs. Here are the steps to fully test the entire system:
1. Connect all the hardware that will be used: a. If using bulkheads or cable-harnesses, make sure those are plugged in to the
appropriate deckplate, wallplate or timer connection. b. Touchpads, pushbuttons and RJPs should be plugged in to deckplates or cable
harnesses. 2. When the pool is empty, start Real Time diagnostics.
All inputs should show up as Open
a. If you see any inputs register as Shorted , Corroded , or Closed , use the table below to determine next steps.
3. After ensuring that all inputs are registering as Open, stop the real-time test and run a pre-meet test.
4. Walk the pool deck and trigger each touchpad, pushbutton and RJP. Each input should show up as Closed.
a. If any inputs register as Shorted, Corroded or Closed, use the table below to determine next steps.
Status key
Start and Stop test
Pre-Meet/ Real Time drop down
Detect Inputs
56 [email protected] +1 970-667-1000
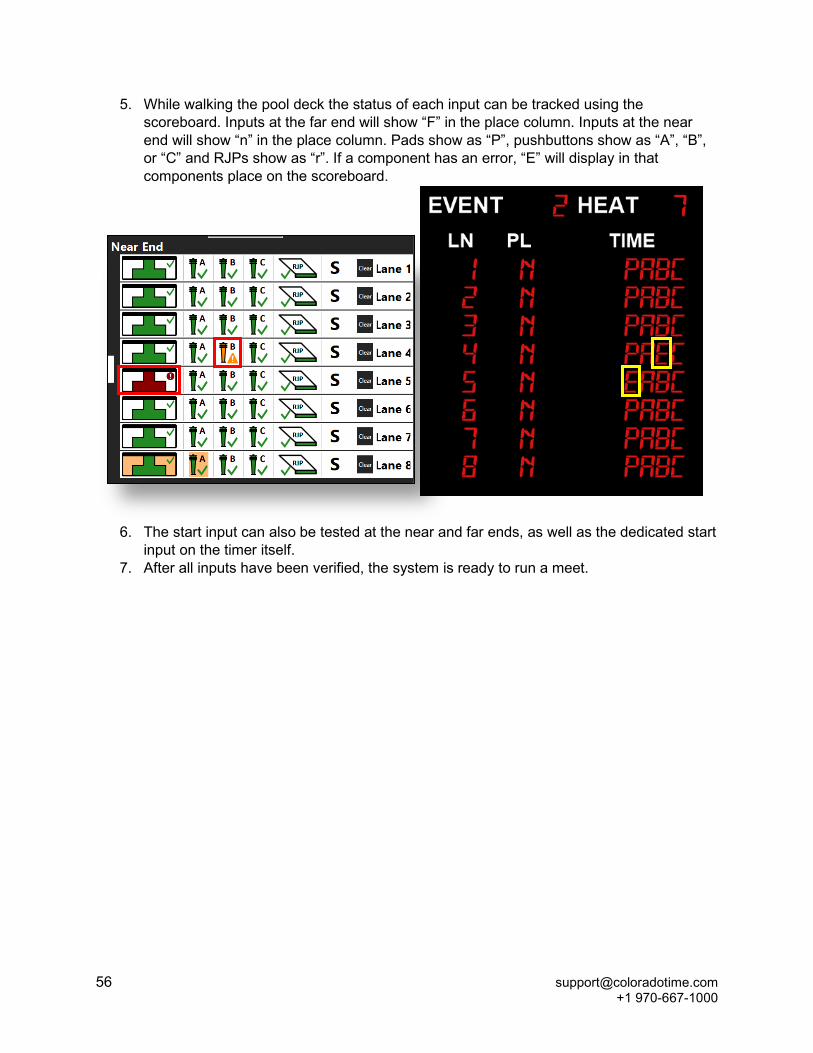
5. While walking the pool deck the status of each input can be tracked using the scoreboard. Inputs at the far end will show “F” in the place column. Inputs at the near end will show “n” in the place column. Pads show as “P”, pushbuttons show as “A”, “B”, or “C” and RJPs show as “r”. If a component has an error, “E” will display in that components place on the scoreboard.
6. The start input can also be tested at the near and far ends, as well as the dedicated start input on the timer itself.
7. After all inputs have been verified, the system is ready to run a meet.
www.coloradotime.com 57
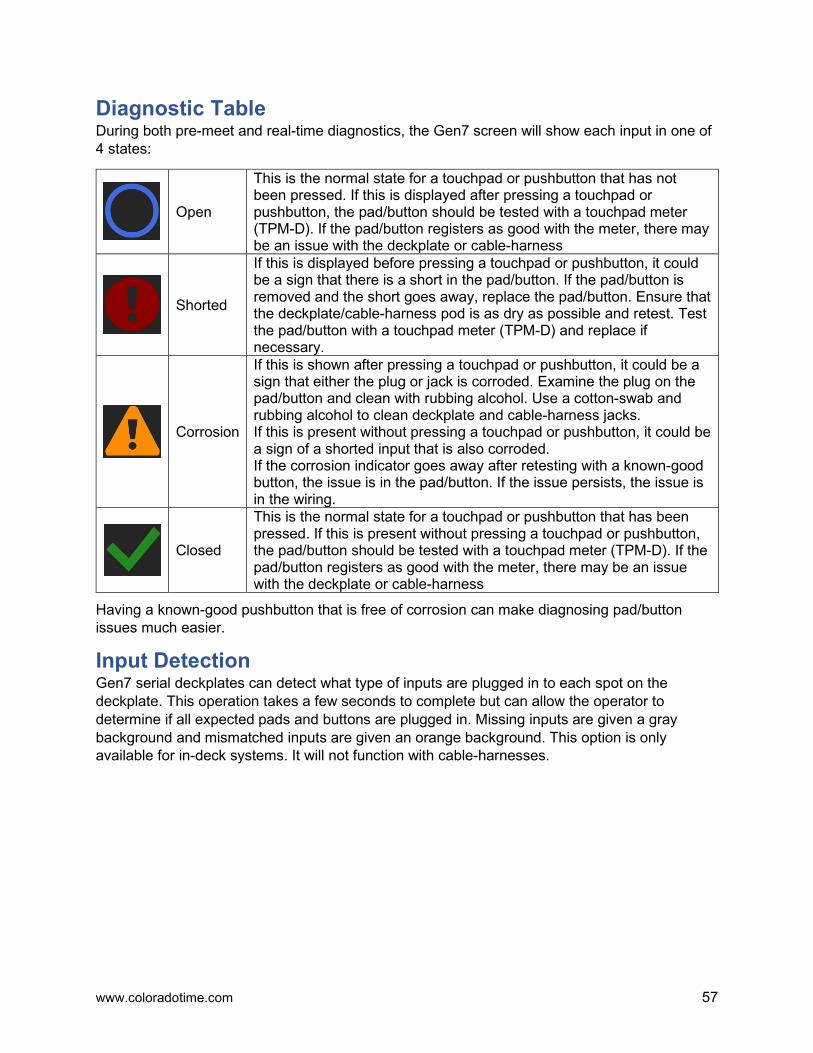
Diagnostic Table During both pre-meet and real-time diagnostics, the Gen7 screen will show each input in one of 4 states:
Open
This is the normal state for a touchpad or pushbutton that has not been pressed. If this is displayed after pressing a touchpad or pushbutton, the pad/button should be tested with a touchpad meter (TPM-D). If the pad/button registers as good with the meter, there may be an issue with the deckplate or cable-harness
Shorted
If this is displayed before pressing a touchpad or pushbutton, it could be a sign that there is a short in the pad/button. If the pad/button is removed and the short goes away, replace the pad/button. Ensure that the deckplate/cable-harness pod is as dry as possible and retest. Test the pad/button with a touchpad meter (TPM-D) and replace if necessary.
Corrosion
If this is shown after pressing a touchpad or pushbutton, it could be a sign that either the plug or jack is corroded. Examine the plug on the pad/button and clean with rubbing alcohol. Use a cotton-swab and rubbing alcohol to clean deckplate and cable-harness jacks. If this is present without pressing a touchpad or pushbutton, it could be a sign of a shorted input that is also corroded. If the corrosion indicator goes away after retesting with a known-good button, the issue is in the pad/button. If the issue persists, the issue is in the wiring.
Closed
This is the normal state for a touchpad or pushbutton that has been pressed. If this is present without pressing a touchpad or pushbutton, the pad/button should be tested with a touchpad meter (TPM-D). If the pad/button registers as good with the meter, there may be an issue with the deckplate or cable-harness
Having a known-good pushbutton that is free of corrosion can make diagnosing pad/button issues much easier.
Input Detection Gen7 serial deckplates can detect what type of inputs are plugged in to each spot on the deckplate. This operation takes a few seconds to complete but can allow the operator to determine if all expected pads and buttons are plugged in. Missing inputs are given a gray background and mismatched inputs are given an orange background. This option is only available for in-deck systems. It will not function with cable-harnesses.

www.coloradotime.com 59
Routine Maintenance Connectors Inspect the cable connectors on the Gen7 back panel every time you plug a cable into the connector(s). Clean as necessary.
To clean cable connectors, put two or three drops of alcohol on a cleaning cotton swab available at almost any electrical supply store, or a folded soft pipe-cleaner, and insert the swab into the connector. Pull the swab straight out. Move the swab to the next section of the connector and repeat. Do not slide the cotton swab along the inside of the connector. Damage to the contacts could result. Rinse the connectors with a damp cotton swab, and then dry with a dry swab using the same motion. Never use corrosive cleaners such as steel wool or corrosive chemicals such as Lime-A-Way® to clean these connectors!
Note: In order to reduce corrosion on the touchpad connectors, it is advised that you power off the touchpads when they are not being used.
Case The Gen7 case is made of high-impact plastic. Use any neutral detergent to clean the case. Do not use alcohol, thinner or other solvents. These products can change the color or otherwise damage the case.
Cables Inspect all cable and in-deck connectors for corrosion before use. All connectors must be corrosion-free for the timing system to operate properly.
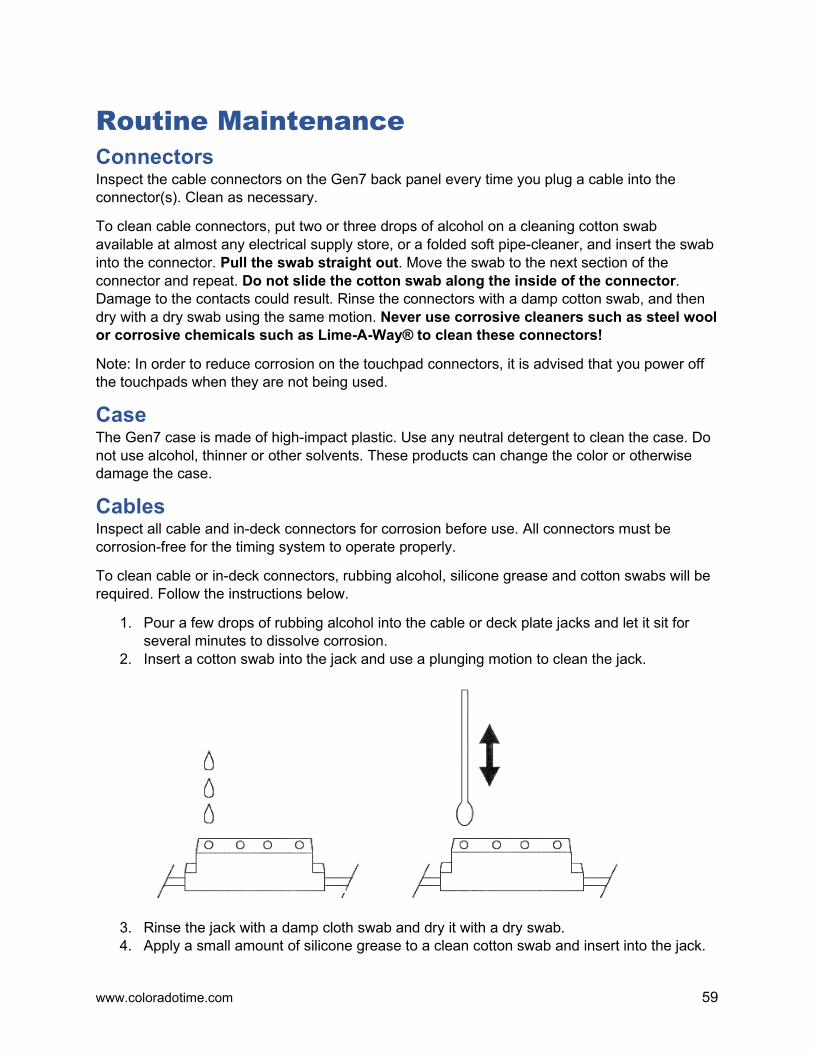
To clean cable or in-deck connectors, rubbing alcohol, silicone grease and cotton swabs will be required. Follow the instructions below.
1. Pour a few drops of rubbing alcohol into the cable or deck plate jacks and let it sit for several minutes to dissolve corrosion.
2. Insert a cotton swab into the jack and use a plunging motion to clean the jack.
3. Rinse the jack with a damp cloth swab and dry it with a dry swab. 4. Apply a small amount of silicone grease to a clean cotton swab and insert into the jack.
60 [email protected] +1 970-667-1000
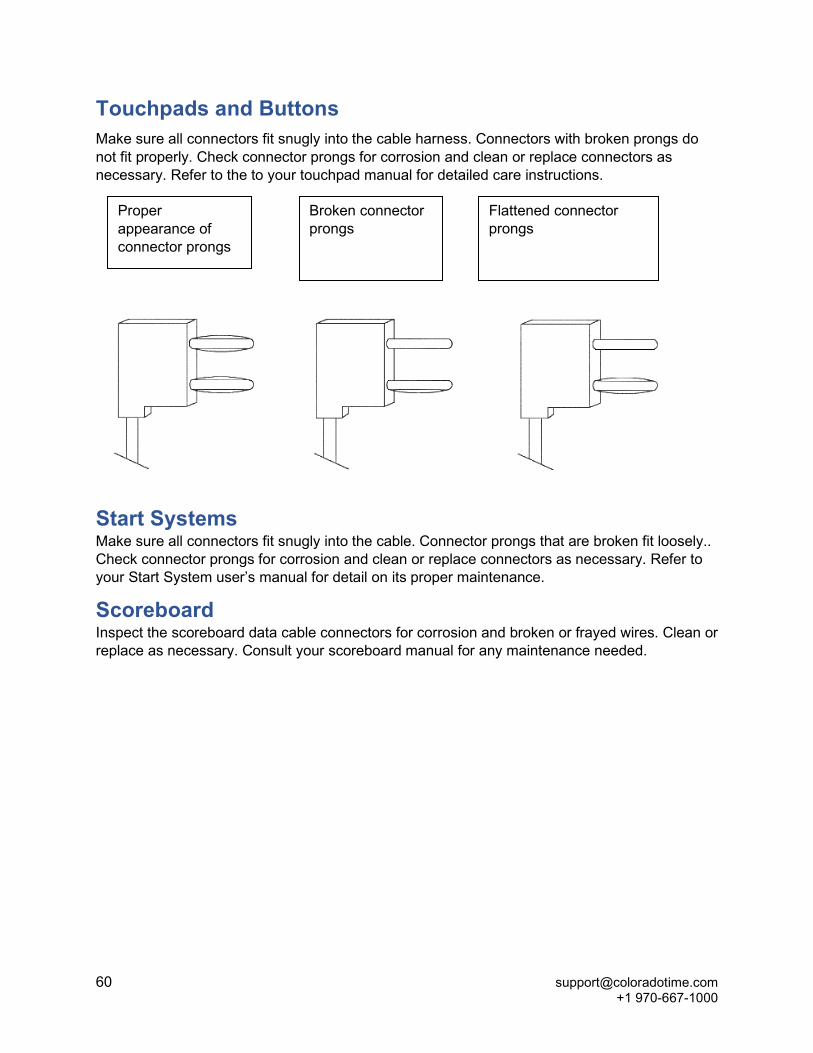
Touchpads and Buttons Make sure all connectors fit snugly into the cable harness. Connectors with broken prongs do not fit properly. Check connector prongs for corrosion and clean or replace connectors as necessary. Refer to the to your touchpad manual for detailed care instructions.
Start Systems Make sure all connectors fit snugly into the cable. Connector prongs that are broken fit loosely.. Check connector prongs for corrosion and clean or replace connectors as necessary. Refer to your Start System user’s manual for detail on its proper maintenance.
Scoreboard Inspect the scoreboard data cable connectors for corrosion and broken or frayed wires. Clean or replace as necessary. Consult your scoreboard manual for any maintenance needed.
Proper appearance of connector prongs
Broken connector prongs
Flattened connector prongs

www.coloradotime.com 61
Appendix A: Specifications Environmental Operating temperature: 0°C - 45°C, storage temperature -20°C - 70°C Humidity: 90% (non-condensing) Altitude: 0 to 3000 m
Electrical Use Class 2 power supply for the correct type of power outlet in your area: models R-920-055, R-920-056, R-920-057 or R-920-058 (12 VDC @ 7.5A) only. Battery: NiMH, rechargeable, 7.2V nominal, 10,000 mAh. Battery operating time: up to 6 hours of normal use with small 10 node in-deck system and/or cable harnesses; up to 3 hours of normal use with large 60 node in-deck system
Input and Output Connections (from top left to bottom right) Scoreboard output RS-485, differential pair, 3V, 300 mA max. Power [email protected] max, short cut protected. Scoreboard output RS-485, differential pair, 3V, 300 mA max. Power [email protected] max, short cut protected.
Scoreboard output RS-485, differential pair, 3V, 300 mA max. Power [email protected] max, short cut protected. USB B to PC (CTS expansion port): Bidirectional, powered by PC USB B to Meet Management PC: Bidirectional, powered by PC USB A: Bidirectional, powered by device, 5V, 500mA Ethernet port: 1GBit max, isolated Start input: 3.3V @1.7mA Speaker input/output: Only to be used with a Colorado Time Systems start system and speakers. Do not use other power amplifiers or speakers other than specified by Colorado Time Systems. Timing connections: In-deck [email protected] max, short cut protected. On-deck near and far end together 12V 200mA, short cut protected Power input: 12V, 7A max. Powers device and charges battery.
Installation/Maintenance This product is intended to be used in an indoor or outdoor swimming pool environment. When the timer is operated in the US it must be used in accordance with the National Electric Code. When the timer is operated elsewhere it must be used in accordance with all appropriate national and local electrical codes and regulations for the country of installation. Run the Gen7 Serial Timer in a safe distance from the pool where it won’t be splashed. If the Gen7 Serial Timer has been in a cold location, allow it to come to room temperature in a non-humid area before use to prevent condensation in the unit.
Using the Gen7 Timer in a manner not specified by Colorado Time Systems may cause the protection provided by the equipment to be impaired. There are no user serviceable parts in the Gen7 Timer. Do not attempt to open the enclosure. Removing or tampering with the labels covering the screws on the bottom of the unit voids the warranty.
Warranty is void if the product is misused, altered, tampered with or is installed or used in a manner that is inconsistent with Colorado Time System’s written recommendations, specifications and/or instructions, or fails to perform due to normal wear and tear.
62 [email protected] +1 970-667-1000
Gen7 serielles Zeitmeßgerät Umgebung Betriebstemperatur: 0°C - 45°C. Lagertemperatur -20°C - 70°C Luftfeuchtigkeit: 90% (nicht kondensierend) Höhe: 0 bis 3000 m
Elektrische Daten Nur mit Klasse 2 DC Stromversorgungs-Modellen R-920-056, R-920-057 oder R-920-058 (12 VDC @ 7.5A), passend für die korrekten Steckdosen Ihres Landes zu verwenden Batterie: Nickelmetallhydrid, wiederaufladbar, 7,2V, 10.000 mAh Betriebsdauer batteriebetrieben: bis zu 6 Stunden normalen Gebrauches mit einem kleinen eingebauten System (10 Deckverbindungen) und/oder Kabelsträngen, bis zu 3 Stunden mit einem großen eingebauten System (60 Deckverbindungen).
Eingänge und Ausgänge (von links oben nach rechts unten) Anzeigetafelausgang : RS-485, differenzielle Leitungen, 3V, 300 mA max. 12V, 2,5A Stromversorgung, kurzschlussgeschützt. Anzeigetafelausgang : RS-485, differenzielle Leitungen, 3V, 300 mA max. 12V, 2,5A Stromversorgung, kurzschlussgeschützt.
Anzeigetafelausgang : RS-485, differenzielle Leitungen, 3V, 300 mA max. 12V, 2,5A Stromversorgung, kurzschlussgeschützt. USB B zu PC (CTS Expansionsport): Bidirektional, versorgt vom PC USB B zu Wettkampf Management PC: Bidirektional, versorgt vom PC USB A: Bidirektional, versorgt vom Zeitmeßgerät Ethernet Verbindung: 1GBit max, isoliert Start Eingang: 3.3V @1,7mA Lautsprechereingang/ausgang: Nur mit einem Startsystem und Lautsprechern von Colorado Time Systems zu verwenden. Zeitmeßverbindungen: Für eingebautes System (in-deck) 12V@2,5A max, kurzschlussgeschützt. Für nicht eingebautes System (on-deck) 12V@200mA max, kurzschlussgeschützt. Stromversorgungseingang: 12V, 7A max. Versorgt das Gerät und lädt die Batterie, nur mit Klasse 2 Gleichstromstromversorgungs-Modell R-920-056, R-920-057 or R-920-058 (12 VDC @ 7,5A) zu verwenden
Bestimmungsgemäßer Gebrauch Dieses Produkt ist für die Benutzung in Swimming Pools für innen und außen bestimmt. Die Installation und Verwendung des Gen7 Zeitmeßgerätes muß gemäß den landesüblichen Vorschriften erfolgen. Das Gen7 Zeitmeßgerätes sollte in einer sicheren Entfernung vom Pool verwendet werden damit es nicht angespritzt wird. Wenn das Gerät im Kalten gelagert war muss es vor Verwendung auf Raumtemperatur gebracht werden um Kondensation zu vermeiden.
Installation/Wartung Wenn das Gen7 Zeitmeßgerät nicht so installiert und verwendet wird wie von CTS spezifiziert, können die Funktion und die Schutzvorrichtungen beeinträchtigt.werden. Es gibt keine weiteren notwendigen Service-Wartungsarbeiten für das Gen7 Zeitmeßgerät als die routinemäßigen Reinigungsarbeiten wie sie im Handbuch beschrieben werden. Versuchen Sie nicht, das Gerät zu öffnen. Wenn die Aufkleber die die Geräteschrauben abdecken entfernt oder verletzt werden, erlischt die Garantie.


Customer Service Department www.coloradotime.com Email: [email protected] Phone: +1 970-667-1000 Toll Free U.S. and Canada 800-287-0653 Fax: +1 970-667-1032