Embed Size (px)
Citation preview

Serial Analysis of Gene Expression
Detailed Protocol
Victor E. Velculescu, Lin Zhang, Wei Zhou, Giovanni Traverso, Brad St. Croix,
Bert Vogelstein and Kenneth W. Kinzler
Johns Hopkins Oncology Center and Howard Hughes Medical Institute,
424 North Bond Street Baltimore, MD 21231
FAX (410) 955-0548
This protocol is provided for noncommercial use only
Version 1.0e June 23, 2000

2
Table of Contents Page
Overview 3 Methods
1. mRNA preparation 4 2. cDNA synthesis 4 3. Cleavage of biotinylated cDNA with anchoring enzyme 5 4. Binding biotinylated cDNA to magnetic beads 6 5. Ligating linkers to bound cDNA 6 6. Release of cDNA tags using Tagging Enzyme 7 7. Blunt ending released cDNA tags 7 8. Ligating tags to form ditags 8 9. PCR amplification of ditags 8 10. Isolation of ditags 10 11. Purification of ditags 12 12. Ligation of ditags to form concatemers 14 13. Cloning concatemers and sequencing 16
Appendix A: Special Reagents to order 19 Appendix B: Solutions 20 Appendix C: Gel Electrophoresis and miscellaneous methods 21 Appendix D: Linker & primer sequences 23 Appendix E: Frequently asked questions and answers 24

3
Overview
Serial analysis of gene expression (SAGE) is an approach that allows the rapid and detailed analysis of thousands of transcripts (Science 270: 484-487, 1995, Cell 88: 243-251, 1997). For more information on SAGE applications and recent publications, visit the SAGE web site: http://www.sagenet.org/. An outline of SAGE with numbers corresponding to the steps in this protocol is presented below.
AAAAATTTTT
AAAAATTTTT
AAAAATTTTT
Cleave with Anchoring Enzyme (AE) Bind to Streptavidin Beads
Divide in HalfLigate to Linkers (A + B)
Cleave with Tagging Enzyme (TE) Blunt End
GGATGCATGCCTAC
XXXXXXXXXXGTACXXXXXXXXXX
Primer A
Primer A
GGATGCATGCCTAC
OOOOOOOOOOGTACOOOOOOOOOO
Primer B
Primer B
----- ---------- -----
CATGXXXXXXXXXXOOOOOOOOOOCATGXXXXXXXXXXOOOOOOOOOOCATGGTACXXXXXXXXXXOOOOOOOOOOGTACXXXXXXXXXOOOOOOOOOOGTAC
Ligate and Amplify with Primers A and B
GGATGCATGCCTAC
XXXXXXXXXXOOOOOOOOOOCATGGTACXXXXXXXXXXOOOOOOOOOO
CATCCGTACGTAGG
Cleave with Anchoring EnzymeIsolate DitagsConcatenate and Clone
DITAG
AAAAATTTTTGTAC
AAAAATTTTTGTAC
AAAAATTTTTGTAC
AAAAATTTTT
CATGGTACB
AAAAATTTTT
CATGGTACB
AAAAATTTTT
CATGGTACB
AAAAATTTTT
CATGGTACA
AAAAATTTTT
CATGGTACA
AAAAATTTTT
CATGGTACA
TE AE Tag TE AE Tag
TAG 1 TAG 2 TAG 3 TAG 4AE AE AEDITAGDITAG
1,2
3,4
5
6,7
8,9
10,11,12,13

4
Methods 1. mRNA preparation •Prepare total RNA from tissue or cells of choice using standard methods (guanidium isothiocynate, RNAgent (Promega), Trizol reagent (GibcoBRL), etc.). •polyA+ RNA which can be obtained in a variety of ways including use of Messagemaker kit (GibcoBRL Cat. No. 10298-016) following manufacturer=s protocol. �500ug to 1mg of total RNA usually provides 5-20ug polyA RNA. Be sure to check integrity of RNA by gel electrophoresis and northern hybridization. 2. cDNA synthesis ����Before beginning, the following must be obtained:
•••• RNA, at least 5ug polyA+ RNA, checked for quality by northern hybridization. •••• Biotinylated oligo-dT, checked for biotinylation by streptavidin gel-shift assay (see Appendix C). •••• Linkers, kinased and tested by self ligation (see Appendix D)
•Synthesize cDNA using Superscript Choice System for cDNA synthesis (GibcoBRL Cat. No. 18090-019) with a gel-purified 5' biotinylated oligo-dT (Integrated DNA Technologies, Inc.) following BRL's protocol. �2.5ug biotinylated oligo-dT are used instead of the oligo-dT that comes with the kit. A. First Strand Synthesis Contents Volume Biotin-dT (1 ug/ul) 2.5ul PolyA+ RNA (5ug) adjusted with DEPC treated dH20 4.5 Heat to 70°C for 10min and place on ice. Spin tube in microfuge and add the following 5X First Strand Buffer (F1) 4 ul 0.1M DTT (F5) 2 ul 10mM dNTPs (C1) 1 ul DEPC treated dH20 (C2) 1 ul Superscript II RT 5 ul

5
• Incubate for 1hr at 37°C, then place on ice •Remove 1ul for gel analysis (see below). B. Second Strand Synthesis Contents Volumes 1st strand reaction products 19 ul DEPC teated dH20 94 ul 5X 2nd strand buffer 30 ul 10mM dNTPs 3 ul E. coli DNA ligase 1 ul E. coli DNA Polymerase I 4 ul E. coli RNase H 1 ul •Mix gently and then incubate for 2 hours at 16°C, then place on ice •Add 2ul (10units) of T4 DNA Polymerase and continue incubating at 16°C for 5 minutes •Add 10ul 0.5M EDTA (pH 7.5), heat to 70°C for 10 minutes •After second strand synthesis, add 50ul of dH20, extract with PC8 twice (phenol:chloroform 1:1, pH 8) – do not be greedy when removing aqueous layer!, then ethanol precipitate cDNA,
200 ul sample 133ul 7.5M NH4OAc
3ul glycogen 777ul 100% EtOH
•Wash twice with 70% ethanol •Centrifuge and remove ethanol and resuspend in 20ul LoTE �Check integrity of cDNA by gel electrophoresis (run 1ul of the 1st strand and 2ul of the 2nd strand synthesis. The 2nd strand synthesis product should yield a uniform intense smear ranging from several hundred bp to over 10kb). 3. Cleavage of biotinylated cDNA with anchoring enzyme �Store NlaIII at –80°C •Mix the following components: Contents Volume Sample cDNA (1/2 of total cDNA) 10ul LoTE 163ul BSA (100X) (NEB) 2ul Buffer 4 (10X) (NEB) 20ul Nla III (10 U/ul) (NEB Cat. No. 125S) 5ul

6
• Incubated at 37°C for 1 hour: •Extract with equal volume PC8, ethanol precipitate,
200 ul sample 133ul 7.5M NH4OAc
3ul glycogen 777ul 100% EtOH
•Wash twice with 70% ethanol, •Centrifuge and remove ethanol •Resuspend in 20ul LoTE. 4. Binding biotinylated cDNA to magnetic beads ����Note there are 2 tubes for each sample •Add 100ul Dynabead M-280 Streptavidin slurry (Dynal Cat. No. 112.05, 10mg/ml) to each of 2 1.5ml microcentrifuge tubes. •Use magnet to immobilize beads and remove supernatant. •Wash beads once as follows: add 200ul 1X B+W buffer, mix, magnet, remove wash. •Add 100ul 2X B+W to each microcentrifuge tube, 90ul dH20 and 10ul cDNA restriction products to each tube. • Incubate 15 minutes at room temperature. Mix intermittently. •Wash as above three times with 200ul 1X B+W, once with 200ul LoTE, removing the wash each time. •Proceed immediately to step 5 below. 5. Ligating linkers to bound cDNA ����Linkers (Appendix D) should be obtained gel-purfied after synthesis from oligo company (we use Integrated DNA Technologies for linker syntheses). ���� Linkers 1B and 2B must be kinased and annealed to their complementary linker 1A and 2A, respectively, before ligation. Kinasing can be performed chemically at the time of oligo synthesis or enzymatically as detailed in Appendix C. ����Linker kinasing should be tested by self-ligation as described in Appendix C. �One tube for linker 1, the other for linker 2 •Remove the LoTE from step 4 and process the two microcentrifuge tubes as follows:

7
Contents Tube1 Tube2 Dynabeads bound to cDNA fragments beads beads LoTE 25ul 25ul Annealed Linker 1A,B (200ng/ul) (See Appendix D) 5 ul 0 ul Annealed Linker 2A,B (200ng/ul) (See Appendix D) 0 ul 5 ul 5X Ligase Buffer (GibcoBRL) 8ul 8ul •Resuspend Dynabead slurry by mixing microcentrifuge tubes gently. •Heat microcentrifuge tubes at 50°C for 2 minutes, then let sit at room temperature for 15 minutes. •Add 2ul T4 Ligase (High concentration 5U/ul; GibcoBRL Cat. No. 15224-041) to each microcentrifuge tube. •Incubate for 2 hours at 16°C, gently mixing intermittently. •After ligation, wash each microcentrifuge tube 3 times with 200ul 1X B+W buffer •Transfer contents to new tube •Wash once with 200ul 1X B+W buffer and twice with 200ul 1X Buffer 4 (NEB). 6. Release of cDNA tags using Tagging Enzyme •Add the following to each microcentrifuge tube after washing magnetic beads.
Contents Tube1 Tube2 Beads sample 1 or 2 beads beads LoTE 86ul 86ul 10X Buffer 4 (NEB) 10ul 10ul 100X BSA (NEB) 2ul 2ul BsmFI (2U/ul; NEB Cat. No. 572S) 2ul 2ul
•Incubate at 65°C for 1 hour, gently mixing intermittently. •Magnet, collect supernatant. •Extract with equal volume PC8, ethanol precipitate
200 ul sample 133ul 7.5M NH4OAc
3ul glycogen 1000ul 100% EtOH
•Spin for 30 min at 4°C •Wash twice with 70% ethanol, centrifuge and remove ethanol, •Resuspend in 10ul LoTE.
8
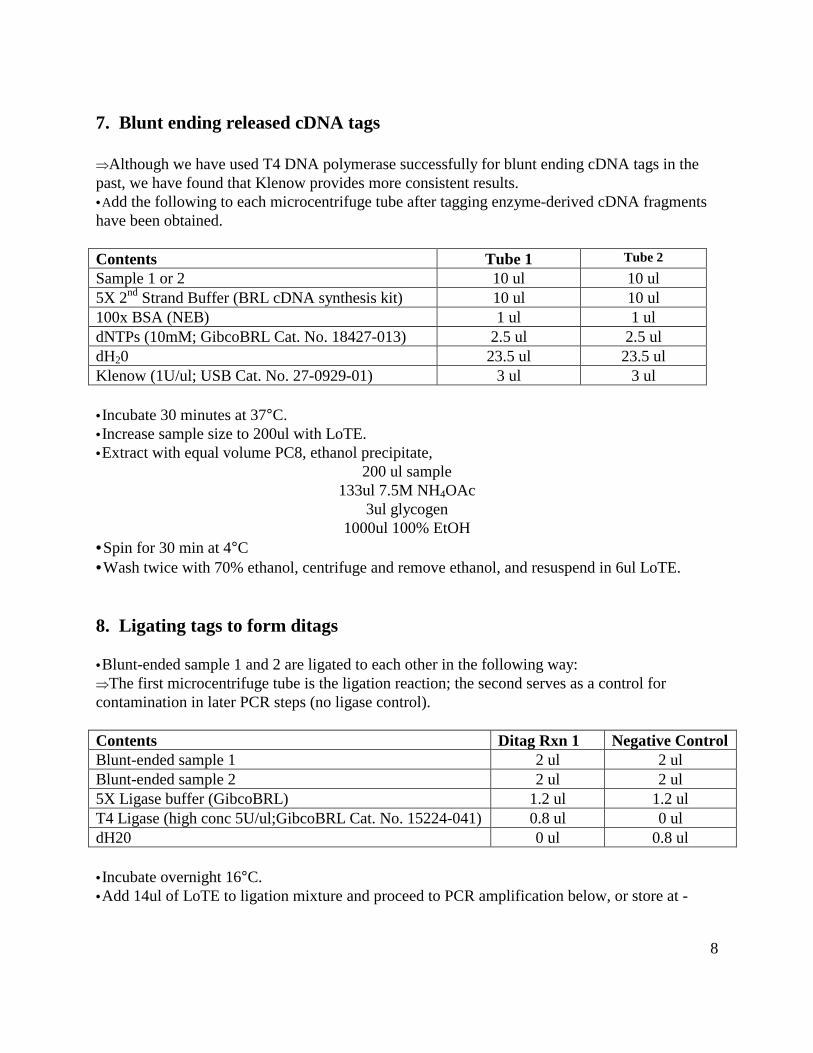
7. Blunt ending released cDNA tags �Although we have used T4 DNA polymerase successfully for blunt ending cDNA tags in the past, we have found that Klenow provides more consistent results. •Add the following to each microcentrifuge tube after tagging enzyme-derived cDNA fragments have been obtained. Contents Tube 1 Tube 2 Sample 1 or 2 10 ul 10 ul 5X 2nd Strand Buffer (BRL cDNA synthesis kit) 10 ul 10 ul 100x BSA (NEB) 1 ul 1 ul dNTPs (10mM; GibcoBRL Cat. No. 18427-013) 2.5 ul 2.5 ul dH20 23.5 ul 23.5 ul Klenow (1U/ul; USB Cat. No. 27-0929-01) 3 ul 3 ul •Incubate 30 minutes at 37°C. •Increase sample size to 200ul with LoTE. •Extract with equal volume PC8, ethanol precipitate,
200 ul sample 133ul 7.5M NH4OAc
3ul glycogen 1000ul 100% EtOH
•Spin for 30 min at 4°C •Wash twice with 70% ethanol, centrifuge and remove ethanol, and resuspend in 6ul LoTE. 8. Ligating tags to form ditags •Blunt-ended sample 1 and 2 are ligated to each other in the following way: �The first microcentrifuge tube is the ligation reaction; the second serves as a control for contamination in later PCR steps (no ligase control).
Contents Ditag Rxn 1 Negative ControlBlunt-ended sample 1 2 ul 2 ul Blunt-ended sample 2 2 ul 2 ul 5X Ligase buffer (GibcoBRL) 1.2 ul 1.2 ul T4 Ligase (high conc 5U/ul;GibcoBRL Cat. No. 15224-041) 0.8 ul 0 ul dH20 0 ul 0.8 ul •Incubate overnight 16°C. •Add 14ul of LoTE to ligation mixture and proceed to PCR amplification below, or store at -

9
20°C. 9. PCR amplification of ditags �Amplify ditags using primers 1 and 2 (Appendix D). �Optimize amplification by using different dilutions of template (1ul of 1/50, 1/100 and 1/200 dilutions of ligation product per PCR reaction). •Perform PCR using the following ingredients: Contents Per reaction 10 rxn mix 10X PCR Buffer (see appendix A) 5 ul 50 ul DMSO (Sigma Cat. No. D-2650) 3 ul 30 ul 10 mM dNTPs (GibcoBRL) 7.5 ul 75 ul Primer 1 (350 ng/ul) 1 ul 10 ul Primer 2 (350 ng/ul) 1 ul 10 ul dH20 30.5 ul 305 ul Platinum Taq (5U/ul; GibcoBRL Cat. No. 10966-034) 1 ul 10 ul Ligation Product (at various dilutions) 1 ul
•Aliquot 49ul of each 10 reaction mix to each tube. •Add 1ul of each tested dilution to the reaction. •Add 30ul mineral oil to the reaction, perform PCR at following temperatures (optimized for HYBAID PCR machine): Cycles Temp / time 1 cycle 94oC 1 min 26-30 cycles 94°C 30"; 55°C 1 min; 70°C 1 min; 1 cycle 70°C 5 min at end. ����No ligase sample should be amplified for 35 cycles �The appropriate cycle number is critical for isolating an adequate amount of DNA for SAGE. Too few cycles will result in a low yield and may cause problems with subsequent steps. Too many cycles will give erratic results and can also result in low yields (see trouble shooting section). Therefore, we recommend trying various cycle numbers (eg. 26, 28, 30) to determine the optimal number. �We have recently found batch to batch variability in dNTPs. Occasionally at the above dNTP concentrations, PCR reactions are inhibited. We recommend optimizing dNTP concentrations before performing large-scale amplifications. Typically, for the optimization step we use final dNTP concentrations from 0.8 to 2.0 mM in 0.2mM increments (4ul to 10ul, in 1ul increments of the 10mM dNTP stock solution in the above reaction mixture). Use the highest dNTP

concentration where the 102bp band (the ditag PCR product) is robustly amplified. •Remove 10ul from each reaction and run on a 12% polyacrylamide gel (Appendix C) or pre-poured 20% polyacrilamide gel (Novex Cat. No. EC6315 or EC6225), using a 20bp ladder as a marker (10ul of a 1:5 dilution of the stock solution from GenSura Cat. NO. SLL-101). �Amplified ditags should be 102bp in size. �A background band of equal or lower intensity occurs around 80 bp. All other background bands should be of substantially lower intensity. �The no ligase samples should not contain any amplified product of the size of the ditags even at 35 cycles.
•After PCR condcontaining 50ul r•We usually use (Omniplate 96; M 10. Isolation •Pool PCR react•Extract with eqtubes, ethanol pr
102 bp
102 bp PCR Products
Cycle number 25 26
10
itions have been optimized, large scale PCR (two to three 96-well plates eactions/well) can be performed. a 300 reaction PCR premix which we aliquot into three 96 well plates
arsh Biomedical Products, Cat # J3-2031) of 50ul PCR reactions/well.
of ditags
ions into eight microfuge tubes (approximately 450ul each) ual volume PC8, transfer 300ul aqueous solution to twelve 1.6ul microcentrifuge ecipitate
300ul sample,

11
133ul 7.5M NH4OAc 5ul glycogen,
1000ul 100% ethanol, •Wash twice with 70% ethanol, resuspend each tube in 18ul LoTE (216ul LoTE total). • (Optional) Dot quantitate the DNA sample, and the total amount of DNA should be between 60 to 100ug. �Alternative approach: •Pool PCR products into one 50ml conical tube. •Add equal volume PC8 (approximately 13ml), spin in swinging bucket rotor (SIGMA 4K15, rotor 11156/13115) at 5100 rpm for 10 minutes. •Transfer aqueous phase to a new 50ml tube, and ethanol precipitate
11.5 ml product, 5.1 ml 7.5M ammonium acetate,
191 ul glycogen, 38.3 ml ethanol
•Vortex vigorously, spin in fixed angle rotor (SIGMA 4K15, rotor 12169) at 10,000 rpm for 30 minutes. •Wash with 5ml 70% ethanol, vortex and spin for 5 minutes in swing bucket rotor at 5100 rpm for 5 minutes. •Resuspend in 216ul LoTE •Add 54ul 5X sample buffer to this sample (270ul total volume). •Load 10ul of the sample into each well of 9 wells of three 12% polyacrylamide 10 well gels (samples are loaded in 27 total lanes; 10ul sample per lane loaded with extralong micropipet tips). •10ul of a 20 bp ladder is used as a marker on each gel. •Run gel for 3 hours 20 minutes at 160V. •Stain gel using SYBR Green I stain, at 1:10,000 dilution (add 20ul SYBR Green I to 200mls 1X TAE Buffer (Appendix C) in foil wrapped container; let gel soak in stain for 15 minutes. •Visualize on UV box using SYBR green filter. �Amplified ditags should run at 102 bp while a background band runs at about 80 bp. •Cut out only amplified ditags from gel, and place 3 cut-out-bands in a 0.5ml microcentrifuge tube (nine 0.5ml tubes total) whose bottom has been pierced with a 21 gauge needle to form a small hole of about 0.5mm diameter. •Place 0.5ml microcentrifuge tubes in 2.0ml siliconized microcentrifuge tubes (Ambion Cat No. 12475) and spin in microfuge at full speed for 2 minutes (this serves to break up the cut-out-bands into small fragments at the bottom of the 2.0ml microcentrifuge tubes). •Discard 0.5ml tubes, add 250ul LoTE and 50ul 7.5M ammonium acetate to each 2.0ml tube. •Tubes can remain at this point at 4ΕC overnight. •Then, vortex each tube, and place at 65ΕC for 15 min.

12
•Place 5ul of LoTE on the membrane of each of 18 SpinX tubes. •Transfer contents of each tube to 2 SpinX microcentrifuge tubes (9 tubes transfered to 18 SpinX microcentrifuge tubes). •Spin each SpinX in microcentrifuge for 5 minutes at full speed. •Consolidate sets of 2 eluates (300ul total) and transfer to 1.6ml tube. •Ethanol precipitate eluates
300ul sample 5ul glycogen
133ul 7.5M NH4OAc 1000ul 100% ethanol
•Spin in a microcentrifuge at full speed for 15 minutes. •Wash twice with 75% ethanol. •Resuspend DNA in 10ul LoTE in each tube. •Pool samples into one tube (90ul total) and dot quantitate. •Total amount of DNA at this stage should be 10 to 20ug. •Digest PCR products with NlaIII by adding the following to the sample tube:
Contents Tube PCR products in LoTE 90ul LoTE 226 10X NEB Buffer 4 40ul BSA (100X; NEB) 4ul Nla III (10 U/ul; NEB) 40ul •Incubate 1 hr 37°C. 11. Purification of ditags �Biotinylation of Primer 1 and Primer 2 allows the removal of linker products following NlaIII digestion by use of streptavidin-linked magnetic beads. Historically we removed the linkers by gel purifying the ditags and have generated many libraries without the use of biotinylated primers. However, we have found that addition of this extra purification step ensures complete removal of linkers which can poison the subsequent ditag concatamerization reaction by capping the concatamer ends, and rendering the concatamers unclonable. In our experience the combination of these two purifications techniques is better than the use of either alone. Removal of linkers by steptavidin beads can be done either before or after gel purification. We prefer the former because it allows us to visualize the purity of the ditags following removal of linkers by streptavidin-linked magnetic beads.

13
•Linker purification: 1. During the NlaIII digestion, 1600µl of Dynal streptavadin magnetic beads is placed into 2
tubes (800ul each) and each is prewashed 3 times with 800ul 1X B&W wash containing 1X BSA (NEB). After adding the last wash, aliquot 200µl into each of 8 tubes (2 for each of 4 purification cycle). Label four tubes A through D, do this twice for each set (e.g. A1,B1,C1, D1 and A2, B2, C2, D2).
2. To the completed NlaIII digest, add 400ul 2X B&W buffer and 4ul 100X BSA. Using a magnet, remove wash buffer from the first 2 tubes containing beads i.e. A1 & A2. Aliquot the 800ul digest mix to both tubes (i.e. 400ul into A1 and A2) (purification cycle 1). Mix end over end at RT 15 min (Labquake rotator).
3. Place on magnet 2 min. At same time place second set 200µl aliquot of beads onto magnet. Remove wash buffer from second 200µl aliquot of beads i.e. B1 & B2. Transfer sup from first set of tubes i.e. A1 & A2 to B1 & B2 respectively.
4. Immediately add 200µl of rinse (1X B&W, 1X BSA) to first aliquot of beads (tubes A1 & A2). Pipette back and forth several times to remove residual ditags. Mix end over end A1, A2, B1 & B2 at room temp for 15 minutes.
5. Remove sup from C1 & C2. Transfer sup from B1 & B2 to C1 & C2 respectively. Transfer sup from A1 & A2 to B1 & B2 respectively. Mix end over end for 15 minutes.
6. Remove sup from D1 & D2. Transfer C1 & C2 to D1 & D2 respectively. Transfer B1 & B2 to C1 & C2. Mix end over end for 15minutes.
Collect sup from D1 & D2 and transfer to new tubes. Transfer sup from C1 & C2 to D1 & D2 respectively. Mix end over end for 15’. Consolidate supernatants (~550ul in each of 2 tubes). �We have noted that the ditags, although very stable in the present of high salt, occasionally melt in the presence of low salt especially if the temperature rises above RT or DNA pellets are allowed to dry. Therefore, the following steps are performed on ice until samples are placed in the high salt TAE gel buffer. Also, pellets are resuspended in TE instead of LoTE. •Extract with equal volume PC8. •Pool aqueous phases and transfer into 5 tubes and then ethanol precipitate in dry ice as follows:
200ul Sample 66ul 7.5 M NH4OAc
5ul Glycogen 825ul 100% EtOH
•Vortex •Place in dry-ice/methanol bath for 15 min •Warm at RT for 2 min until solution has melted •Spin at 4°C for 15 min •Wash once with cold 75% ethanol, remove ethanol traces with a needle-nose pipette tip •Resuspend pellet in each tube in 6ul of cold TE (not LoTE) •Pool resuspended DNA into 1 tube (30ul total).

•On ice add 7.5ul 5X sample buffer (37.5ul total volume) •Load this sample into 4 lanes of a 12% polyacrylamide gel (10-well) and run at 160 V for 2.5 hrs. •Stain gel using SYBR Green I stain, at 1:10,000 dilution
•Cut out 24-26tube (2 tubes to•Pierce the botmicrocentrifug•Discard 0.5mlthe tubes, and p�Longer incubsignificantly hi•Use 4 SpinX t•Ethanol precip
•Place in dry-ic•Wash 2X with•Resuspend ea 12. Ligation �Length of lig
(With (Wit
Released Ditagsout linker purification)
bp band from 4 lanes, and place 2 cut-out-batal).
tom of 0.5ml tube with a 21 gauge needle, ane tubes and spin in microfuge at full speed fo tubes, add 250ul TE and 50ul 7.5M ammonilace at 37°C (not 65°°°°C!) for 15 min. ations (even overnight) can be performed bugher yields. ubes as above to isolate eluate. itate in 3 tubes (200ul each)
200 ul sample 66ul 7.5M NH4OAc
5ul glycogen 825ul 100% Ethanol
e/methanol bath for 10 min, spin at 4°C for cold 75% ethanol.
ch DNA sample in 2.5ul cold TE (7.5ul total)
of ditags to form concatemers
ation time depends on quantity and purity of
26 bp ditag
Released Ditags h linker purification)
14
nds in each 0.5ml microcentrifuge
d place the tubes in 2.0ml siliconized r 2 min. um acetate to 2.0ml tubes. •Vortex
t do not appear to result in
15 min
.
ditags.

15
�Typically, several hundred nanograms of ditags are isolated and produce large concatemers when the ligation reaction is carried for 1 to 3 hours at 16°C (lower quantities or less pure ditags will require longer ligations). •Mix the following: Contents Tube Pooled purfied ditags 7ul 5x Ligation Buffer (BRL) 2ul T4 Ligase (high concentration 5U/ul; GibcoBRL Cat. No. 15224-041) 1ul • Incubate 1-3 hours at 16 oC. •Afterwards, add 2.5ul 5X sample buffer to ligation reaction. •Heat sample 65oC 5 min then place on ice. �Polyacrylamide gel electrophoresis to separate concatemers • In the first lane of an 8% polyacrilamide gel (see Appendix C), load 10ul 1 kb ladder (25ng/ul) as a marker. •Load entire concatenated sample onto the third well (ie. one lane). •Samples are run at 130 volts for 3 hours. •Stain gel with SYBR Green I 1:10,000 dilution. •Visualize on UV box using SYBR green filter. �Concatemers will form a smear on gel with a range from about one hundred base pairs to several kilobases. We usually isolate region 600-1200bp and 1200bp to 2500bp.
•Place each of these gel pieces into a 0.5ml microcentrifuge tube (2 tubes total).
Concatemer
600 – 1200 bp 1200 – 2500 bp

16
•Pierce bottom of the 0.5ml tube with a 21 gauge needle, and place the tubes in a 2.0ml microcentrifuge tube and spin in microfuge at full speed for 2 min. •Discard 0.5ml tubes, add 300ul LoTE to 2.0ml tubes. •Vortex the tubes, and place at 65°C for 15 min. •If necessary this incubation can be extended to overnight but yields are not significantly increased. •Transfer contents of each tube to two SpinX microcentrifuge tubes (4 SpinX tubes total). •Spin SpinX tubes in microcentrifuge for 5 minutes at full speed. •Pool eulatues from 2 SpinX tubes into one 1.5ml tube and ethanol precipitate
300ul eluate, 3ul glycogen,
133ul 7.5M NH4OAc 1000ul 100% ethanol and
•Spin in microcentrifuge at full speed for 15 minutes. •Wash twice with 70% ethanol, and centrifuge and remove ethanol. •Resuspend purified concatemer DNA in 6ul of LoTE. �Alternative protocol using agarose gels to separate concatemers. •Prepare a 13cm long 1.5% agarose gel (we use rigs from Owl Scientific Cat. No. B2) . •In the first lane of the gel load 10ul 1 kb ladder (25ng/ul) as a marker. •After ligation reaction and subsequent heating and ice step detailed above, load entire concatemer mix onto 1 lane of a 1mm 20 well gel. •Run at 90V until bromophenol blue dye reaches end of gel (~5 hours). •Stain for 15-30 minutes, and excise desired fractions. •Extract DNA with QIAquick gel extraction kit (Qiagen, Cat. No. 28704) following manufacturer’s protocol, except that step 5 on page 25 should be skipped. •Increase eluate volume from 50 to 200ul with LoTE. •Extract with PC8, and ethanol precipitate
200ul sample 133ul 7.5M ammonium acetate,
5ul glycogen, 777ul 100% ethanol.
•Wash twice with 70% ethanol, and centrifuge and remove ethanol. •Resuspend in 6ul LoTE. 13. Cloning concatemers and sequencing �Concatemers can be cloned and sequenced in a vector of choice. We currently clone concatemers into an SphI cleaved pZero (Invitrogen Cat. No. K2500-01). •To do this mix the following:

17
Contents Sample Vector Alone Control
No Ligase Control
purified concatemer 6ul dH20 6ul 7ul pZero cut with SphI (25ng/ul) 1ul 1ul 1ul 5X Ligase buffer (GibcoBRL) 2ul 2ul 2ul T4 ligase (1U/ul; GibcoBRL Cat. No. 15224-017) 1ul 1ul 0 •Incubate overnight at 16°C. •Bring sample volume to 200ul with LoTE. •Extract with equal volume PC8, ethanol precipitate,
200ul sample 133ul 7.5M ammonium acetate,
5ul glycogen, 777ul 100% ethanol.
•wash four times with 70% ethanol, •centrifuge and remove ethanol, and resuspend in 10ul LoTE. •Transfect 1ul DNA into ElecctroMAX DH10Bs (GibcoBRL Cat. No. 18290-015) by electroporation, •Plate 1/10 of transfected bacteria onto each 10cm zeocin-containing plate, analyze 12-16hrs later. �Insert containing plates should have hundreds to thousands of colonies while control plates should have 0 to tens of colonies •Save all 10 plates for each concatemer ligation reaction since, if insert size appears appropriate these may be used for sequencing as described below. •Check insert sizes by PCR. Set up 25ul PCR reactions using the following conditions: Contents Tube 10X PCR Buffer (see appendix A) 2.5ul DMSO (Sigma Cat. No. D-2650) 1.25ul 10 mM dNTPs (GibcoBRL) 1.25ul M13F (350 ng/ul) 0.5ul M13R (350 ng/ul) 0.5ul dH20 19ul Platinum Taq (5U/ul; GibcoBRL Cat. No. 10966-034) 0.2ul •Add PCR components to wells of a 96-well PCR plate (e.g. Omniplate 96; Marsh Biomedical Products, Cat # J3-2031), •Use a sterile tip to gently touch colony and then dip tip into PCR mix. •Add one drop of oil over PCR mix.

18
•Perform PCR at following temperatures (optimized for HYBAID PCR machine) : 1 cycle 95°C 2 min at start; 25 cycles 95°C 30"; 56°C 1 min; 72°C 30"; 1 cycle 70°C 5 min at end. •Run 4ul on a 1.5% agarose gel. �For large scale screening we use Transferpette multichannel pipettes. The tips of these multichannel pipettes fit into every second well of of the 50-slot comb used on our Owl Centipede horizontal rigs. Consequently, to maintain a sequential loading order for each 96-well plate we prepare a separate 96-well loading plate as follows: First add sample loading dye to all the wells of the loading plate. Next, 8 tips of the multichannel are used to transfer 4ul from wells the first column of odd wells (i.e. A1-H1) of the original PCR plate to the corresponding wells of the loading plate. Next, transfer 4ul from the second column of odd wells (i.e.A3-H3) to wells A2-H2 of the loading plate. This process is continued until the first 6 columns of the loading plate (i.e. 1,2,3,4,5,6) are filled with all of the odd columns from the original plate (i.e. 1,3,5,7,9,11). Next, the even wells (i.e. 2,4,6,8,10) are transferred to the last six columns of the loading plate (i.e. 7,8,9,10,11,12). Subsequently, the gel is loaded using 6 tips by transferring the first odd row of the loading plate followed by the second odd row, and so on. Finally, the empty wells of the gel (in between the odd wells) are filled in with all of the even rows. �Purify remaining PCR reactions that contain concatemers comprised of at least 15 ditags ( > 616 bp [226bp vector + 26bp per ditag x 15 ditags]) by ispopropanol precipitation. • Mix 17ul of PCR reaction with 75ul of the following premixed isopropanol solution: dH2O 28ul 2M NaClO4 15ul 2-Propanol 33ul Total 75ul •Spin at maximum speed in a centrifuge containing 96-well buckets. •Decant and soak up residual precipitation mix by placing upside-down on paper towel. •Rinse once by adding 100ul 70% ethanol to wells. •Spin 5 min at maximum speed. •Decant, blot on paper towel, dry samples (e.g. under laminar flow or in an immobile speed vacuum) and resuspend in 25ul dH2O. •Store at -20oC. �Sequencing can be performed manually or on automated sequencers. We currently sequence using ABI -21M13 Dye Primer FS sequencing kit (Perkin Elmer Cat. No. 402111) following Perkin Elmer=s protocol. We use about 1/5 of the purified PCR product per sequencing reaction. Load and run on ABI 373 or 377 automated sequencer.

19
Appendix A: Special Reagents to Order RNA reagents RNAgents - Total RNA Isolation Kits (Promega Cat. No. Z5110) MessageMaker mRNA kit (GibcoBRL Cat. No. 10298-016) Superscript Choice System cDNA Synthesis Kit (GibcoBRL Cat. No. 18090-019) Magnetic Beads Dynabeads M-280 Streptavidin Slurry (Dynal Cat. No. 112.05) Magnet (Dynal Cat No. 120.04) Enzymes BsmFI (NEB Cat. No. 572S) NlaII (NEB Cat. No. 125S) – ship on dry ice and store at –80°C Sph 1 (NEB Cat. No. 182S) Klenow (Pharmacia/USB Cat. No. 27-0929-01) T4 Ligase High Concentration (5U/ul) (GibcoBRL Cat. No. 15224-041) T4 Ligase Regular Conentration (1U/ul) (GibcoBRL Cat. No. 15224-017) Platinum Taq (BRL Cat. No.10966-034) Miscellaneous Glycogen (Boerhinger Mannheim Cat. No. 901-393) pZERO-1 plasmid (Invitrogen Cat No. K2500-01) 10mM dNTP mix (GibcoBRL Cat. No. 18427-013) DMSO (Sigma Cat. No. D2650) 7.5 M NH4OAc (Sigma Cat. No. A2706) Primers and linkers (Appendix D)

20
Appendix B: Solutions 2X B+W Buffer
10mM Tris-HCl (pH 7.5) 1mM EDTA 2.0 M NaCl store at room temperature
LoTE 3mM Tris-HCl (pH 7.5) 0.2mM EDTA (pH 7.5) in dH20 store at 4°C
PC8
480ml Phenol (warm to 65°C) 320ml 0.5M Tris-HCl (pH 8.0) 640ml Chloroform Add in sequence, shake, and place at 4°C. After 2-3hours shake again. After another 2-3 hours, aspirate aqueous layer. Aliquot and store at -20°C.
10X PCR Buffer
166mM (NH4)2SO4 670mM Tris pH 8.8 67mM MgCl2 100mM Beta-mercaptoethanol distribute into 0.5ml aliquots and store at -20°C

21
Appendix C: Gel Electrophoresis and miscellaneous methods 12% PAGE (for isolating PCR products and ditags)
40% Polyacrylamide (19:1 acrylamide:bis)(Bio-Rad Cat No. 161-0144) 10.5ml dH20 23.5ml 50X Tris Acetate Buffer (Quality Biological Cat. No. 330-008-161) 700ul 10% APS 350ul TEMED 30ul Mix above and add to vertical gel apparatus. We currently use Owl Scientific Products (Model No. P9DS) with 1.5mm spacers. Add comb and let gel sit at least 30 minutes to polymeize. Run gel at 160 V for 2 - 2.5 hours (see text for details).
8% PAGE (for separating concatemers)
40% Polyacrylamide (37.5:1 acrylamide:bis) (Bio-Rad Cat No. 161-0148) 7ml dH20 27ml 50X Tris Acetate Buffer (Quality Biological Cat. No. 330-008-161) 700ul 10% APS 350ul TEMED 30ul Mix above and add to vertical gel apparatus. We currently use Owl Scientific Products (Model No. P9DS) with 1.5mm spacers. Add comb and let gel sit at least 30 minutes to polymerize. Run gel at 130 V for 2.5 hours.
PC8 extraction
Add equal volume PC8 to sample. Vortex for several seconds. Spin for 2 minutes at full speed in microcentrifuge. Transfer aqueous (top) layer to a new microcentrifuge tube.
Kinasing reaction for linkers
Dilute Linker 1B and 2B to 350 ng/ul Mix the following
Contents Tube 1 Tube 2 Linker 1B (350 ng/ul) 9ul - Linker 2B (350 ng/ul) - 9ul LoTE 6ul 6ul 10X Kinase Buffer (NEB) 2ul 2ul 10mM ATP 2ul 2ul

22
T4 Polynucleotide Kinase (10U/ul; NEB Cat. No. 201S) 1ul 1ul Incubate at 37°C for 30 minutes. Heat inactivate at 65°C for 10 minutes. Mix 9ul Linker 1A to 20ul kinased Linker 1B (final conc 200 ng/ul)
9ul Linker 2A to 20ul kinased Linker 2B (final conc 200 ng/ul) To anneal linkers, heat to 95°C for 2 min, then place at 65°C for 10 min, 37°C for 10 min and room temp for 20 minutes, store at -20°C. Kinasing should be tested by self ligating about 200ng of each linker pair and running on 20% Novex gel (Cat. No. EC6315). Kinased linkers should allow linker-linker dimers (80-100 bp) to form after ligation, while unkinased linkers will prevent self-ligation. Only linker pairs that self-ligate >70% should be used in further steps.
Ethidium bromide dot quantitation (From Current Protocols in Mol. Bio. Supplement 2.6.9)
Use any solution of pure DNA to prepare the following standards: 0ng/ul, 1ng/ul, 2.5ng/ul, 5ng/ul, 7.5ng/ul, 10ng/ul, 20ng/ul. Use 1ul of sample DNA to make 1/5, 1/25, and 1/125 dilutions in LoTE. Add 4ul of each standard or 4ul of each diluted sample to 4ul 1ug/ml ethidium bromide. Mix well. Place a sheet of plastic wrap on a UV transilluminator. Spot each 8ul mix on plastic wrap and photograph under UV light. Estimate DNA concentration by comparing the intensity of the sample to the standards.
Testing biotinylation of biotin-oligo dT Obtain biotin-oligo dT gel purified from oligo synthesis company. Test biotinylation by adding to several hundred nanograms of biotin-oligo dT to 1ug streptavidin (Sigma Cat No. S-4762). Incubate several minutes at room temperature. Both the oligo alone and bound to streptavidin are run on a 20% Novex gel (Cat. No. EC6315). If the oligo is well biotinylated, the the entire amount of oligo should be shifted to higher molecular weight in the lane containing the streptavidin. Alternatively, increasing amounts of oligo (from several hundred nanograms to several micrograms) can be incubated with and without separate aliquots of 100ul of Dynabeads (Dynal). After 15’, the beads are separated from the supernatant using a magnet, the supernatant is removed, and DNA quantitation is performed at OD260. At low amounts of oligo, when bead binding capacity is not saturated, the ratio of unbound oligo to the total oligo will indicate the percent of oligo that is not biotinylated.

23
Appendix D: Linker & Primer Sequences Linker 1 A (obtain gel-purified) 5' TTT GGA TTT GCT GGT GCA GTA CAA CTA GGC TTA ATA GGG ACA TG 3' Linker 1 B (obtain gel-purified) 5' TCC CTA TTA AGC CTA GTT GTA CTG CAC CAG CAA ATC C[amino mod. C7] 3' Linker 2 A (obtain gel-purified) 5' TTT CTG CTC GAA TTC AAG CTT CTA ACG ATG TAC GGG GAC ATG 3' Linker 2 B (obtain gel-purified) 5' TCC CCG TAC ATC GTT AGA AGC TTG AAT TCG AGC AG[amino mod. C7] 3' �We now order primer 1 and primer 2 with the addition of 2 sequential biotins on the 5' end gel-purified from Integrated DNA Technologies. Primer 1 5' GGA TTT GCT GGT GCA GTA CA 3' Primer 2 5' CTG CTC GAA TTC AAG CTT CT 3' Biotinylated oligo dT (obtain gel-purified) 5' [biotin]T18 M13 Forward 5' GTA AAA CGA CGG CCA GT 3' M13 Reverse 5' GGA AAC AGC TAT GAC CAT G 3' Note: High quality linkers are crucial to several steps in the SAGE method. Linkers 1A, 1B, 2A, 2B, and the biotinylated oligo dT should be obtained gel-purified from the oligo synthesis company. We routinely obtain these oligos from Integrated DNA Technologies (tel. 800-328-2661).

24
Appendix E: Frequently asked questions and answers
Q: I’ve tried the SAGE method and I do not obtain 102bp ditag-containg PCR products. Why not? A: The SAGE method is composed of a series of straightforward enzymatic reactions, each of which can fail for a number of reasons. Listed below are the most common causes of failure of the method:
1. Poor starting material - insufficient, poor quality, or degraded RNA. Check RNA on denaturing gel before cDNA synthesis. Use no less than 2.5ug of high quality polyA RNA.
2. Poor quality or insufficient cDNA synthesis. Check cDNA quality by gel electrophoresis (cDNA synthesis should result in several micrograms of cDNA and should range in size from several hundred base pairs to over 10kb) .
3. Poor quality linkers. Obtain linkers and biotin-oligo dT gel purified. Check linker kinasing by self -ligation, and oligo dT biotinylation by biotin gel shift experiment (see appendix B for details).
4. Poor quality reagents. Obtain fresh reagents from recommended sources. Note that the half life of NlaIII is less than 3 months at -20°C.
5. Not following the detailed protocol. The specific steps in the protocol have been optimized, so try to keep to them as much as possible (e.g. only use the PCR buffer and cycle temperatures in the protocol as other conditions may not work).
6. Concentration of dNTPs is too high in the 102bp PCR amplification. Increasing the concentration of dNTPs in the PCR reaction causes a dose-dependent increase in PCR product untill a threshold is reached. An slight increase beyond this treshold results in a rapid and complete loss of PCR product. Because the maximum dNTP concentration varies with each lot purchased, we strongly recommend titrating the dNTPs before doing the large scale. To simply check if a PCR product exists, we recommend starting with a low but safe dNTP conentration (eg. 0.5-1.0mM).
7. Too many PCR cycles. When doing the large scale PCR amplification be sure to try a range of cycle numbers. Too many cycles can result in loss of the 102bp PCR product.
Q: I can see a 102bp product, but when I try to digest with NlaIII it only partially digests or it doesn’t digest at all. A: This is a common problem that many people have noticed. There are several reasons why this may occur.
1. NlaIII is inactive. When ordering NlaIII we ask NEB to send us the enzyme on

25
dry ice. If not specified, the enzyme, which is normaly sent on an ice pack, will often arrive at room temperature. We also store NlaIII in aliquots at -80oC which helps prolong its activity. Make sure the enyme is fresh- its half life is only a few months.
2. Not enough enyme in the digestion reaction. On occasion, with certain less active batches of NlaIII and high yields of PCR product, it may help to add more enyme by scaling up the volume of the digestion reaction. NEB is currently redefining what a unit of NlaIII should be.
3. Perhaps the most important reason for lack of digestion is that the CATG site of the PCR product is missing and therefore cannot be cut. This occurs because of exonuclease contamination during early steps of the SAGE protocol. The exonuclease activity appears to come from the DNApol1 used in the second strand reaction of the cDNA synthesis. Subsequently, the exonuclease activity of this enzyme can chew back the CATG ends of both the linkers and NlaIII cut cDNAs resulting in partial or complete blunt end ligation of the linkers. Although the original SAGE protocol uses phenol extraction to remove the enzyme, a small amount may still remain. We now recommend doing two sequential phenol extractions for large scale SAGE users. For microSAGE users the problem has been worse since phenol extractions are not used at this step. In this case inactivation of the enzyme with SDS seems to be the most effective way to remove residual exonuclease activity.
Q. Although I can obtain 24-26bp ditags, I cannot generate large concatemers. How can I improve this? A: There are essentially two parameters that affect the size of the concatemers. One is the quantity of the ditags present in the ligation reaction. We routinely perform 100 to 200 50ul PCR reactions using the PCR protocol specified in the SAGE protocol. This generates 500ng to over 1ug of ditags. The second parameter is the purity of the ditags. After the NlaIII digest, the resulting products contain large amounts of linker material (around 40-42bp) or other DNA products as smears in the background. Although the ditag is gel purified, these other DNA fragments may contaminte that portion of the gel, and serve to "poison" the ligation reaction. The linkers for example, if present in the ligation reaction could ligate the end of a concatemer, but prevent its extension and cloning. Removal of linkers with an extra purification step using biotinylated primer 1 and primer 2 and streptavidin beads overcomes this problem. Isolation of several hundred nanograms of ditags using this procedure is sufficient to generate large concatemers. The ideal length of ligation reactions will vary depending on the quantity and quality of the ditags. For several hundred nanograms of ditags ligation times of 30 minutes to 3 hours are optimal.

26
Q: How do I find out about current SAGE applications and recent publications? A: Access the SAGE home page on the internet: http://www.sagenet.org/