Embed Size (px)
Citation preview
1
E-PROCUREMENT PORTAL SUPPLIER USER GUIDE
(SELF REGISTRATION)
Group Strategic Procurement

2
Objective of this user guide?
This user guide provides a step-by-step guide on how to register as a supplier in e-
Procurement Portal
Who should use this user guide?
This user guide is to be used by supplier who wish to be a Maybank Supplier
e-Procurement Self Registration & Supplier Guide
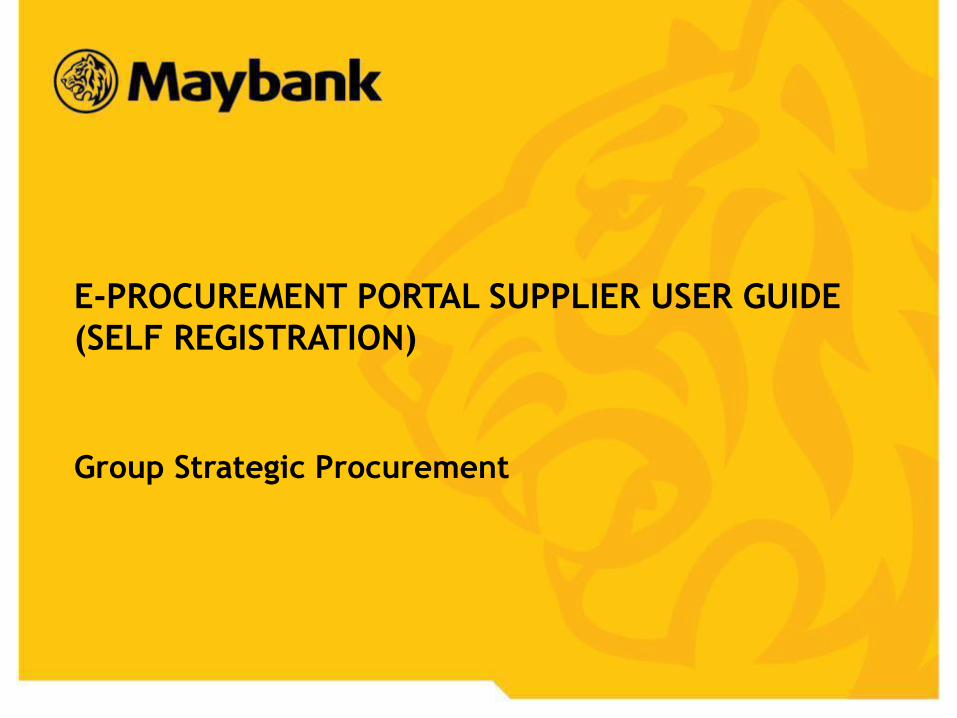
Self Registration
• Action 1 – First Time Setup
• Action 2 – Create New Account
• Action 3 – Supplier Login & Documentation
• Action 4 – Supplier Activation
FAQ
3
Topic in this guide

4
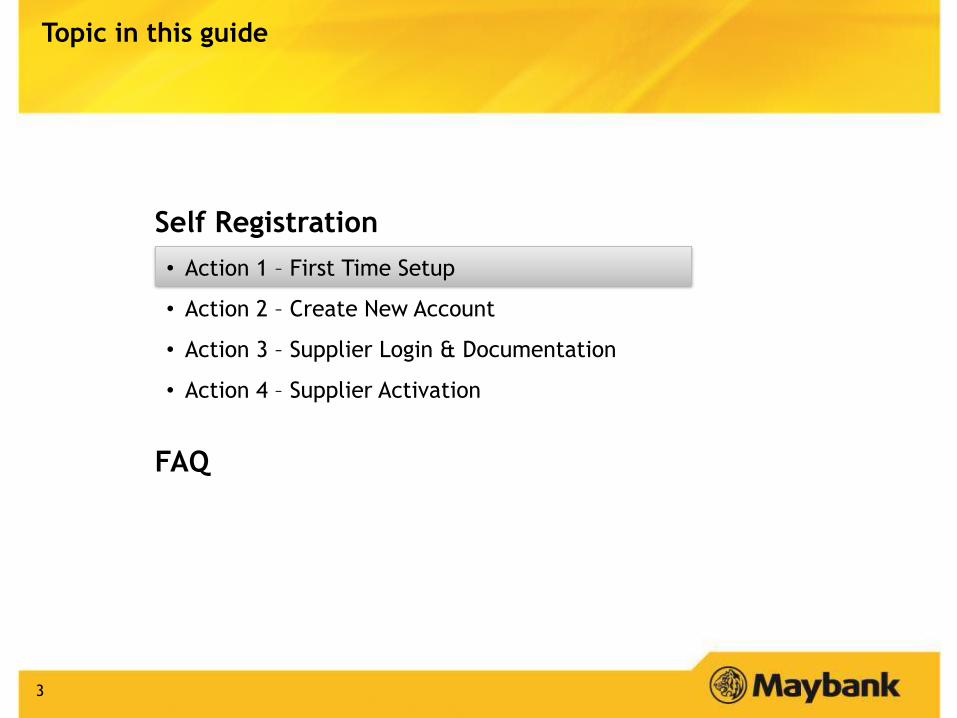
STEP 1 : Click on “FIRST
TIME SETUP” tab.
Action 1 – First Time Setup
1
Before you begin, please ensure that you are on Maybank e-Procurement Portal homepage
or access to http://eproc.maybank.com.my
5
STEP 2 : Click “Download
Here” linkage.
Action 1 – First Time Setup
2

6
STEP 3 : Click “Open”
to download the
setting file.
Action 1 – First Time Setup
3
7
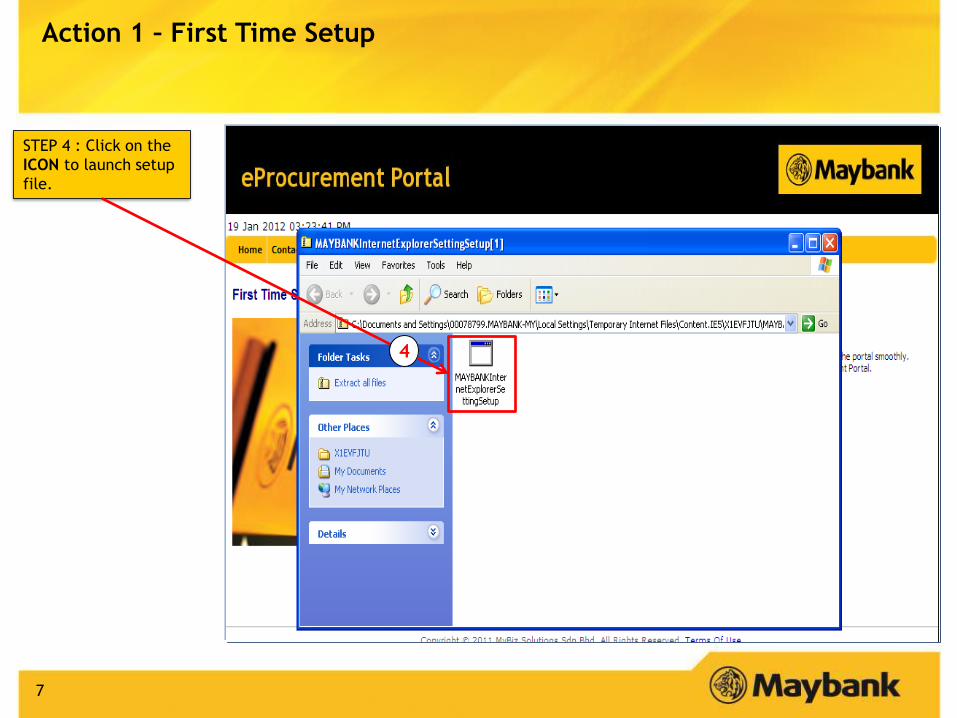
STEP 4 : Click on the
ICON to launch setup
file.
Action 1 – First Time Setup
4
8
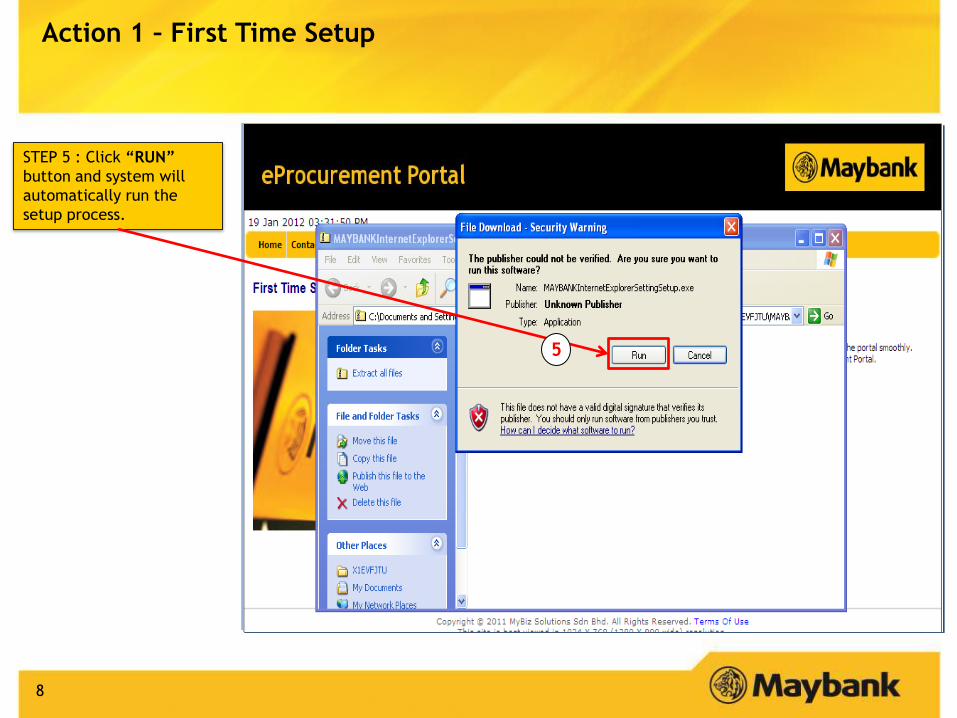
STEP 5 : Click “RUN”
button and system will
automatically run the
setup process.
Action 1 – First Time Setup
5
9
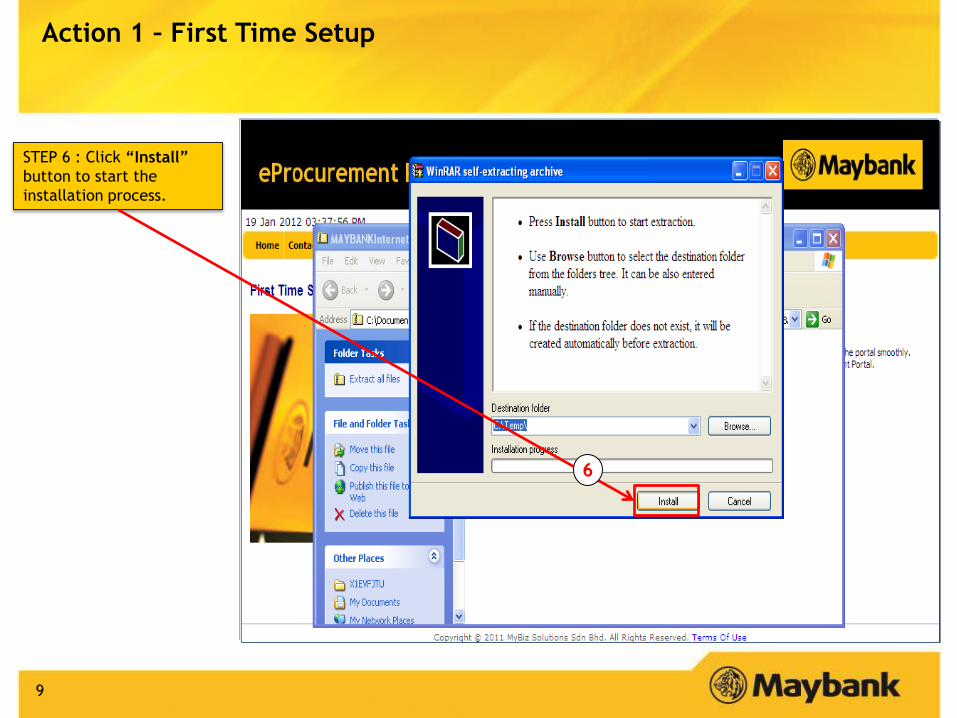
STEP 6 : Click “Install”
button to start the
installation process.
6
Action 1 – First Time Setup

10
STEP 7 : Click on “Close”
button.
This button will only be
appeared if the system
configuration has been
completed.
Once the FIRST TIME SETUP has been successfully configured, CLOSE the Internet Explorer (IE)
browser and RE-OPEN the e-Procurement Portal.
7
Action 1 – First Time Setup
Important !

11
STEP 8 :
Check the “Trusted Sites”
icon at the e-Procurement
Portal.
This icon will be appeared
if you have successfully
performed the first time
setup.
Action 1 – First Time Setup
8
Self Registration
• Action 1 – First Time Setup
• Action 2 – Create New Account
• Action 3 – Supplier Login & Documentation
• Action 4 – Supplier Activation
FAQ
12
Topic in this guide

13
STEP 1 : Click at
“Supplier
Application” menu.
Action 2 – Create New Account
1
14
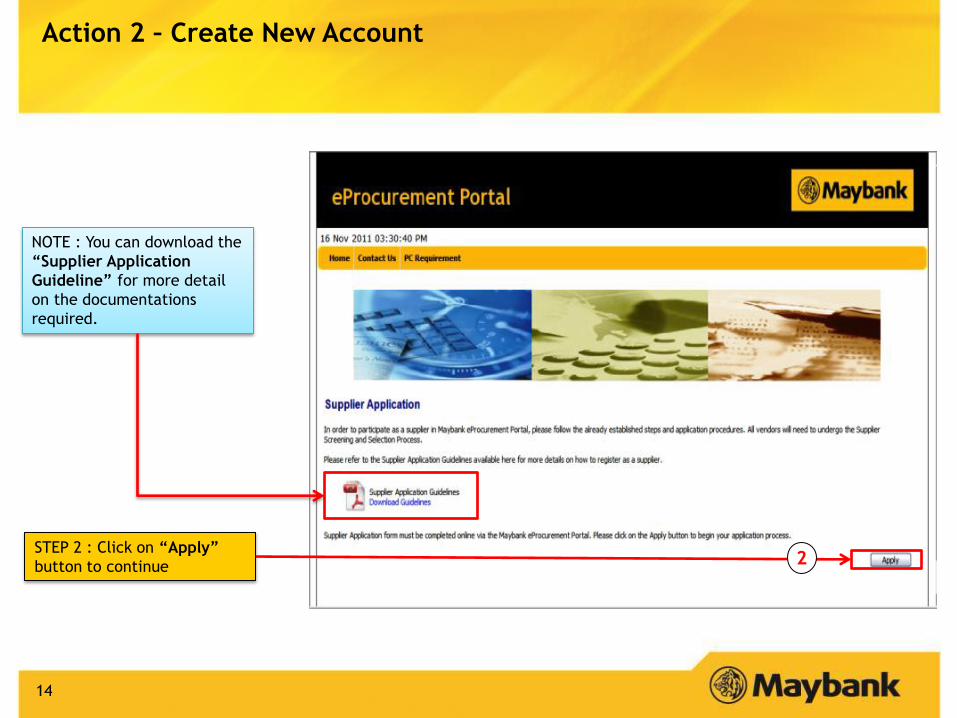
STEP 2 : Click on “Apply”
button to continue
Action 2 – Create New Account
2
NOTE : You can download the
“Supplier Application
Guideline” for more detail
on the documentations
required.
15
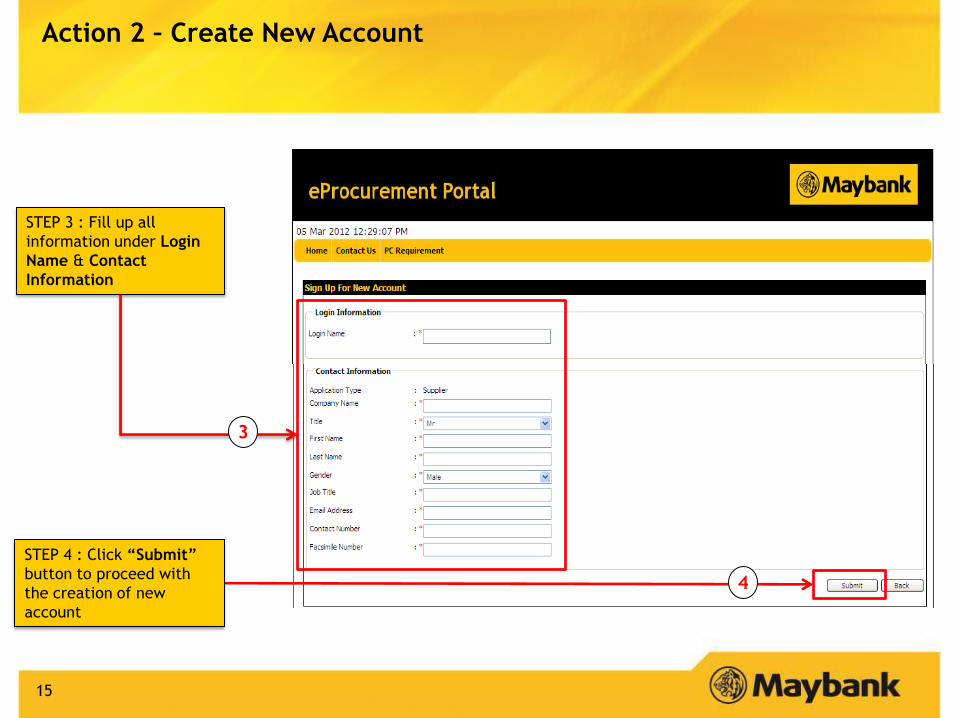
STEP 3 : Fill up all
information under Login
Name & Contact
Information
STEP 4 : Click “Submit”
button to proceed with
the creation of new
account
Action 2 – Create New Account
3
4

16
NOTE : Once you have
created the new account,
system will send two
separate email to inform
your Login Name &
password.
STEP 5 : Click “OK” to
proceed 5
Action 2 – Create New Account

17
Action 2 – Create New Account
Check your email notification to retrieve the Login Name & Password (8 digit).
(Refer slide 18 for detail).
Please note that the above ID is your temporary Account to be used for
registration only.
You will receive a new user account IF your application to be a Maybank
supplier has been approved.
Before you proceed !

18
Action 2 – Create New Account
Sample : email notification on new Login Name & Password
NOTE : Your 8 digit
password
NOTE : Your
temporary Login
Name

Self Registration
• Action 1 – First Time Setup
• Action 2 – Create New Account
• Action 3 – Supplier Login & Documentation
• Action 4 – Supplier Activation
FAQ
19
Topic in this guide

20
STEP 1 : At Portal
Homepage, click “USER
LOGIN” to logon to the
system.
1
Action 3 – Supplier Login & Documentation

21
STEP 2 : At the Member
Login, key in your
temporary “Login Name”
& “Password”.
STEP 3 : Click on “Login”
button to continue. 3
2
Action 3 – Supplier Login & Documentation

22
NOTE : Once you login, system will
route you to Maybank e-
Procurement Portal User License
Agreement.
Please ensure you read the
content first before proceed.
Action 3 – Supplier Login & Documentation
STEP 4 : Click “I Accept” to
continue.
If you choose to withdraw from
registration, click “I Decline”
button
4

23
STEP 5 : Change your default
password to your own password.
Your new password must have the
combination of Alphabet,
Number and Special Character
with a minimum of 8 digit.
Example: P@ssw0rd
Action 3 – Supplier Login & Documentation
5
STEP 6 : Click on “Save” button
to proceed. 6

24
STEP 7 : Click “OK” to
proceed.
Action 3 – Supplier Login & Documentation
7
NOTE : Once you have successfully changed your password, system will route you to the Profile Management. In this profile,
you are required to fill up all 8 sections pertaining to your company.

25
STEP 8 : Under profile
management, fill in all
information required.
Note that all information
mark with asterisk (*) is a
mandatory questions.
Action 3 – Supplier Login & Documentation
STEP 9 : Click “Save”
button to continue. 9
8
NOTE : You must
complete all information
required under Action.
i.e. from the Company
information till supplier
declaration.
Section 1 of 8 : Company Information

26
STEP 10 : Select tax
registration status, key-in
Tax registration No and
make declaration
Action 3 – Supplier Login & Documentation
Section 1 of 8 : Tax Information
Note:-
a) Please refer to page 28 for Tax Code
definition
b) Tax registration No is 12 digit number
provided by custom
10

27
STEP 11 : Click “Yes”
button to continue
Action 3 – Supplier Login & Documentation
11
Section 1 of 8 : Company Information

TAX CODE DEFINITION
28
Tax Code Definition Tax Rate
TX Purchases with GST incurred at 6% and directly attributable to taxable
supplies
6%
NR Purchase from Non GST registered supplier with no GST incurred. 0%
ZP Purchase from GST registered supplier with no GST incurred. (e.g. Supplier
Provides Transportation of Goods).
0%
EP Purchases exempted from GST. (e.g. Purchase of Residential Property or
Financial Services, Non Taxable Island).
0%
OX Purchase transactions from foreign company which is out of the scope of
GST legislation (e.g. Purchase of Goods/Services).
0%
29
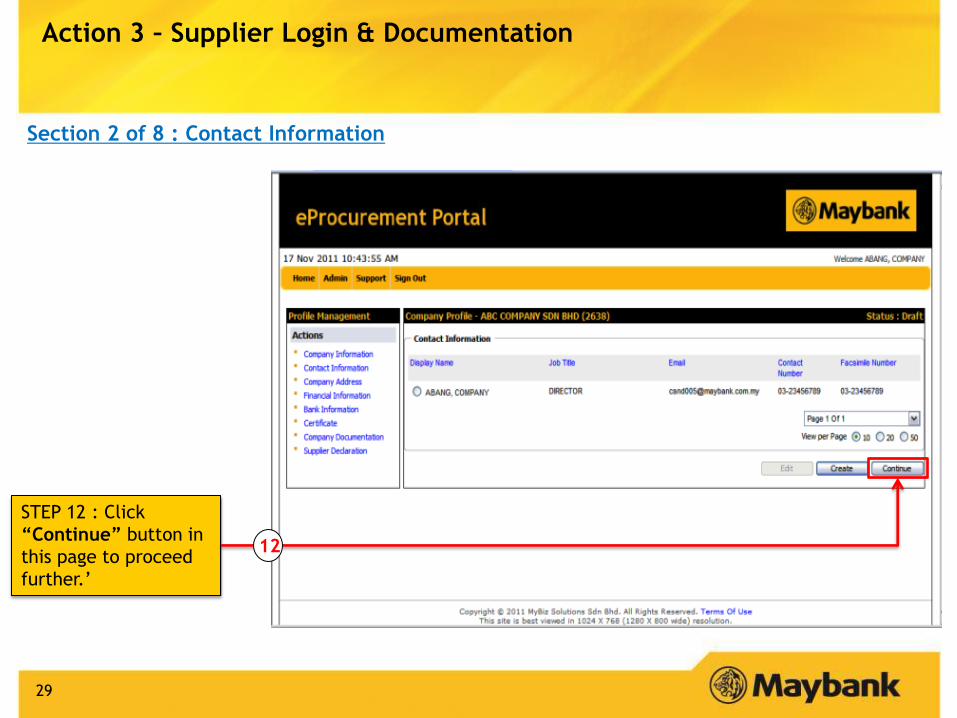
STEP 12 : Click
“Continue” button in
this page to proceed
further.’
Action 3 – Supplier Login & Documentation
12
Section 2 of 8 : Contact Information
30
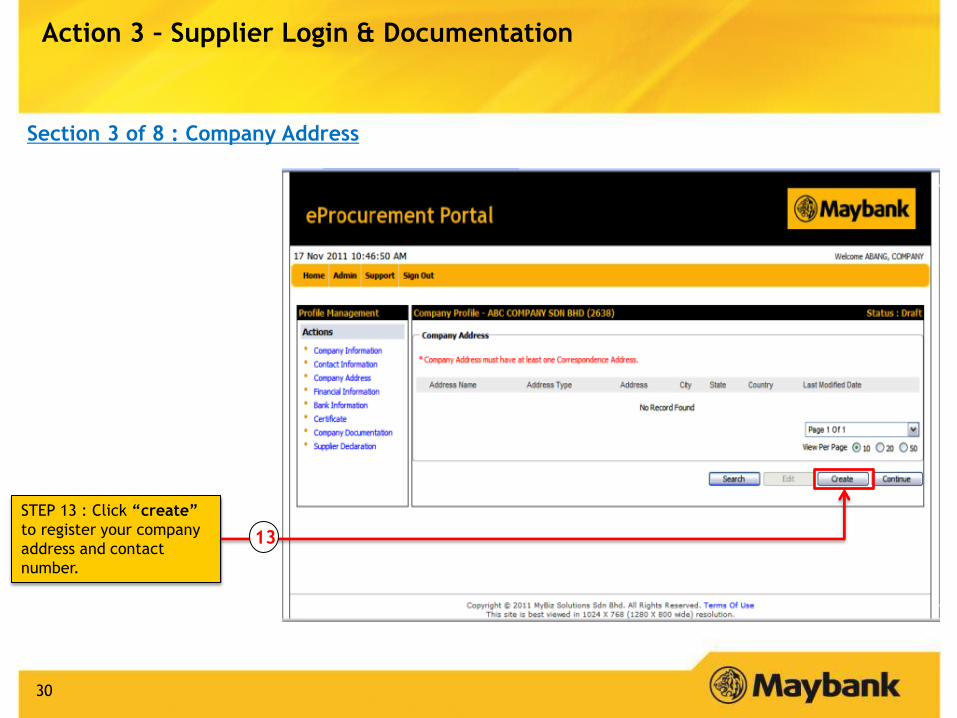
STEP 13 : Click “create”
to register your company
address and contact
number.
Action 3 – Supplier Login & Documentation
13
Section 3 of 8 : Company Address

31
STEP 14 : Fill in all
compulsory field.
Action 3 – Supplier Login & Documentation
Section 3 of 8 : Company Address
14
STEP 15 : Click “Save”
button to proceed. 15
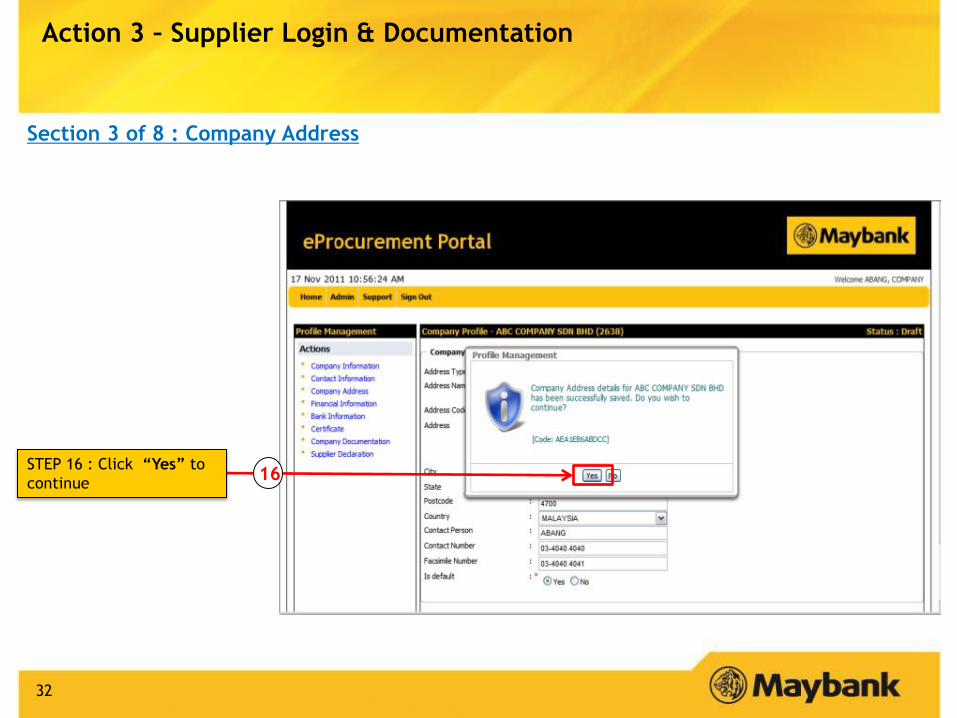
32
STEP 16 : Click “Yes” to
continue
Action 3 – Supplier Login & Documentation
Section 3 of 8 : Company Address
16

33
STEP 17 : Click
“Continue” button to
proceed.
Action 3 – Supplier Login & Documentation
Section 3 of 8 : Company Address
17
34
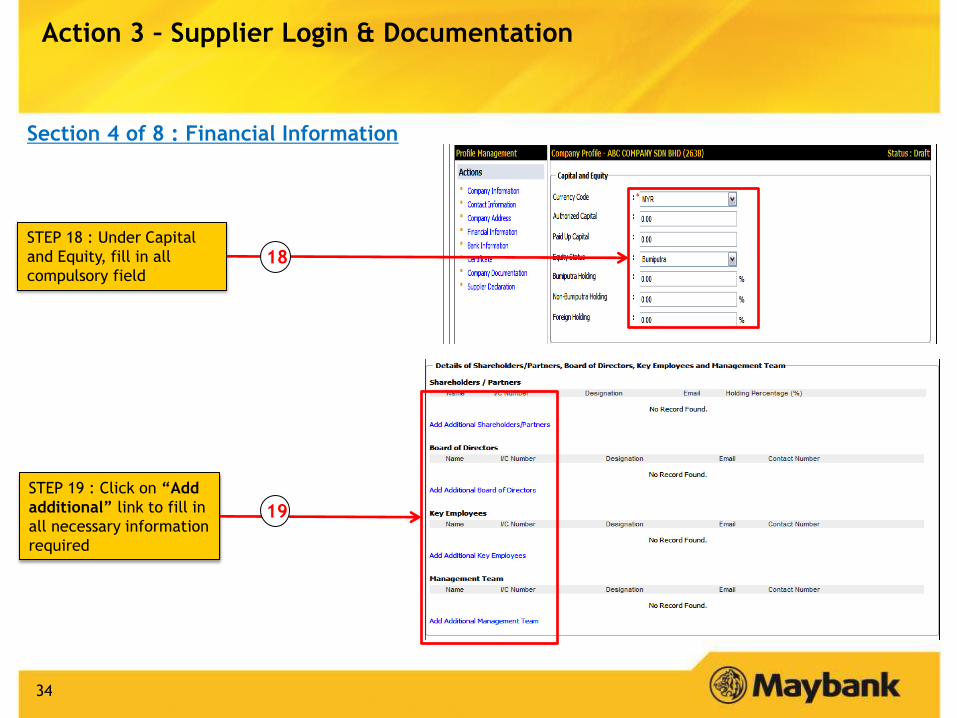
STEP 18 : Under Capital
and Equity, fill in all
compulsory field
Action 3 – Supplier Login & Documentation
Section 4 of 8 : Financial Information
18
STEP 19 : Click on “Add
additional” link to fill in
all necessary information
required
19

35
STEP 209 : Fill in
all necessary
information
required.
Action 3 – Supplier Login & Documentation
Section 4 of 8 : Financial Information
20
STEP 21 : Click
“Save” button to
proceed 21

36
STEP 22 : Click “Yes” to
continue
Action 3 – Supplier Login & Documentation
Section 4 of 8 : Financial Information
22

37
STEP 23 : Under Bank
Information, fill in all
necessary information
required
Action 3 – Supplier Login & Documentation
Section 5 of 8 : Bank Information
23
STEP 24 : Click “Save” to
continue 24
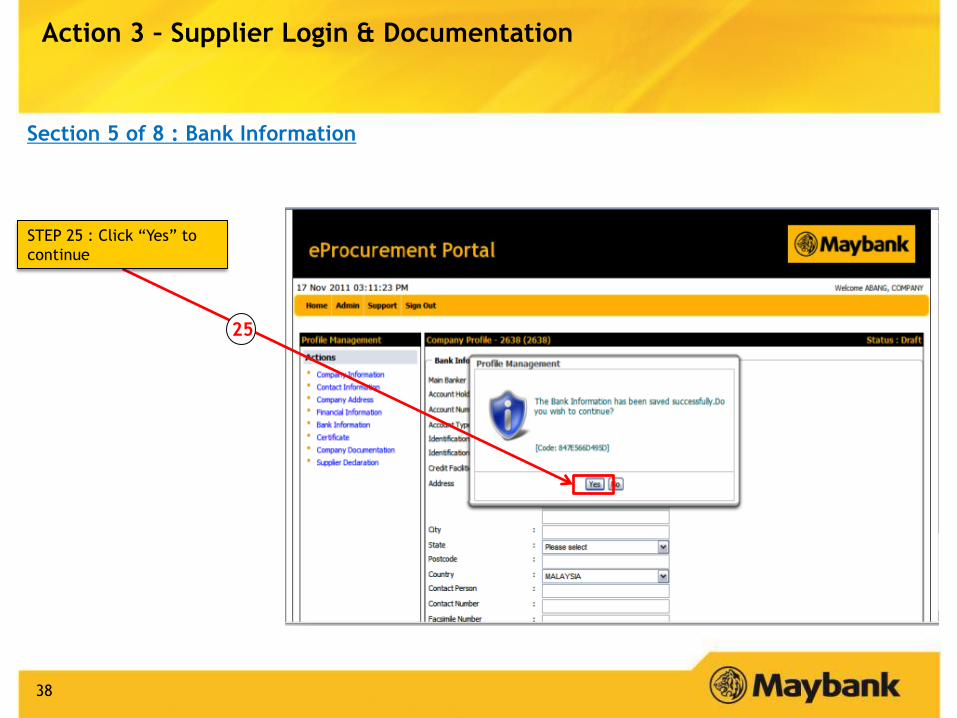
38
STEP 25 : Click “Yes” to
continue
Action 3 – Supplier Login & Documentation
Section 5 of 8 : Bank Information
25
39
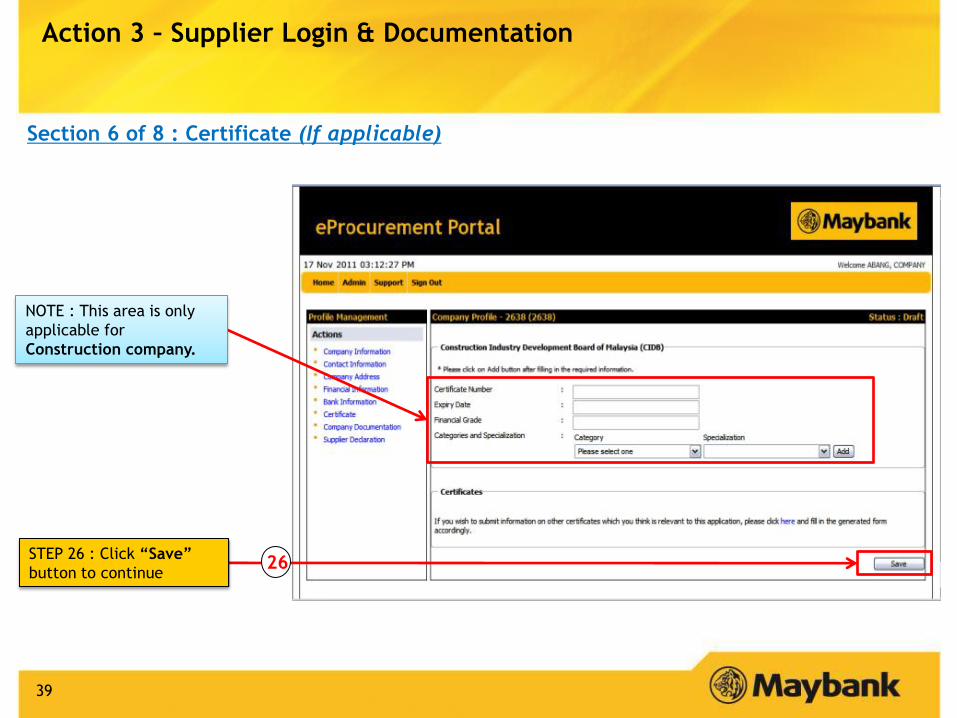
STEP 26 : Click “Save”
button to continue
NOTE : This area is only
applicable for
Construction company.
Action 3 – Supplier Login & Documentation
26
Section 6 of 8 : Certificate (If applicable)
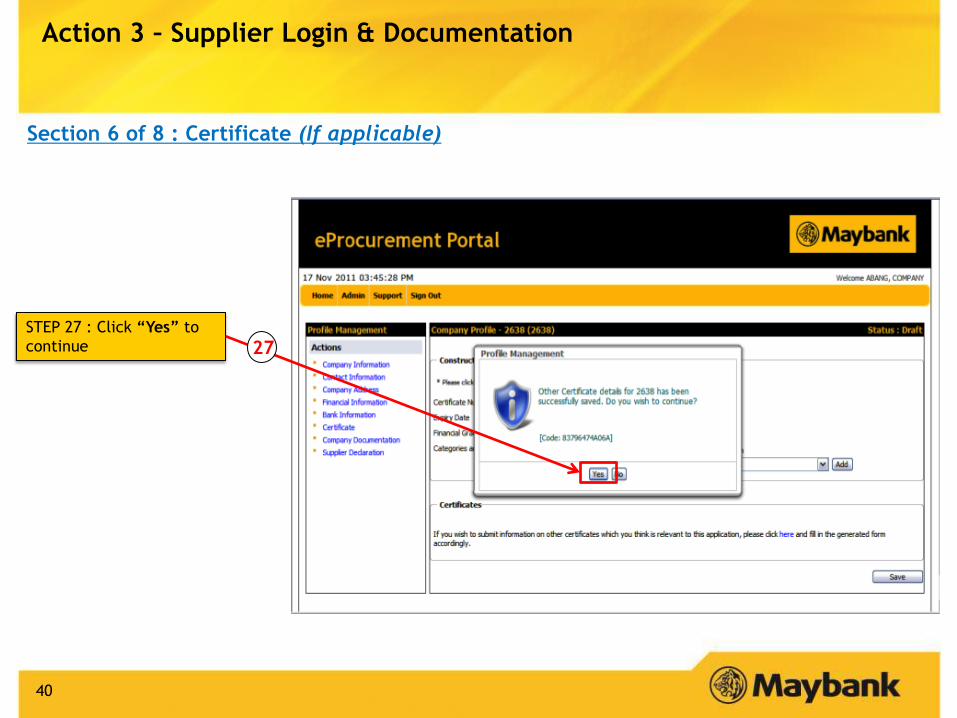
40
STEP 27 : Click “Yes” to
continue
Action 3 – Supplier Login & Documentation
Section 6 of 8 : Certificate (If applicable)
27
41
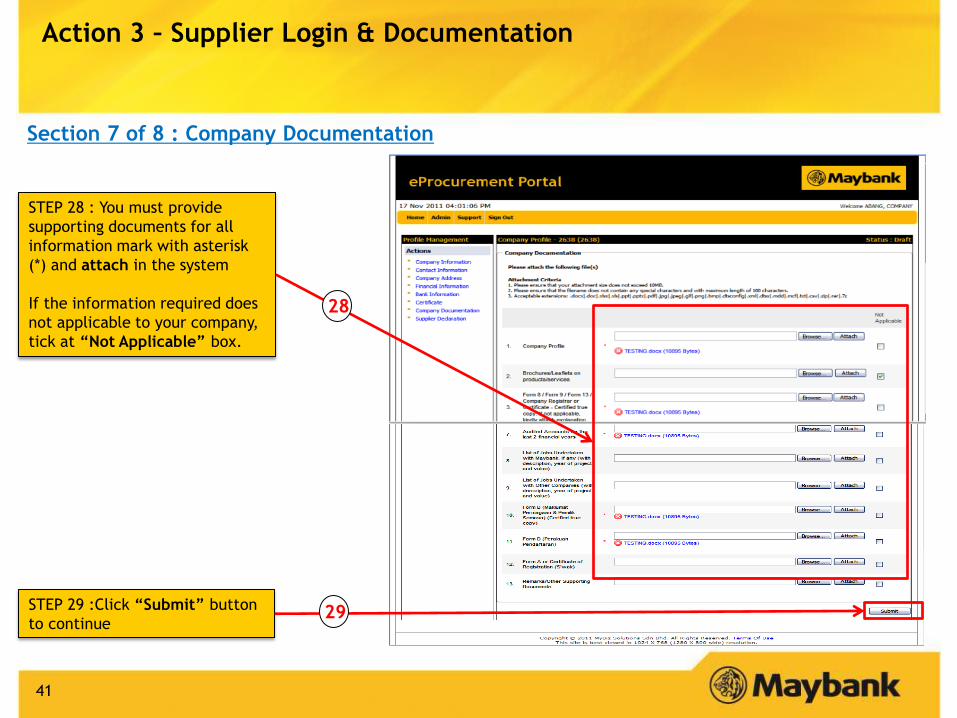
STEP 28 : You must provide
supporting documents for all
information mark with asterisk
(*) and attach in the system
If the information required does
not applicable to your company,
tick at “Not Applicable” box.
Action 3 – Supplier Login & Documentation
Section 7 of 8 : Company Documentation
28
STEP 29 :Click “Submit” button
to continue 29
42
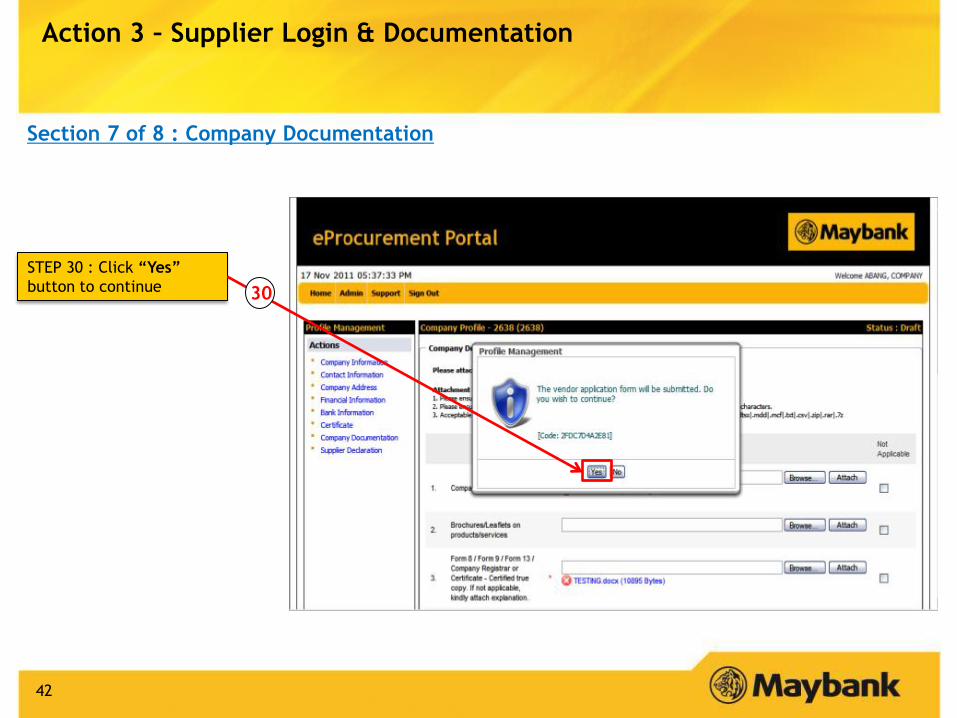
STEP 30 : Click “Yes”
button to continue
Action 3 – Supplier Login & Documentation
Section 7 of 8 : Company Documentation
30
43
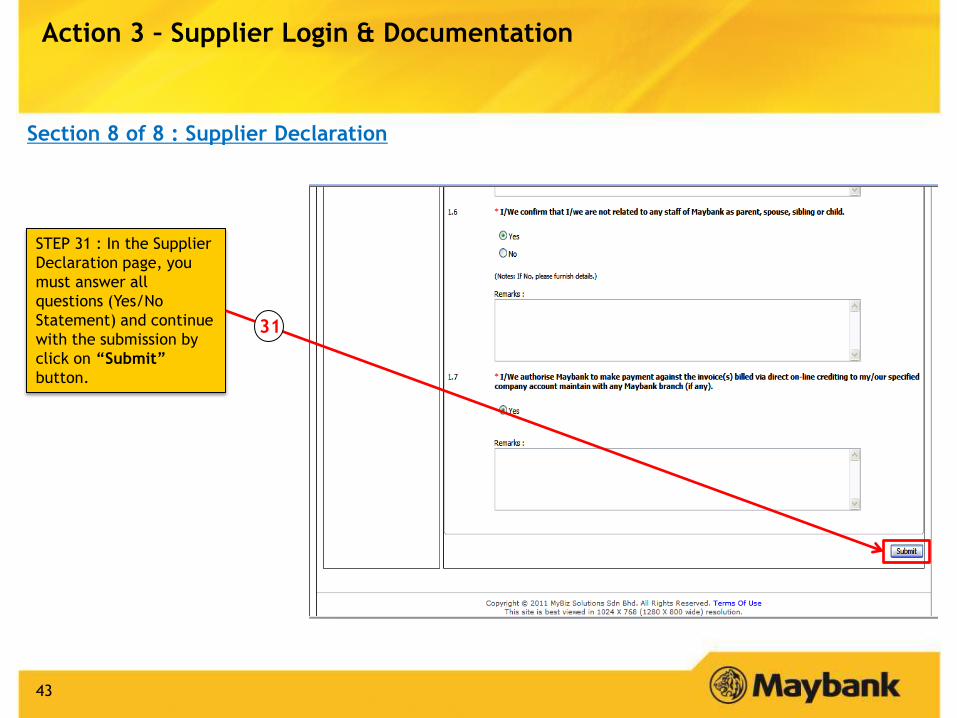
STEP 31 : In the Supplier
Declaration page, you
must answer all
questions (Yes/No
Statement) and continue
with the submission by
click on “Submit”
button.
Action 3 – Supplier Login & Documentation
Section 8 of 8 : Supplier Declaration
31
44
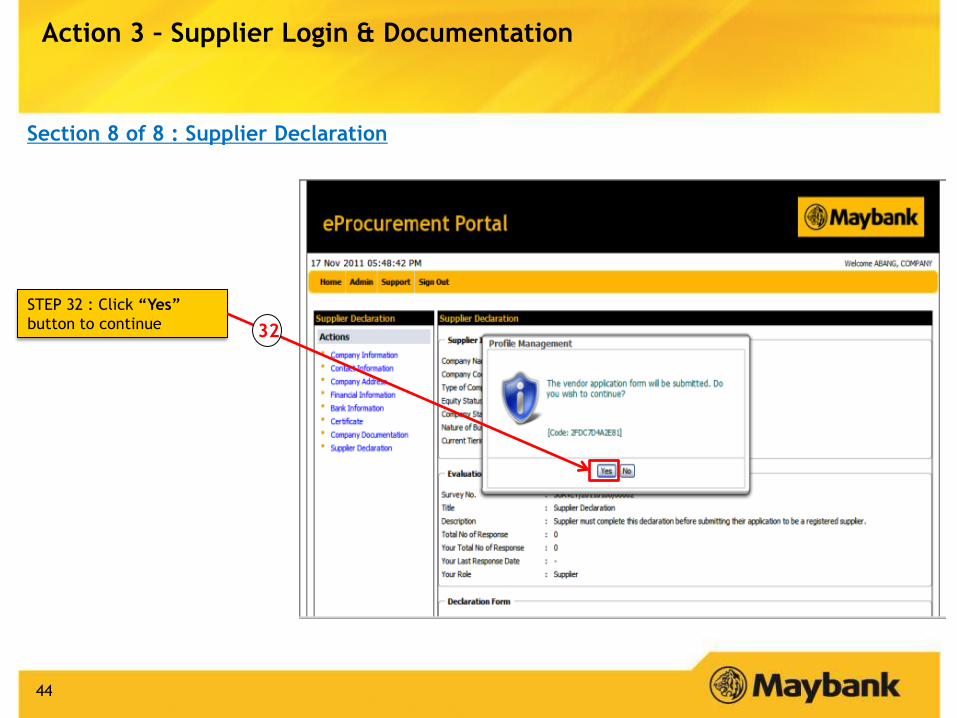
STEP 32 : Click “Yes”
button to continue
Action 3 – Supplier Login & Documentation
Section 8 of 8 : Supplier Declaration
32

45
STEP 33 : Click “OK”
button to continue
Action 3 – Supplier Login & Documentation
Section 8 of 8 : Supplier Declaration
33

46
STEP 34 : Click “OK” button to
continue
Action 3 – Supplier Login & Documentation
Section 8 of 8 : Supplier Declaration
34
NOTE : Once you have
successfully submitted your
application to be a Maybank
Supplier, admin will receive a
notification and will do the
checking on your company
before your application can be
approved.

47
NOTE : Before you sign out
from the system, check your
supplier application status.
IF your status here shows
“DRAFT”, please continue
with the submission process
by click on “Submit” button.
IF your status here shows
“NEW”, you have
successfully submitted the
application.
Action 3 – Supplier Login & Documentation

48
Action 3 – Supplier Login & Documentation
Insufficient or false information submitted by applicant will be REJECTED.
(Refer slide 47 for detail).
Maybank has the right to use the information provided by new applicant to do the
internal checking process.
You will receive an email notification from Maybank IF your application has been
approved
IMPORTANT !

49
Action 3 – Supplier Login & Documentation
Sample : Email notification for the approved application
NOTE : Your new User
Account (permanent ID)
Self Registration
• Action 1 – First Time Setup
• Action 2 – Create New Account
• Action 3 – Supplier Login & Documentation
• Action 4 – Supplier Activation
FAQ
50
Topic in this guide
51
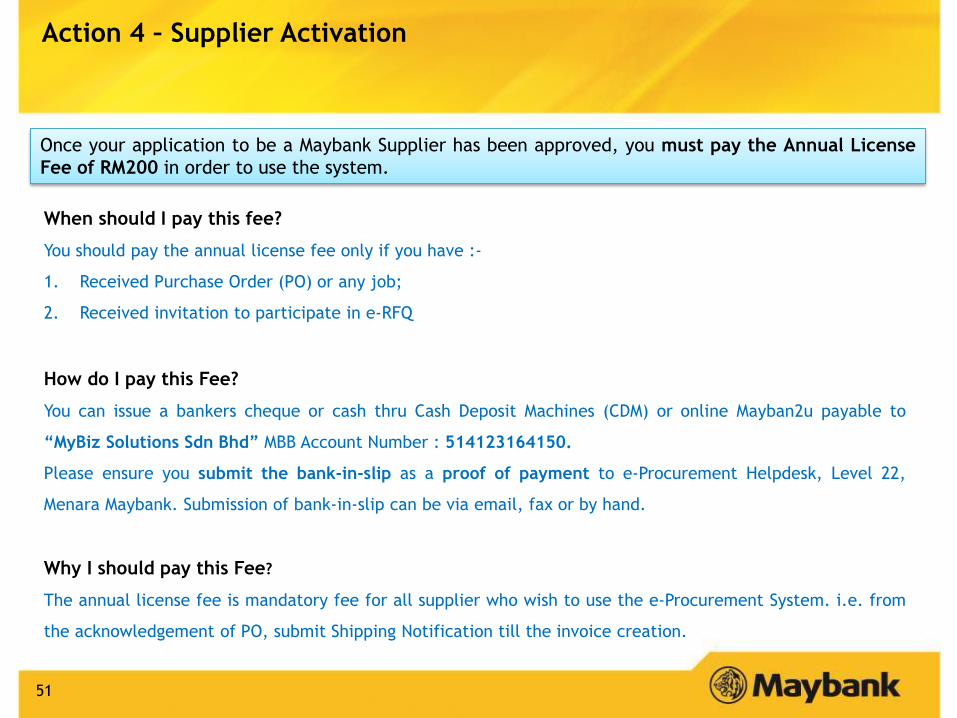
Action 4 – Supplier Activation
Once your application to be a Maybank Supplier has been approved, you must pay the Annual License
Fee of RM200 in order to use the system.
When should I pay this fee?
You should pay the annual license fee only if you have :-
1. Received Purchase Order (PO) or any job;
2. Received invitation to participate in e-RFQ
How do I pay this Fee?
You can issue a bankers cheque or cash thru Cash Deposit Machines (CDM) or online Mayban2u payable to
“MyBiz Solutions Sdn Bhd” MBB Account Number : 514123164150.
Please ensure you submit the bank-in-slip as a proof of payment to e-Procurement Helpdesk, Level 22,
Menara Maybank. Submission of bank-in-slip can be via email, fax or by hand.
Why I should pay this Fee?
The annual license fee is mandatory fee for all supplier who wish to use the e-Procurement System. i.e. from
the acknowledgement of PO, submit Shipping Notification till the invoice creation.

Self Registration
• Action 1 – First Time Setup
• Action 2 – Create New Account
• Action 3 – Supplier Login & Documentation
• Action 4 – Supplier Activation
FAQ
52
Topic in this guide

53
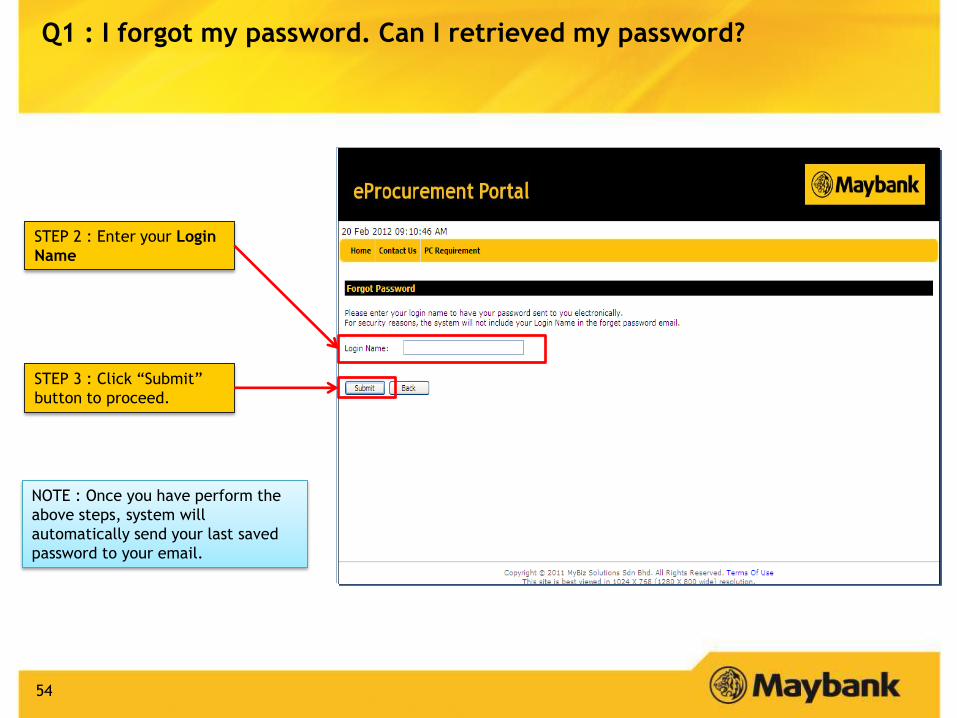
Q1 : I forgot my password. Can I retrieved my password?
Answer :
Yes, you can retrieve back your current password. If you forgot your password, kindly perform below steps :-
STEP 1 : Click at “Forgot
your Password” link.
54
Q1 : I forgot my password. Can I retrieved my password?
STEP 2 : Enter your Login
Name
STEP 3 : Click “Submit”
button to proceed.
NOTE : Once you have perform the
above steps, system will
automatically send your last saved
password to your email.

55
Q2 : My user ID is locked. How to unlock my ID?
Answer 1:
IF your ID is Locked out because you logged in another computer or you did not logout properly, kindly
perform below steps :-
STEP 1 : Click at “here”
link.

56
Q2 : My user ID is locked. How to unlock my ID?
STEP 2 : Select your locked
out reason from the
dropdown list
STEP 3 : Key in your
password
STEP 4 : Click “Submit”
button

57
Q2 : My user ID is locked. How to unlock my ID?
STEP 1 : Read the
instruction & check your
email notification
Answer 2:
IF your ID is Locked out because you have entered invalid password more than 3 times, kindly perform
below steps :-

58
Q3 : I am unable to upload or download attachment in the system?
Answer :
System will not allow you to upload or download any document from the system if you have not
performed the first time setup.
Please ensure you have successfully performed the FIRST TIME SETUP in order to upload or download
the attachment from system.
To perform the setup, kindly refer to page 4 till 11 in this guide.

59
Q4 : How to upload document in the system?
Answer :
Please ensure that you have successfully performed the first time setup if you would like to upload
document in the system. To upload the documents, kindly follow below steps :-
STEP 1: Click at “browse”
button.
NOTE : Please ensure the
file name is not included
any special character.
Example: -
()!@#$%^&*?{}[]<>+~-_

60
STEP 2 : Click at the file
name.
Q4 : How to upload document in the system?
STEP 3 : Click “Open”
button

61
STEP 4 : Click “Attach”
button and please wait
until the document
appeared in the system
NOTE : The file name will
appeared here.
Q4 : How to upload document in the system?
NOTE : If you have successfully
attached the document, it will
appeared here

62
Q5 : I have successfully register as Maybank Supplier but has not been
awarded any job with Maybank. Should I pay the License Fee of RM200?
Answer :
No. You should pay the annual license fee only if you have :-
1. Received Purchase Order (PO) or any job;
2. Received invitation to participate in e-RFQ

You may submit your inquiries through the following channels :-
Phone : +603-2074 7009
E-mail : [email protected]
Address : Procurement Support, Strategic Procurement
22nd Floor, Menara Maybank,
100 Jalan Tun Perak,
50050 Kuala Lumpur, Malaysia
Please take note on e-Procurement Helpdesk operating hours :
8.45 am – 5.45 pm (Monday – Thursday)
8.45 am – 4.45 pm (Friday)
Contact Us
64
Thank You