Embed Size (px)
Citation preview

HOW TO INTRODUCE, GROW, HARVEST AND PREPARE VEGETABLES
With ideas, crafts & food tastings for summer gardening program
Our mission is to provide resources that
will assist groups who are starting a
sustainable gardening program as part
of a Community- Level Program.
Our goal is to reach out to all segments
of the community through
“Seed Time Through Harvest”
We focus on the value of using
sustainable gardening to educate on
environmental and nutritional topics.
This is your support materials package with easy to use weekly hands-on projects.
With Wishes for Good Gardening
Brian Gathright

HOW TO INTRODUCE, GROW, HARVEST AND PREPARE VEGETABLES
Welcome to “Seed Time Through Harvest” a vegetable gardening based learning program. Our
mission is to present sustainable gardening as a platform so that its participants will become better
stewards of the earth. The objective of this course is to encourage people to grow, harvest and
prepare vegetables from their own garden.
The incorporation of garden themed activities; food tastings and craft projects will give your group a
needed variety in the program. In this gardening program guide, you will find helpful information
for introducing vocabulary to go along with gardening methods. This booklet was developed to
encourage the novice level gardener and to equip them with basic background knowledge.
“Seed Time Through Harvest” will help learners develop a greater appreciation for nature. It draws
a wider population that views gardening as a leisure activity with a cause. Keep in mind your
participants may not be ready at all times for chores in the garden. There are some individuals who
will not be physically able or even enjoy the process of planting outside in the dirt, even those who
may be frightened by butterflies and other insects. By incorporating a variety of activities it will make
your program more inclusive and interesting. Participants will look forward to the sessions and it will
impact them in a positive manner.
Once your garden site is created vegetable gardening is an uncomplicated procedure. A novice can
have success growing crops with a little practice. Maintaining it can be relatively time-consuming. All
the time spent working the garden will pay off, once the first harvest is ready.
Gardens need four things to thrive:
•Sunlight : Locate gardens in an area that gets six to eight hours of full sun.
•Good soil: It must be well draining so that no water puddle will remain for long periods and
free from tree roots and other type of plants that may compete for water and nutrients in the
soil.
•Water: A source of clean water must be available to the garden.
•Human Resource: People who are willing to get involved and work .
You must also factor in:
•The time frame allotted. [can be as little as 15 – 30 minutes if this is part of a larger day
camp, after school, or faith based program].
•The skill sets of facilitator. [ remember with good planning and at least one dependable
helper, things will come together and work out fine. The garden, crafts and activities portion
will drive the sessions. You don’t have to be an expert, just willing to do the work].
•The abilities of group. [ things may not always work out as planned when working with kids,
relax and be ready to regroup and keep it moving forward].
Include in your weekly program.
•Nature themed activities and crafts
•Multimedia presentations and hands on visuals
•Games
•Snacks
•Free time to socialize

HOW TO INTRODUCE,GROW, HARVEST AND PREPARE VEGETABLES
Learning goals for unit I
Practicing gardening;
Developing life skills. Develop children's understanding of vegetable production;
Raise children's interest in a more varied diet;
Help children to learn to produce vegetables;
Produce foods appreciation by involving the family and community
Give opportunities for children to consume the vegetables they grow
Encourage children to acquire attitudes of cooperation, responsibility, self-esteem and
self-confidence, motivation and the value of work
Unit 1 lesson 1 pages 1 – 5
The six parts of a plant introduction [covers 2 sessions the lesson and presentation]
Review six part plant lesson during the second session
6 Part Tree craft: [divide this project into 2 sessions]Page 2 Craft project instructions
Page 3 & 4 Craft Template sheets
Page 5 [to be attached] word search sheet to reinforce vocabulary words
Short video presentation on plants.
Unit 1 lesson 2A & 2B pages 6 – 8
Sample Apples activity [10 minutes]
Seeds - corn, peas, nuts, berriesRev. Gregor Mendel pea plants development
Page 7 Vocabulary word wall
TO BE COMPLETED AT A LATER DATE
Unit 1 lesson 3 pages 9 – 12
Roots - carrots, radishes, beets
Unit 1 lesson 4 pages 13 – 15
Leaves - cabbage, spinach, lettuce
Unit 1 lesson 5 pages 16 – 18
Stems - asparagus, celery, sugar cane
Unit 1 lesson 6 pages 19 – 21
Flowers - broccoli, cauliflower
Unit 1 lesson 7 pages 22 – 25
Fruits - tomatoes, peppers, squash
Biographies:
Rev. Gregor Mendel
Dr. George Washington Carver

“Seed Time Through Harvest”
Unit 1 / Lesson 1a Introducing Plant life
“SIX SUPER STARS THE STEMS STALKS SEEDS AND OTHERS”
Overview: Students will learn vegetable gardening and their health benefits of plants. With the use of
edible plants they will discover some of the functions and purposes of each of the 6 part of the
plants; Seeds, Roots, Stems, Leaves, Flowers and Fruits.
Learning Objectives:
•How to start and operate a vegetable garden
•Students will examine the different structures and functions of each plant part, and then
identify some uses of each of the six plant parts.
•We will sample a variety of fruits and vegetables to learn about nutrition.
•We will observe some influential people that made a contribution to the agriculture
industry.
•For younger learners we teach “Roots, Shoots, Flowers and Fruit” [Kindergarten – 1st grades]
Lesson Procedure:
1. Set up a plant display using your choice of materials, as a visual for the lesson. If your
budget allows present a variety of seeds, fruits, and vegetables .[I like including a herb
plant like rosemary or a plant in bloom, something as simple as a mum plant works great
with elementary and middle school learners.]In this lesson the words plant and tree are
used interchangeably .
• We suggest making use of a KWL chart in the instruction portion, to introduce your 6
part plant lesson and discover who your audience is. This chart should be displayed
large enough that the whole group can easily view it.
• KWL chart: is a an acronym for a teaching method [graphical organizer] • Know: what do they already know about the subject of trees.
• Want to know: knowledge or information they feel is important to gain of about plants.
• Learned: What new information was added to their skill set at the end of the session,
what was ultimately learned.
• This method will help you customize your weekly lessons for the group you are leading.
2. Shift into the topic “plants are like people”
•Start with “people have arms, legs, ears, mouth, nose and other parts to help us survive.
How do we use these parts of our body.
•After the group has exhausted their answers, it’s time to, shift the discussion, just like
people, plants have parts with different functions too.
•Distribute the “plant handout ” poster from the set, to point out the parts of a plant.
•Have students give examples of plants they have seen.
•Briefly list the names of the 6 plant part. Start with seeds, then continue to the root
system, next the stems, followed by leaves, flowers and fruit one by one.
3. Activity Allow students to be creative and brainstorm on how to complete tree.
Students will Create a model of a tree and label it with the names
of the 6 parts and its function, including the roots, stem, leaves, flower, fruit
and the internal part of the fruit showing seeds. All parts will be labeled for
example: Leaves make food for the plant.
4. Present project: after art project is completed, allow students to present
the 6 part plant presentation.
Materials
Styrofoam cup, Chenille stems / Pipe cleaners ,crayons, glue
Tree templates 1 & 2 printed on heavy weight paper 1

S T E M
Activity 1 parts of a plant Tree with 2 template sheets / Brian Gathright / Seed Time Through Harvest
Activity Allow students to be creative and brainstorm on how to complete and label tree.
Students will Create a model of a tree and label it with the names of the 6 parts and
its function, including the roots, stem, leaves, flower, fruit and seeds .
For example: Leaves -make food for the plant.
Directions: part 1 [prep work will take 30 minutes up to 45 minutes]
1. Color and decorate template #1 [remember to add flowers, fruit, and seeds]
2. Color and decorate template #2 [ allow students to be as creative as they like.
3. Color and decorate Styrofoam cup. Use a pencil to etch “TAP ROOT” or “ROOT SYSTEM”
4. Use crayons to decorate cup & Attach pipe cleaners to cup.
Please note there should be a break between part 1 & part 2. Whether you start project in the morning
session and complete that afternoon. Or do part 1 on the first day then complete on the next day.
Directions: part 2 [assemble will take 15 – 30 minutes ]
1. Fold and apply glue or staple template #1
2. Roll template #2 into a cylinder and apply glue to secure.
3. Insert template #2 into cup, attach template #1 to template #2
Direction: part 3: allow students to do a 6 part plant presentation using their project as a visual.
MaterialsStyrofoam cup
Chenille stems / Pipe Cleaners
Tree templates 1 & 2 printed on
heavy weight paper
Tools / Supplies
Glue, Crayons, Pencil. Scissors
1
2a 2b 3 4
S
T
E
M

FOLD AND STAPLE OR GLUE THE BOTTOM CORNERS TOGETHER Tree template # 1 - branches and leaves
Fold Here
Fold Here
FOLD AND STAPLE OR GLUE THE BOTTOM CORNERS TOGETHER

HOW TO INTRODUCE, GROW, HARVEST AND PREPARE VEGETABLES
Welcome to “Seed Time Through Harvest” a vegetable gardening based learning program. Our
mission is to present sustainable gardening as a platform so that its participants will become better
stewards of the earth. The objective of this course is to encourage people to grow, harvest and
prepare vegetables from their own garden.
The incorporation of garden themed activities; food tastings and craft projects will give your group a
needed variety in the program. In this gardening program guide, you will find helpful information
for introducing vocabulary to go along with gardening methods. This booklet was developed to
encourage the novice level gardener and to equip them with basic background knowledge.
“Seed Time Through Harvest” will help learners develop a greater appreciation for nature. It draws
a wider population that views gardening as a leisure activity with a cause. Keep in mind your
participants may not be ready at all times for chores in the garden. There are some individuals who
will not be physically able or even enjoy the process of planting outside in the dirt, even those who
may be frightened by butterflies and other insects. By incorporating a variety of activities it will make
your program more inclusive and interesting. Participants will look forward to the sessions and it will
impact them in a positive manner.
Once your garden site is created vegetable gardening is an uncomplicated procedure. A novice can
have success growing crops with a little practice. Maintaining it can be relatively time-consuming. All
the time spent working the garden will pay off, once the first harvest is ready.
Gardens need four things to thrive:
•Sunlight : Locate gardens in an area that gets six to eight hours of full sun.
•Good soil: It must be well draining so that no water puddle will remain for long periods and
free from tree roots and other type of plants that may compete for water and nutrients in the
soil.
•Water: A source of clean water must be available to the garden.
•Human Resource: People who are willing to get involved and work .
You must also factor in:
•The time frame allotted. [can be as little as 15 – 30 minutes if this is part of a larger day
camp, after school, or faith based program].
•The skill sets of facilitator. [ remember with good planning and at least one dependable
helper, things will come together and work out fine. The garden, crafts and activities portion
will drive the sessions. You don’t have to be an expert, just willing to do the work].
•The abilities of group. [ things may not always work out as planned when working with kids,
relax and be ready to regroup and keep it moving forward].
Include in your weekly program.
•Nature themed activities and crafts
•Multimedia presentations and hands on visuals
•Games
•Snacks
•Free time to socialize

Seeds contain new plants. Seeds form in fruit of the plant.
The Root System is usually underground it anchor the plant in the soil, Absorbs water and
nutrients to feed the plant.
Some plants have a root system which are tubers and bulbs they store food.
The Stem or Shoot System conduct water and nutrients to the entire plant.
Leaves are designed to capture sunlight which the plant uses to make food through a process
called photosynthesis. Most of the food a plant need is made in their leaves.
Flowers are the reproductive part of most plants. Flowers contain pollen and tiny eggs called
ovules. After pollination of the flower and fertilization, it develops into a fruit.
Fruit is the part of the plant that protects seeds as they grow. Fruit provides a covering for
seeds. 5
Word Search VocabularyFind the words that are in darker letters

Unit 1 lesson 2a Seeds, Plant traits and germination
This lesson combines plant science & healthy snacking components
Cross breeding of flowers created seeds lead to making new varieties of fruits and vegetables
Materials Needed
Apple corer / 3 distinct varieties of apples
•Red delicious [red /sweet / crisp / slightly juicy]
•Granny smith [green / tart / crisp and firm texture]
•Golden delicious [yellow/ sweet / softer texture]
•Fresh lemon or lemon juice [to keep apples from
turning brown if you cut apples in advance]
Open the session with ice breaker game.
“I am thinking of a character” [see word wall template 1]
1. Start with the opening question:
What is the fruit an apple like? Record the students
answer on the board if possible.[color, shape, texture..]
2. Distribute the sample of apples to be tasted
Repeat the question “What is the fruit an apple like?
Which apple was the sweetest, the most tart, easiest to chew, prettiest color…
3. Introduce the lesson
We sampled different varieties of apples to introduce today's lesson on creating new seeds varieties.
We also introduced the word of the day characteristics or traits
We will discover how and why gardeners breed plants to create new varieties of the same plant.
Lesson Objectives:
•Pupils understand the nature of seeds and know how they germinate.
•How to produce sprouts, and care for them.
Sweet Peas are an important human and animal food crop cultivated throughout the world. Peas were one of
the first plants studied in Europe, starting with Thomas Andrew Knight in the 1790s, and later by the famous
scientist, Gregor Mendel in the 1860s. During the time of Mendel the flowers of peas only came in two
colors, purple and white. In his experiments, which is called crossbreeding, he took the pollen from both
types of plants to see what the results would be. He recorded his research, which lead to the science of
genetics. Today the science of genetics is very important in medical research. [Cancer & sickle cell anemia]
Farmers had known for centuries that crossbreeding of plants could create certain desirable traits.
Peas were first used as an agricultural crop 11,000 years ago. They are a rich source of protein (23-25%),
essential amino acids, complex carbohydrates, and mineral content like iron, calcium and potassium.
Gregor Mendel experiments with peas. Just like apples sweet peas have different Characteristics .
• He experimented with pea plants in his garden to study how traits are passed from parents
to offspring.
• He performed crossbreeding with peas in order to invent a better pea plant.
• His research lead to the science of genetics.
• He selected peas and predicted what variety of plant each seed will make.
The 7 traits [characteristics] of the sweet pea
•Pea shape (round or wrinkled)
•Pea color (green or yellow)
•Pod shape (slender or puffed up)
•Pod color (green or yellow)
•Flower color (purple or white)
•Plant size (long tall vines or short bush)
•Position of flowers (along the stems or
on the tip)
Granny Smith Apples and Apple Corer
6
• In today's lesson we will introduce students to the vocabulary words [which are all
interchangeable ] : traits, description, characteristics, variety and how they relates to
gardening, breeding and plant identification.
We will start with a quiz game I am thinking of a character.
• You can narrow it down to a character to someone you and the group are familiar with such
as super hero, cartoon, television, movie,…
• Explain to the students you have to describe them by their characteristics.
• After the student catch the concept of the game select 3 – 4 students to lead the game or if it
is a small group and time allows let each student take a turn.
• In the next round change the rules use simple fruits and see if they can discover their
name. In this round write the name of the fruit on an index card and maybe give them a
couple of characteristics to start them off.
• We recognize characters through their characteristics. The same is true with varieties of
vegetables and fruits. Most of them were created by the process of Cross breeding of the
pollen of flowers. By crossbreeding new varieties of fruits and vegetables grew from the
seeds.
• In this lesson traits & characteristics are used interchangeable words]
B U I L D I N GGathrightSeed Time 2 Harvest W O R D W A L L
•My color is yellow
•I am sour to eat
•Most people mix me with water
and sugar to make a drink out of
me.
In this round write the name of the fruit on an index card and
maybe give them a couple of characteristics to start them off.
Who am I
I am a lemon
“I am thinking of a character” word wall template 1]
word wall template 1
v o c a b u l a r y
7
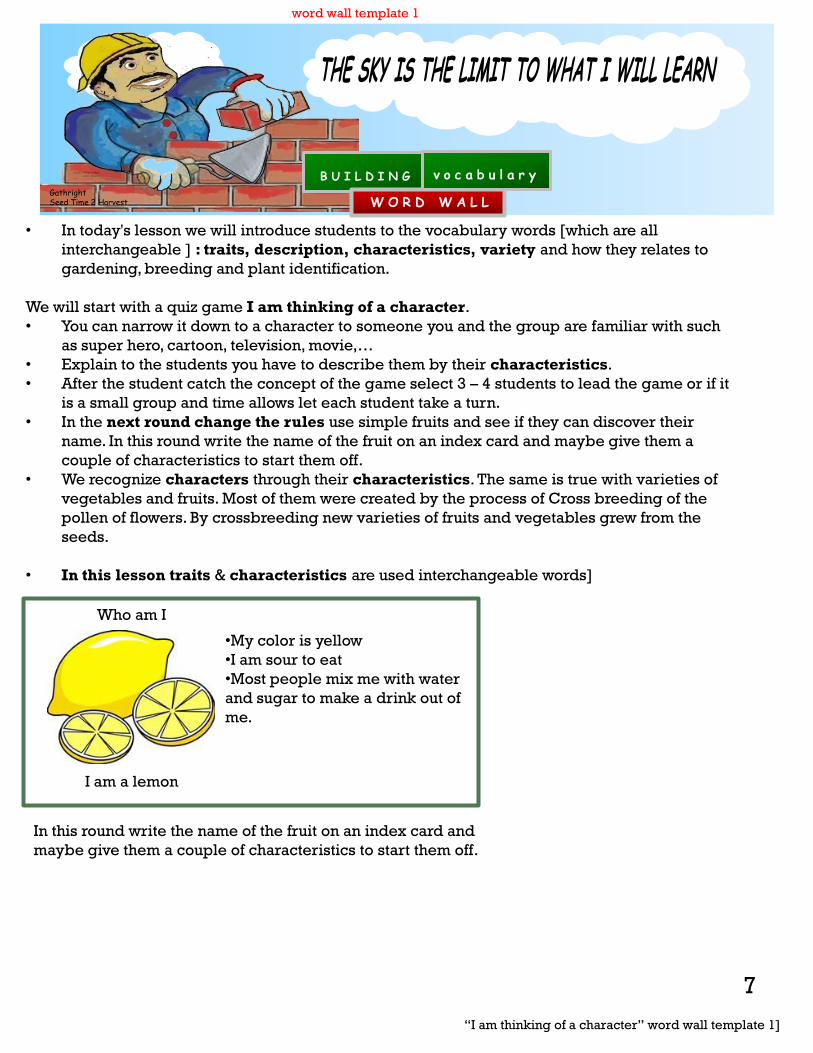
Where Do Plants Come From?
Plants come from seeds, the final stage of a plant’s cycle. Their
main purpose is to produce another plant. Each seed contains a
tiny plant waiting for the right conditions to germinate, or start the
growth process. Seeds come in many shapes and sizes they can
be as small as a fragment of dust or larger than a soft ball.
If you use your imagination you can draw a picture of a seed as a
vitamin store, or even a sleeping plant. Some seeds are used to
provide the world's daily food. Your breakfast cereal and toast,
your pasta or pizza lunch and your rice dishes as well as many
deserts.
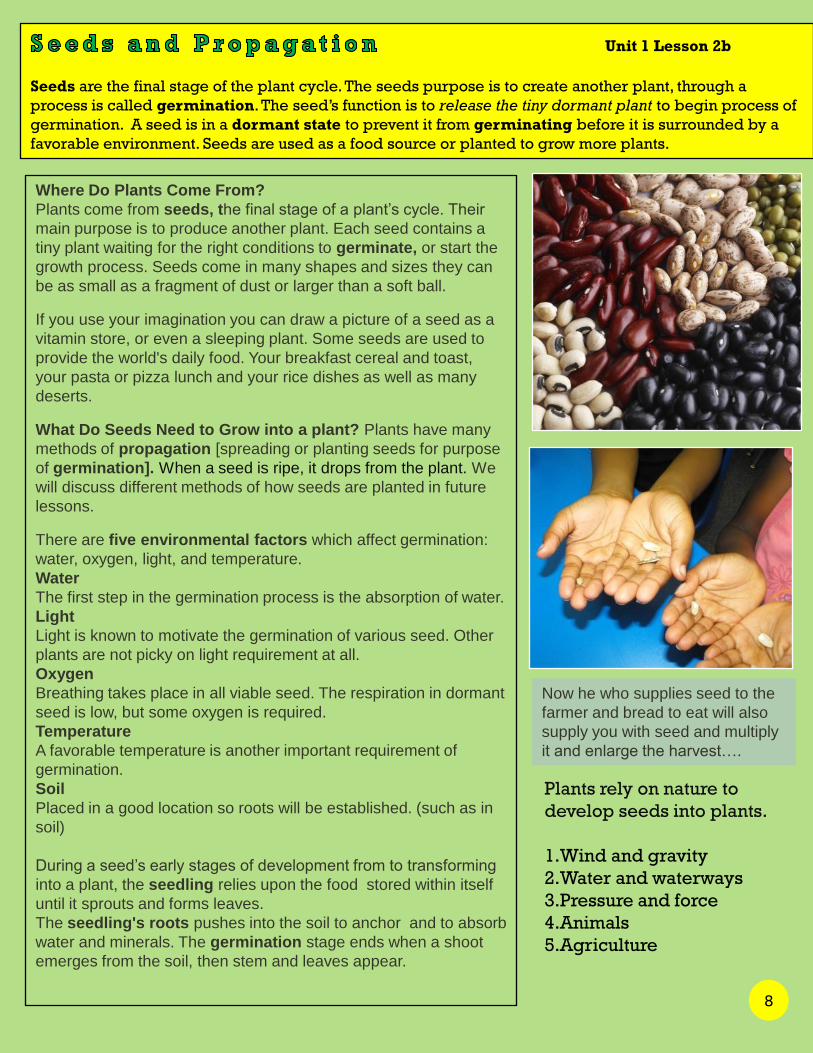
What Do Seeds Need to Grow into a plant? Plants have many
methods of propagation [spreading or planting seeds for purpose
of germination]. When a seed is ripe, it drops from the plant. We
will discuss different methods of how seeds are planted in future
lessons.
There are five environmental factors which affect germination:
water, oxygen, light, and temperature.
Water
The first step in the germination process is the absorption of water.
Light
Light is known to motivate the germination of various seed. Other
plants are not picky on light requirement at all.
Oxygen
Breathing takes place in all viable seed. The respiration in dormant
seed is low, but some oxygen is required.
Temperature
A favorable temperature is another important requirement of
germination.
Soil
Placed in a good location so roots will be established. (such as in
soil)
During a seed’s early stages of development from to transforming
into a plant, the seedling relies upon the food stored within itself
until it sprouts and forms leaves.
The seedling's roots pushes into the soil to anchor and to absorb
water and minerals. The germination stage ends when a shoot
emerges from the soil, then stem and leaves appear.
Now he who supplies seed to the
farmer and bread to eat will also
supply you with seed and multiply
it and enlarge the harvest….
Unit 1 Lesson 2b
Seeds are the final stage of the plant cycle. The seeds purpose is to create another plant, through a
process is called germination. The seed’s function is to release the tiny dormant plant to begin process of
germination. A seed is in a dormant state to prevent it from germinating before it is surrounded by a
favorable environment. Seeds are used as a food source or planted to grow more plants.
Plants rely on nature to
develop seeds into plants.
1.Wind and gravity
2.Water and waterways
3.Pressure and force
4.Animals
5.Agriculture
8

Snack Ideas for this lesson
Sunflower
Kernels / Nuts
Pick up a few
Sunflowers as
well as a package
of whole Sunflower
Seeds for display
purposes
Three Bean Salad
Rename 3 Bean Salad to Pickled Beans.
Salads are not appealing to most kids and
the name turns some kids off before they
try them. In rebranding this snack by
calling them pickled , it draws interest.
Dress up three beans with:
Add apple cider vinegar
Early English peas
Purple onions
Broccoli florets
A little sugar
Black pepper
Nutmeg
Activity for lesson 2
#1. Examining Beans
The purpose of activity#1 is to observe the different shapes colors and sizes of beans.
Seed Identification exercise
Completion Time 10 minutes
Pupils separate the 15 Bean Soup Seeds into groups
by color and size to compare their differences.
#2. Plant Propagation Chamber
•See page 10 for instructions
•Completion time: 30 minutes
Dry Beans from grocery store will sprout
and can be used for gardening projects. 15 Bean Soup are an Assortment of 15 kinds of natural
dried beans which includes; Reds, Lentils, Peas, Limas,
Pinto, Navy, Great Northern, Cranberry, and Blacks.
Canned Three Bean Salad is a classic
mixture of green beans, wax beans and
kidney beans in a vinegar based, sweet-
tangy dressing. Serve chilled or at room
temperature 9

Activity for lesson 2P l a n t P r o p a g a t i o n C h a m b e rTake home and observe projectTime: up to 30 minutes
Learners will enjoy watching the process of seeds sprouting into plants.
Materials Needed•Potting soil mix•Clear plastic wrap•16 Ounce Clear plastic cup [ 1 per student]•3 types of bean seeds [ 1 set per student]•Plastic spoons [ 1 per student]Directions1. Place plastic container with soil at each work
station [ students should be grouped 6 – 8 students per work station]
2. Distribute to each student: • 1 plastic cup • 3 assorted seeds [Lima bean, Pinto
bean, Red bean] • 1 spoon per student.
3. Explain to the students the 4 steps to complete the project. [have a completed unit as a visual]
• Step 1. Use spoon or fingers to fill cup half way with moist potting soil.
• Step 2. Place the 3 seeds on top of soil• Step 3. Cover seeds with a layer of soil
[enough to fill container ¼th from the top].
• Step 4. Seal container with plastic wrap or lid. Write name on cup with marker.
4. Cover each students project with plastic wrap. [upscale cups are available on line that come complete with plastic lids]
BKG / 2016
BKG / 2016
BKG / 2016BKG / 2016
BKG / 2016BKG / 2016
1 2 3 4
10

11

Lessons 1 &2
Seed Time Through Harvest
Submitted
By
Brian Gathright
Houston, Texas