Embed Size (px)
Citation preview

Security Guide
SUSE OpenStack Cloud 8

Security GuideSUSE OpenStack Cloud 8
Publication Date: 05/22/2020
SUSE LLC1800 South Novell PlaceProvo, UT 84606USA
https://documentation.suse.com
Copyright © 2006– 2020 SUSE LLC and contributors. All rights reserved.
Except where otherwise noted, this document is licensed under Creative Commons Attribution 3.0 Li-
cense : http://creativecommons.org/licenses/by/3.0/legalcode
For SUSE trademarks, see http://www.suse.com/company/legal/ . All other third-party trademarks are the
property of their respective owners. Trademark symbols (®, ™ etc.) denote trademarks of SUSE and its
affiliates. Asterisks (*) denote third-party trademarks.
All information found in this book has been compiled with utmost attention to detail. However, this does
not guarantee complete accuracy. Neither SUSE LLC, its affiliates, the authors nor the translators shall be
held liable for possible errors or the consequences thereof.

Contents
1 SUSE® OpenStack Cloud: Security FeaturesOverview 1
1.1 Security features in SUSE OpenStack Cloud 8 1
1.2 Role-Based Access Control (RBAC) Support for Neutron Networks 1
1.3 Separate Service Administrator Role 1
1.4 Inter-service Password Enhancements 2
1.5 SELinux for KVM 2
1.6 Data In Transit Protection 2
1.7 Data-at-Rest Protection Using Project-Based Encryption 3
1.8 CADF-Compliant Security Audit Logs 3
1.9 PCI Readiness 3
1.10 Glance-API Rate Limit to Address CVE-2016-8611 3
2 Key Management with the Barbican Service 4
2.1 Barbican Service Overview 4
2.2 Key Features 4
2.3 Installation 5
2.4 Auditing Barbican Events 9
2.5 Barbican Key Management Service Bootstrap Data 10
2.6 Known issues and workarounds 14
3 Key Management Service Administration 15
3.1 Post-installation verification and administration 15
3.2 Updating the Barbican Key Management Service 15
iii Security Guide

3.3 Barbican Settings 15
3.4 Enable or Disable Auditing of Barbican Events 16
3.5 Updating the Barbican API Service Configuration File 17
3.6 Starting and Stopping the Barbican Service 18
3.7 Changing or Resetting a Password 18
3.8 Checking Barbican Status 19
3.9 Updating Logging Configuration 19
4 SUSE® OpenStack Cloud: Service Admin RoleSegregation in the Identity Service 21
4.1 Overview 21
4.2 Pre-Installed Service Admin Role Components 21
4.3 Features and Benefits 22
4.4 Roles 23
5 Role-Based Access Control in Neutron 24
5.1 Creating a Network 24
5.2 Creating an RBAC Policy 25
5.3 Listing RBACs 25
5.4 Listing the Attributes of an RBAC 26
5.5 Deleting an RBAC Policy 26
5.6 Sharing a Network with All Tenants 26
5.7 Target Project (demo2) View of Networks and Subnets 31
5.8 Target Project: Creating a Port Using demo-net 32
5.9 Target Project Booting a VM Using Demo-Net 33
5.10 Limitations 35
iv Security Guide

6 Configuring Keystone and Horizon to use X.509 ClientCertificates 37
6.1 Keystone configuration 37
6.2 HAProxy Configuration 41
6.3 Create CA and client certificates 42
6.4 Horizon configuration 42
6.5 Browser configuration 44
6.6 User accounts 44
6.7 How it works 46
7 Transport Layer Security (TLS) Overview 48
7.1 Comparing Clean Installation and Upgrade of SUSE OpenStackCloud 48
7.2 TLS Configuration 49
Using the Default My Public Cert 49 • Certificate
Terms 49 • Configuring TLS in the input model 51 • Generating
and Signing Certificates 52 • User-provided certificates and
trust chains 53 • Edit the Input Model to Include Your Certificate
Files 54 • Generating a Self-signed CA 55 • Generate a Certificate
Signing Request 57 • Generate a Server Certificate 58 • Upload
to the Cloud Lifecycle Manager 60 • Configuring the Cipher
Suite 62 • Testing 62 • Verifying That the Trust Chain is Correctly
Deployed 62 • Turning TLS on or o 63
7.3 Enabling TLS for MySQL Trac 64
Enabling TLS on the database server for client access 64 • MySQL
replication over TLS 65 • Enabling TLS for MySQL replication on a new
deployment 65 • Enabling TLS for MySQL replication on an existing
system 66 • Testing whether a service is using TLS 66
7.4 Enabling TLS for RabbitMQ Trac 67
Testing 68
v Security Guide

7.5 Troubleshooting TLS 69
Troubleshooting TLS certificate errors when running playbooks with a
limit 69 • Certificate Update Failure 69 • Troubleshooting trust
chain installation 69 • Expired TLS Certificates 71 • Troubleshooting
certificates 72
8 SUSE® OpenStack Cloud: Preventing Host HeaderPoisoning 73
9 Encryption of Passwords and Sensitive Data 75
9.1 SSH Introduction 75
9.2 Protecting sensitive data on the Cloud Lifecycle Manager 76
9.3 Interacting with Encrypted Files 77
10 Encryption of Ephemeral Volumes 79
10.1 Enabling ephemeral volume encryption 79
11 Refining Access Control with AppArmor 81
11.1 AppArmor in SUSE OpenStack Cloud 8 81
12 Data at Rest Encryption 82
12.1 Configuring KMIP and ESKM 82
12.2 Configuring Cinder volumes for encryption 85
12.3 For More Information 86
13 Glance-API Rate Limit (CVE-2016-8611) 87
14 Security Audit Logs 89
14.1 The need for auditing 89
14.2 Audit middleware 89
14.3 Centralized auditing configuration 90
vi Security Guide

1 SUSE® OpenStack Cloud: Security FeaturesOverview
1.1 Security features in SUSE OpenStack Cloud 8Enterprises need protection against security breaches, insider threats, and operational issuesthat increase the risk to sensitive data. By combining technologies from both OpenStack servicesand Micro Focus Security–Data Security products, SUSE OpenStack Cloud 8 provides capabilitiesthat help you protect your data at rest and in transit, enable centralized key management, andcomply with Payment Card Industry Data Security Standard (PCI-DSS).
In SUSE OpenStack Cloud 8, a number of security enhancements are available to strengthenand harden your cloud deployment. Below is an overview of some of the features and briefdescriptions. Follow the links to the relevant topics for instructions on setup, configuration, anduse of these security features.
1.2 Role-Based Access Control (RBAC) Support forNeutron NetworksThe RBAC feature in this release enables better security as administrators can now control whohas access to specific networks. This is a significant improvement over the previous all-or-noth-ing approach to shared networks. This is beneficial from a security standpoint as some projects(or tenants) have stricter security policies. For example, a finance department must run PCI-compliant workloads in isolation from other departments, and thus cannot share their Neutronnetwork resources. RBAC enables cloud admins to create granular security policies for sharingNeutron resources with one or more tenants or projects using the standard CRUD (Create, Read,Update, Delete) model. More information can be found in Chapter 5, Role-Based Access Control in
Neutron.
1.3 Separate Service Administrator RoleEach OpenStack service account now has an optional role available to restrict the OpenS-tack functions each account can access. This feature enables cloud administrators to apply ser-vice-specific role-based, admin-level access to a specific UserID, with the ability to audit ad-
1 Security features in SUSE OpenStack Cloud 8 SUSE OpenStack Cloud 8
min-level actions. This functionality provides better security by not only providing full visibilityinto admin-level activities via audit logs, but also by fulfilling compliance requirements such asPCI DSS v3.1 standards. More information in Section 4.1, “Overview”.
1.4 Inter-service Password EnhancementsYou can conveniently change the inter-service passwords used for authenticating communica-tions between services in your SUSE OpenStack Cloud deployment, promoting better compliancewith your organization’s security policies. The inter-service passwords that can be changed in-clude (but are not limited to) Keystone, MariaDB, RabbitMQ, Cloud Lifecycle Manager, Monascaand Barbican. Admins can implement this feature by running the configuration processor togenerate new passwords followed by Ansible playbook commands to change the credentials.
1.5 SELinux for KVMSELinux (also known as Security-Enhanced Linux) provides enhanced security at the hypervisorlayer on Compute Nodes by mitigating the risk of hypervisor attacks and strongly isolating theguest VMs. It enforces mandatory access control security policies for the Compute Nodes (svirtprocess) running KVM, thus reducing the risk of a hypervisor breakout. By providing a lockeddown profile for the KVM/QEMU processes that the guest VMs run in, it strongly isolates theguest VMs. With such strong security measures as SELinux, malicious attacks on VMs and theunderlying host OS are much less possible. SELinux provides enhanced security for instancesmanaged by libvirt . It does not, however, provide enhanced security for OpenStack processes.
1.6 Data In Transit ProtectionWith SUSE OpenStack Cloud 8, data transmission between internal API endpoints is encrypt-ed using TLS v 1.2 to protect sensitive data against unauthorized disclosure and modification(spoofing and tampering attacks). Additionally, you can configure TLS using your own certifi-cates, from a Certificate Authority of your choice, providing deployment flexibility. More atSection 7.2, “TLS Configuration”.
2 Inter-service Password Enhancements SUSE OpenStack Cloud 8

1.7 Data-at-Rest Protection Using Project-BasedEncryptionYou can encrypt sensitive data-at-rest on per tenant or project basis, while storing and manag-ing keys externally and centrally using Enterprise Secure Key Manager (ESKM). This capabilityrequires the Barbican API and OASIS KMIP (Key Management Interoperability Protocol) plug-ins for integration, and supports encryption of Cinder block storage with SUSE OpenStack Cloud8. More information at Chapter 12, Data at Rest Encryption.
1.8 CADF-Compliant Security Audit LogsSecurity audit logs for critical services such as Keystone, Nova, Cinder, Glance, Heat, Neutron,Barbican are available in a standard CADF (Cloud Audit Data Federation) format. These logscontain information on events such as unauthorized logins, admin level access, unsuccessfullogin attempts, and anomalous deletion of VMs that are critical from a security threat monitoringstandpoint. Audit logs are useful as a tool for risk mitigation, identifying suspicious or anomalousactivity, and for fulfilling compliance. For more information see Chapter 14, Security Audit Logs.
1.9 PCI ReadinessSUSE OpenStack Cloud 8 is PCI (Payment Card Industry) ready, enabling retail and finance in-dustries that are subject to PCI compliance, to become certified. The readiness is based on labassessment and verification conducted by an external audit rm, against the more than 250 se-curity requirements specified in the PCI DSS (Data Security Standard) v3.1 standards document.Since SUSE OpenStack Cloud satisfies the requirements that fall under vendor responsibility,customers can proceed with their certification efforts with full confidence and peace of mindthat SUSE OpenStack Cloud will not be a blocker.
1.10 Glance-API Rate Limit to Address CVE-2016-8611No limits are enforced within the Glance service for both v1 and v2/images API POST methodfor authenticated users, resulting in possible denial of service through database table saturation.Further explanation and instructions for adding a rate-limiter are in Chapter 13, Glance-API Rate
Limit (CVE-2016-8611).
3 Data-at-Rest Protection Using Project-Based Encryption SUSE OpenStack Cloud 8

2 Key Management with the Barbican Service
2.1 Barbican Service OverviewBarbican is an OpenStack key management service offering secure storage, provisioning, andmanagement of key data. The Barbican service provides management of secrets, keys and cer-tificates via multiple storage back-ends. The support for various back ends is provided via a plug-in mechanism, a Key Management Interoperability Protocol (KMIP) plug-in for a KMIP-compli-ant HSM Hardware Secure Module (HSM) device. Barbican supports symmetric and asymmetrickey generation using various algorithms. Cinder, neutron-lbaas v2 and Nova will integrate withBarbican for their encryption key generation and storage.
Barbican has two types of core feature sets:
The Barbican component, a Web Server Gateway Interface (WSGI) application that exposesa REST API for secrets/containers/orders.
Barbican workers for asynchronous processing, which is used for various messaging-event-driven tasks related to certificate generation.
2.2 Key FeaturesThe major features of the Barbican key management service are:
The ability to encrypt volumes/disks. In an OpenStack context, this means support forencrypting Cinder volumes (volume encryption). Cinder has its own key manager interface(KeyMgr) and can use BarbicanClient as one of its implementations. By default in SUSEOpenStack Cloud 8, Cinder uses Barbican as its key manager when Barbican is enabled.KeyMgr encrypts data in the virtualization host before writing data to the remote disk.There are three options available in SUSE OpenStack Cloud:
Tenant-based encryption for block volume storage using Barbican for KMS,
Barbican with KMIP and PKCS11 and external KMS (certified with Micro FocusESKM),
3PAR StoreServ Data-At-Rest Encryption,
Storage and retrieval of secrets (passwords)
4 Barbican Service Overview SUSE OpenStack Cloud 8

Certificate management for Load Balancer as a Service V2 (previously known as Neu-tron-LBaaS)
The ability to define and manage access policies for key material
Administrative functionality, and the ability to control the lifecycle of key material
A well-defined auditing ability in OpenStack services for key access and lifecycle events
Key management as a service for PaaS application(s) deployed on an OpenStack cloud
The ability to scale key management effectively and make it highly available (able tohandle failover)
WarningDo not delete the certificate container associated with your load balancer listeners beforedeleting the load balancers themselves. If you delete the certificate rst, future operationson your load balancers and failover will stop working.
2.3 InstallationNew installations of SUSE OpenStack Cloud 8:
For new installations, no changes are needed for Barbican to be enabled. When installingyour cloud, you should use the input models which already define the necessary Barbicancomponents. When using the pre-defined input model les that come with SUSE OpenStackCloud 8, nothing else needs to be done in those les.
Generate a master key.
WarningDo not change your master key after deploying it to Barbican.
If you decide to make configuration changes to your clean install of SUSE OpenStack Cloud8, you will need to redeploy the Barbican service. For details on available customizationoptions, please see Chapter 3, Key Management Service Administration.
5 Installation SUSE OpenStack Cloud 8

Master Key Configuration
Barbican currently supports databases and KMIP as its secret store back-ends. In OpenStackupstream additional back-ends are available, such as the PKCS11 and dogtag plug-ins, but theyare not tested or supported by SUSE OpenStack Cloud.
In SUSE OpenStack Cloud, by default Barbican is configured to use a database as a secret (keys)storage back-end. This back-end encrypts Barbican-managed keys with a project level key (KEK/Key Encryption Key) before storing it in the database. Project-level keys are encrypted usinga master key. As part of the initial Barbican configuration, you must generate and configurethis master key.
When Barbican is used with simple_crypto_plugin as its secret store back-end, its master keyneeds to be defined before initial deployment. If no key is specified before deployment, thedefault master key is used—this practice is discouraged.
1. Generate the master key using the provided python *generate_kek* script on the CloudLifecycle Manager node:
python ~/openstack/ardana/ansible/roles/KEYMGR-API/templates/generate_kek
The master key is generated at stdout from this command.
2. Set the master key in ~/openstack/my_cloud/config/barbican/barbican_de-
ploy_config.yml .
3. If there is an existing barbican_customer_master_key value, replace it with the gener-ated master key you just generated.
4. Commit the change to the Git repository:
cd ~/openstackgit add -Agit commit -m "My config"
5. Run ready-deployment:
cd ~/openstack/ardana/ansible/ansible-playbook -i hosts/localhost ready-deployment.yml
6. When the master key is set, continue with your cloud deployment.
6 Installation SUSE OpenStack Cloud 8

Upgrade Master Key Configuration
1. Check the master key.If a master key is already defined, check ~/openstack/ardana/ansible/roles/
barbican-common/vars/barbican_deploy_config.yml for barbican_customer_mas-ter_key value. If the value does not have a prefix @ardana@ , it is not encrypted. It ishighly recommended to encrypt this value.
2. Encrypt the existing key during upgrade:
a. Set up the environment variable.
ARDANA_USER_PASSWORD_ENCRYPT_KEY
which contains the key used to encrypt Barbican master key.
b. Before you run any playbooks, you need to export the encryption key in the followingenvironment variable:
i. export ARDANA_USER_PASSWORD_ENCRYPT_KEY=<USER_ENCRYPTION_KEY>
ii. python*roles/KEYMGR-API/templates/generate_kek <barbican_customer_master_key>
iii. Master key is generated at stdout.
iv. Set this master key in le
~/openstack/ardana/ansible/roles/barbican-common/vars/barbican_deploy_config.yml
v. Replace existing barbican_customer_master_key value with the master keyyou just generated.
vi. Commit the change in git repository.
vii. cd ~/openstack/ardana/ansible/ansible-playbook -i hosts/localhost ready-deployment.yml
viii. When the master key is set, continue with cloud deployment.
7 Installation SUSE OpenStack Cloud 8
3. Changing the master key during the upgrade process is discouraged. Changing the masterkey will result in a read error for existing secrets as they were encrypted using the previousmaster key.
NoteFor a Barbican deployment with a database back-end, the master key needs to be gener-ated and configured before Barbican is deployed for the rst time. Once the master keyis set, it must not be modified.
NoteChanging the master key can result in read errors for existing secrets as those secretsare stored in the database and are encrypted using the previous master key. Once a newmaster key is used, Barbican will not be able to read those secrets. Also it will not be ableto create new secrets within that project as the project key is encrypted using previousmaster key.
KMIP Plug-in Support
Barbican has a KMIP plug-in to store encryption keys (called secrets in Barbican service termi-nology) in an HSM device using the KMIP protocol. This plug-in has been tested against MicroFocus ESKM with KMIP server. To enable support for it, Barbican needs to be configured with thecorresponding plug-in connection details, and client certificate information needs to be definedin its configuration. The ESKM KMIP server uses a client certificate to validate a KMIP clientconnection established by the Barbican server. As part of that KMIP configuration, playbooksprovide a mechanism to upload your client certs to nodes hosting the Barbican API server.
KMIP deployment instructions can be found in Section 12.1, “Configuring KMIP and ESKM”.
NoteInstallation and deployment of the Micro Focus ESKM or any other HSM devices and de-pendent components is beyond the scope of this document. Please refer the relevant doc-umentation for your choice of product. For example, you can get more information on Mi-cro Focus ESKM and related Data Security and Encryption Products at https://software.mi-
crofocus.com/en-us/products/eskm-enterprise-secure-key-management/overview .
8 Installation SUSE OpenStack Cloud 8

2.4 Auditing Barbican EventsThe Barbican service supports auditing and uses Chapter 14, Security Audit Logs to generate audit-ing data in Cloud Auditing Data Federation (CADF) format. The SUSE OpenStack Cloud inputmodel has a mechanism to enable and disable auditing on a per-service basis. When Barbicanauditing is enabled, it writes audit messages to an audit log le that is separate from the Barbicaninternal logging. The base location of audit log le is driven by common auditing configuration.
Enabling and Disabling Auditing
The auditing of Barbican events can be enabled and disabled through the Barbican reconfigureplaybook. As part of the configuration of Barbican, its audit messages can be directed to a logor to a messaging queue. By default, messages are written to the Barbican log le. Once anarchitecture-level decision is made with regards to the default consumer of audit events (eitherlogging or messaging), the Barbican service can be configured to use it as the default optionwhen auditing is enabled.
Auditing can be disabled or enabled by following these steps on the Cloud Lifecycle Managernode.
PROCEDURE 2.1: ENABLING OR DISABLING AUDITING
1. Edit the le ~/openstack/my_cloud/definition/cloudConfig.yml . All audit-relatedconfiguration is defined in the audit-settings section. You must use valid YAML syntaxwhen specifying values.
2. Any service (including Barbican) that is listed under enabled-services or disabled-serviceswill override the default setting. To enable auditing, make sure that the Barbican servicename is in the enabled-services list of the audit-settings section or is not present indisabled-services list when default: is set to enabled.The relevant section of cloudConfig.yml is shown below. Enabled-services are com-mented out.The default: enabled setting applies to all services. If you want to disable (or enable)a few, whichever is the opposite of the default global setting you used, you can do so ina disabled-services (or enabled-services) section below it. Here the enabled-services entryis commented out. You should only have either a default of enabled (or disabled) or asection of disabled (or enabled). There is no need to duplicate the setting.
audit-settings:
9 Auditing Barbican Events SUSE OpenStack Cloud 8

default: enabled #enabled-services: # - keystone # - barbican disabled-services: - nova - barbican - keystone - cinder - ceilometer - neutron
3. When you are satisfied with your settings, copy the les to ~/openstack/my_cloud/def-inition/ , and commit the changes in the git repository. For example, if you are using theEntry Scale KVM model, you would copy from ~/openstack/examples/entry-scale-kvm and commit.
cp -r ~/openstack/examples/entry-scale-kvm/* ~/openstack/my_cloud/definition/ cd ~/openstack git add -A git commit -m "My config"
4. Run the configuration processor and ready-deployment:
cd ~/openstack/ardana/ansible/ ansible-playbook -i hosts/localhost config-processor-run.yml ansible-playbook -i hosts/localhost ready-deployment.yml
5. Run barbican-reconfigure:
cd ~/scratch/ansible/next/ardana/ansible ansible-playbook -i hosts/verb_hosts barbican-reconfigure.yml
2.5 Barbican Key Management Service BootstrapDataWhen the key management service is installed, some of the Keystone-related initial data is boot-strapped as part of its initial deployment. The data added is primarily related to Barbican user,roles, service and endpoint definitions, and Barbican role assignments.
10 Barbican Key Management Service Bootstrap Data SUSE OpenStack Cloud 8

User, Roles, Service and Endpoint Definitions
Type Name orkey-valuepair
Purpose Comments
Key-stoneUserAc-count
barbican Barbican user account associatedwith administrative privileges.
Password is randomly generatedand made available in the Barbi-can client environment setup script,barbican.osrc, , on the CloudLifecycle Manager node.
Key-stoneUserAc-count
barbi-can_ser-vice
Service account used for Keystonetoken validation by barbican ser-vice.
Password is randomly generatedand stored in barbican paste config-uration, barbican-api-paste.i-ni .
Key-stoneRole
key-man-ager:cre-ator
Barbican specific role with priv-ilege to create, modify, list, anddelete keys and certificates.
This role has the same privilegesdefined for creator role in up-stream Barbican. Referenced in theservice policy config le, poli-cy.json .
Key-stoneRole
key-man-ager:ad-min
Barbican-specific role that has ad-ministrative privileges. Privilegesinclude modifications (update anddelete) in container's consumer,transport keys, certificate authori-ties (CA), assignment, and manage-ment of per-project CA.
This role has the same privilegesdefined for admin role in upstreamBarbican. Referenced in the servicepolicy config le, policy.json .
Key-stoneRole
key-man-ager:ob-server
Barbican specific role which hasprivileges limited to read/list ofkeys, certificates.
This role has the same privilegesdefined for observer role in up-stream Barbican. Referenced in theservice policy config le, poli-cy.json .
11 Barbican Key Management Service Bootstrap Data SUSE OpenStack Cloud 8

Type Name orkey-valuepair
Purpose Comments
Key-stoneRole
key-man-ager:audi-tor
Barbican specific role which hasprivileges limited to reading meta-data of keys, certificates. This roledoes not allow reading and listingof actual keys and certificates.
This role has the same privilegesdefined for auditor role in up-stream Barbican. Referenced in theservice policy config le, poli-cy.json .
Key-stoneRole
key-man-ager:ser-vice-ad-min
Barbican specific role which hasprivilege to modify global preferredCA and modify default project quo-tas.
This role has the same privilegesdefined for key-manager:ser-vice-admin role in upstream Bar-bican. Referenced in the servicepolicy config le, policy.json .
Key-stoneSer-vice
name:barbicantype: key-manager
Barbican service definition. Servicetype is key-manager.
Key-stoneEnd-point
interface:internalregion: re-gion1
Barbican internal endpoint. This isthe load-balanced endpoint exposedfor internal service usage.
Key-stoneEnd-point
interface:public re-gion: re-gion1
Barbican public endpoint. This isthe load-balanced endpoint exposedfor external/public service usage.
12 Barbican Key Management Service Bootstrap Data SUSE OpenStack Cloud 8

Role Assignments
Username
Projectname
Role name Purpose
bar-bican
ad-min
key-manager:admin User is assigned Barbican administration privileges onKeystone-defined admin project. This allows the user tomanage Barbican resources associated with that projectusing the Barbican CLI setup.
bar-bican
ad-min
key-manager:ser-vice-admin
User is assigned Barbican service administration privi-leges on Keystone-defined admin project. This role andthe one above allows full Barbican-related administra-tion capabilities.
bar-bican
ad-min
admin User assigned Keystone defined administrative role onits admin project. This way customer can continue touse Barbican CLI and OpenStack CLI without need toswitch when testing or verifying data.
ad-min
ad-min
key-manager:admin Keystone-defined admin user is given Barbican relatedadministrative privileges on Keystone-defined adminproject.
ad-min
ad-min
key-manager:ser-vice-admin
In lines of above role assignment, Barbican specific ser-vice administrator role is assigned to allow global pre-ferred CA and quotas modifications.
bar-bi-can_ser-vice
ser-vices
service Barbican service account is given service role onservices project for token validation. API server us-es this for creating scoped service token and then in-cludes it as X-Service-Token when requesting cus-tomer/client token validation from Keystone.
13 Barbican Key Management Service Bootstrap Data SUSE OpenStack Cloud 8

2.6 Known issues and workarounds
1. Make sure that in your Certificate Signing Request (CSR) Common Name matches the bar-bican_kmip_username value defined in roles/barbican-common/vars/barbican_de-ploy_config.yml . Otherwise you may see an internal server error message in Barbicanfor secret create request.
2. Barbican does not return a clear error message with regards to client certificate setupand its connectivity with KMIP server. During secret create request, a general "InternalServer Error" is returned when the certificate is invalid or missing any of necessary clientcertificate data (client certificate, key and CA root certificate).
14 Known issues and workarounds SUSE OpenStack Cloud 8

3 Key Management Service Administration
3.1 Post-installation verification and administrationIn a production environment, you can verify your installation of the Barbican key managementservice by running the barbican-status.yml Ansible playbook on the Cloud Lifecycle Man-ager node.
ansible-playbook -i hosts/verb_hosts barbican-status.yml
In any non-production environment, along with the playbook, you can also verify the serviceby storing and retrieving the secret from Barbican.
3.2 Updating the Barbican Key Management ServiceSome Barbican features and service configurations can be changed. This is done using the CloudLifecycle Manager Reconfigure Ansible playbook. For example, the log level can be changedfrom INFO to DEBUG and vice-versa. If needed, this change can be restricted to a set of nodesvia the playbook's host limit option. Barbican administration tasks should be performed by anadmin user with a token scoped to the default domain via the Keystone identity API. Thesesettings are preconfigured in the barbican.osrc le. By default, barbican.osrc is configuredwith the admin endpoint. If the admin endpoint is not accessible from your network, changeOS_AUTH_URL to point to the public endpoint.
3.3 Barbican SettingsThe following Barbican configuration settings can be changed:
Anything in the main Barbican configuration le: /etc/barbican/barbican.conf
Anything in the main Barbican worker configuration le: /etc/barbican/barbi-
can-worker.conf
15 Post-installation verification and administration SUSE OpenStack Cloud 8

You can also update the following configuration options and enable the following features. Forexample, you can:
Change the verbosity of logs written to Barbican log les ( var/log/barbican/ ).
Enable and disable auditing of the Barbican key management service
Edit barbican_secret_store plug-ins. The two options are:
store_crypto used to store the secrets in the database
kmip_plugin used to store the secrets into KMIP-enabled external devices
3.4 Enable or Disable Auditing of Barbican EventsAuditing of Barbican key manager events can be disabled or enabled by following steps on theCloud Lifecycle Manager node.
1. Edit the le ~/openstack/my_cloud/definition/cloudConfig.yml .All audit-related configuration is defined under audit-settings section. Valid YAMLsyntax is required when specifying values.Service name defined under enabled-services or disabled-services override thedefault setting (that is, default: enabled or default: disabled )
2. To enable auditing, make sure that the barbican service name is listed in the en-abled-services list of audit-settings section or is not listed in the disabled-ser-vices list when default: is set to enabled .
3. To disable auditing for the Barbican service specifically, make sure that barbican ser-vice name is in disabled-services list of the audit-settings section or is not presentin the enabled-services list when default: is set to disabled . You should not speci-fy the service name in both lists. If it is specified in both, the enabled-services list takesprecedence.
4. Commit the change in git repository.
cd ~/openstack/ardana/ansiblegit add -Agit commit -m "My config"
16 Enable or Disable Auditing of Barbican Events SUSE OpenStack Cloud 8
5. Run the configuration-processor-run and ready-deployment playbooks, followedby the barbican-reconfigure playbook:
cd ~/openstack/ardana/ansible/ansible-playbook -i hosts/localhost config-processor-run.ymlansible-playbook -i hosts/localhost ready-deployment.ymlcd ~/scratch/ansible/next/ardana/ansibleansible-playbook -i hosts/verb_hosts barbican-reconfigure.yml
3.5 Updating the Barbican API Service ConfigurationFile
1. The Barbican API service configuration le ( /etc/barbican/barbican.conf ), locatedon each control plane server (controller node) is generated from the following template lelocated on the Cloud Lifecycle Manager node: /var/lib/ardana/openstack/my_cloud/config/barbican/barbican.conf.j2 . Modify this template le as appropriate. This is aJinja2 template, which expects certain template variables to be set. Do not change valuesinside double curly braces: {{ }} .
2. Once the template is modified, copy the les to ~/openstack/my_cloud/definition/ ,and commit the change to the local git repository:
cp -r ~/hp-ci/padawan/* ~/openstack/my_cloud/definition/cd ~/openstack/ardana/ansiblegit add -Agit commit -m "My config"
3. Then rerun the configuration processor and ready-deployment playbooks:
cd ~/openstack/ardana/ansibleansible-playbook -i hosts/localhost config-processor-run.ymlansible-playbook -i hosts/localhost ready-deployment.yml
4. Finally, run the barbican-reconfigure playbook in the deployment area:
cd ~/scratch/ansible/next/ardana/ansibleansible-playbook -i hosts/verb_hosts barbican-reconfigure.yml
17 Updating the Barbican API Service Configuration File SUSE OpenStack Cloud 8

3.6 Starting and Stopping the Barbican ServiceYou can start or stop the Barbican service from the Cloud Lifecycle Manager nodes by runningthe appropriate Ansible playbooks:
To stop the Barbican service:
cd ~/scratch/ansible/next/ardana/ansibleansible-playbook -i hosts/verb_hosts barbican-stop.yml
To start the Barbican service:
cd ~/scratch/ansible/next/ardana/ansibleansible-playbook -i hosts/verb_hosts barbican-start.yml
3.7 Changing or Resetting a PasswordTo change the password for the Barbican administrator:
1. Copy the le as shown below:
cp ~/openstack/my_cloud/info/private_data_metadata_ccp.yml \ ~/openstack/change_credentials/
2. Then edit private_data_metadata_ccp.yml found here:
~/openstack/change_credentials/private_data_metadata_ccp.yml
3. Change credentials for the Barbican admin user and/or Barbican service user. Removeeverything else. The le will look similar to this:
barbican_admin_password: value: 'testing_123' metadata: - clusters: - cluster1 component: barbican-api cp: ccp version: '2.0'barbican_service_password: value: 'testing_123' metadata: - clusters: - cluster1
18 Starting and Stopping the Barbican Service SUSE OpenStack Cloud 8

component: barbican-api cp: ccp version: '2.0'
The value (shown in bold) is optional; it is used to set a user-chosen password. If left blank,the playbook will generate a random password.
4. Execute the following playbooks from ~/openstack/ardana/ansible/ :
cd ~/openstack/ardana/ansible/ansible-playbook -i hosts/localhost config-processor-run.yml -e encrypt="" -e rekey=""ansible-playbook -i hosts/localhost ready-deployment.ymlcd ~/scratch/ansible/next/ardana/ansibleansible-playbook -i hosts/verb_hosts barbican-reconfigure-credentials-change.yml
5. SSH to the controller and make sure the password has been properly updated.
/etc/barbican# vi barbican-api-paste.ini
3.8 Checking Barbican StatusYou can check the status of Barbican by running the barbican-status.yml Ansible playbookon the Cloud Lifecycle Manager node.
ansible-playbook -i hosts/verb_hosts barbican-status.yml
NoteMake sure you remove/delete ~/openstack/change_credentials/private_da-
ta_metadata.yml after successfully changing the password.
3.9 Updating Logging ConfigurationAll Barbican logging is set to INFO by default. To change the level from the Cloud LifecycleManager, there are two options available
1. Edit the Barbican configuration le, /barbican_deploy_config.yml , in the followingdirectory.
19 Checking Barbican Status SUSE OpenStack Cloud 8

~/openstack/my_cloud/config/barbican/
To change log level entry ( barbican_loglevel ) to DEBUG, edit the entry:
barbican_loglevel = {{ openstack_loglevel | default('DEBUG') }}
To change the log level to INFO, edit the entry:
barbican_loglevel = {{ openstack_loglevel | default('INFO') }}
2. Edit le ~/openstack/ardana/ansible/roles/KEYMGR-API/templates/api-log-
ging.conf.j2 and update the log level accordingly.
Commit the change to the local git repository:
cd ~/openstack/ardana/ansiblegit add -Agit commit -m "My config"
Run the configuration-processor-run and ready-deployment playbooks, followed by the barbi-can-reconfigure playbook:
ansible-playbook -i hosts/localhost config-processor-run.ymlansible-playbook -i hosts/localhost ready-deployment.ymlcd ~/scratch/ansible/next/ardana/ansibleansible-playbook -i hosts/verb_hosts barbican-reconfigure.yml
20 Updating Logging Configuration SUSE OpenStack Cloud 8
4 SUSE® OpenStack Cloud: Service Admin Role Se-gregation in the Identity Service
4.1 OverviewUnder the default OpenStack user policies, a user can have either member privilege or adminprivilege. Admin privilege is assigned by creating a user account with the role of admin. How-ever, the default admin role is too broad and often grants users more privilege than they need,giving them access to additional tasks and resources that they should not have.
Ideally, each user account should only be assigned privileges necessary to perform tasks they arerequired to perform. According to the widely accepted principle of least privilege, a user whoneeds to perform administrative tasks should have a user account with the privileges required toperform only those administrative tasks and no others. This prevents the granting of too muchprivilege while retaining the individual accountability of the user.
Service Administrator Roles is an alternative to the current one-size-ts-all admin role modeland can help you institute different privileges for different administrators.
4.2 Pre-Installed Service Admin Role ComponentsThe main components of Service Administrator Roles are:
nova_admin role in the identity service (Keystone) and support in nova_policy.json
neutron_admin role in the identity service and support in neutron_policy.json
cinder_admin role in the identity service and support in cinder_policy.json
swiftoperator role in the identity service, defined in the keystoneauth section of theproxy-server.conf le.
glance_admin role in the identity service and support in glance_policy.json
21 Overview SUSE OpenStack Cloud 8

Warning: Changing glance_policy.json may Introduce aSecurity IssueA security issue is described in the OpenStack Security Note OSSN-0075 https://
wiki.openstack.org/wiki/OSSN/OSSN-0075 . It refers to a scenario where a malicioustenant is able to reuse deleted Glance image IDs to share malicious images withother tenants in a manner that is undetectable to the victim tenant.
The default policy glance_policy.json that is shipped with SUSE OpenStackCloud prevents this by ensuring only admins can deactivate/reactivate images:
"deactivate": "role:admin""reactivate": "role:admin"
It is suggested to not change these settings. If you do change them, please referto the OSSN-0075 https://wiki.openstack.org/wiki/OSSN/OSSN-0075 . This referencehas details about on the exact scope of the security issue.
The OpenStack admin user has broad capabilities to administer the cloud, including Nova,Neutron, Cinder, Swift, and Glance. This is maintained to ensure backwards compatilibity,but if separation of duties is desired among administrative sta then the OpenStack rolesmay be partitioned across different administrators. For example, it is possible to have a setof network administrators with the neutron_admin role, a set of storage administratorswith the cinder_admin and/or swiftoperator roles, and a set of compute administra-tors with the nova_admin and glance_admin roles.
4.3 Features and BenefitsService Administrator Roles offer the following features and benefits:
Support separation of duties through more granular roles
Are enabled by default
Are backwards compatible
22 Features and Benefits SUSE OpenStack Cloud 8

Have predefined service administrator roles in the identity service
Have predefined policy.json les with corresponding service admin roles to facilitatequick and easy deployment
4.4 RolesThe following are the roles defined in SUSE OpenStack Cloud 8. These roles serve as a wayto group common administrative needs at the OpenStack service level. Each role representsadministrative privilege into each service. Multiple roles can be assigned to a user. You canassign a Service Admin Role to a user once you have determined that the user is authorized toperform administrative actions and access resources in that service.
Pre-Installed Service Admin Roles
The following service admin roles exist by default:
nova_admin role
Assign this role to users whose job function it is to perform Nova compute-related admin-istrative tasks.
neutron_admin role
Assign this role to users whose job function it is to perform Neutron networking-relatedadministrative tasks.
cinder_admin role
Assign this role to users whose job function it is to perform Cinder storage-related admin-istrative tasks.
glance_admin role
Assign this role to users whose job function it is to perform Glance image service-relatedadministrative tasks.
For configuration steps, see Book “User Guide”, Chapter 4 “Cloud Admin Actions with the Command
Line”.
23 Roles SUSE OpenStack Cloud 8

5 Role-Based Access Control in Neutron
This topic explains how to achieve more granular access control for your Neutron networks.
Previously in SUSE OpenStack Cloud, a network object was either private to a project or couldbe used by all projects. If the network's shared attribute was True, then the network could beused by every project in the cloud. If false, only the members of the owning project could useit. There was no way for the network to be shared by only a subset of the projects.
Neutron Role Based Access Control (RBAC) solves this problem for networks. Now the networkowner can create RBAC policies that give network access to target projects. Members of a tar-geted project can use the network named in the RBAC policy the same way as if the networkwas owned by the project. Constraints are described in the section Section 5.10, “Limitations”.
With RBAC you are able to let another tenant use a network that you created, but as the ownerof the network, you need to create the subnet and the router for the network.
To use RBAC, Neutron configuration les do not need to be changed.
5.1 Creating a Network
ardana > openstack network create demo-net+---------------------------+--------------------------------------+| Field | Value |+---------------------------+--------------------------------------+| admin_state_up | UP || availability_zone_hints | || availability_zones | || created_at | 2018-07-25T17:43:59Z || description | || dns_domain | || id | 9c801954-ec7f-4a65-82f8-e313120aabc4 || ipv4_address_scope | None || ipv6_address_scope | None || is_default | False || is_vlan_transparent | None || mtu | 1450 || name | demo-net || port_security_enabled | False || project_id | cb67c79e25a84e328326d186bf703e1b || provider:network_type | vxlan || provider:physical_network | None || provider:segmentation_id | 1009 |
24 Creating a Network SUSE OpenStack Cloud 8

| qos_policy_id | None || revision_number | 2 || router:external | Internal || segments | None || shared | False || status | ACTIVE || subnets | || tags | || updated_at | 2018-07-25T17:43:59Z |+---------------------------+--------------------------------------+
5.2 Creating an RBAC PolicyHere we will create an RBAC policy where a member of the project called 'demo' will share thenetwork with members of project 'demo2'
To create the RBAC policy, run:
ardana > openstack network rbac create --target-project DEMO2-PROJECT-ID --type network --action access_as_shared demo-net
Here is an example where the DEMO2-PROJECT-ID is 5a582af8b44b422fafcd4545bd2b7eb5
ardana > openstack network rbac create --target-tenant 5a582af8b44b422fafcd4545bd2b7eb5 \ --type network --action access_as_shared demo-net
5.3 Listing RBACsTo list all the RBAC rules/policies, execute:
ardana > openstack network rbac list+--------------------------------------+-------------+--------------------------------------+| ID | Object Type | Object ID |+--------------------------------------+-------------+--------------------------------------+| 0fdec7f0-9b94-42b4-a4cd-b291d04282c1 | network | 7cd94877-4276-488d-b682-7328fc85d721 |+--------------------------------------+-------------+--------------------------------------+
25 Creating an RBAC Policy SUSE OpenStack Cloud 8

5.4 Listing the Attributes of an RBACTo see the attributes of a specific RBAC policy, run
ardana > openstack network rbac show POLICY-ID
For example:
ardana > openstack network rbac show 0fd89dcb-9809-4a5e-adc1-39dd676cb386
Here is the output:
+---------------+--------------------------------------+| Field | Value |+---------------+--------------------------------------+| action | access_as_shared || id | 0fd89dcb-9809-4a5e-adc1-39dd676cb386 || object_id | c3d55c21-d8c9-4ee5-944b-560b7e0ea33b || object_type | network || target_tenant | 5a582af8b44b422fafcd4545bd2b7eb5 || tenant_id | 75eb5efae5764682bca2fede6f4d8c6f |+---------------+--------------------------------------+
5.5 Deleting an RBAC PolicyTo delete an RBAC policy, run openstack network rbac delete passing the policy id:
ardana > openstack network rbac delete POLICY-ID
For example:
ardana > openstack network rbac delete 0fd89dcb-9809-4a5e-adc1-39dd676cb386
Here is the output:
Deleted rbac_policy: 0fd89dcb-9809-4a5e-adc1-39dd676cb386
5.6 Sharing a Network with All TenantsEither the administrator or the network owner can make a network shareable by all tenants.
26 Listing the Attributes of an RBAC SUSE OpenStack Cloud 8

The administrator can make a tenant's network shareable by all tenants. To make the networkdemo-shareall-net accessible by all tenants in the cloud:
To share a network with all tenants:
1. Get a list of all projects
ardana > ~/service.osrcardana > openstack project list
which produces the list:
+----------------------------------+------------------+| ID | Name |+----------------------------------+------------------+| 1be57778b61645a7a1c07ca0ac488f9e | demo || 5346676226274cd2b3e3862c2d5ceadd | admin || 749a557b2b9c482ca047e8f4abf348cd | swift-monitor || 8284a83df4df429fb04996c59f9a314b | swift-dispersion || c7a74026ed8d4345a48a3860048dcb39 | demo-sharee || e771266d937440828372090c4f99a995 | glance-swift || f43fb69f107b4b109d22431766b85f20 | services |+----------------------------------+------------------+
2. Get a list of networks:
ardana > openstack network list
This produces the following list:
+--------------------------------------+-------------------+----------------------------------------------------+| id | name | subnets |+--------------------------------------+-------------------+----------------------------------------------------+| f50f9a63-c048-444d-939d-370cb0af1387 | ext-net | ef3873db-fc7a-4085-8454-5566fb5578ea 172.31.0.0/16 || 9fb676f5-137e-4646-ac6e-db675a885fd3 | demo-net | 18fb0b77-fc8b-4f8d-9172-ee47869f92cc 10.0.1.0/24 || 8eada4f7-83cf-40ba-aa8c-5bf7d87cca8e | demo-shareall-net | 2bbc85a9-3ffe-464c-944b-2476c7804877 10.0.250.0/24 || 73f946ee-bd2b-42e9-87e4-87f19edd0682 | demo-share-subset | c088b0ef-f541-42a7-b4b9-6ef3c9921e44 10.0.2.0/24 |+--------------------------------------+-------------------+----------------------------------------------------+
27 Sharing a Network with All Tenants SUSE OpenStack Cloud 8

3. Set the network you want to share to a shared value of True:
ardana > openstack network set --share 8eada4f7-83cf-40ba-aa8c-5bf7d87cca8e
You should see the following output:
Updated network: 8eada4f7-83cf-40ba-aa8c-5bf7d87cca8e
4. Check the attributes of that network by running the following command using the ID ofthe network in question:
ardana > openstack network show 8eada4f7-83cf-40ba-aa8c-5bf7d87cca8e
The output will look like this:
+---------------------------+--------------------------------------+| Field | Value |+---------------------------+--------------------------------------+| admin_state_up | UP || availability_zone_hints | || availability_zones | || created_at | 2018-07-25T17:43:59Z || description | || dns_domain | || id | 8eada4f7-83cf-40ba-aa8c-5bf7d87cca8e || ipv4_address_scope | None || ipv6_address_scope | None || is_default | None || is_vlan_transparent | None || mtu | 1450 || name | demo-net || port_security_enabled | False || project_id | cb67c79e25a84e328326d186bf703e1b || provider:network_type | vxlan || provider:physical_network | None || provider:segmentation_id | 1009 || qos_policy_id | None || revision_number | 2 || router:external | Internal || segments | None || shared | False || status | ACTIVE || subnets | || tags | || updated_at | 2018-07-25T17:43:59Z |+---------------------------+--------------------------------------+
28 Sharing a Network with All Tenants SUSE OpenStack Cloud 8

5. As the owner of the demo-shareall-net network, view the RBAC attributes for de-mo-shareall-net ( id=8eada4f7-83cf-40ba-aa8c-5bf7d87cca8e ) by rst getting anRBAC list:
ardana > echo $OS_USERNAME ; echo $OS_PROJECT_NAMEdemodemoardana > openstack network rbac list
This produces the list:
+--------------------------------------+--------------------------------------+| id | object_id |+--------------------------------------+--------------------------------------+| ... || 3e078293-f55d-461c-9a0b-67b5dae321e8 | 8eada4f7-83cf-40ba-aa8c-5bf7d87cca8e |+--------------------------------------+--------------------------------------+
6. View the RBAC information:
ardana > openstack network rbac show 3e078293-f55d-461c-9a0b-67b5dae321e8
+---------------+--------------------------------------+| Field | Value |+---------------+--------------------------------------+| action | access_as_shared || id | 3e078293-f55d-461c-9a0b-67b5dae321e8 || object_id | 8eada4f7-83cf-40ba-aa8c-5bf7d87cca8e || object_type | network || target_tenant | * || tenant_id | 1be57778b61645a7a1c07ca0ac488f9e |+---------------+--------------------------------------+
7. With network RBAC, the owner of the network can also make the network shareable byall tenants. First create the network:
ardana > echo $OS_PROJECT_NAME ; echo $OS_USERNAMEdemodemoardana > openstack network create test-net
The network is created:
+---------------------------+--------------------------------------+| Field | Value |+---------------------------+--------------------------------------+
29 Sharing a Network with All Tenants SUSE OpenStack Cloud 8

| admin_state_up | UP || availability_zone_hints | || availability_zones | || created_at | 2018-07-25T18:04:25Z || description | || dns_domain | || id | a4bd7c3a-818f-4431-8cdb-fedf7ff40f73 || ipv4_address_scope | None || ipv6_address_scope | None || is_default | False || is_vlan_transparent | None || mtu | 1450 || name | test-net || port_security_enabled | False || project_id | cb67c79e25a84e328326d186bf703e1b || provider:network_type | vxlan || provider:physical_network | None || provider:segmentation_id | 1073 || qos_policy_id | None || revision_number | 2 || router:external | Internal || segments | None || shared | False || status | ACTIVE || subnets | || tags | || updated_at | 2018-07-25T18:04:25Z |+---------------------------+--------------------------------------+
8. Create the RBAC. It is important that the asterisk is surrounded by single-quotes to preventthe shell from expanding it to all les in the current directory.
ardana > openstack network rbac create --type network \ --action access_as_shared --target-project '*' test-net
Here are the resulting RBAC attributes:
+---------------+--------------------------------------+| Field | Value |+---------------+--------------------------------------+| action | access_as_shared || id | 0b797cc6-debc-48a1-bf9d-d294b077d0d9 || object_id | a4bd7c3a-818f-4431-8cdb-fedf7ff40f73 || object_type | network || target_tenant | * || tenant_id | 1be57778b61645a7a1c07ca0ac488f9e |
30 Sharing a Network with All Tenants SUSE OpenStack Cloud 8

+---------------+--------------------------------------+
5.7 Target Project (demo2) View of Networks andSubnetsNote that the owner of the network and subnet is not the tenant named demo2 . Both the networkand subnet are owned by tenant demo . Demo2members cannot create subnets of the network.They also cannot modify or delete subnets owned by demo .
As the tenant demo2 , you can get a list of neutron networks:
ardana > openstack network list
+--------------------------------------+-----------+--------------------------------------------------+| id | name | subnets |+--------------------------------------+-----------+--------------------------------------------------+| f60f3896-2854-4f20-b03f-584a0dcce7a6 | ext-net | 50e39973-b2e3-466b-81c9-31f4d83d990b || c3d55c21-d8c9-4ee5-944b-560b7e0ea33b | demo-net | d9b765da-45eb-4543-be96-1b69a00a2556 10.0.1.0/24 | ...+--------------------------------------+-----------+--------------------------------------------------+
And get a list of subnets:
ardana > openstack subnet list --network c3d55c21-d8c9-4ee5-944b-560b7e0ea33b
+--------------------------------------+---------+--------------------------------------+---------------+| ID | Name | Network | Subnet |+--------------------------------------+---------+--------------------------------------+---------------+| a806f28b-ad66-47f1-b280-a1caa9beb832 | ext-net | c3d55c21-d8c9-4ee5-944b-560b7e0ea33b | 10.0.1.0/24 |+--------------------------------------+---------+--------------------------------------+---------------+
To show details of the subnet:
ardana > openstack subnet show d9b765da-45eb-4543-be96-1b69a00a2556
+-------------------+--------------------------------------------+| Field | Value |+-------------------+--------------------------------------------+
31 Target Project (demo2) View of Networks and Subnets SUSE OpenStack Cloud 8

| allocation_pools | {"start": "10.0.1.2", "end": "10.0.1.254"} || cidr | 10.0.1.0/24 || dns_nameservers | || enable_dhcp | True || gateway_ip | 10.0.1.1 || host_routes | || id | d9b765da-45eb-4543-be96-1b69a00a2556 || ip_version | 4 || ipv6_address_mode | || ipv6_ra_mode | || name | sb-demo-net || network_id | c3d55c21-d8c9-4ee5-944b-560b7e0ea33b || subnetpool_id | || tenant_id | 75eb5efae5764682bca2fede6f4d8c6f |+-------------------+--------------------------------------------+
5.8 Target Project: Creating a Port Using demo-netThe owner of the port is demo2 . Members of the network owner project ( demo ) will not seethis port.
Running the following command:
ardana > openstack port create c3d55c21-d8c9-4ee5-944b-560b7e0ea33b
Creates a new port:
+-----------------------+-----------------------------------------------------------------------------------------------------+| Field | Value |+-----------------------+-----------------------------------------------------------------------------------------------------+| admin_state_up | True || allowed_address_pairs | || binding:vnic_type | normal || device_id | || device_owner | || dns_assignment | {"hostname": "host-10-0-1-10", "ip_address": "10.0.1.10", "fqdn": "host-10-0-1-10.openstacklocal."} || dns_name | || fixed_ips | {"subnet_id": "d9b765da-45eb-4543-be96-1b69a00a2556", "ip_address": "10.0.1.10"} |
32 Target Project: Creating a Port Using demo-net SUSE OpenStack Cloud 8

| id | 03ef2dce-20dc-47e5-9160-942320b4e503 || mac_address | fa:16:3e:27:8d:ca || name | || network_id | c3d55c21-d8c9-4ee5-944b-560b7e0ea33b || security_groups | 275802d0-33cb-4796-9e57-03d8ddd29b94 || status | DOWN || tenant_id | 5a582af8b44b422fafcd4545bd2b7eb5 |+-----------------------+-----------------------------------------------------------------------------------------------------+
5.9 Target Project Booting a VM Using Demo-NetHere the tenant demo2 boots a VM that uses the demo-net shared network:
ardana > openstack server create --flavor 1 --image $OS_IMAGE --nic net-id=c3d55c21-d8c9-4ee5-944b-560b7e0ea33b demo2-vm-using-demo-net-nic
+--------------------------------------+------------------------------------------------+| Property | Value |+--------------------------------------+------------------------------------------------+| OS-EXT-AZ:availability_zone | || OS-EXT-STS:power_state | 0 || OS-EXT-STS:task_state | scheduling || OS-EXT-STS:vm_state | building || OS-SRV-USG:launched_at | - || OS-SRV-USG:terminated_at | - || accessIPv4 | || accessIPv6 | || adminPass | sS9uSv9PT79F || config_drive | || created | 2016-01-04T19:23:24Z || flavor | m1.tiny (1) || hostId | || id | 3a4dc44a-027b-45e9-acf8-054a7c2dca2a || image | cirros-0.3.3-x86_64 (6ae23432-8636-4e...1efc5) || key_name | - || metadata | {} || name | demo2-vm-using-demo-net-nic || os-extended-volumes:volumes_attached | [] || progress | 0 || security_groups | default || status | BUILD || tenant_id | 5a582af8b44b422fafcd4545bd2b7eb5 || updated | 2016-01-04T19:23:24Z || user_id | a0e6427b036344fdb47162987cb0cee5 |
33 Target Project Booting a VM Using Demo-Net SUSE OpenStack Cloud 8

+--------------------------------------+------------------------------------------------+
Run openstack server list:
ardana > openstack server list
See the VM running:
+-------------------+-----------------------------+--------+------------+-------------+--------------------+| ID | Name | Status | Task State | Power State | Networks |+-------------------+-----------------------------+--------+------------+-------------+--------------------+| 3a4dc...a7c2dca2a | demo2-vm-using-demo-net-nic | ACTIVE | - | Running | demo-net=10.0.1.11 |+-------------------+-----------------------------+--------+------------+-------------+--------------------+
Run openstack port list:
ardana > neutron port-list --device-id 3a4dc44a-027b-45e9-acf8-054a7c2dca2a
View the subnet:
+---------------------+------+-------------------+-------------------------------------------------------------------+| id | name | mac_address | fixed_ips |+---------------------+------+-------------------+-------------------------------------------------------------------+| 7d14ef8b-9...80348f | | fa:16:3e:75:32:8e | {"subnet_id": "d9b765da-45...00a2556", "ip_address": "10.0.1.11"} |+---------------------+------+-------------------+-------------------------------------------------------------------+
Run neutron port-show:
ardana > openstack port show 7d14ef8b-9d48-4310-8c02-00c74d80348f
+-----------------------+-----------------------------------------------------------------------------------------------------+| Field | Value |+-----------------------+-----------------------------------------------------------------------------------------------------+| admin_state_up | True || allowed_address_pairs | |
34 Target Project Booting a VM Using Demo-Net SUSE OpenStack Cloud 8

| binding:vnic_type | normal || device_id | 3a4dc44a-027b-45e9-acf8-054a7c2dca2a || device_owner | compute:None || dns_assignment | {"hostname": "host-10-0-1-11", "ip_address": "10.0.1.11", "fqdn": "host-10-0-1-11.openstacklocal."} || dns_name | || extra_dhcp_opts | || fixed_ips | {"subnet_id": "d9b765da-45eb-4543-be96-1b69a00a2556", "ip_address": "10.0.1.11"} || id | 7d14ef8b-9d48-4310-8c02-00c74d80348f || mac_address | fa:16:3e:75:32:8e || name | || network_id | c3d55c21-d8c9-4ee5-944b-560b7e0ea33b || security_groups | 275802d0-33cb-4796-9e57-03d8ddd29b94 || status | ACTIVE || tenant_id | 5a582af8b44b422fafcd4545bd2b7eb5 |+-----------------------+-----------------------------------------------------------------------------------------------------+
5.10 LimitationsNote the following limitations of RBAC in Neutron.
Neutron network is the only supported RBAC Neutron object type.
The "access_as_external" action is not supported – even though it is listed as a valid actionby python-neutronclient.
The neutron-api server will not accept action value of 'access_as_external'. The ac-cess_as_external definition is not found in the specs.
The target project users cannot create, modify, or delete subnets on networks that haveRBAC policies.
The subnet of a network that has an RBAC policy cannot be added as an interface of atarget tenant's router. For example, the command neutron router-interface-add tgt-tenant-router <sb-demo-net uuid> will error out.
35 Limitations SUSE OpenStack Cloud 8

The security group rules on the network owner do not apply to other projects that canuse the network.
A user in target project can boot up VMs using a VNIC using the shared network. The userof the target project can assign a floating IP (FIP) to the VM. The target project must haveSG rules that allows SSH and/or ICMP for VM connectivity.
Neutron RBAC creation and management are currently not supported in Horizon. For now,the Neutron CLI has to be used to manage RBAC rules.
A RBAC rule tells Neutron whether a tenant can access a network (Allow). Currently thereis no DENY action.
Port creation on a shared network fails if --fixed-ip is specified in the neutron port-create command.
36 Limitations SUSE OpenStack Cloud 8

6 Configuring Keystone and Horizon to use X.509Client Certificates
The Keystone service supports X.509 SSL cerificate authentication and authorization for access-ing the Horizon dashboard in SUSE OpenStack Cloud. This feature is disabled by default, andmust be manually configured and enabled by running a number of Ansible playbooks.
NoteEnabling client SSL certificate authentication and authorization for the Horizon dash-board is a non-core feature in SUSE OpenStack Cloud.
6.1 Keystone configurationTo configure and enable X.509 SSL authentication and authorization support for the Keystoneservice, perform the following steps.
1. Create a new configuration le named x509auth.yml and place it in any directory inyour deployer node. For example, perform the following command to create the le inthe /tmp directory:
touch /tmp/x509auth.yml
2. Edit the new le to include the following text. Note that YAML les are whitespace-sen-sitive. Preserve the indentation format of the following text.
keystone_x509auth_conf: identity_provider: id: intermediateca description: This is the trusted issuer HEX Id. mapping: id: x509_mapping1 rules_file: /tmp/x509auth_mapping.json protocol: id: x509 remote_id: intermediateca ca_file: /tmp/cacert.pem
37 Keystone configuration SUSE OpenStack Cloud 8

The preceding example sets a number of configuration parameters for the X.509/Keystoneconfiguration. The following are detailed descriptions of each parameter.
identity_provider This section identifies and describes an outside identity provider.
id: Any unique, readable string that identifies the identitiy provider.
description: A description of the identity provider.
mapping: This section describes a JSON-format le that maps X.509 client certificateattributes to a local Keystone user.
id: Any unique, readable string that identifies the user-certificate mapping.
rules_le: The lepath to a JSON le that contains the client certificate attrib-utes mapping.
protocol: This section sets the cryptographic protocol to be used.
id: The cryptographic protocol used for the certificate-based authentication/au-thorization.
remote_id: By default, this eld expects the client certificate's issuer's common name(CN) as a value. The expected value is set in the keystone.conf le, where thedefault setting is:
remote_id_attribute = SSL_CLIENT_I_DN_CN
ca_le: The le that contains the client certificate's related intermediary and rootCA certificates.
Note: In the /tmp/x509auth.yml le, the ca_file value should be a le that containsboth the root and signing CA certificates (often found in /home/pki/cacert.pem ).
3. Create a JSON-formatted mapping le. To do so, edit the x509auth.yml le you createdin Step 2 to reference this le in the mapping→ rules_le parameter. You can create thele with the following example command:
touch /tmp/x509auth_mapping.json
38 Keystone configuration SUSE OpenStack Cloud 8

4. Edit the JSON le you created in Step 3 to include the following content:
[ { "local": [ { "user": { "name": "{0}", "domain": { "name": "{1}" }, "type": "local" } } ], "remote": [ { "type": "SSL_CLIENT_S_DN_CN" }, { "type": "SSL_CLIENT_S_DN_O" }, { "type": "SSL_CLIENT_I_DN", "any_one_of": [ ] } ] }]
5. Enter the distinguished name(s) (DN) of the certificate issuer(s) that issued your clientcertificates into the any_one_of eld in the remote block. The any_one_of eld is a com-ma-separated list of all certificate issuers that you want the Keystone service to trust.All DNs in the any_one_of eld must adhere to the following format: A descending list ofDN elements, with each element separated by a forward slash ( / ).The following is an example of a properly formatted DN for a certificate issuer namedintermedia .
/C=US/ST=California/O=EXAMPLE/OU=Engineering/CN=intermediateca/[email protected]
The following example le illustrates an x509auth_mapping.json le with the inter-media certificate issuer added to the any_one_of eld. Note that the DN string is in quotes.
39 Keystone configuration SUSE OpenStack Cloud 8

[ { "local": [ { "user": { "name": "{0}", "domain": { "name": "{1}" }, "type": "local" } } ], "remote": [ { "type": "SSL_CLIENT_S_DN_CN" }, { "type": "SSL_CLIENT_S_DN_O" }, { "type": "SSL_CLIENT_I_DN", "any_one_of": [ "/C=US/ST=California/O=EXAMPLE/OU=Engineering/CN=intermediateca/[email protected]" ] } ] }]
The Keystone service will trust all client certificates issued by any of the certificate issuerslisted in the any_one_of eld.
6. Run the following commands to enable the new X.509/Keystone settings.
cd ~/scratch/ansible/next/ardana/ansibleansible-playbook -i hosts/verb_hosts keystone-reconfigure.yml -e@/tmp/x509auth.yml
40 Keystone configuration SUSE OpenStack Cloud 8

6.2 HAProxy ConfigurationBecause of the experimental nature of the HAProxy feature, it is important to minimize the riskof impacting other services. If you have implemented, or wish to implement the HAProxy featurealongside client SSL certificate login to the Horizon dashboard in your cloud, please completethe following steps to make the necessary manual configuration changes.
NoteYou must perform the Keystone configuration steps in the previous section before per-forming the following HAProxy configuration changes.
1. Locate and open the ~/openstack/ardana/ansible/roles/haproxy/tem-
plates/haproxy.cfg le.
2. Locate the following line in the haproxy.cfg le.
listen {{ network.vip }}-{{ port }}
Enter the following codeblock in the open space immediately preceding the listen{{ network.vip }}-{{ port }} line.
{%- if service == 'KEY_API' and port == '5000' %} {% set bind_defaults = 'ca-file /etc/ssl/private/cacert.pem verify optional' %}{%- endif %}
After entering the preceding code, your haproxy.cfg le should look like the followingexample.
{%- if network.terminate_tls is defined and network.terminate_tls and port == '80' %} {% set port = '443' %}{%- endif %}
{%- if service == 'KEY_API' and port == '5000' %} {% set bind_defaults = 'ca-file /etc/ssl/private/cacert.pem verify optional' %}{%- endif %}
listen {{ network.vip }}-{{ port }} {%- set options = network.vip_options | default(vip_options_defaults) %} {%- if options > 0 %} {%- for option in options %}
41 HAProxy Configuration SUSE OpenStack Cloud 8
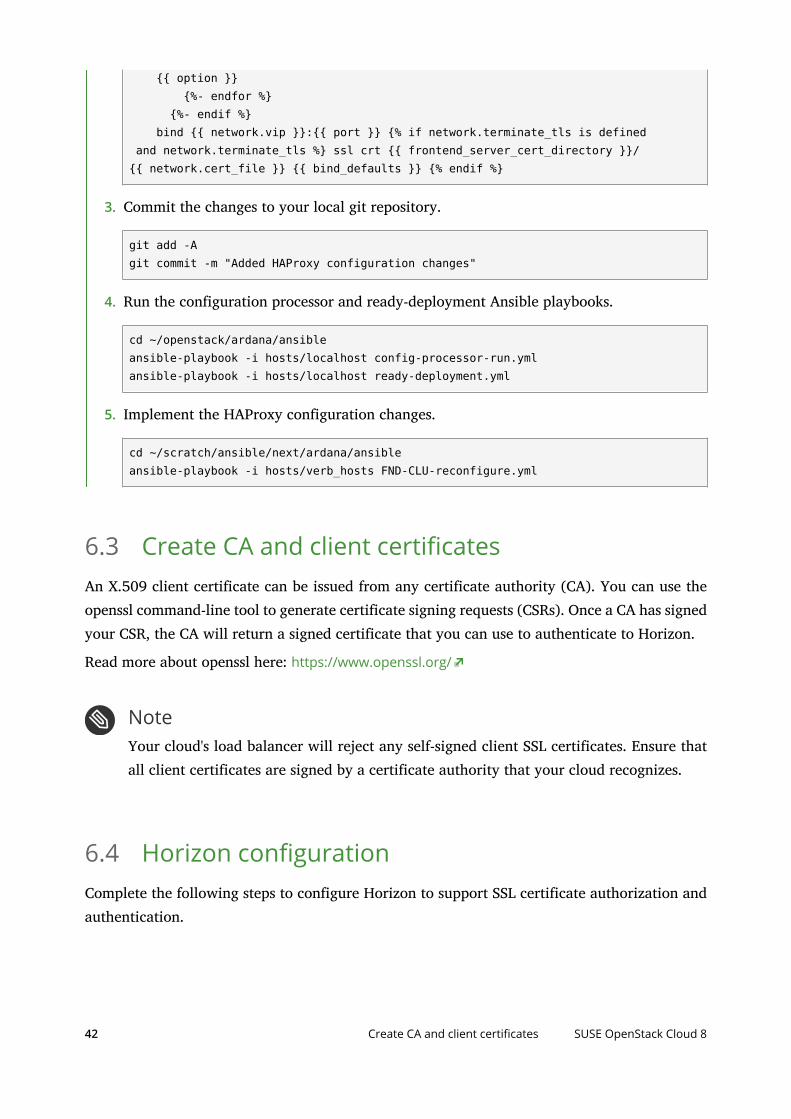
{{ option }} {%- endfor %} {%- endif %} bind {{ network.vip }}:{{ port }} {% if network.terminate_tls is defined and network.terminate_tls %} ssl crt {{ frontend_server_cert_directory }}/{{ network.cert_file }} {{ bind_defaults }} {% endif %}
3. Commit the changes to your local git repository.
git add -Agit commit -m "Added HAProxy configuration changes"
4. Run the configuration processor and ready-deployment Ansible playbooks.
cd ~/openstack/ardana/ansibleansible-playbook -i hosts/localhost config-processor-run.ymlansible-playbook -i hosts/localhost ready-deployment.yml
5. Implement the HAProxy configuration changes.
cd ~/scratch/ansible/next/ardana/ansibleansible-playbook -i hosts/verb_hosts FND-CLU-reconfigure.yml
6.3 Create CA and client certificatesAn X.509 client certificate can be issued from any certificate authority (CA). You can use theopenssl command-line tool to generate certificate signing requests (CSRs). Once a CA has signedyour CSR, the CA will return a signed certificate that you can use to authenticate to Horizon.
Read more about openssl here: https://www.openssl.org/
NoteYour cloud's load balancer will reject any self-signed client SSL certificates. Ensure thatall client certificates are signed by a certificate authority that your cloud recognizes.
6.4 Horizon configurationComplete the following steps to configure Horizon to support SSL certificate authorization andauthentication.
42 Create CA and client certificates SUSE OpenStack Cloud 8

1. Edit the ~/openstack/ardana/ansible/roles/HZN-WEB/defaults/main.yml le andset the following parameter to True .
horizon_websso_enabled: True
2. Locate the last line in the ~/openstack/ardana/ansible/roles/HZN-WEB/de-
faults/main.yml le. The default configuration for this line should look like the follow-ing.
horizon_websso_choices: - {protocol: saml2, description: "ADFS Credentials"}
If your cloud does not have AD FS enabled, then replace the preceding hori-zon_websso_choices: parameter with the following.
- {protocol: x509, description: "X.509 SSL Certificate"}
The resulting block should look like the following.
horizon_websso_choices: - {protocol: x509, description: "X.509 SSL Certificate"}
If your cloud does have AD FS enabled, then simply add the following parameter tothe horizon_websso_choices: section. Do not replace the default parameter, addthe following line to the existing block.
- {protocol: saml2, description: "ADFS Credentials"}
If your cloud has AD FS enabled, the final block of your ~/openstack/ardana/an-sible/roles/HZN-WEB/defaults/main.yml should have the following entries.
horizon_websso_choices: - {protocol: x509, description: "X.509 SSL Certificate"} - {protocol: saml2, description: "ADFS Credentials"}
3. Run the following commands to add your changes to the local git repository, and recon-figure the Horizon service, enabling the changes made in Step 1:
cd ~/openstackgit add -Agit commit -m "my commit message"cd ~/openstack/ardana/ansible/ansible-playbook -i hosts/localhost config-processor-run.yml
43 Horizon configuration SUSE OpenStack Cloud 8

ansible-playbook -i hosts/localhost ready-deployment.ymlcd ~/scratch/ansible/next/ardana/ansibleansible-playbook -i hosts/verb_hosts horizon-reconfigure.yml
6.5 Browser configurationTo enable your web browser to present a certificate to the Horizon dashboard upon login, yourst need to import the certificate. The steps to complete this action will vary from browser tobrowser. Please refer to your browser's documentation for specific instructions.
1. Import the desired certificate into your web browser's certificate store.
2. After importing the certificate, verify that it appears in your browser's certificate manager.
6.6 User accountsFor the Keystone service to use X.509 certificates to grant users access to Horizon, there must bea Keystone user account associated with each certificate. Keystone associates user accounts withcertificates by matching the common name (CN) and organization (O) of a presented certificatewith the username and domain of an existing Keystone user.
When an X.509 certificate is presented to Horizon for authentication/authorization, Horizonpasses the certificate information along to the Keystone service. Keystone attempts to match theCN and O of the certificate with the username and domain of an existing local user account. Forthis operation to be successful, there must be a Keystone user account and domain that matchthe CN and O of the certificate.
For example, if a user named Sam presents a certificate to Horizon with the following informa-tion,
CN=sam
O=EXAMPLE
Then there must be an existing Keystone user account with the following values,
Username=sam
Domain=EXAMPLE
44 Browser configuration SUSE OpenStack Cloud 8

Further, Sam's client certificate must have been issued by one of the certificate issuers listed inthe any_one_of eld in the x509auth_mapping.json le.
Also, when creating a local Keystone user, you must assign the user account a project scope.Without a project scope, the authorization portion of the sign-on process will fail.
The following steps illustrate how to use the CLI to create a domain, create and manage a user,and assign a permissions role to the new user.
1. Create a new domain, named EXAMPLE .
openstack domain create EXAMPLE
2. Create a new project named xyz , under the EXAMPLE domain.
openstack project create --domain EXAMPLE xyz
3. Create a new user named Sam in the EXAMPLE domain. Set the password and email forthe new account.
openstack user create --domain EXAMPLE --password pass \ --email [email protected] --enable sam
4. Create a new role named role1 .
openstack role create role1
5. Grant the new role, role1 to the new user Sam from the EXAMPLE domain. Note thatboth the user account and domain must be referenced by their unique ID numbers ratherthan their friendly names.
openstack role add --user 04f3db9e7f3f45dc82e1d5f20b4acfcc \ --domain 6b64021839774991b5e0df16077f11eb role1
6. Add the user Sam to the newly-created project from Step 2. Note that the project anduser account must be referenced by their respective unique ID numbers rather than theirfriendly names.
openstack role add --project 4e2ad14406b247c7a9fc0a48c0b1713e \ --user 04f3db9e7f3f45dc82e1d5f20b4acfcc role1
45 User accounts SUSE OpenStack Cloud 8

6.7 How it worksThe SSL authentication and authorization process is detailed in the following steps.
1. User directs a web browser to the SUSE OpenStack Cloud Horizon login landing page.
2. The user selects the "X.509 Certificate" login option from the dropdown menu.
3. Horizon responds with an HTTP 302 redirect, redirecting the browser to the SSL-protectedKeystone (federated) authentication endpoint.
4. The browser then prompts user to select the certificate to use for the login (if there is morethan one certificate for the given trusted Certificate Authority (CA)).
5. The web browser establishes a 2-way SSL handshake with the Keystone service.
6. Keystone, utilizing federation mapping, maps the user to a federated persona and issuesan (federated) unscoped token.
7. The token is then passed to the browser, along with JavaScript code that redirects thebrowser back to the Horizon dashboard.
8. The browser then logs into the Horizon dashboard using the newly issued unscoped tokento authenticate the user.
9. Horizon queries the Keystone service for the list of federated projects the authenticateduser has access to.
10. Horizon then rescopes the token to the rst project, granting the user authorization.
11. The login process is completed.
46 How it works SUSE OpenStack Cloud 8

47 How it works SUSE OpenStack Cloud 8

7 Transport Layer Security (TLS) Overview
The Transport Layer Security (TLS) protocol, successor to SSL, provides the mechanisms to en-sure authentication, non-repudiation, confidentiality, and integrity of user communications toand between the SUSE OpenStack Cloud services from internal and public endpoints.
OpenStack endpoints are HTTP (REST) services providing APIs to other OpenStack services onthe management network. All traffic to OpenStack services coming in on the public endpointsand some traffic between services can be secured using TLS connections.
In SUSE OpenStack Cloud 8, the following are enabled for TLS
API endpoints in the internal and admin VIPs can now be secured by TLS.
API endpoints can be provided with their own certificates (this is shown in the modelexamples) or they can simply use the default certificate.
The Barbican key management service API can be secured by TLS from the load balancerto the service endpoint.
You can add multiple trust chains (certificate authority (CA) certificates).
Fully qualified domain names (FQDNs) can be used for public endpoints and now they canbe changed. The external name in the input model les (in ~/openstack/my_cloud/defi-nition/data/network_groups.yml ) is where the domain name is indicated and changed.
There are two monitoring alarms specific to certificates, 14-days to certificate expirationand 1-day to expiration.
TLS can be turned o/on for individual endpoints.
7.1 Comparing Clean Installation and Upgrade ofSUSE OpenStack CloudClean install: all TLS-encrypted services are already listed under tls-components in net-work_groups.yml
You just have to:
Add your self-signed CA cert and server cert (for testing)
Or add your public (or company) CA-signed server cert and the public (or company) CAcert (for production)
48
Comparing Clean Installation and Upgrade of SUSE OpenStack Cloud SUSE OpenStack
Cloud 8

Upgrade: you do not have TLS enabled already on the internal endpoints so you need to
Add your self-signed CA cert and server cert (for testing)
Or add your public (or company) CA-signed server cert and the public (or company) CAcert (for production)
Add all the services to tls-components in network_groups.yml
For information on enabling and disabling TLS, see Section 7.2, “TLS Configuration”.
For instructions on installing certificates, see Section 7.2, “TLS Configuration”.
7.2 TLS ConfigurationIn SUSE OpenStack Cloud 8, you can provide your own certificate authority and certificatesfor internal and public virtual IP addresses (VIPs), and you should do so for any productioncloud. The certificates automatically generated by SUSE OpenStack Cloud are useful for testingand setup, but you should always install your own for production use. Certificate installationis discussed below.
7.2.1 Using the Default My Public Cert
Read the following if you are using the default cert-name: my-public-cert in your model.
The bundled test cert for public endpoints, located at ~/openstack/my_cloud/config/tls/certs/my-public-cert , is now expired but was left in the product in case you changed thecontent with your valid cert. Please verify if the certificate is expired and generate your ownby following the guidelines further down on this page or by using a generic instruction fromthe web.
You can verify the expiry by running this command:
openssl x509 -in ~/openstack/my_cloud/config/tls/certs/my-public-cert -noout -enddatenotAfter=Feb 12 01:18:46 2019 GMT
7.2.2 Certificate Terms
Before you begin, the following list of terms will be helpful when generating and installingcertificates.
49 TLS Configuration SUSE OpenStack Cloud 8

Openstack-generated public CA
An OpenStack-generated public CA ( openstack_frontend_cacert.crt ) is available foryou in /usr/local/share/ca-certificates .
Fully qualified domain name (FQDN) of the public VIP
The registered domain name. A FQDN is not mandatory. It is valid to have no FQDN anduse IP addresses instead. You can use FQDNs on public endpoints, and you may changethem whenever the need arises.
Certificate authority (CA) certificate
Your certificates must be signed by a CA, such as your internal IT department or a publiccertificate authority. For this example we will use a self-signed certificate.
Server certificate
It is easy to confuse server certificates and CA certificates. Server certificates reside on theserver and CA certificates reside on the client. A server certificate affirms that the serverthat sent it serves a set of IP addresses, domain names, and set of services. A CA certificateis used by the client to authenticate this claim.
SAN (subject-alt-name)
The set of IP addresses and domain names in a server certificate request: A template fora server certificate.
Certificate signing request (CSR)
A blob of data generated from a certificate request and sent to a CA, which would thensign it, produce a server certificate, and send it back.
External VIP
External virtual IP address
Internal VIP
Internal virtual IP address
The major difference between an external VIP certificate and an internal VIP certificate is thatthe internal VIP has approximately 40 domain names in the SAN. This is because each servicehas a different domain name in SUSE OpenStack Cloud 8. So it is unlikely that you can create aninternal server certificate before running the configuration processor. But after a configurationprocessor run, a certificate request would be created for each of your cert-names.
50 Certificate Terms SUSE OpenStack Cloud 8

7.2.3 Configuring TLS in the input model
For this example certificate configuration, let us assume there is no FQDN for the external VIPand that you are going to use the default IP address provided by SUSE OpenStack Cloud 8. Let'salso assume that for the internal VIP you will use the defaults as well. If you were to call yourcertificate authority "example-CA," the CA certificate would then be called "example-CA.crt"and the key would be called "example-CA.key." In the following examples, the external VIPcertificate will be named "example-public-cert" and the internal VIP certificate will be named"example-internal-cert."
Any time you make a cert change when using your own CA:
You should use a distinct name from those already existing in config/tls/cacerts . Thisalso means you should not reuse your CA names. You should use unique and distinguishablenames such as MyCompanyXYZ_PrivateRootCA.crt. A new name is what indicates that ale is new or changed, so reusing a name means that the le is not considered changedeven its contents have changed.
You should not remove any existing CA les from config/tls/cacerts .
If you want to remove an existing CA use the following steps:
1. Remove the le.
2. Then run:
ansible -i hosts/verb_hosts FND-STN -a 'sudo keytool -delete -alias debian:<filename to remove> \-keystore /usr/lib/jvm/java-7-openjdk-amd64/jre/lib/security/cacerts -storepass changeit'
ImportantBe sure to install your own certificate for all production clouds after installing and testingyour cloud. If you ever want to test or troubleshoot later, you will be able to revert to thesample certificate to get back to a stable state for testing.
NoteUnless this is a new deployment, do not update both the certificate and the CA together.Add the CA rst and then run a site deploy. Then update the certificate and run tls-reconfigure, FND-CLU-stop, FND-CLU-start and then hlm-reconfigure. If a playbook has
51 Configuring TLS in the input model SUSE OpenStack Cloud 8

failed, rerun it with -vv to get detailed error information. The configure, HAproxy restart,and reconfigure steps are included below. If this is a new deployment and you are addingyour own certs/CA before running site.yml this caveat does not apply.
You can add your own certificate by following the instructions below. All changes must go intothe following le:
~/openstack/my_cloud/definition/data/network_groups.yml
The entries for TLS for the internal and admin load balancers are:
- provider: ip-cluster name: lb tls-components: - default components: # These services do not currently support TLS so they are not listed # under tls-components - nova-metadata roles: - internal - admin cert-file: openstack-internal-cert # The openstack-internal-cert is a reserved name and # this certificate will be autogenerated. You # can bring in your own certificate with a different name
# cert-file: customer-provided-internal-cert # replace this with name of file in "config/tls/certs/"
The configuration processor will also create a request template for each named certificate underinfo/cert_reqs/ , which looks like:
info/cert_reqs/customer-provided-internal-cert
7.2.4 Generating and Signing Certificates
These request templates contain the subject Alt-names that the certificates need. You can addto this template before generating your certificate signing request.
You would then send the CSR to your CA to be signed, and once you receive the certificate,place it in config/tls/certs
52 Generating and Signing Certificates SUSE OpenStack Cloud 8

When you bring in your own certificate, you may want to bring in the trust chains (or CAcertificate) for this certificate. This is usually not required if the CA is a public signer that istypically bundled with the operating system. However, we suggest you include it anyway bycopying the le into the directory config/cacerts/ .
7.2.5 User-provided certificates and trust chains
SUSE OpenStack Cloud generates its own internal certificates but is designed to allow you tobring in your own certificates for the VIPs. Here is the general process.
1. You must have a server certificate and a CA certificate to go with it (unless the signer isa public CA and it is already bundled with most distributions).
2. You must decide the names of the server certificates and configure the network_group-s.yml le in the input model such that each load balancer provider has at least one cert-name associated with it.
3. Run the configuration processor. You may or may not have the certificate le at thispoint. The configuration processor would create certificate request le artefacts underinfo/cert_reqs/ for each of the cert-name(s) in the network_groups.yml le. Whilethere is no special reason to use the request le created for an external endpoint VIPcertificate, it is important to use the request les created for internal certificates since thecanonical names for the internal VIP as there can be many of them and they will be servicespecific. Each of these needs to be in the Subject Alt Names attribute of the. certificate.
4. Create a certificate signing request for this request le and send it to your internal CA ora public CA to get it certified and issued with a certificate. You will now have a servercertificate and possibly a trust chain or CA certificate.
5. Upload to the Cloud Lifecycle Manager. Server certificates should be added to con-fig/tls/certs and CA certificates should be added to config/tls/cacerts . The leextension should be .crt for the CA certificate to be processed by SUSE OpenStack Cloud.Detailed steps are next.
53 User-provided certificates and trust chains SUSE OpenStack Cloud 8

7.2.6 Edit the Input Model to Include Your Certificate Files
1. Edit the load balancer configuration in openstack/my_cloud/definition/data/net-work_groups.yml :
load-balancers: - provider: ip-cluster name: lb tls-components: - default components: - cassandra - nova-metadata roles: - internal - admin cert-file: example-internal-cert #<<<-------- Certificate name for the internal VIP
- provider: ip-cluster name: extlb external-name: myardana.test #<<<------ Use just IP for the external VIP in this example tls-components: - default roles: - public cert-file: example-public-cert #<<<-------- Certificate name for the external VIP
2. Commit your changes to the local git repository and run the configuration processor:
cd ~/openstack/ardana/ansiblegit add -Agit commit -m "changed VIP certificates"ansible-playbook -i hosts/localhost config-processor-run.yml
3. Verify that certificate requests have been generated by the configuration processor forevery certificate le configured in the networks_groups.yml le. In this example, thereare two les, as shown from the list command:
ls ~/openstack/my_cloud/info/cert_reqsexample-internal-certexample-public-cert
54 Edit the Input Model to Include Your Certificate Files SUSE OpenStack Cloud 8
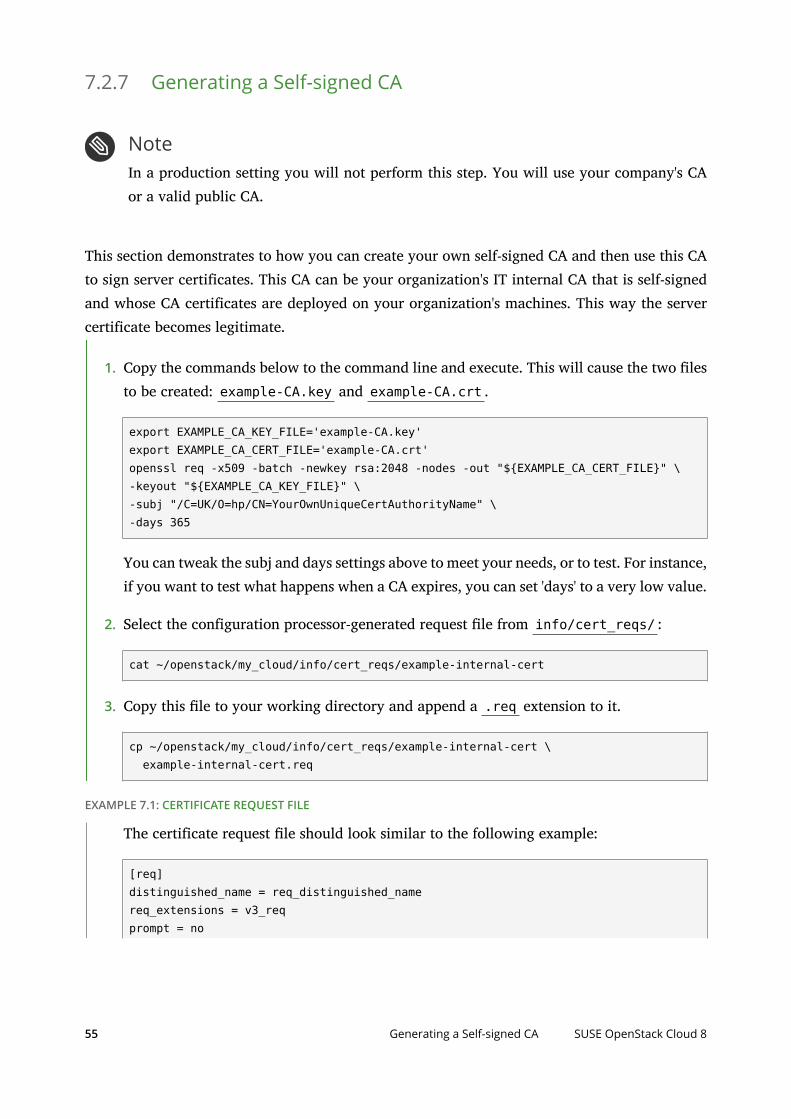
7.2.7 Generating a Self-signed CA
NoteIn a production setting you will not perform this step. You will use your company's CAor a valid public CA.
This section demonstrates to how you can create your own self-signed CA and then use this CAto sign server certificates. This CA can be your organization's IT internal CA that is self-signedand whose CA certificates are deployed on your organization's machines. This way the servercertificate becomes legitimate.
1. Copy the commands below to the command line and execute. This will cause the two lesto be created: example-CA.key and example-CA.crt .
export EXAMPLE_CA_KEY_FILE='example-CA.key'export EXAMPLE_CA_CERT_FILE='example-CA.crt'openssl req -x509 -batch -newkey rsa:2048 -nodes -out "${EXAMPLE_CA_CERT_FILE}" \-keyout "${EXAMPLE_CA_KEY_FILE}" \-subj "/C=UK/O=hp/CN=YourOwnUniqueCertAuthorityName" \-days 365
You can tweak the subj and days settings above to meet your needs, or to test. For instance,if you want to test what happens when a CA expires, you can set 'days' to a very low value.
2. Select the configuration processor-generated request le from info/cert_reqs/ :
cat ~/openstack/my_cloud/info/cert_reqs/example-internal-cert
3. Copy this le to your working directory and append a .req extension to it.
cp ~/openstack/my_cloud/info/cert_reqs/example-internal-cert \ example-internal-cert.req
EXAMPLE 7.1: CERTIFICATE REQUEST FILE
The certificate request le should look similar to the following example:
[req]distinguished_name = req_distinguished_namereq_extensions = v3_reqprompt = no
55 Generating a Self-signed CA SUSE OpenStack Cloud 8

[ req_distinguished_name ]CN = "openstack-vip"
[ v3_req ]basicConstraints = CA:FALSEkeyUsage = nonRepudiation, digitalSignature, keyEnciphermentsubjectAltName = @alt_names
[ alt_names ]DNS.1 = "deployerincloud-ccp-c0-m1-mgmt"DNS.2 = "deployerincloud-ccp-vip-CEI-API-mgmt"DNS.3 = "deployerincloud-ccp-vip-CND-API-mgmt"[...]DNS.47 = "192.168.245.5"IP.1 = "192.168.245.5"
=============end of certificate request file.
NoteIn the case of a public VIP certificate, please add all the FQDNs you want it to supportCurrently, SUSE OpenStack Cloud does not add the hostname for the external-name spec-ified in network_groups.yml to the certificate request le. However, you can add it tothe certificate request le manually. Here we assume that myopenstack.test is yourexternal-name. In that case you would add this line (to the full sample certificate requestle shown in Example 7.1, “Certificate request file”):
DNS.48 = "myopenstack.test"
NoteAny attempt to use IP addresses rather than FQDNs in certificates must use subject alter-nate name entries that list both the IP address (needed for Google) and DNS with an IP(needed for a Python bug workaround). Failure to create the certificates in this mannerwill cause future installations of Go-based tools (such as Cloud Foundry, Stackato andother PaaS components) to fail.
56 Generating a Self-signed CA SUSE OpenStack Cloud 8

In the case of a public VIP certificate, add all the FQDNs you want it to support. Openstackdoes not add the hostname for the external-name specified in network_groups.yml to thecertificate request le. However, you can add it to the certificate request le manually. Assumethat myopenstack.test is your external-name. In that case you would add this line to the fullsample certificate request le shown above.
DNS.48 = "myopenstack.test"
NoteAny attempt to use IP addresses rather than FQDNs in certificates must use subject alter-nate name entries that list both the IP address (needed for Google) and DNS with an IP(needed for a Python bug workaround). Failure to create the certificates in this mannerwill cause future installations of Go-based tools (such as Cloud Foundry, Stackato andother PaaS components) to fail.
7.2.8 Generate a Certificate Signing Request
NoteIn a production setting you will not perform this step. You will use your company's CAor a valid public CA.
Now that you have a CA and a certificate request le, it is time to generate a CSR.
NotePlease use a unique CN for your example Certificate Authority and do not install multipleCA certificates with the same CN into your cloud.
export EXAMPLE_SERVER_KEY_FILE='example-internal-cert.key'export EXAMPLE_SERVER_CSR_FILE='example-internal-cert.csr'export EXAMPLE_SERVER_REQ_FILE=example-internal-cert.reqopenssl req -newkey rsa:2048 -nodes -keyout "$EXAMPLE_SERVER_KEY_FILE" \-out "$EXAMPLE_SERVER_CSR_FILE" -extensions v3_req -config "$EXAMPLE_SERVER_REQ_FILE"
In production you would usually send the generated example-internal-cert.csr le to yourIT department. But in this example you are your own CA, so sign and generate a server certificate.
57 Generate a Certificate Signing Request SUSE OpenStack Cloud 8

7.2.9 Generate a Server Certificate
NoteIn a production setting you will not perform this step. You will send the CSR created inthe previous section to your company CA or a to a valid public CA and have them signand send you back the certificate.
This section demonstrates how you would use the self-signed CA that you created earlier tosign and generate a server certificate. A server certificate is essentially a signed public key, thesigner being a CA and trusted by a client. When you install this signed CA's certificate (called CAcertificate or trust chain) on the client machine, you are telling the client to trust this CA, andto implicitly trust any server certificates that are signed by this CA. This creates a trust anchor.
CA configuration le
When the CA signs the certificate, it uses a configuration le that tells it to verify the CSR. Notethat in a production scenario the CA takes care of this for you.
1. Create a le called openssl.cnf and add the following contents to it.
# Copyright 2010 United States Government as represented by the# Administrator of the National Aeronautics and Space Administration.# All Rights Reserved.#...
# OpenSSL configuration file.#
# Establish working directory.
dir = .
[ ca ]default_ca = CA_default
[ CA_default ]serial = $dir/serialdatabase = $dir/index.txtnew_certs_dir = $dir/certificate = $dir/cacert.pemprivate_key = $dir/cakey.pemunique_subject = nodefault_crl_days = 365
58 Generate a Server Certificate SUSE OpenStack Cloud 8

default_days = 365default_md = md5preserve = noemail_in_dn = nonameopt = default_cacertopt = default_capolicy = policy_matchcopy_extensions = copy
[ policy_match ]countryName = optionalstateOrProvinceName = optionalorganizationName = optionalorganizationalUnitName = optionalcommonName = suppliedemailAddress = optional
[ req ]default_bits = 1024 # Size of keysdefault_keyfile = key.pem # name of generated keysdefault_md = md5 # message digest algorithmstring_mask = nombstr # permitted charactersdistinguished_name = req_distinguished_namereq_extensions = v3_reqx509_extensions = v3_ca
[ req_distinguished_name ]# Variable name Prompt string#---------------------- ----------------------------------0.organizationName = Organization Name (company)organizationalUnitName = Organizational Unit Name (department, division)emailAddress = Email AddressemailAddress_max = 40localityName = Locality Name (city, district)stateOrProvinceName = State or Province Name (full name)countryName = Country Name (2 letter code)countryName_min = 2countryName_max = 2commonName = Common Name (hostname, IP, or your name)commonName_max = 64
[ v3_ca ]basicConstraints = CA:TRUEsubjectKeyIdentifier = hashauthorityKeyIdentifier = keyid:always,issuer:alwayssubjectAltName = @alt_names
59 Generate a Server Certificate SUSE OpenStack Cloud 8

[ v3_req ]basicConstraints = CA:FALSEsubjectKeyIdentifier = hash
[ alt_names ]
######### end of openssl.cnf #########
2. Sign the server certificate with your CA. Copy the comands below to the command lineand execute. This will cause the le, example-internal-cert.crt , to be created.
export EXAMPLE_SERVER_CERT_FILE='example-internal-cert.crt'export EXAMPLE_SERVER_CSR_FILE='example-internal-cert.csr'export EXAMPLE_CA_KEY_FILE='example-CA.key'export EXAMPLE_CA_CERT_FILE='example-CA.crt'
touch index.txtopenssl rand -hex -out serial 6
openssl ca -batch -notext -md sha256 -in "$EXAMPLE_SERVER_CSR_FILE" \-cert "$EXAMPLE_CA_CERT_FILE" \-keyfile "$EXAMPLE_CA_KEY_FILE" \-out "$EXAMPLE_SERVER_CERT_FILE" \-config openssl.cnf -extensions v3_req
3. Concatenate both the server key and certificate in preparation for uploading to the CloudLifecycle Manager.
cat example-internal-cert.key example-internal-cert.crt > example-internal-cert
4. You have only created the internal-cert in this example. Repeat the above sequence forexample-public-cert . Make sure you use the appropriate certificate request generatedby the configuration processor.
7.2.10 Upload to the Cloud Lifecycle Manager
1. The two les created from the example above will need to be uploaded to the CloudLifecycle Manager and copied into config/tls :
example-internal-cert
example-CA.crt
60 Upload to the Cloud Lifecycle Manager SUSE OpenStack Cloud 8
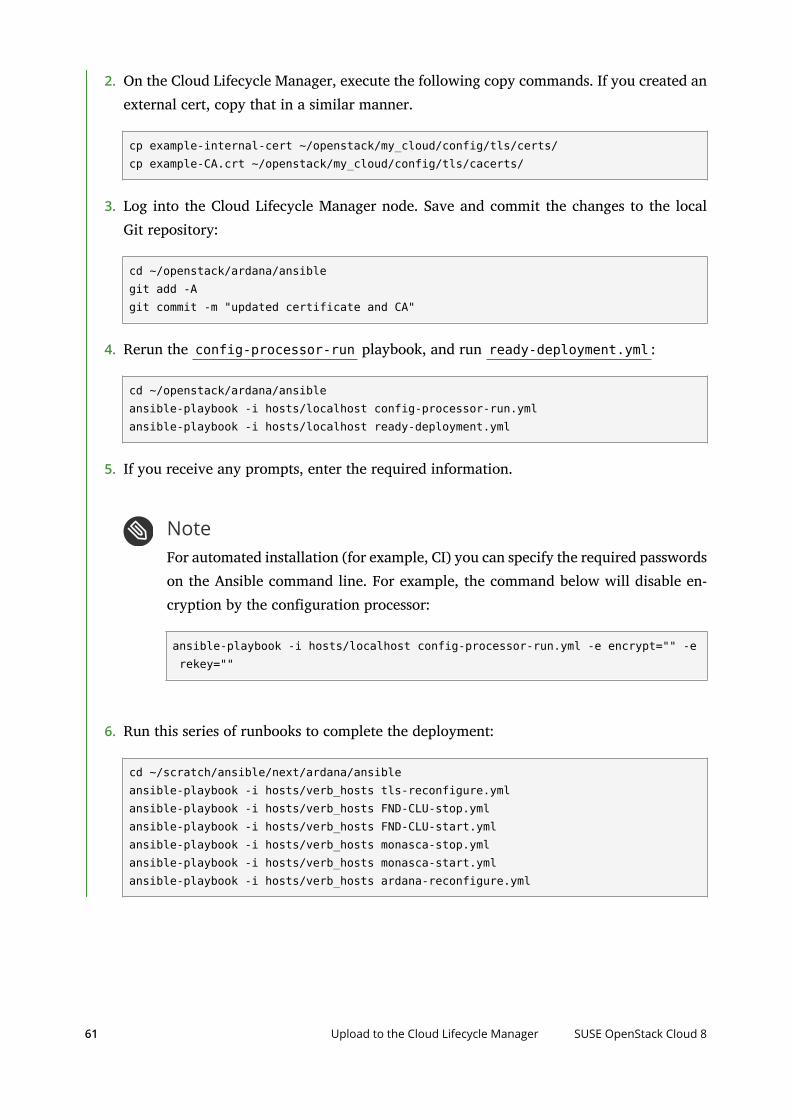
2. On the Cloud Lifecycle Manager, execute the following copy commands. If you created anexternal cert, copy that in a similar manner.
cp example-internal-cert ~/openstack/my_cloud/config/tls/certs/cp example-CA.crt ~/openstack/my_cloud/config/tls/cacerts/
3. Log into the Cloud Lifecycle Manager node. Save and commit the changes to the localGit repository:
cd ~/openstack/ardana/ansiblegit add -Agit commit -m "updated certificate and CA"
4. Rerun the config-processor-run playbook, and run ready-deployment.yml :
cd ~/openstack/ardana/ansibleansible-playbook -i hosts/localhost config-processor-run.ymlansible-playbook -i hosts/localhost ready-deployment.yml
5. If you receive any prompts, enter the required information.
NoteFor automated installation (for example, CI) you can specify the required passwordson the Ansible command line. For example, the command below will disable en-cryption by the configuration processor:
ansible-playbook -i hosts/localhost config-processor-run.yml -e encrypt="" -e rekey=""
6. Run this series of runbooks to complete the deployment:
cd ~/scratch/ansible/next/ardana/ansibleansible-playbook -i hosts/verb_hosts tls-reconfigure.ymlansible-playbook -i hosts/verb_hosts FND-CLU-stop.ymlansible-playbook -i hosts/verb_hosts FND-CLU-start.ymlansible-playbook -i hosts/verb_hosts monasca-stop.ymlansible-playbook -i hosts/verb_hosts monasca-start.ymlansible-playbook -i hosts/verb_hosts ardana-reconfigure.yml
61 Upload to the Cloud Lifecycle Manager SUSE OpenStack Cloud 8

7.2.11 Configuring the Cipher Suite
By default, the cipher suite is set to: HIGH:!aNULL:!eNULL:!DES:!3DES . This setting isrecommended in the OpenStack documentation (http://docs.openstack.org/security-guide/se-
cure-communication/introduction-to-ssl-and-tls.html) . You may override this by editing con-fig/haproxy/defaults.yml . The parameters can be found under the haproxy_globals list.
- "ssl-default-bind-ciphers HIGH:!aNULL:!eNULL:!DES:!3DES"- "ssl-default-server-ciphers HIGH:!aNULL:!eNULL:!DES:!3DES"
Make the changes as needed. Keep the two options identical.
7.2.12 Testing
You can determine if an endpoint is behind TLS by running the following command, whichprobes a Keystone identity service endpoint that is behind TLS:
tux > echo | openssl s_client -connect 192.168.245.5:5000 | \ openssl x509 -fingerprint -nooutdepth=0 CN = openstack-vipverify error:num=20:unable to get local issuer certificateverify return:1depth=0 CN = openstack-vipverify error:num=27:certificate not trustedverify return:1depth=0 CN = openstack-vipverify error:num=21:unable to verify the first certificateverify return:1DONESHA1 Fingerprint=C6:46:1E:59:C6:11:BF:72:5E:DD:FC:FF:B0:66:A7:A2:CC:32:1C:B8
The next command probes a MariaDB endpoint that is not behind TLS:
echo | openssl s_client -connect 192.168.245.5:3306 | openssl x509 -fingerprint -noout140448358213264:error:140770FC:SSL routines:SSL23_GET_SERVER_HELLO:unknown protocol:s23_clnt.c:795:unable to load certificate140454148159120:error:0906D06C:PEM routines:PEM_read_bio:no start line:pem_lib.c:703:Expecting: TRUSTED CERTIFICATE
7.2.13 Verifying That the Trust Chain is Correctly Deployed
You can determine if the trust chain is correctly deployed by running the following commands:
tux > echo | openssl s_client -connect 192.168.245.9:5000 2>/dev/null \
62 Configuring the Cipher Suite SUSE OpenStack Cloud 8

| grep codeVerify return code: 21 (unable to verify the first certificate)tux > echo | openssl s_client -connect 192.168.245.9:5000 -CAfile \ /usr/local/share/ca-certificates/openstack_frontend_cacert.crt 2>/dev/null \ | grep codeVerify return code: 0 (ok)
The rst command produces error 21, which is then xed by providing the CA certificate le.This verifies that the CA certificate matches the server certificate.
7.2.14 Turning TLS on or o
You should leave TLS enabled in production. However, if you need to disable it for any rea-son, you must change tls-components to components in network_groups.yml (as shownearlier) and comment out the cert-le. Additionally, if you have a network_groups.yml lefrom a previous installation, TLS will not be enabled unless you change components to tls-components in that le. By default, Horizon is configured with TLS in the input model. Youshould not disable TLS in the input model for Horizon as that is a public endpoint and is re-quired. Additionally, you should keep all services behind TLS, but using the input model lenetwork_groups.yml you may turn TLS o for a service for troubleshooting or debugging. TLSshould always be enabled for production environments.
If you are using an example input model on a clean install, all supported TLS services will beenabled before deployment of your cloud. If you want to change this setting later, such as whenupgrading, you can change the input model and reconfigure the system. The process is as follows:
1. Edit the input model network_groups.yml le appropriately as described above, chang-ing tls-components to components .
2. Commit the changes to the Git repository:
cd ~/openstack/ardana/ansible/git add -Agit commit -m "TLS change"
3. Change directories again and run the configuration processor and ready deployment play-books:
ansible-playbook -i hosts/localhost config-processor-run.ymlansible-playbook -i hosts/localhost ready-deployment.yml
63 Turning TLS on or o SUSE OpenStack Cloud 8

4. Change directories again and run the reconfigure playbook:
cd ~/scratch/ansible/next/ardana/ansibleansible-playbook -i hosts/verb_hosts ardana-reconfigure.yml
7.3 Enabling TLS for MySQL TracMySQL traffic can be encrypted using TLS. For completely new SUSE OpenStack Cloud deploy-ments using the supplied input model example les, you will have to uncomment the comment-ed entries for tls-component-endpoints: . For upgrades from a previous version, you willhave to add the entries to your input model les if you have not already done so. This topicexplains how to do both.
7.3.1 Enabling TLS on the database server for client access
1. Edit network_groups.yml to either add mysql under tls-component-endpoints in yourexisting le from a previous version, or uncomment it if installing from scratch.
tls-component-endpoints: - mysql
2. After making the necessary changes, commit the changed le to git and run the con-fig-processor-run and reconfigure Ansible playbooks:
cd ~/openstackgit add -Agit commit -m "My changed config"cd ~/openstack/ardana/ansible/ansible-playbook -i hosts/localhost config-processor-run.yml -e encrypt="<encryption key>" -e rekey=""ansible-playbook -i hosts/localhost ready-deployment.ymlcd ~/scratch/ansible/next/ardana/ansible
3. Next, either run site.yml if you are installing a new system:
ansible-playbook -i hosts/verb_hosts site.yml
4. or ardana-reconfigure if you are reconfiguring an existing one:
ansible-playbook -i hosts/verb_hosts ardana-reconfigure.yml
64 Enabling TLS for MySQL Traffic SUSE OpenStack Cloud 8

7.3.2 MySQL replication over TLS
MySQL replication over TLS is disabled. This is true even if you followed the instruction to turnon Mysql TLS in the previous section. Those steps turn on the service interactions to the database.
Turning on MySQL replication over TLS
NoteUsing TLS connections for MySQL replication will incur a performance cost.
You should have already enabled TLS for MySQL client interactions in the previous section. Ifnot, read Section 7.3.1, “Enabling TLS on the database server for client access”.
TLS for MySQL replication is not turned on by default. Therefore, you will need to follow amanual process. Again, the steps are different for new systems and upgrades.
7.3.3 Enabling TLS for MySQL replication on a new deployment
1. Log in to the Cloud Lifecycle Manager node and before running the config processor, editthe ~/openstack/my_cloud/config/mariadb/defaults.yml le.
2. Search for mysql_gcomms_bind_tls. You should nd this section:
# TLS disabled for cluster#mysql_gcomms_bind_tls: "{{ host.bind['FND_MDB'].mysql_gcomms.tls }}"mysql_gcomms_bind_tls: False
3. Uncomment the appropriate line so the le looks like this:
# TLS disabled for clustermysql_gcomms_bind_tls: "{{ host.bind['FND_MDB'].mysql_gcomms.tls }}"#mysql_gcomms_bind_tls: False
4. Follow the steps to deploy or reconfigure your cloud: Step 2 in Section 7.3.1, “Enabling TLS
on the database server for client access”.
65 MySQL replication over TLS SUSE OpenStack Cloud 8

7.3.4 Enabling TLS for MySQL replication on an existing system
If your cluster is already up, perform these steps to enable MySQL replication over TLS:
1. Edit the following two les: ~/openstack/my_cloud/config/mariadb/de-
faults.yml and ~/scratch/ansible/next/ardana/ansible/roles/FND-MDB/de-
faults/main.yml . Note that these les are identical. The rst is a master le and thesecond is a scratch version that is used for the current deployment. Make the same changesas explained in Section 7.3.3, “Enabling TLS for MySQL replication on a new deployment”.
2. Then run the following command:
ansible-playbook -i hosts/verb_hosts tls-percona-reconfigure.yml
After this your MySQL should come up and replicate over TLS. You need to follow thissection again if you ever want to switch TLS o for MySQL replication. You also mustrepeat these steps if any lifecycle operation changes the mysql_gcomms_bind_tls option.
7.3.5 Testing whether a service is using TLS
Almost all services that have a database are able to communicate over TLS. You can test whethera service, in this example the Identity service (Keystone), is communicating with MySQL overTLS by executing the following steps:
1. Log into the Cloud Lifecycle Manager as root and run the mysql command.
root@<server>:~# mysql
Type 'help;' or '\h' for help. Type '\c' to clear the current input statement.
2. Run:
mysql> select * from information_schema.user_statistics where user='keystone'\G
3. Note the results. TOTAL_SSL_CONNECTIONS should not be zero:
*************************** 1. row *************************** USER: keystone TOTAL_CONNECTIONS: 316CONCURRENT_CONNECTIONS: 0 CONNECTED_TIME: 905790 BUSY_TIME: 205
66 Enabling TLS for MySQL replication on an existing system SUSE OpenStack Cloud 8

CPU_TIME: 141 BYTES_RECEIVED: 197137617 BYTES_SENT: 801964 BINLOG_BYTES_WRITTEN: 0 ROWS_FETCHED: 972421 ROWS_UPDATED: 6893 TABLE_ROWS_READ: 1025866 SELECT_COMMANDS: 660209 UPDATE_COMMANDS: 3039 OTHER_COMMANDS: 299746 COMMIT_TRANSACTIONS: 0 ROLLBACK_TRANSACTIONS: 295200 DENIED_CONNECTIONS: 0 LOST_CONNECTIONS: 83 ACCESS_DENIED: 0 EMPTY_QUERIES: 71778 TOTAL_SSL_CONNECTIONS: 2981 row in set (0.00 sec)
mysql>
7.4 Enabling TLS for RabbitMQ TracRabbitMQ traffic can be encrypted using TLS. To enable it, you will have to add entries fortls-component-endpoints: in your input model les if you have not already done so. Thistopic explains how.
1. Edit openstack/my_cloud/definition/data/network_groups.yml , adding rabbitmqto the tls-component-endpoints section:
tls-component-endpoints: - barbican-api - mysql - rabbitmq
2. Commit the changes:
cd ~/openstackgit add -Agit commit -m "My changed config"
3. Then run the typical deployment steps:
cd ~/openstack/ardana/ansible/
67 Enabling TLS for RabbitMQ Traffic SUSE OpenStack Cloud 8

ansible-playbook -i hosts/localhost config-processor-run.yml -e encrypt="<encryption key>" -e rekey=""ansible-playbook -i hosts/localhost ready-deployment.yml
4. Change directories:
cd ~/scratch/ansible/next/ardana/ansible
5. Then for a fresh TLS install run:
ansible-playbook -i hosts/verb_hosts site.yml
6. Or, to reconfigure an existing system run:
ansible-playbook -i hosts/verb_hosts ardana-reconfigure.yml
7.4.1 Testing
On the one of the rabbitmq nodes you can list the clients and their TLS status by running:
$ sudo rabbitmqctl -q list_connections ssl state ssl_protocol user name
You will see output like this where true indicates the client is using TLS for the connection, andfalse, as shown here, indicates the connection is over TCP:
Listing connections ...
rmq_barbican_user false
Other indicators will be rabbit_use_ssl = True in the Oslo messaging section of client con-figurations. The list of clients that support TLS are as follows:
Barbican
Ceilometer
Cinder
Designate
Eon
Glance
68 Testing SUSE OpenStack Cloud 8

Heat
Ironic
Keystone
Monasca
Neutron
Nova
Octavia
7.5 Troubleshooting TLS
7.5.1 Troubleshooting TLS certificate errors when runningplaybooks with a limit
Has the deployer been restarted after the original site installation or is this a new deployer? Ifso, TLS certificates need to be bootstrapped before a playbook is run with limits. You can dothis by running the following command.
cd ~/scratch/ansible/next/ardana/ansibleansible-playbook -i hosts/verb_hosts tls-reconfigure.yml --limit TLS-CA
7.5.2 Certificate Update Failure
In general, if a certificate update fails, it is because of the following: Haproxy has not restarted orthe Trust chain is not installed. This is the certificate of the CA that signed the server certificate.
7.5.3 Troubleshooting trust chain installation
It is important to note that while SUSE OpenStack Cloud 8 allows you to add new trust chains,it would be better if you add all the required trust chains during the initial deploy. Trust chainchanges can impact services.
69 Troubleshooting TLS SUSE OpenStack Cloud 8

However, this does not apply to certificates. There is a certificate-related issue whereby haproxyis not restarted if certificate content has been changed but the certificate le name remained thesame. If you are having issues and you have replaced the content of existing CA le with newcontent, create another CA le with a new name. Also make sure the CA le has a .crt extension.
Do not update both certificate and the CA together. Add the CA rst and then run a site deploy.Then update the certificate and run tls-reconfigure, FND-CLU-stop, FND-CLU-start and then ar-dana-reconfigure. If you know which playbook failed, rerun it with -vv to get detaled errorinformation. The configure, HAproxy restart, and reconfigure steps are included in Section 7.2,
“TLS Configuration”.
You can run the following commands to see if client libraries see the CA you have added:
~/scratch/ansible/next/ardana/ansible$ ansible -i hosts/verb_hosts FND-STN -a 'sudo keytool -list -alias \ debian:username-internal-cacert-001.pem -keystore /usr/lib/jvm/java-7-openjdk-amd64/jre/lib/security/cacerts -storepass changeit' padawan-ccp-c0-m1-mgmt | FAILED | rc=1 >> sudo: keytool: command not found
padawan-ccp-comp0001-mgmt | FAILED | rc=1 >> sudo: keytool: command not found
padawan-ccp-comp0003-mgmt | FAILED | rc=1 >> sudo: keytool: command not found
padawan-ccp-comp0002-mgmt | FAILED | rc=1 >> sudo: keytool: command not found
padawan-ccp-c1-m1-mgmt | success | rc=0 >> debian:username-internal-cacert-001.pem, May 9, 2016, trustedCertEntry, Certificate fingerprint (SHA1): E7:B2:6E:9E:00:FB:86:0F:E5:46:CD:B8:C5:67:13:53:4E:3D:8F:43
padawan-ccp-c1-m2-mgmt | success | rc=0 >> debian:username-internal-cacert-001.pem, May 9, 2016, trustedCertEntry, Certificate fingerprint (SHA1): E7:B2:6E:9E:00:FB:86:0F:E5:46:CD:B8:C5:67:13:53:4E:3D:8F:43
padawan-ccp-c1-m3-mgmt | success | rc=0 >> debian:username-internal-cacert-001.pem, May 9, 2016, trustedCertEntry, Certificate fingerprint (SHA1): E7:B2:6E:9E:00:FB:86:0F:E5:46:CD:B8:C5:67:13:53:4E:3D:8F:43
70 Troubleshooting trust chain installation SUSE OpenStack Cloud 8

Java client libraries are used by Monasca, so compute nodes will not have them. So the rstthree errors are expected. Check that the fingerprint is correct by checking the CA:
~/scratch/d002-certs/t002$ openssl x509 -in example-CA.crt -noout -fingerprint SHA1 Fingerprint=E7:B2:6E:9E:00:FB:86:0F:E5:46:CD:B8:C5:67:13:53:4E:3D:8F:43
If they do not match, there likely was a name collision. Add the CA cert again with a new lename. If you get Monasca errors but nd that the fingerprints match, try stopping and restartingMonasca.
ansible-playbook -i hosts/verb_hosts monasca-stop.ymlansible-playbook -i hosts/verb_hosts monasca-start.yml
7.5.4 Expired TLS Certificates
Use the following steps to re-create expired TLS certificates for MySQL Percona clusters.
1. Regenerate the TLS certificates on the deployer.
ardana > cd ~/scratch/ansible/next/hos/ansibleardana > ansible-playbook -i hosts/verb_hosts tls-reconfigure.yml --limit DEPLOYER_HOST
2. Distribute the regenerated TLS certificates to the MySQL Percona clusters.
ardana > cd ~/scratch/ansible/next/hos/ansibleardana > ansible-playbook -i hosts/verb_hosts --extra-vars "mysql_certs_needs_regeneration=true" tls-percona-reconfigure.yml
3. Verify Percona cluster status on a controller node
ardana > sudo mysql -e 'show status'
Use the following steps to re-create expired TLS certificates for RabbitMQ.
1. Determine if SSL certificate for RabbitMQ is expired
root # cd /etc/rabbitmqroot # openssl x509 -noout -text -in control-plane-1-rabbitmq.pem | grep AfterNot After : Nov 6 15:15:38 2018 GMT
2. Regenerate the TLS certificates on the deployer.
71 Expired TLS Certificates SUSE OpenStack Cloud 8

ardana > cd ~/scratch/ansible/next/hos/ansibleardana > ansible-playbook -i hosts/verb_hosts tls-reconfigure.yml --limit DEPLOYER_HOST
3. Reconfigure RabbitMQ. Certificate will be re-created if the input model is correct.
ardana > cd ~/scratch/ansible/next/ardana/ansibleardana > ansible-playbook -i hosts/verb_hosts --extra-vars "rabbitmq_tls_certs_force_regeneration=true" rabbitmq-reconfigure.yml
7.5.5 Troubleshooting certificates
Certificates can fail in SUSE OpenStack Cloud 8 due to the following.
Trust chain issue. This is dealt with in the previous section
Wrong certificate: Compare the fingerprints. If they differ, then you have a wrong certifi-cate somewhere.
Date range of the certificate is either in the future or expired: Check the dates and changecertificates as necessary, observing the naming cautions above.
TLS handshake fails because the client does not support the ciphers the server offers. Itis possible that you reused a certificate created for a different network model. Make surethe request le found under info/cert_req/ are used to create the certificate. If not, theservice VIP names may not match.
72 Troubleshooting certificates SUSE OpenStack Cloud 8

8 SUSE® OpenStack Cloud: Preventing Host HeaderPoisoning
Depending on the environment and context of your SUSE OpenStack Cloud deployment, it maybe advisable to configure Horizon to protect against Host header poisoning (see ref. #1 below)by using Django's ALLOWED_HOSTS setting (see ref. #2 below). To configure Horizon to usethe ALLOWED_HOSTS setting, take the following steps:
1. Edit the haproxy settings to reconfigure the health check for Horizon to specify the allowedhostname(s). This needs to be done rst, before configuring Horizon itself. Otherwise, ifHorizon is rst configured to restrict the values of the "Host" header on incoming HTTPrequests, the haproxy health checks will start to fail. So, the haproxy configuration needsto be updated rst, if this is being done on an existing installation.
a. On your Cloud Lifecycle Manager node, make a backup copy of this le and thenopen /usr/share/ardana/input-model/2.0/services/horizon.yml
b. Find the line that contains "option httpchk" and modify it so it reads the followingway:
- "option httpchk GET / HTTP/1.1\r\nHOST:\ my.example.com"# Note the escaped escape characters.
In this example, my.example.com is the hostname associated with the Horizon VIP onthe external API network. However, you are not restricted to just one allowed host.In addition, allowed hosts can contain wildcards (though not in the horizon.yml le;there you must have an actual resolvable hostname or a routeable IP address). How-ever, for this change to the haproxy healthcheck, it is suggested that the hostnameassociated with the Horizon VIP on the external API network be used.
2. Edit the template le that will be use for Horizon's local_settings.py configuration le
a. While still on your Cloud Lifecycle Manager node, open ~/openstack/my_cloud/config/horizon/local_settings.py .
b. Change the line that sets the "ALLOWED_HOSTS" setting. This can be a list of host-names and (V)IPs that eventually get routed to Horizon. Wildcards are supported.
ALLOWED_HOSTS = ['my.example.com', '*.example.net', '192.168.245.6']
73 SUSE OpenStack Cloud 8

In the above example, any HTTP request received with a hostname not matching anyin this list will receive an HTTP 400 reply.
c. Commit the change with a "git commit -a" command.
3. Run the configuration processor
cd ~/openstack/ardana/ansibleansible-playbook -i hosts/localhost config-processor-run.yml
4. Enable the configuration: This can be done in one of a few ways: As part of a site deployplay as part of an upgrade play or by re-running the FND-CLU and Horizon deploys onan existing deployment: If modifying an existing deploy, the FND-CLU deploy will need tobe run rst, since changing the ALLOWED_HOSTS setting in Horizon rst will cause thedefault health check to fail, if it does not specify a Host header in the HTTP request sentto check the health of Horizon's Apache virtual host.
cd ~/openstack/ardana/ansibleansible-playbook -i hosts/localhost ready-deployment.ymlcd ~/scratch/ansible/next/ardana/ansibleansible-playbook -i hosts/verb_hosts horizon-deploy.ymlansible-playbook -i hosts/verb_hosts FND-CLU-deploy.yml
References:
https://www.djangoproject.com/weblog/2013/feb/19/security/#s-issue-host-
header-poisoning
https://docs.djangoproject.com/en/dev/ref/settings/#allowed-hosts
74 SUSE OpenStack Cloud 8

9 Encryption of Passwords and Sensitive Data
In SUSE OpenStack Cloud, sensitive connection data is encrypted. The passwords that are en-crypted include:
Inter-service passwords generated by the configuration processor (Keystone, MariaDB,RabbitMQ and Cassandra passwords)
Secret keys generated by the configuration processor (MariaDB cluster-id, erlang cookiefor RabbitMQ, Horizon secret key, Keystone admin token)
User-supplied passwords (IPMI passwords, Block Storage back-end passwords)
9.1 SSH Introduction
What is encrypted Encryption mecha-nism
Is password change-able
Is encryption keychangeable
Inter-service pass-words and secretkeys generated bythe configurationprocessor (Keystone,MariaDB, RabbitMQand Cassandra pass-words)
Uses PyCrypto li-braries & Ansiblevault for encryption
No Yes
Passphrase for theencryption key willbe prompted whenrunning Ansible play-book. Can also usecommand ask-an-sible-pass
User supplied pass-words (IPMI pass-words, Block Storageback-end passwords)
OpenSSL Yes Yes
The environ-ment variable AR-DANA_USER_PASS-WORD_ENCRYP-T_KEY must con-tain the key used toencrypt those pass-words.
75 SSH Introduction SUSE OpenStack Cloud 8

Other protected data:
The SSH private key used by Ansible to connect to client nodes from the Cloud LifecycleManager is protected with a passphrase.
The Swift swift-hash prefix and suffix values are encrypted.
All of the Ansible variables generated by the configuration processor are encrypted andheld in Ansible Vault.
However, if a user wants to change the encryption keys then that can be done for all categoriesof password and secret-keys listed below, and the processes are documented.
The SSH private key passphrase needs to be entered once before any Ansible plays are runagainst the cloud.
The configuration processor encryption key will be prompted for when the relevant Ansible playis run. Once the configuration processor output has been encrypted, all subsequent Ansible playsneed to have --ask-ansible-pass added to the command line to ensure that the encryption keywhich is needed by Ansible is prompted for.
Finally, if user-supplied passwords have been encrypted (this process uses the OpenSSL library)then the environment variable ARDANA_USER_PASSWORD_ENCRYPT_KEY must contain the keyused to encrypt those passwords.
In the case where the ARDANA_USER_PASSWORD_ENCRYPT_KEY environment variable is eithernull, the empty string, or not defined, then no encryption will be performed on your passwordswhen using the ardanaencrypt.py script.
The generated passwords are stored in Ansible inputs generated by the configuration processorand also in the persistent state information maintained by the configuration processor.
9.2 Protecting sensitive data on the Cloud LifecycleManagerThere are a number of mechanisms that can be used to protect sensitive data such as passwords,some Ansible inputs, and the SSH key used by Ansible on the Cloud Lifecycle Manager. See theinstallation documents for details. Please remember the need to guard against exposure of yourenvironment variables, which may happen through observation over the shoulder.
76 Protecting sensitive data on the Cloud Lifecycle Manager SUSE OpenStack Cloud 8

There are instructions included in the installation documents that show how to encrypt yourdata using the ardanaencrypt.py script. You may want to change the encryption keys used toprotect your sensitive data in the future and this shows you how:
SSH keys - Run the command below to change the passphrase used to protect the key:
ssh-keygen -f id_rsa -p
configuration processor Key - If you wish to change an encryption password that youhave already used when running the configuration processor then enter the existing pass-word at the rst prompt and the new password at the second prompt when running theconfiguration processor playbook. See Book “Installing with Cloud Lifecycle Manager”, Chap-
ter 12 “Installing Mid-scale and Entry-scale KVM” for more details.
IPMI passwords if encrypted with ardanaencrypt.py - Rerun the utility specifying anew encryption key when prompted. You will need to enter the plain text passwords atthe password prompt.
9.3 Interacting with Encrypted FilesOnce you have enabled encryption in your environment you may have a need to interact withthese encrypted les at a later time. This section will show you how.
ardanaencrypt.py script password encryption
If you used the ardanaencrypt.py script to encrypt your IPMI or other passwords and have aneed to view them later, you can do so with these steps.
You will want to ensure that the ARDANA_USER_PASSWORD_ENCRYPT_KEY environment variableis set prior to running these commands:
export ARDANA_USER_PASSWORD_ENCRYPT_KEY="<encryption_key>"
To view an encrypted password, you can use this command below which will promot you forthe encrypted password value. It will then output the decrypted value:
./ardanaencrypt.py -d
Configuration processor encryption key
If you have used the encryption options available with the configuration processor, which usesAnsible vault, you can do so with these commands. Each of these commands will prompt youfor the password you used when setting the encryption initially.
77 Interacting with Encrypted Files SUSE OpenStack Cloud 8

To view an encrypted le in read-only mode, use this command:
ansible-vault view <filename>
To edit an encrypted le, use this command. This allows you to edit a decrypted version of thele without the need to decrypt and re-encrypt it:
ansible-vault edit <filename>
For other available commands, use the help le:
ansible-vault -h
78 Interacting with Encrypted Files SUSE OpenStack Cloud 8

10 Encryption of Ephemeral Volumes
By default, ephemeral volumes are not encrypted. If you wish to enable this feature, you shoulduse the following steps.
NoteFor more details about this feature, see Ephemeral storage encryption for LVM back-
end (http://specs.openstack.org/openstack/nova-specs/specs/juno/approved/lvm-ephemer-
al-storage-encryption.html) .
10.1 Enabling ephemeral volume encryptionBefore deploying the Compute nodes you will need to change the disk configuration to createa new volume-group which will be used for your ephemeral disks. To do this, following thesesteps:
1. Log in to the Cloud Lifecycle Manager.
2. Add details about the volume-group you will be using for your encrypted volumes. Youhave two options for this, you can either create a new volume-group or add the details foran already existing volume-group.
a. To create a new volume-group, add the following lines to your Compute disk config-uration le.The location of the Compute disk configuration le is:
~/openstack/my_cloud/definition/data/disks_compute.yml
name: vg-comp physical-volumes: - /dev/sdb
b. To utilize an existing volume-group you can add the following lines to your no-va.conf le, using the name of your volume-group:
[libvirt]images_type = lvmimages_volume_group = <volume_group_name>
79 Enabling ephemeral volume encryption SUSE OpenStack Cloud 8

NoteThe requirement here is to have free space available on a volume-group . The cor-rect disk to use and the name for the volume group will depend on your environ-ment's needs.
3. Modify the nova.conf le for the Compute and API nodes. Verify that the following en-tries exist, if they do not then add them and then restart the nova-compute and nova-apiservices:
[libvirt]images_type = lvmimages_volume_group = vg-comp
[ephemeral_storage_encryption]key_size = 256cipher = aes-xts-plain64enabled = True
[keymgr]api_class = nova.keymgr.barbican.BarbicanKeyManager
[barbican]endpoint_template = https://192.168.245.9:9311/v1
To restart the services, use the following commands:
sudo systemctl restart nova-computesudo systemctl restart nova-api
4. Assign the role in Keystone using the CLI tool. Using the openstack client you can assignthe user key-manager:creator role for the project.
5. Boot an instance with an ephermal disk and verify that the disk is encrypted. Once theinstance is active it is possible to check on the Compute node if the ephermal disk isencrypted.SSH into the Compute node then run the following commands:
sudo dmsetup statuscryptsetup -v status <name_of_ephemeral_disk>
80 Enabling ephemeral volume encryption SUSE OpenStack Cloud 8
11 Refining Access Control with AppArmor
AppArmor is a Mandatory Access Control (MAC) system as opposed to a discretionary accesscontrol system. It is a kernel-level security module for Linux that controls access to low-levelresources based on rights granted via policies to a program rather than to a user role. It enforcesrules at the lowest software layer (the kernel level) preventing software from circumventingresource restrictions that reside at levels above the kernel. With AppArmor, the final gatekeeperis closest to the hardware.
Controlling resource access per application versus per user role allows you to enforce rules basedon specifically what a program can do versus trying to create user roles that are broad enoughyet specific enough to apply to a group of users. In addition, it prevents the trap of having topredict all possible vulnerabilities in order to be secure.
AppArmor uses a hybrid of whitelisting and blacklisting rules, and its security policies are/can be cascading, permitting inheritance from different or more general policies. Policies areenforced on a per-process basis.
AppArmor also lets you tie a process to a CPU core if you want, and set process priority.
AppArmor profiles are loaded into the kernel, typically on boot. They can run in either enforce-ment or complain modes. In enforcement mode, the policy is enforced and policy violation at-tempts are reported. In complain mode, policy violation attempts are reported but not prevented.
11.1 AppArmor in SUSE OpenStack Cloud 8At this time, AppArmor is not enabled by default in SUSE OpenStack Cloud 8. However, werecommend enabling it for key virtualization processes on compute nodes. For more information,see the https://documentation.suse.com/sles/12-SP5/single-html/SLES-security/#part-apparmor .
81 AppArmor in SUSE OpenStack Cloud 8 SUSE OpenStack Cloud 8

12 Data at Rest Encryption
The data at rest encryption features in SUSE OpenStack Cloud 8 include the Barbican key man-agement service for safely storing encryption keys, and Cinder volume encryption. This topicexplains how to configure a back end for Barbican key storage, and how to configure Cindervolumes to be encrypted.
The Barbican service in SUSE OpenStack Cloud 8 supports two types of back ends for safelystoring encryption keys:
A native database back end
An HSM device (KMIP + Micro Focus ESKM)
Configuring the key management back-end key store
Using the Cloud Lifecycle Manager reconfigure playbook, you can configure one of two backends for the Barbican key management service:
Native database: This is the default configuration in SUSE OpenStack Cloud 8.
KMIP + Atalla ESKM: For a KMIP device, an SSL client certificate is needed as HSM devicesgenerally require two-way SSL for security reasons. You will need a client certificate, aclient private key and client root certificate authority recognized by your HSM device.
12.1 Configuring KMIP and ESKM
1. To configure KMIP + Atalla ESKM in place of the default database, begin by providingcertificate information by modifying the sample configuration le, barbican_kmip_plu-gin_config_sample.yml , on the Cloud Lifecycle Manager node:
~/openstack/ardana/ansible/roles/KEYMGR-API/files/samples/barbican_kmip_plugin_config_sample.yml
2. Copy this le to a temporary directory such as /tmp.
3. Edit the le to provide either client certificates as absolute le paths as shown below inbold, or by pasting certificate and key content directly into the le.
82 Configuring KMIP and ESKM SUSE OpenStack Cloud 8

NoteFile paths take precedence over content variables if both are provided.
4. To set le path variables, open kmip_plugin_certs.yml for editing and setting the pathsto the cert les:
vi /tmp/kmip_plugin_certs.yml # File paths takes precedence over cert content if both are provided. # Here file path refers to local filesystem path where ansible is # executed. client_cert_file_path: /path/to/cert/file client_key_file_path: /path/to/key/file client_cacert_file_path: /path/to/cacert/file
5. Alternatively, set the content variables by opening /tmp/kmip_plugin_certs.yml andcopy the certificates and keys directly into the le.
vi /tmp/kmip_plugin_certs.yml # Following are samples you need to replace with your # own content here or via file path approach mentioned above. client_cert_content: | -----BEGIN CERTIFICATE----- MIID0jCCArqgAwIBAgICAKQwDQYJKoZIhvcNAQELBQAwgZQxCzAJBgNVBAYTAlVT MQswCQYDVQQIEwJDTzEUMBIGA1UEBxMLRnQuIENvbGxpbnMxGDAWBgNVBAoTD0hl ... d2xldHQgUGFja2FyZDEMMAoGA1UECxMDQ1RMMRYwFAYDVQQDFA1LTUlQX0xvY2Fs L7x0qB6Zaf3IBkOZqf5bMfAQoKfxww== -----END CERTIFICATE----- client_key_content: | -----BEGIN RSA PRIVATE KEY----- MIIEowIBAAKCAQEArjYVZzdsSMsk520UD1E94jl0/AZGLlsAB152dEP5E9C3mXzQ ZYvfApMh8PFc53gZwLBCb4joy1r8mZj/e7CwCUuo1cJHR9xnhwdK3RLeRbU3dfW8 ... 98DmYxBio8+wQWQdiAPRRthtnvhSWL67oYACPwvWUJJ+D18HfpWCEgCmBU3a8ZHc AaW8rRXtMZzuujGgAbA1hpf5z1lHuiG/X7/XMDVGiRALMyBbHV57 -----END RSA PRIVATE KEY----- client_cacert_content: | -----BEGIN CERTIFICATE----- MIIEmjCCA4KgAwIBAgIBADANBgkqhkiG9w0BAQsFADCBlDELMAkGA1UEBhMCVVMx CzAJBgNVBAgTAkNPMRQwEgYDVQQHEwtGdC4gQ29sbGluczEYMBYGA1UEChMPSGV3 ... FAimEB/a2E+A0oxwuHmhMg0kOpDuXIWn4BW+Z6z5h1j3PFyg/CZ548Fz0XOgvXC7 Ejpkd+5R+24HloruUV1R2EYvmlr8UMFX80og11u+
83 Configuring KMIP and ESKM SUSE OpenStack Cloud 8
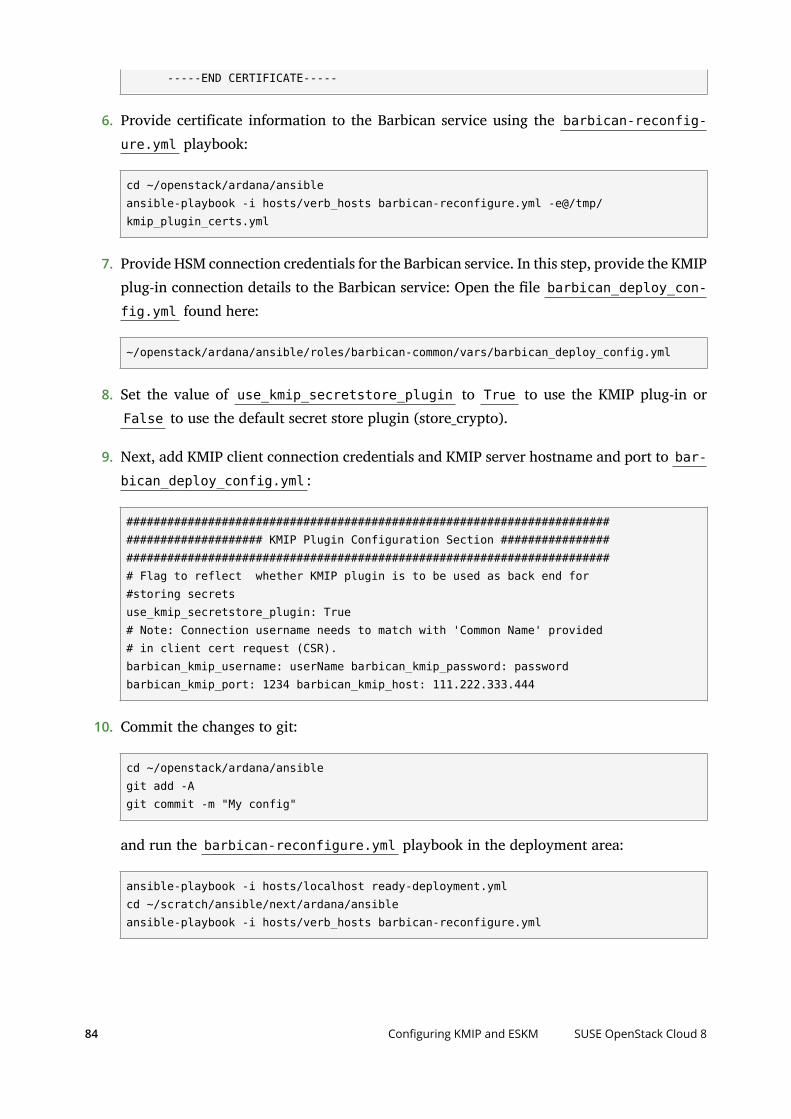
-----END CERTIFICATE-----
6. Provide certificate information to the Barbican service using the barbican-reconfig-ure.yml playbook:
cd ~/openstack/ardana/ansibleansible-playbook -i hosts/verb_hosts barbican-reconfigure.yml -e@/tmp/kmip_plugin_certs.yml
7. Provide HSM connection credentials for the Barbican service. In this step, provide the KMIPplug-in connection details to the Barbican service: Open the le barbican_deploy_con-fig.yml found here:
~/openstack/ardana/ansible/roles/barbican-common/vars/barbican_deploy_config.yml
8. Set the value of use_kmip_secretstore_plugin to True to use the KMIP plug-in orFalse to use the default secret store plugin (store_crypto).
9. Next, add KMIP client connection credentials and KMIP server hostname and port to bar-bican_deploy_config.yml :
########################################################################################### KMIP Plugin Configuration Section ######################################################################################## Flag to reflect whether KMIP plugin is to be used as back end for#storing secretsuse_kmip_secretstore_plugin: True# Note: Connection username needs to match with 'Common Name' provided# in client cert request (CSR).barbican_kmip_username: userName barbican_kmip_password: passwordbarbican_kmip_port: 1234 barbican_kmip_host: 111.222.333.444
10. Commit the changes to git:
cd ~/openstack/ardana/ansiblegit add -Agit commit -m "My config"
and run the barbican-reconfigure.yml playbook in the deployment area:
ansible-playbook -i hosts/localhost ready-deployment.ymlcd ~/scratch/ansible/next/ardana/ansibleansible-playbook -i hosts/verb_hosts barbican-reconfigure.yml
84 Configuring KMIP and ESKM SUSE OpenStack Cloud 8

12.2 Configuring Cinder volumes for encryptionThe data-at-rest encryption model in SUSE OpenStack Cloud provides support for encryptingCinder volumes (Volume Encryption). These encrypted volumes are protected with an encryp-tion key that can be stored in an HSM appliance.
Assuming Barbican and Cinder services have been installed, you can configure a Cinder volumetype for encryption. Doing so will create a new Cinder volume type, "LUKS," that can be selectedwhen creating a new volume. Such volumes will be encrypted using a 256bit AES key:
source ~/service.osrcopenstack role add --user admin --project admin cinder_admincinder type-create LUKScinder encryption-type-create \ --cipher aes-xts-plain64 --key_size 256 --control_location \ front-end LUKS nova.volume.encryptors.luks.LuksEncryptor
+--------------------------------------+-------------------------------------------+-----------------+----------+------------------+| Volume Type ID | Provider | Cipher | Key Size | Control Location |+--------------------------------------+-------------------------------------------+-----------------+----------+------------------+| 99ed804b-7ed9-41a5-9c5e-e2002e9f9bb4 | nova.volume.encryptors.luks.LuksEncryptor | aes-xts-plain64 | 256 | front-end |+--------------------------------------+-------------------------------------------+-----------------+----------+------------------+
You should now be able to create a new volume with the type LUKS, which will request a newkey from Barbican. Once created, you can attach the new volume to an instance:
cinder create --display-name testVolumeEncrypted --volume-type LUKS --availability-zone nova 1
The volume list ( cinder show with the volume ID) should now show that you have a newvolume and that it is encrypted.
cinder show 2ebf610b-98bf-4914-aee1-9b866d7b1897 +---------------------------------------+--------------------------------------+ | Property | Value | +---------------------------------------+--------------------------------------+ | attachments | [] | | availability_zone | nova | | bootable | false | | consistencygroup_id | None |
85 Configuring Cinder volumes for encryption SUSE OpenStack Cloud 8

| created_at | 2016-03-04T00:17:45.000000 | | description | None | | encrypted | True | | id | 2ebf610b-98bf-4914-aee1-9b866d7b1897 | | metadata | {} | | migration_status | None | | multiattach | False | | name | testVolumeEncrypted | | os-vol-host-attr:host | ha-volume-manager@lvm-1#LVM_iSCSI | | os-vol-mig-status-attr:migstat | None | | os-vol-mig-status-attr:name_id | None | | os-vol-tenant-attr:tenant_id | 5f3b093c603f4dc8bc377d04e5385d42 | | os-volume-replication:driver_data | None | | os-volume-replication:extended_status | None | | replication_status | disabled | | size | 1 | | snapshot_id | None | | source_volid | None | | status | available | | user_id | 3bdde5491e174a8aafcbc5a88e01cac7 | | volume_type | LUKS | +---------------------------------------+--------------------------------------+
When using an ESKM appliance as the back end, you can also confirm that key operations aregoing to your HSM via its admin portal.
UUID Owner Object Type State Creation Date8d54f41d-91dd-4f5e-bcfe-964af8213a8c barbican SymmetricKey PreActive 2016-03-02 13:58:58
12.3 For More InformationFor more information on data at rest security with ESKM, see Data Security Protection for SUSE
OpenStack Cloud (http://files.asset.microfocus.com/4aa6-5241/en/4aa6-5241.pdf) .
86 For More Information SUSE OpenStack Cloud 8

13 Glance-API Rate Limit (CVE-2016-8611)
Within the Glance service, calls to the POST method within v1 or v2/images creates records inqueued status. No limit is enforced within the Glance API on the number of images a singletenant may create. The only limit is on the total amount of storage a single user may consume.More information about this vulnerability is at https://nvd.nist.gov/vuln/detail/CVE-2016-8611
Therefore a user could maliciously or unintentionally ll multiple database tables (images, im-age_properties, image_tags, image_members) with useless image records, thereby causing a de-nial of service by lengthening transaction response times in the Glance database.
This issue can be mitigated with a rate limiter to the glance-api haproxy endpoints. Only POSTrequests are affected. Instance launch is not impacted. The number of images that can be cre-ated in a 60 minute window is limited. The default value is 600 connections per 60 minutewindow which should cover most normal glance-api use cases. When the number of connec-tions has been exceeded, the user is locked out for the duration of the 60 minute interval. Thevalue for the number of connections per 60 minute period can be overridden by editing thecontrol_plane.yml le.
The following steps will implement the rate limiter patch.
1. Edit control_plane.yml , adding the following glance_rate_limit entry. Change theglance_rate_limit if the default 600 connections does not t your situation.
- glance-api: ha_mode: false glance_stores: 'file' glance_default_store: 'file' glance_rate_limit: LIMIT
2. Commit the change to Git
ardana > git add -Agit commit "Change glance rate limit"
3. Run playbooks
ardana > cd ~/openstack/ardana/ansibleardana > ansible-playbook -i hosts/localhost config-processor-run.ymlardana > ansible-playbook -i hosts/localhost ready-deployment.ymlardana > cd ~/scratch/ansible/next/ardana/ansibleardana > ansible-playbook -i hosts/localhost FND-CLU-reconfigure.yml
87 SUSE OpenStack Cloud 8

Access attempts are logged in /var/log/haproxy.log . Users who exceed the limit will see amessage such as:
429 Too Many RequestsYou have sent too many requests in a given amount of time.
HTTP/1.0 429 Too Many RequestsCache-Control: no-cacheConnection: closeContent-Type: text/html
88 SUSE OpenStack Cloud 8

14 Security Audit Logs
14.1 The need for auditingEnterprises need the ability to audit and monitor workflows and data in accordance withtheir strict corporate, industry or governmental policies and compliance requirements such asFIPS-140-2, PCI-DSS, HIPAA, SOX, or ISO. To meet this need, SUSE OpenStack Cloud supportsCADF (Cloud Auditing Data Federation)-compliant security audit logs that can easily be inte-grated with your organization's Security Information and Event Management (SIEM) tools. Suchauditing is valuable not only to meet regulatory compliance requirements, but also for correlat-ing threat forensics.
Note that logs from existing OpenStack services can also be used for auditing purposes, eventhough they are not in a consistent audit friendly CADF format today. All logs can easily beintegrated with a SIEM tool such as HPE ArcSight, Splunk etc.
14.2 Audit middlewareAudit middleware is python middleware logic that addresses the aforementioned logging short-comings. Audit middleware constructs audit event data in easily consumed CADF format. Thisdata can be mined to answer critical questions about activities over REST resources such as whomade the request, when, why, and so forth.
Audit middleware supports delivery of audit data via the Oslo messaging notifier feature. Eachservice is configured to route data to an audit-specific log le.
The following are key aspects of auditing support in SUSE OpenStack Cloud 8:
Auditing is disabled by default and can be enabled only after SUSE OpenStack Cloud in-stallation.
Auditing support has been added to eight SUSE OpenStack Cloud services (Nova, Cinder,Glance, Keystone, Neutron, Heat, Barbican, and Ceilometer).
Auditing has been added for interactions where REST API calls are invoked.
All audit events are recorded in a service-specific audit log le.
89 The need for auditing SUSE OpenStack Cloud 8
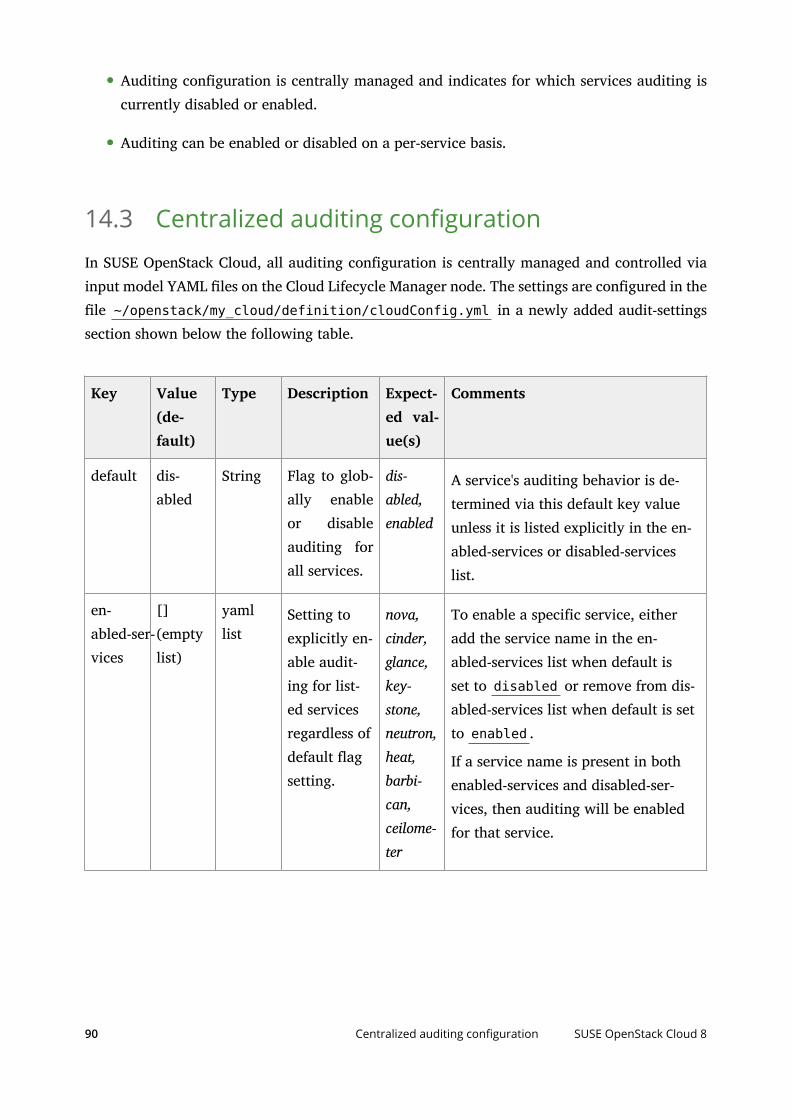
Auditing configuration is centrally managed and indicates for which services auditing iscurrently disabled or enabled.
Auditing can be enabled or disabled on a per-service basis.
14.3 Centralized auditing configurationIn SUSE OpenStack Cloud, all auditing configuration is centrally managed and controlled viainput model YAML les on the Cloud Lifecycle Manager node. The settings are configured in thele ~/openstack/my_cloud/definition/cloudConfig.yml in a newly added audit-settingssection shown below the following table.
Key Value(de-fault)
Type Description Expect-ed val-ue(s)
Comments
default dis-abled
String Flag to glob-ally enableor disableauditing forall services.
dis-abled,enabled
A service's auditing behavior is de-termined via this default key valueunless it is listed explicitly in the en-abled-services or disabled-serviceslist.
en-abled-ser-vices
[](emptylist)
yamllist
Setting toexplicitly en-able audit-ing for list-ed servicesregardless ofdefault agsetting.
nova,cinder,glance,key-stone,neutron,heat,barbi-can,ceilome-ter
To enable a specific service, eitheradd the service name in the en-abled-services list when default isset to disabled or remove from dis-abled-services list when default is setto enabled .
If a service name is present in bothenabled-services and disabled-ser-vices, then auditing will be enabledfor that service.
90 Centralized auditing configuration SUSE OpenStack Cloud 8

Key Value(de-fault)
Type Description Expect-ed val-ue(s)
Comments
dis-abled-ser-vices
Nova,Barbi-can,Key-stone,Cinder,Ceilome-ter,Neu-tron
yamllist
Setting toexplicitlydisable au-diting forlisted ser-vices regard-less of de-fault agsetting.
nova,cinder,glance,key-stone,neu-tron,heat,barbi-can,ceilome-ter
To disable a specific service, eitheradd the service name in disabled-ser-vices when default is set to enabled .or remove from enabled-services listwhen default is set to disabled .
Audit settings in cloudConfig.yml with default set to disabled and services selectively en-abled:
product: version: 2 cloud: .... .... # Disc space needs to be allocated to the audit directory before enabling # auditing. # keystone and nova has auditing enabled # cinder, ceilometer, glance, neutron, heat, barbican have auditing disabled audit-settings: audit-dir: /var/audit default: disabled enabled-services: - keystone - nova disabled-services: - cinder - ceilometer
Audit setting in cloudConfig.yml with default set to enabled and services selectively dis-abled:
product:
91 Centralized auditing configuration SUSE OpenStack Cloud 8

version: 2 cloud: .... .... # Disc space needs to be allocated to the audit directory before enabling # auditing. # keystone, nova, glance, neutron, heat, barbican has auditing enabled # cinder, ceilometer has auditing disabled audit-settings: audit-dir: /var/audit default: enabled enabled-services: - keystone - nova disabled-services: - cinder - ceilometer
Because auditing is disabled by default, you will need to follow the steps below to enable it:
1. Book “Operations Guide”, Chapter 12 “Managing Monitoring, Logging, and Usage Reporting”, Sec-
tion 12.2 “Centralized Logging Service”, Section 12.2.7 “Audit Logging Overview”, Section 12.2.7.1
“Audit Logging Checklist”
2. Book “Operations Guide”, Chapter 12 “Managing Monitoring, Logging, and Usage Reporting”, Sec-
tion 12.2 “Centralized Logging Service”, Section 12.2.7 “Audit Logging Overview”, Section 12.2.7.2
“Enable Audit Logging”
For instructions on backing up and restoring audit logs, see: Book “Operations Guide”, Chapter 14
“Backup and Restore”, Section 14.13 “Backing up and Restoring Audit Logs” .
92 Centralized auditing configuration SUSE OpenStack Cloud 8