Embed Size (px)
Citation preview

Security Best Practices in AOS
Document rev. 1.7 1/70 TKC 000018877
.........................................................
1. Introduction ......................................................................................................... 2
2. Access control, Authentication and Non-repudiation ........................... 3
2.1. Authentication and Authorization ......................................................................................... 3
2.2. Access control ................................................................................................................................ 7
2.3. Event logging ................................................................................................................................. 9
3. Data confidentiality and Communication ............................................... 13
3.1. Secure Socket Layer ................................................................................................................. 13
4. Availability ........................................................................................................ 18
4.1. DoS attacks on reserved network ranges ........................................................................ 18
4.2. TTL 0 flooding ............................................................................................................................ 21
4.3. IGMP flooding ............................................................................................................................. 22
4.4. DHCP flooding ............................................................................................................................ 23
4.5. Cisco proprietary MAC flooding .......................................................................................... 25
4.6. MLD flooding ............................................................................................................................... 26
4.7. ARP flooding ................................................................................................................................ 26
4.8. ARP attacks on end stations and MAC spoofing ............................................................ 29
4.9. Broadcast and unknown unicast flooding ....................................................................... 32
4.10. ICMP attack on router interfaces ........................................................................................ 36
4.11. ARP attacks on router interfaces ........................................................................................ 36
4.12. CAM overflow attack ................................................................................................................ 39
4.13. DHCP rogue server attack ...................................................................................................... 44
4.14. STP claiming root role attack ............................................................................................... 47
4.15. Attacks on routing protocols ................................................................................................ 54
4.16. Rogue IGMP Querier attack ................................................................................................... 57
4.17. LLDP rogue agent attack ........................................................................................................ 58
4.18. Filtering DoS attacks on router interfaces ...................................................................... 60
5. Important security fixes ............................................................................... 62
6. AOS 6 example configuration ..................................................................... 63
7. AOS 7 example configuration ..................................................................... 66
8. AOS 8 example configuration ..................................................................... 68
9. Summary ............................................................................................................ 70

Security Best Practices in AOS
Document rev. 1.7 2/70 TKC 000018877
.........................................................
1. Introduction
This article describes AOS features which can be used to address selected dimensions in the X.805 “Security architecture for systems providing end-to-end communications” security model (“Data Integrity” and “Privacy” are not covered in this document). This article is focused on management and control plane (therefore port based access control, for example 802.1X, UNP, ClearPass are not covered in this document either, see section Access Guardian in Network Configuration Guide). It is explained how selected AOS features can be used to prevent network attacks including Denial-of-service (DoS), unauthorized access, intrusions, layer 2 and layer 3 attacks. This article covers only selected scenarios. Each network requires dedicated security policy.
This article is applicable to following hardware platforms and AOS releases:
6250 6400 6450 6850 6850E 6855 6860 6900 9000 9000E 10K
6.4.X 6.6.X 6.7.1 7.1.X 7.2.X 7.3.X 8.1.1 8.2.1

Security Best Practices in AOS
Document rev. 1.7 3/70 TKC 000018877
.........................................................
2. Access control, Authentication and Non-repudiation
Access Control is concerned with providing authorized access to network resources. Authentication is concerned with confirming the identity of communicating parties. Non-repudiation in concerned with maintaining an audit trail, so that the origin of data or the cause of an event or action cannot be denied.
2.1. Authentication and Authorization
RADIUS
T1.276-2003 and other standards recommend using a remote RADIUS server for account control. This allows network wide control of accounts reducing the risk of inadvertently leaving an account unsecured. The only local account should be the admin account to be used only for emergency reconfiguration.
Applicable to AOS 6, AOS 7, AOS 8
Extract from “OmniSwitch AOS Release 6 Network Configuration Guide”:
RADIUS is a standard authentication and accounting protocol defined in RFC 2865 and RFC
2866. A built-in RADIUS client is available in the switch. A RADIUS server that supports
Vendor Specific Attributes (VSAs) is required. The Alcatel-Lucent attributes can include VLAN
information, time-of-day, or slot/port restrictions.
Use the aaa radius-server command to configure RADIUS parameters on the switch. When
creating a new server, at least one host name or IP address (specified by the host keyword) is
required as well as the shared secret (specified by the key keyword). In this example, the server
name is rad, the host address is 10.10.2.1, the backup address is 10.10.3.5, and the shared secret
is switch. Note that the shared secret must be configured exactly the same as on the server.
-> aaa radius-server rad host 10.10.2.1 10.10.3.5 key switch
Use the aaa authentication command to specify the management interface through which switch
access is permitted (such as console, telnet, ftp, http, or ssh). Specify the server and backup
servers to be used for checking user login and privilege information. Multiple servers of different
types may be specified. For example:
-> aaa authentication console rad
-> aaa authentication ssh rad
-> aaa authentication snmp rad
-> aaa authentication http rad
Suggested secure configuration:
aaa radius-server radius_server host ip_address
aaa authentication default radius_server local
Privileges can be controlled using following attributes:
Alcatel-Acce-Priv-F-R1
Alcatel-Acce-Priv-F-R2
Alcatel-Acce-Priv-F-R3
Alcatel-Acce-Priv-F-W1
Alcatel-Acce-Priv-F-W2
Alcatel-Acce-Priv-F-W3

Security Best Practices in AOS
Document rev. 1.7 4/70 TKC 000018877
.........................................................
The list of available options can be displayed using the following command:
show aaa priv hexa
Displays hexadecimal values for command domains/families. Useful for determining how to
express command families in hexadecimal; hexadecimal values are used in configuring user
privileges in attributes on an external LDAP or RADIUS authentication server.
TACACS+
A TACACS+ server can be used to provide centralized authentication and authorization services for switch management users.
Applicable to AOS 6, AOS 7, AOS 8
Extract from “OmniSwitch AOS Release 6 Network Configuration Guide”:
When creating a new server, at least one host name or IP address (specified by the host keyword)
is required as well as the shared secret (specified by the key keyword). In this example, the server
name is tac, the host address is 10.10.5.2, the backup address is 10.10.5.5, and the shared secret
is switch. Note that the shared secret must be configured exactly the same as on the server.
-> aaa tacacs+-server tac host 10.10.5.2 10.10.5.5 key switch
Use the aaa authentication command to specify the management interface through which switch
access is permitted (such as console, telnet, ftp, http, or ssh). Specify the server and backup
servers to be used for checking user login and privilege information. Multiple servers of different
types may be specified. For example:
-> aaa authentication console tac
-> aaa authentication ssh tac
-> aaa authentication snmp tac
-> aaa authentication http tac
TACACS+ Client Limitations
The following limitations apply to this implementation of the TACACS+ client application:
• TACACS+ supports Authenticated Switch Access and cannot be used for user authentication.
• Authentication and Authorization are combined together and cannot be performed
independently.
• On the fly, command authorization is not supported. Authorization is similar to the AOS
partition management families.
• Only inbound ASCII logins are supported.
• A maximum of 50 simultaneous TACACS+ sessions can be supported when no other
authentication mechanism is activated.
• Accounting of commands performed by the user on the remote TACACS+ process is not
supported in the boot.cfg file at boot up time.
User password policy
User password policies can be used to enforce strong passwords for locally stored user database.
Applicable to AOS 6, AOS 7, AOS 8
Extract from “OmniSwitch AOS Release 6 Switch Management Guide:

Security Best Practices in AOS
Document rev. 1.7 5/70 TKC 000018877
.........................................................
Description Command Default
Minimum password length user password-size min 8 characters
Default password expiration for any user user password-expiration disabled
Password expiration for particular user expiration keyword in the
user command
none
Username is not allowed in password. user password-policy
cannot-contain-username
disabled
Minimum number of uppercase characters
allowed in a password. user password-policy
min-uppercase
0 (disabled)
Minimum number of lowercase characters
allowed in a password. user password-policy
min-lowercase
0 (disabled)
Minimum number of base-10 digits allowed
in a password. user password-policy
min-digit
0 (disabled)
Minimum number of non-alphanumeric
characters allowed in a password. user password-policy
min-nonalpha
0 (disabled)
Maximum number of old passwords to
retain in the password history. user password-history 4
Minimum number of days user is blocked
from changing password. user password-min-age 0 (disabled)
Suggested secure configuration:
user admin password user_defined_password
user password-expiration 90
user password-min-age 1
user lockout-window 3
user lockout-threshold 5
user lockout-duration 4
user password-size min 8
user password-policy cannot-contain-username enable
user password-policy min-uppercase 1
user password-policy min-lowercase 1
user password-policy min-digit 1
user password-policy min-nonalpha 1
user password-history 5
“user lockout-window”, “user lockout-threshold” and “user lockout-duration” are used to stop malicious actors and automated systems from trying to guess the password via a brute-force attack. The normal login process has built in delays on user-password authentication failure which discourages guessing. The literature suggests that a longer lock out period should be used after extend failures to allow an administrator to identify the breach. The period should be sufficiently long enough for an administrator to be notified and take appropriate action. The values recommended are a balance between blocking programmatic password crackers and potential denial of authorized access. Account lock up does not apply to the admin account.
“user password-size”, “user password-history”, and “user password-policy *” commands are used to require complex passwords be set by users. Values are taken from T1.276-2003. Passwords using these criteria are considered to be complex enough to provide minimum level of security. Organizations may require stronger passwords. Once commands for enforcing password strength are entered be sure to update existing passwords.

Security Best Practices in AOS
Document rev. 1.7 6/70 TKC 000018877
.........................................................
Once a password expires the next login will prompt the user to change the password. The password aging and lockout commands only apply to local accounts. See your RADIUS manufacturer’s guide for applying these to remote accounts.
FIPS
FIPS can be used to ensure that only strong cryptographic algorithms are used when accessing a switch.
Applicable to AOS 6.4.5.R02, AOS 7, AOS 8
Extract from “OmniSwitch AOS Release 6 Switch Management Guide”:
Federal Information Processing Standards (FIPS) is a mode of operation that satisfies security
requirements for cryptographic modules. It is a requirement as per the National Institute of
Standards and Technology (NIST), FIPS 140-2 standard that strong cryptographic algorithms has
to be supported to achieve FIPS compliance. When FIPS mode is enabled on OmniSwitch, FIPS
140-2 compliant encryption is used by the OmniSwitch devices in the various management
interfaces such as SFTP, HTTP, SSh and SSL.
These strong cryptographic algorithms ensure secure communication with the device to provide
interoperable, high quality, cryptographically-based security for IP networks through the use of
appropriate security protocols, cryptographic algorithms, and keys and prevent any form of
hijacking/ hacking or attack on the device through the secure mode of communication.
FIPS mode functionalities:
• FIPS operates in OpenSSL mode allowing only highly secure and strong cryptographic
algorithms.
• OpenSSH and Web Server which use the OpenSSL as the underlying layer for secure
communications also works in the FIPS mode.
• SNMPv3 supports secure AES and 3-DES. MD5 is not allowed.
• The FIPS mode is enabled/disabled only with a reboot of the switch.
The SNMPv3 module as well as all switch management protocols such as SFTP, HTTP, SSH,
and SSL use the FIPS 140-2 compliant encryption algorithms.
FIPS Specifications
Algorithms Supported for ESP: DES-CBC - 64 bits
3DES-CBC - 192 bits
AES-CBC - 128, 192, or 256 bits
AES-CTR - 160, 224, or 288 bits
Note: MD5 is not allowed
Access types: SSH, SFTP, HTTPS, SNMPV3
Prior to enabling the FIPS mode of communication, complete the following pre-requisites:
• The SSH/SFTP/SSL/SNMPv3 clients should support the secure FIPS standard cryptographic
algorithms to communicate with an OmniSwitch device on FIPS mode.
• SNMPv3 communications in the FIPS mode should only support SHA+AES or SHA+3DES
algorithms. Session establishment with MD5 or DES should be rejected.
• User-specific certificates/ keys have to be generated using FIPS compliant cryptographic
algorithms. There are no checks in the OpenSSL module to verify the FIPS compliance of the
certificate/keys in the flash.

Security Best Practices in AOS
Document rev. 1.7 7/70 TKC 000018877
.........................................................
• When takeover happens, management sessions with the old Primary will be disconnected.
User will have to reconnect to the new Primary.
Enable the FIPS mode on an OmniSwitch using the following command:
-> system fips enable
WARNING: FIPS mode has been enabled. System reboot required for
the changes to take effect.
Reboot the system.
Use the show system fips-status to view the configured and running status of the FIPS mode on
the Switch. show system fips-status is the only show command which displays the FIPS status
on the switch. The FIPS status is not displayed by a show configuration snapshot command.
Disable insecure management interfaces such as Telnet/ FTP manually after FIPS mode is
enabled to achieve a complete secure device.
Configure a user-id and password.
-> user snmpadmin password trustno1 sha+3des
This user-id and password can be used to access an OmniSwitch in secure mode when FIPS is
enabled on the switch.
Access the OmniSwitch from the SSH/SFTP/SSL/SNMPv3 clients with encryption AES using
the user credentials defined.
Use the show user command to view the SNMP level configured for the user.
User name = snmpadmin,
Password expiration = 12/22/2012 11:01 (30 days from now),
Password allow to be modified date = 12/25/2007 10:59 (3 days from now),
Account lockout = Yes (Automatically unlocked after 19 minute(s)from now),
Password bad attempts = 3,
Read Only for domains = None,
Read/Write for domains = Admin System Physical Layer2 Services policy Security ,
Read/Write for families = ip rip ospf bgp vrrp ip-routing ipx ipmr ipms ,
Snmp allowed = YES,
Snmp authentication = SHA,
Snmp encryption = DES
Console-Only = Disabled
A secure session of the user “snmpadmin” is established between the client and the OmniSwitch
in FIPS enabled mode.
2.2. Access control
ACLs with destination network group Switch
The build in network group Switch can be used in ACLs to facilitate creation of Access Control Lists allowing management connections only from predefined list of IP addresses.
Applicable to AOS 6.4.6.R01
Example configuration:
policy network group management <ip_address> mask <mask> <ip_address> mask
<mask> <ip_address> mask <mask> ...
policy condition trusted source network group management destination network
group Switch

Security Best Practices in AOS
Document rev. 1.7 8/70 TKC 000018877
.........................................................
policy condition untrusted destination network group Switch
policy action accept
policy action drop disposition drop
policy rule trusted precedence 65010 condition trusted action accept
policy rule untrusted precedence 65000 condition untrusted action drop
qos apply
It may be necessary for protocols like BGP and BFD to include in the management network group IP addresses of all neighbor routers.
This kind of QoS configuration may consume a lot of TCAM entries in case there are many predefined management network ranges and many active local IP addresses (the number of predefined management network ranges multiplied by the number of active local IP addresses gives the number of consumed TCAM entries). It is recommended to use network ranges in place of IP addresses with 32 bit mask to reduce the number of reserved TCAM entries.
In AOS 7.3.2.613.R01 and AOS 7.3.4.R01 there is an option to reduce the number of consumed TCAM resources using “qos switch-group compact”. See below an example of configuration on OS6900, which consumes 16 (4×4) TCAM entries in the expanded mode and 4 (4×1) in the compact mode. A reboot is necessary to apply changes.
-> show configuration snapshot qos ip
! IP:
ip interface "vlan100" address 192.168.100.1 vlan 100
ip interface "vlan101" address 192.168.101.1 vlan 101
ip interface "vlan102" address 192.168.102.1 vlan 102
ip interface "vlan103" address 192.168.103.1 vlan 103
! QOS:
qos switch-group compact
policy network group management 192.168.200.1 192.168.201.1
policy network group management 192.168.202.1 192.168.203.1
policy condition trusted source network group management destination network
group Switch
policy action accept
qos apply
Before reboot 16 TCAM entries are consumed in slice 7:
-> show qos slice | grep " 7 "
7 256/240 256/240 …
After reboot the number of consumed entries in slice 7 is reduced to 4:
-> show qos slice | grep " 7 "
7 256/252 256/252 …
Console port access restriction
Console access can be used for example to reset the admin password. Access to console port can be disabled for security reasons.
Applicable to AOS 6.4.6.R01
Extract from “OmniSwitch AOS Release 6 CLI Reference Guide”:
Enable or disable the CLI shell through the console port of the switch.

Security Best Practices in AOS
Document rev. 1.7 9/70 TKC 000018877
.........................................................
session console {enable | disable}
Syntax Definitions
enable Enables the switch access through the console port via the CLI shell.
disable Disables the switch access through the console port via the CLI shell.
Defaults
default: enable
Usage Guidelines
• It is recommended to create a back-up of the configuration file before using this command. If
the telnet or SSH or webview access to the switch is lost, contact customer support to recover
the switch.
• Before disabling the CLI console shell, configuration for telnet or SSH access with proper
user privilege should be made.
• The command should be issued only via telnet or SSH session, and not through console
sessions.
• When the CLI console shell is disabled, the switch log output to the console is also disabled.
• When the CLI console shell is disabled, switch can be accessed through SSH or telnet or
webview session.
• The command can be stored to the configuration file using write memory.
• The command can be used on standalone unit and in a stack on the primary switch.
2.3. Event logging
Command logging
Command logging can be used to keep audit trail of all commands entered through CLI.
Applicable to AOS 7, AOS 8
In AOS 7 and AOS 8 CLI commands are logged by default in SWLOG. Enter the following command to list commands entered via CLI:
-> show log swlog | grep "CLI log"
Applicable to AOS 6, AOS 7, AOS 8
Extract from “OmniSwitch AOS Release 6 Switch Management Guide”:
By default, command logging is disabled. To enable command logging on the switch, enter the
following command:
-> command-log enable
When command logging is enabled via the command-log enable syntax, a file called
command.log is automatically created in the switch’s flash directory. Once enabled,
configuration commands entered on the command line will be recorded to this file until
command logging is disabled.

Security Best Practices in AOS
Document rev. 1.7 10/70 TKC 000018877
.........................................................
The command.log file has a 66402 byte capacity. This capacity allows up to 100 of the most
recent commands to be recorded. Because all CLI command logging information is archived to
the command.log file, command history information will be lost if the file is deleted.
To view a list of logged commands, along with the corresponding information (including entry
results), enter the show ssh config command. For example:
-> show command-log
Command : ip interface vlan-68 address 168.14.12.120 vlan 68
UserName : admin
Date : MON APR 28 01:42:24
Ip Addr : 128.251.19.240
Result : SUCCESS
Remote command logging can be enabled using the following command:
swlog remote command-log enable
RADIUS and TACACS+
Accounting through RADIUS or TACACS+ can be used to keep audit trail of all user sessions.
Applicable to AOS 6, AOS 7, AOS 8
Extract from “OmniSwitch AOS Release 6 Network Configuration Guide”:
To enable accounting (logging a user session) for Authenticated Switch Access, use the aaa
accounting session command with the relevant server name(s). In this example, the RADIUS
and LDAP servers have already been configured through the aaa radius-server and aaa ldap-
server commands.
After this command is entered, accounting will be performed through the rad1 RADIUS server.
If that server is unavailable, the LDAP server, ldap2, will be used for accounting. If that server is
unavailable, logging will be done locally on the switch through the Switch Logging feature
-> aaa accounting session rad1 ldap2 local
Extract from “OmniSwitch AOS Release 6 CLI Reference Guide”:
aaa accounting session
Configures an accounting server or servers for authenticated switch sessions. Accounting servers
keep track of network resources (time, packets, bytes, etc.) and user activity.
aaa accounting session [server_name1] [server_name2...] [local]
no aaa accounting session
Syntax Definitions
server_name1 The name of the RADIUS, TACACS+, or LDAP server used for
accounting of authenticated switch sessions. At least one server is required.
RADIUS, TACACS+, and LDAP server names are set up through the aaa
radius-server, aaa tacacs+-server, and aaa ldap-server commands.
server_name2... The names of backup servers. Up to 3 backups may be specified (including
local); each server name should be separated by a space. These backups are
only used if server1 becomes unavailable. They are polled in the order they

Security Best Practices in AOS
Document rev. 1.7 11/70 TKC 000018877
.........................................................
are listed in this command. The first available server becomes the
accounting server.
Local Local accounting is done through the Switching Logging feature on the
switch. See Chapter 57, “Switch Logging Commands,” for information
about Switch Logging commands.
Defaults
Accounting is disabled by default.
Platforms Supported
OmniSwitch 6400, 6850E, 6855, 9000E
Usage Guidelines
• Use the no form of the command to disable accounting for Authenticated Switch Access.
• Up to 4 accounting servers (total) may be specified. At least one server is required. Each server
name should be separated by a space.
• The servers may be RADIUS, TACACS+, LDAP servers, and/or the local Switch Logging
facility.
• If local is specified as server1, the switch will only use the local Switching Logging facility for
accounting.
• If local is specified as a backup, it should be entered last in the list of servers. The Switch
Logging facility is always available if the switch is up.
• The switch uses only the first available server in the list for accounting. For example, if
server1 is not available, the switch will use server2.
• RADIUS, TACACS+, and LDAP servers may each have an additional backup specified
through the aaa radius-server, aaa tacacs+-server, and aaa ldap-server commands.
Centralized audit trail using SNMP traps, SWLOG and Syslog
OmniSwitch is set up to assist in monitoring activity on the switch with SNMP traps, local switch log and remote syslog (via switch log).
Suggested secure configuration:
snmp station <ip_address> <username> v3 enable
no swlog output
swlog output flash
swlog output socket <ip_address>
swlog appid all level info
swlog
“snmp station <ip_address> <username> v3 enable” is used to set up a trap interface to an SNMP station. Alcatel-Lucent recommends using an OmniVista 2500 Network Management Station to monitor and log traps coming from a switch. Traps which may indicate tampering with a network should be forwarded to the network administrator for immediate attention. Traps which may require immediate security action are:
coldStart, warmStart – detect physical tampering with a switch. Physical access to switches and wiring closets allows an intruder to power cycle a switch, remove or replace critical components, and to alter cable wiring. Physical

Security Best Practices in AOS
Document rev. 1.7 12/70 TKC 000018877
.........................................................
access to network jacks allows an intruder to enter the network inside the firewall. It is recommended that critical switches be housed in locked rooms with limited access. The OmniSwitch’s coldStart and warmStart traps should be monitored to detect cycling of critical switches.
alaStackMgrRoleChangeTrap – The primary or secondary stack was changed. This also could indicate physical tampering.
httpServerDoSAttackTrap – HTTP server is under possible DoS attack.
alaDoSTrap – A possible DoS attack on the switch has been identified.
stpRootPortChange – Spanning Tree root port changed. A change of root may indicate a possible hijacking of the spanning tree configuration. Networks which change configuration often may be difficult to monitor this trap.
Depending on the configuration of your network these traps may also provide important security information.
chassisTrapsPossibleDuplicateMac – Possible spoofing of a device.
lpsViolationTrap – Learned Port Security violation has occurred.
“swlog output flash” causes the switch log output to be stored in the switch’s flash. This keeps a copy in case the syslog server is unreachable.
“swlog output socket <ip_address>” causes the switch log output to be sent to a remote syslog server. Having a remote server is important for backup, protection from swlog clear, and from wrap around of the flash file. Free or reasonably priced syslog servers can be found by searching the web. Alcatel-Lucent’s OmniVista Network Management Suite can act as a syslog server.
“swlog appid all level info” resets the log level to info. Level “warn” and higher should always be logged for security reasons. “Info” level gives additional information which can aid in security audits. Debug levels should not be used except when tracking specific issues as they can cause premature wrap around of the swlog file overwriting important security information.
“swlog” enables logging to the swlog output destinations. Logging is enabled by default. This should never be turned off.
It is recommended that the swlog be cleared (swlog clear) when first configuring a switch to remove events which are not applicable.
“swlog output flash file-size bytes” should not be reduced from the shipped default. The shipped size is determined specifically for each product family to allow for maximum logging.

Security Best Practices in AOS
Document rev. 1.7 13/70 TKC 000018877
.........................................................
3. Data confidentiality and Communication
Data Confidentiality is concerned with protecting data from unauthorized disclosure. Communication Security is concerned with ensuring that information only flows between authorized end-points without being diverted or intercepted.
3.1. Secure Socket Layer
Allowing only secure protocols
Insecure protocols are provided by AOS to support legacy systems. They are not recommended. Secure protocols are available which provide the same type of functionality. All services which are not used should be disabled to further reduce exposure. For example, if SNMP is not used then remove the enable commands for SNMP.
Disabled Protocol
Replacement Reason
telnet ssh telnet does not use encryption nor certificates.
ftp sftp scp
FTP does not use encryption or certificates.
tftp sftp scp
TFTP does not require user authentication and does not use encryption.
snmp v1 snmp v3 SNMP v1 does not provide for user authentication. V3 provides encryption.
snmp v2 snmp v3 SNMP v1 does not provide for user authentication. V3 provides encryption.
avlan-http avlan-secure-http
Disable unless avlan is used. HTTP is an insecure protocol.
avlan-secure-http
Disable unless AVLAN is used.
avlan-telnet Disable unless AVLAN is used. Telnet is an insecure protocol.
udp-relay Disable unless relay service is used.
ntp Disable unless NTP is used.
Applicable to AOS 6
Extract from “OmniSwitch AOS Release 6 CLI Reference Guide”:
ip service
Enables (opens) or disables (closes) well-known TCP/UDP service ports (SSH, telnet, FTP, and
so on). Selectively enabling or disabling these types of ports provides an additional method for
protecting against denial of service (DoS) attacks.
ip service {all | service_name | port service_port} no ip service {all | service_name | port service_port}

Security Best Practices in AOS
Document rev. 1.7 14/70 TKC 000018877
.........................................................
Suggested secure configuration:
no ip service all
ip service ssh
ssh enable
ssh pubkey-auth enable
ip service snmp
ip service https
snmp security privacy all (default)
“ssh enable”, “ssh pubkey-auth enable” require SSH to work with public key certificates. The user key must be loaded on the switch in /flash/network/pub.
“snmp security privacy all” requires SNMP accesses to use v3.
Enabled services can be verified using “show ip service”:
-> show ip service
Name Port Status
----------------------+-------+---------
ftp 21 disabled
ssh 22 enabled
telnet 23 disabled
udp-relay 67 disabled
http 80 disabled
network-time 123 enabled
snmp 161 enabled
avlan-telnet 259 disabled
avlan-http 260 disabled
avlan-secure-http 261 disabled
secure-http 443 enabled
avlan-http-proxy 262 disabled
Applicable to AOS 7, AOS 8
Extract from “OmniSwitch AOS Release 7 CLI Reference Guide”:
ip service
Enables (opens) or disables (closes) well-known or user-defined TCP/UDP service ports.
Selectively enabling or disabling these types of ports provides an additional method for
protecting against unauthorized switch access or Denial of Service (DoS) attacks.
[vrf vrf_name] ip service {all | service_name | port service_port} admin-state {enable |
disable}
Note: "ip service http admin-state enable/disable" enables/disables both http and https. Even if the http port is open, a user is always redirected to https port and it is not a security threat. It is the expected behavior. More details can be found in PR 201677 notes.
Suggested secure configuration:
ip service all admin-state disable
ip service ssh admin-state enable
ssh enforce-pubkey-auth enable
ip service snmp admin-state enable
ip ip service http admin-state enable
webview force-ssl enable
snmp security privacy all

Security Best Practices in AOS
Document rev. 1.7 15/70 TKC 000018877
.........................................................
“ssh enforce-pubkey-auth enable” is required by SSH to work with public key certificates. The user key must be loaded on the switch in /flash/network/pub.
“snmp security privacy all” requires SNMP accesses to use v3.
Enabled services can be verified using “show ip service”:
-> show ip service
Name Port Status
----------------------+-------+---------
ftp 21 disabled
ssh 22 enabled
telnet 23 disabled
http 80 enabled
ntp 123 enabled
snmp 161 enabled
https 443 enabled
SNMPv3
SNMPv3 requires additional configuration.
Applicable to AOS 6, AOS 7, AOS 8
Extract from “OmniSwitch AOS Release 6 Switch Management Guide”
By default, the switch is set to “privacy all”, which means the switch accepts only authenticated
and encrypted v3 Sets, Gets, and Get-Nexts. You can configure different levels of SNMP security
by entering snmp security followed by the command parameter for the desired security level.
For example, the following syntax sets the SNMP security level as “authentication all” as defined
in the table below:
-> snmp security authentication all
A new user needs to be created and AAA configured:
-> user snmp3 password 4G76qpjQqBtsY69g sha+des read-write all
-> aaa authentication snmp local
Trap support required additional configuration:
-> snmp station 1.1.1.1 snmp3 v3 enable

Security Best Practices in AOS
Document rev. 1.7 16/70 TKC 000018877
.........................................................
It is recommended to enable authentication traps:
-> snmp authentication-trap enable
Replacing the default SSL certificate
We assume that you have a working copy of OpenSSL installed on your computer. In case you don't have OpenSSL yet, you can download it from http://www.openssl.org. If you already have a certificate and RSA key you can skip generating it and go on with “Install the certificate on the OmniSwitch”.
Generating certificate and RSA key
Open a Windows command-box or UNIX shell and go to the OpenSSL-bin directory. From the command prompt enter the following command to generate a SSL certificate and RSA key. You will have to answer some questions for the certificate.
C:\OpenSSL\bin>openssl req -x509 -nodes -days 1460 -newkey rsa:1024
-keyout wv-key.pem -out wv-cert.pem
Loading 'screen' into random state - done
Generating a 1024 bit RSA private key
...................................++++++
......++++++
writing new private key to 'wv-key.pem'
-----
You are about to be asked to enter information that will be
incorporated into your certificate request.
What you are about to enter is what is called a Distinguished Name or a
DN.
There are quite a few fields but you can leave some blank
For some fields there will be a default value,
If you enter '.', the field will be left blank.
-----
Country Name (2 letter code) [AU]:DE
State or Province Name (full name) [Some-State]:Hamburg
Locality Name (eg, city) []:Hamburg
Organization Name (eg, company) [Internet Widgits Pty Ltd]:Example Corp
Organizational Unit Name (eg, section) []:Example Dept
Common Name (eg, YOUR name) []:John Doe
Email Address []:[email protected]
You will find two new files in the OpenSSL-bin directory.
Install the certificate on the OmniSwitch
Connect to the switch via console/SSH/Telnet and rename the files "wvcert.pem" and "wv-key.pem" in the /switch directory to e.g. “wv-cert.bak” and “wv-key.bak”. Now connect to the switch via FTP to upload your certificates. You need to upload the files to the /switch directory of the switch:
C:\OpenSSL\bin>ftp 192.168.30.1
Connected to 192.168.30.1.
220 FTP server ready
User (192.168.30.1:(none)): admin
331 Password required
Password:
230-
Welcome to the Alcatel-Lucent OmniSwitch 6000
Software Version 6.3.1.1052.R01 Service Release, December 11, 2008.
Copyright(c), 1994-2007 Alcatel-Lucent. All Rights reserved.
OmniSwitch(TM) is a trademark of Alcatel-Lucent registered

Security Best Practices in AOS
Document rev. 1.7 17/70 TKC 000018877
.........................................................
in the United States Patent and Trademark Office.
230
ftp> pwd
257 Current directory is "/flash/working"
ftp> cd ..
250 Changed directory to "/flash"
ftp> cd switch
250 Changed directory to "/flash/switch"
ftp> put wv-key.pem
200 Port set okay
150 Opening ASCII mode data connection
226 Transfer complete
ftp: 891 bytes sent in 0,00Seconds 891000,00Kbytes/sec.
ftp> put wv-cert.pem
200 Port set okay
150 Opening ASCII mode data connection
226 Transfer complete
ftp: 1359 bytes sent in 0,00Seconds 1359000,00Kbytes/sec.
After the upload is finished you need to reboot the switch to load the new certificates. When you connect to the switch via HTTPS afterwards you will see the new certificate.

Security Best Practices in AOS
Document rev. 1.7 18/70 TKC 000018877
.........................................................
4. Availability
Availability is concerned with ensuring that there is no denial of authorized access to network elements, stored information, information flows, services, and applications.
4.1. DoS attacks on reserved network ranges
Multicast Dynamic Control
MDC was introduced to protect AOS switches against high CPU utilization due to unwanted traffic being copied to CPU. There are no limitations for enabling MDC, although there are limitations for MDC in drop-all mode (see below for details).
Applicable to AOS 6.4.4.707.R01, AOS 6.4.6.218.R01
In AOS, IPv4 and IPv6 multicast protocol messages are by default always copied to CPU. High CPU may impact the normal operations of the OmniSwitch protocols such as LACP, ERP, IGMP. In order to resolve this high CPU issue, this feature is introduced to control the processing of the IPv4 multicast protocols.
In other words in pre-AOS 6.4.4.707.R01 and pre-AOS 6.4.6.218.R01 versions all packets from IPv4 range 224.0.0.0/24 and IPv6 range ff02:0::/32 were copied to CPU. There were multiple workarounds introduced to minimize the impact:
In AOS 6.4.4.581.R01 (PR 176341, saved in boot.cfg):
debug ip set ipv4ControlProtocolDisable 0
In AOS 6.4.4.581.R01 (PR 176341, saved in AlcatelDebug.cfg):
debug set ipv6ControlProtocolDisable 0
In AOS 6.4.4.626.R01 (PR 179967, saved in boot.cfg):
debug ip set ipedrL3SlowPathToCpu 0
In AOS 6.4.4.707.R01 and newer the processing of all IPv6 multicast protocols is globally controlled by the presence of an IPv6 Interface:
• No IPv6 interface configured - all protocols in the ff02::/32 range are transparently forwarded and not copied to CPU.
• At least one IPv6 interface configured - all protocol packets in the ff02::/32 range are copied to CPU on all VLANs irrespective on which VLAN IPV6 interface is enabled.
IGMP packets are copied to CPU based on the global IPv4 IPMS status. When IPv4 IPMS is globally enabled, IGMP packets are copied to CPU. When IPMS is globally disabled, IGMP packets are not copied to CPU.
MLD packets are copied to CPU based on the global IPv6 IPMS status. When IPv6 IPMS is globally enabled, MLD packets are copied to CPU. When IPMS is globally disabled, MLD packets are not copied to CPU.
Therefore following workarounds are not applicable anymore (protection is enabled by default):
debug set ipv6ControlProtocolDisable 0
debug ip set ipedrL3SlowPathToCpu 0

Security Best Practices in AOS
Document rev. 1.7 19/70 TKC 000018877
.........................................................
The last workaround:
debug ip set ipv4ControlProtocolDisable 0
Was replaced by the new "ip multicast dynamic-control" command.
Based on AOS 6.4.4.707.R01 Intermediate Release Notes:
ip multicast dynamic-control
Enables or disables Multicast Dynamic Control feature
ip multicast dynamic-control [drop-all] status [{enable|disable}]
Syntax Definitions
drop-all Enables or disables copy to CPU action for all packets in
224.0.0.0/24 range (the same behavior as
"ipv4ControlProtocolDisable").
Defaults
enable | disable: disable
drop-all enable | disable: disable
Platform Supported
OmniSwitch 6400, 6850, 6850E, 6855, 6855-U24X, 9700E, 9702E
Usage Guidelines
• If MDC it is enabled, IPv4 multicast well-known protocol packets alone will be trapped to CPU
and the other multicast packets will be transparently forwarded. Below are the well-known IPv4
multicast protocol packets:
OSPF: 224.0.0.5/32 + IP protocol 89
OSPF: 224.0.0.6/32 + IP protocol 89 VRRP: 224.0.0.18/32 + IP protocol 112
RIPv2: 224.0.0.9 + UDP port 520
PIM: 224.0.0.13/32
DVMRP: 224.0.0.4/32
• The proposed solution does not address all DoS attack concerns
• Dynamic-Control "drop-all" feature should not be enabled if any routing protocol or VRRP is
configured on the OmniSwitch as protocol packets will be dropped.
• Drop-all status can be enabled only after enabling global dynamic control status.
Examples
-> ip multicast dynamic-control status enable
-> ip multicast dynamic-control status disable
-> ip multicast dynamic-control drop-all status enable
-> ip multicast dynamic-control drop-all status disable
-> ip multicast status enable
-> ip multicast status disable
-> ipv6 multicast status enable
-> ipv6 multicast status disable

Security Best Practices in AOS
Document rev. 1.7 20/70 TKC 000018877
.........................................................
-> show ip multicast
Status = disabled,
Querying = disabled,
Proxying = disabled,
Spoofing = disabled,
Zapping = disabled,
Querier Forwarding = disabled,
Flood Unknown = disabled,
Dynamic control status = enabled,
Dynamic control drop-all status = enabled,
Buffer Packet = disabled,
Version = 2,
Robustness = 2,
Query Interval (seconds) = 125,
Query Response Interval (tenths of seconds) = 100,
Last Member Query Interval (tenths of seconds) = 10,
Unsolicited Report Interval (seconds) = 1,
Router Timeout (seconds) = 90,
Source Timeout (seconds) = 30,
Max-group = 0,
Max-group action = none
Helper-address = 0.0.0.0
-> show configuration snapshot ipms
! IPMS :
ip multicast dynamic-control status enable
ip multicast dynamic-control drop-all status enable
Release History
Release 6.4.4.707.R01 and 6.4.6.218.R01; command was introduced.
In AOS 6.6.X.R01 only the “drop-all” option is available.
Extract from “OmniSwitch AOS Release 6.6.5.R01 Switch Management Guide”
ip multicast dynamic-control drop-all status
Enables or disables the processing of IPV4 protocol packets through the CPU.
ip multicast dynamic-control drop-all status [{enable | disable}]
Platforms Supported
OmniSwitch 6250, 6450
Usage Guidelines
• On enabling this feature the IPV4 protocol packets are not trapped to the CPU. The packets are
transparently forwarded.
• This feature should not be enabled if routing protocol or VRRP is configured on the switch.
• This feature has no influence on MDNS traffic since the MDNS Relay rule has higher
precedence over IPV4 specific protocols.
Examples
-> ip multicast dynamic-control drop-all status enable

Security Best Practices in AOS
Document rev. 1.7 21/70 TKC 000018877
.........................................................
-> ip multicast dynamic-control drop-all status disable
Release History
Release 6.6.5; command was introduced.
CPU priority 17
MDC is not available on AOS 7 & 8 platforms. In AOS 7 and 8 (just like in pre-AOS 6.4.4.707.R01 and pre-AOS 6.4.6.218.R01) all packets with IPv6 destination address ff02::/32 and IPv4 with destination address 224.0.0.0/24 are copied to CPU regardless of the configuration. MDC can be easily replaced by a QoS rules using CPU priority 17. Packets which are classified in CPU queue 17 are dropped by CPU, but are still forwarded. This way CPU is protected and the network is transparent to this kind of traffic.
Applicable to AOS 7, AOS 8
The example below can be applied if there are no IPv6 interfaces configured. In rules corresponding to unused routing protocol the “q17” action should be applied:
-> show configuration snapshot qos
! QOS:
policy condition mdc-dvmrp destination ip 224.0.0.4
policy condition mdc-ipv4mc-reserved destination ip 224.0.0.0
mask 255.255.255.0
policy condition mdc-ipv6mc-reserved destination ipv6 ff02::
mask ff:ff:ff:ff::
policy condition mdc-ospf-5 destination ip 224.0.0.5 ip-protocol 89
policy condition mdc-ospf-6 destination ip 224.0.0.6 ip-protocol 89
policy condition mdc-pim destination ip 224.0.0.13
policy condition mdc-ripv2 destination ip 224.0.0.9 destination udp-port 520
policy condition mdc-vrrp destination ip 224.0.0.18 ip-protocol 112
policy action accept
policy action q17 cpu priority 17
policy rule mdc-vrrp precedence 65070 condition mdc-vrrp action accept
policy rule mdc-ripv2 precedence 65060 condition mdc-ripv2 action accept
policy rule mdc-pim precedence 65050 condition mdc-pim action accept
policy rule mdc-ospf-6 precedence 65040 condition mdc-ospf-6 action accept
policy rule mdc-ospf-5 precedence 65030 condition mdc-ospf-5 action accept
policy rule mdc-dvmrp precedence 65020 condition mdc-dvmrp action accept
policy rule mdc-ipv6mc-reserved precedence 65010
condition mdc-ipv6mc-reserved action q17
policy rule mdc-ipv4mc-reserved precedence 65000
condition mdc-ipv4mc-reserved action q17
qos apply
4.2. TTL 0 flooding
Packets with TTL equal zero (not only ICMP packets) are copied to CPU regardless of the configuration. This attack can be used by an attacker to exhaust CPU resources.
ipedrL3UcTtlErrToCpu0 variable Applicable to AOS 6.4.X

Security Best Practices in AOS
Document rev. 1.7 22/70 TKC 000018877
.........................................................
In AOS 6.4.4.658.R01 (see PR 188063) there was a CLI command introduced, which controls ipedrL3UcTtlErrToCpu0 register, this command is saved in boot.cfg):
-> debug ip set ipedrL3UcTtlErrToCpu0
4.3. IGMP flooding
IGMP packets are copied to CPU based on the global IPMS status only in AOS version supporting MDC (regardless of MDS status). In this case when IPMS is globally enabled, IGMP packets are copied to CPU. When IPMS is globally disabled, IGMP packets are not copied to CPU. In all previous AOS version IGMP packets are copied to CPU regardless of the IPMS status. IGMP flooding might be dangerous to system stability especially on AOS 6 platforms.
QoS with mode split
Rate limiting with “mode split” allows rate limiting IGMP messages per port.
On AOS 6.4.X platforms IGMP packets copied to CPU can be rate limited using user QoS rules (they are not rate limited by default).
On AOS 6.6.X platforms IGMP packets copied to CPU cannot be rate limited using user QoS rules (they are not rate limited by default).
On AOS 7 and AOS 8 IGMP packets copied to CPU are rate limited by default.
Extract from “OmniSwitch AOS Release 6 Network Configuration Guide”:
policy port group
Configures a port group and its associated slot and port numbers. A port group can be attached to
a policy condition. The action associated with that policy will be applied to all members of the
port group. This command can be used to specify a rate limiter for the group of ports or
individual port by specifying the mode for the port group.
policy port group group_name [mode {split | non-split}] slot/port[-port] [slot/port[-port]...]
no policy port group group_name
policy port group group_name no slot/port[-port] [slot/port[-port]...]
Syntax Definitions
group_name The name of the port group (up to 31 alphanumeric characters).
split Select the mode as split when the policy action is required to be applied on
individual port basis.
non-split Select the mode as non-split when the policy action is required to be applied
on the port group.

Security Best Practices in AOS
Document rev. 1.7 23/70 TKC 000018877
.........................................................
Applicable to AOS 6.4.X
-> show configuration snapshot qos
! QOS :
policy port group untrusted mode split 1/1-23
policy condition igmp source port group untrusted
destination ip 224.0.0.0 mask 224.0.0.0 ip protocol 2
policy action limit-64 maximum bandwidth 64K
policy rule limit-igmp condition igmp action limit-64
qos apply
4.4. DHCP flooding
All DHCP packets with destination UDP port 68 are copied to CPU regardless of the DHCP Snooping configuration. Rate limiting with “mode split” allows rate limiting DHCP messages per port.
QoS with mode split
Rate limiting with “mode split” allows rate limiting DHCP messages per port.
Extract from “OmniSwitch AOS Release 6 Network Configuration Guide”:
policy port group
Configures a port group and its associated slot and port numbers. A port group can be attached to
a policy condition. The action associated with that policy will be applied to all members of the
port group. This command can be used to specify a rate limiter for the group of ports or
individual port by specifying the mode for the port group.
policy port group group_name [mode {split | non-split}] slot/port[-port] [slot/port[-port]...]
no policy port group group_name
policy port group group_name no slot/port[-port] [slot/port[-port]...]
Syntax Definitions
group_name The name of the port group (up to 31 alphanumeric characters).
split Select the mode as split when the policy action is required to be applied on
individual port basis.
non-split Select the mode as non-split when the policy action is required to be applied
on the port group.
Applicable to AOS 6.4.X and AOS 6.6.4.R01 or newer
For AOS 6.6.X branch 6.6.4.292.R01 or newer is recommended.
-> show configuration snapshot qos
! QOS :
policy port group untrusted mode split 1/1-23
policy condition dhcp-server source port group untrusted
source udp port 67 destination udp port 68
policy action limit-64 maximum bandwidth 64K

Security Best Practices in AOS
Document rev. 1.7 24/70 TKC 000018877
.........................................................
policy rule limit-dhcp-server condition dhcp-server action limit-64
qos apply
All DHCP packets with destination UDP port 67 are copied to CPU with rate limit of 64 kb/s. Switch configuration:
-> show configuration snapshot ip-helper
! UDP Relay :
ip helper forward delay 0
ip helper dhcp-snooping enable
ip helper dhcp-snooping binding enable
ip helper dhcp-snooping port 1/24 trust
In this example DHCP messages from user connected to port 1/2 are not transferred to DHCP server (which is connected to port 1/24) during the attack.
This attack may be prevented using the following QoS configuration (this is a workaround):
-> show configuration snapshot qos
! QOS :
qos stats interval 10
policy condition dhcp-client-1001 source port 1/1 source udp port 68
destination udp port 67
policy condition dhcp-client-1002 source port 1/2 source udp port 68
destination udp port 67
...
policy action limit64 maximum bandwidth 64K
policy rule limit-dhcp-client-1001 condition dhcp-client-1001
action limit64
policy rule limit-dhcp-client-1002 condition dhcp-client-1001
action limit64
...
qos apply
-> debug qos internal "slice 1/0 dhcppps 1048575"
-> more/flash/working/AlcatelDebug.cfg
debug qos internal "slice 1/0 dhcppps 1048575"
Another option is rate limiting with “mode split” - this way DHCP messages are rate limited per port:
-> show configuration snapshot qos
! QOS :
policy port group untrusted mode split 1/1-23
policy condition dhcp-client source port group untrusted
source udp port 68 destination udp port 67
policy action limit64 maximum bandwidth 64K
policy rule limit-dhcp-client condition dhcp-client action limit64
qos apply
-> debug qos internal "slice 1/0 dhcppps 1048575"
-> more/flash/working/AlcatelDebug.cfg
debug qos internal "slice 1/0 dhcppps 1048575"

Security Best Practices in AOS
Document rev. 1.7 25/70 TKC 000018877
.........................................................
Explanation to « debug qos internal "slice 1/0 dhcppps 1048575" »: There is an additional system rule configured in system slices, which limits all DHCP messages originated by DHCP clients to 64 kb/s – this rule is processed in parallel to the previously applied user rules.
The “qosDhcpRateLimit” setting through dshell is lost after a reload. Please use AlcatelDebug.cfg and the following command (this command is not saved in boot.cfg, an example for a single ASIC standalone switch):
-> debug qos internal "slice 1/0 dhcppps 1048575"
CPU priority 17
DHCP packets are copied to CPU by default irrespective of the set of enabled features. To protect the CPU against DHCP flooding CPU priority 17 can be used. Packets which are handled by CPU queue 17 are dropped by CPU, but are still forwarded. This way CPU is protected and the network is transparent to this kind of traffic.
Applicable to AOS 7, AOS 8
This configuration is applicable only in case DHCP Snooping and IP helper features are disabled.
-> show configuration snapshot qos
! QOS:
policy condition dhcp-67 destination udp-port 67
policy condition dhcp-68 destination udp-port 68
policy action q17 cpu priority 17
policy rule dhcp-67 precedence 65100 condition dhcp-67 action q17
policy rule dhcp-68 precedence 65110 condition dhcp-68 action q17
qos apply
4.5. Cisco proprietary MAC flooding
In AOS 6 versions, which supports mac-tunnelling for ethernet-services all frames with the destination MAC 01:00:0c:cd:cd:d0 are copied to CPU regardless of the configuration and not only on UNI and NNI ports. It can be used by an attacker to exhaust CPU resources.
ethernet-service mac-tunneling
Applicable to AOS 6
The MAC 01:00:0c:cd:cd:d0 is the default tunnel MAC. All frames with this destination MAC address are handled in software by default. Therefore this MAC address can be used by an attacker to flood traffic to CPU. In case they need to be handled only in hardware, noMacTunnelFeature has to be set to 1 in AlcatelDebug.cfg or ethernet-service mac-tunneling in CLI:
-> ethernet-service mac-tunneling disable
Both options require a reload. The debug variable was introduced in PR 179716.
Security Best Practices in AOS
Document rev. 1.7 26/70 TKC 000018877
.........................................................
4.6. MLD flooding
MLD packets are copied to CPU based on the global IPv6 IPMS status only in AOS version supporting MDC (regardless of MDS status). In this case when IPv6 IPMS is globally enabled, MLD packets are copied to CPU. When IPv6 IPMS is globally disabled, MLD packets are not copied to CPU. In all previous AOS version MLD packets are copied to CPU regardless of the IPv6 IPMS status. MLD flooding might be dangerous to system stability especially on AOS 6 platforms.
Faulty driver for Intel NICs can cause a storm of ICMPv6 Multicast Listener Report Packets. The issue is seen in the S1 sleep/standby state. The network can be flooded with more than 10000 pps from every machine.
ACL
Create an ACL to drop all ICMPv6. This solution is applicable only to fully IPv4 networks.
On AOS 6.4.X platforms MLD packets copied to CPU can be rate limited or dropped using user QoS rules (they are not rate limited by default).
On AOS 6.6.X platforms MLD packets copied to CPU cannot be rate limited or dropped using user QoS rules (they are not rate limited by default), but they are copied to CPU only in case “ipv6 multicast status enable”
On AOS 7 and AOS 8 IGMP packets copied to CPU are rate limited by default.
Applicable to AOS 6.4.X, AOS 7, AOS 8
-> show configuration snapshot qos
policy condition mld ipv6 icmptype 131
policy action drop disposition drop
policy rule drop-mld condition mld action drop
4.7. ARP flooding
ARP flooding can lead to routing issues, even if CPU utilization on the router stays below 100%.
Traffic Anomaly Detection (TAD)
ARP flooding is one of many types of attacks, which can be detected and prevented by TAD.
Applicable to AOS 6 running on OS6855, OS6850E, OS9000E
Extract from “OmniSwitch AOS Release 6 Network Configuration Guide”:
Network Security (also known as Alcatel-Lucent Traffic Anomaly Detection feature) is a
network monitoring feature that aims to detect the anomalies in the network by analyzing the
patterns of ingress and egress packets on a port. These anomalies occur when the traffic patterns
of a port do not meet the expectations. The detection of anomalies results in logging, SNMP trap
generation, and shutting down of the anomalous port. This feature is mainly used in the Layer2
domain. (…)
Network Security detects the following anomalies:

Security Best Practices in AOS
Document rev. 1.7 27/70 TKC 000018877
.........................................................
Anomaly Description
ARP Address Scan Occurs when a host sends a burst of ARP requests for multiple IP
addresses.
ARP Flood Occurs when a host receives a burst of ARP request packets.
ARP Failure Occurs when ARP queries do not elicit ARP responses.
ICMP Address Scan Occurs when multiple hosts receive ICMP echo request packets at the
same time.
ICMP Flood Occurs when a host receives a burst of ICMP echo request packets.
ICMP Unreachable Occurs when a host receives a flood of ICMP Unreachable packets.
TCP Port Scan Occurs when a host receives a burst of TCP SYN packets for multiple
TCP ports.
TCP Address Scan Occurs when multiple hosts receive TCP SYN packets at the same time.
SYN Flood Occurs when a host receives a burst of TCP SYN packets on the same
TCP port.
SYN Failure Occurs when a host receives fewer SYNACKs than SYNs it sent out.
SYN-ACK Scan Occurs when a host receives more SYNACKs than SYNs it sent out.
Fin Scan Occurs when a host receives a burst of FIN packets.
Fin-Ack Diff Occurs when a host sees more or fewer FINACK packets than it sent.
Rst Count Occurs when a host receives a flood of RST packets.
Below an example of an attack and a solution.
Tools used by the attacker: “mz” from “mz” package for Ubuntu
The attacker starts an ARP Flood attack on an IP address in the network (please use a correct interface name):
attacker@ubuntu:~$ sudo mz eth1 -c 256 -t arp
"reply, targetip=192.168.0.254, targetmac=00:00:00:00:00:01"
Traffic Anomaly Detection detects an ARP Flood attack for all IP addresses in the network:
-> netsec group untrusted port 1/1-24
-> netsec group untrusted anomaly arp-flood state enable
log enable trap enable quarantine enable count 1000 period 5
Security Best Practices in AOS
Document rev. 1.7 28/70 TKC 000018877
.........................................................
->
+++ ++++++++++++++++++++++++++++++++++++++++++++++++++++
+++ ARPFLOOD target detected on 1/2...
+++ Trigger Operation...
+++ Interval Count Sensitivity
+++ --------------------------------------------------
+++ 5 200 50
+++ Traffic Statistics...
+++ Packet-Type Direction Count
+++ --------------------------------------------------
+++ ARP_REP IN 351
+++ ARP_REP OUT 0
+++ ARP_REQ IN 0
+++ ++++++++++++++++++++++++++++++++++++++++++++++++++++
Traffic Anomaly Detection status may be monitored using following command:
-> show netsec anomaly arp-flood summary
Example configuration:
-> show configuration snapshot netsec
! Netsec :
netsec group untrusted port 1/1-23
netsec group untrusted anomaly all state enable log enable
trap enable quarantine enable count 200 period 5
QoS rules with mode split
Rate limiting with “mode split” allows rate limiting ARP messages per port. AOS devices are protected by default against copying too many ARP packets to CPU. This solution should be used on edge devices to protect network from routing issues and link saturation.
Applicable to AOS 6.4.X and AOS 6.6.4.R01 or newer
For AOS 6.6.X branch 6.6.4.292.R01 or newer is recommended.
On AOS 6.6.X platforms ARP packets are copied to CPU only in VLANs with IP interfaces configured. ARP packets copied to CPU cannot be rate limited using user QoS rules (they are rate limited by default).
On AOS 6.4.X platforms packets are copied to CPU in all VLANs irrespective of IP interface configuration. APR packets copied to CPU can be rate limited.
The port group should not include ports facing routers:
-> show configuration snapshot qos
policy port group Users mode split 1/1-23
policy condition arp source port group Users ethertype 0x0806
policy action limit-64 maximum bandwidth 64K
policy rule limit-arp condition arp action limit-64
qos apply
Applicable only to AOS 6.4.X
If this device is routing, then additional configuration is required to make sure that all ARP packet not dropped by the rule above are copied to CPU (this example is applicable to a standalone unit):

Security Best Practices in AOS
Document rev. 1.7 29/70 TKC 000018877
.........................................................
-> debug qos internal "slice 1/0 arppps 1048575"
-> more/flash/working/AlcatelDebug.cfg
debug qos internal "slice 1/0 arppps 1048575"
4.8. ARP attacks on end stations and MAC spoofing
ARP spoofing is used by an attacker to “poison” ARP tables of a user and a server. This way packets exchanged between the user and the server are transferred through attacker’s PC. The attacker continuously sends ARP Replys towards the user and the server.
DHCP Snooping with IP Source Filter
Applicable to AOS 6, AOS 8
Below an example of an attack and a solution.
Tools used by the attacker:
“arpspoof” from the “dsniff” package for Ubuntu
During normal network operation the attacker is not able to sniff packets exchanged between the user and the server. In this example there is “ping 192.168.0.100 -t” command executed on the user PC:
The ARP table of the user:
C:\>arp -a
Interface: 192.168.0.10 --- 0x4
Internet Address Physical Address Type
192.168.0.100 00-00-1c-b6-1f-13 dynamic
The ARP table of the server:
C:\>arp -a
Interface: 192.168.0.100 --- 0x10008
Internet Address Physical Address Type
192.168.0.10 00-50-da-19-78-91 dynamic
User192.168.0.10
Server192.168.0.100
1/1 1/24
Attacker192.168.0.11
1/2
ICMP Echo Request
ICMP Echo Reply

Security Best Practices in AOS
Document rev. 1.7 30/70 TKC 000018877
.........................................................
The attacker enables IP forwarding feature and starts injecting ARPs:
attacker@ubuntu:~$ sudo echo 1 > /proc/sys/net/ipv4/ip_forward
attacker@ubuntu:~$ sudo arpspoof -t 192.168.0.10 192.168.0.100
& >/dev/null
attacker@ubuntu:~$ sudo arpspoof -t 192.168.0.100 192.168.0.10
& >/dev/null
Spoofed ARP table of the user:
C:\>arp -a
Interface: 192.168.0.10 --- 0x4
Internet Address Physical Address Type
192.168.0.11 00-0c-29-29-b3-76 dynamic
192.168.0.100 00-0c-29-29-b3-76 dynamic
Spoofed ARP table of the server:
C:\>arp -a
Interface: 192.168.0.100 --- 0x10008
Internet Address Physical Address Type
192.168.0.10 00-0c-29-29-b3-76 dynamic
192.168.0.11 00-0c-29-29-b3-76 dynamic
The packet flow after the attack is illustrated below:
The attacker is now able to sniff all frames exchanged between the user and the server:
attacker@ubuntu:~$ sudo tcpdump -i eth0 -c 6 'src 192.168.0.10
or dst 192.168.0.10'
tcpdump: verbose output suppressed, use -v or -vv for full protocol
decode
listening on eth0, link-type EN10MB (Ethernet), capture size
96 bytes
02:07:25.784007 IP 192.168.0.10 > 192.168.0.100: ICMP echo request,
id 1024, seq 3379, length 40
02:07:25.784021 IP 192.168.0.10 > 192.168.0.100: ICMP echo request,
id 1024, seq 3379, length 40
02:07:25.784202 IP 192.168.0.100 > 192.168.0.10: ICMP echo reply,
id 1024, seq 3379, length 40
02:07:25.784205 IP 192.168.0.100 > 192.168.0.10: ICMP echo
reply, id 1024, seq 3379, length 40
02:07:26.239264 ARP, Reply 192.168.0.100 is-at 00:0c:29:29:b3:76
(oui Unknown), length 28
02:07:26.239385 ARP, Reply 192.168.0.10 is-at 00:0c:29:29:b3:76
(oui Unknown), length 28
…
User192.168.0.10
Server192.168.0.100
1/1 1/24
Attacker192.168.0.11
1/2
ARP ReplyARP Reply

Security Best Practices in AOS
Document rev. 1.7 31/70 TKC 000018877
.........................................................
Solution in non-DHCP environment
ARP spoofing attacks may be mitigated using ACLs. Example:
-> show configuration snapshot qos
! QOS :
policy network group ARP 192.168.0.10 192.168.0.11 192.168.0.100
policy condition ARP_192_168_0_10 source mac 00:50:DA:19:78:91
ethertype 0x0806 source ip 192.168.0.10
policy condition ARP_192_168_0_100 source mac 00:00:1C:B6:1F:13
ethertype 0x0806 source ip 192.168.0.100
policy condition ARP_192_168_0_11 source mac 00:0C:29:29:B3:76
ethertype 0x0806 source ip 192.168.0.11
policy condition IncorrectARP ethertype 0x0806 source network
group ARP
policy action Accept
policy action Drop disposition drop
policy rule ARP_192_168_0_10 precedence 200 condition
ARP_192_168_0_10 action Accept
policy rule ARP_192_168_0_11 precedence 200 condition
ARP_192_168_0_11 action Accept
policy rule ARP_192_168_0_100 precedence 200 condition
ARP_192_168_0_100 action Accept
policy rule DropIncorrectARP precedence 100 condition IncorrectARP
action Drop
qos apply
These ACLs allow correct ARPs and drop incorrect ARPs for protected IP addresses. For more details see TKC article 000006888.
Solution in DHCP environment
ARP spoofing attacks may be avoided using DHCP Snooping with ip-source-filter. Example:
-> show configuration snapshot ip-helper
! UDP Relay :
ip helper forward delay 0
ip helper dhcp-snooping enable
ip helper dhcp-snooping binding enable
ip helper dhcp-snooping ip-source-filter port 1/1 enable
ip helper dhcp-snooping ip-source-filter port 1/2 enable
ip helper dhcp-snooping port 1/24 trust
AOS 8:
-> show configuration snapshot dhcp-snooping
! DHCP Snooping:
dhcp-snooping admin-state enable
dhcp-snooping binding admin-state enable
dhcp-snooping ip-source-filter port 1/1/1 admin-state enable
dhcp-snooping ip-source-filter port 1/1/2 admin-state enable
dhcp-snooping port 1/1/24 trust

Security Best Practices in AOS
Document rev. 1.7 32/70 TKC 000018877
.........................................................
After enabling DHCP Snooping with ip-source-filter a binding table is created on the switch.
AOS 6:
-> show ip helper dhcp-snooping binding
Total Number of Binding Entries: 2
MAC Slot IP Lease VLAN Binding
Address Port Address Time ID Type
-------------------+------+----------------+---------------+-------+---------
00:0c:29:29:b3:76 1/2 192.168.0.11 360 1 Dynamic
00:50:da:19:78:91 1/1 192.168.0.10 305 1 Dynamic
AOS 8 (similar output is expected):
-> show dhcp-snooping binding
Only packets with registered source IP and MAC addresses are allowed to be received on a particular port. For more details see TKC article 000006888.
DHCP Snooping with ip-source-filter is an equivalent of two Cisco features enabled at the same time: Dynamic ARP Inspection (DAI) with IP Source Filter. For differences see TKC article 000006888.
DHCP Snooping with ip-source-filter can be also used to avoid CAM overflow attacks.
4.9. Broadcast and unknown unicast flooding
Flood rate control
Flood rate control can be used to limit Broadcast, Unknown unicast and Multicast (BUM) traffic. Rate limiting is based on 512 byte packet size, therefore it might be not accurate for very small or very big packets. Flood rate control is applied only on ingress traffic
Applicable to AOS 6
Flood rate limit, action and status has to be specified separately for broadcast, unknown unicast and multicast.
Extract from “OmniSwitch AOS Release 6 CLI Reference Guide”:
interfaces flood
Enables broadcast, multicast or unknown unicast traffic storm control on the specified interface.
interfaces {slot | slot/port[-port2]} flood [broadcast | multicast | unknown-unicast | all]
[enable | disable]
Syntax Definitions
slot The slot number for a specific module.

Security Best Practices in AOS
Document rev. 1.7 33/70 TKC 000018877
.........................................................
slot/port[-port2] The slot and port number (3/1). Use a hyphen to specify a range of ports
(3/1-3/10).
broadcast Packets with a destination MAC address of FF:FF:FF:FF:FF:FF.
multicast Packets with a multicast MAC address.
unknown-unicast Unicast packets with an unknown destination MAC address.
all Applies to broadcast, multicast, and unknown unicast packets.
enable Enables broadcast, multicast, or unknown unicast rate limiting.
disable Disables broadcast, multicast, or unknown unicast rate limiting.
Extract from “OmniSwitch AOS Release 6 CLI Reference Guide”:
interfaces flood rate
Configures flood rate limiting for broadcast, multicast, or unknown unicast traffic on the
specified interface.
interfaces {slot | slot/port[-port2]} flood {broadcast | multicast | unknown-unicast | all} rate
{mbps mbps | pps pps | percentage percent | default} [low-threshold num]
Syntax Definitions
slot The slot number for a specific module.
slot/port[-port2] The slot and port number (3/1). Use a hyphen to specify a range of ports
(3/1-3/10).
mbps The number of megabits per second.
pps The number of packets per second.
percent The percentage of the port speed.
default Default speed of the port.
num The low threshold value. The low threshold value must be lesser than the
high threshold (rate limiting) value.
Defaults
• The default flood limit settings:
• The default value for low threshold is ‘0’. This means, by default, auto recovery is not enabled.
Usage Guidelines
• By default, unknown unicast and multicast traffic is flooded to all Layer 2 ports in a VLAN.
• Enter a slot number to configure flood rate limiting for all interfaces on a specific slot.
• Enter a slot and port number or a range of port numbers to configure flood rate limiting on a
specific interface or range of interfaces.
• The keyword all applies to all traffic types, broadcast, multicast and unknown-unicast.

Security Best Practices in AOS
Document rev. 1.7 34/70 TKC 000018877
.........................................................
• The CLI command ‘interfaces slot[/port[-port2]] flood rate num’ is supported only during
boot up process for backward compatibility. • The high (rate limit value) and low threshold (if) configured will have same threshold type
[Mbps or PPS or percentage].
• Low threshold cannot be configured for unknown unicast traffic.
• The violated port is displayed as "Storm" violation in the “show interface port” command.
• The violated port can be recovered by any of the following ways when low threshold is not
configured on the port: - Use ‘interface slot/port admin down’, then ‘interface slot/port admin
up’ command on the port. - Unplug and replug the cable. - Use ‘interface slot/port clear-
violation-all’ command to clear all the violation on the port.
• The global interface violation recovery timer is not applicable for storm threshold violation.
Extract from “OmniSwitch AOS Release 6 CLI Reference Guide”:
interfaces flood action
Configures the storm control action when the port reaches the storm violated state.
interfaces {slot | slot/port[-port2]} flood [broadcast | multicast] action [shutdown | trap |
default]
Syntax Definitions
slot The slot number for a specific module.
slot/port[-port2] The slot and port number (3/1). Use a hyphen to specify a range of ports
(3/1-3/10).
broadcast Packets with a destination MAC address of FF:FF:FF:FF:FF:FF.
multicast Packets with a multicast MAC address.
shutdown When the ingress storm traffic exceeds high threshold value, the port
moves to violated state (Storm Violation) and a violation trap is gener-
ated. The port state moves to operationally down and admin enable.
When the ingress traffic reaches the low threshold or goes below the low
threshold, the port state moves to normal state, and a trap is generated.
trap When the ingress storm traffic exceeds high threshold value, the port
controls the storm by rate limiting the traffic, and a violation trap is
generated. The port remains in the normal state. When the ingress traffic
reaches the low threshold, a trap is generated.
default When the ingress storm traffic exceeds high threshold value, the port
controls the storm by rate limiting the traffic. No trap is generated, and
the port remains in the normal state.

Security Best Practices in AOS
Document rev. 1.7 35/70 TKC 000018877
.........................................................
Example configuration:
-> show configuration snapshot interface
! Interface :
interfaces 1/1 flood broadcast rate pps 244
interfaces 1/1 flood unknown-unicast rate pps 244
interfaces 1/1 flood multicast rate pps 244
interfaces 1/1 flood broadcast action shutdown
interfaces 1/1 flood unknown-unicast action shutdown
interfaces 1/1 flood multicast action shutdown
Applicable to AOS 7, AOS 8
Extract from “OmniSwitch AOS Release 8 CLI Reference Guide”:
interfaces flood-limit
Configures the flood rate settings on a single port, a range of ports, or an entire Network Interface
(NI).
interfaces {slot [chassis_id/]slot| port [chassis_id/]slot/port[-port2]} flood-limit
{bcast|mcast|uucast|all} rate { pps pps_num| mbps mbps_num | cap% cap_num | enable |
disable}
Syntax Definitions
chassis_id The chassis identifier when running in virtual chassis mode.
slot Slot number you want to configure.
port Port number of the interface you want to configure.
port2 Last port number in a range of ports you want to configure.
bcast Specifies broadcast flood limit.
mcast Specifies multicast flood limit.
uucast Specifies unicast flood limit.
all Specifies flood limit for all types of traffic.
pps_num Packets per second.
mbps_num Megabits per second.
cap_num Percentage of port’s capacity.
enable Enables flood rate limits.
disable Disables flood rate limits.
Defaults
parameter default
admin-status enable

Security Best Practices in AOS
Document rev. 1.7 36/70 TKC 000018877
.........................................................
Example configuration:
-> show configuration snapshot interface
! Interface:
interfaces port 1/1/1 flood-limit bcast rate pps 244
interfaces port 1/1/1 flood-limit uucast rate pps 244
interfaces port 1/1/1 flood-limit uucast rate pps 244
4.10. ICMP attack on router interfaces
ICMP Request packets are copied to CPU. This attack can be used by an attacker to exhaust CPU resources.
QoS rules
This attack can be prevented by using a QoS rule to rate limit ICMP packet with IP destination address matching local IP addresses. This attack is not applicable to AOS 7 and 8 due to different CPU queue handling.
Applicable to AOS 6.4.X
-> show configuration snapshot qos
! QOS :
policy condition icmp destination network group Switch ip protocol 1
policy action limit128 maximum bandwidth 128K
policy rule limit-icmp condition icmp action limit128
qos apply
4.11. ARP attacks on router interfaces
ARP spoofing against router interfaces is used by an attacker to “poison” ARP tables of a user and a router. Then routed packets can be transferred through attacker’s PC.
IP Anti-Spoofing
Applicable to AOS 6
Below an example of an attack and a solution.
By default ARP Spoofing protection is enabled on AOS switches. In this example it will be disabled only for demonstration purposes. It is not recommended to disable ARP Spoofing protection in a production environment.
Tools used by the attacker:
“arpspoof” from the “dsniff” package for Ubuntu

Security Best Practices in AOS
Document rev. 1.7 37/70 TKC 000018877
.........................................................
During normal network operation the attacker is not able to sniff packets exchanged between the user and the server. In this example there is the “ping 192.168.100.100 -t” command executed on the user PC:
To disable ARP Spoofing protection on an AOS switch use the “ip dos anti-spoofing disabled” command and update “ipni_arp_poison_lrn” variable in dshell:
-> ip dos anti-spoofing disable
-> dshell
Working: [Kernel]->ipni_arp_poison_lrn=1
ipni_arp_poison_lrn = 0xc8aabbc: value = 1 = 0x1
Working: [Kernel]->exit
Also an additional VLAN and two IP interfaces are configured on the router:
-> show configuration snapshot ip vlan
! VLAN :
vlan 1 enable name "VLAN 1"
vlan 100 enable name "VLAN 100"
vlan 100 port default 1/24
! VLAN SL:
! IP :
ip service all
ip dos anti-spoofing disable
ip interface "vlan100" address 192.168.100.254 mask 255.255.255.0
vlan 100 ifindex 1
ip interface "vlan1" address 192.168.0.254 mask 255.255.255.0 vlan 1
ifindex 2
! VLAN AGG:
! VLAN STACKING:
The attacker enables IP forwarding feature and starts injecting ARPs:
attacker@ubuntu:~$ sudo echo 1 > /proc/sys/net/ipv4/ip_forward
attacker@ubuntu:~$ sudo arpspoof -t 192.168.0.10 192.168.0.254
& >/dev/null
attacker@ubuntu:~$ sudo arpspoof -t 192.168.0.254 192.168.0.10
& >/dev/null
The ARP table of the user is updated with a new entry:
User192.168.0.10
Server192.168.100.100
1/1 1/24
Attacker192.168.0.11
1/2
ICMP EchoRequest
ICMP EchoReplay
ICMP EchoRequest
ICMP EchoReplay
VLAN 1 VLAN 100
VLAN 1
RouterGW in VLAN 1
- 192.168.0.254GW in VLAN 100
- 192.168.100.254

Security Best Practices in AOS
Document rev. 1.7 38/70 TKC 000018877
.........................................................
C:\>arp -a
Interface: 192.168.0.10 --- 0x4
Internet Address Physical Address Type
192.168.0.11 00-0c-29-29-b3-76 dynamic
192.168.0.254 00-0c-29-29-b3-76 dynamic
The ARP table of the router is updated with a new entry:
-> show arp
Total 3 arp entries
Flags (P=Proxy, A=Authentication, V=VRRP)
IP Addr Hardware Addr Type Flags Port Interface Name
-----------------+-------------------+----------+-------+--------+-----------+-------
192.168.0.10 00:0c:29:29:b3:76 DYNAMIC 1/2 vlan 1
192.168.0.11 00:0c:29:29:b3:76 DYNAMIC 1/2 vlan 1
192.168.100.100 00:00:1c:b6:1f:13 DYNAMIC 1/24 vlan 100
The attacker is now able to sniff all frames exchanged between the user and the server:
attacker@ubuntu:~$ sudo tcpdump -i eth0 -c 4 'src 192.168.0.10 or dst
192.168.0.10'
tcpdump: verbose output suppressed, use -v or -vv for full protocol
decode
listening on eth0, link-type EN10MB (Ethernet), capture size 96 bytes
01:09:22.290831 IP 192.168.0.10 > 192.168.100.100: ICMP echo request,
id 1024, seq 45664, length 40
01:09:22.290851 IP 192.168.0.10 > 192.168.100.100: ICMP echo request,
id 1024, seq 45664, length 40
01:09:22.291031 IP 192.168.100.100 > 192.168.0.10: ICMP echo reply,
id 1024, seq 45664, length 40
01:09:22.291037 IP 192.168.100.100 > 192.168.0.10: ICMP echo reply,
id 1024, seq 45664, length 40
…
The packet flow after the attack is illustrated below:
User192.168.0.10
Server192.168.100.100
1/1 1/24
Attacker192.168.0.11
1/2
RouterGW in VLAN 1 - 192.168.0.254
GW in VLAN 100 - 192.168.100.254
VLAN 1 VLAN 100
VLAN 1

Security Best Practices in AOS
Document rev. 1.7 39/70 TKC 000018877
.........................................................
To enable the ARP Spoofing protection on the router use the “ip dos anti-spoofing disabled” command and update “ipni_arp_poison_lrn” variable in dshell:
-> ip dos anti-spoofing enable
-> dshell
Working: [Kernel]->ipni_arp_poison_lrn=0
ipni_arp_poison_lrn = 0xc8aabbc: value = 0 = 0x0
Working: [Kernel]->exit
From now on the router drops all incorrect ARP messages with its own IP addresses and it doesn’t learn IP addresses in its ARP table from unexpected ARP Replies.
Detailed statistics are available only if the “ip dos anti-spoofing” feature is explicitly enabled:
-> show ip dos anti-spoofing
Global Status:
IP Spoof Status - ENABLED
ARP Spoof Status - DISABLED
* - VRRP IP Address
Last Attempted Source
IP Address Anti-Spoofing Attacks VLAN MAC PORT
---------------+----------------+-----------+-----+--------------------+---------
127.0.0.1 IN 0 0 00:00:00:00:00:00 0/0
192.168.0.254 IP 79 1 00:0c:29:29:b3:76 1/2
192.168.100.254 IP 0 0 00:00:00:00:00:00 0/0
IP - Anti-spoofing for IP Pkts
ARP - Anti-spoofing for ONLY ARP Pkts
IN - Inactive
The attacker is not able to sniff packets exchanged between the user and the server if “ip dos anti-spoofing” feature is enabled.
4.12. CAM overflow attack
Conditional Access Memory (CAM) stores the MAC address table. CAM overflow is used by an attacker to turn a switch into a hub. The attacker sends frames with random source MAC addresses. These addresses are learned in MAC address table, which has limited capacity. When the MAC address table is full, then the switch starts flooding instead of switching – it becomes a hub.
Learned Port Security
Learned Port Security (LPS) provides a mechanism for authorizing source learning of MAC addresses on Ethernet ports.
LPS does not support link aggregate and tagged (trunked) link aggregate ports. Using LPS to control source MAC address learning provides the following benefits:
A configurable source learning time limit that applies to all LPS ports.
A configurable limit on the number of MAC addresses allowed on an LPS port.
Dynamic configuration of a list of authorized source MAC addresses.
Static configuration of a list of authorized source MAC addresses.
Two methods for handling unauthorized traffic: stopping all traffic on the port or only blocking traffic that violates LPS criteria.

Security Best Practices in AOS
Document rev. 1.7 40/70 TKC 000018877
.........................................................
By default, LPS is disabled on all switch ports. To enable LPS on a port, use the port-security command. For example, the following command enables LPS on port 1 of slot 4:
port-security 1/1 admin-status enable
To enable LPS on multiple ports, specify a range of ports or multiple slots. For example:
port-security 1/1-5 admin-status enable
port-security 1/1-5 1/10-15 admin-status enable
When LPS is enabled on an active port, all MAC addresses learned on that port prior to the time LPS was enabled are cleared from the source learning MAC address table.
To disable LPS on a port, use the port-security command with the disable parameter. For example, the following command disables LPS on a range of ports:
port-security 1/1-5 1/10-15 admin-status disable
To convert all learned bridge MAC address on LPS port into static MAC address, use the port-security chassis command with the convert-to-static parameter. For example:
port-security chassis convert-to-static
To disable all the LPS ports on a chassis, use the port-security chassis disable command, as shown:
port-security chassis disable
When LPS is disabled on a port, MAC address entries for that port are retained in the LPS table. The next time LPS is enabled on the port, the same LPS table entries are again active. If there is a switch reboot before the switch configuration is saved, however, dynamic MAC address entries are discarded from the table.
Applicable to AOS 6, AOS 7, AOS 8
Below an example of an attack and a solution.
Tools used by the attacker: “macof” from the “dsniff” package for Ubuntu
During normal network operation the attacker is not able to sniff packets exchanged between the user and the server, because the switch forwards frames only to ports, which were associated with MAC addresses during learning process. In this example there is “ping 192.168.0.100 -t” command executed on the user PC:

Security Best Practices in AOS
Document rev. 1.7 41/70 TKC 000018877
.........................................................
The MAC address table content before the attack
AOS 6:
-> show mac-address-table count
Mac Address Table Count:
Permanent Address Count = 0,
DeleteOnReset Address Count = 0,
DeleteOnTimeout Address Count = 0,
Dynamic Learned Address Count = 2,
Static Multicast Address Count = 0,
Total MAC Address In Use = 2
AOS 7&8:
-> show mac-learning summary
Mac Address Table Summary:
Domain Static Static-Multicast Bmac Dynamic
------------+------------+-------------------+------------+------------
VLAN 0 0 0 2
VPLS 0 0 0 0
SPB 0 0 0 0
EVB 0 0 0 0
Total MAC Address In Use = 2
To demonstrate the attack, the continuous ping from the user PC to the server should be stopped and the MAC address table needs to be flushed.
AOS 6:
-> no mac-address-table learned
AOS 7&8:
-> mac-learning flush dynamic
User192.168.0.10
Server192.168.0.100
1/1 1/24
Attacker192.168.0.11
1/2
ICMP Echo Request
ICMP Echo Reply
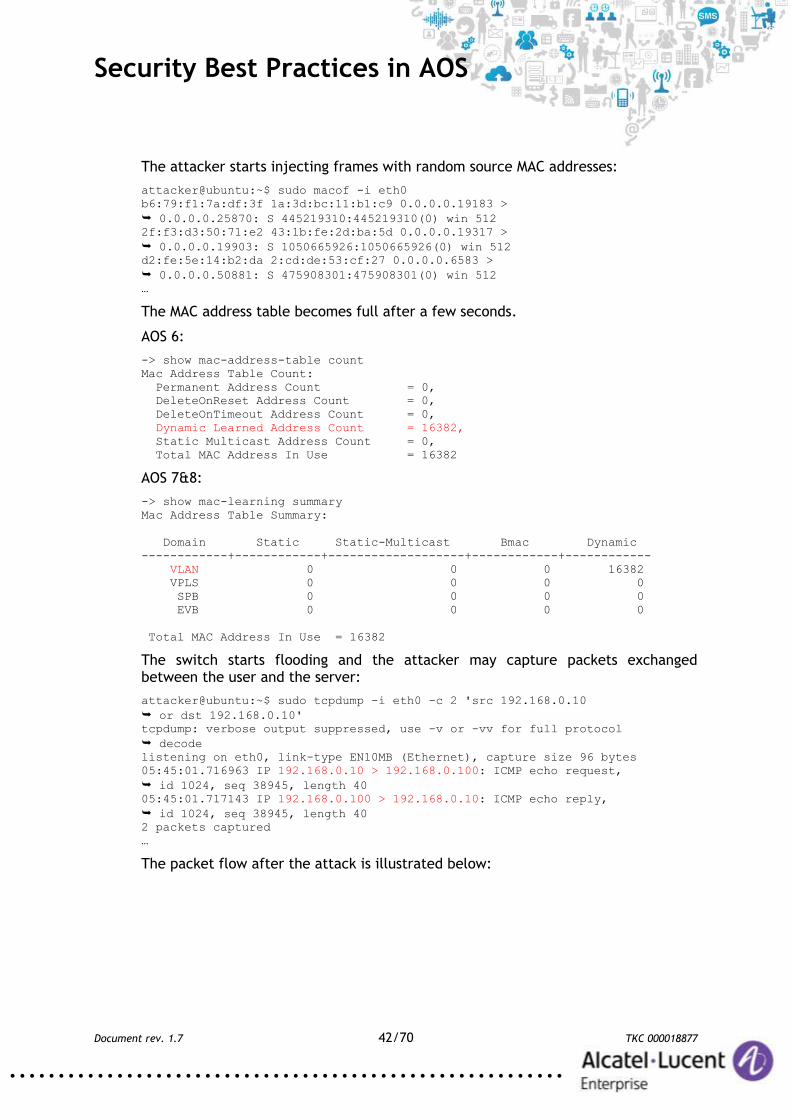
Security Best Practices in AOS
Document rev. 1.7 42/70 TKC 000018877
.........................................................
The attacker starts injecting frames with random source MAC addresses:
attacker@ubuntu:~$ sudo macof -i eth0
b6:79:f1:7a:df:3f 1a:3d:bc:11:b1:c9 0.0.0.0.19183 >
0.0.0.0.25870: S 445219310:445219310(0) win 512
2f:f3:d3:50:71:e2 43:1b:fe:2d:ba:5d 0.0.0.0.19317 >
0.0.0.0.19903: S 1050665926:1050665926(0) win 512
d2:fe:5e:14:b2:da 2:cd:de:53:cf:27 0.0.0.0.6583 >
0.0.0.0.50881: S 475908301:475908301(0) win 512
…
The MAC address table becomes full after a few seconds.
AOS 6:
-> show mac-address-table count
Mac Address Table Count:
Permanent Address Count = 0,
DeleteOnReset Address Count = 0,
DeleteOnTimeout Address Count = 0,
Dynamic Learned Address Count = 16382,
Static Multicast Address Count = 0,
Total MAC Address In Use = 16382
AOS 7&8:
-> show mac-learning summary
Mac Address Table Summary:
Domain Static Static-Multicast Bmac Dynamic
------------+------------+-------------------+------------+------------
VLAN 0 0 0 16382
VPLS 0 0 0 0
SPB 0 0 0 0
EVB 0 0 0 0
Total MAC Address In Use = 16382
The switch starts flooding and the attacker may capture packets exchanged between the user and the server:
attacker@ubuntu:~$ sudo tcpdump -i eth0 -c 2 'src 192.168.0.10
or dst 192.168.0.10'
tcpdump: verbose output suppressed, use -v or -vv for full protocol
decode
listening on eth0, link-type EN10MB (Ethernet), capture size 96 bytes
05:45:01.716963 IP 192.168.0.10 > 192.168.0.100: ICMP echo request,
id 1024, seq 38945, length 40
05:45:01.717143 IP 192.168.0.100 > 192.168.0.10: ICMP echo reply,
id 1024, seq 38945, length 40
2 packets captured
…
The packet flow after the attack is illustrated below:

Security Best Practices in AOS
Document rev. 1.7 43/70 TKC 000018877
.........................................................
CAM overflows attacks can be mitigated using the Learned Port Security feature (LPS). This feature limits the maximum number of MAC addresses which can be learned on a port, or shuts a port down if this limit is reached.
To enable LPS on a port, use the port-security command. For example, the following command enables LPS on port 24 of slot.
AOS 6:
port-security 1/1-2 maximum 1
port-security 1/1-2 admin-state enable
AOS 7&8:
port-security port 1/1-2 maximum 1
port-security port 1/1-2 admin-state enable
Shutdown or restrict actions may be used if the maximum number of MAC addresses is reached:
-> port-security 1/1-2 violation ?
^
SHUTDOWN RESTRICT
(Source Learning Command Set
A network administrator can be notified by a trap if a specified number of MAC addresses are learned on one port.
AOS 6:
port-security 1/1-2 learn-trap-threshold 5
AOS 7&8:
port-security port 1/1-2 learn-trap-threshold 5
User192.168.0.10
Server192.168.0.100
1/1 1/24
Attacker192.168.0.11
1/2
Packets with random MAC
addresses
Flooding

Security Best Practices in AOS
Document rev. 1.7 44/70 TKC 000018877
.........................................................
After enabling LPS the attacker is not able to overflow the MAC address table with random addresses.
AOS 6:
-> show mac-address-table count
Mac Address Table Count:
Permanent Address Count = 0,
DeleteOnReset Address Count = 0,
DeleteOnTimeout Address Count = 0,
Dynamic Learned Address Count = 7,
Static Multicast Address Count = 0,
Total MAC Address In Use = 7
AOS 7&8:
-> show mac-learning summary
Mac Address Table Summary:
Domain Static Static-Multicast Bmac Dynamic
------------+------------+-------------------+------------+------------
VLAN 0 0 0 7
VPLS 0 0 0 0
SPB 0 0 0 0
EVB 0 0 0 0
Total MAC Address In Use = 7
LPS status can be verified per port using the “show port-security” command.
AOS 6:
-> show port-security 1/2
Port: 1/2
Operation Mode : RESTRICTED,
Max MAC bridged : 2,
Trap Threshold : 5,
Max MAC filtered : 5,
Low MAC Range : 00:00:00:00:00:00,
High MAC Range : ff:ff:ff:ff:ff:ff,
Violation : RESTRICT
MAC Address VLAN TYPE
-------------------+------+--------
42:ee:7a:39:ec:ac 1 FILTER
66:43:28:2c:38:aa 1 FILTER
78:81:97:2c:e3:42 1 BRIDGE
cc:03:d2:1f:22:c9 1 FILTER
d0:f6:09:52:66:b1 1 FILTER
e0:68:d3:1e:f4:ae 1 FILTER
4.13. DHCP rogue server attack
The DHCP rogue server attack is used by an attacker to configure a false DNS server and a false gateway. The attacker may use his own IP address as the gateway in DHCP Offers to be able to sniff traffic.

Security Best Practices in AOS
Document rev. 1.7 45/70 TKC 000018877
.........................................................
DHCP Snooping
Applicable to AOS 6, AOS 8
Below an example of an attack and a solution.
Tools used by the attacker:
“macchanger” from the “macchanger” package for Ubuntu
“dhcp3-server” from the “dhcp3-server” package for Ubuntu
A DHCP rogue server attack may be preceded by a DHCP starvation attack, which exhausts DHCP pool, an example for the “eth0” port:
attacker@attacker-desktop:~$ sudo -i
root@ubuntu:~# while true; do ifconfig eth0 down;
macchanger -a eth0 2>&1 | grep Faked; ifconfig eth0 up;
dhclient eth0 2>&1 | grep ACK; done
Faked MAC: 00:0f:f2:3b:79:1d (Loud Technologies Inc.)
DHCPACK of 192.168.0.150 from 192.168.0.100
…
This script may be stopped when all addresses from DHCP pool are reserved. An example configuration of the rogue DHCP server:
root@ubuntu:~# ifconfig eth0 192.168.0.11
root@ubuntu:~# cp /etc/default/dhcp3-server
/etc/default/dhcp3-server.bak
root@ubuntu:~# cp /etc/dhcp3/dhcpd.conf /etc/dhcp3/dhcpd.conf.bak
root@ubuntu:~# echo '' > /etc/default/dhcp3-server
root@ubuntu:~# echo 'INTERFACES="eth0";' > /etc/dhcp3/dhcpd.conf
root@ubuntu:~# echo 'subnet 192.168.0.0 netmask 255.255.255.0 {' >>
/etc/dhcp3/dhcpd.conf
root@ubuntu:~# echo 'range 192.168.0.200 192.168.0.210;' >>
/etc/dhcp3/dhcpd.conf
root@ubuntu:~# echo 'option domain-name-servers 192.168.0.11;' >>
/etc/dhcp3/dhcpd.conf
root@ubuntu:~# echo 'option domain-name "attacker";' >>
/etc/dhcp3/dhcpd.conf
root@ubuntu:~# echo 'option routers 192.168.0.11;' >>
/etc/dhcp3/dhcpd.conf
root@ubuntu:~# echo 'option broadcast-address 192.168.0.255;' >>
/etc/dhcp3/dhcpd.conf
root@ubuntu:~# echo 'default-lease-time 600;' >>
/etc/dhcp3/dhcpd.conf
root@ubuntu:~# echo 'max-lease-time 7200;' >> /etc/dhcp3/dhcpd.conf
root@ubuntu:~# echo '}' >> /etc/dhcp3/dhcpd.conf
Commands above create an empty “/etc/default/dhcp3-server” file and a “/etc/dhcp3/dhcpd.conf” file:
root@ubuntu:~# cat /etc/default/dhcp3-server
root@ubuntu:~# cat /etc/dhcp3/dhcpd.conf
INTERFACES="eth0";
subnet 192.168.0.0 netmask 255.255.255.0 {
range 192.168.0.200 192.168.0.210;
option domain-name-servers 192.168.0.11;
option domain-name "attacker";
option routers 192.168.0.11;
option broadcast-address 192.168.0.255;

Security Best Practices in AOS
Document rev. 1.7 46/70 TKC 000018877
.........................................................
default-lease-time 600;
max-lease-time 7200;
}
The attacker starts the rogue DHCP server:
root@ubuntu:~# /etc/init.d/dhcp3-server restart
* Stopping DHCP server dhcpd3 [ OK ]
* Starting DHCP server dhcpd3 [ OK ]
A user in the network from now on will receive now a response only from the rogue DHCP server with a fake default gateway and a fake DNS server addresses:
The attacker is now able to sniff all user connections to the Internet and redirect user to his servers using fake DNS:
C:\>ipconfig /renew User
Windows IP Configuration
…
Ethernet adapter User:
Connection-specific DNS Suffix . : attacker
IP Address. . . . . . . . . . . . : 192.168.0.200
Subnet Mask . . . . . . . . . . . : 255.255.255.0
Default Gateway . . . . . . . . . : 192.168.0.11
…
DHCP rogue server attacks may be avoided using DHCP Snooping.
AOS 6:
-> show configuration snapshot ip-helper
! UDP Relay :
ip helper forward delay 0
ip helper dhcp-snooping enable
ip helper dhcp-snooping binding enable
ip helper dhcp-snooping port 1/24 trust
AOS 8:
-> show configuration snapshot dhcp-snooping
! DHCP Snooping:
dhcp-snooping admin-state enable
dhcp-snooping binding admin-state enable
dhcp-snooping port 1/1/24 trust
User192.168.0.10
DHCP Server192.168.0.100
1/1 1/24
Attacker192.168.0.11
1/2
DHCP Discover
DHCP Offer

Security Best Practices in AOS
Document rev. 1.7 47/70 TKC 000018877
.........................................................
After applying this configuration the attacker is not able to inject non-user DHCP messages into the network (only DHCP Discover and DHCP Offer are allowed). DHCP Reply and ACK messages are accepted only on trusted ports where DCHP servers are connected.
4.14. STP claiming root role attack
QoS User Port can be used to protect network infrastructure against L2 and L3 attacks (not only against STP attacks as in the example below). The principle is to block traffic or shutdown a port where the feature is enabled on reception of predefined type of traffic.
QoS User Port
Applicable to AOS 6, AOS 7, AOS 8
Extract from “OmniSwitch AOS Release 6 CLI Reference Guide” (selected options are not available on AOS 7&8 platforms):
qos user-port
Configures the option to filter packets or administratively disable a port when the specified type
of traffic is received on a port that is a member of the pre-defined UserPorts group.
qos user-port {filter | shutdown} {spoof | bgp | bpdu | rip | ospf | vrrp | dvmrp | pim | isis |
dhcp-server | dns-reply}
qos no user-port {filter | shutdown}
Syntax Definitions
filter Filters the specified type of traffic when it is received on UserPort ports.
shutdown Administratively disables UserPort ports that receive the specified type of traffic.
spoof Detects IP spoofing. The source IP address of a packet ingressing on a user port is
compared to the subnet of the VLAN for the user port; the packet is dropped if
these two items do not match. Also applies to ARP packets.
bgp Filters only BGP protocol packets from a TCP session that was not originated by
the same switch that has this filter configured.
bpdu Filters conventional Spanning Tree BPDU (destination MAC address
0x0180c2:000000) packets and GVRP (destination MAC address
0x0180c2:000021) packets.
rip Filters RIP protocol packets.
ospf Filters OSPF protocol packets.
vrrp Filters VRRP protocol packets.
dvmrp Filters IGMP packets with a type of 0x13. This applies only to IP packets with no
options.

Security Best Practices in AOS
Document rev. 1.7 48/70 TKC 000018877
.........................................................
pim Filters PIMv1, PIM-DM, and PIM-SM packets. The PIMv1 filter applies only to IP
packets with no options.
isis Filters IS-IS protocol packets.
dhcp-server Filters response packets originating from a DHCP or BOOTP server that is
configured on the known UDP port 67.
dns-reply Filters all packets (both TCP and UDP) that originate from the known DNS port 53.
Defaults
Platforms Supported
OmniSwitch 6400, 6850E, 6855, 9000E
Usage Guidelines
• Use the no form of this command to disable the filter or shutdown function. This form of the
command effects the overall operation of the feature.
• To specify more than one traffic type in the same command line, enter each type separated by a
space (e.g., spoof bgp ospf).
• Note that existing traffic types to filter or shutdown are removed each time the filter or
shutdown option is configured. Specify all desired traffic types each time the qos user-port
command is performed to retain previously configured traffic types.
• No changes to the filtering and shutdown options are applied to the switch until the qos apply
command is performed.
• This command only applies to ports that are members of the UserPorts group. Use the policy
port group command to create and assign members to the UserPorts group.
• An SNMP trap is sent when a port is administratively disabled through a UserPorts shutdown
function or a port disable action.
• To enable a port disabled by a user port shutdown operation, use the interfaces admin
command to administratively enable the port or disconnect and reconnect the port cable.
• Up to 126 IP interfaces are supported with spoof detection on user ports. If the number of
interfaces exceeds this amount, user port packets ingressing on those interfaces that exceed the
126 limit are dropped.
Examples
-> qos user-port filter spoof bpdu
-> qos user-port shutdown spoof bgp ospf
-> qos no user-port shutdown
Below an example of an attack, which can be prevented using QoS User Port.
STP attacks are used by an attacker to destabilize STP operation in the network. In this example the attacker is connected to two switches simultaneously. The attacker PC takes a role of the root bridge.
Tools used by the attacker:
“mz” from the “mz” package for Ubuntu
“brctl” from “uml-utilities” and “bridge-utils” packages for Ubuntu

Security Best Practices in AOS
Document rev. 1.7 49/70 TKC 000018877
.........................................................
During normal network operation the attacker is not able to sniff packets exchanged between the user and the server. In this example there is the “ping 192.168.0.100 -t” command executed on the user PC:
STP configuration on the OS6850_1 switch before the attack:
OS6850_1-> show spantree 1
Spanning Tree Parameters
Spanning Tree Status : ON,
Protocol : IEEE Rapid STP,
mode : FLAT (Single STP),
Auto-Vlan-Containment: Enabled ,
Priority : 32768 (0x8000),
Bridge ID : 8000-00:e0:b1:a4:23:4a,
Designated Root : 8000-00:d0:95:f2:47:dc,
Cost to Root Bridge : 4,
Root Port : Slot 1 Interface 24,
Next Best Root Cost : 0,
Next Best Root Port : None,
…
OS6850_1-> show vlan port
vlan port type status
------+-------+---------+-------------
1 1/1 default forwarding
1 1/2 default forwarding
…
1 1/24 default forwarding
STP configuration on the OS6850_2 switch before the attack:
OS6850_2-> show spantree 1
Spanning Tree Parameters
Spanning Tree Status : ON,
Protocol : IEEE Rapid STP,
mode : FLAT (Single STP),
Auto-Vlan-Containment: Enabled ,
Priority : 32768 (0x8000),
Bridge ID : 8000-00:d0:95:f2:47:dc,
Designated Root : 8000-00:d0:95:f2:47:dc,
Cost to Root Bridge : 0,
Root Port : None,
Next Best Root Cost : 0,
Next Best Root Port : None,
User192.168.0.10
Server192.168.0.100
1/1
Attacker
1/2
ICMP Echo Request
ICMP EchoReply
1/24
1/2
1/11/24
eth1 eth2
OS6850_1 OS6850_2

Security Best Practices in AOS
Document rev. 1.7 50/70 TKC 000018877
.........................................................
…
OS6850_2-> show vlan port
vlan port type status
------+-------+---------+-------------
1 1/1 default forwarding
1 1/2 default forwarding
…
1 1/24 default forwarding
The attacker creates a bridge between interfaces eth1 and eth2:
attacker@ubuntu:~$ sudo brctl addbr bridge0
attacker@ubuntu:~$ sudo brctl addif bridge0 eth1
attacker@ubuntu:~$ sudo brctl addif bridge0 eth2
attacker@ubuntu:~$ sudo ifconfig bridge0 up
The attacker starts injecting STP BPDUs in the network:
attacker@ubuntu:~$ sudo mz eth1 -c 0 -d 2s -t bpdu
"rid=00:00:11:11:11:11:11:11" &
attacker@ubuntu:~$ sudo mz eth2 -c 0 -d 2s -t bpdu
"rid=00:00:11:11:11:11:11:11" &
STP configuration on the OS6850_1 switch after the attack is updated with a new root bridge MAC address:
OS6850_1-> show spantree 1
Spanning Tree Parameters
Spanning Tree Status : ON,
Protocol : IEEE Rapid STP,
mode : FLAT (Single STP),
Auto-Vlan-Containment: Enabled ,
Priority : 32768 (0x8000),
Bridge ID : 8000-00:e0:b1:a4:23:4a,
Designated Root : 0000-11:11:11:11:11:11,
Cost to Root Bridge : 19,
Root Port : Slot 1 Interface 2,
Next Best Root Cost : 23,
Next Best Root Port : Slot 1 Interface 24,
…
OS6850_1-> show vlan port
vlan port type status
------+-------+---------+-------------
1 1/1 default forwarding
1 1/2 default forwarding
…
1 1/24 default blocking

Security Best Practices in AOS
Document rev. 1.7 51/70 TKC 000018877
.........................................................
STP configuration on the OS6850_2 switch after the attack is updated with a new root bridge MAC address:
OS6850_2-> show spantree 1
Spanning Tree Parameters
Spanning Tree Status : ON,
Protocol : IEEE Rapid STP,
mode : FLAT (Single STP),
Auto-Vlan-Containment: Enabled ,
Priority : 32768 (0x8000),
Bridge ID : 8000-00:d0:95:f2:47:dc,
Designated Root : 0000-11:11:11:11:11:11,
Cost to Root Bridge : 19,
Root Port : Slot 1 Interface 2,
Next Best Root Cost : 0,
Next Best Root Port : None,
…
OS6850_2-> show vlan port
vlan port type status
------+-------+---------+-------------
1 1/1 default forwarding
1 1/2 default forwarding
…
1 1/24 default forwarding
The link status between core switches is changed to blocking. Now the attacker is able to sniff all the traffic (not only traffic exchanged between the user and the server):
attacker@attacker-desktop:~$ sudo tcpdump -i eth1 -c 2
'src 192.168.0.10 or dst 192.168.0.10'
tcpdump: verbose output suppressed, use -v or -vv for full protocol
decode
listening on eth1, link-type EN10MB (Ethernet), capture size 96 bytes
16:07:53.086290 IP 192.168.0.10 > 192.168.100.100: ICMP echo request,
id 1280, seq 8221, length 40
16:07:53.086574 IP 192.168.100.100 > 192.168.0.10: ICMP echo reply,
id 1280, seq 8221, length 40
The packet flow after the attack is illustrated below:
This type of an attack can be prevented using the “qos user-port” feature with BPDU shutdown action:
User192.168.0.10
Server192.168.0.100
1/1
Attacker
1/2
ICMP Echo Request
ICMP EchoReply
1/24
1/2
1/1
blocking
eth1 eth2
OS6850_1 OS6850_2

Security Best Practices in AOS
Document rev. 1.7 52/70 TKC 000018877
.........................................................
OS6850_1-> policy port group UserPorts 1/1-23
OS6850_1-> qos user-port shutdown bpdu
OS6850_1-> qos apply
OS6850_2-> policy port group UserPorts 1/1-23
OS6850_2-> qos user-port shutdown bpdu
OS6850_2-> qos apply
STP Root Guard
All ports are automatically eligible for root port selection. A port in a CIST/MSTI instance or per-VLAN instance can be prevented from becoming the root port by restricting the role of the port (also referred to as enabling root guard). This is done using the “spantree cist restricted-role” command or the “spantree lan restricted-role” command regardless of which mode (per-VLAN or flat) is active for the switch. For example:
-> spantree cist port 1/1/2 restricted-role enable
-> spantree cist linkagg 10 restricted-role enable
-> spantree vlan 100 port 8/1/1 restricted-role enable
-> spantree vlan 20 linkagg 1 restricted-role enable
Note that the above commands also provide optional syntax; restricted-role or root-guard. For example, the following two commands perform the same function:
-> spantree vlan port 2/1/1 restricted-role enable
-> spantree vlan port 2/1/1 root-guard enable
When root guard is enabled for a port, it cannot become the root port, even if it is the most likely candidate for becoming the root port. However, this same port is designated as the alternate port when the root port is selected.
Enabling the restricted role status is used by network administrators to prevent bridges external to the core region of the network from influencing the Spanning Tree topology. Note that enabling the restricted role status for a port may impact connectivity within the network.
Applicable to AOS 6
Extract from “OmniSwitch AOS Release 6 CLI Reference Guide”:
bridge cist restricted-role
Configures whether or not to prevent a port (or an aggregate of ports) from becoming the root
port. When this parameter is enabled, the port does not become the root even if the port is the
most likely candidate for the root. Once another port is selected as the root port, the restricted
port becomes the Alternate Port.
bridge cist {slot/port | logical_port} {restricted-role | root-guard} {on | off | enable | disable}
Syntax Definitions
slot/port Enter the slot number for the module and the physical port number on
that module (for example, 3/1 specifies port 1 on slot 3).
logical_port Link aggregate ID number (0–31).

Security Best Practices in AOS
Document rev. 1.7 53/70 TKC 000018877
.........................................................
root-guard Optional command syntax. Enter root-guard instead of restricted-
role; both parameters specify the same functionality for this
command.
on Turns on (enables) the restricted role status for the specified port.
off Turns off (disables) the restricted role status for the specified port.
enable Enables the restricted role status for the specified port.
disable Disables the restricted role status for the specified port.
By default, all ports are eligible for root port selection. A port in a CIST/MSTI instance or 1x1
instance can be prevented from becoming the root port by restricting the role of the port (also
referred to as enabling root guard). This is done using the bridge cist restricted-role command
or the bridge 1x1
restricted-role command. For example: -> bridge cist 1/24 restricted-role enable
-> bridge 1x1 100 8/1 restricted-role enable
Note that the above commands also provide optional syntax; restricted-role or root-guard. For
example, the following two commands perform the same function: -> bridge 1x1 2/1 restricted-role enable
-> bridge 1x1 2/1 root-guard enable
When root guard is enabled for a port, it cannot become the root port, even if it is the most likely
candidate for becoming the root port. It can be selected as the alternate port when the root port is
selected.
Applicable to AOS 7, AOS 8
Extract from “OmniSwitch AOS Release 7 CLI Reference Guide”:
spantree cist restricted-role
Configures the restricted role status for a port or a link aggregate of ports. Enabling this
parameter blocks the port from becoming the Root Port, even if it is the most likely candidate for
root. Once a root port is selected, the restricted port is selected as an Alternate Port.
spantree cist {port [chassis_id/]/slot/port[-port2] | linkagg linkagg_id[-linkagg_id2]}
restricted-role {enable | disable}
Syntax Definitions
chassis_id The chassis identifier when running in virtual chassis mode.
slot/port[-port2] The slot number and port number of the physical port. Use a hyphen
to specify a range of ports (4/1-8).
linkagg_id[-linkagg_id2] The link aggregate ID number. Use a hyphen to specify a range of IDs
enable Enables the restricted role status for the specified port.
disable Disables the restricted role status for the specified port.
Defaults
By default, the restricted role status for the port is disabled.

Security Best Practices in AOS
Document rev. 1.7 54/70 TKC 000018877
.........................................................
Usage Guidelines
• When running in flat mode, this is a per-port setting and is applicable to any CIST or MSTI
instances
configured on that port.
• Enabling the restricted role status is used by network administrators to prevent bridges external
to the
core region of the network from influencing the Spanning Tree topology.
• Note that enabling the restricted role status for a port may impact connectivity within the
network.
Examples
-> spantree cist linkagg 15-20 restricted-role enable
-> spantree cist port 8/23 restricted-role disable
-> spantree cist port 8/24-27 restricted-role disable
-> spantree cist linkagg 10 restricted-role disable
4.15. Attacks on routing protocols
Routing protocols need to be protected against unauthorized injection of routes.
Routing protocol authentication
RIP, OSPF, ISIS, BGP allow for the use of authentication on configured interfaces. When authentication is enabled, only neighbors using the same type of authentication and the matching passwords or keys can communicate.
In OSPF there are two types of authentication: simple and MD5. Simple authentication requires only a text string as a password, while MD5 is a form of encrypted authentication that requires a key and a password. Both types of authentication require the use of more than one command.
Simple Authentication
To enable simple authentication on an interface, enter the “ip ospf interface auth-type” command with the interface name, as shown:
-> ip ospf interface vlan100 auth-type simple
Once simple authentication is enabled, the password must be set with the “ip ospf interface auth-key” command, as shown:
-> ip ospf interface vlan100 auth-key switch
In the above instance, only other interfaces with simple authentication and a password of “switch” will be able to use the configured interface.
MD5 Encryption
To configure the same interface for MD5 encryption, enter the ip ospf interface auth-type as shown:
-> ip ospf interface vlan100 auth-type md5
Once MD5 authentication is set, a key identification and key string must be set with the “ip ospf interface md5 key” command. For example to set interface vlan100 to

Security Best Practices in AOS
Document rev. 1.7 55/70 TKC 000018877
.........................................................
use MD5 authentication with a key identification of 1 and key string of “switch”, enter:
-> ip ospf interface vlan100 md5 1
And
-> ip ospf interface vlan100 md5 1 key "switch"
Note that setting the key ID and key string must be done in two separate commands. Once the key ID and key string have been set, MD5 authentication is enabled. To disable it, use the “ip ospf interface md5” command, as shown:
-> ip ospf interface vlan100 md5 1 disable
To remove all authentication, enter the “ip ospf interface auth-type” as follows:
-> ip ospf interface vlan100 auth-type none
Applicable to AOS 6
-> show configuration snapshot ospf
! OSPF:
ip load ospf
ip ospf area 0.0.0.0
ip ospf interface "vlan100"
ip ospf interface "vlan100" area 0.0.0.0
ip ospf interface "vlan100" auth-type md5
ip ospf interface "vlan100" status enable
ip ospf interface "vlan100" md5 1
ip ospf interface "vlan100" md5 1 key switch
ip ospf status enable
Applicable to AOS 7, AOS 8
-> show configuration snapshot ospf
! OSPF:
ip load ospf
ip ospf area 0.0.0.0
ip ospf interface "vlan100"
ip ospf interface "vlan100" area 0.0.0.0
ip ospf interface "vlan100" auth-type md5
ip ospf interface "vlan100" admin-state enable
ip ospf interface "vlan100" md5 1
ip ospf interface "vlan100" md5 1 key switch
ip ospf admin-state enable
OSPF Passive Interface
Setting hello interval to 0 enabled OSPF Passive Interface on a particular interface. Passive interfaces should be enabled in all VLANs without OSPF neighbors.
Applicable to AOS 6
-> show configuration snapshot ospf
! OSPF:
ip load ospf
ip ospf area 0.0.0.0
ip ospf interface "vlan1"
ip ospf interface "vlan1" area 0.0.0.0
ip ospf interface "vlan1" hello-interval 0
ip ospf interface "vlan1" status enable
ip ospf interface "vlan100"
ip ospf interface "vlan100" area 0.0.0.0

Security Best Practices in AOS
Document rev. 1.7 56/70 TKC 000018877
.........................................................
ip ospf interface "vlan100" status enable
ip ospf status enable
Applicable to AOS 7, AOS 8
-> show configuration snapshot ospf
! OSPF:
ip load ospf
ip ospf area 0.0.0.0
ip ospf interface "vlan1"
ip ospf interface "vlan1" area 0.0.0.0
ip ospf interface "vlan1" hello-interval 0
ip ospf interface "vlan1" admin-state enable
ip ospf interface "vlan100"
ip ospf interface "vlan100" area 0.0.0.0
ip ospf interface "vlan100" admin-state enable
ip ospf admin-state enable
Disabling Auto-Fabric
Auto-Fabric might be very useful in well controlled environments. It enables autodiscovery using LLDP and MVRP. For security reasons it should be disabled in case network can be accessed by unauthorized users.
Applicable to AOS 7.3.X
Extract from “OmniSwitch AOS Release 7 Network Configuration Guide”:
Auto-Fabric Overview
Auto-Fabric can be used to dynamically discover and configure a switch for the LACP, SPB, and
MVRP protocols. It is supported in both standalone or virtual chassis mode. If LACP auto
discovery is enabled, the system will attempt LACP discovery and auto configuration for a set
discovery window. After LACP discovery window expires, SPB auto discovery will occur if
enabled. Then, MVRP auto discovery will occur if enabled.
Some of the key benefits provided by Auto-Fabric are:
• Automatic discovery reduces administrative overhead.
• Auto discovery supports the discovery of the LACP, SPB, and MVRP protocols.
• The automatically discovered configuration for LACP and SPB (not MVRP) can be
permanently saved to the switch’s configuration file so it is kept after a reboot.
Basic Auto-Fabric Operation
By default, the auto-fabric discovery window will be started to determine if there are any eligible
ports to participate in discovery. In order for a port to be eligible for auto-fabric discovery it must
be in it’s default state. If the port is in its default state, the system will attempt to determine a port
can be a member of an existing or new link aggregate by analyzing any received LACP PDUs or
Auto-discovery LLDP PDUs. If any ports are determined to be possible link aggregate members
with an existing port that is already up both ports plus any subsequent ports will be placed into a
single link-aggregate. After link aggregates are formed or new non-aggregate ports are brought
up, SPB will run its discovery on those ports followed by MVRP which will be enabled on all the
newly formed aggregates and ports which are participating and did not join any aggregates.
The switch will continue to stay in auto discovery mode on all ports in their default state unless:
• A port had previously participated in the auto-fabric discovery window. Once a port
participates in the discovery window the port will not participate in the next discovery window.

Security Best Practices in AOS
Document rev. 1.7 57/70 TKC 000018877
.........................................................
• If the learned configuration is written to the configuration file, the port will not participate in
discovery on next reload.
• If only an MVRP configuration is discovered on a port and there are no VLAN registrations for
that port, during the next discovery window the MVRP configuration will be removed and the
auto-discovery process will again run on that port.
From AOS 7.3.2.375.R01 Auto Fabric can be disabled using a single command:
auto-fabric admin-state disable remove-global-config
In previous AOS version following commands need to be applied:
auto-fabric admin-state disable
no spb isis interface linkagg 1
spb isis admin-state disable
no spb bvlan 4000-4015
mvrp disable
mvrp linkagg 1 disable
spantree mode per-vlan
4.16. Rogue IGMP Querier attack
In case IPMS Querying is enabled in L2 multicast network there will be only one elected (the one with lower IP address) as the active querier and only this querier is allowed to send IGMP General Queries. All IPMS enabled devices in L2 multicast network maintain a table with active queriers and forward IGMP Membership Reports to the active querier. An attacker may use a lower IP address to inject an IGMP General Query on an untrusted port.
QoS rules
Before the attack the aggregation switch is the active querier:
Output from the access switch:
-> show ip multicast querier
Total 1 Queriers
Host Address VLAN Port Static Count Life
---------------+-----+-----+-------+------+-----
192.168.0.254 1 1/24 no 1 252
After the attack the attacker becomes the active querier:
User192.168.0.10
Server192.168.0.100
1/1
IGMP General Query
1/24 1/11/24
Access SwitchAggregation
Switch

Security Best Practices in AOS
Document rev. 1.7 58/70 TKC 000018877
.........................................................
Output from the access switch:
-> show ip multicast querier
Total 1 Queriers
Host Address VLAN Port Static Count Life
---------------+-----+-----+-------+------+-----
192.168.0.10 1 1/1 no 1 167
This attack can be prevented using QoS policies. Note that this policy doesn’t drop the rogue IGMP General Query. It prevents the rogue IGMP General Query to be learned locally on the switch where the QoS rule is configured.
AOS 6
-> show configuration snapshot qos
! QOS :
policy port group untrusted 1/1-23
policy condition general-query-sw destination port group untrusted multicast
ip 224.0.0.1
policy action drop disposition deny
policy rule deny-general-query-sw condition general-query-sw action drop
qos apply
4.17. LLDP rogue agent attack
This feature is applicable to AOS 6 platforms only.
The OmniSwitch LLDP Agent Security mechanism provides a solution for secure access to the network by detecting rogue devices and preventing them from accessing the internal network. LLDP agent security can be achieved by allowing only one trusted LLDP remote agent on a network port.
User is provided an option to configure the Chassis ID subtype that can be used in validating the Chassis ID type in the incoming LLDP PDU. If the Chassis ID is not configured, by default, the first LLDP remote agent is learned with the received Chassis ID. When more than one LLDP agent is learned on a port, the port is moved to a violation state.
The OmniSwitch LLDP Agent Security mechanism provides a solution for secure access to the network by detecting rogue devices and preventing them from accessing the internal network. LLDP agent security can be achieved by allowing only one trusted LLDP remote agent on a network port.
User192.168.0.10
Server192.168.0.100
1/1
IGMP General Query
1/24 1/11/24
Access SwitchAggregation
Switch
Rogue IGMP General Query

Security Best Practices in AOS
Document rev. 1.7 59/70 TKC 000018877
.........................................................
For example, when someone tries to take control over the network by connecting non-registered devices to an NNI port, the LLDP Security mechanism is activated. Following actions are performed according to the security configuration:
When the rogue device is detected, a violation is reported on the port
The NNI port that is connected to the rogue device is blocked, thus the rogue device is prevented from accessing the internal network
Only a learned and validated LLDP remote agent is declared as a valid user
Statically configuring a trusted agent is not allowed
Converting the trusted database to a permanent database is not allowed
If the port on which LLDP trusted remote agent is enabled does not receive any LLDP PDU within 2-3 times the LLDP transmit interval (20-30 seconds) after the link is UP, the port is moved to a violated state
By default, the violation status is set to “Trusted” and the admin status is set to “Disabled” when LLDP trust agent is not enabled on the port
The violation status is set to “Trusted” and the admin status is changed to “Enabled” after enabling a LLDP trust agent configuration on the port
The violation status is moved to “Violated” from “Trusted” if the port does not receive LLDP PDU or if received LLDP PDU does not match the Chassis ID subtype (if Chassis ID subtype is configured by user on the port explicitly)
If the Chassis ID subtype is not configured for validating the remote agent, then LLDP will learn the first remote agent with whatever chassis ID TLV received in the PDU
The learned remote agent entry is also stored in the switch (/flash directory) as a database file, “lldpTrustedRemoteAgent.db”, which is updated every 2 to 5 minutes
There are three configurable options to specify the action taken when the port moves into the violation state: send trap, shut down the port, or send trap and shut down the port
When a LLDP trusted agent port shutdown occurs, a CLI command is used to clear the violation. However, clearing the violation does not clear the trusted remote agent on a port. To clear a trusted remote agent, disable the LLDP security mechanism for the port
LLDP Trusted Agent Configuration example:
-> lldp chassis notification enable
-> lldp chassis tlv management port-description enable
-> lldp chassis tlv system-name enable system-description enable
-> lldp chassis tlv management management-address enable
-> lldp chassis tlv dot1 vlan-name enable port-vlan enable
-> lldp chassis tlv dot3 mac-phy enable
-> lldp 1/1 trust-agent enable
LLDP Violation Action Configuration
-> lldp 1/1 trust-agent violation-action trap
or
-> lldp 1/1 trust-agent violation-action trap-and-shutdown
or

Security Best Practices in AOS
Document rev. 1.7 60/70 TKC 000018877
.........................................................
-> lldp 1/1 trust-agent violation-action shutdown
Chassis-ID Subtype Configuration
-> lldp 1/1 trust-agent chassis-id-subtype <chassis-id-subtype-name>
4.18. Filtering DoS attacks on router interfaces
By default OmniSwitches filters denial of service (DoS) attacks on IP router interfaces, which are security attacks aimed at devices that are available on a private network or the Internet. Few attacks aim at system bugs or vulnerabilities (for example teardrop attacks), while other types of attacks involve generating large volumes of traffic so that network service is denied to legitimate network users (such as pepsi attacks). These attacks include the following:
ICMP Ping of Death—Ping packets that exceed the largest IP datagram size (65535 bytes) are sent to a host and crash the system.
SYN Attack — Floods a system with a series of TCP SYN packets, resulting in the host issuing SYN-ACK responses. The half open TCP connections can exhaust TCP resources, such that no other TCP connections are accepted.
Land Attack — Spoofed packets are sent with the SYN flag set to a host on any open port that is listening. The machine can crash or reboot in an attempt to respond.
Pepsi Attack — The most common form of UDP flooding directed at harming networks. A pepsi attack is an attack consisting of a large number of spoofed UDP packets aimed at diagnostic ports on network devices. A pepsi attack can cause network devices to use up a large amount of CPU time responding to these packets.
ARP Flood Attack — Floods a switch with a large number of ARP requests, resulting in the switch using a large amount of the CPU time to respond to these requests. If the number of ARP requests exceeds the preset value of 500 per second, an attack is detected.
Invalid IP Attack — Packets with invalid source or destination IP addresses are received by the switch. When such an Invalid-IP attack is detected, the packets are dropped, and SNMP traps are generated. Following are few examples of invalid source and destination IP addresses:
Invalid Source IP address – 0.X.X.X – 255.255.255.255 – Subnet broadcast – In the range 224.X.X.X - 255.255.255.254 – Source IP address equals one of Switch IP Interface addresses
Invalid Destination IP address – 127.X.X.X – In the range 240.X.X.X - 255.255.255.254 – 0.0.0.0 (valid exceptions - certain DHCP packets) – 172.28.0.0 for a router network 172.28.4.11/16 – 0.x.x.x.
Multicast IP and MAC Address Mismatch — When such an IP address mismatch attack is detected, the packets are dropped, and SNMP traps are generated

Security Best Practices in AOS
Document rev. 1.7 61/70 TKC 000018877
.........................................................
(exception: the destination IP is a unicast IP and the destination MAC address is either a broadcast or multicast address. In such a condition, an event is recorded in the DoS statistics. No SNMP traps are generated as valid packets can also fall under this category). This attack is detected when:
The source MAC address of a packet received by a switch is a Multicast MAC address.
The destination IP and MAC addresses of a packet received by a switch is same as the Multicast IP and MAC addresses, but the Multicast IP and the Multicast MAC addresses do not match.
Ping overload—Floods a switch with a large number of ICMP packets, resulting in the switch using a large amount of CPU time to respond to these packets. If the number of ICMP packets exceeds 100 per second, a DoS attack is detected. By default, the detection of attack is disabled.
Packets with loopback source IP address — Packets with an invalid source address of 127.0.0.0/8 (loopback network) are received by the switch. When such packets are detected, they are dropped, and SNMP traps are generated.
The switch can be set to detect various types of port scans by monitoring for TCP or UDP packets sent to open or closed ports. If the total penalty value exceeds the set port scan penalty value threshold, a trap is generated to alert the administrator that a port scan can be in progress. Monitoring is done in the following manner:
Packet penalty values set. TCP and UDP packets destined for open or closed ports are assigned a penalty value. Each time a packet of this type is received, its assigned penalty value is added to a running total. This total is cumulative and includes all TCP and UDP packets destined for open or closed ports.
Port scan penalty value threshold. The switch is given a port scan penalty value threshold. This number is the maximum value the running penalty total can achieve before triggering an SNMP trap.
Decay value. A decay value is set. The running penalty total is divided by the decay value every minute.

Security Best Practices in AOS
Document rev. 1.7 62/70 TKC 000018877
.........................................................
5. Important security fixes
Updated March 2nd, 2016
Vulnerability Security Advisory
TKC Article AOS 6.4.X AOS 6.6.X AOS 7.3.X
AOS 8.1.1
JPAKE CVE-2010-5107 CVE-2011-5000 CVE-2010-4755
000017740 PR 198586:
6.4.4.713.R01
6.4.5.595.R02
6.4.6.224.R01
PR 198586:
6.6.3.R01 vulnerable
6.6.4.R01 vulnerable
6.6.5.R02 vulnerable
PR 197844:
7.3.2.R01 vulnerable
7.3.3.R01 vulnerable
PR 197844:
8.1.1.567.R01
DTLS CVE-2014-3571 CVE-2015-0206
000020226 PR 202371:
6.4.4.R01 vulnerable
6.4.5.R02 vulnerable
6.4.6.241.R01
PR 202371:
6.6.3.R01 vulnerable
6.6.4.289.R01
6.6.5.67.R02
PR 202371:
7.3.2.629.R01
7.3.3.555.R01
PR 202371:
8.1.1.600.R01
ntpd CVE-2013-5211 CVE-2014-9295
- PR 201881:
6.4.4.R01 vulnerable
6.4.5.R02 vulnerable
6.4.6.238.R01
PR 201881:
6.6.3.R01 vulnerable
6.6.4.287.R01
6.6.5.67.R02
PR 201881:
7.3.2.625.R01
7.3.3.547.R01
PR 201881:
8.1.1.593.R01
POODLE CVE-2014-3566 000017736 PR 199440:
6.4.4.721.R01
6.4.5.595.R02
6.4.6.216.R01
PR 199440:
6.6.3.R01 vulnerable
6.6.4.275.R01
6.6.5.67.R02
PR 199440:
7.3.2.590.R01
7.3.3.514.R01
PR 199440:
8.1.1.568.R01
Heartbleed CVE-2014-0160 000013243 Not applicable Not applicable PR 195083:
7.3.2.524.R01
7.3.3.468.R01
Not applicable
ShellShock CVE-2014-6271 CVE-2014-7169
000017297 Not applicable Not applicable No impact as non-admin users don’t have access to Maintenance Shell PR 198700:
7.3.2.590.R01
7.3.3.516.R01
No impact as non-admin users don’t have access to Maintenance Shell PR 198700:
8.1.1.609.R01
Weak Session ID
CVE-2015-2804
- Vulnerable Vulnerable Not applicable
Not applicable
Cross-Site Request Forgery
CVE-2015-2805 - 6.4.5.635.R02
6.4.6.302.R01
6.6.5.101.R02 7.3.4.204.R02 8.1.1.663.R01
8.2.1.R01
Glibc DNS Stack-based Buffer Overflow
CVE-2014-9761 CVE-2015-5229 CVE-2015-7547 CVE-2015-8776 CVE-2015-8778 CVE-2015-8779
000031391 Vulnerable Vulnerable Vulnerable Vulnerable

Security Best Practices in AOS
Document rev. 1.7 63/70 TKC 000018877
.........................................................
6. AOS 6 example configuration
Requirements:
OmniSwitch 6850E running 6.4.6.218.R01
An edge device
Ports 1/1-22 are user ports with PCs and/or an IP phones connected
Ports 1/23-24 are uplinks
PCs and IP phones use DHCP for IP assignment
IPv6 is not used by end stations
Routing protocol support is disabled
A single management interface activated and a single static route
Security features are configured in aggressive mode – in case of a violation a port is blocked
LLDP is enabled only on uplinks
AMAP is completely disabled
NMS and Syslog IP address is 192.168.100.253
Gateway IP address is 192.168.100.254
! Chassis :
system name OS6850E
system timezone CET
system daylight savings time enable
! VLAN :
vlan 1 enable name "VLAN 1"
vlan 4094 1x1 stp disable name "Management"
! IP :
no ip service ftp
ip service ssh
no ip service telnet
no ip service udp-relay
no ip service http
ip service network-time
ip service snmp
no ip service avlan-telnet
no ip service avlan-http
no ip service avlan-secure-http
ip service secure-http
no ip service avlan-http-proxy
ip interface "vlan4094" address 192.168.100.1 mask 255.255.255.0 vlan 4094
ifindex 1
! IPMS :
ip multicast dynamic-control status enable
ip multicast dynamic-control drop-all status enable
! AAA :
aaa authentication console "local"
no aaa authentication telnet
no aaa authentication ftp
no aaa authentication http
aaa authentication snmp "local"
aaa authentication ssh "local"
user password-policy cannot contain-username enable
user password-policy min-uppercase 1
user password-policy min-lowercase 1

Security Best Practices in AOS
Document rev. 1.7 64/70 TKC 000018877
.........................................................
user password-policy min-digit 1
user password-policy min-nonalpha 1
! QOS :
qos user-port shutdown bpdu bgp ospf rip vrrp dhcp-server dvmrp isis dns-reply
policy network group management 192.168.100.253 mask 255.255.255.255
policy port group UserPorts 1/1-22
policy condition ipv6 source ipv6 Any ipv6
policy condition trusted source network group management
destination network group Switch
policy condition untrusted destination network group Switch
policy action accept
policy action drop disposition drop
policy rule trusted precedence 65010 condition trusted action accept
policy rule untrusted precedence 65000 condition untrusted action drop
policy rule drop-ipv6 condition ipv6 action drop
qos apply
! Session manager :
session prompt default "OS6850E->"
command-log enable
! SNMP :
snmp security authentication all
snmp station 192.168.100.253 162 "snmp3" v3 enable
! IP multicast :
ip static-route 0.0.0.0/0 gateway 192.168.100.254 metric 1
! Netsec :
netsec group untrusted port 1/1-22
netsec group untrusted anomaly arp-addr-scan state enable log enable trap enable
quarantine enable count 200 period 5
netsec group untrusted anomaly arp-flood state enable log enable trap enable
quarantine enable count 200 period 5
netsec group untrusted anomaly arp-failure state enable log enable trap enable
quarantine enable count 200 period 5
netsec group untrusted anomaly icmp-addr-scan state enable log enable trap enable
quarantine enable count 200 period 5
netsec group untrusted anomaly icmp-flood state enable log enable trap enable
quarantine enable count 200 period 5
netsec group untrusted anomaly icmp-unreachable state enable log enable trap enable
quarantine enable count 200 period 5
netsec group untrusted anomaly tcp-port-scan state enable log enable trap enable
quarantine enable count 200 period 5
netsec group untrusted anomaly tcp-addr-scan state enable log enable trap enable
quarantine enable count 200 period 5
netsec group untrusted anomaly syn-flood state enable log enable trap enable
quarantine enable count 200 period 5
netsec group untrusted anomaly syn-failure state enable log enable trap enable
quarantine enable count 200 period 5
netsec group untrusted anomaly syn-ack-scan state enable log enable trap enable
quarantine enable count 200 period 5
netsec group untrusted anomaly fin-scan state enable log enable trap enable
quarantine enable count 200 period 5
netsec group untrusted anomaly fin-ack-diff state enable log enable trap enable
quarantine enable count 200 period 5
netsec group untrusted anomaly rst-count state enable log enable trap enable
quarantine enable count 200 period 5
Link Aggregate :
! Udld :
udld port 1/13 enable
udld port 1/13 mode aggressive
! Port Mapping :
! VLAN AGG:

Security Best Practices in AOS
Document rev. 1.7 65/70 TKC 000018877
.........................................................
! 802.1Q :
vlan 4093 802.1q 1/45 "TAG PORT 1/45 VLAN 4093"
vlan 4001 802.1q 1/47 "TAG PORT 1/47 VLAN 4001"
vlan 4093 802.1q 1/47 "TAG PORT 1/47 VLAN 4093"
! Spanning tree
interfaces 1/1-22 flood all rate pps 244
interfaces 1/1-22 flood all action shutdown
! 802.1Q :
vlan 4094 802.1q 1/23
vlan 4094 802.1q 1/24
! Spanning tree :
bridge mode flat
! Bridging :
! Port mirroring :
! UDP Relay :
ip helper forward delay 0
ip helper dhcp-snooping enable
ip helper dhcp-snooping binding enable
ip helper dhcp-snooping ip-source-filter port 1/1 enable
...
ip helper dhcp-snooping ip-source-filter port 1/22 enable
ip helper dhcp-snooping port 1/23 trust
ip helper dhcp-snooping port 1/24 trust
! System service :
swlog output socket 172.26.60.244
swlog console level info
! AMAP :
amap disable
! VLAN STACKING:
ethernet-service mac-tunneling disable
! WCCP :
ip wccp admin-state disable
! LLDP :
lldp chassis tlv management port-description enable system-name enable
system-description enable
lldp chassis tlv management management-address enable
lldp 1/1 lldpdu disable
...
lldp 1/22 lldpdu disable

Security Best Practices in AOS
Document rev. 1.7 66/70 TKC 000018877
.........................................................
7. AOS 7 example configuration
Requirements:
OmniSwitch 6900 running 7.3.3.505.R01
A core device
Management through EMP port
All ports are used as interconnections with switches and routers
Routing is enabled only for OSPF
NTP, NMS and Syslog IP address is 192.168.100.253
Auto Fabric is disabled
auto-fabric admin-state disable remove-global-config
! Chassis:
system name "OS6900"
system fips admin-state enable
! VLAN:
vlan 1 admin-state enable
! Spanning Tree:
spantree vlan 1 admin-state enable
! IP:
ip service port 21 admin-state disable
ip service port 23 admin-state disable
ip service port 80 admin-state disable
ip service port 123 admin-state disable
ip service port 443 admin-state disable
ip service port 3799 admin-state disable
ip interface emp address 192.168.254.1
ip interface "vlan1" address 192.168.1.254 mask 255.255.255.0 vlan 1
telnet admin-state disable
ftp admin-state disable
! AAA:
aaa authentication console "local"
aaa authentication snmp "local"
aaa authentication ssh "local"
user password-policy min-uppercase 1
user password-policy min-lowercase 1
user password-policy min-digit 1
user password-policy min-nonalpha 1
! NTP:
ntp server 192.168.100.253 key 1
ntp client admin-state enable
! QOS:
policy condition mdc-dvmrp destination ip 224.0.0.4
policy condition mdc-ipv4mc-reserved destination ip 224.0.0.0 mask 255.255.255.0
policy condition mdc-ipv6mc-reserved destination ipv6 ff02:: mask ff:ff:ff:ff::
policy condition mdc-ospf-5 destination ip 224.0.0.5 ip-protocol 89
policy condition mdc-ospf-6 destination ip 224.0.0.6 ip-protocol 89
policy condition mdc-pim destination ip 224.0.0.13
policy condition mdc-ripv2 destination ip 224.0.0.9 destination udp-port 520
policy condition mdc-vrrp destination ip 224.0.0.18 ip-protocol 112
policy action accept
policy action q17 cpu priority 17
policy rule mdc-vrrp precedence 65070 condition mdc-vrrp action q17
policy rule mdc-ripv2 precedence 65060 condition mdc-ripv2 action q17
policy rule mdc-pim precedence 65050 condition mdc-pim action q17
policy rule mdc-ospf-6 precedence 65040 condition mdc-ospf-6 action accept
policy rule mdc-ospf-5 precedence 65030 condition mdc-ospf-5 action accept
policy rule mdc-dvmrp precedence 65020 condition mdc-dvmrp action q17

Security Best Practices in AOS
Document rev. 1.7 67/70 TKC 000018877
.........................................................
policy rule mdc-ipv6mc-reserved precedence 65010 condition mdc-ipv6mc-reserved
action q17
policy rule mdc-ipv4mc-reserved precedence 65000 condition mdc-ipv4mc-reserved
action q17
qos apply
! LLDP:
lldp all chassis tlv management port-description enable system-name enable
system-description enable
lldp all chassis tlv management management-address enable
! Session manager :
session prompt default "OS6900->"
command-log enable
! SNMP :
snmp security authentication all
snmp authentication-trap enable
snmp station 192.168.100.253 162 "snmp3" v3 enable
! Web:
webview server disable
webview access disable
! System Service:
swlog output socket 192.168.100.253
! VRRP:
ip load vrrp
! OSPF:
ip load ospf
ip ospf area 0.0.0.0
ip ospf interface "vlan1"
ip ospf interface "vlan1" area 0.0.0.0
ip ospf interface "vlan1" auth-type md5
ip ospf interface "vlan1" admin-state enable
ip ospf interface "vlan1" md5 1
ip ospf interface "vlan1" md5 1 key switch
ip ospf admin-state enable

Security Best Practices in AOS
Document rev. 1.7 68/70 TKC 000018877
.........................................................
8. AOS 8 example configuration
Requirements:
OmniSwitch 6860E running 8.1.1.557.R01
An edge device
Management through EMP port
Ports 1/1-24 are user ports with PCs and/or an IP phones connected
Ports 1/25-26 are uplinks
PCs and IP phones use DHCP for IP assignment
Routing is enabled only for OSPF
Security features are configured in aggressive mode – in case of a violation a port is blocked
LLDP is enabled only on uplinks
NTP, NMS and Syslog IP address is 192.168.100.253
! Chassis:
system name "OS6860"
system fips admin-state enable
! Capability Manager:
hash-control extended
! VLAN:
vlan 1 admin-state enable
vlan 100 admin-state enable
vlan 100 members port 1/1/25-26 untagged
! Spanning Tree:
spantree vlan 1 admin-state enable
spantree vlan 100 admin-state enable
! IP:
ip service port 21 admin-state disable
ip service port 23 admin-state disable
ip service port 80 admin-state disable
ip service port 123 admin-state disable
ip service port 443 admin-state disable
ip service port 3799 admin-state disable
ip interface emp address 192.168.254.1
ip interface "vlan1" address 192.168.1.254 mask 255.255.255.0 vlan 1
ip interface "vlan100" address 192.168.100.1 mask 255.255.255.0 vlan 100
telnet admin-state disable
ftp admin-state disable
! AAA:
aaa authentication console "local"
aaa authentication snmp "local"
aaa authentication ssh "local"
user password-policy min-uppercase 1
user password-policy min-lowercase 1
user password-policy min-digit 1
user password-policy min-nonalpha 1
! NTP:
ntp server 192.168.100.253 key 1
ntp client admin-state enable
! QOS:
qos user-port shutdown bpdu bgp ospf rip vrrp dhcp-server dvmrp isis dns-reply
policy port group UserPorts 1/1/1-24
policy condition mdc-dvmrp destination ip 224.0.0.4
policy condition mdc-ipv4mc-reserved destination ip 224.0.0.0 mask 255.255.255.0
policy condition mdc-ipv6mc-reserved destination ipv6 ff02:: mask ff:ff:ff:ff::
policy condition mdc-ospf-5 destination ip 224.0.0.5 ip-protocol 89

Security Best Practices in AOS
Document rev. 1.7 69/70 TKC 000018877
.........................................................
policy condition mdc-ospf-6 destination ip 224.0.0.6 ip-protocol 89
policy condition mdc-pim destination ip 224.0.0.13
policy condition mdc-ripv2 destination ip 224.0.0.9 destination udp-port 520
policy condition mdc-vrrp destination ip 224.0.0.18 ip-protocol 112
policy action accept
policy action q17 cpu priority 17
policy rule mdc-vrrp precedence 65070 condition mdc-vrrp action q17
policy rule mdc-ripv2 precedence 65060 condition mdc-ripv2 action q17
policy rule mdc-pim precedence 65050 condition mdc-pim action q17
policy rule mdc-ospf-6 precedence 65040 condition mdc-ospf-6 action accept
policy rule mdc-ospf-5 precedence 65030 condition mdc-ospf-5 action accept
policy rule mdc-dvmrp precedence 65020 condition mdc-dvmrp action q17
policy rule mdc-ipv6mc-reserved precedence 65010 condition mdc-ipv6mc-reserved
action q17
policy rule mdc-ipv4mc-reserved precedence 65000 condition mdc-ipv4mc-reserved
action q17
qos apply
! LLDP:
lldp all chassis tlv management port-description enable system-name enable
system-description enable
lldp all chassis tlv management management-address enable
lldp all port 1/1/1-24 lldpdu disable
! Session manager :
session prompt default "OS6860E->"
command-log enable
! SNMP :
snmp security authentication all
snmp authentication-trap enable
snmp station 192.168.100.253 162 "snmp3" v3 enable
! Web:
webview server disable
webview access disable
! System Service:
swlog output socket 192.168.100.253
! VRRP:
ip load vrrp
! OSPF:
ip load ospf
ip ospf area 0.0.0.0
ip ospf interface "vlan1"
ip ospf interface "vlan1" area 0.0.0.0
ip ospf interface "vlan1" hello-interval 0
ip ospf interface "vlan1" admin-state enable
ip ospf interface "vlan100"
ip ospf interface "vlan100" area 0.0.0.0
ip ospf interface "vlan100" auth-type md5
ip ospf interface "vlan100" admin-state enable
ip ospf interface "vlan100" md5 1
ip ospf interface "vlan100" md5 1 key switch
ip ospf admin-state enable
! DA-UNP:
port-security port 1/1/1-24 maximum 2
port-security port 1/1/1-24 learn-trap-threshold 2
port-security port 1/1/1-24 admin-state enable
! DHCP Snooping:
dhcp-snooping admin-state enable
dhcp-snooping binding admin-state enable
dhcp-snooping ip-source-filter port 1/1/1-24 admin-state enable
dhcp-snooping port 1/1/25-26 trust

Security Best Practices in AOS
Document rev. 1.7 70/70 TKC 000018877
.........................................................
9. Summary
X.805 Dimension Attack / Challenge AOS Feature AOS 6.4.X
AOS 6.6.X 6.7.1
AOS 7.3.X
AOS 8.1.1 8.2.1
Access control, Authentication and Non-repudiation
Authentication and Authorization
RADIUS
TACACS+
User Password policy
FIPS [1]
Access restriction
ACLs
Console access restriction
[2]
Event logging
Command logging
RADIUS
TACACS+
Syslog
Data confidentiality and Communication
Secure Socket Layer
Allowing only secure protocols
SNMPv3
Availability
DoS attacks on well known network ranges
Multicast Dynamic Control
[3] [7]
CPU queue 17
TTL 0 Flooding A debug variable [4]
IGMP Flooding QoS rules [9] [6] [6]
DHCP Flooding QoS rules [8] [6] [6]
Cisco proprietary MAC flooding
MAC tunneling n/a n/a
MLD flooding QoS rules [9]
ARP flooding TAD [5] [9]
QoS rules [8] [6] [6]
Multicast and unknown unicast flooding
Flood control
ARP attacks on end stations and MAC spoofing
DHCP Snooping with IP Source Filter
ARP attacks on router interfaces
IP Anti-Spoofing
CAM overflow attack Learned Port Security
DHCP rogue server attack DHCP Snooping
QoS User Port
STP claiming root attack QoS User Port
STP Root Guard
Attacks on routing protocols Routing protocol authentication
[1] – 6.4.5.GA [2] – 6.4.6.GA [3] – 6.4.4.707.R01, 6.4.6.218.R01 [4] - 6.4.4.658.R01 [5] – OS6850E, OS6855, OS9700E
[6] – port group split mode is not supported
[7] – 6.6.4.285.R01, 6.6.5.R02 [8] – minimum recommended
version for policy port group
in split mode is 6.6.4.292.R01 (with exception to AOS 6.6.5.R02)
[9] – not applicable to traffic copied to CPU