Embed Size (px)
Citation preview
SecureTransportVersion 5.2.1 SP48 August 2017
Administrator Guide
Copyright © 2016 Axway
All rights reserved.
This documentation describes the following Axway software:
Axway SecureTransport 5.2.1 SP4
No part of this publication may be reproduced, transmitted, stored in a retrieval system, or translated into any human or computer language, in any form or by any means, electronic, mechanical, magnetic, optical, chemical, manual, or otherwise, without the prior written permission of the copyright owner, Axway.
This document, provided for informational purposes only, may be subject to significant modification. The descriptions and information in this document may not necessarily accurately represent or reflect the current or planned functions of this product. Axway may change this publication, the product described herein, or both. These changes will be incorporated in new versions of this document. Axway does not warrant that this document is error free.
Axway recognizes the rights of the holders of all trademarks used in its publications.
The documentation may provide hyperlinks to third-party web sites or access to third-party content. Links and access to these sites are provided for your convenience only. Axway does not control, endorse or guarantee content found in such sites. Axway is not responsible for any content, associated links, resources or services associated with a third-party site.
Axway shall not be liable for any loss or damage of any sort associated with your use of third-party content.
Contents
1 Introduction 17
SecureTransport overview 17
SecureTransport Server 18
SecureTransport Edge 20
Clustering models 21
Stand-alone deployment 21
SecureTransport appliances 21
SecureTransport clients 21
Ad hoc file transfers 22
Axway and third-party software support 23
SecureTransport documentation set 26
Support services 27
2 Operations 29
Log in to the SecureTransport Administration Tool 29
Spaces in required fields 30
Operations menu overview 30
Manage your servers 31
Server status indicators 33
Start and stop servers 34
Reload server configuration 34
Key alias 34
Manage the FTP server 35
Manage the HTTP server 35
Manage the AS2 server 36
Manage the SSH server 36
Manage the PeSIT server 39
Manage the Transaction Manager server 40
Manage the Proxy server on SecureTransport Edge 40
Manage the Monitor server 41
Use the operating system to monitor SecureTransport processes 42
Monitor server usage 43
Enable automatic snapshot updates 43
Disable automatic snapshot updates 43
Server usage snapshot by user class 43
Connection details 44
Track file transfer activity 44
Resubmit status 45
Transfer status 46
AxwaySecureTransport 5.2.1 SP4 Administrator Guide 3
View file transfer information 46
Manage file transfers 54
Transfer Log Maintenance application 54
Server log 55
Search and view server log contents 55
Export the results of a server log search 57
Log Entry Maintenance application 58
Audit log 58
Enable or disable audit logging 60
Search and view audit log contents 60
Export the results of an audit log search 61
Add or edit an audit log entry comment 61
Display audit log entry details 61
Compare audit log entries 62
Link to the audit log 62
Audit Log Maintenance application 63
Server configuration 64
Editable server configuration parameters 64
Local server configuration parameters 64
View and change server configuration parameters 64
Update server configuration files 66
Export and import server configuration 66
Support tool 72
Configure the support tool 72
Add custom information to the support information file 74
Run the support tool 74
Directory browsing 76
Set up the structure for directory browsing 76
Standard browser client 76
Customize a web client 77
SecureTransport Web Client Control for Internet Explorer 81
Enable and configure the SecureTransport Web Client Control 82
Configure Internet Explorer to use the ActiveX controls 83
Server backup 84
3 Setup 85
Certificates 85
Certificate types 85
Certificate Management page 86
Repository encryption certificate 87
Manage local certificates and certificate signing requests 88
Manage trusted CAs 95
Manage the internal CA 96
Change the certificate keystore password 101
AxwaySecureTransport 5.2.1 SP4 Administrator Guide 4
Certificates to generate during initial setup 102
Convert certificate formats 102
Store certificates in a hardware security module 103
PGP key encryption and signing 105
Manage PGP keys 106
PGP transfer settings dependencies 107
FTP server configuration 109
FTP server messages 110
Set up FTP active mode 111
Set up FTP passive mode 112
FTP server limitations 114
Improve FTP performance on a multi-homed system 115
Increase the timeout for large files using server-initiated transfer 115
AS2 server configuration 115
Configure AS2 transfer settings 116
SSH server configuration 117
Bind SSH and SSHD to the same port number 118
Debug SSH Issues 118
Administration Tool server configuration 119
Change password settings 119
Change session settings 120
Change certificate settings 120
PeSIT server configuration 121
Ad hoc file transfer configuration 123
Change the package manager base folder 127
File Retention Maintenance Application 128
SiteMinder integration configuration 128
Database configuration 133
Change the embedded database port or password 133
Switch from the embedded database to an external Oracle database 134
Direct log data to separate Oracle databases 136
Change the external Oracle database 137
Change the external Microsoft SQL Server database 138
Axway Sentinel integration 139
Event states 139
Axway Sentinel Tracked Objects 141
Axway Sentinel dashboards 144
Axway Sentinel requests 148
Configure SecureTransport to send events to Axway Sentinel 148
Server licenses 151
Account session count 151
Ad hoc user licenses 152
Update SecureTransport licenses 152
FTP command log configuration 153
AxwaySecureTransport 5.2.1 SP4 Administrator Guide 5
Add a command logging entry 154
Enable or disable command logging entries 154
Edit a command logging entry 154
Delete command logging entries 155
Transfer log configuration 155
Add transfer logging entries 155
Enable or disable transfer logging entries 156
Edit transfer logging entries 156
Delete transfer logging entries 156
Holiday schedule configuration 156
Mail templates 157
Mail template commands and variables 158
Add a mail template 159
Download a mail template 160
Upload an updated mail template 160
Delete mail templates 160
Miscellaneous configuration 160
Miscellaneous options 161
SMTP Configuration 166
FTP and HTTP server shutdown options 167
Password policy 168
Transaction Manager, protocol, and proxy server communication 169
Manage Transaction Manager, protocol, and proxy server communication 171
4 Standard clustering 179
The standard cluster model 179
Active/active and active/passive clustering 179
Scheduled tasks 183
Consolidated log data representation 183
Services used for cluster management 183
Cluster configuration and setup 184
Set up an active/active cluster 184
Specify the cluster connection timeout 186
Configure servers in a cluster to trust a certificate 186
Set up an active/passive cluster 186
Manage a standard cluster 187
Manage an active/active cluster 187
Manage an active/passive cluster 189
Standard cluster synchronization 190
5 Large enterprise clustering 193
The large enterprise cluster model 193
Large enterprise cluster deployment 193
Workload distribution 195
AxwaySecureTransport 5.2.1 SP4 Administrator Guide 6

Passive disaster recovery 195
Manage a large enterprise cluster 198
Cluster prerequisites 198
Set up a cluster 198
Add a server to a cluster 199
Remove a server from a cluster 200
View cluster status 201
Notification of cluster status 201
Set up a disaster recovery cluster 202
Maintain a disaster recovery cluster 204
DR failover and failback 204
Direct cluster workload 205
6 SecureTransport Edge synchronization 209
Manual synchronization 209
Requirements for synchronization 209
What information is synchronized 210
Set up SecureTransport Edge servers for synchronization 210
Manually synchronize SecureTransport Edge servers 211
Maintain synchronized SecureTransport Edge servers 212
7 LDAP integration 214
LDAP connections, binds, and searches 214
LDAP logins 214
LDAP agents 216
LDAP domains 217
Enable or disable LDAP 217
Create a domain 217
Define LDAP search criteria for a domain 220
Define LDAP user settings for a domain 221
Define attribute mappings for a domain 221
Manage DN filters for a domain 222
Edit a domain 223
Delete domains 224
Configure default domains 224
LDAP domains example 224
Secure LDAP 225
LDAP and Active Directory configuration 225
LDAP home folders 226
Create a home folder entry 226
Enable or disable home folder entries 227
Edit a home folder entry 227
Delete home folder entries 227
LDAP user type ranges 228
AxwaySecureTransport 5.2.1 SP4 Administrator Guide 7

Create a user type range entry 228
Enable or disable user type range entries 228
Edit a user type range entry 228
Delete user type range entries 229
8 SiteMinder integration 230
SiteMinder overview 230
User authentication 231
Web client (HTTP, HTTPS) user authentication 231
Command line client (FTP, FTPS, HTTPS, SSH) user authentication 231
User access control (authorization) 232
Configure SiteMinder for SecureTransport integration 233
Configure SiteMinder settings in SecureTransport 234
Disable the SecureTransport login 234
Configure client certificate authentication settings 234
Import trusted CA certificates 234
Update the Secure Socket Layer settings 235
Integration troubleshooting 235
SiteMinder troubleshooting tools 235
SecureTransport troubleshooting tools 235
9 Manage accounts 237
Accounts overview 237
User accounts 237
Service accounts 237
Subscriptions, transfer sites, and certificates 237
Applications 238
User accounts 238
Display the list of user accounts 238
Page through the list of user accounts 238
Search for a user account 239
Create a user account 240
Web password compatibility 247
View account settings 247
Change how long user account information is cached in memory 247
Disable or enable a user account 247
Lock or unlock a user account 248
Expire a user account password 248
Change a user account password 249
Edit user account settings 249
Delete user accounts 251
Delete and purge a user account 251
Export a single user account 251
Unlicensed users 252
AxwaySecureTransport 5.2.1 SP4 Administrator Guide 8

Protected folders and accounts 254
User certificates 255
Manage certificates 256
Transfer sites 274
Transfer site properties 274
AS2 transfer sites 275
Connect:Direct transfer sites 281
Folder Monitor transfer sites 285
File services interface protocol transfer sites 288
FTP(S) transfer sites 290
HTTP(S) transfer sites 294
PeSIT transfer sites 299
System to Human transfer sites 305
SSH transfer sites 308
Manage transfer sites 313
Transfer profiles 315
Create a transfer profile 316
Edit a transfer profile 317
Delete a transfer profile 318
Subscriptions 318
Encryption options 318
Post-transmission actions 319
Manage subscriptions 322
Service accounts 330
Export a single service account 330
Duplicate an account 331
Control login name case sensitivity 332
10 Advanced account administration 334
Account export and import 334
The account XML schema 334
Export and import accounts 335
Manage administrator accounts 342
Add an administrator account 345
Edit an administrator account 345
Delete an administrator account 346
Locking an administrator account 346
Expire an administrator account password 347
Reset an expired administrator account password 347
Change your administrator password 347
Delegated administration 348
Administrative roles 350
Predefined administrative roles 350
Add an administrative role 353
AxwaySecureTransport 5.2.1 SP4 Administrator Guide 9
Edit an administrative role 355
Account templates 355
Account templates and external users 356
Account template required values 356
Manage account templates 357
Site templates 367
Manage site templates 367
Use a site template to define a transfer site 370
System users 372
Real users 372
Manage password files 373
Business units 376
Manage business units 376
Display active users 380
Client-initiated and server-initiated transfers 381
Transfer mode for server-initiated transfers 381
Transfer multiple files 382
Configure retry parameters for server-initiated transfers 382
Outgoing connections 383
Authentication 383
Server authentication 384
Limitations 384
Encryption and server-initiated transfers 385
11 Access control 386
User classes 386
Custom expressions 387
Default user classes 389
Manage user classes 389
Secure Socket Layer access 392
SSL and SSH 393
Manage SSL access 394
Virtual groups 397
Manage virtual groups 397
Filesystem restrictions 398
Manage filesystem restrictions 399
Upload restrictions 401
Manage upload restrictions 402
Download restrictions 404
Manage download restrictions 404
FTP command restrictions 406
FTP SITE command 407
Manage FTP command restrictions 407
Administration Tool and protocol server access control 409
AxwaySecureTransport 5.2.1 SP4 Administrator Guide 10
Access rule order 409
Enable host names for access control 410
Manage Administration Tool or protocol server access 410
User limits 413
Manage user limits 413
User and group access 415
Manage user and group access 415
12 Applications 417
Application overview 417
Manage applications 418
Access applications 418
Create an application 418
View or edit an application 419
Delete an application 420
Create an Archive Maintenance type application 420
Create an Audit Log Maintenance type application 422
Create an Axway Sentinel Link Data Maintenance type application 424
Create an Axway Transfer CFT type application 425
Create a Basic Application type application 426
Create a File Transfer via File Services Interface type application 427
Create a Human to System type application 428
Create a Log Entry Maintenance type application 429
Create a Package Retention Maintenance type application 431
Create a Shared Folder type application 433
Create a Site Mailbox type application 434
Create a Standard Router type application 435
Create a Transfer Log Maintenance type application 440
Create an Unlicensed Accounts Maintenance type application 444
13 Transaction Manager 446
Rules 446
Rules overview 446
Define a rule 447
Built-in rules packages 448
Streaming 448
Server-initiated transfers 448
Ad hoc transfers 448
Applications 449
Permission checking 449
Other 449
Manage rules packages 452
Enable or disable a rules package 452
Create rules 452
AxwaySecureTransport 5.2.1 SP4 Administrator Guide 11
Edit rules 453
Condition and action editors 453
Create rules packages 454
Add a rule to a rules package 456
Modify a rule 457
Specify rule comparisons and conditions 458
Add a condition function to a rule condition 458
Add a clause in a rule condition 459
Add a nested clause in a rule condition 460
Verify condition rules 461
Save the condition 462
Add actions to a rule 462
Verify actions 463
Save actions 464
Conditions and actions 464
Edit a condition or action 464
Add a condition or action in a sequence 465
Delete a condition or action 466
Export and import rules packages 467
Export rules and rules packages 467
Export a rule 468
Import a rules package 469
Load a rules package 469
Delete a rules package 469
Install agents 470
Install an in-process agent 470
Install an external agent 471
14 AS2 transfers 472
AS2 implementation 472
Synchronous and asynchronous receipts 472
AS2 and application framework: architecture and workflow 473
SecureTransport AS2 server: setup overview 474
15 File services interface transfers 475
File services interface overview 475
Receive files using a file services interface protocol 475
Metadata file 476
Location of the transferred file 479
Send files using a file services interface protocol 479
AxwaySecureTransport 5.2.1 SP4 Administrator Guide 12
Appendix A: Administration Tool features checklist 481
Appendix B: Troubleshooting common problems 484
Communication problems 484
Clocks out of sync 484
Trust establishment issues 485
Connectivity 485
Servers do not start 486
No SSL certificate configured for the server 486
Conflicting port numbers 486
Incorrect host name and IP address in the host file 487
Cannot log in as a client 487
License issues 488
Connectivity to server failed 488
SiteMinder issues 488
LDAP issues 489
File system commands not functional 489
Cannot log in to SecureTransport Edge 490
Client certificate authentication fails 490
Logged in to client with reduced functionality 490
Session terminates due to CSRF protection 491
FTP does not work through the firewall 491
Firewall rules prevent the port from opening 491
Passive port range is not defined in the firewall 492
Check Point firewall is not configured for bidirectional transfers 492
PeSIT file transfer from Axway Transfer CFT to SecureTransport fail for certain ciphers 492
Performance issues 493
Evaluate performance issues 493
DNS settings 493
Firewall issues 494
Other services using too much CPU or memory 495
Installation on network drive 495
Debug log output slows computer 495
Appendix C: FIPS transfer mode 497
FIPS transfer mode details 497
FIPS certified cryptographic libraries 497
Required ciphers and cipher suites 497
Appendix D: Command line utilities 500
Control the servers 500
Utility files 500
AxwaySecureTransport 5.2.1 SP4 Administrator Guide 13
Appendix E: Server logs 503
Log file list 503
Log output details 506
Log4j files 506
Database log files 506
FTPD log file 507
Admin log file 507
General log files 507
Change the log4j files 509
Redirect log4j output from the database 510
Control log fallback from database to file 512
Server log rotation scheduling 513
Appendix F: Transaction Manager rule syntax 515
Expressions 515
Name value pair lists 516
Conditions 517
Number attribute 517
Logical and enumerated attributes 518
Time attributes 518
String attributes 518
Regular expressions 519
Actions 519
Execution control 520
Process agents 520
External agents 520
Appendix G: SecureTransport agent exit codes 521
Appendix H: Firewall settings 530
Enable bidirectional connections in a firewall 530
Check Point firewall 530
Cisco PIX firewall 531
Raptor firewall 531
Configure firewall ports 531
Communication between the outside and SecureTransport Edge 531
Communication between SecureTransport Server and SecureTransport Edge 532
Communication between SecureTransport Server and an internal network 532
Internal SecureTransport communication 532
Firewall rules 533
Protocol rules 533
Authentication rules 536
Administration rules 537
TM server communication rules 537
AxwaySecureTransport 5.2.1 SP4 Administrator Guide 14

Server transfer rules 538
Standard clustering rules 538
Large enterprise clustering rules 538
Protocol rules - outbound from SecureTransport Edge 539
Appendix I: Expression language 541
Overview 541
Operators 541
Predefined variables 542
Predefined variable examples 543
Predefined functions 543
Predefined function examples 544
SecureTransport-specific named variable sets 545
SecureTransport-specific named variable set examples 546
PeSIT variables 547
Match and replace functions 549
Regular expression examples 549
Expression examples 549
Expression variables and examples 550
Appendix J: IP addresses and host names 552
IP address and host name syntax 552
Exact IPv4 or IPv6 address 552
Range of address using Classless Inter-Domain Routing notation 553
Range of address using IPv4 address and subnet mask 553
Patten matching an IPv4 address 553
Exact host name 553
Pattern matching a host name 554
Appendix K: Regular expressions 555
Overview 555
Characters 555
General character classes 556
Predefined character classes 556
Boundary matches 558
Closures 559
Logical and grouping operators 559
Back references 559
Appendix L: Velocity email notification package 561
Email notification overview 561
Velocity overview 562
Configure the ServerTransferNotify rules package 563
Customize the email notification templates 564
AxwaySecureTransport 5.2.1 SP4 Administrator Guide 15
Troubleshooting 566
Restart SecureTransport 567
AxwaySecureTransport 5.2.1 SP4 Administrator Guide 16

1 Introduction
The SecureTransport Administrator Guide provides information about common administration and management tasks performed by Axway SecureTransport administrators.
This guide is intended for system administrators who configure and maintain SecureTransport. As SecureTransport system administrator, you must be able to work effectively with the operating system platform and network used by SecureTransport. As a system administrator who deploys and configures SecureTransport and maintains its configuration, you must know or learn the file transfer requirements of your organization including the systems, protocols, and other standards used within your corporate network and by your partners. You must also be familiar with the configuration of systems that you integrate with SecureTransport, including LDAP, CA SiteMinder, Axway Sentinel, Axway Transfer CFT, and other file transfer clients and servers. As a system administrator who manages user and service account and maintains day-to-day operation of SecureTransport, you must understand the roles of your users and partners so you can assign them correct account properties and access permissions and restrictions. You must also be familiar with application logs and reports so you can interpret those provided by SecureTransport.
This chapter provides an overview of the SecureTransport and provides contact information for obtaining technical support for SecureTransport.
SecureTransport overviewSecureTransport is an enhanced multi-protocol managed file transfer (MFT) gateway solution that enables organizations to secure, manage, and track the transfer of files inside and outside the enterprise firewall in support of both mission-critical business processes and ad hoc human transactions. Designed to handle everything from high-volume automated file transfers between systems, sites, lines of business, and external partners, to user-driven ad hoc communications, to portal-based file exchange, SecureTransport supports the full range of file transfer scenarios while satisfying stringent security, policy, and regulatory compliance requirements. Serving as an MFT gateway, SecureTransport can perform the following key MFT functions:
l Accelerate and manage movement of files (push or pull) and host files in secure mailboxes or folders
l Push data securely to trading partners in real time
l Support ultra-high-end shared service bureaus to meet the demands of multiple business units and organizations in one scalable infrastructure
l Provide a configurable workflow for flexible and dynamic file handling and routing
Also, user-friendly governance and configuration capabilities, including delegated administration and pre-defined and configurable workflows, make SecureTransport a secure, easy-to-implement, and easy-to-use alternative to high-maintenance proprietary file transfer software, simple MFT gateways, and costly VANs and VPNs.
AxwaySecureTransport 5.2.1 SP4 Administrator Guide 17

1 Introduction
SecureTransport is compatible with FTP, FTPS, HTTP, HTTPS, SSH, FIPS 140-2 Level 1, AS2, and PeSIT standards. SecureTransport includes features that support business processes that are mission-critical to the enterprise and the documentation, auditing, and accountability required by government regulations such as HIPAA, GLBA, and Sarbanes-Oxley.
SecureTransport has many enterprise-class features, including the following:
l Standard and large enterprise clustering
l Comprehensive authentication and access control
l A user-friendly HTML5-based end user client for file transfers, transfer status, and full email-style message compose, inbox, and outbox views for ad hoc transactions
l Comprehensive multiple LDAP system integration and mapping
l Complete representational state transfer (REST) web services APIs for administration, for file transfers management, and for custom end user interactions
l Interactive and automated transfers
l Guaranteed delivery
l Flexible support for deployments using one or more peripheral networks (DMZs) that host SecureTransport Edge servers configured to provide specific protocol and proxy services
l Data integrity
l Comprehensive logging and auditing
l Event-driven agents
l Java APIs and protocol support for application integration
l Scheduled transfers
l PGP encryption and decryption
The cryptographic libraries used by SecureTransport for the AS2 (SSL), FTPS, HTTPS, PeSIT (SSL and legacy SSL) and SSH (SFTP and SCP) protocols have been certified Federal Information Protection Standard (FIPS) 140-2 Level 1 compliant by the US National Institute of Standards and Technology (NIST), Computer Security Division, and the Communications Security Establishment of the Government of Canada Information Protection Group.
SecureTransport ServerSecureTransport Server provides a centrally managed system for monitoring and managing secure file transfer activity across multiple file transfer sites or applications. Key capabilities of the SecureTransport Server include:
l Guaranteed delivery – Guarantees secure, reliable, and scalable file transfer service even over unstable network connections or dial-up lines using integrity checking implemented with a cryptographic hash algorithm and provides powerful automation to integrate with back-end systems
l Checkpoint restart – With Axway clients, allows restarting stopped or failed HTTP, PeSIT, and some FTP file transfer from the point of failure
l Secure connectivity – Accepts, validates, and secures incoming connections and file transfers
AxwaySecureTransport 5.2.1 SP4 Administrator Guide 18

1 Introduction
l Multi-protocol support – Executes file transfers using widely adopted open standard FTP, secure FTP, HTTP, HTTP(S), AS2, PeSIT, SSH-based (SFTP and SCP), and Folder Monitor protocols
l Proxy support – Can use the SOCKS5 proxy provided by SecureTransport Edge or an HTTP proxy
l Native Axway File Bus support – Supports PeSIT for connectivity with the Axway File Bus and implements the Axway File Bus using metadata, routing, and automation capabilities aligned with Axway Transfer CFT
l Ad hoc file transfer support – Manages human-to-human (H2H) and human-to-system (H2S) file transfers sent using SecureTransport Web Access Plus or one of the Axway Email Plug-ins and system-to-human (S2H) file transfers delivered through email notifications
l Repository encryption – Encrypts all files on disk at the server transparently
l Transaction management – Provides a customization framework for application integration
l PGP encryption – Handles PGP encryption and decryption, the generation and storing of PGP keys, and the management of the stored keys
l Application integration – Includes REST and Java APIs, protocols, a file services interface, and Axway File Bus support
l Transfer scheduling – Allows administrators to plan and configure scheduled file transfers and ad-hoc tasks
l Monitoring and reporting – Monitors and analyzes file transfer activity, providing real-time reports and alerts
l Signed messaging disposition notification (MDN) receipts – Can generate receipts for all transfers, regardless of protocol
l Flexible clustering models - Include standard clustering for simple deployment with no external dependencies and optional large enterprise clustering to increase the capacity of a SecureTransport deployment to handle large workloads
l Database support – Uses an embedded database or, with optional large enterprise clustering, an external database to store and retrieve configuration parameters and data pertaining to objects and events
l Web administration and configuration – Provides a web-based user interface (the Administration Tool) for centralized administration, configuration, and monitoring of file transfer activity and applications
l Fully Embeddable – Includes a REST API with resources for administration, configuration, and file transfer request management and for creating custom end user access
SecureTransport Server is available as an appliance or as software on Windows and UNIX platforms. You can deploy it as part of a large enterprise cluster or as a stand-alone server
AxwaySecureTransport 5.2.1 SP4 Administrator Guide 19
1 Introduction
SecureTransport EdgeYou can use SecureTransport Edge to implement secure interactions between client systems in a public or other external network and SecureTransport Servers in your internal secure network. SecureTransport Edge is the gateway required in the perimeter network (also called demilitarized zone or DMZ) in a typical multilayer security architecture deployment.
SecureTransport Edge serves as a protocol converter in such a deployment. It treats a wide range of file transfer protocols as presentation layer services and each protocol server translates its protocol onto the streaming protocol used to communicate with the Transaction Manager (TM) server on the SecureTransport Server. The TM Server connects to the protocol servers on the configured SecureTransport Edge servers to establish the connections for the streaming protocol, so no process on a SecureTransport Edge ever makes a connection from the DMZ into the internal secure network. A flexible network zone configuration supports connection to the protocol servers on specific SecureTransport Edge servers for different protocols and file transfers. For more information see Transaction Manager, protocol, and proxy server communication on page 169.
SecureTransport Edge serves all the protocols supported by Axway SecureTransport. When an external partner client program or file transfer server initiates a connection to one of the protocol servers hosted on SecureTransport Edge, it terminates the inbound connection from the client, collects the client’s credentials, and establishes an authenticated encrypted connection to the TM. SecureTransport Edge sends the credentials to the TM as a service request. The TM attempts to authenticate the account using the configured method and returns the result to SecureTransport Edge. If the account is authenticated, SecureTransport Edge establishes the connection.
For a file transfer, SecureTransport Edge uses the streaming protocol to check the access control rules on SecureTransport Server to authorize the transfer. SecureTransport Edge converts the network messages between the client protocol and the SecureTransport streaming protocol, decrypting and encrypting the data as needed. The data is streamed between the external-facing protocol server and the Transaction Manager, the streaming protocol server, running on the SecureTransport Server. No transferred file data is stored in the SecureTransport Edge file system in the perimeter network.
When SecureTransport Server connects to a partner server in the external network to pool for files or to transfer a file, it can use a SOCKS5 circuit-level proxy in SecureTransport Edge to broker the connection through the perimeter network to the external network. Thus, the authentication credentials exist only in the internal secure network and are encrypted until they are presented to the external server. (SecureTransport Server can also use an HTTP proxy.)
SecureTransport Edge is available as an appliance or as software on Windows and UNIX platforms. You can deploy it with stand-alone or clustered SecureTransport Servers. You can deploy two or more SecureTransport Edge systems in support of a SecureTransport Server cluster and synchronize configuration changes dynamically. Each SecureTransport Edge stores its configuration in a local embedded MySQL database. For more information see SecureTransport Edge synchronization on page 209.
AxwaySecureTransport 5.2.1 SP4 Administrator Guide 20
1 Introduction
Clustering modelsTo provide flexibility for both ease in managing clustering and scale to meet the most demanding of loads, SecureTransport Server offers two clustering models. These are standard clustering and large enterprise clustering.
Standard clustering uses an embedded MySQL database, which minimizes external dependencies and overhead and reduces the cost of clustering. A standard cluster can have from two to four nodes (servers). For more information, see Standard clustering on page 179.
For a situation that exceeds the capacity of a standard cluster or requires a shared Microsoft SQL Server or Oracle database, SecureTransport 5.2.1 SP4 offers a Large Enterprise Cluster (LEC) option. A large enterprise cluster using an external database and a high-performance cache-management layer significantly improves efficiency, provides near-linear scaling, and enables very large scale configurations. With the LEC option, an active/active cluster can have up to 20 nodes. The LEC option requires your organization to provide and maintain an Oracle or Microsoft SQL Server database. You must also provide a high-performance shared file system for the user files. For more information, see Large enterprise clustering on page 193.
Stand-alone deploymentWhen you do not need a cluster for additional capacity or improved availability, you can deploy SecureTransport Server as a single server. A stand-alone SecureTransport Server can use the embedded database or, with the LEC option, an external database. All stand-alone deployments can use a local file system for user files.
SecureTransport appliancesIn addition to being offered as software versions, both SecureTransport Server and SecureTransport Edge are offered as appliances. The Axway SecureTransport Appliance offers the SecureTransport file transfer solution using the Axway appliance platform, which is an easily deployable hardened Linux server. This self-contained appliance version of SecureTransport greatly simplifies the implementation and management of a secure file transfer infrastructure. SecureTransport appliances provide enterprises with enhanced security, high performance, and lower acquisition, deployment, and ownership costs.
SecureTransport clientsAxway Secure Client is a secured FTP, HTTP and SFTP client designed to operate with Axway SecureTransport, Axway Gateway, or any standard FTP server. Axway Secure Client runs as a stand-alone application, as a service, or as a background task. Moreover, working with Axway SecureTransport, Axway Interchange, and Axway Gateway, Axway Secure Client guarantees data delivery and data integrity while protecting corporate bandwidths. The Auto Restart feature
AxwaySecureTransport 5.2.1 SP4 Administrator Guide 21

1 Introduction
automatically re-establishes broken connections and resumes transfers from the point where the transfer stopped. When a clustered deployment supports automatic failover, the transfer can resume on another server after a server failure.
SecureTransport Server and SecureTransport Edge support a broad set of file transfer clients to enable a wide range of applications and data transfer scenarios, including third-party file transfer clients or browser-based open standard protocols.
SecureTransport supports the following Axway clients:
l Axway Secure Client
l Axway SecureTransport Web Access Plus
l SecureTransport Browser Client
See Axway and third-party software support on page 23 for supported browsers and versions.
Ad hoc file transfersIn additional to scheduled and event-driven server-initiated file transfers, SecureTransport supports ad hoc file transfers. Using the SecureTransport Web Access Plus client or an Axway Email Plug-in, a SecureTransport user with the required rights can compose an email, attach one or more files, and send it to any email address. Because the files are uploaded to the SecureTransport Server instead of sent in the email, SecureTransport ad hoc file transfer provide the following features not available with the standard email protocol:
l Large file size (for Light Web Access Plus in a 32-bit browser, a maximum of 2 GB per message)
l Choice of methods of file delivery to the mail recipient, including limits on allowed recipients and secure delivery options
l Human-to-system (H2S) ad hoc file transfers where the SecureTransport server can process the file and forward it to another system
A message from Web Access Plus can transfer at most 2 GB data. There is no limit for messages from an Axway Email Plug-in.
The route the email takes to its recipient depends on the client the sender uses:
l Web Access Plus – The SecureTransport Server sends the email using its SMTP configuration.
l Axway Email Plug-ins – The email client, Microsoft Outlook or Lotus Notes, sends the email.
The recipient has different requirements to access the files, depending on the delivery mode, Delivery modes are:
l Anonymous – The recipient clicks a link to access the files.
l Challenge – The recipient must answer a question correctly to access the files.
l Account – The recipient must log on to SecureTransport using Web Access Plus with an existing user account or use an Axway Email Plug-in to access the files.
l Auto-enroll – SecureTransport creates a user account for the recipient before the recipient can access the files. The recipient must log in to SecureTransport using a temporary password and set a new password before retrieving the files.
AxwaySecureTransport 5.2.1 SP4 Administrator Guide 22
1 Introduction
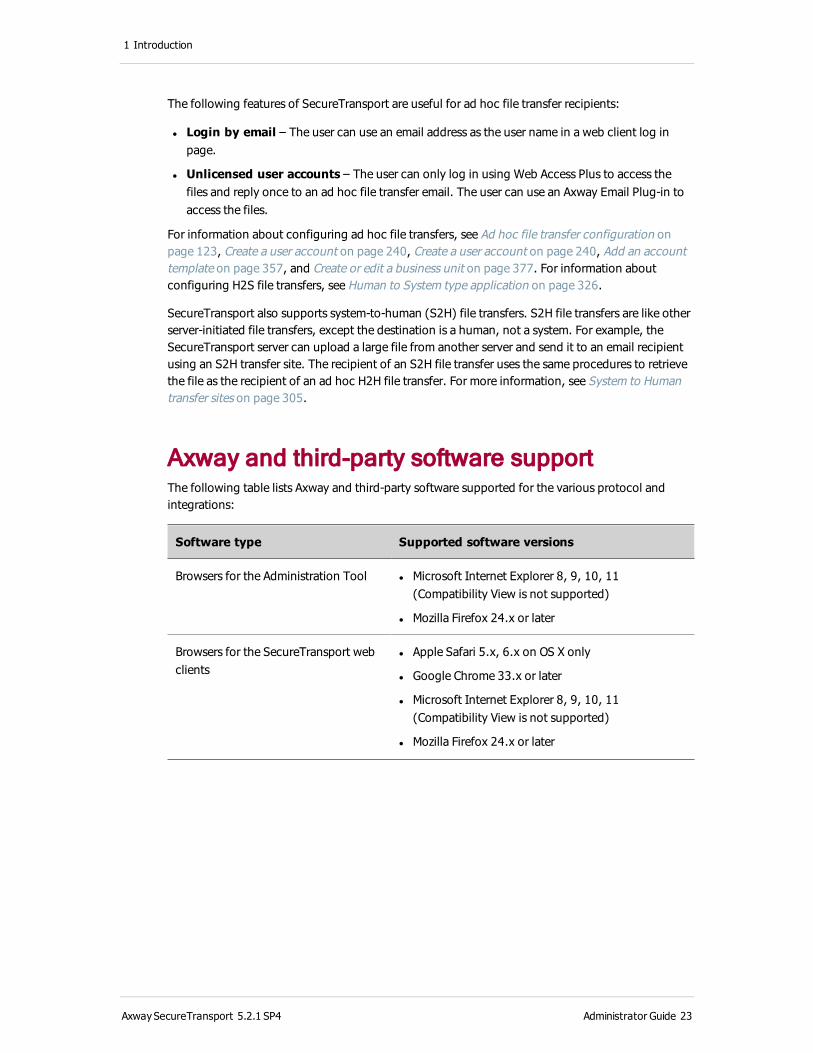
The following features of SecureTransport are useful for ad hoc file transfer recipients:
l Login by email – The user can use an email address as the user name in a web client log in page.
l Unlicensed user accounts – The user can only log in using Web Access Plus to access the files and reply once to an ad hoc file transfer email. The user can use an Axway Email Plug-in to access the files.
For information about configuring ad hoc file transfers, see Ad hoc file transfer configuration on page 123, Create a user account on page 240, Create a user account on page 240, Add an account template on page 357, and Create or edit a business unit on page 377. For information about configuring H2S file transfers, see Human to System type application on page 326.
SecureTransport also supports system-to-human (S2H) file transfers. S2H file transfers are like other server-initiated file transfers, except the destination is a human, not a system. For example, the SecureTransport server can upload a large file from another server and send it to an email recipient using an S2H transfer site. The recipient of an S2H file transfer uses the same procedures to retrieve the file as the recipient of an ad hoc H2H file transfer. For more information, see System to Human transfer sites on page 305.
Axway and third-party software supportThe following table lists Axway and third-party software supported for the various protocol and integrations:
Software type Supported software versions
Browsers for the Administration Tool l Microsoft Internet Explorer 8, 9, 10, 11 (Compatibility View is not supported)
l Mozilla Firefox 24.x or later
Browsers for the SecureTransport web clients
l Apple Safari 5.x, 6.x on OS X only
l Google Chrome 33.x or later
l Microsoft Internet Explorer 8, 9, 10, 11 (Compatibility View is not supported)
l Mozilla Firefox 24.x or later
AxwaySecureTransport 5.2.1 SP4 Administrator Guide 23

1 Introduction
Software type Supported software versions
FTP clients l Axway Secure Client 5.8, 6.0, 6.1
l cURL 7.19 to 7.22
l CuteFTP Professional 8.3.2 to 9.0.5
l FileZilla Client 3.5.x
l IglooFTP PRO 3.9
l Ipswitch WS_FTP 12.2, 12.3
l LFTP 3.7 to 4.3.2
l SmartFTP Client 3.0, 4.0
HTTP clients l Axway SecureTransport Browser Clients 5.2.1 SP4
l Axway SecureTransport Web Access Plus 5.2.1 SP4 (requires JRE 1.6 or later)
l Axway Secure Client 5.8, 6.0, 6.1
l cURL 7.19 to 7.22
SSH clients l Axway Secure Client 5.8, 6.0, 6.1
l cURL 7.19 to 7.22
l FileZilla Client 3.5.x
l PSCP 0.60
l PSFTP 0.60
l Tectia Client 6.1, 6.2
l VanDyke SecureFX 6.6.1 to 6.7
l WinSCP 4.2.9 to 4.3.5
l Any client that complies with RFCs 4251–4254
Ad hoc file transfer clients l Axway Email Plug-ins 3.0, 3.1
l Axway SecureTransport Web Access Plus 5.2.1 SP4 (requires JRE 1.6 or later)
FTP(S) servers for server-initiated transfers
l Axway Gateway 6.13.1, 6.14.1
l Axway SecureTransport 5.0, 5.1, 5.2, 5.2.1 SP4
l GlobalSCAPE EFT Server 6
l IBM Mainframe FTP(S)
l Ipswitch WS_FTP Server 7.5, 7.5.1
l Oracle Solaris 10 FTP Server
AxwaySecureTransport 5.2.1 SP4 Administrator Guide 24
1 Introduction
Software type Supported software versions
HTTP(S) servers for server-initiated transfers
l Axway SecureTransport 5.0, 5.1, 5.2, 5.2.1 SP4
Note Only another SecureTransport server is supported for server-initiated HTTP(S) transfers.
SSH servers for server-initiated transfers l Axway Gateway 6.13.1, 6.14.1
l Axway SecureTransport 5.0, 5.1, 5.2, 5.2.1 SP4
l OpenSSH 5.x
l Tectia Server 6.0.7 to 6.2
l VanDyke VShell 3.5.3 to 3.8
AS2 servers for server-initiated transfers l Axway SecureTransport 5.0, 5.1, 5.2, 5.2.1 SP4
l Any server certified by Drummond Group
PeSIT servers l Axway Gateway 6.13.1, 6.14.1
l Axway Interchange 5.10.x
l Axway SecureTransport 5.1, 5.2, 5.2.1 SP4
l Axway Transfer CFT 2.7.1, 3.0.1, 3.1.2
Single sign-on servers l CA SiteMinder 6.x, 12.x
l Microsoft Windows 2003 and 2008 ActiveDirectory
l SunOne Directory Server 5.2
Proxy servers l Apache Reverse Proxy
l IBM Webseal 6
l Microsoft Forefront Threat Management Gateway 2010
l Oracle iPlanet Web Proxy Server 4.0
Business Activity Monitoring server l Axway Sentinel 3.6, 4.x
PGP utilities to encrypt file, decrypt files, and generate key pairs
l PGP Desktop 9.0.0 (for UNIX-based systems)
l PGP Desktop 9.8.2 (for Microsoft Windows)
l GnuPG 2.0
Note Axway tests the latest available production version of Google Chrome and Mozilla Firefox prior to each release of SecureTransport.
SecureTransport 5.2.1 SP4 includes the Java SE 7u51 (security update 14.Jan.2014) JRE for all platforms except AIX. On AIX, SecureTransport 5.2.1 SP4 includes the IBM Java 7.0 Service Refresh 6 JRE.
AxwaySecureTransport 5.2.1 SP4 Administrator Guide 25

1 Introduction
Axway SecureTransport 5.2.1 SP4 complies with the applicable standards for the protocols it supports. You can expect all client and server software that complies with following standards to operate correctly with SecureTransport:
l AS2 – Drummond-certified
l FTP(S) client and server – RFCs 959, 2228, 2389, 2428, and 2640, 4217, the Internet-Draft The 'MD5' and "MMD5" FTP Command Extensions, and the Modify File Modification Time (MFMT) section of the Internet-Draft The 'MFxx' Command Extensions for FTP
l HTTP(S) client – RFCs 1945, 2109, 2116, 2616, 2617, 2818, and 2965 (server-initialed transfers to or from another SecureTransport server only)
l HTTP(S) server – RFCs 2616, 2818, and 6455, and JSR-245
l PeSIT – Protocol profile E, all features in the version 1 specification except CRC (PI-1) support, messages (PI-91) are limited to 4 kB
l SSH client – RFCs 4251–4254, protocol versions 1.99, 2.0, and 4, Internet-Drafts SSH Fingerprint Format and Generic Message Exchange Authentication For SSH
l SSH server – RFCs 4251–4254, protocol versions 1.99, 2.0, and 3, Internet-Draft SSH Fingerprint Format
SecureTransport documentation setSecureTransport provides the following documentation:
l SecureTransport Administrator Guide – (This document) This guide describes how to use the SecureTransport Administration Tool to configure and administer your SecureTransport Server. The content of this guide is also available in the Administration Tool online help.
l SecureTransport Web Client User Guide – This guide describes how to use the SecureTransport Browser Client and Web Access Plus to transfer files between your local machine and your SecureTransport Server. The Web Access Plus content of this guide is also available in the Web Access Plus online help.
l SecureTransport Installation Guide – This guide explains how to install, upgrade, and uninstall SecureTransport Server on UNIX-based platforms, Microsoft Windows, and Axway Appliances.
l SecureTransport Release Notes – This document contains information about new features and enhancements, late-breaking information that could not be included in one of the other documents, and a list of known and fixed issues.
l SecureTransport Developer Guide – This guide explains how to use rules, rule packages, and agents to customize SecureTransport. Additional information includes an explanation of how to use the application framework.
l SecureTransport Capacity Planning Guide – This guides provides information useful when planning your production environment for SecureTransport.
l Axway Appliance Quick Start – This document provides instructions for unpacking, mounting, connecting, and powering up an appliance, provides instructions for installing and deploying an Axway Appliance, plus technical specifications and references to safety, regulatory, and recycling information.
AxwaySecureTransport 5.2.1 SP4 Administrator Guide 26
1 Introduction
l Axway Email Plug-ins Installation Guide – This guide provides instructions for installing and deploying the Axway Microsoft Outlook add-in and the Axway Lotus Notes plug-in.
l Axway Email Plug-ins Release Notes – This document contains information about installation and upgrade packages, new features, and a list of known limitations.
l Axway Outlook Add-in Installation Guide – This guide provides instructions for installing and deploying the Axway Microsoft Outlook add-in .
l Axway Outlook Add-in Release Notes – This document contains information about installation and upgrade packages, new features, and a list of known limitations.
l Axway Integrator and SecureTransport interoperability Guide – This guide describes the interface between Axway Integrator and Axway SecureTransport and how to configure those products to interoperate.
l SecureTransport Software Developer Kit (SDK) online help – The SDK includes an HTML-based API reference developers can use while customizing SecureTransport.
l SecureTransport REST API online reference – The SecureTransport Server hosts an HTML-based API reference developers can use while developing integrations for SecureTransport.
Support servicesSupport services are available from Axway at support.axway.com, including:
l Official documentation
l Product downloads, service packs and patches
l Information about supported platforms
l Knowledgebase articles
l Access to your cases
The Axway Global Support team also provides worldwide 24 x 7 support, subject to validation of your license agreement. Email [email protected] or, for your local support telephone number, visit Axway at support.axway.com and click Contact Axway Support.
When you contact Axway Support with a problem, be prepared to provide the following information for more efficient service:
l Product version and build number
l Database type and version
l Operating system type and version
l Service packs and patches applied
l Description of the sequence of actions and events that led to the problem
l Symptoms of the problem
l Text of any error or warning messages
l Description of any attempts you have made to fix the problem and the results
AxwaySecureTransport 5.2.1 SP4 Administrator Guide 27
1 Introduction
To list the SecureTransport version, service pack level, and installed patches, use the Axway Installer Display function. For example, on UNIX-based platforms, run <AxwayHome>/display.sh where <AxwayHome> is the installer installation directory.
The SecureTransport version and build number are listed in the <FILEDRIVEHOME>/conf/version.txt file, where <FILEDRIVEHOME> is the SecureTransport installation directory.
For information about Axway training services, go to: www.axway.com.
AxwaySecureTransport 5.2.1 SP4 Administrator Guide 28
2 Operations
Use the Operations menu of the Axway SecureTransport Administration Tool to initiate operator-driven actions, planned daily tasks, statistics, monitors, and responses to events.
Administration Tool server runs as an HTTPS server using port 444 by default. The Administration Tool server starts automatically each time a UNIX-based system starts. The installer includes a startup item in the system’s rc directory tree. On a Windows system, the server runs as a service.
You can also manually start the Administration Tool server by executing the following commands:
l For UNIX, go to <FILEDRIVEHOME>/bin and run ./start_admin.
l For Windows, go <FILEDRIVEHOME>\bin\ and run start_admin.com.
Note The Administration Tool server reserves ports 8004, 8005, and 8009 to be used by the Java-based component. These ports are used strictly for internal communication within the Administration Tool and cannot be used for other purposes.
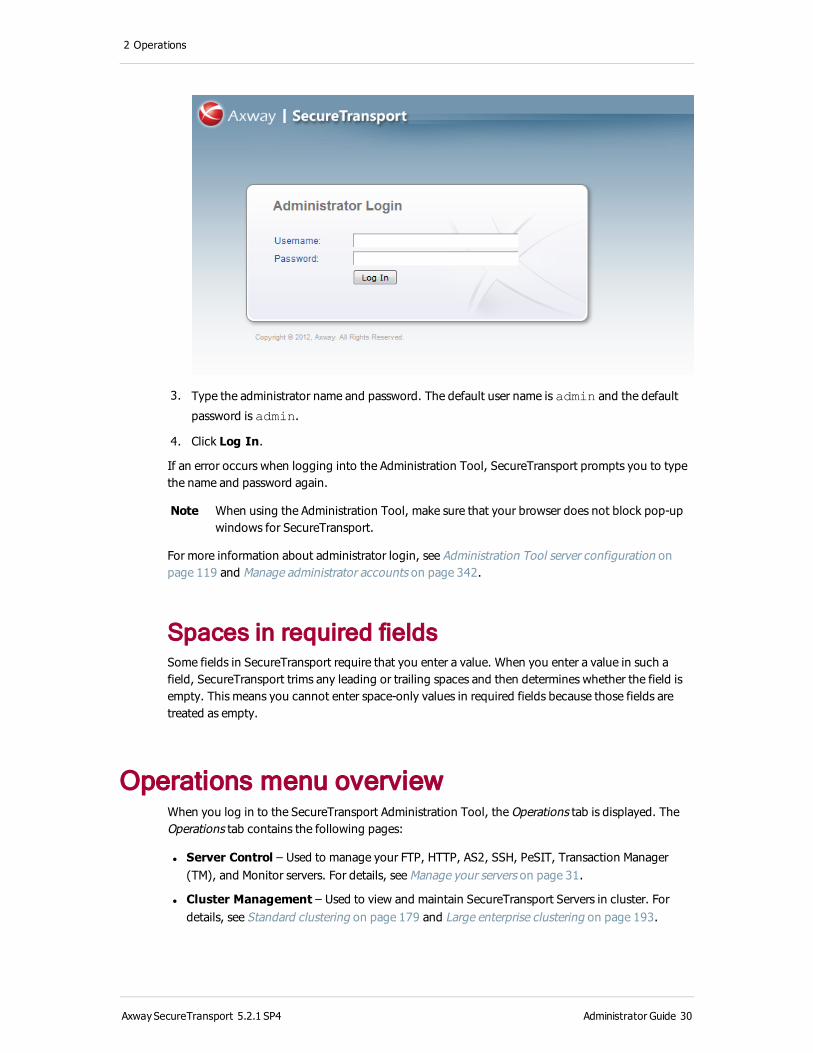
Log in to the SecureTransport Administration Tool
For a list of supported web browsers, see Axway and third-party software support on page 23.
1. Open the web browser.
2. Type the URL for the Administration Tool as follows:
https://<host>:port
where <host> is the host name, FQDN or IP of the computer running SecureTransport and
port is the administration port number entered during installation. The default port number is
444.
The login page is displayed.
AxwaySecureTransport 5.2.1 SP4 Administrator Guide 29
2 Operations
3. Type the administrator name and password. The default user name is admin and the default
password is admin.
4. Click Log In.
If an error occurs when logging into the Administration Tool, SecureTransport prompts you to type the name and password again.
Note When using the Administration Tool, make sure that your browser does not block pop-up windows for SecureTransport.
For more information about administrator login, see Administration Tool server configuration on page 119 and Manage administrator accounts on page 342.
Spaces in required fieldsSome fields in SecureTransport require that you enter a value. When you enter a value in such a field, SecureTransport trims any leading or trailing spaces and then determines whether the field is empty. This means you cannot enter space-only values in required fields because those fields are treated as empty.
Operations menu overviewWhen you log in to the SecureTransport Administration Tool, the Operations tab is displayed. The Operations tab contains the following pages:
l Server Control – Used to manage your FTP, HTTP, AS2, SSH, PeSIT, Transaction Manager (TM), and Monitor servers. For details, see Manage your servers on page 31.
l Cluster Management – Used to view and maintain SecureTransport Servers in cluster. For details, see Standard clustering on page 179 and Large enterprise clustering on page 193.
AxwaySecureTransport 5.2.1 SP4 Administrator Guide 30
2 Operations
l Server Usage Monitor – Used to monitor by user class the FTP and HTTP sessions and the protocol bandwidth consumed. For details, see Monitor server usage on page 43.
l File Tracking – Displays a log of the status and attributes of each file transfer. Also, used to display detailed information about a transfer and to cancel or resubmit a transfer. SecureTransport Server only. For details, see Track file transfer activity on page 44.
l Server Log – Used to view, search, and filter the logs from the SecureTransport Server. For details, see Server log on page 55.
l Audit Log – Used to view, compare, and export log entries that SecureTransport records when any change is made to the SecureTransport configuration. For details, see Audit log on page 58.
l Server Configuration – Used to view, change, export, and import server configuration settings. For details, see Server configuration on page 64.
l Support Tool – Used to collect information about SecureTransport and its host operating system and save it in a support information file that you can send to Axway Global Support. For details, see Support tool on page 72.
Manage your serversUse the Server Control page to manage the protocol and TM component servers of your SecureTransport system. On the Server Control page for a SecureTransport Server you can specify port, SSL key alias, and FIPS transfer mode settings for the FTP, HTTP, AS2, SSH, PeSIT, and Transaction Manager (TM) servers and start and stop them. These are the component servers of the SecureTransport Server. You can also start and stop the Monitor server.
AxwaySecureTransport 5.2.1 SP4 Administrator Guide 31

2 Operations
On the Server Control page for a SecureTransport Edge, there is no TM Server pane because the Transaction Manager does not run on the SecureTransport Edge, but you can configure the port for the SecureTransport Edge proxy server. For details, see Manage the Proxy server on SecureTransport Edge on page 40.
AxwaySecureTransport 5.2.1 SP4 Administrator Guide 32
2 Operations
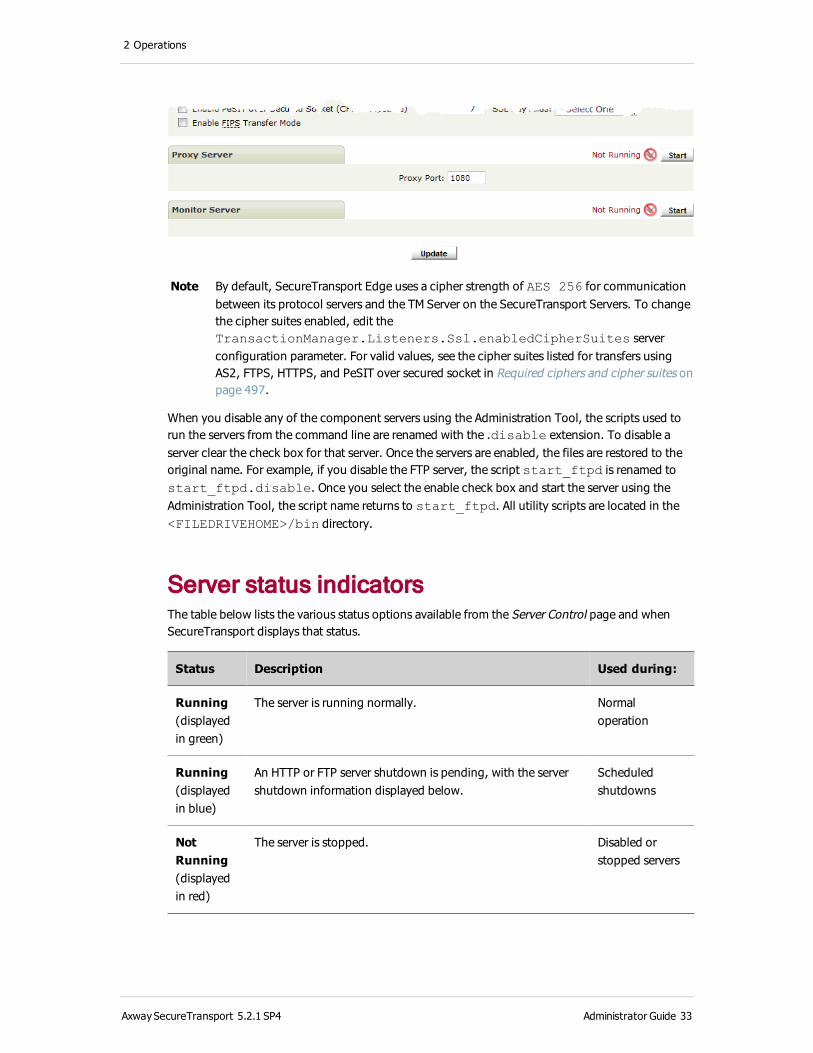
Note By default, SecureTransport Edge uses a cipher strength of AES 256 for communication between its protocol servers and the TM Server on the SecureTransport Servers. To change the cipher suites enabled, edit the TransactionManager.Listeners.Ssl.enabledCipherSuites server configuration parameter. For valid values, see the cipher suites listed for transfers using AS2, FTPS, HTTPS, and PeSIT over secured socket in Required ciphers and cipher suites on page 497.
When you disable any of the component servers using the Administration Tool, the scripts used to run the servers from the command line are renamed with the .disable extension. To disable a server clear the check box for that server. Once the servers are enabled, the files are restored to the original name. For example, if you disable the FTP server, the script start_ftpd is renamed to start_ftpd.disable. Once you select the enable check box and start the server using the Administration Tool, the script name returns to start_ftpd. All utility scripts are located in the <FILEDRIVEHOME>/bin directory.
Server status indicatorsThe table below lists the various status options available from the Server Control page and when SecureTransport displays that status.
Status Description Used during:
Running(displayed in green)
The server is running normally. Normal operation
Running(displayed in blue)
An HTTP or FTP server shutdown is pending, with the server shutdown information displayed below.
Scheduled shutdowns
Not Running(displayed in red)
The server is stopped. Disabled or stopped servers
AxwaySecureTransport 5.2.1 SP4 Administrator Guide 33

2 Operations
Status Description Used during:
Shutdown(displayed in red)
The HTTP or FTP server is scheduled to shut down in the near future. The HTTP or FTP server is running, but does not allow transfers. Users can still connect and get messages.
Temporary shutdowns, such as for maintenance
Start and stop serversUse the button to the right of the status indicator for each server to start or stop that server. Always restart a server when you change a port number or enable FIPS transfer mode.
l When the server is not running, the button label is Start. Click it to start the server.
l When the server is running, the button label is Stop. Click it to stop the server.
Use the Stop All and Start All buttons in the top right corner of the Server Control page to stop or start all servers. Stop All stops all running servers. Start All start all protocol servers that are enabled plus the TM server. It also start the Monitor server if it was running and then stopped.
Note When a server is stopped or disabled, its services are unavailable. However, any connections active at the time the FTP server is disabled are not terminated until the user or the server closes the session.
Reload server configurationThe SecureTransport server configuration is stored in the database and loaded into the server component processes when they start or when the configuration changes. You can bounce the server to force a configuration reload. This is the procedure for a stand-alone SecureTransport Server or a SecureTransport Edge. To bounce servers in a cluster, use the Cluster Management page.
l In the SecureTransport menu bar, click Bounce.
The server reloads its configuration. If the bounce is successful, the server displays an "OK" message.
Key aliasWhen you set up FTPS, HTTPS, AS2 (SSL), SSH, PeSIT, or SecureTransport Edge communication with the Transaction Manager on the SecureTransport Server, you select a key alias to specify the certificate to use to secure the communications. You created the alias when you generated the certificate. For information about importing and generating certificates, see Certificates on page 85. For a list of certificates commonly used with SecureTransport, refer to the SecureTransport Installation Guide.
AxwaySecureTransport 5.2.1 SP4 Administrator Guide 34
2 Operations
Manage the FTP serverTo use FTP, specify the FTP settings for both the SecureTransport Edge and SecureTransport Server.
1. Select Enable FTP.
2. The default FTP port number is 21 for root installation and 8021 for non-root installation. If the default port is in use, SecureTransport displays a message and you must change the FTP Port to use a port number other than the default setting.
Note FTP might already be running on port 21. To avoid a port conflict, you can disable FTP at the OS level or assign it a different port number instead of changing the port number in SecureTransport.
3. To enabled FTPS:
a. Select Enable FTPS.
b. Select an SSL Key Alias from the drop-down list, for example, ftpd. For information
about storing the FTPS certificate in a hardware security module, see Store certificates in a hardware security module on page 103.
c. To restrict FTPS connections to FIPS 140-2 Level 1 certified cryptographic libraries, select the Enable FIPS Transfer Mode check box. For more information, see FIPS transfer mode on page 497.
4. Click Start.
Note To enable FTP without SSL (FTP and not FTPS), you must disable SSL FTP connections and create an SSL encryption entry for a user class with SSL encryption optional. See Manage SSL access on page 394.
For information about more FTP settings, see FTP server configuration on page 109.
Manage the HTTP serverTo use HTTP, specify the HTTP settings for both the SecureTransport Edge and SecureTransport Server.
1. Select one or both of Enable HTTP and Enable HTTPS.
2. The default HTTP port number is 80 for root installations and 8080 for non-root installations. The default HTTPD port number is 443 for root installations and 8443 for non-root installations. If a default port is in use, SecureTransport displays a message and you must change the Port to use a port number other than the default setting.
3. If you enabled HTTPS, select an SSL Key Alias from the drop-down list, for example, httpd.
For information about storing the HTTPS certificate in a hardware security module, see Store certificates in a hardware security module on page 103.
4. If you enabled HTTPS, to restrict HTTPS connections to FIPS 140-2 Level 1 certified cryptographic libraries, select the Enable FIPS Transfer Mode check box. For more
AxwaySecureTransport 5.2.1 SP4 Administrator Guide 35

2 Operations
information, see FIPS transfer mode on page 497.
5. Click Start.
Note To enable HTTP without SSL (HTTP and not HTTPS), you must create an SSL encryption entry for a user class with SSL encryption optional. See Manage SSL access on page 394.
Manage the AS2 serverAS2 (Applicability Statement 2) is a specification about how to transport data securely and reliably over the Internet. Security is achieved by using digital certificates and encryption. The AS2 specification describes how to exchange business data securely and reliably using HTTP as an underlying transport. The data is packaged using standard MIME content types so you can use XML, EDI, binary data, and any other data describable in MIME. Message security (authentication, confidentiality) is implemented using S/MIME. Message reliability is enabled through the use of MDNs. Nonrepudiation and Nonrepudiation of Receipt are business and legal concepts that build upon the security and reliability components in AS2.
If an AS2 license is available, enable the AS2 server. Specify the AS2 settings on both SecureTransport Server and SecureTransport Edge.
1. Select one or both of Enable AS2 (non-SSL) and Enable AS2 (SSL).
2. Type a port for each protocol you enabled. The default ports are 10080 for AS2 (non-SSL) and 10443 for AS2 (SSL).
3. If you enabled AS2 (SSL), select an SSL Key Alias from the drop-down list.
4. If you enabled AS2 (SSL), to restrict AS2 (SSL) connections to FIPS 140-2 Level 1 certified cryptographic libraries, select the Enable FIPS Transfer Mode check box. For more information, see FIPS transfer mode on page 497.
5. In the AS2 Shutdown Port field, type a shutdown port for AS2 server. The default port number is 8006.
6. Click Start.
Note To enable AS2 without SSL, you must create an SSL encryption entry for a user class with SSL encryption optional. See Manage SSL access on page 394.
For information about more AS2 settings, see AS2 server configuration on page 115.
Manage the SSH serverSecure Shell (SSH) is a command interface and protocol that a user can use to connect to a remote host over an encrypted connection. SecureTransport provides an SSH server that authenticates users of an SSH or SFTP client and enables users to perform file transfers over an SSH channel.
Note The default port number for the SecureTransport SSH server is 22 for a root installation, and 8022 for a non-root installation. This port is typically assigned to the native SSH server. The SecureTransport SSH server and the native SSH server cannot share the same port. Use another available port for the SecureTransport SSH server. If the SSH port number is changed, restart the SSH server to apply the change.
AxwaySecureTransport 5.2.1 SP4 Administrator Guide 36
2 Operations
For information about more SSH settings, see SSH server configuration on page 117.
SCP and SFTP supportThe SecureTransport SSH server supports the protocol version and the following SSH file transfer features:
l Secure Copy (SCP)
l Secure File Transfer Protocol (SFTP)
SecureTransport SSH file transfers can be performed using third-party SSH clients that support SFTP or SCP. (For a complete list of supported SSH clients, see Axway and third-party software support on page 23.)
Note SecureTransport SSH does not support guaranteed delivery of file transfers and interactive SSH sessions.
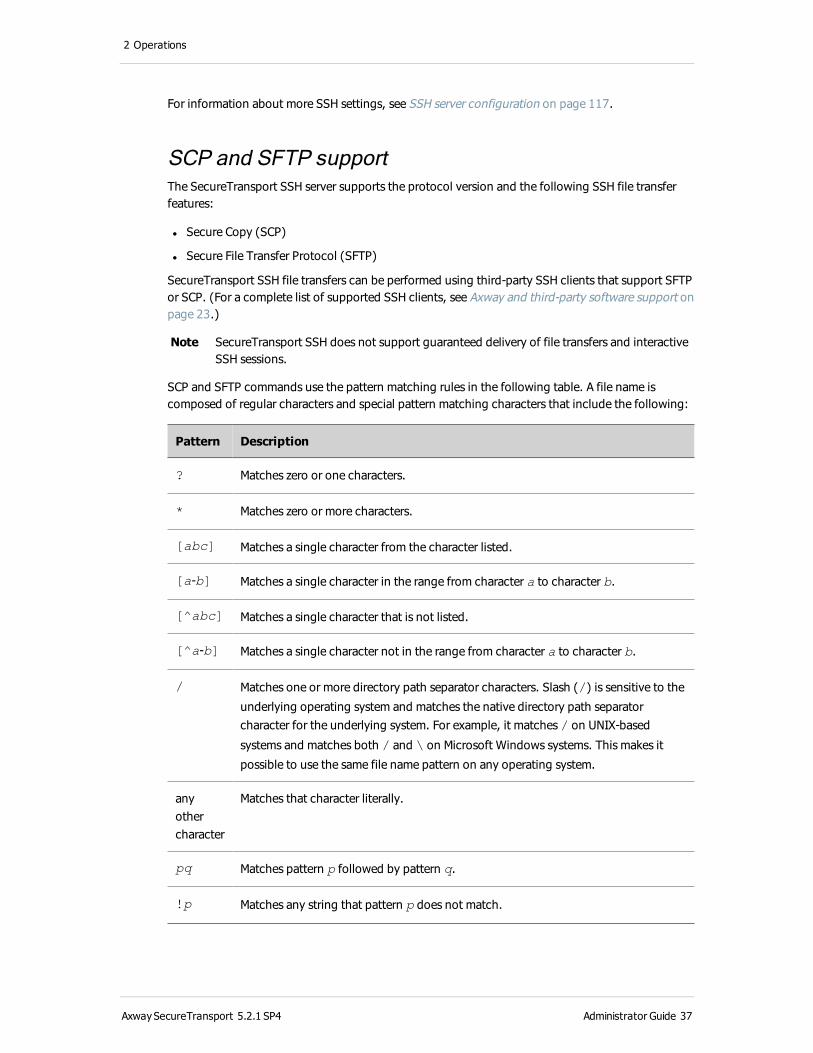
SCP and SFTP commands use the pattern matching rules in the following table. A file name is composed of regular characters and special pattern matching characters that include the following:
Pattern Description
? Matches zero or one characters.
* Matches zero or more characters.
[abc] Matches a single character from the character listed.
[a-b] Matches a single character in the range from character a to character b.
[^abc] Matches a single character that is not listed.
[^a-b] Matches a single character not in the range from character a to character b.
/ Matches one or more directory path separator characters. Slash (/) is sensitive to the
underlying operating system and matches the native directory path separator character for the underlying system. For example, it matches / on UNIX-based
systems and matches both / and \ on Microsoft Windows systems. This makes it
possible to use the same file name pattern on any operating system.
any other character
Matches that character literally.
pq Matches pattern p followed by pattern q.
!p Matches any string that pattern p does not match.
AxwaySecureTransport 5.2.1 SP4 Administrator Guide 37
2 Operations
Pattern Description
\c Backslash (\) removes (escapes) any special meaning of character c.
Secure File Transfer ProtocolSecure File Transfer Protocol (SFTP) is a protocol for transferring files over an encrypted SSH channel.
While the SFTP protocol provides a wide-range of operations, not all of these operations are relevant to SecureTransport file transfers. The SecureTransport SSH server accepts the following SFTP client file operations only:
l Upload and download (including cancel and resume)
l Create directory
l Remove directory
l Remove file
l Rename file
l Get directory listings
l Change file mode
SSH settingsIf you are using SSH, specify the SSH settings for both the SecureTransport Edge and SecureTransport Server.
1. Select one or both of Enable Secure File Transfer Protocol (SFTP) and Enable Secure Copy (SCP).
2. Type a port for the SSH server.
3. If the operating system SSH server is using port 22, assign a different port number. To avoid a port conflict, you can disable SSH at the OS level or assign it a different port number instead of changing the port number in SecureTransport. To avoid this conflict, the operating system SSH port for Axway appliances is 10022 by default.
4. Select an SSH Key Alias from the drop-down list. The list includes only certificates with RSA keys. SecureTransport does not support DSA keys.
5. To restrict SSH (SFTP and SCP) connections to FIPS 140-2 Level 1 certified cryptographic libraries, select the Enable FIPS Transfer Mode check box. For more information, see FIPS transfer mode on page 497.
6. Click Start.
To view the SSH Server Public Key Fingerprint, click View Fingerprint.
Note View Fingerprint does not work until a key alias is assigned and the page is updated.
AxwaySecureTransport 5.2.1 SP4 Administrator Guide 38
2 Operations
Configure third party clients for SSHSome third-party clients might provide a Resume function that is not compatible with SSH in SecureTransport.
The Resume function fails because of a conflict with post-transmission actions: the file is uploaded using a different extension, such as .part and once uploaded the third party client renames it back to the original file name. At this point the post-transmission actions cause the transfer to fail because SecureTransport cannot find the file with the .part extension. To avoid this issue, disable the third party client resume feature.
Manage the PeSIT serverPeSIT (Protocole d’Echanges pour un Systeme Interbancaire de Telecompensation, in English, Exchange Protocol for an Interbank Teleclearing System) is a file transfer protocol and framework developed by GSIT, the French interback teleclearing system. SecureTransport implements the PeSIT version E non-SIT profile and supports the following features also supported by Axway Transfer CFT:
l Mutual authentication by passwords
l Send and receive
l ASCII, EBCDIC and BINARY transfer modes
l Fixed and variable record formats
l Data compression during transfer
l Transfer checkpoint and automatic restart
l Flow control with sliding window
l Integrity checking
l Store and forward routing
l pTCP protocol version 2
When a partner sends a file to SecureTransport using PeSIT, SecureTransport retains the values of many PeSIT PI codes with the file as metadata. The expression in the User Message Send field of a PeSIT transfer site can access the protocol identifier (PI) values. For details, see PeSIT transfer sites on page 299.
When SecureTransport routes a transferred file to a final PeSIT destination, SecureTransport includes both PI 61 and PI 62.
Because PeSIT transmissions can use SSL, SecureTransport include options to enable SSL.
To use PeSIT, specify the PeSIT settings for both the SecureTransport Edge and SecureTransport Server.
AxwaySecureTransport 5.2.1 SP4 Administrator Guide 39
2 Operations
1. Select one or more of the PeSIT transmission options:
l Enable PeSIT over Plain Socket – PeSIT E over TCP/IP without SSL
l Enable PeSIT over Secured Socket – PeSIT E over TCP/IP using SSL
l Enable PeSIT over pTCP Plain Socket – PeSIT E over parallel TCP/IP without SSL
l Enable PeSIT over pTCP Secured Socket – PeSIT E over parallel TCP/IP using SSL
l Enable PeSIT over Secured Socket (Legacy Transfer CFT Compatible) – PeSIT E over TCP/IP using a version of SSL that is compatible with Axway Transfer CFT versions before 2.7.1 SP2 and 3.0.1
2. If you are not using the default port, type a port for each option you selected.
3. If you enabled any SSL option, select an SSL Key Alias from the drop-down list.
4. If you enabled any SSL option, to restrict PeSIT SSL connections to FIPS 140-2 Level 1 certified cryptographic libraries, select the Enable FIPS Transfer Mode check box. For more information, see FIPS transfer mode on page 497.
5. Click Start.
Note To enable PeSIT without SSL (over plain socket), you must create an SSL encryption entry for a user class with SSL encryption optional. See Manage SSL access on page 394.
For information about more PeSIT settings, see PeSIT server configuration on page 121.
Manage the Transaction Manager serverThe Transaction Manager (TM) server connects to the ports specified in the network zones. For more information, see Transaction Manager, protocol, and proxy server communication on page 169.
l Click Start.
Manage the Proxy server on SecureTransport EdgeOn the SecureTransport Edge, specify the port for the SecureTransport proxy server. The proxy port is used by SecureTransport Server to handle outgoing connections passed through a SecureTransport Edge. The default is port number 1080.
1. Select Operations > Server Control.
The Server Control page is displayed.
2. Under Proxy Server, enter a value in the Proxy Port field.
3. Click Start.
AxwaySecureTransport 5.2.1 SP4 Administrator Guide 40
2 Operations
Manage the Monitor serverThe Monitor server checks that the SecureTransport servers are running and restarts them if they terminate. However, the Monitor server does not restart a server if a dependent server is not running. The Monitor server can run on SecureTransport Server or SecureTransport Edge.
l Click Start.
You can configure the overall behavior of the Monitor server by changing cluster-wide server configuration parameters.
l Cluster.ServiceStatusChecks.delayBetweenChecks – the time in seconds that
the Monitor server waits between checking the servers. The default is 5 seconds.
l Cluster.ServiceStatusChecks.serviceExpireTime – the time in seconds that a
server is down before the Monitor server stops checking the server and attempting to restart it. The default is 15 seconds. Once the Monitor server stops attempting to restart a service, you must restart it manually.
You can configure how the Monitor server attempts to restart each server by changing local configuration parameters. The parameters include one of the server names: ADMIN, AS2D, DB (embedded database only), FTPD, HTTPD, SSHD, and TM.
l Monitor.<server>.retryCount – how many times the Monitor server tries to restart the
server. The default value varies depending on the server.
l Monitor.<server>.retryDelay – the time in seconds that the Monitor server waits
between attempts to restart the server. The default value varies depending on the server.
Note The Monitor server must use a non-SSL connection to check the PeSIT server, so you must select Enable PeSIT (no SSL) on the Server Control page for monitoring. To prevent non-SSL PeSIT connections, restrict access to the non-SSL port you configure to the system where the PeSIT server and the Monitor server are running.
Entries in crontab start the monitor server processes. For example,
* * * * * "<FILEDRIVEHOME>/bin/monitor_admin" >> /tmp/monitor_admin.out 2>&1
controls monitoring of the Administration Tool server. The entries run the processes every minute and append the log output to files in the /tmp directory on UNIX-based systems and the <FILEDRIVEHOME>\..\cygwin\tmp directory on Windows. Edit the crontab file to change these settings. On Windows, the file is <FILEDRIVEHOME>\..\cygwin\var\cron\tabs. For example, to disable monitoring of a server, insert a number sign (#) comment character at the beginning of the crontab entry for that server.
Note On Windows, it is not possible to modify existing cron jobs or to use cron to run any jobs other than the predefined SecureTransport jobs. Instead, use the Windows Task Scheduler.
AxwaySecureTransport 5.2.1 SP4 Administrator Guide 41
2 Operations
Use the operating system to monitor SecureTransport processesAs an alternative to the Monitor server, you can monitor the state of specific processes using operating system tools.
There are two categories of processes, those that implement file transfer and related functions and those that implement the administrative functions. You need to know their process IDs to monitor them.
File Transfer ProcessesFor file transfer, there are six parent processes to monitor:
l java – AS2 proxy server
l java – FTP server
l java – HTTP server
l java – PeSIT server
l java – SSH server
l java – Transaction Manager server
l mysqld – Embedded (MySQL) database server, when used
The first five processes all interact with the Transaction Manager server.
The process IDs for each for these processes can be found in <FILEDRIVEHOME>/var/run. The files are called:
l as2d.pid
l ftpd.pid
l httpd.pid
l pesitd.pid
l sshd.pid
l tm.pid
l db.pid
Admin ProcessesFor administration functions, there is one parent processes to monitor:
l java – Tomcat Admin server
It interacts with the file transfer processes by manipulating configuration and performing signaling.
AxwaySecureTransport 5.2.1 SP4 Administrator Guide 42
2 Operations
The process ID for this process can be found in <FILEDRIVEHOME>/var/run/admin/tomcat.pid.
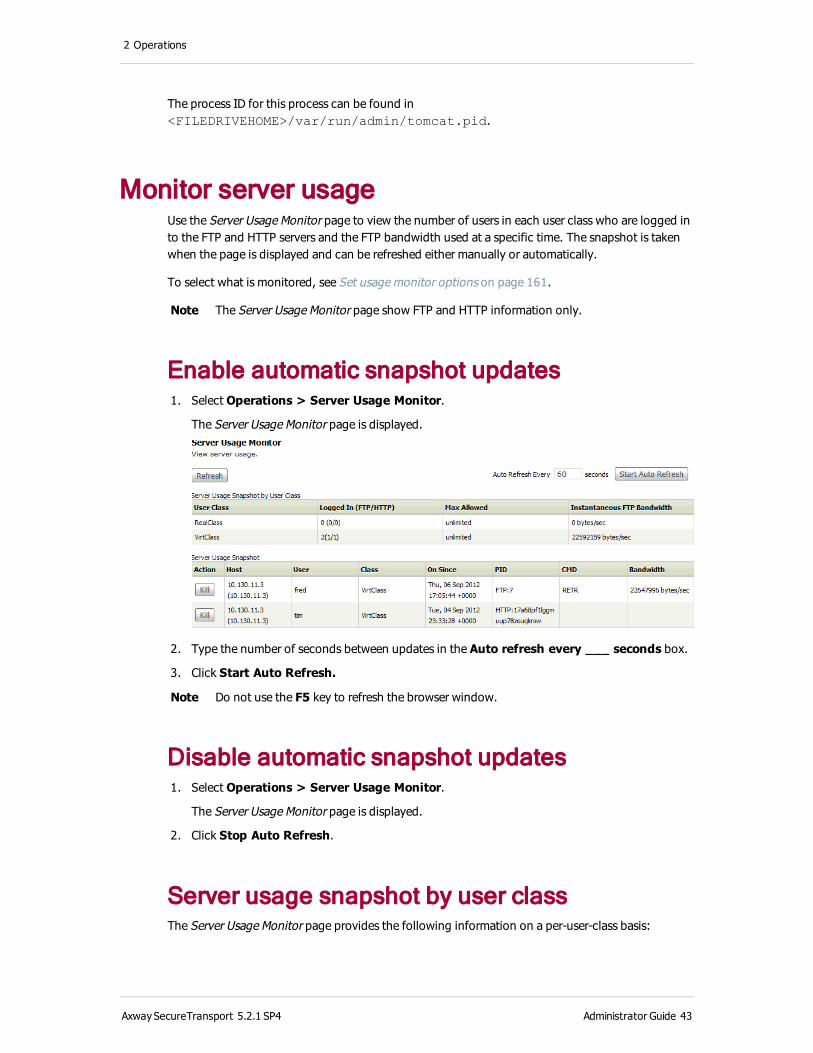
Monitor server usageUse the Server Usage Monitor page to view the number of users in each user class who are logged in to the FTP and HTTP servers and the FTP bandwidth used at a specific time. The snapshot is taken when the page is displayed and can be refreshed either manually or automatically.
To select what is monitored, see Set usage monitor options on page 161.
Note The Server Usage Monitor page show FTP and HTTP information only.
Enable automatic snapshot updates 1. Select Operations > Server Usage Monitor.
The Server Usage Monitor page is displayed.
2. Type the number of seconds between updates in the Auto refresh every ___ seconds box.
3. Click Start Auto Refresh.
Note Do not use the F5 key to refresh the browser window.
Disable automatic snapshot updates 1. Select Operations > Server Usage Monitor.
The Server Usage Monitor page is displayed.
2. Click Stop Auto Refresh.
Server usage snapshot by user classThe Server Usage Monitor page provides the following information on a per-user-class basis:
AxwaySecureTransport 5.2.1 SP4 Administrator Guide 43
2 Operations
l The number of users currently logged in to the FTP and the HTTP servers
l The maximum number of simultaneous users of that class who are allowed to be logged in for the respective protocol (FTP(S) and HTTP(S) maximum online user limits are separate.)
l The currently used FTP bandwidth
Note If a user does not belong to any class, the Class column has the value unnamed.
For information on maximum number of users, see User limits on page 413.
Connection detailsThe Server Usage Monitor page also lists each FTP and HTTP connection with the following details:
l Host name from which the user connected
l User name
l User class
l Date and time connected
l PID: The internal process ID of an FTP or HTTP session within the server process.
l Transfer command
l Bandwidth consumption
You can use the Kill button for each connection to terminate the session.
Track file transfer activityUse the File Tracking page to view information about both client-initiated and server-initiated file transfers and to cancel or resubmit failed transfers. The File Tracking page is available only on SecureTransport Server. The log SecureTransport displays on the File Tracking page is the transfer log.
By default, SecureTransport stores the transfer log entries in the SecureTransport database. If you have the Large Enterprise Cluster (LEC) option, you can store the transfer log data in a separate external database from the rest of the SecureTransport data. See Direct log data to separate Oracle databases on page 136.
To control which transfers are logged, see Transfer log configuration on page 155.
AxwaySecureTransport 5.2.1 SP4 Administrator Guide 44
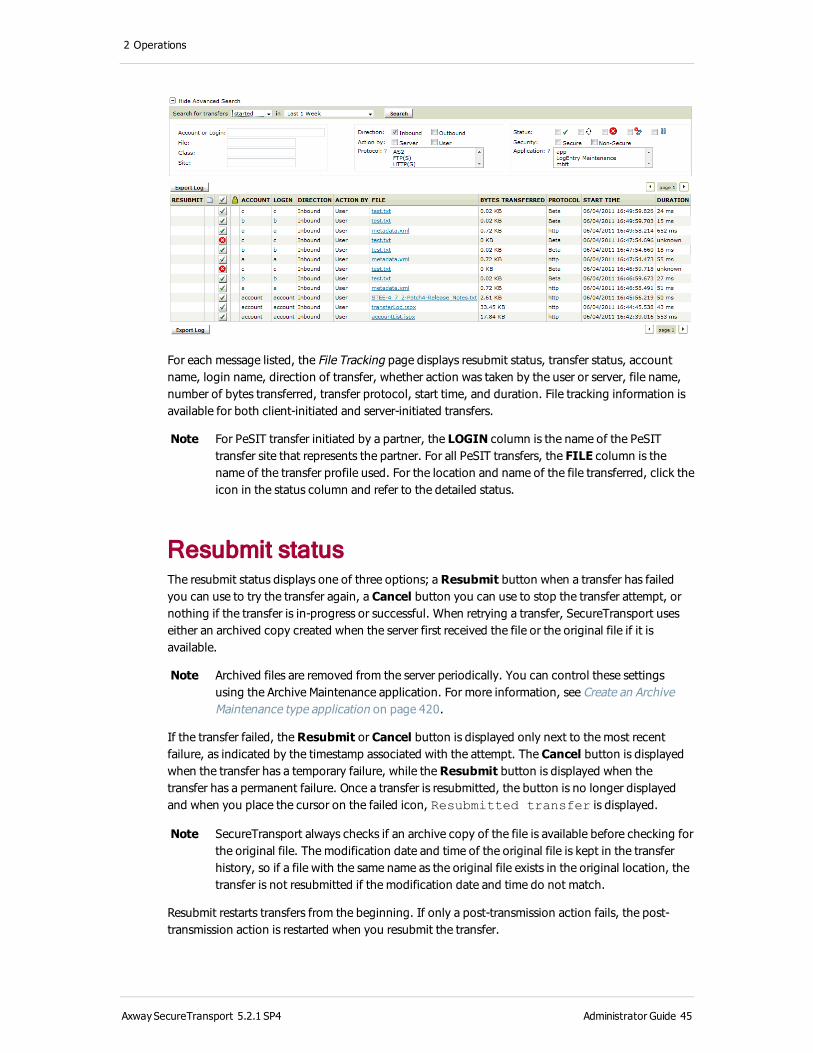
2 Operations
For each message listed, the File Tracking page displays resubmit status, transfer status, account name, login name, direction of transfer, whether action was taken by the user or server, file name, number of bytes transferred, transfer protocol, start time, and duration. File tracking information is available for both client-initiated and server-initiated transfers.
Note For PeSIT transfer initiated by a partner, the LOGIN column is the name of the PeSIT transfer site that represents the partner. For all PeSIT transfers, the FILE column is the name of the transfer profile used. For the location and name of the file transferred, click the icon in the status column and refer to the detailed status.
Resubmit statusThe resubmit status displays one of three options; a Resubmit button when a transfer has failed you can use to try the transfer again, a Cancel button you can use to stop the transfer attempt, or nothing if the transfer is in-progress or successful. When retrying a transfer, SecureTransport uses either an archived copy created when the server first received the file or the original file if it is available.
Note Archived files are removed from the server periodically. You can control these settings using the Archive Maintenance application. For more information, see Create an Archive Maintenance type application on page 420.
If the transfer failed, the Resubmit or Cancel button is displayed only next to the most recent failure, as indicated by the timestamp associated with the attempt. The Cancel button is displayed when the transfer has a temporary failure, while the Resubmit button is displayed when the transfer has a permanent failure. Once a transfer is resubmitted, the button is no longer displayed and when you place the cursor on the failed icon, Resubmitted transfer is displayed.
Note SecureTransport always checks if an archive copy of the file is available before checking for the original file. The modification date and time of the original file is kept in the transfer history, so if a file with the same name as the original file exists in the original location, the transfer is not resubmitted if the modification date and time do not match.
Resubmit restarts transfers from the beginning. If only a post-transmission action fails, the post-transmission action is restarted when you resubmit the transfer.
AxwaySecureTransport 5.2.1 SP4 Administrator Guide 45

2 Operations
Note There are limitations on Resubmit and Cancel. If an account template and its transfer site are defined using expressions, failed transfers for that account template might not be restarted using the Resubmit button. You cannot cancel or resubmit a transfer that was started using the REST API.
Transfer statusTransfer status is represented by an icon. The following table shows each icon and its meaning:
Icon Status Protocolssupported
MDN Receipt – Click to view or verify the MDN receipt for the transfer or to view the PeSIT acknowledgement for the transfer.
All
Processed/Successful – The file was transferred successfully. All
In progress – The file is currently being transferred. All
Paused – The remote server has paused the PeSIT transfer. PeSIT
Failed – The file transfer failed for some reason. Transfers intentionally aborted by file transfer clients and end users are included in this category.
The File Tracking page provides additional information to help distinguish transfers intentionally aborted from those that failed for other reasons.
All
Failed Subtransmission – The file transfer was successful, but one or more Subtransmission actions requested failed for some reason. Subtransmission actions include post-transmission actions and data transformations such as encryption or decryption.
All
Click each transfer status icon to view detailed status information about the file transfer.
If a padlock icon displays in the Secure Transfer column (third from the left), then the transfer was performed over a secure connection such as FTPS, HTTPS, or SSH.
Note If a file is renamed immediately after a file transfer, the MDN receipt creation and/or verification might fail.
View file transfer informationUse the File Tracking page to search for file tracking information and to view information about a file transfer including:
AxwaySecureTransport 5.2.1 SP4 Administrator Guide 46
2 Operations
l Export log statistics
l MDN receipt information
l Detailed status about a file transfer
l History of a file transfer
View and export log statistics about transferred files 1. Select Operations > File Tracking.
The File Tracking page is displayed.
2. Click Export Log to export the displayed file tracking data to a .csv file. You cannot export
all the records from the database at one time.
A dialog box is displayed asking whether you want to open the file or save it to disk.
3. Specify whether to save the file or open the file, and then click OK.
Search file tracking information 1. Select Operations > File Tracking.
The File Tracking page is displayed.
2. Specify the search criteria.
a. In the Search for transfers pane, specify whether you want to search based on time the transfer started or completed and the time frame in which to search.
b. (Optional) Specify the account or login associated with the transfer for which you are searching.
c. (Optional) Specify whether to search for inbound or outbound transfers.
d. (Optional) Specify whether you want to include successful transfers, transfers currently in progress, paused transfers, failed transfers, or failed subtransmissions. You can specify more than one.
3. (Optional) Show the Advanced Search fields and specify additional search criteria.
a. Specify the file name, class, or site associated with the transfer for which you are searching.
b. Specify transfers initiated by the server or the user.
c. Specify the protocols used for the transfers. You can use Control+click and Shift+click to select more than one.
d. Specify whether the transfer was secure or non-secure.
e. Specify the application associated with the transfer. You can use Control+click and Shift+click to select more than one.
4. When you have finished specifying your search criteria, click Search.
AxwaySecureTransport 5.2.1 SP4 Administrator Guide 47
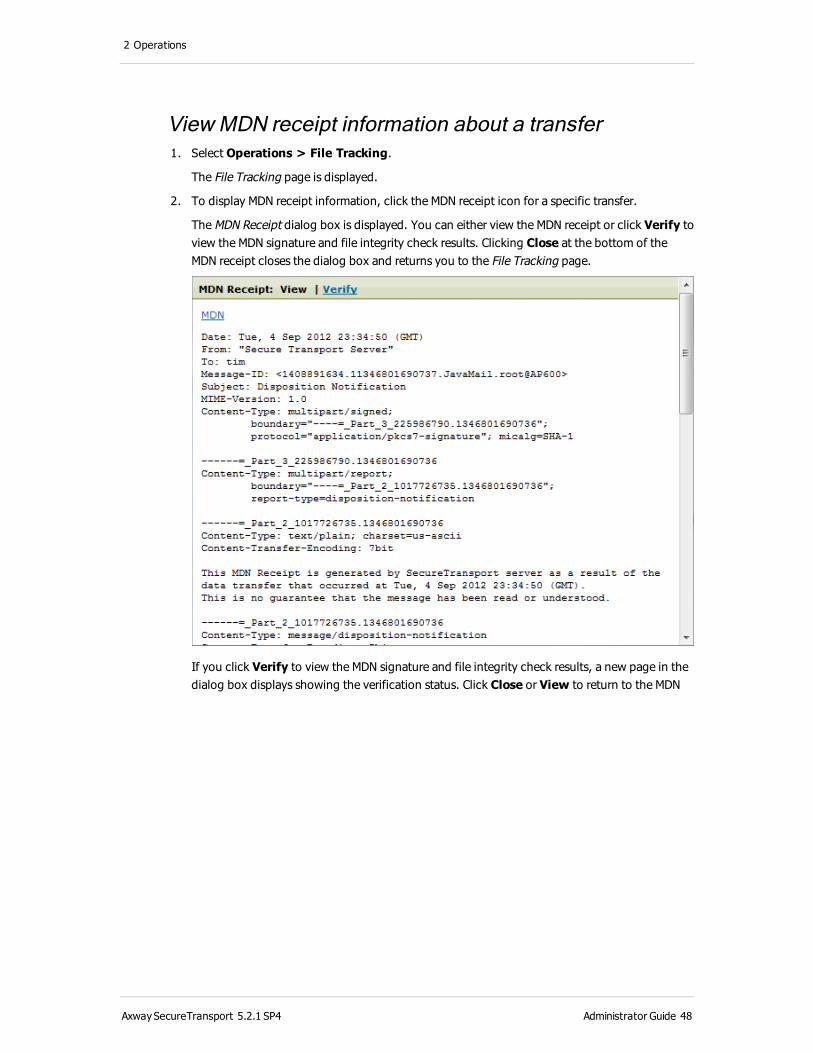
2 Operations
View MDN receipt information about a transfer 1. Select Operations > File Tracking.
The File Tracking page is displayed.
2. To display MDN receipt information, click the MDN receipt icon for a specific transfer.
The MDN Receipt dialog box is displayed. You can either view the MDN receipt or click Verify to view the MDN signature and file integrity check results. Clicking Close at the bottom of the MDN receipt closes the dialog box and returns you to the File Tracking page.
If you click Verify to view the MDN signature and file integrity check results, a new page in the dialog box displays showing the verification status. Click Close or View to return to the MDN
AxwaySecureTransport 5.2.1 SP4 Administrator Guide 48

2 Operations
receipt.
Note An MDN receipt icon is displayed only when a receipt for the transfer is available in the system and the transfer was successful. To enable MDN receipts, see Certificates to generate during initial setup on page 102.
View the detailed status information about a transfer 1. Select Operations > File Tracking.
The File Tracking page is displayed.
2. Click the status icon or the file name for a specific transfer.
The Status Detail window is displayed.
AxwaySecureTransport 5.2.1 SP4 Administrator Guide 49

2 Operations
3. Click Close at the bottom of the details to return to the File Tracking page.
The Status Detail dialog box shows the following information:
Name Description
Status Displays the transfer status. Values include Processed, In Progress, Failed, Aborted, and Failed Subtransmission.
Time Displays the Transfer Start date and time and the duration of the transfer in milliseconds.
User Displays the Account name, login name, class type and user type.
Application Displays the application instance name.
Transfer Displays the transfer type, transfer site name, file name, file size, transfer protocol, transfer mode, remote host name, remote folder name, account folder name, real file location, transfer ID link, session ID link, success or failure details, and protocol messages.
PostTransmissionStatus
Displays the operation type, whether the operation whether the operation succeeded or failed, the result of the operation, and comments that can provide additional information, such as if a transformation was performed. Multiple operations might be displayed.
AxwaySecureTransport 5.2.1 SP4 Administrator Guide 50

2 Operations
NoteWhen a logged-in account does not have permission to delete files and tries to delete them, the Status Detail dialog box is not available.If the file transfer includes encrypting or decrypting files, this information might be displayed in the success or failure details or the Post Transmission Status. For more information about encryption and decryption, see Encryption options on page 318.
The Status Detail for a server-initiated transfer shows the protocol messages as part of the transfer details. For HTTP transfers, the headers are provided since there are no commands sent. For AS2 transfers, messages are also generated from the HTTP headers.
View the file history details information about a transfer 1. Select Operations > File Tracking.
The File Tracking page is displayed.
2. Click the name of a file to open the File History Details dialog box.
The File History Details dialog box is displayed. Click Close at the bottom of the details to return to the File Tracking page.
AxwaySecureTransport 5.2.1 SP4 Administrator Guide 51
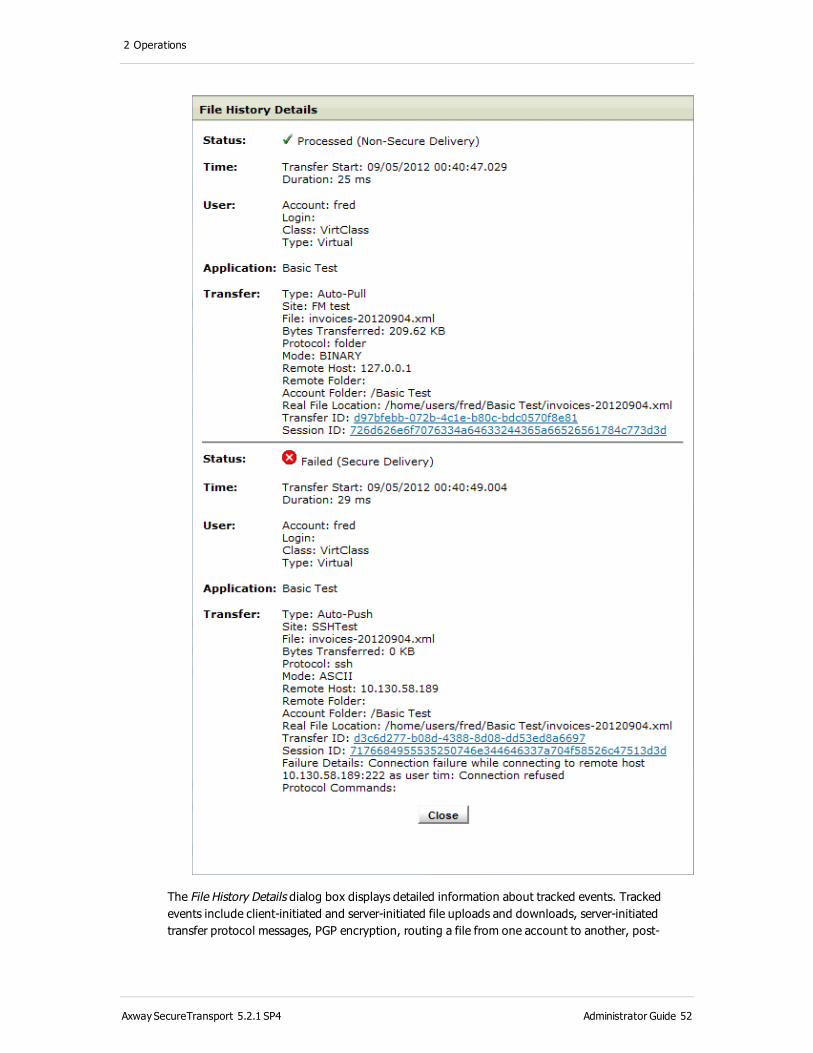
2 Operations
The File History Details dialog box displays detailed information about tracked events. Tracked events include client-initiated and server-initiated file uploads and downloads, server-initiated transfer protocol messages, PGP encryption, routing a file from one account to another, post-
AxwaySecureTransport 5.2.1 SP4 Administrator Guide 52

2 Operations
transmission actions, and file deletion or renaming from a client-initiated command. PGP encryption information includes the compression type and level. For more information, see Encryption options on page 318.
Note When a logged in account does not have permission to delete files and tries to delete them, the File History Details dialog box is not available.
The File History Details dialog box displays a chronological list of detailed transfer statuses starting from the last client-initiated upload or server-initiated download and ending with the first renaming or deletion of the file with the same name. If the client-initiated upload or server-initiated download is missing because the file tracking log was rotated, the dialog box shows the first event for that file name.
The File History Details dialog box shows the following information:
Name Description
Status Displays the transfer status. Values include Processed, In Progress, Failed, Aborted, and Failed Subtransmission
Time Displays the Transfer Start date and time and the duration of the transfer in milliseconds
User Displays the Account name, login name, class type and user type
Application Displays the application instance name
Transfer Displays the transfer type, transfer site name, file name, file size, transfer protocol, transfer mode, remote host name, remote folder name, account folder name, real file location, transfer ID link, session ID link, success or failure details, and protocol messages. Protocol messages are displayed only when a server-initiated transfer is part of the file transfer history. If you are encrypting or decrypting files, this information is included in the success or failure details.
PostTransmissionStatus
Displays the operation type and if the operation was client-initiated (local) or server-initiated (remote), whether the operation succeeded or failed, the result of the operation, and comments that can provide additional information, such as if a transformation was performed.
Link to the server logThe session ID and transfer ID listed in the Status Details dialog box and the File History Details dialog box are links you can use to view the server log entries for that session or transfer.
l From either the Status Details dialog box or the File History Details dialog box, click the value of either the Transfer ID field or the Session ID field.
SecureTransport copies the session ID or the transfer ID to the search criteria of the Server Log page and displays the results of the search.
AxwaySecureTransport 5.2.1 SP4 Administrator Guide 53

2 Operations
Manage file transfers
Restart a transferIf a file transfer fails permanently, SecureTransport displays a Resubmit button in the RESUBMIT column.
1. Select Operations > File Tracking.
The File Tracking page is displayed.
2. Click Resubmit to the left of the failed transfer you want to restart.
After you restart a file transfer, the Resubmit button no longer displays and a new line is added to the File Tracking page showing the progress of the resubmitted transfer.
Cancel a transferIf a server-initiated file transfer fails temporarily and is scheduled for a retry, SecureTransport displays a Cancel button in the RESUBMIT column.
l To cancel the file transfer retry, click Cancel.
Transfer Log Maintenance applicationThe built-in SecureTransport application type, Transfer Log Maintenance, maintains the SecureTransport transfer log by exporting and cleaning up transfer log entries on a regular basis, following a schedule you define.
A Transfer Log Maintenance type application has the following features:
l User-definable schedule for transfer log daily backup and/or export. For more information, see Scheduled downloads and tasks on page 327.
l Application-specific parameters regarding the processing of transfer log entries include:
o Expiration period for log entries until export and/or deletion
o A condition to export the entries before deleting them or not
o Delete exported files
o Number of records per file
l Support for a dedicated export folder. By default the exported entries are stored in the following location:
<FILEDRIVEHOME>/var/db/hist/transfer-log
For more information, see Create a Transfer Log Maintenance type application on page 440.
AxwaySecureTransport 5.2.1 SP4 Administrator Guide 54

2 Operations
Server logUse the Server Log page to view the contents of the SecureTransport log messages from the following SecureTransport components: the Transaction Manager (TM) and the processes that implement the AS2, FTP, HTTP, SSH (SFTP), and SOCKS5 protocols, the Administration Tool interface (ADMIN), and auditing (AUDIT). You can filter the log using one or more of 12 criteria to find an entry in a large log.
By default, the server log entries are stored in the SecureTransport database. If you have the Large Enterprise Cluster (LEC) option, you can store the server log data in a separate external database from the rest of the SecureTransport data. See Direct log data to separate Oracle databases on page 136.
Each line in the log display include the following information:
l TIME – The date and time the entry was logged. This is link you can use to display more detailed information.
l LEVEL – The severity level of the entry.
l COMPONENT – The name of the SecureTransport component that produced the entry.
l THREAD – The ID of the SecureTransport execution thread that produced the entry.
l MESSAGE – The primary log information.
On SecureTransport Server, but not on SecureTransport Edge, the following information is also included.
l SESSION ID – An identifier of the login session associated with the entry. This is a link you can use to copy the session ID into the Session ID field in the search criteria.
l TRANSFER ID – An identifier of the file transfer associated with this entry. This is a link you can use to copy the transfer ID into the Transfer ID field in the search criteria.
Also, you can export the filtered log entries to a .csv file.
Search and view server log contents 1. Select Operations > Server Log.
The Server Log page is displayed.
2. In the Search pane, specify search criteria.
a. In the Time Interval drop-down list, select the time frame of the log entries to display. Choose from the following:
l Last Hour (default)
l Last 4 Hours
l Last 8 Hours
l Last 12 Hours
l Last 24 Hours
AxwaySecureTransport 5.2.1 SP4 Administrator Guide 55
2 Operations
l Last 48 Hours
l Last 1 Week
l Last 2 Weeks
l Specific Date/Time Range – Displays field that you use to specify the range
b. (Optional) In the Account or Login field, type the name of the account or login associated with the log entries to display.
c. (Optional) In the Thread field, type the name of the thread associated with the log entries for to display.
d. (Optional) Under Level, select the levels of the log entries to display. Choose from the following:
l TRACE
l DEBUG
l INFO
l NOTICE
l WARN
l ERROR
l FATAL
e. (Optional) Under Component, Select the SecureTransport Server component associated with the log entries to display. Choose from the following:
l TM
l AS2D
l SSHD
l Socks
l ADMIN
l AUDIT
l FTPD
l HTTPD
l PESITD
f. (Optional) In a clustered deployment, select the Cluster Node associated with the log entries to display. The nodes shown are those listed on the Cluster Management page. To select more than one node, click Select Multiple and selected the nodes from the list.
3. (Optional) Click Advanced Search to display more fields and specify the following:
a. (Optional) Using the ST Activity check boxes, specify whether to display inbound or outbound SecureTransport activity.
b. (Optional) In the Message field, type a string contained in the messages to display.
c. (Optional) Use a link in the SESSION ID column to copy a session identifier into the Session ID field.
AxwaySecureTransport 5.2.1 SP4 Administrator Guide 56
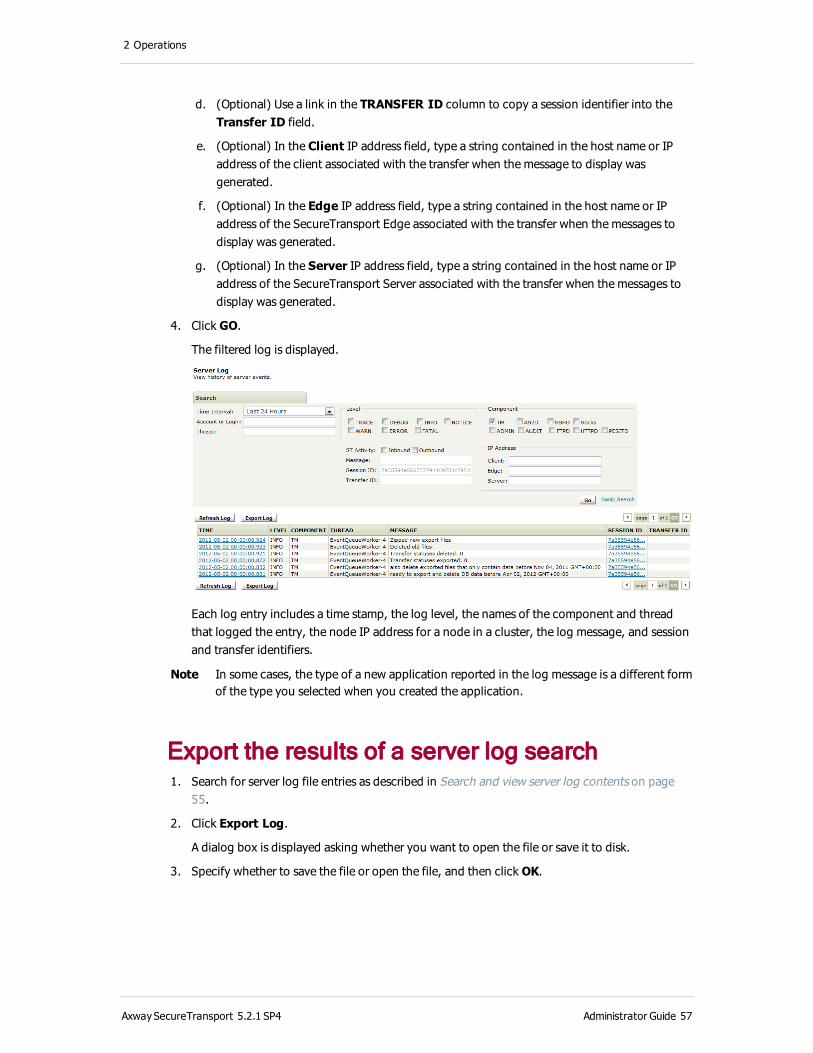
2 Operations
d. (Optional) Use a link in the TRANSFER ID column to copy a session identifier into the Transfer ID field.
e. (Optional) In the Client IP address field, type a string contained in the host name or IP address of the client associated with the transfer when the message to display was generated.
f. (Optional) In the Edge IP address field, type a string contained in the host name or IP address of the SecureTransport Edge associated with the transfer when the messages to display was generated.
g. (Optional) In the Server IP address field, type a string contained in the host name or IP address of the SecureTransport Server associated with the transfer when the messages to display was generated.
4. Click GO.
The filtered log is displayed.
Each log entry includes a time stamp, the log level, the names of the component and thread that logged the entry, the node IP address for a node in a cluster, the log message, and session and transfer identifiers.
Note In some cases, the type of a new application reported in the log message is a different form of the type you selected when you created the application.
Export the results of a server log search 1. Search for server log file entries as described in Search and view server log contents on page
55.
2. Click Export Log.
A dialog box is displayed asking whether you want to open the file or save it to disk.
3. Specify whether to save the file or open the file, and then click OK.
AxwaySecureTransport 5.2.1 SP4 Administrator Guide 57
2 Operations
Log Entry Maintenance applicationThe built-in SecureTransport application type, Log Entry Maintenance, performs the exclusive function of rotating server log files.
The main characteristic features of the Log Entry Maintenance application type are:
l User-definable schedule for transfer log daily backup and/or export. For more information, see Scheduled downloads and tasks on page 327.
l Application-specific parameters regarding the processing of server log entries include:
o Expiration period for log entries until export and/or deletion.
o Number of records per file.
l Support for a dedicated export folder. By default the exported entries are stored in the following location:
<FILEDRIVEHOME>/var/db/hist/log-entry
For more information, see Create a Log Entry Maintenance type application on page 429.
Audit logUse the Audit Log page to view, compare, and export log entries that SecureTransport records when any change is made to the SecureTransport configuration. The audit log entries record:
l Changes made using the Administration Tool
l Changes made using the administration REST API
l Changes due to user actions, such as new user enrollment and password change
l Changes that result from a change on another SecureTransport Server in a cluster or on another synchronized SecureTransport Edge
l Changes to configuration objects, such as accounts, business units, and network zones
l Changes to server configuration parameters, whether they are made on the Server Configuration page or on other Administration Tool pages
In an active/active standard cluster, SecureTransport forwards audit log updates from the secondary servers to the primary server, so the audit log on the secondary servers includes local changes only and the audit log on the primary server includes changes to all servers in the cluster.
Many Administration Tool pages include a Last Modified link that you can use to display in the audit log the entry that records the last change for that page. From the audit log, you can compare that entry with the last one to see what changes were made or with any previous entry for that object or parameter.
You can filter the log using one or more of eight criteria to find an entry.
Each line in the log display includes the following information:
AxwaySecureTransport 5.2.1 SP4 Administrator Guide 58
2 Operations
l Time - The date and time the entry was logged. This column includes a drop-down menu indicated by an inverted caret that you can use to display more detailed information or compare log entries.
l User Name - The name of the administrator or user who made the change.
l Remote Address - The IP address of the client that made the configuration change – either a browser running the Administration Tool or a program using the administrator resources of the REST API.
l Object Type - The type of the object changed. Possible values are:
o Account – for user account, unlicensed user account, service account and account
template
o Administrator
o AdministrativeRole
o Application
o BusinessUnit
o Certificate – for certificate and trusted CA
o CertificateSigningRequests
o ClusterNode
o HolidaySchedule
o LdapDomain
o LdapHomeFolderPrefix
o LdapUidRangeMapping
o MailTemplate
o NetworkZone
o PasswordVault
o ServerConfigurationParameter – for changes that are not represented internally
as objects by SecureTransport
o SiteTemplate
o UserClass
l Object ID - A unique identifier for the object changed. For most configuration objects, the object ID is an internal ID.
For server configuration parameters, the object ID includes the server configuration parameter name, a node ID, and a profile ID. In a cluster, the node ID (mNode) identifies the server where
a local server configuration parameters is changed. Otherwise, the value is UNSPECIFIED.
SecureTransport 5.2.1 SP4 does not implement the feature that uses the profile ID (mProfile), so the value is always Default.
l Object Name - The name of the object changed.
AxwaySecureTransport 5.2.1 SP4 Administrator Guide 59

2 Operations
l Operation Type - The type of operation that changed the object. The value can be Create,
Delete, Overwrite, or Update.
When you add a user class, it is added as the first user class as shown on the User Classes page. The audit log shows an update for each user classes, because adding a class changes the Order
attribute for every class.
l Comment - Additional information added by SecureTransport or the administrator who made the change.
Enable or disable audit loggingAudit logging is enabled by default. You can disable or enable it by setting the following server configuration parameters:
l To disable audit logging, set the Admin.Audit server configuration parameter to
disabled. The default value is enabled.
l To disable logging of changes made by the Administration Tool, set the AuditLog.Enabled.Admin server configuration parameter to false. The default value is
true.
l To enable logging of changes made by the Transaction Manager, set the AuditLog.Enabled.TM server configuration parameter to true. The default value is
false.
To change these parameters, see View and change server configuration parameters on page 64.
Search and view audit log contents 1. Select Operations > Audit Log.
The Audit Log page is displayed.
2. In the Search pane, specify the search criteria.
The search fields include all the information displays in the audit log.
3. Click Search.
AxwaySecureTransport 5.2.1 SP4 Administrator Guide 60

2 Operations
The filtered log is displayed.
Export the results of an audit log search 1. Search the audit log described in Search and view audit log contents on page 60.
2. Click Export Log.
A dialog box is displayed asking whether you want to open the file or save it to disk.
3. Specify whether to save the file or to open the file, and then click OK.
In addition to the fields displayed on the Audit Log page, the exported audit log contains the User-Agent string of the client that made the change.
Add or edit an audit log entry commentOnly the administrator that made the change represented by the audit log entry can add or edit a comment.
1. Click the Edit icon ( ) in the Comment column.
2. Type or update the comment.
3. Click the Save icon ( ).
Display audit log entry details l From the menu in the Time column, select Details.
SecureTransport opens an Object Detail window that lists all attributes of the object at the time of the audit log entry with the attribute values.
AxwaySecureTransport 5.2.1 SP4 Administrator Guide 61

2 Operations
Compare audit log entries 1. From the menu in the Time column, select Compare with or Compare with previous.
2. If you selected Compare with, SecureTransport displays a Compare with Another Entry window.
3. If pervious audit log entries are listed, select one and click OK.
4. If you selected Compare with previous and there is a previous audit log entry for that object, the result is the same as selecting the previous entry in the Compare with Another Entry window.
If there is no previous audit log entry for the object, SecureTransport displays a message.
5. SecureTransport opens an Audit Log Entry Comparison window.
The Audit Log Entry Comparison window lists all attributes and values of the object with one column for each audit log entry. Timestamps in the column headers identify the entries. The older entry is on the left. A colored background indicates attributes with different values.
Link to the audit logThe following Administration Tool pages have a Last Modified link that gives the date and time of the last update to any object listed:
l Operations menu:
o Cluster Management – large enterprise cluster only, indicates changes to the configuration of the cluster nodes only
o Server Configuration
l Setup menu:
o Local Certificates
o Trusted CAs
o Internal CA
o Holiday Schedule
o Mail Template Repository
o Network Zone List
o Edit Network Zone entry
l LDAP menu:
o LDAP Domains
o LDAP Domain
o User Type Ranges
o Home Folders
AxwaySecureTransport 5.2.1 SP4 Administrator Guide 62
2 Operations
l Accounts menu:
o User Account
o Unlicensed User Account
o Service Account
o Administrators
o Edit Administrator
o Administrative Roles
o Edit Administrative Role
o Account Template
o Passwords Files
o Edit Password File
o Business Units
o Business Units Settings
l Access menu:
o User Classes
l Application:
o Applications
o Application Details
If there has been no change to the object or objects since SecureTransport was installed or upgraded to a version that includes the audit log, the link indicates No tracked change.
SecureTransport stores configuration that you change on other pages of the Administration Tool in sever configuration parameters. Some pages save values that are not changed when you make a change, so the audit log might include entries for the corresponding server configuration parameters in addition to the ones for the fields you changed.
When you click a link on a page, SecureTransport opens the Audit Log page and displayed the entry for the update that the link represents.
Audit Log Maintenance applicationAn application of the built-in SecureTransport application type Audit Log Maintenance deletes old audit log entries periodically and can export them to a file. By default, SecureTransport has an Audit Log Maintenance application that runs at midnight on the first day of each month and deletes audit log entries that are six months old after saving them in a file in the <FILEDRIVEHOME>/var/db/hist/audit-log directory
For more information, see Create an Audit Log Maintenance type application on page 422.
AxwaySecureTransport 5.2.1 SP4 Administrator Guide 63

2 Operations
Server configurationSecureTransport server configuration consists of all the information the server and its components require to operate. You establish most of the server configuration by setting fields on the various pages of the Administration Tool. In a SecureTransport cluster, the servers store server configuration parameters in a shared database for a large enterprise cluster and in synchronized embedded databases for a standard cluster. The server configuration parameters include both shared, cluster-wide parameters and parameters for individual servers. When you change a shared parameter, all the servers in the cluster get the new value.
To support operation of the components that use configuration files, the server copies the configuration from the database into those files when it starts and when you change a parameter on any node of the cluster. It is not necessary to bounce the servers manually to propagate the change.
Use the Server Configuration page to view configuration parameters that are stored in the database and change those that are not set elsewhere in the Administration Tool. This page also includes access to pages you can use to view or update server configuration files on your local computer, synchronize configuration files, and export and import server configuration.
Editable server configuration parametersYou set many server configuration parameters in fields elsewhere in the Administration Tool. You can view, but not change those parameters in the Server Configuration page.
Sever configuration parameters that you can change have an Edit icon ( ) in the Edit column of the list.
Local server configuration parametersMost of the parameters included in the Server Configuration page apply to all servers in the cluster. The parameters that apply to the local SecureTransport Server and are not copied to other servers are marked with a check in the Local column.
View and change server configuration parametersMany SecureTransport server configuration parameters are stored in the database. In a cluster, any change you make to any shared parameter is automatically copied to all nodes in the cluster.
The Server Configuration page, accessed by selecting Operations > Server Configuration, shows all configuration parameters that are stored in the database. You can view the values of all parameters and you can edit the values of some of them. You set the values of parameters you cannot edit on the Server Configuration page using fields on other pages of the Administration Tool.
AxwaySecureTransport 5.2.1 SP4 Administrator Guide 64

2 Operations
Search for a parameterYou can filter the list of parameters using fields in the Search pane.
1. To display only parameters that contain a string in their name, type that string in the Parameter field. The parameter name search is not case sensitive.
2. To display only parameters that contain a string in their value, type that string in the Value field. The parameter value search is case sensitive.
3. To display only parameters you can edit, select Editable Parameters.
4. To display only local parameters, select Local Parameters.
5. Click Go.
The filtered list is displayed.
Note Drag the resize handle of a field in the Value column to see or change all the text.
Page through the parameter listIf there are more than 100 parameters in the filtered list, they are displayed on pages.
1. To display to the next or previous page, click the forward or back arrow.
2. To display a page, type the page number in the page field and click GO.
Change a parameter valueIf a parameter is editable, you can change its value. In many case, the valid values are include in the Description column.
1. In the Edit column, click the Edit icon ( ).
2. Type the new value in the Value column.
3. In the Edit column, click the Save icon ( ).
AxwaySecureTransport 5.2.1 SP4 Administrator Guide 65
2 Operations
SecureTransport saves the value to the database. If the parameter applies to all nodes in the cluster, SecureTransport copies it to the other nodes.
4. To cancel an edit, click Go in the Search pane.
Note If you edit the value of a second parameter before saving the value of the first, save each value in turn, waiting for each save operation to complete before saving the next.
Update server configuration filesSecureTransport stores the following server configuration files in the database:
l brules.xml
l FileServicesInterfaceRegistry.xml
l mime.types
l sentinel-returncode-translation.xml
l ssl.csr.conf
You can use the Server Configuration Files page to make changes on your local computer to the files listed, save the changes to the database, and propagate the changes to all servers in a cluster.
1. On the Server Configuration page, select Configuration Files.
The Server Configuration Files page is displayed.
2. Download the file to update. (For example, right-click the file name link in your browser and selected Save Link As or Save Target As.)
3. Update the file using a editor on your local computer.
4. Click Choose File and select the file or type the path to the file in the Selected File column.
5. When you have completed updating one or more files, select the files to upload in the first column.
6. Click Upload.
SecureTransport uploads the selected files to the server and copies the files to all the other servers in the cluster. The servers load the updated configuration immediately.
Note Alternately, you can edit these configuration files on the server and then click Synchronize on the Server Configuration Files page for that server. The server saves the file in the database and copies the files to all the other servers in the cluster, and the servers load the updated configuration immediately.
Export and import server configurationYou can export and import server configuration information in a ZIP file. You can export and import to backup your server configuration, to copy local server configuration to another node in a cluster, or to replicate configuration on a new system which runs the same version of SecureTransport on the same platform with the same installation directory (<FILEDRIVEHOME>). For example you can replicate configuration from a staging system to a production system.
AxwaySecureTransport 5.2.1 SP4 Administrator Guide 66

2 Operations
You can also export and import configuration to migrate it from an installation of a version of SecureTransport that can be upgraded to SecureTransport 5.2.1 SP4.
Note Local certificates that are not overwritten might not work after a configuration import because the secret file, used to decrypt these certificates, might have changed. To be sure that there are no encryption conflicts, import server configuration immediately after installing SecureTransport and applying the server licenses.
Because SecureTransport copies shared server configuration parameters to every node in a cluster upon import, you only import the shared server configuration once for the whole cluster.
The compressed export_configuration.zip file includes the files from the <FILEDRIVEHOME> directory plus XML files that record system the configuration parameters stored in the database (including those set on the Server Configuration page and elsewhere in the Administration Tool), the holiday schedule, and the local certificates, certificate signing requests, and trusted CAs.
You can export the server configuration files using the Import or Export Server Configuration page or command line utility. Use the command line utility to customize which folders and files will be exported. For more information, see Export server configuration files from the command line on page 69.
Only a master administrator can access the Import or Export Server Configuration page to import or export the server information. Any administrator who can access the server can use the command line to import or export server information.
You must supply a password that SecureTransport uses to encrypt sensitive information such as private keys and custom attributes during the export process. When you import the server configuration information, you must type the password to import the server configuration files and decrypt the sensitive information.
Note To move from a test or staging environment to a production environment, you can use the server configuration export and import feature to migrate your changes if the environments on both computers are consistent. For a successful migration both SecureTransport installation must have the same <FILEDRIVEHOME>.
When you import the server configuration files from a SecureTransport release that can be upgraded to SecureTransport 5.2.1 SP4, the imported files overwrite the existing files, the database is updated with the parameter values from the imported files, the imported files are modified to support changes made to SecureTransport, and the importer adds any new properties needed for the features introduced in the current version of SecureTransport. At the same time, the importer preserves any custom changes you have made to the imported files, applying them to the current version of SecureTransport. However, the SiteMinder password is reset. You must reenter it in the Administrator Password field on the SiteMinder Setting page.
Export user limit messagesTo export messages defined on the Limit User Access page for successful import, add lines for all files that match lib/msgs/msg.*Class*.* pattern to <FILEDRIVEHOME>/conf/export.conf before exporting.
AxwaySecureTransport 5.2.1 SP4 Administrator Guide 67

2 Operations
Export and import Internal CA filesFor SecureTransport 5.0 and later, the Internal CA certificate is exported with system export and with account export. In both cases, the private key for the CA is not exported. You cannot use an imported Internal CA to sign additional certificates without the correct private key. To preserve the Internal CA private key, configure server export and import to include the private key. Perform the following procedures before you export the system configuration files. For more information on exporting and importing accounts, see Account export and import on page 334. For more information about exporting and importing the Internal CA, see Manage the internal CA on page 96.
Export the Internal CA with the private key 1. Add the following lines to the <FILEDRIVEHOME>/conf/export.conf file:
lib/certs/db/ca-crt.pem
lib/certs/db/ca-key.pem
lib/certs/db/index
lib/certs/db/serial
2. Export the system configuration.
It contains the Internal CA with its private key.
Import the Internal CA with the private key 1. Delete the temporary Internal CA generated during installation, so that the Internal CA is not
incorrectly imported as CA-old.
2. Import the system configuration.
Export server configuration using the Administration ToolYou can export and download server configuration using the SecureTransport Administration Tool. The ZIP file is also automatically backed up on the server as <FILEDRIVEHOME>/var/tmp/export_configuration.zip. You cannot specify the file name and location on the server, and the back up file overwrites any existing back up file.
When you export the server configuration from the Administration Tool, SecureTransport uses the file <FILEDRIVEHOME>/conf/export.conf to read the list of configuration files to be exported. In addition, the files in the <FILEDRIVEHOME>/brules/local/wptdocuments directory are always included.
You can control the file name and location, and the list of files to be exported by using the command line tool to export your server configuration files. For more information, see Export server configuration files from the command line on page 69.
1. On the Server Configuration page, click Import/Export Server Configuration.
The Import or Export Server Configuration page is displayed.
AxwaySecureTransport 5.2.1 SP4 Administrator Guide 68

2 Operations
2. Select Export Server Configuration.
3. Type the file password in the Password and Re-enter Password fields.
4. Click Export. The Export Complete prompt is displayed. The ZIP file is save as <FILEDRIVEHOME>/var/tmp/export_configuration.zip.
5. To download the ZIP file to your local computer, click Download Exported Configuration. The File Download dialog box is displayed.
6. Click Save to save the file to a new location or click Open to view the contents of the ZIP file.
To save the file, select the location for the exported server configuration data and click Save. You are returned to the Import or Export Server Configuration window.
If you clicked Open, the ZIP file attempts to open and display the contents of the file in a new window.
If you do not want to download the ZIP file, click Cancel to return to the Import or Export Server Configuration page.
Export server configuration files from the command lineYou can export sever configuration information using a command line tool. When you are using the tool to export a server configuration, you must specify the file name and location that contains the exported configuration.
AxwaySecureTransport 5.2.1 SP4 Administrator Guide 69
2 Operations
You can also specify which files you want to export by creating a list file with a .conf extension. This file contains the list of configuration files you want to export. This is useful when you have customized SecureTransport and need to export additional files to those listed in the default export list. The default export list is located in <FILEDRIVEHOME>/conf/export.conf. Do not modify this file, but create a file with a new name if you need to make a new export list.
SecureTransport provides a script called system_export that you can run from the command line to export the server configuration information to a ZIP file. The script has the following options:
l -exf=<export_file> where <export_file> is the file name and location of the ZIP
file. You must specify the file name.
l -ex1=<export_list> where <export_list> is the file containing a list of all files to be
exported. The <export_list> file name is relative to <FILEDRIVEHOME>. The default is
conf/export.conf.
l -help displays the command format and options.
Note If you run system_export without specifying any options, the help message is displayed.
During the export process, you are prompted for an export password. Later, when you import the exported configuration from the command line, you must use the same password for the import process. The following steps illustrate an example sever configuration export:
1. Change to the <FILEDRIVEHOME>/bin directory.
If you installed SecureTransport on Windows, you can run the command without changing to the /bin directory.
2. Type one of the following commands:
l ./system_export -exf=<export_file> for UNIX-based systems
l system_export -exf=<export_file> for Windows
where <export_file> is the name and location of the ZIP file you are creating.
3. When prompted, type a password for the exported information.
4. Confirm the password by typing it again when prompted.
The exported file is created in the specified location.
Import server configuration files using the Administration ToolYou can import server configuration information for a cluster or only the local server configuration information for a single server using the Administration Tool. You must know the password entered during the server configuration export process.
Exported configuration from SecureTransport 4.x.y systems does not include the SiteMinder administrator password. To set the password after importing configuration, see SiteMinder integration configuration on page 128.
AxwaySecureTransport 5.2.1 SP4 Administrator Guide 70
2 Operations
1. On the Server Configuration page, click Import/Export Server Configuration.
The Import or Export Server Configuration page is displayed.
2. Select Import Server Configuration.
3. Select the Configuration File by clicking Choose File. The file must be in the zip format.
4. Type the Password to use to encrypt sensitive information in the file. You must use the password specified when the file was exported.
5. Select the options:
a. Select Cancel Import on Error to stop the import process if any error is encountered. This option is selected by default. If the import process is stopped, no changes are made to the server. If you clear this option and the password does not match, the import completes with a warning that information from the zip archive could not be decrypted.
b. Select Continue on Version Mismatch to import server configuration from a different version of SecureTransport.
c. Select Import local configuration data only to exclude cluster configuration data, for example, when you are importing configuration data into a SecureTransport Server that is in an existing cluster. This option is not available if Continue on Version Mismatch is selected.
6. Click Import.
The Import Complete message is displayed and the server configuration import is successful. If you did not select Import local configuration data only, the imported cluster configuration data is propagated to all servers in the cluster.
Note When you import a server configuration, the process overwrites the current configuration. If an improper configuration file is imported (for example, an empty file), no error message is displayed and the configuration files are overwritten.
Import server configuration files from the command lineYou can import server configuration information from the command line.
SecureTransport provides a command named system_import that can be run from the command line to import information from the ZIP file. The command requires that the Administration Tool service is running on the SecureTransport server where you run the command.
In a standard cluster, run the system_import command on the primary server. When the import completes, the updates are automatically synchronized to the other servers in the standard or large enterprise cluster. The script comes with the following options:
l -exf=<export_file> where <export_file> is the file name and location of the ZIP
file. You must specify the file name.
l -coe=<true | false> where when set to true, the import stops if an error occurs and
no changes are made to the server ("cancel on error"). If set to false the import continues if
an error occurs. The default setting is true. If set this option to false and the password does
not match, the import completes with a warning that information from the zip archive could not be decrypted.
AxwaySecureTransport 5.2.1 SP4 Administrator Guide 71
2 Operations
l -ivm=<true | false> where when set to true, the import continues even if there is a
version mismatch. Setting this option to false stops the import if there is a version mismatch.
The default setting is false.
l -ilo means import only local configuration parameters. This options requires -ivm=false.
l -help displays the command format and options.
Note If you run system_import without specifying any options, the help message is displayed.
1. Change to the <FILEDRIVEHOME>/bin directory.
If you installed SecureTransport on Windows, you can run the command without changing to the /bin directory.
2. Type one of the following commands:
./system_import -exf=<export_file> for UNIX-based systems
system_import -exf=<export_file> for Windows
where <export_file> is the file name and location of the ZIP file. You must specify the file
name.
3. When prompted, type the password for the ZIP file. You must type the password created when the file was exported.
The server configuration information is imported into SecureTransport.
Note When you import a server configuration, the process overwrites the current configuration. If an improper configuration file is imported (for example, a blank file), no error message is displayed and the configuration files are overwritten.
If you import the wrong configuration, and then immediately try to import the correct one, the command displays an error message regarding the database password. You must restart SecureTransport after each system import.
Support toolThe Axway SecureTransport support tool collects information about SecureTransport and its host operating system and saves it in a support information file that you can send to Axway Global Support to help them diagnose an issue.
You use the Support Tool Configuration page to specify the information that the support tool saves and where it saves the file. You run a command line utility to create the support information file. If needed, you can add other information to the file by editing a custom script.
Configure the support toolUse the Support Tool Configuration page to specify the information that the support tool saves in the support information file and where it saves the file.
AxwaySecureTransport 5.2.1 SP4 Administrator Guide 72

2 Operations
1. Select Operations > Support Tool to display the Support Tool Configuration page.
2. Specify the fields listed below.
3. Click Save.
SecureTransport saves the configuration and replicates it to all nodes in a Server cluster or to all synchronized Edge servers.
4. (AIX only) If you selected or deselected the Collect TM thread dump or Collect TM heap dump option, restart the Transaction Manager on all clustered SecureTransport Servers or all synchronized SecureTransport Edge servers using the stop_tm and start_tm commands in
<FILEDRIVEHOME>/bin.
5. Under Files and Folders to Save, add, remove, or edit the path names of files and folders to include in the support tool information file. Relative path names are relative to <FILEDRIVEHOME>. You can also add absolute path names.
SecureTransport saves each the change and replicates it to all nodes in a SecureTransport Server cluster or to all synchronized SecureTransport Edge servers.
FieldsThis section includes information about the fields you must complete.
l Support Access Code - The support tool includes the value of this field in the name of the support information file. Enter the Support Access Code for the support contact that covers this system. Axway Global Support uses the code in the file name to make sure the file is handled correctly.
l Output Directory - Enter the path to the directory where the support tool writes the support information file. The default is ${FILEDRIVEHOME}/support where
${FILEDRIVEHOME} represents the SecureTransport installation directory.
l Collect ... - Select the check box for each category of information that the support tool saves. For the log information, specify the period by selecting a predefined period for the list or specifying the start and end dates and times. The information available for collection is different on SecureTransport Server and SecureTransport Edge.
l Collect files and folders - Select this to specify that the support tool save the files listed in the Files and Folder to Save table.
l Files and Folders to Send - If Collect files and folders is selected, the support tool saves the contents of the files listed in this table in the support information file.
To add a file, click Add File or Folder, type the file or folder name in the File/Folder Name column, and click the Save icon ( ) in the right column. To remove files from the list, select the
files in left column, and click Remove. To change a file or folder name in the list, click the Edit icon ( ) in the right column, type the file or folder name in the File/Folder Name column, and
click the Save icon ( ).
AxwaySecureTransport 5.2.1 SP4 Administrator Guide 73
2 Operations
Exclude filesThe support tool does not save the contents of files or folders whose names are listed in the SupportTool.ExcludeFilesFoldersList server configuration parameter. By default, the excluded names are certs and passwd.
To add or remove names from the excluded files list, see Change a parameter value on page 65.
Add custom information to the support information fileThe support tool is implemented as an executable script, <FILEDRIVEHOME>/bin/collect_support_information, that collects the information that is specified on the Support Tool Configuration page and saves it in the support information file.
To add custom information to the support information file, edit the <FILEDRIVEHOME>/bin/custom_collect_support_information script. The main script calls this script before it creates the support information file from the collected information.
By default, the custom script does nothing. Your custom script must write the information that you need to include in the support information files to the support directory that the main script writes to. The script can create files and directories in the support directory. The last action that the main script takes is to combine all the files in the support directory into the support information file.
When you write a custom script, you can use the following defined environment variables:
l ${HOST}–The host name of the system
l ${SUPPORT_DIR}–The full path name of the directory where the custom script
must write its information
The following example <FILEDRIVEHOME>/bin/custom_collect_support_information script illustrates writing a file to the support directory.
# Collect user files
#
USER_HOME="/home/users"
USERS="partner2 partner7"
echo "=== Saving user files ==="tar -cf "${SUPPORT_DIR}/users_${HOST}.tar" -C "${USER_HOME}" "${USERS}"
Run the support toolThe support tool is implemented as an executable script. To create the support information file, run <FILEDRIVEHOME>/bin/collect_support_information. The script saves the information configured on the Support Tool Configuration page in the configured output directory.
AxwaySecureTransport 5.2.1 SP4 Administrator Guide 74

2 Operations
The file name is support_<supportAccessCode>_<hostName>_<timestamp>.tar.gz where:
l <supportAccessCode> is the value of the Support Access Code field on the Support
Tool Configuration page.
l <hostName> is the host name of the system that the support tool is run on.
l <timestamp> is the UNIX time (the number of seconds that have elapsed since midnight
Coordinated Universal Time on January 1, 1970).
To write the support information file to a different directory from the one specified in the Output Directory field on the Support Tool Configuration page, use the following command:
<FILEDRIVEHOME>/bin/collect_support_information -d <outputDirectory>
If the output directory does not exist, the support tool creates it.
The support tool can run when the SecureTransport database in not available, but it cannot collect the following information that is stored in the database:
l Server log
l File tracking
l Audit log
l Server configuration
During execution, the support tool outputs status messages and a final message that path name of the support information file. You can use SecureTransport to push the file to another location.
Note The TM thread dump can slow the operation of the TM and, more significantly, the TM heap dump can prevent the TM from processing events for 30 minutes or more, depending on the configured heap size. It is best to run the support tool when there is no load on SecureTransport.
Run the support tool automatically when the TM runs out of memoryYou can configure SecureTransport to run the support tool automatically when the Transaction Manager (TM) fails with an OutOfMemoryError. SecureTransport runs the support tool before it restarts the TM.
1. Edit the <FILEDRIVEHOME>/bin/crash_tm file and comment out a line so that it is:
# collect_crash_info="false"
2. If Collect TM heap dump is selected on the Support Tool Configuration page, edit the <FILEDRIVEHOME>/bin/start_tm_console file and comment out a line so that it is:
# disableHeapDumpOnOutOfMemoryError="true"
AxwaySecureTransport 5.2.1 SP4 Administrator Guide 75
2 Operations
3. Restart the Transaction Manager on all clustered SecureTransport Servers or all synchronized SecureTransport Edge servers using the stop_tm and start_tm commands in
<FILEDRIVEHOME>/bin.
SecureTransport runs the support tool using the configuration from the Support Tool Configuration page.
Note Due to a technical limitation, when the crash_tm script runs the support tool on any system other than IBM AIX, the support information file does not include the TM thread dump.
Directory browsingBy setting up a directory structure, you can access system drives and network mounts on Windows.
Set up the structure for directory browsing 1. Enable browsing for system drives.
For system drives, create a directory under <FILEDRIVEHOME>\..\cygwin\drives
with the drive letter as a name, and give permission to everyone. For example, to enable browsing of the C drive, create the following folder:
<FILEDRIVEHOME>\..\cygwin\drives\c
2. Enable browsing for network shares.
For network shares \\<hostname>\<sharename>, create a directory structure like the
following:
<FILEDRIVEHOME>\..\cygwin\net\<hostname>\<sharename>
and give permission to everyone for this directory. <hostname> and <sharename> are
both required.
For example, to enable browsing of network share with path:
\\myhost\my-shared-folder
create the following folder:
<FILEDRIVEHOME>\..\cygwin\net\myhost\my-shared-folder
Note System drives in the user’s home folder are enabled for browsing by default.
Standard browser clientYou can use a standard browser, such as Firefox or Microsoft Internet Explorer (IE) to connect to a SecureTransport Server. Using a browser allows easy access to the SecureTransport Server, but it does not offer all the features of Axway Secure Client applications. For example, the browser client
AxwaySecureTransport 5.2.1 SP4 Administrator Guide 76
2 Operations
does not support the Automatic Restart function. Browsers connecting to SecureTransport must support JavaScript.
No additional configuration is required on the server side for users to connect to the server with a standard browser. You can customize the interface if you prefer.
Note Customization of the interface requires knowledge of HTML and JavaScript.
The client must have JavaScript and cookies enabled.
Customize a web clientTo create a custom browser client, copy the files for an existing browser HTML template and modify them. You must make the changes on all servers in a cluster.
Customize the browser client interface The pages for the SecureTransport default browser client interface are created from HTML template pages. There are template pages for each locale supported by the server. The pages are located in the <FILEDRIVEHOME>/share/ftdocs/html/<Locale> directory, where <Locale> is the supported locale. The default pages are in the C (for English) directory.
Note Additional template pages reside in <FILEDRIVEHOME>/share/ftdocs/html/skin/jb9 and <FILEDRIVEHOME>/share/ftdocs/html/skin/sm6. A <Locale> subdirectory contains the HTML files for each additional template. For more information about setting the HTML template used for the browser client, see Select a default HTML template on page 163.
The pages include embedded macro strings. A macro string is a special string in HTML which the SecureTransport Server understands and replaces with HTML or JavaScript code. A macro string is enclosed in angle brackets and two dashes and includes an exclamation point. For example:
<!--FDX_PARENT_DIR_FUNC-->
To customize the browser client interface, edit the HTML template pages. All custom pages must include the appropriate macro strings as listed in the Macro Strings table. Most of the HTML in the templates can be changed. The JavaScript functions can also be changed. Make these changes on each node of the cluster where they are required.
Note Editing or creating a JavaScript function must be defined in the template page.
Do not change the following parameters while editing the templates:
l Name/Value in any of the forms
These are hardcoded in the server.
l URLs for listing, downloading, and deleting files. Do not define new macro strings or change the definition of existing macro strings.
The browser interface has template pages for the following functions:
AxwaySecureTransport 5.2.1 SP4 Administrator Guide 77

2 Operations
l Login and logout
l List
l Download
l Session timeout
l Options
l Account and password management
l Message
Macro stringsThe following table provides information on the macro strings that are supported by SecureTransport. Some macro strings are only supported in specific template pages, as indicated in the Description column.
Macro string
Replaced with: Description
FDX_CHANGE_PASSWORD_MSGS
The policy used in changing passwords. It is replaced by one of four FDX Messages (see FDX_MESSAGE on page 79).
Used only on the Change Passwords page.
FDX_CLICK_URL
/~ Specifies the relative URL to which the user is redirected after displaying the authentication message, for example if the AuthMessage
parameter of AuthAgent is set to "Yes".
FDX_DIRECTORY_LIST
For every file or directory present in the current directory, SecureTransport adds the following line:
<script>PrintFileURL("FileURL", "FileName", "isDir", "size", "date", "icon")</script>
FileURL – the name of the file which can be used as the URL
FileName – the name of file
isDir – 0 for directory or 1 for a file
size – size of the file (for a directory, size is N/A), date is the modification date of a file
icon – the URL of an image file to be used as icon
Used on the List page only.
FDX_FILE_NAME
The current file or directory name.
Used in the List and Options pages.
FDX_FILE_URL
The escaped file name, which can be used as a URL.
Used in the List and Options pages.
AxwaySecureTransport 5.2.1 SP4 Administrator Guide 78
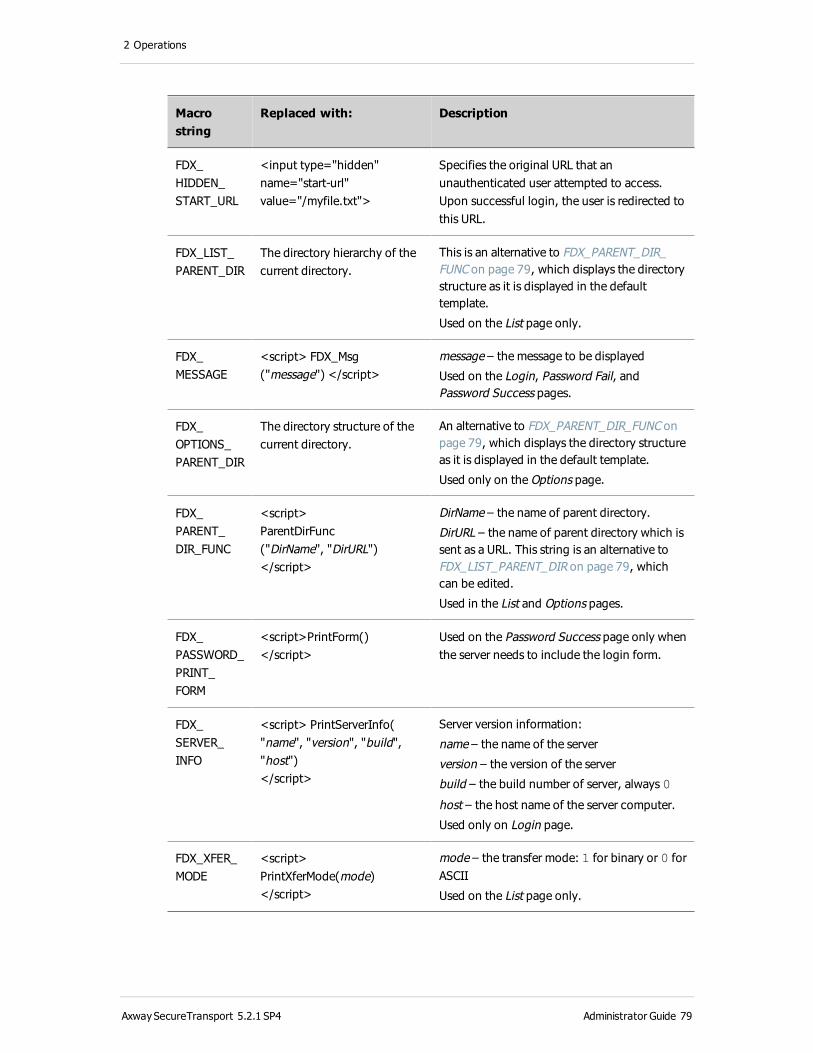
2 Operations
Macro string
Replaced with: Description
FDX_HIDDEN_START_URL
<input type="hidden" name="start-url" value="/myfile.txt">
Specifies the original URL that an unauthenticated user attempted to access. Upon successful login, the user is redirected to this URL.
FDX_LIST_PARENT_DIR
The directory hierarchy of the current directory.
This is an alternative to FDX_PARENT_DIR_FUNC on page 79, which displays the directory structure as it is displayed in the default template.
Used on the List page only.
FDX_MESSAGE
<script> FDX_Msg("message") </script>
message – the message to be displayed
Used on the Login, Password Fail, and Password Success pages.
FDX_OPTIONS_PARENT_DIR
The directory structure of the current directory.
An alternative to FDX_PARENT_DIR_FUNC on page 79, which displays the directory structure as it is displayed in the default template.
Used only on the Options page.
FDX_PARENT_DIR_FUNC
<script>ParentDirFunc("DirName", "DirURL")</script>
DirName – the name of parent directory.
DirURL – the name of parent directory which is sent as a URL. This string is an alternative to FDX_LIST_PARENT_DIR on page 79, which can be edited.
Used in the List and Options pages.
FDX_PASSWORD_PRINT_FORM
<script>PrintForm() </script>
Used on the Password Success page only when the server needs to include the login form.
FDX_SERVER_INFO
<script> PrintServerInfo("name", "version", "build", "host")</script>
Server version information:
name – the name of the server
version – the version of the server
build – the build number of server, always 0
host – the host name of the server computer.
Used only on Login page.
FDX_XFER_MODE
<script>PrintXferMode(mode) </script>
mode – the transfer mode: 1 for binary or 0 for ASCII
Used on the List page only.
AxwaySecureTransport 5.2.1 SP4 Administrator Guide 79
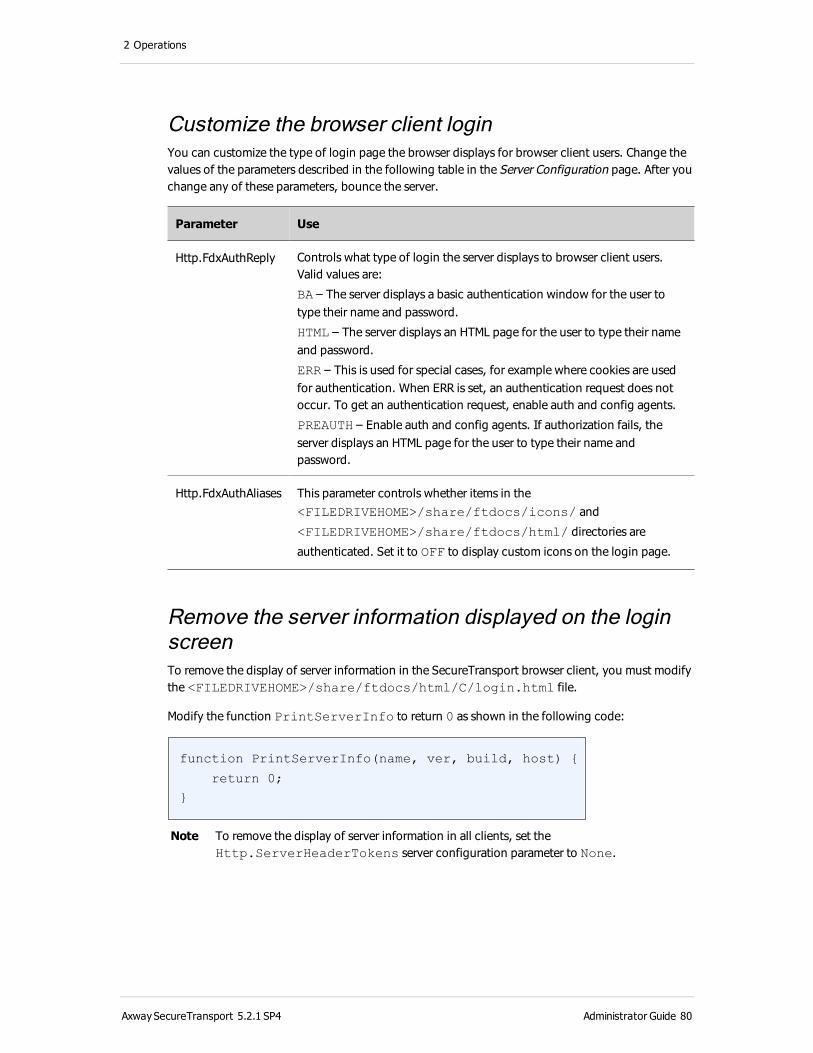
2 Operations
Customize the browser client loginYou can customize the type of login page the browser displays for browser client users. Change the values of the parameters described in the following table in the Server Configuration page. After you change any of these parameters, bounce the server.
Parameter Use
Http.FdxAuthReply Controls what type of login the server displays to browser client users. Valid values are:
BA – The server displays a basic authentication window for the user to type their name and password.
HTML – The server displays an HTML page for the user to type their name and password.
ERR – This is used for special cases, for example where cookies are used for authentication. When ERR is set, an authentication request does not occur. To get an authentication request, enable auth and config agents.
PREAUTH – Enable auth and config agents. If authorization fails, the server displays an HTML page for the user to type their name and password.
Http.FdxAuthAliases This parameter controls whether items in the <FILEDRIVEHOME>/share/ftdocs/icons/ and
<FILEDRIVEHOME>/share/ftdocs/html/ directories are
authenticated. Set it to OFF to display custom icons on the login page.
Remove the server information displayed on the login screenTo remove the display of server information in the SecureTransport browser client, you must modify the <FILEDRIVEHOME>/share/ftdocs/html/C/login.html file.
Modify the function PrintServerInfo to return 0 as shown in the following code:
function PrintServerInfo(name, ver, build, host) {
return 0;
}
Note To remove the display of server information in all clients, set the Http.ServerHeaderTokens server configuration parameter to None.
AxwaySecureTransport 5.2.1 SP4 Administrator Guide 80
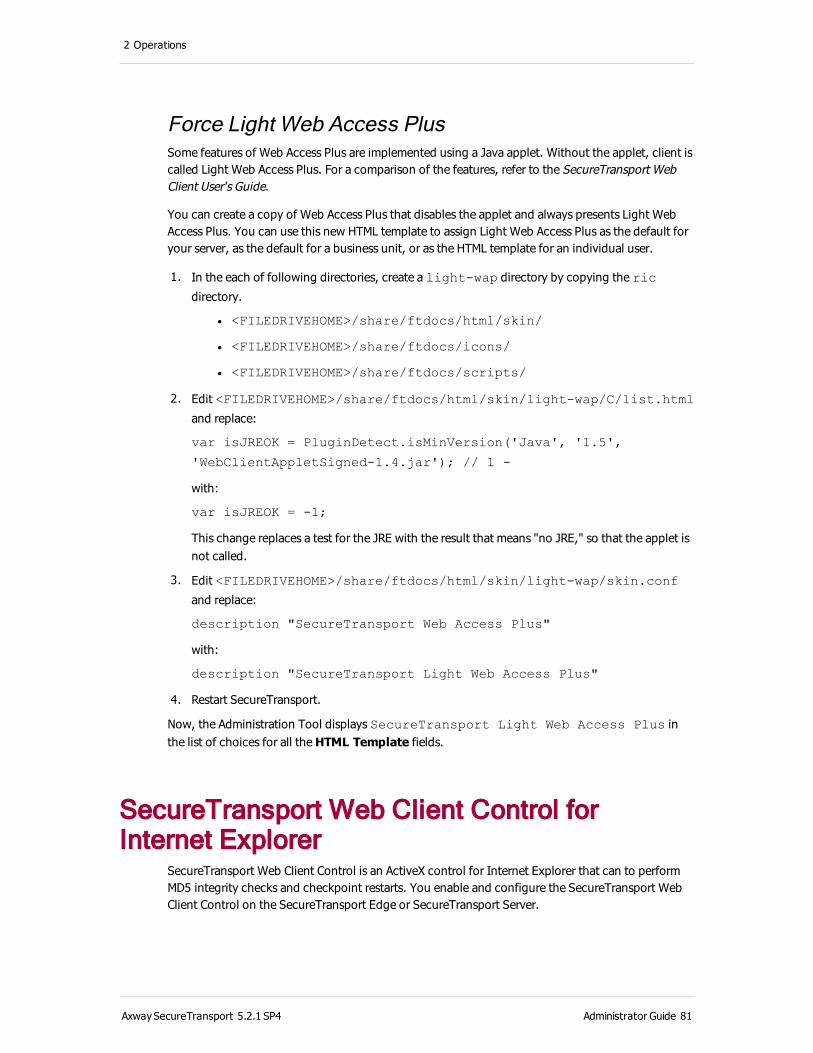
2 Operations
Force Light Web Access PlusSome features of Web Access Plus are implemented using a Java applet. Without the applet, client is called Light Web Access Plus. For a comparison of the features, refer to the SecureTransport Web Client User's Guide.
You can create a copy of Web Access Plus that disables the applet and always presents Light Web Access Plus. You can use this new HTML template to assign Light Web Access Plus as the default for your server, as the default for a business unit, or as the HTML template for an individual user.
1. In the each of following directories, create a light-wap directory by copying the ric
directory.
l <FILEDRIVEHOME>/share/ftdocs/html/skin/
l <FILEDRIVEHOME>/share/ftdocs/icons/
l <FILEDRIVEHOME>/share/ftdocs/scripts/
2. Edit <FILEDRIVEHOME>/share/ftdocs/html/skin/light-wap/C/list.html
and replace:
var isJREOK = PluginDetect.isMinVersion('Java', '1.5',
'WebClientAppletSigned-1.4.jar'); // 1 -
with:
var isJREOK = -1;
This change replaces a test for the JRE with the result that means "no JRE," so that the applet is not called.
3. Edit <FILEDRIVEHOME>/share/ftdocs/html/skin/light-wap/skin.conf
and replace:
description "SecureTransport Web Access Plus"
with:
description "SecureTransport Light Web Access Plus"
4. Restart SecureTransport.
Now, the Administration Tool displays SecureTransport Light Web Access Plus in the list of choices for all the HTML Template fields.
SecureTransport Web Client Control for Internet Explorer
SecureTransport Web Client Control is an ActiveX control for Internet Explorer that can to perform MD5 integrity checks and checkpoint restarts. You enable and configure the SecureTransport Web Client Control on the SecureTransport Edge or SecureTransport Server.
AxwaySecureTransport 5.2.1 SP4 Administrator Guide 81
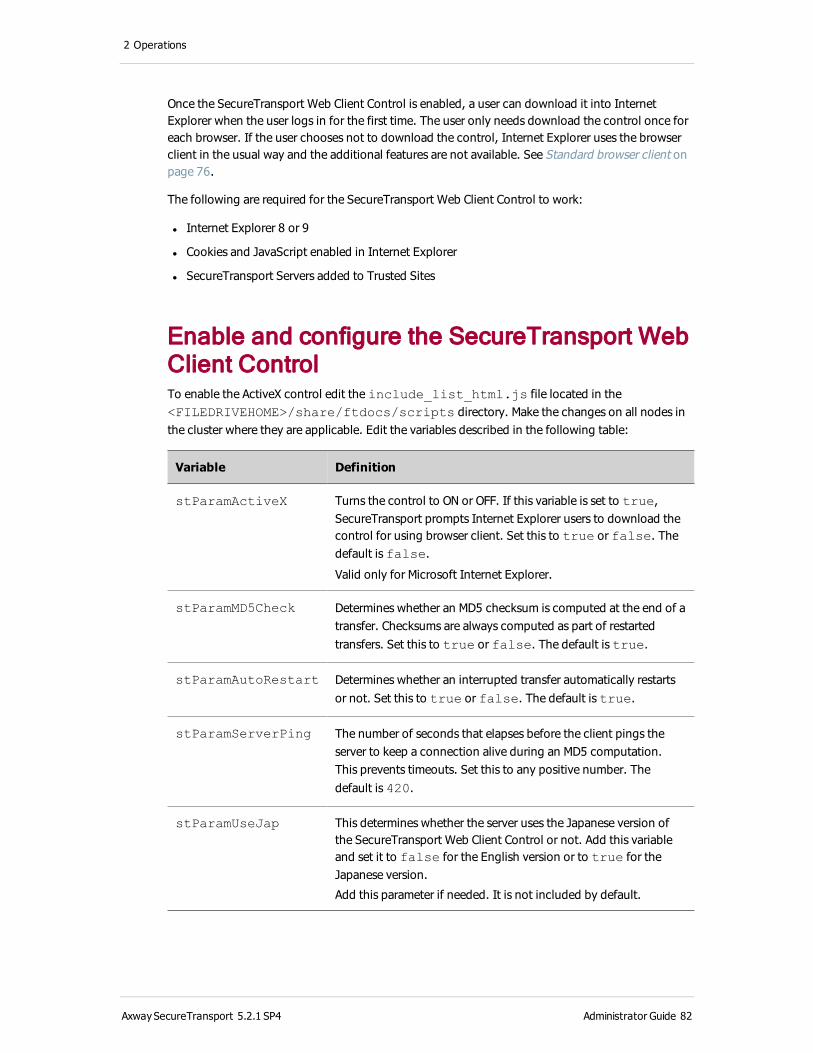
2 Operations
Once the SecureTransport Web Client Control is enabled, a user can download it into Internet Explorer when the user logs in for the first time. The user only needs download the control once for each browser. If the user chooses not to download the control, Internet Explorer uses the browser client in the usual way and the additional features are not available. See Standard browser client on page 76.
The following are required for the SecureTransport Web Client Control to work:
l Internet Explorer 8 or 9
l Cookies and JavaScript enabled in Internet Explorer
l SecureTransport Servers added to Trusted Sites
Enable and configure the SecureTransport Web Client ControlTo enable the ActiveX control edit the include_list_html.js file located in the <FILEDRIVEHOME>/share/ftdocs/scripts directory. Make the changes on all nodes in the cluster where they are applicable. Edit the variables described in the following table:
Variable Definition
stParamActiveX Turns the control to ON or OFF. If this variable is set to true, SecureTransport prompts Internet Explorer users to download the control for using browser client. Set this to true or false. The default is false.
Valid only for Microsoft Internet Explorer.
stParamMD5Check Determines whether an MD5 checksum is computed at the end of a transfer. Checksums are always computed as part of restarted transfers. Set this to true or false. The default is true.
stParamAutoRestart Determines whether an interrupted transfer automatically restarts or not. Set this to true or false. The default is true.
stParamServerPing The number of seconds that elapses before the client pings the server to keep a connection alive during an MD5 computation. This prevents timeouts. Set this to any positive number. The default is 420.
stParamUseJap This determines whether the server uses the Japanese version of the SecureTransport Web Client Control or not. Add this variable and set it to false for the English version or to true for the Japanese version.
Add this parameter if needed. It is not included by default.
AxwaySecureTransport 5.2.1 SP4 Administrator Guide 82

2 Operations
You configure the SecureTransport Web Client Control by editing the list.html template page. Template pages are located in the <FILEDRIVEHOME>/share/ftdocs/html/%L directory, where L is the supported locale. The default pages are in the C (for ASCII) directory.
You can modify the list.html file to set the default transfer mode to BINARY or ASCII.
Configure Internet Explorer to use the ActiveX controlsIf you are using certificates to authenticate users with the SecureTransport browser client, you need to be able to download and run ActiveX controls. The relevant Internet Explorer 8 and 9 settings are shown here. All the settings should be set for the zone where the SecureTransport Server is located.
1. Select Tools > Internet Options. Click the Security tab and select the zone where the SecureTransport Server is located.
2. If there is a security level for the zone, set it to Medium-high or lower.
3. Click Custom Level. Make sure that the following options are set:
ActiveX controls and plug-ins:
l Download signed ActiveX controls: Enable (or Prompt)
l Download unsigned ActiveX controls: Disable
l Initialize and script ActiveX controls not marked as safe: Disable
l Run ActiveX controls and plug-ins: Enable
l Script ActiveX controls marked safe for scripting: Enable
Miscellaneous:
l Include local directory path when uploading files to a server: Enable
Scripting:
l Allow status bar updates via script: Enable
4. Click OK to save the settings. Exit the Internet Options window.
Each user must import the Valicert root certificate into their Trusted Root Certificate store.
1. A prompt in the Internet Explorer information bar (near the top of the screen) displays stating that it blocked installation of the ActiveX control. Click the message and select Install ActiveX Control.
2. Click View Certificate, then Install Certificate, and follow the prompts (accepting all defaults) to install the new certificate in the Trusted Root Certification Authorities store.
3. Click OK three times to dismiss all the dialog boxes.
4. Click the message, select Install ActiveX Control, and click Install.
AxwaySecureTransport 5.2.1 SP4 Administrator Guide 83
2 Operations
Server backupTo minimize the risk of data loss, perform regular backups of the SecureTransport Server and SecureTransport Edge data.
When performing a server backup, you must back up the following files and directories in <FILEDRIVEHOME>:
l conf/
l etc/
l lib/certs/
l brules/conf/brules.xml
l brules/local/
l bin/agents/
l var/db/mysql/ (for servers using the embedded database)
Include the following files if changes have been made after the initial installation of SecureTransport:
l lib/perl5/
l lib/msgs/
l share/ftdocs/
Include the user account home folders.
Add the following files to keep existing log files, statistics, and MDN receipts:
l var/logs/
l var/db/hist/logs/
l var/db/stats/
l var/receipts/
For SecureTransport Server with an external database, back up the database using standard Oracle or Microsoft SQL Server procedures.
For SecureTransport Server with an embedded database or SecureTransport Edge, use <FILEDRIVEHOME>/bin/backup_db to back up the database tables. The backup_db Backup_File command writes the backup data to the file named. You must enter the database password. You can use the -skiplog option to prevent the TransactionStatus or TransactionData tables from being included. To restore the data, use the following command:
<FILEDRIVEHOME>/mysql/bin/mysql -u root -p < Backup_File
For additional information about export and importing server configuration parameters and files for backup and restore, see Server configuration on page 64.
AxwaySecureTransport 5.2.1 SP4 Administrator Guide 84
3 Setup
This chapter describes how to set up the most common functions of the Axway SecureTransport Administration Tool.
CertificatesSecureTransport uses digital certificates for many security functions. These certificates can either be signed by a self-signed Internal Certificate Authority (CA), that is, issued by the SecureTransport Server; signed by an imported internal CA; or signed by a third party, such as an external company like Verisign or a corporate CA. During the installation process, SecureTransport installs a default self-signed CA (valid for one month) that you replace during the initial setup procedures. For details about initial setup procedures for certificates, refer to the SecureTransport Installation Guide. You can also import an external CA to serve as the SecureTransport internal CA so that certificates signed by SecureTransport are trusted by clients that trust that CA.
This section describes the different types of certificates used in SecureTransport and how to import, export, and generate certificates and certificate signing requests.
Certificate typesSecureTransport uses the following types of certificates overall:
l Local Certificates – Local certificates used for server authentication. They are also used to decrypt incoming documents and sign documents and receipts. The Certificate Manager can generate self-issued local certificates, import local certificates signed by a third-party certificate authority, and export certificate public keys and private keys to a file. For example, if you have a certificate signed by a widely-trusted CA such as Verisign, you can import it as a local certificate and use it for the HTTPS SSL key alias so browsers do not require the user to accept a certificate which they cannot validate. You manage server-scoped local certificates from the Setup menu. For more information, see Manage local certificates and certificate signing requests on page 88.
l Trusted Certificate Authority (CA) Certificates – CA certificates used for indirect trust of SSL client or server certificates. SecureTransport includes a set of commonly used CA certificates. For SecureTransport to use imported local certificates, the trusted CA certificates must include certificates for all CAs in their certification paths (certificate chains). CA certificates are only server-scoped, and there are no account-specific CA certificates.
l Internal Certificates – A CA is the authority that issues, manages, revokes, and renews certificates, and assists people with performing certificate life cycle tasks such as retrieving, renewing, revoking, and so on. CAs are represented by a certificate that contains the name of the issuer and they are used to sign end-user certificates. An internal CA represents the company that you work for or a company that you pay to issue you a certificate.
AxwaySecureTransport 5.2.1 SP4 Administrator Guide 85
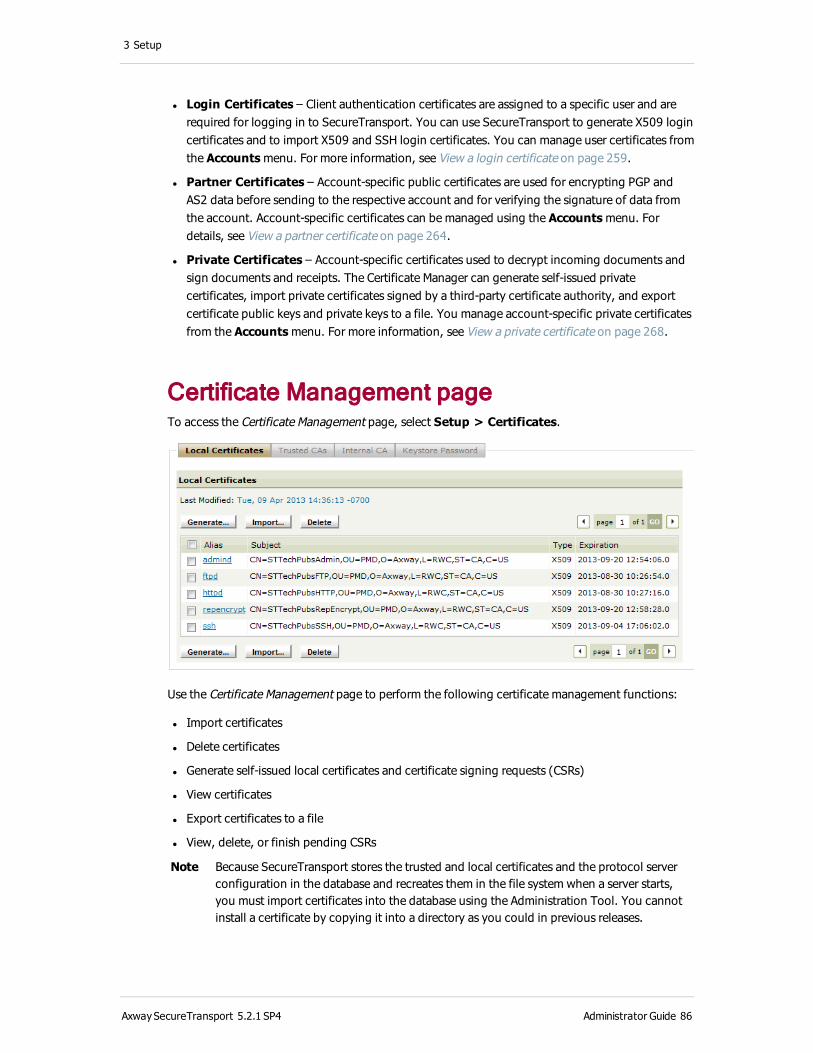
3 Setup
l Login Certificates – Client authentication certificates are assigned to a specific user and are required for logging in to SecureTransport. You can use SecureTransport to generate X509 login certificates and to import X509 and SSH login certificates. You can manage user certificates from the Accounts menu. For more information, see View a login certificate on page 259.
l Partner Certificates – Account-specific public certificates are used for encrypting PGP and AS2 data before sending to the respective account and for verifying the signature of data from the account. Account-specific certificates can be managed using the Accounts menu. For details, see View a partner certificate on page 264.
l Private Certificates – Account-specific certificates used to decrypt incoming documents and sign documents and receipts. The Certificate Manager can generate self-issued private certificates, import private certificates signed by a third-party certificate authority, and export certificate public keys and private keys to a file. You manage account-specific private certificates from the Accounts menu. For more information, see View a private certificate on page 268.
Certificate Management pageTo access the Certificate Management page, select Setup > Certificates.
Use the Certificate Management page to perform the following certificate management functions:
l Import certificates
l Delete certificates
l Generate self-issued local certificates and certificate signing requests (CSRs)
l View certificates
l Export certificates to a file
l View, delete, or finish pending CSRs
Note Because SecureTransport stores the trusted and local certificates and the protocol server configuration in the database and recreates them in the file system when a server starts, you must import certificates into the database using the Administration Tool. You cannot install a certificate by copying it into a directory as you could in previous releases.
AxwaySecureTransport 5.2.1 SP4 Administrator Guide 86

3 Setup
Repository encryption certificateRepository encryption increases SecureTransport security by avoiding storing unencrypted files. When you enable repository encryption, SecureTransport encrypts each file that it pulls from a partner site or that a client pushes to it. When SecureTransport pushes a file to a partner site or a client pulls a file from it, SecureTransport decrypts the file. SecureTransport encrypts and decrypts each file dynamically in memory as it receives and sends it, so the files never exist unencrypted in the storage of the host system.
1. Generate a self-issued local certificate or import a PKCS#12 file. See Generate a self-issued server certificate on page 89 and Import a local certificate on page 92.
2. Set the value of the Stfs.Encryption.CertAlias server configuration parameter to the
alias of the certificate. SecureTransport uses this certificate to encrypt and decrypt files. See View and change server configuration parameters on page 64.
SecureTransport prevents you from deleting the certificate referenced by Stfs.Encryption.CertAlias.
3. To choose the encryption algorithm, set the value of the Stfs.Encryption.Algorithm
server configuration parameter to one of the following values:
l AES128 (default)
l AES256
l 3DES
See View and change server configuration parameters on page 64.
4. To configure SecureTransport to compute the MD5 checksum for an uploaded file dynamically as the file is uploaded, set the value of the Stfs.Hash.HashOnUpload server
configuration parameter to true. When the value is false, the default value,
SecureTransport computes the MD5 checksum after the file transfer is complete.
5. Create a user class named EncryptClass. Files transferred by users in this class are
encrypted. See Add a user class on page 389.
Note For server-initiated transfers, the user class is defined by the UID and GID only. If you define the EncryptClass using user name or other attributes, there are limitation on server-initiated transfers. See Encryption and server-initiated transfers on page 385.
6. Restart the TM Server. See Start and stop servers on page 34.
Note If you enable repository encryption, the following SecureTransport functions are not supported: resume PeSIT transfers and pause and resume transfers when SecureTransport is the server.
AxwaySecureTransport 5.2.1 SP4 Administrator Guide 87

3 Setup
Manage local certificates and certificate signing requestsUse the Certificate Management page to generate local, self-issued server certificates or to generate certificate signing requests. Generated certificates are assigned RSA keys.
A certificate signing request is an unsigned copy of a certificate that you submit to a CA when requesting a signed certificate. Based on the information in the CSR, the CA creates a new signed certificate for your use. After receiving the signed certificate from the CA, you must import it into SecureTransport. For details, see Import a new certificate for a pending certificate signing request on page 90.
View local certificatesYou can view a list of all the local certificates or view the details of a specific certificate.
1. Select Setup > Certificates.
2. Click the Local Certificates tab.
3. Select a certificate alias from the list.
The View Certificate page displays the detailed information about the certificate.
AxwaySecureTransport 5.2.1 SP4 Administrator Guide 88
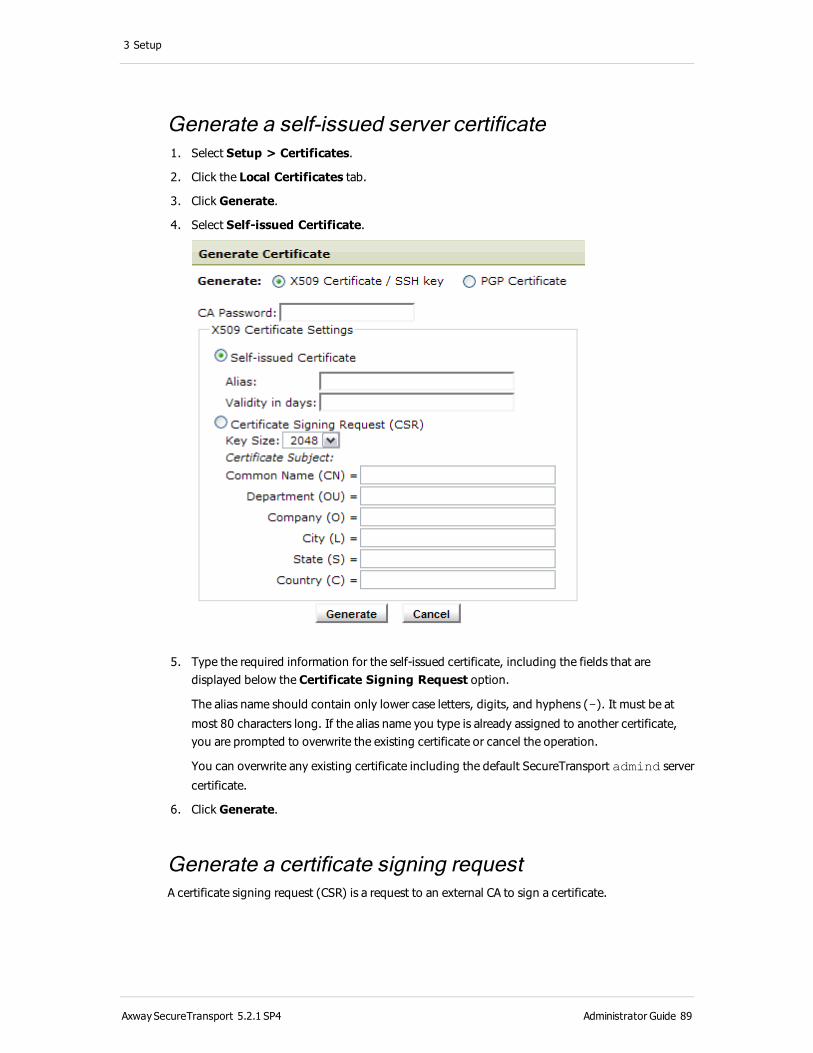
3 Setup
Generate a self-issued server certificate 1. Select Setup > Certificates.
2. Click the Local Certificates tab.
3. Click Generate.
4. Select Self-issued Certificate.
5. Type the required information for the self-issued certificate, including the fields that are displayed below the Certificate Signing Request option.
The alias name should contain only lower case letters, digits, and hyphens (-). It must be at
most 80 characters long. If the alias name you type is already assigned to another certificate, you are prompted to overwrite the existing certificate or cancel the operation.
You can overwrite any existing certificate including the default SecureTransport admind server
certificate.
6. Click Generate.
Generate a certificate signing requestA certificate signing request (CSR) is a request to an external CA to sign a certificate.
AxwaySecureTransport 5.2.1 SP4 Administrator Guide 89
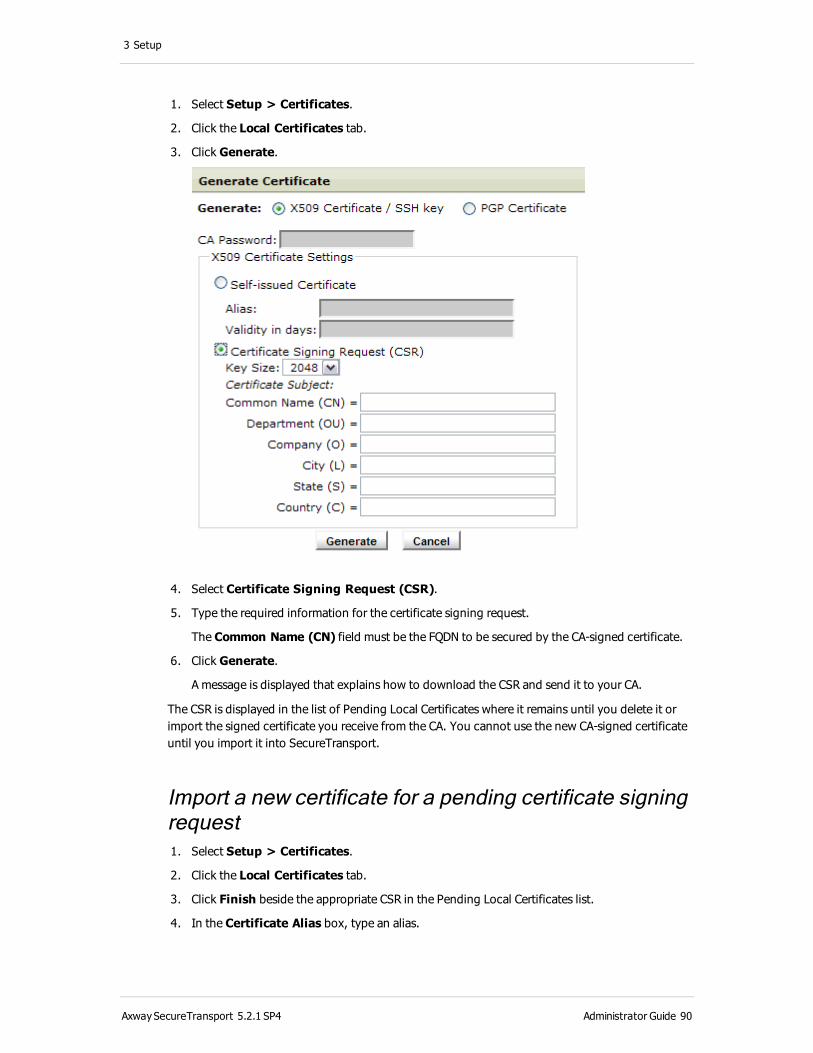
3 Setup
1. Select Setup > Certificates.
2. Click the Local Certificates tab.
3. Click Generate.
4. Select Certificate Signing Request (CSR).
5. Type the required information for the certificate signing request.
The Common Name (CN) field must be the FQDN to be secured by the CA-signed certificate.
6. Click Generate.
A message is displayed that explains how to download the CSR and send it to your CA.
The CSR is displayed in the list of Pending Local Certificates where it remains until you delete it or import the signed certificate you receive from the CA. You cannot use the new CA-signed certificate until you import it into SecureTransport.
Import a new certificate for a pending certificate signing request 1. Select Setup > Certificates.
2. Click the Local Certificates tab.
3. Click Finish beside the appropriate CSR in the Pending Local Certificates list.
4. In the Certificate Alias box, type an alias.
AxwaySecureTransport 5.2.1 SP4 Administrator Guide 90
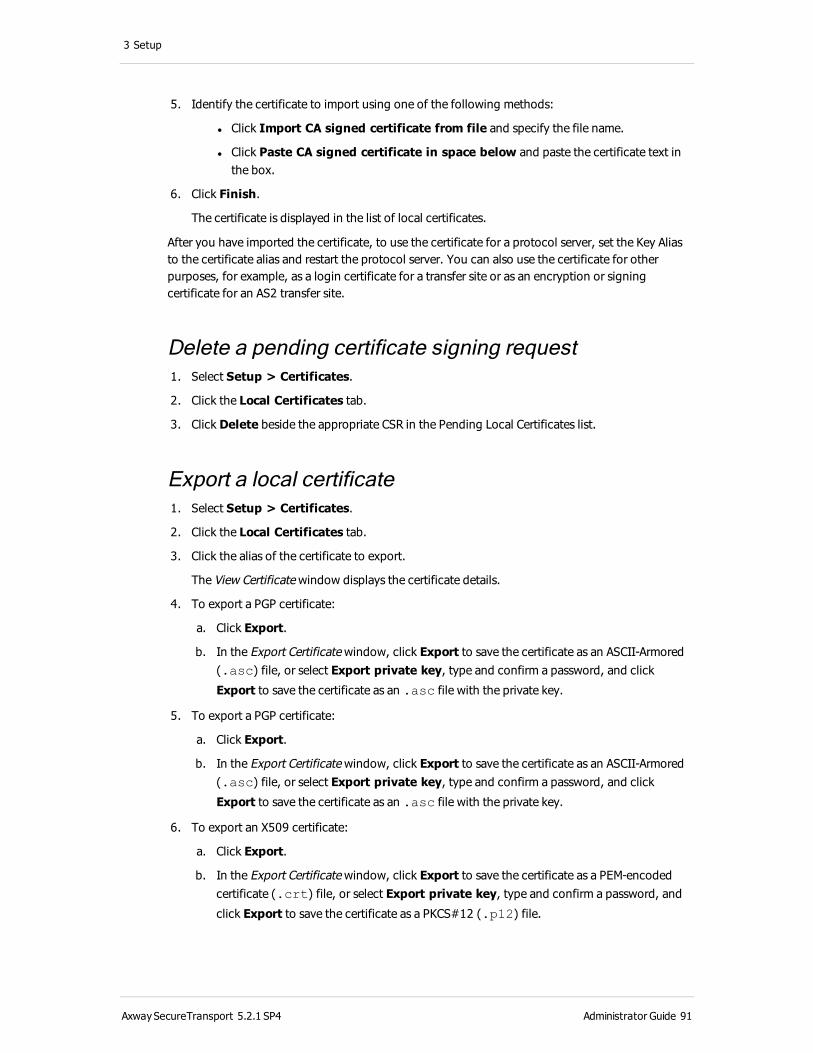
3 Setup
5. Identify the certificate to import using one of the following methods:
l Click Import CA signed certificate from file and specify the file name.
l Click Paste CA signed certificate in space below and paste the certificate text in the box.
6. Click Finish.
The certificate is displayed in the list of local certificates.
After you have imported the certificate, to use the certificate for a protocol server, set the Key Alias to the certificate alias and restart the protocol server. You can also use the certificate for other purposes, for example, as a login certificate for a transfer site or as an encryption or signing certificate for an AS2 transfer site.
Delete a pending certificate signing request 1. Select Setup > Certificates.
2. Click the Local Certificates tab.
3. Click Delete beside the appropriate CSR in the Pending Local Certificates list.
Export a local certificate 1. Select Setup > Certificates.
2. Click the Local Certificates tab.
3. Click the alias of the certificate to export.
The View Certificate window displays the certificate details.
4. To export a PGP certificate:
a. Click Export.
b. In the Export Certificate window, click Export to save the certificate as an ASCII-Armored (.asc) file, or select Export private key, type and confirm a password, and click
Export to save the certificate as an .asc file with the private key.
5. To export a PGP certificate:
a. Click Export.
b. In the Export Certificate window, click Export to save the certificate as an ASCII-Armored (.asc) file, or select Export private key, type and confirm a password, and click
Export to save the certificate as an .asc file with the private key.
6. To export an X509 certificate:
a. Click Export.
b. In the Export Certificate window, click Export to save the certificate as a PEM-encoded certificate (.crt) file, or select Export private key, type and confirm a password, and
click Export to save the certificate as a PKCS#12 (.p12) file.
AxwaySecureTransport 5.2.1 SP4 Administrator Guide 91
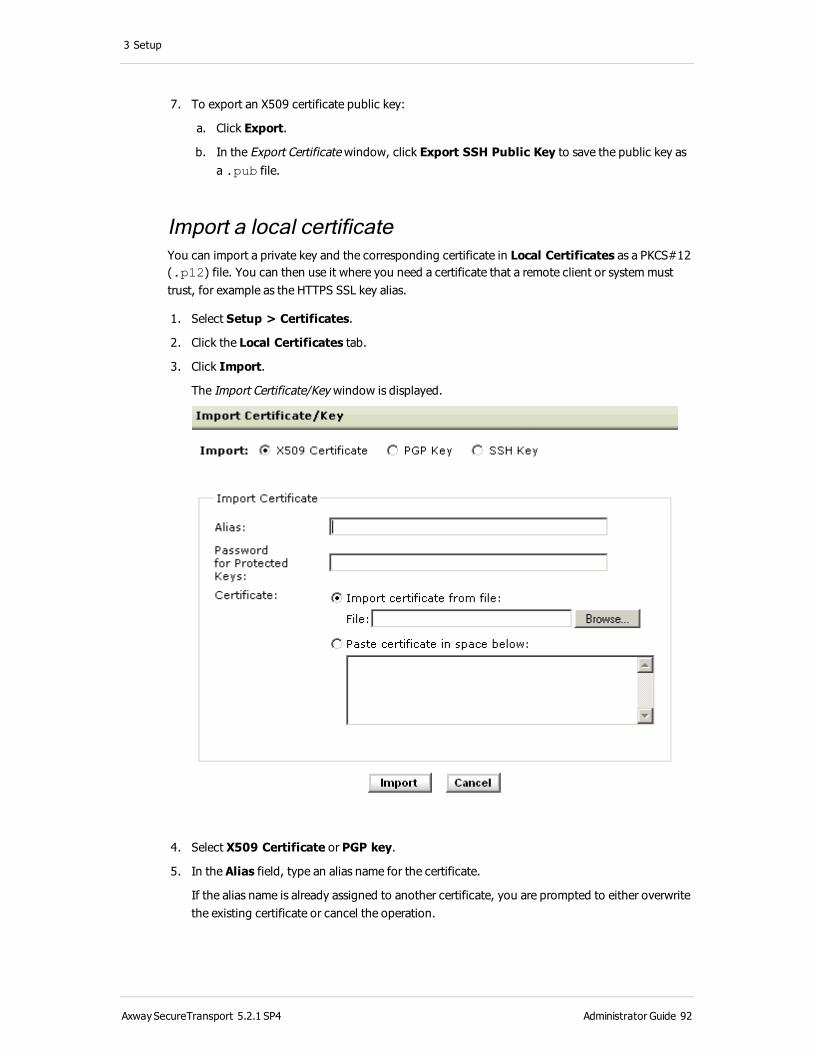
3 Setup
7. To export an X509 certificate public key:
a. Click Export.
b. In the Export Certificate window, click Export SSH Public Key to save the public key as a .pub file.
Import a local certificateYou can import a private key and the corresponding certificate in Local Certificates as a PKCS#12 (.p12) file. You can then use it where you need a certificate that a remote client or system must trust, for example as the HTTPS SSL key alias.
1. Select Setup > Certificates.
2. Click the Local Certificates tab.
3. Click Import.
The Import Certificate/Key window is displayed.
4. Select X509 Certificate or PGP key.
5. In the Alias field, type an alias name for the certificate.
If the alias name is already assigned to another certificate, you are prompted to either overwrite the existing certificate or cancel the operation.
AxwaySecureTransport 5.2.1 SP4 Administrator Guide 92

3 Setup
6. If the PKCS#12 (.p12) file being imported is password protected, type the password. You can
also import PGP certificate files (.asc files).
7. Select Import certificate from file and type or browse to the file name or select Paste certificate in space below and paste the certificate text into the text field.
8. Click Import.
Note For specific requirements for certificates used to secure the SSL communication between the TM Server and the other servers, see Secure the communication between the TM server and the protocol servers on page 177.
Import an SSH key 1. Select Setup > Certificates.
2. Click the Local Certificates tab.
3. Click Import.
The Import Certificate/Key window is displayed.
4. Select SSH key.
AxwaySecureTransport 5.2.1 SP4 Administrator Guide 93

3 Setup
5. Type the CA Key Password specified during the certificate generation.
6. Type the information necessary to import the key. Alias, Validity in days, and Common Name (CN) are required fields.
7. Paste the certificate content directly in the provided space, or import the certificate from a file. To import from file, type the file path or click Browse to browse for the file.
8. Click Import.
Delete a local certificate 1. Select Setup > Certificates.
2. Click the Local Certificates tab.
3. Select the check boxes for the certificates to delete or select the check box in the table header to select all certificates.
AxwaySecureTransport 5.2.1 SP4 Administrator Guide 94

3 Setup
4. Click Delete.
5. Confirm the deletion.
Do not delete the certificate with the admind alias which is implicitly assigned to the Administration Tool server. SecureTransport prevents you from deleting a certificate that is in use, for example, a server certificate configured as the SSL key alias the AS2, FTP, HTTP, or SSH server or configured as the repository encryption certificate.
Manage trusted CAsTrusted CAs represent the list of root and intermediate CAs used to build the certificate chain for client and server certificates.
View a trusted CA certificates 1. Select Setup > Certificates.
2. Click the Trusted CAs tab.
The list of trusted certificates is displayed.
3. Navigate to the page that lists the certificate to view.
4. Click the alias from the list.
The View Certificate page displays the detailed information about the certificate.
AxwaySecureTransport 5.2.1 SP4 Administrator Guide 95

3 Setup
Export a trusted CA certificate 1. Select Setup > Certificates.
2. Click the Trusted CAs tab.
3. Navigate to the page that lists the certificate to export.
4. Click the alias of the certificate to export.
5. On the View Certificate page, click Export and save the certificate file in the desired location.
Import a trusted CAX509 certificate can be imported as a Trusted CA in the form of X509 DER or PEM encoded file.
1. Select Setup > Certificates.
2. Click the Trusted CAs tab.
3. Click Import.
4. Type an alias for the certificate in the Alias box.
If you use an alias that is already assigned to another certificate, the imported certificate overwrites the original one. Be sure that you are entering the appropriate alias for the new certificate.
5. Identify the certificate to import using one of the following methods:
l Click Import certificate from file and type the file name.
l Click Paste certificate in space below and paste the certificate text in the box.
6. Click Import.
Delete trusted CAs 1. Select Setup > Certificates.
2. Click the Trusted CAs tab.
3. Navigate to the page that lists the certificates to delete.
4. Select the check boxes for the certificates to delete.
5. Click Delete.
Note If an end user has a certificate issued by a trusted CA that was deleted, the user can no longer authenticate using that certificate.
Manage the internal CAEach SecureTransport installation maintains its own copy of the internal CA. During the initial post-installation setup procedure, an internal CA is generated. All SecureTransport Servers in a cluster share the same internal CA. If you have a disaster recovery site, the DR cluster uses the same internal
AxwaySecureTransport 5.2.1 SP4 Administrator Guide 96
3 Setup
CA, replicated from the primary production site.
The internal CA can be used to generate server or client certificates. It provides a convenient alternative to using a third-party CA. It is used implicitly in the following cases:
l Generating a local certificate. For detail, see Manage local certificates and certificate signing requests on page 88.
l Generating an account certificate. For detail, see Manage certificates on page 256.
l Signing imported SSH Keys. For detail, see Import an SSH login public key on page 262.
The internal CA key is protected with a password. Any operation that involves use of the internal CA require that password. Contact Axway Global Support for more information. For contact information, see Support services on page 27.
In addition to issuing certificates signed by internal CA, SecureTransport supports a few management operations for the internal CA. These operations include:
l Viewing the internal CA certificate
l Generating a new internal CA
l Importing an internal CA
l Exporting the internal CA
Note If you attempt to delete an internal CA, an alert dialog box is displayed. If the certificate of the internal CA is deleted the Validation Status of all X509 local certificates, as well as imported SSH keys (because they are converted to X509 certificates during the import,) become Not chained to a trusted root. This has critical impact on the generated Login Certificates because users are no longer able to log into the SecureTransport Server.
View the internal CA 1. Select Setup > Certificates.
2. Click the Internal CA tab.
AxwaySecureTransport 5.2.1 SP4 Administrator Guide 97

3 Setup
Basic certificate information is displayed including the validation status.
Generate an internal CAThere are a number of reasons why you might want to generate an internal CA. The most common reason is that the current CA is nearing its expiration date.
1. Select Setup > Certificates.
2. Click the Internal CA tab.
3. Click Generate New CA.
The Generate Internal CA dialog box is displayed.
AxwaySecureTransport 5.2.1 SP4 Administrator Guide 98
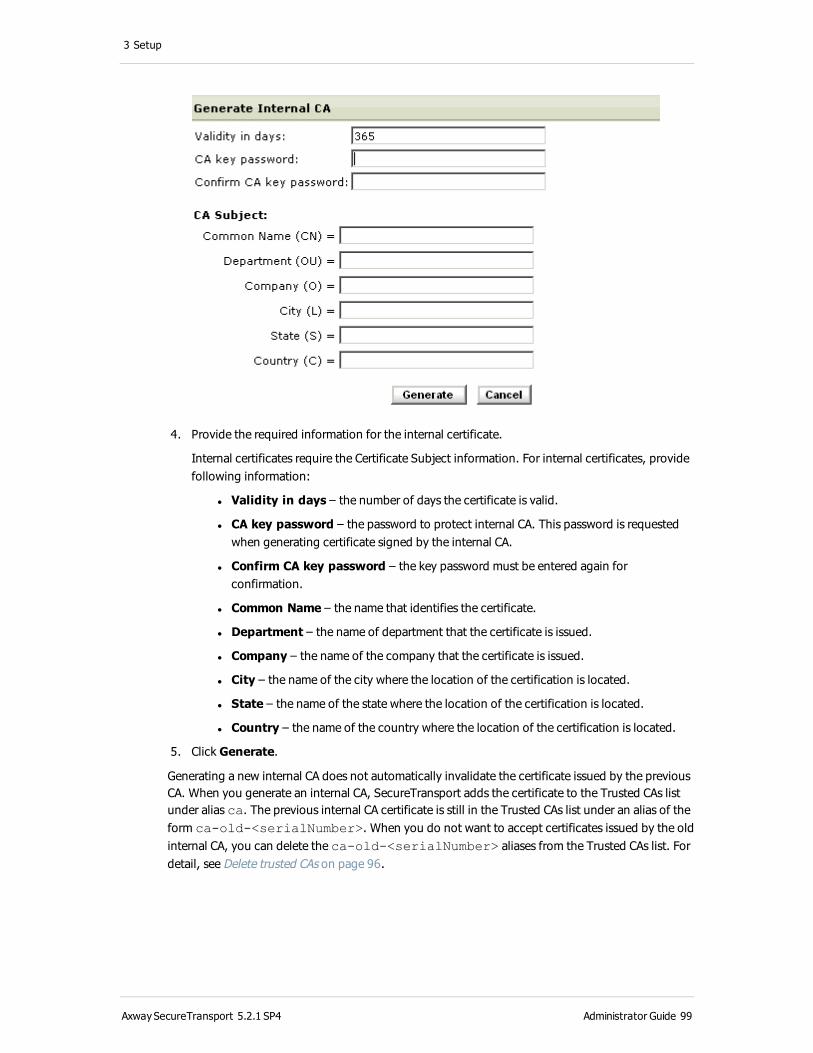
3 Setup
4. Provide the required information for the internal certificate.
Internal certificates require the Certificate Subject information. For internal certificates, provide following information:
l Validity in days – the number of days the certificate is valid.
l CA key password – the password to protect internal CA. This password is requested when generating certificate signed by the internal CA.
l Confirm CA key password – the key password must be entered again for confirmation.
l Common Name – the name that identifies the certificate.
l Department – the name of department that the certificate is issued.
l Company – the name of the company that the certificate is issued.
l City – the name of the city where the location of the certification is located.
l State – the name of the state where the location of the certification is located.
l Country – the name of the country where the location of the certification is located.
5. Click Generate.
Generating a new internal CA does not automatically invalidate the certificate issued by the previous CA. When you generate an internal CA, SecureTransport adds the certificate to the Trusted CAs list under alias ca. The previous internal CA certificate is still in the Trusted CAs list under an alias of the form ca-old-<serialNumber>. When you do not want to accept certificates issued by the old internal CA, you can delete the ca-old-<serialNumber> aliases from the Trusted CAs list. For detail, see Delete trusted CAs on page 96.
AxwaySecureTransport 5.2.1 SP4 Administrator Guide 99

3 Setup
Once the new internal CA is generated, all certificates generated from that point on are signed by the new internal CA. Unless the new internal CA is added to the list of trusted certificates on the remote host, the host might reject the new certificates. An internal CA can be exported into a file that in turn can be used to add the CA to the list of trusted CAs.
Import an external CAOptionally, you can also import an external certificate. Make sure the certificate is valid and configured to validate certificates before you import it. The CA attribute in the X509v3 extension section of the certificate must be true.
1. On the Generate CA page, click Import CA.
SecureTransport displays Import Certificate page.
2. Type a password in the field provided. The password is required.
If the CA certificate requires a pass phrase, SecureTransport uses this password. If the certificate does not require a pass phrase, the password is ignored. SecureTransport also uses this password to encrypt the CA private key in the keystore stored in the database and file system.
3. Specify the certificate by typing the path to the PKCS#12 (.p12) file in the field or by
browsing to the file.
4. Click Import.
SecureTransport reports if the import was successful.
Now, SecureTransport uses the imported certificate as the internal CA and signs all certificates generated using that CA. To make sure that a remote host accepts those certificates, add the certificate for this CA to the list of trusted certificates on that host. To export the certificate for import on another system, see Export the internal CA certificate on page 101.
Generating or importing an internal CA does not automatically invalidate the certificate issued by the previous CA. When you generate or import an internal CA, SecureTransport adds the certificate to the Trusted CAs list under alias ca. The previous internal CA certificate is still in the Trusted CAs list under an alias of the form ca-old-<serialNumber>, where <serialNumber> is the value
AxwaySecureTransport 5.2.1 SP4 Administrator Guide 100

3 Setup
of the certificate serialNumber field. When you do not want to accept certificates issued by the old internal CA, you can delete the ca-old-<serialNumber> aliases from the Trusted CAs list. For detail, see Delete trusted CAs on page 96.
Once the internal CA is imported, all certificates generated from that point on are signed by the new internal CA. Unless the new internal CA is added to the list of trusted certificates on the remote host, the host might reject the new certificates. An internal CA can be exported into a file that in turn can be used to add the CA to the list of trusted CAs.
After you import a certificate authority, you might need to update the CertificateStores.CertificateAuthority.serialNo server configuration parameter. SecureTransport uses this parameter as a serial number and then increments it every time it generates a certificate. If the imported CA has been used by another SecureTransport server, set the parameter to the value from that server for consistency. To propagate the change, restart all SecureTransport servers in the cluster.
Export the internal CA certificateYou can export the internal CA public certificate using the Administration Tool. You can also copy the certificate files from the server file system.
1. Select Setup > Certificates.
2. Click the Trusted CAs tab.
3. In the Alias column, click ca.
The View Certificate page for the internal CA is displayed.
4. Click Export to export the public certificate for the internal CA as a .crt file.
Note The internal CA files are located in the <FILEDRIVEHOME>/lib/certs/db directory as .pem files. The public certificate is ca-crt.pem. The private key is ca-key.pem.
Change the certificate keystore password SecureTransport stores all the available certificates for the system in the Certificate Keystore and the database.
1. Select Setup > Certificates.
2. Click the Keystore Password tab.
AxwaySecureTransport 5.2.1 SP4 Administrator Guide 101
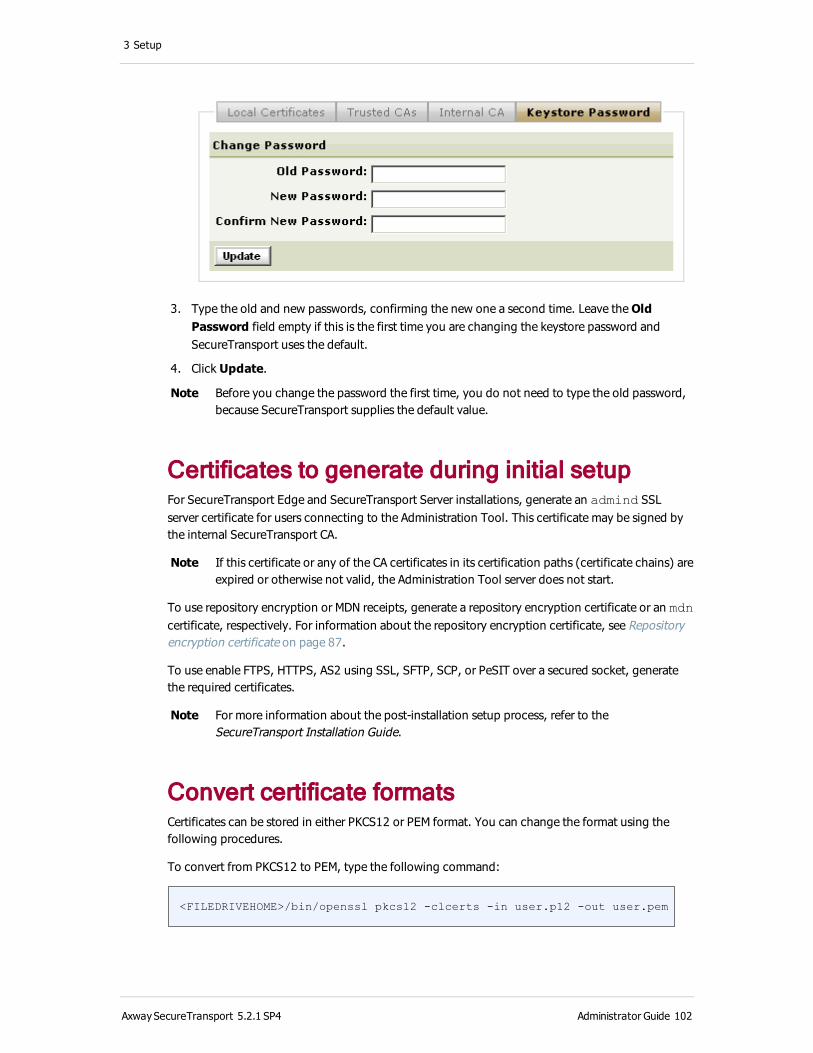
3 Setup
3. Type the old and new passwords, confirming the new one a second time. Leave the Old Password field empty if this is the first time you are changing the keystore password and SecureTransport uses the default.
4. Click Update.
Note Before you change the password the first time, you do not need to type the old password, because SecureTransport supplies the default value.
Certificates to generate during initial setupFor SecureTransport Edge and SecureTransport Server installations, generate an admind SSL server certificate for users connecting to the Administration Tool. This certificate may be signed by the internal SecureTransport CA.
Note If this certificate or any of the CA certificates in its certification paths (certificate chains) are expired or otherwise not valid, the Administration Tool server does not start.
To use repository encryption or MDN receipts, generate a repository encryption certificate or an mdn certificate, respectively. For information about the repository encryption certificate, see Repository encryption certificate on page 87.
To use enable FTPS, HTTPS, AS2 using SSL, SFTP, SCP, or PeSIT over a secured socket, generate the required certificates.
Note For more information about the post-installation setup process, refer to the SecureTransport Installation Guide.
Convert certificate formatsCertificates can be stored in either PKCS12 or PEM format. You can change the format using the following procedures.
To convert from PKCS12 to PEM, type the following command:
<FILEDRIVEHOME>/bin/openssl pkcs12 -clcerts -in user.p12 -out user.pem
AxwaySecureTransport 5.2.1 SP4 Administrator Guide 102
3 Setup
The user.pem file created contains both the certificate and private key. Edit the user.pem file and copy the certificate and private key.
To convert from PEM to PKCS12, type the following command:
<FILEDRIVEHOME>/bin/openssl pkcs12 -export -in user-crt.pem \
-inkey user-key.pem -out user.p12
For example, to convert an Internal CA certificate to PKCS#12 format to import it into SecureTransport 5.2.1 SP4, type the following command:
openssl pkcs12 -export -in <FILEDRIVEHOME>/lib/certs/db/ca-crt.pem\
-inkey <FILEDRIVEHOME>/lib/certs/db/ca-key.pem \
-out ca-from-old-ST.p12
You need to provide two passwords, the passphase for the Internal CA and the passphase used to create the new .p12 file.
Store certificates in a hardware security moduleYou can store the certificates for the FTPS and HTTPS protocols in the HSM key storage provider or security world of a Thales nShield hardware security module (HSM). You can use any Thales nShield HSM that supports the nCipherKM JAC/JCE Java API. You must obtain the API and install it on the SecureTransport system.
Install and configure the HSMSecureTransport maintains a keystore that stores references to the certificates stored in the HSM. Before you configure the HSM, decide on a location for the SecureTransport keystore file, for example, <FILEDRIVEHOME>/lib/certs/hsm.keystore.
1. Install the nShield hardware.
2. Install the nShield software, including the JCA/JCE cryptography service provider (CSP) on the system where the FTP Server and the HTTP Server run. Note the following values:
l <NFAST_HOME>, the path name of the installation directory of the nFast client,
/opt/nfast by default
l The keystore passphase
3. Make sure that nonpriv_port is set to 9000 and priv_port is set to 9001 in the
hardserver configuration file, <NFAST_HOME>/kmdata/config/config.
4. Copy the nCipherKM.jar file from <NFAST_HOME>/java/classes to
<FILEDRIVEHOME>/jre/lib/ext.
5. Run <FILEDRIVEHOME>/jre/bin/java
com.ncipher.provider.InstallationTest.
AxwaySecureTransport 5.2.1 SP4 Administrator Guide 103
3 Setup
The output include a list of installed providers. Ignore the statement that the nCipher provides is not correctly installed. The provider is installed at run time.
Generate and sign an HSM certificateThis procedure uses the following placeholders:
l <alias> – the SSL key alias for FTPS or HTTPS, for example ftpd or httpd
l <cert_file> is the file name of the PEM-format certificate file, for example, ftpd.pem or
httpd.pem
l <CSR_file> – the file name of the CSR request file, for example, ftpd.req or httpd.req
l <FILEDRIVEHOME> – SecureTransport installation directory, for example,
/opt/TMWD/SecureTransport
l <key_size> – the key size, for example, 1024, 2048, 3072, or 4096
l <keystore_passphrase> – the passphrase for the HSM keystore
l <keystore_path> – the path to the SecureTransport HSM keystore
l <validity> – the validity of the certificate in days
1. Make the SecureTransport installation directory the current working directory using the following command.
cd <FILEDRIVEHOME>
2. Generate a key using the following command.
jre/bin/keytool -genkey -keyalg RSA -keysize <key_size> \
-keystore <keystore_path> -storetype nCipher.sworld \ -providername nCipherKM \
-providerclass com.ncipher.provider.km.nCipherKM \ -alias <alias> -storepass <keystore_passphrase>
3. Generate a certificate signing request (CSR) using the following command.
jre/bin/keytool -certreq -keystore <keystore_path> \
-storetype nCipher.sworld -providername nCipherKM \
-providerclass com.ncipher.provider.km.nCipherKM \ -alias <alias> -file <CSR_file> -storepass <keystore_passphrase>
4. Sign certificate and create the PEM-format certificate file using the following command.
bin/openssl x509 -req -in <CSR_file> -days <validity> \
-CA lib/certs/db/ca-crt.pem -CAkey lib/certs/db/ca-key.pem \ -CAserial lib/certs/db/serial -out <cert_file>
AxwaySecureTransport 5.2.1 SP4 Administrator Guide 104
3 Setup
5. Append the public part of the internal CA to the certificate file using the following command. This is required so that SecureTransport can build the certificate chain .
cat lib/certs/db/ca-crt.pem >> <cert_file>
6. Import the signed certificate into the HSM device using the following command.
jre/bin/keytool -importcert -keystore <keystore_path> \ -storetype nCipher.sworld -providername nCipherKM \
-providerclass com.ncipher.provider.km.nCipherKM -storepass <keystore_passphrase> -alias <alias> -file <cert_file>
Use an HSM certificate for FTPS or HTTPS 1. Specify the HSM for SecureTransport by setting the following server configuration parameters:
l Set Hsm.keystorePath to the location of the SecureTransport HSM keystore
relative to <FILEDRIVEHOME>.
l (Optional) Set Hsm.keystorePassword to the keystore passphrase.
If you do not store the passphrase as a server configuration parameter, you must enter it each time you start a protocol server that uses an HSM certificate. If you do not type the passphrase in the time allotted, the protocol server does not start.
2. Enable HSM for the protocol servers by setting the following server configuration parameters:
l Set Ftp.Hsm.enabled to true to enable HSM for the FTP Server
l Set Http.Hsm.enabled to true to enable HSM for the HTTP Server
3. Create a local certificate with the same alias as the HSM certificate you created, for example, ftpd or httpd. See Generate a self-issued server certificate on page 89. SecureTransport
does not use this certificate, but you must have a certificate with the correct alias to reference the HSM certificate.
4. Set the SSL key aliases for the protocol servers. See Manage the FTP server on page 35 and Manage the HTTP server on page 35.
5. Restart the protocol servers. See Start and stop servers on page 34.
PGP key encryption and signingSecureTransport supports PGP encryption. The system handles the generation and storing of PGP keys and the management of the stored keys. The PGP keys are managed from the Administration Tool and used by the PGP plug-in.
PGP encryption and signing do not work properly when the PGP key has expired. However, SecureTransport continues to decrypt files successfully even when the PGP key is expired.
PGP encryption and signing only support ZIP, BZIP2, and ZLIB compression.
AxwaySecureTransport 5.2.1 SP4 Administrator Guide 105
3 Setup
PGP verification is performed using the current time on the computer, not the time when signing occurred. If the key is expired, decryption succeeds, but signature verification, encryption, and signing fail.
Manage PGP keysPGP keys are managed from the Administration Tool according to their scope: local or partner.
l Local PGP keys can be either server-scoped or account-based. To manage server-scoped certificates select Setup > Certificates and the Local Certificates tab. Account-based certificates are managed from the Private Certificates pane of the Certificates pane of the User Account page. You can use either page to get detailed information for a particular key, generate a key, delete a key, or export public and private keys.
l Partner PGP keys are also managed by account, even though they are stored in a single key store. You can generate, import, delete, and export account-specific PGP keys. For partner PGP keys, the private key can be exported on certificate creation only. For more information on managing account-based PGP keys, see Import a partner PGP key on page 257.
GenerateThe two scenarios for generation of PGP keys are:
l Generate a local key pair and export it into a text file that can be used by the respective partners for encryption of the incoming data. You can export the private key for a local or account private certificate at any time.
l Generate a partner key pair and export the private key in a file that can be used by the partner for decryption and signing. In this case only the public key is saved and used by SecureTransport. You can save the private key immediately after you generate the key pair.SecureTransport deletes the private key after you save it or decline to save it..
Note Partner and local PGP keys are stored in different key rings. Partner keys are account-specific and have a relation to the account, while local keys are not connected to a particular account. To this end, all partner keys are stored in a single key ring and all partner private keys are stored in a corresponding single secret key ring.
ExportPGP keys are exported in the format of ASCII-armored key data in compliance with RFC 2440. The data of the exported PGP key is stored directly in a file. The private key of a partner key pair can only be exported when the certificate is first generated by SecureTransport.
ImportThere are three scenarios for importing PGP keys into SecureTransport:
AxwaySecureTransport 5.2.1 SP4 Administrator Guide 106

3 Setup
l Import a partner PGP public key
l Import a PGP key pair, generated by a third party, in the set of local keys that applies to all of the SecureTransport system
l Import a local PGP key pair as a private certificate from the Private Certificates pane of the Certificates pane of the User Account page
Note The supported formats of the imported keys are as specified in the RFC 2440 standard: a binary or armored PGP public/private key message.
Local (server) PGP keys managementLocal (server) and partner PGP keys are generated, exported, imported, and deleted for a particular account. See Manage certificates on page 256.
PGP transfer settings dependenciesThe following PGP transfer settings dependency matrix shows different configurations and scenarios for PGP-encrypted transfers depending on the transfer settings, accessible from the Subscription page.
Incomingfile
Encryptionrequired
Signaturerequired
Server action Result Transferstatus
Signed only
ON ON SecureTransport attempts decryption and verification.
Decryption fails, because the file is not encrypted, and therefore no verification is performed.
Unsuccessful
Encrypted only
ON ON SecureTransport attempts decryption and verification.
Decryption is successful, but verification fails, because the file is not signed.
Unsuccessful
Signed and Encrypted
ON ON SecureTransport attempts decryption and verification.
Decryption and verification are successful, and the signature is removed.
Successful
AxwaySecureTransport 5.2.1 SP4 Administrator Guide 107
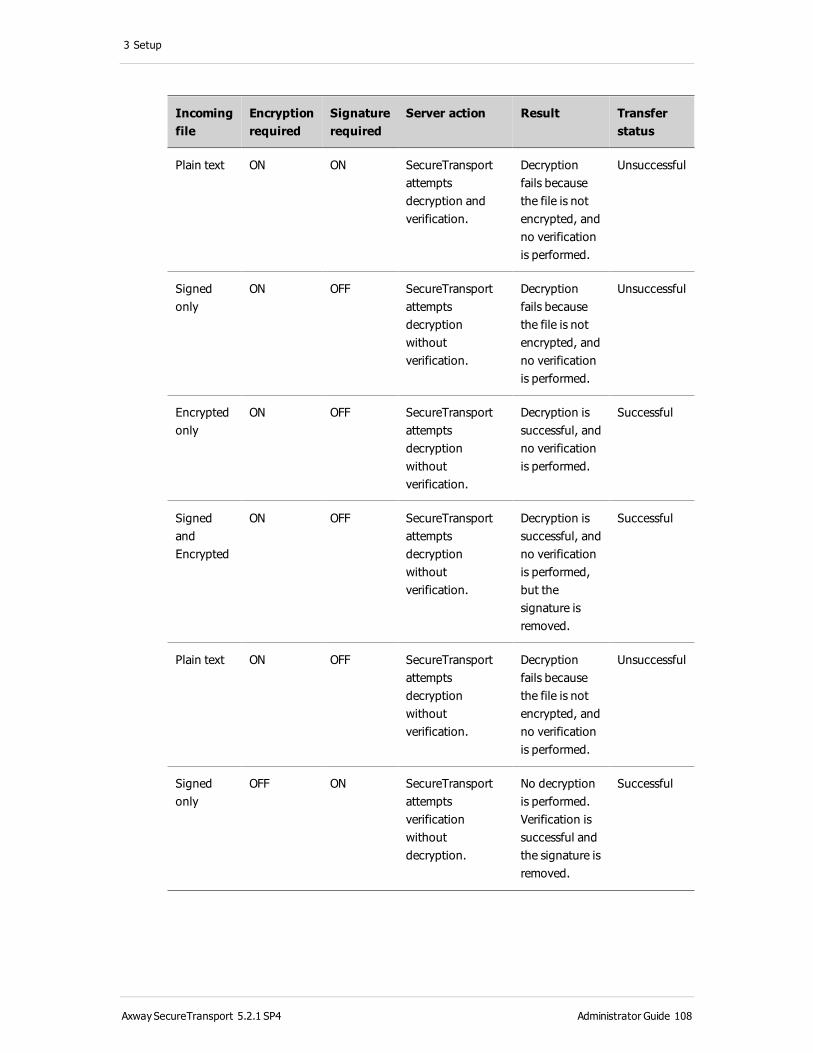
3 Setup
Incomingfile
Encryptionrequired
Signaturerequired
Server action Result Transferstatus
Plain text ON ON SecureTransport attempts decryption and verification.
Decryption fails because the file is not encrypted, and no verification is performed.
Unsuccessful
Signed only
ON OFF SecureTransport attempts decryption without verification.
Decryption fails because the file is not encrypted, and no verification is performed.
Unsuccessful
Encrypted only
ON OFF SecureTransport attempts decryption without verification.
Decryption is successful, and no verification is performed.
Successful
Signed and Encrypted
ON OFF SecureTransport attempts decryption without verification.
Decryption is successful, and no verification is performed, but the signature is removed.
Successful
Plain text ON OFF SecureTransport attempts decryption without verification.
Decryption fails because the file is not encrypted, and no verification is performed.
Unsuccessful
Signed only
OFF ON SecureTransport attempts verification without decryption.
No decryption is performed. Verification is successful and the signature is removed.
Successful
AxwaySecureTransport 5.2.1 SP4 Administrator Guide 108
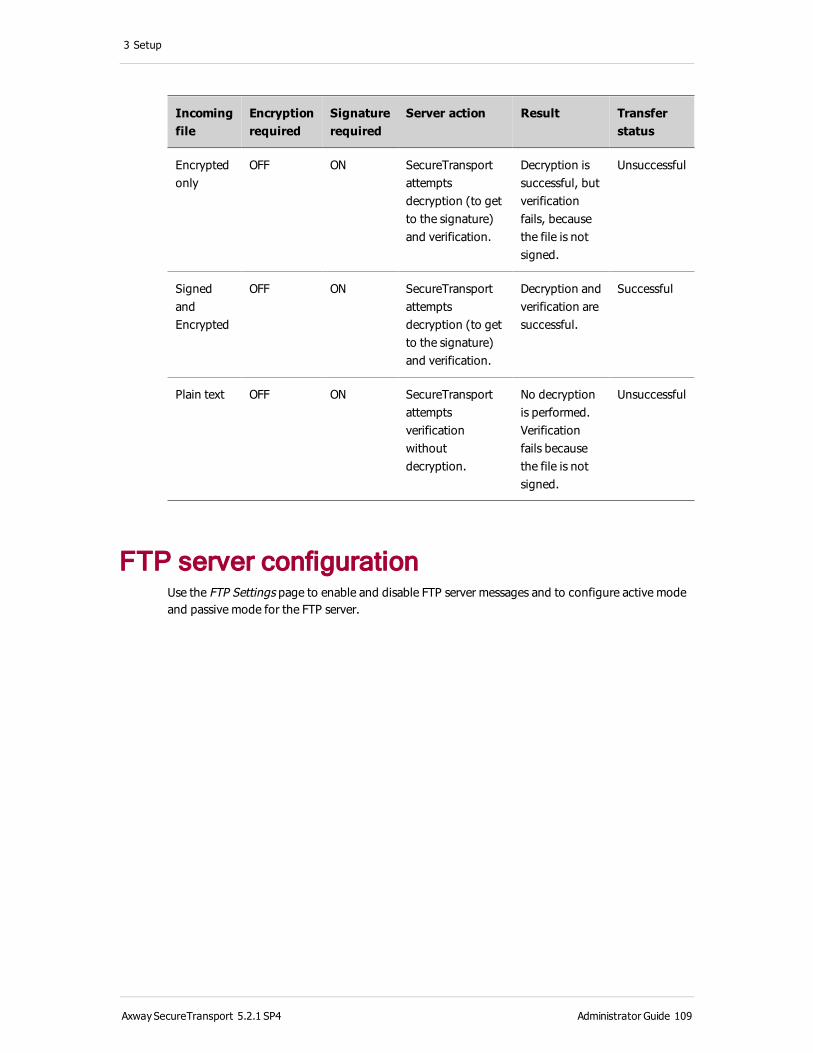
3 Setup
Incomingfile
Encryptionrequired
Signaturerequired
Server action Result Transferstatus
Encrypted only
OFF ON SecureTransport attempts decryption (to get to the signature) and verification.
Decryption is successful, but verification fails, because the file is not signed.
Unsuccessful
Signed and Encrypted
OFF ON SecureTransport attempts decryption (to get to the signature) and verification.
Decryption and verification are successful.
Successful
Plain text OFF ON SecureTransport attempts verification without decryption.
No decryption is performed. Verification fails because the file is not signed.
Unsuccessful
FTP server configurationUse the FTP Settings page to enable and disable FTP server messages and to configure active mode and passive mode for the FTP server.
AxwaySecureTransport 5.2.1 SP4 Administrator Guide 109

3 Setup
FTP server messagesFTP server messages are messages displayed to users at the startup of an FTP session. Two types of startup FTP server messages are available:
l FTP connect messages
l FTP server ready messages
Users might or might not see FTP server messages, depending on the software they use to connect to SecureTransport. Most FTP client applications display these messages, but they are not displayed on browser clients. Users downloading a single file by URL from a browser might not see these messages.
Startup messages are displayed while a connection to the server is being established, prior to any login prompt. A message is displayed to the user when the connection is established. A server ready message also be displayed when SecureTransport is ready to accept a login. The default message displays the host name of the server and the server version, but this can be overridden.
AxwaySecureTransport 5.2.1 SP4 Administrator Guide 110

3 Setup
Create or edit the server connect message 1. Select Setup > FTP Settings to open the FTP Settings page.
2. Under Server Start up Messages:
a. Select Enable Message on FTP Server Connect to display a message to users logging onto SecureTransport through the FTP Server. By default, this option is not selected.
b. In the FTP Connect Message field, type the message you want to be displayed when a user connects to the SecureTransport Server
3. Click Save to apply the changes.
Creating or editing the server ready message 1. Select Setup > FTP Settings to open the FTP Settings page.
2. Under Server Start up Messages:
a. Select Enable Message on FTP Server ready to display a message indicating that the server is ready to accept logins. By default, this option is not selected.
b. In the FTP Ready Message field, type the message you want to be displayed when the server is ready.
3. Click Save to apply the changes.
Set up FTP active modeYou can configure SecureTransport to use active mode connections for server-initiated transfers over FTP. Use the active mode options to configure the server-initiated transfer agents to initiate these requests. You can specify an active mode base port and a range of ports that can be used for active mode. Make sure the ports are accessible on the firewall.
The base port represents the first port number you want to assign. The number of ports specifies how many open ports you want to allow. For example, the base port is set to 10000 and the number of ports is set to 1024, active mode connections can use only the ports from 10000 to 11023. The end port should display 11023. Acceptable values are between 1024 and 65535. If the range is not specified, the server randomly selects an unused high port number greater than 1023 for active mode.
AxwaySecureTransport 5.2.1 SP4 Administrator Guide 111

3 Setup
Active FTP mode can be used only for internal connections where there is no proxy between SecureTransport and the remote server. You must select Enable Active Connection Mode to use Active FTP in an FTP transfer site.
1. Select Setup > FTP Settings to open the FTP Settings page.
2. Under FTP Active Mode:
a. Type the appropriate port number for the Base Port. This is the first port used.
b. Type the Number Of Ports. This value sets the range of ports available for use.
The Port End field should display the appropriate port number for the last port in the range you want to use.
3. Click Save to apply the changes.
Note To use Active FTP with an FTP(S) transfer site, by pass the proxy by setting the Network Zone field to none. See FTP(S) transfer sites on page 290.
Set up FTP passive modeIf an FTP client is behind a firewall that does not permit SecureTransport to open a data port as required by active mode FTP, you use the passive mode options to configure the FTP server to accept passive mode FTP connections. You specify a passive mode base port and a number of ports that can be used for passive mode. Make sure the ports are accessible through the firewall. Do not use these ports for any other service.
The base port represents the number of the first port available for the FTP server to use for a passive mode data connection. The number of ports specifies how many open ports to allocate. For example, the base port is set to 10000 and the number of ports is set to 1024, the FTP server can use only the ports from 10000 to 11023 for passive mode data connections.
Specify ports for five times the expected number of concurrent connections based on the following considerations:
l If the port range is too small or equal to the number of expected number of connections, a port to connect might not be available when needed. The operating system does not release a port immediately after a user disconnects, so the free port does not become available for another connection immediately. This can result in a failure when a new connection is attempted.
l When most of the ports are used up and a new connection is attempted, the server scans for the next available port. This is resource intensive and can affect the performance of the server. With a large pool of ports, finding next available port is quicker and is less likely to affect the performance.
You can also set up passive address rules, which allow the SecureTransport server to respond with the external address of the firewall instead of the internal address of the server when a FTP client issues the PASV (passive mode) command.
AxwaySecureTransport 5.2.1 SP4 Administrator Guide 112

3 Setup
1. Select Setup > FTP Settings to open the FTP Settings page.
2. Under FTP Passive Mode:
a. Type the appropriate port number for the Base Port. This is the first port used.
b. Type the Number Of Ports. This value sets the range of ports available for use.
3. The Port End field displays the number for the last port to use.
4. Click Save to apply the changes.
Add passive mode address rules 1. Under Passive Mode Address Rules, enter in the User Class field a pattern that matches the user
classes for which this rule will be applied. Use question mark (?) to match one character and
asterisk (*) to match any sequences of characters. For example, enter * to apply the rule to all
user classes.
2. Type the external address with which the FTP server should respond in the Passive Address field.
3. Click Add to add the rule. To make the change permanent, click Save.
Edit a passive mode address rule 1. To change the User Class, Passive Address or Status of a rule, click the Edit icon ( ) at
the end of the rule.
2. Make the required changes in the fields and click the Save icon ( ).
AxwaySecureTransport 5.2.1 SP4 Administrator Guide 113

3 Setup
3. To change the status of one or more rules or to remove a rule entirely, select in the left column each rule to modify.
4. From the Select Action list, choose Delete, Enable, or Disable and click Apply to make the change.
5. To make your updates on this page permanent, click Save.
Assure that passive mode session are initiated on the correct systemWhen clients open passive mode sessions though a load balancer, a client communicating on the server assigned port might create a new session which opens a port on a different system than the originally contacted one. You can prevent this issue by configuring the load balancers and servers.
l Set the load balancer to use "session sticky" mode. This ensures that the data-channel connection goes to the same system that serviced the control-channel connection.
l Make sure to set a passive-mode address rule on all the SecureTransport Edge gateways to return the external IP address of the load balancer in the response to the PASV command instead of the internal address of the SecureTransport Edge.
FTP server limitationsThe FTP Server has the following limitations.
FTP APPE commandSecureTransport handles the FTP APPE command differently than it is typically handled. Typically, the APPE command appends uploaded content to an existing file of the same name. However, when SecureTransport receives this command, it overwrites the server’s copy of the file with the client’s copy.
FTP COMB commandSecureTransport supports the COMB command only for the CuteFTP client. The CuteFTP client separates the file into chunks and uploads them as temporary files on the FTP server. Once CuteFTP uploads all the file chunks are uploaded on the FTP server, it sends the COMB command to combine them. By default, file names are generated by the CuteFTP client to match the pattern: \d.tmp where \d is a decimal number. However, the first file chunk name is the original file name.
Note The COMB command cannot be combined with post-transmission actions, repository encryption, or PGP data transformations. Because SecureTransport releases the FTP command channel after successfully uploading the multiple file chunks, using the COMB command does not provide a guaranteed file transfer. If there is no space left on the upload directory or if similar errors exist during the process of combining the file chunks, the transfer fails, but no errors are sent to the client.
AxwaySecureTransport 5.2.1 SP4 Administrator Guide 114
3 Setup
FTP client configurationIf FTP clients with default settings use SmartFTP and IglooFTP, when users connect to a server, they are unable to view remote files and folders. Some settings for LIST arguments need to be configured manually. The Resolve Links [-L] argument must be removed for both clients, but leave the show all file [-a] argument.
Improve FTP performance on a multi-homed systemYou can improve FTP performance by assigning an IP address to the server if you are using a multi-homed system.
1. Select Operations > Server Configuration.
2. In the Server Configuration page, search for the Ftp.Host parameter.
3. Set the value of the parameter to the IP address for the server.
4. Restart the FTP Server on all servers in your cluster.
Increase the timeout for large files using server-initiated transferWhen sending 1.5 GB or larger files, the default timeout settings might be too low and SecureTransport might throw an exception error. You can increase the timeout settings for the FTP(S) and HTTP(S).
1. Select Operations > Server Configuration.
The Server Configuration page is displayed.
2. Search for the OutboundConnections.connectTimeout and
OutboundConnections.receiveTimeout parameters.
The default value for each parameter is 25 seconds.
3. Set the value of each parameter to the the amount of time it takes to upload the file in seconds. For example, if the file takes 20 minutes to upload, then increase the value of each parameter to 1200 seconds or higher.
4. Restart the TM Server on all servers in your cluster.
AS2 server configurationUsing the AS2 Settings page, you can configure the following AS2 settings that apply to all partnerships:
AxwaySecureTransport 5.2.1 SP4 Administrator Guide 115
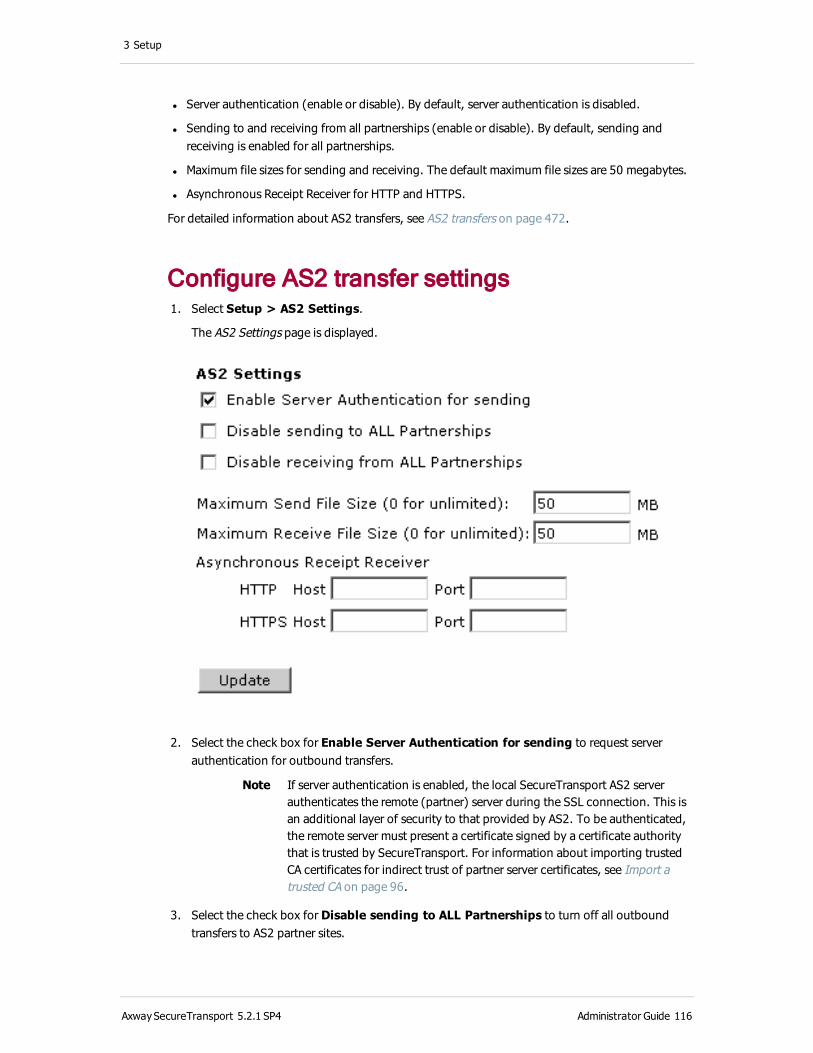
3 Setup
l Server authentication (enable or disable). By default, server authentication is disabled.
l Sending to and receiving from all partnerships (enable or disable). By default, sending and receiving is enabled for all partnerships.
l Maximum file sizes for sending and receiving. The default maximum file sizes are 50 megabytes.
l Asynchronous Receipt Receiver for HTTP and HTTPS.
For detailed information about AS2 transfers, see AS2 transfers on page 472.
Configure AS2 transfer settings 1. Select Setup > AS2 Settings.
The AS2 Settings page is displayed.
2. Select the check box for Enable Server Authentication for sending to request server authentication for outbound transfers.
Note If server authentication is enabled, the local SecureTransport AS2 server authenticates the remote (partner) server during the SSL connection. This is an additional layer of security to that provided by AS2. To be authenticated, the remote server must present a certificate signed by a certificate authority that is trusted by SecureTransport. For information about importing trusted CA certificates for indirect trust of partner server certificates, see Import a trusted CA on page 96.
3. Select the check box for Disable sending to ALL Partnerships to turn off all outbound transfers to AS2 partner sites.
AxwaySecureTransport 5.2.1 SP4 Administrator Guide 116
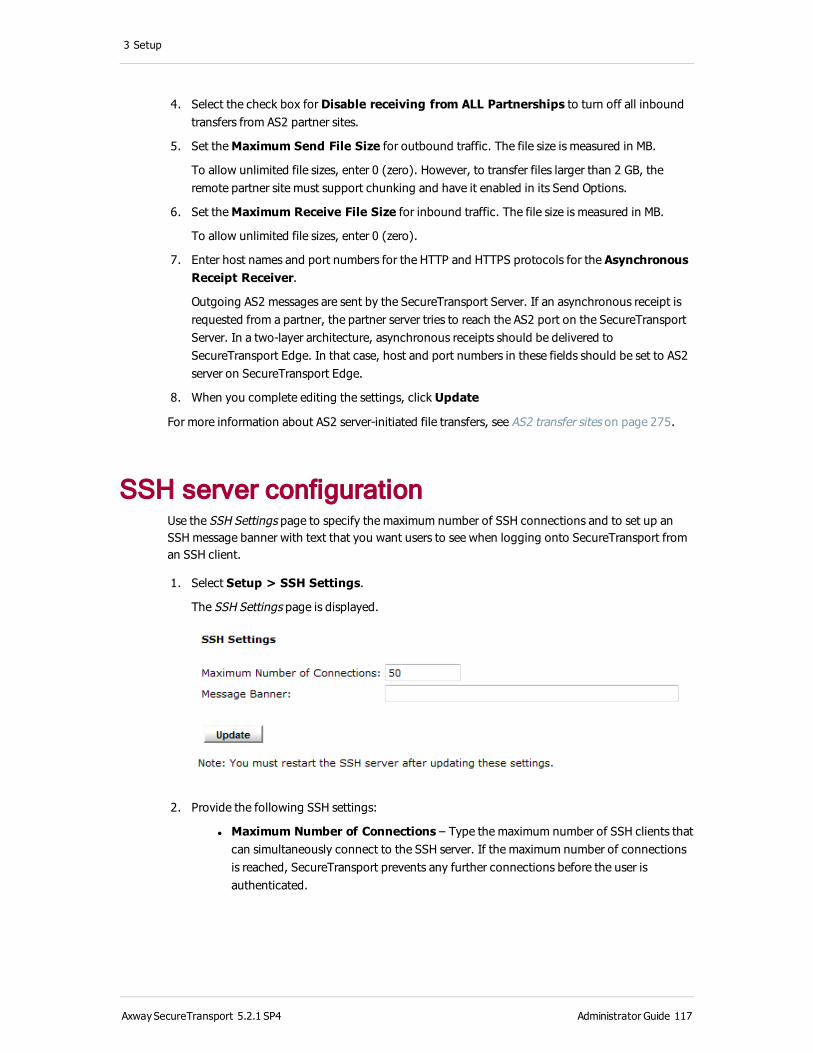
3 Setup
4. Select the check box for Disable receiving from ALL Partnerships to turn off all inbound transfers from AS2 partner sites.
5. Set the Maximum Send File Size for outbound traffic. The file size is measured in MB.
To allow unlimited file sizes, enter 0 (zero). However, to transfer files larger than 2 GB, the remote partner site must support chunking and have it enabled in its Send Options.
6. Set the Maximum Receive File Size for inbound traffic. The file size is measured in MB.
To allow unlimited file sizes, enter 0 (zero).
7. Enter host names and port numbers for the HTTP and HTTPS protocols for the Asynchronous Receipt Receiver.
Outgoing AS2 messages are sent by the SecureTransport Server. If an asynchronous receipt is requested from a partner, the partner server tries to reach the AS2 port on the SecureTransport Server. In a two-layer architecture, asynchronous receipts should be delivered to SecureTransport Edge. In that case, host and port numbers in these fields should be set to AS2 server on SecureTransport Edge.
8. When you complete editing the settings, click Update
For more information about AS2 server-initiated file transfers, see AS2 transfer sites on page 275.
SSH server configurationUse the SSH Settings page to specify the maximum number of SSH connections and to set up an SSH message banner with text that you want users to see when logging onto SecureTransport from an SSH client.
1. Select Setup > SSH Settings.
The SSH Settings page is displayed.
2. Provide the following SSH settings:
l Maximum Number of Connections – Type the maximum number of SSH clients that can simultaneously connect to the SSH server. If the maximum number of connections is reached, SecureTransport prevents any further connections before the user is authenticated.
AxwaySecureTransport 5.2.1 SP4 Administrator Guide 117

3 Setup
l Message Banner – Type the message that you want users to see when logging in to the SecureTransport Server from an SSH client. For example, you can enter a legal notice, a disclaimer, or a welcome message.
3. If you increase the value of Maximum Number of Connections, you must also increase the value of JAVA_MEM_MAX in the <FILEDRIVEHOME>/bin/start_sshd script.
The script uses the JAVA_MEM_MAX value to set the maximum heap size for the Java Virtual
Machine (JVM). The SSH server allocates memory in the heap for each connection (and frees it when the connection is closed). To avoid SSH service interruptions when no memory is available in the Java heap, set JAVA_MEM_MAX to <required number of concurrent
connections> * 5 MB or at least 120 MB. For example, 500 concurrent connections requires a value of 500 * 5 MB = 2500 MB. In the script file, enter this as:
JAVA_MEM_MAX="2500M"
Use M to specify megabytes. Do not insert a space between the number and the M. The highest
workable value for JAVA_MEM_MAX is 3072 MB. This value provides reliable service for 610
concurrent SSH connections.
4. Click Update.
5. After updating the SSH settings, restart the SSH server. See Start and stop servers on page 34.
Bind SSH and SSHD to the same port numberWhen you need to use port 22 for an AIX server and for SecureTransport, use the following steps:
1. On the server hosting SecureTransport, edit the SSHD configuration file, for example, /etc/ssh/sshd_config. (To find the location on your system, refer to man 5 sshd_
config.) Set the ListenAddress directive, then find the sshd process ID and use the
command kill -HUP. You should perform these steps directly on the server so you must
have a keyboard and monitor for the computer.
2. Log on to the Administration Tool and select Operations > Server Configuration.
3. On the Server Configuration page, search for the SSH.Host parameter and sets its value to the
actual IP address of the host.
4. Restart the SSH server.
Debug SSH IssuesIf you are trying to determine an issue with SSH, changing the mchange and ehcache logger parameters in the sshd-log4j.xml file to Debug can prevent SSH from receiving connections. To work around this issue, you can reset sshd-log4j.xml to send log messages to a file instead of the database. Follow the steps in Redirect log4j output from the database on page 510 to change the log.
Note When log messages are stored in the database, they are displayed in the Server Log page. When you store the log messages in a file, they are not displayed in the Server Log page.
AxwaySecureTransport 5.2.1 SP4 Administrator Guide 118
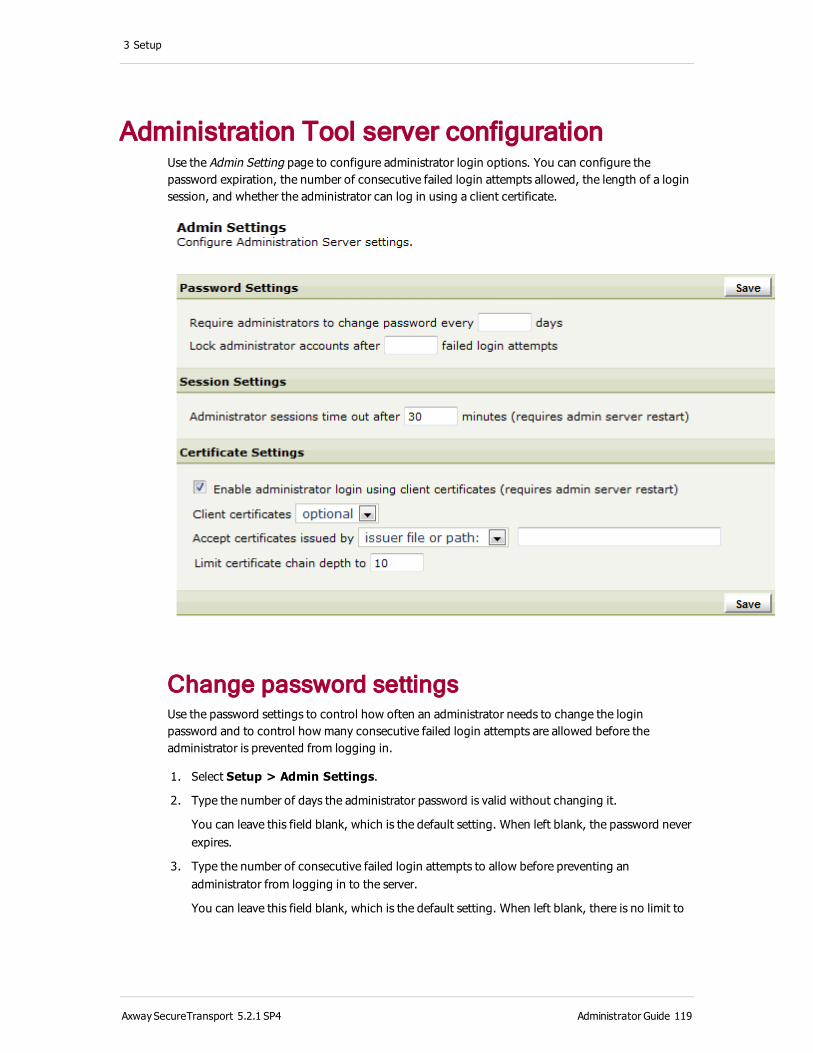
3 Setup
Administration Tool server configurationUse the Admin Setting page to configure administrator login options. You can configure the password expiration, the number of consecutive failed login attempts allowed, the length of a login session, and whether the administrator can log in using a client certificate.
Change password settingsUse the password settings to control how often an administrator needs to change the login password and to control how many consecutive failed login attempts are allowed before the administrator is prevented from logging in.
1. Select Setup > Admin Settings.
2. Type the number of days the administrator password is valid without changing it.
You can leave this field blank, which is the default setting. When left blank, the password never expires.
3. Type the number of consecutive failed login attempts to allow before preventing an administrator from logging in to the server.
You can leave this field blank, which is the default setting. When left blank, there is no limit to
AxwaySecureTransport 5.2.1 SP4 Administrator Guide 119
3 Setup
the number of login attempts permitted.
4. Click Save to accept the changes.
Note If the master administrator is locked out (or the wrong password is used too many times), contact Axway Global Support for the procedure to reset the required parameters.
Change session settingsUse the session settings to control how long an administrator can be logged into SecureTransport before the session expires and the administrator must log in again.
1. Select Setup > Admin Settings.
2. Type the number of minutes the session stays active. The default setting is 30 minutes.
3. Click Save to accept the changes.
4. Restart the Administration Tool server using the stop_admin and start_admin
commands.
Change certificate settingsSet the certificate settings to allow administrators to log in to using a client certificate or using dual authentication with both a certificate and a password. You can enable the ability to login with a client certificate, determine whether the certificate is optional or required, select the certificate issuer, and set the certificate chain limit.
When you want to access the Administration Tool and you have enabled client certificates, you are prompted to select the certificate you are using. Once the certificate is verified, you are logged in unless dual authentication is required. If certificates are optional and you do not select one, the login page is displayed. If SecureTransport cannot verify the certificate, or certificates are required and you did not select one, a connection error displays and you cannot log in.
If you are unable to successfully log in when using a certificate, close the browser and try again with a new browser instance.
1. Select Setup > Admin Settings.
2. Select Enable administrator login using client certificates to allow administrators to log in using client certificates.
The remaining fields are displayed.
3. Select either optional or required in the Client certificates list. If you select
optional, administrators do not need a certificate. If you select required, each
administrator must have a client certificate set up. If certificates are required, all administrators must be mapped to a certificate, and all users must present a valid trusted certificate to even gain access to the login page.
AxwaySecureTransport 5.2.1 SP4 Administrator Guide 120

3 Setup
4. Select one of the following choices from the Accept certificates issued by list:
l internal issuer only – The certificate must be issued by the internal CA. See
Manage the internal CA on page 96.
l any trusted issuer – The certificate must be issued by a CA that is trusted by
one of the CAs listed as a trusted CA. See Manage trusted CAs on page 95.
l issuer file or path – The certificate must be issued by a
CA whose certificate is in a file you specify.
5. If you select issuer file or path, the following fields are displayed:
l A field that you use to specify the location of the certificate PEM-encoded (.pem) file or
a directory that contains the PEM-encoded files.
You can type either a fully qualified file or path names or a file or path names relative to <FILEDRIVEHOME>. Do not put the PEM-encoded files in the keystore directory,
<FILEDRIVEHOME>/lib/certs/issuers, because the certificates in that
directory are regenerated from the database when servers start.
l A Limit certificate chain depth to field. Type a number that sets the maximum number of levels for SecureTransport to go through in validating the certificate up to a trusted root. For example, if you set the chain depth to 1, then only a certificate issued directly by a trusted root is allowed and a certificate issued by an intermediate CA is rejected.
6. Click Save to accept the changes.
7. Restart the Administration Tool server using the stop_admin and start_admin
commands. If you are running on Windows, you can also use the Services console to restart the admin service.
If you choose to use certificates for administrator logins, a Certificate DN field displays in the New Administrator and Edit Administrator pages where you must provide the certificate domain name information. For more information, see Add an administrator account on page 345.
PeSIT server configurationUse the PeSIT Settings page to configure the PeSIT protocol server.
1. Select Setup > PeSIT Settings.
The PeSIT Settings page is displayed.
AxwaySecureTransport 5.2.1 SP4 Administrator Guide 121

3 Setup
2. Provide the information as described in the following table:
Name Description
Settings
Enable Segmentation
If a data article (record) is larger than the maximum size, it is sent in multiple FPDUs (messages).
Enable multiple records
If more than one data article fits in a FPDU, they are sent in one FPDU.
Enable Concatenation
Allow several FPDUs to be sent in one TCP message unit.
Maximum number of connections
The maximum number of concurrent TCP connections remote PeSIT servers can make
Maximum number of sessions
The maximum number of concurrent sessions remote PeSIT servers can make
Timeouts
AxwaySecureTransport 5.2.1 SP4 Administrator Guide 122
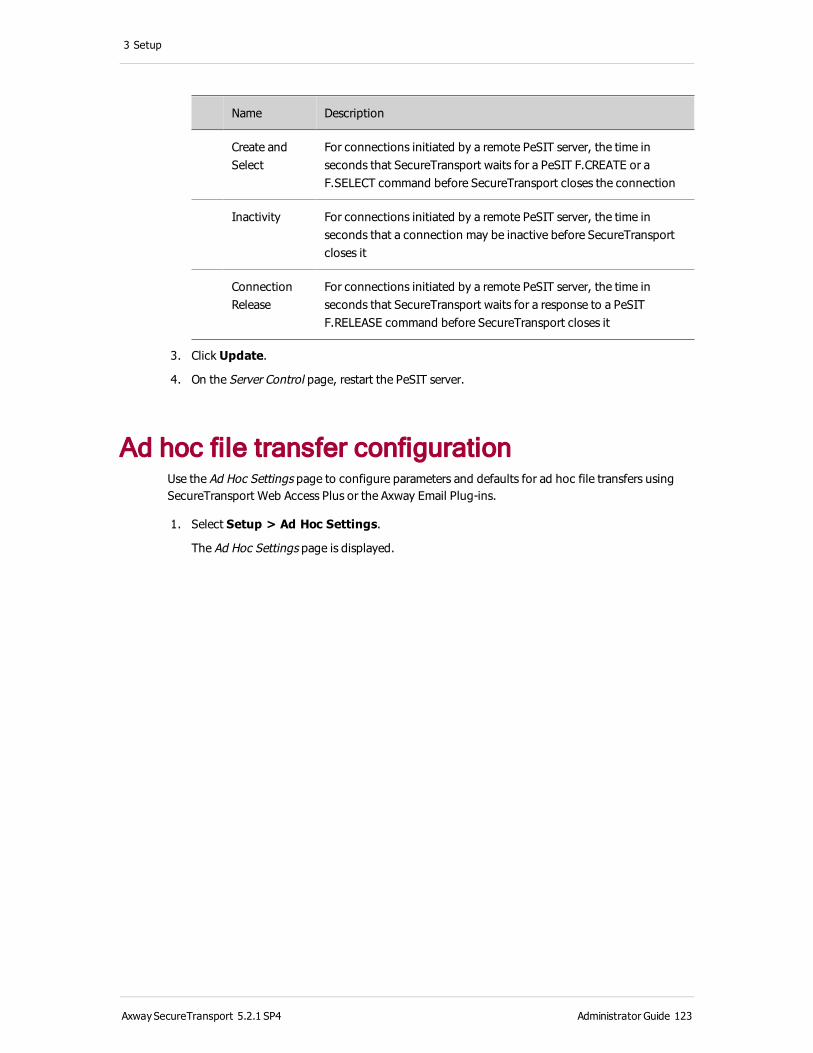
3 Setup
Name Description
Create and Select
For connections initiated by a remote PeSIT server, the time in seconds that SecureTransport waits for a PeSIT F.CREATE or a F.SELECT command before SecureTransport closes the connection
Inactivity For connections initiated by a remote PeSIT server, the time in seconds that a connection may be inactive before SecureTransport closes it
Connection Release
For connections initiated by a remote PeSIT server, the time in seconds that SecureTransport waits for a response to a PeSIT F.RELEASE command before SecureTransport closes it
3. Click Update.
4. On the Server Control page, restart the PeSIT server.
Ad hoc file transfer configurationUse the Ad Hoc Settings page to configure parameters and defaults for ad hoc file transfers using SecureTransport Web Access Plus or the Axway Email Plug-ins.
1. Select Setup > Ad Hoc Settings.
The Ad Hoc Settings page is displayed.
AxwaySecureTransport 5.2.1 SP4 Administrator Guide 123

3 Setup
2. Provide the information as described in the following table:
Name Description
Mailbox Plugin Enabled
SecureTransport allows ad hoc file transfers using the Axway Email Plug-ins when selected.
Minimum file size
SecureTransport does not transfer files smaller than the value specified using the Axway Email Plug-ins.
Maximum file size
SecureTransport does not transfer files larger than the value specified using the Axway Email Plug-ins.
Default enrollment account template
SecureTransport uses this account template when enrolling an ad hoc file transfer recipient. For information about account templates, see Account templates on page 355.
AxwaySecureTransport 5.2.1 SP4 Administrator Guide 124
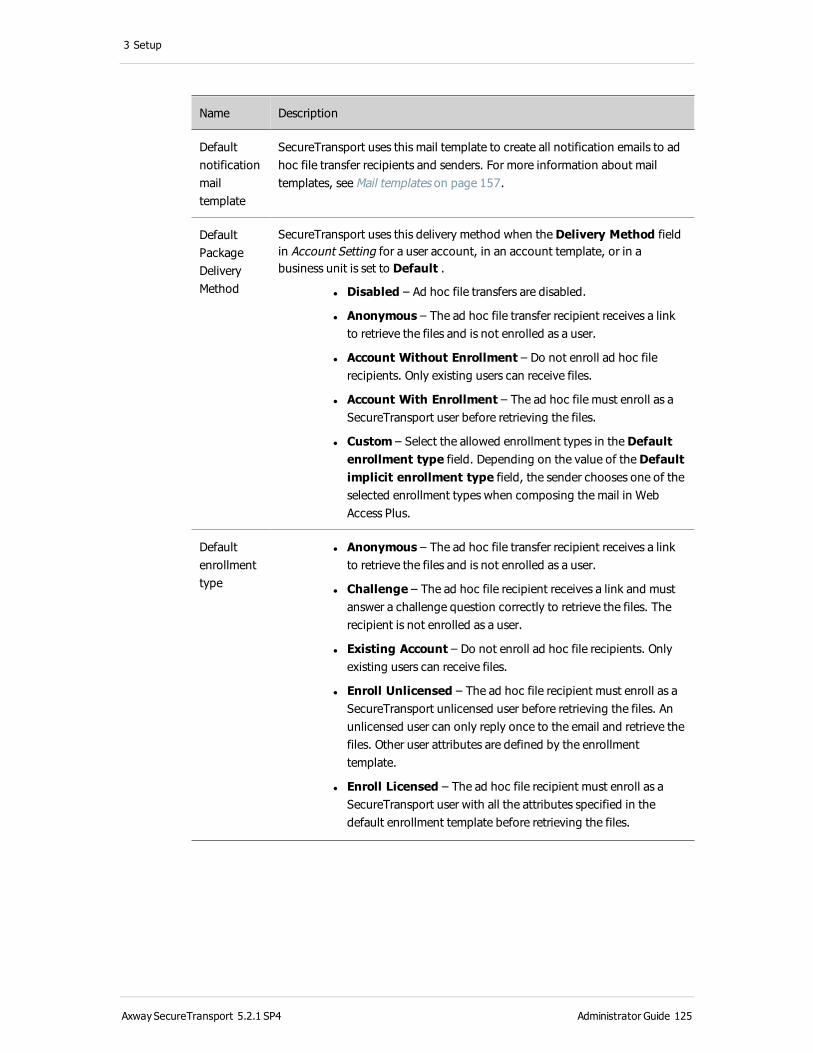
3 Setup
Name Description
Default notification mail template
SecureTransport uses this mail template to create all notification emails to ad hoc file transfer recipients and senders. For more information about mail templates, see Mail templates on page 157.
Default Package Delivery Method
SecureTransport uses this delivery method when the Delivery Method field in Account Setting for a user account, in an account template, or in a business unit is set to Default .
l Disabled – Ad hoc file transfers are disabled.
l Anonymous – The ad hoc file transfer recipient receives a link to retrieve the files and is not enrolled as a user.
l Account Without Enrollment – Do not enroll ad hoc file recipients. Only existing users can receive files.
l Account With Enrollment – The ad hoc file must enroll as a SecureTransport user before retrieving the files.
l Custom – Select the allowed enrollment types in the Default enrollment type field. Depending on the value of the Default implicit enrollment type field, the sender chooses one of the selected enrollment types when composing the mail in Web Access Plus.
Default enrollment type
l Anonymous – The ad hoc file transfer recipient receives a link to retrieve the files and is not enrolled as a user.
l Challenge – The ad hoc file recipient receives a link and must answer a challenge question correctly to retrieve the files. The recipient is not enrolled as a user.
l Existing Account – Do not enroll ad hoc file recipients. Only existing users can receive files.
l Enroll Unlicensed – The ad hoc file recipient must enroll as a SecureTransport unlicensed user before retrieving the files. An unlicensed user can only reply once to the email and retrieve the files. Other user attributes are defined by the enrollment template.
l Enroll Licensed – The ad hoc file recipient must enroll as a SecureTransport user with all the attributes specified in the default enrollment template before retrieving the files.
AxwaySecureTransport 5.2.1 SP4 Administrator Guide 125
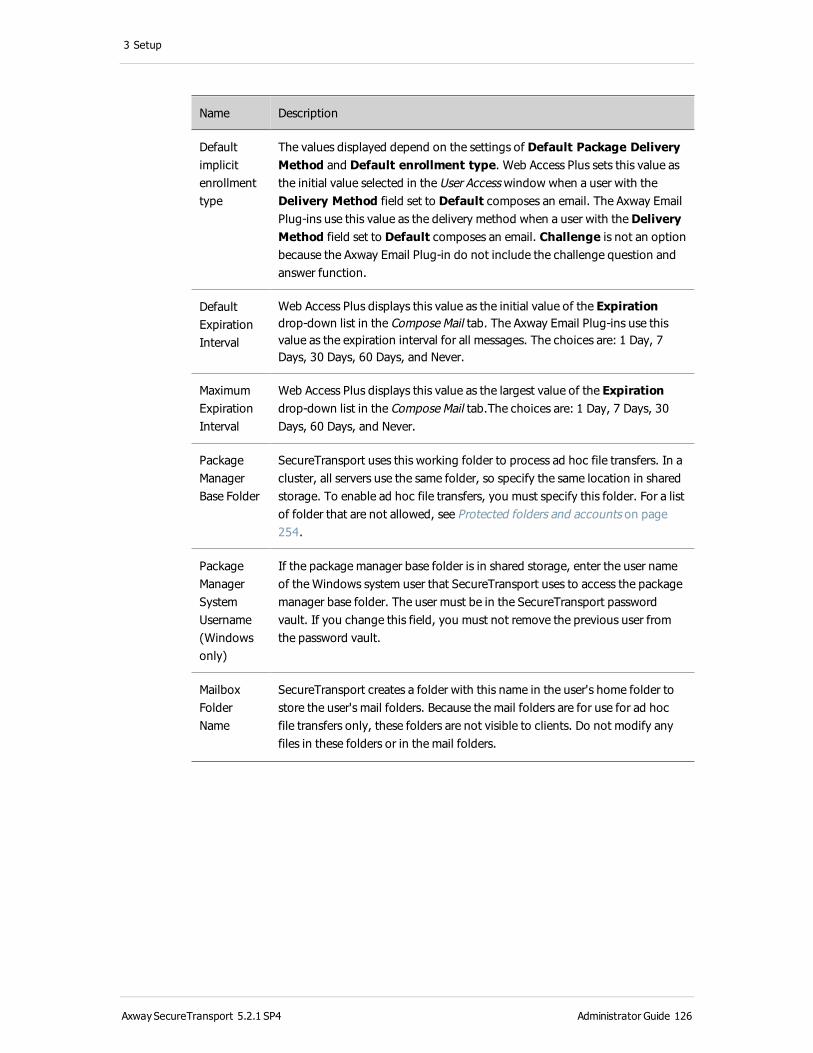
3 Setup
Name Description
Default implicit enrollment type
The values displayed depend on the settings of Default Package Delivery Method and Default enrollment type. Web Access Plus sets this value as the initial value selected in the User Access window when a user with the Delivery Method field set to Default composes an email. The Axway Email Plug-ins use this value as the delivery method when a user with the Delivery Method field set to Default composes an email. Challenge is not an option because the Axway Email Plug-in do not include the challenge question and answer function.
Default Expiration Interval
Web Access Plus displays this value as the initial value of the Expiration drop-down list in the Compose Mail tab. The Axway Email Plug-ins use this value as the expiration interval for all messages. The choices are: 1 Day, 7 Days, 30 Days, 60 Days, and Never.
Maximum Expiration Interval
Web Access Plus displays this value as the largest value of the Expiration drop-down list in the Compose Mail tab.The choices are: 1 Day, 7 Days, 30 Days, 60 Days, and Never.
Package Manager Base Folder
SecureTransport uses this working folder to process ad hoc file transfers. In a cluster, all servers use the same folder, so specify the same location in shared storage. To enable ad hoc file transfers, you must specify this folder. For a list of folder that are not allowed, see Protected folders and accounts on page 254.
Package Manager System Username(Windows only)
If the package manager base folder is in shared storage, enter the user name of the Windows system user that SecureTransport uses to access the package manager base folder. The user must be in the SecureTransport password vault. If you change this field, you must not remove the previous user from the password vault.
Mailbox Folder Name
SecureTransport creates a folder with this name in the user's home folder to store the user's mail folders. Because the mail folders are for use for ad hoc file transfers only, these folders are not visible to clients. Do not modify any files in these folders or in the mail folders.
AxwaySecureTransport 5.2.1 SP4 Administrator Guide 126
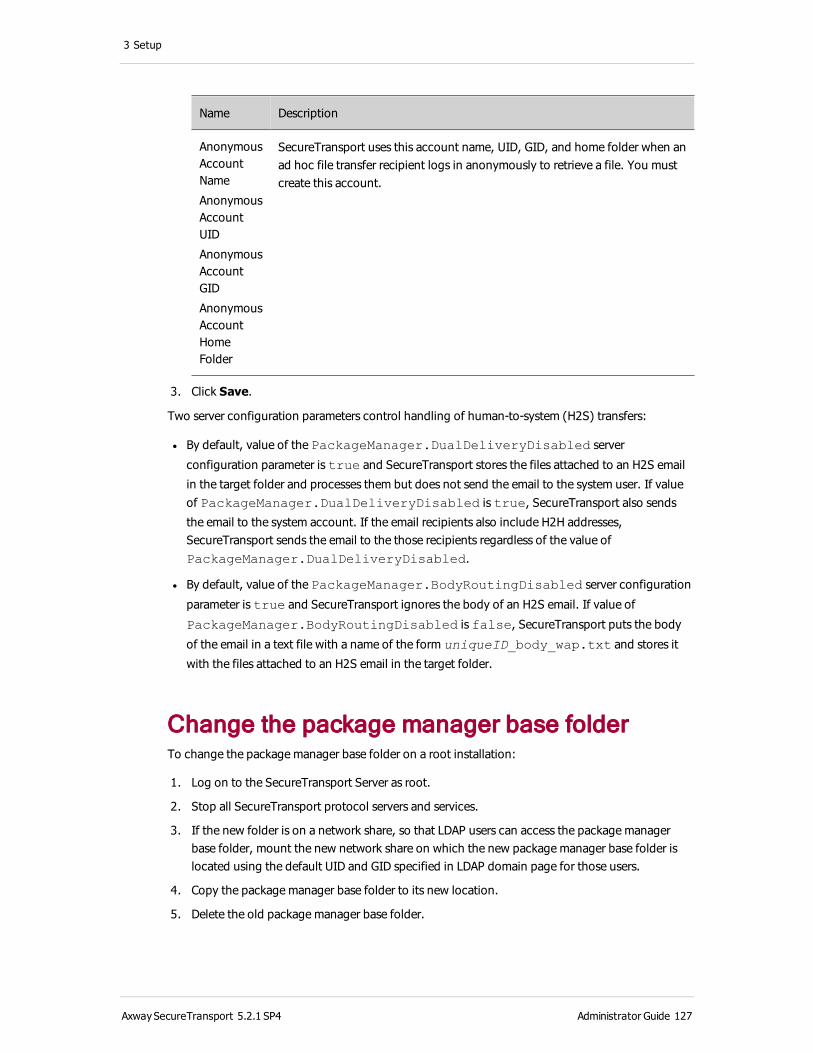
3 Setup
Name Description
Anonymous Account Name
Anonymous Account UID
Anonymous Account GID
Anonymous Account Home Folder
SecureTransport uses this account name, UID, GID, and home folder when an ad hoc file transfer recipient logs in anonymously to retrieve a file. You must create this account.
3. Click Save.
Two server configuration parameters control handling of human-to-system (H2S) transfers:
l By default, value of the PackageManager.DualDeliveryDisabled server
configuration parameter is true and SecureTransport stores the files attached to an H2S email
in the target folder and processes them but does not send the email to the system user. If value of PackageManager.DualDeliveryDisabled is true, SecureTransport also sends
the email to the system account. If the email recipients also include H2H addresses, SecureTransport sends the email to the those recipients regardless of the value of PackageManager.DualDeliveryDisabled.
l By default, value of the PackageManager.BodyRoutingDisabled server configuration
parameter is true and SecureTransport ignores the body of an H2S email. If value of
PackageManager.BodyRoutingDisabled is false, SecureTransport puts the body
of the email in a text file with a name of the form uniqueID_body_wap.txt and stores it
with the files attached to an H2S email in the target folder.
Change the package manager base folderTo change the package manager base folder on a root installation:
1. Log on to the SecureTransport Server as root.
2. Stop all SecureTransport protocol servers and services.
3. If the new folder is on a network share, so that LDAP users can access the package manager base folder, mount the new network share on which the new package manager base folder is located using the default UID and GID specified in LDAP domain page for those users.
4. Copy the package manager base folder to its new location.
5. Delete the old package manager base folder.
AxwaySecureTransport 5.2.1 SP4 Administrator Guide 127

3 Setup
6. So that references to the old package manager base folder still work, create a symbolic link that points to the new package manager base folder at the location of the old package manager base folder with the same names as the old package manager base folder.
7. Start the database and the Administration Tool service.
8. In the Administration Tool, change the Package Manager Base Folder field to reference the new package manager base folder.
9. Start the remaining SecureTransport services and protocol servers.
Note You can make a package manager base folder stored on a network share accessible for users of only one LDAP domain.
File Retention Maintenance ApplicationThe built-in SecureTransport application type, File Retention Maintenance, removes expired packages following a schedule you define. For information about how to define the schedule and set the time limit for application execution, see Create a Package Retention Maintenance type application on page 431.
SiteMinder integration configurationCA SiteMinder is a third-party application that controls user access to secured applications and provides a single sign-on (SSO) portal. A SSO portal is a Web gateway or proxy that enables users to access multiple secured Web applications using a single user name and password they provide once at the start of the user session.
SecureTransport can be integrated into a SiteMinder SSO environment and use SiteMinder to authenticate and authorize the HTTP(S), FTP(S), and SSH (SFTP) clients.
Note Before configuring SiteMinder settings, be sure to read SiteMinder integration on page 230.
Before using SecureTransport with SiteMinder, you must configure the SiteMinder settings using the SecureTransport Administration Tool.
Note If SecureTransport is deployed in a secure perimeter network (DMZ) configuration, configure the SiteMinder settings on SecureTransport Server as described in this section. The SiteMinder Settings page is not available on SecureTransport Edge.
1. Select Setup > SiteMinder Settings.
The CA SiteMinder Setting page is displayed.
AxwaySecureTransport 5.2.1 SP4 Administrator Guide 128
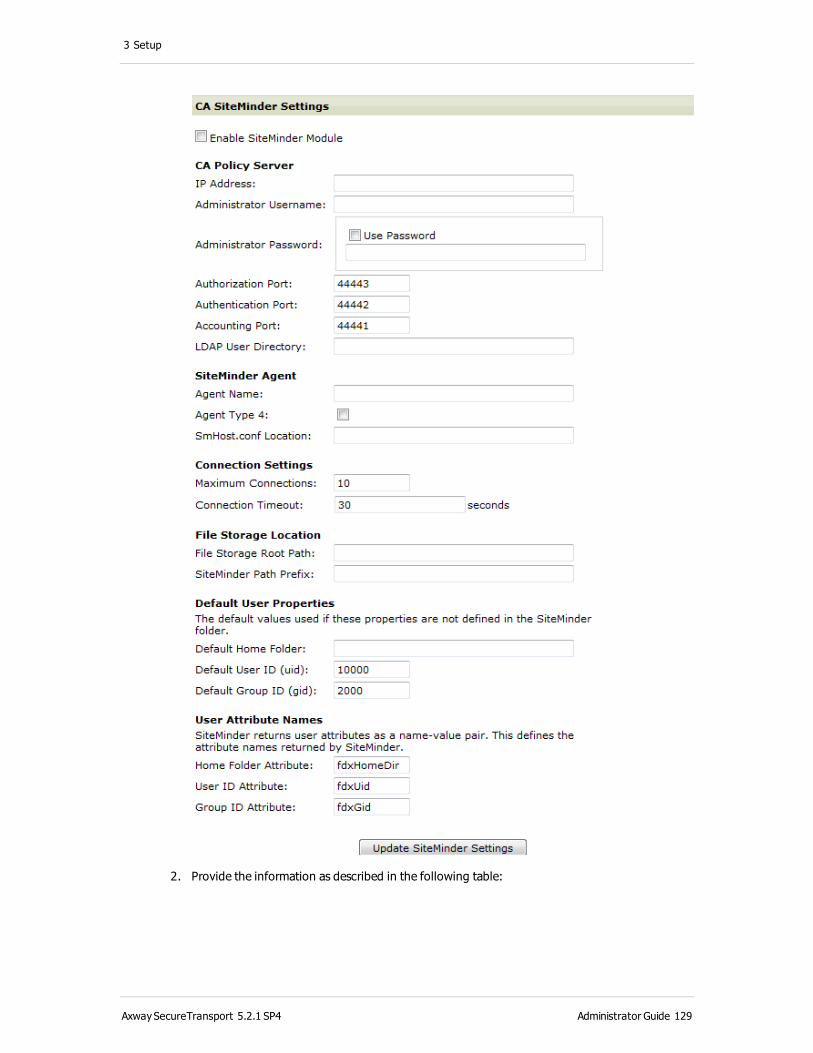
3 Setup
2. Provide the information as described in the following table:
AxwaySecureTransport 5.2.1 SP4 Administrator Guide 129
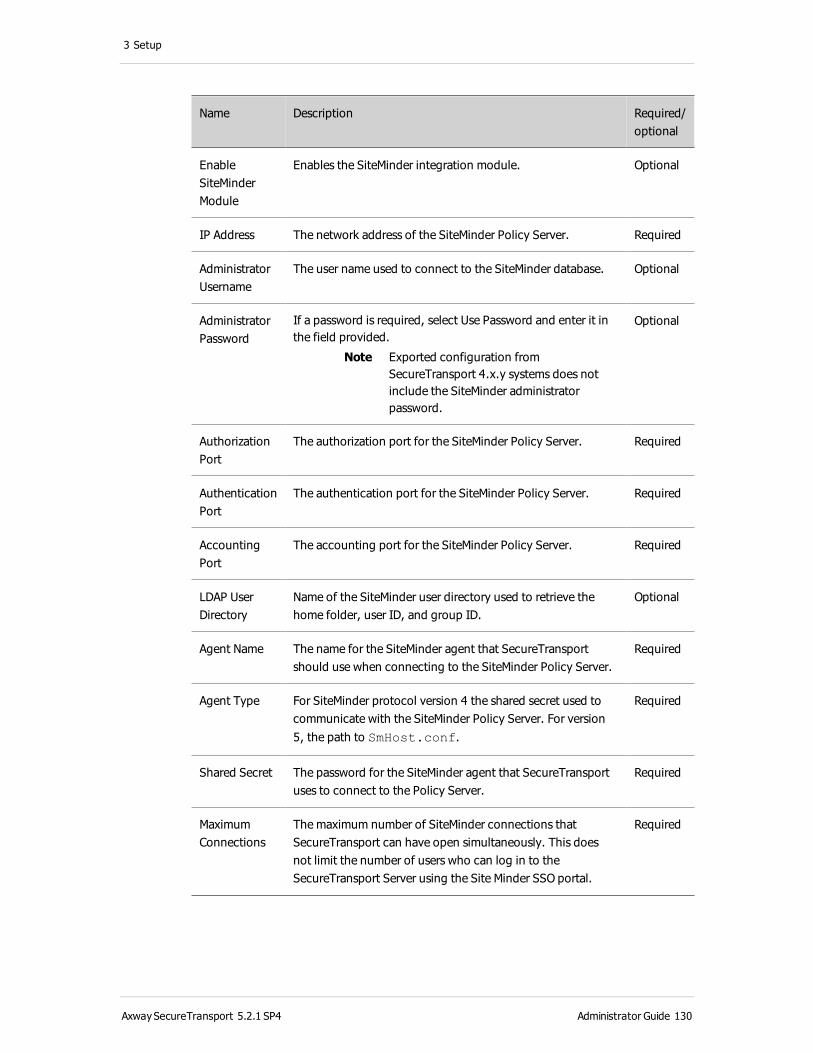
3 Setup
Name Description Required/ optional
Enable SiteMinder Module
Enables the SiteMinder integration module. Optional
IP Address The network address of the SiteMinder Policy Server. Required
Administrator Username
The user name used to connect to the SiteMinder database. Optional
Administrator Password
If a password is required, select Use Password and enter it in the field provided.
Note Exported configuration from SecureTransport 4.x.y systems does not include the SiteMinder administrator password.
Optional
Authorization Port
The authorization port for the SiteMinder Policy Server. Required
Authentication Port
The authentication port for the SiteMinder Policy Server. Required
Accounting Port
The accounting port for the SiteMinder Policy Server. Required
LDAP User Directory
Name of the SiteMinder user directory used to retrieve the home folder, user ID, and group ID.
Optional
Agent Name The name for the SiteMinder agent that SecureTransport should use when connecting to the SiteMinder Policy Server.
Required
Agent Type For SiteMinder protocol version 4 the shared secret used to communicate with the SiteMinder Policy Server. For version 5, the path to SmHost.conf.
Required
Shared Secret The password for the SiteMinder agent that SecureTransport uses to connect to the Policy Server.
Required
Maximum Connections
The maximum number of SiteMinder connections that SecureTransport can have open simultaneously. This does not limit the number of users who can log in to the SecureTransport Server using the Site Minder SSO portal.
Required
AxwaySecureTransport 5.2.1 SP4 Administrator Guide 130

3 Setup
Name Description Required/ optional
Connection Timeout
The amount of time (in seconds) that a SiteMinder connection can be idle before it is closed. The default is 30 seconds. This is independent of user session timeout.
Required
File Storage Root Path
The segment of the absolute URI that is removed before it is submitted to the SiteMinder Policy Server for authorization. If the entire absolute URI is submitted for authorization, type /
in this field.
Required
SiteMinder Path Prefix
After the File Storage Root Path is removed, but prior to SiteMinder authorization, this entry is prefixed to the absolute URI. For example, if the absolute URI is /mnt/ab/user1, the File Storage Root Path is /mnt/ab, and the SiteMinder Path Prefix is /root; then /root/user1 is sent to SiteMinder for authorization. If this box is left blank, no prefix is applied to the URI prior to authorization.
Note: When SiteMinder is enabled, all SecureTransport users must have GET access to the path specified in the SiteMinder Path Prefix to successfully log in. If this setting is left blank, then users must have GET access to /. The SiteMinder administrator must set up the SiteMinder Policy Server accordingly.
Optional
Default Home Folder
The default home folder of the local user. This default is used if a home folder is not supplied by the SiteMinder Policy Server.
Required
Default Local User ID
The numeric user ID (UID) of a user that has full read/write access to the directory specified as the File Storage Root Path and its subdirectories. This default is used only if a UID is not supplied by SiteMinder.
Note On Windows, type the name of the respective virtual user. Windows does not support UIDs.
Required
Default Local Group ID
The numeric group ID (GID) of a user that has full read/write access to the directory specified in the File Storage Root Path and its subdirectories. If no UID or GID are supplied by SiteMinder, these defaults are used for all file operations (including ownership of new files) performed by SecureTransport for users authenticated by SiteMinder.
Required
AxwaySecureTransport 5.2.1 SP4 Administrator Guide 131
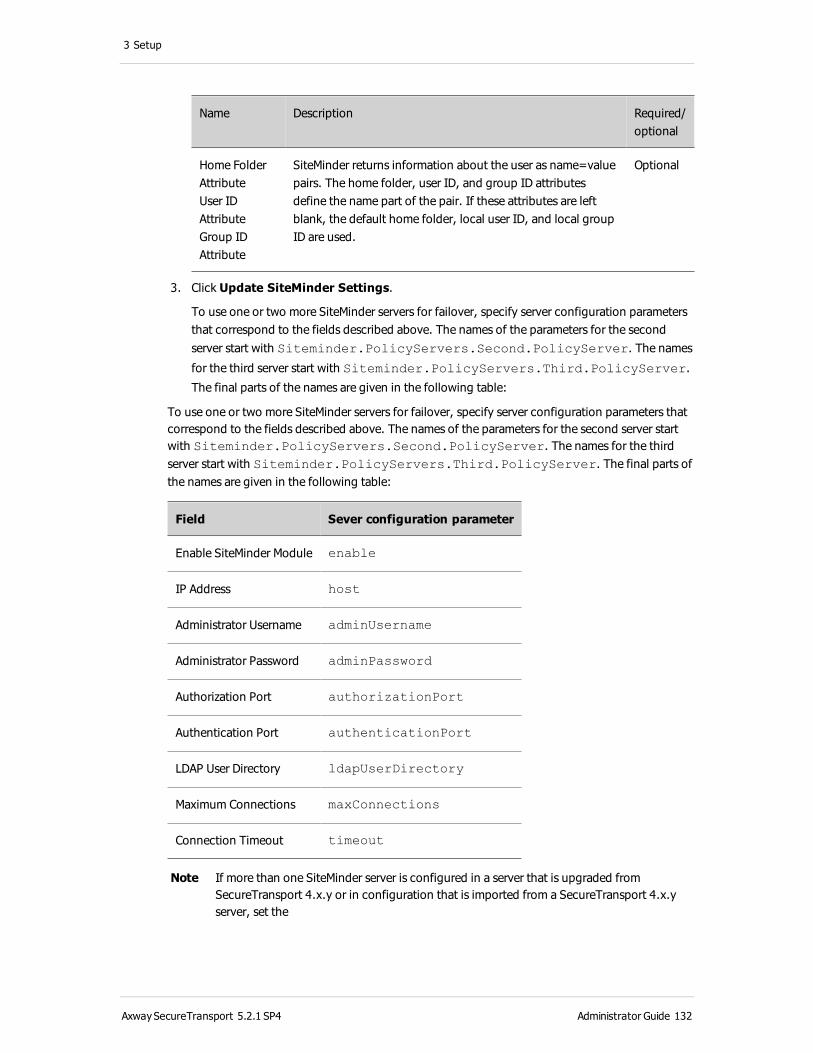
3 Setup
Name Description Required/ optional
Home Folder AttributeUser ID AttributeGroup ID Attribute
SiteMinder returns information about the user as name=value pairs. The home folder, user ID, and group ID attributes define the name part of the pair. If these attributes are left blank, the default home folder, local user ID, and local group ID are used.
Optional
3. Click Update SiteMinder Settings.
To use one or two more SiteMinder servers for failover, specify server configuration parameters that correspond to the fields described above. The names of the parameters for the second server start with Siteminder.PolicyServers.Second.PolicyServer. The names
for the third server start with Siteminder.PolicyServers.Third.PolicyServer.
The final parts of the names are given in the following table:
To use one or two more SiteMinder servers for failover, specify server configuration parameters that correspond to the fields described above. The names of the parameters for the second server start with Siteminder.PolicyServers.Second.PolicyServer. The names for the third server start with Siteminder.PolicyServers.Third.PolicyServer. The final parts of the names are given in the following table:
Field Sever configuration parameter
Enable SiteMinder Module enable
IP Address host
Administrator Username adminUsername
Administrator Password adminPassword
Authorization Port authorizationPort
Authentication Port authenticationPort
LDAP User Directory ldapUserDirectory
Maximum Connections maxConnections
Connection Timeout timeout
Note If more than one SiteMinder server is configured in a server that is upgraded from SecureTransport 4.x.y or in configuration that is imported from a SecureTransport 4.x.y server, set the
AxwaySecureTransport 5.2.1 SP4 Administrator Guide 132
3 Setup
Siteminder.PolicyServers.Second.PolicyServer.enable and the Siteminder.PolicyServers.Third.PolicyServer.enable system configuration parameters to true as required.
There are also parameters for minConnections and connectionsStep which are not set in the CA SiteMinder Setting page.
Database configurationSecureTransport uses a database to store configuration parameters and data, including log data. With standard clustering, SecureTransport Server uses an embedded MySQL database server. With the Large Enterprise Clustering (LEC) option, SecureTransport Server uses a shared external Microsoft SQL Server or Oracle database. With the external Oracle database, you can direct log data to separate databases. SecureTransport Edge always uses an embedded database server.
During installation, you specified the database to use and its parameters. Use the Database Setting page to change database parameters, to switch from the embedded database to an external Oracle database, or to direct log data to separate Oracle databases.
Change the embedded database port or password If this SecureTransport installation uses the embedded database, you can change the database port or password.
Note After installation, the embedded database password is tumbleweed. For better security, change it as described in the following procedure.
1. Select Setup > Database Settings.
The Database Setting page is displayed.
AxwaySecureTransport 5.2.1 SP4 Administrator Guide 133
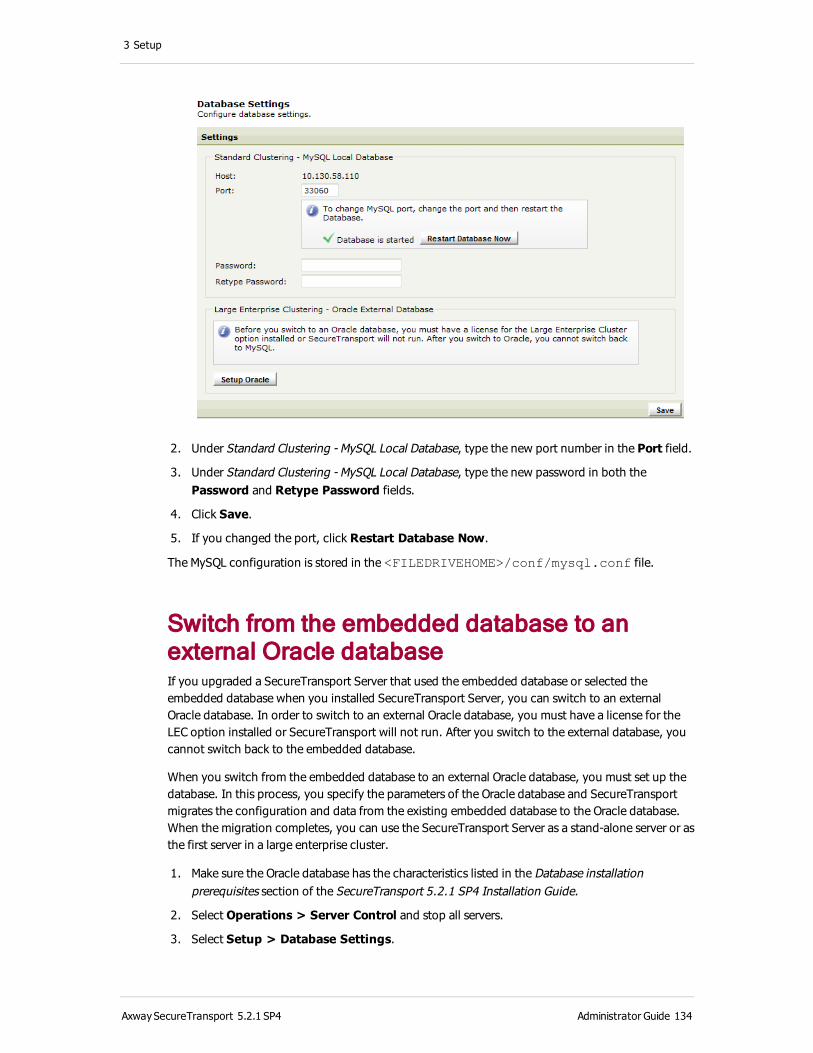
3 Setup
2. Under Standard Clustering - MySQL Local Database, type the new port number in the Port field.
3. Under Standard Clustering - MySQL Local Database, type the new password in both the Password and Retype Password fields.
4. Click Save.
5. If you changed the port, click Restart Database Now.
The MySQL configuration is stored in the <FILEDRIVEHOME>/conf/mysql.conf file.
Switch from the embedded database to an external Oracle databaseIf you upgraded a SecureTransport Server that used the embedded database or selected the embedded database when you installed SecureTransport Server, you can switch to an external Oracle database. In order to switch to an external Oracle database, you must have a license for the LEC option installed or SecureTransport will not run. After you switch to the external database, you cannot switch back to the embedded database.
When you switch from the embedded database to an external Oracle database, you must set up the database. In this process, you specify the parameters of the Oracle database and SecureTransport migrates the configuration and data from the existing embedded database to the Oracle database. When the migration completes, you can use the SecureTransport Server as a stand-alone server or as the first server in a large enterprise cluster.
1. Make sure the Oracle database has the characteristics listed in the Database installation prerequisites section of the SecureTransport 5.2.1 SP4 Installation Guide.
2. Select Operations > Server Control and stop all servers.
3. Select Setup > Database Settings.
AxwaySecureTransport 5.2.1 SP4 Administrator Guide 134
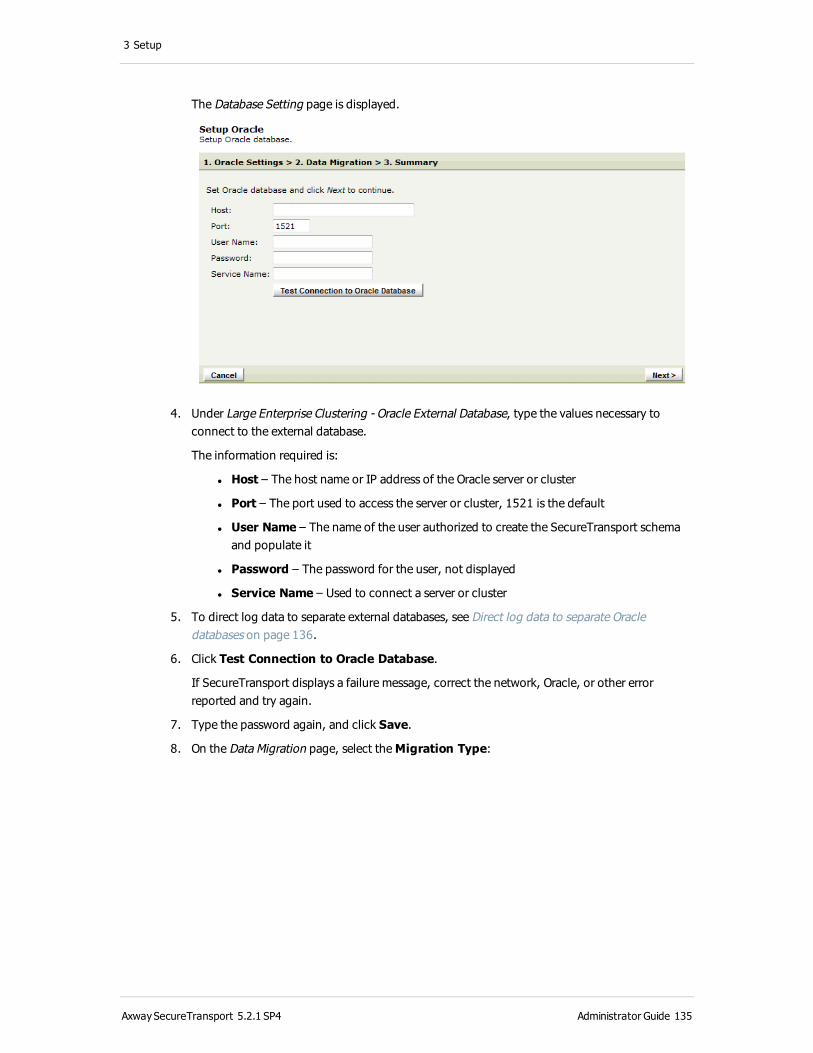
3 Setup
The Database Setting page is displayed.
4. Under Large Enterprise Clustering - Oracle External Database, type the values necessary to connect to the external database.
The information required is:
l Host – The host name or IP address of the Oracle server or cluster
l Port – The port used to access the server or cluster, 1521 is the default
l User Name – The name of the user authorized to create the SecureTransport schema and populate it
l Password – The password for the user, not displayed
l Service Name – Used to connect a server or cluster
5. To direct log data to separate external databases, see Direct log data to separate Oracle databases on page 136.
6. Click Test Connection to Oracle Database.
If SecureTransport displays a failure message, correct the network, Oracle, or other error reported and try again.
7. Type the password again, and click Save.
8. On the Data Migration page, select the Migration Type:
AxwaySecureTransport 5.2.1 SP4 Administrator Guide 135
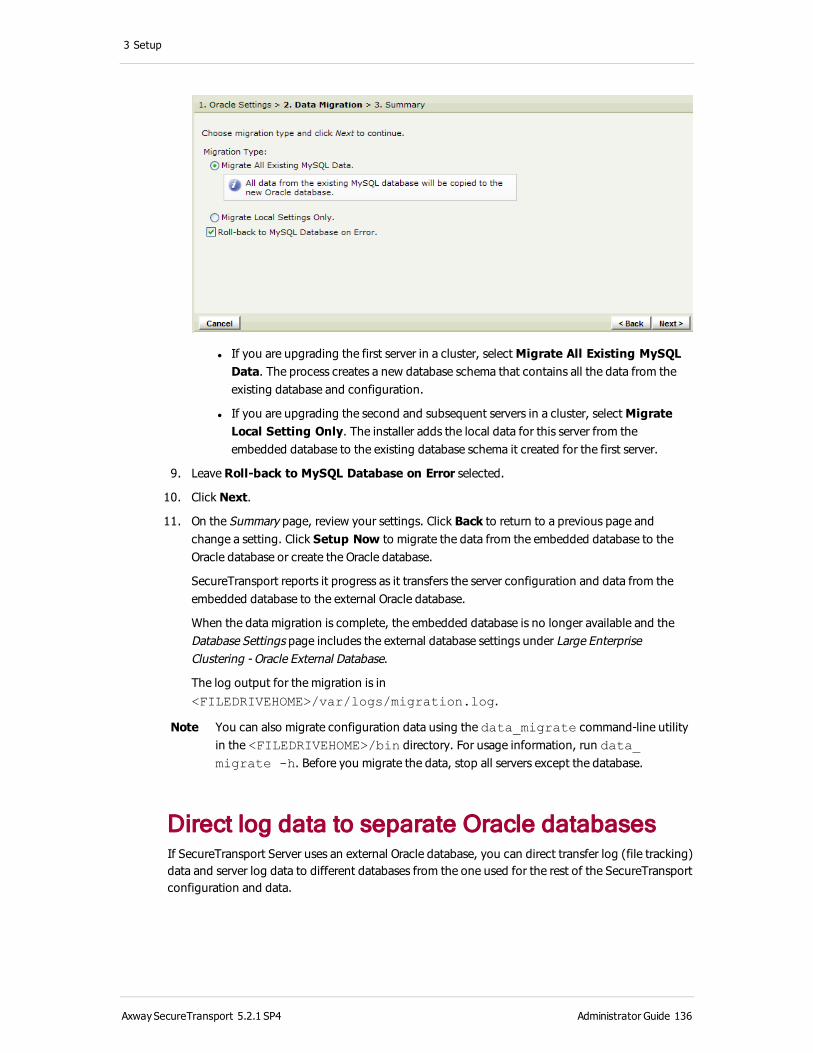
3 Setup
l If you are upgrading the first server in a cluster, select Migrate All Existing MySQL Data. The process creates a new database schema that contains all the data from the existing database and configuration.
l If you are upgrading the second and subsequent servers in a cluster, select Migrate Local Setting Only. The installer adds the local data for this server from the embedded database to the existing database schema it created for the first server.
9. Leave Roll-back to MySQL Database on Error selected.
10. Click Next.
11. On the Summary page, review your settings. Click Back to return to a previous page and change a setting. Click Setup Now to migrate the data from the embedded database to the Oracle database or create the Oracle database.
SecureTransport reports it progress as it transfers the server configuration and data from the embedded database to the external Oracle database.
When the data migration is complete, the embedded database is no longer available and the Database Settings page includes the external database settings under Large Enterprise Clustering - Oracle External Database.
The log output for the migration is in <FILEDRIVEHOME>/var/logs/migration.log.
Note You can also migrate configuration data using the data_migrate command-line utility in the <FILEDRIVEHOME>/bin directory. For usage information, run data_migrate -h. Before you migrate the data, stop all servers except the database.
Direct log data to separate Oracle databasesIf SecureTransport Server uses an external Oracle database, you can direct transfer log (file tracking) data and server log data to different databases from the one used for the rest of the SecureTransport configuration and data.
AxwaySecureTransport 5.2.1 SP4 Administrator Guide 136

3 Setup
You can direct the transfer log data and server log data to the same database or to different databases. When you change the database used to store log data, SecureTransport does not copy the data from its current location to the new location.
SecureTransport continues to operate when the external server log database is unavailable. SecureTransport directs the server log data to <FILEDRIVEHOME>/var/logs/serverlog-fallback.log. The Server Log page indicates that the log is unavailable and provides a link you can use to download the file.
1. Make sure the Oracle databases have the characteristics listed in the Database installation prerequisites section of the SecureTransport 5.2.1 SP4 Installation Guide. Depending on the log data you direct to a database, you must define the ST_FILETRACKING tablespace or the
ST_SERVERLOG tablespace.
2. Select Setup > Database Settings.
The Database Setting page is displayed with the external database settings under Large Enterprise Clustering - Oracle External Database.
3. Select Show Advanced Settings.
The settings for the two additional databases are displayed.
4. Under Large Enterprise Clustering - Oracle External Database - Transfer Log and Large Enterprise Clustering - Oracle External Database - Server Log, type the values necessary to connect to the external databases. To continue to use the primary database, retain the default values.
For description of the required values, see Switch from the embedded database to an external Oracle database on page 134.
5. For each database, click Test Connection to Oracle Database.
If SecureTransport displays a failure message, correct the network, Oracle, or other error reported and try again.
6. Type the passwords again and click Save.
The first time the new database is referenced, SecureTransport creates the tables for the log data. SecureTransport does not copy the log data from the previous database to the new database and does not display the log entries from the previous database in the File Tracking and Server Log pages.
7. Select Operations > Server Control.
8. On the Server Control page, stop and restart all the protocol servers and the TM Server.
9. Log out of the Administration Tool.
10. Log on to the SecureTransport server and stop and restart the Administration Tool service using the stop_admin and start_admin commands in <FILEDRIVEHOME>/bin.
11. In a large enterprise cluster, repeat steps 2 though 10 for all SecureTransport Servers.
Change the external Oracle databaseIf the SecureTransport Server uses an external Oracle database and any of the database settings change, you must change the corresponding settings in the Administration Tool.
AxwaySecureTransport 5.2.1 SP4 Administrator Guide 137
3 Setup
1. Log on to the SecureTransport Administration Tool as user dbsetup.
2. Select Setup > Database Settings.
The Database Setting page is displayed with the external database settings under Large Enterprise Clustering - Oracle External Database..
3. Type the values necessary to connect to the new external database.
For description of the required values, see Switch from the embedded database to an external Oracle database on page 134.
4. Click Test Connection to Oracle Database.
If SecureTransport displays a failure message, correct the network, database, or other error reported and try again.
5. Click Save.
Note You can enable encryption of the communication between the SecureTransport Server and the Oracle database by adding SQLNET.ENCRYPTION_SERVER=requested to the $ORACLE_HOME/network/admin/sqlnet.ora file for your Oracle server. For more information, refer to the Oracle documentation.
Change the external Microsoft SQL Server databaseIf the SecureTransport Server uses an external Microsoft SQL Server database and any of the database settings change, you must change the corresponding settings in the Administration Tool.
1. Log on to the SecureTransport Administration Tool as user dbsetup.
2. Select Setup > Database Settings.
The Database Setting page is displayed with the external database settings under Large Enterprise Clustering - Microsoft SQL Server External Database.
3. Type the values necessary to connect to the new external database:
l Host – The FQDN or IP address of the Microsoft SQL Server system
l Port – The number of the port used to access the server, 1433 is the default
l User Name – The name of the user authorized to connect to the database
l Password – The password for the user, not displayed
l Database Name – Used to connect to the Microsoft SQL Server.
4. Click Test Connection to SQL Server Database.
If SecureTransport displays a failure message, correct the network, database, or other error reported and try again.
5. Click Save.
AxwaySecureTransport 5.2.1 SP4 Administrator Guide 138
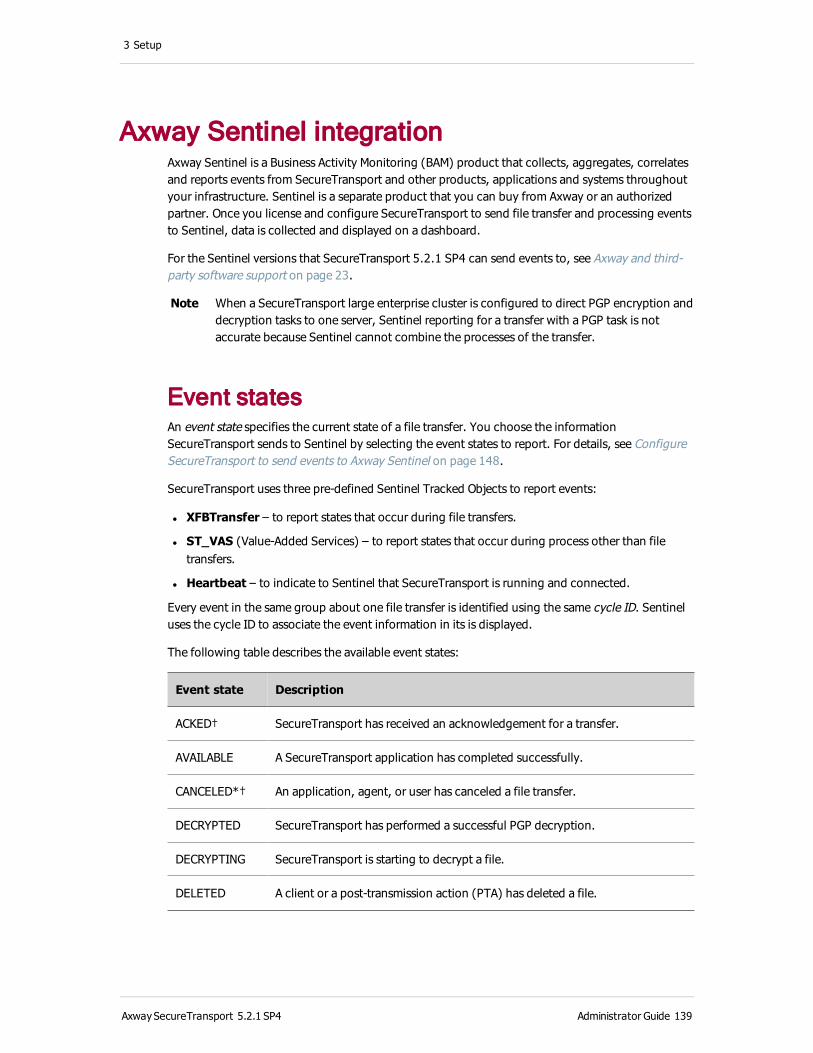
3 Setup
Axway Sentinel integrationAxway Sentinel is a Business Activity Monitoring (BAM) product that collects, aggregates, correlates and reports events from SecureTransport and other products, applications and systems throughout your infrastructure. Sentinel is a separate product that you can buy from Axway or an authorized partner. Once you license and configure SecureTransport to send file transfer and processing events to Sentinel, data is collected and displayed on a dashboard.
For the Sentinel versions that SecureTransport 5.2.1 SP4 can send events to, see Axway and third-party software support on page 23.
Note When a SecureTransport large enterprise cluster is configured to direct PGP encryption and decryption tasks to one server, Sentinel reporting for a transfer with a PGP task is not accurate because Sentinel cannot combine the processes of the transfer.
Event statesAn event state specifies the current state of a file transfer. You choose the information SecureTransport sends to Sentinel by selecting the event states to report. For details, see Configure SecureTransport to send events to Axway Sentinel on page 148.
SecureTransport uses three pre-defined Sentinel Tracked Objects to report events:
l XFBTransfer – to report states that occur during file transfers.
l ST_VAS (Value-Added Services) – to report states that occur during process other than file transfers.
l Heartbeat – to indicate to Sentinel that SecureTransport is running and connected.
Every event in the same group about one file transfer is identified using the same cycle ID. Sentinel uses the cycle ID to associate the event information in its is displayed.
The following table describes the available event states:
Event state Description
ACKED† SecureTransport has received an acknowledgement for a transfer.
AVAILABLE A SecureTransport application has completed successfully.
CANCELED*† An application, agent, or user has canceled a file transfer.
DECRYPTED SecureTransport has performed a successful PGP decryption.
DECRYPTING SecureTransport is starting to decrypt a file.
DELETED A client or a post-transmission action (PTA) has deleted a file.
AxwaySecureTransport 5.2.1 SP4 Administrator Guide 139
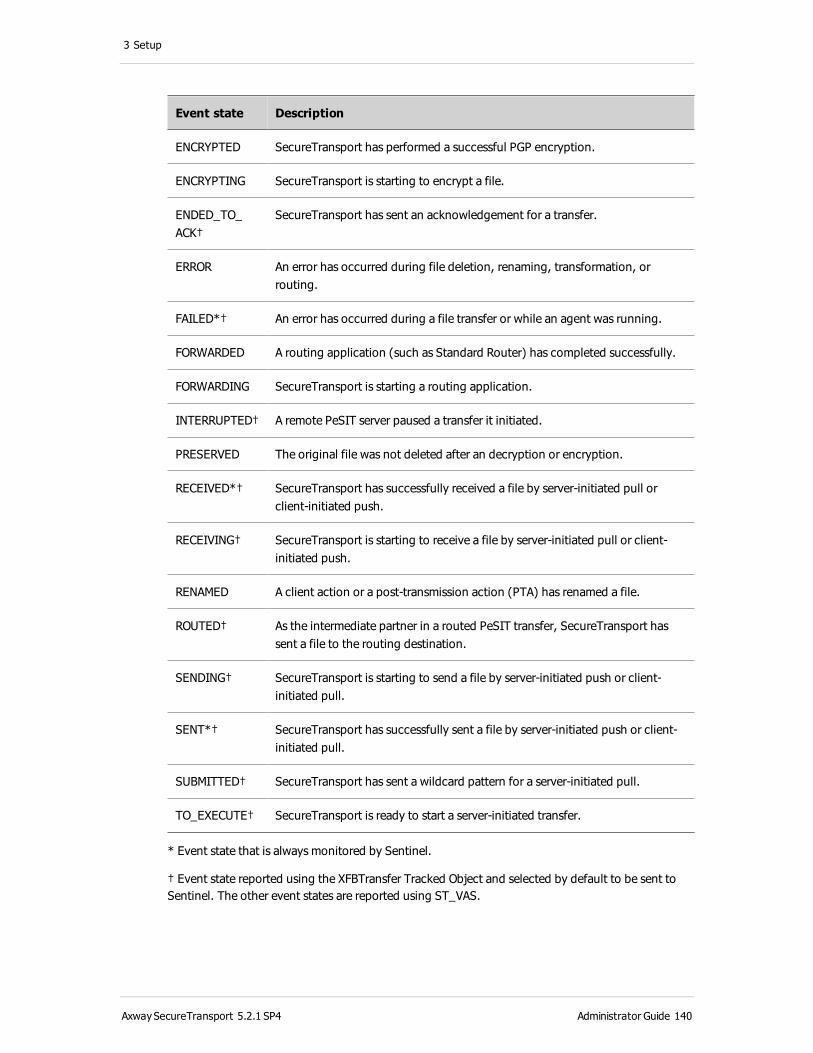
3 Setup
Event state Description
ENCRYPTED SecureTransport has performed a successful PGP encryption.
ENCRYPTING SecureTransport is starting to encrypt a file.
ENDED_TO_ACK†
SecureTransport has sent an acknowledgement for a transfer.
ERROR An error has occurred during file deletion, renaming, transformation, or routing.
FAILED*† An error has occurred during a file transfer or while an agent was running.
FORWARDED A routing application (such as Standard Router) has completed successfully.
FORWARDING SecureTransport is starting a routing application.
INTERRUPTED† A remote PeSIT server paused a transfer it initiated.
PRESERVED The original file was not deleted after an decryption or encryption.
RECEIVED*† SecureTransport has successfully received a file by server-initiated pull or client-initiated push.
RECEIVING† SecureTransport is starting to receive a file by server-initiated pull or client-initiated push.
RENAMED A client action or a post-transmission action (PTA) has renamed a file.
ROUTED† As the intermediate partner in a routed PeSIT transfer, SecureTransport has sent a file to the routing destination.
SENDING† SecureTransport is starting to send a file by server-initiated push or client-initiated pull.
SENT*† SecureTransport has successfully sent a file by server-initiated push or client-initiated pull.
SUBMITTED† SecureTransport has sent a wildcard pattern for a server-initiated pull.
TO_EXECUTE† SecureTransport is ready to start a server-initiated transfer.
* Event state that is always monitored by Sentinel.
† Event state reported using the XFBTransfer Tracked Object and selected by default to be sent to Sentinel. The other event states are reported using ST_VAS.
AxwaySecureTransport 5.2.1 SP4 Administrator Guide 140

3 Setup
The following event states are in-process states: DECRYPTING, ENCRYPTING, FORWARDING, RECEIVING, SENDING, and TO_EXECUTE. All other event states are processed states that report the successful or unsuccessful completion of processing.
Note Added data transformations and other SecureTransport customizations can add additional event states to be sent to Sentinel.
Axway Sentinel Tracked ObjectsThe tables in this section list the attributes of the Tracked Objects used to report Axway SecureTransport events to Axway Sentinel. All the Tracked Objects have the same standard attributes. Each Tracked Object also has attributes specific to it.
The standard attributes are:
Name Format Description
CYCLEID string For XFBTransfer and ST_VAS: ID used to relate events about the same transfer
For Heartbeat: ID used to identify the SecureTransport Server
EVENTDATE date Date (generated by Sentinel)
EVENTID integer Unique ID for the event (generated by Sentinel, not in Heartbeat))
EVENTTIME time Timestamp (generated by Sentinel)
GMTDIFF integer Time zone (generated by Sentinel)
ISALERT 0/1 1 means permanent error or last entry (not in Heartbeat)
ISEND integer 1 or 2 means End (not in Heartbeat)
ISEXCEPTION 0/1 1 means temporary failure (not in Heartbeat)
OBJECTID string Object ID (generated by Sentinel, not in Heartbeat)
PRODUCTID string ST
PRODUCTIPADDR string IP address of the SecureTransport host
PRODUCTNAME string Secure Transport
PRODUCTOS string Operating system of Axway SecureTransport host (generated by Sentinel)
AxwaySecureTransport 5.2.1 SP4 Administrator Guide 141
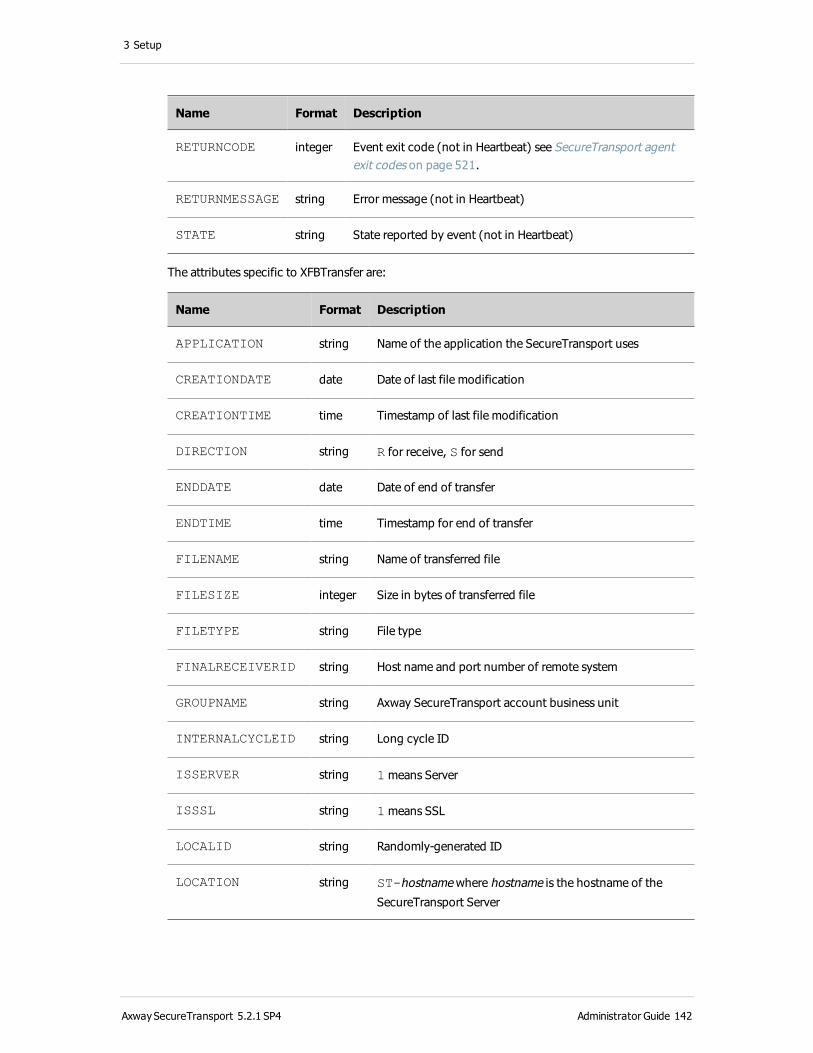
3 Setup
Name Format Description
RETURNCODE integer Event exit code (not in Heartbeat) see SecureTransport agent exit codes on page 521.
RETURNMESSAGE string Error message (not in Heartbeat)
STATE string State reported by event (not in Heartbeat)
The attributes specific to XFBTransfer are:
Name Format Description
APPLICATION string Name of the application the SecureTransport uses
CREATIONDATE date Date of last file modification
CREATIONTIME time Timestamp of last file modification
DIRECTION string R for receive, S for send
ENDDATE date Date of end of transfer
ENDTIME time Timestamp for end of transfer
FILENAME string Name of transferred file
FILESIZE integer Size in bytes of transferred file
FILETYPE string File type
FINALRECEIVERID string Host name and port number of remote system
GROUPNAME string Axway SecureTransport account business unit
INTERNALCYCLEID string Long cycle ID
ISSERVER string 1 means Server
ISSSL string 1 means SSL
LOCALID string Randomly-generated ID
LOCATION string ST-hostname where hostname is the hostname of the
SecureTransport Server
AxwaySecureTransport 5.2.1 SP4 Administrator Guide 142
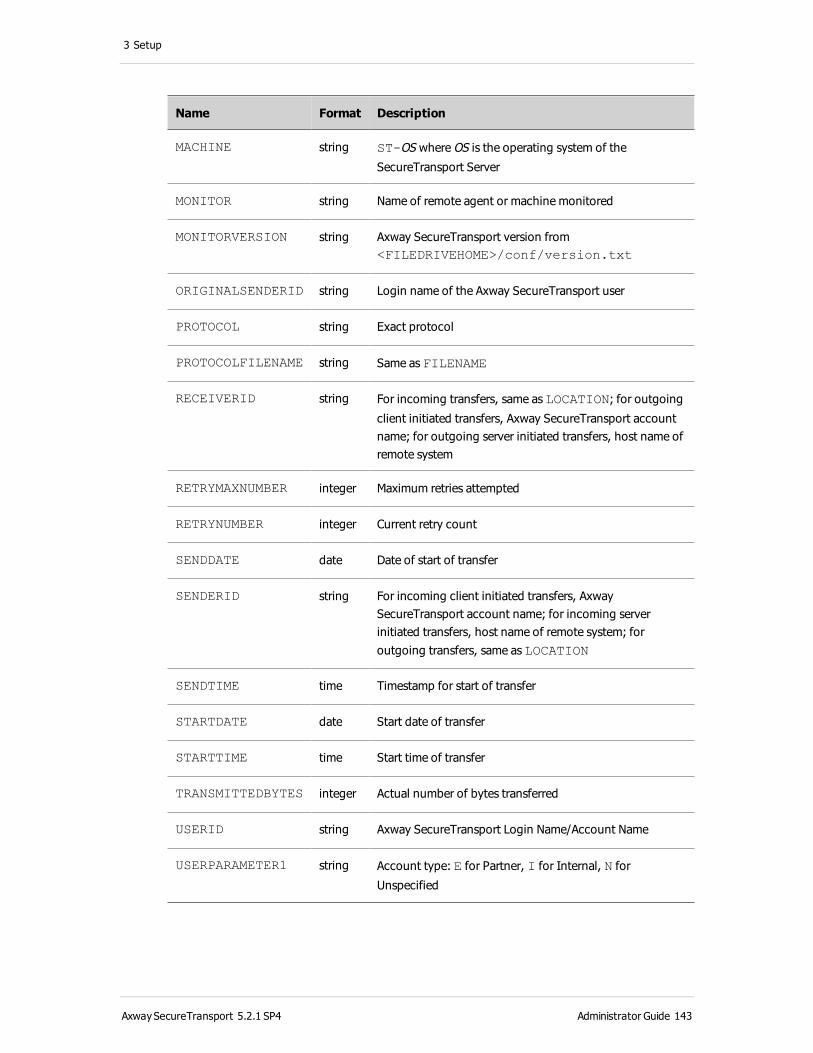
3 Setup
Name Format Description
MACHINE string ST-OS where OS is the operating system of the
SecureTransport Server
MONITOR string Name of remote agent or machine monitored
MONITORVERSION string Axway SecureTransport version from <FILEDRIVEHOME>/conf/version.txt
ORIGINALSENDERID string Login name of the Axway SecureTransport user
PROTOCOL string Exact protocol
PROTOCOLFILENAME string Same as FILENAME
RECEIVERID string For incoming transfers, same as LOCATION; for outgoing
client initiated transfers, Axway SecureTransport account name; for outgoing server initiated transfers, host name of remote system
RETRYMAXNUMBER integer Maximum retries attempted
RETRYNUMBER integer Current retry count
SENDDATE date Date of start of transfer
SENDERID string For incoming client initiated transfers, Axway SecureTransport account name; for incoming server initiated transfers, host name of remote system; for outgoing transfers, same as LOCATION
SENDTIME time Timestamp for start of transfer
STARTDATE date Start date of transfer
STARTTIME time Start time of transfer
TRANSMITTEDBYTES integer Actual number of bytes transferred
USERID string Axway SecureTransport Login Name/Account Name
USERPARAMETER1 string Account type: E for Partner, I for Internal, N for
Unspecified
AxwaySecureTransport 5.2.1 SP4 Administrator Guide 143

3 Setup
Name Format Description
USERPARAMETER2 string Indicates whether the transfer is originated by a user account, a service account, or a site
VIRTUALDIRNAME string Name of the virtual directory used in the transfer
The attributes specific to ST_VAS are:
Name Format Description
ACTIVITYDURATION integer Duration of activity in milliseconds
ACTIVITYNAME string Name of activity reporting the event
DIRECTION string R for receive, S for send
DIRECTORYNAME string Directory name
FILENAME string Name of transferred file
FILESIZE integer Size in bytes of transferred file
ORIGINALFILENAME string File name before the action of the activity
USERID string Axway SecureTransport Login Name/Account Name
The attribute specific to Heartbeat is:
Name Format Description
DELAY integer Heartbeat interval set on the Axway Sentinel Events page
Axway Sentinel dashboardsWhen integrated with SecureTransport, Sentinel can display the following dashboards. Axway provides these dashboards for the SecureTransport and Sentinel integration at no additional cost.
Some dashboards display information about small and large files. You can set the cutoff points for these classes. By default, small files are smaller than 1 KB and large files are 10 MB or larger.
AxwaySecureTransport 5.2.1 SP4 Administrator Guide 144
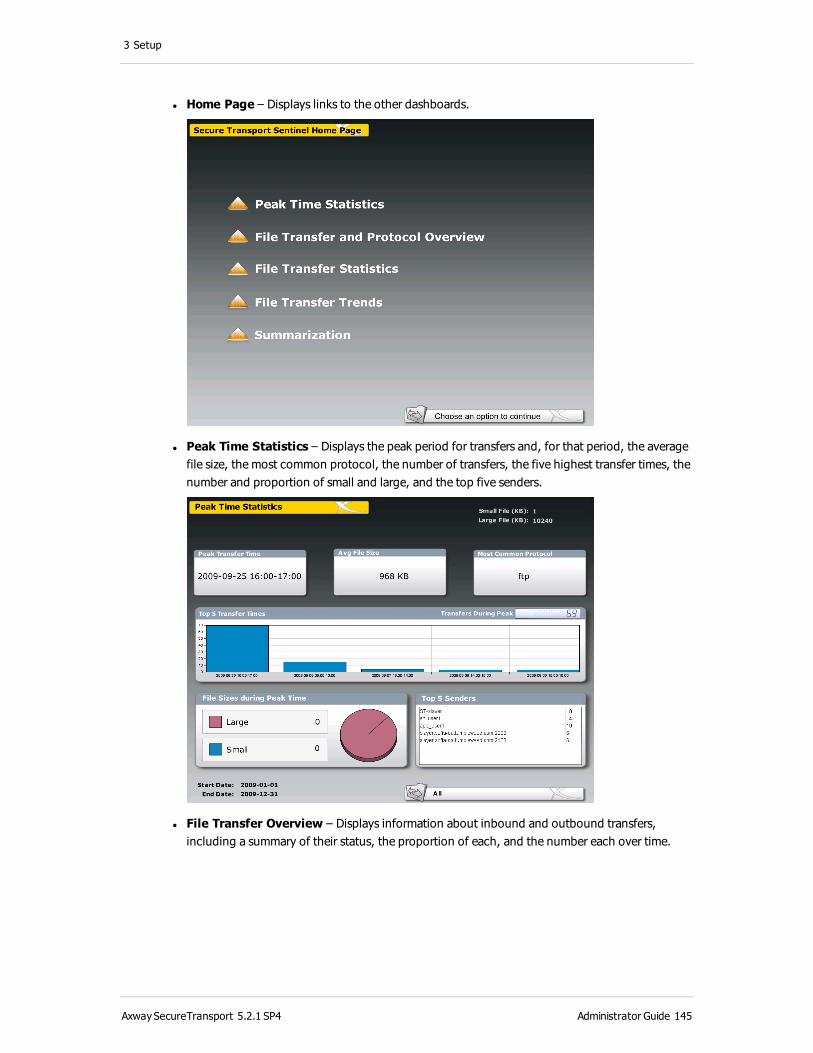
3 Setup
l Home Page – Displays links to the other dashboards.
l Peak Time Statistics – Displays the peak period for transfers and, for that period, the average file size, the most common protocol, the number of transfers, the five highest transfer times, the number and proportion of small and large, and the top five senders.
l File Transfer Overview – Displays information about inbound and outbound transfers, including a summary of their status, the proportion of each, and the number each over time.
AxwaySecureTransport 5.2.1 SP4 Administrator Guide 145
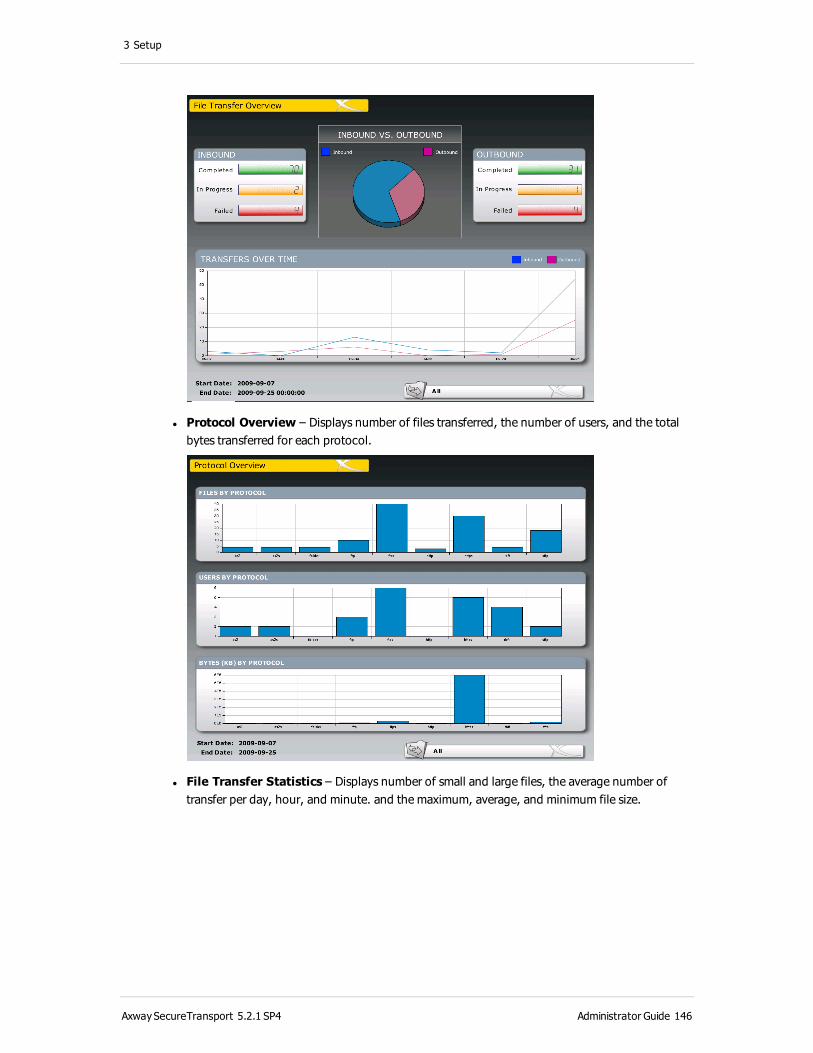
3 Setup
l Protocol Overview – Displays number of files transferred, the number of users, and the total bytes transferred for each protocol.
l File Transfer Statistics – Displays number of small and large files, the average number of transfer per day, hour, and minute. and the maximum, average, and minimum file size.
AxwaySecureTransport 5.2.1 SP4 Administrator Guide 146

3 Setup
l File Transfer Trends – Displays trends for number of files transferred, total bytes transferred, and average transfer rate in KB per second.
l Summarization – Displays the number of files transferred, total bytes transferred, and average transfer rate in KB per second for recent days, weeks, and months.
AxwaySecureTransport 5.2.1 SP4 Administrator Guide 147
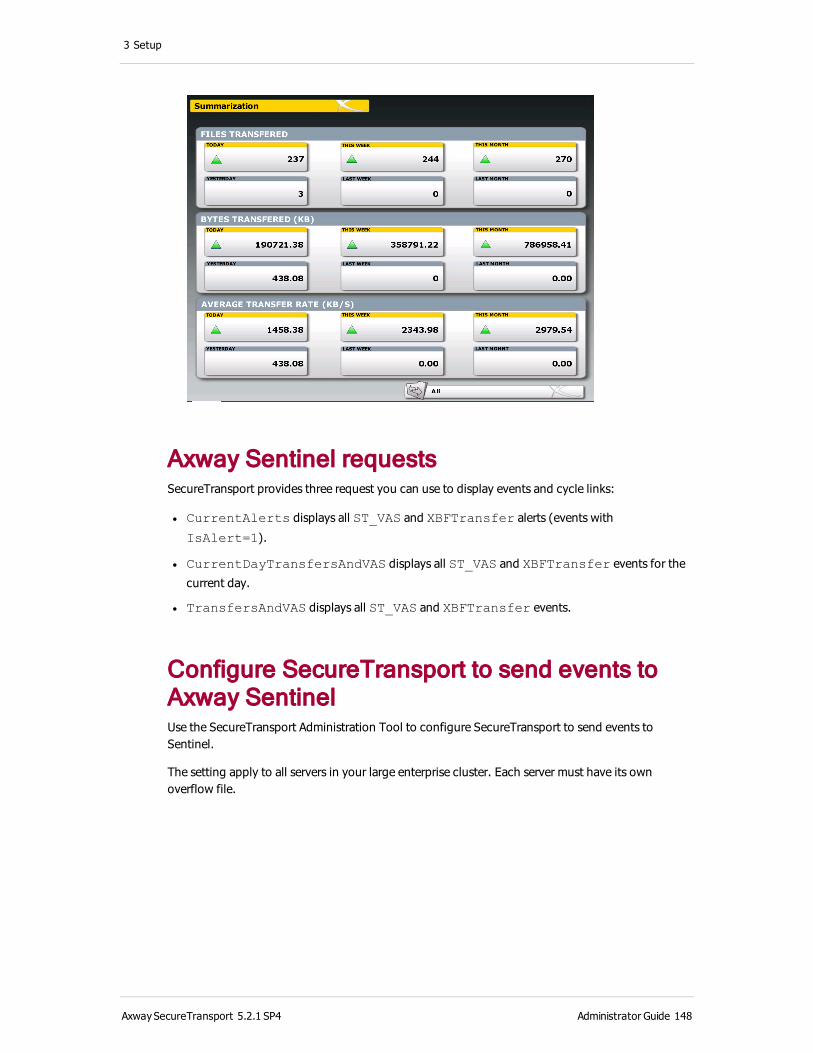
3 Setup
Axway Sentinel requestsSecureTransport provides three request you can use to display events and cycle links:
l CurrentAlerts displays all ST_VAS and XBFTransfer alerts (events with
IsAlert=1).
l CurrentDayTransfersAndVAS displays all ST_VAS and XBFTransfer events for the
current day.
l TransfersAndVAS displays all ST_VAS and XBFTransfer events.
Configure SecureTransport to send events to Axway SentinelUse the SecureTransport Administration Tool to configure SecureTransport to send events to Sentinel.
The setting apply to all servers in your large enterprise cluster. Each server must have its own overflow file.
AxwaySecureTransport 5.2.1 SP4 Administrator Guide 148

3 Setup
1. Select Setup > Axway Sentinel to open the Axway Sentinel Events page.
2. Select the check box for Enable Sending Events to Sentinel Server.
The rest of the fields on the screen are enabled and SecureTransport sends events to Sentinel as configured following.
3. In theAxway Sentinel pane, specify the FQDN or IP address of the Sentinel server in the Host field and a valid TCP port on the server to which events will be sent in the Port field. Changes to these settings take effect the next time you restart the Transaction Manager.
4. (Optional) Click the Test Connection to Sentinel Server button. This test indicates whether the port specified on the Sentinel host accepts connections.
5. (Optional) Select Send Heartbeat to Axway Sentinel and set the heartbeat interval to send periodic messages to Sentinel to tell it that SecureTransport is running and connected. The default interval is 10 seconds.
6. In the Events pane, select the event states to send to Sentinel.
AxwaySecureTransport 5.2.1 SP4 Administrator Guide 149

3 Setup
An Event State specifies the current state of a file transfer. If an Event State is not selected to be sent, SecureTransport performs the processing represented by the state, but it does not send the event that reports that state to Sentinel. For the available states, see Event states on page 139.
7. In the Overflow file pane, specify information about the file to be used to store SecureTransport event data when there is no connection between SecureTransport and Sentinel. Changes to these settings take effect the next time the Transaction Manager is restarted. Specify the following information:
Field Description
Name The base name of the file to contain buffered SecureTransport event data.
Path The path of the directory where the overflow file will be located. You can specify either a local absolute or relative path. If you specify a relative path, it is created within the <FILEDRIVEHOME> directory.
Specify a local path, not one in shared storage, because each server in a cluster must have its own overflow file.
Size (MB) The maximum overflow file size in MB. A 1 MB file can store events from about 150-200 transfers. With a fast and dependable connection between the SecureTransport Server and a dependable Sentinel server, 1-10 MB should be sufficient. If the connection is slow or the connection or the Sentinel server might be down, 10-50 MB is better.
When the overflow file size exceeds this size, it invokes the action you configure under When Overflow File Exceeds Maximum Size.
Warning Threshold
Specify a percentage of the maximum file size that, when reached, triggers a warning. The value you enter must be an integer between 1 and 94. When a warning is triggered, an email is sent to the SecureTransport administrator. The email message is formatted using the standard email template, SentinelOverflowFileWarning.xhtml, located in
<FILEDRIVEHOME>/conf/mailer-templates/. The recipient of any
warning email is the administrator specified in the FTP/HTTP Startup Password Timeout Configuration pane of the Setup > Miscellaneous page. For details, see Set the administrator’s email on page 161.
AxwaySecureTransport 5.2.1 SP4 Administrator Guide 150

3 Setup
Field Description
When Overflow File Exceeds Maximum Size
Select the action to take when the overflow files exceed the maximum size you set. Choose one of the following:
l Stop Collecting New Events – Stop tracking events for Sentinel, but continue to process transfers, run agents, and run SecureTransport applications. Use this option in a clustered configuration so that the Sentinel server is not a potential single point of failure.
l Pause All File Transfers – Stop tracking events for Sentinel and stop processing transfers, running agents, and running SecureTransport applications. Use this option with care because it is operationally equivalent to stopping SecureTransport. To restart transfers, either clear the overflow file or select the other option.
8. Click Save.
Your settings are saved and SecureTransport transmits data about file transfer activities to the Sentinel server you specified.
Server licensesUse the Server License page to update SecureTransport licenses. You usually install licenses when you perform initial SecureTransport setup and configuration after installation. Update licenses whenever required, for example, when you receive your permanent license for SecureTransport after an evaluation period.
SecureTransport requires two licenses. The core server license specifies the number of accounts allowed and the number of ad hoc users allowed. The features license can limit the license to a specified host and to a specified date range. It also specifies if the AS2, SSH, and Connect:Direct protocols are allowed, if SiteMinder integration is allowed, if the Large Enterprise Cluster (LEC) option is included, and the number of large enterprise cluster nodes allowed.
The FTP and HTTP protocols are included in the core license. For other features, contact your local account executive or supplier.
Account session countThe number of accounts in the core server license controls the number of connections allowed to the server. An account license is considered in use when a user logs in. A license is also considered in use when used for a site that is initiating transfers. The license is considered in use for 60 days after the initial login or site transfer. If you use the same site for both uploads and downloads, it is considered one usage. Regardless of how many accounts use a specific site, that site is still considered one usage. The Folder Monitor, AS2 receiving, and asynchronous AS2 MDN receiving are excluded from license counting.
AxwaySecureTransport 5.2.1 SP4 Administrator Guide 151
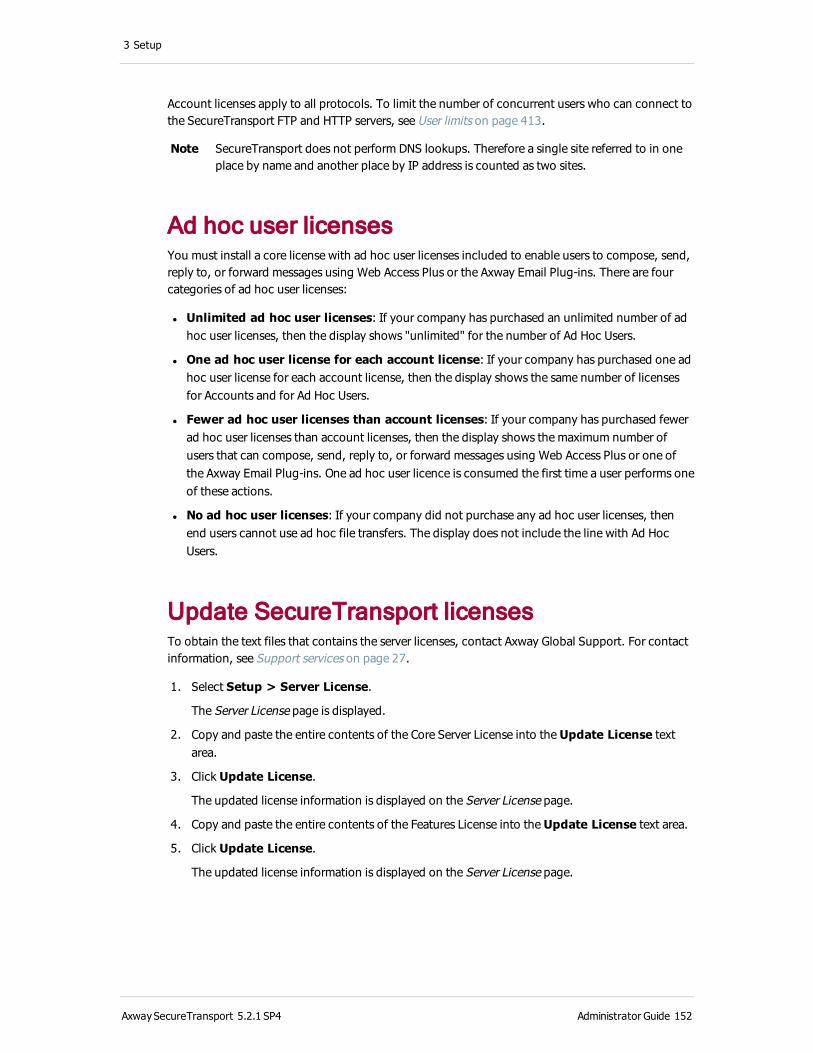
3 Setup
Account licenses apply to all protocols. To limit the number of concurrent users who can connect to the SecureTransport FTP and HTTP servers, see User limits on page 413.
Note SecureTransport does not perform DNS lookups. Therefore a single site referred to in one place by name and another place by IP address is counted as two sites.
Ad hoc user licensesYou must install a core license with ad hoc user licenses included to enable users to compose, send, reply to, or forward messages using Web Access Plus or the Axway Email Plug-ins. There are four categories of ad hoc user licenses:
l Unlimited ad hoc user licenses: If your company has purchased an unlimited number of ad hoc user licenses, then the display shows "unlimited" for the number of Ad Hoc Users.
l One ad hoc user license for each account license: If your company has purchased one ad hoc user license for each account license, then the display shows the same number of licenses for Accounts and for Ad Hoc Users.
l Fewer ad hoc user licenses than account licenses: If your company has purchased fewer ad hoc user licenses than account licenses, then the display shows the maximum number of users that can compose, send, reply to, or forward messages using Web Access Plus or one of the Axway Email Plug-ins. One ad hoc user licence is consumed the first time a user performs one of these actions.
l No ad hoc user licenses: If your company did not purchase any ad hoc user licenses, then end users cannot use ad hoc file transfers. The display does not include the line with Ad Hoc Users.
Update SecureTransport licensesTo obtain the text files that contains the server licenses, contact Axway Global Support. For contact information, see Support services on page 27.
1. Select Setup > Server License.
The Server License page is displayed.
2. Copy and paste the entire contents of the Core Server License into the Update License text area.
3. Click Update License.
The updated license information is displayed on the Server License page.
4. Copy and paste the entire contents of the Features License into the Update License text area.
5. Click Update License.
The updated license information is displayed on the Server License page.
AxwaySecureTransport 5.2.1 SP4 Administrator Guide 152

3 Setup
Note The Connect:Direct license is listed only when the Connect:Direct protocol is enabled.
6. Restart all SecureTransport servers that are running.
The licenses for your SecureTransport Server are updated.
FTP command log configurationThe SecureTransport command logging feature works as a tracking system. It maintains a log of the commands entered by the users during an FTP session. Command logging is available for the FTP server only. You can use the Ftp.CommandLogging.File server configuration parameter to set the location of the command log. By default, the location is <FILEDRIVEHOME>/var/logs/cmdlog.
Use the Command Logging page to view and determine which user classes should have their commands logged. You can restrict this feature by user class, so that the FTP sessions of only certain user classes are logged.
AxwaySecureTransport 5.2.1 SP4 Administrator Guide 153

3 Setup
Add a command logging entry 1. Select Setup > Command Logging to open the Command Logging page.
2. Click Add Logging.
3. An entry is added to the Command logging entries table.
4. Select a User Class or * for all classes.
On SecureTransport Server, the user class is validated. On SecureTransport Edge, the user class is not validated, and if it does not exist, nothing is logged.
5. Click the Save icon ( ) in the Edit column.
The status of the new entry is set to disabled.
Note To cancel an add operation, select Setup > Command Logging again.
Enable or disable command logging entries 1. Select Setup > Command Logging to open the Command Logging page.
2. Select the entries to enable or disable.
3. Click Enable or Disable.
The icon in the User Class column changes to show that the entry is enabled or disabled.
Edit a command logging entry 1. Select Setup > Command Logging to open the Command Logging page.
2. For the entry to edit, click the Edit icon ( ) in the Edit column.
3. Change the value in the User Class column as needed.
4. Click Enable or Disable.
5. Click the Save icon ( ) in the Edit column.
Note To cancel an edit operation, select Setup > Command Logging again.
AxwaySecureTransport 5.2.1 SP4 Administrator Guide 154

3 Setup
Delete command logging entries 1. Select Setup > Command Logging to open the Command Logging page.
2. Select the entries to delete.
3. Click Delete.
The entry is removed from the Command logging entries table.
Transfer log configurationThe transfer log tracks the file uploads and downloads on the system and records a lot of basic and additional information, such as whether the transfer was initiated by the server or by a user, protocol used, and other information.
The tracking information is kept in the database and in a log file named xferlog, which is located in the <FILEDRIVEHOME>/var/logs directory. For information about the xferlog log file, see General log files on page 507. If you have the Large Enterprise Cluster (LEC) option, you can store the transfer log data in a separate external database from the rest of the SecureTransport data. See Direct log data to separate Oracle databases on page 136.
Use the Transfer Logging page to add and edit logging entries to determine which transfers will be logged. You can also enable this feature for a specific user class.
Add transfer logging entries 1. Select Setup > Transfer Logging.
The Transfer Logging page is displayed.
2. Click Add Logging. A row is added to the Transfer logging entries list.
3. Select a User Class. The user class must already be defined in the User Classes page of the Access menu.
Asterisk (*) means all users.
4. In the Log Transfers On list, select Uploads, Downloads, or Uploads and
Downloads.
5. Click the Save icon ( ) in the Edit column.
Your entry is added to the Transfer logging entries. By default, the status is disabled.
AxwaySecureTransport 5.2.1 SP4 Administrator Guide 155
3 Setup
Note To cancel an add operation, select Setup > Transfer Logging again.
Enable or disable transfer logging entries 1. Select Setup > Transfer Logging.
The Transfer Logging page is displayed.
2. Select the check box for each entry to modify.
3. Click Enable or Disable.
The icons in the User Class column change to indicate the status of the entries.
Edit transfer logging entries 1. Select Setup > Transfer Logging.
The Transfer Logging page is displayed.
2. Click the Edit icon ( ) in the Edit column for the entry to edit.
3. Make the required changes to the fields in the entry.
4. Click the Save icon ( ) in the Edit column.
Note To cancel an edit operation, select Setup > Transfer Logging again.
Delete transfer logging entries 1. Select Setup > Transfer Logging.
The Transfer Logging page is displayed.
2. Select the entries to delete.
3. Click Delete.
The entry is removed from the Transfer logging entries table.
Holiday schedule configurationYou can specify holiday dates for the SecureTransport system and use them later when creating scheduled transfers or tasks. Having set up official holiday dates, you can take one of the following actions when creating a scheduled task or transfer:
l Ignore the holiday schedule – this is the default option
l Take no action if the scheduled date happens to be a holiday specified in the holiday schedule
Keep the following items in mind when listing holiday dates:
AxwaySecureTransport 5.2.1 SP4 Administrator Guide 156

3 Setup
l The list of holidays applies to all of the server – it is not dependent on the time zones of users. The dates specified as scheduled are interpreted in local time by the server.
l The Holiday Schedule functionality does not allow for executing a scheduled task on the next working day if the specified date happens to be a holiday – when this occurs, the tasks are not executed.
l Weekend days are treated as holidays by default.
For information about creating scheduled transfers, see Scheduled downloads and tasks on page 327 and Set up a scheduled transfer task for a subscription on page 327.
1. Click Setup > Holiday Schedule.
The Holiday Schedule page is displayed.
2. Enter one or more holiday dates in the Holiday Schedule field.
Use the MM/dd/yyyy date format. If you enter more than one date, separate them with commas.
3. Click Update.
The days marked as holidays in the Holiday Schedule apply to all of the SecureTransport system and are applicable for all accounts and transfers.
Mail templatesUse the Mail Template Repository page to manage the email templates used in Human to Human and System to Human file transfers. SecureTransport uses the mail template selected on the Ad Hoc Settings page to create all notification emails to ad hoc file transfer recipients and senders. To select the mail template, see Ad hoc file transfer configuration on page 123.
SecureTransport sends the following email notifications to ad hoc file transfer recipients and senders:
l Account enrollment notification to the recipient
l Package delivery notification to the recipient and the sender
AxwaySecureTransport 5.2.1 SP4 Administrator Guide 157
3 Setup
l Account enrollment failure notification to the sender
l Package delivery failure notification to the sender
The mail template uses variables in style attributes to select the information that SecureTransport includes in each notification.
Mail template commands and variablesWhen you create a custom mail template, make sure to include the CSS in the <style> element in the default file, AdhocDefault.xhtml. You can download the default mail template, rename it, customize it, and upload your custom mail template.
Notification type variablesReference the following variables in the display property of the style attribute of an XHTML element in the mail template to select what information is included:
l $DISPLAY_ENROLLMENT – Enrollment notification
l $DISPLAY_DELIVERY – Delivery success or failure notification
l $DISPLAY_PKG_INFO – Display the message information including the sender, the recipient,
and the message text
l $DISPLAY_FAILURE_ENROLLMENT – Enrollment failed
l $DISPLAY_FAILURE_FORBIDDEN – Delivery was forbidden based on the delivery method
l $DISPLAY_FAILURE_GENERAL – General delivery failure
l $DISPLAY_FAILURE_RECIPIENT – Delivery to the recipient failed
l $DISPLAY_FAILURE_UNRESOLVED – The recipient could not be resolved
If the value of a variable is the empty string, the information is displayed. If the value is none, the information is not displayed.
Notification information variablesThe following variables contain information used in account enrollment notifications:
l $ENROLL_USERNAME – User name for enrollment
l $ENROLL_PASSWORD – Password for enrollment
l $ENROLL_LOGINURL – URL for enrollment using $ENROLL_USERNAME and $ENROLL_
PASSWORD
The following variables contain information used in package delivery failure notifications:
l $PKG_FAILURE_ENROLLMENT – Error message for an account enrollment failure
l $PKG_FAILURE_FORBIDDEN – Error message for a forbidden delivery failure
AxwaySecureTransport 5.2.1 SP4 Administrator Guide 158

3 Setup
l $PKG_FAILURE_GENERAL – Error message for a general delivery failure
l $PKG_FAILURE_RECIPIENT – Error message when the email cannot be delivered to a
recipient
l $PKG_FAILURE_UNRESOLVED – Error message when an account cannot be resolved
l $PKG_TO – Recipients from the TO list
l $PKG_CC – Recipients from the CC list
l $PKG_BODY – Text of the message
l $PKG_ATTACHMENTS – Names of the files attached to the message
ExampleThe following example from the default email template uses a variables to select a row of a table that includes information from another variable.
<tr style="display: $DISPLAY_DELIVERY">
<th>To</th>
<td style="vertical-align: top;">$PKG_DELIVERY_TO</td></tr>
Add a mail template 1. Click Setup > Mail Templates.
The Mail Template Repository page is displayed.
The default mail template is loaded in the repository initially.
2. Click Add Mail Template.
A line is added to the list.
3. On the new line, click Browse.
A file upload window is displayed.
4. Select a file template file to upload.
5. Click the Save icon ( ) in the Selected File column.
SecureTransport uploads the mail template file and adds it to the repository.
AxwaySecureTransport 5.2.1 SP4 Administrator Guide 159
3 Setup
Download a mail template 1. Right-click the template name in the Mail Template File column and select Save Link As or
Save Target As.
The web browser displays a dialog box.
2. Navigate to the folder and change the file name as needed.
3. Click Save.
The file is saved to the location you specify.
Upload an updated mail templateAfter you download a mail template and update it, you can upload the update to SecureTransport.
1. In the first column, select the mail templates for which you have updated files.
2. On each selected line, click Browse and selected the updated file.
The file name of the updated template must be the same as the file name of the existing template.
3. Click Upload.
SecureTransport uploads the updated files and replaces the existing files. Any references to the file templates are not changed.
Delete mail templates 1. In the first column, select the mail template files to delete.
2. Click Delete.
SecureTransport displays a confirmation dialog,
3. Click OK to delete the selected mail template files.
Miscellaneous configurationUse the miscellaneous configuration page to specify the administrator’s e-mail address, set usage monitor options, enable or disable reverse DNS lookups, set the session timeout limits, select a default HTML template, limit FTP login failures, set FTP and HTTP server startup password timeout configuration and shutdown options, and define password policy.
AxwaySecureTransport 5.2.1 SP4 Administrator Guide 160

3 Setup
Miscellaneous options
Set the administrator’s emailThe administrator e-mail is the email address for the system administrator of the FTP server. This address (if specified) is used in several server response messages and is available (%E macro) for run-time messages. Administrator email is available for the FTP server only.
1. Select Setup > Miscellaneous and view the Miscellaneous Options pane.
2. Enter an e-mail address in the Administrator Email field.
3. Click Apply.
Set usage monitor optionsThe Server Usage Monitor can be configured to monitor several different aspects of the server or can be turned off entirely.
Each of the monitoring options requires additional CPU resources per server process to compute and track the enabled measurements. To improve server performance, disable all unnecessary monitoring functions. The usage monitor is available for the FTP server only.
The possible option settings are as follows:
Options Description
Enable all monitoring functions. Enables all monitoring functions
Enable monitor - Measure bandwidth
Keeps track of the instantaneous transfer rate of each FTP server process running
Enable monitor - Display user commands
Keeps track of which FTP command a user is currently executing
AxwaySecureTransport 5.2.1 SP4 Administrator Guide 161

3 Setup
Options Description
Enable monitor - No bandwidth/commands
Displays process information per FTP server connection
Disable Disable all FTP and HTTP monitoring
1. Select Setup > Miscellaneous and view the Miscellaneous Options pane.
2. In the Usage Monitor Options field, select a monitoring option or disable monitoring.
3. Click Apply.
Enable or disable reverse DNS lookupsReverse DNS lookups are used to resolve an IP address into a fully qualified domain name. The domain name is used for logging purposes and for applying access rules that specify a host name (instead of an IP address).
In cases where the DNS server is under heavy load, this can significantly affect the startup time of an FTP or HTTP session. If the fully qualified domain name is not needed in the log files, it is best to turn off this feature.
Note This feature is available for the FTP and HTTP servers only.
1. Select Setup > Miscellaneous and view the Miscellaneous Options pane.
2. In the FTP Reverse DNS Lookups field, choose to enable or disable reverse DNS lookups.
3. In the HTTP Reverse DNS Lookups field, choose to enable or disable reverse DNS lookups.
4. Click Apply.
To disable reverse DNS lookups for the Administration Tool server, see DNS settings on page 493.
Set the session timeoutYou can set a session timeout for SecureTransport so that users are automatically logged out if they are inactive for the specified duration. SecureTransport always uses the session timeout configured on the SecureTransport Server, even when the client connects to a SecureTransport Edge.
1. Select Setup > Miscellaneous and view the Miscellaneous Options pane.
2. Enter the number of seconds in the Session Timeout field to specify the session timeout duration.
3. Click Apply.
AxwaySecureTransport 5.2.1 SP4 Administrator Guide 162
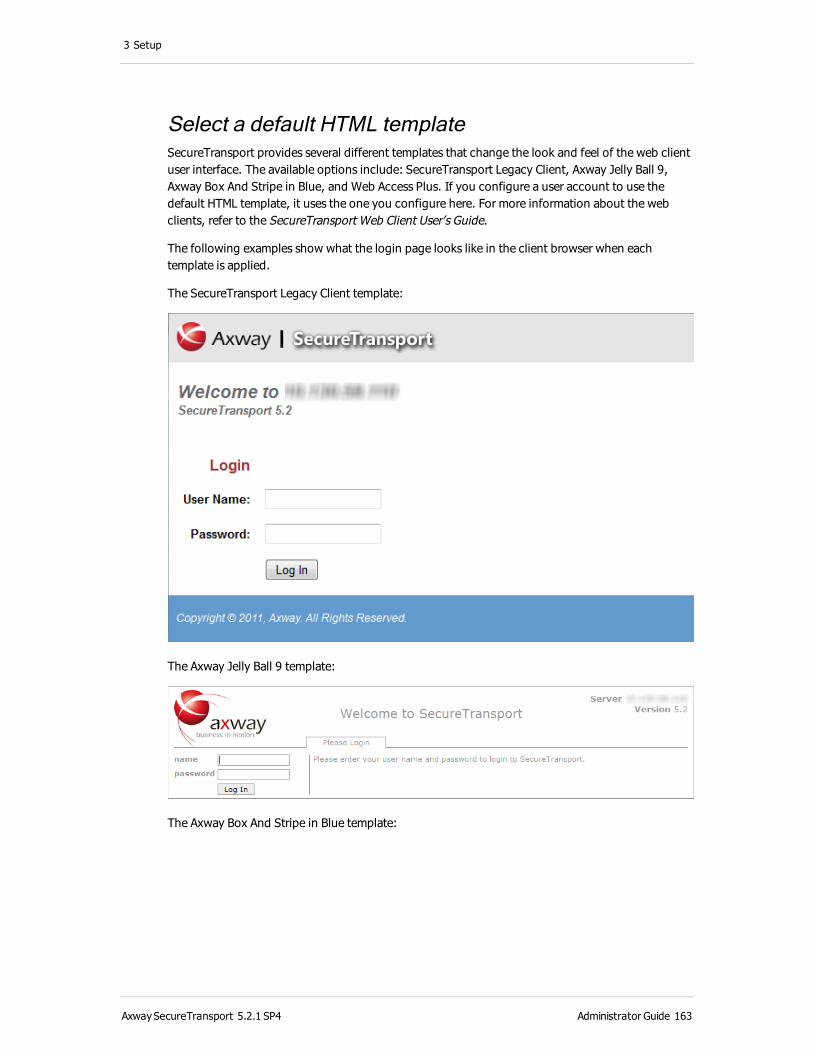
3 Setup
Select a default HTML templateSecureTransport provides several different templates that change the look and feel of the web client user interface. The available options include: SecureTransport Legacy Client, Axway Jelly Ball 9, Axway Box And Stripe in Blue, and Web Access Plus. If you configure a user account to use the default HTML template, it uses the one you configure here. For more information about the web clients, refer to the SecureTransport Web Client User’s Guide.
The following examples show what the login page looks like in the client browser when each template is applied.
The SecureTransport Legacy Client template:
The Axway Jelly Ball 9 template:
The Axway Box And Stripe in Blue template:
AxwaySecureTransport 5.2.1 SP4 Administrator Guide 163
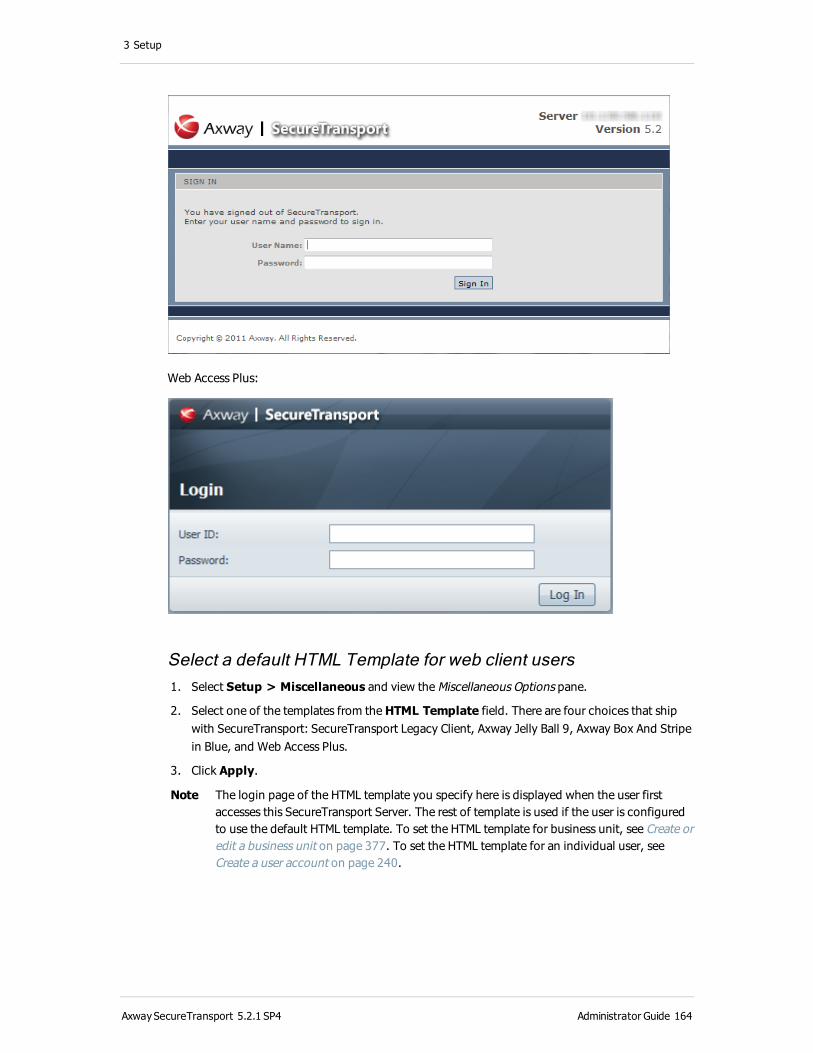
3 Setup
Web Access Plus:
Select a default HTML Template for web client users 1. Select Setup > Miscellaneous and view the Miscellaneous Options pane.
2. Select one of the templates from the HTML Template field. There are four choices that ship with SecureTransport: SecureTransport Legacy Client, Axway Jelly Ball 9, Axway Box And Stripe in Blue, and Web Access Plus.
3. Click Apply.
Note The login page of the HTML template you specify here is displayed when the user first accesses this SecureTransport Server. The rest of template is used if the user is configured to use the default HTML template. To set the HTML template for business unit, see Create or edit a business unit on page 377. To set the HTML template for an individual user, see Create a user account on page 240.
AxwaySecureTransport 5.2.1 SP4 Administrator Guide 164

3 Setup
Use the HTML templates in a new localeYou can adapt an HTML template to a different locale by copying the existing template files and editing them. You also need to create a file for each locale named skin.conf that contains the descriptive information for the HTML Template. The SecureTransport Legacy Client template resides in <FILEDRIVEHOME>/share/ftdocs/html/C. In SecureTransport, C is the default locale.
You need to create a locale folder for the files in the following location: <FILEDRIVEHOME>/share/ftdocs/html/skin/<SKIN_NAME>/<LOCALE>/ where <SKIN_NAME> is the name of the template you want to use and <LOCALE> is the name of the new locale.
Create a locale folder 1. Copy the files you want to modify from <FILEDRIVEHOME>/share/ftdocs/html/C.
The files for the default template are in the locale directory C. To use one of the other template styles, copy the files from <FILEDRIVEHOME>/share/ftdocs/html/skin/jb9 or
<FILEDRIVEHOME>/share/ftdocs/html/skin/sm6.
2. create a directory based on the new locale: <FILEDRIVEHOME>/share/ftdocs/html/skin/<SKIN_NAME>/<LOCALE>/ and
paste the copied files into the new directory.
Note If you only translate the templates, you can use an existing skin name when you create the new directory, just create a locale subdirectory. If you change the file content, use a new skin name. Do not overwrite the original HTML templates.
3. Create the file skin.conf using a text editor. The contents of skin.conf are:
description "<SkinTitle>"
icons-access "public"
where <SkinTitle> is the name of the HTML templates you are modifying. You can use any
name.
4. Select Operations > Server Configuration.
The Server Configuration page is displayed.
5. Search for the Admin.Locale parameter and change its value to the new locale.
6. Restart all servers in the cluster.
Modify the HTML Files 1. Edit the copied HTML files. You can translate or modify the files.
For additional information about editing the HTML pages and the default locale, see Customize a web client on page 77.
Note If you change the file content, use a new skin name. Do not overwrite the original HTML templates. create a <SKIN_NAME> directory and create a C subdirectory if
AxwaySecureTransport 5.2.1 SP4 Administrator Guide 165
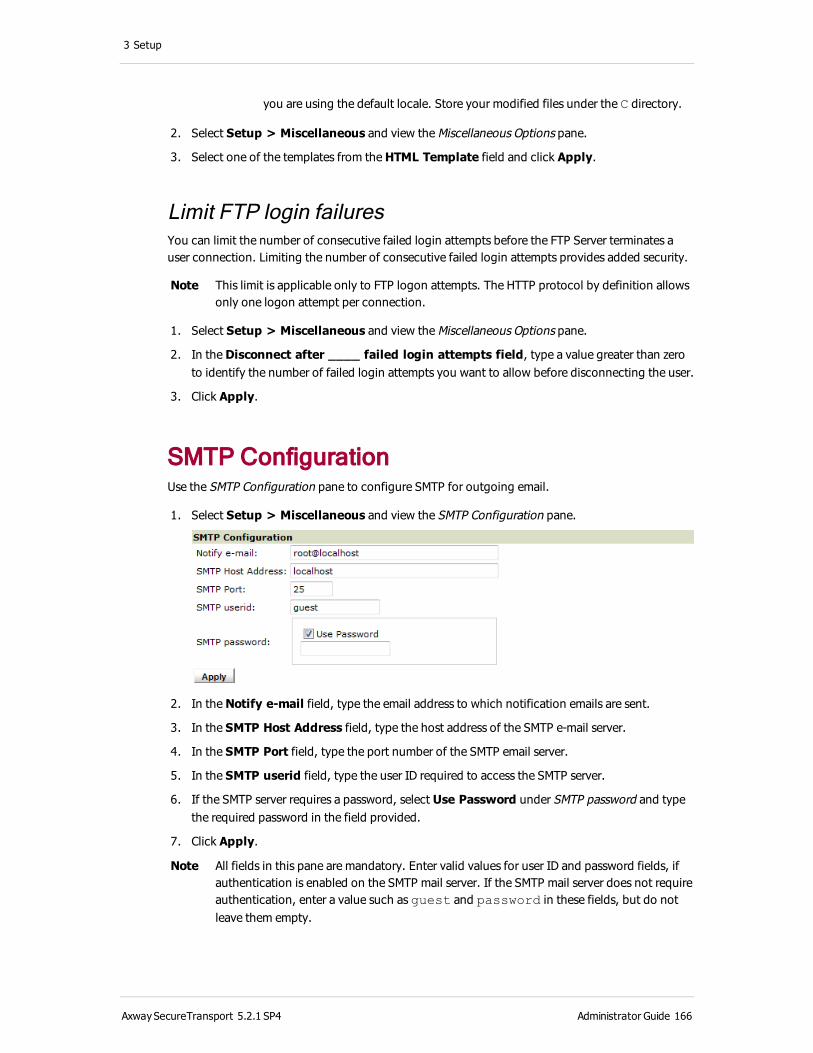
3 Setup
you are using the default locale. Store your modified files under the C directory.
2. Select Setup > Miscellaneous and view the Miscellaneous Options pane.
3. Select one of the templates from the HTML Template field and click Apply.
Limit FTP login failuresYou can limit the number of consecutive failed login attempts before the FTP Server terminates a user connection. Limiting the number of consecutive failed login attempts provides added security.
Note This limit is applicable only to FTP logon attempts. The HTTP protocol by definition allows only one logon attempt per connection.
1. Select Setup > Miscellaneous and view the Miscellaneous Options pane.
2. In the Disconnect after ____ failed login attempts field, type a value greater than zero to identify the number of failed login attempts you want to allow before disconnecting the user.
3. Click Apply.
SMTP ConfigurationUse the SMTP Configuration pane to configure SMTP for outgoing email.
1. Select Setup > Miscellaneous and view the SMTP Configuration pane.
2. In the Notify e-mail field, type the email address to which notification emails are sent.
3. In the SMTP Host Address field, type the host address of the SMTP e-mail server.
4. In the SMTP Port field, type the port number of the SMTP email server.
5. In the SMTP userid field, type the user ID required to access the SMTP server.
6. If the SMTP server requires a password, select Use Password under SMTP password and type the required password in the field provided.
7. Click Apply.
Note All fields in this pane are mandatory. Enter valid values for user ID and password fields, if authentication is enabled on the SMTP mail server. If the SMTP mail server does not require authentication, enter a value such as guest and password in these fields, but do not leave them empty.
AxwaySecureTransport 5.2.1 SP4 Administrator Guide 166
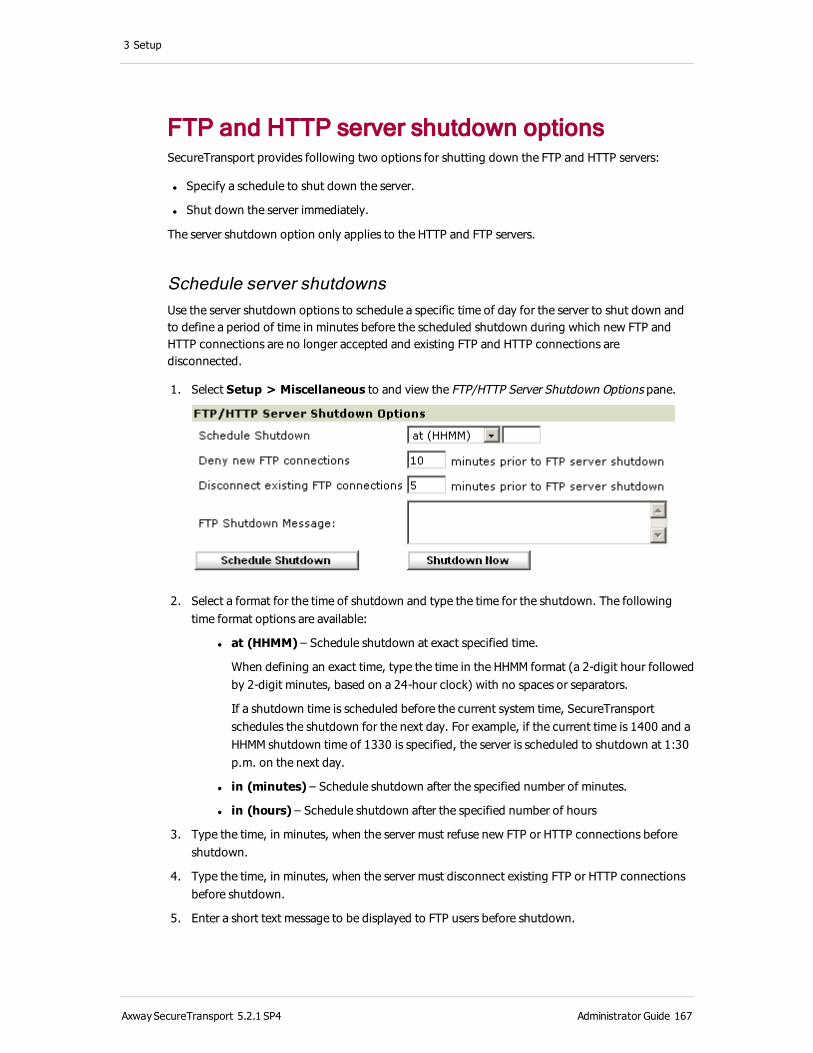
3 Setup
FTP and HTTP server shutdown optionsSecureTransport provides following two options for shutting down the FTP and HTTP servers:
l Specify a schedule to shut down the server.
l Shut down the server immediately.
The server shutdown option only applies to the HTTP and FTP servers.
Schedule server shutdownsUse the server shutdown options to schedule a specific time of day for the server to shut down and to define a period of time in minutes before the scheduled shutdown during which new FTP and HTTP connections are no longer accepted and existing FTP and HTTP connections are disconnected.
1. Select Setup > Miscellaneous to and view the FTP/HTTP Server Shutdown Options pane.
2. Select a format for the time of shutdown and type the time for the shutdown. The following time format options are available:
l at (HHMM) – Schedule shutdown at exact specified time.
When defining an exact time, type the time in the HHMM format (a 2-digit hour followed by 2-digit minutes, based on a 24-hour clock) with no spaces or separators.
If a shutdown time is scheduled before the current system time, SecureTransport schedules the shutdown for the next day. For example, if the current time is 1400 and a HHMM shutdown time of 1330 is specified, the server is scheduled to shutdown at 1:30 p.m. on the next day.
l in (minutes) – Schedule shutdown after the specified number of minutes.
l in (hours) – Schedule shutdown after the specified number of hours
3. Type the time, in minutes, when the server must refuse new FTP or HTTP connections before shutdown.
4. Type the time, in minutes, when the server must disconnect existing FTP or HTTP connections before shutdown.
5. Enter a short text message to be displayed to FTP users before shutdown.
AxwaySecureTransport 5.2.1 SP4 Administrator Guide 167
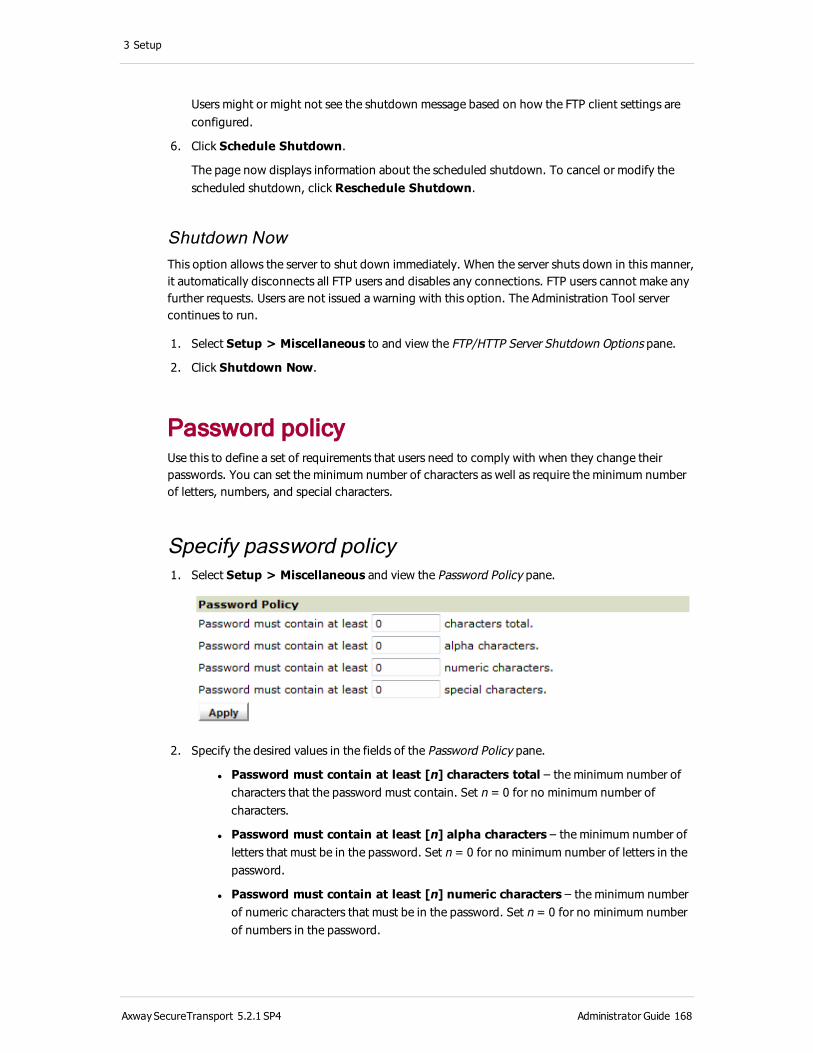
3 Setup
Users might or might not see the shutdown message based on how the FTP client settings are configured.
6. Click Schedule Shutdown.
The page now displays information about the scheduled shutdown. To cancel or modify the scheduled shutdown, click Reschedule Shutdown.
Shutdown NowThis option allows the server to shut down immediately. When the server shuts down in this manner, it automatically disconnects all FTP users and disables any connections. FTP users cannot make any further requests. Users are not issued a warning with this option. The Administration Tool server continues to run.
1. Select Setup > Miscellaneous to and view the FTP/HTTP Server Shutdown Options pane.
2. Click Shutdown Now.
Password policyUse this to define a set of requirements that users need to comply with when they change their passwords. You can set the minimum number of characters as well as require the minimum number of letters, numbers, and special characters.
Specify password policy 1. Select Setup > Miscellaneous and view the Password Policy pane.
2. Specify the desired values in the fields of the Password Policy pane.
l Password must contain at least [n] characters total – the minimum number of characters that the password must contain. Set n = 0 for no minimum number of characters.
l Password must contain at least [n] alpha characters – the minimum number of letters that must be in the password. Set n = 0 for no minimum number of letters in the password.
l Password must contain at least [n] numeric characters – the minimum number of numeric characters that must be in the password. Set n = 0 for no minimum number of numbers in the password.
AxwaySecureTransport 5.2.1 SP4 Administrator Guide 168
3 Setup
l Password must contain at least [n] special characters – the minimum number of special characters (anything other than letters or numeric characters) that must be in the password. Set n = 0 for no minimum number of special characters in the password.
3. Click Apply.
4. Restart the HTTP server on both the SecureTransport Server and the SecureTransport Edge.
If you are using a streaming setup and you change the password policy while a user is logged into SecureTransport, the old password policy is displayed in the Browser Client when a user tries to change the password.
Transaction Manager, protocol, and proxy server communication
SecureTransport uses a streaming protocol for communication between the protocol servers running on SecureTransport Edge and the Transaction Manager (TM) server running on SecureTransport Server. The streaming protocol abstracts all file transfer protocols and unifies and secures this central communication. When you deploy one or more SecureTransport Edge servers in a peripheral network (DMZ), the deployment is called streaming because no file transfer data is stored on the SecureTransport Edge server. The protocol servers translate the protocol they are serving to the streaming protocol but do not read or write files.
With a streaming deployment, the TM Server connects to the protocol servers on the configured SecureTransport Edge servers to establish the connections for the streaming protocol, so no process on a SecureTransport Edge ever makes a connection from the DMZ into the internal secure network. For more information, see SecureTransport Edge on page 20. (The TM server and protocol servers running on SecureTransport Server also use the streaming protocol internally.)
SecureTransport Edge provides a SOCKS5 proxy for server-initiated file transfers.
You configure the communication between the TM server and protocol servers and access to SOCKS5 and HTTP proxies by defining network zones. Each network zone on a SecureTransport Server can have one or more network zone nodes that define access either within the SecureTransport Server or between the SecureTransport Server and one or more SecureTransport Edge servers or HTTP or SOCKS5 proxy servers. The TM Server connects to all protocol servers configured in all network zones. In each AS2, FTP(S), HTTP(S), PeSIT, or SSH transfer site, you can select a network zone to specify which HTTP or SOCKS5 proxy SecureTransport uses for server-initiated transfers through that transfer site. SecureTransport selects a node from the network zone using a load-balancing policy when a server-initiated transfer uses the network zone.
Because you can specify multiple SecureTransport Edge addresses in a node and multiple nodes in a network zone, you can implement any required many-to-many communication between TM servers on SecureTransport Servers and protocol and SOCKS5 proxy servers on SecureTransport Edge servers.
On a SecureTransport Server, a special network zone named Private defines the ports used for internal communication between the TM Server and the protocol servers and the Administration Tool server running on the SecureTransport server.
AxwaySecureTransport 5.2.1 SP4 Administrator Guide 169
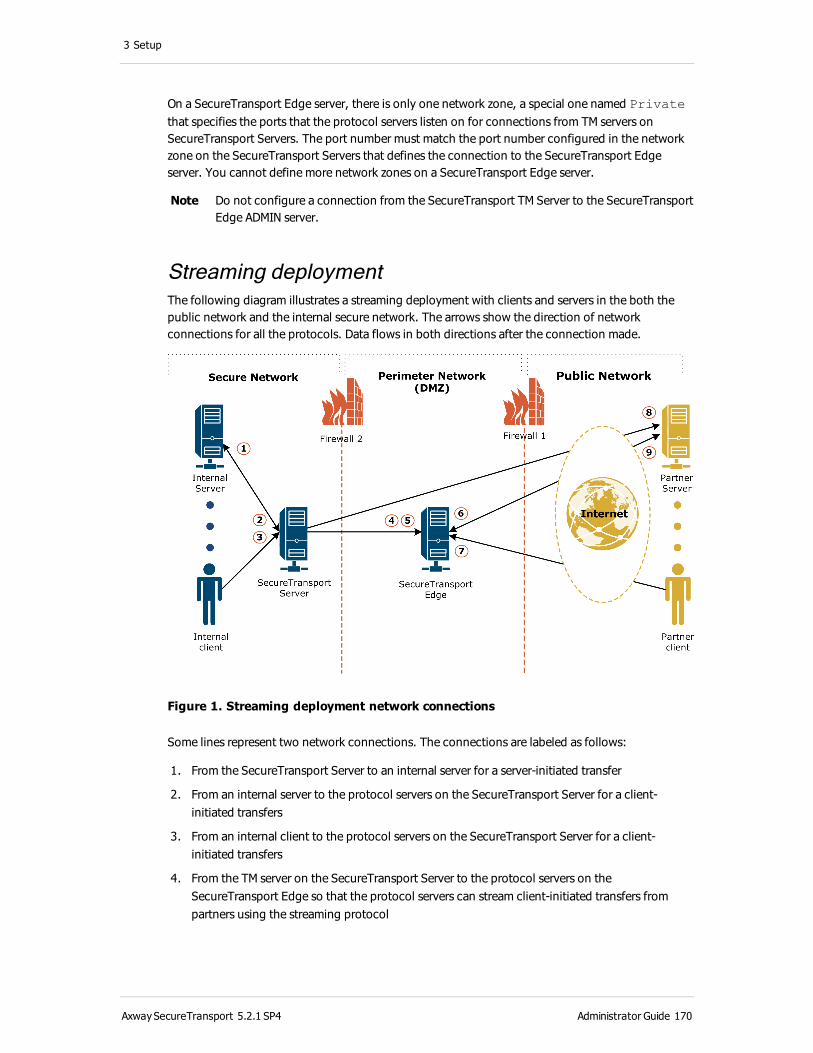
3 Setup
On a SecureTransport Edge server, there is only one network zone, a special one named Private that specifies the ports that the protocol servers listen on for connections from TM servers on SecureTransport Servers. The port number must match the port number configured in the network zone on the SecureTransport Servers that defines the connection to the SecureTransport Edge server. You cannot define more network zones on a SecureTransport Edge server.
Note Do not configure a connection from the SecureTransport TM Server to the SecureTransport Edge ADMIN server.
Streaming deploymentThe following diagram illustrates a streaming deployment with clients and servers in the both the public network and the internal secure network. The arrows show the direction of network connections for all the protocols. Data flows in both directions after the connection made.
Figure 1. Streaming deployment network connections
Some lines represent two network connections. The connections are labeled as follows:
1. From the SecureTransport Server to an internal server for a server-initiated transfer
2. From an internal server to the protocol servers on the SecureTransport Server for a client-initiated transfers
3. From an internal client to the protocol servers on the SecureTransport Server for a client-initiated transfers
4. From the TM server on the SecureTransport Server to the protocol servers on the SecureTransport Edge so that the protocol servers can stream client-initiated transfers from partners using the streaming protocol
AxwaySecureTransport 5.2.1 SP4 Administrator Guide 170
3 Setup
5. From the SecureTransport Server to the SOCKS5 proxy server on the SecureTransport Edge for server-initiated transfers
6. From a partner server to a protocol server on the SecureTransport Edge for a client-initiated transfer
7. From a partner client to a protocol server on the SecureTransport Edge for a client-initiated transfer
8. From the SecureTransport Server directly to a partner server for a server-initiated transfer
9. From the SOCKS5 proxy server on the SecureTransport Edge to a partner server for server-initiated transfers
The diagram does not illustrate the following network connections that you might need to configure depending on the requirements of your deployment:
l From the TM server to the protocol servers within the SecureTransport Server so that the protocol servers can serve client-initiated transfers from the secure network
l From the SecureTransport Server to a separate HTTP proxy server for server-initiated transfers
l From a separate HTTP proxy server to a partner server for server-initiated transfers
l From the TM server on the SecureTransport Server to the protocol servers and the SOCKS5 proxy server on a SecureTransport Edge in a less restrictive DMZ for internal clients and servers
l From the TM server on the SecureTransport Server to the protocol servers and the SOCKS5 proxy server on a SecureTransport Edge in a DMZ that has a VPN connection to a specific partner
Manage Transaction Manager, protocol, and proxy server communication
Specify ports for internal Transaction Manager server communicationsUse the Private network zone to specify the ports and certificates used for communication between the TM Server and the protocol servers and the Administration Tool server running on the SecureTransport Server. The Private network zone defines one node named Host with one address, localhost. For the Private network zone and internal Transaction Manager server communications to work correctly, localhost must resolve to the IP address of the system loopback device.
1. Select Setup > Network Zones.
The Network Zone List page is displayed.
AxwaySecureTransport 5.2.1 SP4 Administrator Guide 171

3 Setup
2. In the list, click Private.
The Edit Network Zone entry page is displayed.
3. In the Node List, click Host.
The Edit Network Zone node page is displayed.
AxwaySecureTransport 5.2.1 SP4 Administrator Guide 172
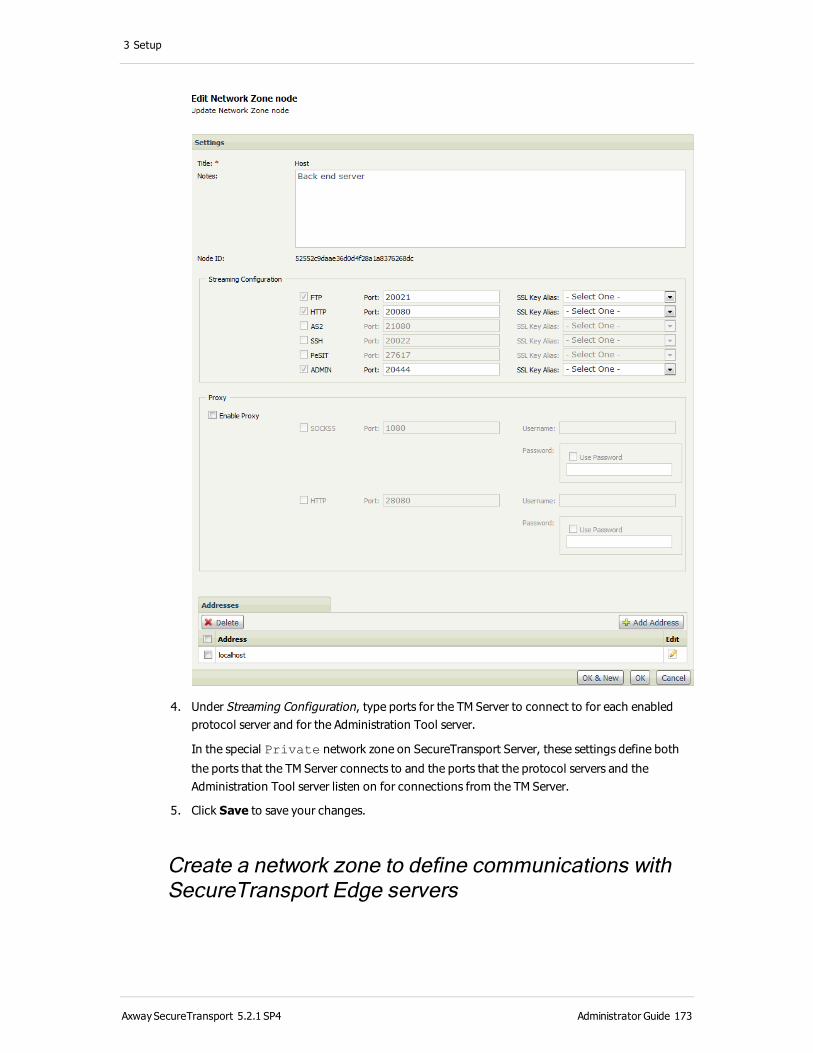
3 Setup
4. Under Streaming Configuration, type ports for the TM Server to connect to for each enabled protocol server and for the Administration Tool server.
In the special Private network zone on SecureTransport Server, these settings define both
the ports that the TM Server connects to and the ports that the protocol servers and the Administration Tool server listen on for connections from the TM Server.
5. Click Save to save your changes.
Create a network zone to define communications with SecureTransport Edge servers
AxwaySecureTransport 5.2.1 SP4 Administrator Guide 173
3 Setup
Each network zone can define the communications between the TM Server on a SecureTransport Server and one or more SecureTransport Edge servers. If different protocol servers run on different SecureTransport Edge servers, you can control which protocol servers on which SecureTransport Edge servers the TM Server connects to by specifying different protocol servers and different SecureTransport Edge servers in different nodes.
1. Select Setup > Network Zones.
The Network Zone List page is displayed.
2. Click New Network Zone.
The New Network Zone entry page is displayed.
3. In the Name field, type a name for the network zone. This name is only used in the Network Zone List page.
4. In the Description field, type a description of the network zone to help you understand it purpose and use.
5. In the Public URL Prefix field, type a prefix for the URLs displayed in notification emails send to ad hoc file transfer recipients.
If a user is assigned to a business unit that references a network zone, emails from that user use the prefix specified in that network zone. If a user is not assigned to a business unit, emails from that user use the prefix specified in the default network zone. See Set a default network zone on page 176.
6. If the SOCKS5 proxy is enabled in a network zone node in this network zone and DNS is not available on this SecureTransport Server, select Use the Edge DNS configuration to resolve transfer site host names and FQDNs using the DNS on the SecureTransport Edge so that SecureTransport can route transfers correctly.
7. Click New Node.
The New Network Zone Node page is displayed.
8. In the Title field, type a title for the node.
9. If this server is part of a DR deployment, select the value for Deployment Site. For more information, see Set up a disaster recovery cluster on page 202.
10. In the Notes field, type information to help you understand the purpose and use of the node.
11. Under Streaming Configuration, select the protocol servers that the TM Server connects to using this node of this network zone.
12. For each enabled protocol server, type the port for the TM Servers to connect to.
For each SecureTransport Edge server configured under Addresses, for a connection to be successful, the SecureTransport Edge server must allow connection from this SecureTransport Server, the Private network zone must specify the same port for the protocol server, and the
certificate must be trusted. See Specify allowed SecureTransport Servers on SecureTransport Edge on page 178 and Specify TM Server communication ports and IP address for protocol servers on SecureTransport Edge on page 176.
13. Under Addresses, click Add Address.
14. In the Address field, type the host name or IP address of a SecureTransport Edge server that runs the protocol servers configured for this network zone node.
AxwaySecureTransport 5.2.1 SP4 Administrator Guide 174
3 Setup
15. Repeat step 10 and 11 for each SecureTransport Edge server in this network zone node.
16. Click OK to save this node or OK & New to save this node and add another using steps 7 though 12.
17. Click Save to save the network zone.
SecureTransport save the network zone in the database.
Specify proxy setting in a network zoneUse network zones to specify how SecureTransport connects to a SOCKS5 proxy or an HTTP proxy for server-initiated file transfers. You can use the same network zone node to define streaming and proxy configuration or you can define only streaming or only proxy configuration in a node or network zone.
When you define an AS2, FTP(S), HTTP(S), PeSIT, or SSH transfer site, you can select a network zone to specify the proxy servers for transfer through that transfer site.
1. Select Setup > Network Zones.
The Network Zone List page is displayed.
2. Click a name in the list or click New Network Zone.
The Edit Network Zone entry page or the New Network Zone entry page is displayed.
3. For a new network node, type values in the Name, Description, and Public URL Prefix fields as needed.
4. Click a title in the Node List or click New Node.
The Edit Network Zone node or the New Network Zone node page is displayed.
5. For a new node, type values in the Title and Notes fields as needed.
6. Under Proxy, select Enable Proxy.
7. Select the proxies, SOCKS5 or HTTP, to configure in the node.
8. For each selected proxy:
a. Type the Port. The proxy server must listen for connections on this port. For the SOCKS5 proxy on SecureTransport Edge, configure the port for the proxy server on the Server Control page. See Manage the Proxy server on SecureTransport Edge on page 40. If you use a third-party proxy server, refer to its documentation to configure the port.
b. (Optional) If required by the proxy server, type a Username and, if also required, select User Password and type a Password. The SOCKS5 proxy on SecureTransport Edge does not use this authentication.
9. For a new node, add the address of the SecureTransport Edge servers that run the SOCKS5 proxies or the addresses of the other proxy servers. If you selected SOCKS5, you must use IPv4 addresses. SecureTransport Server selects the servers at these address sequentially (round-robin) when it uses this node for server-initialed transfer.
10. If DNS is not available on this SecureTransport Server, select Use the Edge DNS configuration to resolve transfer site host names and FQDNs using the DNS on the SecureTransport Edge so that SecureTransport can route transfers correctly.
AxwaySecureTransport 5.2.1 SP4 Administrator Guide 175
3 Setup
11. Click OK to save the new node or the changes to the node.
12. Click Save to save the network zone.
Set a default network zoneBusiness units can specify a network zone that defines the public URL for users in that business unit. For details, see Create or edit a business unit on page 377. AS2, FTP(S), HTTP(S), PeSIT, and SSH transfer sites can specify a network zone that defines the proxy for that site. For details, see and Transfer sites on page 274. In all cases, you can select Default in the business unit or transfer site.
The default network zone defines the public URL for users in business units where you selected Default and for users who are not in a business unit. The default network zone also defines the proxy for transfer sites where you selected Default. If a transfer site selects the default network zone and no default is defined, transfers from that site fail.
1. Select Setup > Network Zones.
The Network Zone List page is displayed.
2. Select one network zone in the list.
3. Click Change Default.
The selected network zone is marked as the default.
Specify TM Server communication ports and IP address for protocol servers on SecureTransport EdgeThe Private network zone is the only network zone defined on the SecureTransport Edge server. You cannot delete it or define more network zones.
Use the Private network zone to specify the ports and IP address that the protocol servers and the Administration Tool server listen on for connections from TM Servers. The Private network zone defines one node named Host.
1. Select Setup > Network Zones.
The Network Zone List page is displayed.
2. In the list, click Private.
The Edit Network Zone entry page is displayed.
3. In the Node List, click Host.
The Edit Network Zone Node page is displayed.
4. For each enabled protocol server, type the protocol server listens on for connections from TM Servers.
For a connection to be successful, the SecureTransport Edge server must allow connection from this SecureTransport Server, there must be a network zone on a SecureTransport Server with these same ports configured for the host name or IP address of this SecureTransport Edge
AxwaySecureTransport 5.2.1 SP4 Administrator Guide 176
3 Setup
server, and the certificate must be trusted on the SecureTransport Server. See Specify allowed SecureTransport Servers on SecureTransport Edge on page 178 and Create a network zone to define communications with SecureTransport Edge servers on page 173.
5. Under Addresses, Click the Edit icon ( ) for the localhost entry.
6. In the Address field, type the IP address of the interface that the servers listen on for connections from TM Servers.
7. Click the Save icon ( ).
8. Click OK to save your changes.
Secure the communication between the TM server and the protocol serversYou can use SSL to secure the communication between the TM server running on SecureTransport Server and the protocol servers running on SecureTransport Edge.
In a streaming deployment, the protocol servers on SecureTransport Edge have the role of server because the TM server on SecureTransport Server connects to them and the TM server on SecureTransport Server has the role of client because it connects to the protocol servers on SecureTransport Edge.
1. Generate or obtain the following certificates:
l The TM server client certificate with extendedKeyUsage = clientAuth and
keyUsage = digitalSignature
l The protocol servers server certificate with extendedKeyUsage = serverAuth
and keyUsage = digitalSignature, keyEncipherment
2. On SecureTransport Edge:
a. Import into the trusted CAs the public part of the certificate for the CA used to generate the TM server client certificate.
b. Add to the Streaming.TrustedAliases server configuration parameter the alias
you specified when you imported the certificate in step a.
c. Import into the local certificates the protocol servers server certificate.
d. In the Private network zone, open the Edit Network Node page and, to secure the SSL
communication for a protocol, select the SSL Key Alias you specified when you imported the certificate in step c.
3. On SecureTransport Server:
a. Import into the trusted CAs the public part of the certificate for the CA used to generate the protocol servers server certificate.
b. Add to the Streaming.TrustedAliases server configuration parameter the alias
you specified when you imported the certificate in step a.
c. Import into the local certificates theTM server client certificate.
AxwaySecureTransport 5.2.1 SP4 Administrator Guide 177

3 Setup
d. In the network zone you created to define communications with SecureTransport Edge servers, open the Edit Network Node page and, to secure the SSL communication for a protocol, select the SSL Key Alias you specified when you imported the certificate in step c.
Specify the SecureTransport Edge load-balancing policyWhen a client establishes a user session to a protocol server running on SecureTransport Edge, the load-balancing policy that SecureTransport Edge uses to allocate a Transaction Manager connection to that session is specified by the Streaming.LoadBalancingPolicy server configuration parameter. The valid values are:
l Round-Robin – SecureTransport Edge directs connections to connected Transaction
Managers in a circular sequence and allocates the least-used connection to that Transaction Manager to the session. Round-Robin is the default and recommended value.
l Random – SecureTransport Edge randomly selects a connection from all the connections to all
the connected Transaction Managers and allocates it to the session.
In both cases, the user session uses the allocated connection until it terminates.
Specify allowed SecureTransport Servers on SecureTransport EdgeThe SOCKS5 proxy on a SecureTransport Edge server accepts connections for server-initiated transfers from only the SecureTransport Servers listed. There is no HTTP proxy on the SecureTransport Edge server. The Transaction Manager on any SecureTransport Server can connect to a protocol server on any SecureTransport Edge server.
1. Select Setup > Allowed ST Servers.
A page is displayed with the server list.
2. Under ST Servers, list the host names or IP address of the SecureTransport Servers that are allowed to connect to this SecureTransport Edge server, either to a protocol server or to a SOCKS5 or HTTP proxy.
3. Click Update.
AxwaySecureTransport 5.2.1 SP4 Administrator Guide 178
4 Standard clustering
This chapter describes the concepts and procedures for deploying active-active and active-passive configurations of Axway SecureTransport using standard clustering. For information about large enterprise clustering, see Large enterprise clustering on page 193.
The standard cluster modelAs described in Clustering models on page 21, you can use a standard cluster to provide more capacity than a single SecureTransport Server or to provide a passive standby server to take over processing if an active server fails.
Standard clustering uses an embedded database in each node. This minimizes external dependencies and overhead and reduces the cost of clustering. SecureTransport synchronizes most configuration changes on all node in the cluster.
You can configure a standard cluster as an active/active or active/passive (1:1) cluster. You can deploy a maximum of four servers (nodes) in a standard active/active cluster. An active/passive cluster has one active server and one passive standby server.
One node of a standard cluster is distinguished as the primary server. The passive node of an active/passive cluster and the one to three other nodes of an active/active standard cluster are secondary servers. The Administration Tool login screen and banner indicate Primary Server or Secondary Server.
Active/active and active/passive clusteringSecureTransport supports two types of clustering: active/active and active/passive.
Active/active clustersIn an active/active cluster, SecureTransport balances the load between the primary and the secondary servers. All servers in the cluster are active and provide processing capacity. SecureTransport automatically replicates all event information collected by the primary server to the secondary servers. If the primary server fails, the cluster automatically switches control to the secondary server. An active/active cluster requires a third-party load-balancer.
The main advantages of an active/active cluster are:
l SecureTransport automatically balances the load between the different servers in the cluster.
l The secondary servers are active. This means that they can assume the load from a failed secondary server or take over from a failed primary server almost immediately.
AxwaySecureTransport 5.2.1 SP4 Administrator Guide 179
4 Standard clustering
However, to prevent performance problems, you must carefully monitor the load on an active/active cluster. An active/active cluster can suffer performance degradation when one server fails unless the remaining servers can handle the total workload for the cluster.
For more information, see Set up an active/active cluster on page 184.
Active/passive clustersAn active/passive cluster consists of one active server and one passive standby server with a third-party load-balancer to determine when failover is required. To prevent performance degradation if the primary server fails in an active/passive cluster, the servers should have identical hardware.
In an active/passive cluster, the primary server handles the event queue and processes events. While the primary server is active, the standby server remains in a passive state and does not process events. Depending on the server mode (set in the Cluster.mode server configuration parameter), an active/passive cluster has different features and advantages.
When the cluster mode is passive, the Transaction Manager runs on the secondary standby server and the event data is synchronized from the primary server. The primary server does not dispatch events to the Transaction Manager on the standby server, and the standby server does not process events. The Sentinel link data is also synchronized.
The advantages of an active/passive cluster with passive cluster mode are:
l The cluster includes a fully redundant secondary standby server to handle the cluster workload if the primary server fails.
l Failover from the primary server to the secondary standby server is automatic.
l On failover, the cluster reports the states of file transfers to Sentinel consistently so that Sentinel can link them, so this mode is required for an active/passive cluster that works with Sentinel.
With passive_legacy cluster mode, the Transaction Manager listeners start on the standby server. The event data is not synchronized from the primary server, but the Transaction Manager on the standby server might accept connections and process events. You must stop the Transaction Manager on the standby server or configure your load balancer so that it does not direct traffic to it when the primary server is up and running. The Sentinel link data is not synchronized. You must disable the Folder Monitor and scheduler on the standby server. If the primary server fails, you must perform a manual failover to make the standby server active.
The advantages an active/passive cluster with passive_legacy cluster mode are:
l The cluster includes a fully redundant secondary standby server to handle the cluster workload if the primary server fails.
l Because events and Sentinel link data are not sent to a standby server with passive_legacy
cluster mode, it can be in a different location for a disaster recovery (DR) if the network between the sites has required bandwidth and latency. For information on a more general DR solution using large enterprise clustering, see Passive disaster recovery on page 195.
For more information, see Set up an active/passive cluster on page 186.
AxwaySecureTransport 5.2.1 SP4 Administrator Guide 180
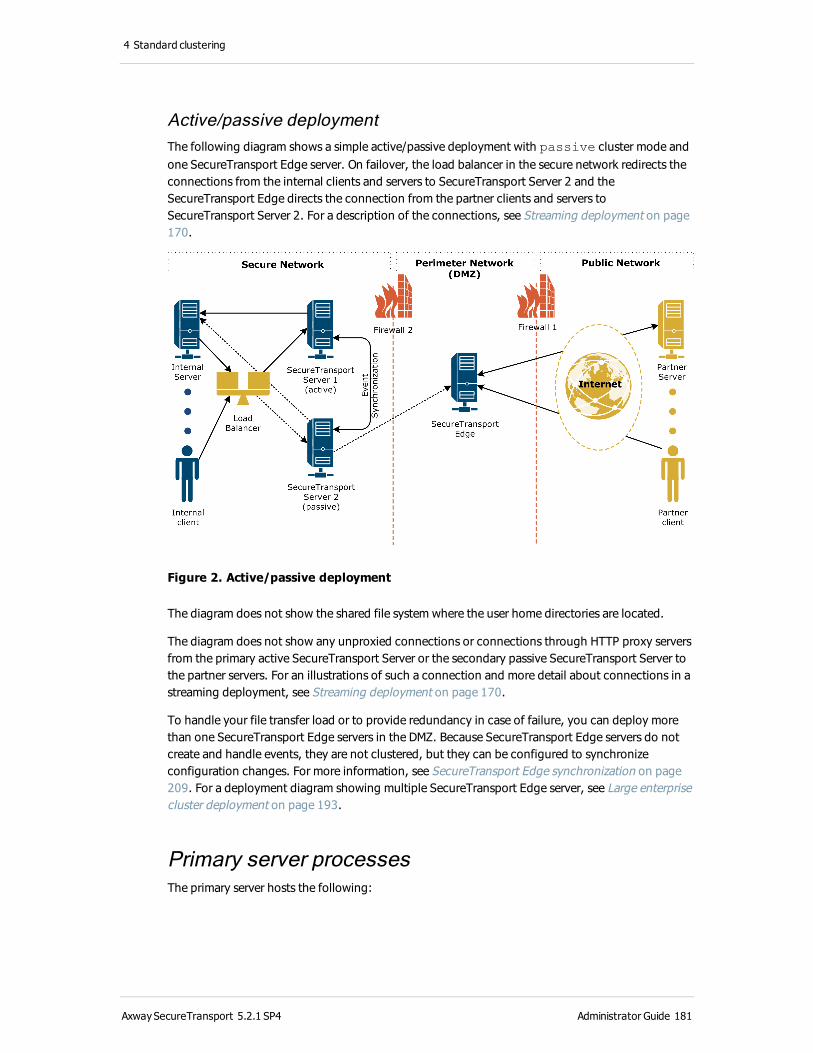
4 Standard clustering
Active/passive deploymentThe following diagram shows a simple active/passive deployment with passive cluster mode and one SecureTransport Edge server. On failover, the load balancer in the secure network redirects the connections from the internal clients and servers to SecureTransport Server 2 and the SecureTransport Edge directs the connection from the partner clients and servers to SecureTransport Server 2. For a description of the connections, see Streaming deployment on page 170.
Figure 2. Active/passive deployment
The diagram does not show the shared file system where the user home directories are located.
The diagram does not show any unproxied connections or connections through HTTP proxy servers from the primary active SecureTransport Server or the secondary passive SecureTransport Server to the partner servers. For an illustrations of such a connection and more detail about connections in a streaming deployment, see Streaming deployment on page 170.
To handle your file transfer load or to provide redundancy in case of failure, you can deploy more than one SecureTransport Edge servers in the DMZ. Because SecureTransport Edge servers do not create and handle events, they are not clustered, but they can be configured to synchronize configuration changes. For more information, see SecureTransport Edge synchronization on page 209. For a deployment diagram showing multiple SecureTransport Edge server, see Large enterprise cluster deployment on page 193.
Primary server processesThe primary server hosts the following:
AxwaySecureTransport 5.2.1 SP4 Administrator Guide 181
4 Standard clustering
l The Folder Monitor service
l A consolidated transfer log for the cluster, displayed on the Administration Tool File Tracking page
l The scheduler that initiates scheduled transfers and maintenance applications
The scheduler submits items to the internal event queue. The event queue distributes them among servers in the cluster.
FailoverWhen a server in an active/active cluster fails, two events occur. First, any internal load balancer for the cluster detects the server outage and fails over incoming requests to another server and all protocols servers on SecureTransport Edge servers detect the server outage and begin sending incoming requests to the TM Servers on the other SecureTransport Servers. In these case, the original client sessions are terminated and the clients must reestablish the sessions. Second, items in the event queue are reassigned from the failed server to other servers in the cluster.
When the primary server fails, one of the secondary servers is promoted to primary and the cluster continues processing messages. The secondary server promoted to primary status is determined by the order in which the server names are listed in the <FILEDRIVEHOME>/lib/admin/config/servers configuration file. The server listed just below the primary server in the file is considered the new primary server. When the cluster is synchronized, the state of the servers listed in the file are examined. If the first server in the servers list is online, it is reassigned as the new primary.
You can specify a timeout value that controls how long a secondary server waits before becoming the primary. For details, see Specify the cluster connection timeout on page 186.
When a secondary server is promoted to primary, it must run the scheduler and the Folder Monitor service. To enable this, the scheduler configuration on the primary server is replicated on all the other computers in the cluster.
When the active (primary) server fails in an active/passive cluster with cluster mode passive, the scheduler and the Folder Monitor service are already running on the passive standby server and failover is automatic. As with an active/active cluster, when the original active mode recovers and the cluster is synchronized, the servers return to their original roles.
When the active (primary) server fails in an active/passive cluster with cluster mode passive_legacy, you must fail over the cluster to the standby server manually. All queued events and Sentinel link data are lost. For details, see Manual failover on page 190.
SynchronizationYou can configure the cluster on any server. Most configuration changes are dynamically synchronized with the other servers immediately.
You must use the Administration Tool on the primary server to perform manual synchronization after you perform certain actions. Manual synchronization replaces the cluster configuration on the secondary servers with the configuration from the primary server. Data replicated during
AxwaySecureTransport 5.2.1 SP4 Administrator Guide 182
4 Standard clustering
synchronization includes database tables, cluster configuration data, and cluster management data. The Administration Tool server also performs manual synchronization each time it starts on the primary server. For more details, see Standard cluster synchronization on page 190.
Scheduled tasksIn an active/active cluster, the SecureTransport scheduler manages all scheduled tasks centrally from the primary server in the cluster. When schedules trigger events for scheduled tasks, one consolidated queue for all events is maintained across the cluster. This queue is shared and replicated across all the servers in the cluster so that they share the load by taking events one item at a time from the queue and performing the actual transfers or other tasks. If the primary server fails, the scheduler start on the server that becomes the new primary server.
In an active/passive cluster, the secondary standby server does not process events. If the server mode is passive, the standby server starts the scheduler and starts processing events when the primary server fails.
Consolidated log data representationThe transfer log allows file tracking information to be monitored across the entire cluster. To this end, the Administration Tool on the primary server in the cluster provides a consolidated view of the transfer data stored in the server logs.
If the primary server goes down, a secondary server is promoted to primary and starts maintaining the transfer log information. If the old primary server comes back up again and resumes its role as primary server for the cluster, the transfer log information from the temporary primary server is not migrated to the original primary server.
Services used for cluster managementSecureTransport implements the following services to manage and synchronize the cluster and the computers deployed in it:
Persistent Event Queue serviceThe Persistent Event Queue service is used to:
l Store certain events and replicates them to all cluster servers
l Synchronize the persistent events state to all cluster servers
l Perform recovery operations when a computer from the cluster fails during the processing of an event
AxwaySecureTransport 5.2.1 SP4 Administrator Guide 183
4 Standard clustering
l Spread the execution of following operations to all cluster servers:
o Add a new event to the persistent queue
o Delete an event from the persistent queue
o Mark an event as active
o Repair an event of a failed computer
Note The Event Queue service dispatches all events related to one remote PeSIT server to the same SecureTransport server in the cluster.
Account Manager serviceThe Account Manager distributes to all cluster servers dynamic information for the following events:
l Change of a user password.
l User login.
Transfer Status Manager serviceThe Transfer Status Manager service consolidates the transfer log on the primary server. All transfer log entries are stored in the database on the primary server.
Cluster configuration and setupMuch of SecureTransport configuration is stored in the database and synchronized dynamically to all servers in a cluster. Some configuration is stored in files that require manual synchronization. For more information, see the following topics:
l Requirements for synchronization on page 191
l Server configuration on page 64
l Synchronize the cluster from the primary server on page 192
Set up an active/active clusterYou can set up a cluster of SecureTransport Server computers. When you set up a cluster, a shared secret file is used by each of the servers in the cluster for authentication purposes across servers and for encryption. The secret file contains a randomly-generated data that secures the SecureTransport cookies exchanged during server administration. SecureTransport generates the shared secret file as part of the installation process. Refer to the SecureTransport Installation Guide for more information.
Note When you install SecureTransport on your secondary computers, you have an opportunity to import the secret file from the primary server. You can only import the secret file on a secondary computer during the installation process.
AxwaySecureTransport 5.2.1 SP4 Administrator Guide 184
4 Standard clustering
To set up an active/passive cluster, see Set up an active/passive cluster on page 186.
1. Make sure that the host names and IP addresses of all servers are in the host files of all servers. Use the nslookup command to verify that the host names of all servers resolve on all hosts.
2. Select the computer that is to serve as the primary server.
3. Make sure that the secret file of the primary server is installed on all secondary computers.
4. Set up the secondary servers as independent installations. Add licenses for all servers. For instructions, refer to the SecureTransport Installation Guide or see Server licenses on page 151.
5. Generate an internal CA on each server. For instructions, refer to the SecureTransport Installation Guide or see Generate an internal CA on page 98. Synchronization will copy the new CAs to all servers in the cluster.
6. Exchange CA certificates between all servers in the cluster. For details, refer to the procedures for exporting and importing SecureTransport Server CA certificates in the SecureTransport Installation Guide or in Manage local certificates and certificate signing requests on page 88.
7. Make sure that Transaction Manager (TM) servers are stopped on all computers.
8. On the primary and all secondary servers, list the servers in the <FILEDRIVEHOME>/lib/admin/config/servers configuration file. List the primary
server first and continue with the secondary servers in the order you want them promoted to primary server in the event of failover.
Edit the file and add a line of following form for each server in the cluster:
host.example.com https://host.example.com:444
where:
l host.example.com is the FQDN or IP address of the computer
l https://host.example.com:444 is the URL of the Administration Tool on that
computer
and the two fields are separated by a tab character.
Note The <FILEDRIVEHOME>/lib/admin/config/servers file must be the same on all computer in your cluster. You can create it on one server and copy it to the others.
9. On the primary server, generate a local certificate for encrypting cluster communications. For instructions, see Generate a self-issued server certificate on page 89.
10. On the primary server, export the certificate in .p12 format protected with a password. For
instructions, see Export a local certificate on page 91.
11. Import the certificate on each secondary server. For instructions, see Import a local certificate on page 92.
12. On the primary and all secondary servers, configure encryption for cluster communications. On the Server Configuration page, change the value of the Cluster.Crypto.Alias server
configuration parameter to the alias of the certificate.
13. On the primary server and all secondary servers, activate the cluster. On the Server Configuration page, change the value of the Cluster.mode parameter to active.
AxwaySecureTransport 5.2.1 SP4 Administrator Guide 185

4 Standard clustering
14. Start the TM server on the primary server. Start the TM server on all other servers in the cluster. For instructions, see Start and stop servers on page 34.
15. Synchronize the secondary servers manually from the Administration Tool of the primary server. For instructions, see Synchronize the cluster from the primary server on page 192.
During cluster operation, most configuration changes are synchronized dynamically. For more information, see Synchronization on page 182.
Specify the cluster connection timeoutYou can specify a timeout value that determines how long a secondary server waits before declaring itself the primary server. This is important in cases where the primary server is heavily loaded and takes an extended period of time to respond to a secondary computer.
l On the Server Configuration page of the primary server, change the value of the Cluster.connectionTimeout parameter to the value required in milliseconds. The
default value is 60000.
Configure servers in a cluster to trust a certificateIn a cluster environment, the CA that issued the certificate must be trusted by all servers in the cluster. Refer to the procedure below. The self-signed certificates used to sign the server certificates during the installation of the servers also need to be configured across the servers. If the signing certificates for the SecureTransport servers are issued by different CAs, configure each server with the root CA certificate of that CA.
1. On primary server, export the CA certificate to a local file using the Trusted CAs page.
2. Copy the certificate file with the CA certificate from the primary server to the secondary server and import the certificate using the Trusted CAs page.
3. On secondary server, export the CA certificate to a local file using the Trusted CAs page.
4. Copy the certificate file with the CA certificate from the secondary server to the primary server and import the certificate using the Trusted CAs page.
5. Bounce both servers. For instructions, see Limit FTP login failures on page 166.
Set up an active/passive clusterWhen you change the cluster settings to be active/passive, the secondary standby server stops processing events. For details, see Active/passive clusters on page 180.
1. Set up a two-server cluster using the instructions in Set up an active/active cluster on page 184.
2. Stop the TM server on both servers in the cluster.
AxwaySecureTransport 5.2.1 SP4 Administrator Guide 186
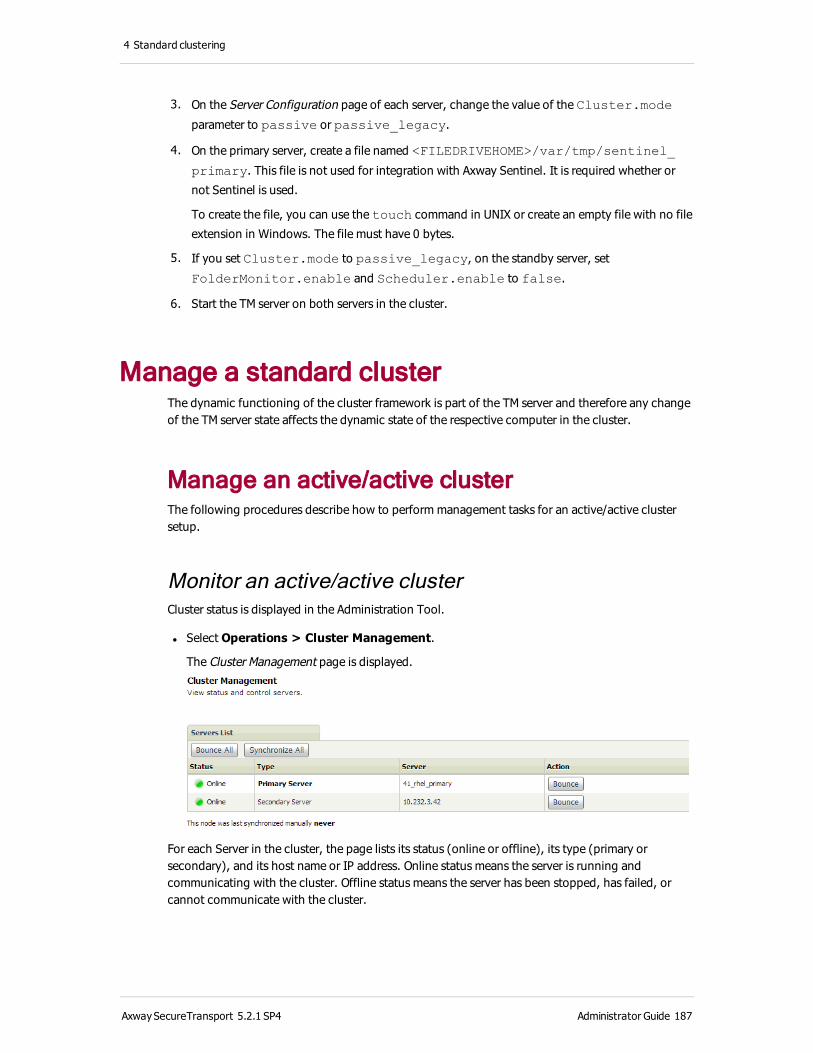
4 Standard clustering
3. On the Server Configuration page of each server, change the value of the Cluster.mode
parameter to passive or passive_legacy.
4. On the primary server, create a file named <FILEDRIVEHOME>/var/tmp/sentinel_
primary. This file is not used for integration with Axway Sentinel. It is required whether or
not Sentinel is used.
To create the file, you can use the touch command in UNIX or create an empty file with no file
extension in Windows. The file must have 0 bytes.
5. If you set Cluster.mode to passive_legacy, on the standby server, set
FolderMonitor.enable and Scheduler.enable to false.
6. Start the TM server on both servers in the cluster.
Manage a standard clusterThe dynamic functioning of the cluster framework is part of the TM server and therefore any change of the TM server state affects the dynamic state of the respective computer in the cluster.
Manage an active/active clusterThe following procedures describe how to perform management tasks for an active/active cluster setup.
Monitor an active/active clusterCluster status is displayed in the Administration Tool.
l Select Operations > Cluster Management.
The Cluster Management page is displayed.
For each Server in the cluster, the page lists its status (online or offline), its type (primary or secondary), and its host name or IP address. Online status means the server is running and communicating with the cluster. Offline status means the server has been stopped, has failed, or cannot communicate with the cluster.
AxwaySecureTransport 5.2.1 SP4 Administrator Guide 187
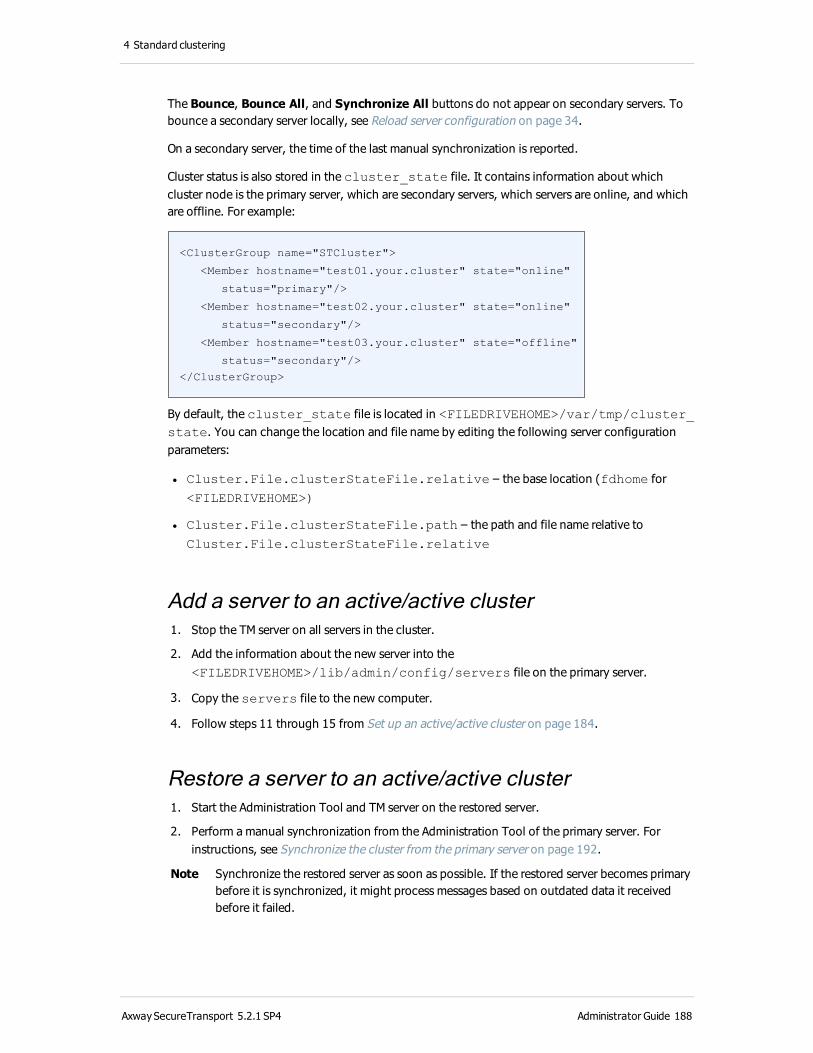
4 Standard clustering
The Bounce, Bounce All, and Synchronize All buttons do not appear on secondary servers. To bounce a secondary server locally, see Reload server configuration on page 34.
On a secondary server, the time of the last manual synchronization is reported.
Cluster status is also stored in the cluster_state file. It contains information about which cluster node is the primary server, which are secondary servers, which servers are online, and which are offline. For example:
<ClusterGroup name="STCluster">
<Member hostname="test01.your.cluster" state="online"
status="primary"/>
<Member hostname="test02.your.cluster" state="online"
status="secondary"/>
<Member hostname="test03.your.cluster" state="offline"
status="secondary"/>
</ClusterGroup>
By default, the cluster_state file is located in <FILEDRIVEHOME>/var/tmp/cluster_state. You can change the location and file name by editing the following server configuration parameters:
l Cluster.File.clusterStateFile.relative – the base location (fdhome for
<FILEDRIVEHOME>)
l Cluster.File.clusterStateFile.path – the path and file name relative to
Cluster.File.clusterStateFile.relative
Add a server to an active/active cluster 1. Stop the TM server on all servers in the cluster.
2. Add the information about the new server into the <FILEDRIVEHOME>/lib/admin/config/servers file on the primary server.
3. Copy the servers file to the new computer.
4. Follow steps 11 through 15 from Set up an active/active cluster on page 184.
Restore a server to an active/active cluster 1. Start the Administration Tool and TM server on the restored server.
2. Perform a manual synchronization from the Administration Tool of the primary server. For instructions, see Synchronize the cluster from the primary server on page 192.
Note Synchronize the restored server as soon as possible. If the restored server becomes primary before it is synchronized, it might process messages based on outdated data it received before it failed.
AxwaySecureTransport 5.2.1 SP4 Administrator Guide 188

4 Standard clustering
Remove a server from an active/active clusterWhen you remove a server from an active/active cluster, you can configure it as a stand-alone server.
1. On each of the nodes in t he cluster, stop the TM server.
2. On the node you are removing from the cluster:
a. Open the <FILEDRIVEHOME>/lib/admin/config/servers file and remove the
lines of information about the servers in the cluster.
b. On the Server Configuration page, set the Cluster.mode parameter to disabled.
3. On each of the remaining nodes in the cluster, open the <FILEDRIVEHOME>/lib/admin/config/servers file and remove the line of
information about the server you are removing from the cluster.
4. On each of the remaining nodes in the cluster, start the TM server.
5. On the primary server, perform a manual synchronization from the Administration Tool. For instructions, see Synchronize the cluster from the primary server on page 192.
Manage an active/passive clusterThe following procedures describe how to perform management tasks for an active/passive cluster setup.
Note A cluster with cluster mode passive_legacy does not monitor the state of each server in the cluster. However, if you attempt to synchronize all the servers in the cluster, and no errors occur, it indicates that both servers in the cluster are up.
Restore a server to an active/passive cluster 1. Start the Administration Tool server and the TM server on the restored computer.
2. On the primary server, perform a manual synchronization from the Administration Tool. For instructions, see Synchronize the cluster from the primary server on page 192.
Note It is recommended that you synchronize the restored computer as soon as possible. If the restored computer becomes primary before it is synchronized, it might process messages based on outdated data it received before it failed.
Remove a server from an active/passive clusterWhen you remove a server from an active/passive cluster, the result is two stand-alone servers.
1. Stop the TM server on both servers in the cluster.
2. On each servers, open the <FILEDRIVEHOME>/lib/admin/config/servers file and
remove the lines of information about the servers in the cluster.
AxwaySecureTransport 5.2.1 SP4 Administrator Guide 189

4 Standard clustering
3. On each server, set Cluster.mode to disabled.
4. If the cluster mode was passive_legacy, on the previous standby server, set
FolderMonitor.enable and Scheduler.enable to true.
5. Restart the TM server on both servers.
Manual failoverWhen the primary server fails in an active/passive cluster with cluster mode set to passive_legacy, you must perform a manual failover on the passive standby server:
1. Create a file named <FILEDRIVEHOME>/var/tmp/sentinel_primary.
To create the file, you can use the touch command in UNIX or create an empty file with no file
extension in Windows. The file must have 0 bytes.
2. On the Server Configuration page, set both FolderMonitor.enable and
Scheduler.enable to true.
3. On the Server Control page, start the TM Server.
Standard cluster synchronizationYou can configure the cluster on any server. Most configuration changes are synchronized with the other servers immediately.
When needed, you must propagate configuration data from the primary server to secondary servers across a cluster through manual synchronization. Use the Administration Tool on the primary server to perform synchronization.
You must perform manual synchronization after you:
l Upgrade SecureTransport
l Restart the whole cluster
l Restore a failed primary server
l Restart the Administration Tool server on a secondary server, if you made changes using the Administration Tool on the primary server while it was down
Manual synchronization replaces the information on the secondary servers with the configuration from the primary server. The Administration Tool server also performs manual synchronization each time it starts on the primary server.
You cannot use manual synchronization to data move information from the primary server to selected secondary servers.
A full synchronization may take a long time to complete and during the synchronization process, all dynamic updates are stopped, so make sure that you perform the synchronization when your system is not under heavy load.
AxwaySecureTransport 5.2.1 SP4 Administrator Guide 190
4 Standard clustering
When you create an application or account, or change the keystore password on the primary server, like most configuration information, the new application, account settings, or keystore password is copied to the secondary servers using dynamic synchronization when you save the settings. However, the audit log entry for the application, keystore password, or account creation is not copied from the primary to the secondary servers.
The directories for accounts that are synchronized manually use the UID and GID specified within the account settings on the secondary servers when the parent directory of the account exists only on the primary server in the cluster.
Note When synchronizing an application, an error message is returned indicating that the application was not copied if the secondary servers do not already have the application type the application is based on. Clicking the Synchronize button copies the application types from the primary server to the secondary servers, along with the application instances created.
Servers that are online, but not fully synchronized, are updated with new account and application information without having to perform a manual synchronization. You must still perform a full synchronization to start the TM server on a server that was previously down, even though the account and application information might be current.
Requirements for synchronizationDynamic and manual cluster synchronization requires the following:
l The SecureTransport administrator account names must be the same on all servers.
l The SecureTransport installation path must be the same on all servers.
l The secret file must be the same on all servers.
l The certificate for encrypting cluster communications specified in the Cluster.Crypto.Alias server configuration parameter must be the same on all servers.
l The internal CAs on all nodes must be trusted by all other nodes. Optionally, you can import the same internal CA on all nodes.
l All the SecureTransport server certificates must be issued by a common CA.
l Each server must be hosted on a different computer or virtual machine.
l All the servers in an active/active cluster must be in the same LAN.
l The two servers in an active/passive cluster with cluster mode passive_legacy can be in
different locations, but they must be in the same low latency network.
l All servers in a cluster must have their clocks set to the same time.
l The TM Server must be running on all servers.
l All database settings must be identical on all the servers.
What information is synchronizedThe following types of information are synchronized:
AxwaySecureTransport 5.2.1 SP4 Administrator Guide 191

4 Standard clustering
l All configuration files listed in the <FILEDRIVEHOME>/conf/sync.conf file
l All database tables listed in the <FILEDRIVEHOME>/conf/sync_tables.conf file
l All server configuration parameters that are not local to the server
The files listed in sync.excl are not copied from the primary to the secondary server.
Synchronize the cluster from the primary serverUse the Administration Tool on the primary server to synchronize the SecureTransport servers in a standard cluster.
Note The upper right corner of the Administration Tool shows whether the server on which it is running is a primary or secondary server.
1. Select Operations > Cluster Management.
The Cluster Management page is displayed.
2. Click Synchronize All.
When synchronization completes, the page displays the status of the operation and links to the secondary server Administration Tools.
AxwaySecureTransport 5.2.1 SP4 Administrator Guide 192
5 Large enterprise clustering
This chapter describes the concepts and procedures for deploying active-active clusters and clusters with passive disaster recover (DR) of Axway SecureTransport using large enterprise clustering. For information about standard clustering, see Standard clustering on page 179.
The large enterprise cluster modelAs described in Clustering models on page 21, the managed file transfer workload of a large enterprise can exceed the capacity of standard clustering. Also, an enterprise might prefer to use an external database to allow their DBAs additional tuning of the underlying database. In either of these cases, you can use Axway SecureTransport 5.2.1 SP4 with the Large Enterprise Clustering option to implement at a single site a cluster that provides the capacity to handle the file transfer workload required by your organization. With a large enterprise cluster, an external database and a high-performance cache-management layer significantly improve efficiency and increase potential scale. This allows up to 20 nodes in an active/active cluster. The Large Enterprise Clustering option requires your organization to provide and maintain a Microsoft SQL Server database or an Oracle database.
A large enterprise cluster is efficient and flexible. All tasks, including scheduled work, are distributed across the cluster. You can add and remove servers as needed up to the maximum allowed by your SecureTransport features license. You can also control how the workload is directed to the servers in the cluster, for example, based on task type.
In a large enterprise cluster, all servers are active, so there are no standby servers to replace an active server that fails. However, because the components that direct and schedule tasks are distributed across the clustered servers, the cluster implements failover by continuing to process its workload with reduced capacity when a server fails. For increased availability, you can remove another potential single point of failure by implementing a database cluster for the shared database.
Also, with the Large Enterprise Clustering option, you can implement an active/active cluster with a passive Disaster Recovery (DR) site. For this, you must provide a properly distributed and replicated database and file storage. To enable your implementation of passive DR, the primary production active/active cluster can notify an external mechanism to trigger failover automatically when the number of active nodes in the cluster falls below a threshold.
Large enterprise cluster deploymentA large enterprise cluster distributes the workload among a collection of networked SecureTransport Servers, all of which are active. All servers in a large enterprise cluster must be on the same low latency network.
AxwaySecureTransport 5.2.1 SP4 Administrator Guide 193

5 Large enterprise clustering
The following diagram illustrates a possible deployment architecture for a large enterprise cluster that serves partners who access it using the Internet. The arrows show the direction of network connections for all the protocols. Data flows in both directions after the connection made.
Figure 3. Large enterprise cluster
The diagram does not illustrate the event synchronization among the SecureTransport Servers or any unproxied connections or connections through HTTP proxy servers from the SecureTransport Servers to the partner servers. For an illustration of an unproxied connection and more detail about connections in a streaming deployment and configuration for internal clients and servers, see Streaming deployment on page 170.
Deploy the number of SecureTransport Servers and SecureTransport Edge servers required for your file transfer workload. The connections from the TM Servers on the SecureTransport Servers to the protocol and SOCKS5 proxy servers on the SecureTransport Edge servers is many-to-many, so you can design your deployment with consistent or specialized configuration. For more information, see Transaction Manager, protocol, and proxy server communication on page 169. Because SecureTransport Edge servers do not create and handle events, they are not clustered, but they can be configured to synchronize configuration changes. For more information, see SecureTransport Edge synchronization on page 209.
ComponentsThis example deployment architecture includes the following components:
l SecureTransport Servers – A large enterprise cluster has two or more SecureTransport Servers. Each SecureTransport Server has an installation directory on its local file system. All the installation directories must have the same path. You can also deploy SecureTransport with the LEC option as a single Server when you require an external database.
AxwaySecureTransport 5.2.1 SP4 Administrator Guide 194
5 Large enterprise clustering
l Shared external database – The SecureTransport Servers share an external database that they use to implement the cluster. The shared database stores all the shared (cluster-wide) configuration data and much of the local (individual) configuration data for the servers.
l Shared file system – The SecureTransport Servers share a file system on external storage for working directories and files, for example, using a shared disk file system on a storage area network (SAN) or using network-attached storage (NAS). Because all servers in a cluster share many configuration definitions that include references to directories, such as accounts, the shared file system hosts those directories.
l SecureTransport Edge servers – If a large enterprise cluster provides service to systems in a public or external unsecured network, it usually includes SecureTransport Edge servers. A cluster deployment usually includes one SecureTransport Edge for each SecureTransport Server, but this can vary depending on the characteristics of the workload. The SecureTransport Edge servers are not clustered, but their configuration can be synchronized.
l Firewalls – The firewalls implement the perimeter network required to serve client systems in a public or external network.
l Load balancer – In the large enterprise cluster deployment diagram, the load balancer implements workload distribution by distributing the incoming requests from the external clients and servers among the SecureTransport Edge gateways. The specific load balancing method depends on the characteristics of your workload and cluster deployment.
Workload distributionEvent distribution in a SecureTransport large enterprise cluster is handled by a distributed event processor and a distributed scheduler. As long as one SecureTransport Server is running, incoming and scheduled tasks are assigned.
You can configure the event processor to distribute events based on their attributes, however the event processor assigns all events related to one remote PeSIT server to the same SecureTransport server. Event assignment options are:
l Events can be assigned to a server with required functionality. For example, you can direct PGP encryption and decryption events to a server running on a computer with greater numeric processing power than others in the cluster.
l Events associated with an particular account can be assigned to the same server. This can improve the performance of the distributed object cache by caching the object that represents the account and related object where they are used.
Passive disaster recoveryIf Axway SecureTransport provides an essential function in your organization, it is likely to require a business continuity plan. To assure business continuity, you can deploy your Axway SecureTransport 5.2.1 SP4 large enterprise cluster with passive disaster recovery (DR). The following diagram illustrates a recommended deployment architecture for a large enterprise cluster with passive disaster recovery. The arrows show the direction of network connections for all the protocols. Data flows in both directions after the connection made.
AxwaySecureTransport 5.2.1 SP4 Administrator Guide 195

5 Large enterprise clustering
Figure 4. Large enterprise cluster with passive disaster recovery
The diagram does not illustrate the event synchronization among the SecureTransport Servers in one site or any unproxied connections or connections through HTTP proxy servers from the SecureTransport Servers to the partner servers. For simplicity, the diagram shows only one connection from a SOCKS5 proxy on a SecureTransport Edge to a partner server. The SOCKS5 proxies on all the SecureTransport Edge servers can connect to the partner servers through the firewalls as needed. For an illustration of an unproxied connection and more detail about connections in a streaming deployment and configuration for internal clients and servers, see Streaming deployment on page 170.
AxwaySecureTransport 5.2.1 SP4 Administrator Guide 196
5 Large enterprise clustering
This deployment architecture uses a redundant large enterprise cluster and SecureTransport Edge servers at a separate site to provide passive DR. The DR cluster must provide the functionality of the production cluster with the same number or fewer servers than the production cluster. The SecureTransport Edge servers must also provide the functionality of the production site with the same number or fewer servers than the production site. All the servers must run on the same type of operating systems with the same installation directory, secret file, and configuration as the production servers. The SecureTransport Servers in the DR cluster must also have the same database type and configuration as the production SecureTransport Servers and the shared file system must be mounted under the same path on all SecureTransport Servers.
Each server in the DR site is associated with a server in the production site. So if there are fewer servers in the DR site, some servers in the production site are not associated with a server in the DR site. If there are fewer servers in the DR cluster, the configuration of the production site servers that are not associated with a server in the DR site must be maintained on the DR site so that the configuration can be replicated to the production site failback. The DR site Cluster Management page lists any production site servers that are not associated with a server in the DR site and shows them as offline.
The DR site is a passive standby. The servers in the DR site do not run when the production site is operational, but the configuration of the DR cluster and the DR SecureTransport Edge servers must be consistent with the configuration of the production cluster and SecureTransport Edge servers so that the DR site is ready to replace the production site. However, the IP addresses of the servers in the production site and the servers in the DR site can be different.
Each cluster has its own shared database and shared file system. So that the DR cluster can replace the production cluster when it is needed, you must implement database synchronization between the production cluster database and the DR cluster database so that the configuration and operational data is consistent. You must also implement data synchronization between the production cluster shared file system and the DR cluster shared file system so that the account home folders and other folders are consistent. Do not synchronize the file systems that host the operating systems and the SecureTransport application files. You keep these consistent by applying the same patches, services packs, and configuration file changes to all servers.
The system configuration and account information of the SecureTransport Edge servers in the production site and the SecureTransport Edge servers in the DR site must be consistent. If there is just one SecureTransport Edge server or if the SecureTransport Edge servers in the sites are synchronized, you can export the system configuration and administrator account information from one of the SecureTransport Edge servers in the active site, import it into one of the SecureTransport Edge servers in the inactive site, and synchronize the SecureTransport Edge servers in the inactive site. You need to do this whenever you change the system configuration or accounts on a SecureTransport Edge server in the active site. To import system configuration and account information into a SecureTransport Edge server or to manually synchronize SecureTransport Edge servers, you must start the database and the Administration Tool server. After the SecureTransport Edge servers are updated, you must stop all services on them.
If you maintain consistency between the production and the DR sites, you can choose to use an external DR solution.
AxwaySecureTransport 5.2.1 SP4 Administrator Guide 197
5 Large enterprise clustering
Manage a large enterprise clusterAs described in Clustering models on page 21, a large enterprise cluster is a SecureTransport deployment that uses a collection of servers at a single site to provide the capacity to handle a very large file transfer workload. All SecureTransport Server systems in the cluster share an external database and a file system. This section describes how to set up and maintain a large enterprise cluster. These operations are available only on the SecureTransport Server.
Cluster prerequisitesBefore you deploy a large enterprise cluster, you must have:
l A features license that permits the number of clustered SecureTransport Servers (nodes) in your cluster
l A license for all the SecureTransport Edge gateways in your cluster
l An external Oracle or Microsoft SQL Server database server or cluster that satisfies the requirements described in the SecureTransport Installation Guide
l A file system that all servers in the cluster can access (for example, using network-attached storage)
l The working network, including the firewall and load balancer systems required by your cluster deployment
l The time settings (clocks) on all computers in the network synchronized
Set up a clusterThis is an overview of the steps required to create a large enterprise cluster. For the procedures to perform the server installation and initial configuration, refer to the SecureTransport Installation Guide.
1. Implement and test the network and computers for the cluster, including the shared database and shared file system.
2. Install the first SecureTransport Server.
When you install the first SecureTransport Server, the installer creates the schema for the cluster in the shared database.
3. Perform the initial configuration for the first SecureTransport Server.
4. Install the other SecureTransport Servers. Specify the same installation directory, specify using the existing database schema, and import the secret file from the first server.
5. Perform the Install Licenses steps of the initial configuration for the other SecureTransport Servers.
Do not perform the other steps of the initial configuration because the configuration is copied to the other servers when they are added to the cluster.
AxwaySecureTransport 5.2.1 SP4 Administrator Guide 198

5 Large enterprise clustering
6. Stop all the protocol servers and services on all nodes except one. Make sure that the Administration Tool server and the Transaction Manager server are running on only one SecureTransport Server.
7. Log on to the Administration Tool on the running server as the admin user, and add to the
cluster each of the cluster nodes, including the one you are logged on to. For details, see Add a server to a cluster on page 199.
Note Do not restart any other SecureTransport Server until it is added to the cluster.
8. Restart all SecureTransport Servers.
9. Install all the SecureTransport Edge gateways and perform the initial configuration for them.
The large enterprise cluster is now operational with its basic initial configuration. Because SecureTransport Server automatically copies most configuration to all SecureTransport Servers in the cluster, you perform most configuration tasks once on one SecureTransport Server. For more details, see Server configuration on page 64.
Add a server to a clusterIf a SecureTransport Server uses the cluster shared database schema and shared file system, you can add it to the cluster using the Administration Tool. To connect a SecureTransport Server to an existing database schema, see Switch from the embedded database to an external Oracle database on page 134 or Change the external Oracle database on page 137.
To use IPv6 addresses for communication between servers in a large enterprise cluster, you must edit the <FILEDRIVEHOME>/conf/tangosol-coherence-override.xml file on each server and set the value of the <address> element to the IPv6 address of the network interface used for cluster communications. The first lines of the <cluster-config> element must be:
<cluster-config>
<unicast-listener>
<address>IPv6-address</address>
1. Make sure that the Administration Tool server and the Transaction Manager server are not running on the SecureTransport Server that you are adding to the cluster.
2. Select Operations > Cluster Management.
The Cluster Management page is displayed.
AxwaySecureTransport 5.2.1 SP4 Administrator Guide 199

5 Large enterprise clustering
3. Type the IP address of the SecureTransport Server to add to the cluster in the Server Address field in the Servers table.
Note You must use the IP address of the server. You cannot use a host name or FQDN.
4. Click Add Server.
Note The Administration Tool does not prevent you from adding the same IP address to the cluster more than one, but this is not a valid operation and the additional entries do not add servers to the cluster.
5. Start the Administration Tool server on the added SecureTransport Server. Log on to the Administration Tool on the server and start the TM server and required protocol servers. If all the cluster nodes (servers) allowed by your features license are running, the TM server does not start, the server does not process tasks, and a warning is added to the server log.
Note The Administration Tool server must run on all servers in the cluster whether or not you are accessing them using the Administration Tool.
Remove a server from a clusterYou can remove a SecureTransport Server from the cluster.
1. Select Operations > Cluster Management.
The Cluster Management page is displayed.
2. In the Servers table, select the servers to remove from the cluster.
3. Click Remove Server.
The lines for the servers are removed to the Servers table and the servers are no longer part of the cluster.
4. Stop all SecureTransport servers and services on the removed systems.
The local server configuration setting for the removed server remains in the shared database.
Note To avoid problems with the shared database, do not start any SecureTransport servers or services on the removed systems unless and until you add them back to the same cluster.
AxwaySecureTransport 5.2.1 SP4 Administrator Guide 200
5 Large enterprise clustering
View cluster status 1. Select Operations > Cluster Management.
The Cluster Management page is displayed.
2. In the Servers table, check the Status column.
l Online – The SecureTransport Server is reachable and both the TM and Administration Tool server are running.
l Offline – Either the SecureTransport Server is not reachable, the Transaction Manager is not running, or the Administration Tool server is not running.
SecureTransport makes an entry in the server log when a server in the cluster goes offline.
To refresh the Status column, select Operations > Cluster Management.
If the status of a SecureTransport Server is Offline, you can check its status in more detail.
l Log in to the server using the Administration Tool, select Operations > Server Control, and make sure that the TM Server is running.
l If you cannot connect to the server using the Administration Tool, log in to the computer that hosts the server and make sure that the SecureTransport Administration Tool and TM server are running.
Note If a SecureTransport Server fails, the distributed event manager assigns pending events to other servers, but user sessions connected to the failed server are closed. However, Axway Secure Client automatically reestablishes the closed session and resumes any transfers.
Notification of cluster statusSecureTransport can send an email notification when the number of online servers in the cluster falls below a limit that you set. If enabled, SecureTransport sends an email each time it detects a server failure. You can use this notification for the following purposes, among others:
l Set the limit to one less than the number of nodes in the cluster and use the notification to inform you to restore the node that is offline.
l Set the limit to one less than the number of nodes required for acceptable performance and use the notification to inform you to evaluate whether to fail over to your standby disaster recovery site.
You configure the email notification in the Node Threshold section of the Cluster Management page.
1. Select Operations > Cluster Management.
The Cluster Management page is displayed.
AxwaySecureTransport 5.2.1 SP4 Administrator Guide 201

5 Large enterprise clustering
2. To change the value of the Minimum Number of Nodes field:
a. Click the Edit icon ( ).
b. Type the new value in the field.
c. Click the Save icon ( ).
3. To configure the notification email, click Edit Email Notification.
The Email Notification page is displayed.
a. To send the emails, select Send Notification.
b. Type the email subject in the Subject field and the email body in the Notification field.
c. Click Save to save your changes or Cancel to reset the values to the last saved values.
d. Select Operations > Cluster Management to return to the Cluster Management page.
4. To set the address the email is sent to, select Setup > Miscellaneous.
5. Make sure all the fields in the FTP/HTTP Startup Password Timeout Configuration pane have valid values.
Note You must change the default value, root@localhost, of the Notify e-mail field to a complete and valid email address. This address is used for both the sender address and recipient address.
Set up a disaster recovery cluster 1. For each SecureTransport Server in your production cluster, edit the
<FILEDRIVEHOME>/conf/options-overwrite.conf file and replace
#Cluster.DeploymentSite=Prod
with
Cluster.DeploymentSite=Prod
2. On one SecureTransport Server in the production site:
a. On the Server Configuration page:
l Set Cluster.EnableDRConfiguration to true.
l Make sure that Cluster.DeploymentSite is set to Prod.
b. For each network zone node, make sure the Deployment Site field is set to Prod so that
this node will be used when Cluster.DeploymentSite is set to Prod and define
another node for the DR site with the Deployment Site field set to DR.
3. Deploy a separate cluster that duplicates your production cluster. For information you need when you plan your DR cluster and install the servers, see Passive disaster recovery on page 195. To initialize the DR site:
AxwaySecureTransport 5.2.1 SP4 Administrator Guide 202
5 Large enterprise clustering
a. Synchronize the database for the DR cluster with database for the production cluster so that configuration is consistent with the production cluster.
b. Synchronize the data for the DR cluster with data for the production cluster so that the account home folders and other folders are consistent.
4. For each SecureTransport Server in the DR site:
a. Copy the <LocalConfigurationsId> element in
<FILEDRIVEHOME>/conf/configuration.xml from the corresponding server in
the production site.
The content of the <LocalConfigurationsId> element establishes the
correspondence between a production server and its corresponding DR server.
b. Edit the <FILEDRIVEHOME>/conf/options-overwrite.conf file.
l Replace
#Cluster.DeploymentSite=Prod
with
Cluster.DeploymentSite=DR
l Replace
#node.ip=
with
node.ip=IP_adderess
where IP_adderess is the IP address of the system that the SecureTransport
Server is running on.
When SecureTransport Server starts, it updates the database with this IP address.
Note You can use options-overwrite.conf to overwrite any local or shared editable server configuration parameter that you can set on the Server Configuration page.
5. For each SecureTransport Edge in the DR site:
a. Update the network zone node of the Private network zone so that it references the
SecureTransport Servers in the DR cluster.
b. Export system configuration from the associated production SecureTransport Edge and import it.
6. If you are using a separate shared databases for each site, log in to the Administration Tool on each SecureTransport Server in the DR cluster and change the database to the DR shared database.
7. Set up email notification on the production cluster and define the procedure by which you decide to switch to the DR site and the method you use to switch.
8. Set up and test the data replication from the production cluster to the DR cluster.
AxwaySecureTransport 5.2.1 SP4 Administrator Guide 203
5 Large enterprise clustering
Maintain a disaster recovery clusterOnce your DR site is set up, you must maintain consistency with the production site as described in Passive disaster recovery on page 195 so that the data in the DR shared database and the DR shared file system are current.
When you edit a configuration file or a script on an active SecureTransport Server or SecureTransport Edge, consider if you need to make the same changes on the corresponding server in the other site.
After you fail over to the DR cluster, you need to restore your production cluster’s functionality. Before you switch back to your production cluster and return your DR cluster to standby status, you must replicate the data in the DR shared database and the DR shared file system to the production site.
DR failover and failbackYou can use cluster status notification to decide when you must fail over to the DR site. See Notification of cluster status on page 201.
When the production site is unable to process file transfers, failover to the DR site:
1. If possible, makes sure that the DR site configuration and data is consistent with the production site.
2. On every SecureTransport Server and SecureTransport Edge in the production site, use the <FILEDRIVEHOME>/bin/stop_all (or, on Windows,
<FILEDRIVEHOME>\bin\stop_all.com) command to stop all SecureTransport
processes.
3. On every SecureTransport Server and SecureTransport Edge in the DR site, use the <FILEDRIVEHOME>/bin/start_all (or, on Windows,
<FILEDRIVEHOME>\bin\start_all.com) command to start all SecureTransport
processes.
4. Make any changes to your load balancers or other network infrastructure to direct your SecureTransport traffic to the DR site.
When the production site is able to process file transfers, failback:
1. If possible, makes sure that any configuration changes made on the DR site are transferred to the production site and make sure that production data is consistent with the DR site.
2. On every SecureTransport Server and SecureTransport Edge in the production site, use the <FILEDRIVEHOME>/bin/start_all (or, on Windows,
<FILEDRIVEHOME>\bin\start_all.com) command to start all SecureTransport
processes.
AxwaySecureTransport 5.2.1 SP4 Administrator Guide 204
5 Large enterprise clustering
3. On every SecureTransport Server and SecureTransport Edge in the DR site, use the <FILEDRIVEHOME>/bin/stop_all (or, on Windows,
<FILEDRIVEHOME>\bin\stop_all.com) command to stop all SecureTransport
processes.
4. Make any changes to your load balancers or other network infrastructure to direct your SecureTransport traffic to the production site.
Direct cluster workloadAs described in Workload distribution on page 195, an event processor directs events that represent workload tasks to the SecureTransport Servers in the cluster. Using its default policies, the event processor directs all events associated with an account to the same set of servers. This policy improves the performance of the distributed object cache that SecureTransport uses to avoid database fetches for object references. If all tasks associated with an account are performed by the same set of servers, the object that represents that account and related objects are cached at that server. This improves performance because the cache manager does not need to fetch them from another server.
In addition to the default account-based event management, event processor policies can direct events to particular servers based on attributes of each event. By default, the event processor uses a round-robin policy to direct events to servers in the set that is processing events for the account, directing each event to the next server in sequence.
If a server in your cluster has performance characteristics or other resources required for certain tasks, you can direct events that represent those tasks that to those particular servers. By default the following task-type attributes are defined:
l FM_TRIGGERED – Caused by an action of a transfer site that uses the Folder Monitor protocol
l MAINTENANCE – Log applications: LogEntry Maintenance, Sentinel Link Data Maintenance, and Transfer Log Maintenance
l PGP – PGP encryption or decryption
l PULL – Server-initiated incoming transfer
l PUSH – Server-initiated outgoing transfer
For example, to improve performance of PGP encryption and decryption, you can include in your cluster a server with better computational performance, and direct all PGP task to that server.
The EventQueue.DispatchPolicy.name system configuration parameter controls the behavior of the event queue. Valid values are:
l cacheBasedPolicy (default) – Directs all events associated with an account to the same
server to improve performance
l attributeMatchPolicy – Directs events based on specified attributes
l roundRobinPolicy – Causes the event queue to direct each event to the next server in
sequence without regard to account or attributes
AxwaySecureTransport 5.2.1 SP4 Administrator Guide 205

5 Large enterprise clustering
The attributeMatchPolicy is not used when a node in the cluster is overloaded. For more information, refer to the description of the EventQueue.taskProcessor.threshold parameter on the Server Configuration page.
In each case, either the policy identifies a set of servers or, if no servers match, the criteria, a set that includes the whole cluster. The event manager uses the round-robin method and select the next server from the set in sequence. Of course, round-robin distribution does not occur when only one server is selected by the policy.
You can configure a SecureTransport Server to process tasks of one or more types by editing a local configuration parameter.
1. Log on to the SecureTransport Server.
2. Select Operations > Server Configuration.
The Server Configuration page is displayed.
3. Search for the local parameter EventQueue.taskProcessor.attributes.
The value is a comma-separated list of task types to direct to this server. The default value is PGP=false, PUSH=false, PULL=false, FM_TRIGGERED=false,
MAINTENANCE=false.
4. Edit the value and change false to true for each event type to direct to this server.
5. Save the new value.
6. Search for the parameter EventQueue.DispatchPolicy.name, edit it, and change its
value to attributeMatchPolicy.
7. Select Operations > Server Control and restart the TM Server.
The distributed Event Manager now prefers the Server for events of the selected types.
If you configure a SecureTransport Server to process PGP tasks, you must make other changes on every node of your cluster.
1. If your deployment uses NFS to provide the shared file system, you must export the file system with the sync and no_wdelay options.
2. Log on the SecureTransport Server computer.
3. If your deployment uses NFS to provide the shared file system, change the NFS mount to use the -o noac,sync options.
4. Make a backup copy and open the <FILEDRIVEHOME>/brules/local/wptdocuments/Streaming.xml file in a text
editor.
5. Find the following text:
<!-- Uncomment the following if you want to enable the PGP Event type distribution --><!--<operator name="or" />
AxwaySecureTransport 5.2.1 SP4 Administrator Guide 206
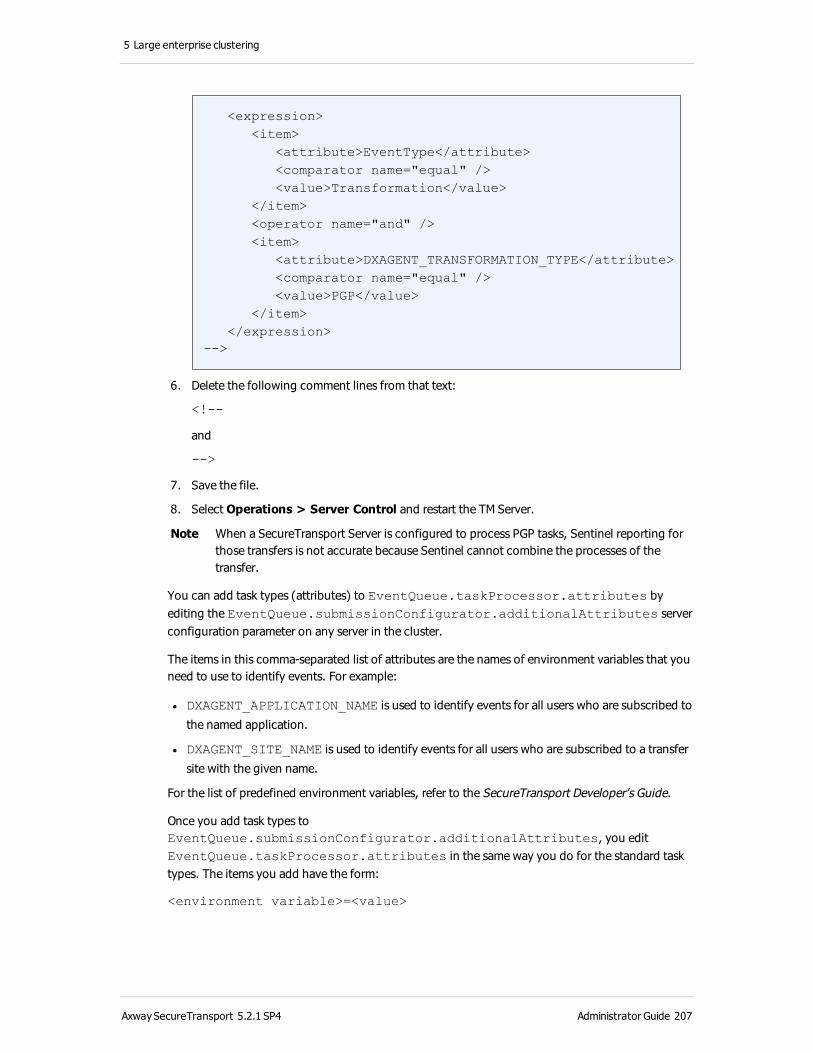
5 Large enterprise clustering
<expression> <item> <attribute>EventType</attribute> <comparator name="equal" /> <value>Transformation</value> </item> <operator name="and" /> <item> <attribute>DXAGENT_TRANSFORMATION_TYPE</attribute> <comparator name="equal" /> <value>PGP</value> </item> </expression>-->
6. Delete the following comment lines from that text:
<!--
and
-->
7. Save the file.
8. Select Operations > Server Control and restart the TM Server.
Note When a SecureTransport Server is configured to process PGP tasks, Sentinel reporting for those transfers is not accurate because Sentinel cannot combine the processes of the transfer.
You can add task types (attributes) to EventQueue.taskProcessor.attributes by editing the EventQueue.submissionConfigurator.additionalAttributes server configuration parameter on any server in the cluster.
The items in this comma-separated list of attributes are the names of environment variables that you need to use to identify events. For example:
l DXAGENT_APPLICATION_NAME is used to identify events for all users who are subscribed to
the named application.
l DXAGENT_SITE_NAME is used to identify events for all users who are subscribed to a transfer
site with the given name.
For the list of predefined environment variables, refer to the SecureTransport Developer’s Guide.
Once you add task types to EventQueue.submissionConfigurator.additionalAttributes, you edit EventQueue.taskProcessor.attributes in the same way you do for the standard task types. The items you add have the form:
<environment variable>=<value>
AxwaySecureTransport 5.2.1 SP4 Administrator Guide 207
5 Large enterprise clustering
where the environment variable is listed in EventQueue.submissionConfigurator.additionalAttributes and the value selects the events to direct to the server. For example:
l To define a task type for events for all users who are subscribed to an Site Mailbox application named smbBU1, the attribute is DXAGENT_APPLICATION_NAME=smbBU1.
l To define a task type for events for all users who have a transfer site named FtpNode3Unit1,
the attribute is DXAGENT_SITE_NAME=FtpNode3Unit1.
AxwaySecureTransport 5.2.1 SP4 Administrator Guide 208

6 SecureTransport Edge synchronization
You can deploy SecureTransport Edge servers so that configuration changes are dynamically synchronized from a primary SecureTransport Edge to the other (secondary) SecureTransport Edge servers. This synchronization works like configuration synchronization in a standard cluster, but because SecureTransport Edge servers do not process events, they are not in a cluster.
You configure the secondary SecureTransport Edge servers on the primary SecureTransport Edge server. Most configuration changes are dynamically synchronized across the SecureTransport Edge servers immediately.
Manual synchronizationYou can also propagate configuration information across the cluster by synchronizing the secondary servers to the primary server manually.
A full synchronization can take some time to complete, so perform it when your SecureTransport system is not under heavy load.
Perform manual synchronization after you:
l Upgrade SecureTransport Edge
l Restart all the SecureTransport Edge servers
l Restore a failed primary SecureTransport Edge server
l Add or update administrators or administrative roles, either using the Administration Tool or by importing account configuration
l Add or remove SecureTransport Edge servers
l Change the primary server
l Restart the Administration Tool server on a secondary SecureTransport Edge server, if you made changes using the Administration Tool on the primary server while it was down
Requirements for synchronizationCluster synchronization requires the following:
l The <FILEDRIVEHOME>/lib/admin/config/servers configuration file is correct
and identical on all SecureTransport Edge servers.
AxwaySecureTransport 5.2.1 SP4 Administrator Guide 209

6 SecureTransport Edge synchronization
l The <FILEDRIVEHOME>/var/tmp/sentinel_primary file exists on the primary
SecureTransport Edge only.
l A shared common secret file is used on all servers.
l Each server is hosted on a different computer or VM.
l All servers use the same installation path.
l All the servers are on the same LAN.
l The primary administrator user ID is the same on all servers.
l The clocks are set to the same time on all servers.
l The internal CAs on all servers is trusted by all other servers. Optionally, you can import the same internal CA on all servers.
l All database settings are identical on all the computers that will be synchronized.
l Only files used for server configuration are configured for synchronization.
l All the server certificates are issued by a common CA.
What information is synchronizedSecureTransport Edge synchronization moves configuration data from the primary SecureTransport Edge server to all the SecureTransport Edge secondary servers only. SecureTransport does not support moving data from secondary servers to the primary server or from the primary server to selected secondary servers.
The following information is synchronized dynamically from the primary SecureTransport Edge server to the secondary SecureTransport Edge servers when you change it on the primary server:
l All server configuration parameters that are not local to the server
The following information is also synchronized during manual synchronization:
l All configuration files listed in the <FILEDRIVEHOME>/conf/sync.conf file
l All database tables listed in the <FILEDRIVEHOME>/conf/sync_tables.conf file
The files listed in <FILEDRIVEHOME>/conf/sync.excl are not copied from the primary to the secondary server.
Set up SecureTransport Edge servers for synchronization
1. Install SecureTransport Edge on the system that will be the primary server.
2. Copy the secret file from the <FILEDRIVEHOME>/lib/certs/private/ directory to
all the other systems.
3. Using the secret file, install SecureTransport Edge on the other systems.
AxwaySecureTransport 5.2.1 SP4 Administrator Guide 210
6 SecureTransport Edge synchronization
4. Add licenses for all servers. For instructions, refer to the SecureTransport Installation Guide.
5. Generate an internal CA on each server. For instructions, refer to the SecureTransport Installation Guide.
6. Exchange CA certificates between all servers in the cluster. For details, refer to the procedures for exporting and importing SecureTransport Server CA certificates in the SecureTransport Installation Guide.
7. On the primary and all secondary servers, list all the servers in the <FILEDRIVEHOME>/lib/admin/config/servers configuration file. List the primary
server first and continue with the secondary servers.
Edit the file and add a line of following form for each server in the cluster:
<host> https://<host>:<port>
where:
l <host> is the FQDN or IP address of the system
l https://<host>:<port> is the URL of the Administration Tool on that system
l <port> is usually 444
The two fields are separated by a tab character.
The <FILEDRIVEHOME>/lib/admin/config/servers file must be the same on all
computer in your cluster. You can create it on the primary server and copy it to the others.
8. On the primary server, create a file named <FILEDRIVEHOME>/var/tmp/sentinel_
primary. This file is not used for integration with Axway Sentinel. It is required whether or
not Sentinel is used.
To create the file, you can use the touch command in UNIX or create an empty file with no file
extension in Windows. The file must have 0 bytes.
9. Log out of the primary SecureTransport Edge server and log in again. Make sure that the server is identified as the primary server and that the Remote button is displayed.
10. Synchronize the secondary servers manually from the Administration Tool of the primary server.
11. On the primary server, either import an external CA or generate a local CA. For instructions, refer to the SecureTransport Installation Guide. Dynamic synchronization copies the new CA to all servers in the cluster.
12. On the primary server, generate the server certificate required by your configuration and complete other configuration tasks.
Manually synchronize SecureTransport Edge servers
Use the Administration Tool to synchronize the SecureTransport Edge servers. This option is not displayed when the SecureTransport Edge server is not configured for synchronization.
AxwaySecureTransport 5.2.1 SP4 Administrator Guide 211

6 SecureTransport Edge synchronization
Note The upper right corner of the Administration Tool shows whether the server on which it is running is a primary or secondary server.
1. Select Operations > Cluster Management.
The Cluster Management page is displayed.
2. Click Synchronize All.
Note The Status column Cluster Management page contains N/A entries because the Transaction Manager does not run on the SecureTransport Edge .
Maintain synchronized SecureTransport Edge servers
As long as your synchronized SecureTransport Edge servers meet the requirements for synchronization, you can make changes to the group, such as:
l Change the primary server (manually failing over the primary server to another server or restoring a server to its role as primary server)
l Add a server
l Remove a server
The key requirement is that the <FILEDRIVEHOME>/lib/admin/config/servers configuration file is correct and identical on all servers and that only the primary server has a <FILEDRIVEHOME>/var/tmp/sentinel_primary file.
1. Stop all the SecureTransport Edge servers.
2. If you are adding or removing a secondary server, update the <FILEDRIVEHOME>/lib/admin/config/servers file on the primary server and
copy the servers file to all the SecureTransport Edge server systems.
3. If you are changing the primary server, list it as the first line in the <FILEDRIVEHOME>/lib/admin/config/servers file on the primary server, copy
the servers file to all the SecureTransport Edge server systems, delete the
<FILEDRIVEHOME>/var/tmp/sentinel_primary file on the previous primary
server, and create the <FILEDRIVEHOME>/var/tmp/sentinel_primary file on the
new primary server.
AxwaySecureTransport 5.2.1 SP4 Administrator Guide 212

6 SecureTransport Edge synchronization
4. Restart all the SecureTransport Edge servers.
5. Log in to the Administration Tool and manually synchronize the servers.
AxwaySecureTransport 5.2.1 SP4 Administrator Guide 213

7 LDAP integration
You can configure Axway SecureTransport to use Lightweight Directory Access Protocol (LDAP) servers to authenticate users and provide information it uses to set up the user session.
The SecureTransport LDAP integration includes:
l Optional or mandatory LDAP authentication.
l Support for LDAP versions 2 and 3.
l Support for Secure LDAP, also know as LDAP over SSL or LDAPS.
l Search over multiple LDAP domains that provide authentication information and user attributes for different groups of users.
l Multiple, redundant LDAP servers in a domain for backup when an LDAP server is down or inaccessible.
l One or more default LDAP domains that SecureTransport searches when a user does not specify a domain name on login.
Note You cannot configure both LDAP integration and SiteMinder integration.
LDAP connections, binds, and searchesTo configure backup LDAP servers in case a server is not accessible or not responding, you can list two or more LDAP servers for any domain. SecureTransport attempts to connect to the servers and bind to their LDAP databases in the order you specify in the server list. SecureTransport uses the first LDAP database it can bind to. If SecureTransport does not find a record for the user in the first available LDAP database, it does not try to connect to other servers in the sequence. So for each login attempt, SecureTransport searches at most one LDAP database in a domain.
You can configure SecureTransport to bind to an LDAP database anonymously or using a bind DN and password.
To locate a DN in the LDAP database, SecureTransport searches using partial DN information and the user’s common name (CN), unique identifier (UID), or Active Directory account name (sAMAccountName). You must define the base DN as required by the server and select the search attribute. You can also define an alias query that is a filter that uses values from an email address used as a login user name.
LDAP loginsIf you configure and enable LDAP, SecureTransport uses it as follows when users log in:
AxwaySecureTransport 5.2.1 SP4 Administrator Guide 214
7 LDAP integration
l If the user includes a domain name in the login name, domain_name/user_name,SecureTransport attempts to connect the LDAP servers configured for the named domain. If the first server SecureTransport connect to has record for the user, SecureTransport use it. If not, the login fails.
l If the user does not include a domain name in the login name,SecureTransport can still find the authentication information and user attributes in the LDAP databases of the default domains in the order on the LDAP Domains page. Depending on whether or not LDAP authentication is mandatory, SecureTransport also searches other databases:
1. If LDAP authentication is not mandatory, SecureTransport searches the SecureTransport database before it searched the LDAP databases in the default domains.
2. If the authentication information is not in the SecureTransport database, SecureTransport searches the databases of the LDAP servers configured of the default domains in the order on the LDAP Domains page.
3. If LDAP authentication is not mandatory and the authentication information is not in any of the databases of the LDAP servers in the default domains, SecureTransport searches the operating system.
If SecureTransport does not find the user name in one of these locations, the login fails.
When SecureTransport finds an LDAP entry for the user name, it uses the password from the entry to authenticate the user. If authentication fails, the login fails.
If authentication succeeds, SecureTransport uses information in the LDAP entry to begin to establish the values of the following user attributes for real users:
l User ID (UID) (UNIX-based systems only) – fdxUid. This is the numeric value required by the
UNIX system to identify the user. This is not the LDAP attribute UID, which represents an LDAP
unique identifier.
l Group ID (GID) – fdxGid
l Home folder (HomeDir) – fdxHomeDir
l User type – fdxUserType
l User shell (UNIX-based systems only) – fdxShell
l System user (Windows only) – fdxSysUser. This is name of a local or domain user of the
Windows server. SecureTransport uses this user's credentials to access the Windows files in the session. If this is a real user, you must add the user to a SecureTransport password vault before you specify the user as the System User in an LDAP record or as the default system user for a domain. See Add a user to a password vault on page 374.
l Login by email – fdxAuthByEmail. If this is enabled, the user can login using an email
address as well as a user name if the login by email is enabled in the LDAP domain and the email attribute of the LDAP record has the correct value.
If the LDAP record SecureTransport finds does not include some of the user attributes, SecureTransport uses any enabled attributes maps, any enabled user type ranges, any enabled home folder entries, and the configured defaults for the domain to set the attributes. If any required attribute information is not available or not valid, the login fails.
AxwaySecureTransport 5.2.1 SP4 Administrator Guide 215
7 LDAP integration
SecureTransport performs the following actions to set the user attributes and other required session information:
1. Sets all attributes from LDAP record values based on any enabled attribute maps.For configuration, see Define attribute mappings for a domain on page 221.
2. On UNIX-based systems, if the fdxUserType attribute is not set and there is an applicable
entry in the User Type Ranges page, sets the user type based on the value of the user ID. For configuration, see LDAP user type ranges on page 228.
3. For attributes that are not set, applies the default values for the domain. For configuration, see Define LDAP user settings for a domain on page 221.
4. Sets the user class. See User classes on page 386.
5. Checks any enabled DN filters configured for the domain. You can use DN filters to permit access to only certain sub-trees of the LDAP directory structure within the domain. If there is an enabled DN filter for the user class set in the previous step or for all users, denoted by asterisk (*), the DN from the LDAP record must match one of those filters. If there are enabled DN filters
for the user class or for all users and no filter matches, the login fails. See Manage DN filters for a domain on page 222.
6. If the fdxHomeDir attribute is not set, sets it based on the user class using the entries in the
Home Folder page. For configuration, see LDAP home folders on page 226.
7. Use the alphabetically first applicable account template. If there is an applicable account template, the values from the template replace any value already set. For details, see Account templates and external users on page 356.
If, after this process, any required user attributes are not set because there is no enabled attribute map, because the LDAP value for an enabled attribute map is not present in the LDAP record, or because the value was not set by a later step, the login fails.
SecureTransport real users authenticated using LDAP have the following limitations:
l They cannot use certificate authentication.
l They cannot change their passwords using a SecureTransport client.
l You can only subscribe them to an application if you do it in an account template or create a SecureTransport account that stores its password in the LDAP record.
To configure Active Directory in a SecureTransport LDAP domain, see LDAP and Active Directory configuration on page 225.
LDAP agentsLDAP functionality is implemented using in-process agents referenced in actions in rules in the Streaming rules package. For more information about rules and rules packages, see Transaction Manager on page 446. For more information about in-process agents, refer to the SecureTransport Developer’s Guide.
AxwaySecureTransport 5.2.1 SP4 Administrator Guide 216
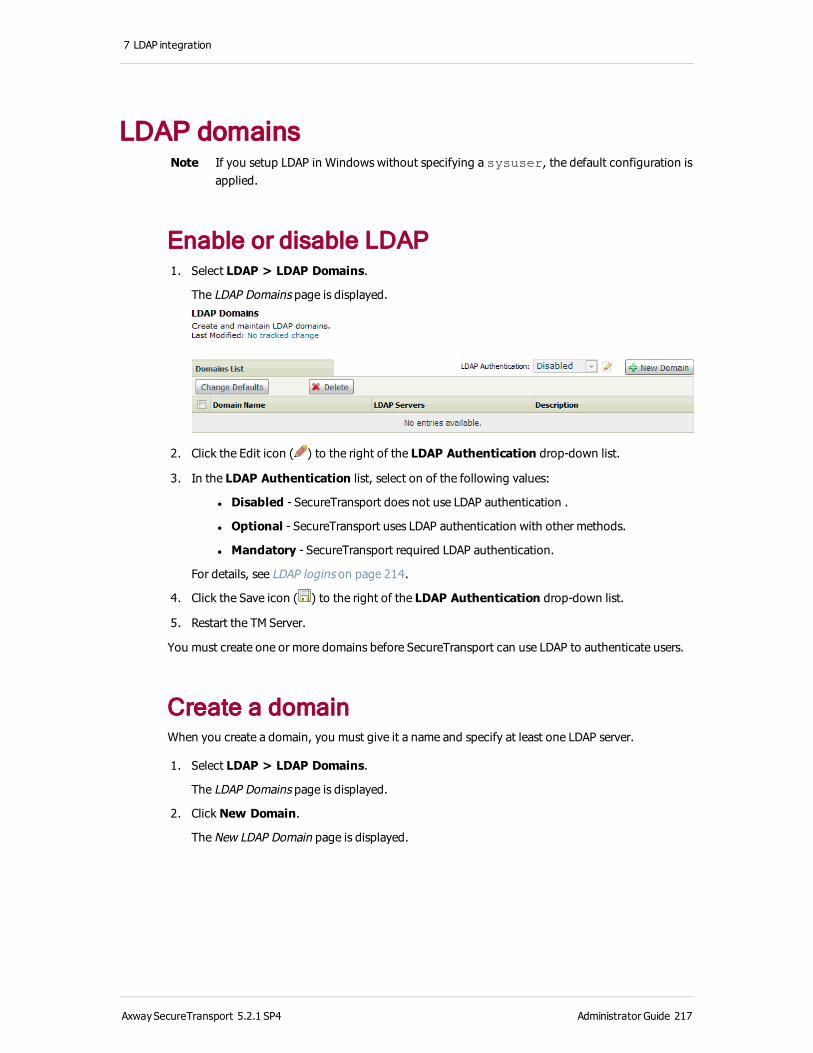
7 LDAP integration
LDAP domainsNote If you setup LDAP in Windows without specifying a sysuser, the default configuration is
applied.
Enable or disable LDAP 1. Select LDAP > LDAP Domains.
The LDAP Domains page is displayed.
2. Click the Edit icon ( ) to the right of the LDAP Authentication drop-down list.
3. In the LDAP Authentication list, select on of the following values:
l Disabled - SecureTransport does not use LDAP authentication .
l Optional - SecureTransport uses LDAP authentication with other methods.
l Mandatory - SecureTransport required LDAP authentication.
For details, see LDAP logins on page 214.
4. Click the Save icon ( ) to the right of the LDAP Authentication drop-down list.
5. Restart the TM Server.
You must create one or more domains before SecureTransport can use LDAP to authenticate users.
Create a domainWhen you create a domain, you must give it a name and specify at least one LDAP server.
1. Select LDAP > LDAP Domains.
The LDAP Domains page is displayed.
2. Click New Domain.
The New LDAP Domain page is displayed.
AxwaySecureTransport 5.2.1 SP4 Administrator Guide 217
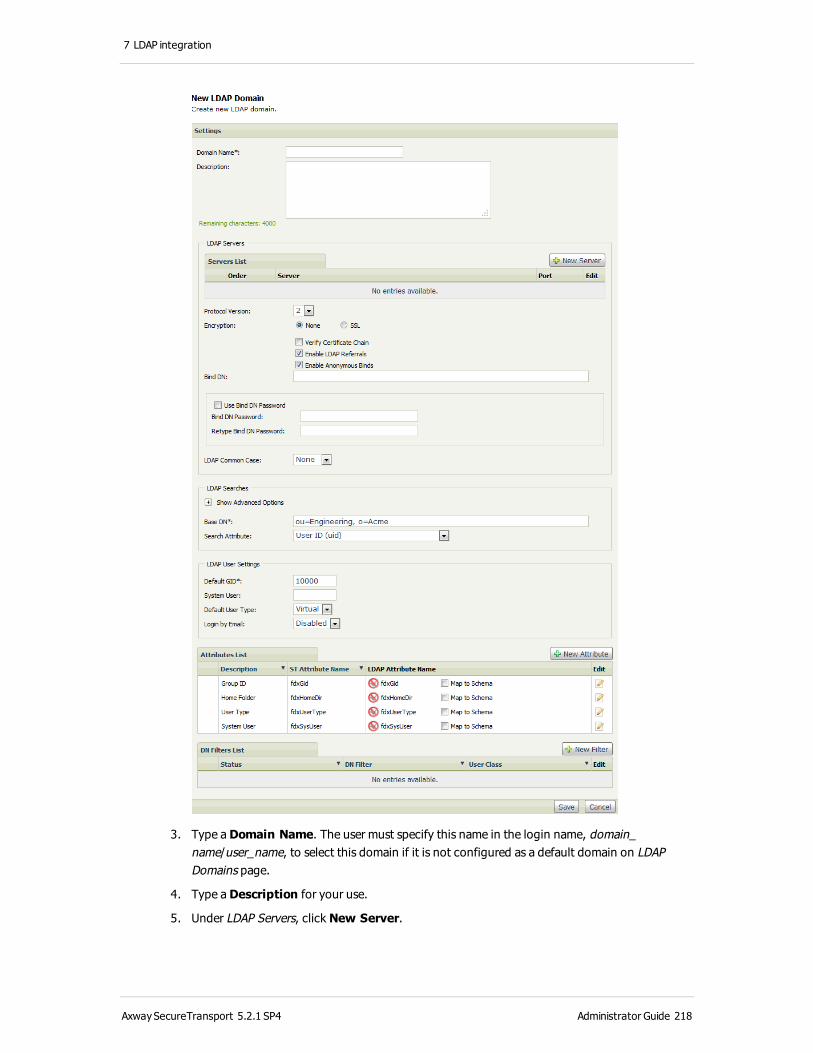
7 LDAP integration
3. Type a Domain Name. The user must specify this name in the login name, domain_name/user_name, to select this domain if it is not configured as a default domain on LDAP Domains page.
4. Type a Description for your use.
5. Under LDAP Servers, click New Server.
AxwaySecureTransport 5.2.1 SP4 Administrator Guide 218
7 LDAP integration
A line is added to the Servers List.
6. In the Server field, type the host name or IP address of the LDAP server.
7. In the Port field type the LDAP port number for the server. The default is 389.
8. To test the connection to the LDAP server, click the icon in the column after the Server column.
9. Click the Save icon ( ) in the Edit column.
10. Add backup LDAP servers, if any, to the Servers List.
11. To change the order SecureTransport tries the servers, click Reorder, update the numbers in the Order column, and click Save.
12. Under LDAP Servers, complete the following fields:
Field Description Valid values and notes
Protocol Version
Select the LDAP protocol version. 2 or 3
Encryption Enable Secure LDAP, also know as LDAP over SSL or LDAPS.
None, SSL, or TLS (for LDAP protocol 3 )
Verify Certificate Chain
Configure whether SecureTransport implicitly trusts the LDAP servers in this domain or verifies the LDAP server certificates.
See Secure LDAP on page 225.
Enable LDAP Referrals
Configure whether SecureTransport allows the LDAP server to refer a request to another LDAP server.
This option is required when the LDAP directory tree is distributed over a group of servers.
Enable Anonymous Binds
Configure whether SecureTransport uses a Bind DN to access to the LDAP server.
You can select this option when LDAP servers supports anonymous binding.
If this option is not selected, the Bind DN field is required.
Bind DN Type the distinguished name of a user who is allowed access to the LDAP directory for user lookups.
For authorization purposes, this field is case sensitive.
If Enable Anonymous Binds is not selected, this field is required.
Use Bind DN Password
If a password is required to bind to the directory service on the LDAP server, select Use Password and enter the password in the fields provided.
AxwaySecureTransport 5.2.1 SP4 Administrator Guide 219

7 LDAP integration
Field Description Valid values and notes
LDAP Common Case
Configure whether and how SecureTransport changes the case of the user name it receives from the LDAP database.
None, Lower, or Upper.
If the value is Lower or Upper, SecureTransport maps the case of all letters in the user name to the case you specify.
13. Click Save.
Define LDAP search criteria for a domainFor information about how SecureTransport uses the search criteria, see LDAP connections, binds, and searches on page 214.
Note A specific LDAP configuration is required for Active Directory. For details, see LDAP and Active Directory configuration on page 225.
1. If you do not have the New LDAP Domain page open, select LDAP > LDAP Domains and click the domain name in the Domains List to open the LDAP Domain page.
2. Under LDAP Searches, complete the following fields:
Field Description Valid values and notes
Base DN Define the base DN for the searches A valid DN, such as,
OU=Sales, DC=ldaps1, DC=Example, DC=com
Search Attributes
Select the LDAP attribute to use for the searches
User ID (uid), Common Name (cn), or SAM-Account-Name (sAMAccountName)
Alias Query
Define a filter using values from an email address used as a login user name
Click Show Advanced Options to display the Alias Query field.
3. Click Save.
The value of Alias Query field can reference the following values from the email address:
l %s – Complete email address
l %u – User name
l %d – Domain name
The value can use the following prefix logical operators:
l & – And
l | – Or
AxwaySecureTransport 5.2.1 SP4 Administrator Guide 220

7 LDAP integration
Use backslash (\) followed by two hexadecimal digits to specify any character and parentheses to specify the order of operations.
Examples:
l (proxyAddresses=smtp\3A%s) – The proxyAddresses Active Directory attribute
must be smtp: followed by the email address.
l (|(cn=%u)(mail=%s)) – Either the cn attribute is the user name or the mail attribute is
the email address.
Define LDAP user settings for a domainSecureTransport uses these default values when the LDAP entry does not include the attribute and no mapping to the attribute is enabled in the Default Attributes List. For information, see LDAP logins on page 214.
1. If you do not have the New LDAP Domain page open, select LDAP > LDAP Domains and click the domain name in the Domains List to open the LDAP Domain page.
2. Under LDAP User Settings, complete the following fields:
Field Description Valid values and notes
Default GID
The value for the fdxGid attribute (group ID) for
the LDAP user.
The default value is 10000.
Default UID
The value for the fdxUid attribute (user ID) for
the LDAP user.
UNIX-based systems only.
The default value is 10000.
Default User Shell
The value for the fdxShell attribute (user shell)
for the LDAP user.
UNIX-based systems only.
Valid user shell. The default value is /bin/sh.
Default User Type
The value for the fdxUserType attribute (user
type) for the LDAP user.
Real or Virtual. The default value is Virtual.
Allow login by email
Controls whether the user can log in using an email address stored in the email attribute of the LDAP record.
Enabled or Disabled.
The default value is Disabled.
3. Click Save.
Define attribute mappings for a domainFor information about how SecureTransport uses the default attribute mappings, see LDAP logins on page 214.
AxwaySecureTransport 5.2.1 SP4 Administrator Guide 221
7 LDAP integration
The session variables available depend on the attribute mappings:
l The following session variables are always available: LDAP_AUTH_BY_EMAIL, LDAP_DN,
LDAP_DOMAIN_ID, and LDAP_DOMAIN_NAME.
l To enable LDAP_fdxGid, LDAP_fdxHomeDir, LDAP_fdxShell, LDAP_fdxUid, and
LDAP_fdxUserType, select Map to Schema for the corresponding default attribute.
l If you do not select Map to Schema for any custom mappings, all LDAP attribute are mapped to session variables named LDAP_DIR_ followed by the attribute name.
l If you add a custom mapping, only those attributes added with Map to Schema selected are mapped to session variables named LDAP_DIR_ followed by the attribute name.
A multivalued LDAP attribute is mapped to several session variables. To use a multivalued LDAP variable, map it and check the SecureTransport session for the names of the session variables.
1. If you do not have the New LDAP Domain page open, select LDAP > LDAP Domains and click the domain name in the Domains List to open the LDAP Domain page.
2. Under Attributes List, for each SecureTransport attribute that will be mapped from an LDAP attribute, select Map to Schema to enable an attribute mapping.
You can modify a default attribute mapping.
1. Click the Edit icon ( ) in the Edit column.
2. Type the new value in the LDAP Attribute Name column.
3. Click the Save icon ( ) in the Edit column.
You can define a mapping for a custom LDAP attribute.
1. Click New Attribute.
SecureTransport adds a line to the Attributes List.
2. Type the Description, ST Attribute Name, and LDAP Attribute Name.
3. Click the Save icon ( ) in the Edit column.
4. Select Map to Schema to enable the mapping.
To delete a custom attribute mapping, click X in the first column of the table.
Manage DN filters for a domainSecureTransport uses DN filters to accept users with matching DNs. For details, see LDAP logins on page 214.
Add a DN filter 1. If you do not have the New LDAP Domain page open, select LDAP > LDAP Domains and
click the domain name in the Domains List to open the LDAP Domain page.
2. Under DN Filter List, click New Filter.
AxwaySecureTransport 5.2.1 SP4 Administrator Guide 222
7 LDAP integration
A line is added to the DN Filters List.
3. In the DN Filter field, type a regular expression to match against the DN retrieved from the LDAP database. To specify only a portion of a DN, use wild cards. For example, to allow access to users from the organization acme, enter.*O=acme.* in this field. For more information
about regular expressions supported by SecureTransport, see Regular expressions on page 555.
4. In the User Class field, select a user class to apply the DN filter only to users in that class or asterisk (*) to apply the DN filter to all users.
5. Click the Save icon ( ) in the Edit column.
The status of the new DN filter is Disabled.
Enable or disable a DN filter l In the entry in the DN Filter List, click Enable or Disable.
The Status column is updated.
Edit a DN filter 1. In an entry in the DN Filter List, click the Edit icon ( ) in the Edit column.
2. Make the required changes to the fields in the entry.
3. Click the Save icon ( ) in the Edit column.
Delete a DN filter l In the entry in the DN Filter List, click X in the first column.
The entry is removed from the list.
Edit a domain 1. Select LDAP > LDAP Domains.
The LDAP Domains page is displayed.
2. Click the domain name in the Domains List.
The LDAP Domain page is displayed.
3. Make the required changes.
4. Click Save.
AxwaySecureTransport 5.2.1 SP4 Administrator Guide 223

7 LDAP integration
Delete domains 1. Select LDAP > LDAP Domains.
The LDAP Domains page is displayed.
2. Select the domains to delete in first column of the Domains List.
3. Click Delete.
4. Confirm the deletion.
The selected domains are removed from the Domains List.
Configure default domainsFor information about how SecureTransport uses the default domains, see LDAP logins on page 214.
1. Select LDAP > LDAP Domains.
The LDAP Domains page is displayed.
2. Click Change Defaults.
The Default column is displayed.
3. Click Toggle in the Default column to add a domain to or remove a domain from the default domains.
The default domains are moved to the top of the Domains List and indicated in the Domain Name column.
4. If you specify two ore more default domains, up and down arrows are displayed in a column before the Domain Name column.
5. Using the arrows, you can drag the default domain rows in the Domains List to the order you want SecureTransport to search the domains.
6. When the default domains are correct, click Save Defaults.
The Default column and arrow columns are removed.
LDAP domains exampleThis example illustrates a scenario with three LDAP domains, one each for Engineering, Operations, and Security. The configuration has the following features:
l Each domain has a primary LDAP server and backup LDAP server.
l The Engineering and Operations domains are default domains. Users with login credentials in those LDAP databases do not need to specify a domain to log in.
l The Engineering domain is searched first. Users who have the same login credentials in both the Engineering and Operations domain will get the attributes stored in the entry in the Engineering domain unless they specify the Operations domain when they log in.
AxwaySecureTransport 5.2.1 SP4 Administrator Guide 224
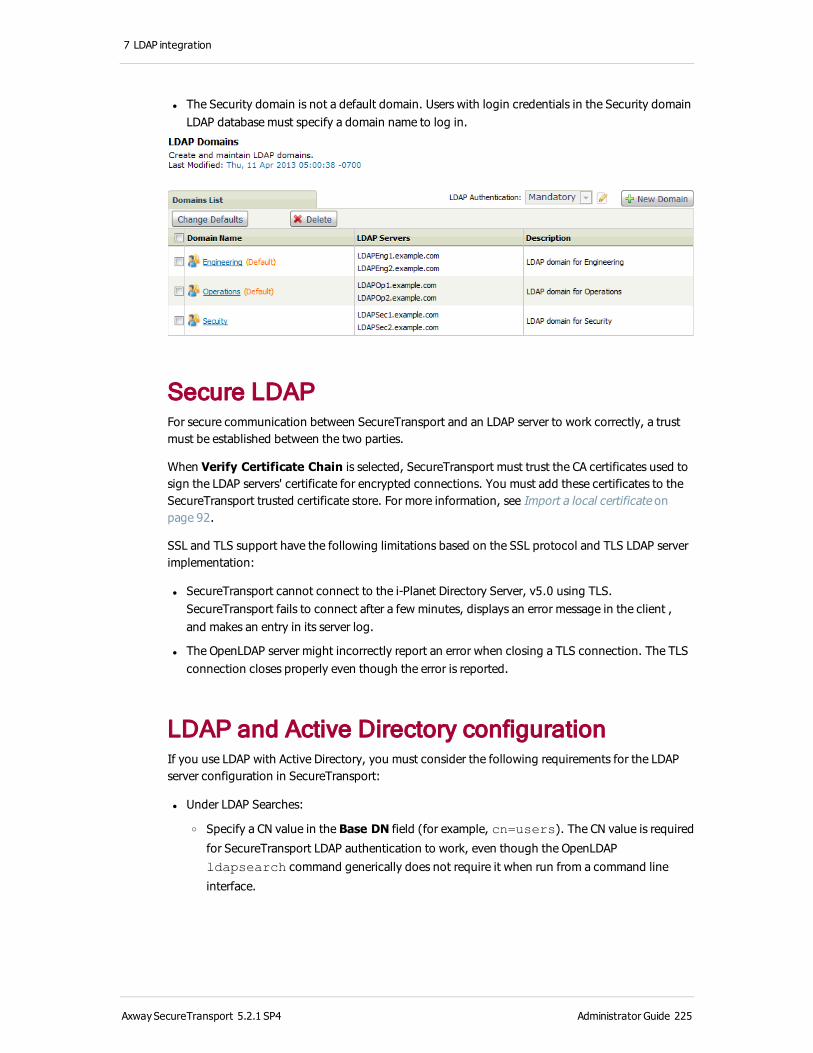
7 LDAP integration
l The Security domain is not a default domain. Users with login credentials in the Security domain LDAP database must specify a domain name to log in.
Secure LDAPFor secure communication between SecureTransport and an LDAP server to work correctly, a trust must be established between the two parties.
When Verify Certificate Chain is selected, SecureTransport must trust the CA certificates used to sign the LDAP servers' certificate for encrypted connections. You must add these certificates to the SecureTransport trusted certificate store. For more information, see Import a local certificate on page 92.
SSL and TLS support have the following limitations based on the SSL protocol and TLS LDAP server implementation:
l SecureTransport cannot connect to the i-Planet Directory Server, v5.0 using TLS. SecureTransport fails to connect after a few minutes, displays an error message in the client , and makes an entry in its server log.
l The OpenLDAP server might incorrectly report an error when closing a TLS connection. The TLS connection closes properly even though the error is reported.
LDAP and Active Directory configurationIf you use LDAP with Active Directory, you must consider the following requirements for the LDAP server configuration in SecureTransport:
l Under LDAP Searches:
o Specify a CN value in the Base DN field (for example, cn=users). The CN value is required
for SecureTransport LDAP authentication to work, even though the OpenLDAP ldapsearch command generically does not require it when run from a command line
interface.
AxwaySecureTransport 5.2.1 SP4 Administrator Guide 225
7 LDAP integration
o Select Common Name (cn) or SAM-Account-Name (sAMAccountName) for the Search Attribute. Use the SAM-Account-Name parameter instead of the CN parameter to log in using the Windows domain login name.
l TLS is only supported in Windows Server 2003 Active Directory or later.
l Disable Anonymous Binds.
LDAP home foldersYou can define entries in the Home Folder page that SecureTransport uses to set the home folder (fdxHomeDir attribute) for an LDAP user when the attribute is not set by the other actions listed in LDAP logins on page 214. If there is an entry for the user's user class or for all users, SecureTransport uses the configured prefix. For example, if the prefix is /home/users/partners and the user name is suplco, SecureTransport set the home folder to /home/users/partners/suplco.
When SecureTransport is running under Windows, you can use a local file path, such as D:\home\users\partners or a UNC path for a share such as \\NAS2\home\users\partners. The permissions for the share must permit the SecureTransport Administration Tool service, which runs on Windows with a local system user as its owner, to create the folder. If the permissions granted for the share are not sufficient to create the subfolder for the LDAP user’s home folder, SecureTransport refuses the connection.
Note Because operating systems do not accept angle brackets (< >) and quotation marks (") in file names, LDAP users with any of those characters in his their user name cannot log in to SecureTransport and get a default home directory. You must map such users to a properly configured account template.
You can define a user class based on values from the LDAP entry. See User classes on page 386.
If there is no entry for the user class, SecureTransport uses the entry for all users indicated by an asterisk (*) in the User Class field.
For more information about how SecureTransport uses the entries on the Home Folder page during LDAP logins, see LDAP logins on page 214 In particular, if there is an applicable account template, the home folder defined in the account template replaces any home folder set from configuration on the Home Folders page.
Create a home folder entry 1. Select LDAP > Home Folders.
The Home Folders page is displayed.
AxwaySecureTransport 5.2.1 SP4 Administrator Guide 226
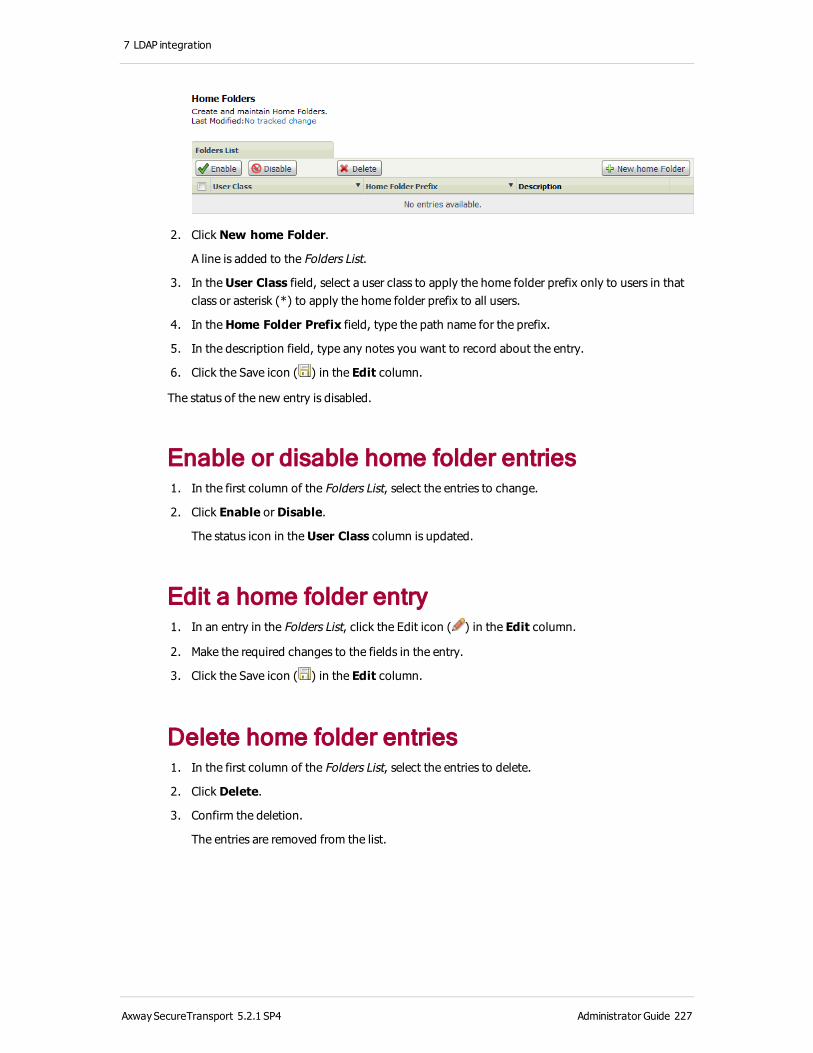
7 LDAP integration
2. Click New home Folder.
A line is added to the Folders List.
3. In the User Class field, select a user class to apply the home folder prefix only to users in that class or asterisk (*) to apply the home folder prefix to all users.
4. In the Home Folder Prefix field, type the path name for the prefix.
5. In the description field, type any notes you want to record about the entry.
6. Click the Save icon ( ) in the Edit column.
The status of the new entry is disabled.
Enable or disable home folder entries 1. In the first column of the Folders List, select the entries to change.
2. Click Enable or Disable.
The status icon in the User Class column is updated.
Edit a home folder entry 1. In an entry in the Folders List, click the Edit icon ( ) in the Edit column.
2. Make the required changes to the fields in the entry.
3. Click the Save icon ( ) in the Edit column.
Delete home folder entries 1. In the first column of the Folders List, select the entries to delete.
2. Click Delete.
3. Confirm the deletion.
The entries are removed from the list.
AxwaySecureTransport 5.2.1 SP4 Administrator Guide 227
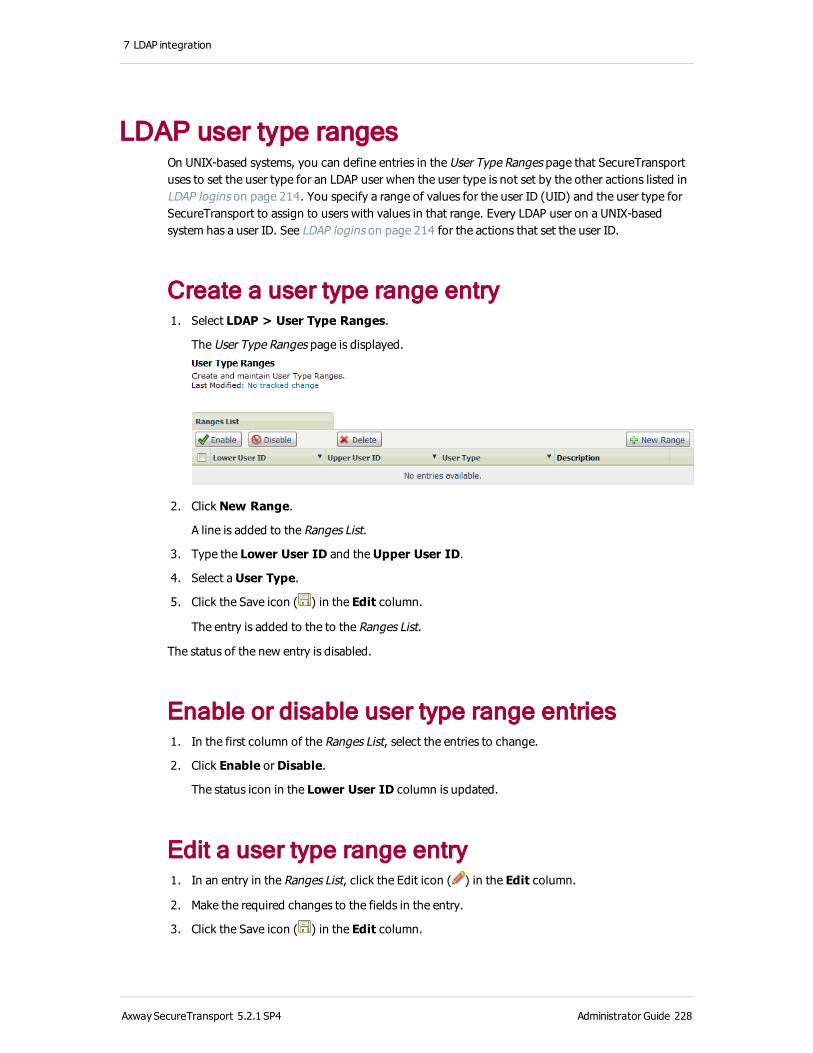
7 LDAP integration
LDAP user type rangesOn UNIX-based systems, you can define entries in the User Type Ranges page that SecureTransport uses to set the user type for an LDAP user when the user type is not set by the other actions listed in LDAP logins on page 214. You specify a range of values for the user ID (UID) and the user type for SecureTransport to assign to users with values in that range. Every LDAP user on a UNIX-based system has a user ID. See LDAP logins on page 214 for the actions that set the user ID.
Create a user type range entry 1. Select LDAP > User Type Ranges.
The User Type Ranges page is displayed.
2. Click New Range.
A line is added to the Ranges List.
3. Type the Lower User ID and the Upper User ID.
4. Select a User Type.
5. Click the Save icon ( ) in the Edit column.
The entry is added to the to the Ranges List.
The status of the new entry is disabled.
Enable or disable user type range entries 1. In the first column of the Ranges List, select the entries to change.
2. Click Enable or Disable.
The status icon in the Lower User ID column is updated.
Edit a user type range entry 1. In an entry in the Ranges List, click the Edit icon ( ) in the Edit column.
2. Make the required changes to the fields in the entry.
3. Click the Save icon ( ) in the Edit column.
AxwaySecureTransport 5.2.1 SP4 Administrator Guide 228

7 LDAP integration
Delete user type range entries 1. In the first column of the Ranges List, select the entries to delete.
2. Click Delete.
3. Confirm the deletion.
The entries are removed from the list.
AxwaySecureTransport 5.2.1 SP4 Administrator Guide 229

8 SiteMinder integration
Axway SecureTransport can be integrated into a SiteMinder SSO environment and use SiteMinder to authenticate and authorize all supported client protocols, including HTTP(S), FTP(S), and SSH (SFTP).
Note You cannot configure both SiteMinder integration and LDAP integration.
SiteMinder overviewNetegrity SiteMinder is a third-party application that controls user access to secured applications and provides a single sign-on (SSO) portal. A single sign-on portal is a Web gateway or proxy that enables users to access multiple secured Web applications using a single user name and password that are provided once only at the start of the user session.
SecureTransport can be integrated into a SiteMinder SSO environment. When integrated, users can authenticate for HTTP and HTTPS using SiteMinder SSO. They can authenticate for other protocols though SiteMinder using user name and password, but not using SSO.
The following illustration shows how SecureTransport can be integrated into a typical SiteMinder environment.
Figure 5. Integration of SecureTransport into a SiteMinder deployment
AxwaySecureTransport 5.2.1 SP4 Administrator Guide 230
8 SiteMinder integration
Typically, in a SiteMinder SSO environment, users log onto the SSO portal using a Browser Client. The SSO portal directly handles all user authentication and access control for the secured Web applications in the SiteMinder network. However, because SecureTransport supports command line clients, it requires more control over authentication and authorization than a typical Web application. The following section describes how SecureTransport user authentication and authorization is handled in a SiteMinder environment.
User authenticationIn a SiteMinder environment, a user can access SecureTransport resources using a web client or a command line client. If the SecureTransport SiteMinder module is enabled, SecureTransport uses different authentication methods depending on the type of client.
Note All SiteMinder users are represented in SecureTransport by default as virtual users, unless no other specific user class is created for them from Access > User Classes.
Web client (HTTP, HTTPS) user authenticationWeb clients can log in to SecureTransport directly or through the SiteMinder single sign-on (SSO) portal. Depending on the SiteMinder configuration, when a web client logs in, SecureTransport can require a client certificate, which it presents to SiteMinder for authentication.
When a web client logs on through the SiteMinder SSO portal, the portal authenticates the user and provides the client with a SiteMinder session cookie. When the client tries to access a SecureTransport resource, SecureTransport presents the user’s session cookie to SiteMinder for authentication.
Note Session cookies are by domain, so the SiteMinder SSO portal must be in the same domain as the SecureTransport Server.
Note The SiteMinder SSO portal must be accessed using a fully-qualified domain name (FQDN) because SiteMinder uses domain cookies, and it is possible that different browsers can handle the conversion from partial name to FQDN incorrectly. In the latter case, access to the SSO portal can be denied.
Command line client (FTP, FTPS, HTTPS, SSH) user authenticationCommand line clients log on to SecureTransport directly, not through the SSO portal. If the client presents a certificate, SecureTransport immediately passes the certificate to SiteMinder for authentication. However, if the client presents a user name and password, SecureTransport first tries to authenticate the user by comparing it to the user profiles defined in SecureTransport. If SecureTransport cannot authenticate the user, it passes the user name and password to SiteMinder for authentication. If all authentication attempts fail, the user receives an error message and is disconnected.
AxwaySecureTransport 5.2.1 SP4 Administrator Guide 231

8 SiteMinder integration
Note The SecureTransport command line client does not work through a Web gateway or proxy (even when using HTTPS). So, SecureTransport Server must be made directly accessible to command line clients.
User access control (authorization)Regardless of the type of client, access control is always performed by SecureTransport, which uses SiteMinder rules to obtain the user’s read/write authority to a particular resource. The SSO portal cannot perform access control for SecureTransport resources.
After a user is authenticated, SecureTransport sends an authorization request to SiteMinder to determine whether the user has read/write access to the requested resource. If SiteMinder grants the appropriate access level, SecureTransport proceeds with the file operation.
Note The SiteMinder SSO portal must be accessed using FQDN because SiteMinder uses domain cookies and it is possible that different browsers can handle the conversion from partial name to FQDN in an incorrect manner. In the latter case, access to the SSO portal can be denied.
SiteMinder authorization rulesConfigure the SiteMinder authorization rules to accommodate SecureTransport authorization requests. A SecureTransport authorization request contains the following elements:
l Resource Path – The absolute URI of the resource being accessed by the user. SecureTransport determines the actual file path and uses that file path as the URI. This URI can be modified (section removed or prefix added) based on the File Storage Root Path and SiteMinder Path Prefix in the SecureTransport SiteMinder settings. (For details, see Configure SiteMinder settings in SecureTransport on page 234.) For Windows systems, backslashes (\) in the file path are replaced with forward slashes (/) before the file path is modified as described above.
l Command – Either GET or PUT depending on whether the user is requesting a read or write
operation.
Example authorization requestThe following example shows how SecureTransport would construct an authorization request to SiteMinder.
Assume a user requests a listing for the following resource:
/mnt/data/SecureTransport/MyDirectory
If the File Storage Root Path (in the SecureTransport SiteMinder settings) is configured as:
/mnt/data/SecureTransport
and the SiteMinder Path Prefix (in the SecureTransport SiteMinder settings) is configured as:
AxwaySecureTransport 5.2.1 SP4 Administrator Guide 232

8 SiteMinder integration
/ST
the authorization request for this file operation would be:
GET /ST/MyDirectory/
In this example, SiteMinder authorization rule would be configured to allow or deny the GET command to access the /ST/MyDirectory/ resource. When SiteMinder is enabled, all SecureTransport users must have GET access to the path specified in the SiteMinder Path Prefix to successfully log in. If the SiteMinder Path Prefix setting is left blank, then users must have GET access to the / directory. The SiteMinder Policy Server must be set accordingly.
Configure SiteMinder for SecureTransport integration
To successfully integrate SecureTransport with SiteMinder, SiteMinder must be configured appropriately using the SiteMinder administration system. This section provides general guidelines for configuring SiteMinder 4.X and 5.X. For more information, refer to the SiteMinder documentation.
1. Create a SiteMinder agent that SecureTransport is to use to connect to the SiteMinder Policy Server.
When creating the agent, either select the 4.X compatibility option and fill in the IP address of the SecureTransport Server (not the SiteMinder Policy server) and Shared secret or select the 5.X compatibility option and fill in the name of the agent only.
2. Create an authentication scheme by selecting one of the following types:
l Basic Template – password authentication
l X509 Client Cert Template – certificate authentication
l X509 Client Cert or Basic Template – certificate or password authentication
l X509 Client Cert and Basic Template – certificate and password authentication
3. Create a Realm, selecting the agent and authentication scheme that have been created for SecureTransport.
4. Create new rules under the Realm.
5. Create a Response that returns the attributes required by the SecureTransport SiteMinder settings. For details, see SiteMinder integration configuration on page 128.
6. Apply the new rules to the necessary SiteMinder Policy.
AxwaySecureTransport 5.2.1 SP4 Administrator Guide 233

8 SiteMinder integration
Configure SiteMinder settings in SecureTransport
Before using SecureTransport with SiteMinder, the you must configure the SiteMinder settings on the SecureTransport Server using the Administration Tool. For details, see SiteMinder integration configuration on page 128.
Disable the SecureTransport loginWeb clients that have logged on through the SiteMinder SSO portal should not log on again to the SecureTransport login page. Therefore, it is necessary to disable the SecureTransport login page for these clients.
1. Select Operations > Server Configuration.
The Server Configuration page is displayed.
2. Search for the Http.FdxAuthReply parameter.
3. Change the value to PREAUTH.
4. Restart the HTTP server and the TM Server.
Configure client certificate authentication settings
Instead of logging on through the SSO portal, web clients and command line clients can log on to SecureTransport directly and request authentication using a client certificate. (Command line clients can also request authentication using a user name and password.) SecureTransport then presents the client certificate to SiteMinder for authentication. To configure SecureTransport to perform client certificate authentication using SiteMinder, complete these steps:
1. Import into SecureTransport the trusted Certificate Authority (CA) certificates for the client certificates to be authenticated. Client certificates are authenticated using indirect trust.
2. Restart the SSH Server.
3. Bounce the SecureTransport Servers.
Import trusted CA certificatesImport the trusted CA certificates into SecureTransport that are needed for indirect trust of client certificates. For information about importing trusted CA certificates, see Import a trusted CA on page 96.
AxwaySecureTransport 5.2.1 SP4 Administrator Guide 234
8 SiteMinder integration
Update the Secure Socket Layer settingsIf SecureTransport Edge is deployed in a peripheral network (DMZ) configuration, change these settings on both the SecureTransport Edge and SecureTransport Server.
1. Select Access > Secure Socket Layer.
The Secure Socket Layer page is displayed.
2. Under Client Certificate Authentication, make the following changes:
l Set HTTPS to Optional or Mandatory.
l Set FTPS to Optional or Mandatory.
l Set SSH to Optional or Mandatory.
3. Select Operations > Server Control.
4. Restart the TM Server.
The new settings do not take effect until the Transaction Manager server is restarted.
Integration troubleshootingUse the recommendations in this section to troubleshoot problems that you might encountered when integrating SecureTransport with SiteMinder.
SiteMinder troubleshooting toolsOne of the first things to determine is if a problem is in the SiteMinder configuration settings. The following SiteMinder tools are helpful in troubleshooting the SiteMinder configuration:
l SiteMinder Test Tool – helpful in testing agent, rule, and policy configurations in SiteMinder.
l SiteMinder Debug Log files – helpful in troubleshooting SiteMinder Policy Server configuration issues. These debug log files are configured using the Netegrity Policy Server Management Console.
Refer to the SiteMinder documentation for information about these tools.
SecureTransport troubleshooting toolsIf problems still exist after troubleshooting with the SiteMinder tools, use the SecureTransport log files to try to ascertain the problem.
To use the SecureTransport log files effectively to troubleshoot the SiteMinder integration issues, consider the following recommendations:
l Increase the log level of com.tumbleweed.st.server.siteminder log generator in
<FILEDRIVEHOME>/conf/tm-log4j.xml to debug. Increase the log levels of other log
AxwaySecureTransport 5.2.1 SP4 Administrator Guide 235

8 SiteMinder integration
generators in this file as well.
l Increase all the log levels in <FILEDRIVEHOME>/conf/tm-log4j.xml from warn to
debug.
l Check the <FILEDRIVEHOME>/var/logs/tm.log file and the Server Log page for any
messages when a SiteMinder login fails.
After increasing the logging level settings, restart Transaction Manager to apply the changes.
Restart Transaction Manager 1. Select Operations > Server Control.
The Server Control page is displayed.
2. Under TM Server, click Stop and then click Start.
AxwaySecureTransport 5.2.1 SP4 Administrator Guide 236
9 Manage accounts
Use the pages of the Accounts menu to create and manage login accounts for users, administrators, and partners.
Accounts overviewAn Axway SecureTransport account contains information about a user or an internal system that processes SecureTransport file transfers. SecureTransport supports two kinds of accounts: user and service.
User accountsA user account is typically external to your enterprise. A user account consists of settings such as the account name, contact information, login information, subscription information (the applications this user account uses to process file transfers), transfer site information, and certificate information. User accounts connect to SecureTransport through subscriptions to one or more applications. For details, see User accounts on page 238.
Service accountsA service account is typically used to represent processes on systems internal to your enterprise. It consists of settings, transfer site information, and certificate information. Instead of subscribing to an application, however, a service account uses a connector to connect to one or more applications. For details, see Service accounts on page 330.
Subscriptions, transfer sites, and certificatesA subscription defines how files are submitted to and received from applications. For details, see Manage subscriptions on page 322.
A transfer site is a location such as a local folder or protocol server used by SecureTransport to pull data from or send data to during a transfer. For details, see Transfer sites on page 274.
A certificate can be one of three types: login, partner, or private. Each certificate type can be used by the account for different purposes. For details, see Manage certificates on page 256.
AxwaySecureTransport 5.2.1 SP4 Administrator Guide 237

9 Manage accounts
ApplicationsAn application is an instance of an application type. An application type is a workflow definition that is triggered by either data arrival or a scheduled event. An application is created when you configure an application type, name it, and save it. For more information, see Applications on page 417.
User accountsUse the User Accounts page to display, create, modify, and delete user accounts.
Display the list of user accountsThe User Accounts page displays a list of accounts. You can display a list of all user accounts, or search the list based on account name or login name.
l Select Accounts > User Accounts. The User Accounts page is displayed.
The User Accounts page lists 100 account entries per page by default.
Note You can change the default number of records per page by editing the LinesPerPage parameter in the file <FILEDRIVEHOME>/tomcat/admin/webapps/coreadmin/WEB-INF/web.xml.
Page through the list of user accountsUse the browse buttons at the top and bottom of the page.
AxwaySecureTransport 5.2.1 SP4 Administrator Guide 238
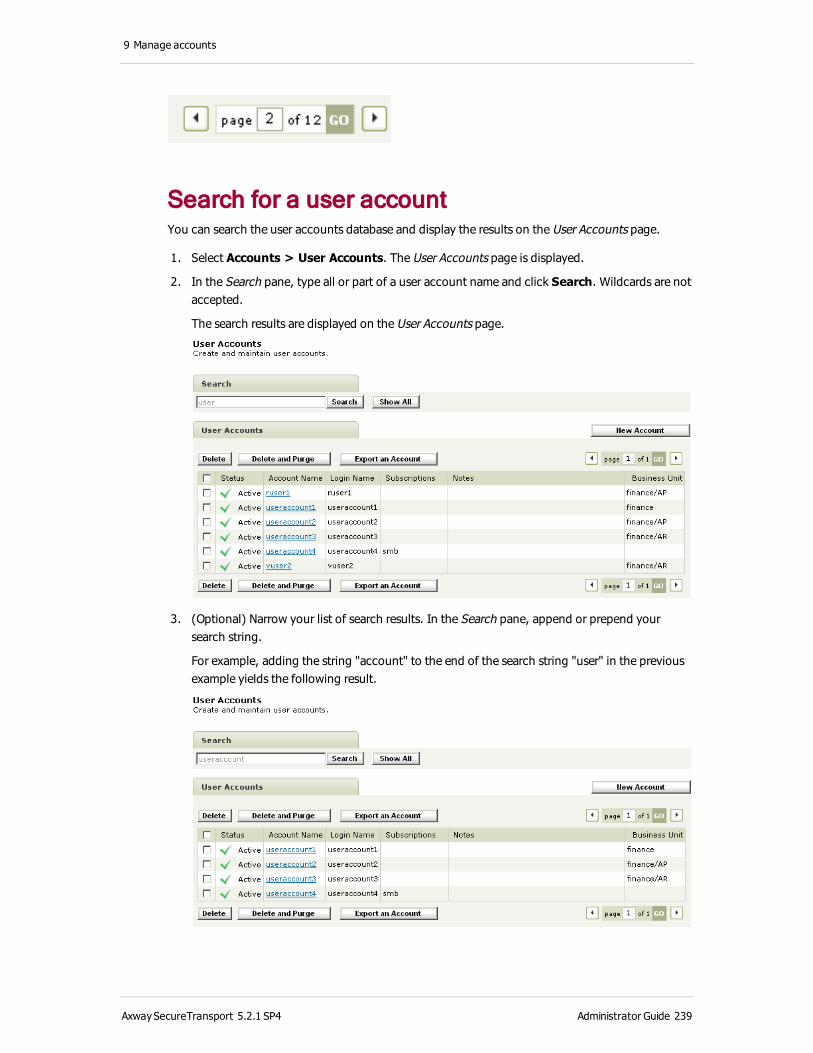
9 Manage accounts
Search for a user accountYou can search the user accounts database and display the results on the User Accounts page.
1. Select Accounts > User Accounts. The User Accounts page is displayed.
2. In the Search pane, type all or part of a user account name and click Search. Wildcards are not accepted.
The search results are displayed on the User Accounts page.
3. (Optional) Narrow your list of search results. In the Search pane, append or prepend your search string.
For example, adding the string "account" to the end of the search string "user" in the previous example yields the following result.
AxwaySecureTransport 5.2.1 SP4 Administrator Guide 239
9 Manage accounts
After you perform a search, the Show All button is displayed.
4. To display all accounts, click Show All.
Create a user accountYou can create new user accounts using the Administration Tool.
1. Select Accounts > User Accounts. The User Accounts page is displayed.
2. Click New Account.
The Settings pane of the New User Account page is displayed.
AxwaySecureTransport 5.2.1 SP4 Administrator Guide 240
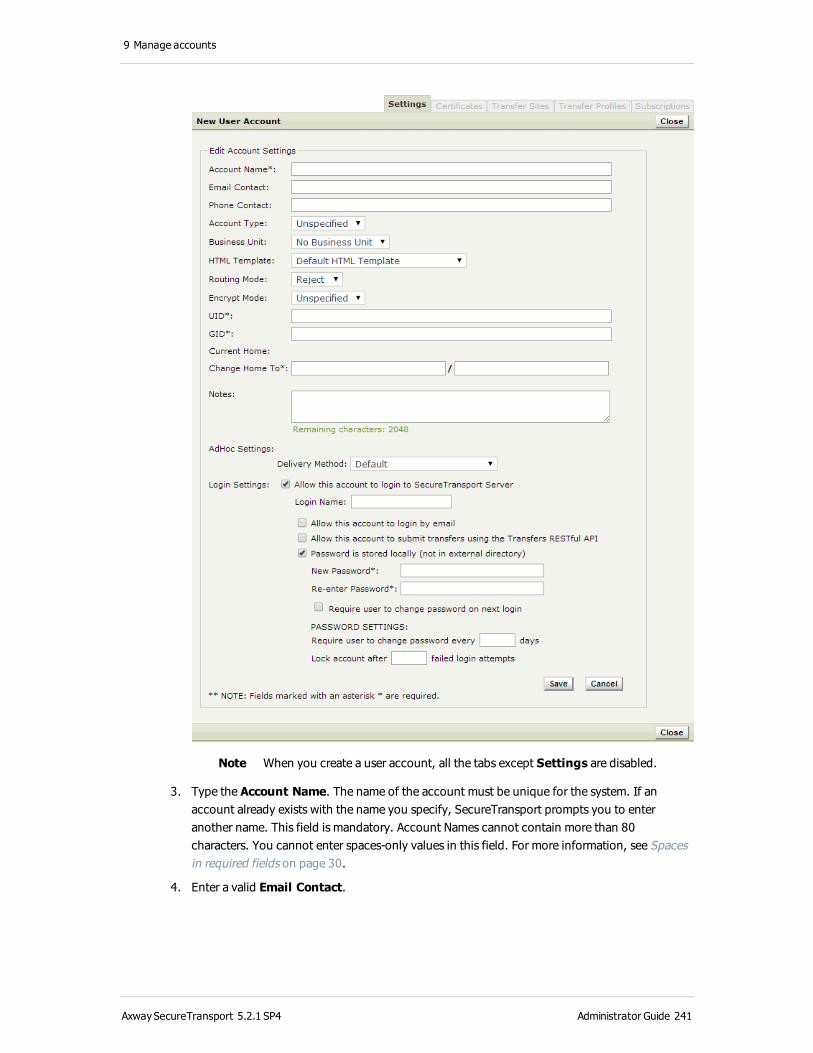
9 Manage accounts
Note When you create a user account, all the tabs except Settings are disabled.
3. Type the Account Name. The name of the account must be unique for the system. If an account already exists with the name you specify, SecureTransport prompts you to enter another name. This field is mandatory. Account Names cannot contain more than 80 characters. You cannot enter spaces-only values in this field. For more information, see Spaces in required fields on page 30.
4. Enter a valid Email Contact.
AxwaySecureTransport 5.2.1 SP4 Administrator Guide 241
9 Manage accounts
When this email address is the recipient of an ad hoc file transfer email sent from Web Access Plus or one of the Axway Email Plug-ins, SecureTransport determines that this user is the recipient. If the user is allowed to log in by email, this is the value used in the User Name field of the login page.
5. Enter a valid Phone Contact.
6. Select an Account Type. Use this parameter to differentiate between accounts that transfer files internally and those that transfer files between partners. Choose from the following:
l Unspecified – Default value. All accounts created using versions of SecureTransport that do not have this option have this value.
l Internal – Transfers for this account occur within a single organization.
l Partner – Transfers for this account occur between organizations
7. Select a Business Unit. The default setting is No Business Unit.
8. Select the HTML Template that SecureTransport displays when the user logs in to the SecureTransport web client.
Note If you select the default HTML template, the SecureTransport web client uses whatever template is specified on Miscellaneous Options page.
9. Select a Routing Mode.
This field controls how SecureTransport behaves when it is the intermediate partner in a PeSIT transfer directed to this account and the transfer cannot be completed because no transfer site matches the routing destination and the account has no PeSIT default site.
l Reject (default) – A PeSIT transfer that cannot be routed is rejected before it starts.
l Accept – A PeSIT transfer that cannot be routed is performed and the file is retained locally.
10. Select Encrypt Mode.
This field can enable repository encryption for this user.
l Unspecified (default) – Repository encryption is enabled based on the EncryptClass user class evaluation.
l Enabled – Repository encryption is enabled for this user account.
11. Type the numeric user ID of the user in the UID field. This field is mandatory on UNIX and Linux platforms. You cannot enter spaces-only values in this field. For more information, see Spaces in required fields on page 30.
On Windows platforms, this field is named Real User and is optional.
12. Type the numeric group ID for the user account in the GID field. The account uses the system access rights and privileges valid for this user group on the system. You cannot enter spaces-only values in this field. For more information, see Spaces in required fields on page 30.
13. Enter a valid home folder in the Change Home To field for the account as an absolute path. SecureTransport validates the directory path you specify and prompts you for a new path if necessary. This field is mandatory. You cannot enter spaces-only values in this field. For more information, see Spaces in required fields on page 30.
AxwaySecureTransport 5.2.1 SP4 Administrator Guide 242
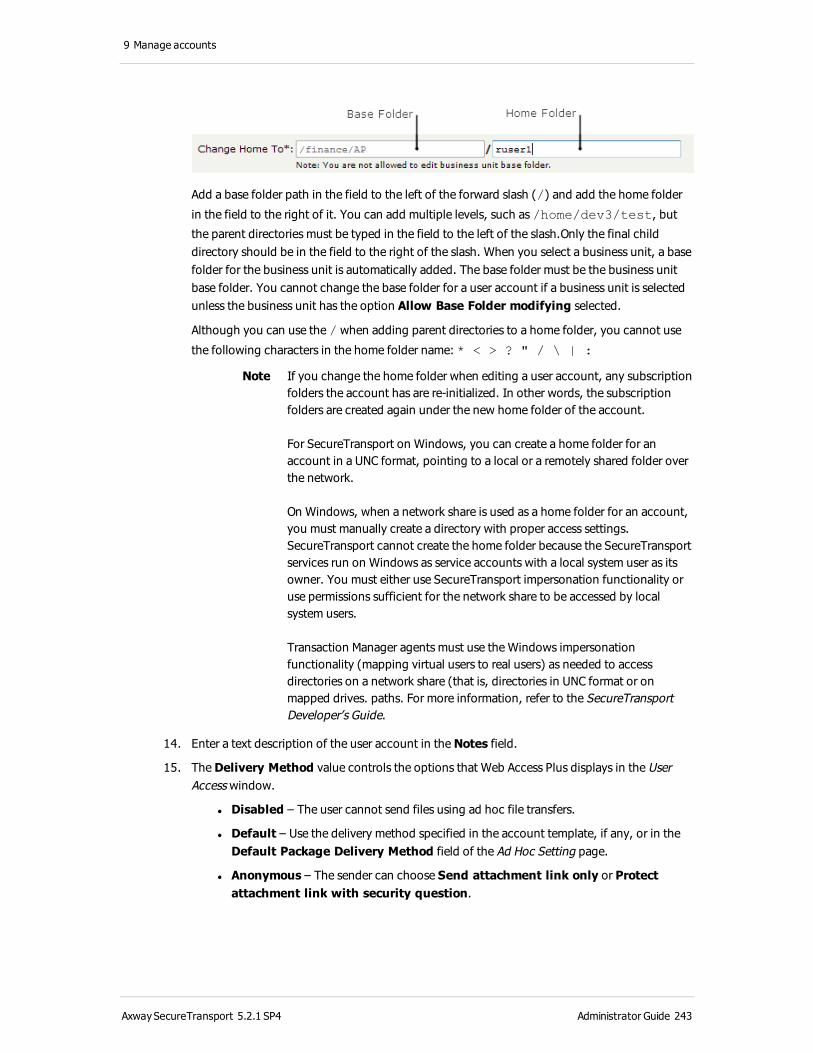
9 Manage accounts
Add a base folder path in the field to the left of the forward slash (/) and add the home folder
in the field to the right of it. You can add multiple levels, such as /home/dev3/test, but
the parent directories must be typed in the field to the left of the slash.Only the final child directory should be in the field to the right of the slash. When you select a business unit, a base folder for the business unit is automatically added. The base folder must be the business unit base folder. You cannot change the base folder for a user account if a business unit is selected unless the business unit has the option Allow Base Folder modifying selected.
Although you can use the / when adding parent directories to a home folder, you cannot use
the following characters in the home folder name: * < > ? " / \ | :
Note If you change the home folder when editing a user account, any subscription folders the account has are re-initialized. In other words, the subscription folders are created again under the new home folder of the account.
For SecureTransport on Windows, you can create a home folder for an account in a UNC format, pointing to a local or a remotely shared folder over the network.
On Windows, when a network share is used as a home folder for an account, you must manually create a directory with proper access settings. SecureTransport cannot create the home folder because the SecureTransport services run on Windows as service accounts with a local system user as its owner. You must either use SecureTransport impersonation functionality or use permissions sufficient for the network share to be accessed by local system users.
Transaction Manager agents must use the Windows impersonation functionality (mapping virtual users to real users) as needed to access directories on a network share (that is, directories in UNC format or on mapped drives. paths. For more information, refer to the SecureTransport Developer’s Guide.
14. Enter a text description of the user account in the Notes field.
15. The Delivery Method value controls the options that Web Access Plus displays in the User Access window.
l Disabled – The user cannot send files using ad hoc file transfers.
l Default – Use the delivery method specified in the account template, if any, or in the Default Package Delivery Method field of the Ad Hoc Setting page.
l Anonymous – The sender can choose Send attachment link only or Protect attachment link with security question.
AxwaySecureTransport 5.2.1 SP4 Administrator Guide 243

9 Manage accounts
l Account Without Enrollment – The sender can choose Send attachment link only, Protect attachment link with security question, or Send to existing users only.
l Account With Enrollment – The sender can choose Send attachment link only, Protect attachment link with security question, Send to existing users only, Allow recipients to enroll as restricted users (receive and reply to messages only), or Allow recipients to enroll as unrestricted users. (Elsewhere the Administration Tool refers to restricted users as unlicensed users and unrestricted users as licensed users.)
l Custom – Select the allowed enrollment types in the Enrollment Types field. The sender can chose any of the selected enrollment types.
16. For a custom delivery method, select one or more allowed enrollment types in the Enrollment Types field:
l Anonymous – The ad hoc file recipient receives a link to retrieve the files and is not enrolled as a user. The Web Access Plus option is Send attachment link only.
l Challenge – The ad hoc file recipient receives a link and must answer correctly a challenge question specified by the sender to retrieve the files. The recipient is not enrolled as a user. The Web Access Plus option is Protect attachment link with security question.
l Existing Account – Do not enroll ad hoc file recipients. Only existing users can receive files. The Web Access Plus option is Send to existing users only.
l Enroll Unlicensed – If the ad hoc file recipient does not have a user account, the recipient must enroll and create an account before retrieving the files. The ad hoc file recipient becomes a restricted user who can only reply once to the email and retrieve the files. Other user attributes are defined by the enrollment template. The Web Access Plus option is Allow recipients to enroll as restricted users (receive and reply to messages only).
l Enroll Licensed – If the ad hoc file recipient does not have a user account, the recipient must enroll and create an account before retrieving the files. The ad hoc file recipient becomes a SecureTransport user with all the attributes specified in the default enrollment template. The Web Access Plus option is Allow recipients to enroll as unrestricted users.
17. When the value of the Delivery Method field is not Default, the Implicit Enrollment Type value controls which option Web Access Plus selects initially in the User Access window and which enrollment type is used by the Axway Email Plug-ins. The choices depend on the enrollment types enabled by the Delivery Methods and Enrollment Types fields. Challenge is not an option because the Axway Email Plug-in do not include the challenge question and answer function.
18. Select Allow this account to log in to SecureTransport Server to allow the new account to log in to SecureTransport. This setting is enabled by default. Disabling the option restricts access of this account to the SecureTransport Server. If you enable this option, the following options are enabled.
AxwaySecureTransport 5.2.1 SP4 Administrator Guide 244
9 Manage accounts
a. Enter a Login Name for the account. This is the unique name with which the account is identified by the SecureTransport Server. Login names cannot contain the following characters: +, :, or [. Login Names cannot start with the following character: *.
b. Select Allow this account to login by email to allow the user to log in using with the value of the Email Contact field as well as the Login Name.
Note A user of one of the Axway Email Plug-ins must either have Allow this account to login by email selected or have the identical values in the Email Contact field and the Login Name field.
c. Select Allow this account to submit transfers using the ST RESTful API to enable calls from the SecureTransport REST file transfer API authenticated with the credentials from this account.
d. Select Password is stored locally (not in external directory) to store the password locally in the system. SecureTransport stores the passwords of real, LDAP, and SiteMinder users in an external directory, and the passwords of virtual users are stored in the SecureTransport database.
e. Specify the remaining password-related settings according to the information for the options available on the page.
Note The Password is stored locally (not in external directory) option can only be used for a user account that has a virtual user associated with it. If the user associated with the account is a real, LDAP, or SiteMinder user, then the password cannot be stored locally in the SecureTransport database and this option is unusable.
19. Click Save.
The user account information is saved and displayed in the Settings pane of the user account.
AxwaySecureTransport 5.2.1 SP4 Administrator Guide 245
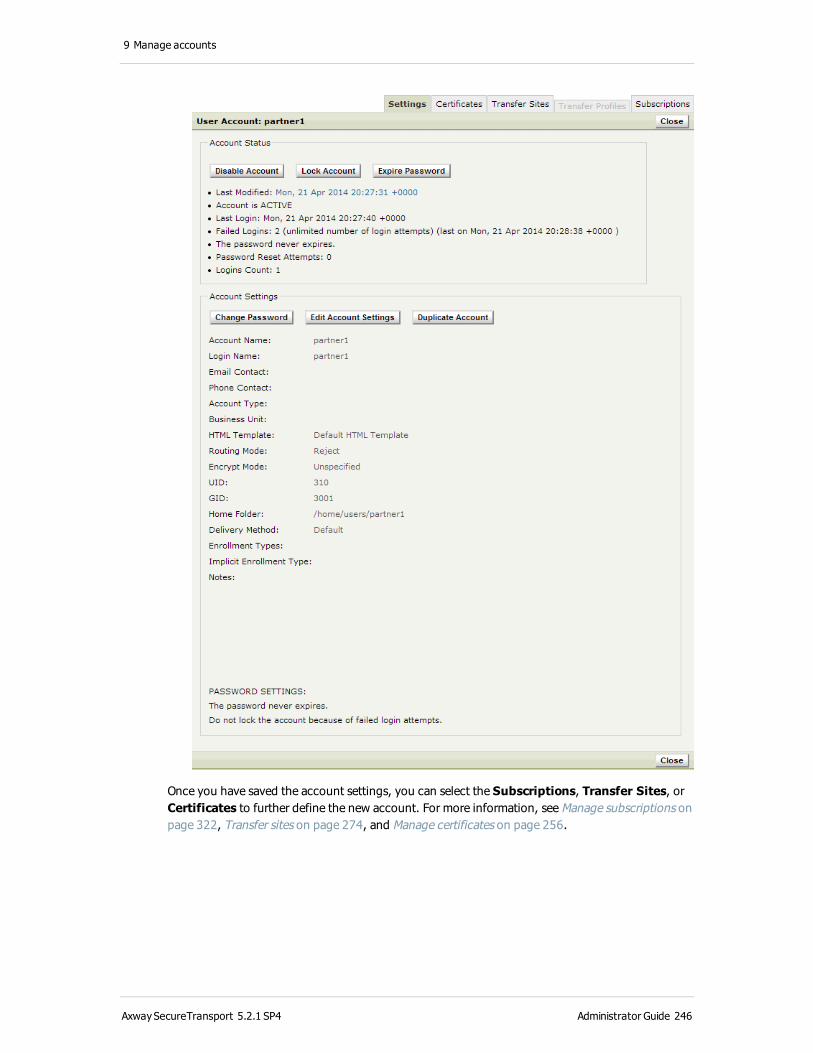
9 Manage accounts
Once you have saved the account settings, you can select the Subscriptions, Transfer Sites, or Certificates to further define the new account. For more information, see Manage subscriptions on page 322, Transfer sites on page 274, and Manage certificates on page 256.
AxwaySecureTransport 5.2.1 SP4 Administrator Guide 246

9 Manage accounts
Web password compatibilityIf a user created a password that contained the plus symbol (+) while running a web client in a previous version of SecureTransport, you must change the value of the Http.Password.Compatability.Mode server configuration parameter to on to allow passwords with the + symbol.
When set to on this parameter allows users who previously changed their password to a string containing the plus character through a web client to log in and change their password. This option affects only the web clients. Once the password is changed, the user can log in using any client or protocol.
If you have upgraded or performed a system import, and you did not already manually change the parameter, SecureTransport sets the value set to on to allow legacy users with a + symbol in the password to log on without an error.
View account settingsUse the Settings pane to view and modify account status and settings. When an account is defined for an external authenticated user, such as an LDAP or SiteMinder user, the external UID, GID, and home folder attributes are replaced with the values taken from the account information while the external user is logged into SecureTransport.
1. Select Accounts > User Accounts. The User Accounts page is displayed.
2. Click the name of the account whose settings you want to view.
The Settings pane is displayed with details for the selected account.
Change how long user account information is cached in memoryYou can set how long SecureTransport keeps the user account information cached in memory by editing the TransactionManager.AccountContextAgent.cacheTimeout parameter on the Server Configuration page. The default value is 900 seconds. Change the value to keep the cached information for a longer or shorter period of time. You can also set it to null or a negative value to not cache the account information. Changes you make to an account do not show up until after the cache is refreshed.
Disable or enable a user account 1. Select Accounts > User Accounts. The User Accounts page is displayed.
2. Click Disable Account or Enable Account, depending on the current status of the account.
If an account is disabled:
AxwaySecureTransport 5.2.1 SP4 Administrator Guide 247
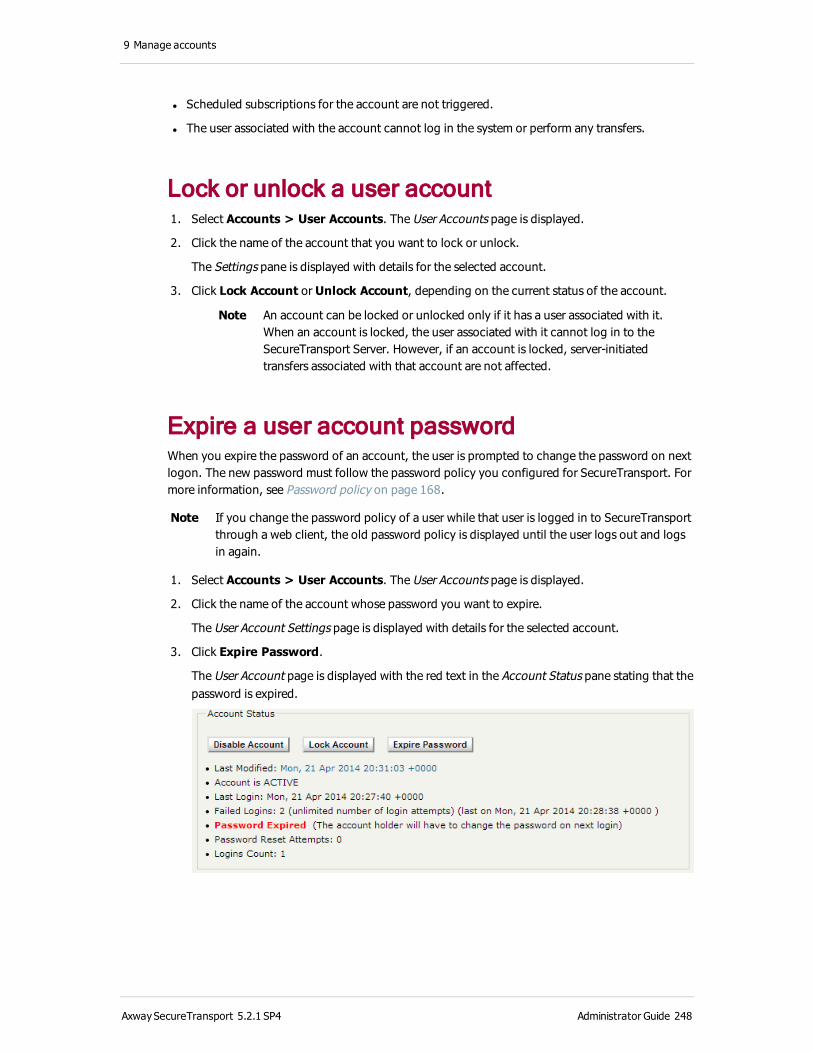
9 Manage accounts
l Scheduled subscriptions for the account are not triggered.
l The user associated with the account cannot log in the system or perform any transfers.
Lock or unlock a user account 1. Select Accounts > User Accounts. The User Accounts page is displayed.
2. Click the name of the account that you want to lock or unlock.
The Settings pane is displayed with details for the selected account.
3. Click Lock Account or Unlock Account, depending on the current status of the account.
Note An account can be locked or unlocked only if it has a user associated with it. When an account is locked, the user associated with it cannot log in to the SecureTransport Server. However, if an account is locked, server-initiated transfers associated with that account are not affected.
Expire a user account passwordWhen you expire the password of an account, the user is prompted to change the password on next logon. The new password must follow the password policy you configured for SecureTransport. For more information, see Password policy on page 168.
Note If you change the password policy of a user while that user is logged in to SecureTransport through a web client, the old password policy is displayed until the user logs out and logs in again.
1. Select Accounts > User Accounts. The User Accounts page is displayed.
2. Click the name of the account whose password you want to expire.
The User Account Settings page is displayed with details for the selected account.
3. Click Expire Password.
The User Account page is displayed with the red text in the Account Status pane stating that the password is expired.
AxwaySecureTransport 5.2.1 SP4 Administrator Guide 248

9 Manage accounts
Change a user account password 1. Select Accounts > User Accounts. The User Accounts page is displayed.
2. Click the name of the account whose password you want to change.
The User Account Settings page is displayed with details for the selected account.
3. Click Change Password.
The Change Password pane is displayed.
4. Type the new password.
5. Re-type the password to confirm it.
6. (Optional) Select the Require user to change password on next login check box.
7. Click Save.
Note Password policy restrictions apply.
Edit user account settings 1. Select Accounts > User Accounts. The User Accounts page is displayed.
2. Click the name of the account whose settings you want to edit.
The User Account Settings page is displayed with details for the selected account.
3. Click Edit Account Settings.
The Edit Account Settings page is displayed.
AxwaySecureTransport 5.2.1 SP4 Administrator Guide 249
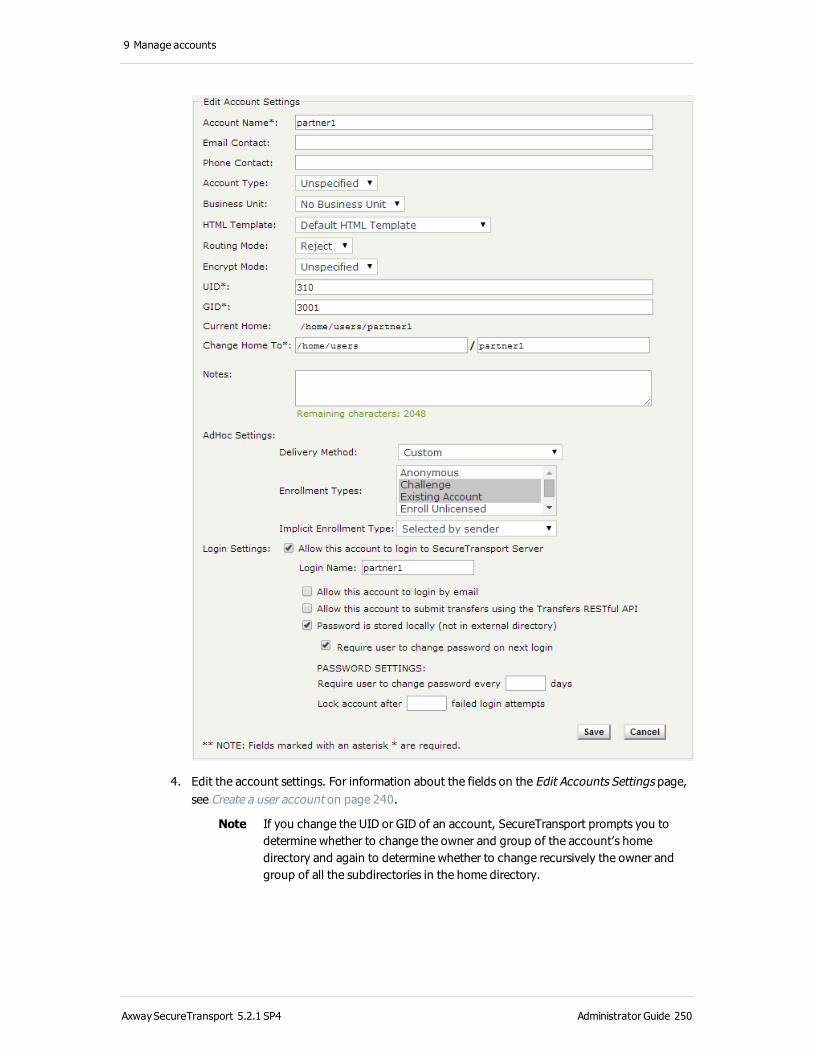
9 Manage accounts
4. Edit the account settings. For information about the fields on the Edit Accounts Settings page, see Create a user account on page 240.
Note If you change the UID or GID of an account, SecureTransport prompts you to determine whether to change the owner and group of the account’s home directory and again to determine whether to change recursively the owner and group of all the subdirectories in the home directory.
AxwaySecureTransport 5.2.1 SP4 Administrator Guide 250
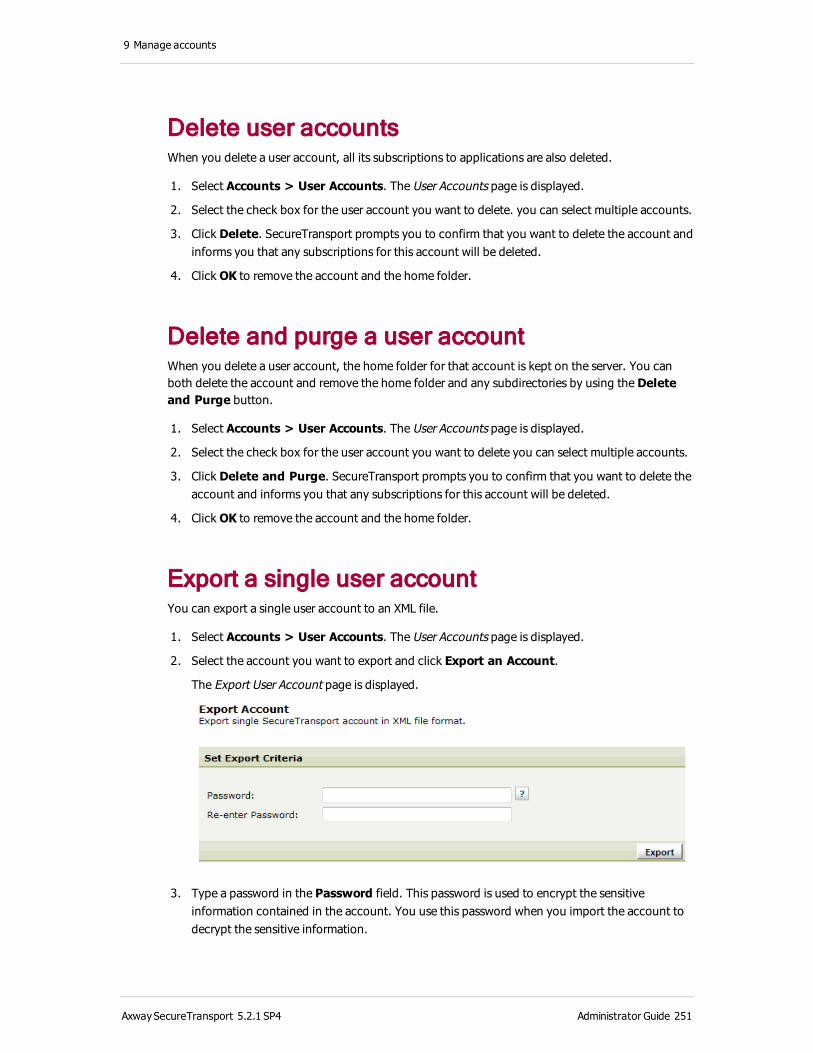
9 Manage accounts
Delete user accountsWhen you delete a user account, all its subscriptions to applications are also deleted.
1. Select Accounts > User Accounts. The User Accounts page is displayed.
2. Select the check box for the user account you want to delete. you can select multiple accounts.
3. Click Delete. SecureTransport prompts you to confirm that you want to delete the account and informs you that any subscriptions for this account will be deleted.
4. Click OK to remove the account and the home folder.
Delete and purge a user accountWhen you delete a user account, the home folder for that account is kept on the server. You can both delete the account and remove the home folder and any subdirectories by using the Delete and Purge button.
1. Select Accounts > User Accounts. The User Accounts page is displayed.
2. Select the check box for the user account you want to delete you can select multiple accounts.
3. Click Delete and Purge. SecureTransport prompts you to confirm that you want to delete the account and informs you that any subscriptions for this account will be deleted.
4. Click OK to remove the account and the home folder.
Export a single user accountYou can export a single user account to an XML file.
1. Select Accounts > User Accounts. The User Accounts page is displayed.
2. Select the account you want to export and click Export an Account.
The Export User Account page is displayed.
3. Type a password in the Password field. This password is used to encrypt the sensitive information contained in the account. You use this password when you import the account to decrypt the sensitive information.
AxwaySecureTransport 5.2.1 SP4 Administrator Guide 251
9 Manage accounts
4. Retype the password in the Re-enter Password field.
5. Click Export.
The account is exported to an XML file you can download to your local computer.
For more information, see Account export and import on page 334.
Note Because of a difference in the implementation of a hashing algorithm, account export and import does not interoperate between SecureTransport running on IBM AIX and SecureTransport running on another operating system. Also, account import is not supported from a version of SecureTransport that cannot be upgraded to the installed version.
Unlicensed usersThe recipient of an ad hoc human-to-human file transfer email or a system-to-human file transfer email does not need all SecureTransport user account functionality to retrieve the files. If the recipient does not need other SecureTransport functionality, the recipient can be an unlicensed user. As the name implies, unlicensed users do not require an account license to connect to SecureTransport to retrieve or reply to messages.
Unlicensed users can log in to SecureTransport using Web Access Plus or one of the Axway Email Plug-ins to retrieve files. Using Web Access Plus, they can reply once to the sender of a file transfer email. Using Microsoft Outlook or Lotus Notes, they can reply to a file transfer email as they would to any email. They cannot create or forward messages with ad hoc file transfers. For an unlicensed user, Web Access Plus does not include the file transfer functions.
If the ad hoc human-to-human file transfer specifies enrollment as an unlicensed user or the System to Human transfer site specifies a security level of Enroll User - Unlicensed, the recipient becomes an unlicensed user on enrollment.
Create account templates for unlicensed users. Configure the account template that applies to unlicensed users in the business unit or in the Default enrollment account template field on the Ad Hoc Setting page. See Manage account templates on page 357, Create or edit a business unit on page 377, and Ad hoc file transfer configuration on page 123.
You can also create an unlicensed user account from the Unlicensed User Accounts page.
1. Select Accounts > Unlicensed Users. The Unlicensed User Accounts page is displayed.
2. Click New Account.
The Settings pane of the New Unlicensed User Account page is displayed.
AxwaySecureTransport 5.2.1 SP4 Administrator Guide 252
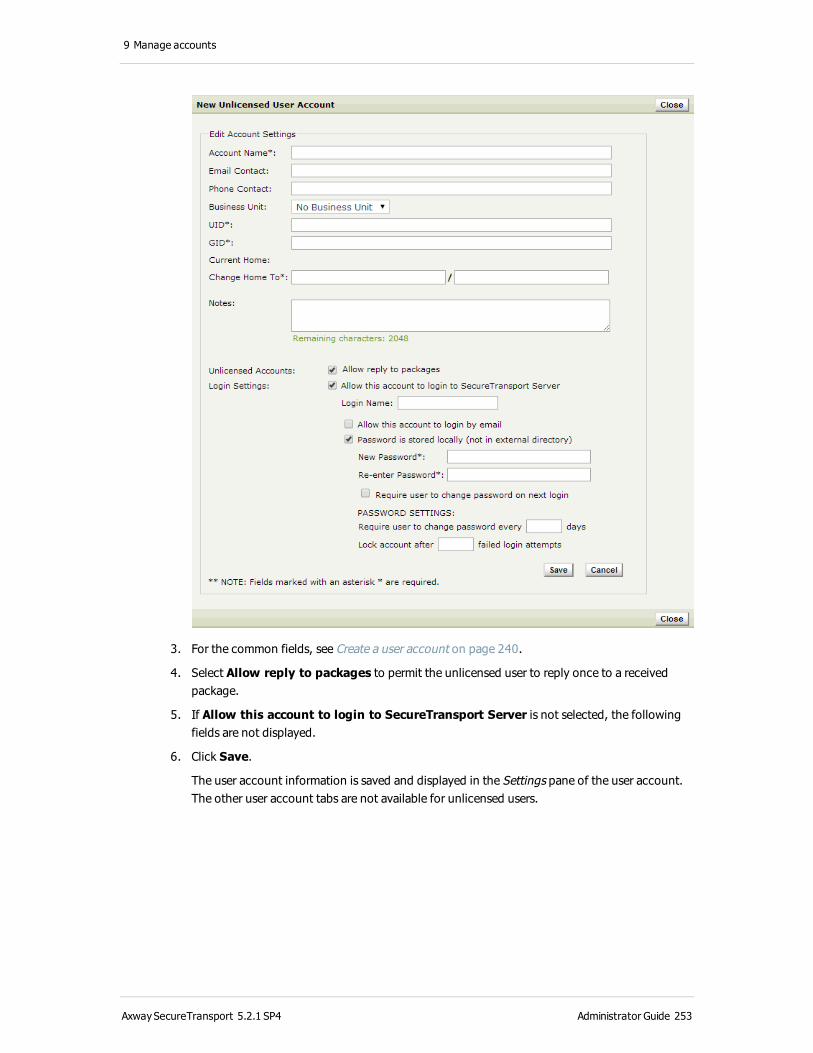
9 Manage accounts
3. For the common fields, see Create a user account on page 240.
4. Select Allow reply to packages to permit the unlicensed user to reply once to a received package.
5. If Allow this account to login to SecureTransport Server is not selected, the following fields are not displayed.
6. Click Save.
The user account information is saved and displayed in the Settings pane of the user account. The other user account tabs are not available for unlicensed users.
AxwaySecureTransport 5.2.1 SP4 Administrator Guide 253

9 Manage accounts
You can convert an unlicensed user account to a licensed user account.
1. Select Accounts > Unlicensed Users. The Unlicensed User Accounts page is displayed.
2. Click the name of the account to convert to a licensed user account.
The User Account Settings page is displayed with details for the selected account.
3. Click Convert to Licensed.
The Administration Tool displays the Settings pane for the new user account.
The other procedures are the same for licensed and unlicensed user accounts.
Protected folders and accountsSecureTransport maintains a list of directories which you should not use for home folders for user or service accounts. This type of directory is called a protected folder. Protected folders are identified by a specific prefix in the path. The following table lists the prefixes used by default.
Virtual accounts can be purged using SecureTransport, provided these accounts are not in a protected folder.
SecureTransport provides the following precautions that are built-in to prevent accidental or malicious account deletion:
AxwaySecureTransport 5.2.1 SP4 Administrator Guide 254
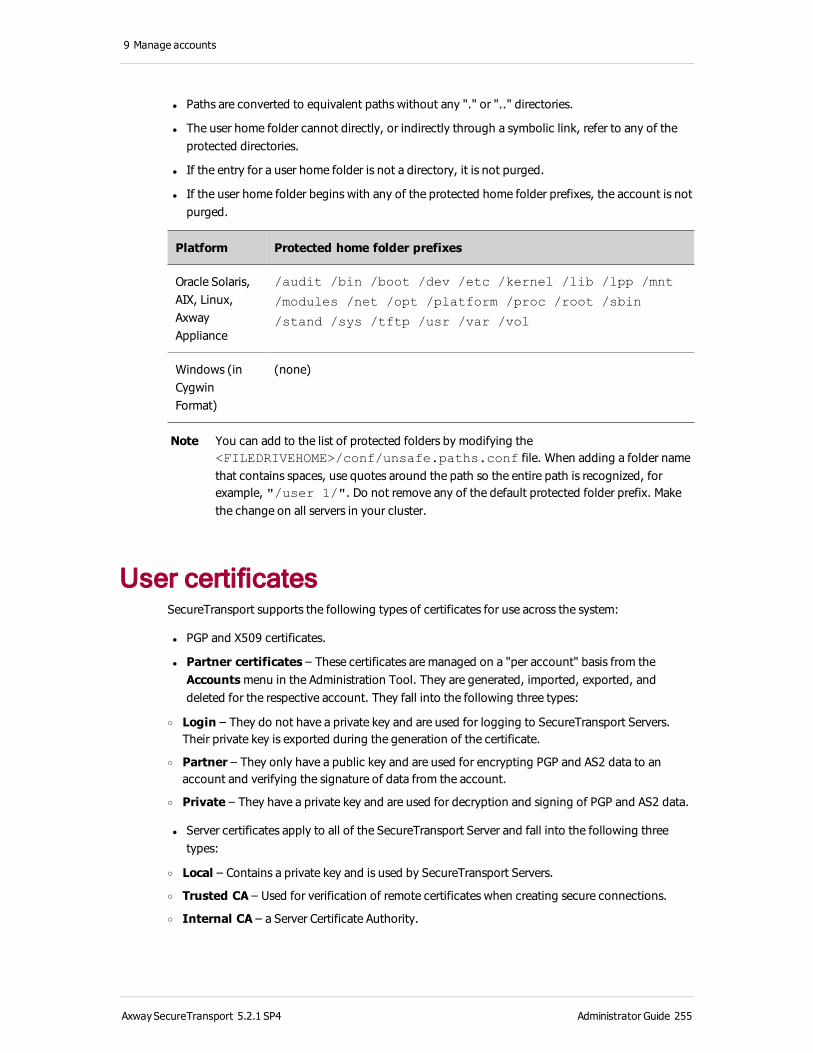
9 Manage accounts
l Paths are converted to equivalent paths without any "." or ".." directories.
l The user home folder cannot directly, or indirectly through a symbolic link, refer to any of the protected directories.
l If the entry for a user home folder is not a directory, it is not purged.
l If the user home folder begins with any of the protected home folder prefixes, the account is not purged.
Platform Protected home folder prefixes
Oracle Solaris, AIX, Linux, Axway Appliance
/audit /bin /boot /dev /etc /kernel /lib /lpp /mnt
/modules /net /opt /platform /proc /root /sbin
/stand /sys /tftp /usr /var /vol
Windows (in Cygwin Format)
(none)
Note You can add to the list of protected folders by modifying the <FILEDRIVEHOME>/conf/unsafe.paths.conf file. When adding a folder name that contains spaces, use quotes around the path so the entire path is recognized, for example, "/user 1/". Do not remove any of the default protected folder prefix. Make the change on all servers in your cluster.
User certificatesSecureTransport supports the following types of certificates for use across the system:
l PGP and X509 certificates.
l Partner certificates – These certificates are managed on a "per account" basis from the Accounts menu in the Administration Tool. They are generated, imported, exported, and deleted for the respective account. They fall into the following three types:
o Login – They do not have a private key and are used for logging to SecureTransport Servers. Their private key is exported during the generation of the certificate.
o Partner – They only have a public key and are used for encrypting PGP and AS2 data to an account and verifying the signature of data from the account.
o Private – They have a private key and are used for decryption and signing of PGP and AS2 data.
l Server certificates apply to all of the SecureTransport Server and fall into the following three types:
o Local – Contains a private key and is used by SecureTransport Servers.
o Trusted CA – Used for verification of remote certificates when creating secure connections.
o Internal CA – a Server Certificate Authority.
AxwaySecureTransport 5.2.1 SP4 Administrator Guide 255

9 Manage accounts
Manage certificatesUse the Certificates pane of the User Account page to manage user certificates.
Generate a partner PGP key 1. Select Accounts > User Accounts.
2. Click the name of the account containing the certificate.
The User Account Settings page is displayed with details for the selected account.
3. Click the Certificates tab.
4. Click Partner Certificates sub-tab.
The Partner Certificates options are displayed.
5. Click Generate to generate a partner PGP key.
The Generate Certificate dialog box is displayed.
6. Fill in the fields in the Generate Certificate dialog box and click Generate.
AxwaySecureTransport 5.2.1 SP4 Administrator Guide 256
9 Manage accounts
The Save PGP keypair file dialog box is displayed.
7. Enter the password in the Password field and enter it again in the Confirm Password field.
8. Click Continue.
You are prompted to open or save the PGP ASCII-Armored (.asc) file. This file contains both
the public and private keys.
9. Save a copy of the PGP file and send it to the account user so they can transfer files successfully with PGP encryption.
The certificate is added to the partner certificates for the user. Only the public key is stored.
Import a partner PGP key 1. On the Partner Certificates sub-tab, click Import.
The Import Certificate/Key dialog box is displayed.
AxwaySecureTransport 5.2.1 SP4 Administrator Guide 257

9 Manage accounts
2. Select PGP key, fill in the Alias field, and select the appropriate radio button to Import certificate from file or Paste certificate in space below.
The value you specify in the Alias field cannot exceed 50 characters in length.
3. As required, enter the name of the .asc file, browse to it, or paste the PGP public key block
into the text field.
4. Click Import.
The certificate is added to the partner certificates for the user. Only the public key is stored.
Note The PGP keys imported for use with an account must specify signing algorithms.
Delete a partner PGP key 1. On the Partner Certificates sub-tab, select the check boxes for the certificates to delete.
2. Click Delete.
Export a PGP public key 1. On the Partner Certificates sub-tab, click the certificate you want to export.
The View Certificate dialog box is displayed.
AxwaySecureTransport 5.2.1 SP4 Administrator Guide 258
9 Manage accounts
2. Click Export.
3. Save the .asc file with the public key.
View a login certificateSecureTransport uses login certificates when the respective (currently active) account logs in to a SecureTransport Server using a certificate or SSH Key.
You can view, generate, import and delete login certificates for the active account from the Login Certificates tab.
Note SecureTransport generates only X509 login certificates, but you are allowed to import both X509 and SSH Key certificates.
1. Select Accounts > User Accounts.
2. Click the name of the account for which you want to view the certificate.
The User Account Settings page is displayed with details for the selected account.
3. Click the Certificates tab.
The list of login certificates for the selected account is displayed.
4. Click the View link for the certificate you want to view.
Certificate information for the certificate you selected is displayed in a View Certificate dialog
AxwaySecureTransport 5.2.1 SP4 Administrator Guide 259

9 Manage accounts
box.
Export a login certificate 1. Select Accounts > User Accounts.
2. Click the name of the account containing the certificate.
The User Account Settings page is displayed with details for the selected account.
3. Click the Certificates tab.
The list of login certificates for the selected account is displayed.
4. Click the name of the certificate you want to view.
Certificate information for the certificate you selected is displayed in a View Certificate dialog box.
5. Click Export or Export as SSH Public Key, as desired.
6. When prompted, save the file containing the key on your file system.
Generate a login certificate 1. Select Accounts > User Accounts.
2. Click the name of the account where you want to add the certificate.
The User Account Settings page is displayed with details for the selected account.
AxwaySecureTransport 5.2.1 SP4 Administrator Guide 260
9 Manage accounts
3. Click the Certificates tab.
The list of login certificates for the selected account is displayed.
4. Click Generate. The Generate Certificate dialog box is displayed.
5. Type the necessary information in the Generate Certificate dialog box, and then click Generate.
Validity in days and Common Name (CN) are required fields.
Import an X509 login certificateBefore the user attempts to log in using an imported certificate, ensure that the CA referenced in the certificate is include in the trusted CAs for the SecureTransport server. For details, see Manage trusted CAs on page 95.
1. Select Accounts > User Accounts.
2. Click the name of the account where you want to import the certificate.
The User Account Settings page is displayed with details for the selected account.
3. Click the Certificates tab.
The list of login certificates for the selected account is displayed.
4. Click Import.
The Import Certificate/Key dialog box is displayed.
AxwaySecureTransport 5.2.1 SP4 Administrator Guide 261
9 Manage accounts
5. Select X509 Certificate.
6. Type the necessary information in the Import Certificate/Key dialog box.
Paste the certificate content directly in the provided space, or import the certificate from a file. To import from file, type the file path or click Browse to browse for the file.
7. Click Import.
Import an SSH login public key 1. Select Accounts > User Accounts.
2. Click the name of the account where you want to import the certificate. The User Account Settings page is displayed with details for the selected account.
3. Click the Certificates tab. The list of login certificates for the selected account is displayed.
4. Click Import.
The Import Certificate/Key dialog box is displayed.
AxwaySecureTransport 5.2.1 SP4 Administrator Guide 262
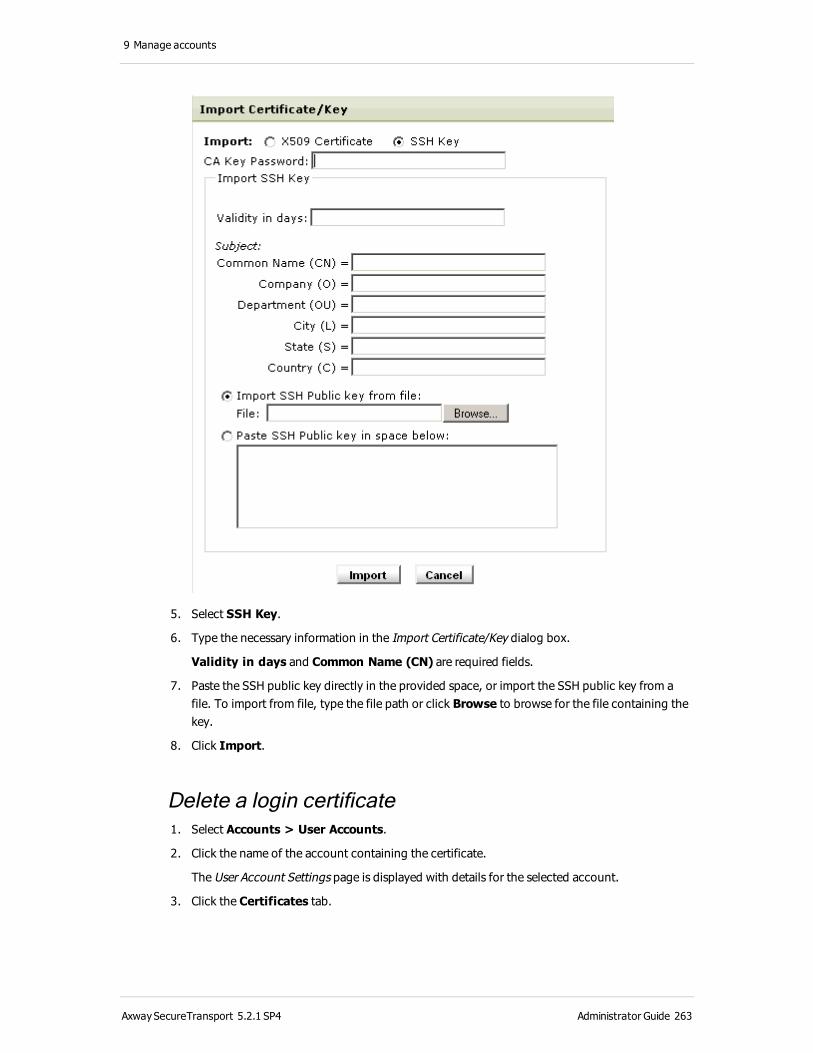
9 Manage accounts
5. Select SSH Key.
6. Type the necessary information in the Import Certificate/Key dialog box.
Validity in days and Common Name (CN) are required fields.
7. Paste the SSH public key directly in the provided space, or import the SSH public key from a file. To import from file, type the file path or click Browse to browse for the file containing the key.
8. Click Import.
Delete a login certificate 1. Select Accounts > User Accounts.
2. Click the name of the account containing the certificate.
The User Account Settings page is displayed with details for the selected account.
3. Click the Certificates tab.
AxwaySecureTransport 5.2.1 SP4 Administrator Guide 263

9 Manage accounts
The list of login certificates for the selected account is displayed.
4. Select the check box next to the certificate you want to delete, and then click Delete.
View a partner certificateSecureTransport uses partner certificates as public certificates for encrypting PGP and AS2 data to the respective account and for verification of the signature of data from the account.
You can view, generate, import and delete partner certificates for the active account from the Partner Certificates tab page.
1. Select Accounts > User Accounts.
2. Click the name of the account for which you want to view the certificate.
The User Account Settings page is displayed with details for the selected account.
3. Click the Certificates tab, and then click Partner Certificates.
A list of partner certificates for the selected account is displayed on the Partner Certificates page.
4. Click the alias name of the partner certificate you want to view.
AxwaySecureTransport 5.2.1 SP4 Administrator Guide 264

9 Manage accounts
Partner certificate information is displayed in the View Certificate dialog box.
Note SecureTransport generates and imports X509, PGP, and SSH partner certificates.
Export a partner certificate 1. Select Accounts > User Accounts.
2. Click the name of the account containing the certificate.
The User Account Settings page is displayed with details for the selected account.
3. Click the Certificates tab, and then click Partner Certificates.
A list of partner certificates for the selected account is displayed on the Partner Certificates page.
4. Click the name of the certificate you want to export.
Partner certificate information is displayed in the View Certificate dialog box.
AxwaySecureTransport 5.2.1 SP4 Administrator Guide 265
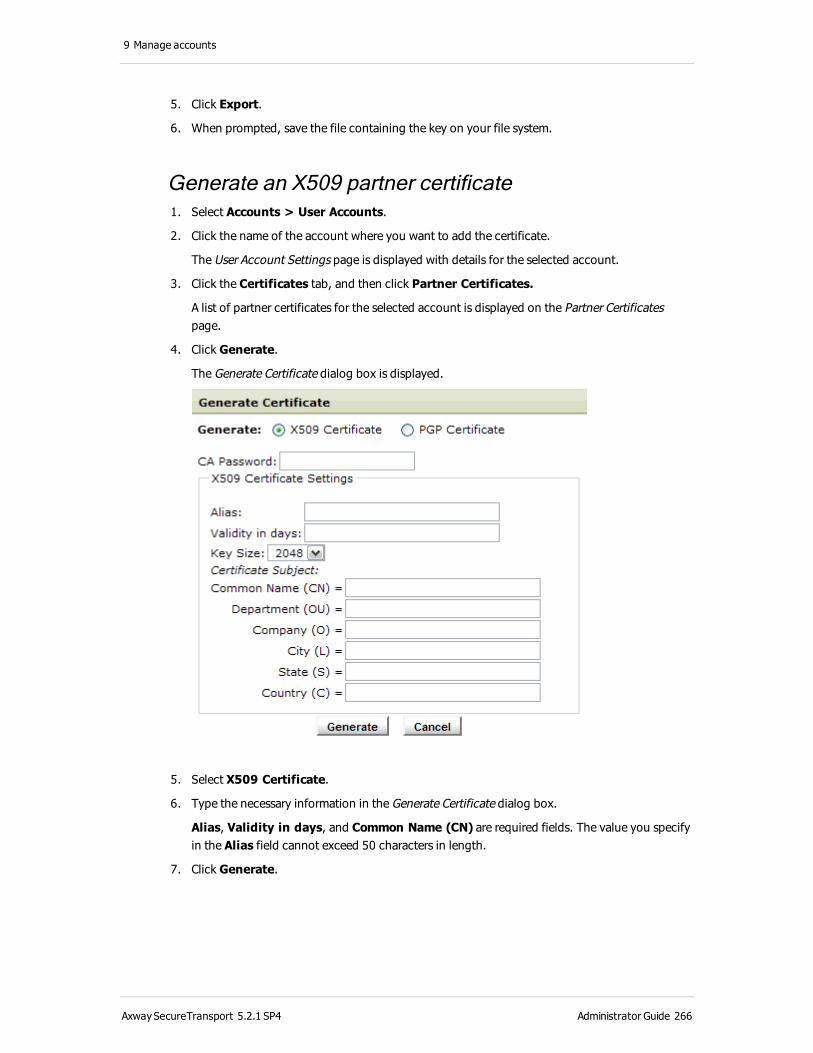
9 Manage accounts
5. Click Export.
6. When prompted, save the file containing the key on your file system.
Generate an X509 partner certificate 1. Select Accounts > User Accounts.
2. Click the name of the account where you want to add the certificate.
The User Account Settings page is displayed with details for the selected account.
3. Click the Certificates tab, and then click Partner Certificates.
A list of partner certificates for the selected account is displayed on the Partner Certificates page.
4. Click Generate.
The Generate Certificate dialog box is displayed.
5. Select X509 Certificate.
6. Type the necessary information in the Generate Certificate dialog box.
Alias, Validity in days, and Common Name (CN) are required fields. The value you specify in the Alias field cannot exceed 50 characters in length.
7. Click Generate.
AxwaySecureTransport 5.2.1 SP4 Administrator Guide 266
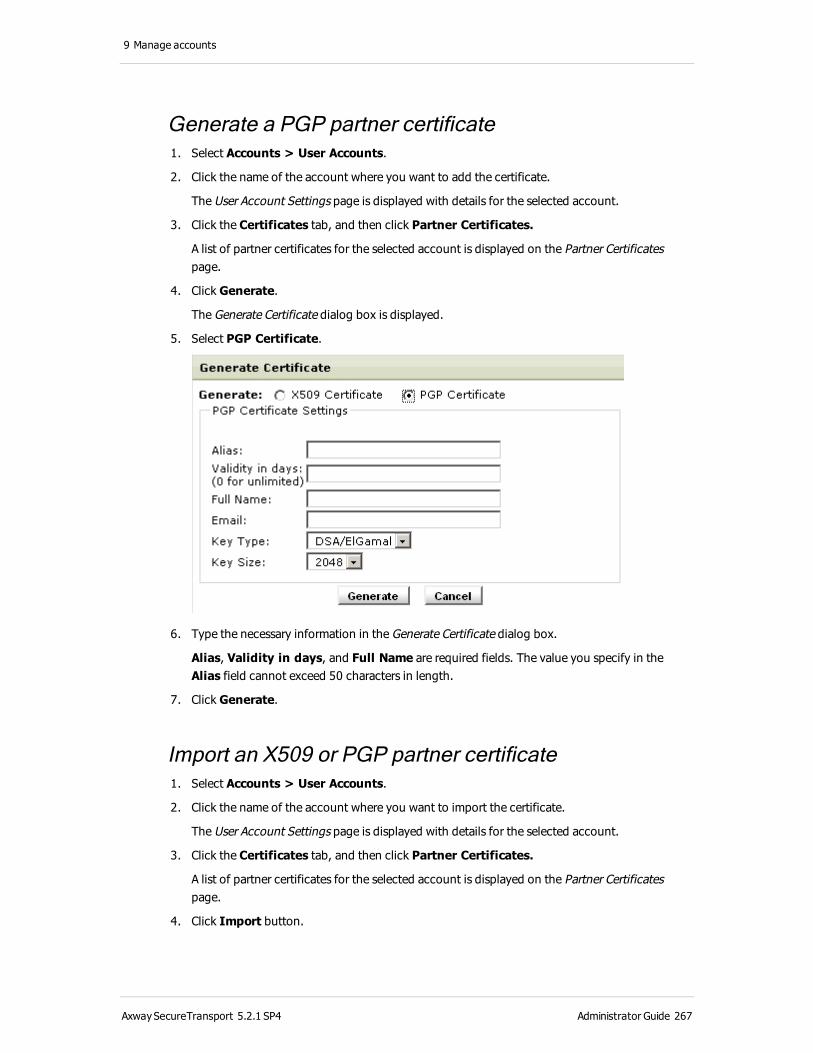
9 Manage accounts
Generate a PGP partner certificate 1. Select Accounts > User Accounts.
2. Click the name of the account where you want to add the certificate.
The User Account Settings page is displayed with details for the selected account.
3. Click the Certificates tab, and then click Partner Certificates.
A list of partner certificates for the selected account is displayed on the Partner Certificates page.
4. Click Generate.
The Generate Certificate dialog box is displayed.
5. Select PGP Certificate.
6. Type the necessary information in the Generate Certificate dialog box.
Alias, Validity in days, and Full Name are required fields. The value you specify in the Alias field cannot exceed 50 characters in length.
7. Click Generate.
Import an X509 or PGP partner certificate 1. Select Accounts > User Accounts.
2. Click the name of the account where you want to import the certificate.
The User Account Settings page is displayed with details for the selected account.
3. Click the Certificates tab, and then click Partner Certificates.
A list of partner certificates for the selected account is displayed on the Partner Certificates page.
4. Click Import button.
AxwaySecureTransport 5.2.1 SP4 Administrator Guide 267

9 Manage accounts
The Import Certificate/Key dialog box is displayed.
5. Select the certificate type of the certificate you want to import: X509 or PGP.
6. Type the necessary information in the Import Certificate/Key dialog box.
Paste the certificate content directly in the provided space, or import the certificate from a file. To import from file, type the file path or click Browse to browse for the file.
7. Click Import.
Note The PGP keys imported for use with an account must specify signing algorithms.
Delete one or more partner certificates 1. Select Accounts > User Accounts. The User Accounts page is displayed.
2. Click the name of the account containing the certificate.
The User Account Settings page is displayed with details for the selected account.
3. Click the Certificates tab, and then click Partner Certificates.
A list of partner certificates for the selected account is displayed on the Partner Certificates page.
4. Select the check box next to the certificate you want to delete, and then click Delete.
View a private certificateSecureTransport uses private certificates to log in to remote transfer sites for this account, as well as for decrypting and signing PGP and AS2 data.
AxwaySecureTransport 5.2.1 SP4 Administrator Guide 268
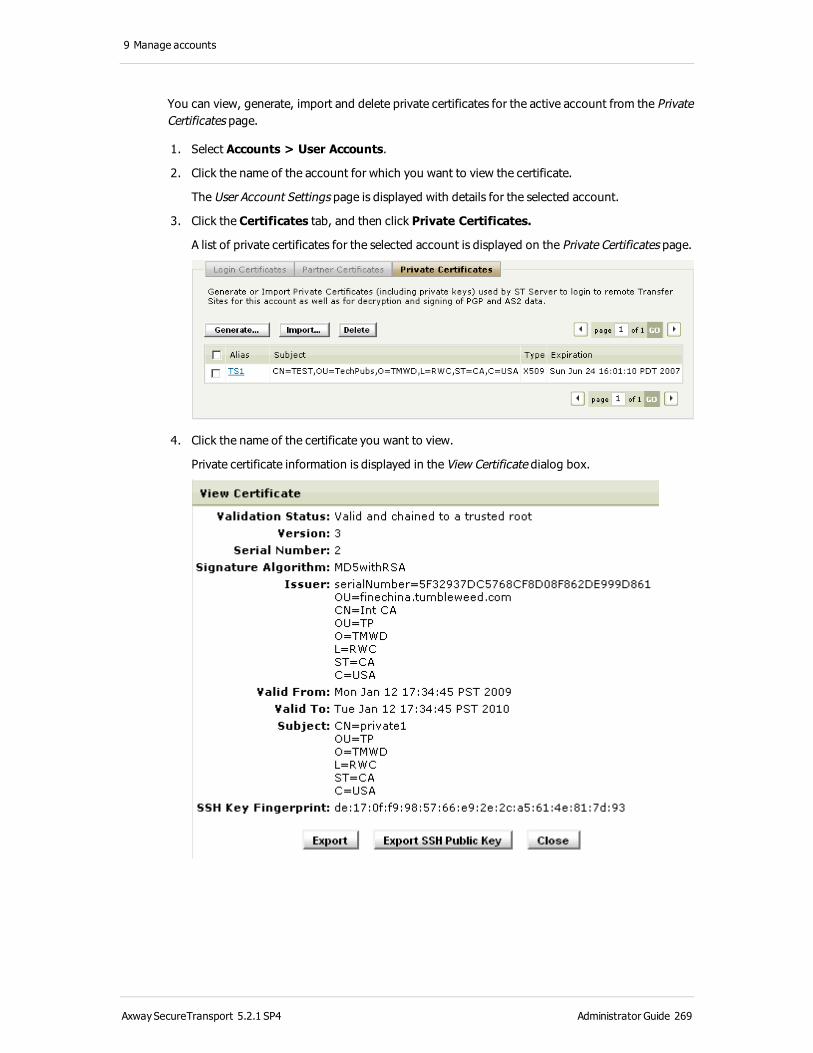
9 Manage accounts
You can view, generate, import and delete private certificates for the active account from the Private Certificates page.
1. Select Accounts > User Accounts.
2. Click the name of the account for which you want to view the certificate.
The User Account Settings page is displayed with details for the selected account.
3. Click the Certificates tab, and then click Private Certificates.
A list of private certificates for the selected account is displayed on the Private Certificates page.
4. Click the name of the certificate you want to view.
Private certificate information is displayed in the View Certificate dialog box.
AxwaySecureTransport 5.2.1 SP4 Administrator Guide 269
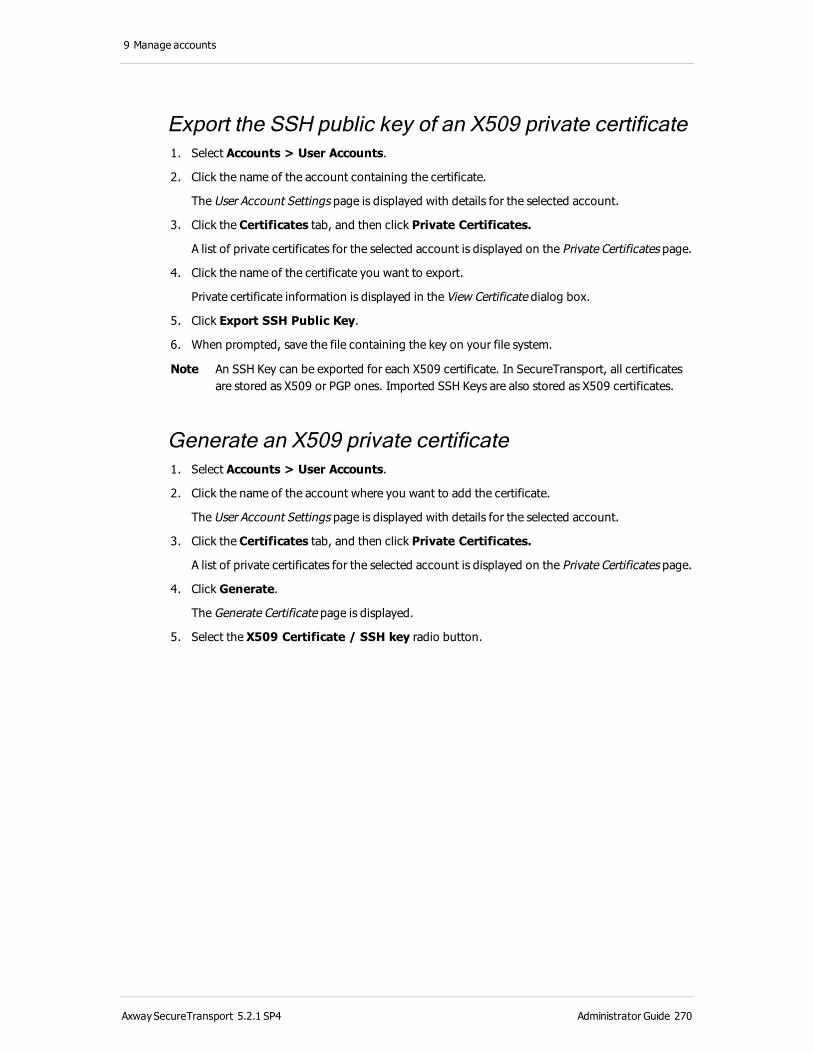
9 Manage accounts
Export the SSH public key of an X509 private certificate 1. Select Accounts > User Accounts.
2. Click the name of the account containing the certificate.
The User Account Settings page is displayed with details for the selected account.
3. Click the Certificates tab, and then click Private Certificates.
A list of private certificates for the selected account is displayed on the Private Certificates page.
4. Click the name of the certificate you want to export.
Private certificate information is displayed in the View Certificate dialog box.
5. Click Export SSH Public Key.
6. When prompted, save the file containing the key on your file system.
Note An SSH Key can be exported for each X509 certificate. In SecureTransport, all certificates are stored as X509 or PGP ones. Imported SSH Keys are also stored as X509 certificates.
Generate an X509 private certificate 1. Select Accounts > User Accounts.
2. Click the name of the account where you want to add the certificate.
The User Account Settings page is displayed with details for the selected account.
3. Click the Certificates tab, and then click Private Certificates.
A list of private certificates for the selected account is displayed on the Private Certificates page.
4. Click Generate.
The Generate Certificate page is displayed.
5. Select the X509 Certificate / SSH key radio button.
AxwaySecureTransport 5.2.1 SP4 Administrator Guide 270

9 Manage accounts
6. Select either a Self-issued Certificate or a Certificate Signing Request (CSR).
Note If you select Certificate Signing Request (CSR), the field below theSelf-issued Certificate option are disabled for editing.
7. Depending on your choice, type the necessary information.
Alias, Validity in days, and Common Name (CN) are required fields. The value you specify in the Alias field cannot exceed 50 characters in length.
8. Click Generate.
Generate a PGP private certificate 1. Select Accounts > User Accounts.
2. Click the name of the account where you want to add the certificate.
The User Account Settings page is displayed with details for the selected account.
3. Click the Certificates tab, and then click Private Certificates.
A list of private certificates for the selected account is displayed on the Private Certificates page.
4. Click Generate.
The Generate Certificate page is displayed.
AxwaySecureTransport 5.2.1 SP4 Administrator Guide 271
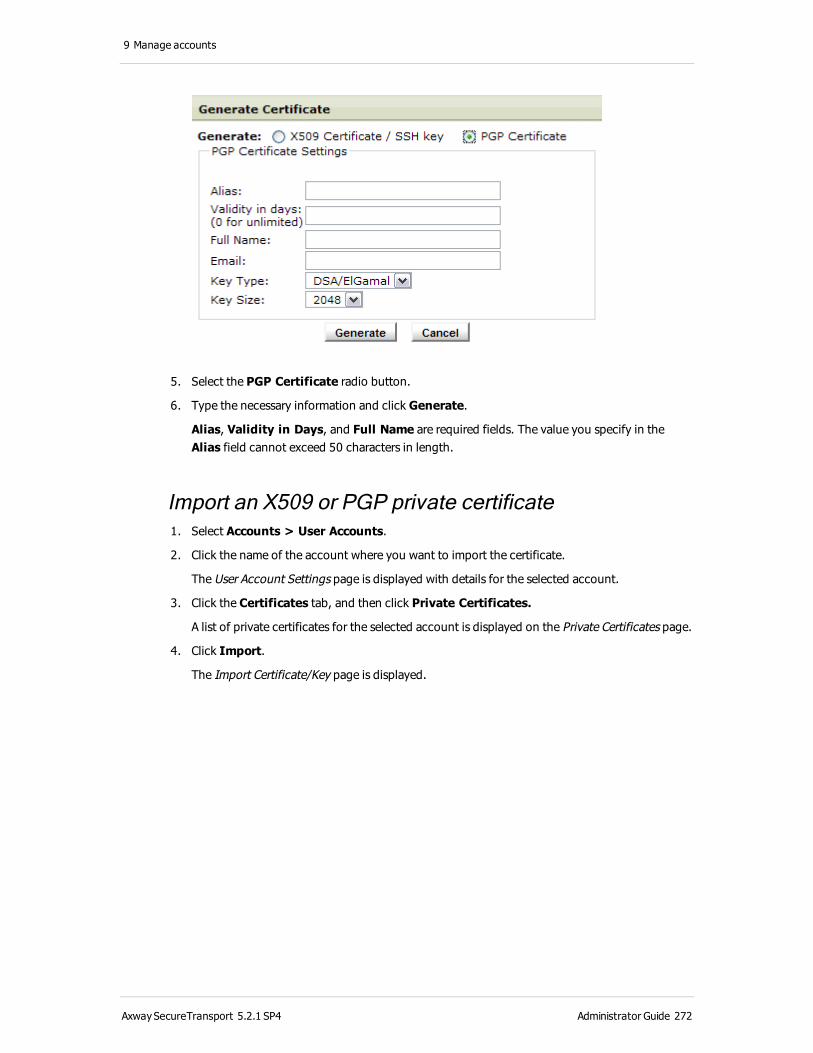
9 Manage accounts
5. Select the PGP Certificate radio button.
6. Type the necessary information and click Generate.
Alias, Validity in Days, and Full Name are required fields. The value you specify in the Alias field cannot exceed 50 characters in length.
Import an X509 or PGP private certificate 1. Select Accounts > User Accounts.
2. Click the name of the account where you want to import the certificate.
The User Account Settings page is displayed with details for the selected account.
3. Click the Certificates tab, and then click Private Certificates.
A list of private certificates for the selected account is displayed on the Private Certificates page.
4. Click Import.
The Import Certificate/Key page is displayed.
AxwaySecureTransport 5.2.1 SP4 Administrator Guide 272
9 Manage accounts
a. Select the type of the certificate you want to import: X509 or PGP.
b. Type the certificate Alias. The value you specify in the Alias field cannot exceed 50 characters in length.
c. Type the certificate Password, if one was specified during the certificate generation.
d. Paste the certificate content directly in the provided space, or import the certificate from a file. To import from file, type the file path or click Browse to browse for the file.
5. Click Import.
Note The PGP keys imported for use with an account must specify signing algorithms.
Import an SSH private certificate 1. Select Accounts > User Accounts.
2. Click the name of the account where you want to import the certificate.
The User Account Settings page is displayed with details for the selected account.
3. Click the Certificates tab, and then click Private Certificates.
A list of private certificates for the selected account is displayed on the Private Certificates page.
4. Click Import.
The Import Certificate/Key page is displayed.
5. Select the certificate type of the certificate you want to import: SSH Key.
6. Type the CA Key Password specified during the certificate generation.
AxwaySecureTransport 5.2.1 SP4 Administrator Guide 273
9 Manage accounts
7. Type the information necessary to import the key.
Alias, Validity in days, and Common Name (CN) are required fields. The value you specify in the Alias field cannot exceed 50 characters in length.
8. Paste the certificate content directly in the provided space, or import the certificate from a file. To import from file, type the file path or click Browse to browse for the file.
9. Click Import.
Delete private certificates 1. Select Accounts > User Accounts.
2. Click the name of the account containing the certificate.
The User Account Settings page is displayed with details for the selected account.
3. Click the Certificates tab, and then click Private Certificates.
A list of private certificates for the selected account is displayed on the Private Certificates page.
4. Select the check boxes next to the certificates you want to delete, and then click Delete.
Transfer sitesA transfer site is a location such as a local folder or protocol server used when sending or receiving files during a server-initiated transfer. Supported protocol servers include AS2, Connect:Direct, Folder Monitor, FTP(S), HTTP(S), SSH (SFTP), Recipient Based File Transfer (RBFT), and PeSIT. Transfer sites are specified and managed on a per-account basis.
When defining a transfer site as part of an account, you need to provide the information required for connecting to the site, authenticating the login, and sending or receiving files. The transfer protocol you select dictates what information required to define the transfer site.
In general, a site is used for AS2 transfers and server-initiated transfers. In the case of a server-initiated transfer, a file is either uploaded to the site when a subscription processes an uploaded file or downloaded from the site using a schedule in a subscription.
An account can have zero or more transfer sites. An account can subscribe to zero or more applications, and an application can be triggered when a file is transferred using a site.
Transfer site propertiesA transfer site in SecureTransport is defined with the following properties:
l Site Name – the name of the site. This name must be unique for the account.
You cannot enter spaces-only values in the Site Name field. For more information, see Spaces in required fields on page 30.
AxwaySecureTransport 5.2.1 SP4 Administrator Guide 274
9 Manage accounts
l Site Type – indicates whether transfers are internal (within a single organization) or partner (between organizations). Reported to Axway Sentinel as USERPARAMETER1 and displayed in
the Sentinel event attributes.
l Transfer Protocol – one of the supported protocols: AS2, Connect:Direct, Folder Monitor, FTP(S), HTTP(S), SSH (SFTP), PeSIT, Recipient Based File Transfer (RBFT), or a protocol implemented using the file services interface.
l Custom properties – these vary according to the protocol used for the transfer site. For more information about each protocol, refer to the reference topics for each protocol.
AS2 transfer sitesAlthough transfers using the AS2 protocol function in a different way than the other supported protocols, you can subscribe accounts with AS2 transfer sites to applications. Among the standard applications, the Site Mailbox and Standard Router applications are appropriate for an AS2 transfer site.
Unlike transfer sites for other transfer protocols, an AS2 transfer site is also used for transfers initiated by the remote AS2 site (considered client-initiated by SecureTransport). Only the fields marked with an asterisk (*) as required are needed to define the partnership to enable these transfers.
For detailed information about AS2 transfers, see AS2 transfers on page 472.
The following is the Add Transfer Site page for a transfer site definition that uses the AS2 transfer protocol.
AxwaySecureTransport 5.2.1 SP4 Administrator Guide 275
9 Manage accounts
The following table describes the AS2 protocol options for defining a transfer site.
AxwaySecureTransport 5.2.1 SP4 Administrator Guide 276
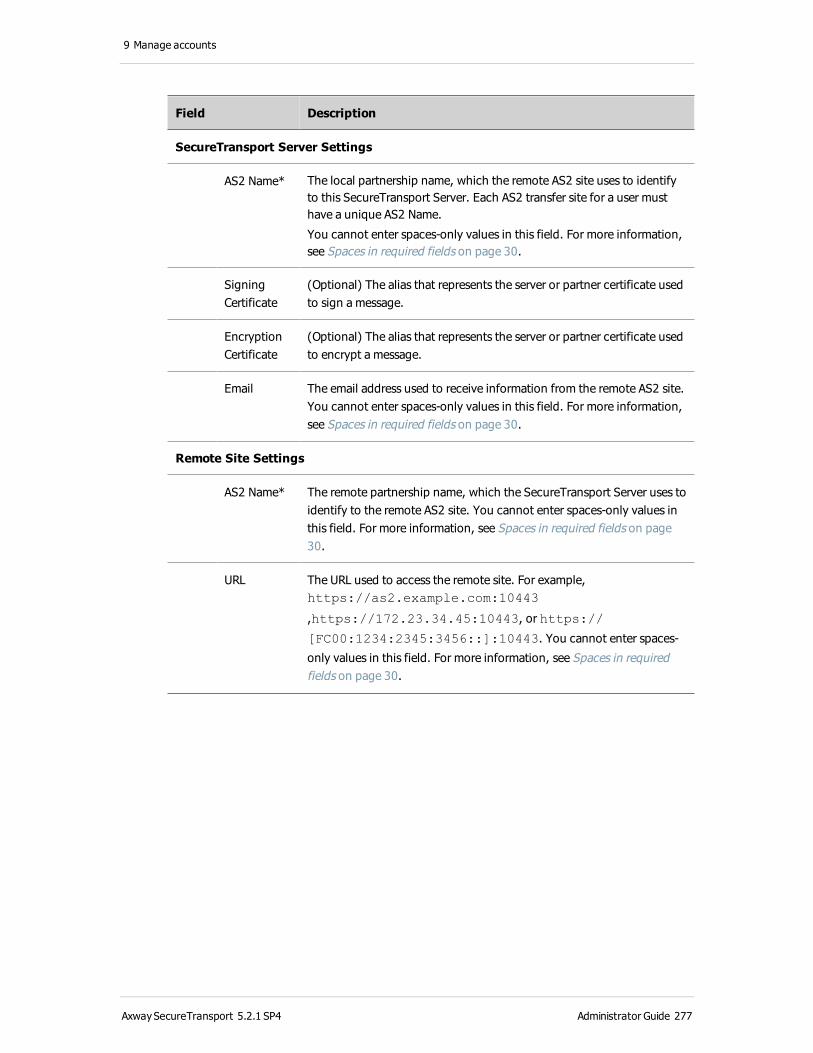
9 Manage accounts
Field Description
SecureTransport Server Settings
AS2 Name* The local partnership name, which the remote AS2 site uses to identify to this SecureTransport Server. Each AS2 transfer site for a user must have a unique AS2 Name.
You cannot enter spaces-only values in this field. For more information, see Spaces in required fields on page 30.
Signing Certificate
(Optional) The alias that represents the server or partner certificate used to sign a message.
Encryption Certificate
(Optional) The alias that represents the server or partner certificate used to encrypt a message.
Email The email address used to receive information from the remote AS2 site. You cannot enter spaces-only values in this field. For more information, see Spaces in required fields on page 30.
Remote Site Settings
AS2 Name* The remote partnership name, which the SecureTransport Server uses to identify to the remote AS2 site. You cannot enter spaces-only values in this field. For more information, see Spaces in required fields on page 30.
URL The URL used to access the remote site. For example, https://as2.example.com:10443
,https://172.23.34.45:10443, or https://
[FC00:1234:2345:3456::]:10443. You cannot enter spaces-
only values in this field. For more information, see Spaces in required fields on page 30.
AxwaySecureTransport 5.2.1 SP4 Administrator Guide 277

9 Manage accounts
Field Description
Network Zone
The network zone that defines the proxies to use for transfers through this site.
l Select none to connect directly to the partner AS2 server.
l Select any to allow SecureTransport to select the proxy connection using a network zone that enables an HTTP proxy.
l Select Default to use the default network zone proxy configuration. If no default is network zone is defined, transfers from this transfer site fail.
l Select a specific network zone to use the proxy configuration defined for that zone.
For more information, see Specify TM Server communication ports and IP address for protocol servers on SecureTransport Edge on page 176.
Enable FIPS Transfer Mode
Restrict AS2 to use only FIPS 140-2 Level 1 certified cryptographic libraries.
The sender and the recipient must use the ciphers and ciphers suites listed in FIPS transfer mode on page 497. If the sender and the recipient do not provide the required ciphers and ciphers suites SecureTransport does not complete the transfer.
Signing Certificate
(Optional) The alias that represents the user or partner certificate used to sign a message from this site.
Encryption Certificate
(Optional) The alias that represents the user or partner certificate used to encrypt a message from this site.
Email The email address used to receive information from SecureTransport Server. You cannot enter spaces-only values in this field. For more information, see Spaces in required fields on page 30.
* Each AS2 transfer site must have a unique combination of SecureTransport Server AS2 Name and Remote Site AS2 Name.
The following example shows the Send Options and Receive Options pages for AS2 transfer sites.
AxwaySecureTransport 5.2.1 SP4 Administrator Guide 278
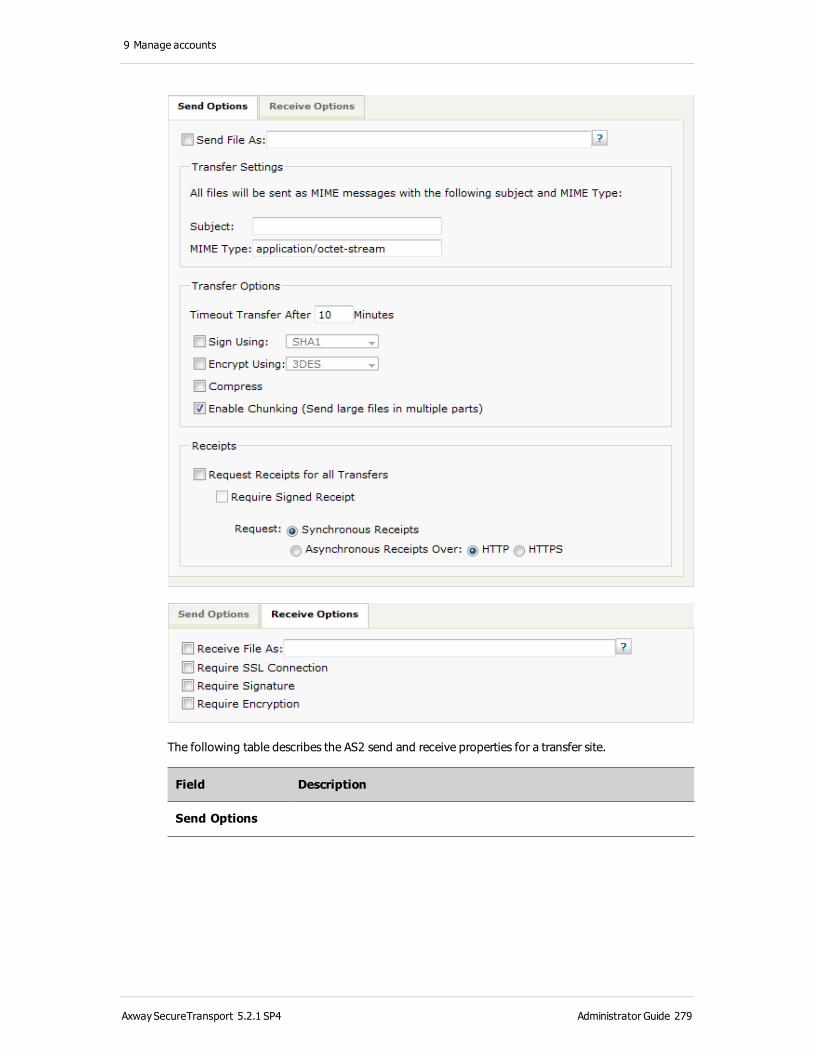
9 Manage accounts
The following table describes the AS2 send and receive properties for a transfer site.
Field Description
Send Options
AxwaySecureTransport 5.2.1 SP4 Administrator Guide 279

9 Manage accounts
Field Description
Send File As Select the check box to specify a file name. You can use the expression language to specify the criteria you want to match. The expression uses the criteria provided to create a new file name from the original file name. When you enter a new file name in this field, the AS2 message header uses the new name as the value for original filename.
Subject The MIME subject to be used for outgoing messages.
Mimetype The MIME type to be used for outgoing messages. For example, application/edi-x12.
Timeout Transfer After x Minutes
The number of minutes after which a transfer is timed out if it is not successful.
Sign Using The algorithm to be used to sign messages from this site.
Encrypt Using The algorithm used to encrypt messages from this site.
The RC2/40, RC2/64 and RC2/128 algorithms are not FIPS compliant.
Compress Select this check box to enable compression.
Enable Chunking
Select this check box to enable chunking.
Request receipts for all Transfers
Select this check box to request receipts for all transfers.
Require Signed Receipt
If you select the Request receipts for all transfers check box, select the check box to require those receipts to be signed.
Request:SynchronousAsynchronous
Specify whether you want receipts to be synchronous or asynchronous. If you select asynchronous receipts, specify whether you want to receive those receipts via HTTP or HTTPS.
If you request receipts via asynchronous HTTP and you specify that an SSL connection in Receive Options, you receive receipts via HTTPS instead of HTTP.
Receive Options
AxwaySecureTransport 5.2.1 SP4 Administrator Guide 280
9 Manage accounts
Field Description
Receive File As
Select the check box to specify a file name. You can use the expression language to specify the criteria you want to match. The expression uses the criteria provided to create a new file name from the original file name when the transfer is received. You can use the SecureTransport-specific variable ${stenv.rawsource} which takes the value from the original filename in the AS2 message header. See Expression language on page 541 for information on SecureTransport-specific variables. Refer to the SecureTransport Developer’s Guide for information on the DXAGENT_RAWSOURCE environment variable.
Require SSL Connection
Select this check box to require an SSL connection for transfers received.
If you request receipts via asynchronous HTTP and you specify that an SSL connection, you receive receipts via HTTPS instead of HTTP.
Require Signature
Select this check box to require transfers received to be signed.
Require Encryption
Select this check box to require transfers received to be encrypted.
Note Use a subscription to a Basic application or a Site Mailbox application to process files received by an AS2 transfer site.When using asynchronous receipts for outgoing AS2 transfers, post-transmission actions execute, even if the AS2 transfer has failed. This occurs because the transfer initially reports success, triggering the post-transmission action. After the post-transmission action is triggered, an asynchronous failure message is returned, causing the transfer to fail.
Connect:Direct transfer sitesTo use the Connect:Direct protocol, you must install the Connect:Direct Java Application Interface (CDJAI.jar) in the <FILEDRIVEHOME>/lib/jars directory or any subdirectory on the server running SecureTransport. You cannot create or modify a Connect:Direct transfer site without installing the Connect:Direct Java Application Interface. The CDJAI.jar file is available as part of the Connect:Direct software.
Note Support for the NDM protocol through a Connect:Direct transfer site does not replace or append your Connect:Direct license.
You also need to manually configure some options in SecureTransport.
1. Stop SecureTransport by running <FILEDRIVEHOME>/bin/stop_all.
2. Copy the CDJAI.jar file to the <FILEDRIVEHOME>/lib/jars directory.
3. If you are using the embedded database, run <FILEDRIVEHOME>/bin/start_db.
4. Start the Administration Tool server by running <FILEDRIVEHOME>/bin/start_admin.
AxwaySecureTransport 5.2.1 SP4 Administrator Guide 281

9 Manage accounts
5. Log in to the Administration Tool and select Operations > Server Configuration.
The Server Configuration page is displayed.
6. Search for the ConnectDirectTransferAgent parameters.
7. Set ConnectDirectTransferAgent.transfersFolder to full path of the directory
for the SecureTransport Server to use for the Connect:Direct transfers.
Note The directory path is not relative to <FILEDRIVEHOME>. Specify a full absolute path from / (root) in UNIX or C:\ or another volume on Windows.
8. Set ConnectDirectTransferAgent.commandTimeout to the interval in seconds
that SecureTransport waits before the transfer times out.
9. Create the directory for the SecureTransport Server to use for the Connect:Direct transfers on the server. Verify that SecureTransport has full permissions for the directory.
10. Start SecureTransport by running <FILEDRIVEHOME>/bin/start_all.
11. Enable the ConnectDirectTransfer rules package in the Rules Packages page of the
Administration Tool.
The following is the Add Transfer Site page for a transfer site definition that uses the Connect:Direct transfer protocol.
AxwaySecureTransport 5.2.1 SP4 Administrator Guide 282
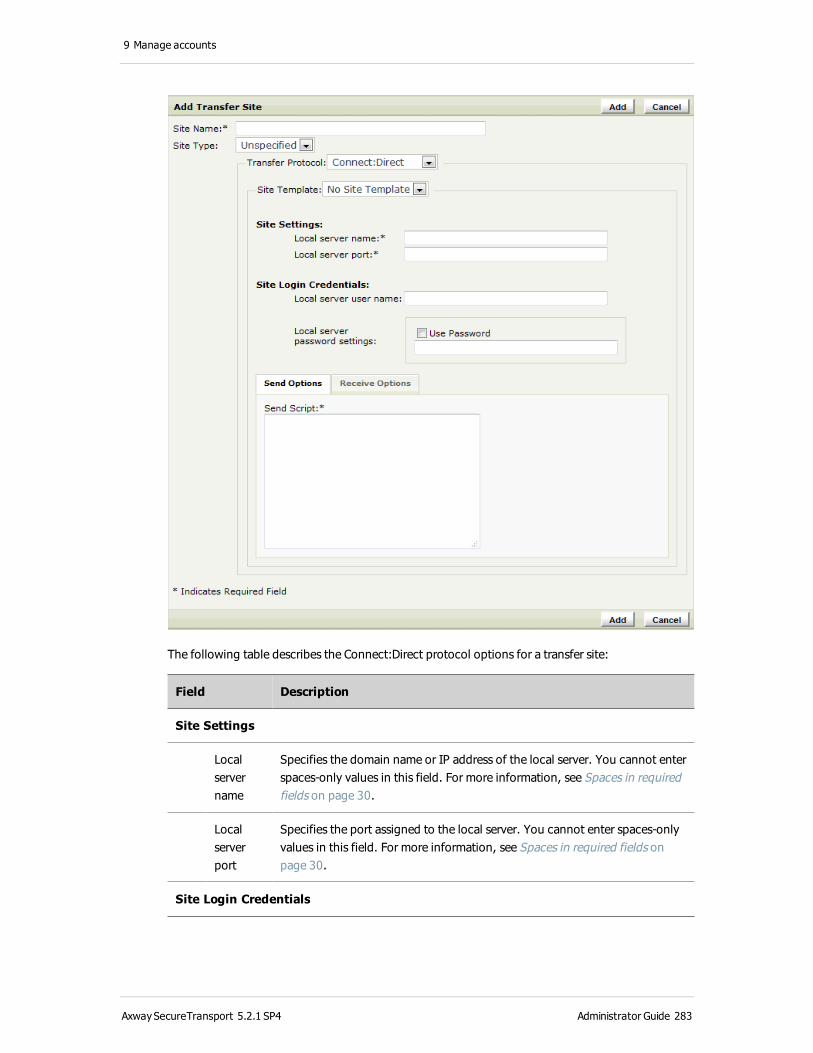
9 Manage accounts
The following table describes the Connect:Direct protocol options for a transfer site:
Field Description
Site Settings
Local server name
Specifies the domain name or IP address of the local server. You cannot enter spaces-only values in this field. For more information, see Spaces in required fields on page 30.
Local server port
Specifies the port assigned to the local server. You cannot enter spaces-only values in this field. For more information, see Spaces in required fields on page 30.
Site Login Credentials
AxwaySecureTransport 5.2.1 SP4 Administrator Guide 283
9 Manage accounts
Field Description
Local server user name
Username used to log in to the local server.
Local server password
If the local server uses a password, select Use Password and enter the password in the field provided.
Send Options
Send Script
Specifies the Connect:Direct process to execute when uploading a file to a remote site. You must provide a script in for either the Send Options or the Receive Options. This field must contain a valid Connect:Direct process language script. You can use expression language variables such as ${stenv.target} in the script. For example, you can use the script field to execute a copy command. The remote server you are calling must be identified by its alias in the script.
To correctly identify the file name in a script you must use the variable ${cd_transfer_file}. The variable is required because the file names might not be known at the time you write the script.
When creating an upload script you must use ${cd_transfer_file} instead of the file name of the file being uploaded.
You cannot enter spaces-only values in this field. For more information, see Spaces in required fields on page 30.
Receive Options
Receive Script
Specifies the Connect:Direct process to execute when downloading a file from a remote site. You must provide a script for either the Send Options or the Receive Options. This field must contain a valid Connect:Direct process language script. You can use expression language variables such as ${stenv.target} in the script. For example, you can use the script field to execute a copy command. The remote server you are calling must be identified by its alias in the script.
To correctly identify the file name in a script you must use the variable ${cd_transfer_file}. The variable is required because the file names might not be known at the time you write the script.
When creating a download script you must use ${cd_transfer_file} to specify the directory where downloaded files will be saved. When downloading a single file, use ${cd_transfer_file}<path_separator><file_name>. For example, ${cd_transfer_file}/xls_sheet.xls.
You cannot enter spaces-only values in this field. For more information, see Spaces in required fields on page 30.
AxwaySecureTransport 5.2.1 SP4 Administrator Guide 284
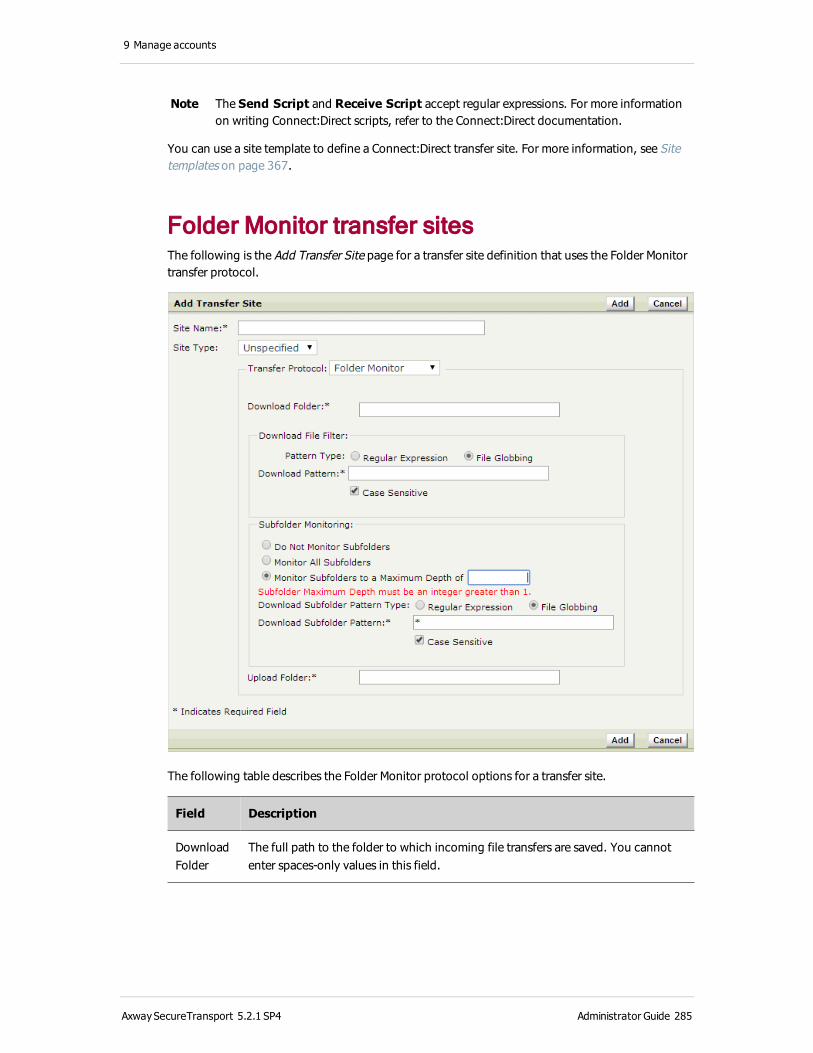
9 Manage accounts
Note The Send Script and Receive Script accept regular expressions. For more information on writing Connect:Direct scripts, refer to the Connect:Direct documentation.
You can use a site template to define a Connect:Direct transfer site. For more information, see Site templates on page 367.
Folder Monitor transfer sitesThe following is the Add Transfer Site page for a transfer site definition that uses the Folder Monitor transfer protocol.
The following table describes the Folder Monitor protocol options for a transfer site.
Field Description
Download Folder
The full path to the folder to which incoming file transfers are saved. You cannot enter spaces-only values in this field.
AxwaySecureTransport 5.2.1 SP4 Administrator Guide 285
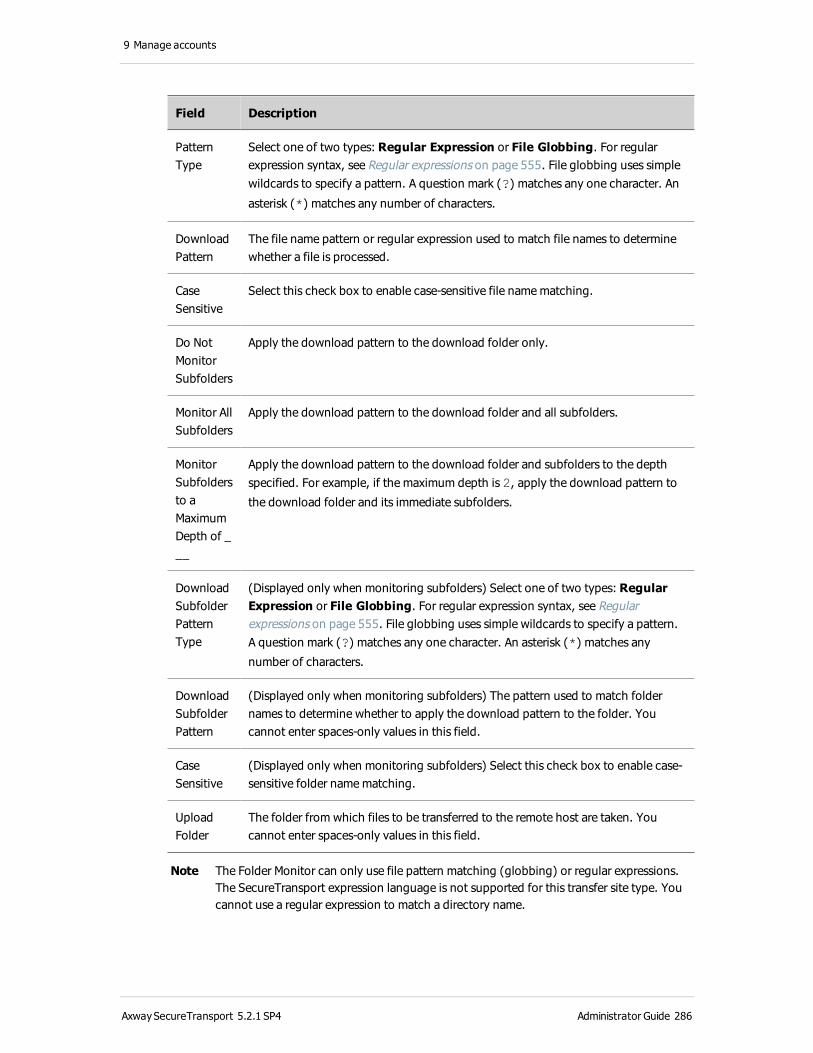
9 Manage accounts
Field Description
Pattern Type
Select one of two types: Regular Expression or File Globbing. For regular expression syntax, see Regular expressions on page 555. File globbing uses simple wildcards to specify a pattern. A question mark (?) matches any one character. An
asterisk (*) matches any number of characters.
Download Pattern
The file name pattern or regular expression used to match file names to determine whether a file is processed.
Case Sensitive
Select this check box to enable case-sensitive file name matching.
Do Not Monitor Subfolders
Apply the download pattern to the download folder only.
Monitor All Subfolders
Apply the download pattern to the download folder and all subfolders.
Monitor Subfolders to a Maximum Depth of ___
Apply the download pattern to the download folder and subfolders to the depth specified. For example, if the maximum depth is 2, apply the download pattern to
the download folder and its immediate subfolders.
Download Subfolder Pattern Type
(Displayed only when monitoring subfolders) Select one of two types: Regular Expression or File Globbing. For regular expression syntax, see Regular expressions on page 555. File globbing uses simple wildcards to specify a pattern. A question mark (?) matches any one character. An asterisk (*) matches any
number of characters.
Download Subfolder Pattern
(Displayed only when monitoring subfolders) The pattern used to match folder names to determine whether to apply the download pattern to the folder. You cannot enter spaces-only values in this field.
Case Sensitive
(Displayed only when monitoring subfolders) Select this check box to enable case-sensitive folder name matching.
Upload Folder
The folder from which files to be transferred to the remote host are taken. You cannot enter spaces-only values in this field.
Note The Folder Monitor can only use file pattern matching (globbing) or regular expressions. The SecureTransport expression language is not supported for this transfer site type. You cannot use a regular expression to match a directory name.
AxwaySecureTransport 5.2.1 SP4 Administrator Guide 286

9 Manage accounts
l The Folder Monitor protocol differs from the other supported protocols in the following aspects:
l The folders listed in <FILEDRIVEDHOME>/conf/unsafe.paths.conf file (and their
sub-folders) cannot be specified in the Upload Folder and Download Folder fields.
l The paths, specified in the Upload Folder and Download Folder fields, must be full system paths (not relative paths), such as:/tmp/folder_name/opt/TMWD/folder_name/
l The files uploaded/moved into the specified upload folder are owned by the root user of the system.
l If SecureTransport is installed as a non-root deployment, the files in upload folder are owned by the user running the SecureTransport Server.
l If you configure the account to impersonate a user, the impersonated user must have full rights to the directories specified in the Folder Monitor.
l If you upload or move a file in the specified upload folder and such a file already exists there, it is overwritten without a prompt.
l If SecureTransport is installed as a non-root deployment, the user running the SecureTransport Server must have the necessary permissions to overwrite the file.
l When the Folder Monitor starts to monitor the download folder, the download pattern is applied to all the files in the folder, even if they existed in the download folder before the Folder Monitor began monitoring.
l If SecureTransport is installed as a non-root deployment, the user running the SecureTransport Server must have the necessary permissions to write to the upload folder.
l SecureTransport does not support placing the download folder and the upload folder under a repository encryption user home folder.
l If you create a service account and a Standard Router application that uses a Folder Monitor transfer site, and you specify the same directory for sending and receiving messages, file transfers fail.
l A Folder Monitor transfer site can be used to receive messages for only one subscription.
l The names of the download folder and the upload folder of a Folder Monitor transfer site cannot contain two or more of the following characters in a sequence: ( ) _ - + = { } ~ ! @
# $ % ^ & ; “ ” ‘ ’. For example, folder_name is supported, but folder_
+name is not supported.
l The name of a file processed by a Folder Monitor transfer site cannot contain two more of the following characters in sequence: < > | : ? " * / \ % [ ] ~ (at the beginning of the
file only).
l Two Folder Monitor transfer sites cannot have the same download folder and download pattern.
l The Folder Monitor service runs on the primary server in a standard cluster. If that server fails, the Folder Monitor service automatically fails over to the new primary server.
l The Folder Monitor service runs on one server in a large enterprise cluster. If that server fails, the Folder Monitor service automatically fails over to the server in the cluster with the Transaction Manager that has been running the longest.
AxwaySecureTransport 5.2.1 SP4 Administrator Guide 287

9 Manage accounts
File services interface protocol transfer sitesEach file services interface protocol can have different required and optional parameters as configured by the developer in the file services interface protocol registry file. The developer who created the transfer site protocol can provide you with a list of required and optional parameters with descriptions and valid values.
The following is the Add Transfer Site page for a transfer site definition that uses the file services interface transfer.
The fields under Site Settings are required. If they have default values in the file services interface registry file, the Administration Tool displays those values when the transfer protocol is selected.
To specify a password, select Use Password and type the password.
The fields in the Optional Parameters table are not required.
l To add an optional parameter, select its name from the Parameter list, type a value in the Value column, click Add.
l To edit a parameter value, click the Edit icon ( ) type a new value in the Value column, and click the Save icon ( ).
l To delete a parameter, click the Delete icon ( ).
AxwaySecureTransport 5.2.1 SP4 Administrator Guide 288
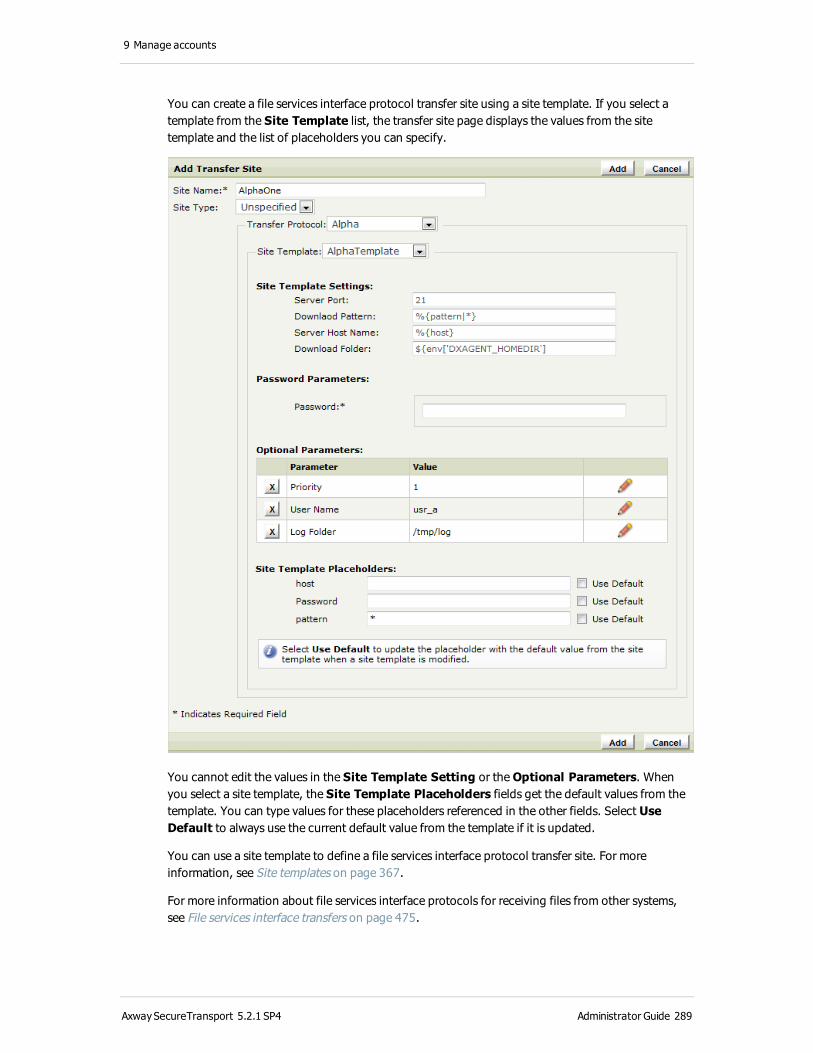
9 Manage accounts
You can create a file services interface protocol transfer site using a site template. If you select a template from the Site Template list, the transfer site page displays the values from the site template and the list of placeholders you can specify.
You cannot edit the values in the Site Template Setting or the Optional Parameters. When you select a site template, the Site Template Placeholders fields get the default values from the template. You can type values for these placeholders referenced in the other fields. Select Use Default to always use the current default value from the template if it is updated.
You can use a site template to define a file services interface protocol transfer site. For more information, see Site templates on page 367.
For more information about file services interface protocols for receiving files from other systems, see File services interface transfers on page 475.
AxwaySecureTransport 5.2.1 SP4 Administrator Guide 289
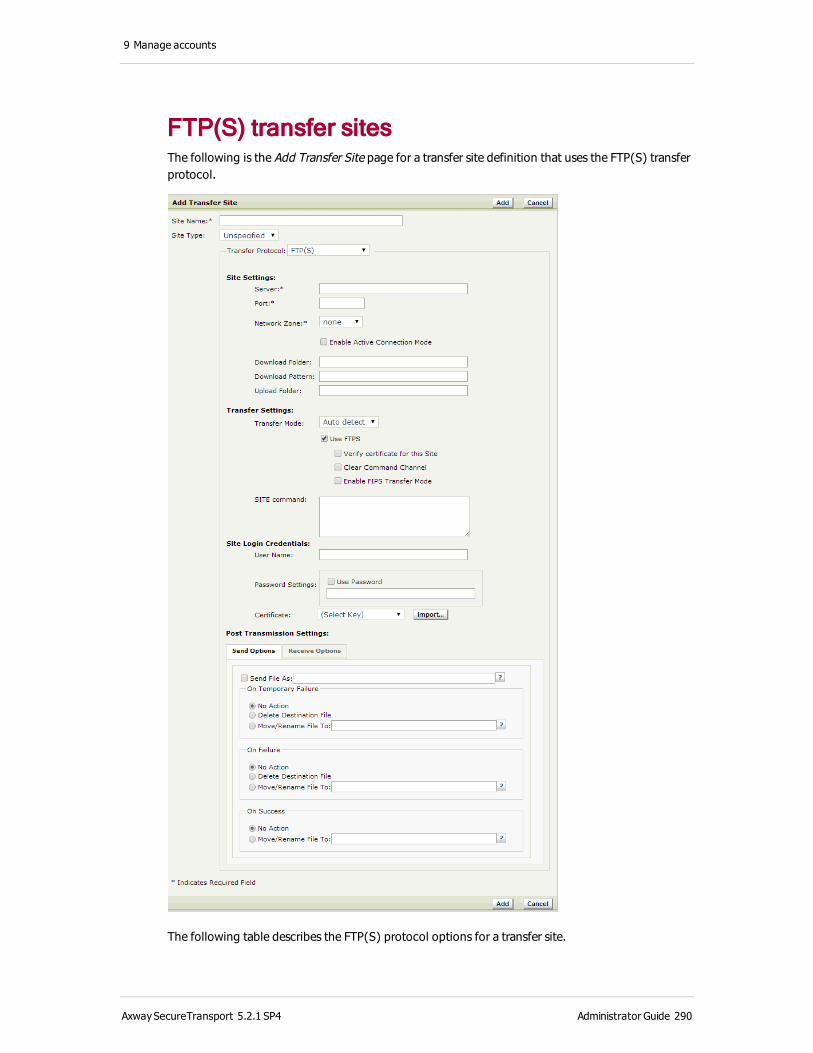
9 Manage accounts
FTP(S) transfer sitesThe following is the Add Transfer Site page for a transfer site definition that uses the FTP(S) transfer protocol.
The following table describes the FTP(S) protocol options for a transfer site.
AxwaySecureTransport 5.2.1 SP4 Administrator Guide 290
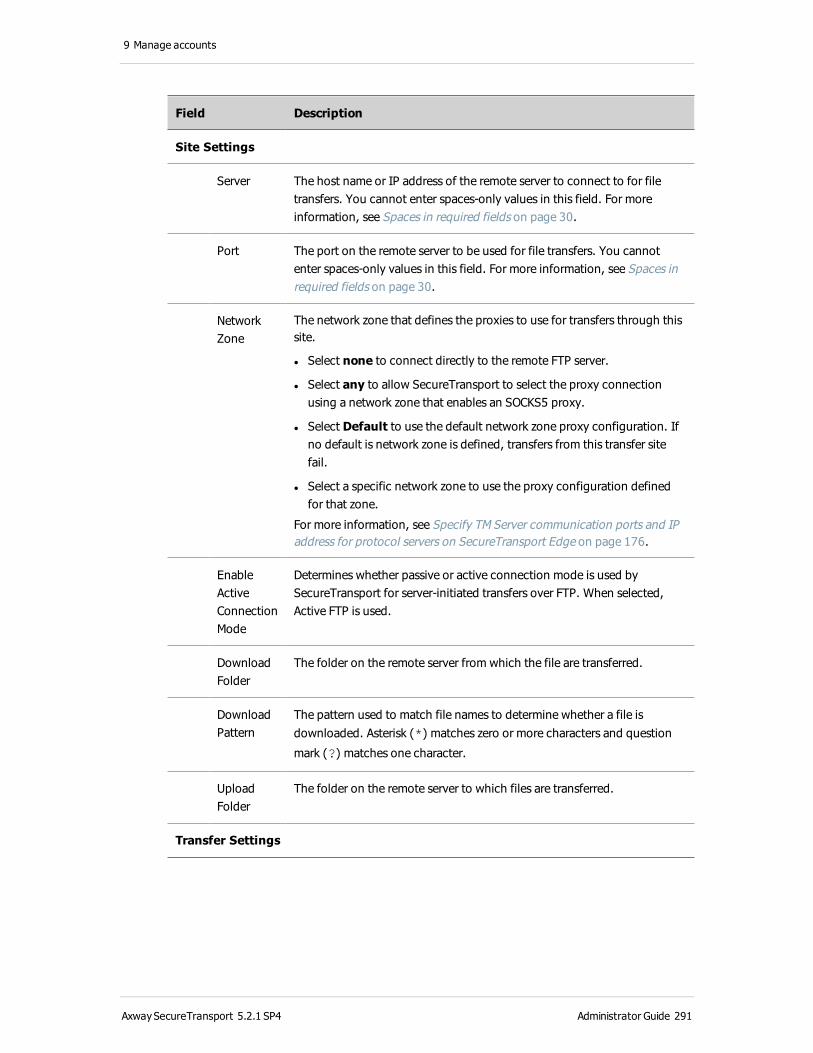
9 Manage accounts
Field Description
Site Settings
Server The host name or IP address of the remote server to connect to for file transfers. You cannot enter spaces-only values in this field. For more information, see Spaces in required fields on page 30.
Port The port on the remote server to be used for file transfers. You cannot enter spaces-only values in this field. For more information, see Spaces in required fields on page 30.
Network Zone
The network zone that defines the proxies to use for transfers through this site.
l Select none to connect directly to the remote FTP server.
l Select any to allow SecureTransport to select the proxy connection using a network zone that enables an SOCKS5 proxy.
l Select Default to use the default network zone proxy configuration. If no default is network zone is defined, transfers from this transfer site fail.
l Select a specific network zone to use the proxy configuration defined for that zone.
For more information, see Specify TM Server communication ports and IP address for protocol servers on SecureTransport Edge on page 176.
Enable Active Connection Mode
Determines whether passive or active connection mode is used by SecureTransport for server-initiated transfers over FTP. When selected, Active FTP is used.
Download Folder
The folder on the remote server from which the file are transferred.
Download Pattern
The pattern used to match file names to determine whether a file is downloaded. Asterisk (*) matches zero or more characters and question
mark (?) matches one character.
Upload Folder
The folder on the remote server to which files are transferred.
Transfer Settings
AxwaySecureTransport 5.2.1 SP4 Administrator Guide 291

9 Manage accounts
Field Description
Transfer Mode
Specify whether data is transferred as ASCII or binary. You can also choose to have SecureTransport automatically determine the correct transfer mode.
For more information about automatically determining transfer mode, see Transfer mode for server-initiated transfers on page 381.
Use FTPS Deselect to use FTP instead of FTPS.
Verify certificate for the Site
Select to verify that the remote system is trusted. This option is displayed when Use FTPS is selected.
Clear Command Channel
Select to accept and process a Clear Command Channel subcommand. If the user is authorized to perform the command, send a confirmation message, and change the control connection transmission mode to clear text. This option is displayed when Use FTPS is selected.
TLS Shutdown on CCC
Perform a TLS shutdown upon receiving a Clear Command Channel subcommand. This option is displayed when Clear Command Channel is selected.
Enable FIPS Transfer Mode
Restrict FTPS to use only FIPS 140-2 Level 1 certified cryptographic libraries. This option is displayed when Use FTPS is selected.
The sender and the recipient must use the ciphers and ciphers suites listed in FIPS transfer mode on page 497. If the sender and the recipient do not provide the required ciphers and ciphers suites SecureTransport does not complete the transfer.
SITE command
Enter a SITE command. You use this command is to provide services specific to your system that are not available as FTP commands.
Site Login Credentials
User Name The user name to log in to the FTP server. You cannot enter spaces-only values in this field. For more information, see Spaces in required fields on page 30.
Use Password
Select to use a password to log in to the FTP server.
Password Password used to log in to the FTP server.
Certificate A private certificate for SecureTransport to use to log in to the FTP server. You can select a certificate or import a certificate. This field is displayed when Use FTPS is selected.
AxwaySecureTransport 5.2.1 SP4 Administrator Guide 292

9 Manage accounts
Field Description
Post-transmission Settings
Send Options
Send File As
Select the check box to specify a file name. You can use the expression language to specify the criteria you want to match. The expression useS the criteria provided to create a new file name from the original file name.
On Temporary Failure
A temporary failure can occur when the transfer is incomplete and a retry occurs. Select one of the three choices: No Action, Delete Destination File, or Move File To. Selecting No Action causes the file to stay in the new location with the file name you specified. If another file with the same name is transferred to this location, the original file is overwritten. Selecting Delete Destination File removes the file from the new location. Selecting Move File To requires you to specify a directory in the location where you are transferring the files to and to provide an expression used to rename the file.
On Failure A failure occurs when the transfer is incomplete and all retry attempts were unsuccessful. Select one of the three choices: No Action, Delete Destination File, or Move File To. Selecting No Action causes the file to stay in the new location with the file name you specified. If another file with the same name is transferred to this location, the original file is overwritten. Selecting Delete Destination File removes the file from the new location. Selecting Move File To requires you to specify a directory in the location where you are transferring the files to and to provide an expression used to rename the file.
On Success Select one of the choices: No Action, or Move File To. Selecting No Action causes the file to stay in the new location with the file name you specified. If another file with the same name is transferred to this location, the original file is overwritten. Selecting Move File To requires you to specify a directory in the location where you are transferring the files to and to provide an expression used to rename the file.
Receive Options
AxwaySecureTransport 5.2.1 SP4 Administrator Guide 293

9 Manage accounts
Field Description
Receive File As
Select the check box to specify a file name. You can use the expression language to specify the criteria you want to match. The expression useS the criteria provided to create a new file name from the original file name when the transfer is received. You can use the SecureTransport-specific variable ${stenv.site_target} which takes the value from the
remote file path. see Expression language on page 541 for information on SecureTransport-specific variables. Refer to and the SecureTransport Developer's Guide for information on the DXAGENT_SITE_TARGET
environment variable.
On Failure A failure occurs when the transfer is incomplete and all retry attempts were unsuccessful. Select one of the three choices: No Action, Delete Source File, or Move File To. Selecting No Action causes the file to stay in the original location. If another file with the same name is transferred to this location, the original file is overwritten. Selecting Delete Source File removes the file from the original location. Selecting Move File To requires you to specify a directory in the location where you are transferring the files from and to provide an expression used to rename the file.
On Success Select one of the three choices: No Action, Delete Source File, or Move File To. Selecting No Action causes the file to stay in the original location. If another file with the same name is transferred to this location, the original file is overwritten. Selecting Delete Source File removes the file from the original location. Selecting Move File To requires you to specify a directory in the location where you are transferring the files from and to provide an expression used to rename the file.
Note To preserve the original file name when using the Move File To option, use the ${stenv.target} or ${stenv['target']} expressions.
HTTP(S) transfer sitesSecureTransport Server provides support for guaranteed delivery and restart for transfers using the HTTP protocol when the remote server is a SecureTransport Server.
The following is the Add Transfer Site page for a transfer site definition that uses the HTTP(S) transfer protocol.
AxwaySecureTransport 5.2.1 SP4 Administrator Guide 294
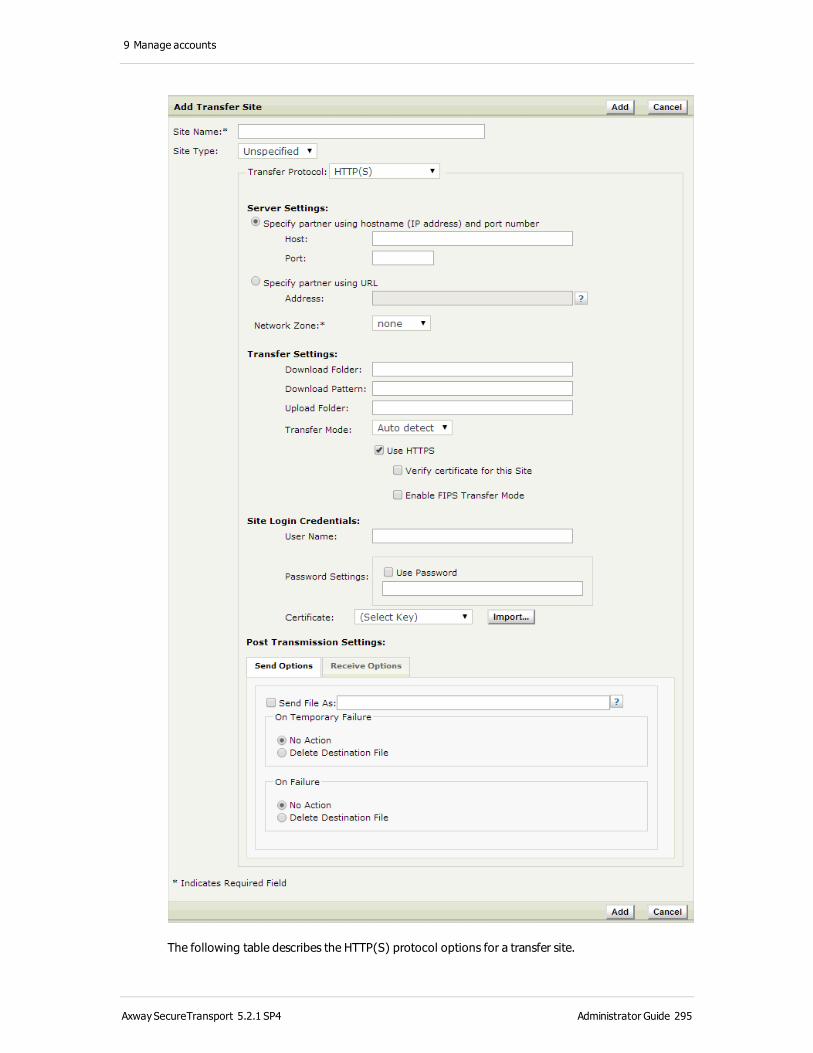
9 Manage accounts
The following table describes the HTTP(S) protocol options for a transfer site.
AxwaySecureTransport 5.2.1 SP4 Administrator Guide 295
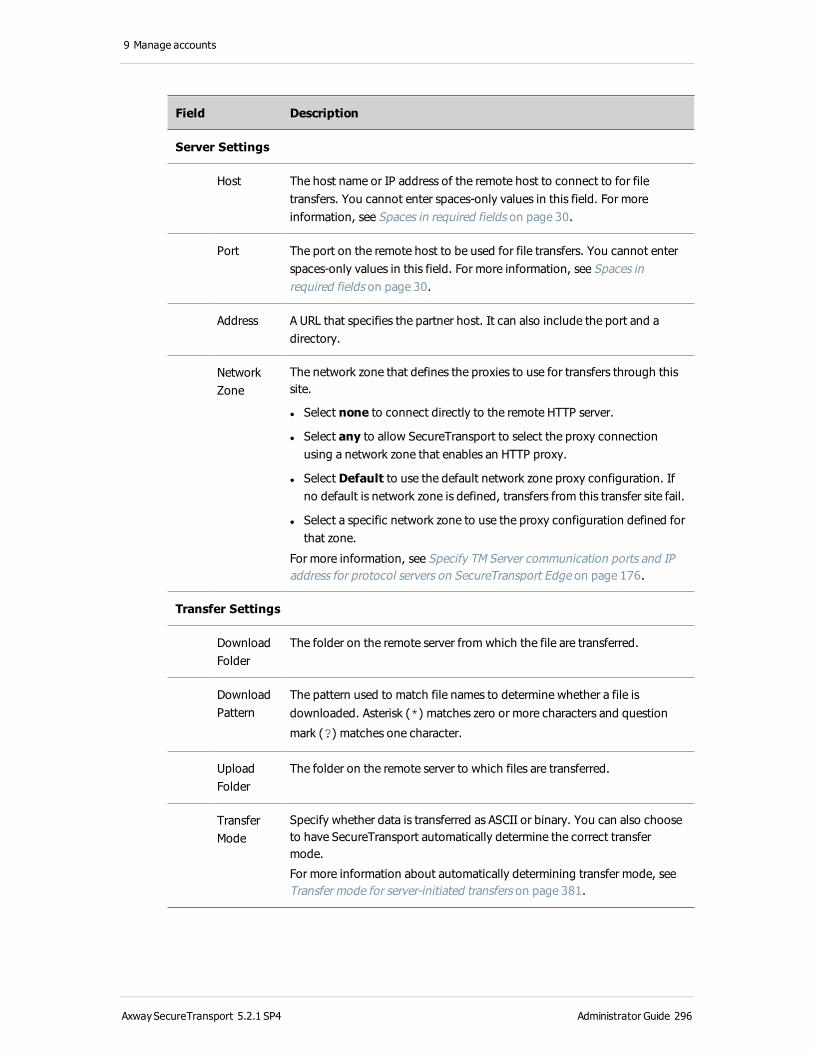
9 Manage accounts
Field Description
Server Settings
Host The host name or IP address of the remote host to connect to for file transfers. You cannot enter spaces-only values in this field. For more information, see Spaces in required fields on page 30.
Port The port on the remote host to be used for file transfers. You cannot enter spaces-only values in this field. For more information, see Spaces in required fields on page 30.
Address A URL that specifies the partner host. It can also include the port and a directory.
Network Zone
The network zone that defines the proxies to use for transfers through this site.
l Select none to connect directly to the remote HTTP server.
l Select any to allow SecureTransport to select the proxy connection using a network zone that enables an HTTP proxy.
l Select Default to use the default network zone proxy configuration. If no default is network zone is defined, transfers from this transfer site fail.
l Select a specific network zone to use the proxy configuration defined for that zone.
For more information, see Specify TM Server communication ports and IP address for protocol servers on SecureTransport Edge on page 176.
Transfer Settings
Download Folder
The folder on the remote server from which the file are transferred.
Download Pattern
The pattern used to match file names to determine whether a file is downloaded. Asterisk (*) matches zero or more characters and question
mark (?) matches one character.
Upload Folder
The folder on the remote server to which files are transferred.
Transfer Mode
Specify whether data is transferred as ASCII or binary. You can also choose to have SecureTransport automatically determine the correct transfer mode.
For more information about automatically determining transfer mode, see Transfer mode for server-initiated transfers on page 381.
AxwaySecureTransport 5.2.1 SP4 Administrator Guide 296
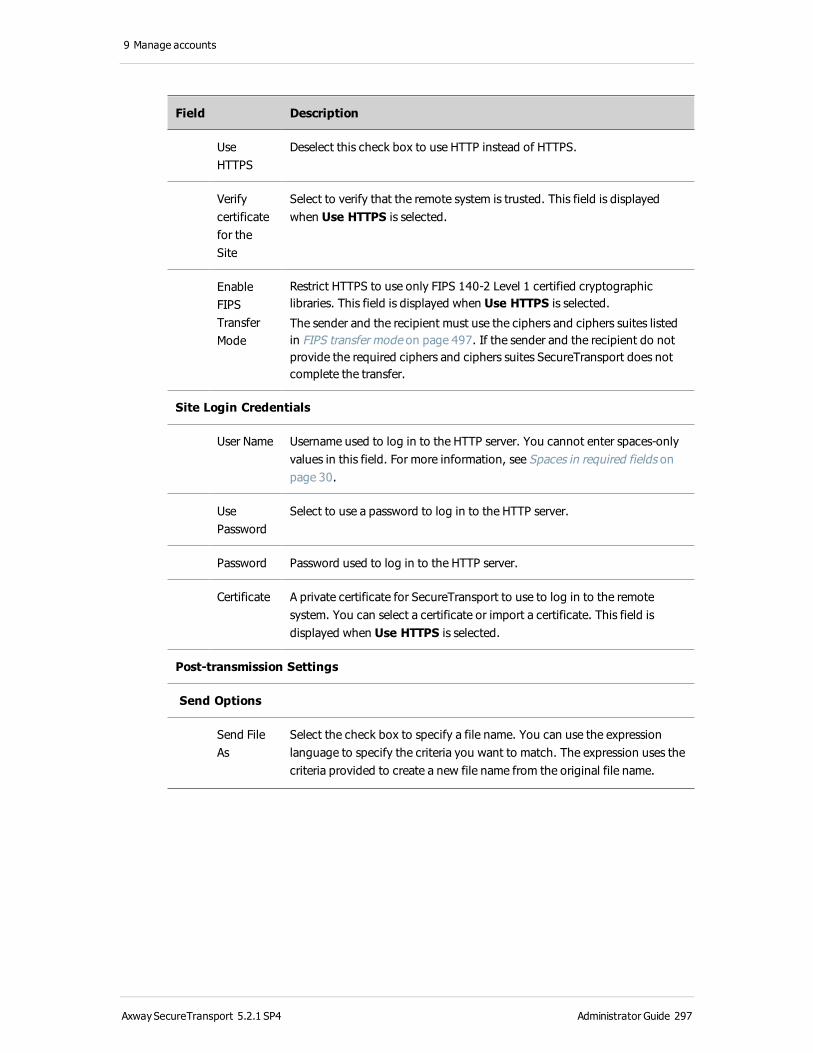
9 Manage accounts
Field Description
Use HTTPS
Deselect this check box to use HTTP instead of HTTPS.
Verify certificate for the Site
Select to verify that the remote system is trusted. This field is displayed when Use HTTPS is selected.
Enable FIPS Transfer Mode
Restrict HTTPS to use only FIPS 140-2 Level 1 certified cryptographic libraries. This field is displayed when Use HTTPS is selected.
The sender and the recipient must use the ciphers and ciphers suites listed in FIPS transfer mode on page 497. If the sender and the recipient do not provide the required ciphers and ciphers suites SecureTransport does not complete the transfer.
Site Login Credentials
User Name Username used to log in to the HTTP server. You cannot enter spaces-only values in this field. For more information, see Spaces in required fields on page 30.
Use Password
Select to use a password to log in to the HTTP server.
Password Password used to log in to the HTTP server.
Certificate A private certificate for SecureTransport to use to log in to the remote system. You can select a certificate or import a certificate. This field is displayed when Use HTTPS is selected.
Post-transmission Settings
Send Options
Send File As
Select the check box to specify a file name. You can use the expression language to specify the criteria you want to match. The expression uses the criteria provided to create a new file name from the original file name.
AxwaySecureTransport 5.2.1 SP4 Administrator Guide 297
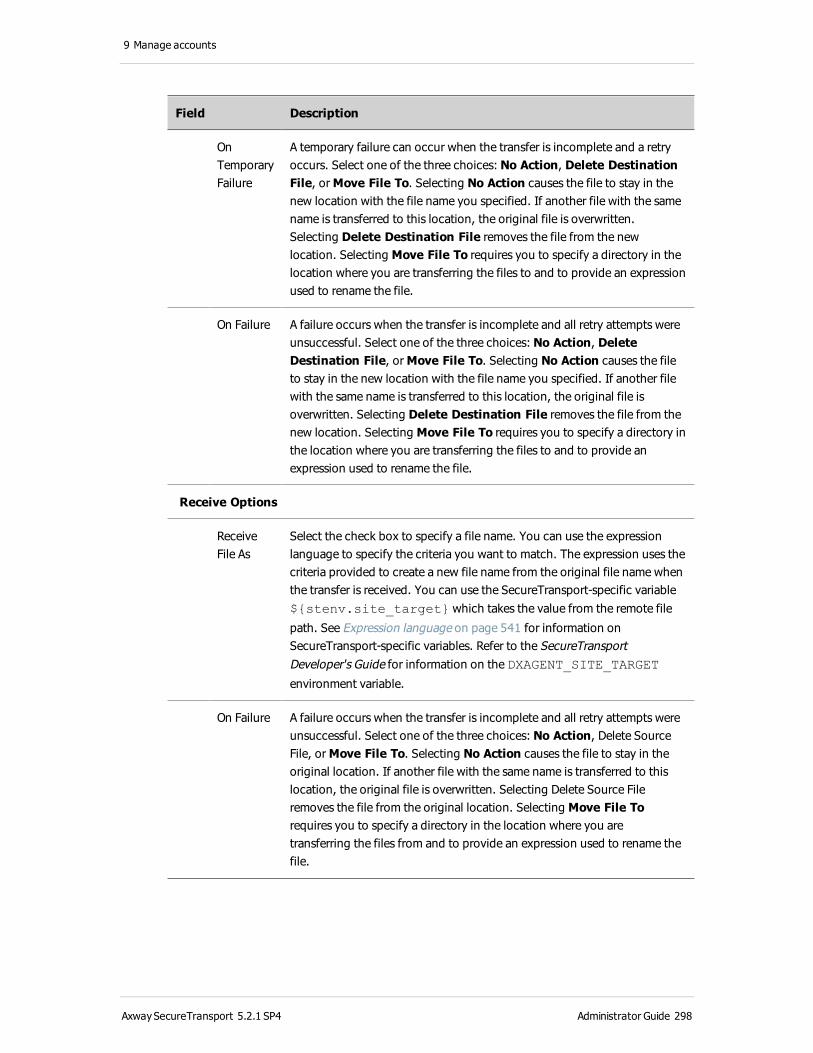
9 Manage accounts
Field Description
On Temporary Failure
A temporary failure can occur when the transfer is incomplete and a retry occurs. Select one of the three choices: No Action, Delete Destination File, or Move File To. Selecting No Action causes the file to stay in the new location with the file name you specified. If another file with the same name is transferred to this location, the original file is overwritten. Selecting Delete Destination File removes the file from the new location. Selecting Move File To requires you to specify a directory in the location where you are transferring the files to and to provide an expression used to rename the file.
On Failure A failure occurs when the transfer is incomplete and all retry attempts were unsuccessful. Select one of the three choices: No Action, Delete Destination File, or Move File To. Selecting No Action causes the file to stay in the new location with the file name you specified. If another file with the same name is transferred to this location, the original file is overwritten. Selecting Delete Destination File removes the file from the new location. Selecting Move File To requires you to specify a directory in the location where you are transferring the files to and to provide an expression used to rename the file.
Receive Options
Receive File As
Select the check box to specify a file name. You can use the expression language to specify the criteria you want to match. The expression uses the criteria provided to create a new file name from the original file name when the transfer is received. You can use the SecureTransport-specific variable ${stenv.site_target} which takes the value from the remote file
path. See Expression language on page 541 for information on SecureTransport-specific variables. Refer to the SecureTransport Developer's Guide for information on the DXAGENT_SITE_TARGET
environment variable.
On Failure A failure occurs when the transfer is incomplete and all retry attempts were unsuccessful. Select one of the three choices: No Action, Delete Source File, or Move File To. Selecting No Action causes the file to stay in the original location. If another file with the same name is transferred to this location, the original file is overwritten. Selecting Delete Source File removes the file from the original location. Selecting Move File To requires you to specify a directory in the location where you are transferring the files from and to provide an expression used to rename the file.
AxwaySecureTransport 5.2.1 SP4 Administrator Guide 298
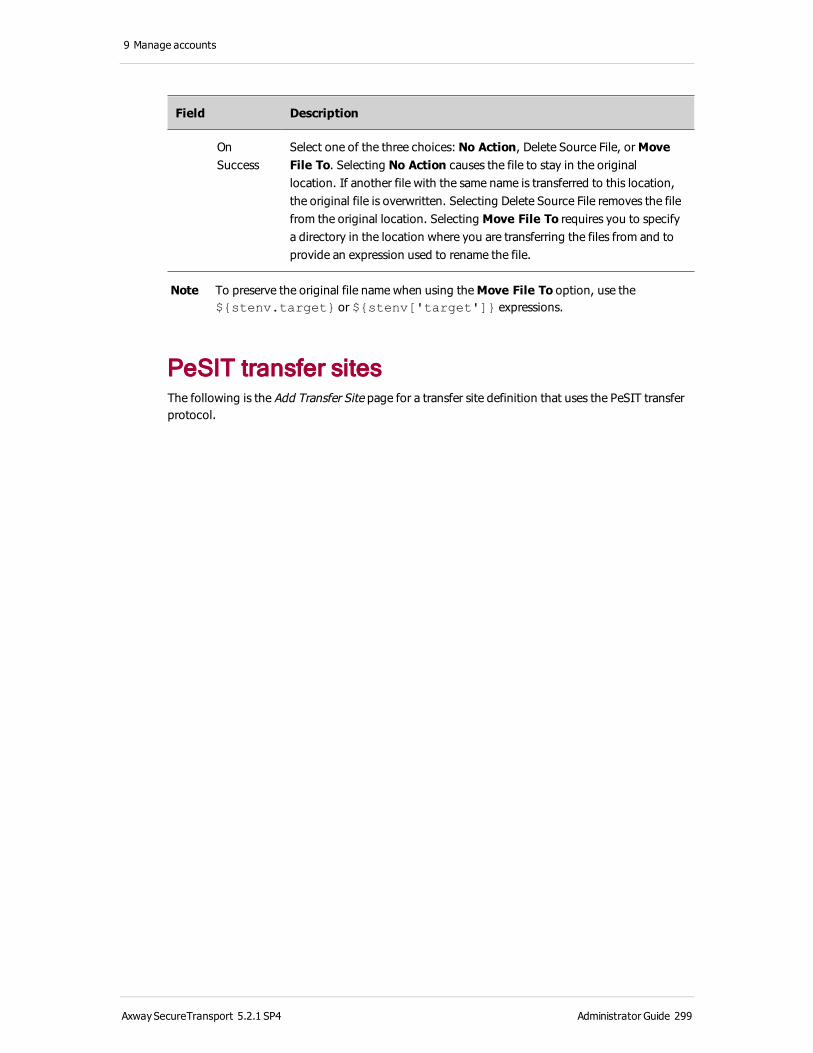
9 Manage accounts
Field Description
On Success
Select one of the three choices: No Action, Delete Source File, or Move File To. Selecting No Action causes the file to stay in the original location. If another file with the same name is transferred to this location, the original file is overwritten. Selecting Delete Source File removes the file from the original location. Selecting Move File To requires you to specify a directory in the location where you are transferring the files from and to provide an expression used to rename the file.
Note To preserve the original file name when using the Move File To option, use the ${stenv.target} or ${stenv['target']} expressions.
PeSIT transfer sitesThe following is the Add Transfer Site page for a transfer site definition that uses the PeSIT transfer protocol.
AxwaySecureTransport 5.2.1 SP4 Administrator Guide 299

9 Manage accounts
Note If you deselect the Show Advanced Settings option, SecureTransport does not display many of the fields.
Unlike transfer sites for other transfer protocols, a PeSIT transfer site is also used for transfers initiated by the external PeSIT partner (considered client-initiated by SecureTransport). Only the Site Name is required in that case to define the partnership, so a PeSIT transfer site needs only a Site Name if it is not used for transfers initiated by the SecureTransport server on which it is defined.
AxwaySecureTransport 5.2.1 SP4 Administrator Guide 300
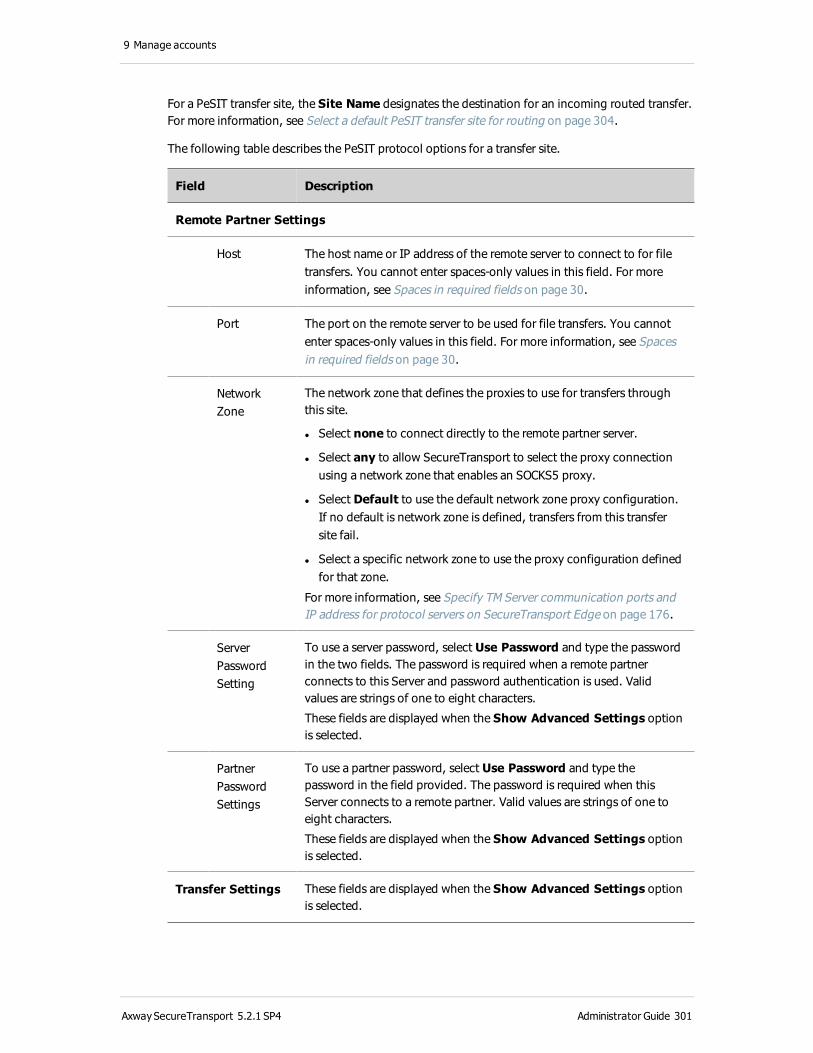
9 Manage accounts
For a PeSIT transfer site, the Site Name designates the destination for an incoming routed transfer. For more information, see Select a default PeSIT transfer site for routing on page 304.
The following table describes the PeSIT protocol options for a transfer site.
Field Description
Remote Partner Settings
Host The host name or IP address of the remote server to connect to for file transfers. You cannot enter spaces-only values in this field. For more information, see Spaces in required fields on page 30.
Port The port on the remote server to be used for file transfers. You cannot enter spaces-only values in this field. For more information, see Spaces in required fields on page 30.
Network Zone
The network zone that defines the proxies to use for transfers through this site.
l Select none to connect directly to the remote partner server.
l Select any to allow SecureTransport to select the proxy connection using a network zone that enables an SOCKS5 proxy.
l Select Default to use the default network zone proxy configuration. If no default is network zone is defined, transfers from this transfer site fail.
l Select a specific network zone to use the proxy configuration defined for that zone.
For more information, see Specify TM Server communication ports and IP address for protocol servers on SecureTransport Edge on page 176.
Server Password Setting
To use a server password, select Use Password and type the password in the two fields. The password is required when a remote partner connects to this Server and password authentication is used. Valid values are strings of one to eight characters.
These fields are displayed when the Show Advanced Settings option is selected.
Partner Password Settings
To use a partner password, select Use Password and type the password in the field provided. The password is required when this Server connects to a remote partner. Valid values are strings of one to eight characters.
These fields are displayed when the Show Advanced Settings option is selected.
Transfer Settings These fields are displayed when the Show Advanced Settings option is selected.
AxwaySecureTransport 5.2.1 SP4 Administrator Guide 301
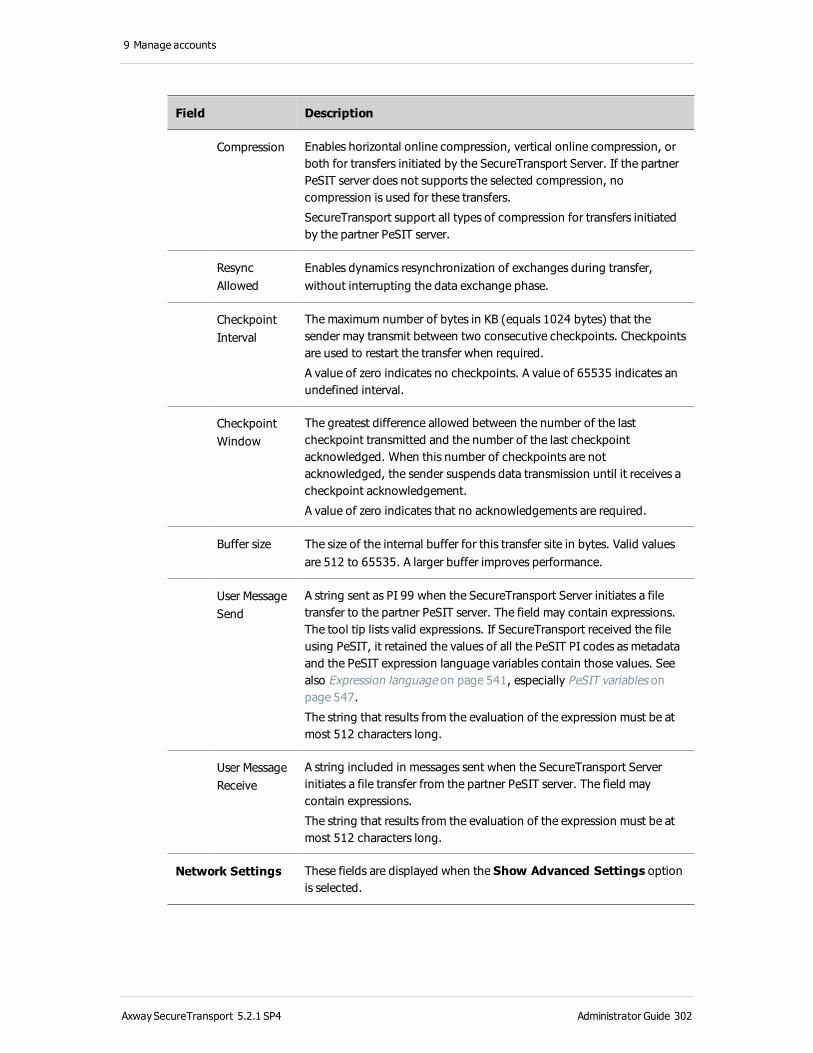
9 Manage accounts
Field Description
Compression Enables horizontal online compression, vertical online compression, or both for transfers initiated by the SecureTransport Server. If the partner PeSIT server does not supports the selected compression, no compression is used for these transfers.
SecureTransport support all types of compression for transfers initiated by the partner PeSIT server.
Resync Allowed
Enables dynamics resynchronization of exchanges during transfer, without interrupting the data exchange phase.
Checkpoint Interval
The maximum number of bytes in KB (equals 1024 bytes) that the sender may transmit between two consecutive checkpoints. Checkpoints are used to restart the transfer when required.
A value of zero indicates no checkpoints. A value of 65535 indicates an undefined interval.
Checkpoint Window
The greatest difference allowed between the number of the last checkpoint transmitted and the number of the last checkpoint acknowledged. When this number of checkpoints are not acknowledged, the sender suspends data transmission until it receives a checkpoint acknowledgement.
A value of zero indicates that no acknowledgements are required.
Buffer size The size of the internal buffer for this transfer site in bytes. Valid values are 512 to 65535. A larger buffer improves performance.
User Message Send
A string sent as PI 99 when the SecureTransport Server initiates a file transfer to the partner PeSIT server. The field may contain expressions. The tool tip lists valid expressions. If SecureTransport received the file using PeSIT, it retained the values of all the PeSIT PI codes as metadata and the PeSIT expression language variables contain those values. See also Expression language on page 541, especially PeSIT variables on page 547.
The string that results from the evaluation of the expression must be at most 512 characters long.
User Message Receive
A string included in messages sent when the SecureTransport Server initiates a file transfer from the partner PeSIT server. The field may contain expressions.
The string that results from the evaluation of the expression must be at most 512 characters long.
Network Settings These fields are displayed when the Show Advanced Settings option is selected.
AxwaySecureTransport 5.2.1 SP4 Administrator Guide 302
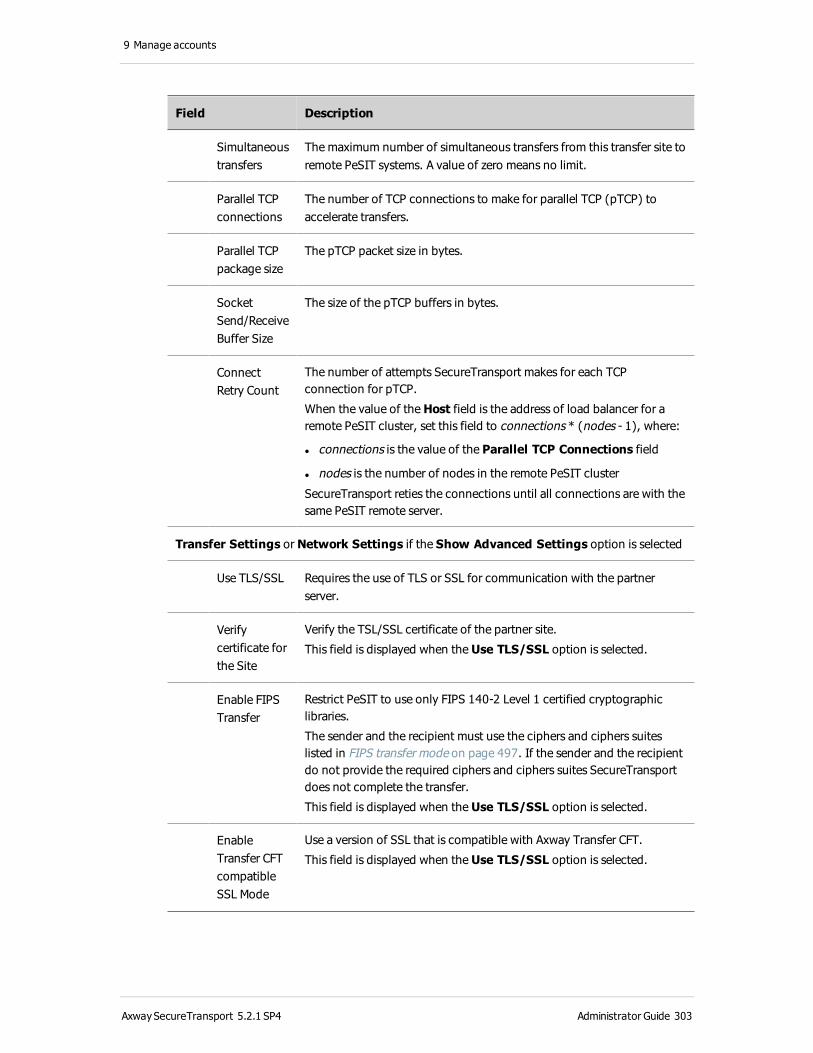
9 Manage accounts
Field Description
Simultaneous transfers
The maximum number of simultaneous transfers from this transfer site to remote PeSIT systems. A value of zero means no limit.
Parallel TCP connections
The number of TCP connections to make for parallel TCP (pTCP) to accelerate transfers.
Parallel TCP package size
The pTCP packet size in bytes.
Socket Send/Receive Buffer Size
The size of the pTCP buffers in bytes.
Connect Retry Count
The number of attempts SecureTransport makes for each TCP connection for pTCP.
When the value of the Host field is the address of load balancer for a remote PeSIT cluster, set this field to connections * (nodes - 1), where:
l connections is the value of the Parallel TCP Connections field
l nodes is the number of nodes in the remote PeSIT cluster
SecureTransport reties the connections until all connections are with the same PeSIT remote server.
Transfer Settings or Network Settings if the Show Advanced Settings option is selected
Use TLS/SSL Requires the use of TLS or SSL for communication with the partner server.
Verify certificate for the Site
Verify the TSL/SSL certificate of the partner site.
This field is displayed when the Use TLS/SSL option is selected.
Enable FIPS Transfer
Restrict PeSIT to use only FIPS 140-2 Level 1 certified cryptographic libraries.
The sender and the recipient must use the ciphers and ciphers suites listed in FIPS transfer mode on page 497. If the sender and the recipient do not provide the required ciphers and ciphers suites SecureTransport does not complete the transfer.
This field is displayed when the Use TLS/SSL option is selected.
Enable Transfer CFT compatible SSL Mode
Use a version of SSL that is compatible with Axway Transfer CFT.
This field is displayed when the Use TLS/SSL option is selected.
AxwaySecureTransport 5.2.1 SP4 Administrator Guide 303

9 Manage accounts
Field Description
Login certificate
The local certificate to use when connecting to the partner site.
Partner certificate
The login certificate to use when authenticating the remote site.
Select a default PeSIT transfer site for routingSecureTransport implements PeSIT routing as an intermediate partner by sending a received file to a PeSIT transfer site specified as the destination of the PeSIT transfer.
SecureTransport matches the specified destination to the names of the transfer sites for the account that receives the file. If a transfer site name matches, SecureTransport transfers the file to that site. No subscription is required. If no transfer site name matches and a default PeSIT transfer site is defined, SecureTransport transfers the file to that site.
If there is no default site, SecureTransport checks the Routing Mode value for the account. If it is Reject, the transfer is rejected before it starts. If it is Accept, the transfer is performed and the file is retained locally.
When SecureTransport routes a transferred file to a final PeSIT destination, SecureTransport includes PI 61 and PI 62.
1. Select Accounts > User Accounts. The User Accounts page is displayed.
2. Click the name of the account for which you want to set the default transfer site.
3. Click the Transfer Site tab.
4. Select the check box next to the name of the PeSIT transfer site to make the default.
5. Click Set PeSIT Default.
AxwaySecureTransport 5.2.1 SP4 Administrator Guide 304
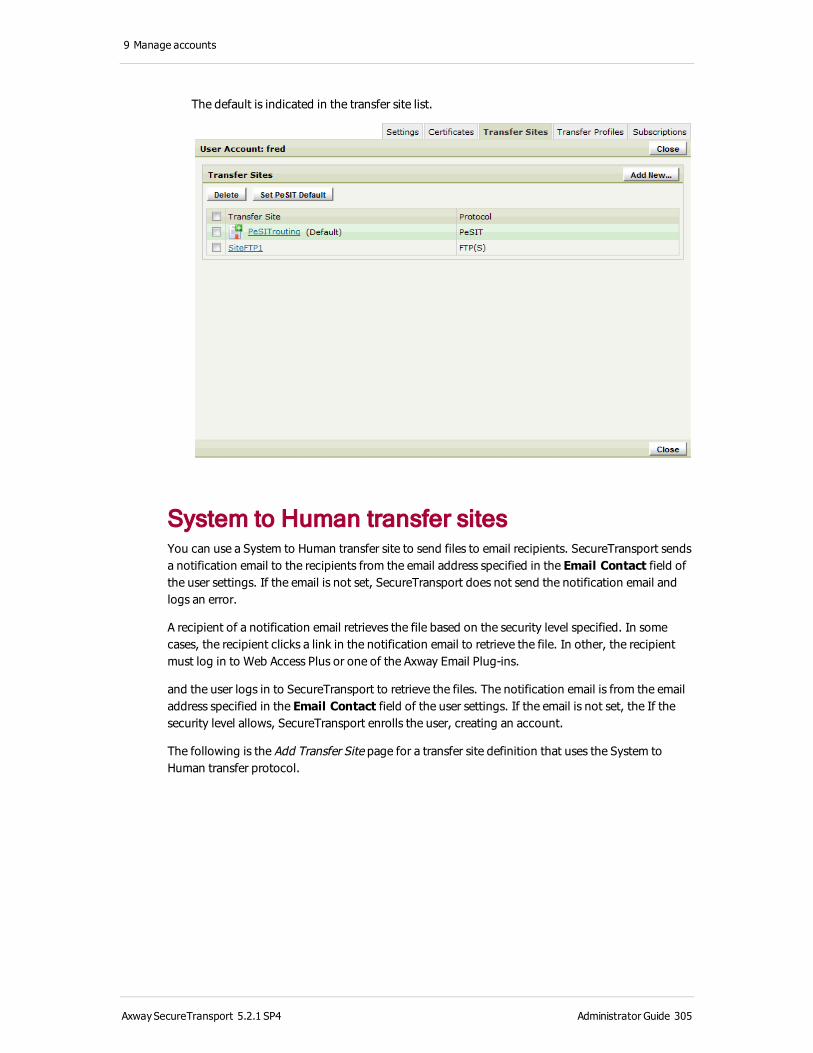
9 Manage accounts
The default is indicated in the transfer site list.
System to Human transfer sitesYou can use a System to Human transfer site to send files to email recipients. SecureTransport sends a notification email to the recipients from the email address specified in the Email Contact field of the user settings. If the email is not set, SecureTransport does not send the notification email and logs an error.
A recipient of a notification email retrieves the file based on the security level specified. In some cases, the recipient clicks a link in the notification email to retrieve the file. In other, the recipient must log in to Web Access Plus or one of the Axway Email Plug-ins.
and the user logs in to SecureTransport to retrieve the files. The notification email is from the email address specified in the Email Contact field of the user settings. If the email is not set, the If the security level allows, SecureTransport enrolls the user, creating an account.
The following is the Add Transfer Site page for a transfer site definition that uses the System to Human transfer protocol.
AxwaySecureTransport 5.2.1 SP4 Administrator Guide 305
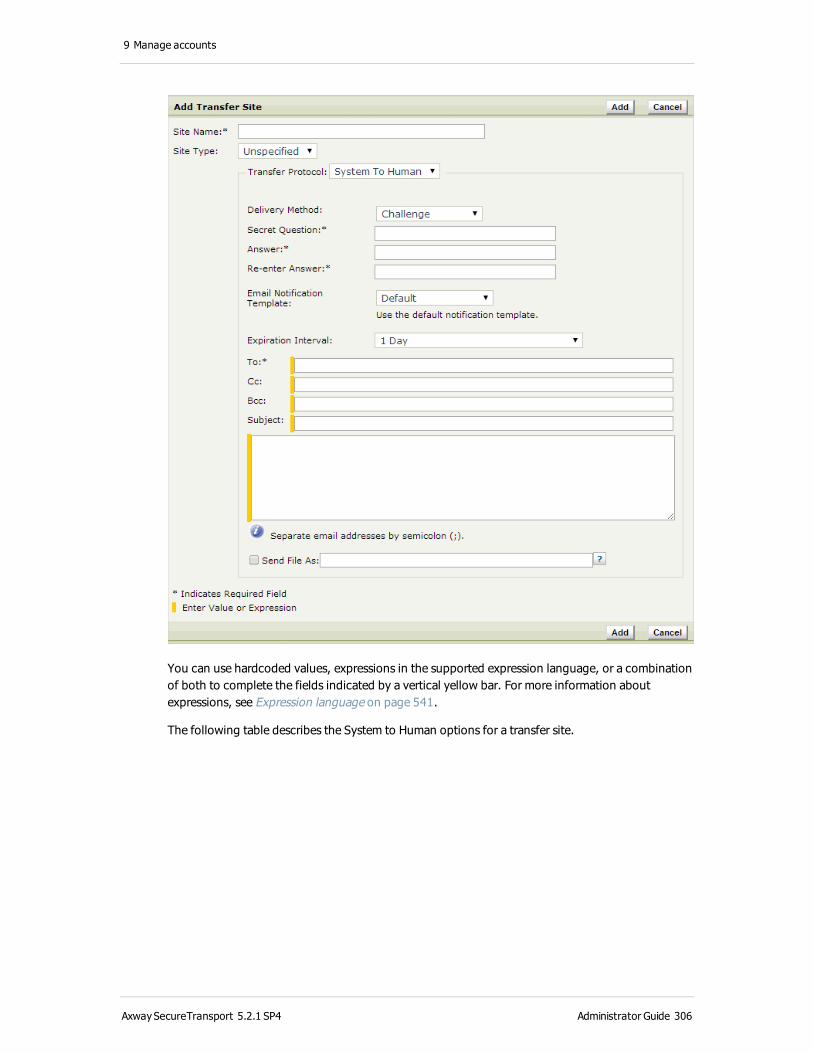
9 Manage accounts
You can use hardcoded values, expressions in the supported expression language, or a combination of both to complete the fields indicated by a vertical yellow bar. For more information about expressions, see Expression language on page 541.
The following table describes the System to Human options for a transfer site.
AxwaySecureTransport 5.2.1 SP4 Administrator Guide 306

9 Manage accounts
Field Description
Delivery Method
Controls user enrollment:
l Anonymous – The recipient clicks a link in the email and can retrieve the files.
l Challenge – When the recipient clicks the link in the email to retrieve the files, the recipient must answer a secret question correctly.
l Existing Account – The recipient must have a SecureTransport accounts.
l Enroll Unlicensed – SecureTransport enrolls the recipient as an unlicensed user, if necessary.
l Enroll Licensed – SecureTransport enrolls the recipients as licensed users, if necessary.
Secret Question
This field is displayed when the Delivery Method is Challenge. Type the
question that the email recipient must answer to retrieve the files.
AnswerRe-enter Answer
These fields are displayed when the Delivery Method is Challenge. Type the
answer to the question.
Email Notification Template
Select Default or an email template that SecureTransport uses to compose the
file transfer notification and status emails. You specify the email templates on the Mail Template Repository page. You specify the default email notification template on the Ad Hoc Settings page.
Expiration Interval
The number of days before the message expires. The choices are: 1 Day, 7 Days, 30 Days, 60 Days, and Never.
To Type values that can include expressions for the email addresses of the main recipients. Use a semicolon (;) to separate email addresses.
Cc Type values that can include expressions for the email addresses of the copy recipients. Use a semicolon (;) to separate email addresses.
Bcc Type values that can include expressions for the email addresses of the blind copy recipients. Use a semicolon (;) to separate email addresses.
Subject Type a value that can include expressions for the subject of the file transfer emails.
Text In the unlabeled email body field, type a value that can include expressions for the text of the notification emails.
AxwaySecureTransport 5.2.1 SP4 Administrator Guide 307

9 Manage accounts
Field Description
Send File As
Select the check box to specify a file name. You can use the expression language to specify the criteria you want to match. The expression uses the criteria provided to create a new file name from the original file name.
For example, when a file arrives in a H2S file transfer, SecureTransport renames the file by prepending a unique ID to the file name. If the file it routed to an H2S transfer site to forward it, the expression, ${stenv.target.replace('^.{66}', '')}, removes the ID.
SSH transfer sitesThe following is the Add Transfer Site page for a transfer site definition that uses the SSH transfer protocol.
AxwaySecureTransport 5.2.1 SP4 Administrator Guide 308

9 Manage accounts
The following table describes the SSH protocol options for a transfer site.
Field Description
Site Settings
AxwaySecureTransport 5.2.1 SP4 Administrator Guide 309
9 Manage accounts
Field Description
Server The host name or IP address of the remote server to connect to for file transfers. You cannot enter spaces-only values in this field. For more information, see Spaces in required fields on page 30.
Port The port on the remote server to be used for file transfers. You cannot enter spaces-only values in this field. For more information, see Spaces in required fields on page 30.
Network Zone
The network zone that defines the proxies to use for transfers through this site.
l Select none to connect directly to the remote SSH server.
l Select any to allow SecureTransport to select the proxy connection using a network zone that enables an SOCKS5 proxy.
l Select Default to use the default network zone proxy configuration. If no default is network zone is defined, transfers from this transfer site fail.
l Select a specific network zone to use the proxy configuration defined for that zone.
For more information, see Specify TM Server communication ports and IP address for protocol servers on SecureTransport Edge on page 176.
Download Folder
The folder on the remote server from which the file are transferred.
Download Pattern Type
Select one of two types: Regular Expression or File Globbing. For regular expression syntax, see Regular expressions on page 555. File globbing uses simple wildcards to specify a pattern. A question mark (?)
matches any one character. An asterisk (*) matches any number of
characters.
Download Pattern
The pattern used to match file names to determine whether a file is downloaded.
Upload Folder
The folder on the remote server to which files are transferred.
Site Login Credentials
User Name Username used to log in to the SSH server. You cannot enter spaces-only values in this field. For more information, see Spaces in required fields on page 30.
AxwaySecureTransport 5.2.1 SP4 Administrator Guide 310

9 Manage accounts
Field Description
Use Password
Select to use a password to log in to the SSH server.
Password Password used to log in to the SSH server.
SSH Key The certificate used to identify the user logging in. You can select a certificate or import a certificate.
Network Settings
Connection Read/Write timeout
The maximum number of seconds SecureTransport waits to read a block of data from or to write a block of data to the remote SSH server.
Connection Read/Write Buffer Size
The size of the SecureTransport buffer for reads from and writes to the remote SSH server.
Transfer Settings
Transfer Mode
Specify whether data is transferred as ASCII or binary. You can also choose to have SecureTransport automatically determine the correct transfer mode. For more information about automatically determining transfer mode, see Transfer mode for server-initiated transfers on page 381.
Verify Fingerprint for this Site
Select this check box to require SecureTransport to verify the fingerprint for the SSH key against the value you specify below. If the values do not match, the connection is refused.
Fingerprint The value against which you want to verify the fingerprint from the remote server.
If the partner SSH server has both DSA and RSA keys configured, the fingerprint that SecureTransport must verify for a server-initiated transfer depends on FIPS transfer mode. With FIPS transfer mode enabled, enter the fingerprint for the DSA key. With FIPS transfer mode disabled, enter the fingerprint for the RSA key.
Enable FIPS Transfer Mode
Restrict SSH to use only FIPS 140-2 Level 1 certified cryptographic libraries.
The sender and the recipient must use the ciphers and ciphers suites listed in FIPS transfer mode on page 497. If the sender and the recipient do not provide the required ciphers and ciphers suites SecureTransport does not complete the transfer.
Post-transmission Settings
AxwaySecureTransport 5.2.1 SP4 Administrator Guide 311
9 Manage accounts
Field Description
Send Options
Send File As
Select the check box to specify a file name. You can use the expression language to specify the criteria you want to match. The expression uses the criteria provided to create a new file name from the original file name.
On Temporary Failure
A temporary failure can occur when the transfer is incomplete and a retry occurs. Select one of the three choices: No Action, Delete Destination File, or Move File To. Selecting No Action causes the file to stay in the new location with the file name you specified. If another file with the same name is transferred to this location, the original file is overwritten. Selecting Delete Destination File removes the file from the new location. Selecting Move File To requires you to specify a directory in the location where you are transferring the files to and to provide an expression used to rename the file.
On Failure A failure occurs when the transfer is incomplete and all retry attempts were unsuccessful. Select one of the three choices: No Action, Delete Destination File, or Move File To. Selecting No Action causes the file to stay in the new location with the file name you specified. If another file with the same name is transferred to this location, the original file is overwritten. Selecting Delete Destination File removes the file from the new location. Selecting Move File To requires you to specify a directory in the location where you are transferring the files to and to provide an expression used to rename the file.
On Success Select one of the choices: No Action, or Move File To. Selecting No Action causes the file to stay in the new location with the file name you specified. If another file with the same name is transferred to this location, the original file is overwritten. Selecting Move File To requires you to specify a directory in the location where you are transferring the files to and to provide an expression used to rename the file.
Select Allow Overwrite to allow the file move to overwrite an existing file. If Allow Overwrite is not selected, a file transfer that attempts to overwrite an existing file fails.
Receive Options
AxwaySecureTransport 5.2.1 SP4 Administrator Guide 312
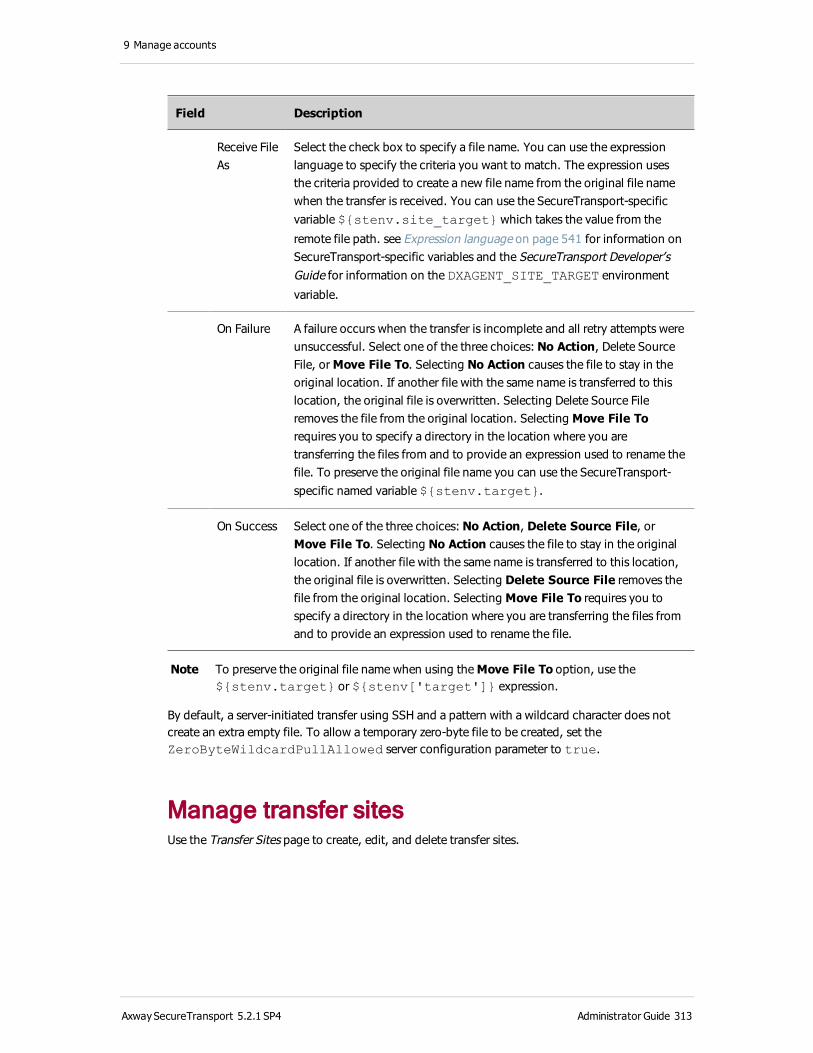
9 Manage accounts
Field Description
Receive File As
Select the check box to specify a file name. You can use the expression language to specify the criteria you want to match. The expression uses the criteria provided to create a new file name from the original file name when the transfer is received. You can use the SecureTransport-specific variable ${stenv.site_target} which takes the value from the
remote file path. see Expression language on page 541 for information on SecureTransport-specific variables and the SecureTransport Developer’s Guide for information on the DXAGENT_SITE_TARGET environment
variable.
On Failure A failure occurs when the transfer is incomplete and all retry attempts were unsuccessful. Select one of the three choices: No Action, Delete Source File, or Move File To. Selecting No Action causes the file to stay in the original location. If another file with the same name is transferred to this location, the original file is overwritten. Selecting Delete Source File removes the file from the original location. Selecting Move File To requires you to specify a directory in the location where you are transferring the files from and to provide an expression used to rename the file. To preserve the original file name you can use the SecureTransport-specific named variable ${stenv.target}.
On Success Select one of the three choices: No Action, Delete Source File, or Move File To. Selecting No Action causes the file to stay in the original location. If another file with the same name is transferred to this location, the original file is overwritten. Selecting Delete Source File removes the file from the original location. Selecting Move File To requires you to specify a directory in the location where you are transferring the files from and to provide an expression used to rename the file.
Note To preserve the original file name when using the Move File To option, use the ${stenv.target} or ${stenv['target']} expression.
By default, a server-initiated transfer using SSH and a pattern with a wildcard character does not create an extra empty file. To allow a temporary zero-byte file to be created, set the ZeroByteWildcardPullAllowed server configuration parameter to true.
Manage transfer sitesUse the Transfer Sites page to create, edit, and delete transfer sites.
AxwaySecureTransport 5.2.1 SP4 Administrator Guide 313

9 Manage accounts
Create a transfer siteThis section provides a general procedure for creating a transfer site for an account. All supported protocols require custom settings. For details, see the reference topic for each protocol.
1. Select Accounts > User Accounts. The User Accounts page is displayed.
2. Click the name of the account to which you want to add a transfer site.
The Account Settings page for that account is displayed.
3. Click Transfer Sites.
The Transfer Sites page is displayed.
4. Click Add New.
The Add Transfer Site page is displayed.
5. In the Site Name box, enter a unique name for the transfer site.
6. The Site Name is unique per account. Two sites could have the same names if they are associated with different accounts.
7. Select an Site Type. Use this parameter to differentiate between sites that transfer files internally and those that transfer files between partners. Choose from the following:
l Unspecified – Default value. All transfer sites created using previous versions of SecureTransport will have this value.
l Internal – Transfers for this site occur within a single organization.
l Partner – Transfers for this site occur between organizations.
AxwaySecureTransport 5.2.1 SP4 Administrator Guide 314
9 Manage accounts
8. Select the protocol that the transfer site uses for file transfers. The supported protocols are AS2, FTP(S), HTTP(S), PeSIT, SSH (SFTP and SCP), Connect:Direct, Folder Monitor, and System to Human.
9. By default, the AS2 protocol settings are displayed first. This example displays the settings for creating an FTP(S) transfer site.
10. Edit the custom options depending on the selected transfer protocol.
11. Click Add
The transfer site is added to the list of transfer sites available to the current account.
Edit a transfer site 1. Select Accounts > User Accounts. The User Accounts page is displayed.
2. Click the name of the account that owns the transfer site to edit.
3. Click the Transfer Sites tab.
4. Click the name of the transfer site to edit.
5. The Edit Transfer Site page is displayed.
Note Editing a transfer site does not affect transfers in progress, including transfers that are being retried.
6. Edit the desired settings for the transfer site.
Note The Edit Transfer Site page is identical to the Add Transfer Site page for the corresponding protocol.
7. Click Save.
Delete a transfer site 1. Select Accounts > User Accounts. The User Accounts page is displayed.
2. Click the name of the account that owns the transfer site to delete.
3. Click the Transfer Sites tab.
4. Select the check boxes next to the names of the transfer sites to delete.
5. Click Delete.
Transfer profilesTransfer profiles provide additional information for PeSIT transfers. A subscription that retrieves files from a PeSIT transfer site or sends files directly to a PeSIT transfer site can specify a transfer profile for that site to use when receiving or sending the files. If no transfer profile is specified, there must be a default transfer profile and it is used.
AxwaySecureTransport 5.2.1 SP4 Administrator Guide 315
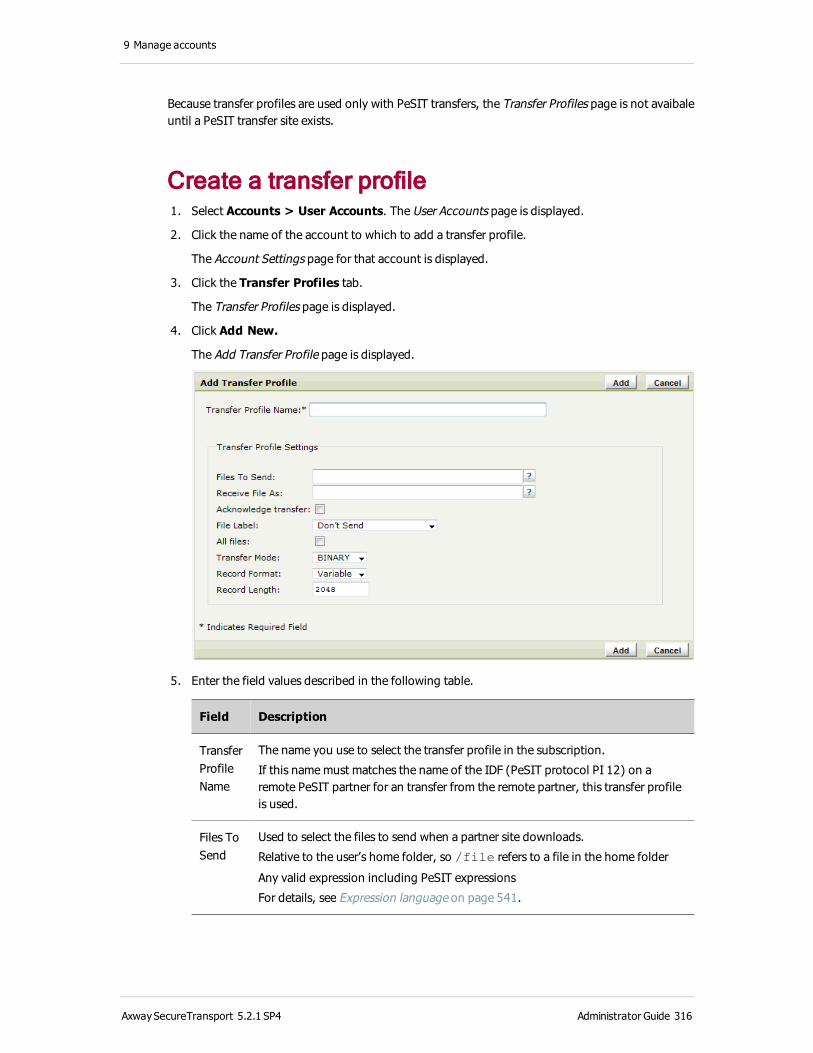
9 Manage accounts
Because transfer profiles are used only with PeSIT transfers, the Transfer Profiles page is not avaibale until a PeSIT transfer site exists.
Create a transfer profile 1. Select Accounts > User Accounts. The User Accounts page is displayed.
2. Click the name of the account to which to add a transfer profile.
The Account Settings page for that account is displayed.
3. Click the Transfer Profiles tab.
The Transfer Profiles page is displayed.
4. Click Add New.
The Add Transfer Profile page is displayed.
5. Enter the field values described in the following table.
Field Description
Transfer Profile Name
The name you use to select the transfer profile in the subscription.
If this name must matches the name of the IDF (PeSIT protocol PI 12) on a remote PeSIT partner for an transfer from the remote partner, this transfer profile is used.
Files To Send
Used to select the files to send when a partner site downloads.
Relative to the user’s home folder, so /file refers to a file in the home folder
Any valid expression including PeSIT expressions
For details, see Expression language on page 541.
AxwaySecureTransport 5.2.1 SP4 Administrator Guide 316

9 Manage accounts
Field Description
Receive Files As
Used to name the files received when files are transferred to SecureTransport.
Relative to the user’s home folder, so /file refers to a file in the home folder
Any valid expression including PeSIT expressions
For details, see Expression language on page 541.
File Label
Controls whether the file name relative to the user’s home folder is sent, the full file path and name is sent, or no file name is sent. Ignored when receiving files.
All files If this option is selected, when SecureTransport initiates a download from the PeSIT partner, it gets all files whose names match the pattern. If this option is cleared, SecureTransport gets the first file with a matching file name.
Transfer Mode
BINARY, ASCII, EBCDIC, or EBCDIC_NATIVE. Use EBCDIC_NATIVE for
files that use EBCDIC LF (0x25) as the end-of-line character.
Record Format
Fixed or Variable.
Record Length
When Record Format is Fixed, this specifies the length of the records in bytes.
6. Click Add.
The new transfer profile is added to the list for the user.
Edit a transfer profile 1. Select Accounts > User Accounts. The User Accounts page is displayed.
2. Click the name of the account that owns the transfer profile to edit.
3. Click the Transfer Profiles tab.
4. Click the name of the transfer profile to edit.
Note Editing a transfer profile does not affect transfers in progress, including transfers that are being retried..
5. Edit the desired settings for the transfer profile. For details about the fields, see Create a transfer profile on page 316.
Note The Edit Transfer Profile page is identical to the Add Transfer Profile page.
6. Click Save.
AxwaySecureTransport 5.2.1 SP4 Administrator Guide 317

9 Manage accounts
Delete a transfer profile 1. Select Accounts > User Accounts. The User Accounts page is displayed.
2. Click the name of the underaccount that owns the transfer profile you want to delete.
3. Click the Transfer Profiles tab.
4. Select the check boxes next to the names of the transfer profiles to delete.
5. Click Delete.
SubscriptionsA subscription provides a functional connection between a user account and an application.
For each subscription, SecureTransport creates a subscription folder and stores and manages all files that are transferred or transformed as a result of the application activity. A single application can have subscriptions from multiple accounts and a single account can subscribe to multiple applications. An account can subscribe to new instances of the same application as long as each instance has a unique subscription folder name.
Additional transfer configurations are possible for subscriptions. Use subscriptions to trigger the execution of specific actions, defined in the respective application, when a subscription event occurs, such as an incoming file transfer in the dedicated subscription folder.
Note The application is not triggered if the file is uploaded into another folder first and is then moved or copied into the subscription folder.
Encryption optionsSecureTransport can encrypt a file before transferring it. You can specify the following options for files you are uploading:
Encryption setting
Description
Encrypt File As
Determines if the file should be encrypted and if the encrypted file is saved to a different name, location, or both. You can use a file name expression.
Encrypt Using PGP Key
Determines if SecureTransport uses PGP to encrypt the file and which PGP key it uses.
Sign Using PGP Key
Determines if SecureTransport signs the file using a PGP key and which PGP key it uses.
AxwaySecureTransport 5.2.1 SP4 Administrator Guide 318
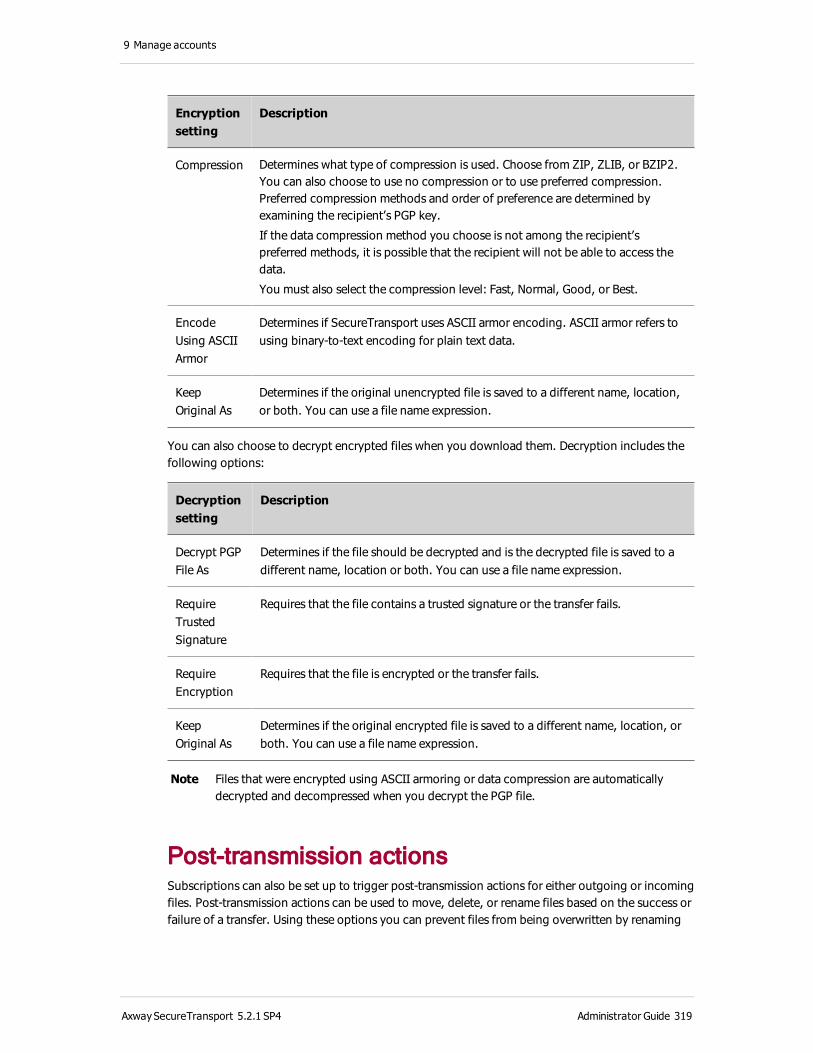
9 Manage accounts
Encryption setting
Description
Compression Determines what type of compression is used. Choose from ZIP, ZLIB, or BZIP2. You can also choose to use no compression or to use preferred compression. Preferred compression methods and order of preference are determined by examining the recipient’s PGP key.
If the data compression method you choose is not among the recipient’s preferred methods, it is possible that the recipient will not be able to access the data.
You must also select the compression level: Fast, Normal, Good, or Best.
Encode Using ASCII Armor
Determines if SecureTransport uses ASCII armor encoding. ASCII armor refers to using binary-to-text encoding for plain text data.
Keep Original As
Determines if the original unencrypted file is saved to a different name, location, or both. You can use a file name expression.
You can also choose to decrypt encrypted files when you download them. Decryption includes the following options:
Decryption setting
Description
Decrypt PGP File As
Determines if the file should be decrypted and is the decrypted file is saved to a different name, location or both. You can use a file name expression.
Require Trusted Signature
Requires that the file contains a trusted signature or the transfer fails.
Require Encryption
Requires that the file is encrypted or the transfer fails.
Keep Original As
Determines if the original encrypted file is saved to a different name, location, or both. You can use a file name expression.
Note Files that were encrypted using ASCII armoring or data compression are automatically decrypted and decompressed when you decrypt the PGP file.
Post-transmission actionsSubscriptions can also be set up to trigger post-transmission actions for either outgoing or incoming files. Post-transmission actions can be used to move, delete, or rename files based on the success or failure of a transfer. Using these options you can prevent files from being overwritten by renaming
AxwaySecureTransport 5.2.1 SP4 Administrator Guide 319
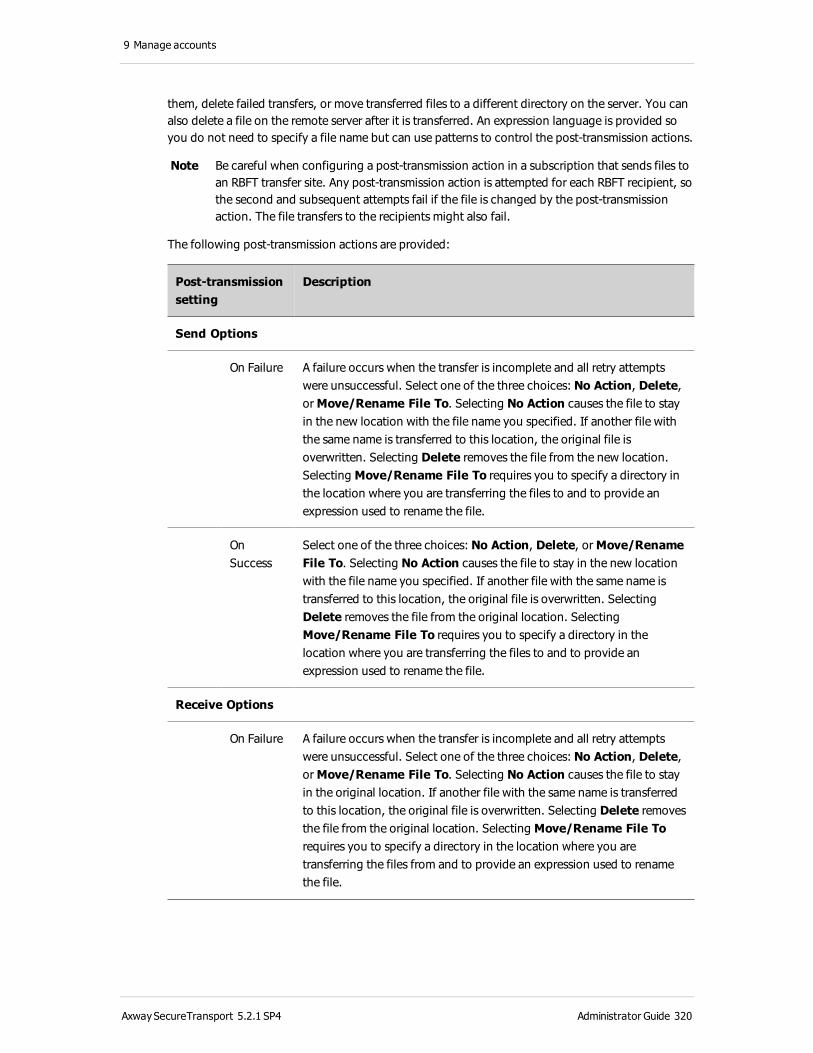
9 Manage accounts
them, delete failed transfers, or move transferred files to a different directory on the server. You can also delete a file on the remote server after it is transferred. An expression language is provided so you do not need to specify a file name but can use patterns to control the post-transmission actions.
Note Be careful when configuring a post-transmission action in a subscription that sends files to an RBFT transfer site. Any post-transmission action is attempted for each RBFT recipient, so the second and subsequent attempts fail if the file is changed by the post-transmission action. The file transfers to the recipients might also fail.
The following post-transmission actions are provided:
Post-transmission setting
Description
Send Options
On Failure A failure occurs when the transfer is incomplete and all retry attempts were unsuccessful. Select one of the three choices: No Action, Delete, or Move/Rename File To. Selecting No Action causes the file to stay in the new location with the file name you specified. If another file with the same name is transferred to this location, the original file is overwritten. Selecting Delete removes the file from the new location. Selecting Move/Rename File To requires you to specify a directory in the location where you are transferring the files to and to provide an expression used to rename the file.
On Success
Select one of the three choices: No Action, Delete, or Move/Rename File To. Selecting No Action causes the file to stay in the new location with the file name you specified. If another file with the same name is transferred to this location, the original file is overwritten. Selecting Delete removes the file from the original location. Selecting Move/Rename File To requires you to specify a directory in the location where you are transferring the files to and to provide an expression used to rename the file.
Receive Options
On Failure A failure occurs when the transfer is incomplete and all retry attempts were unsuccessful. Select one of the three choices: No Action, Delete, or Move/Rename File To. Selecting No Action causes the file to stay in the original location. If another file with the same name is transferred to this location, the original file is overwritten. Selecting Delete removes the file from the original location. Selecting Move/Rename File To requires you to specify a directory in the location where you are transferring the files from and to provide an expression used to rename the file.
AxwaySecureTransport 5.2.1 SP4 Administrator Guide 320
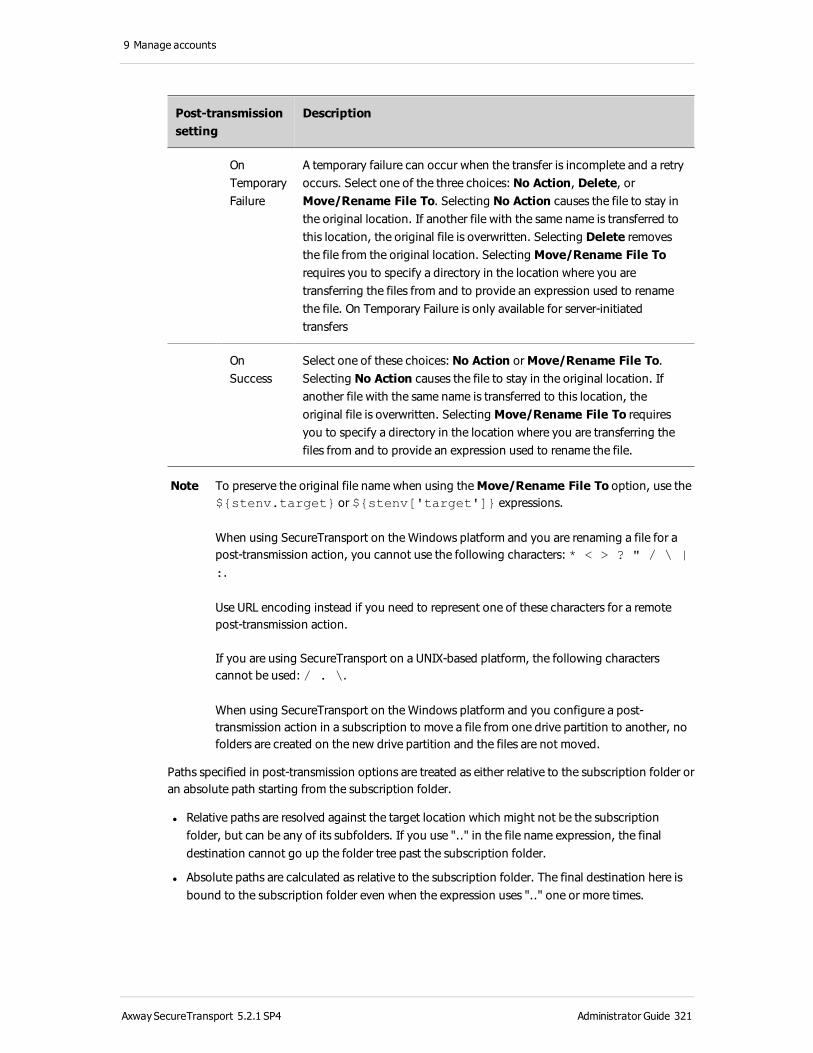
9 Manage accounts
Post-transmission setting
Description
On Temporary Failure
A temporary failure can occur when the transfer is incomplete and a retry occurs. Select one of the three choices: No Action, Delete, or Move/Rename File To. Selecting No Action causes the file to stay in the original location. If another file with the same name is transferred to this location, the original file is overwritten. Selecting Delete removes the file from the original location. Selecting Move/Rename File To requires you to specify a directory in the location where you are transferring the files from and to provide an expression used to rename the file. On Temporary Failure is only available for server-initiated transfers
On Success
Select one of these choices: No Action or Move/Rename File To. Selecting No Action causes the file to stay in the original location. If another file with the same name is transferred to this location, the original file is overwritten. Selecting Move/Rename File To requires you to specify a directory in the location where you are transferring the files from and to provide an expression used to rename the file.
Note To preserve the original file name when using the Move/Rename File To option, use the ${stenv.target} or ${stenv['target']} expressions.
When using SecureTransport on the Windows platform and you are renaming a file for a post-transmission action, you cannot use the following characters: * < > ? " / \ | :.
Use URL encoding instead if you need to represent one of these characters for a remote post-transmission action.
If you are using SecureTransport on a UNIX-based platform, the following characters cannot be used: / . \.
When using SecureTransport on the Windows platform and you configure a post-transmission action in a subscription to move a file from one drive partition to another, no folders are created on the new drive partition and the files are not moved.
Paths specified in post-transmission options are treated as either relative to the subscription folder or an absolute path starting from the subscription folder.
l Relative paths are resolved against the target location which might not be the subscription folder, but can be any of its subfolders. If you use ".." in the file name expression, the final destination cannot go up the folder tree past the subscription folder.
l Absolute paths are calculated as relative to the subscription folder. The final destination here is bound to the subscription folder even when the expression uses ".." one or more times.
AxwaySecureTransport 5.2.1 SP4 Administrator Guide 321
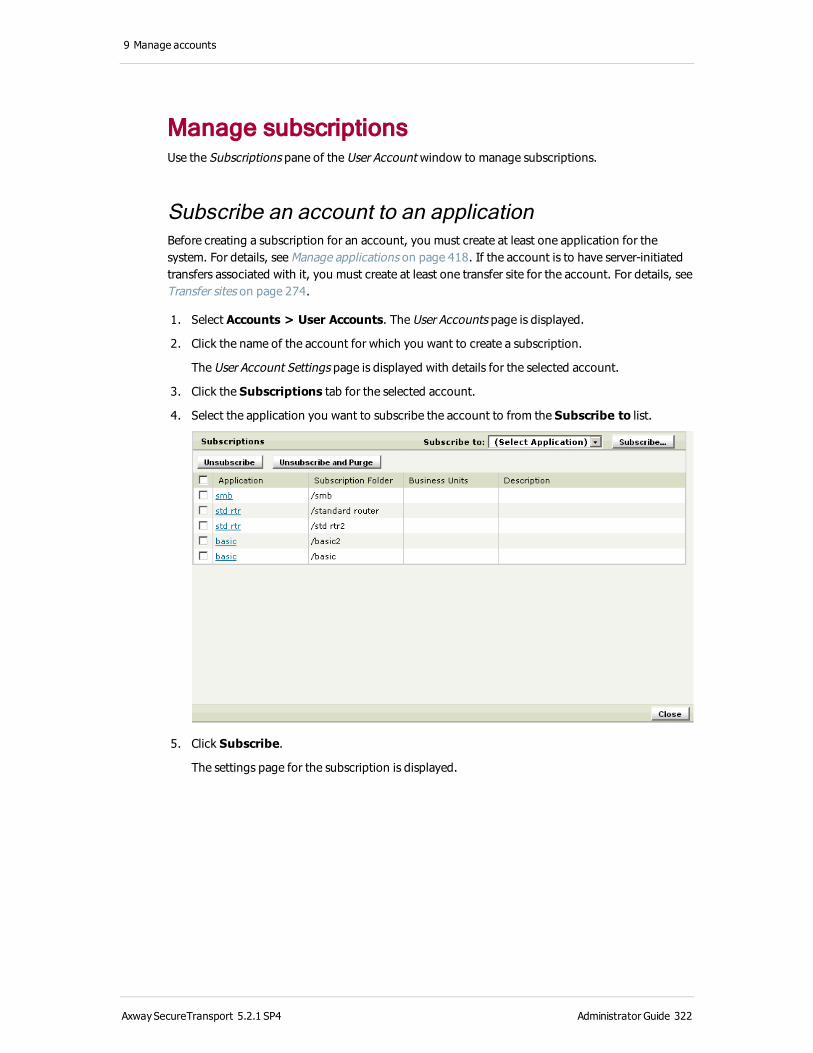
9 Manage accounts
Manage subscriptionsUse the Subscriptions pane of the User Account window to manage subscriptions.
Subscribe an account to an applicationBefore creating a subscription for an account, you must create at least one application for the system. For details, see Manage applications on page 418. If the account is to have server-initiated transfers associated with it, you must create at least one transfer site for the account. For details, see Transfer sites on page 274.
1. Select Accounts > User Accounts. The User Accounts page is displayed.
2. Click the name of the account for which you want to create a subscription.
The User Account Settings page is displayed with details for the selected account.
3. Click the Subscriptions tab for the selected account.
4. Select the application you want to subscribe the account to from the Subscribe to list.
5. Click Subscribe.
The settings page for the subscription is displayed.
AxwaySecureTransport 5.2.1 SP4 Administrator Guide 322
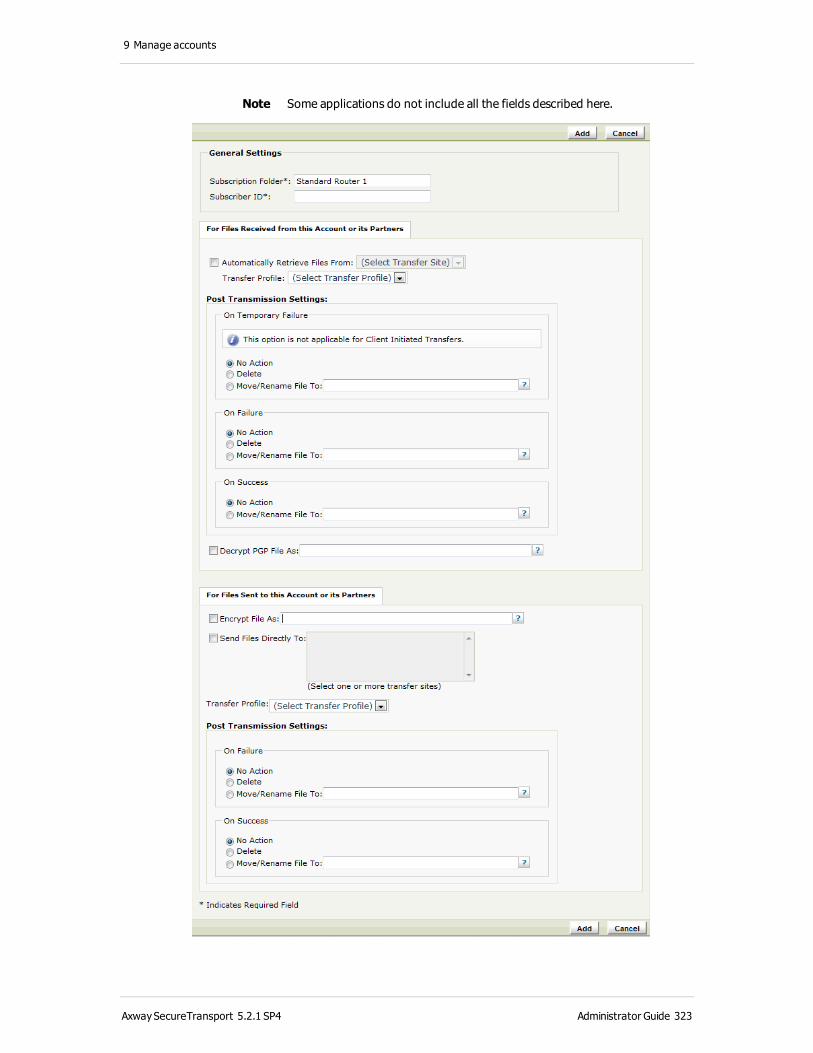
9 Manage accounts
Note Some applications do not include all the fields described here.
AxwaySecureTransport 5.2.1 SP4 Administrator Guide 323

9 Manage accounts
6. In the Subscription Folder field, type the full path to the subscription folder or use the default folder name. The subscription folder name can contain 254 characters or less.
Note You cannot use the following characters in the subscription folder name: * < > ? " / \ | :
7. If you selected the Standard Router application type, Enter an ID in the Subscriber ID field.
When the Rename submitted files to include Subscriber ID check box is selected during the application definition, the uploaded file is renamed before it is sent to the internal system. The file is renamed in the format <ID> <FILE_NAME> where <ID> is the Subscriber
ID that is specified here for the current Subscription, and <FILE_NAME> is original file name.
For details, see Create a Standard Router type application on page 435.
8. In the For Files Received from this Account or its Partners pane:
a. To set a schedule for automatic retrieval of the transferred files, select the Automatically Retrieve Files From check box and then select the respective transfer site from the drop-down list. If you select a PeSIT transfer site, you can select a Transfer Profile from the list or leave the field empty to use the default PeSIT transfer profile. For more information, see Transfer profiles on page 315.
The Schedule pane is displayed.
A subscription that retrieves files from an AS2 transfer site does not use a schedule. To retrieve files from an AS2 transfer site, see Considerations for subscriptions and AS2 transfer sites on page 325.
For a subscription that retrieves files from a Folder Monitor transfer site, to configure scheduled Folder Monitor operation, you must select Set explicit FolderMonitor Schedule .
b. Click Configure in the Schedule pane.
The Configure Schedule dialog box is displayed.
c. Specify the desired schedule. For details, see Set up a scheduled transfer task for a subscription on page 327.
d. (Optional) In the Post Transmission Settings pane, set the failure and success options. For details, see Post-transmission actions on page 319.
e. To decrypt the transferred files, select Decrypt PGP File As and enter a file name or expression.
f. (Optional) Select or clear the Require Trusted Signature and Require Encryption options as needed for incoming transfers.
g. (Optional) Select Keep Original As to save the encrypted file. You can move the file to a different folder, rename the file, or both using either hard-coded text or by entering an expression.
AxwaySecureTransport 5.2.1 SP4 Administrator Guide 324
9 Manage accounts
9. In the For Files Sent to this Account or its Partners pane:
a. Select or clear Encrypt File As for outgoing transfers. Enter a file name or an expression for the encrypted file.
If you selected Encrypt File As, additional fields display. You must select either Encrypt Using PGP Key or Sign using PGP Key and select a PGP key.
b. Select or clear Encrypt Using PGP Key for outgoing transfers. If you turn this option on, you must select the PGP key used for encryption of outbound transfers from the list.
c. Select or clear Sign using PGP Key for outgoing transfers. If you turn this option on, you must select the PGP key used for signing of outbound transfers from the list.
d. (Optional) Select or clear Use Data Compression for outgoing transfers. If you turn this option on, you must select a data compression Type from the list. You must also select a Compression Level.
e. (Optional) Select or clear Encode Using ASCII Armor for outgoing transfers.
f. (Optional) Select Keep Original As to move the file to a different folder, rename the file, or both using either hard-coded text or by entering an expression.
g. (Optional) To set automatic sending of the files, select Send Files Directly To and choose one or more transfer sites from the drop-down list. Press either the Shift or Ctrl key while selecting the transfer sites to choose more than one site. All files in the outbox of the subscription folder are automatically sent to the selected transfer sites. If you select a PeSIT transfer site, you can select a Transfer Profile from the list or leave the field empty to use the default PeSIT transfer profile. For more information, see Transfer profiles on page 315.
Note Enable the SendToSite rules package to upload files without subscribing an account to an application. For more information, see SendToSite on page 451.
h. (Optional) Under Post Transmission Settings, set the failure and success options.
Note If you configure two or more sites in Send Files Directly To, do not configure Post Transmission Settings. If you select an AS2 transfer site, see Considerations for subscriptions and AS2 transfer sites on page 325.
10. Click Add.
Note PGP decryption and encryption paths, regardless of whether you use a relative or an absolute path type, are relative and restricted to the directory where the file resides.
Considerations for subscriptions and AS2 transfer sitesYou can set independently the options to enable or disable automatic sending to and receiving files from an AS2 transfer site. For example, for a particular site, you can enable the Automatically Retrieve Files From option and disable the Send Files Directly To option.
Also, you can specify different AS2 transfer sites for each of the options. For example, you can send files directly to one AS2 transfer site and automatically receive files from a different AS2 transfer site.
AxwaySecureTransport 5.2.1 SP4 Administrator Guide 325
9 Manage accounts
When you specify an AS2 transfer site in the Automatically Retrieve Files From list for a subscription, you cannot reuse the AS2 transfer site again in a different subscription.
If you specify an AS2 transfer site in the Automatically Retrieve Files From list for a subscription, the On Temporary Failure option is not displayed. This setting is not applicable for AS2 incoming transfers as they are never retried.
Human to System type applicationUse a subscription to a Human to System type application to specify email addresses that represent destinations for files sent in emails from Web Access Plus or from an email client using one of the Axway Email Plug-ins. When SecureTransport receives an email for one of these addresses, it process the files sent as you specify in the Package Routing Rules list in the subscription. SecureTransport applies all the rules that match the email.
Note An account can have at most one subscription to a Human to System type application.
1. In the Subscription Folder field, type the path to a folder that the application uses for temporary files or use the default folder name. The path is relative to the account home folder. The subscription folder name can contain 254 characters or less.
2. Create one or more package routing rules.
a. Click New Rule.
b. In the Recipient Pattern field, type a regular expression that matches the email addresses that this rule applies to. For example, invoices@example\.com.
c. In the File Filter Pattern field, type a regular expression that matches the names of the files that this rules applies to. For example, *\.xls.
d. In the Target Folder field, type the path to the folder that receives the files that arrive at a matching address and with a matching file name. The path is relative to the account home folder.
AxwaySecureTransport 5.2.1 SP4 Administrator Guide 326
9 Manage accounts
Note For information about regular expressions, see Regular expressions on page 555.
The new rules are enabled by default.
3. Click Add.
Scheduled downloads and tasksUse the scheduler functionality of SecureTransport to scheduled file downloads and tasks initiated by the server. You can schedule jobs to pull files from remote server in two ways, either per subscription or per application. You can access the scheduler page by creating or editing any application or subscription with a transfer site that supports scheduled transfers. Only file downloads can be scheduled.
When you create a scheduled transfer, for example, when creating a subscription connecting an account to an application where you are transferring files from a remote site or an internal system, you can set the following configuration options:
l Start Date and Time
l Perform the task once or perform recurring tasks at configurable regular intervals.
l Do not perform the scheduled task if it falls on a holiday.
Note The scheduler cannot be used for AS2 transfer sites.
Before queuing a new task, the server checks if a previous instance of same periodic task is still pending. If there is an instance of the same periodic scheduled task is pending, the new task is not scheduled.
If the server goes down and then restarts, the scheduler does not execute any scheduled tasks missed during the server down time.
You can set up holiday dates and use them later when creating scheduled transfers or tasks.
Set up a scheduled transfer task for a subscriptionWhen you subscribe a specific account to an application, depending on the transfer site protocol used you can schedule server-initiated downloads from a particular transfer site.
1. Click Accounts > User Accounts and click the account you want to subscribe.
2. Click Subscriptions > Subscribe to <application_name>.
The Subscription to <application name> page is displayed.
AxwaySecureTransport 5.2.1 SP4 Administrator Guide 327
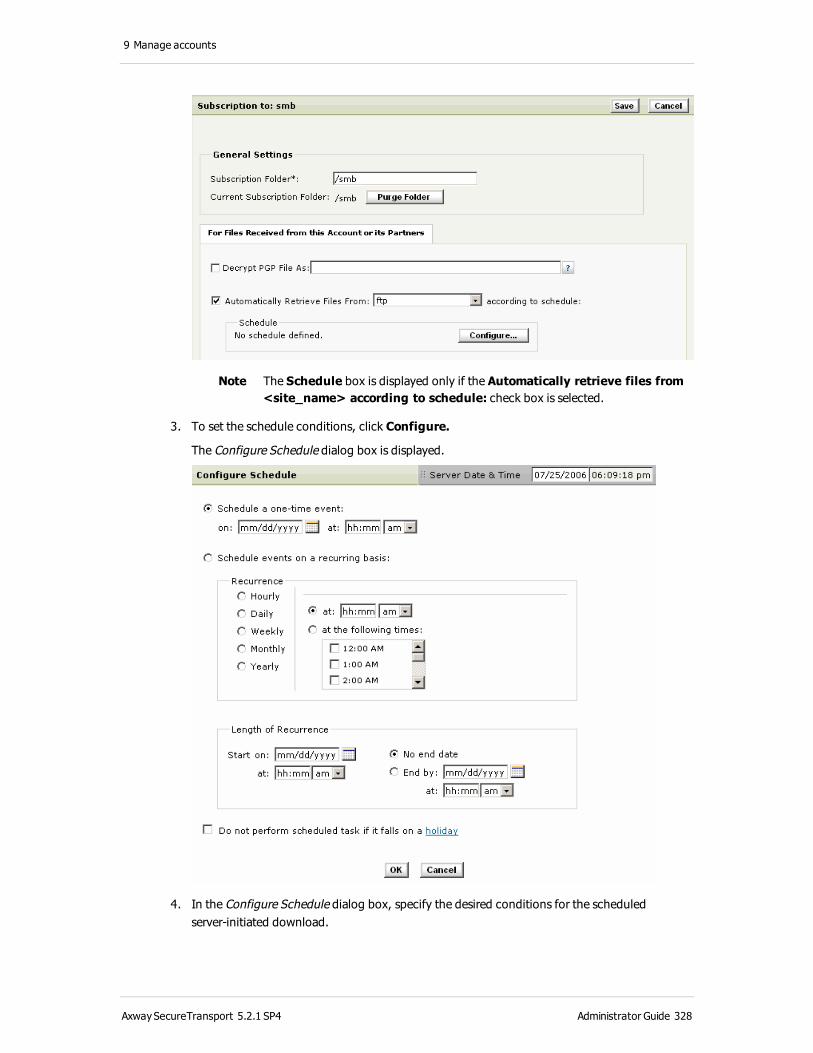
9 Manage accounts
Note The Schedule box is displayed only if the Automatically retrieve files from <site_name> according to schedule: check box is selected.
3. To set the schedule conditions, click Configure.
The Configure Schedule dialog box is displayed.
4. In the Configure Schedule dialog box, specify the desired conditions for the scheduled server-initiated download.
AxwaySecureTransport 5.2.1 SP4 Administrator Guide 328

9 Manage accounts
Note You cannot specify a schedule with a start time before the current time.If the schedule is set on a recurring basis, the Recurrence options dynamically change with respect to the recurrence condition: Hourly, Daily, Weekly, Monthly, or Yearly.If the server goes down for some time and restarts, the scheduler does not execute any scheduled tasks missed during the server down time.
Purge a subscription folderYou can delete the contents of the subscription folder specified for an account.
1. Click Accounts > User Accounts and click the account containing the subscription.
2. Click Subscriptions and click the subscription you want to edit.
3. Click Purge Folder to remove the contents of the current subscription folder.
4. A message asking you to confirm the deletion of the folder contents is displayed. Click OK to remove the folder contents or click Cancel to do nothing.
Unsubscribe an account from an application 1. Click Accounts > User Accounts and click the account containing the subscription.
2. Click the Subscriptions tab and select the check box next to the subscription you want to remove.
3. Click Unsubscribe. A message asking you to confirm the deletion of the subscription is displayed. Click OK to remove the folder contents or click Cancel to do nothing.
Unsubscribe an account and delete the subscription folderYou can remove a subscription and delete the associated subscription folder, including any subfolders.
1. Click Accounts > User Accounts and click the account containing the subscription.
2. Click the Subscriptions tab and select the check box next to the subscription you want to remove.
AxwaySecureTransport 5.2.1 SP4 Administrator Guide 329

9 Manage accounts
3. Click Unsubscribe and Purge. A message asking you to confirm the deletion of the subscription and the subscription folder is displayed. Click OK to remove the folder contents or click Cancel to do nothing.
Service accountsService accounts are internal accounts used for representing internal systems, as opposed to partner sites that are identified in SecureTransport by user accounts.
Service accounts are defined and managed in the same way as user accounts, with the following exceptions and distinctions that you must consider when working with user accounts:
l The account settings, per-account transfer sites definition, and per-partner certificates are defined and managed identically to those of user accounts.
l Service accounts do not subscribe to applications using subscriptions. The functional connection between a service account and an application is called a connector and is defined at the application level. For this reason, the Service Accounts page does not contain a Subscriptions tab.
l Service accounts are internal to the system, and user accounts are external to the system.
Export a single service accountYou can export a single service account to an XML file.
1. Select Accounts > Service Accounts.
The Service Accounts page is displayed.
2. Select the account you want to export and click Export an Account.
AxwaySecureTransport 5.2.1 SP4 Administrator Guide 330

9 Manage accounts
The Export User Account page is displayed.
3. Type a password in the Password field. This password is used to encrypt the sensitive information contained in the account. You use this password when you import the account to decrypt the sensitive information.
4. Retype the password in the Re-enter Password field.
5. Click Export. The account is exported to an XML file you can download to your local computer.
Duplicate an accountYou can use an already created account as a template to create additional accounts with the same settings. Some information in each account must be unique to that account such as the account name, the home folder and so on. Items that must be unique have an asterisk by the field name. When you select Duplicate Account you are guided through the different pages where you can alter the user information, the transfer site and subscription details, and the accounts.
1. Open the user or service account you want to use as a template. On the Settings tab, click Duplicate Account.
A New Service Account or New User Account page is displayed with a Next button at the bottom of the page.
2. Change the account name, home folder and any other user information you want to modify, such as the password. Click Next to continue
If the account you are using as a template has a transfer site set up, the Add Transfer Site page is displayed.
3. Add a new transfer site, modify the existing settings, or click Next to continue without making any changes.
If you did not add a transfer site, the Subscriptions page is displayed. Continue with step 5.
If you added a transfer site, the Transfer Profiles page is displayed.
4. Add a new transfer profile, modify the existing settings, or click Next to continue without making any changes.
The Subscriptions page is displayed.
Note If you are duplicating a service account using a Standard Router application, only
AxwaySecureTransport 5.2.1 SP4 Administrator Guide 331
9 Manage accounts
the transfer site and the certificates are copied to the new account.
5. Modify the subscription settings and click Next to continue.
The new account is saved to the server and displayed on the Settings tab of the user account. The new account is disabled.
Control login name case sensitivityYou can avoid login errors caused by different treatment of the case sensitivity of user names for the different user types by setting server configuration parameters that control converting the case of login names and the case sensitivity of the names of a virtual users.
l Users.LoginNames.normalizedCaseInsensitiveUsername– Controls the conversion of user names entered during login. Valid values are:
o lower – The user name is converted by mapping all alphabetic character to lower case. This
is the default.
o upper – The user name is converted by mapping all alphabetic character to upper case.
o none – The user name is not converted.
l Users.LoginNames.virtualUserCaseSensitive – Controls whether the user name
of a virtual user is case sensitive. Valid values are true, the default, or false.
The case sensitivity of login names is specified as follows, by user type:
l Real users – User names are case-sensitive on UNIX-based systems and case-insensitive on Windows systems.
l Virtual users – Case sensitivity depends on the parameter Users.LoginNames.virtualUserCaseSensitive. When the value of this parameter
is true, login names must match configured user names exactly. When the value of this
parameter is false and the value of
Users.LoginNames.normalizedCaseInsensitiveUsername is lower, the login
name is converted and there must be no upper case letters in the configured user name. When the value of this parameter is false and the value of
Users.LoginNames.normalizedCaseInsensitiveUsername is upper, the login
name is converted and there must be no lower case letters in the configured user name. When the value of this parameter is false and the value of
Users.LoginNames.normalizedCaseInsensitiveUsername is none, login
names must match configured user names exactly.
l LDAP users – Case sensitivity depends on the LDAP Common case setting on the LDAP Server page. This setting specifies that an LDAP user name must be converted into upper or lower case before it is submitted for authentication. If the value of LDAP Common case is either Upper
or Lower, the LDAP user name authentication is case insensitive. If the value of LDAP
AxwaySecureTransport 5.2.1 SP4 Administrator Guide 332

9 Manage accounts
Common case is None, then case sensitivity is assumed. In other words, you must set LDAP
Common case to either Lower or Upper to indicate that LDAP performs case insensitive
match during login, even if it does not require normalization of the input string.
l SiteMinder – Case sensitivity depends on the Siteminder.UserAttributesMap.commonCaseAttr parameter on the Server
Configuration page. Valid values are disabled, which causes case sensitive authentication,
and enabled, which causes case insensitive authentication with the user name converted
according to the value of Users.LoginNames.normalizedCaseInsensitiveUsername.
AxwaySecureTransport 5.2.1 SP4 Administrator Guide 333
10 Advanced account administration
In addition to creating user and service accounts, you can control account access through additional tools such as account export and import, account templates, delegated administration, and administrative roles.
Account export and importSecureTransport provides a way to export or import all account information, such as account templates, user accounts, service accounts, business units, administrators, and site templates. Exported account template, user account, and service account information includes: user settings, transfer sites, transfer profiles, certificates, certificate requests, subscriptions, applications, business units, and those certificates that apply to all of the system.
You can use the command line interface or the Administration Tool to export and import the account information. Accounts can be exported to use as a template, to create a backup, to move from a test to a production environment, or to move from one platform to another.
Note Only a master administrator or a delegated administrator with the appropriate privileges can use the Administration Tool to import or export accounts. For more information, see Delegated administration on page 348. Any administrator who can access the server can use the command line to import or export accounts.Because of a difference in the implementation of a hashing algorithm, account export and import does not interoperate between SecureTransport running on IBM AIX and SecureTransport running on another operating system. Also, account export and import is not supported from one version of SecureTransport to another, so you cannot use these functions to migrate account information from one version to another.
Information is exported to and imported from an XML file. This file can be edited and re-imported. Sensitive information such as private keys and passwords are encrypted during the export process, and you are asked to create a password to protect the sensitive information. When you import the account information, you are asked for the password to allow the sensitive information to be decrypted.
The account XML schemaSecureTransport provides an XML schema for importing and exporting account information. You can use this schema when creating an XML file that can be read by SecureTransport. You can also export an account and use the exported XML file as a template. The schema is located in the <FILEDRIVEHOME>/conf/xmlExport.sxd file.
AxwaySecureTransport 5.2.1 SP4 Administrator Guide 334

10 Advanced account administration
Export and import accountsUse the Import or Export Accounts page and command-line utilities to export and import SecureTransport accounts.
Export accounts using the Administration ToolYou can export accounts using the SecureTransport Administration Tool. When you use the Import or Export Accounts page, all the account information on the server is exported. This includes user accounts, service accounts, account templates, certificates, application instances, business units, administrators, administrative roles, and site templates. To export a single account from the Administration Tool, see Export a single user account on page 251. To control which account information is exported, see Export accounts from the command line on page 336.
The exported file is written to the <FILEDRIVEHOME>/var/tmp/export_accounts.xml file. This file is overwritten every time you export account information.
1. Select Accounts > Import/Export.
The Import or Export Accounts page is displayed.
2. Select Export Accounts.
3. Enter a password in the Password field, then type the same password in the Re-enter Password field. The password must contain at least eight characters.
AxwaySecureTransport 5.2.1 SP4 Administrator Guide 335

10 Advanced account administration
4. Click Export. SecureTransport creates an export file in <FILEDRIVEHOME>/var/tmp/export_accounts.xml and displays a message
indicating that the export was successful.
5. To save the exported account information to a new location, click Download Exported Accounts. A dialog box displays prompting you to Save or Open the XML file.
Note You can download the exported file multiple times to the same or a new location. The Export Complete message with the Download Exported Accounts button remains, enabling you to download again, until you change tabs, select an option in the navigation bar at the left, or click Back twice.
6. (Optional) To refresh the Import or Export Accounts page, select Accounts > Import/Export or click Back twice.
Export accounts from the command lineUsing the command line, you can export a single account or all the accounts. Exported account information includes: user accounts, administrators, administrative roles, transfer sites, site templates, transfer profiles, partner certificates, certificate requests, applications, and subscriptions.
Run the xml_export utility in the <FILEDRIVEHOME>/bin directory from the command line to export account information into an XML file.
The form of the command is:
./xml_export [options] [fileNameAndPath] on a UNIX-based system
or
xml_export [options] [fileNameAndPath] on a Windows system
where options can be:
l -help means display the usage information and exit.
l -acc=accountName where accountName is the name of the account template, user or
service account to export.
l -adm=adminName where adminName is the name of the administrator account to export.
l -role=adminRoleName where adminRoleName is the name of administrative role to
export.
l -bu=buName where buName is the name of the business unit to export.
l -st=stName where stName is the name of the site template to export.
AxwaySecureTransport 5.2.1 SP4 Administrator Guide 336
10 Advanced account administration
l -crt=certName where certName is the name of the certificate to export.
l -app=appname where appName is the name of the application to export.
l -pwd=passwordFile where passwordFile is a file containing the password used to
encrypt or decrypt sensitive information stored in the XML file. The text in this file is not encrypted. You can create the file using any text editor. If you do not use this option, the utility prompts you to type the password in the command window.
and fileNameAndPath is the name and location of the XML file to write containing the exported data, such as /user/XMLExport/ST_Acct_Export.XML. If fileNameAndPath is not specified, xml_export writes the XML output to the standard output.
To export specific information, use only the option for the information you want. To export all items of one type, set the option to *, such as -acc="*". To export all accounts, administrator accounts (including delegated administrators), administrative roles, business units, site templates, applications, and global certificates, do not use any of the -acc, -adm, -role, -bu, -st, -crt, or -app options.
Exporting a single account using the command lineWhen you export a single account the following items are not exported:
l Applications
l Business units
l Global certificates
l Site templates
It is best to use the single account export to create an XML template for account import only.
1. On a UNIX-based system, change to the <FILEDRIVEHOME>/bin directory.
2. Type the following command:
./xml_export -acc=accountName fileNameAndPath on a UNIX-based system
or
xml_export -acc=accountName fileNameAndPath on a Windows system
where accountName is the name of the account template, user account, or service account
you want to export and fileNameAndPath is the XML file name and location where you
want to store the exported data.
3. When prompted, type a password for the exported information. This password is requested when you import the account from the file.
4. Confirm the password by typing it again when prompted.
The XML file is created in the specified location.
AxwaySecureTransport 5.2.1 SP4 Administrator Guide 337
10 Advanced account administration
Export information using a specific option You can use the command line to export only the information for a specific option such as global certificates or application instances.
Export global certificates 1. On a UNIX-based system, change to the <FILEDRIVEHOME>/bin directory.
2. Type the following command:
./xml_export -crt=certName FileNameAndPath on a UNIX-based system
or
xml_export -crt=crtName FileNameAndPath on a Windows system
where crtName is the name of the global certificate you want to export or * to export all
global certificates and FileNameAndPath is the XML file name and location where you want
to store the exported data. Multiple certificates may use the same name.
3. When prompted, type a password for the exported information. This password is requested when you import the global certificates from the file.
4. Confirm the password by typing it again when prompted.
The XML file is created in the specified location.
Export an application 1. On a UNIX-based system, change to the <FILEDRIVEHOME>/bin directory.
2. Type the following command:
./xml_export -app=appName FileNameAndPath on a UNIX-based system
or
xml_export -app=appName FileNameAndPath on a Windows system
where appName is the name of the application you want to export or * to export all the
application instances and FileNameAndPath is the XML file name and location where you
want to store the exported data.
3. When prompted, type a password for the exported information. This password is requested when you import the application from the file.
4. Confirm the password by typing it again when prompted.
The XML file is created in the specified location.
Export a business unit 1. On a UNIX-based system, change to the <FILEDRIVEHOME>/bin directory.
2. Type the following command:
AxwaySecureTransport 5.2.1 SP4 Administrator Guide 338

10 Advanced account administration
./xml_export -bu=buName FileNameAndPath on a UNIX-based system
or
xml_export -bu=buName FileNameAndPath on a Windows system
where buName is name of the business unit you want to export or * to export all the business
units and FileNameAndPath is the XML file name and location where you want to store the
exported data.
3. When prompted, type a password for the exported information. This password is requested when you import the business unit from the file.
4. Confirm the password by typing it again when prompted.
The XML file is created in the specified location.
Export a site template 1. On a UNIX-based system, change to the <FILEDRIVEHOME>/bin directory.
2. Type the following command:
./xml_export -st=stName FileNameAndPath on a UNIX-based system
or
xml_export -st=stName FileNameAndPath on a Windows system
where stName is name of the the site template you want to export or * to export all the site
templates and FileNameAndPath is the XML file name and location where you want to store
the exported data.
3. When prompted, type a password for the exported information. This password is requested when you import the site template from the file.
4. Confirm the password by typing it again when prompted.
The XML file is created in the specified location.
Export all the information using the command lineYou can generate an XML file that contains all the account, global and account certificate, application, business unit, delegated administrator, and site template information to use as a backup or to move information from a test environment to a production environment.
1. On a UNIX-based system, change to the <FILEDRIVEHOME>/bin directory.
2. Type the following command:
./xml_export FileNameAndPath on a UNIX-based system
or
xml_export FileNameAndPath on a Windows system
where FileNameAndPath is the XML file name and location where you want to store the
exported data.
AxwaySecureTransport 5.2.1 SP4 Administrator Guide 339
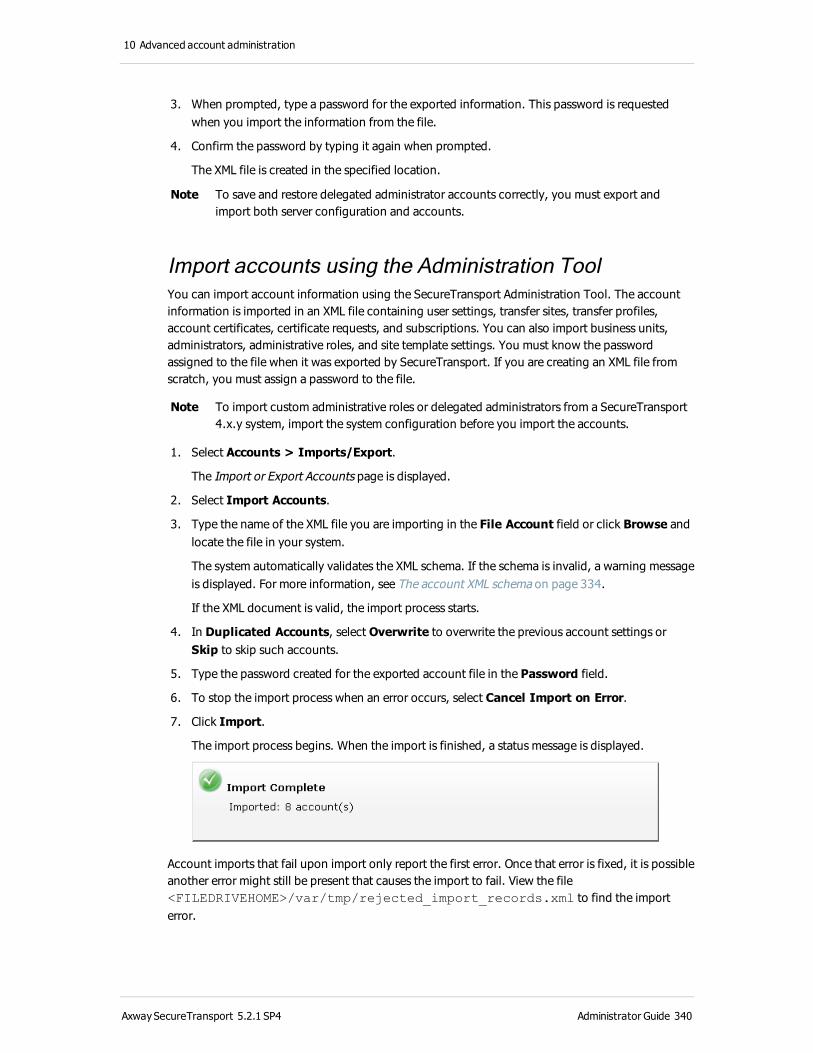
10 Advanced account administration
3. When prompted, type a password for the exported information. This password is requested when you import the information from the file.
4. Confirm the password by typing it again when prompted.
The XML file is created in the specified location.
Note To save and restore delegated administrator accounts correctly, you must export and import both server configuration and accounts.
Import accounts using the Administration ToolYou can import account information using the SecureTransport Administration Tool. The account information is imported in an XML file containing user settings, transfer sites, transfer profiles, account certificates, certificate requests, and subscriptions. You can also import business units, administrators, administrative roles, and site template settings. You must know the password assigned to the file when it was exported by SecureTransport. If you are creating an XML file from scratch, you must assign a password to the file.
Note To import custom administrative roles or delegated administrators from a SecureTransport 4.x.y system, import the system configuration before you import the accounts.
1. Select Accounts > Imports/Export.
The Import or Export Accounts page is displayed.
2. Select Import Accounts.
3. Type the name of the XML file you are importing in the File Account field or click Browse and locate the file in your system.
The system automatically validates the XML schema. If the schema is invalid, a warning message is displayed. For more information, see The account XML schema on page 334.
If the XML document is valid, the import process starts.
4. In Duplicated Accounts, select Overwrite to overwrite the previous account settings or Skip to skip such accounts.
5. Type the password created for the exported account file in the Password field.
6. To stop the import process when an error occurs, select Cancel Import on Error.
7. Click Import.
The import process begins. When the import is finished, a status message is displayed.
Account imports that fail upon import only report the first error. Once that error is fixed, it is possible another error might still be present that causes the import to fail. View the file <FILEDRIVEHOME>/var/tmp/rejected_import_records.xml to find the import error.
AxwaySecureTransport 5.2.1 SP4 Administrator Guide 340

10 Advanced account administration
Import accounts from the command lineYou can import accounts to move from one platform to another or to create a large number of accounts without creating them one at a time. Using an exported account as a template, you can create a list of new accounts that can be imported into SecureTransport.
Note To import custom administrative roles or delegated administrators from a SecureTransport 4.x.y system, import the system configuration before you import the accounts.Certificates must be valid on the system where they are imported.
Run the xml_import utility in the <FILEDRIVEHOME>/bin directory from the command line to import account information from an XML file. The utility has the following options and parameters:
The form of the command is:
./xml_import [options] FileNameAndPath on a UNIX-based system
or
xml_import [options] FileNameAndPath on a Windows system
where options can be:
l -dup=[overwrite|skip] where overwrite overwrites duplicate account entries and
skip does not import duplicate accounts. If no option is specified, the default setting is
overwrite.
l -err=[continue|exit] where continue continues importing the accounts when an
error occurs and exit stops the utility when an error occurs. If no option is specified, the
default setting is exit. Errors are written to the admin.log file
l -pwd=passwordFile where passwordFile is a file containing the password used to
encrypt or decrypt sensitive information stored in the XML file. You can use this file instead of typing the password from the command line. The text in this file is not encrypted. You can create the file using any text editor.
l -sync=[y|n] where y synchronizes the imported accounts with all Servers in a cluster after
the import and n only imports the accounts to the Server where the command is run. If no
option is specified, the default setting is y.
Use -sync=n to reduce the time to import large numbers of accounts or accounts with many
transfer sites or other features. Then restart the Transaction Manager and the Administration Tool server on the other Servers in the cluster to synchronize.
Note Synchronization requires that the Administration Tool server is running on all Servers in the cluster.
and FileNameAndPath is the location and file name of XML file containing the accounts you want to import, such as /user/XMLExport/ST_Acct_Export.XML.
AxwaySecureTransport 5.2.1 SP4 Administrator Guide 341
10 Advanced account administration
Import accounts from an XML file 1. Make sure the Administration Tool server is running on all Servers in the cluster.
2. On a UNIX-based system, change to the <FILEDRIVEHOME>/bin directory.
3. Type the xml_import command.
4. Type the password for the XML file at the prompt.
The accounts are imported into SecureTransport.
Note To restore administrator accounts exported from a pre-5.0 version of SecureTransport correctly, you must import server configuration before you import the accounts.
Set the location of the overwrite fileIf you set the dup option to overwrite, and a specific account, certificate, template, or application cannot be imported, the information is written to the following location:
<FILEDRIVEHOME>/var/tmp/rejected_import_records.xml
To store the overwrite information in a different directory relative to <FILEDRIVEHOME>, set the value of the Directories.Directory.exportHome.path parameter on the Server Configuration page to the relative path name for the directory. The default value is /var/tmp.
To store the overwrite information in a different directory not relative to <FILEDRIVEHOME>, clear the value of Directories.Directory.exportHome.relative and set the value of Directories.Directory.exportHome.path to the absolute path name for the directory.
Manage administrator accountsUse the Administrators page to manage administrative accounts. You can create, edit, delete, and lock administrator accounts. You can also expire and reset administrator account passwords. If a custom hierarchical administration exists in an organization, you can specify different privileges for each administrator. Use the Change Password page to change your password even if you cannot edit accounts.
To display the Administrators page, select Accounts > Administrators in the Administration Tool. To show only administrators whose names match a character string, type the string in the field in the Search pane and click Search.
AxwaySecureTransport 5.2.1 SP4 Administrator Guide 342
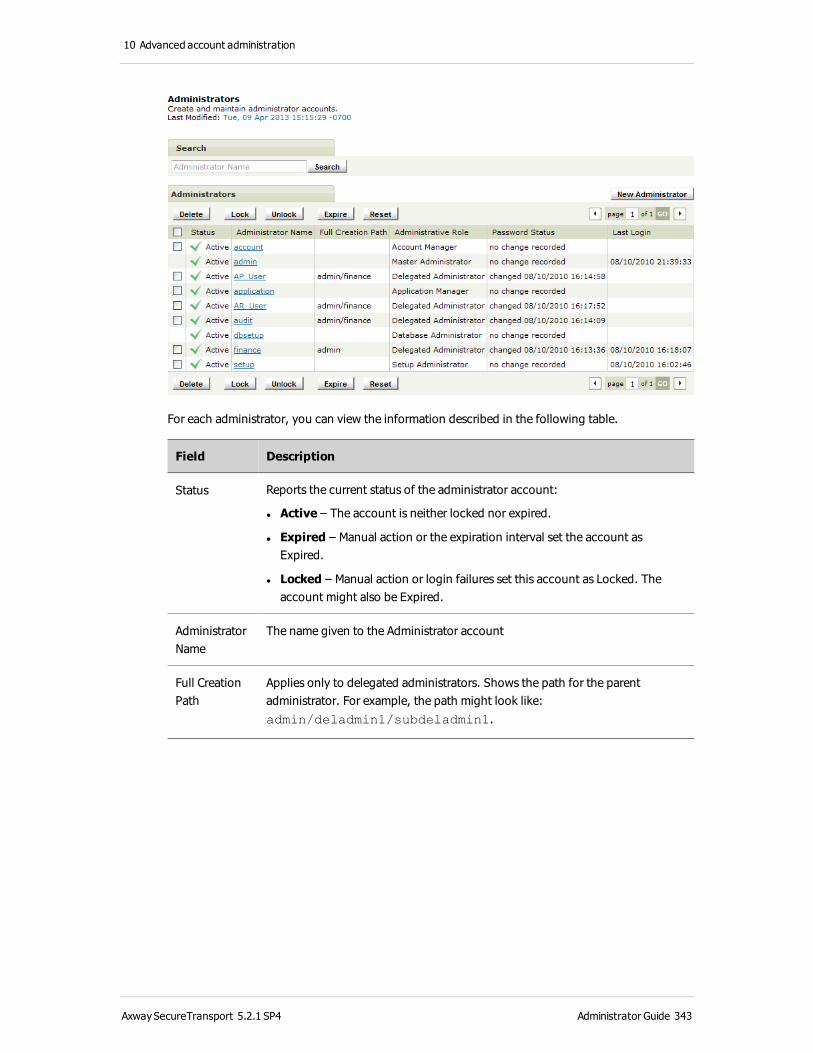
10 Advanced account administration
For each administrator, you can view the information described in the following table.
Field Description
Status Reports the current status of the administrator account:
l Active – The account is neither locked nor expired.
l Expired – Manual action or the expiration interval set the account as Expired.
l Locked – Manual action or login failures set this account as Locked. The account might also be Expired.
Administrator Name
The name given to the Administrator account
Full Creation Path
Applies only to delegated administrators. Shows the path for the parent administrator. For example, the path might look like: admin/deladmin1/subdeladmin1.
AxwaySecureTransport 5.2.1 SP4 Administrator Guide 343

10 Advanced account administration
Field Description
Administrative Role
Role assigned to the administrator account. The predefined administrative roles are:
l Master Administrator – Access to all menus, tabs and pages of the Administration Tool. Cannot be modified.
l Database Administrator – Access to the Database Setting page only. Only the dbsetup administrator can have this role. Cannot be modified.
l Setup Administrator – Access through the custom Configure menu to pages required to perform the post-installation tasks and setup operations described in the SecureTransport Installation Guide. Cannot be modified.
l Account Manager – Access restricted to the User Accounts, Unlicensed Users Accounts, Service Accounts, Templates, and Business Units pages on the Accounts menu and all pages on the Access menu.
l Application Manager – Access restricted to the pages on the Service Accounts and Applications menus.
l Delegated Administrator – Configurable access to menus and data based on the function the administrator has within an organization.
Password Status
The password status is reported differently depending on whether or not password expiration is enabled on the Admin Settings page.
If password expiration if enabled, this field shows one of the following:
l the expiration date
l the date the password expires
l a reminder to change the password at the next login
l non-expiring
If password expiration if not enabled, this field shows one of the following:
l the date the password was changed
l a reminder to change the password at the next login
l no change recorded
Depending on your policy for these accounts, you can use the Reset function to mark the last password change time as the current time, or use the Expire function to force a password change at next login.
Last Login Reports the last login attempt recorded. This is either the date and time of the last successful login, or if the last recorded activity was a failed login, the number of failures and the date and time.
AxwaySecureTransport 5.2.1 SP4 Administrator Guide 344

10 Advanced account administration
Add an administrator accountIf you have access to the Administrators page, you can define multiple administrators with varied access privileges for SecureTransport administration. Master administrators and delegated administrators with the Manage Administrators privilege have access to the Administrators page by default.
1. Select Accounts > Administrators.
The Administrators page is displayed.
2. Click New Administrator.
The New Administrator page is displayed.
3. In the Administrator Name field, enter a name for the administrator. Administrator names are case-sensitive.
4. In the Password field, enter a password for the administrator. Passwords are case-sensitive.
5. In the Confirm Password field, type the password again to confirm it.
6. Select the Administrative Role for the new administrator.
7. If you have enabled administrators to login using a client certificate on the Admin Settings page, the Certificate DN field and Dual authentication check box are displayed. If client certificates are required or to specify one for this administrator, complete the fields.
a. In the Certificate DN field, type the Subject field value from the certificate.
b. To require the administrator to use both a certificate and password, select Dual authentication. If you select this option, you must type the Distinguished Name in the Certificate DN field.
8. Click Save to add the administrator account.
The new administrator is displayed in the list of administrators on the Administrators page.
Edit an administrator accountIf you have access to the Administrators page, you can edit an Administrator account. Master administrators and delegated administrators with the Manage Administrators privilege are granted access to the Administrators page by default.
AxwaySecureTransport 5.2.1 SP4 Administrator Guide 345
10 Advanced account administration
1. Select Accounts > Administrators.
The Administrators page is displayed.
2. Click the administrator entry you want to edit.
The Edit Administrator page is displayed.
3. Make any desired changes in the Administrator Account Status pane. You can lock the account, expire the administrator account password, or reset an expired password.
4. Make any desired changes to the fields in the Edit Administrator Settings pane.
You can change the Administrative Role and the administrator password. If you have enabled administrators to login using a client certificate on the Admin Settings page, you can change the Certificate DN field and Dual authentication check box. If the Administrative Role is set to Delegated Administrator, you can also modify the Delegated Administrator Settings.
5. Click Save to apply the changes.
Delete an administrator accountIf you have access to the Administrators page, you can remove an existing administrator account. Master administrators and delegated administrators with the Manage Administrators privilege are granted access to the Administrators page by default.
1. Select Accounts > Administrators.
The Administrators page is displayed.
2. Select the check box for one or more administrators you want to delete.
3. Click Delete.
Locking an administrator accountYou can lock an administrator account to remove or modify it or if you are not ready to make it active. Unlock the account when you want the administrator to have access to the server. You cannot lock the account of an administrator who is currently logged in.
1. Select Accounts > Administrators.
The Administrators page is displayed.
2. Select the check box for one or more administrators you want to lock.
3. Click Lock.
The Status column shows that the accounts are locked.
Unlocking an administrator account 1. Select Accounts > Administrators.
The Administrators page is displayed.
AxwaySecureTransport 5.2.1 SP4 Administrator Guide 346
10 Advanced account administration
2. Select the check box for one or more administrators you want to unlock.
3. Click Unlock.
Expire an administrator account passwordYou can force the immediate expiration of the password for an administrator account. The administrator must set a new password upon the next log in. You cannot expire the password of an administrator who is currently logged in.
If you need to change the password for the administrate account that is currently logged in, edit the account or select Change Password from the Accounts menu.
1. Select Accounts > Administrators.
The Administrators page is displayed.
2. Select the check box for one or more administrators for which you want to expire the passwords.
3. Click Expire, then click Save to apply the change.
Reset an expired administrator account passwordYou can cancel the password expiration and restore the current administrator account password. You can use Reset to cancel an expired administrator password until the administrator changes the password.
1. Select Accounts > Administrators.
The Administrators page is displayed.
2. Select the check box for one or more administrators for which you want to reset the passwords.
3. Click Reset, then click Save to apply the change.
Change your administrator passwordYou can change your administrator password even if you cannot edit your administrator account by using the Change Password page. Use this page to view the last date and time the password was changed and to enter a new password.
1. Select Accounts > Change Password.
The Change Password page is displayed.
2. Type the new password you want to use in the Password field.
3. Retype the new password in the Confirm Password field.
4. Click Save.
AxwaySecureTransport 5.2.1 SP4 Administrator Guide 347
10 Advanced account administration
Delegated administrationSecureTransport provides a customizable administrator type called a delegated administrator. The delegated administrator works with specific user groups referred to as business units. User accounts, service accounts, and applications are divided into business unit groups and each user or service account is assigned to only one business unit.
Each delegated administrator is assigned one or more business units that determine the user accounts, service accounts, and applications managed by that administrator. Tracking information is also displayed based on the business unit assigned.
When you log in to the SecureTransport Administration Tool as a delegated administrator, you see a subset of the menus and pages normally available. You are allowed to view the file transfer tracking information, accounts, and applications that are assigned to your business unit.
As a delegated administrators with the Manage Administrators privilege, you can create other delegated administrators and perform the following actions:
l Delegate to the new administrator any privileges that you have
l Assign your business unit or any child business unit to the new administrator
When you create a delegated administrator, you can assign Read Only or any combination of the other following privileges.
Privilege Description
Read Only Allows the administrator to view the pages only. This administrator cannot make any changes. Use Read Only for auditing.
Create Users Allows the administrator to create new user accounts for an assigned business unit.
Update Users Allows the administrator to modify existing user accounts for an assigned business unit.
HelpDesk Rights
Allows the administrator to change the password of users in an assigned business unit. The administrator can also enable or disable a user in the assigned business unit.
Manage Administrators
Allows the administrator to create, modify, and delete delegated administrators for an assigned business unit.
Manage Applications
Allows the administrator to create, modify, and delete applications other than Shared Folder type applications for an assigned business unit.
Manage Shared Folders
Allows the administrator to create, modify, and delete Shared Folder type applications for an assigned business unit.
AxwaySecureTransport 5.2.1 SP4 Administrator Guide 348

10 Advanced account administration
Privilege Description
Manage Business Units
Allows the administrator to create, modify, and delete business units.
When each delegated administrator delegates privileges and assigns business unit to delegated administrators he creates, the result is a hierarchy of delegated administrators where those higher in the hierarchy can have greater responsibility and more privileges than those below them.
For example, a finance delegated administrator with permission for the finance business unit can create an audit delegated administrator who can view the Administration Tool pages and two other delegated administrators to administer business units within finance. The following diagram shows the hierarchy:
Figure 6. Example delegated administration hierarchy
Create a delegated administrator 1. Create or edit an administrator and set the Administrative Role to Delegated Administrator.
2. Select a Parent Administrator. This is the administrator whose role and access rights most closely match those required for the delegated administrator.
3. Select the business units you want to assign to the administrator, if required. Business Units can be added or modified through the Business Units page.
4. Select the appropriate privileges for the delegated administrator.
5. Click Save to add the new administrator.
AxwaySecureTransport 5.2.1 SP4 Administrator Guide 349
10 Advanced account administration
Administrative rolesWhen you create or edit an administrator account you can set an administrative role that defines the account’s privileges and permissions in the Administration Tool. You can create multiple administrators whose account management capabilities are based on administrative roles you create. Each role can have different account management capabilities. Use the Administrative Roles page on the SecureTransport Server to create the roles and assign administrative privileges.
For each role, you control:
l Role type
l Permission to bounce servers
l Access to SecureTransport menus and submenus
Predefined administrative rolesThe following administrative roles are predefined:
l Master Administrator – Access to all menus, tabs, and pages of the Administration Tool. Cannot be modified.
l Database Administrator – Access to the Database Setting page only. Access to the Setup Oracle page is not included when SecureTransport is running on the embedded database. Only the dbsetup administrator can have this role. Information is maintained in the file system so
that dbsetup can log in to the Administration Tool when the database is not running. Cannot
be modified.
Note If, as the dbsetup administrator, you change your password, have your password expired, or have your account disabled or enabled while there is no connection to the database, that change is not recorded in the database. The next time you log in as the dbsetup administrator with the database connected, the change is overwritten by the information from the database.
l Setup Administrator – Access through the custom Configure menu to pages required to perform the post-installation tasks and setup operations described in the SecureTransport Installation Guide. Cannot be modified.
l Account Manager – Access restricted to the User Accounts, Unlicensed User Accounts, Service Accounts, Templates, and Business Units pages on the Accounts menu and all pages on the Access menu.
l Application Manager – Access restricted to the pages on the Service Accounts and Applications menus.
l Delegated Administrator – Configurable access to menus and data based on the function the administrator has within an organization. This administrator type is created by a master administrator or a parent delegated administrator.
AxwaySecureTransport 5.2.1 SP4 Administrator Guide 350
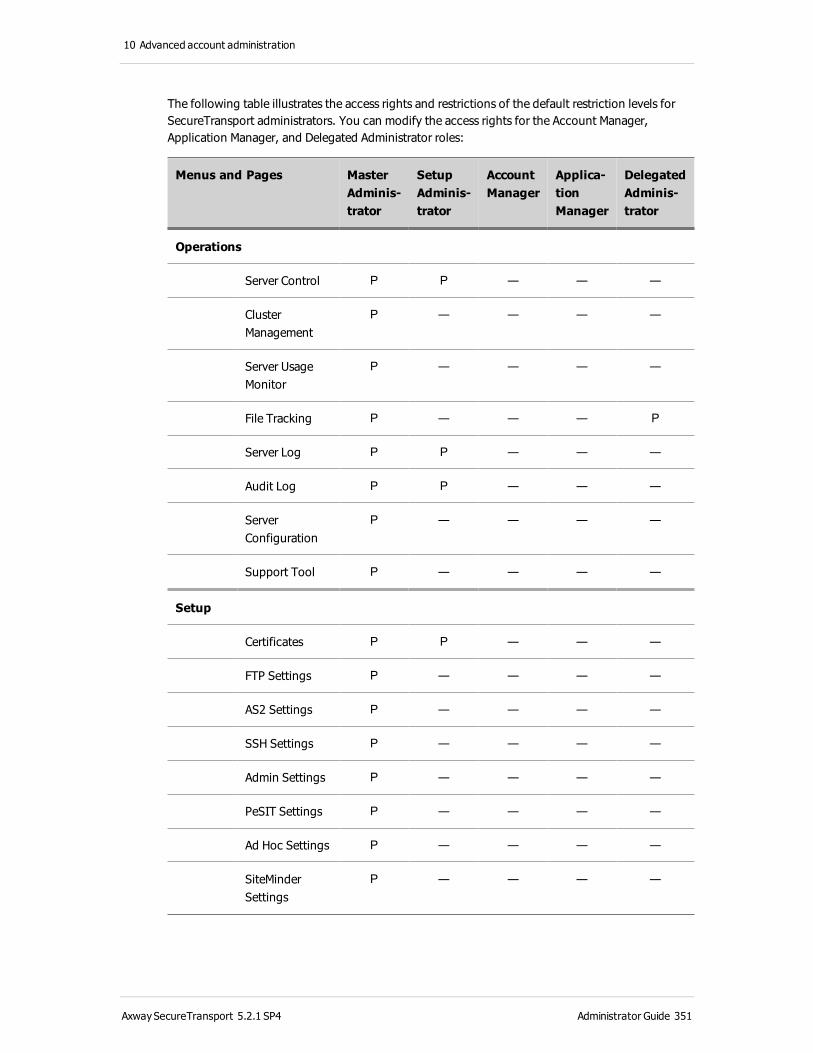
10 Advanced account administration
The following table illustrates the access rights and restrictions of the default restriction levels for SecureTransport administrators. You can modify the access rights for the Account Manager, Application Manager, and Delegated Administrator roles:
Menus and Pages MasterAdminis-trator
SetupAdminis-trator
AccountManager
Applica-tionManager
DelegatedAdminis-trator
Operations
Server Control P P — — —
Cluster Management
P — — — —
Server Usage Monitor
P — — — —
File Tracking P — — — P
Server Log P P — — —
Audit Log P P — — —
Server Configuration
P — — — —
Support Tool P — — — —
Setup
Certificates P P — — —
FTP Settings P — — — —
AS2 Settings P — — — —
SSH Settings P — — — —
Admin Settings P — — — —
PeSIT Settings P — — — —
Ad Hoc Settings P — — — —
SiteMinder Settings
P — — — —
AxwaySecureTransport 5.2.1 SP4 Administrator Guide 351

10 Advanced account administration
Menus and Pages MasterAdminis-trator
SetupAdminis-trator
AccountManager
Applica-tionManager
DelegatedAdminis-trator
Database Settings
P P — — —
Axway Sentinel P — — — —
Server License P P — — —
Command Logging
P — — — —
Transfer Logging
P — — — —
Holiday Schedule
P — — — —
Miscellaneous P — — — —
Network Zones P — — — —
LDAP—All submenus P — — — —
Account
User Accounts P — P — P
Unlicensed Users
P — P — P
Service Accounts
P — P P P
Import/Export P — — — P
Administrators P — — — P
Change Password
P — — — P
Manage Roles P — — — —
Account Templates
P — P — P
AxwaySecureTransport 5.2.1 SP4 Administrator Guide 352

10 Advanced account administration
Menus and Pages MasterAdminis-trator
SetupAdminis-trator
AccountManager
Applica-tionManager
DelegatedAdminis-trator
Site Templates P — P — P
System P — — — P
Business Units P — P — P
Active Users P — — — —
Access—All submenus P — P — —
Application—All submenus
P — — P P
Transaction Manager—All submenus
P — — — —
Add an administrative role 1. Select Accounts > Manage Roles.
The Administrative Roles page is displayed.
If you do not see roles with Master in the Type column, you are logged on as a user with a limited role.
2. Click New Administrative Role.
The New Administrative Role window is displayed.
AxwaySecureTransport 5.2.1 SP4 Administrator Guide 353
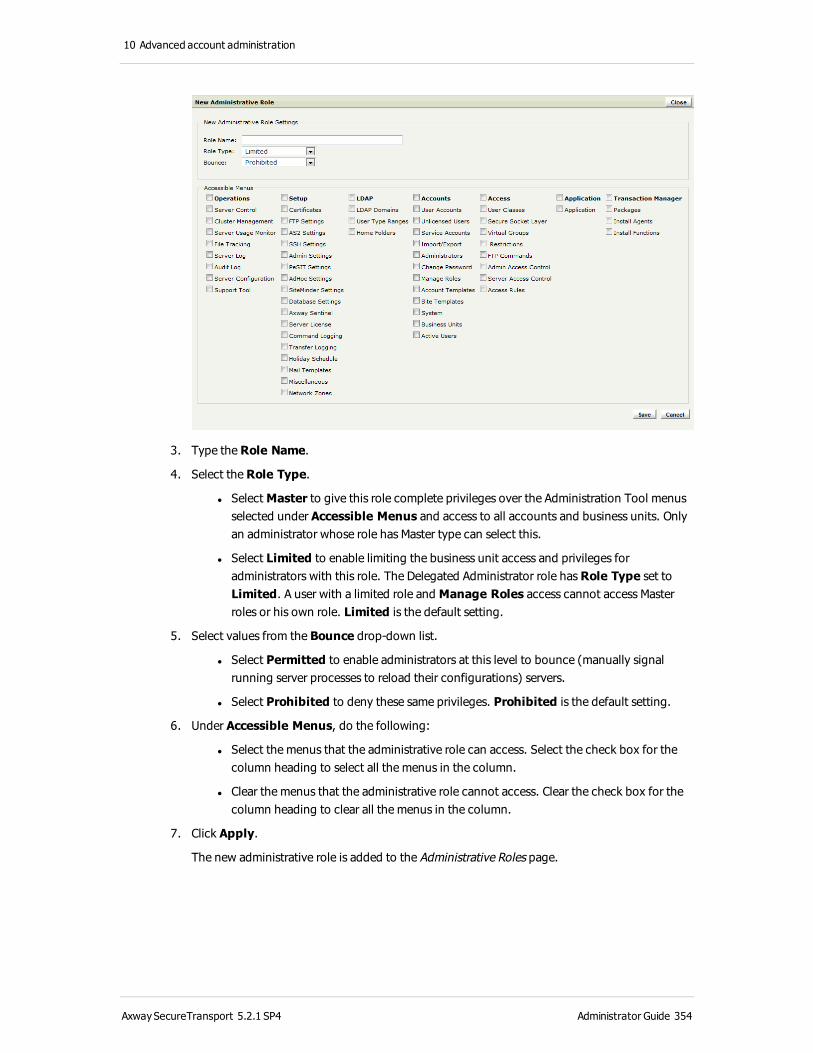
10 Advanced account administration
3. Type the Role Name.
4. Select the Role Type.
l Select Master to give this role complete privileges over the Administration Tool menus selected under Accessible Menus and access to all accounts and business units. Only an administrator whose role has Master type can select this.
l Select Limited to enable limiting the business unit access and privileges for administrators with this role. The Delegated Administrator role has Role Type set to Limited. A user with a limited role and Manage Roles access cannot access Master roles or his own role. Limited is the default setting.
5. Select values from the Bounce drop-down list.
l Select Permitted to enable administrators at this level to bounce (manually signal running server processes to reload their configurations) servers.
l Select Prohibited to deny these same privileges. Prohibited is the default setting.
6. Under Accessible Menus, do the following:
l Select the menus that the administrative role can access. Select the check box for the column heading to select all the menus in the column.
l Clear the menus that the administrative role cannot access. Clear the check box for the column heading to clear all the menus in the column.
7. Click Apply.
The new administrative role is added to the Administrative Roles page.
AxwaySecureTransport 5.2.1 SP4 Administrator Guide 354
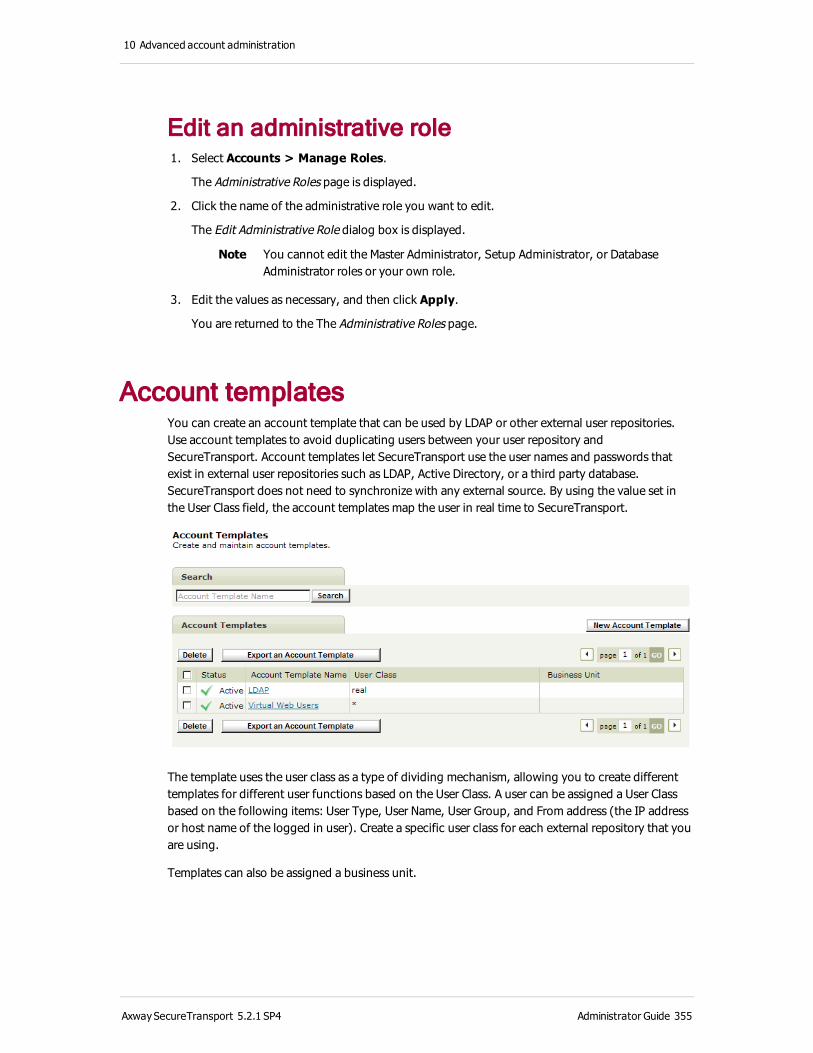
10 Advanced account administration
Edit an administrative role 1. Select Accounts > Manage Roles.
The Administrative Roles page is displayed.
2. Click the name of the administrative role you want to edit.
The Edit Administrative Role dialog box is displayed.
Note You cannot edit the Master Administrator, Setup Administrator, or Database Administrator roles or your own role.
3. Edit the values as necessary, and then click Apply.
You are returned to the The Administrative Roles page.
Account templatesYou can create an account template that can be used by LDAP or other external user repositories. Use account templates to avoid duplicating users between your user repository and SecureTransport. Account templates let SecureTransport use the user names and passwords that exist in external user repositories such as LDAP, Active Directory, or a third party database. SecureTransport does not need to synchronize with any external source. By using the value set in the User Class field, the account templates map the user in real time to SecureTransport.
The template uses the user class as a type of dividing mechanism, allowing you to create different templates for different user functions based on the User Class. A user can be assigned a User Class based on the following items: User Type, User Name, User Group, and From address (the IP address or host name of the logged in user). Create a specific user class for each external repository that you are using.
Templates can also be assigned a business unit.
AxwaySecureTransport 5.2.1 SP4 Administrator Guide 355

10 Advanced account administration
Account templates and external usersSecureTransport assigns external users to the account template using the following steps:
1. Determine the User Class based on the already known values for the UID, GID, User Type, and IP address.
2. Compare the determined User Class with the defined User Class in all enabled external account templates. Since the User Class in the template can contain wildcards there might be more than one template that matches the User Class of the currently logged user. In this case, the templates are sorted alphabetically, and the first one is selected.
3. If the User Class matches the User Class of a template, SecureTransport tries to determine the new UID, GID, and Home Folder values as defined in the template. The templates can contain expressions in the supported expression language to dynamically select the UID, GID, or Home Folder. The result is one of the following:
l If the system fails to determine even one of the required attributes (UID, GID, or Home Folder) from the template the user is not assigned to that template and the login fails.
l If the system manages to determine all of the required attributes, the currently logged external user is assigned to the selected template.
l If the User Class does not match any of the User Classes in the account template, the server treats the user as a regular external user.
4. If the user is assigned to a template, the UID, GID, and Home Folder are determined from the template, and the values used to determine the User Class are ignored. If the home folder of the user is missing, it is automatically created with the correct permissions.
5. After the external user is mapped to a template the user is automatically assigned a User Type of Virtual, the same as a regular user account.
Account template required valuesEach template has several required values: Account Template Name, User Class, UID, Group ID, and Change Home To.
There are three ways to configure a template once you have specified the User Class and Account Template Name, and Business Unit:
l Hardcoded values – The values of the UID, Group ID, Change Home To, and Notes fields are explicitly specified in the template. In this scenario every external user mapped to the template uses the same home folder and has the same UID and Group ID (GID).
l Expressions – In this scenario the values of the UID, Group ID, Change Home To, and Notes fields are specified expressions in the supported expression language. Usually the values of the attributes are different for each external user.
l Mixed – Some values are hardcoded and some are expressions or text that includes hardcoded values and expressions. For example you can specify the Change Home To as /tmp/users/${stenv['loginname']} which means that the home folder of every
external user is determined by adding the path /tmp/users/ and the login name.
AxwaySecureTransport 5.2.1 SP4 Administrator Guide 356
10 Advanced account administration
Directory path names in an account template are case sensitive.
Note If you configure the home directory of an account template that is used for LDAP users to include the user name in the home directory, and LDAP user whose user name contains one or more of the characters <, >, #, and \ or begins or ends with a space character cannot log in to SecureTransport. This is due to operating system limitation on file names. To allow such LDAP users to use an account template, use the UID or some other user-unique value to name the home directory.
Manage account templatesUse the Account Templates page to manage account templates.
Add an account template 1. Select Accounts > Account Templates.
The Account Templates page is displayed.
2. Click New Account Template to open a new account template.
The New Account Template page is displayed.
AxwaySecureTransport 5.2.1 SP4 Administrator Guide 357
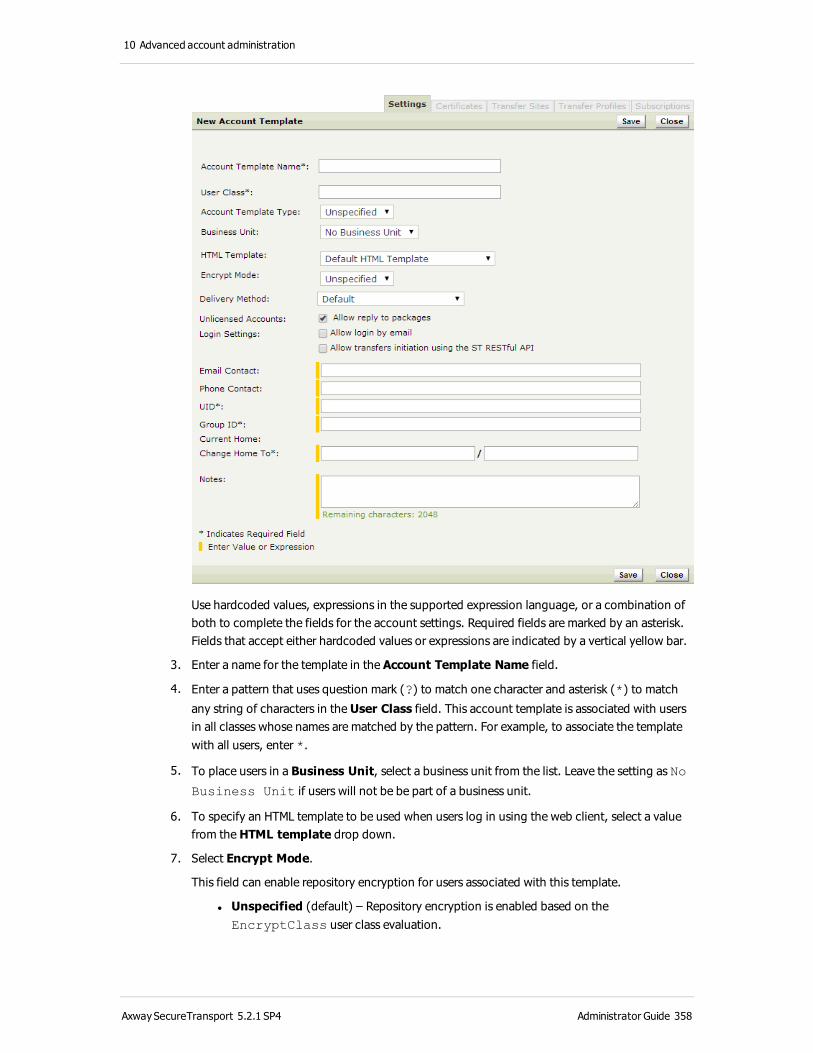
10 Advanced account administration
Use hardcoded values, expressions in the supported expression language, or a combination of both to complete the fields for the account settings. Required fields are marked by an asterisk. Fields that accept either hardcoded values or expressions are indicated by a vertical yellow bar.
3. Enter a name for the template in the Account Template Name field.
4. Enter a pattern that uses question mark (?) to match one character and asterisk (*) to match
any string of characters in the User Class field. This account template is associated with users in all classes whose names are matched by the pattern. For example, to associate the template with all users, enter *.
5. To place users in a Business Unit, select a business unit from the list. Leave the setting as No
Business Unit if users will not be be part of a business unit.
6. To specify an HTML template to be used when users log in using the web client, select a value from the HTML template drop down.
7. Select Encrypt Mode.
This field can enable repository encryption for users associated with this template.
l Unspecified (default) – Repository encryption is enabled based on the EncryptClass user class evaluation.
AxwaySecureTransport 5.2.1 SP4 Administrator Guide 358
10 Advanced account administration
l Enabled – Repository encryption is enabled for users associated with this template.
8. The Delivery Method value controls the options that Web Access Plus displays in the User Access window.
l Disabled – The user cannot send files using ad hoc file transfers.
l Default – Use the delivery method specified in the account template, if any, or in the Default Package Delivery Method field of the Ad Hoc Setting page.
l Anonymous – The sender can choose Anonymous or Challenge.
l Account Without Enrollment – The sender can choose Anonymous, Challenge, or Existing Account.
l Account With Enrollment – The sender can choose Anonymous, Challenge, Existing Account, Enroll Unlicensed, or Enroll Licensed.
l Custom – Select the allowed enrollment types in the Enrollment Types field. The sender can chose any of the selected enrollment types.
9. For a custom delivery method, select one or more allowed enrollment types in the Enrollment Types field:
l Anonymous – The ad hoc file recipient receives a link to retrieve the files and is not enrolled as a user. The Web Access Plus option is Send attachment link only.
l Challenge – The ad hoc file recipient receives a link and must answer correctly a challenge question specified by the sender to retrieve the files. The recipient is not enrolled as a user. The Web Access Plus option is Protect attachment link with security question.
l Existing Account – Do not enroll ad hoc file recipients. Only existing users can receive files. The Web Access Plus option is Send to existing users only.
l Enroll Unlicensed – If the ad hoc file recipient does not have a user account, the recipient must enroll and create an account before retrieving the files. The ad hoc file recipient becomes an unlicensed user who can only reply once to the email and retrieve the files. Other user attributes are defined by the enrollment template. The Web Access Plus option is Allow recipients to enroll as new Unlicensed Users.
l Enroll Licensed – If the ad hoc file recipient does not have a user account, the recipient must enroll and create an account before retrieving the files. The ad hoc file recipient becomes a SecureTransport user with all the attributes specified in the default enrollment template. The Web Access Plus option is Allow recipients to enroll as new Full Licensed Users.
10. The Implicit Enrollment Type value controls which option Web Access Plus selects initially in the User Access window and which enrollment type is used by the Axway Email Plug-ins. The choices depend on the enrollment types enabled by the Delivery Methods and Enrollment Types fields.
11. Select Allow reply to packages in Unlicensed Accounts to allow an unlicensed user associated with this template to reply to emails.
AxwaySecureTransport 5.2.1 SP4 Administrator Guide 359

10 Advanced account administration
12. Specify Login Settings.
a. Select Allow this account to login by email to allow the user to log in using with the value of the Email Contact field as well as the Login Name. A user of one of the Axway Email Plug-ins must have Allow this account to login by email selected.
b. Select Allow this account to submit transfers using the ST RESTful API to enable calls from the SecureTransport REST file transfer API authenticated with the credentials from this account.
13. Enter a value or expression for the Email Contact.
When this email address is the recipient of an ad hoc file transfer email sent from Web Access Plus or one of the Axway Email Plug-ins, SecureTransport determines that this user is the recipient. If the user is allowed to log in by email, this is the value used in the User Name field of the login page.
14. Enter a value or expression for the Phone Contact.
15. Enter a value or expression for the numeric user ID of the user in the UID field.
On Windows platforms, this field is named Real User and is optional.
16. Enter a value or expression for the numeric group ID for the user account in the GID field. The account uses the system access rights and privileges valid for this user group on the system.
17. Enter values or expressions for the home folder in the Change Home To fields for the account as an absolute path.
18. Enter a value or expression for the text description of the user account in the Notes field.
19. Once you have completed the information in the Settings pane, click Save to create the account template.
20. To enable the account template, click Enable Account Template.
Select the Certificates,Transfer Sites, Transfer Profiles, or Subscriptions tabs to add additional information to the template. Those pages are similar to the pages for an account, but permit expressions in some fields.
21. To return to the Account Templates page, click Close or select Accounts > Account Templates.
Enable an account templateOnce you have created the template, you must enable it to use it.
1. Select Accounts > Account Templates.
The Account Templates page is displayed.
2. Click the name of the template you want to enable to view the template settings.
3. Click Enable Template to make the template active.
4. To return to the Account Templates page, click Close.
AxwaySecureTransport 5.2.1 SP4 Administrator Guide 360
10 Advanced account administration
Disable an account templateYou can also disable an already created template.
1. Select Accounts > Account Templates.
The Account Templates page is displayed.
2. Click the name of the template you want to enable to view the template settings.
3. Click Disable Template to make the template active.
4. To return to the Account Templates page, click Close or select Accounts > Account Templates.
Certificates for an account templateLike a user account, an account template can have partner certificates and private certificates. It cannot have login certificates.
For more information, see Manage certificates on page 256.
Configure transfer sites for an account template 1. With the account template open, select Transfer Sites and click Add New.
You must define the transfer site completely. Transfer sites in an account template do not support site templates.
2. Type a Site Name.
3. Select a Site Type.
4. In the Add Transfer Site box, select the Transfer Protocol.
To comply with AS2 protocols, it is not available.
5. Type values or expressions for the required fields and the optional fields needed to define the transfer site.
Transfer sites in an account template do not support server-initiated downloads, so the fields used for them are not displayed.
You can use expressions in the fields indicated by a vertical yellow bar.
6. To use expressions for the check boxes, select Advanced Expressions, and, in each field that replaced a check box, type 1 for selected (true) or 0 for cleared (false) or an expression that evaluates to 0 or 1.
7. Click Add to save the transfer site.
For example, to select Use FTPS for the transfer site depending on the whether the target variable contains the string class, type the following in the Use FTPS field:
${stenv['target'].matches('.*class.*') ? '1' : '0'}
This expression tests the value of target and returns 1 if it contains the string class, 0 if not.
AxwaySecureTransport 5.2.1 SP4 Administrator Guide 361

10 Advanced account administration
Note If an account template and its transfer site are defined using expressions, you cannot restart failed transfers for that account template using the Resubmit button on the File Tracking page.
Configure transfer profiles for an account templateAn account template can have transfer profiles. You can use expressions in the Files To Send and Receive Files As fields.
For more information, see Transfer profiles on page 315.
Configure subscriptions for an account template 1. With the account template open, select Subscriptions, select an application, and click
Subscribe
Subscriptions in an account template do not support applications of type Standard Router, so they are not include in the drop-down list.
2. Type values or expressions for the required fields and the optional fields needed to define the subscription.
Subscriptions in an account template do not support server-initiated downloads, so the fields used for them do not appear.
You can use expressions in the fields indicated by a vertical yellow bar.
3. To use expressions for additional fields including the check boxes, select Advanced Expressions.
The fields and check boxes are replaced by fields with a vertical yellow bar.
l In each field that replaces a check box, type 1 for selected (true) or 0 for deselected (false) or an expression that evaluates to 0 or 1.
l In the other fields, type a value or an expression that evaluates to the value required.
In the Compression Type field for applications that have the Encrypt File option such as application of type Basic Application and Site Mailbox, type one of the following values that represent available compression algorithms or an expression that evaluates to one them:
Type Value
Use preferred (algorithm obtained from PGP key) -1
Uncompressed 0
ZIP 1
ZLIB 2
AxwaySecureTransport 5.2.1 SP4 Administrator Guide 362

10 Advanced account administration
Type Value
BZIP2 3
In the Compression Level field, type an integer between 1 and 9, where 1 represents the least compressed but fastest level and 9 represents the most compressed but slowest level or an expression that evaluates to an integer between 1 and 9. The values that correspond to the levels available when Advanced Expressions is not selected are:
Level Value
Fast 2
Normal 5
Good 7
Best 9
4. Click Add to save the transfer site.
Examples of expressions in an account templateYou can use expressions on the Settings pane, Transfer Sites pane, and Subscriptions pane when creating an account template. The following examples show some of the expressions you can use.
The following table gives examples of expressions in account settings:
Field Expression Description
UID ${sess['STSESSION_
LDAP_DIR_
uidNumber']}
Returns the UID from the LDAP session.
GID ${sess['STSESSION_
LDAP_DIR_
gidNumber']}
Returns the GID from the LDAP session.
Home Folder ${sess['STSESSION_
LDAP_DIR_
homeDirectory']}
Returns the home folder specified in the LDAP session.
When you have attribute maps configured, you can use the following named variable expressions instead:
AxwaySecureTransport 5.2.1 SP4 Administrator Guide 363

10 Advanced account administration
Field Expression Description
UID ${stenv.useruid} Returns the UID.
GID ${stenv.usergid} Returns the GID.
HomeDir ${stenv.homedir} Returns the home folder.
In the account template is for licensed or unlicensed users enrolled after receiving notification of an ad hoc file transfer:
Email Contact ${stenv.recipient_
email}
Returns the email address for recipient of the ad hoc file transfer.
Home Folder ${stenv.recipient_
email}
Returns the email address for recipient of the ad hoc file transfer to create a unique home folder.
The following table gives examples of expressions in transfer sites:
Field Expression Description
Upload Folder
/upload/${stenv.loginname} Returns the subfolder based on the user login name in the upload folder.
User Name ${stenv.loginname} Returns the user login name.
Certificate x509_${stenv.loginname} Returns the user login certificate.
With Advanced Expressions selected, you can use the following complex expressions:
Upload Folder
/${stenv['target'].
replace('^(.*)_(.*)_
(.*)$','$2')}
or/upload/${stenv['target'].
matches('.*\\.((jpg)|(gif)|
(txt))$') ? stenv
['target'].
replace('^.*\\.((txt)|
(jpg)|(gif))$','$1') :
'general/'}
Returns the upload folder based on the match and replace expression criteria.
Enable SSL ${stenv['target'].matches
('^(ssl).*')}
Returns a 0 (false) or 1 (true) based on the match criteria.
AxwaySecureTransport 5.2.1 SP4 Administrator Guide 364

10 Advanced account administration
Note You can also use regular expressions such as ${stenv.target}only to return the file name or ${filename(stenv.target)}-${random} to change the file name.
The following table gives examples of expressions in subscriptions:
Field Expression Description
Subscription Folder
mailbox_el_
${stenv.useruid}
Returns the folder using the UID.
Receive Options Decrypt PGP File As:
${stenv.loginname}_
${embedded}
Returns a file name based on the login name and the embedded file name.
Keep Original As:
archive/${date
('yyyy.MM.dd')}/
${filename
(stenv.transformation_
input)}
Returns the location and file name based on the date and the PGP file name.
With Advanced Expressions selected, you can use the following complex expressions:
Send OptionsSend Files Directly To:
${stenv.loginname}_ftp Returns a location based on the user login name.
Receive OptionsDecrypt PGP File:
${stenv['target'].
matches('.*((\\.pgp)|
(\\.gpg)|(\\.asc))')}
Returns a 0 (false) or 1 (true) based on the match criteria.
As: ${empty embedded ?
${filename
(stenv.transformation_
input)
.replace('(\\.pgp)|
(\\.gpg)|(\\.asc)') :
embedded}
Returns the file name to which the decrypted file will be saved.
Keep Original:
1 The value 1 represents true.
SecureTransport recognizes the field as being selected.
AxwaySecureTransport 5.2.1 SP4 Administrator Guide 365
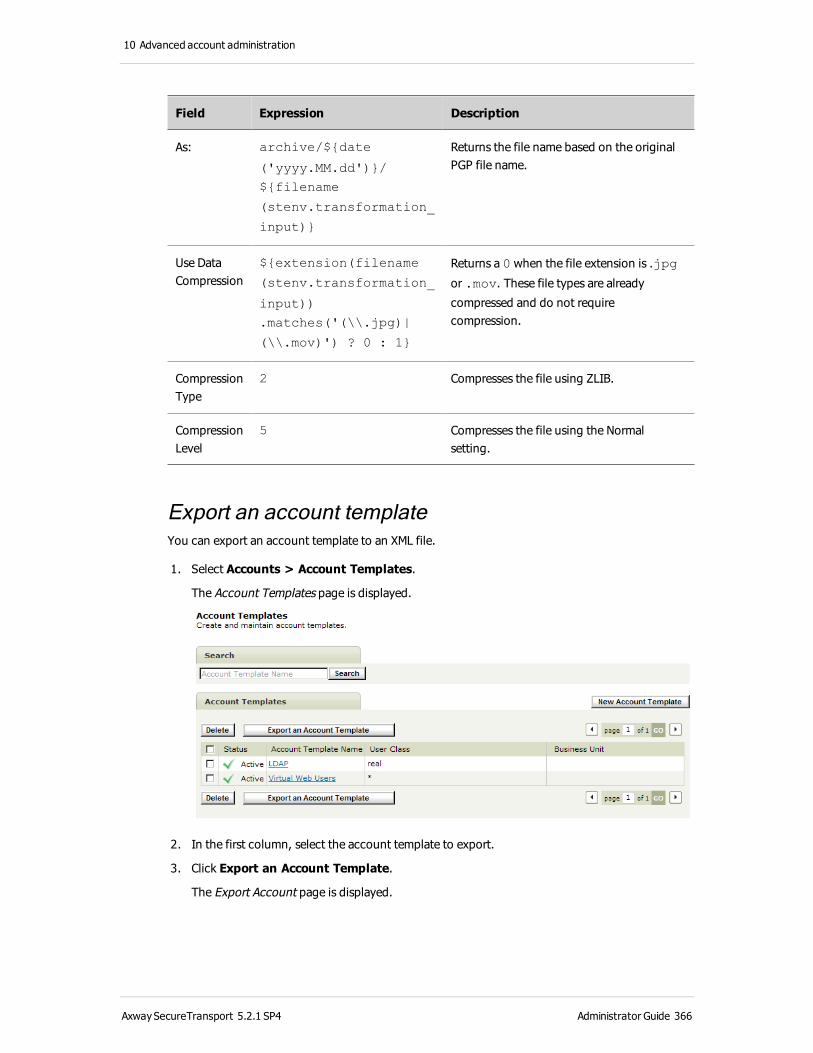
10 Advanced account administration
Field Expression Description
As: archive/${date
('yyyy.MM.dd')}/
${filename
(stenv.transformation_
input)}
Returns the file name based on the original PGP file name.
Use Data Compression
${extension(filename
(stenv.transformation_
input))
.matches('(\\.jpg)|
(\\.mov)') ? 0 : 1}
Returns a 0 when the file extension is .jpg
or .mov. These file types are already
compressed and do not require compression.
Compression Type
2 Compresses the file using ZLIB.
Compression Level
5 Compresses the file using the Normal setting.
Export an account templateYou can export an account template to an XML file.
1. Select Accounts > Account Templates.
The Account Templates page is displayed.
2. In the first column, select the account template to export.
3. Click Export an Account Template.
The Export Account page is displayed.
AxwaySecureTransport 5.2.1 SP4 Administrator Guide 366
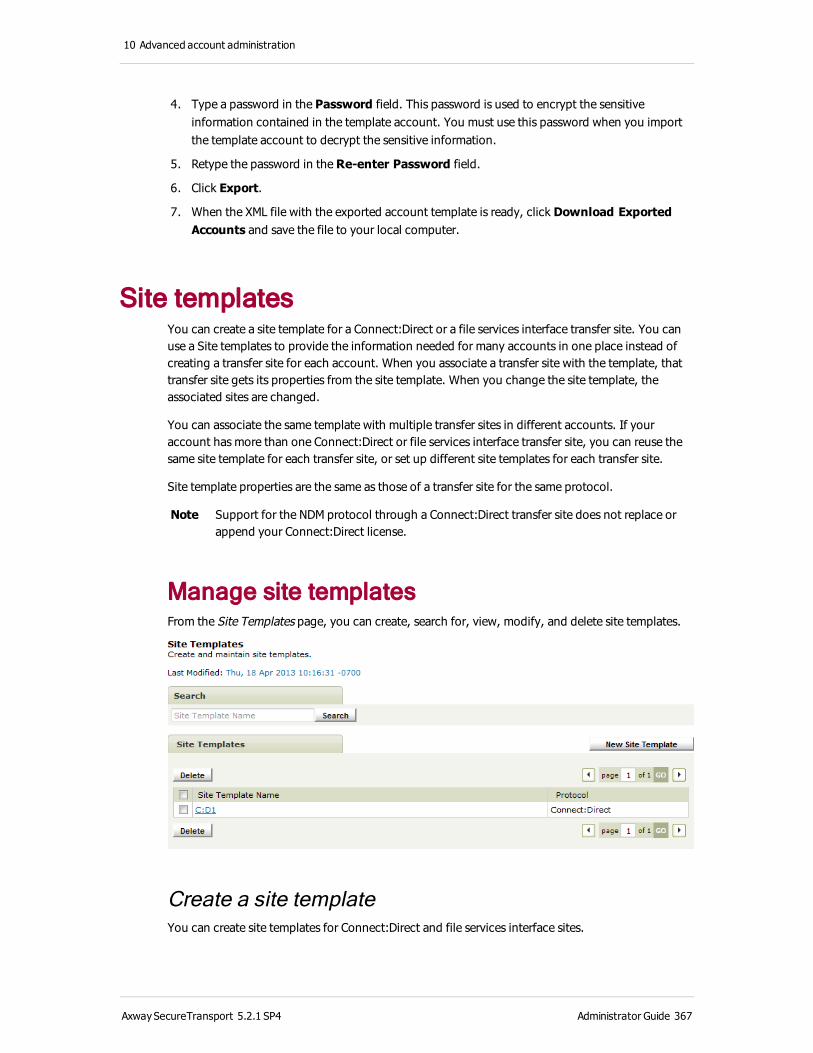
10 Advanced account administration
4. Type a password in the Password field. This password is used to encrypt the sensitive information contained in the template account. You must use this password when you import the template account to decrypt the sensitive information.
5. Retype the password in the Re-enter Password field.
6. Click Export.
7. When the XML file with the exported account template is ready, click Download Exported Accounts and save the file to your local computer.
Site templatesYou can create a site template for a Connect:Direct or a file services interface transfer site. You can use a Site templates to provide the information needed for many accounts in one place instead of creating a transfer site for each account. When you associate a transfer site with the template, that transfer site gets its properties from the site template. When you change the site template, the associated sites are changed.
You can associate the same template with multiple transfer sites in different accounts. If your account has more than one Connect:Direct or file services interface transfer site, you can reuse the same site template for each transfer site, or set up different site templates for each transfer site.
Site template properties are the same as those of a transfer site for the same protocol.
Note Support for the NDM protocol through a Connect:Direct transfer site does not replace or append your Connect:Direct license.
Manage site templatesFrom the Site Templates page, you can create, search for, view, modify, and delete site templates.
Create a site templateYou can create site templates for Connect:Direct and file services interface sites.
AxwaySecureTransport 5.2.1 SP4 Administrator Guide 367
10 Advanced account administration
A site template contains the same fields as the corresponding transfer site. Within those fields you can provide hardcoded values such as a server name or port number, or you can provide a placeholder parameter. You can specify an optional default value as part of a placeholder parameter. This default value can be changed after the site template is applied to a transfer site. When you select a site template while defining an account transfer site, you can provide values tailored for a specific transfer site in each field that specified a placeholder parameter.
Note You can create multiple site templates, but each site template must have a unique name.
SecureTransport provides a placeholder parameter you can use when you do not want to hard code values in the fields for the site template. A placeholder parameter is associated only with the site template where it is used. You can, however, specify different placeholder parameters for each site template you create. A placeholder parameter consist of two parts, the placeholder name and an optional default value. The format for entering a placeholder parameter is:
%{PlaceholderName|DefaultValue}
where PlaceholderName is the name of the placeholder parameter and DefaultValue is an optional default value assigned to a specific field.
Note If you are using the optional default value, it must be separated from the placeholder name by the | character.
For example, the placeholder parameter %{ServerPort|456} has both a placeholder name and a default value. In this example, the placeholder parameter is entered in the Local server port field and a server port number of 456 is used by all transfer sites that apply this site template and accept the default value.
Placeholder names can only contain the following characters: a-z, A-Z, 0-9, and the underscore (_). The first character of a placeholder name cannot be a digit. The default value can use any characters, but to include a right brace (}), precede it with a backslash (\}).
Placeholder examples:
%{ServerPort|456}
pull %{pullTransferFile}
Note The placeholder parameter cannot include regular expressions.
1. Select Accounts > Site Templates.
The Site Templates page is displayed.
2. Click New Site Template to create the template.
AxwaySecureTransport 5.2.1 SP4 Administrator Guide 368
10 Advanced account administration
3. Type a site template name in the Template Name field.
4. Select Connect:Direct or the file services interface protocol from the Transfer Protocol list.
5. Complete the remaining fields for the transfer protocol you selected.
Note You can use placeholder parameters or hardcoded values for each field or script. For more information about the fields, see Connect:Direct transfer sites on page 281 and File services interface protocol transfer sites on page 288.All the fields for the site template must have a value or a placeholder parameter.
6. Click Add to save the site template. Click Cancel to close the page without saving the site template.
Search for a site template 1. Select Accounts > Site Templates.
The Site Templates page is displayed.
2. In the Search pane, type all or part of a site template name and click Search. Wildcards are not
AxwaySecureTransport 5.2.1 SP4 Administrator Guide 369
10 Advanced account administration
accepted.
All site templates that match the search criteria are displayed.
Note You can use individual characters to search for a template, such as typing a 1 to see all site templates that contain a 1 in the name. If you have site templates named NDM1, 1NDM, and NDM 1, all three site templates are displayed. If you have a fourth site template named NDM2, it is not displayed.
View a site template 1. Select Accounts > Site Templates.
The Site Templates page is displayed.
2. Click the site template name. The Edit Transfer Site Template page is displayed. Use this page to view the site template settings.
3. Click Save or Cancel to return to the Site Templates page.
Modify a site template 1. Select Accounts > Site Templates.
The Site Templates page is displayed.
2. Click the site template name. The Edit Transfer Site Template page is displayed.
3. Modify any fields you want to change.
4. Click Save to return to the Site Templates page. Click Cancel to close the site template without saving the changes.
Delete a site template 1. Select Accounts > Site Templates.
The Site Templates page is displayed.
2. Select one or more site templates.
3. Click Delete to remove the site templates. A dialog box displays asking you to confirm the deletion. Click OK to continue or Cancel to stop.
Use a site template to define a transfer site 1. Create or edit a Connect:Direct or file services interface protocol site as described in Create a
transfer site on page 314 or Edit a transfer site on page 315.
2. In the Site Template field, select the site template from the drop-down list.
3. At the bottom of the page, type values for the Site Template Placeholders. If a default value was provided by the site template, you can modify it for this account.
AxwaySecureTransport 5.2.1 SP4 Administrator Guide 370
10 Advanced account administration
(Optional) To have the placeholder default values automatically filled in when the site template is updated, select the Use Default check box for one or more placeholder parameters.
When you modify a site template, the changes are automatically applied to all transfer sites that use that template. For example:
l Add or remove a placeholder parameter adds or removes it to or from all associated transfer sites.
l Modify an optional default value of a placeholder parameter updates it in all associated
AxwaySecureTransport 5.2.1 SP4 Administrator Guide 371

10 Advanced account administration
sites that have the Use Default check box selected for that placeholder.
l Delete the default value of a placeholder parameter clears it in all associated sites that have the Use Default check box selected for that placeholder.
4. Click Add or Save to save your changes and close the Add Transfer Site or Edit Transfer Site page. Click Cancel to close the page without saving your changes.
System usersYou can allow users who already have an account on the computer running SecureTransport to log in without creating a SecureTransport account by configuring the settings on the Password Files page in the Administration Tool. This page is only applicable for real users in SecureTransport.
Real usersReal users are the users defined at the operating-system level. Access rights to the server file system for real users are based on the underlying operating system file access rights. Real users can be defined locally on the server (for instance, on a UNIX-based platform in /etc/passwd, or on Windows as a computer-specific local user) or on a network resource (NIS for UNIX or on a domain controller for Windows).
Set a home folder for each real user to ensure that the user is not logged into a randomly-selected directory when logging in to SecureTransport.
Note Real users can view the complete file system of the SecureTransport Server, regardless of the location of the home folder.
Real users on UNIXUNIX real users are the users defined in /etc/passwd, or in NIS. Real users are created at the system level. They can login using telnet or rlogin, in addition to FTP access only if their rights and permissions give them access.
Real users on WindowsWindows real users are created locally on the server or on the domain controller with the system controls. For Windows Server 2008 R2, the system controls are accessed through Control Panel > User Accounts > Add or remove user accounts.
For more information on Windows users, refer to the Microsoft documentation.
Note Real users set up on the SecureTransport Edge are unable to log into either a SecureTransport Edge or SecureTransport Server. You must create a user account for each real user set up on a SecureTransport Edge to allow log ins.
AxwaySecureTransport 5.2.1 SP4 Administrator Guide 372

10 Advanced account administration
When SecureTransport is running on a Windows platform, the Password Files page provides an additional option to specify password vaults. A password vault stores usernames and passwords of real users on Windows, is used to mimic virtual users on Windows, and is applicable only for Windows. See Manage password files on page 373.
Manage password filesUse the Password Files page to add, enable, disable, and delete password entries for real users.
By default the Password File List contains a disabled entry for real users. On a UNIX-based system, you cannot delete this entry or add an entry. On Windows, you can delete the entry for real uses and add password vault entries. SecureTransport stores password vaults in the SecureTransport database.
Add the password file entry 1. Select Accounts > System.
The Password Files page is displayed.
2. Click Add Password File.
A new row is displayed in the table.
3. In the Type list, select Real Users or Password Vault.
Note On UNIX-based platforms, Real Users is the only option in the Type list. On Windows platforms, there are two options: Real Users and Password Vault.
4. If you selected Password Vault, in the Location column, enter a Windows file path for
the password vault.
SecureTransport stores the password vault entries in the database and uses the value of the Location field to identify the password vault. SecureTransport does not create a file for the password vault.
5. Click the Save icon ( ) in the last column of the list.
Enable or disable password file entriesOnce you have created the password file entry, you can enable it. You can disable entries you want to keep but not use.
AxwaySecureTransport 5.2.1 SP4 Administrator Guide 373
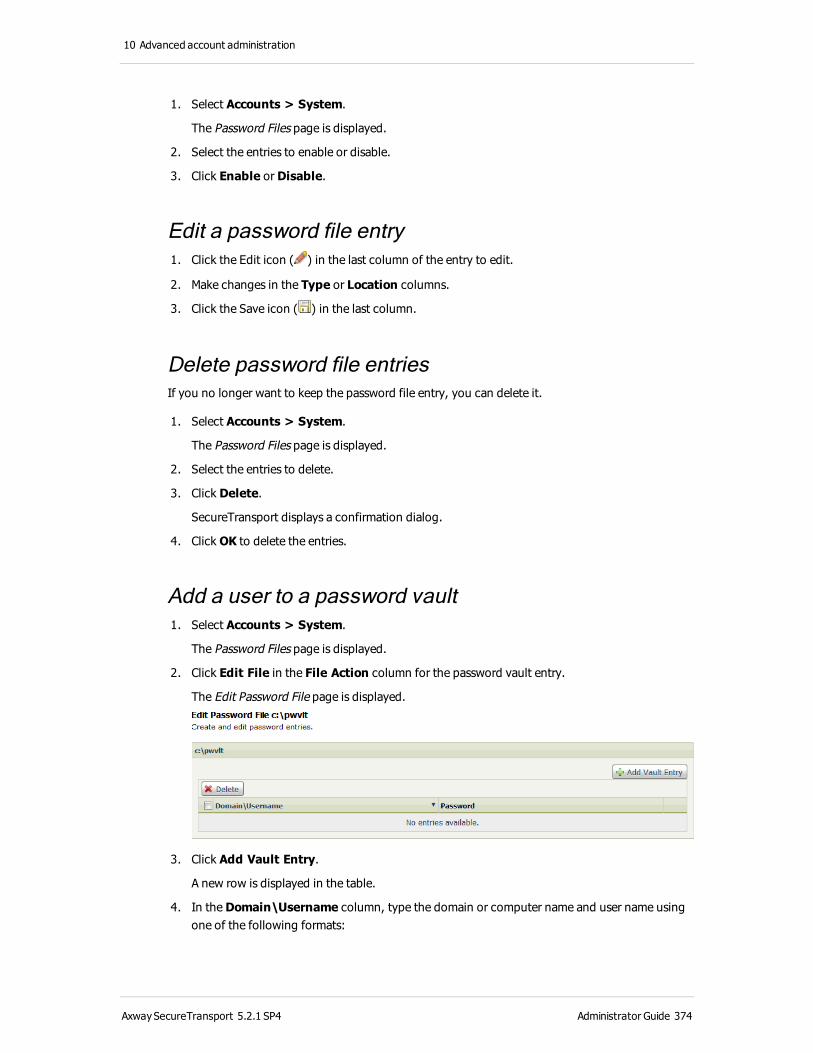
10 Advanced account administration
1. Select Accounts > System.
The Password Files page is displayed.
2. Select the entries to enable or disable.
3. Click Enable or Disable.
Edit a password file entry 1. Click the Edit icon ( ) in the last column of the entry to edit.
2. Make changes in the Type or Location columns.
3. Click the Save icon ( ) in the last column.
Delete password file entriesIf you no longer want to keep the password file entry, you can delete it.
1. Select Accounts > System.
The Password Files page is displayed.
2. Select the entries to delete.
3. Click Delete.
SecureTransport displays a confirmation dialog.
4. Click OK to delete the entries.
Add a user to a password vault 1. Select Accounts > System.
The Password Files page is displayed.
2. Click Edit File in the File Action column for the password vault entry.
The Edit Password File page is displayed.
3. Click Add Vault Entry.
A new row is displayed in the table.
4. In the Domain\Username column, type the domain or computer name and user name using one of the following formats:
AxwaySecureTransport 5.2.1 SP4 Administrator Guide 374
10 Advanced account administration
Domain\Username or Computer\Username
where Username is the valid domain or computer user.
5. In the Password column, type the password of the user.
6. Click the Save icon ( ) in the last column of the list.
Note If the password is incorrect, or the specified user does not have the relevant Windows local or domain permissions, the addition of the user fails with an appropriate error message. If the reason is wrong permissions, contact the domain administrator.
Edit a user in a password vault 1. Select Accounts > System.
The Password Files page is displayed.
2. Click Edit File in the File Action column for the password vault entry.
The Edit Password File page is displayed.
3. Click the Edit icon ( ) in the last column of the user to edit.
4. Make changes in the Domain\Username or Password columns.
5. Click the Save icon ( ) in the last column of the list.
Note If the password is incorrect, or the specified user does not have the relevant Windows local or domain permissions, the addition of the user fails with an appropriate error message. If the reason is wrong permissions, contact the domain administrator.
Delete users from a password vault 1. Select Accounts > System.
The Password Files page is displayed.
2. Click Edit File in the File Action column for the password vault entry.
The Edit Password File page is displayed.
3. Select the entries to delete.
4. Click Delete.
SecureTransport displays a confirmation dialog.
5. Click OK to delete the users.
Purge a password vault 1. Select Accounts > System.
The Password Files page is displayed.
2. Click Purge File in the File Action column for the password vault entry.
AxwaySecureTransport 5.2.1 SP4 Administrator Guide 375
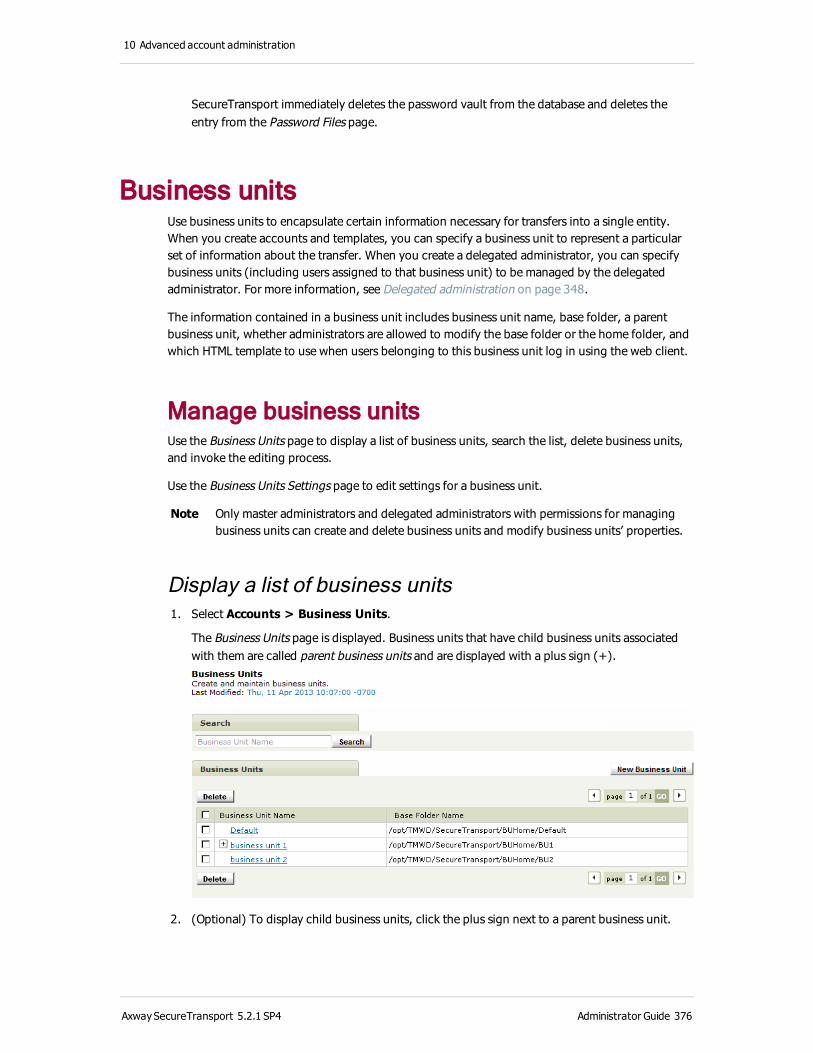
10 Advanced account administration
SecureTransport immediately deletes the password vault from the database and deletes the entry from the Password Files page.
Business unitsUse business units to encapsulate certain information necessary for transfers into a single entity. When you create accounts and templates, you can specify a business unit to represent a particular set of information about the transfer. When you create a delegated administrator, you can specify business units (including users assigned to that business unit) to be managed by the delegated administrator. For more information, see Delegated administration on page 348.
The information contained in a business unit includes business unit name, base folder, a parent business unit, whether administrators are allowed to modify the base folder or the home folder, and which HTML template to use when users belonging to this business unit log in using the web client.
Manage business unitsUse the Business Units page to display a list of business units, search the list, delete business units, and invoke the editing process.
Use the Business Units Settings page to edit settings for a business unit.
Note Only master administrators and delegated administrators with permissions for managing business units can create and delete business units and modify business units’ properties.
Display a list of business units 1. Select Accounts > Business Units.
The Business Units page is displayed. Business units that have child business units associated with them are called parent business units and are displayed with a plus sign (+).
2. (Optional) To display child business units, click the plus sign next to a parent business unit.
AxwaySecureTransport 5.2.1 SP4 Administrator Guide 376
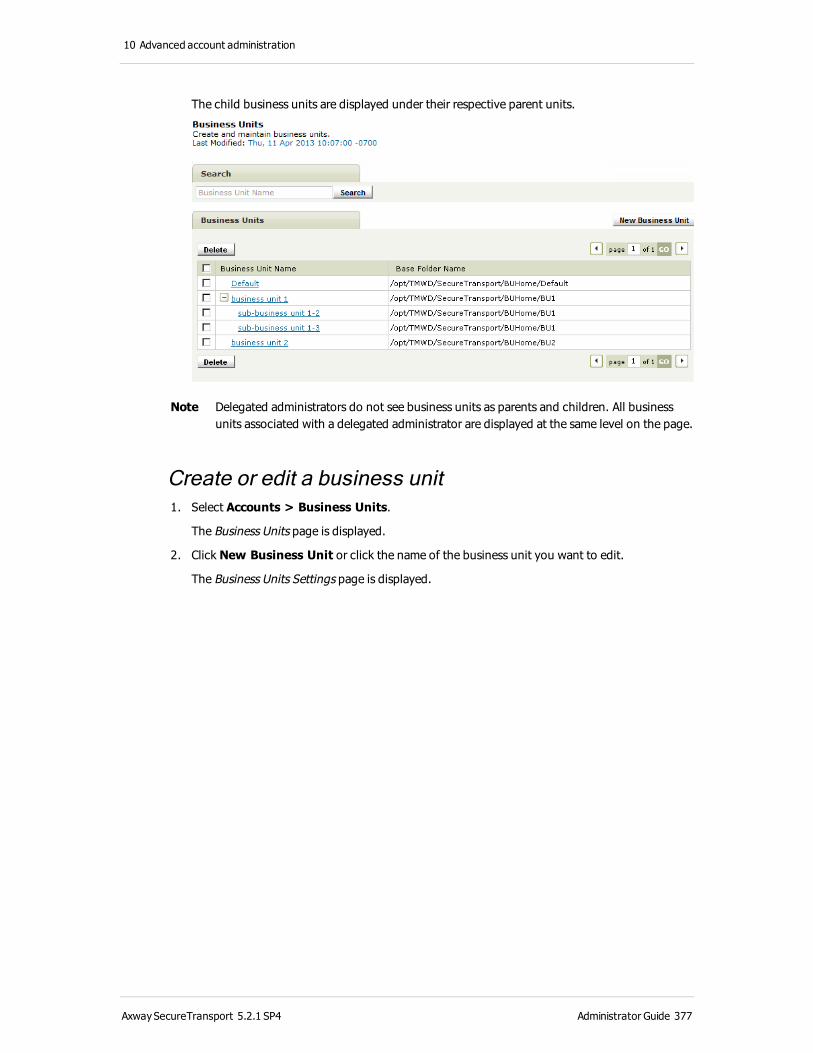
10 Advanced account administration
The child business units are displayed under their respective parent units.
Note Delegated administrators do not see business units as parents and children. All business units associated with a delegated administrator are displayed at the same level on the page.
Create or edit a business unit 1. Select Accounts > Business Units.
The Business Units page is displayed.
2. Click New Business Unit or click the name of the business unit you want to edit.
The Business Units Settings page is displayed.
AxwaySecureTransport 5.2.1 SP4 Administrator Guide 377

10 Advanced account administration
3. If you are creating a business unit, enter a value in the Name field.
4. In the Base Folder field, specify a folder that is to contain the home directories of new accounts belonging to this business unit.
5. Select the Allow Base Folder modifying check box to allow administrators to change the base folder when creating an account.
6. Select the Allow Home Folder modifying check box to allow administrators to change the account name suffix when creating an account.
7. In the Parent Business Unit drop-down list, select the name of the parent business unit. If you do not want this business unit to be a child, select None, the default.
8. In the Network Zone field, select the network zone that defines the public URL prefix for users in this business unit.
l Select Default to use the setting in the default network zone.
l Select a specific network zone to use the setting defined for that zone.
For more information, see Manage Transaction Manager, protocol, and proxy server communication on page 171.
AxwaySecureTransport 5.2.1 SP4 Administrator Guide 378
10 Advanced account administration
9. From the HTML Template drop-down, select the HTML template you want to use for accounts and account templates that belong to this business unit.
10. Select the Allow HTML Template modifying check box to allow administrators to change the HTML template when editing or creating an account for this business unit.
11. Select Allow transfers initiation using the ST RESTful API to enable calls from the SecureTransport REST file transfer API authenticated with the credentials from accounts in the business unit.
12. Select Allow RESTful API permissions modifying to allow a delegated administrator to modify this fields for users in the business unit.
13. Select Login by email to allow users in the business unit to log in using with the value of the Email Contact field as well as the Login Name. A user of one of the Axway Email Plug-ins must be able to login by email.
14. Select the Allow Login by Email modifying check box to allow administrators to change the Allow this account to login by email field when editing or creating an account for this business unit.
15. Select the Allow Delivery Method modifying check box to allow administrators to change the delivery method values when editing or creating an account for this business unit.
16. The Delivery Method value controls the options that Web Access Plus displays in the User Access window.
l Disabled – The user cannot send files using ad hoc file transfers.
l Default – Use the delivery method specified in the account template, if any, or in the Default Package Delivery Method field of the Ad Hoc Setting page.
l Anonymous – The sender can choose Anonymous.or Challenge.
l Account Without Enrollment – The sender can choose Anonymous, Challenge, or Existing Account.
l Account With Enrollment – The sender can choose Anonymous, Challenge, Existing Account, Enroll Unlicensed, or Enroll Licensed.
l Custom – Select the allowed enrollment types in the Enrollment Types field. The sender can chose any of the selected enrollment types.
17. For a custom delivery method, select one or more allowed enrollment types in the Enrollment Types field:
l Anonymous – The ad hoc file recipient receives a link to retrieve the files and is not enrolled as a user. The Web Access Plus option is Send attachment link only.
l Challenge – The ad hoc file recipient receives a link and must answer correctly a challenge question specified by the sender to retrieve the files. The recipient is not enrolled as a user. The Web Access Plus option is Protect attachment link with security question.
l Existing Account – Do not enroll ad hoc file recipients. Only existing users can receive files. The Web Access Plus option is Send to existing users only.
AxwaySecureTransport 5.2.1 SP4 Administrator Guide 379

10 Advanced account administration
l Enroll Unlicensed – If the ad hoc file recipient does not have a user account, the recipient must enroll and create an account before retrieving the files. The ad hoc file recipient becomes an unlicensed user who can only reply once to the email and retrieve the files. Other user attributes are defined by the enrollment template. The Web Access Plus option is Allow recipients to enroll as new Unlicensed Users.
l Enroll Licensed – If the ad hoc file recipient does not have a user account, the recipient must enroll and create an account before retrieving the files. The ad hoc file recipient becomes a SecureTransport user with all the attributes specified in the default enrollment template. The Web Access Plus option is Allow recipients to enroll as new Full Licensed Users.
18. The Implicit Enrollment Type value controls which option Web Access Plus selects initially in the User Access window and which enrollment type is used by the Axway Email Plug-ins. The choices depend on the enrollment types enabled by the Delivery Methods and Enrollment Types fields.
19. Select the Enrollment Template for this business unit. When a user is enrolled based on an ad hoc file transfer from a user in this business unit, the selected account template is used. You specify the default enrollment template on the Ad Hoc Settings page.
20. Select the Email Notification Template for this business unit. When a user is enrolled based on an ad hoc file transfer from a user in this business unit, the selected email notification template is used. You specify the default enrollment template on the Ad Hoc Settings page.
21. Click Save.
Delete a business unit 1. Before you delete a business unit, make sure that it is not associated with any account,
administrator, or application and that it does not have any child business units.
2. Select Accounts > Business Units. The Business Units page is displayed.
3. Using the check boxes, select the business units to delete. To select or clear all the check boxes, select or clear the check box in the table header.
4. Click Delete. A confirmation window is displayed.
5. Click OK to delete the selected business units.
Display active usersUsers who log in to the SecureTransport client are called active users. Use the Active Users page to view and search a list of the active users.
1. Select Accounts > Active Users.
The Active Users list is displayed. A line for each user includes the user login name, the last time the user sent an ad hoc file transfer, and the last time the user accessed the server.
AxwaySecureTransport 5.2.1 SP4 Administrator Guide 380

10 Advanced account administration
2. In the Search pane, enter a user login name and click Search.
Users that match your search criteria are displayed.
Client-initiated and server-initiated transfersYou can use SecureTransport to set up and execute server-initiated transfers. There are four types of transfers:
l Client-initiated downloads – A client application "pulls" a file from the SecureTransport Server.
l Client-initiated uploads – A client application "pushes" a file to the SecureTransport Server.
l Server-initiated downloads – The SecureTransport Server "pulls" a file from a remote server.
l Server-initiated uploads – The SecureTransport Server "pushes" a file to a remote server.
Client- and server-initiated transfers can be performed using any supported protocol. The protocol servers that handle client-initiated transfers run on the SecureTransport Server or on the SecureTransport Edge in the perimeter network (DMZ). The protocol clients that perform the server-initiated transfers run on the SecureTransport Server in the Transaction Manager server JVM and can connect out through a SOCKS5 Proxy on a SecureTransport Edge or through an HTTP proxy to a remote system. This allows the protocol clients to have direct access to the file system.
Server-initiated transfers can be triggered by any of the following events, depending on the configuration of the transfer:
l A Folder Monitor
l A scheduler
l The arrival of a file
In addition to the protocols mentioned above, the Folder Monitor can be used for inbound and outbound file transfers.
l For outbound transfers, SecureTransport can copy the files to a specified folder.
l For inbound transfers, SecureTransport can monitor the folder for newly arrived files and use the event to trigger an application executing specific tasks.
Any server-initiated transfer requires an account to be subscribed to an application based on one of the application types: Standard Router, Site Mailbox, Shared Folder, Basic Application, File Transfer via File Service Interface, or Human to System. For detailed information about application types and applications, see Applications on page 417.
Note When setting up a server-initiated outbound transfer, make sure that the target folder exists. SecureTransport does not create the target folder on the remote system automatically.
Transfer mode for server-initiated transfersTransfer mode for server-initiated transfers is determined by protocol and file content type.
AxwaySecureTransport 5.2.1 SP4 Administrator Guide 381

10 Advanced account administration
For AS2, transfer mode is always binary. For all other protocols, including FTP(S), HTTP(S), and SFTP, SecureTransport uses the content-type of the file name to determine whether a transfer is text (ASCII) or binary (IMAGE).
If the content type is text, the file is transferred as text. If the content-type is not text, the file is transferred as binary.
Content-type is determined based on the file name extension. The default mapping for file name extension to content-type is stored in the file, <FILEDRIVEHOME>/conf/mime.types. Use the Server Configuration Files page to edit this file to change or add entries.
Transfer multiple filesSecureTransport allows a server-initiated transfer job to process a single file, a set of multiple files specified using wildcards in the file name, or a directory.
Note Except for with Folder Monitor type applications, wildcards in directory names and recursive directory traversal are not supported.
A single transfer request for transferring multiple files is defined at the beginning of the transfer process only. If the number of files happens to change during the transfer process, these changes are not reflected and the transfer of these additional/missing files or directories fails.
The SecureTransport system keeps track of the status of all the individual transfers. If a transfer fails, it is rescheduled for a later point in time until the retry limit value is exceeded.
Configure retry parameters for server-initiated transfersWhen a server-initiated transfer fails, SecureTransport can automatically retry the transfer. By default, SecureTransport is configured to retry such a transfer five times at two-minute intervals. You can configure the retry count and interval by editing parameters on the Server Configuration page:
l EventQueue.maxRetryCount – The number of times SecureTransport retries a transfer.
The default value is 5.
l EventQueue.retryDelayInterval – The time in seconds that SecureTransport waits
after a transfer fails before retrying a it. The default value is 120.
l EventQueue.internalRetryDelayInterval – The time in seconds that
SecureTransport waits when a transfer cannot be started (for example, because all outbound connection to an FTP server are in use) before retrying it. The default value is 120.
AxwaySecureTransport 5.2.1 SP4 Administrator Guide 382
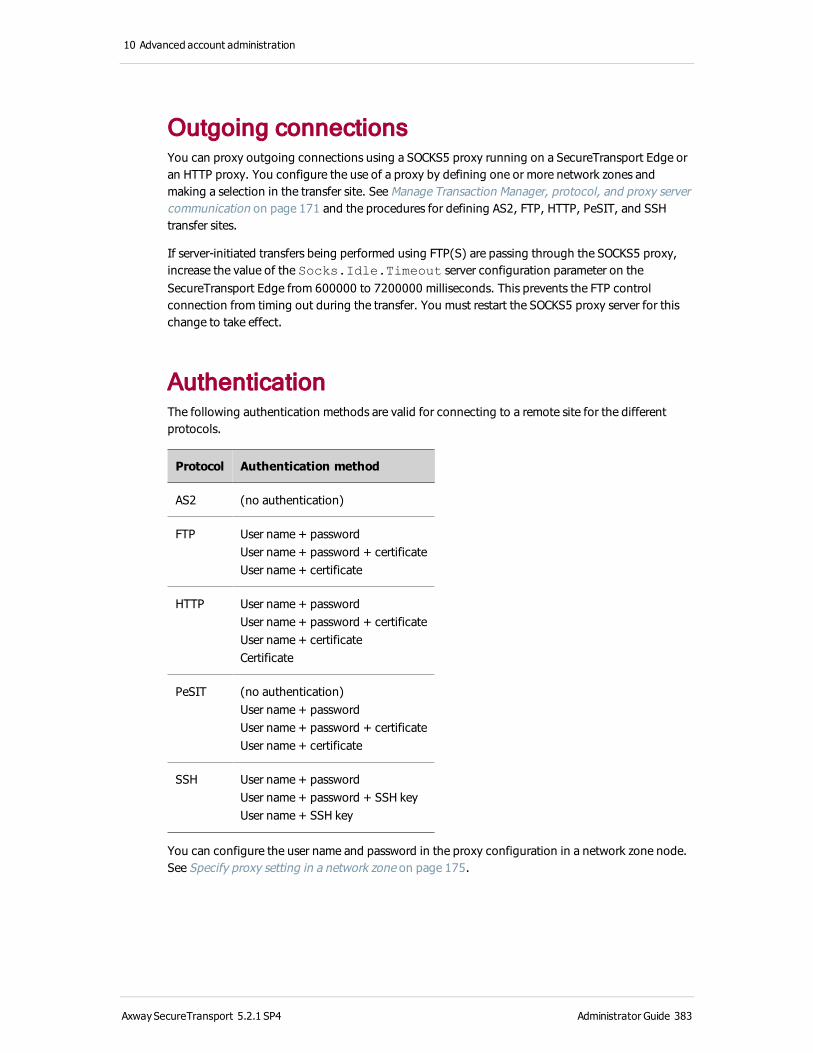
10 Advanced account administration
Outgoing connectionsYou can proxy outgoing connections using a SOCKS5 proxy running on a SecureTransport Edge or an HTTP proxy. You configure the use of a proxy by defining one or more network zones and making a selection in the transfer site. See Manage Transaction Manager, protocol, and proxy server communication on page 171 and the procedures for defining AS2, FTP, HTTP, PeSIT, and SSH transfer sites.
If server-initiated transfers being performed using FTP(S) are passing through the SOCKS5 proxy, increase the value of the Socks.Idle.Timeout server configuration parameter on the SecureTransport Edge from 600000 to 7200000 milliseconds. This prevents the FTP control connection from timing out during the transfer. You must restart the SOCKS5 proxy server for this change to take effect.
AuthenticationThe following authentication methods are valid for connecting to a remote site for the different protocols.
Protocol Authentication method
AS2 (no authentication)
FTP User name + passwordUser name + password + certificateUser name + certificate
HTTP User name + passwordUser name + password + certificateUser name + certificateCertificate
PeSIT (no authentication)User name + passwordUser name + password + certificateUser name + certificate
SSH User name + passwordUser name + password + SSH keyUser name + SSH key
You can configure the user name and password in the proxy configuration in a network zone node. See Specify proxy setting in a network zone on page 175.
AxwaySecureTransport 5.2.1 SP4 Administrator Guide 383
10 Advanced account administration
Server authenticationSecureTransport provides an option to turn on the target server authentication for server-initiated transfers. This server-wide option is turned on by default and can be turned off using the Transfer Sites pane for a user account. For details, see Manage transfer sites on page 313.
To manage the list of trusted certificates for server authentication, use the Certificates page, accessible from the Setup menu in the Administration Tool. For details, see Certificates on page 85.
LimitationsSecureTransport has the following limitations for server-initiated transfers:
l SecureTransport Server supports server-initiated transfers over HTTP only to remote sites running on another SecureTransport Server.
l Server-initiated transfers over FTPS from a streaming configuration with SecureTransport Edge to remote sites support only passive connection mode.
l When performing server-initiated uploads using the SSH protocol SecureTransport cannot always identify the remote operating system when the remote SSH server has version 3 or less.
For ASCII mode SSH transfers, if the remote SSH server supports the newline ([email protected]) extension, SecureTransport correctly converts the end-of-line characters of the file.
If the remote SSH server does not support the newline extension, SecureTransport can be configured to convert the end-of-line characters during server-initiated uploads based on the value of server configuration parameters. If the value of the Ssh.EndOfLineConversion.enabled server configuration parameter is true,
SecureTransport uses the value of the Ssh.EndOfLineConversion.type server
configuration parameter as the end-of-line sequence. Valid values are: 0x0A (LF), 0x0D (CR),
and 0x0D0A (CRLF). By default, the value of Ssh.EndOfLineConversion.enabled is
false and the value of Ssh.EndOfLineConversion.type is 0x0D0A.
Whether or not the remote SSH server supports the newline extension, the remote server sees these transfers as BINARY mode.
In all other cases of ASCII mode SSH server-initiated uploads and downloads, SecureTransport cannot identify the correct end-of-line characters to use. SecureTransport performs these transfers in BINARY mode and indicates this on the File Tracking page.
l The name of a file processed by a Folder Monitor transfer site cannot contain two more of the following characters in sequence: < > | : ? " * / \ % [ ] ~ (at the beginning of the
file only).
AxwaySecureTransport 5.2.1 SP4 Administrator Guide 384
10 Advanced account administration
Encryption and server-initiated transfersWhen SecureTransport performs server-initiated transfers, it defines user classes by UID and GID only – no user name is specified. As a result, if you use EncryptClass for encrypting or decrypting transferred files and EncryptClass is defined only by user name, the following is true:
l Encrypted files transferred using a server-initiated upload are decrypted before the start of the transfer.
l Files transferred using a server-initiated download are transferred with encryption.
AxwaySecureTransport 5.2.1 SP4 Administrator Guide 385
11 Access control
Use the Axway SecureTransport Access menu to configure how SecureTransport performs access control. Access control defines and restricts the rights of individuals to obtain data from, or place data onto, a storage device. Access control changes are copied to all SecureTransport Servers in your large enterprise cluster.
Note If your SecureTransport deployment includes SecureTransport Edge servers in a peripheral network (DMZ), you must configure all the settings under the Access menu that are applicable to SecureTransport Edge exactly the same on both SecureTransport Edge and SecureTransport Server.
User classesUser classes define sets of SecureTransport users who share characteristics and privileges.
Use user classes to define the following access restrictions:
l SSL encryption
l Filesystem, upload, and download
l FTP command
l Server
l User limits
You might also define user classes to support the following SecureTransport functions :
l The Server Usage Monitor page reports usage information by user class.
l On the Setting page, you define a FTP passive mode address rules for a user class.
l On the Command Logging page, you enable logging for a user class.
l On the Transfer Logging page, you enable logging for a user class.
l When you create an LDAP domain, you can define a DN filter for a user class.
l On the LDAP Home Folders page, you define the home folder prefix for a user class.
l When you create an account template, you specify the user class SecureTransport applies it to.
l You define a user class named EncryptClass to enable repository encryption for users.
To determine the user class for a user, SecureTransport evaluates the criteria for each user class in the sequence and puts the user in the first class that matches.
User classes are defined by the following values:
l User type – The user type can be real, virtual, or either
l User name – The user’s login name
AxwaySecureTransport 5.2.1 SP4 Administrator Guide 386
11 Access control
l User group – The account group for the user
l From address – The IP address or host name from which the user connects
l Custom expression – An expression comprised of values of SecureTransport user attributes and LDAP attributes, constant values, and patterns using arithmetic, comparison, string matching, logical, and conditional operations
You can use wildcard characters to define patterns in the User name, User group, and From address fields. Question mark (?) matches one character and asterisk (*) matches any string of characters.
Configure user classes on SecureTransport Server only.
Custom expressionsYou can use the Custom expression field to define a user class based on the values of any SecureTransport user attributes and LDAP attributes include custom attributes.
The following user attributes are supported:
l fdxUid – User ID (UNIX-based systems only)
l fdxGid – Group ID
l fdxHomeDir – Home folder
l fdxUserType – User type
l fdxShell – User shell (UNIX-based systems only)
l fdxSysUser – Name of a local or domain user of the Windows server whose credentials
SecureTransport uses to access the Windows files in the session (Windows only)
l Any custom SecureTransport user attribute defined in the LDAP domain. See Define attribute mappings for a domain on page 221.
The following variables that represent values from the SecureTransport LDAP domain are supported:
l LDAP_DOMAIN_ID – Internal ID
l LDAP_DOMAIN_NAME – Value of the Domain Name field
l LDAP_DN – Value of the Base DN field
l LDAP_AUTH_BY_EMAIL – Value of the Login by Email field, 0 for Disabled, 1 for Enabled
The following constants are supported:
l Numeric constants: -5, 100, .5, 1.05, 3.14159D, 6.0221415e23, 214748364,
0xFFECDE5E
l Character constants: 'a', '\u0061', '\t', '\u0009', '\n', '\b', '\r', '\f',
'\\', '\"'
l String constants: "Finance", "US", "^.*@finance\.example\.com$"
AxwaySecureTransport 5.2.1 SP4 Administrator Guide 387
11 Access control
l Logical constants: true, false
l Null constant: null (represents no value, so fdxShell = null is true if that fdxShell
is not defined)
The following functions are supported:
l isSet("A") – true if there is a session variable named A
l memberOf(A, B$collection) – true if A is a member of the multivalued session variable
B
l toInt(A) – converts A to an integer
l toString(A) – converts A to an string
SecureTransport evaluates the expression based on the following operator precedence from highest to lowest:
l Logical unary not
l Arithmetic unary + and -
l Arithmetic binary *, /, and % (integer remainder)
l Arithmetic binary + and -
l String concatenation +
l Numeric, date, and string comparison >, >=, <, <=, and like
l Logical, numeric, date, and string comparison = and <>
l Logical and
l Logical or
l Conditional expression A ? B : C (which has the value B if A is true or C if A is not true)
Use parentheses to group expressions and override the operator precedence.
SecureTransport dynamically converts numeric expressions to long integers, single-precision real numbers, or double-precision real numbers when it is necessary to evaluate an operator. When an operator requires a logical value, SecureTransport converts any value of a type other than logical to false.
The like operator matches its string left operand against a string right operand that is a Java regular expression. The result is true if the regular expression matches all of the left operand. The backslash (\) is the escape character Java regular expressions, so, in a regular expression, use two backslashes (\\) to match a backslash. See the examples.
The following expression checks for virtual users who are in one of three groups:
fdxUserType = "virtual" and (fdxGid = 1200 or fxdGid = 1400 or fdxGid = 1500)
The following expression tests the prefix of the user home directory on a Windows system:
fdxHomeDir like "C:\\home\\users\\finance\\.*"
AxwaySecureTransport 5.2.1 SP4 Administrator Guide 388

11 Access control
The following two expressions return the same result, checking the email address against different regular expressions depending on the UID:
fdxUid > 100 and fdxUid <= 200 and fdxEmail like ".*@finance\.example\.com" or fdxEmail like ".*@hr\.example\.com"
fdxEmail like (fdxUid > 100 and fdxUid <= 200 ? ".*@finance\.example\.com" : ".*@hr\.example\.com")
Default user classesSecureTransport provides the following default user classes:
l RealClass – all users of type real, connecting from any host address (*)
l VirtClass – all users of type virtual, connecting from any host address (*)
If not other user classes are defined, all users are in one of the default user classes. You can use these user classes to create access and security settings. For example, you can prevent virtual users from uploading documents to the server. To define more specific access and security settings more specific sets of users, create custom user classes.
Manage user classesUse the User Classes page to add, enable, disable, reorder, and delete user classes.
Add a user class 1. Select Access > User Classes.
The User Classes page is displayed.
2. Click New User Class. A new line is displayed in the User Classes List.
3. In the Class Name field, enter the name for the user class to create.
If the name is not unique, SecureTransport uses only the first user class with that name in the User Class List.
4. In the User Type field, select the predefined user type for the user class.
Note Because of the different ways SecureTransport treats the path name specification of the download or upload directory for real and virtual users when download or
AxwaySecureTransport 5.2.1 SP4 Administrator Guide 389

11 Access control
upload restrictions are defined, you should avoid selecting * to match all users.
5. In the User Name field, enter one of the following:
l The user name, such as the UNIX-based system login name, the Windows user name, virtual user name, LDAP user name, or SiteMinder user name.
On Windows, type either a username, COMPUTERNAME\username, or
DOMAIN\username.
l A pattern using * and ? to include matching users. For example, * includes all users.
Only one pattern is allowed.
6. In the User Group field, enter one of the following:
l The name or numerical GID of the group assigned to the user. If all characters are numeric, the value is a GID. Otherwise, it is group name. On Windows, the value can be either the Windows security identifier (SID) of the group or the GID from the group
file.
l An asterisk (*) to include users in all groups.
7. In the From Address field, enter a host name, a host name pattern, an IP address, or subnet specification. For valid values, see IP addresses and host names on page 552.
Only one host name, an IP address, or subnet specification is allowed.
8. To define the user class using other user attributes or LDAP attributes, enter a Custom expression. See Custom expressions on page 387.
9. Click the Save icon ( ) in the Edit column.
The status of a new user class is set to Disabled.
Note To cancel an add operation, select Access > User Classes again.
Enable or disable a user class 1. Select Access > User Classes.
The User Classes page is displayed.
2. In the User Classes List, select the check box for each user class to modify.
3. Click Enable or Disable.
The icons in the Class Name column change to indicate the status of the classes.
Edit a user class 1. Select Access > User Classes.
The User Classes page is displayed.
2. In the User Classes List, click the Edit icon ( ) in the Edit column for the user class entry to edit.
AxwaySecureTransport 5.2.1 SP4 Administrator Guide 390
11 Access control
3. Make the required changes to the fields in the row.
4. Click the Save icon ( ) in the Edit column.
Note To cancel an edit operation, select Access > User Classes again.
Reorder user classesIf a user belongs to multiple classes, SecureTransport categorizes the user as belonging to the first matching class in the User Classes List.
If two or more user classes have the same name, SecureTransport processes only the first of those classes in the User Classes List.
1. Select Access > User Classes.
The User Classes page is displayed.
2. In the User Classes List, click Reorder.
Up and down arrows are displayed in a column before the Class Name column in the User Classes List.
3. Drag the rows of the User Classes List to the required order.
4. Click Save Order.
Note To cancel a reorder operation, select Access > User Classes again.
Delete a user class 1. Select Access > User Classes.
The User Classes page is displayed.
2. In the User Classes List, select the check box for each user class to delete.
3. Click Delete.
4. Click OK in the confirmation dialog box.
Note If you delete a user class, it is best to remove all references to that user class from all access rules. SecureTransport ignores access rules that reference an undefined user class.
User class examplesThe following example illustrates some sample user class entries.
AxwaySecureTransport 5.2.1 SP4 Administrator Guide 391
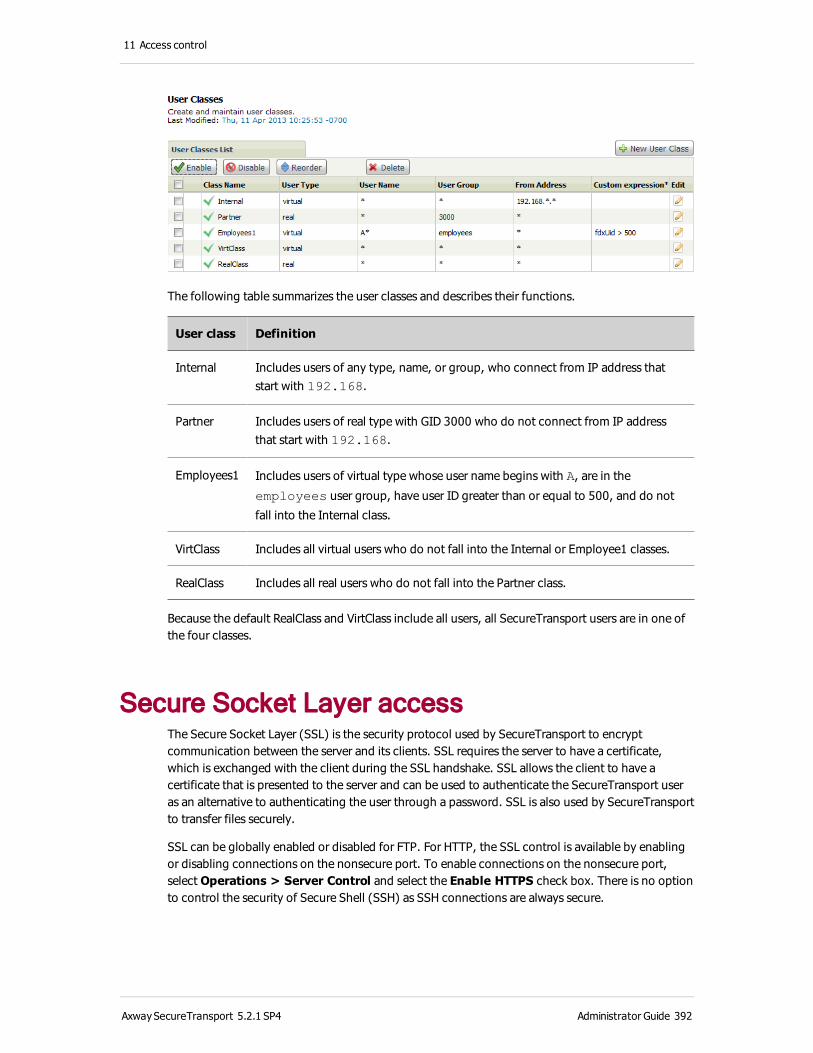
11 Access control
The following table summarizes the user classes and describes their functions.
User class Definition
Internal Includes users of any type, name, or group, who connect from IP address that start with 192.168.
Partner Includes users of real type with GID 3000 who do not connect from IP address that start with 192.168.
Employees1 Includes users of virtual type whose user name begins with A, are in the
employees user group, have user ID greater than or equal to 500, and do not
fall into the Internal class.
VirtClass Includes all virtual users who do not fall into the Internal or Employee1 classes.
RealClass Includes all real users who do not fall into the Partner class.
Because the default RealClass and VirtClass include all users, all SecureTransport users are in one of the four classes.
Secure Socket Layer accessThe Secure Socket Layer (SSL) is the security protocol used by SecureTransport to encrypt communication between the server and its clients. SSL requires the server to have a certificate, which is exchanged with the client during the SSL handshake. SSL allows the client to have a certificate that is presented to the server and can be used to authenticate the SecureTransport user as an alternative to authenticating the user through a password. SSL is also used by SecureTransport to transfer files securely.
SSL can be globally enabled or disabled for FTP. For HTTP, the SSL control is available by enabling or disabling connections on the nonsecure port. To enable connections on the nonsecure port, select Operations > Server Control and select the Enable HTTPS check box. There is no option to control the security of Secure Shell (SSH) as SSH connections are always secure.
AxwaySecureTransport 5.2.1 SP4 Administrator Guide 392
11 Access control
If the SSL option is disabled for FTP, then the client certificate setting and other SSL related settings are not applicable for FTP. These options are still applicable for HTTPS and SSH.
Based on user class, encryption (SSL) can be set as optional or mandatory.
l If SSL is mandatory, the SecureTransport Server only accepts SSL connections. If SSL is not enabled at the client end, SecureTransport refuses the connection.
l If SSL is optional, then both SSL and non-SSL connections are enabled. If the client requests an SSL connection, then it is negotiated. Otherwise, SecureTransport accepts the connection to proceed without encryption. If the client certificate verification is enabled, SecureTransport checks the validity and authenticity of the certificate presented by the client. If SSL is optional and the client requests SSL, but the client certificate verification fails, the client is allowed to log in with a user name and password.
If your SecureTransport deployment includes SecureTransport Edge servers in a peripheral network (DMZ), you should configure SSL access exactly the same on both SecureTransport Edge and SecureTransport Server.
SSL and SSHSSH provides mutual authentication. The client authenticates the server and the server authenticates the client. The data transferred between the client and server is encrypted.
For SSH server authentication, a key is assigned to the SSH server. As part of the connection handshake, the SSH client verifies the server key by checking whether the user has successfully connected to the server in the past. If a user is connecting to the server for the first time, the SSH client asks the user to confirm that the SSH server key and accept it before connecting to the server.
Generally, the SSH protocol provides three methods of authenticating clients: keyboard-interactive authentication, password authentication, and public key authentication. All types of client authentication are supported by SecureTransport.
Note SSH authentication is based on the public key, while SSL authentication is based on certificates. A certificate includes a public key, but it also includes information about the entity to which the key belongs.
In SecureTransport, keys are always managed in the form of certificates. Server keys are associated with Local Certificates. For details, see Manage local certificates and certificate signing requests on page 88.
You can assign a local server certificate to the SSH server. The key contained in the certificate is used to establish the SSH connection. Similarly SSH client keys are associated with login certificates. For details, see Certificate types on page 85.
The Secure Socket Layer configuration includes an option to control the use of client certificates in SSL. This option also applies to the use of SSH client keys as described in Specify client certificate authentication options on page 395.
Note If SecureTransport is deployed with SecureTransport Edge Server installed in a peripheral network (DMZ), you must configure the SSL access control settings on both the SecureTransport Edge and the SecureTransport Server. The settings can be the same to
AxwaySecureTransport 5.2.1 SP4 Administrator Guide 393
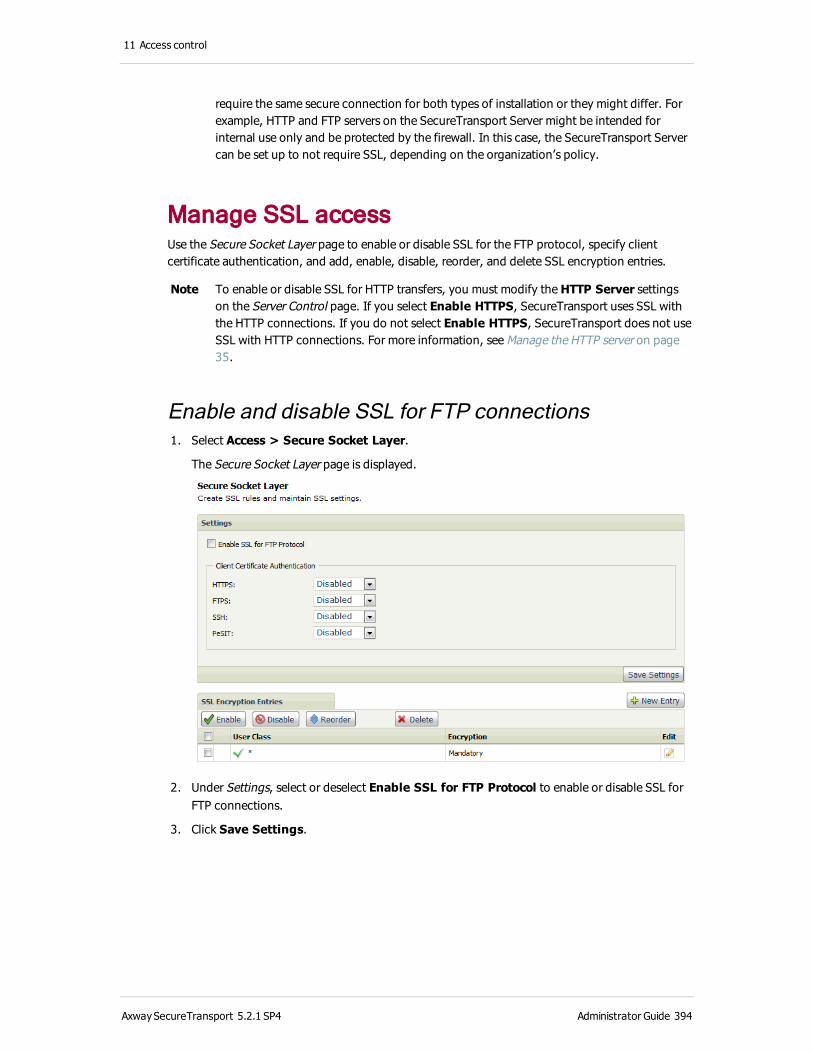
11 Access control
require the same secure connection for both types of installation or they might differ. For example, HTTP and FTP servers on the SecureTransport Server might be intended for internal use only and be protected by the firewall. In this case, the SecureTransport Server can be set up to not require SSL, depending on the organization’s policy.
Manage SSL accessUse the Secure Socket Layer page to enable or disable SSL for the FTP protocol, specify client certificate authentication, and add, enable, disable, reorder, and delete SSL encryption entries.
Note To enable or disable SSL for HTTP transfers, you must modify the HTTP Server settings on the Server Control page. If you select Enable HTTPS, SecureTransport uses SSL with the HTTP connections. If you do not select Enable HTTPS, SecureTransport does not use SSL with HTTP connections. For more information, see Manage the HTTP server on page 35.
Enable and disable SSL for FTP connections 1. Select Access > Secure Socket Layer.
The Secure Socket Layer page is displayed.
2. Under Settings, select or deselect Enable SSL for FTP Protocol to enable or disable SSL for FTP connections.
3. Click Save Settings.
AxwaySecureTransport 5.2.1 SP4 Administrator Guide 394
11 Access control
Specify client certificate authentication optionsThe following table describes the settings for Client Certificate Authentication. The settings are the same for the three supported protocols: HTTPS, FTPS, SSH, and PeSIT. Each protocol can be configured independently.
Option Description
Mandatory Client must have a certificate to present to the Server during the SSL handshake. If the certificate is missing, the Server rejects the connection. The SSH server accepts only a key for client authentication.
Optional Client might have a certificate. The server asks for it during the SSL handshake, but allows the connection to proceed if the client does not present a certificate or when authentication with the presented certificate is not successful. The SSH server accepts either a password or a key for client authentication.
Disabled The server will never ask for a client certificate. The server accepts only a password for client authentication.
1. Select Access > Secure Socket Layer.
The Secure Socket Layer page is displayed.
2. Under Client Certificate Authentication, select one of the three options to set the client certificate for each of the four protocols:
l Disabled
l Mandatory
l Optional
3. Click Save Settings.
Note After you modify client certificate authentication options, restart the SSH server.
Add an SSL users encryption entryYou can define SSL encryption settings based on user classes.
1. Select Access > Secure Socket Layer.
The Secure Socket Layer page is displayed.
2. At SSL Encryption Entries, click New Entry. A new line is displayed in the User Classes List.
3. Select a User Class. The user class must already be defined in the User Classes page. Asterisk (*) means all users.
4. Select an Encryption option for the user class. The two option types are: Mandatory and
Optional.
5. Click the Save icon ( ) in the Edit column.
AxwaySecureTransport 5.2.1 SP4 Administrator Guide 395

11 Access control
Note When using certificate-based authentication on Windows with real users, add the real user to the password vault to log in without being prompted for a password. For more information, see Real users on page 372.
Note To cancel an add operation, select Access > Secure Socket Layer again.
Enable or disable an encryption entry 1. Select Access > Secure Socket Layer.
The Secure Socket Layer page is displayed.
2. Under SSL Encryption Entries, select the check box for each entry to modify.
3. Click Enable or Disable.
The icons in the User Class column change to indicate the status of the entries.
Edit an encryption entry 1. Select Access > Secure Socket Layer.
The Secure Socket Layer page is displayed.
2. Under SSL Encryption Entries, click the Edit icon ( ) in the Edit column for the entry to edit.
3. Make the required changes to the fields in the entry.
4. Click the Save icon ( ) in the Edit column.
Note To cancel an edit operation, select Access > Secure Socket Layer again.
Reorder encryption entriesSecureTransport applies the first entry in the SSL Encryption Entries that matched the user class of the user. So, for SecureTransport to use them, you want the more specific entries before the more general entries in the list.
1. Select Access > Secure Socket Layer.
The Secure Socket Layer page is displayed.
2. Under SSL Encryption Entries, click Reorder.
Up and down arrows are displayed in a column before the User Class column in the SSL Encryption Entries.
3. Drag the rows of the SSL Encryption Entries to the required order.
4. Click Save Order.
Note To cancel a reorder operation, select Access > Secure Socket Layer again.
AxwaySecureTransport 5.2.1 SP4 Administrator Guide 396

11 Access control
Delete an encryption entry 1. Select Access > Secure Socket Layer.
The Secure Socket Layer page is displayed.
2. Under SSL Encryption Entries, select the check box for each entry to delete.
3. Click Delete.
4. Click OK in the confirmation dialog box.
Virtual groupsEvery user on a UNIX-based system has a user ID and a group ID. UNIX-based systems use these IDs to set process and file permissions. You can define certain groups as virtual users. Any user who is a member of a virtual group becomes a virtual user whether or not they are included in the virtual password file.
Configure virtual groups on SecureTransport Server only.
Manage virtual groupsUse the Virtual Groups page to add, enable, disable, and delete SSL virtual group entries.
Add a virtual group 1. Select Access > Virtual Groups.
The Virtual Groups page is displayed.
2. At Virtual Groups List, click New Entry. A new line is displayed in the Virtual Groups List.
3. In the Virtual Group Name field, enter the name or the group ID (GID) of the group.
4. Click the Save icon ( ) in the Edit column.
The status of a new virtual group is set to Disabled.
Note To cancel an add operation, select Access > Virtual Groups again.
AxwaySecureTransport 5.2.1 SP4 Administrator Guide 397
11 Access control
Enable or disable a virtual group 1. Select Access > Virtual Groups.
The Virtual Groups page is displayed.
2. In the Virtual Groups List, select the check box for each user class to modify.
3. Click Enable or Disable.
The icons in the Virtual Group Name column change to indicate the status of the classes.
Edit a virtual group 1. Select Access > Virtual Groups.
The Virtual Groups page is displayed.
2. In the Virtual Groups List, click the Edit icon ( ) in the Edit column for the virtual group entry to edit.
3. Make the required changes to the Virtual Group Name field.
4. Click the Save icon ( ) in the Edit column.
Note To cancel an edit operation, select Access > Virtual Groups again.
Delete a virtual group 1. Select Access > Virtual Groups.
The Virtual Groups page is displayed.
2. In the Virtual Groups List, select the check box for each user class to delete.
3. Click Delete.
4. Click OK in the confirmation dialog box.
Filesystem restrictionsUse the Filesystem pane of the Restrictions page to control rights for specific user classes to modify files and directories on the SecureTransport server.
Operations that can be allowed or denied are:
l Delete a File – Specifies whether or not users from the specified user class may delete files on the SecureTransport Server.
l Rename a File – Specifies whether or not users from the specified user class may rename files on the SecureTransport Server.
l Overwrite a File – Specifies whether or not users from the specified user class may overwrite existing files on the SecureTransport Server.
AxwaySecureTransport 5.2.1 SP4 Administrator Guide 398
11 Access control
l Make a Directory – Specifies whether or not users from the specified user class may create directories on the SecureTransport Server.
l Remove a Directory – Specifies whether or not users from the specified user class may remove directories from the SecureTransport Server.
l Change File Mode – Specifies whether or not users from the specified user class may change file access permissions on the SecureTransport Server. This option is applicable only for UNIX.
l Change Umask – Specifies whether or not users from the specified user class may change the access permissions mask for new files being uploaded to the SecureTransport Server. This option is applicable only for UNIX.
l Access a File/Directory – Specifies whether or not users from the specified user class have access to files or directories on the SecureTransport Server.
Note When a Web Access Plus user moves a file using cut and paste, SecureTransport checks the filesystem Rename a File permission. SecureTransport does not check the upload restrictions in this case.
Configure filesystem restrictions on SecureTransport Server only.
Manage filesystem restrictionsUse the Filesystem pane of the Restrictions page to add, enable, disable, and delete filesystem restriction entries.
Note SecureTransport applies filesystem restrictions starting with the last in the list and proceeding to the first. When you create two or more restrictions with the same action and that apply to the same users and the same path, make sure to put an entry with a more general path above one with a more specific path.
Add a filesystem restriction 1. Select Access > Restrictions.
2. Click the Filesystem tab.
The Filesystem Restrictions pane is displayed.
3. Click New Entry. A new line is displayed in the list.
4. Select an Action from the list. For description of the options, see Filesystem restrictions on page 398.
5. In the Allowed field, select No to deny the action or Yes to allow it.
AxwaySecureTransport 5.2.1 SP4 Administrator Guide 399
11 Access control
6. In the Class field, select a user class. Asterisk (*) means all users.
7. In the Path field, type the path of the directory for which the restriction applies.
Specify the path relative to the file system root for the user. For a real user, the file system root is the operating system root. For a virtual user, the file system root is the user's home directory.
On Windows, you must use a POSIX path. Specify drives as /drives/c and /drives/d
instead of C:\ and D:\.
You can use UNIX-style wildcard characters to apply restrictions for an entire directory. Path entries must contain both a forward slash and the asterisk wildcard (/*) to allow or deny
everything. For example, on Windows, to prevent deletion of the contents of the C:\temp
directory, specify /drives/C/temp/* as the path. In this example, specifying
/drives/C/temp only prevents the directory itself from being deleted, not its contents.
8. Click the Save icon ( ) in the Edit column.
SecureTransport adds the new entry at the top of the list, The status of a new entry is set to Disabled.
Note To cancel an add operation, select Access > Restrictions again.
Enable or disable a filesystem restriction 1. Select Access > Restrictions.
2. Click the Filesystem tab.
The Filesystem Restrictions pane is displayed.
3. Select the check box for each entry to modify.
4. Click Enable or Disable.
The icons in the Action column change to indicate the status of the classes.
Edit a filesystem restriction 1. Select Access > Restrictions.
2. Click the Filesystem tab.
The Filesystem Restrictions pane is displayed.
3. Click the Edit icon ( ) in the Edit column for the entry to edit.
4. Make the required changes to the fields.
5. Click the Save icon ( ) in the Edit column.
Note To cancel an edit operation, select Access > Restrictions again.
AxwaySecureTransport 5.2.1 SP4 Administrator Guide 400

11 Access control
Delete a filesystem restriction 1. Select Access > Restrictions.
2. Click the Filesystem tab.
The Filesystem Restrictions pane is displayed.
3. Select the check box for each entry to delete.
4. Click Delete.
5. Click OK in the confirmation dialog box.
ExampleThe following example allows access to the /outgoing folder only.
Upload restrictionsUse upload restrictions to allow or deny permission for users to upload files based on user class. For each user class, you can specify upload permissions and, for UNIX-based systems, the value of the owner, group, and access permissions of the uploaded file.
The order of the entries in the list in the Upload pane of the Restrictions page is important because SecureTransport applies the entries in the order they are displayed. Once the user class for the user uploading the file is established, SecureTransport applies the first entry for that user class or for all user classes (*) that has a file pattern that matches the file to be uploaded. If no entry matches, SecureTransport allows the upload.
For each user class, put the entries with more specific paths before those with more general paths. For example, to allow users to upload to the /incoming directory only, put an entry that allows uploads to that path before an entry that denies upload to all locations (*).
Note For metadata file upload for a protocol implemented using the file services interface, the IP address is not used to choose the user class. The upload restrictions defined for the first user class that matches the user type, name, and group control these transfers.
Configure upload restrictions on SecureTransport Server only.
AxwaySecureTransport 5.2.1 SP4 Administrator Guide 401
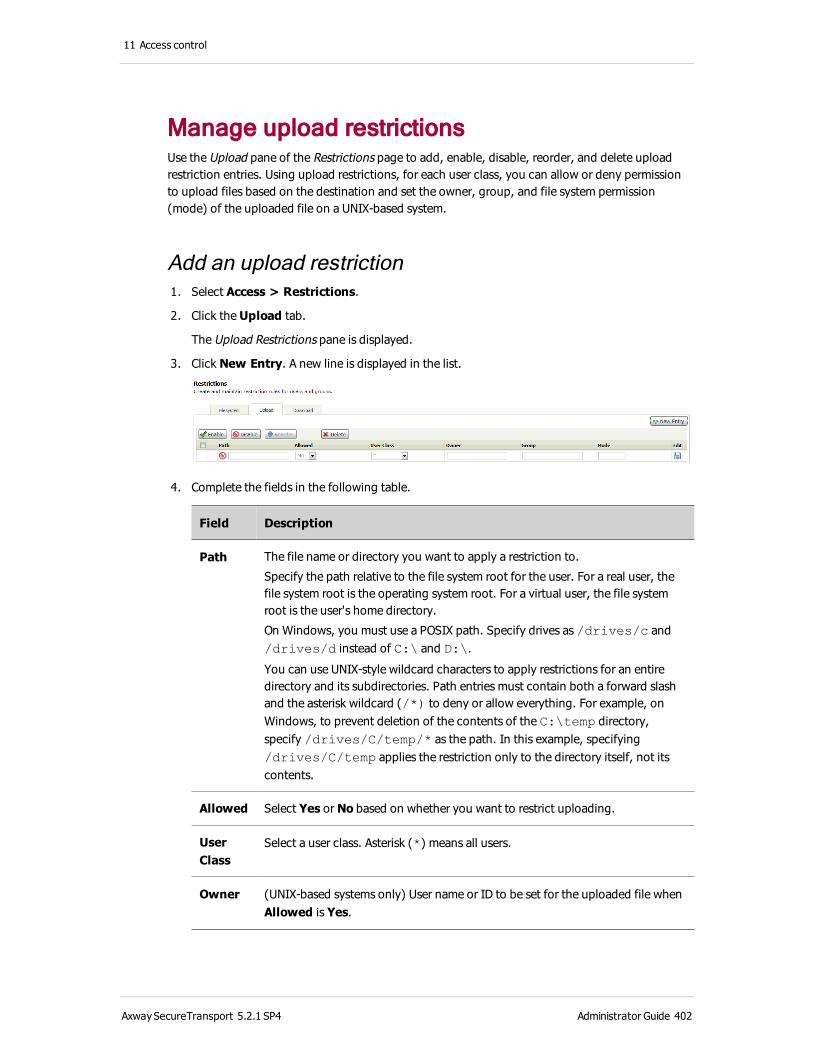
11 Access control
Manage upload restrictionsUse the Upload pane of the Restrictions page to add, enable, disable, reorder, and delete upload restriction entries. Using upload restrictions, for each user class, you can allow or deny permission to upload files based on the destination and set the owner, group, and file system permission (mode) of the uploaded file on a UNIX-based system.
Add an upload restriction 1. Select Access > Restrictions.
2. Click the Upload tab.
The Upload Restrictions pane is displayed.
3. Click New Entry. A new line is displayed in the list.
4. Complete the fields in the following table.
Field Description
Path The file name or directory you want to apply a restriction to.
Specify the path relative to the file system root for the user. For a real user, the file system root is the operating system root. For a virtual user, the file system root is the user's home directory.
On Windows, you must use a POSIX path. Specify drives as /drives/c and /drives/d instead of C:\ and D:\.
You can use UNIX-style wildcard characters to apply restrictions for an entire directory and its subdirectories. Path entries must contain both a forward slash and the asterisk wildcard (/*) to deny or allow everything. For example, on Windows, to prevent deletion of the contents of the C:\temp directory, specify /drives/C/temp/* as the path. In this example, specifying /drives/C/temp applies the restriction only to the directory itself, not its contents.
Allowed Select Yes or No based on whether you want to restrict uploading.
User Class
Select a user class. Asterisk (*) means all users.
Owner (UNIX-based systems only) User name or ID to be set for the uploaded file when Allowed is Yes.
AxwaySecureTransport 5.2.1 SP4 Administrator Guide 402

11 Access control
Field Description
Group (UNIX-based systems only) Group name or ID to be set for the uploaded file when Allowed is Yes.
Mode (UNIX-based systems only) File access permissions to be applied to the uploaded file when Allowed is Yes.
5. Click the Save icon ( ) in the Edit column.
The status of a new entry is set to Disabled.
Note To cancel an add operation, select Access > Restrictions again.
Enable or disable an upload restriction 1. Select Access > Restrictions.
2. Click the Upload tab.
The Upload Restrictions pane is displayed.
3. Select the check box for each entry to modify.
4. Click Enable or Disable.
The icons in the Path column change to indicate the status of the classes.
Edit an upload restriction 1. Select Access > Restrictions.
2. Click the Upload tab.
The Upload Restrictions pane is displayed.
3. Click the Edit icon ( ) in the Edit column for the entry to edit.
4. Make the required changes in the fields.
5. Click the Save icon ( ) in the Edit column.
Note To cancel an edit operation, select Access > Restrictions again.
Reorder upload restrictions 1. Select Access > Restrictions.
2. Click the Upload tab.
The Upload Restrictions pane is displayed.
3. Click Reorder.
Up and down arrows are displayed in a column before the Path column.
AxwaySecureTransport 5.2.1 SP4 Administrator Guide 403

11 Access control
4. Drag the rows of the entries to the required order.
5. Click Save Order.
Note To cancel a reorder operation, select Access > Restrictions again.
Delete an upload restriction 1. Select Access > Restrictions.
2. Click the Upload tab.
The Upload Restrictions pane is displayed.
3. Select the check box for each entry to delete.
4. Click Delete.
5. Click OK in the confirmation dialog box.
Download restrictionsUse download restrictions to allow or deny permission for users to download files based on user class. For each user class, you can specify upload permissions that allow or deny the user the ability to view, create, or modify files and directories.
The order of the entries in the list in the Download pane of the Restrictions page is important because SecureTransport applies the entries in the order they are displayed. Once the user class for the user downloading the file is established, SecureTransport applies the first entry for that user class or for all user classes (*) that has a file pattern that matches the file to be downloaded. If no entry matches, SecureTransport allows the download.
For each user class, put the entries with more specific paths before those with more general paths. For example, to allow users to download from the /outgoing directory only, put an entry that allows downloads from that path before an entry that denies download from all locations (*).
Configure download restrictions on SecureTransport Server only.
Manage download restrictionsUse the Download pane of the Restrictions page to add, enable, disable, reorder, and delete download restriction entries.
Add a download restriction 1. Select Access > Restrictions.
2. Click the Download tab.
The Download Restrictions pane is displayed.
3. Click New Entry. A new line is displayed in the list.
AxwaySecureTransport 5.2.1 SP4 Administrator Guide 404

11 Access control
4. Complete the fields in the following table.
Field Description
Path The file name or directory you want to apply a restriction to.
Specify the path relative to the file system root for the user. For a real user, the file system root is the operating system root. For a virtual user, the file system root is the user's home directory.
On Windows, you must use a POSIX path. Specify drives as /drives/c and /drives/d instead of C:\ and D:\.
You can use UNIX-style wildcard characters to apply restrictions for an entire directory and its subdirectories. Path entries must contain both a forward slash and the asterisk wildcard (/*) to deny or allow everything. For example, on Windows, to prevent deletion of the contents of the C:\temp directory, specify /drives/C/temp/* as the path. In this example, specifying /drives/C/temp applies the restriction only to the directory itself, not its contents.
Allowed Select Yes or No based on whether you want to restrict downloading.
User Class
Select a user class. Asterisk (*) means all users.
5. Click the Save icon ( ) in the Edit column.
The status of a new entry is set to Disabled.
Note To cancel an add operation, select Access > Restrictions again.
Enable or disable a download restriction 1. Select Access > Restrictions.
2. Click the Download tab.
The Download Restrictions pane is displayed.
3. Select the check box for each entry to modify.
4. Click Enable or Disable.
The icons in the Path column change to indicate the status of the classes.
AxwaySecureTransport 5.2.1 SP4 Administrator Guide 405
11 Access control
Edit a download restriction 1. Select Access > Restrictions.
2. Click the Download tab.
The Download Restrictions pane is displayed.
3. Click the Edit icon ( ) in the Edit column for the entry to edit.
4. Make the required changes in the fields.
5. Click the Save icon ( ) in the Edit column.
Note To cancel an edit operation, select Access > Restrictions again.
Reorder download restrictions 1. Select Access > Restrictions.
2. Click the Download tab.
The Download Restrictions pane is displayed.
3. Click Reorder.
Up and down arrows are displayed in a column before the Path column.
4. Drag the rows of the entries to the required order.
5. Click Save Order.
Note To cancel a reorder operation, select Access > Restrictions again.
Delete a download restriction 1. Select Access > Restrictions.
2. Click the Download tab.
The Download Restrictions pane is displayed.
3. Select the check box for each entry to delete.
4. Click Delete.
5. Click OK in the confirmation dialog box.
FTP command restrictionsThe SecureTransport FTP server uses a number of standard and extended FTP commands. You can restrict individual FTP commands for specified user classes. By default, the page includes entries that allow all listed commands for all users.
To allow an FTP command for some users and restrict it for others, create two or more entries and reorder them so that the more restrictive rule comes before the less restrictive rules.
AxwaySecureTransport 5.2.1 SP4 Administrator Guide 406
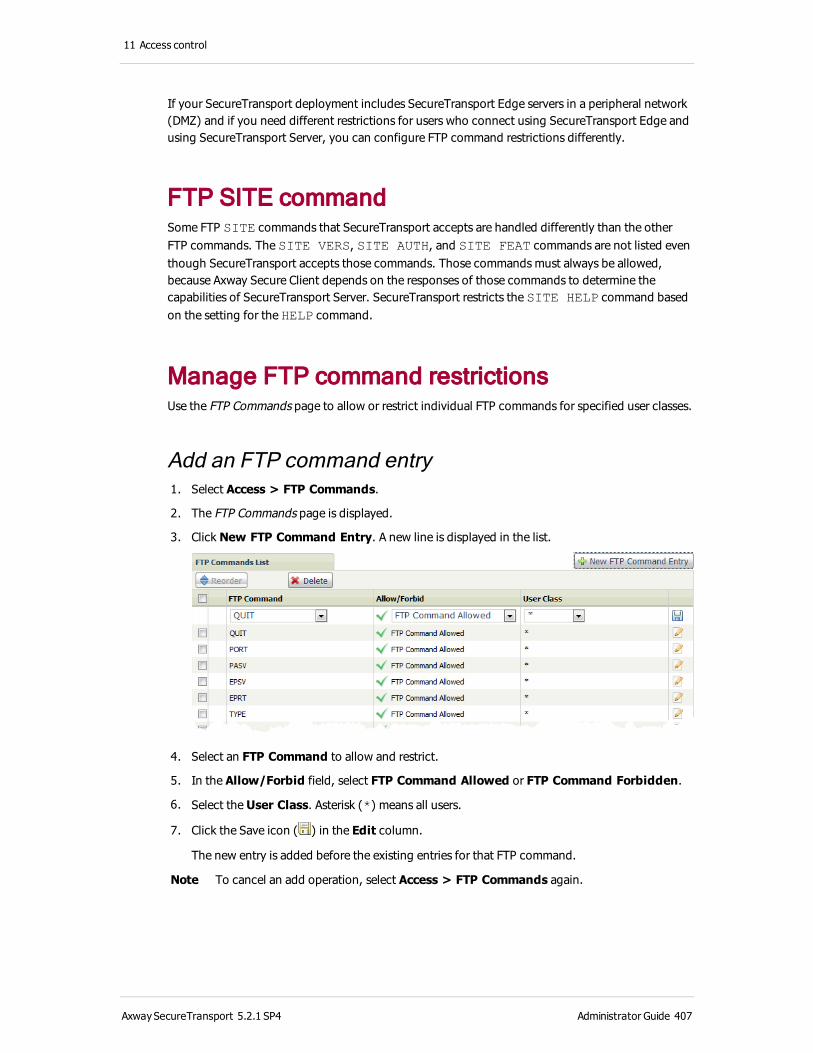
11 Access control
If your SecureTransport deployment includes SecureTransport Edge servers in a peripheral network (DMZ) and if you need different restrictions for users who connect using SecureTransport Edge and using SecureTransport Server, you can configure FTP command restrictions differently.
FTP SITE commandSome FTP SITE commands that SecureTransport accepts are handled differently than the other FTP commands. The SITE VERS, SITE AUTH, and SITE FEAT commands are not listed even though SecureTransport accepts those commands. Those commands must always be allowed, because Axway Secure Client depends on the responses of those commands to determine the capabilities of SecureTransport Server. SecureTransport restricts the SITE HELP command based on the setting for the HELP command.
Manage FTP command restrictionsUse the FTP Commands page to allow or restrict individual FTP commands for specified user classes.
Add an FTP command entry 1. Select Access > FTP Commands.
2. The FTP Commands page is displayed.
3. Click New FTP Command Entry. A new line is displayed in the list.
4. Select an FTP Command to allow and restrict.
5. In the Allow/Forbid field, select FTP Command Allowed or FTP Command Forbidden.
6. Select the User Class. Asterisk (*) means all users.
7. Click the Save icon ( ) in the Edit column.
The new entry is added before the existing entries for that FTP command.
Note To cancel an add operation, select Access > FTP Commands again.
AxwaySecureTransport 5.2.1 SP4 Administrator Guide 407
11 Access control
Edit an FTP command entry 1. Select Access > FTP Commands.
The FTP Commands page is displayed.
2. Click the Edit icon ( ) in the Edit column for the entry to edit.
3. Make the required changes in the fields.
4. Click the Save icon ( ) in the Edit column.
Note To cancel an edit operation, select Access > FTP Commands again.
Reorder FTP command entriesSecureTransport applies the FTP restrictions for each command in the order they are displayed in the list. To restrict an FTP command for some users and allow it for others, create two or more entries and reorder them with the most restrictive commands first.
1. Select Access > FTP Commands.
The FTP Commands page is displayed.
2. Click Reorder.
Up and down arrows are displayed in a column before the FTP Command column for the FTP commands that have two or more entries.
3. Drag the rows of the entries to the required order.
You can reorder the entries for only one FTP command each time you click Reorder.
4. Click Save Order.
Note To cancel a reorder operation, select Access > FTP Commands again.
Delete an FTP command entry 1. Select Access > FTP Commands.
The FTP Commands page is displayed.
2. Select the check box for each entry to delete.
3. Click Delete.
4. Click OK in the confirmation dialog box.
Note You cannot delete the last entry for each FTP command.
AxwaySecureTransport 5.2.1 SP4 Administrator Guide 408

11 Access control
Administration Tool and protocol server access control
You can limit access to the SecureTransport Administration Tool, FTP, and HTTP servers to specified hosts by defining access rules.
When a client attempts to connect to the SecureTransport Administration Tool or either of the protocol servers, the server looks up the address and, if reverse DNS lookup is enable, the host name of the computer the client is connecting from, and for protocol servers, the user class, and applies the access rules to allow or deny access.
If your SecureTransport deployment includes SecureTransport Edge servers in a peripheral network (DMZ) and if you need different Administration Tool access control for administrators who use the Administration Tool for SecureTransport Edge and for SecureTransport Server, you can configure Administration Tool access control differently.
Configure protocol server access control on SecureTransport Server only.
Note Protocol server access restrictions do not work for SiteMinder logins.
Access rule orderYou set the order that the server applies the access rules. Using rule order and multiple rules, you can implement detail access control.
If you select Allow then Deny rule order, the server denies access to a computer if:
l It is not explicitly specified in an allow rule
or
l It is explicitly specified in a deny rule.
With Allow then Deny, if the IP address or host name of a computer is not specified in either an allow rule or a deny rule, the server denies access. So, the default is no access.
A more general deny rule overrides a more specific allow rule, So to allow access from an entire subnet or range of IP addresses and deny access from specific hosts, select Allow then Deny and define an allow rule for the subnet or range of IP addresses and deny rules for each host.
Note Be careful not to deny access to the Administration Tool from all computers. If you select Allow then Deny rule order and delete all admin access control rules, no computer can access the Administration Tool. If this happens, contact Axway Global Support.
If you select Deny then Allow rule order, the Administration Tool server allows access to a computer if:
l It is not explicitly specified in a deny rule
or
l It is explicitly specified in an allow rule.
AxwaySecureTransport 5.2.1 SP4 Administrator Guide 409
11 Access control
With Deny the Allow, if the IP address or host name of a computer is not specified in either an allow rule or a deny rule, the server allows access. So, the default is access.
A more general allow rule overrides a more specific deny rule, So to deny access from an entire subnet or range of IP addresses and allow access from specific hosts, select Deny the Allow and define an deny rule for the subnet or range of IP addresses and allow rules for each host.
Enable host names for access controlTo use host names in the Address field of rules that control access to the Administration Tool, FTP, and HTTP servers, enable reverse DNS lookup for those severs.
Note Enabling reverse DNS lookup might reduce the server’s performance because DNS lookups involve a series of requests through the DNS name server tree.
To enable DNS lookups for the FTP server, use Reverse DNS Lookups on the Miscellaneous Options page.
Enable reverse DNS lookups for the Administration Tool server 1. Select Operations > Server Configuration.
The Server Configuration page is displayed.
2. To enable reverse DNS lookups for the Administration Tool server, search for the Admin.ReverseDNSLookup parameter and set it to true.
3. Bounce the server.
Enable reverse DNS lookups for the FTP server or the HTTP server 1. Select Setup > Miscellaneous.
The Miscellaneous Options page is displayed.
2. In the FTP Reverse DNS Lookups list or the HTTP Reverse DNS Lookups list, select Reverse DNS lookups enabled.
3. Click Apply.
Manage Administration Tool or protocol server accessDefine any number of rules in the Admin Access Control page control access to the SecureTransport Administration Tool. Define any number of rules in the Server Access Control page to control access to the FTP and HTTP servers.
AxwaySecureTransport 5.2.1 SP4 Administrator Guide 410
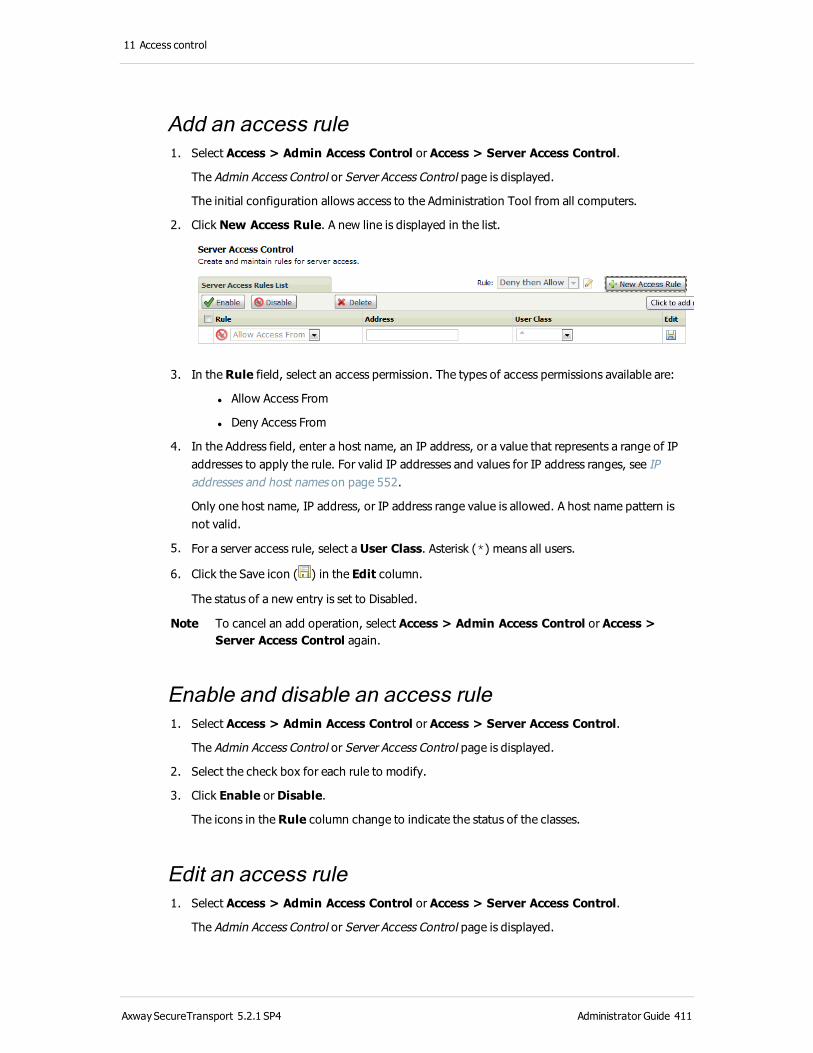
11 Access control
Add an access rule 1. Select Access > Admin Access Control or Access > Server Access Control.
The Admin Access Control or Server Access Control page is displayed.
The initial configuration allows access to the Administration Tool from all computers.
2. Click New Access Rule. A new line is displayed in the list.
3. In the Rule field, select an access permission. The types of access permissions available are:
l Allow Access From
l Deny Access From
4. In the Address field, enter a host name, an IP address, or a value that represents a range of IP addresses to apply the rule. For valid IP addresses and values for IP address ranges, see IP addresses and host names on page 552.
Only one host name, IP address, or IP address range value is allowed. A host name pattern is not valid.
5. For a server access rule, select a User Class. Asterisk (*) means all users.
6. Click the Save icon ( ) in the Edit column.
The status of a new entry is set to Disabled.
Note To cancel an add operation, select Access > Admin Access Control or Access > Server Access Control again.
Enable and disable an access rule 1. Select Access > Admin Access Control or Access > Server Access Control.
The Admin Access Control or Server Access Control page is displayed.
2. Select the check box for each rule to modify.
3. Click Enable or Disable.
The icons in the Rule column change to indicate the status of the classes.
Edit an access rule 1. Select Access > Admin Access Control or Access > Server Access Control.
The Admin Access Control or Server Access Control page is displayed.
AxwaySecureTransport 5.2.1 SP4 Administrator Guide 411
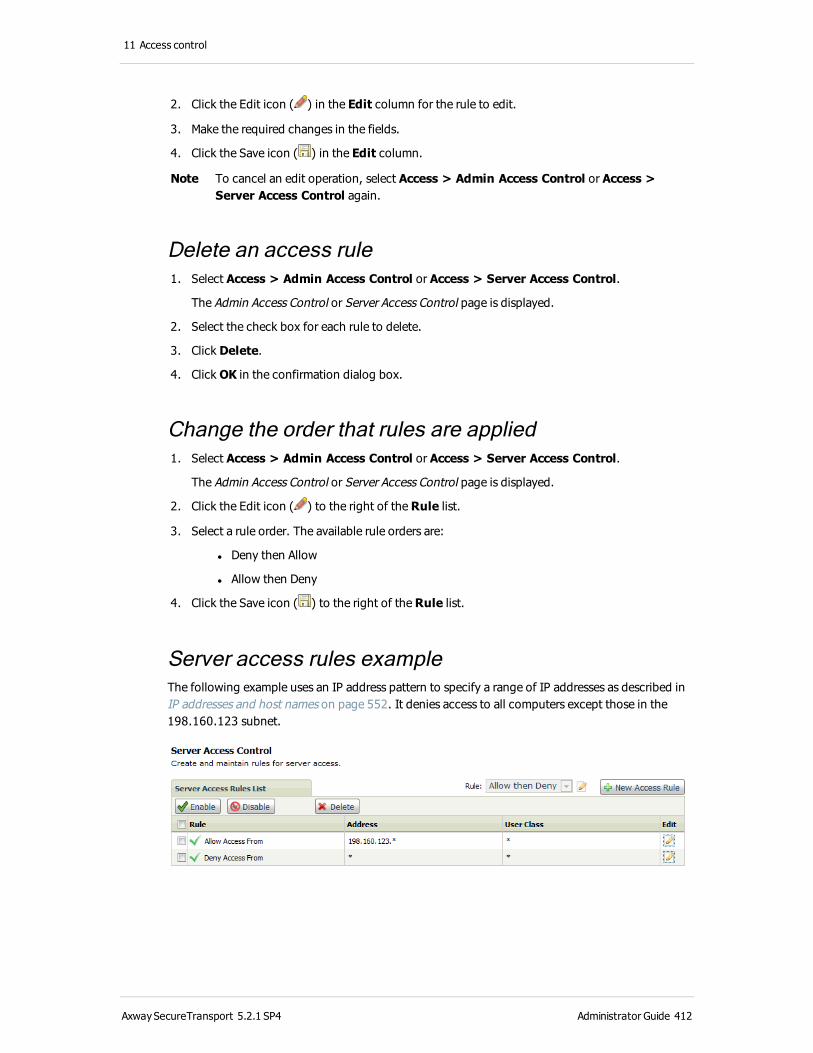
11 Access control
2. Click the Edit icon ( ) in the Edit column for the rule to edit.
3. Make the required changes in the fields.
4. Click the Save icon ( ) in the Edit column.
Note To cancel an edit operation, select Access > Admin Access Control or Access > Server Access Control again.
Delete an access rule 1. Select Access > Admin Access Control or Access > Server Access Control.
The Admin Access Control or Server Access Control page is displayed.
2. Select the check box for each rule to delete.
3. Click Delete.
4. Click OK in the confirmation dialog box.
Change the order that rules are applied 1. Select Access > Admin Access Control or Access > Server Access Control.
The Admin Access Control or Server Access Control page is displayed.
2. Click the Edit icon ( ) to the right of the Rule list.
3. Select a rule order. The available rule orders are:
l Deny then Allow
l Allow then Deny
4. Click the Save icon ( ) to the right of the Rule list.
Server access rules exampleThe following example uses an IP address pattern to specify a range of IP addresses as described in IP addresses and host names on page 552. It denies access to all computers except those in the 198.160.123 subnet.
AxwaySecureTransport 5.2.1 SP4 Administrator Guide 412
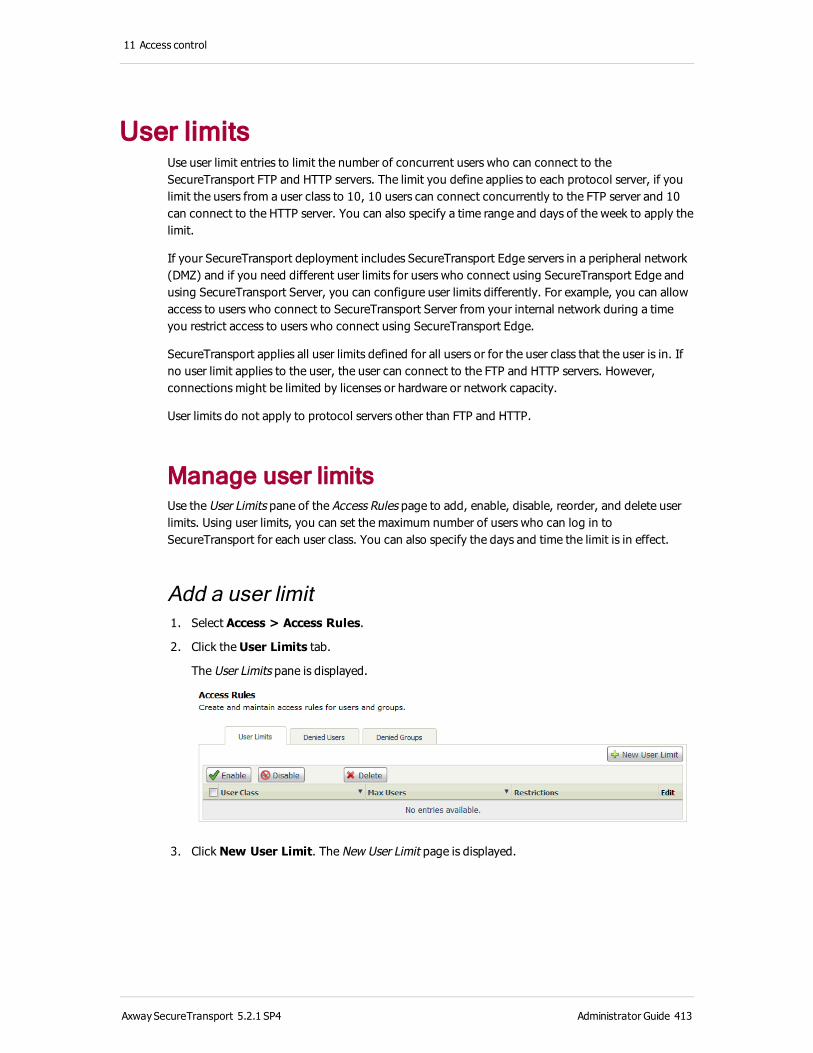
11 Access control
User limitsUse user limit entries to limit the number of concurrent users who can connect to the SecureTransport FTP and HTTP servers. The limit you define applies to each protocol server, if you limit the users from a user class to 10, 10 users can connect concurrently to the FTP server and 10 can connect to the HTTP server. You can also specify a time range and days of the week to apply the limit.
If your SecureTransport deployment includes SecureTransport Edge servers in a peripheral network (DMZ) and if you need different user limits for users who connect using SecureTransport Edge and using SecureTransport Server, you can configure user limits differently. For example, you can allow access to users who connect to SecureTransport Server from your internal network during a time you restrict access to users who connect using SecureTransport Edge.
SecureTransport applies all user limits defined for all users or for the user class that the user is in. If no user limit applies to the user, the user can connect to the FTP and HTTP servers. However, connections might be limited by licenses or hardware or network capacity.
User limits do not apply to protocol servers other than FTP and HTTP.
Manage user limitsUse the User Limits pane of the Access Rules page to add, enable, disable, reorder, and delete user limits. Using user limits, you can set the maximum number of users who can log in to SecureTransport for each user class. You can also specify the days and time the limit is in effect.
Add a user limit 1. Select Access > Access Rules.
2. Click the User Limits tab.
The User Limits pane is displayed.
3. Click New User Limit. The New User Limit page is displayed.
AxwaySecureTransport 5.2.1 SP4 Administrator Guide 413
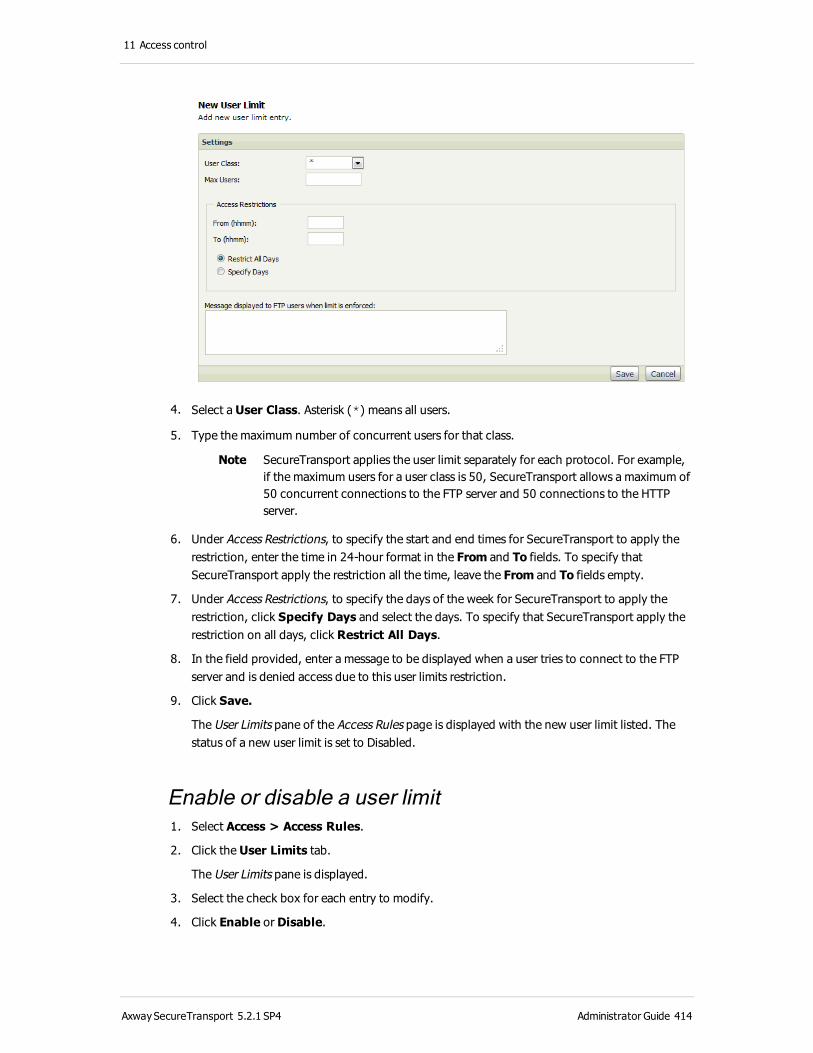
11 Access control
4. Select a User Class. Asterisk (*) means all users.
5. Type the maximum number of concurrent users for that class.
Note SecureTransport applies the user limit separately for each protocol. For example, if the maximum users for a user class is 50, SecureTransport allows a maximum of 50 concurrent connections to the FTP server and 50 connections to the HTTP server.
6. Under Access Restrictions, to specify the start and end times for SecureTransport to apply the restriction, enter the time in 24-hour format in the From and To fields. To specify that SecureTransport apply the restriction all the time, leave the From and To fields empty.
7. Under Access Restrictions, to specify the days of the week for SecureTransport to apply the restriction, click Specify Days and select the days. To specify that SecureTransport apply the restriction on all days, click Restrict All Days.
8. In the field provided, enter a message to be displayed when a user tries to connect to the FTP server and is denied access due to this user limits restriction.
9. Click Save.
The User Limits pane of the Access Rules page is displayed with the new user limit listed. The status of a new user limit is set to Disabled.
Enable or disable a user limit 1. Select Access > Access Rules.
2. Click the User Limits tab.
The User Limits pane is displayed.
3. Select the check box for each entry to modify.
4. Click Enable or Disable.
AxwaySecureTransport 5.2.1 SP4 Administrator Guide 414
11 Access control
The icons in the User Class column change to indicate the status of the classes.
The User Access page is displayed.
Edit a user limit 1. Select Access > Access Rules.
2. Click the User Limits tab.
The User Limits pane is displayed.
3. Click the Edit icon ( ) in the Edit column for the entry to edit. The User Limit page is displayed.
4. Make the required changes in the fields.
5. Click Save.
The User Limits pane of the Access Rules page is displayed with the user limit updated.
Delete a user limit 1. Select Access > Access Rules.
2. Click the User Limits tab.
The User Limits pane is displayed.
3. Select the check box for each user limit to delete.
4. Click Delete.
5. Click OK in the confirmation dialog box.
User and group accessUse this configuration to deny access to SecureTransport to individual users and to users who are members of a group.
By default, the rules deny access to the user root and the group daemon.
User and group access restrictions apply only to the FTP and HTTP servers.
If your SecureTransport deployment includes SecureTransport Edge servers in a peripheral network (DMZ) and if you need different user and group access for users who connect using SecureTransport Edge and using SecureTransport Server, you can configure user and group access rules differently.
Manage user and group accessUse the Denied Users pane and the Denied Groups pane of the Access Rules page to add and remove user and groups that SecureTransport prevents from connecting to the FTP and HTTP servers.
AxwaySecureTransport 5.2.1 SP4 Administrator Guide 415
11 Access control
Every group listed as a denied group must be defined at the operating system level so that SecureTransport can determine the group name from the GID in the user account.
Add a user or group to the denied list 1. Select Access > Access Rules.
2. Click the Denied Users tab or the Denied Groups tab.
The Denied Users or Denied Groups pane is displayed.
3. Enter in the field to the left of the Add button a user name for denied users or a group name or group ID (GID) for denied groups.
4. Click Add.
5. The user or group is added to the denied list.
Remove users or groups from the denied list 1. Select Access > Access Rules.
2. Click the Denied Users tab or the Denied Groups tab.
The Denied Users or Denied Groups pane is displayed.
3. Select the check box for each user or group to remove.
4. Click Remove.
5. Click OK in the confirmation dialog box.
AxwaySecureTransport 5.2.1 SP4 Administrator Guide 416
12 Applications
This chapter introduces Axway SecureTransport applications and describes how to use the Applications menu features of the SecureTransport Administration Tool.
Application overviewIn SecureTransport, applications are sets of workflow you can create to perform file processing, including the following:
l Transform data
l Schedule file transfers
l Route files
l Monitor shared folder monitoring across user accounts
l Trigger sequential sets of actions
An application is defined as an instance of a set of workflow called an application type. Once you have defined an application, you create a connection between an application and one or more accounts. Such a connection is defined through a subscription.
SecureTransport ships with the following built-in application types:
l Archive Maintenance – Archives transferred files and manages how often the archived files are deleted. Does not archive ad hoc packages.
l Audit Log Maintenance – Manages audit log entries through export or deletion.
l Axway Sentinel Link Data Maintenance – Removes all SentinelLinkData entries to files that do not exist.
l Axway Transfer CFT – Enables Axway Transfer CFT to push files to SecureTransport.
l Basic Application – Provides a way to perform server-initiated transfers and data transformations without file routing.
l File Transfer via File Services Interface– Processes metadata files sent from another system for a protocol implemented using the file services interface.
l Human to System – Provides a way to route H2S file transfers.
l Log Entry Maintenance – Manages server log entries through export or deletion.
l Package Retention Maintenance – Deletes expired file packages from ad hoc file transfers.
l Shared Folder – Provides shared data storage between accounts.
l Site Mailbox – Provides a means of communication between an account and its transfer sites. This site is used for AS2 transfers.
AxwaySecureTransport 5.2.1 SP4 Administrator Guide 417

12 Applications
l Standard Router – Provides a means of communication between an account and internal systems.
l Transfer Log Maintenance – Manages transfer log entries through export or deletion.
l Unlicensed Users Maintenance – Deletes inactive unlicensed user accounts.
For information on applications, application types, data transformations, and all other aspects of the application framework from a developer’s point of view, refer to the SecureTransport Developer’s Guide.
Manage applicationsThis section discusses creating, editing, viewing and deleting applications based on the application types built into SecureTransport.
For detailed technical instructions on developing custom applications and application types in SecureTransport, refer to the SecureTransport Developer’s Guide.
Access applicationsUse the Application menu to access applications.
The following example shows the main page that opens from the menu:
The Applications page lists all the applications available currently on the system. Use it to add, delete, view, and edit applications.
Create an applicationEvery application in SecureTransport must be based on an application type. Currently, SecureTransport supports 14 application types. This following topics describe the specific attributes and considerations for and how to create applications of each application type:
l Create an Archive Maintenance type application on page 420
l Create an Audit Log Maintenance type application on page 422
AxwaySecureTransport 5.2.1 SP4 Administrator Guide 418
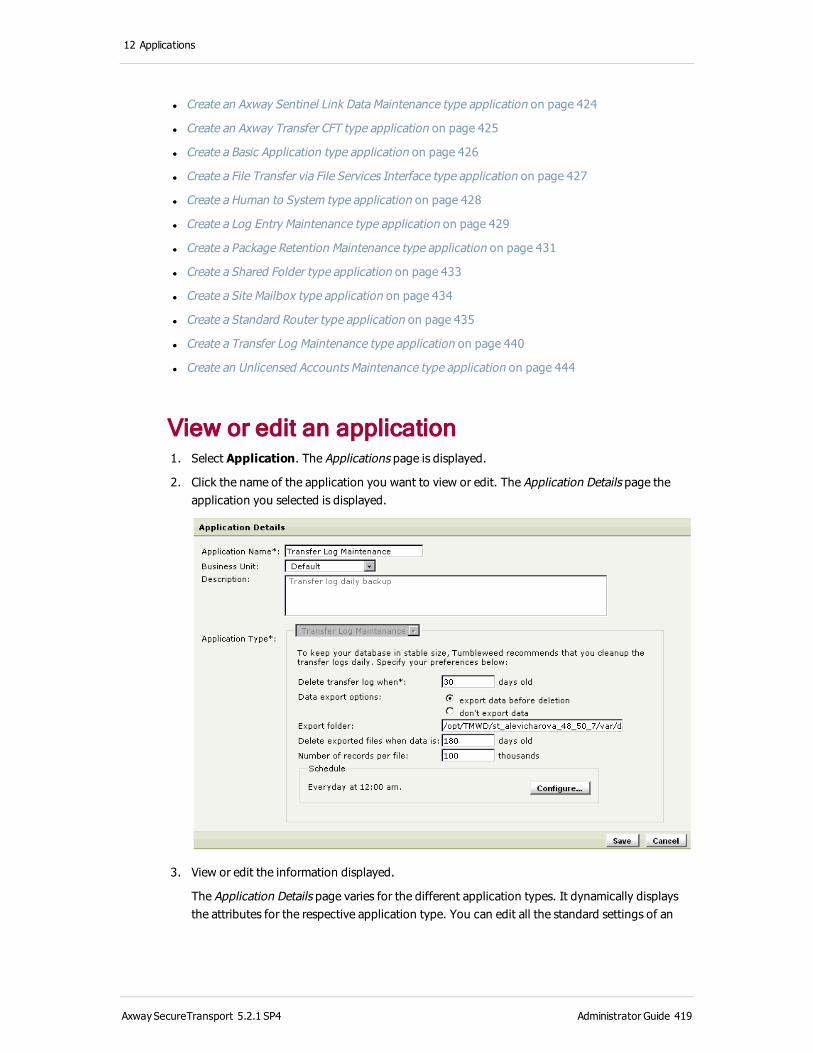
12 Applications
l Create an Axway Sentinel Link Data Maintenance type application on page 424
l Create an Axway Transfer CFT type application on page 425
l Create a Basic Application type application on page 426
l Create a File Transfer via File Services Interface type application on page 427
l Create a Human to System type application on page 428
l Create a Log Entry Maintenance type application on page 429
l Create a Package Retention Maintenance type application on page 431
l Create a Shared Folder type application on page 433
l Create a Site Mailbox type application on page 434
l Create a Standard Router type application on page 435
l Create a Transfer Log Maintenance type application on page 440
l Create an Unlicensed Accounts Maintenance type application on page 444
View or edit an application 1. Select Application. The Applications page is displayed.
2. Click the name of the application you want to view or edit. The Application Details page the application you selected is displayed.
3. View or edit the information displayed.
The Application Details page varies for the different application types. It dynamically displays the attributes for the respective application type. You can edit all the standard settings of an
AxwaySecureTransport 5.2.1 SP4 Administrator Guide 419

12 Applications
application, except application type.
4. If you edit the information, click Save to preserve the changes.
Delete an application 1. Select Application. The Applications page is displayed.
2. Select the check box for the application you want to delete.
3. Click Delete.
4. When prompted, confirm that any subscription to this application will be lost.
Note When you delete an application, all subscriptions to this application are removed.
Create an Archive Maintenance type applicationYou must enable the ArchiveMaintApp rules package in the Transaction Manager before you can use an Archive Maintenance application. For more information, see Enable or disable a rules package on page 452.
The configuration for an Archive Maintenance application is stored in the database.
1. Select Application and click Add New.
The New Application page is displayed.
2. Select Archive Maintenance from the mandatory Application Type list.
AxwaySecureTransport 5.2.1 SP4 Administrator Guide 420

12 Applications
3. Enter a unique Application Name. You cannot enter spaces-only values in this field. For more information, see Spaces in required fields on page 30.
4. (Optional) Use the Assign and Remove buttons to assign business units for the application.The Business Unit List is contains the names of business units you create. For details, see Business units on page 376.
5. (Optional) Enter an application Description.
6. Specify an Archive folder. This is mandatory. You cannot enter spaces-only values in this field. For more information, see Spaces in required fields on page 30.
Note If you specify the archive storage location on another server in a cluster or when using SAN, NAS, or NFS, make sure that the time setting on the storage server is synchronized with the time setting on all servers running SecureTransport, including SecureTransport Edge servers.
7. Set the options for Delete preserved files when field. You can specify days or hours and any number equal to or greater than 1. The default setting is 3 days. You cannot enter spaces-only values in this field. For more information, see Spaces in required fields on page 30.
8. In the Schedule pane, click Configure.
The Configure Schedule dialog box is displayed.
9. Set a recurring schedule for some period of time less than or equal to the value you specified in the Delete preserved files when fields.
AxwaySecureTransport 5.2.1 SP4 Administrator Guide 421

12 Applications
For information on working with the SecureTransport scheduler , see Scheduled downloads and tasks on page 327. Click OK when finished setting the schedule.
10. Click Create Application.
To use the Archive Maintenance application, make sure that the ArchiveMaintApp and the
ArchiveAgent rules packages are enabled in the Rules Packages page.
Create an Audit Log Maintenance type applicationMake sure that the AuditLogMaintApp rules package is enabled in the Transaction Manager before you enable an Audit Log Maintenance application. For more information, see Enable or disable a rules package on page 452.
1. Select Application and click Add New.
The New Application page is displayed.
2. Select Audit Log Maintenance from the mandatory Application Type list.
3. Enter a unique Application Name. You cannot enter spaces-only values in this field. For more information, see Spaces in required fields on page 30.
4. (Optional) Use the Assign and Remove buttons to assign business units for the application.The Business Unit List is contains the names of business units you create. For details, see Business units on page 376.
AxwaySecureTransport 5.2.1 SP4 Administrator Guide 422
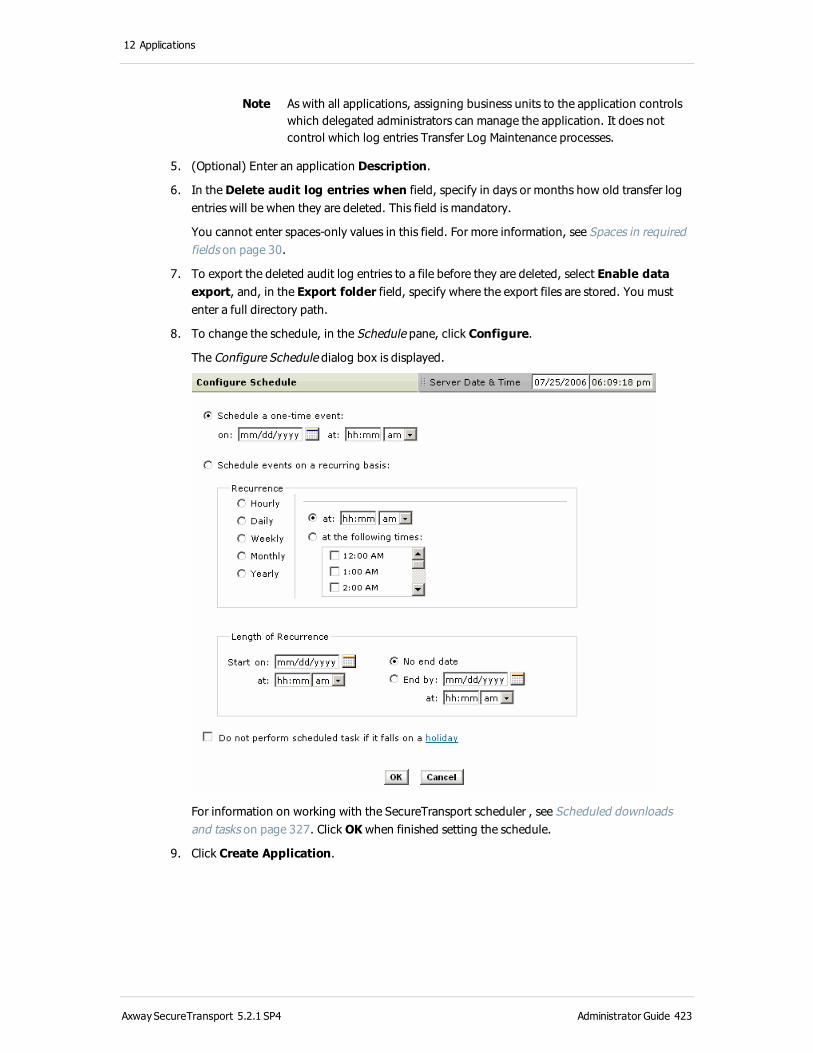
12 Applications
Note As with all applications, assigning business units to the application controls which delegated administrators can manage the application. It does not control which log entries Transfer Log Maintenance processes.
5. (Optional) Enter an application Description.
6. In the Delete audit log entries when field, specify in days or months how old transfer log entries will be when they are deleted. This field is mandatory.
You cannot enter spaces-only values in this field. For more information, see Spaces in required fields on page 30.
7. To export the deleted audit log entries to a file before they are deleted, select Enable data export, and, in the Export folder field, specify where the export files are stored. You must enter a full directory path.
8. To change the schedule, in the Schedule pane, click Configure.
The Configure Schedule dialog box is displayed.
For information on working with the SecureTransport scheduler , see Scheduled downloads and tasks on page 327. Click OK when finished setting the schedule.
9. Click Create Application.
AxwaySecureTransport 5.2.1 SP4 Administrator Guide 423
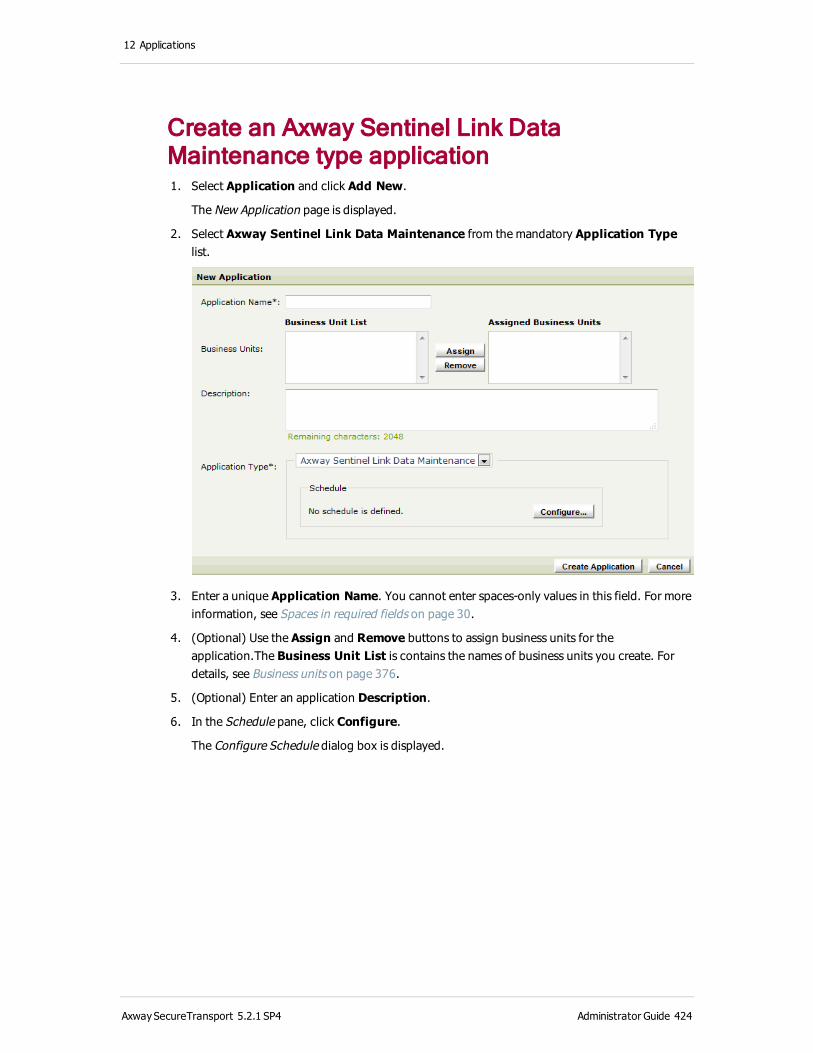
12 Applications
Create an Axway Sentinel Link Data Maintenance type application 1. Select Application and click Add New.
The New Application page is displayed.
2. Select Axway Sentinel Link Data Maintenance from the mandatory Application Type list.
3. Enter a unique Application Name. You cannot enter spaces-only values in this field. For more information, see Spaces in required fields on page 30.
4. (Optional) Use the Assign and Remove buttons to assign business units for the application.The Business Unit List is contains the names of business units you create. For details, see Business units on page 376.
5. (Optional) Enter an application Description.
6. In the Schedule pane, click Configure.
The Configure Schedule dialog box is displayed.
AxwaySecureTransport 5.2.1 SP4 Administrator Guide 424
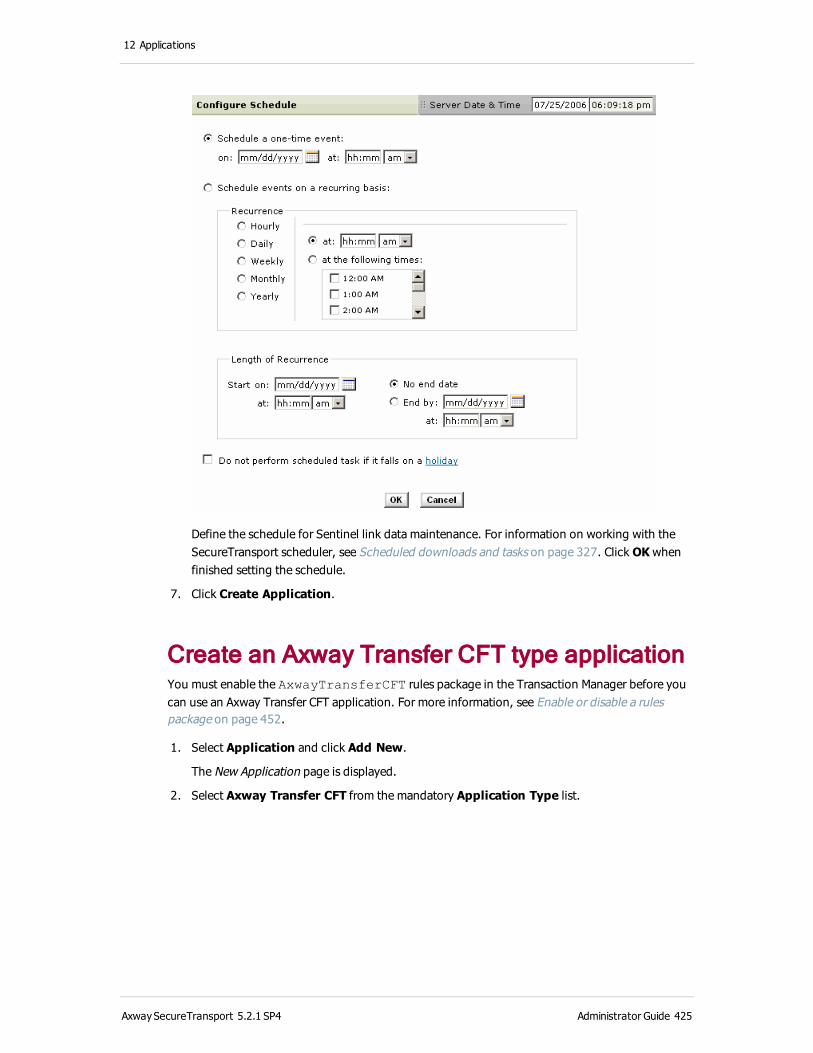
12 Applications
Define the schedule for Sentinel link data maintenance. For information on working with the SecureTransport scheduler, see Scheduled downloads and tasks on page 327. Click OK when finished setting the schedule.
7. Click Create Application.
Create an Axway Transfer CFT type applicationYou must enable the AxwayTransferCFT rules package in the Transaction Manager before you can use an Axway Transfer CFT application. For more information, see Enable or disable a rules package on page 452.
1. Select Application and click Add New.
The New Application page is displayed.
2. Select Axway Transfer CFT from the mandatory Application Type list.
AxwaySecureTransport 5.2.1 SP4 Administrator Guide 425
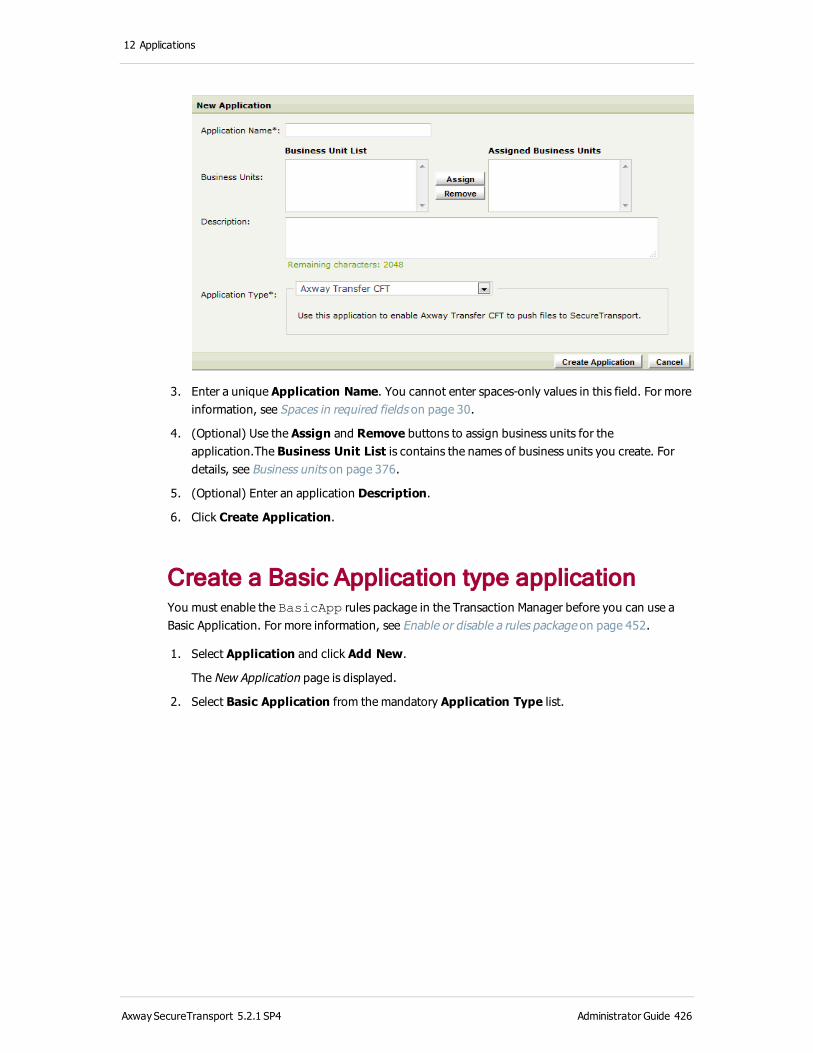
12 Applications
3. Enter a unique Application Name. You cannot enter spaces-only values in this field. For more information, see Spaces in required fields on page 30.
4. (Optional) Use the Assign and Remove buttons to assign business units for the application.The Business Unit List is contains the names of business units you create. For details, see Business units on page 376.
5. (Optional) Enter an application Description.
6. Click Create Application.
Create a Basic Application type applicationYou must enable the BasicApp rules package in the Transaction Manager before you can use a Basic Application. For more information, see Enable or disable a rules package on page 452.
1. Select Application and click Add New.
The New Application page is displayed.
2. Select Basic Application from the mandatory Application Type list.
AxwaySecureTransport 5.2.1 SP4 Administrator Guide 426

12 Applications
3. Enter a unique Application Name. You cannot enter spaces-only values in this field. For more information, see Spaces in required fields on page 30.
4. (Optional) Use the Assign and Remove buttons to assign business units for the application.The Business Unit List is contains the names of business units you create. For details, see Business units on page 376.
5. (Optional) Enter an application Description.
6. Click Create Application.
Create a File Transfer via File Services Interface type applicationYou must enable the FileServicesInterface rules package in the Transaction Manager before you can use a File Transfer via File Services Interface application. For more information, see Enable or disable a rules package on page 452.
1. Select Application and click Add New.
The New Application page is displayed.
2. Select File Transfer via File Services Interface from the mandatory Application Type list.
AxwaySecureTransport 5.2.1 SP4 Administrator Guide 427
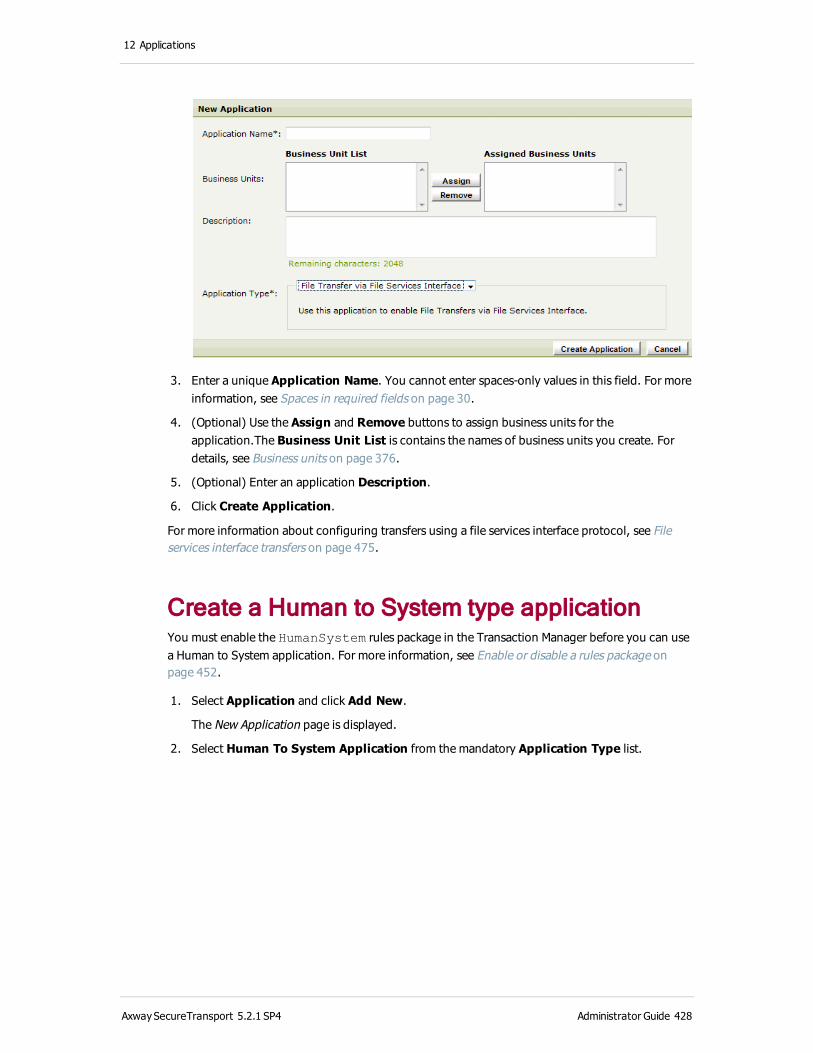
12 Applications
3. Enter a unique Application Name. You cannot enter spaces-only values in this field. For more information, see Spaces in required fields on page 30.
4. (Optional) Use the Assign and Remove buttons to assign business units for the application.The Business Unit List is contains the names of business units you create. For details, see Business units on page 376.
5. (Optional) Enter an application Description.
6. Click Create Application.
For more information about configuring transfers using a file services interface protocol, see File services interface transfers on page 475.
Create a Human to System type applicationYou must enable the HumanSystem rules package in the Transaction Manager before you can use a Human to System application. For more information, see Enable or disable a rules package on page 452.
1. Select Application and click Add New.
The New Application page is displayed.
2. Select Human To System Application from the mandatory Application Type list.
AxwaySecureTransport 5.2.1 SP4 Administrator Guide 428
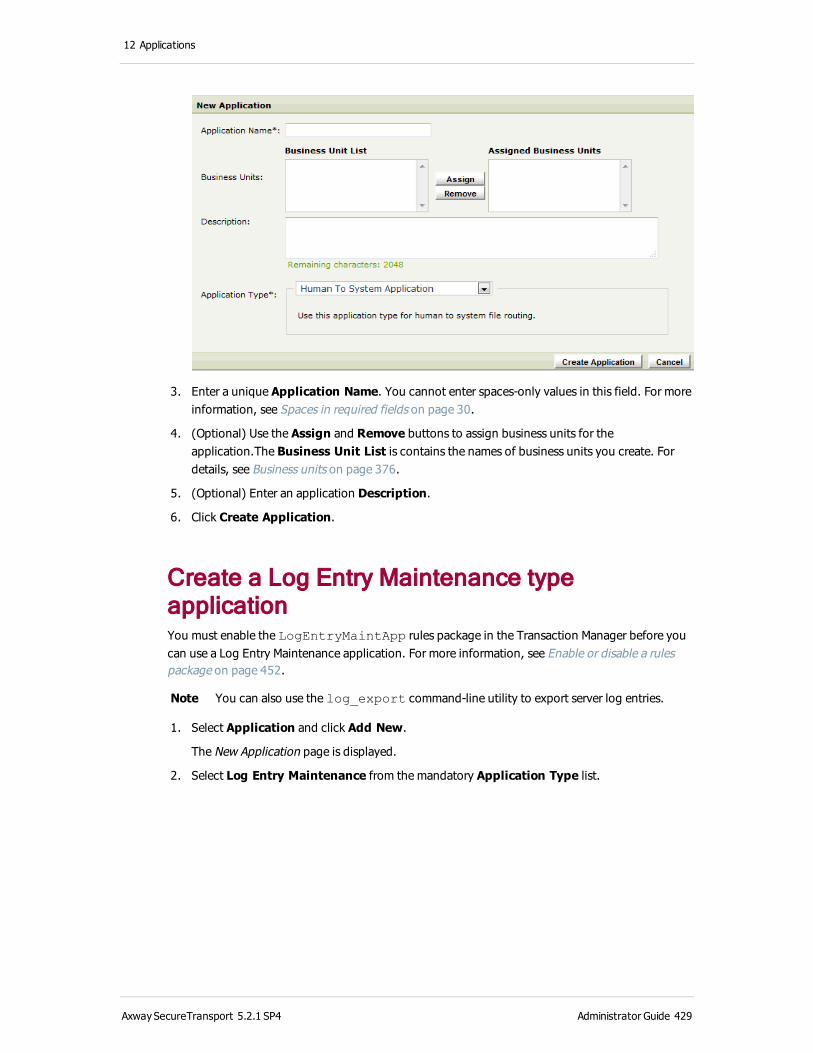
12 Applications
3. Enter a unique Application Name. You cannot enter spaces-only values in this field. For more information, see Spaces in required fields on page 30.
4. (Optional) Use the Assign and Remove buttons to assign business units for the application.The Business Unit List is contains the names of business units you create. For details, see Business units on page 376.
5. (Optional) Enter an application Description.
6. Click Create Application.
Create a Log Entry Maintenance type applicationYou must enable the LogEntryMaintApp rules package in the Transaction Manager before you can use a Log Entry Maintenance application. For more information, see Enable or disable a rules package on page 452.
Note You can also use the log_export command-line utility to export server log entries.
1. Select Application and click Add New.
The New Application page is displayed.
2. Select Log Entry Maintenance from the mandatory Application Type list.
AxwaySecureTransport 5.2.1 SP4 Administrator Guide 429

12 Applications
Note When your server uses an Oracle database, the Export folder and Number of records per file fields is not displayed. Instead, SecureTransport uses a partitioned table for the log entries and creates a new partition each day. Your Oracle DBA can implement data export using Oracle functionality.
3. Enter a unique Application Name.
You cannot enter spaces-only values in this field. For more information, see Spaces in required fields on page 30.
4. (Optional) Use the Assign and Remove buttons to assign business units for the application.The Business Unit List is contains the names of business units you create. For details, see Business units on page 376.
5. (Optional) Enter an application Description.
6. In the Delete log entries when field, specify how old log entries will be when they are deleted in terms of days, hours, or minutes.
You cannot enter spaces-only values in this field. For more information, see Spaces in required fields on page 30.
If your server uses an Oracle database, continue with step 9.
7. In the Export folder field, specify where the export files will be stored. You must enter a full directory path.
8. In the Delete exported files when data is: ____ days old field, specify when SecureTransport will delete old exported log entry data.
AxwaySecureTransport 5.2.1 SP4 Administrator Guide 430
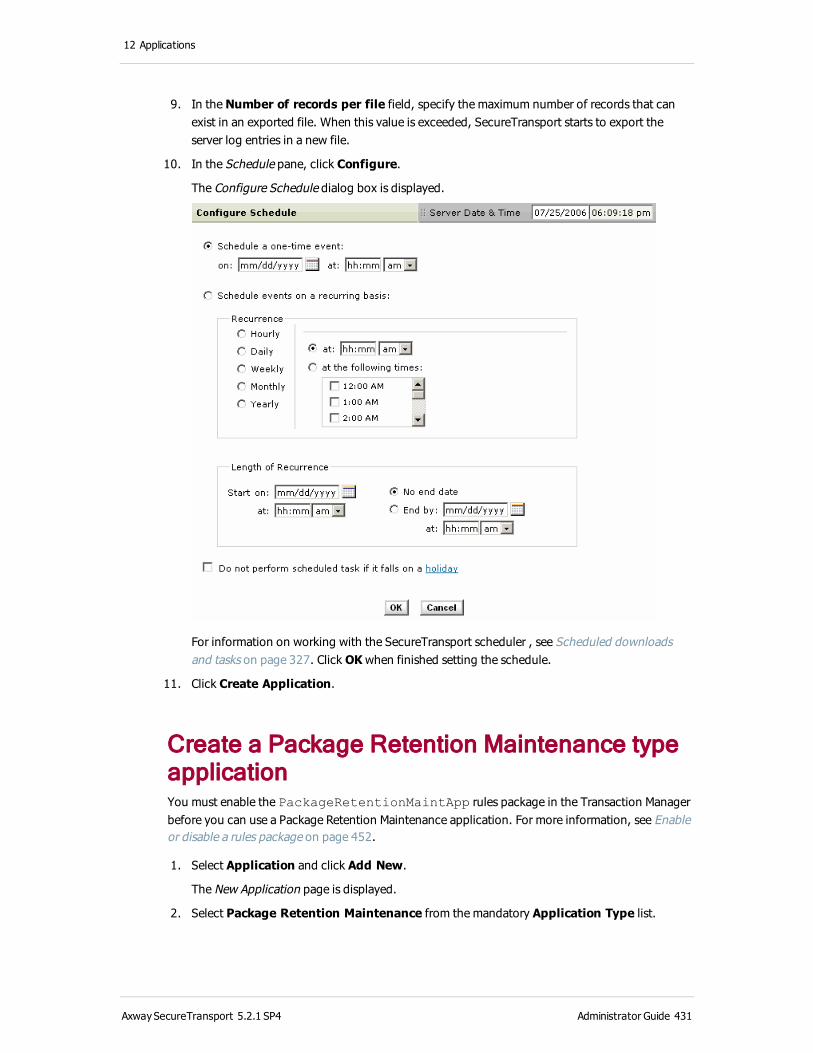
12 Applications
9. In the Number of records per file field, specify the maximum number of records that can exist in an exported file. When this value is exceeded, SecureTransport starts to export the server log entries in a new file.
10. In the Schedule pane, click Configure.
The Configure Schedule dialog box is displayed.
For information on working with the SecureTransport scheduler , see Scheduled downloads and tasks on page 327. Click OK when finished setting the schedule.
11. Click Create Application.
Create a Package Retention Maintenance type applicationYou must enable the PackageRetentionMaintApp rules package in the Transaction Manager before you can use a Package Retention Maintenance application. For more information, see Enable or disable a rules package on page 452.
1. Select Application and click Add New.
The New Application page is displayed.
2. Select Package Retention Maintenance from the mandatory Application Type list.
AxwaySecureTransport 5.2.1 SP4 Administrator Guide 431

12 Applications
3. Enter a unique Application Name.
You cannot enter spaces-only values in this field. For more information, see Spaces in required fields on page 30.
4. (Optional) Use the Assign and Remove buttons to assign business units for the application.The Business Unit List is contains the names of business units you create. For details, see Business units on page 376.
5. (Optional) Enter an application Description.
6. In the Stop running after: ____ minutes field, enter the maximum number of minutes the application runs each time it is started.
7. In the Schedule pane, click Configure.
The Configure Schedule dialog box is displayed.
AxwaySecureTransport 5.2.1 SP4 Administrator Guide 432

12 Applications
For information on working with the SecureTransport scheduler , see Scheduled downloads and tasks on page 327. Click OK when finished setting the schedule.
8. Click Create Application.
Create a Shared Folder type applicationYou must enable the SharedFolder rules package in the Transaction Manager before you can use a Shared Folder application. For more information, see Enable or disable a rules package on page 452.
All users of a shared folder must be either repository encryption users or not repository encryption users.
1. Select Application and click Add New.
The New Application page is displayed.
2. Select Shared Folder from the mandatory Application Type list.
AxwaySecureTransport 5.2.1 SP4 Administrator Guide 433
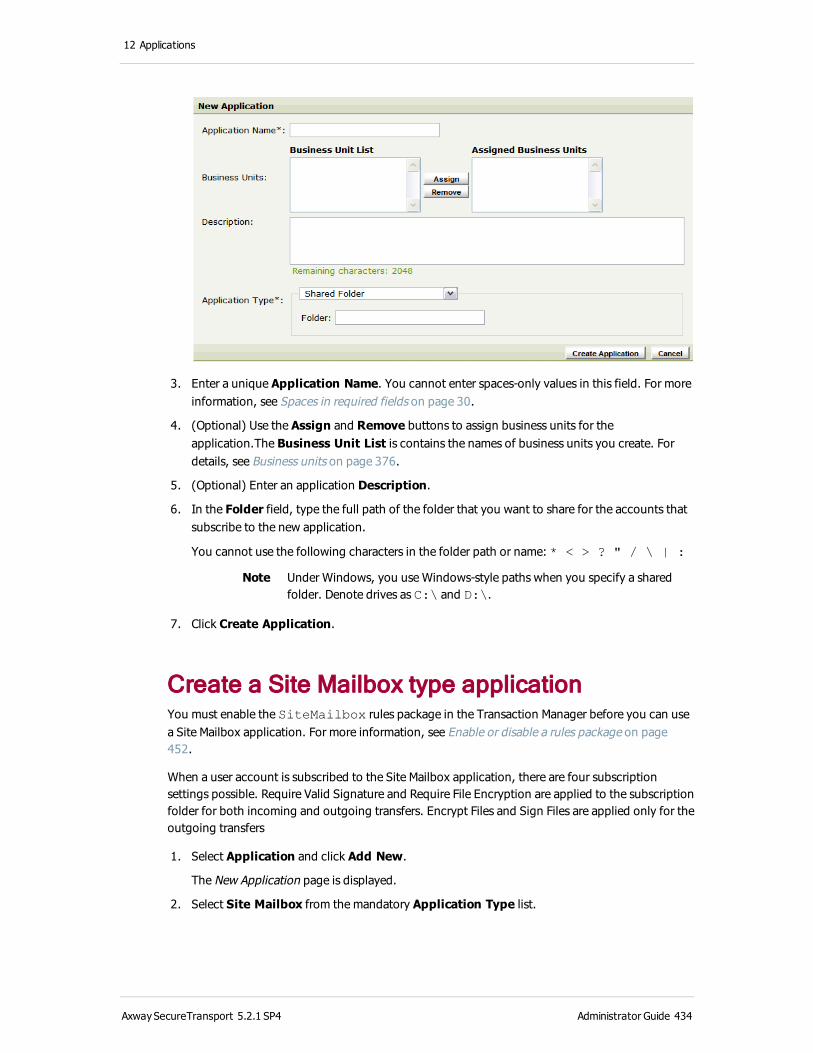
12 Applications
3. Enter a unique Application Name. You cannot enter spaces-only values in this field. For more information, see Spaces in required fields on page 30.
4. (Optional) Use the Assign and Remove buttons to assign business units for the application.The Business Unit List is contains the names of business units you create. For details, see Business units on page 376.
5. (Optional) Enter an application Description.
6. In the Folder field, type the full path of the folder that you want to share for the accounts that subscribe to the new application.
You cannot use the following characters in the folder path or name: * < > ? " / \ | :
Note Under Windows, you use Windows-style paths when you specify a shared folder. Denote drives as C:\ and D:\.
7. Click Create Application.
Create a Site Mailbox type applicationYou must enable the SiteMailbox rules package in the Transaction Manager before you can use a Site Mailbox application. For more information, see Enable or disable a rules package on page 452.
When a user account is subscribed to the Site Mailbox application, there are four subscription settings possible. Require Valid Signature and Require File Encryption are applied to the subscription folder for both incoming and outgoing transfers. Encrypt Files and Sign Files are applied only for the outgoing transfers
1. Select Application and click Add New.
The New Application page is displayed.
2. Select Site Mailbox from the mandatory Application Type list.
AxwaySecureTransport 5.2.1 SP4 Administrator Guide 434
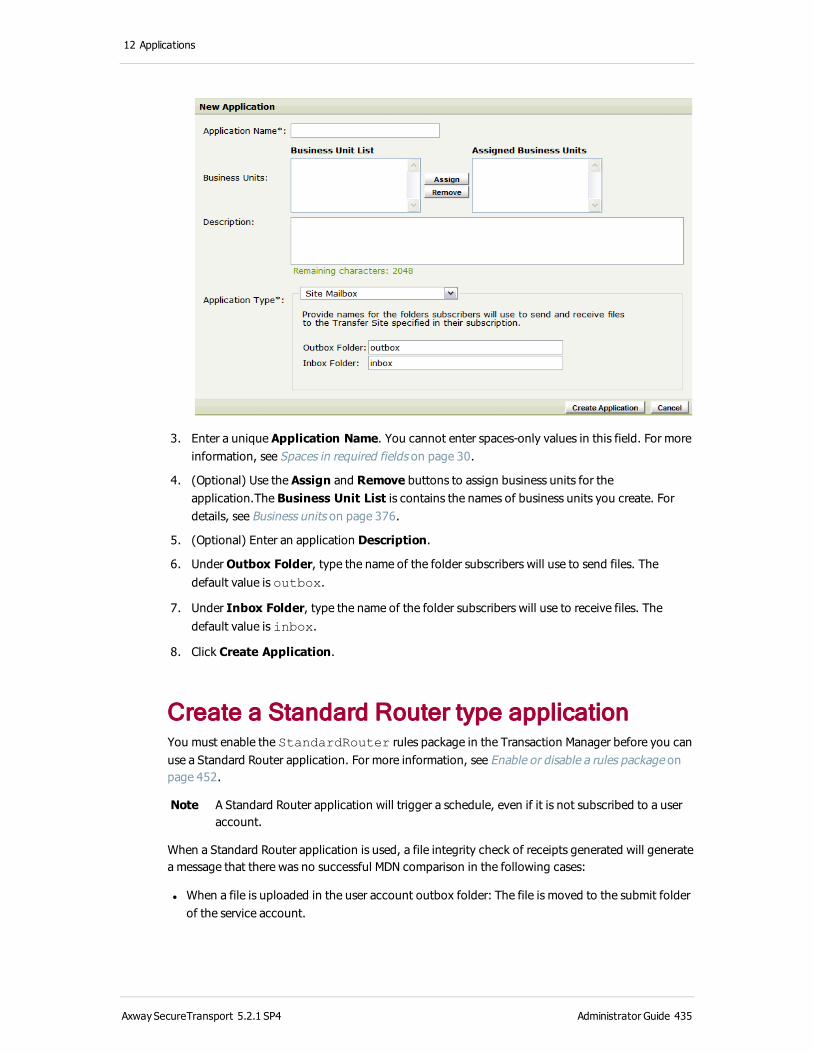
12 Applications
3. Enter a unique Application Name. You cannot enter spaces-only values in this field. For more information, see Spaces in required fields on page 30.
4. (Optional) Use the Assign and Remove buttons to assign business units for the application.The Business Unit List is contains the names of business units you create. For details, see Business units on page 376.
5. (Optional) Enter an application Description.
6. Under Outbox Folder, type the name of the folder subscribers will use to send files. The default value is outbox.
7. Under Inbox Folder, type the name of the folder subscribers will use to receive files. The default value is inbox.
8. Click Create Application.
Create a Standard Router type applicationYou must enable the StandardRouter rules package in the Transaction Manager before you can use a Standard Router application. For more information, see Enable or disable a rules package on page 452.
Note A Standard Router application will trigger a schedule, even if it is not subscribed to a user account.
When a Standard Router application is used, a file integrity check of receipts generated will generate a message that there was no successful MDN comparison in the following cases:
l When a file is uploaded in the user account outbox folder: The file is moved to the submit folder of the service account.
AxwaySecureTransport 5.2.1 SP4 Administrator Guide 435
12 Applications
l When the service account pulls a file from its transfer site: The file is moved from the receive folder of the service account to the inbox folder of the user account.
Note You can set up the Standard Router as a one-way configuration by selecting only one of the two choices: Allow Subscribers to Submit files to this Application or Send files to Subscribers. When you set up a one-way configuration, you do not need to specify a folder.
1. Select Application and click Add New.
The New Application page is displayed.
2. Select Standard Router from the mandatory Application Type list.
AxwaySecureTransport 5.2.1 SP4 Administrator Guide 436

12 Applications
3. Enter a unique Application Name. You cannot enter spaces-only values in this field. For more information, see Spaces in required fields on page 30.
4. (Optional) Use the Assign and Remove buttons to assign business units for the application.The Business Unit List is contains the names of business units you create. For details, see Business units on page 376.
5. (Optional) Enter an application Description.
AxwaySecureTransport 5.2.1 SP4 Administrator Guide 437
12 Applications
6. (Optional) Select Allow Subscribers to Submit files in this Application to permit incoming file transfers from the subscriber parties to the application. If you enable this option, continue specifying values for the parameters in the pane.
a. In the Submit folder field, type the name of the folder where incoming transferred files are submitted via subscriptions. The application only processes files stored in the submit folder. Any files stored outside the submit folder are not routed for transferring. The submit folder is created as a sub-folder of the subscription folder. The subscription folder is specified during the creation of the respective subscription. For details, see Transfer sites on page 274.
b. In the File Submission Settings group, select the Require Secure Connection for transfer option to enable SSL for the incoming transfers.
c. In the File Submission Settings group, select the Rename submitted files to include Subscriber ID option to add a prefix to the file name identifying the sender before it is sent to the internal system. The subscriber ID is specified during the creation of the respective subscription. For details, see Transfer sites on page 274.
Then, in the New Filename field, define the format of the new file name. By default, the file is renamed in the format <ID> <FILENAME> where, <ID> is the Subscriber ID
specified when the subscription is created and <FILENAME> is the original name of the
transferred file.
The use of the placeholders, <ID> and <FILENAME>, in the new file name format is
mandatory. The character you use to separate <ID> from <FILENAME> must not be
included in the <ID> string.
d. In Service Account, select a service account to which you want to send submitted files.
e. In the put in folder field, type the name of the folder to be used by the service account you specified.
f. (Optional) Click Send Options to display the Send Options dialog box.
AxwaySecureTransport 5.2.1 SP4 Administrator Guide 438

12 Applications
Define the settings for sending files to the service account. Choose one or more of the following options, and then click OK in the Send Options dialog box.
Encrypt File As – Select this check box to require that files submitted are encrypted.
Send files directly to <transfer site> – Select this check box to send files directly to the transfer site you select from the drop-down list.
Post Transmission Settings – Select which action you want SecureTransport to take when the transfer fails or succeeds.
7. (Optional) Select the Send files to Subscribers check box to permit outgoing file transfers from the application to the subscribed parties. If you enable this option, continue specifying values for the parameters in the pane.
a. In the Receive folder field, type the name of the folder where outgoing transferred files are submitted to the subscriber. The receive folder is created as a sub-folder of the subscription folder.
b. Select a service account to receive files from in the Service Accounts list.
c. In the get from folder field, type the name of the folder to be used by the service account you specified.
d. (Optional) Click Receive Options to display the Receive Options dialog box and configure the settings for receiving files from this service account. Choose one or more of the following options, and then click OK in the Receive Options dialog box.
Automatically retrieve files from – Select this check box and select a transfer site from the drop-down list to automatically retrieve files from the transfer site when they arrive.
Post Transmission Settings – Select which action you want SecureTransport to take when the transfer has a temporary failure, a permanent failure, or succeeds.
AxwaySecureTransport 5.2.1 SP4 Administrator Guide 439
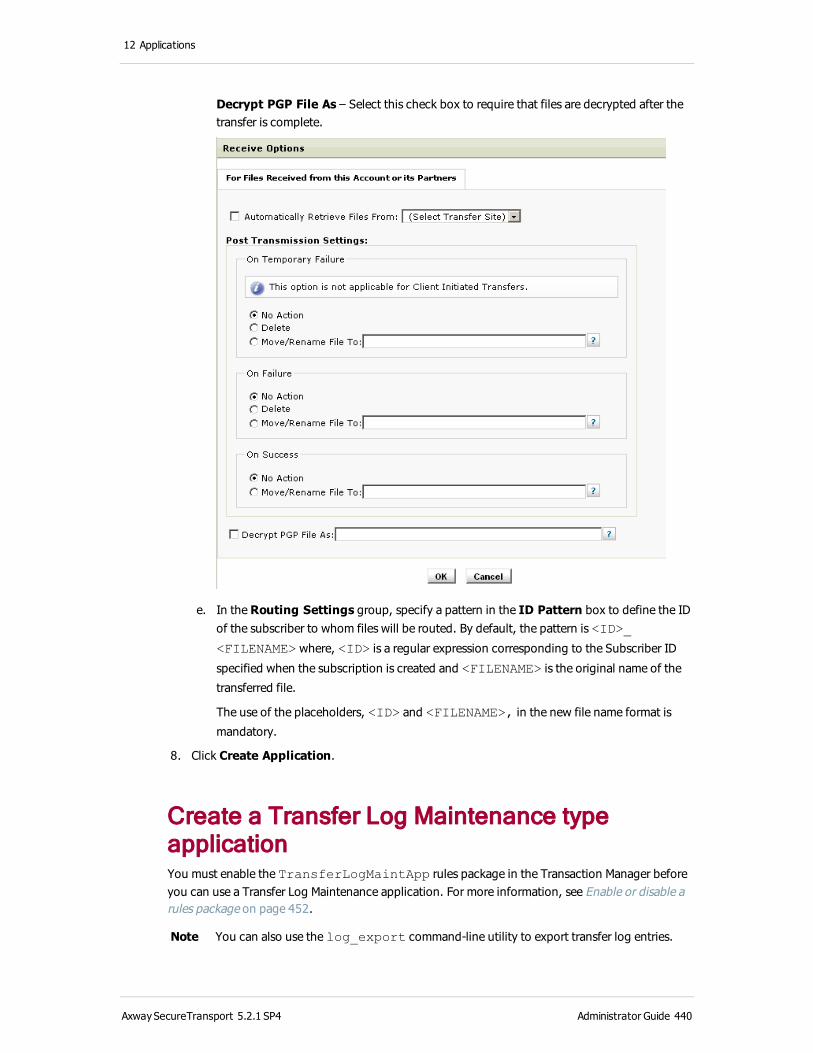
12 Applications
Decrypt PGP File As – Select this check box to require that files are decrypted after the transfer is complete.
e. In the Routing Settings group, specify a pattern in the ID Pattern box to define the ID of the subscriber to whom files will be routed. By default, the pattern is <ID>_
<FILENAME> where, <ID> is a regular expression corresponding to the Subscriber ID
specified when the subscription is created and <FILENAME> is the original name of the
transferred file.
The use of the placeholders, <ID> and <FILENAME>, in the new file name format is
mandatory.
8. Click Create Application.
Create a Transfer Log Maintenance type applicationYou must enable the TransferLogMaintApp rules package in the Transaction Manager before you can use a Transfer Log Maintenance application. For more information, see Enable or disable a rules package on page 452.
Note You can also use the log_export command-line utility to export transfer log entries.
AxwaySecureTransport 5.2.1 SP4 Administrator Guide 440
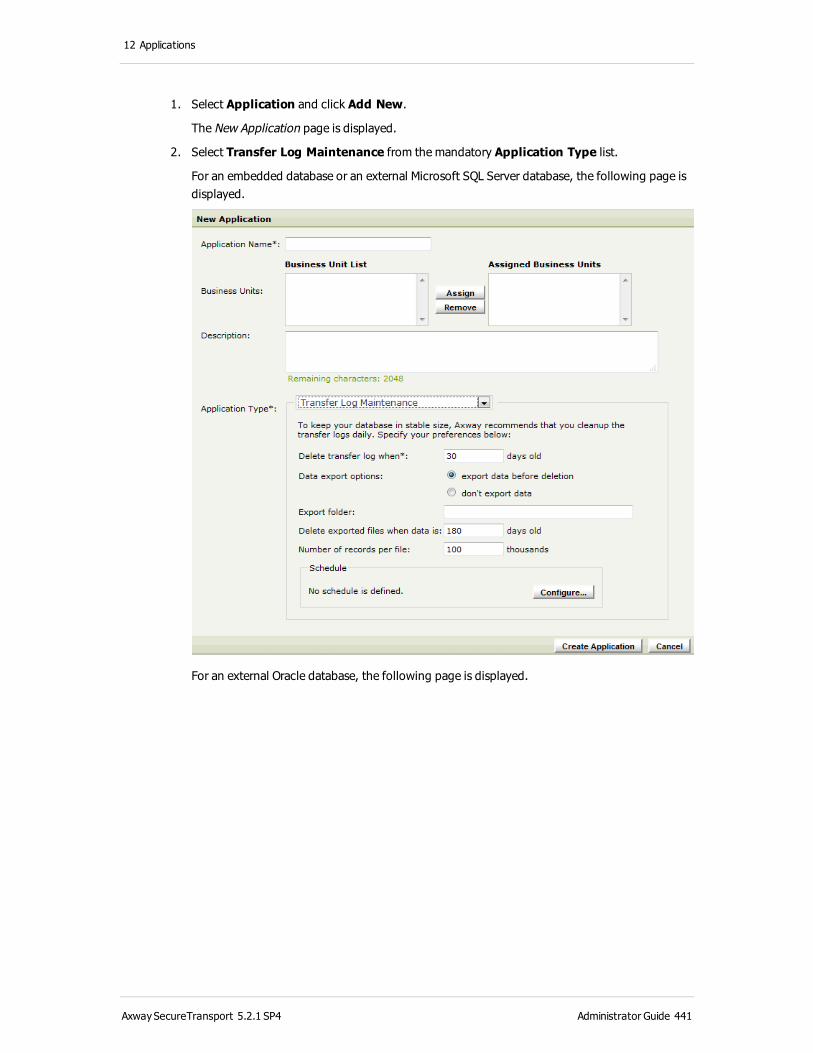
12 Applications
1. Select Application and click Add New.
The New Application page is displayed.
2. Select Transfer Log Maintenance from the mandatory Application Type list.
For an embedded database or an external Microsoft SQL Server database, the following page is displayed.
For an external Oracle database, the following page is displayed.
AxwaySecureTransport 5.2.1 SP4 Administrator Guide 441
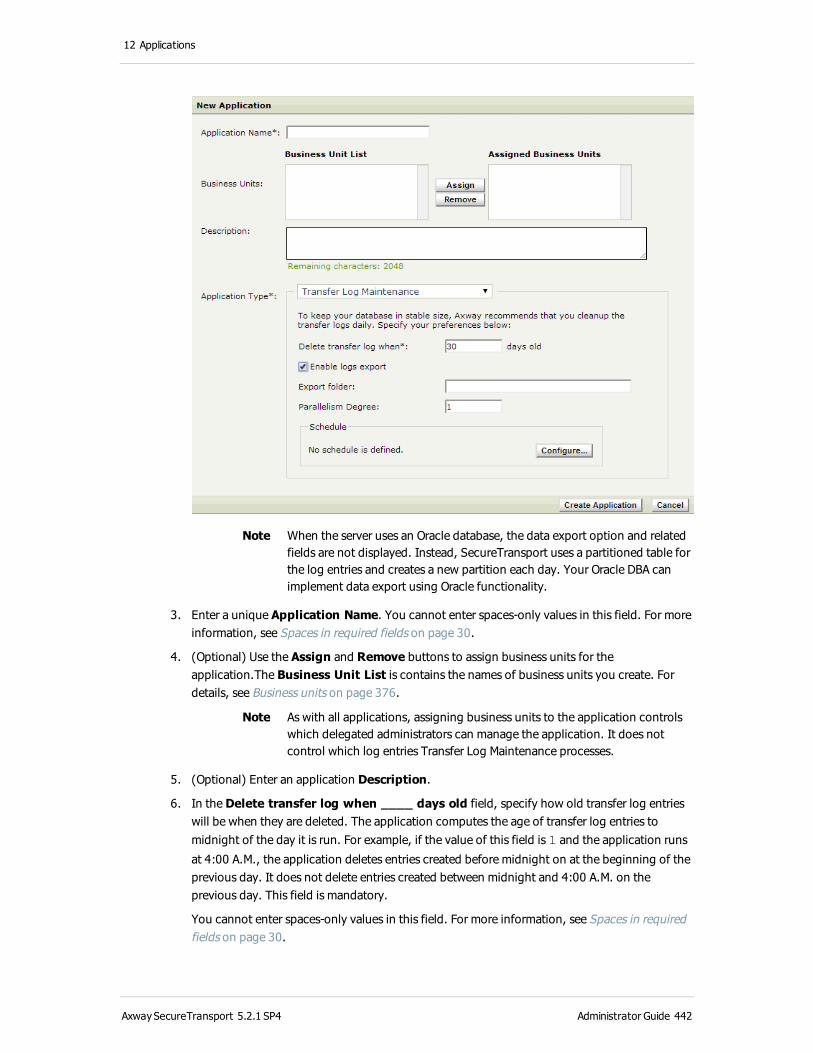
12 Applications
Note When the server uses an Oracle database, the data export option and related fields are not displayed. Instead, SecureTransport uses a partitioned table for the log entries and creates a new partition each day. Your Oracle DBA can implement data export using Oracle functionality.
3. Enter a unique Application Name. You cannot enter spaces-only values in this field. For more information, see Spaces in required fields on page 30.
4. (Optional) Use the Assign and Remove buttons to assign business units for the application.The Business Unit List is contains the names of business units you create. For details, see Business units on page 376.
Note As with all applications, assigning business units to the application controls which delegated administrators can manage the application. It does not control which log entries Transfer Log Maintenance processes.
5. (Optional) Enter an application Description.
6. In the Delete transfer log when ____ days old field, specify how old transfer log entries will be when they are deleted. The application computes the age of transfer log entries to midnight of the day it is run. For example, if the value of this field is 1 and the application runs
at 4:00 A.M., the application deletes entries created before midnight on at the beginning of the previous day. It does not delete entries created between midnight and 4:00 A.M. on the previous day. This field is mandatory.
You cannot enter spaces-only values in this field. For more information, see Spaces in required fields on page 30.
AxwaySecureTransport 5.2.1 SP4 Administrator Guide 442
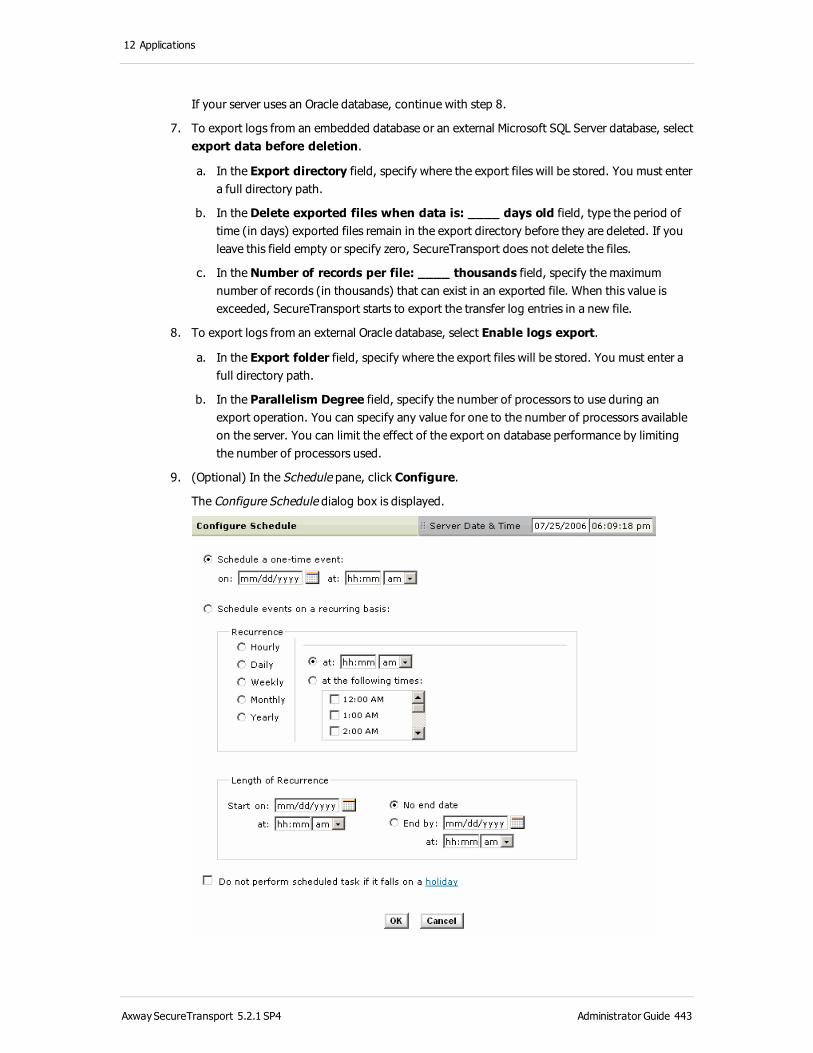
12 Applications
If your server uses an Oracle database, continue with step 8.
7. To export logs from an embedded database or an external Microsoft SQL Server database, select export data before deletion.
a. In the Export directory field, specify where the export files will be stored. You must enter a full directory path.
b. In the Delete exported files when data is: ____ days old field, type the period of time (in days) exported files remain in the export directory before they are deleted. If you leave this field empty or specify zero, SecureTransport does not delete the files.
c. In the Number of records per file: ____ thousands field, specify the maximum number of records (in thousands) that can exist in an exported file. When this value is exceeded, SecureTransport starts to export the transfer log entries in a new file.
8. To export logs from an external Oracle database, select Enable logs export.
a. In the Export folder field, specify where the export files will be stored. You must enter a full directory path.
b. In the Parallelism Degree field, specify the number of processors to use during an export operation. You can specify any value for one to the number of processors available on the server. You can limit the effect of the export on database performance by limiting the number of processors used.
9. (Optional) In the Schedule pane, click Configure.
The Configure Schedule dialog box is displayed.
AxwaySecureTransport 5.2.1 SP4 Administrator Guide 443
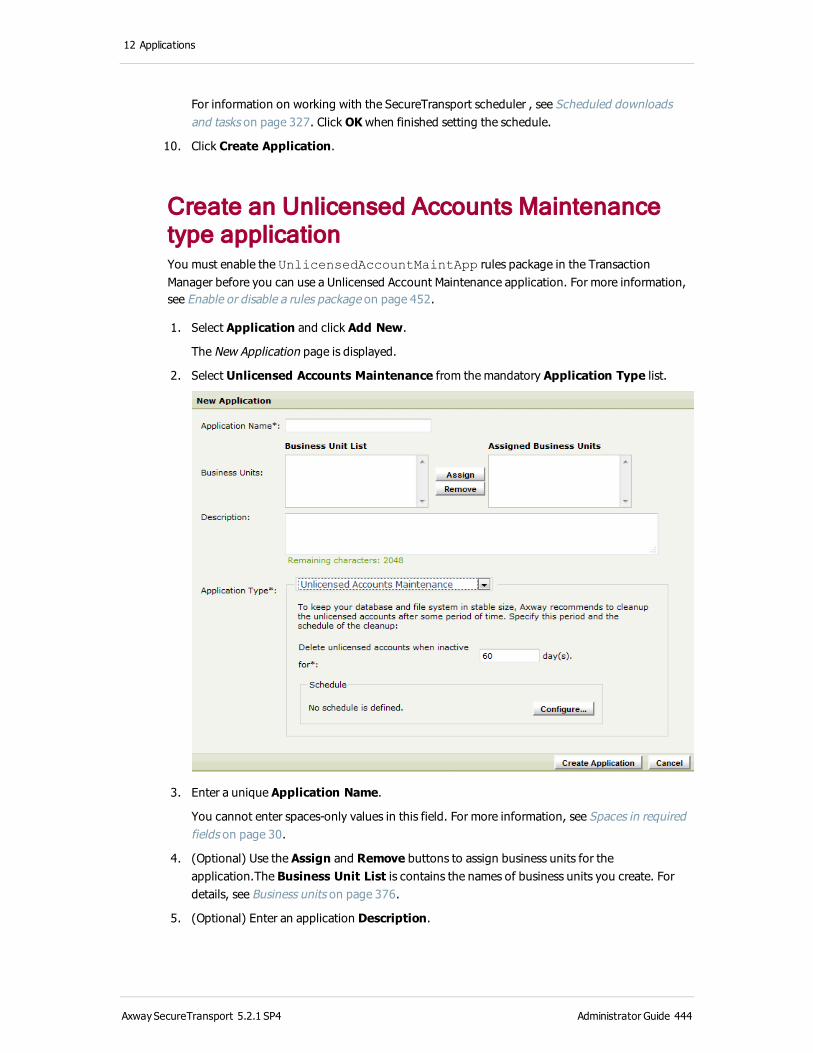
12 Applications
For information on working with the SecureTransport scheduler , see Scheduled downloads and tasks on page 327. Click OK when finished setting the schedule.
10. Click Create Application.
Create an Unlicensed Accounts Maintenance type applicationYou must enable the UnlicensedAccountMaintApp rules package in the Transaction Manager before you can use a Unlicensed Account Maintenance application. For more information, see Enable or disable a rules package on page 452.
1. Select Application and click Add New.
The New Application page is displayed.
2. Select Unlicensed Accounts Maintenance from the mandatory Application Type list.
3. Enter a unique Application Name.
You cannot enter spaces-only values in this field. For more information, see Spaces in required fields on page 30.
4. (Optional) Use the Assign and Remove buttons to assign business units for the application.The Business Unit List is contains the names of business units you create. For details, see Business units on page 376.
5. (Optional) Enter an application Description.
AxwaySecureTransport 5.2.1 SP4 Administrator Guide 444

12 Applications
6. In the Delete unlicensed accounts when inactive for field, specify how long in days an unlicensed account must be inactive before it is deleted.
You cannot enter spaces-only values in this field. For more information, see Spaces in required fields on page 30.
7. In the Schedule pane, click Configure.
The Configure Schedule dialog box is displayed.
For information on working with the SecureTransport scheduler , see Scheduled downloads and tasks on page 327. Click OK when finished setting the schedule.
8. Click Create Application.
AxwaySecureTransport 5.2.1 SP4 Administrator Guide 445
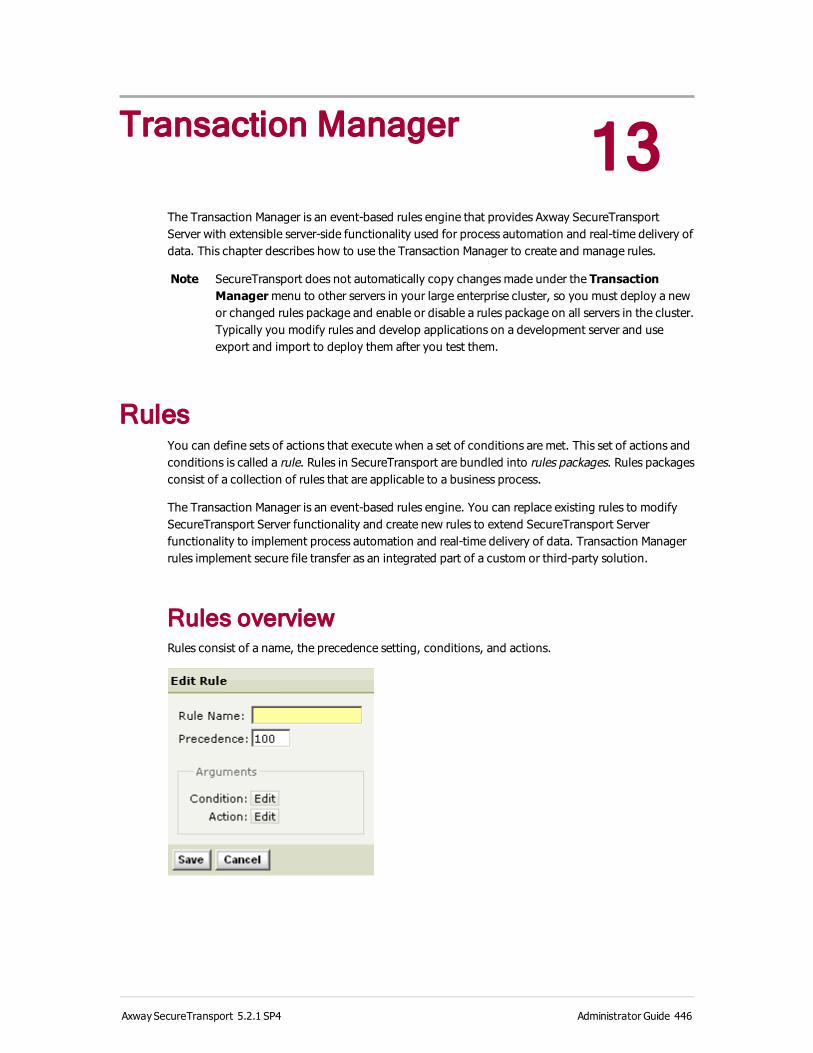
13 Transaction Manager
The Transaction Manager is an event-based rules engine that provides Axway SecureTransport Server with extensible server-side functionality used for process automation and real-time delivery of data. This chapter describes how to use the Transaction Manager to create and manage rules.
Note SecureTransport does not automatically copy changes made under the Transaction Manager menu to other servers in your large enterprise cluster, so you must deploy a new or changed rules package and enable or disable a rules package on all servers in the cluster. Typically you modify rules and develop applications on a development server and use export and import to deploy them after you test them.
RulesYou can define sets of actions that execute when a set of conditions are met. This set of actions and conditions is called a rule. Rules in SecureTransport are bundled into rules packages. Rules packages consist of a collection of rules that are applicable to a business process.
The Transaction Manager is an event-based rules engine. You can replace existing rules to modify SecureTransport Server functionality and create new rules to extend SecureTransport Server functionality to implement process automation and real-time delivery of data. Transaction Manager rules implement secure file transfer as an integrated part of a custom or third-party solution.
Rules overviewRules consist of a name, the precedence setting, conditions, and actions.
AxwaySecureTransport 5.2.1 SP4 Administrator Guide 446
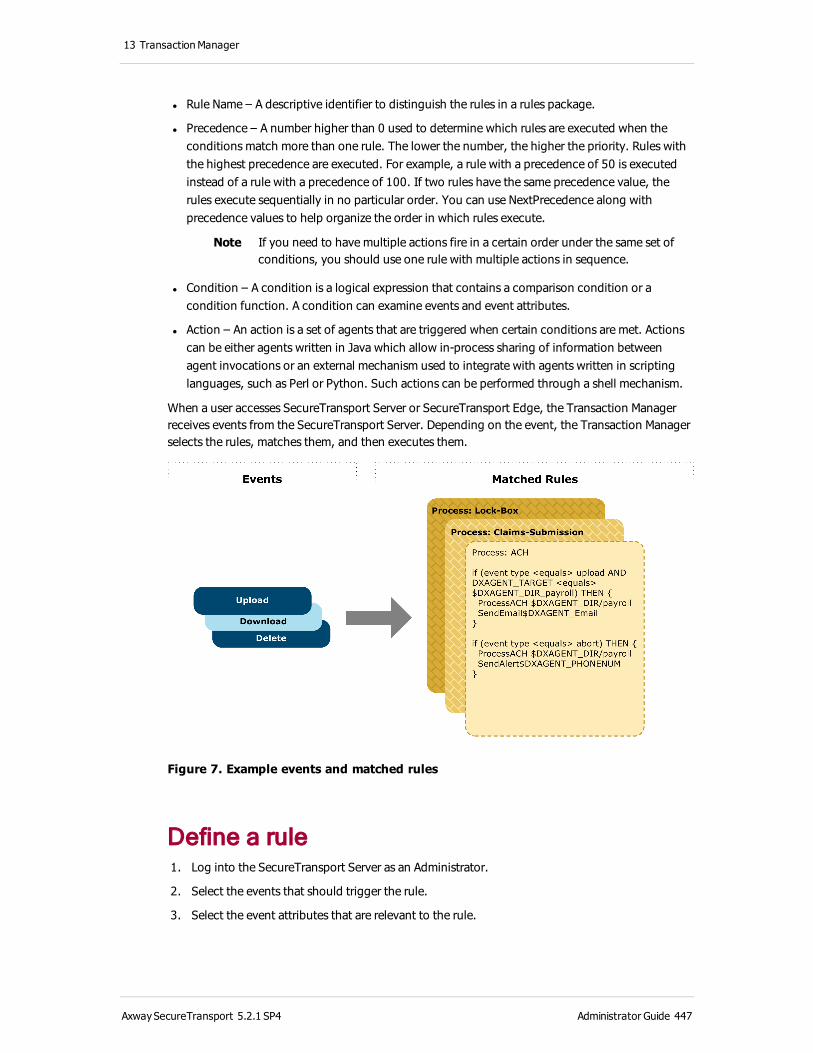
13 Transaction Manager
l Rule Name – A descriptive identifier to distinguish the rules in a rules package.
l Precedence – A number higher than 0 used to determine which rules are executed when the conditions match more than one rule. The lower the number, the higher the priority. Rules with the highest precedence are executed. For example, a rule with a precedence of 50 is executed instead of a rule with a precedence of 100. If two rules have the same precedence value, the rules execute sequentially in no particular order. You can use NextPrecedence along with precedence values to help organize the order in which rules execute.
Note If you need to have multiple actions fire in a certain order under the same set of conditions, you should use one rule with multiple actions in sequence.
l Condition – A condition is a logical expression that contains a comparison condition or a condition function. A condition can examine events and event attributes.
l Action – An action is a set of agents that are triggered when certain conditions are met. Actions can be either agents written in Java which allow in-process sharing of information between agent invocations or an external mechanism used to integrate with agents written in scripting languages, such as Perl or Python. Such actions can be performed through a shell mechanism.
When a user accesses SecureTransport Server or SecureTransport Edge, the Transaction Manager receives events from the SecureTransport Server. Depending on the event, the Transaction Manager selects the rules, matches them, and then executes them.
Figure 7. Example events and matched rules
Define a rule 1. Log into the SecureTransport Server as an Administrator.
2. Select the events that should trigger the rule.
3. Select the event attributes that are relevant to the rule.
AxwaySecureTransport 5.2.1 SP4 Administrator Guide 447
13 Transaction Manager
4. Specify conditions associated with event attributes you want to select and combine them with logical expressions such as, AND and OR.
5. Outline the set of actions to be taken if the conditions are matched as specified.
Built-in rules packagesSecureTransport ships with several predefined rules packages. These packages contain rules used by SecureTransport as part of the standard functionality of the product. Because these rules and packages are part of the product, it is very important that you do not delete or modify the rules or the rules packages. This section provides a list of the built-in packages and explains their uses.
StreamingThe following packages control much of the functionality involved with authenticating users and executing transfers. Streaming and InStreaming packages contain the default functionality optimized for performance in the current release. ExtStreaming contains an older implementation. This package is disabled and might be removed in a future release.
l Streaming
l InStreaming
l ExtStreaming
Server-initiated transfersThe following packages call agents when a server-initiated transfer is executed. Each rules package represents a different protocol.
l FolderTransfer
l FtpTransfer
l HttpTransfer
l Pesit
l PesitTransfer
l SshTransfer
l STAS2
Note The STAS2 package provides AS2 functionality including file transfer and handling of receipts.
Ad hoc transfersThe following packages support ad hoc file transfers:
AxwaySecureTransport 5.2.1 SP4 Administrator Guide 448
13 Transaction Manager
l AddressBook
l PackageManager
ApplicationsThe following packages calls the agents used in the corresponding built-in application types:
l ArchiveMaintApp
l AxwaySentinel
l AxwayTransferCFT
l BasicApp
l FileServicesInterface
l HumanSystem
l LogEntryMaintApp
l PackageRetentionMaintApp
l SharedFolder
l SiteMailbox
l StandardRouter
l TransferLogMaintApp
l UnlicensedAccountMaintApp
The rules are required to trigger the application agent.
Permission checkingInPermissionCheck and ExtPermissionsCheck represent two different implementations of checking file permissions before allowing SecureTransport operations to continue. These two packages are mutually exclusive; only one of them can be enabled at a time.
InPermissionCheck contains an in-process Java agent. It's efficient and provides basic check based on UID/GID and the file permission flags. For details, see Access control on page 386. This is the default rules package.
ExtPermissionsCheck is deprecated. It is included for backward compatibility.
l InPermissionCheck
l ExtPermissionsCheck
OtherThe following packages handle specific SecureTransport functionality.
AxwaySecureTransport 5.2.1 SP4 Administrator Guide 449

13 Transaction Manager
ArchiveAgentUse this package archive transferred files. This package is disabled by default. When enabled, the package copies each transferred file to the archive directory specified as part of the Archive Maintenance application. Copied files are renamed to a unique file name to avoid duplicates. The file name format is:
<last_modified_time_of_file>_<unique_file_name_modifier>
For example:
1223375981000_12233759819160.08926095676257206
For more information, see Create an Archive Maintenance type application on page 420.
AxwaySentinelThis package is enabled by default. SecureTransport uses it to send file transfer and processing events to Axway Sentinel and to call the agent used in a.Axway Sentinel Link Data Maintenance application.For more information about configuring SecureTransport to send events to Sentinel, see Axway Sentinel integration on page 139.
ConnectDirectTransferEnable this package when you want to create and use a Connect:Direct transfer site. This package is disabled by default. For more information, see Connect:Direct transfer sites on page 281.
FileServicesInterfaceThis package is used to implement transfers initiated by SecureTransport using a file services interface protocol.
MDNReceiptingThis package provides functionality to generate MDN receipts for the transferred files. The package is enabled by default.
Note To generate MDN receipts, create an mdn certificate in addition to enabling the MDNReceipting package. For more information about the mdn certificate, see Certificates to generate during initial setup on page 102.
Pesit and PesitTransferThese packages provide the functionality for PeSIT protocol operations, including authentication, server-initiated transfers, client-initiated transfers, routed transfers, and acknowledgements. They are enabled by default.
AxwaySecureTransport 5.2.1 SP4 Administrator Guide 450
13 Transaction Manager
PGPTransformThis package handles PGP encryption and decryption tasks. The package is enabled by default.
ResubmitThis package contains rules for canceling events. It is enabled by default.
SendToSiteUse this package when you want to upload files to a specific site without subscribing an account to an application. This package is disabled by default. This package is used with the Send Files Directly To option. For details, see Subscribe an account to an application on page 322.
ServerTransferNotifyThis package implements HTML email notification for file transfers. This package is disabled by default. For more information, see Velocity email notification package on page 561.
SNMPTransferNotifyThis package implements SNMP notifications for failed transfers. This package is disabled by default.
SecureTransport includes support for Simple Network Management Protocol (SNMP) v2 and v3 to help you monitor failed transfers. SecureTransport works with SNMP managers such as Hewlett-Packard OpenView Network Node Manager. You can send messages when file transfers fail after retrying the transfer the number of times allotted. SecureTransport provides a trap MIB file located at <FILEDRIVEHOME>/conf/Transfer.mib.
1. Select Operations > Server Configuration.
The Server Configuration page is displayed.
2. Search for TransactionManager.SNMP.enabled and change the value to true.
3. Search for TransactionManager.SNMP.ManagerHost and change the value to the IP
address of the SNMP manager.
4. Search for TransactionManager.SNMP.Port and change the value to the port of the
SNMP manager.
5. Set the other TransactionManager.SNMP.* server configuration parameters as required
by your SNMP manager and configuration
6. Select Transaction Manager > Packages.
The Rules Packages page is displayed.
7. Click Enable SNMPTransferNotify.
8. Select Operations > Server Control.
AxwaySecureTransport 5.2.1 SP4 Administrator Guide 451
13 Transaction Manager
9. Restart the TM Server.
10. Repeat steps 6 through 9 on each server in your cluster.
WebServicesAPIThis package supports the REST web service file transfer API. For information about the API, refer to the SecureTransport Developer's Guide.
Manage rules packagesManaging rules packages consists of:
l Enabling and disabling rules packages
l Creating Rules and Rules Packages
l Editing Rules and Rules Packages
l Importing and Exporting Rules and Rules Packages
To work with rules, you must login to the SecureTransport Administration Tool as a system administrator with the appropriate privileges.
Note All changes to rules packages are local to the SecureTransport server you are logged in to. For a large enterprise cluster, you typically develop and modify rules packages on a development server, test them, export them, and import them on the production servers.
Enable or disable a rules package 1. Select Transaction Manager > Packages to display Rules Packages page.
2. In the Enable / Disable column, click the link to enable or disable the rules package.
Create rules Rules packages are a collection of rules applicable to a business process. To create rules, you must first define a rules package.
You can create, edit, and manage rules from the Rules Packages page accessed by clicking Transaction Manager in the SecureTransport Administration Tool. For a detailed explanation of each step in this procedure, refer to the following sections.
1. Create a rules package.
2. Add the arguments that need to be passed to the rule.
3. Specify rule comparisons and conditions for the rule.
AxwaySecureTransport 5.2.1 SP4 Administrator Guide 452
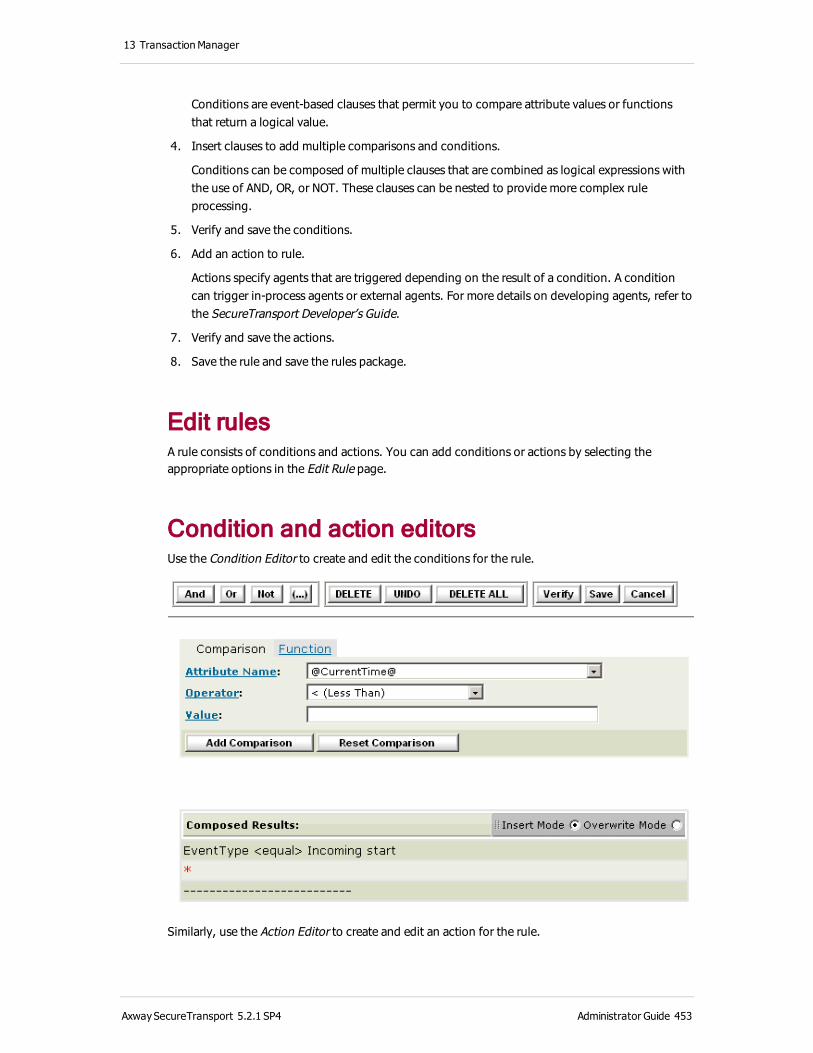
13 Transaction Manager
Conditions are event-based clauses that permit you to compare attribute values or functions that return a logical value.
4. Insert clauses to add multiple comparisons and conditions.
Conditions can be composed of multiple clauses that are combined as logical expressions with the use of AND, OR, or NOT. These clauses can be nested to provide more complex rule processing.
5. Verify and save the conditions.
6. Add an action to rule.
Actions specify agents that are triggered depending on the result of a condition. A condition can trigger in-process agents or external agents. For more details on developing agents, refer to the SecureTransport Developer’s Guide.
7. Verify and save the actions.
8. Save the rule and save the rules package.
Edit rulesA rule consists of conditions and actions. You can add conditions or actions by selecting the appropriate options in the Edit Rule page.
Condition and action editorsUse the Condition Editor to create and edit the conditions for the rule.
Similarly, use the Action Editor to create and edit an action for the rule.
AxwaySecureTransport 5.2.1 SP4 Administrator Guide 453
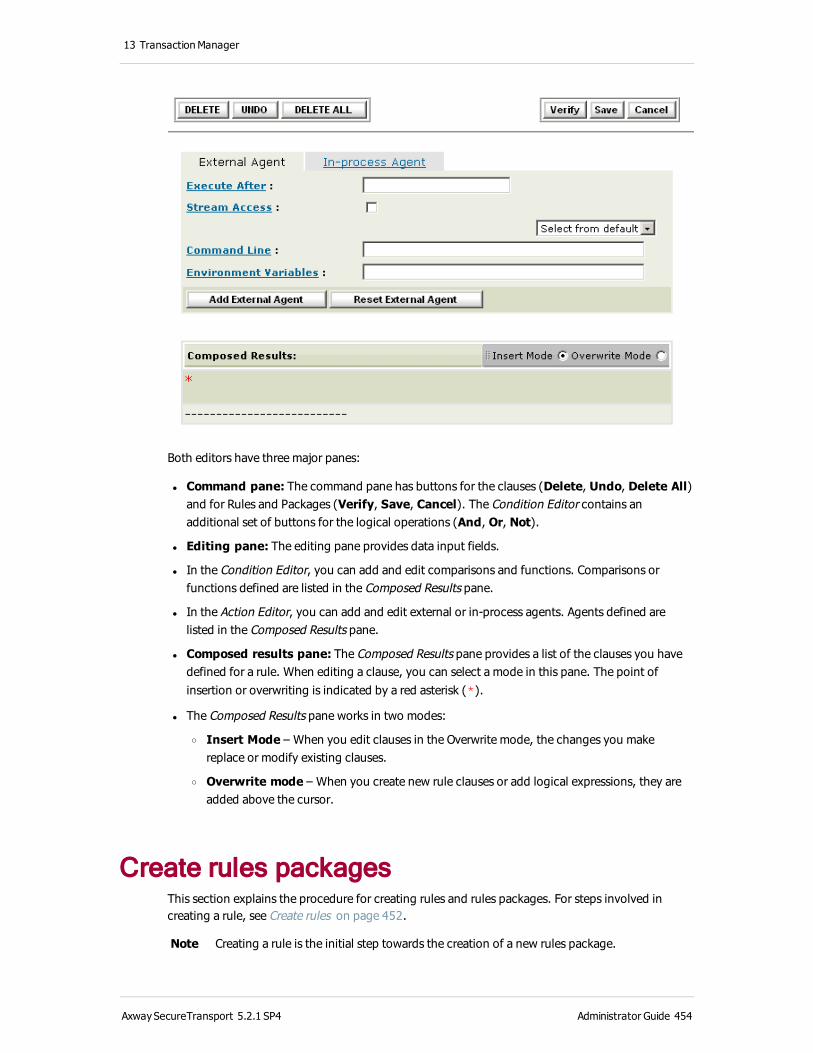
13 Transaction Manager
Both editors have three major panes:
l Command pane: The command pane has buttons for the clauses (Delete, Undo, Delete All) and for Rules and Packages (Verify, Save, Cancel). The Condition Editor contains an additional set of buttons for the logical operations (And, Or, Not).
l Editing pane: The editing pane provides data input fields.
l In the Condition Editor, you can add and edit comparisons and functions. Comparisons or functions defined are listed in the Composed Results pane.
l In the Action Editor, you can add and edit external or in-process agents. Agents defined are listed in the Composed Results pane.
l Composed results pane: The Composed Results pane provides a list of the clauses you have defined for a rule. When editing a clause, you can select a mode in this pane. The point of insertion or overwriting is indicated by a red asterisk (*).
l The Composed Results pane works in two modes:
o Insert Mode – When you edit clauses in the Overwrite mode, the changes you make replace or modify existing clauses.
o Overwrite mode – When you create new rule clauses or add logical expressions, they are added above the cursor.
Create rules packagesThis section explains the procedure for creating rules and rules packages. For steps involved in creating a rule, see Create rules on page 452.
Note Creating a rule is the initial step towards the creation of a new rules package.
AxwaySecureTransport 5.2.1 SP4 Administrator Guide 454
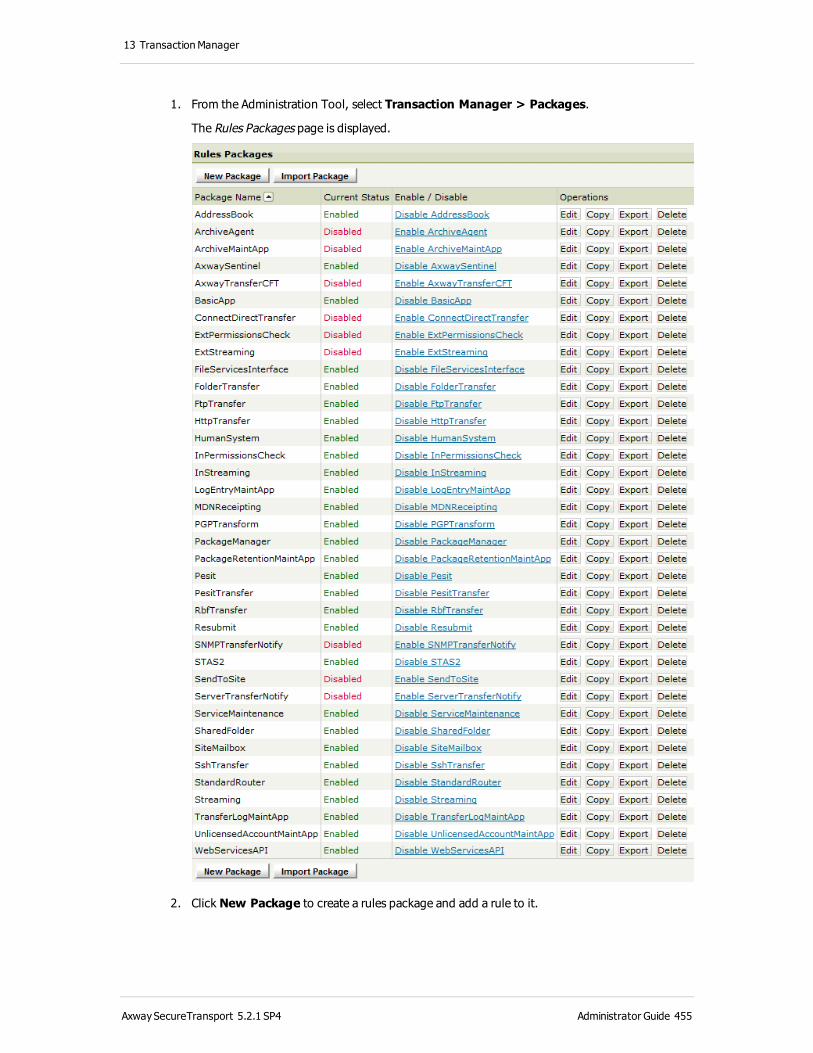
13 Transaction Manager
1. From the Administration Tool, select Transaction Manager > Packages.
The Rules Packages page is displayed.
2. Click New Package to create a rules package and add a rule to it.
AxwaySecureTransport 5.2.1 SP4 Administrator Guide 455
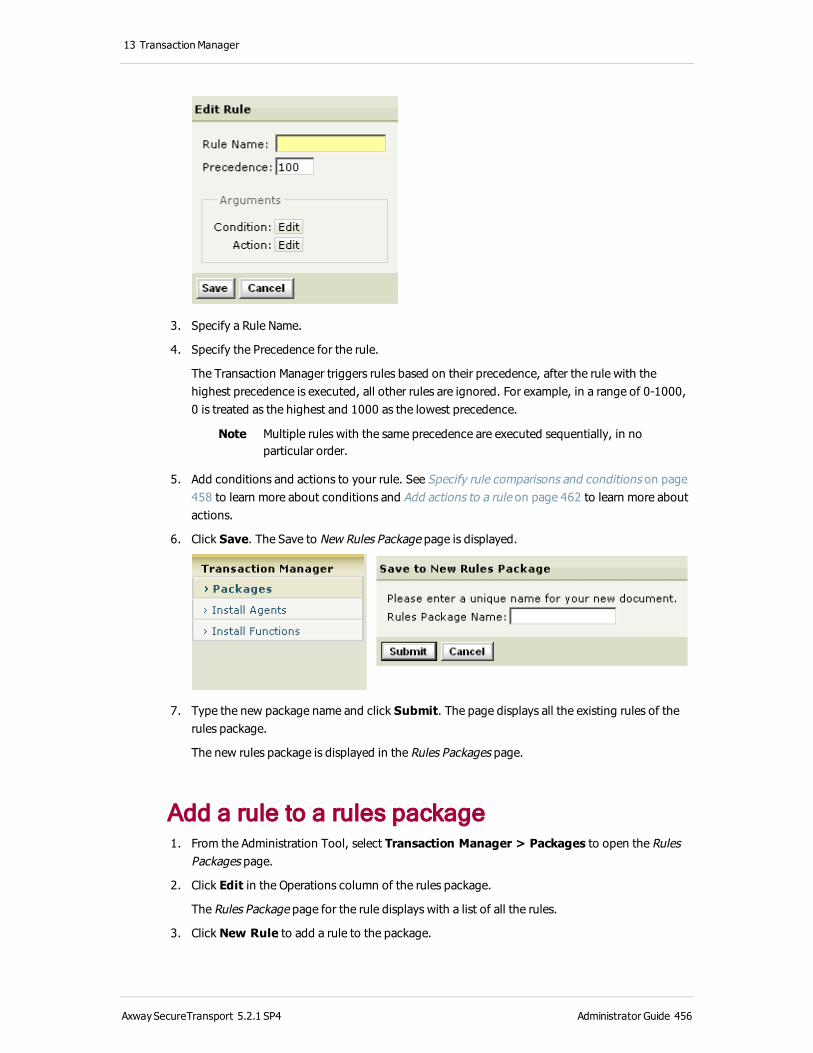
13 Transaction Manager
3. Specify a Rule Name.
4. Specify the Precedence for the rule.
The Transaction Manager triggers rules based on their precedence, after the rule with the highest precedence is executed, all other rules are ignored. For example, in a range of 0-1000, 0 is treated as the highest and 1000 as the lowest precedence.
Note Multiple rules with the same precedence are executed sequentially, in no particular order.
5. Add conditions and actions to your rule. See Specify rule comparisons and conditions on page 458 to learn more about conditions and Add actions to a rule on page 462 to learn more about actions.
6. Click Save. The Save to New Rules Package page is displayed.
7. Type the new package name and click Submit. The page displays all the existing rules of the rules package.
The new rules package is displayed in the Rules Packages page.
Add a rule to a rules package 1. From the Administration Tool, select Transaction Manager > Packages to open the Rules
Packages page.
2. Click Edit in the Operations column of the rules package.
The Rules Package page for the rule displays with a list of all the rules.
3. Click New Rule to add a rule to the package.
AxwaySecureTransport 5.2.1 SP4 Administrator Guide 456

13 Transaction Manager
4. Specify a Rule Name and the Precedence for the rule.
5. Add conditions and actions to your rule. see Specify rule comparisons and conditions on page 458 to learn more about conditions and Add actions to a rule on page 462 to learn more about actions.
6. Click Save.
The new rule is displayed in the Rules Package page for the rule.
Modify a rule 1. From the Administration Tool, select Transaction Manager > Packages to open the Rules
Packages page.
2. Click Edit in the Operations column of the rules package, then click a rule name within the package to edit an existing rule.
3. Modify the Rule Name or Precedence, if necessary.
4. Click Edit to modify a condition or action. See Specify rule comparisons and conditions on page 458 for more information about conditions and Add actions to a rule on page 462 for more information about actions.
5. Click Save.
The updated rule is displayed in the Rules Package page for the rule.
AxwaySecureTransport 5.2.1 SP4 Administrator Guide 457
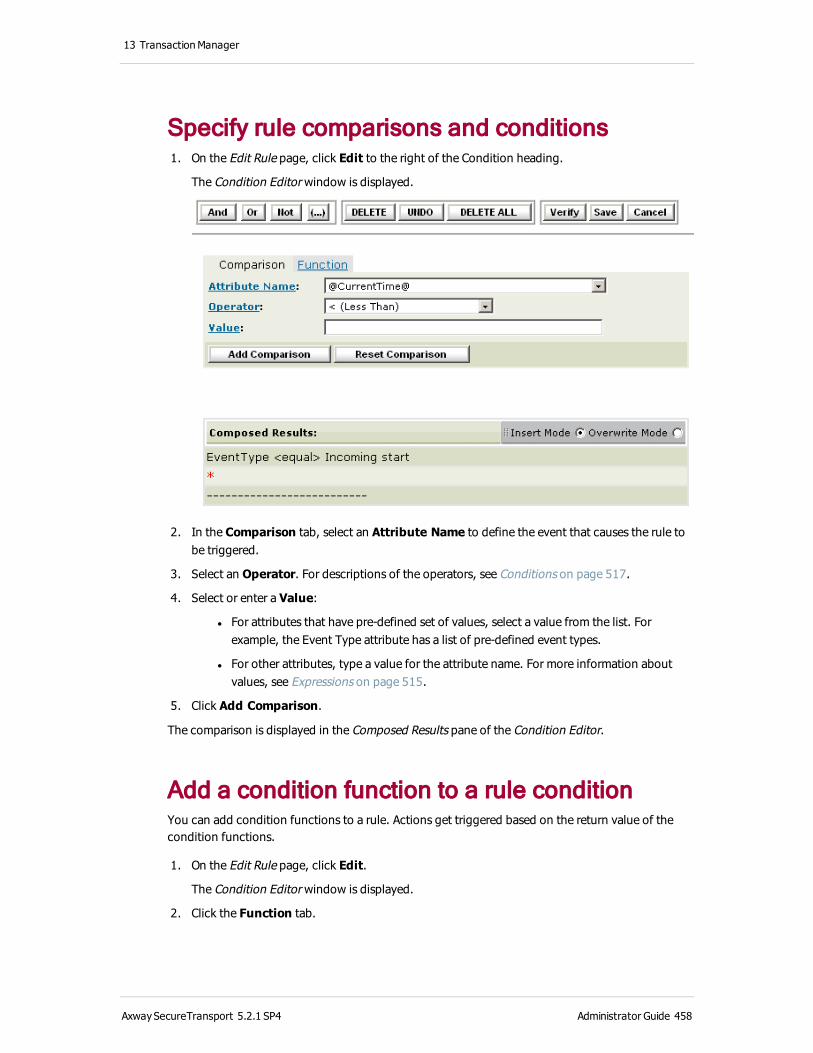
13 Transaction Manager
Specify rule comparisons and conditions 1. On the Edit Rule page, click Edit to the right of the Condition heading.
The Condition Editor window is displayed.
2. In the Comparison tab, select an Attribute Name to define the event that causes the rule to be triggered.
3. Select an Operator. For descriptions of the operators, see Conditions on page 517.
4. Select or enter a Value:
l For attributes that have pre-defined set of values, select a value from the list. For example, the Event Type attribute has a list of pre-defined event types.
l For other attributes, type a value for the attribute name. For more information about values, see Expressions on page 515.
5. Click Add Comparison.
The comparison is displayed in the Composed Results pane of the Condition Editor.
Add a condition function to a rule conditionYou can add condition functions to a rule. Actions get triggered based on the return value of the condition functions.
1. On the Edit Rule page, click Edit.
The Condition Editor window is displayed.
2. Click the Function tab.
AxwaySecureTransport 5.2.1 SP4 Administrator Guide 458
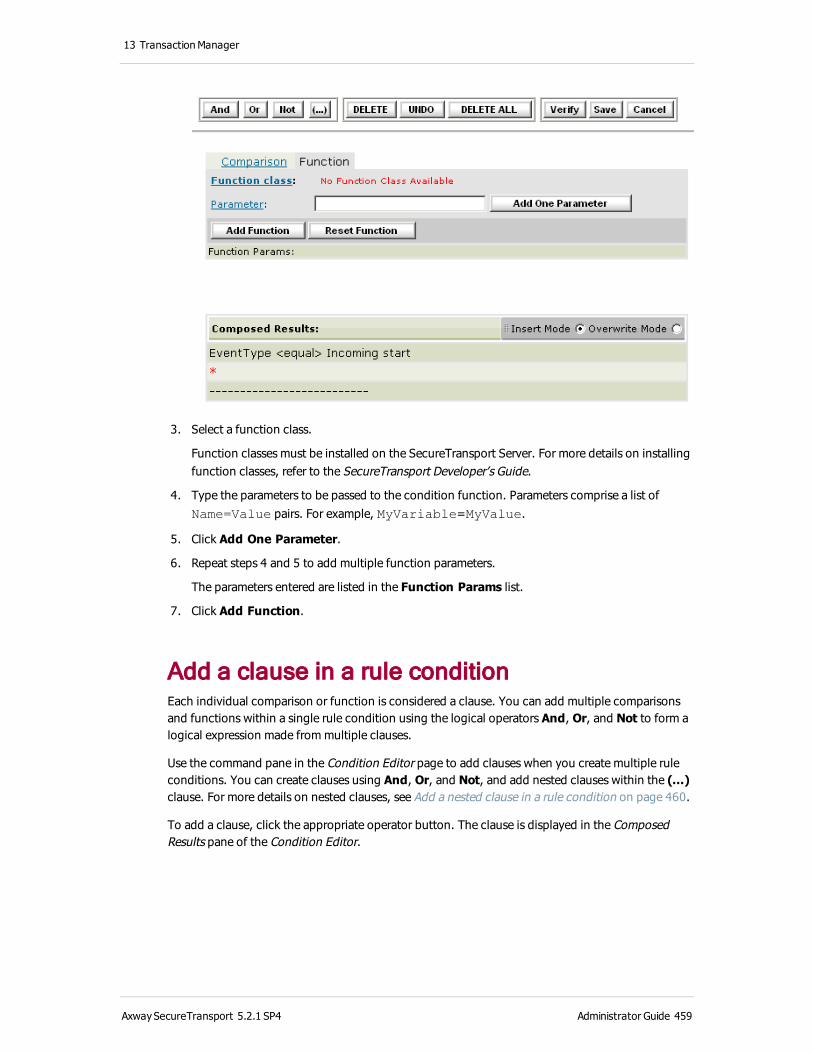
13 Transaction Manager
3. Select a function class.
Function classes must be installed on the SecureTransport Server. For more details on installing function classes, refer to the SecureTransport Developer’s Guide.
4. Type the parameters to be passed to the condition function. Parameters comprise a list of Name=Value pairs. For example, MyVariable=MyValue.
5. Click Add One Parameter.
6. Repeat steps 4 and 5 to add multiple function parameters.
The parameters entered are listed in the Function Params list.
7. Click Add Function.
Add a clause in a rule conditionEach individual comparison or function is considered a clause. You can add multiple comparisons and functions within a single rule condition using the logical operators And, Or, and Not to form a logical expression made from multiple clauses.
Use the command pane in the Condition Editor page to add clauses when you create multiple rule conditions. You can create clauses using And, Or, and Not, and add nested clauses within the (...) clause. For more details on nested clauses, see Add a nested clause in a rule condition on page 460.
To add a clause, click the appropriate operator button. The clause is displayed in the Composed Results pane of the Condition Editor.
AxwaySecureTransport 5.2.1 SP4 Administrator Guide 459
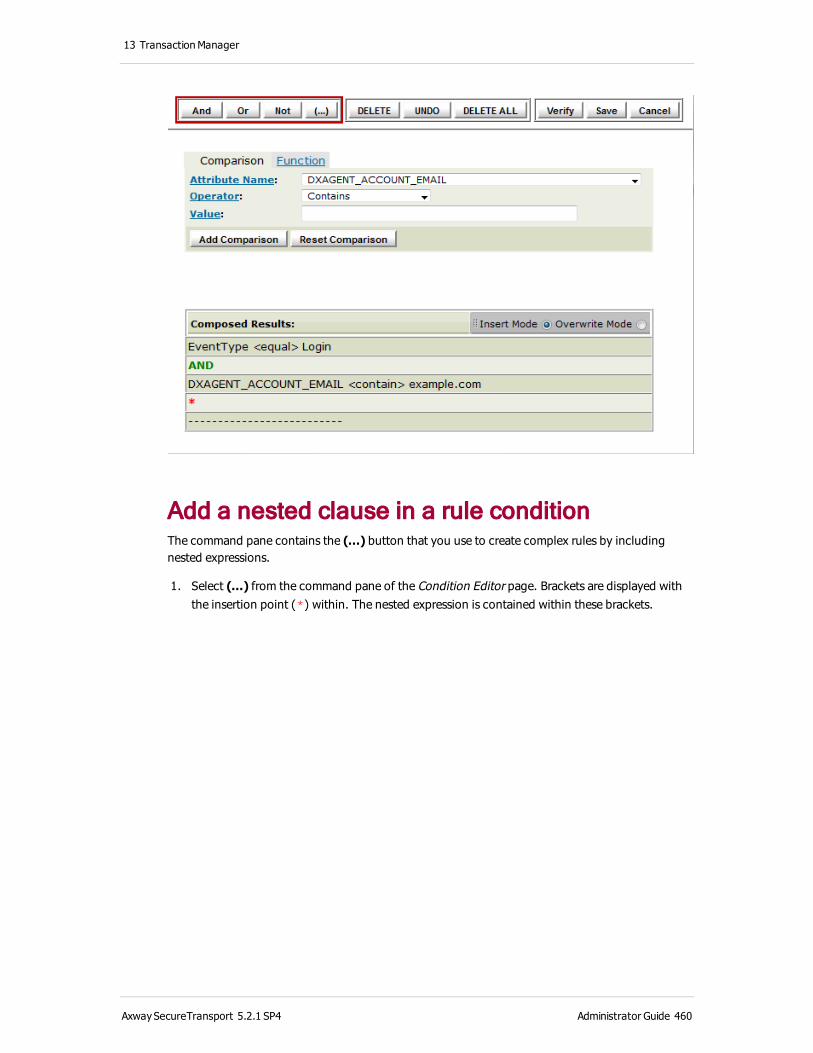
13 Transaction Manager
Add a nested clause in a rule conditionThe command pane contains the (...) button that you use to create complex rules by including nested expressions.
1. Select (...) from the command pane of the Condition Editor page. Brackets are displayed with the insertion point (*) within. The nested expression is contained within these brackets.
AxwaySecureTransport 5.2.1 SP4 Administrator Guide 460
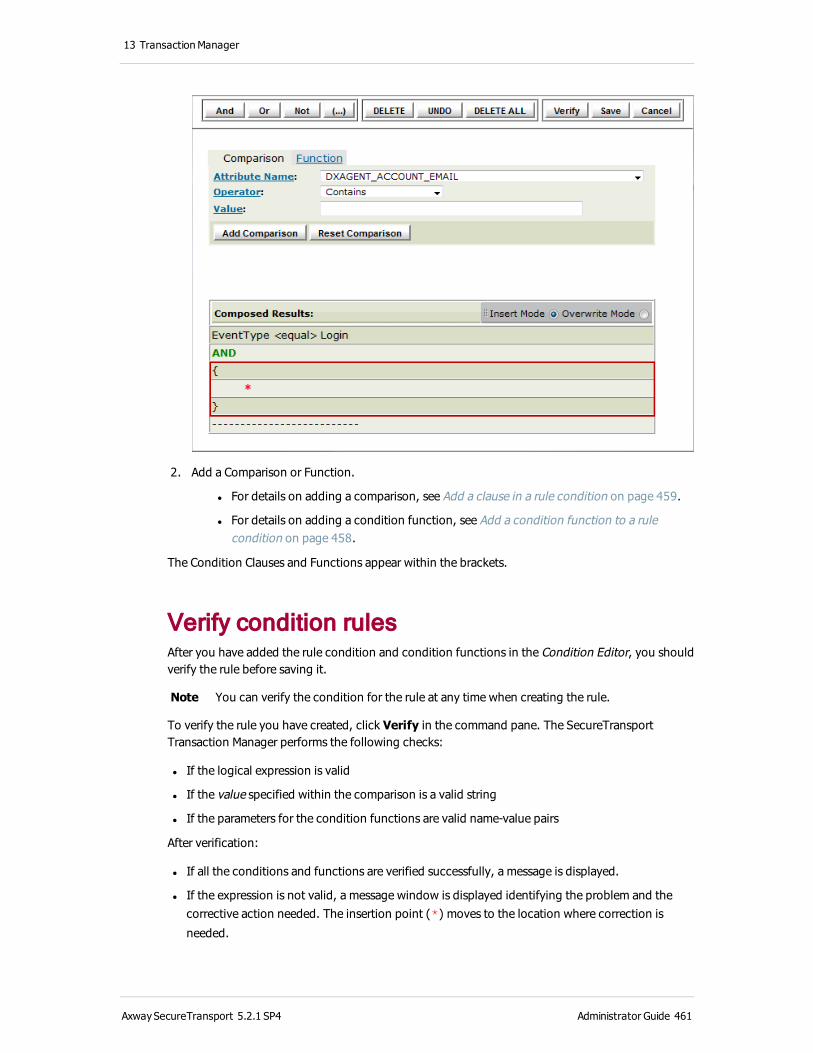
13 Transaction Manager
2. Add a Comparison or Function.
l For details on adding a comparison, see Add a clause in a rule condition on page 459.
l For details on adding a condition function, see Add a condition function to a rule condition on page 458.
The Condition Clauses and Functions appear within the brackets.
Verify condition rulesAfter you have added the rule condition and condition functions in the Condition Editor, you should verify the rule before saving it.
Note You can verify the condition for the rule at any time when creating the rule.
To verify the rule you have created, click Verify in the command pane. The SecureTransport Transaction Manager performs the following checks:
l If the logical expression is valid
l If the value specified within the comparison is a valid string
l If the parameters for the condition functions are valid name-value pairs
After verification:
l If all the conditions and functions are verified successfully, a message is displayed.
l If the expression is not valid, a message window is displayed identifying the problem and the corrective action needed. The insertion point (*) moves to the location where correction is
needed.
AxwaySecureTransport 5.2.1 SP4 Administrator Guide 461

13 Transaction Manager
Save the conditionAfter you have created and verified the rule condition, you must save the rule condition. To save the rule condition, click Save in the command pane of the Condition Editor window. The rule conditions are updated in the Condition pane in the Edit Rules page.
Add actions to a ruleYou can use Actions to specify the agent that needs to be triggered based on the condition and its return value. You can also define parameters or additional environment variables that need to be passed to the agent. You can use Actions to trigger both in-process and external agents.
1. On the Edit Rule page, click Edit to the right of the Action heading.
The Action Editor window is displayed.
2. Depending on the type of agent you want to invoke, do one of the following:
l Click the External Agents tab
l Click the In-process Agents tab
3. In the Clause Editing pane, enter values for the appropriate options.
l Execute After: Type the sequence number of the agent after which the new agent must be invoked. Use this option to sequence the agents if a dependency is required. Each agent is listed with a sequence number in the Editor window.
l Stream Access: Select this check box to allow the agent read or write access to the data stream between the Transaction Manager server and the SecureTransport Server. When multiple agents are being executed at a time, it is necessary to define agents that
AxwaySecureTransport 5.2.1 SP4 Administrator Guide 462
13 Transaction Manager
require read or write access to the data stream between the Transaction Manager server and the SecureTransport Server. For example, File Upload or File Download events need to access the read or write access data stream of the SecureTransport Server.
For External Agents:
l Command Line: Specify a script written in a scripting language or environment such as Perl that can be called through a shell mechanism. For details on installing the scripts, refer to the SecureTransport Developer’s Guide.
You can specify the script in the Command Line as shown in the following example:
"${FILEDRIVEHOME}/bin/agent/dumpenv"
l Environment Variables: Specify environment variables that are necessary for the agent to execute correctly. Environment variables are comma separated name=value
pairs.
For In-Process Agents:
l Agent Class Name: Select an in-process agent function installed on the SecureTransport Server. For details on installing in-process, refer to the SecureTransport Developer’s Guide.
l Invocation Parameters: Specify the parameters to be passed to the in-process agents at runtime. They are defined as name-value pairs. Use commas to separate multiple parameters.
4. Provide the necessary information and do one of the following:
l Click Add External Agent if you are adding an external agent.
l Click Add In-process Agent if you are adding an in-process agent.
The agent is displayed in the Composed Results pane of the Action Editor. All the agents are numbered to allow relative sequencing between actions.
Verify actionsAfter you have added the actions in the Action Editor, you should verify the actions before you save them.
To verify the actions you have created, click Verify in the command pane. SecureTransport performs the following checks:
l Identifiers used in the Execute After field exist.
l Environment variable defined for external agents are valid name-value pairs.
l Parameters for the in-process agent are valid name-value pairs.
l Command line parameter is a valid string.
Note You can verify the action for the rule at any time when creating the rule.
If all the actions are verified successfully, a message displayed.
AxwaySecureTransport 5.2.1 SP4 Administrator Guide 463
13 Transaction Manager
If the expression is not valid, a message window is displayed. The message window displays the problem and the corrective action required. The insertion point (*) also moves to the location where correction is needed.
Save actionsAfter you have created and verified the actions, you must save them.
To save the actions, click Save in the command pane of the Action Editor page. The actions are updated in the Action pane of the Edit Rules page.
Conditions and actionsUse the Condition Editor window and the Action Editor window to manage your rule conditions and actions. You can do the following:
l Edit existing Conditions or Actions.
l Add Conditions or Actions within an existing sequence.
l Delete Conditions or Actions.
Edit a condition or actionYou can edit existing conditions or actions.
AxwaySecureTransport 5.2.1 SP4 Administrator Guide 464

13 Transaction Manager
1. Select Overwrite Mode in the Composed Results pane of the Editor window.
2. Move the red asterisk insertion point (*) to the condition or action you want to modify. To do
this, select the condition or action in the Composed Results pane. The insertion point moves next to the selected condition or action.
The fields in the Editing pane display the values defined in the selected condition or action.
3. Make the necessary changes and do one of the following:
l If you are editing a comparison, click Replace Comparison.
l If you are editing a condition function, click Replace Function.
l If you are editing an external agent, click Replace External Agent.
l If you are editing a in-process agent, click Replace In-process Agent.
4. Click Verify. For details on verifying the condition rule, see Verify condition rules on page 461. For details on verifying the action, see Verify actions on page 463.
5. Click Save. For details on saving the condition rule, see Save the condition on page 462. For details on saving the action, see Save actions on page 464.
Your changes are reflected in the Edit Rules page.
6. Click Save.
The Rules Package page is displayed. Changes made in the rule are reflected in the rules list.
Add a condition or action in a sequenceYou can add conditions or actions to a rule with existing conditions or actions.
AxwaySecureTransport 5.2.1 SP4 Administrator Guide 465

13 Transaction Manager
Agents defined within the Action can be executed in a pre-defined sequence. For the agents to follow a pre-defined sequence, it is necessary that you add them in the sequence they will be executed. Once the agents are added to the Actions, they cannot be conveniently reordered. You can include new conditions or actions within the existing sequence.
Note You can sequence actions by defining an agent in the Execute After field in the Action Editor window.
1. Select Insert Mode in the Composed Results pane of the Editor window.
2. Click the condition or action before which you want to add the new rule.
3. To add the condition or action, do one of the following:
l For details on adding a comparison, see Add a clause in a rule condition on page 459.
l For details on adding a condition function, see Add a condition function to a rule condition on page 458.
l For details on adding an Action, see Add actions to a rule on page 462.
The new condition or action is displayed in the Composed Results pane of the Action Editor.
Delete a condition or actionYou can use the command pane of the Editor window to delete conditions or actions defined in a rule.
AxwaySecureTransport 5.2.1 SP4 Administrator Guide 466
13 Transaction Manager
1. Select Overwrite Mode.
2. Click the condition or action you want to delete in the Composed Results pane of the Editor window.
Fields in the Editing pane display values that are already defined for the selected condition or action.
3. Click DELETE in the command pane.
Note Click DELETE ALL in the command pane to delete all the conditions or actions.
The selected rule is deleted from the list in the Composed Results pane.
Export and import rules packagesRules and packages can be exported and imported into the system. When you export a rules package, it is saved as an XML file. Exported rules and packages can be migrated and imported to other installations of SecureTransport. They can also be used to duplicate existing rules to new packages where they can be combined with new rules or variations to embody new business processes. Any files used with an agent such as script and class files must also be imported or exported separately through the file system.
Note You must log into the system as an Administrator to manage rules packages.
Export rules and rules packagesYou can export an entire rules package or individual rules within a rules package as a single XML file. You can also copy rules from a package to existing rules packages on the same SecureTransport Server.
1. Select Transaction Manager > Packages.
A list of existing rules packages is displayed.
2. Click Export in the Operations field of the rules package.
The XML file is opened in a new browser window.
3. Select the Save As option from the File menu of the new browser window.The Save As dialog box is displayed.
4. Select the directory in which you want to save the rules package.
5. Type an appropriate name for the rules package.
6. Click Save.
The rule is saved as an XML file in the location you selected.
Use the Transaction Manager to save individual rules within the rules packages as XML files or export individual rules among rules packages.
AxwaySecureTransport 5.2.1 SP4 Administrator Guide 467
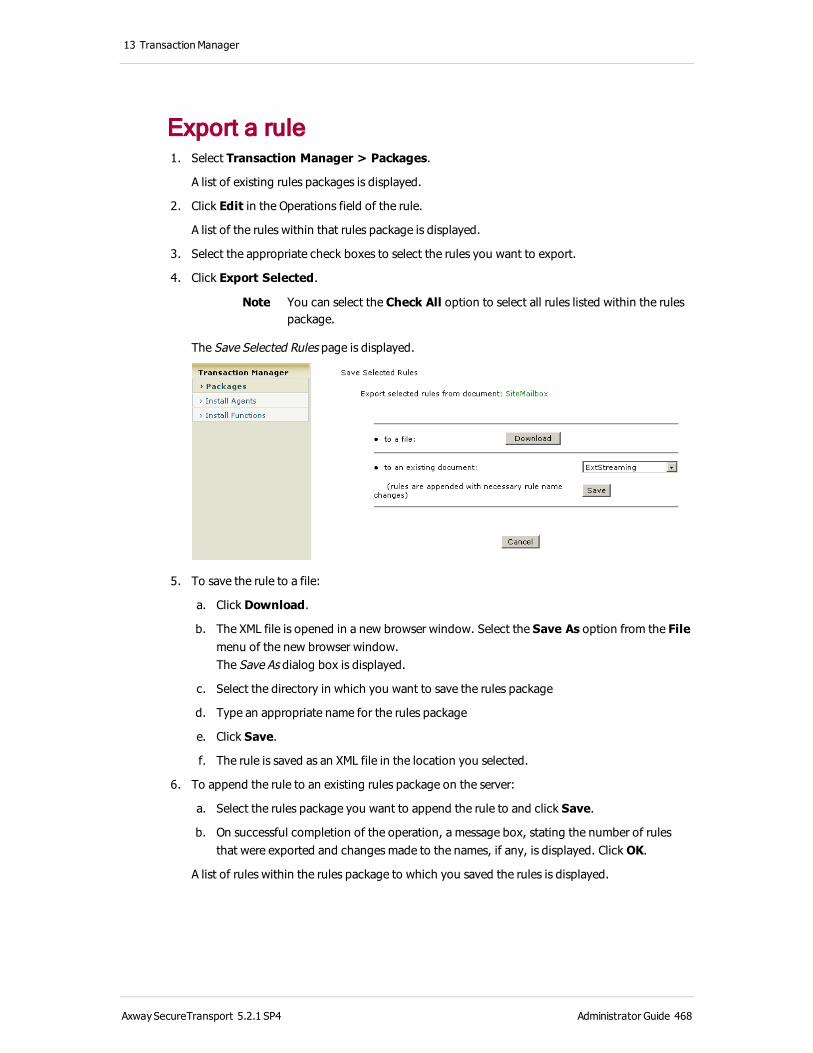
13 Transaction Manager
Export a rule 1. Select Transaction Manager > Packages.
A list of existing rules packages is displayed.
2. Click Edit in the Operations field of the rule.
A list of the rules within that rules package is displayed.
3. Select the appropriate check boxes to select the rules you want to export.
4. Click Export Selected.
Note You can select the Check All option to select all rules listed within the rules package.
The Save Selected Rules page is displayed.
5. To save the rule to a file:
a. Click Download.
b. The XML file is opened in a new browser window. Select the Save As option from the File menu of the new browser window.The Save As dialog box is displayed.
c. Select the directory in which you want to save the rules package
d. Type an appropriate name for the rules package
e. Click Save.
f. The rule is saved as an XML file in the location you selected.
6. To append the rule to an existing rules package on the server:
a. Select the rules package you want to append the rule to and click Save.
b. On successful completion of the operation, a message box, stating the number of rules that were exported and changes made to the names, if any, is displayed. Click OK.
A list of rules within the rules package to which you saved the rules is displayed.
AxwaySecureTransport 5.2.1 SP4 Administrator Guide 468

13 Transaction Manager
Import a rules package 1. On the Rules Packages page, click Import Package.
2. Type the name of the file to import or click Browse to locate the file on your system. To save the imported rules package with a different name, type the new name in the text field provided.
Note The XML file used to import rules packages must be well formatted. Importing an XML file with the XML elements in a single line causes the import to fail. If the import fails, an error message is written to tm.log and the rule are unavailable to execute at runtime.
3. Click Submit.
The server checks if the file is a valid XML file. If the file is a valid XML file, the Rules Packages are displayed. If the file is not a valid XML file, an error message is displayed.
Load a rules packageThe Transaction Manager packages that have been created or modified are stored in the SecureTransport Server file system. They have to be loaded into Transaction Manager by bouncing the server. For details, see Reload server configuration on page 34.
Delete a rules packageRemoving a rules package from the server is allowed. Agents referred to by a deleted rules package are not removed. These agents maybe used in other rules packages.
1. Select Transaction Manager > Packages.
2. Locate the rules package you want to delete. Under Operations, click Delete.
AxwaySecureTransport 5.2.1 SP4 Administrator Guide 469

13 Transaction Manager
3. Click Delete to confirm you want to remove the rules package.
Install agentsAfter developing an agent, you must install it to use the agent. An agent can be a script file, a Java class file, or JAR file. In a standard cluster and a large enterprise cluster, each agent must be installed on each node in the cluster individually.
Install an in-process agentAfter developing an in-process agent, you must install it in order to use the agent. You can install multiple agents in one jar file or install each agent in a separate class file. If you have additional jar files that an agent calls, install each jar file once only. Agents have access to all uploaded files, and can call any class specified in the agent that is available.
Classes installed using the Install Agents page can be selected from the Agent Class Name field when creating an in-process agent.
1. Select Transaction Manager > Install Agents. This Install Agent page is displayed.
2. Type the name of the .class or .jar file of the agent or click Browse to select the .class
or .jar file of the agent from your local system.
Note Make sure External Java Agent is not selected when installing in-process agents.
3. Click Install.
AxwaySecureTransport 5.2.1 SP4 Administrator Guide 470
13 Transaction Manager
If the file already exists on the server, you are prompted for a confirmation to overwrite it. Class files are uploaded to the <FILEDRIVEHOME>/brules/local/agents/inprocess/classes directory and
.jar files are uploaded to the
<FILEDRIVEHOME>/brules/local/agents/inprocess/jars directory on the
server.
Repeat the process to add additional files.
If you do not see the new in-process agent when editing an action, perform the following steps:
1. Open a remote connection tool such as Telnet and connect to the SecureTransport Server.
2. Locate the file <FILEDRIVEHOME>/brules/local/agentlist.
3. Add the class name using the qualified path with package name as in the following example:
com.myexample.agents.NotifyAgent
4. Save the agentlist file and exit the remote connection tool.
Install an external agentAfter you have created the external agent file, you must install it in order to use the agent.
Note During the install process a ̂ M character is appended to each line of the script file. If you are using a Perl or shell script you need to convert the scripts to a UNIX format before installing.
1. Select Transaction Manager > Install Agents.
The Install Agents page is displayed.
2. Browse your local file system and choose the agent’s script file.
3. Select the External Java Agent check box if the external agent you are installing is a .jar or
.class file.
4. Click Install. If the file already exists on the server, you are prompted to overwrite it.
5. Make necessary changes to the SecureTransport Agents pane so that the event is handled by the Transaction Manager server.
AxwaySecureTransport 5.2.1 SP4 Administrator Guide 471
14 AS2 transfers
Axway SecureTransport supports AS2 (Applicability Statement 2) as the industry standard for Internet-based data exchange.
Use the SecureTransport AS2-certified solution to exchange data with any trading partner using an AS2-interoperable solution over the Internet. AS2 simplifies communication by reducing the number of technologies an organization must support and manage. It would be cost-prohibitive for small business partners to exchange data electronically with large organizations that use a different data transport standard. The AS2 standard allows organizations, both large and small, to implement one solution for data exchange with all business partners using an AS2 solution.
The AS2 standard secures data with S/MIME (Secure/Multipurpose Internet Mail Extensions) over HTTP (Hypertext Transfer Protocol) or HTTPS (secure HTTP over SSL), also using MDN (Message Disposition Notification). AS2 provides synchronous, real-time transmission of data with immediate message delivery notice.
Note In Windows, file names of files transferred using the AS2 protocol is limited to 255 characters.
AS2 implementation Companies that conduct Business-to-Business (B2B) Electronic Commerce can use SecureTransport Server to send business documents to their business partners using the AS2 protocol.
The SecureTransport AS2 server provides security by utilizing encryption and signing. The server sends a document that is signed and encrypted to the partner using digital certificates that are agreed upon between the server and the target partner.
The partner checks the signature of the document and sends a signed MDN receipt to acknowledge that the transfer succeeded. MDN is an Internet messaging format used to transmit a receipt. MDN is used interchangeably with receipt. MDN is a receipt. This MDN signature is used to prove that the original document was sent from the SecureTransport AS2 server to the partner in a process called non-repudiation.
Note The use of signing, encryption, and MDN receipts are optional AS2 features that are decided when businesses enter into a partnership.
Synchronous and asynchronous receiptsA synchronous receipt is returned to the sender during the same HTTP session as the sender’s original message. An asynchronous receipt is returned to the sender on a different communication session than the sender’s original message session.
AxwaySecureTransport 5.2.1 SP4 Administrator Guide 472
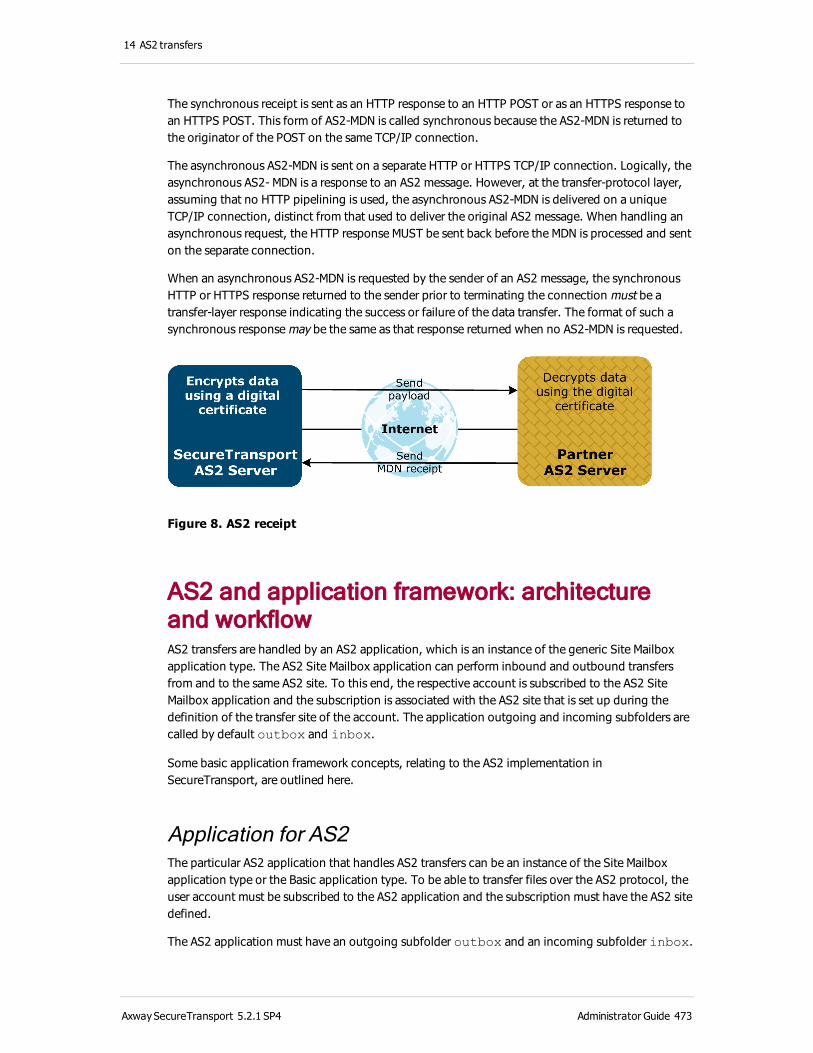
14 AS2 transfers
The synchronous receipt is sent as an HTTP response to an HTTP POST or as an HTTPS response to an HTTPS POST. This form of AS2-MDN is called synchronous because the AS2-MDN is returned to the originator of the POST on the same TCP/IP connection.
The asynchronous AS2-MDN is sent on a separate HTTP or HTTPS TCP/IP connection. Logically, the asynchronous AS2- MDN is a response to an AS2 message. However, at the transfer-protocol layer, assuming that no HTTP pipelining is used, the asynchronous AS2-MDN is delivered on a unique TCP/IP connection, distinct from that used to deliver the original AS2 message. When handling an asynchronous request, the HTTP response MUST be sent back before the MDN is processed and sent on the separate connection.
When an asynchronous AS2-MDN is requested by the sender of an AS2 message, the synchronous HTTP or HTTPS response returned to the sender prior to terminating the connection must be a transfer-layer response indicating the success or failure of the data transfer. The format of such a synchronous response may be the same as that response returned when no AS2-MDN is requested.
Figure 8. AS2 receipt
AS2 and application framework: architecture and workflowAS2 transfers are handled by an AS2 application, which is an instance of the generic Site Mailbox application type. The AS2 Site Mailbox application can perform inbound and outbound transfers from and to the same AS2 site. To this end, the respective account is subscribed to the AS2 Site Mailbox application and the subscription is associated with the AS2 site that is set up during the definition of the transfer site of the account. The application outgoing and incoming subfolders are called by default outbox and inbox.
Some basic application framework concepts, relating to the AS2 implementation in SecureTransport, are outlined here.
Application for AS2The particular AS2 application that handles AS2 transfers can be an instance of the Site Mailbox application type or the Basic application type. To be able to transfer files over the AS2 protocol, the user account must be subscribed to the AS2 application and the subscription must have the AS2 site defined.
The AS2 application must have an outgoing subfolder outbox and an incoming subfolder inbox.
AxwaySecureTransport 5.2.1 SP4 Administrator Guide 473

14 AS2 transfers
AS2 siteAS2 partnership holds a description of local and remote parties which participate in AS2 transfers. Besides identification information (local and remote IDs and remote address), the partnership holds information about data transformation of payload and MDN requirements.
The SecureTransport architecture, implemented by the application framework, introduces the site concept. A SecureTransport site has all the necessary attributes to connect to the AS2 site and transfer the contents. The only partnerships items that are not a part of the SecureTransport site specification are the following:
l Subfolder – an attribute of subscription between the AS2 user account and the AS2 Site Mailbox application.
l Username – an attribute of the user account for AS2.
Note AS2 site does not support server-initiated inbound transfers (server pull).
For details, see Manage applications on page 418.
For more details on AS2 and application framework, refer to the SecureTransport Developer’s Guide.
SecureTransport AS2 server: setup overviewThis section outlines the overall steps required to set up SecureTransport for AS2 transfers. To setup SecureTransport Server for AS2, complete these steps:
1. Configure the AS2 server control settings. See Manage the AS2 server on page 36.
2. Configure the AS2 settings. See Manage the AS2 server on page 36.
3. Configure an HTTP proxy (optional). See Specify proxy setting in a network zone on page 175.
4. Start Transaction Manager and AS2 servers. See Manage your servers on page 31.
5. Create a SiteMailbox application. See Create a Site Mailbox type application on page 434.
6. Create a user account. See Create a user account on page 240.
7. In the user account, create a AS2 transfer site using the AS2 protocol. During this step you specify the AS2 local and remote sites in the transfer site definition. See AS2 transfer sites on page 275.
8. In the user account, create a subscription to the SiteMailbox application and specify the
AS2 transfer site. See Subscribe an account to an application on page 322.
AxwaySecureTransport 5.2.1 SP4 Administrator Guide 474
15 File services interface transfers
A developer can use the Axway SecureTransport file services interface feature to implement a protocol that can use a shared file system and a transferred metadata file.
File services interface overviewFor SecureTransport to receive a file using the file services interface, the external system must copy the file into the shared file system. The external system then sends the parameters for the transfer in the metadata file using another protocol.
To perform a file services interface transfer, the external server:
1. Copies the file to transfer to a location in the shared folder.
2. Construct a metadata file that specifies the parameters of the transfer.
3. Upload the metadata file into the subscription folder of an application of type File Transfer via File Services Interface.
The SecureTransport Server:
1. Reads the specification of the transfer from the metadata file.
2. Copies the transferred file from the shared directory to the locations specified in the metadata file.
3. Deletes the metadata file.
4. Deletes the transferred file from the shared directory, if specified in the metadata file.
When SecureTransport sends a file using the file services interface, it calls a connector process configured by the developer which pushes the file to the remote server.
Receive files using a file services interface protocol
For SecureTransport to receive files sent by another system using a file services interface protocol, you must set up access to a shared directory, create an application, and subscribe an account to that application.
1. Determine which shared directory the systems are to use to transfer the files and make it accessible from both systems.
AxwaySecureTransport 5.2.1 SP4 Administrator Guide 475
15 File services interface transfers
2. Perform the procedure in Create a File Transfer via File Services Interface type application on page 427.
3. Create or identify an account to receive the metadata files from the other system. For details, see Create a user account on page 240.
4. Subscribe that account to the file services interface application. For details, see Subscribe an account to an application on page 322.
When the remote system transfers the metadata file to the subscription folder, the file services interface application reads it and processes the transferred file based on its contents.
Metadata fileThe metadata file is an XML file that contains a Transfer element. The elements in the following table must be included in the Transfer element unless noted as optional:
Element Description Valid values Notes
SourceFileLocation Path to the transferred file
Full path name or path relative to RemoteSharePath
See Location of the transferred file on page 479.
RemoteSharePath Path to the shared directory on the remote system
Full path name Optional. SecureTransport uses this to determine the location of the transferred file. See Location of the transferred file on page 479.
LocalSharePath Path to the shared directory on the SecureTransport system
Full path name Optional.
Optional for transfers to SecureTransport. SecureTransport uses this to determine the location of the transferred file. See Location of the transferred file on page 479.
AxwaySecureTransport 5.2.1 SP4 Administrator Guide 476
15 File services interface transfers
Element Description Valid values Notes
CycleID Processing cycle identifier for the file transfer
Any valid cycle ID SecureTransport uses this cycle ID in events reported to Axway Sentinel.
Protocol Name of a file services interface protocol
Any protocol defined in the file services interface protocol registry
SecureTransport displays the corresponding display name in Protocol column of the File Tracking page and in events it sends to Axway Sentinel.
Mode File transfer mode
A for ASCII or I for
binary
Recipients Container for Recipient
elements
N/A Optional. Contains any number of Recipient
elements.
Recipient A recipient for the file
N/A Optional. Contains a Name element and,
optionally, a Path
element
Name Login name of a SecureTransport account to receive the file
Any existing account login name
Path Path to the directory where SecureTransport copies the file, relative to the account home folder
Path to any directory in the home folder of the named account
Optional. The default is the home folder of the account.
AxwaySecureTransport 5.2.1 SP4 Administrator Guide 477
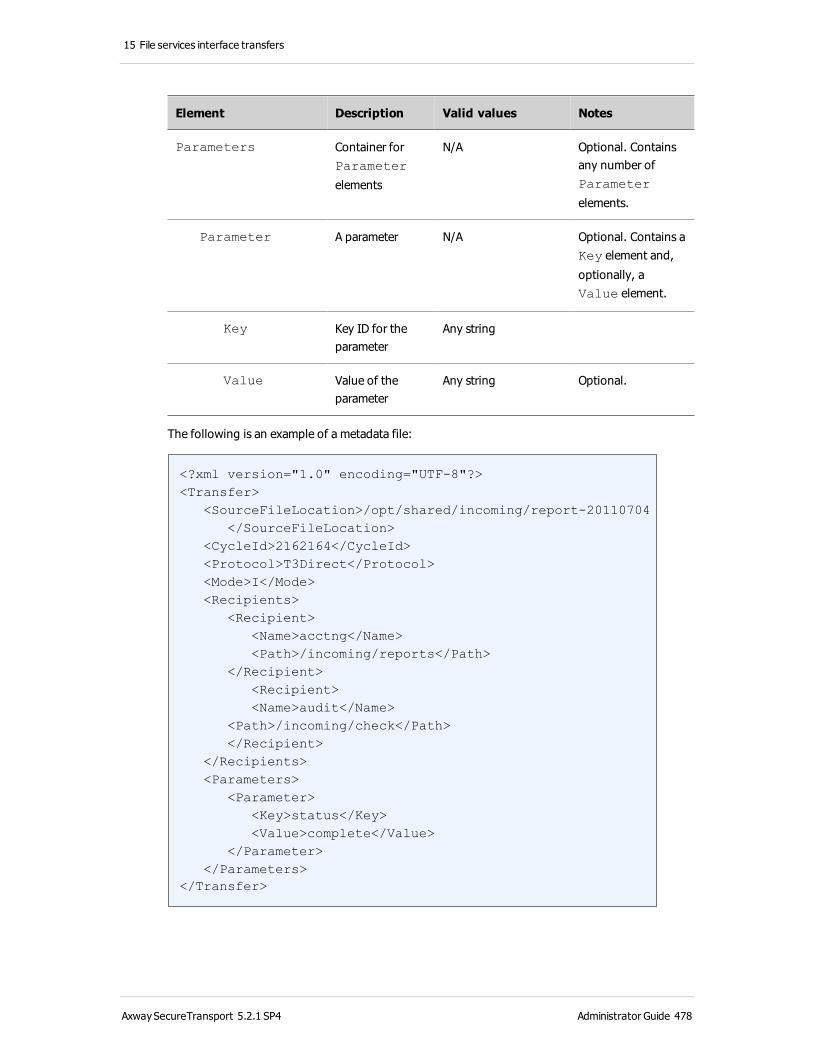
15 File services interface transfers
Element Description Valid values Notes
Parameters Container for Parameter
elements
N/A Optional. Contains any number of Parameter
elements.
Parameter A parameter N/A Optional. Contains a Key element and,
optionally, a Value element.
Key Key ID for the parameter
Any string
Value Value of the parameter
Any string Optional.
The following is an example of a metadata file:
<?xml version="1.0" encoding="UTF-8"?><Transfer> <SourceFileLocation>/opt/shared/incoming/report-20110704 </SourceFileLocation> <CycleId>2162164</CycleId> <Protocol>T3Direct</Protocol> <Mode>I</Mode> <Recipients> <Recipient> <Name>acctng</Name> <Path>/incoming/reports</Path> </Recipient> <Recipient> <Name>audit</Name> <Path>/incoming/check</Path> </Recipient> </Recipients> <Parameters> <Parameter> <Key>status</Key> <Value>complete</Value> </Parameter> </Parameters></Transfer>
AxwaySecureTransport 5.2.1 SP4 Administrator Guide 478
15 File services interface transfers
Location of the transferred fileFor files pushed to SecureTransport from a remote system, use SourceFileLocation and optionally RemoteSharePath and LocalSharePath to specify the location of the transferred file:
l If RemoteSharePath or LocalSharePath is not specified, SourceFileLocation is
the location of the transferred file on the SecureTransport system.
l If RemoteSharePath and LocalSharePath are specified and SourceFileLocation
starts with RemoteSharePath, then SecureTransport replaces RemoteSharePath with
LocalSharePath to determine the location of the transferred file on the SecureTransport
system.
l If RemoteSharePath and LocalSharePath are specified and SourceFileLocation
does not start with RemoteSharePath, then SecureTransport concatenates
LocalSharePath and SourceFileLocation to determine the location of the
transferred file on the SecureTransport system.
For files pushed to a remote system from SecureTransport, LocalSharePath must be specified. Use SourceFileLocation and optionally RemoteSharePath to specify the location of the transferred file:
If RemoteSharePath is specified, SecureTransport concatenates LocalSharePath, a unique directory name, RemoteSharePath, a unique file prefix, and SourceFileLocation to determine the location of the transferred file on the SecureTransport system.
If RemoteSharePath is not specified, SecureTransport concatenates LocalSharePath, a unique directory name, a unique file prefix, and SourceFileLocation to determine the location of the transferred file on the SecureTransport system.
Send files using a file services interface protocol
For SecureTransport to send files to another system using a file services interface protocol, you must create a transfer site for a file services interface protocol, and subscribe to an application that sends files to that site.
1. Create or identify an account to send files to the other system. For details, see Create a user account on page 240.
2. Create a transfer site in that account that references the file services interface protocol. For details, see File services interface protocol transfer sites on page 288.
3. Subscribe that account to an application configured to send files to that transfer site. For details, see Subscribe an account to an application on page 322.
AxwaySecureTransport 5.2.1 SP4 Administrator Guide 479
15 File services interface transfers
When the application sends a file to the transfer site, SecureTransport finds the information for the protocol in the protocol registry and calls a program configured for the protocol to perform the transfer.
AxwaySecureTransport 5.2.1 SP4 Administrator Guide 480

Appendix A: Administration Tool features checklist
Most Administration Tool features are present in Axway SecureTransport Server, but not all of those are available in the Administration Tool for SecureTransport Edge. The following table lists all available features within the Administration Tool for both SecureTransport Edge and SecureTransport Server.
Administration Tool features SecureTransport Edge
SecureTransport Server
Operations Menu P P
Server Control P P
Cluster Management P P
Server Usage Monitor P P
File Tracking — P
Server Log P P
Audit Log P P
Server Configuration P P
Support Tool P P
Setup Menu P P
Certificates P P
FTP Settings P P
AS2 Settings P P
SSH Settings P P
Admin Settings P P
PeSIT Settings P P
AxwaySecureTransport 5.2.1 SP4 Administrator Guide 481
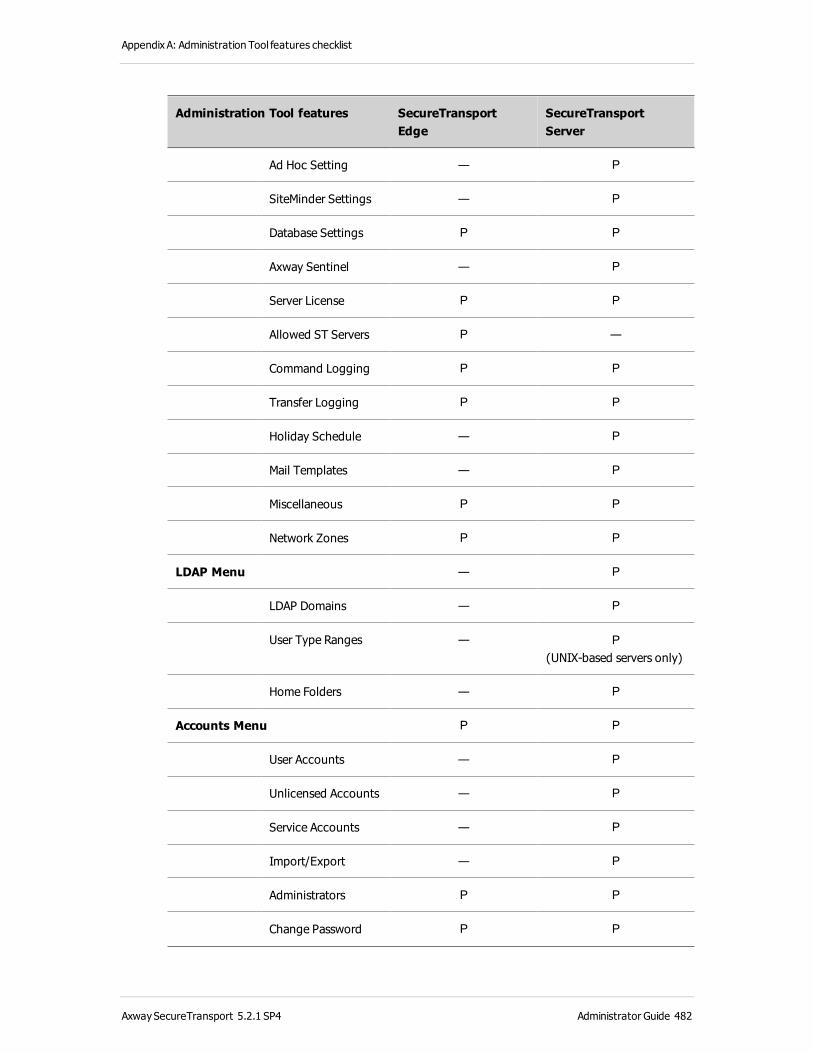
Appendix A: Administration Tool features checklist
Administration Tool features SecureTransport Edge
SecureTransport Server
Ad Hoc Setting — P
SiteMinder Settings — P
Database Settings P P
Axway Sentinel — P
Server License P P
Allowed ST Servers P —
Command Logging P P
Transfer Logging P P
Holiday Schedule — P
Mail Templates — P
Miscellaneous P P
Network Zones P P
LDAP Menu — P
LDAP Domains — P
User Type Ranges — P(UNIX-based servers only)
Home Folders — P
Accounts Menu P P
User Accounts — P
Unlicensed Accounts — P
Service Accounts — P
Import/Export — P
Administrators P P
Change Password P P
AxwaySecureTransport 5.2.1 SP4 Administrator Guide 482
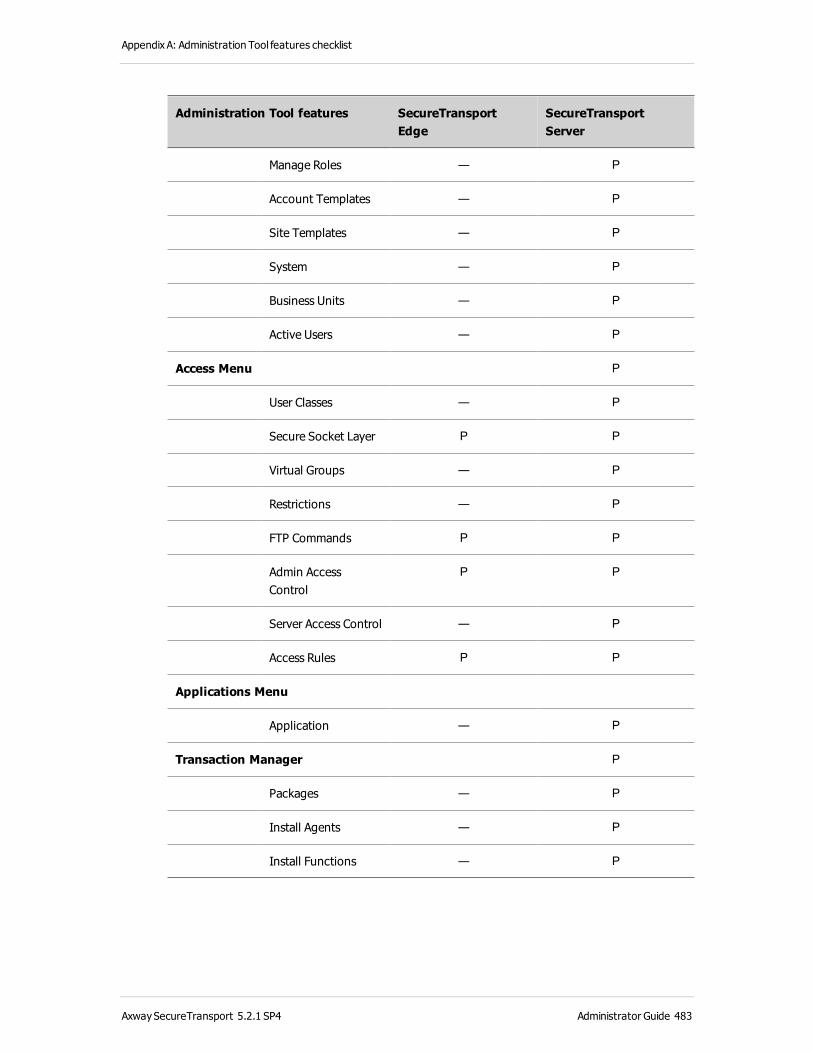
Appendix A: Administration Tool features checklist
Administration Tool features SecureTransport Edge
SecureTransport Server
Manage Roles — P
Account Templates — P
Site Templates — P
System — P
Business Units — P
Active Users — P
Access Menu P
User Classes — P
Secure Socket Layer P P
Virtual Groups — P
Restrictions — P
FTP Commands P P
Admin Access Control
P P
Server Access Control — P
Access Rules P P
Applications Menu
Application — P
Transaction Manager P
Packages — P
Install Agents — P
Install Functions — P
AxwaySecureTransport 5.2.1 SP4 Administrator Guide 483

Appendix B: Troubleshooting common problems
The following topics discuss the most common issues that can occur when using SecureTransport. If you are still having issues after following the procedures in this chapter, contact Axway Global Support for further assistance. For more information, see Support services on page 27.
Communication problemsWhen the SecureTransport Server and the SecureTransport Edge are unable to communicate with each other, you can follow the procedures below. The main symptom of a communication problem is the inability to log into the server from the client. Each topic explains how to troubleshoot the system to determine if you are experiencing one of these common problems. Make sure that you check each item in the order listed.
1. Clock Settings – Verify that the clock settings for the servers are correct.
2. Trust Establishment – Check the log files for errors that can occur between SecureTransport Server and SecureTransport Edge
3. Connectivity – Make sure that the correct IP addresses are listed.
Clocks out of syncIf the clock on both the SecureTransport Server and SecureTransport Edge are out of sync, the two servers might not be able to communicate correctly. Verify that both systems are set for the same time and date.
If you are using the Windows platform, the SecureTransport Edge might not be in the same domain, but in a workgroup instead. If this is the case, the SecureTransport Edge does not use the Windows Time Service and you must manually verify that the clocks are in sync.
When using a UNIX-based platform, make sure that the time formats and time zones are the same. If they are not the same, the imported CA certificate might have a different "valid from" date and time, and are considered invalid until the server reach the listed date and time.
For a large enterprise cluster, the clocks of all servers must be synchronized.
AxwaySecureTransport 5.2.1 SP4 Administrator Guide 484
Appendix B: Troubleshooting common problems
Trust establishment issuesIf the certificates are not configured correctly for both the SecureTransport Server and the SecureTransport Edge, trust might not be properly established between the two systems. Try the following procedures to verify your trust settings.
l To establish trust between SecureTransport Server and SecureTransport Edge, you need to exchange Trusted CA certificates. Exchanging certificates consists of:
o Saving the CA certificate for SecureTransport Server to a file on a local system and importing the file to the SecureTransport Edge using the SecureTransport Administration Tool.
o Saving the CA certificate for SecureTransport Edge to a file on a local system and importing the file to the SecureTransport Server using the SecureTransport Administration Tool.
To export or import a CA certificate, see Manage trusted CAs on page 95.
Common certificate errorsIf certificates are not correctly imported or the certificate has expired, you might see ERROR-level entries regarding SSL handshaking in the server log on the SecureTransport Server such as:
com.valicert.brules.eventmonitor - SSL handshake failed
Specific issues that can cause an error include:
l SecureTransport Server CA certificate is not imported into Edge.
l SecureTransport Edge CA certificate is not imported into Server.
l SecureTransport Server CA certificate is expired.
l SecureTransport Edge CA certificate is expired.
l SecureTransport Server certificate is expired.
l SecureTransport Edge certificate is expired.
Use Setup > Certificates to view the certificates and monitor expiration dates on a regular basis.
ConnectivityCommunication issues can arise when IP addresses are not recognized properly. Use the following procedures to check your connectivity settings.
l Make sure that the correct IP addresses are listed for the SecureTransport Server and SecureTransport Edge in the hosts file. For details, see Incorrect host name and IP address in
the host file on page 487.
l Make sure that the network zones on the SecureTransport Server and SecureTransport Edge are correct and consistent.
l Make sure that the SecureTransport Server is listed as an allowed server on the SecureTransport Edge.
AxwaySecureTransport 5.2.1 SP4 Administrator Guide 485
Appendix B: Troubleshooting common problems
l Make sure that the Streaming.TrustedAliases server configuration parameter is set
correctly. For more information, see Secure the communication between the TM server and the protocol servers on page 177.
l Make sure that the firewall is configured correctly. For more information on configuring the firewall, see Firewall settings on page 530.
Servers do not startIf a SecureTransport protocol or TM server does not start, check the following topics to troubleshoot the problem. Make sure you check each item in the order listed.
1. SSL Certificate – Verify that the SSL certificate is properly configured for the server.
2. Conflicting Port Numbers – Verify that the port number assigned to the server is not in use elsewhere.
3. Host Name – Look in the server host file for an entry for each host name with the correct IP address.
No SSL certificate configured for the serverVerify that the SSL certificate configured for the server has not expired. If the certificate is valid, use the following procedure to make sure that the SSL certificate is properly configured for the server that is not starting.
1. Select Operations > Server Control.
2. For each server, select an appropriate certificate alias from the SSL Key Alias list.
3. At the bottom of the page, click Update.
4. Restart each server for which you changed the certificate.
In a synchronized configuration, the certificate aliases must match on the primary and the secondary nodes, or after synchronizing, the link between the server and the certificate is broken.
Conflicting port numbersMake sure the port number assigned to the server is not in use elsewhere, such as the operating system SSH server using port 22. To check the port, open the SecureTransport Administration Tool and select Operations > Server Control. Verify that the ports assigned to the FTP Server, the HTTP server, the AS2 Server, the SSH server, and the PeSIT Server are not in use by other servers.
AxwaySecureTransport 5.2.1 SP4 Administrator Guide 486
Appendix B: Troubleshooting common problems
Incorrect host name and IP address in the host fileVerify that the correct IP addresses are in the hosts file for each system running SecureTransport. Look in the hosts file for an entry for each host name with the correct IP address. This file is located in the /etc directory on UNIX-based systems. The hosts file can be found in the WINNT\System32\drivers directory on Windows Server.
Entries in the hosts file have the following format:
127.0.0.1 localhost.localdomain localhost
If the entry is not present, create it. If there is an entry, make sure that it has the correct IP address listed. Entries should have the primary alias for each IP address first, followed by the aliases for all other interfaces. You should also verify that your DNS is set up correctly. For more information, see DNS settings on page 493.
Cannot log in as a clientIf you attempt to login to SecureTransport and the login fails despite using a correct user name and password, try the following topics to troubleshoot the problem. Make sure that you check each item in the order listed.
1. License Issues – Verify that the required licenses are installed and current.
2. Connection to Server – Verify that the client system can communicate with the server and that no other client is experiencing a problem.
3. Authentication – Check the LDAP or SiteMinder settings.
4. LDAP – Verify that the LDAP configuration is set correctly.
5. Unable to use file system commands such as ls – make sure that you have plenty of hard drive space available.
6. Unable to log in to SecureTransport Edge, but can log in to SecureTransport Server – Make sure that the certificates for Edge and Server match.
7. Client certificate authentication fails – Make sure that you do not have two Root CA certificates in the "Trusted Certificates" keystore with an identical DN specified.
8. Logged in to client with reduced functionality – Make sure that you are using the required browser and that the required features are installed and enabled.
9. Session terminates due to CSRF protection – Add the client to the white list.
AxwaySecureTransport 5.2.1 SP4 Administrator Guide 487
Appendix B: Troubleshooting common problems
License issuesIf you get an error indicating that the license is expired or that there is no license available for ad hoc users, verify that the license is installed and within the validity period. Use the following procedure to verify that your license is still valid.
To view server licenses:
1. Open the SecureTransport Administration Tool and select Setup > Server License.
2. Verify that the license is installed and not expired by checking the Core Server License for the FTP and HTTP servers, user accounts, and ad hoc users and the Features License for AS2, SSH, and Connect:Direct protocols and the SiteMinder feature.
3. If your license has passed the expiration date, contact Axway Global Support to renew it. For details, see Support services on page 27.
For each license type, the validity period is given in the Valid from and Valid to fields. Check the following items if your license is valid.
l Make sure that you are using the correct IP address to connect to the server from the client.
l Make sure that your server’s clock is set correctly.
l If you experience a license error, log in to the SecureTransport Administration Tool, select Operations > Server Log, and look in the following log entries for the exact error code and description.
o AS2: AS2D
o FTP or FTPS logins (secure or nonsecure): FTPD
o HTTP or HTTPS logins: HTTPD
o SiteMinder: TM
o SSH: SSHD
o Transaction Manager: TM
Connectivity to server failedSecureTransport Server and SecureTransport Edge must be able to communicate with each other properly. Make sure that the following settings are configured correctly.
l DNS Settings – For details, see DNS settings on page 493.
l Firewall – For details, see Firewall settings on page 530.
SiteMinder issuesCheck the SiteMinder settings to make sure that authentication is configured correctly.
To view the SiteMinder settings:
AxwaySecureTransport 5.2.1 SP4 Administrator Guide 488
Appendix B: Troubleshooting common problems
1. Open the SecureTransport Administration Tool on the SecureTransport Server and select Setup.
2. Select SiteMinder Settings. Verify that the following settings are correct: IP Address, Authorization Port, Authentication Port, Accounting Port, Agent Name, Shared Secret, Maximum Connections, Connection Timeout, File Storage Root Path, Default Home Directory, Default Local User ID, and Default Local Group ID.
LDAP issuesCommon LDAP problems are incorrect LDAP configuration, incorrect service account credentials, and an inability to access LDAP through the firewall. Check the following setting in the SecureTransport Administration Tool to troubleshoot problems:
l Make sure that the credentials LDAP can search through are correct for each user unable to login from the client. If the users are connecting to an Active Directory (AD) LDAP server, the Bind DN and Password need to be specified. AD does not allow anonymous binds. Verify that the user has the correct user name and password and is entering the correct information into the client.
l For Windows-based systems, make sure that the LDAP SysUser is set correctly to a local or domain user that has the necessary permissions on the directory. The LDAP SysUser must be present in the password vault.
l Make sure that the correct LDAP port, generally 389 or 3268, is available to SecureTransport in the firewall.
l Check that for each LDAP-based user, the settings allow the user to obtain the UID/GID (UNIX-based systems only), user type, and home directory either from the LDAP directory (using attribute mapping) or through the user defaults. Make sure that the user home directory exists and has the correct permissions. You can set up a login agent for this purpose.
l Make sure that you use the correct LDAP Protocol version. SecureTransport supports version 2 and version 3. Make sure that the LDAP server is the same version as the one selected in the SecureTransport Administration Tool on the LDAP Server page.
l Try using the ldapsearch command from the command line. If the command fails, you
might have an incorrect search query or insufficient credentials.
l If you are not using attribute mapping, make sure that the home directory exists in the LDAP User Default and that the entry is enabled. For more information, see LDAP logins on page 214.
File system commands not functionalIf you are unable to log in or file system commands such as ls or dir do not work correctly, the server might be low or out of disk drive space on the installation volume. Free up additional disk space and try logging in again.
AxwaySecureTransport 5.2.1 SP4 Administrator Guide 489
Appendix B: Troubleshooting common problems
Cannot log in to SecureTransport EdgeIf you are unable to log in to a SecureTransport Edge, but you can log into the SecureTransport Server directly, make sure that the Internal CA certificate matches the local certificates created for the protocol servers.
Also make sure that your SecureTransport Server and SecureTransport Edge have exchanged certificates as appropriate.
Client certificate authentication failsIf you have two Root CA certificates in the "Trusted Certificates" keystore with an identical DN specified, you might not be able to log into SecureTransport. SecureTransport searches for the first certificate that matches the DN of the Certificate Authority. If a match is found, then SecureTransport does not continue to search. When two or more CA certificates with the same DN exist, the correct CA might never be selected.
Make sure that all CA certificates have unique DN values.
Logged in to client with reduced functionalityTo get access to the full functionality of the following SecureTransport clients, you must use the listed web browser, have the listed features enabled, and have the related software installed.
For both the SecureTransport Browser Client and SecureTransport Web Access Plus:
l The web browser must have JavaScript enabled.
For the SecureTransport Browser Client basic functionality:
l Supported web browsers are listed in Axway and third-party software support on page 23.
For the SecureTransport Browser Client Web Client Control:
l Supported web browsers are listed in Axway and third-party software support on page 23.
l The SecureTransport server must have the Web Client ActiveX Control configured as described in Enable and configure the SecureTransport Web Client Control on page 82.
l Internet Explorer must allow the download of ActiveX controls from the SecureTransport server.
l After the Web Client Control is downloaded, it must not be disabled in the Manage Add-ons window.
For the SecureTransport Web Access Plus:
l Supported web browsers are listed in Axway and third-party software support on page 23.
For the full SecureTransport Web Access Plus functionality:
l Java 1.6 (Java 6) or higher must be installed on the client computer and enabled in the web browser. If the requirsed version of Java is not installed and enabled, the Light Web Access Plus
AxwaySecureTransport 5.2.1 SP4 Administrator Guide 490
Appendix B: Troubleshooting common problems
functionality is available. For details, refer to the SecureTransport Web Client User's Guide.
Session terminates due to CSRF protectionSecureTransport implements token-based cross-site request forgery (CSRF) protection. This prevents a user who is logged in to a SecureTransport web client from causing unwanted modification of user data, such as uploading or deleting a file, by opening a malicious web page or clicking a crafted link in another browser tab or window. When the CSRF protection detects a violation, SecureTransport marks the session as expired and logs out the user.
If an HTTP client identifies itself with a User-Agent string, SecureTransport matches the string against a white list of clients represented by a Perl-compatible regular expression. If the User-Agent string matches, SecureTransport does not perform CSRF protection. By default, the white list is (^SecureTransport|^Axway/SecureClient|^Axway/EndPoint|Java|^curl/|^Jakarta Commons\-HttpClient).
To configure a different white list, save the regular expression in the Http.UserAgentWhiteList server configuration parameter. To exclude another client from CSRF protection, add a pattern that matches the User-Agent string for that client to the regular expression. For example, to exclude Wget in addition to the clients in default, set the value of the Http.UserAgentWhiteList server configuration parameter to (^SecureTransport|^Axway/SecureClient|^Axway/EndPoint|Java|^curl/|^Jakarta Commons\-HttpClient|^Wget). If the value of the Http.UserAgentWhiteList server configuration parameter is empty, SecureTransport uses the default white list.
FTP does not work through the firewallIf you are having a problem using FTP through a firewall, use the following topics to help you troubleshoot the problem. Make sure you check each item in the order listed.
1. Firewall Rules – Verify that the firewall rules open the ports specified for using FTP.
2. Passive Port Range – Make sure the passive port range is configured correctly.
3. Check Point Firewalls – Make sure you set up the Check Point firewall to use bidirectional transfers.
Firewall rules prevent the port from openingMake sure the rules for your firewall open the ports specified for using FTP. For more information, see Firewall settings on page 530.
AxwaySecureTransport 5.2.1 SP4 Administrator Guide 491
Appendix B: Troubleshooting common problems
Passive port range is not defined in the firewallConfigure the passive mode port range in your firewall if you are planning on using passive FTP. The passive range is defined on the SecureTransport Server and must be made available on the firewall. To set the passive range on the SecureTransport Server, open the SecureTransport Administration Tool and select Setup > FTP Settings. Configure the port range in the FTP Passive Mode pane of the page.
Firewalls with no stateful inspection must make this port range explicitly available. Firewalls that support stateful inspection can define the port range dynamically. To ensure proper operation, the FTP control channel must not be encrypted. If you are using a third-party secure FTP client, use Clear Command Channel (CCC).
If you are using Axway Secure Client, you can use firewall-friendly Tunnel mode.
Note Because the Axway Secure Client firewall-friendly Tunnel mode uses SSL v3, you cannot use it for FTPS in FIPS transfer mode.
Check Point firewall is not configured for bidirectional transfersThe symptoms of incorrectly configured bidirectional FTP transfers include:
l The error message message_info violated unidirectional connection in the
Check Point log viewer
l Bidirectional FTP data connections getting dropped
These symptoms can occur because bidirectional FTP data connections are not allowed by default. Bidirectional FTP data connections are not considered as safe since the data connection is interactive and the connection changes the basic way FTP works.
Check Point firewalls need to be configured to use bidirectional transfers. In the Check Point NG firewall (AI R55 and higher), set the FTP connection to FTP_BASIC. This allows bidirectional communications and sets the firewall to allow commands not terminated with a new line.
PeSIT file transfer from Axway Transfer CFT to SecureTransport fail for certain ciphers
A change to CBC ciphers in SecureTransport made in response to CVE-2011-3398 causes older version of Transfer CFT and other PeSIT clients to fail to transfer files to a SecureTransport server. These clients fail because they do have the update or have other deficiencies in their SSL implementations.
To enable these clients to transfer to SecureTransport, add the following line after the last Java_OPTS= line in <FILEDRIVEHOME>/bin/start_pesitd to disable the fix in SecureTransport:
AxwaySecureTransport 5.2.1 SP4 Administrator Guide 492
Appendix B: Troubleshooting common problems
JAVA_OPTS="-Djsse.enableCBCProtection=false $JAVA_OPTS"
Performance issuesWhen SecureTransport performance is reduced from previous levels or is not consistent your expectations, use the checklist below to troubleshoot the issue and determine if performance can be improved. Make sure you check each item in the order listed.
1. Evaluate performance issues – Investigate factors that might result in reduced performance.
2. DNS Settings – Verify that the DNS settings for the servers are correct by using nslookup in
Windows or UNIX-based systems.
3. Firewall Settings – Verify that the firewall is configured properly for SecureTransport and that no other application is also experiencing a firewall problem.
4. System Resources – Look at the memory and CPU usage for any other services running on the same computer.
5. Installation Drive – To avoid performance problems, always install SecureTransport on a local disk drive.
6. Log Level – Check the log level.
Evaluate performance issuesBefore considering configuration changes to improve performance, investigate factors that might result in reduced performance. Consider the following factors:
l How many transfers have occurred during recent typical and peak transfer periods? Has the number of transfers increased from the levels before the performance problems were observed?
l How many concurrent users or partner sessions are transferring files during recent typical and peak transfer periods? Has the number of user or sessions increased from the levels before the performance problems were observed?
l Is your organization no longer meeting service level agreements with your customers?
If performance issues are due to increased workload, perhaps increasing slowly over time, evaluate implementing a high-capacity cluster or adding a server to an existing high-capacity cluster to accommodate the additional workload.
DNS settingsTry the following procedures to verify that your DNS settings are not causing performance to deteriorate.
l Verify that the DNS settings for the servers are correct by using nslookup in Windows or UNIX-
based systems. If the nslookup returns an error you need to reconfigure your DNS settings. If
nslookup times out, make sure that the firewall allows port 53 UDP/TCP.
AxwaySecureTransport 5.2.1 SP4 Administrator Guide 493
Appendix B: Troubleshooting common problems
l Reverse DNS lookups are used to resolve an IP address into a fully qualified domain name. The domain name is used for logging purposes and for applying access rules that specify a host name instead of an IP address. Reverse DNS lookups might cause server performance to deteriorate since a series of requests through the DNS name server tree is made each time.
To disable reverse DNS lookups for the FTP server and the HTTP server:
1. Open the SecureTransport Administration Tool in a web browser and log in as the administrator.
2. Select Setup > Miscellaneous.
3. For FTP Reverse DNS Lookups and HTTP Reverse DNS Lookups, choose Reverse DNS lookups disabled.
4. Click Apply.
To disable DNS lookups for Administration Tool server:
1. Open the SecureTransport Administration Tool in a web browser and log in as the administrator.
2. Select Operations > Server Configuration.
3. Search for the Admin.ReverseDNSLookup system configuration parameter.
4. Click the Edit icon ( ) in the Edit column, type Off in the Value column, and click the Save icon ( ) in the Edit column.
5. Restart the server.
l If you need to use reverse DNS lookups, make sure that the DNS path is not blocked by a firewall. Firewalls can block the DNS path when SecureTransport is in the peripheral network (DMZ). Try one of the following workarounds to allow access through the firewall:
o Allow SecureTransport access to port 53 TCP/UDP.
o Include a hosts file entry for every computer using the Administration Tool.
o Connect to the Administration Tool through a proxy, and put a host file entry for just the proxy.
l In some cases, SecureTransport performs NIS lookups for users and groups, even when real users are disabled in SecureTransport. If there is a large number of users defined in NIS, server performance can deteriorate. To work around the issue, take the computer out of NIS.
Firewall issuesTo eliminate any possible firewall settings that can affect performance, check the following:
l Make sure the ports SecureTransport user are set correctly. If your firewall uses passive mode, make sure that you are using Clear Command Channel (CCC) or Firewall Friendly mode.
l Verify that no other applications are experiencing problems with the firewall.
AxwaySecureTransport 5.2.1 SP4 Administrator Guide 494

Appendix B: Troubleshooting common problems
l The Transaction Manager has a timeout value that allows connections to close before the firewall can close them. Make sure the timeout setting in <FILEDRIVEHOME>/brules/conf/brules.xml on the SecureTransport Server is a
lower value than the timeout setting for the firewall. Look for the following setting in the Event Monitor element in the file:
<!-- single simple value, timeout in seconds -->
<client timeout="900"/>
Change the setting to be smaller than the value of the firewall timeout.
Other services using too much CPU or memoryOne possible reason performance deteriorates can be caused by other services using too many system resources. Perform the following procedures to fine tune performance.
l Look at the memory and CPU usage for any other services running on the same computer. If you turn off all the SecureTransport services, but you still see high memory usage, you might need to add more memory or assign a dedicated memory amount to SecureTransport. If the CPU usage is still too high, you need to move some of the services to another computer or turn them off. If you can configure the services to use less CPU resources, do so.
Because SecureTransport is a CPU-intensive application, during peak demand times, it can consume most or all of the CPU resources. This can reduce the performance of other services. To provide sufficient processor resources for SecureTransport and other services, allocate a computer with higher processing power to SecureTransport. For example, employ a computer with multiple processors.
Installation on network driveThe SecureTransport Server and Edge must access disk files and the database on disk for all file transfer and processing actions. If SecureTransport is installed on a network or shared drive, application performance depends on network throughput and processes from other computers accessing the drive.
SecureTransport installation on a network drive, regardless of its performance characteristics, is not supported. To avoid performance problems, always install SecureTransport on a local disk drive.
Debug log output slows computerYou might need to set the log level for one or more of the SecureTransport logs configured in files in the <FILEDRIVEHOME>/conf/ directory to debug to produce a detailed log for problem isolation. If you leave a log set to debug, it can produce a very large volume of log output. Because this keeps the database and disk busy, it can affect the performance of all processes running on the computer.
AxwaySecureTransport 5.2.1 SP4 Administrator Guide 495
Appendix B: Troubleshooting common problems
l Always reset the log level after using debug to gather log information for problem isolation.
l Never set a log level to debug for routine operation.
AxwaySecureTransport 5.2.1 SP4 Administrator Guide 496
Appendix C: FIPS transfer mode
This appendix describes FIPS transfer mode for client-initiated and server-initiated transfers.
FIPS transfer mode detailsFor client-initiated file transfers using the AS2 (SSL), FTPS, HTTPS, PeSIT (SSL, legacy SSL), or SSH (SFTP and SCP) protocols, you can restrict the Axway SecureTransport Server to use only FIPS 140-2 Level 1 certified cryptographic libraries. This requires the sender and the recipient (clients and partner servers) to use only approved algorithms, ciphers, and cipher suites and assures that the entire transfer is secure at FIPS 140-2 Level 1.
Note Because Axway Secure Client firewall-friendly Tunnel Mode uses SSL v3, you cannot use it for FTPS in FIPS transfer mode.
For the relevant protocols, you can select Enable FIPS Transfer Mode in the Server Control page or the Add Transfer Site or Edit Transfer Site page.
For client-initiated transfers, see Manage your servers on page 31.
Note Enabling FIPS transfer mode for a protocol server causes transfers to fail if the client that uses that server does not provide the required FIPS cipher or cipher suite.
For server-initiated transfers, see Transfer sites on page 274.
Note Enabling FIPS Transfer Mode for an existing transfer site causes transfers to fail if the other server does not provide the required cipher or cipher suite.
FIPS certified cryptographic librariesSecureTransport uses the following cryptographic library in FIPS transfer mode:
l Security Builder® FIPS Java Module Version 2.8, FIPS 140-2 Validation Certificate No. 1637 – Used for all server-initiated and client-initiated transfers.
Required ciphers and cipher suitesIn FIPS transfer mode, SecureTransport advertises the following ciphers, cipher suites, or algorithms in the order given. The remote system must use one of them for the file transfer to succeed.
Cipher suites for AS2 (SSL) transfers initiated by the remote site:
l TLS_DHE_RSA_WITH_AES_256_CBC_SHA
l TLS_RSA_WITH_AES_256_CBC_SHA
AxwaySecureTransport 5.2.1 SP4 Administrator Guide 497
Appendix C: FIPS transfer mode
l TLS_DHE_RSA_WITH_AES_128_CBC_SHA
l TLS_RSA_WITH_AES_128_CBC_SHA
l TLS_DHE_RSA_WITH_3DES_EDE_CBC_SHA
l TLS_RSA_WITH_3DES_EDE_CBC_SHA
Cipher suites for server-initiated transfers using AS2:
l TLS_DHE_DSS_WITH_AES_256_CBC_SHA
l TLS_DHE_RSA_WITH_AES_256_CBC_SHA
l TLS_RSA_WITH_AES_256_CBC_SHA
l TLS_DHE_DSS_WITH_AES_128_CBC_SHA
l TLS_DHE_RSA_WITH_AES_128_CBC_SHA
l TLS_RSA_WITH_AES_128_CBC_SHA
l TLS_DHE_DSS_WITH_3DES_EDE_CBC_SHA
l TLS_DHE_RSA_WITH_3DES_EDE_CBC_SHA
l TLS_RSA_WITH_3DES_EDE_CBC_SHA
Cipher suites for client-initiated transfers using FTPS and HTTPS:
l TLS_RSA_WITH_AES_256_CBC_SHA
l TLS_RSA_WITH_AES_128_CBC_SHA
l TLS_RSA_WITH_3DES_EDE_CBC_SHA
Cipher suites for server-initiated transfers using FTPS and HTTPS:
l TLS_DHE_DSS_WITH_AES_256_CBC_SHA
l TLS_DHE_RSA_WITH_AES_256_CBC_SHA
l TLS_RSA_WITH_AES_256_CBC_SHA
l TLS_DHE_DSS_WITH_AES_128_CBC_SHA
l TLS_DHE_RSA_WITH_AES_128_CBC_SHA
l TLS_RSA_WITH_AES_128_CBC_SHA
l TLS_DHE_DSS_WITH_3DES_EDE_CBC_SHA
l TLS_DHE_RSA_WITH_3DES_EDE_CBC_SHA
l TLS_RSA_WITH_3DES_EDE_CBC_SHA
Ciphers for transfers using SSH (SCP/SFTP):
l aes256-cbc
l aes192-cbc
l aes128-cbc
l 3des-cbc
Algorithms for key exchange:
AxwaySecureTransport 5.2.1 SP4 Administrator Guide 498

Appendix C: FIPS transfer mode
l diffie-hellman-group1-sha1
l diffie-hellman-group14-sha1
l diffie-hellman-group-exchange-sha1
Algorithm for message authentication codes:
l HMAC-SHA1
Ciphers for transfers using SSH (SCP/SFTP):
Algorithms for key exchange:
l diffie-hellman-group1-sha1
l diffie-hellman-group14-sha1
l diffie-hellman-group-exchange-sha1
Algorithm for message authentication codes:
l HMAC-SHA1
Note In FIPS transfer mode, SecureTransport ignores the values of the Ftp.Listeners.Ssl.enabledCipherSuites and Http.Ssl.EnabledCipherSuites server configuration parameters.
AxwaySecureTransport 5.2.1 SP4 Administrator Guide 499
Appendix D: Command line utilities
The Axway SecureTransport Server includes several utility files that allow users to manually perform functions like installing a license file, stopping a server, and starting a server. These files are scripts on UNIX and batch files (.bat) on Windows. The utility files are located in the <FILEDRIVEHOME>/bin directory.
Utility files on page 500 provides a summary of the utilities and their functions.
Note If an alias is used to install SecureTransport, use the -A option for any other commands for the server on UNIX. For example, to stop all servers for a SecureTransport installation with an alias as myserver on UNIX, use the following command:./stop_all -A myserverOn Windows, you do not need to use the -A option. Instead, use the following command:stop_all
Control the serversIf a private key is specified for a server during installation and the server needs to be stopped or restarted, you must type the password for the private key. If the password is entered incorrectly during the boot process, use the Ctrl+C keyboard combination to stop the boot process and then restart the server.
Utility filesSecureTransport includes the utility files listed in the following table:
Utility file Description
bounce Bounces the SecureTransport protocol servers.
bounce_
cluster
Bounces the protocol servers on all SecureTransport servers in the cluster.
collect_
support_
information
Collects information for Axway Global Support as specified on the Support Tool Configuration page.
AxwaySecureTransport 5.2.1 SP4 Administrator Guide 500
AppendixD: Command line utilities
Utility file Description
gencsr Generates a key pair and the associated certificate request file. Users can submit the CSR file to a CA to get a CA-issued certificate.
install_
secret
Installs a file that contains randomly-generated data. The secret file
secures the admin system cookies and is used for other encryption. Use this
utility only immediately after the server is installed.
log_export Export server log or File Tracking (transfer log) entries from the database in CSV or DBF format.
mkadmin Adds a new administrator account or changes the password of an existing administrator account.. Changes are automatically synchronized across all servers in a standard or large enterprise cluster, unless the -sync=n option
is present.
mksecret Installs a file that contains random data, which is used to secure the admin system cookies as well as providing key material for encrypting passwords and sensitive information in configuration files. Use this utility only after the server is installed.
Note After you run mksecret, you must restart SecureTransport servers. Run stop_all and then run start_all.
repconv Updates repository encryption by decrypting files encrypted in a previous version of SecureTransport and encrypting them for the current version. Can also change the cipher algorithm and certificate SecureTransport uses to encrypt files and decrypt files and folders.
show_ports Displays the ports on which the servers are configured to run.
start_admin Starts the Administration Tool server.
start_all Starts all SecureTransport servers.
start_as2d Starts the AS2 server.
start_db Starts the embedded database server.
start_ftpd Starts the FTP server.
start_httpd Starts the HTTP server.
start_
pesitd
Starts the PeSIT server.
AxwaySecureTransport 5.2.1 SP4 Administrator Guide 501
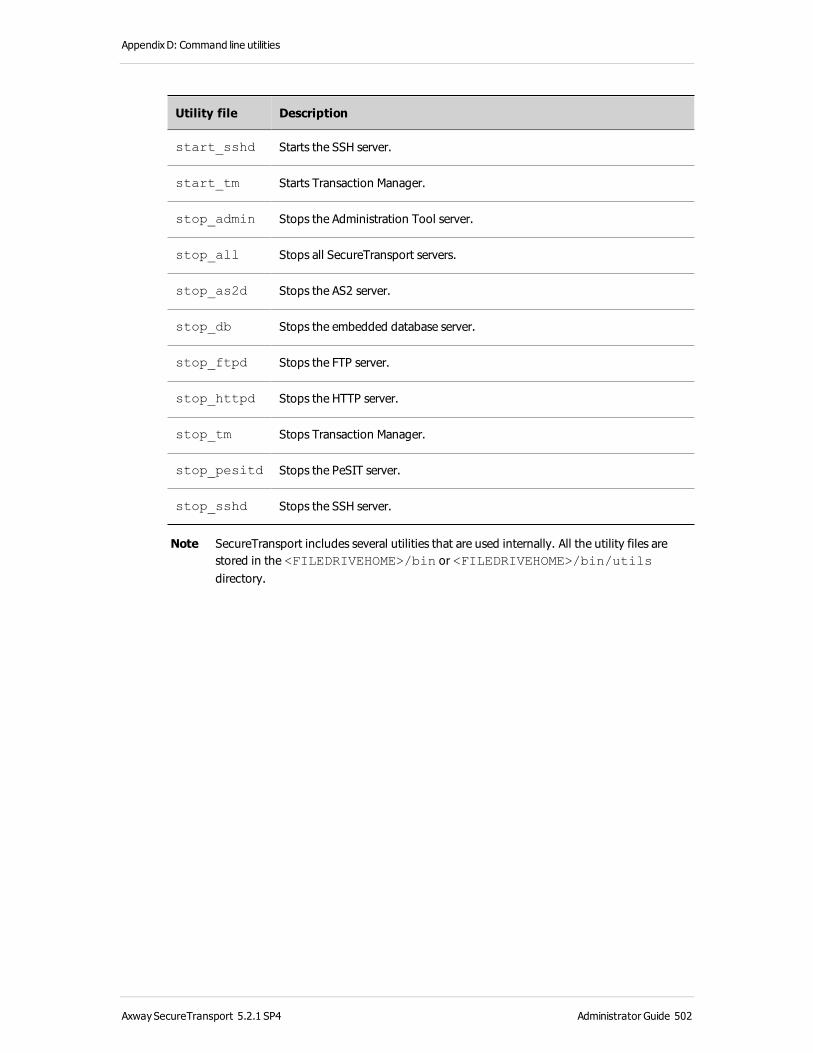
AppendixD: Command line utilities
Utility file Description
start_sshd Starts the SSH server.
start_tm Starts Transaction Manager.
stop_admin Stops the Administration Tool server.
stop_all Stops all SecureTransport servers.
stop_as2d Stops the AS2 server.
stop_db Stops the embedded database server.
stop_ftpd Stops the FTP server.
stop_httpd Stops the HTTP server.
stop_tm Stops Transaction Manager.
stop_pesitd Stops the PeSIT server.
stop_sshd Stops the SSH server.
Note SecureTransport includes several utilities that are used internally. All the utility files are stored in the <FILEDRIVEHOME>/bin or <FILEDRIVEHOME>/bin/utils directory.
AxwaySecureTransport 5.2.1 SP4 Administrator Guide 502
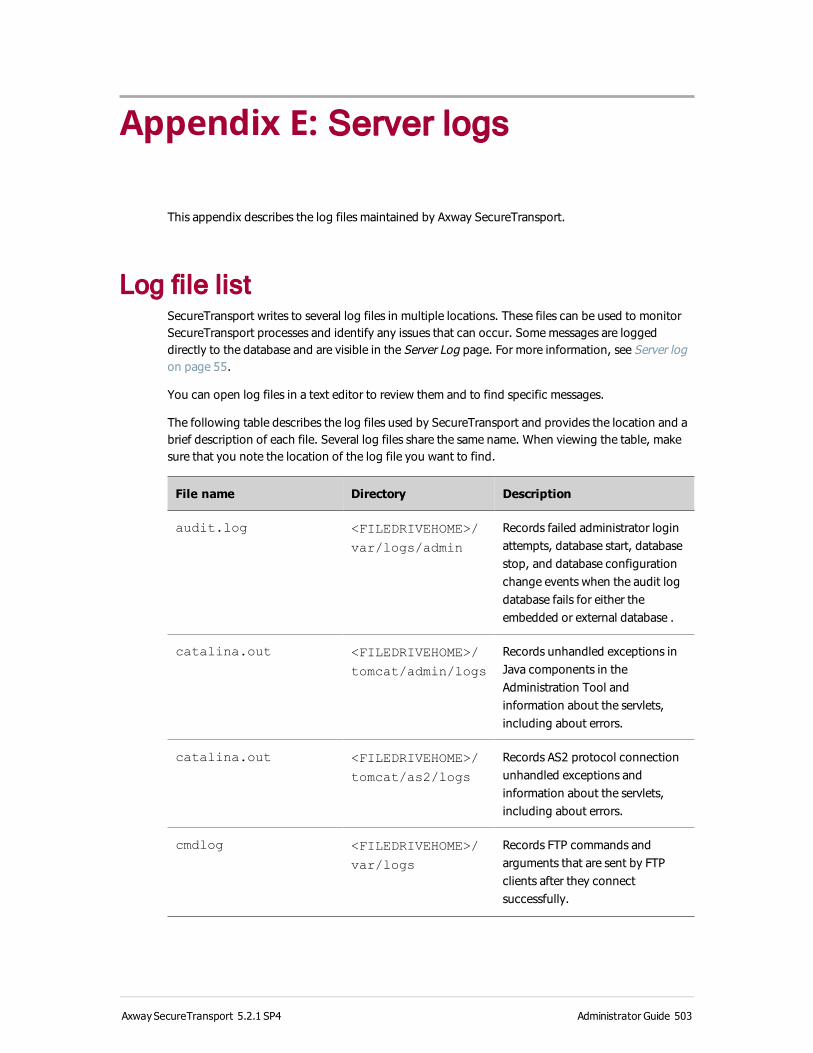
Appendix E: Server logs
This appendix describes the log files maintained by Axway SecureTransport.
Log file listSecureTransport writes to several log files in multiple locations. These files can be used to monitor SecureTransport processes and identify any issues that can occur. Some messages are logged directly to the database and are visible in the Server Log page. For more information, see Server log on page 55.
You can open log files in a text editor to review them and to find specific messages.
The following table describes the log files used by SecureTransport and provides the location and a brief description of each file. Several log files share the same name. When viewing the table, make sure that you note the location of the log file you want to find.
File name Directory Description
audit.log <FILEDRIVEHOME>/
var/logs/admin
Records failed administrator login attempts, database start, database stop, and database configuration change events when the audit log database fails for either the embedded or external database .
catalina.out <FILEDRIVEHOME>/
tomcat/admin/logs
Records unhandled exceptions in Java components in the Administration Tool and information about the servlets, including about errors.
catalina.out <FILEDRIVEHOME>/
tomcat/as2/logs
Records AS2 protocol connection unhandled exceptions and information about the servlets, including about errors.
cmdlog <FILEDRIVEHOME>/
var/logs
Records FTP commands and arguments that are sent by FTP clients after they connect successfully.
AxwaySecureTransport 5.2.1 SP4 Administrator Guide 503
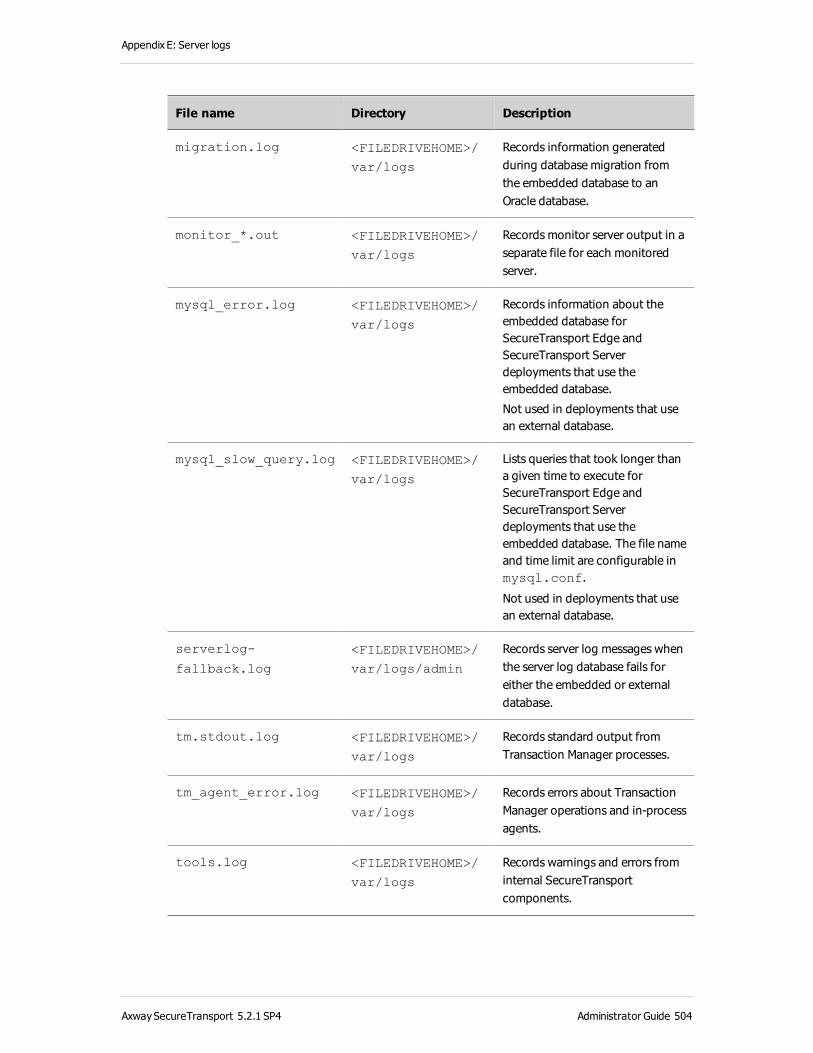
Appendix E: Server logs
File name Directory Description
migration.log <FILEDRIVEHOME>/
var/logs
Records information generated during database migration from the embedded database to an Oracle database.
monitor_*.out <FILEDRIVEHOME>/
var/logs
Records monitor server output in a separate file for each monitored server.
mysql_error.log <FILEDRIVEHOME>/
var/logs
Records information about the embedded database for SecureTransport Edge and SecureTransport Server deployments that use the embedded database.
Not used in deployments that use an external database.
mysql_slow_query.log <FILEDRIVEHOME>/
var/logs
Lists queries that took longer than a given time to execute for SecureTransport Edge and SecureTransport Server deployments that use the embedded database. The file name and time limit are configurable in mysql.conf.
Not used in deployments that use an external database.
serverlog-
fallback.log
<FILEDRIVEHOME>/
var/logs/admin
Records server log messages when the server log database fails for either the embedded or external database.
tm.stdout.log <FILEDRIVEHOME>/
var/logs
Records standard output from Transaction Manager processes.
tm_agent_error.log <FILEDRIVEHOME>/
var/logs
Records errors about Transaction Manager operations and in-process agents.
tools.log <FILEDRIVEHOME>/
var/logs
Records warnings and errors from internal SecureTransport components.
AxwaySecureTransport 5.2.1 SP4 Administrator Guide 504
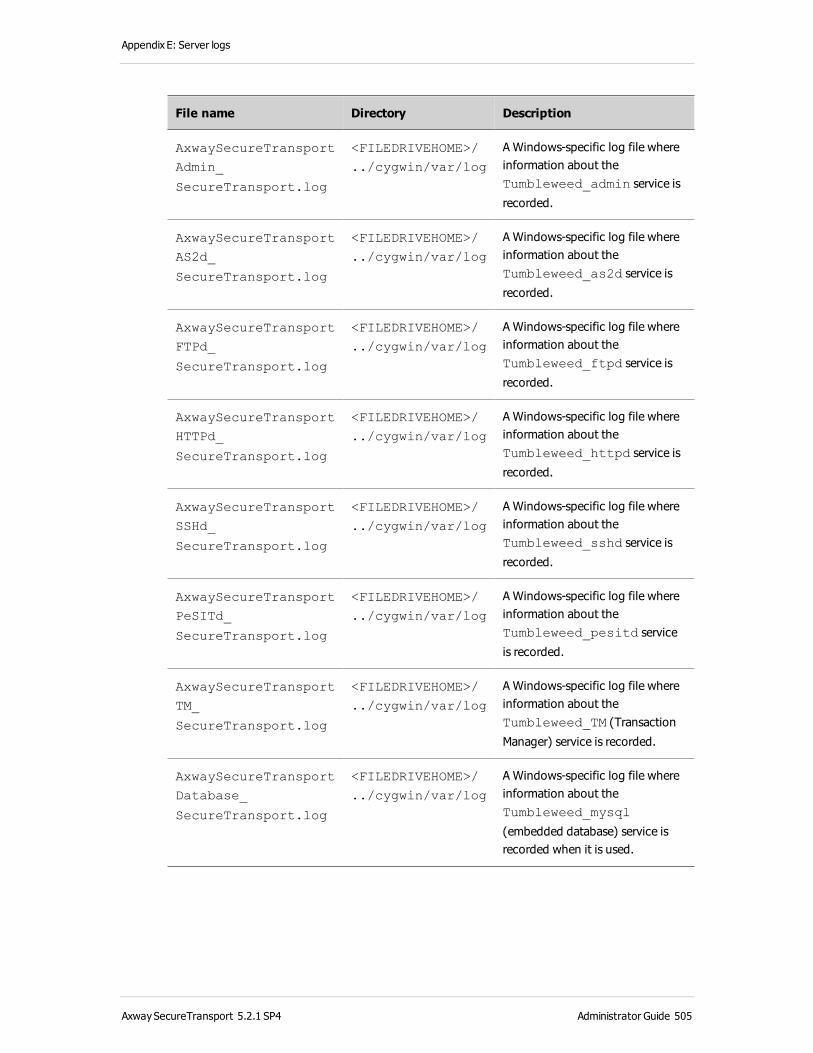
Appendix E: Server logs
File name Directory Description
AxwaySecureTransport
Admin_
SecureTransport.log
<FILEDRIVEHOME>/
../cygwin/var/log
A Windows-specific log file where information about the Tumbleweed_admin service is
recorded.
AxwaySecureTransport
AS2d_
SecureTransport.log
<FILEDRIVEHOME>/
../cygwin/var/log
A Windows-specific log file where information about the Tumbleweed_as2d service is
recorded.
AxwaySecureTransport
FTPd_
SecureTransport.log
<FILEDRIVEHOME>/
../cygwin/var/log
A Windows-specific log file where information about the Tumbleweed_ftpd service is
recorded.
AxwaySecureTransport
HTTPd_
SecureTransport.log
<FILEDRIVEHOME>/
../cygwin/var/log
A Windows-specific log file where information about the Tumbleweed_httpd service is
recorded.
AxwaySecureTransport
SSHd_
SecureTransport.log
<FILEDRIVEHOME>/
../cygwin/var/log
A Windows-specific log file where information about the Tumbleweed_sshd service is
recorded.
AxwaySecureTransport
PeSITd_
SecureTransport.log
<FILEDRIVEHOME>/
../cygwin/var/log
A Windows-specific log file where information about the Tumbleweed_pesitd service
is recorded.
AxwaySecureTransport
TM_
SecureTransport.log
<FILEDRIVEHOME>/
../cygwin/var/log
A Windows-specific log file where information about the Tumbleweed_TM (Transaction
Manager) service is recorded.
AxwaySecureTransport
Database_
SecureTransport.log
<FILEDRIVEHOME>/
../cygwin/var/log
A Windows-specific log file where information about the Tumbleweed_mysql
(embedded database) service is recorded when it is used.
AxwaySecureTransport 5.2.1 SP4 Administrator Guide 505
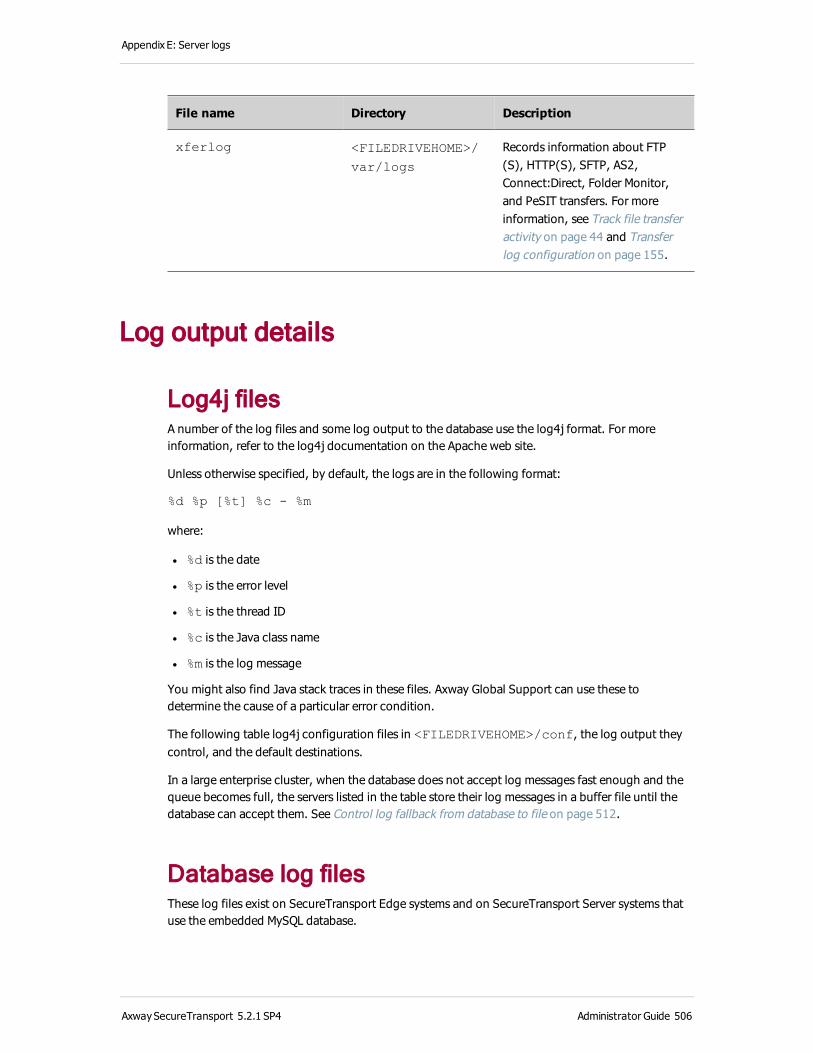
Appendix E: Server logs
File name Directory Description
xferlog <FILEDRIVEHOME>/
var/logs
Records information about FTP(S), HTTP(S), SFTP, AS2, Connect:Direct, Folder Monitor, and PeSIT transfers. For more information, see Track file transfer activity on page 44 and Transfer log configuration on page 155.
Log output details
Log4j filesA number of the log files and some log output to the database use the log4j format. For more information, refer to the log4j documentation on the Apache web site.
Unless otherwise specified, by default, the logs are in the following format:
%d %p [%t] %c - %m
where:
l %d is the date
l %p is the error level
l %t is the thread ID
l %c is the Java class name
l %m is the log message
You might also find Java stack traces in these files. Axway Global Support can use these to determine the cause of a particular error condition.
The following table log4j configuration files in <FILEDRIVEHOME>/conf, the log output they control, and the default destinations.
In a large enterprise cluster, when the database does not accept log messages fast enough and the queue becomes full, the servers listed in the table store their log messages in a buffer file until the database can accept them. See Control log fallback from database to file on page 512.
Database log filesThese log files exist on SecureTransport Edge systems and on SecureTransport Server systems that use the embedded MySQL database.
AxwaySecureTransport 5.2.1 SP4 Administrator Guide 506
Appendix E: Server logs
mysql_error.log – This log file contains the messages from the embedded database server. The log file contains information indicating when mysqld was started and stopped and also any critical errors that occur while the server is running. For more information on MySQL, refer to the documentation of the error log on the MySQL Developer Zone website.
mysql_slow_query.log – This log file contains SQL statements that took more than long_query_time seconds to execute. For more information on MySQL, refer to the documentation of the slow query log on the MySQL Developer Zone website.
FTPD log filecmdlog – This log file contains the FTP commands and arguments that are sent by FTP clients after they connect successfully. (Thus, it does not show the USER and PASS commands.) Note that this log is not enabled by default. For more information, see FTP command log configuration on page 153.
The format of this file is:
date time [process ID]: username: command
Admin log fileaudit.log – This log file contains information on configuration changes made by Java components of the SecureTransport Administration Tool and database starts and stops. When the configuration changes are logged to the database (the default), failed administrator login attempts and database starts, stops, and configuration changes are still logged to this file.
The format and content of this file is controlled by the <FILEDRIVEHOME>/conf/admin-log4j.xml file. This file uses the log4j format. By default, the logs are in the following format:
%d %s %m
Where:
l %d is the date
l %s is the subcomponent
l %m is the log message
General log filesxferlog – This log file contains information about uploads and downloads for all protocols.
The xferlog file records information about all the AS2, FTP(S), HTTP(S), PeSIT, and SFTP transfers made with SecureTransport Server and Edge. This information is also stored in the database.
Each server entry is composed of a single line of the format shown below. All fields are separated by spaces.
AxwaySecureTransport 5.2.1 SP4 Administrator Guide 507
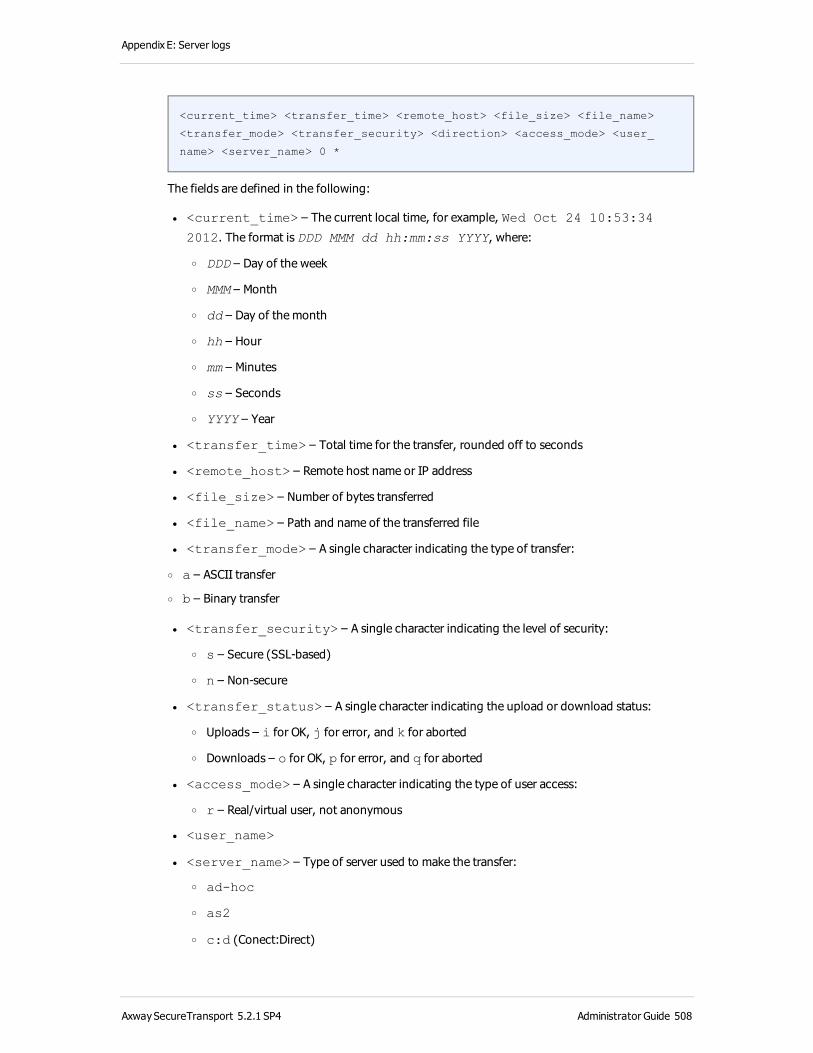
Appendix E: Server logs
<current_time> <transfer_time> <remote_host> <file_size> <file_name>
<transfer_mode> <transfer_security> <direction> <access_mode> <user_
name> <server_name> 0 *
The fields are defined in the following:
l <current_time> – The current local time, for example, Wed Oct 24 10:53:34
2012. The format is DDD MMM dd hh:mm:ss YYYY, where:
o DDD – Day of the week
o MMM – Month
o dd – Day of the month
o hh – Hour
o mm – Minutes
o ss – Seconds
o YYYY – Year
l <transfer_time> – Total time for the transfer, rounded off to seconds
l <remote_host> – Remote host name or IP address
l <file_size> – Number of bytes transferred
l <file_name> – Path and name of the transferred file
l <transfer_mode> – A single character indicating the type of transfer:
o a – ASCII transfer
o b – Binary transfer
l <transfer_security> – A single character indicating the level of security:
o s – Secure (SSL-based)
o n – Non-secure
l <transfer_status> – A single character indicating the upload or download status:
o Uploads – i for OK, j for error, and k for aborted
o Downloads – o for OK, p for error, and q for aborted
l <access_mode> – A single character indicating the type of user access:
o r – Real/virtual user, not anonymous
l <user_name>
l <server_name> – Type of server used to make the transfer:
o ad-hoc
o as2
o c:d (Conect:Direct)
AxwaySecureTransport 5.2.1 SP4 Administrator Guide 508

Appendix E: Server logs
o folder (Folder Monitor)
o ftp
o http
o pesit
o ssh
l A zero (0)
l An asterisk (*)
Note The zero and asterisk are inserted as authentication method and authenticated user id respectively for compatibility with the wu-ftp log format.
The following is an example of a typical log entry:
Wed Jan 11 10:55:13 2006 3 10.191.2.33 5873
/drives/c/home/Virtual/vuser/avatar.jpg b s i r vuser http 0 *
Note On Windows, it is not possible to modify existing cron jobs or to use cron to run any jobs other than those SecureTransport jobs documented in these sections. Instead, use the Windows Task Scheduler.
tools.log – This log4j-format log file records warnings and error from internal SecureTransport components. The format and content of this file is controlled by the <FILEDRIVEHOME>/conf/tools-log4j.xml file.
For example, importing accounts using command-line tool might produce the following message:
2010-11-16 00:56:14,505 PST WARN [main]
com.tumbleweed.st.server.appframework.sql.SessionFactoryManagerImpl -
Component type '' is unknown. Using TOOLS configuration.
Change the log4j filesYou can set up the rotation of several log files based on the file size by editing the files listed under Log4j files on page 506.
In this example, the configuration file is <FILEDRIVEHOME>/conf/tm-log4j.xml. The example uses FILEDRIVEHOME instead of <FILEDRIVEHOME> to represent the SecureTransport installation directory to avoid confustion with the syntactic use of pointed brackets in XML.
Change:
<appender name="ServerLog"
class="com.tumbleweed.st.server.logging.DailyRollingFileAppender">
AxwaySecureTransport 5.2.1 SP4 Administrator Guide 509
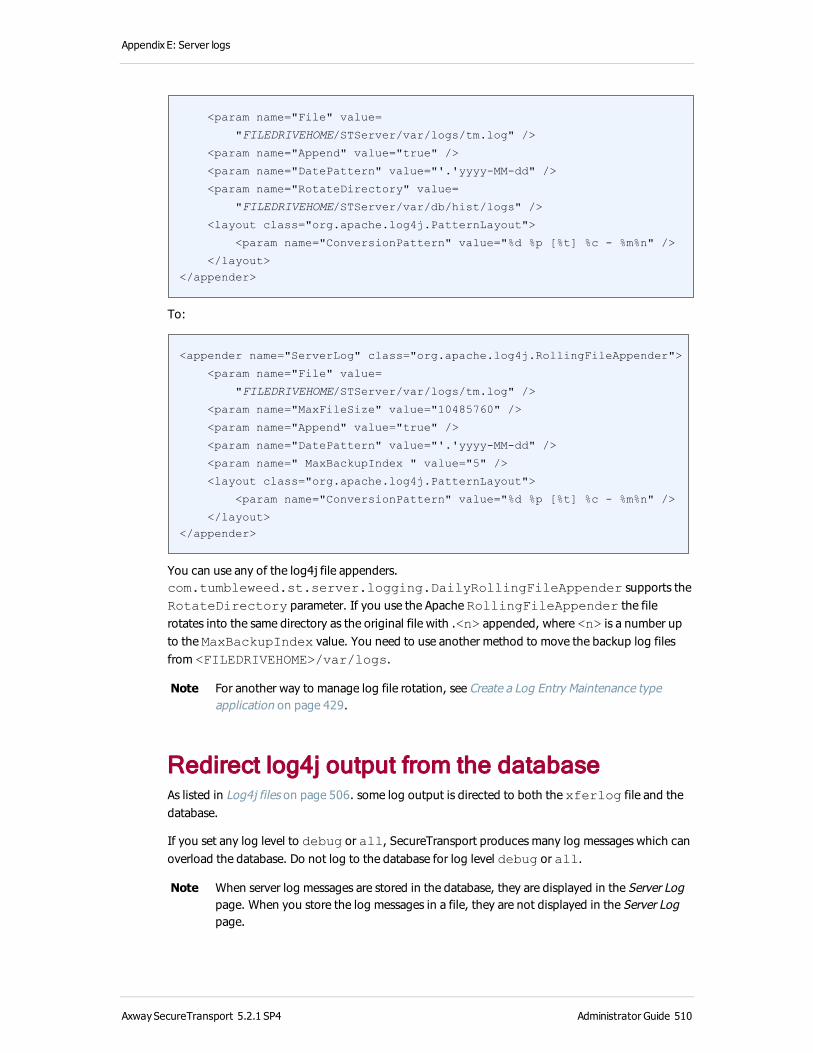
Appendix E: Server logs
<param name="File" value=
"FILEDRIVEHOME/STServer/var/logs/tm.log" />
<param name="Append" value="true" />
<param name="DatePattern" value="'.'yyyy-MM-dd" />
<param name="RotateDirectory" value=
"FILEDRIVEHOME/STServer/var/db/hist/logs" />
<layout class="org.apache.log4j.PatternLayout">
<param name="ConversionPattern" value="%d %p [%t] %c - %m%n" />
</layout>
</appender>
To:
<appender name="ServerLog" class="org.apache.log4j.RollingFileAppender">
<param name="File" value=
"FILEDRIVEHOME/STServer/var/logs/tm.log" />
<param name="MaxFileSize" value="10485760" />
<param name="Append" value="true" />
<param name="DatePattern" value="'.'yyyy-MM-dd" />
<param name=" MaxBackupIndex " value="5" />
<layout class="org.apache.log4j.PatternLayout">
<param name="ConversionPattern" value="%d %p [%t] %c - %m%n" />
</layout>
</appender>
You can use any of the log4j file appenders. com.tumbleweed.st.server.logging.DailyRollingFileAppender supports the RotateDirectory parameter. If you use the Apache RollingFileAppender the file rotates into the same directory as the original file with .<n> appended, where <n> is a number up to the MaxBackupIndex value. You need to use another method to move the backup log files from <FILEDRIVEHOME>/var/logs.
Note For another way to manage log file rotation, see Create a Log Entry Maintenance type application on page 429.
Redirect log4j output from the databaseAs listed in Log4j files on page 506. some log output is directed to both the xferlog file and the database.
If you set any log level to debug or all, SecureTransport produces many log messages which can overload the database. Do not log to the database for log level debug or all.
Note When server log messages are stored in the database, they are displayed in the Server Log page. When you store the log messages in a file, they are not displayed in the Server Log page.
AxwaySecureTransport 5.2.1 SP4 Administrator Guide 510
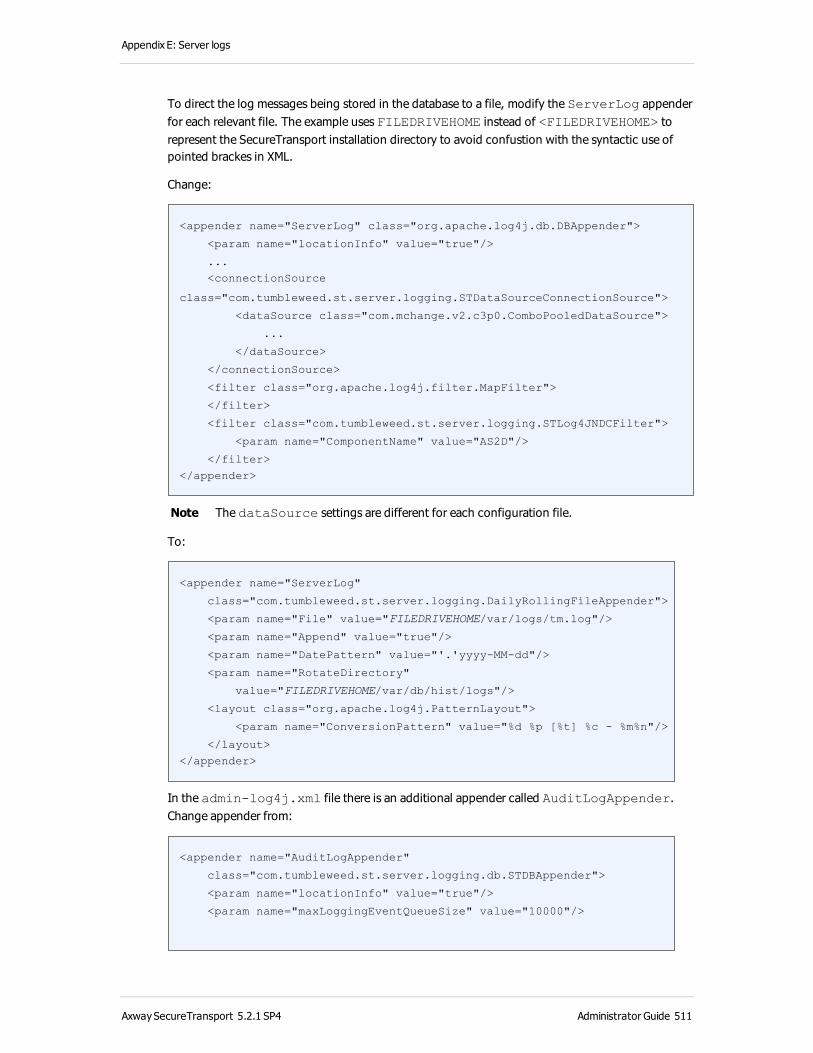
Appendix E: Server logs
To direct the log messages being stored in the database to a file, modify the ServerLog appender for each relevant file. The example uses FILEDRIVEHOME instead of <FILEDRIVEHOME> to represent the SecureTransport installation directory to avoid confustion with the syntactic use of pointed brackes in XML.
Change:
<appender name="ServerLog" class="org.apache.log4j.db.DBAppender">
<param name="locationInfo" value="true"/>
...
<connectionSource
class="com.tumbleweed.st.server.logging.STDataSourceConnectionSource">
<dataSource class="com.mchange.v2.c3p0.ComboPooledDataSource">
...
</dataSource>
</connectionSource>
<filter class="org.apache.log4j.filter.MapFilter">
</filter>
<filter class="com.tumbleweed.st.server.logging.STLog4JNDCFilter">
<param name="ComponentName" value="AS2D"/>
</filter>
</appender>
Note The dataSource settings are different for each configuration file.
To:
<appender name="ServerLog"
class="com.tumbleweed.st.server.logging.DailyRollingFileAppender">
<param name="File" value="FILEDRIVEHOME/var/logs/tm.log"/>
<param name="Append" value="true"/>
<param name="DatePattern" value="'.'yyyy-MM-dd"/>
<param name="RotateDirectory"
value="FILEDRIVEHOME/var/db/hist/logs"/>
<layout class="org.apache.log4j.PatternLayout">
<param name="ConversionPattern" value="%d %p [%t] %c - %m%n"/>
</layout>
</appender>
In the admin-log4j.xml file there is an additional appender called AuditLogAppender. Change appender from:
<appender name="AuditLogAppender"
class="com.tumbleweed.st.server.logging.db.STDBAppender">
<param name="locationInfo" value="true"/>
<param name="maxLoggingEventQueueSize" value="10000"/>
AxwaySecureTransport 5.2.1 SP4 Administrator Guide 511

Appendix E: Server logs
<param name="fallbackLogger" value="ServerLogFallback"/>
<param name="databaseStatusCheckupDelay" value="60"/>
<param name="databaseCheckupTimeout" value="30"/>
<!-- WARNING - changing the id area may cause deletion of existing
logs and crash of the appender! -->
<param name="idAreaBegin" value="-40000000000"/>
<param name="idAreaEnd" value="-30000000000"/>
<!-- Connection pool parameters -->
<param name="driverClass" value="com.mysql.jdbc.Driver"/>
<param name="initialPoolSize" value="5"/>
<param name="maxPoolSize" value="25"/>
<param name="minPoolSize" value="5"/>
<param name="acquireIncrement" value="5"/>
<param name="maxStatements" value="4000"/>
<filter class="com.tumbleweed.st.server.logging.STLog4JNDCFilter">
<param name="ComponentName" value="AUDIT"/>
</filter>
</appender>
To:
<appender name="AuditLogAppender"
class="com.tumbleweed.st.server.logging.DailyRollingFileAppender">
<param name="File" value="FILEDRIVEHOME/var/logs/admin/audit.log"/>
<param name="Append" value="true" />
<param name="DatePattern" value="'.'yyyy-MM-dd" />
<param name="RotateDirectory"
value="FILEDRIVEHOME/var/db/hist/logs/admin"/>
<layout class="org.apache.log4j.PatternLayout">
<param name="ConversionPattern" value="%d %p [%t] %c - %m%n" />
</layout>
</appender>
Control log fallback from database to fileIf the embedded or external database stops accepting log messages, SecureTransport directs the messages to <FILEDRIVEHOME>/var/logs/admin/serverlog-fallback.log.
You can control this behavior by setting the following parameters for each server in <FILEDRIVEHOME>/conf/configuration.xml:
AxwaySecureTransport 5.2.1 SP4 Administrator Guide 512
Appendix E: Server logs
l When the embedded database is used, the hibernate.c3p0.timeout attribute of the
component for each server controls the timeout after which an idle connection will be removed from the pool. The default value is 30 minutes.
l When an external Oracle database is used, the hibernate.connection.oracle.jdbc.ReadTimeout attribute of the component
for each server controls the read timeout, how long to wait for a response from the database before failing a query, for all TCP sockets to the database.The default is five minutes.
l When an external database is used, the hibernate.c3p0.checkoutTimeout attribute
of the component for each server controls the Database connect timeout, how long to wait for a connection to be established. The default is five minutes.
Server log rotation schedulingNote For another way to schedule server log rotation, see Create a Transfer Log Maintenance
type application on page 440 and Create a Log Entry Maintenance type application on page 429.
Log files are rotated so that you do not lose any information because you have reached a file size limit. The log rotation schedule for log4j files is specified in the log4j configuration files. All other log files are rotated on a regular schedule as directed by a log rotation scheduling tool. You can modify the log rotation schedule by editing the root crontab file. (For details, refer to man 5 crontab.)
On UNIX-based systems, the root crontab file is located in the /var/spool/cron/crontabs/root directory for Oracle Solaris and AIX or the /var/spool/cron/root directory for Linux. These paths are under the system root directory, not <FILEDRIVEHOME>. Use the crontab -e command to edit this file while logged in as root; it opens the file in the vi editor.
On Windows, it is not possible to modify existing cron jobs or to use cron to run any jobs other than the predefined SecureTransport jobs. Use the Task Scheduler or some other method to schedule server log rotation.
Note If SecureTransport is installed to run a non-root user, the crontab file is named after the non-root user.
The schedule fields in this file, and the allowable values for each one, are:
l Minutes 0-59
l Hours 0-23
l Day of Month 1-31
l Month 1-12 (or name)
l Day of Week 0-7, where Sunday is 0 or 7 (or name)
So the format looks like the following:
<Minutes> <Hours> <Day of Month> <Month> <Day of Week> <path to rotate
AxwaySecureTransport 5.2.1 SP4 Administrator Guide 513
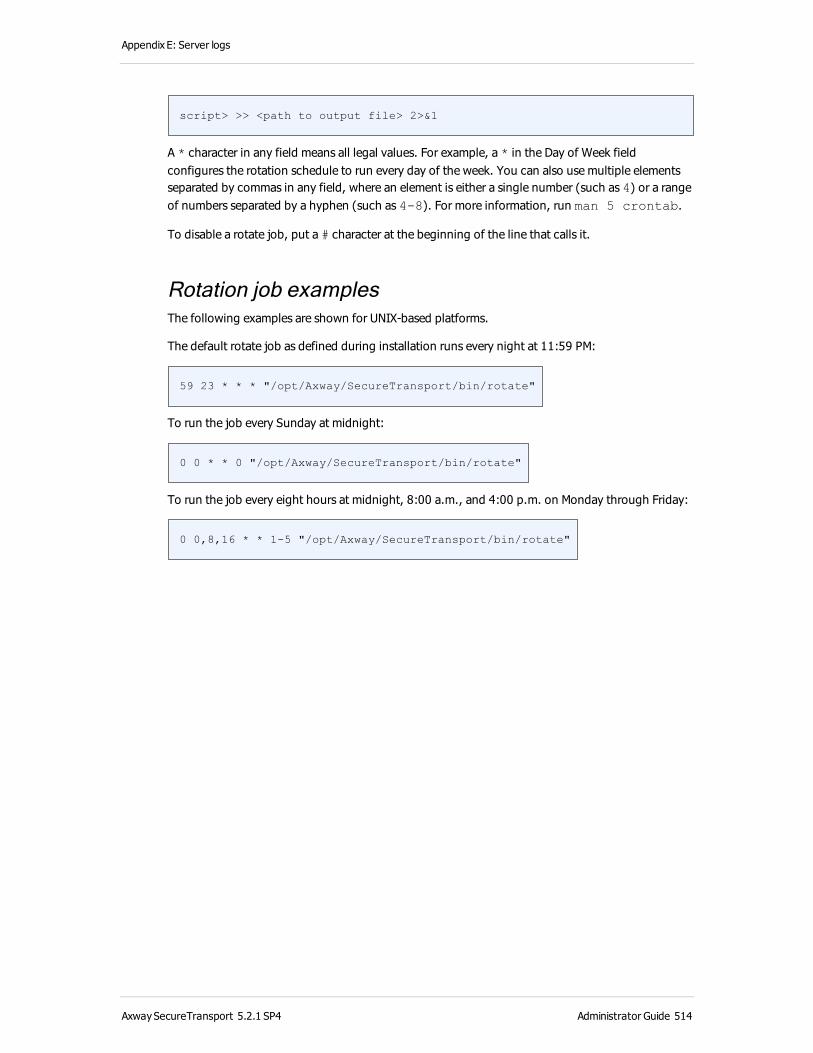
Appendix E: Server logs
script> >> <path to output file> 2>&1
A * character in any field means all legal values. For example, a * in the Day of Week field configures the rotation schedule to run every day of the week. You can also use multiple elements separated by commas in any field, where an element is either a single number (such as 4) or a range of numbers separated by a hyphen (such as 4-8). For more information, run man 5 crontab.
To disable a rotate job, put a # character at the beginning of the line that calls it.
Rotation job examplesThe following examples are shown for UNIX-based platforms.
The default rotate job as defined during installation runs every night at 11:59 PM:
59 23 * * * "/opt/Axway/SecureTransport/bin/rotate"
To run the job every Sunday at midnight:
0 0 * * 0 "/opt/Axway/SecureTransport/bin/rotate"
To run the job every eight hours at midnight, 8:00 a.m., and 4:00 p.m. on Monday through Friday:
0 0,8,16 * * 1-5 "/opt/Axway/SecureTransport/bin/rotate"
AxwaySecureTransport 5.2.1 SP4 Administrator Guide 514

Appendix F: Transaction Manager rule syntax
A rule consists of a condition that determines when the rule is triggered and an action that determines the results when the rules are triggered. The condition and the action defined in a rule can contain expressions. This appendix provides the rule syntax for expressions, conditions, and actions.
ExpressionsBoth the conditions and the actions defined in a rule allow the use of expressions. For example, the comparison part of a rule allows the comparison of an event attribute with an expression.
Probably the simplest expression is a string constant. String constants are specified as a set of characters. For example, Hello World! is an example of a string constant.
A few things to remember about string special characters within a string constant:
l Leading and trailing spaces are removed. You can avoid this by using double quotes:
" This has a leading space and a trailing space "
l The only non-printing character allowed within a string is the space. For other non-printing characters, use a backslash escape to represent the character. For example:
\tThis string starts with a tab character
The following table lists the backslash (\) escape strings you can use to represent any character.
Usage Meaning
\f An ASCII form feed character
\n An ASCII newline character
\r An ASCII return character
\t An ASCII tab character
\\ An ASCII single backslash (\) character
\' An ASCII apostrophe or single quote (') character
AxwaySecureTransport 5.2.1 SP4 Administrator Guide 515

Appendix F: Transaction Manager rule syntax
Usage Meaning
\" An ASCII quote (") character
\$ An ASCII dollar ($) character
\uhhhh The 16-bit character represented by the four hexadecimal digits (Unicode)
\xhh The 8-bit character represented by the two hexadecimal digits
Aside from strings, expressions can also contain the values of event attributes represented by $atttributeName or $(attributeName). For example:
The current user is $(DXAGENT_USERNAME)
Variables are expanded within double quotes:
"The current user is $DXAGENT_USERNAME"
Variables are not expanded within single quotes:
'This will not get expanded $DXAGENT_USERNAME'
Name value pair listsThis applies to specifying the following:
l Condition function arguments
l In-process agent arguments
l External agent environment variables
The syntax for name value pair is a set of name value pairs separated by commas. Name value pairs comprise a name, followed by and equal sign (=), followed by an expression. The name must be an alphanumeric string.
For example,
webserver=www.example.com, port=80
Because the equal sign and comma are special characters in a name value pair, if the value contains an equal sign or comma, you must precede it with a backslash (\).
For example:
processorder=4\,5\,1\,3\,2
AxwaySecureTransport 5.2.1 SP4 Administrator Guide 516

Appendix F: Transaction Manager rule syntax
ConditionsConditions in a rule comprise a set of comparison expressions, condition functions, and logical operations. A condition function is defined as a function that takes a set of arguments and returns either true of false. SecureTransport allows developers to define condition functions. To learn more about this, refer to the SecureTransport Developer’s Guide.
To create a condition, in the Edit Rule page after Condition:, select the Edit.
You define attributes and values using various comparison operators in the Condition Editor window when defining a condition.
Comparison operators support three attribute types. These include
l Number — attributes that accept numeric values
l String — attributes that accept string values
l Time — time related attributes
Number attributeExamples of attributes of type Number include:
l DXAGENT_USERGID
l DXAGENT_USERUID
l DXAGENT_TRANSFERRED_BYTES
The condition operators for attribute of type Number include:
Operator Description
= (Equals) When the value of the attribute is equal to the value defined in the Value field.
!= (Not Equals) When the value of the attribute is not equal to the value defined in the Value field.
< (Less Than) When the value of the attribute is less than the value defined in the Value field.
<= (Less Than or
Equals)
When the value of the attribute is less than or equal to the value defined in the Value field.
> (Greater Than) When the value of the attribute is greater than the value defined in the Value field.
>= (Greater Than or
Equals)
When the value of the attribute is greater than or equal to the value defined in the Value field.
AxwaySecureTransport 5.2.1 SP4 Administrator Guide 517
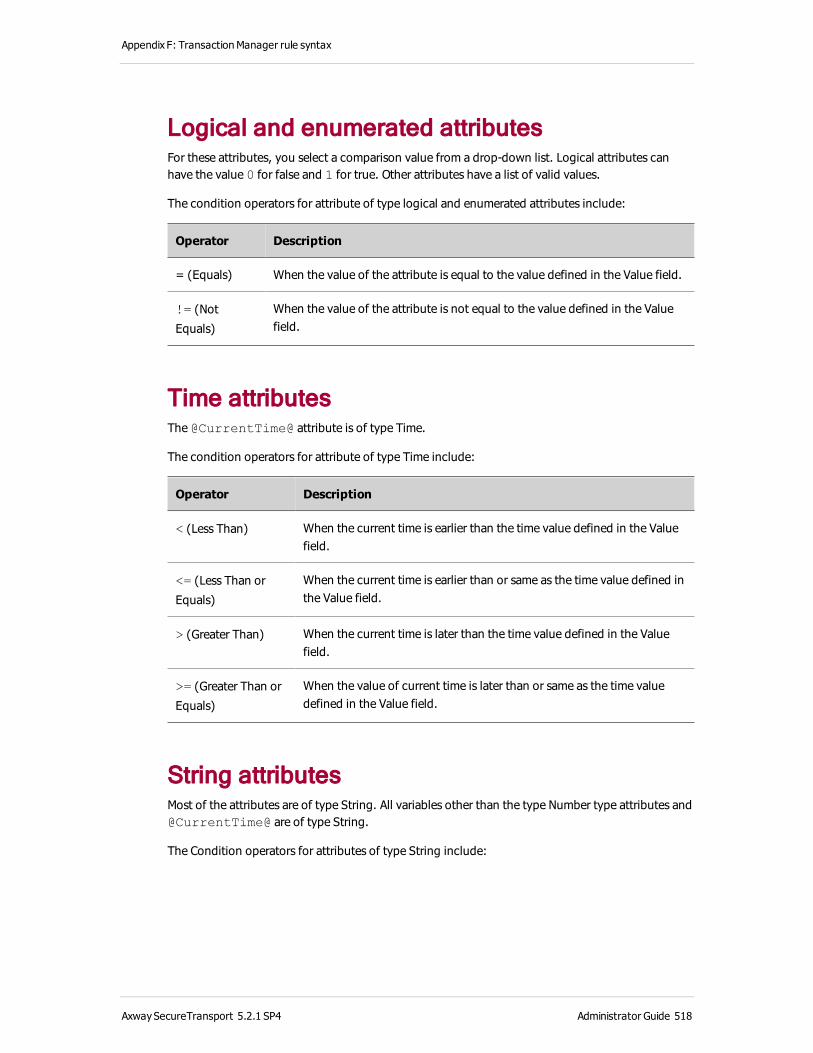
Appendix F: Transaction Manager rule syntax
Logical and enumerated attributesFor these attributes, you select a comparison value from a drop-down list. Logical attributes can have the value 0 for false and 1 for true. Other attributes have a list of valid values.
The condition operators for attribute of type logical and enumerated attributes include:
Operator Description
= (Equals) When the value of the attribute is equal to the value defined in the Value field.
!= (Not
Equals)
When the value of the attribute is not equal to the value defined in the Value field.
Time attributesThe @CurrentTime@ attribute is of type Time.
The condition operators for attribute of type Time include:
Operator Description
< (Less Than) When the current time is earlier than the time value defined in the Value field.
<= (Less Than or
Equals)
When the current time is earlier than or same as the time value defined in the Value field.
> (Greater Than) When the current time is later than the time value defined in the Value field.
>= (Greater Than or
Equals)
When the value of current time is later than or same as the time value defined in the Value field.
String attributesMost of the attributes are of type String. All variables other than the type Number type attributes and @CurrentTime@ are of type String.
The Condition operators for attributes of type String include:
AxwaySecureTransport 5.2.1 SP4 Administrator Guide 518
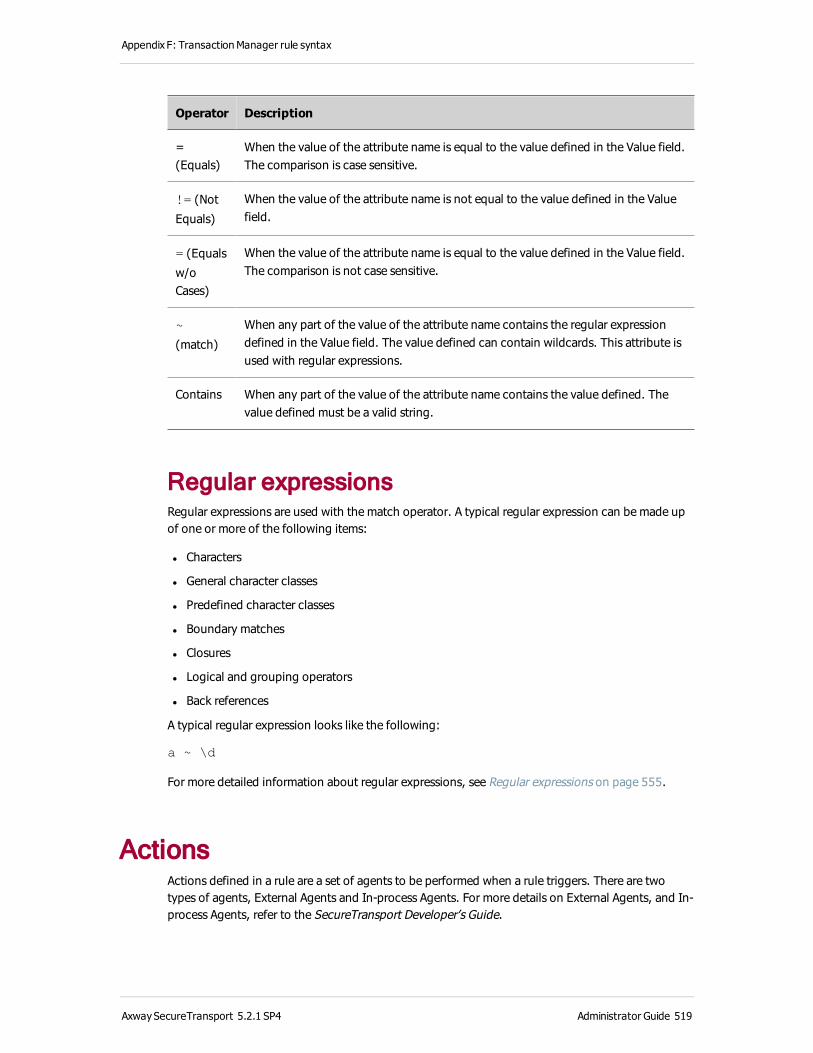
Appendix F: Transaction Manager rule syntax
Operator Description
= (Equals)
When the value of the attribute name is equal to the value defined in the Value field. The comparison is case sensitive.
!= (Not
Equals)
When the value of the attribute name is not equal to the value defined in the Value field.
= (Equals
w/o Cases)
When the value of the attribute name is equal to the value defined in the Value field. The comparison is not case sensitive.
~
(match)
When any part of the value of the attribute name contains the regular expression defined in the Value field. The value defined can contain wildcards. This attribute is used with regular expressions.
Contains When any part of the value of the attribute name contains the value defined. The value defined must be a valid string.
Regular expressionsRegular expressions are used with the match operator. A typical regular expression can be made up of one or more of the following items:
l Characters
l General character classes
l Predefined character classes
l Boundary matches
l Closures
l Logical and grouping operators
l Back references
A typical regular expression looks like the following:
a ~ \d
For more detailed information about regular expressions, see Regular expressions on page 555.
ActionsActions defined in a rule are a set of agents to be performed when a rule triggers. There are two types of agents, External Agents and In-process Agents. For more details on External Agents, and In-process Agents, refer to the SecureTransport Developer’s Guide.
AxwaySecureTransport 5.2.1 SP4 Administrator Guide 519
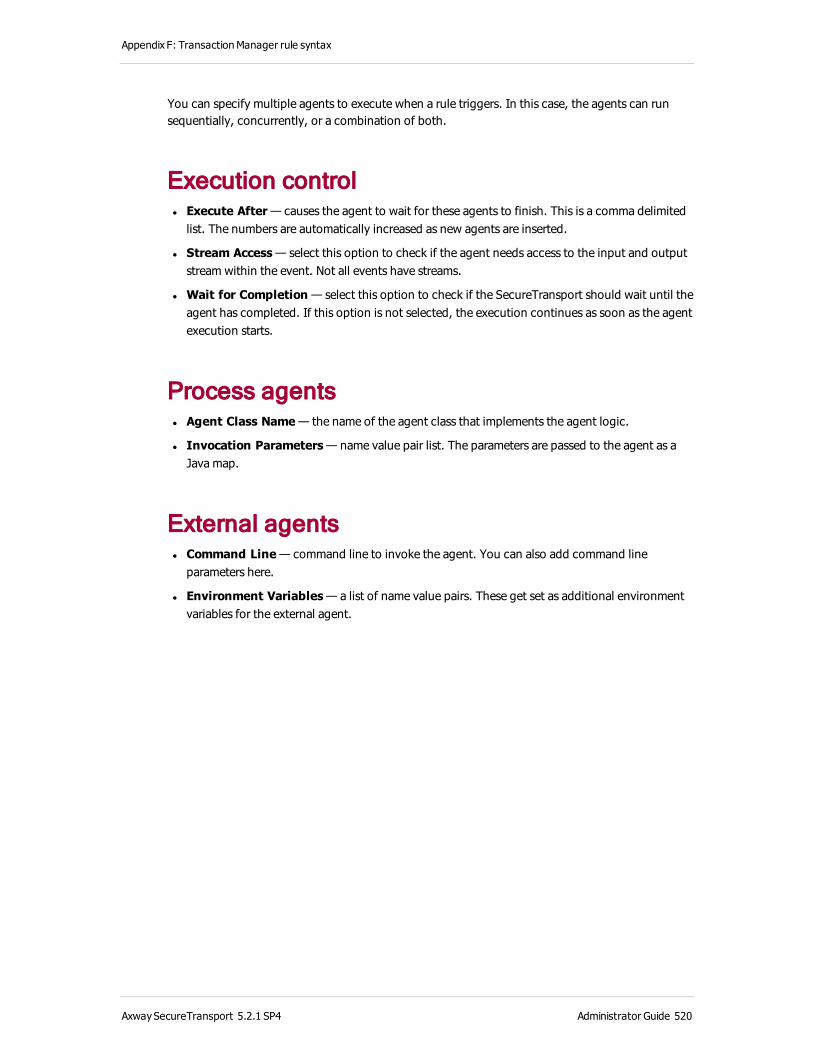
Appendix F: Transaction Manager rule syntax
You can specify multiple agents to execute when a rule triggers. In this case, the agents can run sequentially, concurrently, or a combination of both.
Execution control l Execute After — causes the agent to wait for these agents to finish. This is a comma delimited list. The numbers are automatically increased as new agents are inserted.
l Stream Access — select this option to check if the agent needs access to the input and output stream within the event. Not all events have streams.
l Wait for Completion — select this option to check if the SecureTransport should wait until the agent has completed. If this option is not selected, the execution continues as soon as the agent execution starts.
Process agents l Agent Class Name — the name of the agent class that implements the agent logic.
l Invocation Parameters — name value pair list. The parameters are passed to the agent as a Java map.
External agents l Command Line — command line to invoke the agent. You can also add command line parameters here.
l Environment Variables — a list of name value pairs. These get set as additional environment variables for the external agent.
AxwaySecureTransport 5.2.1 SP4 Administrator Guide 520
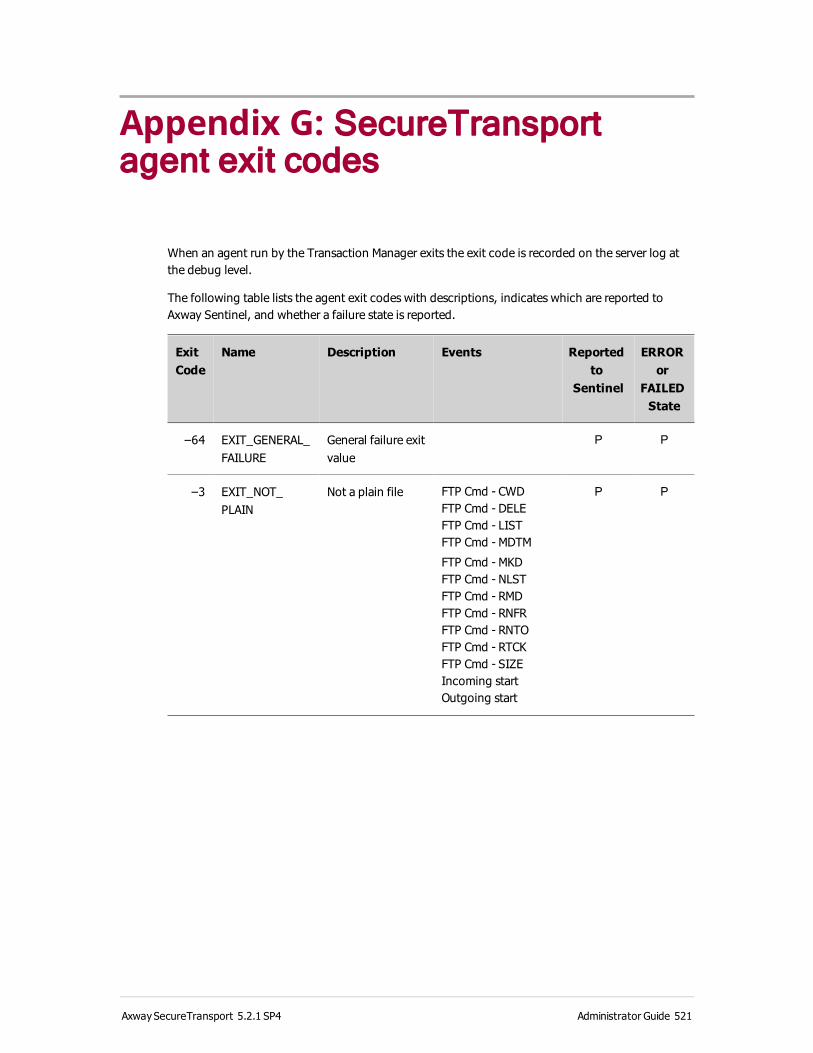
Appendix G: SecureTransport agent exit codes
When an agent run by the Transaction Manager exits the exit code is recorded on the server log at the debug level.
The following table lists the agent exit codes with descriptions, indicates which are reported to Axway Sentinel, and whether a failure state is reported.
Exit Code
Name Description Events Reported to
Sentinel
ERROR or
FAILED State
–64 EXIT_GENERAL_FAILURE
General failure exit value
P P
–3 EXIT_NOT_PLAIN
Not a plain file FTP Cmd - CWDFTP Cmd - DELEFTP Cmd - LISTFTP Cmd - MDTM
FTP Cmd - MKDFTP Cmd - NLSTFTP Cmd - RMDFTP Cmd - RNFRFTP Cmd - RNTOFTP Cmd - RTCKFTP Cmd - SIZEIncoming startOutgoing start
P P
AxwaySecureTransport 5.2.1 SP4 Administrator Guide 521

AppendixG: SecureTransport agent exit codes
Exit Code
Name Description Events Reported to
Sentinel
ERROR or
FAILED State
–2 EXIT_NO_SUCH_FILE
No such file or directory
FTP Cmd - CWDFTP Cmd - DELEFTP Cmd - LISTFTP Cmd - MDTM
FTP Cmd - MKDFTP Cmd - NLSTFTP Cmd - RMDFTP Cmd - RNFRFTP Cmd - RNTOFTP Cmd - RTCKFTP Cmd - SIZEIncoming endIncoming startOutgoing endOutgoing start
P P
–1 EXIT_PERMISSION_DENIED
Permission denied P P
0 EXIT_OK Normal termination
P —
0 EXIT_TRANSFORM_OK
The transformation occurred and the output directory contains the resulting files or directories
Transformation P —
AxwaySecureTransport 5.2.1 SP4 Administrator Guide 522
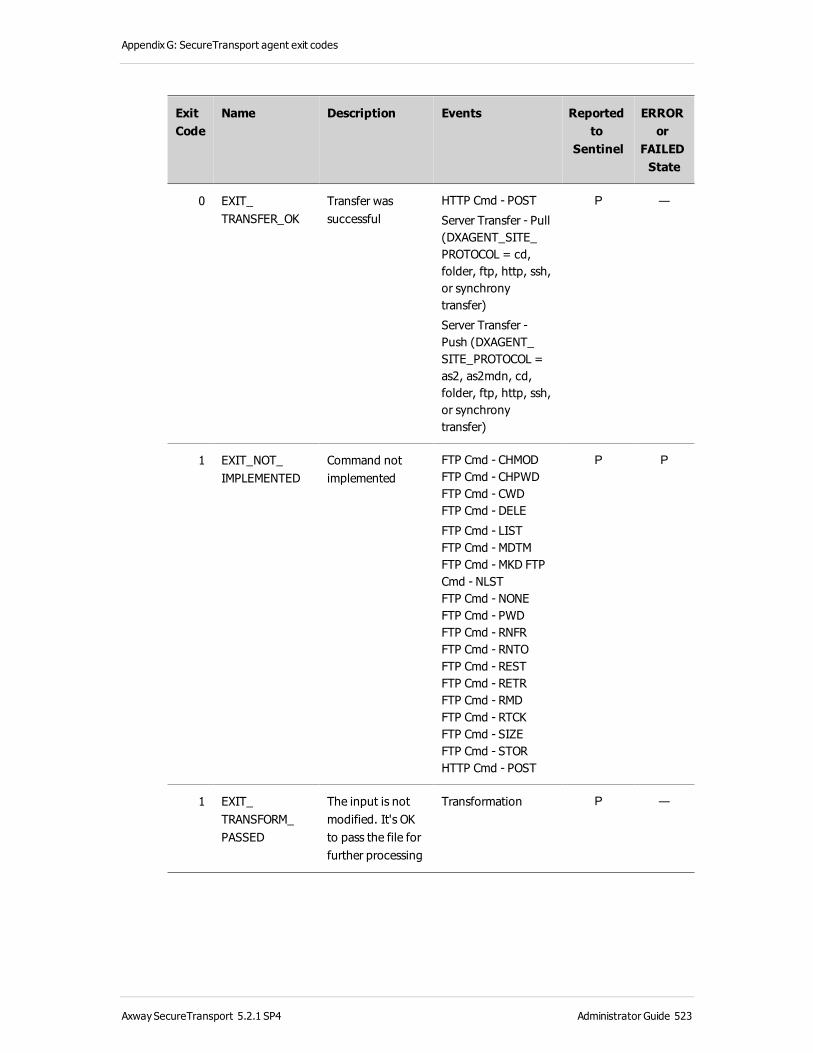
AppendixG: SecureTransport agent exit codes
Exit Code
Name Description Events Reported to
Sentinel
ERROR or
FAILED State
0 EXIT_TRANSFER_OK
Transfer was successful
HTTP Cmd - POST
Server Transfer - Pull (DXAGENT_SITE_PROTOCOL = cd, folder, ftp, http, ssh, or synchrony transfer)
Server Transfer - Push (DXAGENT_SITE_PROTOCOL = as2, as2mdn, cd, folder, ftp, http, ssh, or synchrony transfer)
P —
1 EXIT_NOT_IMPLEMENTED
Command not implemented
FTP Cmd - CHMODFTP Cmd - CHPWDFTP Cmd - CWDFTP Cmd - DELE
FTP Cmd - LISTFTP Cmd - MDTMFTP Cmd - MKD FTP Cmd - NLSTFTP Cmd - NONEFTP Cmd - PWD FTP Cmd - RNFRFTP Cmd - RNTOFTP Cmd - RESTFTP Cmd - RETRFTP Cmd - RMDFTP Cmd - RTCKFTP Cmd - SIZEFTP Cmd - STORHTTP Cmd - POST
P P
1 EXIT_TRANSFORM_PASSED
The input is not modified. It's OK to pass the file for further processing
Transformation P —
AxwaySecureTransport 5.2.1 SP4 Administrator Guide 523
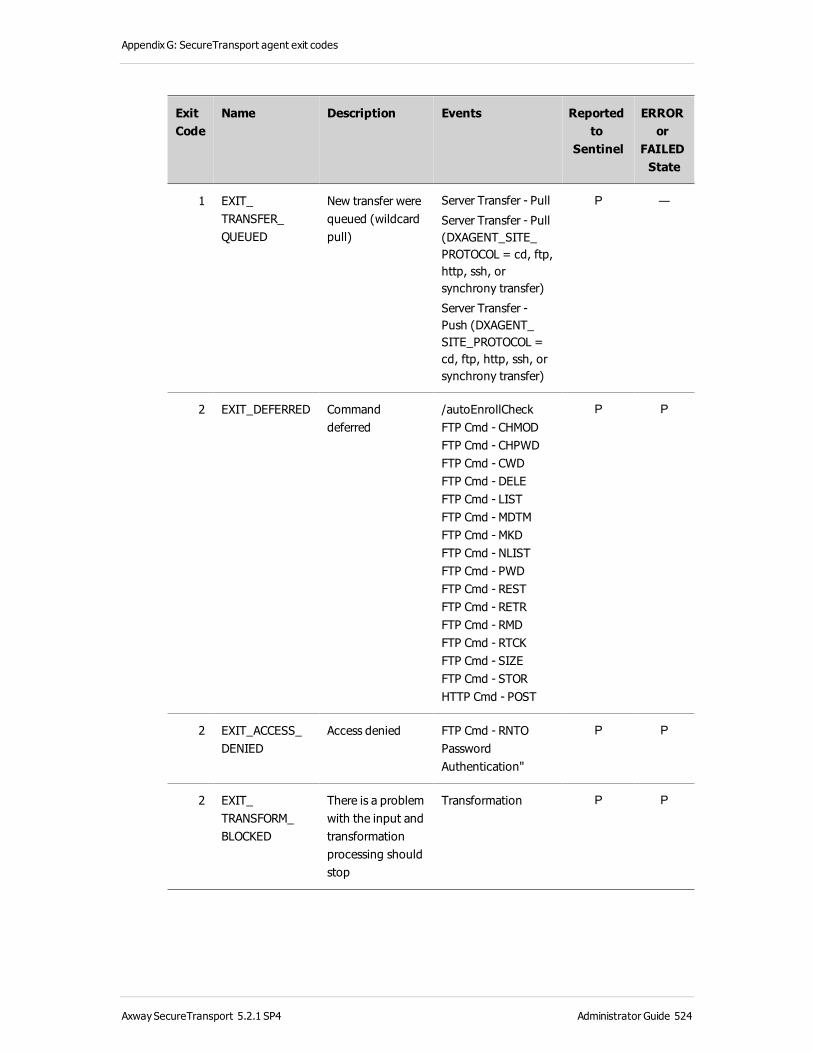
AppendixG: SecureTransport agent exit codes
Exit Code
Name Description Events Reported to
Sentinel
ERROR or
FAILED State
1 EXIT_TRANSFER_QUEUED
New transfer were queued (wildcard pull)
Server Transfer - Pull
Server Transfer - Pull (DXAGENT_SITE_PROTOCOL = cd, ftp, http, ssh, or synchrony transfer)
Server Transfer - Push (DXAGENT_SITE_PROTOCOL = cd, ftp, http, ssh, or synchrony transfer)
P —
2 EXIT_DEFERRED Command deferred
/autoEnrollCheckFTP Cmd - CHMODFTP Cmd - CHPWDFTP Cmd - CWDFTP Cmd - DELEFTP Cmd - LISTFTP Cmd - MDTMFTP Cmd - MKDFTP Cmd - NLISTFTP Cmd - PWDFTP Cmd - RESTFTP Cmd - RETRFTP Cmd - RMDFTP Cmd - RTCKFTP Cmd - SIZEFTP Cmd - STOR HTTP Cmd - POST
P P
2 EXIT_ACCESS_DENIED
Access denied FTP Cmd - RNTOPassword Authentication"
P P
2 EXIT_TRANSFORM_BLOCKED
There is a problem with the input and transformation processing should stop
Transformation P P
AxwaySecureTransport 5.2.1 SP4 Administrator Guide 524
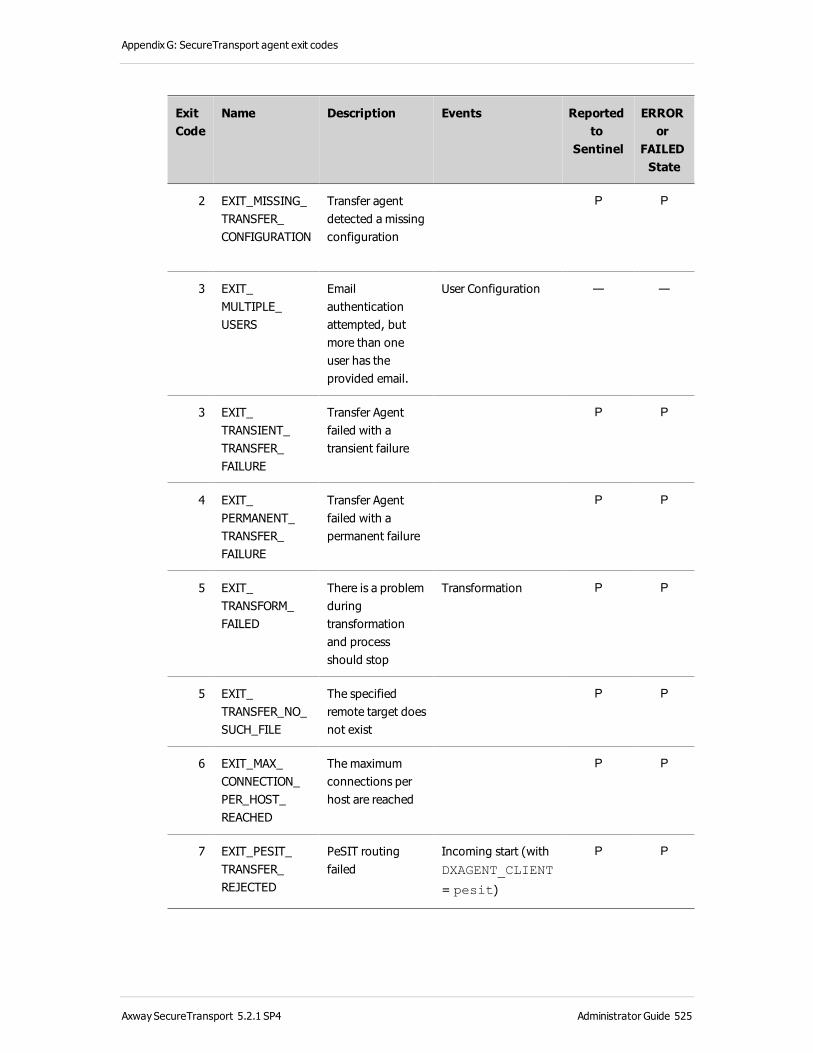
AppendixG: SecureTransport agent exit codes
Exit Code
Name Description Events Reported to
Sentinel
ERROR or
FAILED State
2 EXIT_MISSING_TRANSFER_CONFIGURATION
Transfer agent detected a missing configuration
P P
3 EXIT_MULTIPLE_USERS
Email authentication attempted, but more than one user has the provided email.
User Configuration — —
3 EXIT_TRANSIENT_TRANSFER_FAILURE
Transfer Agent failed with a transient failure
P P
4 EXIT_PERMANENT_TRANSFER_FAILURE
Transfer Agent failed with a permanent failure
P P
5 EXIT_TRANSFORM_FAILED
There is a problem during transformation and process should stop
Transformation P P
5 EXIT_TRANSFER_NO_SUCH_FILE
The specified remote target does not exist
P P
6 EXIT_MAX_CONNECTION_PER_HOST_REACHED
The maximum connections per host are reached
P P
7 EXIT_PESIT_TRANSFER_REJECTED
PeSIT routing failed
Incoming start (with DXAGENT_CLIENT
= pesit)
P P
AxwaySecureTransport 5.2.1 SP4 Administrator Guide 525

AppendixG: SecureTransport agent exit codes
Exit Code
Name Description Events Reported to
Sentinel
ERROR or
FAILED State
8 EXIT_PESIT_NO_MORE_FILES
No more files in the transfer profile
Incoming start (with DXAGENT_CLIENT
= pesit)
— —
9 EXIT_PESIT_IDF_MISSING_CONFIGURATION
No transfer profile for the account
Incoming start (with DXAGENT_CLIENT
= pesit)
P P
10 EXIT_PESIT_IDF_ERROR
Bad transfer profile in the account
Incoming start (with DXAGENT_CLIENT
= pesit)
P P
11 EXIT_RESUBMIT_CANCEL_FAILED
Cancellation of a file transfer resubmit failed
Resubmit start — —
12 EXIT_NO_SUCH_ACCOUNT_FOUND
Server-initiated transfer using the REST API for an account that does not exist
Server Transfer - Pull (with DXAGENT_
IS_API_CALL =
1)
Server Transfer - Push (with DXAGENT_IS_
API_CALL = 1)
P P
13 EXIT_NO_SUCH_SITE_FOUND
Server-initiated transfer using the REST API for a site that does not exist
Server Transfer - Pull (with DXAGENT_
IS_API_CALL =
1)
Server Transfer - Push (with DXAGENT_IS_
API_CALL = 1)
P P
45 EXIT_RESOURCE_BUSY
Resource is currently busy
FTP Cmd - RNFRFTP Cmd - RNTO
P P
AxwaySecureTransport 5.2.1 SP4 Administrator Guide 526
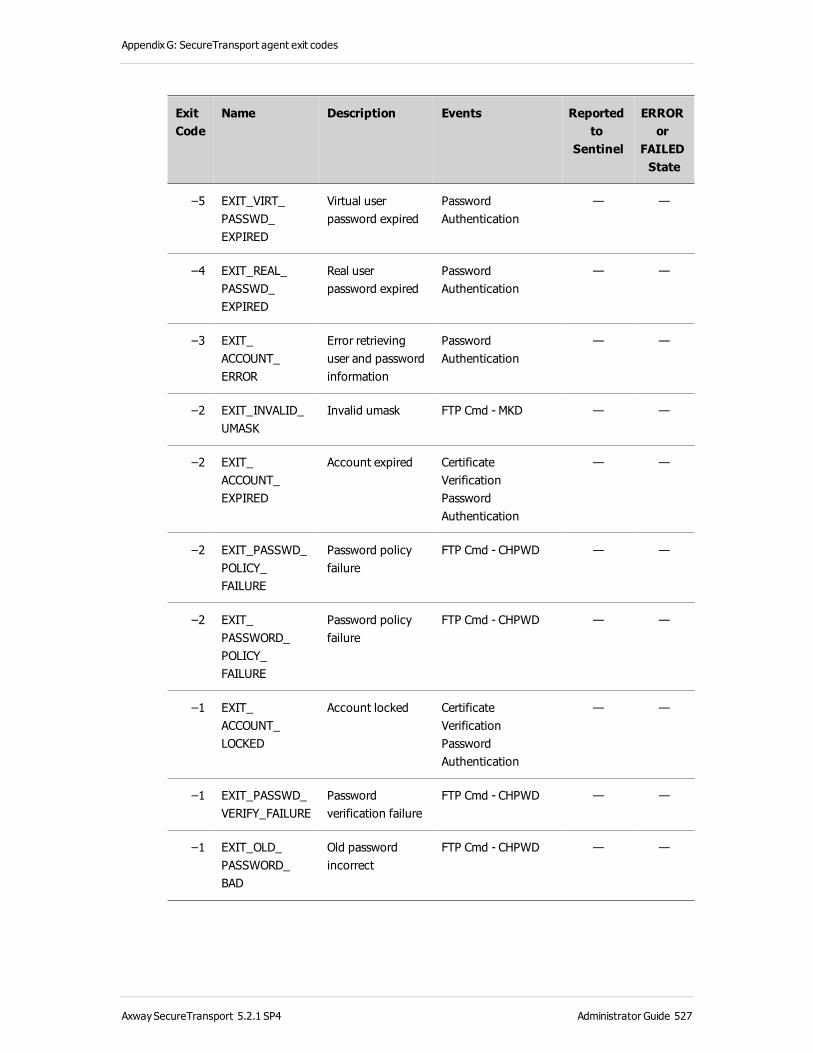
AppendixG: SecureTransport agent exit codes
Exit Code
Name Description Events Reported to
Sentinel
ERROR or
FAILED State
–5 EXIT_VIRT_PASSWD_EXPIRED
Virtual user password expired
Password Authentication
— —
–4 EXIT_REAL_PASSWD_EXPIRED
Real user password expired
Password Authentication
— —
–3 EXIT_ACCOUNT_ERROR
Error retrieving user and password information
Password Authentication
— —
–2 EXIT_INVALID_UMASK
Invalid umask FTP Cmd - MKD — —
–2 EXIT_ACCOUNT_EXPIRED
Account expired Certificate VerificationPassword Authentication
— —
–2 EXIT_PASSWD_POLICY_FAILURE
Password policy failure
FTP Cmd - CHPWD — —
–2 EXIT_PASSWORD_POLICY_FAILURE
Password policy failure
FTP Cmd - CHPWD — —
–1 EXIT_ACCOUNT_LOCKED
Account locked Certificate VerificationPassword Authentication
— —
–1 EXIT_PASSWD_VERIFY_FAILURE
Password verification failure
FTP Cmd - CHPWD — —
–1 EXIT_OLD_PASSWORD_BAD
Old password incorrect
FTP Cmd - CHPWD — —
AxwaySecureTransport 5.2.1 SP4 Administrator Guide 527
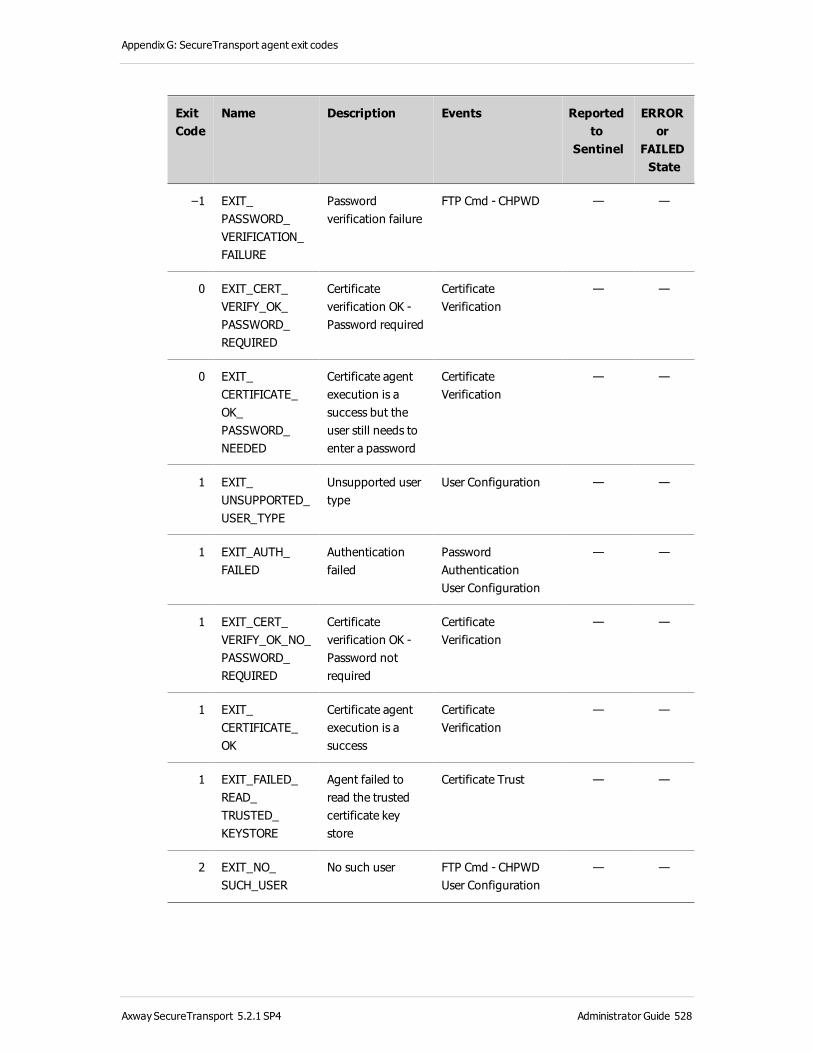
AppendixG: SecureTransport agent exit codes
Exit Code
Name Description Events Reported to
Sentinel
ERROR or
FAILED State
–1 EXIT_PASSWORD_VERIFICATION_FAILURE
Password verification failure
FTP Cmd - CHPWD — —
0 EXIT_CERT_VERIFY_OK_PASSWORD_REQUIRED
Certificate verification OK - Password required
Certificate Verification
— —
0 EXIT_CERTIFICATE_OK_PASSWORD_NEEDED
Certificate agent execution is a success but the user still needs to enter a password
Certificate Verification
— —
1 EXIT_UNSUPPORTED_USER_TYPE
Unsupported user type
User Configuration — —
1 EXIT_AUTH_FAILED
Authentication failed
Password AuthenticationUser Configuration
— —
1 EXIT_CERT_VERIFY_OK_NO_PASSWORD_REQUIRED
Certificate verification OK - Password not required
Certificate Verification
— —
1 EXIT_CERTIFICATE_OK
Certificate agent execution is a success
Certificate Verification
— —
1 EXIT_FAILED_READ_TRUSTED_KEYSTORE
Agent failed to read the trusted certificate key store
Certificate Trust — —
2 EXIT_NO_SUCH_USER
No such user FTP Cmd - CHPWDUser Configuration
— —
AxwaySecureTransport 5.2.1 SP4 Administrator Guide 528
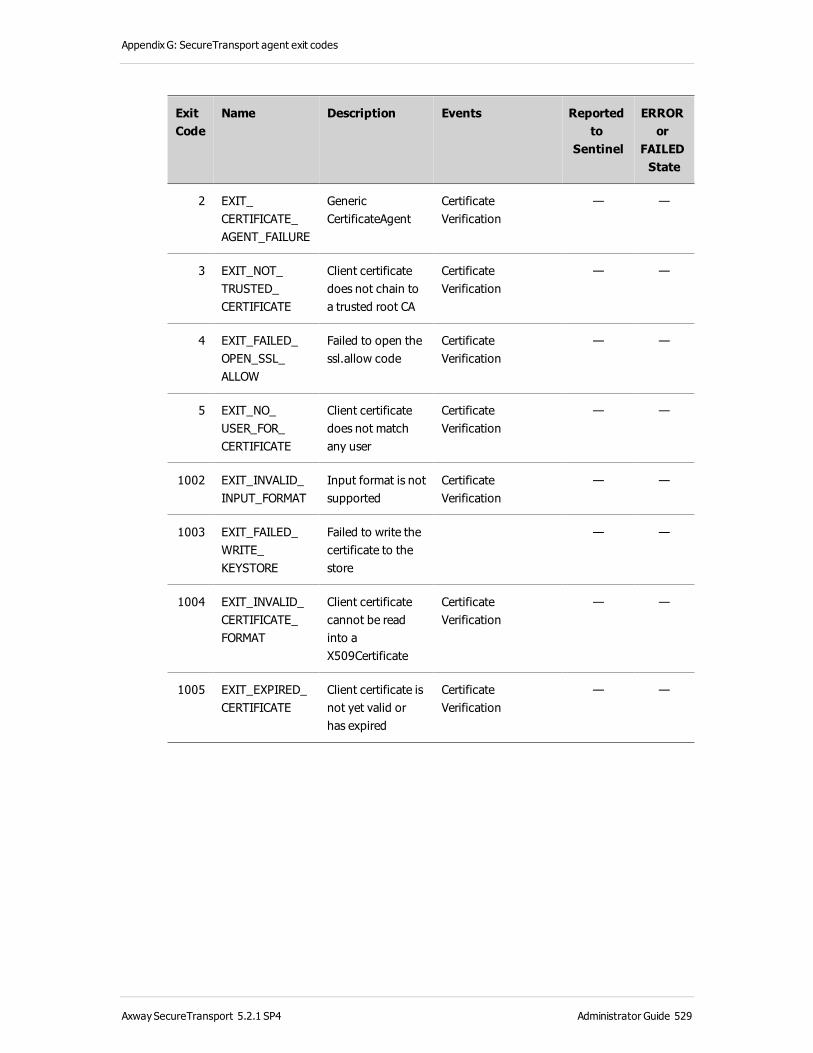
AppendixG: SecureTransport agent exit codes
Exit Code
Name Description Events Reported to
Sentinel
ERROR or
FAILED State
2 EXIT_CERTIFICATE_AGENT_FAILURE
Generic CertificateAgent
Certificate Verification
— —
3 EXIT_NOT_TRUSTED_CERTIFICATE
Client certificate does not chain to a trusted root CA
Certificate Verification
— —
4 EXIT_FAILED_OPEN_SSL_ALLOW
Failed to open the ssl.allow code
Certificate Verification
— —
5 EXIT_NO_USER_FOR_CERTIFICATE
Client certificate does not match any user
Certificate Verification
— —
1002 EXIT_INVALID_INPUT_FORMAT
Input format is not supported
Certificate Verification
— —
1003 EXIT_FAILED_WRITE_KEYSTORE
Failed to write the certificate to the store
— —
1004 EXIT_INVALID_CERTIFICATE_FORMAT
Client certificate cannot be read into a X509Certificate
Certificate Verification
— —
1005 EXIT_EXPIRED_CERTIFICATE
Client certificate is not yet valid or has expired
Certificate Verification
— —
AxwaySecureTransport 5.2.1 SP4 Administrator Guide 529

Appendix H: Firewall settings
The SecureTransport client and server software is frequently used in conjunction with network firewalls, designed to permit access only to authorized protocols and possibly specific source networks, hosts, or users. Firewalls provide essential protection from hackers, corporate raiders, and other types of access that are unauthorized or should be restricted.
A firewall refers to a hardware, software, or combination product that provides stateful inspection or filtering functionality only. There are other types of network devices, such as proxy servers and caching stores that can provide these functions as well, but these devices are not covered in the following topics.
One frequently deployed firewall is the Check Point FireWall-1 product (VPN-1), produced by Check Point Software Technologies Ltd. Other popular products include the Cisco PIX, Symantec Enterprise Firewall (Raptor), and Network Associates Gauntlet firewalls.
Enable bidirectional connections in a firewallIf you are using FTP for file transfers, you might need to configure your firewall to use bidirectional FTP transfers. Bidirectional FTP data connections might not be enabled in your firewall by default. Bidirectional FTP data connections are not considered as safe since the data connection is interactive and the connection changes the basic way FTP works.
Check Point firewallTo enable Check Point firewalls, in Check Point NG firewalls (AI R55 and higher), set the FTP connection to FTP_BASIC. This allows bidirectional communications and sets the firewall to allow commands not terminated with a newline.
The Check Point firewall must allow bidirectional communication. It must not enforce new line termination.
As the Check Point documentation states, the FTP_BASIC protocol type was introduced in the Check Point R55 NG AI. If you apply it to the FTP object, it enforces a reduced set of the FTP security checks done by the regular FTP protocol type. The following checks are not enforced by FTP_BASIC:
l That every packet is terminated with a newline character, so that the PORT command is not split across packets.
l Bidirectional traffic on the data connection is not allowed, as it can be used improperly.
Note FTP_BASIC also disables FTP BOUNCE protection and so can be viewed as potentially less secure. This, as well as a more secure method to disable the newline check (FTP PACKET check) are described in Check Point SecureKnowledge SK27122.
AxwaySecureTransport 5.2.1 SP4 Administrator Guide 530
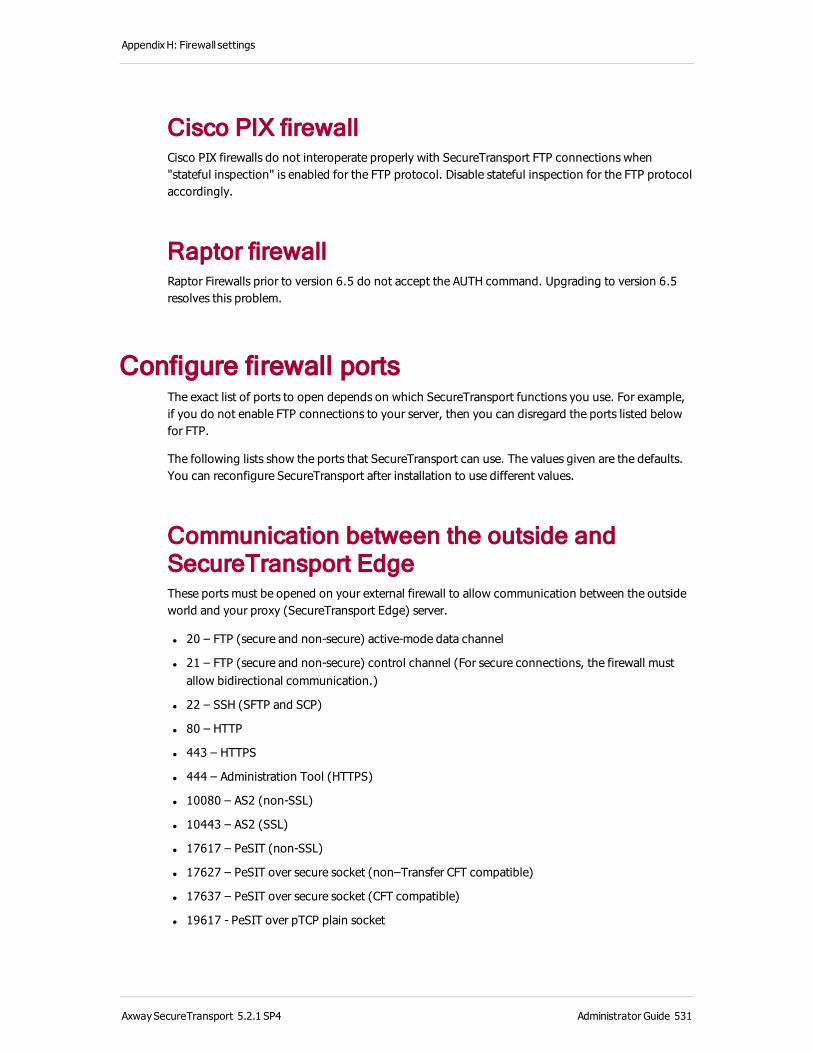
AppendixH: Firewall settings
Cisco PIX firewallCisco PIX firewalls do not interoperate properly with SecureTransport FTP connections when "stateful inspection" is enabled for the FTP protocol. Disable stateful inspection for the FTP protocol accordingly.
Raptor firewallRaptor Firewalls prior to version 6.5 do not accept the AUTH command. Upgrading to version 6.5 resolves this problem.
Configure firewall portsThe exact list of ports to open depends on which SecureTransport functions you use. For example, if you do not enable FTP connections to your server, then you can disregard the ports listed below for FTP.
The following lists show the ports that SecureTransport can use. The values given are the defaults. You can reconfigure SecureTransport after installation to use different values.
Communication between the outside and SecureTransport EdgeThese ports must be opened on your external firewall to allow communication between the outside world and your proxy (SecureTransport Edge) server.
l 20 – FTP (secure and non-secure) active-mode data channel
l 21 – FTP (secure and non-secure) control channel (For secure connections, the firewall must allow bidirectional communication.)
l 22 – SSH (SFTP and SCP)
l 80 – HTTP
l 443 – HTTPS
l 444 – Administration Tool (HTTPS)
l 10080 – AS2 (non-SSL)
l 10443 – AS2 (SSL)
l 17617 – PeSIT (non-SSL)
l 17627 – PeSIT over secure socket (non–Transfer CFT compatible)
l 17637 – PeSIT over secure socket (CFT compatible)
l 19617 - PeSIT over pTCP plain socket
AxwaySecureTransport 5.2.1 SP4 Administrator Guide 531

AppendixH: Firewall settings
l 19627 - PeSIT over pTCP Secured Socket
l User-defined range – FTP (secure and non-secure) passive-mode data channel
Communication between SecureTransport Server and SecureTransport EdgeThese port must be open between the private network and the peripheral network (DMZ) for the Transaction Manager Server on SecureTransport Server to connect to the protocol servers on SecureTransport Edge. The protocol is the SecureTransport secure streaming protocol.
l 20021 – FTP Server
l 20022 – SSH Server
l 20080 – HTTP Server
l 20444 – Administration Tool server
l 21080 – AS2 Server
l 27617 – PeSIT Server
Communication between SecureTransport Server and an internal networkAll of the ports used for communication between the outside and SecureTransport Edge can be used for user connections originating within your internal network. The following ports might be used for interfacing with infrastructure components:
l 389 or 3268 – LDAP
l 1305 – Axway Sentinel
l 1433 - Microsoft SQL Server database (default)
l 1521 – Oracle database (default)
l 44441 – SiteMinder Accounting
l 44442 – SiteMinder Authentication
l 44443 – SiteMinder Authorization
Internal SecureTransport communication l 7800 thorough 7802 – Hibernate second-level cache
l 8005 – Tomcat shutdown
l 8006 – AS2 shutdown
l 8009 – Tomcat JK connector
AxwaySecureTransport 5.2.1 SP4 Administrator Guide 532
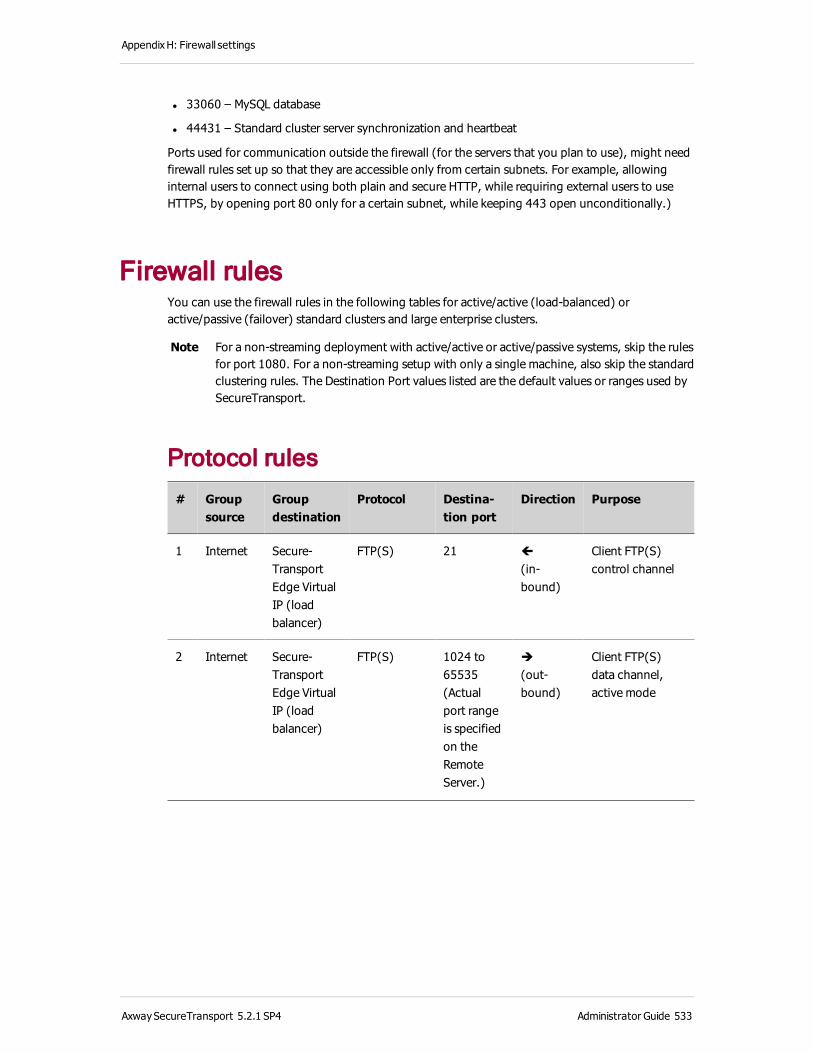
AppendixH: Firewall settings
l 33060 – MySQL database
l 44431 – Standard cluster server synchronization and heartbeat
Ports used for communication outside the firewall (for the servers that you plan to use), might need firewall rules set up so that they are accessible only from certain subnets. For example, allowing internal users to connect using both plain and secure HTTP, while requiring external users to use HTTPS, by opening port 80 only for a certain subnet, while keeping 443 open unconditionally.)
Firewall rulesYou can use the firewall rules in the following tables for active/active (load-balanced) or active/passive (failover) standard clusters and large enterprise clusters.
Note For a non-streaming deployment with active/active or active/passive systems, skip the rules for port 1080. For a non-streaming setup with only a single machine, also skip the standard clustering rules. The Destination Port values listed are the default values or ranges used by SecureTransport.
Protocol rules
# Groupsource
Group destination
Protocol Destina-tion port
Direction Purpose
1 Internet Secure-TransportEdge Virtual IP (load balancer)
FTP(S) 21 ç
(in-bound)
Client FTP(S) control channel
2 Internet Secure-TransportEdge Virtual IP (load balancer)
FTP(S) 1024 to 65535 (Actual port range is specified on the Remote Server.)
è
(out-bound)
Client FTP(S) data channel, active mode
AxwaySecureTransport 5.2.1 SP4 Administrator Guide 533
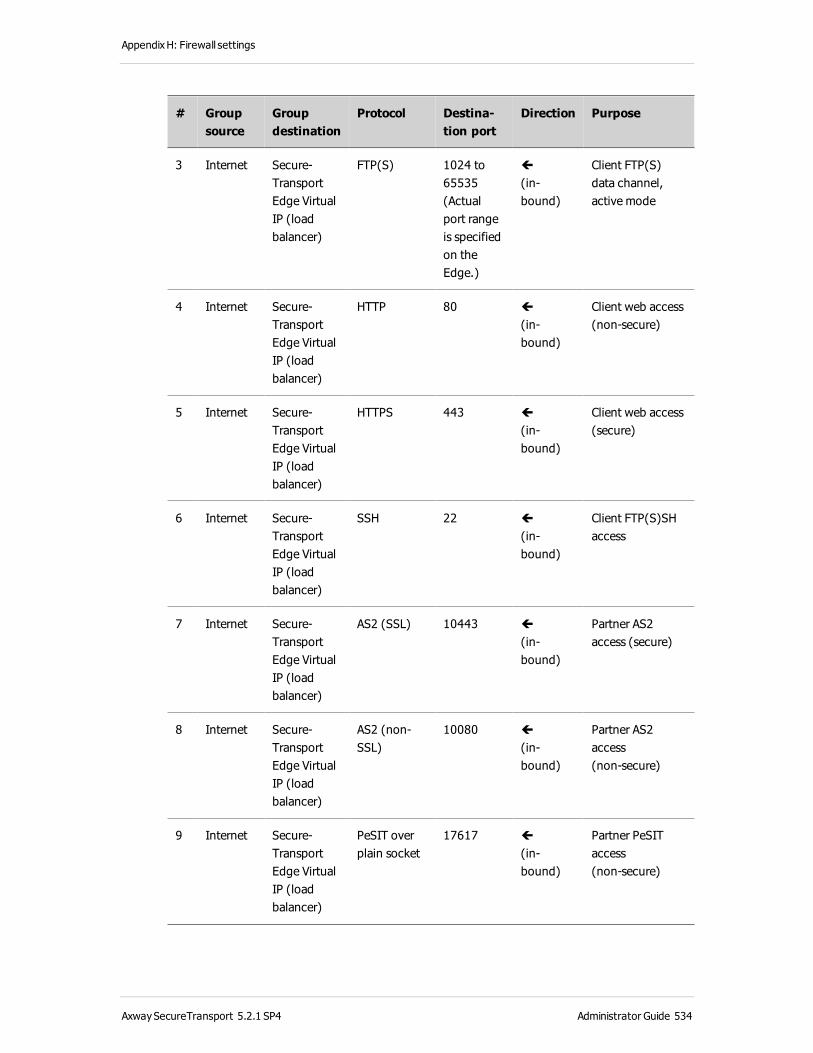
AppendixH: Firewall settings
# Groupsource
Group destination
Protocol Destina-tion port
Direction Purpose
3 Internet Secure-TransportEdge Virtual IP (load balancer)
FTP(S) 1024 to 65535 (Actual port range is specified on the Edge.)
ç
(in-bound)
Client FTP(S) data channel, active mode
4 Internet Secure-TransportEdge Virtual IP (load balancer)
HTTP 80 ç
(in-bound)
Client web access (non-secure)
5 Internet Secure-TransportEdge Virtual IP (load balancer)
HTTPS 443 ç
(in-bound)
Client web access (secure)
6 Internet Secure-TransportEdge Virtual IP (load balancer)
SSH 22 ç
(in-bound)
Client FTP(S)SH access
7 Internet Secure-TransportEdge Virtual IP (load balancer)
AS2 (SSL) 10443 ç
(in-bound)
Partner AS2 access (secure)
8 Internet Secure-TransportEdge Virtual IP (load balancer)
AS2 (non-SSL)
10080 ç
(in-bound)
Partner AS2 access (non-secure)
9 Internet Secure-TransportEdge Virtual IP (load balancer)
PeSIT over plain socket
17617 ç
(in-bound)
Partner PeSIT access (non-secure)
AxwaySecureTransport 5.2.1 SP4 Administrator Guide 534

AppendixH: Firewall settings
# Groupsource
Group destination
Protocol Destina-tion port
Direction Purpose
10 Internet Secure-TransportEdge Virtual IP (load balancer)
PeSIT over secured socket (non–Transfer CFT Compatible)
17627 ç
(in-bound)
Partner PeSIT access (non-secure)
11 Internet Secure-TransportEdge Virtual IP (load balancer)
PeSIT over secured socket (Transfer CFT Compatible)
17637 ç
(in-bound)
Partner PeSIT access (non-secure)
12 Internet Secure-TransportEdge Virtual IP (load balancer)
PeSIT over pTCP plain socket
19617 ç
(in-bound)
Partner PeSIT access (non-secure)
13 Internet Secure-TransportEdge Virtual IP (load balancer)
PeSIT over pTCP secured socket
19627 ç
(in-bound)
Partner PeSIT access (non-secure)
14 Trusted(secure network)
Secure-TransportEdge
HTTPS 444 ç
(in-bound)
SecureTransport Administration Tool (if access is required through the firewall)
15 Secure-TransportServer
Mail server for outgoing mail
SMTP (TCP) 25 è
(out-bound)
Ad hoc file transfer email notifications from Web Access Plus
16 Secure-TransportServer
SNMP Masters
SNMP (UDP) 162 è
(out-bound)
SNMP monitoring
For a streaming deployment with one SecureTransport Edge and one SecureTransport Server there is no load balancer, so substitute the real IP address of the SecureTransport Edge for the IP address of the load balancer in the Group Destination column for rules 1 through 13.
AxwaySecureTransport 5.2.1 SP4 Administrator Guide 535

AppendixH: Firewall settings
For outbound AS2 transfers or asynchronous MDN receipts for inbound AS2 transfers, define outbound rules for ports 10080 and 10443. If the AS2 listener is on the SecureTransport Server and an SOCKS5 proxy is on the SecureTransport Edge, define these rules on the firewall between the SecureTransport Edge and the SecureTransport Server. Otherwise, define these rules on the firewall between the SecureTransport Edge and the Internet.
For internal users to upload or download files to SecureTransport, they must log into the SecureTransport Server directly using HTTP(S) or FTP(S). So those ports from the secure network to the SecureTransport Server must be open. In some installations, access is only through a proxy. In this case secure network requires access to the Proxy server.
Both FTP and FTPS use port 20 for the data channel in active mode. If preferred, you can define a passive-port range instead, and set up a similar rule for that range of ports. Both FTP and FTPS use port 21 for the control channel. For more details, see Passive port range is not defined in the firewall on page 492.
HTTP access is optional. To disable HTTP, do not define rule 4.
If the SMTP server that handles ad hoc file transfer email notifications from Web Access Plus is in the secure network, do not define rule 15.
Authentication rules
# Group source
Group destination
Protocol Destina-tion port
Direction Purpose
17 Secure-TransportServer
Trusted (secure network)
SiteMinder 44441 è
(out-bound)
SiteMinder Accounting
18 Secure-TransportServer
Trusted (secure network)
SiteMinder 44442 è
(out-bound)
SiteMinder Authentication
19 Secure-TransportServer
Trusted (secure network)
SiteMinder 44443 è
(out-bound)
SiteMinder Authorization
20 Secure-TransportServer
Trusted (secure network)
LDAP 389 or 3268
è
(out-bound)
LDAP user lookup and authentication
AxwaySecureTransport 5.2.1 SP4 Administrator Guide 536
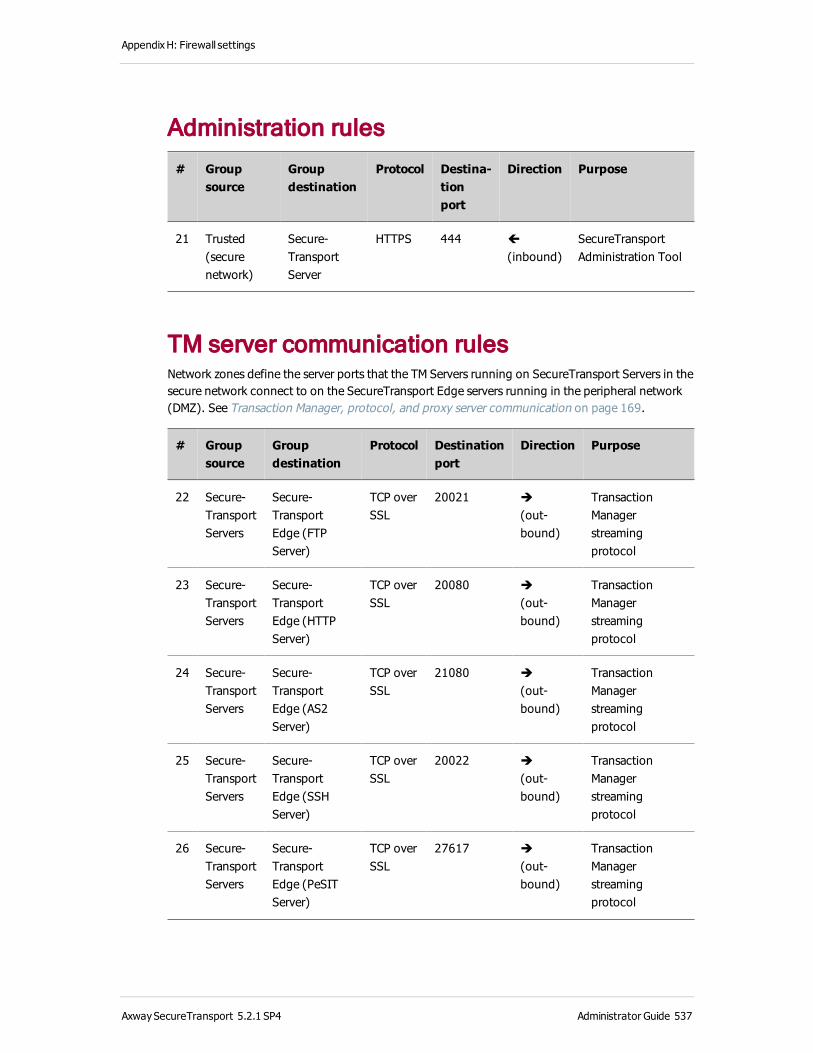
AppendixH: Firewall settings
Administration rules
# Group source
Group destination
Protocol Destina-tion port
Direction Purpose
21 Trusted (secure network)
Secure-TransportServer
HTTPS 444 ç
(inbound)SecureTransport Administration Tool
TM server communication rulesNetwork zones define the server ports that the TM Servers running on SecureTransport Servers in the secure network connect to on the SecureTransport Edge servers running in the peripheral network (DMZ). See Transaction Manager, protocol, and proxy server communication on page 169.
# Group source
Group destination
Protocol Destination port
Direction Purpose
22 Secure-TransportServers
Secure-TransportEdge (FTP Server)
TCP over SSL
20021 è
(out-bound)
Transaction Manager streaming protocol
23 Secure-TransportServers
Secure-TransportEdge (HTTP Server)
TCP over SSL
20080 è
(out-bound)
Transaction Manager streaming protocol
24 Secure-TransportServers
Secure-TransportEdge (AS2 Server)
TCP over SSL
21080 è
(out-bound)
Transaction Manager streaming protocol
25 Secure-TransportServers
Secure-TransportEdge (SSH Server)
TCP over SSL
20022 è
(out-bound)
Transaction Manager streaming protocol
26 Secure-TransportServers
Secure-TransportEdge (PeSIT Server)
TCP over SSL
27617 è
(out-bound)
Transaction Manager streaming protocol
AxwaySecureTransport 5.2.1 SP4 Administrator Guide 537

AppendixH: Firewall settings
# Group source
Group destination
Protocol Destination port
Direction Purpose
27 Secure-TransportServers
Administration Tool server
TCP over SSL
20444 è
(out-bound)
Transaction Manager streaming protocol
Do not define these rules for a deployment with no SecureTransport Edge. Define only the rules for the protocols you are using.
Server transfer rules
# Group source
Group destination
Protocol Destination port
Direction Purpose
28 Secure-TransportServers
Secure-TransportEdge
SOCKS 1080 è
(out-bound)
SOCKS5 proxy for server-initiated transfers (out-bound)
Do not define rule 28 for a deployment with no SecureTransport Edge.
Standard clustering rulesThe following rules are required for a standard cluster.
# Group source
Group destination
Protocol Destina-tion port
Direction Purpose
29 Secure-TransportServers
Secure-TransportServers
Proprietary 44431 çè
(server-to-server)
Server synchronization and heartbeat
30 Secure-TransportServers
Secure-TransportServers
HTTPS 444 çè
(server-to-server)
Synchronization
Large enterprise clustering rulesThe following rule is required for a large enterprise cluster. The cluster cache manager uses the first free port starting at 8088.
AxwaySecureTransport 5.2.1 SP4 Administrator Guide 538
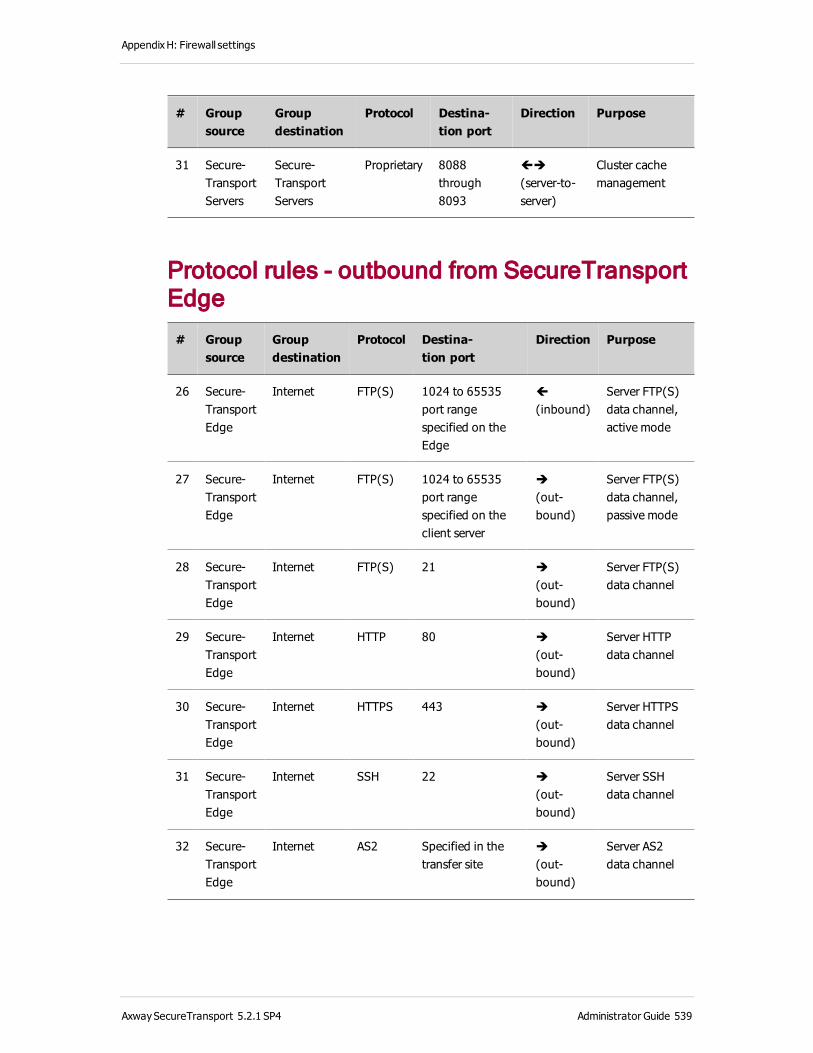
AppendixH: Firewall settings
# Group source
Group destination
Protocol Destina-tion port
Direction Purpose
31 Secure-TransportServers
Secure-TransportServers
Proprietary 8088 through 8093
çè
(server-to-server)
Cluster cache management
Protocol rules - outbound from SecureTransport Edge
# Group source
Group destination
Protocol Destina-tion port
Direction Purpose
26 Secure-TransportEdge
Internet FTP(S) 1024 to 65535 port range specified on the Edge
ç
(inbound)Server FTP(S) data channel, active mode
27 Secure-TransportEdge
Internet FTP(S) 1024 to 65535 port range specified on the client server
è
(out-bound)
Server FTP(S) data channel, passive mode
28 Secure-TransportEdge
Internet FTP(S) 21 è
(out-bound)
Server FTP(S) data channel
29 Secure-TransportEdge
Internet HTTP 80 è
(out-bound)
Server HTTP data channel
30 Secure-TransportEdge
Internet HTTPS 443 è
(out-bound)
Server HTTPS data channel
31 Secure-TransportEdge
Internet SSH 22 è
(out-bound)
Server SSH data channel
32 Secure-TransportEdge
Internet AS2 Specified in the transfer site
è
(out-bound)
Server AS2 data channel
AxwaySecureTransport 5.2.1 SP4 Administrator Guide 539
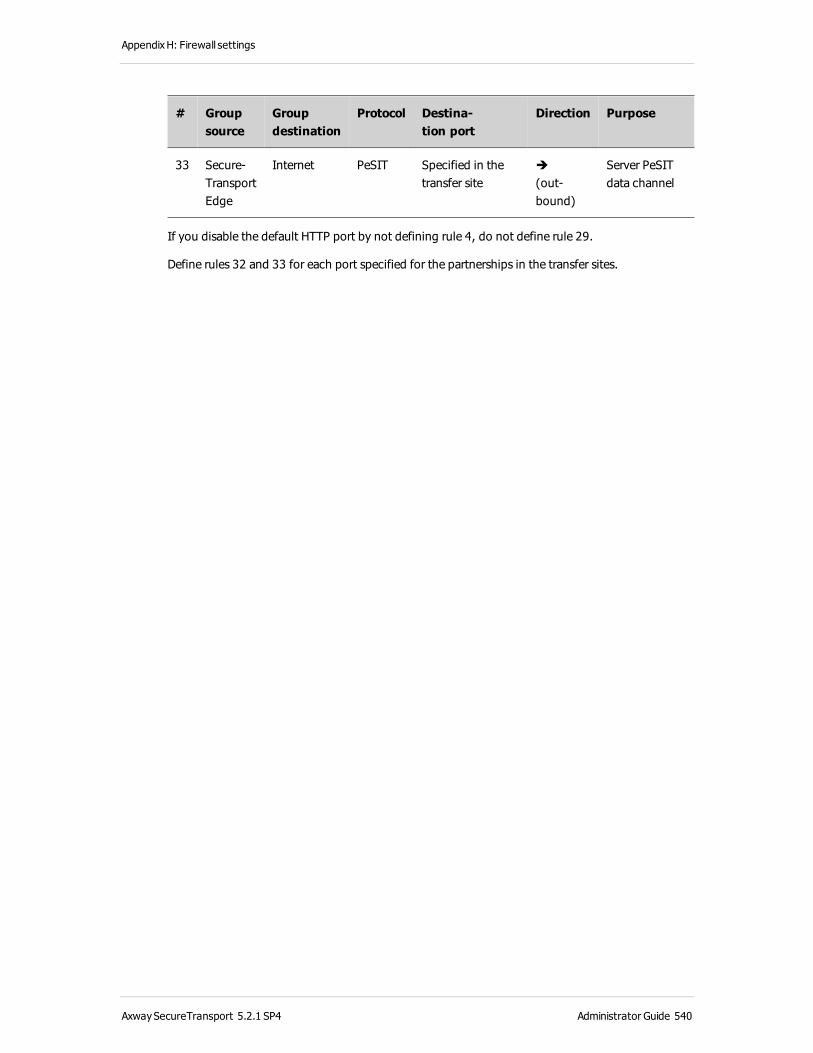
AppendixH: Firewall settings
# Group source
Group destination
Protocol Destina-tion port
Direction Purpose
33 Secure-TransportEdge
Internet PeSIT Specified in the transfer site
è
(out-bound)
Server PeSIT data channel
If you disable the default HTTP port by not defining rule 4, do not define rule 29.
Define rules 32 and 33 for each port specified for the partnerships in the transfer sites.
AxwaySecureTransport 5.2.1 SP4 Administrator Guide 540
Appendix I: Expression language
This appendix provides information about the syntax for the expressions used for post-transmission actions, PGP, and account templates supported by Axway SecureTransport.
OverviewMany features of SecureTransport use expressions. The expression language SecureTransport uses is based on the Sun JSP Expression Language. Only the syntax listed in this appendix is supported by SecureTransport, any other syntax is not guaranteed to function properly.
The following SecureTransport features can use the expression language:
l Transfer site post-transmission actions
l Subscription post-transmission actions
l PGP
l Account templates
Note If an account template and its transfer site are defined using expressions, you cannot restart failed transfers for that account template using the Resubmit button on the File Tracking page.
This appendix provides a list of the supported syntax with examples.
Note When creating expressions that use file paths you must use the forward slash (/) regardless of the platform where the file path is located. For example, instead of writing c:\tmp\${stenv['loginname'], write c:/tmp/${stenv['loginname'].
OperatorsThe following operators are supported:
Operator Description
[ ] and . Compares expressions
+, -, *, / or div, % or mod Arithmetic Operators. Both binary and unary operators are supported
AxwaySecureTransport 5.2.1 SP4 Administrator Guide 541
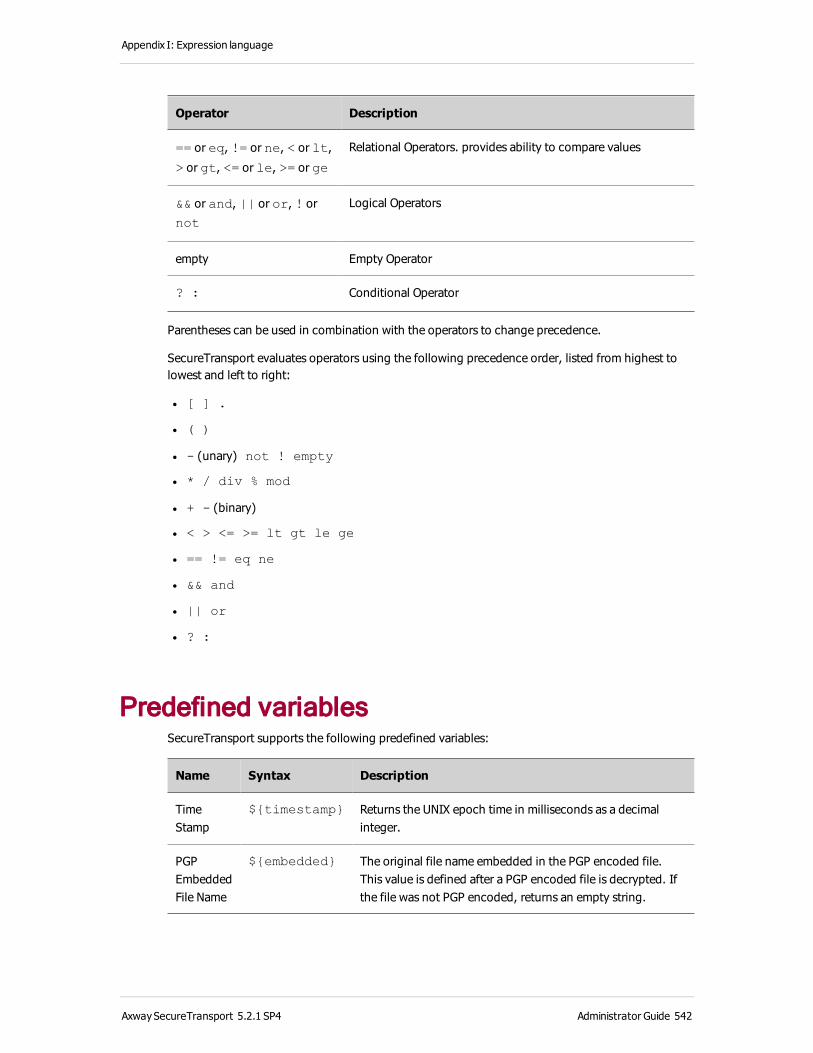
Appendix I: Expression language
Operator Description
== or eq, != or ne, < or lt,
> or gt, <= or le, >= or ge
Relational Operators. provides ability to compare values
&& or and, || or or, ! or
not
Logical Operators
empty Empty Operator
? : Conditional Operator
Parentheses can be used in combination with the operators to change precedence.
SecureTransport evaluates operators using the following precedence order, listed from highest to lowest and left to right:
l [ ] .
l ( )
l - (unary) not ! empty
l * / div % mod
l + - (binary)
l < > <= >= lt gt le ge
l == != eq ne
l && and
l || or
l ? :
Predefined variablesSecureTransport supports the following predefined variables:
Name Syntax Description
Time Stamp
${timestamp} Returns the UNIX epoch time in milliseconds as a decimal integer.
PGP Embedded File Name
${embedded} The original file name embedded in the PGP encoded file. This value is defined after a PGP encoded file is decrypted. If the file was not PGP encoded, returns an empty string.
AxwaySecureTransport 5.2.1 SP4 Administrator Guide 542
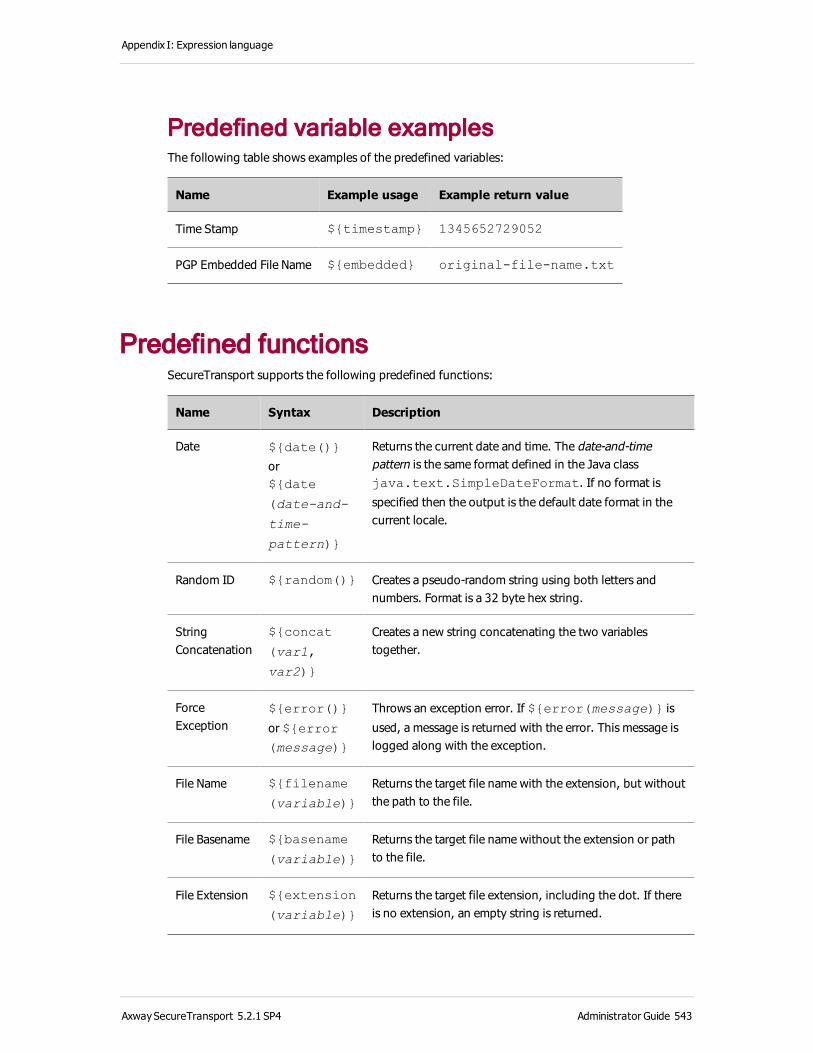
Appendix I: Expression language
Predefined variable examplesThe following table shows examples of the predefined variables:
Name Example usage Example return value
Time Stamp ${timestamp} 1345652729052
PGP Embedded File Name ${embedded} original-file-name.txt
Predefined functionsSecureTransport supports the following predefined functions:
Name Syntax Description
Date ${date()}
or${date
(date-and-
time-
pattern)}
Returns the current date and time. The date-and-time pattern is the same format defined in the Java class java.text.SimpleDateFormat. If no format is
specified then the output is the default date format in the current locale.
Random ID ${random()} Creates a pseudo-random string using both letters and numbers. Format is a 32 byte hex string.
String Concatenation
${concat
(var1,
var2)}
Creates a new string concatenating the two variables together.
Force Exception
${error()}
or ${error
(message)}
Throws an exception error. If ${error(message)} is
used, a message is returned with the error. This message is logged along with the exception.
File Name ${filename
(variable)}
Returns the target file name with the extension, but without the path to the file.
File Basename ${basename
(variable)}
Returns the target file name without the extension or path to the file.
File Extension ${extension
(variable)}
Returns the target file extension, including the dot. If there is no extension, an empty string is returned.
AxwaySecureTransport 5.2.1 SP4 Administrator Guide 543
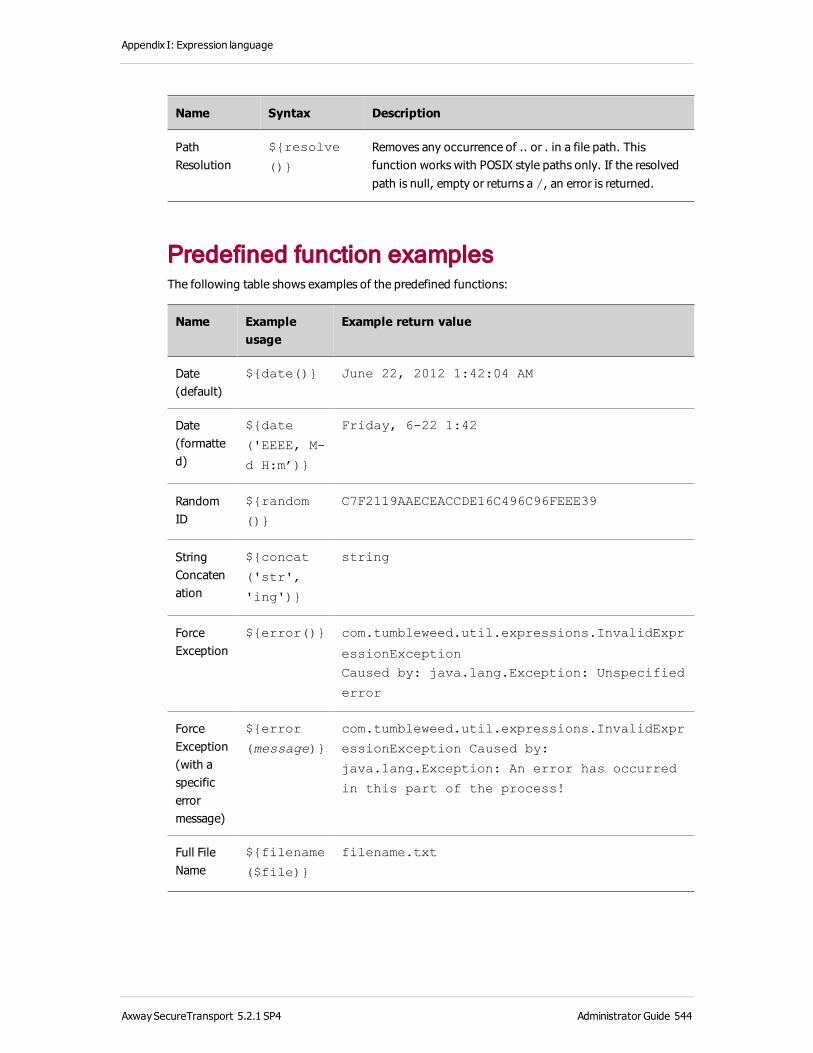
Appendix I: Expression language
Name Syntax Description
Path Resolution
${resolve
()}
Removes any occurrence of .. or . in a file path. This function works with POSIX style paths only. If the resolved path is null, empty or returns a /, an error is returned.
Predefined function examplesThe following table shows examples of the predefined functions:
Name Example usage
Example return value
Date (default)
${date()} June 22, 2012 1:42:04 AM
Date (formatted)
${date
('EEEE, M-
d H:m’)}
Friday, 6-22 1:42
Random ID
${random
()}
C7F2119AAECEACCDE16C496C96FEEE39
String Concatenation
${concat
('str',
'ing')}
string
Force Exception
${error()} com.tumbleweed.util.expressions.InvalidExpr
essionException
Caused by: java.lang.Exception: Unspecified
error
Force Exception (with a specific error message)
${error
(message)}
com.tumbleweed.util.expressions.InvalidExpr
essionException Caused by:
java.lang.Exception: An error has occurred
in this part of the process!
Full File Name
${filename
($file)}
filename.txt
AxwaySecureTransport 5.2.1 SP4 Administrator Guide 544

Appendix I: Expression language
Name Example usage
Example return value
File Basename
${basename
($file)}
filename
File Extension
${extensio
n($file)}
.txt
Path Resolution
${resolve
('.././pat
h')}
path
Path Resolution with Error
${resolve
('../../..
')}
com.tumbleweed.util.expressions.
InvalidExpansionException: Invalid path
resolution: /
Path Resolution with Error
${resolve
('\\')}
com.tumbleweed.util.expressions.
InvalidExpansionException: Path must not
contain '\' character
SecureTransport-specific named variable setsNamed variable sets separate variables into logical groups. Named variable sets use the following syntax:
${name['variable']}
or
${name.variable}
SecureTransport uses the following named variable sets:
l ${sess['variable']} – used with SecureTransport session variables including LDAP
l ${env['variable']}, ${stenv['variable']}, or ${stenv.variable} – used
with SecureTransport predefined environment variables
l ${pesit['variable']} – used with SecureTransport PeSIT variables described in PeSIT
variables on page 547
LDAP session variables can be used with the sess named variable set. For details, refer to LDAP Session Variables in Chapter 7 of the SecureTransport Developer’s Guide. You can also develop an agent that contains the session variables you want to use. All session variables must be prefixed with STSESSION_.
AxwaySecureTransport 5.2.1 SP4 Administrator Guide 545
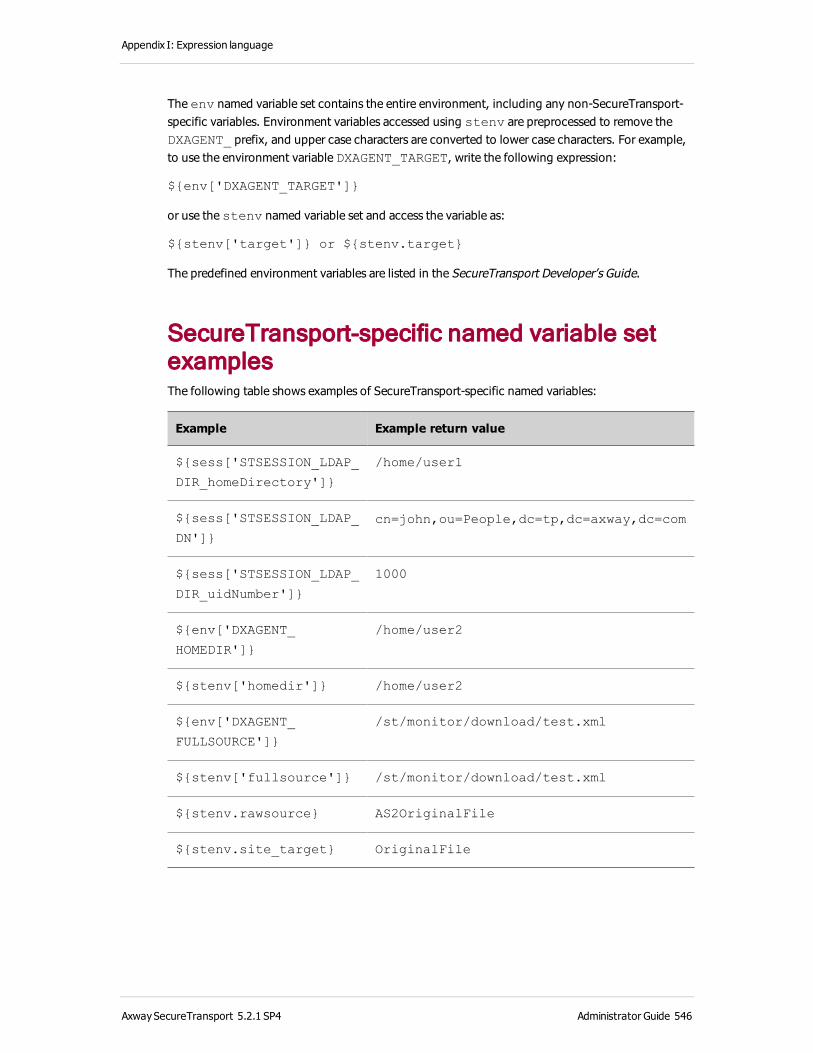
Appendix I: Expression language
The env named variable set contains the entire environment, including any non-SecureTransport-specific variables. Environment variables accessed using stenv are preprocessed to remove the DXAGENT_ prefix, and upper case characters are converted to lower case characters. For example, to use the environment variable DXAGENT_TARGET, write the following expression:
${env['DXAGENT_TARGET']}
or use the stenv named variable set and access the variable as:
${stenv['target']} or ${stenv.target}
The predefined environment variables are listed in the SecureTransport Developer’s Guide.
SecureTransport-specific named variable set examplesThe following table shows examples of SecureTransport-specific named variables:
Example Example return value
${sess['STSESSION_LDAP_
DIR_homeDirectory']}
/home/user1
${sess['STSESSION_LDAP_
DN']}
cn=john,ou=People,dc=tp,dc=axway,dc=com
${sess['STSESSION_LDAP_
DIR_uidNumber']}
1000
${env['DXAGENT_
HOMEDIR']}
/home/user2
${stenv['homedir']} /home/user2
${env['DXAGENT_
FULLSOURCE']}
/st/monitor/download/test.xml
${stenv['fullsource']} /st/monitor/download/test.xml
${stenv.rawsource} AS2OriginalFile
${stenv.site_target} OriginalFile
AxwaySecureTransport 5.2.1 SP4 Administrator Guide 546

Appendix I: Expression language
PeSIT variablesThe following expressions are valid in transfer profiles:
Expression PeSIT PI code
${pesit.crc} PI 1
${pesit.diagCode} PI 2
${pesit.callerID} PI 3
${pesit.senderID} PI 3
${pesit.serverID} PI 4
${pesit.receiverID} PI 4
${pesit.version} PI 6
${pesit.checkPointInterval} PI 7
${pesit.checkPointWindow} PI 7
${pesit.fileType} PI 11
${pesit.fileName} PI 12
${pesit.transferID} PI 13
${pesit.fileAttributes} PI 14
${pesit.restart} PI 15
${pesit.dataEncoding} PI 16
${pesit.priority} PI 17
${pesit.restartCheckPoint} PI 18
${pesit.cancelCode} PI 19
${pesit.checkPointNumber} PI 20
${pesit.compressed} PI 21
AxwaySecureTransport 5.2.1 SP4 Administrator Guide 547
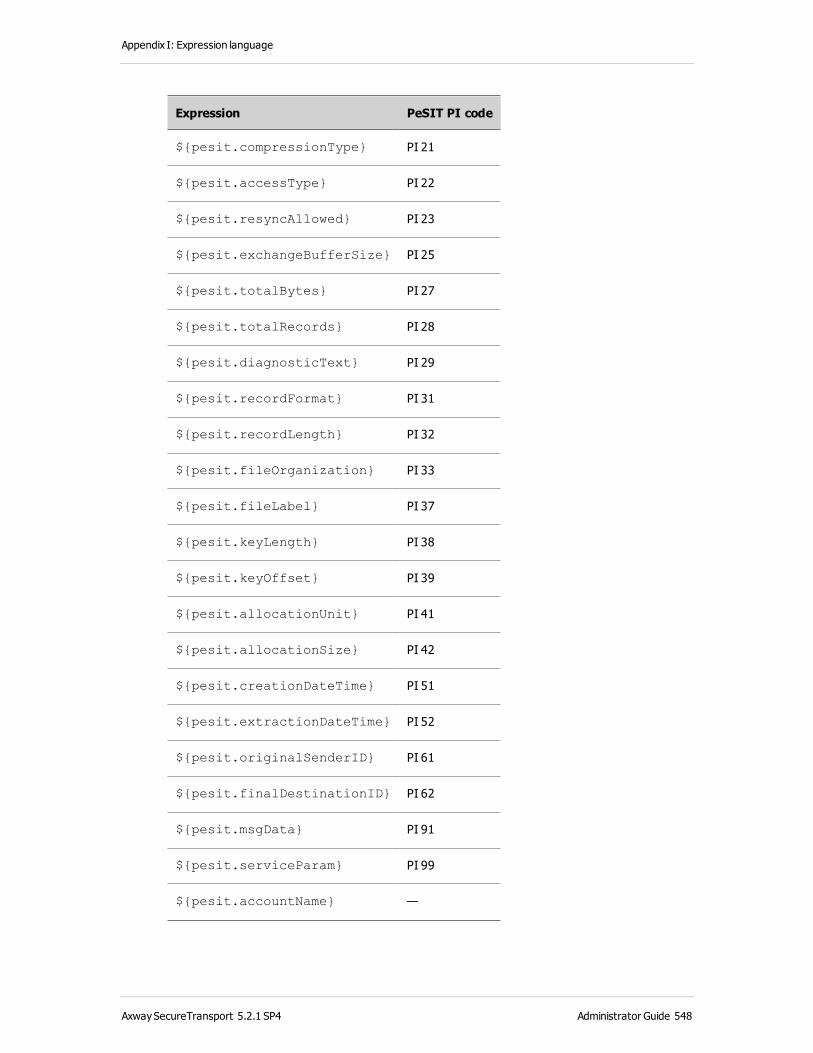
Appendix I: Expression language
Expression PeSIT PI code
${pesit.compressionType} PI 21
${pesit.accessType} PI 22
${pesit.resyncAllowed} PI 23
${pesit.exchangeBufferSize} PI 25
${pesit.totalBytes} PI 27
${pesit.totalRecords} PI 28
${pesit.diagnosticText} PI 29
${pesit.recordFormat} PI 31
${pesit.recordLength} PI 32
${pesit.fileOrganization} PI 33
${pesit.fileLabel} PI 37
${pesit.keyLength} PI 38
${pesit.keyOffset} PI 39
${pesit.allocationUnit} PI 41
${pesit.allocationSize} PI 42
${pesit.creationDateTime} PI 51
${pesit.extractionDateTime} PI 52
${pesit.originalSenderID} PI 61
${pesit.finalDestinationID} PI 62
${pesit.msgData} PI 91
${pesit.serviceParam} PI 99
${pesit.accountName} —
AxwaySecureTransport 5.2.1 SP4 Administrator Guide 548

Appendix I: Expression language
Expression PeSIT PI code
${pesit.datetime} —
${pesit.details} —
Note The expressions ${pesit.originalSenderID} and are ${pesit.finalDestinationID} are set only for routed transfers.
Match and replace functionsThe expression language match and replace functions can match a regular expression or replace it.
The syntax for the replace operation is:
${variable.replace(<match RE>, <replace RE>)}
If the match succeeds, the value is the string with the matched string replaced.
The syntax for a match operation is:
${variable.matches(<match RE>)}
If the match succeeds, the value is true. If it does not, the value is false.
Note The match operation returns a logical value that can be used with relational or conditional operators.
For more about regular expressions, see Regular expressions on page 555.
Regular expression examplesThe following table shows several examples of using the match and replace operations with regular expressions.
Name Example Example return value
Match ${foo.matches('fo*')} true
Replace ${foo.replace('f(.*)', 'm$1')} moo
Expression examplesThis section provides additional examples on expression usage. In this section, Sample variable values are given to show how various expressions can use the information.
AxwaySecureTransport 5.2.1 SP4 Administrator Guide 549

Appendix I: Expression language
Expression variables and examplesThe following table provides the variable names and values that are used in the subsequent examples:
Variable name Value
DXAGENT_LOGINNAME stuser
DXAGENT_HOMEDIR /home/users/stuser
DXAGENT_TARGET document_12.txt
DXAGENT_TARGETPATH /home/users/stuser
DXAGENT_TRANSFORMATION_
INPUT
/home/users/stuser/PGP/encrypted.pgp
Note The variable DXAGENT_TRANSFORMATION_INPUT is only available from within a PGP transformation agent. Expressions using this variable do not evaluate correctly in other cases. In the example using this variable, assume that the original file name before encryption is original_12.txt.
The following table shows additional examples of the different expressions available for use in SecureTransport:
Example variable name Example return value
${env['DXAGENT_TARGET']} document_12.txt
${stenv['target']} document_12.txt
${stenv["target"]} document_12.txt
Prefix${stenv
["target"]}.newext
Prefixdocument_12.txt.newext
${stenv.targetpath} /home/users/stuser
${basename(stenv.target)} document_12
${extension(stenv.target)} txt
AxwaySecureTransport 5.2.1 SP4 Administrator Guide 550
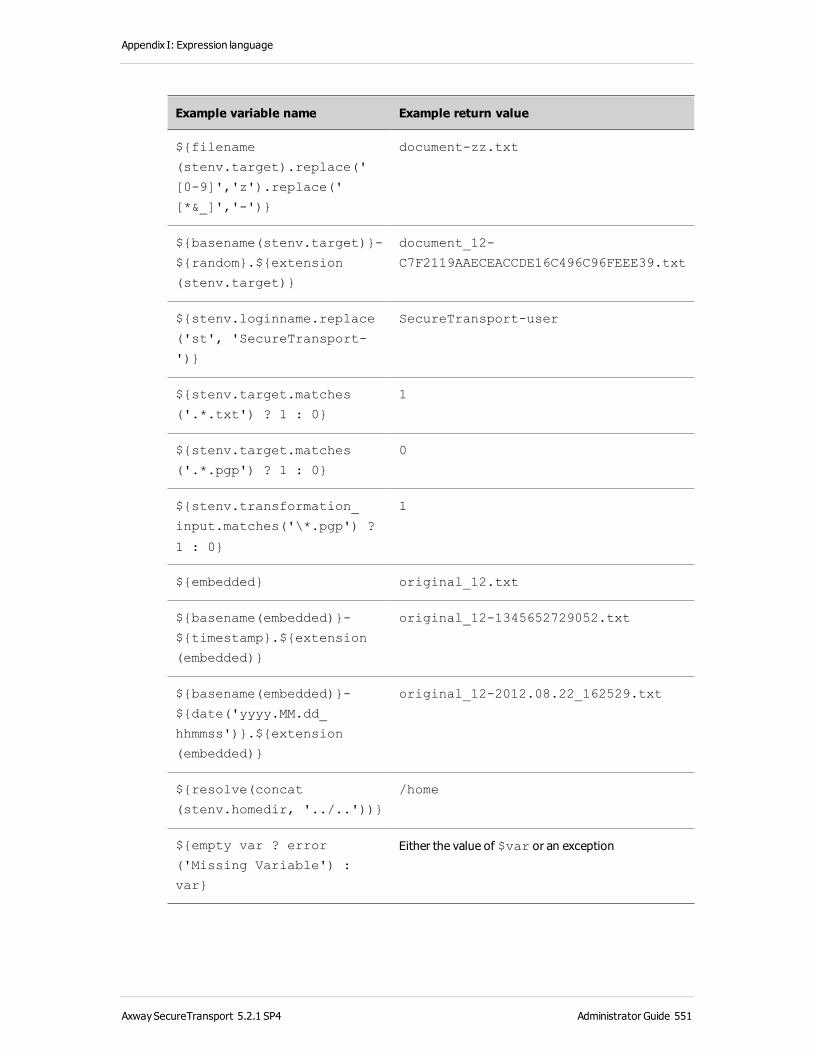
Appendix I: Expression language
Example variable name Example return value
${filename
(stenv.target).replace('
[0-9]','z').replace('
[*&_]','-')}
document-zz.txt
${basename(stenv.target)}-
${random}.${extension
(stenv.target)}
document_12-
C7F2119AAECEACCDE16C496C96FEEE39.txt
${stenv.loginname.replace
('st', 'SecureTransport-
')}
SecureTransport-user
${stenv.target.matches
('.*.txt') ? 1 : 0}
1
${stenv.target.matches
('.*.pgp') ? 1 : 0}
0
${stenv.transformation_
input.matches('\*.pgp') ?
1 : 0}
1
${embedded} original_12.txt
${basename(embedded)}-
${timestamp}.${extension
(embedded)}
original_12-1345652729052.txt
${basename(embedded)}-
${date('yyyy.MM.dd_
hhmmss')}.${extension
(embedded)}
original_12-2012.08.22_162529.txt
${resolve(concat
(stenv.homedir, '../..'))}
/home
${empty var ? error
('Missing Variable') :
var}
Either the value of $var or an exception
AxwaySecureTransport 5.2.1 SP4 Administrator Guide 551

Appendix J: IP addresses and host names
This topic described valid syntax for IP addresses and host names you can use with Axway SecureTransport. In fields in the Administration Tool, you enter an IP address or host name to represent a host or server, a pattern to represent a range of IP address, or a pattern that SecureTransport matches against input data.
IP address and host name syntaxIn SecureTransport, you can specify a host address in any of the following formats:
l Exact IPv4 or IPv6 address
l Range of address using Classless Inter-Domain Routing (CIDR) notation
l Range of address using IPv4 address and netmask
l Patten matching an IPv4 address
l Exact host name
l Pattern matching a host name
Exact IPv4 or IPv6 addressUse an exact IPv4 or IPv6 address to specify a single server. In IPv6 addresses, two colons (::) can represent one sequence of zero bits.
Examples of valid values include the following:
l 172.23.34.45
l 127.0.0.1
l FC00:1234:56:0:0:0:AB:EF
l FC00:1234:56::AB:EF
l ::1
AxwaySecureTransport 5.2.1 SP4 Administrator Guide 552

Appendix J: IP addresses and host names
Range of address using Classless Inter-Domain Routing notationClassless Inter-Domain Routing (CIDR) notation specifies an IPv4 or IPv6 address and a number of significant bits separated by a slash (/). In other contexts, CIDR notation is used to specify an IP address and a subnet. For SecureTransport, use CIDR notation to represent a range of IP addresses.
Examples of valid values include the following:
l 172.23.34.0/24 represents 172.23.34.0 through 172.23.34.255
l FC00:1234:56::/120 represents FC00:1234:56:: through FC00:1234:56::FF
Range of address using IPv4 address and subnet maskUse an IPv4 address and a subnet mask separated by a colon (:) to represent a range of IPv4 addresses.
Examples of valid values include the following:
l 172.23.34.0:255.255.255.0 represents 172.23.34.0 through 172.23.34.255
l 172.56.67.128:255.255.255.224 represents 172.56.67.128 through
172.56.67.159
Patten matching an IPv4 addressUse an IPv4 address pattern to represent a range of IPv4 addresses. Use an asterisk (*) to match any sequence of octal digits.
Examples of valid values include the following:
l 172.23.34.* represents 172.23.34.0 through 172.23.34.255
l 172.56.*.* represents 172.56.0.0 through 172.56.255.255
Exact host nameUse a literal host name to represent a single host where host names are valid. The host name must resolve to a valid IPv4 or IPv6 address.
AxwaySecureTransport 5.2.1 SP4 Administrator Guide 553

Appendix J: IP addresses and host names
Pattern matching a host nameUse a host name pattern that uses asterisk (*) to represent one or more characters and question mark (?) to represent one character. The pattern specifies any host whose name matches. A host name pattern is valid for values that SecureTransport uses to match a host name, for example, in a user class definition.
Examples of valid values include the following:
l *.example.com
l mail?.example.edu
l int?*
AxwaySecureTransport 5.2.1 SP4 Administrator Guide 554
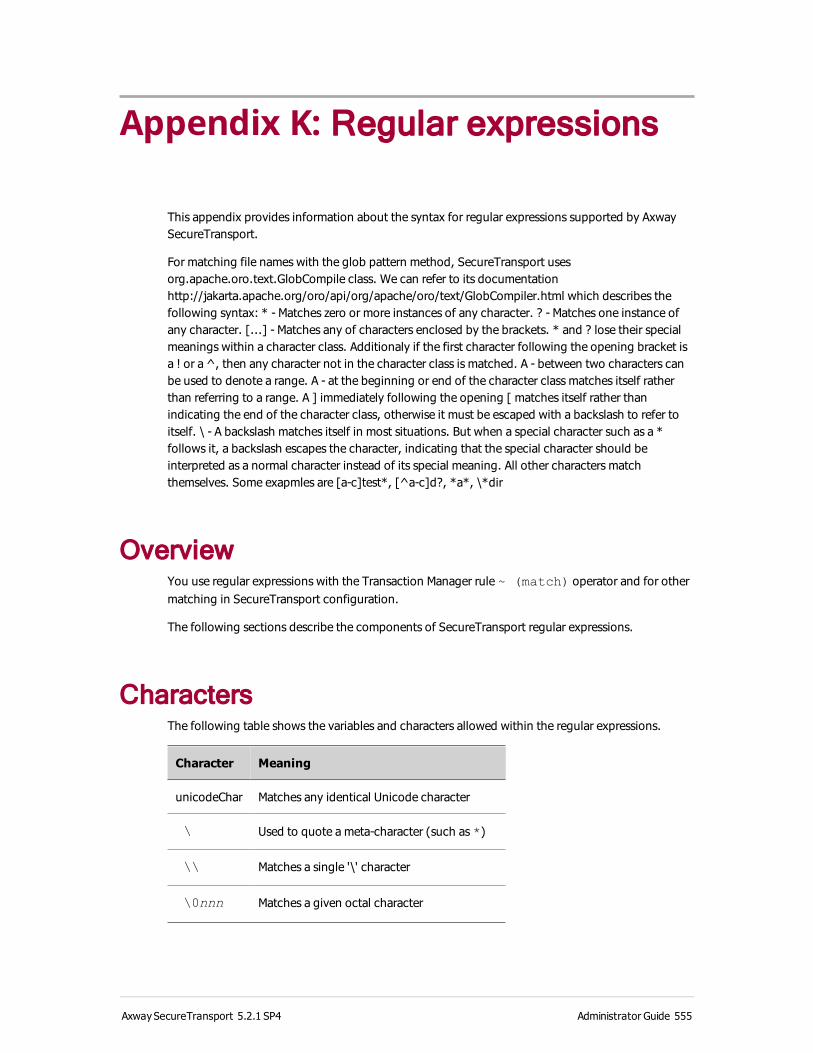
Appendix K: Regular expressions
This appendix provides information about the syntax for regular expressions supported by Axway SecureTransport.
For matching file names with the glob pattern method, SecureTransport uses org.apache.oro.text.GlobCompile class. We can refer to its documentation http://jakarta.apache.org/oro/api/org/apache/oro/text/GlobCompiler.html which describes the following syntax: * - Matches zero or more instances of any character. ? - Matches one instance of any character. [...] - Matches any of characters enclosed by the brackets. * and ? lose their special meanings within a character class. Additionaly if the first character following the opening bracket is a ! or a ̂ , then any character not in the character class is matched. A - between two characters can be used to denote a range. A - at the beginning or end of the character class matches itself rather than referring to a range. A ] immediately following the opening [ matches itself rather than indicating the end of the character class, otherwise it must be escaped with a backslash to refer to itself. \ - A backslash matches itself in most situations. But when a special character such as a * follows it, a backslash escapes the character, indicating that the special character should be interpreted as a normal character instead of its special meaning. All other characters match themselves. Some exapmles are [a-c]test*, [^a-c]d?, *a*, \*dir
OverviewYou use regular expressions with the Transaction Manager rule ~ (match) operator and for other matching in SecureTransport configuration.
The following sections describe the components of SecureTransport regular expressions.
CharactersThe following table shows the variables and characters allowed within the regular expressions.
Character Meaning
unicodeChar Matches any identical Unicode character
\ Used to quote a meta-character (such as *)
\\ Matches a single '\' character
\0nnn Matches a given octal character
AxwaySecureTransport 5.2.1 SP4 Administrator Guide 555
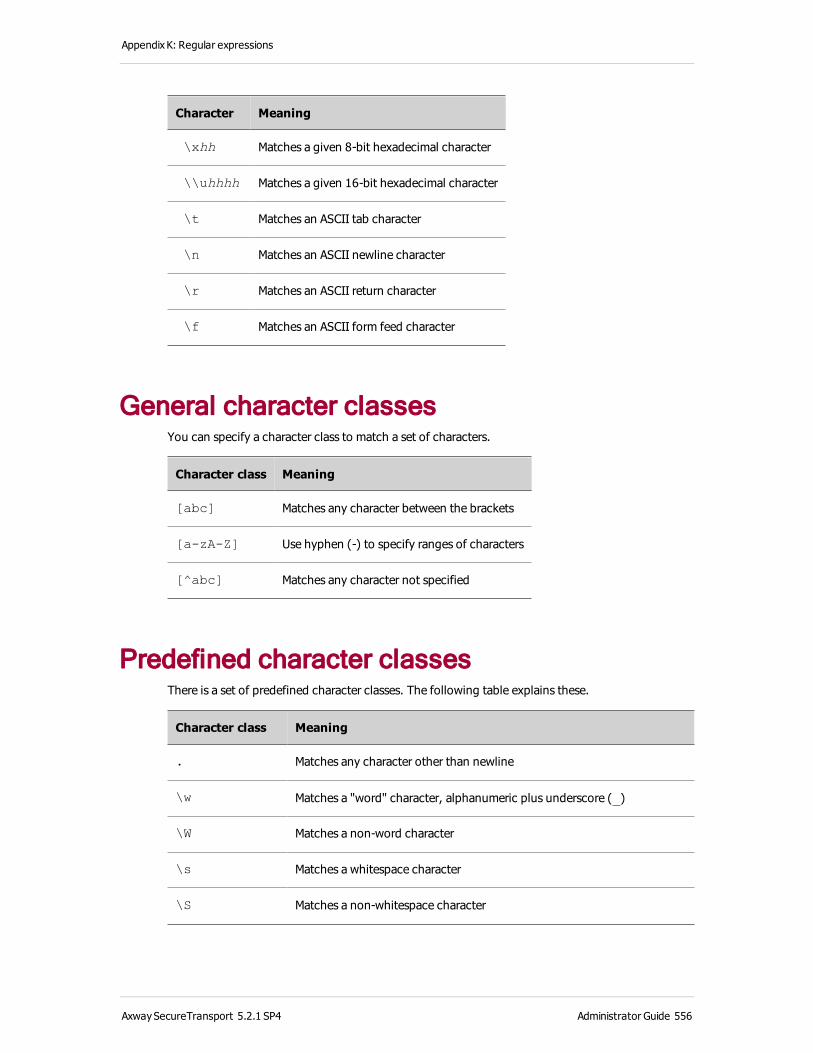
Appendix K: Regular expressions
Character Meaning
\xhh Matches a given 8-bit hexadecimal character
\\uhhhh Matches a given 16-bit hexadecimal character
\t Matches an ASCII tab character
\n Matches an ASCII newline character
\r Matches an ASCII return character
\f Matches an ASCII form feed character
General character classesYou can specify a character class to match a set of characters.
Character class Meaning
[abc] Matches any character between the brackets
[a-zA-Z] Use hyphen (-) to specify ranges of characters
[^abc] Matches any character not specified
Predefined character classesThere is a set of predefined character classes. The following table explains these.
Character class Meaning
. Matches any character other than newline
\w Matches a "word" character, alphanumeric plus underscore (_)
\W Matches a non-word character
\s Matches a whitespace character
\S Matches a non-whitespace character
AxwaySecureTransport 5.2.1 SP4 Administrator Guide 556
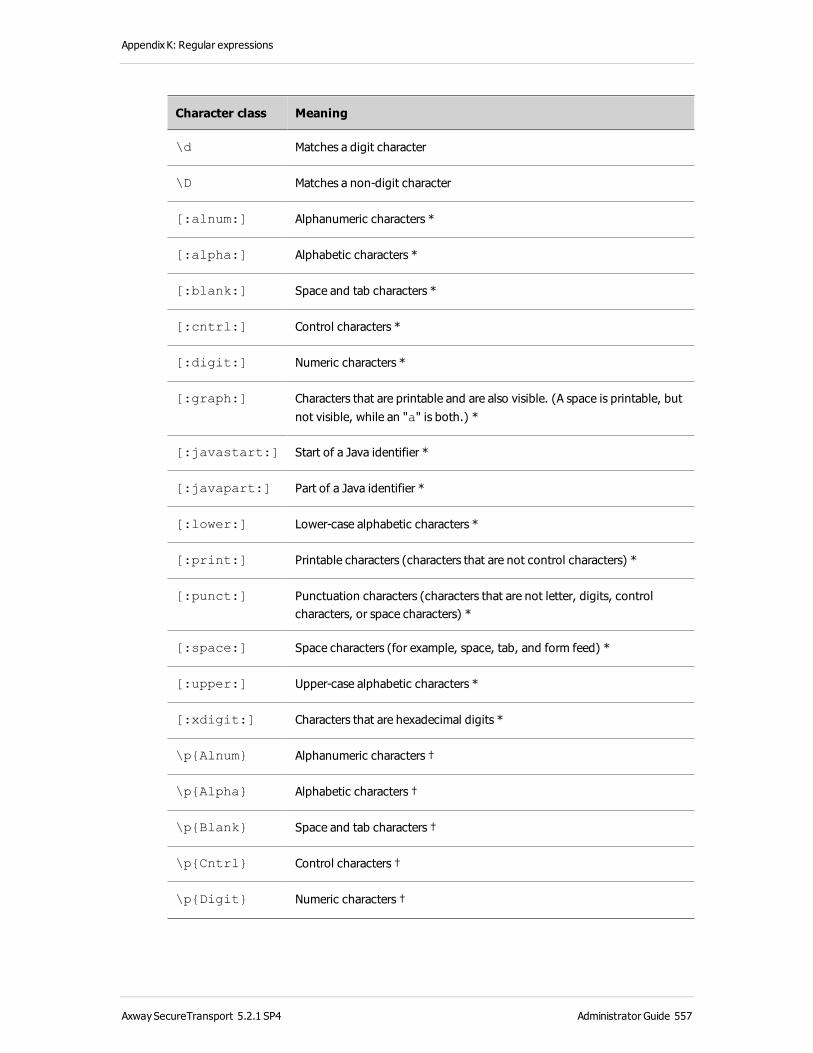
Appendix K: Regular expressions
Character class Meaning
\d Matches a digit character
\D Matches a non-digit character
[:alnum:] Alphanumeric characters *
[:alpha:] Alphabetic characters *
[:blank:] Space and tab characters *
[:cntrl:] Control characters *
[:digit:] Numeric characters *
[:graph:] Characters that are printable and are also visible. (A space is printable, but not visible, while an "a" is both.) *
[:javastart:] Start of a Java identifier *
[:javapart:] Part of a Java identifier *
[:lower:] Lower-case alphabetic characters *
[:print:] Printable characters (characters that are not control characters) *
[:punct:] Punctuation characters (characters that are not letter, digits, control characters, or space characters) *
[:space:] Space characters (for example, space, tab, and form feed) *
[:upper:] Upper-case alphabetic characters *
[:xdigit:] Characters that are hexadecimal digits *
\p{Alnum} Alphanumeric characters †
\p{Alpha} Alphabetic characters †
\p{Blank} Space and tab characters †
\p{Cntrl} Control characters †
\p{Digit} Numeric characters †
AxwaySecureTransport 5.2.1 SP4 Administrator Guide 557
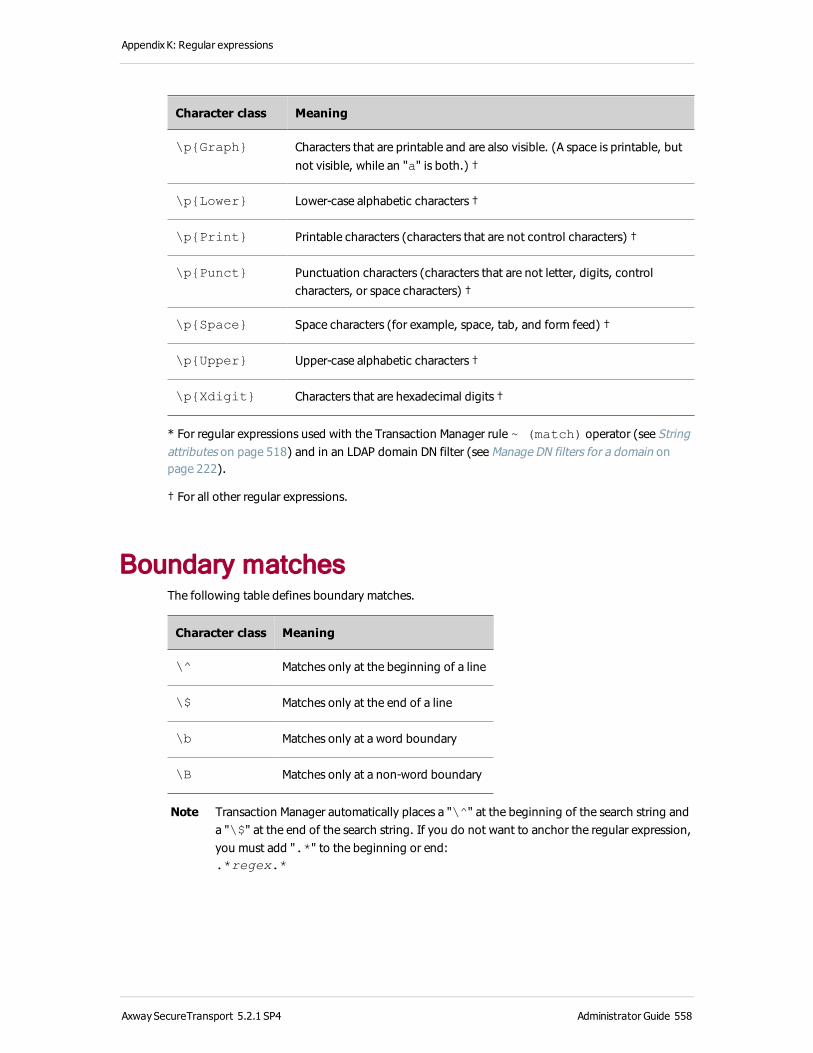
Appendix K: Regular expressions
Character class Meaning
\p{Graph} Characters that are printable and are also visible. (A space is printable, but not visible, while an "a" is both.) †
\p{Lower} Lower-case alphabetic characters †
\p{Print} Printable characters (characters that are not control characters) †
\p{Punct} Punctuation characters (characters that are not letter, digits, control characters, or space characters) †
\p{Space} Space characters (for example, space, tab, and form feed) †
\p{Upper} Upper-case alphabetic characters †
\p{Xdigit} Characters that are hexadecimal digits †
* For regular expressions used with the Transaction Manager rule ~ (match) operator (see String attributes on page 518) and in an LDAP domain DN filter (see Manage DN filters for a domain on page 222).
† For all other regular expressions.
Boundary matchesThe following table defines boundary matches.
Character class Meaning
\^ Matches only at the beginning of a line
\$ Matches only at the end of a line
\b Matches only at a word boundary
\B Matches only at a non-word boundary
Note Transaction Manager automatically places a "\^" at the beginning of the search string and a "\$" at the end of the search string. If you do not want to anchor the regular expression, you must add ".*" to the beginning or end:.*regex.*
AxwaySecureTransport 5.2.1 SP4 Administrator Guide 558
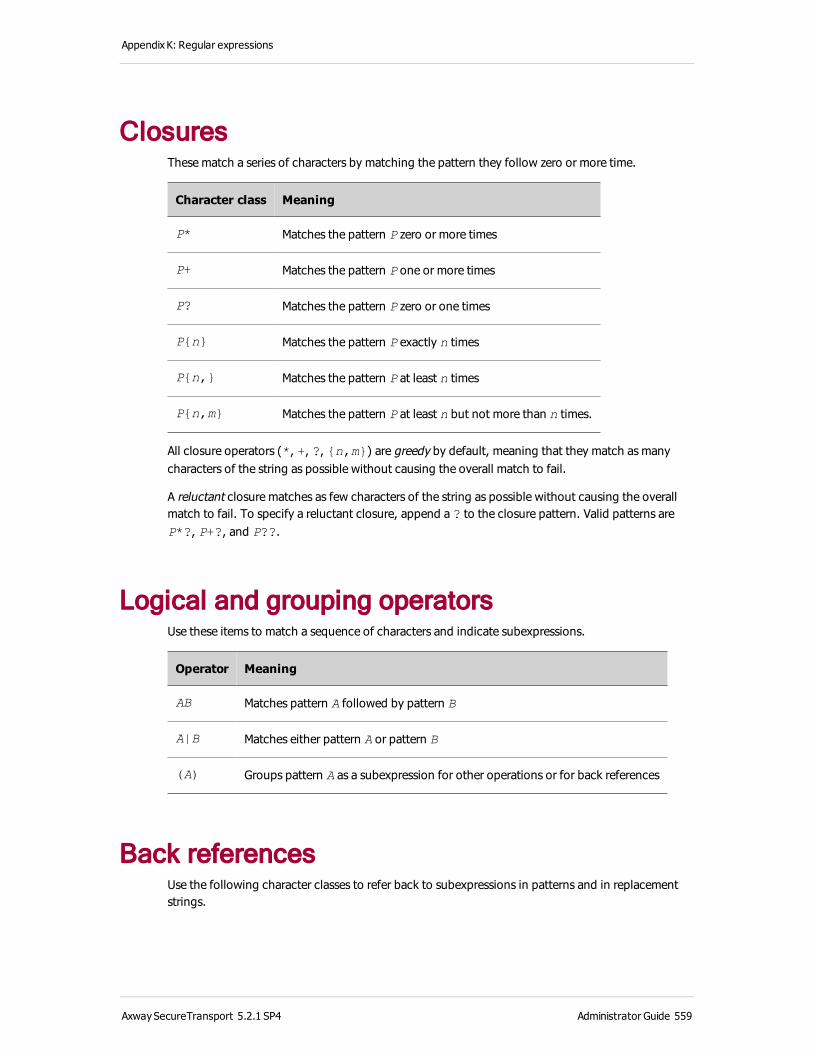
Appendix K: Regular expressions
ClosuresThese match a series of characters by matching the pattern they follow zero or more time.
Character class Meaning
P* Matches the pattern P zero or more times
P+ Matches the pattern P one or more times
P? Matches the pattern P zero or one times
P{n} Matches the pattern P exactly n times
P{n,} Matches the pattern P at least n times
P{n,m} Matches the pattern P at least n but not more than n times.
All closure operators (*, +, ?, {n,m}) are greedy by default, meaning that they match as many characters of the string as possible without causing the overall match to fail.
A reluctant closure matches as few characters of the string as possible without causing the overall match to fail. To specify a reluctant closure, append a ? to the closure pattern. Valid patterns are P*?, P+?, and P??.
Logical and grouping operatorsUse these items to match a sequence of characters and indicate subexpressions.
Operator Meaning
AB Matches pattern A followed by pattern B
A|B Matches either pattern A or pattern B
(A) Groups pattern A as a subexpression for other operations or for back references
Back referencesUse the following character classes to refer back to subexpressions in patterns and in replacement strings.
AxwaySecureTransport 5.2.1 SP4 Administrator Guide 559

Appendix K: Regular expressions
Character class Meaning
\1 Back reference to 1st parenthesized subexpression
\2 Back reference to 2nd parenthesized subexpression
\3 Back reference to 3rd parenthesized subexpression
\4 Back reference to 4th parenthesized subexpression
\5 Back reference to 5th parenthesized subexpression
\6 Back reference to 6th parenthesized subexpression
\7 Back reference to 7th parenthesized subexpression
\8 Back reference to 8th parenthesized subexpression
\9 Back reference to 9th parenthesized subexpression
AxwaySecureTransport 5.2.1 SP4 Administrator Guide 560

Appendix L: Velocity email notification package
This appendix describes how to set up and configure the Velocity email notification package.
Email notification overviewThere are four benefits of using this package:
l It generates HTML rather than plain text notifications.
l It utilizes notification templates that allow SecureTransport variables to be used as substitution tokens.
l The notification templates also contain meta-data to allow customizations of the email subject line and the SMTP envelope headers
l It supports attachments making it easy to attach a target file.
The following example shows what an email generated using the Velocity Email Notification package can look like:
There are many scenarios in SecureTransport which might require generating a notification. This package contains examples that show how to generate a notification when:
AxwaySecureTransport 5.2.1 SP4 Administrator Guide 561
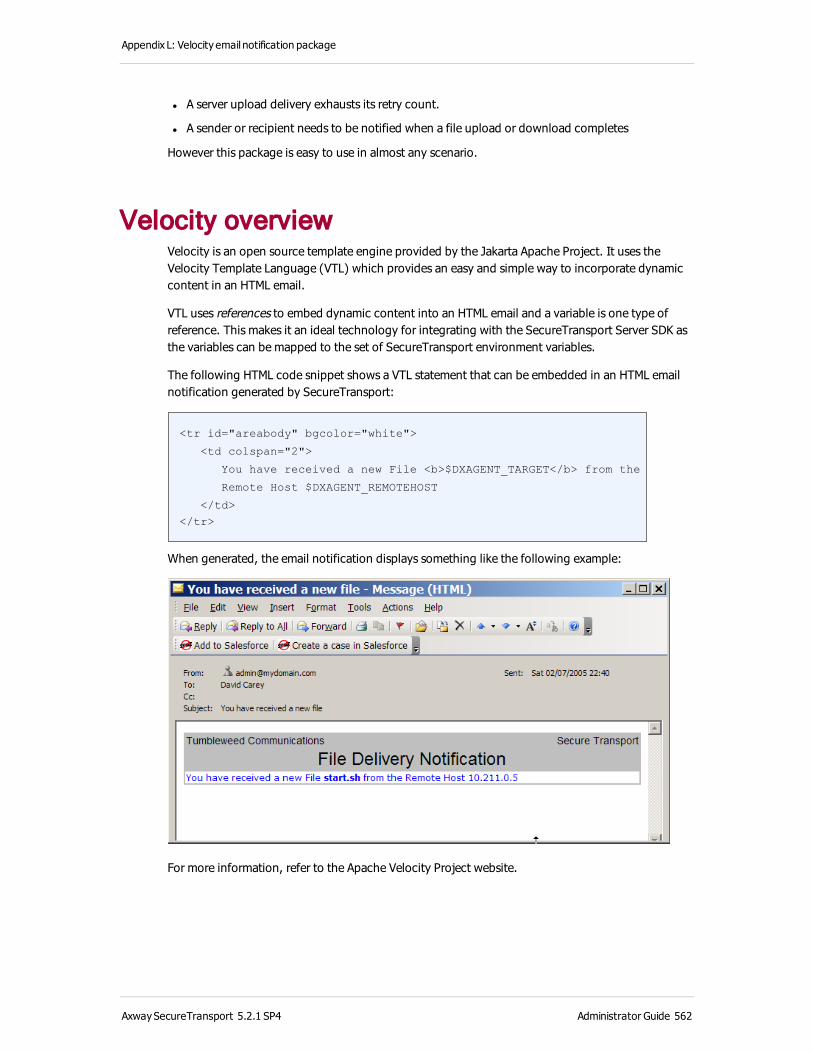
Appendix L: Velocity email notification package
l A server upload delivery exhausts its retry count.
l A sender or recipient needs to be notified when a file upload or download completes
However this package is easy to use in almost any scenario.
Velocity overviewVelocity is an open source template engine provided by the Jakarta Apache Project. It uses the Velocity Template Language (VTL) which provides an easy and simple way to incorporate dynamic content in an HTML email.
VTL uses references to embed dynamic content into an HTML email and a variable is one type of reference. This makes it an ideal technology for integrating with the SecureTransport Server SDK as the variables can be mapped to the set of SecureTransport environment variables.
The following HTML code snippet shows a VTL statement that can be embedded in an HTML email notification generated by SecureTransport:
<tr id="areabody" bgcolor="white">
<td colspan="2">
You have received a new File <b>$DXAGENT_TARGET</b> from the
Remote Host $DXAGENT_REMOTEHOST
</td>
</tr>
When generated, the email notification displays something like the following example:
For more information, refer to the Apache Velocity Project website.
AxwaySecureTransport 5.2.1 SP4 Administrator Guide 562

Appendix L: Velocity email notification package
Configure the ServerTransferNotify rules package
Use the following steps to open the rules package and modify the contents to work in your environment.
1. Select Transaction Manage > Packages to display the Rules Packages page.
2. Locate the ServerTransferNotify package and click Edit to open the package.
The ServerTransferNotify rules package ships with one rule, also named
ServerTransferNotify. This rule is configured to send an email if the server initiated
upload or download operation exhausts the last retry or encounters a permanent failure.
You can configure other rules to trigger email notification under different conditions. For example, the following rule sends an email upon successful upload or server download of a file.
When you edit the action for a rule, you can add parameters to the Invocation Parameters field. Specifying the parameters here overrides the parameters specified in the template files located in the <FILEDRIVEHOME>/conf/mailer-templates directory. These files are
named using the following format: <TemplateName>.xhtml.
3. Specify the following parameters in the Invocation Parameters field:
AxwaySecureTransport 5.2.1 SP4 Administrator Guide 563

Appendix L: Velocity email notification package
l messagetemplate — specifies which template to use from the
<FILEDRIVEHOME>/conf/mailer-templates directory. If the template is not specified, the
DefaultNotification.xhtml template is used.
l mailserver — SMTP server to use to send out the email notification.
l mailfrom — specify who the email notification is coming from.
l mailto — the recipient who should receive the email notification. If you do not specify a recipient,
the agent uses the value specified when the user account was created. It is captured in the variable: $DXAGENT_ACCOUNT_EMAIL
The mailto parameter can contain a single email address or multiple email addresses. To use
multiple email addresses, separate each address by a semi-colon.
For example:
mailto="[email protected]"
or
mailto="[email protected];[email protected]"
Note When a multiple email list contains a non-existing or invalid e-mail address, your mail server might refuse all e-mails from the list and none of the recipients will receive a notification. Check the mail server configuration to make sure that valid recipients can receive notifications.
Alternately, you can use a mail group alias if you need to send to multiple recipients.
l subject — subject line of the email notification.
l attachment — when specified and set to true, the value in $DXAGENT_FULLTARGET is added
as a MIME type attachment.
Note The attachment parameter can only be specified in the Invocation Parameters field.
Customize the email notification templatesThe templates are located in <FILEDRIVEHOME>/conf/mailer-templates. You can customize the email notification template with any text or HTML editor. An HTML editor is recommended because you can use it to preview the notification before deploying it in SecureTransport.
There are seven prerequisite fields that must be set in the XHTML email notification template.
l $subject — The subject line for the email
l $mailfrom — Who the email is coming from
l $mailto — Who the email is going to
l $mailserver — The name of the local SMTP mail server that will be used to deliver the email
l $mailserverport — The TCP port on the SMTP server to connect to.
AxwaySecureTransport 5.2.1 SP4 Administrator Guide 564

Appendix L: Velocity email notification package
l $smtpUser — A user to be used when authenticating to an SASL-enabled SMTP server.
l $smtpPassword — Authentication password for the user specified in the smtpUser field.
The following code example shows an XHTML file with the prerequisites set:
<?xml version="1.0" encoding="windows-1252"?><!DOCTYPE html PUBLIC "-//W3C//DTD XHTML 1.1//EN" "http://www.w3.org/TR/xhtml11/DTD/xhtml11.dtd">
<!-- #set( $subject = "ST was unable to deliver a file to $DXAGENT_SITE_ATTR_HOST") --><!-- #set( $mailfrom = "[email protected]") --><!-- #set( $mailto = $DXAGENT_ACCOUNT_EMAIL) --><!-- #set( $mailserver = "mail.example.com") --><!-- #set( $mailserverport = "25") --><!-- #set( $smtpUser = "user") --><!-- #set( $smtpPassword = "password") -->
<html xmlns="http://www.w3.org/1999/xhtml"><head> <meta http-equiv="Content-Type" content="text/html; charset=windows-1252" /></head>
<body> <table border="0" bgcolor="#C0C0C0" width="100%"> <tr id="areatop"> <td style="text-align: left">Axway</td> <td style="text-align: right">Secure Transport</td> </tr> <tr id="areatopmain"> <td colspan="2" align="center"> File Delivery Failure </td> </tr> <tr id="areabody" bgcolor="white"> <td colspan="2"> Delivery of the file <b>$DXAGENT_TARGET</b> to the host <b>$DXAGENT_SITE_ATTR_HOST</b> failed after <b>$DXAGENT_PERSISTED_EVENT_RETRY_COUNT</b> attempts. <p>Inspect the File Tracking Page in the ST Administration Tool for more information on the reason for the failure.</p> </td> </tr> </table>
AxwaySecureTransport 5.2.1 SP4 Administrator Guide 565
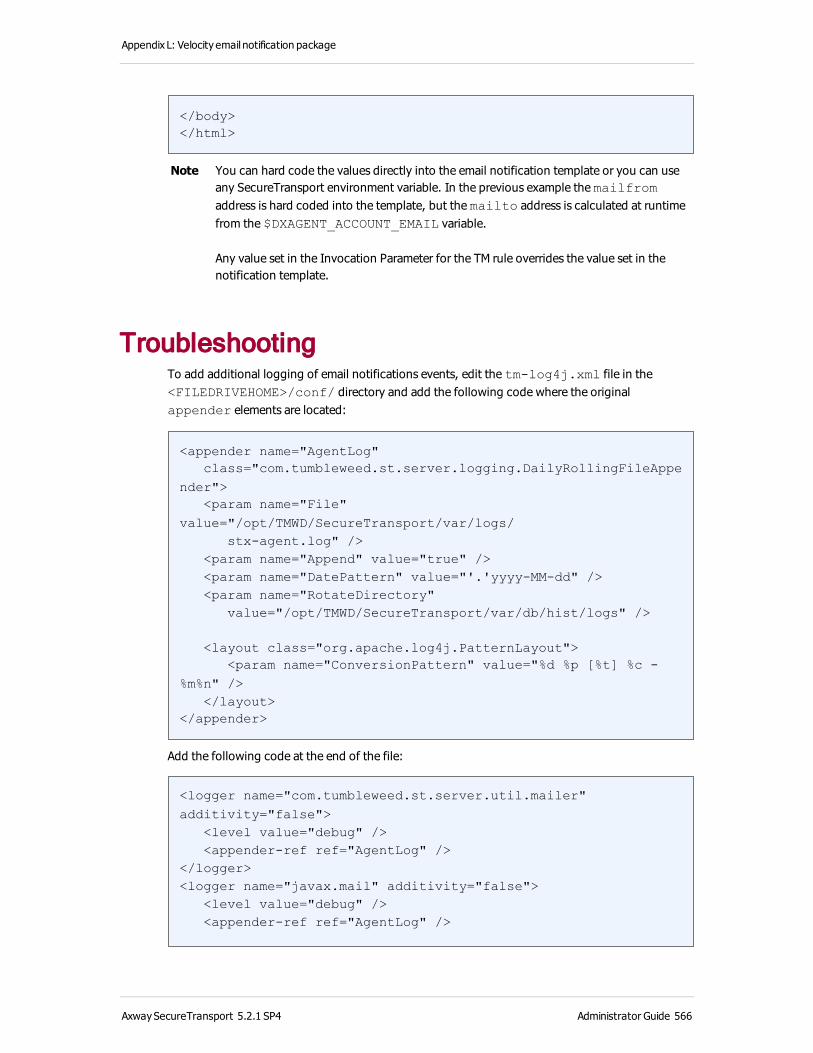
Appendix L: Velocity email notification package
</body></html>
Note You can hard code the values directly into the email notification template or you can use any SecureTransport environment variable. In the previous example the mailfrom address is hard coded into the template, but the mailto address is calculated at runtime from the $DXAGENT_ACCOUNT_EMAIL variable.
Any value set in the Invocation Parameter for the TM rule overrides the value set in the notification template.
TroubleshootingTo add additional logging of email notifications events, edit the tm-log4j.xml file in the <FILEDRIVEHOME>/conf/ directory and add the following code where the original appender elements are located:
<appender name="AgentLog" class="com.tumbleweed.st.server.logging.DailyRollingFileAppender"> <param name="File" value="/opt/TMWD/SecureTransport/var/logs/ stx-agent.log" /> <param name="Append" value="true" /> <param name="DatePattern" value="'.'yyyy-MM-dd" /> <param name="RotateDirectory" value="/opt/TMWD/SecureTransport/var/db/hist/logs" />
<layout class="org.apache.log4j.PatternLayout"> <param name="ConversionPattern" value="%d %p [%t] %c - %m%n" /> </layout></appender>
Add the following code at the end of the file:
<logger name="com.tumbleweed.st.server.util.mailer" additivity="false"> <level value="debug" /> <appender-ref ref="AgentLog" /></logger><logger name="javax.mail" additivity="false"> <level value="debug" /> <appender-ref ref="AgentLog" />
AxwaySecureTransport 5.2.1 SP4 Administrator Guide 566
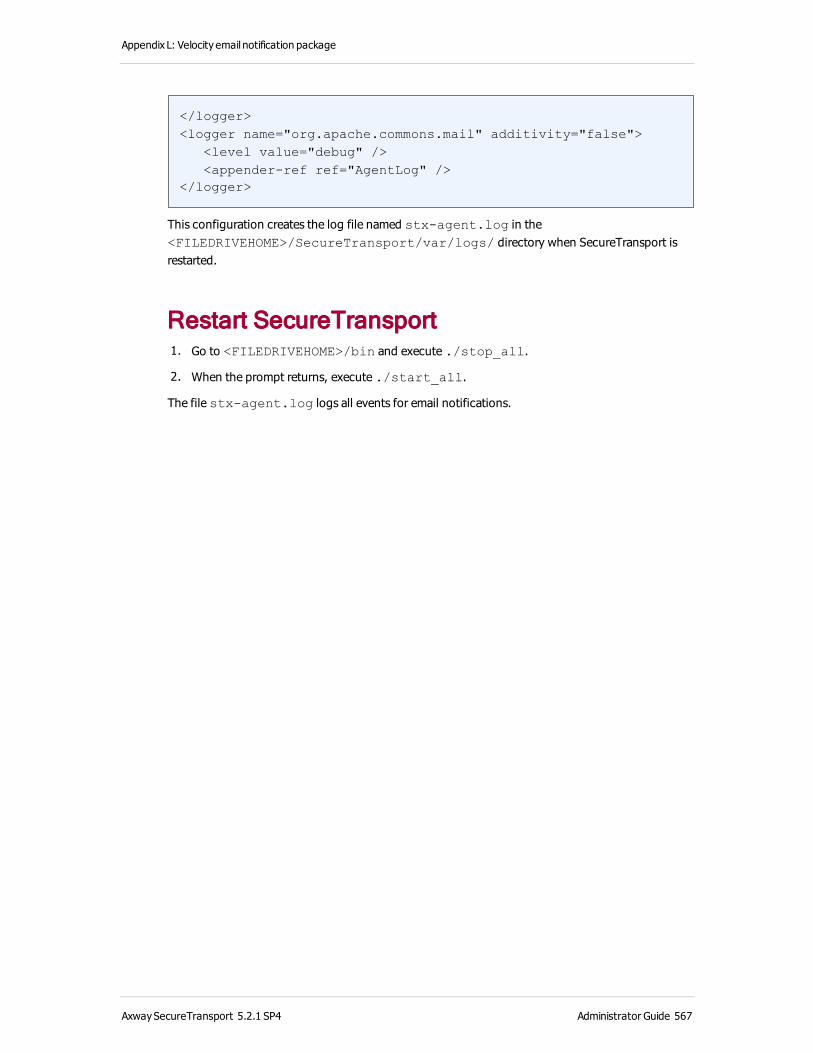
Appendix L: Velocity email notification package
</logger><logger name="org.apache.commons.mail" additivity="false"> <level value="debug" /> <appender-ref ref="AgentLog" /></logger>
This configuration creates the log file named stx-agent.log in the <FILEDRIVEHOME>/SecureTransport/var/logs/ directory when SecureTransport is restarted.
Restart SecureTransport 1. Go to <FILEDRIVEHOME>/bin and execute ./stop_all.
2. When the prompt returns, execute ./start_all.
The file stx-agent.log logs all events for email notifications.
AxwaySecureTransport 5.2.1 SP4 Administrator Guide 567