Embed Size (px)
Citation preview

1
SCRUBBERSde-chlorinatorS
Owners Manual
w w w . g r o w o n i x . c o m
6
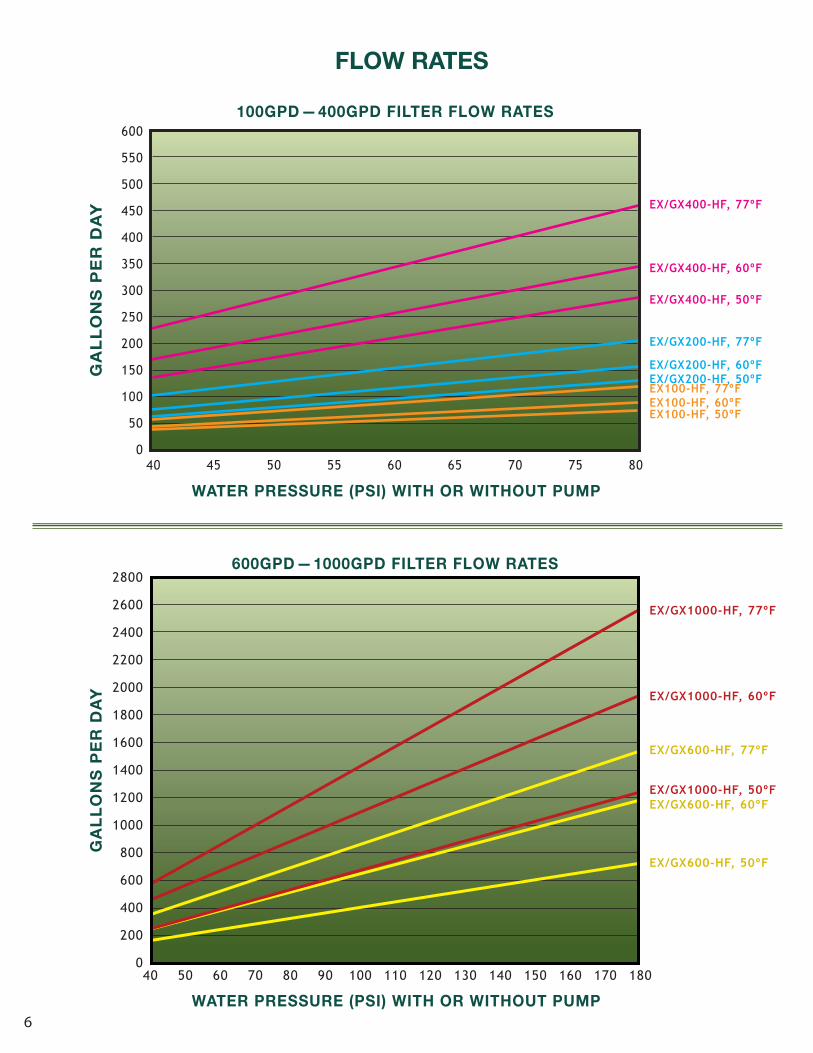
FLOW RATES
600GPD —1000GPD FILTER FLOW RATES
WATER PRESSURE (PSI) WITH OR WITHOUT PUMP
2400
2600
2800
EX/GX1000-HF, 77ºF
EX/GX1000-HF, 60ºF
EX/GX1000-HF, 50ºF
EX/GX600-HF, 77ºF
EX/GX600-HF, 60ºF
EX/GX600-HF, 50ºF
2200
2000
1800
1600
1400
1200
1000
800
600
400
200
0
GA
LLO
NS
PER
DAY
40 50 60 70 80 90 100 110 120 130 140 150 160 170 180
100GPD —400GPD FILTER FLOW RATES
WATER PRESSURE (PSI) WITH OR WITHOUT PUMP
600
550
500
450
400
350
300
250
200
150
100
50
0
EX/GX200-HF, 50ºFEX/GX200-HF, 60ºF
EX/GX200-HF, 77ºF
EX/GX400-HF, 60ºF
EX/GX400-HF, 77ºF
EX/GX400-HF, 50ºF
EX100-HF, 50ºFEX100-HF, 60ºFEX100-HF, 77ºF
40 45 50 55 65 7560 70 80
GA
LLO
NS
PE
R D
AY

5
INFORMATION ON QUICK CONNECT FITTINGS
INSERT TUBE INTO FITTINGPush the tubing through the collet and dual o-rings until it bottoms out against the tube stop. The collet holds the tube in place and the dual o-rings provide a leak resistant seal.
MAKE A CLEAN TUBE CUTCut the tube squarely and if using plastic tubing, ensure that the cut has not made the tube out of round. Also ensure that the tube has a smooth outside diameter without any burrs or score marks prior to inserting it into the fitting.
TEST AND INSPECTPush and pull the tubing toward and away from the fitting to ensure that it has been installed properly. Test and inspect the installation for any leaks.
TUBE REMOVALRelieve pressure from the tubing and fitting. Push uniformly around the collet flange against the fitting body while pulling the tubing away from the fitting to release it.
O-RING COLLET TUBING
PUSH COLLET IN
PULL TUBE OUT
GROWONIX WATER FILTERS USE QUICK CONNECT FITTINGS THAT ALLOW FOR EASY MAINTENANCE.
2
tuned for growing tm
w/HIGH FLOW
MEMBRANE
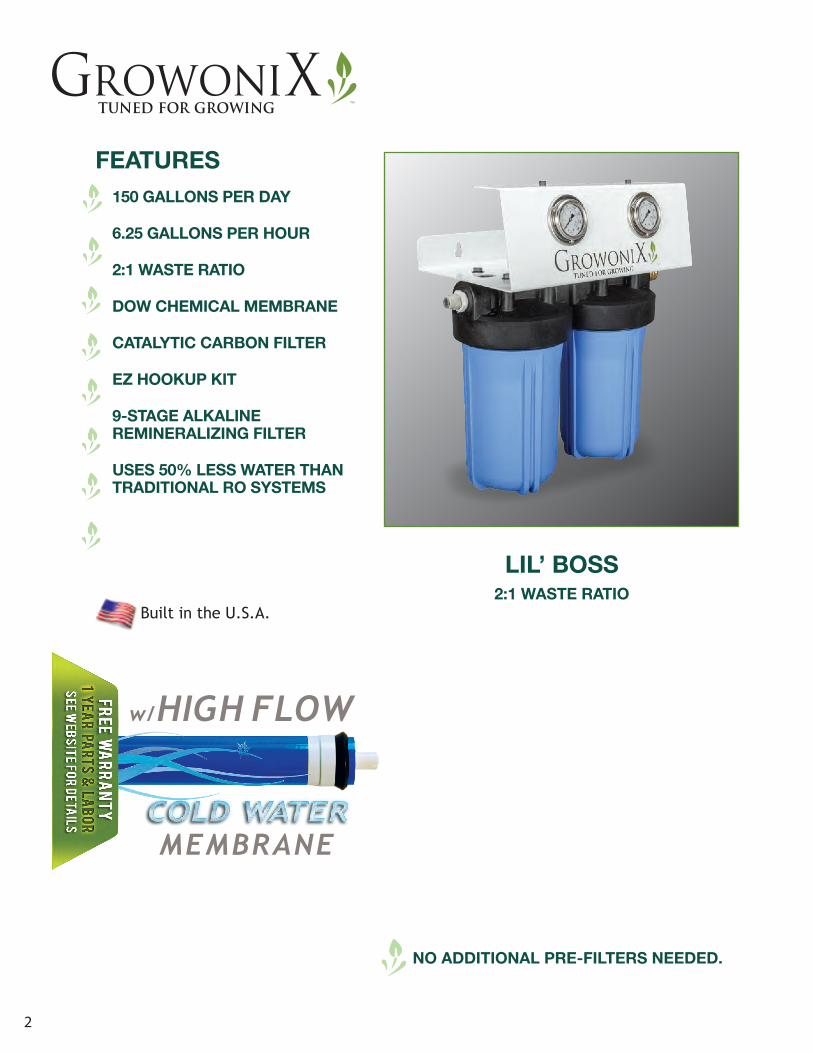
FEATURES150 GALLONS PER DAY
6.25 GALLONS PER HOUR
2:1 WASTE RATIO
DOW CHEMICAL MEMBRANE
CATALYTIC CARBON FILTER
EZ HOOKUP KIT
9-STAGE ALKALINE REMINERALIZING FILTER
USES 50% LESS WATER THAN TRADITIONAL RO SYSTEMS
NO ADDITIONAL PRE-FILTERS NEEDED.
Built in the U.S.A.
LIL’ BOSS2:1 WASTE RATIO

4
• Do not use unit with inlet water pressure exceeding 80 psi. If inlet water pressure is too high, install water pressure regulator before the unit. Regulators and pressure limiters are available at www.Growonix.com or your local plumbing supply.
• Keep unit away from direct light. Direct light can cause algae and other biologicals to grow inside of the filter housings.
• Do not install unit near electrical outlets or electrical devices. Do not install in places where a leak can cause damage.
Chlorine, Chloramine and Chloride are but a few of the chemicals added to municipal water sources to kill harmful bacteria in our drinking water. This chlorine in low doses may not harm humans, but will kill beneficial bacteria and micro organisms essential for healthy plant growth. Our EX Scrub de-chlorinator will eliminate 95% of the chlorine in the water, and 90% of the sediment.
Chloramine, a mix of chlorine and ammonia, used as a disinfectant, is being applied more and more to local water supplies because of it inability to evaporate when left in the air. Chloramine will not evaporate. To eliminate chloramine, a special KDF filter is required for the EX Scrub which GrowoniX or your local dealer can supply. Ask for the GrowoniX KDF filter.
The GX Scrubber will not lower your parts per million or “ppm”. Only a Reverse Osmosis membrane can eliminate those particles. GrowoniX sells a complete line of Reverse Osmosis water filters from 100 gallons per day all the way up to 2000 gallons per day. You can see our complete product line at www.growonix.com.
Durability, Reliability, Efficiency, Purity, and Conservation form the foundation on which we design and build all of our products. Consistent and superior quality sets us apart from other manufacturers and increases our value to you - our customer. Whether you are a hydroponics hobbyist, serious enthusiast, or large-scale gardener, GrowoniX is committed to bringing you the best solution for water purification systems.
The GX Scrubber can filter up to 8000 gallons of water before changing filters, based on 2 gallons per minute with 1ppm of chlorine. You may need to replace your filter more frequently if your water is heavily contaminated.
OUR MISSION
WHY USE A GX SCRUBBER ?
FLOW RATES AND FILTER REPLACEMENT
PRECAUTIONS
8
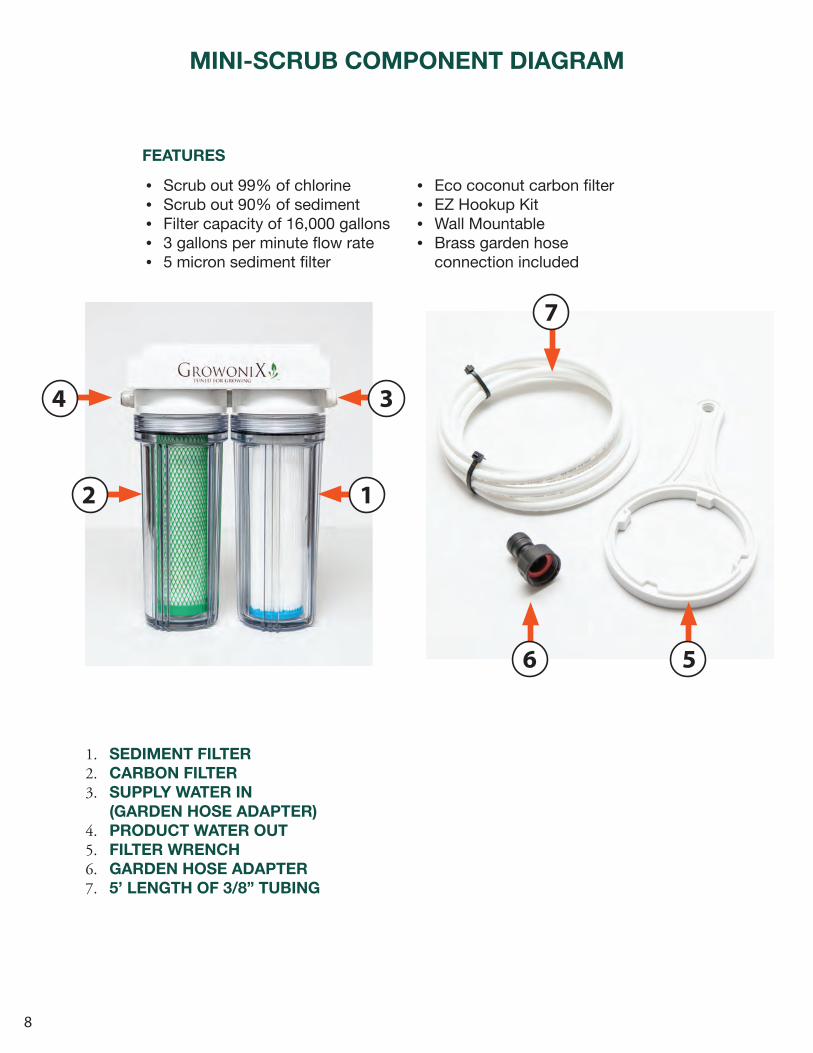
MINI-SCRUB COMPONENT DIAGRAM
1. SEDIMENT FILTER2. CARBON FILTER3. SUPPLY WATER IN
(GARDEN HOSE ADAPTER)4. PRODUCT WATER OUT5. FILTER WRENCH6. GARDEN HOSE ADAPTER7. 5’ LENGTH OF 3/8” TUBING
FEATURES
• Scrub out 99% of chlorine• Scrub out 90% of sediment• Filter capacity of 16,000 gallons• 3 gallons per minute flow rate• 5 micron sediment filter
• Eco coconut carbon filter• EZ Hookup Kit• Wall Mountable • Brass garden hose
connection included
7
6 5
3
1
4
2
9
1
3
2
4
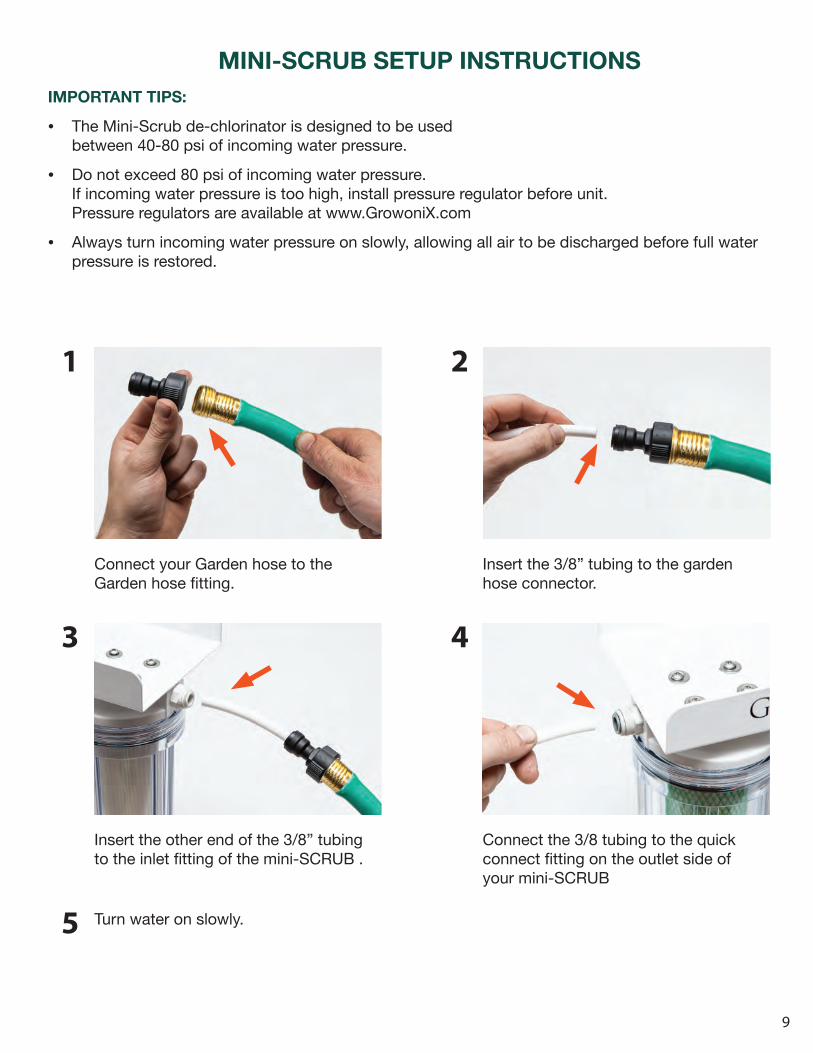
MINI-SCRUB SETUP INSTRUCTIONSIMPORTANT TIPS:
• The Mini-Scrub de-chlorinator is designed to be used between 40-80 psi of incoming water pressure.
• Do not exceed 80 psi of incoming water pressure. If incoming water pressure is too high, install pressure regulator before unit. Pressure regulators are available at www.GrowoniX.com
• Always turn incoming water pressure on slowly, allowing all air to be discharged before full water pressure is restored.
Turn water on slowly.5
Connect the 3/8 tubing to the quick connect fitting on the outlet side of your mini-SCRUB
Connect your Garden hose to the Garden hose fitting.
Insert the 3/8” tubing to the garden hose connector.
Insert the other end of the 3/8” tubing to the inlet fitting of the mini-SCRUB .
10
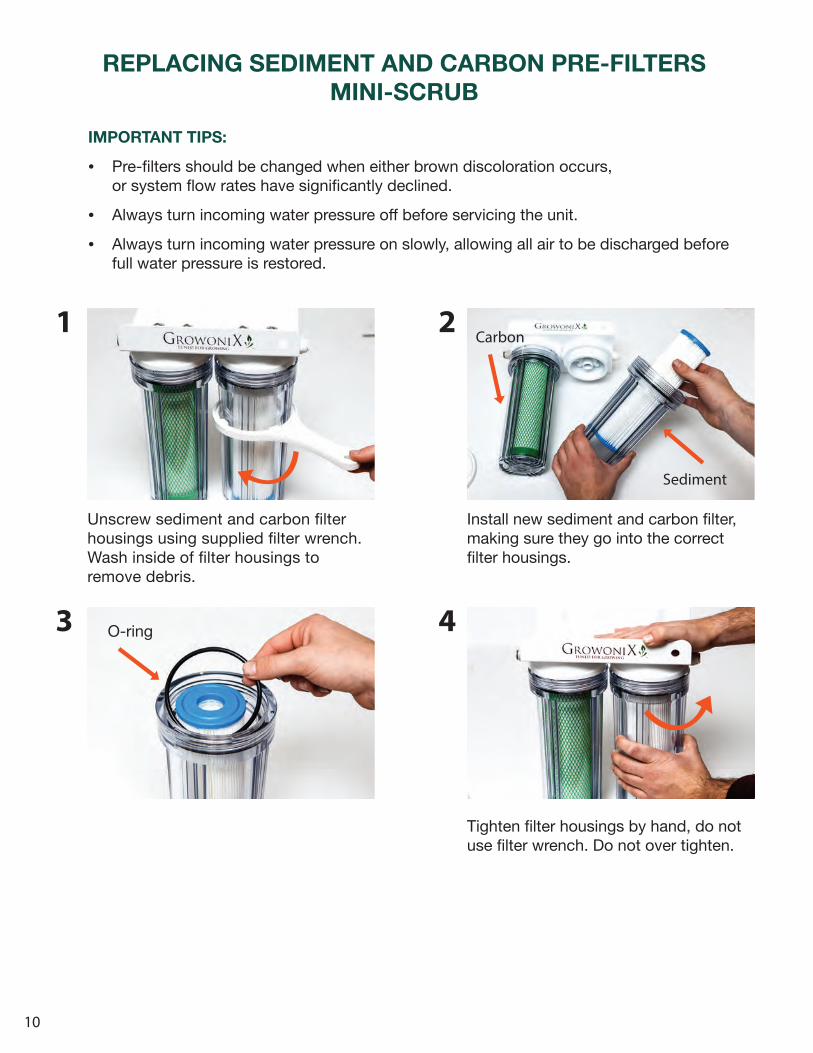
REPLACING SEDIMENT AND CARBON PRE-FILTERSMINI-SCRUB
1
3
2
4
Unscrew sediment and carbon filter housings using supplied filter wrench. Wash inside of filter housings to remove debris.
Tighten filter housings by hand, do not use filter wrench. Do not over tighten.
Install new sediment and carbon filter, making sure they go into the correct filter housings.
Sediment
Carbon
O-ring
IMPORTANT TIPS:
• Pre-filters should be changed when either brown discoloration occurs, or system flow rates have significantly declined.
• Always turn incoming water pressure off before servicing the unit.
• Always turn incoming water pressure on slowly, allowing all air to be discharged before full water pressure is restored.
11
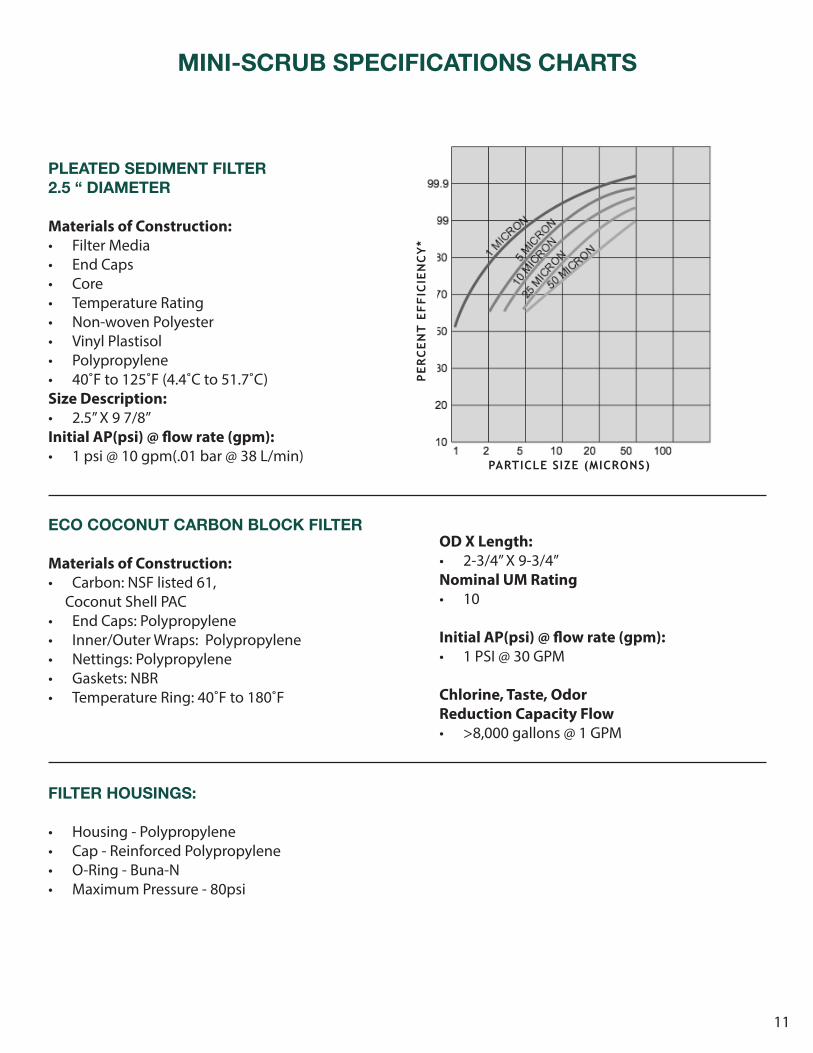
MINI-SCRUB SPECIFICATIONS CHARTS
PLEATED SEDIMENT FILTER 2.5 “ DIAMETER
Materials of Construction:• Filter Media• End Caps• Core• Temperature Rating• Non-woven Polyester• Vinyl Plastisol• Polypropylene• 40˚F to 125˚F (4.4˚C to 51.7˚C) Size Description:• 2.5” X 9 7/8” Initial AP(psi) @ flow rate (gpm):• 1 psi @ 10 gpm(.01 bar @ 38 L/min)
ECO COCONUT CARBON BLOCK FILTER
Materials of Construction:• Carbon: NSF listed 61, Coconut Shell PAC• End Caps: Polypropylene• Inner/Outer Wraps: Polypropylene• Nettings: Polypropylene• Gaskets: NBR• Temperature Ring: 40˚F to 180˚F
OD X Length:• 2-3/4” X 9-3/4”Nominal UM Rating• 10
Initial AP(psi) @ flow rate (gpm):• 1 PSI @ 30 GPM
Chlorine, Taste, Odor Reduction Capacity Flow• >8,000 gallons @ 1 GPM
PARTICLE SIZE (MICRONS)
PE
RC
EN
T E
FF
ICIE
NC
Y*
FILTER HOUSINGS:
• Housing - Polypropylene• Cap - Reinforced Polypropylene• O-Ring - Buna-N• Maximum Pressure - 80psi
12
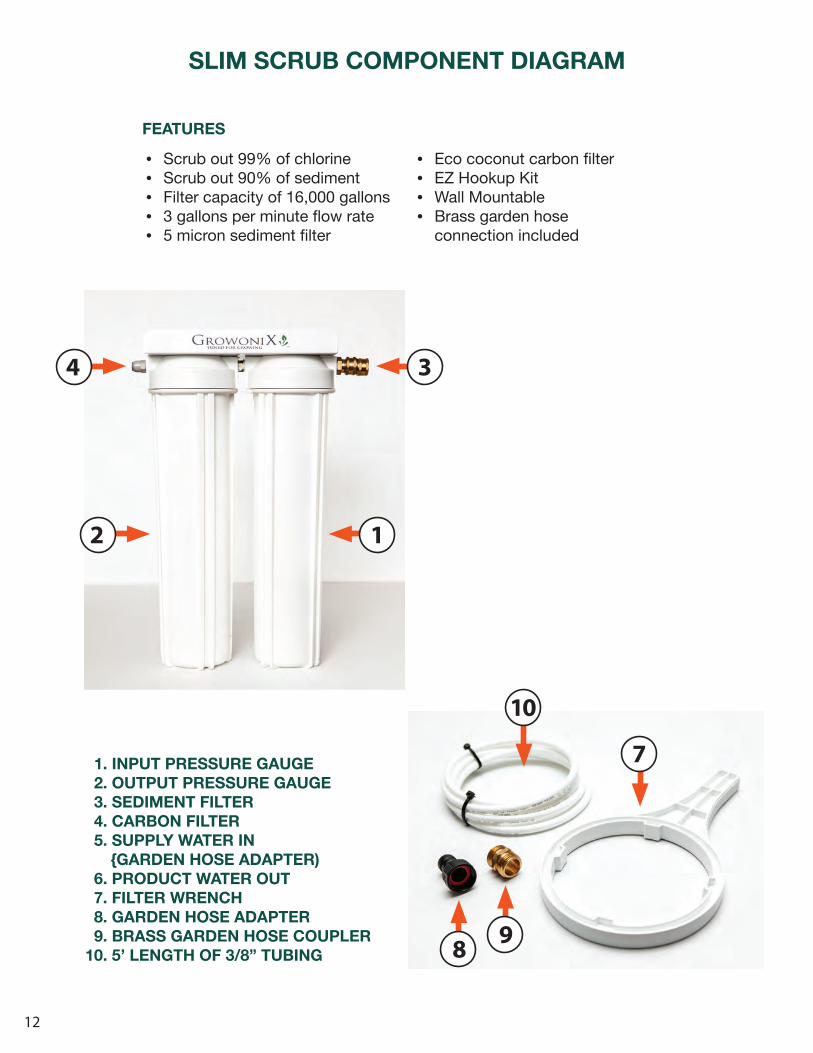
SLIM SCRUB COMPONENT DIAGRAM
FEATURES
• Scrub out 99% of chlorine• Scrub out 90% of sediment• Filter capacity of 16,000 gallons• 3 gallons per minute flow rate• 5 micron sediment filter
• Eco coconut carbon filter• EZ Hookup Kit• Wall Mountable • Brass garden hose
connection included
3
1
4
2
7
10
98
1. INPUT PRESSURE GAUGE 2. OUTPUT PRESSURE GAUGE 3. SEDIMENT FILTER 4. CARBON FILTER 5. SUPPLY WATER IN {GARDEN HOSE ADAPTER) 6. PRODUCT WATER OUT 7. FILTER WRENCH 8. GARDEN HOSE ADAPTER 9. BRASS GARDEN HOSE COUPLER10. 5’ LENGTH OF 3/8” TUBING
13
1 2
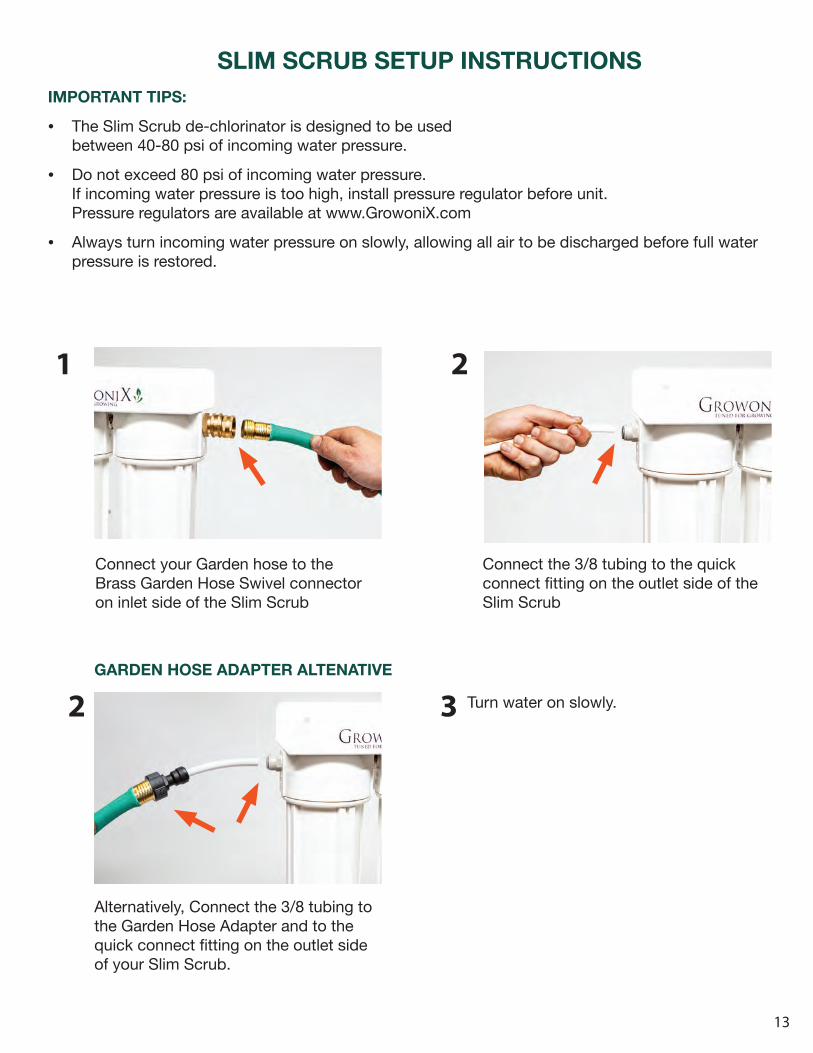
SLIM SCRUB SETUP INSTRUCTIONS
Connect your Garden hose to the Brass Garden Hose Swivel connector on inlet side of the Slim Scrub
Connect the 3/8 tubing to the quick connect fitting on the outlet side of the Slim Scrub
2 Turn water on slowly.3
Alternatively, Connect the 3/8 tubing to the Garden Hose Adapter and to the quick connect fitting on the outlet side of your Slim Scrub.
GARDEN HOSE ADAPTER ALTENATIVE
IMPORTANT TIPS:
• The Slim Scrub de-chlorinator is designed to be used between 40-80 psi of incoming water pressure.
• Do not exceed 80 psi of incoming water pressure. If incoming water pressure is too high, install pressure regulator before unit. Pressure regulators are available at www.GrowoniX.com
• Always turn incoming water pressure on slowly, allowing all air to be discharged before full water pressure is restored.
14
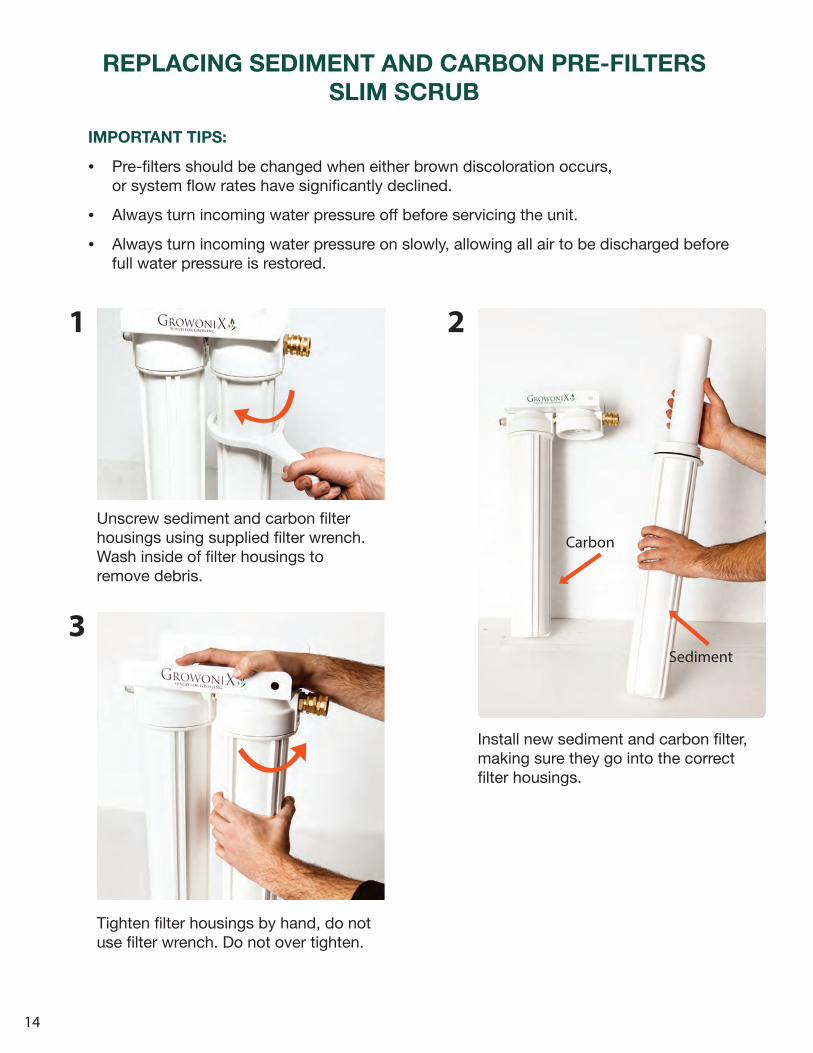
REPLACING SEDIMENT AND CARBON PRE-FILTERSSLIM SCRUB
1
3
2
Unscrew sediment and carbon filter housings using supplied filter wrench. Wash inside of filter housings to remove debris.
Tighten filter housings by hand, do not use filter wrench. Do not over tighten.
Install new sediment and carbon filter, making sure they go into the correct filter housings.
Sediment
Carbon
IMPORTANT TIPS:
• Pre-filters should be changed when either brown discoloration occurs, or system flow rates have significantly declined.
• Always turn incoming water pressure off before servicing the unit.
• Always turn incoming water pressure on slowly, allowing all air to be discharged before full water pressure is restored.
15
SLIM SCRUB SPECIFICATIONS CHARTS
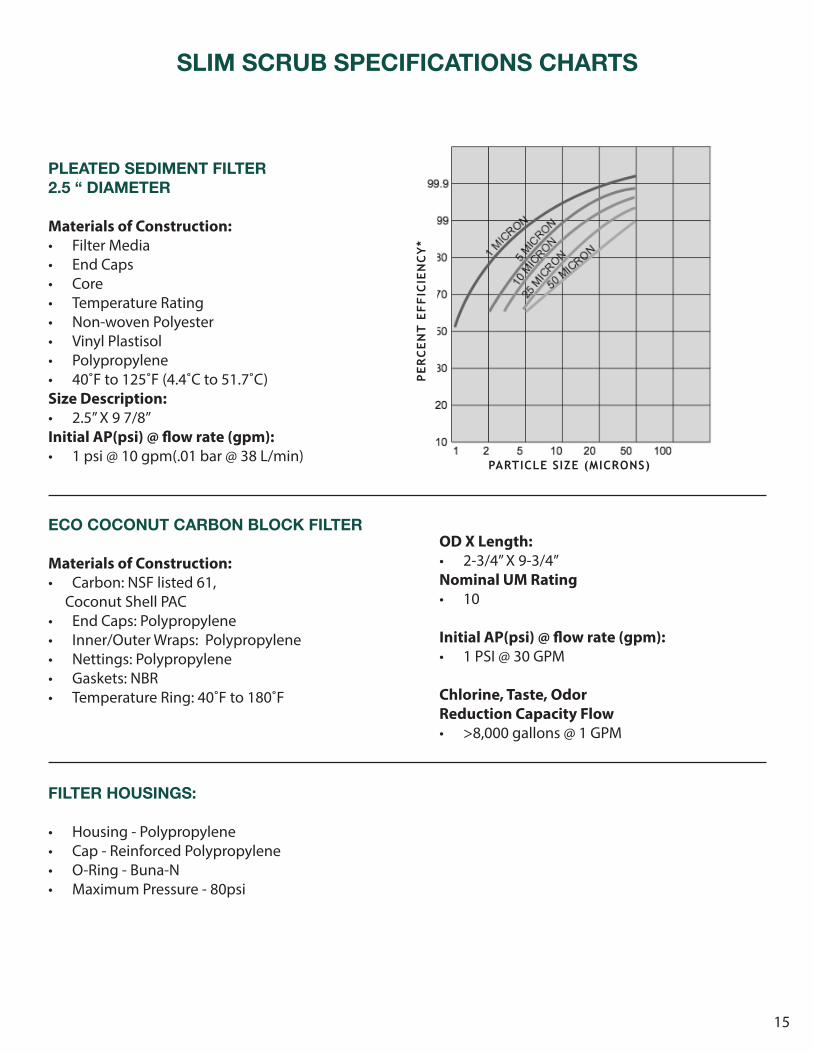
PLEATED SEDIMENT FILTER 2.5 “ DIAMETER
Materials of Construction:• Filter Media• End Caps• Core• Temperature Rating• Non-woven Polyester• Vinyl Plastisol• Polypropylene• 40˚F to 125˚F (4.4˚C to 51.7˚C) Size Description:• 2.5” X 9 7/8” Initial AP(psi) @ flow rate (gpm):• 1 psi @ 10 gpm(.01 bar @ 38 L/min)
ECO COCONUT CARBON BLOCK FILTER
Materials of Construction:• Carbon: NSF listed 61, Coconut Shell PAC• End Caps: Polypropylene• Inner/Outer Wraps: Polypropylene• Nettings: Polypropylene• Gaskets: NBR• Temperature Ring: 40˚F to 180˚F
OD X Length:• 2-3/4” X 9-3/4”Nominal UM Rating• 10
Initial AP(psi) @ flow rate (gpm):• 1 PSI @ 30 GPM
Chlorine, Taste, Odor Reduction Capacity Flow• >8,000 gallons @ 1 GPM
PARTICLE SIZE (MICRONS)
PE
RC
EN
T E
FF
ICIE
NC
Y*
FILTER HOUSINGS:
• Housing - Polypropylene• Cap - Reinforced Polypropylene• O-Ring - Buna-N• Maximum Pressure - 80psi
16
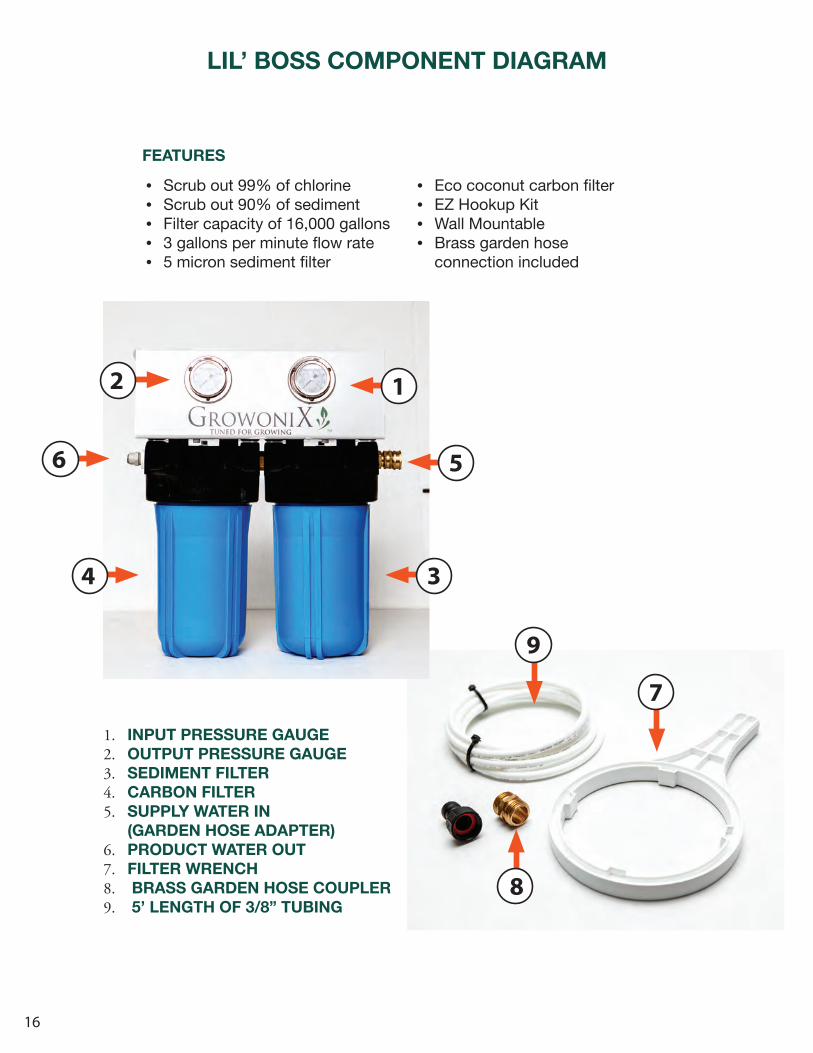
LIL’ BOSS COMPONENT DIAGRAM
1. INPUT PRESSURE GAUGE 2. OUTPUT PRESSURE GAUGE3. SEDIMENT FILTER4. CARBON FILTER5. SUPPLY WATER IN
(GARDEN HOSE ADAPTER)6. PRODUCT WATER OUT7. FILTER WRENCH8. BRASS GARDEN HOSE COUPLER9. 5’ LENGTH OF 3/8” TUBING
FEATURES
• Scrub out 99% of chlorine• Scrub out 90% of sediment• Filter capacity of 16,000 gallons• 3 gallons per minute flow rate• 5 micron sediment filter
• Eco coconut carbon filter• EZ Hookup Kit• Wall Mountable • Brass garden hose
connection included
7
9
8
3
5
1
4
6
2
17
1 2
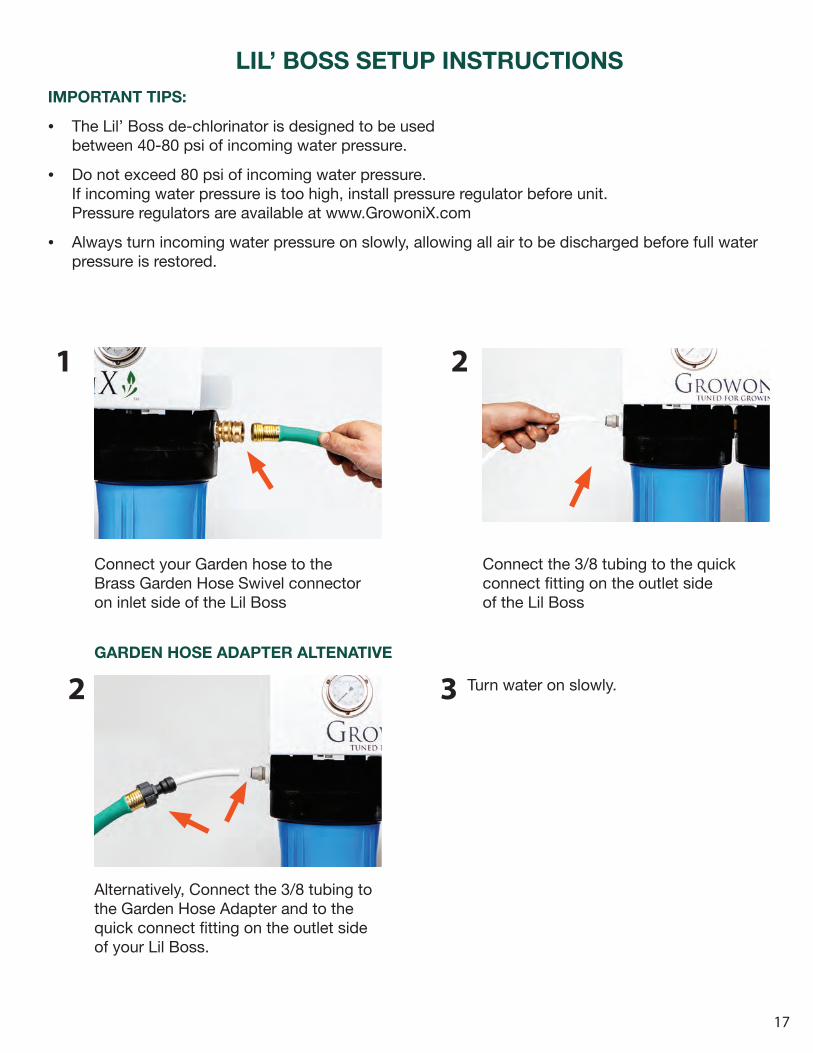
LIL’ BOSS SETUP INSTRUCTIONS
Connect your Garden hose to the Brass Garden Hose Swivel connector on inlet side of the Lil Boss
Connect the 3/8 tubing to the quick connect fitting on the outlet side of the Lil Boss
2 Turn water on slowly.3
Alternatively, Connect the 3/8 tubing to the Garden Hose Adapter and to the quick connect fitting on the outlet side of your Lil Boss.
GARDEN HOSE ADAPTER ALTENATIVE
IMPORTANT TIPS:
• The Lil’ Boss de-chlorinator is designed to be used between 40-80 psi of incoming water pressure.
• Do not exceed 80 psi of incoming water pressure. If incoming water pressure is too high, install pressure regulator before unit. Pressure regulators are available at www.GrowoniX.com
• Always turn incoming water pressure on slowly, allowing all air to be discharged before full water pressure is restored.
18
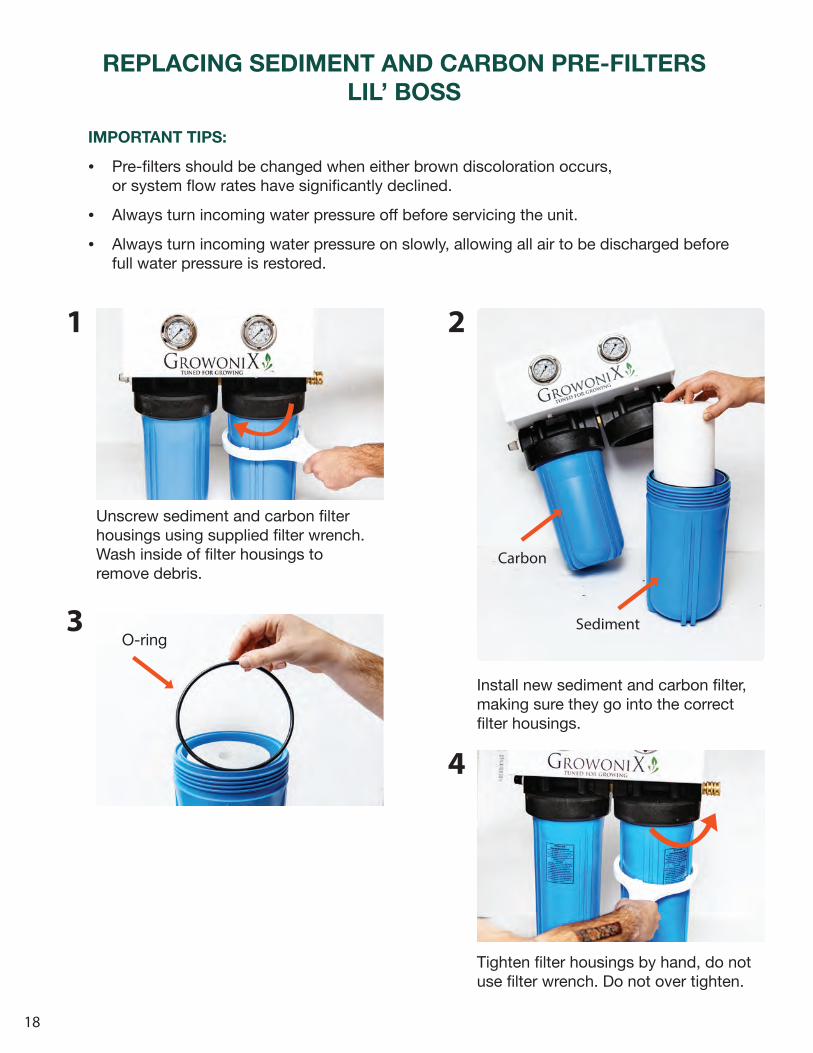
REPLACING SEDIMENT AND CARBON PRE-FILTERSLIL’ BOSS
1
3
2
4
Unscrew sediment and carbon filter housings using supplied filter wrench. Wash inside of filter housings to remove debris.
Tighten filter housings by hand, do not use filter wrench. Do not over tighten.
Install new sediment and carbon filter, making sure they go into the correct filter housings.
Sediment
Carbon
O-ring
IMPORTANT TIPS:
• Pre-filters should be changed when either brown discoloration occurs, or system flow rates have significantly declined.
• Always turn incoming water pressure off before servicing the unit.
• Always turn incoming water pressure on slowly, allowing all air to be discharged before full water pressure is restored.
19
LIL’ BOSS SPECIFICATIONS CHARTS
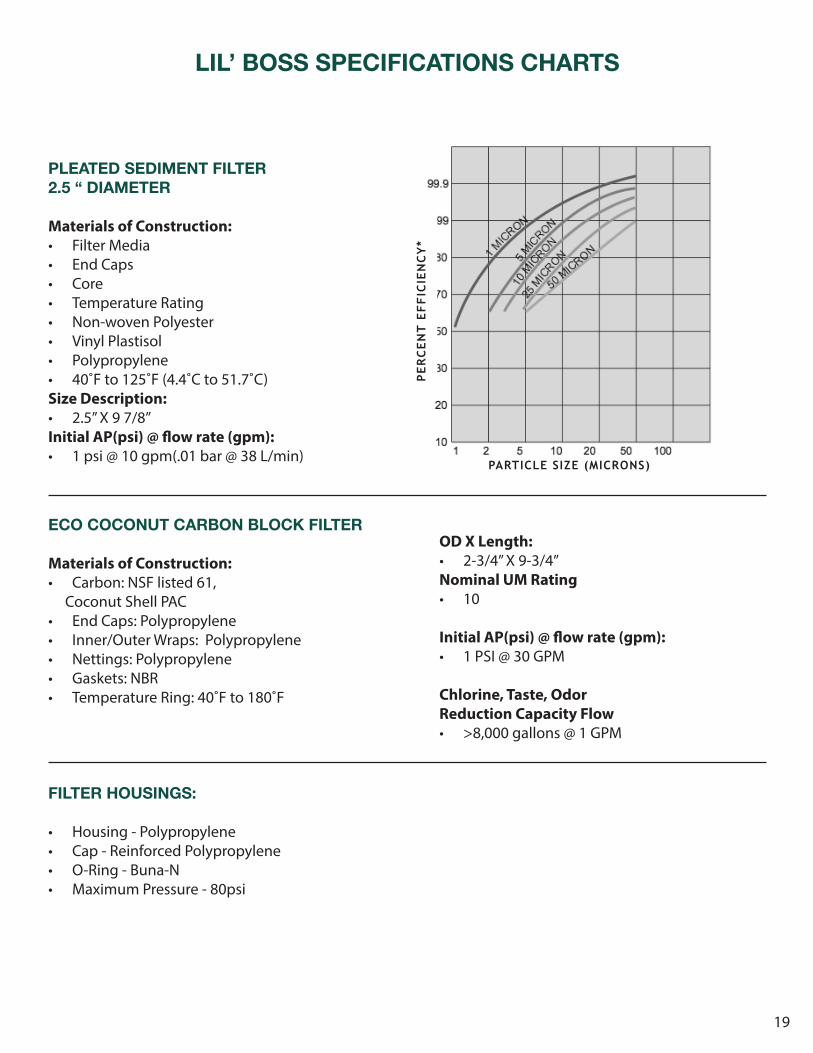
PLEATED SEDIMENT FILTER 2.5 “ DIAMETER
Materials of Construction:• Filter Media• End Caps• Core• Temperature Rating• Non-woven Polyester• Vinyl Plastisol• Polypropylene• 40˚F to 125˚F (4.4˚C to 51.7˚C) Size Description:• 2.5” X 9 7/8” Initial AP(psi) @ flow rate (gpm):• 1 psi @ 10 gpm(.01 bar @ 38 L/min)
ECO COCONUT CARBON BLOCK FILTER
Materials of Construction:• Carbon: NSF listed 61, Coconut Shell PAC• End Caps: Polypropylene• Inner/Outer Wraps: Polypropylene• Nettings: Polypropylene• Gaskets: NBR• Temperature Ring: 40˚F to 180˚F
OD X Length:• 2-3/4” X 9-3/4”Nominal UM Rating• 10
Initial AP(psi) @ flow rate (gpm):• 1 PSI @ 30 GPM
Chlorine, Taste, Odor Reduction Capacity Flow• >8,000 gallons @ 1 GPM
PARTICLE SIZE (MICRONS)
PE
RC
EN
T E
FF
ICIE
NC
Y*
FILTER HOUSINGS:
• Housing - Polypropylene• Cap - Reinforced Polypropylene• O-Ring - Buna-N• Maximum Pressure - 80psi
20
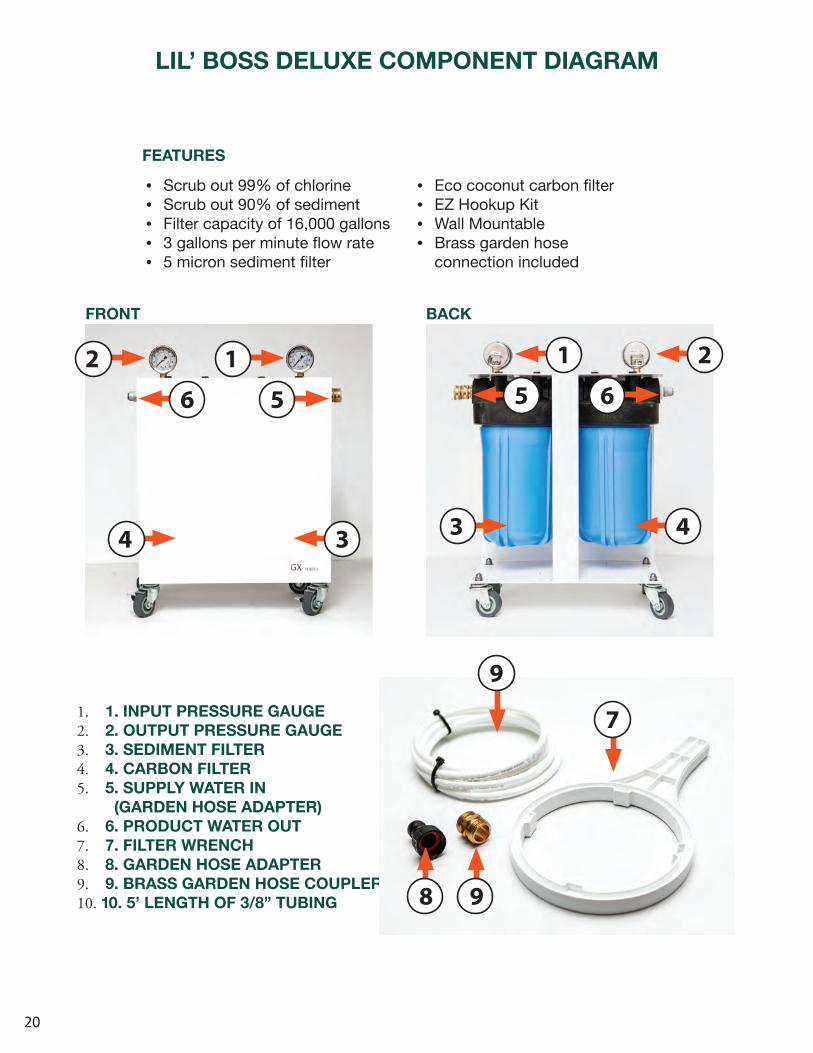
LIL’ BOSS DELUXE COMPONENT DIAGRAM
1. 1. INPUT PRESSURE GAUGE 2. 2. OUTPUT PRESSURE GAUGE3. 3. SEDIMENT FILTER4. 4. CARBON FILTER5. 5. SUPPLY WATER IN
(GARDEN HOSE ADAPTER)6. 6. PRODUCT WATER OUT7. 7. FILTER WRENCH8. 8. GARDEN HOSE ADAPTER9. 9. BRASS GARDEN HOSE COUPLER10. 10. 5’ LENGTH OF 3/8” TUBING
FRONT BACK
FEATURES
• Scrub out 99% of chlorine• Scrub out 90% of sediment• Filter capacity of 16,000 gallons• 3 gallons per minute flow rate• 5 micron sediment filter
• Eco coconut carbon filter• EZ Hookup Kit• Wall Mountable • Brass garden hose
connection included
7
9
98
3 4
6 5
21
4 3
2
5 61

21
1 2
2
LIL’ BOSS DELUXE SETUP INSTRUCTIONS
Turn water on slowly.3
Connect your Garden hose to the Brass Garden Hose Swivel connector on inlet side of your Lil Boss Deluxe
Connect the 3/8 tubing to the quick connect fitting on the outlet side of your Lil Boss Deluxe
Alternatively, Connect the 3/8 tubing to the Garden Hose Adapter and to the quick connect fitting on the outlet side of your Lil Boss Deluxe
GARDEN HOSE ADAPTER ALTENATIVE
5
IMPORTANT TIPS:
• The Lil’ Boss Deluxe de-chlorinator is designed to be used between 40-80 psi of incoming water pressure.
• Do not exceed 80 psi of incoming water pressure. If incoming water pressure is too high, install pressure regulator before unit. Pressure regulators are available at www.GrowoniX.com
• Always turn incoming water pressure on slowly, allowing all air to be discharged before full water pressure is restored.

22
REPLACING SEDIMENT AND CARBON PRE-FILTERSLIL’ BOSS DELUXE
1
3
2
4
Unscrew sediment and carbon filter housings using supplied filter wrench. Wash inside of filter housings to remove debris.
Tighten filter housings by hand, do not use filter wrench. Do not over tighten.
Install new sediment and carbon filter, making sure they go into the correct filter housings.
Sediment
Carbon
O-ring
IMPORTANT TIPS:
• Pre-filters should be changed when either brown discoloration occurs, or system flow rates have significantly declined.
• Always turn incoming water pressure off before servicing the unit.
• Always turn incoming water pressure on slowly, allowing all air to be discharged before full water pressure is restored.
23
LIL’ BOSS DELUXE SPECIFICATIONS CHARTS
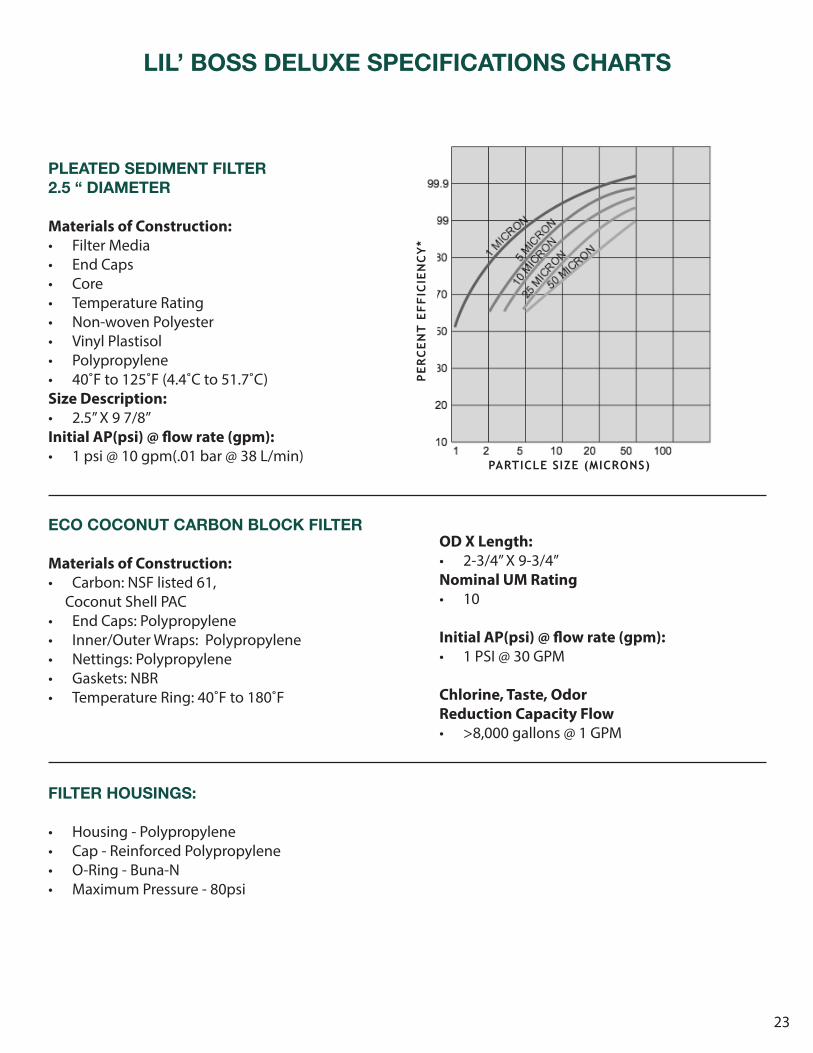
PLEATED SEDIMENT FILTER 2.5 “ DIAMETER
Materials of Construction:• Filter Media• End Caps• Core• Temperature Rating• Non-woven Polyester• Vinyl Plastisol• Polypropylene• 40˚F to 125˚F (4.4˚C to 51.7˚C) Size Description:• 2.5” X 9 7/8” Initial AP(psi) @ flow rate (gpm):• 1 psi @ 10 gpm(.01 bar @ 38 L/min)
ECO COCONUT CARBON BLOCK FILTER
Materials of Construction:• Carbon: NSF listed 61, Coconut Shell PAC• End Caps: Polypropylene• Inner/Outer Wraps: Polypropylene• Nettings: Polypropylene• Gaskets: NBR• Temperature Ring: 40˚F to 180˚F
OD X Length:• 2-3/4” X 9-3/4”Nominal UM Rating• 10
Initial AP(psi) @ flow rate (gpm):• 1 PSI @ 30 GPM
Chlorine, Taste, Odor Reduction Capacity Flow• >8,000 gallons @ 1 GPM
PARTICLE SIZE (MICRONS)
PE
RC
EN
T E
FF
ICIE
NC
Y*
FILTER HOUSINGS:
• Housing - Polypropylene• Cap - Reinforced Polypropylene• O-Ring - Buna-N• Maximum Pressure - 80psi
24
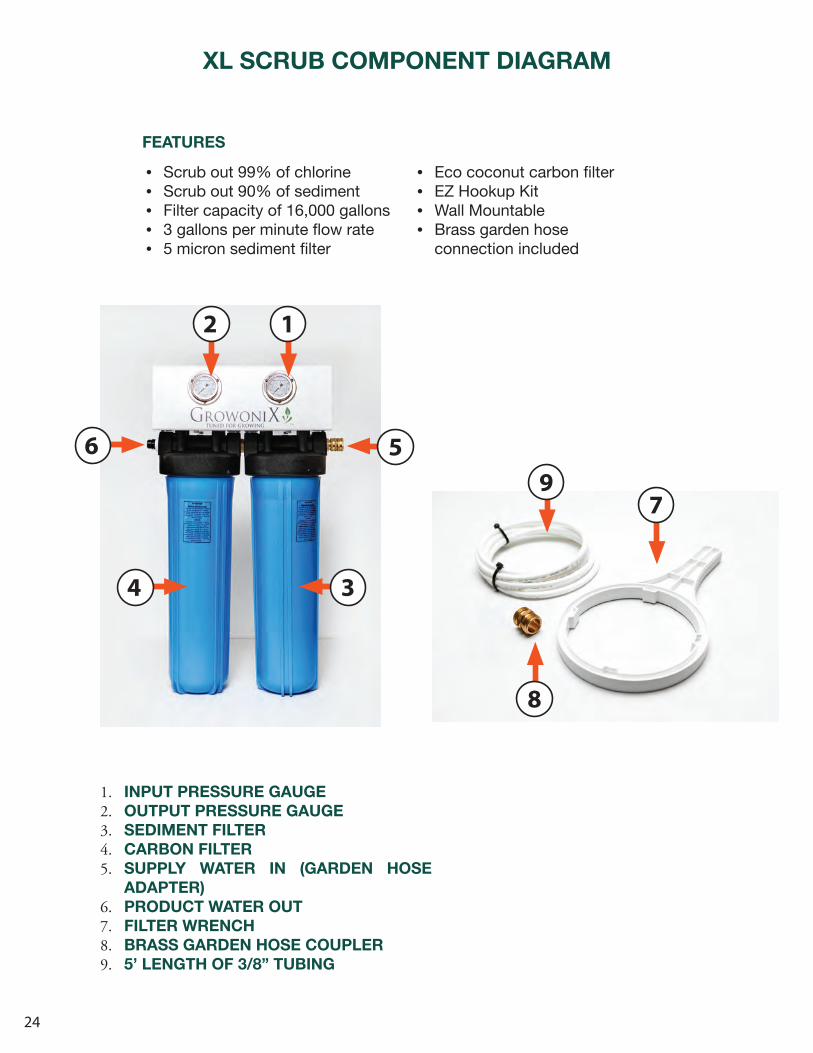
XL SCRUB COMPONENT DIAGRAM
97
8
1. INPUT PRESSURE GAUGE 2. OUTPUT PRESSURE GAUGE3. SEDIMENT FILTER4. CARBON FILTER5. SUPPLY WATER IN (GARDEN HOSE
ADAPTER)6. PRODUCT WATER OUT7. FILTER WRENCH8. BRASS GARDEN HOSE COUPLER9. 5’ LENGTH OF 3/8” TUBING
FEATURES
• Scrub out 99% of chlorine• Scrub out 90% of sediment• Filter capacity of 16,000 gallons• 3 gallons per minute flow rate• 5 micron sediment filter
• Eco coconut carbon filter• EZ Hookup Kit• Wall Mountable • Brass garden hose
connection included
1
3
5
4
6
2

25
1 2
XL SCRUB SETUP INSTRUCTIONS
Turn water on slowly.3
Connect your Garden hose to the Brass Garden Hose Swivel connector on inlet side of the XL-Scrub
Connect the 3/8 tubing to the quick connect fitting on the outlet side of your XL-Scrub
IMPORTANT TIPS:
• The XL Scrub de-chlorinator is designed to be used between 40-80 psi of incoming water pressure.
• Do not exceed 80 psi of incoming water pressure. If incoming water pressure is too high, install pressure regulator before unit. Pressure regulators are available at www.GrowoniX.com
• Always turn incoming water pressure on slowly, allowing all air to be discharged before full water pressure is restored.
26
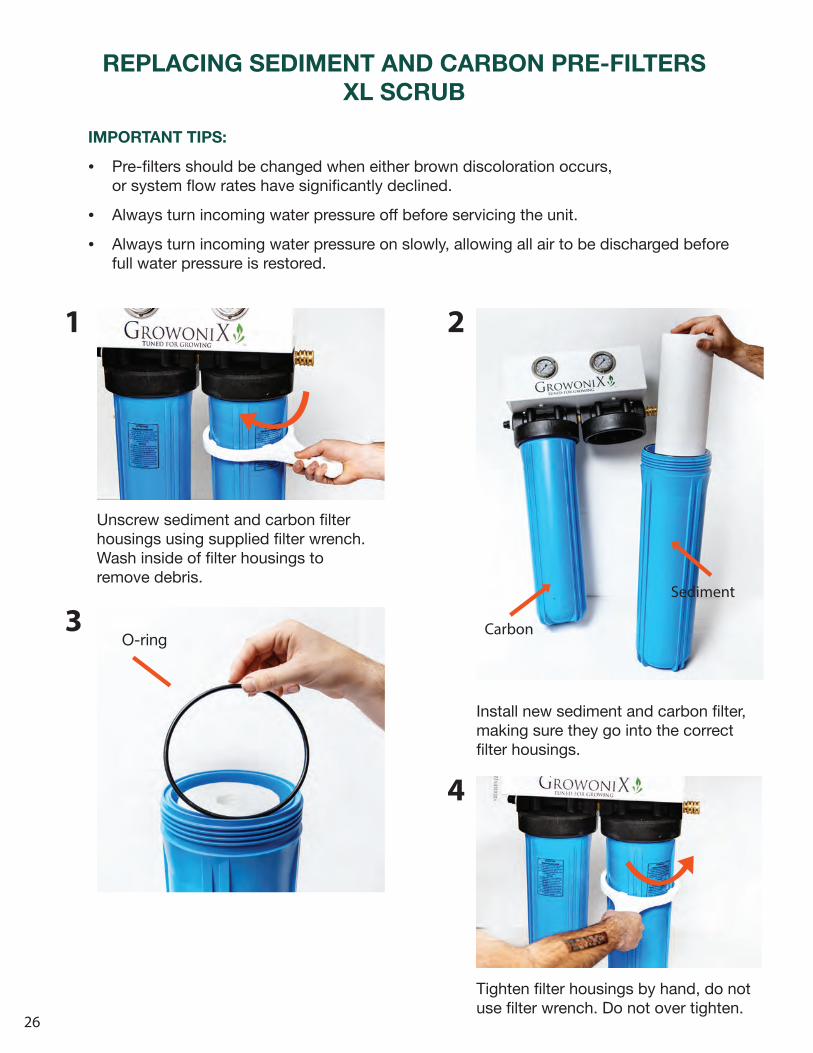
REPLACING SEDIMENT AND CARBON PRE-FILTERSXL SCRUB
1 2
4
Unscrew sediment and carbon filter housings using supplied filter wrench. Wash inside of filter housings to remove debris.
Tighten filter housings by hand, do not use filter wrench. Do not over tighten.
Install new sediment and carbon filter, making sure they go into the correct filter housings.
Sediment
Carbon3O-ring
IMPORTANT TIPS:
• Pre-filters should be changed when either brown discoloration occurs, or system flow rates have significantly declined.
• Always turn incoming water pressure off before servicing the unit.
• Always turn incoming water pressure on slowly, allowing all air to be discharged before full water pressure is restored.
27
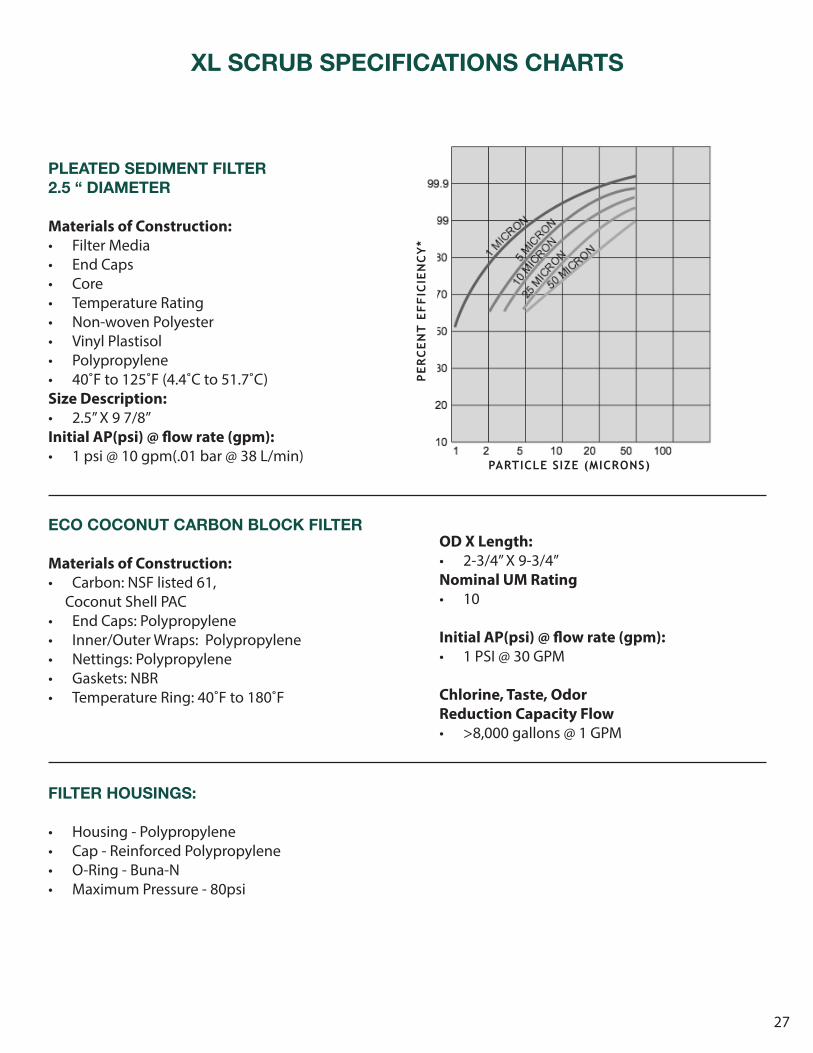
XL SCRUB SPECIFICATIONS CHARTS
PLEATED SEDIMENT FILTER 2.5 “ DIAMETER
Materials of Construction:• Filter Media• End Caps• Core• Temperature Rating• Non-woven Polyester• Vinyl Plastisol• Polypropylene• 40˚F to 125˚F (4.4˚C to 51.7˚C) Size Description:• 2.5” X 9 7/8” Initial AP(psi) @ flow rate (gpm):• 1 psi @ 10 gpm(.01 bar @ 38 L/min)
ECO COCONUT CARBON BLOCK FILTER
Materials of Construction:• Carbon: NSF listed 61, Coconut Shell PAC• End Caps: Polypropylene• Inner/Outer Wraps: Polypropylene• Nettings: Polypropylene• Gaskets: NBR• Temperature Ring: 40˚F to 180˚F
OD X Length:• 2-3/4” X 9-3/4”Nominal UM Rating• 10
Initial AP(psi) @ flow rate (gpm):• 1 PSI @ 30 GPM
Chlorine, Taste, Odor Reduction Capacity Flow• >8,000 gallons @ 1 GPM
PARTICLE SIZE (MICRONS)
PE
RC
EN
T E
FF
ICIE
NC
Y*
FILTER HOUSINGS:
• Housing - Polypropylene• Cap - Reinforced Polypropylene• O-Ring - Buna-N• Maximum Pressure - 80psi
28
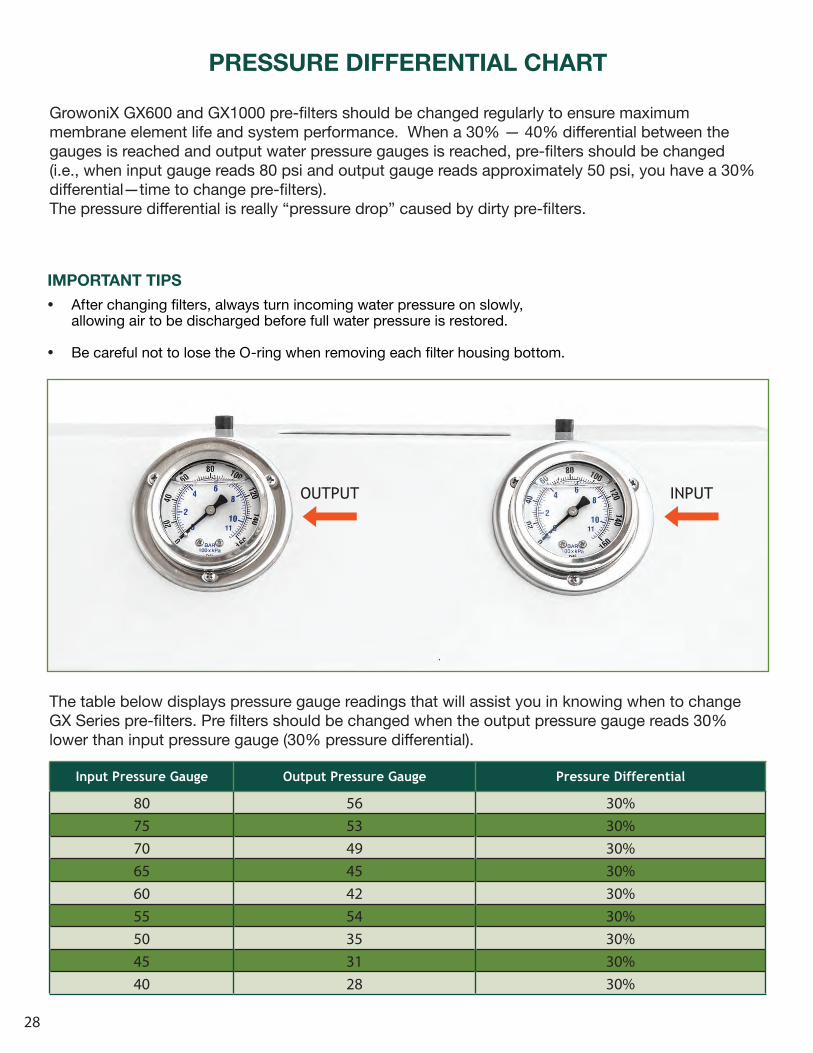
OUTPUT INPUT
The table below displays pressure gauge readings that will assist you in knowing when to changeGX Series pre-filters. Pre filters should be changed when the output pressure gauge reads 30% lower than input pressure gauge (30% pressure differential).
Input Pressure Gauge Output Pressure Gauge Pressure Differential
80 56 30%75 53 30%70 49 30%65 45 30%60 42 30%55 54 30%50 35 30%45 31 30%40 28 30%
PRESSURE DIFFERENTIAL CHART
GrowoniX GX600 and GX1000 pre-filters should be changed regularly to ensure maximum membrane element life and system performance. When a 30% — 40% differential between the gauges is reached and output water pressure gauges is reached, pre-filters should be changed (i.e., when input gauge reads 80 psi and output gauge reads approximately 50 psi, you have a 30% differential—time to change pre-filters). The pressure differential is really “pressure drop” caused by dirty pre-filters.
IMPORTANT TIPS• After changing filters, always turn incoming water pressure on slowly,
allowing air to be discharged before full water pressure is restored.
• Be careful not to lose the O-ring when removing each filter housing bottom.

30
FLUSHING THE KDF85 CARBON FILTER
Growonix water filters can be upgraded with a KDF85 Catalytic Carbon Pre-Filter. The "KDF" carbon filter is a superior blend of highly reactive catalytic carbon and KDF85 process media used to remove/reduce iron, hydrogen sulfide, chlorine, chloramine, bacteria, scale, and algae.
The catalytic carbon in these filters is in a loose form, and thus will discharge a small amount of carbon dust upon initial startup. It is recommended to unhook the membrane input side and flush ten gallons of water through the carbon filter before re-connecting to the RO membrane. This will ensure no dust gets into the membrane causing premature fouling.
KDF85 FILTERS DOUBLE YOUR OUTPUT
DISCONNECT TUBING FROM PUMP INPUT
OR MEMBRANE INPUT AND FLUSH 10 GALLONS
THROUGH KDF CARBON FILTER
WARNING
31
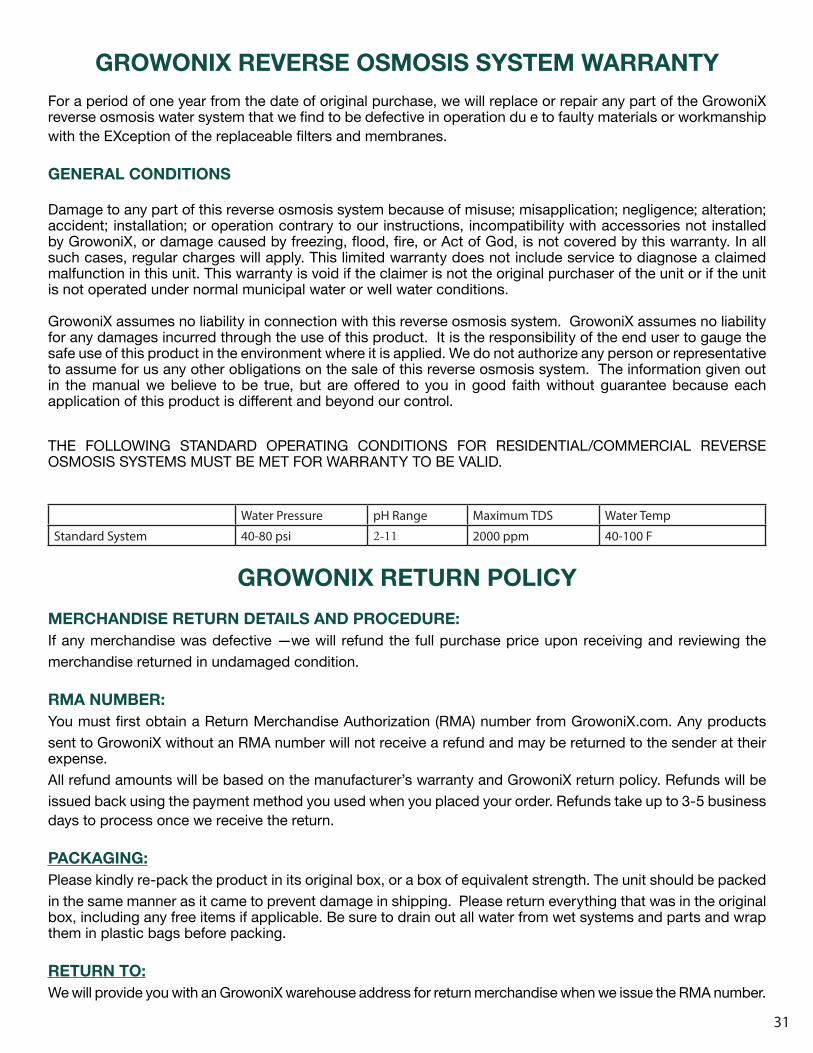
GROWONIX REVERSE OSMOSIS SYSTEM WARRANTYFor a period of one year from the date of original purchase, we will replace or repair any part of the GrowoniX reverse osmosis water system that we find to be defective in operation du e to faulty materials or workmanship with the EXception of the replaceable filters and membranes.
GENERAL CONDITIONS
Damage to any part of this reverse osmosis system because of misuse; misapplication; negligence; alteration; accident; installation; or operation contrary to our instructions, incompatibility with accessories not installed by GrowoniX, or damage caused by freezing, flood, fire, or Act of God, is not covered by this warranty. In all such cases, regular charges will apply. This limited warranty does not include service to diagnose a claimed malfunction in this unit. This warranty is void if the claimer is not the original purchaser of the unit or if the unit is not operated under normal municipal water or well water conditions.
GrowoniX assumes no liability in connection with this reverse osmosis system. GrowoniX assumes no liability for any damages incurred through the use of this product. It is the responsibility of the end user to gauge the safe use of this product in the environment where it is applied. We do not authorize any person or representative to assume for us any other obligations on the sale of this reverse osmosis system. The information given out in the manual we believe to be true, but are offered to you in good faith without guarantee because each application of this product is different and beyond our control.
THE FOLLOWING STANDARD OPERATING CONDITIONS FOR RESIDENTIAL/COMMERCIAL REVERSE OSMOSIS SYSTEMS MUST BE MET FOR WARRANTY TO BE VALID.
Water Pressure pH Range Maximum TDS Water Temp
Standard System 40-80 psi 2-11 2000 ppm 40-100 F
GROWONIX RETURN POLICYMERCHANDISE RETURN DETAILS AND PROCEDURE:If any merchandise was defective —we will refund the full purchase price upon receiving and reviewing the merchandise returned in undamaged condition.
RMA NUMBER:You must first obtain a Return Merchandise Authorization (RMA) number from GrowoniX.com. Any products sent to GrowoniX without an RMA number will not receive a refund and may be returned to the sender at their expense.All refund amounts will be based on the manufacturer’s warranty and GrowoniX return policy. Refunds will be issued back using the payment method you used when you placed your order. Refunds take up to 3-5 business days to process once we receive the return.
PACKAGING:Please kindly re-pack the product in its original box, or a box of equivalent strength. The unit should be packed in the same manner as it came to prevent damage in shipping. Please return everything that was in the original box, including any free items if applicable. Be sure to drain out all water from wet systems and parts and wrap them in plastic bags before packing.
RETURN TO:We will provide you with an GrowoniX warehouse address for return merchandise when we issue the RMA number.