Embed Size (px)
DESCRIPTION
Step by Step Visual Guide for the Screen Tight® Porch Screening Congifurator Application The goal behind the manual is to help you, the new user, get the most out of this powerful and helpful tool. We hope that this app will guide you through all you need to know to get your porch screening project up and running, and you well on your way to enjoying your home and outdoor life in a whole new way. The best way to get started is to quickly flip through the steps to get an overview of the application. Next, follow the guide as you go through the app for the first time. Please let us know about your experience. Connect with us if you have questions, comments or suggestions about the app. You can email us at [email protected] or give us a call Monday - Friday between 8am and 5pm eastern time at 800.768.3265. Or visit our website at http://www.ScreenTight.com
Citation preview
Step by Step Visual Guide for the
Screen Tight Porch Screening Congifurator Application
Thank you for taking the time to view our Configurator Application Instruction Manual. The goal behind the manual is to help you, the new user, get the most out of this powerful and helpful tool. We hope that this app will guide you through all you need to know to get your porch screening project up and running, and you well on your way to enjoying your home and outdoor life in a whole new way.
The best way to get started is to quickly flip through the steps to get an overview of the application. Next, follow the guide as you go through the app for the first time.
Please let us know about your experience. Connect with us if you have questions, comments or suggestions about the app. You can email us at [email protected] or give us a call Monday - Friday between 8am and 5pm eastern time at 800.768.3265.
Screen Tight Porch Screening Systems
Do you need to know more about the 3 porch screening systems we offer? Below is a quick look at the options along with links to our website.
Screen Tight - Affordable - Easy to Install & Repair - Low Maintenance UV Protected Vinyl - Fits 2”x4” & 4”x4” Construction - Screen Stays Tight - No Painting - Screen openings up to 40 sq. ft.
FASTtrack - 100% Hidden Fasteners - Self-Mating 1”x2”Channels allow Unlimited Configurations - White or Bronze powder coated aluminum - Easy 2 part system for framing and structural elements - Screen from interior or exterior of porch quickly - Large screen opennings up to 60 sq. ft.
MINItrack - Innovative 2 part system with 100% Hidden Fasteners - Unlimited Trim Possibilities perfect for all architectural styles - Perfect for higher elevations with interior or exterior installation - Ultra low-profile 3/4” x 3/4”channels for great views - White or bronze powder coated finishes - Create screen openings up to 30 sq. ft.
Step by Step Instructions for the Screen Tight Porch Screening Configurator Application.
If you are having technical issues or have questions about the application please email [email protected].
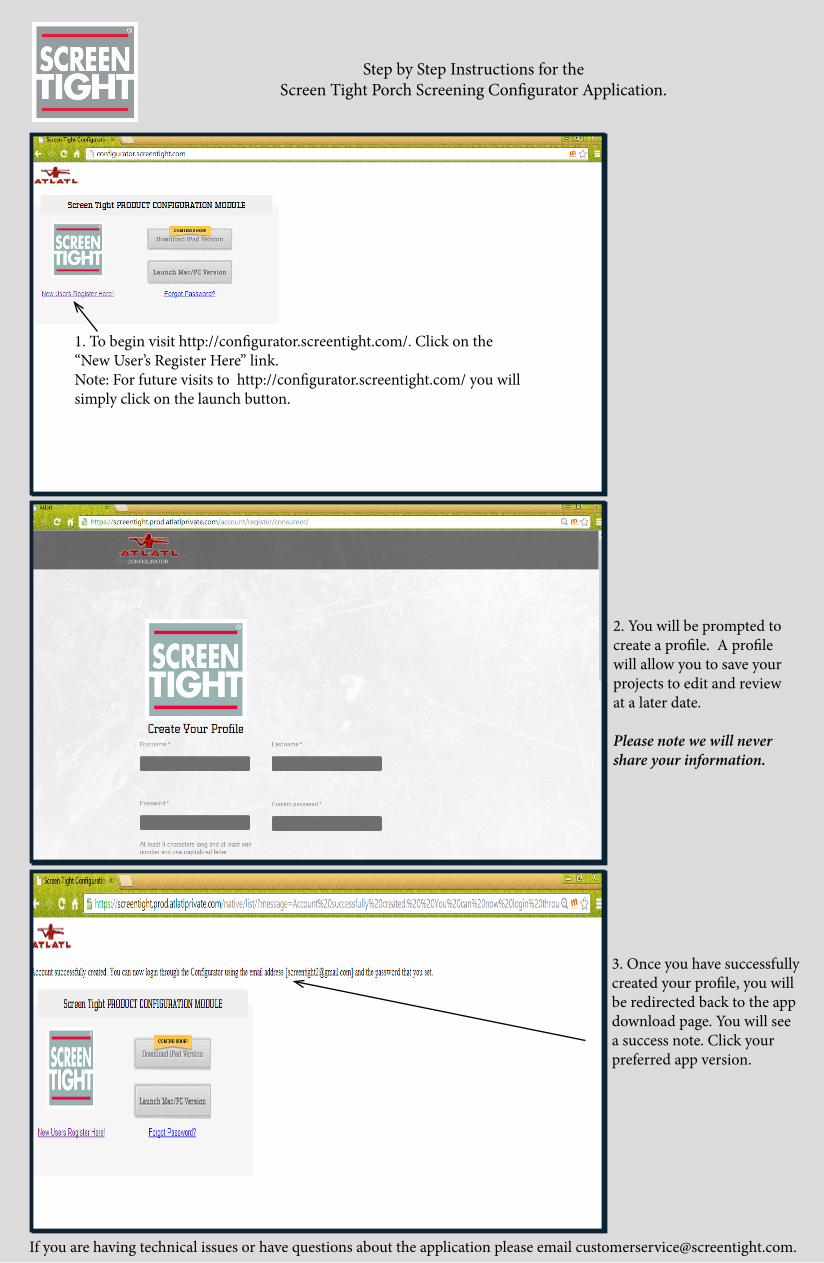
1. To begin visit http://configurator.screentight.com/. Click on the “New User’s Register Here” link. Note: For future visits to http://configurator.screentight.com/ you will simply click on the launch button.
2. You will be prompted to create a profile. A profile will allow you to save your projects to edit and review at a later date.
Please note we will never share your information.
3. Once you have successfully created your profile, you will be redirected back to the app download page. You will see a success note. Click your preferred app version.

Step by Step Instructions for the Screen Tight Porch Screening Configurator Application.
If you are having technical issues or have questions about the application please email [email protected].
4a. Loading page will appear. Please be patient. The application may take a few minutes to load.
4b. You will notice the Screen Tight logo will appear in your visible task bar*. Click on the icon to launch the application login page.
*Your bar may be at the bottom of your screen.
5a. A login pop-up will appear. After entering your username and password correctly, please note “Login Successful, Synching with Server.”
Give this a moment to synch.
Step by Step Instructions for the Screen Tight Porch Screening Configurator Application.
If you are having technical issues or have questions about the application please email [email protected].
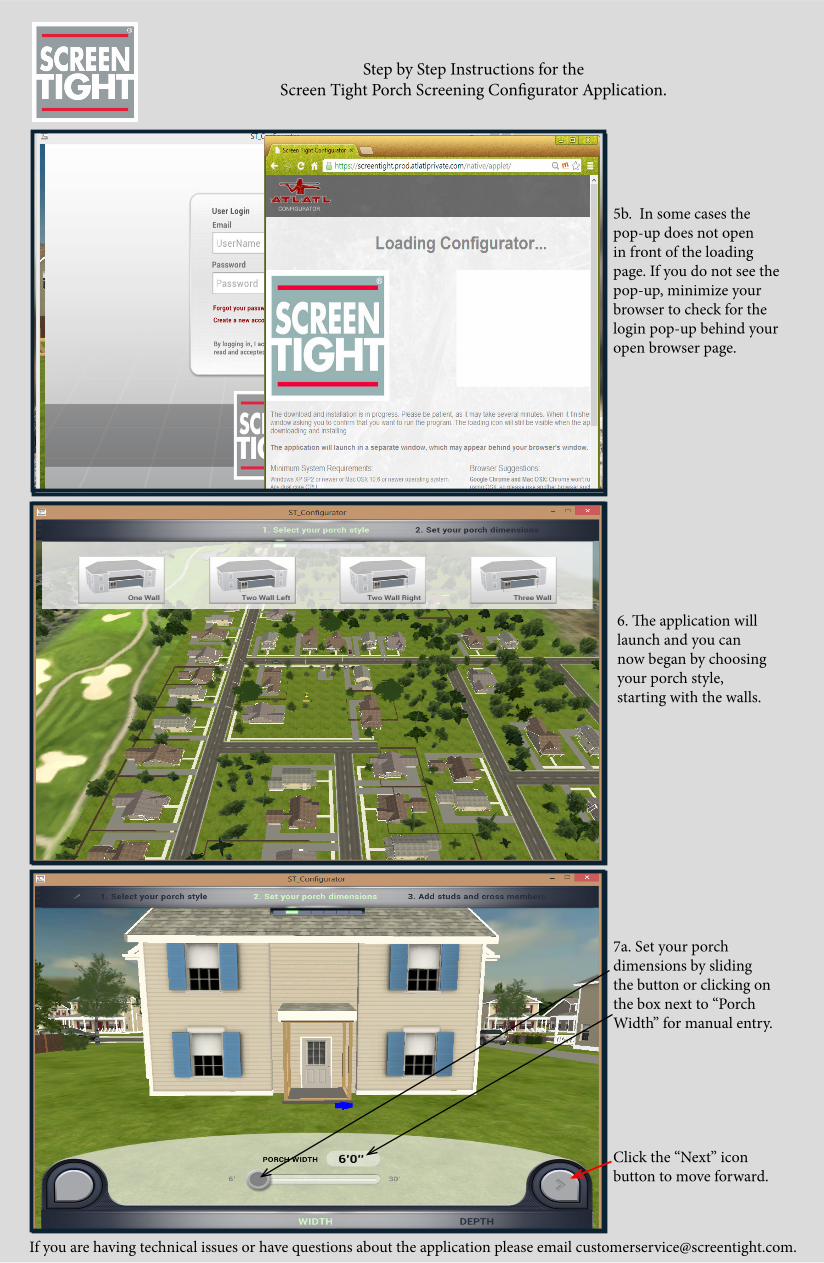
5b. In some cases the pop-up does not open in front of the loading page. If you do not see the pop-up, minimize your browser to check for the login pop-up behind your open browser page.
6. The application will launch and you can now began by choosing your porch style, starting with the walls.
7a. Set your porch dimensions by sliding the button or clicking on the box next to “Porch Width” for manual entry.
Click the “Next” icon button to move forward.

Step by Step Instructions for the Screen Tight Porch Screening Configurator Application.
If you are having technical issues or have questions about the application please email [email protected].
7b. If you choose the manual entry option a numeric pad will appear.
As you move through the application, and need to add measurements, you can click on this location for the numeric pad to pop-up.
8. Choose the depth of your porch.
9. Set your porch height.
This is the final stage of setting up the dimensions. Click on the check button to move to the next phase.
Quick Tip!You can use the < or > buttons or text
located at the top and bottom of your app as another way to navigate around.

Step by Step Instructions for the Screen Tight Porch Screening Configurator Application.
If you are having technical issues or have questions about the application please email [email protected].
10. Depending on how many walls you have chosen, you will be routed to a section of your porch to begin adding the structural elements of your porch.
Click the > to go to the next wall.
11. You can change the size of individual studs or cross members as needed. Lock a stud of cross member in place.
12. Click add a door and you will be prompted to select the stud (location) of your door.
Step by Step Instructions for the Screen Tight Porch Screening Configurator Application.
If you are having technical issues or have questions about the application please email [email protected].
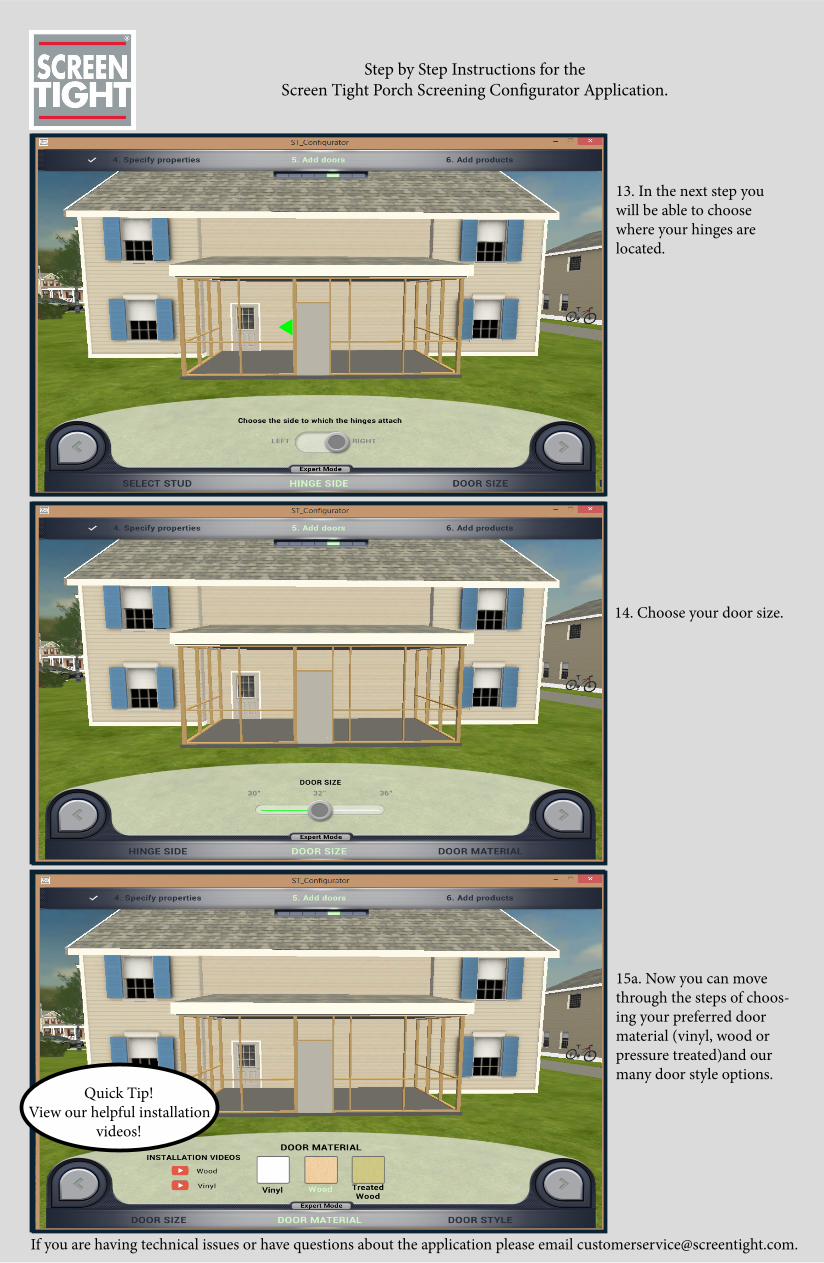
13. In the next step you will be able to choose where your hinges are located.
14. Choose your door size.
15a. Now you can move through the steps of choos-ing your preferred door material (vinyl, wood or pressure treated)and our many door style options.
Quick Tip!View our helpful installation
videos!

Step by Step Instructions for the Screen Tight Porch Screening Configurator Application.
If you are having technical issues or have questions about the application please email [email protected].
15b. If have an existing door you will be using, click on “None”. If you would like to add another door, use your cursor to scroll through the door selection.
Please note only one door per side.
16. After you have chosen your door, you will notice a cost is now visible on your screen. The next step is to choose hardware. If you have existing hardware choose “None”. If you have more than one wall, you will be prompted to add another door.
Click the check mark if no other door is needed.
17a. You are now ready to apply one of our three screening systems, Screen Tight, FASTtrack or MINItrack.
Step by Step Instructions for the Screen Tight Porch Screening Configurator Application.
If you are having technical issues or have questions about the application please email [email protected].
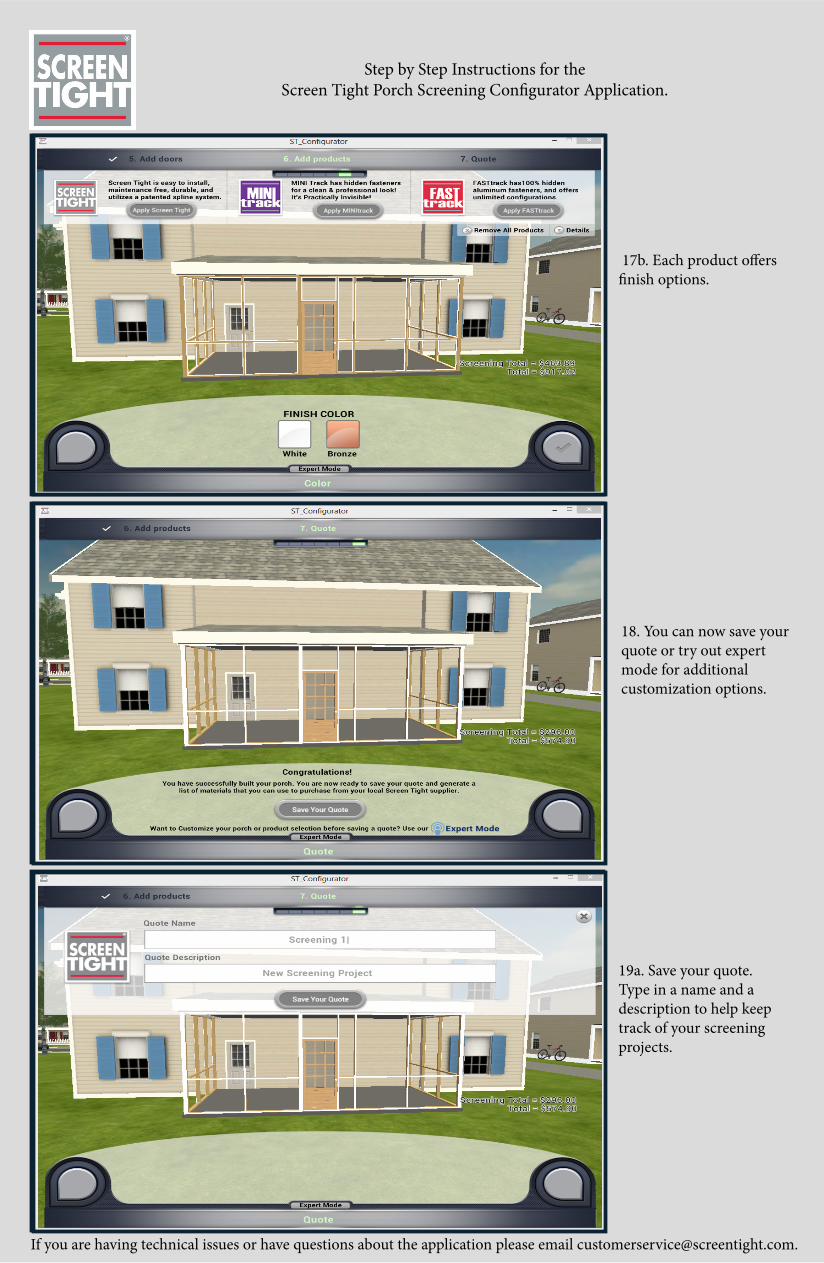
17b. Each product offers finish options.
18. You can now save your quote or try out expert mode for additional customization options.
19a. Save your quote. Type in a name and a description to help keep track of your screening projects.
Step by Step Instructions for the Screen Tight Porch Screening Configurator Application.
If you are having technical issues or have questions about the application please email [email protected].
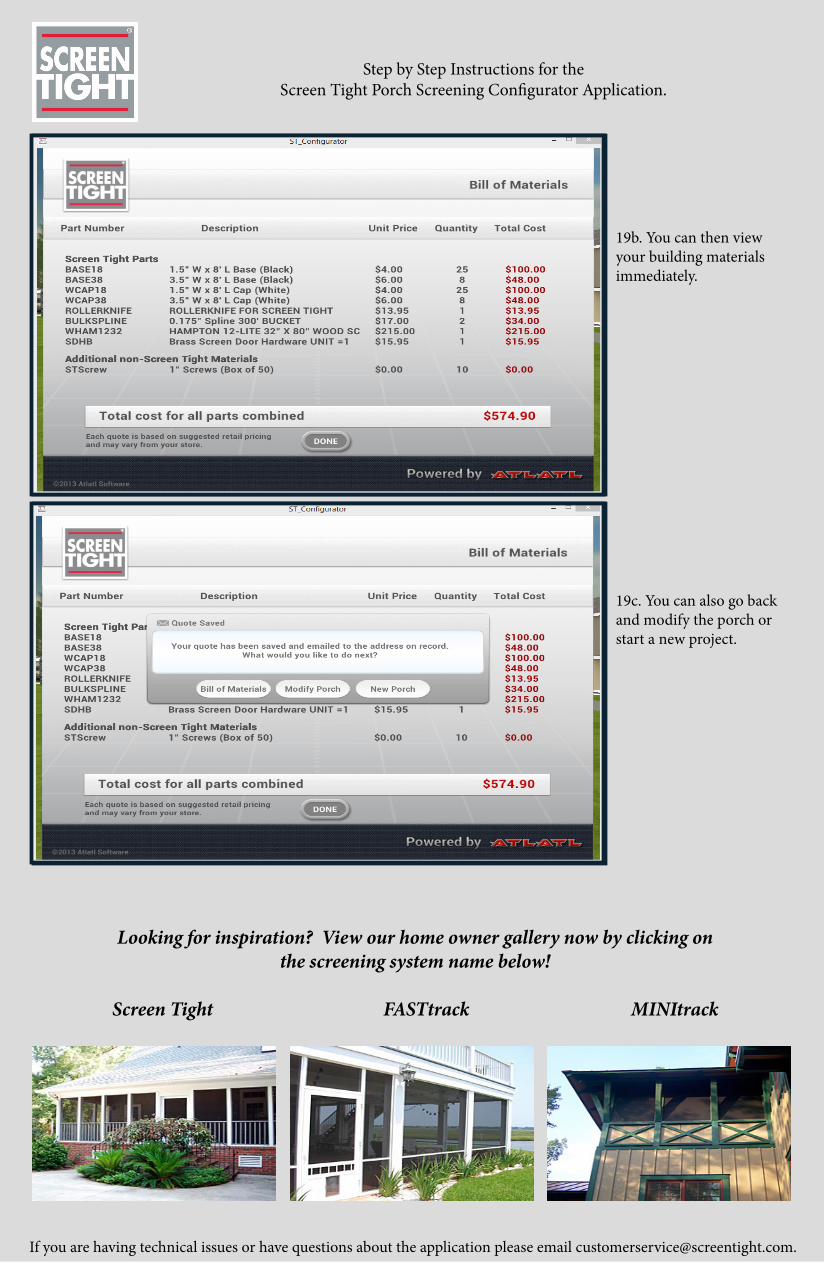
19b. You can then view your building materials immediately.
19c. You can also go back and modify the porch or start a new project.
Looking for inspiration? View our home owner gallery now by clicking on the screening system name below!
Screen Tight FASTtrack MINItrack

Step by Step Instructions for the Screen Tight Porch Screening Configurator Application.
If you are having technical issues or have questions about the application please email [email protected].
Expert Mode
After you have completed your first screening project through the self-guided process, you can move into Expert Mode.
In this mode you have a little more freedom to move items around, change the scenery and make adjustments to the sensitivity of the application.
1. In this step you can move/delete/change crossbars and studs.
2. Apply Products - Change your screening product or add/delete doors to your porch.
Quick Tip!Click on the ? for additional
instruction.

Step by Step Instructions for the Screen Tight Porch Screening Configurator Application.
If you are having technical issues or have questions about the application please email [email protected].
3. Change View allows you to quickly switch between wall views
4. Settings - Click on the gear to access different settings. This option allows you to modify settings for the application, changing the speed and sensitivity.
5. Change location of your porch from the Low Country scene to Anywhere, USA.