Embed Size (px)
Citation preview

ScopTELTM IP PBX Software
ScopTELTM IP PBX Software
Managing Incoming Lines

ScopTELTM IP PBX Software
Incoming Lines must be created to Route incoming calls to required destinations
From Configuration > Telephony > Lines > Incoming Lines
Click on “Add a new Incoming Line”
2 2
Incoming Lines
ScopTELTM IP PBX Software
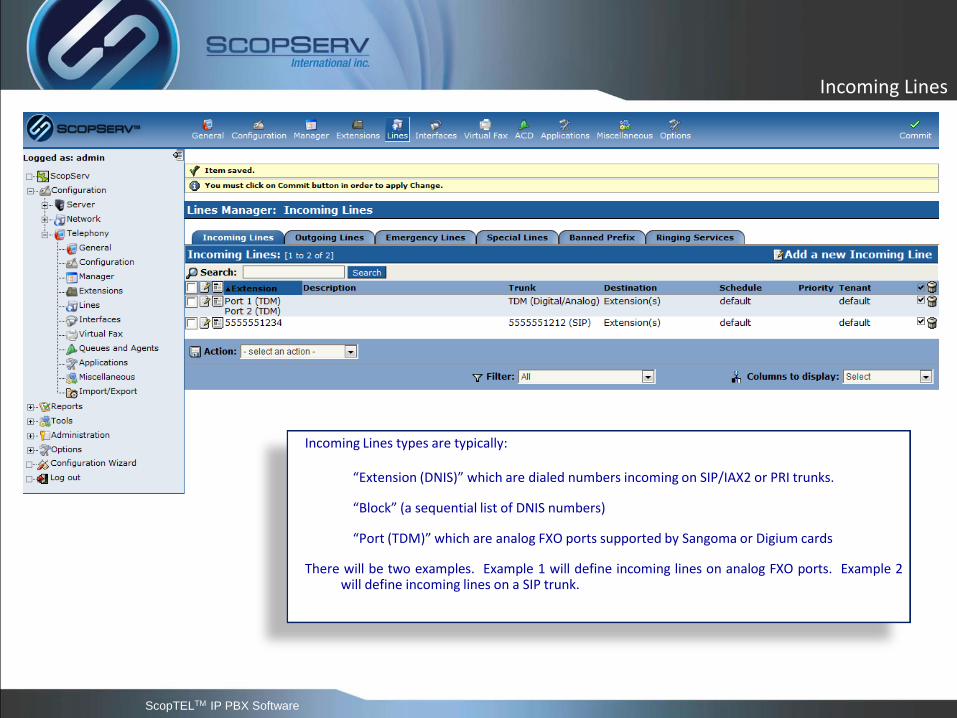
Incoming Lines types are typically:
“Extension (DNIS)” which are dialed numbers incoming on SIP/IAX2 or PRI trunks.
“Block” (a sequential list of DNIS numbers)
“Port (TDM)” which are analog FXO ports supported by Sangoma or Digium cards
There will be two examples. Example 1 will define incoming lines on analog FXO ports. Example 2 will define incoming lines on a SIP trunk.
3 3
Incoming Lines

ScopTELTM IP PBX Software
Analog FXO ports are port based trunks
The Incoming Line is used to define a destination for one or more FXO ports.
Additional options allow to define custom schedules, Caller ID Prefixes, Music On Hold sources, Call Recording Options
From the drop down menu list select “Port (TDM)”
Click on the “Select” button to open a new window and add the required ports to the Incoming Line
Click on “OK” when the required ports have been added
Click on the “Destination” tab next
4 4
Incoming Lines

ScopTELTM IP PBX Software
DNIS rules apply to T1/E1 trunks with ISDN signaling and many ITSP SIP trunks route the same method
The Telco forwards the dialed number to the physical interface so that this information can be used to route many dialed numbers to many destinations using the same physical interface. This is a very flexible and highly efficient method to route multiple numbers to various destinations using a single trunk
There is no fixed length requirement for the DNIS digits
There is no restriction preventing any Outgoing Line prefixes from matching the leading digit of any incoming DNIS digits
This is Example 2
The Options tab must be configured to use the required SIP trunk in the “Trunk” selection menu
All other tabs are common to both port based trunks and DNIS based trunks
Incoming Lines

ScopTELTM IP PBX Software
Set Destination #1 to the first required destination
In this example the Incoming Line will ring Destination Extension 100
Choose the “Extension(s)” option from the menu drop down list
Incoming Lines

ScopTELTM IP PBX Software
It is typical for the forwarding rules defined in the Extensions’ User Options to be required therefore the “Use User-defined CallForward” checkbox needs to be checked else additional destinations must be configured on this Incoming Line
Click on the “Options” tab when finished configuring the Destination
Incoming Lines

ScopTELTM IP PBX Software
Choose an already configured Trunk from the Trunk drop down selection. In this example the SIP trunk = 5555551234 is used.
The “Options” tab is also used to set shared Incoming Line fax detection, language, and the Music On Hold source among other options
Click on the “Caller ID“ tab after reviewing
Incoming Lines

ScopTELTM IP PBX Software
The Caller ID tab is used to add additional Caller ID prefixes or source routing to Incoming Lines
In this example since the Outgoing Line that was configured requires a leading prefix of 9 a 9 will be added to the Incoming Caller ID prefix for each incoming call number. This adds the 9 to any incoming caller ID history feature provided by supporting SIP end points so that the user does not have to edit the call history to add the 9 prefix to the existing call history
In this example the “Company ABC:” prefix is added to the incoming Caller ID name so that a receptionist/operator can easily distinguish inbound calls for each customer and answer the phone with the correct greeting response
Click on the “Add” button when finished adding an Incoming Line
Incoming Lines

ScopTELTM IP PBX Software
Ringing Services
Ringing Services: • Sometimes it is necessary to override a schedule or incoming line rule and route
incoming calls to a preset destination. • This is often referred to as Night Service but has many uses • Examples: • Receptionist normally answers calls but wants to forward to someone else so they can
take a break or change a shift. • An emergency situation requires that lines are forwarded to an emergency greeting or
business closed greeting or routed to an external phone number such as an answering service
• The system uses an automated schedule but needs to close early and enable an IVR menu
• The system does not use automated schedules an wants to manually toggle routes during the day between open and closed hours. Operator during open hours Vs. IVR menu during closed hours
• ScopServ does not put any restrictions on the number of Ringing Services you can create

ScopTELTM IP PBX Software
Ringing Services
Ringing Services: • The first step is to add a new Ringing Service • Lines>Ringing Services>Add a new Ringing Service • Give each Ringing Service a unique numerical Ringing ID value • Then click on the Destination tab

ScopTELTM IP PBX Software
Ringing Services
Ringing Services: • Choose your preferred destination type which in this example is an after hours IVR
menu • In this example the Menu is an existing IVR Menu called ivrclosed • Click on Add when your are done

ScopTELTM IP PBX Software
Ringing Services
Ringing Services: • Incoming Lines>Edit or Add a new Incoming Line • In this example we are editing an existing Incoming Line • Click the Edit button and navigate to the Options tab

ScopTELTM IP PBX Software
Ringing Services
Ringing Services: • Put the Ringing Service ID value you defined on the Ringing Service object earlier into
the Line ID (Ringing Service) text field • Save or Add the new Incoming Line • The PIN/Password is optional but recommended to control user access

ScopTELTM IP PBX Software
Ringing Services
Ringing Services: • Put the Ringing Service ID value you defined on the Ringing Service object earlier into
the Line ID (Ringing Service) text field • Save or Add the new Incoming Line

ScopTELTM IP PBX Software
Ringing Services
Ringing Services: • Navigate to the Applications section • Click on Add a new Application

ScopTELTM IP PBX Software
Ringing Services
Ringing Services: • Give this Application a number you would like to use as a feature code and make sure
this code does not conflict with any other extension number, Feature Code or Outgoing Line string
• This 3 digit code starting with *87 dedicates *87 for Ringing Services codes and allows Ringing Groups 1-9 to be controlled
• Click on the Destination tab

ScopTELTM IP PBX Software
Ringing Services
Ringing Services: • Choose Ringing Service from the Destination pull down • Enter the Line ID value you specified earlier on the Incoming Line Manager • Enter the Ring ID to the Ringing Service you specified on the Ringing Services Manager • These settings allow you to control Multiple Incoming Lines and override the Incoming Line Destination with the
Ring ID you define in this section • Click Add when done

ScopTELTM IP PBX Software
Ringing Services
Ringing Services: • Choose Ringing Service from the Destination pull down • Enter the Line ID value you specified earlier on the Incoming Line Manager • Enter the Ring ID to the Ringing Service you specified on the Ringing Services Manager • These settings allow you to control Multiple Incoming Lines and override the Incoming Line Destination with the
Ring ID you define in this section • Click Add when done • Commit changes to activate the feature

ScopTELTM IP PBX Software
Ringing Services
Ringing Services: IMPORTANT: • Ensure you allow this Ringing Service in the Class of Service you assign to the
extension(s) used to dial the code USAGE: • Dial the code as in example *871 once to enable the Ringing Service and override the
default schedule or configured schedules. • Dial the code again to disable the Ringing Service and allow the default schedule or
configured schedules to control Incoming Line routes
NOTES: • Some phones will allow you to configure a BLF DSS Key to monitor the on off status of
the Ringing Service • The BLF value would be in the format ‘ringservice_<tenant>_<application>’ without
quotes • Example: ‘ringservice_default_*871’

ScopTELTM IP PBX Software
Ringing Service BLF
Ringing Services BLF on Yealink DSS Key • It is very easy to set up a Ringing Service Key on a Yealink phone. • Using the previous steps to build an application *871 to enable Ringing Service ID 1 • Navigate to Provisioning>Yealink>DSS Keys and configure as in this example • Once the phone is rebooted you can use the DSS Key to enable and disable the Ringing Service • The BLF key will light Red when in Use

ScopTELTM IP PBX Software
22 22