Embed Size (px)
Citation preview

ReaxFF TutorialADF Program System
Release 2010
Scientific Computing & Modelling NVVrije Universiteit, Theoretical ChemistryDe Boelelaan 1083; 1081 HV Amsterdam; The NetherlandsE-mail: [email protected]
Copyright © 1993-2010: SCM / Vrije Universiteit, Theoretical Chemistry, Amsterdam, The NetherlandsAll rights reserved
1

Table of ContentsReaxFF Tutorial .............................................................................................................................................. 1Table of Contents ........................................................................................................................................... 2Introduction..................................................................................................................................................... 3
ReaxFF GUI modules ............................................................................................................................ 3Starting the ADF-GUI modules............................................................................................................. 4
UNIX (such as Linux) users............................................................................................................ 4Windows users ............................................................................................................................... 4Macintosh users ............................................................................................................................. 4
Tutorial 1: Burning methane and ethanol .................................................................................................... 5Step 1: Preparations ............................................................................................................................. 5
Start ADFjobs ................................................................................................................................. 5Make a directory for the tutorial ...................................................................................................... 5Start ReaxFFinput .......................................................................................................................... 5Undo............................................................................................................................................... 6
Step 2: Create ethanol........................................................................................................................... 7Step 3: Add your Methane / Oxygen mixture ...................................................................................... 8Step 3: Prepare for burning: set up the simulation.......................................................................... 10Step 4: Burn it: run the simulation..................................................................................................... 11
Tutorial 2: Water on an aluminum surface................................................................................................. 17Step 1: Preparations ........................................................................................................................... 17
Start ADFjobs ............................................................................................................................... 17Make a directory for the tutorial .................................................................................................... 17Start BANDinput ........................................................................................................................... 17
Step 2: Creating the surface............................................................................................................... 17Step 3: Add solvent ............................................................................................................................. 21Step 4: Set up the simulation, including a temperature regime...................................................... 22Step 5: Run the simulation ................................................................................................................. 27
2

IntroductionThis document will provide a hands-on tutorials demonstrating ReaxFF. We do this using a graphical userinterface (GUI). Parts of the GUI are intended for ReaxFF only, for example ReaxFFinput. Other parts (likeADFmovie) are also used for other software in the ADF package. The purpose of the tutorials is to give aquick tour of how to use ReaxFF via the GUI.
The first tutorial provides you with an overview over all relevant GUI modules. It will also show you somebasic editing of your input structures, and the reactive feature of ReaxFF.
The editing features of ReaxFFinput are identical to those of the ADF-GUI. If you are not familiar with theADF-GUI, we suggest strongly you try some of the ADF-GUI tutorials (especially numbers 1 and 4).
The second tutorial will show you how to set up a more complex system and how to use some of theadvanced features of ReaxFF. In setting up the system you will also use BANDinput to create an aluminumsurface.
Additional information may be found in the ReaxFF Reference manual
ReaxFF GUI modules
The ReaxFF GUI is the Graphical User Interface for ReaxFF. It consists of ReaxFFinput and severalmodules also used for the ADF-GUI and BAND-GUI:
ADFjobs
This utility ($ADFBIN/adfjobs) manages your jobs: run a job on your local machine or on remotemachines. It also serves as an interface to all files belonging to your job, and it serves as a convenientlauncher of the other GUI modules.
ReaxFFinput
ReaxFFinput ($ADFBIN/reaxffinput) helps ReaxFF users to easily create ReaxFF jobs. You can useReaxFFinput to define your molecule (geometry), and to set details of your ReaxFF job using an easy-to-use graphical user interface. ReaxFFinput will generate the basic job script for you. This script takescare of running ReaxFF as required.
ADFmovie
ADFmovie ($ADFBIN/adfmovie) follows geometry steps (thus, trajectories) as generated by allprograms in the ADF package, including ReaxFF. In addition, it can show graphs of most of theproperties that ReaxFF calculates. It can be used to monitor the progress of a simulation (while thesimulation is still running), or it can be used to analyze the results after your job has finished.
ADFtail
ADFtail ($ADFBIN/adftail) shows the contents of a text file, updating when the text file grows (like theUNIX tail -f command). It is used to monitor the 'logfile'. The progress of a ReaxFF calculation is alwayswritten to this file.
GUIprefs
GUIprefs ($ADFBIN/guiprefs) allows you to adjust and save numerous GUI preferences, such as colorschemes, environmental variables, etc. All GUI modules will use these preferences.
BANDinput
3

BANDinput ($ADFBIN/bandinput) allows you to set up a BAND calculation. It also contains tools to buildcrystals and slabs (surfaces). For this reason it is often useful together with ReaxFFinput.
All GUI modules have the SCM menu on the left-hand side, on most systems represented by a small SCMlogo. Using the SCM menu commands you can easily switch between the different modules needed forReaxFF.
Starting the ADF-GUI modules
We will assume that you have installed the ADF package on your machines.
Depending on your platform, you start the ADF-GUI modules in a slightly different way:
UNIX (such as Linux) users
In this tutorial we will assume that you have added $ADFBIN to your PATH. We advise you to do this if youhave not already done so. If you do not wish to add $ADFBIN to your PATH, you must start the utilities using
$ADFBIN/adfjobs &
instead of just
adfjobs &
On all UNIX platforms, including Mac OS X, the ADF-GUI programs are XWindow (X11) programs. Yourenvironment should have been set up correctly to run such programs. In particular, you need to make surethat your DISPLAY environment variable has been set properly.
You can test this easily by starting a simple X program from your shell:
xcalc &
Assuming the xcalc program is in your $PATH, a small window should appear with the image of a calculator.If not, please consult your local system administrator for additional help. Typical problems have to do withyour DISPLAY variable, and with security issues when trying to connect to the X server.
Windows users
In this tutorial we will assume that you have installed the ADF package using the Installer with all the optionsset to default.
You can start the ADF-GUI (adfjobs) by double-clicking its icon on the desktop.
Macintosh users
Macintosh users have several easy ways of starting the ADF-GUI modules: just like on any other UNIXsystem (thus, using the command line), or using the ADFLaunch program.
The easiest way is using the 'ADFLaunch' program. When you start it, ADFjobs will be started automatically.Next you can use the SCM menu to start the other ADF-GUI modules.
4
Tutorial 1: Burning methane and ethanolThis tutorial will help you to:
• create a simple molecule (ethanol)• create a simple mixture (methane and oxygen)• set up to burn it quickly (set up your ReaxFF simulation)• burn it: perform the actual ReaxFF simulation• visualize what is happening during and after the simulation
Step 1: Preparations
Start ADFjobs
On a Unix-like system, enter the following command:
cdadfjobs &
On Windows, one can start ADFjobs by double-clicking on the ADF-GUI icon on the Desktop:
Double click the ADF-GUI icon on the Desktop
On Macintosh, use the ADFLaunch program to start ADFjobs:
Double click on the ADFLaunch icon
Make a directory for the tutorial
We prefer to run the tutorial in a new, clean, directory. That way we will not interfere with other projects.ADFjobs not only manages your jobs, but also has some file management options. In this case we useADFjobs to make the new directory:
Select the File → New Directory command (thus, the New Directory command from theFile menu)Rename the new directory by typing 'Tutorial' and a ReturnChange into that directory by clicking once on the folder icon in front of it
Start ReaxFFinput
Now we will start ReaxFFinput in this directory using the SCM menu:
Use the SCM → ReaxFF input menu command
The ReaxFFinput module should start:
5

The ReaxFFinput window consists of the following main parts:
• the menu bar with the menu commands• the drawing area of the molecule editor (the dark area on the middle left side)• the status field (lower part of the dark area, blank when the ReaxFFinput is empty as shown
above)• the molecule editor tools• many panels with several kinds of options (currently the 'Main Options' panel is visible)
Undo
ReaxFFinput has an Undo command, which works on your molecule (thus not on your input options).
6

If you make a mistake while making changes to your molecule, just use the Edit → Undo menu command togo back in time. You can Undo more than one step, or Redo a step (with Edit → Redo) if you wish to do so.
Step 2: Create ethanol
To show you how to create new molecules, we will start by making a single ethanol molecule.
The molecule editor is identical to the molecule editor in ADFinput.
For a long and detailed tutorial on the builder, please check the ADF-GUI tutorials.
Click on the C-toolClick once in the drawing area: a carbon atom should be drawnClick a second time in the drawing area, next to the carbon atom just created:
a second carbon atom connected to the first oneClick on the O-toolClick in the drawing area, next to the second carbon atom: an oxygen atom willbe addedPress ESC to go back to the pointer toolClick in empty space to clear the selectionUse the Atoms → Add Hydrogen menu command to add hydrogenClick the optimize button (the gear-like button on the bottom)
7

You now should have a single ethanol molecule.
You can move your molecule using the mouse, again identical to the ADF-GUI modules:
Click once somewhere in empty space to make sure nothing is selected.
Click with the left mouse button, and drag:your molecule will rotate.
Click with the left mouse button with the ctrl-key, and drag:your molecule will rotate in-plane.
Click with the middle mouse button (or left with alt-key), and drag:your molecule will be translated.
Click with the right mouse button (or left with command key), and drag up anddown:you will zoom closer to or away from your molecule.
Use the scroll-wheel on your mouse, if you have one:you will zoom closer to or away from your molecule.
Step 3: Add your Methane / Oxygen mixture
Next we will add methane and oxygen to your molecule. For full combustion we need at least 2 oxygenmolecules for each methane molecule. So we will add (to your ethanol molecule) 100 methane moleculesand 250 oxygen molecules.
On the right hand side, use the pull-down menu on the top (currently reading'Main Options') to select the 'Builder' panel
8

The Builder allows you to build your system, and set some things like the cell vectors that define thecomputation cell. ReaxFF always uses periodic boundary conditions. The default cell is a cube with sides of25 Angstrom.
Next you can use the Builder to add many molecules, randomly distributed. In the list of molecules to beadded the Current molecule is already present. This will make sure that your ethanol molecule will be part ofthe final system. However, we want to move it to the center of the simulation cell:
Check the 'Move to center of box' check box on the 'Current' molecule line inthe builderClick the + button in front of 'Molecules' twice to add extra molecules (oncefor methane, and once for oxygen)
Click the file select button on the first 'Fill box with' line (it looks likea folder)Select Methane.xyzClick the file select button on the other 'Fill box with' lineSelect O2.xyzChange the 100 in front of the O2 to 250
You now have specified how the builder should build your system: the ethanol molecule, with methane (100times) and oxygen (250 times) added.
At the bottom of the Buidler panel you can see that the current density is very low (only an ethanol moleculein your cell). The new density, after adding methane and oxygen, will be around 1 g/mL, which is obviouslyvery high for this mixture. For this tutorial that is fine as it means things will happen faster.
Next we will actually generate the molecules:
Click the 'Generate Molecules' button
9

The molecules are generated at random positions and orientations, with constraint that all atoms (betweendifferent molecules) are at least the specified distance (2.0 Angstrom) apart.
Step 3: Prepare for burning: set up the simulation
The next step is to set up the details of the simulation. For this tutorial we will perform an MD simulation, atvery high temperature and density. This is to make things happen quickly. Obviously it is not a realisticsystem.
Select the 'Main Options' panelChoose the 'Molecular Dynamics' option from the Task pull-down menuSpecify a temperature of 3500 KClick the 'i' on the right side of the Force field line
A new window should appear describing what force fields are available, including a short description andreferences. For this particular example we will use the CHO force field for hydrocarbon oxidation.
Close the window describing the force fieldsClick on the folder-like button in the Force field lineSelect the CHO.ff force field file
10

Step 4: Burn it: run the simulation
Now we will run your set-up:
Use the File → Run commandWhen asked to save your input, save it with the name 'Methane'
ADFjobs should come to the foreground, and your job should be visible at the top. On the right side you cansee that the job is running (this is indicated by the gear-icon). When running, also a window will appearshowing the progress of your simulation (the logfile):
As you can see in the logfile, the simulation is running.
To see more details, we now will use ADFmovie. Note that you can do this while the simulation is stillrunning!
11

Start ADFmovie: SCM → Movie in the logfile window
ADFmovie will show you the trajectory of your system. Note that it will automatically read new data as soonas it becomes available.
It can also show graphs of the properties that ReaxFF calculates:
In the ADFMovie window:Use the Properties → Temperature commandUse the Properties → Temperature (Set) commandUse the Properties → Potential Energy commandMake the window bigger to make viewing the graph easier
12

Note that the two temperatures (the actual temperature, and the set temperature) are both plotted on oneaxes. The other axes is used for the second property (in this case the potential energy).
You can go to a particular point in the simulation using the slider below the window showing your system, oryou can click somewhere on one of the curves plotted. You can also use the arrow keys (left and right) tomove through the simulation.
Click on the temperature curve
As ReaxFF is a reactive force field, reactions may take place. In this particular example the methane andethanol should react with the oxygen, eventually producing H2O and CO2.
You can make graphs that show how many of the different molecule types are present. The followinginstructions often work, but it depends on what molecules are present in your simulation. You might try thisstep again after waiting some time. Especially the production of H2O and CO2 take some time.
Use the Properties → Molecule Fractions commandIn the window that pop-ups, select H2OClick Add / Remove
Repeat these three steps for CO2 and for CH4
13

You can put one of the curves on a different axes if you wish:
Let the simulation run for some timeClick once on the curve showing the number of CH4 molecules, this makes it the'active' curveUse the Graph → Curve On Right Axes command
Clicking on the curve also had two other effects (besides making it the active curve): you jumped to theiteration in the movie corresponding to the point where you clicked, and the molecules that belonged to thatcurve are selected.
14

The selected molecules are shown with Balls and Sticks, instead of wireframe only, to make it easier to spotthem. Flying to the selection also makes it easer to spot them:
Click on the curve showing the CO2 productionUse the View → Fly To Selection command a few times
When you now go forward or backwards in time, it is easier to see how the reactions actually take place.Note that the atoms remain selected, even if they are no longer part of a CO2 molecule. In a similar way youcan focus on H2O produced:
Click on the curve showing the H2O productionUse the View → Fly To Selection command if needed
15

You can add additional curves for other molecules present, or for any of the energy terms calculated byReaxFF. Just play around with it.
To prepare for the next tutorial, quit everything:
Bring the ADFjobs window to the foreground
If your job is still running:select itJob → Kill
Alternatively you can let it run to the end (40000 iterations) to see whathappens.
Use the SCM → Close command to close all windows for this job
16

Tutorial 2: Water on an aluminum surfaceThis tutorial will help you to:
• create a slab using BANDinput• import this slab in to ReaxFFinput• add a solvent• run the simulation and see what happens
Step 1: Preparations
Start ADFjobs
On a Unix-like system, enter the following command:
cdadfjobs &
On Windows, one can start ADFjobs by double-clicking on the ADF-GUI icon on the Desktop:
Double click the ADF-GUI icon on the Desktop
On Macintosh, use the ADFLaunch program to start ADFjobs:
Double click on the ADFLaunch icon
Make a directory for the tutorial
We prefer to run the tutorial in a new, clean, directory. That way we will not interfere with other projects. UseADFjobs to make the new directory:
Select the File → New Directory command (thus, the New Directory command from theFile menu)Rename the new directory by typing 'Tutorial2' and a ReturnChange into that directory by clicking once on the folder icon in front of it
Start BANDinput
First we need to start BANDinput. We will use BANDinput to generate the Aluminum surface. StartBANDinput using the SCM menu:
Use the SCM → BAND input menu command
Step 2: Creating the surface
Bulk aluminum has an fcc crystal structure, with a lattice constant of about 4.0 Angstrom.
To create the surface, we first build bulk aluminum:
17
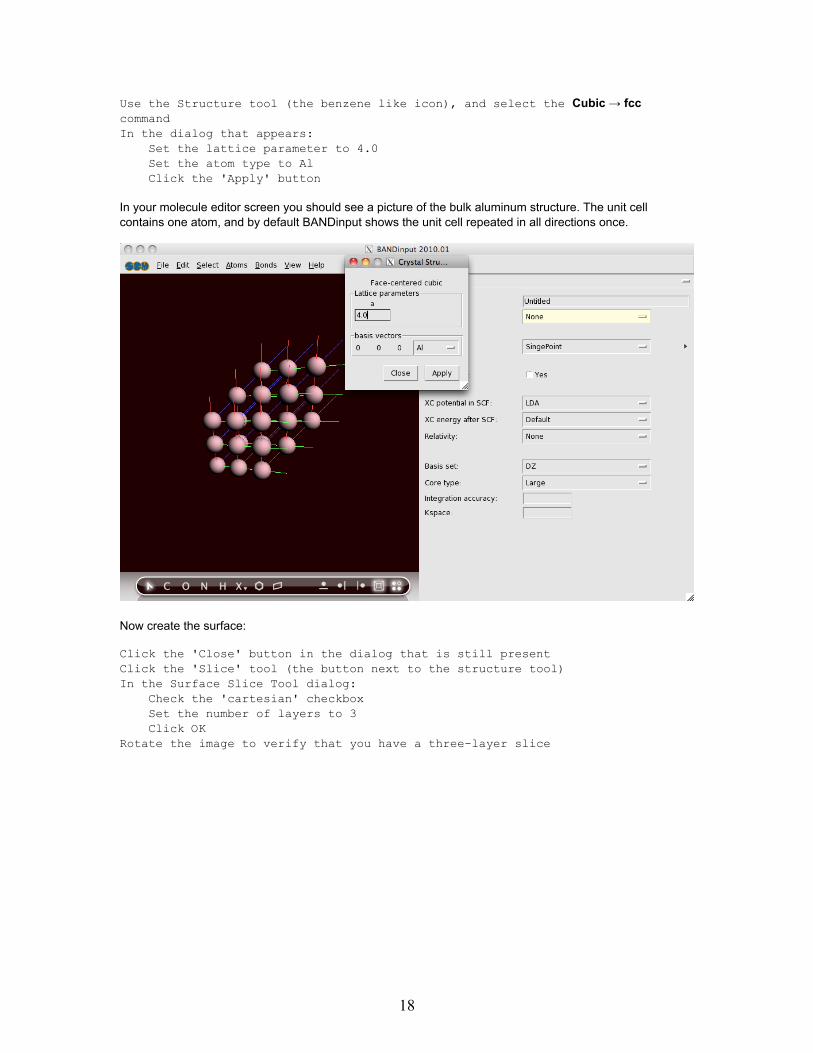
Use the Structure tool (the benzene like icon), and select the Cubic → fcccommandIn the dialog that appears:
Set the lattice parameter to 4.0Set the atom type to AlClick the 'Apply' button
In your molecule editor screen you should see a picture of the bulk aluminum structure. The unit cellcontains one atom, and by default BANDinput shows the unit cell repeated in all directions once.
Now create the surface:
Click the 'Close' button in the dialog that is still presentClick the 'Slice' tool (the button next to the structure tool)In the Surface Slice Tool dialog:
Check the 'cartesian' checkboxSet the number of layers to 3Click OK
Rotate the image to verify that you have a three-layer slice
18

Now we will copy this layer into ReaxFFinput:
Select → Select AllEdit → Copy
SCM → ReaxFF inputEdit → Paste
Rotate a little to verify three atoms are present
Select the 'Builder' panel
19

The unit cell for the aluminum layer has been copied to ReaxFFinput, and as you can see in the Builderpanel the lattice vectors have also been adjusted properly. However, in this case we do not want just oneunit cell, but a much bigger piece of the slab:
Edit → Generate Super Cell...Put 10, 10, 1 on the diagonalClick OKMove around to get a better view
20

Now we have a real slab of aluminum, three layers thick. Note that the Generate Super Cell commandadjusted the lattice vectors to match the new unit cell.
Step 3: Add solvent
The next step is to add water to the system, and make sure that the slab is in the center of the simulationbox:
Check the 'Move to center of box' box on the line for the Current moleculeClick the + button in front of Molecules:Click the file select button (on the right side of the 'Fill box with:' line)Select 'Water.xyz' and click OpenSpecify 2500 copiesSpecify a distance of 1.0 Angstrom (this is the minimum distance between themolecules)Click the 'Generate Molecules' button on the bottomUse the View → Show Unit Cell command to visualize the boxRotate to your favorite view
21

Step 4: Set up the simulation, including a temperature regime
Now we will set up the MD-simulation. We will use the Al-water force field included in the undocumenteddirectory:
Select the 'Main Options' panelSelect the 'Molecular Dynamics' TaskClick on the folder icon to select a force fieldIn the file select box, go into the undocumented folderSelect Al-water.ffClick OpenSpecify 100000 iterations
In the simulation we would like something to happen. So we will use a high temperature for water, but try tokeep the aluminum cool. Also, we will start with a low temperature MD to relax the initial set-up. This can allbe accomplished using a temperature regime, specifying different temperatures for different regions.
For this we first need to define two new regions: one for the aluminum slab, and one for the water. Regionsin ReaxFFinput are the same as in the ADF-GUI: they are defined as a collection of atoms. Via the Regionspanel you can define the regions:
Go to the Regions panelClick once on the select button (the V like button) in the Auto-Generated regionRotate and zoom to get a good view
22

By pressing the select button you have selected all atoms in the 'Auto-Generated' region. This region willalways contain the atoms that are added by the Builder. Thus, as you can see, all water molecules areselected.
We are going to set up a region for the water molecules, and a region for the aluminum surface:
With the water molecules still selected, press the + button in front of theRegions labelClick and select the text 'Region_2' and change it into 'Water'
23

Now we have a region defined that contains all water molecules. Note that the selected atoms (in this caseall water molecules) where automatically added to the new region. The + and - buttons add or remove theselected atoms to a region.
Select → Select AllPress the + button in front of the Regions label again to add a new region
(containing everything as everything was selected)Change the name Region_3 to AlClick the select button in the Water region to select all water moleculesClick the '-' button in the Al region to remove the water from the Al regionClick in empty space to clear the selection
24

The different regions are shown with colors. This does make the display a lot slower. You can turn off (or on)this display with the check box in front of the Region names, and you can set visualization style per region:
Uncheck the check box at the left of the Water region linePress the triangle on the right side of the Al region line,
and choose for the 'Balls And Sticks' visualization option
25

Now we have defined the regions that we need, now set up the temperature regime:
Select the 'Temperature Regime' panelPress the '+' button in front of the Regime label twice to add two temperaturesteps
At iteration 0, we start with an MD simulation at T=0 K:
change the first 298 to 0 (note this applies to region All which is everything)
At iteration 20000, we set the water temperature to 2000, while keeping the aluminum temperature at 0:
Change the 10000 to 20000Press the + button on the right side of the line starting with 20000Change the first All on the 20000 step to Al, and change its temperature to 0Change the second All on the 20000 step to Water, and change its temperatureto 2000
Your temperature regime setup should look like this:
26

Step 5: Run the simulation
Now we can run our set up:
File → RunWhen asked to save, specify Al-water as filenameLet it run for some time (until iteration 500 or so)SCM → MovieView → Molecule Ball & Sticks → Balls And Sticks
27

If you look around, you will most likely see many water molecules attaching to the aluminum surface. Aftersome time, you might also see hydrogen atoms distracted from the water molecules, which are now movingaround the surface on their own.
You might leave the simulation running to see what will happen. It will take a lot of time though.
If you do not want to wait for the simulation to finish, kill the job:
Bring the ADFjobs window to the frontMake sure your Al-water job is selected (click once on it if not)Kill it Job → Kill
Close all GUI modules: SCM → Close All
28
![Tutorial: Using ReaxFF to Model Electrochemical Interfaces · Seite 7 Electrolyte calculation Comparison Solvation energy for CuCl 2 based on experimental thermodynamic data.[a] ΔH](https://img.dokumen.tips/doc/110x75/5ed5c472f7886e5e76734b51/tutorial-using-reaxff-to-model-electrochemical-interfaces-seite-7-electrolyte-calculation.jpg)