Embed Size (px)
Citation preview

1
Forest Resources and Environmental Science – Mike Gaule ~ June 2005
School Forest Inventory for Dummies Target Grades: 10 – 12 Unit Overview: This unit guides a teacher in developing a school forest management plan that addresses many parameters such as identification of overstory and understory, inventory, soils description, habitat suitability, insect identification, pest and disease management and usage parameters for humans, animals and plants. The development of a comprehensive forest management plan may take several weeks or months, and are generally developed by a forester or other expert in the field which can be expensive. However, teachers with a little bit of knowledge in forest ecosystems and forest management can start to develop their own plan with the involvement of students. This unit will lead to long term student research, ownership, and lifelong learning and appreciation of natural resources. Plant identification, the first step in taking inventory of a forest, is probably one of the greatest obstacles for most teachers. Teachers can use this inquiry-based unit to introduce plant and tree identification to students, which will then lead to the development of sample plots to collect inventory data of their school forest. Teachers can learn right along with the students (and even from them!) in collecting data on plant characteristics, dichotomous keys, Internet keys, plant ecology and journaling for use in identification. The unit is intended for use with a school forest within walking distance of the school. However, modifications can be made if the forest location is off campus such as taking tree samples (leaves, twigs, fruit, etc.) one day and returning for assessments, sample plots and measurements on a separate day. The use of local trees on campus or in nearby neighborhoods for samples and assessments may also be incorporated. Activities: Day 1: Introduction to forests during a tour of the forest. Tree and leaf terminology, characteristics, and use of dichotomous keys. See Handout 1 and various keys and descriptions. Day 2: Tree identification activity that includes tree sampling, plant characteristics, and tagging. Day 3: Tree identification activity continued and start journal activity for personal site description, observation and identification. See Handout 2. Day 4: Tree identification activity with student presentations of tree or plant species with characteristics and ecology of each. For an additional assessment, a quiz on the identification of 15-20 trees or plants found in forest for next class period. Day 5: Outdoor quiz on 15 to 20 trees identified by students and teacher(s). Discussion on sample plots and measurements. Practice dbh and height measurements. Set up study plots for data collection. See Handout 3.

2
Assessments: Although there will not be a typical test at the end of this unit on identification, assessment is embedded throughout the activities of this unit in the form of sampling, data collection, presentations, journal activity and an identification quiz. The following is a list of assessments: Day One Homework – Five tree samples with identifying characteristic sample – 25 points Plant Identification and Ecology Presentation – 50 points Plant Identification and Ecology Collection (20 samples – 10 points per sample) – 200 points Plant Identification Quiz – 15 to 20 plants (2 points for each plant correctly identified) – 30-40 points Journal Activity Report – 50 points Total points for unit – 355-365 points Michigan Content Standards: Science Content Standards: Strand I. Constructing New Scientific Knowledge: Scientifically literate students are learners as well as users of knowledge. With scientific literacy comes the ability to ask questions about the world that can be answered by using scientific knowledge and techniques. Scientifically literate students can also develop solutions to problems that they encounter or questions they ask. In developing solutions, scientifically literate students may use their own knowledge and reasoning abilities, seek out additional knowledge from other sources, and engage in empirical investigations of the real world. They can learn by interpreting text, graphs, tables, pictures, or other representations of scientific knowledge. Finally, scientifically literate students can remember key points and use sources of information to reconstruct previously learned knowledge, rather than try to remember every detail of what they study. Strand II. Reflecting on Scientific Knowledge: Scientifically literate students can also “step back” and analyze or reflect on their own knowledge. One important type of analysis is the justification of personal knowledge or beliefs using either theoretically or empirically based arguments. Scientifically literate students can also show an appreciation for scientific knowledge and the patterns that it reveals in the world; this often involves seeing connections among different areas of knowledge. They may be able to take a historical and cultural perspective on concepts and theories or to discuss institutional relationships among science, technology, and society. Finally, scientifically literate students can describe the limitations of their own knowledge and scientific knowledge in general. Standard II.1 Reflecting on Scientific Knowledge All students will analyze claims for their scientific merit and explain how scientists decide what constitutes scientific knowledge; how science is related to other ways of knowing; how science and technology affect our society; and how people of diverse cultures have contributed to and influenced developments in science. Strand III. Using Scientific Knowledge in Life Science: Scientifically literate students and adults can use their knowledge to understand the world around them and to guide their actions. Important types of activities that use scientific

3
knowledge include description and explanation of real-world objects, systems, or events; prediction of future events or observations; and the design of systems or courses of action that enable people to adapt to and modify the world around them. In the life sciences, real-world contexts in which scientifically literate people use knowledge are often described in terms of systems and subsystems, such as cells, organisms, and ecosystems. Standard III.2 The Organization of Living Things All students will use classification systems to describe groups of living things; compare and contrast differences in the life cycles of living things; investigate and explain how living things obtain and use energy; and analyze how parts of living things are adapted to carry out specific functions. Standard III.5 Ecosystems All students will explain how parts of an ecosystem are related and how they interact; explain how energy is distributed to living things in an ecosystem; investigate and explain how communities of living things change over a period of time; describe how materials cycle through an ecosystem and get reused in the environment; and analyze how humans and the environment interact. English Language Arts Content Standards Standard 1, 2, 3 Meaning and Communication All students will read and comprehend general and technical material. All students will demonstrate the ability to write clear and grammatically correct sentences, paragraphs, and compositions. All students will focus on meaning and communication as they listen, speak, view, read, and write in personal, social, occupational, and civic contexts.
Day One Goal: Students will be introduced to forest management and the components involved in a complete forest management plan. Students will be able to understand and use a dichotomous key and will become familiar with tree/shrub characteristics for identification. Materials: Handout 1 on tree characteristics, various examples of dichotomous keys and tree descriptions (included), Internet sites for tree identification using dichotomous keys. Students will need notebook and pen/pencil.

4
Activities: Tour school forest, campus or local neighborhood. Explain as you tour, the forest management system that includes inventory of trees, shrubs and plants, cover story, understory, seedling layer and ground flora. That is just the first part, also included are soils description including the horizon layers and soil permeability, habitat suitability, insect identification, pest and disease management and usage parameters for humans, animals and plants. While still outside, find a place to sit and explain to students that this week we will focus on forest inventory. Forest inventory begins with identification of plants, which are systematically grouped and separated out according to characteristics of the individual organism. To become familiar with this systematic approach of similar and unique characteristics to identify any organism (plants, animals, fungi, protista, and bacteria,) students need to understand the concept of identifying characteristics to sort out objects with similar and unique characteristics. Have students get into groups of four or five students. Ask all students to remove their left shoe. Each group will identify similar and unique characteristics of each of their group’s shoes and then separate them out based on the individual distinct characteristics of each shoe in the group. Each group will write out a “key” to the identification of each shoe, starting with general characteristics and differentiating them to individual unique shoes. Have each group present their “keys” to the class. After presentations, explain how they just made their own dichotomous keys to identify shoes! In science we identify organisms using the same concept! Explain how dichotomous keys work on a “present” or “not present” basis or as a “have” or “have not” basis. The use of these types of keys makes identification easy (most of the time!). Before handing out various examples of dichotomous keys, explain that students need to understand some characteristics and vocabulary of plant identification. Hand out the notes on Tree Characteristics (Handout 1) and go through them with the students, pointing out the vocabulary with opposite and alternate branching, simple and compound, leaf margins (smooth, entire, serrated, toothed, etc.), lobes and vein patterns. Finally, handout various examples of tree identification keys and tree descriptions for each student. I have included a tree description of Upper Peninsula trees by Dr. Andrew Burton, MTU, Dept. of Forest Resources and Environmental Sciences, 2005 and below are several Internet sites that contain dichotomous keys for tree and shrub identification. Most Internet keys have a glossary that will help with terminology and vocabulary!
http://www.arborday.org/trees/treeID.cfm
http://www.uwsp.edu/cnr/leaf/treeid.htm
http://www.dnr.state.wi.us/ORG/land/forestry/treeid/BeginKey/dikey1.htm
http://www.uwgb.edu/biodiversity/herbarium/trees/tree_key_intro01.htm
http://www.for.msu.edu/extension/ExtDocs/idents.htm

5
http://uptreeid.com/ Homework: Students need to identify five trees in their neighborhood using the above keys. They will write out the major identifying characteristics of each tree and include a leaf sample or some other identifying characteristic sample.
Day 1 Handout 1 - Tree Characteristics (Modified from http://uptreeid.com/idchars.htm, This site created and maintained by Bill Cook, MSU Extension Forester for the Upper Peninsula of Michigan.
Editing and modification is ongoing. Submit suggestions, questions, and corrections to [email protected])
Trees are cool!
Learning how to ID trees and learning about their "personalities" is like making new friends.
There’s a lot more to know about trees than just how to tell them apart! The more time you spend with trees and in the forest, the more you will understand about some of the neatest places on earth.
6
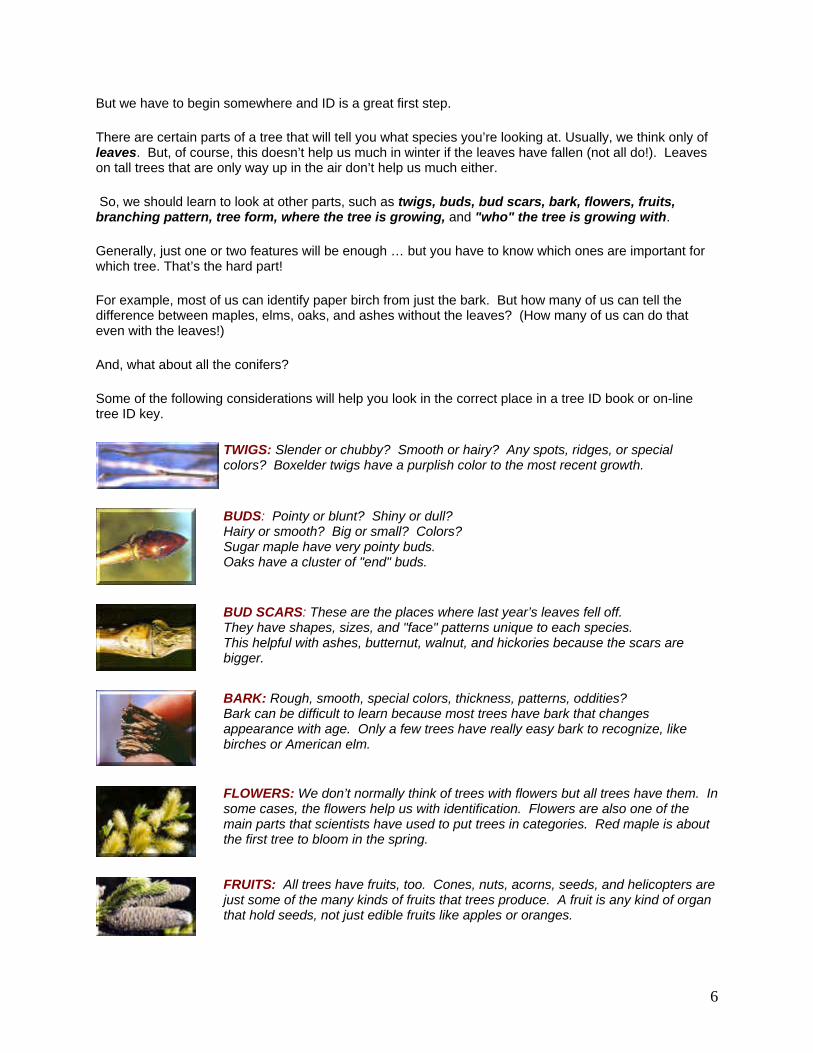
But we have to begin somewhere and ID is a great first step.
There are certain parts of a tree that will tell you what species you’re looking at. Usually, we think only of leaves. But, of course, this doesn’t help us much in winter if the leaves have fallen (not all do!). Leaves on tall trees that are only way up in the air don’t help us much either.
So, we should learn to look at other parts, such as twigs, buds, bud scars, bark, flowers, fruits, branching pattern, tree form, where the tree is growing, and "who" the tree is growing with.
Generally, just one or two features will be enough … but you have to know which ones are important for which tree. That’s the hard part!
For example, most of us can identify paper birch from just the bark. But how many of us can tell the difference between maples, elms, oaks, and ashes without the leaves? (How many of us can do that even with the leaves!)
And, what about all the conifers?
Some of the following considerations will help you look in the correct place in a tree ID book or on-line tree ID key.
TWIGS: Slender or chubby? Smooth or hairy? Any spots, ridges, or special colors? Boxelder twigs have a purplish color to the most recent growth.
BUDS: Pointy or blunt? Shiny or dull? Hairy or smooth? Big or small? Colors? Sugar maple have very pointy buds. Oaks have a cluster of "end" buds.
BUD SCARS: These are the places where last year’s leaves fell off. They have shapes, sizes, and "face" patterns unique to each species. This helpful with ashes, butternut, walnut, and hickories because the scars are bigger.
BARK: Rough, smooth, special colors, thickness, patterns, oddities? Bark can be difficult to learn because most trees have bark that changes appearance with age. Only a few trees have really easy bark to recognize, like birches or American elm.
FLOWERS: We don’t normally think of trees with flowers but all trees have them. In some cases, the flowers help us with identification. Flowers are also one of the main parts that scientists have used to put trees in categories. Red maple is about the first tree to bloom in the spring.
FRUITS: All trees have fruits, too. Cones, nuts, acorns, seeds, and helicopters are just some of the many kinds of fruits that trees produce. A fruit is any kind of organ that hold seeds, not just edible fruits like apples or oranges.

7
BRANCHING PATTERN: The way in which a tree branches can sometimes be a helpful thing to know. "Opposite" branching occurs in only a few trees such as maples and ashes. Most other trees have "alternate" branching. The angle at which branches come off the trunk, or the density of branches in the crown, can be good clues in tree ID.
TREE FORM: The overall shape of a tree is the form. Some trees have very distinctive forms. An American elm is shaped like a large flower vase.
GROWING PLACE or SITE: Some trees, like cedar, black spruce and tamarack are usually found on wet sites. Yellow birch and hemlock grow in cooler, moister places like ravines and the north side of hills.
TREE ASSOCIATES: Trees, like people, like to "hang" around in certain groups. If you can identify one or two trees in an area, you’ll have some clues to what else might grow there. For example, if there is a lot of sugar maple, chances are good that you’ll find basswood, beech, and ironwood. Aspen, paper birch, and jack pine probably won’t be there.
LEAVES: Leaves include needles and scales of conifers. Leaves are one of the best ways to ID a tree, when they are available. Simple, compound or needle-like? Margins smooth or margins rough? Shape? Size? Color variation? Texture? Any sinuses or lobes?
Getting good at identifying trees takes practice. Once you know your trees, it becomes much easier to learn about shrubs, flowers, and wildlife that grow together with the trees.
Trees dominate forest ecosystems, so if you have a pretty good idea of what trees are there, you’ll have a pretty good idea of what’s happening in that environment and what else might be living with those trees. It’s a good thing to know about trees and forests because we need them for many reasons. So, have fun learning to identify trees and discovering how they grow! The forest is a great place to live and work.
Day 1 Handout - Optional Tree Identification Field Sheet – Dr. Andrew Burton MTU, Dept. of Forest
Resources and Environmental Sciences, 2005 eastern white pine Pinus strobus
5 needles per cluster, 7 - 12 cm (2.5 - 5 in) long cylindrical cone, twice as long as wide, 10 - 25 cm (4- 10 in) long bark is thin and greenish on young trees, dark gray with broad, scaly ridges in large trees can exist in hardwood forests, dry pine forests, oak forests and in swamps red pine Pinus resinosa two long needles per cluster, 10 - 17 cm (4 - 7 in) long needles snap cleanly when bent cones are small and egg shaped, about 5 cm (2 in) long

8
bark is thick, reddish, and flaky, on very old trees forming broad flat flaky plates or ridges jack pine Pinus banksiana two short, sometimes twisted needles per cluster, 2-4 cm (1-2 in) long closed and open seed cones persistent on branches closed cones incurved, pointing toward end of branch, 4 - 7 cm (1.5 to 2.5 in) long bark is thin, dark reddish brown to dark gray with a rough, scaly surface characteristic of dry, nutrient poor soils eastern hemlock Tsuga canadensis short needles, two ranked, also with tiny needles appressed to the top of the shoots, 0.6 to 1.4 cm (1/4 to ¾ in) long reddish purple inner bark outer bark is thick reddish brown to dark gray drooping leader and foliage in flat sprays very small seed cones, 1.3 - 2 cm (0.5 to ¾ in) long found in cool and moist to wet swamps and wetland edges, also in northern hardwood forests, likes cool moist locations such as ravines and north facing slopes balsam fir Abies balsamea 2 ranked needles, leave a round leaf scar, white lines beneath, 1.3 - 3 cm (0.5 to 1.25 in long) bark smooth, dull green to gray, with resin blisters (pitch pockets) seed cones erect, 5 - 10 cm long when mature (2 to 4 in), purple, disintegrate on tree, leaving cone axis behind in upper crown characteristic of cold, wet boreal forest, but can exist in habitats from cold, poorly drained swamps to well drained hardwood-dominated uplands very aromatic, a common Christmas tree northern white-cedar Thuja occidentalis flat, scale like yellowish green leaves bark in shreddy, linear strips small oblong cones with a few dull brown scales, 0.8 to 1.3 cm (1/4 to ½ in) long found in swamps, along streams and lakes shores, and occasionally on limestone ridges white spruce Picea glauca
slender cylindrical seed cones, 2.5 to 5 cm (1-2 in) long outer bark thin, light grayish brown, separating into thin plate like scales inner bark layers cinnamon or reddish brown common in many habitats including both wetlands and uplands, can occur in hardwood dominated uplands twigs essentially without hair needles are pointy, don’t squeeze

9
black spruce Picea mariana very short needles on sterigmata (pegs), spreading in all directions, 0.5 to 1.5 cm long (1/4 to 5/8 in) thin scaly grayish brown bark, inner bark layers olive green cone margins roughly toothed cones egg shaped, 2-3 cm long (about 1 in) dense pure stands in undrained swamps and bog margins twigs with short, dense reddish brown pubescence sugar maple (hard maple) Acer saccharum leaves simple, opposite, 5-lobed, entire between points on lobes, 7 - 13 cm (3 to 5 in ) long and wide terminal bud reddish brown and sharply pointed twigs opposite and reddish brown, becoming gray fruit a samara, borne in pairs, drops in the fall mature bark dark gray, when older deeply furrowed and sometimes curling outward to form long, thick, irregular plates, also sometimes scaly mesic deciduous forests, well to moderately well drained, northern hardwoods very shade tolerant red maple (soft maple) Acer rubrum leaves simple, opposite, 3 to 5 lobes, with serrate margins between lobe points, 7 - 12 cm (3 to 5 in) long and wide terminal bud dark red, blunted twigs opposite, bright red becoming smooth and light gray bark thin, smooth and light gray when young, becoming dark gray, rough-ridged with plate like scales when older fruit a paired samara in the spring found in virtually all habitats from swamps to dry uplands and outwash plains northern red oak Quercus rubra alternate, simple leaves with 5 to 11 bristle-tipped lobes leaves 13 -23 cm (5 - 9 in) long, 9 - 15 cm (3.5 to 6 in) wide acorn with sahllog cup, enclosing just the base of the nut terminal bud lustrous, reddish brown, buds cluster at tip of twigs bark smooth grayish brown when young, on old trunks darker and thicker, with long, broad flat and smooth topped ridges as if ironed out (ski trails) characteristic of mesic forests (northern hardwoods and other moist upland forests), also in dry-mesic upland forests and well-drained sands American basswood Tilia americana leaves are simple, alternate, large and obliquely heart shaped, 12 - 15 cm long (5 -6 in) and 7 - 10 cm (3 - 4 in) wide leaves are coarsely serrate

10
buds are broad, lopsided and green to reddish brown fruit is a round nut borne on a leafy bract mature bark is thick with long, narrow, flat-topped parallel ridges young bark is smooth and dark gray characteristic of mesic deciduous forests yellow birch Betula Alleghaniensis simple, alternate leaves, 7-12 cm (3 - 6 in) long, half as wide leaves sharply, doubly serrate yellowish, gray, exfoliating bark when older bark thin smooth and dark on young stems, with conspicuous lenticels twigs and buds with wintergreen odor and taste northern hardwood forests and poorly drained swamps paper birch (white birch) Betula papyrifera simple, alternate leaves, 5 - 8 cm (2-3 in) long and 3 - 5 cm (1 - 2 in) wide leaves doubly serrate, except for rounded, entire base mature bark creamy white and peeling young bark smooth and dark, reddish brown with conspicuous lenticels twigs and buds have no wintergreen odor burned over, cutover and otherwise disturbed areas can occur in well-drained forests, dunes, wetland and swamp margins trembling aspen (quaking aspen) Populus tremuloides alternate, simple leaves leaves with flattened petioles, tremble in the slightest breeze, 4 - 6 cm long and wide, finely serrate buds slender, angled, acute, reddish brown, resinous but not gummy or fragrant bark smooth, creamy white to yellowish green sprouts vigorously when cut less vigorous on dry sites than bigtooth aspen, can occur in sites ranging from wet to dry, seeds in after disturbance or sprouts after death from fire or cutting bigtooth aspen Populus grandidentata alternate, simple leaves leaves with large teeth, about 10 per side, 7-13 cm long, 5-9 cm wide bark smooth, tan with greenish or orange cast

11
bud ovoid to conical, dusty looking, not gummy or fragrant mesic to dry mesic forest, often with pines, oaks and upland hardwoods does not tolerate wet, poorly drained sites sprouts vigorously white ash Fraxinus americana leaves opposite and pinnately compound, 7 - 9 leaflets, 7 - 13 cm (3 - 6 in) long leaflets with short stalks, entire or obscurely serrate twigs opposite, stout and glabrous, appearing “knobby” leaf scars with a concave upper margin, sometimes deeply notched blunt, rusty or reddish brown buds bark thick, gray, deeply furrowed into narrow regular interlacing diamond-shaped pattern fruit a single samara in the fall typically dry and dry mesic upland sites, doesn’t tolerate wet sites black ash Fraxinus nigra leaves opposite and pinnately compound, 7 - 11 leaflets, 7 - 13 cm (3 - 6 in) long leaflets sessile, entire or obscurely serrate twigs opposite, stout and glabrous, eventually becoming dark gray and warty ovoid, pointed, bluish black, buds (chocolate chips) bark thin, soft, ash gray and scaly fruit a single samara in the fall occurs in poorly drained swamps and wet depressions black cherry Prunus serotina alternate, simple leaves, finely serrate with incurved teeth leaves 6-12 cm (2.5 - 5 in) long, 1/3 as wide petioles usually with 2 red glands near the blade, brown pubescence on lower midrib mature bark broken into rough, irregular dark plates resembling burnt potato chips young bark thin, smooth, reddish brown with conspicuous gray lenticils fruit a small, globose drupe, nearly black in fall occasional in northern hardwood forests in UP, occurs in dry-mesic oak forests and beech maple of LP does not tolerate high water tables or poorly drained sites ironwood (hop-hornbeam) Ostrya virginiana simple, alternate leaves, 7 - 12 cm (3 - 5 in) long and 3 - 5 cm (0.5 to 1 in) wide leaves doubly serrate with veins near the base of the blade that branch near the margin

12
twigs and buds have no wintergreen odor bark grayish brown, separating into thin, longitudinal strips, giving a shredded appearance young bark smooth, thin, chestnut brown with conspicuous lenticels fruit a hop typically and understory tree in oak-hickory, beech maple and northern hardwood forests Below is a simple Tree ID Key written by Bill Cook – MSU Extension Office – This is not a dichotomous key, however it is simple and easy to use. It is for Upper Peninsula trees but is a good general key for all of Michigan.
Simple TreeKey ID - Bill Cook MSUE.pdf
Day Two Goal: Students will learn to observe and use plant characteristics for identification, learn to sample and tag plants and sort them into a systematic process for identification and presentation. Materials: Each student will need 15 resealable sandwich bags, 15- 15cm (approx) pieces of string, 30- 5cm X 5cm (approx) paper tags with a hole punched in one corner, notebook and pen/pencil. Activities: Collect homework from previous day and allow students to present their findings and samples to the class. Homework is worth 25 points (5 points for each correctly identified plant). Students will start a new project today that is due on the fourth day of this unit. Students will have to collect a total of 20 plant samples from the school forest, campus or neighborhood area, identify them, list the major identifying characteristics, include a sample or hand drawing of the plant and give a short (2 or 3 paragraphs) description of the ecology of this plant, including
13
habitat, reproduction, soil type preference and occurrence in north America. Each student will present their plant collections on the 4th day of this unit. Power Point or computer presentations are encouraged (5-7 minute presentation – worth 50 points). Day 5 of this unit will include a quiz on 15 to 20 plants identified by the students during their presentations. In order to identify the plants in the forest, students will need to sample them and keep their own record of plants sampled and identified. Each student will receive 15 resealable sandwich bags, 15 pieces of string and 30 small tags with a hole punched in one corner. Explain to students that as they sample a plant they should number that sample and observe the characteristics of that plant. Then, write down sample number or other ID and any characteristics of that plant in your notebook and attach a tag (using string) with sample number to the plant. Take a sample of the plant (leaf, buds, fruit etc.) and put it in one of the bags and enclose a tag with the sample number. This system will allow the student to match up samples when they come back to the area and if they need more information for identification, they can backtrack to the original sample. Point out to students to be careful of taking duplicate samples of the same plant from different areas of the forest. Sampling and tagging will continue until the end of the class period. Homework: Students will work on their identification and ecology projects.
Day Three Goal: Students will demonstrate the use of Internet identification keys for their samples and research the ecology of their plants online. Students will also begin a journaling activity that will help in their development of observation and writing for scientific as well as formal expression of ideas. Materials: Handout 2 for journal activity and access to computer lab for all students. Activities: Take students outdoors and explain to them that part of learning (lifelong!) is taking ownership of the process. Today each student will take ownership of not only the plants they have collected but also their own area within the forest! Handout to students the journal activity (Handout 2). Explain how the process works and allow them to find their own area and start journaling. Allow approximately 30 minutes for the first journal period so they can find an area,

14
start observations and begin their journal process. Each class period for the next two weeks will include a 20-minute time for journaling. This may be extended due to weather or enthusiasm by the students. I have found that students really enjoy this activity and I have had several parents comment on the benefit of this on their daughters! After the journaling time, take students into the computer lab and allow them time to work on their presentations. This is a chance for students to ask questions on any problems they may have with identification or research on the ecology of their plants. Homework: Students will continue work on their presentations.
Day Three - Handout 2 - Journal Experience Activity This activity is designed to introduce each of you to the concept of journaling. Journals are a valuable tool that provides opportunities for you to “connect” with the natural world. Research has shown that the development of environmental understanding depends on spending time in the outdoors, something this activity will allow you to do! Here’s how it works! Site Selection is CRITICAL! Choose a spot in the “Ladywood Forest” that is interesting to you. Get away from other students. You must be at least 15 meters from another person and you must stay in the “loop area” of the forest. Pick a place that gives you lots to look at up close, not far away.

15
Make detailed observations of the natural world around you in your journal. This is your own journal, it is not restricted! You make it anyway you want. Making a connection with the outdoors includes your feelings, thoughts and impressions of the area. This does not have to be a scientific writing! (Hints: Try to keep your observation to areas within a few meters of you! Try to observe the “small” things around you.) We will be making at least 6 twenty minute observations over the next two weeks. (Weather permitting, it may be adjusted.) By the end of the activity, you should be able to recreate a mental picture of your special site. Remember that you are part of this site too! Think creatively! Write; draw; make leaf rubbings; etc. This is your time and your journal! Because the type of journal you are creating is a personal and private connection between you and the outdoors, I will not be collecting them. Instead, you will write an experience paper about your journal that will be handed in at the end of the activity. At this time the due date for the experience paper is September 27, 2005. Your journal experience paper will answer the following questions.
1. Give a brief description of your site. 2. What new things did you discover at the site that you have never noticed outdoors
before? 3. Describe one idea or object in the outdoors that you look at or think about differently now
compared to the beginning of the journal activity. 4. Did you learn the names of any new organisms? 5. What did you like and dislike about the journal activity? 6. Conclusions? Do you think this activity helped you connect with the outdoors? Is this an
activity that should be continued with other classes?
Day Four Goal: Students will continue journal activity with creative writing and observation. Students will present their plant identification and ecology projects indicating a systematic approach to their presentations. Activities: Take students outside for their journal activity. Allow approximately 20 minutes for this activity. The rest of the period will be student presentations. Students may find this redundant with most students presenting the same plants, however, the students are getting visual, auditory, kinesthetic and repetitive modes of learning the identification of plants. This will help for their quiz the next period and lifelong learning. Students will hand in their plant identification projects for grading (10 points per plant for identification, characteristics and ecology =200 total points).

16
Presentations will be graded on accuracy of identification of the 20 plants (20 points), systematic approach to their presentation (10 points), content of material (5 points), creativity (5 points), visual appeal (5 points) and effort (5 points) for a total of 50 points. Homework: Quiz next class period on 15 to 20 plants in our forest, campus or neighborhood.
Day Five Goal: Students will demonstrate their learning experience with plant identification in the field. They will continue their journaling experience and begin an introduction of the next unit dealing with forest measurements. Materials: Pre-surveyed plants for field quiz, student copies of notes for forest measurements (modified from Dr. Andrew Burton MTU, Dept. of Forest Resources and Environmental Sciences, 2005), d-tapes, Biltmore sticks with Merritt hypsometers. Activities: – Finish student presentations if not completed from the previous day. Take students outside for a field quiz using 15 to 20 plant samples (teacher choice for samples and number of plants to be identified). You may decide to grade the quiz immediately as a class or collect the
17
quiz papers and grade later. While outside, take the next 20 minutes and continue with the journal activity. If time permits, introduce students to a discussion on the next unit dealing with forest measurements using stratified sampling plots (1/10 acre) and developing inventory data – overstory, understory and ground cover to determine density, frequency, basal area, volume and biomass. Demonstrate the use of D-tapes, Biltmore sticks and Merritt hypsometer. Pass out notes modified from Dr. Andy Burton (attached) and begin discussion of measurement of forests. The next unit (approximately 3 to 4 block periods will deal with the set-up of sample plots, data collection of measurements and determination of determine density, frequency, basal area, volume and biomass of the forest. Additional units will deal with soils description, habitat suitability, insect identification, pest and disease management and usage parameters for humans, animals and plants. Once these parameters have been completed, students, teachers, administrators and others will be well on the way to developing a comprehensive forest management plan for their school forest which will lead to long term research, student ownership and life long learning and appreciation for natural resources! Day Five – Handout 3 - Forest Measurements - Modified from: Dr. Andrew Burton MTU, Dept. of Forest Resources and Environmental Sciences, 2005
Introduction
A. Importance
- Cannot manage something unless you know what is there
B. Understory vs. Overstory
1. Overstory
- Canopy trees - typically > 4 in (10 cm) diameter
2. Understory

18
- Plants underneath the forest canopy
- Will include seedlings, ground flora, shrubs, small saplings
- Often further divided into a mid-story, understory and ground flora
I. Understory Vegetation
A. Why measure
1. To know about possible regeneration success
2. To identify rare or endangered species
3. To identify ecosystem or habitat type (indicator species)
4. To assess wildlife forage or damage (might be looking for specific species or their distribution)
5. To look for exotic species and assess their extent
B. Characteristics of Interest
1. Density
- Abundance, number of individuals on some unit area
- Seedling per ft2, plants per m2, trees per acre
2. Frequency
- Probability of finding a species in a given sample area
- “Find” indicates that there was at least one individual of the species in the sample area, the number actually occurring does not matter
- Expressed as a %
3. Cover
- Proportion of the ground covered by the vertical projection of the plants above it
- Expressed as a %
4. Biomass
- Measure of the dry weight (mass) per unit area
- g/m2, lbs/ac
C. Typical size of area sampled for density (areas for cover or frequency can be much larger)
1. Herbs and seedlings 1 m x 1 m (3 ft x 3 ft)
2. Woody understory and shrubs 4 m x 4 m (15 ft x 15 ft)
3. Trees 10 m x 10 m or bigger (30 ft x 30 ft)
D. Comparing density and frequency

19
E. Measuring cover
1. Visual estimates
- Graphical examples of percent cover are used as guides
- Cover for each species is estimated by comparison
2. Cover class scales used for visual estimation
- Evenly distributed 5 or 10% intervals (5, 10, 15, 20, etc.)
- Braun-Blanquet and Domin scales (have smaller gradations near the lower end of the scale, which is more representative of the way plants actually occur)
1 m
1 m
Species A
Species B
Species C
Density Frequency
Species D
Species E
Species F1 m
1 m
1 m
1 m
Species ASpecies A
Species BSpecies B
Species CSpecies C
Density Frequency
Species D
Species E
Species F
present
present
present
absent
absent
absent
7 / m2
3 / m2
2 / m2
0 / m2
0 / m2
0 / m2
2431091349
831108236216767256
14212523313441253127432
2371FEDCBAQuadrat
Number per m2 for species
Average Density = 5.5 2.2 0.8 7.72.7 2.5
2431091349
831108236216767256
14212523313441253127432
2371FEDCBAQuadrat
Number per m2 for species
Average Density = 5.5 2.2 0.8 7.72.7 2.5
Frequency = 90% 100% 40% 60% 30% 70%
(number/m2)
Sample

20
- The sum of cover for all species in an area can exceed 100% due to overlap of plants
Value Braun - Blanquet Domin
+ < 1% cover Single individual, no measurable cover
1 1 – 5% 1-2 individuals, no measurable cover
2 6 – 25% Several individuals, but less than 1% cover
3 26 – 50% 1 – 4%
4 51 – 75% 5 – 10%
5 76 – 100% 11-25%
6 26-33%
7 34-50%
8 51-75%
9 76-90%
10 91-100%
II. Overstory Measurements
A. Characteristics of interest
- Individual tree measurements (height, diameter, age)
- Individual tree calculated characteristics (basal area and volume)
- Stand characteristics (stand density, stand volume, site index)
B. Individual tree measurements
1. Diameter
a. Most frequent measurement made by foresters – because of good relationship between diameter and tree volume
b. Dbh = diameter at breast height (most common measurement of diameter)

21
- Breast height = 4.5 feet in US
- 1.3 m in countries that use the metric system (1.3 m = 4.3 ft)
c. Where to measure DBH for irregular trees
d. Instruments for measuring dbh
i. Calipers
ii. Diameter tapes (D-tapes)
- Steel tape, with graduations in inches (or centimeters) of diameter
- Tape actually measures circumference, tape gradations are 3.14 inches (or 3.14 cm) apart since the circumference of a circle is 3.14 x diameter
- Assumes that tree’s cross section is a circle
iii. Biltmore stick
- Wooden stick with graduations that allow direct measurement of dbh
- Not as accurate

22
align zero end of stick with one side of treealign zero end of stick with one side of tree
read diameter on line of sight to other side of the tree, use one eye only
read diameter on line of sight to other side of the tree, use one eye only
Biltmore stick placed against treeBiltmore stick placed against tree
Biltmore sticks are normally calibrated for a 25” reach, but can be calibrated for any reach using the equation:
DAAD+
=2
graduationdbh
Where A is the person’s reach (distance from eye to stick) and D is the tree’s diameter
e. Tree diameter classes (diameters are often measured to nearest 0.1 inch, but measurements are often grouped into diameter classes for summarizing)
- Diameter classes are typically 1” or 2” wide
- If a diameter is midway between two classes, tree is placed in the smaller class
- For 1” classes, the 12” class runs from 11.6” to 12.5”
- For 2” classes, the 20” class would run from 19.1” to 21.0”
2. Height
a. Why measured
- For use in calculating tree volume or biomass
- As an index of site quality
b. Types of heights
- Total height – ground to top of tree (used in biomass equations)
- Merchantable height – ground to the top of the usable portion of the tree beyond which tree diameter is too small (used to determine timber volume)
c. Measured used triangles

23
- Similar triangles (geometry)
ab/ac=de/fg
If you know ab, ac, and de, you can solve for the height of the tree (fg)
- Tangents of right triangles (trigonometry)
tan(α) = h/d
If you know the angle and the distance from the tree, you can solve for height d. Instruments
i. Clinometer
- Uses tangents of right triangles
- Degree scale – tells angle you are looking at, can use to determine percent slope or to calculate height using distance to tree and tangent of the angle
- Percent scale – can read height directly if you are 100’ from the tree
- Topog scale – can read height directly if you are 66’ from the tree
a b c
d
e
f
g
a b c
d
e
f
g
distance = d
α
height = h
distance = d
α
height = h

24
- Actually determines the height (or angle) from your eye to where you are looking, so you must take into account the height from you eye to the top of the tree and from your eye to the bottom of the tree
ii. Merritt hypsometer
- Wooden stick with gradations that allow height to be read directly from a specified distance (usually 50’, 66’, or 100’)
- Used to calculate tree height using similar triangles, usually calibrated for 25” reach (can be built for any reach)
- Easy and cheap, but not as accurate as clinometers
iii. Height poles
- Graduated poles (often telescoping) that are held against the tree and then read from a distance
- Accurate and quick for smaller trees
3. Age
Height = height to top plus height to bottom
c
f
gab/ac = de/fg
bd
ea
arm reach (in) scale reading (in) =distance from tree (ft) tree height (ft)
25
a. Annual rings - count them to get age
b. Increment borer
- Takes a core so you don’t have to cut tree down to count rings
- Want to hit the center (pith) of the tree
c. Age at breast height is not total age
- Must add years it took to get to breast height for true total age (2-4 years, maybe more)
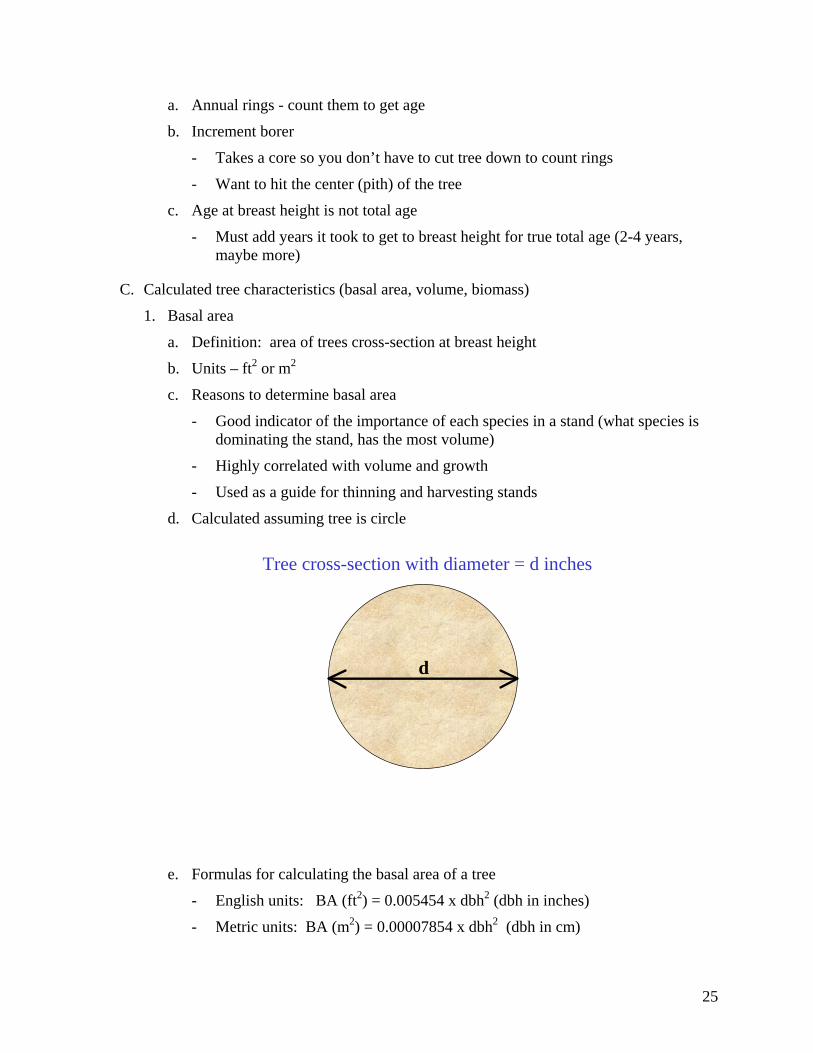
C. Calculated tree characteristics (basal area, volume, biomass)
1. Basal area
a. Definition: area of trees cross-section at breast height
b. Units – ft2 or m2
c. Reasons to determine basal area
- Good indicator of the importance of each species in a stand (what species is dominating the stand, has the most volume)
- Highly correlated with volume and growth
- Used as a guide for thinning and harvesting stands
d. Calculated assuming tree is circle
e. Formulas for calculating the basal area of a tree
- English units: BA (ft2) = 0.005454 x dbh2 (dbh in inches)
- Metric units: BA (m2) = 0.00007854 x dbh2 (dbh in cm)
d
Tree cross-section with diameter = d inches
26
f. Assumes tree is circular in cross section
- Underestimates true cross-sectional area
2. Volume and Biomass of Standing Trees
a. Why calculated
- To estimate amount of merchantable material (pulp, firewood, sawtimber, veneer, etc.)
- To determine carbon and nutrient storage and cycling
b. Types of volume or biomass
i. Cubic foot (ft3 or cu ft) or cubic meter (m3)
- Often for products where whole stem can be used
- Pulp and paper, chip board, fiber board
ii. Board feet
- One board foot is a board 1 ft wide x 1 ft long x 1 inch thick
- MBF = 1000 board feet
- For sawtimber and veneer logs
iii. Cord
- Standard cord = a stack of wood 4 ft high x 8 ft wide x 4 ft deep (128 cu ft)
- Solid cubic foot volume of a cord is less than 128 cu feet (about 2/3)
- Firewood, pulpwood, other low value products
iv. Green weight
v. Dry weight

27
c. Volume and biomass are calculated with equations or tables
d. Data needed to use equations and tables
i. Dbh
ii. Height
- Total height in feet
- Merchantable height in feet, or logs (16’ lengths) and half logs, or pulp sticks (8’ bolts)
Merchantable height = height to an upper stem diameter limit
(Diameter limit for pulp is 4” and for hardwood, sawtimber is 9 or 10”)
e. Examples of volume and biomass equations for sugar maple
dry weight (kg) = 0.1259 D2.52 (D in cm)
dry weight (kg) = 0.06116 + 1.752 D – 0.8988 H + 0.02761 D2H(D in cm, H in m)
gross volume (cu ft) = 1.3746 + 0.002206 D2M(D in inches, M = merchantable height in ft)

28
D. Summarizing tree data at the stand level (trees/ac, BA/ac, volume/ac)
1. Stand density – quantitative measure of the degree of stem crowding in a stand, expressed in terms of either trees per unit area, basal area per unit area, or volume per unit area
a. Trees per acre (or trees per hectare in metric system)
For fixed area plots: # trees per plot Trees/ac = ---------------------- plot size in acres
b. Basal area per acre (ft2/ac) (in the metric system basal area per hectare in m2/ha is used)
For fixed area plots: BA per plot in ft2
BA/ac = ---------------------- plot size in acres
c. Volume per acre (cords/ac or bd ft/ac) (in metric system, volume per hectare in m3/ha is used)
For fixed area plots: bd ft per plot
bd ft/ac = ---------------------- plot size in acres
29
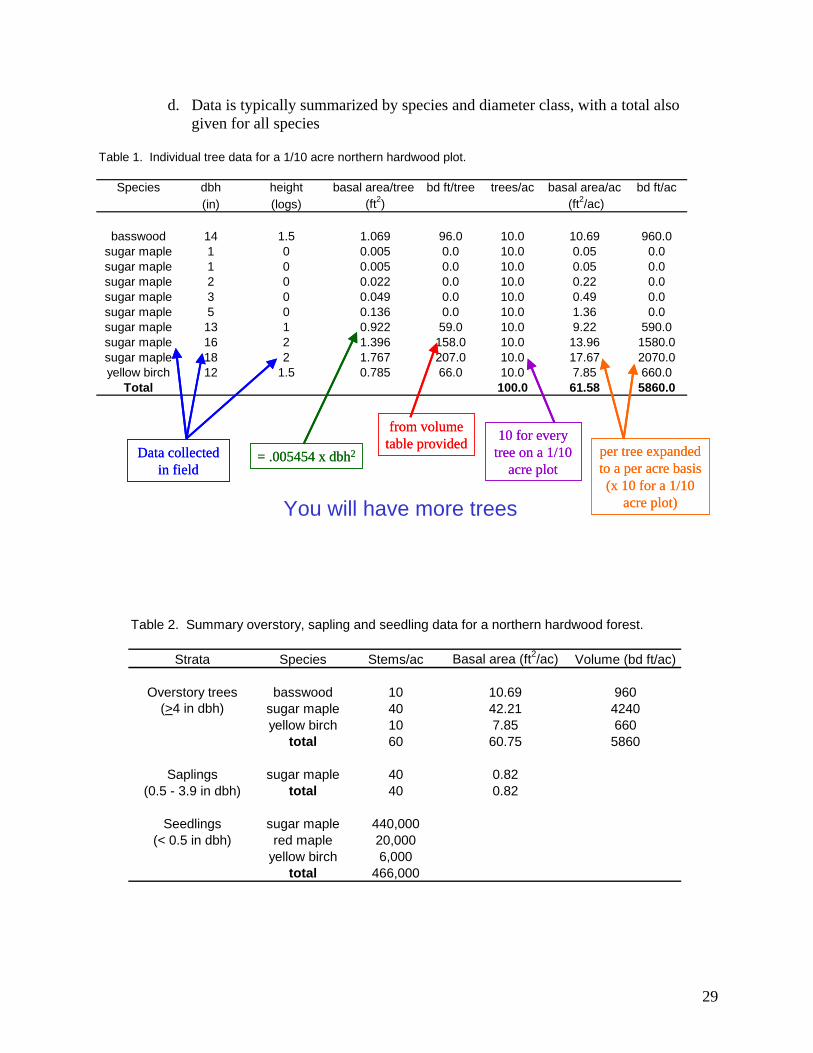
d. Data is typically summarized by species and diameter class, with a total also given for all species
Table 1. Individual tree data for a 1/10 acre northern hardwood plot.
Species dbh height basal area/tree bd ft/tree trees/ac basal area/ac bd ft/ac(in) (logs) (ft2) (ft2/ac)
basswood 14 1.5 1.069 96.0 10.0 10.69 960.0sugar maple 1 0 0.005 0.0 10.0 0.05 0.0sugar maple 1 0 0.005 0.0 10.0 0.05 0.0sugar maple 2 0 0.022 0.0 10.0 0.22 0.0sugar maple 3 0 0.049 0.0 10.0 0.49 0.0sugar maple 5 0 0.136 0.0 10.0 1.36 0.0sugar maple 13 1 0.922 59.0 10.0 9.22 590.0sugar maple 16 2 1.396 158.0 10.0 13.96 1580.0sugar maple 18 2 1.767 207.0 10.0 17.67 2070.0yellow birch 12 1.5 0.785 66.0 10.0 7.85 660.0
Total 100.0 61.58 5860.0
You will have more trees
Data collected in field
Data collected in field
= .005454 x dbh2= .005454 x dbh2
from volume table providedfrom volume
table provided 10 for every tree on a 1/10
acre plot
10 for every tree on a 1/10
acre plotper tree expanded to a per acre basis (x 10 for a 1/10
acre plot)
per tree expanded to a per acre basis (x 10 for a 1/10
acre plot)
Table 2. Summary overstory, sapling and seedling data for a northern hardwood forest.
Strata Species Stems/ac Basal area (ft2/ac) Volume (bd ft/ac)
Overstory trees basswood 10 10.69 960(>4 in dbh) sugar maple 40 42.21 4240
yellow birch 10 7.85 660total 60 60.75 5860
Saplings sugar maple 40 0.82(0.5 - 3.9 in dbh) total 40 0.82
Seedlings sugar maple 440,000(< 0.5 in dbh) red maple 20,000
yellow birch 6,000total 466,000

30
IV. Plot sampling
A. Plot shape
- Plots are usually circular, but can be rectangular, square or triangular
B. Plot size
- In U.S., 1/10, 1/5, and 1/4 acre plots common
- Smaller plots are used for pole timber and sapling stands
- Concentric circles are sometimes used to measure different sized trees at one location (1/5 acre for sawtimber, 1/10 acre for pulpwood trees, 1/1000 acre for regeneration)
C. Information recorded
- Species
- dbh – often by 1” or 2” diameter classes
- Merchantable height – often by logs or pulp sticks
- Tree class or grade

31
V. Sampling Designs (how do we place our sample points in order to come up with a good inventory)
A. Common sampling designs
1. Systematic sampling – sample plots are spaced at uniform intervals across a tract of land
2. Simple random sampling – every possible combination of sample units has an equal and independent chance of being selected
3. Stratified sampling – a heterogeneous area is subdivided into smaller areas, each of which is fairly homogenous. Each of the smaller areas (or strata) is sampled
4. Why stratify? An area contains several forest stands that differ in:
a. Species composition
b. Age
c. Past management
d. Productivity (changes in soils or topography can change productivity greatly)

32
5. Advantages of stratified sampling
a. Provides more precise information about each separate ecosystem or stand within a larger area
b. The different strata may be managed differently, making it administratively more efficient to inventory by strata
Stratifying gives us a more accurate picture of what is there and allows us to manage it better
B. How many sample plots? - Each group will only do one this afternoon
- To adequately sample a forested property of 40 acres you typically would want 20 to 40 sample plots
- For forests with high variability from location to location or many strata, even more plots would be desired
aspen/white birch
youngbeechstand