Embed Size (px)
Citation preview

T A B L E O F C O N T E N T SSCENARIO BOOK
GMT Games, LLC • P.O. Box 1308, Hanford, CA 93232-1308 • www.GMTGames.com
Introduction to 16Dec44 Scenarios .......................................2German 7th Army Scenarios (70.0-78.0) ..............................2German 5PzA Scenarios (80.0-88.0) .....................................9German 6PzA Scenarios (90.0-99.0) ...................................15The Campaign Game (100.0 to 109.0) ................................25Scenario Setup Instructions ................................................32Allied At Start Units West Setup Chart .............................33Monschau Setup Map - Chart ............................................34Losheim Setup Map - German Chart ................................36Losheim Setup Map - Allied Chart.....................................39Schnee Eifel Setup Map - Chart .........................................40
Our River Setup Map - German Chart .............................42Our Setup Map - German Rear and Allied Chart ............45Vianden Setup Map - Chart ................................................46Sauer River Setup Map - Chart ..........................................49Introduction to End Game Scenarios .................................50Race to the Meuse (110.0-114.0) ..........................................50Battle of Bastogne (120.0-127.0) .........................................52US 3 Corps Offensive (130.0-136.0) ....................................54The St.Vith Goose Egg (140.0-145.0) ..................................56The Salm and the Ourthe (150.0-154.0) .............................57End Game Campaign (160.0-164.0) ...................................60

A Time for Trumpets ~ Scenario Book2
© 2020 GMT Games, LLC
Introduction to 16Dec44 ScenariosOn 16Dec44, the Germans launched their last gasp offensive in the west in an attempt to stave off utter defeat in WWII. At the time, Allied leaders believed it was impossible for the Germans to supply and conduct a major offensive. In fact, seven timely intelligence reports from units in the front line warning that a major offensive was coming were dismissed or ignored. The Allies had become reliant upon Ultra and the fact that there were no obvious Ultra disclosures for a major offensive, resulted in the assessment that there would not be a major offensive.The scenario rules will explain why units must follow certain rules of movement and deployment, despite the fact that the war-gamer wants or needs to send those units somewhere else. That is because both opponents knew little of what was happening on the other side of the front line, even after they had been fighting for ten days. This environment was designed into the game, such that movements and reactions are reasonably based upon what the commanders knew at the time, and not what a wargamer knows as history, and not what a wargamer knows with his perfect intelligence of the situation on the map. On the other hand, if an enemy wargamer is significantly outperforming his historical counterpart, there will be triggers that will allow his opponent to make decisions to alter the deployment orders of his historical counterparts.It should also be noted, that while Allied Intelligence personnel were dismissive of the evidence before them, the Germans at the front were also operationally devoid of knowledge of the Ameri-cans opposing them due to Hitler directives. German knowledge of American dispositions was very limited on 16 Dec 44, because Hitler ordered that front line units must not conduct recon patrols after 30 Nov 44. The 26VG ignored this order and it is reflected in the game. In addition, from 1-15 Dec 44, German artillery units were not allowed to register even a single gun per battalion, lest the Allies surmise that they were using the Durch Bruchmuller artillery method in preparation for a large offensive.
German 7th Army Scenarios: 70.0 - 78.070.0 Briefing for German 7A Scenarios 71.0 The Introductory German 7A Scenario72.0 The 7-Turn German 7A Scenario73.0 The 11-Turn German 7A Scenario74.0 Scenario Rules for the German 7A 75.0 German 7A Bridge Construction 76.0 Scenario Rules for the US vs the 7A77.0 Allied Areas of Operation (AO)78.0 Random Events for the German 7A
70.0 Briefing for German 7A Scenarios70.1 German 7A ObjectivesThe primary objective of the German 7th Army was to provide flank protection for the 5th Panzer Army. Hitler’s basic objectives for the 7A were Luxembourg City, Arlon and Neufchateau, which were unrealistic for the forces available. Generals Model and Von Manteuffel recognized the fact that the 7A would not get as far as Hitler wished and they assigned more reasonable objectives. The LXXX Corps objectives were to emplace a bridge across the Sure
for each of the 212VG and 276VG Divisions, take the high ground from the Americans that allowed American artillery to maintain superiority south of the Sauer, and to form a defensive line from Mompach-Herborn-Altrier west to Mersch. The LXXXV Corps objectives were to capture Wiltz and Martelange and to form a defensive line along the Attert River from Bissen to Bettborn and thence to the west in order to protect the southern flank of the 5th Panzer Army.
70.2 Surprise on 16 DecWhen applicable, German attacks receive a column shift right for surprise on the 16MO turn.a. The 28ID is surprised on 16MO, unless superseded by a random
event rolled for the German LXXXV Corps.b. The 9AD is surprised on 16MO. The 9AD had no significant
intelligence to warn them of the coming offensive.c. The 4ID is not surprised on 16MO; see section 76.5.1
70.3 German 7A Bridge BuildingOn Dec 16-17, American artillery repeatedly disrupted, damaged or destroyed German 7A bridge work. This resulted in acute shortages of supply and combat support for the German VG Divisions south of the Sauer River and prevented the 212 and 276 Volksgrenadier Divisions from over-running the vastly outnumbered Americans. Random Events are included that reflect the bridge building prob-lems experienced by the Germans early in the offensive. Eventually, the Germans built bridges in more secluded or distant locations to protect them from American artillery. Capturing certain villages on high ground will reduce the chance that American artillery will hinder the work of German Engineers attempting to bridge the Sauer and Our Rivers.
70.4 The Swartz Ernz GorgeThe German 276 VG Division infiltration into the American rear is a major historical event that is reproduced in this game. One Regiment of the weakest German Volksgrenadier Division in the Ardennes infiltrated into the natural fortress of the Swartz Ernz Gorge at Mullerthal and was able to hold off elements of three US Divisions for a week.
70.5 American ReinforcementsThe swift American reaction to the attack of the German 7th Army was due to the proximity of the attack to Luxembourg City, which was an important U.S. command and supply hub. The 10CCA and 10CCR were sent from Thionville due north on 17 Dec when it was realized that the German Offensive was not a spoiling attack. The 10CCB was sent northwest to Arlon and thence to Bastogne to shield that important road junction from the 5th Panzer Army.
70.6 The OOB and the RulesThe most significant components of the scenario rules are those concerning the Order of Battle and Order of Appearance. These are the sections titled “Scenario Rules for the German 7A” and “Scenario Rules for the Allies vs the 7A.” Note that these rules are provided only when the information on the Setup and Reinforce-ment Charts is incomplete. Players should refer to them as the game progresses, so that historical events and circumstances may be incorporated into the contest.

A Time for Trumpets ~ Scenario Book 3
© 2020 GMT Games, LLC
71.0 The Introductory German 7A Scenario71.1 TimeframeThe scenario begins with the German 16MO turn and ends with the US 17EV turn.
71.2 Maps RequiredThe southeast map is required initially and the south central map is required on later turns.
71.3 German Participantsa. Units of the 7A depicted on the Setup Chart Sauer River with
its corresponding Setup Map. b. Units of the 7A depicted on the Setup Chart Vianden with its
corresponding Setup Map. c. The German LIII Corps includes two infantry battalions that are
attached to the 212VG Division.d. The 7A units that arrive in accordance with German Reinforce-
ment Chart 1.
71.4 American Participants a. Allied units depicted on the Setup Chart Sauer River with its
corresponding Setup Map. b. Allied units depicted on the Setup Chart Vianden with its cor-
responding Setup Map. c. The two 28ID/110 Companies on the Army Boundary in 7348
and 7547 will remain uninvolved in those hexes, if they are not attacked. If they are attacked, the US player is free to move and deploy them in the scenario.
d. Eight units on the “Setup Chart Allied At-Start Units West” that begin in Bastogne (3), Wiltz (4) and Martelange (1).
e. The units that arrive at the south edge in accordance with Allied Reinforcement Chart 1.
71.5 Applicable Scenario Specific Rulesa. 74.0 Scenario Rules for the German 7th Army.b. 75.0 German 7A Bridge Construction Progress.c. 76.0 Scenario Rules for Allies vs the 7th Army.d. 77.0 Allied Areas of Operations (AO).e. 78.0 Not used in this scenario are Random Events.
71.6 Victory Conditions 71.6.1 American VictoryThe US wins by preventing the Germans from attaining their vic-tory conditions.
71.6.2 German VictoryGerman combat units in any status occupy the following hexes after the US 17EV turn: Bourscheid Ettelbruck Schrondweiler Medernach Christnach Mullerthal Scheidgen Echternach Osweiler Mompach
72.0 The 7-Turn German 7A Scenario72.1 TimeframeThe scenario begins with the German 16MO turn and ends with the US 17EV turn.
72.2 Maps RequiredThe southeast map is required initially and the south central map is required on later turns.
72.3 German Participantsa. Units of the 7A depicted on the Setup Chart Sauer River with
its corresponding Setup Map. b. Units of the 7A depicted on the Setup Chart Vianden with its
corresponding Setup Map. c. The German LIII Corps includes two infantry battalions that are
attached to the 212VG Division.d. The 7A units that arrive in accordance with German Reinforce-
ment Chart 1.
72.4 American Participants a. Allied units depicted on the Setup Chart Sauer River with its
corresponding Setup Map. b. Allied units depicted on the Setup Chart Vianden with its cor-
responding Setup Map. c. The two 28ID/110 Companies on the Army Boundary in 7348
and 7547 will remain uninvolved in those hexes, if they are not attacked. If they are attacked, the US player is free to move and deploy them in the scenario.
d. Eight units on the “Setup Chart Allied At-Start Units West” that begin in Bastogne (3), Wiltz (4) and Martelange (1).
e. The units that arrive at the south edge in accordance with Allied Reinforcement Chart 1.
72.5 Applicable Scenario Specific Rulesa. 74.0 Scenario Rules for the German 7th Army.b. 75.0 German 7A Bridge Construction Progress.c. 76.0 Scenario Rules for Allies vs the 7th Army.d. 77.0 Allied Areas of Operations (AO).e. 78.0 Random Events for the German 7A.
72.6 Victory Conditions 72.6.1 American VictoryThe US wins by preventing the Germans from attaining their vic-tory conditions.
72.6.2 German VictoryGerman combat units in any status occupy the following hexes after the US 17EV turn: Bourscheid Ettelbruck Schrondweiler Medernach Christnach Mullerthal Scheidgen Echternach Osweiler Mompach

A Time for Trumpets ~ Scenario Book4
© 2020 GMT Games, LLC
73.0 The 11-Turn German 7A Scenario73.1 TimeframeThe scenario begins with the German 16MO turn and ends with the US 18EV turn.
73.2 Maps RequiredThe southeast map is required initially and the south central map is required on later turns.
73.3 German Participantsa. Units of the 7A depicted on the Setup Chart Sauer River with
its corresponding Setup Map.b. Units of the 7A depicted on the Setup Chart Vianden with its
corresponding Setup Map.c. The German LIII Corps includes two infantry battalions that are
attached to the 212VG Division.d. The 7A units that arrive in accordance with German Reinforce-
ment Chart 1.
73.4 American Participantsa. Allied units depicted on the Setup Chart Sauer River with its
corresponding Setup Map. b. Allied units depicted on the Setup Chart Vianden with its cor-
responding Setup Map. c. The two 28ID/110 Companies on the Army Boundary in 7348
and 7547 will remain uninvolved in those hexes, if they are not attacked. If they are attacked, the US player is free to move and deploy them in the scenario. This rule is not applicable for the Campaign Game.
d. Eight units on the “Setup Chart Allied At-Start Units West” that begin in Bastogne (3), Wiltz (4) and Martelange (1).
e. The units that arrive at the south edge in accordance with Al-lied Reinforcement Charts 1 and 2; but not the 82AB, which is traveling north to Werbomont.
73.5 Applicable Scenario Specific Rulesa. 74.0 Scenario Rules for the German 7th Army.b. 75.0 German 7A Bridge Construction Progress.c. 76.0 Scenario Rules for Allies vs the 7th Army.d. 77.0 Allied Areas of Operations (AO).e. 78.0 Random Events for the German 7A.
73.6 Victory Conditions73.6.1 American Victory. The US wins by preventing the Germans from attaining their vic-tory conditions.
73.6.2 German Marginal VictoryThe Germans attain a Marginal Victory by fulfilling the following objectives at the end of the US 18EV turn: a. A bridge must be operational at Echternach or Rosport.b. A bridge must be operational at Wallendorf or Bollendorf.
c. German combat units in any status occupy the following hexes after the US 18EV turn:
Bourscheid Ettelbruck Schrondweiler Larochette Heffingen Mullerthal Consdorf Echternach Osweiler Mompach
73.6.3 German Substantial VictoryThe Germans attain a Substantial Victory at the end of the US 18EV turn by fulfilling the objectives listed in 73.6.2 above and by also occupying the following towns and villages with German combat units in any status at the end of the US 18EV turn. Mersch Vichten Eschdorf Buderscheid Boevange-Attert Grosbous Esch-sur-Sure Wiltz
73.6.4 German Substantial Victory The Germans attain a Substantial Victory at the end of the German 18MO turn, if a German combat unit in any status occupies a hex on the road from Attert to Bastogne. Such an event would likely allow the Germans to reach Bastogne before the 101AB.
74.0 Scenario Rules for the German 7AIf there is no entry below with respect to the participating German formations or individual units, then the instructions on the appli-cable Setup Chart or Reinforcement Chart are sufficient.
74.1 German Comm and Supplya. All German units are In Comm and In Supply on the 16MO,
16AF and 16EV turns. b. Starting on the 17PD turn, Comm and Supply is traced in ac-
cordance with the rules.
74.2 7th Army Echelona. On 16MO, only the 7A HQ may move may move in the Move-
ment Segment.b. All units of the 7A Echelon that are not immobile (units with
0MF) are free to move after the 16MO turn.c. The 7A artillery in 8952, 9052 and 9153 may support any unit
in the 7A on any turn as long as they are not mobilized.d. If the 7A artillery units in (c) above are mobilized with captured
trucks, they must rest when the 7A Echelon rests.e. Many 7A Engineers are involved in bridge construction.
74.3 LXXX Corps 74.3.1 LXXX Corps Echelona. On 16MO, only the LXXX Corps HQ may move in the Move-
ment Segment. Priority is given to Division assets.b. The 8 NW Brigade and the 408 VAK may only fire in support
of LXXX Corps unitsc. The 7A/Trng Eng Battalion is placing the 965 “B Class” Bridge
at Echternach.1) The 7A/965 Bridge can never be moved.2) Bridge work at Echternach is hampered by US artillery; a
“Begin Bridge” marker may not be placed on 16MO.3) The 7A/Trng Engineers may not move until the 965 bridge
is completed or destroyed.d. The 7A/677 Eng and 276VG Eng are placing the 961 “B Class”
Bridge at Wallendorf into the Our-Sure Triangle.

A Time for Trumpets ~ Scenario Book 5
© 2020 GMT Games, LLC
1) The 7A/961 Bridge can never be moved.2) Bridge work at Wallendorf is hampered by US artillery; a
“Begin Bridge” marker may not be placed on 16MO.3) The 7A/677 Eng and 276VG Engineers may not move until
the 961 bridge is completed or destroyed.74.3.2 212VG Division a. On 16MO, only the fusiliers and the four battalions of 212/320
and 212/423 may move in the Movement Segment.b. The two battalions of 212/316 in Reserve are free to move during
the Exploitation Segment of the 16MO turn.c. The 212VG Engineers are preparing a ferry at Weilerbach (9058).
They cannot move until the 17PD turn. The ferry becomes op-erational on the 17PD turn as a Random Event only.
74.3.3 276VG Divisiona. Rules for the 16MO and 16AF turns:
1) On 16MO, only the fusiliers and the four Battalions of 276/986 and 276/988 may move in the Movement Segment.
2) See 74.3.3b below. On 16MO and 16AF, the two battalions of the 276/987 in Reserve at 8755 infiltrate the Swartz Ernz Gorge during the Exploitation Segment. These two units may not move freely until the turn after they infiltrate.
b. The Swartz Ernz Gorge: The German 276 VG Division infiltra-tion into the American rear is a significant historical event that is reflected in this effort. One Regiment of the weakest German Volksgrenadier Division in the Ardennes infiltrated into the natural fortress of the Swartz Ernz Gorge at Mullerthal and was able to hold off elements of three US Divisions for a week. 1) During the 16MO Exploitation Segment move a battalion
of 276/987 from Bollendorf to Mullerthal. German units in Mullerthal cannot be attacked until the 17PD turn, and only then, if US units occupy 8660 and 8561. If attacked, they cannot be surrounded and any retreat result sends them back down the Gorge to 8757.
2) During the 16AF Exploitation Segment move the other bat-talion of 276/987 from Bollendorf to any hex adjacent to the Swartz Ernz Gorge. If a US unit occupies the hex, it is evicted to an adjacent hex; German player’s choice. German units in the Gorge, other than in Mullerthal, may only be attacked if the Allies occupy Mullerthal.
74.4 LXXXV Corps 74.4.1 LXXXV Corps Echelona. On 16MO, only the LXXXV Corps HQ may move in the Move-
ment Segment. Priority is given to Division assets.b. The 18 NW Brigade and the 406 VAK may only fire in support
of LXXXV Corps unitsc. The 7A/47/I Eng is placing the only 7A Tank Bridge, 7A/974,
at Roth, across the Our River into Vianden.1) The 7A/974 Bridge can never be moved away from Vianden.2) The river banks at Roth need extra preparation. A “Begin
Bridge” marker may not be placed on 16MO.3) The 7A/47/I Engineers may not move until the 974 bridge
is completed.d. The 7A/47/II Eng is placing the 964 “B Class” Bridge at the
Gentigen Ford (8253).1) The 7A/964 Bridge and the 7A/47(II) Engineers may not
move on the 16MO turn.
2) The river banks at Gentigen need extra preparation. A “Begin Bridge” marker may not be placed on 16MO.
3) The 7A/964 Bridge is not critical, because the J Bridge at Roth eventually became the primary bridge for the 7A.
4) On the 16AF turn, construction at the Gentigen Ford may be cancelled and the bridge and engineers may move.
74.4.2 352VG Divisiona. On 16MO, only the fusiliers and the four battalions of 352/915
and 352/916 may move in the Movement Segment.b. The two battalions of 352/914 in Reserve are free to move during
the Exploitation Segment of the 16MO turn.c. The 352VG Engineers are assisting crossing operations on the
16MO turn. They cannot move until the 16AF turn.
74.4.3 5FJ Division a. On 16MO, only the six battalions of 5FJ/14 and 5FJ/15 may
move in the Movement Segment.b. The three battalions of 5FJ/13 in Reserve are free to move during
the Exploitation Segment of the 16MO turn.c. The 5FJ Engineers are assisting crossing operations on the 16MO
turn. They cannot move until the 16AF turn.d. The 5FJ Division has a Command Post, which may deployed
when needed to extend Comm Path. The 5FJ becomes respon-sible for a great deal of territory as time passes. The CP may trace Comm to the 5FJ HQ or the LXXXV HQ.
74.5 LIII Corps a. For the 7-turn and 11-turn scenarios, there is minimal participa-
tion by units of the LIII Corps.b. At the start of the offensive, the LIII Corps consists of two units
in the SE corner, 999 Infantry and 44MG. c. The two units above attached to the 212VG Division until the
20PD turn, when the LIII Corps begins to arrive.
74.6 German Arty Formation Substitutes See Rule Section 44.0. If the substitutes are used, they are placed in the hexes listed on the Artillery Park Charts.
75.0 German 7A Bridge Construction Note that “Bridge Damage or Improvement” applies to Random Events that are not used in the Introductory Scenario (71.0).a. The bridge at Vianden must be built. b. A bridge at Echternach or Rosport must be built. Bridges need
not be built at both locations.c. A bridge at Wallendorf or Bollendorf must be built. Bridges
need not be built at both locations.d. The bridge at Gentigen Ford may be moved and built elsewhere.e. Bridges are critical in the 7A area, or units across the Our and
Sauer Rivers will be Out of Supply on 17Dec and later.f. On 17Dec-18Dec, unfinished bridges may require “Bridge Halt”
markers due to “Resting” Status; see 21.1L and 21.1m.
75.1 German 7A Bridge Construction Procedure - 16Deca. The Germans may not place “Begin Bridge” markers on 7A
Bridges until the 16AF turn.b. There are no German Bridge Engineers in the 7A on 16Dec, so
construction will require four turns, if not interrupted.

A Time for Trumpets ~ Scenario Book6
© 2020 GMT Games, LLC
c. In order to reflect history, Random Events may affect bridge construction across the Our and the Sauer.
d. The Introductory German 7A Scenario (71.0) does not include the random event aspects of 75.2 through 75.5 below.
e. All other 7A Scenarios incorporate the aspects of the special bridge progress rules of 75.2 through 75.5 below.
75.2 Construction Progress - No Bridge Damaged or Improved MarkerSee German Bridge Construction Segment (section 21.1-21.2) and the Construction Progress Phase (section 60.3.1). a. 16AF Bridge Construction Segment: Place a “Begin Bridge”
marker on the German bridge; section 21.2.1.b. 16AF Bridge Construction Progress Phase: Trade the “Begin
Bridge” for “Construction 1” marker; section 60.3.1.c. Next Bridge Construction Segment: if in compliance with sec-
tion 21.1, the “Construction 1” marker is retained.d. Next Bridge Construction Progress Phase: replace a “Construc-
tion 1” with a “Construction 2”; section 60.3.1.e. Next Bridge Construction Segment: if in compliance with sec-
tion 21.1, the “Construction 2” marker is retained.f. Next Bridge Construction Progress Phase: replace a “Construc-
tion “2” with a “Construction 3”; section 60.3.1.g. Next Bridge Construction Segment: if in compliance with sec-
tion 21.1, the “Construction 3” marker is retained.h. Next Bridge Construction Progress Phase: replace a “Construc-
tion “3” with a “Construction 4”; section 60.3.1.i. Immediately upon placement of a “Construction 4” marker, the
bridge is completed; see 60.3.1h.
75.3 Bridge Construction is Damaged by Random Eventa. If no bridge construction is in progress or if the bridge has been
completed, then the Random Event is irrelevant.b. If there is a bridge under construction at the site of the Random
Event, place a “Bridge Damaged” marker.c. At the start of the Bridge Construction Progress Phase (section
60.3.1), if a bridge has a “Begin Bridge” marker and also a “Bridge Damaged” marker, both markers are removed. Note that a “Bridge Halt” marker is irrelevant in this situation.
d. At the start of the Bridge Construction Progress Phase (section 60.3.1), if a bridge has a Construction 1, 2, or 3 marker and also a “Bridge Damaged” marker, progress is resolved is as follows:1) If there is a “Construction 1” marker, it remains at Construc-
tion 1. Remove the “Bridge Damaged” marker. 2) If there is a “Construction 2” marker, it remains at Construc-
tion 2. Remove the “Bridge Damaged” marker. 3) If there is a “Construction 3” marker, it remains at Construc-
tion 3. Remove the “Bridge Damaged” marker. 4) Note that a “Bridge Halt” is irrelevant in this situation.
75.4 Bridge Construction is Improved by Random Eventa. If no bridge construction is in progress or if the bridge has been
completed, then the Random Event is irrelevant.b. If there is a bridge under construction at the site of the Random
Event, place a “Bridge Improved” marker.c. At the start of the Bridge Construction Progress Phase (section
60.3.1), if a bridge has a “Begin Bridge” marker and also a “Bridge Improved” marker, replace the “Begin Bridge” marker
with a “Construction 2,” and remove the “Bridge Improved” marker. Note that a “Bridge Halt” marker is irrelevant in this situation.
d. At the start of the Bridge Construction Progress Phase (section 60.3.1), if a bridge has a Construction 1, 2, or 3 marker and also a “Bridge Improved” marker, progress is resolved is as follows:1) If there is a “Construction 1” marker, it becomes “Construc-
tion 3.” Remove the “Bridge Improved” marker. 2) If there is a “Construction 2” or “3” marker, it becomes
“Construction 4.” Remove the “Bridge Improved” marker.3) Immediately upon placement of a “Construction 4” marker,
the bridge is completed; see 60.3.1h.4) Note that a “Bridge Halt” is irrelevant in this situation.
76.0 Scenario Rules for the US vs the 7AIf there is no entry below with respect to the participating Allied formations or individual units, then the instructions on the appli-cable Setup Chart or Reinforcement Chart are sufficient.
76.1 Allied Comm and Supplya. All Allied units are In-Comm on the 16MO turn. Starting on
16AF, Comm is traced in accordance with the rules; however, due to the limits of the 7A scenarios, the 8C HQ is not required to trace a Comm path to the 1A HQ.
b. All Allied units are In Supply on 16MO, 16AF and 16EV.
76.2 American Dispersed Companies -16DecThe formations arrayed against the German 7A in the Ardennes were of two statuses: they were there to recover from losses suffered in the Huertgen Forest or they were inexperienced units placed in a quiet sector to train. There was the green 9CCA along with the battered 28ID/109 and 4ID/12. In this area of the Ardennes, the front was not fully manned. Rather than a full line, the battalions dispersed their companies in long term defensive positions that are termed Forts for this effort. On 16MO, the Germans are faced against such companies in Forts. For example, see Dispersed Companies of the 4ID below.
a. On the front side the units appear as One-Step combat units. b. On the back side the same two units appear as a Fort with combat
factors reflecting the front side.c. The units shown below begin the 16MO turn on their back sides
or flipped sides, in Forts.d. Forts provide two column shifts left when attacked.e. The American player can flip a Dispersed At-Start Company to
the front side and move it normally.f. If combat results in a Step Loss to the defender, then one hit will
eliminate a Fort/unit such as those shown below.g. If combat results in a retreat for the defender, the Fort flips to
the front side and the unit retreats normally.h. After a Dispersed At-Start Company flips to the front side, it
cannot flip back to the Fort side.i. Other US units in a hex with a Fort unit receive the benefits of
the Fort as long as the Fort unit remains in the hex.

A Time for Trumpets ~ Scenario Book 7
© 2020 GMT Games, LLC
76.3 US 1st Army Echelona. The 299 Eng in Martelange is attached to the US 8C. After it is
released, it activates when the 8C HQ activates.b. 1A Echelon Engineers may not move, construct defenses or
place Prep Bridge Demo charges until released.c. The 740 Tank Battalion in Neufchateau is sent north on 18PD.
Remove it from the map on the 18PD turn. This rule is not ap-plicable for the Campaign Game.
76.4 US 8 Corps Echelon a. 8C Echelon units are free to move when a German unit moves
adjacent or as shown on the appropriate Setup Chart.b. The 174 FA Bn in 9262 is “In Comm” with its HQ below the
south edge. It can fire on the 16MO turn. c. The 35 Eng in 7352 may not construct defenses or move until
an enemy unit moves adjacent or until the 17MO Turn. d. The 44 Eng in Wiltz may not construct defenses nor move until
an enemy unit moves adjacent or until the 17AF Turn.e. Throughout the game reinforcements arrive for the 8 Corps as
provided on Allied Reinforcement Charts 1 and 2.
76.5 US 8 Corps - 4th Infantry Division76.5.1 4ID Situation Based upon local intelligence, MG Tubby Barton cancelled leaves and gathered his staff on 15Dec44 to plan for an expected German raid on 16Dec. He ordered that there would be no retreats, if at-tacked. Although he did not deduce the enormity of the offensive, his preparations enabled the 4ID to hold onto to many of its defensive positions with the understanding that they would eventually be relieved, even if surrounded.a. Other than the 174 FA Bn, all units starting east of the Swartz
Ernz belong to the 4ID.b. The 4ID CP in Consdorf is “In Comm” with VIII Corps HQ
elements in Junglinster, SW of Consdorf.c. All American non-artillery units east of the Swartz Ernz are free
to move on 16MO. d. The 4ID is not surprised on 16MO. There is no column shift for
surprise against any hex east of the Swartz Ernz.e. Furthermore, due to the 4ID alert a +1 drm is added for 16MO
attacks against units east of the Swartz Ernz Gorge.f. Units of the 4ID that are not Shocked may “Hold at all Costs,”
choosing to suffer step losses rather than retreat; see 39.7.g. In accordance with rule section 24.5, the 4ID and the 10AD may
stack together and cooperate without penalty.
76.5.2 4ID CP Comm Path a. From 16MO to 21PM, 4ID units can be In-Comm, only if they
start a turn within the 4ID AO; see section 77.0.b. Also, from 16MO to 21PM, instead of tracing a Comm Path
that is within Command Range of the Corps HQ, the 4 ID CP traces Comm Path to any of the eight board-edge, road hexes between Mersch and the Sauer River.
c. The Comm Path may not exceed 10 hexes to any of the eight board-edge, road hexes.
76.5.3 Supply Path to 4ID CPThe 4ID CP must trace its Supply Road off any of the eight board-edge, road hexes between Mersch and the Sauer River. These eight board-edge, road hexes are the only supply sources to which the 4ID CP may trace its supply road.
76.6 US 8 Corps - 9CCA76.6.1 9CCA Situationa. All the units starting between the Blanch Ernz and the Swartz
Ernz belong to the 9AD/CCA.b. The 9CCA is surprised on 16MO. German attacks receive a
column shift right.c. The 9AD HQ in Waldbilliq is “In Comm” with VIII Corps HQ
elements in Junglinster, SW of Consdorf.d. All American non-artillery units between the Blanch Ernz and
the Swartz Ernz are free to move anywhere on 16MO.e. The engineers may construct Improved Positions, Strong Points
or Roadblocks.f. Since 9AD units are Corps Echelon units, (note color within
Nato box), they may stack with any 8C units.g. Also, the 9AD/3 arty can support any unit of the 8 Corps.
76.6.2 9CCA HQ Comm Path Alternativesa. 9AD units can be In-Comm anywhere in the 8C AO; see 77.0.b. The 9CCA HQ may trace a Comm Path that is within Command
Range of the Corps HQ.c. Alternatively, the 9AD HQ may trace a Comm Path to any of
the eight board-edge, road hexes between Mersch and the Sauer River. The Comm Path may not exceed 10 hexes to any of the eight board-edge, road hexes.
76.6.3 Supply PathThe 9CCA HQ may trace Supply Path off any map-edge road in accordance with section 9.1.
76.7 US 8 Corps - 28th Infantry Division76.7.1 28ID Situationa. All the 28ID units starting south of the 5PzA-7A Boundary
belong to the 28ID/109 Regiment.b. The 28ID is surprised on 16MO, unless superseded by a random
event rolled for the German LXXXV Corps.c. The 28ID units are free to move when a German unit moves
adjacent or as indicated on the Vianden Setup Chart.
76.7.2 28/109 CP Comm Path Alternatives a. 28ID units can be In-Comm anywhere in the 8C AO; see 77.0. b. The 28/109 CP may trace a Comm Path that is within Command
Range of the Corps HQ.c. Alternatively, the 28/109 CP may trace a Comm Path to any of
the eight board-edge, road hexes between Mersch and the Sauer River. The Comm Path may not exceed 10 hexes to any of the eight board-edge, road hexes.
76.8.3 Supply PathThe 28/109 CP may trace Supply Path off any map-edge road in accordance with section 9.1.

A Time for Trumpets ~ Scenario Book8
© 2020 GMT Games, LLC
76.8 US 8 Corps - 10CCA and 10CCR76.8.1 10CCA - 10CCR Situation for all Scenariosa. On 17AF and 17EV, the 10CCA and the 10CCR arrive.b. Units of 10CCA or 10CCR that are withheld for later entry may
not arrive west of 8062.c. In accordance with rule section 24.5, the 4ID and the 10AD may
stack together and cooperate without penalty.
76.8.2 10CCA - 10CCR Comm Path a. From 16MO to 21PM, 10AD units can be In-Comm, only if they
start a turn within the 4ID AO; see section 77.0. b. Also, from 17AF to 21PM, instead of tracing a Comm Path that
is within Command Range of the Corps HQ, the 10AD HQ traces Comm Path to any of the eight board-edge, road hexes between Mersch and the Sauer River.
c. The Comm Path may not exceed 10 hexes to any of the eight board-edge, road hexes.
76.8.3 Supply Path to 10AD HQThe 10AD HQ must trace its Supply Road off any of the eight board-edge, road hexes between Mersch and the Sauer River. These eight board-edge, road hexes are the only supply sources to which the 10AD HQ may trace its supply road.
76.9 US 8 Corps - 101st Airborne Divisiona. On 18MO, the 101AB reinforcements arrive at G. Note the MF
reduction at the G entry roads on the south edge. b. They arrive in Strat Move and must enter Mande-St.Etienne or
Sibret before moving elsewhere.c. They must remain in Strat Move until the turn after they enter
or pass through Mande-St.Etienne or Sibret.d. If German units occupy both hexes of Bastogne, or if the Ger-
mans arrive in or adjacent to Mande-St.Etienne or Sibret before the 101AB units, then the 101AB units may deploy anywhere in the 8C Area of Operations.
76.10 US 8 Corps - 10CCB76.10.1 10CCB Situation for 7A Scenariosa. On the 18MO turn, the 10CCB units arrive at Attert must move
directly to Bastogne.b. If a German unit moves next to any unit of the 10CCB before
it reaches Bastogne, the entire 10CCB is immediately released for deployment anywhere in the US 8 Corps Area of Operation.
c. Historical Integrity Rules for the 10CCB in 7A Scenarios - not applicable for the Campaign Game: If no German unit moves next to any unit of the 10CCB before all of the units enter Bas-togne, the movement of 10CCB units after they enter Bastogne is limited as follows:1) Units of Team Cherry, Note 55 on Allied Reinforcement
Chart 2, may not deploy south of the 5PzA-7A Boundary.2) Units of Team Desobry, Note 57 on Allied Reinforcement
Chart 2, may not deploy south of the 5PzA-7A Boundary.3) Units of Team O’Hara, Note 56 on Allied Reinforcement
Chart 2, may deploy south of the 5PzA-7A Boundary.d. In accordance with rule section 24.6, the 10CCB and the 101AB
may stack together and cooperate without penalty.
76.10.2 10CCB Comm Path Alternativesa. 10CCB units can be In-Comm anywhere in the 8C AO; see
section 77.0. b. The 10CCB CP may trace a Comm Path that is within Command
Range of the Corps HQ.c. Alternatively, the 10CCB CP may trace a Comm Path to the 8C
Signal Unit in Bastogne.
76.10.3 Supply PathThe 10CCB CP may trace Supply Path off any map-edge road in accordance with section 9.1.
77.0 Allied Areas of Operation77.1 Allied AO Maps for the 7A Introductory Scenarioa. During the 16MO-17EV timeframe, the 1A AO is the entire
map; therefore, an Army AO map is not required.b. During the 16MO-17EV timeframe, only the US Corps 16EV-
17EV AO map is required; page 25 of the Play-Aid Booklet.c. Note that the 4ID and the 10AD may be In-Comm only within
the 4ID AO depicted.
77.2 Allied AO Maps for the 7-Turn German 7A Scenarioa. During the 16MO-17EV timeframe, the 1A AO is the entire
map; therefore, an Army AO map is not required.b. During the 16MO-17EV timeframe, only the US Corps 16EV-
17EV AO map is required; page 25 of the Play-Aid Booklet.c. Note that the 4ID and the 10AD may be In-Comm only within
the 4ID AO depicted.
77.3 Allied AO Maps for the 11-Turn German 7A Scenarioa. During the 16MO-18EV timeframe, the 1A AO is the entire
map; therefore, an Army AO map is not required.b. During the 16MO-17EV timeframe, the US Corps 16EV-17EV
AO map is required; page 25 of the Play-Aid Booklet.c. During the 18PD-18EV timeframe, the US Corps 18PD-19EV
AO map is required; pages 26-27 of the Play-Aid Booklet.d. Note that the 4ID and the 10AD may be In-Comm only within
the 4ID AO depicted.
78.0 Random Events in the 7A Areaa. The Random Events for the German LXXX Corps are found on
page 2 in the Play-aid Booklet and occur subject to the activation of German LXXX Corps on the 16MO through 18EV turns.
b. The Random Events for the German LXXXV Corps are found on page 3 in the Play-aid Booklet and occur subject to the activation of German LXXXV Corps on the 16MO through 18EV turns.
c. The Random Events for the German LIII Corps are found on page 11 in the Play-aid Booklet and occur subject to the activa-tion of German LIII Corps on the 22PD through 24EV turns.
d. Random Event Basics:1) Random Events can supersede the rules process and alter
reinforcement schedules.2) If a singular event is rolled a second time, the second roll is
of no effect.3) Random Events that include special movement and place-
ment do not affect Resting Status.

A Time for Trumpets ~ Scenario Book 9
© 2020 GMT Games, LLC
German 5th Pz Army Scenarios: 80.0 - 88.080.0 Briefing for German 5PzA Scenarios 81.0 The 7-Turn German 5PzA Scenario82.0 The 11-Turn German 5PzA Scenario83.0 Scenario Rules for the German 5PzA84.0 German 5PzA Bridge Construction 85.0 Scenario Rules for the US vs the 5PzA86.0 Inclusion of the 7A - LXXXV Corps 87.0 Allied Areas of Operation (AO)88.0 Random Events for the German 5PzA
80.0 Briefing for German 5PzA Scenarios80.1 German 5PzA ObjectivesThe German 5th Panzer Army consisted on three attacking Corps. On the left, the XLVII Panzer Corps was to cross the Our River in the vicinity of Dasburg and Gemünd, push west via Clerf, seize the vital road center at Bastogne and then race for the Meuse River crossings south of Namur. In the center, the LVIII Panzer Corps was to cross the Our River on both sides of Ouren, drive west through Houffalize and create a bridgehead over the Meuse River in the neighborhood of Namur and Andenne. On the right a small Corps with two Volksgrenadier Divisions was given the task of capturing St.Vith and then to follow the LVIII Corps to Andenne. The 5th Panzer Army had two armored formations in reserve, the Panzer Lehr Division and the Fuehrer Begleit Brigade, which were to fol-low behind the two Panzer Corps in the lead. After the Meuse River was crossed, the 5th Panzer Army was to push on to Brussels while the 6th Panzer Army on the right pushed on to Antwerp.
80.2 Surprise on 16 DecWhen applicable, German attacks receive a column shift right for surprise on the 16MO turn.
80.2.1 5th Panzer Army Areaa. The 28/110 is surprised on 16MO, unless superseded by a ran-
dom event rolled by the German XLVII Corps. b. The 28/112 is surprised on 16MO, unless superseded by a ran-
dom event rolled by the German LVIII Corps.c. The 106ID is surprised on 16MO, unless superseded by a random
event rolled by the German LXVI Corps.
80.2.2 7th Army Area - LXXXV CorpsThe 28/109 is surprised on 16MO, unless superseded by a random event rolled for the German LXXXV Corps.
80.3 German 5 PzA Bridge BuildingOn 16Dec, German bridge work at Dasburg and Gemund progressed with little opposition and both bridges were operational at dusk. The 2Pz Division Panzers crossed the Our River and eventually eliminated the Bloody 110; however, the self-sacrifice of the Bloody 110 was one factor that permitted the 101AB to win the race to Bastogne. The bridge at Dasburg was originally reserved for the 2nd Panzer Division; however, elements of Panzer Lehr crossed there in addition to some of the 116 Panzer Division. The bridge at Gemund was reserved for 26VG and Panzer Lehr; however, the failure of the 26VG to rapidly clear the Americans off the Skyline Drive caused a traffic jam at the bridge and elements of Lehr were re-routed to Dasburg.
80.4 The German 7A - LXXXV CorpsThe German 5th Panzer Army scenarios always include the LXXXV Corps of the German 7th Army. Although, the 5th Panzer Army and the LXXXV Corps cannot cooperate in any manner, the parallel play of these diverse formations must proceed at the same time in order to somewhat replicate the flow of the battle as it occurred in December 1944.
80.5 American ReinforcementsOn 17-18Dec, reinforcements were sent to the 8 corps from the north and the south to stem the German advance. The 7AD was sent south to the vicinity of Vielsalm on 17Dec. The 10CCB was sent northwest to Arlon and thence to Bastogne to shield that important road hub from the 5th Panzer Army. The decision to detach the 10CCB for use at Bastogne was extremely fortuitous, as Roadblocks established by Teams Desobry, Cherry and O’Hara enabled the 101st Airborne Division to beat the Germans into Bastogne. The 10AD/420 Artillery Battalion accompanied the 10CCB and brought a small convoy of artillery ammunition along to assure its supply would be sufficient in the event of a prolonged deployment.
80.6 The OOB and the RulesThe most significant components of the 5PzA scenario rules are those concerning the Order of Battle and Order of Appearance. These are the sections titled “Scenario Rules for the German 5PzA” and “Scenario Rules for the US vs the 5PzA.” Note that rules are provided only when the information on the Setup and Reinforce-ment Charts is incomplete. Players should refer to them as the game progresses, so that historical events and circumstances may be incorporated into the contest.
81.0 The 7-Turn German 5PzA Scenario81.1 TimeframeThe scenario begins with the German 16MO turn and ends with the US 17EV turn.
81.2 Maps RequiredThe southeast, northeast and south central maps are required.
81.3 German ParticipantsThe German 5th Panzer Army scenarios include the LXXXV Corps of the German 7th Army.
81.3.1 The German 5Pz Armya. Units of the 5PzA depicted on the Setup Chart Schnee Eifel with
its corresponding Setup Map.b. Units of the 5PzA depicted on the Setup Chart Our River - Ger-
mans and the Setup Chart Our River - German Rear Area with the corresponding Setup Map.
c. The 5PzA units that arrive in accordance with German Reinforce-ment Charts 1 and 2.
81.3.2 The 7A - LXXXV Corpsa. German units of the 7A and the LXXXV Corps depicted on
Setup Chart Vianden with its corresponding Setup Map.b. The 7A reinforcements that arrive on the 16MO turn only; see
German Reinforcement Chart 1.

A Time for Trumpets ~ Scenario Book10
© 2020 GMT Games, LLC
81.4 American Participants 81.4.1 At Starta. Allied units depicted on the Setup Chart Schnee Eifel with its
corresponding Setup Map. b. Allied units depicted on the Setup Chart Our River - Americans
with its corresponding Setup Map. c. Allied units depicted on the Setup Chart Vianden with its cor-
responding Setup Map. d. Eight US 8C units depicted on the Setup Chart Losheim identi-
fied by, and subject to, Notes 10, 12 and 14. e. Two 1A Echelon units depicted on the Setup Chart “Allied At-
Start Units West” that begin south of the 5PzA-6PzA Boundary: the 1278 Engineers and 299 Engineers.
f. Nine 5C Echelon units depicted on the Setup Chart “Allied At-Start Units West” that begin on or south of the 5PzA-6PzA Boundary: 8C HQ, Middleton, 14/32 Cav, Cota, 28ID HQ, 635AW, 28ID/Recon, 158 Engineers and 44 Engineers.
81.4.2 Allied Reinforcement Chart 1a. Certain US 8C units that arrive at the north edge: the 8C/58
Arty; and the 7AD units per Notes 43, 44 and 45. b. None of the US units that arrive at the south edge.
81.5 Applicable Scenario Specific Rulesa. 83.0 Scenario rules for the German 5PzA.b. 84.0 German 5PzA Bridge Construction Progress.c. 85.0 Scenario rules for the US vs the 5PzAd. 86.0 Inclusion of the 7A-LXXXV Corps e. 87.0 Allied Areas of Operations (AO)f. 88.0 German 5PzA Random Events.
81.6 Victory Conditions 81.6.1 American VictoryThe US wins by preventing the Germans from attaining their vic-tory conditions.
81.6.2 German VictoryGerman combat units in any status occupy the following hexes and bridgeheads after the US 17EV turn: Schrondweiler Wilwerwiltz Ouren Ettelbruck Drauffelt Berg Reuland Bourscheid Clervaux Steinebruck Kautenbach Weiswampach Schonberg
82.0 The 11-Turn German 5PzA Scenario82.1 TimeframeThe scenario begins with the German 16MO turn and ends with the US 18EV turn.
82.2 Maps RequiredThe southeast, northeast and south central maps are required.
82.3 German ParticipantsThe German 5th Panzer Army scenarios include the LXXXV Corps of the German 7th Army.
82.3.1 The German 5Pz Armya. Units of the 5PzA depicted on the Setup Chart Schnee Eifel with
its corresponding Setup Map. b. Units of the 5PzA depicted on the Setup Chart Our River - Ger-
mans and the Setup Chart Our River - German Rear Area with the corresponding Our River Setup Map.
c. The 5PzA units that arrive in accordance with German Reinforce-ment Charts 1 and 2.
82.3.2 The 7A - LXXXV Corpsa. Units of the 7A and the LXXXV Corps depicted on Setup Chart
Vianden with its corresponding Setup Map.b. The 7A units that arrive on the 16MO turn only; see German
Reinforcement Chart 1.
82.4 American Participants82.4.1 At Starta. Allied units depicted on the Setup Chart Schnee Eifel with its
corresponding Setup Map.b. Allied units depicted on the Setup Chart Our River - Americans
with its corresponding Setup Map.c. Allied units depicted on the Setup Chart Vianden with its cor-
responding Setup Map.d. Eight US 8C units depicted on the Setup Chart Losheim identi-
fied by and subject to Notes 10, 12 and 14.e. Two 1A Echelon units depicted on the Setup Chart “Allied At-
Start Units West” that begin south of the 5PzA-6PzA Boundary: the 1278 Engineers and 299 Engineers.
f. Nine 5C Echelon units depicted on the Setup Chart “Allied At-Start Units West” that begin on or south of the 5PzA-6PzA Boundary: 8C HQ, Middleton, 14/32 Cav, Cota, 28ID HQ, 635AW, 28ID/Recon, 158 Engineers and 44 Engineers.
82.4.2 Allied Reinforcement Chart 1a. Certain US units that arrive at the north edge: 8C/58 Arty; 8C/755
Arty; and 7AD units per Notes 43, 44 and 45. b. None of the US units that arrive at the south edge.
82.4.3 Allied Reinforcement Chart 2a. The 101/705 TD Battalion that arrives at the north edge on 18EV;
however, it will have no effect on the scenario.b. The US units that arrive at the south edge; but not the 82AB,
which is moving to oppose the 6PzA in the north.c. The rules above are not applicable for the Campaign Game.
82.5 Applicable Scenario Specific Rulesa. 83.0 Scenario rules for the German 5PzAb. 84.0 German 5PzA Bridge Construction Progressc. 85.0 Scenario rules for the US vs the 5PzAd. 86.0 Inclusion of the 7A-LXXXV Corpse. 87.0 Allied Areas of Operations (AO)f. 88.0 German 5PzA Random Events.
82.6 Victory Conditions 82.6.1 American VictoryThe US wins by preventing the Germans from attaining their vic-tory conditions.
A Time for Trumpets ~ Scenario Book 11
© 2020 GMT Games, LLC
82.6.2 German Marginal VictoryGerman combat units in any status must occupy one Bastogne town hex and the following towns and villages hexes after the US 18EV turn: Gouvy Houffalize Wiltz Vichten Beho Noville Esch-sur-Sure Bissen Crombach Martelange (5656) Eschdorf Schieren Wallerode Arsdorf Grosbous Schrondweiler
82.6.3 German Substantial Victory. German combat units in any status must occupy both Bastogne town hexes the after the US 18EV turn plus the same towns and villages listed in 82.6.2 above.
83.0 Scenario Rules for the German 5PzAIf there is no entry below with respect to the participating German formations or individual units, then the instructions on the appli-cable Setup Chart or Reinforcement Chart are sufficient.
83.1 German Comm and SupplyAll German units are In Comm and In Supply on the 16MO, 16AF and 16EV turns.
83.2 The 5th Panzer Army Echelona. On 16MO, only the 5PzA HQ and its AA escort move during
the 16MO Exploitation Segment. b. The 5PzA artillery in 8143 and 8243 may support any unit in
the 5PzA on ANY turn as long as they are not mobilized.c. If the 5PzA artillery units above are mobilized with captured
trucks, they must rest when the 5PzA Echelon rests.d. The 207 Eng Battalion is involved in work to repair a damaged
bridge at Tintesmuhle. The Bridge is repaired on the German End of Turn Segment on 17AF; remove the “Blown Bridge” marker. The 207 Eng is free move on 17EV.
83.3 XLVII Corps83.3.1 XLVII Corps Echelona. On 16MO, only the XLVII Corps HQ may move in the Move-
ment Segment. Priority is given to Division assets.b. The 15 NW Brigade may only fire in support XLVII Corps units.c. As noted on the Our River Setup Chart, Bn II and Bn IV of the
766 VAK may only fire in support of the 26VG Division until construction of the 846 Bridge is completed at Gemund.
d. The other four battalions of the 766 VAK may fire in support any XLVII Corps units.
e. The 600 Eng and the 803 Eng are placing the 850 “J Class” Bridge at Dasburg.1) The 850 Bridge can never be moved away from Dasburg.2) Bridge work at Dasburg began before dawn; a “Begin
Bridge” marker may be placed on 16MO.3) The Engineers may not move until the bridge is built.
f. The 999 Eng and Lehr Eng are placing the 846 “J Class” Bridge at Gemund.1) Bridge work at Gemund began before dawn; a “Begin
Bridge” marker may be placed on 16MO.2) The Engineers may not move until the bridge is built.
83.3.2 26VG Divisiona. On 16MO, ten units of the 26VG are fee to move as indicated
on the Our River Setup Chart.b. Note that the battalions of the 26VG/78 have already moved on
the 16MO turn. These two units were holding the front line in the place of the 116 Pz and 62 VG and they were not relieved until late in the evening on 15Dec.
c. The two Assault Companies of 26VG/39 and 26VG/77 have special capabilities as follows:1) Valor. Many of the men in these companies were decorated
for valor and their boldness led to high casualties; if a hit is experienced for an attack in which they participate, they must take the step loss.
2) Artillery Support. For two weeks prior to 16Dec, these companies disobeyed Hitler’s orders and patrolled American rear areas. Also, the companies were equipped with new radios and they searched out locations that enabled them to have clear radio communications with their supporting arty units east of the Our River. Consequently, for attacks on the 16MO turn in which they participate, the 26VG Artil-lery Battalions do not use the “German 16MO Row” on the “Field Artillery Attack Support Chart,” rather, they use the applicable “Any other turn” Row.
d. Panzer Lehr Attachments. As indicated on the Our River Setup Chart, there are a number of units from Lehr Panzer Division that are attached to 26VG; see 83.3.3b for details.
e. VAK 766 Arty. As indicated on the Our River Setup Chart, Bat-talions II and IV of the 766 VAK may only support the 26VG until Bridge 846 at Gemund is completed.
83.3.3 Panzer Lehr Divisiona. Panzer Lehr units on the “Our River Setup Chart - German Rear
Area” move during the 16MO Exploitation Segment.b. Panzer Lehr units depicted on the “Our River Setup Chart -
Germans” are attached to the 26VG on 16MO; see below.1) The attached include the Engineers, Recon, a Mark IV
Panzer Company and three Arty Battalions.2) The attachments to 26VG end after the 846 Bridge at Ge-
mund is completed.3) After the attachments end, Lehr units stacked with 26VG
units may unstack without penalty.4) Lehr Recon and the Mark IV Panzer Company move during
16MO Exploitation Segment.5) The Lehr Artillery Battalions may only support the 26VG
until the bridge at Gemund is built.6) The Engineer cannot move until the 846 Bridge is built.
83.3.4 2nd Panzer DivisionOn 16MO, most of the 2nd Panzer Division is free to move. The AA and Arty Battalions cannot move until the 16AF turn.
83.4 LVIII Corps 83.4.1 LVIII Corps Echelona. On 16MO, only the LVIII Corps HQ may move in the Movement
Segment. Priority is given to Division assets.b. The 7 NW Brigade and the 401 VAK may only fire in support
of LVIII Corps units.c. Two battalions of the 401 VAK are in transit and will arrive on
17PD or sooner, depending upon Random Events.

A Time for Trumpets ~ Scenario Book12
© 2020 GMT Games, LLC
83.4.2 560VG Divisiona. On 16MO, only the fusiliers and the four battalions of 560/1128
and 560/1130 may move in the Movement Segment.b. Four 560VG battalions in transit will arrive on the 17PD turn
or sooner, depending upon Random Events.c. The 560 Eng Battalion is involved in work to repair a damaged
bridge at Tintesmuhle. The Bridge is repaired on the German End of Turn Segment on 17AF; remove the “Blown Bridge” marker. The 560 Eng is free move on 17EV.
83.4.3 116 Panzer Divisiona. On 16MO, most of the 116 Panzer Division is free to move.b. The 116 Recon Battalion, 116 Engineer Battalion, plus a Com-
pany of Panthers are in Reserve.c. The Reserves are free to move during the Exploitation Segment
of the 16MO turn.d. A company of Sturmgeshutz, plus Panthers and Mark IV Pan-
zers, in transit will arrive in accordance with the Reinforcement Charts, or sooner due to LVIII Corps Random Event.
83.4.4 560VG - 116Pz Cooperationa. Starting on 16MO, the 116 Panzer Division and the 560 VG
Division cooperate as one formation.b. All actions of these Divisions must be combined, including
choice of Resting or Active Status.c. The subordinate units of each Division trace command and
supply normally to their own respective HQ.d. The 560VG does not suffer a movement penalty for low fuel, if
the 116 Panzer Division is so penalized.
83.5 LXVI Corps 83.5.1 LXVI Corps Echelona. On 16MO, only two units of the LXVI Corps may move in the
Movement Segment: the 244 StuG Bn and the LXVI HQ.b. The 16 NW Brigade, the 460 FA Bn and the 10SS Panzer Divi-
sion Artillery may only fire in support of LXVI Corps units
83.5.2 The 62VG Divisiona. On 16MO, only the fusiliers and the four battalions of 62/183
and 62/190 may move in the Movement Segment.b. The two battalions of 62/164 and the 62VG Hetzer Battalion in
Reserve are free to move during the Exploitation Segment of the 16MO turn.
83.5.3 The 18VG Divisiona. On 16MO, only the “R” Companies and the six Bn’s of 18/293,
294 and 295, may move in the Movement Segment. b. The 18VG Fusilier, Engineer and Hetzer units in Reserve are
free to move during the 16MO Exploitation Segment.
83.5.4 Führ Escort Brigadea. The Führ Escort HQ begins with a Rested marker.b. The Führ Escort Foot Infantry Battalion is equipped with a truck
counter (captured trucks) when it assembles; see 142.4.c. The Führ Escort Brigade was graced with an inordinate equipage
of AAA for a Brigade. The Führ Escort AAA Companies stack free, one per hex, when stacked with a Führ Escort Panzer unit.
d. The Führ Escort Brigade may transfer to the LVIII Corps on the 19MO turn or later. Switch the HQ if the transfer is made.
83.6 German Arty Formation Substitutes See Rules Section 44.0. If the substitutes are used, they are placed in the hexes listed on the Artillery Park Charts.
84.0 German 5PzA Bridge Constructiona. The bridges at Dasburg and Gemund must be built. b. The bridge at Gemund may be dismantled and moved.
84.1 German Bridge Construction Procedurea. The Germans may place “Begin Bridge” markers at Dasburg
and Gemund on the 16MO turn.b. German Bridge Engineers are working on both bridges, so
construction will only require two turns.
84.2 Construction Progress for the 5PzA BridgesSee German Bridge Construction Segment (section 21.1-21.2) and the Construction Progress Phase (section 60.3.2). Note that situa-tions involving “Halt Bridge” construction cannot occur on 16Dec, because “Resting” is not required at that time.a. 16MO Bridge Construction Segment: Place a “Begin Bridge”
marker on each bridge; section 21.2.1.b. 16MO Bridge Construction Progress Phase: Place a “Con-
struction 1” marker on each bridge; section 60.3.2.c. 16AF Bridge Construction Segment: If in compliance with
section 21.1, the “Construction 1” marker is retained.d. 16AF Bridge Construction Progress Phase: Replace a “Con-
struction 1” with a “Construction 2” marker; section 60.3.2.e. Immediately upon placement of a Construction “2” marker by
a Bridge Engineer, the bridge is completed; section 60.3.2d.
85.0 Scenario Rules for the US vs the 5PzAIf there is no entry below with respect to the participating Allied formations or individual units, then the instructions on the appli-cable Setup Chart or Reinforcement Chart are sufficient.
85.1 Allied Comm and Supply85.1.1 Allied Comma. All Allied units are In-Comm on the 16MO turn. Starting on
16AF, Comm is traced in accordance with the rules; however, due to the limits of the 5PzA scenarios, the 8C HQ is not required to trace a Comm path to the 1A HQ.
b. The 8C Comm Node in St.Vith functions as the 8C HQ for trac-ing Comm.
c. The 8C Comm Node in Bastogne functions as the 8C HQ for tracing Comm.
85.1.2 Allied SupplyAll Allied units are In Supply on the 16MO, 16AF and 16EV turns.
85.2 American Dispersed CompaniesThe formations arrayed against the German 5PzA in the Ardennes were of two statuses: there was the battered 28ID recovering from losses suffered in the Huertgen Forest and the inexperienced 106ID units placed in a quiet sector to train. In the 28ID and the 106ID areas, the front line was not fully manned. Rather than a front line, the 28ID and the 106ID battalions dispersed their companies in long term defensive positions that are termed Forts for this effort.

A Time for Trumpets ~ Scenario Book 13
© 2020 GMT Games, LLC
On 16MO the Germans are faced against such companies in Forts. For example, see Dispersed Companies of the 4ID below.
a. On the front side the units appear as One-Step combat units.b. On the back side the same two units appear as a Fort with combat
factors reflecting the front side.c. The units shown below begin the 16MO turn on their back sides
or flipped sides, in Forts.d. Forts provide two column shifts left when attacked.e. The American player can flip a Dispersed At-Start Company to
the front side and move it normally.f. If combat results in a Step Loss to the defender, then one hit will
eliminate a Fort/unit such as those shown below.g. If combat results in a retreat for the defender, the Fort flips to
the front side and the unit retreats normally.h. After a Dispersed At-Start Company flips to the front side, it
cannot flip back to the Fort side.i. Other US units in a hex with a Fort unit receive the benefits of
the Fort as long as the Fort unit remains in the hex.
85.3 US 1st Army EchelonThe four units of the 1A Echelon that appear in 5PzA scenarios are found on the “Allied At-Start Units West” Setup Chart. a. The 299 Eng in Martelange is attached to the US 8C. After it is
released, it activates when the 8C HQ activates.b. The 1278 Eng in 4739 is attached to the US 8C. After it is re-
leased, it activates when the 8C HQ activates.c. 1A Echelon Engineers may not move, construct defenses or
place Prep Bridge Demo charges until released.d. The Canadian 9th Forestry Company in Hotton is sent north on
17AF. Remove it from the map on the 17AF turn.e. The 740 Tank Battalion in Neufchateau is sent north on 18PD.
Remove it from the map on the 18PD turn.f. Rules (d) and (e) are not applicable for the Campaign Game.
85.4 US 8 Corps Echelona. 8C Echelon units are free to move when a German unit moves
adjacent or as shown on the appropriate Setup Chart.b. 8C Echelon Engineers may not move, construct defenses or
place Prep Bridge Demo charges until released.c. On 16MO there are eight 8C Echelon units that begin north of
the 5PzA-6PzA Boundary. They are identified by Notes 10, 12 and 14 on the Losheim Setup Chart. Seven of the eight units are from the 9CCB.
85.5 US 8 Corps - 28th Infantry Divisiona. All the 28ID units starting on or north of the 5PzA-7A Boundary
belong to the 28ID/110 and 28/112 Regiments.b. The 28/110 is surprised on 16MO, unless superseded by a ran-
dom event rolled by the German XLVII Corps.c. The 28/112 is surprised on 16MO, unless superseded by a ran-
dom event rolled by the German LVIII Corps.d. The 28ID units are free to move when a German unit moves
adjacent or as indicated on the applicable Setup Chart.
85.6 US 8 Corps - 106th Infantry Divisiona. The 106/424 is surprised on 16MO, unless superseded by a
random event rolled by the German LXVI Corps.b. Historically, two regiments of the 106ID were trapped in the
Schnee Eifel as a result questionable leadership and poor com-munications. It is likely that history will be repeated in this game; however, LXVI Random Events make it possible for five battalions in the Schneifel to escape, if the Germans fail to close the trap; see LXVI Corps Random Event D.
85.7 US 8 Corps - 7th Armored Division85.7.1 7CCB Reinforcementsa. On 17PD, the 7CCB reinforcements arrive. They are identified
as Note 43 units on Allied Reinforcement Chart 1.b. They arrive in Strat Move and must move through Verviers,
Stavelot and finally Vielsalm before moving elsewhere.c. They must remain in Strat Move until they begin a turn on or
south of the 5PzA-6PzA Boundary.d. If German units are in or adjacent to Verviers on the 17PD turn,
the units must continue in Strat Move via any route until they begin a turn on or south of the 5PzA-6PzA Boundary.
e. If German units arrive in or adjacent to Stavelot before the 7CCB units, the 7CCB units must continue in Strat Move via any route until they begin a turn on or south of the 5PzA-6PzA Boundary.
f. If German units DO NOT arrive in or adjacent to Stavelot before the 7CCB units, the 7CCB units must travel through Stavelot, then Wanne, then Grand Halleux, then enter Vielsalm at which point they are free to deploy elsewhere.
g. If situation (f) above occurs, a historical condition reflecting lack of local intelligence may now occur south of the Warche-Ambleve River. It is possible for the 7CCB column to bump into a German unit between Stavelot and Vielsalm. If that occurs, the 7CCB column must proceed as follows:1) The lead 7CCB unit must bump into the German unit, even
though it is traveling in Strategic Movement.2) The prohibition preventing Strat Move next to an enemy
unit is suspended to recreate the lack of intel condition.3) If the German unit does not exert a ZOC for any reason, the
lead unit must continue in Strat Move, if possible, along the road Stavelot-Wanne-Grand Halleux-Vielsalm. For example, a German unit in 6921 during a fog turn would not halt travel of the lead unit. The trailing 7CCB units would likewise follow along in Strategic Movement.
4) If, however, a German ZOC or German presence blocks movement of the lead 7CCB unit along the road Stavelot-Wanne-Grand Halleux-Vielsalm, then the lead unit must halt and lose its “Strat Move” marker. The trailing 7CCB units must then pile-up behind the lead unit, one per hex, each halting and losing their “Strat Move” markers.
5) The 7CCB units may not attack.
85.7.2 7CCA Reinforcementsa. On 17PD, the 7CCA reinforcements arrive. They are identified
as Note 44 units on Allied Reinforcement Chart 1.b. The 7CCA units are subject to the rules in 85.7.1b through
85.7.1g; however, they arrive on 17PD with only 4MF.

A Time for Trumpets ~ Scenario Book14
© 2020 GMT Games, LLC
85.7.3 7CCR Reinforcementsa. On 17PD, the 7CCR reinforcements arrive. They are identified
as Note 45 units on Allied Reinforcement Chart 1.b. They arrive in Strat Move and must move through Eupen,
Malmedy and finally Recht before moving elsewhere.c. They must remain in Strat Move until they begin a turn on or
south of the 5PzA-6PzA Boundary.d. If German units are in or adjacent to Eupen on the 17PD turn,
the units must continue in Strat Move via any route until they begin a turn on or south of the 5PzA-6PzA Boundary.
e. If Germans arrive in or adjacent to Malmedy before 7CCR, the 7CCR units must continue Strat Move via any route until they begin a turn on or south of the 5PzA-6PzA Boundary.
f. If German units DO NOT arrive in or adjacent to Malmedy before the 7CCR units, the 7CCR units must travel through Malmedy, then Baugnez Crossroads, then Ligneuville, then enter Recht at which point they may deploy elsewhere.
g. If situation (f) above occurs, a historical condition reflecting lack of local intelligence may now occur south of the Warche-Ambleve River. It is possible for the 7CCR column to bump into a German unit between Malmedy and Recht. If that occurs, the 7CCR column must proceed as follows:1) The lead 7CCR unit must bump into the German unit, even
though it is traveling in Strategic Movement.2) The prohibition preventing Strat Move next to an enemy
unit is suspended to recreate the lack of intel condition.3) If the German unit does not exert a ZOC for any reason, the
lead unit must continue in Strat Move, if possible, along the road Malmedy-Baugnez Crossroads-Ligneuville-Recht. For example, a German unit in 7618 during a fog turn would not halt travel of the lead unit. The trailing 7CCR unit would likewise follow along in Strategic Movement.
4) If, however, a German ZOC or German presence blocks movement of the lead 7CCR unit along the road Malmedy-Baugnez Crossroads-Ligneuville-Recht, then the lead unit must halt and lose its “Strat Move” marker. The trailing 7CCR unit(s) must then pile-up behind the lead unit, one per hex, each halting and losing their “Strat Move” markers.
5) The 7CCR units may not attack.
85.7.4 7AD Arty and AA ReinforcementsOn 17MO the 7AD Arty-AA reinforcements arrive. They are identified as Note 45 units on Allied Reinforcement Chart 1. The movement rules for these units are the same as those for 7CCR found in sections 85.7.3b through 85.7.3g above. When using the referenced rules, substitute the term “7AD Arty-AA” whenever the term “7CCR” appears. It was an element from this serial that was massacred by KGP at Baugnez Crossroads on 17 Dec 1944.
85.7.5 7AD Commands and Attachmentsa. The 7AD may be transferred to the US 18C on 19MO.b. In 1944, the 9CCB, the 106/424 and the 28/112 were attached
to the 7AD. In ATFT, German progress might force similar at-tachments for better Command.
85.8 US 8 Corps - 101st Airborne Divisiona. On 18MO the 101AB reinforcements arrive at G. Note the MF
reduction at the G entry roads on the south edge.
b. They arrive in Strat Move and must enter Mande-St.Etienne or Sibret before moving elsewhere.
c. They must remain in Strat Move until the turn after they enter or pass through Mande-St.Etienne or Sibret.
d. If German units occupy both hexes of Bastogne, or if the Ger-mans arrive in or adjacent to Mande-St.Etienne or Sibret before the 101AB units, then the 101AB units may deploy anywhere in the 8C Area of Operations.
85.9 US 8 Corps - 10CCB85.9.1 10CCB Situation for 5PzA Scenariosa. On the 18MO turn, the 10CCB units that arrive at Attert must
move directly to Bastogne.b. If a German unit moves next to any unit of the 10CCB before
it reaches Bastogne, the entire 10CCB is immediately released for deployment anywhere in the US 8 Corps Area of Operation.
c. If no German unit moves next to any unit of the 10CCB before all units of the 10CCB enter Bastogne, the entire 10CCB may be deployed anywhere in the US 8 Corps Area of Operation after the units enter Bastogne.
d. In accordance with rule section 24.6, the 10CCB and the 101AB may stack together and cooperate without penalty.
85.9.2 10CCB Comm Path Alternativesa. 10CCB units can be In-Comm anywhere in the 8C AO; see
section 87.0.b. The 10CCB CP may trace a Comm Path that is within Command
Range of the Corps HQ.c. Alternatively, the 10CCB CP may trace a Comm Path to the 8C
Signal Unit in Bastogne or St.Vith.
85.9.3 Supply PathThe 10CCB CP may trace Supply Path off any map-edge road in accordance with section 9.1.
85.10 US 18 Corps Echelona. On 18PD the 18C Echelon HQ is placed at the 1A HQ.b. On 18MO Gavin is placed at the 1A HQ.
85.11 US 18 Corps - 30th Infantry Division85.11.1 30ID/117 Reinforcementsa. On 18PD, the 30/117 reinforcements arrive. They are identified
as Note 54 units on Allied Reinforcement Chart 2.b. They arrive in Strat Movement. They may be taken out of Strat
Move on any turn after the 18PD turn.c. If Malmedy is controlled by the Allies on the 18PD turn, the
units must enter Xhoffraix before moving elsewhere.d. If Malmedy is controlled by the Germans on the 18PD turn, the
units may be moved as desired by the Allied player.
85.11.2 30ID/120 Reinforcementsa. On 18MO, the 30/120 reinforcements arrive. They are identified
as Note 54 units on Allied Reinforcement Chart 2.b. They arrive in Strat Movement. They may be taken out of Strat
Move on any turn after the 18MO turn.c. If Malmedy is controlled by the Allies on the 18MO turn, the
units must enter Xhoffraix before moving elsewhere.d. If Malmedy is controlled by the Germans on the 18MO turn,
the units may be moved as desired by the Allied player.
A Time for Trumpets ~ Scenario Book 15
© 2020 GMT Games, LLC
85.11.3 30ID/119 Reinforcementsa. On 18AF, the 30/119 reinforcements arrive. They are found as
Note 58 units on Allied Reinforcement Chart 2. They arrive in Strat Movement. They may be taken out of Strat Move on any turn after the 18AF turn. Two of the units arrive with only 4MF.
b. The 30/119 units must enter Theux before moving elsewhere.c. If German units are in or adjacent to Theux on the 18AF turn,
the units may be moved as desired by the Allied player.
85.12 US 18 Corps - 82nd Airborne Divisiona. On 18PD, the 82AB arrives at G. Note the MF reduction at the
G entry roads on the south edge.b. They arrive in Strat Move and must move through Werbomont
before moving elsewhere.c. The 82AB need not be moved onto the map, because it must first
move to Werbomont before deploying elsewhere and it would not be available until 19PD. This rule is not applicable for the Campaign Game.
86.0 Inclusion of the 7A-LXXXV Corps This entire rule section is not applicable for the Campaign Game.
86.1 Limitationsa. The German and US units that begin on the Vianden Setup Chart
are included in 5PzA Scenarios.b. The German and US units on the Vianden Setup Chart may not
cross to the east side of the Blanch Ernz.c. The German and US units that begin on the Sauer River Setup
Chart are not included in 5PzA Scenarios.
86.2 Scenario Rules for the German 7AThe following 7A Scenario rules pertain to the 5PzA Scenarios:a. 74.1 German Comm and Supplyb. 74.2 7th Army Echelonc. 74.4.1 LXXXV Corps Echelond. 74.4.2 352VG Divisione. 74.4.3 5FJ Division f. 75.0 German 7A Bridge Construction g. 78.2 LXXXV Corps Random Events
86.2 Scenario Rules for the US vs the 7AThe following 7A Scenario rules pertain to the 5PzA Scenarios:a. 76.1 Allied Comm and Supplyb. 76.2 American Dispersed Companiesc. 76.3 US 1st Army Echelond. 76.4 US 8 Corps Echelone. 76.7 US 28th Infantry Divisionf. 77.0 Allied AO Maps
87.0 Allied Areas of Operation87.1 Allied AO for the 7-Turn 5PzA Scenarioa. During the 16MO-17EV timeframe, the 1A AO is the entire
map; therefore, an Army AO map is not required.b. During the 16MO-17EV timeframe, only the US Corps 16EV-
17EV AO map is required; page 25 of the Play-Aid Booklet.
87.2 Allied AO for the 11-Turn 5PzA Scenarioa. During the 16MO-18EV timeframe, the 1A AO is the entire
map; therefore, an Army AO map is not required.b. During the 16MO-17EV timeframe, the US Corps 16EV-17EV
AO map is required; page 25 of the Play-Aid Booklet.c. During the 18PD-18EV timeframe, the US Corps 18PD-19EV
AO map is required; pages 26-27 of the Play-Aid Booklet.
88.0 Random Events in the 5PzA Army Areaa. The Random Events for the German XLVII Corps are found on
page 4 in the Play-aid Booklet and occur subject to the activation of German XLVII Corps on the 16MO through 18EV turns.
b. The Random Events for the German LVIII Corps are found on page 6 in the Play-aid Booklet and occur subject to the activation of German LVIII Corps on the 16MO through 18EV turns.
c. The Random Events for the German LXVI Corps are found on page 7 in the Play-aid Booklet and occur subject to the activation of German LXVI Corps on the 16MO through 18EV turns.
d. Random Event Basics:1) Random Events can supersede the rules process and alter
reinforcement schedules.2) If a singular event is rolled a second time, the second roll is
of no effect.3) Random Events that include special movement and place-
ment do not affect Resting Status.
German 6th Pz Army Scenarios: 90.0 - 99.090.0 Briefing for German 6PzA Scenarios 91.0 The 7-Turn German 6PzA Scenario92.0 The 11-Turn German 6PzA Scenario93.0 Scenario Rules for the German 6PzA94.0 Operation Greif - Operation Stoesser 95.0 Kampfgruppe Peiper Breakout96.0 Scenario Rules for the US vs the 6PzA97.0 US 8C on the Periphery of the 6PzA 98.0 Allied Areas of Operation (AO)99.0 Random Events for the German 6PzA
90.0 Briefing for German 6PzA Scenarios90.1 German 6PzA ObjectivesHitler’s Grand Solution: the enemy was not to be beaten east of the Meuse, but encircled by a turning movement beyond the river. The main effort would be made by the 1SS Panzer Corps with the 2SS Panzer Corps to follow immediately behind on day three (18Dec). The 6th Panzer Army was to cross the Meuse, wheel north, strike for the Albert Canal, then fan out to form a front extending from Maastricht to Antwerp. The infantry Divisions of 6PzA would fol-low the armored columns and form a blocking position east of the Meuse along the Vesdre River. Eventually, or so Hitler intended, the Fifteenth Army would advance to take a station protecting the Sixth Panzer Army right flank and rear.
90.2 Surprise on 16 DecWhen applicable, German attacks receive a column shift right for surprise on the 16MO turn.

A Time for Trumpets ~ Scenario Book16
© 2020 GMT Games, LLC
a. All German attacks against US 5 Corps units receive a column shift right for surprise on the 16MO turn.
b. The 14Cav units on or north of the 5PzA-6PzA Boundary, in hexes 9021, 9123 and Manderfeld, are surprised on 16MO, un-less superseded by a 1SS Panzer Corps Random Event.
90.3 German 6PzA Bridge BuildingBridge construction was not required for the 6PzA on the 16MO turn, although one unrepaired bridge did delay KGP until an alter-nate route was explored. The 6PzA was delayed more by heavy forests and their own minefields than by blown bridges.
90.4 US 8C in the Path of the 6PzA On 16Dec44 there were a number of US 8C units stationed on or north of the 5PzA-6PzA Boundary that were in the path of the 6PzA. In addition, the 7AD traveled through the 6PzA Area to reinforce the US units near St.Vith. In order to maintain historical integrity of the limited duration 6PzA Scenarios, rules are provided concerning the interface of these units with the 6PzA.
90.5 Buzz-Bomb AlleyOn 16Dec44 many American AAA units were located on and behind Elsenborn Ridge in order to shoot down German V-1 Buzz Bombs heading for Liege. The official mission was known as the Liege Pilotless Aircraft (PAC) Defense. Soldiers referred to the mission as a deployment to “Buzz Bomb Alley.” When it became obvious to 1A HQ that the Ardennes Offensive was a major attack, the Heavy AA (90mm Gun) units in Buzz Bomb Alley were ordered to im-mediately ship their sighting mechanisms to the rear and prepare to fight in a ground role. In addition, at least 14 AA Battalions from the Antwerp X Anti-Aircraft Brigade were sent south to protect Liege and other towns on the Meuse River. Contrary to popular belief, American AA was not relegated only to protect rear areas, HQ and Artillery. Quad 50 Automatic Weapons units were devastating against soft targets, while 90mm Gun units were proficient against tanks. When interviewed by the US Coastal Artillery School after the Battle of the Bulge, soldiers who manned AA Gun units stated that “tanks were much easier to hit than aircraft.” For reference, see First Army AA in the Battle of the Bulge, Primary and Secondary Roles, US Army Command and General Staff, 1946.
90.6 American ReinforcementsOn 16Dec44, the left wing of the German 6PzA attacked into the weakest held section of the Ardennes, the Losheim Gap. On the other hand, the center and right of the 6PzA attacked and into the strongest held sections of the Ardennes, the Monschau Forest and the Monschau Corridor. Due to the difficult terrain and sparse road net in the Monschau Forest, it is understandable that the 12SS Panzer Division will rarely have an easy passage to the Elsenborn Ridge. In addition, the full strength 99ID is a formidable obstacle and the unknown presence of the veteran 2ID in the Monschau Forest makes things worse. As a result, the US will have time to send strong reinforcements south to slow the drive of the 6Pz Army north of the Warche-Ambleve.
90.7 The OOB and the RulesThe most significant components of the 6PzA scenario rules are those concerning the Order of Battle and Order of Appearance. These are the sections titled “Scenario Rules for the German 6PzA” and “Scenario Rules for the US vs the 6PzA.” Note that these
rules are provided only when the information on the Setup and Reinforcement Charts is incomplete. Players should refer to them as the game progresses, so that historical events and circumstances may be incorporated into the contest.
91.0 The 7-Turn German 6PzA Scenario91.1 TimeframeThe scenario begins with the German 16MO turn and ends with the US 17EV turn.
91.2 Maps RequiredThe northeast map is required.
91.3 German Participantsa. Units of the 6PzA depicted on the Setup Chart Monschau with
its corresponding Setup Map. b. Units of the 6PzA depicted on the Setup Chart Losheim with its
corresponding Setup Map. c. The 6PzA units that arrive in accordance with German Reinforce-
ment Charts 1 and 2.
91.4 American Participants 91.4.1 At Starta. Allied units depicted on the Setup Chart Monschau with its
corresponding Setup Map. b. Allied units depicted on the Setup Chart Losheim with its cor-
responding Setup Map. c. Six 8C units identified on the Schnee Eifel Setup Chart and its
corresponding Setup Map as follows: C01, C08, C09, C11 and C15. They start the game on or north of the Army Boundary.
d. One 8C unit, the 14/32 Cavalry, depicted on the Setup Chart “Allied At-Start Units West.”
e. Twelve 1A Echelon units depicted on the Setup Chart “Allied At-Start Units West” that are released by 18EV: Hodges, 1A HQ, Can 9F, B5Fus, 99 Nor, 526 Arm Inf, 825 AT, 740 Tank, 143 Hvy AA, 563 AW, 110 Hvy AA and 639 AW.
f. Six US 5C Echelon units depicted on the Setup Chart “Allied At-Start Units West” that are released by 18EV: 5C HQ, 51 Engineers, 202 Engineers, 291 Engineers, 112 Engineers and 1111 Engineers.
g. Eight 1st Infantry/16 Regiment units depicted on the Setup Chart “Allied At-Start Units West” in and around Verviers that are released on 18AF, but which could be released earlier.
91.4.2 Allied Reinforcement Chart 1a. All US units that arrive at the north edge. b. None of the US units that arrive at the south edge.
91.5 Applicable Scenario Specific Rulesa. 93.0 Scenario rules for the German 6PzA.b. 94.0 Operation Greif - Operation Stoesser c. 95.0 Kampfgruppe Peiper Breakoutd. 96.0 Scenario Rules for the US vs the 6PzAe. 97.0 US 8C on the Periphery of the 6PzA f. 98.0 Allied Areas of Operation (AO)g. 99.0 Random Events for the German 6PzA

A Time for Trumpets ~ Scenario Book 17
© 2020 GMT Games, LLC
91.6 Victory Conditions 91.6.1 American Victory. The US wins by preventing the Germans from attaining their vic-tory conditions.
91.6.2 German Victory. The Germans must attain four of the Victory Conditions below:a. Multiple Conditions: At the end of the US 17EV turn, German
combat units in any status occupy towns that were controlled by the US on the 16MO turn; for example, Bullingen. Each of such towns counts as one victory condition.
b. Single Condition: At the end of the US 17EV turn, German combat units in any status occupy Francorchamps.
c. Single Condition: At the end of the US 17EV turn, German combat units in any status occupy Trois Ponts.
92.0 The 11-Turn German 6PzA Scenario92.1 TimeframeThe scenario begins with the German 16MO turn and ends with the US 18EV turn.
92.2 Maps RequiredThe northeast map is required.
92.3 German Participantsa. Units of the 6PzA depicted on the Setup Chart Monschau with
its corresponding Setup Map.b. Units of the 6PzA depicted on the Setup Chart Losheim with its
corresponding Setup Map.c. The 6PzA units that arrive in accordance with German Reinforce-
ment Charts 1 and 2.
92.4 American Participants 92.4.1 At Starta. Allied units depicted on the Setup Chart Monschau with its
corresponding Setup Map.b. Allied units depicted on the Setup Chart Losheim with its cor-
responding Setup Map.c. Six 8C units identified on the Schnee Eifel Setup Chart and its
corresponding Setup Map as follows: C01, C08, C09, C11 and C15. They start the game on or north of the Army Boundary.
d. One 8C unit, the 14/32 Cavalry, depicted on the Setup Chart “Allied At-Start Units West.”
e. Twelve 1A Echelon units depicted on the Setup Chart “Allied At-Start Units West” that are released by 18EV: Hodges, 1A HQ, Can 9F, B5Fus, 99 Nor, 526 Arm Inf, 825 AT, 740 Tank, 143 Hvy AA, 563 AW, 110 Hvy AA and 639 AW.
f. Six US 5C Echelon units depicted on the Setup Chart “Allied At-Start Units West” that are released by 18EV: 5C HQ, 51 Engineers, 202 Engineers, 291 Engineers, 112 Engineers and 1111 Engineers.
g. Eight 1st Infantry/16 Regiment units depicted on the Setup Chart “Allied At-Start Units West” in and around Verviers that are released on 18AF, but which could be released earlier.
92.4.2 Allied Reinforcement Chart 1 a. All US units that arrive at the north edge. b. None of the US units that arrive at the south edge.
92.4.3 Allied Reinforcement Chart 2 a. All US units that arrive at the north edge, plus the 18C HQ and
Gavin at the 1A HQ. b. The 82AB units that arrive at the south edge; they are the only
south edge reinforcements available for this scenario.
92.5 Applicable Scenario Specific Rulesa. 93.0 Scenario rules for the German 6PzA.b. 94.0 Operation Greif - Operation Stoesser c. 95.0 Kampfgruppe Peiper Breakoutd. 96.0 Scenario Rules for the US vs the 6PzAe. 97.0 US 8C on the Periphery of the 6PzA f. 98.0 Allied Areas of Operation (AO)g. 99.0 Random Events for the German 6PzA
92.6 Victory Conditions 92.6.1 American Victory. The US wins by preventing the Germans from attaining their vic-tory conditions.
92.6.2 German Victory. The Germans must attain four of the Victory Conditions described 91.6.2 above, plus the following at the end of the US 18EV turn:a. The Germans must control a bridge on both sides of the Salm
River between 6626 and 6520, inclusive.b. The Germans must control a bridge on both sides of the Warche-
Ambleve River between 7216 and 6116, inclusive.c. The Germans must occupy both sides of a Lienne Creek bridge
hex. The bridge need not be intact.
93.0 Scenario Rules for the German 6PzAIf there is no entry below with respect to the participating German formations or individual units, then the instructions on the appli-cable Setup Chart or Reinforcement Chart are sufficient.
93.1 German Comm and SupplyAll German units are In Comm and In Supply on the 16MO, 16AF and 16EV turns.
93.2 The 6th Panzer Army Echelona. The 6PzA artillery in 9718 and 9618 may support any unit in the 6PzA on ANY turn as long as they are not mobilized.b. If the 6PzA artillery units above are mobilized with captured trucks, they must rest when the 6PzA Echelon rests.
93.3 1SS Panzer Corps93.3.1 1SS Corps Echelona. The 4NW and 9NW may only fire in support 1SS Corps units.b. The 388 and 402 VAK may only fire in support 1SS Corps units.c. The 1SS Corps HQ is just off the east edge of the board and its
subordinate Division HQ are within Command Range.

A Time for Trumpets ~ Scenario Book18
© 2020 GMT Games, LLC
93.3.2 12VG DivisionIn Reserve: the Fusiliers, plus Bn I and II of the 12/89. They are free to move during the 16MO Exploitation Segment.
93.3.3 150th Bde - KGP Cooperationa. Coordination was accomplished on 15Dec44 to insert compo-
nents of the 150th Brigade into the KGP column.b. The units of KGP and the 150th Brigade may stack together and
fight together without penalty.c. Units of the 150th Brigade may not stack freely with units of
the 1SS Panzer Division that do not have the KGP ID.d. The Command, Supply and Activity Status functions of the KGP
and the 150th Brigade remain separate
93.3.4 1SS Pz Division - 3FJ Division a. Starting on the 16AF turn, the 1SS Pz Division HQ takes control
of the 3FJ Division. They operate as one formation.b. All actions of these Divisions must be combined, including
choice of Resting or Active Status.c. The subordinate units of each Division trace command and
supply normally to their own respective HQ.d. The 3FJ does not suffer a movement penalty for low fuel, if the
1SS Panzer Division is so penalized.
93.3.5 1SS Panzer and Rollbahn Ca. Rollbahn “C” traveled Losheimergraben, Butgenbach, Waimes,
Baugnez, Malmedy, Francorchamps, Spa. b. Historically, Rollbahn C went on to Aywaille, Oneux, Rotheux,
Meuse River; however, in ATFT we mark it only to Spa.c. After Rollbahn C crosses the Warche River, it is highlighted by
gold road signs to Spa.d. In ATFT the 1SSPz Division can use Rollbahn C north of the
Warche from 7216 to Spa; however, it may not move east of Rollbahn C unless KGP usurps 12SS Rollbahns (1SS Corps Random Event F).
e. On the other hand, 12SS Division units are not likewise re-stricted. They may move west of the highlighted Rollbahn C.
93.4 LXVII Corpsa. The 17NW and the 405 VAK may only fire in support LXVII
Corps units.b. The LXVII Corps HQ is just off the east edge of the board and
its subordinate Division HQ are within Command Range.
93.4.1 272VG DivisionThe 272VG Division was in the process of redeploying from Berg-stein to Kesternich for the Ardennes Offensive when the US 78ID began an offensive in the Monschau Corridor towards the Roer and Urft Dams. The 78ID captured Kesternich on 15 Dec, but this drew and immediate reaction from Field Marshal Model. The 272/980, the 326VG/752-Bn II and the 326/753-Bn II counterattacked and recaptured Kesternich at midnight on 15 Dec. In this affair the 272VG and the US 78ID suffered heavy casualties and both sides were left with little offensive capability. In fact, the 272 Fusilier Company holding Konzen on 16 Dec was there comfortably until 6 Feb 45. Until released, the 272VG is restricted as follows:a. A unit of the 272VG may only move one hex or up to half of
the unit’s movement factor.b. A hex originally occupied by a unit of the 272VG may not be
left vacant at the end of a Movement Segment.
c. Units of the 272VG may not attack.d. The 272VG is released after the US 78ID is released.
93.4.2 326VG DivisionThe 326VG Division was hamstrung due to the shifting of the 326VG/752-Bn II and the 326/753-Bn II for the counterattack at Kesternich. In addition, the 326/751-Bn got lost in the Monschau Forest on 16MO. As a result, the 16 Dec objectives of Hofen, Mon-schau and Mutzenich were almost impossible to attain. Then, after surprise was lost, the task became even more difficult.
93.5 German Arty Formation Substitutes a. See Rules Section 44.0.b. If the substitutes are used, they are placed in the hexes listed on
the Artillery Park Charts.
94.0 Operation Greif - Operation StoesserThis section includes the abortive paratroop operation by Von Der Heydte, the infiltration of the Einheit Steilau Commandoes and the planned infiltration by the 150th Brigade and subsequent capture of the Meuse River bridges at Amay and Huy.
94.1 Skorzeny and the 150th Brigade The primary aspect of Operation Greif was the planned infiltra-tion by the 150th Brigade. The Germans committed significant resources for the operation, but Skorzeny himself believed they would be fortunate to even sneak past inexperienced soldiers. The rules below attempt to quantify 150th Bde Infiltration. It should be noted that successful infiltration frequently results in annihilation of the Brigade, but when Skorzeny drives through a string of US units it does cause problems for the Allied player.a. If a combat unit moves into an enemy ZOC, it must immediately
stop movement per 25.6.b. However, Skorzeny and the combat units of the 150th may at-
tempt to ignore ZOC and/or pass through enemy units.c. Players should be able to apply the logic provided in sections
94.1.1 through 94.1.4 in order to address all possibilities. d. The attempts may be made during movement or during exploita-
tion on the 16EV through 18EV turns.e. The units may attempt infiltration individually or as a stack.f. Skorzeny cannot infiltrate by himself, but may accompany a
150th Brigade combat unit.
94.1.1 Infiltration through one ZOCa. It is possible to infiltrate through a vacant hex in a US ZOC.b. Prior to infiltration through a vacant hex in a US ZOC, the
infiltration attempt must be declared.c. The vacant hex to be traversed that is in a US ZOC and the hex
to be entered afterwards must be identified.d. The Skorzeny unit(s) then enter the ZOC, stop, and roll for
infiltration on the Skorzeny Infiltration Table.e. An unsuccessful attempt to pass through an enemy ZOC ends
the move in the ZOC hex.f. If the infiltration is successful, the unit(s) may continue move-
ment and even attempt additional infiltrations.
94.1.2 Infiltration through Consecutive ZOCa. It is possible to infiltrate through a string of consecutive vacant
hexes in enemy ZOC.

A Time for Trumpets ~ Scenario Book 19
© 2020 GMT Games, LLC
b. The vacant hexes to be traversed that are in US ZOC and the last hex to be entered must be identified.
c. The Skorzeny unit(s) then enter the first ZOC, stop, and roll for infiltration on the Skorzeny Infiltration Table.
d. If the first infiltration is successful, the unit(s) may continue into the next hex and roll again.
e. An unsuccessful attempt to pass through an enemy ZOC ends the move in that ZOC hex.
f. If each infiltration through the vacant hexes is successful, the units are moved into the last hex identified. If the infiltrating units have MF remaining, they may continue movement and even attempt additional infiltrations.
94.1.3 Infiltration through Enemy Unitsa. It is possible to infiltrate through enemy occupied hexes.b. Prior to infiltration through the enemy occupied hex, the infiltra-
tion attempt must be declared.c. The occupied hex to be traversed and the vacant hex to be entered
afterwards must be identified.d. The Skorzeny unit(s) then move next to the enemy occupied
hex and roll on the Skorzeny Infiltration Table.e. An unsuccessful attempt to pass through an enemy occupied
hex ends the move next to the enemy occupied hex.f. If the infiltration is successful, the unit(s) may continue move-
ment and even attempt additional infiltrations.
94.1.4 Infiltration through Consecutive Enemy Unitsa. It is possible to infiltrate through a string of consecutive enemy
occupied hexes.b. Prior to infiltration through the enemy occupied hexes, the
infiltration attempt must be declared.c. Each consecutive enemy occupied hex to be traversed and the
last hex to be entered must be identified.d. The Skorzeny unit(s) then move next to the first enemy occupied
hex and rolls for each hex to be traversed.e. An unsuccessful attempt to pass through any of the enemy oc-
cupied hexes ends the move at the start hex.f. If all infiltration rolls are successful, the units are moved into
the last hex identified. If the infiltrating units have movement remaining, they may continue movement and even attempt ad-ditional infiltrations.
94.2 Einheit Steilau CommandoesA controversial aspect of Operation Greif was the infiltration of English speaking German Commandoes in American Jeeps. The teams and vehicles were disguised as units from the 5AD. Nine teams infiltrated into the American line on 16 Dec. The nine in-cluded four recon teams, two demolition teams and three pathfinder teams. The three pathfinder teams are not represented, as they were employed simply to guide the 1SS, 12SS and 12VG Divisions. The four recon teams and the two demolition teams are represented. The mission of the recon teams was to scout the enemy rear and sow confusion. The mission of the demolition teams was to perform sabotage and sow confusion. For this effort, the different missions of the teams are morphed together; thus, each of the six teams can perform the following functions:a. Take position at an Allied controlled bridge crossing in order to
sabotage the demolition of the bridge.
b. Occupy intersections in the enemy rear and attempt to disrupt the movement of Allied units.
94.2.1 Commando Team Characteristicsa. A commando unit is only one jeep and does not count for stack-
ing purposes for either side.b. A commando unit is not a combat unit, has no ZOC and cannot
control hexes. c. A commando unit moves as a cross-country mobile unit.d. The commandoes are subject to traffic jam rules.e. On the 16AF turn, place the six commando teams with any HQ
in the 1SS Panzer Corps.
94.2.2 Sabotage Allied Bridge Demolition a. One Commando (only) at a bridge crossing can add a +1 drm
to the Allied attempt to blow the bridge.b. When a commando is used to affect a bridge demolition roll,
the commando is removed from the map and placed on the next turn of the turn record track.
c. The German player can decline to affect a bridge demolition die roll and leave the commando on the map.
94.2.3 Disrupt Allied Movementa. An Einheit Steilau Commando at an intersection can misdirect
the movement of Allied units passing through.b. When a commando successfully misdirects Allied movement,
the commando is removed from the map and placed on the next turn of the turn record track.
c. When a commando attempt to misdirect Allied movement is unsuccessful, the commando may be eliminated.
d. The German player can decline to misdirect Allied movement and leave the commando on the map.
e. Follow the procedure below to resolve Allied movement mis-direction by German Commandoes:1) When the first Allied unit enters the intersection, the German
must declare a misdirection attempt or decline.2) If the German declines, all Allied units passing through the
intersection will be unaffected on the present turn.3) If the German resolves a misdirection attempt, all Allied
units passing through the hex will be affected this turn. 4) Roll two dice and resolve the attempt on the Commando
Misdirection Table below.5) If the attempt is within 10 hexes of a 5CCR unit, flip the
commando to the 5CCR side and add +1 to the dice roll.
Commando Misdirection Table Dice Roll Result 2-4 No movement factor loss; commando team eliminated 5-6 No movement factor loss * 7 No movement factor loss; place commando team with
any German HQ 8-9 No movement factor loss * 10 Allied units lose 1MF; if they have less than 1MF, they
lose their remaining MF * 11 Allied units lose 2MF; if they have less than 2MF, they
lose their remaining MF * 12 Allied units lose 3MF; if they have less than 3MF, they
lose their remaining MF ** Place the commando team on the next turn of the turn record track.

A Time for Trumpets ~ Scenario Book20
© 2020 GMT Games, LLC
94.2.4 Returning Commando TeamsIn Dec44, Commandoes returned to German HQ to report on the Allied situation and then resumed their missions.a. Commando Teams on the turn record track may be returned to
the game by 1SS Corps Random Event.b. When the event is rolled, the teams on the track may be placed
with any HQ in the 1SS Panzer Corps.c. Teams on the turn record track are removed from the game after
the 18EV turn.
94.3 Von der Heydte The mission of the Von der Heydte paratroopers was to land at Baraque Michel and block Allied Reinforcements traveling south from the US 9th Army. Unexpected high head winds, inexperienced German pilots and American AA in Buzz Bomb Alley caused wide dispersal of the airdrop. Three dice must be rolled for airdrop reso-lution, so players will need to borrow a white die from one of their kids in order to make the four VDH Company dice rolls required. The procedure for airdrop resolution follows in 94.3.2.
94.3.1 Von der Heydte Company Characteristicsa. A VDH Company counts as an infantry unit for stacking.b. A VDH unit is a combat unit, has a ZOC and can control hexes. c. A Fallschirmjager Company moves as an infantry (foot) unit.
94.3.2 Von der Heydte Airdropa. Roll three dice for the airdrop of each of the four Von der Heydte
Companies into Baraque Michel (7510).b. If triples is rolled, place the airdropped VDH Company in
Baraque Michel (7510).c. If triples is not rolled, the company is scattered. The red die
determines the direction of scatter; see diagram below.d. After direction is determined, observe the two white dice.e. If the red die was a 1, 2 or 3, total the two white dice and place
the VDH Company that many hexes from Baraque Michel in the applicable direction.
f. If the red die was a 4, 5 or 6, multiply the two white dice and use the product to place the VDH Company that many hexes from Baraque Michel in the NE direction.
g. If the VDH Company lands off the map, the unit is eliminated.h. VDH Companies that land on the map are In-Comm and In-
Supply through the 17EV turn.i. If the VDH Company lands on an Allied combat unit, it must
attack. Determine the odds and drm normally. For an attacker retreat result, the VDH Company is eliminated. For a defender retreat result, the defender is eliminated.
95.0 KGP Breakout - 16EV and 17PD TurnsEarly in the Ardennes Offensive, KGP infiltrated at night through the front line and surprised many U.S. combat units in the rear.
95.1 KGP HQ Capabilitiesa. The KGP HQ is always mobile. b. The KGP HQ has two steps, and can attack and advance after
combat like a front line combat unit.c. The KGP HQ also has two engineer companies attached and has
all the capabilities of an engineer combat unit.d. The KGP HQ is automatically In Comm and In Supply through
the end of the 18EV turn.e. After the 18EV turn, KGP may trace Comm Path from the 1SS
Corps HQ or the 1SS Division HQ.
95.2 KGP Preparation for Breakout Exploitation a. On 16MO, KGP units arrive as reinforcements.b. At the start of the 16EV and 17PD turns the entire KGP may be
placed in Reserve.c. Place a “Reserve” marker on the KGP HQ to denote the entire
KGP in Reserve.d. The KGP may be placed in reserve, even if the KGP units are
adjacent to a US combat unit.e. If the KGP is NOT in placed in for the 16EV and/or 17PD turns,
the KGP combat units are treated normally.
95.3 Readiness of US Units in KGP Patha. Many times U.S. units in Peiper’s path mistook the KGP column
as American.b. Peiper’s Path includes any hex that is south of the Warche River
and that is on or north of the 6Pz Army Boundary. c. During the 16EV-17PD turns, combat units in Peiper’s Path may
be “Alert” per 95.3d or “Surprised” per 95.4e. d. At the end of the German Movement Segment on the 16EV and
17PD turns, place “Alert” markers on U.S. units that are adjacent to a German Combat Unit.
95.4 Hold the Reins Loose 95.4.1 KGP Breakout Movement Effectsa. The rules below reflect the daring movement and unexpected
success attained by KGP in Dec 1944.b. When in reserve on the 16EV and 17PD turns, KGP moves with
full MF during the Exploitation Segment.c. The combat units of KGP ignore American ZOC during the
German Exploitation Segment of the 16EV and 17PD turns.d. Correspondingly, during the German Exploitation Segment of
the 16EV and 17PD turns, the units of KGP exert no ZOC. e. U.S. units that are not Alert will be “Surprised” when attacked
by Exploiting KGP units on the 16EV and 17PD turns.f. A Surprised US unit attacked by KGP on the 16EV turn earns
an “Alert” marker for the 17PD turn.g. The rules in section 36.0 for Overrun at Night by KGP are modi-
fied as follows versus a hex containing Surprised units only: 1) The clear, woods or broken hex may be overrun during
exploitation, if KGP can achieve 10-1 odds.2) Multiple Surprised Steps can be overrun in a hex.

A Time for Trumpets ~ Scenario Book 21
© 2020 GMT Games, LLC
95.4.2 KGP Overruns Honsfelda. In Dec44, the village of Honsfeld was an R&R Center for the
99ID and security was lax.b. KGP overran Honsfeld amidst much confusion. The defenders
slept and many of the Anti-tank guns were unlimbered.c. The village of Honsfeld can be overrun, if a Panzer unit from
KGP participates, and if the 801TD is by itself.d. This is the only instance in ATFT in which a unit occupying a
village can be overrun.
95.5 KGP and the 3FJ a. During the 16EV Exploitation Segment, the KGP may com-
mandeer one infantry battalion of the 3FJ.b. The FJ Battalion may be commandeered by any KGP Panzer
unit that passes through its hex. The FJ stacks for free.c. The FJ Battalion rides with the panzer unit, even if the FJ has
already moved during the German Movement Segmentd. The FJ Battalion becomes part of the KGP and stays with the
commandeering panzer unit until eliminated.
95.6 12SS Division Rollbahn Respecteda. During the Bulge, KGP used the southernmost 12SS Division
Rollbahn briefly, but did not usurp it fully.b. The combat units of KGP may not cross the Warche River at
Malmedy or to the east. c. The combat units of KGP may cross the Warche from 7317 to
7216 or at any hex to the west.d. Across the Warche, KGP units may not move east or northeast
of the road net marked by gold signs within the road.e. That KGP restricted road net follows “Rollbahn C” from 7216
to Francorchamps to Spa; see 93.3.5.f. Units of the KGP/1SS that reach Spa are free to move anywhere
after entering Spa.
95.7 12SS Division Rollbahn Usurpeda. By Random Event, KGP may be freed from movement restric-
tions north of the 6th Panzer Army Boundary.b. Random Event F allows KGP to cross the Warche River at any
point and roll up the flank of the V Corps. c. Major General Lauer, CG of the 99ID, while atop a hill in
hex 8316, observed KGP turn to the southwest after exiting Bullingen. He was amazed that KGP did cross the undefended bridges on the Warche and roll up the American flank along the undefended Elsenborn Ridge. The 2ID and 99ID were thus spared annihilation.
95.8 KGP Breakout Combat Effectsa. When KGP is placed in reserve on the 16EV and 17PD turns, it
may attack during the German Exploitation Segment.b. During Exploitation Breakout, KGP may move, attack and
advance after combat multiple times.c. Attacks by KGP during the Exploitation Segment versus Sur-
prised units gain a column shift to the right on the CRT.d. Note that the column shift for Surprise is in addition to the
column shifts for KGP Night Superiority and Panzer Scare.e. Surprised US units may not receive artillery support.
f. When Surprised units are attacked, they receive no defensive benefits for constructed defensive positions; i.e., roadblocks, improved positions or strongpoints.
95.9 KGP Rear Area Havoc a. Havoc occurs due to infiltration through U.S. ZOC, Surprise,
Overruns, Panzer Scare and Night Combat Superiority.b. The number of times KGP can move and attack is limited only
by the MF of the KGP combat units.c. Mark the MF expended by each KGP unit with numbered chits
that will need to be provided by the players.d. Advances after combat do not count as MF expended.e. The procedure for KGP movement, combat, advance after com-
bat, movement again, combat again, etc., is as follows:1) The movement of each KGP unit is counted out as it moves.2) If a unit expends its entire MF and then stops, cover the unit
with a “Can’t Move” marker to show it is spent.3) If a unit expends less than the full MF, cover the unit with
a numbered chit indicating how many MF it has spent.4) After every KGP unit has finished its first exploitation move-
ment, conduct KGP combat against adjacent Americans.5) The only artillery unit that may support any of the combat-
ants is the KGP artillery unit, if In Battery.6) Perform KGP advance after combat for each KGP exploita-
tion combat when applicable. 7) Advance after combat does not count against any remaining
KGP movement factors.8) KGP units with MF remaining from their original MF may
now move again, repeating steps 1, 2 and 3 above.9) After every KGP unit has finished its second movement,
conduct KGP combat again, but at the cost of 1MF.10) The same US combat units can be attacked more than once
as limited only by KGP combat unit MF.11) KGP units with MF remaining from their original MF may
now move again, repeating steps 8, 9 and 10 above.12) After all KGP units have spent their entire MF, the Breakout
turn ends.
96.0 Scenario Rules for the US vs the 6PzAIf there is no entry below with respect to the participating Allied formations or individual units, then the instructions on the appli-cable Setup Chart or Reinforcement Chart are sufficient.
96.1 Allied Comm and Supplya. All Allied units are In-Comm on the 16MO turn. b. Starting on 16AF, Comm is traced in accordance with the rules.c. All Allied units are In Supply on 16MO, 16AF and 16EV.
96.2 American Dispersed CompaniesThe formations arrayed against the German 6PzA in the Ardennes included the inexperienced 99ID in the Monschau Forest and the light 14th Armored Cavalry screening the Losheim Gap. Many of the full strength 99ID units holding the front are in Forts to reflect the natural defensive terrain of the Monschau Forest. In addition, there are dispersed companies in Forts in Hofen and in the Losheim Gap. Therefore, on the 16MO turn, the Germans are faced against many full strength units and a few dispersed companies in Forts.

A Time for Trumpets ~ Scenario Book22
© 2020 GMT Games, LLC
For an example of Dispersed Companies in Forts, see the 4ID units below.
a. On the front side the units appear as One-Step combat units. b. On the back side the same two units appear as a Fort with combat
factors reflecting the front side.c. The units shown below begin the 16MO turn on their back sides
or flipped sides, in Forts.d. Forts 16MO provide two column shifts left when attacked.e. The American player can flip a Dispersed At-Start Company to
the front side and move it normally.f. If combat results in a Step Loss to the defender, then one hit will
eliminate a Fort/unit such as those shown below.g. If combat results in a retreat for the defender, the Fort flips to
the front side and the unit retreats normally.h. After a Dispersed At-Start Company flips to the front side, it
cannot flip back to the Fort side.i. Other US units in a hex with a Fort unit receive the benefits of
the Fort as long as the Fort unit remains in the hex.
96.3 US 1st Army EchelonThere are many units of the 1A Echelon that appear in 6PzA sce-narios. They are found on the Monschau Setup Chart, the Losheim Setup Chart and the Allied At-Start Units West Setup Chart. There are two 1A Echelon units listed in (c) and (d) below that begin the game south of the 5PzA-6PzA Boundary, and which must move into the 6PzA area to oppose the 6PzA.a. 1A Echelon units are free to move when a German unit moves
adjacent or as shown on the appropriate Setup Chart.b. 1A Echelon Engineers may not move, construct defenses or
place Prep Bridge Demo charges until released.c. The Canadian 9th Forestry Company is sent north on 17AF. d. The 740 Tank Battalion in Neufchateau is sent to the 6PzA on
the 18PD turn; see below for its characteristics.1) The unit must move to and enter Sprimont. Before moving
elsewhere, it must stop after entering Sprimont.2) If ever adjacent to a German combat unit before reaching
Sprimont, it is eliminated. It had only nine Shermans.3) On the turn after entering Sprimont or any turn thereafter,
the unit may be deployed. If it leaves on the first turn, it becomes an M4 Step with CF of 5. For every turn it delays leaving Sprimont, it gains a Step to a maximum of 15CF.
96.4 US 5 Corps EchelonThere are many 5C Echelon combat units that appear in 6PzA sce-narios. They are found on the Monschau Setup Chart, the Losheim Setup Chart and the Allied At-Start Units West Setup Chart. The use of 5C Echelon units is critical for the US defense on the first few days of the battle, because 5C Echelon combat units can be “In Comm” south of the Warche-Ambleve River, while most 5C Divisional units will be “Out Comm” south of the River; see the US Corps Area of Operations Map: 16EV-17EV and the US Corps Area of Operations Map: 18PD-19EV in the Play-Aid booklet.a. 5C Echelon units are free to move when a German unit moves
adjacent or as shown on the appropriate Setup Chart.
b. 5C Echelon Engineers may not move, construct defenses or place Prep Bridge Demo charges until released.
c. The 134 Heavy AA must move to Waimes on the 16EVturn. If the unit cannot enter Waimes on 16EV, it is free to deploy any-where on or north of the 5PzA-6PzA Boundary; however, if a German 6PzA unit moves next to a US unit west of Waimes on the 17PD, 17MO or 17AF turn, the AA unit must move north of the Warche-Ambleve River and not return south of it.
d. The 413 Heavy AA is free to deploy anywhere on or north of the 5PzA-6PzA Boundary on the 16EV turn; however, if a German 6PzA unit moves next to a US unit west of the Waimes row on the 17PD, 17MO or 17AF turn the AA unit must move north of the Warche-Ambleve River and not return south of it.
96.5 US 5 Corps - 78th Infantry DivisionThe 78ID attacked in the Monschau Corridor towards the Roer Dams on 13Dec44. The 78ID captured Kesternich on 15 Dec, but a German Counterattack by the 272VG and 326VG recaptured the village at midnight. The Kesternich battles depleted the 272VG and the US 78ID and both sides were left with little offensive capability. Until released, the 78ID is restricted as follows:a. A unit of the 78ID may only move one hex or up to half of the
unit’s movement factor.b. A hex originally occupied by a unit of the 78ID may not be left
vacant at the end of a Movement Segment.c. Units of the 78ID may not attack.d. The 78ID is released, if at any point on any turn the US cannot
trace a supply road into Mutzenich.
96.6 US 5 Corps - 99th Infantry DivisionThe inexperienced 99ID was tasked to cover both flanks of the 2ID and support the 2ID attack towards the Roer and Urft Dams. The 99ID performed with valor and received acclaim for its performance during the Battle of the Bulge.a. Only six units of the 99ID may operate south of the Warche
River; see Note 18 on the Losheim Setup Chart.b. One of the six units above, an 801 TD Company, was overrun
in Honsfeld by KGP; see 95.4.2.c. If the Germans do not capture Lanzerath on the 16MO turn, it
is possible that the 99ID/394 I&R Platoon will fortify a hill along the road west of Lanzerath, and thus hinder the advance of the 6PzA; see 1SS Corps Random Event C.
96.7 US 5 Corps - 2nd Infantry Division96.7.1 Background.a. 16Dec44. The US 2ID captured Wahlerscheid Crossroads on
the morning of 16Dec. At the same time, the 6PzA was attack-ing the 99ID to the north and south of the crossroads. On the afternoon of 16Dec General Gerow, the 5 Corps Commander asked General Hodges, for permission for the 2ID to pull back in order to avoid encirclement.
b. 17Dec44. Permission was not given to withdraw until 1000 hours on 17 Dec, because the US 1A HQ was sure that the Germans could no longer launch a full scale offensive and Hodges did not want to give back the crossroads to the Germans. The 1A HQ eventually realized its analysis was wrong when Kampfgruppe Peiper showed up at Stavelot.
c. Robertson’s Role. It is possible that the 2ID could have been trapped in the Monschau Forest, but General Robertson prepared

A Time for Trumpets ~ Scenario Book 23
© 2020 GMT Games, LLC
an alternative. Although he could not order a retreat of 2/9 and 2/38 from Wahlerscheid Crossroads, he implemented a plan to extricate them. He positioned his uncommitted units in defensive positions to hold open the road from Wirtzfeld to Wahlerscheid, and when permission to withdraw was granted, he personally commanded the intricate movement of the battalions from the crossroad through the forest to Rocherath and Krinkelt. General Robertson received the DSC for his foresight and leadership during the Battle of the Bulge.
d. German Role. The 2ID Battalions in the Forest are stuck until the 17AF turn, unless the Germans do something to release them; i.e., attacking the 2ID, capturing Malmedy or cutting the supply road from Wirtzfeld to Wahlerscheid.
e. Question: Why didn’t the Germans make an effort to trap the veteran 2ID when they had the chance? Answer: they did not know the 2ID was in the neighborhood until they clashed at the twin villages. Clearly, the fog of war was affecting both sides. Although the 2ID began its attack on the crossroad on 13 Dec, the Germans did not know the 2ID was in their midst until 17 Dec, because no American prisoners were taken during the three day crossroad battle.
96.7.2 Robertson in ATFT.a. The non-engaged units of the 2ID move to hold the road open
from Wahlerscheid to Wirtzfeld and give the lead units in the Monschau Forest a chance to escape.
b. Units identified by Note 7 on the Losheim Setup Chart reflect General Hodges refusal to allow the 2ID units in the Monschau Forest to withdraw back to Elsenborn Ridge.
c. Units identified by Notes 6, 9 and 11 on the Losheim Setup Chart reflect the positioning of unengaged 2ID units to hold the road open from Wahlerscheid Crossroad to Wirtzfeld.
d. The unit identified by Note 15 on the Losheim Setup Chart reflects General Robertson’s anticipation of General Hodges imminent order to allow the 2ID to withdraw.
e. The unit identified by Note 8 on the Losheim Setup Chart re-flects General Robertson granting of General Lauer’s request that a rifle battalion to be sent to Murringen and Hunningen to backstop the 99/394.
96.8 US 5 Corps - 1st Infantry Divisiona. On 16MO, eight units of 1ID/16 group begin the game in and
around Verviers. They are released on 18AF; however, it is likely that they will be released earlier; see Notes 36 and 37 on the Allied At Start West Setup Chart.
b. On 17AF, the 1ID/18, Bn III arrives at 7301 and moves by truck to garrison Baraque Michel. It is released from garrison duty on the 19AF turn. The unit must attack German Paratroopers on the road between Baraque Michel and Eupen.
c. On 17AF the 1/18 CP arrives at 7301. On 17EV, four units of the 1ID/18 arrive at 7301. Their mission follows:1) The units must move to within three hexes of Eupen to
protect the city from German Paratroopers. 2) The units must stay within three hexes of Eupen until the
19AF turn when relieved by the 3CCA. 3) The units must attack German Paratroopers that get within
three hexes of Eupen.
96.9 US 5 Corps - 9th Infantry Divisiona. On 17EV, eight units of the 9ID/47 group arrive at Q.b. If the US can trace a supply road into Mutzenich on 17EV, the
units must enter Mutzenich before moving elsewhere.c. If the US cannot trace a supply road into Mutzenich on 17EV,
the units may be deployed anywhere in the 5C AO north of the Warche-Ambleve River.
96.10 US 8C Echelon - 9CCBa. On 16MO there are seven 8C Echelon - 9CCB units that begin
north of the 5PzA-6PzA Boundary.b. The 9CCB units are identified by Notes 10 and 12 on the Losheim
Setup Chart. c. Historical Integrity Rule for limited duration 6PzA Scenarios;
not applicable for the Campaign Game. The units identified by Notes 10 and 12 are required to move onto the 5PzA-6PzA Boundary on 16AF. On 16EV they must move to St.Vith, after which they are removed from the 6PzA scenarios.
96.11 US 8C Echelon Artillerya. On 16MO there are two 8C Echelon Artillery units north of the
5PzA-6PzA Boundary; the 8C/776 and the 8C/275.b. Historical Integrity Rule for limited duration 6PzA Scenarios -
not applicable for the Campaign Game. The units above must move south of the 5PzA-6PzA Boundary, after which they are removed from the 6PzA scenarios.
96.12 US 8C Echelon - Dispersed 14/18 Cav Unitsa. On 16MO there are three 8C Echelon Dispersed Cavalry units
on or north of the 5PzA-6PzA Boundary. b. See the Losheim Setup Chart (bottom row) and Setup Map:
cavalry units set up in hexes C09, C11 and C15. c. Historical Integrity Rule for limited duration 6PzA Scenarios; not
applicable for the Campaign Game: The three dispersed cavalry units may remain north of the 5PzA-6PzA Boundary through the end of the 16AF turn. On the 16EV turn or later, the dispersed cavalry units can move freely south of the boundary and end their moves on the 5PzA-6pzA Boundary, but they cannot move into a hex north of the boundary.
96.13 US 8C Echelon - 14/32 Cavalrya. On 16MO the 14/32 Cavalry begins in Vielsalm.b. Historical Integrity Rule for limited duration 6PzA Scenarios
– not applicable for the Campaign Game. Historically, this unit defended territory on the Army Boundary. In the 6PzA Scenarios the 14/32 Cav can move freely south of the boundary and end its move on the boundary, but it cannot move into a hex north of the boundary.
96.14 US 8 Corps - 106th Infantry Divisiona. On 16MO there are two 106ID units on the Army Boundary. b. See the Losheim Setup Chart (bottom row) and Setup Map: the
infantry unit in C01 and the AT unit in C11.c. Historical Integrity Rule for limited duration 6PzA Scenarios;
not applicable for the Campaign Game:1) The 106/423, Bn II, is located in C01 on the Losheim Setup
Chart: On the 16AF turn, the unit was sent to cover the left

A Time for Trumpets ~ Scenario Book24
© 2020 GMT Games, LLC
flank of the 106/422 in the Schnee Eifel. It is removed from the 6PzA Scenarios on the 16AF turn.
2) The 106/820 AT is located in C11 on the Losheim Setup Chart: If able to move, the AT unit may remain north of the 5PzA-6PzA Boundary through the end of the 16AF turn. On the 16EV turn or later, the AT unit can move freely south of the boundary and end its move on the 5PzA-6PzA Boundary, but it cannot move into a hex north of the boundary.
96.15 US 8C Echelon Arty Reinforcementsa. On 17PD, the 8C/58 Artillery arrives at O.b. On 18PD, the 8C/755 Artillery arrives at O.c. Historical Integrity Rule for limited duration 6PzA Scenarios -
not applicable for the Campaign Game. The units above must move south of the 5PzA-6PzA Boundary, after which they are removed from the 6PzA scenarios.
96.16 US 8 Corps - 7th Armored Divisiona. On 17PD and 17MO, the 7AD units that arrive are identified by
Notes 43, 44 and 45 on Allied Reinforcement Chart 1.b. The 5PzA Scenario movement rules for the 7AD are applicable
to the 6PzA Scenarios; see section 85.7.c. Historical Integrity Rule for limited duration 6PzA Scenarios -
not applicable for the Campaign Game: on the turn after the 7AD reinforcements move onto or south of the 5PzA-6PzA Boundary, they are removed from the 6PzA Scenarios except as follows:1) The 7CCR/17 Tank Battalion can move freely south of the
5PzA-6PzA Boundary and end its move on the 5PzA-6PzA Boundary, but it cannot move into a hex north of the 5PzA-6PzA Boundary. Historically, this unit defended Recht and other nearby territory.
2) The 7CCA/40 and 7CCA/48 Battalions, which are required to be removed from the scenario after they reach the Army Boundary, become available as reinforcements at St. Vith on the turn after a German combat unit enters Poteau. When they return to the scenario, these two battalions can move freely south of the 5PzA-6PzA Boundary and end their move on the Boundary, but they cannot move into a hex north of the boundary. Historically, these units were sent to recapture Poteau after it was taken by the Germans.
96.17 US 18 Corps Echelona. On 18PD the 18C Echelon HQ is placed at the 1A HQ.b. On 18MO Gavin is placed at the 1A HQ.
96.18 US 18 Corps - 30th Infantry Divisiona. On 18PD, 18MO and 18AF, 30ID units that arrive are identified
by Notes 54 and 58 on Allied Reinforcement Chart 2.b. The 6PzA Scenario rules for the 30ID are the same as those for
the 30ID in the 5PzA scenarios; see section 85.11.
96.19 US 18 Corps - 82nd Airborne Divisiona. On 18PD, the 82AB arrives at G. Note the MF reduction at the
G entry roads on the south edge. b. The units arrive in Strat Move and must move through Werbo-
mont before moving elsewhere.c. If German units are adjacent to Werbomont before all 82AB
units arrive, the 82AB units are free to deploy after they cross the 5PzA-6PzA Boundary.
97.0 US 8C on the Periphery of the 6PzA In order to maintain historical integrity for the limited duration 6PzA Scenarios, restrictions are placed on the US 8 Corps Units that begin on the periphery of the 6PzA, or that arrive as reinforcements on the north edge. These restrictions do not apply to the Campaign Game. These restrictions have been explained above in the sections referenced below.a. 96.10 US 8C Echelon - 9CCBb. 96.11 US 8C Echelon - 8C/776 Arty and 8C/275 Artyc. 96.12 US 8C Echelon - Dispersed 14/18 Cavalry Unitsd. 96.13 US 8C Echelon - 14/32 Cavalry Battalione. 96.14 US 8 Corps - 106th Infantry Division unitsf. 96.15 US 8 Corps - Arty Reinforcements: 8C/58 and 8C/755g. 96.16 US 8 Corps - 7th Armored Division
98.0 Allied Areas of Operation98.1 Allied AO for the 7-Turn 6PzA Scenarioa. During the 16MO-17EV timeframe, the 1A AO is the entire
map; therefore, an Army AO map is not required.b. During 16MO-17EV, only the US Corps 16EV-17EV AO map
is required; see page 25 in the Play-Aid Booklet.
98.2 Allied AO for the 11-Turn 6PzA Scenarioa. During the 16MO-18EV timeframe, the 1A AO is the entire
map; therefore, an Army AO map is not required.b. During 16MO-17EV, only the US Corps 16EV-17EV AO map
is required; see page 25 in the Play-Aid Booklet.c. During 18PD-18EV, the US Corps 18PD-19EV AO map is
required; see page 26-27 in the Play-Aid Booklet.
99.0 Random Events in the 6PzA Army Areaa. The Random Events for the German 1SS Corps are found on
page 8 in the Play-aid Booklet and occur subject to the activation of German 1SS Corps on the 16MO through 18EV turns.
b. The Random Events for the German LXVII Corps are found on page 10 in the Play-aid Booklet and occur subject to the activa-tion of German LXVII Corps on the 16MO through 18EV turns.
c. Random Event Basics:1) Random Events can supersede the rules process and alter
reinforcement schedules.2) If a singular event is rolled a second time, the second roll is
of no effect.3) Random Events that include special movement and place-
ment do not affect Resting Status.

A Time for Trumpets ~ Scenario Book 25
© 2020 GMT Games, LLC
The Campaign Game: 100.0 - 109.0100.0 Briefing for the Campaign Game 101.0 Attack of the 7A - 16MO to 18EV Turn 102.0 Attack of the 5PzA - 16MO to 18EV Turn103.0 Attack of the 6PzA - 16MO to 18EV Turn104.0 Weather Review - 19PD to 26EV105.0 Game Rules for the Germans - 19PD to 26EV106.0 Game Rules for the Allies - 19PD to 26EV107.0 Random Events in the Campaign Game108.0 Allied Areas of Operation (AO)109.0 Campaign Game Victory Conditions
100.0 Briefing for the Campaign Game100.1 BackgroundThe information presented below is a greatly condensed version of Cole, Chapter II, plus tidbits from other authors. Any Bulge discus-sion begins with Hitler’s Plan – The Big Solution. The attack was designed to surround and destroy the British and American forces north of the line Bastogne-Brussels. It would be carried out in two phases: the first phase to close the attacking force along the Meuse River and seize bridgeheads; the second phase to culminate in the capture of Antwerp. The date of the offensive had to meet the Fueh-rer’s demand for a period in which at least ten days of continuous bad weather and poor visibility might be expected. Such a stretch of poor flying weather would ground the superior Allied air forces.The weaknesses of Hitler’s plan were diagnosed by Rundstedt and Westphal as follows: sufficient force was not available to attain the distant goal of Antwerp and there was a better than average chance that all the attack could produce would be a salient or bulge of the Great War variety, consuming too many German divisions in what would be only a holding operation.Generals, Model, Rundstedt and Westphal, set out to propose a smaller solution, which would be less ambitious and which would aim at maximum destruction of Allied forces with minimum risk. In fact just about every German General involved favored a Small Solution. On 1Nov44, General Jodl presented plans to Hitler for the Big Solution and his own version of the Small Solution: the seizure of Liège and the envelopment of those enemy forces east of the Meuse in the sector roughly demarcated by Givet in the south and Sittard in the north. Hitler ignored the Generals and chose the Big Solution.Jodl went ahead with the planning for the Big Solution, aiming at the seizure of Antwerp, but he did not hesitate to push his favored solution. Jodl recommended extreme measures be taken in order to allow the Big Solution with the proviso that if Hitler would not agree to the measures then he should accept his Small Solution. Hitler considered the Small Solution a half measure, which could produce no real success; however, at the same time he was unwilling to adopt the stern measures necessary to make the Big Solution a success. The German Generals were overruled repeatedly and the Big Solution was a go.
100.2 Campaign Game Setup - 16MOa. The start of the Campaign Game is identical to the start of the
11-Turn Scenarios for the 7A, the 5PzA and the 6PzA.
b. It would be inefficient to restate the rules for those scenarios in order to begin the Campaign Game.
c. Additional rules needed to extend the game beyond the 18EV turn are provided in 101.0, 102.0 and 103.0.
d. the Victory Conditions for the shorter, individual Army Scenarios do not apply for the Campaign Game.
e. The special rules required to maintain historical integrity for the shorter, individual Army Scenarios do not apply. These rules have been identified in the shorter scenario rules as Not Applicable for the Campaign Game.
101.0 Attack of the 7A - 16MO to 18EV Turna. See 73.0 - (73.1-73.5) for the 11-Turn German 7A Scenario. b. See 74.0 - Scenario Rules for the 7A. c. See 75.0 - German 7A Bridge Construction. d. See 76.0 - Scenario Rules for the US vs the 7A. e. See 77.0 - Allied Areas of Operation. f. See 78.0 - Random Events in the 7A Area.
102.0 Attack of the 5PzA - 16MO to 18EV Turna. See 82.0 - (82.1-82.5) for the 11-Turn German 5PzA Scenario. b. See 83.0 - Scenario Rules for the 5PzA. c. See 84.0 - German 5PzA Bridge Construction. d. See 85.0 - Scenario Rules for the US vs the 5PzA. e. See 86.0 - Inclusion of the 7A-LXXXV Corps applies.f. See 87.0 - Allied Areas of Operation. g. See 88.0 - Random Events in the 5PzA Area.
103.0 Attack of the 6PzA - 16MO to 18EV Turna. See 92.0 - (92.1-92.5) for the 11-Turn German 6PzA Scenario. b. See 93.0 - Scenario Rules for the 6PzA. c. See 94.0 - Operation Greif - Operation Stoesser. d. See 95.0 - KGP Breakout - 16EV and 17PD Turns. e. See 96.0 - Scenario Rules for the US vs the 6PzA. f. See 98.0 - Allied Areas of Operation. g. See 99.0 - Random Events in the 6PzA Area.
104.0 Weather Review - 19PD to 26EV104.1 Ground Conditions As noted on the Time Record Track on the Map, the ground condi-tion is Mud from 18AF through 19EV. Historically, the temperature began to drop on 19Dec44 and the ground started to become more firm on 20Dec44. In ATFT, it happens at some point on 20Dec rather than on a specific turn in order to mitigate perfect intelligence. Similarly, the ground will Freeze on 22EV or 23PD, rather than on 23PD for certain.a. As reflected on the Variable Ground Conditions Table, the ground
will become Firm at some point on 20Dec. b. As reflected on the Variable Ground Conditions Table, the ground
will Freeze on 22EV or 23PD.
104.2 Snow Squalls - 20PD to 22MOOn 19Dec44, the misty conditions of 17-18 Dec gave way to the heavier overcast similar to that of 16Dec. In addition, the tem-perature began to drop and Snow Squalls occurred unexpectedly

A Time for Trumpets ~ Scenario Book26
© 2020 GMT Games, LLC
throughout the Ardennes. After the atmospheric conditions are determined on the 20PD through 22MO turns, the German player rolls again, if Fog was rolled. It is possible that both Fog and Snow Squalls will be in effect in a German Army Area. Remember that Snow Squalls are a Combat Effect, not a general weather condi-tion. Place a “Snow Squalls” marker in each German Army Area when applicable.
104.3 Weather Front Clash: 22AF-22EV-23PDOn 22Dec44, a high pressure system from Russia moved into the Ardennes. This cold wave clashed with the low pressure system over the Ardennes causing the variable weather conditions reflected on the Atmospheric Conditions Table: Dense Fog or Fog or Snow or Clear. Eventually, the high pressure system would prevail and it would become Clear and Cold.
104.4 Clear and Cold - 23MO to 26EVStarting on the 23MO turn, it is guaranteed that the atmospheric conditions will be Clear and the ground will be Frozen. The frozen ground results in increased mobility for vehicles in all types of terrain. The Clear weather results in a dramatic increase of Allied Aircraft Missions.
105.0 Game Rules for the Germans - 19PD to 26EVIf there is no entry below for arriving German reinforcements, then the instructions on the Reinforcement Chart are sufficient.
105.1 2SS Panzer Corps and Divisionsa. On 19PD the 2SS Panzer Corps Echelon plus the 2SS Division
and 9SS Division arrive. b. The group was planned as the second wave to follow the 1SS Pz
Corps on 18Dec; however, the failure of the SS Panzer Corps to pass rapidly through the Hohe Venn delayed the commitment of the 2SS Panzer Corps; therefore, arrival is based upon the actual release on 19Dec44 and not the scheduled arrival of 18Dec44.
105.1.1 2SS Corps Echelona. As noted on the Losheim Setup Chart, Note C, the 410 VAK
was deployed as part of a southern grouping of 6PzA Artillery for the 16MO barrage. The 410 VAK Formation Substitute is located at 9524 awaiting release on 19PD.
b. When the 2SS Corps reinforcements arrive, the German player may assign the 2SS Panzer Corps to the 5PzA rather than the 6PzA. If that reassignment occurs, use the appropriately colored 2SS Corps HQ to reflect 5PzA subordination.
105.1.2 2SS and 9SS Panzer Divisionsa. The 2SS Division Foot Infantry Battalion is equipped with a
truck counter (captured trucks) when it arrives; see 152.5.b. As noted on the Losheim Setup Chart, the 2SS and 9SS Divi-
sion Arty was deployed as part of a southern grouping of 6PzA Artillery for the 16MO barrage. The 2SS Division Artillery For-mation Substitute is located at 9824 awaiting release on 19PD. The 9SS Division Artillery Formation Substitute is located at 9823 awaiting release on 19PD.
c. If the German player assigns the 2SS Panzer corps to the 5PzA rather than the 6PzA, use the appropriately colored 2SS and 9SS Division HQ to reflect subordination to the 5PzA.
105.2 7A - LIII Corps EchelonOn 20PD the LIII Corps HQ arrives. The LIII/99 Infantry and the LIII/44MG in the SE corner of the map may be left with the 212VG or transferred from 212VG control to the LIII HQ.
105.3 5FJ Division to LIII CorpsOn the 21AF turn or any turn thereafter, the 5FJ Division may be transferred from the LXXXV Corps to the LIII Corps. Switch the 5FJ HQ to reflect subordination as applicable.
105.4 6PzA - 506 Tiger Battaliona. On 21AF, the four Companies of the 506 Tiger Battalion are
transferred to the 7A as they exist. If any of the units are dead or isolated on 21AF, those units are never transferred.
b. Place “Strat Move” markers on the Tiger Companies that qualify to be transferred. The markers are retained until the turn after the units enter Eschdorf, Bourscheid or Chaumont.
c. If Allied units are adjacent to all three villages before the Tigers arrive, or if Allied units block all paths to those villages, then the “Strat Move” markers are retained until the turn after the Tigers cross the 5PzA-7A Boundary.
105.5 Lehr - 559 Jagd Panther Companya. On 21AF, the 559 Jagd Panther Company is transferred from
the 5PzA to the 7A in its existing condition.b. If the unit is isolated on 21AF, it is never transferred. c. Place a “Strat Move” marker on the unit. The marker is retained
until the turn after the unit enters Martelange (5656). d. If Allied units are next to 5656 before the unit arrives, or if the
path to the hex is blocked, the “Strat Move” marker is retained until the turn after the unit crosses the 5PzA-7A Boundary.
105.6 LIII Corps - Fuhrer Grenadier Brigadea. On 23PD, place the “Note VA” units on the road 7352-7350-
Hoscheid, one per hex, with zero MF on the 23PD turn.b. On 23PD, place the “Note VB” units on the road 8449-8549-
8648-8748, one per hex, in Strat Move, with zero MF on the 23PD turn. Further details restricting movement follow:1) The units were plagued by delays east of the Our River.2) Roll a die on the reinforcement phase starting 23MO. On a
1-3 roll, the units are free to move then and thereafter.3) The units are automatically free to move on the 24PD turn.4) They may cross the Our River at Gemund or Vianden.5) The foot unit travels with a Truck unit until it begins a turn
west of the Wiltz-Sure River system.
105.7 LXXXV Corps - 79VG Divisiona. On 23PD, place the “Note WA” infantry units in Welscheid
(7554). If US units occupy Welscheid, the infantry units may be placed in any hex between the Sure and the Blees. Place the 79VG HQ within 3 hexes of Welscheid, east of the Sure.
b. On 23PD, place the “Note WB” units on the road Diekirch-Vianden, in Strat Move. No more than two foot units per hex, and no more than one vehicular unit per hex.
105.8 LVIII Corps - 9Pz Divisiona. On 23PD, 9Pz moves in Strat Move with a Rested marker.b. The 9Pz Foot Infantry has captured trucks-see 112.6.

A Time for Trumpets ~ Scenario Book 27
© 2020 GMT Games, LLC
c. The 301st Tiger Bn is late. On the reinforcement phase of 24PD, 25PD and 26PD roll a die. On a roll of 1-2, place the three Tiger Co’s in or next to Houffalize in Strat Move.
105.9 LIII Corps - 9VG DivisionOn 25EV, after the star in the east on Christmas morn had set, the 9VG headed west to reinforce the 7A. It took the formation almost two days to move out after receiving the orders. a. The Note ZB units are placed in Consthum.b. The Note ZC units are placed in 8449 in Strat Move.c. The Note ZD units are placed in 9648 in Strat Move.d. The Note ZE units enter in Strat Move at 9949.e. They may cross the Our River at Gemund or Vianden.
106.0 Game Rules for the Allies - 19PD to 26EVIf there is no entry below for arriving Allied reinforcements, then the instructions on the Reinforcement Chart are sufficient.
106.1 1A Echelon Anti-AircraftThe 1A Anti-Aircraft units on PAC Liege Defense Missions and those from Antwerp X PAC Defense were deployed to defend the Meuse River crossings during the Battle of the Bulge. When the units are assigned to a specific hex, they must garrison those hexes until a German combat unit moves adjacent, at which time they may re-deploy. Detailed instructions are provided below.
106.1.1 AA Arriving North of the Vesdrea. On 19MO, three 1A AA units arrive at O for move to Verviers
or Eupen; Note 61, Reinforcement Chart 3. b. On 19MO, 1A/116 Heavy AA arrives per Note 62, Reinforce-
ment Chart 3. May deploy anywhere north of the Vesdre.c. On 20PD, 20MO and 20EV, a 1A AA unit arrives at O for move
to Liege east of the Meuse; Note 65, Reinforcement Chart 3.d. Any 1A AA reinforcement listed above that cannot move to its
destination for any reason, may be deployed anywhere north of the Vesdre and east of the Meuse, but neither of those rivers may be crossed.
106.1.2 AA Arriving North of the Meusea. On 19MO, 1A/141 Heavy AA arrives at L for move to Huy;
Note 63, Reinforcement Chart 3. b. On 20PD, 1A/142 Heavy AA arrives at L for move to Amay;
Note 63, Reinforcement Chart 3. c. On 20MO and 20AF, 1A AA units arrive at N for a move to
Liege west of the Meuse; Note 68, Reinforcement Chart 3. d. Any reinforcement listed above that cannot move to its desti-
nation for any reason may be deployed anywhere north of the Meuse-Sambre River, but neither of those rivers may be crossed.
106.1.3 AA Arriving at Givet, Dinant and Namura. On 20MO, 20AF, 20EV and 22PD, 1AA units are placed in 1624,
Givet or 1410, as indicated above the unit; see units identified by Note 67 on Allied Reinforcement Charts 3 and 4.
b. An Allied Supply Road must be traced to the hex in order for the unit to be placed.
c. If the reinforcement cannot be placed in the hex indicated, it may be deployed anywhere south of the Sambre and west of the Meuse, but neither of those rivers may be crossed.
106.2 1A Echelon - 3CCA a. On 19MO, six units of the 3CCA group arrive to protect Eupen
against German Paratroopers.b. The 3CCA must stay within three hexes of Eupen until the 21AF
turn when the paratroop threat ends. c. Surviving German Paratroopers that get within three hexes of
Eupen must be attacked.
106.3 1A Echelon - 3CCR a. On 19AF, nine units of the 3CCR arrive at Q; Note 64, Allied
Reinforcement Chart 3.b. The units of 3CCR must enter Barvaux (4620) before moving
elsewhere. If a German unit is adjacent to Barvaux before any unit of the 3CCR arrives, then the 3CCR may be deployed anywhere in the 1A Area of Operations.
106.4 1A Echelon - 3CCB a. On 20PD, six units of the 3CCB arrive at Q; Note 66, Allied
Reinforcement Chart 3.b. The units of 3CCB must enter Theux (6308) before moving
elsewhere. If a German unit is adjacent to Theux before any unit of the 3CCB arrives, then the 3CCB may be deployed anywhere in the 1A Area of Operations.
106.5 1A Echelon - 87CM On 21AF, the 87CM arrives at 6901. It must move to and enter Ouffet before moving elsewhere. If a German unit is adjacent to Ouffet before the 87CM arrives, then the unit may be deployed anywhere in the 1A Area of Operations.
106.6 1A Echelon - 5CCA and 5CCBa. On 24AF, the 5CCA and 5CCB arrive at P. They must deploy
on the road net Limbourg-Eupen, inclusive. b. The 5CCA and 5CCB are released when the 78ID is released.
If the 78ID was released prior to 24AF, the 5AD units arrive at O-P and may deploy anywhere in the 1A AO.
c. If Germans are next to Limbourg or Eupen on or before 24AF, they arrive at O-P and deploy anywhere in the 1A AO.
106.7 US 7 Corps Echelona. On 20MO, 22MO, 22EV, 23MO and 26PD, elements of the 7C
Echelon arrive in the northwest.b. The 7C Echelon units are identified by Note 69 on Allied rein-
forcement Charts 3, 4, 6 and 7.c. When they arrive they must move to and then remain within
two hexes of Ohey or Modave until released. d. The 7C echelon is released after the 2AD is released as described
in 106.9.2 or 106.9.3.e. If Germans are next to Ohey or Modave prior to the arrival of
any of the 7C reinforcements, those yet to arrive may deploy anywhere in the 7 Corps AO and they are immediately released.
106.8 US 7C - 2AD/82 Cav Recon MissionOn what would be the 22EV turn, the 2AD completed a 22-hour march and bivouacked around Havelange. The 2AD was to be held in Reserve until the German advance had been checked, but events dictated otherwise. The 82Cav was to recon towards the Lesse-

A Time for Trumpets ~ Scenario Book28
© 2020 GMT Games, LLC
L’Homme-Wanne River, but it was ambushed by the 2Pz Division at the Hamlet of Haid (2926), west of Haversin. The 82Cav reported the attack to the 2AD CG and he quickly ordered his closest units to action lest the element of surprise be lost. On 23EV, the lead elements of the 2AD secured Ciney and attacked towards Buis-sonville. Consequently, in ATFT, if the 82Cav recon mission does not reveal German units, the 2AD will remain in Reserve until it is released on the 24MO turn.
106.8.1 82 Recon ArrivalOn the 22EV turn, the 82 Recon arrives at L. On the 23PD turn, it must move to Havelange and stop.
106.8.2 82 Recon MissionOn the 23MO turn the 82 Recon begins a Recon Mission towards the Lesse-L’Homme-Wanne Rivers as follows:a. On 23MO, 82 Recon must move Havelange, Hamois, Ciney and
end the turn in Haversin. b. If 82 Recon moves adjacent to a German unit on 23MO, it must
stop, and the 2AD is released on 23AF; see 106.9.1.c. If 82 Recon does not move adjacent to a German combat unit
on 23MO, the turn ends without incident.d. If the Germans move adjacent to 82 Recon on 23AF, the 2AD
is released on 23EV; see 106.9.1.e. If the Germans do not move adjacent to 82 Recon on 23AF, the
82 Recon Mission continues on the US 23AF turn.f. On 23AF, 82 Recon must move Haversin, Buissonville, 3132,
Humain, Aye, Hogne and end the turn in 3325.g. If 82 Recon moves adjacent to a German unit on 23AF, it must
stop, and the 2AD is released on 23EV; see 106.9.1.h. If 82 Recon does not move adjacent to a German combat unit
on 23AF, the turn ends without incident.i. If the Germans move adjacent to 82 Recon on 23EV, the 2AD
is released on 24PD; see 106.9.1.j. If the Germans do not move adjacent to 82 Recon on 23EV, the
2AD will chose “Resting” status on 24PD.k. The 2AD is released on 24MO, if has yet to be released by an
event described above.
106.9 US 7 Corps - 2ADa. On the 22EV turn, the 2AD arrives at L. b. On the 23PD turn, the 2AD must choose “Resting” Status and
bivouac on the road net Havelange-Evelette-Tahier. c. The 2AD HQ locates in Havelange. d. The 2AD must remain on the road net Havelange-Evelette-Tahier
until it is released.e. The 2AD may be partially released on 23AF, 23EV or 24PD
due to the 82Cav Recon Mission; see 106.9.1.f. The turn after partial release, the rest of the 2AD is released.g. If the 2AD is not released due to the 82Cav Recon Mission, it
is fully released on 24MO; see 106.9.3.
106.9.1 Release due to 82Cav Recon Missiona. Per 106.8.2, the 2AD is released on 23AF, 23EV or 24PD, if the
82Cav moves adjacent to a German combat unit.b. Or, per 106.8.2, the 2AD is released on 23AF, 23EV or 24PD,
if the 82Cav is attacked by German combat units.c. When the 2AD is released in accordance with (a) or (b) above,
only the following units are released:
1) 2AD/82 Cavalry Battalion.2) 2AD/66 Armored, Battalions I, II and III.3) 2AD/41 Armored Infantry, Battalion II4) 2AD/17 Engineer Battalion.5) 2AD/92 Armored FA Battalion.
106.9.2 After 2AD Partial Release a. The remainder of the 2AD is released on the turn after he 2AD
is partially released due to 106.9.1.b. On the turn after the remainder of the 2AD is released per (a)
above, then the 7C echelon is released.
106.9.3 Release on 24MO Turna. If the 2AD is not released due to the 82Cav Recon Mission, then
the entire 2AD is released on the 24MO turn.b. The 7C Echelon is released the turn after the 2AD is released.
106.10 British 30 CorpsThe following historical observation (Cole) is of particular interest: the Fifth Panzer Army had ruptured the VIII Corps center. If German forces continued to hold their pace westward, the reinforcements from the UK would arrive at the Meuse too late. On 19 December, therefore, Field Marshal Montgomery on his own initiative started troops moving south from the 21 Army Group.
106.10.1 Comm Path for 30C units not across the Meusea. All British HQ/units north or west of the Meuse are automati-
cally “In Comm,” if no German unit is across the Meuse.b. If a German unit is across the Meuse, the 30C HQ is “In Comm,”
if it is within Command Range of the US 1A HQ.c. If a German unit is across the Meuse, a British Div/Bde HQ is
“In Comm,” if it is within Comm Range of the 30C HQ.d. If a German unit is across the Meuse, British subordinate units
are “In Comm,” if within Comm Range of their HQ.e. Alternatively, If a German unit is across the Meuse, any British
HQ or unit north or west of the Meuse is “In Comm, if it traces a Comm Path not to exceed 10 hexes to an Allied road entry hex on the west or north edge from 0635 to 5101.
106.10.2 Comm Path for 2HH Cavalrya. The unit is 1 of 7 British units that may cross the Meuse.b. The unit traces Comm to the 30C HQ on the 22EV turn.c. Prior to 22EV, the unit can be “In Comm” anywhere west of the
Ourthe River from Liege to Remagne, if it can trace a “Supply Path” per section 9.6.
106.10.3 Comm Path for 29th Bdea. The Brigade has 5 of 7 Brit units that may cross the Meuse.b. The Bde HQ traces Comm to the 30C HQ on the22EV turn.c. Prior to arrival of the 30C HQ, any Brigade unit can be “In
Comm” if it can trace a “Supply Path” per section 9.6.
106.10.4 29th Brigade Missiona. On 21PD, 21MO and 21AF, the five units of the 29th Brigade
arrive at KW.b. These units are five of the seven British units that may cross the
Meuse, along with Monty and the 2HH Cavalry.

A Time for Trumpets ~ Scenario Book 29
© 2020 GMT Games, LLC
c. The Brigade units must move to the destinations listed and remain within five hexes through the 26EV turn.1) 29th Brigade HQ Dinant Village2) 3RTR and 8RB Dinant Town 3) 23Hussars Givet 4) 2FFY Namur
106.11 US 5 Corps - 9ID/60On 21AF, the five units of the 9ID/60 group arrive at Q. They are identified by Note 74 on Allied Reinforcement Chart 4. The Regi-ment was sent to Ouffet, but when it arrived it was turned around and sent back east to join the rest of the 9ID. For ease of play, the Allied player may have the group arrive on 22AF at Q.
106.12 US 18 Corps - 75IDa. The 75ID is released on 25PD, or sooner, as described below.b. If Germans are ever next to any hex of the Ocquier-Hamois road
net before 25PD, the 75ID is immediately released.c. If a German enters Manhay, Werbomont, Aywaille or a hex
north or west of the road Hotton-Manhay-Aywaille, the 75ID is immediately released.
106.12.1 Support for 2IDOn 25PD, or on any turn thereafter, the three infantry battalions of the 75/291 may be attached to the 2AD.
106.13 US 8 Corps Transfer to 3AIf the US player decides to hold Bastogne, it will be expedient to transfer the 8C HQ to the 3A on 22MO. If the U.S. decides to fall back with the 101AB, transfer of the 8C HQ may not be wise.a. On 22MO, if the 8C HQ transfers to 3A, replace the 8C HQ that
is subordinate to the 1A (white boxed ER) with the 8C HQ that is subordinate to the 3A (orange boxed ER).
b. If the 8C HQ transfers to 3A on 22MO, the 28ID HQ and the 101AB HQ remain subordinate to the 8C.
106.14 8C Subordinate Transfers to 12C On 21EV there are five possible transfers. When applicable, switch to the 12C colored HQ that reflects the change.a. On 21EV turn, the 4ID CP with formation and the 10AD HQ
with formation must be transferred from 8 Corps to 12 Corps.b. On 21EV turn, at the Allied player’s option, the following HQ
and formations may be transferred from 8 Corps to 12 Corps: the 9CCA HQ; the 28/109 CP; and the 422 FA Group HQ.
106.14.1 Note 4ID and 10AD Comm Pathsa. From 16MO to 21EV, 4ID and 10AD units can be In-Comm,
only if they start a turn within the 4ID AO; see Allied AO Maps.b. Also, from 16MO to 21EV, instead of tracing a Comm Path that
is within Command Range of the Corps HQ, the 4ID HQ and 10AD HQ may trace Comm Path to any of the eight board-edge, road hexes between Mersch and the Sauer River. The Comm Path may not exceed 10 hexes to any of the eight board-edge, road hexes.
c. On the 22PD turn, the 4ID and the 10AD having been transferred to 12 Corps, now trace Comm Path normally to the 12C HQ.
106.15 US III CorpsDue to recent US Intelligence failures, flank security was paramount as the III Corps began its attacks on 22Dec, and this is reflected in the objectives that must be attained on the west flank before the III Corps can deploy further to the west.
106.15.1 The 4CCB a. The 4CCB units are Note 90 units on Allied Reinforcement
Chart 5. They enter at 5163 or 5262. b. The initial objective was Fauvillers. 4CCB and the engineers
covering its left flank were the left flank of the III Corps. For security, no units of the III Corps may move west of hex row 4600 unless Allied units occupy Fauvillers, Traimont and Ebly.
106.15.2 The 4CCA a. The 4CCA units are Note 91 units on Allied Reinforcement
Chart 5. They enter from 5662 to Attert. b. The initial objective was Martelange (5656); however, the flanks
had to be solidified. The III Corps must hold Martelange, Fauvil-lers and Bigonville, before any of the nine units of 4CCA can move west of row 5400 or east of row 6000.
106.15.3 The 4CCR a. The 4CCR units are Note 94 units on Allied Reinforcement Chart
5. They enter at Attert. b. On 23MO the 5FJ still held the village of Bigonville and 4CCR
was ordered to capture it. After that was achieved, Patton sent the 4CCR to Neufchateau in order to attack the German ring from the west. The III Corps must capture Bigonville before the 4CCR can move west of row 5400.
106.15.4 The 26ID a. The 26ID units are Note 92 units on Allied Reinforcement Chart
5. On 22MO they set up on the board south of the Attert from Ell to 6962. If setup on board is not possible, the 26ID enters from Ell to 6763.
b. The initial objective was Eschdorf via Grasbous. The six bat-talions of 26/104 and 26/328 may not enter or attack any village south of the Sure until a US unit enters Grasbous.
106.15.5 The 80ID a. The 80ID units are Note 93 units on Allied Reinforcement Chart
5. They enter from 7163 to Mersch. b. The 80ID cannot cross the Alzette and enter the US XII Corps
Area; however, the 80ID is free to cross the Sure.c. Shift West. The 80ID bounced between objectives: Mertzig,
Ettelbruck, Welscheid, Bourscheid, Heiderscheid. On 24Dec after little progress, two infantry battalions from the 80/318 were sent to the 4CCA. On 24PD, the Allies may choose a Regiment from the 80ID and send 1, 2 or 3 of its battalions to the 4CCA. Add truck and Strat move markers until the battalions begin a turn within 5 hexes of the 4AD HQ.
106.16 US 3A Random Reinforcementsa. On the 22PD turn, the German LIII Corps begins rolling for
Random Events when the Corps is activated.b. The 3A Ranger and AA units identified as Varies on Allied
Reinforcement Chart 7 may be assigned to the US 3rd Corps or the US 12th Corps by LIII Random Event B or G.

A Time for Trumpets ~ Scenario Book30
© 2020 GMT Games, LLC
c. The 3A - 35ID units identified as Random on Allied Reinforce-ment Chart 7 may be assigned to the US 12th Corps by LIII Random Event H.
107.0 Random Events in the Campaign GameThe Random Events that occur during this stage of the Campaign Game involve the German LIII Corps of the 7A. The pertinent rules are found on page 11 in the Play-aid Booklet and occur subject to the activation of German LIII Corps on the 22PD through 24EV turns.
108.0 Allied AO for the Campaign Game a. During the 16MO-21EV turns, the 1A AO is the entire map;
therefore, an Army AO map is not required for those turns.b. During the 22PD-26EV turns, the US Army AO Map is required;
see the Play-Aid Booklet, page 24 .c. During the 16MO-17EV turns, the US Corps 16EV-17EV AO
Map is required; see the Play-Aid Booklet, page 25.d. During the 18PD-19EV turns, the US Corps 18PD-19EV AO
Map is required; see the Play-Aid Booklet, pages 26-27.e. During the 20PD-21EV turns, the US Corps 20PD-21EV AO
Map is required; see the Play-Aid Booklet, pages 28-29.f. During the 22PD-26EV turns, the US Corps 22PD-26EV AO
Map is required; see the Play-Aid Booklet, pages 30-31.
109.0 Campaign Game Victory ConditionsThe full Campaign Game includes the turns from 16MO to 26EV
109.1 Allied VictoryThe Allies wins by preventing the Germans from attaining their victory conditions.
109.2 German Substantial VictoryThis victory reflects the Small Solution favored by General Jodl. Liege was a plum in the eyes of the Germans. In fact, Liège had a brief respite from the V Weapon Offensive, when the German Armed Forces High Command on 19 Dec ordered the assault on the city to cease when it was expected that it soon would be captured - less than two days later it was resumed. The value of the city cannot be understated. When the Allies realized the German attack was a major offensive, American and British leaders committed power-ful reserves to protect the Meuse River and Liege. Regardless of Hitler’s intentions and plans, the historical accounts of the Battle of the Bulge are replete with the Allied preoccupation to defend Liege. Allied leaders were so paranoid about the city that General Littlejohn was ordered on three occasions to evacuate the Liège depots; however, evacuation was just about impossible, because the Red Ball Express kept delivering an enormous amount of supplies to the depots in an uninterrupted flow, 24 hours a day, 7 days a week.a. This type of victory ends the game immediately.b. The Germans win a substantial victory the instant a German
combat unit enters any of the six Liege City hexes.
109.3 German Tactical VictoryThis victory reflects the Hitler’s Grand Solution. Although it would not guarantee the capture of Antwerp, nor end the war in the Ger-mans favor, it would be an achievement nonetheless. In fact, the German player should heed Field Marshall Model’s words and “get down on his hands and knees and thank God.”
a. This type of victory ends the game immediately.b. The Germans win a Tactical Victory the instant a German AFV
enters a hex across the Meuse River from Givet to Liege City hex 5101. Note that a Substantial Victory and a Tactical Victory could happen simultaneously.
109.4 German Tactical VictoryThis victory reflects the Small Solution favored by Generals Model, Von Rundstedt and Westfall. The three Generals proposed a less ambitious plan aimed at defeat and destruction of Allied forces east of the Meuse. At the end of any game turn, the Germans earn a Tactical Victory, if the following conditions are attained:a. The Allies cannot trace a supply road to any town or village on
the 5PzA-7A Boundary from Bitburg to the Wiltz River.b. German units in any status occupy Kautenbach, Wiltz, 6446,
6145, Neffe and both Bastogne Town hexes.c. The Allies cannot trace a supply road to any town or village on
the 5PzA-7A Boundary from Bastogne to Beauraing.d. German units in any status occupy the villages of Houyet, Hul-
sonniaux and Drehance at the west end of the left flank.e. German units in any status occupy the town of Dinant and the
villages Yvoir, Mont, Lustin, Sart Bernard and Mozet. f. German units in any status occupy Haltinne, Ohey, Jallet,
Marchin, 3610, Stree, Tinlot, Nandrin, Rotheux and Plainevaux.g. German units in any status occupy Tilff, Esneux, Sprimont,
Louveigne, Theux, Polleur, Spa and Tiege, h. German units in any status occupy Jailay, 7506, Mutzenich,
Monschau, Konzen, Simmerath and Siegfreid Strauch.
109.5 German Marginal Victory. 109.5.1 Background This victory reflects German attempts to salvage a level of success when it was obvious they were not going to cross the Meuse, or take Liege, or eliminate all Allied forces east of the Meuse. The logic used to develop the marginal victory condition, therefore, is based upon the fact that the Germans changed their objectives after they realized they were going to lose. This idea is based on the statement below from the Schramm Manuscript, A-862: “In the event that it would be impossible to cross the Meuse, the advocates of the ’small solution’ expected that they would be al-lowed to carry out their alternative plan; i.e., a more restricted pincer operation, through which the conditions for a renewed as-sault towards the west could be created. As we shall see further on, they had all the reason to expect this, since Hitler, when it later on turned out that the Meuse could not be reached, promptly adjusted and modified the aim of the offensive.”Excerpts below are mostly from Cole, Chapters 22 and 23, edited and morphed to reduce input: By 24 December the Fifth Panzer Army had been slowed signifi-cantly. In part, the loss of momentum arose from supply failures, but it also stemmed from the failure of the Sixth Panzer Army to protect the flank and the line of communications for Manteuffel’s Army. The Sixth Panzer Army Panzer formations needed to dis-engage at Elsenborn, so that the point of the Sixth Panzer Army might shake free and start moving again. Rundstedt hoped that Dietrich could wheel his forward divisions into a good position on defensible ground from which the Fifth Panzer Army could be covered and supported.

A Time for Trumpets ~ Scenario Book 31
© 2020 GMT Games, LLC
To the west, General Manteuffel faced a military and political di-lemma as day drew to a close on 24 December… his Fifth Panzer Army faced toward the Marche plateau, the road to Dinant, and towards Bastogne… a résumé of decisions were made by higher German HQ between 22 Dec and the night of the 24th. Hitler’s new orders, as relayed to the Fifth Panzer headquarters by Jodl early on the 25th, told Manteuffel to put all available forces into the battle for control of the Marche plateau.Manteuffel had problems: 1) the road to the isolated 2d Panzer advance guard must be reopened; 2) the northern flank toward Dinant would have to be covered in considerable strength; 3) the southern flank must be barricaded; 4) and last, the assault in the center required greater width and depth on the Marche plateau… Jodl assured him that the II SS Panzer Corps was being rushed forward by the Sixth Panzer Army to take over the fight on his right wing east of the Ourthe River… and the 9th Panzer Division would arrive in time to take part in the attack planned.The right shoulder of the expanding salient would be formed by the 116th Panzer Division, which was in full force on the west bank of the Ourthe, and had penetrated the American line at Verdenne… The objective given the 116th Panzer was the town of Baillonville. The 116th had to breach the American defenses between Marche and Hotton and press forward to cover the drive to Dinant. The 9th Panzer Division, upon arrival, was ticketed to beef up the 2d Panzer attack in the center.The German attack plans between the Salm and the Ourthe, formu-lated during the night of 23 December, called for the 2d SS Panzer to attack northwest, the immediate objective being the Manhay crossroads. After the fall of Manhay, the 2d SS Panzer was to turn west from Manhay, drive along the lateral road to Erezée, then pivot northwest to seize the Ourthe Bridge at Durbuy (this would coincide with 116 Panzer capture of Baillonville) and strike the American VII Corps in the flank to break its grasp in the Celles-Marche sector.
109.5.2 Marginal Victory Conditions A marginal victory reflects German attempts to salvage some level of success when it was obvious they were not going to cross the Meuse, or take Liege, or eliminate all Allied forces east of the Meuse. At end of any game turn that ends on 24PD or later, a Mar-ginal Victory is earned, if the following are attained:a. The Allies cannot trace a supply road to any town or village on
the 5PzA-7A Boundary from Bitburg to the Wiltz River.b. German units in any status occupy Kautenbach, Wiltz, 6446,
6145, Neffe and both Bastogne Town hexes.c. The Allies cannot trace a supply road to any town or village on
the 5PzA-7A Boundary from Bastogne to Grupont.d. German units in any status occupy Wavreille, Han-sur-Lesse,
Eprave, Ciergnon, Houyet, Hulsonniaux and Drehance.e. German units in any status occupy Dinant, Purnode, Spontin,
Braibant, Ciney, Pessoux, Nettinne, Baillonville and Noiseux.f. The Germans control an operational bridge across the Ourthe
River to Noiseux.g. Supplied German units occupy Rochefort, Marche and Hotton.h. German units in any status occupy Grand Han, Durbuy, Barvaux
and Bomal.i. German units in any status occupy Filot, Xhoris, Oneux, Spri-
mont, Remouchamps, 6111, 6411, Spa, and Tiege.
j. German units in any status occupy Jailay, 7506, Mutzenich, Monschau, Konzen, Simmerath and Siegfreid Strauch.

A Time for Trumpets ~ Scenario Book32
© 2020 GMT Games, LLC
SCENARIO SETUP INSTRUCTIONS1. The combatants for a scenario are identified at the beginning of the scenario rules. 2. Likewise, the specific setup charts required for a scenario are listed at the beginning of the scenario rules.3. Setup Hex: On a Setup Chart, the setup hex of the unit is listed above the unit; this will be a four-digit number.
4. Alpha-numeric Code: When the four-digit hex number is pre-ceded by a three-character alpha-numeric code, then the setup hex of the unit may be easily located on the corresponding setup map.
Example: See 3 US units from the Monschau Setup Chart in hex 8402. Find their location easily without using the fine print hex number. Use the three digit alphanumeric code, A02, and locate the hex on the corresponding Monschau setup Map.
5. Allied Units West of Front Line: There is one Setup Chart for Allied units west of the front line, which will not have a correspond-ing Setup Map. This chart will only have the four-digit hex number for the units involved.6. Free-to-Move Turn: The turn that a unit is free to move is listed below the unit. 7. Release Color Codes: If the release turn is highlighted green , the unit may move on the 16MO turn. If the release turn is high-lighted yellow , the unit is free to move on the 16AF turn. If the release turn is highlighted pink , the unit is free to move on the 16EV turn. If the release turn is highlighted teal , the unit is free to move on a turn later than the 16EV turn.8. Release Conditions: If there are conditions for release, a note (abbreviated N) will be referenced below the unit. 9. Default Early Release: An Allied unit is released immediately if a German unit moves adjacent to the unit prior to the turn of release, or before the specified release conditions are met.10. Pre-Release Fire Support: Prior to release for movement, artillery units “In Battery” may provide fire support in accordance with the game rules and scenario rules. 11. Special Abbreviations: Certain abbreviations (Ft), (SP), (IP6) or (IP5) also appear beneath the unit when applicable; see defini-tions below.
16MO-Res: In Reserve at Start; released for movement during 16MO Exploitation Segment without command by a Leader.
Ft: Unit occupies a Fort. SP: Unit occupies a Strongpoint. IP5, IP6: Unit occupies an Improved Position ER5 or ER6.
12. When starting a scenario, the German player has the option to use the German Artillery Formation Substitute counters in order to reduce counter congestion and facilitate ease of play. See rule section 44.0 and the German Artillery Park Cards. The use of the substitutes significantly reduces counter density.13. Examples of some of the depictions on the setup charts are shown below.
A01: Three-character alphanumeric code
correlates with hex on related Setup Map
Teal Highlight: Released after 16 Dec with a note describing
conditions
N1: Conditions forrelease; explained elsewhere on chart
8001: Four-digit hex number
SP: Unit occupies a Strongpoint; released on 16MO
Yellow highlight: released on 16 AF
Artillery unit setup In-Battery for firing
No three-digit alphanumeric code, so unit sets up west of the Setup
Maps; place in Spa, hex 6611
Teal highlight: released after 16 Dec with a note describing conditions
Artillery unit setup In-Battery for firing
Pink highlight: released on 16 EV

A Time for Trumpets ~ Scenario Book 33
© 2020 GMT Games, LLC

A Time for Trumpets ~ Scenario Book34
© 2020 GMT Games, LLC

A Time for Trumpets ~ Scenario Book 35
© 2020 GMT Games, LLC
Phot
ocop
y th
is c
hart
at 1
00%
or l
arge
r in
orde
r to
set u
p un
its o
n it.

A Time for Trumpets ~ Scenario Book36
© 2020 GMT Games, LLC

A Time for Trumpets ~ Scenario Book 37
© 2020 GMT Games, LLC
Phot
ocop
y th
is c
hart
at 1
00%
or l
arge
r in
orde
r to
set u
p un
its o
n it.

A Time for Trumpets ~ Scenario Book38
© 2020 GMT Games, LLC

A Time for Trumpets ~ Scenario Book 39
© 2020 GMT Games, LLC
Phot
ocop
y th
is c
hart
at 1
00%
or l
arge
r in
orde
r to
set u
p un
its o
n it.

A Time for Trumpets ~ Scenario Book40
© 2020 GMT Games, LLC

A Time for Trumpets ~ Scenario Book 41
© 2020 GMT Games, LLC
Phot
ocop
y th
is c
hart
at 1
00%
or l
arge
r in
orde
r to
set u
p un
its o
n it.

A Time for Trumpets ~ Scenario Book42
© 2020 GMT Games, LLC

A Time for Trumpets ~ Scenario Book 43
© 2020 GMT Games, LLC
Phot
ocop
y th
is c
hart
at 1
00%
or l
arge
r in
orde
r to
set u
p un
its o
n it.

A Time for Trumpets ~ Scenario Book44
© 2020 GMT Games, LLC

A Time for Trumpets ~ Scenario Book 45
© 2020 GMT Games, LLC
Phot
ocop
y th
is c
hart
at 1
00%
or l
arge
r in
orde
r to
set u
p un
its o
n it.

A Time for Trumpets ~ Scenario Book46
© 2020 GMT Games, LLC

A Time for Trumpets ~ Scenario Book 47
© 2020 GMT Games, LLC
Phot
ocop
y th
is c
hart
at 1
00%
or l
arge
r in
orde
r to
set u
p un
its o
n it.

A Time for Trumpets ~ Scenario Book48
© 2020 GMT Games, LLC
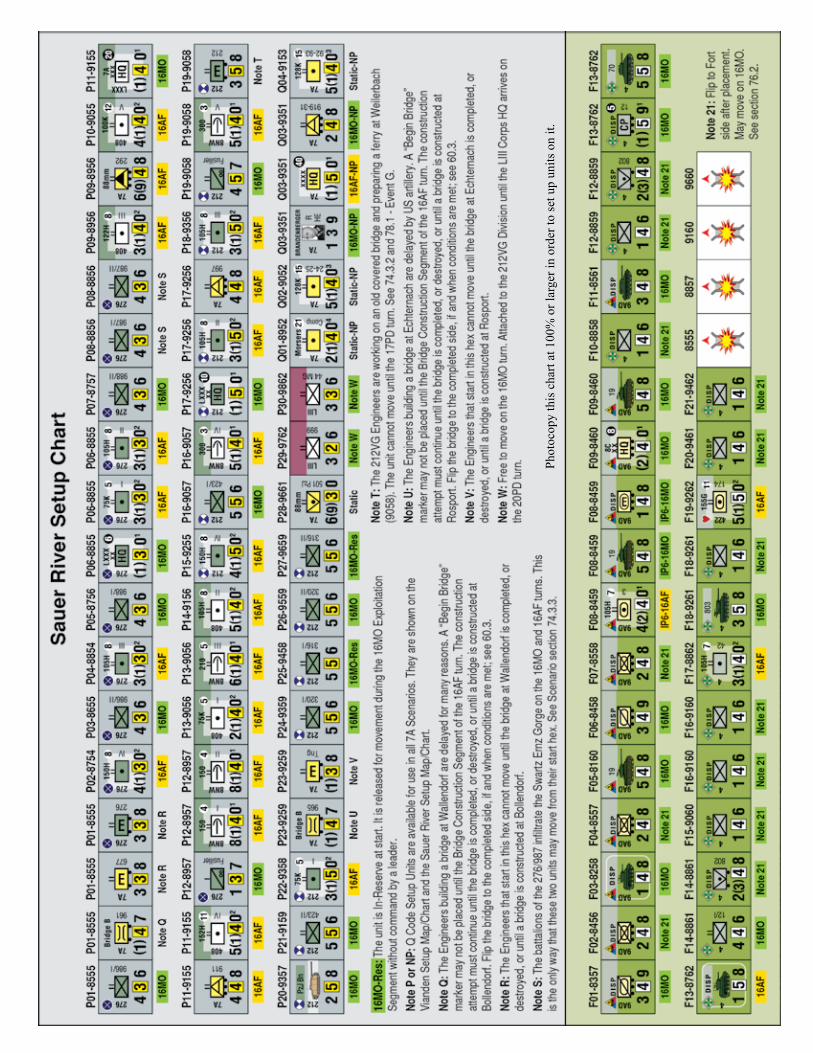
A Time for Trumpets ~ Scenario Book 49
© 2020 GMT Games, LLC
Phot
ocop
y th
is c
hart
at 1
00%
or l
arge
r in
orde
r to
set u
p un
its o
n it.

A Time for Trumpets ~ Scenario Book50
© 2020 GMT Games, LLC
Introduction to End Game ScenariosDesign: The end game scenarios have been designed so that they may be merged together to form an End Game Campaign Game involving the play of 5PzA and the German 7A versus the US 1A and 3A. There are five end game scenarios; however, the start times are staggered as explained below. Players may start with single scenarios and later combine all five into an End Game Campaign.Start Dates: the scenarios start on 22Dec or 23Dec. These types of scenarios are difficult to design due to the problems associated with finding the unit positions after they have moved around for a week. Also, as stated previously, there is the war game issue of perfect intelligence, which is worse for scenarios that start later than 16Dec. In later scenarios, players can see weak areas that could not be seen by their historical counterparts. Also, players have perfect knowledge of the arrival of reinforcements. As a result, scenario rules include historical intelligence limitations.Unit Locations. Much research was required in order to locate the positions of the units that appear in the end game scenarios. The front line units and HQ’s were the easiest to find, although those who spent hundreds of hours on the scenarios would say that easy is a relative term. Tank destroyers and engineers were usually not too hard to find. Artillery units were rarely found, so we had to resort to extrapolation based upon doctrine to position them. Anti-aircraft unit locations were rarely found in the major sources, so time consuming searches were necessary to find most locations.Sepp Excluded. As the first week of the Bulge drew to a close, the 5PzA had experienced some success, while the 6PzA had achieved little. Eventually, Rundstedt and Model decided to shift 6PzA units south and to focus on the limited success achieved by the 5PzA. As such, the end game scenarios do not include the stalemated situation north of the 5PzA-6PzA Boundary.Southeast Excluded. Due to the weakness of the German LXXX Corps and the firm resistance of the 4ID, 9CCA and 10AD, the battle east of the Alzette and south of the Sure became a stalemated situation. The units are packed into a small area and there is little space for maneuver. For this reason, the area in the southeast with the German LXXX Corps and the US 12 Corps is excluded from the end game scenarios.
The Race to the MeuseScenario begins with German 22MO Turn.
110.0 Briefing 111.0 Scenario Parameters112.0 Scenario Rules for German 5PzA113.0 Scenario Rules for US vs the 5PzA114.0 Allied Areas of Operation (AO)
110.0 Briefing A Fuel convoy arrives for the 2nd Panzer Division on the morning of 22Dec. Kampfgruppe Von Bohm is fueled first and moves out on 22MO, followed by Kampfgruppe Cochenhausen on 22AF, and finally, the rest of 2Pz on 22EV. Panzer Lehr, which has been tasked to cover the left flank of 2Pz, has an interesting day on 22Dec. Lehr Recon takes out the 58FA Bn, while other elements of Lehr cap-ture a great deal of American equipment and supply on 22PD and
22MO. Lehr, minus Kampfgruppe 901, which is attached to 26VG, rests and regroups on 23AF. Eventually, on 22EV, Lehr moves out unopposed via open roads south of St.Hubert. The right flank of 2Pz is expected to be covered by 116Pz, which starts 22Dec stuck in the forest between Hotton and Samree.
111.0 Scenario Parameters111.1 TimeframeThe scenario begins with the German 22MO turn and ends with the Allied 26EV turn.
111.2 Maps RequiredThe northwest, southwest and south central maps are required.
111.3 Aircraft Allocationa. Aircraft are allocated for this scenario in accordance with the
following Table. b. When 2 aircraft are allocated to the Brits or 7C, one of the aircraft
must Strafe.
23MO 23AF 24MO 24AF 25MO 25AF 26MO 26AFXLVII 1 1 1 1 1 1 1 0British 1 1 2 2 1 1 1 1US 7C 0 0 2 2 2 2 2 2
111.4 German ParticipantsSetup Charts and Reinforcement Charts for the Germans are found in the Play-aid Book.a. See Setup Chart 2nd Panzer on page 32.b. See Setup Chart Panzer Lehr on page 33.c. See German Reinforcement Chart 4 for the 9th Panzer Division
that arrives on 23PD.
111.5 American ParticipantsSetup Charts and Reinforcement Charts for the Allies are found in the Play-aid Book.a. See Setup Chart Allies on page 34.b. See Allied Reinforcement Chart 3 for Brits that arrived on 21PD.
They may be deployed In Comm per Note 73. c. See Allied Reinforcement Chart 4 for Brits that arrived on 21EV
and 22PD. They may be deployed In Comm per Note 76. d. See Allied Reinforcement Chart 4 for units arriving on the 22MO
turn, identified by Note 69. e. See Allied Reinforcement Chart 5 for British units arriving on
the 22AF turn.f. See Allied Reinforcement Chart 5 for American units arriving
on the 22AF turn.g. See Allied Reinforcement Chart 6 for the following units:
1) Units arriving on the 23PD turn, identified by Note 80. 2) Units arriving on the 23MO turn, identified by Note 69.3) Units arriving on the 23AF turn, two 1A Engineer Bn’s.4) Units arriving on the 24PD turn, three 118 Infantry Bn’s.
h. See Allied Reinforcement Chart 7 for the 774 Tank Bn.
111.6 Applicable Scenario Specific Rulesa. 112.0 Scenario Rules for German 5PzAb. 113.0 Scenario Rules for US vs the 5PzAc. 114.0 Allied Areas of Operation (AO)

A Time for Trumpets ~ Scenario Book 51
© 2020 GMT Games, LLC
111.7 Victory Conditions111.7.1 Allied VictoryThe Allies win by preventing the Germans from attaining their Victory conditions.
111.7.2 German Marginal VictoryThe Germans win a Marginal Victory if the conditions below are met at the end of any game turn that ends on 24PD or later:1) Supplied German units occupy Rochefort and Hargimont.2) German units in any status occupy Drehance, Dinant, Purnode,
Spontin, Braibant, Ciney, Pessoux, Sinsin, Hogne and Aye.3) German units in any status occupy Wavreille, Han-sur-Lesse,
Eprave, Ciergnon, Houyet and Hulsonniaux.
111.7.3 German Tactical Victory The Germans win a Tactical Victory the instant a German AFV enters a hex across the Meuse from Givet to Huy.
112.0 Scenario Rules for German 5PzAIf there is no entry below with respect to the participating German formations or individual units, then the instructions on the appli-cable Setup Chart or Reinforcement Chart are sufficient.
112.1 German Rested StatusAll German HQ begin the scenario with a Rested marker.
112.2 German Comm Statusa. All German units are In Comm on the 22MO turn. b. Due to the limited territory of the scenario, Comm need not be
traced from Corps HQ to Army HQ.c. Starting on 22AF, other than for (b) above, Comm is traced in
accordance with the rules except for Kampfgruppe Cochenhau-sen as explained in 122.5.
112.3 German Supply Statusa. All German units are In Supply on 22MO, 22AF and 22EV.b. Starting on 23PD, Supply is traced in accordance with the rules
except for Kampfgruppe Cochenhausen as explained in 122.5.
112.4 XLVII Corps Echelona. The 15NW Bde and the 766 VAK may assist the attack on Bas-
togne on the 22MO, 22AF and 22EV turns.b. On 23PD, one of the formations in (b) above must leave to assist
the 2nd Panzer in the Race to the Meuse, while the other must remain to assist in the reduction of Bastogne. German Choice of formation.
112.5 Kampfgruppe CochenhausenAt the start of the Ardennes Offensive, KGC consisted of a Panther Bn, a Panzer Grenadier Bn, an Artillery Bn, and two Companies of Anti-Aircraft; however, by 24Dec, KGC was commanding the preceding plus the Recon Bn and two more artillery battalions; see the Setup Chart 2nd Panzer.a. From the 23PD turn through the 24EV turn, the KGC HQ is
automatically “In Comm” and “In Supply.” The subordinate battalions trace Comm and Supply to the KGC HQ.
b. Starting on 25PD, the KGC HQ traces Comm and Supply in accordance with the rules.
112.6 Foot Infantry with Captured TrucksThe 2Pz/304 Infantry/Battalion I and the 9Pz/10 Infantry/Battalion II are equipped with captured trucks.a. Foot Infantry with captured trucks may move with the Truck
MF of 8, if they begin the turn with a truck. If the first hex moved is at the truck movement rate, the entire move must be as a truck unit.
b. If the first hex moved by the infantry is as a foot unit, the entire move must be as a foot unit. The truck moves separately. The infantry and the truck may re-unite at the start of a new turn.
c. If foot infantry with captured trucks is forced to retreat into truck prohibited terrain, the truck unit is eliminated, but the foot infantry may retreat. This is not applicable for Motorized Infantry with inherent trucks.
112.7 Panzer Lehr Panzer Lehr was overrunning and capturing vehicles, equipment and supplies beyond the Bastogne perimeter on 26PD and 26MO. Meanwhile, Lehr scouts found that the roads west through Pironpre and Amberloup were thouroughly compromised by American Engi-neers and that extensive road work would be required before they could be used by vehicular units. On the other hand, Lehr scouts also found that a secondary road through Remagne and Moircy was undefended and unmolested. On 22AF, the main body of Panzer Lehr rested and regrouped. The setup positions depicted on the Setup Chart Panzer Lehr reflect the situation and Rested Status at the end of the 22AF turn. On 22EV, Panzer Lehr must leave the Bastogne area via an unimpeded southern route through Morhet, Vaux-les-Rosieres, Remagne and Moircy.
113.0 Scenario Rules for US vs 5PzAIf there is no entry below with respect to the participating Allied formations or individual units, then the instructions on the appli-cable Setup Chart or Reinforcement Chart are sufficient
113.1 Allied Rested StatusAll Allied HQ begin the scenario with a Rested marker.
113.2 Allied Comm Statusa. All Allied units are In Comm on the 22MO turn. b. Due to the limited territory of the scenario, Comm need not be
traced from Corps HQ to Army HQ.c. Starting on 22AF, other than for (b) above, Comm is traced in
accordance with the rules.
113.3 Allied Supply StatusAll Allied units are In Supply on 22MO, 22AF and 22EV. On the 23PD turn and later, Supply is traced in accordance with the rules.
113.4 RochefortThe Defensive Position at is a Strong Point. As long as the 335 CP remains, it can call for “Hold at all Cost.”
113.5 84ID Infantry BattalionsThe Infantry Battalions of the 84ID cannot move until attacked. They may construct defensive positions.

A Time for Trumpets ~ Scenario Book52
© 2020 GMT Games, LLC
113.6 84ID Combat SupportThe Non-Infantry units of the 84ID may not move until one or more of the 84ID Infantry Battalions is attacked or until a German unit crosses the Wanne-Hedree. In addition, these units may not move Out of Comm.
113.7 Hotton and RendeuxThe units that start in Hotton and Rendeux cannot move until attacked, or until a unit from the LVIII Corps moves west out of LaRoche, or until a unit from the LVIII Corps crosses the Ourthe at a location other than LaRoche, or until the 25PD turn.
114.0 Allied Areas of Operation (AO)a. During the 22PD-26EV turns, the US Army AO Map is required;
see the Play-Aid Booklet.b. During the 22PD-26EV timeframe, the US Corps 22PD-26EV
AO map is required; see the Play-Aid Booklet.
The Battle of BastogneScenario begins with German 22MO Turn.
120.0 Briefing 121.0 Scenario Parameters122.0 Scenario Rules for German 5PzA123.0 Excluded XLVII Corps Units124.0 The 7A near Bastogne125.0 Scenario Rules for US vs the 5PzA126.0 Scenario Supply Rules127.0 Allied Areas of Operation (AO)
120.0 Briefing The scenario is about the 26VG and Lehr 901 attempt to take Bas-togne. Not an easy scenario to design. The Germans with about 20,000 men are expected to defeat 18,000 men that include an elite Airborne Division with many small attachments and eleven artil-lery battalions. Lack of supply for the Americans is an equalizer. The eleven US artillery battalions are comprised as follows: the 101 Glider Arty Group is a composite of the 321st and the 907th Glider FA Battalions; the 101 Parachute Arty Group is a composite of the 377th and the 463rd Parachute FA Battalions; 28/109 FA; 10CCB/420 FA; 9CCR/73 FA; 333/333 FA; 333/771 FA; 174/969 FA; and 8C/755 FA. Some of the artillery battalions at Bastogne lost guns before reaching the perimeter, but this was offset by not includ-ing the 8C/687 FA, which fought at Bastogne with half of its guns.
121.0 Scenario Parameters121.1 TimeframeThe scenario begins with the German 22MO turn and ends with the Allied 26EV turn.
121.2 Maps RequiredThe south central map is required.
121.3 Aircraft Allocationa. Aircraft are allocated for this scenario in accordance with the
following Table.
b. The US is receiving more aircraft than listed, but one air is diverted on each day turn for Air Supply.
23MO 23AF 24MO 24AF 25MO 25AF 26MO 26AF26VG 1 1 1 1 1 1 1 0US 8C 0 0 1 1 1 1 1 1
121.4 German ParticipantsSetup Charts and Reinforcement Charts for the Germans are found in the Play-aid Book.a. See Setup Chart Germans on page 35.b. See Setup Chart Panzer Lehr on page 33. Although the main
body of Lehr cannot assist the attack on Bastogne, the space it occupies affects the movement of other German forces.
c. See German Reinforcement Chart 4 for the Hetzers that arrive on 23PD and for the 167VG that arrives on 25AF.
121.5 American ParticipantsSetup Charts and Reinforcement Charts for the Allies are found in the Play-aid Book.a. See Setup Chart Americans on page 36.b. See Allied Reinforcement Chart 7 for the 11AD that arrives on
the 24MO turn.
121.6 Applicable Scenario Specific Rulesa. 122.0 Scenario Rules for German 5PzAb. 123.0 Excluded XLVII Corps Unitsc. 124.0 The 7A near Bastogned. 125.0 Scenario Rules for US vs the 5PzAe. 126.0 Scenario Supply Rulesf. 127.0 Allied Areas of Operation (AO)
121.7 Victory Conditions121.7.1 Allied VictoryThe Allies wins by preventing the Germans from attaining their Victory conditions.
121.7.2 German Marginal VictoryThe Germans win a marginal victory if the Allies cannot trace a Supply road into Bastogne at the end of the 26EV turn.
121.7.3 German Substantial Victory The Germans win a substantial victory if they occupy one or more of the Bastogne hexes at the end of any turn.
122.0 Scenario Rules for German 5PzAIf there is no entry below with respect to the participating German formations or individual units, then the instructions on the appli-cable Setup Chart or Reinforcement Chart are sufficient.
122.1 German Rested StatusAll German HQ begin the scenario with a Rested marker.
122.2 German Comm Statusa. All German units are In Comm on the 22MO turn. b. Starting on 22AF, the 5PzA Echelon, XLVII Echelon, 26VG
and Lehr 901 may trace Comm to any of the following HQ: the 5PzA HQ, the XLVII HQ, the 26VG HQ and the Lehr 901 CP.

A Time for Trumpets ~ Scenario Book 53
© 2020 GMT Games, LLC
122.3 German Supply Statusa. All German units are In Supply on 22MO, 22AF and 22EV. b. Starting on 23PD, the 5PzA Echelon, XLVII Echelon, 26VG
and Lehr 901 may trace Supply to any of the following HQ: the 5PzA HQ, the XLVII HQ, the 26VG HQ and the Lehr 901 CP.
122.4 XLVII Corps Echelona. The 15NW Bde and the 766 VAK may assist the attack on Bas-
togne on the 22MO, 22AF and 22EV turns.b. On 23PD, one of the formations in (b) above must leave to assist
the 2nd Panzer in the Race to the Meuse, while the other must remain to assist in the reduction of Bastogne. German Choice of formation.
122.5 Lehr 901 and 26VG CooperationThe units of the 26VG and Lehr 901 may stack freely with each other. They are considered as the same formation for this scenario, including their artillery units.
122.6 Neffe and Foya. Neffe. The vagaries of hexagons have an effect on this scenario.
The castle at Neffe was actually occupied by the Germans on 22MO, but they held only the edge of the hex. So, the US gets the hex, but without a defensive position.
b. Foy. Similar situation as Neffe. The Germans hold the village, but the hex is contested, so the front line has been arranged to conform to the hexagonal grid.
123.0 Excluded XLVII Corps Units123.1 Panzer LehrOther than the seven units of Kampfgruppe 901 that were attached to the 26ID, the rest of Panzer Lehr was freely moving around south, southwest and west of Bastogne on 22PD and 22MO. The 58 FA Battalion was destroyed while scores of vehicles, much equipment and many supplies were captured by Lehr throughout the area in that time frame. On 22AF, the main body of Panzer Lehr rested and regrouped. The setup positions of Panzer Lehr and Rested Status reflect the situation at the end of the 22AF turn. Although, the main body of Lehr cannot participate in the attacks on Bastogne, the lo-cation of the formation has an impact on other units moving about the area. On 22EV, Panzer Lehr must leave the Bastogne area via an unimpeded southern route through Morhet, Vaux-les-Rosieres, Remagne and Moircy. Remove the 16 units of the Lehr main body at the start of the German 22EV turn.
123.2 2nd Panzer DivisionDue to lack of fuel, the 2Pz Division has been sitting around Cham-plon, etc., since it re-captured the bridge at Ortheuville on 20 Dec. The 2Pz cannot participate in the attacks on Bastogne, because it will soon begin its race to the Meuse.
124.0 The 7A near BastogneThe 7A has a number of units south of Bastogne. The mission of the 7A is to prevent the relief of Bastogne; however, 7A units can-not participate in the attacks on Bastogne and need not be placed on the map unless the Battle of Bastogne Scenario and the US 3C Offensive Scenario are played simultaneously.
125.0 Scenario Rules for US vs 5PzAIf there is no entry below with respect to the participating Allied formations or individual units, then the instructions on the appli-cable Setup Chart or Reinforcement Chart are sufficient
125.1 Allied Rested StatusAll Allied HQ begin the scenario with a Rested marker.
125.2 Allied Comm Statusa. All Allied units are In Comm on the 22MO turn.b. Due to the limited territory of the scenario, Comm need not be
traced from Corps HQ to Army HQ.c. Starting on the 22AF turn, all units within the Bastogne perimeter
trace Comm to the 8C Signal Node in Bastogne. If the 8C Signal Node is captured, Comm must be traced normally.
125.3 Allied Supply Statusa. All Allied units are “Out of Supply” on 22MO, 22AF and 22EV. b. It is expected that all Allied units will “Out of Supply” on 23PD.c. Starting on 23MO, Air Supply is possible; see 126.0.
125.4 Allied Commanda. Stacking: all units within the Bastogne perimeter are attached
to the 101AB and may stack together without penalty.b. Command: all units within the Bastogne perimeter are under
the command of General McAuliffe. c. Reserves: See 18.4. McAuliffe can Designate units as reserves
even if they are Out of Supply - this is an exception to 18.4 that applies for this scenario. They may be released for up to half MF (round up) during the Leader Reaction Phase regardless of supply status. Due to the amalgamation of units, the Benefit of Reserves per 18.5 does not apply for this scenario.
d. Artillery: all artillery battalions within the Bastogne perimeter are considered to be of the same formation.
126.0 Scenario Supply Rulesa. These rules below apply when a normal supply line per rule
section 9.0 cannot be traced.b. Based on the history of the 101AB to fight while surrounded and
out of supply, the following special supply rules are provided for the Battle of Bastogne Scenario.
126.1 Non-Arty Unitsa. When such units are Out of Supply, they are subject to all the
effects of rule section 9.15. b. Air Supply is received on the daylight turns starting on 23MO.
All units within the perimeter are In Supply for the MO, AF and EV turns from 23MO through 26EV.
c. However, all units within the perimeter are Out of Supply for each PD turn from 23PD through 26PD when the 101AB is surrounded.
126.2 The 420 FA a. When the 420 FA is Out of Supply, it is subject to the effects of
rule section 9.15, but not 9.15e. b. The Commander of the 420 FA had the foresight to bring a
convoy of artillery ammo with the battalion.

A Time for Trumpets ~ Scenario Book54
© 2020 GMT Games, LLC
c. The 420 FA Battalion may always fire with full combat factor, even when Out of Supply.
126.3 Other US Arty Units a. When these are Out of Supply, they are subject to the effects of
rule section 9.15, but not 9.15e.b. The 101AB expected to surrounded and restricted artillery fire
to preserve artillery capability when it did become surrounded.
126.4 Bastogne Supply Table The Table below incorporates rationing and the air supply received on daylight turns while the 101AB is surrounded. The Arty CF ap-plies for both defense and attack, although resting precludes attack.
Turn Non-Arty 420FA Other Arty22MO-22AF-22EV OOS Full CF 1 CF23PD-24PD-25PD-26PD OOS Full CF 1 CF23MO-24MO-25MO-26MO In Supply Full CF 2 CF23AF-24AF-25AF-26AF In Supply Full CF Full CF23EV-24EV-25EV-26EV In Supply Full CF 2 CF
127.0 Allied Areas of Operation (AO)a. During the 22PD-26EV turns, the US Army AO Map is required;
see the Play-Aid Booklet.b. During the 22PD-26EV timeframe, the US Corps 22PD-26EV
AO map is required; see the Play-Aid Booklet.
US 3 Corps Offensive Scenario begins with US 22MO Turn.
130.0 Briefing 131.0 Scenario Parameters132.0 Scenario Rules for the German 7A133.0 The 5PzA-XLVII Corps in the 7A Area134.0 Scenario Rules for the US vs the 7A135.0 Allied Areas of Operation (AO)136.0 Random Events for the German 7A
130.0 Briefing This scenario starts after the Germans have already moved re-inforcements on the German 22MO turn, thus the action begins with the US 22MO turn. The US 3 Corps is attacking the German LXXXV Corps and LIII Corps. The US objectives are to relieve the surrounded 101AB at Bastogne and obtain a bridgehead across the Sure River. Progress is hindered by 12 to 18 inches of snowfall south of the Sure River.
131.0 Scenario Parameters131.1 TimeframeThe scenario begins with the US 22MO turn and ends with the US 26EV turn. The 7A has already moved on the 22MO turn.
131.2 Maps RequiredThe southeast and south central maps are required.
131.3 Aircraft AllocationAircraft are allocated for this scenario in accordance with the fol-lowing Table.
23MO 23AF 24MO 24AF 25MO 25AF 26MO 26AF7A HQ 1 1 1 1 1 1 1 0US 3C 1 1 2 2 2 2 2 2
131.4 Snow South of the SureDespite weather rule 3.3.4, on 22MO, 22AF and 22EV, the condi-tion for the peculiar 7A Area south of the Sure River is Snow; this applies to hex row 4600 and all hex rows to the east.
131.5 German ParticipantsSetup Charts and Reinforcement Charts for the Germans are found in the Play-aid Book.a. See Setup German Chart 7th Army on page 38.b. See German Reinforcement Chart 3 for the 7A units that arrive
on the 23PD turn.c. See German Reinforcement Chart 4 for the 7A units that arrive
on the 23AF, 24EV and 25EV turns.
131.6 American ParticipantsSetup Charts and Reinforcement Charts for the Allies are found in the Play-aid Book.a. See Setup Chart Patton on page 37.b. See Allied Reinforcement Chart 4 for the units that arrive in the
south on the 22MO turn.c. See Allied Reinforcement Chart 5 for the units that arrive in the
south on the 22MO turn.d. See Allied Reinforcement Chart 6 for the following units:
1) Units arriving on the 23MO turn at 4363. 2) Units arriving on the 23MO turn, identified by Note 94.3) Units arriving on the 23AF turn, identified by Note 95.4) Units arriving on the 24PD turn at E and D.
e. See Allied Reinforcement Chart 7 for the following units: 1) Units arriving on the 25PD turn, identified by Note 96.2) Units arriving on 22AF-24EV, identified by “Varies.”.
131.7 Applicable Scenario Specific Rulesa. 132.0 Scenario Rules for the German 7A.b. 133.0 The 5PzA-XLVII Corps in the 7A Area.c. 134.0 Scenario Rules for the US vs the 7A.d. 135.0 Allied Areas of Operations (AO).e. 136.0 Random Events for the US 3 Corps Offensive.
131.8 Victory Conditions131.8.1 German VictoryThe German wins by preventing the Allies from attaining their Victory conditions.
131.8.2 Allied Victory When Played Stand AloneBoth of the following objectives must be met at the end of the any turn:1) The US can trace a supply road into Sibret and Assenois.2) US units in any status occupy one or more bridgeheads across
the Sure at 6154, 6352 or 6752. An intact bridge is not required.

A Time for Trumpets ~ Scenario Book 55
© 2020 GMT Games, LLC
131.8.3 Allied Victory When Played with the Bastogne Scenario Both of the following objectives must be met at the end of the any turn:1) The US can trace a supply road into Bastogne. 2) US units in any status occupy one or more bridgeheads across
the Sure at 6154, 6352 or 6752. An intact bridge is not required.
132.0 Scenario Rules for German 7AIf there is no entry below with respect to the participating German formations or individual units, then the instructions on the appli-cable Setup Chart or Reinforcement Chart are sufficient.
132.1 German Rested StatusAll German HQ begin the scenario with a Rested marker.
132.2 German Comm StatusAll German units are In Comm on the 22MO turn. Starting on the 22AF turn, Comm is traced in accordance with the rules.
132.3 German Supply StatusAll German units are In Supply on 22MO, 22AF and 22EV. On the 23PD turn and later, Supply is traced in accordance with the rules.
132.4 Southeast ExclusionGerman units may not move into the area in the southeast bounded by the Alzette and the Sure. Units forced to retreat into that area are eliminated.
132.5 The German 7A EchelonThe 7A Echelon includes a Jagdpanther transferred from the 5PzA in Martelange and four Tiger units sent from the 6PzA in Chaumont, Eschdorf, Bourscheid and 6756.
132.6 LXXXV Corps132.6.1 LXXXV Corps Echelona. The 18NW Brigade remains in the LXXXV Corps Echelon.b. In a cumbersome arrangement with regard to game admin, two
transfers were made by the 7A in Dec44 as follows:1) The 406 VAK transfers from the LXXXV to the LIII Corps.2) The 5FJ Arty is transferred to act as the LXXXV Corps Arty.
132.6.2 LXXXV Corps Subordinate Divisionsa. The 5FJ is transferred to the LIII Corps - note the HQ change.b. The 352VG remains subordinate to the LXXXV Corps.c. The 79VG reinforces the LXXXV Corps.
132.7 LIII Corpsa. The 406 VAK transfers from LXXXV to the LIII Corps.b. The 5FJ transfers from the LXXXV Corps to the LIII Corps.
133.0 The 5PzA-XLVII Corps in the 7A AreaThe German 5PzA-XLVII is permitted to operate in the 7A Area in accordance with game rules, but it is not part of the scenario and the units would not be placed on the map unless the US 3C Offensive Scenario and the Bastogne Scenario are played simultaneously.
134.0 Scenario Rules for US vs 7AIf there is no entry below with respect to the participating Allied formations or individual units, then the instructions on the appli-cable Setup Chart or Reinforcement Chart are sufficient.
134.1 Allied Rested StatusAll Allied HQ begin the scenario with a Rested marker.
134.2 Allied Comm StatusAll Allied units are In Comm on the 22MO turn. Starting on the 22AF turn, Comm is traced in accordance with the rules.
134.3 Allied Supply StatusAll Allied units are In Supply on 22MO, 22AF and 22EV. On the 23PD turn and later, Supply is traced in accordance with the rules.
134.4 Southeast ExclusionAllied units may not move into the area in the southeast bounded by the Alzette and the Sure. Units forced to retreat into that area are eliminated.
134.5 The US 8C Echelona. The US 8C was transferred to the US 3A prior to the 3C attack in
Dec44. Note the HQ swap on Reinforcement Chart 4 on 22MO. b. Five 8C arty battalions are transferred to 3C; see 131.6b. Four
were “Heavies” that struggled to stay ahead of the Germans on 16-17 Dec due to displacement time. A Heavy could completely destroy a typical Ardennes village with a few salvoes.
c. On 22MO, there are 17 units of the US 8C in towns and villages beyond the Bastogne perimeter as depicted on the Patton Setup Chart on page 37 of the Play-aid Book. These units may not move unless a German combat unit moves adjacent.
d. On 22MO, there are seven units of the 28ID in villages south of Grosbous as depicted on the Patton Setup Chart on page 37 of the Play-aid Book. Remove them from the map as units of the 3 Corps enter their hexes.
e. The 16 Battalions of 8C Artillery during the Bulge.1) 58FA - trapped by Lehr Recon at Tillet. Lost all guns.2) 81FA and 174FA - fought with the 4ID.3) 275FA and 965FA - fought at St.Vith and with 18C.4) 333FA, 755FA, 771FA and 969FA - fought at Bastogne.5) 687FA - overrun at Harlange. Two Btry’s fought at Bastogne.6) 770FA - barely escapes Samree. Rejoins 8C at Neufchateau.7) 776FA - loaned to Patton. Assists 4CCB and 4CCR.8) 559FA, 561FA, 578FA and 740FA - Heavies. Escaped to
rejoin the 8C HQ. Loaned to Patton. Assists 4CCA and 26ID.
134.6 The US 3C Subordinate DivisionsNotes 90 to 96 on Allied reinforcement Charts 5, 6 and 7 refer to restrictions and capabilities for the 4AD, 26ID and 80ID. These rules apply to the 3C Offensive Scenario without modification.
135.0 Allied Areas of Operation (AO)a. During the 22PD-26EV turns, the US Army AO Map is required;
see the Play-Aid Booklet.b. During the 22PD-26EV timeframe, the US Corps 22PD-26EV
AO map is required; see the Play-Aid Booklet.
A Time for Trumpets ~ Scenario Book56
© 2020 GMT Games, LLC
136.0 Random Events for the LIII CorpsThe Random Events that occur during for this scenario involve the German LIII Corps. The pertinent rules are found on page 11 in the Play-aid Booklet and occur subject to the activation of German LIII Corps on the 22PD through 24EV turns. Note that Random Events G and H are of No Effect for this scenario.
The St.Vith Goose EggScenario begins with German 22AF Turn.
140.0 Briefing 141.0 Scenario Parameters142.0 Scenario Rules for German 5PzA143.0 Scenario Rules for US vs the 5PzA144.0 The US Withdrawal 145.0 Allied Areas of Operation (AO)
140.0 Briefing The scenario begins on 22AF, because it was a time easier to more accurately locate the combatants. Record keeping was sparse except for the reports provided by the 7AD. The 18VG captured St. Vith late on 21 Dec and then crashed until the next afternoon. Fuhr Escort and 62VG continued to attack all night and through the morning before resting. Farther west, Kampfgruppe Krag of 2SS Panzer was sped forward and ordered to cut the road from St.Vith to Sart in order to bag the US units defending the Goose Egg.
141.0 Scenario Parameters141.1 TimeframeThe scenario begins with the German 22AF turn and ends after the Germans capture Vielsalm, Salmchateau, Sart, Arbrefontaine, Lierneux and Regne.
141.2 Maps RequiredThe northeast, southeast and south central maps are required.
141.3 Aircraft AllocationNone.
141.4 German ParticipantsSee Setup Chart Germans on page 39 in the Play-aid Book.
141.5 American ParticipantsSee Setup Chart Americans on page 40 in the Play-aid Book.
141.6 Applicable Scenario Specific Rulesa. 142.0 Scenario Rules for the German 5PzA.b. 143.0 Scenario Rules for the US vs the 5PzA.c. 144.0 Allied Areas of Operations (AO).
141.7 Victory Conditions141.7.1 Allied VictoryThe Allies win by preventing the Germans from attaining their Victory conditions.
141.7.2 German Victorya. German Incentive: eliminate US units. The US units that escape
during the planned US withdrawal will be available for use at Manhay, if the scenario is played as part of the End Game Campaign Game.
b. Marginal Victory. When the scenario is played as a standalone scenario, a Marginal Victory is attained, if Poteau, Beho and Gouvy are captured before the end of the 23EV turn.
c. Substantial Victory. When the scenario is played as a standalone scenario, a Substantial Victory is attained, if Vielsalm and Salm-chaeau are captured before the end of the 23EV turn.
142.0 Scenario Rules for German 5PzAIf there is no entry below with respect to the participating German formations or individual units, then the instructions on the appli-cable Setup Chart or Reinforcement Chart are sufficient.
142.1 German Rested StatusThe LXVI Corps HQ and the 18VG HQ begin the scenario with a Rested marker.
142.2 German Comm Statusa. All German units are In Comm on the 22AF turn. b. Due to the limited territory of the scenario, Comm need not be
traced from Corps HQ to Army HQ.c. Starting on the 22EV turn, other than for (b) above, Comm is
traced in accordance with the rules.
142.3 German Supply StatusAll German units are In Supply on 22AF and 22EV. On the 23PD turn and later, Supply is traced in accordance with the rules.
142.4 Fuhr Escorta. Note FE capabilities in 2.6.2f, 24.4, 31.3 and 55.2.b. The FE consisting of eight combat battalions was equipped with
two battalions of AA. Consider that an SS Panzer Division with 18 combat battalions usually had one battalion of AA. After stopping the July 20 Plot while it still had a chance to succeed, Remer achieved Prima Donna status with Hitler. He got extra Anti-Aircraft and followed orders when he agreed with them.
142.5 Foot Infantry with Captured TrucksThe Fuhr Escort/Battalion III is equipped with captured trucks.a. Foot Infantry with captured trucks may move with the Truck MF
of 8, if they begin the turn with a truck. If the first hex moved is at the truck MF, the entire move must be as a truck unit.
b. If the first hex moved by the infantry is as a foot unit, the entire move must be as a foot unit. The truck moves separately. The infantry and the truck may re-unite at the start of a new turn.
c. If foot infantry with captured trucks is forced to retreat into truck prohibited terrain, the truck unit is eliminated, but the foot infantry may retreat. This is not applicable for Motorized Infantry with inherent trucks.
A Time for Trumpets ~ Scenario Book 57
© 2020 GMT Games, LLC
142.6 Territorial Limitationsa. The 18VG, 62VG and LXVI Corps Echelon are expected to
clear the road net Salmchateau-Sart-Lierneux-Arbrefontaine-Vielsalm. The force is then scheduled to assist the 9SS Panzer between the Lienne Creek and the Salm. The units are thus prohibited from moving west beyond hex row 6100.
b. The Fuhr Escort Brigade is eventually ordered to assist the 116Pz and is thus transferred to the LVIII Corps after the Germans capture Beho, Gouvy, Cherain, Salmchateau, Sart and Regne. The FE may be placed in Strat Move for the move west. The FE/Infantry Bn III is equipped with captured trucks.
c. The 2SS Panzer may use the road net Sart-Lierneux-Vaux-Chavanne-Manhay and operate freely on that road net and any hexes to the south; however, if units of 2SS Pz are forced to retreat north of that road net, they are eliminated.
143.0 Scenario Rules for US vs 5PzAIf there is no entry below with respect to the participating Allied formations or individual units, then the instructions on the appli-cable Setup Chart or Reinforcement Chart are sufficient.
143.1 Allied Rested StatusAll Allied HQ begin the scenario with a Rested marker.
143.2 Allied Comm Statusa. All Allied units are In Comm on the 22AF turn. b. Due to the limited territory of the scenario, Comm need not be
traced from Corps HQ to Army HQ.c. Starting on the 22AF turn, other than for (b) above, Comm is
traced in accordance with the rules.
143.3 Allied Supply StatusAll Allied units are In Supply on 22AF and 22EV. On the 23PD turn and later, Supply is traced in accordance with the rules.
143.4 Allied Cooperationa. All Allied units defending the St.Vith Goose Egg are attached
to the 7AD and may stack together without penalty. All artillery battalions defending the St.Vith Goose Egg are considered to be of the same formation.
b. The 82AB units are not attached to the 7AD.
144.0 The US Withdrawal After the loss of St.Vith, the fall-back position of the US defenders was threatened when Fuhr Escort took Rodt just before noon on 22Dec. It was also known that the 2SS Pz Division was moving into the rear of the Goose Egg. As a result, Monty ordered the 7AD to withdraw that afternoon. A complex plan was developed and it was implemented in an organized manner starting at 0600 on 23Dec. In this scenario, the organized, phased withdrawal plan begins on the 23MO turn; however, German action could impede the operation.
144.1 Organized Withdrawala. The withdrawal begins on the 23MO turn.b. As the units withdraw, they must move to Lierneux or Arbre-
fontaine, after which they must move north from those villages. After they move one hex north of the villages, remove them from
the map. The withdrawal process may continue beyond the first turn until conditions are met.
c. Withdrawing units may pass through the 82AB without penalty, but they cannot stack without penalty.
d. When the sequence requires for a unit to withdraw, it must move as far as possible.
e. The units of 7AD may “Hold at all Costs” without the presence of a leader in order to allow the phased withdrawal to proceed according to plan.
f. If the full movement of the withdrawing units is cut short by the 2SS Panzer, the withdrawing units may attack.
g. The withdrawal sequence that must be followed is listed below. It is not necessary, nor may it be possible, that all the sequenced withdrawals below be initiated on 23MO. 1) The seven units of 9CCB must perform withdrawal move-
ment before any other unit is moved.2) The 7CCR/17 and 7CCR/38 must perform withdrawal move-
ment before any other unit is moved.3) All units of the 106ID must perform withdrawal movement
before any other unit is moved.4) Non-Cavalry units of the 8C Echelon must perform with-
drawal movement before any other unit is moved.5) The 7CCB/31 and 7CCB/23 must perform withdrawal move-
ment before any other unit is moved.6) The 7AD Artillery may be repositioned or withdrawn.7) The 7CCA/40 (Steps) and 7CCA/48 must perform with-
drawal movement before any other unit is moved. A rear guard and a Roadblock may be left in Petit Thier; see h below.
8) The 7AD combat support units (TD, Cav, AA and Eng) must perfrom withdrawal movement before any other unit is moved. A rear guard and a Roadblock may be left in Beho, Courtil or Bovigny; see h below.
9) The units of the 28ID and the 8C Cav (Task Force Jones) are the last to withdraw. These groups may leave a rear guard and a Roadblock in any village; see h below.
h. Rear Guard. When a group of units is leaving a rear guard, the priority for the mission must be as follows: Engineers first, then Cavalry, then Infantry, then any other front line or combat support unit available.
144.2 Impeded Withdrawala. The withdrawal is impeded, if a German combat unit is in or
adjacent to Poteau, Beho or Gouvy when the withdrawal begins.b. The process for the impeded withdrawal is almost identical to
that of the organized withdrawal. The only change involves 143.4.1e. The units of 7CCA and 7CCB may not “Hold at all Costs” without the presence of a leader.
145.0 Allied Areas of Operation (AO)a. During the 22PD-26EV turns, the US Army AO Map is required;
see the Play-Aid Booklet.b. During the 22PD-26EV timeframe, the US Corps 22PD-26EV
AO map is required; see the Play-Aid Booklet.

A Time for Trumpets ~ Scenario Book58
© 2020 GMT Games, LLC
The Salm and the OurtheScenario begins with German 23PD Turn.
150.0 Briefing 151.0 Scenario Parameters152.0 Scenario Rules for German 5PzA153.0 Scenario Rules for US vs the 5PzA154.0 Allied Areas of Operation (AO)
150.0 Briefing This is a weird scenario reflecting the mishandling of the 116Pz by LVIII Corps and 5PzA Army HQ. The 116Pz morale was up after almost annihilating the retreating 9CCR as the unsuspect-ing Americans blundered into the 116Pz tanks and infantry units regrouping at Tavigny. Then, moving unopposed to the west, lead elements of the 116Pz captured the bridge at Ortheuville on 19/20 Dec, a day before the 2Pz did likewise. A few miles back to the east the 116Pz was overrunning the 101AB field Hospital near Bertogne. Unfortunately, the road through Bertogne to Ortheuville was a 2Pz Rollbahn and the 116Pz was ordered to countermarch back to Houffalize. After the war, LVIII Corps personnel claimed they didn’t know the Ortheuville bridge had been captured until hours after the countermarch order had been issued. So, 116Pz turned around, passed through Houffalize and captured LaRoche with an intact bridge; however, the 116Pz was ordered to move north along the Ourthe and capture the bridge at Hotton. The 116Pz then drove into a dead end as the forest between the Salm and the Ourthe hampered the deployment. The US defenders in Hotton were few, but the terrain and the US 3CCR on the right flank brought the 116Pz to a halt. Eventually, new orders came; the 116Pz must countermarch back to LaRoche, cross the Ourthe, attack through the US 84ID, capture Baillionville and solidify the right flank of the 2Pz. In order for the retrograde move to occur, the 560VG would take over the ground captured by the 116Pz. A bit further east, the 2SS Panzer was moving with orders to capture the area beyond the Aine River in order to gain a bridgehead across the Ourthe at Noiseau.
151.0 Scenario Parameters151.1 TimeframeThe scenario begins with the German 23PD turn and ends with the US 26EV turn.
151.2 Maps RequiredThe south central map is required.
151.3 Aircraft AllocationAircraft are allocated for this scenario in accordance with the fol-lowing Table.
23MO 23AF 24MO 24AF 25MO 25AF 26MO 26AFLVIII 1 1 1 1 1 1 1 0US 18C 1* 1* 1 1 1 1 1 1
* - The US rolls a die. On a roll of 1-3, the 18C receives one aircraft.
151.4 German ParticipantsSee Setup Chart Germans on page 41 in the Play-aid Book.
151.5 American ParticipantsSetup Charts and Reinforcement Charts for the Allies are found in the Play-aid Book.a. See Setup Chart Americans on page 42.b. See Allied Reinforcement Chart 6 for the units that arrived on
the 22EV turn, identified by Note 79. These units move twice on the 23PD turn.
c. See Allied Reinforcement Chart 6 for the units that arrive on the 23PD turn, identified by Note 79.
d. See Allied Reinforcement Chart 6 for the 18 FAG and the 188 FAG arriving on the 23MO turn—a total of nine units.
151.6 Applicable Scenario Specific Rulesa. 152.0 Scenario Rules for the German 5PzA.b. 153.0 Scenario Rules for the US vs the 5PzA.c. 154.0 Allied Areas of Operations (AO).
151.7 Victory Conditions151.7.1 Allied Victorya. The Allies win, if the Germans have not entered Hampteau,
Verdenne and Marenne by the end of the 25EV turn.b. Otherwise, the Allies win by preventing the Germans from at-
taining their Victory conditions.
151.7.2 German Marginal VictoryA Marginal Victory is earned at the end of any turn in which the Allies cannot trace a supply road to all of the following hexes: LaRoche, Samree, Parker’s Crossroad, Malempre, Manhay, and the 12 villages and towns between the Ourthe and the Aine, of which Beffe is the southernmost.
151.7.2 German Substantial VictoryA Substantial Victory is earned at the end of any turn in which the conditions for a Marginal Victory are met and the Germans also have an operational bridge across the Ourthe into Noiseux.
152.0 Scenario Rules for German 5PzAIf there is no entry below with respect to the participating German formations or individual units, then the instructions on the appli-cable Setup Chart or Reinforcement Chart are sufficient.
152.1 German Rested StatusAll German HQ begin the scenario with a Rested marker.
152.2 German Comm Statusa. All German units are In Comm on the 23PD turn. b. Due to the limited territory of the scenario, Comm need not be
traced from Corps HQ to Army HQ.c. Starting on the 23MO turn, other than for (b) above, Comm is
traced in accordance with the rules.
152.3 German Supply Statusa. All German units are In Supply on all 23Dec turns.b. On the 24PD turn and later, Supply is traced in accordance with
the rules.
152.4 Fuel Status for 116PzThe 116Pz HQ has a captured fuel unit.

A Time for Trumpets ~ Scenario Book 59
© 2020 GMT Games, LLC
152.5 Foot Infantry with Captured TrucksThe 2SS Pz/3rd Inf/ Battalion I is equipped with captured trucks.a. Foot Infantry with captured trucks may move with the Truck MF
of 8, if they begin the turn with a truck. If the first hex moved is at the truck MF, the entire move must be as a truck unit.
b. If the first hex moved by the infantry is as a foot unit, the entire move must be as a foot unit. The truck moves separately. The infantry and the truck may re-unite at the start of a new turn.
c. If foot infantry with captured trucks is forced to retreat into truck prohibited terrain, the truck unit is eliminated, but the foot infantry may retreat. This is not applicable for Motorized Infantry with inherent trucks.
152.6 Territorial LimitationsThe 2SS Panzer may use the road net Sart-Lierneux-Vaux-Cha-vanne-Manhay and operate freely on that road net and any hexes to the south; however, if units of 2SS Pz are forced to retreat north of that road net, they are eliminated.
153.0 Scenario Rules for US vs 5PzAIf there is no entry below with respect to the participating Allied formations or individual units, then the instructions on the appli-cable Setup Chart or Reinforcement Chart are sufficient.
153.1 Allied Rested StatusAll Allied HQ begin the scenario with a Rested marker.
153.2 Allied Comm Statusa. Based on the Atmospheric Conditions Table, it is likely that the
Allied units in Marcouray will start the scenario In Comm. If the atmosphere is Clear, the units will be Out Comm.
b. Allied units other than those above in (a) are In Comm on the 23PD turn.
c. Due to the limited territory of the scenario, Comm need not be traced from Corps HQ to Army HQ.
d. Starting on the 23MO turn, other than for (b) above, Comm is traced in accordance with the rules.
153.3 Allied Supply Statusa. The Allied units in Marcouray start the scenario Out of Supply.b. Allied units other than those above in (a) are In Supply on all
23Dec turns.c. On the 24PD turn and later, Supply is traced in accordance with
the rules.
153.4 MarcourayThe Defensive Position at Marcouray is a Fort that imparts a two column shift for the defenders. Furthermore, as long as the Hogan CP remains, it can call for “Hold at all Cost.”
153.5 84ID Infantry BattalionsThe Infantry Battalions of the 84ID cannot move until attacked. They may construct defensive positions.
153.6 84ID Combat SupportThe Non-Infantry units of the 84ID and the attached 87CM may not move until one or more of the 84ID Infantry Battalions is attacked or until a German unit crosses the Wanne-Hedree..
153.7 Hotton and RendeuxThe units that start in Hotton and Rendeux cannot move until attacked, or until a unit from the LVIII Corps moves west out of LaRoche, or until a unit from the LVIII Corps crosses the Ourthe at a location other than LaRoche, or until the 25PD turn.
153.8 The 7AD153.8.1 Stand Alone ScenarioWhen the Salm and the Ourthe is played as a Stand Alone Scenario, the 7CCA/40, 7CCA/48 and the TD Step arrive at Manhay, while the 7AD/440 FA supports from north of the 5PzA-6PzA Boundary; however, if Manhay is occupied by the Germans, the units do not ar-rive - instead, they defend to the north of the 5PzA-6PzA Boundary.
153.8.2 Conjunction with St.Vith ScenarioWhen the Salm and the Ourthe is played in conjunction with the St.Vith Goose Egg Scenario, the 7AD units arrive only if at least 12CF of 7AD/M4 Tanks and 4CF of 7AD Armored Infantry escaped from St.Vith; however, if Manhay is occupied by the Germans, the units do not arrive; instead, they defend to the north of the 5PzA-6PzA Boundary.
153.9 The 106ID/424153.9.1 Stand Alone ScenarioWhen the Salm and the Ourthe is played as a Stand Alone Scenario, the 106/424 Infantry arrives at Manhay, while the 106/591 and 592 FA support from north of the 5PzA-6PzA Boundary; however, if Manhay is occupied by the Germans, the units do not arrive; instead, they defend to the north of the 5PzA-6PzA Boundary.
153.9.2 Conjunction with St.Vith ScenarioWhen the Salm and the Ourthe is played in conjunction with the St.Vith Goose Egg Scenario, the 106ID units are available for use at Manhay only if the 106/424/Battalion I escaped intact from St.Vith; however, if Manhay is occupied by the Germans, “the units do not arrive; instead, they defend to the north of the 5PzA-6PzA Boundary.
153.10 The 9CCB153.10.1 Stand Alone ScenarioWhen the Salm and the Ourthe is played as a Stand Alone Scenario, the 9CCB units arrive at Vaux-Chavanne; however, if Malempre is occupied by the Germans, the units do not arrive - instead, they defend to the north of Vaux-Chavanne.
153.10.2 Conjunction with St.Vith ScenarioWhen the Salm and the Ourthe is played in conjunction with the St.Vith Goose Egg Scenario, the only 9CCB units available are those that escaped from St.Vith, and they arrive in the condition that they escaped; however, if Malempre is occupied by the Ger-mans, the units do not arrive; instead, they defend to the north of the 5PzA-6PzA Boundary.
154.0 Allied Areas of Operation (AO)a. During the 22PD-26EV turns, the US Army AO Map is required;
see the Play-Aid Booklet.b. During the 22PD-26EV timeframe, the US Corps 22PD-26EV
AO map is required; see the Play-Aid Booklet.

A Time for Trumpets ~ Scenario Book60
© 2020 GMT Games, LLC
The End Game Campaign Scenario begins with German 22MO Turn.
160.0 Briefing 161.0 Scenario Parameters162.0 Scenario Rules for Germans163.0 Scenario Rules for US 164.0 Allied Areas of Operation (AO)
160.0 Briefing The End Game Campaign involves playing the end game scenarios simultaneously with staggered starts. The rules for the individual scenarios have been written so that simultaneous play should be seamless. When a facet of one scenario affects an adjacent scenario, it will be noted within the scenario rules.
161.0 End Game Campaign Parameters161.1 TimeframeThe end game begins with the German 22MO turn and ends with the US 26EV turn.
161.2 Maps RequiredAll five maps are required.
161.3 Aircraft AllocationAircraft are allocated for the end game campaign in accordance with the individual scenarios.
161.4 German ParticipantsIn accordance with individual scenarios.
161.5 American ParticipantsIn accordance with individual scenarios.
161.6 Applicable Scenario Specific RulesIn accordance with individual scenarios.
161.7 Victory Conditions161.7.1 Allied VictoryThe Allies win by preventing the Germans from attaining their Victory conditions.
© 2020 GMT Games LLCP.O. Box 1308 • Hanford, CA 93232
www.GMTGames.com
161.7.2 German VictoryAt the end of any game turn, the Germans earn a Marginal Victory, if the following conditions are attained:a. The Allies cannot trace a supply road to any town or village on
the 5PzA-7A Boundary from Bitburg to the Wiltz River.b. German units in any status occupy Kautenbach, Wiltz, 6446,
6145, Neffe and both Bastogne Town hexes.c. The Allies cannot trace a supply road to any town or village on
the 5PzA-7A Boundary from Bastogne to Grupont.d. German units in any status occupy Wavreille, Han-sur-Lesse,
Eprave, Ciergnon, Houyet, Hulsonniaux and Drehance.e. German units in any status occupy Dinant, Purnode, Spontin,
Braibant, Ciney, Pessoux, Nettinne, Baillonville and Noiseux.f. The Germans control an operational bridge across the Ourthe
River to Noiseux.g. Supplied German units occupy Rochefort, Marche and Hotton.h. German units in any status occupy Grand Han, Durbuy, Barvaux,
Bomal and Heyd.i. The Allies cannot trace a supply road to any town or village on
the 5PzA-6PzA Boundary from Mormont to the east edge.
162.0 Scenario Rules for GermansIn accordance with individual scenarios.
163.0 Scenario Rules for AlliesIn accordance with individual scenarios.
164.0 Allied Areas of Operation (AO)a. During the 16MO-21EV turns, the 1A AO is the entire map;
therefore, an Army AO map is not required for those turns.b. During the 22PD-26EV turns, the US Army AO Map is required;
see the Play-Aid Booklet, page 24 .c. During the 16MO-17EV turns, the US Corps 16EV-17EV AO
Map is required; see the Play-Aid Booklet, page 25.d. During the 18PD-19EV turns, the US Corps 18PD-19EV AO
Map is required; see the Play-Aid Booklet, pages 26-27.e. During the 20PD-21EV turns, the US Corps 20PD-21EV AO
Map is required; see the Play-Aid Booklet, pages 28-29.f. During the 22PD-26EV turns, the US Corps 22PD-26EV AO
Map is required; see the Play-Aid Booklet, pages 30-31.