Embed Size (px)
Citation preview

SBClient®
A 4GL Tool Set for Rapid ApplicationDevelopment and Guitization
Getting Started


All rights to this publication are reserved. No part of this document may be reproduced, transmitted, tran-scribed, stored in a retrieval system, or translated into any language, in any form or by any means, without prior written permission from Ardent Software, Inc. If you are a licensed user of this product, Ardent Software, Inc. grants you a limited, nontransferable license to reproduce this particular document. This is limited to photo-copy reproduction of a Ardent Software-supplied master copy. Copies must include all pages contained in the master copy (including this page) and must be intended strictly for internal distribution and use by the licensee, its employees, and assigns. Reproduced copies may not be transferred, in whole or in part, to any party outside the licensee’s place(s) of business. The software described in this document is furnished under a license agree-ment. The software may be used or copied only in accordance with the terms of the agreement. It is against the law to copy this software on magnetic tape, disk, or any other medium for any purpose other than the licensee's personal use.
Copyright © 2000 Ardent Software, Inc.All Rights ReservedSBClient Release 5Documentation DSC-5001Rev. 02032000
Ardent Software, Inc., reserves the right to make changes to this document and the software described herein at any time and without notice. Ardent Software, Inc. makes no warranty, express or implied, other than those contained in the terms and conditions of sale, and in no case is Ardent Software, Inc. liable for more than the license fee or purchase price of this product.
Ardent Software, Inc.50 Washington Street
Westboro, Massachusetts USA 01581-1021Telephone: (508) 366-3888Facsimile: (508) 366-3669
World Wide Web: www.ardentsoftware.com
Principal Technical WriterTony Watkin
Contributors and Technical ReviewersMark Chazan, and Mike Goddard
Ardent Software is a trademark of Ardent Software Inc. uniVerse, UniData, SB+, SBOPEN, SBClient, DATA/C++, TERMULATOR,
SBDesktop, ObjectCall, EasyX, DataStage, ESL, UniVerse Call Interface, UniVerse Objects, uV/Net, RetrieVe, PI/open and Prime
INFORMATION are trademarks of Ardent Software, Inc. TERMiTE is a trademark of Pixel Innovations, Ltd. Pick is a registered trade-
mark of Pick Systems. Microsoft, Windows, and Windows NT are registered trademarks of Microsoft Corporation in the United States
and or other countries. UNIX is a registered trademark in the United States and other countries, licensed through X/Open Company. All
other products, standards, or company names mentioned may be trademarks or registered trademarks of their respective owners.


Contents
Chapter 1 - Before Installing SBClient .........................................13
Before Installation .....................................................................................14
SBClient Release Numbering Methodology .............................................16
Compatibility Information ........................................................................17
Chapter 2 - Installing SBClient on a Standalone PC...................19
Procedure for Installing SBClient .............................................................20
Running SBClient ...............................................................................25
Licensing Information .........................................................................26
Uninstalling SBClient ...............................................................................27
Upgrading Existing Termulator & SBClient installations ........................28
Termulator Installations ......................................................................28
SBClient Installations .........................................................................29
Chapter 3 - Creating a Client/Server SBClient Environment......31
Installing SBClient to a File Server ..........................................................31
Installing Client Software .........................................................................32
Running SBClient ...............................................................................38
Getting Started 5

Contents
Uninstalling Client Software ..............................................................38
Deploying SBClient in a Network Environment ......................................39
Client Installation ................................................................................39
Import/Export Configurations .............................................................39
Self Extracting Executable ..................................................................39
Document Interface .............................................................................40
Using SMS to Copy Configuration Files ............................................40
Upgrading a Client/Server Installation .....................................................41
Chapter 4 - Installing on Windows NT Terminal Server..............43
Installing SBClient ....................................................................................44
Performance Tuning .................................................................................45
SBClient With Citrix MetaFrame .............................................................46
Chapter 5 - Installation Troubleshooting .....................................47
BTrieve .....................................................................................................49
Chapter 6 - Introduction to SBClient ............................................51
Active Areas .............................................................................................53
The SBClient Menu Bar ...........................................................................55
Opening a Session .....................................................................................56
Opening a Document Based Session ..................................................56
Opening Additional Sessions ..............................................................57
Closing a Session ......................................................................................58
Chapter 7 - Basic Session Configuration ....................................61
Overview ...................................................................................................62
Creating a New Session Configuration ...............................................62
6 Getting Started

Contents
Saving a Session Configuration ..........................................................62
Configuring a Session ...............................................................................66
Communication Setup .........................................................................67
Network Communication Setup ..........................................................69
Modem Communication Setup ...........................................................70
Dialing Directory ................................................................................75
Getting Started 7

Contents
8 Getting Started

Preface
Introduction to Ardent Product DocumentationThis preface contains useful information about Ardent’s conventions for documenting command syntax and system output, as well as providing explanations of the specially designed icons that indicate important notes, tips, and warnings in the documentation.
Getting Started 9

Features of Ardent ManualsArdent strives to produce useful, high quality documentation while maintaining a consistent look and feel. It will help you to know the following conventions which are common to this and all Ardent manuals. This section explains the following:
• conventions
• elements of syntax statements
• notes, warnings, and tips
• screen captures
ConventionsAll Ardent manuals depict command syntax according to industry standards. The following table lists the syntax conventions:
Convention Description
bold courier font Bold courier font indicates required commands that you must enter in the manner shown. You must enter all punctuation marks that appear in bold, unless otherwise indicated.
courier font Courier font indicates system output, such as prompt signs, responses to commands, and program code. Courier font is also used to depict paths to directories or files.
bold Bold font indicates the name of an element on the screen, such as a menu, a form, or a prompt. Also indicates the names of files or directo-ries.
lower case italics Lower case italics is used for syntactical expression of user-supplied words, variables, and expressions
xx Italic lower-case xx indicates a placeholder for a system id. For exam-ple, xxCONTROL.
Conventions
10 Getting Started

Elements of Syntax Statementsin some cases commands may be entered as part of paragraphs. The syntax statement includes the command name, required arguments, and options that you can use with the command. Italics rep-resents a variable that you can replace with any valid option. The following figure illustrates the elements of a syntax statement:
> The > character separates each option in a menu hierarchy. For exam-ple, “choose Setup > Miscellaneous”, means choose the Setup menu then the Miscellaneous option.
[ ] Square brackets indicate an item that is optional. You may include a number of items enclosed in brackets in a Unidata command or func-tion.
{ } Braces indicate that you must choose one of the items separated by the vertical bar ( | ).
| Vertical bar separates option arguments from which you may choose.
. . . An ellipsis (...) after an argument indicates that you may use more than one argument on a single command line.
Convention Description
Conventions (continued)
COMMAND required [option] [option1 | option2]{option1 | option2} required... "string"
command names
no brackets or bracesindicates a requiredargument
square brackets indicatean optional argument
a vertical line indicates thatyou may choose betweenthe given arguments
braces indicate that youmust choose betweenthe given arguments
an ellipsis indicates thatyou may enter more thanone argument
quotation marks
appear in boldface
must enclose aliteral string
Getting Started 11

Important Notes, Warnings, and TipsYou will notice several different icons throughout this manual. These icons draw attention to important information about the product.
NoteA Note icon indicates important additional information on the subject.
WarningA Warning icon alerts you to the danger of deleting or corrupting data.
ReminderA Reminder icon marks information that is discussed in detail in another chapter or another Ardent manual.
TipA Tip icon denotes shortcuts, commands, or procedures that may help you use Ardent products more efficiently.
12 Getting Started

Chapter 1 - Before Installing SBClient
You can install SBClient on a network drive or as a stand-alone application on a personal com-puter.
There are three different types of SBClient installation. These are:
• Standalone PC installation
• Client/Server installation
• Terminal Server installation
A standalone PC installation will install SBClient in its entirety to the local PC’s hard disk.
A client/server installation is made up of two parts:
• the server installation where SBClient is installed on a file server, and
• the client installation where only the minimum files required are copied from the server to the client. This predominantly consists of the user’s configuration files.
A terminal server installation is a further refinement of the client/server installation but one which uses Microsoft’s Windows Terminal Server.
Getting Started 13

Chapter 1 - Before Installing SBClient
Before Installation
Before you install SBClient, complete the following steps:
1. Check that your SBClient package contains the following materials:
• SBClient CD-ROM.
• Product Registration Card. Ardent provides support for registered customers of SBClient. To be eligible for this support, complete and return the product registration card.
• Ardent License Agreement.
• Product license details. This includes your product serial number and authorization code.
2. Check your system requirements. The following table shows the minimum hardware and soft-ware requirements you need to run SBClient. SBClient works best with the recommended components.
Component Recommended Minimum
Computer Pentium or better Pentium
Disk drives Hard disk with 45MB or more available disk space) and CD-ROM
Hard disk (minimum of 35MB to 45MB available disk space) and CD-ROM
RAM for Win95 Win98
32MB 16MB
RAM for NT 4.0 64MB 32MB
Monitor Super VGA VGA or compatible
Communication Network card Network card or serial port
Hardware Requirements
14 Getting Started

Before Installation
NoteYou need approximately 30 megabytes (MB) available on your hard drive to install SBClient and all of its program files.
3. Turn off any virus protection software because it can interfere with the installation.
WarningIf you have Microsoft Outlook running then you will need to exit Microsoft Outlook now. Microsoft Outlook will interfere with the installation process.
4. Exit all Windows programs. This frees up memory for installation and prevents possible con-flicts between the SBClient installation program and other programs.
Operating System Recommended Minimum
Windows95 OEM Service Release 2
OEM Service Release 2
Windows98 Second Edition Second Edition
Windows NT 4.0 Service Pack 5 Service Pack 4
Windows Terminal Server 4.0
Service Pack 4 Service Pack 3
Software Requirements
Getting Started 15
Chapter 1 - Before Installing SBClient
SBClient Release Numbering Methodology
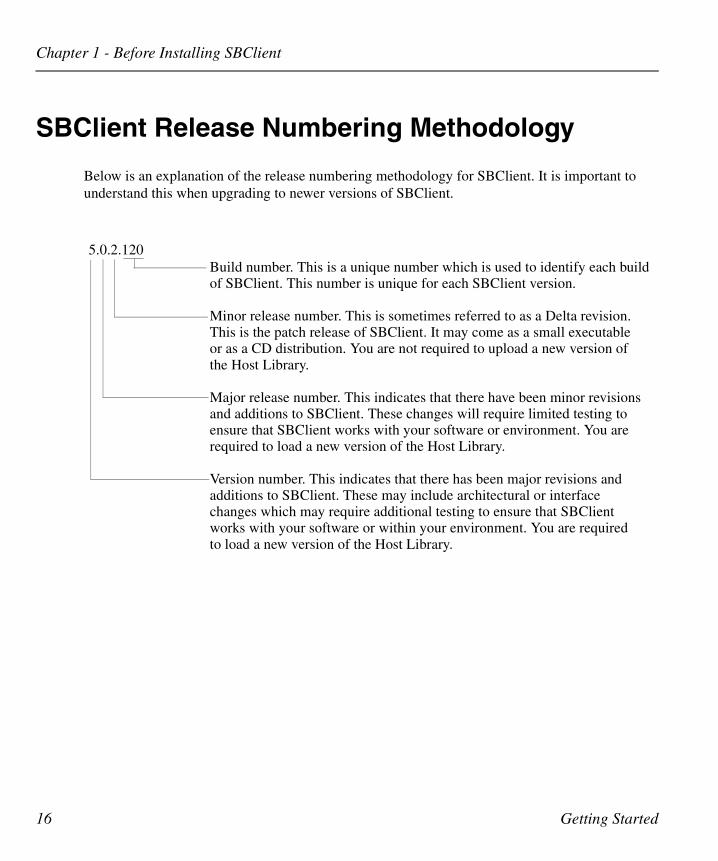
Below is an explanation of the release numbering methodology for SBClient. It is important to understand this when upgrading to newer versions of SBClient.
5.0.2.120Build number. This is a unique number which is used to identify each buildof SBClient. This number is unique for each SBClient version.
Minor release number. This is sometimes referred to as a Delta revision.This is the patch release of SBClient. It may come as a small executableor as a CD distribution. You are not required to upload a new version ofthe Host Library.
Major release number. This indicates that there have been minor revisionsand additions to SBClient. These changes will require limited testing toensure that SBClient works with your software or environment. You arerequired to load a new version of the Host Library.
Version number. This indicates that there has been major revisions andadditions to SBClient. These may include architectural or interfacechanges which may require additional testing to ensure that SBClientworks with your software or within your environment. You are requiredto load a new version of the Host Library.
16 Getting Started

Compatibility Information
Compatibility Information
SBClient 5 or higher is required for correct functioning of GUI mode in SB+ Server release 5. SBClient is backwardly compatible with previous SB+ Server 5.x, 4.x releases, and 3.4.0.7, in GUI runtime mode only.
For GUI development you must be running a matched server and client, e.g. SB+ 4.4.x GUI devel-opment requires SBClient 4.4.x. If you have any queries in this regard please contact the Support section of Ardent Software Inc.
NoteIf you are running SB+ Server version 4.x it is recommended that you upgrade the host library. Please see the “Patching SB+ Server” section in the “Using SBClient” manual.
Below are the minimum database releases which the SBClient 3GL Host API requires:
• UniData 3.3.2 and above on UNIX.
• UniData 3.6.4 and above on NT.
• UniVerse 8.3 (Pick compatibility) and above on UNIX.
• UniVerse 9.4 (Pick compatibility) and above on NT.
• Reality-X 7.0
SB+ Server Release
GUI Runtime
GUI Development
Character Runtime &
Development
3.4.0.7 Y N Y
4.x Y N Y
5.x Y Y Y
SBClient 5 GUI Compatibility Matrix
Getting Started 17

Chapter 1 - Before Installing SBClient
• mvEnterprise 4.0
• mvBase 1.2
• Ultimate Plus 10 rev 228E-4
• D3 7.1.x
See the readme file supplied with SBClient for the latest updates to the above information.
18 Getting Started

Chapter 2 - Installing SBClient on a Standalone PC
Installation takes 5 to 20 minutes, depending on the options you choose and the speed of your computer.
The installation process performs the following:
• Installs the SBClient files at a location you specify during the installation process.
• Creates an SBClient folder in the Start menu.
• Add the SBClient manager to the Start group if requested during the installation process.
NoteIf you are installing SBClient for the first time, you will be required at the end of the installation process to register your copy of SBClient (by entering the product serial number and authorization key code issued to you).
Getting Started 19

Chapter 2 - Installing SBClient on a Standalone PC
Procedure for Installing SBClient
1. Start Windows 95, 98 or NT 4.0. We recommend that you close any programs that are open.
2. Insert the SBClient CD into the CD-ROM drive. The setup program on the CD runs automati-cally and after a few moments will display the SBClient Setup dialog:
NoteIf your machine has autorun disabled then you will need to rightclick CD “AutoPlay” or run cdsetup.exe from the \autorun directory.
This contains the following options:
• View Readme File. This contains information relevant to this release of SBClient that may not be in the printed documentation.
• View Getting Started Guide. Displays this Getting Started guide. This is an acrobat PDF file. PDF files are viewed, and can be printed, using Adobe’s Acrobat Reader software. A copy of this software is stored on the CD and is automatically invoked when you select this option.
• Install SBClient. Installs the SBClient software on the network or local computer.
20 Getting Started

Procedure for Installing SBClient
• Install Acrobat Reader. Use this option if you want to install a copy of Adobe’s Acrobat Reader on your computer.
• Install Online Documentation. This installs the manuals. The manuals are in Adobe Acrobat (pdf) format.
• Browse CD. Allows you to view the contents of the SBClient CD.
• Exit. Exits the SBClient dialog.
3. Choose Install SBClient. This runs the InstallShield wizard, which will take you through the rest of the installation process.
4. If you have a copy of SBClient already installed you are given the option of continuing the installation and updating your existing copy, or exiting the installation.
5. In the User Information dialog enter your name and the name of your company.
Getting Started 21

Chapter 2 - Installing SBClient on a Standalone PC
6. In the Choose Destination Directory dialog specify the destination directory for the SBClient files and administrator account.
You can accept the default directory or use the Browse button to change the directory. The Space Required and Space Available fields show the required and available space for installing SBClient on the current drive. Use the Change Disk button to install SBClient on a different drive.
22 Getting Started
Procedure for Installing SBClient
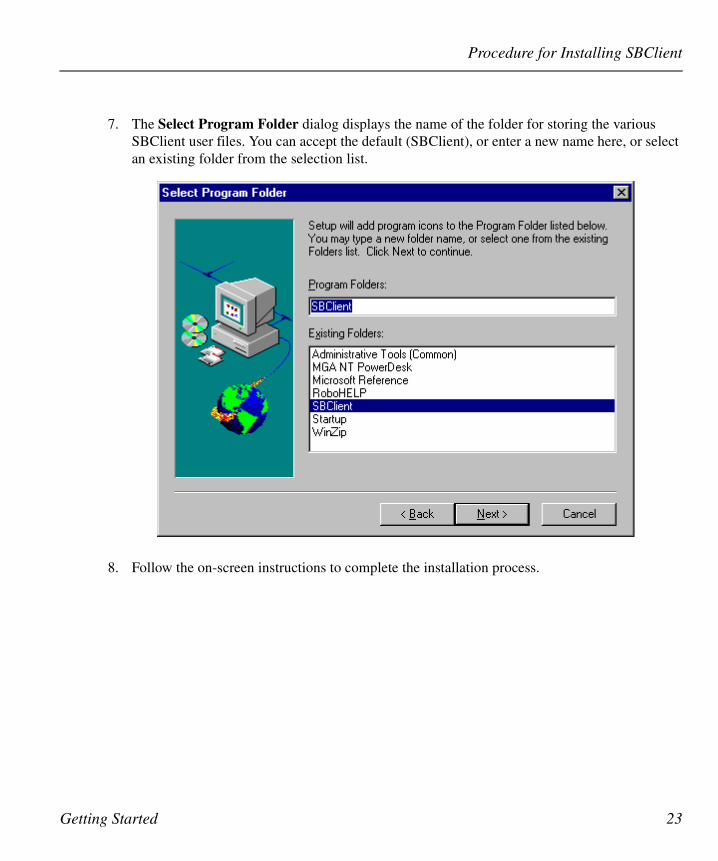
7. The Select Program Folder dialog displays the name of the folder for storing the various SBClient user files. You can accept the default (SBClient), or enter a new name here, or select an existing folder from the selection list.
8. Follow the on-screen instructions to complete the installation process.
Getting Started 23

Chapter 2 - Installing SBClient on a Standalone PC
9. If you are installing SBClient for the first time, you will need to enter the product serial num-ber and authorization code key for the product into the Registration dialog (see “Licensing Information” on page 26).
You can click on the Skip button and register the product later on from within SBClient if pre-ferred. SBClient will run in demo mode until SBClient is registered.
NoteWhen SBClient runs in demo mode the full functionality of SBClient is still available. However, SBClient will display a dialog every 3 minutes stating that it is a demonstration version.
10. You will be asked if you want to add the SBClient Manager to the Windows Start menu. If you answer Yes, then the SBClient Manager will start every time you start Windows. This can be disabled later (if desired) by removing the shortcut from the Windows Startup directory.
24 Getting Started

Procedure for Installing SBClient
When the SBClient Manager is running, SBClient sessions will start much faster than would otherwise be the case.
11. When installation is complete, you are asked if you want to read the SBClient Readme docu-ment. This contains information relevant to this release of SBClient that may not be in the printed documentation.
12. You may need to restart Windows in order to run SBClient.
Running SBClient1. Click Start and point to Programs. On the Programs menu, point to SBClient. On the
SBClient menu, click SBClient to start the program.
Getting Started 25

Chapter 2 - Installing SBClient on a Standalone PC
Licensing InformationSBClient broadcasts message packets over a network looking for installations of the product with the same serial number. If the number of installations found exceeds the number allowed by the license, the product will revert to 'Demonstration' mode. SBClient’s functionality won’t be affected, but a dialog box will appear at regular intervals stating that the copy of SBClient you are running is a 'Demonstration Copy'.
Release 3 and above of SB+ will recognize SBClient and will not require any extra licensing unless SBTerm style licensing is being used. Release 2 of SB+ will also recognize SBClient but it will count SBClient as an instance of SBTerm for licensing purposes.
NoteIf you have SBClient 4.3.x or 4.4.3 and you wish to be able to run the older release as well as release 4.4.4 or later, you will need to do the following:
- License SBClient 4.4.4 (or later) with the license that has been issued to you.
- Copy the file ..\SBOFFICE\SBCLIENT45\SBOPEN\BIN\SECURITY.DLL from your SBClient 4.4.4 (or later) release to the 4.3.x or 4.4.3 installation.
26 Getting Started

Uninstalling SBClient
Uninstalling SBClient
This section shows you how to uninstall SBClient.
To uninstall SBClient:
1. Ensure that SBClient and the SBClient Manager are not running.
2. Click Start and point to Settings. On the Settings menu, click on Control Panel. Now click on the Add/Remove Programs icon.
3. Choose SBClient from the selection list and click the Add/Remove button.
NoteSBClient uses some shared dlls (Windows dynamic link libraries). When SBClient is uninstalled and no other program has registered itself as using these dlls then SBClient will ask you whether you wish to remove the dlls or not. If you are not sure what to do when these prompts appear it is recommended that you do not delete these dlls.
Getting Started 27

Chapter 2 - Installing SBClient on a Standalone PC
Upgrading Existing Termulator & SBClient installations
Termulator InstallationsWhen upgrading from Termulator 1.x to SBClient 5, you should install SBClient in a different directory to preserve your Termulator configurations. After you start SBClient, the SBOffice screen will be displayed. Selecting File > Import Configurations will present a subscreen from
which you can choose the configurations you would like to import as well as specify where to import from (see the “Using SBClient” manual for more information regarding this dialog). You should use the browse button to locate Termulator's 'TU' directory and import all configurations from this directory.
28 Getting Started

Upgrading Existing Termulator & SBClient installations
SBClient InstallationsTo upgrade prior releases of SBClient to release 5 you must install SBClient to a new location. The first time that SBClient is run SBClient will prompt you to import your configuration from your previous release into its current configuration. Software that repackages and deploys SBClient can disable this upgrade prompt by setting the NoUpgrade registry entry. This entry is a string and should be set to “1” to disable the upgrade prompt. This entry is part of the SBClient key found in HKEY_LOCAL_MACHINE\SOFTWARE\Ardent Software\SBClient. Please note that on Win-dows Terminal Server installations the above key path needs be to HKEY_CURRENT_USER rather than HKEY_LOCAL_MACHINE.
SBClient 5.x can self upgrade. In other words SBClient can install over the top of itself and main-tain user configurations.
If you install over the top of an older release, SBClient files that were part of the older release and which are no longer required, will be removed. If the group you choose for your program icons is the same as a previous release, then the older icons that are no longer used will be removed.
Getting Started 29

Chapter 2 - Installing SBClient on a Standalone PC
30 Getting Started

Chapter 3 - Creating a Client/Server SBClient Environment
Installing SBClient to a File Server
SBClient allows you to create a complete multiuser system using the network server and multiple user workstations.
NoteThe term “client software” was referred to as “user accounts” in previous releases.
To create a multiuser SBClient system the following steps need to be performed:
1. Install SBClient to the network server.
2. Start SBClient and create the required configurations.
3. Export the configuration to the ...\TU\Profile folder. The ...\TU\Profile folder contains the default configuration for new users.
4. Install the client software on the hard drives of individual users’ computers. SBClient copies the default configurations for each new client installation from the server installation.
5. Customize the client configuration as necessary.
To install SBClient to a server you should follow all the procedures documented earlier in chapter 2. There is no difference between a server installation or a standalone install.
Getting Started 31

Chapter 3 - Creating a Client/Server SBClient Environment
Installing Client Software
Once you install SBClient on a network server, you can create any number of client installations on which individual settings can be customized.
1. Click Start and then Run.
2. Enter the path to the SBClient Setup program on the network. This program resides in the SBClient installation directory (e.g. networkdrive\sbclientpath\SETUP). This runs the InstallShield wizard which will take you through the rest of the SBClient setup process.
3. If an SBClient has already been installed on your computer you are given the option of exiting the setup process or continuing and overwriting the existing installation.
WarningWhen installing the client software, ensure that the server copy of SBClient is not running, other-wise your files may become corrupted.
WarningIt is important to ensure that the SBClient software is licensed. It the server software is not licensed then all client installations will be prompted for the license details.
NoteYou cannot install the server and client software on the same machine.
32 Getting Started

Installing Client Software
4. In the User Information dialog enter your name and the name of your company.
Getting Started 33

Chapter 3 - Creating a Client/Server SBClient Environment
5. In the Choose Destination Directory dialog enter the path to the location on the local computer where you want to install SBClient (for example, C:\Program Files\Ardent Soft-ware\SBClient.
You can accept the default directory or use the Browse button to change the directory. The Space Required and Space Available fields shows the required and available space for install-ing the user account on the current drive. Use the Change Disk button to install the user account on a different drive. If the directory you choose does not exist, it will be created.
34 Getting Started

Installing Client Software
6. The Select Program Folder dialog displays the name of the folder for storing the various SBClient user files. You can accept the default (SBClient), or enter a new name here, or select an existing folder from the selection list.
7. Follow the on-screen instructions to complete the setup process.
Getting Started 35

Chapter 3 - Creating a Client/Server SBClient Environment
8. During the setup process you will be asked to select a directory to be used as a cache for your GUI forms:
This cache is used for temporarily storing GUI forms to speed up performance. You can choose to create the cache in the same directory as your SBClient installation (the default), in the same directory as the server installation, or you can browse for an alternative location for the cache.
If the cache is on your local machine (default) then any GUI form that is accessed will auto-matically be downloaded from the host to the local cache. Once all PCs have downloaded the forms, the network traffic will reduce. If the cache is on a network drive that all users share, then the first person to access the form will trigger the download, and thereafter anyone else who accesses the same form will use the already cached version. This will result in increase network traffic on the LAN but less traffic between the client and server machines.
It is recommended that you accept the default as this generally provides for better performance in most network configurations.
36 Getting Started

Installing Client Software
9. If you are installing a client for the first time and the server software was not licensed before creating this install, then you will need to enter the product serial number and authorization code key, (see the Licensing Information section in Chapter 2):
10. You will be asked if you want to add the SBClient Manager to the Windows Start menu. If you answer Yes, then the SBClient Manager will start every time you start Windows. This can be disabled later (if desired) by removing the shortcut from the Windows Startup directory. When the SBClient Manager is running, SBClient sessions will start much faster than would otherwise be the case.
11. When installation is complete, you are asked if you want to read the SBClient Readme docu-ment. This contains information relevant to this release of SBClient that may not be in the printed documentation.
12. The installation program creates a new item in the Program menu. Now you can start SBCli-ent. You may need to restart Windows in order to run SBClient.
Getting Started 37

Chapter 3 - Creating a Client/Server SBClient Environment
Running SBClient1. Click Start and point to Programs. On the Programs menu, point to the menu for your instal-
lation (for example, SBClient). On this menu, click SBClient to start the program.
Uninstalling Client SoftwareThis section shows you how to remove a client installation of SBClient.
To remove SBClient client installation:
1. Ensure that SBClient and the SBClient Manager are not running.
2. Click Start and point to Settings. On the Settings menu, click on Control Panel. Now click on the Add/Remove Programs icon.
3. Choose SBClient from the selection list and click the Add/Remove button.
38 Getting Started

Deploying SBClient in a Network Environment
Deploying SBClient in a Network Environment
SBClient can easily be deployed using tools like Microsoft’s Systems Management Server. There are a variety of ways that these tools can deploy SBClient to the user’s desktop. It is not the pur-pose of this section to detail how you would use these tools to deploy SBClient. This section docu-ments features of SBClient that you can use to make deployment easier.
Deploying an installation of SBClient to a standalone workstation or creating a client/server envi-ronment is a relatively simple task. The greatest difficulty that an administrator may face is how to push configurations of SBClient out to all of the users desktops. There are various ways in which an administrator can deploy user configurations. These are described below.
Client InstallationWhen a client/server environment of SBClient is created the administrator can, before the installa-tion of client software, update the configuration files on the server. Once this has been done the administrator can start the client installations. The client installations will contain the same config-uration as the server which the administrator has setup. This is an install time option only.
Import/Export ConfigurationsThere are two functions on the SBClient File menu. These are Import Configuration and Export Configuration. The Import Configuration option can be used to browse to a location on the net-work or the local machine. From this location the user can then load configurations into their SBClient environment. The export configuration facility can be used to export a user’s SBClient configuration to a local or network directory. The location is usually directory that contains files such as tustate, tuspecs, and tuphonebook. Please see “Using SBClient” for more details on how to use these functions.
Self Extracting ExecutableThere is an additional option on the Export Configuration dialog. This is to create a self-extracting executable. Once created, this executable can be used by any user to overlay their existing configu-ration. This executable will not maintain any of the user’s current settings.
Getting Started 39

Chapter 3 - Creating a Client/Server SBClient Environment
Document InterfaceSBClient version 4 introduced the concept of the SBC configuration file. This file contains all details about a particular session. This file, through file extension association, will run SBClient when executed. These files are extremely portable and may reside anywhere on the user’s system or network.
Using SMS to Copy Configuration FilesIn SBClient version 5, the user’s configuration files are stored within the user’s system profile. This will generally be at the following location:
Windowsdirectory\Profiles\Username\Application Data\Ardent Software\SBClient
Tools such as SMS can copy the configuration files from a master source to each user’s installa-tion.
NoteIf profiling is not enabled in the operating system on Windows95/98 then these files will reside in the following location:Windowsdirectory\Application\Data\Ardent Software\SBClient
40 Getting Started

Upgrading a Client/Server Installation
Upgrading a Client/Server Installation
To upgrade a Client/Server installation of SBClient you will be required to perform the following steps:
1. On the existing Server Installation (previously known as the administrator account), start SBClient and export the configuration out to a location on the hard disk. Ensure that this loca-tion is not contained within the SBClient install directory.
2. Quit SBClient. Uninstall SBClient.
3. Install SBClient 5 to the same location that the previous release of SBClient was installed to.
4. Start SBClient and Import the configuration from the location which you save to in step 1 above.
This completes the SBClient server installation upgrade. To configure the server installation so that the client installations acquire the server configurations, you need to perform the following steps:
1. On the Server Installation, start SBClient and configure the sessions as required.
2. Export the configuration to the ...\Tu\Profile folder in the server installation of SBClient.
3. Quit SBClient.
When SBClient client installations are installed or upgraded they will read their default configura-tion from the ...\Tu\Profile folder in the Server Installation.
Getting Started 41

Chapter 3 - Creating a Client/Server SBClient Environment
42 Getting Started

Chapter 4 - Installing on Windows NT Terminal Server
Microsoft’s Windows NT Terminal Server provides clients with access to Windows based applica-tions running entirely on the server. Multiple client sessions to the server are supported. The server manages all computing resources for each client connected to the server and provides all logged in users with their own environment. The server receives all input from the various devices on the cli-ent, processes the input and directs all display output to the client. For more information on Win-dows NT Terminal Server please consult Microsoft’s website.
SBClient can be used and installed on Windows NT Terminal Server 4.0. Installing to Windows NT Terminal Server is almost the same as creating a client/server environment documented in Chapter 3. The only distinction between a Windows NT Terminal Server and a client/server instal-lation is that all the software resides on one machine.
Please familiarize yourself with installing a client/server environment (chapter 3 refers) before proceeding with a Terminal Server installation.
Getting Started 43

Chapter 4 - Installing on Windows NT Terminal Server
Installing SBClient
WarningEnsure that you are familiar with a client/server installation (chapter 3 refers) before proceeding with an installation to Windows NT Terminal Server.
To install SBClient on a Windows NT Terminal Server installation:
1. Login to the terminal server on the console as the "Administrator".
2. Install the SBClient server software.
3. Set up any session configurations needed.
4. Export the configuration to the ...\TU\Profile folder. The ...\TU\Profile folder contains the default configuration for new users.
5. Login as individual domain users.
6. Run the setup.exe located in the directory where SBClient was installed,
7. Follow on screen prompts. It is suggested that you keep the client install local to the users con-figuration.
WarningDue to various limitations it is not possible to uninstall SBClient from Windows NT Terminal Server. To remove SBClient you need to delete the software from where it is installed, and then delete the registry key HKEY_LOCAL_MACHINE\SOFTWARE\Ardent Software\SBClient or in the case of a client installation HKEY_CURRENT_USER\SOFTWARE\Ardent Soft-ware\SBClient.
44 Getting Started

Performance Tuning
Performance Tuning
If you experience performance problems on Windows NT Terminal Server using SBClient then you should attempt the following:
• Ensure that all session configurations which your users are using are setup to use Network Copy (if your host is on NT) or FTP (if your host is on Unix) as the file transfer protocol. See Setup > File Transfer. This should reduce the amount of CPU resources consumed by SBClient at runtime.
• You can modify the following settings to reduce the amount of CPU resources used by SBClient. Unless you are familiar with networking and have knowledge of sockets pro-gramming it is recommended that you use the default settings:
Sleeptime (default value 10). The Sleeptime value determines the number of millisec-onds an SBClient thread will wait before checking the socket for incoming data.
Polltime (default value 0). The Polltime value determines the amount of time SBClient will poll the socket looking for incoming data. The time is calculated by 1/Polltime, so a Polltime of 1 will poll for 1 second, a Polltime of 10 will poll for 100 milliseconds, a Polltime of 0 will result in no polling being performed.
NoteThe above settings can be found in the Windows registry at the following location:
HKEY_CURRENT_USER\Software\Ardent Software\SBClient
Getting Started 45

Chapter 4 - Installing on Windows NT Terminal Server
SBClient With Citrix MetaFrame
MetaFrame is server-based software for Windows NT Terminal Server 4.0. MetaFrame provides extensions to the Windows Terminal Server environment with additional client and server func-tionality. Please consult Citrix’s website for more details. There has been no formal certification of SBClient with MetaFrame. However given that MetaFrame is an extension of Windows NT Termi-nal Server there is no known reason why SBClient cannot function correctly in this environment. You should contact your local Ardent Software support office to find out if there are any known problems with running SBClient in this environment.
NoteSBClient is not supported with Citrix’s product WinFrame.
46 Getting Started

Chapter 5 - Installation Troubleshooting
If you have trouble installing SBClient, try one or more of the following:
• Turn off any virus protection software or other utilities on your computer.
• Close all Windows applications.
• Check the Readme file on the CD in the \install directory for any additional information about installing SBClient.
• Try rebooting the PC and going through the installation steps again.
If you still have trouble, contact your Ardent Software support office.
Getting Started 47

Chapter 5 - Installation Troubleshooting
If problems are encountered during the installation process, a description of the problem is dis-played in a Warning dialog at the end of the installation process:
You should make a note of these errors in case you need to describe the nature of the problem.
NoteIf the installation gives an error message which states that SBClient failed to register either wwtree.ocx or comctl32.ocx, then it is probably because the version of Windows 95/98 or NT has older versions of dlls that these controls need. To update the dlls run the utility oadist.exe. This utility can be found in the SBOFFICE\SBCLIENT\SBOPEN\BIN directory.
After running oadist.exe, reboot and then try reinstalling SBClient.
48 Getting Started

BTrieve
BTrieve
SBClient uses BTrieve which is a 3rd party windows database.
In releases of SBClient prior to 4.5, setting the account permissions to read only in the administra-tor account caused the work accounts to behave incorrectly. This was due to a defect in BTrieve which caused BTRieve to repeatedly try to write temporary empty lock files to the read only direc-tory even when set to not do so.
Release 4.5 (and later) addresses this issue by creating the files at install time and notifying BTrieve not to delete them.
Releases prior to 4.5 also had a potential conflict using BTrieve when another program used BTrieve in a "requestor" mode. SBClient uses BTrieve in a "local" mode. Previously SBClient did not set the "local" registry entry, as that was the default mode. If however, another application uses "requestor" mode and explicitly sets the local mode to 0, then SBClient can not open SBClient's BTrieve files and presents an error message similar to "Cannot open TUMSG file" soon after the splash screen disappears on startup. The BTrieve behavior is controlled by two registry keys under the key:
HKEY_LOCAL_MACHINE\SOFTWARE\Btrieve Technologies\Microkernel WorkstationEngine\Version 6.15\Microkernel InterfaceSettings
The keys are "local" and "requester".
SBClient requires the "local" key/value to be set to 1 and doesn't need to know about the "requester' key/value. Some other programs require the "requester" key/value to be 1 and don't care about the "local" key/value however they nevertheless sometimes set "local" to 0.
This has been resolved by SBClient always setting the registry variable to "local" at install time. SBClient does not change the "requestor" key/value so both programs will be able to run simulta-neously. If however the other program is reinstalled at any time, it may reset the "local" key/value to 0 and prevent SBClient from functioning.
SBClient can either then be reinstalled or the registry variable can be manually set with regedit. Discussions with BTRieve’s technical support confirmed that both settings can be set to 1 without affecting the other program.
Getting Started 49

Chapter 5 - Installation Troubleshooting
50 Getting Started
Chapter 6 - Introduction to SBClient
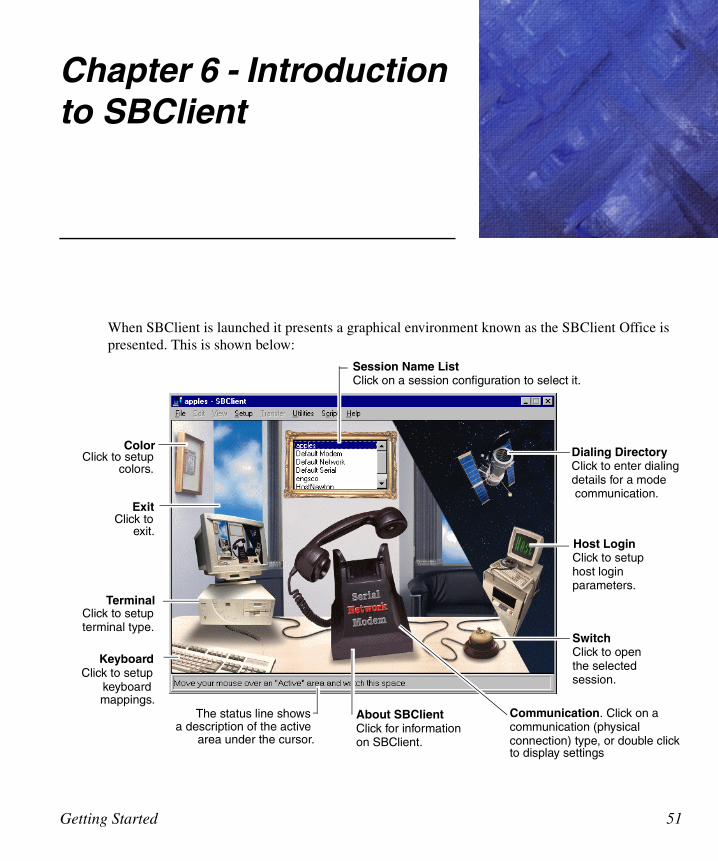
When SBClient is launched it presents a graphical environment known as the SBClient Office is presented. This is shown below:
Color
Exit
Terminal
Keyboard
The status line shows About SBClient Communication. Click on a
Dialing Directory
Host Login
Switch
Click to enter dialingdetails for a mode communication.
Click to setuphost loginparameters.
Click to openthe selectedsession.
communication (physicalconnection) type, or double clickto display settings
Click for informationon SBClient.
a description of the activearea under the cursor.
Click to setupkeyboardmappings.
Click to setupterminal type.
Click toexit.
Click to setupcolors.
Session Name ListClick on a session configuration to select it.
Getting Started 51

Chapter 6 - Introduction to SBClient
The SBClient Office represents a new, unopened session. SBClient allows you to easily maintain your session configurations, and open a session. The SBClient Office is displayed when you:
• first invoke SBClient.
NoteIf you have previously used the File > Save Desktop option to save details of your open sessions, the SBClient Office will not appear when you initially invoke SBClient. The saved session win-dows will be displayed instead.
• choose File > New Session. A separate SBClient Office is displayed for each new session you create.
• click the New Session button on the dialog displayed when you exit the active session (if only one session is open).
The SBClient Office is made up of a montage of images incorporating active areas. An active area performs the same function as a Windows button. You click on an active area to perform an opera-tion just as you would click on a button.
The active areas on the SBClient Office provide you with an alternative means of selecting com-monly used options from the SBClient menu bar. For example, clicking on the PC keyboard dis-plays the PC Keyboard Setup dialog (as if you had selected Setup > Keyboard).
As you move your mouse pointer around the SBClient Office, you will see your standard pointer change to a small hand. This indicates you are in an active area. A description of the active area is displayed in the status line at the base of the SBClient Office.
52 Getting Started

Active Areas
Active Areas
Active areas are divided into two parts on the SBClient Office, with PC active areas on the left and host active areas on the right. Active areas are:
Session Name List
This is located in the picture frame above the telephone. It provides a list of your pre-configured session configuration names. Click on a session configuration name to select that configuration. Double clicking on a session configuration name will open a session with that configuration (as if you had clicked the Switch active area, or you had selected File > Open Session > Classic).
Communication
This is located on the telephone. Communication types (based on the means of physical connec-tion: serial, network or modem) are shown embossed on the front of the phone, with the communi-cation type of the current session highlighted. Click on an unselected communication type to select it. Click on the telephone or double-click on a communication type to display the Communication Setup dialog (as if you had selected Setup > Communication).
Terminal
This is located on the PC to the left of the telephone. It displays the Terminal Setup dialog (as if you had selected Setup > Terminal). This dialog displays a selection list of the types of terminal that SBClient emulates, with the terminal type for the current session highlighted.
Keyboard
This is located on the PC keyboard. It displays the PC Keyboard Setup dialog (as if you had selected Setup > Keyboard).
Color
This is located on the picture above the PC. It displays the Color Setup dialog (as if you had selected Setup > Color).
Getting Started 53

Chapter 6 - Introduction to SBClient
Dialing Directory
This is located on the satellite. It displays the Dialing Directory dialog, where you can maintain details of modem phone numbers (as if you had selected Setup > Dialing Directory). This is only active if Modem is selected as the communication type.
About SBClient
This is located on the base of the telephone, and displays information about your version of SBCli-ent (as if you had selected Help > About SBClient).
Switch
This is located on the switch to the right of the telephone. It opens a session using the currently selected session configuration (as if you had double clicked on the session list, or selected File > Open Session).
Exit
This is located on the window above the PC. It allows you to exit SBClient (as if you had selected File > Exit All).
54 Getting Started

The SBClient Menu Bar
The SBClient Menu Bar
This provides a range of options for maintaining your session configurations, opening sessions and writing scripts. Some of these options may also be invoked by selecting the appropriate active area. Options that are available only from the session window menu bar (displayed when you open a session) are grayed out.
You can choose an option using your mouse, the arrow keys (when the menu is activated using the mouse or the Esc key) or by pressing Esc and typing the letter underscored in the option and any suboptions. SBClient displays a short help prompt on the status line for each option that you high-light.
Getting Started 55

Chapter 6 - Introduction to SBClient
Opening a Session
This topic assumes that one or more session configurations have already been set up for your sys-tem.
To open a session from the SBClient Office:
1. Select a configuration from the Session Name List.
You can change the configuration settings for this session by clicking on the appropriate active area or by choosing the appropriate option from the Setup menu. Any changes you make will apply only to the current session unless you save those changes.
2. When you are satisfied with your session configuration click on the Switch active area. This will open the session. You may also open a session by double clicking on the session name in the Session Name List, or choosing File > Open Session.
SBClient opens the session using its current configuration settings. If you have selected a modem connection and a telephone number, SBClient connects to the modem, dials the number, then establishes a connection to the remote host. If you have selected a network connection, SBClient establishes a connection over the local area network to the specified host. If you have selected a serial connection, SBClient establishes a connection to the host through the serial port.
When the session has been successfully opened (a logical connection to the host system has been established), SBClient displays a session window for that particular session. The full range of menu options are available from the session window.
NoteOnce you have opened a session you cannot get back to the SBClient Office for that session. The SBClient Office is only displayed if you choose File > New Session, or if you close a session and click the New Session button.
Opening a Document Based SessionYou can also open document based sessions by selecting File > Open Session > Document and clicking OK. You can also doubleclick on a .sbc file in the Windows Explorer to open that saved session.
56 Getting Started

Opening a Session
Opening Additional SessionsSBClient allows you to open more than one session concurrently. You can open additional sessions that use the same configuration as your active session, or that use a different configuration. Each additional session is displayed in its own session window.
To open a new session using the same configuration as your active session:
• From the session window menu, choose File > Duplicate Session. SBClient opens another session using the active session's configuration. SBClient uses the same session name as that duplicated, but appends a different number to it, so that you can differentiate between sessions.
Getting Started 57

Chapter 6 - Introduction to SBClient
Closing a Session
To close an open session from the session window:
1. Select the session window for the session you wish to close, if there is more than one session open.
2. Choose File > Close Session. This displays the following dialog:
If you have made changes to the session configuration and have not saved them, SBClient dis-plays an additional Save Changes checkbox. Select this to save changes made to the session configuration.
3. Click one of the displayed buttons:
• Close button closes your connection to the host system and returns you to the previous active session, if you have more than one session open. If you are closing the only open session, SBClient exits.
• New Session button closes the active session and displays the SBClient Office, where you may open a new session or create a new session configuration.
• Cancel button. Returns you to the session.
58 Getting Started
Closing a Session
To close an open session from within the session:
1. Enter the appropriate exit or quit command in the session area.
2. This displays the following dialog:
If you have made changes to the session configuration and have not saved them, SBClient dis-plays an additional Save Changes checkbox. Select this to save changes made to the session configuration.
3. Click one of the displayed buttons:
• Close button closes your connection to the host system and returns you to the previous active session, if you have more than one session open. If you are closing the only open session, SBClient exits.
• New Session button closes the active session and displays the SBClient Office, where you may select a new session or create a new session configuration.
• Re-Connect button. Reconnects you to the session.
To close an unopened session from the SBClient Office:
1. Choose File > Close Session.
Getting Started 59

Chapter 6 - Introduction to SBClient
If you have made changes to the current session configuration and have not saved them, SBClient displays a dialog with a Save Changes checkbox:
If you select the Save Changes checkbox, any existing session configurations will be replaced.
2. Click the Close button. SBClient returns you to the session window for the previous active ses-sion, if you have more than one session open. If you are closing the only open session, SBCli-ent exits.
60 Getting Started

Chapter 7 - Basic Session Configuration
This chapter describes how to maintain basic session configuration details.
There are two styles of configuration namely “classic” and “document”. Classic sessions are held internally within SBClient, whereas document sessions are saved as files with a .SBC file exten-sion. It is intended to move SBClient towards a document centric environment in future releases.
Getting Started 61
Chapter 7 - Basic Session Configuration
Overview
Creating a New Session ConfigurationYou can create a new session configuration by modifying an existing configuration and saving it under a different name.
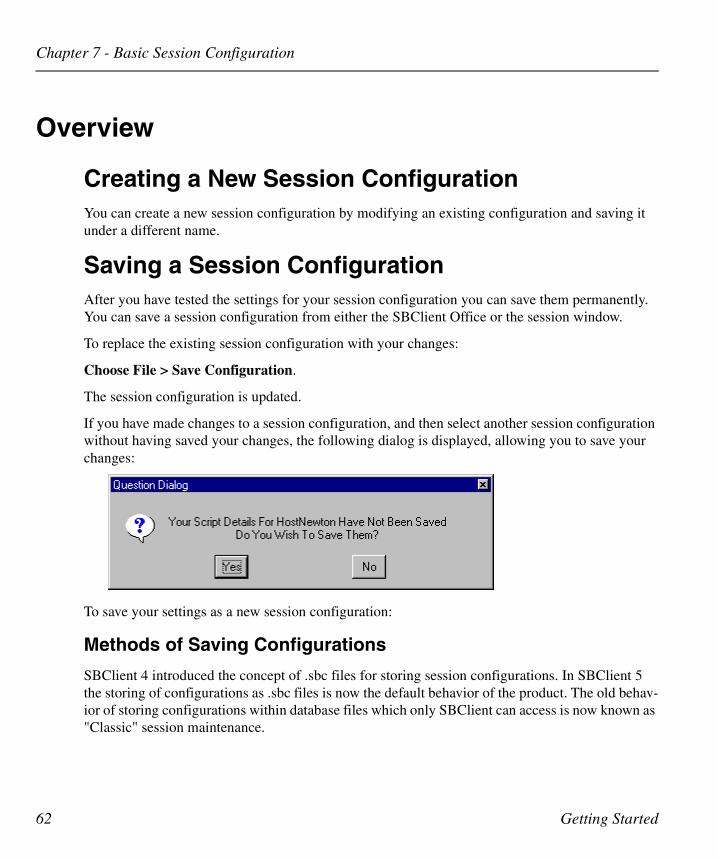
Saving a Session ConfigurationAfter you have tested the settings for your session configuration you can save them permanently. You can save a session configuration from either the SBClient Office or the session window.
To replace the existing session configuration with your changes:
Choose File > Save Configuration.
The session configuration is updated.
If you have made changes to a session configuration, and then select another session configuration without having saved your changes, the following dialog is displayed, allowing you to save your changes:
To save your settings as a new session configuration:
Methods of Saving Configurations
SBClient 4 introduced the concept of .sbc files for storing session configurations. In SBClient 5 the storing of configurations as .sbc files is now the default behavior of the product. The old behav-ior of storing configurations within database files which only SBClient can access is now known as "Classic" session maintenance.
62 Getting Started

Overview
The default behavior is known as "Document" session maintenance. SBClient is keeping pace with Microsoft's push for the operating system and applications to become more document centric.
Saving Configuration Using the Document Method
1. Choose File > Save Configuration As. This displays the Save Configuration As dialog.
2. A default Save path will be provided. This path is the path to your SBClient data in your user profile. It is possible to amend this path to any location on the machine for which you have both read and write permissions. The default Save path is:
C:\windowsdirectory\Profiles\username\Application Data\Ardent
Software\SBClient\SESSIONS
NoteOn Windows95 and Windows98 machines if profiling is not enabled then this path will be:C:\Windowsdirectory\Application Data\Ardent Software\SBClient\SESSIONS
The path can be amended by either typing in a changed path or by using the Browse button provided to the righthand side of the Save in textbox.
3. Either select a file name from the list provided by doubleclicking on it or enter a new File Name.
Getting Started 63

Chapter 7 - Basic Session Configuration
4. Check the Add a Shortcut to this Configuration to the Start Menu checkbox if you would like the configuration to be added to the Windows Start menu. This will create an SBClient group in your personal settings. This group will contain shortcuts to all SBClient configura-tions that have been added to the Windows Start menu.
5. Click the OK button.
NoteIf you are overwriting an existing configuration then SBClient will prompt you to confirm that you want to do this.
Saving Configuration Using the Classic Method
1. Choose File > Save Configuration As. This displays the Save Configuration As dialog.
2. Enter a New Session Name. If you select an existing session configuration, it will be overwrit-ten (a warning dialog will be displayed).
3. Check the Add a Shortcut to this Configuration to the Start Menu checkbox if you would like the configuration to be added to the Windows Start menu. This will create an SBClient group in your personal settings. This group will contain shortcuts to all SBClient configura-tions that have been added to the Start menu.
64 Getting Started

Overview
4. Click the OK button.
Getting Started 65

Chapter 7 - Basic Session Configuration
Configuring a Session
When SBClient is first installed it provides a set of default serial, network and modem configura-tions. If you are running SBClient on a network, your system administrator may have added to or modified these default configurations
You can use the Setup menu to change the existing configurations to meet your particular commu-nication requirements. If you make changes to an existing session configuration, you can: discard them at the end of the session, permanently save them as the new settings for the session configu-ration, or permanently save them as a new session configuration.
To configure a session correctly you need some knowledge of the host computer, your connection to the host and the terminal you are emulating. If you are unsure of any parameter (or if you have difficulties in operating a session after configuration), consult the appropriate hardware, network or terminal documentation and check your configuration, or consult your system administrator.
The Setup menu is available from both the SBClient Office and the session window (some of the Setup options are also represented as active areas on the SBClient Office).
Options are:
• Communication. Allows you to configure the communication method used by the session to connect your PC with the host computer. The communication method chosen depends on the type of physical connection used: serial, network or modem.
• Terminal. Allows you to configure the session to emulate the characteristics of a particu-lar terminal type (eg VT220).
• File Transfer. Allows you to configure some overriding flow control options for file trans-fer.
• Font. Allows you to select the initial font to be used during a session.
• Color. Allows you to associate color with video attributes such as foreground and back-ground, reverse video etc.
• Keyboard. Allows you to reprogram any key on the keyboard to send a different sequence to the host. This allows you to emulate many different types of keyboard.
66 Getting Started

Configuring a Session
• Toolbar. Allows you to customize the toolbar located at the top of your session window. For example, you could create buttons for commonly used menu options, host commands or DOS/Windows programs.
• Status Line. Allows you to select the items to be displayed on the status line located at the bottom of your session window.
• Nationality. Allows you to define the character set to be used during a session.
• Script. Allows you to specify additional script data substitution parameters, to be used for all scripts run from a session.
• Miscellaneous. Allows you to define additional settings such as the characteristics of your cursor and window resize behavior.
• Dialing Directory. Allows you to specify telephone numbers for use when opening a ses-sion using a modem.
• GUI Parameters. Allows you to define the GUI parameters.
• Smart Query. Allows you to build, save and run report queries for a host computer which is running a nested relational operating system.
• Environment variables. Allows you to change or add environment variables.
Communication SetupThe Communication option on the Setup menu allows you to configure the communication method used by the session to connect your PC to the host computer.
When you select this option, SBClient displays a configuration dialog specific to the type of com-munication used in the current session. The configuration dialog presented enables you to modify settings for one the following (depending on communication type selected):
• The configuration of your serial port (ie COM1, COM2, etc).
• The configuration for your host network connection.
• The initialization commands and dialing options for your modem, as well as the configura-tion of the serial port the modem will be using.
Getting Started 67

Chapter 7 - Basic Session Configuration
Serial Communication Setup
The Serial Communication Setup dialog allows you to change the communication settings for your serial port.
Parameters are:
Port
The serial port you are using to connect to the host. COM1 through COM9 may be selected.
Baud Rate
The baud rate for transmission. When you set the baud rate, ensure the port on the host computer connected to your PC is set to the same baud rate. 300 through to 115200 may be selected. Consult your system administrator or the appropriate host documentation for more information.
Data Bits
The number of data bits together with the number of stop bits (see Stop Bits) determines how a character is encoded. In addition, the number of data bits is usually set together with a given parity type (see Parity). 4 through to 8 may be selected. Normally you would choose 8 data bits per char-acter. If you are using parity, the link may only support 7 data bits.
Stop Bits
The number of stop bits, together with the number of data bits (see Data Bits) determines how a character is encoded. 1, 1.5 and 2 stop bits may be selected. Normally you would set Stop Bits to 1 (the default), regardless of the number of data bits.
68 Getting Started

Configuring a Session
Parity
Parity is one of several methods the communication program uses for detecting transmission errors. Normally you would choose no parity (None). If the communication link can only be made with parity, then select the parity method required: Odd, Even, Mark or Space.
Parity, data bits and stop bits are normally set using either of the following combinations:
• 8 data bits, 1 stop bit, no parity
• 7 data bits, 1 stop bit, even parity
Consult your system administrator or the appropriate host documentation for more information.
Network Communication Setup
The Telnet Setup dialog allows you to change the settings for the network software you use to connect to your host.
Parameters are:
Host Name or IP Address
The name or IP address of the host computer.
Term Type
This is used to specify the type of terminal that will be used.
Port
This is the port type to use.
Getting Started 69

Chapter 7 - Basic Session Configuration
Modem Communication Setup
The Modem Communication Setup dialog allows you to change the communication settings for your serial port.
Parameters are:
Port
The serial port you are using to connect to the host. COM1 through COM9 may be selected.
Baud Rate
The baud rate for transmission. When you set the baud rate, ensure the port on the host computer connected to your PC is set to the same baud rate. 300 through to 115200 may be selected. Consult your system administrator or the appropriate host documentation for more information.
Data Bits
The number of data bits together with the number of stop bits (see Stop Bits) determines how a character is encoded. In addition, the number of data bits is usually set together with a given parity type (see Parity). 4 through to 8 may be selected. Normally you would choose 8 data bits per char-acter. If you are using parity, the link may only support 7 data bits.
Stop Bits
The number of stop bits, together with the number of data bits (see Data Bits) determines how a character is encoded. 1, 1.5 and 2 stop bits may be selected. Normally you would set Stop Bits to 1 (the default), regardless of the number of data bits.
70 Getting Started

Configuring a Session
Parity
Parity is one of several methods the communication program uses for detecting transmission errors. Normally you would choose no parity (None). If the communication link can only be made with parity, then select the parity method required: Odd, Even, Mark or Space.
Parity, data bits and stop bits are normally set using either of the following combinations:
• 8 data bits, 1 stop bit, no parity
• 7 data bits, 1 stop bit, even parity
Consult your system administrator or the appropriate host documentation for more information.
Modem Configuration
The Modem button on the Modem Communications Setup dialog displays the Modem Configu-ration dialog. This allows you to change the communication settings of the serial port you use to connect to your modem.
The dialog displays the current modem settings assigned to your session. The term (Current Con-fig) prefixes the modem model name on which the current settings are based. This differentiates your settings from the permanent settings in the modem database. The modem database contains
Getting Started 71

Chapter 7 - Basic Session Configuration
the default settings for each modem that SBClient supports and is unaffected by any changes you make in this dialog. For example, if you select the model name GENERIC HIGH SPEED and change a setting, SBClient retains the original GENERIC HIGH SPEED settings in the Model list and assigns the name (Current Config) GENERIC HIGH SPEED to your new settings. This helps you identify which modem you used for the base settings. The original GENERIC HIGH SPEED modem settings are unaffected.
If you want to save your changes, you should save your session configuration. If you do not save your changes, they apply only for the duration of your session. Your changes do not affect any other user's modem settings.
NoteYou should make changes to these modem settings only if you understand modem operations and are familiar with the specific characteristics of your modem. Consult your modem documentation for an explanation of the settings displayed in this dialog.
Parameters are:
Model
This is the list of modems that SBClient maintains in its modem database. Select the modem that most closely resembles the settings you require from this list. The selected modem appears in the Model text box, prefaced with the term (Current Config).
Speaker Mode
You can turn the modem speaker permanently off (Off), permanently on (On) or on until a connec-tion has been established (Until Connected).
Speaker Volume
You can adjust the modem speaker volume to Low, Medium or High. This parameter may not work with some modems.
Initialization String
The initialization string is a series of commands used to initialize and configure your modem. SBClient sends this command string to the modem before establishing a connection.
72 Getting Started

Configuring a Session
Reset String
The command(s) used to reset your modem to its default settings.
Hangup String
The control character and command sequence required to instruct your modem to hang up.
Connect String
The message sent by the modem to your PC indicating a connection has been established.
No Connect Strings
The messages (separated by commas) that your modem sends to your PC, indicating a connection attempt has failed.
Pulse Dial
Uses pulse instead of tone dialing.
NoteNational telecommunications authorities may impose restrictions on the use of pulse dialing.
Detect Busy Tone
Checks for a busy signal from the dialled number.
Detect Dial Tone
Does not attempt to dial a phone number until a dial tone is detected.
Dial Retries
The number of times SBClient redials a number (or set of numbers) before aborting the connection attempt.
Retry Every
The number of seconds SBClient waits before redialing a number.
Getting Started 73

Chapter 7 - Basic Session Configuration
Wait For Carrier
The number of seconds SBClient waits before deciding a connection has failed.
NoteNational telecommunications authorities impose restrictions on the number of times a phone num-ber may be redialed. Check the regulations for your country before altering the setting of Dial Retries, Retry Every or Wait for Carrier.
Auto Answer
The modem will automatically answer if the phone rings.
Answer After Rings
The number of rings the modem waits before answering an incoming call.
Drop DTR to Hangup
Choose this option if your modem requires the DTR signal to be lowered to make it hang up.
74 Getting Started

Configuring a Session
Dialing Directory
The Dialing Directory dialog is displayed when you click on the Modem Communications Setup dialog, or if you have a modem connection and choose File > Dial a Number.
You can select the telephone number you wish to dial from the list of saved numbers. The tele-phone number associated with the selected name is displayed in the Prefix and Number text boxes.
Getting Started 75

Chapter 7 - Basic Session Configuration
The Edit button displays the Dialing Directory Maintenance dialog, allowing you to add or edit modem phone numbers.
To add new numbers to the dialing directory:
1. Click the New button. The Directory Details’ text boxes are cleared.
2. In the Directory Details’ text boxes, enter the new name, prefix, telephone number and any additional comments.
3. Click the Add button. The entry is added to the directory.
To change an existing number in the dialing directory:
1. Highlight the name in the Phone Book list. The details of the selected entry are displayed in the Directory Details’ text boxes.
2. Changes the details.
3. Click the Update button to save the changes. The Update button becomes active when you click on any of the Directory Details’ text boxes.
76 Getting Started

Configuring a Session
To specify additional numbers in the dialing directory:
Each entry in the Phone Book list can have up to ten additional numbers associated with it. These are used in cases where the service provider or bulletin board has more than one access line. If you specify additional numbers, SBClient will attempt to get through to the service provider by trying each number in turn until a connection is made.
1. Highlight the name in the Phone Book list.
2. Click the No's button. This displays the Additional Telephone Numbers dialog.
3. Enter any additional numbers and their prefixes.
4. Click the OK button.
To change communication or login settings for an entry in the dialing directory:
You can associate specific communication and login configuration settings to a selected entry in the dialing directory. These settings may be different to the settings you have selected using the Communication and Login options from the Setup menu.
1. Highlight the name in the Phone Book list.
2. To change communication settings, click the Comms button to display the Serial Communi-cation Setup dialog.
To change login settings, click the Login button to display the Host Login Details dialog.
3. Any changes you make to either of these dialogs apply only to the selected phone book entry. They override the settings defined in the Communications or Script options in the Setup menu for that phone book entry.
Getting Started 77

Chapter 7 - Basic Session Configuration
78 Getting Started


THE ART OF DATA MANAGEMENT
Getting Started DSC-5001


![Skaffold - storage.googleapis.com · [getting-started getting-started] Hello world! [getting-started getting-started] Hello world! [getting-started getting-started] Hello world! 5](https://img.dokumen.tips/doc/110x75/5ec939f2a76a033f091c5ac7/skaffold-getting-started-getting-started-hello-world-getting-started-getting-started.jpg)


