Embed Size (px)
Citation preview
SAS INSTALLATION GUIDE DepartmentofMathematicalSciencesBentleyUniversityVersion:November2013

1
Table of Contents
SASInstallationRequirements.........................................................................................................2
HowtoAccessSAS.................................................................................................................................2ToaccessVLABonaNon‐Bentleylaptop........................................................................................................3
HowtoInstallSAS.................................................................................................................................6
Troubleshooting..................................................................................................................................14

2
SAS Installation Requirements SAS9.3runsontheprofessionalversionsofWindows8,Windows7,VistaandXP.It
isalsocompatiblewithLinux.FormoreinformationgototheSASInstallCenter.
SAS9.3cannotberundirectlyonaMAC.ToinstallSASonMACcomputers,youmusthaveavirtualizationsoftwaresuchas“Parallels,”whichcanbepurchasedthroughBentleyatadiscountedpriceattheonlineBentleySoftwareCenter.WhenthesoftwareisinstalledandyouinstallWindowsonyourMAC(whichcanalsobedownloadedfromtheBentleySoftwareCenter),youcanproceedwiththeSASinstallationasyouwouldnormallyonaWindows.
Note:Determineifyourcomputerisrunninga32‐bitor64‐bitversionofthe
operatingsystem.SAS9.3isavailableinbotha32‐bitand64‐biteditionssomakesuretoinstallthecorrecteditionforoptimumperformance.
Also,besuretoupdateyourJavaenvironmentbeforeinstallingSAS,sothatthe
programinstallsproperly.IfyouhavetodownloadanupdatedversionofJava,besuretorestartyourcomputerforchangestotakeeffect,beforetheinstallation.
Makesurethatyouhavesufficientstoragespaceonyourcomputer.SAS9.3requires
about5gigabytesofdiskspace,justfortheinstallationfiles.Youwillneedadditionaldiskspaceforsmoothoperationoftheprogram.
How to Access SAS YoucanrunSASfromon‐campusPCs,installSASonyourBentley‐providedlaptop,oryoucaninstallSASonanon‐BentleylaptoporhomePC.A.RunningSASfromOn‐CampusPCsIfyouwouldliketouseSASoncampus,itisavailableonallofthecomputersintheCenterforMarketingTechnology(CMT)inMorisonHall,andthecomputerlabinLindsay.ItisalsoavailablethroughtheVirtualLab(VLAB),whichisBentley’sacademicapplicationserverandisaccessiblefromanyBentley‐maintainedPConcampus.B.InstallingSASonyourBentley‐providedLaptoporNon‐BentleyLaptoporPCIfyouwouldliketoinstallSASwhileonthecampus’network,youcaninstallitusingVLAB.IfyouwouldliketogothroughtheSASinstallationprocessoff‐campus,youcanalsoinstallitusingaSASinstallationflashdrivethatcanberentedoutfromtheBentleyLibrary.

3
To access VLAB on a Non‐Bentley laptop Followthestepsbelow:ClickthecomputericononyourPC
SelectMapanetworkdrive
SelecttheP:driveandtypein\\vlab.bentley.edu\vlab95$andchecktheboxreconnectatlogin.Selectconnectusingadifferentusername.

4
Connectwithusernameblue\yourusernameandyournetworkpassword.
SelectFinish

5
Laststep,openthenewnetdrive:Vlab,andinstallSAS.
ClickonSAS9.3icontoinstallSASonyourcomputer
Note:1.PleaseupdateyourJavaenvironmentonyourcomputerbeforeyouinstallSAS;2.Iftheinstallationprocessfailedandyouwanttoretry.PleasegotocontrolpaneltoremoveSAScompletelybeforeyouretry.

6
How to Install SAS Followtheinstructionsbelow:
WhenyouclicktheSAS9.3iconinVLABorafterinsertingtheflashdrive,thefollowingwindowwillpopup.Click“yes”toallowtheinstallationtoproceed.
Thewindowbelowwillappear.Ittakesatleast10secondsormorefortheSAS
DeploymentWizardtofireup.
ChoosethelanguageforrunningSAS.
7
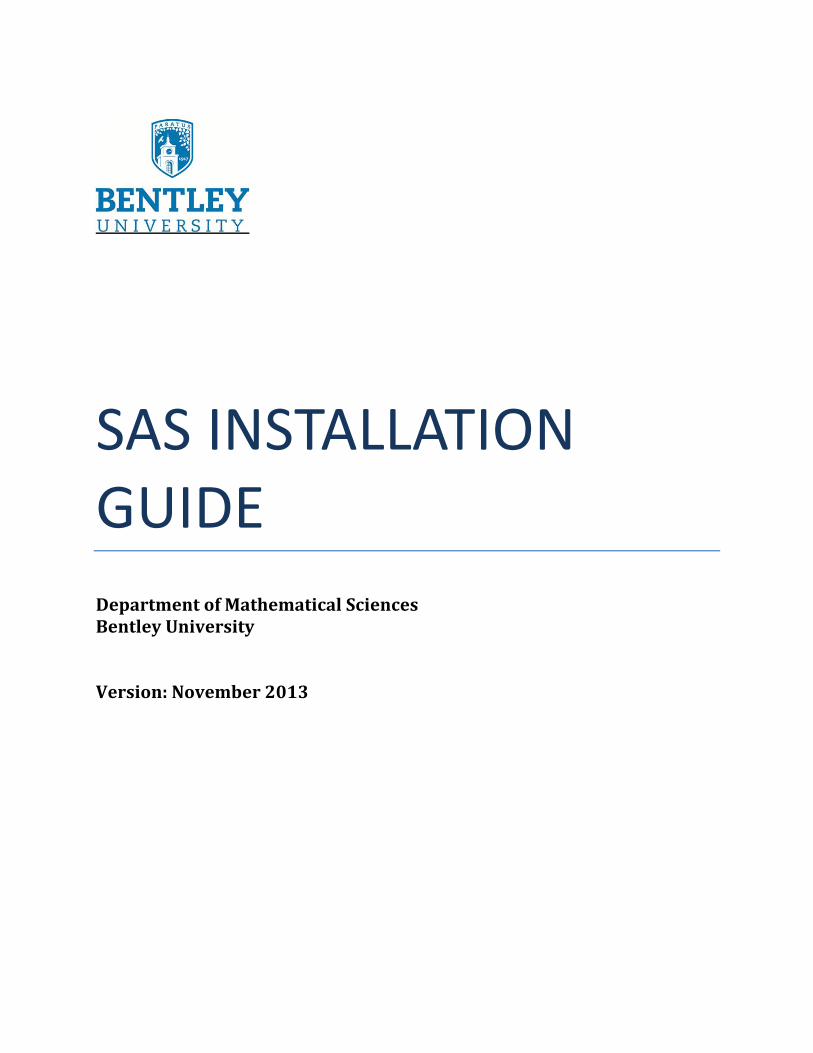
IndicatethelocationwhereyouwanttheSASsoftwaretobeinstalledonyourmachine.
SelectInstallSASFoundationandRelatedSoftwareandclicknext.

8
Selecttheproductsthatyouwanttoinstallandclicknext.Thecomponentsthatareautomaticallycheckedaretheonesthataremostcommonlyused.
Specifyadditionalproductstoinstallandclicknext.Again,thecomponentsautomaticallycheckedaretheonesmostcommonlyused.

9
IndicatethelocationofyourInstallationDataFile.IfyouhaveavalidInstallationDataFile,youwillseeawindowsimilartotheonebelowwiththerightexpirationdate.
ClickNext.

10
ClickNext.
SelectUsetherecommendedJavaRuntimeEnvironmentandclicknext.

11
ClickNext.
TheDeploymentWizardwillnowcheckyoursystemtomakesurethatitisreadyforSAStobeinstalled.Ifthesystemisready,thewindowshouldlookliketheonebelow.

12
Tobegintheinstallationprocess,clickStart.Itmaytakeabout20to30minutesforthewholeinstallationprocesstocomplete.
Aftersuccessfulinstallationofallthecomponents,youwillseegreencheckmarksnexttoeachonewiththelastonecalled,“InstallPostProcessing.”ClickNext.

13
Selectthesupportoptionyouwant.
ClickonFinishandyoushouldhaveSAS9.3installedonyourcomputer.
14
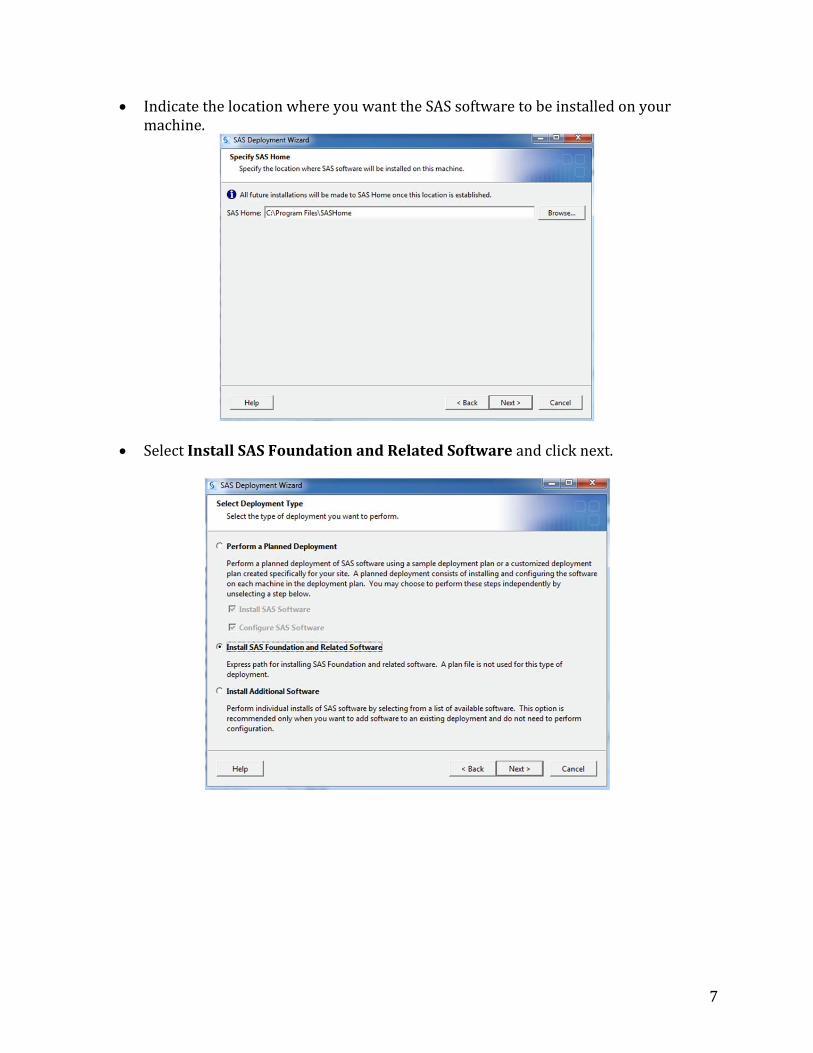
Troubleshooting IssueinstallingSASsoftware:
MakesureyourJavaenvironmentisupdatedbeforeinstallingSASsoftware.
IfinstallingSASonaMAC(usingParallels),makesurethatyouhaveallofyoursoftwareupdated,includingtheupdatedversionsofyourMicrosoftprograms.
Ifyouneedtoreinstallsoftwareinthecasethatsomethinggoeswrong,makesure
tofirstuninstallitcompletely.UninstallingSASfromtheControlPanelWILLNOTdeleteitcompletely.AlsouninstallitbygoingtotheC:/drive,thenclicking“ProgramFiles”,andthendeletingthe“SAShome”folder.Then,restartyourcomputer.
IssueimportingexcelfileintoSAS:
Ifyouareusinga64‐bitversionofSAS,youmayhaveanissueimportingexcelfilesintoprogramsuccessfully.Ifthisisthecase,resaveexcelfileintoa.csvformatandreimport.
Ifyouareusinga64‐bitversionofSAS,buthave32‐bitMicrosoftOfficefiles,youwillhavetodownloadandinstalltheSAS9.3PCfilesserverinordertoconvertthemtoSAS64‐bitfiles.Formoreinfo:http://support.sas.com/kb/43/802.html
Foradditionalresources:http://support.sas.com/documentation/installcenter/93/win/index.html