Embed Size (px)
Citation preview

SAS® Infrastructure for Risk Management 3.6: Administrator’s Guide
SAS® DocumentationJune 10, 2021

The correct bibliographic citation for this manual is as follows: SAS Institute Inc. 2019. SAS® Infrastructure for Risk Management 3.6: Administrator’s Guide. Cary, NC: SAS Institute Inc.
SAS® Infrastructure for Risk Management 3.6: Administrator’s Guide
Copyright © 2019, SAS Institute Inc., Cary, NC, USA
All Rights Reserved. Produced in the United States of America.
For a hard copy book: No part of this publication may be reproduced, stored in a retrieval system, or transmitted, in any form or by any means, electronic, mechanical, photocopying, or otherwise, without the prior written permission of the publisher, SAS Institute Inc.
For a web download or e-book: Your use of this publication shall be governed by the terms established by the vendor at the time you acquire this publication.
The scanning, uploading, and distribution of this book via the Internet or any other means without the permission of the publisher is illegal and punishable by law. Please purchase only authorized electronic editions and do not participate in or encourage electronic piracy of copyrighted materials. Your support of others' rights is appreciated.
U.S. Government License Rights; Restricted Rights: The Software and its documentation is commercial computer software developed at private expense and is provided with RESTRICTED RIGHTS to the United States Government. Use, duplication, or disclosure of the Software by the United States Government is subject to the license terms of this Agreement pursuant to, as applicable, FAR 12.212, DFAR 227.7202-1(a), DFAR 227.7202-3(a), and DFAR 227.7202-4, and, to the extent required under U.S. federal law, the minimum restricted rights as set out in FAR 52.227-19 (DEC 2007). If FAR 52.227-19 is applicable, this provision serves as notice under clause (c) thereof and no other notice is required to be affixed to the Software or documentation. The Government’s rights in Software and documentation shall be only those set forth in this Agreement.
SAS Institute Inc., SAS Campus Drive, Cary, NC 27513-2414
June 2021
SAS® and all other SAS Institute Inc. product or service names are registered trademarks or trademarks of SAS Institute Inc. in the USA and other countries. ® indicates USA registration.
Other brand and product names are trademarks of their respective companies.
3.6-P1:irmag

Contents
What’s New in SAS Infrastructure for Risk Management . . . . . . . . . . . . . . . . . . . . . . . . vii
PART 1 Introduction to SAS Infrastructure for Risk Management 1
Chapter 1 • Welcome to SAS Infrastructure for Risk Management . . . . . . . . . . . . . . . . . . . . . . . . 3What Is SAS Infrastructure for Risk Management? . . . . . . . . . . . . . . . . . . . . . . . . . . . . . 3Audience . . . . . . . . . . . . . . . . . . . . . . . . . . . . . . . . . . . . . . . . . . . . . . . . . . . . . . . . . . . . . . 3Related Documentation . . . . . . . . . . . . . . . . . . . . . . . . . . . . . . . . . . . . . . . . . . . . . . . . . . 4
Chapter 2 • SAS Infrastructure for Risk Management Architecture . . . . . . . . . . . . . . . . . . . . . . . 5SAS Infrastructure for Risk Management Architecture . . . . . . . . . . . . . . . . . . . . . . . . . . 5SAS Infrastructure for Risk Management Data Flow . . . . . . . . . . . . . . . . . . . . . . . . . . . . 7SAS Infrastructure for Risk Management Distributed Development . . . . . . . . . . . . . . . . 8
Chapter 3 • SAS Infrastructure for Risk Management Federated Content . . . . . . . . . . . . . . . . . 11About Federated Areas . . . . . . . . . . . . . . . . . . . . . . . . . . . . . . . . . . . . . . . . . . . . . . . . . . 11Folders in a Federated Area . . . . . . . . . . . . . . . . . . . . . . . . . . . . . . . . . . . . . . . . . . . . . . 12Base Date Folder Entity Table . . . . . . . . . . . . . . . . . . . . . . . . . . . . . . . . . . . . . . . . . . . . 14Federated Content . . . . . . . . . . . . . . . . . . . . . . . . . . . . . . . . . . . . . . . . . . . . . . . . . . . . . . 15
PART 2 Deploying SAS Infrastructure for Risk Management 19
Chapter 4 • Pre-installation Tasks . . . . . . . . . . . . . . . . . . . . . . . . . . . . . . . . . . . . . . . . . . . . . . . . . . 21Pre-installation Checklist . . . . . . . . . . . . . . . . . . . . . . . . . . . . . . . . . . . . . . . . . . . . . . . . 21Verify Your System Requirements . . . . . . . . . . . . . . . . . . . . . . . . . . . . . . . . . . . . . . . . . 22Review the SAS Intelligence Platform Documentation . . . . . . . . . . . . . . . . . . . . . . . . . 22Set Up User Accounts Required for Deployment . . . . . . . . . . . . . . . . . . . . . . . . . . . . . . 22Define Groups . . . . . . . . . . . . . . . . . . . . . . . . . . . . . . . . . . . . . . . . . . . . . . . . . . . . . . . . . 23Obtain a Deployment Plan . . . . . . . . . . . . . . . . . . . . . . . . . . . . . . . . . . . . . . . . . . . . . . . 24Create a SAS Software Depot . . . . . . . . . . . . . . . . . . . . . . . . . . . . . . . . . . . . . . . . . . . . . 24Grant Linux Directory Permissions . . . . . . . . . . . . . . . . . . . . . . . . . . . . . . . . . . . . . . . . 24Check for SAS Installation Notes . . . . . . . . . . . . . . . . . . . . . . . . . . . . . . . . . . . . . . . . . . 25Default File Locations . . . . . . . . . . . . . . . . . . . . . . . . . . . . . . . . . . . . . . . . . . . . . . . . . . 25
Chapter 5 • Installation Tasks . . . . . . . . . . . . . . . . . . . . . . . . . . . . . . . . . . . . . . . . . . . . . . . . . . . . . 27Overview of the Installation Tasks . . . . . . . . . . . . . . . . . . . . . . . . . . . . . . . . . . . . . . . . . 27General Installation Information . . . . . . . . . . . . . . . . . . . . . . . . . . . . . . . . . . . . . . . . . . . 28Install and Configure SAS Infrastructure for Risk Management . . . . . . . . . . . . . . . . . . 28Install Hot Fixes . . . . . . . . . . . . . . . . . . . . . . . . . . . . . . . . . . . . . . . . . . . . . . . . . . . . . . . 30Configure an External Location to the Persistent Area . . . . . . . . . . . . . . . . . . . . . . . . . 30Install Federated Content . . . . . . . . . . . . . . . . . . . . . . . . . . . . . . . . . . . . . . . . . . . . . . . . 33Verify the Installation Using Sample Content . . . . . . . . . . . . . . . . . . . . . . . . . . . . . . . . 33

Chapter 6 • Post-installation Tasks . . . . . . . . . . . . . . . . . . . . . . . . . . . . . . . . . . . . . . . . . . . . . . . . . 37Overview of the Post-installation Tasks . . . . . . . . . . . . . . . . . . . . . . . . . . . . . . . . . . . . . 37Use the Instructions File . . . . . . . . . . . . . . . . . . . . . . . . . . . . . . . . . . . . . . . . . . . . . . . . . 38Create Roles, Groups, and Users . . . . . . . . . . . . . . . . . . . . . . . . . . . . . . . . . . . . . . . . . . 38Configure the Metadata Accounts for SAS Infrastructure for Risk Management . . . . . 40Apply SAS Security Updates . . . . . . . . . . . . . . . . . . . . . . . . . . . . . . . . . . . . . . . . . . . . . 42Configure HTTPS as the SAS Infrastructure for Risk Management Web Connection . 43Configure the LOCKDOWN Feature . . . . . . . . . . . . . . . . . . . . . . . . . . . . . . . . . . . . . . . 44Configure SAS Infrastructure for Risk Management Grid Computing . . . . . . . . . . . . . 44Customizing the Amount of Data That Can Be Viewed . . . . . . . . . . . . . . . . . . . . . . . . . 48Back Up Content . . . . . . . . . . . . . . . . . . . . . . . . . . . . . . . . . . . . . . . . . . . . . . . . . . . . . . . 49
PART 3 Migrate or Upgrade SAS Infrastructure for Risk Management 51
Chapter 7 • Upgrade and Migration Overview . . . . . . . . . . . . . . . . . . . . . . . . . . . . . . . . . . . . . . . . 53About Migrating and Upgrading . . . . . . . . . . . . . . . . . . . . . . . . . . . . . . . . . . . . . . . . . . 53Releases That Support Migration or Upgrade . . . . . . . . . . . . . . . . . . . . . . . . . . . . . . . . 53
Chapter 8 • Migrating SAS Infrastructure for Risk Management . . . . . . . . . . . . . . . . . . . . . . . . . 55About the Migration Process . . . . . . . . . . . . . . . . . . . . . . . . . . . . . . . . . . . . . . . . . . . . . 55Review Additional Documentation . . . . . . . . . . . . . . . . . . . . . . . . . . . . . . . . . . . . . . . . 56Design Your Migration . . . . . . . . . . . . . . . . . . . . . . . . . . . . . . . . . . . . . . . . . . . . . . . . . . 57Create a Migration Package in the Source Environment . . . . . . . . . . . . . . . . . . . . . . . . 57Migrate SAS Infrastructure for Risk Management . . . . . . . . . . . . . . . . . . . . . . . . . . . . . 57Migrate Federated Content . . . . . . . . . . . . . . . . . . . . . . . . . . . . . . . . . . . . . . . . . . . . . . . 59Troubleshoot Migration Errors . . . . . . . . . . . . . . . . . . . . . . . . . . . . . . . . . . . . . . . . . . . . 61
Chapter 9 • Upgrading SAS Infrastructure for Risk Management . . . . . . . . . . . . . . . . . . . . . . . . 63About the Upgrade Process . . . . . . . . . . . . . . . . . . . . . . . . . . . . . . . . . . . . . . . . . . . . . . 63Perform the Pre-upgrade Tasks . . . . . . . . . . . . . . . . . . . . . . . . . . . . . . . . . . . . . . . . . . . . 64Upgrade SAS Infrastructure for Risk Management . . . . . . . . . . . . . . . . . . . . . . . . . . . . 64Troubleshoot Upgrade Errors . . . . . . . . . . . . . . . . . . . . . . . . . . . . . . . . . . . . . . . . . . . . . 65
PART 4 Administering SAS Infrastructure for Risk Management 67
Chapter 10 • Performing Additional Administrative Tasks . . . . . . . . . . . . . . . . . . . . . . . . . . . . . . 69Configure Middle-Tier Server Clustering . . . . . . . . . . . . . . . . . . . . . . . . . . . . . . . . . . . . 69Add a Solution Federated Area to an Existing Deployment . . . . . . . . . . . . . . . . . . . . . . 70Load Data into a Federated Area Using Live ETL . . . . . . . . . . . . . . . . . . . . . . . . . . . . . 73Access SAS Infrastructure for Risk Management Information Using WebDAV . . . . . . 74Change the Persistent Area’s Location . . . . . . . . . . . . . . . . . . . . . . . . . . . . . . . . . . . . . . 79Map Libraries . . . . . . . . . . . . . . . . . . . . . . . . . . . . . . . . . . . . . . . . . . . . . . . . . . . . . . . . . 80Run the Hot Fix Post-installation Tool . . . . . . . . . . . . . . . . . . . . . . . . . . . . . . . . . . . . . . 85
Chapter 11 • Performing Programming Interface Administrative Tasks . . . . . . . . . . . . . . . . . . . 91About the SAS Infrastructure for Risk Management Programmer’s Interfaces . . . . . . . 91Configure the Development Environment . . . . . . . . . . . . . . . . . . . . . . . . . . . . . . . . . . . 91Install a Stand-Alone Federated Area without a Server Restart . . . . . . . . . . . . . . . . . . . 93Back Up and Restore Job Flow Instances . . . . . . . . . . . . . . . . . . . . . . . . . . . . . . . . . . . . 99
iv Contents

Chapter 12 • Troubleshooting . . . . . . . . . . . . . . . . . . . . . . . . . . . . . . . . . . . . . . . . . . . . . . . . . . . . 103Gather Information . . . . . . . . . . . . . . . . . . . . . . . . . . . . . . . . . . . . . . . . . . . . . . . . . . . . 103Enable Detailed Logging . . . . . . . . . . . . . . . . . . . . . . . . . . . . . . . . . . . . . . . . . . . . . . . 105Fix Your Web Application Log File Display . . . . . . . . . . . . . . . . . . . . . . . . . . . . . . . . 106Log and Configuration File Locations . . . . . . . . . . . . . . . . . . . . . . . . . . . . . . . . . . . . . 106
Contents v

vi Contents

What’s New in SAS Infrastructure for Risk Management
SAS Infrastructure for Risk Management 3.6 New Feature History
This table list the changes made to this administrator’s guide for new features and support delivered as SAS Infrastructure for Risk Management 3.6 hot fixes.
New Feature History Table
Feature Description Hot Fix and Date
Support for custom dynamic mapping definitions (using the %mv configuration variable) for generic libraries.
See “Generic Library Mapping”.
Hot Fix G2T004, March 30, 2020
What’s New in SAS Infrastructure for Risk Management 3.6
SAS Infrastructure for Risk Management 3.6 does not introduce any administrative-level procedures.
For information about end user or programming new features and enhancements, see the what’s new information in the following documents:
• SAS Infrastructure for Risk Management: User’s Guide
• SAS Infrastructure for Risk Management: Programmer’s Guide for Python
• SAS Infrastructure for Risk Management: Programmer’s Guide for SAS
vii

What’s New in Recent Releases
What’s New in SAS Infrastructure for Risk Management 3.6For information about end user or programming new features and enhancements, see the what’s new information in the following documents:
• SAS Infrastructure for Risk Management: User’s Guide
• SAS Infrastructure for Risk Management: Programmer’s Guide for Python
• SAS Infrastructure for Risk Management: Programmer’s Guide for SAS
What’s New in SAS Infrastructure for Risk Management 3.5The following new features and enhancements were introduced in SAS Infrastructure for Risk Management 3.5:
• Ability to install stand-alone federated areas that do not require a server restart.
See “Install a Stand-Alone Federated Area without a Server Restart”.
• Additional capabilities that enable additional user management actions, such as install federated areas and change ownership of job flow instances.
See “Create Roles, Groups, and Users”.
• Enhanced library mapping definitions, including support of extended custom mapping definitions and the ability to separate data inputs (entities, base dates, configuration sets) into folders.
See “Map Libraries”.
• Full support for generic libraries, including the ability to import and export data as a Microsoft Excel spreadsheet or SAS data set.
See “Generic Library Mapping”.
• Faster and more efficient support for uploading large data sets.
• SAS Infrastructure for Risk Management hot fix post-installation tool that verifies and automates post-installation steps that are required when you apply a SAS Infrastructure for Risk Management hot fix that includes the SAS Infrastructure for Risk Management server JAR.
See “Run the Hot Fix Post-installation Tool”.
viii What’s New in SAS Infrastructure for Risk Management

Part 1
Introduction to SAS Infrastructure for Risk Management
Chapter 1Welcome to SAS Infrastructure for Risk Management . . . . . . . . . . . . . . 3
Chapter 2SAS Infrastructure for Risk Management Architecture . . . . . . . . . . . . . 5
Chapter 3SAS Infrastructure for Risk Management Federated Content . . . . . . 11
1

2

Chapter 1
Welcome to SAS Infrastructure for Risk Management
What Is SAS Infrastructure for Risk Management? . . . . . . . . . . . . . . . . . . . . . . . . . 3
Audience . . . . . . . . . . . . . . . . . . . . . . . . . . . . . . . . . . . . . . . . . . . . . . . . . . . . . . . . . . . . . 3
Related Documentation . . . . . . . . . . . . . . . . . . . . . . . . . . . . . . . . . . . . . . . . . . . . . . . . . 4
What Is SAS Infrastructure for Risk Management?SAS Infrastructure for Risk Management is a high-performance job execution engine with a web-based user interface and a programming interface that is based on SAS.
SAS Infrastructure for Risk Management solutions are delivered as industry-specific content releases that are downloaded and installed after SAS Infrastructure for Risk Management is installed. The calculations that make up the solution content releases are performed using job flows in the SAS Infrastructure for Risk Management web application.
Alternatively, SAS Infrastructure for Risk Management can be ordered as part of the SAS Risk Analytics Builder package, which does not contain any content. With this package, SAS programmers can use SAS Infrastructure for Risk Management as a programming interface that enables them to easily create parallel programs that run on SAS Infrastructure for Risk Management.
SAS Infrastructure for Risk Management is designed to be customizable and flexible. The architecture of SAS Infrastructure for Risk Management provides a simplified way to develop and run the fastest analytics.
AudienceThis guide is for administrators who are responsible for installing and configuring SAS Infrastructure for Risk Management and the content that uses it as a platform.
This administrator must be able to perform the following tasks:
• Use SAS Download Manager to download a SAS Software Depot to each machine on which an installation is performed.
• Install and configure the SAS Intelligence Platform and the SAS Infrastructure for Risk Management platform and associated content modules.
3

• Use SAS Management Console to maintain the metadata for the servers, users, and other global resources that are required by the solution.
Related Documentation• SAS Infrastructure for Risk Management: User’s Guide
• SAS Infrastructure for Risk Management: Programmer’s Guide for Python
• SAS Infrastructure for Risk Management: Programmer’s Guide for SAS
• SAS High-Performance Risk: Administrator’s Guide
4 Chapter 1 • Welcome to SAS Infrastructure for Risk Management

Chapter 2
SAS Infrastructure for Risk Management Architecture
SAS Infrastructure for Risk Management Architecture . . . . . . . . . . . . . . . . . . . . . . 5
SAS Infrastructure for Risk Management Data Flow . . . . . . . . . . . . . . . . . . . . . . . . 7
SAS Infrastructure for Risk Management Distributed Development . . . . . . . . . . . . 8Overview . . . . . . . . . . . . . . . . . . . . . . . . . . . . . . . . . . . . . . . . . . . . . . . . . . . . . . . . . . . 8Contributors . . . . . . . . . . . . . . . . . . . . . . . . . . . . . . . . . . . . . . . . . . . . . . . . . . . . . . . . 8Federated Content . . . . . . . . . . . . . . . . . . . . . . . . . . . . . . . . . . . . . . . . . . . . . . . . . . . . 9
SAS Infrastructure for Risk Management Architecture
SAS Infrastructure for Risk Management operates in a three-tiered environment, as shown in the following figure:
5

SAS Visual Analytics Administration and Reporting Server
Server Tier
Middle Tier
Client Tier
SAS Workspace Server
Other SAS Servers
Other SAS web applications
Desktop Clients
SAS Management ConsoleSAS Data Integration ClientsOther SAS Client Applications
Client Tier
Web Browser
SAS Foundation Services
SAS Web Application Server
Web Doc
SAS Web Infrastructure PlatformSAS Content ServerOther SAS products
SAS Web Infrastructure PlatformApplication Server
SAS Visual Analytics Administration and Reporting Application Server
Data Tier
SAS Solution Data Mart
SAS Metadata Server
SAS 9.4
SAS Infrastructure for Risk Management Content Module
SAS Infrastructure for Risk ManagementPersonal Federated Area
Server Tier• handles requests from the client tier and the middle tier
• serves as an abstract layer between the data tier and the middle tier or between the data tier and the client tier
• consists of SAS applications, such as the SAS Metadata Server and a SAS Application Server
Middle Tier• receives and processes web requests from the client tier and passes these requests
to the server tier and the data tier
• contains a web application server in addition to web applications such as the SAS Infrastructure for Risk Management web application
Client Tier• initiates requests (via desktop client applications or web browsers) to perform the
necessary work and to view formatted output
6 Chapter 2 • SAS Infrastructure for Risk Management Architecture

• contains the SAS Infrastructure for Risk Management user interface
SAS Infrastructure for Risk Management Data Flow
The following figure shows the basic flow of data in SAS Infrastructure for Risk Management:
ETL
SAS Solution Data Mart
Customer submits data
Preprocessed data
MMDDYYYY
MMDDYYYY
MMDDYYYYHHMMSS
Landing area
ETL
Static
Staging
Mapping
Contains configuration data and portfolio data for one entity base date
Contains portfolio data for multiple entity base dates
Sub
setti
ng
P ersi stent area
SAS Solution Analytics
Job flow
Job flow
Job flow
output table
output table
output table
Granulardata
Input area
1. A user can supply data to a federated area in one of the following ways:
• When the SAS Infrastructure for Risk Management server is down, the customer submits data directly to the landing area of a federated area.
• When the server is running, the user submits data directly to the input area of a federated area and SAS Infrastructure for Risk Management uses live ETL to move the data into the landing area.
• If the SAS Detail Data Store is in place, data can be drawn from the SAS Detail Data Store to the input area of a federated area.
2. Subsets of the input data are created in separate folders for each reporting period. These subsets of input data are created in the Read-Only staging or Read-Only landing area of the SAS Infrastructure for Risk Management federated area. Tables are versioned by date (8-character string – mmddyyyy) or date and time (14-character string – mmddyyyyhhmmss).
3. The output of the job flow is placed in the persistent area. The persistent area is a Read/Write area for input and output data (for example, XLSX, XBRL, and SAS data sets).
SAS Infrastructure for Risk Management Data Flow 7

SAS Infrastructure for Risk Management Distributed Development
OverviewSAS Infrastructure for Risk Management solutions are designed to support distributed development. Distributed development means that developers in different locations can independently develop code that runs on the SAS Infrastructure for Risk Management platform.
Distributed development has the following implications:
• Code that is developed in one location must not break code that is developed in another location.
• Subsequent releases of a SAS Infrastructure for Risk Management solution must support all changes or fixes that are deployed since the prior release, including additions to flows, code, and data.
• Developers are responsible for the integrity of their code.
• If you modify a subflow that is used by other flows, you can break those flows. For example, you might break the flows if you changed the number or nature of the outputs of a subflow. Therefore, coordination of development groups is also necessary to ensure the integrity of the code that is being developed.
• With the exception of loading data, all installed federated areas are read-only.
• The personal federated area can be modified within the parameters described in SAS Infrastructure for Risk Management: Programmer's Guide.
• Once installed, a federated area must never be removed.
ContributorsContributors to the distributed development of SAS Infrastructure for Risk Management solutions include the following:
• SAS Research and Development
SAS Research and Development provides the content that is included with your SAS Infrastructure for Risk Management solution.
• SAS Consultants
SAS Consultants provide custom content that can be included in a future release of all SAS Infrastructure for Risk Management solutions.
• Consulting firms
Consulting firms develop a custom product on top of SAS Infrastructure for Risk Management solutions.
8 Chapter 2 • SAS Infrastructure for Risk Management Architecture
Federated ContentSAS Infrastructure for Risk Management solutions are delivered as federated content. Federated content is computational and reporting logic that is designed, produced, and owned by people outside SAS Research & Development. This might be a SAS department that is not SAS Research and Development, a third-party consulting company, and so on.
For more information about federated content, see “SAS Infrastructure for Risk Management Federated Content”.
SAS Infrastructure for Risk Management Distributed Development 9

10 Chapter 2 • SAS Infrastructure for Risk Management Architecture
Chapter 3
SAS Infrastructure for Risk Management Federated Content
About Federated Areas . . . . . . . . . . . . . . . . . . . . . . . . . . . . . . . . . . . . . . . . . . . . . . . . . 11
Folders in a Federated Area . . . . . . . . . . . . . . . . . . . . . . . . . . . . . . . . . . . . . . . . . . . . 12
Base Date Folder Entity Table . . . . . . . . . . . . . . . . . . . . . . . . . . . . . . . . . . . . . . . . . . . 14
Federated Content . . . . . . . . . . . . . . . . . . . . . . . . . . . . . . . . . . . . . . . . . . . . . . . . . . . . 15What is Federated Content? . . . . . . . . . . . . . . . . . . . . . . . . . . . . . . . . . . . . . . . . . . . 15Federated Content Processing . . . . . . . . . . . . . . . . . . . . . . . . . . . . . . . . . . . . . . . . . . 15Federated Job Flows . . . . . . . . . . . . . . . . . . . . . . . . . . . . . . . . . . . . . . . . . . . . . . . . . 15Federated Tasks . . . . . . . . . . . . . . . . . . . . . . . . . . . . . . . . . . . . . . . . . . . . . . . . . . . . 16Federated Input Data . . . . . . . . . . . . . . . . . . . . . . . . . . . . . . . . . . . . . . . . . . . . . . . . . 16How Federated Input Data Is Processed . . . . . . . . . . . . . . . . . . . . . . . . . . . . . . . . . . 17Personal Federated Area . . . . . . . . . . . . . . . . . . . . . . . . . . . . . . . . . . . . . . . . . . . . . . 18
About Federated AreasA federated area is a folder structure that conforms to specific SAS Infrastructure for Risk Management rules. It is a storage area for content.
Federated areas enable content developers to deploy content independently of the SAS Infrastructure for Risk Management platform. In addition, federated areas provide reproducibility. That is, federated areas have the ability to run existing content repeatedly.
Deploying new content or a new platform should never break existing content. Therefore, it is important to note the following rules about federated areas:
• A federated area is independent, but must be designed to not conflict with other federated areas.
• They must not be altered, modified, moved, or deleted once they are deployed.
The exceptions to this rule are:
• You can upload data to the input area or the landing area of a federated area other than the platform federated area.
• You can modify your personal federated area.
• Tasks, job flows, and input data are federated content, which can be shared across all federated areas. Therefore, do not change the definition of tasks, job flows, and data. Changing definitions can cause unpredictable results.
11

All other content in a federated area is local to that federated area and cannot be shared with other federated areas.
The content of a federated area consists of the following elements:
• job flow definitions — files that describe the job flow
• code — task files (nodes), string message data, and macros
• input files — SAS data sets, CSV files, Microsoft Excel templates, or XBRL templates
• documentation and tooltip files — information that is presented to the end user through the user interface
When you install SAS Infrastructure for Risk Management 3.6, the following federated areas are installed:
• fa.0.3.6 — contains only elements that are required to make the platform run. There is no analytical content in the platform federated area. The platform federated area should not be modified.
• fa.sample.3.6 — contains SAS sample content that you can use to test the SAS Infrastructure for Risk Management installation, create SAS parallel programs, and use as a reference.
• fa.sample.3.6.py — contains Python sample content that you can use to test the SAS Infrastructure for Risk Management installation, create Python parallel programs, and use as a reference.
• fa.user_name — an optional personal federated area that is created on demand. You must have a personal federated area if you want to develop your own content.
Folders in a Federated AreaAll federated areas have the same basic folder structure. Custom federated areas might contain additional or fewer folders than the ones described in this section. SAS Infrastructure for Risk Management does not require all folders to be included in a federated area. However, a specific type of content must be located in the appropriate folder.
Here is an example of the basic folder structure of a federated area:
12 Chapter 3 • SAS Infrastructure for Risk Management Federated Content

Figure 3.1 Federated Area Folder Structure
Here are descriptions of the contents of some of the folders that are located in a federated area:
• client_scripts — contains the job flow scripts that a content developer creates.
• config — contains files that a programmer uses to configure the behavior of job flows. Specifically, this folder contains the following files and folders:
• messages — contains the labels that are visible in the SAS Infrastructure for Risk Management web application. The labels are for nodes, job flows (and subflows), and inputs and outputs.
• job_flow_definitions.csv — lists the job flows that are available in the SAS Infrastructure for Risk Management web application.
• libnames.txt — maps the libraries for the input data that is used in job flows.
• macrovarload.txt — lists the SAS data sets that define the global macro variables that must be loaded before a task executes.
• input_area — the area in which data can be loaded directly into a federated area without having to stop the SAS Infrastructure for Risk Management server. For more information about loading data into the input_area, see “Load Data into a Federated Area Using Live ETL”.
• jobflow — contains job flow definitions or subdirectories that contain job flow definitions. Subfolders within the job flow folder are displayed as categories in the SAS Infrastructure for Risk Management web application. Only a single level of folder hierarchy is supported in the job flow folder. A job flow subfolder can contain a subflow folder.
• landing_area — the read-only data mart of a federated area. The landing area contains the data objects (for example, SAS data sets) that are required for the job flows that are defined in that federated area.
The SAS Infrastructure for Risk Management server must be shut down before you load data into the landing area unless you use live ETL to upload data. For information about loading data, see “Load Data into a Federated Area Using Live ETL”.
• source — contains the individual task files (programs) that are used in job flows. The source folder contains subfolders for each task type (for example, sas, Lua, and
Folders in a Federated Area 13

Java). Located in the task type folder is a nodes folder that holds the task file (for example, source/sas/nodes). Uncompiled SAS macros for a federated area must be stored in the ucmacros folder source/sas/ucmacros.
Each task type folder contains a nodes folder that contains the task file (for example, source/sas/nodes). Uncompiled SAS macros for a federated area must be stored in source / sas / ucmacros.
Note: Depending on your content, additional folders might be listed in your personal federated area.
• nodes — contains the task files that are directly called by job flows. To make code more manageable, a single-level hierarchy of subfolders can be used in the nodes folder.
• smd — contains string messages (.smd files).
• ucmacros — contains the uncompiled .sas macro files that are called by .sas task files in the nodes folder.
Base Date Folder Entity TableAt least one federated area in a SAS Infrastructure for Risk Management deployment must contain a base date folder in its landing_area. The base date folder contains input data for a period of time. The naming convention for a base date folder is MMDDYYYY (for example, 03312019). Entity tables in the highest federated areas take precedence over the entity tables in lower federated areas.
Each base date folder must contain an entity table. SAS Infrastructure for Risk Management uses entity tables to configure aspects of the SAS Infrastructure for Risk Management web application. For example, the options that are available in the drop-down menus are determined by the configuration of the entity table.
Typically, the data in an entity table is static. However, data can be updated via live ETL.
Important: The structure of the entity table should be consistent across federated areas and base date folders. For example, MAIN in the ENTITY_ID column should not use SOLO as the value for the ENTITY_ROLE_CD in one base date folder and GROUP as the value in another base date folder. If the structure of your organization requires that a federated area use a different role code than another federated area, ensure that you use BOTH as the value for the ENTITY_ROLE_CD in the higher federated area.
CAUTION:Entities that are being used cannot be deleted. Deletion of an entity row being used would render existing job flow instances invalid.
Here is an example of an entity table:
where:
14 Chapter 3 • SAS Infrastructure for Risk Management Federated Content

• ENTITY_ID — (Required) alphanumeric identifier that specifies the organizational or operational unit of an organization. A value that contains spaces or any special characters except for an underscore ( _ ) is rejected when SAS Infrastructure for Risk Management is started.
• ENTITY_NM — specifies the name of the organizational or operational unit of an organization. If a value is not specified for this attribute, the value for the ENTITY_ID is displayed in the SAS Infrastructure for Risk Management web application.
• ENTITY_ROLE_CD — (Required) specifies which calculation level options are available in an entity. Here are the possible values:
• BOTH — configures SAS Infrastructure for Risk Management to enable calculations at the solo and group level.
• GROUP — configures SAS Infrastructure for Risk Management to enable calculations at the group level, which includes the subsidiary units within an entity.
• SOLO — configures SAS Infrastructure for Risk Management to enable calculations for the chosen entity as a single unit.
• GROUP_ID — (Required) specifies the identification of the group to which a particular entity belongs. Note that a solo entity can belong to a group (ENTITY_BE) and also a group can belong to another group (REGIONAL_GROUP).
Federated Content
What is Federated Content?• Federated content is contained in federated areas.
• Federated content is the mechanism by which developers add custom content to SAS Infrastructure for Risk Management.
• Only job flows, tasks, and input data are considered to be federated because the content is shared across all federated areas. All other content in a federated area (macros) is not shared. This non-shared content is accessible only from within the federated area in which the content is located.
Federated Content Processing• Job flows, tasks, and input data are shared across federated area. All other content is
specific to the federated area in which it is located and is not shared. For example, a task in federated area 1 cannot call a macro in federated area 2.
• SAS Infrastructure for Risk Management searches for federated content in federated areas from the highest to lowest precedence (by the federated ID assigned in metadata and in alphabetical order), until it finds the content.
Federated Job Flows• Job flow files are shared across federated areas.
Federated Content 15

• When searching for a job flow definition, SAS Infrastructure for Risk Management searches the federated areas from the highest to lowest precedence. For example, if federated area 2 contains a file named flow1 and federated area 1 also contains a file named flow1, the file in federated area 2 is used for creating a new instance of a job flow.
• After a new instance is created, the instance does not change the definition. For example, if a flow1 file is added to a federated area that is at a higher precedence, the existing instances of previously created flows that use this definition are not affected. However, new instances use the new definition.
Federated Tasks• Tasks that are identified within a job flow are searched for in federated areas from
the highest to lowest precedence.
• Tasks with the same name are assumed to be the same content. Therefore, a task named task1.sas accepts the same input tables and produces the same output tables as other tasks with the same name, regardless of their federated location.
• Like job flow definition files, changing or adding a new version of a task does not affect existing job flow instances. However, new executions of an instance use the newest definition of task1.sas.
• During execution of a task, the context of that execution environment is isolated to the federated area in which it resides. Any macro that is called by the task must exist in the same federated area of the task.
• Tasks can have input and output files that are partitioned. Partitioned tasks enable large amounts of data to be partitioned into smaller units of data and calculated across multiple cores. A subsequent task recombines the results of the partitioned data.
For detailed information about partitioned tasks, see the documentation that is included in the generic sample federated area (fa.sample.3.6). The sample federated area contains sample flows that demonstrate the partitioning capabilities and functionality of SAS Infrastructure for Risk Management.
Federated Input Data• Input data is shared across multiple federated areas.
• All input data that is used by SAS Infrastructure for Risk Management tasks must be mapped in the libnames.txt file that is located in the config folder of the federated area.
CAUTION:Directly accessing SAS data sets that are not mapped via the libnames.txt file is not permissible. All tasks must define all of their inputs and outputs.
CAUTION:Do not change the definition of a library reference that another federated area is using. Changing the definition of a library reference that another federated area is using might result in data issues.
• All static input tables reside in the landing_area folder. Mappings are relative to the landing area. The file maps a logical name (using the LIBNAME statement) to a folder.
16 Chapter 3 • SAS Infrastructure for Risk Management Federated Content

For example, GLOBAL=%la/base/global specifies the folder base/global within the federated area in the landing_area folder. The libref GLOBAL should refer to that path.
• Tasks can reference tables using one-, two-, or three-level names. Here are examples of table names:
• GLOBAL
• GLOBAL.myglobal
• GLOBAL.myglobal.sas7bdat
Note: The latter two examples are processed identically. In the second example, the sas7bdat suffix is assumed by default. One-level names are processed somewhat differently than two- and three-level names.
• SAS Infrastructure for Risk Management supports generic library mapping definitions in the libnames.txt file. Generic library mapping definitions enable access to data that is located outside of a SAS Infrastructure for Risk Management federated area. For example, this data might be located in a relational database management system, such as Hadoop, CAS, and so on. (See “Generic Library Mapping”.)
• SAS Infrastructure for Risk Management supports temporary library mapping definitions in the libnames.txt file. A temporary library is a data library that is promptly and automatically deleted as soon as it is no longer needed during the execution of a job flow. Temporary libraries minimize the disk space in the persistent area that is used by large data sets. (See “Temporary Library Mapping”.)
How Federated Input Data Is ProcessedThis section explains how federated input tables are processed by SAS Infrastructure for Risk Management.
Assume that the following three federated areas exist:
• com.sas.solutions.risk.irm.fa.0.3.6 — /sas-configuration-directory/Levn/AppData/SASIRM/fa.0.3.6
• com.sas.solutions.risk.irm.fa.2 — /sas-configuration-directory/Levn/AppData/SASIRM/fa2
• com.sas.solutions.risk.irm.fa.2.5 — /sas-configuration-directory/Levn/AppData/SASIRM/fa2.5
If a one-level name is specified, then SAS Infrastructure for Risk Management searches each libnames.txt file for the mapping in question in the federated area from the highest to lowest precedence.
For example, if the table references GLOBAL, then SAS Infrastructure for Risk Management searches the libnames.txt file in federated area 2.5. (Federated area 2.5 has the highest precedence because 2.5 is greater than 2.)
SAS Infrastructure for Risk Management is looking for a mapping for GLOBAL. If it finds a mapping, it adds the path to the concatenated LIBNAME statement that is used to define GLOBAL. This path is the first path in the LIBNAME statement. If the mapping is not found, the search continues through the federated areas for a libnames.txt file that contains a mapping for GLOBAL. If no mapping is found, the task fails with an error.
Processing two- or three-level names is similar to processing one-level names, except that SAS Infrastructure for Risk Management has the information that is required to verify that the actual table exists. As before, SAS Infrastructure for Risk Management
Federated Content 17

searches for a mapping in the libnames.txt file. If it does not find a mapping, it searches the next federated area (by precedence). If SAS Infrastructure for Risk Management finds a mapping, it verifies that the file actually exists in the folder that is specified in the mapping.
Mapping enables content developers to overwrite a single table without having to override all tables using the same mapping (LIBNAME).
If SAS Infrastructure for Risk Management cannot locate the table, the task is not created and the SAS Infrastructure for Risk Management New Instance wizard reports an error that the instance cannot be created.
Consider the case of a pair of two-level names (GLOBAL.table1 and GLOBAL.table2), that use the same mapping that was previously described. Both tables reside in federated area 1, but only GLOBAL.table1 resides in federated area 2. The following LIBNAME statement is generated:
LIBNAME GLOBAL (‘/sas-configuration-directory/Levn/AppData/SASIRM/fa2/landing_area/base/global’ ‘‘/sas-configuration-directory/Levn/AppData/SASIRM/fa1/landing_area/base/global);
According to the LIBNAME statement, the tables are located as follows:
• table1.sas7bdat is found in federated area 2 (sas-configuration-directory/Levn/AppData/SASIRM/fa2/landing_area/base/global)
• table2.sas7bdat is found in federated area 1 (sas-configuration-directory/Levn/AppData/SASIRM/fa1/landing_area/base/global)
The search for mappings uses the following case order:
1. as specified in the flow definition (for example, “GloBal”, if so specified in the flow definition)
2. all uppercase (for example, “GLOBAL”)
3. all lowercase (for example, “global”)
4. initial capitalization (for example, “Global”)
Note: SAS recommends that you use three-level names in your job flow definitions and uppercase mapping in your libnames.txt files.
Personal Federated AreaSAS Infrastructure for Risk Management introduces support for a developer persona. When logging on to the SAS Infrastructure for Risk Management web application for the first time, the developer’s personal federated area is automatically created. A personal federated area is where a developer creates content using parallel programs called job flows.
For information about the SAS Infrastructure for Risk Management personal federated area, see SAS Infrastructure for Risk Management: Programmer’s Guide for SAS or SAS Infrastructure for Risk Management: Programmer’s Guide for Python.
18 Chapter 3 • SAS Infrastructure for Risk Management Federated Content

Part 2
Deploying SAS Infrastructure for Risk Management
Chapter 4Pre-installation Tasks . . . . . . . . . . . . . . . . . . . . . . . . . . . . . . . . . . . . . . . . . . . . 21
Chapter 5Installation Tasks . . . . . . . . . . . . . . . . . . . . . . . . . . . . . . . . . . . . . . . . . . . . . . . . 27
Chapter 6Post-installation Tasks . . . . . . . . . . . . . . . . . . . . . . . . . . . . . . . . . . . . . . . . . . . 37
19

20

Chapter 4
Pre-installation Tasks
Pre-installation Checklist . . . . . . . . . . . . . . . . . . . . . . . . . . . . . . . . . . . . . . . . . . . . . . . 21
Verify Your System Requirements . . . . . . . . . . . . . . . . . . . . . . . . . . . . . . . . . . . . . . . 22
Review the SAS Intelligence Platform Documentation . . . . . . . . . . . . . . . . . . . . . . . 22
Set Up User Accounts Required for Deployment . . . . . . . . . . . . . . . . . . . . . . . . . . . 22
Define Groups . . . . . . . . . . . . . . . . . . . . . . . . . . . . . . . . . . . . . . . . . . . . . . . . . . . . . . . . 23Linux: Set Up the SAS Group . . . . . . . . . . . . . . . . . . . . . . . . . . . . . . . . . . . . . . . . . 23Windows: Set Up a SAS Server Users Group . . . . . . . . . . . . . . . . . . . . . . . . . . . . . 24
Obtain a Deployment Plan . . . . . . . . . . . . . . . . . . . . . . . . . . . . . . . . . . . . . . . . . . . . . . 24
Create a SAS Software Depot . . . . . . . . . . . . . . . . . . . . . . . . . . . . . . . . . . . . . . . . . . . 24
Grant Linux Directory Permissions . . . . . . . . . . . . . . . . . . . . . . . . . . . . . . . . . . . . . . 24
Check for SAS Installation Notes . . . . . . . . . . . . . . . . . . . . . . . . . . . . . . . . . . . . . . . . 25
Default File Locations . . . . . . . . . . . . . . . . . . . . . . . . . . . . . . . . . . . . . . . . . . . . . . . . . . 25
Pre-installation ChecklistBefore you install SAS Infrastructure for Risk Management, you must complete the pre-installation tasks that are included in the following checklist.
Table 4.1 Pre-installation Checklist
Completed? Task
Verify your system requirements.
Review the SAS Intelligence Platform documentation.
Set up required deployment user accounts.
Define groups.
Obtain a deployment plan.
21

Completed? Task
Create a SAS Software Depot.
Set Linux Directory Permissions
Check for SAS installation notes.
Review the default file locations.
Verify Your System RequirementsEnsure that your system meets the minimum system requirements for SAS Infrastructure for Risk Management.
For a list of the requirements, see System Requirements – SAS Infrastructure for Risk Management 3.6 at https://support.sas.com/documentation/installcenter/en/ikirmbndlsr/73521/HTML/default/index.html.
Note: Depending on the federated content that is installed, the system requirements might differ.
Review the SAS Intelligence Platform Documentation
SAS Infrastructure for Risk Management is built on SAS Intelligence Platform. Before you install SAS Infrastructure for Risk Management, review SAS Intelligence Platform: Installation and Configuration Guide. That documentation provides pre-installation tasks and instructions to guide you through a typical installation of SAS Intelligence Platform.
Set Up User Accounts Required for DeploymentUser accounts that are required for your deployment can be either local accounts on the target machine for SAS Infrastructure for Risk Management or domain accounts that have access to that machine. Although you can use your own account names, it is recommended that you use the names that are listed in the following table.
22 Chapter 4 • Pre-installation Tasks

Table 4.2 Required User Accounts
User Account Description Recommended User ID Required User Rights
SAS Installer The SAS Installer account is used to install SAS Infrastructure for Risk Management and to start the SAS Web Application Server.
It is recommended that this account remain available for possible maintenance releases and updates for SAS Infrastructure for Risk Management.
my-domain\sas or my-machine\sas
Do not use root as the SAS Installer user ID.
• Windows: The SAS Installer account must have administrator rights.
• Linux: The group that you designate as the primary group for the SAS Installer account must contain the SAS Spawned Servers account.
SAS Spawned Servers
The SAS Spawned Servers account is the process owner for the SAS Stored Process Servers and the SAS Pooled Workspace Servers on the machine. During the deployment process, SAS Deployment Wizard prompts you to enter the account name and password.
my-domain\sassrv or my-machine\sassrv
Note: If you are deploying a multiple machine installation, you must use a domain account in the form sassrv@domain.
• Windows: The SAS Spawned Servers account must have the Log on as a batch job right.
• Linux: The SAS Spawned Servers account must be a member of a group that is the primary group for the SAS Installer account. This group does not have to be the primary group for the SAS Spawned Servers account.
SAS First User (Optional)
The SAS First User account is used for demonstration purposes. This account is often referred to as sasdemo. During the deployment process, SAS Deployment Wizard prompts you to specify the account name for this account. The SAS First User account is optional.
my-domain\sasdemo or my-machine\sasdemo
• Windows: The SAS First User account must have the Log on as a batch job right.
• Linux: No additional user rights are needed.
Note: SAS Deployment Wizard automatically assigns the Log on as a batch job right to the SAS Spawned Servers account and to the SAS First User account.
Define GroupsOn Linux, you must add users to a group in order to assign the necessary operating system privileges for deploying and running SAS. On Windows, using a group is one method for granting the necessary user rights. For detailed information about groups, see SAS Intelligence Platform: Installation and Configuration Guide.
Linux: Set Up the SAS Group1. Create the SAS group.
2. Make this group the primary group for the SAS Installer user.
Define Groups 23

3. Add the SAS Spawned Servers account to this group. (You should limit membership to this group because members are given access to certain directories and files that are created by the SAS Deployment Wizard.)
Windows: Set Up a SAS Server Users Group1. Create the SAS Servers Users group.
2. Add the SAS Installer user and the SAS Spawned Server user to this group.
3. Grant the privilege Log On as a Batch Job to the group.
4. Grant the privilege Create Symbolic Links to the SAS Spawned Server.
Obtain a Deployment PlanA deployment plan is a preselection of the software that is installed by the SAS Deployment Wizard. It contains a description of what the plan deploys, identifies the target machines, and lists the software to be installed and configured. The deployment file is an XML file that is named plan.xml.
SAS Infrastructure for Risk Management solution installation plan files are custom deployment plans that have been created by a SAS Installation Representative specifically for your site. The representative emails the XML file (or a ZIP file containing an XML file) to you.
Before installing, ensure that you copy the plan file to a location from which the SAS Deployment Wizard can obtain it during installation.
For more information about deployment plans, see SAS Intelligence Platform: Installation and Configuration Guide.
Create a SAS Software DepotDownload the software that is listed in your SAS Software Order with the SAS Download Manager. A SAS Software Depot is created, which includes the SAS installation data (SID) file. The SID file is used by SAS to install and license SAS software. After you have downloaded the SAS Software Depot, you can then use the SAS Deployment Wizard to install your software. Verify that Base SAS (SAS) is listed as a selected product. Then, select additional products that are specific to your environment.
For more information about creating a SAS Software Depot, see SAS Intelligence Platform: Installation and Configuration Guide.
Grant Linux Directory PermissionsTo deploy SAS Infrastructure for Risk Management in Linux environments, you must create and grant Write permissions on the /etc/opt/vmware/vfabric directory.
24 Chapter 4 • Pre-installation Tasks

Refer to the SAS Pre-installation Checklist that is included with your deployment plan for instructions about how to set up this directory.
Check for SAS Installation NotesFor additional information, check the SAS Installation Notes that are available on the SAS Customer Support website. You can search for SAS Installation Notes for SAS Infrastructure for Risk Management and solutions at http://support.sas.com/notes/index.html.
Default File LocationsAfter you install and configure SAS Infrastructure for Risk Management, the following directories exist on the SAS Infrastructure for Risk Management server by default.
Table 4.3 Default File Locations
Directory Default Location
sas-installation-directory
• Linux: installation-directory/SASHome/
• Windows: installation-directory\SASHome\
SAS-configuration-directory
• Linux: installation-directory/SASConfig/
• Windows: installation-directory\SAS\Config\
SAS Infrastructure for Risk Management data directory
(the product’s root directory)
• Linux: SAS-configuration-directory/Levn/AppData/SASIRM/
• Windows: SAS-configuration-directory\Levn\AppData\SASIRM
SAS Infrastructure for Risk Management middle-tier staging directory
• Linux: SAS-configuration-directory/Levn/Web/Staging/
• Windows: SAS-configuration-directory\Levn\Web\Staging
Default File Locations 25

26 Chapter 4 • Pre-installation Tasks

Chapter 5
Installation Tasks
Overview of the Installation Tasks . . . . . . . . . . . . . . . . . . . . . . . . . . . . . . . . . . . . . . . 27
General Installation Information . . . . . . . . . . . . . . . . . . . . . . . . . . . . . . . . . . . . . . . . 28
Install and Configure SAS Infrastructure for Risk Management . . . . . . . . . . . . . . 28
Install Hot Fixes . . . . . . . . . . . . . . . . . . . . . . . . . . . . . . . . . . . . . . . . . . . . . . . . . . . . . . 30
Configure an External Location to the Persistent Area . . . . . . . . . . . . . . . . . . . . . . 30
Install Federated Content . . . . . . . . . . . . . . . . . . . . . . . . . . . . . . . . . . . . . . . . . . . . . . 33
Verify the Installation Using Sample Content . . . . . . . . . . . . . . . . . . . . . . . . . . . . . . 33
Overview of the Installation TasksTo install and configure SAS Infrastructure for Risk Management, complete the tasks that are included in the following checklist.
Completed? Task
Review the general installation information about the components that are specified in your deployment plan.
Install and configure SAS Infrastructure for Risk Management.
(Optional) Configure an external location for the SAS Infrastructure for Risk Management persistent area.
Install hot fixes.
(Optional) Download and install the SAS Infrastructure for Risk Management solution’s federated content package.
Verify the SAS Infrastructure for Risk Management installation.
27

General Installation InformationGeneral information about using the SAS Deployment Wizard to install SAS software components that are specified in your deployment plan is documented in SAS Intelligence Platform: Installation and Configuration Guide. Review this information before you install SAS Infrastructure for Risk Management.
Install and Configure SAS Infrastructure for Risk Management
You can install SAS Infrastructure for Risk Management on only one machine or on several machines as listed in your customized deployment plan (plan.xml file).
Although the SAS Deployment Wizard contains steps for all the products that are a part of your deployment, this section describes only those steps that pertain to SAS Infrastructure for Risk Management. In addition, this installation example explains how to install on a single machine using the Typical prompting level.
The SAS Deployment Wizard pages that you see during installation vary according to the following properties:
• the prompt level that you choose
• the SAS tier on which you are deploying SAS Infrastructure for Risk Management
• the contents of your custom order
• the plan.xml file
CAUTION:Do not add spaces to the installation and configuration paths when installing SAS Infrastructure for Risk Management. If you add a space to the paths, it causes the SAS Infrastructure for Risk Management server to fail.
To install a SAS Infrastructure for Risk Management solution:
1. Use the SAS Installer account or an account that is a member of the Windows Administrators group to log on to the machine on which you want to install SAS Infrastructure for Risk Management.
2. Navigate to the highest-level directory in your SAS Software Depot, as appropriate:
• On Windows: Navigate to the highest-level directory in your SAS Software Depot. Right-click setup.exe, and select Run as administrator.
• On Linux: Navigate to the highest-level directory in your SAS Software Depot, and run setup.sh.
3. In the Choose Language window, select the language that you want SAS Deployment Wizard to use when it displays text. Then, click OK. SAS Deployment Wizard is displayed.
4. Navigate through SAS Deployment Wizard, and specify the requested information. The wizard gathers information for all the products that are a part of your deployment. However, the following table lists only the prompts that pertain to SAS Infrastructure for Risk Management.
28 Chapter 5 • Installation Tasks

Depending on your deployment, the prompts that appear in SAS Deployment Wizard might be different. This example uses the following deployment configuration:
• The software is being installed and configured at the same time.
• All the components are being installed on a single Linux machine.
• The prompting level for SAS Deployment Wizard is set to Typical.
Note: If the hot fixes are available when you are installing SAS Infrastructure for Risk Management, you can install them after the installation phase of the deployment process but before the configuration phase. In this way, you can configure the product and the hot fixes at the same time. However, you can also install hot fixes after SAS Infrastructure for Risk Management is fully deployed. For more information, see “Install Hot Fixes”.
Table 5.1 Instructions for SAS Infrastructure for Risk Management Pages in SAS Deployment Wizard
SAS Deployment Wizard Page Instructions
Select Regional Settings Select Configure as a Unicode server.
Important: Use the UTF-8 character encoding for your SAS installation. Otherwise, errors occur.
SAS IRM Super User Credentials Enter a password for the SAS Infrastructure for Risk Management super user.
Note: The IRM super user is a built-in internal account that has privilege levels significantly beyond those of most user accounts. A member of the super user account can perform system-level administrative tasks. The IRM super user is a member of the predefined IRM:Access All Entities role.
SAS IRM Database Credentials Enter the credentials for accessing the SAS Infrastructure for Risk Management database.
SAS IRM Mid-tier Configuration (Optional) Enter a name for the SAS Infrastructure for Risk Management installation. The name that you enter is displayed on the banner of the web application. By default, the product name, SAS Infrastructure for Risk Management, is displayed in the banner.
Note: When the SAS Infrastructure for Risk Management web application is set to a 100% zoom factor and the screen resolution is 1280 x 1024, a limited number of letters, numbers, and spaces can be seen in the banner. In addition, do not use single or double quotation marks in the name.
5. When the Deployment Summary page is displayed, review the list of products to be installed and click Start.
SAS Deployment Wizard launches the deployment process and provides an ongoing status update.
6. When the deployment process completes, the Deployment Complete page is displayed.
A status icon is displayed next to each software application. The status icon indicates whether the installation process completed successfully, completed with warnings, or completed with errors.
If you received errors during your deployment, contact SAS Technical Support.
7. On the Additional Resources page, note the location of the Instructions.html file, which is listed in the Review Manual Configuration Instructions section.
Install and Configure SAS Infrastructure for Risk Management 29

8. Click Finish to exit SAS Deployment Wizard.
9. Repeat the preceding steps for additional tiers as needed.
If you ordered SAS Infrastructure for Risk Management as part of a solution (such as SAS Firmwide for Solvency II), after you install and configure SAS Infrastructure for Risk Management, you must download, unzip, and install the solution’s federated content. For information about downloading and installing federated content, see “Install Federated Content”.
Install Hot FixesHot fixes that were released before the current maintenance release are automatically installed when you run the SAS Deployment Wizard. If additional hot fixes are available for your products, install them now.
To ensure that SAS Infrastructure for Risk Management functions correctly, install all the hot fixes for the following products:
• SAS Infrastructure for Risk Management 3.6
• SAS 9.4M6
Complete one or more of the following steps to find applicable hot fixes:
• Go to the Technical Support Hot Fixes page and download the hot fixes that are applicable to SAS Infrastructure for Risk Management.
• Use the SAS Hot Fix Analysis, Download and Deployment Tool to create a customized report that lists the hot fixes that are available for the installed SAS products. This tool also generates the scripts that automate the download of the hot fixes.
• Use SAS Deployment Manager to locate and apply the hot fixes.
For more information about hot fixes, see SAS Deployment Wizard and SAS Deployment Manager 9.4: User's Guide.
For information about applying SAS Security Updates to an existing deployment, see “Apply SAS Security Updates”.
For information about using the SAS Infrastructure for Risk Management hot fix post-installation tool to apply SAS Infrastructure for Risk Management server-tier hot fixes to an existing deployment, see “Run the Hot Fix Post-installation Tool”.
Configure an External Location to the Persistent Area
When you install SAS Infrastructure for Risk Management, the default location of the persistent area is in the SAS Infrastructure for Risk Management root data directory:
• Linux: /SAS-configuration-directory/Levn/AppData/SASIRM/pa
• Windows: \SAS-configuration-directory\Levn\AppData\SASIRM\pa
The default location is recommended for most SAS Infrastructure for Risk Management deployments. However, there might be environments that require that you move the
30 Chapter 5 • Installation Tasks

persistent area to a location outside of the SAS Infrastructure for Risk Management root directory. For example:
• The persistent area needs to be in a location with more storage.
• The persistent area needs to be in a location with faster storage.
• SAS Infrastructure for Risk Management is configured for grid computing, which requires the persistent area to be located on a shared area network.
CAUTION:You can configure an external location for the persistent area in a fresh environment only. This is the environment that exists right after SAS Infrastructure for Risk Management is installed and before any job flows are executed. The persistent area cannot contain any data. If you need to move the location of the persistent area in an established SAS Infrastructure for Risk Management deployment, see “Change the Persistent Area’s Location”.
To configure a location for the persistent area that is outside of SAS Infrastructure for Risk Management:
1. Stop the SAS Infrastructure for Risk Management web application server.
For a non-clustered environment, the web application server is SASServer8_1. For a clustered environment, the web application servers can include SASServer8_2, SASServer_3, and so on, and can be on the same machine or on different machines within the cluster.
For more information about stopping SAS Web Application Servers, see SAS Intelligence Platform: Middle-Tier Administration Guide.
2. Copy or move the SAS Infrastructure for Risk Management persistent area (config/Lev1/AppData/SASIRM/pa to the desired external location.
3. In SAS Management Console, add the new federated area property by completing the following steps:
a. Connect to the appropriate metadata server as a SAS administrator (for example, sasadm@saspw).
b. On the Plug-ins tab, verify that the correct repository is selected in the Repository field. The default repository is Foundation.
c. Select Application Management ð Configuration Manager ð SAS Application Infrastructure .
d. In the main pane, right-click SAS IRM Mid-Tier Server and select Properties. The IRM Mid-Tier Server Properties window is displayed.
e. Click the Advanced tab, select the default entry for the persistent area and click Remove.
Configure an External Location to the Persistent Area 31

f. Click Add. The Define New Property dialog box is displayed.
g. In the Property Name field, specify the default property name of the persistent area (com.sas.solutions.risk.irm.server.pa) and in the Property Value field, enter the new location of the persistent area.
h. Click OK.
4. Click OK.
5. Restart the SAS Infrastructure for Risk Management web application server.
32 Chapter 5 • Installation Tasks

Install Federated ContentSAS delivers the federated content for a solution as a downloadable content release that is located on the Downloads support page. If you are installing SAS Infrastructure for Risk Management as part of a solution, you must download and install the solution’s content release after you have installed SAS Infrastructure for Risk Management.
Note: Before installing federated content, ensure that you back up your system. For information about backing up your system, see “Back Up Content”.
To obtain the content release for your solution:
1. Access the Downloads page at support.sas.com/downloads/.
2. Locate the content release for your solution. You can search alphabetically, by product category, or by release date.
3. If prompted, enter your SAS Profile logon credentials and click Sign in.
4. To initiate the download, click the ZIP file name of the content release.
5. In the SAS License Validation window, enter your site number for verification and click Submit.
6. In the SAS License Agreement for Download window, click Accept to agree to the license agreement and proceed with the download.
7. After you have downloaded the content release for your SAS Infrastructure for Risk Management solution, use the installation instructions that are provided with the package to install and verify the content.
Verify the Installation Using Sample ContentSAS Infrastructure for Risk Management provides sample content that you can use to verify the installation by creating a job flow instance and to begin to familiarize yourself with the user interface. The sample content is in a federated area and is identified as fa.sample.3.6.
To create a job flow instance:
1. Log on to the SAS Infrastructure for Risk Management web application.
You access the SAS Infrastructure for Risk Management through your web browser at http://your-middle-tier-host:port/SASIRM.
For more information about this URL and the port number, see the Instructions.html file that is generated for SAS Infrastructure for Risk Management.
When you log on, the instance list view is displayed. It displays a list of job flow instances that you have created or job flow instances that have been shared with you. The first time that you log on, the table of job flow instances is empty.
2. Click . The New Instance window is displayed.
3. (Optional) In the Instance field, accept the default name assigned to the instance or enter a unique name for the job flow instance.
Verify the Installation Using Sample Content 33

4. (Optional) Enter a description of the instance in the Description field.
5. In the Base date field, select Mar 31, 2019 from the drop-down menu as the base date for which to perform the calculation.
Note: If you select a base date for which no input is available, an error message is generated and SAS Infrastructure for Risk Management cannot create the instance.
6. Select an entity from the Entity drop-down menu. Alternatively, you can click Select to the right of the Entity field to display a hierarchical list of entities from which you can search for and select an entity.
7. In the Configuration field, select SAMPLE_36_CONFIGURATION from the drop-down menu.
8. Select sample_basic from the Flow drop-down menu. The value for the Flow field is the job flow definition on which you want to base your job flow instance.
9. In the Federated Area field, select sample.3.6 from the drop-down menu.
Note: You can display documentation about the federated area by clicking Show Help to the right of the federated area.
Here is an example of the New Instance window configured to create a sample job flow instance:
10. Click Create.
The job flow instance is added to the list of instances.
11. To view the job flow instance diagram, double-click the job flow instance in the list of instances. The job flow instance diagram is displayed.
34 Chapter 5 • Installation Tasks

For detailed information about working with job flow instances and the SAS Infrastructure for Risk Management user interface, see SAS Infrastructure for Risk Management: User’s Guide.
Verify the Installation Using Sample Content 35

36 Chapter 5 • Installation Tasks

Chapter 6
Post-installation Tasks
Overview of the Post-installation Tasks . . . . . . . . . . . . . . . . . . . . . . . . . . . . . . . . . . . 37
Use the Instructions File . . . . . . . . . . . . . . . . . . . . . . . . . . . . . . . . . . . . . . . . . . . . . . . . 38
Create Roles, Groups, and Users . . . . . . . . . . . . . . . . . . . . . . . . . . . . . . . . . . . . . . . . . 38About Roles, Groups, and Users . . . . . . . . . . . . . . . . . . . . . . . . . . . . . . . . . . . . . . . . 38Defining Roles . . . . . . . . . . . . . . . . . . . . . . . . . . . . . . . . . . . . . . . . . . . . . . . . . . . . . 39Defining Groups . . . . . . . . . . . . . . . . . . . . . . . . . . . . . . . . . . . . . . . . . . . . . . . . . . . . 39Defining Users . . . . . . . . . . . . . . . . . . . . . . . . . . . . . . . . . . . . . . . . . . . . . . . . . . . . . 39
Configure the Metadata Accounts for SAS Infrastructure for Risk Management . . . . . . . . . . . . . . . . . . . . . . . . . . . . . . . . . . . . . . . . . . . . . . . . . . . . . 40
About Configuring Metadata Accounts for SAS Infrastructure for Risk Management . . . . . . . . . . . . . . . . . . . . . . . . . . . . . . . . . . . . . . . . . . . . . . 40
Configure a User Who Has an Operating System Account . . . . . . . . . . . . . . . . . . . 40Configure a User Who Does Not Have an Operating System Account . . . . . . . . . . 41
Apply SAS Security Updates . . . . . . . . . . . . . . . . . . . . . . . . . . . . . . . . . . . . . . . . . . . . 42
Configure HTTPS as the SAS Infrastructure for Risk Management Web Connection . . . . . . . . . . . . . . . . . . . . . . . . . . . . . . . . . . . . . . . . . . . 43
Configure the LOCKDOWN Feature . . . . . . . . . . . . . . . . . . . . . . . . . . . . . . . . . . . . . 44
Configure SAS Infrastructure for Risk Management Grid Computing . . . . . . . . . 44About SAS Infrastructure for Risk Management Grid Computing . . . . . . . . . . . . . 44Prerequisites . . . . . . . . . . . . . . . . . . . . . . . . . . . . . . . . . . . . . . . . . . . . . . . . . . . . . . . 44Performing the SAS Infrastructure for Risk Management Grid Installation . . . . . . 45
Customizing the Amount of Data That Can Be Viewed . . . . . . . . . . . . . . . . . . . . . . 48
Back Up Content . . . . . . . . . . . . . . . . . . . . . . . . . . . . . . . . . . . . . . . . . . . . . . . . . . . . . . 49
Overview of the Post-installation TasksAfter installing SAS Infrastructure for Risk Management, complete the post-installation tasks in the following checklist before using SAS Infrastructure for Risk Management.
Completed? Task
Follow the instructions in the Instructions.html file.
37

Completed? Task
Create roles, groups, and users.
Configure metadata user accounts and assign the user to groups.
Apply SAS security updates.
Enable grid support.
Use the Instructions FileAt the end of the installation process for SAS Infrastructure for Risk Management, the SAS Deployment Wizard produces a document named Instructions.html.
Note: If the server tier and the middle tier are hosted on separate machines, there is an Instructions.html file for each machine.
The Instructions.html file is located in the SAS-configuration-directory/Levn/Documents/ directory. Follow the instructions that are provided in the document.
Create Roles, Groups, and Users
About Roles, Groups, and UsersTo use SAS Infrastructure for Risk Management, you must configure your roles, groups, and users.
RolesRoles determine what a user can do within the application. Roles can be assigned to groups to allow a restricted set of users within that group to perform an activity.
GroupsA group consists of users who are classified by common traits or by common data access levels. Groups are typically used for granting users access to data. Groups can also be used within workflows to allow a restricted set of users to perform an activity.
UsersEvery user who needs to log on to SAS Infrastructure for Risk Management must be defined in the SAS Metadata Repository. The user must be associated with one or more roles that permit one or more capabilities within SAS Infrastructure for Risk Management.
Use the SAS Management Console to define roles, groups, and users. You can also use SAS Management Console to associate capabilities with roles. For more information, see SAS Management Console: Guide to Users and Permissions.
38 Chapter 6 • Post-installation Tasks

Defining RolesRoles in SAS Infrastructure for Risk Management are activity-based. You assign roles to groups, and those role assignments are cumulative.
For example, suppose a group is associated with Role 1 and Role 2. If Role 1 grants a group a specific capability but Role 2 does not, the group retains the capability that is granted by Role 1.
The following table lists the predefined roles for SAS Infrastructure for Risk Management. After you deploy the solution, ensure that these roles are defined in SAS Management Console.
Table 6.1 Predefined Roles and Capabilities
Predefined Role Description and Capabilities Assigned to the Role
IRM: Access All Entities Description:
The IRM Super User Entity Access Role
Capabilities:
• Allow Access to All Entities
• Allow Access to IRM
Note: By default, the SAS General Servers group, the SAS IRM Super User, and if configured, the SAS Demo User are assigned to the IRM: Access All Entities role.
IRM: Change Owner Description: IRM Change Ownership of Job Flows Role
Capability: Can Change Owner
IRM: Install Federated Areas
Description: IRM Allow Install of Federated Areas Role
Capability: Allow Install of Federated Area
Defining GroupsA group in SAS Infrastructure for Risk Management is based on the area of work that is associated with the users in that particular group. You can add a user to multiple groups. Every group can be assigned one or more roles, and the capabilities of those roles are inherited by the group.
Defining UsersThe SAS Infrastructure for Risk Management platform has a built-in internal super user (sasirmsu). This user is defined in SAS Management Console with the user ID sasirmsu@saspw. The sasirmsu super user is a member of IRM: Access All Entities role.
The SAS Deployment Wizard does not create application users by default. You must create users in SAS Management Console with the appropriate group and role permissions. For information about creating users, see “Configure the Metadata Accounts for SAS Infrastructure for Risk Management”.
Create Roles, Groups, and Users 39

Configure the Metadata Accounts for SAS Infrastructure for Risk Management
About Configuring Metadata Accounts for SAS Infrastructure for Risk Management
All users must have a metadata account on the SAS Metadata Server for the SAS Infrastructure for Risk Management web application. However, users are not required to have an operating system account. The steps for configuring a metadata account vary according to whether the user has an operating system account. For information about importing user accounts from another provider such as LDAP into the SAS metadata, see SAS Intelligence Platform: System Administration Guide.
Important: SAS Infrastructure for Risk Management does not support token authentication.
Configure a User Who Has an Operating System AccountTo configure a SAS Infrastructure for Risk Management metadata user account for a user who has an operating system account:
1. Log on to SAS Management Console as a SAS administrator (for example, sasadm@saspw).
2. Right-click the User Manager plug-in and select New ð User. The New User Properties window is displayed.
3. On the General tab:
a. In the Name field, enter a user ID for the user. This ID is used to log on to the application.
T I P Avoid using spaces or special characters in the Name field. Not all components support spaces and special characters.
Important: SAS Infrastructure for Risk Management supports user IDs that are up to 32 characters in length.
b. In the Display Name field, enter the name that you want to associate with the user ID.
4. On the Accounts tab:
a. Click New to create a new SAS Metadata account for the user. The New Login Properties window is displayed.
b. In the User ID field, enter the user ID. It corresponds to the user ID that is used to log on to SAS Infrastructure for Risk Management.
c. Select an Authentication Domain (for example, DefaultAuth), and click OK.
5. On the Group and Roles tab:
a. In the Available Groups and Roles section, select the group to which you want the user to belong. For example, select IRM: Access All Entities to permit the user access to all entities.
b. Move the group to the Member of section.
40 Chapter 6 • Post-installation Tasks

6. To create a custom role for granting access to selected entities and capabilities:
a. From the User Manager plug-in, select New Role.
b. In the Name field, enter the appropriate values:
IRM: action Entity entity_role entity_ID. Here are descriptions of the values that you specify:
• action — specifies the capabilities of the role. Possible values are Access (create, view, and modify job flow instances for a specified entity), Publish (publish job flow instances of a specified entity), or Delete (delete job flow instances of a specified entity).
• entity_role — specifies whether to treat the entity as a solo entity or as a group entity. Possible values are Solo or Group. The default is Group.
• entity_ID — specifies the name of the entity.
Here is an example of a custom role that enables a user to publish instances for an entity named ENTITY_BE:
IRM: Publish Entity ENTITY_BE
Here is an example of a customer role that enables a user to create, view, and modify job flow instances for the same entity (ENTITY_BE):
IRM: Access Entity ENTITY_BE
Note: By default, the author of a job flow instance can delete the instance.
7. To create the new user, click OK. The new user appears in the User Manager list.
Configure a User Who Does Not Have an Operating System AccountTo configure a SAS Infrastructure for Risk Management metadata user account for a user who does not have an operating system account:
1. Log on to SAS Management Console as a SAS administrator (for example, sasadm@saspw).
2. Right-click the User Manager plug-in and select New ð User. The New User Properties window is displayed.
3. On the General tab:
a. In the Name field, enter a user ID for the user. This ID is used to log on to the application.
T I P Avoid using spaces or special characters in the Name field. Not all components support spaces and special characters.
b. In the Display Name field, enter the name that you want to associate with the user ID.
4. On the Accounts tab:
a. Click Create Internal Account. The New Internal Account for New User window is displayed.
b. Enter a password for the new user and click OK.
5. On the Group and Roles tab:
Configure the Metadata Accounts for SAS Infrastructure for Risk Management 41
a. In the Available Groups and Roles section, select the group to which the user belongs. For example, select IRM: Access All Entities to enable the user to access all entities.
b. Move the group to the Member of section.
6. To create a custom role for granting access to selected entities and capabilities:
a. From the User Manager plug-in, select New Role.
b. In the Name field, enter:
IRM: action Entity entity_role entity_ID. Here are descriptions of the values that you specify:
• action — specifies the capabilities of the role. Possible values are Access (create, view, and modify job flow instances for a specified entity), Publish (publish job flow instances of a specified entity), or Delete (delete job flow instances of a specified entity).
• entity_role — (Optional) Possible values are Solo or Group permissions. The default is Group.
• entity_ID — specifies the name of the entity.
Here is an example of a custom role that enables a user to publish instances for an entity named ENTITY_BE:
IRM: Publish Entity ENTITY_BE
Here is an example of a customer role that enables a user to create, view, and modify job flow instances for the same entity (ENTITY_BE):
IRM: Access Entity ENTITY_BE
Note: By default, the author of a job flow instance can delete the instance.
7. To create the new user, click OK. The new user appears in the User Manager list.
Apply SAS Security UpdatesAs a part of the hot fix process, SAS delivers security fixes.
After you apply a security fix, if any updated JAR files also exist in the SAS Infrastructure for Risk Management platform federated area (fa.0.3.6), you must manually copy those JAR files from where the files are installed to where they are located in the SAS Infrastructure for Risk Management platform federated area.
Here is a table that lists the JAR files by SAS security update that you have to manually copy to the SAS Infrastructure for Risk Management platform federated area after applying the security update.
Table 6.2 SAS Security Updates and Updated JAR Files
SAS Security Update Updated JAR Files
SAS Security Update 2018-12 commons_cli_1.4.0.0_SAS_20180727143240/commons-cli.jar
42 Chapter 6 • Post-installation Tasks

SAS Security Update Updated JAR Files
SAS Security Update 2018-09 commons_io_2.6.0.0_SAS_20180621100654/commons-io.jar
To obtain SAS Security Updates and to access detailed information about how to apply security updates to your SAS Infrastructure for Risk Management installation, see SAS Security Updates and Hot Fixes.
After you apply the security update:
1. Back up the SAS Infrastructure for Risk Management platform federated area.
2. Stop the SAS Infrastructure for Risk Management web application server.
3. Copy the updated JAR file or files from the SAS Versioned JAR Repository location:
/SASHome/SASVersionedJarRepository/eclipse/plugins/
to the SAS Infrastructure for Risk Management platform federated area location:
SAS-configuration-directory/LevN/AppData/SASIRM/fa.0.3.6/source/java/lib/
Note: Overwrite the existing JAR files in the SAS Infrastructure for Risk Management platform federated area.
4. Restart the SAS Infrastructure for Risk Management web application server.
Configure HTTPS as the SAS Infrastructure for Risk Management Web Connection
Use HTTPS (also referred to HTTP over SSL) as the SAS Infrastructure for Risk Management web connection.
To configure SAS Infrastructure for Risk Management to use HTTPS:
1. Navigate to /SASHome/SASVersionedJarRepository/eclipse/plugins/.
2. In the subdirectories, locate the following two SAS/SECURE JAR files: sastpj.rutil_version-number.jar and sas.rutil_version-number.jar where version-number is a variable that indicates the release of the file.
3. Copy the files to the Java file folder for the platform federated area /sas_config_directory/Levn/AppData/SASIRM/fa.0.3.6/source/java/lib.
4. Restart the SAS Infrastructure for Risk Management web application server.
For more information about configuring HTTP over an SSL connection, see SAS Intelligence Platform: System Administration Guide.
Configure HTTPS as the SAS Infrastructure for Risk Management Web Connection 43

Configure the LOCKDOWN FeatureSAS 9.4 includes a LOCKDOWN statement. This statement limits the accessibility and activities of a SAS server by putting the server in a locked-down state. This function enables SAS administrators to limit the file access and directory access of the SAS servers to a user-defined list of approved locations. This list, referred to as a lockdown path list, is a allowlist. That is, it specifies which paths are accessible by SAS Infrastructure for Risk Management. You must configure your system so that SAS Infrastructure for Risk Management environments and any data that is used by these environments are included in this list.
For more information about the LOCKDOWN feature, see SAS Intelligence Platform: System Administration Guide.
When configuring the LOCKDOWN statement in your SAS Infrastructure for Risk Management environment, ensure that you specify the ENABLE_AMS=JAVA option as well as the ENABLE_AMS option for other components that you are using with SAS Infrastructure for Risk Management (for example, Hadoop).
Note: When you use LOCKDOWN, it is recommended that you put SAS Infrastructure for Risk Management in its own server context to prevent the ENABLE_AMS=JAVA option from affecting other SAS applications.
Configure SAS Infrastructure for Risk Management Grid Computing
About SAS Infrastructure for Risk Management Grid ComputingA SAS Infrastructure for Risk Management grid computing implementation provides scalability by distributing computing tasks across multiple SAS workspace servers on a network.
SAS Infrastructure for Risk Management grid computing uses SAS Application Servers that are installed on each grid node (machine) in the grid computing implementation. Each application server context contains a SAS Logical Workspace Server with its own object spawner. The properties that are defined in the SAS Metadata Repository specify which servers to use in the SAS Infrastructure for Risk Management grid computing implementation.
Note: SAS Infrastructure for Risk Management grid computing environment is not implemented using SAS Grid Manager.
PrerequisitesYou must meet the following prerequisites before performing a SAS Infrastructure for Risk Management grid installation:
• Verify that the deployment plan that you obtained from a SAS Installation Representative contains an additional SAS Application Server (with a logical workspace server and an object spawner).
44 Chapter 6 • Post-installation Tasks

This application server context must be installed on each of the grid nodes in your grid computing implementation. The only exception is that the initial application server context is created and used by SAS Infrastructure for Risk Management during a typical installation.
• Use the same SAS Installer account for all the servers, and use the same user to launch the workspace servers on all the grid nodes.
• To prevent permission and ownership issues with Linux implementations, all SAS solution users (for example, sas, sassrv, and so on) should have the same ID. In addition, the primary account of sas and sassrv should have the same ID.
Linux users can have local accounts. Here is an example:
uid=200(sas) gid=2000(sas) groups=2000(sas)uid=201(sassrv) gid=2000(sas) groups=2000(sas)
• If you are installing SAS Infrastructure for Risk Management in a Windows x64 environment, ensure that you use domain accounts for the SAS Installer account and the SAS General Servers user group. In SAS Management Console, enter the accounts as user@domain (not domain\user).
• Ensure that the SASHome and SASConfig directories are installed on local disks that are not shared. In addition, the SAS Work folder should point to a local disk.
• Share all SAS Infrastructure for Risk Management federated areas and the persistent area. To share the federated areas and the persistent area, use a production file sharing system. An example is Global File System (GFS2) on Linux.
CAUTION:Do not use Network File System (NFS) or Windows mapped drives. Do not use NFS, Windows mapped drives, or shared resources. Use of any of these strategies can cause intermittent and unreliable file issues.
As with a standard SAS Infrastructure for Risk Management installation, if the SAS Infrastructure for Risk Management middle tier is located on a separate machine from one or more workspace servers, no file sharing is required on the middle-tier machine.
Performing the SAS Infrastructure for Risk Management Grid Installation
1. Use the deployment plan and instructions.html file obtained from a SAS Installation Representative to perform your SAS Infrastructure for Risk Management installation. This installation should be on a local disk (not shared storage). (See Chapter 5, “Installation Tasks,”. )
2. Use the sample job flows in the SAS Infrastructure for Risk Management located in the sample federated area (fa.sample.3.6) to verify that you can create and successfully execute SAS Infrastructure for Risk Management sample job flow instances.
After verifying that the SAS Infrastructure for Risk Management installation was successful, delete the job flow instances that you created.
3. Stop the SAS Infrastructure for Risk Management web application server (SASServer8_1), move the SAS Infrastructure for Risk Management federated areas and the persistent area to the shared file system, and update the properties in SAS Management Console. (See “Configure an External Location to the Persistent Area”.)
Configure SAS Infrastructure for Risk Management Grid Computing 45

Here is an example of the properties before you moved the federated areas and the persistent area to a shared file system:
Here is an example of the properties after you moved the federated areas and the persistent area to a shared file system:
46 Chapter 6 • Post-installation Tasks

4. Restart SASServer8_1 and verify that you can still successfully create and execute SAS Infrastructure for Risk Management sample job flow instances. (Then, you can delete these sample job flow instances.)
5. Use SAS Deployment Wizard to install a SAS Application Server context on each grid node in your installation and validate each new workspace server in SAS Management Console. (See SAS Intelligence Platform: Installation and Configuration Guide)
Note: You can continue to use SAS Infrastructure for Risk Management during this process.
6. After you have installed an application server context on all of the grid nodes, stop SASServer8_1.
7. In SAS Management Console, add the workspace server properties to the SAS IRM Mid-Tier component:
a. Connect to the appropriate metadata server as a SAS administrator (for example, sasadm@saspw).
b. On the Plug-ins tab, verify that the correct repository is selected. The default repository is Foundation.
c. Select Application Management ð Configuration Manager ð SAS Application Infrastructure
d. In the main pane, right-click SAS IRM Mid-Tier and select Properties. The IRM Mid-Tier Properties window is displayed.
Configure SAS Infrastructure for Risk Management Grid Computing 47

e. Click the Advanced tab and then click Add to define the properties for each grid node in the following format:
workspacesrv.logical.name.n
where n is a consecutive number from 2 to the number of grid nodes that you are adding (for example, the first additional server is workspacesrv.logical.name.2, the second additional server is workspacesrv.logical.name.3, and so on). Each has the property value of the application server context that you added.
Note: The property workspacesrv.logical.name already exists. Do not modify the property.
Here is an example of how these properties might be defined if you are running a grid computing implementation that contains three grid nodes:
Property Name Property Value
workspacesrv.logical.name SASApp — Logical Workspace Server
Note: This property exists. Do not modify this property.
workspacesrv.logical.name.2 SASApp2 — Logical Workspace Server
workspacesrv.logical.name.3 SASApp3 — Logical Workspace Server
f. Click OK to save the new properties. Click OK again to exit SAS Management Console.
g. Restart the SASServer8_1 and use the sample content to verify that you can successfully create and execute sample SAS Infrastructure for Risk Management job flow instances.
You can add or remove grid nodes at any time (except for the original SAS Infrastructure for Risk Management application server context (workspacesrv.logical.name SASApp - Logical Workspace Server shown in the preceding example).
Before adding or removing a grid node, stop SASServer8_1.
Customizing the Amount of Data That Can Be Viewed
You can download SAS data sets to Microsoft Excel or view them in the SAS Infrastructure for Risk Management web application using the integrated table viewer. (See “View Task Input or Output Data Objects” in SAS Infrastructure for Risk Management: User’s Guide.)
Managing very large SAS data sets (for example, data sets that contain more than one million columns) can create performance issues. Therefore, SAS Infrastructure for Risk Management limits the maximum number of cells and the maximum number of columns that can be downloaded to a Microsoft Excel worksheet or viewed in the SAS Infrastructure for Risk Management web application integrated table viewer.
By default, the maximum number of cells that can be downloaded or viewed is 10,000 and the maximum number of columns is 1,000. However, if necessary, you can
48 Chapter 6 • Post-installation Tasks

customize the maximum defaults by setting the following two properties in SAS Management Console:
Table 6.3 Data Download Properties
Property DescriptionMaximum Value
com.sas.solutions.risk.irm.server.export.maxrecords the default maximum number of cells that can be downloaded
1,048,575
com.sas.solutions.risk.irm.server.export.maxcolumns the default maximum number of columns that can be downloaded
16,348
If a data set exceeds the maximum numbers, the data set is truncated when it is downloaded or viewed and the amount of data that is being viewed or downloaded out of the actual amount in the data set is identified as follows:
• If the number of cells exceeds the default maximum, the title indicates obs_num2_out_of num1, where num2 is the number of cells in the worksheet out of the total number of cells in the data set.
• If the column number exceeds the default maximum, the title indicates cols_num2_out_of num1, where num2 is the number of columns in the worksheet out of the total number of columns in the data set.
• If both the number of cells and the number of columns exceeds the maximum defaults, the title indicates cols_num2_out_of num1, where num2 is the number of columns in the worksheet out of the total number of columns in the data set.
Note: After making changes in SAS Management Console, restart the SAS Infrastructure for Risk Management server.
Back Up ContentIt is recommended that you implement a system to back up and restore metadata, databases, and disk drive content that is generated by SAS Infrastructure for Risk Management. Ensure that the backup includes the SAS Infrastructure for Risk Management database and the persistent area.
For more information about how to back up content, see SAS Intelligence Platform: System Administration Guide
Back Up Content 49

50 Chapter 6 • Post-installation Tasks

Part 3
Migrate or Upgrade SAS Infrastructure for Risk Management
Chapter 7Upgrade and Migration Overview . . . . . . . . . . . . . . . . . . . . . . . . . . . . . . . . . 53
Chapter 8Migrating SAS Infrastructure for Risk Management . . . . . . . . . . . . . . . 55
Chapter 9Upgrading SAS Infrastructure for Risk Management . . . . . . . . . . . . . . 63
51

52

Chapter 7
Upgrade and Migration Overview
About Migrating and Upgrading . . . . . . . . . . . . . . . . . . . . . . . . . . . . . . . . . . . . . . . . 53
Releases That Support Migration or Upgrade . . . . . . . . . . . . . . . . . . . . . . . . . . . . . . 53
About Migrating and UpgradingTwo options are available when you move to a new release of SAS Infrastructure for Risk Management from a previous release:
• migration
The process of moving SAS metadata and other data and files from one instance of SAS Infrastructure for Risk Management to another instance of SAS, as part of a new installation. This option typically involves new hardware.
For more information, see “Migrating SAS Infrastructure for Risk Management”.
• upgrade
Involves updating SAS Infrastructure for Risk Management from a previous version to a new version on the same supporting platform.
This option does not require new hardware and can be performed on the same operating system.
For more information, see “Upgrading SAS Infrastructure for Risk Management”.
Releases That Support Migration or UpgradeThe following table lists the releases of SAS Infrastructure for Risk Management that can be migrated to the current release of SAS Infrastructure for Risk Management.
Migration from the Specified Release
Migration to SAS Infrastructure for Risk Management 3.6
3.1 No
3.2 Yes
53
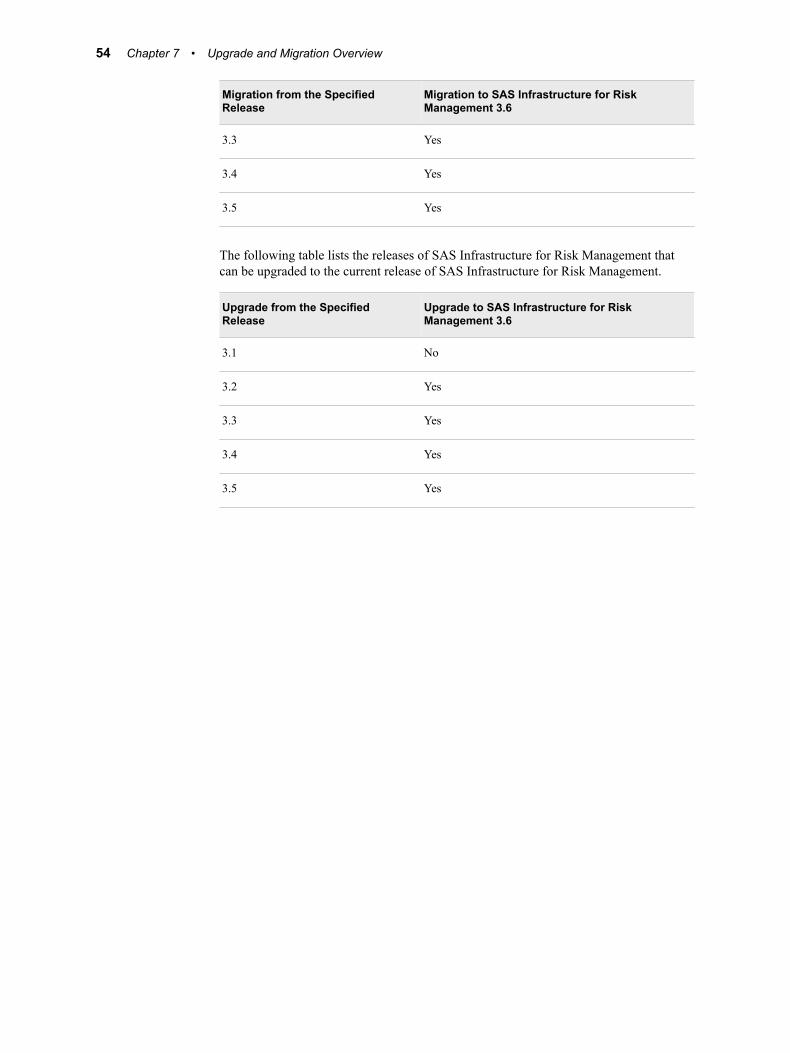
Migration from the Specified Release
Migration to SAS Infrastructure for Risk Management 3.6
3.3 Yes
3.4 Yes
3.5 Yes
The following table lists the releases of SAS Infrastructure for Risk Management that can be upgraded to the current release of SAS Infrastructure for Risk Management.
Upgrade from the Specified Release
Upgrade to SAS Infrastructure for Risk Management 3.6
3.1 No
3.2 Yes
3.3 Yes
3.4 Yes
3.5 Yes
54 Chapter 7 • Upgrade and Migration Overview

Chapter 8
Migrating SAS Infrastructure for Risk Management
About the Migration Process . . . . . . . . . . . . . . . . . . . . . . . . . . . . . . . . . . . . . . . . . . . . 55
Review Additional Documentation . . . . . . . . . . . . . . . . . . . . . . . . . . . . . . . . . . . . . . . 56
Design Your Migration . . . . . . . . . . . . . . . . . . . . . . . . . . . . . . . . . . . . . . . . . . . . . . . . . 57
Create a Migration Package in the Source Environment . . . . . . . . . . . . . . . . . . . . . 57
Migrate SAS Infrastructure for Risk Management . . . . . . . . . . . . . . . . . . . . . . . . . 57
Migrate Federated Content . . . . . . . . . . . . . . . . . . . . . . . . . . . . . . . . . . . . . . . . . . . . . 59
Troubleshoot Migration Errors . . . . . . . . . . . . . . . . . . . . . . . . . . . . . . . . . . . . . . . . . . 61
About the Migration ProcessWhen you migrate SAS Infrastructure for Risk Management, the same operating system must be running in the source environment and in the target environment.
To migrate SAS Infrastructure for Risk Management, complete the tasks that are included in the following checklist.
Completed? Task
Review additional documentation.
Design your migration.
Create a migration package in your source environment.
Back up your source system.
Migrate SAS Infrastructure for Risk Management.
Migrate the solution’s federated content.
CAUTION:Ensure that you follow the steps included in this chapter when migrating a system. Performing any step that is not documented could result in an installation
55

that SAS Infrastructure for Risk Management does not support. For questions about whether SAS Infrastructure for Risk Management supports a configuration step that is not clearly documented, contact SAS Technical Support (at http://support.sas.com/techsup) before you proceed.
Review Additional DocumentationBefore you start your migration, review the following documents:
• Quick Start Guide
This document is shipped with your SAS software and is also available online:
• Windows:
http://support.sas.com/documentation/installcenter/94/win/index.html
• Linux:
http://support.sas.com/documentation/installcenter/94/unx/index.html
• Software Order Email (SOE)
This email is sent to your site to provide information about your order.
• SAS order information (SOI)
The SOI file indicates when the order was placed and provides a list of the products that are in your order. The SOI is in your SAS Software Depot at /install_doc/order-number/soi.html.
• SAS software summary
The summary provides information about the products that are in your order and specifies the software that supports your order. The SAS software summary is in your SAS Software Depot at install_doc/order-number/ordersummary.html.
Note: The SAS Deployment Wizard installs only what is listed in the deployment plan. The SAS software summary might list more products than are included in the deployment plan.
• SAS 9.4 system requirements
http://support.sas.com/resources/sysreq/index.html
• System Requirements – SAS Infrastructure for Risk Management 3.6
http://support.sas.com/documentation/prod-p/irm/index.html
• SAS Notes
SAS Notes provides late-breaking installation information. You can search for SAS Notes for SAS Infrastructure for Risk Management and SAS Infrastructure for Risk Management solutions at http://support.sas.com/notes/index.html.
• SAS Intelligence Platform: Migration Guide
56 Chapter 8 • Migrating SAS Infrastructure for Risk Management

Design Your MigrationTo design your migration, complete the following tasks:
• Review “High-Level SAS Migration Requirements” in SAS Intelligence Platform: Migration Guide.
Compare these requirements to your current deployment and develop a plan for moving your SAS content (data and configuration) to a SAS Infrastructure for Risk Management 3.6 system.
• Run the SAS Migration Utility that is provided in your SAS Software Depot. The utility creates a migration analysis report that enables you to answer the following questions:
• Which SAS products currently reside on each machine?
• Which SAS products require maintenance before you can migrate them?
• Contact your SAS Installation Representative to obtain a valid SAS 9.4 deployment plan for your current SAS deployment.
• Schedule time for your migration so that users are aware of when the system is unavailable.
Create a Migration Package in the Source Environment
Use the SAS Migration Utility to create a migration package that contains your current SAS data and configuration information from the source system. You use this migration package as input to the SAS Deployment Wizard when you migrate to the target system.
For information about how to use the SAS Migration Utility, see SAS Intelligence Platform: Migration Guide.
Migrate SAS Infrastructure for Risk ManagementNote: The following migration process explains how to migrate a single machine
installation.
When you perform a migration for SAS Infrastructure for Risk Management, the process is similar to a typical out-of-the-box deployment. The primary difference between the two methods is that during the SAS Deployment Wizard session, you select the Perform Migration option on the Migration Information page. The following points identify the differences between a typical out-of-the-box deployment and a migration.
CAUTION:Before beginning the migration process, ensure that you back up your installation.
When migrating, note the following differences between a migration and a typical out-of-the-box deployment:
Migrate SAS Infrastructure for Risk Management 57

1. To configure all products in one execution of the SAS Deployment Wizard, click Typical on the Configuring Prompting Level page.
2. During a migration, SAS Deployment Wizard makes one configuration pass for the SAS Application tier. Therefore, you must select all products for configuration in a migration scenario.
58 Chapter 8 • Migrating SAS Infrastructure for Risk Management

3. To migrate SAS Infrastructure for Risk Management, select Step 1: Server and Middle Tier on the Select Deployment Step and Products to Install page.
4. On the Migration Information page, select Perform migration and click Browse to navigate to the migration package that was generated by the SAS Migration Utility.
5. Click Next.
For detailed information about each page of the SAS Deployment Wizard, see SAS Intelligence Platform: Migration Guide.
6. When complete, in the target environment, stop the SAS Infrastructure for Risk Management web application server.
7. Complete the migration by manually copying the federated areas and persistent area from the source system to the target system. For information about copying the federated content, see "Migrate Federated Content".
Migrate Federated ContentAfter migrating SAS Infrastructure for Risk Management, you must migrate the content in the federated areas and the persistent area from the source system to the target system.
Note: Before completing the steps in this section, ensure that the SAS Infrastructure for Risk Management web application server is stopped.
To migrate federated content:
1. Copy all federated areas from the source location to the exact same location on the target system.
This includes the following:
Migrate Federated Content 59

• all the platform federated areas from earlier releases (for example, com.sas.solutions.risk.irm.fa.0.3.2, com.sas.solutions.risk.irm.fa.0.3.3, and com.sas.solutions.risk.irm.fa.0.3.4)
• where applicable, earlier versions of QRT federated area
• earlier versions of the federated areas solution content
2. Copy the persistent area folder from the source location to the exact same location on the target system. Ensure that the ownership and permissions of the files and folders in the persistent area are retained during the copy.
3. In SAS Management Console on the target system, change the persistent area path to point to the newly copied persistent area by completing the following steps:
a. From the Plug-ins tab, select Application Management ð Configuration Manager ð SAS Application Infrastructure.
b. Right-click IRM Mid-Tier Server and select Properties.
c. On the IRM Mid-Tier Server Properties window, select the Advanced tab.
d. Ensure that the Property Value of the com.sas.solutions.risk.irm.server.pa points to the location of the persistent area folder.
Note: The location of the persistent area must be exactly the same on the target system as it was on the source system.
60 Chapter 8 • Migrating SAS Infrastructure for Risk Management

4. Ensure that the contents of the persistent area are owned by the installer and that the SAS General Server user account owns data and messages.
5. To complete the migration, restart the SAS Infrastructure for Risk Management web application server.
Troubleshoot Migration ErrorsIf you receive any errors during migration, complete the following tasks on the target system:
1. Examine the SASIRMServer log to determine which instance or instances generated the error or errors. The SASIRMServer log is located in one of the following locations:
• Linux: SAS-configuration-directory/Levn/Web/Logs/SASServer8_1/
• Windows: SAS-configuration-directory\Levn\Web\Logs\SASServer8_1\
2. For each instance that did not successfully migrate, note the instance key, the instance name, and the error reason.
3. Uninstall the newer SAS Infrastructure for Risk Management installation and re-install the previous installation.
4. Restore the source system database backup.
5. Restore the source system persistent area backup.
6. Using your notes from Step 2, review each instance that did not successfully migrate, and address the issue or issues that caused the error. If necessary, re-create the instance.
7. Re-install the new version of SAS Infrastructure for Risk Management and migrate the federated content.
8. If necessary, repeat the steps 1 through 7 until all instances migrate successfully.
Troubleshoot Migration Errors 61

62 Chapter 8 • Migrating SAS Infrastructure for Risk Management

Chapter 9
Upgrading SAS Infrastructure for Risk Management
About the Upgrade Process . . . . . . . . . . . . . . . . . . . . . . . . . . . . . . . . . . . . . . . . . . . . . 63
Perform the Pre-upgrade Tasks . . . . . . . . . . . . . . . . . . . . . . . . . . . . . . . . . . . . . . . . . 64
Upgrade SAS Infrastructure for Risk Management . . . . . . . . . . . . . . . . . . . . . . . . . 64
Troubleshoot Upgrade Errors . . . . . . . . . . . . . . . . . . . . . . . . . . . . . . . . . . . . . . . . . . . 65
About the Upgrade ProcessWhen you upgrade SAS Infrastructure for Risk Management, the same operating system must be running in the source environment and in the target environment.
When upgrading, ensure that you follow the instructions in the SAS Intelligence Platform documentation. For more information, see SAS Intelligence Platform: Installation and Configuration Guide.
The steps to perform an upgrade are similar to those required for a migration. However, you do not have to copy the federated areas and the persistent areas since they are already located in the required location.
When performing an upgrade, ensure that you do not remove any federated areas. This includes the following:
• all of the platform federated areas from earlier releases (for example, com.sas.solutions.risk.irm.fa.0.3.2, com.sas.solutions.risk.irm.fa.0.3.3, and com.sas.solutions.risk.irm.fa.0.3.4)
• where applicable, earlier versions of QRT federated area
• earlier versions of the current federated areas
To upgrade SAS Infrastructure for Risk Management, complete the tasks that are included in the following checklist.
Completed? Task
Perform the pre-upgrade tasks.
Upgrade SAS Infrastructure for Risk Management.
63

CAUTION:Ensure that you follow the steps included in this chapter when upgrading a system. Performing any step that is not documented could result in an installation that SAS Infrastructure for Risk Management does not support. For questions about whether SAS Infrastructure for Risk Management supports a configuration step that is not clearly documented, contact SAS Technical Support (at http://support.sas.com/techsup before you proceed.
Perform the Pre-upgrade TasksBefore upgrading, ensure that you complete the following tasks:
1. Review SAS 9.4 Guide to Software Updates.
2. Back up your existing system.
CAUTION:The upgrade writes over the existing system. If any problems are encountered, it might be necessary to recover the existing system from backup. Keep in mind that your existing system can be corrupted to the point of being unusable and unrecoverable.
Note: When you back up your system, ensure that you also back up the SAS Metadata Server. For more information, see SAS Intelligence Platform: System Administration Guide.
3. Understand how the SAS Deployment Wizard upgrades SAS software. For more information, see SAS Intelligence Platform: Installation and Configuration Guide.
4. Locate and familiarize yourself with your SAS software order. For more information, see SAS Intelligence Platform: Installation and Configuration Guide.
5. Download your order and create a SAS Software Depot. For instructions about how to download and create a SAS Software Depot, see “Create a SAS Software Depot”.
6. Stop all SAS services that are running in your environment.
Upgrade SAS Infrastructure for Risk ManagementYou upgrade SAS Infrastructure for Risk Management using the SAS Deployment Wizard.
When running the SAS Deployment Wizard from your SAS Infrastructure for Risk Management 3.6 depot, point to the location of your existing SAS‑installation‑directory. The SAS Deployment Wizard upgrades your installation to the new version.
For complete instructions about upgrading SAS Infrastructure for Risk Management from one version to another version on the same machine, see SAS Guide to Software Updates and Product Changes.
64 Chapter 9 • Upgrading SAS Infrastructure for Risk Management

Troubleshoot Upgrade ErrorsIf you receive any errors when migrating federated content after upgrading your SAS Infrastructure for Risk Management, complete the following tasks:
1. Examine the SASIRMServer log to determine which instance or instances generated the error or errors. The SASIRMServer log is located in one of the following locations:
• Linux: SAS-configuration-directory/Levn/Web/Logs/SASServer8_1/
• Windows: SAS-configuration-directory\Levn\Web\Logs\SASServer8_1\
2. For each instance that did not successfully migrate, note the instance key, the instance name, and the error reason.
3. Uninstall the newer SAS Infrastructure for Risk Management installation and re-install the previous installation.
4. Restore the system database backup.
5. Restore the persistent area backup.
6. Using your notes from Step 2, review each instance that did not successfully migrate, and address the issue or issues that caused the error. If necessary, re-create the instance.
7. Re-install the new version of SAS Infrastructure for Risk Management and migrate the federated content.
8. If necessary, repeat the steps 1 through 7 until all instances migrate successfully.
Troubleshoot Upgrade Errors 65

66 Chapter 9 • Upgrading SAS Infrastructure for Risk Management

Part 4
Administering SAS Infrastructure for Risk Management
Chapter 10Performing Additional Administrative Tasks . . . . . . . . . . . . . . . . . . . . . . 69
Chapter 11Performing Programming Interface Administrative Tasks . . . . . . . . . 91
Chapter 12Troubleshooting . . . . . . . . . . . . . . . . . . . . . . . . . . . . . . . . . . . . . . . . . . . . . . . . 103
67

68

Chapter 10
Performing Additional Administrative Tasks
Configure Middle-Tier Server Clustering . . . . . . . . . . . . . . . . . . . . . . . . . . . . . . . . . 69
Add a Solution Federated Area to an Existing Deployment . . . . . . . . . . . . . . . . . . . 70
Load Data into a Federated Area Using Live ETL . . . . . . . . . . . . . . . . . . . . . . . . . . 73Overview . . . . . . . . . . . . . . . . . . . . . . . . . . . . . . . . . . . . . . . . . . . . . . . . . . . . . . . . . . 73Setting Permissions . . . . . . . . . . . . . . . . . . . . . . . . . . . . . . . . . . . . . . . . . . . . . . . . . . 73Creating an Input Area . . . . . . . . . . . . . . . . . . . . . . . . . . . . . . . . . . . . . . . . . . . . . . . 73Invoking Live ETL . . . . . . . . . . . . . . . . . . . . . . . . . . . . . . . . . . . . . . . . . . . . . . . . . . 74
Access SAS Infrastructure for Risk Management Information Using WebDAV . . 74About Using WebDAV . . . . . . . . . . . . . . . . . . . . . . . . . . . . . . . . . . . . . . . . . . . . . . . 74Using a WebDAV URL in a Browser . . . . . . . . . . . . . . . . . . . . . . . . . . . . . . . . . . . . 75Mapping a WebDAV Drive to Your Computer . . . . . . . . . . . . . . . . . . . . . . . . . . . . . 76Directly Mapping a Libref to a WebDAV URL . . . . . . . . . . . . . . . . . . . . . . . . . . . . 77
Change the Persistent Area’s Location . . . . . . . . . . . . . . . . . . . . . . . . . . . . . . . . . . . . 79
Map Libraries . . . . . . . . . . . . . . . . . . . . . . . . . . . . . . . . . . . . . . . . . . . . . . . . . . . . . . . . 80About SAS Infrastructure for Risk Management Library Mapping . . . . . . . . . . . . . 80How the Inputs for SAS Infrastructure for Risk Management Are Defined . . . . . . 80Static Mapping . . . . . . . . . . . . . . . . . . . . . . . . . . . . . . . . . . . . . . . . . . . . . . . . . . . . . 81Dynamic Custom Mapping . . . . . . . . . . . . . . . . . . . . . . . . . . . . . . . . . . . . . . . . . . . . 82Generic Library Mapping . . . . . . . . . . . . . . . . . . . . . . . . . . . . . . . . . . . . . . . . . . . . . 84Temporary Library Mapping . . . . . . . . . . . . . . . . . . . . . . . . . . . . . . . . . . . . . . . . . . 85
Run the Hot Fix Post-installation Tool . . . . . . . . . . . . . . . . . . . . . . . . . . . . . . . . . . . . 85About the Hot Fix Post-installation Tool . . . . . . . . . . . . . . . . . . . . . . . . . . . . . . . . . 85Prerequisites . . . . . . . . . . . . . . . . . . . . . . . . . . . . . . . . . . . . . . . . . . . . . . . . . . . . . . . 86Actions Performed by the Hot Fix Post-Installation Tool . . . . . . . . . . . . . . . . . . . . 86Run the Hot Fix Post-installation Tool . . . . . . . . . . . . . . . . . . . . . . . . . . . . . . . . . . . 86Additional Supported Options . . . . . . . . . . . . . . . . . . . . . . . . . . . . . . . . . . . . . . . . . 87
Configure Middle-Tier Server ClusteringSAS Infrastructure for Risk Management supports the SAS 9.4 Intelligence Platform middle-tier server clustering feature.
Horizontal clustering is the practice of deploying SAS Web Application Server instances on multiple machines. This configuration can help improve performance (load balancing) and provide greater availability to guard against hardware failure. If one
69

machine or web application server instance crashes (or an application on one server instance stops), the applications remain available on the other machines (failover).
For information about middle-tier server clustering, see SAS Intelligence Platform: Middle-Tier Administration Guide.
Add a Solution Federated Area to an Existing Deployment
You can add any number of federated areas to run on a SAS Infrastructure for Risk Management deployment.
If you license more than one SAS Infrastructure for Risk Management solutions, you can install the second solution’s federated areas by completing the following tasks:
1. Download the content package for the additional solution. For more information, see “Install Federated Content”.
2. After you download the content for the additional solution, unzip the content package and use the installation instructions that are provided with the package to install the content.
3. Add the new content as a federated area to SAS Infrastructure for Risk Management. For information about how to add a content, see “Install Federated Content”.
Adding a new solution’s federated area requires an understanding of how these federated areas relate to each other.
CAUTION:Adding a federated area is the only operation that you can perform on a federated area.
When working with federated areas, note that the following operations are not supported and could result in system and data corruption:
• removing an installed federated area
• modifying the content of an installed federated area, with the exception of loading data
• modifying the federated area ID of an installed federated area
• modifying the path of an installed federated area
• adding the same federated area twice using different federated area IDs
Before adding a federated area, consider the following key points:
• SAS Infrastructure for Risk Management defines the property com.sas.solutions.risk.irm.fa.
This property is followed by a period-separated suffix that is the identifier for the federated area. For example, com.sas.solutions.risk.irm.fa.1.0.3 defines a federated area with ID 1.0.3.
Here is a full example of federated content that is supplied for a SAS Infrastructure for Risk Management federated area:
com.sas.solutions.risk.irm.fa.1.0.3=/sas-configuration-directory/Levn/AppData/SASIRM/fa1
70 Chapter 10 • Performing Additional Administrative Tasks
This statement defines a federated root of /sas-configuration-directory/Levn/AppData/SASIRM/fa1.
• The ID for a federated area can contain numeric characters, alphabetic characters, and periods only.
Note: Identifiers that start with the number zero (0) are reserved for functionality content that is delivered by the SAS Infrastructure for Risk Management platform federated area. Do not use these identifiers when adding an additional federated area.
• The lexical ordering of identifiers determines the precedence of federated areas, as shown in the following example:
com.sas.solutions.risk.irm.fa.0.3.6=/config/Lev1/AppData/fa.0.3.6com.sas.solutions.risk.irm.fa.2=/config/Lev1/AppData/fa_lifecom.sas.solutions.risk.irm.fa.c=/config/Lev1/AppData/fa_cpmncom.sas.solutions.risk.irm.fa.sample.3.6=/config/Lev1/AppData/fa.sample.3.6
• When adding a federated area, you must define the property com.sas.solutions.risk.irm.fa and point to a location that is accessible to the workspace server.
To add an additional federated area:
1. Stop the SAS Infrastructure for Risk Management web application server by running the following command in the appropriate directory.
tcruntime-ctl.sh stop
For a non-clustered environment, the web application server is SASServer8_1. For a clustered environment, the web application servers can include SASServer8_2, SASServer_3, and so on, and can be on the same machine or on different machines within the cluster.
For more information about stopping SAS Web Application Servers, see SAS Intelligence Platform: Middle-Tier Administration Guide.
2. Grant Read and Write permissions to the primary SAS group of the spawned server user.
3. In SAS Management Console, add the new federated area property by completing the following steps:
a. Start SAS Management Console and connect to the appropriate metadata server as a SAS administrator (for example, sasadm@saspw).
b. On the Plug-ins tab, verify that the repository is selected in the Repository field. The default repository is Foundation.
c. Select Application Management ð Configuration Manager ð SAS Application Infrastructure.
d. In the main pane, right-click SAS IRM Mid-Tier Server and select Properties. The IRM Mid-Tier Server Properties window is displayed.
e. Click the Advanced tab and then click Add. The Define New Property dialog box is displayed.
Add a Solution Federated Area to an Existing Deployment 71

• In the Property Name field, enter com.sas.solutions.risk.irm.fa.n, where n is an ID that does not start with the number zero (0).
Note: Typically, you want the new property to have precedence. Therefore, the ID of the new federated area should be lexicographically greater than the ID of previous federated version IDs.
• In the Property Value field, enter the federated area directory path.
Click OK.
f. Grant Read permissions to the spawned server on the federated area directory.
g. Restart the SAS Infrastructure for Risk Management web application server.
For more information about starting SAS Web Application Servers, see SAS Intelligence Platform: Middle-Tier Administration Guide.
72 Chapter 10 • Performing Additional Administrative Tasks

Load Data into a Federated Area Using Live ETL
OverviewTypically, SAS Infrastructure for Risk Management reads initial input data objects from the landing_area folder of a federated area. Because SAS Infrastructure for Risk Management can simultaneously run multiple job flows and tasks that might access the input data objects from the landing area, you should avoid manually loading your data into the landing_area folder while the SAS Infrastructure for Risk Management server is running. Loading data into the landing_area folder of a federated area while the SAS Infrastructure for Risk Management server is running can cause errors (for example, file locking issues, or incorrect results).
To avoid potential problems, load your input data to the input_area folder of a federated area. SAS Infrastructure for Risk Management automatically uses live ETL to copy the input data objects from the input_area folder to the landing_area folder.
When you use the live ETL process to upload data, server operation are not affected. All server operations are available. These server operations include the following:
• logging in and logging out
• creating job flow instances
• deleting job flow instances
• modifying job flow instances
• executing job flow instances
When using live ETL to upload data, note that you can upload all existing data using live ETL. There is no restriction on the number of tables that you can upload at the same time. In addition, you can create entities, configuration sets, and new base dates via live ETL.
Live ETL supports the creation of new input data objects. However, it does not support deleting input data objects.
Setting PermissionsEnsure that the following permissions are set up for the user-delivered federated areas:
• The landing areas and the contents under it have Write permission to the SAS General Server user.
• The input areas directories have Read and Write permission to the SAS General Server user.
Creating an Input AreaBecause data objects in the landing area cannot be modified while job flow instances are running, you must create an input area into which you upload the new data. When creating the input area, note the following:
• The input area is located under the root of the federated area.
• There is one input area per federated area.
Load Data into a Federated Area Using Live ETL 73

• To ensure compatibility with existing deployments, the path of the input area is %FA/input_area, where%FA is the path to the federated area.
Here is an example of the input area in the federated area:
/federated_area ... /landing_area /input_area /03312017 entity.sas7bdat ... /03312016 entity.sas7bdat ... funds.sas7bdat ... last_update.txt last_live_etl.success.txt
Invoking Live ETLAfter you have uploaded the new data objects into the input area, invoke live ETL by modifying the marker file named last_update.txt to update the file’s timestamp. The file is located in the input area. After the data has been uploaded to the input area and you update the marker file, live ETL automatically performs the following tasks:
1. Stops the execution of all job flow instances that depend on the data that was uploaded.
2. Stops all new job flow execution requests that use the uploaded data.
3. Copies the content from the input area to the landing area.
4. Reloads the base dates and the configuration sets.
5. Updates the last_live.etl.success | failure.txt file to indicate whether the process completed successfully or with errors.
After the live ETL process has been completed, all job flow instances that were affected by the upload have an OUT_OF_DATE status. If an affected instance is running, it is stopped and then marked OUT_OF_DATE. If a new instance is run during the live ETL process, and is impacted by the live ETL process, it is not executed and its status is set to OUT_OF_DATE.
Access SAS Infrastructure for Risk Management Information Using WebDAV
About Using WebDAVSAS Infrastructure for Risk Management uses WebDAV to provide an easy way to access the following types of SAS Infrastructure for Risk Management information:
• job flow definition files
74 Chapter 10 • Performing Additional Administrative Tasks

• input and output SAS data sets and their corresponding Microsoft Excel files
• the execution status of job flow instances and sub-flow instances
• the execution status of tasks
• the navigation hierarchy of the data
Before using WebDAV to access SAS Infrastructure for Risk Management data, note the following restrictions:
• The scope of data that a user can access is controlled by permissions that are associated with the user’s logon credentials.
• The content of a flow instance that has not been shared is accessible only to the owner of the flow. If the instance is shared, the content is accessible to users who have access to the business entities of the flow instance.
• The contents of the SAS Infrastructure for Risk Management WebDAV servlet are Read-Only and cannot be deleted.
SAS Infrastructure for Risk Management users can access the data store in a centralized location on a remote server using WebDAV by using any of the following methods:
• a WebDAV URL in a browser
• a WebDAV drive that is mapped to your computer
• the LIBNAME statement to directly map a libref to a WebDAV URL
Using a WebDAV URL in a BrowserYou can access your SAS Infrastructure for Risk Management information using a WebDAV URL in your browser. In this example, the user ID is sasdemo.
To view job flow information for the hello_world job flow instance:
1. Enter the WebDAV URL in your browser.
Here is an example:
protocol//IRM_server_name:port/SASIRMServer/irmwebdav/sasdemo
Note: You will be prompted to log on to the SAS Infrastructure for Risk Management server.
Here is how the WebDAV directories appear after you have logged on to the server:
Access SAS Infrastructure for Risk Management Information Using WebDAV 75
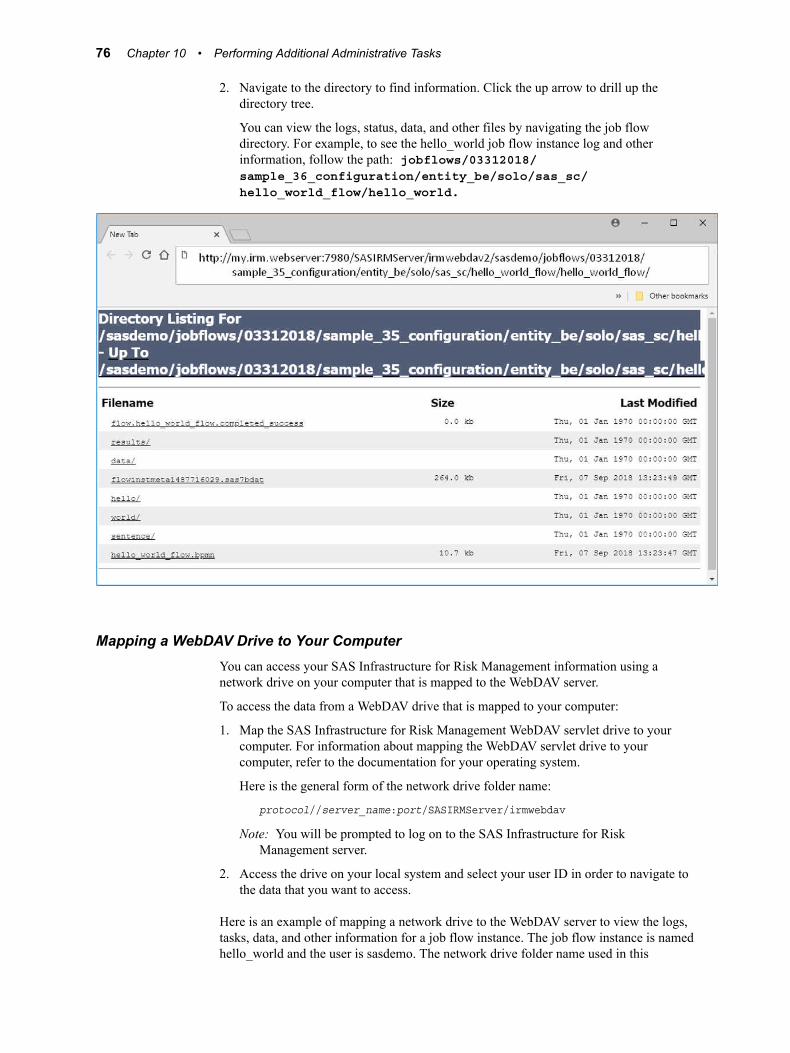
2. Navigate to the directory to find information. Click the up arrow to drill up the directory tree.
You can view the logs, status, data, and other files by navigating the job flow directory. For example, to see the hello_world job flow instance log and other information, follow the path: jobflows/03312018/sample_36_configuration/entity_be/solo/sas_sc/hello_world_flow/hello_world.
Mapping a WebDAV Drive to Your ComputerYou can access your SAS Infrastructure for Risk Management information using a network drive on your computer that is mapped to the WebDAV server.
To access the data from a WebDAV drive that is mapped to your computer:
1. Map the SAS Infrastructure for Risk Management WebDAV servlet drive to your computer. For information about mapping the WebDAV servlet drive to your computer, refer to the documentation for your operating system.
Here is the general form of the network drive folder name:
protocol//server_name:port/SASIRMServer/irmwebdav
Note: You will be prompted to log on to the SAS Infrastructure for Risk Management server.
2. Access the drive on your local system and select your user ID in order to navigate to the data that you want to access.
Here is an example of mapping a network drive to the WebDAV server to view the logs, tasks, data, and other information for a job flow instance. The job flow instance is named hello_world and the user is sasdemo. The network drive folder name used in this
76 Chapter 10 • Performing Additional Administrative Tasks

example is http://my.irm.webserver:7980/SASIRMServer/irmwebdav/. The user is sasdemo.
In addition to viewing the files, you can access them directly for reporting or other tasks.
Directly Mapping a Libref to a WebDAV URLNote: To be able to directly map a libref to a WebDAV URL, the user credentials that
you use in your SAS session must be stored in the SAS Metadata Server.
You can associate a libref with a SAS library to enable access to directories on a WebDAV server. You can then use this library to access the data that is associated with a job flow instance in SAS Studio or in a local SAS session.
Here is the format of the LIBNAME statement to access the WebDAV server for job flow instance data:
libname mylibref "protocol//server_name:port/SASIRMServer/irmwebdav/userid/jobflows/base_date/config_set_id/entity/entity_role/flow_category/flow_bpmn_name/instance_name" WEBDAV AUTHDOMAIN="DefaultAuth" user="username";
Note: The information that you need to supply in the LIBNAME statement is provided in the Details tab in a job flow instance’s diagram view in the SAS Infrastructure for Risk Management user interface. The information is located in the following fields: Instance (instance_name), Flow (flow_bpmn_name), Base date (base_date), Configuration (config_set_id), Entity (entity), Entity role (entity_role), Owner (userid), and Category (flow_category).
To create a SAS library to access the job flow instance WebDAV directory and to produce the simple report using an output data set:
1. Start a SAS session.
Access SAS Infrastructure for Risk Management Information Using WebDAV 77

Note: This example uses a local SAS session, but you can use any type of SAS session that has access to the SAS Infrastructure for Risk Management server.
2. Submit the LIBNAME statement to access the WebDAV data directory for an instance.
Here is an example of a LIBNAME statement that creates the library MYFLOW for a job flow instance that is named hello_world_flow:
libname myflow "http://my.irm.webserver:7980/SASIRMServer/irmwebdav/sasdemo/jobflows/03312018/sample_36_configuration/entity_be/solo/sas_sc/hello_world_flow/hello_world_flow" WEBDAV AUTHDOMAIN="DefaultAuth" USER="sasdemo";
Note: Depending on your SAS session, you might be prompted to log on to the SAS Infrastructure for Risk Management server when you submit this LIBNAME statement.
3. The MYFLOW library contains the job flow instance metadata table (flowinstmeta*.sas7bdat).
To see a listing of the WebDAV URLs for the job flow instance data, view the contents of the job flow instance metadata table:
The data set (OUTPUT.sentence) that is needed for the report is in the WebDAV output directory. The WebDAV directory path for the output directory shown in the job flow instance metadata table is SASIRMServer/irmwebdav/sasdemo/jobflows/03312018/sample_35_configuration/entity_be/solo/sas_sc/hello_world_flow/hello_world_flow/data/output.
4. Submit the LIBNAME statement to access the WebDAV data directory for this job flow instance’s output library:
libname output "http://my.irm.webserver:7980/SASIRMServer/irmwebdav/sasdemo/jobflows/03312018/sample_36_configuration/entity_be/solo/sas_sc/hello_world_flow/hello_world_flow/data/output" WEBDAV AUTHDOMAIN="DefaultAuth" USER="sasdemo";
5. To print the report, access the job flow instance data via the WebDAV library in this local SAS session:
title "Report the Final Sentence";proc print data=output.sentence; var say_what;
78 Chapter 10 • Performing Additional Administrative Tasks

run;
Here is how the report appears in the local SAS session:
For detailed information about using the LIBNAME statement for WebDAV server access, see SAS Global Statements: Reference.
Change the Persistent Area’s LocationThere are some conditions that might require that you change the location of the SAS Infrastructure for Risk Management persistent area in an established SAS Infrastructure for Risk Management deployment. One example of such a condition is that the location of the persistent area is running out of space.
CAUTION:In an established SAS Infrastructure for Risk Management deployment, do not modify the path to the persistent area in SAS Management Console. Once job flows have been executed in a SAS Infrastructure for Risk Management deployment, you cannot modify the path to the persistent area in SAS Management Console. The only time that you can modify the path to the persistent area in SAS Management Console is in a fresh SAS Infrastructure for Risk Management installation, before any job flows are executed. (See “Configure an External Location to the Persistent Area”.)
Change the Persistent Area’s Location 79

To change the location of the persistent area in an established SAS Infrastructure for Risk Management deployment:
1. Copy the existing persistent area folder to a new location.
2. Create a symbolic link from the former location of the persistent area to its new location.
With a symbolic link, the output that SAS Infrastructure for Risk Management writes to the former location of the persistent area is rerouted to the new location.
Map Libraries
About SAS Infrastructure for Risk Management Library MappingEach SAS Infrastructure for Risk Management federated area contains a libnames.txt file that is located in the config folder of that federated area. This file contains a mapping definition to each library that contains inputs for the tasks that are used in job flows. SAS Infrastructure for Risk Management resolves the library names using the mappings that are defined in the libnames.txt file. Therefore, you must define a mapping statement in the libnames.txt file for each library that contains inputs that are used by the job flows in the federated area.
SAS Infrastructure for Risk Management supports the following types of mapping definitions:
• SAS library mapping definitions
• dynamic custom mapping definitions
• generic library definitions (to simplify access to third-party data)
• temporary library definitions (for large data sets)
CAUTION:Do not change the definition of a library reference that another federated area is using. Changing the definition of a library reference that another federated area is using might result in data issues.
How the Inputs for SAS Infrastructure for Risk Management Are Defined
The inputs and outputs for SAS Infrastructure for Risk Management tasks and subflows can be defined using a three-part name.
Here is an example where the name of the input data set for a task is irm_cfg.byn_configuration.sas7bdat.
80 Chapter 10 • Performing Additional Administrative Tasks

where:
• irm_cfg is the name of the library in which the input is located. (This location must be mapped in the libnames.txt file.)
• byn_configuration is the file name of the input data set.
• sas7bdat is the file extension of the input data set.
When a job flow instance is created, SAS Infrastructure for Risk Management resolves the library name irm_cfg using the mappings that are defined in the libnames.txt file.
Static MappingHere is an example in which a user wants to create a job flow instance that is based on the following parameters:
• Job flow location = /config/Lev1/AppData/SASIRM/fa.id
• Selected entity = ENTITY_BE
• Input data set = static.run_options.sas7bdat
• libnames.txt defined mapping = STATIC=%la/base/%et
Here is an example of the mapping in the libnames.txt file:
Map Libraries 81
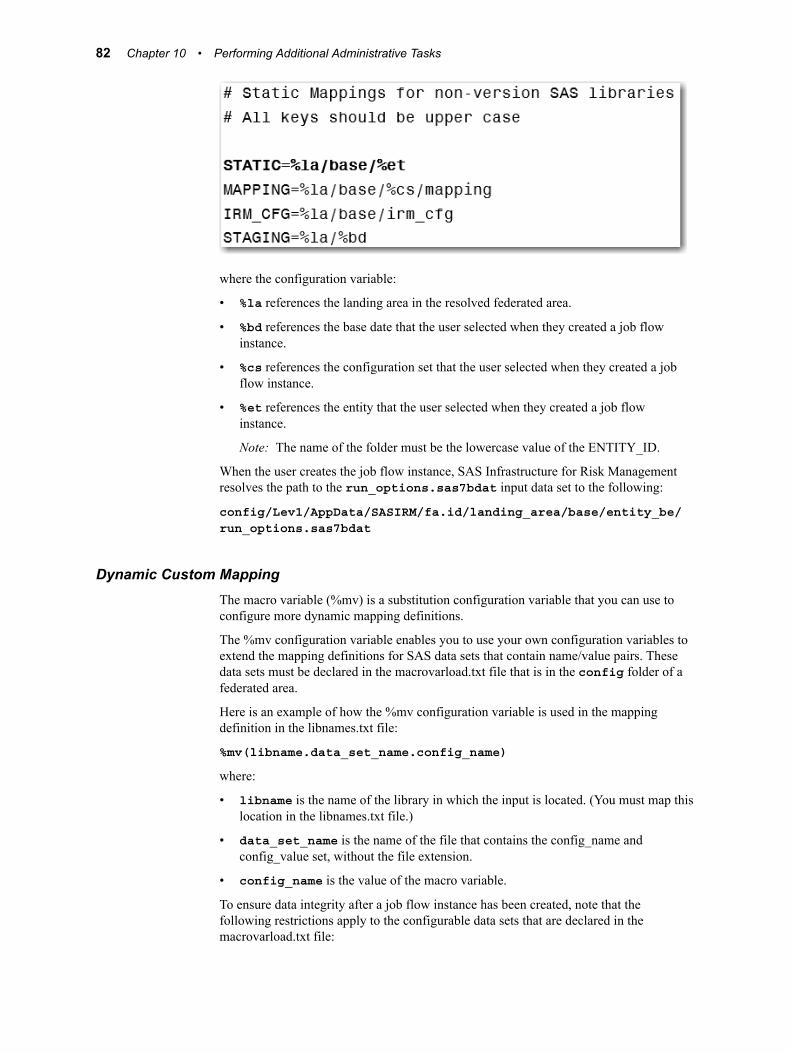
where the configuration variable:
• %la references the landing area in the resolved federated area.
• %bd references the base date that the user selected when they created a job flow instance.
• %cs references the configuration set that the user selected when they created a job flow instance.
• %et references the entity that the user selected when they created a job flow instance.
Note: The name of the folder must be the lowercase value of the ENTITY_ID.
When the user creates the job flow instance, SAS Infrastructure for Risk Management resolves the path to the run_options.sas7bdat input data set to the following:
config/Lev1/AppData/SASIRM/fa.id/landing_area/base/entity_be/run_options.sas7bdat
Dynamic Custom MappingThe macro variable (%mv) is a substitution configuration variable that you can use to configure more dynamic mapping definitions.
The %mv configuration variable enables you to use your own configuration variables to extend the mapping definitions for SAS data sets that contain name/value pairs. These data sets must be declared in the macrovarload.txt file that is in the config folder of a federated area.
Here is an example of how the %mv configuration variable is used in the mapping definition in the libnames.txt file:
%mv(libname.data_set_name.config_name)
where:
• libname is the name of the library in which the input is located. (You must map this location in the libnames.txt file.)
• data_set_name is the name of the file that contains the config_name and config_value set, without the file extension.
• config_name is the value of the macro variable.
To ensure data integrity after a job flow instance has been created, note that the following restrictions apply to the configurable data sets that are declared in the macrovarload.txt file:
82 Chapter 10 • Performing Additional Administrative Tasks

• The data set cannot be modified from the Edit instance window in the SAS Infrastructure for Risk Management web application. All paths must resolve to characters (lowercase) on disk.
• All paths must resolve to characters (lowercase) on disk.
• The data set cannot be modified using the Download and Upload feature in the SAS Infrastructure for Risk Management user interface.
Here is an example in which a user wants to create a job flow instance that is based on the following parameters:
• Job flow location = /config/Lev1/AppData/SASIRM/fa.id
• Input data set for a task = ACT.QUOTE_FX.SAS7BDAT
• Selected configuration set = SAMPLE_35_CONFIGURATION
Here is an example of a dynamic mapping definition in the libnames.txt file:
When the user creates the job flow instance, SAS Infrastructure for Risk Management resolves the path to the STATIC.ANALYTICS_OPTION input data set to the following:
/Config/Lev1/AppData/SASIRM/fa.id/landing_area/base/03312017/static/analytics_option.sas7bdat
The data set contains the following entries:
After SAS Infrastructure for Risk Management resolves the path to the STATIC.ANALYTICS_OPTION data set, it resolves the path to the ACT.QUOTE_FX.SAS7BDAT input data set to the following on disk:
/config/Lev1/AppData/SASIRM/fa.id/landing_area/03312017/ifrs/quotes_fx.sas7bdat
CAUTION:If you use an existing configuration table for one of the dynamic library configurations, the table can no longer be edited for that job flow instance.
Map Libraries 83

Therefore, you might consider creating a custom table that contains a pointer to the dynamic library. You can create this table anywhere in the landing area.
Generic Library MappingGeneric library mapping definitions enable access to third-party data that is located outside of a SAS Infrastructure for Risk Management federated area. For example, this data might be located in a relational database management system, Hadoop, CAS, and so on.
When working with generic libraries, note the following:
• In the libnames.txt file, all generic libraries must start with the keyword LIBREF (for example, LIBREF PGLIB=).
• The exact syntax for the LIBREF keyword follows the equal sign (=) in the libnames.txt file. Depending on the type of library that you are defining, the engine information, database, and schema might also be required.
• A generic library definition that contains %pa (persistent area) is ignored and flagged as an error.
• A generic library can be an input or output library, but not both. If the library is used as an output library, that output cannot be consumed as input by any other node. It is a terminal output. If the library is used as an input library, then it cannot be used an output in another node.
• If a generic library is used by multiple federated areas, it must be defined using the exact same definition in the libnames.txt file of the other federated areas.
• Generic libraries are supported for SAS tasks.
• The SAS General Servers group must own any required authentication domains or the user credentials must allow access to the external data. Therefore, you must specify the authentication domain of the generic library or specify the user credentials.
Here is a syntax that you use to define a generic library entry in the libnames.txt file:
LIBREF <LIB_NAME>=<engine_verbatim>; IRMAUTHDOMAIN=<Domain>,<user>
where:
• LIBREF is the keyword to begin the definition.
• LIB_NAME is the name of the generic library.
• engine_verbatim is the engine and location to use to access the files in the library.
• (Optional) IRMAUTHDOMAIN is the keyword to specify the authentication domain and user.
Here are two examples of generic libraries mapping definitions. The first example uses standard authentication and the second example uses user credentials.
LIBREF NOTUSER=POSTGRES SERVER=”localhost” PORT=9432;IRMAUTHDOMAIN=GeneralLIBREF USERYES=POSTGRES SERVER=”localhost” PORT=9432;IRMAUTHDOMAIN=General,user
Note: With Hot Fix G2T004 applied, SAS Infrastructure for Risk Management supports dynamic mapping definitions for generic libraries. This support enables new libraries to be assigned with the %mv configuration variable. You can use the %mv configuration variable in all LIBREF statements (SERVER=, PORT=, and so on). You can also create mapping definitions that use partial substitution.
84 Chapter 10 • Performing Additional Administrative Tasks

For detailed information about how the %mv substitution configuration variable is used, see “Dynamic Custom Mapping”.
Note: In the following examples, CECL is a library that is defined in the libnames.txt file.
Here is an example of a metadata library definition:
LIBREF CECLDR=META liburi="SASLibrary?@Name='%mv(CECL_CFG.RUN_OPTION.META_LIBRARY_NAME)'" metaout=data;IRMAUTHDOMAIN=DefaultAuth
where:
• @Name value is the value found in the RUN_OPTION table.
• config_name is the name of the metadata library.
Here is an example of a PostgreSQL library definition, which uses the same RUN_OPTION table as the metadata library definition:
LIBREF PGIRM=POSTGRES SERVER="%mv(CECL_CFG.RUN_OPTION.SERVER)" DATABASE="%mv(CECL_CFG.RUN_OPTION.DATABASE)" PORT=9432;IRMAUTHDOMAIN=IRMDBAuth
Temporary Library MappingA temporary library is a data library that is promptly and automatically deleted as soon as it is no longer needed during the execution of a job flow. Using temporary libraries minimizes the disk space footprint of large data sets.
Before you define a temporary library, note the following restrictions:
• Because temporary data is nonpersistent data, it does not participate in the data object pooling process. Therefore, during the execution of a job flow, tasks with any temporary data as its input or output is always executed.
• You can define a temporary library only for libraries that are generated as SAS Task output.
Here is an example of the mapping definition that you enter in the libnames.txt file of the federated area in which you want to create the temporary library:
MK_CONF=%TMPLIB
Run the Hot Fix Post-installation Tool
About the Hot Fix Post-installation ToolHot fixes that are released for SAS Infrastructure for Risk Management 3.5 and later include the SAS Infrastructure for Risk Management hot fix post-installation tool.
The SAS Infrastructure for Risk Management hot fix post-installation tool is a stand-alone Java executable. It verifies and automates post-installation steps that are required when you apply a SAS Infrastructure for Risk Management hot fix that includes the SAS Infrastructure for Risk Management server JAR.
You need to use this tool only when you apply SAS Infrastructure for Risk Management server tier hot fixes.
Note: The information and examples in this section use the default directories that are created during the SAS installation. The default path to the SASHome directory
Run the Hot Fix Post-installation Tool 85

is /local/install/SASHome, and the default path to the SASConfig directory is /local/install/SASConfig. If you have not used the default paths, you must substitute your installation paths for the default paths that are used in the examples.
PrerequisitesBefore you can run the hot fix post-installation tool:
• Install the applicable hot fix on the SAS Infrastructure for Risk Management server tier.
For information about installing the hot fix, see the instructions that are provided with the hot fix.
• Have the SAS Private Java Runtime Environment (JRE) in order to run the hot fix post-installation tool. The SAS Private JRE is provided as part of the standard SAS deployment process.
• Ensure that the SAS Web Infrastructure Platform Data Server is running.
Actions Performed by the Hot Fix Post-Installation ToolWhen you run the SAS Infrastructure for Risk Management hot fix post-installation tool, it performs the following actions:
• Verifies that the SASHome directory exists and that it can be read.
• Verifies that the SASConfig directory exists and that it can be read and written to.
• Verifies that the SAS Infrastructure for Risk Management platform federated area exists and that it can be read and written to.
• Verifies that the SAS Versioned JAR Repository (VJR) exists and that it can be read.
• Locates and parses the VJR picklist.
• Locates all the versions of the SAS Infrastructure for Risk Management JAR files in the picklist.
• Verifies that the JAR file from which the hot fix post-installation tool was launched is the same file as the server JAR file in the picklist. If the JAR files do not match, the tool terminates the process.
• Copies all the SAS Infrastructure for Risk Management JAR files in the picklist to the SAS Infrastructure for Risk Management platform federated area.
• Copies and extracts all the SAS Infrastructure for Risk Management platform federated area classes to the appropriate locations in the platform federated area.
• Determines whether any SQL updates have not been applied to the SAS Infrastructure for Risk Management database and applies the updates as needed.
• Records the SAS Infrastructure for Risk Management database updates that are applied.
Run the Hot Fix Post-installation ToolAfter you have installed the tool, you execute it by running the SAS Private JRE and pointing to the class that contains the hot fix.
86 Chapter 10 • Performing Additional Administrative Tasks

To run the hot fix post-installation tool:
1. Using the SAS Installer account, log on to the SAS Infrastructure for Risk Management server.
2. To run the tool, execute the following command on the same command line:
/local/install/SASHome/SASPrivateJavaRuntimeEnvironment/9.4/jre/bin/java -cp path_to_server_jar com.sas.solutions.risk.irm.server.utils.IRMHFHelper -home path_to_SASHome -config path_to_SASConfig -dbpassword password
If you are using Windows and a path that contains spaces, enclose the path in quotation marks. Here is an example:
‑home "C:\Program Files\SASHome"
Note: The path to SASHome and SASConfig and the SAS Infrastructure for Risk Management database password are required arguments. Additional options might be required if the values that are specified in your installation differ from the default installation values in SAS Deployment Wizard. For more information about these options, see “Additional Supported Options”.
Here is an example of how to run the post-installation hot fix tool:
Note: The example contains default paths, and the SAS Infrastructure for Risk Management database password is "secret".
/local/install/SASHome/SASPrivateJavaRuntimeEnvironment/9.4/jre/bin/java -cp /local/install/SASHome/SASVersionedJarRepository/eclipse/plugins/sas.solutions.risk.irm.server_305001.5.0.20181112123700_f0irm35.jar com.sas.solutions.risk.irm.server.utils.IRMHFHelper -home /local/install/SASHome -config /local/install/Config -dbpassword secret
When you run the tool, it validates the values that are specified for the ‑home and ‑config options. If the values are not valid, the tool generates an error message and terminates. The tool verifies that the JAR file that is specified in the class path matches the server JAR file that is installed by the hot fix. If files do not match, the tool terminates, and the error message identifies the location of the server JAR file that should be used.
All error messages that are produced during the execution of the tool are sent to standard error, and all normal messages are sent to standard out. For more information about options and usage, use the -help option.
Here is an example of how to specify the -help option:
/local/install/SASHome/SASPrivateJavaRuntimeEnvironment/9.4/jre/bin/java ‑cp path_to_server_jar com.sas.solutions.risk.irm.server.utils.IRMHFHelper ‑help
Additional Supported OptionsTable 10.1 lists and describes the additional options for the command line for the SAS Infrastructure for Risk Management hot fix post-installation tool.
Note:
• For options that do not take a value, "None" is listed in the Value column.
• For options that do not have a default value, “None” is listed in the Default column.
Run the Hot Fix Post-installation Tool 87

• If a non-default value for an option was used during installation, that option is required. If the default value was used during installation, the option is not required.
• Following the class name (com.sas.solutions.risk.irm.server.utils.IRMHFHelper), options can be specified in any order.
Table 10.1 Additional Supported Options
Option Value Description Default Required?
-config path_to_SASConfig Specifies the absolute path to the SAS configuration folder.
None Yes
-dbhost host Specifies the name of the SAS Infrastructure for Risk Management database host.
localhost No
-dbname name Specifies the name of the SAS Infrastructure for Risk Management database to update.
irmdb No
-dbpassword password Specifies the clear-text password to access the SAS Infrastructure for Risk Management Postgres database.
None Yes
-dbport port Specifies the port of the SAS Infrastructure for Risk Management database.
9432 No
-dbuser userid Specifies the name of the SAS Infrastructure for Risk Management database user ID.
irmadmin No
-encoding name Specifies the name of the encoding used to read the SAS Infrastructure for Risk Management picklist.
This value is not typically required.
JVM default No
-help None Displays information about tool usage and options.
Off No
-home path_to_SASHome Specifies the absolute path to the SAS home folder.
None Yes
-jarfile path_to_pgjar Specifies the path to the Postgres JDBC JAR file (postgresql.jar).
Typically, the tool locates this JAR file automatically. Use this option only if the tool’s attempt to locate the Postgres JDBC JAR file fails.
Path to the Postgres JDBC JAR file
No
-level number Specifies an integer that indicates the configuration level. For example, 1 indicates level 1, 2 indicates level 2, and so on.
1 No
-nosql None Disables SQL updates to the SAS Infrastructure for Risk Management database.
Note: Use this option only on the advice of SAS Technical Support.
SQL updates are enabled
No
88 Chapter 10 • Performing Additional Administrative Tasks

Option Value Description Default Required?
-preview None Provides a preview of the changes that would be applied. Although the SQL tracking table is created, it does not affect the operation of SAS Infrastructure for Risk Management.
Note: If you specify this option, no changes to the system are applied. This option provides a preview of the changes only.
Off No
-verbose None Generates additional messages during execution. This option is typically used for debugging purposes only.
Off No
Run the Hot Fix Post-installation Tool 89

90 Chapter 10 • Performing Additional Administrative Tasks

Chapter 11
Performing Programming Interface Administrative Tasks
About the SAS Infrastructure for Risk Management Programmer’s Interfaces . . 91
Configure the Development Environment . . . . . . . . . . . . . . . . . . . . . . . . . . . . . . . . . 91
Install a Stand-Alone Federated Area without a Server Restart . . . . . . . . . . . . . . . 93Before Installing a Stand-Alone Federated Area . . . . . . . . . . . . . . . . . . . . . . . . . . . 94Installing Stand-Alone Federated Areas . . . . . . . . . . . . . . . . . . . . . . . . . . . . . . . . . . 95Example Installation Scenarios . . . . . . . . . . . . . . . . . . . . . . . . . . . . . . . . . . . . . . . . . 96
Back Up and Restore Job Flow Instances . . . . . . . . . . . . . . . . . . . . . . . . . . . . . . . . . 99Backing Up Job Flow Instances . . . . . . . . . . . . . . . . . . . . . . . . . . . . . . . . . . . . . . . . 99Restoring Job Flow Instances . . . . . . . . . . . . . . . . . . . . . . . . . . . . . . . . . . . . . . . . . 100
About the SAS Infrastructure for Risk Management Programmer’s Interfaces
SAS Infrastructure for Risk Management provides a SAS programming interface (using SAS Studio) and a Python programming interface (using a Python interactive development environment, IDE for short). These interfaces provide the following capabilities:
• task and job flow development
• backup and restore job flow instances
• macros that simplify data partitioning
• data visualization
For information about using these programming interfaces, see SAS Infrastructure for Risk Management: Programmer’s Guide for SAS and SAS Infrastructure for Risk Management: Programmer’s Guide for Python.
Configure the Development EnvironmentTo configure the development environment, complete the following tasks on the SAS Infrastructure for Risk Management mid-tier server:
1. Enable development mode.
91

a. In SAS Management Console, select Plug-ins ð Application Management ð Configuration Manager ð SAS Application Infrastructure.
b. Right-click IRM Mid-Tier Server and select Properties.
c. In the IRM Mid-Tier Server Properties window, select the Advanced tab and add the property and value:
Property Name Property Value
com.sas.solutions.risk.irm.server.devmode true
d. Click OK.
2. Verify that Doxygen is installed and configured on the SAS Infrastructure for Risk Management server.
For information about installing Doxygen on your system, refer to the Doxygen documentation:
http://www.doxygen.nl/
3. Set the value for the Doxygen property in SAS Management Console.
a. Select Plug-ins ð Application Management ð Configuration Manager ð SAS Application Infrastructure.
b. Right-click IRM Mid-Tier Server and select Properties.
c. In the IRM Mid-Tier Server Properties window, select the Advanced tab and add the following property and value:
Property Name Property Value
com.sas.solutions.risk.irm.sc.doxygen.path path-to-the-Doxygen-binary-file
The value for the property varies depending on where Doxygen is installed. Here are two examples:
• Windows:
C:\Program Files\doxygen\bin\doxygen.exe
• Linux:
/usr/bin/doxygen
d. Click OK.
4. Create a programmer’s account for each programmer who will be using the SAS Infrastructure for Risk Management scripting clients to create parallel programs. This is the name of the user in SAS Management Console.
When creating the programmer’s account, consider the following key points:
• The configuration of the programmer’s account enables files and folders that are created to be discovered by stored process servers and SAS workspace servers.
• The user name of the programmer’s account cannot contain any special characters ( \ / : * ? " < > | ). If a user name contains a special character (for example, domain\user), the user’s personal federated area cannot be created when the user logs on to SAS Infrastructure for Risk Management.
92 Chapter 11 • Performing Programming Interface Administrative Tasks

• The programmer’s account must have the same primary operating system group of the user account under which stored process servers and SAS workspace servers run.
Here is an example:
sudo useradd -g primary-OS-group user-ID
where:
• primary-OS-group is the primary operating system group of the user account under which stored process servers and SAS workspace servers run.
• user-ID is the user ID of the programmer’s account.
• A programmer’s account can be a local account. However, it must be able to authenticate to the SAS Metadata Server and the workspace server.
5. In SAS Management Console, select Environment Manager ð User Manager. Right-click the programmer’s user name, and on the Account tab, store the user password to enable the user to perform the following tasks:
• In the SAS Infrastructure for Risk Management web application, open a job flow data set in SAS Studio.
• Execute scripting client macros or other statements that use the SAS WebDAV library engine in SAS Studio.
6. In SAS Management Console, configure the SAS Infrastructure for Risk Management metadata user account for each programmer account in the DefaultAuth authentication domain and as a member of IRM: Access All Entities.
7. Restart the SAS Infrastructure for Risk Management web application server.
For more information about starting SAS Web Application Servers, see SAS Intelligence Platform: Middle-Tier Administration Guide.
If you are configuring a Python development environment, Python 3.6 or later must be installed and configured on the SAS Infrastructure for Risk Management server.
In addition, the Python Pandas and NumPy libraries must be installed.
For information about installing and configuring Python on the server, refer to the Python documentation:
https://www.python.org/
Install a Stand-Alone Federated Area without a Server Restart
This method of installing a federated area applies to stand-alone federated areas that are created in a SAS Infrastructure for Risk Management development environment. This method does not apply to federated areas that are delivered in a SAS Infrastructure for Risk Management solution content package. For information about installing federated areas in SAS Infrastructure for Risk Management solution content releases, see “Add a Solution Federated Area to an Existing Deployment”.
Install a Stand-Alone Federated Area without a Server Restart 93

Before Installing a Stand-Alone Federated AreaBefore installing a stand-alone federated area using the process that is documented in this section, note the following guidelines:
• When you install a new federated area with generic library mapping when a federated area with generic library mapping already exists, ensure that you use an underscore ( _ ) in the LIBREF definition in the new federated area. This prevents library conflicts. For example, instead of defining as LIBREF ABC, use LIBREF_ABC. For more information, see SAS Note 67947. For more information about generic library mapping, see “Generic Library Mapping”.
• To successfully install a new federated area, you must have the correct permissions on the IRM Mid-Tier Server in SAS Management Console. Specifically, you must be a member of the IRM: Install Federated Areas role and with the Allow Install of Federated Area capability.
• From the top folder of the federated area, compress the federated area with any percentage of compression.
Note: SAS recommends that for Windows, you use WinZip or 7-Zip to create compressed files. If you use another option, you might have problems during the installation process. For Linux, use the zip command or an equivalent for creating compressed files.
Here is an example of how the ZIP file should appear after you have compressed it correctly:
• The target location (to where you are copying the federated area) cannot be the same location as the location of the source federated area ZIP file. In addition, the target location must have Write permission.
• You have to copy the new federated area (with Read/Write permissions) to the server on which other federated areas reside.
• You must also provide the required macro parameters.
• When you install a new federated area, the installation process verifies whether the new federated area contains library definitions (in /config/libnames.txt) that conflict with definitions in existing federated areas.
If you receive an error message similar to the following, The zip file "/path‑to‑the‑zip‑file/fa.name.zip conflicts with one or more existing federated areas.”, it means that library definitions exist in the new federated area ZIP file that differ from those definitions defined in previously
94 Chapter 11 • Performing Programming Interface Administrative Tasks

installed federated areas. When this condition occurs, the installation process stops and prints a list of conflicts to the execution log.
Installing Stand-Alone Federated AreasTo install a stand-alone federated area, you use the %irm_fa_install() macro in SAS Studio.
/* Un-authenticated */ %irm_install_fa( meta_host=somehost.na.sas.com , username= , passwd= , fa_src_path= , fa_tgt_path= , fa_id= , fa_tgt_path= , debug= , logOptions= , connection_type=/* Default: INTERNAL */);
where:
meta_host=(Required) name of the server that is running the SAS Metadata Server.
meta_port=(Optional) port on which the SAS Metadata Server is listening. The default is 8561.
meta_repos=(Optional) name of the metadata repository.
username=(Optional in authenticated environments) user name credentials for logging on to SAS Infrastructure for Risk Management.
passwd=(Optional in authenticated environments) password credentials, which can be plain text or encoded (masked during execution).
fa_src_path=(Required) path, including the ZIP file name, of the source location of the federated area ZIP file.
fa_tgt_path=(Required) path to the installation target location for the new federated area. The target location should not be the same location as the source federated area ZIP file location.
fa_id(Optional) user-provided name for the federated ID. If provided, this ID becomes the new federated ID.
force_flg=(Optional) flag that forces or cancels installation if the federated area is determined to be invalid. Specifying true forces the installation of the federated area even if it is invalid. It also forces the use of the fa_id if specified. Specifying false cancels the installation of the federated area if the federated area determined to be invalid. The default is false.
Install a Stand-Alone Federated Area without a Server Restart 95

debug=(Optional) determines the amount of execution information that is collected and logged. Valid values are true and false. The default is false.
logOptions=(Optional) specifies the amount of macro execution information that is logged. It accepts a space-separated list of supported SAS options (for example, logOptions = source mprint mlogic symbolgen).
connection_type=(Required for external connections) type of connection to the SAS Infrastructure for Risk Management server. Valid values are internal (for regular connections) and external (for redirected, reverse proxy type connections). The default is internal.
Example Installation Scenarios
Installing in an Authenticated or Unauthenticated EnvironmentIf you are installing the federated area in an authenticated environment, you can leave the username and passwd parameters blank. When installing in an authenticated environment, the credentials of the logged-on user are used.
Example:
/* Authenticated */ %irm_install_fa( meta_host=somehost.na.sas.com , username= , passwd= , fa_src_path=/local/install/New_FA/fa_new.zip , fa_tgt_path=/local/install/Config/Lev1/AppData/SASIRM/fa_new , fa_id= , force_flg=true , debug=true , logOptions=mprint mlogic symbolgen source , connection_type=/* Default: INTERNAL */ );
In an unauthenticated environment, you must provide values for the username and passwd parameters that match those that are stored in metadata.
In addition, you must make sure that the macro location is included in the SASAUTOS path. Here are two examples:
In Linux:
OPTIONS SASAUTOS=('/home/local/install/SASHome/SASFoundation/9.4/ucmacros/rmifirmmva' SASAUTOS);
In Windows:
OPTIONS SASAUTOS=("C:\Program Files\SASHome\SASFoundation\9.4\rmifirmmva\ucmacros" SASAUTOS);
Example:
/* Un-authenticated */ %irm_install_fa( meta_host=somehost.na.sas.com , username=sasdemo
96 Chapter 11 • Performing Programming Interface Administrative Tasks

, passwd=XXXXXXXXXXXXXX , fa_src_path=/local/install/New_FA/fa_new.zip , fa_tgt_path=/local/install/Config/Lev1/AppData/SASIRM/fa_new , fa_id= , force_flg=true , debug=true , logOptions=mprint mlogic symbolgen source , connection_type=/* Default: INTERNAL */);
Installing with a Value Specified for the fa_id ParameterWhen you install a federated area with a value that is specified for the fa_id parameter, the value is registered as the new federated ID only if it is unique in the system and the force_flg parameter is set to true. If these conditions are not met, you receive a response from the server that indicates that there is a duplication issue and the new federated area is not installed.
The value that you specify for the fa_id parameter must comply with the standard SAS Infrastructure for Risk Management federated ID naming rules:
• The identifier for a federated area can contain numeric characters, alphabetic characters, and periods only.
• Identifiers that start with the number zero (0) are reserved for functionality content that is delivered by the SAS Infrastructure for Risk Management platform federated area. Also, an identifier cannot start with the letter, z. Therefore, do not use identifiers that start with 0 or the letter z.
Example:
/* Specify fa_id */ %irm_install_fa( meta_host=somehost.na.sas.com , username= , passwd= , fa_src_path=/local/install/New_FA/fa_new.zip , fa_tgt_path=/local/install/Config/Lev1/AppData/SASIRM/fa_new , fa_id=machine.learning /* must be unique */ , force_flg=true , debug=true , logOptions=mprint mlogic symbolgen source , connection_type=/* Default: INTERNAL */);
When successfully executed, the content of the federated area ZIP file (fa_new.zip) is copied to the target location and the value that you specified for the fa_id parameter is added to metadata.
Note: The newly installed federated area might not be the highest among the other federated areas that are already installed on the server.
Install a Stand-Alone Federated Area without a Server Restart 97
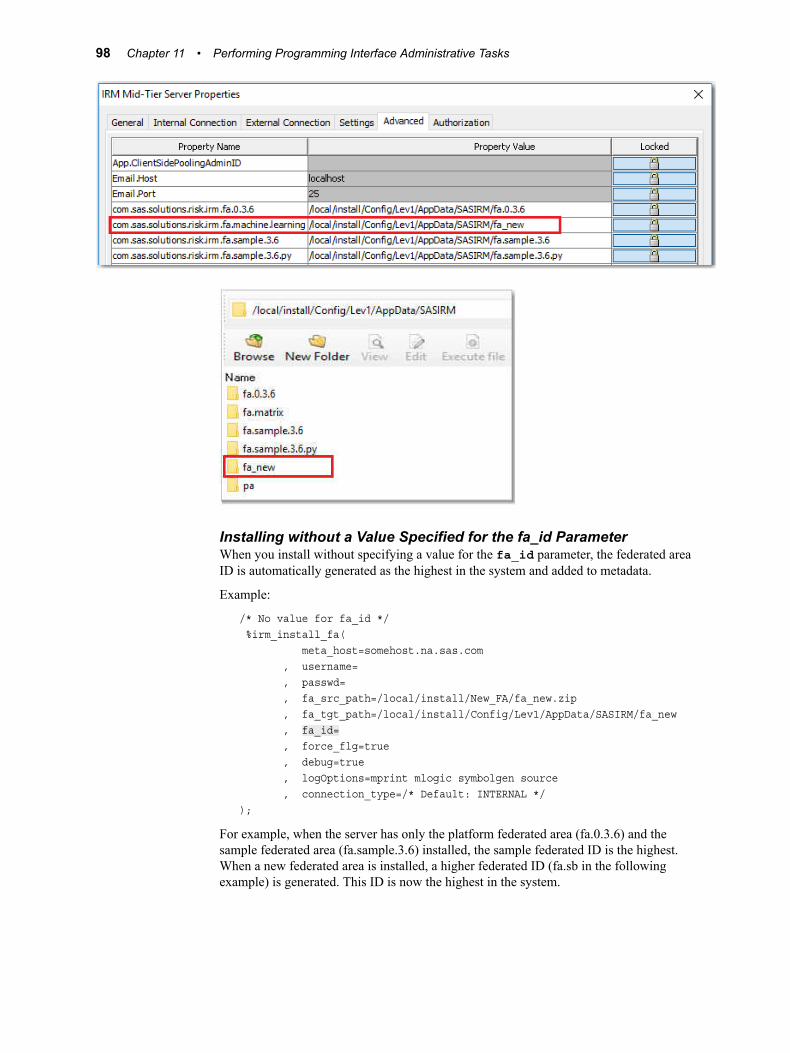
Installing without a Value Specified for the fa_id ParameterWhen you install without specifying a value for the fa_id parameter, the federated area ID is automatically generated as the highest in the system and added to metadata.
Example:
/* No value for fa_id */ %irm_install_fa( meta_host=somehost.na.sas.com , username= , passwd= , fa_src_path=/local/install/New_FA/fa_new.zip , fa_tgt_path=/local/install/Config/Lev1/AppData/SASIRM/fa_new , fa_id= , force_flg=true , debug=true , logOptions=mprint mlogic symbolgen source , connection_type=/* Default: INTERNAL */);
For example, when the server has only the platform federated area (fa.0.3.6) and the sample federated area (fa.sample.3.6) installed, the sample federated ID is the highest. When a new federated area is installed, a higher federated ID (fa.sb in the following example) is generated. This ID is now the highest in the system.
98 Chapter 11 • Performing Programming Interface Administrative Tasks

Installing with the force_flg Parameter SetThe values for the force_flg parameter are true and false. If you do not specify a value for the parameter when you execute the %irm_fa_install() macro, false is the default.
If you set force_flg=true, the following actions occur:
• The new federated area is installed even if the federated area is determined to be invalid (the checksums differ).
• If you specified a value for the fa_id parameter, it is used as the federated area ID for the newly installed federated area.
If you set force_flg=false, the following actions occur:
• The new federated area is not installed if is determined to be invalid.
• If you specified a value for the fa_id parameter, it is not used. The next higher federated area ID is generated and used for the newly installed federated area.
Back Up and Restore Job Flow InstancesSAS Infrastructure for Risk Management provides two scripts that a user can use to back up all information specific to job flow instances in a Microsoft Excel file. After backing up a user’s instances, the file is used to restore the instances on a different machine or a different version of SAS Infrastructure for Risk Management. These scripts are executed in SAS Studio (connected to a SAS Infrastructure for Risk Management server). The information in this section assumes that users have logged on to SAS Infrastructure for Risk Management and created job flow instances.
Backing Up Job Flow InstancesBefore you back up job flow instances, ensure that the users who created the instances that you are backing up have passwords that have been configured for their user accounts.
To verify that SAS Infrastructure for Risk Management users have passwords that have been configured for their accounts:
1. In SAS Management Console, select User Manager from the Plug-ins tab.
2. Right-click the user name and select Properties ð Accounts.
Back Up and Restore Job Flow Instances 99

3. In the logins defined for the user list, select the user row and click Edit. The Edit Login Properties window is displayed.
4. If necessary, enter a password in the Password field and the same password in the Confirm Password field, and click OK.
5. Exit SAS Management Console.
To back up instances created by a specific user:
1. Log on to SAS Studio as the user who created or modified the job flow instances that you are backing up.
2. Press F4 to open a new SAS program in the work area.
3. In the work area, click the Code tab, enter the following:
%irm_bkup_instances(debug={TRUE | FALSE}, logOptions= , bkup_file_path=path-to-where-to-create-the-backup-file
where:
• debug — Enables or disables debug logging. The default is False.
• logOptions — Specifies standard SAS logging options such as mprint, mlogic, symbolgen, and so on. The default is blank.
• bkup_file_path — Specifies the path to a writable location where the backup file is created.
4. Click .
After executing the script, the following should occur:
• A tabular display of instances created by or shared with the logged in user should appear in the Results tab
• A ZIP file named bkup_inst_YYYYMMDD_HH-MI-SS.zip is located in the navigation pane under Files (Home). To view the contents of the file, double-click the name of the file. Inside the ZIP file is an .xlsx file named existing_instances_username.xlsx, where username is the name of the user whose job flow instances you backed up. This file contains the tabular listings that are displayed under the Results tab.
Note: The ZIP file is saved at the location that you specified for the bkup_file_path parameter. You will use this ZIP file to restore the job flow instances.
• If a job flow instance had uploaded input data, the uploaded data sets are located in instance-specific folders. The name of the folder is the instance key. The name of the folder that contains the data sets corresponds to the libref of the data sets in the job flow instance.
Note: To view any errors or warnings that occurred during the execution of the backup script, click the Log tab.
Restoring Job Flow InstancesAfter you have backed up job flow instances, you can restore the instances on a different machine or different version of SAS Infrastructure for Risk Management.
1. Copy the ZIP file of the backed up instances to the target machine.
100 Chapter 11 • Performing Programming Interface Administrative Tasks

2. If desired, you can unzip the file and edit the existing_instances_username.xlsx file. You can change the names of instances or delete the row of an instance if you do not want to re-create it on the target machine. If you make edits, ensure that you save the file. It is not necessary to re zip the file after making edits.
3. Log on to the SAS Infrastructure for Risk Management web application as the same user that executed the backup instances process.
4. Ensure the following:
• That there are no instances with the same name as an instance in the .xlsx file of backed up instances.
• That the user on the target machine has the same roles (such as access entities, publishing entities, and so on) as they had on the source machine.
• That the user has Write permissions to where the ZIP file or unzipped directory is copied over.
5. Log on to SAS Studio as the same user who executed the backup instances process.
6. Press F4 to open a new SAS program in the work area.
7. In the work area, click the Code tab, enter the following:
%irm_restore_instances(bkup_dir=absolute-path, debug={TRUE | FALSE}, logOptions= , pollInterval=number-of-seconds, maxWait=max-seconds
where:
• backup_dir — Specifies the absolute path to the backed up instances, including the ZIP file or directory name if the file is unzipped.
• debug — (Optional) Enables or disables debug logging. The default is FALSE.
• logOptions — (Optional) Specifies standard SAS logging options such as mprint, mlogic, symbolgen, and so on. The default is blank.
• pollInterval — (Optional) Number of seconds between checks of instance creation. The default is 10.
• maxWait — (Optional) Maximum number of seconds to wait for an instance creation to complete. The default is 3600.
8. Click .
After executing the script, the following should occur:
• A tabular display of instances created in the restore session should be displayed in the Results tab
• A ZIP file named restore_inst_YYYYMMDD_HH_MI_SS is located in the navigation pane under Files (Home). You can view the contents of this file in SAS Studio or by navigating to the physical location of the file on the target machine. Inside the ZIP file should be an .xlsx file named latest_instances_username.xlsx, where username is the name of the user whose job flow instances you restored. This file contains the tabular listings that are displayed under the Results tab.
• Instances with status of 4 (success) or of 6 (published) are created. Other instances, if any, in the existing_instances_username.xlsx are ignored.
• Instances with the same name that exist on the target machine are not created again. If the debug parameter in the macro invocation is set to TRUE, a list of these duplicated instances is printed to the log. To view this list, click the Log tab. To enable the process that restores instances to create duplicate instances, you must
Back Up and Restore Job Flow Instances 101

delete the instances on the target machine or edit the names of the instances in the source .xlsx file.
102 Chapter 11 • Performing Programming Interface Administrative Tasks

Chapter 12
Troubleshooting
Gather Information . . . . . . . . . . . . . . . . . . . . . . . . . . . . . . . . . . . . . . . . . . . . . . . . . . 103Overview . . . . . . . . . . . . . . . . . . . . . . . . . . . . . . . . . . . . . . . . . . . . . . . . . . . . . . . . . 103Information about Your Environment and Configuration . . . . . . . . . . . . . . . . . . . 104Problem Description . . . . . . . . . . . . . . . . . . . . . . . . . . . . . . . . . . . . . . . . . . . . . . . . 104Sample Test Data . . . . . . . . . . . . . . . . . . . . . . . . . . . . . . . . . . . . . . . . . . . . . . . . . . 105
Enable Detailed Logging . . . . . . . . . . . . . . . . . . . . . . . . . . . . . . . . . . . . . . . . . . . . . . 105
Fix Your Web Application Log File Display . . . . . . . . . . . . . . . . . . . . . . . . . . . . . . . 106
Log and Configuration File Locations . . . . . . . . . . . . . . . . . . . . . . . . . . . . . . . . . . . 106
Gather Information
OverviewWhen troubleshooting, try to isolate and describe the problem and the context in which it occurs.
T I P Specific error messages and warnings from SAS logs can help resolve a problem. Start at the top of SAS logs and search for the first error message. An initial error can cause many subsequent errors. Resolving the first error might eliminate subsequent errors.
Awareness of the following general classes of information can help expedite troubleshooting:
• operating system and configuration information
• a detailed description of the problem that includes the error messages and the action that was performed when the problem was encountered
• log files
• other files or screen shots
• sample test data
Before contacting SAS Technical Support, it is recommended that you review the SAS Knowledge Base for installation, problem, and usage notes. For more information, see the support website at http://support.sas.com/resources.
103

Also, it is recommended that you check for any hot fixes that might be available. For a list of hot fixes, see the SAS Hot Fix Downloads website.
You can use the SAS Hot Fix Analysis, Download and Deployment Tool to help automate deployment of hot fixes. This tool analyzes the SAS deployment registry and creates a customized report that lists hot fixes available for the installed SAS products. In addition, it generates scripts that automate the deployment of the hot fixes.
You can contact SAS Technical Support at http://support.sas.com/techsup.
Information about Your Environment and ConfigurationIf you request help from SAS Technical Support, be prepared with the following information:
• The site number for your organization.
• The name of your company.
• The SAS SAS Infrastructure for Risk Management release number.
• The SAS release number (including the maintenance level or the patch level number).
• The list of installed SAS software releases and the hot fixes that are based on your SAS Deployment Registry. For information about how to obtain this list, see http://support.sas.com/kb/35/968.html.
• The number of tiers that are used in your SAS installation and the version of the operating system that is used for each tier.
• The hardware platform, the operating environment, the amount of physical memory, and the number of processors.
• The server language and locale settings.
• A list of any nonstandard customizations that you have incorporated in the installation.
• The version of the SAS Infrastructure for Risk Management solution’s content. For information about where to find the content version number, see the content help.
Problem DescriptionProvide a complete description of the problem. Include a description of the general task being performed, your role and permissions, and what occurred during the SAS session. Provide details such as the following:
• Are you working with new data or updating existing data?
• How is the problem reproduced?
• What browser and release are you using?
• Is the problem locale-specific? If so, which locales are having problems?
• When did the problem first occur?
• Were any changes made that might have caused the problem? In particular, were any permissions changed on directories? Such changes can have unforeseen consequences.
104 Chapter 12 • Troubleshooting

Sample Test DataIf possible, capture the information entered that caused the problem. In certain situations, SAS Technical Support might request your data load files so that they can replicate your operating environment.
Enable Detailed LoggingSAS Infrastructure for Risk Management uses log4j to perform logging. When SAS Infrastructure for Risk Management begins running, the log4j configuration files for SAS Infrastructure for Risk Management are read from one of the following locations:
• Linux: SAS-configuration-directory/Levn/Web/Common/LogConfig/
• Windows: SAS-configuration-directory\Levn\Web\Common\LogConfig\
The configuration file names are SASIRM-log4j.xml and SASIRMServer-log4j.xml.
SAS Infrastructure for Risk Management writes information to the following log files, which are located in SAS-configuration-directory/Levn/Web/Logs/SASServer8_1/ by default:
• SASIRM.log — contains messages from the SAS Infrastructure for Risk Management client.
• SASIRMServer.log — contains messages from the SAS Infrastructure for Risk Management server.
To debug a problem, you can change the log level to DEBUG.
SAS Infrastructure for Risk Management should run under this logging level only for capturing additional log information. Do not use this logging level for daily operations of SAS Infrastructure for Risk Management.
CAUTION:Excessive logging can degrade performance. Therefore, use the DEBUG level only when directed by SAS Technical Support.
For detailed information about logging, see SAS Intelligence Platform: Middle-Tier Administration Guide.
For information about the log4j configuration file, see http://logging.apache.org/log4j/index.html and http://logging.apache.org/log4j/1.2/manual.html.
To enable DEBUG logging for SAS Infrastructure for Risk Management:
1. Navigate to the SASIRMServer-log4j.xml configuration file that is located in one of the following directories:
• Linux: SAS-configuration-directory/Web/Common/LogConfig/
• Windows: SAS-configuration-directory\Web\Common\LogConfig\
Note: For most troubleshooting purposes, enable DEBUG logging in the SASIRMServer-log4j.xml configuration file.
2. Locate the following code:
<logger name="com.sas.solutions.risk.irm" additivity="false"> <level value="INFO"/><appender-ref ref="SAS_FILE"/>
Enable Detailed Logging 105

<appender-ref ref="SAS_CONSOLE"/></logger>
3. Replace “INFO” with “DEBUG” and save the file.
<logger name="com.sas.solutions.risk.irm" additivity="false"> <level value="DEBUG"/><appender-ref ref="SAS_FILE"/> <appender-ref ref="SAS_CONSOLE"/> </logger>
4. Restart the SAS Infrastructure for Risk Management web application server.
Fix Your Web Application Log File DisplayIn some environments (for example, Simplified Chinese), SAS Infrastructure for Risk Management web application log files that are viewed in a web browser contain unreadable content. Log files are unreadable because SAS Infrastructure for Risk Management web application log files are not created with UTF-8 character encoding, but they are displayed on the web browser in UTF-8 character encoding.
To fix the display of an unreadable log file in a Windows environment:
1. Stop the SAS Infrastructure for Risk Management web application server.
2. Navigate to the \SAS-configuration-directory\config\Levn\Web\WebAppServer\SASServer8_1\conf directory.
3. In the wrapper.conf file, add the following statement:
wrapper.java.additional.n=-Dfile.encoding=UTF-8
where n. is the next available digit in the series of additional Java parameters.
4. Restart the SAS Infrastructure for Risk Management web application server.
To fix an unreadable log file display in a Linux environment:
1. Stop the SAS Infrastructure for Risk Management web application server.
2. Navigate to the /SAS-configuration-directory/config/Levn/Web/WebAppServer\SASServer8_1\bin\ directory.
3. Use the setenv.sh to set the Java environment to the UTF-8 encoding as follows:
JVM_OPTS="Dfile.encoding=UTF-8"
4. Restart the SAS Infrastructure for Risk Management web application server.
Log and Configuration File LocationsThe following table lists the log files that might contain relevant logging information.
106 Chapter 12 • Troubleshooting

Table 12.1 Log Files
File Default Location
SAS Deployment Wizard Summary
/SAS-configuration-directory/Documents/DeploymentSummary.html
Configuration logs /SAS-configuration-directory/Logs/Configure
SAS Infrastructure for Risk Management web application logs
/SAS-configuration-directory/Web/Logs
Note: By default, the log files for the SAS Infrastructure for Risk Management application do not appear at this location unless they are configured in SAS Management Console.
SAS Infrastructure for Risk Management Log4J application log
SAS Infrastructure for Risk Management uses the open-source Java library Log4j for application logging. The logging behavior is configured in the SASIRM-log4j.xml file and in the SASIRMServer-log4j.xml file (located in /SAS-configuration-directory/Web/Common/LogConfig/) for the SAS Infrastructure for Risk Management middle tier. Most of the details in these files, especially the various logging levels, should not be modified. However, you can customize some information by modifying these files. Here are examples of information that you can modify:
• the location of the log file
• file storage properties
• use of rolling logs
• the number of log files
• the maximum size of log files
Object spawner log /SAS-configuration-directory/ObjectSpawner/Logs
SAS Workspace Server logs
/SAS-configuration-directory/SASApp/WorkspaceServer/Logs
SAS Metadata Server log /SAS-configuration-directory/SASMeta/MetadataServer/Logs
Note: Note that the paths in the preceding table are different if you choose to set up common directories.
Log and Configuration File Locations 107

108 Chapter 12 • Troubleshooting