Embed Size (px)
DESCRIPTION
SAP HANA Developer guide (English)
Citation preview

PUBLIC
SAP HANA Appliance Software SPS 05Document Version: 1.2 - 2013-03-01
SAP HANA Developer Guide

Table of Contents
1 Document History . . . . . . . . . . . . . . . . . . . . . . . . . . . . . . . . . . . . . . . . . . . . . . . . . . . . . . . . . . . . . 9
2 Overview. . . . . . . . . . . . . . . . . . . . . . . . . . . . . . . . . . . . . . . . . . . . . . . . . . . . . . . . . . . . . . . . . . . . 11
3 SAP HANA Architecture. . . . . . . . . . . . . . . . . . . . . . . . . . . . . . . . . . . . . . . . . . . . . . . . . . . . . . . . .123.1 SAP HANA In-Memory Database. . . . . . . . . . . . . . . . . . . . . . . . . . . . . . . . . . . . . . . . . . . . . . . . . . . . 12
3.1.1 Columnar Data Storage. . . . . . . . . . . . . . . . . . . . . . . . . . . . . . . . . . . . . . . . . . . . . . . . . . . 123.1.2 Parallel Processing. . . . . . . . . . . . . . . . . . . . . . . . . . . . . . . . . . . . . . . . . . . . . . . . . . . . . . .133.1.3 Simplifying Applications. . . . . . . . . . . . . . . . . . . . . . . . . . . . . . . . . . . . . . . . . . . . . . . . . . . 13
3.2 SAP HANA Database Architecture. . . . . . . . . . . . . . . . . . . . . . . . . . . . . . . . . . . . . . . . . . . . . . . . . . . 143.3 SAP HANA Extended Application Services. . . . . . . . . . . . . . . . . . . . . . . . . . . . . . . . . . . . . . . . . . . . . 153.4 Refactoring SAP HANA-Based Applications. . . . . . . . . . . . . . . . . . . . . . . . . . . . . . . . . . . . . . . . . . . . 18
4 SAP HANA Development Platform. . . . . . . . . . . . . . . . . . . . . . . . . . . . . . . . . . . . . . . . . . . . . . . . . 194.1 Developer Scenarios. . . . . . . . . . . . . . . . . . . . . . . . . . . . . . . . . . . . . . . . . . . . . . . . . . . . . . . . . . . . 19
4.1.1 Scenario: Developing Native SAP HANA Applications. . . . . . . . . . . . . . . . . . . . . . . . . . . . . . 204.1.2 Scenario: Using Database Client Interfaces. . . . . . . . . . . . . . . . . . . . . . . . . . . . . . . . . . . . . 21
4.2 Development Objects. . . . . . . . . . . . . . . . . . . . . . . . . . . . . . . . . . . . . . . . . . . . . . . . . . . . . . . . . . . .224.3 Repository. . . . . . . . . . . . . . . . . . . . . . . . . . . . . . . . . . . . . . . . . . . . . . . . . . . . . . . . . . . . . . . . . . . 244.4 SAP HANA Studio. . . . . . . . . . . . . . . . . . . . . . . . . . . . . . . . . . . . . . . . . . . . . . . . . . . . . . . . . . . . . . 25
4.4.1 Modeler Perspective. . . . . . . . . . . . . . . . . . . . . . . . . . . . . . . . . . . . . . . . . . . . . . . . . . . . . 264.4.2 SAP HANA Development Perspective. . . . . . . . . . . . . . . . . . . . . . . . . . . . . . . . . . . . . . . . . 274.4.3 Debug Perspective. . . . . . . . . . . . . . . . . . . . . . . . . . . . . . . . . . . . . . . . . . . . . . . . . . . . . . 324.4.4 Administration Console Perspective. . . . . . . . . . . . . . . . . . . . . . . . . . . . . . . . . . . . . . . . . . 33
4.5 Getting Started. . . . . . . . . . . . . . . . . . . . . . . . . . . . . . . . . . . . . . . . . . . . . . . . . . . . . . . . . . . . . . . . 344.5.1 Adding a System. . . . . . . . . . . . . . . . . . . . . . . . . . . . . . . . . . . . . . . . . . . . . . . . . . . . . . . . 34
5 Setting Up Your Application. . . . . . . . . . . . . . . . . . . . . . . . . . . . . . . . . . . . . . . . . . . . . . . . . . . . . 355.1 Before you Start. . . . . . . . . . . . . . . . . . . . . . . . . . . . . . . . . . . . . . . . . . . . . . . . . . . . . . . . . . . . . . . 365.2 Setting up Delivery Units. . . . . . . . . . . . . . . . . . . . . . . . . . . . . . . . . . . . . . . . . . . . . . . . . . . . . . . . . 37
5.2.1 Maintaining the Delivery-Unit Vendor ID. . . . . . . . . . . . . . . . . . . . . . . . . . . . . . . . . . . . . . . .375.2.2 SAP HANA Delivery Unit Naming Conventions. . . . . . . . . . . . . . . . . . . . . . . . . . . . . . . . . . . 385.2.3 Creating a Delivery Unit. . . . . . . . . . . . . . . . . . . . . . . . . . . . . . . . . . . . . . . . . . . . . . . . . . . 38
5.3 Using SAP HANA Projects. . . . . . . . . . . . . . . . . . . . . . . . . . . . . . . . . . . . . . . . . . . . . . . . . . . . . . . . 395.3.1 SAP HANA Repository: Workspaces. . . . . . . . . . . . . . . . . . . . . . . . . . . . . . . . . . . . . . . . . . 405.3.2 Creating a Repository Workspace. . . . . . . . . . . . . . . . . . . . . . . . . . . . . . . . . . . . . . . . . . . . 415.3.3 SAP HANA Studio Projects. . . . . . . . . . . . . . . . . . . . . . . . . . . . . . . . . . . . . . . . . . . . . . . . . 415.3.4 Creating a Project for SAP HANA XS. . . . . . . . . . . . . . . . . . . . . . . . . . . . . . . . . . . . . . . . . . 42
2
P U B L I C© 2013 SAP AG or an SAP affiliate company. All rights reserved.
SAP HANA Developer GuideTable of Contents

5.3.5 Sharing a Project for SAP HANA XS. . . . . . . . . . . . . . . . . . . . . . . . . . . . . . . . . . . . . . . . . . .435.3.6 Importing a Project in SAP HANA XS. . . . . . . . . . . . . . . . . . . . . . . . . . . . . . . . . . . . . . . . . . 44
5.4 Maintaining Repository Packages. . . . . . . . . . . . . . . . . . . . . . . . . . . . . . . . . . . . . . . . . . . . . . . . . . . 455.4.1 SAP HANA Repository Packages and Namespaces. . . . . . . . . . . . . . . . . . . . . . . . . . . . . . . .465.4.2 Defining Repository Package Privileges. . . . . . . . . . . . . . . . . . . . . . . . . . . . . . . . . . . . . . . . 485.4.3 Creating a Package. . . . . . . . . . . . . . . . . . . . . . . . . . . . . . . . . . . . . . . . . . . . . . . . . . . . . . 485.4.4 Defining a Package Hierarchy. . . . . . . . . . . . . . . . . . . . . . . . . . . . . . . . . . . . . . . . . . . . . . . 49
5.5 Creating the Application Descriptors. . . . . . . . . . . . . . . . . . . . . . . . . . . . . . . . . . . . . . . . . . . . . . . . . 515.5.1 The SAP HANA XS Application Descriptor. . . . . . . . . . . . . . . . . . . . . . . . . . . . . . . . . . . . . . 525.5.2 Create an Application Descriptor File. . . . . . . . . . . . . . . . . . . . . . . . . . . . . . . . . . . . . . . . . .525.5.3 The Application-Access File. . . . . . . . . . . . . . . . . . . . . . . . . . . . . . . . . . . . . . . . . . . . . . . . 535.5.4 Application-Access File Keyword Options. . . . . . . . . . . . . . . . . . . . . . . . . . . . . . . . . . . . . . 565.5.5 Application-Access URL Rewrite Rules. . . . . . . . . . . . . . . . . . . . . . . . . . . . . . . . . . . . . . . . 605.5.6 Enabling Access to SAP HANA XS Application Packages. . . . . . . . . . . . . . . . . . . . . . . . . . . . 615.5.7 The Application-Privileges File. . . . . . . . . . . . . . . . . . . . . . . . . . . . . . . . . . . . . . . . . . . . . . 645.5.8 Create an SAP HANA XS Application Privileges File. . . . . . . . . . . . . . . . . . . . . . . . . . . . . . . .65
5.6 Tutorial: My First SAP HANA Application. . . . . . . . . . . . . . . . . . . . . . . . . . . . . . . . . . . . . . . . . . . . . . 675.6.1 Open the Development Perspective. . . . . . . . . . . . . . . . . . . . . . . . . . . . . . . . . . . . . . . . . . 685.6.2 Add a System. . . . . . . . . . . . . . . . . . . . . . . . . . . . . . . . . . . . . . . . . . . . . . . . . . . . . . . . . . 695.6.3 Add a Workspace. . . . . . . . . . . . . . . . . . . . . . . . . . . . . . . . . . . . . . . . . . . . . . . . . . . . . . . .725.6.4 Add a Project. . . . . . . . . . . . . . . . . . . . . . . . . . . . . . . . . . . . . . . . . . . . . . . . . . . . . . . . . . 735.6.5 Share Your Project. . . . . . . . . . . . . . . . . . . . . . . . . . . . . . . . . . . . . . . . . . . . . . . . . . . . . . .745.6.6 Write Server-Side JavaScript. . . . . . . . . . . . . . . . . . . . . . . . . . . . . . . . . . . . . . . . . . . . . . . 765.6.7 Retrieve Data. . . . . . . . . . . . . . . . . . . . . . . . . . . . . . . . . . . . . . . . . . . . . . . . . . . . . . . . . . 78
6 Setting Up the Persistence Model. . . . . . . . . . . . . . . . . . . . . . . . . . . . . . . . . . . . . . . . . . . . . . . . . 796.1 Schema. . . . . . . . . . . . . . . . . . . . . . . . . . . . . . . . . . . . . . . . . . . . . . . . . . . . . . . . . . . . . . . . . . . . . 806.2 Creating Schemas. . . . . . . . . . . . . . . . . . . . . . . . . . . . . . . . . . . . . . . . . . . . . . . . . . . . . . . . . . . . . . 816.3 Tables. . . . . . . . . . . . . . . . . . . . . . . . . . . . . . . . . . . . . . . . . . . . . . . . . . . . . . . . . . . . . . . . . . . . . . 826.4 Table Configuration Schema. . . . . . . . . . . . . . . . . . . . . . . . . . . . . . . . . . . . . . . . . . . . . . . . . . . . . . 836.5 Creating Tables. . . . . . . . . . . . . . . . . . . . . . . . . . . . . . . . . . . . . . . . . . . . . . . . . . . . . . . . . . . . . . . . 886.6 Sequences. . . . . . . . . . . . . . . . . . . . . . . . . . . . . . . . . . . . . . . . . . . . . . . . . . . . . . . . . . . . . . . . . . . 896.7 Creating Sequences. . . . . . . . . . . . . . . . . . . . . . . . . . . . . . . . . . . . . . . . . . . . . . . . . . . . . . . . . . . . . 916.8 SQL Views. . . . . . . . . . . . . . . . . . . . . . . . . . . . . . . . . . . . . . . . . . . . . . . . . . . . . . . . . . . . . . . . . . . 926.9 Creating SQL Views. . . . . . . . . . . . . . . . . . . . . . . . . . . . . . . . . . . . . . . . . . . . . . . . . . . . . . . . . . . . . 936.10 Data Provisioning Using Table Import. . . . . . . . . . . . . . . . . . . . . . . . . . . . . . . . . . . . . . . . . . . . . . . . 94
6.10.1 Table-Import Model. . . . . . . . . . . . . . . . . . . . . . . . . . . . . . . . . . . . . . . . . . . . . . . . . . . . . . 946.10.2 Table-Import Data. . . . . . . . . . . . . . . . . . . . . . . . . . . . . . . . . . . . . . . . . . . . . . . . . . . . . . . 956.10.3 Table-Import Extensions. . . . . . . . . . . . . . . . . . . . . . . . . . . . . . . . . . . . . . . . . . . . . . . . . . 956.10.4 Table-Import Configuration-File Syntax. . . . . . . . . . . . . . . . . . . . . . . . . . . . . . . . . . . . . . . . 96
6.11 Importing Data Using Table Import. . . . . . . . . . . . . . . . . . . . . . . . . . . . . . . . . . . . . . . . . . . . . . . . . . 976.12 Using Imported Table Data in SAP HANA. . . . . . . . . . . . . . . . . . . . . . . . . . . . . . . . . . . . . . . . . . . . . . 99
SAP HANA Developer GuideTable of Contents
P U B L I C© 2013 SAP AG or an SAP affiliate company. All
rights reserved. 3

6.13 Using Imported Table Data in an SAP HANA XS Application. . . . . . . . . . . . . . . . . . . . . . . . . . . . . . . . .996.14 Extending a Table Import. . . . . . . . . . . . . . . . . . . . . . . . . . . . . . . . . . . . . . . . . . . . . . . . . . . . . . . . 101
7 Setting Up the Analytic Model. . . . . . . . . . . . . . . . . . . . . . . . . . . . . . . . . . . . . . . . . . . . . . . . . . . 1037.1 Setting Up the Modeling Environment. . . . . . . . . . . . . . . . . . . . . . . . . . . . . . . . . . . . . . . . . . . . . . . 105
7.1.1 Setting Modeler Preferences. . . . . . . . . . . . . . . . . . . . . . . . . . . . . . . . . . . . . . . . . . . . . . .1057.1.2 Configuring the Import Server. . . . . . . . . . . . . . . . . . . . . . . . . . . . . . . . . . . . . . . . . . . . . .1067.1.3 Importing Table Definitions. . . . . . . . . . . . . . . . . . . . . . . . . . . . . . . . . . . . . . . . . . . . . . . . 1077.1.4 Loading Data into Tables. . . . . . . . . . . . . . . . . . . . . . . . . . . . . . . . . . . . . . . . . . . . . . . . . 1097.1.5 Copying Content Delivered by SAP. . . . . . . . . . . . . . . . . . . . . . . . . . . . . . . . . . . . . . . . . . . 1117.1.6 Mapping the Authoring Schema to the Physical Schema. . . . . . . . . . . . . . . . . . . . . . . . . . . 1127.1.7 Generating Time Data. . . . . . . . . . . . . . . . . . . . . . . . . . . . . . . . . . . . . . . . . . . . . . . . . . . . 113
7.2 Creating Views. . . . . . . . . . . . . . . . . . . . . . . . . . . . . . . . . . . . . . . . . . . . . . . . . . . . . . . . . . . . . . . . 1147.2.1 Attributes and Measures. . . . . . . . . . . . . . . . . . . . . . . . . . . . . . . . . . . . . . . . . . . . . . . . . . 1147.2.2 Attribute Views. . . . . . . . . . . . . . . . . . . . . . . . . . . . . . . . . . . . . . . . . . . . . . . . . . . . . . . . .1157.2.3 Creating Attribute Views. . . . . . . . . . . . . . . . . . . . . . . . . . . . . . . . . . . . . . . . . . . . . . . . . . 1167.2.4 Analytic Views. . . . . . . . . . . . . . . . . . . . . . . . . . . . . . . . . . . . . . . . . . . . . . . . . . . . . . . . . 1207.2.5 Creating Analytic Views. . . . . . . . . . . . . . . . . . . . . . . . . . . . . . . . . . . . . . . . . . . . . . . . . . .1217.2.6 Calculation Views. . . . . . . . . . . . . . . . . . . . . . . . . . . . . . . . . . . . . . . . . . . . . . . . . . . . . . . 1287.2.7 Creating Calculation Views . . . . . . . . . . . . . . . . . . . . . . . . . . . . . . . . . . . . . . . . . . . . . . . . 1297.2.8 Assigning Variables. . . . . . . . . . . . . . . . . . . . . . . . . . . . . . . . . . . . . . . . . . . . . . . . . . . . . 1367.2.9 Creating Input Parameters. . . . . . . . . . . . . . . . . . . . . . . . . . . . . . . . . . . . . . . . . . . . . . . . 1387.2.10 Creating Hierarchies. . . . . . . . . . . . . . . . . . . . . . . . . . . . . . . . . . . . . . . . . . . . . . . . . . . . 1407.2.11 Using Currency and Unit of Measure. . . . . . . . . . . . . . . . . . . . . . . . . . . . . . . . . . . . . . . . . 1427.2.12 Activating Objects. . . . . . . . . . . . . . . . . . . . . . . . . . . . . . . . . . . . . . . . . . . . . . . . . . . . . . 144
7.3 Creating Decision Tables. . . . . . . . . . . . . . . . . . . . . . . . . . . . . . . . . . . . . . . . . . . . . . . . . . . . . . . . 1467.3.1 Changing the Layout of a Decision Table. . . . . . . . . . . . . . . . . . . . . . . . . . . . . . . . . . . . . . . 1517.3.2 Using Parameters in a Decision Table. . . . . . . . . . . . . . . . . . . . . . . . . . . . . . . . . . . . . . . . .152
7.4 Managing Object Versions. . . . . . . . . . . . . . . . . . . . . . . . . . . . . . . . . . . . . . . . . . . . . . . . . . . . . . . .1537.4.1 Switching Ownership of Inactive Objects. . . . . . . . . . . . . . . . . . . . . . . . . . . . . . . . . . . . . . 1537.4.2 Toggling Versions of Content Objects. . . . . . . . . . . . . . . . . . . . . . . . . . . . . . . . . . . . . . . . .1547.4.3 Viewing Version History of Content Objects. . . . . . . . . . . . . . . . . . . . . . . . . . . . . . . . . . . . 154
7.5 Working with Objects. . . . . . . . . . . . . . . . . . . . . . . . . . . . . . . . . . . . . . . . . . . . . . . . . . . . . . . . . . . 1547.5.1 Managing Layout. . . . . . . . . . . . . . . . . . . . . . . . . . . . . . . . . . . . . . . . . . . . . . . . . . . . . . . 1547.5.2 Filtering Packages and Objects. . . . . . . . . . . . . . . . . . . . . . . . . . . . . . . . . . . . . . . . . . . . . 1557.5.3 Refactoring Objects. . . . . . . . . . . . . . . . . . . . . . . . . . . . . . . . . . . . . . . . . . . . . . . . . . . . . 1567.5.4 Validating Models . . . . . . . . . . . . . . . . . . . . . . . . . . . . . . . . . . . . . . . . . . . . . . . . . . . . . . 1567.5.5 Generating Object Documentation. . . . . . . . . . . . . . . . . . . . . . . . . . . . . . . . . . . . . . . . . . . 1577.5.6 Enabling Multilanguage Support for Objects. . . . . . . . . . . . . . . . . . . . . . . . . . . . . . . . . . . . 1577.5.7 Checking Model References. . . . . . . . . . . . . . . . . . . . . . . . . . . . . . . . . . . . . . . . . . . . . . . 1587.5.8 Viewing the Job Log. . . . . . . . . . . . . . . . . . . . . . . . . . . . . . . . . . . . . . . . . . . . . . . . . . . . . 1587.5.9 Maintaining Search Attributes. . . . . . . . . . . . . . . . . . . . . . . . . . . . . . . . . . . . . . . . . . . . . . 158
4
P U B L I C© 2013 SAP AG or an SAP affiliate company. All rights reserved.
SAP HANA Developer GuideTable of Contents

7.5.10 Previewing Data of Content Objects. . . . . . . . . . . . . . . . . . . . . . . . . . . . . . . . . . . . . . . . . . 1597.5.11 Functions used in Expressions. . . . . . . . . . . . . . . . . . . . . . . . . . . . . . . . . . . . . . . . . . . . . .1597.5.12 Searching Tables, Models and Column Views. . . . . . . . . . . . . . . . . . . . . . . . . . . . . . . . . . . 1647.5.13 Setting Keyboard Shortcuts. . . . . . . . . . . . . . . . . . . . . . . . . . . . . . . . . . . . . . . . . . . . . . . 1647.5.14 Copying an Object. . . . . . . . . . . . . . . . . . . . . . . . . . . . . . . . . . . . . . . . . . . . . . . . . . . . . . 165
7.6 Importing BW Objects. . . . . . . . . . . . . . . . . . . . . . . . . . . . . . . . . . . . . . . . . . . . . . . . . . . . . . . . . . 166
8 Developing Procedures. . . . . . . . . . . . . . . . . . . . . . . . . . . . . . . . . . . . . . . . . . . . . . . . . . . . . . . . 1708.1 Editing SQLScript. . . . . . . . . . . . . . . . . . . . . . . . . . . . . . . . . . . . . . . . . . . . . . . . . . . . . . . . . . . . . . 171
8.1.1 Defining Local Table Types in Procedures. . . . . . . . . . . . . . . . . . . . . . . . . . . . . . . . . . . . . . 1728.2 Debugging SQLScript. . . . . . . . . . . . . . . . . . . . . . . . . . . . . . . . . . . . . . . . . . . . . . . . . . . . . . . . . . . 1738.3 Developing Procedures in the Modeler Editor. . . . . . . . . . . . . . . . . . . . . . . . . . . . . . . . . . . . . . . . . . 175
9 Defining Web-based Data Access. . . . . . . . . . . . . . . . . . . . . . . . . . . . . . . . . . . . . . . . . . . . . . . . . 1779.1 Data Access with OData in SAP HANA XS. . . . . . . . . . . . . . . . . . . . . . . . . . . . . . . . . . . . . . . . . . . . . 177
9.1.1 OData in SAP HANA XS. . . . . . . . . . . . . . . . . . . . . . . . . . . . . . . . . . . . . . . . . . . . . . . . . . .1779.1.2 Defining the Data an OData Service Exposes. . . . . . . . . . . . . . . . . . . . . . . . . . . . . . . . . . . .1789.1.3 OData Service Definitions. . . . . . . . . . . . . . . . . . . . . . . . . . . . . . . . . . . . . . . . . . . . . . . . . 1799.1.4 Creating an OData Service Definition. . . . . . . . . . . . . . . . . . . . . . . . . . . . . . . . . . . . . . . . . 1819.1.5 Tutorial: Using the SAP HANA OData Interface. . . . . . . . . . . . . . . . . . . . . . . . . . . . . . . . . . 1829.1.6 OData Service-Definition Examples. . . . . . . . . . . . . . . . . . . . . . . . . . . . . . . . . . . . . . . . . . 1849.1.7 OData Service Definition Language Syntax. . . . . . . . . . . . . . . . . . . . . . . . . . . . . . . . . . . . . 1969.1.8 OData Service Definition: SQL-EDM Type Mapping. . . . . . . . . . . . . . . . . . . . . . . . . . . . . . . 1989.1.9 OData URI Parameters, Query Options, and Features. . . . . . . . . . . . . . . . . . . . . . . . . . . . . 1999.1.10 OData Security Considerations. . . . . . . . . . . . . . . . . . . . . . . . . . . . . . . . . . . . . . . . . . . . . 213
9.2 Data Access with XMLA in SAP HANA XS. . . . . . . . . . . . . . . . . . . . . . . . . . . . . . . . . . . . . . . . . . . . . 2149.2.1 XML for Analysis (XMLA). . . . . . . . . . . . . . . . . . . . . . . . . . . . . . . . . . . . . . . . . . . . . . . . . 2149.2.2 XMLA Service Definition. . . . . . . . . . . . . . . . . . . . . . . . . . . . . . . . . . . . . . . . . . . . . . . . . . 2159.2.3 XMLA Security Considerations. . . . . . . . . . . . . . . . . . . . . . . . . . . . . . . . . . . . . . . . . . . . . 2159.2.4 Multidimensional Expressions (MDX). . . . . . . . . . . . . . . . . . . . . . . . . . . . . . . . . . . . . . . . .2169.2.5 MDX Functions. . . . . . . . . . . . . . . . . . . . . . . . . . . . . . . . . . . . . . . . . . . . . . . . . . . . . . . . 2169.2.6 MDX Extensions. . . . . . . . . . . . . . . . . . . . . . . . . . . . . . . . . . . . . . . . . . . . . . . . . . . . . . . 2209.2.7 Defining the Data an XMLA Service Exposes. . . . . . . . . . . . . . . . . . . . . . . . . . . . . . . . . . . .2229.2.8 Creating an XMLA Service Definition. . . . . . . . . . . . . . . . . . . . . . . . . . . . . . . . . . . . . . . . . 2239.2.9 Tutorial: Using the SAP HANA XMLA Interface. . . . . . . . . . . . . . . . . . . . . . . . . . . . . . . . . . 223
10 Writing Server-Side JavaScript Code. . . . . . . . . . . . . . . . . . . . . . . . . . . . . . . . . . . . . . . . . . . . . .22610.1 Data Access with JavaScript in SAP HANA XS. . . . . . . . . . . . . . . . . . . . . . . . . . . . . . . . . . . . . . . . . 22610.2 Server-Side JavaScript in SAP HANA XS. . . . . . . . . . . . . . . . . . . . . . . . . . . . . . . . . . . . . . . . . . . . . 226
10.2.1 JavaScript Editor. . . . . . . . . . . . . . . . . . . . . . . . . . . . . . . . . . . . . . . . . . . . . . . . . . . . . . . 22710.2.2 Server-Side JavaScript Security Considerations. . . . . . . . . . . . . . . . . . . . . . . . . . . . . . . . . 22810.2.3 Writing Server-Side JavaScript Application Code. . . . . . . . . . . . . . . . . . . . . . . . . . . . . . . . 235
SAP HANA Developer GuideTable of Contents
P U B L I C© 2013 SAP AG or an SAP affiliate company. All
rights reserved. 5

10.3 Server-Side JavaScript Libraries. . . . . . . . . . . . . . . . . . . . . . . . . . . . . . . . . . . . . . . . . . . . . . . . . . . 23710.3.1 Writing Server-Side JavaScript Libraries. . . . . . . . . . . . . . . . . . . . . . . . . . . . . . . . . . . . . . 23710.3.2 Importing Server-Side JavaScript Libraries. . . . . . . . . . . . . . . . . . . . . . . . . . . . . . . . . . . . 238
10.4 Server-Side JavaScript APIs. . . . . . . . . . . . . . . . . . . . . . . . . . . . . . . . . . . . . . . . . . . . . . . . . . . . . . 23910.5 The SQL Connection Configuration File. . . . . . . . . . . . . . . . . . . . . . . . . . . . . . . . . . . . . . . . . . . . . . 24010.6 Connection-language Settings in SAP HANA XS. . . . . . . . . . . . . . . . . . . . . . . . . . . . . . . . . . . . . . . . 24110.7 Server-Side JavaScript Tracing. . . . . . . . . . . . . . . . . . . . . . . . . . . . . . . . . . . . . . . . . . . . . . . . . . . .243
10.7.1 Tracing Server-Side JavaScript Applications. . . . . . . . . . . . . . . . . . . . . . . . . . . . . . . . . . . 24310.7.2 Viewing Server-Side JavaScript Application Trace Files. . . . . . . . . . . . . . . . . . . . . . . . . . . .244
10.8 Debugging Server-Side JavaScript. . . . . . . . . . . . . . . . . . . . . . . . . . . . . . . . . . . . . . . . . . . . . . . . . 24410.8.1 Opening a Port for Server-Side JavaScript Debugging. . . . . . . . . . . . . . . . . . . . . . . . . . . . . 24710.8.2 Troubleshooting Server-Side JavaScript Debugging. . . . . . . . . . . . . . . . . . . . . . . . . . . . . . 247
11 Building UIs. . . . . . . . . . . . . . . . . . . . . . . . . . . . . . . . . . . . . . . . . . . . . . . . . . . . . . . . . . . . . . . . .24811.1 Building UIs with SAPUI5. . . . . . . . . . . . . . . . . . . . . . . . . . . . . . . . . . . . . . . . . . . . . . . . . . . . . . . . 248
11.1.1 Installing SAPUI5 Application Development Tools. . . . . . . . . . . . . . . . . . . . . . . . . . . . . . . .24811.1.2 Creating an SAPUI5 Application. . . . . . . . . . . . . . . . . . . . . . . . . . . . . . . . . . . . . . . . . . . . 24911.1.3 Supporting Translation. . . . . . . . . . . . . . . . . . . . . . . . . . . . . . . . . . . . . . . . . . . . . . . . . . .252
11.2 Using UI Integration Services. . . . . . . . . . . . . . . . . . . . . . . . . . . . . . . . . . . . . . . . . . . . . . . . . . . . . 25311.2.1 Creating an Application Site. . . . . . . . . . . . . . . . . . . . . . . . . . . . . . . . . . . . . . . . . . . . . . . 25311.2.2 Designing an Application Site. . . . . . . . . . . . . . . . . . . . . . . . . . . . . . . . . . . . . . . . . . . . . . 25411.2.3 Creating a Widget . . . . . . . . . . . . . . . . . . . . . . . . . . . . . . . . . . . . . . . . . . . . . . . . . . . . . . 25611.2.4 Developing Widgets. . . . . . . . . . . . . . . . . . . . . . . . . . . . . . . . . . . . . . . . . . . . . . . . . . . . . 257
12 Enabling Search. . . . . . . . . . . . . . . . . . . . . . . . . . . . . . . . . . . . . . . . . . . . . . . . . . . . . . . . . . . . . 26412.1 Creating Full Text Indexes. . . . . . . . . . . . . . . . . . . . . . . . . . . . . . . . . . . . . . . . . . . . . . . . . . . . . . . 264
12.1.1 Full Text Index Types. . . . . . . . . . . . . . . . . . . . . . . . . . . . . . . . . . . . . . . . . . . . . . . . . . . . 26612.1.2 Synchronization. . . . . . . . . . . . . . . . . . . . . . . . . . . . . . . . . . . . . . . . . . . . . . . . . . . . . . . 26912.1.3 Text Analysis. . . . . . . . . . . . . . . . . . . . . . . . . . . . . . . . . . . . . . . . . . . . . . . . . . . . . . . . . .27012.1.4 Dropping Full Text Indexes. . . . . . . . . . . . . . . . . . . . . . . . . . . . . . . . . . . . . . . . . . . . . . . . 27412.1.5 Altering Full Text Index Parameters. . . . . . . . . . . . . . . . . . . . . . . . . . . . . . . . . . . . . . . . . . 27412.1.6 Full Text Index Parameters. . . . . . . . . . . . . . . . . . . . . . . . . . . . . . . . . . . . . . . . . . . . . . . . 275
12.2 Building SQL Search Queries. . . . . . . . . . . . . . . . . . . . . . . . . . . . . . . . . . . . . . . . . . . . . . . . . . . . . 27912.2.1 Search Queries with CONTAINS. . . . . . . . . . . . . . . . . . . . . . . . . . . . . . . . . . . . . . . . . . . . 28012.2.2 EXACT Search. . . . . . . . . . . . . . . . . . . . . . . . . . . . . . . . . . . . . . . . . . . . . . . . . . . . . . . . .28312.2.3 LINGUISTIC Search. . . . . . . . . . . . . . . . . . . . . . . . . . . . . . . . . . . . . . . . . . . . . . . . . . . . . 28312.2.4 FUZZY Search. . . . . . . . . . . . . . . . . . . . . . . . . . . . . . . . . . . . . . . . . . . . . . . . . . . . . . . . . 284
12.3 Building Search Apps. . . . . . . . . . . . . . . . . . . . . . . . . . . . . . . . . . . . . . . . . . . . . . . . . . . . . . . . . . . 32712.3.1 Introduction to the UI Toolkit for Info Access. . . . . . . . . . . . . . . . . . . . . . . . . . . . . . . . . . . 32712.3.2 Installing the Service and the Toolkit. . . . . . . . . . . . . . . . . . . . . . . . . . . . . . . . . . . . . . . . . 32812.3.3 Getting to Know the Demo App. . . . . . . . . . . . . . . . . . . . . . . . . . . . . . . . . . . . . . . . . . . . . 33012.3.4 Getting to Know the Demo HTML. . . . . . . . . . . . . . . . . . . . . . . . . . . . . . . . . . . . . . . . . . . 330
6
P U B L I C© 2013 SAP AG or an SAP affiliate company. All rights reserved.
SAP HANA Developer GuideTable of Contents

12.3.5 Preparing Your Source Data. . . . . . . . . . . . . . . . . . . . . . . . . . . . . . . . . . . . . . . . . . . . . . . 33112.3.6 Connecting Your Source Data. . . . . . . . . . . . . . . . . . . . . . . . . . . . . . . . . . . . . . . . . . . . . . 33312.3.7 Defining the Page Layout. . . . . . . . . . . . . . . . . . . . . . . . . . . . . . . . . . . . . . . . . . . . . . . . . 33412.3.8 Configuring the Widgets. . . . . . . . . . . . . . . . . . . . . . . . . . . . . . . . . . . . . . . . . . . . . . . . . . 33412.3.9 Defining the Layout of Result Lists and Details. . . . . . . . . . . . . . . . . . . . . . . . . . . . . . . . . . 338
13 Setting Up Roles and Authorizations. . . . . . . . . . . . . . . . . . . . . . . . . . . . . . . . . . . . . . . . . . . . . .33913.1 The Authorization Model. . . . . . . . . . . . . . . . . . . . . . . . . . . . . . . . . . . . . . . . . . . . . . . . . . . . . . . . 33913.2 Authentication Overview. . . . . . . . . . . . . . . . . . . . . . . . . . . . . . . . . . . . . . . . . . . . . . . . . . . . . . . . 34013.3 Roles. . . . . . . . . . . . . . . . . . . . . . . . . . . . . . . . . . . . . . . . . . . . . . . . . . . . . . . . . . . . . . . . . . . . . . 340
13.3.1 Roles. . . . . . . . . . . . . . . . . . . . . . . . . . . . . . . . . . . . . . . . . . . . . . . . . . . . . . . . . . . . . . . 34113.3.2 Roles as Repository Objects. . . . . . . . . . . . . . . . . . . . . . . . . . . . . . . . . . . . . . . . . . . . . . . 34213.3.3 Creating Roles in the Repository. . . . . . . . . . . . . . . . . . . . . . . . . . . . . . . . . . . . . . . . . . . . 343
13.4 Privileges. . . . . . . . . . . . . . . . . . . . . . . . . . . . . . . . . . . . . . . . . . . . . . . . . . . . . . . . . . . . . . . . . . . 34713.4.1 System Privileges. . . . . . . . . . . . . . . . . . . . . . . . . . . . . . . . . . . . . . . . . . . . . . . . . . . . . . 34713.4.2 Object Privileges. . . . . . . . . . . . . . . . . . . . . . . . . . . . . . . . . . . . . . . . . . . . . . . . . . . . . . . 34813.4.3 Package Privileges. . . . . . . . . . . . . . . . . . . . . . . . . . . . . . . . . . . . . . . . . . . . . . . . . . . . . .34813.4.4 Analytic Privileges. . . . . . . . . . . . . . . . . . . . . . . . . . . . . . . . . . . . . . . . . . . . . . . . . . . . . . 35113.4.5 Creating Analytic Privileges. . . . . . . . . . . . . . . . . . . . . . . . . . . . . . . . . . . . . . . . . . . . . . . 36013.4.6 Granting Privileges to Users. . . . . . . . . . . . . . . . . . . . . . . . . . . . . . . . . . . . . . . . . . . . . . . 364
13.5 Application Access. . . . . . . . . . . . . . . . . . . . . . . . . . . . . . . . . . . . . . . . . . . . . . . . . . . . . . . . . . . . 365
14 Implementing Lifecycle Management . . . . . . . . . . . . . . . . . . . . . . . . . . . . . . . . . . . . . . . . . . . . . 36714.1 SAP HANA Delivery Units. . . . . . . . . . . . . . . . . . . . . . . . . . . . . . . . . . . . . . . . . . . . . . . . . . . . . . . . 36714.2 The SAP HANA Delivery-Unit Lifecycle. . . . . . . . . . . . . . . . . . . . . . . . . . . . . . . . . . . . . . . . . . . . . . .36714.3 Exporting Delivery Units. . . . . . . . . . . . . . . . . . . . . . . . . . . . . . . . . . . . . . . . . . . . . . . . . . . . . . . . . 36814.4 Importing Delivery Units. . . . . . . . . . . . . . . . . . . . . . . . . . . . . . . . . . . . . . . . . . . . . . . . . . . . . . . . .37014.5 Translating Delivery Units. . . . . . . . . . . . . . . . . . . . . . . . . . . . . . . . . . . . . . . . . . . . . . . . . . . . . . . . 371
14.5.1 SAP HANA Delivery-Unit Translation Details. . . . . . . . . . . . . . . . . . . . . . . . . . . . . . . . . . . .37214.5.2 Maintaining Translation Details. . . . . . . . . . . . . . . . . . . . . . . . . . . . . . . . . . . . . . . . . . . . . 372
15 Using Database Client Interfaces. . . . . . . . . . . . . . . . . . . . . . . . . . . . . . . . . . . . . . . . . . . . . . . . 37415.1 Connecting via ODBC. . . . . . . . . . . . . . . . . . . . . . . . . . . . . . . . . . . . . . . . . . . . . . . . . . . . . . . . . . .374
15.1.1 Using the User Store. . . . . . . . . . . . . . . . . . . . . . . . . . . . . . . . . . . . . . . . . . . . . . . . . . . . 37515.1.2 Testing the ODBC Installation. . . . . . . . . . . . . . . . . . . . . . . . . . . . . . . . . . . . . . . . . . . . . . 376
15.2 Connecting via JDBC. . . . . . . . . . . . . . . . . . . . . . . . . . . . . . . . . . . . . . . . . . . . . . . . . . . . . . . . . . . 37715.2.1 Tracing JDBC Connections. . . . . . . . . . . . . . . . . . . . . . . . . . . . . . . . . . . . . . . . . . . . . . . . 37815.2.2 Valid Java-to-SQL Conversions. . . . . . . . . . . . . . . . . . . . . . . . . . . . . . . . . . . . . . . . . . . . .380
15.3 Connecting via ODBO. . . . . . . . . . . . . . . . . . . . . . . . . . . . . . . . . . . . . . . . . . . . . . . . . . . . . . . . . . 38015.3.1 Connecting with Microsoft Excel. . . . . . . . . . . . . . . . . . . . . . . . . . . . . . . . . . . . . . . . . . . . 38115.3.2 Multidimensional Expressions (MDX). . . . . . . . . . . . . . . . . . . . . . . . . . . . . . . . . . . . . . . . 38315.3.3 MDX Functions. . . . . . . . . . . . . . . . . . . . . . . . . . . . . . . . . . . . . . . . . . . . . . . . . . . . . . . . 384
SAP HANA Developer GuideTable of Contents
P U B L I C© 2013 SAP AG or an SAP affiliate company. All
rights reserved. 7

15.3.4 MDX Extensions. . . . . . . . . . . . . . . . . . . . . . . . . . . . . . . . . . . . . . . . . . . . . . . . . . . . . . . 388
16 SAP HANA Developer References. . . . . . . . . . . . . . . . . . . . . . . . . . . . . . . . . . . . . . . . . . . . . . . . 391
8
P U B L I C© 2013 SAP AG or an SAP affiliate company. All rights reserved.
SAP HANA Developer GuideTable of Contents

1 Document History
The document history includes all versions of the document that have been published.
Version Date SAP HANA Revision Description
1.1 21 Dec 2012 47 References to the following have been added:
● Sections 7.2.3, Creating Attribute Views and 7.2.5, Creating Analytic Views have been updated for Label Mapping functionality.
● Section 7.6, Importing BW Objects has been updated with the support to import role based authorizations into the Modeler as analytic privileges.
● Section 8.1.1, Defining Local Table Types in Procedures.
● Section 11.2, Using UI Integration Services.
1.2 01 Mar 2013 50 References to the following have been added:
● Section 7.1.1 Generating Time Data has been revised.
● Section 7.2.5 Creating Analytic Views has been revised with the addition of documentation regarding Temporal Join.
● Section 7.5.13 Setting Keyboard Shortcuts
SAP HANA Developer GuideDocument History
P U B L I C© 2013 SAP AG or an SAP affiliate company. All
rights reserved. 9

Version Date SAP HANA Revision Description
has been updated with the change in a keyboard shortcut for Data Preview.
● Section 7.6 Importing BW Objects has been updated.
● Section 8.2 Debugging SQLScript has been updated with a prerequisite describing how to grant debugger system privileges.
● Section 11. 2 Using UI Integration Services has been revised and updated with the following changed features:
○ The design panel has a new look and feel, and additional capabilities, such as search for widgets, configuration of site layout, and improved edit mode.
○ The GadgetPrefs API enables personalization of widgets by storing widget preferences separately for each user.
● Section 13.4.4 Analytic Privileges has been revised.
10
P U B L I C© 2013 SAP AG or an SAP affiliate company. All rights reserved.
SAP HANA Developer GuideDocument History

2 Overview
This guide presents a developer’s view of SAP HANA®. It explains how to use the SAP HANA development tools to create comprehensive analytical models and to build applications with SAP HANA's programmatic interfaces and integrated development environment, including to develop native code that runs inside SAP HANA.The guide is organized as follows:
● SAP HANA Architecture [page 12] describes the capabilities of SAP HANA.● SAP HANA Development Platform [page 19] describes the main developer scenarios, the development
process and the development environment.● Setting Up Your Application [page 35] describes how to get started developing SAP HANA applications.
Most of the remaining chapters explain how to develop various SAP HANA development objects.
NoteApplication development with SAP HANA Extended Application Services (SAP HANA XS) is currently only available as an SAP-led project solution, for pre-approved customers and partners. This applies to server-side JavaScript programming, support for ODATA and XMLA, Web server features and the Web application development environment. For more information, see SAP Note 1779803.
AudienceThis guide is aimed at two developer roles:
● Modeler: This person, often a business/data analyst or database expert, is concerned with the definition of the model and schemas that will be used in SAP HANA, the specification and definition of tables, views, primary keys, indexes, partitions and other aspects of the layout and inter-relationship of the data in SAP HANA.The data modeler is also concerned with designing and defining authorization and access control, through the specification of privileges, roles and users.The modeler generally uses the Administration Console and Modeler perspectives and tools of the SAP HANA studio.
● Application Programmer: The programmer is concerned with building SAP HANA applications, which could take many forms but are designed based on the model-view-controller architecture. Programmers develop the code for:
○ View, which could run inside a browser or on a mobile device○ Controller, which typically runs in the context of an application server○ Model, which interacts closely with the data model, performs efficient queries, and may be developed to
run within the SAP HANA data engine, using embedded procedures or libraries
The programmer generally uses the SAP HANA Development perspective and tools of the SAP HANA studio.
SAP HANA Developer GuideOverview
P U B L I C© 2013 SAP AG or an SAP affiliate company. All
rights reserved. 11

3 SAP HANA Architecture
SAP HANA is an in-memory data platform that is deployable as an appliance or in the cloud. At its core, it is an innovative in-memory relational database management system that makes full use of the capabilities of current hardware to increase application performance, to reduce cost of ownership, and to enable new scenarios and applications that were not possible before.With SAP HANA, you have the opportunity to build applications that integrate the business control logic and the database layer with unprecedented performance. As a developer, one of the key questions is how you can minimize data movements. The more you can do directly on the data in memory next to the CPUs, the better the application will perform.
3.1 SAP HANA In-Memory Database
SAP HANA was designed to run on modern, distributed computers built out of multi-core CPUs (multiple CPUs on one chip) with fast communication between processor cores, and containing terabytes of main memory. With SAP HANA, all data is available in main memory, which completely avoids the performance penalty of disk I/O. Either disk or solid-state drives are still required for permanent persistency in the event of a power failure or some other catastrophe. This does not slow down performance, however, because the required backup operations to disk can take place asynchronously as a background task.
3.1.1 Columnar Data StorageA database table is conceptually a two-dimensional data structure organized in rows and columns. Computer memory, in contrast, is organized as a linear structure. A table can be represented in row-order or column-order. A row-oriented organization stores a table as a sequence of records. Conversely, in column storage the entries of a column are stored in contiguous memory locations. SAP HANA supports both, but is particularly optimized for column-order storage.
Columnar data storage allows highly efficient compression. Especially if a column is sorted, there will normally be repeated adjacent values. SAP HANA employs highly efficient compression methods, such as run-length encoding, cluster coding and dictionary coding. With dictionary encoding, columns are stored as sequences of bit-coded integers. That means that a check for equality can be executed on the integers (for example during scans or join operations). This is much faster than comparing, for example, string values.
12
P U B L I C© 2013 SAP AG or an SAP affiliate company. All rights reserved.
SAP HANA Developer GuideSAP HANA Architecture

Columnar storage, in many cases, eliminates the need for additional index structures. Storing data in columns is functionally similar to having a built-in index for each column. The column scanning speed of the in-memory column store and the compression mechanisms – especially dictionary compression – allow read operations with very high performance. In many cases it will not be required to have additional indexes. Eliminating additional indexes reduces complexity and eliminates effort for defining and maintaining metadata.
3.1.2 Parallel ProcessingSAP HANA was designed from the ground up to perform its basic calculations (such as analytic joins, scans and aggregations) in parallel, often using hundreds of cores at the same time, fully utilizing the available computing resources of distributed systems.With columnar data, operations on single columns, such as searching or aggregations, can be implemented as loops over an array stored in contiguous memory locations. Such an operation has high spatial locality and can efficiently be executed in the CPU cache. With row-oriented storage, the same operation would be much slower because data of the same column is distributed across memory and the CPU is slowed down by cache misses.Compressed data can be loaded into the CPU cache faster. This is because the limiting factor is the data transport between memory and CPU cache, and so the performance gain will exceed the additional computing time needed for decompression.Column-based storage also allows execution of operations in parallel using multiple processor cores. In a column store, data is already vertically partitioned. This means that operations on different columns can easily be processed in parallel. If multiple columns need to be searched or aggregated, each of these operations can be assigned to a different processor core. In addition, operations on one column can be parallelized by partitioning the column into multiple sections that can be processed by different processor cores.
3.1.3 Simplifying ApplicationsTraditional business applications often use materialized aggregates to increase performance. These aggregates are computed and stored either after each write operation on the aggregated data, or at scheduled times. Read operations read the materialized aggregates instead of computing them each time they are required.With a scanning speed of several gigabytes per millisecond, SAP HANA makes it possible to calculate aggregates on large amounts of data on-the-fly with high performance. This eliminates the need for materialized aggregates in many cases, simplifying data models, and correspondingly the application logic. Furthermore, with on-the fly
SAP HANA Developer GuideSAP HANA Architecture
P U B L I C© 2013 SAP AG or an SAP affiliate company. All
rights reserved. 13

aggregation, the aggregate values are always up-to-date unlike materialized aggregates that may be updated only at scheduled times.
3.2 SAP HANA Database Architecture
A running SAP HANA system consists of multiple communicating processes (services). The following shows the main SAP HANA database services in a classical application context.
Such traditional database applications use well-defined interfaces (for example, ODBC and JDBC) to communicate with the database management system functioning as a data source, usually over a network connection. Often running in the context of an application server, these traditional applications use Structured Query Language (SQL) to manage and query the data stored in the database.The main SAP HANA database management component is known as the index server. The index server contains the actual data stores and the engines for processing the data. The index server processes incoming SQL or MDX statements in the context of authenticated sessions and transactions.The SAP HANA database has its own scripting language named SQLScript. The motivation for SQLScript is to embed data-intensive application logic into the database. Classical applications tend to offload only very limited functionality into the database using SQL. This results in extensive copying of data from and to the database, and in programs that slowly iterate over huge data loops and are hard to optimize and parallelize. SQLScript is based on side-effect free functions that operate on tables using SQL queries for set processing, and is therefore parallelizable over multiple processors.
14
P U B L I C© 2013 SAP AG or an SAP affiliate company. All rights reserved.
SAP HANA Developer GuideSAP HANA Architecture

In addition to SQLScript, SAP HANA supports a framework for the installation of specialized and optimized functional libraries, which are tightly integrated with different data engines of the index server. Two of these functional libraries are the SAP HANA Business Function Library (BFL) and the SAP HANA Predictive Analytics Library (PAL). BFL and PAL functions can be called directly from within SQLScript.SAP HANA also supports the development of programs written in the popular statistics language R.SQL and SQLScript are implemented using a common infrastructure of built-in data engine functions that have access to various meta definitions, such as definitions of relational tables, columns, views, and indexes, and definitions of SQLScript procedures. This metadata is stored in one common catalog.The database persistence layer is responsible for durability and atomicity of transactions. It ensures that the database can be restored to the most recent committed state after a restart and that transactions are either completely executed or completely undone.The index server uses the preprocessor server for analyzing text data and extracting the information on which the text search capabilities are based. The name server owns the information about the topology of a SAP HANA system. In a distributed system, the name server knows where the components are running and which data is located on which server. The statistics server collects information about status, performance and resource consumption from the other servers in the system. Monitoring clients, such as the SAP HANA studio, access the statistics server to get the status of various alert monitors. The statistics server also provides a history of measurement data for further analysis.Related LinksSAP HANA SQLScript ReferenceSAP HANA Business Function Library (BFL) Reference SAP HANA Predictive Analysis Library (PAL) Reference SAP HANA R Integration Guide
3.3 SAP HANA Extended Application Services
Traditional database applications use interfaces such as ODBC and JDBC with SQL to manage and query their data. The following illustrates such applications using the common Model-View-Controller (MVC) development architecture.
SAP HANA greatly extends the traditional database server role. SAP HANA functions as a comprehensive platform for the development and execution of native data-intensive applications that run efficiently in SAP HANA, taking advantage of its in-memory architecture and parallel execution capabilities.
SAP HANA Developer GuideSAP HANA Architecture
P U B L I C© 2013 SAP AG or an SAP affiliate company. All
rights reserved. 15

By restructuring your application in this way, not only do you gain from the increased performance due to the integration with the data source, you can effectively eliminate the overhead of the middle-tier between the user-interface (the view) and the data-intensive control logic, as shown in the following figure.
In support of this data-integrated application paradigm, SAP HANA Extended Application Services provides a comprehensive set of embedded services that provide end-to-end support for Web-based applications. This includes a lightweight web server, configurable OData support, server-side JS execution and, of course, full access to SQL and SQLScript.These SAP HANA Extended Application Services are provided by the SAP HANA XS server, which provides lightweight application services that are fully integrated into SAP HANA. It allows clients to access the SAP HANA system via HTTP. Controller applications can run completely natively on SAP HANA, without the need for an additional external application server.The following shows the SAP HANA XS server as part of the SAP HANA system.
16
P U B L I C© 2013 SAP AG or an SAP affiliate company. All rights reserved.
SAP HANA Developer GuideSAP HANA Architecture

The application services can be used to expose the database data model, with its tables, views and database procedures, to clients. This can be done in a declarative way using OData services or by writing native application-specific code that runs in the SAP HANA context . Also, you can use SAP HANA XS to build dynamic HTML5 UI applications.In addition to exposing the data model, SAP HANA XS also hosts system services that are part of the SAP HANA system. The search service is an example of such a system application. No data is stored in the SAP HANA XS server itself. To read tables or views, to modify data or to execute SQLScript database procedures and calculations, it connects to the index server (or servers, in case of a distributed system).
NoteApplication development with SAP HANA Extended Application Services (SAP HANA XS) is currently only available as an SAP-led project solution, for pre-approved customers and partners. This applies to server-side JavaScript programming, support for ODATA and XMLA, Web server features and the Web application development environment. For more information, see SAP Note 1779803.
Related LinksBuilding UIs with SAPUI5 [page 248]This section provides introductory information about UI development toolkit for HTML5.
Enabling Search [page 264]With a SAP HANA database, your users will want to search tables and views much like they would when searching for information on the Internet. In SAP HANA, you can either directly query data using SQL queries or you can build search apps using a UI toolkit.
SAP HANA Developer GuideSAP HANA Architecture
P U B L I C© 2013 SAP AG or an SAP affiliate company. All
rights reserved. 17

3.4 Refactoring SAP HANA-Based Applications
The possibility to run application-specific code in SAP HANA raises the question: What kind of logic should run where? Clearly, data-intensive and model-based calculations must be close to the data and, therefore, need to be executed in the index server, for instance, using SQLScript or the code of the specialized functional libraries.The presentation (view) logic runs on the client – for example, as an HTML5 application in a Web browser or on a mobile device.Native application-specific code, supported by SAP HANA Extended Application Services, can be used to provide a thin layer between the clients on one side, and the views, tables and procedures in the index server on the other side. Typical applications contain, for example, control flow logic based on request parameters, invoke views and stored procedures in the index server, and transform the results to the response format expected by the client.The communication between the SAP HANA XS server and index server is optimized for high performance. However, performance is not the only reason why the SAP HANA XS server was integrated into SAP HANA. It also leads to simplified administration and a better development experience.The SAP HANA XS server completes SAP HANA to make it a comprehensive development platform. With the SAP HANA XS server, developers can write SAP HANA-based applications that cover all server-side aspects, such as tables and database views, database procedures, server-side control logic, integration with external systems, and provisioning of HTTP-based services. The integration of the SAP HANA XS server into the SAP HANA system also helps to reduce cost of ownership, as all servers are installed, operated and updated as one system.
18
P U B L I C© 2013 SAP AG or an SAP affiliate company. All rights reserved.
SAP HANA Developer GuideSAP HANA Architecture

4 SAP HANA Development Platform
To simplify and support the development of SAP HANA-based applications, SAP HANA serves as the integrated development environment (IDE) for developing and delivering these SAP HANA applications.Built around the Eclipse-based SAP HANA studio the SAP HANA IDE supports integrated and collaborative development, debugging and deployment of applications that use native database procedures for data processing, server-side JavaScript for control and an HTML5 SDK for the development of user interface representation.The design-time environment's central component is the SAP HANA repository, which stores and manages all design-time objects. The following figure illustrates the principle of co-development with SAP HANA.
Using the SAP HANA studio on your workstation, you design and create development objects such as data models or server-side code files, and then store, manage and share them with other developers, by interacting with the SAP HANA repository. The repository enables teams to work together on a set of development objects, and ultimately turn them into runtime objects which can be used by clients or other applications. The repository provides the basis for concepts like namespaces (through packages), transport and delivery support.
4.1 Developer Scenarios
The possibility to run application specific code in SAP HANA creates several possibilities for developing SAP HANA based applications, representing various integration scenarios, and corresponding development processes.Broadly, we distinguish SAP HANA based applications into two broad categories:
● Web-based scenarios that take full advantage of the SAP HANA Extended Application Services. In these scenarios, clients access SAP HANA data using standard OData or XMLA interfaces, or directly use a Web-based GUI that was developed using the SAPUI5 toolkit, and that uses custom-developed server-side JavaScript, as well as native SQLScript procedures.
● Traditional client-based scenarios, where an external application accesses the SAP HANA data model (tables, analytic views, etc.) via client interfaces such as ODBC, ODBO and JDBC, and only uses SQL and native SQLScript procedures.
In either case, as a developer you need to understand the SAP HANA development environment, which enables you to design and develop your data and analytical models, and your other HANA-based development objects in the form of portable and deployable delivery units.Common activities include:
SAP HANA Developer GuideSAP HANA Development Platform
P U B L I C© 2013 SAP AG or an SAP affiliate company. All
rights reserved. 19

Table
Activity More Information
Setting up your development environment. Setting Up Your Application [page 35]
Setting up your schema and tables. Setting Up the Persistence Model [page 79]
Setting up views of your data. Setting Up the Analytic Model [page 103]
Developing procedures for data-intensive logic. Developing Procedures [page 170]
Setting Up Roles and Authorizations. The Authorization Model [page 339]
Managing the delivery of your application. SAP HANA Delivery Units [page 367]
For these activites, you will want to keep handy the following references:
● SAP HANA SQL Reference, to help you writing SQL statements within procedures and from your server-side JavaScript.
● SAP HANA SQLScript Reference, to help you if you are writing procedures.
The next two sections describes the main scenarios and what activities you may need to perform for them.
4.1.1 Scenario: Developing Native SAP HANA ApplicationsHere, you want to create a Web-based scenario that takes full advantage of SAP HANA Extended Application Services. In this scenario, clients access SAP HANA data using standard OData or XMLA interfaces, or directly use a Web-based GUI that was developed using the SAPUI5 toolkit, and that uses custom-developed server-side JavaScript, as well as native SQLScript procedures.
For this scenario, you may need to perform the following activities:
20
P U B L I C© 2013 SAP AG or an SAP affiliate company. All rights reserved.
SAP HANA Developer GuideSAP HANA Development Platform

Table
Activity More Information
Develop server-side JavaScript for control logic. Writing Server-Side JavaScript Code [page 226]
Define OData data interfaces. Data Access with OData in SAP HANA XS [page 177]
Define XMLA data interfaces Data Access with XMLA in SAP HANA XS [page 214]
How to build HTML pages with SAPUI5. Building UIs with SAPUI5 [page 248]
You will also want to keep handy the following references:
● SAP HANA SQL Reference, to help you write SQL statements within procedures and from your server-side JavaScript.
● SAP HANA XS JavaScript Reference, to help you use the SAP HANA XS JavaScript API.
For a list of all references, see SAP HANA Developer References [page 391].
4.1.2 Scenario: Using Database Client InterfacesHere, you want to build an application outside of SAP HANA, for example, within SAP NetWeaver, that accesses the SAP HANA data model (for example, tables and analytic views) via client interfaces such as ODBC, ODBO and JDBC, and only uses SQL and native SQLScript procedures.
For this scenario, you may need to perform the following activities:
Table
Activity More Information
Installing and using the SAP HANA client interfaces Using Database Client Interfaces [page 374]
Developing procedures for data-intensive logic. Developing Procedures [page 170]
You will also want to keep handy several references:
SAP HANA Developer GuideSAP HANA Development Platform
P U B L I C© 2013 SAP AG or an SAP affiliate company. All
rights reserved. 21

● SAP HANA SQL Reference, to help you write SQL statements.For information on MDX in SAP HANA, see MDX Functions [page 216].
● SAP HANA SQLScript Reference, to help you if you are writing procedures.
For a list of all references, see SAP HANA Developer References [page 391].
4.2 Development Objects
The design-time building blocks of your SAP HANA applications are called development objects. Some of these development objects, such as projects and packages, are concepts that help you structure your application. Others, like schemas, table definitions, analytical and attribute views, help you organize the structure of your data. Procedures and server-side JavaScript code are the backbone of the SAP HANA application. Other types of development objects help you control the access to runtime objects.Understanding the different development objects and their use is one of the main objectives of this guide.The following are the building blocks for an SAP HANA application, showing the file extension and where to get information for building it:
Table
Object Description File Extension More Information
Structure
Project An Eclipse project for developing your application or part of an application. The .project file can be stored in the SAP HANA repository.
.project SAP HANA Studio Projects [page 41]
Package A container in the repository for development objects.
Packages are represented by folders.
Maintaining Repository Packages [page 45]
Modeling Data
Schema A database schema for organizing database objects.
.hdbschema Schema [page 80]
Table A database table. .hdbtable Tables [page 82]
SQL View A virtual table based on a SQL query. .hdbview SQL Views [page 92]
Attribute, Analytic and Calculation View
A view created with modeling tools and designed to model a business use case.
Created with the Navigator view.
Setting Up the Analytic Model [page 103]
Decision Table A database table used to define business rules, for example, for validating data.
Creating Decision Tables [page 146]
Analytic Privilege
A set of rules that allows users to seeing a subset of data in a table or view.
Creating Analytic Privileges [page 360]
22
P U B L I C© 2013 SAP AG or an SAP affiliate company. All rights reserved.
SAP HANA Developer GuideSAP HANA Development Platform

Object Description File Extension More Information
Sequence A set of unique numbers, for example, for use as primary keys for a specific table.
.hdbsequence Sequences [page 89]
Procedure A database function for performing complex and data-intensive business logic that cannot be performed with standard SQL.
.procedure Developing Procedures [page 170]
Web Access
Application Descriptor
A file in a repository package that defines a root folder of a native SAP HANA application. All files in that package are available to be called via URL.
.xsapp Creating the Application Descriptors [page 51]
Application Access File
A file that defines permissions for a native SAP HANA application, that is, permissions for accessing and running objects in the package.
.xsaccess Enabling Access to SAP HANA XS Application Packages [page 61]
Application Privilege
A file that defines a privilege related to an SAP HANA Extended Application Services application, for example, the right to start or administer the application.
.xsprivileges The Application-Privileges File [page 64]
Server-Side JavaScript Code
JavaScript code that can run in SAP HANA Extended Application Services and that can be accessed via URL.
.xsjs Writing Server-Side JavaScript Application Code [page 235]
Server-Side JavaScript Library
JavaScript code that can run in SAP HANA Extended Application Services but cannot be accessed via URL. The code can be imported into an .xsjs code file.
.xsjslib
OData Descriptor
A file that defines an OData service that exposes SAP HANA data.
.xsodata Data Access with OData in SAP HANA XS [page 177]
XMLA Descriptor
A file that defines an XMLA service that exposes SAP HANA data.
.xsxmla Data Access with XMLA in SAP HANA XS [page 214]
SQL Connection Configuration
A file that enables execution of SQL statements from inside server-side JavaScript code with credentials that are different than those of the requesting user.
.xssqlcc The SQL Connection Configuration File [page 240]
Other
Role A file that defines an SAP HANA role. .hdbrole Creating Roles in the Repository [page 343]
Search Rule Set A file that defines a set of rules for use with fuzzy searches. The rules help decide what is a valid match in a search.
.searchruleset Search Rules [page 321]
SAP HANA Developer GuideSAP HANA Development Platform
P U B L I C© 2013 SAP AG or an SAP affiliate company. All
rights reserved. 23

Object Description File Extension More Information
Resource Bundle
A file for defining translatable UI texts for an application.
.hdbtextbundle Creating an SAPUI5 Application [page 249]
Application Site A file that defines an application site. .xsappsite Creating an Application Site [page 253]
Widget A file that defines a standalone SAP HANA application for the purpose of integration into an application site. A file that defines a standalone SAP HANA application for the purpose of integration into an application site.
.xswidget Creating a Widget [page 256]
4.3 Repository
The SAP HANA repository is the design-time storage system for development objects and is built into SAP HANA. The repository is the source control for all your development work on SAP HANA. You can add objects to the repository, update the objects, publish the objects, and compile these design-time objects into runtime objects.The repository supports the following:
● Version Control● Sharing of objects between multiple developers● Transport
The repository manages all development objects. You can browse the repository for a specific system with the SAP HANA Repositories view.
PackagesWithin the repository, development objects are managed as files within packages. Packages enable you to:
● Create namespaces, so you can uniquely identify development objects.● Group objects that logically belong together.● Provide containers for your objects so you can easily insert relevant objects into delivery units and transport
them.● Assign permissions at the package level.
You might create a top-level package for your company, and then a subpackage for each project, and then subpackages for parts of your project, for example, a subpackage for your HTML files, another for server-side JavaScript files, and so forth.
WorkspacesWhen working with development objects, you need to retrieve them from the repository, work on them on your workstation, and then return them to the repository. To make this simpler, the SAP HANA studio enables you to create a repository workspace, which establishes a link between two locations:
● The repository of the SAP HANA system where you wish to maintain the development object files of your projects (in the form of a package hierarchy).
24
P U B L I C© 2013 SAP AG or an SAP affiliate company. All rights reserved.
SAP HANA Developer GuideSAP HANA Development Platform

● A directory/folder on your workstation where you checkout these project files while you are working on them.
Working with ObjectsWhen creating development objects, the following is the workflow:
1. Create a project.2. Share the project to associate it with a workspace, and thus a specific SAP HANA system. Shared projects,
once they are activated, are available for import by other members of the application-development team.3. Create a new object file within the project, and save it to your workstation. Depending on the extension of the
file you create, you may use a dedicated editor for that type of object, for example, a JavaScript editor for .xsjs files.
4. Commit the file.Committing the file saves it in the repository, but the object is inactive and cannot be run, and only you can see it.
5. Activate the file.Activating a file does the following:
○ Publishes the file so others can see it.○ Adds the previously active version of the file to the history. The repository maintains a history of changes
to the file.○ Validates the file and compiles it or exposes it as a runtime object.
The design-time object is now active.
Related LinksSetting Up Your Application [page 35]In SAP HANA Extended Application Services (SAP HANA XS), the design-time artifacts that make up your application are stored in the repository like files in a file system. You first choose a root folder for your application-development activities, and within this folder you create additional subfolders to organize the applications and the application content according to your own requirements.
4.4 SAP HANA StudioThe SAP HANA studio is an Eclipse-based development and administration tool for working with SAP HANA, including creating projects, creating development objects, and deploying them to SAP HANA. As a developer, you may want to also perform some administrative tasks, such as configuring and monitoring the system.There are several key Eclipse perspectives that you will use while developing:
● Modeler: Used for creating various types of views and analytical privileges.● SAP HANA Development: Used for programming applications, that is, creating development objects that
access or update the data models, such as server-side JavaScript or HTML files.
SAP HANA Developer GuideSAP HANA Development Platform
P U B L I C© 2013 SAP AG or an SAP affiliate company. All
rights reserved. 25

● Debug: Used to debug code, such as server-side JavaScript or SQLScript.● Administration: Used to monitor the system and change settings.
To open a perspective, go to Window Open Perspective , or select on the toolbar.
4.4.1 Modeler PerspectiveThe Modeler perspective is used to define your analytic model by creating various types of views.
The perspective contains the following main areas:
● Navigator view: A view of the database objects, that is, those objects you create from the Modeler perspective.● Quick Launch Area: A collection of shortcuts for performing the most common modeling tasks. If you close
the Quick Launch tab, you can reopen it by selecting Help Quick Launch .
Navigator ViewThe Navigator view shows a view of the database objects in SAP HANA, both those that have been activated and those objects you created and have not activated yet.The view is divided into the following main sections:
26
P U B L I C© 2013 SAP AG or an SAP affiliate company. All rights reserved.
SAP HANA Developer GuideSAP HANA Development Platform

● Security: Contains the roles and users defined for this system.● Catalog: Contains the database objects that have been activated. The objects are divided into schemas, which
is a way to organize activated database objects.● Content: Contains design-time database objects, both those that have been activated and those not activated.
If you want to see other development objects, use the SAP HANA Repositories view.
Related LinksSAP HANA Repositories View [page 28]
4.4.2 SAP HANA Development PerspectiveThe SAP HANA Development perspective is where you will do most of your programming work, creating projects, associating them to SAP HANA systems, creating development objects, and deploying them.
SAP HANA Developer GuideSAP HANA Development Platform
P U B L I C© 2013 SAP AG or an SAP affiliate company. All
rights reserved. 27

The perspective contains the following main areas:
● Development Objects: Several views for browsing your development objects: the objects on your workstation, and the objects in the repository of the SAP HANA system you are working with.
● Editors: Specialized editors for working with different types of development objects.
SAP HANA Repositories ViewThe SAP HANA Repositories view enables you to browse the repository of a specific SAP HANA system, viewing the package hierarchy and to download files to your workstation.
The view essentially is a list of repository workspaces that you have created for developing on various systems. Generally, you create a workspace, check out files from the repository, and then do most of your development work in the Project Explorer.
28
P U B L I C© 2013 SAP AG or an SAP affiliate company. All rights reserved.
SAP HANA Developer GuideSAP HANA Development Platform

If you are creating a project from scratch, you do not need anything from this view, except to see the hierarchy of the repository. You create the project in the Project Explorer.
Project Explorer ViewThe Project Explorer is the standard Project Explorer view in Eclipse, which shows you the development files located on your workstation.
Here you can create files, edit files, and deploy them to the repository.
Working with the RepositoryTo work with the repository, you need to either:
● Share your project with the repository via a workspace. Sharing a project associates it with a SAP HANA system, so that files within the project can be added to the repository on that system.
● Check out an existing package in the repository from a workspace. This creates copies on your workstation of the package, its subpackages and their objects.
Team MenuYou can interact with the repository by right-clicking on a file or project (in the Project Explorer view) or package (in the SAP HANA Repositories view), and selecting an option from the Team menu.
SAP HANA Developer GuideSAP HANA Development Platform
P U B L I C© 2013 SAP AG or an SAP affiliate company. All
rights reserved. 29

You can perform the following on a file, folder or project in the Project Explorer view, that is, development objects that you are working on and located on your workstation:
Table
Action Description
Commit Saves the object to the repository.The object (or changes to the object) are only visible to you. There is no versioning of committed objects; the repository stores only the latest committed changes.
Activate Makes the development object active, and does the following:
● Publishes the object so it is visible to others.● Compiles the object into runtime objects.● Deploys the runtime object.● Creates a new version of the design-time object.
Check Simulates activation of the object in order to check if the object is valid and can be activated.
30
P U B L I C© 2013 SAP AG or an SAP affiliate company. All rights reserved.
SAP HANA Developer GuideSAP HANA Development Platform

Action Description
Checkout Retrieves the latest version of the object from the repository.
Revert Removes all your committed changes (inactive object) with the latest version of the object that was activated.
Share/Unshare (project only)
Associates a project with a specific SAP HANA system, so that files within the project can be added and updated on the repository on that system. For more information, see Using SAP HANA Projects [page 39].
The following options are available for files only.
Show Local History Shows a history of all versions of your object saved on your workstation. This is the Eclipse local history feature.
Show History Shows a history of all the versions of the object that were activated in the repository.
Currently, you can only view a list of versions.
You can perform the following on a package and file in the SAP HANA Repositories view:
Table
Action Description
Checkout (package only)
Retrieves the latest version of the objects from the repository in this package and its subpackages.
Checkout and Import Projects (package only)
Retrieves the latest version of the objects from the repository in this package, and imports a project into the SAP HANA studio. For more information, see Using SAP HANA Projects [page 39].
Show History (file only)
Shows a history of all the versions of the object that were activated in the repository.
Status of Development ObjectsEach object displayed in your project within the Project Explorer view is shown with an icon that indicates its status.
SAP HANA Developer GuideSAP HANA Development Platform
P U B L I C© 2013 SAP AG or an SAP affiliate company. All
rights reserved. 31

Table
Icon Description
The file is not committed. You made a change to the file and saved it to your workstation, but have not yet committed the changes to the repository.
The file is committed.
The file is activated.
4.4.3 Debug PerspectiveThe Debug perspective in the SAP HANA studio is the standard Eclipse Debug perspective, enabling you to start debug sessions, create breakpoints and watch variables.In the SAP HANA studio, the debug tools have been enhanced to let you also debug SAP HANA code, both server-side JavaScript (.xsjs files) and SQLScript code (.procedure files). The following shows the tools available in the Debug perspective and how it is organized:
● Debug Session: The debug sessions that have been started● Watch: Breakpoints and variables to watch● Code: Code files that you have opened
Related LinksDebugging Server-Side JavaScript [page 244]SAP HANA studio enables you to debug XS JavaScript files, including setting breakpoints and inspecting variables.
Debugging SQLScript [page 173]
32
P U B L I C© 2013 SAP AG or an SAP affiliate company. All rights reserved.
SAP HANA Developer GuideSAP HANA Development Platform

The SAP HANA SQLScript debugger allows you to debug and analyze procedures. In a debug session, your procedures will be executed in a serial mode, not in parallel (not-optimized). This allows you to test the correctness of the procedure logic and is not for evaluating the performance.
4.4.4 Administration Console PerspectiveThe Administration Console perspective enables you to configure the SAP HANA server so that you can do your development work. For example, when debugging, the debug port must be opened and debugging enabled, which is done by setting configuration parameters within the administration console.The Administration Console perspective displays the Navigator view, for adding or selecting systems, and the administration console, where you can monitor and configure the system. Configuration parameters can viewed and changed from the Configuration tab.
NoteYou may need additional permissions to work with the administration console.
If the console is closed, you can open it by clicking the Administration icon in the Navigator view.
SAP HANA Developer GuideSAP HANA Development Platform
P U B L I C© 2013 SAP AG or an SAP affiliate company. All
rights reserved. 33

4.5 Getting Started
Before starting development work in the SAP HANA studio, make sure to have the following:
● An installation of the SAP HANA studio on your workstation.● A live SAP HANA system to which to connect.● A user on the SAP HANA server that has at least the following roles or their equivalent:
○ MODELING○ CONTENT_ADMIN
4.5.1 Adding a SystemTo develop applications, you must first make a connection from your SAP HANA studio to an SAP HANA system.
1. In the Navigator view, right-click anywhere in the view and select Add System.2. In the System window, enter the host name, instance number, and a description for the SAP HANA system
you want to add.3. Select Next.4. Enter a user name and password, and select Finish.
The Navigator view includes a new top-level node for the system. You can now create a repository workspace for this system so you can start to develop objects to run in it.Related LinksSetting Up Your Application [page 35]In SAP HANA Extended Application Services (SAP HANA XS), the design-time artifacts that make up your application are stored in the repository like files in a file system. You first choose a root folder for your application-development activities, and within this folder you create additional subfolders to organize the applications and the application content according to your own requirements.
34
P U B L I C© 2013 SAP AG or an SAP affiliate company. All rights reserved.
SAP HANA Developer GuideSAP HANA Development Platform

5 Setting Up Your Application
In SAP HANA Extended Application Services (SAP HANA XS), the design-time artifacts that make up your application are stored in the repository like files in a file system. You first choose a root folder for your application-development activities, and within this folder you create additional subfolders to organize the applications and the application content according to your own requirements.
NoteApplication development with SAP HANA Extended Application Services (SAP HANA XS) is currently only available as an SAP-led project solution, for pre-approved customers and partners. This applies to server-side JavaScript programming, support for ODATA and XMLA, Web server features and the Web application development environment. For more information, see SAP Note 1779803.
As part of the application-development process, you typically need to perform the tasks described in the following list. Each of the tasks in more detail is described in its own section:
1. Check application-development prerequisitesBefore you start developing applications using the features and tools provided by the SAP HANA XS, developers who want to build applications to run on SAP HANA XS need to be granted access to development tools, SAP HANA systems, database accounts, and so on.
2. Set up delivery units.To create and manage delivery units, you must set the identity of the vendor with whom the delivery units are associated. To avoid conflicts with applications from SAP or other providers, we recommend that you name the root application-development folder for your company using the DNS name of your company. For example, you could use the name acme.com.hr.newHires for the root folder for a new application managing new hires in a company called acme.
3. Set up SAP HANA projects.In SAP HANA, projects enable you to group together all the artifacts you need for a specific part of the application-development environment. To start the application-development work flow, you first create a repository workspace in the SAP HANA Development perspective, which creates a directory structure to store files on your PC; the workspace you create enables you to synchronize changes in local files with changes in the repository. Then you can use the SAP HANA studio to create a project to manage the development activities for the new application.
4. Maintain repository packages.To perform the high-level tasks that typically occur during the process of maintaining repository packages, you need to be familiar with the concepts of packages and package hierarchies, which you use to manage the artifacts in your applications.
5. Maintain application descriptors.The framework defined by the application descriptors includes the root point in the package hierarchy where content is to be served to client requests. The framework also defines if the application is permitted to expose data to client requests, what kind of access to the data is allowed, and what if any privileges are required to perform actions on packages and package content.
SAP HANA Developer GuideSetting Up Your Application
P U B L I C© 2013 SAP AG or an SAP affiliate company. All
rights reserved. 35

5.1 Before you Start
To enable application-developers to start building native applications that take advantage of the SAP HANA Extended Application Services (SAP HANA XS), the SAP HANA administrator must set up the application-development environment in such a way that developers have access to the tools and objects that they need to perform the tasks required during the application-development process.Before you start developing applications using the features and tools provided by the SAP HANA XS, bear in mind the following prerequisites. Developers who want to build applications to run on SAP HANA XS need the following tools, accounts, and privileges:
NoteThe following tasks can only be performed by someone who has the required authorizations in SAP HANA, for example, a SAP HANA administrator.
● Access to a running SAP HANA development system (with SAP HANA XS)● A valid user account in the SAP HANA database on that system● Access to SAP HANA studio tools● Access to the SAP HANA client (which SAP HANA studio uses to connect to the repository)● Access to the SAP HANA repository● Access to selected run-time catalog objects
NoteTo provide access to the repository for application developers, you can use a predefined role or create your own custom role to which you assign the privileges that the application developers need to perform the everyday tasks associated with the application-development process.
To provide access to the repository from the SAP HANA studio, the EXECUTE privilege is required for SYS.REPOSITORY_REST, the database procedure through with the REST API is tunneled. To enable the activation and data preview of information views, the technical user _SYS_REPO also requires SELECT privilege on all schemas where source tables reside.In SAP HANA, you can use roles to assign one or more privileges to a user according to the area in which the user works; the role defines the privileges the user is granted. For example, a role enables you to assign SQL privileges, analytic privileges, system privileges, package privileges, and so on. To create and maintain artifacts in the SAP HANA repository, you can assign application-development users the following roles:
● One of the following:
○ MODELINGThe predefined MODELING role assigns wide-ranging SQL privileges, for example, on _SYS_BI and _SYS_BIC. It also assigns the analytic privilege _SYS_BI_CP_ALL, and some system privileges. If these permissions are more than your development team requires, you can create your own role with a set of privileges designed to meet the needs of the application-development team.
○ Custom DEVELOPMENT roleA user with the appropriate authorization can create a custom DEVELOPMENT role specially for application developers. The new role would specify only those privileges an application-developer needs to perform the everyday tasks associated with application development, for example: maintaining packages in the repository, executing SQL statements, displaying data previews for views, and so on.
36
P U B L I C© 2013 SAP AG or an SAP affiliate company. All rights reserved.
SAP HANA Developer GuideSetting Up Your Application

● PUBLICThis is a role that is assigned to all users by default.
Related LinksCreating Roles in the Repository [page 343]You model roles in the SAP HANA repository in a domain-specific language (DSL).
Defining Repository Package Privileges [page 48]In the SAP HANA repository, you can set package authorizations for a specific user or for a role. Authorizations that are assigned to a repository package are implicitly assigned to all sub-packages, too. You can also specify if the assigned user authorizations can be passed on to other users.
5.2 Setting up Delivery Units
A delivery unit is a collection of packages that are to be transported together. You assign all the packages belonging to your application to the same delivery unit to ensure that they are transported consistently together within your system landscape. Each delivery unit has a unique identity.
The identity of a delivery unit consists of two parts: a vendor name and a delivery-unit name. The combined ID ensures that delivery units from different vendors are easy to distinguish and follows a pattern that SAP uses for all kinds of software components.To create and manage delivery units you first need to maintain the identity of the vendor, with whom the delivery units are associated, and in whose namespace the packages that make up the delivery unit are stored. As part of the vendor ID maintenance process, you must perform the following tasks:
1. Understand delivery unitsYou must be familiar with the conventions that exist for delivery-unit names and understand the phases of the delivery-unit lifecycle.
2. Maintain details of the vendor ID associated with a delivery unit.Delivery units are located in the namespace associated with the vendor who creates them and who manages the delivery-unit's lifecycle.
3. Create a delivery unit.
Related LinksMaintaining the Delivery-Unit Vendor ID [page 37]In SAP HANA, the vendor ID is used primarily to define the identity of the company developing a software component that they plan to ship for use with SAP HANA. If you want to create a delivery unit, it is a prerequisite to maintain a vendor ID in your system.
Creating a Delivery Unit [page 38]A delivery unit is a group of transportable objects used for content delivery. You can use a delivery unit to transport the design-time objects that are stored in the SAP HANA repository between two systems, for example, from a development system to a consolidation system.
5.2.1 Maintaining the Delivery-Unit Vendor IDIn SAP HANA, the vendor ID is used primarily to define the identity of the company developing a software component that they plan to ship for use with SAP HANA. If you want to create a delivery unit, it is a prerequisite to maintain a vendor ID in your system.
SAP HANA Developer GuideSetting Up Your Application
P U B L I C© 2013 SAP AG or an SAP affiliate company. All
rights reserved. 37

Before creating your first own delivery unit you must set the identity of the vendor in the development system's configuration. To maintain details of the delivery-unit vendor ID, perform the following steps:
1. Start the SAP HANA studio.2. Switch to the Administration Console perspective.
In the SAP HANA studio's Navigator view, select the desired system, and choose Administration from the context-sensitive menu. Alternatively, use the menu path: Window > Open Perspective > Administration Console .
3. Display configuration details for the SAP HANA instance; choose the Configuration tab page.4. Maintain details of the vendor ID.
In the Configuration tab page, perform the following steps:a) Locate indexserver.ini in the list of configuration files displayed in the Name column.b) Expand the indexserver.ini entry.c) Expand the repository entry.d) Edit the content_vendor parameter.e) Double-click content_vendor and enter the name of your vendor. Note that guidelines and conventions
exist for vendor names.
NoteWe recommend that you use your DNS name to set the vendor ID, for example, acme.com.
f) Save your changes.
5.2.2 SAP HANA Delivery Unit Naming ConventionsIn SAP HANA, conventions and guidelines exist for the naming of delivery units (DU). The delivery unit is the vehicle that lifecycle management (LCM) uses to ship one or more software components from SAP (or a partner) to a customer. The DU is also the container you use to transport application content in your system landscape.If you are creating a delivery unit, you must adhere to the following naming conventions
● The name of a delivery unit must contain only capital letters (A-Z), digits (0-9), and underscores (_)● You cannot use an underscore (_) as the first character of a delivery-unit name.
NoteThe naming conventions for packages in a delivery unit differ from the naming conventions that apply to the delivery unit itself. For example, the maximum length of a package name is not restricted to 30 characters; it must be less than 190 characters (including the namespace hierarchy).
5.2.3 Creating a Delivery UnitA delivery unit is a group of transportable objects used for content delivery. You can use a delivery unit to transport the design-time objects that are stored in the SAP HANA repository between two systems, for example, from a development system to a consolidation system.
In the SAP HANA studio, you can create a delivery unit in the Quick Launch view of the Modeler perspective :
NoteYou cannot create a delivery unit unless you have already defined the delivery unit's vendor ID; the vendor ID defines the namespace in which the new delivery unit resides.
38
P U B L I C© 2013 SAP AG or an SAP affiliate company. All rights reserved.
SAP HANA Developer GuideSetting Up Your Application

To create a new delivery unit, perform the following steps:
1. In the SAP HANA studio, start the Modeler perspective.2. In the Setup screen area of the Quick Launch tab, choose Delivery Units....3. Create a new delivery unit.
In the Delivery Units dialog, choose Create...4. Maintain delivery unit details.
a) Enter a name for the new delivery unit.The delivery unit Name is mandatory.
b) Fill in the other information as required:Note the following points when entering information:
○ The name of the Vendor is set to the vendor ID that is specified in the system configuration, for example, acme.com.
○ The Responsible text box enables you to specify the name of the person responsible for managing the delivery unit.
○ In the text boxes Version, Support Package Version, and Patch Version enter integer values only; the combined values define the version of the delivery unit that is currently being developed. For example, enter Version = 1, Support Package Version = 3, and Patch Version = 17 to specify that the current version of your delivery unit is 1.3.17. The version number is transported to other systems with every DU transport.
NoteThe numbers you enter here refer to the application component that you are developing; the numbers do not refer to the patch or service-pack level deployed on the SAP HANA server.
○ The PPMS ID is the product ID used by the SAP Product and Production Management System (PPMS).
NoteCustomers and partners should leave the PPMS ID text box empty.
Related LinksMaintaining the Delivery-Unit Vendor ID [page 37]In SAP HANA, the vendor ID is used primarily to define the identity of the company developing a software component that they plan to ship for use with SAP HANA. If you want to create a delivery unit, it is a prerequisite to maintain a vendor ID in your system.
SAP HANA Delivery Unit Naming Conventions [page 38]In SAP HANA, conventions and guidelines exist for the naming of delivery units (DU). The delivery unit is the vehicle that lifecycle management (LCM) uses to ship one or more software components from SAP (or a partner) to a customer. The DU is also the container you use to transport application content in your system landscape.
5.3 Using SAP HANA Projects
Projects group together all the artifacts you need for a specific part of the application-development environment.
SAP HANA Developer GuideSetting Up Your Application
P U B L I C© 2013 SAP AG or an SAP affiliate company. All
rights reserved. 39

Before you can start the application-development workflow, you must create a project, which you use to group together all your application-related artifacts. However, a project requires a repository workspace, which enables you to synchronize changes in local files with changes in the repository. You can create the workspace before or during the project-creation step. As part of the project-creation process, you perform the following tasks:
1. Create a development workspace.The workspace is the link between the SAP HANA repository and your local filesystem, where you work on project-related objects.
2. Create a project.Create a new project for a particular application or package; you can use the project to collect in a convenient place all your application-related artifacts.
3. Share a project.Sharing a project enables you to ensure that changes you make to project-related files are visible to other team members and applications. Shared projects are available for import by other members of the application-development team.
4. Import a project.Import a project (and its associated artifacts) that has been shared by another member of the application-development team.
Related LinksCreate a Development Workspace [page 41]A workspace is a local directory that you map to all (or part) of a package hierarchy in the SAP HANA repository. When you check out a package from the repository, SAP HANA copies the contents of the package hierarchy to your workspace, where you can work on the files..
Create a New Project [page 42]Before you can start the application-development workflow, you must create a project, which you use to group all your application-related artifacts.
Share a Project [page 43]Before you can start working on files associated with a new project, you must share the project; sharing a project enables you to track and synchronize local changes with the repository.
Import a Project [page 44]Before you can start the application-development workflow, you must either create a new project and share it (with the repository), or import a shared project from the repository into your workspace. Importing a project enables you to track and synchronize local changes with the colleagues working on the objects in the imported project.
5.3.1 SAP HANA Repository: WorkspacesThe place where you work on project-related objects is called a repository workspace. A workspace is an environment that maps a local directory to all (or part) of a package hierarchy in the SAP HANA repository.In SAP HANA studio, the repository tools enable you to view and browse the entire hierarchy of design-time objects stored in the repository. However, when you checkout a package from the repository, SAP HANA copies the contents of the package hierarchy to your workspace, where you can work on the files in your local file system.
NoteBefore you can create a workspace you must maintain connection information in the SAP HANA database user store.
40
P U B L I C© 2013 SAP AG or an SAP affiliate company. All rights reserved.
SAP HANA Developer GuideSetting Up Your Application

To start development work with SAP HANA studio, for example, to checkout the contents of a package, you must create a repository workspace. The workspace contains a system folder with metadata and package folders for the repository content. The file-system folders and their subfolders reflect the package hierarchy in the repository; the repository client ensures that changes are synchronized.
5.3.2 Creating a Repository WorkspaceA workspace is a local directory that you map to all (or part) of a package hierarchy in the SAP HANA repository. When you check out a package from the repository, SAP HANA copies the contents of the package hierarchy to your workspace, where you can work on the files..
Before you can start work on the development of the application, you need to set up a workspace, where you store checked-out copies of your application’s source-code files.To create a new workspace in the SAP HANA studio, perform the following steps:
1. Open the SAP HANA studio.2. Open the SAP HANA Development perspective.3. Choose the SAP HANA Repositories view.4. Choose Create Workspace…
The Create Workspace… button is located in the top right-hand corner of the SAP HANA Repositories view.5. Specify the workspace details. In the Create New Repository Workspace dialog, enter the following
information and choose Finish:a) Specify the SAP HANA system, for which you want to create a new workspace.b) Enter a workspace name, for example the name of the SAP HANA system where the repository is located.
To avoid the potential for confusion, it is recommended to associate one workspace with one repository.c) Specify where the workspace root directory should be located on your local file system, for example: C:
\users\username\workspacesThe new workspace is displayed in the SAP HANA Repositories view.
NoteAlthough the packages and objects in the chosen repository are visible in the SAP HANA Repositories view, you cannot open or work on the objects here. To work on objects, you must create a project and use the Project Explorer view.
5.3.3 SAP HANA Studio ProjectsBefore you can start the application-development workflow, you must create a project, which you use to group all your application-related artifacts.Projects group together all the artifacts you need for a specific part of the application-development environment. A basic project contains folders and files. More advanced projects are used for builds, version management, sharing, and the organization and maintenance of resources.Projects enable multiple people to work on the same files at the same time. You can use SAP HANA studio to perform the following project-related actions in the repository:
● Checkout folders and files from the repository● Commit changes to the repository● Activate the committed changes● Revert inactive changes to the previously saved version
By committing project-related files to the repository and activating them, you enable team members to see the latest changes. The commit operation detects all changes in packages that you configure SAP HANA studio tool
SAP HANA Developer GuideSetting Up Your Application
P U B L I C© 2013 SAP AG or an SAP affiliate company. All
rights reserved. 41

to track and writes the detected changes back to the repository. The repository client tools also support synchronization with changes on the server, including conflict detection and merging of change. All workspace-related repository actions are available as context-sensitive menu options in SAP HANA studio. For example, if you right click a repository object at the top of the package hierarchy in the Project Explorer in SAP HANA studio, you can commit and activate all changed objects within the selected hierarchy.
NoteIf you create a new project using SAP HANA studio, you can assign the new project to an existing workspace.
You can share and unshare projects. Sharing a project associates it with a particular package in the repository linked to a particular workspace. The act of sharing the project sets up a link between the workspace and the repository and enables you to track and synchronize local changes with the versions of the objects stored in the repository. When a project is shared, it becomes available to other people with authorization to access to the repository, for example, colleagues in an application-development team. Team members can import a shared project and see and work on the same files as the creator of the project.
NoteAlways unshare a project before deleting it.
In the SAP HANA studio you can create a project at any package level, which enables a fine level of control of the artifacts that may (or may not) be exposed by sharing the project.
5.3.4 Creating a Project for SAP HANA XSBefore you can start the application-development workflow, you must create a project, which you use to group all your application-related artifacts.
Projects group together all the artifacts you need for a specific part of your application-development environment. A basic project contains folders and files. More advanced projects are used for builds, version management, sharing, and the organization and maintenance of resources.To create a new project in the SAP HANA studio, perform the following steps:
1. Open the SAP HANA studio.2. Open the SAP HANA Development perspective.3. Choose the Project Explorer view.4. Right-click the white space in the Project Explorer view and choose New > Project… in the popup menu.
The type of project you create determines the details you have to provide in the New Project dialog that appears.a) Enter a project name that describes what the project is about, for example: XS_JavaScript, XS_OData
or XS_SAPUI5.b) Click Finish to create the new project.The new project is displayed in the Project Explorer view.
NoteThe contents of the project depend on the type of project you create. For example, a general project is empty immediately after creation; a JavaScript project contains all the resource files associated with a JavaScript project, such as libraries and build-environment artifacts.
42
P U B L I C© 2013 SAP AG or an SAP affiliate company. All rights reserved.
SAP HANA Developer GuideSetting Up Your Application

5.3.5 Sharing a Project for SAP HANA XSBefore you can start working on files associated with a new project, you must share the project; sharing a project enables you to track and synchronize local changes with the repository.
When you share a project, you set up a connection to the SAP HANA repository associated with a particular SAP HANA instance. Sharing the project enables you to ensure that changes you make to project-related files are visible to other team members and applications. Other developers can import a shared project and work on the same files.
NoteUse the Project Explorer view in the SAP HANA studio to check if a project is shared. In addition to the project name, a shared project displays the SAP HANA system ID of the repository where the shared artifacts are located, a SAP HANA user name, and the path to the repository package to which the shared project is assigned, for example. "XSJS_myproject [SID (dbusername, 'sap.hana.xs.app1')].
To share a project in the SAP HANA studio, perform the following steps:
1. Open the SAP HANA studio2. Open the SAP HANA Development perspective.3. Open the Project Explorer view.4. Share the project
Right-click the project you want to share and choose Team Share Project… in the pop-up menu.5. Select the repository type.
The Share Project dialog displays a list of all available repository types; choose SAP HANA Repository and choose Next.
6. Select the repository workspace where the project should be located.7. Specify the package that you want to associate the shared project with.
The Share Project dialog displays the suggested location for the shared project in the New Project location screen area. The default location is the name of the workspace with the name of the project you want to share. Choose Browse... to locate the package you want to associate the shared project with. The selected package is displayed in the Path to package text box.
NoteThe Keep project folder option appends the name of the project you are sharing to the name of the workspace in which you are sharing the project and creates a new package with the name of the shared project under the workspace location displayed. Use this option only if you want to create multiple projects for a selected package, for example, if you are creating a root project in your root application package.
8. Click Finish to complete the project-sharing procedure.9. Add new files as required
At this point you can start adding project-specific files to the shared project. These artifacts can then be committed to the repository, where they reside as inactive objects until they are activated, for example, using the Team Activate option in the context-sensitive menus available in the Project Explorer view.
Note
SAP HANA Developer GuideSetting Up Your Application
P U B L I C© 2013 SAP AG or an SAP affiliate company. All
rights reserved. 43

The Project Explorer view decorates the file icons to indicate the current state of the repository files, for example: local (not yet committed), committed (inactive), and active (available for use by others).
10. Make the project available for import, for example, so that others can join it and make changes to project content.The project-sharing procedure creates some artifacts (for example, the .project file) that must be committed to the repository and activated so that other team members can import the project more easily into their workspace. The .project file is used in several dialogs to populate the list of available projects.
NoteUse the SAP HANA Repositories view to import projects (and checkout project content).
Related LinksImporting a Project in SAP HANA XS [page 44]Before you can start the application-development workflow, you must either create a new project and share it (with the repository), or import a shared project from the repository into your workspace. Importing a project enables you to track and synchronize local changes with the colleagues working on the objects in the imported project.
5.3.6 Importing a Project in SAP HANA XSBefore you can start the application-development workflow, you must either create a new project and share it (with the repository), or import a shared project from the repository into your workspace. Importing a project enables you to track and synchronize local changes with the colleagues working on the objects in the imported project.
To import an existing project from the repository into your workspace, perform the following steps.
1. Open the SAP HANA studio2. Open the SAP HANA Development perspective.3. Choose the HANA Repositories view.4. Right-click the package where the project you want to import is located and choose Checkout and Import
Projects... in the popup menu.Projects can be assigned to a package at any level of the package hierarchy. If you know where the project is located, browse to the package first before choosing the Checkout and Import Projects... option. This reduces the amount of files to checkout and download to your local file system.
NoteThe existence of a .project file in a package identifies the package as being associated with a project.
The SAP HANA studio checks out the content of the selected package and displays any projects it finds in the Projects screen area.
5. Select the projects to import.If multiple projects are available for import, select the projects you want to import.
6. Choose Finish to import the selected projects.You can add the imported project to your Working Sets.
Note
44
P U B L I C© 2013 SAP AG or an SAP affiliate company. All rights reserved.
SAP HANA Developer GuideSetting Up Your Application
A working set is a concept similar to favorites in a Web browser, which contain the objects you work on most frequently.
5.4 Maintaining Repository Packages
All content delivered as part of the application you develop for SAP HANA is stored in packages in the SAP HANA repository. The packages are arranged in a hierarchy that you define to help make the process of maintaining the packages transparent and logical.
To perform the high-level tasks that typically occur during the process of maintaining repository packages, you need to be familiar with the concepts of packages and package hierarchy that create and maintain the artifacts for your applications. You also need to know about the privileges the application developers will need to have access to (and perform operations on) the packages.
NoteYou can also create and delete packages in the Project Explorer, for example, by creating or deleting folders in shared projects and committing and activating these changes. However, to maintain advanced package properties (for example, privileges, component, the package maintainer, and so on) you must use the Modeling perspective in the SAP HANA studio..
As part of the process of maintaining your application packages, you typically perform the following tasks:
1. Create a packagePackages are necessary to group logically distinct artifacts together in one object location that is easy to transport.
2. Define the package hierarchyThe package hierarchy is essential for ease of maintenance as well as the configuration of access to packages and the privileges that are required to perform actions on the packages.
3. Define package privilegesYou can set package authorizations for a specific user or for a role. Authorizations that are assigned to a repository package are implicitly assigned to all sub-packages, too.
Related LinksCreating a package [page 48]In SAP HANA, a package contains a selection of repository objects. You assemble a collection of packages into a delivery unit, which you can use to transport the repository objects between SAP HANA systems.
Defining the package hierarchy [page 49]Packages belonging to an application-development delivery unit (DU) should be organized in a clear hierarchical structure under a single root package representing the vendor, for example, acme.com.
Defining package privileges [page 48]In the SAP HANA repository, you can set package authorizations for a specific user or for a role. Authorizations that are assigned to a repository package are implicitly assigned to all sub-packages, too. You can also specify if the assigned user authorizations can be passed on to other users.
SAP HANA Developer GuideSetting Up Your Application
P U B L I C© 2013 SAP AG or an SAP affiliate company. All
rights reserved. 45

5.4.1 SAP HANA Repository Packages and NamespacesIn SAP HANA, a package typically consists of a collection of repository objects, which can be transported between systems. Multiple packages can be combined in a delivery unit (DU).A SAP HANA package specifies a namespace in which the repository objects exist. Every repository object is assigned to a package, and each package must be assigned to a specific delivery unit. In the repository, each object is uniquely identified by a combination of the following information:
● Package name● Object name● Object type
NoteMultiple objects of the same type can have the same object name if they belong to different packages.
Before you start the package development process, consider the following important points:
● Package hierarchyEach vendor uses a dedicated namespace, and the package hierarchy you create enables you to store the various elements of an application in a logical order that is easy to navigate.
● Package typePackages can be structural or non-structural; some packages contain content; other packages contain only other (sub)packages.
● Package naming conventionsThere are recommendations and restrictions regarding package names, for example, the name's maximum length and what if any characters must not be used.
Package HierarchyYou can create a package hierarchy, for example, by establishing a parent-child type relationship between packages. The assignment of packages to delivery units is independent of the package hierarchy; packages in a parent-child relationship can belong to different delivery units. SAP recommends that you assign to one specific delivery unit all packages that are part of a particular project or project area.The package hierarchy for a new project typically includes sub-packages, for example, to isolate the data model from the business logic. Although there are no package interfaces to enforce visibility of objects across packages, this separation of logical layers of development is still a recommended best practice.
NoteYou can only assign one project per package; this is important to remember if you have a mixture of design-time objects that need to be used in multiple projects, for example: server-side JavaScript (XSJS), SAPUI5, and a general project (for procedures).
The following simple example shows a package structure containing tutorials for the use of a new application:
sap \ hana \ app1 \ code demos docs
46
P U B L I C© 2013 SAP AG or an SAP affiliate company. All rights reserved.
SAP HANA Developer GuideSetting Up Your Application

\ tutorials manuals help
All content delivered by SAP should be in a sub-package of "sap". Partners and customers should choose their own root package to reflect their own name (for example, the domain name associated with the company) and must not create packages or objects under the "sap" root structural package. This rules ensures that customer or partner created content will not be overwritten by an SAP update or patch.
NoteSAP reserves the right to deliver without notification changes in packages and models below the "sap" root structural package.
There are no system mechanisms for enforcing the package hierarchy. The "sap" root structural package is not automatically protected. However, by default you cannot change the content of packages that did not originate in the system. In addition, an authorization concept exists, which enables you to control who can change what inside packages.
Package TypesSAP HANA Application Services provide or allow the following package types:
● StructuralPackage only contains sub-packages; it cannot contain repository objects.
● Non-StructuralPackage contains both repository objects and subpackages.
The following packages are delivered by default with the repository:
● sapTransportable package reserved for content delivered by SAP. Partners and customers must not use the sap package; they must create and use their own root package to avoid conflicts with software delivered by SAP, for example when SAP updates or overwrites the sap package structure during an update or patch process.
● system-localNon-transportable, structural packages (and subpackages). Content in this package (and any subpackages) is considered system local and cannot be transported. This is similar to the concept of the $tmp development class in SAP NetWeaver ABAP.
● system-local.generatedTransportable, structural packages for generated content, that is; content not created by manual user interaction
● system-local.privateTransportable, structural sub-packages containing objects that belong to individual users and are named after these users (and are exclusively reserved for these users). For example, system-local.private.<user_name>
Package Naming ConventionsThe following rules apply to package names:
● Permitted charactersLower/upper case letters (aA-zZ), digits (0-9), hyphens (-), and dots (.) are permitted in package names. Dots in a package name define a logical hierarchy. For example, "a.b.c" specifies a package "a" that contains sub-package "b", which in turn contains sub-package "c".
SAP HANA Developer GuideSetting Up Your Application
P U B L I C© 2013 SAP AG or an SAP affiliate company. All
rights reserved. 47

● Forbidden charactersA package name must not start with either a dot (.) or a hyphen (-) and cannot contain two or more consecutive dots (..).
● Package name lengthThe maximum permitted length of a package name is 190 characters. To avoid problems, we recommend you restrict the length of package names to well under the 190-character limit.
● Package namespace lengthThe name of the complete package namespace hierarchy (for example, "aa.bb.cc.zz" including dots) must not be more than 190 characters long. To avoid problems, we recommend you restrict the length of the package namespace to well under the 190-character limit.
5.4.2 Defining Repository Package PrivilegesIn the SAP HANA repository, you can set package authorizations for a specific user or for a role. Authorizations that are assigned to a repository package are implicitly assigned to all sub-packages, too. You can also specify if the assigned user authorizations can be passed on to other users.
To set user (or role) authorizations for repository packages, perform the following steps:
1. Open the Navigator view in the SAP HANA studio's Modeler perspective.
2. In the Navigator view, expand the Security Roles/Users node for the system hosting the repository that contains the packages you want to grant access to.You can also define roles via source files; roles defined in this way can be assigned to a delivery unit and transported to other systems.
3. Double click the user (or role) to whom you want to assign authorizations.4. Open the Package Privileges tab page.5. Choose [+] to add one or more packages. Press and hold the Ctrl key to select multiple packages.
6. In the Select Repository Package dialog, use all or part of the package name to locate the repository package that you want to authorize access to.
7. Select one or more repository packages that you want to authorize access to; the selected packages appear in the Package Privileges tab page.
8. Select the packages to which you want authorize access and, in the Privileges for screen page, check the required privileges, for example:a) REPO.READ
Read access to the selected package and design-time objects (both native and imported)b) REPO.EDIT_NATIVE_OBJECTS
Authorization to modify design-time objects in packages originating in the system the user is working inc) REPO.ACTIVATE_NATIVE_OBJECTS
Authorization to activate/reactivate design-time objects in packages originating in the system the user is working in
d) REPO.MAINTAIN_NATIVE_PACKAGESAuthorization to update or delete native packages, or create sub-packages of packages originating in the system in which the user is working
5.4.3 Creating a PackageIn SAP HANA, a package contains a selection of repository objects. You assemble a collection of packages into a delivery unit, which you can use to transport the repository objects between SAP HANA systems.
48
P U B L I C© 2013 SAP AG or an SAP affiliate company. All rights reserved.
SAP HANA Developer GuideSetting Up Your Application

You can use packages to manage the various elements of your application development project. To create a project, perform the following steps:
1. In the SAP HANA studio, start the SAP HANA Development perspective.2. In the Navigator view, select the SAP HANA system where you want to create a new package and expand the
Content node to display the namespace hierarchy for package content.
3. Right-click the package where you want to add a new package and choose New Package... in the context-sensitive popup menu.SAP HANA studio displays the New Package dialog.
4. Maintain the package details.In the New Package dialog, enter information in the following fields:a) Enter a name for the new package.
The package Name is mandatory. Add the new name to the end of the full package path, for example, acme.com.package1.
b) Fill in the other optional information as required:Use the Delivery Unit drop-down list to assign the new package to a delivery unit.Choose Translation if you intend to have the package content localized. You must maintain the translation details.
5. Create the new package.In the New Package dialog, click OK to create a new package in the specified location.
6. Activate the new package.In the Navigator view, right-click the new package and choose Activate from the context-sensitive popup menu.
Related LinksSAP HANA Delivery-Unit Translation Details [page 372]The SAP HANA repository includes features for translating package-related metadata texts. If you plan to translate the contents of the new delivery unit you create, you must maintain translation details.
5.4.4 Defining a Package HierarchyPackages belonging to an application-development delivery unit (DU) should be organized in a clear hierarchical structure under a single root package representing the vendor, for example, acme.com.
The package hierarchy for a new project might include sub-packages, for example, to isolate the data model from the business logic. Although there are no package interfaces to enforce visibility of objects across packages, this separation of logical layers of development is still a recommended best practice.
NoteYou can only assign one project per package; this is important to remember if you have a mixture of design-time objects that need to be used in multiple projects, for example: server-side JavaScript (XSJS), SAPUI5, and a general project (for procedures).
The following simple example shows a package structure containing tutorials for the use of a new application:
acme \ hana \ app1 \
SAP HANA Developer GuideSetting Up Your Application
P U B L I C© 2013 SAP AG or an SAP affiliate company. All
rights reserved. 49
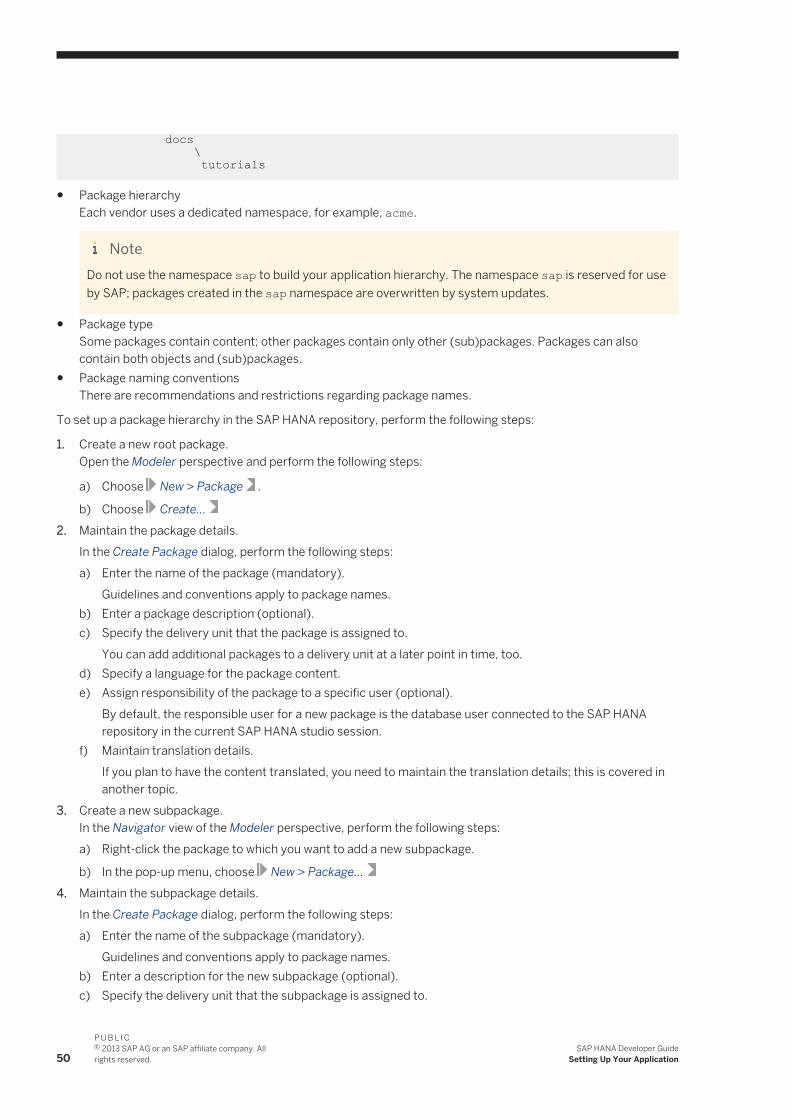
docs \ tutorials
● Package hierarchyEach vendor uses a dedicated namespace, for example, acme.
NoteDo not use the namespace sap to build your application hierarchy. The namespace sap is reserved for use by SAP; packages created in the sap namespace are overwritten by system updates.
● Package typeSome packages contain content; other packages contain only other (sub)packages. Packages can also contain both objects and (sub)packages.
● Package naming conventionsThere are recommendations and restrictions regarding package names.
To set up a package hierarchy in the SAP HANA repository, perform the following steps:
1. Create a new root package.Open the Modeler perspective and perform the following steps:
a) Choose New > Package .
b) Choose Create...2. Maintain the package details.
In the Create Package dialog, perform the following steps:a) Enter the name of the package (mandatory).
Guidelines and conventions apply to package names.b) Enter a package description (optional).c) Specify the delivery unit that the package is assigned to.
You can add additional packages to a delivery unit at a later point in time, too.d) Specify a language for the package content.e) Assign responsibility of the package to a specific user (optional).
By default, the responsible user for a new package is the database user connected to the SAP HANA repository in the current SAP HANA studio session.
f) Maintain translation details.If you plan to have the content translated, you need to maintain the translation details; this is covered in another topic.
3. Create a new subpackage.In the Navigator view of the Modeler perspective, perform the following steps:a) Right-click the package to which you want to add a new subpackage.
b) In the pop-up menu, choose New > Package...4. Maintain the subpackage details.
In the Create Package dialog, perform the following steps:a) Enter the name of the subpackage (mandatory).
Guidelines and conventions apply to package names.b) Enter a description for the new subpackage (optional).c) Specify the delivery unit that the subpackage is assigned to.
50
P U B L I C© 2013 SAP AG or an SAP affiliate company. All rights reserved.
SAP HANA Developer GuideSetting Up Your Application

You can add additional packages to a delivery unit at a later point in time, too.d) Specify a language for the subpackage content.e) Assign responsibility of the subpackage to a specific user (optional).
By default, the responsible user for a new package is the database user connected to the SAP HANA repository in the current SAP HANA studio session.
f) Maintain translation details.If you plan to have the content translated, you need to maintain the translation details; this is covered in another topic.
Related LinksSAP HANA Delivery Unit Naming Conventions [page 38]In SAP HANA, conventions and guidelines exist for the naming of delivery units (DU). The delivery unit is the vehicle that lifecycle management (LCM) uses to ship one or more software components from SAP (or a partner) to a customer. The DU is also the container you use to transport application content in your system landscape.
Maintaining Translation Details [page 372]Translation details provide a brief overview of the type and current status of the text objects to be translated, for example, by specifying the technical area of the new delivery unit and indicating the current status of translation texts.
5.5 Creating the Application Descriptors
When you develop and deploy applications in the context of SAP HANA Extended Application Services (SAP HANA XS), you must define the application descriptors, which describe the framework in which the application runs. The framework defined by the application descriptors includes the root point in the package hierarchy where content is to be served to client requests, whether the application is permitted to expose data to client requests, what kind of access to the data is allowed, and what if any privileges are required to perform actions on packages and package content.
To perform the high-level tasks that make up the process of defining the application descriptors, you must be familiar with the concept of the application descriptor, the application-access file, and if required, the application-privileges file. Maintaining the application descriptors involves the following tasks:
1. Creating the application descriptor file.The package that contains the application descriptor file becomes the root path of the resources exposed to client requests by the application you develop.
2. Creating the application-access file.The application-access file enables you to specify who or what is authorized to access the content exposed by the application package and what content they are allowed to see.
3. Creating the application-privileges file. (Optional)The application-privileges file can be used to define the authorization privileges required for access to an application, for example, to start the application or to perform administrative actions on an application.
Related LinksCreate an application descriptor [page 52]Each application that you want to develop and deploy on SAP HANA Extended Application Services (SAP HANA XS) must have an application-descriptor file. The application descriptor is the core file that you use to describe an application's framework within SAP HANA XS.
SAP HANA Developer GuideSetting Up Your Application
P U B L I C© 2013 SAP AG or an SAP affiliate company. All
rights reserved. 51

Create an application-access file [page 61]The application-access file enables you to specify who or what is authorized to access the content exposed by the application package and what content they are allowed to see.
Create an application-privileges file [page 65]The application-privileges (.xssprivileges) file can be used to define the authorization levels required for access to an application, for example, to start the application or perform administrative actions on an application. You can then assign the application privileges to the individual users who require them.
5.5.1 The SAP HANA XS Application DescriptorEach application that you want to develop and deploy on SAP HANA Extended Application Services (SAP HANA XS) must have an application descriptor file. The application descriptor is the core file that you use to describe an application's framework within SAP HANA XS.The package that contains the application descriptor file becomes the root path of the resources exposed to client requests by the application you develop.
NoteThe application-descriptor file has no contents and no name; it only has the file extension “xsapp”, for example, .xsapp. For backward compatibility, content is allowed in the .xsapp file but ignored.
The application descriptor file performs the following operations:
● Determines the called applicationThe application root is determined by the package containing the .xsapp file. If the package sap.test contains the file .xsapp, the application will be available under the URL http://<host>:<port>/sap.test/.
5.5.2 Create an Application Descriptor FileEach application that you want to develop and deploy on SAP HANA Extended Application Services (SAP HANA XS) must have an application-descriptor file. The application descriptor is the core file that you use to describe an application's framework within SAP HANA XS.
The package that contains the application-descriptor file becomes the root path of the resources exposed by the application you develop.
1. Create a root package for your application, for example, MyPackage.
NoteThe namespace sap is restricted. Place the new package in your own namespace, which you can create alongside the sap namespace.
a) Start the SAP HANA studio and open the SAP HANA Development perspective.b) In the Project Explorer view, right-click the folder where you want to create the new (MyPackage)
package.
c) In the context-sensitive popup menu, choose New Folder .d) Enter the name MyPackage and choose Finish.
2. Activate the new package in the repository.a) In the SAP HANA Development perspective, open the Project Explorer view and right-click the new
(MyPackage) package.
52
P U B L I C© 2013 SAP AG or an SAP affiliate company. All rights reserved.
SAP HANA Developer GuideSetting Up Your Application
b) In the context-sensitive popup menu, choose Team Activate .3. Create an application descriptor for your new application and place it in the package (MyPackage) you
created in the previous step.The application descriptor is the core file that you use to indicate an application's availability within SAP HANA XS. The application descriptor marks the point in the package hierarchy at which an application's content is available to clients. The application-descriptor file has no contents and no name; it only has the file extension .xsapp.
NoteFor backward compatibility, content is allowed in the.xsapp file but ignored.
a) In the SAP HANA studio and open the SAP HANA Development perspective.b) In the Project Explorer view, right-click the folder where you want to create the new (.xsapp) file.
c) In the context-sensitive popup menu, choose New File .d) Enter the name .xsapp and choose Finish.
Files with names that begin with the period (.), for example, .xsapp, are sometimes not visible in the Project Explorer. To enable the display of all files in the Project Explorer view, use the Customize ViewAvailable Customization option and clear all check boxes.
4. Save and activate your changes and additions.a) In the SAP HANA Development perspective, open the Project Explorer view and right-click the new
(.xsapp) package.
b) In the context-sensitive popup menu, choose Team Activate .
5.5.3 The Application-Access FileSAP HANA XS enables you to define access to each individual application package that you want to develop and deploy.The application-access file enables you to specify who or what is authorized to access the content exposed by a SAP HANA XS application package and what content they are allowed to see. For example, you use the application-access file to specify if authentication is to be used to check access to package content and whether if rules are in place for the exposure of target and source URLs.The application-access file does not have a name; it only has the file extension .xsaccess. The content of the .xsaccess file is formatted according to JSON rules and is associated with the package it belongs to as well as any subpackages lower in the package hierarchy. Multiple .xsaccess files are allowed, but only at different levels in the package hierarchy. This enables you to specify different application-access rules for individual packages and subpackages in the package hierarchy.
NoteYou cannot place two .xsaccess files in the same package. Furthermore, the rules specified in a .xsaccess file that is associated with a subpackage take precedence over any rules specified in a .xsaccess file associated with any parent package higher up the package hierarchy.
The application-access file performs the following operations:
● Data exposureUse the exposed keyword to specify if package content is to be exposed to client requests via HTTP.
Note
SAP HANA Developer GuideSetting Up Your Application
P U B L I C© 2013 SAP AG or an SAP affiliate company. All
rights reserved. 53

Exposed package content can include design-time objects, for example, tables and views.
● Authentication rulesUse the authentication keyword to enable authorization for the requests in URLs either at the application level or for single packages in an application. The following authentication methods are supported:
○ SAP logon ticketsSAP logon tickets enable single sign-on across SAP boundaries, for example, to set up single sign-on (SSO) between SAP NetWeaver and SAP HANA XS. SAP logon tickets can also be used as authentication for access to third-party applications.To configure the trust relationship between the issuer of the SAP logon ticket and SAP HANA, you must specify the path to the SAP logon ticket trust store, which contains the trust chain for the ticket issuer. You can use the SapLogonTicketTrustStore keyword in the xsengine.ini file. Default values are: $SECUDIR/saplogon.pse or $HOME/.ssl/saplogon.pem.
NoteSAP HANA XS does not issue SAP logon tickets; it only accepts them. Since the tickets usually reside in a cookie, the issuer and SAP HANA XS need to be in the same domain to make sure that your browser sends the SAP logon ticket cookie with each call to SAP HANA XS.
○ Form-based authenticationRedirect the logon request to a form to fill in, for example, on a Web page.
NoteIf you need to troubleshoot problems when developing a form-based logon solution for your application, you can configure the generation of useful trace information in the XSENGINE section of the database trace component using the following entry: xsa:sap.hana.xs.formlogon.
○ Basic (user name and password)Log on with a recognized user name and password
The authentication methods can also be written as an array, for example, to allow applications to support multiple authentication methods. The order of the authentication methods in the array should proceed from strongest to weakest, for example:
1. SAP logon ticket2. Form-based3. Basic authentication
● Application authorizationUse the authorization keyword in the .xsaccess file to specify which authorization level is required by a user for access to a particular application package. The authorization levels you can choose from are defined in the .xsprivileges file, for example, "execute" for basic privileges, or "admin" for administrative privileges on the specified package.
● URL rewrite rulesUse the rewrite_rules keyword in the .xsaccess file to hide internal URL path details from external users, clients, and search engines. It is not possible to define global rewrite rules; the rules you define apply to the specified local application only. Rules are specified as a source-target pair where the source is written in the JavaScript regex syntax, and the target is a simple string where references to the groups found can be inserted using $groupnumber.
● Connection security
54
P U B L I C© 2013 SAP AG or an SAP affiliate company. All rights reserved.
SAP HANA Developer GuideSetting Up Your Application

Use the force_ssl keyword in the .xsaccess file to enforce the use of secure HTTP (SSL/HTTPS) for client connections. Browser requests that do not use SSL/HTTPS are refused and the 403 Forbidden page is displayed. Note that if you set the force_ssl option, then you must ensure that the SAP Web Dispatcher is configured to accept and manage HTTPS requests. For more information about configuring the SAP Web Dispatcher to use HTTPS/SSL see the SAP HANA Security Guide.
NoteIf the SAP Webdispatcher sends the header “x-sap-webdisp-ap” with the HTTPS port, the request is redirected to a HTTPS page, for example: http://..:80/test -> https://..:433/test. Otherwise, a 403 error is displayed.
● Entity TagsYou can allow or prevent the generation of entity tags (etags) for static Web content using the enable_etags keyword in the .xsaccess file. Etags are used to improve caching performance, for example, so that the same data is not resent if no change has occurred since the last request.
● MIME MappingMIME means Multipurpose Internet Mail Extensions. You can use the mime_mapping keyword in the .xsaccess file to define the way in which to map certain file suffixes to required MIME types: "mime_mapping": [ {"extension":"jpg", "mimetype":"image/jpeg"} ]
● Cross-Site Request Forgery (XSRF)You can use the prevent_xsrf keyword in the .xsaccess file to guard against cross-site request-forgery attacks. XSRF attacks attempt to trick a user into clicking a specific hyperlink, which shows a (usually well-known) Web site and perform some actions on the user’s behalf, for example, in a hidden iframe. The prevent_xsrf keyword checks the validity of a session-specific security token to ensure that it matches the token that SAP HANA XS generates in the backend for the corresponding session.
ExampleThe Application-Access (.xsaccess) File
The following example, shows the composition and structure of the SAP HANA XS application access (.xsaccess) file. In this file, data is available to client requests. The authentication methods specified are SAP logon ticket and then, as a fall-back option if the logon with the SAP logon ticket fails, a logon with a user name and password. Allowing a fall-back log-on mechanism is useful if the requesting client has problems handling the SAP logon ticket mechanism.
{ "exposed" : true, // Expose data via http "authentication" : // Authentication method [ { "method": "LogonTicket", }, { "method" : "Basic" }, ], "authorization": // Grant package privileges [ "sap.xse.test::Execute", "sap.xse.test::Admin" ] "rewrite_rules" : // URL rewriting rules [
SAP HANA Developer GuideSetting Up Your Application
P U B L I C© 2013 SAP AG or an SAP affiliate company. All
rights reserved. 55

{ "source": "/entries/(\\d+)/(\\d+)/(\\d+)/", "target": "/logic/entries.xsjs?year=$1&month=$2&day=$3" } ], "mime_mapping" : // Map file-suffix to MIME type [ { "extension":"jpg", "mimetype":"image/jpeg" } ], "force_ssl" : true, // Refuse request if not SSL "enable_etags" : false // Prevent etag generation "prevent_xsrf" : true // Prevent cross-site request forgery }
Related Linkshttp://help.sap.com/hana/hana_sec_en.pdfApplication-Access File Keyword Options [page 56]The application-access (.xsaccess) file enables you to specify whether or not to expose package content, which authentication method is used to grant access, and what content is visible.
5.5.4 Application-Access File Keyword OptionsThe application-access (.xsaccess) file enables you to specify whether or not to expose package content, which authentication method is used to grant access, and what content is visible.
ExampleThe Application Access (.xsaccess) File
The following example shows all possible keyword combinations in the SAP HANA XS application-access (.xsaccess) file.
NoteIn the form shown below, the .xsaccess file is not a working model; it is used to illustrate all possible options.
{ "exposed" : false, "authentication" : // null = no auth required, [ { "method": "LogonTicket", }, { "method": "Form", }, { "method" : "Basic" } ], "authorization": [ "sap.xse.test::Execute", "sap.xse.test::Admin" ] "rewrite_rules" : [{
56
P U B L I C© 2013 SAP AG or an SAP affiliate company. All rights reserved.
SAP HANA Developer GuideSetting Up Your Application

"source" : "...", "target" : "..." }], "mime_mapping" : [ { "extension":"jpg", "mimetype":"image/jpeg" } ], "force_ssl" : true, "enable_etags" : false "prevent_xsrf" : false }
exposed { "exposed" : false, }
The exposed keyword enables you define if content in a package (and its subpackages) is to be made available by HTTP to client requests. Values are Boolean true or false. If no value is set for exposed, the default setting (false) applies.
authentication { "authentication" : [ { "method": "LogonTicket", }, { "method": "Form", }, { "method" : "Basic", } ],
}
The authentication keyword enables you to define the authentication method to use for Browser requests either at the application level or for single packages in an application. SAP HANA Extended Application Services support the following logon authentication mechanisms:
NoteThe default setting is basic. You can specify multiple authentication methods in the application-access file.
● Basic authenticationLogon with a recognized database user name and password.
● SAP logon ticketSAP logon tickets enable single sign-on across SAP boundaries, for example, to set up single sign-on (SSO) between SAP NetWeaver and SAP HANA XS. SAP logon tickets can be also be used as authentication for access to third-party applications.
SAP HANA Developer GuideSetting Up Your Application
P U B L I C© 2013 SAP AG or an SAP affiliate company. All
rights reserved. 57

To configure the trust relationship between the issuer of the SAP logon ticket and SAP HANA, you must specify the path to the SAP logon ticket trust store, which contains the trust chain for the ticket issuer. You can use the SapLogonTicketTrustStore keyword in the xsengine.ini file. Default values are: $SECUDIR/saplogon.pse or $HOME/.ssl/saplogon.pem.
NoteSAP HANA XS does not issue SAP logon tickets; it only accepts them. Since the tickets usually reside in a cookie, the issuer and SAP HANA XS need to be in the same domain to make sure that your browser sends the SAP logon ticket cookie with each call to SAP HANA XS.
● Form-based authenticationRedirect the logon request to a form to fill in, for example, a Web page.Form-based authentication requires the libxsauthenticator library, which must not only be available but also be specified in the list of trusted applications in the xsengine application container. The application list is displayed in the SAP HANA studio's Administration Console perspective in the following location: Administration Configuration tab xsengine.ini application_container application_list . If it is not displayed, ask the SAP HANA administrator to add it.
NoteIf you need to troubleshoot problems with form-based logon, you can configure the generation of useful trace information in the XSENGINE section of the database trace component using the following entry: xsa:sap.hana.xs.formlogon.
If you use the authentication in the .xsaccess file, you must specify the authentication method to apply, for example, basic or SAP logon ticket. If you use the authentication keyword in the application-access file, but do not set an authentication method, your .xsaccess file is a valid JSON file but is not a semantically valid .xsaccess file and will return a parsing validation error . If you do not set the authentication keyword, your application applies the default basic authentication method (user name and password) to enable access to data.
NoteYou can disable authentication checks with the null options, as follows: {"authentication" : null}.
authorization{ "authorization": [ "sap.xse.test::Execute", "sap.xse.test::Admin" ]}
The authorization keyword in the .xsaccess file enables you to specify which authorization level is required for access to a particular application package, for example, execute or admin on the package sap.xse.text.
NoteThe authorization levels you can choose from are defined in the .xsprivileges file for the package, for example, "execute" for basic privileges, or "admin" for administrative privileges on the specified package. If you use the authorization keyword in the .xsaccess file, for example, to require “execute” privileges for a specific
58
P U B L I C© 2013 SAP AG or an SAP affiliate company. All rights reserved.
SAP HANA Developer GuideSetting Up Your Application

application package, you must create a .xsprivileges file for the same application package (or a parent package higher up the hierarchy, in which you define the “execute” privilege level declared in the .xsaccess file.
rewrite_rules { "rewrite_rules" : [{ "source" : "...", "target" : "..." }]}
The rewrite_rules keyword enables you hide the details of internal URL paths from external users, clients, and search engines. Any rules specified affect the local application where the .xsaccess file resides (and any subpackage, assuming the subpackages do not have their own .xsaccess files); it is not possible to define global rewrite rules. URL rewrite rules are specified as a source-target pair where the source is written in the JavaScript regex syntax and the target is a simple string where references to found groups can be inserted using $groupnumber.
mime_mapping{ "mime_mapping" : [ { "extension":"jpg", "mimetype":"image/jpeg" } ]}
The mime_mapping keyword enables you to define how to map certain file suffixes to required MIME types. For example, you can map files with the .jpg file extension to the MIME type image/jpeg.
force_ssl { "force_ssl" : false, }
The force_ssl keyword enables you to refuse Browser requests that do not use secure HTTP (SSL/HTTPS) for client connections. If no value is set for exposed, the default setting (false) applies and non-secured connections (HTTP) are allowed.
enable_etags { "enable_etags" : true, }
You can allow or prevent the generation of entity tags (etags) for static Web content using the enable_etags keyword. If no value is set, the default setting (true) applies, in which case etags are generated. Etags are used to
SAP HANA Developer GuideSetting Up Your Application
P U B L I C© 2013 SAP AG or an SAP affiliate company. All
rights reserved. 59

improve caching performance, for example, so that the same data is not resent from the server if no change has occurred since the last time a request for the same data was made.
prevent_xsrf { "prevent_xsrf" : true }
You can use the prevent_xsrf keyword in the .xsaccess file to protect applications from cross-site request-forgery (XSRF) attacks. XSRF attacks attempt to trick a user into clicking a specific hyperlink, which shows a (usually well-known) Web site and performs some actions on the user’s behalf, for example, in a hidden iframe. If the targeted end user is logged in and browsing using an administrator account, the XSRF attack can compromise the entire Web application.The prevent_xsrf keyword prevents the XSRF attacks by ensuring that checks are performed to establish that a valid security token is available for a given Browser session. The existence of a valid security token determines if an application responds to the client's request to display content; if no valid security token is available, a 403 Forbidden message is displayed. A security token is considered to be valid if it matches the token that SAP HANA XS generates in the back end for the corresponding session.
NoteThe default setting is false, which means there is no automatic prevention of XSRF attacks. If no value is assigned to the prevent_xsrf keyword, the default setting (false) applies.
To include the XSRF token in the HTTP headers, you must first fetch the token as part of a GET request, as illustrated in the following example:
xmlHttp.setRequestHeader("X-CSRF-Token", "Fetch");
You can use the fetched XSRF token in subsequent POST requests, as illustrated in the following code example:
xmlHttp.setRequestHeader("X-CSRF-Token", xsrf_token);
Related LinksServer-Side JavaScript Security Considerations [page 228]If you choose to use server-side JavaScript to write your application code, you need to bear in mind the potential for (and risk of) external attacks such as cross-site scripting and forgery, and insufficient authentication.
5.5.5 Application-Access URL Rewrite RulesRewriting URLs enables you to hide internal URL path details from external users, clients, and search engines. You define URL rewrite rules in the application-access file (.xsaccess) for each application or for an application hierarchy (an application package and its subpackages).The rewrite rules you define in the .xsaccess file apply only to the local application to which the .xsaccess file belongs; it is not possible to define global rules to rewrite URLs. Rules are specified as a source-target pair where the source is written in the JavaScript regex syntax, and the target is a simple string where references to found groups can be inserted using $groupnumber.The following examples show how to use a simple set of rewrite rules to hide internal URLs from requesting clients and users.
60
P U B L I C© 2013 SAP AG or an SAP affiliate company. All rights reserved.
SAP HANA Developer GuideSetting Up Your Application

The first example illustrates the package structure that exists in the repository for a given application; the structure includes the base package apptest, the subpackages subpackage1 and subpackage2, and several other subpackages:
sap---apptest |---logic | |---users.xsjs | |---posts.xsjs |---posts | |---2011... |---subpackage1 | |---image.jpg |---subpackage2 | |---subsubpackage | | |---secret.txt | |---script.xsjs |---subpackage3 | |---internal.file |---users | |---123... |---.xsapp |---.xsaccess |---index.html
The application-access file for the package apptest (and its subpackages) includes the following rules for rewriting URLs used in client requests:
{ "rewrite_rules": [ { "source": "/users/(\\d+)/", "target": "/logic/users.xsjs?id=$1" }, { "source": "/posts/(\\d+)/(\\d+)/(\\d+)/", "target": "/logic/posts.xsjs?year=$1&month=$2&day=$3" } ]}
Assuming we have the package structure and URL rewrite rules illustrated in the previous examples, the following valid URLs would be exposed; bold URLs require authentication:
/sap/apptest//sap/apptest/index.html/sap/apptest/logic/users.xsjs/sap/apptest/logic/posts.xsjs
The rewriting of the following URLs would be allowed:
/sap/apptest/users/123/ ==> /sap/appTest/logic/users.xsjs?id=123/sap/apptest/posts/2011/10/12/ ==> /sap/appTest/logic/posts.xsjs?year=2011&month=10&day=12
5.5.6 Enabling Access to SAP HANA XS Application PackagesThe application-access file enables you to specify who or what is authorized to access the content exposed by the application package and what content they are allowed to see.
SAP HANA Developer GuideSetting Up Your Application
P U B L I C© 2013 SAP AG or an SAP affiliate company. All
rights reserved. 61

You can use a set of keywords in the application-access file .xsaccess to specify if authentication is required to enable access to package content, which data is exposed, and if rewrite rules are in place to hide target and source URLs, for example, from users and search engines. You can also specify what, if any, level of authorization is required for the package and whether SSL is mandatory for client connections.
1. If it does not already exist, create a root package for the application you want to enable access to, for example, MyPackage.
NoteThe namespace sap is restricted. Place the new package in your own namespace, which you can create alongside the sap namespace.
a) Start the SAP HANA studio and open the SAP HANA Development perspective.b) In the Project Explorer view, right-click the folder where you want to create the new (MyPackage)
package.
c) In the context-sensitive popup menu, choose New Folder .d) Enter the name MyPackage and choose Finish.
2. Activate the new package in the repository.a) In the SAP HANA Development perspective, open the Project Explorer view and right-click the new
(MyPackage) package.
b) In the context-sensitive popup menu, choose Team Activate .3. If it does not already exist, create an application descriptor for the application and place it in the package
(MyPackage) you created in the previous step.
The application descriptor is the core file that you use to indicate an application's availability within SAP HANA XS. The application descriptor marks the point in the package hierarchy at which an application's content is available to clients.
NoteThe application-descriptor file has no contents and no name; it only has the file extension .xsapp.
a) In the SAP HANA studio and open the SAP HANA Development perspective.b) In the Project Explorer view, right-click the folder where you want to create the new (.xsapp) file.
c) In the context-sensitive popup menu, choose New File .d) Enter the name .xsapp and choose Finish.
Files with names that begin with the period (.), for example, .xsapp, are sometimes not visible in the Project Explorer. To enable the display of all files in the Project Explorer view, use the Customize ViewAvailable Customization option and clear all check boxes.
e) Activate the new .xsapp file in the repository.
4. Create the application access file.The application-access file is a JSON-compliant file with the file suffix .xsaccess. Note that the application-access file does not have a name before the dot (.); it only has the suffix .xsaccess.
Create a file called .xsaccess and place it in the root package of the application to which you want to enable access. A basic .xsaccess file must, at the very least, contain a set of curly brackets, for example, {}. Note that the .xsaccess file uses keyword-value pairs to set access rules; if a mandatory keyword-value pair is not set, then the default value is assumed.
62
P U B L I C© 2013 SAP AG or an SAP affiliate company. All rights reserved.
SAP HANA Developer GuideSetting Up Your Application

a) In the SAP HANA studio and open the SAP HANA Development perspective.b) In the Project Explorer view, right-click the folder where you want to create the new (.xsaccess) file.
c) In the context-sensitive popup menu, choose New File .d) Enter the name .xsaccess and choose Finish.
5. Enable application access to data.You use the expose keyword to enable or disable access to content at a package or subpackage level.
{ "exposed" : true }
6. Define the application authentication method.You use the authentication keyword to define how to manage the authentication process for requests to access package content, for example, SAP logon ticket, form-based logon, or a basic user name and password .
{ "authentication" : [ { "method" : "Basic" } ] }
7. Specify the application privileges if required. (Optional)Use the authorization keyword in the .xsaccess file to specify which authorization level is required by a user for access to a particular application package. The authorization keyword requires a corresponding entry in the .xsprivileges file, for example, execute for basic privileges or admin for administrative privileges on the specified package.
{ "authorization": ["sap.xse.test::Execute", "sap.xse.test::Admin" ]}
8. Save the .xsaccess file in the package with which you want to associate the rules you have defined.
9. Commit the .xsaccess file to the repository and activate it.
In the Project Explorer view, right click the object you want to activate and choose Team > Activate in the popup menu.
Related LinksApplication-Access File Keyword Options [page 56]The application-access (.xsaccess) file enables you to specify whether or not to expose package content, which authentication method is used to grant access, and what content is visible.
The Application-Privileges File [page 64]In SAP HANA Extended Application Services (SAP HANA XS), the application-privileges (.xsprivileges) file can be used to create or define the authorization privileges required for access to an SAP HANA XS application, for example, to start the application or to perform administrative actions on an application. These privileges can be checked by an application at runtime.
SAP HANA Developer GuideSetting Up Your Application
P U B L I C© 2013 SAP AG or an SAP affiliate company. All
rights reserved. 63

5.5.7 The Application-Privileges FileIn SAP HANA Extended Application Services (SAP HANA XS), the application-privileges (.xsprivileges) file can be used to create or define the authorization privileges required for access to an SAP HANA XS application, for example, to start the application or to perform administrative actions on an application. These privileges can be checked by an application at runtime.The application-privileges file has only the file extension .xsprivileges; it does not have a name and is formatted according to JSON rules. Multiple .xsprivileges files are allowed, but only at different levels in the package hierarchy; you cannot place two .xsprivileges files in the same application package. The package privileges defined in a .xsprivileges file are bound to the package to which the .xsprivileges file belongs and can only be used in this package and its subpackages.Inside the .xsprivileges file, a privilege is defined by specifying an entry name with an optional description. This entry name is then automatically prefixed with the package name to form the unique privilege name, for example, sap.hana::Execute.As an application privilege is created during activation of an .xsprivileges file, the only user who has the privilege by default is the _SYS_REPO user. To grant or revoke the privilege to (or from) other users you must use the GRANT_APPLICATION_PRIVILEGE or REVOKE_APPLICATION_PRIVILEGE procedure in the _SYS_REPO schema.
NoteThe .xsprivileges file lists the authorization levels that are available for access to an application package; the .xsaccess file defines which authorization level is assigned to which application package.
In the following above, if the application-privileges file is located in the application package sap.hana.xse, then the following privileges are created:
● sap.hana.xse::Execute ● sap.hana.xse::Admin
The privileges defined apply to the package where the .xsprivileges file is located as well as any packages further down the package hierarchy unless an additional .xsprivileges file is present, for example, in a subpackage. The privileges do not apply to packages that are not in the specified package path, for example, sap.hana.app1.
ExampleThe SAP HANA XS Application-Privileges File
The following example shows the composition and structure of a basic SAP HANA XS application-privileges file.
{ "privileges" : [ { "name" : "Execute", "description" : "Basic execution privilege" }, { "name" : "Admin", "description" : "Administration privilege" }, ]}
64
P U B L I C© 2013 SAP AG or an SAP affiliate company. All rights reserved.
SAP HANA Developer GuideSetting Up Your Application

If the .xsprivileges file shown in the example above is located in the package sap.hana.xse, you can assign the Execute privilege for the package to a particular user by calling the GRANT_APPLICATION_PRIVILEGE procedure, as illustrated in the following code:
call "_SYS_REPO"."GRANT_APPLICATION_PRIVILEGE"('"sap.hana.xse::Execute"', '<user>')
5.5.8 Create an SAP HANA XS Application Privileges FileThe application-privileges (.xssprivileges) file can be used to define the authorization levels required for access to an application, for example, to start the application or perform administrative actions on an application. You can then assign the application privileges to the individual users who require them.
The .xssprivileges file must reside in the same application package that you want to define the access privileges for.
NoteIf you use the .xsprivileges file to define application-specific privileges, you must also add a corresponding entry to the .xsaccess file, for example, using the authorization keyword.
1. If you have not already done so, create a root package for your new application, for example, MyPackage.
a) In the SAP HANA studio, open the SAP HANA Development perspective.b) In the Project Explorer view, right-click the folder where you want to create the new (MyPackage)
package.
c) In the context-sensitive popup menu, choose New Folder .d) Enter the name MyPackage and choose Finish.
2. If you have not already done so, create an application descriptor for your new application and place it in the root package (MyPackage) you created in the previous step.
The application descriptor is the core file that you use to indicate an application's availability within SAP HANA XS. The application descriptor marks the point in the package hierarchy at which an application's content is available to clients.
NoteThe application-descriptor file has no contents and no name; it only has the file extension .xsapp.
3. If you have not already done so, create an application-access file for your new application and place it in the package to which you want to grant access.The application-access file does not have a name; it only has the file extension .xsaccess.
a) In the SAP HANA studio, open the SAP HANA Development perspective.b) In the Project Explorer view, right-click the folder where you want to create the new (.xsaccess) file.
c) In the context-sensitive popup menu, choose New File .d) Enter the name .xsaccess and choose Finish.e) Specify the privileges required for access to the application or application package.
Use the authorization keyword in the .xsaccess file to specify which authorization level is required by a user for access to a particular application package.
Note
SAP HANA Developer GuideSetting Up Your Application
P U B L I C© 2013 SAP AG or an SAP affiliate company. All
rights reserved. 65

If you enable the authorization keyword in the .xsaccess file, you must add a corresponding entry to the .xsprivileges file, too.
{ "exposed" : true "authentication" : [ { "method" : "Basic" } ] "authorization": [ "com.acme.myApp::Execute", "com.acme.myApp::Admin" ]}
4. Create the application-privileges (.xsprivileges) file and place it in the application package whose access privileges you want to define.The application-privileges file does not have a name; it only has the file extension .xsprivileges. The contents of the .xsprivileges file must be formatted according to JavaScript Object Notation (JSON) rules.
NoteMultiple .xsprivileges files are allowed, but only at different levels in the package hierarchy; you cannot place two .privileges files in the same application package. The privileges defined in a .xsprivileges file are bound to the package to which the file belongs and can only be applied to this package and its subpackages.
a) In the SAP HANA studio and open the SAP HANA Development perspective.b) In the Project Explorer view, right-click the folder where you want to create the new (.xsprivileges)
file.
c) In the context-sensitive popup menu, choose New File .d) Enter the name .xsprivileges and choose Finish.e) Activate the new (.xsprivileges) file
5. Define the required application privileges.In the .xsprivileges file, you define a privilege for an application package by specifying an entry name with an optional description. This entry name is then automatically prefixed with the package name in which the .xsprivileges file is located to form a unique privilege name. For example, com.acme.myapp::Execute would enable execute privileges on the package com.acme.myapp. The privilege name is unique to the package to which it belongs and, as a result, can be used in multiple .xsprivileges files in different packages.
NoteThe .xsprivileges file lists the authorization levels defined for an application package. A corresponding entry is required in the same application's access file .xsaccess file to define which authorization level is assigned to which application package.
{ "privileges" : [
66
P U B L I C© 2013 SAP AG or an SAP affiliate company. All rights reserved.
SAP HANA Developer GuideSetting Up Your Application

{ "name" : "Execute", "description" : "Basic execution privilege" }, { "name" : "Admin", "description" : "Adminstration privilege" }, ]}
6. Save and activate your changes and additions.The activation of the application privileges creates the corresponding objects, which you can use to assign the specified privileges to an author.
7. Assign the application privilege to the users who require it.After activation of the .xsprivileges object, the only user who by default has the application privileges specified in the .xsprivileges file is the _SYS_REPO user. To grant the specified privilege to (or revoke them from) other users, use the GRANT_APPLICATION_PRIVILEGE or REVOKE_APPLICATION_PRIVILEGE procedure in the _SYS_REPO schema.To grant the execute application privilege to a user, run the following command in the SAP HANA studio's SQL Console:
call "_SYS_REPO"."GRANT_APPLICATION_PRIVILEGE"('"com.acme.myApp::Execute"','<UserName>')
To revoke the execute application privilege to a user, run the following command in the SAP HANA studio's SQL Console:
call "_SYS_REPO"."REVOKE_APPLICATION_PRIVILEGE"('"com.acme.myApp::Execute"','<UserName>')
Related LinksCreate an Application Descriptor File [page 52]Each application that you want to develop and deploy on SAP HANA Extended Application Services (SAP HANA XS) must have an application-descriptor file. The application descriptor is the core file that you use to describe an application's framework within SAP HANA XS.
Enabling Access to SAP HANA XS Application Packages [page 61]The application-access file enables you to specify who or what is authorized to access the content exposed by the application package and what content they are allowed to see.
5.6 Tutorial: My First SAP HANA Application
This tutorial shows you how SAP HANA development is done in the SAP HANA studio, including setting up a project, and developing a simple JavaScript file to extract data from the database.Though extremely simple, the tutorial shows the development process for programming all types of applications.The project creates server-side JavaScript code that retrieves data by executing SQL in the database, and then returns the data to the client, which in this case is a browser. The project can be viewed as adhering to the model-view-controller architecture:
● Model: You have (dummy) data in the database, which we can extract via SQL.● Controller: You have JavaScript code that controls the extraction of the data and delivers it to the view.● View: You have a simple browser that calls the JavaScript code and simply displays the data.
SAP HANA Developer GuideSetting Up Your Application
P U B L I C© 2013 SAP AG or an SAP affiliate company. All
rights reserved. 67

5.6.1 Open the Development PerspectiveBefore you do anything, you have to start the SAP HANA studio and open the SAP HANA Development perspective.
1. Open the SAP HANA studio. The first screen you see is the Welcome screen, with quick links to the main SAP HANA perspectives and to the documentation.
2. Select Open Development.
68
P U B L I C© 2013 SAP AG or an SAP affiliate company. All rights reserved.
SAP HANA Developer GuideSetting Up Your Application

The default SAP HANA Development perspective contains three views on the left for navigating SAP HANA and the repository, which holds the objects that you will create. In addition, the editor area is on the right, where you will build your objects.
Related LinksSAP HANA Development Perspective [page 27]
5.6.2 Add a SystemYou need to add a connection to the development SAP HANA system you will be working with.
1. In the Navigator view, right-click anywhere in the view and select Add System.
SAP HANA Developer GuideSetting Up Your Application
P U B L I C© 2013 SAP AG or an SAP affiliate company. All
rights reserved. 69

2. Enter the following fields for the SAP HANA system:
○ Server name○ Instance number on that server○ A display name for this system. When you start working with a lot of systems, you will want to have a way
to label the systems in the SAP HANA studio. Enter Development System.
70
P U B L I C© 2013 SAP AG or an SAP affiliate company. All rights reserved.
SAP HANA Developer GuideSetting Up Your Application

3. Select Next.4. Enter a user name and password for the connection, and select Finish.
After adding the system, you will see the system in the Navigator view.
SAP HANA Developer GuideSetting Up Your Application
P U B L I C© 2013 SAP AG or an SAP affiliate company. All
rights reserved. 71

5.6.3 Add a WorkspaceAfter you add a system, you need to specify where on your workstation you will be saving development files while working with this system.
1. In the SAP HANA Repositories view, click in the upper-right of the view.2. Provide the following:
○ SAP HANA system, which is the same system you just created.○ Workspace name, which can be anything you like. For this tutorial, enter DevWS.
A folder with this name is created below the workspace root.○ Workspace root, which can be anywhere on your workstation. For this tutorial, create a folder at C:
\SAPHANAworkspaces and make this the root.
3. Click Finish.
In the SAP HANA Repositories view, you will see your workspace, which enables you to browse the repository of the system tied to this workspace. You will see the repository's packages, displayed as folders.
72
P U B L I C© 2013 SAP AG or an SAP affiliate company. All rights reserved.
SAP HANA Developer GuideSetting Up Your Application

At the same time, a folder will be added to your file system to hold all your development files.
5.6.4 Add a ProjectNow that you've set up your development environment for your SAP HANA system, you can add an Eclipse project to contain all the development objects you want to create.There are a variety of project types for different types of development objects. Generally, these projects types import necessary libraries for working with specific types of development objects. Here, you will create an XS Project.
1. From the menu, select File New Project .2. Under SAP HANA Development, select XS Project, and select Next.3. Enter the following for the project:
○ Name: Enter mycompany.myorg.testing.Since Eclipse project names must be unique within the same Eclipse workspace, a good convention is to use the fully qualified package name as the project name.
○ Project Location: You can keep this as the default Eclipse workspace.
SAP HANA Developer GuideSetting Up Your Application
P U B L I C© 2013 SAP AG or an SAP affiliate company. All
rights reserved. 73

4. Select Finish.
Now, in the Project Explorer view, you have a project that is ready to be shared, that is, associated with your workspace.
5.6.5 Share Your ProjectAfter creating a project, you must associate it with a workspace, which enables the project files to be saved to the repository of your development SAP HANA system.
1. In the Project Explorer view, right-click on the project, and select Team Share Project .
74
P U B L I C© 2013 SAP AG or an SAP affiliate company. All rights reserved.
SAP HANA Developer GuideSetting Up Your Application

Since you only have one workspace, the wizard selects it for you. If you had several workspaces, you would choose with which one you wanted to share your project.The dialog also shows the Current project location (the current location of your project, in the Eclipse workspace), and the New project location (where your project will be copied so it can be associated with the repository workspace).Also, since Add project folder as subpackage is checked, subpackages will be created based on the name of your project.
2. Click Finish.Now your project appears in the Project Explorer view associated with your workspace.
The .project file is shown with an asterisk , which indicates that the file has changed but has yet to be committed, or saved, to the repository.
3. Right-click on the project, and select Team Commit . This adds your project and its files to the
repository, though only you can see them. The .project file is now displayed with a diamond, , indicating that the latest version on your workstation has been committed.In addition, the SAP HANA Repositories view shows that a new hierarchy of packages has been created based on the name of your project, mycompany.myorg.testing.
SAP HANA Developer GuideSetting Up Your Application
P U B L I C© 2013 SAP AG or an SAP affiliate company. All
rights reserved. 75

5.6.6 Write Server-Side JavaScriptNow let's write some code. As a first step, to make sure everything is working OK, you will simply output Hello, World!.You will have to create three files:
● .xsjs: This contains your code.● .xsapp: This indicates that everything in your package can be exposed via HTTP. You still need to explicitly
expose the content and assign access controls.● .xsaccess: Exposes your content, meaning it can be accessed via HTTP, and assigned access controls.
1. Right-click your project, and select New Other .
2. Select SAP HANA Development XS JavaScript Source File .3. In File name, call your JavaScript file MyFirstSourceFile.xsjs, and select Finish.
The file, which is blank, opens in the JavaScript editor.4. In the MyFirstSourceFile.xsjs file, enter the following code:
$.response.contentType = "text/html";$.response.setBody( "Hello, World !");
This uses the SAP HANA XS JavaScript API's response object to write out HTML. By typing $. you have access to the API's objects.
5. Add a blank file called .xsapp (no name, just a file extension) by right-clicking to the root of your project. More on this later.
To add a file, right-click the project and select New File , enter a file name, and select Finish.6. Add a file called .xsaccess (no name, just a file extension), and copy the following code:
{ "exposed" : true, "authentication" : [ { "method" : "Basic" }
76
P U B L I C© 2013 SAP AG or an SAP affiliate company. All rights reserved.
SAP HANA Developer GuideSetting Up Your Application

] }
This code exposes the contents via HTTP, and requires you to log in with your SAP HANA credentials to access the file.
7. Right-click on the project, and select Team Commit . This adds your four new files (.xsjs, .xsapp, .xsaccess and .project) to the repository, though only you can see the files and no one can run them.
8. Right-click on the project, and select Team Activate . This publishes your work and you can now test it.
To access your JavaScript code, open a browser and enter the URL:
http://myServer:8000/mycompany/myorg/testing/MyFirstSourceFile.xsjs
Note● Change the server name to your server.● The port is 80 plus two digits for your instance. If your instance is 00, then the port is 8000.
You should get the following:
After logging in with your SAP HANA user name and password, you should get the following:
SAP HANA Developer GuideSetting Up Your Application
P U B L I C© 2013 SAP AG or an SAP affiliate company. All
rights reserved. 77

5.6.7 Retrieve DataTo make things more interesting, let's make a call to the database via the JavaScript and then display the results.You will be using the SQL statement:
select * from DUMMY
This is test SQL to check connectivity, and returns one row with one field called DUMMY, whose value is X.
1. In MyFirstSourceFile.xsjs, delete or comment out all your existing code.
2. Add the following code:
$.response.contentType = "text/html";var output = "Hello, World !<br><br>";
var conn = $.db.getConnection();var pstmt = conn.prepareStatement( "select * from DUMMY" );var rs = pstmt.executeQuery();
if (!rs.next()) { $.response.setBody( "Failed to retrieve data" ); $.response.status = $.net.http.INTERNAL_SERVER_ERROR;} else { output = output + "This is the response from my SQL: " + rs.getString(1);}rs.close();pstmt.close();conn.close();
$.response.setBody(output);
3. Save the file.
4. Commit the file by right-clicking the file and selecting Team Commit .
5. Activate the file by right-clicking the file and selecting Team Activate .
In your browser, refresh the page. You should get the following:
78
P U B L I C© 2013 SAP AG or an SAP affiliate company. All rights reserved.
SAP HANA Developer GuideSetting Up Your Application

6 Setting Up the Persistence Model
In SAP HANA Extended Application Services (SAP HANA XS), the persistence model defines the schema, tables, and views that specify what data to make accessible and how. The persistence model is mapped to the consumption model that is exposed to client applications and users, so that data can be analyzed and displayed.SAP HANA XS enables you to create database schema, tables, views, and sequences as design-time files in the repository. Repository files can be read by applications that you develop.
NoteAll repository files including your view definition can be transported (along with tables, schema, and sequences) to other SAP HANA systems, for example, in a delivery unit. A delivery unit is the medium SAP HANA provides to enable you to assemble all your application-related repository artifacts together into an archive that can be easily exported to other systems.
You can also set up data-provisioning rules and save them as design-time objects so that they can be included in the delivery unit that you transport between systems.As part of the process of setting up the basic persistence model for SAP HANA XS, you perform the following tasks:
● Create a schema.Define a design-time schema and maintain the schema definition in the repository. The transportable schema has the file extension .hdbschema, for example, MYSCHEMA.hdbschema
● Create a table.Define a design-time table and maintain the table definition in the repository. The transportable table has the file extension .hdbtable, for example, MYTABLE.hdbtable
● Create a view.Define a design-time view and maintain the view definition in the repository. The transportable view has the file extension .hdbview, for example, MYVIEW.hdbview
● Create a sequence.Define a design-time sequence and maintain the sequence definition in the repository. The transportable sequence has the file extension .hdbsequence, for example, MYSEQUENCE.hdbsequence
● Import table contentDefine data-provisioning rules that enable you to import data from comma-separated values (CSV) files into SAP HANA tables using the SAP HANA XS table-import feature. The complete configuration can be included in a delivery unit and transported between SAP HANA systems.
NoteOn activation of a repository file, the file suffix, for example, .hdbview, .hdbschema, or .hdbtable, is used to determine which runtime plug-in to call during the activation process. The plug-in reads the repository file selected for activation, for example, a table, sees the object descriptions in the file, and creates the appropriate runtime object.
SAP HANA Developer GuideSetting Up the Persistence Model
P U B L I C© 2013 SAP AG or an SAP affiliate company. All
rights reserved. 79

6.1 Schema
Relational databases contain a catalog that describes the various elements in the system. The catalog divides the database into sub-databases known as schema. A database schema enables you to logically group together objects such as tables, views, and stored procedures. Without a defined schema, you cannot write to the catalog.SAP HANA Extended Application Services (SAP HANA XS) enables you to create a database schema as a transportable design-time file in the repository. Repository files can be read by applications that you develop.If your application refers to the repository (design-time) version of a schema rather than the runtime version in the catalog, for example, by using the explicit path to the repository file (with suffix), any changes to the repository version of the file are visible as soon as they are committed to the repository. There is no need to wait for the repository to activate a runtime version of the schema.If you want to define a transportable schema using the design-time hdbschema specifications, use the configuration schema illustrated in the following example:
string schema_name
The following example shows the contents of a valid transportable schema-definition file for a schema called MYSCHEMA:
schema_name=”MYSCHEMA”;
The schema is stored in the repository with the schema name MYSCHEMA as the file name and the suffix .hdbschema, for example, MYSCHEMA.hdbschema.
Schema ActivationIf you want to create a schema definition as a design-time object, you must create the schema as a flat file. You save the file containing the schema definition with the suffix .hdbschema in the appropriate package for your application in the SAP HANA repository. You can activate the design-time objects at any point in time.
NoteOn activation of a repository file, the file suffix, for example, .hdbschema, is used to determine which runtime plugin to call during the activation process. The plug-in reads the repository file selected for activation, parses the object descriptions in the file, and creates the appropriate runtime objects.
If you activate a schema-definition object in SAP HANA, the activation process checks if a schema with the same name already exists in the SAP HANA repository. If a schema with the specified name does not exist, the repository creates a schema with the specified name and makes _SYS_REPO the owner of the new schema.
NoteThe schema cannot be dropped even if the deletion of a schema object is activated.
If you define a schema in SAP HANA XS, note the following important points regarding the schema name:
● Name mappingThe schema name must be identical to the name of the corresponding repository object.
● Naming conventionsThe schema name must adhere to the SAP HANA rules for database identifiers.
● Name usage
80
P U B L I C© 2013 SAP AG or an SAP affiliate company. All rights reserved.
SAP HANA Developer GuideSetting Up the Persistence Model

The Data Definition Language (DDL) rendered by the repository contains the schema name as a delimited identifier.
6.2 Creating Schemas
A schema defines the container that holds database objects such as tables, views, and stored procedures.
This task describes how to create a file containing a schema definition. Schema definition files are stored in the SAP HANA repository. To complete this task successfully, note the following prerequisites:
● You must have access to a SAP HANA system.● You must have already created a development workspace and a project.● You must have shared the project so that the newly created files can be committed to (and synchronized
with) the repository.
SAP HANA Extended Application Services (SAP HANA XS) enables you to create a database schema as a design-time file in the repository.To create a schema definition file in the repository, perform the following steps:
1. Start the SAP HANA studio.2. Open the SAP HANA Development perspective.3. Open the Project Explorer view.4. Create the schema definition file.
Browse to the folder in your project workspace where you want to create the new schema-definition file and perform the following tasks:a) Right-click the folder where you want to save the schema-definition file and choose New in the context-
sensitive popup menu.b) Enter the name of the schema in the File Name box and add the file suffix .hdbschema, for example,
MYSCHEMA.hdbschema.c) Choose Finish to save the new schema in the repository.
5. Define the schema name.To edit the schema file, in the Project Explorer view double-click the schema file you created in the previous step, for example, MYSCHEMA.hdbschema, and add the schema-definition code to the file:
NoteThe following code example is provided for illustration purposes only.
schema_name=”MYSCHEMA”;
6. Save the schema file.7. Commit the schema file to the repository.
a) Locate and right-click the new schema file in the Project Explorer view.
b) In the context-sensitive pop-up menu, choose Team Commit .8. Activate the schema.
a) Locate and right-click the new schema file in the Project Explorer view.
SAP HANA Developer GuideSetting Up the Persistence Model
P U B L I C© 2013 SAP AG or an SAP affiliate company. All
rights reserved. 81

b) In the context-sensitive pop-up menu, choose Team Activate .9. Grant SELECT privileges to the owner of the new schema.
After activation in the repository, the schema object is only visible in the catalog to the _SYS_REPO user. To enable other users, for example the schema owner, to view the newly created schema in the SAP HANA studio's Modeler perspective, you must grant the user the required SELECT privilege.a) In the SAP HANA studio Navigator view, right-click the SAP HANA system hosting the repository where
the schema was activated and choose SQL Console in the context-sensitive popup menu.b) In the SQL console, execute the statement illustrated in the following example, where <SCHEMANAME> is
the name of the newly activated schema, and <username> is the database user ID of the schema owner:
call _SYS_REPO.GRANT_SCHEMA_PRIVILEGE_ON_ACTIVATED_CONTENT('select','<SCHEMANAME>','<username>');
Related LinksUsing SAP HANA Projects [page 39]Projects group together all the artifacts you need for a specific part of the application-development environment.
6.3 Tables
In the SAP HANA database, as in other relational databases, a table is a set of data elements that are organized using columns and rows. A database table has a specified number of columns, defined at the time of table creation, but can have any number of rows. Database tables also typically have meta-data associated with them; the meta-data might include constraints on the table or on the values within particular columns.SAP HANA Extended Application Services (SAP HANA XS) enables you to create a database table as a design-time file in the repository. All repository files including your table definition can be transported to other SAP HANA systems, for example, in a delivery unit.
NoteA delivery unit is the medium SAP HANA provides to enable you to assemble all your application-related repository artifacts together into an archive that can be easily exported to other systems.
If your application is configured to use the design-time version of a database table in the repository rather than the runtime version in the catalog, any changes to the repository version of the table are visible as soon as they are committed to the repository. There is no need to wait for the repository to activate a runtime version of the table.If you want to define a transportable table using the design-time .hdbtable specifications, use the configuration schema illustrated in the following example:
struct TableDefinition { string SchemaName; optional bool temporary; optional TableType tableType; optional bool public; optional TableLoggingType loggingType; list<ColumnDefinition> columns; optional list<IndexDefinition> indexes; optional PrimaryKeyDefinition primaryKey;
82
P U B L I C© 2013 SAP AG or an SAP affiliate company. All rights reserved.
SAP HANA Developer GuideSetting Up the Persistence Model

optional string description};
The following code illustrates a simple example of a design-time table definition:
table.schemaName = "MYSCHEMA";table.tableType = COLUMNSTORE;table.columns = [ {name = "Col1"; sqlType = VARCHAR; nullable = false; length = 20; comment = "dummy comment";}, {name = "Col2"; sqlType = INTEGER; nullable = false;}, {name = "Col3"; sqlType = NVARCHAR; nullable = true; length = 20; defaultValue = "Defaultvalue";}, {name = "Col4"; sqlType = DECIMAL; nullable = false; precision = 2; scale = 3;}];table.indexes = [ {name = "MYINDEX1"; unique = true; indexColumns = ["Col2"];}, {name = "MYINDEX2"; unique = true; indexColumns = ["Col1", "Col4"];}];table.primaryKey.pkcolumns = ["Col1", "Col2"];
If you want to create a database table as a repository file, you must create the table as a flat file and save the file containing the table dimensions with the suffix .hdbtable, for example, MYTABLE.hdbtable. The new file is located in the package hierarchy you establish in the SAP HANA repository. You can activate the repository files at any point in time.
NoteOn activation of a repository file, the file suffix, for example, .hdbtable, is used to determine which runtime plug-in to call during the activation process. The plug-in reads the repository file selected for activation, in this case a table, parses the object descriptions in the file, and creates the appropriate runtime objects.
Related LinksTable Configuration Schema [page 83]SAP HANA Extended Application Services (SAP HANA XS) enables you to create a database table as a design-time file in the repository. The design-time artifact that contains the table definition must adhere to the .hdbtable syntax specified below.
6.4 Table Configuration SchemaSAP HANA Extended Application Services (SAP HANA XS) enables you to create a database table as a design-time file in the repository. The design-time artifact that contains the table definition must adhere to the .hdbtable syntax specified below.
Table DefinitionThe following code illustrates a simple example of a design-time table definition using the .hdbtable syntax.
NoteKeywords are case-sensitive, for example, tableType and loggingType, and the schema referenced in the table definition, for example, MYSCHEMA, must already exist.
table.schemaName = "MYSCHEMA";table.tableType = COLUMNSTORE;
SAP HANA Developer GuideSetting Up the Persistence Model
P U B L I C© 2013 SAP AG or an SAP affiliate company. All
rights reserved. 83

table.loggingType = NOLOGGING;table.columns = [ {name = "Col1"; sqlType = VARCHAR; nullable = false; length = 20; comment = "dummy comment";}, {name = "Col2"; sqlType = INTEGER; nullable = false;}, {name = "Col3"; sqlType = NVARCHAR; nullable = true; length = 20; defaultValue = "Defaultvalue";}, {name = "Col4"; sqlType = DECIMAL; nullable = false; precision = 2; scale = 3;}];table.indexes = [ {name = "MYINDEX1"; unique = true; indexColumns = ["Col2"];}, {name = "MYINDEX2"; unique = true; indexColumns = ["Col1", "Col4"];}];table.primaryKey.pkcolumns = ["Col1", "Col2"];
Table-Definition Configuration SchemaThe following example shows the configuration schema for tables defined using the .hdbtable syntax. Each of the entries in the table-definition configuration schema is explained in more detail in a dedicated section below:
struct TableDefinition { string SchemaName; optional bool temporary; optional TableType tableType; optional bool public; optional TableLoggingType loggingType; list<ColumnDefinition> columns; optional list<IndexDefinition> indexes; optional PrimaryKeyDefinition primaryKey; optional string description};
Schema NameTo use the .hdbtable syntax to specify the name of the schema that contains the table you are defining, use the schemaName keyword. In the table definition, the schemaName keyword must adhere to the syntax shown in the following example.
table.schemaName = "MYSCHEMA";
TemporaryTo use the .hdbtable syntax to specify that the table you define is temporary, use the boolean temporary keyword. Since data in a temporary table is session-specific, only the owner session of the temporary table is allowed to INSERT/READ/TRUNCATE the data. Temporary tables exist for the duration of the session, and data from the local temporary table is automatically dropped when the session is terminated. In the table definition, the temporary keyword must adhere to the syntax shown in the following example.
temporary = true;
Table TypeTo specify the table type using the .hdbtable syntax, use the tableType keyword. In the table definition, the TableType keyword must adhere to the syntax shown in the following example.
table.tableType = COLUMNSTORE;
The following configuration schema illustrates the parameters you can specify with the tableType keyword:
enum TableType { COLUMNSTORE;
84
P U B L I C© 2013 SAP AG or an SAP affiliate company. All rights reserved.
SAP HANA Developer GuideSetting Up the Persistence Model

ROWSTORE;};
Table Logging TypeTo enable logging in a table definition using the .hdbtable syntax, use the tableLoggingType keyword. In the table definition, the tableLoggingType keyword must adhere to the syntax shown in the following example.
table.tableLoggingType = LOGGING;
The following configuration schema illustrates the parameters you can specify with the tableLoggingType keyword:
enum TableLoggingType { LOGGING; NOLOGGING; };
Table Column DefinitionTo define the column structure and type in a table definition using the .hdbtable syntax, use the columns keyword. In the table definition, the columns keyword must adhere to the syntax shown in the following example.
table.columns = [ {name = "Col1"; sqlType = VARCHAR; nullable = false; length = 20; comment = "dummy comment";}, {name = "Col2"; sqlType = INTEGER; nullable = false;}, {name = "Col3"; sqlType = NVARCHAR; nullable = true; length = 20; defaultValue = "Defaultvalue";}, {name = "Col4"; sqlType = DECIMAL; nullable = false; precision = 2; scale = 3;}];
The following configuration schema illustrates the parameters you can specify with the columns keyword:
struct ColumnDefinition { string name; SqlDataType sqlType; optional bool nullable; optional bool unique; optional int32 length; optional int32 scale; optional int32 precision; optional string defaultValue; optional string comment; };
SQL Data TypeTo define the SQL data type for a column in a table using the .hdbtable syntax, use the sqlType keyword. In the table definition, the sqlType keyword must adhere to the syntax shown in the following example.
table.columns = [ {name = "Col1"; sqlType = VARCHAR; nullable = false; length = 20; comment = "dummy comment";}, ... ];
The following configuration schema illustrates the data types you can specify with the sqlType keyword:
enum SqlDataType { DATE; TIME; TIMESTAMP; SECONDDATE; INTEGER; TINYINT;
SAP HANA Developer GuideSetting Up the Persistence Model
P U B L I C© 2013 SAP AG or an SAP affiliate company. All
rights reserved. 85

SMALLINT; BIGINT; REAL; DOUBLE; FLOAT; SMALLDECIMAL; DECIMAL; VARCHAR; NVARCHAR; CHAR; NCHAR;CLOB; NCLOB; ALPHANUM; TEXT; SHORTTEXT; BLOB; VARBINARY; };
Table OrderTo define the table order type using the .hdbtable syntax, use the order keyword. In the table definition, the order keyword must adhere to the syntax shown in the following example.
table.order = ASC;
The following configuration schema illustrates the parameters you can specify with the order keyword:
enum Order { ASC; DSC; };
You can choose to filter the table contents either by ascending (ASC) or descending (DSC) order.
Primary Key DefinitionTo define the primary key for the specified table using the .hdbtable syntax, use the primaryKey and pkcolumns keywords. In the table definition, the primaryKey and pkcolumns keywords must adhere to the syntax shown in the following example.
table.primaryKey.pkcolumns = ["Col1", "Col2"];
The following configuration schema illustrates the parameters you can specify with the primaryKey keyword:
struct PrimaryKeyDefinition { list<string> pkcolumns; optional IndexType indexType; };
Table Index DefinitionTo define the index type for the specified table using the .hdbtable syntax, use the indexes keyword. In the table definition, the indexes keyword must adhere to the syntax shown in the following example.
table.indexes = [ {name = "MYINDEX1"; unique = true; indexColumns = ["Col2"];}, {name = "MYINDEX2"; unique = true; indexColumns = ["Col1", "Col4"];}];
The following configuration schema illustrates the parameters you can specify with the indexes keyword:
struct IndexDefinition { string name; bool unique; optional Order order; optional IndexType indexType; list<string> indexColumns; };
86
P U B L I C© 2013 SAP AG or an SAP affiliate company. All rights reserved.
SAP HANA Developer GuideSetting Up the Persistence Model

Table Index TypeTo define the index type for the specified table using the .hdbtable syntax, use the indexType keyword. In the table definition, the indexType keyword must adhere to the syntax shown in the following example.
table.indexType = B_TREE;
The following configuration schema illustrates the parameters you can specify with the indexType keyword:
enum IndexType { B_TREE; CPB_TREE; };
B_TREE specifies an index tree of type B+, which maintains sorted data that performs the insertion, deletion, and search of records. CPB_TREE stands for “Compressed Prefix B_TREE” and specifies an index tree of type CPB+, which is based on pkB-tree. CPB_TREE is a very small index that uses a “partial key”, that is; a key that is only part of a full key in index nodes.
NoteIf neither the B_TREE nor the CPB_TREE is specified in the table-definition file, SAP HANA chooses the appropriate index type based on the column data type, as follows:
● CPB_TREECharacter string types, binary string types, decimal types, when the constraint is a composite key or a non-unique constraint
● B_TREEAll column data types other than those specified for CPB_TREE
Complete Table-Definition Configuration SchemaThe following example shows the complete configuration schema for tables defined using the .hdbtable syntax.
enum TableType { COLUMNSTORE; ROWSTORE;};enum TableLoggingType { LOGGING; NOLOGGING;};enum IndexType { B_TREE; CPB_TREE;};enum Order { ASC; DSC;};enum SqlDataType { DATE; TIME; TIMESTAMP; SECONDDATE; INTEGER; TINYINT; SMALLINT; BIGINT; REAL; DOUBLE; FLOAT; SMALLDECIMAL; DECIMAL; VARCHAR; NVARCHAR; CHAR; NCHAR; CLOB; NCLOB; ALPHANUM; TEXT; SHORTTEXT; BLOB; VARBINARY; };struct PrimaryKeyDefinition { list<string> pkcolumns; optional IndexType indexType;};struct IndexDefinition { string name; bool unique; optional Order order; optional IndexType indexType;
SAP HANA Developer GuideSetting Up the Persistence Model
P U B L I C© 2013 SAP AG or an SAP affiliate company. All
rights reserved. 87

list<string> indexColumns;};struct ColumnDefinition { string name; SqlDataType sqlType; optional bool nullable; optional bool unique; optional int32 length; optional int32 scale; optional int32 precision; optional string defaultValue; optional string comment;};struct TableDefinition { string schemaName; optional bool temporary; optional TableType tableType; optional bool public; optional TableLoggingType loggingType; list<ColumnDefinition> columns; optional list<IndexDefinition> indexes; optional PrimaryKeyDefinition primaryKey; optional string description;};TableDefinition table;
Related LinksTables [page 82]In the SAP HANA database, as in other relational databases, a table is a set of data elements that are organized using columns and rows. A database table has a specified number of columns, defined at the time of table creation, but can have any number of rows. Database tables also typically have meta-data associated with them; the meta-data might include constraints on the table or on the values within particular columns.
Creating Tables [page 88]SAP HANA Extended Application Services (SAP HANA XS) enables you to create a database table as a design-time file in the repository.
6.5 Creating Tables
SAP HANA Extended Application Services (SAP HANA XS) enables you to create a database table as a design-time file in the repository.
This task describes how to create a file containing a table definition. Table definition files are stored in the SAP HANA repository. To complete this task successfully, note the following prerequisites:
● You must have access to a SAP HANA system.● You must have already created a development workspace and a project.● You must have shared the project so that the newly created files can be committed to (and synchronized
with) the repository.● You must have created a schema definition MYSCHEMA.hdbschema
To create a table file in the repository, perform the following steps:
1. Start the SAP HANA studio.2. Open the SAP HANA Development perspective.
88
P U B L I C© 2013 SAP AG or an SAP affiliate company. All rights reserved.
SAP HANA Developer GuideSetting Up the Persistence Model

3. Open the Project Explorer view.4. Create the table definition file.
Browse to the folder in your project workspace where you want to create the new table file and perform the following tasks:a) Right-click the folder where you want to save the table file and choose New in the context-sensitive popup
menu.b) Enter the name of the table in the File Name box and add the file suffix .hdbtable, for example,
MYTABLE.hdbtable.c) Choose Finish to save the new table-definition file.
5. Define the table.To edit the table file, in the Project Explorer view double-click the table file you created in the previous step, for example, MYTABLE.hdbtable, and add the table-definition code to the file:
NoteThe following code example is provided for illustration purposes only.
table.schemaName = "MYSCHEMA";table.tableType = COLUMNSTORE;table.columns = [ {name = "Col1"; sqlType = VARCHAR; nullable = false; length = 20; comment = "dummy comment";}, {name = "Col2"; sqlType = INTEGER; nullable = false;}, {name = "Col3"; sqlType = NVARCHAR; nullable = true; length = 20; defaultValue = "Defaultvalue";}, {name = "Col4"; sqlType = DECIMAL; nullable = false; precision = 2; scale = 3;}];table.indexes = [ {name = "MYINDEX1"; unique = true; indexColumns = ["Col2"];}, {name = "MYINDEX2"; unique = true; indexColumns = ["Col1", "Col4"];}];table.primaryKey.pkcolumns = ["Col1", "Col2"];
6. Save the table file.7. Commit the changes to the repository.
a) Locate and right-click the new table file in the Project Explorer view.
b) In the context-sensitive pop-up menu, choose Team Commit .
Related LinksUsing SAP HANA Projects [page 39]Projects group together all the artifacts you need for a specific part of the application-development environment.
Creating Schemas [page 81]A schema defines the container that holds database objects such as tables, views, and stored procedures.
6.6 Sequences
A sequence is a database object that generates an automatically incremented list of numeric values according to the rules defined in the sequence specification. The sequence of numeric values is generated in an ascending or descending order at a defined increment interval, and the numbers generated by a sequence can be used by applications, for example, to identify the rows and columns of a table.
SAP HANA Developer GuideSetting Up the Persistence Model
P U B L I C© 2013 SAP AG or an SAP affiliate company. All
rights reserved. 89

Sequences are not associated with tables; they are used by applications, which can use CURRVAL in a SQL statement to get the current value generated by a sequence and NEXTVAL to generate the next value in the defined sequence. Sequences provide an easy way to generate the unique values that applications use, for example, to identify a table row or a field. In the sequence specification, you can set options that control the start and end point of the sequence, the size of the increment size, or the minimum and maximum allowed value. You can also specify if the sequence should recycle when it reaches the maximum value specified. The relationship between sequences and tables is controlled by the application. Applications can reference a sequence object and coordinate the values across multiple rows and tables.SAP HANA Extended Application Services (SAP HANA XS) enables you to create a database sequence as a transportable design-time file in the repository. Repository files can be read by applications that you develop.You can use database sequences to perform the following operations:
● Generate unique, primary key values, for example, to identify the rows and columns of a table● Coordinate keys across multiple rows or tables
If you want to define a transportable sequence using the design-time sequence specifications, use the configuration schema illustrated in the following example.
string schema;int32 increment_by(default=1);int32 start_with(default=-1);optional int32 maxvalue;bool nomaxvalue(default=false);optional int32 minvalue;bool nominvalue(default=false);optional bool cycles;optional string reset_by;bool public(default=false);optional string depends_on_table;optional string depends_on_view;
The following example shows the contents of a valid sequence-definition file for a sequence called MYSEQUENCE. Note that, in this example, no increment value is defined, so the default value of 1 (ascend by 1) is assumed. To set a descending sequence of 1, set the increment_by value to -1.
schema= "TEST_DUMMY";start_with= 10;maxvalue= 30;nomaxvalue=false;minvalue= 1;nominvalue=true;cycles= false;reset_by= "SELECT \"Col2\" FROM \"TEST_DUMMY\".\"com.sap.test.tables::MY_TABLE\" WHERE \"Col2\"='12'";depends_on_table= "com.sap.test.tables::MY_TABLE";
The sequence definition is stored in the repository with the suffix hdbsequence, for example, MYSEQUENCE.hdbsequence.If you activate a sequence-definition object in SAP HANA XS, the activation process checks if a sequence with the same name already exists in the SAP HANA repository. If a sequence with the specified name does not exist, the repository creates a sequence with the specified name and makes _SYS_REPO the owner of the new sequence.
NoteThe sequence cannot be dropped even if the deletion of a sequence object is activated.
90
P U B L I C© 2013 SAP AG or an SAP affiliate company. All rights reserved.
SAP HANA Developer GuideSetting Up the Persistence Model

6.7 Creating Sequences
A database sequence generates a serial list of unique numbers that you can use while transforming and moving data to between systems.
This task describes how to create a file containing a sequence definition. Sequence-definition files are stored in the SAP HANA repository. To complete this task successfully, note the following prerequisites:
● You must have access to a SAP HANA system.● You must have already created a development workspace and a project.● You must have shared the project so that the newly created files can be committed to (and synchronized
with) the repository.
SAP HANA Extended Application Services (SAP HANA XS) enables you to create a database sequence as a design-time file in the repository.To create a sequence definition file in the repository, perform the following steps:
1. Start the SAP HANA studio.2. Open the SAP HANA Development perspective.3. Open the Project Explorer view.4. Create the sequence-definition file.
Browse to the folder in your project workspace where you want to create the new sequence-definition file and perform the following tasks:a) Right-click the folder where you want to save the sequence-definition file and choose New in the context-
sensitive popup menu.b) Enter the name of the sequence in the File Name box and add the file suffix .hdbsequence, for example,
MYSEQUENCE.hdbsequence.c) Choose Finish to save the new sequence in the repository.
5. Define the sequence properties.To edit the sequence file, in the Project Explorer view double-click the sequence file you created in the previous step, for example, MYSEQUENCE.hdbsequence, and add the sequence code to the file:
schema= "TEST_DUMMY";start_with= 10;maxvalue= 30;nomaxvalue=false;minvalue= 1;nominvalue=true;cycles= false;reset_by= "SELECT \"Col2\" FROM \"TEST_DUMMY\".\"com.sap.test.tables::MY_TABLE\" WHERE \"Col2\"='12'";depends_on_table= "com.sap.test.tables::MY_TABLE";
6. Save the sequence file.7. Commit the changes to the repository.
a) Locate and right-click the new sequence file in the Project Explorer view.
b) In the context-sensitive pop-up menu, choose Team Commit .
Related LinksUsing SAP HANA Projects [page 39]Projects group together all the artifacts you need for a specific part of the application-development environment.
SAP HANA Developer GuideSetting Up the Persistence Model
P U B L I C© 2013 SAP AG or an SAP affiliate company. All
rights reserved. 91

6.8 SQL Views
In SQL, a view is a virtual table based on the dynamic results returned in response to an SQL statement. Every time a user queries an SQL view, the database uses the view's SQL statement to recreate the data specified in the SQL view. The data displayed in an SQL view can be extracted from one or more database tables.An SQL view contains rows and columns, just like a real database table; the fields in an SQL view are fields from one or more real tables in the database. You can add SQL functions, for example, WHERE or JOIN statements, to a view and present the resulting data as if it were coming from one, single table.SAP HANA Extended Application Services (SAP HANA XS) enables you to create a database view as a design-time file in the repository. Repository files can be read by applications that you develop. In addition, all repository files including your view definition can be transported to other SAP HANA systems, for example, in a delivery unit.If your application refers to the design-time version of a view from the repository rather than the runtime version in the catalog, for example, by using the explicit path to the repository file (with suffix), any changes to the repository version of the file are visible as soon as they are committed to the repository. There is no need to wait for the repository to activate a runtime version of the view.To define a transportable view using the design-time view specifications, use the configuration schema illustrated in the following example:
string schema;string query;bool public(default=true);optional list<string> depends_on_table;optional list<string> depends_on_view;
The following example shows the contents of a valid transportable view-definition file for a view called MYVIEW:
schema="TEST_DUMMY";query="SELECT * FROM \"TEST_DUMMY\".\"acme.com.test.tables::02_HDB_DEPARTMENT_VIEW\"";depends_on_view=["acme.com.test.tables::02_HDB_DEPARTMENT_VIEW"];
If you want to create a view definition as a design-time object, you must create the view as a flat file and save the file containing the view definition with the suffix .hdbview, for example, MYVIEW.hdbview in the appropriate package in the package hierarchy established for your application in the SAP HANA repository. You can activate the design-time object at any point in time.
NoteOn activation of a repository file, the file suffix (for example, .hdbview) is used to determine which runtime plugin to call during the activation process. The plug-in reads the repository file selected for activation, parses the object descriptions in the file, and creates the appropriate runtime objects.
Column Names in a ViewIf you want to assign names to the columns in a view, use the SQL query in the .hdbview file. In this example of design-time view definition, the following names are specified for columns defined in the view:
● idea_id● identity_id● role_id
schema = "MYSCHEMA";query = "select role_join.idea_id as idea_id, ident.member_id as identity_id,
92
P U B L I C© 2013 SAP AG or an SAP affiliate company. All rights reserved.
SAP HANA Developer GuideSetting Up the Persistence Model

role_join.role_id as role_id from \"acme.com.odin.db.iam::t_identity_group_member_transitive\" as ident inner join \"acme.com.odin.db.idea::t_idea_identity_role\" as role_join on role_join.identity_id = ident.group_id union distinct select idea_id, identity_id, role_id from \"acme.com.odin.db.idea::t_idea_identity_role\" with read only";
6.9 Creating SQL Views
A view is a virtual table based on the dynamic results returned in response to an SQL statement. SAP HANA Extended Application Services (SAP HANA XS) enables you to create a database view as a design-time file in the repository.
This task describes how to create a file containing an SQL view definition. SQL view definition files are stored in the SAP HANA repository. To complete this task successfully, note the following prerequisites:
● You must have access to a SAP HANA system.● You must have already created a development workspace and a project.● You must have shared the project so that the newly created files can be committed to (and synchronized
with) the repository.
To create a view-definition file in the repository, perform the following steps:
1. Start the SAP HANA studio.2. Open the SAP HANA Development perspective.3. Open the Project Explorer view.4. Create the view-definition file.
Browse to the folder in your project workspace where you want to create the new view-definition file and perform the following tasks:a) Right-click the folder where you want to save the view-definition file and choose New in the context-
sensitive popup menu.b) Enter the name of the view-definition file in the File Name box and add the file suffix .hdbview, for
example, MYVIEW.hdbview.c) Choose Finish to save the new view-definition file in the repository.
5. Define the view.To edit the view-definition file, in the Project Explorer view double-click the view-definition file you created in the previous step, for example, MYVIEW.hdbview, and add the view-definition code to the file:
NoteThe following code example is provided for illustration purposes only.
schema="TEST_DUMMY";query="SELECT * FROM \"TEST_DUMMY\".\"com.sap.test.tables::02_HDB_DEPARTMENT_VIEW\"";depends_on_view=["com.sap.test.tables::02_HDB_DEPARTMENT_VIEW"];
SAP HANA Developer GuideSetting Up the Persistence Model
P U B L I C© 2013 SAP AG or an SAP affiliate company. All
rights reserved. 93

6. Save the view-definition file.7. Commit the changes to the repository.
a) Locate and right-click the new view-definition file in the Project Explorer view.
b) In the context-sensitive pop-up menu, choose Team Commit .
Related LinksUsing SAP HANA Projects [page 39]Projects group together all the artifacts you need for a specific part of the application-development environment.
6.10 Data Provisioning Using Table Import
You can import data from comma-separated values (CSV) into the SAP HANA tables using the SAP HANA Extended Application Services (SAP HANA XS) table-import feature.In SAP HANA XS, you create a table-import scenario by setting up an import-model file, a import-data file, and one or more comma-separated value (CSV) files containing the content you want to import into the specified SAP HANA table. The import-model file links the import operation to one or more target tables. The table definition (for example, in the form of a .hdbtable file) can either be created separately or be part of the table-import scenario itself.To use the SAP HANA XS table-import feature to import data into an SAP HANA table, you need to understand the following table-import concepts:
● Table-Import ModelYou define the table-import model in a configuration file that specifies the data fields to import and import target tables of each data field.
● Table-Import DataYou define the table-import data in a configuration file that specifies how to link the CSV data files to the respective data field and, in turn, the target tables via the table-import model.
● Table-Import ExtensionYou define the table-import extension in a configuration file that modifies the relationship to an existing table import data file.
CSV Data File ConstraintsThe following constraints apply to the table-import feature in SAP HANA XS:
● The number of table columns must match the number of CSV columns.● There must not be any incompatibilities between the data types of the table columns and the data types of the
CSV columns.● Overlapping data in data files is not supported.● The target table of the import must not be modified (or appended to) outside of the data-import operation. If
the table is used for storage of application data, this data may be lost during any operation to re-import or update the data.
6.10.1 Table-Import ModelThe table-import model is a configuration file that you use to specify the parameters associated with the list of comma-separated-value (CSV) files that you want to import. The table-import model also specifies, for each parameter, the target table into which the data in the linked-data files is imported.
94
P U B L I C© 2013 SAP AG or an SAP affiliate company. All rights reserved.
SAP HANA Developer GuideSetting Up the Persistence Model

You can declare a parameter as optional. If a parameter is optional, it is not necessary to assign a value to this parameter in the implementing table import data object. To declare a variable as optional in the table-import model, add the keyword optional before the variable, as illustrated in the example below.
optional listCsvFile csvList;
If you want to add comments to your table-import model, use two back slashes (//) as illustrated in the example below.
listCsvFile fileList; //this is the csv file list
ExampleExample Table-Import Model File
listCsvFile csvFiles;import csvFiles "TISCHEMA" "TiPackage::TiTable";
6.10.2 Table-Import DataThe table-import data configuration file enables you to specify which table-import model is to be implemented, for example, TiModel.hdbtim and how to handle the data to be imported from the comma-separated list to the target database table. The file-list parameters created in the table import-model file are assigned to lists of data-file links, for example, comma-separated values (.csv) files. In the example illustrated below, the .csv is called TiCsv.csv.If you want to add comments to your table-import data-definition file, use two back slashes (//) as illustrated in the following example:
implements TiPackage:TiModel.hdbtim; //This is a the import model
For each CSV file it is possible to define the following options in the data-definition (.hdbtid) file:
● FinalPrevent a variable from being modified, for example, in a table-import extension file.
ExampleExample Table-Import Data File
implements TiPackage:TiModel.hdbtim; //This is a commentcsvFiles = ["TiPackage:TiCsv.csv"];
finalUse the final keyword with the csvFiles or csvFilesExt to you can prevent modifications of values assigned to file lists, for example, in a table-import extension. To declare an option as final in the table-import data file, add the keyword final before the option, as illustrated in the example below.
final csvFiles = ["acme.com.mypackage:data.csv"];
6.10.3 Table-Import ExtensionsThe table-import feature enables you to modify the initial settings for variables defined in table-import configuration files by specifying new settings for defined variables in separate extension files.
SAP HANA Developer GuideSetting Up the Persistence Model
P U B L I C© 2013 SAP AG or an SAP affiliate company. All
rights reserved. 95

If both a table-import model and a table-import data file exist, then you can modify initial variable assignments made in one table-import data file in a subsequent table-import data files (so called extensions) - as long as the variables are not declared explicitly as final in a previous file. The modification takes place only on the data values of variables, for example, in a table-import-extension data file, where values can be augmented or be replaced. The result is a chain of table-import data artifacts. The end result of a successful table import operation is based on the resulting definition of the file-list parameter as a result of all data files in the chain.
NoteYou can only create a linear chain of extensions. It is not permitted to create two table import data files modifying the same base table import data files.
The following example illustrates a simple table-import model named timodel.hdbtim in the package TiPackage.
csvFileList csvList;import csvList "TISCHEMA" "TiPackage::TiTable";
The following example illustrates the contents of a simple table-import data file named tidata.hdbtid, which implements the table-import model defined in timodel.hdbtim illustrated above.
implements TiPackage:timodel.hdbtim;csvList = ["TiPackage:mydata.csv"];
The following example illustrates how to extend the definition in the table-import data file tidata.hdbtid illustrated above.
modifies sap.myPackage:tidata.hdbtid;csvList = csvList + ["TiPackage:myotherdata.csv"];
After activation of the table-import files, the data from both CSV files (TiPackage:mydata.csv, and TiPackage:myotherdata.csv) is imported into the target table.
6.10.4 Table-Import Configuration-File SyntaxWhen you define the details of the table-import operation, you use the following file-list types to enable the processing of certain data formats:
● csvFileListUsed to specify list of comma-separated values (CSV) file links. The linked CSV files are imported into the target table specified in the table import model. The import process parses and validates the CSV file format.
ExampleTable Import Model Example
The following example shows how to use the option csvFileList in the table-import model definition:
listCsvFile csvFiles;import csvFiles "TISCHEMA" "TiPackage::TiTable";
Example
96
P U B L I C© 2013 SAP AG or an SAP affiliate company. All rights reserved.
SAP HANA Developer GuideSetting Up the Persistence Model

Table Import Data Example
The following example shows how to use the option csvFileList in the table-import data definition:
implements TiPackage:TiModel.hdbtim;csvFiles = ["TiPackage:TiCsv.csv"];
6.11 Importing Data Using Table Import
The table-import function imports data from comma-separated values (CSV) files into SAP HANA tables.
Before you start this task, make sure that the following prerequisites are met:
● An SAP HANA database instance is available.● The SAP HANA database client is installed and configured.● You have a database user account set up with the roles containing sufficient privileges to perform actions in
the repository, for example, add packages, add objects, and so on.● The SAP HANA studio is installed and connected to the SAP HANA repository.● You have a development environment including a repository workspace, a package structure for your
application, and a shared project to enable you to synchronize changes to the project files in the local file system with the repository.
NoteThe names used in the following task are for illustration purposes only; replace the names of schema, tables, files, and so on shown in the following examples with your own names.
1. Create a root package for your table import application.In SAP HANA studio, open the SAP HANA Development perspective and perform the following steps:a) In in the package hierarchy displayed in the Navigator view, right-click the package where you want to
create the new package for your table-import configuration and choose New > Package... .b) Enter a name for your package, for example TiPackage.
NoteNaming conventions exist for package names, for example, a package name must not start with either a dot (.) or a hyphen (-) and cannot contain two or more consecutive dots (..). In addition, the name must not exceed 190 characters.
a) Choose OK to create the new package.2. Create a set of table-import files.
The following files are required for a table import scenario.
○ The table-import data file, for example, TiData.hdbtidLinks the CSV data files to the data field and thus the target tables via the model
○ A table-import model, for example, TiModel.hdbtimDefines the data fields and import target tables of each data field
SAP HANA Developer GuideSetting Up the Persistence Model
P U B L I C© 2013 SAP AG or an SAP affiliate company. All
rights reserved. 97

○ A table import package, for example, TiPackageContains all the artifacts you need to complete the table-import operation
○ A CSV file, for example, TiCsv.csvContains the data to be imported into the SAP HANA table
○ A table definition, for example, TiTable.hdbtableDefines the structure of the target import table
○ The schema definition, for example, TISCHEMA.hdbschemaSpecifies the name of the schema in which the target import table is created
○ An application-logic, for example, TiConsumerApp.xsjs
Once all files are created, you can import data from a source file, such as a CSV file, into the desired table during a commit.
3. Using any code editor, open the schema definition (TISCHEMA.schema) file that you just created and enter the name of the schema you want to apply.
schemaname=TISCHEMA;
4. Open the table definition of the target import table (TiTable.hdbtable) file that you just created and enter the following lines of text.
table.schemaName = "TISCHEMA"; table.tableType = COLUMNSTORE; table.columns = [ {name = "Surname"; sqlType = VARCHAR; nullable = false; length = 40; comment = "Person's surname";}, {name = "Forename"; sqlType = VARCHAR; nullable = false; length = 40; comment = "Person's forename";} ... ]; table.primaryKey.pkcolumns = ["Surname"];
5. Open the CSV file, for example, TiCsv.csv in a text editor and enter some values, for example, the following lines.
Meyer,HugoSchmitt,MichaelFoo,Bar
6. Open the table-import model (TiModel.hdbtim) file that you just created and enter the following lines of text.
listCsvFile csvFiles;import csvFiles "TISCHEMA" "TiPackage::TiTable";
7. Open the data definition file (TiData.hdbtid) file that you just created in the same package and enter the following lines of text.
implements TiPackage:TiModel.hdbtim;csvFiles = ["TiPackage:TiCsv.csv"];
8. Deploy the table import.a) Select the package that you created in the first step.b) Click the alternate mouse button and choose Commit.c) Click the alternate mouse button and choose Activate.You have imported data into the SAP HANA table using the table import feature.
98
P U B L I C© 2013 SAP AG or an SAP affiliate company. All rights reserved.
SAP HANA Developer GuideSetting Up the Persistence Model

6.12 Using Imported Table Data in SAP HANA
Before you start, ensure that you have deployed a table import.
NoteIf you activate the files and then log on to the system using the SAP HANA studio, you do not have sufficient privileges to execute a SELECT statement on the table that was created. To be able to execute the select statement on the table that was created, execute the following statement using the SQL Console in the SAP HANA studio:
call _SYS_REPO.GRANT_PRIVILEGE_ON_ACTIVATED_CONTENT('select','"<Path.to.><TiPackageName>::<TiTableName>"','<youruser>');
1. In the SAP HANA studio, write a Select statement to view the imported data.For example:
SELECT * FROM "<Path.to.>TiPackage::TiTable";
2. Choose Execute.You can view the contents of the comma-separated values (CSV) file in the SAP HANA table.
6.13 Using Imported Table Data in an SAP HANA XS Application
Before you start, ensure that you have deployed a table import.
NoteIf you activate the files and then log on to the system using the SAP HANA studio, you do not have sufficient privileges to execute a SELECT statement on the table that was created. You must execute the following statement using the SQL Console in the SAP HANA studio:
call _SYS_REPO.GRANT_PRIVILEGE_ON_ACTIVATED_CONTENT('select','"<Path.to.>TiPackage::TiTable"','<youruser>');
The example in the note above is for illustration purposes only. In the example shown, TiPackage is the path to the table-import package in the repository, where package names are separated by a dot (.); TiTable is the name of the table that is the target for the data-import operation; and <youruser> is the name of a valid SAP HANA database user.To use imported table in an SAP HANA XS application, perform the following steps:
1. Create an application-descriptor file and place it in your table-import package, for example, TiPackage.
The application-descriptor file has no contents and no name; it only has the file extension .xsapp.
SAP HANA Developer GuideSetting Up the Persistence Model
P U B L I C© 2013 SAP AG or an SAP affiliate company. All
rights reserved. 99

2. Create an application-access file and place it in the package to which you want to grant access, for example, in same TiPackage package as the application descriptor file you created in the previous step.
The application-access file does not have a name; it only has the file extension .xsaccess.3. In the application-access (.xsaccess) file, enter the following lines of text:
{ "auth_required" : true}
4. Create an application-logic file using server-side JavaScript, for example, TiConsumerApp.xsjs and place it in your table-import package, for example TiPackage.
The application-logic file is the SAP HANA XS JavaScript application you use to access the data imported into the table.
5. Enter the following lines of text into your application-logic file, for example, TiConsumerApp.xsjs.
NoteThe following example is for illustration purposes only. In the example shown, <Path.to>.TiPackage is the absolute path to the table-import package in the repository and TiTable is the name of the table that is the target for the data-import operation.
$.response.contentType = "text/plain";var conn = $.db.getConnection();var pstatement1 = conn.prepareStatement( "SELECT * FROM \"<Path.to.>TiPackage::TiTable\" WHERE \"Surname\"='Meyer'");var result = pstatement1.executeQuery();if (result){ if (result.next()) { $.response.setBody('The sql statement execution was successful.'); } else { $.response.setBody("No data found"); } $.response.status = $.net.http.OK; }else { $.response.status = $.net.http.INTERNAL_SERVER_ERROR;}result.close();pstatement1.close();conn.close();
6. Select the package that you created in the first step.7. Click the alternate mouse button and choose Commit.8. Click the alternate mouse button and choose Activate.9. Access the SAP HANA XS application with the following URL http://<dbhost>:
80<DB_Instance_Number>/<package_name>/<application_logic_file_name>.xsjs.You receive the message, The SQL statement execution was sucessful.
100
P U B L I C© 2013 SAP AG or an SAP affiliate company. All rights reserved.
SAP HANA Developer GuideSetting Up the Persistence Model

6.14 Extending a Table Import
Extend an existing table import file by creating a new table-import configuration file that you use to specify how to modify the relation to an existing table-import file.
Before you start, ensure that you have deployed a table import; the following files are required for a table import extension scenario.
● The table-import data file, for example, TiData.hdbtidLinks the new comma-separated-values CSV data files to the data fields and, in turn, the target tables via the model
● The table-import extension file, for example, TiDataExtend.hdbtidExtends the table-import data file TiData.hdbtid
● A table-import model, for example, TiModel.hdbtimDefines the data fields and import target tables of each data field
● A table import package, for example, TiPackageContains all the artifacts you need to complete the table-import operation
● A CSV file, for example, TiCsv.csvContains the data to be imported into the SAP HANA table
● A second CSV file, for example, TiCsvExtend.csvContains the new (extended) data to be imported into the table
● A table definition, for example, TiTable.hdbtableDefines the structure of the target import table
● The schema definition, for example, TISCHEMA.schemaSpecifies the name of the schema in which the target import table is created
● An application-logic, for example, TiConsumerApp.xsjs
1. Open the repository package that contains the table-import data file (for example, TiData.hdbtid) that you want to extend.
2. Create a CSV file and give the new CSV file a name, for example, TiCsvExtend.csv.
This is the CSV file that contains the new, extended data to be imported into the table. The extended data either changes or adds to the date specified in the original CSV file TiCsv.csv.
3. Open the new CSV file TiCsvExtend.csv in any code editor and enter the new, extended values you want to import separated by a comma.For example, enter the name NewFoo,Bar.
NewFoo,Bar
NoteThe value NewFoo in theTiCsvExtend.csv modifies the original Foo value specified in the first CSV file TiCsv.csv.
4. Create a table-import data-extension file (for example, TiDataExtend.hdbtid) and place the new data-extension file in the same package (for example, TiPackage) as the other files.
5. Enter the following lines into the data-extension file TiDataExtend.hdbtid.
Note
SAP HANA Developer GuideSetting Up the Persistence Model
P U B L I C© 2013 SAP AG or an SAP affiliate company. All
rights reserved. 101

The following example is for illustration purposes only. In the example shown, <Path.to>.TiPackage is the absolute path to the table-import package in the repository and TiData.hdbtid is the name of the data-extension file for the data-import operation.
modifies <Path.to.>TiPackage:TiData.hdbtid;csvFiles = csvFiles + ["<Path.to.>TiPackage:TiCsvExtend.csv"];
6. In the SAP HANA XS application <application_logic_file_name>.xsjs, modify the script to query the new value(s) specified in the table-import extension configuration.In this example, the table-import extension adds the name NewFoo to the data to be imported to SAP HANA; you now want to query the value NewFoo.
NoteThe following example is for illustration purposes only. In the example shown, <Path.to.>TiPackage is the absolute path to the table-import package in the repository and TiTable is the name of the table that is the target for the data-import operation.
$.response.contentType = "text/plain";var conn = $.db.getConnection();var pstatement1 = conn.prepareStatement( "SELECT * FROM \"<Path.to.>TiPackage::TiTable\" WHERE \"Surname\"='NewFoo");var result = pstatement1.executeQuery();if (result){ if (result.next()) { $.response.setBody('The sql statement execution was successful.'); } else { $.response.setBody("No data found"); } $.response.status = $.net.http.OK; }else { $.response.status = $.net.http.INTERNAL_SERVER_ERROR;}result.close();pstatement1.close();conn.close();
7. Access the SAP HANA XS application with the following URL http://<dbhost>:80<DB_Instance_Number>/<package_name>/<application_logic_file_name>.xsjs.You receive the message, The SQL statement execution was successful.
102
P U B L I C© 2013 SAP AG or an SAP affiliate company. All rights reserved.
SAP HANA Developer GuideSetting Up the Persistence Model

7 Setting Up the Analytic Model
Modeling refers to an activity of refining or slicing data in database tables by creating views to depict a business scenario. The views can be used for reporting and decision-making.The modeling process involves the simulation of entities, such as CUSTOMER, PRODUCT, and SALES, and relationships between them. These related entities can be used in analytics applications such as SAP BusinessObjects Explorer and Microsoft Office. In SAP HANA, these views are known as information views.Information views use various combinations of content data (that is, non-metadata) to model a business use case. Content data can be classified as follows:
● Attribute: Descriptive data, such as customer ID, city, and country.● Measure: Quantifiable data, such as revenue, quantity sold and counters.
You can model entities in SAP HANA using the Modeler perspective, which includes graphical data modeling tools that allow you to create and edit data models (content models) and stored procedures. With these tools, you can also create analytic privileges that govern the access to the models, and decision tables to model related business rules in a tabular format for decision automation.You can create the following types of information views:
● Attribute Views● Analytic Views● Calculation Views
The figure below shows the process flow for modeling in SAP HANA.
You can perform the following tasks in the Modeler perspective:
● Import metadata
SAP HANA Developer GuideSetting Up the Analytic Model
P U B L I C© 2013 SAP AG or an SAP affiliate company. All
rights reserved. 103

Create tables by importing the table definitions from the source systems using the Data Services infrastructure. For more information, see Importing Table Definitions.
NoteYou can also create tables from scratch using the SAP HANA Development perspective. For more information, see Setting Up the Persistence Model [page 79].
● Load dataLoad data into the table definitions imported from the source system using the Load Controller, Sybase Replication Server or SAP Landscape Transformation, and from flat files. For more information, see Loading Data into Tables.
NoteYou can also provision data into the table definitions in the SAP HANA Development perspective. For more information, see Setting Up the Persistence Model [page 79].
● Create packagesLogically group objects together in a structured way. For more information, see Maintaining Repository Packages.
● Create information viewsModel various slices of the data stored in the SAP HANA database. Information views are often used for analytical use cases, such as operational data mart scenarios or multidimensional reporting on revenue, profitability, and so on. For more information, see Creating Views.
● Create proceduresCreate procedures using SQLScript for implementing a complex logic that cannot be achieved using other objects. For more information, see Developing Procedures [page 170].
● Create analytic privilegesControl which data that individual users sharing the same data foundation or view can see. For more information, see Creating Analytic Privileges [page 360] .
● Import SAP NetWeaver BW objectsImport SAP NetWeaver BW objects into SAP HANA, and expose them as information views. For more information, seeImporting BW Objects.
● Create decision tablesCreate a tabular representation of related rules using conditions and actions. For more information, see Creating Decision Tables.
● Import and export objectsImport and export the content objects from and to the client and server location. For more information, see Exporting Delivery Units and Importing Delivery Units.
Note● The Navigator view of the Modeler perspective lists only inactive objects from the default workspace along
with the active objects. Also, in the Modeler perspective, the objects can be created, edited, and saved only when there are no other inactive version exists in other workspaces other than default workspace.
● The object types listed below are supported in the Modeler perspective. The object types other than the ones that are listed below are not fully supported from Modeler perspective, that is, they are opened in the simple text editor using Modeler perspective. They can be opened in respective editors only in other perspectives such as SAP HANA Development or Administration and Monitoring, and so on.
104
P U B L I C© 2013 SAP AG or an SAP affiliate company. All rights reserved.
SAP HANA Developer GuideSetting Up the Analytic Model

○ Attribute Views○ Analytic Views○ Calculation Views○ Procedures○ Analytic Privileges○ Decision Tables○ Process Visibility Scenario
● The objects imported from other systems open in the edit mode with a warning message in the editor. The Edit Imported Objects option has thus been removed from the editor.
Related LinksSAP HANA Studio [page 25]The SAP HANA studio is an Eclipse-based development and administration tool for working with SAP HANA, including creating projects, creating development objects, and deploying them to SAP HANA. As a developer, you may want to also perform some administrative tasks, such as configuring and monitoring the system.
7.1 Setting Up the Modeling Environment
7.1.1 Setting Modeler PreferencesYou can set preferences for your Eclipse workspace to set up the default settings that the system uses whenever you log on.
1. Choose Window Preferences Modeler
Note
You can also set the preferences choosing Quick Launch Manage Preferences
2. Identify the required preference and perform the corresponding substeps from the table below:
Requirement Preference Substeps
To specify the structure of content packages in the Navigator view
Content Presentation Hierarchical - to view the package structure in a hierarchical manner such that, the child folder is inside the parent folder. Flat - to view all the packages at the same level for example, sap, sap.ecc, sap.ecc.ui. Show Object Type Folders - to group together similar objects in a package such as attribute views in the Attribute View package.
To set the preferences for loading data using flat file
Data From Local File 1. Browse the location to save error log files for data load using flat files.
2. Enter the batch size for loading data. For example, if you specify
SAP HANA Developer GuideSetting Up the Analytic Model
P U B L I C© 2013 SAP AG or an SAP affiliate company. All
rights reserved. 105

Requirement Preference Substeps
2000 and a file has records of 10000 rows the data load will happen in 5 batches.
3. Enter a decision maker count that will be used to propose data types based on the file. For example, enter 200 if you want the proposal to be made based on the 200 rows of file data.
To set the default value for the client that will be used while previewing model data
Default Model Parameters Select the client from the Default Client drop-down list.
To enforce various rules on objects
NoteEnforcing validation rules with severity “Error” are mandatory.
Validation Rules Select the required rules to be applied while performing object validation.
To determine the numbers of rows to be displayed in a page
Data Preview Select the maximum rows for data preview as required.
To specify a location for job log files Logs 1. Expand the Logs node.2. Select Job Log.3. Browse the location where you
want to save the job log files.
To enable logging the repository calls and specify location for repository log files
Logs 1. Expand the Logs node.2. Select Job Log.3. Select true from the drop-down
list.4. Browse the location where you
want to save the repository log files.
To enable search for the attributes used in the views
Search Options Select Enable Search Attributes. .
To allow lower case alphabets for attribute view, analytic view, calculation view, procedure and analytic privilege names
Case Restriction Deselect the Model name in upper case checkbox.
NoteAfter changing the preferences make sure you choose Apply and OK.
7.1.2 Configuring the Import ServerIn order to load data from external sources to SAP HANA you need to establish a connection with the server. To connect you need to provide the details of BusinessObjects Data Services repository and ODBC drivers. Once the connection is established you can import the tables definition and then load the data into table definitions.
106
P U B L I C© 2013 SAP AG or an SAP affiliate company. All rights reserved.
SAP HANA Developer GuideSetting Up the Analytic Model

1. In the Quick Launch tab page, choose Configure Import Server.2. Enter the IP address of the server from which you want to import data.3. Enter the repository name.4. Enter the ODBC data source, and choose OK.
7.1.3 Importing Table DefinitionsOne of the ways to create tables to load source system data into SAP HANA is to import the table definitions from the source system.
You have configured the SAP HANA modeler for importing metadata using the Data Services infrastructure.
Use this procedure to import table definitions (metadata) from a source system to load source system data into SAP HANA. You can point to these table definitions for creating various content models such as attribute, analytic, and calculation views.Based on your requirements, use one of the following approaches:
● Mass Import: To import all table definitions from a source system. For example, you can use this approach if this is a first import from the given source system.
● Selective Import: To import only selected table definitions from a source system. For example, you can use this approach if there are only few table definitions added or modified in the source system after your last import.
1. If you want to import all table definitions, do the following:a) In the File menu, choose Import.b) Expand the SAP HANA Content node.c) Choose Mass Import of Metadata, and choose Next.d) Select the target system where you want to import all the table definitions, and choose Next.e) In the Connection Details dialog, enter the operating system user name and password of the target
system.f) Select the required source system, and choose Finish.
NoteIf the required system is not available from the dropdown list, you need to contact your administrator.
2. If you want to import selective table definitions, do the following:a) In the File menu, choose Import.b) Expand the SAP HANA Content node.c) Choose Selective Import of Metadata, and choose Next.d) Select the target system where you want to import the table definitions, and choose Next.e) Select the required source system.
NoteIf the required system is not available from the dropdown list, you need to add the new source system using Manage Connections.
f) In the Type of Objects to Import field, select the required type, and choose Next.g) Add the required objects (tables or extractors) that you want to import.
Note
SAP HANA Developer GuideSetting Up the Analytic Model
P U B L I C© 2013 SAP AG or an SAP affiliate company. All
rights reserved. 107

If you want to add dependent tables of a selected table, select the required table in the Target panel, and choose Add Dependent Tables in the context menu.
h) Select the schema into which you want to import the metadata.i) If you selected object type as extractor, select the package into which you want to place the
corresponding objects.j) Choose Next, then review and confirm the import by choosing Finish.If the source object is a table or non V-type extractor, the system creates physical tables and stores them in the selected schema. However, if the source object is a V-Type extractor, the system creates content models and stores these models in the selected package, and the underlying physical tables in the schema.
Configuring Data Services for Metadata ImportUse this procedure to enable the SAP HANA modeler to import table definitions from the source system using the Data Services infrastructure.
1. Set the Passphrasea) Log on to the Central Management Console of SAP BusinessObjects Enterprise (BOE).
b) Choose Manage Applications Data Services Application Settings .c) In the Encryption Passphrase field, enter the passphrase that you have been using for the SAP HANA
studio, and choose Save.d) Restart the TOMCAT and BOE services.
2. Disable Session Securitya) Log on to the Data Services Management Console.b) Choose Administrator.c) In the Navigator view panel, choose Web Services.d) Choose the Web Services Configuration tab page.e) Select the Import_Repo_Object checkbox to save the connection details.f) Select Disable Session Security from the dropdown menu, and choose Apply.
3. Creating a Data Source
a) Go to Start Control Panel Administrative Tools .b) Choose Data Sources (ODBC).c) Choose the System DSN tab page, and choose Add.d) Select HDBODBC from the driver list, and choose Finish.e) Enter a name and description for the data source.f) Enter server details.
NoteThe format in which you need to enter details is <<host>:3<instance number>15>. For example, abc2012.wdf.sap.corp:30115.
g) Enter the required database details in the format, <<SID><instance number>>. For example, M4701.h) Choose Connect.
Managing Source System ConnectionsUse this procedure to add or manage a source system connection that is required to import table definitions.
108
P U B L I C© 2013 SAP AG or an SAP affiliate company. All rights reserved.
SAP HANA Developer GuideSetting Up the Analytic Model

7.1.4 Loading Data into Tables● If you are using the Load Controller or Sybase Replication Server infrastructure, make sure that you have
imported all table definitions into the SAP HANA database. For more information, see Importing Table Definitions.
● If you are using the SLT component, the source system(s), target system and the target schema, are configured by the administrator during the installation.
Use this procedure to load data into your table definitions. Depending on your requirements, you can perform the following:
● Initial Load - to load all data from a source SAP ERP system into the SAP HANA database by using Load Controller or SAP Landscape Transformation (SLT). This is mostly applicable when you are loading data from the source for the first time.
● Data Replication - to keep the data of selected tables in the SAP HANA database up-to date with the source system tables by using SyBase Replication Server or SAP Landscape Transformation (SLT).
1. In the Quick Launch tab page, choose Data Provisioning.2. If you are using SLT-based replication, choose Source.3. Choose Load (for initial load) or Replicate (for data replication) as appropriate.4. Select the required tables to load or replicate data in any of the following ways:
○ Search for the required tables.
1. Select the table from the list, and choose Add.2. If you want to save the selected list of tables locally for future reference, select the Export selected
tables checkbox, and specify the target location.○ Load the list of tables from a local file as follows:
1. Choose Load from file.2. Select the file that contains the required list of tables.
NoteThe supported file type is .csv.
5. If you are using the load controller infrastructure, choose Next and enter the operating system user name and password.
6. Choose Finish.
Suspending and Resuming Data LoadIf you are using SLT- based replication, you can choose to stop data replication temporarily for a selected list of tables, and later resume data load for these.
1. In the Quick Launch tab page, choose Data Provisioning.2. Select the source system for which you want to suspend or resume data load.3. Choose Suspend or Resume as required.4. Select the tables, and choose Add.5. Choose Finish.
Uploading Data from Flat FilesUse this procedure to upload data from flat files available in a client file system, to SAP HANA database.
SAP HANA Developer GuideSetting Up the Analytic Model
P U B L I C© 2013 SAP AG or an SAP affiliate company. All
rights reserved. 109

● If the table schema corresponding to the file to be uploaded already exists in the SAP HANA database, the new data records are appended to the existing table.
● If the required table for loading the data does not exist in the SAP HANA database, create a table structure based on the flat file.
The application suggests the column names and data types for the new tables and allows you to edit them. The new table always has a 1:1 mapping between the file and table columns. The application does not allow you to overwrite any columns or change the data type of existing data. The supported file types are .csv, .xls, and .xlsx.
1. In the File menu, choose Import.2. In the Select an import source section, expand the SAP HANA content node.3. Select Data from Local File, and choose Next.4. In the Target System section, select the target system to which you want to import the data using the flat file,
and choose Next.5. In the Define Import Properties page, browse and select the file containing the data you want to load.6. If you have selected a CSV file, select a delimiter.
NoteA delimiter is used to determine columns and pick the correct data from them. In a csv file, the accepted delimiters are ',', ';' and ':'.
7. If you have selected an .xls or .xlsx file, select a worksheet.8. If you want to load the data into a new table, select the New option and perform the following substeps:
a. Choose Next.b. On the Manage Table Definition and Data Mapping screen, map the source and target columns.
Note○ Only 1:1 column mapping is supported. You can also edit the table definition by changing the data
types, renaming columns, adding or deleting the columns, and so on.○ You can choose to map the source and target columns using the Auto Map option. If you choose
the one to one option, then first column of the source is mapped to the first column at the target. If you choose the option Map by name, the source and target columns with the same name are mapped.
9. If you want to append the data to an existing table, select the Existing option and perform the following substeps:
a. Choose Next.b. On the Manage Table Definition and Data Mapping screen, map the source and target columns.
10. If you want to provide a constant value for a column at the target, perform the following substeps:
a. Right-click the column.b. From the context menu, choose Make As Constant.c. In the Constant dialog box, enter a value, and choose OK.
NoteYou can set a column to constant if it is not mapped to a source column.
11. To provide a default value for a column at the target, enter a value in the Default Value column.
110
P U B L I C© 2013 SAP AG or an SAP affiliate company. All rights reserved.
SAP HANA Developer GuideSetting Up the Analytic Model

12. Choose Finish.
7.1.5 Copying Content Delivered by SAPYou have the following privileges:
● REPO.READ for the source package.● REPO.MAINTAIN_NATIVE_PACKAGES and REPO.EDIT_NATIVE_OBJECTS for the root package.
Use this functionality for one of the most common scenarios, that is, to copy the standard content shipped by SAP or an SAP partner to your local package to meet your modeling and reporting use cases. For example, from sap.ecc.fin to customer.ecc.fin.
TipWe recommend you copy the content shipped by SAP or an SAP partner to your local package to avoid overwriting your changes during the subsequent import.
You can also use this procedure to copy objects, other than SAP-shipped in a package to other packages in the same system based on your business use case.
CautionIf you copy an object but not its dependent objects (if any), the copied object in the target package will have references to the dependent objects in the source package.
To copy the objects, you need to map the source root packages to the target root packages. You need to activate the copied objects in the target package to consume them for reporting purposes.
RestrictionFor script-based calculation views and procedures, even if you copy the dependent objects, you need to change the script manually and adjust the dependent object references.
1. In the Quick Launch tab page, choose Mass Copy.2. To create a mapping between the source package and the target package, perform the following substeps:
a) Choose Add.b) Select a source package and a target package, and choose Next.
TipIf you want to create more package mapping, select the source and target packages as required.
c) Select the required objects, and choose Add.3. Choose Next to view the summary.
TipYou can deselect an object to avoid copying it to the target package.
4. Choose Finish to confirm content copy.
SAP HANA Developer GuideSetting Up the Analytic Model
P U B L I C© 2013 SAP AG or an SAP affiliate company. All
rights reserved. 111

7.1.6 Mapping the Authoring Schema to the Physical SchemaSchema mapping is done when the physical schema in the target system is not the same as the physical schema in the source system, usually in a transport scenario. The schema mapping is maintained via a mapping table.
You use this procedure to map the authoring schemas to the physical database schemas in the target system to access and deploy the transported objects.A physical schema is the schema in which the tables are available. It may differ in the source and target systems.An authoring schema (logical schema) is the physical database schema in the source system with which the content objects are created.Content object definitions are stored in the repository, and contain references to the physical database schemas. When you copy the content objects to a different system, for example, from an SAP system to a customer system, or between customer systems, the object definition still refers to the physical database schemas at the source. To resolve this, you use schema mapping.
RememberSchema mapping only applies to references from repository objects to catalog objects. It is not intended to be used for repository to repository references.
RestrictionYou need to map the references of script-based calculation views and procedures manually, that is, by changing the script.
You can map several authoring schemas to the same physical schema. For example, content objects delivered by SAP refer to different authoring schemas, whereas in the customer system, all these authoring schemas are mapped to a single physical schema where the tables are replicated.
RememberThe mapping between authoring and physical schema is stored in the configuration table “_SYS_BI”.”M_SCHEMA_MAPPING”
Note● In a system having no schema mapping, the authoring schema is filled 1:1 from the physical schema
otherwise it would not be possible to change the default schema.● In a system if authoring schema mapping is found, it is checked that whether the current authoring schema
is mapped to the current physical schema as follows: If yes, nothing is done. If not (including an empty authoring schema case), then the authoring schema is filled. With the backwards mapped authoring schema if there is a 1:1 mapping i.e. only one authoring schema was found. With this we simplify the mapping table in customer systems because even for enhancements the content schema is kept and no additional mapping must be introduced if the customer transports from development to production With the physical schema in case no or more than one authoring schemas are found. This indicates that the customer has changed the schema-dependent parts and that therefore his physical schema is stored also in the authoring schema.Example use case: Lets assume we have only SAP_ERP -> ERP in the mapping table and an analytic view having defaultSchema = SAP_ERP. Let's assume the customer changes the defaultSchema to CUS. Since CUS has no mapping the authoringSchema of the defaultSchema is set to CUS as well. Then the customer
112
P U B L I C© 2013 SAP AG or an SAP affiliate company. All rights reserved.
SAP HANA Developer GuideSetting Up the Analytic Model

changes the defaultSchema back to ERP. A 1:1 mapping for ERP is found (SAP_ERP) and then the authoring schema is set back to SAP_ERP.
1. In the Quick Launch tab page, choose Schema Mapping.2. Choose Add.3. Enter the authoring schema and physical schema that need to be mapped.4. Choose OK.
Example
Consider a source system, SAP, with an information object, AV1. This refers to the table MARA in the SAP_ERP physical database schema. There is a target system, Customer, with the physical database schema EMEA.After you import content, the object AV1 cannot be activated in the Customer system, since it still refers to SAP_ERP schema.AV1 in the Customer system currently refers to SAP_ERP. To be able to activate the object, you need to modify the mapping of AV1 in the Customer system.To do this, a mapping is created in the target system Customer between the authoring and physical schema as follows:
Authoring Schema Physical Schema
SAP_ERP EMEA
7.1.7 Generating Time DataFor modeling a business scenario that requires time dimension, you can populate time data in the default time-related tables present in _SYS_BI schema, for example while creating time attribute views. You can choose to generate the time data for a given time span based on your requirements such as, calendar type and granularity.If you model a time attribute view without generating time data, when you use data preview an empty view is shown. Note that if you populate the data before modeling time attribute views, you can use the Value Help from the respective time tables.The time range for which you can generate the time data for the selected granularity is mentioned in the table below:
SAP HANA Developer GuideSetting Up the Analytic Model
P U B L I C© 2013 SAP AG or an SAP affiliate company. All
rights reserved. 113

Granularity Range
Seconds <= 5 years
Minutes <= 15 years
Hour <= 30 years
Day <= 50 years
Week <= 50 years
Month <= 50 years
Year <= 50 years
1. In the Quick Launch tab page, choose Generate Time Data.2. If your financial year is same as that of the calendar year, that is, January to December, in the Calendar Type
dropdown, select Gregorian.a) Enter the period for which you want to generate time data.b) Select the required granularity
NoteIf the selected granularity is Week or Month, specify the First day of the week.
c) Choose Generate.System populates the generated time data in M_TIME_DIMENSION_YEAR, M_TIME_DIMENSION_MONTH, M_TIME_DIMENSION_WEEK, M_TIME_DIMENSION tables in _SYS_BI schema.
3. If your financial year is not same as that of the Calendar Year for example, March to April, , in the Calendar Type dropdown, select Fiscal.a) Enter the period for which you want to generate the time data.b) Select the Variant Schema where tables containing variant data are maintained.
NoteTables T009 and T009B contains Variants information.
c) Select the required variant that specifies the number of periods along with their start and end dates according to your use case.
d) Choose Generate.System populates the generated time data in M_FISCAL_CALENDAR table present in the _SYS_BI schema.
7.2 Creating Views
7.2.1 Attributes and MeasuresAttributes and measures form the content data that is used for modeling. While attributes represent the descriptive data like city and country, measures represent quantifiable data like revenue and quantity sold.
AttributesAttributes are the individual non-measurable analytical elements.
114
P U B L I C© 2013 SAP AG or an SAP affiliate company. All rights reserved.
SAP HANA Developer GuideSetting Up the Analytic Model

● Simple AttributesSimple attributes are individual non-measurable analytical elements that are derived from the data foundation.For example, PRODUCT_ID and PRODUCT_NAME are attributes of a PRODUCT subject area.
● Calculated AttributesCalculated attributes are derived from one or more existing attributes or constants.For example, deriving the full name of a customer (first and last name), assigning a constant value to an attribute that can be used for arithmetic calculations.
● Private AttributesPrivate attributes used in an analytic view allow you to customize the behavior of an attribute for only that view.For example, if an analytic view or a calculation view include an attribute view, it inherits the behavior of the attributes from the attribute view (set the parameter once and it is replicated in all views consuming it).By contrast, if you create an analytic view for one specific use case in which you want a particular attribute to behave differently than it does in the attribute view to which it belongs, you can define it as a private attribute.
MeasuresMeasures are simple measurable analytical elements. Measures are derived from analytic and calculation views.
● Simple MeasuresA simple measure is a measurable analytical element that is derived from the data foundation.For example, PROFIT.
● Calculated MeasureCalculated measures are defined based on a combination of data from OLAP cubes, arithmetic operators, constants, and functions.For example, calculated measures can be used to calculate the total sales of a product across five regions, or to assign a constant value to a measure for a calculation.
● Restricted MeasureRestricted measures are used to filter the value based on the user-defined rules for the attribute values.
● CountersCounters add a new measure to the calculation view definition to count the recurrence of an attribute. For example, to count how many times Product appears.
NoteYou can choose to hide the attributes and measures that are not required for client consumption. For example, for a complex calculation that is derived from a series of computations, you can hide the levels of computations that are not required for reporting purposes.
7.2.2 Attribute ViewsAttribute views are used to model an entity based on the relationships between attribute data contained in multiple source tables.For example, customer ID is the attribute data that describes measures (that is, who purchased a product). However, customer ID has much more depth to it when joined with other attribute data that further describes the customer (customer address, customer relationship, customer status, customer hierarchy, and so on).You create an attribute view to locate the attribute data and to define the relationships between the various tables to model how customer attribute data, for example, will be used to address business needs.You can model the following elements within an attribute view:
● Columns
SAP HANA Developer GuideSetting Up the Analytic Model
P U B L I C© 2013 SAP AG or an SAP affiliate company. All
rights reserved. 115

● Calculated Columns
NoteIn the Semantics node, you can classify the columns as attributes and build calculated columns of attribute type.
● Hierarchies
NoteFor more information about the attributes and hierarchies mentioned above, see sections Attributes and Measures, and Hierarchies.
You can choose to further fine-tune the behavior of the attributes of an attribute view by setting the properties as follows:
● Filters to restrict values that are selected when using the attribute view.● Attributes can be defined as Hidden so that they can be used in processes but are not visible to end users.● Attributes can be defined as key attributes and used when joining multiple tables.● The Drill Down Enabled property can be used to indicate if an attribute is available for further drill down when
consumed.
Attribute views can later be joined to tables that contain measures within the definition of an analytic view or a calculation view to create virtual star schema on the SAP HANA data.
7.2.3 Creating Attribute ViewsAttribute views are used to define joins between tables, and to select a subset (or all) of the table's columns and rows. The rows selected can also be restricted by filters. One application of attribute views is to join multiple tables together when using star schemas, to create a single dimension table. The resultant dimension attribute view can then be joined to a fact table via an analytic view to provide meaning to its data. In this use case, the attribute view adds more columns and also hierarchies as further analysis criteria to the analytic view. In the star schema of the analytic view, the attribute view is shown as a single dimension table (although it might join multiple tables), that can be joined to a fact table. For example, attribute views can be used to join employees to organizational units which could then be joined to a sales transaction via an analytic view
You have imported T009 and T009B tables for creating attribute view of type Time.
Use this procedure to create a view that is used to model descriptive attribute data (that does not contain measures) using attributes.
TipYou need this view for creating a multidimensional view.
1. Set Parameter
1. In the Modeler perspective, expand the Content node of the required system.2. Expand the package to which you want to save your information object.3. In the context menu of Attribute Views node, choose New .4. Enter a name and description for the view.5. To create data foundation for the view, perform substeps of the required scenario given in the table
below:
116
P U B L I C© 2013 SAP AG or an SAP affiliate company. All rights reserved.
SAP HANA Developer GuideSetting Up the Analytic Model

Scenario Substeps
Create a view with table attributes.
In the Sub Type dropdown list, choose Standard.
Create a view with time characteristics.
1. In the Sub Type dropdown list, choose Time.2. Select the required calendar type as follows:
a. If the calendar type is Fiscal, select a variant schema, and a fiscal variant.
b. If the calendar type is Gregorian, select the granularity for the data.
3. To use the system-generated time attribute view, select Auto Create.
NoteThe system creates a time attribute view based on the default time tables, and defines the appropriate columns/attributes based on the granularity. It also creates the required filters.
NoteThe tables used for time attribute creation with calendar type Gregorian are, M_TIME_DIMENSION, M_TIME_DIMENSION_ YEAR, M_TIME_DIMENSION_ MONTH, M_TIME_DIMENSION_WEEK and for calendar type Fiscal is M_FISCAL_CALENDAR. If you want to do a data preview for the created attribute view, you need to generate time data into the mentioned tables from the Quick Launch tab page.
Copy a view from an existing view – in this case, you can modify the copied view.
1. Choose Copy From.2. Select the required attribute view.
Derive a view from an existing view – in this case, you cannot modify the derived view that acts as a reference to the base attribute view.
1. In the Sub Type dropdown, choose Derived.2. Select the required attribute view.
6. Choose Finish.
The attribute view editor opens. The Scenario panel of the editor consist of two nodes - Data Foundation and Semantics. The Data Foundation node represents the tables used for defining the output structure of the view. The Semantics node represents the output structure of the view, that is, the dimension. In the Details panel you define the relationship between data sources and output elements.
2. Define Output Structurea) Add the tables that you want to use in any of the following ways:
○ Drag the required tables present in the Catalog to the Data Foundation node.
SAP HANA Developer GuideSetting Up the Analytic Model
P U B L I C© 2013 SAP AG or an SAP affiliate company. All
rights reserved. 117

○ Select the Data Foundation node in the Scenario panel, and in the context menu of the Details panel, choose Add.
NoteYou can choose to add the same table again in Data Foundation using table aliases in the editor. For example, in cases where you want to have different cardinalities from the same table.
RestrictionIt is not allowed to add column views to the Data Foundation.
b) If you want to query data from more than one table, in the Details panel context menu, choose Create Join, and enter the required details.
NoteAfter creating the join, you can edit its properties like join type, cardinality, etc in the Properties view. You can choose to create Text Join between table fields in order to get language-specific data. For example, consider that you have a product table that contains product IDs and no description about products, and you have a text table for products that has a language-specific description for each product. You can create a text join between the two tables to get language-specific details. In a text join, the right table should be the text table and it is mandatory to specify the Language Column.
c) Add the table columns to the output structure that is, the Semantics node that you want to use to define attribute data. You can define the attribute data by doing one of the following:
○ Select the toggle button on the left of the table field.○ Right-click the table field, and choose Add to Output.
d) If you want to specify a filter condition based on which system must display data for a table field in the output do the following:
1. Right-click the table field, and choose Apply Filter.2. Select the required operator, and enter filter values.
All the table fields that you have added to the output are automatically mapped as attributes.3. Define Key Attributes
a) Select the Semantics node.b) In the Attributes tab page of the Column panel, select the required attribute and select the Type as Key
Attribute.
RememberIf there is more than one key attribute, all key attributes of the attribute view must point to the same table in the data foundation. The central table of the attribute view is the one to which all the key attributes point.
NoteIn case of auto-generated time attribute views, the attributes and key attributes are automatically assigned.
118
P U B L I C© 2013 SAP AG or an SAP affiliate company. All rights reserved.
SAP HANA Developer GuideSetting Up the Analytic Model

4. Optional Step: Create Calculated Columnsa) In the Output of Data Foundation panel, right-click Calculated Columns.b) In the context menu, choose New.c) Enter a name and description (label) for the calculated column.d) Select a data type for the calculated column.e) Enter length and scale for the calculated coulmn.f) In the Expression Editor enter the expression. For example, you can write a formula such as,
if("PRODUCT" = 'ABC', "DISCOUNT" * 0.10, "DISCOUNT"). This means if attribute PRODUCT equals the string ‘ABC’ then DISCOUNT equals to DISCOUNT multiplied by 0.10 should be returned. Otherwise the original value of attribute DISCOUNT should be used.
NoteThe expression can also be assembled by dragging and dropping the expression elements from the menus below the editor window.
g) Choose OK.5. Optional Step: To filter and view the table data in the modeled view, which is relevant to a specific client as
specified in the table fields, such as, MANDT or CLIENT, at runtime perform the following:
1. Select the Semantics node, in the Properties panel edit the Default Client property.
NoteThe default value for the property is the one that is specified as a preference. At runtime, if the property is set to Dynamic then, the value set for the Session Client property is used to filter table data. The Session Client property is set while creating a user.
NoteYou can choose to create hierarchies in order to define relationships between attributes.
NoteYou can choose to associate an attribute with another attribute, which describes it in detail. For example, when reporting via Label Mapping (also known as Description Mapping), you can associate Region_ID with Region_Text.Before SP05, you could associate an attribute with another attribute in a model. In the runtime object an <attribute>.description column is generated and is shown during data preview. Now, from SP05 onwards the behavior is as follows:
○ For an attribute (CUSTOMER) you can now maintain label mapping by selecting another attribute (TEXT) from the same model as "Label Column" in the Semantics node. The result is "TEXT" displaying as the label column in data preview. Note that the CUSTOMER.description column is not generated and is not shown in data preview anymore. You can choose to rename a label column as <attribute>.description. For example, if A1 has a label column B1, then you can rename B1 to A1.description but not as B1.description. Once you rename a label column with .description as suffix, the related columns appear side by side during data preview.
○ If you have created an object using the old editor (which supported the old style of description mapping) and try to open it using the new editor you will see a new column CUSTOMER.description (as an attribute) which is hidden and disabled because this column cannot be used in other places
SAP HANA Developer GuideSetting Up the Analytic Model
P U B L I C© 2013 SAP AG or an SAP affiliate company. All
rights reserved. 119

such as parameter/variable, calculated column, restricted column and so on. You cannot maintain properties for this attribute for example, description. CUSTOMER.description displays in the data preview as long as you do not change it in the editor. You can change its name. After changing the name you can maintain its properties and use it like other attributes.You can rename the label column as <attribute>.description. For example, if A1 has a label column A1.description, then you can rename A1.description to B1 and again as A1.description but not as B1.description. Once you rename a label column with .description as suffix, the related columns appear side by side during data preview.
6. Activate the view using one of the following options in the toolbar:
○ Save and Activate - to activate the current view and redeploy the affected objects if an active version of the affected object exists. Otherwise only current view gets activated.
○ Save and Activate All - to activate the current view along with the required and affected objects.
NoteYou can also activate the current view by selecting the view in the Navigator view and choosing Activate in the context menu.
You can find the activated model in the related package. If you want to modify this model, from the context menu, choose Open and make the necessary changes.
RestrictionThe behavior of attribute views with the new editor is as follows:
● When an object (a table of an attribute view) is removed and added again in an attribute view in order to reflect the recently modified columns with its data type, it reflects the previous state of the columns alone. For more information, see SAP Note 1783668.
● When you open an attribute view and there is a missing column in the required object, an error is shown and the editor does not open. For information regarding the solution of this issue, see SAP Note 1788552.
Related LinksCreating Hierarchies [page 140]Activating Objects [page 144]Generating Time Data [page 113]
7.2.4 Analytic ViewsAnalytic views are used to model data that includes measures.For example, an operational data mart representing sales order history would include measures for quantity, price, and so on.The data foundation of an analytic view can contain multiple tables. However, measures that are selected for inclusion in an analytic view must originate from only one of these tables (for business requirements that include measure sourced from multiple source tables, see calculation view ).Analytic views can be simply a combination of tables that contain both attribute data and measure data. For example, a report requiring the following:<Customer_ID Order_Number Product_ID Quantity_Ordered Quantity_Shipped>
120
P U B L I C© 2013 SAP AG or an SAP affiliate company. All rights reserved.
SAP HANA Developer GuideSetting Up the Analytic Model

Optionally, attribute views can also be included in the analytic view definition. In this way, you can achieve additional depth of attribute data. The analytic view inherits the definitions of any attribute views that are included in the definition. For example:<Customer_ID/Customer_Name Order_Number Product_ID/Product_Name/Product_Hierarchy Quantity_Ordered Quantity_Shipped>You can model the following elements within an analytic view:
● Columns● Calculated Columns● Restricted Columns
RememberIn the Semantics node, you can classify columns and calculated columns as type attributes and measures. The attributes you define in an analytic view are Local to that view. However, attributes coming from attribute views in an analytic view are Shared attributes. For more information about the attributes and measures mentioned above, see section Attributes and Measures.
● Variables● Input parameters
NoteFor more information about the variables and input parameters mentioned above, see sections Assigning Variables and Creating Input Parameters.
You can choose to further fine-tune the behavior of the attributes and measures of an analytic view by setting the properties as follows:
● Filters to restrict values that are selected when using the analytic view.● Attributes can be defined as Hidden so that they are able to be used in processes but are not viewable to end
users.● Attributes can be defined as key attribute and used when joining multiple tables.● The Drill Down Enabled property can be used to indicate if an attribute is available for further drill down when
consumed.● Aggregation type on measures● Currency and Unit of Measure parameters (you can set the Measure Type property of a measure, and also in
Calculated Column creation dialog, associate a measure with currency and unit of measure)
7.2.5 Creating Analytic ViewsAnalytic views are typically defined on a fact table that contains transactional data (as measures). Using analytic views you can create a selection of measures, add attributes and join attribute views.
Analytic views leverage the computing power of SAP HANA to calculate aggregate data, e. g. the number of sold cars per country, or the maximum power consumption per day. They are defined on only one fact table, a table which contains for example, one row per sold car or one row per power meter reading, or some form of business transaction records. Fact tables can be joined to allow access to more detailed data using a single analytic view as long as the facts (measures) come from a single table. Analytic views can be defined in a single table, or in joined tables.Analytic views can contain two types of columns, attributes and measures, for which measures are of type simple, calculated, and restricted. Measures are attributes for which an aggregation must be defined. If analytic views are used in SQL statements then the measures have to be aggregated e. g. using the SQL functions SUM(<column
SAP HANA Developer GuideSetting Up the Analytic Model
P U B L I C© 2013 SAP AG or an SAP affiliate company. All
rights reserved. 121

name>), MIN(<column name>), or MAX(<column name>). Normal columns can be handled as regular attributes. They do not need to be aggregated.
1. Set Parametersa) In the Modeler perspective, expand the Content node of the required system.b) Select the package in which you want to save your information object.
c) From the context menu of the package, choose New Analytic View .
NoteOnce you have an analytic view in a package, you can also create another one from the context menu of the Analytic View node in the respective package.
d) Enter a name and description for the view.e) If you want to create a view based on the existing one, choose Copy From option, and select the required
view.f) Choose Finish.The analytic view editor opens. The Scenario panel of the editor consist of the following three nodes:
○ Data Foundation - represents the tables used for defining the fact table of the view.○ Logical Join - represents the relationship between the selected table fields (fact table) and attribute views
that is, used to create the star schema.○ Semantics - represents the output structure of the view.
In the Details panel you define the relationship between data sources and output elements.2. Define Output Structure
a) Add the tables that you want to use in any of the following ways:
○ Drag the required tables present in the Catalog to the Data Foundation node.○ Select the Data Foundation node in the Scenario panel, and in the context menu of the Details panel,
choose Add Tables.
NoteYou can choose to add the same table again in Data Foundation using table aliases in the editor. For example, if you want to have different cardinalities from the same table.
RestrictionIt is not allowed to add column views to the Data Foundation of an analytic view. However, you can add column views in a calculation view.
RememberIf there is more than one table, you need to specify one of the tables as the central table (fact table) from which the measures will be derived. You can specify the central table by selecting a value in the Central Entity property of the Data Foundation node.
b) If you want to query data from more than one table, in the Details panel context menu, choose Create Join, and enter the required details.
Tip
122
P U B L I C© 2013 SAP AG or an SAP affiliate company. All rights reserved.
SAP HANA Developer GuideSetting Up the Analytic Model

After specifying the central table or choosing one of the field as measure, when you save the view automatic assignment of attributes and measures is done. All the numeric fields from the central table are assigned as measures and others as attributes. In this case, you will not be able to join measures with other numeric fields. Also, if you have specified all the attributes and measures of the view before saving it, automatic assignment of attributes and measures will not overwrite them.
NoteAfter creating the join, you can edit its properties such as join type, cardinality, etc in the Properties view. You can choose to create a Text Join between table fields in order to get language specific data. For example, consider that you have a product table that contains product IDs but no product description, and you have a text table for products that has language-specific description for each product. You can create a text join between the two tables to get language-specific details. In a text join, the right table should be the text table and it is mandatory to specify the Language Column.
c) Add the table columns to the output structure (Semantics node) that you want to use to define the facts in any of the following ways:
○ Select the toggle button on the left of the table field.○ Right-click the table field, and choose Add to Output.
d) If you want to specify a filter condition based on which system must display data for a table field in the output, for example to display revenue for only selected companies based on the filter value, do the following:
1. Right-click the table field, and choose Apply Filter.2. Select the required operator, and enter filter values.
The table fields selected above form the fact table.e) To create a star schema that is, linking the fact table with the descriptive data (attribute views), do the
following:
1. Add the required attribute views in the Logical Join node in any of the following ways:
○ Drag the required attribute views present in the Content node to the Logical Join node.○ Select the Logical Join node in the Scenario panel, and choose Add button to add the attribute
views.2. Create joins between the views and fact table.
NoteIn the Logical Join, you can create a temporal join between the date field of the fact table to an interval (to and from) field of the attribute view. The temporal join has to start from the fact table such that the single column must be in the fact table and, the to and from columns must be in the table that is directly joined to the fact table. The join type must be a referential join. The supported data types are timestamp, date, and integer.
RestrictionWhile creating joins you must ensure that a table does not appear twice in any join path (in particular a self join is not supported). A join path is the set of joins that links the fact table to other tables.
SAP HANA Developer GuideSetting Up the Analytic Model
P U B L I C© 2013 SAP AG or an SAP affiliate company. All
rights reserved. 123

While creating joins between analytic view and attribute view the same table cannot be used both in the join path of analytic view and attribute view. Also, in a join path of analytic view and attribute view, the table of the attribute view which is linked to the fact table should not have an alias table.
3. Optional Step: Create Calculated Columna) In the Output of Logical Join panel, right-click Calculated Columns.b) In the context menu, choose New.c) Enter a name and description (label) for the calculated column.d) Select a data type, and enter the length and scale for the calculated column.e) Select the Column Type to determine whether it is a calculated attribute or a calculated measure.f) If you select Calculate Before Aggregation, select the aggregation type.
NoteIf you select Calculate Before Aggregation, the calculation happens as per the expression specified and then the results are aggregated as SUM, MIN, MAX or COUNT. If Calculate Before Aggregation is not selected, the data is not aggregated but it gets calculated as per calculation expression (formula), and the aggregation is shown as FORMULA. If the aggregation is not set, then it will be considered as an attribute.
g) In the Expression Editor enter the expression. For example, you can write a formula:if("PRODUCT" = 'ABC, "DISCOUNT" * 0.10, "DISCOUNT") which is equivalent to, if attribute PRODUCT equals the string ‘ABC’ then DISCOUNT equals to DISCOUNT multiplied by 0.10 should be returned. Otherwise the original value of attribute DISCOUNT should be used.
NoteThe expression can also be assembled by dragging and dropping the expression elements from the menus below the editor window.
h) If you want to associate the calculated column with currency and unit of measuring quantity, select the Advanced tab page and select the required Type.
i) Choose OK.
RememberCalculated Columns can be created only at the Logical Join level and not at the Data Foundation level.
NoteThe aggregation type for calculated columns is only taken into account, if they are calculated before aggregation
4. Optional Step: Create Restricted ColumnsYou can create restricted columns if you want to filter the value for an output field based on the user-defined rules. For example, you can choose to restrict the value for the Revenue column only for Region = APJ, and Year = 2012.a) In the Output panel of the Logical Join, right-click Restricted Columns, and choose New.b) Enter a name and description for the restricted column.c) From the Column dropdown list, select the column for which you want to apply a restriction.
124
P U B L I C© 2013 SAP AG or an SAP affiliate company. All rights reserved.
SAP HANA Developer GuideSetting Up the Analytic Model

CautionThe column for which you apply a restriction must be defined as measure in the semantics node otherwise the validation will fail.
d) Choose Add Restriction.e) In the Parameter field, select the column that you want to create a restriction for, then select the operator
and value.f) Choose OK.
NoteFor a restricted column the aggregation type of the base column is applied.
5. Define Attributes and Measuresa) Select the Semantics node.b) In the Column panel, select the Local tab page, and change the type as attributes and measures.
NoteThe Shared tab page shows the attributes of the used attribute views. While generating the column views, the joined private attribute name is ignored and the shared attribute name is considered, therefore the joined private attribute is not shown on the Semantics node.
RememberIf the MultiDimensional Reporting property of the analytic view is set to false, the view will not be available for reporting purposes. If the value is set to true, an additional column Aggregation is available to specify the aggregation type for measures.
NoteYou can choose to associate an attribute with another attribute, which describes it in detail. For example, when reporting via Label Mapping (also known as Description Mapping), you can associate Region_ID with Region_Text.Before SP05, you could associate an attribute with another attribute in a model. In the runtime object an <attribute>.description column is generated and is shown during data preview. Now, from SP05 onwards the behavior is as follows:
○ For an attribute (CUSTOMER) you can now maintain label mapping by selecting another attribute (TEXT) from the same model as "Label Column" in the Semantics node. The result is "TEXT" displaying as the label column in data preview. Note that the CUSTOMER.description column is not generated and is not shown in data preview anymore.You can choose to rename a label column as <Attribute>.description. For example, if A1 has a label column B1, then you can rename B1 to A1.description but not as B1.description. Once you rename a label column with .description as suffix, the related columns appear side by side during data preview.
○ If you have created an object using the old editor (which supported the old style of description mapping) and try to open it using the new editor you will see a new column CUSTOMER.description (as an attribute) which is hidden and disabled because this column cannot be used in other places such as parameter/variable, calculated column, restricted column and so on. You cannot maintain properties for this attribute for example, description.
SAP HANA Developer GuideSetting Up the Analytic Model
P U B L I C© 2013 SAP AG or an SAP affiliate company. All
rights reserved. 125

CUSTOMER.description displays in the data preview as long as you do not change it in the editor. You can change its name. After changing the name you can maintain its properties and use it like other attributes.You can rename the label column as <Attribute>.description. For example, if A1 has a label column A1.description, then you can rename A1.description to B1 and again as A1.description but not as B1.description. Once you rename a label column with .description as suffix, the related columns appear side by side during data preview.
NoteYou can change the type of a measure and perform currency conversion by selecting it in the Local tab page and changing the Measure Type property in the properties panel.
6. Optional Step: You can filter and view the table data in the modeled view for a specific client as specified in the table fields, such as MANDT or CLIENT, by doing the following:
1. Select the Semantics node, in the Properties panel, edit the Default Client property.
NoteThe default value for the property is the one that is specified as a preference. If the property is set to Dynamic, at runtime the value set for the Session Client property is considered to filter table data. The Session Client property is set while creating a user.
7. Optional Step: Assign VariableYou assign variables to a field at design time for obtaining data based on the values you provide for the variable. At runtime, you can provide different values to the variable to view the corresponding set of attribute data.a) In the Semantics node Variables/Input Parameter panel, choose the Create Variable option.b) Enter a name and description for the variable.c) Select the required attribute from the dropdown list.
NoteAt runtime, the value for the variable is fetched from the selected attribute's data.
d) Choose the required Selection Type from the dropdown list.
Note○ Single Value - Used to filter and view data based on a single attribute value. For example, to view
the sales of a product where the month is equal to January.○ Interval - Used to filter and view a specific set of data. For example, to view the expenditure of a
company from March to April.○ Range - Used to filter and view data based on the conditions that involve operators such as:
○ "="(equal to)○ ">" (greater than)○ "<" (less than)○ ">=" (greater than or equal to)
126
P U B L I C© 2013 SAP AG or an SAP affiliate company. All rights reserved.
SAP HANA Developer GuideSetting Up the Analytic Model

○ "<=" (less than or equal to)
For example, to view the sales of all products in a month where the quantity sold is >= 100.
e) Select Multiple Entries if you want to provide different values at runtime to filter data. For example, to view the revenue from a period of 2000 to 2005 and 2012.
f) If you want to assign the variable to attribute(s), in the Apply variable filter to panel, choose Add.g) Select the attribute(s) from the dropdown list to which you want to assign this variable.
NoteYou can also assign a variable to an attribute later in the Column panel of the Semantics node Details panel. To assign a variable to an attribute, select a variable from the variable dropdown list in the Variable column.
h) Choose OK.8. If you want to parameterize currency conversion and calculated columns, create input parameters.9. In the editor toolbar, choose Save and Activate. This saves and activates the view.
NoteIf an active version of the affected objects exist, activating the current view redeploys the affected objects. You can also activate an object from the object context menu in the Navigator view.
TipYou can choose to activate the other objects (required or impacted objects) along with the currenct object using the Save and Activate All option in the toolbar.
Note
RestrictionThe behavior of analytic views with the new editor is as follows:
○ When an object (a table of or an attribute view) is removed and added again in an attribute view and analytic view editor in order to reflect the recently modified columns with its data type, it reflects the previous state of the columns . For more information about the problem and its solution, see SAP Note 1783668.
○ When you open an analytic view and there is a missing column in the required object, an error is shown and the editor does not open. For information regarding the solution of this issue, see SAP Note 1788552.
Related LinksUsing Currency and Unit of Measure [page 142]Activating Objects [page 144]Creating Input Parameters [page 138]Using Temporal Join [page 128]A temporal join indicates the time interval mapping between the master data and the transaction data for which you want to fetch the records.
SAP HANA Developer GuideSetting Up the Analytic Model
P U B L I C© 2013 SAP AG or an SAP affiliate company. All
rights reserved. 127

Using Temporal JoinA temporal join indicates the time interval mapping between the master data and the transaction data for which you want to fetch the records.
You create a temporal join using the temporal column that specifies the time interval with the start and the end date. The result set is fetched based on the time interval mapped using the temporal column.A record is only included in the results set if time interval lies within the valid time interval. A time interval is assigned to each record in the results set. The records are valid for the duration of the interval to which they are assigned.You use temporal conditions to indicate whether to include or exclude the value of the FROM and TO date fields while executing the join condition.In the logical join, you can create a temporal join between the date field of the fact table to an interval (to and from) field of the attribute view. The temporal join has to start from the fact table such that the single column must be in the fact table and, the to and from columns must be in the table that is directly joined to the fact table. The join type must be of the type referential join. The supported data types are timestamp, date, and integer.
1. Create a referential join between the attribute of the fact table and the attribute view.2. In the Properties panel, select the Temporal Column that indicates the time interval.3. In the Properties panel, select the From Column and the To Column to specify the time range from the
attribute view.4. In the Properties panel, select the Temporal Condition which would be considered while executing the join.
ExampleConsider an attribute view Product that contains master data about Products with attributes like, ProductID, Validity_Date_From, Validity_Date_To, and so on.Similarly, consider an analytic view Sales that contains transactional data corresponding to the products sales with attributes, ProductID, Date, Revenue.Now, to analyze sales data for products you can create a join between the two views using ProductID.But to fetch data for a particular time period you need to assign temporal properties to the join. The temporal column in our example would be Date field in the Analytic view, and the From date and To date would come from the Validity_Date_From, and Validity_Date_To of the attribute view.
7.2.6 Calculation ViewsA calculation view is used to define more advanced slices on the data in SAP HANA database. Calculation views can be simple and mirror the functionality found in both attribute views and analytic views. However, they are typically used when the business use case requires advanced logic that is not covered in the previous types of information views.For example, calculation views can have layers of calculation logic, can include measures sourced from multiple source tables, can include advanced SQL logic, and so on. The data foundation of the calculation view can include any combination of tables, column views, attribute views and analytic views. You can create joins, unions, projections, and aggregation levels on the sources.You can model the following elements within a calculation view:
● Attributes● Measures● Calculated measures● Counters● Hierarchies (created outside of the attribute view)
Note
128
P U B L I C© 2013 SAP AG or an SAP affiliate company. All rights reserved.
SAP HANA Developer GuideSetting Up the Analytic Model

For more information about the attributes, measures, counters, and hierarchies mentioned above, see sections Attributes and Measures, and Hierarchies.
● Variables● Input parameters
NoteFor more information about the variables and input parameters mentioned above, see sections AssigningVariables and Creating Input Parameters.
Calculation views can include measures and be used for multi-dimensional reporting or can contain no measures and used for list-type of reporting. Calculation views can either be created using a graphical editor or using a SQL Console . These various options provide maximum flexibility for the most complex and comprehensive business requirements.
7.2.7 Creating Calculation Views Calculation views are used to provide composites of other views. Essentially they are based on a join or union of two or more data flows or on invoke of built-in or generic SQL functions.Calculation views are defined as either graphical views or scripted views but not as SQLScript (for exceptions, see below) depending on how they are created. They can be used in the same way as analytic views, however, in contrast to analytic views it is possible to join several fact tables in a calculation view.Graphical views can be modeled using the graphical modeling features of the SAP HANA Modeler. Scripted views are created as sequences of SQL statements.As mentioned previously calculation views are generally not created using SQLScript. There are however, exceptions to this rule. SQLScripts with the following properties can be used in calculation views:- No input parameters- Always read-only (that is, do not make changes to the database)- Side-effect freeYou can use calculation views to derive values and key performance indicators(KPIs).
NoteThe terms "attribute" and "columns" are used interchangeably in this procedure. They may denote a table column, a particular data field of a table row, or the contents of such a data field. The respective meaning should be clear from the context.
Procedure1. In the Modeler perspective, expand the system node from the Navigator view.2. Expand the Content node.3. Right-click the required package.
4. From the context menu, choose New Calculation View .
a. Enter a name and description.b. Select the required package.
Create a Script-Based Calculation View1. Choose SQL Script.2. Select the required schema from the Default Schema dropdown list, for unqualified access in SQL.
SAP HANA Developer GuideSetting Up the Analytic Model
P U B L I C© 2013 SAP AG or an SAP affiliate company. All
rights reserved. 129

NoteIf you do not select a default schema, while scripting, you need to provide fully qualified names of the objects used.
3. Select the required option from the Run With dropdown list, which identifies whose rights are to be considered while executing the calculation scenario.
NoteDefiner's right: If you want system to use the rights of the definer while executing the view or procedure for any user.Invoker's right: If you want system to use the rights of the current user while executing the view or procedure .
4. Choose Finish.5. Define the Output Structure
a. Choose Define Output Parameter from the Output pane.b. To add the output parameters with the required data type and length, from the Output pane toolbar,
choose Define Output Parameter button.
NoteThe order and data types of the output parameters should match the table columns order and data type which is used in the select query.
c. Choose OK.6. Define the Function
a. Define the function using SQL Script commands.
Note○ You can create variables, and bind them to attributes for filtering data. The values you provide for
the variables at runtime determine which data records are selected for consumption.○ You can create input parameters for the calculation view that works as a placeholder in a query.○ You can create a hierarchy between attributes of the view.
7. Save and Activate
a. To save the view, choose File Save .b. From the context menu of the calculation view, choose Activate.
Create a Graphical Calculation View1. Choose Graphical.2. Select the required schema from the Schema for Conversion dropdown list.
NoteThe schema selected for conversion is used during the currency conversion. It list down all the schemas which has currency related tables and the same can be changed during design time from the properties.
130
P U B L I C© 2013 SAP AG or an SAP affiliate company. All rights reserved.
SAP HANA Developer GuideSetting Up the Analytic Model

3. Choose Next.4. Follow the instructions in the wizard to select the required tables and content models.
Adding Unions/Joins/ Projections/ Aggregation
a. From the Tools Palette, choose the required option as follows:
View Description
Union Used to combine the result set of two or more data sources. For example, to show the names of all the employees of a store which has different branches each maintaining its own employee records table.
Join Used to query data from two or more data sources, based on a specified condition. For example, to retrieve the sales of two stores maintaining individual table for sales based on the customer ID.
Projection Used to filter or create a subset of the required columns of a table or view for creating the model. For example, selecting the employee name and sales quantity from a table consisting of many more columns.
Aggregation Used to summarize data of a group of rows by calculating values in a column. For example, to retrieve total sales of a product in a month. The supported aggregation types are sum, min, and max.
Note○ The input for union, join, projection, and aggregation views can consist of data sources, union, join,
projection, or aggregation views.○ You can have only one source of input for aggregation and projection views.○ You can choose to create filters on projection and aggregation view attributes.
b. Map the input to the selected option.Mapping attributes
a. To map attributes in a union view, drag and drop the required columns from Source to Target.You can also modify the attribute mapping. For more information, see Managing Attribute Mappings [page 135]
TipTo create a system generated mapping, choose Auto Map By Name.
b. In case of a join view, join the columns of the source data sources.
Note○ The output of a union view is the attributes that you added to the Target.○ The output of a join view is the joined attributes. However, to add additional attributes to the view's
output, from the context menu, choose Add to Output.○ To add attributes of projection or aggregation view to its output, choose Add to Output from the
context menu.
Optional Step: Creating Calculated Columns
SAP HANA Developer GuideSetting Up the Analytic Model
P U B L I C© 2013 SAP AG or an SAP affiliate company. All
rights reserved. 131

The output of union, join, or projection view is stored under the Column node in the Output panel.To perform calculations on these columns, do the following:
1. Right-click the Calculated Columns node.2. From the context menu, choose New.
a. Enter the name.b. Select the data type.c. Enter the length and scale.d. To perform calculations on the output columns, do the following:
○ If you know the formula, enter the expression to perform the calculation.○ From the list, select the required elements, operator, and functions.
e. Choose Add.
Optional Step: Applying Filter on Aggregation and Projection View Attributes
1. Right-click the required attribute.2. From the context menu, choose Apply Filter.3. Select the required operator.4. Enter value.5. Choose OK.
NoteYou can edit a filter using filter expressions from the Output pane which provides you with more conditions that can be used in the filter including AND, OR, and NOT. For example, to retrieve the sales of a product where (revenue >= 100 AND region = India) OR (revenue >=50 AND region = Germany).
NoteIn order to define pattern-based filters in calculation views, you use the expression editor accessed by double-clicking the expression icon under the filter node of the Output panel. If you type
match("ABC",'*abc*')
the equivalent SQL is
where “ABC“ like ‘%abc%’
.
Adding Attributes and Measures to Calculation View Output
a. From the designer panel, choose the Output node.b. To add an attribute, from the context menu, choose Add as Attribute.c. To add a measure, from the context menu, choose Add as Measure.
NoteYou can choose to associate a measure with the currency or unit of measure. To do so, select the measure and in the Properties panel select Measure Type.
132
P U B L I C© 2013 SAP AG or an SAP affiliate company. All rights reserved.
SAP HANA Developer GuideSetting Up the Analytic Model

d. If you want to create calculated attributes, perform the following substeps:
a. In the Output pane, right-click Calculated Attributes.b. From the context menu, choose New.c. Enter a name and description.d. On the Key tab, define the formula for the calculated attribute as follows:
a. Select a data type for the calculated attribute from the dropdown list.b. Enter the length and scale.c. Select the required attributes, operator, and function.d. To check the validity of the formula, choose Validate.e. Choose Add.
e. To add a Description to the calculated attribute, write the formula as above.e. If you want to create calculated measures, do the following:
a. In the Output pane, right-click Calculated Measures.b. From the context menu, choose New.
a. Enter a name and description.b. Select the required Aggregation Type.c. If you want to hide the measure while previewing data, choose Hidden.d. Select the required data type.e. Enter the length and scale.f. Define the measure by selecting the required measures, operator, and function.g. Choose Validate.h. Choose OK.
NoteYou can choose to rename the attributes, calculated attributes, measures, and calculated measures of the view using the Rename button in the Output panel toolbar. However, renaming a field can impact other objects that reuse the field as the new name is not reflected in the other objects.
Optional Step: Creating Counters To obtain the number of distinct values of an attribute, do the following:
1. In the Output pane, right-click Counters.2. From the context menu, choose New.3. Choose Add Attribute.4. Choose OK.
Note1. If you set the calculation view property Multidimensional Reporting as disabled, you can create a
calculation view without adding any measure to the calculation view output. A calculation view without any measure works like an attribute view and is not available for reporting purposes.
2. You can choose to hide the attributes and measures that are not required for client consumption by assigning value true to the property Hidden in the Properties pane.
3. You can choose to create variables, and bind them to attributes for filtering data. The values you provide to the variables at runtime determine which data records are selected for consumption.
SAP HANA Developer GuideSetting Up the Analytic Model
P U B L I C© 2013 SAP AG or an SAP affiliate company. All
rights reserved. 133

4. You can choose to create input parameters for the union, join, projection, aggregation, and calculation view output. Also, if the calculation view data sources have input parameters, you can map them to the calculation view input parameters.
5. You can choose to create hierarchy between attributes of the view.6. You can specify a value for the view's Default Client property to filter the table data that is relevant
to a specific client as specified in the table fields at runtime, such as, MANDT or CLIENT. The default value for the property is the one that is specified as a preference. If the property is set to Dynamic, at runtime, the value set for the Session Client property is considered to filter table data. The Session Client property is set while creating a user.
Activate
a. To activate the view select Save and Activate from the toolbar.
NoteActivating the current view redeploys the impacted objects if an active version of the impacted objects exist. You can also activate an object from the context menu of the object in the Navigator view.
TipYou can choose to activate the other objects (required or impacted objects) along with the current object using the Save and Activate All from the toolbar.
NoteFor more information about activation, see Activating Objects [page 144].
Note1. For an active calculation view, you can preview the data of an intermediate node in a calculation view, which
helps to debug each level of a complex calculation scenario having join, union, aggregation, projection, and output nodes. The data you preview for a node is for the active version of the calculation view. If no active version for the object exists then you need to activate the object first. You can choose the Data Preview option from the context menu of a node.
2. You can choose to generate documentation for the calculation view. For more information, see Generating Object Documentation [page 157].
3. You can find the details of the functions available on content assist that is, by pressing Ctrl + Space in the SQL Console while writing procedures in the SAP HANA SQLScript Reference.
Related LinksAssigning Variables [page 136]Creating Input Parameters [page 138]Creating Hierarchies [page 140]Managing Attribute Mappings [page 135]Using Currency and Unit of Measure [page 142]Activating Objects [page 144]Mapping Input Parameters [page 135]
134
P U B L I C© 2013 SAP AG or an SAP affiliate company. All rights reserved.
SAP HANA Developer GuideSetting Up the Analytic Model

Mapping Input ParametersYou use this procedure to map the input parameters in the underlying data sources (analytic views and calculation views) of the calculation view to the calculation view parameters. You can:
● Map many data source parameters to one calculation view input parameter.● Perform a one on one mapping of the data source parameters to the calculation view parameters.
Procedure1. In the Output pane, select an input parameter.2. In the context menu, choose Manage Mappings.3. In the Map Data Source Parameters dialog, map the data source input parameters with the calculation view
parameters.
NoteYou can choose the Auto Map by Name option to automatically create the input parameters corresponding to the source and perform a 1:1 mapping. You can also select a source input parameter and use the following context menu options:
○ Create New Map 1:1 - to create the same input parameter for the calculation view as for the source, and create a 1:1 mapping between them.
○ Map By Name - to map the source input parameter with the calculation view input parameter having the same name.
○ Remove Mapping - to delete the mapping between the source and calculation view input parameter.
Managing Attribute MappingsYou use this procedure to map the source attribute to the target attribute if there are a large number of attributes, or to assign a constant value to the target attribute.
Procedure1. Right-click the attribute in the target list.2. From the context menu, choose Manage Mappings.
a. To map the source to the target column, select the required source from the dropdown list.b. To assign a default value to the constant column, enter the value in the Constant Value field. For more
information, see Constant Column [page 135].c. Select the required data type.d. Enter the length and scale as required.e. Choose OK.
Constant ColumnIn a union view, a Constant Column is created if there are any target or output attributes for which there are no mappings to the source attributes. The default value for the constant column is NULL.
NoteThe target attribute is mapped to all the sources.
For example, you have two tables with similar structures, Actual Sales and Planned Sales, corresponding to the sales of products. You want to see the combined data in a single view, but differentiate between the data from the
SAP HANA Developer GuideSetting Up the Analytic Model
P U B L I C© 2013 SAP AG or an SAP affiliate company. All
rights reserved. 135

two tables for comparison. To do so, you can create a union view between the two tables and have a constant column indicating constant values like A & P, as shown below:Actual Sales
Sales Product
5000 A1
2000 B1
Planned Sales
Sales Product
3000 A1
6000 B1
The result of this query can be as follows:
Actual Planned Indicator Sales Product
A 5000 A1
P 3000 A1
A 2000 B1
P 6000 B1
7.2.8 Assigning VariablesYou use this procedure to assign variables to a filter at design time for obtaining data based on the values you provide for the variable. At runtime, you can provide different values to the variable to view the corresponding set of attribute data. You provide values to the variables either by entering the values manually, or by selecting them from the Value Help dialog.
NoteYou can apply variables to attributes of analytic and calculation views.
The following types of variables are supported:
Type Description
Single Value Use this to filter and view data based on a single attribute value. For example, to view the sales of a product where the month is equal to January.
Interval Use this to filter and view a specific set of data. For example, to view the expenditure of a company from March to April.
Range Use this to filter and view data based on the conditions that involve operators such as "="(equal to), ">" (greater than), "<" (less than), ">=" (greater than or equal to), and "<=" (less than or equal to). For example, to view the sales of all products in a month where the quantity sold is >= 100..
Each type of variable can be either mandatory or non-mandatory. For a mandatory variable, you need to provide a value at runtime. For a non-mandatory variable, if you have not specified a value at runtime, you view unfiltered data.
136
P U B L I C© 2013 SAP AG or an SAP affiliate company. All rights reserved.
SAP HANA Developer GuideSetting Up the Analytic Model

NoteYou can check whether or not a variable is mandatory from the properties of the variable in the Properties pane.
In Analytic View1. In the Scenario panel, select the Semantics node.2. In the Variables/Input Parameters panel, select the Create Variable option.
a. Enter a name and description (label).b. Select the required attribute from the dropdown list.
NoteAt runtime, the value for the variable is fetched from the selected attribute's data.
c. Choose the required Selection Type from the dropdown list.d. Select Multiple Entries if you want to provide different values at runtime to filter data. For example, to view
the Revenue from a period 2000 to 2005 and 2012.e. If you want to assign the variable to attribute(s), in the Attribute Assignment panel, choose Add.f. Select the attribute from the dropdown to which you want to assign this variable.
NoteYou can also assign a variable to an attribute later in the Column panel of the Semantics node. To assign a variable for an attribute, select the variable from the variable dropdown in the Variable column.
g. Choose OK.
In Calculation View
1. Create a Variable1. In the Output pane, right-click the Variables node.2. From the context menu, choose New and do the following:
a. Enter a name and description.b. Select the required attribute from the dropdown list.
NoteAt runtime, the value for the variable is fetched from the selected attribute's data.
c. Choose the required Selection Type from the dropdown list.d. If you want to specify a default value that is used to filter attribute data, enter the value in the Default
Value field.e. Choose OK.
NoteYou can also choose to create a variable using the Create Variable option from the context menu of an attribute. In this case, the details of the variable are pre-filled.
SAP HANA Developer GuideSetting Up the Analytic Model
P U B L I C© 2013 SAP AG or an SAP affiliate company. All
rights reserved. 137

2. Assign a Variable to a Filter1. On the Output panel, right-click the attribute.2. In the context menu, choose Apply Filter.3. In the Operator dropdown list, choose Variable.4. In the Variable dropdown list, choose the required variable.5. Choose OK.
NoteYou can also choose to create a variable and apply a filter using the Create Variable - Apply Filter option from the context menu of an attribute.
7.2.9 Creating Input ParametersUse this procedure to allow you to provide input for the parameters within stored procedures, in order to obtain a desired functionality when the procedure is executed.In an analytic view you use input parameters as placeholders during currency conversion and formulas like calculated columns. When used in formulas, the calculation of the formula is based on the input that you provide at runtime during data preview. Input parameters are not used for filtering attribute data in analytic views that can be achieved using variables.In calculation views you can use input parameter during currency conversion, calculated measures, input parameters of the script node, and to filter data as well.You can apply input parameters in analytic and calculation views. If a calculation view is created using an analytic view with input parameters, those input parameters are also available in the calculation view but you cannot edit them.The following types of input parameters are supported:
Type Description
Attribute Value/ Column Use this when the value of a parameter comes from an attribute.
Currency (available in Calculation View only) Use this when the value of a parameter is in a currency format, for example, to specify the target currency during currency conversion.
Date (available in Calculation View only) Use this when the value of a parameter is in a date format, for example, to specify the date during currency conversion.
Static List Use this when the value of a parameter comes from a user-defined list of values.
Derived From Table (available in Analytic View and Graphical Calculation View)
Use this when the value of a parameter comes from a table column based on some filter conditions and you do not need to provide any input at runtime.
Empty Use this when the value of a parameter could be anything from the selected data type.
Direct Type (available in Analytic View) Use this to specify an input parameter as currency and date during currency conversion.
In the case of analytic views, all input parameters are mandatory. However, in the case of calculation views, each type of input parameter can be either mandatory or non-mandatory. For a mandatory input parameter, it is
138
P U B L I C© 2013 SAP AG or an SAP affiliate company. All rights reserved.
SAP HANA Developer GuideSetting Up the Analytic Model

necessary to provide a value at runtime. However, for a non-mandatory input parameter, if you do not specify a value at runtime, the data for the column in which the input parameter is used remains blank.
NoteYou can check whether an input parameter is mandatory or not from the properties of the input parameter in the Properties pane.
Example● If you want to create a formula to analyze the annual sales of a product in various regions, you can use Year
and Region as input parameters.● If you want to preview a sales report with data for various countries in their respective currency for a
particular date for correct currency conversion, you can use Currency and Date as input parameters.
Procedure
Analytic View1. In the Output panel of the Data Foundation or Logical Join node, right-click the Input Parameters node.
NoteYou can also create input parameters at the Semantics node level, using the Create Input Parameter option in the Variables/Input Parameters panel.
2. From the context menu, choose New.
a. Enter a name and description.b. Select the type of input parameter from the Parameter Type dropdown list.
Note○ For the Column type of input parameter, you need to select the attribute from the dropdown list. At
runtime the value for the input parameter is fetched from the selected attribute's data.○ For an input parameter of type Derived from Table, you need to select a table and one of it's
column as Return Column whose value is then used as input for the formula calculation. You can also define conditions to filter the values of Return Column in the Filters panel. For example, to calculate Discount for specific clients, you can create an input parameter based on Sales table and return column Revenue with filter set on the Client_ID.
○ For Direct Type input parameter, specify the Semantic Type that describes the use parameter as a currency or date, for example, to specify the target currency during currency conversion.
c. If required, select a data type.d. Enter length and scale for the input parameter.e. Choose OK.
Calculation View1. In the Output panel, right-click the Input Parameters node.2. From the context menu, choose New.
SAP HANA Developer GuideSetting Up the Analytic Model
P U B L I C© 2013 SAP AG or an SAP affiliate company. All
rights reserved. 139

a. Enter a name and description.b. Select the type of input parameter from the dropdown list.
Note○ For the Attribute Value type of input parameter, you need to select the attribute from the
dropdown list. At runtime the value for the input parameter is fetched from the selected attribute's data.
○ For an input parameter of type Derived from Table, you need to select a table and one of it's column as Return Column whose value is then used as input for the formula calculation. You can also define conditions to filter the values of Return Column in the Filters panel. For example, to calculate Discount for specific clients, you can create an input parameter based on Sales table and return column Revenue with filter set on the Client_ID.
c. Select a data type.d. Enter length and scale for the input parameter.e. Choose OK.
7.2.10 Creating HierarchiesYou use this procedure to create hierarchies between attributes to enhance analysis by displaying attributes according to their defined hierarchical relationships. Hierarchies can exist cross-attributes (that is, Country - State - City) or within the values of a single attribute (that is, employee manager - employee direct report).You structure and define relationships between attributes in the attribute view and calculation view using the following hierarchy types:
● Level HierarchyA level hierarchy is rigid in nature, and the root and the child nodes can be accessed only in the defined order.Level hierarchies consist of one or more levels of aggregation. Attributes roll up into the next higher level in a many-to-one relationship, and members at this higher level roll up into the next higher level, and so on to the top level.For example: an address hierarchy comprised of region, country, state, and so on.
● Parent/Child HierarchyA parent/child hierarchy is a hierarchy in a standard view that contains a parent attribute. A parent attribute describes a self-referencing relationship, or self-join, within the main table. Parent-child hierarchies are constructed from a single parent attribute.For example: a bill of materials hierarchy (parent and child) or an employee master (employee and manager) hierarchy.
Procedure
Creating a Level Hierarchy1. Select the Semantics node.2. In the Hierarchies panel, choose Create option .3. Enter a name and description for the hierarchy.4. In the Hierarchy Type dropdown, select Level Hierarchy.5. Select the required value in the Aggregate All Nodes.
Note
140
P U B L I C© 2013 SAP AG or an SAP affiliate company. All rights reserved.
SAP HANA Developer GuideSetting Up the Analytic Model

This option indicates that data is posted on aggregate nodes and should be shown in the user interface. For example, if you have the members A with value 100, A1 with value 10, and A2 with value 20 where A1 and A2 are children of A. By default the value is set to false, and you will see a value of 30 for A.With the value set to true, you will count the posted value 100 for A as well and see a result of 130.If you are sure that there is no data posted on aggregate nodes you should set the option to false. The engine will then calculate the hierarchy faster as when the option is set.Note that this flag is only interpreted by the SAP HANA MDX engine. In the BW OLAP engine the node values are always counted.
6. Enter a value for the default member.7. Select the required option in the With Root Node dropdown.
NoteIf a hierarchy doesn't have a root node but needs one for reporting use case, set the option to true. This will create a root node.
8. Select the required value from the Node Style dropdown list.
NoteNode style determines the composition of a unique node ID. The different values for node styles are as:
○ Level Name - the unique node ID is composed of level name and node name, for example "[Level 2].[B2]".
○ Name Only - the unique node ID is composed of level name, for example "B2".○ Name Path - the unique node ID is composed of the result node name and the names of all ancestors
apart from the (single physical) root node. For example "[A1].[B2]".
9. Add the required attributes from the drop-down list.
NoteYou can select attributes from the required table columns in the drop-down list to add to the view.
10. Select the required Level Type.
NoteThe level type is used to specify formatting instructions for the level attributes.For example, a level of the type LEVEL_TYPE_TIME_MONTHS can indicate that the attributes of the level should have a text format such as "January", and LEVEL_TYPE_REGULAR indicates that a level does not require any special formatting.
11. Choose OK.
Creating a Parent/Child Hierarchy1. Select the Semantics node.2. In the Hierarchies panel, choose Create option .3. Enter a name and description for the hierarchy.4. In the Hierarchy Type dropdown, choose Parent Child Hierarchy.5. Select the required value in the Aggregate All Nodes.
SAP HANA Developer GuideSetting Up the Analytic Model
P U B L I C© 2013 SAP AG or an SAP affiliate company. All
rights reserved. 141

NoteThis option indicates that data is posted on aggregate nodes and should be shown in the user interface. For example, if you have the members A with value 100, A1 with value 10, and A2 with value 20 where A1 and A2 are children of A. By default the value is set to false, and you will see a value of 30 for A.With the value set to true, you will count the posted value 100 for A as well and see a result of 130.If you are sure that there is no data posted on aggregate nodes you should set the option to false. The engine will then calculate the hierarchy faster as when the option is set.Note that this flag is only interpreted by the SAP HANA MDX engine. In the BW OLAP engine the node values are always counted.
6. Enter a value for the default member.7. Select the required option in the With Root Node dropdown.
NoteIf a hierarchy doesn't have a root node but needs to have one for reporting use case, set the option to true. This will create a root node.
8. Select the Parent Node and Child Node from the dropdown list.9. Choose OK.
NoteThe hierarchies belonging to an attribute view are available in an analytic view that reuses the attribute view, in read-only mode. However, the hierarchies belonging to an attribute view are not available in a calculation view that reuses the attribute view.
7.2.11 Using Currency and Unit of MeasureUse this procedure to define a measure as an amount or weight in the analytical space and to perform currency conversion.To simplify the process of currency conversion, the system provides a list of currencies, and exchange rates based on the tables imported for currency. Currency conversion is performed based on source currency, target currency, exchange rate, and date of conversion. You can also select currency from the attribute data used in the view.For example, you need to generate a sales report for a region in a particular currency, and you have sales data in database tables in a different currency. You can create an analytic view by selecting the table column containing the sales data in this other currency as a measure, and perform currency conversion. Once you activate the view, you can use it to generate reports.
NoteCurrency conversion is enabled for analytic views and base measures of calculation views.
Prerequisites● You have imported tables T006 and T006A for Unit of Measure.● You have imported TCURC, TCURF, TCURN, TCURR, TCURT, TCURV, TCURW, and TCURX for currency.
142
P U B L I C© 2013 SAP AG or an SAP affiliate company. All rights reserved.
SAP HANA Developer GuideSetting Up the Analytic Model

Procedure1. Select a measure.2. In the Properties pane, select Measure Type.3. If you want to associate the measure with a currency, do the following:
a. In the Measure Type dropdown list, select the value Amount with Currency.b. In the Currency Dialog, select the required Type as follows:
Type Purpose
Fixed To select currency from the currency table TCURC.
Attribute To select currency from one of the attributes used in the view.
c. Select the required value, and choose OK.d. If you want to convert the value to another currency, choose Enable for Conversion.
a. To select the source currency, choose Currency.b. Select the target currency.
NoteFor currency conversion, in addition to the types Fixed and Attribute, you can select an Input Parameter to provide target currency at runtime. If you select an input parameter for specifying target currency and deselect Enable for Conversion checkbox, the target currency field is cleared because input parameters can be used only for currency conversion.
c. To specify exchange rate type, in the Exchange Rate Types dialog, select the Type as follows:
Type Purpose
Fixed To select exchange rate from the currency table TCURW.
Input Parameter To provide exchange rate input at runtime as input parameter.
d. To specify the date for currency conversion, in the Conversion Date dialog, select the Type as follows:
Type Purpose
Fixed To select conversion date from the calendar.
Attribute To select conversion date from one of the attributes used in the view.
Input Parameter To provide conversion date input at runtime as input parameter.
e. To specify the schema where currency tables are located for conversion, in the Schema for currency conversion, select the required schema.
f. To specify the client for which the conversion rates to be looked for, in the Client for currency conversion, select the required option.
e. From the dropdown list, select the required value that is used to populate data if the conversion fails:
SAP HANA Developer GuideSetting Up the Analytic Model
P U B L I C© 2013 SAP AG or an SAP affiliate company. All
rights reserved. 143

Option Result
Fail In data preview, the system displays an error for conversion failure.
Set to NULL In data preview, the value for the corresponding records is set to NULL.
Ignore In data preview, you view the unconverted value for the corresponding records.
4. If you want to associate a measure with a unit of measure other than currency, do the following:
a. Select the value Quantity with Unit of Measure in the Measure Type dropdown list.b. In the Quantity Units dialog , select the required Type as follows:
Type Purpose
Fixed To select a unit of measure from the unit tables T006 and T006A.
Attribute To select a unit of measure from one of the attributes used in the view.
c. Select the required value, and choose OK.5. Choose OK.
NoteYou can associate currency or unit of measure with a calculated measure, and perform currency conversion for a calculated measure by editing it.
7.2.12 Activating ObjectsYou activate objects available in your workspace to expose the objects for reporting and analysis. Based on your requirements, you can do the following:
● Activate - Deploys the inactive objects.● Redeploy - Deploys the active objects in one of the following scenarios:
○ If your runtime object gets corrupted or deleted, and you want to create it again.○ If an object goes through client-level activation and server-level activation but fails at MDX, and the object
status is still active.
The following activation modes are supported:
● Activate and ignore the inconsistencies in impacted objects - To activate the selected objects even if it results in inconsistent impacted objects. For example, if you choose to activate an object A that is used by B and C, and it causes inconsistencies in B and C but you can choose to go ahead with the activation of A. This is the default activation mode.
● Stop activation in case of inconsistencies in impacted objects - To activate the selected objects only if there are no inconsistent impacted objects.
NoteIrrespective of the activation mode, if even one of the selected objects fails (either during validation or during activation), the complete activation job will fail and none of the selected objects will be activated.
Depending on where you invoke the activation, redeployment or cascade activation, the behavior is as follows:
144
P U B L I C© 2013 SAP AG or an SAP affiliate company. All rights reserved.
SAP HANA Developer GuideSetting Up the Analytic Model

Context Activate Redeploy
Quick Launch tab page A dialog box appears with a preselected list of all your inactive objects.
A dialog box appears with a list of active objects in your workspace.
Package context menu A dialog box appears with a preselected list of all your inactive objects.
A dialog box appears with a list of active objects in your workspace.
Content context menu A dialog box appears with a preselected list of all your inactive objects.
Not applicable
Editor ● If you select Save and Activate, current object is activated and the impacted objects are redeployed if an active version for the impacted objects exist.
● If you select Save and Activate All, a dialog box appears with a preselected list of the selected object along with all the required and impacted objects.
Not applicable
Object context menu A dialog box appears with a preselected list of the selected object along with all the required objects.
A redeployment job is submitted for the selected object.
Note● If an object is the only inactive object in the workspace, the activation dialog box is skipped and the
activation job is submitted.● If an object is inactive and you want to revert back to the active version, from the editor or object context
menu, choose Revert To Active.● In the Activate dialog, you can select the Bypass validation checkbox in order to skip validation before
activation to improve the activation time. For example, if you have imported a number of objects and want to activate them without spending time on validation.
NoteDuring delivery unit import, full server side activation is enabled, activation of objects after import is done. In this case all the imported objects are activated (moved to active table), even if there are errors in activated or impacted objects. But the objects for which activation results in error are considered as broken or inconsistent objects which means that the current runtime representation of these objects is not in sync with the active design time version. The broken objects are shown in the Navigator view with an ‘x’ along side.
NoteThe behavior of activation job is as follows:
● The status (completed, completed with warnings, and completed with errors) of the activation job indicates whether the activation of the objects is successful or failed.
● In case of failure that is when the status is completed with errors, the process is rolled back. This means, even if there are individual objects successfully activated, since the activation job is rolled back, none of the objects are activated.
SAP HANA Developer GuideSetting Up the Analytic Model
P U B L I C© 2013 SAP AG or an SAP affiliate company. All
rights reserved. 145

● Even in case of failure, the job log shows success in the summary part. This is to help the user to indicate that those objects were successfully activated without any issues. But because the entire job is a failure, none of the objects are activated and all of them are rolled back.
● When you open the job log, the summary list shows only those objects that are submitted for activation. It does not list all the affected objects. They are listed only in detail section.
7.3 Creating Decision Tables
You use this procedure to create a decision table to model related business rules in a tabular format for decision automation. Using decision tables you can manage business rules, data validation, data quality rules without any IT knowledge on technical languages like, SQL Script, MDX . A data architect or a developer creates the decision table and activates it. The active version of the decision table can be used in applications.
Procedure
1. Set Parameters 1. In the Modeler perspective, expand <System Name> Content <Package Name> .
2. In the context menu of the package, choose New Decision Table .3. In the New Decision Table dialog box, enter a name and description for the decision table.4. To create data foundation for the decision table, perform substeps of the required scenario given in the table
below:
Scenario Substeps
Create a decision table from scratch. 1. Choose Create New.2. Choose Next.
NoteIf you launch the New Decision Table dialog from the Quick Launch tab page, specify the package where you want to save the decision table.
3. Add the required tables, table type or an information view to the Selected list.
NoteYou can choose to add the required data sources to the decision table later by dragging them from the Catalog node in the Navigator view to the Data Foundation panel.
4. Choose Finish.
Create a decision table from an existing decision table. 1. Choose Copy From.
146
P U B L I C© 2013 SAP AG or an SAP affiliate company. All rights reserved.
SAP HANA Developer GuideSetting Up the Analytic Model

Scenario Substeps
NoteIf you launch the New Decision Table dialog from the Quick Launch page, specify the package where you want to save the decision table.
2. Select the required decision table.3. Choose Finish.
Note○ Only an active version of an information view can be used. Any changes made to the information view
are not reflected in the decision table.○ You can create a decision table using an analytic view only if it has a calculated attribute.○ If you create a decision table using an analytic view, the analytic view must have a calculated attribute.○ If you choose to create a decision table based on a table type or an information view, you cannot add
any other data source. This implies that a decision table can be based on multiple tables or a table type or an information view.
○ You can add only one table type or information view to the data foundation.○ You can mark table type columns and information view columns only as conditions.○ While designing decision table using information view, you can only use view's attributes as conditions
and not the other attributes. In addition, you can use only parameters as actions.
2. Create Joins 1. If you want to define a relationship between tables to query data from two or more tables, do the following:
a. In the editor pane, from the context menu, choose Create Join.b. In the Create Join dialog, select the required tables, columns, join type, and cardinality.c. Choose Create Join.
NoteYou can also create a join between table columns by dragging it from one table column to another table column. The supported join types are inner, left outer and right outer.
3. Add Conditions and Actions 1. In the Data Foundation view, select the required column, and perform substeps of the required scenario given
in the table below:
Scenario Substeps
Include table field in the output structure. From the context menu, choose Add as Attribute.
NoteAttributes contains a subset of columns that you use to derive conditions and actions.
SAP HANA Developer GuideSetting Up the Analytic Model
P U B L I C© 2013 SAP AG or an SAP affiliate company. All
rights reserved. 147

Scenario Substeps
Add conditions based on which you want to derive actions. 1. In the Output view, select the required attributes .2. From the context menu, choose Add as Conditions.
Add actions for the selected conditions. 1. In the Output view, select the required attributes .2. From the context menu, choose Add as Actions.
2. To add condition values, do the following:
a. In the Decision Table view, right-click a condition, and choose Add Conditions Values.
NoteThe supported data types for an operator are:
Operator Supported Data Types Syntax
Not Equal To Number & CHAR-based != ABC
In Number & Char-based In ABC;CDA
Not In Number & Char-based Not In A;B;C
Like CHAR-based Like Abc*
Not Like CHAR-based Not Like Abc*
Greater ThanGreater Than or Equals
Number & CHAR-based >20>=20
Less ThanLess Than or Equals
Number & CHAR-based <10<=10
Between Number Between 20 and 30
Before Date Dates Before 2012-12-12Or< 2012-12-12
After Date Dates After 2012-12-12Or> 2012-12-12
Between Date Dates Between 2012-12-12 and 2012-12-25
b. Enter a value, and choose OK.
Note○ If a database table column is used as condition, you can use the value help dialog to select the
condition values. You can select multiple values at one time. You can edit a condition value by selecting the condition, and entering a value.
○ You can enter a pattern for the condition values having data type as VARCHAR. The pattern must be prefixed with the LIKE and NOT LIKE operators. For example, LIKE a*b or NOT LIKE a?b. If the LIKE or NOT LIKE operator is not present the pattern is treated as a string
148
P U B L I C© 2013 SAP AG or an SAP affiliate company. All rights reserved.
SAP HANA Developer GuideSetting Up the Analytic Model

3. To set action values, right-click an action cell, and enter value.4. If you want to write a complex expression as action value, do the following:
a. Right-click the action field.b. From the context menu, choose Set Dynamic Value.c. Write the expression for example, PRICE-(PRICE*0.1).d. To edit a value you need to select that value.
NoteYou can use parameters and table columns of the same data type as that of the action in expressions.
5. To assign a value to a condition or an action based on the table data, choose Open Value Help Dialog, and do the following:
a. In the Value Help for Column dialog, enter the search string, and choose Find.
NoteIf you do not provide a value for search and choose Find, all the data corresponding to the selected column is shown.
b. Select a value, and choose OK.
Remember● You can provide an alias name to a condition or an action by editing the value of Alias name property.● You can choose to create parameters and use them as conditions or actions. The values you provide to the
parameters at the runtime determine which data records are selected for consumption. For more information regarding how to use parameters, Using Parameters in a Decision Table [page 152].
● You can export decision table data to an excel sheet using context menu option Export Data to Excel in the Decision Table view. You can also import decision table data from an excel using context menu option Import Data from Excel in the Decision Table view.
● You can arrange the condition and action columns of the decision table depending on how you want them to appear. For more information, see Changing the Layout of a Decision Table [page 151].
6. Optional Step: Validate Decision Table1. To set the rules that you want to use for validation do the following:
a. Choose Window Preferences .
b. In the Preferences dialog box, expand Modeler Validation Rules .c. In the Validation Rules view, select Decision Table checkbox to check for all the rules during validation.d. If you want to check for individual rules, select the required rules.e. Choose OK.
2. In the decision table editor, choose Validate in the editor toolbar .
NoteIn the Job Log section, you can see the validation status and detailed report of the decision table
SAP HANA Developer GuideSetting Up the Analytic Model
P U B L I C© 2013 SAP AG or an SAP affiliate company. All
rights reserved. 149

7. Activate Decision Table 1. Choose File Save .2. From the context menu of the decision table, choose Activate.
Note
You can choose to save and activate the view from the editor using .
Result: On successful activation, a procedure corresponding to the decision table is created in _SYS_BIC schema. The name of the procedure is in the format, <package name>/<decision table name>. In addition, if a parameter is used as an action in the decision table, the corresponding table type is created in _SYS_BIC schema. The name of the table type is in the format, <package name>/<decision table name>/TT.
RememberIf in a decision table, parameters are used as conditions then corresponding IN parameters are generated. Also, if the parameters are used as actions then an OUT parameter is generated.
8. Execute Decision Table Procedure 1. To execute the decision table procedure perform the following steps as required:
Data Source Condition Action Script
Physical tables Physical table column
Physical table column
call "<schema name>"."<procedure name>";
Physical tables Parameters Physical table column
call "<schema name>"."<procedure name>"(<IN parameter>,…,<IN parameter>);
Physical tables Physical table column
Parameters call "<schema name>"."<procedure name>"(?);
Physical tables Parameters Parameters call "<schema name>"."<procedure name>"(<IN parameter>,…,<IN parameter>,?);
Information View
View attributes Parameters call "<schema name>"."<procedure name>"(?);
Information View
Parameters Parameters call "<schema name>"."<procedure name>"(<IN parameter>,…,<IN parameter>,?);
Table Type Table Type column
Parameters call "<schema name>"."<procedure name>"(?);
Table Type Parameters Parameters call "<schema name>"."<procedure name>"(<IN parameter>,…,<IN parameter>,?);
Remember
150
P U B L I C© 2013 SAP AG or an SAP affiliate company. All rights reserved.
SAP HANA Developer GuideSetting Up the Analytic Model

The order of the parameter while executing the procedure must be same as in the Output panel, and not as used in the Decision Table.
TipYou can view the procedure name using the Open Definition context menu option on the selected procedure.
Result: On execution of the procedure, the physical table data is updated (if no parameters are used) based on the data that you enter in the form of condition values and action values.
RememberIf parameters are being used as actions in a decision table, the physical table is not updated.
9. Data PreviewTo preview the populated data in the decision table, in the Decision Table editor, from the toolbar, choose Open Data Preview.
RestrictionData preview is supported only if:
● A decision table is based on physical tables and has at least one parameter as action.● A decision table is based on information views and parameter(s) as action.
7.3.1 Changing the Layout of a Decision TableUse this procedure to change the decision table layout by arranging the condition and action columns. By default, all the conditions appear as vertical columns in the decision table. You can choose to mark a condition as a horizontal condition, and view the corresponding values in a row. The evaluation order of the conditions is such that first the horizontal condition is evaluated and then the vertical ones.
NoteYou can only change the layout of a decision table if it has more than one condition. You can select only one condition as horizontal condition.
Procedure1. In the context menu of the Decision Table editor, choose Change Layout.2. If you want to view a condition as a horizontal condition, in the Change Decision Table Layout dialog, select
Table has Horizontal Condition (HC) checkbox.
NoteBy default the first condition in the list of conditions is marked as horizontal.
3. In the Conditions and Actions sections, choose options on the right-hand side of the dialog box to arrange the conditions and actions in the desired sequence.
Note
SAP HANA Developer GuideSetting Up the Analytic Model
P U B L I C© 2013 SAP AG or an SAP affiliate company. All
rights reserved. 151

The available options to arrange the conditions in a sequence are:
○ Move Condition to Top○ Move Condition Up○ Move Condition Down○ Move Condition to Bottom
4. Choose OK.5. Save the changes.
NoteYou can also set a condition as horizontal from the context menu of the condition in the Output view. You can also arrange the conditions and actions in the desired sequence in the Output view using the respective buttons.
7.3.2 Using Parameters in a Decision TableYou use this procedure to create a parameter that can be used to simulate a business scenario. You can use parameters as conditions and actions in the decision table at design time. Parameters used as conditions, determine the set of physical table rows to be updated based on the condition value that you provide at runtime during procedure call. Parameters used as actions, simulate the physical table without updating to it.The following parameter types are supported:
Type Description
Static List Use this when the value of a parameter comes from a user-defined list of values.
Empty Use this when the value of a parameter could be anything of the selected data type.
ExampleConsider a sales order physical table with column headers as follows:
ID Name Supplier Model Price Quantity
If you want to evaluate Discount based on the Quantity and Order Amount, you can create two parameters, Order Amount and Discount. Use Quantity and Order Amount as the condition, and Discount as the action. The sample decision table could be:
Quantity Order Amount Discount
>5 50000 10
>=10 100000 15
Procedure
1. Create a Parameter1. In the Output pane, right-click the Parameters node.2. From the context menu, choose New and do the following:
152
P U B L I C© 2013 SAP AG or an SAP affiliate company. All rights reserved.
SAP HANA Developer GuideSetting Up the Analytic Model

a. Enter a name and description.b. Select the required data type from the dropdown list.c. Enter the length and scale as required.d. Choose the required Type from the dropdown list.
NoteIf you have selectedStatic List for Type, choose Add in the List of Values section to add values. You can also provide an alias for the enumeration value.
e. Choose OK.
2. Use Parameter as Condition or Action 1. In the Output pane, expand the Parameters node.2. Right-click a parameter, choose Add As Conditions/ Add as Actions.
7.4 Managing Object Versions
7.4.1 Switching Ownership of Inactive ObjectsUse this procedure to take over the ownership of the inactive version of an object from other users' workspace.Objects in edit mode in other workspaces are not available for modification. In order to modify such objects you need to own the inactive object.The options available for changing the inactive object ownership are as follows:
Option Purpose
Switch Ownership To take over multiple inactive objects from other users. Inactive objects that do not have an active version are also available for take over using this option
Take Over To take a single inactive object from another workspace that you wish to edit using the editor.
NoteUsing this functionality you can only own the inactive version of the object. The active version is owned by the user who created and activated the object.
PrerequisiteYou have obtained the Work in Foreign Workspace authorization.
Procedure1. If you want to own multiple inactive objects from other workspaces, do the following:
a. In the Quick Launch page, choose Switch Ownership.b. In the Source User field, select the user who owns the inactive objects.c. Add the required inactive objects to the Selected Models section.
SAP HANA Developer GuideSetting Up the Analytic Model
P U B L I C© 2013 SAP AG or an SAP affiliate company. All
rights reserved. 153

d. Choose OK.2. If an object opens in read-only mode and you want to edit it, do the following:
a. In the editor toolbar, select Switch Version.b. Choose Take Over.
NoteYou can choose to save the changes made by the other user (previous owner of the inactive version) to the inactive version of the object.
7.4.2 Toggling Versions of Content ObjectsYou use this procedure to view the active version of an information object while working with its inactive version for example, to view the changes made to the active version.
Procedure1. In the Modeler perspective, expand the Content node of the required system.2. Select the required object from a package.3. From the context menu, choose Open.4. In the editor pane, choose Show Active Version.5. Compare the inactive and active versions of the object.6. Choose OK.
7.4.3 Viewing Version History of Content ObjectsYou use this procedure to view the version details of an information model for tracking purposes.
Procedure1. In the Modeler perspective, expand the Content node of the required system.2. Select the required object from a package.3. From the context menu, choose History.
7.5 Working with Objects
7.5.1 Managing LayoutYou use this procedure to adjust the data foundation and logical view layout comprising user interface controls like, tables and attribute views in a more readable manner. This functionality is supported for attribute views and analytic views.The options available are as follows:
Option Purpose Substeps
Auto Arrange Use this option to arrange the user interface elements automatically. In the editor tool bar, choose .
Show outline Use this option to view an outline of the elements arranged so that , you do not In the editor tool bar, choose .
154
P U B L I C© 2013 SAP AG or an SAP affiliate company. All rights reserved.
SAP HANA Developer GuideSetting Up the Analytic Model

Option Purpose Substeps
have to navigate in the editor using horizontal and vertical scrollbars.
Highlight related tables Use this option if you want to view only those tables that are related to a table selected in the editor.
1. In the editor, right-click the selected table.
2. From the context menu, choose Highlight related tables.
Display Use this option if you have a table with a large number of columns in the editor, and you want to view them in a way that meets your needs: for example, only the table name, or only joined columns, or the expanded form with all the columns.
1. In the editor, right-click the relevant table.
2. From the context menu, choose Display.
3. If you want to view only the table name, choose Collapsed.
4. If you want to view all the columns of the table, choose Expanded.
5. If you want to view only the joined columns of the table, choose Joins only.
7.5.2 Filtering Packages and ObjectsYou use this procedure to filter the content, and view packages and objects that you want to work with. If you apply a filter at the package level, all the packages including subpackages that satisfies the search criteria are shown. You can apply a filter for packages only on the Content node in the Navigator view. You can apply a filter for objects at the package level including subpackages.
Applying Filter for Packages1. In the Navigator view, select the Content node.2. In the context menu, choose Filter Packages....3. In the Filter Packages dialog, enter the filter text.4. If you want to search for the exact word written in the filter text, select Match whole word checkbox.5. Choose OK.
NoteIf a filter already exists on the Content node, the new filter will overwrite the existing one. You can also apply the previous filter on the Content using Apply Filter '<filter text>' option.
Applying Filter for Objects1. In the Navigator view, expand the Content node.2. In the context menu of a package, choose Filter Objects....3. In the Filter Objects dialog, enter the filter text.4. If you want to search for the exact word written in the filter text, select Match whole word checkbox.5. If you want to apply the filter on the subpackages, choose Apply filter to sub packages checkbox.
○ If you want to apply a filter only if no filter already exists on the selected package or otherwise retain the existing filter, choose Apply only if no filter already exists.
○ If you want to apply filter even if there is an existing filter, choose Apply to all and overwrite existing.
SAP HANA Developer GuideSetting Up the Analytic Model
P U B L I C© 2013 SAP AG or an SAP affiliate company. All
rights reserved. 155

6. Choose OK.
NoteIf a filter already exists on the package, the new filter will overwrite the existing one.
7.5.3 Refactoring ObjectsYou use this procedure to restructure your content objects in the Navigator view without changing their behavior. As you move the objects, their references are automatically adjusted. Objects available for refactoring are, packages, attribute views, analytic views, graphical calculation views, and analytic privileges.The activation state of the objects from source package to target package is maintained as follows:
At Source At Target
Base Object- activeImpacted Object- active
Base Object- activeImpacted Object- active
Base Object- inactiveImpacted Object- inactive
Base Object- inactiveImpacted Object- inactive
Base Object- activeImpacted Object- inactive
Base Object- activeImpacted Object- active
Base Object- inactiveImpacted Object- active
Base Object- inactiveImpacted Object- inactive
NoteAn impacted object (also known as affected object) is the one that uses the base object. For example, an analytic view using an attribute view is called impacted object for that attribute view.
1. Open the Modeler perspective.2. Expand the Content node.
3. Select the required objects, in the context menu, choose Refactor Move .4. In the Move dialog, select the target package where you want to move the package/objects, and choose Next.5. If you want to skip the movement of objects/packages, in the Changes to be performed panel, deselect them.6. Choose Finish.
7.5.4 Validating Models You use this procedure to check if there are any errors in an information object and if the object is based on the rules that you specified as part of preferences. For example, the "Check join: SQL" rule checks that the join is correctly formed.For more information about setting preferences, see Setting Preferences for Modeler .
Procedure1. On the Quick Launch page, choose Validate.2. From the Available list, select the required models that system must validate.3. Choose Add.4. Choose Validate.
156
P U B L I C© 2013 SAP AG or an SAP affiliate company. All rights reserved.
SAP HANA Developer GuideSetting Up the Analytic Model

7.5.5 Generating Object DocumentationUse this procedure to capture the details of an information model or a package in a single document. This helps you view the necessary details from the document, instead of referring to multiple tables. The following table specifies the details that you can view from the document.
Type Description
Attribute View General object properties, attributes, calculated attributes (that is, calculated columns of type attribute), data foundation joins, cross references, and where-used
Analytic View General object properties, private attributes, calculated attributes (that is, calculated columns of type attribute), attribute views, measures, calculated measures (that is, calculated columns of type measure), restricted measures (that is, restricted columns), variables, input parameters, data foundation joins, logical view joins, cross references, and where-used
Calculation View General object properties, attributes, calculated attributes, measures, calculated measures, counters, variables, input parameters, calculation view SQL script, cross references, and where-used
Package Sub-packages, general package properties, and list of content objects
Procedure1. From the Quick Launch page, choose Auto Documentation.2. In the Select Content Type field, select one of the following options as required:
Option Description
Model Details To generate documentation for models such as attribute, analytic, and calculation views.
Model List To generate documentation for packages.
3. Add the required objects to the Target list.4. Browse the location where you want to save the file.5. Choose Finish.
7.5.6 Enabling Multilanguage Support for ObjectsYou use this procedure to enable translation of text pertaining to objects and their elements that did not have multilanguage support.For example, you can enable multilanguage support for models along with their elements like attributes and measures in different languages.
Procedure1. From the Quick Launch tab page, choose Migrate.2. Select the required objects.3. Choose Add.4. Choose OK.
SAP HANA Developer GuideSetting Up the Analytic Model
P U B L I C© 2013 SAP AG or an SAP affiliate company. All
rights reserved. 157

ResultObject texts along with the corresponding elements are flagged for translation. These objects can be viewed in multiple languages provided that the object texts are translated.
7.5.7 Checking Model ReferencesYou use this procedure to identify whether an information model is referenced by any other information model(s).
Procedure 1. In the Modeler perspective, expand the system node in the Navigator view.2. Expand the Content node.3. Expand the required package node.4. Select the required object.5. From the context menu, choose Where Used.
7.5.8 Viewing the Job LogThe job log displays information related to requests entered for a job. A job log consists of two tab pages as follows:
● Current: Lists all waiting, running, and last five jobs.● History: Lists all the jobs.
NoteYou can terminate the job only if it is in the waiting state.You can perform the following operations using the job log:
● Open Job Details: Use this to view the job summary in the current tab page.● Open Job Log File: Use this to view the information pertaining to a job in detail using the internal browser.● Clear Log Viewer: Use this to delete all the job from the current tab page.● Export Log File: Use this to export the log file to a target location other than the default location for further
reference.● Delete Job: Use this to delete single job from the current tab page.
7.5.9 Maintaining Search AttributesYou use this procedure to enable an attribute search for an attribute used in a view. Various properties related to attribute search are as follows:
● Freestyle Search: Set to True if you want to enable the freestyle search for an attribute. You can exclude attributes from freestyle search by setting the property to False.
● Weights for Ranking: To influence the relevancy of items in the search results list, you can vary the weighting of the attribute. You can assign a higher or lower weighting (range 0.0 to 1.0). The higher the weighting of the attribute, the more influence it has in the calculation of the relevance of an item. Items with a higher relevance are located higher up the search results list. Default value: 0.5.
NoteTo use this setting the property Freestyle Search must be set to True.
● Fuzziness Threshold: This parameter is reserved for the future usage of the fault-tolerant search..
Note
158
P U B L I C© 2013 SAP AG or an SAP affiliate company. All rights reserved.
SAP HANA Developer GuideSetting Up the Analytic Model

It is recommended to use the default values for ranking and fuzziness at the beginning. You can fine-tune the search settings based on the experience gained using the search. You can also fine-tune the search using feedback collected from your users.
7.5.10 Previewing Data of Content ObjectsYou use this procedure to preview the content of content models for analysis purposes.
1. In the Modeler perspective, expand the Content node of the required system.2. Select the object from a package for which you want to view the content.3. From the context menu, choose Data Preview.
The system displays the content in different formats as shown in the table below.
Tab Page Displays…
Raw Data All attributes along with data in a table format.
Distinct values All attributes along with data in a graphical format.
Analysis All attributes and measures in a graphical format.
TipIf there are inconsistencies in runtime information (that is, calculation views in catalog or in tables related to runtime) of a view, you might get invalidated view error. In such cases, you need to redeploy the view in order to correct the inconsistencies with runtime information.
4. Navigate to the required tab page and view the content.
7.5.11 Functions used in ExpressionsThis topic covers the functions that you can use while creating expressions like, calculated attributes and calculated measures.Conversion Functions
Function Syntax Purpose Example
int int int(arg) convert arg to int type int(2)
float float float(arg) convert arg to float type float(3.0)
double double double (arg) convert arg to double type double(3)
sdfloat sdfloat sdfloat (arg) convert arg to sdfloat type
decfloat decfloat decfloat (arg) convert arg to decfloat type
fixed fixed fixed (arg, int, int) arg2 and arg3 are the intDigits and fractdigits parameters, respectively. Convert arg to a fixed type of either 8, 12, or 16 byte length, depending on intDigits and fractDigits
fixed(3.2, 8, 2) + fixed(2.3, 8, 3)
string string string (arg) convert arg to string type
raw raw raw (arg) convert arg to raw type
SAP HANA Developer GuideSetting Up the Analytic Model
P U B L I C© 2013 SAP AG or an SAP affiliate company. All
rights reserved. 159

Function Syntax Purpose Example
date date date(stringarg)date date(fixedarg)date date(int, int)date date(int, int, int)date date(int, int, int, int)date date(int, int, int, int, int)date date(int, int, int, int, int, int)
convert arg to date type. The first version parses a string in the format "yyyy-mm-dd hh:mi:ss" where trailing components except for the year may be omitted. The version with one fixed number arg strips digits behind the comma and tries to make a date from the rest. The other versions accept the individual components to be set.
date(2009) -> date('2009')date(2009, 1, 2) -> date('2009-01-02')date(fixed(20000203135026.1234567, 10, 4)) -> date('2000-02-03 13:50:26')
longdate longdate longdate(stringarg)longdate longdate(fixedarg)longdate longdate(int, int, int)longdate longdate(int, int, int, int, int)longdate longdate(int, int, int, int, int, int)longdate longdate(int, int, int, int, int, int, int)
convert arg to longdate type, similar to date function above.
longdate(fixed(20000203135026.1234567, 10, 5)) -> longdate('2000-02-03 13:50:26.1234500')longdate(2011, 3, 16, 9, 48, 12, 1234567) -> longdate('2011-03-16 09:48:12.1234567')
time time time(stringarg)time time(fixedarg)time time(int, int)time time(int, int, int)
convert arg to time type, similar to date function above
String Functions
Function Syntax Purpose
strlen int strlen(string) returns the length of a string in bytes, as an integer number.
midstr string midstr(string, int, int) returns a part of the string starting at arg2, arg3 bytes long.arg2 is counted from 1 (not 0)
leftstr string leftstr(string, int) returns arg2 bytes from the left of the arg1. If arg1 is shorterthan the value of arg2, the complete string will be returned.
rightstr string rightstr(string, int) returns arg2 bytes from the right of the arg1. If arg1 is shorterthan the value of arg2, the complete string will be returned.
instr int instr(string, string) returns the position of the first occurrence of the second stringwithin the first string (>= 1) or 0, if the second string is notcontained in the first.
hextoraw string hextoraw(string) convert a hexadecimal representation of bytes to a string of
160
P U B L I C© 2013 SAP AG or an SAP affiliate company. All rights reserved.
SAP HANA Developer GuideSetting Up the Analytic Model

Function Syntax Purpose
bytes. The hexadecimal string may contain 0-9, upper or lowercase a-f and no spaces between the two digits of a byte; spaces between bytes are allowed.
rawtohex string rawtohex(string) convert a string of bytes to its hexadecimal representation.The output will contain only 0-9 and (upper case) A-F, no spaces and is twice as many bytes as the original string.
ltrim string ltrim(string)string ltrim(string, string)
removes a whitespace prefix from a string. The Whitespace characters may be specified in an optional argument. This functions operates on raw bytes of the UTF8-string and has no knowledge of multi byte codes (you may not specify multi byte whitespace characters).
rtrim string rtrim(string)string rtrim(string, string)
removes trailing whitespace from a string. The Whitespace characters may be specified in an optional argument. This functions operates on raw bytes of the UTF8-string and has no knowledge of multi byte codes (you may not specify multi byte whitespace characters).
trim string trim(string)string trim(string, string)
removes whitespace from the beginning and end of a string.
lpad string lpad(string, int)string lpad(string, int, string)
add whitespace to the left of a string. A second string argument specifies the whitespace which will be added repeatedly until the string has reached the intended length. If no second string argument is specified, chr(32) (' ') will be added. This function operated on UTF-8 bytes and has no knowledge of unicode characters (neither for the whitespace string nor for length computation).
rpad string rpad(string, int)string rpad(string, int, string)
add whitespace to the end of a string. A second string argument specifies the whitespace which will be added repeatedly until the string has reached the intended length. If no second string argument is specified, chr(32) (' ') will be added. This function operated on UTF-8 bytes and has no knowledge of unicode characters (neither for the whitespace string nor for length computation).
SAP HANA Developer GuideSetting Up the Analytic Model
P U B L I C© 2013 SAP AG or an SAP affiliate company. All
rights reserved. 161

Function Syntax Purpose
replace string replace(string, string, string) replace every occurrence of arg2 in arg1 with arg3 and return the resulting string
Mathematical Functions
Function Syntax Purpose Example
sign int sign(double)int sign(time)int sign(date)
Sign returns -1, 0 or 1 depending on the sign of its argument. Sign is implemented for all numeric types, date and time.
abs double abs(double)decfloat abs(decfloat)decfloat abs(decfloat)time abs(time)
Abs returns arg, if arg is positive or zero, -arg else. Abs is implemented for all numeric types and time.
round.
double round(double, int) round does rounding of absolute values toward zer while the sign is retained
round(123.456, 0) = 123round(123.456, 1) = 123.5round(-123.456, 1) = -123.5round(123.456, -1) = 120
rounddown double rounddown(double, int)
rounddown rounds toward negative infinity making rounddown(-1.1, 0) = -2
rounddown(123.456, -1) = 120rounddown(-123.456, -1) = -130
Date Functions
Function Syntax Purpose
utctolocal utctolocal(datearg, timezonearg) interprets datearg (a date, without timezone) as utc and convert it to the timezone named by timezonearg (a string)
localtoutc localtoutc(datearg, timezonearg) converts the local datetime datearg to the timezone specified by the string timezonearg, return as a date
weekday weekday(date) returns the weekday as an integer in the range 0..6, 0 is monday.
now now() returns the current date and time (localtime of the server timezone) as date
daysbetween daysbetween(date1, date2)daysbetween(daydate1, daydate2)daysbetween(seconddate1, seconddate2)daysbetween(longdate1, longdate2)
returns the number of days (integer) between date1 and date2. The first version is an alternative to date2 - date1.Instead of rounding or checking for exactly 24 hours distance, this will truncate both date values today precision and subtract the resulting day numbers, meaning that if arg2 is not the calendar day following arg1,
162
P U B L I C© 2013 SAP AG or an SAP affiliate company. All rights reserved.
SAP HANA Developer GuideSetting Up the Analytic Model

Function Syntax Purpose
daysbetween will return 1 regardless of the time components of arg1 and arg2.
secondsbetween secondsbetween(seconddate1, seconddate2)secondsbetween(longdate1, longdate2)
returns the number of seconds the first to the second arg, as a fixed point number. The returned value is positive if the first argument is less than the second. The return values are fixed18.0 in both cases (note that it may prove more useful to use fixed11.7 in case of longdate arguments).
component component(date, int) the int argument may be int the range 1..6, the values mean year, day, month, hour, minute, second, respectively. If a component is not set in the date, the component function will return a default value, 1 for the month or the day, 0 for other components. The component function may also be applied to longdate and time types.
addseconds addseconds(date, int)addseconds(seconddate, decfloat)addseconds(longdate, decfloat)
Return a date plus a number of seconds. Fractional seconds will also be used in case of longdate. Null handling is (in opposition to the default done with adds) to return null if any argument is null.
adddays adddays(date, int)adddays(daydate, int)adddays(seconddate, int)adddays(longdate, int)
Return a date plus a number of days. Null handling is (in opposition to the default done with adds) to return null if any argument is null.
Misc Functions
Function Syntax Purpose Example
if if(intarg, arg2, arg3) return arg2 if intarg is considered true (not equal to zero), else return arg3. Currently, no shortcut evaluation is implemented, meaning that both arg2 and arg3 are evaluated in any case. This means you cannot use if to avoid a divide by zero error which has the side effect of terminating expression evaluation when it occurs.
if("NETWR"<=500000,'A', if("NETWR"<=1000000,'B','C') )
in in(arg1, ...) return 1 (= true) if arg1 is equal to any of the remaining args, return 0 else
SAP HANA Developer GuideSetting Up the Analytic Model
P U B L I C© 2013 SAP AG or an SAP affiliate company. All
rights reserved. 163

Function Syntax Purpose Example
case case(arg1, default) case(arg1, cmp1, value1, cmp2, value2, ..., default)
return value1 if arg1 == cmp1, value2 if arg1 == cmp2 etc, default if there no match
case("CATEGORY", 'A', 'LV', 'B', 'MV', 'HV')
isnull isnull(arg1) return 1 (= true), if arg1 is set to null and null checking is on during Evaluator run (EVALUATOR_MAY_RETURN_NULL)
7.5.12 Searching Tables, Models and Column ViewsYou use this feature to search for tables, models and column views in a system. You can search these objects in any system from the list of systems added in the Navigator view that has all services started, and is up and running.In the search results, for a matching object you can perform the following actions:
● Tables - you can open the table definition and add the table in the analytic and attribute view editor.
NoteYou can add a table only if the editor is open otherwise it results in error.
● Models - you can open the models in the editor and in case of attribute view, you can add it in the view editor of an analytic view.
NoteYou can add a model only if the editor is open otherwise it results in error.
● Column Views - you can only open and view the definition.
1. Enter the object that you want to search in the Modeler toolbar search field.2. Select the system in which you want to search the object from the dropdown option next to the Search
button.3. To execute the search, choose Search.
The matching objects are listed in the expanded results pane with three tab pages, Tables, Models, and Column Views. You can select each to view the matching objects and corresponding actions that you can perform on them, for example, Open and Add.
7.5.13 Setting Keyboard ShortcutsYou use this procedure to enable the keyboard shortcuts for Modeler actions like, activate, validate, and so on. The list of supported commands with the default keyboard shortcuts is as follows:
Command Binding When Category
Activate Ctrl+Shift+A Navigator Modeler Keys
Activate Ctrl+Shift+A In Windows Modeler Keys
Add Table/Model Ctrl+Shift+= In Windows Modeler Keys
Auto Arrange Ctrl+L In Windows Modeler Keys
164
P U B L I C© 2013 SAP AG or an SAP affiliate company. All rights reserved.
SAP HANA Developer GuideSetting Up the Analytic Model

Data Preview Ctlr+Shift+P Navigator Modeler Keys
Data Preview Ctlr+Shift+P In Windows Modeler Keys
Display XML Alt+D In Windows Modeler Keys
Find Ctrl+F Navigator Modeler Navigator
Fit to Window Ctrl+0 In Windows Modeler Keys
Move Element in Output Pane (Direction: Down)
Ctrl+] In Windows Modeler Keys
Move Element in Output Pane (Direction: Up)
Ctrl+[ In Windows Modeler Keys
Open Ctrl+O Navigator Modeler Keys
Show View (View: History) Alt+Shift+H In Windows Views
Show View (View: Job Log)
Alt+Shift+L In Windows Views
Show View (View: Where-Used List)
Alt+Shift+U In Windows Views
Validate Ctrl+Shift+V In Windows Modeler Keys
Validate Ctrl+Shift+V Navigator Modeler Keys
Zoom (Type: In) Ctrl+= In Windows Modeler Keys
Zoom (Type: Out) Ctrl+- In Windows Modeler Keys
Zoom (Type: Reset) Alt+Shift+0 In Windows Modeler Keys
1. Choose Window Preferences General Keys .2. In the Keys panel, select Modeler as Scheme.3. If you want to view only the commands supported by Modeler for keyboard shortcut, in the text field enter
Modeler Keys.
NoteYou cannot add new commands but can choose to customize the commands using the following options:
○ Copy Command - to provide alternate keyboard shortcut for an existing command.○ Unbind Command - to clear the key bindings with the command and provide new keyboard shortcut
for an existing command.○ Restore Command - to restore the default key bindings provided by Modeler for an existing command.
4. Choose Apply.
7.5.14 Copying an ObjectYou can choose to copy an object in the Navigator view and paste it to a required package. You must have write permissions on the target package where you are pasting the object. The copy paste feature is supported for all Modeler objects that is, attribute view, analytic view, calculation view, procedure and analytic privilege. The object that is copied to the target package is always inactive, even if in the source package it is in active state.
SAP HANA Developer GuideSetting Up the Analytic Model
P U B L I C© 2013 SAP AG or an SAP affiliate company. All
rights reserved. 165

By default the keyboard shortcut for copy and paste is CTRL + C and CTRL + V respectively. To enable keyboard shortcut for copy and paste you must apply the Modeler keyboard shortcuts from the Window PreferencesGeneral Keys and select Modeler as scheme.
NoteCopy paste is supported only for a single object.
1. In the Navigator view, select an object and in the contect menu, choose Copy.
NoteIf you have applied the Keyboard shortcuts then you can also press CTRL + C to copy an object.
2. Navigate to the package where you want to paste the object, and choose Paste.
NoteIf you have applied the Keyboard shortcuts then you can also press CTRL + V to paste an object.
7.6 Importing BW Objects
● You have implemented SAP Notes 1703061, 1759172, 1752384, 1733519, 1769374, and 1790333.● You have upgraded your Modeler to SAP HANA 1.0 SP05 Revision 50.● You have added BW schema in the SQL privileges for the Modeler user to import BW models.● _SYS_REPO user has SELECT with GRANT privileges on the schema that contains the BW tables.
You use this feature to import SAP NetWeaver Business Warehouse (SAP NetWeaver BW) models that are SAP HANA-optimized InfoCubes, SAP HANA-optimized DataStore objects, and Query Snapshot InfoProviders to the SAP HANA modeling environment. These imported objects are exposed as SAP HANA information models and can be consumed for reporting using client tools such as, SAP BusinessObjects Explorer, SAP BusinessObjects BI 4.0 Suite (Web Intelligence via Universes, Dashboards, Crystal Reports), Microsoft Office and so on. The model properties are set based on the SAP NetWeaver BW models metadata.If you select a DataStore object, the resultant SAP HANA model is an analytic view with the same name as that of the DataStore object. If you select an InfoCube, two objects- analytic view and calculation view are created. In this case, the name of calculation view and analytic view is same as that of the InfoCube and the name of the analytic view is suffixed with _INTERNAL. The analytic view generated in the case of an InfoCube is used internally for the generation of the respective calculation view and is not available for client consumption. If you select a QuerySnapshot InfoProvider, the resultant SAP HANA model is an analytic view.Conversion of BW analysis authorizations to analytic privilegesWhen you import the SAP NetWeaver BW InfoProviders, you can choose to import the relevant BW analysis authorizations. The analysis authorizations are imported as analytic privileges in the SAP HANA Modeler. These analysis authorizations could be associated with the InfoProviders or roles. You can import the analysis authorizations in the following way:
● ○ You can choose to import only InfoProvider specific analysis authorizations. In this case, for all the authorization objects specific to the InfoProvider having 0CTAIPROV = <InfoProvider name>
166
P U B L I C© 2013 SAP AG or an SAP affiliate company. All rights reserved.
SAP HANA Developer GuideSetting Up the Analytic Model

corresponding analytic privileges are generated. The name of the analytic privilege is the same as that of the BW analysis authorization object.
○ You can choose to import analysis authorizations associated with the BW roles for the InfoProviders. In this case, all the analysis authorizations assigned to the selected roles are merged as one or more analytic privileges. The name of the generated analytic privilege is <InfoProvider name>_BWROLE_<number>, such as, MyCube_BWROLE_1.
These analysis authorizations set on the InfoProviders are applicable at runtime for reporting. For example, consider that a user has the following authorizations in BW:
Table
0CUSTOMER 1000 - 2000
0PRODUCT ABC*
Table
0CTAIPROV CUBE1, CUBE2
0CUSTOMER 3000 - 4000
0CTAACTVT 03 (display)
● Now, if you choose to import only InfoProvider specific authorization, in the SAP HANA side, user would only be able to see 0CUSTOMER from 3000 to 4000.
● However, if you choose to import also role based authorizations, in the SAP HANA side, user would be able to see 0CUSTOMER from 1000 to 4000, and 0PRODUCT = ABC*.
Note● In the case of Query Snapshot, all the BW Analysis Authorization objects which are applicable on the
underlying InfoProvider of the query, will also be applicable on the Query Snapshot.● These BW analysis authorization objects will be imported as analytic privileges when importing the query
snapshot.
The generated models and analytic privileges are placed in the sap.bw package. You can choose to enhance the generated models. However, with the subsequent import of the same objects, the changes are overridden. Also, changes made to the models on BW side are not automatically reflected in the generated models. This may lead to inconsistent generated models based on the changes made to the physical tables. To avoid this, you need to re-import the models.
Caution● The calculated key figures (CKFs) and restricted key figures (RKFs) defined on the SAP BW models are not
created for the generated SAP HANA models. In this case, you can create an RKF as restricted measure in the generated analytic view. For CKF you can create calculated measures in the generated calculation view or analytic view. These CKFs and RKFs are retained during subsequent import. Additionally, the calculated attributes created on the generated analytic views (in case of InfoCubes and DSOs) are also retained during subsequent import. If a change is made to the characteristics or key figures based on which these restricted measures and calculated measures are created, this may lead to inconsistency in the generated models. In this case, you need to manually adjust these restricted measures and calculated measures.
● The restricted measures and calculated measures that you define for the analytic view that correspond to a query snapshot, is overwritten with the subsequent import.
SAP HANA Developer GuideSetting Up the Analytic Model
P U B L I C© 2013 SAP AG or an SAP affiliate company. All
rights reserved. 167

● The BW analysis authorization objects are not always mapped 1:1 with the generated analytic privileges on the SAP HANA Modeler side. If the BW Analysis Authorization object does not include 0TCAIPROV, the authorization is not moved to SAP HANA. Also, restrictions created in the BW analysis authorization are skipped if they do not match with the restrictions supported by the SAP HANA Modeler. In such cases, the data available for reporting for a SAP HANA Modeler user differs from the SAP NetWeaver BW user with the assigned restrictions.
For reporting purposes, data which is visible for a user is:
● For a DSO generated analytic view, all the data in the active table is available for reporting.● For an InfoCube generated calculation view, only successfully loaded requests are available for reporting
(these are the green requests in manage InfoCube section).
Restriction● The following features are not supported on the generated SAP HANA models:
○ DSO without any key figure○ Currency and unit of measure conversion
NoteOnly currency mapping is supported and not the conversion.
○ Time dependent text and attributes○ Non-cumulative key figures○ Conversion routines in the BW system○ Hierarchies
● The following features are not supported on generated analytic privileges:
○ Exclude operator○ Aggregated value operator ‘:’○ Variables, User exits○ Authorization on Key Figures○ Authorization on hierarchy node○ Exception aggregation such as, average, counter, first value, last value, no aggregation, standard
deviation is not supported for generated measures.● The query name for the Query Snapshot should not be the same as the BW InfoProvider name (this results
in conflict on the SAP HANA side).● Query Snapshot InfoProvider for BOE supports only key figures with aggregation types MIN, MAX, SUM,
and COUNT.
1. Open the Modeler perspective.
2. In the main menu, choose File Import .3. Expand the SAP HANA Content node.4. Choose Import SAP NetWeaver BW Models, and choose Next.5. To establish a connection with the SAP NetWeaver BW system (underlying BW Application Server), in the
Source System page, enter the SAP NetWeaver BW system credentials and choose Next.
Note
168
P U B L I C© 2013 SAP AG or an SAP affiliate company. All rights reserved.
SAP HANA Developer GuideSetting Up the Analytic Model

To add new connection details, select New Connection option from the Connection dropdown list. The connection details are saved and are available as dropdown options on subsequent logons.
6. Select the target system (an SAP NetWeaver BW on SAP HANA) to which you want to import the models, and choose Next.
7. Select the BW InfoProviders that you want to import and expose as SAP HANA information models.
RememberIn order to import the QuerySnapshot InfoProvider, make sure that the BW Query is unlocked in transaction RSDDB, and an index is created via the same transaction before it can be used as InfoProviders.
8. If you want import the selected models along with the display attributes for IMO Cube and IMO DSO, select Include display attributes.
9. If you want to replace previously imported models in the target system with a new version, select Overwrite existing models.
10. If you do not want to import the analysis authorizations associated with the selected InfoProviders, deselect Generate InfoProvider based analytic privileges.
11. If you want to import the role based analysis authorizations as analytic privileges, select Generate Role based analytic privileges, and choose Next.
12. Select the roles to import the related analysis authorizations.13. Choose Finish.
The generated information models and analytic privileges are placed in the sap.bw package. In order to view the data of generated models, you need to assign the associated analytic privileges that are generated as part of the model import to the user. If these privileges are not assigned, user is not authorized to view the data.
SAP HANA Developer GuideSetting Up the Analytic Model
P U B L I C© 2013 SAP AG or an SAP affiliate company. All
rights reserved. 169
8 Developing Procedures
SQL in SAP HANA includes extensions for creating procedures, which enables you to embed data-intensive application logic into the database, where it can be optimized for performance (since there are no large data transfers to the application and features such as parallel execution is possible). Procedures are used when other modeling objects, such as analytic or attribute views, are not sufficient.Some of the reasons to use procedures instead of standard SQL:
● SQL is not designed for complex calculations, such as for financials.● SQL does not provide for imperative logic.● Complex SQL statements can be hard to understand and maintain.● SQL queries return one result set. Procedures can return multiple result sets.● Procedures can have local variables, eliminating the need to explicitly create temporary tables for
intermediate results.
Procedures can be written in the following languages:
● SQLScript: The language that SAP HANA provides for writing procedures.● R: An open-source programming language for statistical computing and graphics, which can be installed and
integrated with SAP HANA.
There are additional libraries of procedures, called Business Function Library and Predictive Analysis Library, that can be called via SQL or from within another procedure.
SQL Extensions for ProceduresSQL includes the following statements for enabling procedures:
● CREATE TYPE: Creates a table types, which are used to define parameters for a procedure that represent tabular results. For example:
CREATE TYPE tt_publishers AS TABLE ( publisher INTEGER, name VARCHAR(50), price DECIMAL, cnt INTEGER);
● CREATE PROCEDURE: Creates a procedure. The LANGUAGE clause specifies the language you are using to code the procedure. For example:
CREATE PROCEDURE ProcWithResultView(IN id INT, OUT o1 CUSTOMER) LANGUAGE SQLSCRIPT READS SQL DATA WITH RESULT VIEW ProcView AS BEGIN o1 = SELECT * FROM CUSTOMER WHERE CUST_ID = :id; END;
● CALL: Calls a procedure. For example:
CALL getOutput (1000, 'EUR', NULL, NULL);
Tools for Writing ProceduresUse the SQLScript editor, which includes debugging capabilities, to build SQLScript procedures.
170
P U B L I C© 2013 SAP AG or an SAP affiliate company. All rights reserved.
SAP HANA Developer GuideDeveloping Procedures

You can also use the Navigator view in the Modeler perspective to build procedures, but there are no debugging capabilities. You should only use this method:
● If you need to develop a procedure using a local table type as an input or output parameter. A local table type is created within the SAP HANA Systems procedure tool and for only the current procedure. If you can use a global table type, then use the SQLScript Editor.
● If you need to edit a procedure previously created in the Navigator view that contains table type parameters.
Related LinksSAP HANA SQL ReferenceSAP HANA SQLScript ReferenceSAP HANA R Integration GuideSAP HANA Business Function Library (BFL) ReferenceSAP HANA Predictive Analysis Library (PAL) ReferenceCreating Procedures
8.1 Editing SQLScript
The SAP HANA SQLScript editor allows you to create, edit and activate procedures.
Before you begin working in the SAP HANA SQLScript editor, open the SAP HANA Development perspective and do the following:
● Create a development workspace. For more information, see Creating a Repository Workspace [page 41].● Checkout a package. For more information, see Working with the Repository [page 29].
NoteAfter checking out a package that contains active procedures, you can modify and debug the procedures.
● Create and share a project. For more information, see Using SAP HANA Projects [page 39]..
NoteYou can also share your project after you create your procedure.
To write and edit a procedure in the SAP HANA SQLScript editor, perform the following steps:
1. After you have created your workspace and your project, go to the Project Explorer view in the SAP HANA Development perspective, right-click on the file name, select New, and select File. The New File wizard will appear.
2. Enter or select the parent folder and enter the file name using the following naming convention
<filename>.procedure. Choose Finish. The icon shows that your procedure is created locally. Choose Save.Your procedure will open containing the default Create Procedure template. In the Properties view, you will see the properties of your procedure, such as Access Mode, Name and Language. You can also change the default schema that this procedure is using.
Note
SAP HANA Developer GuideDeveloping Procedures
P U B L I C© 2013 SAP AG or an SAP affiliate company. All
rights reserved. 171

You can also create a folder first and add a file. Right-click on the project name, select New, and select Folder. The New Folder wizard will appear. Enter or select the project, enter the folder name, and choose Finish.
3. To share your project, right-click on the project name, select Team, and select Share Project. The Share
Project wizard will appear. Choose Finish. The icon shows that your procedure is not committed and not activated.
4. You can begin writing your code inside your new procedure and save it locally. The syntax is checked simultaneously and is highlighted. Auto-completion of the syntax appears as you type; press Ctrl + Spacebar to get a list of relevant SQLScript statements.
NoteYou can only write one stored procedure per file. The file name and the procedure name must be the same.
5. To commit your new procedure or make changes to an existing one, first save it, right-click on the procedure, select Team, and select Commit. Your procedure is now synchronized to the repository as a design-time
object and the icon shows that your procedure is committed.
CautionThe design-time presentation of the procedure is currently in XML format that you must not edit.
6. When you have finished writing your procedure and you are ready to activate it, right-click on the procedure,
select Team, and select Activate. Your procedure is created in the catalog as a runtime object and the icon shows that your procedure is activated . This will allow you and other users to call the procedure and debug it.If an error is detected during activation, an error message will appear in the Problems view.
NoteYou can also activate your procedure at the project and folder level.
Related LinksSAP HANA Development Perspective [page 27]
SAP HANA Repository Packages and Namespaces [page 46]In SAP HANA, a package typically consists of a collection of repository objects, which can be transported between systems. Multiple packages can be combined in a delivery unit (DU).
About SAP HANA SQLScriptDefining Local Table Types in Procedures [page 172]You can use table types to define parameters for a procedure that represent tabular results. These parameters have a type and are either based on a global table (with a reference to a catalog table) or a local table type.
SAP HANA SQL ReferenceSAP HANA System Tables and Monitoring Views Reference
8.1.1 Defining Local Table Types in ProceduresYou can use table types to define parameters for a procedure that represent tabular results. These parameters have a type and are either based on a global table (with a reference to a catalog table) or a local table type.
172
P U B L I C© 2013 SAP AG or an SAP affiliate company. All rights reserved.
SAP HANA Developer GuideDeveloping Procedures

Before you define local table types in the SAP HANA SQLScript editor, you must create or open a procedure. For more information, see Editing SQLScript.
To define local table types in a procedure in the SAP HANA SQLScript editor, perform the following steps:
1. Choose the Local Table Types tab.2. Define your local table type structure using a standard SQL create statement. The local table type is specified
using a list of attribute names and primitive data types. For example:
CREATE TYPE <type_name> AS TABLE (<column_definition>[{,<column_definition>}...])
NoteYou can create multiple CREATE TYPE statements.
CautionYou can only use this local table type in the procedure you defined them in.
3. Use the local table table type as input and output parameters of the procedure, for example:
CREATE PROCEDURE <procedure_name> ( IN|OUT|INOUT <param_name> <type_name>, ... )
CautionYou can only use this tab to define local table types and not for other SQL statements.
4. Click the Save button. Commit and activate your procedure to create a local table types in the catalog. For more information about committing and activating a procedure, see Editing SQLScript.
NoteThe local table types are bound to the procedure artifact, so if the procedure is committed, activated, or deleted, then the same applies to the local table type. For example, if you delete a procedure the local table type will be automatically deleted (similar to a drop statement) from the catalog.
Related LinksCREATE TYPETable Types
8.2 Debugging SQLScript
The SAP HANA SQLScript debugger allows you to debug and analyze procedures. In a debug session, your procedures will be executed in a serial mode, not in parallel (not-optimized). This allows you to test the correctness of the procedure logic and is not for evaluating the performance.
Before you begin using the SAP HANA SQLScript debugger, do the following:
● Activate your procedures and they must belong to a project on your local work station. For more information, see Editing SQLScript.
SAP HANA Developer GuideDeveloping Procedures
P U B L I C© 2013 SAP AG or an SAP affiliate company. All
rights reserved. 173

● Grant debugger privileges to your user:
NoteContact your System Administrator if you are not authorized to modify your user.
1. Go to the Navigator view in the SAP HANA Development perspective and open Security Users .2. Double-click your user ID. Your system privilege information will appear. Choose the SQL Privileges tab.3. Select the _SYS_BIC schema and select all of the privileges.4. Select the DEBUG (SYS) procedure and select the EXECUTE privilege.
5. Choose the Deploy button (F8).
To debug a procedure in the SAP HANA SQLScript debugger, perform the following steps:
1. Open the Debug perspective in the SAP HANA studio and select the procedure you want to debug by clicking on the relevant tab in the Editor view.
2. Double-click on the left vertical ruler to add breakpoints to your procedure. You can see a list of all of the breakpoints in the Breakpoints view.
From the Breakpoints view, you can:
○ Deselect specific breakpoints or skip all of them.
○ Delete a specific breakpoint or delete all.
○ Double-click on a breakpoint to see which line it belongs to in the Editor view.
○ See the status of the breakpoint:
○ Pending
○ Valid
○ Invalid
3. To create a debug session you must first create a debug configuration. Choose and select Debug Configurations.... The Debug Configurations wizard will appear.
NoteThe current debug configuration allows you to debug any stored procedure that is opened in the editor. Therefore, you do not have to create a new debug configuration for every procedure you want to debug.
4. Double-click SQLScript Procedure, enter a name, choose Apply, and choose Close.
174
P U B L I C© 2013 SAP AG or an SAP affiliate company. All rights reserved.
SAP HANA Developer GuideDeveloping Procedures

NoteIf you want to start debugging your procedure, choose Apply and choose Debug.
5. To start your debug session, choose and select your debug configuration. The debug session will begin and you will see the status of the session in the Debug view. The status of a breakpoint may change after the server has validated it. The breakpoint position might change if it is placed on an invalid line where the debugger cannot stop. The debugger will stop at the first breakpoint and the session will be suspended until you resume it.
If your run is successful, the valid status will appear next to the breakpoints in the Breakpoints view.
NoteYou must set breakpoints in the lines you want to break at and resume the session again.
You can evaluate your local scalar and table variables in the Variable view. The view shows the values of the scalar variables and the number of rows in each table.
6. To view the content of the tables listed in the Variable view, right-click on the table name and select Open Data Preview. The results will appear in the Preview view. This view will automatically close when you resume your debug session.
The session will be terminated when you reach the end of the procedure run.
8.3 Developing Procedures in the Modeler Editor
To create procedures, use the SQLScript Editor, as described in Editing SQLScript [page 171].If you need to create procedures with local table types, that is, table types created only for the procedure, perform the steps described in this section.
1. On the Quick Launch tab page, choose Procedure.
If the Quick Launch page is not open, go to Help Quick Launch .2. Enter a name and description for the procedure.3. For unqualified access in SQL, select the required schema from the Default Schema dropdown list.
Note○ If you do not select a default schema, while scripting you need to provide fully qualified names of the
catalog objects that include the schema.○ If you specify a default schema, and write SQL such as select * from myTable, the specified
default schema is used at runtime to refer to the table.
4. Select the package in which you want to save the procedure.5. Select the required option from the Run With dropdown list to select which privileges are to be considered
while executing the procedure.
Note
SAP HANA Developer GuideDeveloping Procedures
P U B L I C© 2013 SAP AG or an SAP affiliate company. All
rights reserved. 175

There are two types of rights, as follows:Definer's right: If you want the system to use the rights of the definer while executing the procedure for any user.Invoker's right: If you want the system to use the rights of the current user while executing the procedure.
6. Select the required access mode as follows:
Access Mode Purpose
Read Only Use this mode to create procedures for fetching table data.
Read Write Use this mode to create procedures for fetching and updating table data.
7. Select the language in which you are writing the procedure.
NoteYou can choose to create procedures in Read Write mode and make use of L- Lang and R-lang languages only if you have done the repository configuration for the field SqlScriptMode. Two values for SqlScriptMode feild exist, DEFAULT, and UNSECURE. By default DEFAULT is assigned which means Read Only mode with non-modifiable access mode and SQL Script as language. To change the configuration, go to administration console -> Configuration tab -> indexserver.ini -> repository -> SqlScriptMode, and assign the required value.
8. Choose Finish.9. In the function editor pane, write a script for the function using the following data types:
○ Table or scalar data types for input parameters.○ Table data types for output parameters.
NoteYou can only write one function in the function body. However, you can refer to other functions.
10. Choose File Save .11. Activate the procedure using one of the following options in the toolbar:
○ Save and Activate: Activate the current procedure and redeploy the affected objects if an active version of the affected object exists. Otherwise only the current procedure gets activated.
○ Save and Activate All: Activate the current procedure along with the required and affected objects.
NoteYou can also activate the current procedure by selecting the procedure in the Navigator view and choosing Activate in the context menu. For more information about activation, see Activating Objects [page 144].
176
P U B L I C© 2013 SAP AG or an SAP affiliate company. All rights reserved.
SAP HANA Developer GuideDeveloping Procedures

9 Defining Web-based Data Access
SAP HANA extended application services (SAP HANA XS) provide applications and application developers with access to the SAP HANA database using a consumption model that is exposed via HTTP.In addition to providing application-specific consumption models, SAP HANA XS also host system services that are part of the SAP HANA database, for example: search services and a built-in Web server that provides access to static content stored in the SAP HANA repository.The consumption model provided by SAP HANA XS focuses on server-side applications written in JavaScript and making use of a powerful set of specially developed API functions. However, you can use other methods to provide access to the data you want to expose in SAP HANA. For example, you can set up an ODATA service or use the XML for Analysis (XMLA) interface to send a Multi-dimensional Expressions (MDX) query. This section describes how to set up a service that enables you to expose data using OData or XMLA.
9.1 Data Access with OData in SAP HANA XS
In SAP HANA Extended Application Services (SAP HANA XS), the persistence model (for example, tables, views, and stored procedures) is mapped to the consumption model that is exposed to clients - the applications you write to extract data from the SAP HANA database.You can map the persistence and consumption models with OData, a resource-based Web protocol for querying and updating data. An OData application running in SAP HANA XS is used to provide the consumption model for client applications exchanging OData queries with the SAP HANA database.You can use OData to enable clients to consume authorized data stored in the SAP HANA database. OData defines operations on resources using RESTful HTTP commands (for example, GET, PUT, POST, and DELETE) and specifies the URI syntax for identifying the resources. Data is transferred over HTTP using either the Atom (XML) or the JSON (JavaScript) format.Applications running in SAP HANA XS enable accurate control of the flow of data between the presentational layer, for example, in the Browser, and the data-processing layer in SAP HANA itself, where the calculations are performed, for example, in SQL or SQLScript. If you develop and deploy an OData service running in SAP HANA XS, you can take advantage of the embedded access to SAP HANA that SAP HANA XS provides; the embedded access greatly improves end-to-end performance.
9.1.1 OData in SAP HANA XSOData is a resource-based web protocol for querying and updating data. OData defines operations on resources using HTTP commands (for example, GET, PUT, POST, and DELETE) and specifies the uniform resource indicator (URI) syntax to use to identify the resources.Data is transferred over HTTP using the Atom or JSON format:
NoteOData makes it easier for SAP, for partners, and for customers to build standards-based applications for many different devices and on various platforms, for example, applications that are based on a lightweight consumption of SAP and non-SAP business application data.
SAP HANA Developer GuideDefining Web-based Data Access
P U B L I C© 2013 SAP AG or an SAP affiliate company. All
rights reserved. 177

The main aim of OData is to define an abstract data model and a protocol which, combined, enable any client to access data exposed by any data source. Clients might include Web browsers, mobile devices, business-intelligence tools, and custom applications (for example, written in programming languages such as PHP or Java); data sources can include databases, content-management systems, the Cloud, or custom applications (for example, written in Java).The OData approach to data exchange involves the following elements:
● OData data modelProvides a generic way to organize and describe data. OData uses the Entity 1 Data Model (EDM).
● OData protocolEnables a client to query an OData service. The OData protocol is a set of interactions, which includes the usual REST-based create, read, update, and delete operations along with an OData-defined query language. The OData service sends data in either of the following ways:
○ XML-based format defined by Atom/AtomPub○ JavaScript Object Notation (JSON)
● OData client librariesEnables access to data via the OData protocol. Since most OData clients are applications, pre-built libraries for making OData requests and getting results reduces and simplifies work for the developers who create those applications.A broad selection of OData client libraries are already widely available, for example: Android, Java, JavaScript, PHP, Ruby, and the best known mobile platforms.
● OData servicesExposes an end point that allows access to data in the SAP HANA database. The OData service implements the OData protocol (using the OData Data Services runtime) and uses the Data Access layer to map data between its underlying form (database tables, spreadsheet lists, and so on) and a format that the requesting client can understand.
9.1.2 Defining the Data an OData Service ExposesAn OData service exposes data stored in database tables or views as OData collections for analysis and display by client applications. However, first of all, you need to ensure that the tables and views to expose as an OData collection actually exist.
To define the data to expose using an OData service, you must perform at least the following tasks:
1. Create a database schema.2. Create a simple database table to expose with an OData service.3. Create a simple database view to expose with an OData service.
This step is optional; you can expose tables directly. In addition, you can create a modeling view, for example, analytic, attribute, or calculation.
4. Grant select privileges to the tables and views to be exposed with the OData service.After activation in the repository, schema and tables objects are only visible in the catalog to the _SYS_REPO user. To enable other users, for example the schema owner, to view the newly created schema in the SAP HANA studio's Modeler perspective, you must grant the user the required SELECT privilege.
call _SYS_REPO.GRANT_SCHEMA_PRIVILEGE_ON_ACTIVATED_CONTENT('select','<SCHEMANAME>','<username>');
178
P U B L I C© 2013 SAP AG or an SAP affiliate company. All rights reserved.
SAP HANA Developer GuideDefining Web-based Data Access

9.1.3 OData Service DefinitionsThe OData service definition is the mechanism you use to define what data to expose with OData, how, and to whom. Data exposed as an OData collection is available for analysis and display by client applications, for example, a browser that uses functions provided by an OData client library running on the client system.To expose information by means of OData to applications using SAP HANA XS, you must define database views that provide the data with the required granularity. Then you create an OData service definition, which is a file you use to specify which database views or tables are exposed as OData collections.
NoteSAP HANA XS currently supports OData version 2.0, which you can use to send OData queries (using the http GET method). Language encoding is restricted to UTF-8.
An OData service for SAP HANA XS is defined in a text file with the file suffix .xsodata, for example, OdataSrvDef.xsodata. The file must contain at least the entry service {}, which would generate a completely operational OData service with an empty service catalog and an empty metadata file. However, usually you use the service definition to expose objects in the database catalog, for example: tables, SQL views, or calculation rules.In the OData service-definition file, you can use the following ways to name the SAP HANA objects you want to expose by OData:
NoteThe syntax to use in the OData service-definition file to reference objects depends on the object type, for example, repository (design-time) or database catalog (runtime).
● Repository objectsExpose an object using the object's repository (design-time) name in the OData service-definition file. This method of exposing database objects using OData enables the OData service to be automatically updated if the underlying repository object changes. Note that a design-time name can be used to reference analytic and calculation views; it cannot be used to reference SQL views. The following example shows how to include a reference to a table in an OData service definition using the table's design-time name.
service { "acme.com.odata::myTable" as "myTable"}
NoteCalculation views are only accessible from within xsodata files by referring to the design-time name. However, it is recommended to use design-time names whenever possible for calculation views or common tables. With design-time names, the cross references are recreated during activation (for example, for where-used), which means changes are visible automatically.
● Database objectsExpose an object using the object's database catalog (runtime) name. The support for database objects is mainly intended for existing or replicated objects that do not have a repository design-time representation.
SAP HANA Developer GuideDefining Web-based Data Access
P U B L I C© 2013 SAP AG or an SAP affiliate company. All
rights reserved. 179

The following example shows how to include a reference to a table in an OData service definition using the table's runtime name.
service { "mySchema"."myTable" as "MyTable"}
NoteIt is strongly recommended not to use catalog (runtime) names in an OData service-definition. The use of catalog object names is only enabled in a service-definition because some objects do not have a design-time name. If at all possible, use the design-time name to reference objects in an OData service-definition file.
OData Service-Definition Type MappingDuring the activation of the OData service definition, SQL types defined in the service definition are mapped to EDM types according to a mapping table.For example, the SQL type "Time" is mapped to the EDM type "EDM.Time"; the SQL type "Decimal" is mapped to the EDM type "EDM.Decimal"; the SQL types "Real" and "Float" are mapped to the EDM type "EDM.Single".
NoteThe OData implementation in SAP HANA Extended Application Services (SAP HANA XS) does not support all SQL types.
In the following example, the SQL types of columns in a table are mapped to the EDM types in the properties of an entity type.
{name = "ID"; sqlType = INTEGER; nullable = false;}, {name = "RefereeID"; sqlType = VARCHAR; nullable = true;}
<Property Name="ID" Type="Edm.Int32" Nullable="false"/> <Property Name="RefereeID" Type="Edm.String" Nullable="true"/>
Related LinksOData Service Definition: SQL-EDM Type Mapping [page 198]During the activation of the OData service definition, the SAP HANA SQL types are mapped to the required OData EDM types according to the rules specified in a mapping table.
OData Service Definitions [page 179]The OData service definition is the mechanism you use to define what data to expose with OData, how, and to whom. Data exposed as an OData collection is available for analysis and display by client applications, for example, a browser that uses functions provided by an OData client library running on the client system.
OData Service-Definition FeaturesThe OData service definition provides a list of keywords that you use in the OData service-definition file to enable important features. For example, the following list illustrates the most-commonly used features used in an OData service-definition and, where appropriate, indicates the keyword to use to enable the feature:
● AggregationThe results of aggregations on columns change dynamically, depending on the grouping conditions. As a result, aggregation cannot be done in SQL views; it needs to be specified in the OData service definition itself. Depending on the type of object you want to expose with OData, the columns to aggregate and the function
180
P U B L I C© 2013 SAP AG or an SAP affiliate company. All rights reserved.
SAP HANA Developer GuideDefining Web-based Data Access

used must be specified explicitly (explicit aggregation) or derived from metadata in the database (derived aggregation). Note that aggregated columns cannot be used in combination with the $filter query parameter, and aggregation is only possible with generated keys.
● AssociationDefine associations between entities to express relationships between entities. With associations it is possible to reflect foreign key constraints on database tables, hierarchies and other relations between database objects.
● Key SpecificationThe OData specification requires an EntityType to denote a set of properties forming a unique key. In SAP HANA, only tables can have a unique key, the primary key. All other (mostly view) objects require you to specify a key for the entity. The OData service definition language (OSDL) enables you to do this by denoting a set of existing columns or by generating a local key. Bear in mind that local keys are transient; they exist only for the duration of the current session and cannot be dereferenced.
NoteOSDL is the language used to define a service definition; the language includes a list of keywords that you use in the OData service-definition file to enable the required features.
● Parameter Entity SetsYou can use a special parameter entity set to enter input parameters for SAP HANA calculation views and analytic views. During activation of the entity set, the specified parameters are retrieved from the metadata of the calculation (or analytical) view and exposed as a new EntitySet with the name suffix "Parameters", for example "CalcViewParameters".
● ProjectionIf the object you want to expose with an OData service has more columns than you actually want to expose, you can use SQL views to restrict the number of selected columns in the SELECT. However, for those cases where SQL views are not appropriate, you can use the with or without keywords in the OData service definition to include or exclude a list of columns.
Related LinksOData Service-Definition Examples [page 184]The OData service definition describes how data exposed in an end point can be accessed by clients using the OData protocol.
9.1.4 Creating an OData Service DefinitionThe OData service definition is a configuration file you use to specify which data (for example, views or tables) is exposed as an OData collection for analysis and display by client applications.
An OData service for SAP HANA XS is defined in a text file with the file suffix .xsodata, for example, OdataSrvDef.xsodata. The file resides in the package hierarchy of the OData application and must contain at least the entry service {}, which would generate an operational OData service with an empty service catalog and an empty metadata file.Prerequisites for the creation of an OData service definition:
● SAP HANA studio/client installed and configured● SAP HANA database user available with repository privileges (for example, to add packages)● A SAP HANA development system added to (and available in) SAP HANA studio, for example, in either the
Navigator view or the SAP HANA Repositories view
SAP HANA Developer GuideDefining Web-based Data Access
P U B L I C© 2013 SAP AG or an SAP affiliate company. All
rights reserved. 181

● A working development environment including a repository workspace, a package structure for your OData application, and a shared project to enable you to synchronize changes to the OData project files in the local file system with the repository
● Defined data to expose with the OData application, for example, at least the following:
○ A database schema○ A database table
1. In the shared project you are using for your OData application, use the Project Explorer view to locate the package where you want to create the new OData service definition.
NoteThe file containing the OData service definition must be placed in the root package of the OData application for which the service is intended.
2. Create the file that will contain your OData service definition.In the Project Explorer view, right-click the folder where you want to create the new OData service-definition file and choose New File in the context-sensitive popup menu.
3. Define the OData service.The OData service definition uses the OData Service Definition Language (OSDL), which includes a list of keywords that you specify in the OData service-definition file to enable important features.The following example shows a simple OData service definition exposing a simple table:
service namespace "my.namespace" { "sample.odata::table" as "MyTable";}
This service definition exposes a table defined in the file sample.odata:table.hdbtable and creates an EntitySet for this entity named MyTable. The specification of an alias is optional. If omitted, the default name of the EntitySet is the name of the repository object file, in this example, table.
4. Place the valid OData service definition in the root package of the OData application to which it applies.5. Save, commit, and activate the OData service definition in the SAP HANA repository.
Related LinksOData Service Definitions [page 179]The OData service definition is the mechanism you use to define what data to expose with OData, how, and to whom. Data exposed as an OData collection is available for analysis and display by client applications, for example, a browser that uses functions provided by an OData client library running on the client system.
9.1.5 Tutorial: Using the SAP HANA OData InterfaceThe package you put together to test the SAP HANA OData interface includes all the artifacts you need to use SAP HANA Extended Application Services (SAP HANA XS) to expose an OData collection for analysis and display by client applications.
Since the artifacts required to get a simple OData application up and running are stored in the repository, it is assumed that you have already performed the following tasks:
● Create a development workspace in the SAP HANA repository● Create a project in the workspace● Share the new project
To create a simple OData application, perform the following steps:
182
P U B L I C© 2013 SAP AG or an SAP affiliate company. All rights reserved.
SAP HANA Developer GuideDefining Web-based Data Access

1. Create a root package for your OData application, for example, helloodata and save and activate it in the repository.
NoteThe namespace sap is restricted. Place the new package in your own namespace, which you can create alongside the sap namespace.
2. Create a schema, for example, HELLO_ODATA.hdbschema.
The schema is required for the table that contains the data to be exposed by your OData service-definition. The schema is defined in a flat file with the file extension .hdbschema that you save in the repository and which you must activate.Enter the following code in the HELLO_ODATA.hdbschema file:
schema_name="HELLO_ODATA";
3. Create the database table that contains the data to be exposed by your OData service definition, for example, otable.hdbtable.
The database table is a flat file with the file extension .hdbtable that you save in the repository and which you must activate.Enter the following code in the otable.hdbtable file:
table.schemaName = "HELLO_ODATA";table.tableType = COLUMNSTORE; table.columns = [ {name = "Col1"; sqlType = VARCHAR; nullable = false; length = 20; comment = "dummy comment";}, {name = "Col2"; sqlType = INTEGER; nullable = false;}, {name = "Col3"; sqlType = NVARCHAR; nullable = true; length = 20; defaultValue = "Defaultvalue";}, {name = "Col4"; sqlType = DECIMAL; nullable = false; precision = 12; scale = 3;}];table.primaryKey.pkcolumns = ["Col1", "Col2"];
4. Grant SELECT privileges to the owner of the new schema.After activation in the repository, the schema object is only visible in the catalog to the _SYS_REPO user. To enable other users, for example the schema owner, to view the newly created schema in the SAP HANA studio's Modeler perspective, you must grant the user the required SELECT privilege.a) In the SAP HANA studio Navigator view, right-click the SAP HANA system hosting the repository where
the schema was activated and choose SQL Console in the context-sensitive popup menu.b) In the SQL Console, execute the statement illustrated in the following example, where <SCHEMANAME> is
the name of the newly activated schema, and <username> is the database user ID of the schema owner:
call _SYS_REPO.GRANT_SCHEMA_PRIVILEGE_ON_ACTIVATED_CONTENT('select','<SCHEMANAME>','<username>');
5. Create an application descriptor for your new OData application in your root OData package helloodata.
The application descriptor (.xsapp) is the core file that you use to define an application's availability within SAP HANA application. The .xsapp file sets the point in the application-package structure from which content will be served to the requesting clients.
Note
SAP HANA Developer GuideDefining Web-based Data Access
P U B L I C© 2013 SAP AG or an SAP affiliate company. All
rights reserved. 183

The application-descriptor file has no content and no name; it only has the extension .xsapp.
6. Save, commit, and activate the application-descriptor file in the repository.7. Create an application-access file for your new OData application and place it in your root OData package
helloodata.
The application-access file enables you to specify who or what is authorized to access the content exposed by the application.
NoteThe application-access file has no name; it only has the extension .xsaccess.
Enter the following content in the .xsaccess file for your new OData application:
{ "exposed" : true}
8. Save, commit, and activate the application-access file in the repository.9. Create an OData service-definition file and place it in your root OData package helloodata.
The Odata service-definition file has the file extension .xsodata, for example, hello.xsodata and must be located in the root package of the OData application:Enter the following content in the hello.xsodata OData service-definition file:
service { "helloodata::otable";}
10. Save, commit, and activate the OData service-definition file in the repository.11. Open a browser and enter the following URL.
http://<hana.server.name>:80<HANA_instance_number>/helloodata/hello.xsodata
9.1.6 OData Service-Definition ExamplesThe OData service definition describes how data exposed in an end point can be accessed by clients using the OData protocol.Each of the examples listed below is explained in a separate section. The examples show how to use the OData Service Definition Language (OSDL) in the OData service-definition file to generate an operational OData service that enables clients to use SAP HANA XS to access the OData end point you set up.
● Empty Service● Namespace Definition● Object Exposure● Property Projection● Key Specification● Associations● Aggregation● Parameter Entity Sets
OData Empty ServiceAn OData service for SAP HANA XS is defined by a text file containing at least the following line:
184
P U B L I C© 2013 SAP AG or an SAP affiliate company. All rights reserved.
SAP HANA Developer GuideDefining Web-based Data Access

Service definition sample.odata:empty.xsodata
service {}
A service file with the minimal content generates an empty, completely operational OData service with an empty service catalog and an empty metadata file:http://localhost:8002/sample/odata/empty.xsodata
http://localhost:8002/sample/odata/empty.xsodata/$metadata
An empty service metadata document consists of one Schema containing an empty EntityContainer. The name of the EntityContainer is the name of the .xsodata file, in this example "empty".
OData Namespace DefinitionBy default, as shown in the metadata file of an empty OData service, the namespace of the generated Schema is created by concatenating the package name of the .xsodata file with the file name, and separating the concatenated names with a dot. You can specify your own namespace by using the namespace keyword:Service definition sample.odata:namespace.xsodata
service namespace "my.namespace" {}
The resulting service metadata document has the specified schema namespace:http://localhost:8002/sample/odata/namespace.xsodata/$metadata
SAP HANA Developer GuideDefining Web-based Data Access
P U B L I C© 2013 SAP AG or an SAP affiliate company. All
rights reserved. 185

OData Object ExposureThere are two ways of exposing SAP HANA objects. You can either specify the repository design-time name or the database-object runtime name (with database schema). Although both variants are supported, the preferred method is the exposure via the repository design-time name. It has the advantage that the OData service is automatically updated, if the underlying repository object changes. The support for database objects is mainly intended for existing or replicated objects that do not have a related repository design-time object.In the examples provided to illustrate object exposure, the following definition of a table applies:Table definition sample.odata:table.hdbtable
table.schemaName = "ODATASAMPLES";table.tableType = COLUMNSTORE;table.columns = [ {name = "ID"; sqlType = INTEGER;}, {name = "Text"; sqlType = NVARCHAR; length=1000;}, {name = "Time"; sqlType = TIMESTAMP;} ];table.primaryKey.pkcolumns = ["ID"];
Repository ObjectsIf the object to expose via an OData service is created during an activation in the repository, then it has a repository design-time representation. Examples for those objects are tables, SQL views and calculation views. An example for exposing the table above is shown in the next service defintion.Service definition sample.odata:repo.xsodata
service { "sample.odata::table" as "MyTable"; }
This service definition exposes a table defined in the .hdbtable file sample.odata:table.hdbtable and creates an EntitySet for this entity named "MyTable". The specification of an alias is optional. If omitted the default name of the EntitySet is the name of the repository object file, here "table".http://localhost:8002/sample/odata/repo.xsodata
186
P U B L I C© 2013 SAP AG or an SAP affiliate company. All rights reserved.
SAP HANA Developer GuideDefining Web-based Data Access

http://localhost:8002/sample/odata/repo.xsodata/$metadata
All information about the table, for example, the properties, the data types, and the primary key, is gathered from the database catalog.
Database Objects
CautionDo not use catalog objects if a repository design-time object is available, as changes in the catalog object are not automatically reflected in the OData service.
Similar to the exposure of an object by using the repository design-time name is the exposure by the database name:
SAP HANA Developer GuideDefining Web-based Data Access
P U B L I C© 2013 SAP AG or an SAP affiliate company. All
rights reserved. 187

Service definition sample.odata:db.xsodata
service { "ODATASAMPLES"."sample.odata::table" as "MyTable"; }
The service exposes the same table by using the database catalog name of the object and the name of the schema where the table is created in. The collection in the service catalog and the EntityType that is created in the metadata document is exactly the same as for repository objects.
OData Property ProjectionIf the object you want to expose with an OData service has more columns than you actually want to expose, you can use SQL views to restrict the number of selected columns in the SELECT.Nevertheless, SQL views are sometimes not appropriate, for example with calculation views, and for these cases we provide the possibility to restrict the properties in the OData service definition in two ways. By providing an including or an excluding list of columns.
Including PropertiesYou can specify the columns of an object that have to be exposed in the OData service by using the with keyword. Key fields of tables must not be omitted.Service definition sample.odata:with.xsodata
service { "sample.odata::table" as "MyTable" with ("ID","Text"); }
The resulting EntityType then contains only the properties derived from the specified columns:http://localhost:8002/sample/odata/with.xsodata/$metadata
Excluding PropertiesThe opposite of the with keyword is the without keyword, which enables you to specify which columns you do NOT want to expose in the OData service:Service definition sample.odata:without.xsodata
service { "sample.odata::table" as "MyTable" without ("Text","Time"); }
The generated EntityType then does NOT contain the properties derived from the specified columns:http://localhost:8002/sample/odata/without.xsodata/$metadata
188
P U B L I C© 2013 SAP AG or an SAP affiliate company. All rights reserved.
SAP HANA Developer GuideDefining Web-based Data Access

OData Key SpecificationThe OData specification requires an EntityType to denote a set properties forming a unique key. In HANA only tables may have a unique key, the primary key. For all other (mostly view) objects you need to specify a key for the entity.In OSDL, you can specify a key for an entity by denoting a set of existing columns or by generating a key.For the examples illustrating key specification, we use the following SQL view, which selects all data from the specified table.View definition sample.odata:view.hdbview
{ "name": "view", "schema": "ODATASAMPLES", "query": "SELECT * FROM \"ODATASAMPLES\".\"sample.odata::table\"" }
Existing Key PropertiesIf the object has set of columns that may form a unique key, you can specify them as key for the entity. These key properties are always selected from the database, no matter if they are omitted in the $select query option. Therefore explicit keys are not suitable for calculation views and analytic views as the selection has an impact on the result.Service definition sample.odata:explicitkeys.xsodata/$metadata
service { "sample.odata::view" as "MyView" keys ("ID","Text"); }
The created metadata document for the exposure of the view above is almost equal to the metadata document for repository objects. Only the key is different and consists now of two columns:http://localhost:8002/sample/odata/explicitkeys.xsodata/$metadata
SAP HANA Developer GuideDefining Web-based Data Access
P U B L I C© 2013 SAP AG or an SAP affiliate company. All
rights reserved. 189

CautionThe OData infrastructure cannot check whether your specified keys are unique. So be careful when choosing keys.
Generated Local KeyFor objects that do not have a unique key in their results, for example, calculation views or aggregated tables, you can generate a locally valid key. This key value numbers the results starting with 1 and is not meant for dereferencing the entity; you cannot use this key to retrieve the entity. The key is valid only for the duration of the current session and is used only to satisfy OData's need for a unique ID in the results. The property type of a generated local key is Edm.String and cannot be changed.Service definition sample.odata:generatedkeys.xsodata
service { "sample.odata::view" as "MyView" keys generate local "GenID";}
http://localhost:8002/sample/odata/generatedkeys.xsodata/$metadata
190
P U B L I C© 2013 SAP AG or an SAP affiliate company. All rights reserved.
SAP HANA Developer GuideDefining Web-based Data Access

As a consequence of the transient nature of generated local keys, it is not possible to define navigation properties on these entities or use them in filter or order by conditions.
OData AssociationsYou can define associations between entities to express relationships between entities. With associations it is possible to reflect foreign key constraints on database tables, hierarchies and other relations between database objects. OSDL supports simple associations, where the information about the relationship is stored in one of the participating entities, and complex associations, where the relationship information is stored in a separate association table.Associations themselves are freestanding. On top of them you can specify which of the entities participating in the relationship can navigate over the association to the other entity by creating NavigationPropertys.For the examples used to illustrate OData associations, we use the tables customer and order:Table definition: sample.odata:customer.hdbtable
table.schemaName = "ODATASAMPLES";table.tableType = COLUMNSTORE; table.columns = [ {name = "ID"; sqlType = INTEGER; nullable = false;}, {name = "RecruitID"; sqlType = VARCHAR; nullable = true;} ];table.primaryKey.pkcolumns = ["ID"];
Table definition: sample.odata:order.hdbtable
table.schemaName = "ODATASAMPLES";table.tableType = COLUMNSTORE; table.columns = [ {name = "ID"; sqlType = INTEGER; nullable = false;}, {name = "CustomerID"; sqlType = INTEGER; nullable = false;} ];table.primaryKey.pkcolumns = ["ID"];
There is one relationship order.CustomerID to customer.ID and one relationship customer.RecruitID to customer.ID.
Simple AssociationsThe definition of an association requires you to specify a name, which references two exposed entities and whose columns keep the relationship information. To distinguish the ends of the association, you must use the keywords principal and dependent. In addition, it is necessary to denote the multiplicity for each end of the association.
SAP HANA Developer GuideDefining Web-based Data Access
P U B L I C© 2013 SAP AG or an SAP affiliate company. All
rights reserved. 191

Service definition: sample.odata:assocsimple.xsodata
service { "sample.odata::customer" as "Customers"; "sample.odata::order" as "Orders"; association "Customer_Orders" principal "Customers"("ID") multiplicity "1" dependent "Orders"("CustomerID") multiplicity "*"; }
The association in the example above with the name Customer_Orders defines a relationship between the table customer, identified by its EntitySet name Customers, on the principal end, and the table order, identified by its entity set name Orders, on the dependent end. Involved columns of both tables are denoted in braces ({}) after the name of the corresponding entity set. The multiplicity keyword on each end of the association specifies their cardinality - in this example, one-to-many.The number of columns involved in the relationship must be equal for both ends of the association, and their order in the list is important. The order specifies which column in one table is compared to which column in the other table. In this simple example, the column customer.ID is compared to order.CustomerID in the generated table join.As a result of the generation of the service definition above, an AssociationSet named Customer_Orders and an Association with name Customer_OrdersType are generated:http://localhost:8002/sample/odata/assocsimple.xsodata/$metadata
192
P U B L I C© 2013 SAP AG or an SAP affiliate company. All rights reserved.
SAP HANA Developer GuideDefining Web-based Data Access

The second association is similar to the first one and is shown in the following listing:
association "Customer_Recruit" principal "Customers"("ID") multiplicity "1" dependent "Customers"("RecruitID") multiplicity "*";
Complex AssociationsFor the following example of a complex association, an additional table named knows is introduced that contains a relationship between customers.Table definition: sample.odata:knows.hdbtable
table.schemaName = "ODATASAMPLES";table.tableType = COLUMNSTORE; table.columns = [ {name = "KnowingCustomerID"; sqlType = INTEGER; nullable = false;}, {name = "KnownCustomerID"; sqlType = INTEGER; nullable = false;} ];table.primaryKey.pkcolumns = ["KnowingCustomerID","KnownCustomerID"];
Relationships that are stored in association tables such as knows can be similarly defined as simple associations. Use the keyword over to specify the additional table and any required columns.
SAP HANA Developer GuideDefining Web-based Data Access
P U B L I C© 2013 SAP AG or an SAP affiliate company. All
rights reserved. 193

Service definition: sample.odata:assoccomplex.xsodata
service { "sample.odata::customer" as "Customers"; "sample.odata::order" as "Orders"; association "Customer_Orders" principal "Customers"("ID") multiplicity "*" dependent "Customers"("ID") multiplicity "*" over "sample.odata::knows" principal ("KnowingCustomerID") dependent ("KnownCustomerID"); }
With the keywords principal and dependent after over you can specify which columns from the association table are joined with the principal respectively dependent columns of the related entities. The number of columns must be equal in pairs, and their order in the list is important.The generated Association in the metadata document is similar to the one created for a simple association except that the ReferentialConstraint is missing:tp://localhost:8002/sample/odata/assoccomplex.xsodata/$metadata
Navigation PropertiesBy only defining an association, it is not possible to navigate from one entity to another. Associations need to be bound to entities by a NavigationProperty. You can create them by using the keyword navigates:Service definition: sample.odata:assocnav.xsodata
service { "sample.odata::customer" as "Customers" navigates ("Customer_Orders" as "HisOrders"); "sample.odata::order" as "Orders"; association "Customer_Orders" principal "Customers"("ID") multiplicity "1" dependent "Orders"("CustomerID") multiplicity "*"; }
The example above says that it is possible to navigate from Customers over the association Customer_Order via the NavigationProperty named "HisOrders".The right association end is determined automatically by the entity set name. But if both ends are bound to the same entity, it is necessary to specify the starting end for the navigation. This is done by specifying either from principal or from dependent which refer to the principal and dependent ends in the association.Service definition: sample.odata:assocnavself.xsodata
service { "sample.odata::customer" as "Customers" navigates ("Customer_Orders" as "HisOrders","Customer_Recruit" as "Recruit" from principal);
194
P U B L I C© 2013 SAP AG or an SAP affiliate company. All rights reserved.
SAP HANA Developer GuideDefining Web-based Data Access

"sample.odata::order" as "Orders"; association "Customer_Orders" principal "Customers"("ID") multiplicity "1" dependent "Orders"("CustomerID") multiplicity "*"; association "Customer_Recruit" principal "Customers"("ID") multiplicity "1" dependent "Customers"("RecruitID") multiplicity "*"; }
In both cases a NavigationProperty is added to the EntityType.http://localhost:8002/sample/odata/assocnavself.xsodata/$metadata
OData AggregationThe results of aggregations on columns change dynamically depending on the grouping conditions. This means that aggregation cannot be performed in SQL views; it needs to be specified in the OData service definition itself. Depending on the type of object to expose, you need to explicitly specify the columns to aggregate and the function to use or derived them from metadata in the database.In general, aggregations do not have consequences for the metadata document. It just effects the semantics of the concerning properties during runtime. The grouping condition for the aggregation contain all selected non-aggregated properties. Furthermore, aggregated columns cannot be used in $filter, and aggregation is only possible with generated keys.
Derived AggregationThe simplest way to define aggregations of columns in an object is to derive this information from metadata in the database. The only objects with this information are calculation views and analytic views. For all other object types, for example, tables and SQL views, the activation will not work. To cause the service to use derived information, you must specify the keywords aggregates always, as illustrated in the following example:
service { "sample.odata::calc" as "CalcView" keys generate local "ID" aggregates always; }
Explicit AggregationThe example for the explicit aggregation is based on the following table definition: sample.odata:revenues.hdbtable
table.schemaName = "ODATASAMPLES";table.tableType = COLUMNSTORE; table.columns = [ {name = "Month"; sqlType = INTEGER; nullable = false;}, {name = "Year"; sqlType = INTEGER; nullable = false;}, {name = "Amount"; sqlType = INTEGER; nullable = true;}
SAP HANA Developer GuideDefining Web-based Data Access
P U B L I C© 2013 SAP AG or an SAP affiliate company. All
rights reserved. 195

];table.primaryKey.pkcolumns = ["Month","Year"];
You can aggregate the columns of objects (without metadata) that are necessary for the derivation of aggregation by explicitly denoting the column names and the functions to use, as illustrated in the following example of a service definition: sample.odata:aggrexpl.xsodata
service { "sample.odata::revenues" as "Revenues" keys generate local "ID" aggregates always (SUM of "Amount"); }
The results of the entity set Revenues always contain the aggregated value of the column Amount. To extract the aggregated revenue amount per year, add $select=Year,Amount to your requested URI.
OData Parameter Entity SetsSAP HANA calculation views and analytic views can interpret input parameters. For OData, these parameters can be entered by using a special parameter entity set.Parameter entity sets can be generated for both calculation views and analytic views by adding parameters via entity to the entity, as illustrated in the following service-definition example:
service { "sample.odata::calc" as "CalcView" keys generate local "ID" parameters via entity; }
During activation, the parameters specified in sample.odata/calc.calculationview are retrieved from the metadata of the calculation view and exposed as a new EntitySet named after the entity set name and the suffix Parameters, for example, CalcViewParameters. A NavigationProperty named Results is generated to retrieve the results from the parameterized call.The name of the generated parameter entity set and the navigation property can be customized, as illustrated in the following service-definition example:
service { "sample.odata::calc" as "CalcView" keys generate local "ID" parameters via entity "CVParams" results property "Execute"; }
With the definition above, the name of the parameter entity set is CVParams, and the name of the NavigationProperty for the results is Execute.
9.1.7 OData Service Definition Language SyntaxThe OData Service Definition Language (OSDL) provides a set of keywords that enable you to set up an ODATA service definition file that specifies what data to expose, in what way, and to whom.
The following list shows the syntax of the OData Service Definition Language (OSDL) in an EBNF-like format; conditions that apply for usage are listed after the table.
definition :='service' [namespace] bodynamespace :='namespace' quotedstringquotedstring :=quote string quotestring :=UTF8quote :='"'body :='{' content '}'content :=entry [content]
196
P U B L I C© 2013 SAP AG or an SAP affiliate company. All rights reserved.
SAP HANA Developer GuideDefining Web-based Data Access

entry :=( entity | association ) ';'entity :=object [entityset] [with] [keys] [navigates] [aggregates] [parameters]object :=['entity'] ( repoobject | catalogobject )repoobject :=quote repopackage '/' reponame '.' repoextension quoterepopackage :=stringreponame :=stringrepoextension :=stringcatalogobject :=catalogobjectschema '.' catalogobjectnamecatalogobjectschema :=quotedstringcatalogobjectname :=quotedstringentityset :='as' entitysetnameentitysetname :=quotedstringwith :=( 'with' | 'without' ) propertylistpropertylist :='(' columnlist ')'columnlist :=columnname [',' columnlist]columnname :=quotedstringkeys :='keys' ( keylist | keygenerated )keylist :=propertylistkeygenerated :='generate' ( keygenlocal ) keygenlocal :='local' columnnamenavigates :='navigates' '(' navlist ')'navlist :=naventry [',' navlist]naventry :=assocname 'as' navpropname [fromend]assocname :=quotedstringnavpropname :=quotedstringfromend :='from' ( 'principal' | 'dependent' )aggregates :='aggregates' 'always' [aggregatestuple]aggregatestuple :='(' aggregateslist ')'aggregateslist :=aggregate [',' aggregateslist]aggregate :=aggregatefunction 'of' columnnameaggregatefunction :=( 'SUM' | 'AVG' | 'MIN' | 'MAX' )parameters :='parameters' 'via' 'entity' [parameterentitysetname] [parametersresultsprop]parameterentitysetname :=quotedstringparametersresultsprop :='results' 'property' quotedstringassociation :=associationdef principalend dependentend [assoctable]associationdef :='association' assocnameprincipalend :='principal' enddependentend :='dependent' endend :=endref multiplicityendref :=endtype '(' joinproperties ')'endtype :=entitysetnamejoinproperties :=columnlistmultiplicity :='multiplicity' quote multiplicityvalue quotemultiplicityvalue :=( '1' | '0..1' | '1..*' | '*' )assoctable :='over' repoobject overprincipalend overdependentendoverprincipalend :='principal' overendoverdependentend :='dependent' overendoverend :=propertylist
ConditionsThe following conditions apply when using the listed keywords:
1. If the namespace is not specified, the schema namespace in the EDMX metadata document will be the repository package of the service definition file concatenated with the repository object name. E.g. if the repository design time name of the .xsodata file is sap.hana.xs.doc/hello.xsodata the namespace will implicitly be sap.hana.xs.doc.hello.
2. keyslist must not be specified for objects of type 'table'. They must only be applied to objects referring a view type. keygenerated in turn, can be applied to table objects.
3. If the entityset is not specified in an entity, the EntitySet for this object is named after the repository object name or the catalogobjectname. E.g. if object is "sap.hana.xs.doc/odata_docu" the entitysetname is implicitly set to odata_docu which then can also be referenced in associations.
SAP HANA Developer GuideDefining Web-based Data Access
P U B L I C© 2013 SAP AG or an SAP affiliate company. All
rights reserved. 197

4. The fromend in a naventry must be specified if the endtype is the same for both the principalend and the dependentend of an association.
5. The number of joinproperties in the principalend must be the same as in the dependentend.6. Ordering in the joinproperties of ends is relevant. The first columnname in the joinproperties of the
principalend is compared with the first columnname of the dependentend, the second with the second, and so on.
7. The overprincipalend corresponds to the principalend. The number of properties in the joinproperties and the overproperties must be the same and their ordering is relevant. The same holds for the dependent end.
8. aggregates can only be applied in combination with keygenerated.9. If aggregatestuple is omitted, the aggregation functions are derived from the database. This is only
possible for calculation views and analytic views.10. Specifying parameters is only possible for calculation views and analytic views.11. The default parameterentitysetname is the entitysetname of the entity concatenated with the suffix
"Parameters".12. If the parametersresultsprop is omitted, the navigation property from the parameter entity set to the
entity is called "Results".
9.1.8 OData Service Definition: SQL-EDM Type MappingDuring the activation of the OData service definition, the SAP HANA SQL types are mapped to the required OData EDM types according to the rules specified in a mapping table.
The following mapping table lists how SAP HANA SQL types are mapped to OData EDM types during the activation of an OData service definition.
NoteThe OData implementation in SAP HANA XS supports only those SQL types listed in the following table.
Table
SAP HANA SQL Type OData EDM Type
Time Edm.Time
Date Edm.DateTime
SecondDate Edm.DateTime
LongDate Edm.DateTime
Timestamp Edm.DateTime
TinyInt Edm.Byte
SmallInt Edm.Int16
Integer Edm.Int32
BigInt Edm.Int64
SmallDecimal Edm.Decimal
Decimal Edm.Decimal
198
P U B L I C© 2013 SAP AG or an SAP affiliate company. All rights reserved.
SAP HANA Developer GuideDefining Web-based Data Access

SAP HANA SQL Type OData EDM Type
Real Edm.Single
Float Edm.Single
Double Edm.Double
Varchar Edm.String
NVarchar Edm.String
Char Edm.String
NChar Edm.String
Binary Edm.Binary
Varbinary Edm.Binary
Example SQL Type MappingThe following examples shows how SAP HANA SQL types (name, integer, Varchar) of columns in a table are mapped to the OData EDM types in the properties of an entity type.SAP HANA SQL:
{name = "ID"; sqlType = INTEGER; nullable = false;},{name = "RefereeID"; sqlType = VARCHAR; nullable = true;}
The following example illustrates how the SAP HANA SQL types illustrated in the previous example are mapped to EDM types:
<Property Name="ID" Type="Edm.Int32" Nullable="false"/><Property Name="RefereeID" Type="Edm.String" Nullable="true"/>
9.1.9 OData URI Parameters, Query Options, and FeaturesSince OData fully embraces Web technologies, and more specifically URI concepts, all the actions that manage the interaction with the service at runtime are controlled by HTTP methods, the URI structure, or URI query parameters.The examples listed here illustrate how to use the OData service-definition file to specify what data to extract and what to do with it. You can find examples of the following features:
● HTTP MethodsFor example, HTTPGET
● Resource typesFor example: Service documents, entity sets, $metadata, and so on
● Query optionsFor example, $format, $filter, $select, and so on
HTTP MethodsSince the current OData Infrastructure only supports read services (no Create/Update/Delete), the only supported HTTP Method is GET, although the POST method is used for the $batch resource, which you can use to send a batch of requests in one multipart request (containing only GET requests). The result is that only read requests are possible.
SAP HANA Developer GuideDefining Web-based Data Access
P U B L I C© 2013 SAP AG or an SAP affiliate company. All
rights reserved. 199

Resource TypesYou can use the resource types (or constructs) described and explained here to define how the service definition exposes data. For example, the Service Document, Resource Type, or Entity sets enable you to select and view the contents of the entity sets that are queried.
Service DocumentThe most basic resource type is the call to the .xsodata resource itself. This supplies information about the entity set within this resource; otherwise known as the Service Document.
● Sample XSODATA Service:
service namespace "SAMPLE" { "sample.hello::hello_tbl" as "Entries"; }
● URI Construct:/<service>.xsodata/
● Sample URI:http://hanaxs:8000/sample/hello/hello_odata.xsodata/
● Sample XML Output:
● Sample JSON Output:
Entity SetsThis construct allows you to view the entire content of the queried Entity Set.
● URI Construct
200
P U B L I C© 2013 SAP AG or an SAP affiliate company. All rights reserved.
SAP HANA Developer GuideDefining Web-based Data Access

/<service>.xsodata/<Entity Set Name>● Sample URI:
http://hanaxs:8000/sample/hello/hello_odata.xsodata/Entries● Sample ATOM Output:
● Sample JSON Output:
Single EntityAny single entity (record) can be accessed by supplying the key field values after the Entity Set.
● URI Construct:
SAP HANA Developer GuideDefining Web-based Data Access
P U B L I C© 2013 SAP AG or an SAP affiliate company. All
rights reserved. 201

○ Single Key: /<service>.xsodata/<Entity Set Name>(<KeyValue>)○ Multiple Keys: /<service>.xsodata/<Entity Set Name>(<KeyName>=<KeyValue>,<Repeat>)/
● Sample URI:
○ Single Key: /<service>.xsodata/<Entity Set Name>(<KeyValue>)○ Multiple Keys: http://hanaxs:8000/sap./sflight/spfli.xsodata/
FLIGHTS(CARRID='AA',CONNID='0017')#● Sample ATOM Output:
● Sample JSON Output:
Single PropertyLikewise, any single property of an entry can be directly accessed as well.
202
P U B L I C© 2013 SAP AG or an SAP affiliate company. All rights reserved.
SAP HANA Developer GuideDefining Web-based Data Access

● URI Construct:
○ Single Key: /<service>.xsodata/<Entity Set Name>(<KeyValue>)/<Property Name>○ Multiple Keys: http://hanaxs:8000/sap./sflight/spfli.xsodata/
FLIGHTS(CARRID='AA',CONNID='0017')/CITYFROM● Sample URI:
○ Single Key: http://hanaxs:8000/sample/hello/hello_odata.xsodata/Entries(1)/TEXT ○ Multiple Key: http://hanaxs:8000/sap./sflight/spfli.xsodata/
FLIGHTS(CARRID='AA',CONNID='0017')/CITYFROM● Sample ATOM Output:
● Sample JSON Output:
$metadataThis parameter requests that the OData service return a special document that describes the structure of the service itself. All properties, their data types, and all associations and relationships are described in this document.
● URI Construct:/<service>.xsodata/$metadata
● Sample URI:http://hanaxs:8000/sample/hello/hello_odata.xsodata/$metadata
● Sample Output:
SAP HANA Developer GuideDefining Web-based Data Access
P U B L I C© 2013 SAP AG or an SAP affiliate company. All
rights reserved. 203

$countThis request allows you to return the number of records in an Entity Set instead of the details of the Entity Set. It is basically the same as using a SELECT COUNT(*) in an SQL Statement without top limitation.
● URI Construct:/<service>.xsodata/<Entity Set Name>/$count
● Sample URI:http://hanaxs:8000/sample/hello/hello_odata.xsodata/Entries/$count
● Sample Output:
$valueBy specifying this segment after a single property, the service returns the value of the property as plain text.
● URI Construct:/<service>.xsodata/<Entity Set Name>/$value
● Sample URI:
204
P U B L I C© 2013 SAP AG or an SAP affiliate company. All rights reserved.
SAP HANA Developer GuideDefining Web-based Data Access

http://hanaxs:8000/sample/hello/hello_odata.xsodata/Entries(1)/Text/$value● Sample Output:
$batchThe $batch resource allows you to send multiple requests in one multipart request by using the POST http method.
NoteYou cannot use the $batch resource with a GET request.
● URI Construct:/<service>.xsodata/$batch
● Sample URI:http://hanaxs:8000/sample/hello/hello_odata.xsodata/$batch
● Sample Request:
● Sample ATOM and JSON Output:
SAP HANA Developer GuideDefining Web-based Data Access
P U B L I C© 2013 SAP AG or an SAP affiliate company. All
rights reserved. 205

$format
$formatThis parameter controls the output format. The default format is ATOM. However, the other supported option is JSON, which can be triggered by setting the $format=json.
● URI Construct:/<service>.xsodata/<Entity Set Name>?$format=<json|atom(default)>
● Sample URI:http://hanaxs:8000/sample/hello/hello_odata.xsodata/Entries/?$format=json
● Sample Output:
206
P U B L I C© 2013 SAP AG or an SAP affiliate company. All rights reserved.
SAP HANA Developer GuideDefining Web-based Data Access

$filterA parameter that allows you to restrict the entities in the entity set. This option builds a dynamic WHERE condition into the underlying query.
● URI Construct:/<service>.xsodata/<Entity Set Name>?$filter <Property> eq '<value>'
● Sample URI:http://hanaxs:8000/sample/hello/hello_odata.xsodata/Entries/?$filter=CREATED%20eq%20datetime'2012-05-14T08:28:44.405'
● Sample ATOM Output:
SAP HANA Developer GuideDefining Web-based Data Access
P U B L I C© 2013 SAP AG or an SAP affiliate company. All
rights reserved. 207

● Sample JSON Output:
$orderbyThis is a parameter that controls how the entities in the entity set are sorted.
● URI Construct:/<service>.xsodata/<Entity Set Name>?$orderby=<Property> asc|desc
● Sample URI:http://hanaxs:8000/sample/hello/hello_odata.xsodata/Entries/?$orderby=CREATED%20desc
● Sample ATOM Output:
208
P U B L I C© 2013 SAP AG or an SAP affiliate company. All rights reserved.
SAP HANA Developer GuideDefining Web-based Data Access

● Sample JSON Output:
$skipThis is a parameter that allows you to skip ahead in an entity set only. It is useful when enabling "paging" through an entity set.
● URI Construct:/<service>.xsodata/<Entity Set Name>?$skip=n
● Sample URI:http://hanaxs:8000/sample/hello/hello_odata.xsodata/Entries/?$skip=2
● Sample ATOM Output:
SAP HANA Developer GuideDefining Web-based Data Access
P U B L I C© 2013 SAP AG or an SAP affiliate company. All
rights reserved. 209

● Sample JSON Output:
$topThis option allows you to limit the number of records returned regardless of how many records exist in the Entity Set. It is basically the same as using a SELECT ... UP TO n ROWS in an SQL Statement.
● URI Construct:/<service>.xsodata/<Entity Set Name>?$top=n
● Sample URI:http://hanaxs:8000/sample/hello/hello_odata.xsodata/Entries/?$top=3
● Sample ATOM Output:
210
P U B L I C© 2013 SAP AG or an SAP affiliate company. All rights reserved.
SAP HANA Developer GuideDefining Web-based Data Access
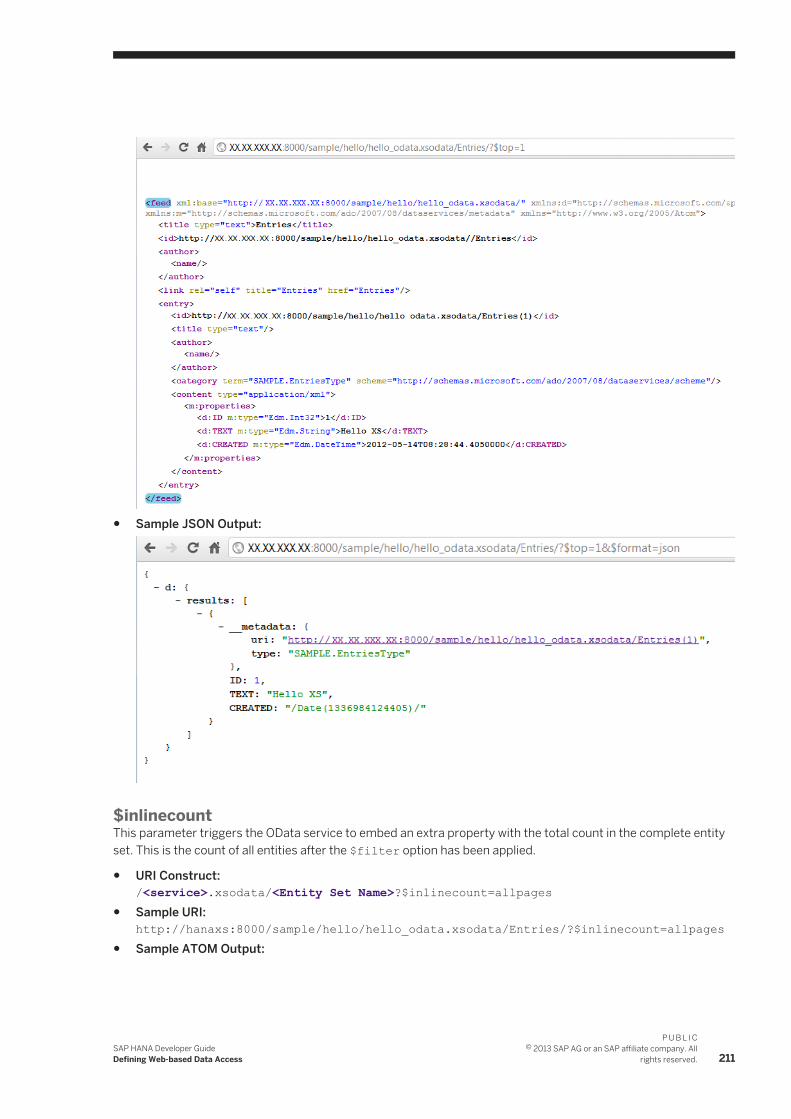
● Sample JSON Output:
$inlinecountThis parameter triggers the OData service to embed an extra property with the total count in the complete entity set. This is the count of all entities after the $filter option has been applied.
● URI Construct:/<service>.xsodata/<Entity Set Name>?$inlinecount=allpages
● Sample URI:http://hanaxs:8000/sample/hello/hello_odata.xsodata/Entries/?$inlinecount=allpages
● Sample ATOM Output:
SAP HANA Developer GuideDefining Web-based Data Access
P U B L I C© 2013 SAP AG or an SAP affiliate company. All
rights reserved. 211

● Sample JSON Output:
$selectThis property allows you to control which properties for each entity are returned in the entity set.
● URI Construct:/<service>.xsodata/<Entity Set Name>?$select=<property>,<property>,<...>
● Sample URI:http://hanaxs:8000/sample/hello/hello_odata.xsodata/Entries/?$select=TEXT
● Sample ATOM Output:
212
P U B L I C© 2013 SAP AG or an SAP affiliate company. All rights reserved.
SAP HANA Developer GuideDefining Web-based Data Access

● Sample JSON Output:
9.1.10 OData Security ConsiderationsEnabling access to data by means of OData can create some security-related issues that you need to consider and address, for example, the data you want to expose, who can start the OData service, and so on.If you want to use OData to expose data to users and clients in SAP HANA application services, you need to bear in mind the security considerations described in the following list:
SAP HANA Developer GuideDefining Web-based Data Access
P U B L I C© 2013 SAP AG or an SAP affiliate company. All
rights reserved. 213

● Data AccessRestrict user select authorization for tables/views exposed by the OData service
● OData ServiceRestrict authorization rights to start the OData service
● OData Statistical contentRestrict access to the URL/Path used to expose OData content in the Web browser
9.2 Data Access with XMLA in SAP HANA XS
In SAP HANA Extended Application Services, the persistence model (for example, tables, views and stored procedures) is mapped to the consumption model that is exposed to clients - the applications you write to extract data from the SAP HANA database.You can map the persistence and consumption models with XML for Analysis (XMLA). With XMLA, you write multi-dimensional -expressions (MDX) queries wrapped in an XMLA document. An XML for Analysis (XMLA) application running in SAP HANA application services is used to provide the consumption model for client applications exchanging MDX queries (wrapped in XMLA documents) with the SAP HANA database.XMLA uses Web-based services to enable platform-independent access to XMLA-compliant data sources for Online Analytical Processing (OLAP). XMLA enables the exchange of analytical data between a client application and a multi-dimensional data provider working over the Web, using a Simple Object Access Protocol (SOAP)-based XML communication application-programming interface (API).Applications running in SAP HANA XS enable very accurate control of the flow of data between the presentational layer, for example, in the Browser, and the data-processing layer in SAP HANA itself, where the calculations are performed, for example in SQL or SqlScript. If you develop and deploy an XMLA service running in SAP HANA XS, you can take advantage of the embedded access to SAP HANA that SAP HANA XS provides; the embedded access greatly improves end-to-end performance.
9.2.1 XML for Analysis (XMLA)XML for Analysis (XMLA) uses Web-based services to enable platform-independent access to XMLA-compliant data sources for Online Analytical Processing (OLAP).XMLA enables the exchange of analytical data between a client application and a multi-dimensional data provider working over the Web, using a Simple Object Access Protocol (SOAP)-based XML communication application-programming interface (API).Implementing XMLA in SAP HANA enables third-party reporting tools that are connected to the SAP HANA database to communicate directly with the MDX interface. The XMLA API provides universal data access to a particular source over the Internet, without the client having to set up a special component. XML for Analysis is optimized for the Internet in the following ways:
● Query performanceTime spent on queries to the server is kept to a minimum
● Query typeClient queries are stateless by default; after the client has received the requested data, the client is disconnected from the Web server.
In this way, tolerance to errors and the scalability of a source (the maximum permitted number of users) is maximized.
214
P U B L I C© 2013 SAP AG or an SAP affiliate company. All rights reserved.
SAP HANA Developer GuideDefining Web-based Data Access

XMLA MethodsThe specification defined in XML for Analysis Version 1.1 from Microsoft forms the basis for the implementation of XML for Analysis in SAP HANA.The following list describes the methods that determine the specification for a stateless data request and provides a brief explanation of the method's scope:
● DiscoverUse this method to query metadata and master data; the result of the discover method is a rowset. You can specify options, for example, to define the query type, any data-filtering restrictions, and any required XMLA properties for data formatting.
● ExecuteUse this method to execute MDX commands and receive the corresponding result set; the result of the Execute command could be a mult-idimensional dataset or a tabular rowset. You can set options to specify any required XMLA properties, for example, to define the format of the returned result set or any local properties to use to determine how to format the returned data.
9.2.2 XMLA Service DefinitionThe XMLA service definition is a file you use to specify which data is exposed as XMLA collections. Exposed data is available for analysis and display by client applications, for example, a browser that uses functions provided either by the XMLA service running in SAP HANA XS or by an XMLA client library running on the client system.To expose information via XMLA to applications using SAP HANA Extended Application Services (SAP HANA XS), you define database views that provide the data with the required granularity and you use the XMLA service definition to control access to the exposed data.
NoteSAP HANA XS supports XMLA version 1.1, which you can use to send MDX queries.
An XMLA service for SAP HANA XS is defined in a text file with the file suffix .xsxmla, for example, XMLASrvDef.xsxmla. The file must contain only the entry {*}, which would generate a completely operational XMLA service.
XMLA Service-Definition KeywordsCurrently, the XMLA service-definition file enables you to specify only that all authorized data is exposed to XMLA requests, as illustrated in the following example:
Service {*}
9.2.3 XMLA Security ConsiderationsEnabling access to data by means of XMLA opens up some security considerations that you need to address, for example, the data you want to expose, who can start the XMLA service, and so on.If you want to use XMLA to expose data to users and clients in SAP HANA XS, you need to bear in mind the security considerations described in the following list:
● Data AccessRestrict user select authorization for data exposed by the XMLA service
● XMLA Statistical contentRestrict access to the URL/Path used to expose XMLA content in the Web browser, for example, using the application-access file (.xsaccess)
SAP HANA Developer GuideDefining Web-based Data Access
P U B L I C© 2013 SAP AG or an SAP affiliate company. All
rights reserved. 215

9.2.4 Multidimensional Expressions (MDX)Multidimensional Expressions (MDX) is a language you can use to query multidimensional data stored in OLAP cubes.MDX uses a multidimensional data model to enable navigation in multiple dimensions, levels, and up and down a hierarchy. With MDX, you can access pre-computed aggregates at specified positions (levels or members) in a hierarchy.
NoteMDX is an open standard. However, SAP has developed extensions to MDX that are designed to enable faster and more efficient access to multidimensional data, for example, to serve specific SAP HANA application requirements and to optimize the resultset for SAP HANA clients.
MDX is implicitly a hierarchy-based paradigm. All members of all dimensions must belong to a hierarchy. Even if you do not explicitly create hierarchies in your SAP HANA data model, the SAP HANA modeler implicitly generates default hierarchies for each dimension. All identifiers that are used to uniquely identify hierarchies, levels and members in MDX statements (and metadata requests) embed the hierarchy name within the identifier.In SAP HANA, the standard use of MDX is to access SAP HANA models (for example, analytical and attribute views) that have been designed, validated and activated in the modeler in the SAP HANA studio. The studio provides a graphical design environment that enables detailed control over all aspects of the model and its language-context-sensitive runtime representation to users.MDX in SAP HANA uses a runtime cube model, which usually consists of an analytical (or calculation) view that represents data in which dimensions are modeled as attribute views. You can use the analytical view to specify whether a given attribute is intended for display purposes only or for aggregation. The key attributes of attribute views are linked to private attributes in an analytical view in order to connect the entities. One benefit of MDX in SAP HANA is the native support of hierarchies defined for attribute views.
NoteMDX in SAP HANA includes native support of hierarchies defined for attribute views. SAP HANA supports level-based and parent-child hierarchies and both types of hierarchies are accessible with MDX.
SAP HANA supports the use of variables in MDX queries; the variables are a SAP-specific enhancement to standard MDX syntax. You can specify values for all mandatory variables that are defined in SAP HANA studio to various modeling entities. The following example illustrates how to declare SAP HANA variables and their values:
MDXSelectFrom [MINI_C1_VAR]Where [Measures].[M2_1_M3_CONV]SAP VARIABLES [VAR_VAT] including 10, [VAR_K2] including 112, [VAR_TARGET_CURRENCY] including 'EUR',
9.2.5 MDX FunctionsMDX in SAP HANA supports a variety of standard MDX functions.
216
P U B L I C© 2013 SAP AG or an SAP affiliate company. All rights reserved.
SAP HANA Developer GuideDefining Web-based Data Access

Table
Function Description
Aggregate Returns a calculated value using the appropriate aggregate function, based on the aggregation type of the member.
Ancestor Returns the ancestor of a member at a specified level or at a specific distance away in the hierarchy.
Ancestors Returns a set of all ancestors of a member at a specified level or at a specific distance away in the hierarchy.
Ascendants Returns the set of the ascendants of the member.
Avg Returns the average value of a numeric expression evaluated over a set.
BottomCount Returns a specified number of items from the bottom of a set, optionally sorting the set first.
Children Returns the children of a member.
ClosingPeriod Returns the last sibling among the descendants of a member at a specified level.
Count Counts the number of members in the tuple.
Cousin Returns the child member with the same relative position under a parent member as the specified child member.
Crossjoin Returns the cross product of two sets.
CurrentMember Returns the current member along a hierarchy.
DefaultMember Returns the default member of a hierarchy.
Descendants Returns the set of descendants of a member at a specified level or at a specific distance away in the hierarchy.
Dimension Returns the hierarchy that contains a specified member or level.
Dimensions Returns a hierarchy specified by a numeric or string expression.
Distinct Returns a set, removing duplicate tuples from a specified set.
DistinctCount Returns the number of distinct tuples in a set.
DrillDownLevel Drills down the members of a set one level below the lowest level represented in the set, or to one level below an optional level of a member represented in the set.
DrillDownLevelBottom Drills down the members of a specified count of bottom members of a set, at a specified level, to one level below.
DrillDownLevelTop Drills down a specified count of top members of a set, at a specified level, to one level below.
DrillDownMember Drills down the members in a specified set that are present in a second specified set.
DrillDownMemberBottom Drills down the members in a specified set that are present in a second specified set, limiting the result set to a specified number of bottommost members.
SAP HANA Developer GuideDefining Web-based Data Access
P U B L I C© 2013 SAP AG or an SAP affiliate company. All
rights reserved. 217

Function Description
DrillDownMemberTop Drills down the members in a specified set that are present in a second specified set, limiting the result set to a specified number of topmost members.
DrillUpLevel Drills up the members of a set that are below a specified level.
DrillUpmember Drills up the members in a specified set that are present in a second specified set.
Except Finds the difference between two sets, optionally retaining duplicates.
Filter Returns the set resulting from filtering a set based on a search condition.
FirstChild Returns the first child of a specified member.
FirstSibling Returns the first child of the parent of a specified member.
Generate Applies a set to each member of another set, and then joins the resulting sets by union. Alternatively, this function returns a concatenated string created by evaluating a string expression over a set.
Head Returns the first specified number of elements in a set.
Hierarchize Orders the members of a specified set in a hierarchy in natural or, optionally, post-natural order.
Hierarchy
Instr The InStr function finds the starting location of a substring within a specified string.
Intersect Returns the intersection of two sets, optionally retaining duplicates.
IsAncestor Returns true if the first member specified is an ancestor of the second member specified, else returns false.
IsGeneration Returns true if the member specified is a leaf, else returns false.
IsLeaf Returns true if the first member specified is an ancestor of the second member specified, else returns false.
IsSibling Returns true if the first member specified is an sibling of the second member specified, else returns false.
Item If an integer is specified, the Item function returns the tuple that is in the zero-based position specified by Index.
IIF Returns one of values determined by a logical test.
Lag Returns the member that is a specified number of positions prior to a specified member along the dimension of the member.
LastChild Returns the last child of a specified member.
LastPeriods Returns a set of members prior to and including a specified member.
LastSibling Returns the last child of the parent of a specified member.
Lead Returns the member that is a specified number of positions following a specified member along the dimension of the member.
218
P U B L I C© 2013 SAP AG or an SAP affiliate company. All rights reserved.
SAP HANA Developer GuideDefining Web-based Data Access

Function Description
Leaves If a dimension name is specified, returns a set that contains the leaf members of the key attribute for the specified dimension.If a dimension name is not specified, the function returns a set that contains the leaf members of the entire cube.
Left The Left function returns a string of a specified number of characters from the left side (beginning) of a specified string.
Level Returns the level of a member.
Levels Returns the level whose zero-based position in a dimension is specified by a numeric expression.
Max Returns the maximum value of a numeric expression evaluated over a set.
Member_caption Returns the caption of a member
Members Returns the set of all members in a specified hierarchy.
MembersAscendantsDescendants
Returns the set of specified members in a given hierarchy.
Mid The Mid function returns a substring of a string argument.
Min Returns the minimum value of a numeric expression evaluated over a set
MTD Returns a set of members from the Month level in a Time dimension starting with the first period and ending with a specified member.
Name Returns the name of a specified hierarchy or member.
NextMember Returns the next member in the level that contains a specified member.
NOT Performs a logical negation on a numeric expression.
OpeningPeriod Returns the first sibling among the descendants of a specified level, optionally at a specified member.
OR Performs a logical disjunction on two numeric expressions.
Ordinal Returns the zero-based ordinal value associated with a specified level.
ParallelPeriod Returns a member from a prior period in the same relative position as a specified member.
Parent Returns the parent of a specified member.
PeriodsToDate Returns a set of members (periods) from a specified level starting with the first member and ending with a specified member.
PrevMember Returns the previous member in the level that contains a specified member.
Properties Returns a string containing the value of the specified member property.
QTD Returns a set of members from the Quarter level in a Time dimension starting with the first period and ending with a specified member.
Range Performs a set operation that returns a naturally ordered set, with the two specified members as endpoints, and all members between the two specified members included as members of the set
SAP HANA Developer GuideDefining Web-based Data Access
P U B L I C© 2013 SAP AG or an SAP affiliate company. All
rights reserved. 219

Function Description
Right The Right function returns a string of a specified number of characters from the right side (end) of a specified string.
Siblings Returns the set of siblings of a specified member, including the member itself.
StrToMember Returns a member from a string expression in MDX format.
StrToSet Constructs a set from a specified string expression in MDX format.
StrToTuple Constructs a tuple from a specified string expression in MDX format.
StrToValue Returns a value from a string expression
Subset Returns a subset of tuples from a specified set.
Sum Returns the sum of a numeric expression evaluated over a specified set.
Tail Returns the last specified number of elements in a set.
TopCount Returns a specified number of items from the topmost members of a specified set, optionally ordering the set first.
Union Performs a set operation that returns a union of two sets, removing duplicate members.
UniqueName Returns the unique name of a specified hierarchy.
WTD Returns a set of members from the Week level in a Time dimension starting with the first period and ending with a specified member.
YTD Returns a set of members from the Year level in a Time dimension starting with the first period and ending with a specified member.
9.2.6 MDX ExtensionsSAP HANA supports several extensions to the MDX language, for example, additional predefined functions and support for variables.
Sibling_Ordinal Intrinsic PropertyThe object Member includes a property called Sibling_Ordinal, that is equal to the 0-based position of the member within its siblings.
Example
WITH MEMBER [Measures].[Termination Rate] AS [Measures].[NET_SALES] / [Measures].[BILLED_QUANTITY]SELECT { [Measures].[NET_SALES], [Measures].[BILLED_QUANTITY], [Measures].[Termination Rate] } ON COLUMNS, Descendants ( [MDX_TEST_10_DISTRIBUTION_CHANNEL].[MDX_TEST_10_DISTRIBUTION_CHANNEL].[All].[(all)], 1, SELF_AND_BEFORE )
220
P U B L I C© 2013 SAP AG or an SAP affiliate company. All rights reserved.
SAP HANA Developer GuideDefining Web-based Data Access

DIMENSION PROPERTIES SIBLING_ORDINAL ON ROWSFROM MDX_TEST_10_ITELO_SALES_DATA
MembersAscendantsDescendants FunctionSAP HANA includes a new function called MembersAscendantsDescendants that enables you to get, for example, all ascendants and descendants of a specific member. This function improves on the standard MDX functions Ascendants and Descendants.The function can be called as follows:
MembersAscendantsDescendants (<set>, <flag>)
● set: A set of members from a single hierarchy● flag: Indicates which related members to return, and can be one of the following:
○ MEMBERS_AND_ASCENDANTS_AND_DESCENDANTS○ MEMBERS_AND_ASCENDANTS○ MEMBERS_AND_DESCENDANTS○ ASCENDANTS_AND_DESCENDANTS○ ONLY_ASCENDANTS○ ONLY_DESCENDANTS
Example
SELECT{ [Measures].[SALES] }ON COLUMNS,NON EMPTY{ Hierarchize( MembersAscendantsDescendants([JUICE_TIME].[TimeHier].[QUARTER].[3]:[JUICE_TIME].[TimeHier].[QUARTER].[4], MEMBERS_AND_ASCENDANTS_AND_DESCENDANTS )) }ON ROWSFROM [JUICE]
Example
SELECT{ [Measures].[SALES] }ON COLUMNS,NON EMPTY{ Hierarchize( MembersAscendantsDescendants([JUICE_TIME].[TimeHier].[QUARTER].[3]:[JUICE_TIME].[TimeHier].[QUARTER].[4], ONLY_ASCENDANTS )) }ON ROWSFROM [JUICE]
VariablesAn MDX SELECT statement in SAP HANA enables you to send values for variables defined within modeling views.Analytic and calculation views can contain variables, that can be bound to specific attributes. When calling the view, you can send values for those variables. These variables can be used, for example, to filter the results.SAP HANA supports an extension to MDX whereby you can pass values for variables defined in views by adding a SAP Variables clause in your select statement. Here is the syntax for a Select statement:
<select_statement>: [WITH <formula_specification> ] SELECT [<axis_specification>[,<axis_specification>...]] FROM <cube_specification> [WHERE <slicer_specification>
SAP HANA Developer GuideDefining Web-based Data Access
P U B L I C© 2013 SAP AG or an SAP affiliate company. All
rights reserved. 221

SAP VARIABLES: <sap_variable> [[,] <sap_variable>…]]<sap_variable>: <variable_name> <sign> [<option>] <variable_value><sign>: INCLUDING | EXCLUDING<option>: = | > | >= | < | <= | <><variable_value>: <unique_member_name> | <unsigned_numeric_literal> | <string_value_expression> | <member> : <member> | <character_string_literal> : <character_string_literal> | <unsigned_numeric_literal> : <unsigned_numeric_literal>
ExampleThe following specifies a single value for variables VAR_KAT, VAR_K2, and VAR_TARGET_CURRENCY.
SELECTFROM [MINI_C1_VAR]WHERE [Measures].[M2_1_M3_CONV]SAP VARIABLES [VAR_VAT] including 10, [VAR_K2] including 112, [VAR_TARGET_CURRENCY] including 'EUR'
ExampleThe following specifies an interval for variable VAR_K2.
SELECT NON EMPTY { [K2].[K2].Members }ON ROWSFROM [MINI_C1_VAR_SIMPLE]WHERE [Measures].[M3_CONV]SAP VARIABLES [VAR_K2] including [K2].[K2].&[122]:[K2].[K2].&[221]
Metadata on Variables in ViewsSAP HANA includes the following set of tables that contain information about the variables defined for views:
● BIMC_VARIABLE● BIMC_VARIABLE_ASSIGNMENT● BIMC_VARIABLE_VALUE● BIMC_VARIABLE_ODBO (virtual table)
The tables enable, for example, an application to retrieve the variables defined for a view and create a user interface so the user can enter values.
9.2.7 Defining the Data an XMLA Service ExposesAn XMLA service exposes data stored in database tables for analysis and display by client applications. However, first of all, you need to ensure that the tables and views to expose as an XMLA service actually exist and are accessible.
To define the data to expose using an XMLA service, you must perform at least the following tasks:
1. Create a simple database schema.2. Create a simple database table to expose with an XMLA service.3. If required, create a simple database view to expose with an XMLA service.
222
P U B L I C© 2013 SAP AG or an SAP affiliate company. All rights reserved.
SAP HANA Developer GuideDefining Web-based Data Access

4. Grant select privileges to the tables and views to be exposed with the XMLA service.
9.2.8 Creating an XMLA Service DefinitionThe XMLA service definition is a file you use to specify which data is exposed as XMLA/MDX collections for analysis and display by client applications.
An XMLA service for SAP HANA XS is defined in a text file with the file suffix .xsxmla, for example, XMLASrvDef.xsxmla. The file resides in the package hierarchy of the XMLA application and must contain the entry service {*}, which generates an operational XMLA service.Prerequisities for the creation of an XMLA service definition:
● SAP HANA studio and client installed and configured● SAP HANA database user available with repository privileges (for example, to add packages)● A SAP HANA development system added to (and available in) SAP HANA studio, for example, in either the
Navigator view or the SAP HANA Repositories view● A working development environment including a repository workspace, a package structure for your XMLA
application, and a shared project to enable you to synchronize changes to the XMLA project files in the local file system with the repository
● Data is available to expose using the XMLA interface
1. In the shared project you are using for your XMLA application, use the Project Explorer view to locate the package where you want to create the new XMLA service definition.
NoteThe file containing the XMLA service definition must be placed in the root package of the XMLA application for which the service is intended.
2. Create the file that will contain your XMLA service definition.In the Project Explorer view, right-click the folder where you want to create the new XMLA service-definition file and choose New File in the context-sensitive popup menu displayed.
3. Create the XMLA service definition.The XMLA service definition is a configuration file that you use to specify which data is to be exposed as an XMLA collection.The following code is an example of a valid XMLA service definition, which exposes all authorized data to XMLA requests:
service{*}
4. Place the valid XMLA service definition in the root package of the XMLA application.5. Save, commit, and activate the XMLA service definition in the SAP HANA repository.
9.2.9 Tutorial: Using the SAP HANA XMLA InterfaceYou can use the XML for Analysis (XMLA) interface included in SAP HANA Extended Application Services (SAP HANA XS) to provide a service that enables XMLA-capable clients to query multidimensional cubes in SAP HANA.
Since the artifacts required to get a simple XMLA service up and running are stored in the repository, make sure that you read through and comply with the following prerequisites:
● You have a development workspace in the SAP HANA repository● You have created a dedicated project in the repository workspace● You have shared the new project
SAP HANA Developer GuideDefining Web-based Data Access
P U B L I C© 2013 SAP AG or an SAP affiliate company. All
rights reserved. 223

● A multidimensional data cube is available in SAP HANA, for example, in the form of a calculation view, an analytic view, or an attribute view
● An XMLA client is available
To send an XMLA query to SAP using the XMLA interface provided by SAP HANA XS, perform the following steps:
1. Create a root package for your XMLA interface test, for example, helloxmla and save and activate it in the repository.
NoteThe namespace sap is restricted. Place the new package in your own namespace, which you can create alongside the sap namespace.
2. Create an application descriptor for your new XMLA test in your root XMLA package helloxmla.
The application descriptor (.xsapp) is the core file that you use to define an application's availability within SAP HANA. The .xsapp file sets the point in the application-package structure from which content will be served to the requesting clients.
NoteThe application-descriptor file has no content and no name; it only has the extension .xsapp.
3. Save, commit, and activate the application-descriptor file in the repository.4. Create an application-access file for your new XMLA test and place it in your root XMLA package helloxmla.
The application-access file enables you to specify who or what is authorized to access the content exposed by the application.
NoteThe application-access file has no name; it only has the extension .xsaccess.
Ensure the application content is exposed to HTTP requests by entering the following command in the .xsaccess file for your new XMLA test:
{ "exposed" : true}
5. Save, commit, and activate the application-access file in the repository.6. Create an XMLA service-definition file and place it in your root XMLA package helloxmla.
The XMLA service-definition file has the file extension .xsxmla, for example, hello.xsxmla and must be located in the root package of the XMLA application:Enter the following content in the hello.xsxmla XMLA service-definition file:
service {*}
7. Save, commit, and activate the XMLA service-definition file in the repository.8. Test the connection to the SAP HANA XS Web server.
http://<hana.server.name>:80<HANA_instance_number>/helloxmla/hello.xsxmla
Note
224
P U B L I C© 2013 SAP AG or an SAP affiliate company. All rights reserved.
SAP HANA Developer GuideDefining Web-based Data Access

You have successfully completed this step if you see a 404 Error page; the page indicates that the SAP HANA XS Web server has responded.
9. Connect your XMLA client application to the inbuilt XMLA interface in SAP HANA XS.To connect an XMLA-capable client (for example, Microsoft Excel) with the XMLA interface in SAP HANA XS, you will need a product (for example, a plug-in for Microsoft Excel) that can transfer the XMLA message that the SAP HANA XS XMLA interface can understand.
10. Configure your client to send an XMLA query to SAP HANA.
SAP HANA Developer GuideDefining Web-based Data Access
P U B L I C© 2013 SAP AG or an SAP affiliate company. All
rights reserved. 225

10 Writing Server-Side JavaScript Code
SAP HANA Extended Application Services (SAP HANA XS) provide applications and application developers with access to the SAP HANA database using a consumption model that is exposed via HTTP.In addition to providing application-specific consumption models, SAP HANA XS also host system services that are part of the SAP HANA database, for example: search services and a built-in Web server that provides access to static content stored in the SAP HANA repository.The consumption model provided by SAP HANA XS focuses on server-side applications written in JavaScript. Applications written in server-side JavaScript can make use of a powerful set of specially developed API functions, for example, to enable access to the current request session or the database. This section describes how to write server-side JavaScript code that enables you to expose data, for example, using a Web Browser or any other HTTP client.
10.1 Data Access with JavaScript in SAP HANA XS
In SAP HANA Extended Application Services, the persistence model (for example, tables, views and stored procedures) is mapped to the consumption model that is exposed via HTTP to clients - the applications you write to extract data from SAP HANA.You can map the persistence and consumption models in the following way:
● Application-specific codeWrite code that runs in SAP HANA application services. Application-specific code (for example, server-side JavaScript) is used in SAP HANA application services to provide the consumption model for client applications.
Applications running in SAP HANA XS enable you to accurately control the flow of data between the presentational layer, for example, in the Browser, and the data-processing layer in SAP HANA itself, where the calculations are performed, for example in SQL or SQLScript. If you develop and deploy a server-side JavaScript application running in SAP HANA XS, you can take advantage of the embedded access to SAP HANA that SAP HANA XS provides; the embedded access greatly improves end-to-end performance.
10.2 Server-Side JavaScript in SAP HANA XS
SAP HANA application services (XS server) supports server-side application programming in JavaScript. The server-side application you develop can use a collection of JavaScript APIs to expose authorized data to client requests, for example, to be consumed by a client GUI such as a Web browser or any other HTTP client.The functions provided by the JavaScript APIs enable server-side JavaScript applications to perform the following actions:
226
P U B L I C© 2013 SAP AG or an SAP affiliate company. All rights reserved.
SAP HANA Developer GuideWriting Server-Side JavaScript Code

● Interact with the SAP HANA XS runtime environment● Directly access SAP HANA database capabilities
NoteUnlike OData and XMLA, the JavaScript API enables you not only to expose data but to update, insert, and delete data, too.
JavaScript programs are stored in the repository along with all the other development resources. When the programs are activated, the code is stored in the repository as a runtime object.
10.2.1 JavaScript EditorYou can write server-side JavaScript using the SAP HANA studio JavaScript editor, which provides syntax validation, code highlighting and code completion.When you edit a JavaScript file within an XS Project, the editor automatically has a reference to the SAP HANA XS JavaScript API. You can access the API’s objects by entering $, following by a period (.), and the objects are available, as in the following example.
JSLint ValidationsThe JavaScript editor includes the JSLint open-source library, which helps to validate JavaScript code. The editor highlights any code that does not conform to the JSLint standards.To configure the JSLint library and determine which validations are performed, go to: Windows PreferencesJSLint . In the preferences window, each JSLint setting is followed by the corresponding JSLint command name, which you can use to lookup more information on the JSLint Web site.You can disable all JSLint validations for files in a specific project by right-clicking the project and choosing Disable JSLint.
NoteEven if you disable some or all of the JSLint validations in the editor, the validations are still performed on the server when the file is activated.
Related LinksJSLint Web Site
SAP HANA Developer GuideWriting Server-Side JavaScript Code
P U B L I C© 2013 SAP AG or an SAP affiliate company. All
rights reserved. 227

10.2.2 Server-Side JavaScript Security ConsiderationsIf you choose to use server-side JavaScript to write your application code, you need to bear in mind the potential for (and risk of) external attacks such as cross-site scripting and forgery, and insufficient authentication.The following list illustrates the areas where special attention is required to avoid security-related problems when writing server-side JavaScript. Each of the problems highlighted in the list is described in detail in its own dedicated section:
● SSL/HTTPSEnable secure HTTP (HTTPS) for inbound communication required by an SAP HANA application.
● Injection flawsIn the context of SAP HANA Extended Application Services (SAP HANA XS) injection flaws concern SQL injection that modifies the URL to expand the scope of the original request.
● Cross-site scripting (XSS)Web-based vulnerability that involves an attacker injecting JavaScript into a link with the intention of running the injected code on the target computer.
● Broken authentication and session managementLeaks or flaws in the authentication or session management functions allow attackers to impersonate users and gain access to unauthorized systems and data.
● Insecure direct object referencesAn application lacks the proper authentication mechanism for target objects.
● Cross-site request forgery (XSRF)Exploits the trust boundaries that exist between different Web sites running in the same web browser session.
● Incorrect security configurationAttacks against the security configuration in place, for example, authentication mechanisms and authorization processes.
● Insecure cryptographic storageSensitive information such as logon credentials is not securely stored, for example, with encryption tools.
● Missing restrictions on URL AccessSensitive information such as logon credentials is exposed.
● Insufficient transport layer protectionNetwork traffic can be monitored, and attackers can steal sensitive information such as logon credentials or credit-card data.
● Invalid redirects and forwardsWeb applications redirect users to other pages or use internal forwards in a similar manner.
● XML processing issuesPotential security issues related to processing XML as input or to generating XML as output
Related LinksSAP HANA Security GuideSAP HANA SQL ReferenceSSL/HTTPS [page 229]If you choose to use server-side JavaScript to write your application code, you need to bear in mind the potential for (and risk of) external attacks such as cross-site scripting and forgery, and insufficient authentication. You can set up SAP HANA to use secure HTTP (HTTPS).
Injection flaws [page 230]If you choose to use server-side JavaScript to write your application code, you need to bear in mind the potential for (and risk of) injection flaws. Typically, injection flaws concern SQL injection and involve modifying the URL to expand the scope of the original request.
228
P U B L I C© 2013 SAP AG or an SAP affiliate company. All rights reserved.
SAP HANA Developer GuideWriting Server-Side JavaScript Code

Cross-site scripting (XSS) [page 231]If you choose to use server-side JavaScript to write your application code, you need to bear in mind the potential for (and risk of) cross-site scripting (XSS) attacks. Cross-site scripting is a web-based vulnerability that involves an attacker injecting JavaScript into a link with the intention of running the injected code on the target computer.
Broken authentication and session management [page 231]If you choose to use server-side JavaScript to write your application code, you need to bear in mind the potential for (and risk of) attack against authentication infrastructure. Leaks or flaws in the authentication or session management functions allow attackers to impersonate users and gain access to unauthorized systems and data.
Insecure direct object references [page 231]If you choose to use server-side JavaScript to write your application code, you need to bear in mind the potential for (and risk of) attacks using insecure references to objects.
Cross-site request forgery (XSRF) [page 232]If you choose to use server-side JavaScript to write your application code, you need to bear in mind the potential for (and risk of) cross-site request forgery (XSRF). Cross-site scripting is a web-based vulnerability that exploits the trust boundaries that exist between different websites running in the same web browser session.
Incorrect security configuration [page 233]If you choose to use server-side JavaScript to write your application code, you need to bear in mind the potential for (and risk of) attacks against the security configuration in place, for example, authentication mechanisms and authorization processes.
Insecure cryptographic storage [page 234]If you choose to use server-side JavaScript to write your application code, you need to bear in mind the potential for (and risk of) attacks against the insecure or lack of encryption of data assets.
Missing restrictions on URL Access [page 234]If you choose to use server-side JavaScript to write your application code, you need to bear in mind the potential for (and risk of) unauthorized access to URLs.
Insufficient transport layer protection [page 234]If you choose to use server-side JavaScript to write your application code, you need to bear in mind the potential for (and risk of) insufficient protection of the transport layer.
XML processing issues [page 235]If you choose to use server-side JavaScript to write your application code, you need to bear in mind the potential for (and risk of) attacks aimed at the process used to parse XML input and generate the XML output.
Server-Side JavaScript: SSL/HTTPSIf you choose to use server-side JavaScript to write your application code, you need to bear in mind the potential for (and risk of) external attacks such as cross-site scripting and forgery, and insufficient authentication. You can set up SAP HANA to use secure HTTP (HTTPS).
SSL/HTTPS ProblemIncoming requests for data from client applications use secure HTTP (HTTPS), but the SAP HANA system is not configured to accept the HTTPS requests.
SSL/HTTPS RecommendationEnsure the SAP Web Dispatcher is configured to accept incoming HTTPS requests. For more information, see the SAP HANA Security Guide.
Note
SAP HANA Developer GuideWriting Server-Side JavaScript Code
P U B L I C© 2013 SAP AG or an SAP affiliate company. All
rights reserved. 229

The HTTPS requests are forwarded internally from the SAP Web Dispatcher to SAP HANA XS as HTTP (clear text).
Related LinksSAP HANA Security Guide
Server-Side JavaScript: Injection FlawsIf you choose to use server-side JavaScript to write your application code, you need to bear in mind the potential for (and risk of) injection flaws. Typically, injection flaws concern SQL injection and involve modifying the URL to expand the scope of the original request.
Injection Flaws ProblemIn the context of SAP HANA XS, injection flaws mostly concern SQL injection, which can occur in the SAP HANA XS JavaScript API or SQL script itself (both standard and dynamic). For example, the URL http://xsengine/customer.xsjs?id=3 runs the code in the JavaScript file customer.xsjs shown below:
var conn = $.db.getConnection();var pstmt = conn.prepareStatement( " SELECT * FROM accounts WHERE custID='" + $.request.parameters.get("id"));var rs = pstmt.executeQuery();
By modifying the URL, for example, to http://xsengine/customer.xsjs?id=3 'OR 1=1', an attacker can view not just one account but all the accounts in the database.
NoteSAP HANA XS applications rely on the authorization provided by the underlying SAP HANA database. Users accessing an SAP HANA XS based application require the appropriate privileges on the database objects to execute database queries. The SAP HANA authorization system will enforce the appropriate authorizations. This means that in those cases, even if the user can manipulate a query, he will not gain more access than is assigned to him through roles or privileges. Definer mode SQL script procedures are an exception to this rule that you need to take into consideration.
Injection Flaws RecommendationTo prevent injection flaws in the JavaScript API, use prepared statements to create a query and place-holders to fill with results of function calls to the prepared-statement object; to prevent injection flaws in standard SQL Script, use stored procedures that run in caller mode; in caller mode, the stored procedures are executed with the credentials of the logged-on HANA user. Avoid using dynamic SQL if possible. For example, to guard against the SQL-injection attack illustrated in the problem example, you could use the following code:
var conn = $.db.getConnection();var pstmt = conn.prepareStatement( " SELECT * FROM accounts WHERE custID=?' );pstmt.setInt(1, $.request.parameters.get("id"), 10);var rs = pstmt.executeQuery();
Prepared statements enable you to create the actual query you want to run and then create several placeholders for the query parameters. The placeholders are replaced with the proper function calls to the prepared statement object. The calls are specific for each type in such a way that the SAP HANA XS JavaScript API is able to properly escape the input data. For example, to escape a string, you can use the setString function.Related LinksSAP HANA Security GuideSAP HANA SQL Reference
230
P U B L I C© 2013 SAP AG or an SAP affiliate company. All rights reserved.
SAP HANA Developer GuideWriting Server-Side JavaScript Code

Server-Side JavaScript: Cross-Site ScriptingIf you choose to use server-side JavaScript to write your application code, you need to bear in mind the potential for (and risk of) cross-site scripting (XSS) attacks. Cross-site scripting is a web-based vulnerability that involves an attacker injecting JavaScript into a link with the intention of running the injected code on the target computer.
Cross-Site Scripting ProblemThe vulnerability to cross-site scripting attacks comes in the following forms:
● Reflected (non-persistent)Code affects individual users in their local Web browser
● Stored (persistent)Code is stored on a server and affects all users who visit the served page
Cross-Site Scripting RecommendationSince there are currently no libraries provided by the standard SAP HANA XS API to provide proper escaping, the best solution for generating HTML on SAP HANA XS is to use the ESAPI JavaScript libraries as a starting point. In addition, we recommend not to write custom interfaces but to rely on well-tested technologies supplied by SAP, for example, OData or JSON together with SAPUI5 libraries.Related LinksSAP HANA Security Guide
Server-Side JavaScript: Broken AuthenticationIf you choose to use server-side JavaScript to write your application code, you need to bear in mind the potential for (and risk of) attack against authentication infrastructure. Leaks or flaws in the authentication or session management functions allow attackers to impersonate users and gain access to unauthorized systems and data.
Authentication ProblemLeaks or flaws in the authentication or session management functions allow attackers to impersonate users; the attackers can be external as well as users with their own accounts to obtain the privileges of those users they impersonate.
Authentication RecommendationUse the built-in SAP HANA XS authentication mechanism and session management (cookies). For example, use the "authentication" keyword to enable an authentication method and set it according to the authentication method you want implement, for example: SAP logon ticket, form-based, or basic (user name and password) in the application's .xsaccess file, which ensures that all objects in the application path are available only to authenticated users.Related LinksSAP HANA Security Guide
Server-Side JavaScript: Insecure Object ReferenceIf you choose to use server-side JavaScript to write your application code, you need to bear in mind the potential for (and risk of) attacks using insecure references to objects.
Object Reference ProblemAn SAP HANA XS application is vulnerable to insecure direct object reference if the application lacks the proper authentication mechanism for target objects.
SAP HANA Developer GuideWriting Server-Side JavaScript Code
P U B L I C© 2013 SAP AG or an SAP affiliate company. All
rights reserved. 231

Object Reference RecommendationMake sure that only authenticated users are allowed to access a particular object. In the context of SAP HANA XS, use the "authentication" keyword to enable an authentication method and set it according to the authentication method you implement, for example: SAP logon ticket, form-based, or basic (user name and password) in the application's .xsaccess file, which ensures that all objects in the application path are available only to authenticated users.Related LinksSAP HANA Security Guide
Server-Side JavaScript: Cross-Site Request ForgeryIf you choose to use server-side JavaScript to write your application code, you need to bear in mind the potential for (and risk of) cross-site request forgery (XSRF). Cross-site scripting is a web-based vulnerability that exploits the trust boundaries that exist between different websites running in the same web browser session.
Cross-Site Request-Forgery ProblemSince there are no clear trust boundaries between different Web sites running in the same Web-browser session, an attacker can trick users (for example, by luring them to a popular Web site that is under the attacker's control) into clicking a specific hyperlink. The hyperlink displays a Web site that performs actions on the visitor's behalf, for example, in a hidden iframe. If the targeted end user is logged in and browsing using an account with elevated privileges, the XSRF attack can compromise the entire Web application.
Cross-Site Request-Forgery RecommendationSAP HANA XS provides a way to include a random token in the POST submission which is validated on the server-side. Only if this token is non-predictable for attackers can one prevent cross-site, request-forgery attacks. The easiest way to prevent cross-site, request-forgery attacks is by using the standard SAP HANA XS cookie. This cookie is randomly and securely generated and provides a good random token which is unpredictable by an attacker ($.session.getSecurityToken()).To protect SAP HANA XS applications from cross-site request-forgery (XSRF) attacks, make sure you always set the prevent_xsrf keyword in the application-acess (.xsaccess) file to true, as illustrated in the following example:
{ "prevent_xsrf" : true }
The prevent_xsrf keyword prevents the XSRF attacks by ensuring that checks are performed to establish that a valid security token is available for given Browser session. The existence of a valid security token determines if an application responds to the client's request to display content. A security token is considered to be valid if it matches the token that SAP HANA XS generates in the backend for the corresponding session.
NoteThe default setting is false, which means there is no automatic prevention of XSRF attacks. If no value is assigned to the prevent_xsrf keyword, the default setting (false) applies.
The following server-side JavaScript code snippet show how to use the HTTP request header to fetch, check, and apply the XSRF security token required to protect against XSRF attacks.
<html><head> <title>Example</title> <script id="sap-ui-bootstrap" type="text/javascript" src="/sap/ui5/1/resources/sap-ui-core.js" data-sap-ui-language="en"
232
P U B L I C© 2013 SAP AG or an SAP affiliate company. All rights reserved.
SAP HANA Developer GuideWriting Server-Side JavaScript Code

data-sap-ui-theme="sap_goldreflection" data-sap-ui-libs="sap.ui.core,sap.ui.commons,sap.ui.ux3,sap.ui.table"> </script> <script type="text/javascript" src="/sap/ui5/1/resources/jquery-sap.js"></script> <script> function doSomething() { $.ajax({ url: "logic.xsjs", type: "GET", beforeSend: function(xhr) { xhr.setRequestHeader("X-CSRF-Token", "Fetch"); }, success: function(data, textStatus, XMLHttpRequest) { var token = XMLHttpRequest.getResponseHeader('X-CSRF-Token'); var data = "somePayLoad"; $.ajax({ url: "logic.xsjs", type: "POST", data: data, beforeSend: function(xhr) { xhr.setRequestHeader("X-CSRF-Token", token); }, success: function() { alert("works"); }, error: function() { alert("works not"); } }); } }); } </script></head><body> <div> <a href="#" onClick="doSomething();">Do something</a> </div></body></html>
Related LinksSAP HANA Security Guide
Server-Side JavaScript: Security MisconfigurationIf you choose to use server-side JavaScript to write your application code, you need to bear in mind the potential for (and risk of) attacks against the security configuration in place, for example, authentication mechanisms and authorization processes.
Insecure Configuration ProblemNo or an inadequate authentication mechanism has been implemented.
Insecure Configuration RecommendationApplications should have proper authentication in place, for example, by using SAP HANA built-in authentication mechanisms and, in addition, the SAP HANA XS cookie and session handling features. Application developers must also consider and control which paths are exposed by HTTP to the outside world and which of these paths require authentication.Related LinksSAP HANA Security Guide
SAP HANA Developer GuideWriting Server-Side JavaScript Code
P U B L I C© 2013 SAP AG or an SAP affiliate company. All
rights reserved. 233
Server-Side JavaScript: Insecure StorageIf you choose to use server-side JavaScript to write your application code, you need to bear in mind the potential for (and risk of) attacks against the insecure or lack of encryption of data assets.
Storage-Encryption ProblemSensitive information such as logon credentials is exposed.
Storage-Encryption RecommendationTo prevent unauthorized access, for example, in the event of a system break-in, data such as user logon credentials must be stored in an encrypted state. Application developers can use the SAP HANA XS API, which provides a secured key value store.Related LinksSAP HANA Security Guide
Server-Side JavaScript: Missing URL RestrictionsIf you choose to use server-side JavaScript to write your application code, you need to bear in mind the potential for (and risk of) unauthorized access to URLs.
URL Access ProblemUnauthenticated users have access to URLs that expose confidential (unauthorized) data.
URL Access RecommendationMake sure you have addressed the issues described in "Broken Authentication and Session Management" and "Insecure Direct Object References". In addition, check if a user is allowed to access a specific URL before actually executing the code behind that requested URL. Consider putting an authentication check in place for each JavaScript file before continuing to send any data back to the client's Web browser.Related LinksSAP HANA Security Guide
Server-Side JavaScript: Transport Layer ProtectionIf you choose to use server-side JavaScript to write your application code, you need to bear in mind the potential for (and risk of) insufficient protection of the transport layer.
Transport Layer Protection ProblemWithout transport-layer protection, the user's network traffic can be monitored, and attackers can steal sensitive information such as logon credentials or credit-card data.
Transport Layer Protection RecommendationTurn on transport-layer protection in SAP HANA XS; the procedure is described in the SAP HANA security guide.Related LinksSAP HANA Security Guide
Server-Side JavaScript: Invalid RedirectionIf you choose to use server-side JavaScript to write your application code, you need to bear in mind the potential for (and risk of) redirection and internal fowarding from the requested Web page.
234
P U B L I C© 2013 SAP AG or an SAP affiliate company. All rights reserved.
SAP HANA Developer GuideWriting Server-Side JavaScript Code

Invalid Redirection ProblemWeb applications frequently redirect users to other pages or use internal forwards in a similar manner. Sometimes the target page is specified in an invalid (not permitted) parameter. This enables an attacker to choose a destination page leading to the possibility of phishing attacks or the spamming of search engines.
Invalid Redirection RecommendationTo prevent invalidated redirects or forwards, application developers should validate the requested destination before forwarding, for example, by checking if the destination is present in a whitelist.Related LinksSAP HANA Security Guide
Server-Side JavaScript: XML Processing IssuesIf you choose to use server-side JavaScript to write your application code, you need to bear in mind the potential for (and risk of) attacks aimed at the process used to parse XML input and generate the XML output.
XML Processing ProblemThere are several potential security issues related to processing XML as input or to generating XML as output. In addition, problems with related technologies (for example, XSL Transformations or XSLT) can enable the inclusion of other (unwanted) files.
XML Processing RecommendationTurn on transport-layer protection in SAP HANA XS; the procedure is described in the SAP HANA security guide.Bear in mind the following rules and suggestions when processing or generating XML output:
● When processing XML coming form an untrusted source, disable DTD processing and entity expansion unless strictly required. This helps prevent Billion Laugh Attacks (Cross-Site Request Forgery), which can bring down the processing code and, depending on the configuration of the machine, an entire server.
● To prevent the inclusion (insertion) of unwanted and unauthorized files, restrict the ability to open files or URLs even in requests included in XML input that comes from a trusted source. In this way, you prevent the disclosure of internal file paths and internal machines.
● Ensure proper limits are in place on the maximum amount of memory that the XML processing engine can use, the amount of nested entities that the XML code can have, and the maximum length of entity names, attribute names, and so on. This practice helps prevent the triggering of potential issues.
Related LinksSAP HANA Security Guide
10.2.3 Writing Server-Side JavaScript Application CodeSAP HANA Extended Application Services (SAP HANA XS) supports server-side application programming in JavaScript. The server-side application you develop can use a collection of JavaScript APIs to expose authorized data to client requests, for example, to be consumed by a client GUI such as a Web browser including SAPUI5 applications and mobile clients.
Since JavaScript programs are stored in the SAP HANA repository, the steps in this task description assume that you have already created a workspace and a project (of type XS Project), and that you have shared the project with other members of the development team. To write a server-side JavaScript application, you must perform the following high-level steps.
1. Create a root package for your application, for example, helloxsjs.
2. Create an application descriptor for your application and place it in the root package you created in the previous step.
SAP HANA Developer GuideWriting Server-Side JavaScript Code
P U B L I C© 2013 SAP AG or an SAP affiliate company. All
rights reserved. 235

The application descriptor is the core file that you use to describe an application's availability within SAP HANA Extended Application Services. The application-descriptor file has no contents and no name; it only has the file extension .xsapp.
NoteFor backward compatibility, content is allowed in the .xsapp file but ignored.
3. Create an application-access file and place it in the package to which you want to grant access.The application-access file does not have a name; it only has the file extension .xsaccess. The contents of the .xsaccess file must be formatted according to JavaScript Object Notation (JSON) rules and associated with the package the file belongs to. The rules defined in the .xsaccess file apply to the package it resides in as well as any subpackages lower in the package hierarchy.
4. If you used the authorization keyword in the application-access file (.xsaccess) file for your application, create an application-privileges file for the application and define the application privileges.The application-privileges file does not have a name; it only has the file extension .xsprivileges. The contents of the .xsprivileges file must be formatted according to JavaScript Object Notation (JSON) rules. Multiple .xsprivileges files are allowed, but only at different levels in the package hierarchy; you cannot place two .xsprivileges files in the same application package. The privileges defined in a .xsprivileges file are bound to the package to which the file belongs and can only be applied to this package and its subpackages.
NoteThe .xsprivileges file lists the authorization levels available for granting to an application package; the .xsaccess file defines which authorization level is assigned to which application package.
5. Create the server-side JavaScript files that contain the application logic.You can use the available JavaScript APIs (for example, the database or request-processing API) to expose authorized data to client requests.Server-side JavaScript files have the file suffix .xsjs, for example, hello.xsjs and contain the code that is executed when SAP HANA XS handles a URL request.
$.response.contentType = "text/plain";$.response.setBody( "Hello, World!");
6. Check the layout workspace.Your application package structure should have a structure that looks like the following example:
. \ helloxsjs \ .xsapp .xsaccess hello.xsjs
7. Save and activate your changes and additions.8. View the results.
The SAP HANA XS Web server enables you to view the results immediately after activation in the repository, for example: http://dbhost:80<DB_Instance_Number>/helloxsjs/hello.xsjs
236
P U B L I C© 2013 SAP AG or an SAP affiliate company. All rights reserved.
SAP HANA Developer GuideWriting Server-Side JavaScript Code

10.3 Server-Side JavaScript Libraries
The elements defined in normal server-side JavaScript programs cannot be accessed from other JavaScript programs. To enable the reuse of program elements, SAP HANA Extended Application Services support server-side JavaScript libraries.Server-side JavaScript libraries are a special type of JavaScript program that can be imported and called in other JavaScript programs. You can use JavaScript libraries to perform simple, repetitive tasks, for example, to handle forms and form date, to manipulate date and time strings, to parse URLs, and so on.
NoteJavaScript libraries are internally developed extensions for SAP HANA.
The following example shows how to import a JavaScript mathematics library using the import function:
// import math lib$.import("sap.myapp.lib","math");
// use math libvar max_res = $.sap.myapp.lib.math.max(3, 7);
The import function requires the following parameters:
● Package nameFull name of the package containing the library object you want to import, for example, sap.myapp.lib
● Library nameName of the library object you want to import, for example, math
10.3.1 Writing Server-Side JavaScript LibrariesServer-side JavaScript libraries are a special type of JavaScript program that can be imported and called in other JavaScript programs. You can use JavaScript libraries to perform simple, repetitive tasks, for example, to handle forms and form date, to manipulate date and time strings, to parse URLs, and so on.
JavaScript libraries are internally developed extensions for SAP HANA. However, you can write your own libraries, too. JavaScript libraries exist in the context of a package, which is referenced when you import the library. To write a JavaScript library to use in your server-side JavaScript application, perform the following steps:
1. Create the file that contains the JavaScript library you want to add to the package and make available for import.In SAP HANA XS, server-side JavaScript libraries have the file extension .xsjslib, for example greetLib.xsjslib.
The following example creates a simple library that displays the word “Hello” along with a supplied name and adds an exclamation point (!) as a suffix.
var greetingPrefix = "Hello, ";var greetingSuffix = "!";function greet (name) { return greetingPrefix + name + greetingSuffix;}
2. Save the new JavaScript library.It is important to remember where the JavaScript library is located; you have to reference the package path when you import the library.
SAP HANA Developer GuideWriting Server-Side JavaScript Code
P U B L I C© 2013 SAP AG or an SAP affiliate company. All
rights reserved. 237

3. Activate your new library in the repository so that it is available for import by other JavaScript applications.
10.3.2 Importing Server-Side JavaScript LibrariesServer-side JavaScript libraries are a special type of JavaScript program that can be imported and called in other JavaScript programs. You can use JavaScript libraries to perform simple, repetitive tasks, for example: handle forms and form date, manipulate date and time strings, parse URLs, and so on.
JavaScript libraries are internally developed extensions for SAP HANA. The libraries exist in the context of a package, which is referenced when you import the library. The following example of a JavaScript library displays the word "Hello" along with a name and an exclamation mark as a suffix.
var greetingPrefix = "Hello, ";var greetingSuffix = "!";function greet (name) { return greetingPrefix + name + greetingSuffix;}
NoteThis procedure uses the illustrated example JavaScript library to explain what happens when you import a JavaScript library, for example, which objects are created, when, and where. If you have your own library to import, substitute the library names and paths shown in the steps below as required.
To import a JavaScript library for use in your server-side JavaScript application, perform the following tasks
1. Import the JavaScript library into a JavaScript application.Open the server-side JavaScript file into which you want to import the JavaScript library.Use the $.import function, as follows:
$.import("<package_your_library_was_deployed>","greetLib");var greeting = $.path.to.your.library.filename.greet("World");$.response.setBody(greeting);
2. Save and activate the changes to the JavaScript file.Although the operation is simple, bear in mind the following points:
○ Additional objects in the package hierarchyThe import operation generates a hierarchy of objects below $ that resemble the library's location in the repository, for example, for the library path/to/your/library/greetLib.xsjslib, you would see the following additional object:
$.path.to.your.library.greetLib
○ Additional properties for the newly generated library object:
$.path.to.your.library.greetLib.greet()$.path.to.your.library.greetLib.greetingSuffix$.path.to.your.library.greetLib.greetingPrefix
○ Pre-import checks:
○ It is not possible to import the referenced library if the import operation would override any predefined runtime objects.
○ Do not import the referenced library if it is already present in the package.○ Library context
Imported libraries exist in the context defined by their repository location.
238
P U B L I C© 2013 SAP AG or an SAP affiliate company. All rights reserved.
SAP HANA Developer GuideWriting Server-Side JavaScript Code

10.4 Server-Side JavaScript APIs
SAP HANA Extended Application Services (SAP HANA XS) provides a set of server-side JavaScript application programming interfaces (API) that enable you to configure your applications to interact with SAP HANA.The SAP HANA XS API Reference lists all the functions that are available for use when programing interaction between your application and SAP HANA. For example, you can use the database API to invoke SQL statements from inside your application, or access details of the current HTTP request for SAP HANA data with the request-processing API.SAP HANA XS includes the following set of server-side JavaScript APIs:
● Request-Processing APIEnables access to the context of the current HTTP request, for example, for read requests and write responses. You can use the functions provided by this API to manipulate the content of the request and the response.
● Database APIEnables access to the SAP HANA by means of SQL statements. For example, you can open a connection to commit or rollback changes in SAP HANA, to prepare stored procedures (or SQL statements) for execution or to return details of a result set or a result set's metadata.
Request-Processing API ExampleThe following example shows how to use the request-processing API to display the message “Hello World” in a browser.
$.response.contentType = "text/plain";$.response.setBody( "Hello, World !");
Database API ExampleThe following example shows how to use the database API to prepare and execute an SQL statement. The response to the SQL query is then prepared and displayed in a Web browser.
var conn = $.db.getConnection();var pstmt = conn.prepareStatement( "select * from DUMMY" );var rs = pstmt.executeQuery();
$.response.contentType = "text/plain";if (!rs.next()) { $.response.setBody( "Failed to retreive data" ); $.response.status = $.net.http.INTERNAL_SERVER_ERROR;} else { $.response.setBody("Response: " + rs.getString(1));}
rs.close();pstmt.close();conn.close();
Related LinksSAP HANA XS JavaScript Reference
SAP HANA Developer GuideWriting Server-Side JavaScript Code
P U B L I C© 2013 SAP AG or an SAP affiliate company. All
rights reserved. 239

10.5 The SQL Connection Configuration File
In SAP HANA Extended Application Services (SAP HANA XS), you use the SQL-connection configuration file to enable the execution of SQL statements from inside your server-side JavaScript application with credentials that are different to the credentials of the requesting user.In cases where it is necessary to execute SQL statements from inside your JavaScript application with credentials that are different to the credentials of the requesting user, SAP HANA XS enables you to define the configuration for individual SQL connections. Each connection configuration has a unique name, for example, Registration or AdminConn, which is generated from the name of the corresponding connection-configuration file (Registration.xssqlcc or AdminConn.xssqlcc) on activation in the repository. The administrator can assign specific, individual database users to this configuration, and you can use the configuration name to reference the unique SQL connection configuration from inside your JavaScript application code.If you want to create an SQL connection configuration, you must create the configuration as a flat file and save the file with the suffix .xssqlcc, for example, MYSQLconnection.xssqlcc. The new configuration file must be located in the same package as the application that references it. You can activate repository files at any point in time.
NoteAn SQL connection configuration can only be accessed from a SAP HANA XS JavaScript application (.xsjs) file that is in the same package as the SQL connection configuration itself. Neither subpackages nor sibling packages are allowed to access an SQL connection configuration.
The following example shows the composition and structure of a configuration file AdminConn.xssqlcc for an SAP HANA XS SQL connection called AdminConn. On activation of the SQL connection configuration file AdminConn.xssqlcc (for example, in the package sap.hana.sqlcon), an SQL connection configuration with the name sap.hana.sqlcon::AdminConn is created, which can be referenced in your JavaScript application.sap.hana.sqlcon:AdminConn.xssqlcc
{ "description" : "Admin SQL connection"}
To create a preconfigured SQL connection using the configuration object AdminConn, for example, from inside your JavaScript application code, you reference the object using the object name and full package path, as illustrated in the following code example.
ExampleCalling the SAP HANA XS SQL-Connection Configuration File
function test() { var body; var conn; $.response.status = $.net.http.OK; try { conn = $.db.getConnection("sap.hana.sqlcon::AdminConn"); var pStmt = conn.prepareStatement("select CURRENT_USER from dummy"); var rs = pStmt.executeQuery(); if (rs.next()) { body = rs.getNString(1); } rs.close();
240
P U B L I C© 2013 SAP AG or an SAP affiliate company. All rights reserved.
SAP HANA Developer GuideWriting Server-Side JavaScript Code

pStmt.close(); } catch (e) { body = "Error: exception caught"; $.response.status = $.net.http.BAD_REQUEST; } if (conn) { conn.close(); } $.response.setBody( body );}
test();
To use the SQL connection from your application during runtime, you must bind the SQL connection configuration to a database user. To maintain this user mapping, SAP HANA XS provides a dedicated application (the SQL Connection Configuration Application), which is pre-installed and accessible under the URL http://<host>:<port>/sap/hana/xs/sqlcc/. You can grant one of the following roles for users who want to use the SQL Connection Configuration Application to view or maintain the available SQL connection configurations:
● sap.hana.xs.sqlcc::ViewerRequired to display the available SQL Connections and the current user mapping
● sap.hana.xs.sqlcc::AdministratorRequired to change the user mapping
10.6 Connection-language Settings in SAP HANA XS
HTTP requests can define the language used for communication in the HTTP header Accept-Language. This header contains a prioritized list of languages (defined in the Browser) that a user is willing to accept. SAP HANA XS uses the language with the highest priority to set the language for the requested connection. The language setting is passed to the database as the language to be used for the database connection, too.In server-side JavaScript, the session object's language property enables you to define the language an application should use for a requested connection. For example, your client JavaScript code could include the following string:
var application_language = $.session.language = 'de';
NoteUse the language-code format specified in BCP 47 to set the session language, for example: “en-US” (US English), “de-AT” (Austrian German), “fr-CA” (Canadian French).
As a client-side framework running in the JavaScript sandbox, the SAP UI5 library is not aware of the Accept-Language header in the HTTP request. Since the current language setting for SAPUI5 is almost never the same as the language specified in the SAP HANA XS server-side framework, SAPUI5 clients could have problems relating to text displayed in the wrong language or numbers and dates formatted incorrectly.The application developer can inform the SAP UI5 client about the current server-side language setting, for example, by adding an entry to the <script> tag in the SAPUI5 HTML page, as illustrated in the following examples:
SAP HANA Developer GuideWriting Server-Side JavaScript Code
P U B L I C© 2013 SAP AG or an SAP affiliate company. All
rights reserved. 241

● Script tag parameter:
<script id="sap-ui-bootstrap" type="text/javascript" src="/sap/ui5/1/resources/sap-ui-core.js" data-sap-ui-theme="sap_goldreflection" data-sap-ui-libs="sap.ui.commons" data-sap-ui-language="de"></script>
● Global sap-ui-config object:
<script> window["sap-ui-config"] = { "language" : "de" }</script>[…]<script id="sap-ui-bootstrap"[…]</script>
The sap-ui-config object must be created and filled before the sap-ui-bootstrap script.
It is important to understand that the session starts when a user logs on, and the specified language is associated with the session. Although the user can start any number of applications in the session, for example, in multiple Browser tabs, it is not possible to set a different language for individual applications called in the session,
Setting the Session Language on the Server sideThe script tag for the SAPUI5 startup can be generated on the server side, for example, using the $.session.language property to set the data-sap-ui-language parameter. Applications that have the SAPUI5 <script> tag in a static HTML page can use this approach, as illustrated in the following example:
<script id="sap-ui-bootstrap" type="text/javascript" src="/sap/ui5/1/resources/sap-ui-core.js" data-sap-ui-theme="sap_goldreflection" data-sap-ui-libs="sap.ui.commons" data-sap-ui-language="$UI5_LANGUAGE$"></script>
The called XSJS page replaces the $UI5_LANGUAGE$ parameter with the value stored in $.session.language when loading the static HTML page, as illustrated in the following example:
var objectId = $.repo.createObjectId("","sap.package_name","StaticPage","html");…var indexHtmlObject = $.repo.readObject(activeSession,objectId,activeVersion);var respTxt = indexHtmlObject.cdata.replace("$UI5_LANGUAGE$", $.session.language);
$.response.setBody(respTxt);
Setting the Session Language with an AJAX CallYou can include an HTTP call in the static HTML page to fetch the correct language from the server using some server-side JavaScript code, as illustrated in the following example:
<script> var xmlHttp = new XMLHttpRequest(); xmlHttp.open( "GET", "getAcceptLanguage.xsjs", false ); xmlHttp.send( null ); window["sap-ui-config"] = {
242
P U B L I C© 2013 SAP AG or an SAP affiliate company. All rights reserved.
SAP HANA Developer GuideWriting Server-Side JavaScript Code

"language" : xmlHttp.getResponseHeader("Content-Language") }</script><script id="sap-ui-bootstrap"…</script>
This approach requires an XSJS artifact (for example, getAcceptLanguage.xsjs) that responds to the AJAX call with the requested language setting, as illustrated in the following example:
$.response.contentType = "text/plain";$.response.headers.set("Content-Language", $.session.language);$.response.setBody("");
10.7 Server-Side JavaScript Tracing
The SAP HANA XS server-side JavaScript API provides tracing functions that enable your application to write predefined messages in the form of application-specific trace output in the xsengine trace files (xsengine*.trc) according to the trace level you specify, for example, “info”(information) or “error”.If you use the server-side JavaScript API to enable your application to write trace output, you can choose from the following trace levels:
● debug● info● warning● error● fatal
For example, to enable debug-level tracing for your JavaScript application:
$.trace.debug("request path: " + $.request.path);
NoteYou can view the xsengine*.trace files in the Diagnosis Files tab page in the Administration perspective of the SAP HANA studio.
10.7.1 Tracing Server-Side JavaScript ApplicationsThe server-side JavaScript API for SAP HANA XS enables you to activate the writing of trace messages into an application-specific trace file; the following trace levels are available: debug, error, fatal, info, and warning.
By default, applications write messages of severity level error to the xsengine*.trc trace files; you can increase the trace level manually, for example, to fatal. In SAP HANA XS, the following steps are required to enable trace output for your server-side JavaScript application:
1. Open the SAP HANA studio.2. In the Navigator view, double-click the SAP HANA instance to open the Administration view for the repository
where your server-side JavaScript source files are located.3. Choose the Trace Configuration view.
SAP HANA Developer GuideWriting Server-Side JavaScript Code
P U B L I C© 2013 SAP AG or an SAP affiliate company. All
rights reserved. 243

4. In the Global Database Trace screen area, choose Edit Configuration.The Edit Configuration icon is only visible if you have the required privileges on the selected SAP HANA system.
5. Select the Show All Components checkbox.6. Enter the partial or full name of your application into the search box.7. Expand the GLOBAL node, if necessary, to view registered traces for the application name returned by the
search operation.8. Find the trace matching your application name and select the trace level you want to use to generate output.
The application name is the location (package) of the .xsapp file associated with the application you are tracing. The trace topic is named xsa: <appName>.
9. Choose Finish to activate the trace level changes.
10.7.2 Viewing Server-Side JavaScript Application Trace FilesThe server-side JavaScript API for SAP HANA XS enables you to instruct your JavaScript applications to write application-specific trace messages in the xsengine*.trc trace files, which you can view in the Diagnosis Files tab page of the Administration perspective in the SAP HANA studio. The following trace levels are available: debug, error, fatal, info, and warning.
To view trace output for your server-side JavaScript application, perform the following steps:
1. Open the SAP HANA studio.2. In the Navigator view, double-click the SAP HANA instance to open the Administration view for the repository
where your server-side JavaScript source files are located.3. Choose the Diagnosis Files tab page.4. In the Filter box, enter a string to filter the list of search files displayed, for example, xsengine*.trc.
The timestamp displayed in the Modified column does not always reflect the precise time at which the trace file was written or most recently modified.
5. Locate the trace file for your SAP HANA XS application and doubleclick the entry to display the contents of the selected trace-file in a separate tab page.
10.8 Debugging Server-Side JavaScript
SAP HANA studio enables you to debug XS JavaScript files, including setting breakpoints and inspecting variables.
CautionA port must be opened to enable debugging. For security reasons, the debug port is turned off by default.
1. In a browser, run the XS JavaScript source file that you want to debug.2. Create a debug configuration for debug sessions for a specific SAP HANA installation.
a) Open the Debug perspective.
b) Choose and select Debug Configurations.c) Create a new XS JavaScript configuration by double-click XS JavaScript.
244
P U B L I C© 2013 SAP AG or an SAP affiliate company. All rights reserved.
SAP HANA Developer GuideWriting Server-Side JavaScript Code

d) Enter a name for the configuration.e) Enter the host and debug port for your SAP HANA system.f) Select Apply.
g) Select Close.3. Set breakpoints in the JavaScript code by double-clicking on the left vertical ruler.
SAP HANA Developer GuideWriting Server-Side JavaScript Code
P U B L I C© 2013 SAP AG or an SAP affiliate company. All
rights reserved. 245

4. Run your debug configuration for your server by choosing and selecting your debug configuration.5. In the Select Session window, select the SAP HANA XS session ID you are debugging, and then click Select.
The session ID is the value of the xsSessionId cookie in your browser session.
6. Refresh the browser. The XS JavaScript is now running in debug mode. Your client is now attached to the session, and execution is suspended at the first breakpoint.
You can now perform standard Eclipse debug tasks, such as resuming execution, stepping through execution, and adding breakpoints. The following debug views are available:
● Debug● Breakpoints● Variables
246
P U B L I C© 2013 SAP AG or an SAP affiliate company. All rights reserved.
SAP HANA Developer GuideWriting Server-Side JavaScript Code

● Expressions, which you can use to inspect global variables, such as $.request and other SAP HANA XS JavaScript API objects
Related LinksDebug Perspective [page 32]The Debug perspective in the SAP HANA studio is the standard Eclipse Debug perspective, enabling you to start debug sessions, create breakpoints and watch variables.
Opening a Port for Server-Side JavaScript Debugging [page 247]
10.8.1 Opening a Port for Server-Side JavaScript DebuggingTo enable debugging of XS JavaScript code, you must open a debug port on SAP HANA.The debug port is unsecured, as anyone can attach a debug client without needing credentials. A connected client can attach to and debug any HTTP session, and can possibly run their own code.Therefore, it is recommended that you enable this feature only in non-production or development environments that are accessible by a limited number of developers and that do not contain sensitive and confidential data. In production systems that contain sensitive or confidential data, it is recommended that you keep debugging disabled or enable it only temporarily.To increase security, customers should consider applying additional network-level security measures, for example, limiting network access to the debug port.
1. In SAP HANA studio, open the Navigator view.2. Right-click your system, and select Administration from the popup menu.
3. In the Configuration tab, add a section called xsengine.ini debugger (if it does not exist) and add the following parameters:
○ enabled = true○ listenport = <debug port>
10.8.2 Troubleshooting Server-Side JavaScript DebuggingIf the execution of your XS JavaScript code is not stopping at a breakpoint, consider the following solutions.
● Make sure the debug port is open on the server.● Make sure you have opened a session with the server by calling an XS JavaScript file from your browser
before starting to debug. Then, when starting to debug, make sure to select the correct session, whose ID is found in the xsSessionId cookie in your browser session.
● Restart your SAP HANA studio with the -clean option, for example:
hdbstudio.exe -clean
You can tell if this solution is needed by checking whether the SAP HANA studio recognizes the breakpoints as type SAP HANA XSE Script Breakpoint. To check, select the Breakpoints view menu, then select Group By Breakpoint Types .
SAP HANA Developer GuideWriting Server-Side JavaScript Code
P U B L I C© 2013 SAP AG or an SAP affiliate company. All
rights reserved. 247

11 Building UIs
11.1 Building UIs with SAPUI5
This section provides introductory information about UI development toolkit for HTML5.UI development toolkit for HTML5 (SAPUI5) is a user interface technology that is used to build and adapt client applications based on SAP HANA. You can install SAPUI5 in the SAP HANA studio to build user interfaces delivered by SAP HANA's Web server.SAPUI5 runtime is a client-side HTML5 rendering library with a rich set of standard and extension controls and a lightweight programming model. To support you in developing applications, SAPUI5 application development tools comes with a set of eclipse-based wizards and editors. SAPUI5 application development tools provides wizards to create application projects and views according to the model-view-controller concept and other features like JavaScript code completion, templates and snippets, and in-place application preview.SAPUI5 provides many features to enable you to easily create and extend state-of-the-art user interfaces. SAPUI5 supports the following features:
● RIA-like client-side features based on JavaScript.● CSS3, which allows you to adapt themes to your company's branding in an effective manner● Extensibility concept regarding custom controls, meaning that you can extend existing SAPUI5 controls as
well as develop your own controls● Open source jQuery library used as foundation● Full support of the SAP product standard● Compliance to Open Ajax; can be used together with standard JavaScript libraries● Produced in a release independent code line to enable short shipment cycles
SAPUI5 SDKThe SAPUI5 SDK (Demo Kit) provides the following sections:
● Developer Guide with additional information about SAPUI5, the used programming languages, open source technologies, development tools, and APIs
● Controls containing running demo examples with descriptions and source codes● API reference with JavaScript documentation of Framework and Control API● Test Suite, which shows all controls running with different property settings where you can interactively adapt
the controls you use for test purposes
The Demo Kit is installed as a delivery unit. To directly access the Demo Kit, use the following link and replace the placeholders accordingly: <xsengine protocol>://<xsengine server>:<xsengine port>/sap/ui5/1/sdk/index.html. The following references to the sections of the Developer Guide in the Demo Kit base on this URL.
11.1.1 Installing SAPUI5 Application Development ToolsThis section provides a short description how to install SAPUI5 tools for SAP HANA.Before you start the installation of SAPUI5 application development tools, make sure that you comply with the following requirements:
● SAP HANA studio is installed.
248
P U B L I C© 2013 SAP AG or an SAP affiliate company. All rights reserved.
SAP HANA Developer GuideBuilding UIs

● SAPUI5 application development tools are downloaded from the SAP Software Download Center on SAP Service Marketplace (http://service.sap.com/swdc) and search for SAPUI5 TOOLS IDE PLUGIN 1.00.
For more information about the installation of SAPUI5 application development tools, see the SAPUI 5 Installation Guide for SAP HANA on SAP Service Marketplace or SAP Note 1747308.
11.1.2 Creating an SAPUI5 ApplicationThis section provides an example how to create an SAPUI5 application.
Prerequisites: You have installed the SAPUI5 application development tools in your SAP HANA studio.
Using the tools SAPUI5 provides, you create application projects and views according to the model-view-controller concept with a clear separation between the user interface and the controller logic.The following steps describe the generic procedure to create an SAPUI5 application for SAP HANA XS:
1. Create an SAPUI5 application project using SAPUI5 application development tools in Eclipse.2. Develop the client-side JavaScript script code.3. If the package that contains your SAPUI5 application project has not been exposed via HTTP already, you
need to create .xsapp and .xsaccess files, see Creating the Application Descriptors. This is not necessary, if the project was created as a sub-package of an SAP HANA XS application. To make this project a valid SAP HANA application, add the .xsapp and .xsaccess files.
4. Optional step (not part of the example below): Develop a server-side logic for the project by means of server-side JavaScript or OData service.
5. Activate the project on SAP HANA's Web server.6. Execute the application on SAP HANA'S Web server.
For SAPUI5 applications, the following view types are supported:
● JavaScript: JSview (file extension: js)● XML: XMLview (file extension: xml)● JSON: JSONview (file extension: json)
The following procedure gives an example for the creation of an SAPUI5 application:
1. To open the wizard for creating an SAPUI5 application, choose File New Other SAPUI5 Application Development Application Project .
2. Specify the name, for example MyApplication, and location for your project. Select Desktop and Create an Initial View.
You can also add a view later on by creating a separate SAPUI5 application view. If a new view has been created for an existing SAPUI5 application project, the view needs to be manually called either from the index.html page, or from another view via view nesting. For more information, see the Demo Kit - Developer Guide under Model View Controller Concept.
3. Enter a name for the initial view in the Name field, for example, helloworld. Do not add a file extension. This is done automatically based on the respective view type.
4. Choose JavaScript and finish the wizard.The following application parts are created:
○ View file; in this example, a JSview file○ Controller file○ index.html file containing the references for the sap.ui.core and sap.ui.commons libraries, the
theme (sap_goldreflection), and information about the script type and the script ID. In a second script
SAP HANA Developer GuideBuilding UIs
P U B L I C© 2013 SAP AG or an SAP affiliate company. All
rights reserved. 249

block, the index file refers to the project name, view type, and name. A content default for placing the controls on the UI later on and the ARIA application role.
5. Change the bootstrap tag (located in the index.html file) to enable the application to access the SAPUI5 libraries on the xsengine as follows: src="resources/sap-ui-core.js" to src="/sap/ui5/1/resources/sap-ui-core.js".
6. Create a new folder i18n in the WebContent folder. Add a new file messagebundle.hdbtextbundle to the i18n folder with the following content:
# TRANSLATE# XBUT,30MY_BUTTON_TEXT=Hello {0} button
NoteA specific suffix .hdbtextbundle is needed for the resource bundles on SAP HANA (so called .properties file on other platforms).
7. To add a control to your view (in this example to the helloworld.view.js), insert the following coding:
createContent : function(oController) { // require the jQuery.sap.resources module jQuery.sap.require("jquery.sap.resources");
// load the resource bundle var oBundle = jQuery.sap.resources({ // specify url of the .hdbtextbundle url : "i18n/messagebundle.hdbtextbundle" });
var aControls = []; var oButton = new sap.ui.commons.Button({ id : this.createId("MyButton"), // access the text using the welcome key and pass the value // for the placeholder ( {0} ) via an array text : oBundle.getText("MY_BUTTON_TEXT", [ "World" ]) }); aControls.push(oButton.attachPress(oController.doIt)); return aControls;}
The coding is put into the createContent method, which creates the content of the view. The View wizard creates the body of the method.
NoteIn your SAPUI5 coding, refer to the resource bundle with the URL containing the file extension, for example:
var oBundle = jQuery.sap.resources({ url : "i18n/messagebundle.hdbtextbundle", locale: sLocale})var oResourceModel = new sap.ui.model.resource.ResourceModel({ bundleURL : "i18n/messagebundle.hdbtextbundle "})
8. To implement the doIt method for the button's press event, insert the following coding into the controller (in this example: helloworld.controller.js):
250
P U B L I C© 2013 SAP AG or an SAP affiliate company. All rights reserved.
SAP HANA Developer GuideBuilding UIs

doIt : function(oEvent) { alert(oEvent.getSource().getId() + "does it!"); }
9. Create a .xsapp and a .xsaccess file.
10. Share, commit, and activate your project to transfer the SAPUI5 application to the SAP HANA repository.11. To start the UI application on SAP HANA's Web server, use the following URL: <xsengine protocol>://
<xsengine server>:<xsengine port>/MyApplication/WebContent/index.html. Replace the placeholders accordingly; MyApplication refers to the name of your project according to Step 2.
Local Testing of a SAPUI5 ApplicationThis section provides a description how local testing can be performed as an optional step.If you want to test the SAPUI5 application before you activate your project, you can test it within Eclipse on your local PC. This local testing is optional. If you perform a local test, note the following:
● The src attribute in the bootstrap tag of the index.html file needs to have a different URL than the src attribute for execution on SAP HANA's Web server. This can be achieved by manually changing the URL before submitting to SAP HANA's Web server, or by using a code snippet, that detects if the application runs locally or not, and sets the URL accordingly.
● If you call a data service in form of a server-side JavaScript or an OData service that resides in the SAP HANA box, it is necessary to use a URL that points to SAP HANA's Web server. It is usually also necessary to use the so-called proxy servlet to avoid cross-domain issues. In case of the bootstrap URL, for example, the URL for local execution differs from the URL for execution on SAP HANA's Web server. For more information, see the procedure below and the referenced section in the Demo Kit.
For more information, see the Demo Kit - Developer Guide under Testing a SAPUI5 Application.To perform a local test, proceed as follows:
1. Change the URL set as "src" in the bootstrap tag of the index.html file (see explanation above). To avoid a manual change before submitting the application, use the following code snippet that detects the context automatically, in which the application runs, and sets the URL accordingly.
<script src="/sap/ui5/1/resources/sap-ui-core.js" id="sap-ui-bootstrap" data-sap-ui-libs="sap.ui.commons" data-sap-ui-theme="sap_goldreflection" ></script><!-- add sap.ui.table,sap.ui.ux3 and/or other libraries to'data-sap-ui-libs' if required --><script>// use alternative bootstrap for testing locally in// Eclipse during development time// this is only a helper mechanism during development timeif (!window.sap) {var oriTag = document.getElementById("sap-ui-bootstrap");oriTag.id = "wrong";oriTag.src = "wrong.js";var script = "<script id='sap-ui-bootstrap' " +"src='resources/sap-ui-core.js' " +"data-sap-ui-theme='sap_goldreflection' " +"data-sap-ui-libs='sap.ui.commons'> " +"<\/script>";document.write(script);}</script>
2. If you use requests to backend services, you need to use a suitable URL that points to the backend server and, to avoid cross-domain issues, you need to use the so-called proxy servlet. Similar to the bootstrap tag, you
SAP HANA Developer GuideBuilding UIs
P U B L I C© 2013 SAP AG or an SAP affiliate company. All
rights reserved. 251

can change the respective code manually before submitting, or you can use a code snippet that determines the URL automatically depending on the context, in which the application runs.
NoteAs the server-side logic of an SAPUI5 application cannot be executed locally on the developer's PC, it can only run on the server. Hence, this needs to be committed and activated before it can be tested.
For more information, see the Demo Kit - Developer Guide under Testing a SAPUI5 Application Enabling Backend Access for Local Testing .
3. To test your application, choose one of the following options:
○ Open the context menu for the index.html file located in your project's WebContent folder and choose Run As Web App Preview .
○ To run your application on a server, for example Tomcat, open the context menu of your project, choose Run As Run on Server and select the respective server.
SAPUI5 Runtime Version ComparisonThis section describes how to compare the SAPUI5 runtime versions installed locally and on SAP HANA' Web server.
It is possible that the SAPUI5 runtime version installed locally in your Eclipse differs from the SAPUI5 runtime version on SAP HANA's Web server.To verify, which version is installed locally, you can check the SAP HANA studio Eclipse version via Help About SAP HANA Studio Installation Details Features under "SAPUI5 Feature" (com.sap.ui5.uilib.feature).To find out the SAPUI5 runtime version on SAP HANA's Web server, open the SAP HANA modeler perspective in the SAP HANA studio Eclipse via Window Open Perspective Modeler . Choose Setup Delivery Units ...
. The version, support package, and patch version of the SAPUI5 runtime libs are displayed there. You can also open the SAPUI5 runtime index page under <xsengine protocol>://<xsengine host>:<xsengine port>/sap/ui5/1/index.html and press CTRL-ALT-SHIFT-P. The SAPUI5 runtime version is displayed in the <SAPUI5 Version> field.If the local version is, for example, newer than the version on SAP HANA's Web server and you use code completion or test the application locally in Eclipse, the results may differ or you may use features that are not available on the server. We recommend the following:
● To detect new features, check the @since tags provided in the JSDoc.● Before deployment, test the application locally in Eclipse with the runtime resources from the server by
configuring the resource servlet to fetch the runtime resources from the server. For more information, see the Demo Kit - Developer Guide under Testing an SAPUI5 Application UI5 Library Location Used for Testing .
● After deployment, always test the application on the server.
11.1.3 Supporting TranslationThis section provides a description of what needs to be done to support the translation of resource bundles.To enable the translation of the user interface, define a specific suffix for the resource bundles and use a specific first line in the resource bundle file. This is described in step 6 in the Creating an SAPUI5 Application topic.For more information, see the Demo Kit - Developer Guide under Localization.Related LinksCreating an SAPUI5 Application [page 249]This section provides an example how to create an SAPUI5 application.
252
P U B L I C© 2013 SAP AG or an SAP affiliate company. All rights reserved.
SAP HANA Developer GuideBuilding UIs

11.2 Using UI Integration Services
SAP HANA UI Integration Services is a set of Eclipse-based and browser-based tools, as well as client-side APIs, which enable you to integrate standalone SAP HANA client applications into Web user interfaces to support end-to-end business scenarios.These user interfaces are referred to as application sites. Pre-built standalone SAP HANA client applications that are integrated into application sites are referred to as widgets.
Prerequisites● You are assigned to the sap.hana.uis.db::SITE_DESIGNER role, and end users are assigned to the
sap.hana.uis.db::SITE_USER role.For more information, see Granting Privileges to Users [page 364]
● The HANA_UI_INTEGRATION_SVC delivery unit is imported and activated.To import the delivery unit, perform the following steps:
1. In the File menu, choose Import....
2. Select the import source SAP HANA Content Delivery Unit , and choose Next.3. Select the target system for the delivery unit.4. Choose the Server option. In the dropdown list of available files, select <path>/
HANA_UI_INTEGRATION_SVC.tgz, and choose Finish.For more information, see Importing Delivery Units [page 370].
Related LinksCreating an Application Site [page 253]Before you can start designing an application site, you need to create it in the SAP HANA studio.
Designing an Application Site [page 254]You can visually design and manage application sites in a browser-based design environment.
Developing Widgets [page 257]SAP HANA UI Integration Services provides a number of tools and client-side APIs to use when developing widgets for integration into application sites.
11.2.1 Creating an Application SiteBefore you can start designing an application site, you need to create it in the SAP HANA studio.
To create a new application site in the SAP HANA studio:
1. In the project's context menu in Project Explorer, choose New Other … .
2. In the New dialog box, choose SAP HANA Development Application Site , and then choose Next.3. In the New Application Site dialog box, select a parent folder, enter the site properties, and choose Finish.4. To open the site in the preferred browser once the wizard is completed, select the Open in Browser checkbox.
NoteApplication sites are best viewed in Google Chrome or Mozilla Firefox. For convenience, select one of these browsers as the default browser in SAP HANA studio.
Note
SAP HANA Developer GuideBuilding UIs
P U B L I C© 2013 SAP AG or an SAP affiliate company. All
rights reserved. 253

If the Open in Browser checkbox is disabled, it means that the site is not automatically committed to the repository. To enable this, follow the instructions on screen.
5. If the site is not automatically committed to the repository, commit it by choosing Team Commit from the site's .xsappsite file context menu.
6. To open the site in browser, double-click the site's .xsappsite file.
NoteIf you open the site from its context menu, make sure you choose the default Application Site Editor. Choosing another editor is not recommended.
7. To make the site available to end users, activate it by choosing Team Activate from the site's .xsappsite file context menu.
NoteThe URL of the site’s end-user version is displayed in the Site Properties pane in the design environment.
Related LinksAccessing Site Properties [page 254]You can view and modify application site properties.
11.2.2 Designing an Application SiteYou can visually design and manage application sites in a browser-based design environment.In this environment, you can perform the following tasks:
Task Instructions
View and modify site properties Accessing Site Properties [page 254]
Add, organize, or remove pages Managing Pages [page 255]
Add widgets to pages Adding Widgets to Pages [page 255]
Manage widgets on pages Managing Widgets on a Page [page 255]
Choose site layout options Configuring Site Layout [page 256]
You perform most of these tasks in the design panel located to the right of the content area of the screen. By default, the design panel is collapsed into a side bar with buttons. To expand the panel, click a side bar button relevant for your current task.
Accessing Site Properties You can view and modify application site properties.
To access the application site's properties, choose in the design panel. Most of the properties are read-only.The URL property contains the URL of the site’s runtime version that is available to end users after the site is activated.You can modify the Title or Description properties:
1. Double-click on the property field and type the new name.2. The change is saved automatically. To discard the change while the field is in focus, press Esc.
254
P U B L I C© 2013 SAP AG or an SAP affiliate company. All rights reserved.
SAP HANA Developer GuideBuilding UIs

Managing Pages You can manage pages of an application site in a browser-based design environment.
To manage pages, choose in the design panel. In the Pages pane that opens, you can perform the following tasks:
Task Description
Add a page Click the Add box. A new page tab with the default name New Page is added after the last page.
Rename a page Click the page name that you want to change, and edit it in the text box that opens. The change is saved automatically. To discard the change while the text box is in focus, press Esc.
Remove a page Point the cursor at the page that you want to remove, and choose . If there are widgets on the page, a confirmation box appears. If you choose OK in the box, the page is removed along with all its widgets.
Move a page Drag and drop a page name to a required position in the list.
Adding Widgets to PagesYou can add available widgets to application site pages.
To add a widget to a page:
1. Open a page by choosing its tab.
2. In the design panel, choose to open the Widgets pane, which contains available widgets.3. To locate the required widgets, type a widget name or a part of it in the search box. You can also filter the
widgets by folder: from the dropdown box, select a folder in which the widgets were created. The widgets displayed in the pane match the selection criteria.
4. Double-click the widget of your choice, or drag and drop it onto the current page. Reposition the widgets on the page as needed.
Related LinksManaging Widgets on a Page [page 255]You can organize and manage widgets on application site pages.
Managing Widgets on a PageYou can organize and manage widgets on application site pages.
You can perform the following tasks with widgets on a page:
Task Description
Remove a widget
In the widget menu, choose Remove, and choose Yes in the confirmation dialog.
Rename a widget
In the widget menu, choose Rename, and modify the text in the title bar.
Toggle display of a widget's frame area
In the widget menu, toggle the Display Frame Area checkbox.
SAP HANA Developer GuideBuilding UIs
P U B L I C© 2013 SAP AG or an SAP affiliate company. All
rights reserved. 255

Task Description
Toggle full screen view
Choose the or icon to open or close the full screen view.
NoteThis setting is not persisted across sessions.
Resize a widget Drag the borders of the widget to resize it.
Rearrange widgets on a page Drag and drop widgets to the required positions.
Configuring Site LayoutYou can configure certain site layout options.
You can adjust the appearance and behavior of the shell's navigation bar to the needs of specific applications. For example, if your application site contains only one widget that has its own navigation controls, you might want to disable the navigation capabilities of the shell.
1. In the design panel, choose to open the Layout pane.2. In the Navigation Bar dropdown box, choose the required option:
Option Description
Full Fully functional navigation bar of the standard size
Narrow Fully functional narrow navigation bar
Header Only header with no navigation; suitable for sites with only one page
None No navigation bar at all; suitable for sites containing a single widget with its own header
The selected option takes effect for all users of the application site once the site is activated.
11.2.3 Creating a Widget To integrate a standalone SAP HANA XS client application or other Web application into application sites, you need to create a widget based on this application.
To create an application-based widget in the SAP HANA studio, you need to write an XML specification file that either references or embeds the client-side code of the application, and run the Create New Widget wizard as follows:
1. In the project's context menu in Project Explorer, choose New Other... .
2. In the New dialog box, choose SAP HANA Development Widget , and choose Next.3. In the New Widget dialog box, choose the parent folder, enter the widget file name and specification file name,
and choose Next.
NoteThe specification file should be located under the current project's folder.
4. In the next step of the wizard, set the widget properties, and choose Finish.
5. To make the widget available for application sites, activate the widget by choosing Team Activate from the .xswidget file's context menu.
256
P U B L I C© 2013 SAP AG or an SAP affiliate company. All rights reserved.
SAP HANA Developer GuideBuilding UIs

6. To edit the widget properties, open the .xswidget file, make the required changes, and then activate the widget, as described previously.
Related LinksSample Widget Specification Files [page 257]A widget specification file should either reference the client-side code of an application, or directly embed the application's HTML code in the <Content> section.
Developing Widgets [page 257]SAP HANA UI Integration Services provides a number of tools and client-side APIs to use when developing widgets for integration into application sites.
11.2.4 Developing WidgetsSAP HANA UI Integration Services provides a number of tools and client-side APIs to use when developing widgets for integration into application sites.Related LinksSample Widget Specification Files [page 257]A widget specification file should either reference the client-side code of an application, or directly embed the application's HTML code in the <Content> section.
Site Context API [page 258]Provides a messaging mechanism that enables you to implement communication between widgets in the same application site.
GadgetPrefs API [page 261]Provides methods to persist widget preferences on the server side.
SetTitle [page 263]A method that can be used to set a widget's title.
Sample Widget Specification FilesA widget specification file should either reference the client-side code of an application, or directly embed the application's HTML code in the <Content> section.
The following are sample widget specification files:
● References an application:
<?xml version="1.0" encoding="UTF-8" ?> <Module> <ModulePrefs title="Calendar"> </ModulePrefs> <Content type="html" href="/content/applications/calendar/index.html"> </Content> </Module>
● Embeds HTML code of an application:
<?xml version="1.0" encoding="UTF-8" ?><Module> <ModulePrefs title="Color Tester"> <Require feature="gadgetprefs"/> </ModulePrefs>
<UserPref name="color" default_value="white"/>
<Content type="html">
SAP HANA Developer GuideBuilding UIs
P U B L I C© 2013 SAP AG or an SAP affiliate company. All
rights reserved. 257

<![CDATA[ <html> <head> <script language="javascript" type="text/javascript"> var gadgetPrefs = new gadgets.GadgetPrefs(); window.onload = initiateGadgetPrefs; function initiateGadgetPrefs() { setBGcolor(); } function setColor() { var selectedColor = document.getElementById('color').value; gadgetPrefs.setPreference('color', selectedColor); setBGcolor(); }
function setBGcolor() { var currentColor = gadgetPrefs.getPreference("color"); document.getElementById('main').setAttribute("bgcolor", currentColor); } </script> </head>
<body id="main" bgcolor="#F290F0" style="font-family:Arial;"> <label style="font-weight: bold ">Select background color: </label><br> Color: <input type="text" name="color" id='color'/> <input type="button" value="Change Color" onClick="setColor();"/><br> </body> </html>
]]> </Content></Module>
Site Context APIProvides a messaging mechanism that enables you to implement communication between widgets in the same application site.
A widget can publish a message to the dedicated context object so that other widgets can subscribe a callback function to this message.To use the API, declare this feature in the <ModulePrefs> section of the widget's specification file:
<ModulePrefs><Require feature="sap-context"/>…</ModulePrefs>
The Site Context API provides the following methods:
● publish(key, value): Publish [page 258]● subscribe(callback): Subscribe [page 259]● unsubscribe(subscriptionID): Unsubscribe [page 260]
PublishA method of the Site Context API that can be used by a widget to publish a message to other widgets.
258
P U B L I C© 2013 SAP AG or an SAP affiliate company. All rights reserved.
SAP HANA Developer GuideBuilding UIs

publish(key, value)Use to publish messages to the sapcontext object. A message is a key-value pair that is stored in the context. The updated context is sent to all subscribed callbacks as a parameter.A widget can publish multiple values with the same key. Each time a widget publishes a different value with the same key, the new value replaces the previous one.
ParametersParameter Type Description
key String The key of the published pair
value String The value of the published pair
Example<script language ="JavaScript"> ... gadgets.sapcontext.publish(“Country”, “France”); ...</script>
Related LinksSubscribe [page 259]A method of the Site Context API that can be used by a widget for subscribing to messages published by other widgets.
Unsubscribe [page 260]A method of the Site Context API that can be used by a widget to remove an existing subscription.
SubscribeA method of the Site Context API that can be used by a widget for subscribing to messages published by other widgets.
subscribe(callback) Use for subscribing widgets to messages that are published to the sapcontext context object. The message is a key-value pair that is stored in the context. The updated context is sent to all subscribed callbacks as a parameter.
ParametersParameter Type Description
callback Function The callback function that is called in response to the published message.Receives two parameters: topic and context.The topic parameter always equals sap-context.
ReturnsSubscription ID
SAP HANA Developer GuideBuilding UIs
P U B L I C© 2013 SAP AG or an SAP affiliate company. All
rights reserved. 259

Example<script language ="JavaScript"> ... var callback = function (topic, context) { var color = context.getPropertyByKey(“widget-color”); paintBackground(color); }
function subscribe() { var subID = gadgets.sapcontext.subscribe(callback); } //To subscribe a widget immediately after it is loaded, // register the subscribe function using gadgets.HubSettings.onConnect
gadgets.HubSettings.onConnect = subscribe; ...</script>
You can also call the subcribe method at any point directly.Related LinksPublish [page 258]A method of the Site Context API that can be used by a widget to publish a message to other widgets.
Unsubscribe [page 260]A method of the Site Context API that can be used by a widget to remove an existing subscription.
UnsubscribeA method of the Site Context API that can be used by a widget to remove an existing subscription.
unsubscribe(subscriptionID) Use to remove an existing subscription.
ParametersParameter Type Description
subscriptionID Int ID of the subscription to remove
Example<script language ="JavaScript"> ... var subID = gadgets.sapcontext.subscribe(callback); ... gadgets.sapcontext.unsubscribe(subID); ...</script>
Related LinksSubscribe [page 259]A method of the Site Context API that can be used by a widget for subscribing to messages published by other widgets.
Publish [page 258]A method of the Site Context API that can be used by a widget to publish a message to other widgets.
260
P U B L I C© 2013 SAP AG or an SAP affiliate company. All rights reserved.
SAP HANA Developer GuideBuilding UIs

Enabling Communication Between WidgetsYou can enable widgets, running in the same application site, to pass data to each other so that their content and behavior change dynamically according to this data.The following code samples illustrate how to implement communication between two widgets by using the publish-subscribe messaging mechanism provided by the Site Context API.The first widget displays a list of sales orders. Once the user selects a sales order from the list, the second widget displays the details of the order.First (source) widget:
<script language ="JavaScript">
// Publish event when user selects a sales order from the list function onSalesOrderSelected(var salesOrderID){gadgets.sapcontext.publish("selectedSalesOrderID", salesOrderID);}</script>
Second (target) widget:
<script language ="JavaScript"> // Callback function to display order detailsfunction callback (topic, context) { var salesOrderID = context.getPropertyByKey(“selectedSalesOrderID”); showSalesOrderDetails(salesOrderID);}
function subscribe() { var subID = gadgets.sapcontext.subscribe(callback);}
// To subscribe a widget immediately after it is loaded, // register the subscribe function using gadgets.HubSettings.onConnect
gadgets.HubSettings.onConnect = subscribe;
</script>
GadgetPrefs APIProvides methods to persist widget preferences on the server side.
The GadgetPrefs API enables you to persist modified widget preferences on the server side. Persisted preferences of a widget override its default preferences. At design time, a single set of preferences is persisted for a widget, whereas at runtime a separate set of widget preferences is persisted for each user.To use the API, declare this feature under the <ModulePrefs>tag of the widget's specification file:
<ModulePrefs><Require feature="gadgetprefs"/>…</ModulePrefs>
The GadgetPrefs API contains the following methods:
● getPreference(key): GetPreference [page 262]● setPreference(key,value): SetPreference [page 262]
SAP HANA Developer GuideBuilding UIs
P U B L I C© 2013 SAP AG or an SAP affiliate company. All
rights reserved. 261

GetPreferenceA method of the GadgetPrefs API that can be used to retrieve a preference of a widget.
getPreference(key) Retrieves the value of a preference specified by its key.
ParametersParameter Type Description
key String Key of a preference
ReturnsThe value assigned to the specified key, or undefined, if the key is not found.
Example<script language ="JavaScript"> ... var val = gadgetPrefsApi.getPreference(key); ...</script>
Related LinksSetPreference [page 262]A method of the GadgetPrefs API that can be used to set a preference of a widget.
SetPreferenceA method of the GadgetPrefs API that can be used to set a preference of a widget.
setPreference(key,value) Sets a preference of a widget by defining a key-value pair.
ParametersParameter Type Description
key String Key of a preference
value String Value of the key
Example<script language ="JavaScript"> ...var gadgetPrefsApi= new gadgets.GadgetPrefs();gadgetPrefsApi.setPreference (“key1”,”value1”); ...</script>
Related LinksGetPreference [page 262]A method of the GadgetPrefs API that can be used to retrieve a preference of a widget.
262
P U B L I C© 2013 SAP AG or an SAP affiliate company. All rights reserved.
SAP HANA Developer GuideBuilding UIs

SetTitleA method that can be used to set a widget's title.
setTitle(title) Use to set the title of a widget in the current session. The title is not persisted across sessions.To use the API, declare this feature under the <ModulePrefs> tag of the widget's specification file:
<ModulePrefs><Require feature="settitle"/>…</ModulePrefs>
ParametersParameter Type Description
title String Title of a widget
Example<script language ="JavaScript"> ...var newTitle="Hello World";gadgets.window.setTitle(newTitle); ...</script>
SAP HANA Developer GuideBuilding UIs
P U B L I C© 2013 SAP AG or an SAP affiliate company. All
rights reserved. 263

12 Enabling Search
With a SAP HANA database, your users will want to search tables and views much like they would when searching for information on the Internet. In SAP HANA, you can either directly query data using SQL queries or you can build search apps using a UI toolkit.
Before enabling search, you must meet the following prerequisites:
● Your SAP HANA database contains column-oriented tables.● A valid data type is assigned to each column. The data types of the columns determine how you can query
your data.
In SAP HANA, you can search on single or multiple columns of almost any visible data type. In addition to standard string search, SAP HANA also supports full text search.During a full text search, the SAP HANA search engine examines structured text, such as author and date attributes, as well as unstructured text, such as body text. Unlike a string search, for a text search, the sequence of words and characters is not critical for finding matches. A full text index enables this functionality by analyzing and preprocessing the available text semantically. This includes normalization, tokenization, word stemming, and parts of speech tagging.To enable search, proceed as follows:
1. Create any required full text indexes for the columns in the table.
○ For columns defined with the data type TEXT or SHORTTEXT(n), full text indexes are automatically generated. For columns of any other data type, you must manually create any required full text indexes.
○ When you create a full text index, you can also define synchronization and trigger text analysis.2. Build SQL search queries.
○ Search queries use the SQL SELECT statement.○ For searches on large object types or text, the queries must include the CONTAINS predicate.
3. Optionally, build search apps using the UI toolkit for SAP HANA Info Access .
○ The UI toolkit provides UI building blocks for developing browser-based search apps for end users.○ The UI toolkit is based on HTML5 and JavaScript libraries.○ The UI toolkit connects to the database using the SAP HANA Info Access service that wraps search and
analytic SQL queries and exposes them through an HTTP interface.
12.1 Creating Full Text Indexes
When you create a TEXT or SHORTTEXT column in a table, SAP HANA automatically creates a corresponding full text index. However, for columns of other data types, you must manually create and define any necessary full text indexes.
A full text index is an additional data structure that is created to enable text search features on a specific column in a table. Conceptually, full text indexes support searching on columns in the same way that indexes support searching through books.
264
P U B L I C© 2013 SAP AG or an SAP affiliate company. All rights reserved.
SAP HANA Developer GuideEnabling Search

To create a full text index, proceed as follows:
1. Determine the columns for which you require an index.2. Use the CREATE FULLTEXT INDEX statement to create an index with the specified index name.
CREATE FULLTEXT INDEX <index_name> ON <tableref> '(' <column_name> ')' [<fulltext_parameter_list>]
3. Specify any of the following additional parameters for the full text index:
LANGUAGE COLUMN <column_name>LANGUAGE DETECTION '(' <string_literal_list> ')'MIME TYPE COLUMN <column_name>FUZZY SEARCH INDEX <on_off>PHRASE INDEX RATIO <on_off>CONFIGURATION <string_literal>SEARCH ONLY <on_off>FAST PREPROCESS <on_off>FUZZY SEARCH INDEX <on_off>TEXT ANALYSIS <on_off>SYNC|ASYNC |ASYNC FLUSH [QUEUE] EVERY n MINUTES |ASYNC FLUSH [QUEUE] AFTER n DOCUMENTS |ASYNC FLUSH [QUEUE] EVERY n MINUTES OR AFTER m DOCUMENTS
If you do not specify any parameters, the default values are used.The system creates a separate hidden full text index column for each source column that you have specified. You can now create queries to search those columns.
You can check the parameters of an existing full text index by using the SYS.FULLTEXT_INDEXES monitoring view.
ExampleYou want to create a full text index i1 for table A, column C, with the following characteristics:
● Synchronous processing● Fuzzy search index disabled● Languages for language detection: English, German, and South Korean
To create the index, you use the following syntax:
CREATE FULLTEXT INDEX i1 ON A(C) FUZZY SEARCH INDEX OFF SYNC LANGUAGE DETECTION ('EN','DE','KR')
Related LinksFull Text Index Types [page 266]SAP HANA automatically creates full text indexes for columns of type TEXT and SHORTTEXT(n). For other column types, you must manually create any required full text indexes.
Synchronization [page 269]Full text indexes in a SAP HANA database must be created and updated in synchronization with the corresponding columns. This synchronization can be either synchronous or asynchronous.
Full Text Index Parameters [page 275]The content and behavior of a full text index is configured by the use of both default and user-specified parameters. To view the configuration of a full text index, you use the SYS.FULLTEXT_INDEXES view.
SAP HANA Developer GuideEnabling Search
P U B L I C© 2013 SAP AG or an SAP affiliate company. All
rights reserved. 265

12.1.1 Full Text Index TypesSAP HANA automatically creates full text indexes for columns of type TEXT and SHORTTEXT(n). For other column types, you must manually create any required full text indexes.
Characteristic TEXT SHORTTEXT (n) Manually Created
SQL data type exposed to user
NCLOB NVARCHAR(n) Original data type
Data returned by SELECT Original data (returns normalized data if the SEARCH_ONLY parameter is ON)
Original data Original data
SQL insertion mode SYNC SYNC SYNC or ASYNC
Drop index Yes (via drop column) Yes (via drop column) Yes
Text search via CONTAINS Yes Yes Yes
SQL string search Not possible Possible Depends on underlying data type
Change parameters of full text index
Partially Partially All (with rebuild)
Rebuild index No No Yes
Base type can be changed No No No (no dependency between base-column and index available)
TEXT IndexesIn a SAP HANA database, when you create a table that contains large text documents, you can define the columns with the TEXT data type. This data type allows you to query large text documents and present content excerpts in search hit lists. You can also reconstruct the document and display it in its original formatting.When you create a TEXT column and insert content, SAP HANA extracts and processes the text from the original document and then automatically generates a full text index for the column. To create this full text index, SAP HANA replaces the original data in the column with the processed text. This text is then returned with the data type NCLOB. The original data is no longer available.If you insert new entries in the TEXT column, the full text index is automatically and synchronously updated.
Example
CREATE COLUMN TABLE <tablename> ( k int primary key, content TEXT FAST PREPROCESS OFF PHRASE INDEX RATIO 0.77)
LimitationsThe TEXT data type has the following search-relevant limitations:
266
P U B L I C© 2013 SAP AG or an SAP affiliate company. All rights reserved.
SAP HANA Developer GuideEnabling Search

● SQL string searches are not supported.● The SQL functions CONCAT and JOIN are not supported.● TEXT columns cannot be converted to other data types.● Text analysis is not supported.
For TEXT columns, SAP HANA does not support the following SQL expressions:
● HAVING● WHERE with strings or non-alphanumeric characters● ORDER BY● GROUP BY● Aggregate expressions (COUNT, MIN, MAX, etc.)● JOIN ON
Changes to TEXT IndexesTEXT full text indexes are automatically generated and you do not specify names for them; therefore, you cannot directly manipulate them. However, when you create, alter, or drop a table column, the same change is automatically applied to the full text index for that column.By using the ALTER TABLE statement to affect changes on the index, you can alter the following parameters:
● PHRASE INDEX RATIO● FUZZY SEARCH INDEX
SHORTTEXT(n) IndexesIf the tables in your SAP HANA database contain columns with text strings that are relatively short in length, you can define those columns with the SHORTTEXT(n) data type. The SHORTTEXT(n) data type enables both SQL string search and full text search capabilities.SAP HANA preprocesses the text in the column and stores that preprocessed text as a full text index in a hidden column attached to the original column. When queried, the text in the full text index returns with the NVARCHAR data type. The original text is still available; however, search queries are performed, by default, on the text in the index.When you create a column table and define a column with the data type SHORTTEXT(n), as in the following example, a full text index is automatically generated. Whenever new entries are then inserted in the column, the full text index is automatically and synchronously updated.
Example
CREATE COLUMN TABLE <tablename> ( k int primary key, content SHORTTEXT(100) FAST PREPROCESS OFF SEARCH ONLY ON)
Changes to SHORTTEXT(n) IndexesSHORTTEXT(n) full text indexes are automatically generated and you do not specify names for them; therefore, you cannot directly manipulate them. However, when you create, alter, or drop a table column, the same change is automatically applied to the index for that column.When using the ALTER TABLE statement to affect changes on the index, you can only alter the following parameters:
SAP HANA Developer GuideEnabling Search
P U B L I C© 2013 SAP AG or an SAP affiliate company. All
rights reserved. 267

● PHRASE INDEX RATIO● FUZZY SEARCH INDEX
NoteYou cannot change the length of the original text and you cannot convert SHORTTEXT(n) to another data type.
Manually Created IndexesIf the tables in your SAP HANA database contain extensive columns that are frequently queried but do not have automatically generated full text indexes, meaning they are not TEXT or SHORTTEXT(n) type columns, you can improve search performance by manually creating full text indexes.To manually create a full text index, the column must have one of the following SQL data types:
● VARCHAR● NVARCHAR● ALPHANUM● CLOB● NCLOB● BLOB
When you manually create an index, the system attaches a hidden column to the specified column. This hidden column contains textual data that SAP HANA Preprocessor has extracted from the text in the source column. The original text in the source column remains unchanged. Search queries are then performed on the hidden column; however, they always return the original text. Depending on the data type that is assigned to a source column, string search may be possible.You can manually create an index directly after creating a table or you can create the index later. Once you create an index for a column, the system automatically processes any text that is inserted into this column and adds the processed text to the index. Processing for manually created indexes can be performed synchronously or asynchronously.You can specify different parameters when you create a full text index. If parameter changes are required later, you can change the values for the existing index directly or re-create the index with the parameters that you want to change.Related LinksCreating Full Text Indexes [page 264]When you create a TEXT or SHORTTEXT column in a table, SAP HANA automatically creates a corresponding full text index. However, for columns of other data types, you must manually create and define any necessary full text indexes.
Altering Full Text Index Parameters [page 274]You can alter a full text index after it is created. Altering an index includes changing the values of the parameters and altering the parameters by replacing the index.
Synchronization [page 269]Full text indexes in a SAP HANA database must be created and updated in synchronization with the corresponding columns. This synchronization can be either synchronous or asynchronous.
Full Text Index Parameters [page 275]The content and behavior of a full text index is configured by the use of both default and user-specified parameters. To view the configuration of a full text index, you use the SYS.FULLTEXT_INDEXES view.
268
P U B L I C© 2013 SAP AG or an SAP affiliate company. All rights reserved.
SAP HANA Developer GuideEnabling Search

12.1.2 SynchronizationFull text indexes in a SAP HANA database must be created and updated in synchronization with the corresponding columns. This synchronization can be either synchronous or asynchronous.
SynchronousIn SAP HANA, indexes of the type TEXT and SHORTTEXT(n) are synchronous. Text preprocessing is automatically performed when a column is created or new text is inserted and the full text index is then automatically updated. The system cannot transport any data to the proper database tables until text preprocessing is complete.
AsynchronousIf you manually create a full text index, you can specify whether the index is synchronous or asynchronous. By default, manually created indexes are asynchronous. Text preprocessing is not initially performed when the table or column is created or whenever new text is inserted. In this case, inserting the results of the text preprocessing and writing the original data do not occur at the same time. Therefore, the full text information may not be immediately available for searching.To handle asynchronous processing of text, SAP HANA uses queues.
QueuesThe queue is a mechanism used to enable a full text index to operate asynchronously. This means that when you insert new entries into the column, the text is not made available in the column until it is preprocessed.When you insert new entries, the queue sends the text to the preprocessor for analysis. It returns a serialized instance of a DAF (document analysis format) object, which is then processed further by the HANA column store. The result is stored in the full text index.The SAP HANA queue manager automatically creates a queue when you create an asynchronous full text index or when the index server is started and the queue manager finds the information that a specific queue is needed. The queues are always created on the server on which the table is stored.Every entry in the queue has one of the following processing states:
● New● Preprocessing● Preprocessed● Indexing● Error
If the original column entry is modified or deleted during text processing, the queue is notified and, if necessary, the entry is preprocessed again.
NoteThe content of the queue is not made persistent at any stage. If the HANA index server process fails, the queue data is lost and the queue manager automatically restarts the process for those entries that were not already processed. Any incomplete text preprocessing is restarted from the beginning.
Flush SchedulingWhen you create an asynchronous full text index, you can specify when documents are removed from the queue after they are preprocessed and inserted into the full text index; this is called flushing. You can schedule flushing based on either time or the number of documents. To do this, when you create the full text index, define one of the following clauses with the ASYNC parameter:
SAP HANA Developer GuideEnabling Search
P U B L I C© 2013 SAP AG or an SAP affiliate company. All
rights reserved. 269
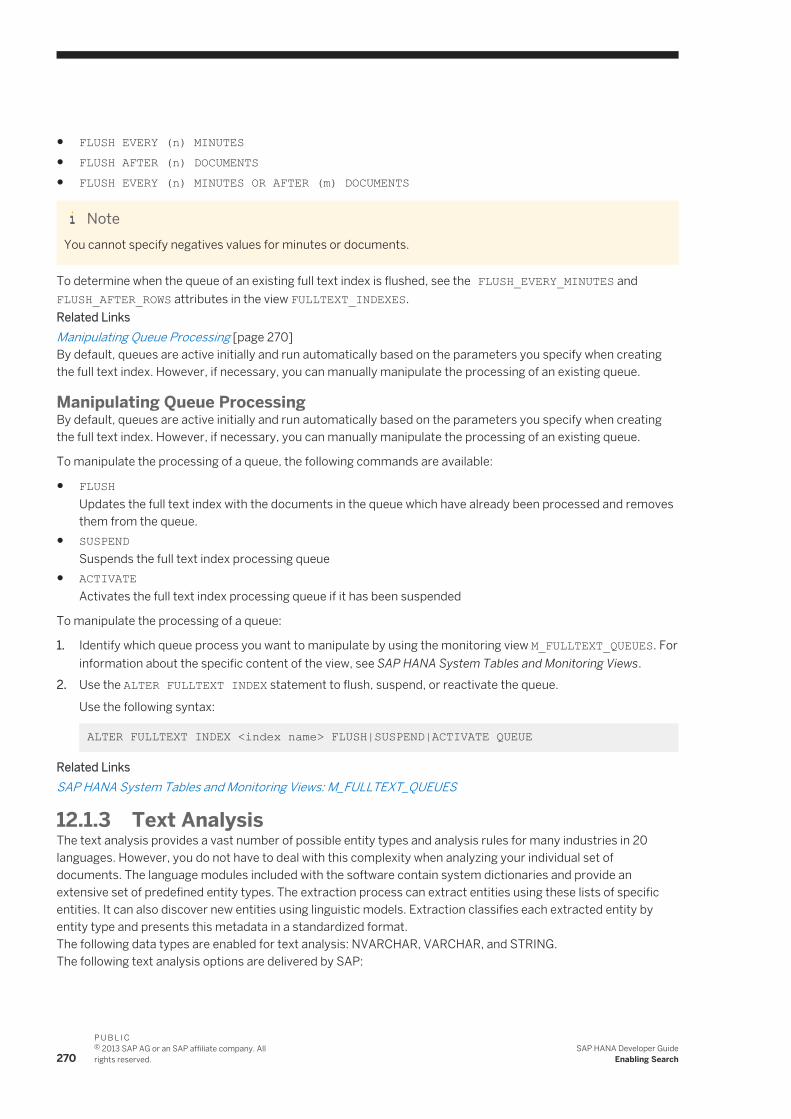
● FLUSH EVERY (n) MINUTES● FLUSH AFTER (n) DOCUMENTS● FLUSH EVERY (n) MINUTES OR AFTER (m) DOCUMENTS
NoteYou cannot specify negatives values for minutes or documents.
To determine when the queue of an existing full text index is flushed, see the FLUSH_EVERY_MINUTES and FLUSH_AFTER_ROWS attributes in the view FULLTEXT_INDEXES.Related LinksManipulating Queue Processing [page 270]By default, queues are active initially and run automatically based on the parameters you specify when creating the full text index. However, if necessary, you can manually manipulate the processing of an existing queue.
Manipulating Queue ProcessingBy default, queues are active initially and run automatically based on the parameters you specify when creating the full text index. However, if necessary, you can manually manipulate the processing of an existing queue.
To manipulate the processing of a queue, the following commands are available:
● FLUSHUpdates the full text index with the documents in the queue which have already been processed and removes them from the queue.
● SUSPENDSuspends the full text index processing queue
● ACTIVATEActivates the full text index processing queue if it has been suspended
To manipulate the processing of a queue:
1. Identify which queue process you want to manipulate by using the monitoring view M_FULLTEXT_QUEUES. For information about the specific content of the view, see SAP HANA System Tables and Monitoring Views.
2. Use the ALTER FULLTEXT INDEX statement to flush, suspend, or reactivate the queue.
Use the following syntax:
ALTER FULLTEXT INDEX <index name> FLUSH|SUSPEND|ACTIVATE QUEUE
Related LinksSAP HANA System Tables and Monitoring Views: M_FULLTEXT_QUEUES
12.1.3 Text AnalysisThe text analysis provides a vast number of possible entity types and analysis rules for many industries in 20 languages. However, you do not have to deal with this complexity when analyzing your individual set of documents. The language modules included with the software contain system dictionaries and provide an extensive set of predefined entity types. The extraction process can extract entities using these lists of specific entities. It can also discover new entities using linguistic models. Extraction classifies each extracted entity by entity type and presents this metadata in a standardized format.The following data types are enabled for text analysis: NVARCHAR, VARCHAR, and STRING.The following text analysis options are delivered by SAP:
270
P U B L I C© 2013 SAP AG or an SAP affiliate company. All rights reserved.
SAP HANA Developer GuideEnabling Search

Table
Name of Option Description
LINGANALYSIS_BASIC This option provides the following language processing capabilities for linguistic analysis of unstructured data:
● Segmentation - the separation of input text into its elements
LINGANALYSIS_STEMS This option provides the following language processing capabilities for linguistic analysis of unstructured data:
● Segmentation - the separation of input text into its elements● Stemming - the identification of word stems, or dictionary
forms
LINGANALYSIS_FULL This option provides the following language processing capabilities for linguistic analysis of unstructured data:
● Segmentation - the separation of input text into its elements● Stemming - the identification of word stems, or dictionary
forms● Tagging - the labeling of words' parts of speech
EXTRACTION_CORE This option extracts entities of interest from unstructured text, e.g. people, organizations, places, and other parties described in the document.In most use cases, this option is sufficient.
EXTRACTION_CORE_VOICEOFCUSTOMER Voice of the customer content includes a set of entity types and rules that address requirements for extracting customer sentiments and requests. You can use this content to retrieve specific information about your customers' needs and perceptions when processing and analyzing text. The option involves complex linguistic analysis and pattern matching that includes processing parts of speech, syntactic patterns, negation, and so on, to identify the patterns to be extracted.Voice of the customer content is supported for these languages:
● English● French● German● Spanish
To use the text analyzing function, create a full text index on the column which contains your texts with the following parameters:TEXT ANALYSIS ONCONFIGURATION '<NAME OF OPTION>'
NoteTechnical names of the options are case-sensitive.
If your tables contain a language indicator, you should enter the name of the column:LANGUAGE COLUMN <NAME OF COLUMN CONTAINING THE LANGUAGE INDICATOR>
SAP HANA Developer GuideEnabling Search
P U B L I C© 2013 SAP AG or an SAP affiliate company. All
rights reserved. 271

If no language is specified, EN will be used by default.Once the indexing is started, the text analysis runs in the background. Depending on the number and size of the texts, one analysis can take hours. To check the status of the text analysis, you can use the default monitoring view FULLTEXT_INDEXES.For each full text index, the system creates an additional table with the naming $TA_<index_name> within the same schema which contains the source table.This table stores the extracted entities and the analysis results. You can use this table to build joins with other search enabled views, for example to use it for interactive navigation or auto-completion in search input fields.You can find detailed information on this table under Structure of the $TA Table.To keep track of deletions in the source table, the keys in the $TA table need to be aligned to the keys of the source table. To do this, use the following SQL statement:ALTER TABLE "<schema>"."$TA_INDEX_NAME" ADD CONSTRAINT <constraint name> COMMAND FOREIGN KEY("key_1", "key_2", "key_n") REFERENCES "<schema>"."<name of source table>"("key_1","key_2","key_n") ON DELETE CASCADE
ExampleUse the CREATE FULLTEXT INDEX statement to create an index named CUSTOMER_INDEX on your table CUSTOMERS to index the customername column: CREATE FULLTEXT INDEX CUSTOMER_INDEX ON "MY_SCHEMA"."CUSTOMERS" ('customername')[<fulltext_parameter_list>]For triggering the text analysis using the option EXTRACTION_CORE, specify the following additional parameters for the full text index:TEXT ANALYSIS ONCONFIGURATION 'EXTRACTION_CORE'LANGUAGE COLUMN LANGALTER TABLE "MY_SCHEMA"."$TA_CUSTOMER_INDEX" ADD CONSTRAINT ALTER_COMMAND FOREIGN KEY("KEY_1", "KEY_2") REFERENCES "MY_SCHEMA"."CUSTOMERS"("KEY_1","KEY_2") ON DELETE CASCADE
Related LinksText Data Processing Language Reference Guide
This guide describes in detail the standard extraction content and the linguistic analysis
Structure of the $TA TableThe table $TA_<index_name> is generated automatically after triggering the index creation. The table is built from the key fields of the source table, additional key fields TA_RULE and TA_COUNTER, and 8 additional fields.
● Key fields of the source table● Name of the analyzed column● Entity type, for example DATE or NOUN_GROUP● Entity value, for example October 29, 2010 or horizontal stabilizer● Normalized entity value, if available, for example 2010-10-29
Table
Column ID Key Description Data Type
<n key columns from source table>
Yes In order to support a foreign key definition linking from the $TA table to its source table, the $TA table has to use exactly the same key
same as in source table
272
P U B L I C© 2013 SAP AG or an SAP affiliate company. All rights reserved.
SAP HANA Developer GuideEnabling Search

Column ID Key Description Data Type
columns of its source table (in data type and ID).The $TA table includes all keys from the source table.
TA_RULE Yes Stores the rule package that yielded the token. This is also required to distinguish between LXP output and output from the entity extraction.
NVARCHAR(200)
TA_COUNTER Yes The token counter counts all tokens across the document. The order is only unique for a given processing type (hence the previous attribute as key).
BIGINT
TA_TOKEN - Term or entity - depending on processing type.
NVARCHAR(250)
TA_LANGUAGE - Usually, the document's language is stated in the source table. In rare cases where this is not true, the language code is stored here. As there is no support for multi-language documents, the language code is identical for all result records of a document.
NVARCHAR(2)
TA_TYPE - The token type contains the linguistic or semantic type of the token; for instance "noun" (if option = LINGANALYSIS_*) or "company" (if option = EXTRACTION_*).
NVARCHAR(100)
TA_NORMALIZED - Stores a normalized representation of the token. This becomes relevant e.g. for German with umlauts, or ß/ss. Normalization with regards to capitalization would not be as important as to justify this column.
NVARCHAR(250)
TA_STEM - Stores the linguistic stemming information, e.g. the singular nominative for nouns, or the indicative for verbs. If text analysis yields several stems, only the first stem will be stored, assuming this to be the best match.
NVARCHAR(300)
TA_PARAGRAPH - Stores the number of all paragraphs in the document.
INTEGER
TA_SENTENCE - Stores the number of all sentences in a document.
INTEGER
TA_CREATED_AT - Stores the creation time. Used for mere administrative information; e.g. for reorganizing purposes.
TIMESTAMP
The $TA table can be modified like any other table, but it cannot be partitioned.
SAP HANA Developer GuideEnabling Search
P U B L I C© 2013 SAP AG or an SAP affiliate company. All
rights reserved. 273

You can add additional columns to this table, e.g. with a statement like ALTER TABLE "TA"."$TA_SOURCE_TEXT_TA" ADD(C INTEGER GENERATED ALWAYS AS 1). In this example, the value 1 will be written to only existing rows in the new column C. The new column will not be filled automatically in delta updates.
NoteIf the source table has a field name identical to one of the default fields from the $TA table, you will receive an error message after the CREATE FULTTEXT INDEX statement informing you to rename the field of the source table. After you rename the corresponding field, you can execute the CREATE FULLTEXT INDEX statement again.
12.1.4 Dropping Full Text IndexesIf you want to delete a full text index that you manually created, for example, because it is referenced only rarely or preprocessing is too time-consuming, you can drop the full text index. For TEXT or SHORTTEXT full text indexes, you cannot drop the full text index; instead, you must delete the related column in the table.
You also need to drop full text indexes when adding or removing index parameters. As parameters cannot be added to or removed from an existing full text index, if you want to change parameters, you must first drop the full text index and then create a new index with the new parameters.To drop a full text index, you use the DROP FULLTEXT INDEX statement:
DROP FULLTEXT INDEX <index_name>
NoteBefore you can drop a full text index, you must remove the relationship between the source table and any existing $TA tables (for text analysis). To do so, use the following statement:
ALTER TABLE SCHEMA <$TA_table> DROP <name_constraint>
The name constraint must be the same as originally used when adding the constraint. For more information, see Text Analysis.
Related LinksAltering Full Text Index Parameters [page 274]You can alter a full text index after it is created. Altering an index includes changing the values of the parameters and altering the parameters by replacing the index.
Text Analysis [page 270]
12.1.5 Altering Full Text Index ParametersYou can alter a full text index after it is created. Altering an index includes changing the values of the parameters and altering the parameters by replacing the index.
● To alter the parameters of a full text index, use the ALTER FULLTEXT INDEX statement.
You can only use this statement to alter the following parameters:
○ Fuzzy search index○ Phrase index ratio
274
P U B L I C© 2013 SAP AG or an SAP affiliate company. All rights reserved.
SAP HANA Developer GuideEnabling Search

Example syntax:
ALTER FULLTEXT INDEX <index_name> PHRASE INDEX RATIO <parameter value> FUZZY SEARCH INDEX <on_off>
● To alter any other parameter, you must replace the existing full text index as follows:a) Delete the existing full text index by using the DROP FULLTEXT INDEX statement.b) Create a new index using the new parameter values.
Related LinksCreating Full Text Indexes [page 264]When you create a TEXT or SHORTTEXT column in a table, SAP HANA automatically creates a corresponding full text index. However, for columns of other data types, you must manually create and define any necessary full text indexes.
Synchronization [page 269]Full text indexes in a SAP HANA database must be created and updated in synchronization with the corresponding columns. This synchronization can be either synchronous or asynchronous.
Queues [page 269]The queue is a mechanism used to enable a full text index to operate asynchronously. This means that when you insert new entries into the column, the text is not made available in the column until it is preprocessed.
Full Text Index Parameters [page 275]The content and behavior of a full text index is configured by the use of both default and user-specified parameters. To view the configuration of a full text index, you use the SYS.FULLTEXT_INDEXES view.
12.1.6 Full Text Index ParametersThe content and behavior of a full text index is configured by the use of both default and user-specified parameters. To view the configuration of a full text index, you use the SYS.FULLTEXT_INDEXES view.In SAP HANA, full text indexes are configured using the following parameters:
Parameter Data Type
Default (TEXT)
Default (SHORTTEXT)
Default (Manually Created)
Description
SCHEMA_NAME NVARCHAR(256)
Specifies the schema name
TABLE_NAME NVARCHAR(256)
Specifies the table name
TABLE_OID BIGINT Specifies the object ID of the table
INDEX_NAME NVARCHAR(256)
Specifies the name of the full text index
INDEX_OID BIGINT Specifies the object ID of the full text index
LANGUAGE_COLUMN
NVARCHAR(256)
None None None Specifies the language used for analyzing the document. If no language is specified, automatic language detection is performed. The detected
SAP HANA Developer GuideEnabling Search
P U B L I C© 2013 SAP AG or an SAP affiliate company. All
rights reserved. 275

Parameter Data Type
Default (TEXT)
Default (SHORTTEXT)
Default (Manually Created)
Description
language is stored with the TEXT_AE attribute.With this option, you can refer to a column of the same database table in which the language for the document is stored. The column is read by the queue.languageColumn in basetable should be of type NVARCHAR/VARCHAR(m) where m>=2when not NULL: table(tableoid).hasColumn(languageColumn)
MIME_TYPE_COLUMN
NVARCHAR(256)
None None None This column holds a format/mimetype indicator (for plain text, the encoding can also be specified), e.g. ('text/plain:CP-1252','PDF','MS_WORD 3.0',..).'FORMAT' is handled in the same way as 'LANGUAGE'.when not NULL: table(tableoid).hasColumn(mimeTypeColumn)
LANGUAGE_DETECTION
NVARCHAR(5000)
EN EN EN Specifies the set of languages to be considered for automatic language detection. If reliable language detection cannot be performed, the first language in the list will be used as the default language.This option is used to limit the languages for text analysis. The parameter is currently ignored by text analysis. when not NULL: for each language L in languageDetection: L in (select language from SYS.M_TEXT_ANALYSIS_LANGUAGES)
FAST_PREPROCESS
TINYINT ON ON ON Specifies if fast preprocessing should be performed. With fast preprocessing the detected language is always the default language.
276
P U B L I C© 2013 SAP AG or an SAP affiliate company. All rights reserved.
SAP HANA Developer GuideEnabling Search

Parameter Data Type
Default (TEXT)
Default (SHORTTEXT)
Default (Manually Created)
Description
If this option is activated, linguisitic analysis is skipped. Only a simple tokenizer is used. This does not work for languages which do not use spaces as word separators. The fast analyzer cannot handle binary documents.
FUZZY_SEARCH_INDEX
TINYINT OFF OFF OFF If this option is enabled, a special index is created for the fuzzy search. This index accelerates the fuzzy search but uses additional memory.
SEARCH_ONLY TINYINT OFF ON for LOB-types OFF, otherwise ON
If set to ON, you cannot reconstruct original content or show the document in its original formatting when using the highlight function. With this setting, the text attributes do not store any DAFs, that means, it is not possible to retrieve the HTML-converted or original data from the text attribute. The document will, however, use less memory.If the text attribute is created via a manually created full text index, the source attribute that contains the original data is not affected by this setting.
IS_EXPLICIT TINYINT 0 0 1 Specifies whether the full text index was manually created (also known as explicit). By default, manually created full text indexes use ASYNC synchronization.
FLUSH_AFTER_DOCUMENTS
INTEGER N/A N/A Specifies when asynchronous full text indexes are flushed. The specified value cannot be negative.
FLUSH_EVERY_MINUTES
INTEGER N/A N/A Specifies when asynchronous full text indexes are flushed. The specified value cannot be negative.
SAP HANA Developer GuideEnabling Search
P U B L I C© 2013 SAP AG or an SAP affiliate company. All
rights reserved. 277

Parameter Data Type
Default (TEXT)
Default (SHORTTEXT)
Default (Manually Created)
Description
CONFIGURATION
NVARCHAR(5000)
None None None Specifies the type of text analysis to be used. This parameter requires the setting TEXT ANALYSIS = ON.You can use one of the following types of text analysis delivered by SAP:
● LINGANALYSIS_BASIC● LINGANALYSIS_STEMS● LINGANALYSIS_FULL● EXTRACTION_CORE● EXTRACTION_CORE_VOICE
OFCUSTOMER
For more information about the types of text analysis, see Text Analysis [page 270].
INTERNAL_COLUMN_NAME
NVARCHAR(512)
Specifies the name of the hidden column created for the full text index (if the index is not a TEXT index). Names of hidden columns have the prefix "$_SYS_SHADOW" .
PHRASE_INDEX_RATIO
FLOAT 0.0 0.0 (0.2 if length <= 1024)
0.0 (0.2 for non-LOB type and length <= 1024)
Stores information about the occurrence of words and the proximity of words to one another.The float value is between 0.0 and 1.0. 1.0 means that the internal phrase index may use 100% of the memory size of the fulltext
TEXT ANALYSIS
TINYINT OFF OFF OFF Enables text analysis capabilities on the indexed column. This parameter cannot be enabled for TEXT or SHORTTEXT columns. If set to ON, the FAST_PREPROCESS parameter is automatically set to OFF.Text analysis can extract entities such as persons, products, or places, from documents and thus enrich the set of structured information in
278
P U B L I C© 2013 SAP AG or an SAP affiliate company. All rights reserved.
SAP HANA Developer GuideEnabling Search

Parameter Data Type
Default (TEXT)
Default (SHORTTEXT)
Default (Manually Created)
Description
SAP HANA. You can use these additional attributes, which are stored in a new table, when creating models (views) for analytics and search scenarios to enable improved analytics and search in SAP HANA.For more information, see Text Analysis [page 270].
Memory Consumption of Full Text Index ParametersIn SAP HANA, certain full text index parameters can have a significant impact on memory consumption based on how they are defined.The following full text index parameters can have a significant impact on memory consumption:
Parameter Memory Impact Details
PHRASE_INDEX_RATIO If the value is greater than 0.0, then there is additional memory overhead. The maximum memory consumption is the memory consumption of the full text index multiplied by the parameter value.
FUZZY_SEARCH_INDEX To increase response times for fuzzy search, when enabled, this parameter creates additional in-memory structures. For text-type columns, fuzzy search indexes require approx. 10% of the memory size of the column.
TEXT ANALYSIS If set to ON, an additional table is created for storing structured data extracted from the source text for text analysis. The amount of extracted data depends on the data in the source column, the text analysis rules, and the structure of the results. In certain cases, the memory consumption of the extracted data could exceed the memory consumption of the source data.
12.2 Building SQL Search Queries
In column-oriented tables, you can perform searches using the SQL SELECT statement.
Before building SQL search queries, the following prerequisites must be met:
● The tables you want to search are column-oriented.● You have created any required views for the tables you want to search.● You have created any required full text indexes for the columns you want to search.
SAP HANA Developer GuideEnabling Search
P U B L I C© 2013 SAP AG or an SAP affiliate company. All
rights reserved. 279

SAP HANA supports the standard SQL search syntax and functions for search queries on nearly all visible data types. You build SQL queries using the SELECT statement, as in the following example:
SELECT * FROM Contacts WHERE ID=1
However, in SAP HANA, columns of large object types and text have additional requirements. To enable search on columns of these types, you must ensure the following requirements are met:
● Full text indexes have been created for the search-relevant columns. For columns of type TEXT and SHORTTEXT, this is done automatically.
● Search queries on the columns use the CONTAINS predicate.
For large object types and text, you build SQL queries using the SELECT statement and CONTAINS predicate, as in the following example:
SELECT * FROM Documents WHERE CONTAINS (*,'Comment')
To build a search query, proceed as follows:
1. Use the SQL SELECT statement and specify the table or view and column you want to search. If required, include the CONTAINS predicate.
2. If required, specify scalar functions for the search.3. Specify the search terms and, optionally, the search type (EXACT, LINGUISTIC, or FUZZY).
NoteIf you do not specify a search type, by default, the search query is performed as an exact search.
ExampleFor further examples of the syntax used with the SELECT statement, see SAP HANA SQL Reference Manual.
Related LinksSAP HANA SQL Reference Manual: SELECT
12.2.1 Search Queries with CONTAINSIn SAP HANA, you can search one or multiple columns by creating a query that includes the CONTAINS predicate. In SAP HANA, a search query with CONTAINS has a look and feel similar to common Internet search engines.The CONTAINS predicate is optional for search queries on columns of most data types; however, for large object types and text, this predicate is mandatory. You can build a search query with the CONTAINS predicate as follows:
SELECT * FROM <tablename>WHERE CONTAINS ((<column1>, <column2>, <column3>), <search_string>)
When you specify the CONTAINS predicate, SAP HANA runs the following internal checks:
● SAP HANA checks if the query contains one or more terms. If the query contains multiple terms, the terms are tokenized and concatenated.
● SAP HANA checks whether the query is to be run on one or more columns. If you only specify one column, to optimize the search, additional processes are skipped and the query is run on the single column. If you specify a wildcard, and therefore possibly numerous columns, SAP HANA automatically determines which columns are relevant for the search query.
After the checks are performed, SAP HANA builds and runs an internal query on the relevant columns only.
280
P U B L I C© 2013 SAP AG or an SAP affiliate company. All rights reserved.
SAP HANA Developer GuideEnabling Search

NoteIf a column has a full text index assigned, SAP HANA will automatically search on the index rather than on the original column.
Determination of Search-Relevant ColumnsYou can specify the search-relevant columns either at the creation of the view or directly for the query. SAP HANA determines which relevant columns to search based on the following hierarchy:
1. You specify a list of columns within the CONTAINS predicate. Even if a list of columns has been defined for the view, it is overridden by the columns stated in the query.
2. If you enter an asterisk (*) instead of a column list but you specified a list of relevant columns when creating the view, this list is used for the query.
3. If you enter an asterisk (*) and no list was provided when the view was created, all visible columns of the view or table are considered as search-relevant.
For information about creating views, see Creating Views in the SAP HANA Administration Guide.
Search Operators and SyntaxWith the CONTAINS predicate, SAP HANA supports the following search operators:
● ORMatches are returned that contain at least one of the terms joined by the OR operator.
● - (minus)With a minus sign, SAP HANA searches in columns for matches that do not contain the term immediately following the minus sign.
● " " (quotation marks)Terms within the quotation marks are not tokenized and are handled as a string. Therefore, all search matches must be exact.
NoteIf you enter multiple search terms, the AND operator is automatically interpreted. Therefore, you do not need to specify it.
For more information about the unique syntax requirements of the CONTAINS predicate, see the SAP HANA SQL Reference.
Scalar FunctionsFor search queries using the CONTAINS predicate, you can use different scalar functions to either return additional information about the results of your search queries or enhance how the results are displayed. These functions include SNIPPETS, HIGHLIGHTED, and SCORE.
LimitationsThe following limitations apply to search queries using the CONTAINS predicate:
● You cannot search on more than one table or view at a time. If more than one table is joined in the SELECT statement, then all columns mentioned in the CONTAINS predicate must come from only one of the tables.
● You cannot enter a minus (-) search operator directly after OR.● Brackets are not supported as search operators.
SAP HANA Developer GuideEnabling Search
P U B L I C© 2013 SAP AG or an SAP affiliate company. All
rights reserved. 281

● Searches using the CONTAINS predicate do not consider non-physical columns, such as calculated columns, as search-relevant because these columns are created during the search and, therefore, are not available when SAP HANA internally checks the CONTAINS search query.
● The CONTAINS predicate only works on column-oriented tables.● If you specify multiple CONTAINS predicates in the WHERE clause of the SELECT statement, only one of the
predicates is allowed to consist of more than one column in the list of <contains_columns>.
Related LinksSAP HANA SQL Reference: CONTAINS PredicateSAP HANA Administration Guide
SNIPPETS FunctionFor search queries using the CONTAINS predicate, you can use the function SNIPPETS to return search results with an excerpt of the text with your search term highlighted in bold. This short text excerpt provides some context for you to see where and how the term is used in the document.This function uses the following syntax:
SELECT *, SNIPPETS (<text_column>) FROM <tablename> WHERE CONTAINS (<search_term>)
LimitationsThe SNIPPETS function has the following limitations:
● Only the first search term specified with the CONTAINS predicate is highlighted in the returned text.● The query result contains only the first hit of the first search term.● The text excerpt that is displayed with the search term is limited to a string of 12 tokens.● This function only works on columns of the TEXT data type or columns with a full text index.
HIGHLIGHTED FunctionFor search queries using the CONTAINS predicate, you can use the function HIGHLIGHTED to return the content of the found document with your search term highlighted in bold.Search queries using the HIGHLIGHTED function return the data type NCLOB.This function uses the following syntax:
SELECT *, HIGHLIGHTED (<text_column>) FROM <tablename> WHERE CONTAINS (<search_term>)
LimitationsThe HIGHLIGHTED function has the following limitations:
● Only the first search term specified with the CONTAINS predicate is highlighted in the returned text.● The query result contains all hits of the first search term.● This function only works on columns of the TEXT data type or columns with a full text index.
SCORE FunctionFor search queries using the CONTAINS predicate, you can use the function SCORE to get the score, that means the relevance, of a record found.SAP HANA calculates a score based on the following information:
282
P U B L I C© 2013 SAP AG or an SAP affiliate company. All rights reserved.
SAP HANA Developer GuideEnabling Search

● The relevance or weighting of attributes in a search using the CONTAINS predicate. The relevance of a hit depends on the weight of the column that caused the hit. You can specify weights when you create the view or in the CONTAINS predicate.
● Fuzziness in fuzzy search. The more exact a hit is, the higher the score is.● Text ranking (TF-IDF).
This function uses the following syntax:
SELECT SCORE (),* FROM <tablename>WHERE CONTAINS (<search_term>)
12.2.2 EXACT SearchAn exact search returns records only if the search term or search phrase is contained in the table column exactly as specified. In the SELECT statement of the search query, you can specify the EXACT search type.In an exact search, the search engine uses the word dictionary and the phrase index to detect the possible matches. The search engine then checks whether the words appear and use exactly the same spelling.
● For text columns, the search term must match at least one of the tokenized terms to return a column entry as a match.
● For string columns, the search term must match the entire string to return a column entry as a match.
NoteFor more flexibility in a search query, you can use the supported wildcards % and *. Wildcards are supported for both text and string columns.
You can perform an exact search by using the CONTAINS predicate with the EXACT option in the WHERE clause of a SELECT statement. The exact search is the default search type. If you do not specify any search type in the search query, an exact search will be executed automatically.
Example
SELECT * FROM <tablename>WHERE CONTAINS (<column_name>, <search_string>, EXACT)
SELECT * FROM <tablename>WHERE CONTAINS (<column_name>, <search_string>)--- Exact search will be executed implicitly.
SELECT * FROM <tablename>WHERE CONTAINS (<column_name>, '"cats and dogs"')--- Phrase search.
12.2.3 LINGUISTIC SearchA linguistic search finds all words that have the same word stem as the search term. It also finds all words for which the search term is the word stem. In the SELECT statement of the full text search query, you can specify the LINGUISTIC search type.When you execute a linguistic search, the system has to determine the stems of the searched terms. It will look up the stems in the stem dictionary. The hits in the stem dictionary point to all words in the word dictionary that have this stemYou can call the linguistic search by using the CONTAINS predicate with the LINGUISTIC option in the WHERE clause of a SELECT statement.
SAP HANA Developer GuideEnabling Search
P U B L I C© 2013 SAP AG or an SAP affiliate company. All
rights reserved. 283

A linguistic search for produced will also find producing and produce.
Example
SELECT * FROM <tablename>WHERE CONTAINS (<column_name, 'produced' , LINGUISTIC)
LimitationsYou can only perform linguistic searches on columns that meet the following conditions:
● The columns contain text.● For the columns, the FAST_PREPROCESS parameter is specified as OFF.
12.2.4 FUZZY SearchFuzzy Search is a fast and fault-tolerant search feature for SAP HANA. A fuzzy search returns records even if the search term contains additional or missing characters or other types of spelling errors.The term ”fault-tolerant search” means that a database query returns records even if the search term (the user input) contains additional or missing characters or other types of spelling error.Fuzzy search can be used in various applications, for example:
● Fault-tolerant search in text columns (for example, html or pdf): Search for documents on 'Driethanolamyn' and find all documents that contain the term 'Triethanolamine'.
● Fault-tolerant search in structured database content: Search for a product called 'coffe krisp biscuit' and find 'Toffee Crisp Biscuits'.
● Fault-tolerant check for duplicate records: Before creating a new customer record in a CRM system, search for similar customer records and verify that there are no duplicates already stored in the system. When, for example, creating a new record 'SAB Aktiengesellschaft & Co KG Deutschl.' in 'Wahldorf', the system shall bring up 'SAP Deutschland AG & Co. KG' in 'Walldorf' as a possible duplicate.
You can call the fuzzy search by using the CONTAINS predicate with the FUZZY option in the WHERE clause of a SELECT statement.
Example
SELECT * FROM <tablename> WHERE CONTAINS (<column_name>, <search_string>, FUZZY (0.8))
NoteYou can improve the performance of a fuzzy search on a text column by defining a fuzzy index at the column. You can define a fuzzy index with the option FUZZY SEARCH INDEX ON in the CREATE FULLTEXT INDEX statement or in the definition of data type TEXT.
Fuzzy ScoreThe fuzzy search algorithm calculates a fuzzy score for each string comparison. The higher the score, the more similar the strings are. A score of 1.0 means the strings are identical. A score of 0.0 means the strings have nothing in common.You can request the score in the SELECT statement by using the SCORE() function. You can sort the results of a query by score in descending order to get the best records first (the best record is the record that is most similar to the user input). When a fuzzy search of multiple columns is used in a SELECT statement, the score is returned as an average of the scores of all columns used.
284
P U B L I C© 2013 SAP AG or an SAP affiliate company. All rights reserved.
SAP HANA Developer GuideEnabling Search

When searching text columns, a TF/IDF (term frequency/inverse document frequency) score is returned by default instead of the fuzzy score. The fuzzy score influences the TF/IDF calculation, but it is important to keep in mind that, with TF/IDF, the range of the score values returned is normed to the interval between 0.0 and 1.0, and the best record always gets a score of 1.0, regardless of its fuzzy score.The TF/IDF calculation can be disabled so that you get the fuzzy score instead. In particular, this makes sense for short-text columns containing data such as product names or company names. On the other hand, you should use TF/IDF for long-text columns containing data such as product descriptions, HTML data, or Word and PDF documents.Option spellCheckFactor
There are two use cases for the option spellCheckFactor.
● A) This option allows you to set the score for terms that are not fully equal but that would be a 100% match because of the internal character standardization used by the fuzzy search.For example, the terms 'Café' and 'cafe' give a score of 1.0 although the terms are not equal. For some users it may be necessary to distinguish between both terms.The decision if two terms are equal is based on the term representation stored in the column dictionary. Therefore the spellCheckFactor option works differently on string and text columns, as described in the following sections.
● B) The fuzzy search can return a 100% match for terms that are not identical but can't be differentiated by the fuzzy-string-compare algorithm.For example, fuzzy search can't differentiate between terms 'abaca' and 'acaba', for example. In this case, the spellCheckFactor can be used to avoid a score of 1.0.
When A) and B) are not needed by an application, you can set the spellCheckFactor to 1.0 to disable the feature.Standardization of Letters and Terms
All characters are replaced by a lowercase character without any diacritics before the fuzzy comparison takes place. This is called standardization. So it is possible to get a 100% match when comparing two unequal terms, because the standardization process returned two identical terms.
Standardization ExamplesOriginal Letter Standardized Letter
E e
e e
É e
é e
Ė e
ė e
The letter i is treated differently as it is not standardized to an ı as would be the 'standard' rule.
Original Letter Standardized Letter
I i
İ i
SAP HANA Developer GuideEnabling Search
P U B L I C© 2013 SAP AG or an SAP affiliate company. All
rights reserved. 285

Original Letter Standardized Letter
i i
ı i
German umlauts are replaced by two characters.
Original Letter Standardized Letter
Ä ae
ä ae
Ö oe
ö oe
Ü ue
ü ue
ß ss
Because of this standardization we get high fuzzy scores for common differences in the spelling of words.
Original term Standardized term
müller mueller
Mueller mueller
Cafe cafe
Café cafe
Search on a String Column (VARCHAR, NVARCHAR)
The decision if two strings are the same is based on the string representation that is stored in the dictionary for that column. The contents of a string column are converted to lowercase characters before they are stored in the dictionary. Other standardizations are not done.So it is possible to use the spellCheckFactor option to, for example, distinguish between 'café' and 'cafe'.
CREATE COLUMN TABLE test_spell_check_factor( id INTEGER PRIMARY KEY, s NVARCHAR(255));
INSERT INTO test_spell_check_factor VALUES ('1','Muller');INSERT INTO test_spell_check_factor VALUES ('2','Mueller');INSERT INTO test_spell_check_factor VALUES ('3','Müller');INSERT INTO test_spell_check_factor VALUES ('4','Möller');
SELECT SCORE() AS score, id, sFROM test_spell_check_factorWHERE CONTAINS(s, 'Müller', FUZZY(0.5, 'spellCheckFactor=0.9'))ORDER BY score DESC;
DROP TABLE test_spell_check_factor;
286
P U B L I C© 2013 SAP AG or an SAP affiliate company. All rights reserved.
SAP HANA Developer GuideEnabling Search

SCORE ID T Description
1.0 3 Müller
0.9 2 Mueller << spellCheckFactor got used
0.88 1 Muller
0.88 4 Möller
Search on a Text Column (SHORTTEXT, TEXT or FULLTEXT INDEX)
Terms in text columns are standardized to lowercase characters without diacritics before they are stored in the dictionary. So on text columns it is not possible to distinguish between, for example, 'café' and 'cafe' or 'Müller' and 'mueller'. In this case, the search always returns a score of 1.0.Therefore, the main use case of spellCheckFactor on text columns is to avoid a score of 1.0 for terms like 'abaca' and 'acaba'.
CREATE COLUMN TABLE test_spell_check_factor( id INTEGER PRIMARY KEY, t SHORTTEXT(200) FUZZY SEARCH INDEX ON);
INSERT INTO test_spell_check_factor VALUES ('1','Muller');INSERT INTO test_spell_check_factor VALUES ('2','Mueller');INSERT INTO test_spell_check_factor VALUES ('3','Müller');INSERT INTO test_spell_check_factor VALUES ('4','Möller');
SELECT SCORE() AS score, id, tFROM test_spell_check_factorWHERE CONTAINS(t, 'Müller', FUZZY(0.5, 'spellCheckFactor=0.9,textSearch=compare'))ORDER BY score DESC;
DROP TABLE test_spell_check_factor;
SCORE ID T
1.0 2 Mueller
1.0 3 Müller
0.88 1 Muller
0.88 4 Möller
Option similarCalculationMode
The option similarCalculationMode controls how the similarity of two strings (or, for TEXT attributes, terms) is calculated.
Score calculation modes Basically, the similarity of two strings is defined by the number of common characters, wrong characters, additional characters in the search string and additional characters in the reference string.There are the following calculation modes:
SAP HANA Developer GuideEnabling Search
P U B L I C© 2013 SAP AG or an SAP affiliate company. All
rights reserved. 287

Table
Mode Impact on wrong characters
Impact on additional characters in search
Impact on additional characters in table
search high high low
compare (default) moderate high high
symmetricsearch high moderate moderate
Note that high impact results in a lower score.
Table
Request Reference Compare
Search Symmetricsearch
search searching 0.76 0.96 0.86
search search 0.85 0.75 0.75
search searchingforextraterrestriallife
0.0 0.91 0.87
searchingforextraterrestriallife
searching 0.0 0.35 0.84
searchingforextraterrestriallife
search 0.0 0.24 0.79
searchingforextraterrestriallife
searchingforthemeaningoflife
0.6 0.57 0.6
SQL ExamplesPreparations
OP TABLE test_similar_calculation_mode;CREATE COLUMN TABLE test_similar_calculation_mode( id INTEGER PRIMARY KEY, s NVARCHAR(255));
INSERT INTO test_similar_calculation_mode VALUES ('1','stringg');INSERT INTO test_similar_calculation_mode VALUES ('2','string theory');INSERT INTO test_similar_calculation_mode VALUES ('3','this is a very very very long string');INSERT INTO test_similar_calculation_mode VALUES ('4','this is another very long string');
similarCalculationMode compare
SELECT TO_INT(SCORE()*100)/100 AS score, id, sFROM test_similar_calculation_modeWHERE CONTAINS(s, 'explain string theory', FUZZY(0.5, 'similarCalculationMode=compare'))ORDER BY score DESC;
288
P U B L I C© 2013 SAP AG or an SAP affiliate company. All rights reserved.
SAP HANA Developer GuideEnabling Search

Score ID S
0.69 2 string theory
similarCalculationMode search
SELECT TO_INT(SCORE()*100)/100 AS score, id, sFROM test_similar_calculation_modeWHERE CONTAINS(s, 'explain string theory', FUZZY(0.5, 'similarCalculationMode=search'))ORDER BY score DESC;
Score ID S
0.68 4 this is another very long string
0.66 3 this is a very very very long string
0.65 2 string theory
similarCalculationMode symmetricsearch
SELECT TO_INT(SCORE()*100)/100 AS score, id, sFROM test_similar_calculation_modeWHERE CONTAINS(s, 'explain string theory', FUZZY(0.5, 'similarCalculationMode=symmetricsearch'))ORDER BY score DESC;
Score ID S
0.85 2 string theory
0.71 1 stringg
0.61 4 this is another very long string
0.58 3 this is a very very very long string
Supported Data TypesFuzzy search works out-of-the-box on the following column-store data types:
● TEXT● SHORTTEXT● VARCHAR, NVARCHAR● DATE● All data types with a full-text index
String TypesString types support a basic fuzzy string search. The values of a column are compared with the user input, using the fault-tolerant fuzzy string comparison.When working with string types, the fuzzy string comparison always compares the full strings. If searching with 'SAP', for example, a record such as 'SAP Deutschland AG & Co. KG' gets a very low score, because only a very small part of the string is equal (3 of 27 characters match).A fuzzy search on string types is an alternative to a non-fault-tolerant SQL statement such asSELECT ... FROM products WHERE product_name = 'coffe krisp biscuit' ...which would not return any results because of the spelling errors.
SAP HANA Developer GuideEnabling Search
P U B L I C© 2013 SAP AG or an SAP affiliate company. All
rights reserved. 289

Supported SQL data types are
● VARCHAR● NVARCHAR
It is possible to speed up the fuzzy search by creating additional data structures, which are used for faster calculation of the fuzzy score. These data structures exist in the memory only, so no additional disk space is required.To get the best response times possible, you should enable the fast fuzzy search structures for all database columns that have a high load of fuzzy searches, and for all database columns that are used in performance-critical queries.
Text TypesText types support a more sophisticated kind of fuzzy search. Texts are tokenized (split into terms) and the fuzzy comparison is done term by term.For example, when searching with 'SAP', a record such as 'SAP Deutschland AG & Co. KG' gets a high score, because the term 'SAP' exists in both texts. A record such as 'SAPPHIRE NOW Orlando' gets a lower score, because 'SAP' is only a part of the longer term 'SAPPHIRE' (3 of 8 characters match).A fuzzy search in text columns replaces non-fault-tolerant statements such asSELECT ... FROM documents WHERE doc_content LIKE '% Driethanolamyn %' ...Supported SQL data types are
● TEXT● SHORTTEXT● Full-text index
A full-text index is an additional index structure that can be defined for non-text columns to add text search features. Supported column types are, for example, NCLOB and NVARCHAR.It is possible to speed up the fuzzy search by creating additional data structures, which are used for faster calculation of the fuzzy score. These data structures exist in the memory only, so no additional disk space is required. To create the additional structures, use the flag 'fast_fuzzy_search' when creating a TEXT or SHORTTEXT column or when creating a full-text index.To get the best response times possible, you should enable the fast fuzzy search structures for all database columns that have a high load of fuzzy searches and for all database columns that are used in performance-critical queries.
Other TypesFuzzy search is available for the SQL type DATE. A fuzzy search on date values checks for date-specific errors such as dates that lie within a given range of days, or dates where the month and day have been interchanged (for example, American versus British date format).It is not possible to create additional data structures for date types to speed up the search. The queries run with optimal performance without any database tuning.
SyntaxYou can call the fuzzy search by using the CONTAINS() function with the FUZZY() option in the WHERE clause of a SELECT statement.Basic example without additional search options
SELECT SCORE() AS score, *FROM documentsWHERE CONTAINS(doc_content, 'Driethanolamyn', FUZZY(0.8))ORDER BY score DESC;
290
P U B L I C© 2013 SAP AG or an SAP affiliate company. All rights reserved.
SAP HANA Developer GuideEnabling Search

Example with additional search options Additional search options that change the default behavior of the fuzzy search can be specified as additional string parameters in the FUZZY() function.
SELECT SCORE() AS score, *FROM documentsWHERE CONTAINS(doc_content, 'Driethanolamyn', FUZZY(0.8, 'option1=value1, option2=value2'))ORDER BY score DESC;
The search options are specified as a comma-separated list of key-value pairs.
Available Fuzzy Search OptionsNote that some data types in the table below are data-type combinations.
● Text: SQL types TEXT and SHORTTEXT and any columns that have an additional full-text index● String: SQL types VARCHAR and NVARCHAR● Date: SQL type DATE
Table
Name of Option Short Name
Range Default
Applies to Types
Description
textSearch ts fulltext, compare
fulltext
Text, String, Date
Switches between full-text search with TF/IDF score and duplicate search with fuzzy score.For more information, see Option textSearch [page 311].
emptyScore es 0.0..1.0 not set
Text, String, Date
Defines how an empty and a non-empty value shall match.
similarCalculationMode
scm search, compare, symmetricsearch
compare
Text, String Defines how the score is calculated for a comparison of strings (or terms in a Text column).For more information, see Option similarCalculationMode [page 287] .
spellCheckFactor
scf 0.0..1.0 0.9 Text, String Sets the score for strings that get a fuzzy score of 1.0 but are not fully equal.For more information, see Option spellCheckFactor [page 285].
abbreviationSimilarity
abs 0.0..1.0 0.0 Text Activates abbreviation similarity and sets the score.For more information, see Option abbreviationSimilarity [page 310].
bestMatchingTokenWeight
bmtw 0.0..1.0 0 Text Influences the score, shifts total score value between best token score values and root mean square of score values.For more information, see Fuzzy Multi-Token Search on Text Columns [page 306].
SAP HANA Developer GuideEnabling Search
P U B L I C© 2013 SAP AG or an SAP affiliate company. All
rights reserved. 291

Name of Option Short Name
Range Default
Applies to Types
Description
considerNonMatchingTokens
cnmt max, min, all, input, table
max Text Influences the score, defines the number of terms used for score calculation.For more information, see Fuzzy Multi-Token Search on Text Columns [page 306].
minTextScore mts 0.0..1.0 0.0 Text Minimum score of a TEXT field; if not reached, the record will not be part of the result.For more information, see Option minTextScore [page 311].
andSymmetric as on,off off Text Activates a symmetric AND content search.For more information, see Fuzzy Multi-Token Search with Soft AND [page 308].
andThreshold at 0.0..1.0 1.0 Text Activates a 'soft AND' and determines the percentage of the tokens that need to match.For more information, see Fuzzy Multi-Token Search with Soft AND [page 308].
termMappingTable
tmt not set
Text Activates the term mappings.For more information, see Fuzzy Search with Term Mappings [page 316].
termMappingListId
tmli Text Activates the term mappings.For more information, see Fuzzy Multi-Token Search with Soft AND [page 308].
stopwordTable st not set
Text Activates the stopwords.For more information, see Fuzzy Search with Stopwords.
stopwordListId sli Text Activates the stopwords.For more information, see Fuzzy Search with Stopwords.
maxDateDistance
mdd 0..100 0 Date Specifies the allowed date distance when using fuzzy search on dates.For more information, see Fuzzy Search on DATE Columns [page 319].
For a list of all allowed search parameter combinations, see Option textSearch [page 311].
Support InformationMemory Usage
ExampleCurrently, all data structures for the fuzzy search share a common 'Pool/FuzzySearch' allocator. Statistics can be obtained through the system view M_HEAP_MEMORY.
SELECT * FROM sys.m_heap_memory WHERE category LIKE '%FuzzySearch%'
292
P U B L I C© 2013 SAP AG or an SAP affiliate company. All rights reserved.
SAP HANA Developer GuideEnabling Search

Activating the Trace in the SAP HANA Studio
1. In the SAP HANA studio, open the Administration perspective by double-clicking your system name in the navigation pane.
2. Select the Diagnosis Files tab and choose Configure in the right corner, as shown below.
3. To configure the trace targets, choose Show All Components and filter for fuzzysearch, as shown below.
SAP HANA Developer GuideEnabling Search
P U B L I C© 2013 SAP AG or an SAP affiliate company. All
rights reserved. 293

To get basic tracing data with information for every search, set the trace level to INFO.To get detailed information for every search, set the trace level to DEBUG.
NoteNote that DEBUG information cannot be read by end users and should be used for support issues only.
The default name for the trace file is indexserver_$host_$port.000.trc.
Basic ExamplesSpeeding Up the Fuzzy Search
You can speed up the fuzzy search for all SQL types except DATE by creating a special data structure called fuzzy search index. The additional data structures increase the total memory footprint of the loaded table. In unfavorable cases, the memory footprint of the column can double.TEXT and SHORTTEXT
294
P U B L I C© 2013 SAP AG or an SAP affiliate company. All rights reserved.
SAP HANA Developer GuideEnabling Search

TEXT and SHORTTEXT columns offer the option 'FUZZY SEARCH INDEX' to enable and disable the additional data structures.When creating a table:
CREATE COLUMN TABLE mytable(id INTEGER PRIMARY KEY,col1 TEXT FUZZY SEARCH INDEX ON FAST PREPROCESS ON,col2 SHORTTEXT(100) FUZZY SEARCH INDEX ON);
Full-Text Index A full-text index offers the option 'FUZZY SEARCH INDEX' to enable and disable the additional data structures.When creating a full-text index:
CREATE COLUMN TABLE mytable(col1 NVARCHAR(2000));CREATE FULLTEXT INDEX myindex ON mytable(col1)FUZZY SEARCH INDEX ONFAST PREPROCESS ON;
This can be changed at a later point in time by using the ALTER FULLTEXT INDEX command:ALTER FULLTEXT INDEX myindex FUZZY SEARCH INDEX OFF;VARCHAR and NVARCHARVARCHAR and NVARCHAR columns also offer the option 'FUZZY SEARCH INDEX' to enable and disable the additional data structures.When creating a table:
CREATE COLUMN TABLE mytable( id INTEGER PRIMARY KEY, col1 VARCHAR(100) FUZZY SEARCH INDEX ON, col2 NVARCHAR(100) FUZZY SEARCH INDEX ON);
Additional performance improvements are possible when creating database indexes on the columns.
CREATE INDEX myindex1 ON mytable(col1);CREATE INDEX myindex2 ON mytable(col2);
The state of the fuzzy search index can be changed at a later point in time by using the ALTER TABLE statement.
ALTER TABLE mytable ALTER( col1 VARCHAR(100) FUZZY SEARCH INDEX OFF, col2 NVARCHAR(100));
The view SYS.TABLE_COLUMNS shows the current state of the fuzzy search index. When working with attribute views, this information is also visible in SYS.VIEW_COLUMNS.
SELECT column_name, data_type_name, fuzzy_search_indexFROM table_columnsWHERE table_name = 'MYTABLE';
SAP HANA Developer GuideEnabling Search
P U B L I C© 2013 SAP AG or an SAP affiliate company. All
rights reserved. 295
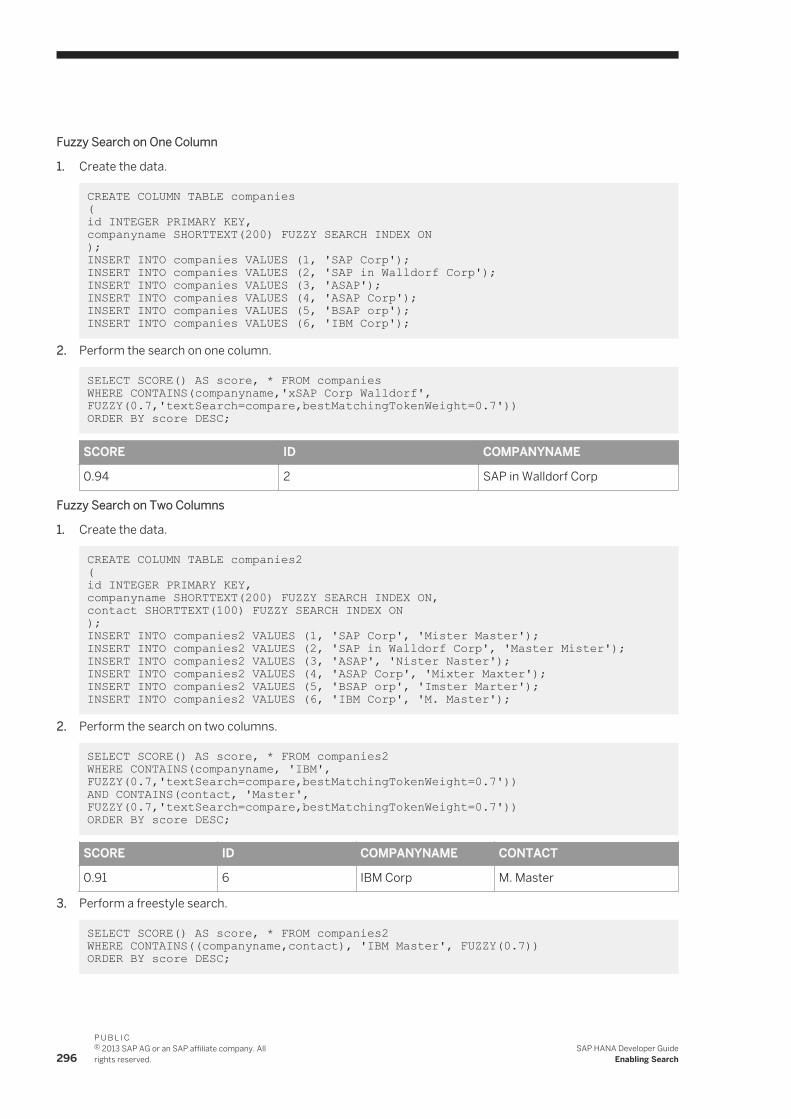
Fuzzy Search on One Column
1. Create the data.
CREATE COLUMN TABLE companies(id INTEGER PRIMARY KEY,companyname SHORTTEXT(200) FUZZY SEARCH INDEX ON);INSERT INTO companies VALUES (1, 'SAP Corp');INSERT INTO companies VALUES (2, 'SAP in Walldorf Corp');INSERT INTO companies VALUES (3, 'ASAP');INSERT INTO companies VALUES (4, 'ASAP Corp');INSERT INTO companies VALUES (5, 'BSAP orp');INSERT INTO companies VALUES (6, 'IBM Corp');
2. Perform the search on one column.
SELECT SCORE() AS score, * FROM companiesWHERE CONTAINS(companyname,'xSAP Corp Walldorf', FUZZY(0.7,'textSearch=compare,bestMatchingTokenWeight=0.7'))ORDER BY score DESC;
SCORE ID COMPANYNAME
0.94 2 SAP in Walldorf Corp
Fuzzy Search on Two Columns
1. Create the data.
CREATE COLUMN TABLE companies2(id INTEGER PRIMARY KEY,companyname SHORTTEXT(200) FUZZY SEARCH INDEX ON,contact SHORTTEXT(100) FUZZY SEARCH INDEX ON);INSERT INTO companies2 VALUES (1, 'SAP Corp', 'Mister Master');INSERT INTO companies2 VALUES (2, 'SAP in Walldorf Corp', 'Master Mister');INSERT INTO companies2 VALUES (3, 'ASAP', 'Nister Naster');INSERT INTO companies2 VALUES (4, 'ASAP Corp', 'Mixter Maxter');INSERT INTO companies2 VALUES (5, 'BSAP orp', 'Imster Marter');INSERT INTO companies2 VALUES (6, 'IBM Corp', 'M. Master');
2. Perform the search on two columns.
SELECT SCORE() AS score, * FROM companies2WHERE CONTAINS(companyname, 'IBM', FUZZY(0.7,'textSearch=compare,bestMatchingTokenWeight=0.7'))AND CONTAINS(contact, 'Master', FUZZY(0.7,'textSearch=compare,bestMatchingTokenWeight=0.7'))ORDER BY score DESC;
SCORE ID COMPANYNAME CONTACT
0.91 6 IBM Corp M. Master
3. Perform a freestyle search.
SELECT SCORE() AS score, * FROM companies2WHERE CONTAINS((companyname,contact), 'IBM Master', FUZZY(0.7))ORDER BY score DESC;
296
P U B L I C© 2013 SAP AG or an SAP affiliate company. All rights reserved.
SAP HANA Developer GuideEnabling Search

SCORE ID COMPANYNAME CONTACT
0.8 6 IBM Corp M. Master
NoteFreestyle search always uses TF/IDF to calculate the score and does not support parameters such as 'textSearch=compare' or 'bestMatchingTokenWeight=0.7' that influence score calculation. Therefore, we get a different score for the same record.
Fuzzy Search on String ColumnsString types support a basic fuzzy string search. The values of a column are compared with the user input using the fault-tolerant fuzzy string comparison.When working with string types, the fuzzy string compare always compares the full strings. When, for example, searching with 'SAP', a record such as 'SAP Deutschland AG & Co. KG' gets a very low score, because only a very small part of the string is equal (3 of 27 characters match).A fuzzy search on string types is a replacement for a non-fault-tolerant SQL statement such asSELECT ... FROM products WHERE product_name = 'coffe krisp biscuit' ...that would not return any results because of the spelling errors.Supported SQL data types are VARCHAR and NVARCHAR.It is possible to speed up the fuzzy search by creating additional data structures called 'fuzzy search indexes', which are used for a faster calculation of the fuzzy score. These indexes exist in the memory only, so no additional disk space is needed.To get the best response times possible, you should enable the fuzzy search indexes for all database columns that have a high load of fuzzy searches and for all database columns that are used in performance-critical queries.Use Case Fuzzy Search - House Numbers
Score CalculationThe house number comparison aims for a 'simple' solution that is easy to understand, gives good results, and works for most countries. The limitations of the algorithm are:
● The algorithm focuses on numeric values - either a single number ('8') or a range of numbers ('8 - 12').● House number additions (for example, the 'a' in '8a') are either equal or not equal.
When comparing two strings containing house numbers with each other, the score is calculated according to the rules described below.House number addition. A house number addition in terms of this backlog item is any additional text that is written before or after the numeric value of a house number.House number ranges. When a string contains at least two numbers and there is a dash between the first and second number, this is treated as a house number range. The first number is the lower bound of the range, the last number is the upper bound.Multiple numbers. When multiple numbers are part of a house number string that does not define a house number range, the first number is the house number used for the comparison. All remaining information is used as a house number addition.Whitespace characters. For all rules, whitespace characters are ignored when comparing the house numbers. For the score calculation it does not matter if a house number is given as '8a' or '8 a' or if it is '8-10' or '8 - 10'.Symmetry. In all examples, the score calculation is symmetric. This means that either string 1 or string 2 can be the user input and the other string is stored in the database table.
SAP HANA Developer GuideEnabling Search
P U B L I C© 2013 SAP AG or an SAP affiliate company. All
rights reserved. 297

Rule 1 - House Numbers or House Number Ranges Are Identical For identical house numbers, a score of 1.0 is returned. Identical house numbers are house number strings that are equal when whitespace characters are ignored.Examples:
String 1 String 2 Score
5 5 1.0
5a 5 a 1.0
8-12 8-12 1.0
9 in the backyard 9 in the backyard 0.9
Rule 2 - House Numbers or House Number Ranges Are Very Similar (House Number Additions Are Different) House numbers or house number ranges are considered very similar when the numeric values are identical but the additional information differs.Examples:
String 1 String 2 Score
5 5 a 0.9
5a 5 b 0.9
5 Nr. 5 0.9
8-12 8 - 12a 0.9
8-12 8 - 12/5 0.9
8 this is a long text -12 8 - 12a 0.9
7 below 7 0.9
9 9 in the backyard 0.9
9 in the backyard 9 in the backyard 0.9
Rule 3 - House Numbers or House Number Ranges Are Less SimilarHouse numbers and house number ranges are considered less similar in the following cases:
1. A house number is compared to a house number range and the numeric value of the house number equals the lower or upper bound of the range.
2. Two house number ranges are compared and the numeric value of either the lower or upper bound are equal.
String 1 String 2 Score
8 8-12 0.8
12a 8-12 0.8
8-10 8-12 0.8
8-10 8-10/12 0.8
10-12a 8-12 0.8
298
P U B L I C© 2013 SAP AG or an SAP affiliate company. All rights reserved.
SAP HANA Developer GuideEnabling Search

String 1 String 2 Score
8 in the backyard 8-12 0.8
Rule 4 - Overlapping House Number RangesHouse numbers and house number ranges overlap in the following cases:
1. A house number is compared to a house number range and the numeric value of the house number lies within the range.
2. Two house number ranges are compared and the ranges overlap.
Examples:
String 1 String 2 Score
10 8-12 0.7
10a 8-12 0.7
9 8-12 0.7
8-12 10-14 0.7
8-12a 10b-14 0.7
Last Rule - House Numbers Are Not EqualExamples:
String 1 String 2 Score
5 6 0.0
8a 9a 0.0
6 8-12 0.0
8-10 12-14 0.0
House Number Columns and Other String Search Options The following search options available for string column types are not valid for house number columns.SpellCheckFactorWhen comparing house numbers, the search option 'spellCheckFactor' is ignored. So for house numbers, the results are always the same as with 'spellCheckFactor=1.0'.SimilarCalculationModeWhen comparing house numbers, the search option 'similarCalculationMode' is ignored and has no effect on the search result. Both options are ignored, no error is returned when any of the options is given.
SQL Syntax To enable the search for house numbers on an (N)VARCHAR column, the FUZZY SEARCH MODE clause is used in a CREATE TABLE statement.
CREATE COLUMN TABLE tab( id INTEGER PRIMARY KEY, col1 NVARCHAR(20) FUZZY SEARCH MODE 'housenumber');
SAP HANA Developer GuideEnabling Search
P U B L I C© 2013 SAP AG or an SAP affiliate company. All
rights reserved. 299

To enable or disable the house number search mode at a later point in time, you use the ALTER TABLE statement. The fuzzy search mode is not changed if the FUZZY SEARCH MODE clause is omitted.
-- enable housenumber searchALTER TABLE tab ALTER( col1 VARCHAR(20) FUZZY SEARCH MODE 'housenumber');
-- disable housenumber searchALTER TABLE tab ALTER( col1 VARCHAR(20) FUZZY SEARCH MODE NULL);
-- do not change the status of the search modeALTER TABLE tab ALTER( col1 VARCHAR(20));
You can query the state of the fuzzy search mode by using the system view TABLE_COLUMNS.
SELECT column_name, data_type_name, fuzzy_search_modeFROM table_columnsWHERE table_name = 'TAB';
NoteYou cannot use a fuzzy search index in combination with the house number search mode.
ExampleThe following example creates a table that contains a single house number column only and executes some searches on this column.
CREATE COLUMN TABLE housenumbers( housenumber NVARCHAR(50) FUZZY SEARCH MODE 'housenumber');
INSERT INTO housenumbers VALUES ('5');INSERT INTO housenumbers VALUES ('5a');INSERT INTO housenumbers VALUES ('5 a');INSERT INTO housenumbers VALUES ('Nr. 5');
INSERT INTO housenumbers VALUES ('8-12');INSERT INTO housenumbers VALUES ('8 - 12');INSERT INTO housenumbers VALUES ('8 - 12a');INSERT INTO housenumbers VALUES ('Nr. 8-12');INSERT INTO housenumbers VALUES ('8 - 12/5');INSERT INTO housenumbers VALUES ('8');INSERT INTO housenumbers VALUES ('12a');INSERT INTO housenumbers VALUES ('8-10');INSERT INTO housenumbers VALUES ('10-12a');INSERT INTO housenumbers VALUES ('10a');INSERT INTO housenumbers VALUES ('10-14');
INSERT INTO housenumbers VALUES ('9');
SELECT TO_DECIMAL(SCORE(),3,2), *FROM housenumbersWHERE CONTAINS(housenumber, '5', FUZZY(0.8))ORDER BY TO_DECIMAL(SCORE(),3,2) DESC;
300
P U B L I C© 2013 SAP AG or an SAP affiliate company. All rights reserved.
SAP HANA Developer GuideEnabling Search

SELECT TO_DECIMAL(SCORE(),3,2), *FROM housenumbersWHERE CONTAINS(housenumber, 'Nr. 5', FUZZY(0.8))ORDER BY TO_DECIMAL(SCORE(),3,2) DESC;
SELECT TO_DECIMAL(SCORE(),3,2), *FROM housenumbersWHERE CONTAINS(housenumber, '8a-12', FUZZY(0.8))ORDER BY TO_DECIMAL(SCORE(),3,2) DESC;
SELECT TO_DECIMAL(SCORE(),3,2), *FROM housenumbersWHERE CONTAINS(housenumber, '10-12', FUZZY(0.8))ORDER BY TO_DECIMAL(SCORE(),3,2) DESC;
SELECT TO_DECIMAL(SCORE(),3,2), *FROM housenumbersWHERE CONTAINS(housenumber, '9 in the BACKYARD', FUZZY(0.8))ORDER BY TO_DECIMAL(SCORE(),3,2) DESC;
Use Case Fuzzy Search - Postcodes
Postcodes in almost all countries are ordered by region. This means that if the leading characters of the postcodes of two different addresses are the same, the addresses are near to each other. In Germany, for example, addresses within large cities share the first or even the first two digits of their postcode.
The only exception known to the development team is Cambodia, where postcodes are not ordered by region.
When doing a fuzzy search on addresses, it makes sense to return a higher score for postcodes that are 'near' to a given user input than for postcodes that are 'far away' from the user input. It makes sense to give a higher weight to the leading characters and a lower weight to the trailing characters of the postcode.
Valid addresses may contain a country code in front of the postcode (for example, 'D-12345' or 'DE-12345' for a German address). This is also supported by the fuzzy postcode search.
Score CalculationBefore the fuzzy score is calculated, the postcode strings are standardized.
1. Country codes are separated from the postcode strings. Country codes in this case consist of one to three letters (a-z only, no numbers) at the beginning of the postcode, followed by a minus sign. Longer words are not considered a country code because postal standards do not allow country names in front of the postcode.
2. Country codes are standardized to enable a comparison of different codes for the same country, for example, 'D-', 'DE-' and 'DEU-' for German postcodes. All unknown/invalid country codes are standardized to one special 'dummy' country code.
3. Spaces and dashes are removed from the remaining postcode.4. All letters are standardized to uppercase.
User Input Country Code Remaining Postcode
71691 71691
716 91 71691
D-71691 D 71691
DE-71 691 DE 71691
D 71691 D71691
Germany-71691 GERMANY71691
SAP HANA Developer GuideEnabling Search
P U B L I C© 2013 SAP AG or an SAP affiliate company. All
rights reserved. 301

User Input Country Code Remaining Postcode
GB-A1H 2ZU GB A1H2ZU
A1H-2ZU A1H2ZU
gb-A1h 2zu GB A1H2ZU
XY-12345 XX 12345
zz-12345 XX 12345
AI-2640 AI 2640
The last example is the only known example where the country code is part of the postcode (AI = Anguilla). The algorithm works here as well, as the country code is also compared. The two examples directly above the AI example show invalid country codes. Both are standardized to the same non-existent 'dummy' country code.
Postcode ComparisonThe standardized postcodes are compared using a variation of the fuzzy string comparison. This variation gives a higher weight to the first two characters of the postcode.
Country codes are given the same weight as a single character at the end of the postcode.
● Only postcodes with the same country code can get a score of 1.0.● If one country code is given and the second country code is empty, the score of the postcode comparison is
less than 1.0.● If both country codes are given and are different, the score of the postcode comparison is also less than 1.0.
Parameter similarCalculationMode The search option 'similarCalculationMode' with options 'search' and 'symmetricsearch' is available for postcode columns.When using the search option 'similarCalculationMode', a postcode search with a postcode prefix will find all addresses in a given area.
● A search with '71' returns all postcodes beginning with '71'.● A search with '1234' returns all postcodes starting with a sequence similar to '1234' and, with a lower score, all
postcodes that contain a '1234'.
Parameter spellCheckFactorTwo postcodes may be considered identical by the fuzzy string comparison, but may still be different. In this case, the value of the parameter 'spellCheckFactor' is applied and the score is multiplied by the spellCheckFactor.Examples for non-equal postcodes that get a score of 1.0 are:
● '123456' and '12 34 56'● '7070717' and '7071707'
The default value of the search option spellCheckFactor is 0.9. To disable this feature, set 'spellCheckFactor=1.0'.
ExampleThe following example uses a spellCheckFactor of 1.0, which is not the default value.
Postcode 1 Postcode 2 Score Remarks
71691 71691 1.0
302
P U B L I C© 2013 SAP AG or an SAP affiliate company. All rights reserved.
SAP HANA Developer GuideEnabling Search

Postcode 1 Postcode 2 Score Remarks
71691 71 691 1.0
71691 81691 0.51 Highest weight on the first digit
71691 72691 0.7 High weight on the second digit
71691 71692 0.96 Lower weight on all other digits
71691 D-71691 0.96 Country code missing in one column
D-71691 A-71691 0.96 Country codes are different
71691 D-71692 0.92
D-71691 A-71692 0.92
GB-A1H 2ZU Gb-a1h2zu 1.0
XX-12345 YY-12345 1.0 Invalid country codes are 'equal'
D-12345 YY-12345 0.96 Valid and invalid country code
SQL Syntax(N)VARCHAR columns have to be defined as postcode columns to enable the fuzzy postcode search. You do this by using the FUZZY SEARCH MODE clause.In addition, it is also possible to increase the performance of the postcode search by activating a fuzzy search index and by creating a database index on the postcode column.
CREATE COLUMN TABLE tab( id INTEGER PRIMARY KEY, postcode NVARCHAR(20) FUZZY SEARCH INDEX ON FUZZY SEARCH MODE 'postcode');
CREATE INDEX myindex1 ON tab(postcode);
The postcode search can be enabled or disabled at a later point in time with the ALTER TABLE statement. Do not specify the FUZZY SEARCH MODE clause to disable the postcode search.
-- enable postcode searchALTER TABLE tab ALTER( postcode NVARCHAR(100) FUZZY SEARCH MODE 'postcode');
-- disable postcode searchALTER TABLE tab ALTER( postcode NVARCHAR(100) FUZZY SEARCH MODE NULL);
-- do not change the status of the search mode
SAP HANA Developer GuideEnabling Search
P U B L I C© 2013 SAP AG or an SAP affiliate company. All
rights reserved. 303

ALTER TABLE tab ALTER( postcode NVARCHAR(100));
You can query the status of the fuzzy search index and the fuzzy search mode from the system view TABLE_COLUMNS.
SELECT column_name, data_type_name, fuzzy_search_index, fuzzy_search_modeFROM table_columnsWHERE table_name = 'TAB';
ExampleCREATE COLUMN TABLE postcodes( postcode NVARCHAR(50) FUZZY SEARCH INDEX ON FUZZY SEARCH MODE 'postcode');
INSERT INTO postcodes VALUES ('71691');INSERT INTO postcodes VALUES ('81691');INSERT INTO postcodes VALUES ('72691');INSERT INTO postcodes VALUES ('71692');INSERT INTO postcodes VALUES ('716 91');INSERT INTO postcodes VALUES ('A1H 2ZU');INSERT INTO postcodes VALUES ('A1H2ZU');INSERT INTO postcodes VALUES ('D-71691');INSERT INTO postcodes VALUES ('D-71692');INSERT INTO postcodes VALUES ('A-71691');INSERT INTO postcodes VALUES ('A-71692');INSERT INTO postcodes VALUES ('DE-71 691');INSERT INTO postcodes VALUES ('D 71691');INSERT INTO postcodes VALUES ('GB-A1H 2ZU');INSERT INTO postcodes VALUES ('XX-12345');INSERT INTO postcodes VALUES ('D-12345');INSERT INTO postcodes VALUES ('71234');
SELECT TO_DECIMAL(SCORE(),3,2), *FROM postcodesWHERE CONTAINS(postcode, '71691', FUZZY(0.5, 'spellCheckFactor=1.0'))ORDER BY SCORE() DESC;
SELECT TO_DECIMAL(SCORE(),3,2), *FROM postcodesWHERE CONTAINS(postcode, 'D-71691', FUZZY(0.5, 'spellCheckFactor=1.0'))ORDER BY SCORE() DESC;
SELECT TO_DECIMAL(SCORE(),3,2), *FROM postcodesWHERE CONTAINS(postcode, 'Gb-a1h2zu', FUZZY(0.5, 'spellCheckFactor=1.0'))ORDER BY SCORE() DESC;
SELECT TO_DECIMAL(SCORE(),3,2), *FROM postcodesWHERE CONTAINS(postcode, 'YY-12345', FUZZY(0.5, 'spellCheckFactor=1.0'))ORDER BY SCORE() DESC;
SELECT TO_DECIMAL(SCORE(),3,2), *FROM postcodesWHERE CONTAINS(postcode, '71', FUZZY(0.5, 'spellCheckFactor=1.0'))ORDER BY SCORE() DESC;
SELECT TO_DECIMAL(SCORE(),3,2), *FROM postcodesWHERE CONTAINS(postcode, '1234', FUZZY(0.5, 'spellCheckFactor=1.0'))ORDER BY SCORE() DESC;
304
P U B L I C© 2013 SAP AG or an SAP affiliate company. All rights reserved.
SAP HANA Developer GuideEnabling Search

Fuzzy Search on Text Columns Text types support a more sophisticated kind of fuzzy search. Texts are tokenized (split into terms) and the fuzzy comparison is done term by term. For example, when searching with 'SAP', a record such as 'SAP Deutschland AG & Co. KG' gets a high score, because the term 'SAP' exists in both texts. A record such as 'SAPPHIRE NOW Orlando' gets a lower score, because 'SAP' is only a part of the longer term 'SAPPHIRE' (3 of 8 characters match).Fuzzy search on text columns replaces non-fault-tolerant statements such asSELECT ... FROM documents WHERE doc_content LIKE '% Driethanolamyn %' ...The following SQL data types are supported:
● TEXT● SHORTTEXT● fulltext index
A fulltext index is an additional index structure that can be defined for non-text columns to add text search features. Supported column types are, for example, NCLOB and NVARCHAR.It is possible to speed up the fuzzy search by creating data structures called 'fuzzy search indexes', which are used for a faster calculation of the fuzzy score. These indexes exist in the memory only, so no additional disk space is needed.To get the best response times possible, you should enable the fuzzy search indexes for all database columns that have a high load of fuzzy searches and for all database columns that are used in performance-critical queries.
Fuzzy Search on SQL Type TEXT A call to contains that references a TEXT column is automatically processed as a text search. In this case, the mode textsearch=compare and all fuzzy search options are allowed:
CREATE COLUMN TABLE mytable( col1 TEXT);
SELECT score() AS score, * FROM mytable WHERE contains(col1, 'a b', fuzzy(0.8, 'textsearch=compare'));
Fuzzy Search on SQL Type SHORTTEXT When a SHORTTEXT column is created, a column of column store type cs_string and a second hidden text column are created. A call to contains that references the SHORTTEXT column is automatically redirected by the freestyler to the additional hidden TEXT column. In this case, the mode textsearch=compare and all fuzzy search options are allowed:
CREATE COLUMN TABLE mytable( col1 SHORTTEXT(200));
SELECT score() AS score, * FROM mytable WHERE contains(col1, 'a b', fuzzy(0.8, 'textsearch=compare'));
Fuzzy Search on a FULLTEXT INDEX When a full text index is created on a column that is not of type TEXT (e.g. NVARCHAR, NCLOB, ...) a hidden text column is added to the table. A call to contains that references the non-TEXT column is automatically redirected
SAP HANA Developer GuideEnabling Search
P U B L I C© 2013 SAP AG or an SAP affiliate company. All
rights reserved. 305

by the freestyler to the additional text column. In this case, the mode textsearch=compare and all fuzzy search options are allowed:
CREATE COLUMN TABLE mytable( col1 NVARCHAR(2000));
CREATE FULLTEXT INDEX myindex ON mytable(col1);
SELECT score() AS score, * FROM mytable WHERE contains(col1, 'a b', fuzzy(0.8, 'textsearch=compare'));
Merge Delta for Better Performance When inserting or loading a large number of rows in a table that has a TEXT or SHORTTEXT column or that uses a FULLTEXT INDEX, it is important to merge the delta part of the table to get a good search performance.A delta merge can be started manually with the following SQL statement:
MERGE DELTA OF mytable;
Alternatively, a delta merge can be triggered automatically by the mergedog process.Fuzzy Multi-Token Search on Text Columns
Content TypesWhen using more than one token within a query, the default content type is AND (for example, ... WHERE CONTAINS (mycolumn, 'software firm', FUZZY(0.5)) ... will return entries that contain a token similar to 'software' and a token similar to 'firm').Alternatively, you can use OR by adding the key word between the tokens (for example, ... WHERE CONTAINS (mycolumn, 'apple OR 'banana', FUZZY(0.5)) ... will return entries that contain a token similar to 'apple' and entries that contain a token similar to 'banana').PHRASE is similar to AND but restricts hits to those that contain the tokens as a phrase, that is, in the same order and with nothing between them. A PHRASE is indicated by adding double quotes around the tokens, within the single quotes (for example, ... WHERE CONTAINS (mycolumn, '"day dream"', FUZZY(0.5)) ... will not return an entry containing 'I dream of a day').The content type AND that is used for a full-text search (default behavior: textSearch=fulltext) is implemented as a logical AND to achieve better performance. For example, a search for 'Miller & Miller AG' with content type AND matches 'Miller AG'.textSearch=compare should be used for duplicate detection and for comparing company names, product names, and so on. Here, search results are better because of the strict AND comparison that is used. In other words, if you search for 'Miller & Miller' with content type AND, only records that contain the term 'Miller' at least twice are returned.A strict AND assigns terms from the user input to terms in the database entry only once (and vice versa). For more information, see Fuzzy Multi-Token Search with Soft AND [page 308].
Parameters Influencing the ScoreName of Option Range Default Applies to Types
bestMatchingTokenWeight
0.0..1.0 not set TEXT
considerNonMatchingTokens
max, min, all, input, table max TEXT
306
P U B L I C© 2013 SAP AG or an SAP affiliate company. All rights reserved.
SAP HANA Developer GuideEnabling Search

Formula for score calculation:score = bestMatchingTokenWeight x max(tokenScores) + (1-bestMatchingTokenWeight) x √(Σ(tokenScore²)/tokenCount)tokenCount is determined according to the parameter considerNonMatchingTokens as follows:
● input: Use search term token count
● table: Use column value token count● all: Use sum of search and column value token count (where the numerator is multiplied by 2)● min: Use smaller value of token counts● max: Use larger value of token counts (default)
Recommendations for specific search content typesIf you are using an "OR" search (searching for "this or that"), you should set considerNonMatchingTokens to table to get a useful score assessment.Example
DROP TABLE test_table;CREATE COLUMN TABLE test_table(id INTEGER PRIMARY KEY,t SHORTTEXT(200) FUZZY SEARCH INDEX ON);INSERT INTO test_table VALUES ('1','eins');INSERT INTO test_table VALUES ('2','eins zwei');INSERT INTO test_table VALUES ('3','eins zwei drei');INSERT INTO test_table VALUES ('4','eins zwei drei vier');INSERT INTO test_table VALUES ('5','eins zwei drei vier funf');SELECT TO_DECIMAL(SCORE(),3,2) AS score, * FROM test_tableWHERE CONTAINS(t, 'eins zwoi drei', FUZZY(0.5,'textSearch=compare,bestMatchingTokenWeight=1.0'))ORDER BY score DESC, id;
SCORE ID T
1 3 eins zwei drei
1 4 eins zwei drei vier
1 5 eins zwei drei vier funf
SELECT TO_DECIMAL(SCORE(),3,2) AS score, * FROM test_tableWHERE CONTAINS(t, 'eins zwoi drei', FUZZY(0.5,'textSearch=compare,bestMatchingTokenWeight=0'))ORDER BY score DESC, id;
SCORE ID T
0.92 3 eins zwei drei
0.8 4 eins zwei drei vier
0.71 5 eins zwei drei vier funf
SELECT TO_DECIMAL(SCORE(),3,2) AS score, * FROM test_tableWHERE CONTAINS(t, 'eins zwoi drei', FUZZY(0.5,'textSearch=compare,bestMatchingTokenWeight=0,considerNonMatchingTokens=all'))ORDER BY score DESC, id;
SAP HANA Developer GuideEnabling Search
P U B L I C© 2013 SAP AG or an SAP affiliate company. All
rights reserved. 307

SCORE ID T
0.92 3 eins zwei drei
0.85 4 eins zwei drei vier
0.8 5 eins zwei drei vier funf
SELECT TO_DECIMAL(SCORE(),3,2) AS score, * FROM test_tableWHERE CONTAINS(t, 'eins zwoi drei', FUZZY(0.5,'textSearch=compare,bestMatchingTokenWeight=0,considerNonMatchingTokens=input'))ORDER BY score DESC, id;
SCORE ID T
0.92 3 eins zwei drei
0.92 4 eins zwei drei vier
0.92 5 eins zwei drei vier funf
Parameters Influencing the Result SetOption Range Default Applies to Types
andSymmetric on,off off TEXT
andThreshold 0.0..1.0 1.0 TEXT
For examples, see Fuzzy Multi-Token Search with Soft AND [page 308] .Fuzzy Multi-Token Search with Soft AND
A fuzzy search on one text column can also use a softer AND, so that not all tokens used in the search term have to match the result.There are two parameters that control this behavior:
Option Name Range Default Applies to Types Short Description
andSymmetric on,off off TEXT Activates a symmetric AND content search
andThreshold 0.0..1.0 1.0 TEXT Determines the percentage of tokens that need to match
Creating example data:
DROP TABLE test_soft_and;CREATE COLUMN TABLE test_soft_and(id INTEGER PRIMARY KEY,t SHORTTEXT(200) FUZZY SEARCH INDEX ON);INSERT INTO test_soft_and VALUES ('1','eins');
308
P U B L I C© 2013 SAP AG or an SAP affiliate company. All rights reserved.
SAP HANA Developer GuideEnabling Search

INSERT INTO test_soft_and VALUES ('2','eins zwei');INSERT INTO test_soft_and VALUES ('3','eins zwei drei');INSERT INTO test_soft_and VALUES ('4','eins zwei drei vier');INSERT INTO test_soft_and VALUES ('5','eins zwei drei vier funf');
Search with andSymmetric=off
SELECT SCORE() AS score, * FROM test_soft_andWHERE CONTAINS(T, 'eins zwei drei', FUZZY(0.5, 'andSymmetric=off,bestMatchingTokenWeight=0.5,textSearch=compare'))ORDER BY score DESC, id;
SCORE ID T
1 3 eins zwei drei
0.933012723922729 4 eins zwei drei vier
0.887298345565796 5 eins zwei drei vier funf
Search with andSymmetric=on
SELECT SCORE() AS score, * FROM test_soft_andWHERE CONTAINS(T, 'eins zwei drei', FUZZY(0.5,'andSymmetric=on,bestMatchingTokenWeight=0.5,textSearch=compare'))ORDER BY score DESC, id;
SCORE ID T
1 3 eins zwei drei
0.933012723922729 4 eins zwei drei vier
0.90824830532074 2 eins zwei
0.887298345565796 5 eins zwei drei vier funf
0.788675129413605 1 eins
Search with andThreshold
SELECT SCORE() AS score, * FROM test_soft_andWHERE CONTAINS(T, 'eins XXX drei vier', FUZZY(0.5,'andThreshold=0.75,bestMatchingTokenWeight=0.5,textSearch=compare'))ORDER BY score DESC, id;
SCORE ID T
0.933012723922729 4 eins zwei drei vier
0.887298345565796 5 eins zwei drei vier funf
SELECT SCORE() AS score, * FROM test_soft_andWHERE CONTAINS(T, 'eins XXX drei vier', FUZZY(0.5,'andThreshold=0.5,bestMatchingTokenWeight=0.5,textSearch=compare'))ORDER BY score DESC, id;
SCORE ID T
0.933012723922729 4 eins zwei drei vier
SAP HANA Developer GuideEnabling Search
P U B L I C© 2013 SAP AG or an SAP affiliate company. All
rights reserved. 309

SCORE ID T
0.887298345565796 5 eins zwei drei vier funf
0.853553414344788 3 eins zwei drei
Option abbreviationSimilarity
The option abbreviationSimilarity is used to search for and find a word using its first character and vice versa with a given score. With abbreviationSimilarity = 0.9, a SELECT retrieves “word” with SCORE = 0.9 when you search with “w” (and vice versa).
CREATE COLUMN TABLE abbrev(id INTEGER PRIMARY KEY,name SHORTTEXT(200) FUZZY SEARCH INDEX ON);INSERT INTO abbrev VALUES ('1','Peter');INSERT INTO abbrev VALUES ('2','Hans');INSERT INTO abbrev VALUES ('3','H.');INSERT INTO abbrev VALUES ('4','P.');INSERT INTO abbrev VALUES ('5','Hans-Peter');INSERT INTO abbrev VALUES ('6','H.-P.');INSERT INTO abbrev VALUES ('7','HP');INSERT INTO abbrev VALUES ('8','G Gerd');INSERT INTO abbrev VALUES ('9','G');INSERT INTO abbrev VALUES ('10','Gerd');
Search one token with abbreviationSimilarity
SELECT SCORE() AS score, id, name FROM abbrevWHERE CONTAINS(name, 'HP', FUZZY(0.5, 'abbreviationSimilarity=0.80,textSearch=compare'))ORDER BY score DESC, id;
SCORE ID NAME
1 7 HP
0.800000011920929 3 H.
0.565685451030731 6 H.-P.
Search two tokens with abbreviationSimilarity
SELECT SCORE() AS score, id, name FROM abbrevWHERE CONTAINS(name, 'Hans Peter',FUZZY(0.5, 'abbreviationSimilarity=0.80,textSearch=compare'))ORDER BY score DESC, id;
SCORE ID NAME
1 5 Hans-Peter
0.800000011920929 6 H.-P.
310
P U B L I C© 2013 SAP AG or an SAP affiliate company. All rights reserved.
SAP HANA Developer GuideEnabling Search

Search two tokens with abbreviationSimilarity
SELECT SCORE() AS score, id, name FROM abbrevWHERE CONTAINS(name, 'Go Gerd',FUZZY(0.5, 'abbreviationSimilarity=0.80,textSearch=compare'))ORDER BY score DESC, id;
SCORE ID NAME
0.905538558959961 8 G Gerd
Option minTextScore
The minTextScore option allows you to set the score a text field has to reach to be a match.
NoteIf you use a fuzzySimilarity of 0.0, the parameter minTextScore will be redundant.
DROP TABLE tab_mintextscore;CREATE COLUMN TABLE tab_mintextscore(id INTEGER PRIMARY KEY,t TEXT FAST PREPROCESS ON FUZZY SEARCH INDEX ON);INSERT INTO tab_mintextscore VALUES ('1','Bert');INSERT INTO tab_mintextscore VALUES ('2','Berta');INSERT INTO tab_mintextscore VALUES ('3','Bart');
Search on a text column
SELECT SCORE() AS score, id, t FROM tab_mintextscoreWHERE CONTAINS(t, 'Ernie OR Bert', FUZZY(0.100, 'textSearch=compare, bestMatchingTokenWeight=0,minTextScore=0.70'))ORDER BY score DESC, id;
SCORE ID T Description
0.7 1 Bert << rank value of 0.7 is reached, this is a match
0.65 1 Berta << no match
0.52 1 Bart << no match
Option textSearch
The textSearch option is used to select the search algorithm for TEXT columns:
● textSearch=fulltext (default value): A full-text search is done on a TEXT column. IDF calculation or specialOrRanking (depending on search flags) is used. This is the 'old' NewDB behavior.
● textSearch=compare: A search similar to a Fuzzy Double search is done. Additional search options are enabled.
Allowed search options and error handlingDepending on the data type of a column and the type of the search (freestyle or attribute search) of a query entry, some of the searchOptions parameters are not allowed because they do not make sense.If the user sets an option that is not allowed, a SQL error is thrown and the SELECT aborts.
SAP HANA Developer GuideEnabling Search
P U B L I C© 2013 SAP AG or an SAP affiliate company. All
rights reserved. 311

FUZZY-Double-like search on TEXT
Full-text search on TEXT
Freestyle full-text search
Search on types other than TEXT
attribute search and textSearch= compare and datatype= TEXT
attribute search and textSearch= fulltext and datatype= TEXT
freestyle search and textSearch= fulltext
attribute search and datatype <>TEXT
textSearch=compare
YES n/a n/a NO
textSearch=fulltext n/a YES n/a (default mode) NO
similarCalculationMode
YES YES YES YES
spellCheckFactor YES YES YES YES
fuzzySimilarity > 0 YES YES YES YES
fuzzySimilarity = 0 YES NO NO YES
emptyScore YES NO NO YES (Only valid for text, string and date types. Numeric types are not supported.)
abbreviationSimilarity
YES NO NO NO
maxDateDistance NO NO YES YES (Only valid for date types. Other types are not supported.)
termMappingTable/ListId
YES YES YES NO
stopwordTable/ListId
YES NO NO NO
andThreshold YES NO NO NO
andSymmetric YES NO NO NO
bestMatchingTokenWeight
YES NO NO NO
considerNonMatchingTokens
YES NO NO NO
minTextScore YES NO NO NO
Rank Calculation fuzzy score IDF IDF (TEXT) or fuzzy score (other types)
fuzzy score
LegendYES - The parameter is allowed.
312
P U B L I C© 2013 SAP AG or an SAP affiliate company. All rights reserved.
SAP HANA Developer GuideEnabling Search

NO - The parameter is not allowed and an error message is returned if the user sets this option.ignored - The parameter is ignored and no error message is returned to the user. This is necessary because the freestyler passes all search options to the generated search on single columns.Rank calculationWhen 'fulltext' is specified, the search is done using IDF or specialOrRanking (depending on the search flags). The fuzzy score is not calculated.When 'compare' is specified, the fuzzy score is calculated using bestMatchingTokenWeight and considerNonMatchingTokens. The user does not have to set these options. In this case, the default values are used.Fuzzy Search with StopwordsUsage
Stopwords are terms that are less significant for a search and are therefore not used to generate the result set. In other words, the search is carried out as if the stopwords are not present (either in the user input or in the database column).However, stopwords influence the score that is calculated. A record with stopwords identical to the user input gets a higher score than a record with differing or missing stopwords.Stopwords can be defined either as single terms or as stopword phrases consisting of multiple terms. Stopword phrases are only applied when all terms of the stopword appear in exactly the given order.Use case example: When searching for company names, the legal form (Ltd, SA, AG, and so on) is less significant and less selective than the other parts of the name.Stopwords are stored in a column-store table with the following format:
CREATE COLUMN TABLE mystopwords(stopword_id VARCHAR(32) PRIMARY KEY,list_id VARCHAR(32) NOT NULL,language_code CHAR(2),term NVARCHAR(200) NOT NULL);
Stopwords are language dependent. It is possible to define the language that a stopword is valid for. You can also define stopwords for all languages by not setting a language.(It makes sense to add the language information now so that you can make use of the feature when it is available, without having to change the stopword definitions.)As with term mappings, stopwords can be grouped together in multiple groups. Groups of stopwords are identified by the value of the list_id column that is part of the stopword table.
INSERT INTO mystopwords VALUES (1, 'legalform', '', 'Ltd');INSERT INTO mystopwords VALUES (2, 'legalform', 'de', 'GmbH');INSERT INTO mystopwords VALUES (3, 'legalform', 'de', 'Gesellschaft mit beschränkter Haftung');INSERT INTO mystopwords VALUES (4, 'legalform', 'de', 'AG');INSERT INTO mystopwords VALUES (5, 'legalform', 'de', 'Aktiengesellschaft');
To activate stopwords for a search on a TEXT column, you need to provide two search options (similar to the options used for term mappings):
● stopwordListId=mylist1,mylist2,mylist3● stopwordTable=[<schemaname>.]<tablename>
SELECT TO_DECIMAL(SCORE(),3,2) as score, company FROM mydataWHERE CONTAINS(company, 'xy gmbh', FUZZY(0.7, 'textsearch=compare,
SAP HANA Developer GuideEnabling Search
P U B L I C© 2013 SAP AG or an SAP affiliate company. All
rights reserved. 313
stopwordTable=MYSTOPWORDS, stopwordListId=legalform'))ORDER BY score DESC;
To activate language-specific stopwords, you must provide the language parameter:
SELECT TO_DECIMAL(SCORE(),3,2) as score, company FROM mydataWHERE CONTAINS(company, 'xy gmbh', FUZZY(0.7, 'textsearch=compare, stopwordTable=MYSTOPWORDS, stopwordListId=legalform'), language('de'))ORDER BY score DESC;
NoteIn this case, all stopwords where language_code is set to 'de' or empty will be used. Any stopwords with other language codes will be ignored.
Stopwords are removed from the search term first. In this example, the result set of the search is the same as for the search '... WHERE CONTAINS(company, 'xy', ...'.When calculating the score, the fuzzy scores of the non-stopword terms have the biggest influence on the resulting score. Stopwords in the user input and in the database records are also given less weight than the non-stopword terms, so records with matching stopwords get a higher score than records with differing or missing stopwords.The result of the above example is as follows:
Score Company Comment
1.00 XY GmbH
0.95 XY Missing stopword
0.95 XY Aktiengesellschaft Differing stopword
0.92 XY Gesellschaft mit beschränkter Haftung
Many differing stopwords
0.78 XY Company Additional non-matching term, no stopword
The value given for stopwordTable can be any valid SQL identifier as defined in the SQL reference manual. If schema is omitted, the current schema is used. The following examples all reference the same stopword table.
SET SCHEMA schema1;SELECT ... WHERE CONTAINS(c, 'xy', FUZZY(0.7, 'stopwordTable=schema1.mystopwords, ...'))...;SELECT ... WHERE CONTAINS(c, 'xy', FUZZY(0.7, 'stopwordTable="SCHEMA1"."MYSTOPWORDS", ...'))...;SELECT ... WHERE CONTAINS(c, 'xy', FUZZY(0.7, 'stopwordTable=mystopwords, ...'))...;
Stopword Example
CREATE COLUMN TABLE stopwords(stopword_id VARCHAR(32) PRIMARY KEY,list_id VARCHAR(32) NOT NULL,language_code CHAR(2) NOT NULL,term NVARCHAR(200) NOT NULL);CREATE COLUMN TABLE companies(id INTEGER PRIMARY KEY,companyname SHORTTEXT(200) FUZZY SEARCH INDEX ON
314
P U B L I C© 2013 SAP AG or an SAP affiliate company. All rights reserved.
SAP HANA Developer GuideEnabling Search

);INSERT INTO companies VALUES ('1', 'SAP AG');INSERT INTO companies VALUES ('2', 'SAP Aktiengesellschaft');INSERT INTO stopwords VALUES ('1', '01', 'de', 'AG');INSERT INTO stopwords VALUES ('2', '01', 'de', 'Aktiengesellschaft');INSERT INTO stopwords VALUES ('3', '01', 'de', 'blub');
Query 1: User input without stopwords. Stopwords in the database table only.
SELECT TO_DECIMAL(SCORE(), 3, 2) AS score, *FROM companiesWHERE CONTAINS(companyname, 'sap', FUZZY(0.8, 'stopwordTable=stopwords, stopwordListId=01, textSearch=compare'))ORDER BY score DESC, ID;
SCORE ID COMPANYNAME
0.95 1 SAP AG
0.95 2 SAP Aktiengesellschaft
Query 2: User input with stopword. Other stopwords in the database table.
SELECT TO_DECIMAL(SCORE(), 3, 2) AS score, *FROM companiesWHERE CONTAINS (companyname, 'sap blub', FUZZY(0.8, 'stopwordTable=stopwords, stopwordListId=01, textSearch=compare'))ORDER BY score DESC, ID;
SCORE ID COMPANYNAME
0.95 1 SAP AG
0.95 2 SAP Aktiengesellschaft
Query 3: User input with stopword. One record with matching stopword, one record with differing stopword.
SELECT TO_DECIMAL(SCORE(), 3, 2) AS score, *FROM companiesWHERE CONTAINS (companyname, 'sap aktiengesellschaft', FUZZY(0.8, 'stopwordTable=stopwords, stopwordListId=01, textSearch=compare'))ORDER BY score DESC, ID;
SCORE ID COMPANYNAME
1 2 SAP Aktiengesellschaft
0.95 1 SAP AG
Query 4: User input with two stopwords. Database records with one matching stopword.
SELECT TO_DECIMAL(SCORE(), 3, 2) AS score, *FROM companiesWHERE CONTAINS (companyname, 'sap ag aktiengesellschaft', FUZZY(0.8, 'stopwordTable=stopwords, stopwordListId=01, textSearch=compare'))ORDER BY score DESC, ID;
SCORE ID COMPANYNAME
0.97 1 SAP AG
SAP HANA Developer GuideEnabling Search
P U B L I C© 2013 SAP AG or an SAP affiliate company. All
rights reserved. 315

SCORE ID COMPANYNAME
0.97 2 SAP Aktiengesellschaft
Stopwords Combined With Term Mappings
When stopwords and term mappings are combined in a single query, term mappings are applied first. Stopwords are then applied to all variations of the search term created by the term mappings.ExampleLet us assume that you have defined the following term mapping:
Term 1 Term 2
Incredible Busy Machines IBM
Ltd Limited
Now you search for "Incredible Busy Machines Ltd".The search would be carried out for all possible search terms:
Search Terms
Incredible Busy Machines Ltd
Incredible Busy Machines Limited
IBM Ltd
IBM Limited
Let us assume that you have defined the following stopwords:
Stopword
busy machines
ltd
The stopwords will not be searched, so the resulting search terms would be:
Search Terms
Incredible Busy Machines Ltd
Incredible Busy Machines Limited
IBM Ltd
IBM Limited
Fuzzy Search with Term Mappings
Facts About Term MappingsTerm mappings have the following characteristics:
● Term mappings can be used to extend the search by adding additional search terms to the user input.Whenever the user enters a search term, the search term is expanded and synonyms, hypernyms, hyponyms, and so on are added. The result that is returned to the user contains additional records or documents related to the search term that may be useful to the user.
316
P U B L I C© 2013 SAP AG or an SAP affiliate company. All rights reserved.
SAP HANA Developer GuideEnabling Search

● Term mappings are defined in a column table and can be changed at any time.The current term-mapping definition is applied when a search is started. The definition of term mappings does not change the data that is stored in the database tables (in contrast to the definition of synonyms in Text Analysis, where a change of synonyms requires a reload or reindexing of the text data).
● Term mappings can be grouped.Each group of term mappings is identified by a list_id that is stored in the term-mapping table. By grouping term mappings it is possible to apply different sets of term mappings to different columns of a table. For example, you may want to use some term mappings when searching company names and other term mappings when searching documents. When starting a search, it is possible to specify the term-mapping list_ids that shall be applied to each column.
● Term mappings can be assigned a weight.In this case, records that are found because of a term mapping will get a lower score than records found with the original user input. From the user's view, the result list is sorted in a more useful way.
● Term mappings are defined as a unidirectional replacement.For a term-mapping definition of 'term1' -> 'term2', 'term1' is replaced with 'term2', but 'term2' is not replaced with 'term1'. This is helpful if you want a search with a hypernym to find all hyponyms, but not the other way round. If a bidirectional replacement is needed (as for synonyms), both directions have to be added to the term-mapping table.
● Term mappings are language dependent.It is possible to define the language that a term mapping is valid for. You can also define term mappings for all languages by not setting a language.
Use CasesSynonymsIf you have a large database of company names, you might want to map the companies' legal forms.For example:
Searching for You would also like to find With a weight of
AG Aktiengesellschaft 1.0
Ltd Limited 1.0
As these are synonyms, the term mappings have to be added to the term-mapping table in both directions, as shown in the example below.Usually, synonym definitions get a weight of 1.0, because records found when the term mapping is applied are as good as records found with the original user input.Hypernyms, HyponymsIf you search with a hypernym, you might also find other documents related to this topic.For example:
Searching for You would also like to find With a weight of
car VW Golf 0.8
As these are not synonyms, and a search with 'VW Golf' shall not return all documents about cars, the term mapping is added to the term-mapping table in this direction only.
SAP HANA Developer GuideEnabling Search
P U B L I C© 2013 SAP AG or an SAP affiliate company. All
rights reserved. 317

Format of the Term-Mapping TableColumn Name Type Primary Key Description Comment
MAPPING_ID VARCHAR(32) x Primary key For example, a GUID
LIST_ID VARCHAR(32) Term-mapping list ID Used to group term mappings
LANGUAGE_CODE CHAR(2) Language code (ISO2)
NULL: term mapping is valid for all languages
TERM_1 NVARCHAR(200) Term 1, the term to be replaced
TERM_2 NVARCHAR(200) Term 2, the term that replaces term 1
WEIGHT DECIMAL Weight, 0.0 <= Weight <= 1.0
The definition of the term-mapping table is checked, so tables with other column names or data types cannot be used for a fuzzy search. Nevertheless, the table may contain additional columns that are ignored by the fuzzy search engine.Example code for creating a term-mapping table:
CREATE COLUMN TABLE termmappings(mapping_id VARCHAR(32) PRIMARY KEY,list_id VARCHAR(32),language_code CHAR(2),term_1 NVARCHAR(255),term_2 NVARCHAR(255),weight DECIMAL);
Basic ExampleThe value given for the termMappingTable parameter can be any valid SQL identifier as defined in the SQL reference manual. If schema is omitted, the current schema is used.
CREATE COLUMN TABLE termmappings(mapping_id VARCHAR(32) PRIMARY KEY,list_id VARCHAR(32),language_code CHAR(2),term_1 NVARCHAR(255),term_2 NVARCHAR(255),weight DECIMAL);CREATE COLUMN TABLE companies(id INTEGER PRIMARY KEY,companyname SHORTTEXT(200) FUZZY SEARCH INDEX ON);INSERT INTO companies VALUES ('1','SAP AG');INSERT INTO companies VALUES ('2','SAP Aktiengesellschaft');INSERT INTO termmappings VALUES ('1','01','de','AG','Aktiengesellschaft','0.9');INSERT INTO termmappings VALUES ('2','01','de','Aktiengesellschaft','AG','0.9');SELECT TO_DECIMAL(SCORE(),3,2) AS score, *FROM companies
318
P U B L I C© 2013 SAP AG or an SAP affiliate company. All rights reserved.
SAP HANA Developer GuideEnabling Search

WHERE CONTAINS(companyname, 'sap aktiengesellschaft',FUZZY(0.8, 'termMappingTable=termmappings,termMappingListId=01,textSearch=compare'))ORDER BY score DESC, id;
SCORE ID COMPANYNAME
1.0 2 SAP Aktiengesellschaft
0.9 1 SAP AG
SELECT TO_DECIMAL(SCORE(),3,2) AS score, * FROM companiesWHERE CONTAINS(companyname, 'sap ag', FUZZY(0.8,'termMappingTable=TERMMAPPINGS,termMappingListId=01,textSearch=compare'))ORDER BY score DESC, id;
SCORE ID COMPANYNAME
1.0 1 SAP AG
0.9 2 SAP Aktiengesellschaft
To activate language-specific term mappings, you must provide the language parameter:
SELECT TO_DECIMAL(SCORE(),3,2) AS score, * FROM companiesWHERE CONTAINS(companyname, 'sap ag', FUZZY(0.8,'termMappingTable=TERMMAPPINGS,termMappingListId=01,textSearch=compare'), language('de'))ORDER BY score DESC, id;
NoteIn this case, all term mappings where language_code is set to 'de' or empty will be used. Any term mappings with other language codes will be ignored.
Fuzzy Search on DATE ColumnsA fuzzy search on DATE columns supports two types of error:
● Date-specific typos● Dates lying within a user-defined maximum distance
Score Calculation for Typos Instead of using Levenshtein distance or other string-compare algorithms, the following date-specific typos and errors are defined as similar:
1. One wrong digit at any position (for example, 2011-08-15 instead of 2011-08-25). This type of error gets a score of 0.90.
2. Two digits interchanged within one component (day, month, or year) (for example, 2001-01-12, 2010-10-12, or 2010-01-21 instead of 2010-01-12). This type of error gets a score of 0.85.
3. Month and day interchanged (US versus European date format) (for example, 2010-10-12 instead of 2010-12-10). This type of error gets a score of 0.80.
Only one of these errors is allowed. Dates with more than one error are not considered similar, so the score is 0.0.Dates with a score less than the fuzzySimilarity parameter are not returned.
SAP HANA Developer GuideEnabling Search
P U B L I C© 2013 SAP AG or an SAP affiliate company. All
rights reserved. 319

Example:
SELECT TO_DECIMAL(SCORE(),3,2) AS score, * FROM datesWHERE CONTAINS(dateofbirth, '2000-01-10', FUZZY(0.8))ORDER BY score DESC;
For this example we get:2000-01-09 -> 0.00 (not returned to the user)2000-01-10 -> 1.002000-01-11 -> 0.902000-01-12 -> 0.90...2000-01-21 -> 0.00 (not returned to the user)...2000-10-01 -> 0.80
Score Calculation for Date DistanceThe maximum allowed distance between dates can be defined using the search option 'maxDateDistance', which defines a number of days.The default for this option is 0, that is, the feature is disabled. This is shown in the following example:
SELECT TO_DECIMAL(SCORE(),3,2) AS score, * FROM datesWHERE CONTAINS(dateofbirth, '2000-01-10', FUZZY(0.95, 'maxDateDistance=5'))ORDER BY score DESC;
This query returns all dates between 2000-01-05 and 2000-01-15.The fuzzy score for dates is calculated as follows:The identical date gets a score of 1.0.The date that is maxDateDistance days away from the search input gets a score that equals the fuzzySimilarity parameter (0.95 in the example above).The score of dates between the identical date and maxDateDistance is calculated as a linear function between the two dates defined above. In other words, for each day the score is reduced by ((1-fuzzySimilarity) / maxDateDistance).For dates outside the range of maxDateDistance, the score is 0.0.Therefore, for the example above we get:2000-01-04 -> 0.002000-01-05 -> 0.952000-01-06 -> 0.96...2000-01-09 -> 0.992000-01-10 -> 1.02000-01-11 -> 0.992000-01-12 -> 0.98...2000-01-15 -> 0.952000-01-16 -> 0.00The distance between dates is calculated following the rules of the Gregorian calendar.The special case 'fuzzySimilarity = 1.0' and maxDateDistance=n is allowed and returns all dates within a range of n days with a rank of 1.0.
320
P U B L I C© 2013 SAP AG or an SAP affiliate company. All rights reserved.
SAP HANA Developer GuideEnabling Search

Dates That Meet Both ConditionsIf a date meets the conditions of a typo and also the conditions of the maxDateDistance parameter, two scores are calculated for the same date. In this case, the score() function returns the highest of both scores. This is shown in the following example:
SELECT TO_DECIMAL(SCORE(),3,2) AS score, * FROM datesWHERE CONTAINS(dateofbirth, '2000-01-10', FUZZY(0.8, 'maxDateDistance=5'))ORDER BY score DESC;
This query returns the following:2000-01-04 -> 0.002000-01-05 -> 0.802000-01-06 -> 0.842000-01-07 -> 0.882000-01-08 -> 0.922000-01-09 -> 0.962000-01-10 -> 1.02000-01-11 -> 0.962000-01-12 -> 0.922000-01-13 -> 0.902000-01-14 -> 0.902000-01-15 -> 0.902000-01-16 -> 0.90
Search Rules
OverviewWith fuzzy search in SAP HANA, you can search for structured database content that is similar to the user input. In this case, the user input and the records in the database are nearly the same but differ in their spelling (for example, typing errors) or contain additional information (for example, additional or missing terms).Among the use cases of fuzzy search on structured data, there is the prevention of duplicate records. New database records can be checked for similar and already existing records in real time, just before the new record is saved.For example, before saving a new customer to the database, the application checks for similar customers that may be duplicates of the newly entered customer. The application does some searches and then presents to the user any existing customers that are similar to the user input. The user then decides whether to create a new customer (because the records presented are similar, but not really duplicates) or to accept one of the existing customers and continue with this customer record.The searches performed by the application are defined by business rules that define when two customers are similar. For example, two customers may be considered similar by the application as soon as one of the following conditions is true:
1. The customers' names and addresses are similar.2. The customers' last names and addresses are identical but the first names are different (may be persons
living in the same household).3. The customers' names are similar and the dates of birth are identical.
These rules can be hardcoded in the application by writing three SELECT statements that do the three searches defined above. Whenever the requirements for the search rules change, the application code has to be changed, tested and deployed to the productive system. This may be costly in terms of time and development resources needed.
SAP HANA Developer GuideEnabling Search
P U B L I C© 2013 SAP AG or an SAP affiliate company. All
rights reserved. 321

Alternatively, the application can use search rules to store the rules as a configuration object in the SAP HANA database. Instead of embedding the rules in SELECT statements that are part of the application code, the application has to call a database procedure only to process all rules defined in the configuration object.When the business requirements change, only the search rule definition in the configuration object has to be changed, tested, and deployed. The interface to the database procedure that is called by the application stays unchanged. So without any change to the application code, the definition of the search rules is changed and the user immediately gets search results according to the new requirements. This results in much less effort and more flexibility when changing search rules.
Supported Database ObjectsYou can search on attribute views. The views have to be modeled using the SAP HANA studio and have to be stored as objects in the SAP HANA repository.Other database objects, such as row tables, column tables, calculation views, or analytic views, are not supported.
Important TermsA search rule set is the configuration object that is stored in the SAP HANA repository and that contains the definition of the search rules. When the database procedure is called to do a search, a search rule set is executed. This means that all rules that are defined in the search rule set are executed.A search rule defines a condition when two records – the user input and a record in the database – are considered similar. Each rule in a search rule set is converted to a SELECT statement and is executed when the search rule set is processed.Creating Search Rule Sets
You created a workspace and a project in the SAP HANA studio. In this workspace, you created a package that will contain your rule set.
1. In the SAP HANA modeler, open the Project Explorer view and navigate to your package.
2. From the context menu of your package, select New Other Search Rule Set .3. Enter a file name for your rule set. The file has to have the extension .searchruleset.
4. Open and edit the search rule set in the search rule set editor. See Working with the Search Rule Set Editor [page 322]
5. Define the attribute view, key columns, score selection parameter, stopwords, and term mappings. See Configuring Search Rule Sets [page 323]
6. From the context menu of your package or search rule, choose Team Activate .
You can now execute a search with the rule set. See Executing a Search With a Rule Set [page 324]Working with the Search Rule Set Editor
● To open a rule set in the editor, double-click a rule set file or, from the context menu, select Open WithSearch Rule Set Editor .
● To add new nodes, children or siblings, you can use the context menu of each node.For example, you can a new key column node in the following ways:
○ Select the attribute view node and, in the context menu, choose New Key Column.○ Select a key column node and, in the context menu, choose New Key Column.
● To delete a node from the search rule set, select the node and, from the context menu, select Delete.This deletes the node and all its child nodes.
● To change the order of nodes or to move nodes to other parent nodes, you can drag and drop the nodes.
322
P U B L I C© 2013 SAP AG or an SAP affiliate company. All rights reserved.
SAP HANA Developer GuideEnabling Search

With the SAP HANA studio running on Microsoft Windows, you can copy nodes below the same parent node or even to another parent node by pressing CTRL while dragging.
● To change properties, click on the value of the property in the Properties view and enter the new value.Each node contains a set of properties that define the behavior of the search rules. Node properties are displayed in the Properties view of the SAP HANA studio when a node is selected in the tree. If the Properties view is not displayed, you can open it by choosing Window Show View Properties .
NoteSome node properties refer to database objects or to column names. These properties are case-sensitive so you have to enter all names in the correct notation.
Configuring Search Rule Sets
● Define the attribute view.The search rule set searches on an attribute view that is modeled using the SAP HANA studio. The attribute view to be used is defined in the attribute view node of the search rule set. The name property contains the name of the attribute view. The FQN notation (fully qualified name) is used to specify the view.
● Define the key columns and the score selection parameter.A search may return the same record more than once because it matches more than one rule.To enable the search to return each record only once, key columns must be defined in a way that makes records in the result set unique. For an attribute view, there is no definition of key columns available, so the key columns have to be defined for each search rule set.The key columns are a set of one or more columns of the attribute view that clearly identify a record in the view. So the key columns are similar to the primary key columns of a database table.As for primary keys, LOB types (BLOB, CLOB, NCLOB, TEXT) are not allowed as key columns.
NoteIt is possible to create an invalid key column definition that does not make the result set unique. In this case, when running a search, an error is raised when records returned by a single rule are not unique.
By default, each search rule set contains one key column node below the attribute view node. If more columns are needed to make records unique, more key column nodes can be added below the attribute view node.In each key column node enter the name of the attribute view column in the properties panel.In addition to the key columns, you have to define how the result set shall be made unique. Records returned by more than one rule usually have different scores assigned. Only one combination of score and rule name can be returned in the result set.The score selection parameter defines whether the values with the highest score or the values found with the first matching rule are returned.The score selection parameter is defined in the properties panel of the rule set node.
● Define stopwords and term mappings.To use stopwords and term mappings in a search rule set, the configuration options have to be added to the rule set.First, open the context menu of the Search Rule Set node and select New Stopwords (table-based) or New Term Mappings (table based).In the properties of the new nodes, you can define the stopword table and term mapping table that is used.On the Stopwords (table-based) or Term Mappings (table-based) node, select New Column to enable the stopwords or term mappings on a column. In the properties panel, you can define the name of the column where stopwords and term mappings shall be applied.
SAP HANA Developer GuideEnabling Search
P U B L I C© 2013 SAP AG or an SAP affiliate company. All
rights reserved. 323

Below the Column nodes, create new List ID nodes (open the context menu and select New List ID). In each list ID node, you can configure a stopword or term mapping list that is applied on the column.The stopword and term mapping settings are valid for a given column in all rules.
Executing a Search With a Rule SetHANA exports a new built-in function: SYS.EXECUTE_SEARCH_RULE_SET, with which you can execute a previously defined search rule set.The function has one parameter, which is an XML string to run the search. Within this XML, you have to specify:
● The ruleset that should be executed● The way the result will be returned● The limitation of the result● The input values
The EXECUTE_SEARCH_RULE_SET method returns by default a ResultSet object. This object contains all the columns from the referenced attribute view plus additional columns _SCORE and _RULE_ID. Alternatively, the EXECUTE_SEARCH_RULE_SET can write the result into a results table that needs to be created by the user.For code samples of SYS.EXECUTE_SEARCH_RULE_SET calls, see Search with a Rule Set - Code Samples [page 324].Transaction Isolation LevelThe EXECUTE_SEARCH_RULE_SET function creates one SELECT statement for each of the rules and runs the statements independent of each other. The statements are executed in the transaction context of the calling application and use the same isolation level as the application. The isolation level has an influence on the results of the EXECUTE_SEARCH_RULE_SET function when there are other transactions running in parallel that change the contents of the database tables.When the isolation level 'READ COMMITTED' is used, each of the SELECT statements of the search rule set sees all changes that have been committed at the time the execution of the SELECT statement begins. So, for example, the second rule of a rule set may see a new record that was not committed when the first rule has been executed. In this case, the new record may be returned by the 'wrong' rule and the user gets an incorrect result.When the isolation levels 'REPEATABLE READ' or 'SERIALIZABLE' are used, all SELECT statements see the same state of the database. So the results returned by EXECUTE_SEARCH_RULE_SET are always correct.Search with a Rule Set - Code SamplesExecuting a search and returning the result as a ResultSet:
CALL SYS.EXECUTE_SEARCH_RULE_SET('<query> <ruleset name="documentation.customersearch:Search.searchruleset" /> -- specifies the SearchRuleSet <column name="FIRSTNAME">Herbert</column> -- specifies the input value for column FIRSTNAME <column name="LASTNAME">Hofmann</column> -- specifies the input value for column LASTNAME</query>');
Executing a search and writing the result to a column table provided by the user:
--First create the result table
set schema MY_SCHEMA;CREATE COLUMN TABLE MY_RESULT_TABLE (_SCORE FLOAT,_RULE_ID VARCHAR(255),"FIRSTNAME" TEXT FUZZY SEARCH INDEX ON FAST PREPROCESS ON,"LASTNAME" TEXT FUZZY SEARCH INDEX ON FAST PREPROCESS ON};
324
P U B L I C© 2013 SAP AG or an SAP affiliate company. All rights reserved.
SAP HANA Developer GuideEnabling Search

-- Afterwards you can execute the search using the created result table.
CALL SYS.EXECUTE_SEARCH_RULE_SET('<query> <ruleset name="documentation.customersearch:Search.searchruleset" /> -- specifies the SearchRuleSet <resulttableschema name="MY_SCHEMA"/> -- specifies the schema of the result table <resulttablename name="MY_RESULT_TABLE"/> -- specifies the name of the result table <column name="FIRSTNAME">Herbert</column> -- specifies the input value for column FIRSTNAME <column name="LASTNAME">Hofmann</column> -- specifies the input value for column LASTNAME</query>');
-- get the resultselect * from MY_RESULT_TABLE;
Limiting the number of rows returned by a search:
NoteWhen calling the system procedure EXECUTE_SEARCH_RULE_SET, the application can define the maximum number of rows that are returned by setting a limit parameter. By default, this parameter is undefined, which means that an unlimited number of rows is returned. The limitation takes place after each rule and in the end when all rules are performed. In the following example, a maximum number of 100 rows will be returned. You can use this parameter with the ResultSet object and with the custom result table.
-- run the searchCALL SYS.EXECUTE_SEARCH_RULE_SET('<query limit="10" offset="100"> <ruleset name="documentation.customersearch:Search.searchruleset" /> <column name="FIRSTNAME">billy</column> <column name="LASTNAME">smith</column></query>');
Frequently Asked Questions
Why are there results with a score lower than the requested fuzzySimilarity?In text fields, the parameter fuzzySimilarity sets the minimum similarity that a token has to match to be included in the search result. All other fuzzy search operations (for example, applying term mappings, considering stopwords, abbreviationSimilarity) can influence the score that you will see.
How many misspellings are allowed with a particular fuzzySimilarity?This question is not easy to answer. The scoring algorithm is not linear to the number of misspellings; the position of the misspelling is also important. You can use the following example to familiarize yourself with it.
DROP TABLE test;CREATE COLUMN TABLE test(id INTEGER PRIMARY KEY,companyname SHORTTEXT(200) FUZZY SEARCH INDEX ON);INSERT INTO test VALUES ('1','abc');INSERT INTO test VALUES ('2','abx');INSERT INTO test VALUES ('3','xbc');INSERT INTO test VALUES ('4','axc');
SAP HANA Developer GuideEnabling Search
P U B L I C© 2013 SAP AG or an SAP affiliate company. All
rights reserved. 325

INSERT INTO test VALUES ('5','abcx');INSERT INTO test VALUES ('6','xabc');SELECT TO_DECIMAL(SCORE(),3,2) AS score, * FROM testWHERE CONTAINS(companyname, 'abc', FUZZY(0.5,'textSearch=compare,bestMatchingTokenWeight=1'))ORDER BY score DESC, id;
SCORE ID COMPANYNAME
1 1 abc
0.89 5 abcx
0.82 2 abx
0.75 6 xabc
0.61 3 xbc
0.61 4 axc
SELECT TO_DECIMAL(SCORE(),3,2) AS score, * FROM testWHERE CONTAINS(companyname, 'abcx', FUZZY(0.5,'textSearch=compare,bestMatchingTokenWeight=1'))ORDER BY score DESC, id;
SCORE ID COMPANYNAME
1 5 abcx
0.89 1 abc
0.88 6 xabc
0.75 3 abx
0.59 3 xbc
0.59 4 axc
How do I find out if the fuzzy search index is enabled for column x?See Basic Examples.
How do I enable the fuzzy search index for a particular column?See Basic Examples.The additional data structures will increase the total memory footprint of the loaded table. In unfavorable cases the memory footprint of the column can double.
How can I see how much memory is used for a fuzzy search index?See Memory Usage [page 292].
Is the score between request and result always stable for TEXT columns?It depends on how you look at the topic. The algorithm is indeed deterministic, but you need to take all parameters into account. Cases can be constructed where a small change in the fuzzySimilarity will change the rank between the same strings.Why is this? The fuzzySimilarity is the minimum score that tokens need to reach to be considered for the result. If you use andThreshold or the keyword "OR" in your search, not all tokens have to reach the fuzzySimilarity to be
326
P U B L I C© 2013 SAP AG or an SAP affiliate company. All rights reserved.
SAP HANA Developer GuideEnabling Search

part of the result. This can lead to a change in the total score if you change the fuzzySimilarity. Let us look at an example:
DROP TABLE companies;CREATE COLUMN TABLE companies(id INTEGER PRIMARY KEY,companyname SHORTTEXT(200));INSERT INTO companies VALUES(1, 'aktien gesellschaft');INSERT INTO companies VALUES(2, 'aktiv gesellschaft');
Important: The similarity between "aktien" and "aktiv" is 0.77.If the fuzzySimilarity is lower than 0.77, the token scoring will be part of the result score. If the fuzzySimilarity is higher than 0.77, the token scoring will not be considered, so the total scoring will be lower.
SELECT TO_DECIMAL(SCORE(),3,2) AS score, id, companynameFROM companiesWHERE CONTAINS(companyname, 'aktiv OR gesellschaft', FUZZY(0.75, 'textSearch=compare'))ORDER BY score DESC, id;
SCORE ID COMPANYNAME
1 2 aktiv gesellschaft
0.89 1 aktien gesellschaft
SELECT TO_DECIMAL(SCORE(),3,2) AS score, id, companynameFROM companiesWHERE CONTAINS(companyname, 'aktiv OR gesellschaft', FUZZY(0.80, 'textSearch=compare'))ORDER BY score DESC, id;
SCORE ID COMPANYNAME
1 2 aktiv gesellschaft
0.71 1 aktien gesellschaft
12.3 Building Search Apps
12.3.1 Introduction to the UI Toolkit for Info AccessThe UI toolkit for SAP HANA Info Access provides UI building blocks for developing browser-based search apps on SAP HANA. Such applications provide real-time information access and faceted search features for huge volumes of structured and unstructured text data.The toolkit enables a freestyle search of a SAP HANA attribute view, displaying and analyzing the result set. The toolkit provides UI elements (widgets) such as a search box, a result list with a detailed view, and charts for basic analytics on the result set. The widgets are interconnected and adapt in real-time to user entries and mouse-over (hover) selections.The toolkit is based on HTML5 and JavaScript libraries such as JQuery/JQueryUI, d3 (Data Driven Documents), and Tempo. The widgets use the SAP HANA Info Access HTTP service. You do not need an additional layer to run the UI; SAP HANA and a Web browser are sufficient. The toolkit is tested on Mozilla Firefox 17. It also runs on Microsoft Internet Explorer 9 in standard mode and Google Chrome.
SAP HANA Developer GuideEnabling Search
P U B L I C© 2013 SAP AG or an SAP affiliate company. All
rights reserved. 327

Along with the actual toolkit (the widgets), we deliver a fully operational demo Web app built using this toolkit. The demo app enables you to explore a search application dealing with a set of sample data for electronic products. You can use the demo app as a template or for reference when you start developing your own app.You can, for example, use the demo site to easily connect your own data and compose your Web site. To create a search application this way, it is sufficient to have experience in HTML and to have read this documentation. For advanced customizing and layout of the site, more in-depth knowledge of CSS and the above-mentioned JavaScript libraries is required.
What is the SAP HANA Info Access HTTP Service?In the first place, SAP HANA is a database. It stores any type of raw data in its tables: master data, transactional data, numbers, texts, and so on. But SAP HANA can do more than a classic database. SAP HANA also enables you to turn raw data into meaningful information.For the world of numbers, there are the analytics features of SAP HANA. By joining, aggregating, and calculating, they can turn raw facts and numbers into meaningful measures and key figures.For the world of texts, there are the full text search and text analysis features of SAP HANA. By tokenizing, stemming, normalizing, and analyzing semantically, they can turn a set of strings into a structured and searchable text corpus.So there is meaningful information in SAP HANA. But it is still not instantly available to business end users. SQL is a very powerful tool for accessing and processing SAP HANA information. However, it operates on a very technical level deep down in the stack and far from an end user UI.This is where the info access service of SAP HANA steps in. As long as you only need read-access, meaning search or basic analytics, the service provides shortcuts to Web and mobile UIs.
SAP HANA Info Access Architecture
The SAP HANA info access HTTP service wraps search and analytic SQL queries and exposes them through an HTTP interface. On the UI layer, Info Access offers the HTML5 development kit including UI widgets and Web site templates. No intermediate layer is required. To provide Info Access apps to your users, you only need SAP HANA and a Web browser.
12.3.2 Installing the Service and the ToolkitThe UI toolkit and the service are part of the default SAP HANA shipment, but they are not installed automatically. They are shipped as separate delivery units that you can import and activate quickly as described below.
328
P U B L I C© 2013 SAP AG or an SAP affiliate company. All rights reserved.
SAP HANA Developer GuideEnabling Search

Importing the Delivery Units● SAP HANA Appliance Software, support package stack (SPS) 05 or higher, running on a server.● SAP HANA studio and SAP HANA client installed on your local machine.
1. To import the UI toolkit and the service, in the SAP HANA studio, choose the Modeler perspective and select your database instance.
2. From the menu, choose File Import .
3. Select HANA Content Delivery Unit and choose Next.4. Select Client and browse for the HCO_INA_UITOOLKIT.tgz delivery unit.
The delivery units can be found on the SAP HANA host under SYS/global/hdb/content.
5. Select both actions and choose Finish.6. Perform the same import procedure for the HCO_INA_SERVICE.tgz delivery unit.
7. In the Navigator view, under Content, check that the following packages are available:sap\bc\ina\uitoolkitsap\bc\ina\demos\epmsap\bc\ina\service\v2
8. To get started developing apps using the toolkit, set up an application project.
Related LinksSetting Up Your Application [page 35]In SAP HANA Extended Application Services (SAP HANA XS), the design-time artifacts that make up your application are stored in the repository like files in a file system. You first choose a root folder for your application-development activities, and within this folder you create additional subfolders to organize the applications and the application content according to your own requirements.
Registering and Activating the Info Access Service1. To register the service, switch to the Lifecycle Management perspective of the SAP HANA studio and select
your database instance.2. Choose the Configuration tab page and expand xsengine.ini\application_container.
3. Double-click the application_list line and, under the System column, add the entry InformationAccess.
CautionOnce InformationAccess is running, SAP HANA data is exposed by an HTTP service (port 80<instance>).
4. To restart SAP HANA XS, choose the Landscape tab page.5. From the context menu of the xsengine service, choose Kill...
The service stops completely and restarts automatically.
Importing the Demo Data1. Go to the SAP Code Exchange Web page of the UI toolkit.2. From the Documents tab page, download the epm_data.zip archive.
3. Follow the instructions in the readme.txt file contained in the archive.
Use the system user for importing and running the demo.
Related Links
SAP HANA Developer GuideEnabling Search
P U B L I C© 2013 SAP AG or an SAP affiliate company. All
rights reserved. 329

SAP Code Exchange Web page of the UI toolkit
12.3.3 Getting to Know the Demo AppYou can now explore what an app built using the UI toolkit looks and feels like. Start the sample UI in a Web browser by opening the following URL:http://<HANAhost>:80<instance>/sap/bc/ina/demos/epm/search.htmlExample: http://hana1.acme.corp:8001/sap/bc/ina/demos/epm/search.htmlStart exploring the UI.
The demo app consists of a header row, a column on the left, and a large content area on the right. The column on the left contains some widgets; the search box and some charts. The charts are used for displaying the count of result items with distinct values. In the EPM example, it is the count of sold products by category and by currency. The content area on the right is for displaying an enlarged view of one of the widgets, the result list is enlarged at page load.The app starts with a search for all. By typing in the search box or filtering in the charts, you can refine the result set. The results are displayed in the list ranked by relevancy.From the right margin of the page, you can pull in the facet repository containing all configured facets that are not displayed in the column and the content pane. Facets are the widgets, such as the results list and charts, that display the dimensions of the result set.You can drag and drop all facets to any position on the UI, be it the column, the content area or the facet repository. When a chart is enlarged in the content pane, you can change the chart type with a click.
12.3.4 Getting to Know the Demo HTMLThe structure and content of the UI are defined in the search.html file. Open the search.html file using the HTML editor. Familiarize yourself with the structure of the HTML.
330
P U B L I C© 2013 SAP AG or an SAP affiliate company. All rights reserved.
SAP HANA Developer GuideEnabling Search

Partly collapsed, search.html looks like this:
In the head area and at the end of the HTML, there is meta data and references to the various JavaScript libraries and CSS used by the UI.The body of the HTML contains the UI's header bar with the title text and the alert bar for displaying messages. The rest of the body is the workarea. A workarea connects to a SAP HANA attribute view and serves as a container for all other widgets on the page. The workarea is divided into the facetPane, the contentPane, and the facetrepository.The facetPane starts with the searchbox followed by a facetcolumn and the facetpane. The workareaitem widgets inside the column and the pane are only placeholders for facets of the repository that the user can shuffle around at runtime.Inside the facetrepository, there are the actual workareaitem widgets. For switching between different chart types, there are the switchbox widgets. The last widget in the repository is the resultlist.
12.3.5 Preparing Your Source DataBefore you start to build your information access application, you need to have a clear understanding of who will use it and for what purpose. Once you are sure which content you need to enable for access, prepare this data as described here. Then you define how the content is to be displayed and which interactive navigation attributes are to be provided.
Ensuring Full Text IndexingMake sure that a full-text index is created for each of your table columns that contains human-readable text data that is suitable for a freestyle search. The index structure is attached to the column and is leveraged to identify texts that contain the search terms. The full text index is automatically updated when new records are entered in the table.Along with the full text index, you can also trigger a text analysis that extracts entities, such as dates or people, from the text and, therefore, enriches the set of attributes.Related Links
SAP HANA Developer GuideEnabling Search
P U B L I C© 2013 SAP AG or an SAP affiliate company. All
rights reserved. 331

Creating Full Text Indexes [page 264]When you create a TEXT or SHORTTEXT column in a table, SAP HANA automatically creates a corresponding full text index. However, for columns of other data types, you must manually create and define any necessary full text indexes.
Text Analysis [page 270]
Checking the Settings in SAP HANA StudioTechnical search in SAP HANA may not be enabled. To check if it is enabled, proceed as follows:
1. In the SAP HANA studio menu, choose Window Preferences Modeler Search Options .2. Check if the Enable Search Attributes option is selected. If not, select it and choose Apply and OK.
NoteYou must make this setting in every SAP HANA studio that you use to model views for search.
Modeling Your Search ContentFor each app user, you have created a named database user with the following authorizations:
● Object privileges: SELECT on database schemas<_SYS_RT> and <_SYS_BI>.● Analytic privileges: For <_SYS_BI_CP_ALL> and for the attribute view you want to visualize in the app.
In the SAP HANA modeler, create an attribute view of type standard using the tables that you want to enable for the search. Create joins and add the attributes you want to use for searching and displaying.
NoteYou can also join additional attributes derived from the text analysis.
To enable certain attributes for the search, proceed as follows:
1. In the Output view, select the attributes.
NoteThe searchable attributes must not be calculated attributes nor have lower case letters in their names.
2. In the lower area of the Properties tab, select the Information Access category.3. Set the Freestyle Search property to true.
In the Information Access category, you can make additional search-specific settings.The Weights for Ranking setting (between 0.0 and 1.0, default 0.5) influences the ranking of items in the results list. The higher the weight of the attribute, the higher up in the list an item with a hit in this attribute is positioned.The Fuzziness Threshold setting (between 0.0 and 1.0, default 0.8) defines the grade of error tolerance for a search on this attribute. The higher the threshold, the more exact the search terms must hit the text to produce a result.
NoteDo not forget to activate the attribute view.
Related LinksAnalytic Views [page 120]
332
P U B L I C© 2013 SAP AG or an SAP affiliate company. All rights reserved.
SAP HANA Developer GuideEnabling Search

FUZZY Search [page 284]Fuzzy Search is a fast and fault-tolerant search feature for SAP HANA. A fuzzy search returns records even if the search term contains additional or missing characters or other types of spelling errors.
12.3.6 Connecting Your Source DataYou can connect any search-enabled SAP HANA attribute view to the app by referencing the view and its attributes directly in your HTML file.To reference the attribute view and its schema in the HTML, enter their names in the workarea widget:
<div data-sap-widget="workarea" data-title="searchandanalytics" data-entityset="J_EPM_PRODUCTCollection" data-schema="SYSTEM" data-packagename="epm" data-aggregationdimension="PRODUCT_ID">
data-entityset is the view name and data-packagename the package this view resides in. data-schema is the database schema (catalog) in which the activated attribute view resides. The data-aggregationdimension is used as basis for counting items with distinct values. Enter an attribute that has unique values, for example, the primary key.For chart facets that display the aggregates of attribute values, for example the grouped bar chart, enter the attribute names here:
<div data-sap-widget="chart" data-title="PRICE-GROUPBAR" data-dimension-line="CURRENCY_CODE" data-dimension-x="CATEGORY" data-dimension-y="$count" data-charttype="groupbar">
NoteYou cannot use attributes of data type TEXT_AE for charts.
In the grouped bar chart example, data-dimension-line is the attribute whose distinct value count is to be displayed as the bars. The data-dimension-x attribute is displayed as an additional dimension inside the chart as a group of bars. data-dimension-y is the measurement that is displayed on the y-axis defining the height of the single bars. In the search app, the only measurement available is the distinct values count ($count) of the attribute defined in data-dimension-line.In a simple bar or pie chart, the data-dimension parameter contains the attribute whose distinct value count is to be displayedTo define the attributes to be displayed in a result list entry, enter the attribute names here:
<div data-sap-widget="inaresultlist" data-maxresultslarge="6" data-maxresultssmall="3" data-responseattributes="PRODUCT_ID, WEIGHT_MEASURE,WEIGHT_UNIT,PRICE,CURRENCY_CODE,DEPTH,DIM_UNIT,CATEGORY, CHANGED_AT,WIDTH,HEIGHT,THUMBNAIL"data-detailwidth="650"
Do not leave the data-responseattributes parameter empty. Only use attributes from the main table of the view or attributes that are joined in 1:1 from other tables. Which response attributes are actually displayed in a result entry depends on the result layout templates. There are CSS and HTML templates available for the small result list, the large list, and the details view.Related Linksworkarea [page 334]chart [page 336]Defining the Layout of Result Lists and Details [page 338]
SAP HANA Developer GuideEnabling Search
P U B L I C© 2013 SAP AG or an SAP affiliate company. All
rights reserved. 333

12.3.7 Defining the Page LayoutNow that your source data is prepared and connected, you can form your UI using the search.html template. You may want to start by arranging the available widgets on your site. To place the column, the panes, and the facets within them, copy, move, or remove the corresponding HTML blocks.First, place the facet pane and its column(s) as well as the content pane. The panes and the columns inside are displayed from left to right on the UI in the same order as in the HTML. Only one content pane is allowed. Typically, a maximum of three facet columns are used. The facet repository is always last in the HTML.The search box and the facets inside the facet columns are next. The search box can span the entire pane across multiple columns. Place as many placeholder work area items as you want to have slots in a column. Inside the content pane, only one placeholder is allowed. Make sure that the data-target-position count is continuously set across the facet columns and the content pane.The facet repository holds the actual facets, meaning the chart switch boxes and the result list. The data-source-position parameter defines their position inside the facet repository as well as inside the columns and the content pane at page load.If the source position equals the target position, the respective facet replaces the placeholder in the columns and pane. If there are two or more facets with the same source position number, only the first one in the HTML replaces the placeholder. In the facet repository, all defined facets are available in the order of the source position or their appearance in the HTML. At runtime, the user can drag and drop the facets.At least one facet pane and content pane are required for the facet repository and free drag-and-drop. However, you could also build a minimal static UI with a workarea containing just a search box and a result list, for example. You can even integrate single widgets into other sites.Related Linksworkareaitem [page 335]
12.3.8 Configuring the WidgetsThe widgets are based on jQuery UI. In the HTML, you can customize the single widgets to a certain degree using parameters. The common parameter data-sap-widget defines the type of the widget.Each widget type has its own set of parameters. The widgets and their parameters are listed in the order of appearance in the demo HTML file.
headerParameter Name Default Value Description
data-title none Title text in the header bar of the UI.
data-helphref none Reference to the documentation for the users of your application.
workareaParameter Name Default
ValueDescription
data-title none This title is not displayed on the UI.
data-packagename none Name of the database package in which the attribute view was created.
data-entityset none Name of the attribute view.
data-schema _SYS_BIC Name of the database schema (catalog) in which the activated attribute view resides. The schema _SYS_BIC is default because your activated attribute views usually end up in this schema.
334
P U B L I C© 2013 SAP AG or an SAP affiliate company. All rights reserved.
SAP HANA Developer GuideEnabling Search

Parameter Name Default Value
Description
data-aggregationdimension
none Primary key attribute of the items you want to search and display. The unique key is used to identify items for the result list and to count items with distinct values for the charts.
data-aggregationsortorder
DESC Descending or ascending (ASC) order for sorting the counts in the charts. This setting is inherited by all charts if you do not set a sort order there.
Related LinksConnecting Your Source Data [page 333]
searchboxParameter Name Default Value Description
data-enablesuggestions
false The system suggests possible search terms as the user types.
data-maxsuggestions 10 Maximum number of suggested terms to be displayed in the drop-down list of the search box.
data-enablelivesearch false The system already performs a search with each letter a user types.
data-maxinputlength 255 Maximum number of characters that users can enter in the search box.
workareaitemParameter Name Default Value Description
data-title none This title is displayed on the UI as the facet headline. If the workareaitem is a placeholder, the title is used as alternative text. The alternative is displayed if the placeholder is not replaced by an actual workareaitem at runtime.
data-target-position 0 Position of a placeholder workareaitem on the UI in the facet or content pane. The count starts on the upper left of the UI.
data-source-position 0 Position of the actual workareaitem on the UI in the facet repository on the right. On page load, the workareaitem placeholders are replaced by the actual workarea items whose source positions match the target positions.
facetrepositoryParameter Name Default Value Description
data-children-drag-handle
body Defines the area where a user can grab a facet for drag and drop. body means the complete facet, header means the facet's header bar only.
SAP HANA Developer GuideEnabling Search
P U B L I C© 2013 SAP AG or an SAP affiliate company. All
rights reserved. 335

switchboxParameter Name Default Value Description
data-activeindex 0 Defines which chart contained in the switchbox is displayed on page load. 0 means the first one, 1 the second, and so on.
chartParameter Name Default Value Description
data-toplarge none Defines how many bars or pie segments are displayed when the chart is enlarged.
data-dimension none Attribute whose distinct value count is to be displayed in a simple bar or pie chart.
NoteYou cannot use attributes of data type TEXT_AE for charts.
data-charttype none Type of the chart (bar, pie, groupbar, or line).
data-color none Color of the chart as hex triplet, for example #FFFFFF for white, or as standard HTML names, for example blue or black.
data-dimension-line none Attribute whose distinct value count is to be displayed in grouped bar or line chart.
data-dimension-x none Attribute that is displayed as additional dimension inside the chart as group of bars or different lines.
data-dimension-y none Measurement that is displayed on the y-axis. In a search scenario, the only measurement available is the distinct value count ($count) of the attribute defined in data-dimension-line.
data-aggregationsortorder
ASC Descending (DESC) or ascending order for sorting the counts in the charts. Here you can override the sort order defined centrally in the workarea widget.
data-topsmall none Defines how many bars or pie segments are displayed when the chart is small.
data-animationduration
1000 Duration of the animation, in milliseconds, when a chart adapts (default 1000). 0 means that animation is switched off.
Related LinksConnecting Your Source Data [page 333]
inaresultlistParameter Name Default Value Description
data-maxresultslarge 10 Maximum number of result items displayed on one page if the list is enlarged in the content pane.
336
P U B L I C© 2013 SAP AG or an SAP affiliate company. All rights reserved.
SAP HANA Developer GuideEnabling Search

Parameter Name Default Value Description
data-maxresultssmall 5 Maximum number of result items displayed on one page if the list is small in the facet column.
data-responseattributes none Attributes to be displayed in a result list entry. The actual scope and layout of the response attributes on the result list and details pane are defined in the files referenced in the data-resulttemplate parameters.
NoteDo not leave the data-responseattributes parameter empty.Only use attributes from the main table of the view or attributes that are joined in 1:1 from other tables.Attributes with data type blob are not supported by the HTTP service.
data-detailwidth 600 Width of the details pop-up in pixels.
data-detailheight 800 Height of the details pop-up in pixels.
data-resulttemplate none Reference to HTML and CSS files defining the layouts of the result lists (small and large) and of the details pop-up.
data-resulttemplate-css none
data-resulttemplate-small none
data-resulttemplate-small-css
none
data-resulttemplate-detail none
data-resulttemplate-detail-css
none
data-scoresortorder DESC By default, the result list is sorted according to the ranking by relevancy for the search term(s). Leave the default sort order unchanged.
data-orderby none Attribute by whose values the list is sorted alphabetically. First choice for sorting is always the ranking by relevancy for the search term(s). The data-orderby setting only steps in if there is no relevancy ranking available, for example before the first search, or if there are equal ranking values.
data-sortorder ASC Ascending or descending (DESC) order for the data-orderby parameter.
Related LinksConnecting Your Source Data [page 333]Defining the Layout of Result Lists and Details [page 338]
SAP HANA Developer GuideEnabling Search
P U B L I C© 2013 SAP AG or an SAP affiliate company. All
rights reserved. 337

12.3.9 Defining the Layout of Result Lists and DetailsYou can select which attributes are displayed and how they are displayed in the result lists (small or centered) and on the details pop-up. In the search HTML file, the result templates are referenced in the inaresultlist widget using the data-resulttemplate parameters.The templates folder contains the HTML and CSS templates of the demo app for adapting. You can create your own result layouts from the templates and reference them in the parameters. Make sure that the path is correct.In the HTML templates, you define what is in a result entry in the different views. You can enter fixed text and reference the response properties and values in double braces.For a deeper understanding of these HTML templates, familiarize yourself with the Tempo JSON rendering engine.
NoteIf you want to integrate graphics in result list templates, define the exact width and height in pixels.
Use the corresponding CSS files to define the result layouts and the behavior on hover events. To tweak the layout of the details screen further, you can also use the widgets provided by jQuery UI.
338
P U B L I C© 2013 SAP AG or an SAP affiliate company. All rights reserved.
SAP HANA Developer GuideEnabling Search

13 Setting Up Roles and Authorizations
13.1 The Authorization Model
Authorization mechanisms ensure that authenticated users can do only those things they are allowed to do. You can use the authorization mechanisms of the SAP HANA database to specify who is allowed to access which data and for which activities.Authorization mechanisms can also be used to help control who is allowed to execute stored procedures and functions or execute system-level activities, for example: making backups, creating schema, users, roles, and so on.Authorizations are specified by granting privileges to principals. Principals are either users or roles. Roles represent collections of privileges that can be granted to users or other roles, which enables you to create a hierarchy of roles. Privileges are granted to principals by users. In SAP HANA, you can use roles to assign permissions for different areas to users. For example, a role enables you to assign SQL privileges, analytic privileges, system privileges, package privileges, and so on. To create and maintain artifacts in the SAP HANA repository, you can assign application-development users pre-defined roles that provide access to the areas and objects they require.
NoteA SAP HANA user with the necessary authorization can modify existing roles, for example, to remove or restrict privileges in particular areas. Authorized users can also create new customized roles, for example, to provide application developers with precisely the privileges they need to perform the every-day tasks associated with application development.
SAP HANA database authorization mechanisms use the following privileges:
● SQL privilegesRun SQL commands and access table data
● System privilegesPerform system-level operations or administrative tasks
● Object privilegesPerform specified actions on specified database objects
● Analytic privilegesAllow selective access control for database views generated when modeled are activated
● Package PrivilegesAllow operations on packages, for example, creation and maintenance. Privileges can differ for native and imported packages.
Other types of privileges enable you to provide specific additional authorizations, for example, to users who need to perform administrative tasks on objects in the repository or to users and clients that need access to applications:
● Repository Privileges
SAP HANA Developer GuideSetting Up Roles and Authorizations
P U B L I C© 2013 SAP AG or an SAP affiliate company. All
rights reserved. 339

Enable users to perform basic repository operations, for example: import and export packages, and maintain delivery units (DU)
● Application PrivilegesEnable users and clients to access an application, configure what data to expose, and set rules for exposing URLs.
13.2 Authentication Overview
Authentication is the process used to validate the identity of the users who connect to SAP HANA.Secure authentication mechanisms ensure that the users requesting a connection really are who they claim to be.
NoteFor connections to SAP HANA it is important to distinguish between SQL- and HTTP-based connections.
For SQL access to SAP HANA by means of client interfaces, for example, JDBC or ODBC, the following authentication methods are supported:
● External authentication:
○ Kerberos servicesA standardized service for client authentication in networks. The client connects to the Kerberos server to authenticate the user and to acquire an authentication ticket that proves the user’s identity to the SAP HANA database. The client uses the ticket to connect to the SAP HANA database. Kerberos also ensures the correct identity of the server.
○ SAML (bearer token)SAP HANA can authenticate users who provide a valid standard-based SAML assertion issued by a trusted identity provider.
● Internal authenticationUsers are authenticated by the SAP HANA database using the database user name and password.
SAP HANA maps the external identity approved by external authentication service to the identity of an internal database user. This internal database user is then used for authorization checks during the database session.For HTTP access to SAP HANA by means of SAP HANA XS, the following authentication methods are supported:
● User name and password:
○ Using HTTP basic authentication○ Form-based authentication
● SAP logon tickets
13.3 Roles
Roles contain privileges that are used to define which data, application, or function can be accessed and in which manner consumed. Roles are assigned either to users or to other roles at runtime.
340
P U B L I C© 2013 SAP AG or an SAP affiliate company. All rights reserved.
SAP HANA Developer GuideSetting Up Roles and Authorizations

SAP delivers some generic roles with SAP HANA that can be used as they are or as templates (during design time) for creating roles that meet your company's specific requirements. More information about roles, their use at runtime and in design time are explained in the subsequent sections.
● Roles● Roles as Repository Objects● Creating Roles in the Repository
13.3.1 RolesA role is a collection of privileges that can be granted to either a user or another role in runtime.A role typically contains the privileges required for a particular function or task, for example:
● Business end users reading reports using client tools such as Microsoft Excel● Modelers creating models and reports in the modeler of the SAP HANA studio● Database administrators operating and maintaining the database and users in the Administration editor of the
SAP HANA studio
Privileges can be granted directly to users of the SAP HANA database. However, roles are the standard mechanism of granting privileges as they allow you to implement complex, reusable hierarchies of user access that can be modeled on business roles. Several standard roles are delivered with the SAP HANA database (for example, MODELING, MONITORING). You can use these as templates for creating your own roles.Roles in the SAP HANA database can exist as runtime objects only, or as design-time objects that become runtime objects on activation.
Role StructureA role can contain any number of the following privileges:
● System privileges for administrative tasks (for example, AUDIT ADMIN, BACKUP ADMIN, CATALOG READ)● Object privileges on database objects (for example, SELECT, INSERT, UPDATE)● Package privileges on repository packages (for example, REPO.READ, REPO.EDIT_NATIVE_OBJECTS,
REPO.ACTIVATE_NATIVE_OBJECTS)● Analytic privileges on SAP HANA information models● Application privileges for enabling access to SAP HANA XS applications
NoteApplication privileges cannot be granted to roles in the SAP HANA studio.
A role can also extend other roles.
Role ModelingYou can model roles in the following ways:
● As runtime objects on the basis of SQL statements● As design-time objects in the repository of the SAP HANA database
It is recommended that you model roles as design-time objects for the following reasons.Firstly, unlike roles created in runtime, roles created as design-time objects can be transported between systems. This is important for application development as it means that developers can model roles as part of their application's security concept and then ship these roles or role templates with the application. Being able to transport roles is also advantageous for modelers implementing complex access control on analytic content. They can model roles in a test system and then transport them into a productive system. This avoids unnecessary duplication of effort.
SAP HANA Developer GuideSetting Up Roles and Authorizations
P U B L I C© 2013 SAP AG or an SAP affiliate company. All
rights reserved. 341

Secondly, roles created as design-time objects are not directly associated with a database user. They are created by the technical user _SYS_REPO and granted through the execution of stored procedures. Any user with access to these procedures can grant and revoke a role. Roles created in runtime are granted directly by the database user and can only be revoked by the same user. Additionally, if the database user is deleted, all roles that he or she granted are revoked. As database users correspond to real people, this could impact the implementation of your authorization concept, for example, if an employee leaves the organization or is on vacation.
CautionThe design-time version of a role in the repository and its activated runtime version should always contain the same privileges. In particular, additional privileges should not be granted to the activated runtime version of a role created in the repository. Although there is no mechanism of preventing a user from doing this, the next time the role is activated in the repository, any changes made to the role in runtime will be reverted. It is therefore important that the activated runtime version of a role is not changed in runtime.
13.3.2 Roles as Repository ObjectsThe repository of the SAP HANA database consists of packages that contain design-time versions of various objects. Being a repository object has several implications for a role.
Grantable PrivilegesAccording to the authorization concept of the SAP HANA database, a user can only grant a privilege to a user directly or indirectly in a role if the following prerequisites are met:
● The user has the privilege him- or herself● The user is authorized to grant the privilege to others (WITH ADMIN OPTION or WITH GRANT OPTION)
A user is also authorized to grant SQL object privileges on objects that he or she owns.The technical user _SYS_REPO is the owner of all objects in the repository, as well as the runtime objects that are created on activation. This means that when you create a role as a repository object, you can grant the following privileges:
● Privileges that have been granted to the technical user _SYS_REPO and that _SYS_REPO can grant further.This is automatically the case for system privileges, package privileges, analytic privileges, and application privileges. Therefore, all system privileges, package privileges, analytic privileges, and application privileges can always be granted in modeled roles.
● Privileges on objects that _SYS_REPO owns._SYS_REPO owns all activated objects. Object privileges on non-activated runtime objects must be explicitly granted to _SYS_REPO. It is recommended that you use a technical user to do this to ensure that privileges are not dropped when the granting user is dropped (for example, because she leaves the company.
The following table summarizes the situation described above:
Privilege Action Necessary to Grant in Repository Role
System privilege None
Package privilege None
Analytic privilege None
Application privilege None
SQL object on activated object (for example, attribute view, analytic view)
None
342
P U B L I C© 2013 SAP AG or an SAP affiliate company. All rights reserved.
SAP HANA Developer GuideSetting Up Roles and Authorizations

Privilege Action Necessary to Grant in Repository Role
SQL object privilege on runtime object (for example, replicated table)
Grant privilege to user _SYS_REPO with WITH GRANT OPTION
Granting and RevokingIt is not possible to grant and revoke activated design-time roles using the GRANT and REVOKE SQL statements. Instead, roles are granted and revoked through the execution of the procedures GRANT_ACTIVATED_ROLE and REVOKE_ACTIVATED_ROLE. Therefore, to be able to grant or revoke a role, a user must have the SQL object privilege EXECUTE on these procedures.
WITH ADMIN OPTION and WITH GRANT OPTIONWhen you create a role on the basis of SQL statements (that is, as a runtime object), you can grant privileges with the additional parameters WITH ADMIN OPTION or WITH GRANT OPTION. This allows a user who is granted the role to grant the privileges contained within the role to other users and roles. However, if you are implementing your authorization concept with privileges encapsulated within roles created in design time, then you do not want users to grant privileges using SQL statements. Therefore, it is not possible to pass the parameters WITH ADMIN OPTION or WITH GRANT OPTION with privileges when you model roles as repository objects.Similarly, when you grant an activated role to a user, it is not possible to allow the user to grant the role further (WITH ADMIN OPTION is not available).
AuditabilityThe auditing feature of the SAP HANA database allows you to monitor and record selected actions performed in your database system. One action that is typically audited is changes to user authorization. If you are using roles created in the repository to grant privileges to users, then it is important to note that the creation of runtime roles through activation cannot be meaningfully audited.
13.3.3 Creating Roles in the RepositoryYou model roles in the SAP HANA repository in a domain-specific language (DSL).
● A shared project must exist with a suitable package for storing roles.● You have the package and system privileges required for modeling and activating objects in the repository.
CautionTheoretically, a user with authorization to model and activate repository objects can change a role that he has been granted. Once the role is activated, the user has the new privileges that he or she just added. Therefore, it is important that roles in productive systems are imported from a test or development system and changes to imported objects are not allowed. This danger is however not specific to roles but also applies to other repository objects, for example, modeled views.
● You have granted privileges on non-activated runtime objects that you want to grant in the new role to the technical user _SYS_REPO.
The following general conventions apply when modeling a role definition using the role DSL:
● Comments start with a double-slash (//) or double-dash (--) and run to the end of the line.● When specifying a reference to a design-time object, you must always specify the package name as follows:
○ package::object if you are referencing a design-time role○ package:object.extension if you are referencing any other design-time object
SAP HANA Developer GuideSetting Up Roles and Authorizations
P U B L I C© 2013 SAP AG or an SAP affiliate company. All
rights reserved. 343

● When specifying multiple privileges on the same object or the same privilege on multiple objects, you can do so individually line by line, or you can group them on a single line. Separate multiple objects and/or multiple privileges using a comma.
1. From the main menu in the SAP HANA studio, choose File New Other SAP HANA Development Role.
The New Role dialog box appears.2. In the Container field, enter the path to the package where you want to create the role.3. In the Role name field, enter the name of the new role.4. Choose Finish.
The new role appears in the Project Explorer view and opens in the role editor as follows:
// an empty rolerole <package_name>::<role_name> {}
The role is now ready to be defined.5. Optional: Specify the role(s) that you want to embed within the new role.
You can specify both roles created in runtime and repository roles as follows:
○ extends role <package_name>::<role_name>○ extends catalog role "role_name"
Example:
role <package_name>::<role_name> extends role sap.example::role1 extends catalog role "CATROLE2"{}
6. Model the required privileges.
NoteUnlike when you create a role using SQL statements, it is not possible to grant ALL PRIVILEGES when creating a role in the repository. You must model every privilege individually.
a) Model system privileges using the keyword "system privilege" as follows: system privilege: PRIVILEGE;Example:
role <package_name>::<role_name>{ // multiple privileges in one line are OK system privilege: BACKUP ADMIN, USER ADMIN;
// you can also split lists into multiple entries system privilege: LICENSE ADMIN;}
b) Optional: Model object privileges on the design-time objects views and procedures using the keyword "SQL object" as follows: sql object <package>:<object>.extension: PRIVILEGE;
344
P U B L I C© 2013 SAP AG or an SAP affiliate company. All rights reserved.
SAP HANA Developer GuideSetting Up Roles and Authorizations

Example:
role <package_name>::<role_name>{ sql object sap.example:MY_VIEW.attributeview: DROP;
// object privileges can be split across lines sql object sap.example:MY_VIEW.attributeview: DROP;
// a single privilege can be given on multiple objects in a single line sql object sap.example:MY_VIEW.attributeview, sap.example:MY_OTHER_VIEW.analyticview, sap.example:MY_THIRD_VIEW.analyticview: SELECT;
}
c) Optional: Model object privileges on catalog objects using the keyword "catalog SQL object" as follows: catalog sql object "SCHEMA"."CATALOG_OBJECT": PRIVILEGE;
NoteYou must always qualify catalog objects with the schema name. You must also reference catalog objects within double quotes, unlike design-time objects.
Example:
role <package_name>::<role_name>{ // catalog objects must always be qualified with the schema name catalog sql object "MY_SCHEMA"."MY_VIEW": SELECT;}
d) Optional: Model schema privileges on schemas using the keywords "catalog schema" or "schema" as follows depending on whether you are referring to an activated schema or a schema in the repository:
○ catalog schema "SCHEMA": PRIVILEGE;○ schema <package>:<schema>.schema: PRIVILEGE;
Example:
role <package_name>::<role_name>{ catalog schema "MY_SCHEMA": SELECT; schema sap.example:MY_OTHER_SCHEMA.schema: SELECT;}
e) Optional: Model package privileges using the keywords "package" as follows: package PACKAGE: PRIVILEGE;Example:
role <package_name>::<role_name>{ package sap.example: REPO.READ;}
f) Optional: Model analytic privileges using the keywords "analytic privilege" or "catalog analytic privilege" depending on whether you are referring to an activated analytic privilege or a runtime analytic privilege
○ analytic privilege: <package>:<analytic_priv_name>.analyticprivilege○ catalog analytic privilege: "analytic_priv_name";
SAP HANA Developer GuideSetting Up Roles and Authorizations
P U B L I C© 2013 SAP AG or an SAP affiliate company. All
rights reserved. 345

Example:
role <package_name>::<role_name>{ analytic privilege: sap.example:sp1.analyticprivilege, sap.example:AP2.analyticprivilege; catalog analytic privilege: "sp3";}
g) Optional: Model application privileges using the keyword "application privilege" as follows: application privilege: <application_priv_name>;Example:
role <package_name>::<role_name>{ application privilege: sap.example::Execute;}
NoteApplication privileges are implemented using the application-privileges file (.xsprivileges).
7. From the main menu, choose File Save .The role is saved as an .hdbrole file. After it has been saved, the file is committed to the repository
8. Activate the role by right-clicking it in the Project Explorer view and choosing Team Activate .
NoteAny changes made to a previously activated version of the role in runtime will be reverted on activation. This is to ensure that the design-time version of a role in the repository and its activated runtime version contain the same privileges. It is therefore important that the activated runtime version of a role is not changed in runtime.
The activated role is now visible in the Navigator view under Security Roles following the naming convention package::role_name and can be granted to users as part of user provisioning.
ExampleComplete Role Definition Example
role <package_name>::<role_name> extends role sap.example::role1 extends catalog role "CATROLE1", "CATROLE2"{ // system privileges system privilege: BACKUP ADMIN, USER ADMIN;
// schema privileges catalog schema "SYSTEM": SELECT; schema sap.example:app1.schema: INSERT, UPDATE, DELETE;
// sql object privileges // privileges on the same object may be split up in several lines catalog sql object "SYSTEM"."TABLE2": SELECT; catalog sql object "SYSTEM"."TABLE2": INSERT, UPDATE, DELETE; // or a list of objects may get a list of privileges (object = table, view, procedure, sequence) // SELECT, DROP for all objects in list
346
P U B L I C© 2013 SAP AG or an SAP affiliate company. All rights reserved.
SAP HANA Developer GuideSetting Up Roles and Authorizations

sql object sap.example:VIEW1.attributeview, sap.example:PROC1.procedure, sap.example:SEQ1.sequence: SELECT, DROP; // additional INSERT, UPDATE for TABLE1 sql object sap.example:MY_VIEW.attributeview: DROP;
// analytic privileges analytic privilege: sap.example:sp1.analyticprivilege, sap.example:AP2.analyticprivilege; catalog analytic privilege: "sp3";
// design time privileges package sap.example: REPO.EDIT_NATIVE_OBJECTS; package sap.example, sap.co: REPO.READ; application privilege: sap.example::Execute, sap.example::Save;
}
Related LinksSetting Up Your Application [page 35]In SAP HANA Extended Application Services (SAP HANA XS), the design-time artifacts that make up your application are stored in the repository like files in a file system. You first choose a root folder for your application-development activities, and within this folder you create additional subfolders to organize the applications and the application content according to your own requirements.
The Application-Privileges File [page 64]In SAP HANA Extended Application Services (SAP HANA XS), the application-privileges (.xsprivileges) file can be used to create or define the authorization privileges required for access to an SAP HANA XS application, for example, to start the application or to perform administrative actions on an application. These privileges can be checked by an application at runtime.
SAP HANA Administration Guide
13.4 Privileges
SAP HANA offers various privileges that can be assigned to users. Users can be a system, an application, a service, or a person, and each user is assigned specific roles. Privileges can be assigned to users, roles, or both.There are several privileges that are required either by the SAP HANA studio or by development tools, such as SQL. The following types of privileges are explained in the subsequent sections.
● System privileges● Object privileges● Package privileges● Analytic privileges
This section also contains information for creating and granting privileges to users.
13.4.1 System PrivilegesSystem privileges are required to perform system-level operations or administrative tasks.The following lists shows some of the most common system-level tasks that administrators regularly must perform:
● Database schemaCreation and deletion of database schema
SAP HANA Developer GuideSetting Up Roles and Authorizations
P U B L I C© 2013 SAP AG or an SAP affiliate company. All
rights reserved. 347

● Users/RolesMaintenance and management of users and roles
● Monitor/TraceAdministration of monitoring and tracing
● Backup/RestorePerformance of backup and restore operations
In the SAP HANA database the user SYSTEM has all system privileges. The SYSTEM user can grant system privileges to other users and roles.
13.4.2 Object PrivilegesObject privileges enable users to perform specified actions on specified database objects.Object privileges are not specific to the SAP HANA database; they are part of the SQL standard. You can use the SQL statements GRANT and REVOKE to manage privileges.
Note. If object privileges (or any other privilege type) are granted to roles created in the repository, granting and revoking actions happen through the execution of stored procedures.
The set of actions that can be allowed by an object privilege depends on the object type. For tables, you can use actions such as: drop, alter, select, insert and update. An execute action is available for privileges for procedures and functions. Privileges on a schema level are used to enable actions such as: create objects, perform select, update, delete or execute operations on all objects contained in the schema.In the SAP HANA database object privileges are not only available for database catalog objects such as tables, views and procedures. Object privileges can also be granted for non-catalog objects such as development objects in the repository of the SAP HANA database.Some database objects depend on other objects. Views, for example, are defined as queries on other tables and views. The authorization for an operation on the dependent object (the queried tables and views) requires privileges for the dependent object and the underlying object. In case of views, the SAP HANA database implements the standard SQL behavior. A user has the authorization for an operation on a view if the following is true:
● The privilege for operations on the view has been granted to the user or a role assigned to the user.● The owner of the view has the corresponding privileges on the underlying objects with the option to grant
them to others.
This behavior can be used to grant selective access to a table.
13.4.3 Package PrivilegesIn the SAP HANA repository, authorizations can be assigned to individual packages.Authorizations assigned to a repository package are implicitly assigned to the design-time objects in the package as well as to all sub-packages. Users are only allowed to maintain objects in a repository package if they have the necessary privileges for the package in which they want to perform an operation, for example to read or write to an object in that package.
NotePackage authorizations can be set for a specific user or for a role.
If the user-authorization check establishes that a user does not have the necessary privileges to perform the requested operation in a specific package, the authorization check is repeated on the parent package and
348
P U B L I C© 2013 SAP AG or an SAP affiliate company. All rights reserved.
SAP HANA Developer GuideSetting Up Roles and Authorizations

recursively up the package hierarchy to the root level of the repository. If the user does not have the necessary privileges for any of the packages in the hierarchy chain, the authorization check fails and the user is not permitted to perform the requested operation.In the context of repository authorizations, there is a distinction to be made between native packages and imported packages.
● Native PackageA package that is created in the current system and expected to be edited in the current system. Changes to package objects must be performed in the original development system where they were created and transported into subsequent systems. The content of native packages are regularly edited by developers.
● Imported PackageA package that is created in a remote system and imported into the current system. Imported packages should not usually be modified, except when replaced by new imports during an update. Otherwise, imported packages should only be modified in exceptional cases, for example, to carry out emergency repairs.
To perform every-day, package-related, application-development tasks in the repository, developers typically need the following privileges for the application packages:
● REPO.READRead access to the selected package and design-time objects (both native and imported)
● REPO.EDIT_NATIVE_OBJECTSAuthorization to modify design-time objects in packages originating in the system the user is working in
● REPO.ACTIVATE_NATIVE_OBJECTSAuthorization to activate/reactivate design-time objects in packages originating in the system the user is working in
● REPO.MAINTAIN_NATIVE_PACKAGESAuthorization to update or delete native packages, or create sub-packages of packages originating in the system in which the user is working
To perform every-day application-development tasks on imported packages, developers need the following privileges:
NoteIt is not recommended to work on imported packages. Imported packages should only be modified in exceptional cases, for example, to carry out emergency repairs.
● REPO.EDIT_IMPORTED_OBJECTSAuthorization to modify design-time objects in packages originating in a system other than the one the user is working in
● REPO.ACTIVATE_IMPORTED_OBJECTSAuthorization to activate/reactivate design-time objects in packages originating in a system other than the one the user is working in
● REPO.MAINTAIN_IMPORTED_PACKAGESAuthorization to update or delete native packages, or create sub-packages of packages originating in a system other than the one in which the user is working
SAP HANA Repository PrivilegesIn addition to the authorizations you can grant users for specific packages (and the design-time objects in those packages), you can also assign general system privileges to users to enable them to perform basic repository operations, for example: importing and exporting content, and maintaining delivery units (DU).If your daily tasks include general administration tasks, you need basic system-level privileges in the repository. To perform basic administration tasks in the repository, you typically need the following privileges:
SAP HANA Developer GuideSetting Up Roles and Authorizations
P U B L I C© 2013 SAP AG or an SAP affiliate company. All
rights reserved. 349

● REPO.EXPORTEnables you to export delivery units; exporting a DU transports it to another system
● REPO.IMPORTEnables you to import delivery units; importing a DU transports it from another system
● REPO.MAINTAIN_DELIVERY_UNITSEnables you to maintain your own delivery units (the DU-vendor must equal the system-vendor)
● REPO.WORK_IN_FOREIGN_WORKSPACEEnables you to move objects from a "foreign" inactive workspace into your own workspace
You can grant or revoke basic, repository privileges to users in the following ways:
● SAP HANA StudioThe System Privileges tab page in the Modeler perspective: Catalog -> Authorization -> Roles or Users
CautionIf you want to access the repository from the SAP HANA studio, Eclipse, or other clients,you need the EXECUTE privilege for SYS.REPOSITORY_REST, the database procedure through which the REST API is tunneled.
Defining Repository Package PrivilegesIn the SAP HANA repository, you can set package authorizations for a specific user or for a role. Authorizations that are assigned to a repository package are implicitly assigned to all sub-packages, too. You can also specify if the assigned user authorizations can be passed on to other users.
To set user (or role) authorizations for repository packages, perform the following steps:
1. Open the Navigator view in the SAP HANA studio's Modeler perspective.
2. In the Navigator view, expand the Security Roles/Users node for the system hosting the repository that contains the packages you want to grant access to.You can also define roles via source files; roles defined in this way can be assigned to a delivery unit and transported to other systems.
3. Double click the user (or role) to whom you want to assign authorizations.4. Open the Package Privileges tab page.5. Choose [+] to add one or more packages. Press and hold the Ctrl key to select multiple packages.
6. In the Select Repository Package dialog, use all or part of the package name to locate the repository package that you want to authorize access to.
7. Select one or more repository packages that you want to authorize access to; the selected packages appear in the Package Privileges tab page.
8. Select the packages to which you want authorize access and, in the Privileges for screen page, check the required privileges, for example:a) REPO.READ
Read access to the selected package and design-time objects (both native and imported)b) REPO.EDIT_NATIVE_OBJECTS
Authorization to modify design-time objects in packages originating in the system the user is working inc) REPO.ACTIVATE_NATIVE_OBJECTS
Authorization to activate/reactivate design-time objects in packages originating in the system the user is working in
d) REPO.MAINTAIN_NATIVE_PACKAGES
350
P U B L I C© 2013 SAP AG or an SAP affiliate company. All rights reserved.
SAP HANA Developer GuideSetting Up Roles and Authorizations

Authorization to update or delete native packages, or create sub-packages of packages originating in the system in which the user is working
13.4.4 Analytic PrivilegesSQL privileges implement coarse-grained authorization at object level only. Users either have access to an object, such as a table, view or procedure, or they do not. While this is often sufficient, there are cases when access to data in an object depends on certain values or combinations of values. Analytic privileges are used in the SAP HANA database to provide such fine-grained control of which data individual users can see within the same view.
NoteSales data for all regions are contained within one analytic view. However, regional sales managers should only see the data for their region. In this case, an analytic privilege could be modeled so that they can all query the view, but only the data that each user is authorized to see is returned.
Analytic privileges are intended to control access to SAP HANA information models, that is:
● Attribute views● Analytic views● Calculation views
Therefore, all column views modeled and activated in the SAP HANA modeler automatically enforce an authorization check based on analytic privileges. Column views created using SQL must be explicitly registered for such a check (by passing the parameter REGISTERVIEWFORAPCHECK).
NoteAnalytic privileges do not apply to database tables or views modeled on row-store tables. Access to database tables and row views is controlled entirely by SQL object privileges.
You create and manage analytic privileges in the SAP HANA modeler.
NoteSome advanced features of analytic privileges, namely dynamic value filters, can only be implemented using SQL. The management of such analytic privileges created in SQL also varies to those created in the SAP HANA modeler.
Structure of Analytic PrivilegesAn analytic privilege consists of a set of restrictions against which user access to a particular attribute view, analytic view, or calculation view is verified. Each restriction controls the authorization check on the restricted view using a set of value filters. A value filter defines a check condition that verifies whether or not the values of the view (or view columns) qualify for user access.The specification of these restrictions is contained in an XML document that conforms to a defined XML schema definition (XSD).The following restriction types can be used to restrict data access:
● View● Activity● Validity● Attribute
The following operators can be used to define value filters in the restrictions.
SAP HANA Developer GuideSetting Up Roles and Authorizations
P U B L I C© 2013 SAP AG or an SAP affiliate company. All
rights reserved. 351

NoteThe activity and validity restrictions support only a subset of these operators.
● IN <list of scalar values>● CP <pattern with *>● EQ (=), LE (<=), LT (<), GT (>), GE (>=) <scalar value>● BT <scalar value as lower limit><scalar value as upper limit>● IS_NULL● NOT_NULL
All of the above operators, except IS_NULL and NOT_NULL, accept empty strings (" ") as filter operands. IS_NULL and NOT_NULL do not allow any input value.The following are examples of how empty strings can be used with the filter operators:
● For the IN operator: IN ("", "A", "B") to filter on these exact values● As a lower limit in comparison operators, such as:
○ BT ("", “XYZ”), which is equivalent to NOT_NULL AND LE "XYZ”"GT "", which is equivalent to NOT_NULL○ LE "", which is equivalent to EQ ""○ LT "", which will always return false○ CP "", which is equivalent to EQ ""
The filter conditions CP "*" will also return rows with empty-string as values in the corresponding attribute.
View RestrictionThis restriction specifies to which column view(s) the analytic privilege applies. It can be a single view, a list of views, or all views. An analytic privilege must have exactly one cube restriction.Example: IN ("Cube1", "Cube2")
NoteWhen an analytic view is created in the SAP HANA modeler, automatically-generated views are included automatically in the cube restriction.
NoteThe SAP HANA modeler uses a special syntax to specify the cube names in the view restriction: _SYS_BIC:<package_hierarchy>/<view_name>For example:
<cubes> <cube name="_SYS_BIC:test.sales/AN_SALES" /> <cube name="_SYS_BIC:test.sales/AN_SALES/olap" /></cubes>
Activity RestrictionThis restriction specifies the activities that the user is allowed to perform on the restricted view(s), for example, read data. An analytic privilege must have exactly one activity restriction.Example: EQ "read", or EQ "edit"
Note
352
P U B L I C© 2013 SAP AG or an SAP affiliate company. All rights reserved.
SAP HANA Developer GuideSetting Up Roles and Authorizations

Currently, all analytic privileges created in the SAP HANA modeler are automatically configured to restrict access to READ activity only. This corresponds to SQL SELECT queries. This is due to the fact that the attribute, analytic, and calculation views are read-only views. This restriction is therefore not configurable.
Validity RestrictionThis restriction specifies the validity period of the analytic privilege. An analytic privilege must have exactly one validity restriction.Example: GT 2010/10/01, 01:01:00.000
NoteAll analytic privileges automatically become immediately valid and have unlimited validity when activated in the SAP HANA modeler. This restriction is therefore not configurable.
Attribute RestrictionThis restriction specifies the value range that the user is permitted to access. Attribute restrictions are applied to the actual attributes of a view. Each attribute restriction is relevant for one attribute, which can contain multiple value filters. Each value filter represents a logical filter condition.
NoteThe HANA modeler uses different ways to specify attribute names in the attribute restriction depending on the type of view providing the attribute. In particular, attributes from attribute views are specified using the syntax "<package_hierarchy>/<view_name>$<attribute_name>", while local attributes of analytical views and calculation views are specified using their attribute name only. For example:
<dimensionAttribute name="test.sales/AT_PRODUCT$PRODUCT_NAME"> <restrictions> <valueFilter operator="IN"> <value value="Car" /> <value value="Bike" /> </valueFilter> </restrictions> </dimensionAttribute>
Value filters for attribute restrictions can be static or dynamic.
● A static value filter consists of an operator and either a list of values as the filter operands or a single value as the filter operand. All data types are supported except those for LOB data types (CLOB, BLOB, and NCLOB).For example, a value filter (EQ 2006) can be defined for an attribute YEAR in a dimension restriction to filter accessible data using the condition YEAR=2006 for potential users.
NoteOnly attributes, not aggregatable facts (for example, measures or key figures) can be used in dimension restrictions for analytic views.
● A dynamic value filter consists of an operator and a stored procedure call that determines the operand value at runtime.For example, a value filter (IN (GET_MATERIAL_NUMBER_FOR_CURRENT_USER())) is defined for the attribute MATERIAL_NUMBER. This filter indicates that a user with this analytic privilege is only allowed to access material data with the numbers returned by the procedure GET_MATERIAL_NUMBER_FOR_CURRENT_USER.
SAP HANA Developer GuideSetting Up Roles and Authorizations
P U B L I C© 2013 SAP AG or an SAP affiliate company. All
rights reserved. 353

NoteIf you create an analytic privilege in the SAP HANA modeler, it is not possible to specify a procedure call when defining restrictions. If you want to create analytic privileges with dynamic filter conditions, you must do so using SQL.
It is possible to combine static and dynamic value filters as shown in the following example:
<dimensionAttribute name=" test.sales/AT_PRODUCT$PRODUCT_NAME "> <restrictions> <valueFilter operator="CP"> <value value="ELECTRO*"/> </valueFilter> <valueFilter operator="IN"> <procedureCall schema="PROCEDURE_OWNER" procedure="DETERMINE_AUTHORIZED_PRODUCT_FOR_USER" /> </valueFilter > </restrictions> </dimensionAttribute> <dimensionAttribute name=" test.sales/AT_TIME$YEAR "> <restrictions> <valueFilter operator="EQ"> <value value="2012"/> </valueFilter> <valueFilter operator="IN"> <procedureCall schema="PROCEDURE_OWNER" procedure="DETERMINE_AUTHORIZED_YEAR_FOR_USER" /> </valueFilter > </restrictions>
An analytic privilege can have multiple attribute restrictions, but it must have at least one attribute restriction. An attribute restriction must have at least one value filter. Therefore, if you want to permit access to the whole content of a restricted view, then the attribute restriction must specify all attributes.Similarly, if you want to permit access to the whole content of the view with the corresponding attribute, then the value filter must specify all values.The SAP HANA modeler automatically implements these two cases if you do not select either an attribute restriction or a value filter. However, if you create the analytic privilege using SQL, you must make the specification manually.Example 1: Specification of all attributes
<dimensionAttributes> <allDimensionAttributes/ > </dimensionAttributes>
Example 2: Specification of all values of an attribute
<dimensionAttributes> <dimensionAttribute name="PRODUCT"> <all /> </dimensionAttribute> </dimensionAttributes>
Logical Combination of Restrictions and Filter ConditionsThe result of user queries on restricted views is filtered according to the conditions specified by the analytic privileges granted to the user as follows:
● Multiple analytic privileges are combined with the logical operator OR.● Within one analytic privilege, all attribute restrictions are combined with the logical operator AND.● Within one attribute restriction, all value filters on the attribute are combined with the logical operator OR.
ExampleYou create two analytic privileges AP1 and AP2. AP1 has the following attribute restrictions:
● Restriction R11 restricting the attribute Year with the value filters (EQ 2006) and (BT 2008, 2010)
354
P U B L I C© 2013 SAP AG or an SAP affiliate company. All rights reserved.
SAP HANA Developer GuideSetting Up Roles and Authorizations

● Restriction R12 restricting the attribute Country with the value filter (IN ("USA", "Germany"))
Given that multiple value filters are combined with the logical operator OR and multiple attribute restrictions are combined with the logical operator AND, AP1 generates the condition:((Year = 2006) OR (Year BT 2008 and 2010)) AND (Country IN ("USA", "Germany"))AP2 has the following restriction:Restriction R21 restricting the attribute Country with the value filter (EQ "France")AP2 generates the condition:(Country = "France")Any query of a user who has been granted both AP1 and AP2 will therefore be appended with the following WHERE clause:((Year = 2006) OR (Year BT 2008 and 2010)) AND (Country IN ("USA", "Germany"))) OR (Country = "France")
Dynamic Value Filters in the Attribute Restriction of Analytic PrivilegesThe attribute restriction of an analytic privilege specifies the value range that the user is permitted to access using value filters. In addition to static scalar values, stored procedures can be used to define filters. This allows user-specific filter conditions to be determined dynamically in runtime, for example, by querying specified tables or views. As a result, the same analytic privilege can be applied to many users, while the filter values for authorization can be updated and changed independently in the relevant database tables. In addition, application developers have full control not only to design and manage such filter conditions, but also to design the logic for obtaining the relevant filter values for the individual user at runtime.Procedures used to define filter conditions must have the following properties:
● They must have the security mode DEFINER.● They must be read-only procedures.● A procedure with a predefined signature must be used. The following conditions apply:
○ No input parameter○ Only 1 output parameter as table type with one single column for the IN operator○ Only 1 output parameter of a scalar type for all unary operators, such as EQUAL○ Only 2 output parameters of a scalar type for the binary operator BETWEEN
● Only the following data types are supported as the scalar types and the data type of the column in the table type:
○ Date/Time types DATE, TIME, SECONDDATE, and TIMESTAMP○ Numeric types TINYINT, SMALLINT, INTEGER, BIGINT, DECIMAL, REAL, and DOUBLE○ Character string types VARCHAR and NVARCHAR○ Binary type VARBINARY
NULL as Operand for Filter OperatorsIn static value filters, it is not possible to specify NULL as the operand of the operator. The operators IS_NULL or NOT_NULL must be used instead. In dynamic value filters where a procedure is used to determine a filter condition, NULL or valid values may be returned. The following behavior applies in the evaluation of such cases during the authorization check of a user query:Filter conditions of operators with NULL as the operand are disregarded, in particular the following:
● EQ NULL, GT NULL, LT NULL, LE NULL, and CP NULL● BT NULL and NULL
If no valid filter conditions remain (that is, they have all been disregarded because they contain the NULL operand), the user query is rejected with a “Not authorized” error.
SAP HANA Developer GuideSetting Up Roles and Authorizations
P U B L I C© 2013 SAP AG or an SAP affiliate company. All
rights reserved. 355

Example 1:Dynamic analytic privilege 1 generates the filter condition (Year >= NULL) and dynamic analytic privilege 2 generates the condition (Country EQ NULL). The query of a user assigned these analytic privileges (combined with the logical operator OR) will return a “Not authorized” error.Example 2:Dynamic analytic privilege 1 generates the filter condition (Year >= NULL) and dynamic analytic privilege 2 generates the condition (Country EQ NULL AND Currency = “USD”). The query of a user assigned these analytic privileges (combined with the logical operator OR) will be filtered with the filter Currency = ‘USD’.In addition, a user query is not authorized in the following cases even if further applicable analytic privileges have been granted to the user.
● The BT operator has as input operands a valid scalar value and NULL, for example, BT 2002 and NULL or BT NULL and 2002
● The IN operator has as input operand NULL among the value list, for example, IN (12, 13, NULL)
Permitting Access to All ValuesIf you want to allow the user to see all the values of a particular attribute, instead of filtering for certain values, the procedure must return "*" and '' '' (empty string) as the operand for the CP and GT operators respectively. These are the only operators that support the specification of all values.
Implementation ConsiderationsWhen the procedure is executed as part of the authorization check in runtime, note the following:
● The user who must be authorized is the database user who executes the query accessing a secured view. This is the session user. The database table or view used in the procedure must therefore contain a column to store the user name of the session user. The procedure can then filter by this column using the SQL function SESSION_USER. This table or view should only be accessible to the procedure owner.
● The user executing the procedure is the _SYS_REPO user. In the case of procedures activated in the SAP HANA modeler, _SYS_REPO is the owner of the procedures. For procedures created in SQL, the EXECUTE privilege on the procedure must be granted to the _SYS_REPO user.
● If the procedure fails to execute, the user’s query stops processing and a “Not authorized” error is returned. The root cause can be investigated in the error trace file of the indexserver, indexserver_alert_<host>.trc.
When designing and implementing procedures as filter for dynamic analytic privileges, bear the following in mind:
● To avoid a recursive analytic privilege check, the procedures should only select from database tables or views that are not subject to an authorization check based on analytic privileges. In particular, views activated in the SAP HANA modeler are to be avoided completely as they are automatically registered for the analytic privilege check.
● The execution of procedures in analytic privileges slows down query processing compared to analytic privileges containing only static filters. Therefore, procedures used in analytic privileges must be designed carefully.
Runtime Authorization Check of Analytic PrivilegesWhen a user requests access to data stored in an attribute, analytic, or calculation view, an authorization check based on analytic privileges is performed and the data returned to the user is filtered accordingly. Access to a view and the way in which results are filtered depend on whether the view is independent or associated with other modeling views (dependent views).
356
P U B L I C© 2013 SAP AG or an SAP affiliate company. All rights reserved.
SAP HANA Developer GuideSetting Up Roles and Authorizations

Independent ViewsThe authorization check for a view that is not defined on another modeling view is as follows:
1. The user requests access to an individual view, for example with a SELECT query.This is possible if the both of the following prerequisites are met:
○ The user has been granted the SQL privilege SELECT on the view or the schema in which it is located.○ The user has been granted an analytic privilege that is applicable to the view. An analytic privilege is
applicable to a view if it contains the view in the view restriction and at least one filter on one attribute of the view.
NoteThe user does not require the SELECT privilege on the underlying base tables or views of the modeling view.
2. The authorization check determines the analytic privileges that are relevant for the current user and view. Relevant analytic privileges are those that met all of the following criteria:
○ Analytic privileges previously granted to the user, either directly or indirectly through a role○ Analytic privileges with a view restriction that includes the accessed view○ Analytic privileges with a currently valid validity restriction
NoteThis check is always positive for analytic privileges created and activated in the SAP HANA modeler.
○ Analytic privileges with an activity restriction covering the activity requested by the query are considered
NoteThis check is always positive for analytic privileges created and activated in the SAP HANA modeler.
○ Analytic privileges with dimension restrictions covering some of the view’s attributes3. If no relevant analytic privileges are found, the user’s queries are rejected with a “Not authorized” error.
This means that even though the user has the SELECT privilege on the view, access is not possible.If the user does have a relevant analytic privilege but does not have the SELECT privilege on the view, access is also not possible. If relevant analytic privileges are found, the authorization check evaluates the value filters specified in the dimension restrictions and presents the appropriate data to the user.
NoteMultiple dimension restrictions and/or multiple value filters are combined as described in the section on the structure of analytic privileges.
Dependent ViewsAnalytic views can be defined on attribute views, and calculation views that are defined on other modeling views. If a user requests access to such a view that is dependent on another view, the behavior of the authorization check varies as follows:
● Analytic view associated with attribute view(s)A user can access an analytic view with associated attribute view(s) if one of the following prerequisites is met:
SAP HANA Developer GuideSetting Up Roles and Authorizations
P U B L I C© 2013 SAP AG or an SAP affiliate company. All
rights reserved. 357

○ The user has been granted an analytic privilege on the analytic view itself.○ The user has been granted an analytic privilege on an underlying attribute view.
Result filtering is performed by a logical OR combination of all analytic privileges found on the analytic view and on its underlying attribute views.An analytic privilege on an analytic view with dependent attributes therefore does not restrict data access to the view, but rather increases it because the privilege on the analytic view is combined with privileges defined on the associated attribute views using logical OR.
● Calculation view based on other view(s)A user can access a calculation view based on other view(s) if both of the following prerequisites are met:
○ The user has been granted an analytic privilege on the calculation view.○ The user has been granted an analytic privilege on all underlying views if they are attribute, analytic, or
calculation views.
Result filtering is performed for each individual view. The underlying attribute, analytic, calculation views are authorized and filtered using the analytic privileges relevant for these views. The result of the top-level calculation view is then filtered using the analytic privileges defined on the calculation view itself.An analytic privilege on a calculation view based on other view(s) therefore further restricts data access to the calculation view as the privilege is evaluated on top of the result filtered by the analytic privileges defined on the underlying views (corresponding to a logical AND combination).
Creation and Management of Analytic Privileges Analytic privileges can be created, dropped, and changed in the SAP HANA modeler and using SQL statements. The SAP HANA modeler should be used in all cases except if you are creating analytic privileges that use dynamic procedure-based value filters.To create analytic privileges, the system privilege CREATE STRUCTURED PRIVILEGE is required. To drop analytic privileges, the system privilege STRUCTUREDPRIVILEGE ADMIN is required.In the SAP HANA modeler, repository objects are technically created by the technical user _SYS_REPO, which by default has the system privileges for both creating and dropping analytic privileges. To be able to create, activate, drop, and redeploy analytic privileges in the SAP HANA modeler therefore, a database user requires the package privileges REPO.EDIT_NATIVE_OBJECTS and REPO.ACTIVATE_NATIVE_OBJECTS for the relevant package.
Implications of Creating Analytic Privileges Using SQLThe SAP HANA modeler is the recommended method for creating and managing analytic privileges. However, it is necessary to use SQL to implement those features of analytic privileges not available in the modeler, that is, dynamic, procedure-based value filters as attribute restrictions.In the SAP HANA modeler, analytic privileges are created as design-time repository objects owned by the technical user _SYS_REPO. They must be activated to become runtime objects available in the database. Analytic privileges created using SQL statements are activated immediately. However, they are also owned by the database user who executes the SQL statements. This is the main disadvantage of using SQL to create analytic privileges. If the database user who created the analytic privilege is deleted, all objects owned by the user will also be deleted. Therefore, if you are using SQL to create analytic privileges, we recommend that you create a dedicated database user (that is, a technical user) for this purpose to avoid the potential loss of complex modeled privileges.An additional disadvantage of creating analytic privileges using SQL is that these analytic privileges are not in the SAP HANA repository and they cannot be transported between different systems.
Granting and Revoking Analytic PrivilegesAnalytic privileges are granted and revoked as part of user provisioning.
358
P U B L I C© 2013 SAP AG or an SAP affiliate company. All rights reserved.
SAP HANA Developer GuideSetting Up Roles and Authorizations

If the analytic privilege was created and activated using the SAP HANA modeler, the analytic privilege is owned by the _SYS_REPO user. Therefore, to be able to grant and revoke the analytic privilege, a user needs the privilege EXECUTE on the procedures GRANT_ACTIVATED_ANALYTICAL_PRIVILEGE and REVOKE_ACTIVATED_ANALYTICAL_PRIVILEGE respectively.If the analytic privilege was created using SQL, only the owner (that is, the creator) of the analytic privilege can grant and revoke it.Related LinksSAP HANA Administration GuideSAP HANA Developer Guide
Example: Creating an Analytic Privilege with Dynamic Value FilterThis example shows you how to create an analytic privilege that contains a dynamic procedure-based value filter and a fixed value filter in the attribute restriction.
Assume you want to restrict access to product data in secured views as follows:
● Users should only see products beginning with ELECTRO, or● Users should only see products for which they are specifically authorized. This information is contained in the
database table PRODUCT_AUTHORIZATION_TABLE in the schema AUTHORIZATION.
To be able to implement the second filter condition, you need to create a procedure that will determine which products a user is authorized to see by querying the table PRODUCT_AUTHORIZATION_TABLE.
1. Create the table type for the output parameter of the procedure:
CREATE TYPE "AUTHORIZATION"."PRODUCT_OUTPUT" AS TABLE("PRODUCT" int);
2. Create the table that the procedure will use to check authorization:
CREATE TABLE "AUTHORIZATION"."PRODUCT_AUTHORIZATION_TABLE" ("USER_NAME" NVARCHAR(128), "PRODUCT" int);
3. Create the procedure that will determine which products the database user executing the query is authorized to see based on information contained in the product authorization table:
CREATE PROCEDURE "AUTHORIZATION"."DETERMINE_AUTHORIZED_PRODUCT_FOR_USER" (OUT VAL "AUTHORIZATION"."PRODUCT_OUTPUT")LANGUAGE SQLSCRIPT SQL SECURITY DEFINER READS SQL DATA ASBEGIN VAL = SELECT PRODUCT FROM "AUTHORIZATION"."PRODUCT_AUTHORIZATION_TABLE” WHERE USER_NAME = SESSION_USER;END;
NoteThe session user is the database user who is executing the query to access a secured view. This is therefore the user whose privileges must be checked. For this reason, the table or view used in the procedure should contain a column to store the user name so that the procedure can filter on this column using the SQL function SESSION_USER.
4. Create the analytic privilege:
CREATE STRUCTURED PRIVILEGE '<?xml version="1.0" encoding="utf-8"?><analyticPrivilegeSchema version="1"> <analyticPrivilege name="AP2"> <cubes> <allCubes /> </cubes>
SAP HANA Developer GuideSetting Up Roles and Authorizations
P U B L I C© 2013 SAP AG or an SAP affiliate company. All
rights reserved. 359

<validity> <anyTime/> </validity> <activities> <activity activity="read" /> </activities> <dimensionAttributes> <dimensionAttribute name="PRODUCT"> <restrictions> <valueFilter operator="CP"> <value value="ELECTRO*"/> </valueFilter> <valueFilter operator="IN"> <procedureCall schema="AUTHORIZATION" procedure="DETERMINE_AUTHORIZED_PRODUCT_FOR_USER"/> </valueFilter> </restrictions> </dimensionAttribute> </dimensionAttributes> </analyticPrivilege></analyticPrivilegeSchema>';
Now when a database user requests access to a secured view containing product information, the data returned will be filtered according to the following condition:
(product LIKE "ELECTRO*" OR product IN (AUTHORIZATION.DETERMINE_AUTHORIZED_PRODUCT_FOR_USER())
13.4.5 Creating Analytic Privileges● To create, activate and drop the privilege you have system privileges CREATE STRUCTURED PRIVILEGE and
STRUCTUREDPRIVILEGE ADMIN.● Make sure that both CREATE STRUCTURED PRIVILEGE and STRUCTUREDPRIVILEGE ADMIN are correctly
owned by SYS_REPO user.● To activate and redeploy analytic privileges in the Modeler, a database user requires corresponding repository
privileges, namely REPO.EDIT_NATIVE_OBJECTS and REPO.ACTIVATE_NATIVE_OBJECTS
You apply analytic privileges when business users access values with certain combinations of dimension attributes. You can use analytic privileges to partition data among various users sharing the same data foundation. You can define restrictions for a selected group of models or apply them to all content models across packages.After activation, an analytic privilege needs to be assigned to a user before taking any effect. The user views the filtered data based on the restrictions defined in the analytic privilege. If no analytic privilege applicable for models is assigned to a user, he cannot access the model. If a user is assigned to multiple analytic privileges, the privileges are combined with OR conditions.
RememberIn addition to the analytic privileges, a user needs SQL Select privileges on the generated column views.
The generated column views adhere to the following naming conventions:For a view “MyView” in package “p1.p2” (i.e. subpackage p2 of package p1) the generated column view lies in schema _SYS_BIC and is named “_SYS_BIC”.”p1.p2/MyView”. Ensure that the users who are allowed to see the view have select privileges on the view (or the entire schema _SYS_BIC).
NoteMultiple restrictions applied on the same column are combined by OR. However, restrictions across several columns are always combined by AND.
360
P U B L I C© 2013 SAP AG or an SAP affiliate company. All rights reserved.
SAP HANA Developer GuideSetting Up Roles and Authorizations

1. Set Parameters for the Analytic Privilegea) In the Modeler perspective, expand the system node from the Navigator view.b) Expand the Content node.c) Select the required package.
d) From the context menu, choose New Analytic Privilege .
1. Enter a name and description for the analytic privilege, and choose Next.2. Select the information models that you want to use for applying restrictions.3. Choose Finish.
TipYou can choose to add more models in the editor pane.
2. Add Attributesa) If you want to add restrictions for all models, select the Applicable to all Information Models option.
NoteIf you do not select this option, the restrictions you create apply only to the secured list of models available in the Reference Models panel that you selected above.
b) In the Associated Attributes Restrictions panel, choose Add to select the attributes for defining restrictions.
c) Choose OK.
NoteIf you do not add any attributes for restrictions there will be unrestricted access to the selected models or to all the models (if Applicable to all the Information Models option is selected).
3. Assign Restrictionsa) In the Assign Restrictions pane, choose Add to add value restriction for the selected attributes.b) Select the required operator and enter a value (manually or via Value Help dialog).
RememberTo activate the analytic privilege, you must assign a minimum of one restriction to each attribute.
4. Activate the analytic privilege using the Save and Activate option in the editor.
NoteSelect the Save and Activate All option to activate the privilege along with all the required objects.
5. Assign the privilege to a user
a) In the Navigator view, navigate the Security Authorizations Users node.b) Select a user.c) In the context menu, choose Open.d) Choose Analytic Privileges tab page, and add the privilege.e) From the editor toolbar, choose Deploy.
SAP HANA Developer GuideSetting Up Roles and Authorizations
P U B L I C© 2013 SAP AG or an SAP affiliate company. All
rights reserved. 361

Example● Consider an analytic view (without fields coming from attribute views) or a calculation view SALES, which is
added as part of an analytic privilege’s secured models having the following data.
CUST_ID CUST_GROUP SALES
1 GRP1 1000
2 GRP2 1500
3 GRP3 1200
1 GRP4 1300
If you create a restriction on column CUST_ID to filter data for CUST_ID 1 and 2, the conditions are combined with OR and the data available for a user is:
CUST_ID CUST_GROUP SALES
1 GRP1 1000
2 GRP2 1500
1 GRP4 1300
If you create restrictions on columns CUST_ID and CUST_GROUP such as CUST_ID = 1 and CUST_GROUP = 1, the conditions are combined with AND, and the data available for a user is:
CUST_ID CUST_GROUP SALES
1 GRP1 1000
Note○ The technical name used for attributes of calculation views and private attributes of analytic views,
is the same as that of the attribute name. Hence any restriction applied to a private attribute of an analytic or calculation view attribute is also applied to any other private attribute of an analytic view and calculation view attribute having the same name.In the above example, if there is any other analytic view or calculation view, which is part of a privilege’s secured list of models, and has a field called “CUST_ID” (not coming from any attribute view), the data for these privileges also gets restricted.
○ If Applicable to all information models is selected, any analytic view/calculation view (even if not part of the secured models) which has a (private) attribute called “CUST_ID”, the data for these privileges also get restricted.
○ The behavior for the calculation view is the same as that of the analytic view described above.
● Consider an attribute view CUSTOMER which is part of an analytic privilege’s secured list of models having the following data.
CUST_ID COUNTRY MANDT
1 IN 1
2 IN 1
3 US 1
1 DE 2
362
P U B L I C© 2013 SAP AG or an SAP affiliate company. All rights reserved.
SAP HANA Developer GuideSetting Up Roles and Authorizations

If you create a restriction on column CUST_ID to filter data for CUST_ID 1 and 2, the conditions are combined with OR and the data is shown as follows:
CUST_ID COUNTRY MANDT
1 IN 1
2 IN 1
1 DE 2
If you create restrictions on columns CUST_ID and COUNTRY such as CUST_ID = 1 and COUNTRY = IN, the conditions are combined with AND, and the data available for a user is:
CUST_ID COUNTRY MANDT
1 IN 1000
Note○ The technical name used for an attribute view attribute is <package name>/<attribute view name>
$<attribute name>. Hence, in the above example, the technical name for CUST_ID is mypackage/CUSTOMER$CUST_ID. This implies that if there is any other attribute view “STORE” which is a part of the analytic privilege and has CUST_ID as its attribute, it will not get restricted.
○ Any analytic view that is part of the privilege’s secured list of models and has this attribute view as its required object, gets restricted using the technical name. In the example above, if an analytic view contains the attribute views CUSTOMER and STORE, both CUST_ID attributes are handled independently, because their internal technical name used for the privilege check are mypackage/CUSTOMER$CUST_ID and myotherpackage/STORE$UST_ID.
○ If Applicable to all information models is selected, any analytic view (even if not part of the secured models) having this attribute view as its required object, also gets restricted.
Related LinksStructure of Analytic Privileges [page 351]An analytic privilege consists of a set of restrictions against which user access to a particular attribute view, analytic view, or calculation view is verified. Each restriction controls the authorization check on the restricted view using a set of value filters. A value filter defines a check condition that verifies whether or not the values of the view (or view columns) qualify for user access.
Runtime Authorization Check of Analytic Privileges [page 356]When a user requests access to data stored in an attribute, analytic, or calculation view, an authorization check based on analytic privileges is performed and the data returned to the user is filtered accordingly. Access to a view and the way in which results are filtered depend on whether the view is independent or associated with other modeling views (dependent views).
Dynamic Value Filters in the Attribute Restriction of Analytic Privileges [page 355]The attribute restriction of an analytic privilege specifies the value range that the user is permitted to access using value filters. In addition to static scalar values, stored procedures can be used to define filters. This allows user-specific filter conditions to be determined dynamically in runtime, for example, by querying specified tables or views. As a result, the same analytic privilege can be applied to many users, while the filter values for authorization can be updated and changed independently in the relevant database tables. In addition, application developers have full control not only to design and manage such filter conditions, but also to design the logic for obtaining the relevant filter values for the individual user at runtime.
Creation and Management of Analytic Privileges [page 358]
SAP HANA Developer GuideSetting Up Roles and Authorizations
P U B L I C© 2013 SAP AG or an SAP affiliate company. All
rights reserved. 363

Analytic privileges can be created, dropped, and changed in the SAP HANA modeler and using SQL statements. The SAP HANA modeler should be used in all cases except if you are creating analytic privileges that use dynamic procedure-based value filters.
Example: Creating an Analytic Privilege with Dynamic Value Filter [page 359]This example shows you how to create an analytic privilege that contains a dynamic procedure-based value filter and a fixed value filter in the attribute restriction.
13.4.6 Granting Privileges to UsersPrivileges can be granted to database users either directly, or indirectly through roles that they have been granted. In this case, the privileges are inherited. Roles are the standard mechanism of granting privileges to users.
To be able to grant and revoke privileges and roles to and from users and roles, the following prerequisites must be met:
Action Prerequisite
Grant system privilege, object privilege, or package privilege to user or role
Granting user must have the privilege being granted and be authorized to grant it to other users and roles
Grant analytic privilege to user or role Granting user must have the object privilege EXECUTE on the procedure GRANT_ACTIVATED_ANALYTICAL_PRIVILEGE
Grant object privilege on activated modeled objects, such as calculation views, to user or role
Granting user must have the object privilege EXECUTE on the procedure GRANT_PRIVILEGE_ON_ACTIVATED_CONTENT
Grant role created in runtime to user or role ● Granting user must have the role being granted and be authorized to grant it to other users and roles, or
● Granting user must be have the system privilege ROLE ADMIN
Grant role created in the repository to user or role Granting user must have the object privilege EXECUTE on the procedure GRANT_ACTIVATED_ROLE
Grant application privilege Granting user must have the object privilege EXECUTE on the procedure GRANT_APPLICATION_PRIVILEGE
Grant object privilege on schema containing activated modeled objects, such as calculation views, to user or role
Granting user must have the object privilege EXECUTE on the procedure GRANT_SCHEMA_PRIVILEGE_ON_ACTIVATED_CONTENT
Revoke system privilege, object privilege, or package privilege from user or role
Revoking user must be the user who granted the privilege
Revoke object privilege on schema activated containing modeled objects, such as calculation views, from user or role
Revoking user must have the object privilege EXECUTE on the procedure REVOKE_SCHEMA_PRIVILEGE_ON_ACTIVATED_CONTENT
364
P U B L I C© 2013 SAP AG or an SAP affiliate company. All rights reserved.
SAP HANA Developer GuideSetting Up Roles and Authorizations

Action Prerequisite
Revoke analytic privilege from user or role Revoking user must have the object privilege EXECUTE on the procedure REVOKE_ACTIVATED_ANALYTICAL_PRIVILEGE
Revoke role created in runtime from user or role Revoking user must be the user who granted the role
Revoke role created in the repository from user or role Revoking user must have the object privilege EXECUTE on the procedure REVOKE_ACTIVATED_ROLE
Revoke application privilege Revoking user must have the object privilege EXECUTE on the procedure REVOKE_APPLICATION_PRIVILEGE
Revoke object privilege on activated modeled objects, such as calculation views from user or role
Revoking user must have the object privilege EXECUTE on the procedure REVOKE_PRIVILEGE_ON_ACTIVATED_CONTENT
1. In the Navigator view, choose Security Users .2. Open the relevant user and grant the required roles and privileges (object privileges, analytic privileges,
system privileges, and package privileges) to the user.
To grant a role or privilege, choose the button and search for the required role or privilege.To allow the user to pass on his or her privileges to other users, select Grantable to other users and roles.
NoteThis option is not available if you are granting a role that was created in the repository.
NoteYou cannot grant application privileges directly to users in the SAP HANA studio. It is recommended that you grant application privileges to roles created in the repository and then grant the role to the user.
3. Choose the (Deploy) button to save the changes.
Related LinksSAP HANA Administration
13.5 Application Access
When you develop and deploy applications in the context of SAP HANA Extended Application Services (SAP HANA XS), you must define the application descriptors, which describe the framework in which the application runs. This application framework includes the root point in the package hierarchy where content is to be served to client requests, whether or not the application is permitted to expose data to client requests, what kind of access to the data is allowed, and what if any privileges are required to perform actions on application-related packages and package content. The application descriptors include the following files:
● Application-descriptor file
SAP HANA Developer GuideSetting Up Roles and Authorizations
P U B L I C© 2013 SAP AG or an SAP affiliate company. All
rights reserved. 365

The location of the application-descriptor file defines the root path of the resources exposed to client requests by the application you develop. You can further restrict access using the application-access and application-privileges files.
● Application-Access FileThe application-access file enables you to specify who or what is authorized to access the content exposed by a SAP HANA XS application package and what content they are allowed to see. You can use keywords in the application-access file to set authentication rules, define package-privilege levels (for example, EXECUTE or ADMIN), specify the connection security level (for example, SSL/HTTPS), allow or prevent the creation of entity tags (Etags), and so on. You can also define rewrite rules for URLs exposed by an application, for example, to hide internal details of URL paths from external users, clients, and search engines.
● Application-Privileges FileThe application-privileges file enables you to define the authorization privileges required for access to an SAP HANA XS application, for example, to start the application (EXECUTE) or to perform administrative actions on an application (ADMIN). The privileges defined here are activated for a particular application in the application-access file. These privileges can be checked by an application at runtime. Privileges defined apply to the package where the privileges file is located as well as any packages further down the package hierarchy unless an additional privileges file is present, for example, in a subpackage.
NoteAn additional access-related file, the SQL-connection configuration file, enables you to execute SQL statements from inside your SAP HANA XS JavaScript application with credentials that are different to the credentials of the requesting user. Each SQL-connection configuration object has a unique name, and the administrator can assign specific, individual database users to this configuration.
Related LinksThe Application-Descriptor File [page 52]Each application that you want to develop and deploy on SAP HANA Extended Application Services (SAP HANA XS) must have an application descriptor file. The application descriptor is the core file that you use to describe an application's framework within SAP HANA XS.
The Application-Access File [page 53]SAP HANA XS enables you to define access to each individual application package that you want to develop and deploy.
The Application-Privileges File [page 64]In SAP HANA Extended Application Services (SAP HANA XS), the application-privileges (.xsprivileges) file can be used to create or define the authorization privileges required for access to an SAP HANA XS application, for example, to start the application or to perform administrative actions on an application. These privileges can be checked by an application at runtime.
366
P U B L I C© 2013 SAP AG or an SAP affiliate company. All rights reserved.
SAP HANA Developer GuideSetting Up Roles and Authorizations

14 Implementing Lifecycle Management
14.1 SAP HANA Delivery Units
In SAP HANA, the delivery unit (DU) is the vehicle that lifecycle management (LCM) uses to ship one or more software components from SAP (or a partner) to a customer .Delivery Units correspond to an "application" with versions, for which support packages and patches are delivered. Delivery units are not an equivalent to development classes; they are similar to Software Component Versions in the Product Availability Matrix (PAM). You can also use the delivery unit to transport repository content between SAP HANA systems, for example, between development systems or between development and productive systems.
NoteA governance plan exists for the naming of delivery units and the package structure.
A delivery unit is identified by the following key properties:
● VendorUsed primarily to define the identity of the company producing the software component to deliver, for example, "sap". However, vendor can also be used to specify any customer implementing SAP HANA. To create a delivery unit, it is a prerequisite to maintain a vendor in your system.
● NameUsed to identify the software component to be delivered
Although a vendor might provide multiple versions of a delivery unit in parallel, only one version of a delivery unit can be installed in a HANA system at any one time. In addition, duplicate names are not allowed for delivery units.SAP HANA treats delivery units and their versions as software components and software-component versions. Software components and software-component versions are usually shipped as part of a product (product version).
NoteIf you try to create a delivery unit using a name that already exists in your system, you will receive a validation error. A validation error also occurs if the check for a valid vendor ID does not find a suitable entry.
14.2 The SAP HANA Delivery-Unit Lifecycle
In SAP HANA, lifecycle management (LCM) includes all the activities you need to plan and perform to ensure that the software components you develop for SAP HANA Application Services are produced and shipped in a regulated way that meets the requirements laid out for the SAP HANA platform.
SAP HANA Developer GuideImplementing Lifecycle Management
P U B L I C© 2013 SAP AG or an SAP affiliate company. All
rights reserved. 367

For example, you need to plan, manage, and maintain the application versions you want to ship, and you need to ensure that a stable plan exists to provide support for existing and all future versions of your application.SAP HANA lifecycle management uses the delivery unit (DU) is a vehicle to ship one or more software components from SAP (or a partner) to a customer. Delivery Units correspond to an "application" with versions, for which support packages and patches are delivered. You can also use the delivery unit to transport content between SAP HANA systems, for example, between development systems or between development and productive systems.
NoteDelivery units are not to be confused with development classes; delivery units are similar to software component versions in the Product Availability Matrix (PAM).
The Application-Development LifecycleApplication development on SAP HANA requires a server-centric life cycle for design-time objects, which are the development artifacts that you store in the SAP HANA repository. As an application developer, you check out design-time content from the repository and edit a copy of the checked-out artifact in the local file system on the your personal computer (PC). The following steps provide a brief, high-level overview of the development lifecycle for design-time content:
1. Check out design-time content.Check out the package containing the design-time artifacts you want to work on (if the package already exists).
2. Edit the design-time content.Edit the copies of the design-time artifacts, which are stored in your SAP HANA repository "workspace" on your local file system; the local copies of the design-time artifacts are created during the checkout process.
3. Commit changes to design-time content.Committing the changes you have made to the design-time artifacts creates new versions of the artifacts in the SAP HANA repository. Note that identical (unchanged) versions of a file are not committed.
4. Activate changes to design-time content.Activating the changes you have made to the design-time artifacts makes these changes available to applications and other users, creating runtime objects where necessary.
14.3 Exporting Delivery Units
Exporting a delivery unit (with all packages and dependencies) is the mechanism SAP HANA uses to enable the transfer of delivery units between systems, for example, to transport application content between development systems of from a development system to a consolidation system.
The SAP HANA studio includes a mechanism that enables you to export and import delivery units. You can use the export feature to create an image of a delivery unit, which you can store either on the SAP HANA server or in the file system of a selected client for future import to another system. You can also export development objects as an archive that you can send to SAP support or share with other members of the development team.To export a delivery unit, perform the following steps:
1. Start the SAP HANA studio.Ensure that the SAP HANA studio is connected to the SAP HANA system hosting the delivery unit you want to export. If this is not the case, choose Select System... and change the system.
368
P U B L I C© 2013 SAP AG or an SAP affiliate company. All rights reserved.
SAP HANA Developer GuideImplementing Lifecycle Management

2. In the File menu, choose Export....3. Select the export destination.
The export destination enables you to specify the purpose for which you want to export the packages that make up the export archive. The option you choose determines the contents of the export archive. In most cases, you would choose the Delivery Unit option, which includes everything you need to transport the application-development structure to another system . However, you can choose from the following additional export destination options:
○ Developer ModeIncludes most objects and data, but does not include translatable text bundles
○ SAP Support ModeIncludes only the active version of objects and any data required by SAP Support to reproduce an issue you have encountered and reported
NoteBy default, the package is saved in the directory: /usr/sap/<SID>/HDB<clientNr>/backup/
Specify the Delivery Unit option, for example, SAP HANA Content > Delivery Unit 4. Select the source system; the system you want to export the delivery unit from.
In the Systems for export screen area of the Delivery Unit dialog, select the SAP HANA system hosting the repository in which the delivery unit is located that you want to export and choose Next to confirm the selection..
5. Select the delivery unit to export.For example, HANA_XS_DOCS
6. Filter the contents of the export package according to a specified time stamp.This step is optional. You can choose to export a complete delivery unit, or only those parts of a delivery unit that were changed during a specified time interval, which you define in the Filter by Time screen area.
7. Select a location for the exported delivery unit:a) Server
The SAP HANA studio automatically selects a file location to export the delivery unit to.b) Client
Browse to the location in the local file-system where you want to store the exported delivery unit.
NoteSome export operations (for example, SAP Support Mode) do not allow you to change the export location.
8. Choose Next to confirm the settings.9. Choose Finish to start the export operation.10. Confirm the export operation succeeded.
You can browse to the location in the file system and examine the package contents in a file explorer to make sure the package contains the required content.
Note
SAP HANA Developer GuideImplementing Lifecycle Management
P U B L I C© 2013 SAP AG or an SAP affiliate company. All
rights reserved. 369

For more information about a specific export operation, right-click the specified export in the Job Log view and choose Open Job Details in the context-sensitive popup menu.
14.4 Importing Delivery Units
Importing a delivery-unit archive is the mechanism SAP HANA uses to enable you to transport delivery units between systems, for example, to upload a delivery unit that was exported from another development system or saved as an archive on a local file system.
The SAP HANA studio includes a mechanism that enables you to export and import delivery units. To import a delivery unit, perform the following steps:
1. Start the SAP HANA studio.Ensure that the SAP HANA studio is connected to the SAP HANA system hosting the delivery unit you want to export. If this is not the case, choose Select System... and change the system.
2. In the File menu, choose Import...3. Select the import mode. The choice you make determines the information you need to enter in the next steps.
The import mode enables you to specify the purpose for which you want to import the packages that make up the import archive. In most cases, you would choose the Delivery Unit option, which includes everything you need to transport the application-development structure from another system . However, you can choose from the following additional import destination options:
○ Data from local fileImports data from a comma-separated-list (CSV) file or a Microsoft Excel file stored on the local file system into a new or an existing table (and schema).
○ Developer ModeIncludes most objects and data, but does not include translatable text bundles. The import operation obeys the following rules regarding the contents of the imported archive:
○ If a package with the same name as the one to be imported already exists on the target system, but the package languages differ, objects are imported with a warning message.
○ If a package with the same name as the one to be imported does not already exist on the target system, then the respective package with its original language (fetched from the properties file) is created.
○ For old objects where no related properties file exists, a package is created with its language set to the logon language of the current import session.
○ Import SAP NetWeaver BW ModelsImports SAP NetWeaver Business Warehouse (SAP NetWeaver BW) models that are InfoCubes optimized forSAP HANA, SAP HANA-optimized DataStore objects, and Query Snapshot InfoProviders to the SAP HANA modeling environment.
NoteWith this option, you must maintain connection details for the BW system you want to import from, for example, host name, instance ID, client number and so on. You can test the connection before continuing with the import operation.
370
P U B L I C© 2013 SAP AG or an SAP affiliate company. All rights reserved.
SAP HANA Developer GuideImplementing Lifecycle Management

Specify the mode in which you want the data to be imported, for example, SAP HANA Content > Delivery Unit .
4. Select the target system; the system you want to import the delivery unit into.In the Systems for export screen area of the Delivery Unit dialog, select the SAP HANA system hosting the repository into which you want to import the delivery unit and choose Next to confirm the selection.
5. Select the file containing the delivery unit you want to import.a) Server
The SAP HANA studio automatically displays a list of available files stored in the default location; use the drop-down list to choose the file you want to import.
b) ClientBrowse to the location in the local file-system where the file you want to import is stored.
Before starting the import operation, the SAP HANA studio compares the contents of the delivery unit selected for imported with the current status of the repository on the target system and displays the results in the Object import simulation screen area. Hover the cursor over the icons in the Status column for a brief description of the indicated status.
6. Choose Finish to start the import operation.Use the Actions screen area to specify what action to take if an imported object already exists in the target repository, for example:
○ Overwrite inactive versionsOverwrite inactive versions in your inactive workspace with objects from the imported delivery unit.
○ Activate objectsActivate objects imported from the delivery unit.
○ Bypass validationDo not perform the client-side validation check on imported objects.
7. Check the status bar in the SAP HANA studio to follow the progress of the import operation.You can also check progress in the Current tag page of the Job Log view.
8. Confirm the import operation succeeded.
14.5 Translating Delivery Units
SAP HANA includes features that enable you to translate package-related metadata texts, for example labels and menu items in the user interface. The translation typically occurs on a separate dedicated system.
If you plan to translate the contents of the new delivery unit you create, you must maintain translation details. The details include the connection to the translation system that the translation team use to store the localized versions of the translated data. The text to be translated is uploaded from the SAP HANA repository to the translation system and then reimported to the repository after the translated text are complete. As part of the translation process for delivery units, you typically perform the following tasks
1. Maintain translation details for each delivery unitTranslation details includes both mandatory and optional information. Mandatory details to maintain include the terminology domain, for example, Financial Accounting (FI), or Production Planning (PP) and the name space for the text collection, which is used by the translation systems.
SAP HANA Developer GuideImplementing Lifecycle Management
P U B L I C© 2013 SAP AG or an SAP affiliate company. All
rights reserved. 371

2. Maintain the connection with the remote translation systemYou need to be able to exchange the translation texts between SAP HANA and the translation system.
3. Upload translation data to the translation system4. Download translated text to the SAP HANA repository
14.5.1 SAP HANA Delivery-Unit Translation DetailsThe SAP HANA repository includes features for translating package-related metadata texts. If you plan to translate the contents of the new delivery unit you create, you must maintain translation details.Translation details provide a brief overview of the type and current status of the text objects to be translated, for example, by specifying the technical area of the new delivery unit and indicating the current status of translation texts.
NoteTranslation text can include the following elements: UI strings (menus, dialog titles), error messages, and documentation, amongst other things. Package names and descriptions are also relevant for translation purposes as are the names and descriptions of database views, tables, columns, and so on.
To make things easier for the translation team, you should maintain the following metadata for translation purposes; the metadata must be maintained at the package level:
● Terminology domain (mandatory)The technical/product area with which your delivery unit (application) is associated, for example: AC (Accounting General), FI (Financial Accounting), or PP (Production Planning and Control). This enables translator teams to assign work to the most suitable experts, and allows the translators to make use of existing terminology databases. The terminology domain is used by SAP internal translation systems.
● Text collection (mandatory)The name space for the text objects in the translation system. Technically, you can use any value, but the text-collection name space is similar to the package namespace used in SAP HANA, for example: "sap.hana.xs.docs". The value assigned to the Text collection field is used by SAP internal translation systems.
● HintAn optional field that customers and partners can use to pass on notes concerning the text objects tagged for translation.
● Text statusAn optional field that customers and partners can use to pass on information indicating the current stage in the translation-review process of the text objects, for example: "New", "In review", "Reviewed", "Approved", "Published", and so on.
14.5.2 Maintaining Translation DetailsTranslation details provide a brief overview of the type and current status of the text objects to be translated, for example, by specifying the technical area of the new delivery unit and indicating the current status of translation texts.
If you plan to translate the contents of a delivery unit, you must maintain translation details. You can maintain the translation details when you create a new delivery unit or for existing delivery units. It is mandatory to maintain the following translation-related details:
● Terminology domainThe technical/product area with which your delivery unit (application) is associated, for example: AC (Accounting General), FI, or PP.
● Text collection
372
P U B L I C© 2013 SAP AG or an SAP affiliate company. All rights reserved.
SAP HANA Developer GuideImplementing Lifecycle Management

The name space for the text objects in the translation system, for example, "sap.hana.xs.docs".
1. In the SAP HANA studio, start the Modeler perspective.2. In the Navigator view, select the SAP HANA instance where the repository containing the delivery unit is
located.3. Expand the Content node until you can see the package whose translation details you want to maintain.4. Maintain the translation details for the selected delivery unit, as follows:
a) Right-click the package whose translation details you want to maintain and choose Edit.b) Choose Translation >> to display the Translation Details screen area at the bottom of the Edit Package
Details dialog.c) Select a Terminology Domain from the drop-down list.d) Enter a Text collection name.e) Save the changes to the translation details.
5. Save the changes to the delivery unit.6. Commit and activate the changes in the SAP HANA repository.
SAP HANA Developer GuideImplementing Lifecycle Management
P U B L I C© 2013 SAP AG or an SAP affiliate company. All
rights reserved. 373

15 Using Database Client Interfaces
SAP HANA provides client interfaces for connecting applications so they can retrieve and update data.SAP HANA provides many methods for applications to access its data. For example, a spreadsheet application could use ODBO to consume analytic views and enable users to create pivot tables, or a Web application could use OData interfaces to access the data and display it.SAP HANA can expose data with the following interfaces:
● Client interfaces, which are available as long as the SAP HANA clients are installed:
○ ODBC○ ODBO○ JDBC
● Web-based interfaces, which must be defined by the application developer, who determines what data to expose and to whom:
○ OData○ XMLA○ Server-Side JavaScript
Related LinksSAP HANA Database - Client Installation GuideDefining Web-based Data Access [page 177]SAP HANA extended application services (SAP HANA XS) provide applications and application developers with access to the SAP HANA database using a consumption model that is exposed via HTTP.
15.1 Connecting via ODBC
SAP HANA provides an ODBC driver for connecting applications to the database.
NoteMake sure to use the 32-bit ODBC driver for 32-bit applications, and the 64-bit driver for 64-bit applications.
1. Install the ODBC driver. The driver is installed as part of the SAP HANA client installation.2. Write code to create a connection to the database. You can use one of the following methods:
○ Connection String (SQLDriverConnect): Use a connection string in the form:
DRIVER={<driver>};UID=<username>;PWD=<password>; SERVERNODE=<server>:<port>;
<driver> should be one of the following:
○ HDBODBC: For 64-bit applications○ HDBODBC32: For 32-bit applications
<port> should be 3<instance number>15, for example, 30015, if the instance is 00.
374
P U B L I C© 2013 SAP AG or an SAP affiliate company. All rights reserved.
SAP HANA Developer GuideUsing Database Client Interfaces

The following is an example of a connection string:
DRIVER={HDBODBC};UID=myUser;PWD=myPassword;SERVERNODE=myServer:30015;
○ DSN (SQLConnect): Create a data source by running the odbcad32.exe tool. You can run this via a command line or via the Control Panel /Administrative Tools /Data Sources (ODBC) .
Note○ The application is located in the system32 directory. To create a data source for the 32-bit driver
on a 64-bit Microsoft Windows machine, run the tool from the SysWOW64 directory.
In the DSN tab, choose Add, select the SAP HANA driver, and select Finish. The following appears:
You cannot enter a user name and password here. For the server and port, you can either enter a key created using the SAP HANA user store (which defines the server, port, user name and password), or you can enter a server and port (e.g., myServer:30015). If you enter a server and port, then the application must supply the user name and password when connecting.
Related LinksSAP HANA Database - Client Installation GuideUsing the User Store [page 375]
15.1.1 Using the User StoreThe SAP HANA user store enables you to store connection information for connecting to an SAP HANA system. Instead of entering connection information each time you make a connection, you store the information, assign it a key, and use this key when making connections.This makes it easier to move between systems (for example, when executing SQL from the command line), and also keeps connection information, including user names and passwords, in a secure place.The SAP HANA user store is part of the client installation.
1. In a command line, run the following:
hdbuserstore.exe set <key> <server>:<port> <user> <password>
The server, port, user name and password are now stored in the user store. The key is a string you use to refer to this set of connection information.
SAP HANA Developer GuideUsing Database Client Interfaces
P U B L I C© 2013 SAP AG or an SAP affiliate company. All
rights reserved. 375

2. Use the key to reference a connection to a particular system. Always precede the key with an @, for example, @mykey.
Use the key in the following ways:
○ In the connection string, use the key for the SERVERNODE parameter, and do not include a user name and password, for example:
SERVERNODE={@mykey};DRIVER={hdbodbc};
○ In creating a DSN, enter the key (for example, @mykey) for the server and port.○ In testing your connection (by running odbcreg -t hdbodbc), use the key (for example, @mykey) for
the server and port. If the connection is successful, you get something like this:
The response includes a sample connection string using the key.
Related LinksTesting the ODBC Installation [page 376]You can test the installation of the ODBC driver and your ability to connect by using the odbcreg tool, which is part of the ODBC installation.
15.1.2 Testing the ODBC InstallationYou can test the installation of the ODBC driver and your ability to connect by using the odbcreg tool, which is part of the ODBC installation.
1. Open a command window.2. Start the odbcreg tool by enter a command in the form: odbcreg -t hdbcodbc (for 64-bit driver) or
odbcreg32 -t hdbcodbc32 (for 32-bit driver).
If the driver is installed properly, you should get the ODBC login screen.
NoteYou can also run the command odbcreg -g or odbcreg32 -g to get a list of installed drivers. The SAP HANA driver is called HDBODBC.
376
P U B L I C© 2013 SAP AG or an SAP affiliate company. All rights reserved.
SAP HANA Developer GuideUsing Database Client Interfaces

3. Test your ability to connect by entering connection information (system, port, user name and password) and select OK. The tool closes and the results of the test are printed in the command window.
You can also run odbcreg -g to get a list of installed ODBC drivers, and check to make sure that the SAP HANA driver (either HDBODBC or HDBODBC32) is installed.
15.2 Connecting via JDBCSAP HANA provides a JDBC driver for connecting Java applications to the database.
1. Install the JDBC driver.The driver (ngdbc.jar) is installed as part of the SAP HANA client installation and is located at:
○ C:\Program Files\sap\hdbclient\ on Microsoft Windows platforms○ /usr/sap/hdbclient/ on Linux and UNIX platforms
2. Add ngdbc.jar to your classpath.
3. If you are on a version of Java earlier than Java 6, load the JDBC driver class, which is called com.sap.db.jdbc.Driver.
4. Write Java code to create a connection to the database and execute SQL commands. Use a connection string in the form of jdbc:sap://<server>:<port>[/?<options>]. For example:
jdbc:sap://myServer:30015/?autocommit=false
The port should be 3<instance number>15, for example, 30015, if the instance is 00.
You can specify one or more failover servers by adding additional hosts, as in the following example:
jdbc:sap://myServer:30015,failover1:30015,failover2:30015/?autocommit=false
Example
SAP HANA Developer GuideUsing Database Client Interfaces
P U B L I C© 2013 SAP AG or an SAP affiliate company. All
rights reserved. 377

The following is an example of connecting to an SAP HANA server called myhdb, which was installed as instance 07, with user name myname and password mysecret. Make sure to change these for your system, and add the JDBC driver (ngdbc.jar) to your classpath.
import java.sql.*;public class jdemo { public static void main(String[] argv) { Connection connection = null; try { connection = DriverManager.getConnection( "jdbc:sap://myhdb:30715/?autocommit=false",myname,mysecret); } catch (SQLException e) { System.err.println("Connection Failed. User/Passwd Error?"); return; } if (connection != null) { try { System.out.println("Connection to HANA successful!"); Statement stmt = connection.createStatement(); ResultSet resultSet = stmt.executeQuery("Select 'hello world' from dummy"); resultSet.next(); String hello = resultSet.getString(1); System.out.println(hello); } catch (SQLException e) { System.err.println("Query failed!"); } } }}
Related LinksSAP HANA Database - Client Installation Guide
15.2.1 Tracing JDBC ConnectionsYou can activate the JDBC trace to find errors while your application is connected to a database via JDBC.
You must be logged on as the operating system user who started (or will start) the JDBC application.
Note● You always activate the JDBC trace for all JDBC applications that the current operating system user has
started.● Configuration changes have an effect on all JDBC applications that the current operating system user has
started.
When the JDBC trace is activated, the JDBC driver logs on the client the following information:
● JDBC API calls called by the JDBC application● JDBC API call parameters● Executed SQL statements and their results
The location of the trace file is determined by the trace options.
Tracing via GUIYou can start tracing by running the tracing configuration tool that includes a graphical user interface (GUI).
Tracing via the GUI enables you to start and configure tracing without stopping and restarting your application that is connected via JDBC.
378
P U B L I C© 2013 SAP AG or an SAP affiliate company. All rights reserved.
SAP HANA Developer GuideUsing Database Client Interfaces

1. On the client, enter the following command on the command line: java -jar <installation_path>\ngdbc.jar.
2. Select Trace enabled.3. Select and modify the tracing options.4. Select OK.
Tracing via Command LineYou can start tracing by running the tracing configuration tool and sending commands via the command line.
Tracing via the command line enables you to start and configure tracing without stopping and restarting your application that is connected via JDBC.
1. Display the current configuration by running the command java -jar <installation_path>\ngdbc.jar.
2. Select trace options by running the command java -jar <installation_path>\ngdbc.jar <option>.
3. Start tracing by running the command java -jar <installation_path>\ngdbc.jar TRACE ON.
Related LinksTrace Options
Tracing via Connection StringYou can start tracing by adding an option in the connection string when creating a JDBC connection.
Tracing via the connection string requires you to stop and restart your application that is making the JDBC connection. Also, with the connection string, you cannot turn off tracing or set any options except setting the trace filename.
Add the trace option to the connection when creating a JDBC connection.
Here is an example connection string that starts tracing:
jdbc:sap://localhost:30015/?autocommit=false&trace=traceFile.txt
The location of the trace file is determined by the trace options.
Trace OptionsOptions when enabling JDBC tracing.
The first column shows the field name in the GUI-based tracing configuration tool, and the second column shows the command to enter when using the command-line tool.
Table
Option Command Line Option Description
Trace enabled TRACE ON | OFF Starts and stops tracing
Trace file folder No command-line option. The folder can be specified with the FILENAME option.
Sets the directory where the system writes the trace files.When no folder is specified, the files are saved in the working directory of the application.
Trace file name TRACE FILENAME [<path>]<file_name> Sets the name of the trace file.
SAP HANA Developer GuideUsing Database Client Interfaces
P U B L I C© 2013 SAP AG or an SAP affiliate company. All
rights reserved. 379

Option Command Line Option Description
The system assigns each trace file an additional unique ID, so the file name is:<file_name>_<id>.prtThe default file name is jdbctrace.
Limit file size TRACE SIZE <size> [KB|MB|GB] To remove the size limit, use the following option:TRACE SIZE UNLIMITED
Limits the size of each trace file.
Stop on error TRACE STOP ON ERROR <error_code>To no longer stop on the specified error, use the following option:TRACE STOP ON ERROR OFF
Stops writing the JDBC trace when the specified error code occurs.
15.2.2 Valid Java-to-SQL ConversionsSAP HANA allows each Java object to be converted to specific SQL types using the JDBC method PreparedStatement.setObject or RowSet.setObject.
Some conversions may fail at runtime if the value passed is invalid.
15.3 Connecting via ODBO
SAP HANA provides an ODBO driver for connecting applications to the database and executing MDX statements.
1. Install the ODBO driver. The driver is installed as part of the SAP HANA client installation.2. Specify in your client the provider name: SAPNewDBMDXProvider3. Create a connection string in the form of:
<host of HANA>;User ID=<your user>;Password=<your password;SFC_USE_ROWCACHE=true;SFC_INSTANCE_NUM=<instance number>
380
P U B L I C© 2013 SAP AG or an SAP affiliate company. All rights reserved.
SAP HANA Developer GuideUsing Database Client Interfaces

For example:
localhost;User ID=system;Password=mypassword;SFC_USE_ROWCACHE=true;SFC_INSTANCE_NUM=00
If the server instance is 00, then you can omit the SFC_INSTANCE_NUM parameter.SFC_USE_ROWCACHE is optional. It enables backward and forward navigation through rowsets.
Related LinksSAP HANA Database - Client Installation Guide
15.3.1 Connecting with Microsoft ExcelYou can use Microsoft Excel and its PivotTables as a practical way to access and analyze SAP HANA data, connecting with ODBO.
SAP HANA supports Microsoft Excel 2007 and 2010.
1. Start the Data Connection Wizard, and select Other/Advanced as the type of data source.2. Select the SAP HANA MDX Provider as the OLE DB Provider.
3. In the Connection tab of the Data Link Properties window, enter the SAP HANA server name, instance number, user name and password.
SAP HANA Developer GuideUsing Database Client Interfaces
P U B L I C© 2013 SAP AG or an SAP affiliate company. All
rights reserved. 381

4. Select the cube from which you want to import data. SAP HANA analytic and calculation views are exposed as cubes.
382
P U B L I C© 2013 SAP AG or an SAP affiliate company. All rights reserved.
SAP HANA Developer GuideUsing Database Client Interfaces

SAP HANA supports the following Microsoft Excel features:
● Drilling down● Selection filtering● Top/bottom filters● Report filters● Member properties● Refresh cube● Convert PivotTable into formulas● Server formatting● Pre-modeled calculated members● Show/hide fields● Enhanced value and label filters● Insert slicer● Text search in report filter● PivotTable filter● Creation of named sets
15.3.2 Multidimensional Expressions (MDX)Multidimensional Expressions (MDX) is a language you can use to query multidimensional data stored in OLAP cubes.MDX uses a multidimensional data model to enable navigation in multiple dimensions, levels, and up and down a hierarchy. With MDX, you can access pre-computed aggregates at specified positions (levels or members) in a hierarchy.
Note
SAP HANA Developer GuideUsing Database Client Interfaces
P U B L I C© 2013 SAP AG or an SAP affiliate company. All
rights reserved. 383

MDX is an open standard. However, SAP has developed extensions to MDX that are designed to enable faster and more efficient access to multidimensional data, for example, to serve specific SAP HANA application requirements and to optimize the resultset for SAP HANA clients.
MDX is implicitly a hierarchy-based paradigm. All members of all dimensions must belong to a hierarchy. Even if you do not explicitly create hierarchies in your SAP HANA data model, the SAP HANA modeler implicitly generates default hierarchies for each dimension. All identifiers that are used to uniquely identify hierarchies, levels and members in MDX statements (and metadata requests) embed the hierarchy name within the identifier.In SAP HANA, the standard use of MDX is to access SAP HANA models (for example, analytical and attribute views) that have been designed, validated and activated in the modeler in the SAP HANA studio. The studio provides a graphical design environment that enables detailed control over all aspects of the model and its language-context-sensitive runtime representation to users.MDX in SAP HANA uses a runtime cube model, which usually consists of an analytical (or calculation) view that represents data in which dimensions are modeled as attribute views. You can use the analytical view to specify whether a given attribute is intended for display purposes only or for aggregation. The key attributes of attribute views are linked to private attributes in an analytical view in order to connect the entities. One benefit of MDX in SAP HANA is the native support of hierarchies defined for attribute views.
NoteMDX in SAP HANA includes native support of hierarchies defined for attribute views. SAP HANA supports level-based and parent-child hierarchies and both types of hierarchies are accessible with MDX.
SAP HANA supports the use of variables in MDX queries; the variables are a SAP-specific enhancement to standard MDX syntax. You can specify values for all mandatory variables that are defined in SAP HANA studio to various modeling entities. The following example illustrates how to declare SAP HANA variables and their values:
MDXSelectFrom [MINI_C1_VAR]Where [Measures].[M2_1_M3_CONV]SAP VARIABLES [VAR_VAT] including 10, [VAR_K2] including 112, [VAR_TARGET_CURRENCY] including 'EUR',
15.3.3 MDX FunctionsMDX in SAP HANA supports a variety of standard MDX functions.
Table
Function Description
Aggregate Returns a calculated value using the appropriate aggregate function, based on the aggregation type of the member.
Ancestor Returns the ancestor of a member at a specified level or at a specific distance away in the hierarchy.
Ancestors Returns a set of all ancestors of a member at a specified level or at a specific distance away in the hierarchy.
Ascendants Returns the set of the ascendants of the member.
Avg Returns the average value of a numeric expression evaluated over a set.
384
P U B L I C© 2013 SAP AG or an SAP affiliate company. All rights reserved.
SAP HANA Developer GuideUsing Database Client Interfaces

Function Description
BottomCount Returns a specified number of items from the bottom of a set, optionally sorting the set first.
Children Returns the children of a member.
ClosingPeriod Returns the last sibling among the descendants of a member at a specified level.
Count Counts the number of members in the tuple.
Cousin Returns the child member with the same relative position under a parent member as the specified child member.
Crossjoin Returns the cross product of two sets.
CurrentMember Returns the current member along a hierarchy.
DefaultMember Returns the default member of a hierarchy.
Descendants Returns the set of descendants of a member at a specified level or at a specific distance away in the hierarchy.
Dimension Returns the hierarchy that contains a specified member or level.
Dimensions Returns a hierarchy specified by a numeric or string expression.
Distinct Returns a set, removing duplicate tuples from a specified set.
DistinctCount Returns the number of distinct tuples in a set.
DrillDownLevel Drills down the members of a set one level below the lowest level represented in the set, or to one level below an optional level of a member represented in the set.
DrillDownLevelBottom Drills down the members of a specified count of bottom members of a set, at a specified level, to one level below.
DrillDownLevelTop Drills down a specified count of top members of a set, at a specified level, to one level below.
DrillDownMember Drills down the members in a specified set that are present in a second specified set.
DrillDownMemberBottom Drills down the members in a specified set that are present in a second specified set, limiting the result set to a specified number of bottommost members.
DrillDownMemberTop Drills down the members in a specified set that are present in a second specified set, limiting the result set to a specified number of topmost members.
DrillUpLevel Drills up the members of a set that are below a specified level.
DrillUpmember Drills up the members in a specified set that are present in a second specified set.
Except Finds the difference between two sets, optionally retaining duplicates.
Filter Returns the set resulting from filtering a set based on a search condition.
FirstChild Returns the first child of a specified member.
FirstSibling Returns the first child of the parent of a specified member.
SAP HANA Developer GuideUsing Database Client Interfaces
P U B L I C© 2013 SAP AG or an SAP affiliate company. All
rights reserved. 385

Function Description
Generate Applies a set to each member of another set, and then joins the resulting sets by union. Alternatively, this function returns a concatenated string created by evaluating a string expression over a set.
Head Returns the first specified number of elements in a set.
Hierarchize Orders the members of a specified set in a hierarchy in natural or, optionally, post-natural order.
Hierarchy
Instr The InStr function finds the starting location of a substring within a specified string.
Intersect Returns the intersection of two sets, optionally retaining duplicates.
IsAncestor Returns true if the first member specified is an ancestor of the second member specified, else returns false.
IsGeneration Returns true if the member specified is a leaf, else returns false.
IsLeaf Returns true if the first member specified is an ancestor of the second member specified, else returns false.
IsSibling Returns true if the first member specified is an sibling of the second member specified, else returns false.
Item If an integer is specified, the Item function returns the tuple that is in the zero-based position specified by Index.
IIF Returns one of values determined by a logical test.
Lag Returns the member that is a specified number of positions prior to a specified member along the dimension of the member.
LastChild Returns the last child of a specified member.
LastPeriods Returns a set of members prior to and including a specified member.
LastSibling Returns the last child of the parent of a specified member.
Lead Returns the member that is a specified number of positions following a specified member along the dimension of the member.
Leaves If a dimension name is specified, returns a set that contains the leaf members of the key attribute for the specified dimension.If a dimension name is not specified, the function returns a set that contains the leaf members of the entire cube.
Left The Left function returns a string of a specified number of characters from the left side (beginning) of a specified string.
Level Returns the level of a member.
Levels Returns the level whose zero-based position in a dimension is specified by a numeric expression.
Max Returns the maximum value of a numeric expression evaluated over a set.
Member_caption Returns the caption of a member
Members Returns the set of all members in a specified hierarchy.
386
P U B L I C© 2013 SAP AG or an SAP affiliate company. All rights reserved.
SAP HANA Developer GuideUsing Database Client Interfaces

Function Description
MembersAscendantsDescendants
Returns the set of specified members in a given hierarchy.
Mid The Mid function returns a substring of a string argument.
Min Returns the minimum value of a numeric expression evaluated over a set
MTD Returns a set of members from the Month level in a Time dimension starting with the first period and ending with a specified member.
Name Returns the name of a specified hierarchy or member.
NextMember Returns the next member in the level that contains a specified member.
NOT Performs a logical negation on a numeric expression.
OpeningPeriod Returns the first sibling among the descendants of a specified level, optionally at a specified member.
OR Performs a logical disjunction on two numeric expressions.
Ordinal Returns the zero-based ordinal value associated with a specified level.
ParallelPeriod Returns a member from a prior period in the same relative position as a specified member.
Parent Returns the parent of a specified member.
PeriodsToDate Returns a set of members (periods) from a specified level starting with the first member and ending with a specified member.
PrevMember Returns the previous member in the level that contains a specified member.
Properties Returns a string containing the value of the specified member property.
QTD Returns a set of members from the Quarter level in a Time dimension starting with the first period and ending with a specified member.
Range Performs a set operation that returns a naturally ordered set, with the two specified members as endpoints, and all members between the two specified members included as members of the set
Right The Right function returns a string of a specified number of characters from the right side (end) of a specified string.
Siblings Returns the set of siblings of a specified member, including the member itself.
StrToMember Returns a member from a string expression in MDX format.
StrToSet Constructs a set from a specified string expression in MDX format.
StrToTuple Constructs a tuple from a specified string expression in MDX format.
StrToValue Returns a value from a string expression
Subset Returns a subset of tuples from a specified set.
Sum Returns the sum of a numeric expression evaluated over a specified set.
Tail Returns the last specified number of elements in a set.
SAP HANA Developer GuideUsing Database Client Interfaces
P U B L I C© 2013 SAP AG or an SAP affiliate company. All
rights reserved. 387

Function Description
TopCount Returns a specified number of items from the topmost members of a specified set, optionally ordering the set first.
Union Performs a set operation that returns a union of two sets, removing duplicate members.
UniqueName Returns the unique name of a specified hierarchy.
WTD Returns a set of members from the Week level in a Time dimension starting with the first period and ending with a specified member.
YTD Returns a set of members from the Year level in a Time dimension starting with the first period and ending with a specified member.
15.3.4 MDX ExtensionsSAP HANA supports several extensions to the MDX language, for example, additional predefined functions and support for variables.
Sibling_Ordinal Intrinsic PropertyThe object Member includes a property called Sibling_Ordinal, that is equal to the 0-based position of the member within its siblings.
Example
WITH MEMBER [Measures].[Termination Rate] AS [Measures].[NET_SALES] / [Measures].[BILLED_QUANTITY]SELECT { [Measures].[NET_SALES], [Measures].[BILLED_QUANTITY], [Measures].[Termination Rate] } ON COLUMNS, Descendants ( [MDX_TEST_10_DISTRIBUTION_CHANNEL].[MDX_TEST_10_DISTRIBUTION_CHANNEL].[All].[(all)], 1, SELF_AND_BEFORE ) DIMENSION PROPERTIES SIBLING_ORDINAL ON ROWSFROM MDX_TEST_10_ITELO_SALES_DATA
MembersAscendantsDescendants FunctionSAP HANA includes a new function called MembersAscendantsDescendants that enables you to get, for example, all ascendants and descendants of a specific member. This function improves on the standard MDX functions Ascendants and Descendants.The function can be called as follows:
MembersAscendantsDescendants (<set>, <flag>)
● set: A set of members from a single hierarchy● flag: Indicates which related members to return, and can be one of the following:
○ MEMBERS_AND_ASCENDANTS_AND_DESCENDANTS
388
P U B L I C© 2013 SAP AG or an SAP affiliate company. All rights reserved.
SAP HANA Developer GuideUsing Database Client Interfaces

○ MEMBERS_AND_ASCENDANTS○ MEMBERS_AND_DESCENDANTS○ ASCENDANTS_AND_DESCENDANTS○ ONLY_ASCENDANTS○ ONLY_DESCENDANTS
Example
SELECT{ [Measures].[SALES] }ON COLUMNS,NON EMPTY{ Hierarchize( MembersAscendantsDescendants([JUICE_TIME].[TimeHier].[QUARTER].[3]:[JUICE_TIME].[TimeHier].[QUARTER].[4], MEMBERS_AND_ASCENDANTS_AND_DESCENDANTS )) }ON ROWSFROM [JUICE]
Example
SELECT{ [Measures].[SALES] }ON COLUMNS,NON EMPTY{ Hierarchize( MembersAscendantsDescendants([JUICE_TIME].[TimeHier].[QUARTER].[3]:[JUICE_TIME].[TimeHier].[QUARTER].[4], ONLY_ASCENDANTS )) }ON ROWSFROM [JUICE]
VariablesAn MDX SELECT statement in SAP HANA enables you to send values for variables defined within modeling views.Analytic and calculation views can contain variables, that can be bound to specific attributes. When calling the view, you can send values for those variables. These variables can be used, for example, to filter the results.SAP HANA supports an extension to MDX whereby you can pass values for variables defined in views by adding a SAP Variables clause in your select statement. Here is the syntax for a Select statement:
<select_statement>: [WITH <formula_specification> ] SELECT [<axis_specification>[,<axis_specification>...]] FROM <cube_specification> [WHERE <slicer_specification> SAP VARIABLES: <sap_variable> [[,] <sap_variable>…]]<sap_variable>: <variable_name> <sign> [<option>] <variable_value><sign>: INCLUDING | EXCLUDING<option>: = | > | >= | < | <= | <><variable_value>: <unique_member_name> | <unsigned_numeric_literal> | <string_value_expression> | <member> : <member> | <character_string_literal> : <character_string_literal> | <unsigned_numeric_literal> : <unsigned_numeric_literal>
ExampleThe following specifies a single value for variables VAR_KAT, VAR_K2, and VAR_TARGET_CURRENCY.
SELECTFROM [MINI_C1_VAR]WHERE [Measures].[M2_1_M3_CONV]
SAP HANA Developer GuideUsing Database Client Interfaces
P U B L I C© 2013 SAP AG or an SAP affiliate company. All
rights reserved. 389

SAP VARIABLES [VAR_VAT] including 10, [VAR_K2] including 112, [VAR_TARGET_CURRENCY] including 'EUR'
ExampleThe following specifies an interval for variable VAR_K2.
SELECT NON EMPTY { [K2].[K2].Members }ON ROWSFROM [MINI_C1_VAR_SIMPLE]WHERE [Measures].[M3_CONV]SAP VARIABLES [VAR_K2] including [K2].[K2].&[122]:[K2].[K2].&[221]
Metadata on Variables in ViewsSAP HANA includes the following set of tables that contain information about the variables defined for views:
● BIMC_VARIABLE● BIMC_VARIABLE_ASSIGNMENT● BIMC_VARIABLE_VALUE● BIMC_VARIABLE_ODBO (virtual table)
The tables enable, for example, an application to retrieve the variables defined for a view and create a user interface so the user can enter values.
390
P U B L I C© 2013 SAP AG or an SAP affiliate company. All rights reserved.
SAP HANA Developer GuideUsing Database Client Interfaces

16 SAP HANA Developer References
The SAP HANA Developer's Guide comes with the following language, API and other references.
Name Link
SAP HANA SQL Reference http://help.sap.com/hana/html/sqlmain.html
SAP HANA SQLScript Reference http://help.sap.com/hana/hana_dev_sqlscript_en.pdf
SAP HANA System Tables and Monitoring Views Reference
http://help.sap.com/hana/html/monitor_views.html
SAP HANA R Integration Guide http://help.sap.com/hana/hana_dev_r_emb_en.pdf
SAP HANA Business Function Library (BFL) Reference http://help.sap.com/hana/hana_dev_bfl_en.pdf
SAP HANA Predictive Analysis Library (PAL) Reference http://help.sap.com/hana/hana_dev_pal_en.pdf
SAP HANA XS JavaScript Reference http://help.sap.com/hana/jsapi/index.html
SAP HANA Developer GuideSAP HANA Developer References
P U B L I C© 2013 SAP AG or an SAP affiliate company. All
rights reserved. 391

www.sap.com/contactsap
© 2013 SAP AG or an SAP affiliate company. All rights reserved.No part of this publication may be reproduced or transmitted in any form or for any purpose without the express permission of SAP AG. The information contained herein may be changed without prior notice.Some software products marketed by SAP AG and its distributors contain proprietary software components of other software vendors. National product specifications may vary.These materials are provided by SAP AG and its affiliated companies ("SAP Group") for informational purposes only, without representation or warranty of any kind, and SAP Group shall not be liable for errors or omissions with respect to the materials. The only warranties for SAP Group products and services are those that are set forth in the express warranty statements accompanying such products and services, if any. Nothing herein should be construed as constituting an additional warranty.SAP and other SAP products and services mentioned herein as well as their respective logos are trademarks or registered trademarks of SAP AG in Germany and other countries.Please see http://www.sap.com/corporate-en/legal/copyright/index.epx for additional trademark information and notices.